

Page 1

NOU S VIVONS SAIN
We l iv e health y
STEAM IRON
(ELECTRONIC TEMPERATURE CONTROL)
ПАРОВОЙ УТЮГ
С ЭЛЕКТРОННЫМ
ТЕРМОРЕГУЛЯТОРОМ
“Vitesse France S.A.R.L”
91 rue du Faubourg Saint Honore´
75008 Paris-France
www.vitesse.ru
VS-657
Page 2

DEAR CUSTOMER!
You have made an excellent decision. Vitesse® “Nouveau” home range offers
you an exclusive, high quality range of appliances for your ultimate home luxury
and healthy living.
IMPORTANT SAFEGUARDS
When using your flatiron, basic safety precautions should always be followed,
including followings:
Read all instructions before using
1. Use iron only for its intended household use only.
2. To protect against risk of electric shock, do not immerse the iron in water or
any other liquids.
3. The iron should always be turned to OFF before plugging or unplugging from
outlet. Never yank cord to disconnect from outlet; instead, grasp plug and pull
to disconnect.
4. Do not allow power cord to touch hot surface. Let iron completely cool before
putting away.
5. Always disconnect the plug of the iron from electrical outlet when filling with
water or emptying and when not in use.
6. Do not operate iron with a damaged cord or if the iron has been dropped or
damaged. To avoid a hazard such as the risk of electric shock, do not
disassemble the iron, it must be taken to a qualified serviceman or
manufacturer for examination and repair. Incorrect reassembly can cause a
risk of electric shock when the iron is used.
7. Place the iron out of the reach of children, close supervision is necessary for
any appliance being used by or near children .Do not leave the iron
unattended while connected to the supply mains or on an ironing board.
8. Burns can occur from touching hot metal parts, hot water or steam. Use
caution when you turn a steam iron upside down there may be hot water in
reservoir.
9. Never use the iron facing towards the people when performing steam and
turbo steam, which can easily cause burns.
10. Check if the voltage indicated in the rating plate corresponding to the mains
voltage in your home.
11. The iron must be used and heel rested on a stable surface.
12. When placing the iron on its stand, ensure that the surface on which the stand
is placed stable.
13. The iron is not to be used if it has been dropped, and there are visible signs of
damage or it is leaking.
www.vitesse.ru
Special instructions
1. To avoid a circuit overload, do not operate another high wattage appliance in
the same circuit.
2. If an extension cord is absolutely necessary, a 10-ampere cord should be
used. Cords rated for a lower amperage may overheat, care should be taken
to ensure that the cord cannot be accidentally pulled or tripped over.
3. During using of this iron, if all indicator light blink or red indicater light blinks,
unplug the unit from the main socket, and then plug into again, it will be OK. If it
still blinks again after re-plugging, please take it to a qualified serviceman or
manufacturer for examination and repair, do not disassemble the iron.
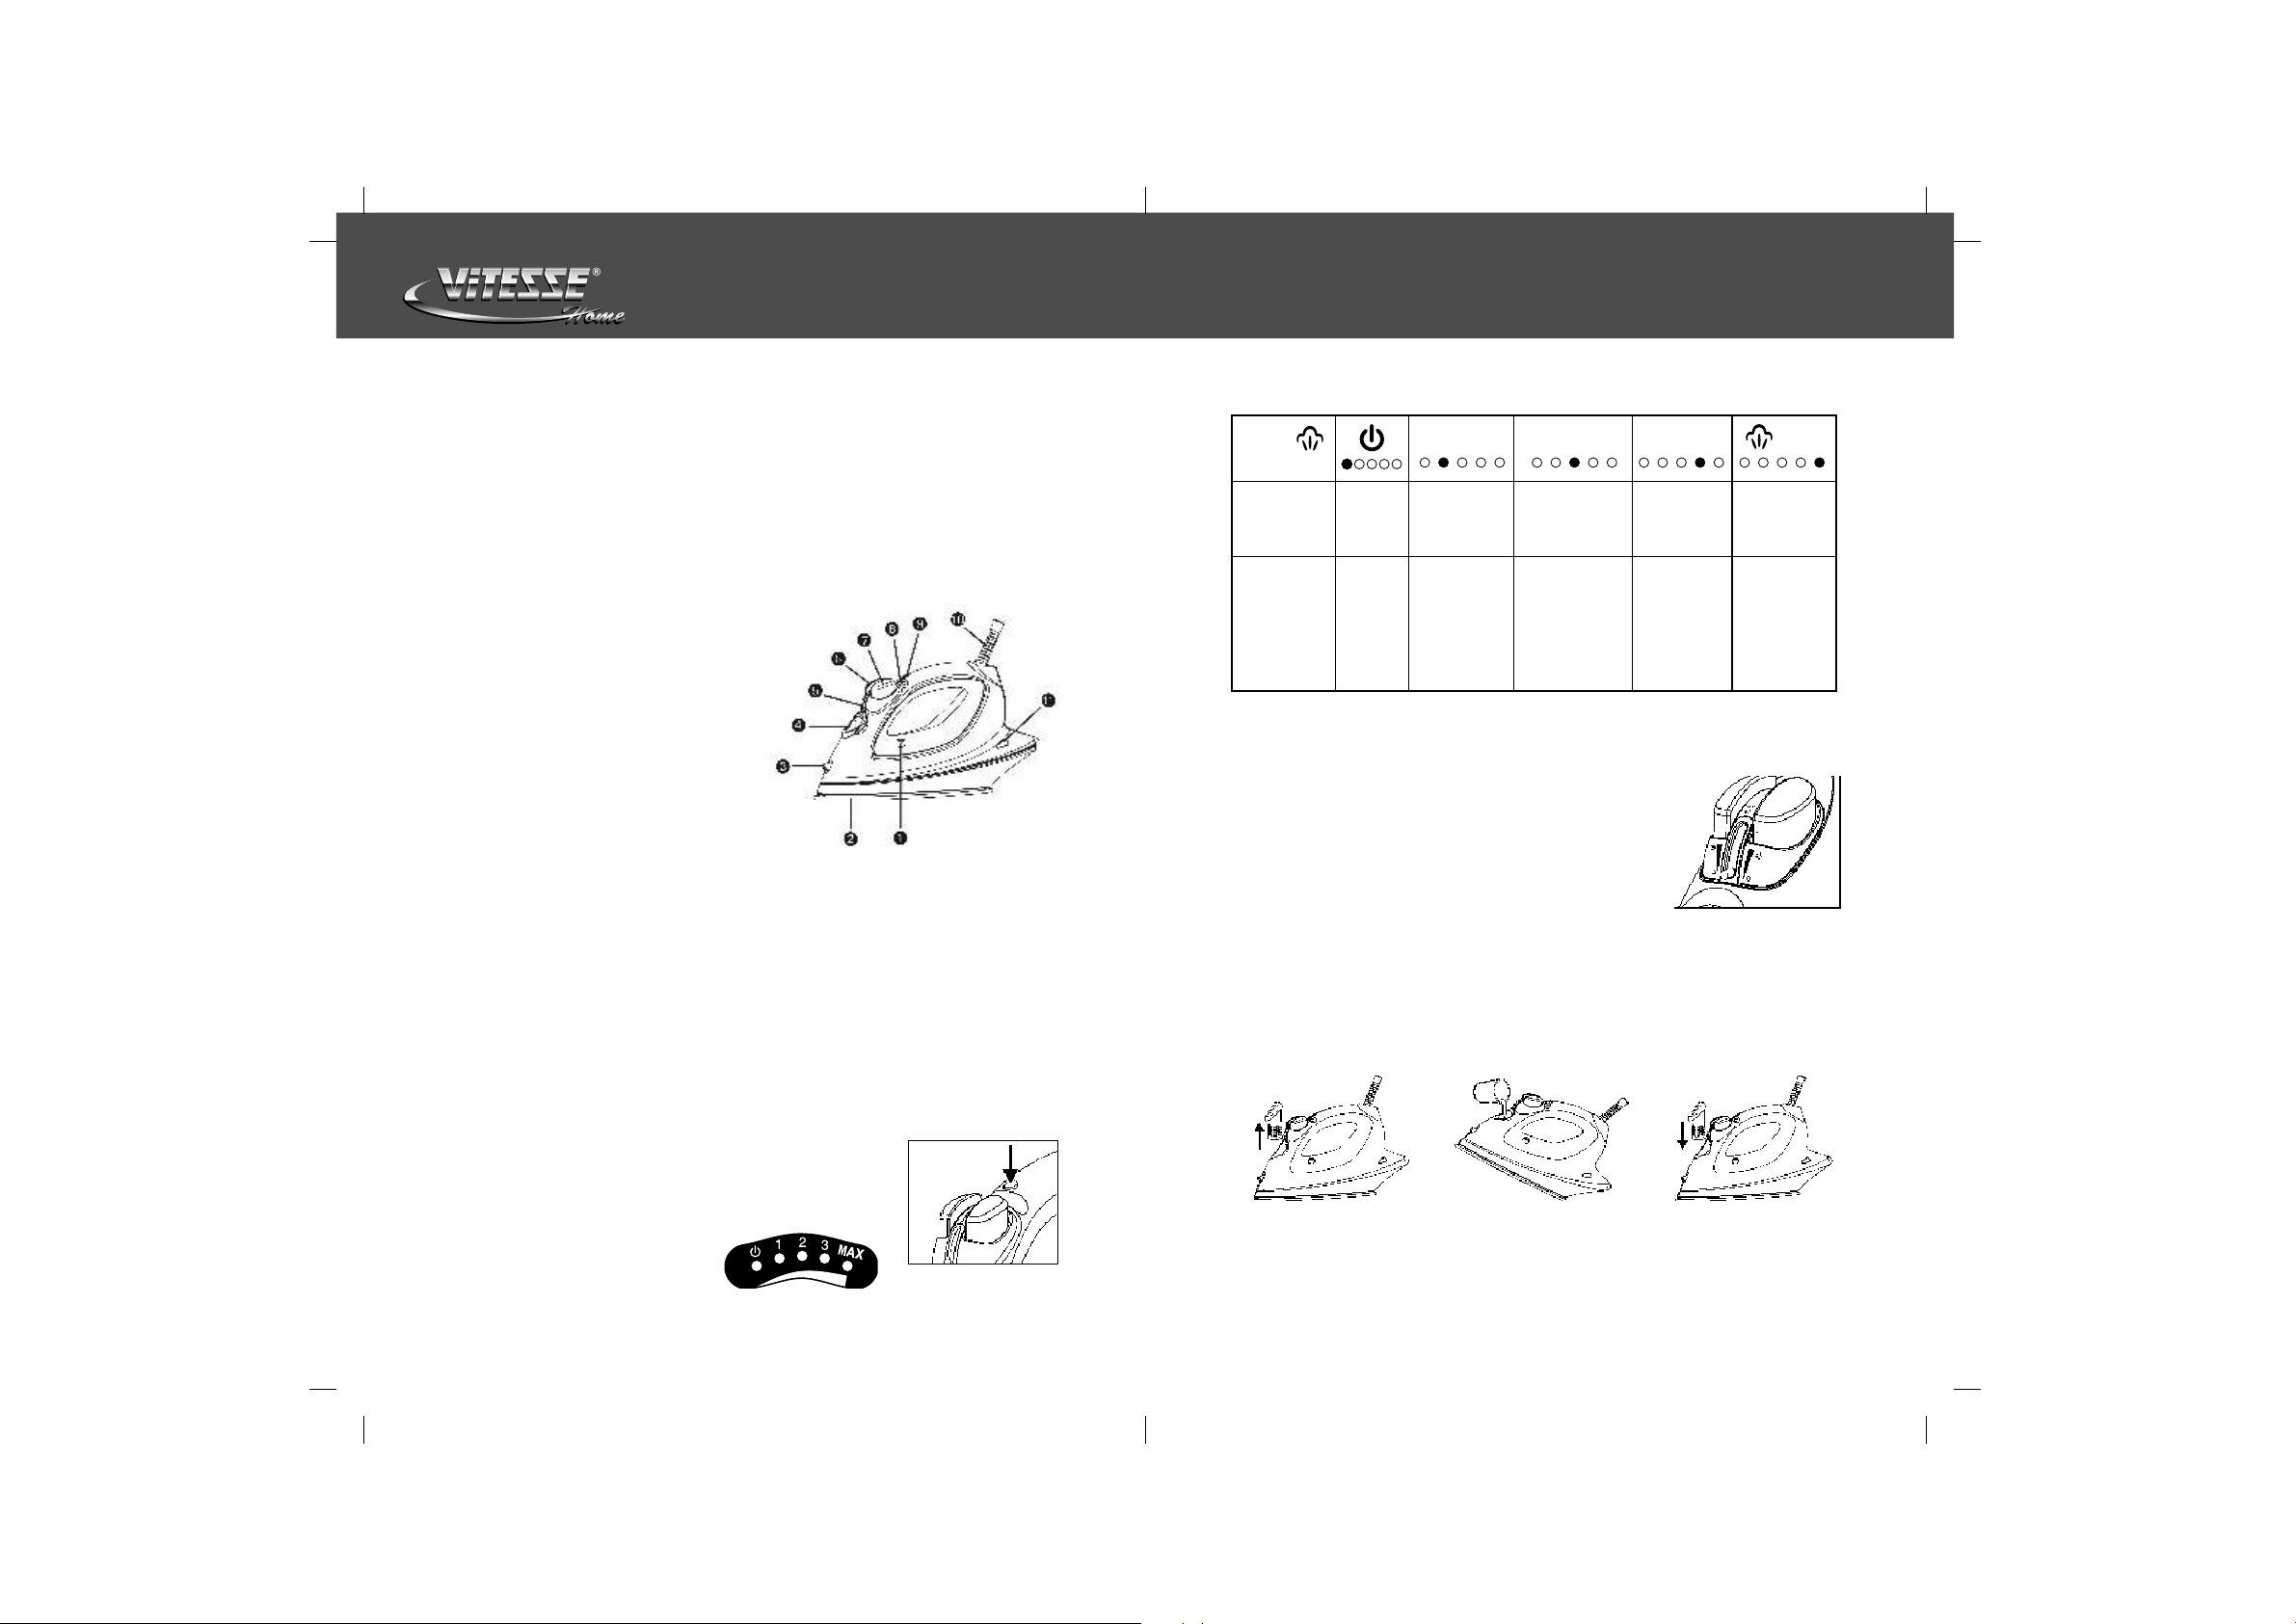
PARTS AND FEATURES
1. Self-cleaning button
2. Soleplate
3. Spray Nozzle
4. Anti-calc Box
5. Adjustable Steam Knob
6. Spray Button
7. Turbo-Steam Button
8. Temperature indicator light lens
9. Temperature control Button
10. Cord Guard
11. Power indicator light
Use of Indicator Light
1. The iron use a red indicator light to indicate Power on/off and reset mode, and
green indicator light for temperature setting.(1,2,3,Max)
2. After plugging into main socket, the red indicator light ON, it indicates that the
unit is ready for use. Once press the temperature control button, it will change
to another temperature setting. No response will be provided if press the
temperature control button successively.
3. The unit use one contact switch to control different temperature setting, once
pressing down the temperature control button, temperature can be changed
to another setting.
4. When temperature of soleplate is lower than required,
the indicator light will blink slowly (once per second) if it
is higher than required, indicator light will blink
quickly(once per 0.25seconds),it will stay on when set
at temperature setting range.
Indicator light
P/1 P/2
fig.1
Page 3

www.vitesse.ru
FABRIC SETTING CHART
Temperature
1 (Low) 2 (Medium) 3 (High)
Setting
Rayon
Cotton,
Linen
Iron while
fabric is still
damp using
steam and
spray
Fabric
Iron
Instructions
Shut
off
Synthetics,
Nylon,
Acetate
Dry Ironing
on the
opposite
side of the
fabric
Wool, Silk
Polyester
Use a press
cloth and
steam or dry
ironing on the
opposite side
of the fabric
Fill Water Tank
Make sure that the iron is unplugged from main socket
before filling water into the water tank.
1. Set the adjustable steam knob to " 0 " position (Fig.2)
2. Take Anti-calc box out of the filling hole (Fig.3)
3. Using a cup, slowly pour tap water or distilled water
into the water tank as shown in Fig.4 .
Never to fill beyond the Max filling line.
4. Replace the Anti-calc box into the filling hole as shown in Fig.5 .
5. Hold the iron in horizontal direction, and then move the iron front and back for
about 30 seconds so that limescales in water can be purified by the ion
exchange resin in the Anti-calc box.
(Max)
Rayon
Cotton,
Linen
Steam
ironing
fig.2
Steam ironing
1. Place the iron on a level, horizontal ironing board
2. Set the adjustable steam knob to " 0 " position(Fig.2), and then fill the water
tank with clean tap water refer to above filling instruction.
3. Connect the appliance to a suitable power socket, set the temperature control
button to "MAX" position. The power indicator light will blink, which indicate
that the unit is being heated up, When the power indicator light change to
illuminate, the required temperature has been reached. In this stage, it is
normal that a "pong" sound produced, it because that the steam switch
automatically turn on.
4. For every first use, press down the turbo steam button several times
continuously, and then press down the self-cleaning button for about 10
seconds to clean the steam chamber.
5. Set temperature control button to desired position
according to different fabrics, put the adjustable steam
knob to " " position (Fig.6), and then steam will come
out from steam vents of soleplate. During steaming
iron, it is normal that the power indicator light cycle from
blinking to illuminate steadily. It is because the
appliance automatically heat preservation.
6. After use, turn adjustable steam knob to " 0 "position,
disconnect the appliance from power socket.
fig.6
7. Before storing, allow the unit completely cool down.
Note:
VS-657
1. For every first use,the appliance should be pre-heated for about 2 minutes.
2. During steam ironing, it is normal that steam is stopped for a while, which may
be caused by lower temperature of soleplate or steam rate is so high that the
anti-drip system automatically reacted.
3. When setting the temperature control dial on ” ” position, there are
no steam go out of the soleplate since the temperature of soleplate is so low
/
that it can not produce steam.
VS-657-M:
Allow the iron resting motionlessly on the soleplate or on its heel, the
unit will come into auto-shut off mode, please refer to the auto-shut off
function described below.
fig.3 fig.4 fig.5
Note: When using distilled water, you can mix it with tap water in a
proportion of 50%.
P/3 P/4
Dry Ironing
1. Place the iron on a level, horizontal ironing board
2. Set the adjustable steam knob to “0”position(Fig.2).
3. Connect the appliance to suitable power socket, and then set temperature
control button to the desired position according to different fabrics. The power
indicator light will blink, which indicate that the unit being heated up, When the
power indicator light change to steadily illuminate, the required temperature
has been reached. It is ready for dry ironing.
4. If water spray is necessary, press down the spray button two or three times in
quick succession, water can be sprayed evenly in the fabric.
5. After use, disconnect the appliance from main socket.
6. Before storing, allow the unit completely cool down.
When changing your temperature control button from high setting to
Note:
lower, it is proposed that not to start ironing immediately since there may be
any burns caused on your fabrics by high temperature. Please wait for the
indicator light illuminate steadily, and then start ironing.
Page 4

www.vitesse.ru
Turbo Steam Ironing
Turbo Steam feature provides additional steam for removing stubborn creases.
1. Set the "adjustable steam knob" to " 0 "position(Fig.2), and then fill the water
tank with clean tap water refer to above filling instruction.
2. Connect the appliance to a suitable main socket, set the temperature control
button to "MAX" position. The power indicator light will blink, which indicate
that the unit being heated up, When the power indicator light change to light up
steadily, the required temperature has been reached.
3. Press the turbo steam button two or three times in quick succession to obtain
more powerful turbo steam.
4. It is normal that a small amount of water may be ejected from the soleplate
when pressing turbo steam button so frequently that temperature of soleplate
will be decreased accordingly. It is supposed to stop pressing turbo steam
button, and allow it to heat up again.
5. After use, turn adjustable steam knob to “0”position, disconnect the appliance
from power socket.
6. Before storing, please allow the unit completely cool down. Caution: when
using turbo steam ironing, turn adjustable steam knob to ”0” position.
Vertical steam ironing:
Vertical steam ironing is especially used for removing creases from hanging
clothes and curtains
1. Set the adjustable steam knob to “0”position,fill water
into water tank as described in water filling instruction.
2. Connect the appliance to suitable power socket, and
Fig.7
then set temperature control button to the max
temperature setting. The power indicator light will
blink, which indicate that the unit being heated up,
When the power indicator light change to light up
steadily, the required temperature has been reached.
It is ready for vertical steam ironing.
3. Hold the iron in vertical position as shown in Fig.7, and then press down the
steam button, vertical steam will go out from the steam outlet of the soleplate.
Never perform steam ironing directly on person.
Auto-shut off function
VS-657:
The appliance will automatically shut off if it has been successively used for about
60 minutes, and all indicator light will go out. To continue ironing, only press the
temperature control button again.
VS-657-M:
When the iron is stationary in horizontal position for about 30seconds or in vertical
position for about 8 minutes, the unit will auto-shut off. All indicator lights turn off.
Press down the reset button or allow the
iron move from front to back.. it will be reacted to original fabric setting again.
Anti-drip system:
This appliance has a safety mechanical protection which can protect water drip
from the soleplate when the temperature of steam chamber decrease so low that
it cannot provide steam, therefore it is normal that the steam go out of the steam
outlet un-continuously during use.
Anti-calc system:
1. The anti-calc box as shown in Fig. 8 is designed to purify hard
water and reduce the build-up of limescale which occurs during
steam ironing, this will prolong the working life of your iron.
2. The anti-calc box should be replaced with a new one after two
months, in case of using one time each day, and you can
contact with manufacturer or agency for purchasing a new one.
3. To replace the anti-calc box, take it out of the water filling hole,
and then replace with a new one.
Maintenance:
Fig.8
After several use of your iron, a little amount of limescale will be built up in the
steam chamber and steam outlet, following up below selfcleaning process, it will
be well removed.
1. Set the adjustable steam knob to" 0 "position.
2. Fill water tank with water to max filling line.
3. Place the iron on the ironing rest, and put a
sink under the ironing rest to prepare for
pouring water and ejecting steam.
4. Set temperature control button to "MAX"
position.
5. Plug the unit into the main socket.
6. Allow the iron to heat up for 2 minutes
7. Disconnect the iron from main socket.
8. Hold the iron horizontally over the sink.
Fig.9
9. Press the self-cleaning button. (Fig.9)
10. Boiling water and steam will emit from the outlet of the soleplate and wash
away the impurities and scale.
11. Move the iron backwards and forwards while this happens. Go on letting
steam and water escape until the water tank is virtually empty.
12. Set the adjustable steam knob to “0” position.
13. Insert the iron into main socket again.
14. Set the temperature control button to “MAX” position, Let the iron heat up
again. The remainder of the water inside the steam chamber will now
vaporize.
15. Unplug from power supply and allow soleplate to cool down and wipe it clean
with a soft damp cloth.
P/5 P/6
Page 5

www.vitesse.ru
PROBLEM
Won't
heat
The
appliance
does not
produce
steam
Leaves
spots
T
wisted
cord
All light off
(no function)
All
lights
blinking
Continuous
blinking
green light
TROUBLE SHOOTING
THINGS TO CHECK
• Is the iron plugged in and the outlet working?
Check the outlet by plugging in a lamp.
• Is the Temperature Control button turned to a fabric setting?
• Check the water level.
• Is the Adjustable Steam in the STEAM position?
• Has the temperature setting at the ”Dot 3” or Max setting?
• Has the iron had enough time to preheat?
• ALWAYS empty the water tank of the iron after using.
Water left in the tank may discolor clothing and soleplate.
• If the iron cord should become twisted, unplug iron and
let cool. Hold iron cord in the middle of entire length.
Let plug and iron dangle freely until cord uncoils.
This will extend the life of your iron cord.
• The unit will automatically shut off after continuous
usage for one hour, iron will refunction after press the
reset button. (temperature control button)
• Unplug the iron from main socket, and then re-plug into
again. Reselect previous temperature setting. If all lights
are still blinking, call Customer Service.
• Over usage of steam causes the soleplate to cool.
The light blinks as the iron reheats.
УВАЖАЕМЫЕ ПОКУПАТЕЛИ! ВЫ ПРИНЯЛИ БЛЕСТЯЩЕЕ РЕШЕНИЕ!
Фи рма Vitesse® “Nouv eau” предла гает Вам гамм у эксклюз ивных
высококачественных приборов для несомненно роскошного и здорового образа
жизни.
Руководство по эксплуатации
Перед первым использованием прибора внимательно прочитайте
руководство по эксплуатации. Сохраните руководство для дальнейших
консультаций.
ТЕХНИКА БЕЗОПАСНОСТИ
При использовании утюга, следует придерживаться основных мер
безопасности, включая следующие:
1. Используйте прибор только по назначению.
2. Во избежание поражения электрическим током, не погружайте прибор в
воду или другую жидкость.
3. Следите, чтобы шнур питания не касался горячих поверхностей. Перед
тем как поставить утюг на хранение, дайте ему полностью остыть. Не
наливайте горячей воды в резервуар.
4. При наполнении утюга водой, при его опорожнении, или когда прибор не
используется, всегда отключайте его от сети.
5. Не используйте утюг с поврежденным шнуром питания или в случае
падения или повреждения прибора. Чтобы избежать поражения
электрическим током, не разбирайте прибор. Неправильная сборка
прибора может причинить поражение электрическим током во время
использования утюга. Обратитесь в сервисный центр для осмотра и
ремонта прибора.
6. Необходимо быть особо внимательным, если при использовании
прибора рядом находятся дети. Держите прибор вдали от детей. Не
оставляйте включенный утюг без присмотра или на гладильной доске.
7. Во избежание ожога, не касайтесь горячих металлических элементов
утюга, горячей воды или пара. Буд ьт е о сторожны, когд а
переворачиваете утюг, так как можно получить ожог горячей водой из
резервуара.
8. Никогда не направляйте утюг на людей, так как выпускаемый пар может
причинить ожог.
9. Проверьте, соответствует ли напряжение в сети техническим
характеристикам прибора, указанных на табличке с техническими
данными.
10. Всегда используйте и устанавливайте утюг на ровной и устойчивой
поверхности.
11. При установке утюга на его подставку, убедитесь, что поверхность, на
которую будет поставлена подставка является устойчивой.
12. Не пользуйтесь утюгом в случае его падения, и если при этом
наблюдаются видимые следы повреждения, или утюг начал протекать.
P/7 P/8
Page 6
www.vitesse.ru
ВАЖНАЯ ИНФОРМАЦИЯ
1. Чтобы избежать перегрузки сети, не подключайте одновременно
несколько приборов с высоким напряжением в одну розетку.
2. При необходимости использовать удлинитель, используйте шнур на 10
ампер. Шнур с меньшим напряжением может перенагреться. Следите,
чтобы шнур питания был расположен таким образом, чтобы за него не
зацепились и не потянули.
3. Прежде чем отключить утюг от сети, переключите кнопку
терморегуляции в положение «Выкл». Чтобы отключить прибор от сети,
возьмитесь за штепсель и выньте его из розетки, а не тяните за сам шнур.
ОПИСАНИЕ
1. Кнопка самоочистки
2. Подошва
3. Распылитель
4. Картридж “Anti-Calc”
5. Регулятор подачи пара
6. Кнопка распылителя
7. Кнопка подачи пара
8. Индикаторы температурных режимов
9. Кнопка терморегуляции
10. Шнур питания
11. Индикатор питания
ИНДИКАТОРЫ РАБОТЫ УТЮГА
1. Данный утюг оснащен красным индикатором, что указывает на
включение/выключение питания и на установку режима работы, а также
зелеными индикаторами, указывающими на выбранный режим
температуры во время глажки (1,2,3,Max).
2. После того, как прибор будет подключен к сети, загорится красный
индикатор питания, что будет указывать на то, что прибор готов к работе.
При нажатии кнопки терморегуляции будет включен другой
температурный режим. При непрерывном нажатии данной кнопки может
возникнуть состояние отсутствия реакции прибора на управление.
3. Данный утюг имеет всего лишь одну кнопку для установки различных
температурных режимов работы. При каждом нажатии кнопки
терморегуляции, прибор переходит в следующий режим температуры.
4. Если температура подошвы ниже, чем требуется,
индикатор будет медленно мигать (посекундно),
если же температура подошвы выше требуемой,
индикатор будет мигать быстрее (чаще одного раза
в секунду). Индикатор будет гореть стабильно, если
температура подошвы
будет отвечать требуемой.
Ðèñ.1
Индикаторы
ТАБЛИЦА СООТВЕТСТВИЯ РЕЖИМОВ И ТИПОВ ТКАНИ
Режим
1(Низкий)
2(Средний)
3(Высокий)
температуры
Тип ткани
Инструкции
Выключить
Синтетика,
Нейлон,
Ацетатная ткань
Сухая глажка
с обратной
стороны ткани
Шерсть,
Полиэстер
Глажка через
дополнительную
ткань и с паром,
или сухая глажка с
противоположной
стороны ткани
øåëê,
Вискоза
Хлопок
Лен
Глажка при
влажной
ткани изделия с
использованием
пара и
распылителя
НАПОЛНЕНИЕ РЕЗЕРВУАРА ВОДОЙ
Перед наполнением резервуара водой, отключите
утюг от сети.
1. Установите регулятор подачи пара в положение
“0” (Рис.2).
2. Извлеките картридж “Anti-Calc из отверстия для
залития воды в утюге (Рис.3).
3. С помощью стаканчика медленно налейте воду
из-под крана или дистиллированную воду в
резервуар, как показано на рисунке 4. Не
пе ре пол ня й те р езе рв у ар в одо й в ыш е
максимальной отметки.
4. Установите картридж обратно в отверстие, как показано на рисунке 5.
Держите утюг в горизонтальном положении и поводите им вперед-назад
около 30 секунд, чтобы вода могла очиститься от осадков через
ионообменный материал картриджа “Anti-Calc”.
Ðèñ.3 Ðèñ.4 Ðèñ.5
Примечание: При использовании дистиллированной воды можно
смешивать ее с проточной водой из крана в соответствии 50/50.
(Максим
альный)
Вискоза
Хлопок
Лен
Глажка
с паром
Ðèñ.2
P/9 P/10
Page 7

www.vitesse.ru
ГЛАЖЕНИЕ С ПАРОМ
1. Расположите утюг горизонтально к поверхности гладильной доски.
2. Установите регулятор подачи пара в положение “0” (Рис.2). Затем
наполните резервуар утюга чистой проточной водой, следуя
вышеописанным инструкциям.
3. Подключите п рибор к локальной сет и, установите кнопку
терморегуляции в положение “MAX” («Максимальный»). Индикатор
питания начнет мигать, что указывает на то, что прибор нагревается.
Если индикатор питания перестанет мигать и начнет гореть постоянно,
это значит, что достигнута необходимая температура. Это является
нормальным явлением, если в этом состоянии прибор производит
определенный звук, что указывает на автоматическое отключение
подачи пара.
4. При первом использовании утюга следует нажать кнопку подачи пара
непрерывно несколько раз, и затем нажать и удерживать кнопку
самоочистки в течении 10 секунд, чтобы очистить систему
парообразования от накипи.
5. Установите кнопку терморегуляции в желаемое
положение в зависимости от типа ткани, а
регулятор подачи пара установите в положение " "
(«Пар») (Рис.6), и после этого из выпускных
отверстий на подошве утюга начнет выходить пар.
Во время процесса глажения с паром, индикатор
питания может изменяться от мигающего к
стабильному. Это считается нормальным. Причина
этому есть то, что в приборе автоматически
Ðèñ.6
срабатывает предохранение от перегрева.
6. При установке кнопки терморегуляции в положение “1” или “2”,
парообразование не будет происходить из-за слишком низкой
температуры подошвы, что не может способствовать образованию пара.
Рис.6
7. После использования установите регулятор подачи пара в положение
“0” и отключите прибор от сети.
8. Прежде чем ставить прибор на хранение, дайте ему полностью остыть.
СУХАЯ ГЛАЖКА
1. Расположите утюг горизонтально к поверхности гладильной доски.
2. Установите регулятор подачи пара в положение “0” (Рис.2).
3. Подключите прибор к сети, а затем установите кнопку терморегуляции в
желаемое положение в зависимости от типа ткани. Индикатор питания
начнет мигать, что указывает на то, что прибор нагревается. Если
индикатор питания перестанет мигать и начнет гореть постоянно, это
значит, что достигнута необходимая температура. Прибор готов к сухой
глажке.
4. Если необходимо увлажнить ткань, воспользуйтесь кнопкой
распылителя. Нажмите кнопку два или три раза в быстрой
последовательности, и вода будет подаваться ровно на ткань.
5. После использования отключите утюг от сети.
6. Прежде чем ставить прибор на хранение, дайте ему полностью остыть.
Примечание:
При изменении положения кнопки терморегуляции от
верхнего до нижнего режима, не рекомендуется сразу прикладывать
подошву утюга к ткани, так как она может быть слишком нагрета и, таким
образом, прижечь ткань. Подождите, пока индикатор питания перестанет
мигать, и затем начинайте процесс глажки.
ФУНКЦИЯ ПАРОВОГО УДАРА
Функция кратковременной и резкой подачи пара обеспечивает сильный
паровой удар. Данная функция используется для разглаживания складок и
глубоких загибов.
1. Установите регулятор подачи пара в положение “0”. Затем наполните
резервуар утюга чистой проточной водой, следуя инструкциям по
наполнению резервуара водой.
2. Подключите прибор к сети, а затем установите кнопку терморегуляции в
положение “MAX” («Максимальный»). Индикатор питания начнет мигать,
что указывает на то, что прибор нагревается. Если индикатор питания
перестанет мигать и начнет гореть постоянно, это значит, что достигнута
необходимая температура.
3. Нажмите кнопку подачи пара два или три раза в быстрой
последовательности, чтобы получить более мощный удар пара.
4. Это считается нормальным, если при частом нажатии кнопки подачи
пара, выступит небольшое количество воды из подошвы утюга, так как
температура подошвы может снизиться. Поэтому следует прекратить
нажатие кнопки и дать прибору нагреться.
5. После использования установите регулятор подачи пара в положение
“0” и отключите утюг от сети.
6. Прежде чем ставить прибор на хранение, дайте ему полностью остыть.
Внимание!
При использовании функции парового удара, регулятор подачи
пара должен находиться в положение “0”.
ВЕРТИКАЛЬНОЕ ОТПАРИВАНИЕ
Следуйте инструкциям в разделе «Глажение с паром»,
держа утюг в вертикальном положении на расстоянии
15 см от обрабатываемой ткани, что находиться в
висячем положении. (Рис.7). Нажмите кнопку подачи
пара, после этого будет выпущен вертикальный пар.
Данная функция используется для разглаживания
складок на висящих тканях и занавесках.
Не направляйте пар на людей.
Примечание:
Индикатор питания быстро мигает, что
указывает на то, что температура подошвы слишком
высокая. Если же индикатор мигает медленно, это
значит, что температура подошвы низкая.
Ðèñ.7
ФУНКЦИЯ АВТОМАТИЧЕСКОГО ОТКЛЮЧЕНИЯ
Данная функция обеспечивает автоматическое отключение утюга, после
того, как прибор был подключен к сети и был включен на протяжении более
60 минут. Также все индикаторы при этом погаснут. Чтобы возобновить
работу прибора, нажмите кнопку терморегуляции снова.
СИСТЕМА “Anti-drip”
Данный утюг оснащен безопасным механизмом защиты от случайного
проливания воды из подошвы во время глажения, в случае если
температура системы парообразования снижается настолько, что
парообразование становится невозможным. Таким образом, это
нормально, что во время использования пар выходит непостоянно из
отверстия выпуска пара.
P/11 P/12
Page 8

СИСТЕМА “Anti-calc”
1. Данный утюг оснащен картриджем “Anti-calc” (Рис.8) для смягчения и
очистки жесткой воды от солей и минералов, а также предотвращения
образования накипи в системе парообразования. Это значительно
увеличивает срок службы прибора.
2. Картридж“Anti-calc”с ионообменным материалом следует
заменять на новый после двух месяцев использования прибора,
при условии, что утюг используется как минимум раз в день. Для
приобретения нового картриджа вам следует обратиться к
производителю или по месту продажи электроприбора.
3. Чтобы заменить старый картридж на новый, извлеките его из
отверстия для залития воды и вставьте новый картридж или
замените ионообменный материал в картридже (Рис.8).
Ðèñ.8
ХРАНЕНИЕ И УХОД
После нескольких использований утюга, в системе парообразования и в
отверстиях выпуска пара образуется накипь. Следуйте нижеописанным
инструкциям по самоочистке прибора, чтобы продлить нормальную работу
прибора.
1. Установите регулятор подачи пара в положение " 0 " (Рис.2).
2. Затем наполните резервуар утюга чистой проточной водой до
максимальной отметки.
3. Установите утюг на ровной поверхности, а также разметите под ним
какую-либо емкость, подготовившись к выливанию воды и выбросу пара.
4. Ус т анов ите к н опк у тер мо рег у л яци и в
положение “MAX” («Максимальный»).
5. Подключите прибор к сети.
6. Дайте утюгу нагреться в течении 2 минут.
7. Отключите прибор от сети.
8. Держите утюг горизонтально к емкости или
раковине.
9. Нажмите кнопку самоочистки. (Рис.9)
10. С помощью кипящей воды и пара, которые выпускаþòñÿ ÷åðåç îтверстия
Ðèñ.9
на подошве, удаляются осадки и накипь.(Рис.9)
11. При этом передвигайте утюг взад-вперед. Продолжайте выпускать воду
и пар до тех пор, пока резервуар прибора не будет опорожнен.
12. Установите регулятор подачи пара в положение " 0 " .
13. Снова подключите утюг к сети.
14. Ус т ано в ите к ноп к у те р мор егул я ции в пол о жен и е “M AX ”
(«Максимальный»). Дайте утюгу снова нагреться. Оставшаяся вода
внутри системы парообразования будет испаряться.
15. Отключите прибор от сети и дайте подошве полностью остыть. Протрите
ее начисто мягкой влажной тканью.
Примечание:
Никогда не используйте жесткие щетки или мочалки, а также
абразивные моющие средства, так как они могут повредить поверхность
прибора.
ПОИСК И УСТРАНЕНИЕ НЕИСПРАВНОСТЕЙ
ПРОБЛЕМА
Прибор не
нагревается
Не происходит
парообразования
Образование
пятен
Шнур питания
скрутился
Индикатор
погас
Индикатор
мигает
Индикаторы
мигают или
только один из
них горит
постоянно
• Проверьте, подключен ли утюг к сети, и не повреждена ли сама
сеть.
Проверьте сеть, подключив, например, лампу.
• Установлена ли кнопка терморегуляции в рабочее положение.
• Проверьте уровень воды в резервуаре.
• Находиться ли регулятор подачи пара в положении «Пар».
• Находиться ли кнопка терморегуляции в третьем положении
или в положении “MAX” («Максимальный»).
• Достаточно ли времени прошло для нагрева утюга.
• ВСЕГДА опорожняйте резервуар утюга после каждого
использования. Оставшаяся вода в резервуаре может
оставлять пятна на ткани или подошве утюга.
• В случае если шнур питания утюга скручен, отключите прибор
от сети и дайте ему остыть. Возьмите шнур посредине.
Подвесьте утюг и шнур, так чтобы они свободно свисали, пока
шнур полностью не раскрутится. Таким образом, это продлит
срок службы шнура.
• Возможно п рибор авто матически отключился после
продолжительного использования на протяжении более
одного часа. Утюг снова заработает, после нажатия кнопки
терморегуляции.
• Отключите прибор от сети, и затем подключите его снова.
Произведите последующие установки. Если и после этого
индикатор будет продолжать мигать, обратитесь в сервисную
мастерскую.
• Длительное и интенсивное использование пара может
привести к охлаждению подошвы утюга. При этом индикатор
мигает, так как происходит нагревание утюга.
УСТРАНЕНИЕ
www.vitesse.ru
P/13 P/14
 Loading...