

Page 1

3796new1.qxd 4/1/05 5:56 PM Page 2
Page 2

PORTABLE MP3/WMA PLAYER WITH FM-RADIO
MODEL VT-3796
MANUAL INSTRUCTION
www.vitek-aus.com
1
22
45
3796new1.qxd 4/1/05 5:56 PM Page 3
Page 3

3796new1.qxd 4/1/05 5:56 PM Page 4
Page 4

3796new1.qxd 4/1/05 5:56 PM Page 5
Page 5

Please read the recommendations in these instructions carefully and save them for
future use.
Design specifics and technical data may be changed without prior notice in order to
bring our consumers the best possible product.
IMPORTANT TECHNICAL SAFETY RECOMMENDATIONS
Do not expose the device to extreme temperatures (above 35 or below -5) or high
levels of humidity.
Do not place heavy objects on the device.
Do not drop the unit from high places.
Do not build other device into the device.
Do not clean the device with chemical cleaners like gasoline or solvents.
Do not expose the device to direct sunlight and do not leave it near heating units.
Do not place the device in dusty locations.
Do not take apart or try to repair the device yourself.
Remove the batteries if the device will not be used for a long period of time.
Note:
We are not responsible for the loss of stored information resulting from malfunction or
repair.
SAFETY MEASURES
If you do not plan on using the device for a long period of time, remove the batteries
to avoid damage to the device from battery leakage or corrosion.
Do not use the device while driving a car or any other mode of transportation.
Do not use the device in places where it is very hot, cold, where there are elevated
humidity levels or it is very dusty.
Deactivate the HOLD button before using the device.
Do not drop the device while using it.
Battery life
Battery MP3/WMA Playback
Alkaline battery (2EA) About 8 hours
Battery life (in accordance with EIAJ standards)
Power level: 5mWt + 5mWt (non-stop playback of a compact disc at a frequency of 1 kHz)
ENGLISH
1
3796new1.qxd 4/1/05 5:56 PM Page 1
Page 6

When listening for 4 hours a day and stopping playback - total time equals 16 hours.
Playback time can vary depending on how the device is used.
Charge the rechargeable batteries or replace the regular batteries in the following situations:
The " " symbol blinks on the display.
The display reads “Weak batteries” and then turns off after one second.
Operating buttons do not work.
To avoid electrostatic charges when using the device, obey the following rules:
Whenever possible, do not use the device in extremely dry air conditions.
If the device stops operating during normal use, change the batteries.
PLAYER FUNCTIONS AND CONTROL ELEMENTS
Accessories
ENGLISH
2
3796new1.qxd 4/1/05 5:56 PM Page 2
Page 7

3
CONTROL ELEMENTS
Front / Rear panel Side panel
1. Jack for neckband
2. Liquid Crystal Display
3. Function selector (F)
(Music, Voice, FM Radio)
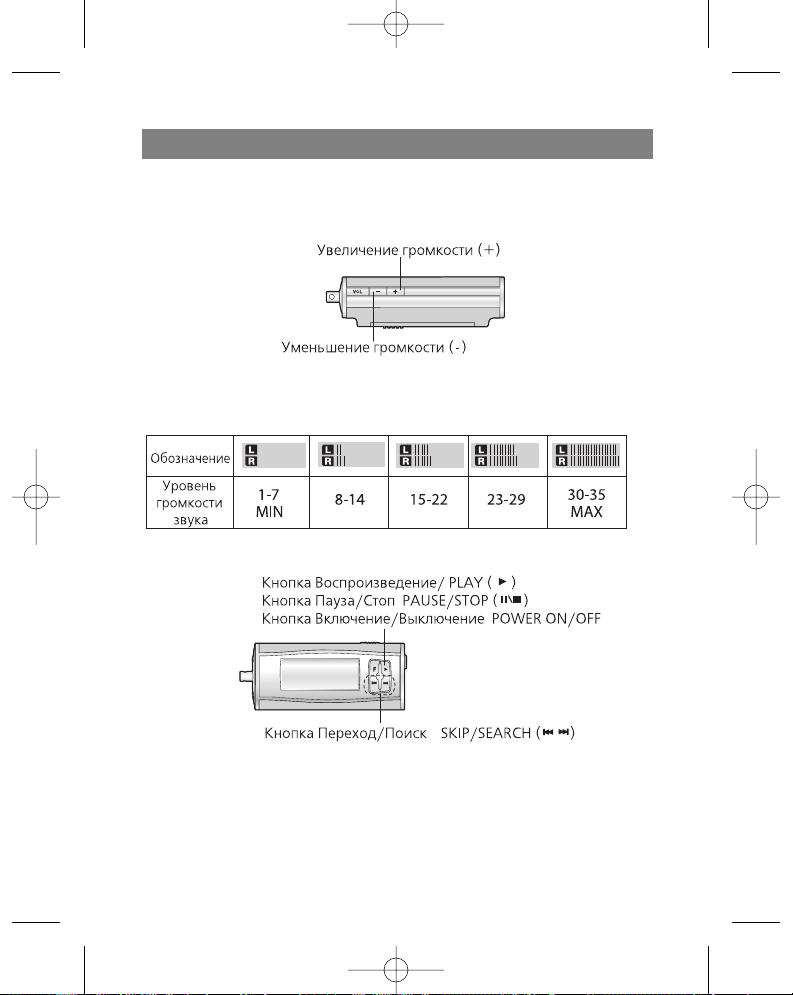
SPEED button
4. PLAY () button
PAUSE/STOP (/ ) button
POWER ON/OFF button
5. SKIP/SEARCH ( /)
6. Battery compartment lid
7. Volume regulator (-/+)
8. MENU button
9. Bookmark button (B.MARK)
10. Record button ( REC)
11. Control elements lock button
(HOLD)
ENGLISH
3796new1.qxd 4/1/05 5:56 PM Page 3
Page 8

Top/ Bottom panel
LCD Display
ENGLISH
4
12. Microphone (MIC)
13. Headphones jack ( ): Ø 3,5 mm
14. Auxiliary device jack: Ø 3,5 mm
15. USB jack
A. Music/Voice
B. Current track/Total tracks
C. Bookmark
D. Playback time
E. Repeat mode
F. Buttons lock
G. Battery level indicator
H. File information
I. MP3/WMA format
J. Sampling frequency
K. Transfer speed in bits
L. Volume level
M.Backlight
3796new1.qxd 4/1/05 5:56 PM Page 4
Page 9
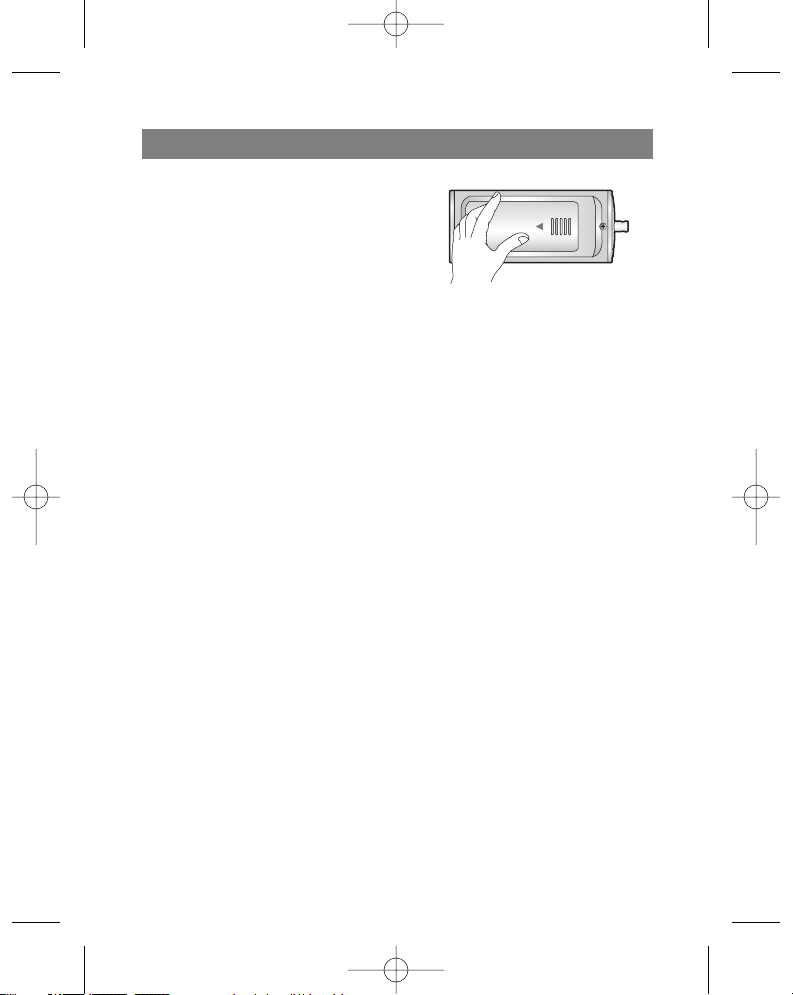
Installing the battery
1. Open the battery compartment lid.
2. Insert the battery.
Make sure that the + and - symbols on the
battery correspond to the same symbols
in the battery compartment.
3. Close the battery compartment lid.
Notes
Improper battery installation can lead to battery leakage and corrosion.
If the battery leaks, clean the battery compartment of the leakage and install a new
battery.
SYSTEM REQUIREMENTS
In order to connect the MP3/WMA player to a computer, it should meet the following
requirements:
Operating characteristics
Operating system: Windows 98/ME/2000/XP
Computer: at least a Pentium - 133 MHz
Memory: no less than 32 MB (more than 32 MB is recommended)
Hard disk space: no less than 100 MB
Video-card: 640 x 480 mode, no less than High Color (16 bit)
USB port
CD-ROM drive
What is USB?
USB stand for Universal Serial Bus.
This is a new interface based on a new concept for connecting your PC to peripher-
al devices.
Maximum bandwidth: 12 MB/s, up to 127 USB devices can be connected to one
PC.
ENGLISH
5
3796new1.qxd 4/1/05 5:56 PM Page 5
Page 10

USING THE MP3/WMA PLAYER
You must have music files in the MP3/WMA on your computer, a USB cable and your
player.
You can transfer music files from your computer to the player using a USB port and
USB cable. Besides that, you can transfer data from your player to a computer.
CONNECTING THE USB CABLE
Connecting the MP3/WMA player to a computer
Connect the player to the computer using the supplied USB cable.
ENGLISH
6
3796new1.qxd 4/1/05 5:56 PM Page 6
Page 11

COMPARE THE PLUGS ON THE USB
CABLE
Connect one end of the USB cable to the
USB port on your computer and the other
end to the data transfer jack on the
MP3/WMA player.
BEFORE USING
Turning the unit On/Off
Press and hold the POWER ON/OFF (4) button for more than 1 second to turn the
player on.
Press and hold the POWER ON/OFF (4) button for more than 1.5 seconds in pause
or stop mode to turn the player off.
Listening with Headphones
Connect the headphones to the headphones jack. (13).
ENGLISH
7
3796new1.qxd 4/1/05 5:56 PM Page 7
Page 12
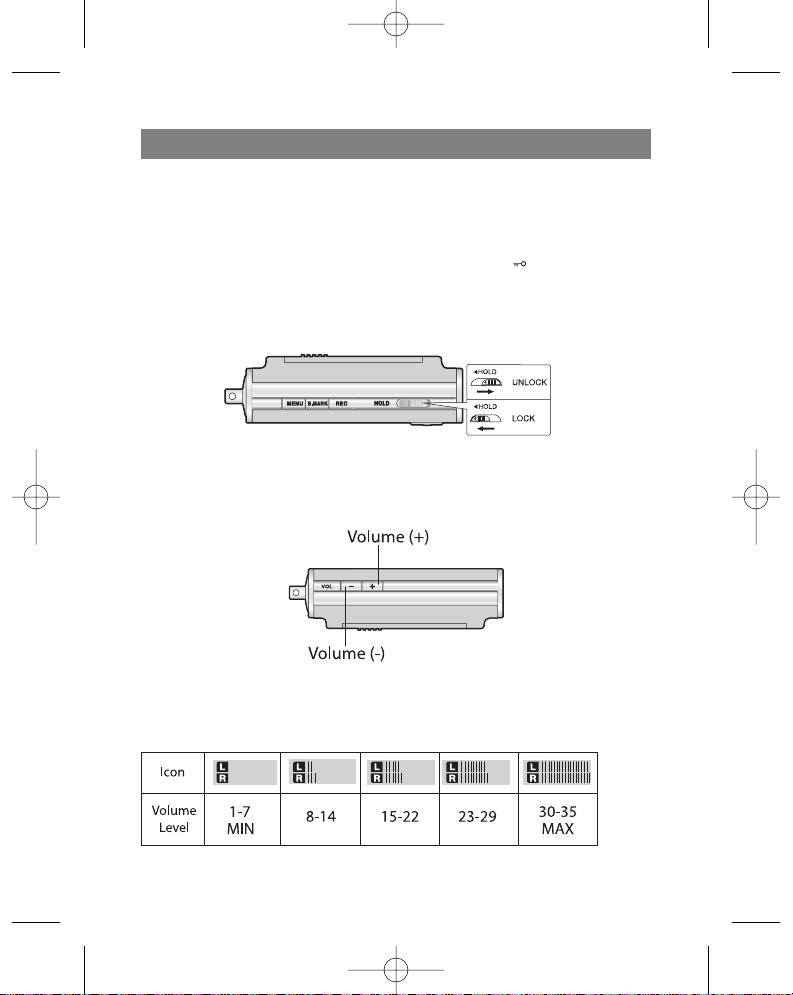
Hold function
This function locks the buttons on the player so that they cannot be accidentally
pressed.
Before using the player
With the player on, press the HOLD button (HOLD); the " " symbol will appear
on the display.
With the player off, press the HOLD button; the words ""HOLD ON !!!" will blink on
the display for two seconds.
Volume adjustment
You can adjust the volume using the (+/-) buttons.
There are 35 volume levels.
For your reference
Depending on the volume level, the display will show the following information:
ENGLISH
8
3796new1.qxd 4/1/05 5:56 PM Page 8
Page 13

USING THE PLAYER
PLAYING FILES
1. Press the Power On/Off button to turn the player on.
2. Use the Skip/Search (/ ) buttons to choose the desired file.
3. Press the Play ( ) button to begin playback of the chosen file.
Pausing file playback
Press the Pause/Stop (/ ) button during playback of a file.
Stopping file playback
Press and hold the Pause/Stop (/ ) button for more than 2 seconds during playback.
Notes
You can playback WMA files with speeds of 32KB/s (or less).
During playback of MP3 format files at low data transfer speeds (64 KB/s or less),
you may notice a delay when pressing buttons.
Skipping to the next or previous file
Skipping to the next file
Use the Skip/Search ( ) button to choose the next file.
Skipping to the pr
evious file
Press the Skip/Search ( ) button twice to skip to the previous file.
Returning to the beginning of the curr
ent file
Press the Skip/Search ( ) button once.
ENGLISH
9
3796new1.qxd 4/1/05 5:56 PM Page 9
Page 14

Fast skip or file search
Press and hold the Skip/Search ( / ) button for 2 seconds during playback.
Choosing a function mode
Press the FUNCTION (F) button for more than 1 second.
You can choose one of the following modes: Music, Voice, or FM radio, by using the
Skip/Search ( /) button and then press the () button to confirm the chosen
mode.
During recording you cannot choose a function mode.
Playback speed
Press the SPEED button several times repeatedly.
You can choose a playback speed (-30%, -15% or +15% of the normal playback of
the file)
ADDITIONAL FUNCTIONS
Bookmarks
If, during playback of a file, you activate the Bookmark function, you can automatically
find the desired moment in the composition.
1. Choose the desired moment in the composition during playback and then press
and hold the Bookmark (B.MARK) button for 2 seconds. The " " symbol will
appear on the display.
2. Press the Bookmark button once during playback of another file. The player automatically searches for the saved spot and begins playing the composition from the
exact spot that you programmed the Bookmark.
3. To cancel the Bookmark function, press the (B.MARK) and hold buttons for 2 seconds. The " " symbol will disappear from the display.
Repeating a specific segment of a composition
You can repeat a specific segment of a composition using the Bookmark button
ENGLISH
10
3796new1.qxd 4/1/05 5:56 PM Page 10
Page 15

(B.MARK). This function is designed to repeat parts of compositions lasting more than
three seconds. To choose the starting point of the specific segment of a composition,
press the Bookmark button once during playback of a file.
1. The “A " symbol will appear on the display.
2. To choose the ending point of the segment, press the button again during playback
of a file. The "A B" symbol will appear on the display.
3. To cancel the segment repeat function, press the Bookmark button. The “A B”
symbol will disappear from the display.
Note
In radio mode (FM band), the Bookmark function and segment repeat function will not
work.
Equalizer
You can choose from one of these five sound modes.
1. Press and hold the MENU button for
two seconds and then select the
EQUALIZER function using the function selector.
2. Use the Skip/Search (/ ) buttons
to find the desired sound mode (normal, classical, rock, jazz, pop)
3. Choose the desired sound mode by pressing the Play ( ) button and then press
the MENU button again to exit the equalizer mode.
Note
The equalizer function is not available in radio mode (FM band).
Language
You can choose from four different display languages.
1. Press and hold the Menu button for two
seconds and then use the function selector
to choose the “Language” function.
ENGLISH
11
3796new1.qxd 4/1/05 5:56 PM Page 11
Page 16
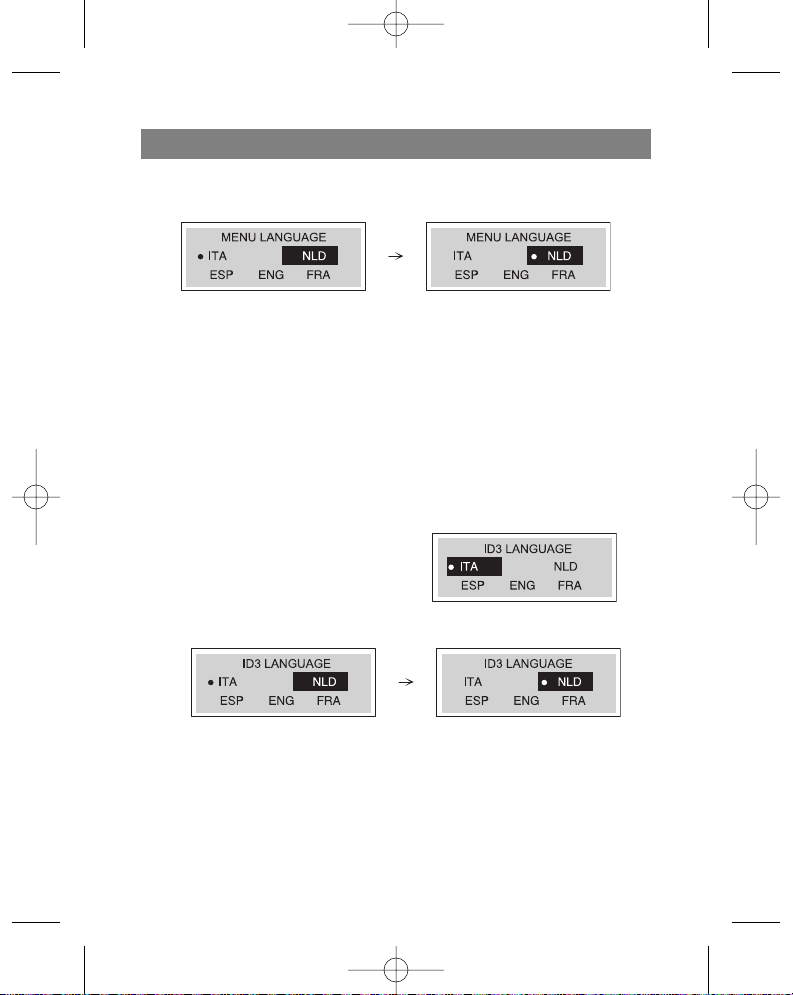
2. Use the Skip/Search ( / ) buttons to find the desired language and choose it by
pressing the Play () button.
-"ITA" - Italian
-"NLD" - Dutch
-"ESP" - Spanish
-"ENG" - English
-"FRA" - French
3. Press the Menu button to exit the language mode
Note
This function is not available when listening to FM band radio stations.
ID3 Language (MP3 text: name of album, song and artist)
You can choose from five different ID3 languages.
1. Press and hold the Menu button for two
seconds and then use the function selector
to choose the “ID3 Language” function.
2. Use the Skip/Search ( / ) buttons to
find the desired language and choose it by
pressing the Play () button.
-"ITA" - Italian
-"NLD" - Dutch
-"ESP" - Spanish
-"ENG" - English
-"FRA" - French
3. Press the Menu button to exit the language mode
ENGLISH
12
3796new1.qxd 4/1/05 5:56 PM Page 12
Page 17

Notes
This function is not available when listening to FM band radio stations.
If the file does not contain ID3 information, only the filename will be displayed.
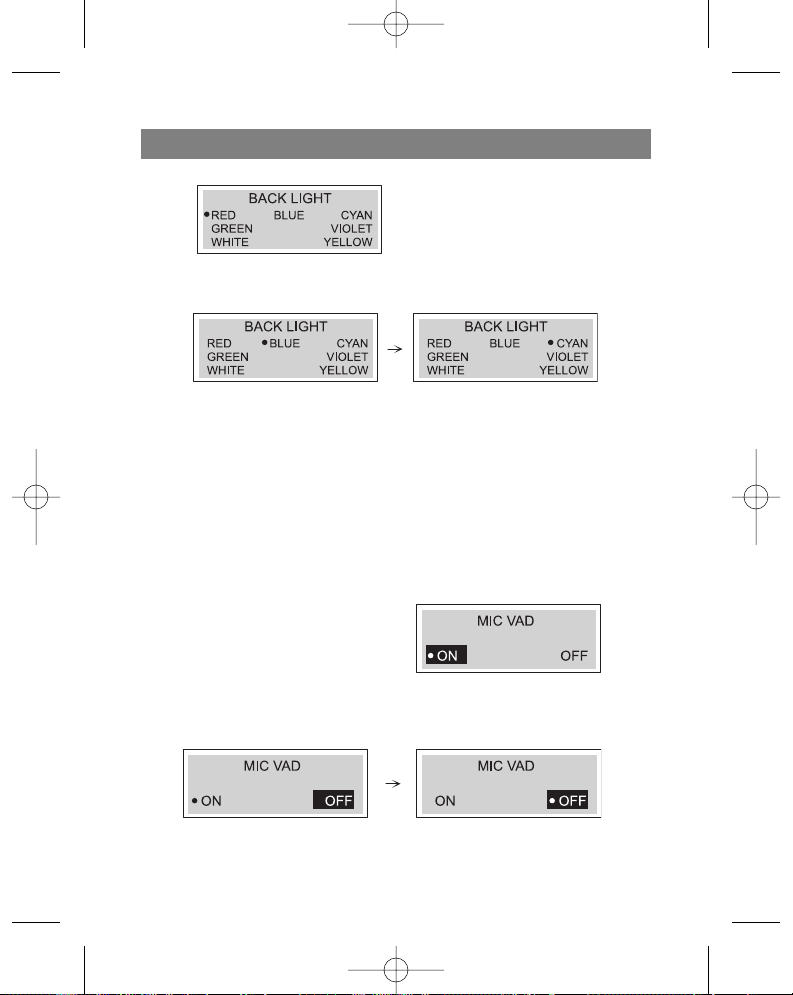
Backlight
Press and hold the Menu button for two seconds and then choose the “Backlight” menu.
Using this function you can change the color
of the display's backlight.
1. Choose the desired color (red, blue, cyan, green, violet, white, yellow) for the display backlight using the Skip/Search (/ ) buttons.
2. Press the Play () button to program the desired color and then press Menu to exit
the “Backlight” menu.
3. Turn on the backlight by pressing and holding the "VOL +" button for 2 seconds.
Dictaphone Function
Before recording anything to the MP3/WMA player, you can install the Voice Activated
Dictaphone (VAD) function.
1. Press and hold the Menu button for two
seconds and then use the function selector to choose the “MIC VAD" function.
2. Use the Skip/Search (/ ) button to
choose the “On” or “Off” position and
then press the Play () button to program the chosen position.
3. Press the Menu button to exit the "MIC VAD" menu.
ENGLISH
13
3796new1.qxd 4/1/05 5:56 PM Page 13
Page 18

Repeat Function
Press the ( REC) (10) button, to choose one of the five repeat modes.
Mode Display Symbol Description
Normal Plays each song one time in order.
Intro Plays the first 10 seconds of each song in order
to acquaint you with the music
Random Random playback of all songs
Repeat All Repeat playback of all song files
Repeat One Repeat playback of the currently chosen song
Notes
The repeat function is not available when listening to FM radio stations.
After playing the first 10 seconds of each song file in Introduction mode, the device
automatically turns off.
You can only choose one of the above listed repeat modes during playback
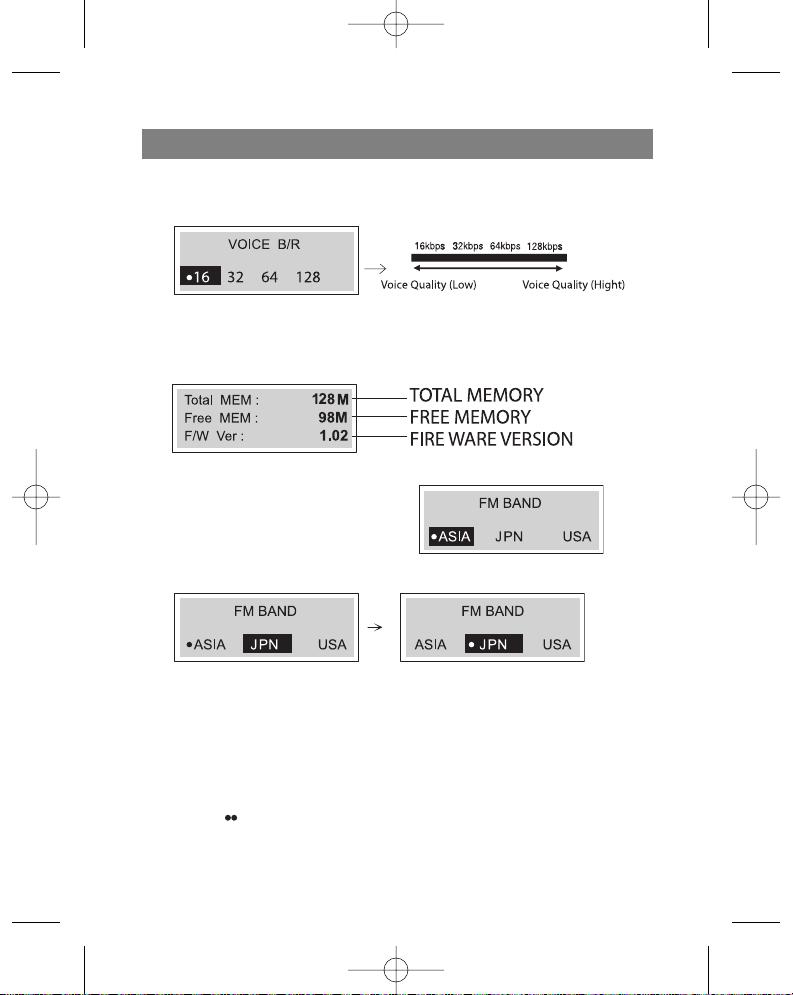
Data transfer speed in bits
Before recording anything to the MP3/WMA player; choose the speed of voice data
transfer in bits.
1. Press and hold the Menu button for two
seconds and then use function selector to
choose the (VOICE B/R) menu.
2. Use the Skip/Search (/ ) button to
select the needed speed and choose it
with the Play () button.
3. Press the menu button to exit the “Voice transfer data speed in bits” menu.
ENGLISH
14
3796new1.qxd 4/1/05 5:56 PM Page 14
Page 19

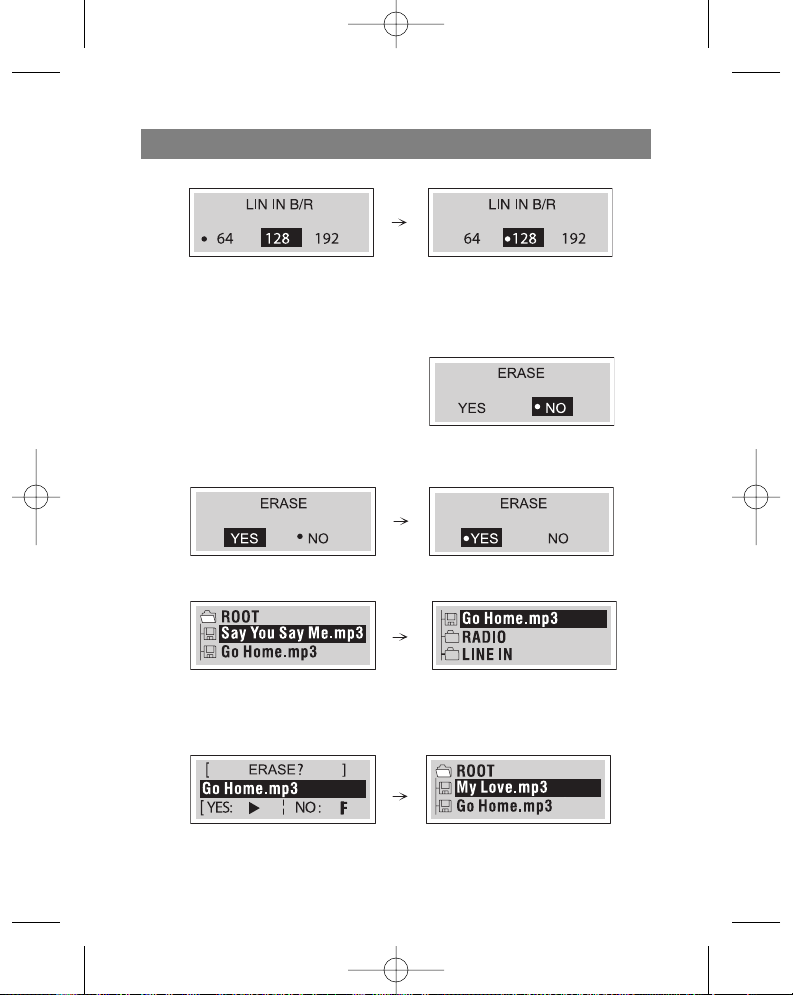
Speed of data recording from line input
Before recording anything on the MP3/WMA player, choose the line data transfer
speed in bits.
1. Press and hold the Menu button for two
seconds and then use function selector to
choose the (LINE IN B/R) menu.
2. Use the Skip/Search (/ ) button to
select the needed speed and choose it
with the Play () button .
3. Press the Menu button to exit the “Line in data transfer» menu.
Deleting files from the MP3/WMA player
1. Press and hold the menu button for two
seconds and then use the function selector
to choose the “Erase” function.
2. Use the Skip/Search ( /) buttons to
choose ”YES” and then press the Play ( )
button.
3. Use the (+/-) button to choose the files that you want to delete.
ENGLISH
15
3796new1.qxd 4/1/05 5:56 PM Page 15
Page 20
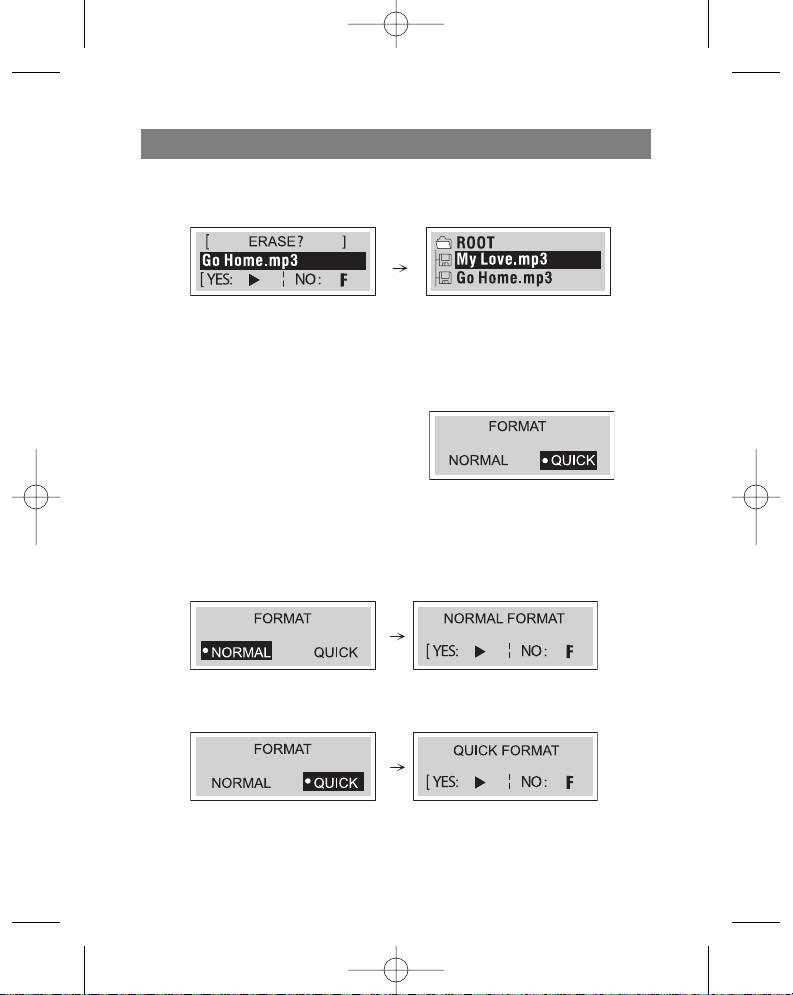
4. Press the Play () button to delete the chosen files and then the “F” button and
Menu to exit the Delete menu.
Notes
This function is only available in stop or pause modes.
Files cannot be deleted while listening to FM radio stations or MP3 format files.
Formatting files on the MP3/WMA player
1. Press and hold the menu button for two
seconds and then use the function selector to choose the “Format menu.”
2. The display will show you the “Normal”
and “Quick” formats; use the Skip/Search
(/) buttons, choose the desired format and then pres Play ( ) to set the
desired format and the (F) button to exit the menu.
“Normal” Format
”Quick” Format
ENGLISH
16
3796new1.qxd 4/1/05 5:56 PM Page 16
Page 21
Choosing the Voice Data Recording Speed
1. Before recording voice data to the MP3 player, choose the recording speed.
Checking the memory level and the operating system version
Press and hold the memory button for two seconds and then use the function
selector to display the following information:
FM Band
1. Press and hold the Menu button for two
seconds and then use the function
selector to choose the FM BAND menu.
2. Use the Skip/Search (/ ) buttons to
choose the desired position and then press Play ().
3. In order to exit the FM BAND mode, press and hold the function selector (F) for two
seconds and then use the Skip/Search (/ ) buttons to choose another mode.
RECORDING VOICE DATA
1. Press and hold the function selector for more than 1 second and then choose the
RECORD menu and press the Play ( ) button.
2. Set the sound recording speed in bits . The sound settings are finished.
3. Press the ( REC) button once in play/stop mode.
ENGLISH
17
3796new1.qxd 4/1/05 5:56 PM Page 17
Page 22

4. Record voice data using the microphone (MIC) on the main unit.
5. PRESS STOP TO END VOICE DATA RECORDING
Notes
Recording files are saved with names like VORC001.MP3, VORC002.MP3,
VORC003.MP3....and so forth.
If the “FULL!!!" symbol appears on the display, delete some files in order to create
more recording time on the player.
Enter the "Voice" mode in order to play back recorded files.
Recording from auxiliary devices
1. Set the line in data transfer speed in bits.
2. Choose the record mode by pressing and holding the function selector (F) button
for more than one second. The player will then be ready to record from an auxiliary
device.
3. Connect a line audio cable from the line out on the auxiliary audio device to the line
in jack on the player.
4. Press the ( REC) button momentarily in idle mode and start playback on the auxiliary device. Recording of data from the auxiliary device will begin.
5. Press the Play ( ) button to pause recording. To stop recording, press the Record
( REC) button; line in recording will end.
ENGLISH
18
3796new1.qxd 4/1/05 5:56 PM Page 18
Page 23

Notes
Recorded files are saved under the names LINI001.MP3, LINI002.MP3,
LINI003.MP3... and so forth.
If the "FULL!!!" symbol appears on the display, delete some files in order to free-up
space for new recordings.
Enter the "LINE IN" folder to play back recorded files.
LISTENING TO THE RADIO
Listening to radio stations
1. Press and HOLD THE FUNCTION SELECTOR (F) FOR MORE THAN ONE SECOND
AND THEN USE THE (/) BUTTONS to choose the FM Radio mode and press the
Play () button. The radio is ready for use.
2. Press the function selector (F) to choose the desired mode (ST: Stereo, MO: Mono)
3. Tune to the desired frequency using the Skip/Search (/) buttons.
Tuning a radio station manually
- Tune to the desired station by pressing the Skip/Search ( ) buttons.
Tuning a radio station automatically
- Press and hold the Skip/Search (/) buttons for more than one second (The
search will end as soon as the radio tunes to a radio station)
Notes
When listening to FM band radio stations,
connect the headphones to the correct
jack. The headphones also act as an
antenna.
If you press the Play ( ) button while lis-
tening to a FM Band radio station, the
sound will mute.
You can program up to 20 radio stations into the player's memory.
ENGLISH
19
3796new1.qxd 4/1/05 5:56 PM Page 19
Page 24

Saving into memory
All available radio stations with good signal quality can be saved into memory automatically.
Press and hold the Bookmark (B.MARK) button for more than two seconds in order
to begin the automatic scanning process.
Saving a tuned radio station frequency
1. Use the Skip/Search (/ ) buttons to choose the
frequency that you want to save in radio station
search mode.
(For example: You are programming the frequency
FM 87.5 MHz).
2. Press the Bookmark (B.MARK) button and use the
Skip/Search (/ ) buttons to choose the memo-
ry location in which you want to save the station
and then press the Bookmark (B.MARK) button
again. The station is now saved in memory.
3. Repeat steps 1-3 to save other radio frequencies
Recalling a saved radio station
Press the Menu button and then use the Skip/Search (/ ) buttons to choose the
memory location.
Deleting a programmed radio station
If you want to delete a saved radio frequency, press and hold the Bookmark (B.MARK)
button for more than 1 second while in preliminary radio frequency setting mode.
Recording from the radio
1. Choose the FM radio mode.
2. Choose the station that you want to record.
3. While listening to the radio station in the FM band,
press the Record ( REC) button. Recording of
the radio station will begin.
4. Press the Play ( ) button to pause recording. Press the Record ( REC) button
again to end recording.
Notes
Recorded files are named FMRC001.MP3, FMRC002.MP3, FMRC003.MP3.... and
so forth.
If the "FULL!!!" symbol appears on the display, delete some files to make room for
new recordings.
ENGLISH
20
3796new1.qxd 4/1/05 5:56 PM Page 20
Page 25

Enter the “Radio” folder to play back recorded files.
TROUBLESHOOTING
1. The MP3 player doesn't work or nothing appears on the display.
- Check the polarity of the installed battery.
2. The buttons don't work
- Make sure the button block function is not activated.
- The battery is missing or weak.
3. Files will not download.
- Check the USB connection with your computer and the USB cable itself.
- The file format may not be compatible with this MP3/WMA player.
SPECIFICATION
Memory capacity 128 MB
Dimension (WxHxD) 83x33x23mm
Weight 40 g (without battery)
Dynamic band 55dB
Headphones output power 5mV+5mV (1kHz,0 dB/16 K)
Signal/noise ratio 55/80 dB (No Filter/JIS-A Filter)
Channel separation 35/40 dB (1 kHz/10 kHz)
Power source 3 V alkaline batteries 2 x size AAA
Equalizer Normal/Classical/Rock/Jazz/Pop
FM Radio
Frequency band Europe/Asia (87.50-108.00 MHz, step: 50 KHz)
Japan (76.00-108.00 MHz, step: 100 KHz)
USA (87.50-108.00 MHz, step: 100 KHz)
Signal/noise ratio 40 dB
Channel separation 20/25 dB (10 KHz/1 KHz)
Antenna Antenna - headphones
Recording 128 MB : About 15 hours (16 kb/s)
Due to constant upgrading, the characteristics and design of this product may be changed without prior notification.
SERVICE LIFE OF THE UNIT NOT LESS 5 YEARS
GUARANTEE
Details regarding guarantee conditions can be obtained from the dealer from
whom the appliance was purchased. The bill of sale or receipt must be produced
when making any claim under the terms of this guarantee.
This product conforms to the EMC-Requirements as laid down by the
Council Directive 89/336/EEC and to the Low Voltage Regulation (23/73
EEC)
ENGLISH
21
3796new1.qxd 4/1/05 5:56 PM Page 21
Page 26

22
Lesen Sie bitte aufmerksam die Anweisungen dieser Anleitung durch und bewahren
Sie sie auf.
Die Bau-und Kenndaten können zwecks Verbesserung ohne Vorbescheid geändert
werden.
WICHTIGE SICHERHEITSANWEISUNGEN
Schützen Sie das Gerät vor der Einwirkung von hohen oder niedrigen Temperaturen
(über 35 oder unter -5) und hoher Feuchtigkeit.
Legen Sie keine schweren Gegenstände auf das Gerät.
Schützen Sie das Gerät vor Druckeinwirkung.
Bauen Sie keine anderen Vorrichtungen in dieses Gerät ein.
Reinigen Sie das Gerät nicht mit chemischen Reinigungsmitteln, wie etwa Benzin
oder Lösungsmittel.
Schützen Sie das Gerät vor direkten Sonnenstrahlen und stellen Sie es nicht neben
Heizgeräten auf.
Legen Sie das Gerät nicht auf verstaubte Stellen.
Nehmen Sie es nicht auseinander und versuchen Sie nicht das Gerät selbstständig
zu reparieren.
Wenn das Gerät für längere Zeit nicht benutzt wird, nehmen Sie die Batterien raus.
Anmerkung:
Wir tragen keine Haftung für den Verlust von gespeicherten oder aufgenommenen
Informationen, der aufgrund von Störungen in der Arbeit des Gerätes oder von
Reparaturarbeiten aufgetreten ist.
VORSICHTSMASSNAHMEN
Wenn Sie vorhaben das Gerät innerhalb einer längeren Zeit nicht zu benutzen, ent-
fernen Sie die Batterien, um eine Beschädigung des Gerätes in Folge von einem
Auslaufen der Batterien oder Korrosion zu vermeiden.
Benutzen Sie das Gerät nicht beim Steuern eines Fahrzeugs oder eines anderen
Transportmittels.
Verwenden Sie das Gerät nicht an Orten, wo es zu heiß, zu kalt, zu feucht oder zu
staubig ist.
Deaktivieren Sie vor der Anwendung des Gerätes die Taste HOLD.
Lassen Sie das Gerät während der Anwendung nicht fallen.
DEUTSCH
3796new1.qxd 4/1/05 5:56 PM Page 22
Page 27

Lebensdauer der Batterien
Batterie Wiedergabe MP3/WMA
Alkalibatterie (2EA) Etwa 8 Stunden
Betriebsdauer der Batterien (nach dem EIAJ-Standard)
Leistungskraft: 5mW + 5mW (ununterbrochene Wiedergabe der CD mit Frequenz
1 kHz)
Beim 4 Stunden langem Anhören pro Tag mit Übergang in den Stoppbetrieb der
Wiedergabe - Gesamtzeit 16 Stunden.
Die Wiedergabezeit kann sich in Abhängigkeit von den Gebrauchsbedingungen
ändern.
Laden Sie die Akkubatterien auf oder wechseln Sie herkömmliche Batterien in den folgenden Fällen aus:
Das Symbol " " blinkt.
Auf dem LCD-Display erscheint die Aufschrift "Schwache Batterien" und ver-
schwindet nach einer Sekunde wieder.
Die Funktionstasten arbeiten nicht.
Um eine elektrostatische Entladung zu vermeiden, sollten Sie die folgenden
Bedingungen einhalten
Benutzen Sie das Gerät nach Möglichkeit nicht bei zu trockener Luft
Wenn das Gerät bei normaler Anwendung nicht mehr funktioniert, wechseln
Sie die Batterien aus.
DEUTSCH
23
3796new1.qxd 4/1/05 5:56 PM Page 23
Page 28

FUNKTIONEN DES SPIELERS UND STEUERUNGSTASTEN
Bestandteile
DEUTSCH
24
Installations-CD USB-Kabel Kopfhörer
Etui Batterien LR03 (Größe AAA) Audio-Linearkabel
Bedienungsanleitung
3796new1.qxd 4/1/05 5:56 PM Page 24
Page 29

STEUERUNGSORGANE
Vordere / hintere Tafel Seitentafel
DEUTSCH
25
1. Befestigungsstelle für Halstragriemen
2. Flüssigkristalldisplay
3. Funktionsschalter (F) (Musik,
Sprechsendung, FM-Radio)
Geschwindigkeitstaste SPEED
4. Wiedergabetaste PLAY ( )
Taste PAUSE/STOPP
PAUSE/STOP (/)
Taste EIN/AUS POWER ON/OFF
5. Taste ÜBERGANG/SUCHE
SKIP/SEARCH ( / )
6. Batteriefachdeckel
7. Lautstärkenregler (-/+)
8. Taste MENU
9. Taste Bandzeichen (B.MARK)
10.Taste Aufnahme ( REC)
11. Sperrtaste der Steuerungstasten
(HOLD)
3796new1.qxd 4/1/05 5:56 PM Page 25
Page 30

OBERE/UNTERE TAFEL
FLÜSSIGKRISTALLDISPLAY
DEUTSCH
26
12. Mikrofon (MIC)
13. Kopfhörerbüchse ( ): Ø 3,5 mm
14. Büchse für den Anschluss von
zusätzlichen Geräten: Ø 3,5 mm
15. USB-Büchse
A. Musik/Stimme
B. Aktueller Titel/Gesamtzahl der Titel
C. Markierzeichen
D. Wiedergabezeit
E. Wiederholungsbetrieb
F. Tastensperre
G. Indikator der Batterieladung
H. File-Info
I. Format MP3/WMA
J. Abtastungsfrequenz
K. Übertragungsgeschwindigkeit in Bit
L. Lautstärkenpegel
M. Beleuchtung
3796new1.qxd 4/1/05 5:56 PM Page 26
Page 31

Einlegen der Batterien
1. Öffnen Sie den Batteriefachdeckel.
2. Legen Sie die Batterien ein.
Überzeugen Sie sich davon, dass die
Markierungen + und - auf den Batterien
mit den entsprechenden Symbolen im
Batteriefach zusammenfallen.
3. Schließen Sie den Batteriefachdeckel
Anmerkung
Ein inkorrektes Einlegen der Batterien kann deren Auslaufen und Korrosion zur
Folge haben.
Falls die Batterien auslaufen sollten, reinigen Sie das Batteriefach von der ausge-
laufenen Flüssigkeit und legen Sie neue Batterien ein.
SYSTEMFORDERUNGEN
Für den Anschluss des MP3/WMA-Spielers an den Computer muss er den Folgenden
Forderungen entsprechen:
Betriebsdaten
Operationssystem: Windows 98/ME/2000/XP
Computer: mindestens Pentium - 133 MHz
Speicher: mindestens 32 MB (zu empfehlen: über 32MB)
Platz auf der Festplatte: mindestens100 MB
Video-Card: Betriebsart 640 x 480, mindestens High Color (16 Bit)
USB-Port
CD-ROM-Vorrichtung
Anmerkungen
Was ist USB?
USB bedeutet Universal Serial Bus (universelle sequentielle Schiene).
Das ist ein neuer Interface, der auf einer neuen Konzeption der Verbindung des
PCs mit peripheren Geräten basiert.
Maximale Bandweite 12 MB/sek, an einen PC können bis zu 127 USB-Geräte
angeschlossen werden.
DEUTSCH
27
3796new1.qxd 4/1/05 5:56 PM Page 27
Page 32

ANWENDUNG DES MP3/WMA-SPIELERS
Sie benötigen Musikdateien im Format MP3/WMA auf Ihrem Computer, ein USB-Kabel
und den Spieler.
Sie können die Musikfiles von Ihrem Computer auf das Gerät mittels USB-Port und
USB-Kabel übertragen. Außerdem können Sie Daten von Ihrem MP3/WMA-Spieler auf
den Computer übertragen.
ANSCHLUSS DES USB-KABELS
Anschluss des MP3/WMA-Spielers an den Computer
Verbinden Sie den Spieler mit dem Computer mit de beigelegtem USB-Kabel.
DEUTSCH
28
3796new1.qxd 4/1/05 5:56 PM Page 28
Page 33

VERGLEICHEN SIEDIE STECKER DES USB-KABELS
Schließen Sie ein Ende des USB-Kabels an
den USB-Port von Ihrem Computer an, und
schließen Sie das andere Ende an die USBDatenübertragungsbüchse des MP3/WMASpielers an.
VOR DER ANWENDUNG
Einschalten/Ausschalten
Pressen Sie zum Einschalten die Taste Ein/Aus POWER ON/OFF (4) und halten Sie
sie über 1 Sekunde lang gedrückt.
Zum Ausschalten pressen Sie die Taste POWER ON/OFF (4) und halten Sie sie über
1.5 Sekunden im Pausebetrieb oder im Stillstandbetrieb gedrückt.
Anwendung von Köpfhörern
Schließen Sie die Kopfhörer an die Kopfhörerbüchse an. (13).
DEUTSCH
29
3796new1.qxd 4/1/05 5:56 PM Page 29
Page 34

SPERRFUNKTION
Diese Funktion blockiert alle Tasten des Gerätes, um einen zufälligen Tastendruck
zu vermeiden.
Vor der Anwendung des MP3/WMA-Spielers
Pressen Sie bei eingeschaltetem Gerät die Sperrtaste (HOLD), dabei erscheint
auf dem Display das Symbol " ".
Bei ausgeschaltetem Gerät pressen Sie die Sperrtaste, dabei erscheint auf dem
Display für 2 Sekunden die Aufschrift ""HOLD ON !!!".
Einstellen der Lautstärke
Sie können die Lautstärke mit den Tasten (+/-) einstellen.
Es sind 35 Lautstärkestufen vorgesehen.
Zur Information
In Abhängigkeit von der Lautstärkenstufe erscheinen auf dem Display die folgenden
Angaben:
DEUTSCH
30
3796new1.qxd 4/1/05 5:56 PM Page 30
Page 35

31
ANWENDUNG DES MP3/WMA-SPIELERS
FILE-WIEDERGABE
1. Pressen Sie die Taste An/Aus, um das Gerät einzuschalten.
2. Wählen Sie mit den Tasten Übergang/Suche ( /) die gewünschte Datei aus.
3. Pressen Sie die Taste Wiedergabe (), um die Wiedergabe der Datei zu starten.
Pause bei File-Wiedergabe
Pressen Sie die Taste Pause/Stopp (/ ) im Wiedergabebetrieb.
Anhalten der Wiedergabe
Pressen Sie die Taste Pause/Stopp (/ ) und halten Sie die über 2 Sekunden lang
während der Wiedergabe gepresst.
Anmerkung
Sie könne Files im WMA-Format mit einer Geschwindigkeit von 32 KB/Sek (oder
weniger) abspielen.
Bei der Wiedergabe von Files im MP3-Format mit einer niedrigen
Datenübertragungsgeschwindigkeit ( 64 KB/Sek oder weniger) können
Verzögerungen beim Drücken der Tasten auftreten.
Übergang zum nächsten oder zum vorangegangenen File
Über
gang zum nächsten File
Wählen Sie mit der Taste Übergabg/Suche () die nächste Datei aus.
Über
gang zum vorangegangenen File
Durch ein zweifaches Drücken der Taste Übergang/Suche () schalten Sie zum vorangegangenen File um.
DEUTSCH
3796new1.qxd 4/1/05 5:56 PM Page 31
Page 36

Zurück zu Anfang des laufenden Files
Pressen Sie einmal die Taste Übergang/Suche ( ).
Schnellübergang oder Filesuche
Pressen Sie die Taste Übergang/Suche ( / ) und halten Sie sie i
Wiedergabebetrieb innerhalb von 2 Sekunden gepresst.
Funktionsbetriebwahl
Pressen Sie die Taste FUNCTION (F) über 1 Sekunde lang.
Sie können eine der Betriebsarten wählen: Musik, Stimme, FM-Radio, indem Sie
die Taste Übergang/Suche (/ ) pressen, und pressen Sie danach die Taste
(), um die gewählte Betriebsart zu bestätigen.
Während der Aufnahme kann der Funktionsbetrieb nicht angewählt werden.
Wiedergabegeschwindigkeit
Pressen Sie die Geschwindigkeitstaste SPEED mehrmals kurz nacheinander.
Sie können Die Datenwiedergabegeschwindigkeit wählen (-30%, -15% oder +15%
von der gewöhnlichen Filewiedergabegeschwindigkeit)
ZUSÄTZLICHE FUNKTIONEN
Bandmarkierung
Wenn Sie während der Filewiedergabe die Markierungsfunktion aktivieren, werden Sie
automatisch die gewünschte Stelle der Aufnahme zum gewünschten Zeitpunkt finden
können.
1. Wählen Sie die gewünschte Stelle der Aufnahme während der Wiedergabe, pressen
und halten Sie 2 Sekunden lang die Taste Bandmarkierung (B.MARK). Auf dem
Flüssigkristalldisplay erscheint das Symbol " ".
2. Pressen Sie während der Wiedergabe von einem anderen File einmal kurz die Taste
Bandmarkierung. Der Spieler wird automatisch die Suche ausführen und den Titel von
der Stelle wiedergeben, die mit der Taste Bandmarkierung vorprogrammiert wurde.
DEUTSCH
32
3796new1.qxd 4/1/05 5:56 PM Page 32
Page 37

3. Um die Funktion Bandmarkierung abzustellen, pressen Sie die Taste
Bandmarkierung (B.MARK) und halten Sie sie 2 Sekunde lang gepresst. Dabei
wird das Symbol " " vom Display verschwinden.
Wiederholungsfunktion eines bestimmten Titelabschnittes
Einen bestimmten Titelabschnitt können Sie wiederholen lassen, indem Sie die Taste
Bandmarkierung (B.MARK) pressen. Diese Funktion ist nicht für die Wiedergabe von
Titelabschnitten unter 3 Sekunden bestimmt. Um den Anfang eines bestimmten
Titelabschnittes zu wählen, pressen Sie einmal die Taste Bandmarkierung während der
Filewiedergabe.
1. Auf dem Display erscheint das Symbol “A".
2. Um das Ende eines bestimmten Titelabschnittes zu wählen, pressen Sie diese Taste
während der Filewiedergabe noch einmal. Auf dem Display erscheint das Symbol
"A B".
3. Um die Wiederholungsfunktion eines bestimmten Titelabschnittes abzustellen,
pressen Sie die Taste Bandmarkierung. Dabei wird das Symbol “A B” vom Display
verschwinden.
Anmerkung
Im Radiobetrieb (FM-Bereich) sind die Funktionen Bandmarkierung und der
Wiederholung eines bestimmten Titelabschnittes nicht vorgesehen.
Equalizer
Sie können eine der fünf Klangarten wählen.
1. Pressen Sie sie Taste MENU und halten
Sie sie innerhalb von 2 Sekunden
gepresst, wählen Sie danach mit dem
Funktionsumschalter die Funktion
«EQUALIZER».
2. Finden Sie mit den Tasten Übergang/Suche (/) die gewünschte Klangart
(Normal, Klassik, Rock, Jazz, Pop)
DEUTSCH
33
3796new1.qxd 4/1/05 5:56 PM Page 33
Page 38

34
3. Wählen Sie mit der Wiedergabetaste () die gewünschte Klangart, und pressen Sie
ein weiteres Mal die Taste MENU, um den Equalizerbetrieb zu verlassen.
Anmerkung
Die Equalizerfunktion ist im Radiobetrieb nicht zugänglich (FM-Bereich).
Sprache
Sie können eine der vier voreingestellten Sprachen einstellen.
1. Pressen Sie die Taste Menu und halten Sie sie
zwei Sekunden lang gepresst, wählen Sie
danach mit dem Funktionsumschalter die
Funktion «Sprache».
2. Finde Sie mit den Tasten Übergang/Suche
( /) die gewünschte Sprache und wählen Sie sie durch ein Pressen der
Wiedergabetaste ().
-"ITA" - Italienisch
-"NLD" - Holländisch
-"ESP" - Spanisch
-"ENG" - Englisch
-"FRA" - Französisch
3. Pressen Sie die Taste Menu, um die Betriebsart «Sprache» zu verlassen
Anmerkung
Diese Funktion ist im FM-Radiobetrieb nicht zugänglich.
Funktion Sprache ID3 («MP3 Text: Album- und Titelname, Künstlername»)
Sie können eine der fünf Sprachen wählen.
1. Pressen Sie die Taste Menu und halten Sie
sie innerhalb von 2 Sekunden gepresst,
wählen Sie danach mit dem
Funktionsschalter das Menu "Sprache ID3”.
2. Finden Sie mit den Tasten Übergang/Suche
(/ ) die gewünschte Sprache und wählen Sie sie, indem die die Taste
DEUTSCH
3796new1.qxd 4/1/05 5:56 PM Page 34
Page 39

Wiedergabe () pressen.
-"ITA" - Italienisch
-"NLD" - Holländisch
-"ESP" - Spanisch
-"ENG" - Englisch
-"FRA" - Französisch
3. Pressen Sie die Taste Menu, um die Betriebsart «Sprache» zu verlassen
Anmerkung
Funktion ist im FM-Radiobetrieb nicht zugänglich.
Wenn der File keine ID3-Daten enthält, wird auf de Display nur der Filename
angezeigt.
Beleuchtung
Pressen Sie die Taste Menu und halten Sie
sie innerhalb von 2 Sekunden lang gepresst,
wählen Sie danach das Menu «Beleuchtung»
aus. Mit dieser Funktion können Sie die
Farbe der Displaybeleuchtung ändern.
1. Wählen Sie die gewünschte Farbe (rot, blau, hellblau, grün, violett, weiß, gelb) der
Displaybeleuchtung mit den Tasten Übergang/Suche ( /).
2. Durch ein Pressen der Wiedergabetaste () stellen Sie die gewünschte Farbe ein,
pressen Sie danach die Taste Menu, um die Betriebsart «Beleuchtung» zu verlassen.
3. Schalten Sie die Beleuchtung ein, indem Sie die Taste «Lautstärke auf» "VOL +"
innerhalb von 2 Sekunden pressen. Pressen Sie die Taste «Lautstärke auf» "VOL +"
und halten Sie sie 2 Sekunden lang gepresst, um die Beleuchtung auszuschalten.
DEUTSCH
35
3796new1.qxd 4/1/05 5:56 PM Page 35
Page 40

Diktiergerätfunktion
Bevor Sie Aufnahen mit dem MP3/WMA-Spieler machen, können Sie Die
Stimmenaktivierung des Diktiergerätes (VAD) einstellen.
1. Pressen Sie die Taste Menu 2 Sekunden
lang, wählen Sie danach mit dem
Funktionsumschalter das Menu «MIC
VAD".
2. Wählen Sie mit de Tasten
Übergang/Suche (/) die Position «Anschalten» oder «Ausschalten», pressen Sie
danach die Wiedergabetaste (), um die gewählte Position zu programmieren.
3. Pressen Sie die Taste Menu, um die Betriebsart "MIC VAD" zu verlassen.
Wiederholungsfunktion
Pressen Sie die Taste Aufnahme ( REC) (10), um einen der fünf
Wiederholungsbetriebe zu wählen.
Betriebsart Symbol am Display Beschreibung
Normal Einmalige Wiedergabe der Titel
der Reihenfolge nach.
Intro Wiedergabe von jedem Titel
innerhalb der ersten 10
Sekunden zum Voranhören
Zufällige Reihenfolge Wiedergabe der Titel in zufälliger
Reihenfolge
Wiederholung aller Titel Wiedergabe aller Titel der Datei
Wiederholung eines Titel Wiederholte Wiedergabe des
laufenden Titels
DEUTSCH
36
3796new1.qxd 4/1/05 5:56 PM Page 36
Page 41

37
Anmerkung
Die Funktion Wiederholung ist im FM-Radiobetrieb nicht zugänglich.
Nach der Wiedergabe von jeweils 10 Sekunden aller Titel der Datei im Intro-Betrieb
schaltet sich das Gerät automatisch ab.
Sie können eine der oben genannten Wiederholungsarten nur im Wiedergabebetrieb
wählen.
Geschwindigkeit der Stimmdatenübertragung in Bit
Bevor Sie etwas mit dem MP3/WMA-Spieler aufnehmen, können Sie die Übertragungsgeschwindigkeit der Stimmdaten wählen.
1. Pressen Sie die Taste Menu 2 Sekunden lang,
wählen Sie danach mit dem Funktionsschalter
das Menu «Geschwindigkeit der
Stimmdatenübertragung in Bit » (VOICE B/R).
2. Finden Sie mit den Tasten
Übergang/Suche (/) die gewünschte Geschwindigkeitsstufe und wählen Sie sie
mit der Wiedergabetaste ().
3. Pressen Sie die Taste Menu, um das Menu «Geschwindigkeit der
Stimmdatenübertragung in Bit» zu verlassen.
Datenaufnahmegeschwindigkeit vom Lineareingang
Bevor Sie etwas mit dem MP3/WMA-Spieler aufnehmen, können Sie die lineare Übertragungsgeschwindigkeit in Bit wählen.
1. Pressen Sie 2 Sekunden lang die Taste
Menu, wählen Sie danach mit dem
Funktionsumschalter das neu
«Datenaufnahmegeschwindigkeit vom
Lineareingang ("LINE IN B/R").
2. Finden Sie mit den Tasten
Übergang/Suche (/ ) die gewünschte Geschwindigkeitsstufe und wählen Sie
sie mit der Wiedergabetaste ().
DEUTSCH
3796new1.qxd 4/1/05 5:56 PM Page 37
Page 42
3. Pressen Sie die Menutaste, um die Betriebsart « Datenaufnahmegeschwindigkeit
vom Lineareingang » zu verlassen.
Löschen von Files im MP3/WMA-Spieler
1. Pressen Sie 2 Sekunden lang die Taste
Menu, wählen Sie danach mit dem
Funktionsumschalter das Menu «Löschen»
("ERASE").
2. Wählen Sie mit den Tasten Übergang/Suche (/ ) die Position «Ja» («YES») und
pressen Sie die Wiedergabetaste ( ).
3. Wählen Sie mit den Tasten (+/-) die Files, die Sie löschen wollen.
4. Pressen Sie die Wiedergabetaste ( ), um die gewählten Dateien zu löschen,
danach die Taste (F), und danach die Taste Menu, um das Menu «Löschen» zu verlassen.
DEUTSCH
38
3796new1.qxd 4/1/05 5:56 PM Page 38
Page 43

Anmerkung
Diese Funktion ist nur bei abgestellter Wiedergabe oder im Pausebetrieb
zugänglich.
Im FM-Radiobetrieb oder während der Wiedergabe von Files im MP3-Format kön-
nen die Files nicht gelöscht werden.
Formatierung der Dateien im MP3/WMA-Spieler
1. Pressen Sie 2 Sekunden lang die Taste
Menu, wählen Sie danach mit dem
Funktionsumschalter das Menu
«Formatieren».
2. Auf dem Display erscheinen das «normale» und das «schnelle» Format, wählen Sie mit den Tasten Übergang/Suche
(/ ) das gewünschte Format, Pressen Sie danach die Wiedergabetaste (), u
das gewünschte Format einzustellen, und pressen Sie danach die Taste (F), um das
Menu zu verlassen.
«Normales» Format
«Schnelles» Format
Wahl der Aufnahmegeschwindigkeit der Stimmdaten
1. Bevor Sie Stimmdaten mit dem MP3-Spieler machen, wählen Sie die
Aufnahmegeschwindigkeit der Stimmdaten.
DEUTSCH
39
3796new1.qxd 4/1/05 5:56 PM Page 39
Page 44

Überprüfung des Speichervolumens und der Angaben über die Softwareversion
Pressen Sie zwei Sekunden lang die Menu-Taste, führen Sie danach mit dem
Funktionsumschalter die folgenden Daten auf das Display:
Bandbereich FM
1. Pressen Sie 2 Sekunden lang die Menu-
Taste, wählen Sie danach mit dem
Funktionsumschalter das Menu
«Bandbereich FM» ("FM BAND").
2. Wählen Sie mit den Tasten Übergang/Suche (/ ) die gewünschte Position,
pressen Sie danach die Wiedergabetaste ().
3. Um die Betriebsart «Bandbereich FM» zu verlassen, pressen und halten Sie den
Funktionsumschalter (F) innerhalb von 2 Sekunden, wählen Sie danach mit den
Tasten Übergang/Suche (/ ) eine andere Betriebsart aus.
AUFNAHME VON STIMMDATEN
1. Pressen Sie über eine Sekunde lang den Funktionsumschalter, wählen Sie danach
das Menu «Aufnahme» ("RECORD") und pressen Sie die Wiedergabetaste ().
2. Stellen Sie die Übertragungsgeschwindigkeit der Stimmdaten in Bit.
Die Einstellung der Aufnahmewerte ist beendet.
3. Pressen Sie einmal die Taste Aufnahme ( REC) im Betrieb Pause/Abgestellte
Wiedergabe.
4. Nehmen Sie Stimmdaten mit dem Mikrofon (MIC) auf dem Hauptgerät auf.
5. UM DIE AUFNAHME DER STIMDATEN ZU STOPPEN, PRESSEN SIE DIE AUFNAH-
METASTE. Die Aufnahme der Stimmdaten ist beendet.
DEUTSCH
40
3796new1.qxd 4/1/05 5:56 PM Page 40
Page 45

41
Anmerkung
Die aufgenommenen Daten werden unter den Namen VORC001 .MP3,
VORC002.MP3, VORC003.MP3....etc. gespeichert.
Wenn auf dem Display die Aufschrift «Voll» ("FULL!!!") erscheint, löschen Sie einige
der Dateien, um die zugängliche Zeit für die Stimmdatenaufnahme zu sparen.
Schalten Sie in die Betriebsart «Stimme» ("Voice"), um die Wiedergabe der
aufgenommenen Daten zu beginnen.
Aufnahme von zusätzlichen Geräten
1. Stellen Sie die Übertragungsgeschwindigkeit in Bit für den Lineareingang ein.
2. Wählen Sie den Aufnahmebetrieb, indem Sie den Funktionsschalter (F) über eine
Sekunde lang pressen. Der MP3/WMA-Spieler ist bereit für die Aufnahme von
äußeren Audiogeräten.
3. Schließen Sie das Audio-Linearkabel mit einem Ende an die Linearausgangsbüchse
am äußeren Audiogerät an, und das andere Ende und die Linearausgangsbüchse a
MP3/WMA-Spieler an.
4. Pressen Sie kurz die Taste Aufnahme ( REC) bei abgestellter Wiedergabe und
schalten Sie die Wiedergabe auf dem äußeren Gerät ein. Auf diese Weise erfolgt die
Datenaufnahme von äußeren Gerät.
5. Um die Aufnahme anzuhalten, pressen Sie die Wiedergabetaste ( ). Um die
Datenaufnahme zu stoppen, pressen Sie die Taste Aufnahme ( REC), die
Aufnahme vom Linearausgang ist beendet.
DEUTSCH
3796new1.qxd 4/1/05 5:56 PM Page 41
Page 46

Anmerkung
Die aufgenommenen Dateien werden unter den Namen LINI001 .MP3,
LINI002.MP3, LINI003.MP3... etc. gespeichert.
Wenn auf dem Display die Aufschrift «Voll» ("FULL!!!") erscheint, löschen Sie einige
der Dateien, um Platz für neue Aufnahmen zu befreien.
Öffnen Sie die Directory "LINE IN" für die Wiedergabe der aufgenommenen
Dateien.
ANWENDUNG DES RADIOEMPFÄNGERS
Anhören von Radiosendern
1. Pressen Sie den Funktionsumschalter (F) ÜBER 1 SEKUNDE LANG, WÄHLEN SIE
DANACH MIT DER TASTE (/ ) den FM-Radiobetrieb und pressen Sie die
Wiedergabetaste (). Der Radioempfänger ist betriebsbereit.
2. Wählen Sie mit dem Funktionsumschalter (F) die gewünschte Betriebsart
(ST: Stereo, MO: Mono)
3. Finden Sie die gewünschte Frequenz mit den Tasten Übergang/Suche (/ ).
Manuelle Abstimmung der Radiosender
- Stellen Sie den gewünschten Sender mit den Tasten Übergang/Suche (/ ) ein.
Automatische Abstimmung der Radiosender
- Pressen Sie die Taste Übergang/Suche (/ ) über eine Sekunde lang (Die
Suche wird gestoppt, sobald sich der Empfänger auf den Sender eingestellt hat)
Anmerkung
- Beim Anhören der Radiosender im FM-Bandbereich müssen Sie die Köpfhörer an
die entsprechende Büchse anschließen. Die Kopfhörer sind ein Bestandteil der
Antenne.
- Wenn Sie die Wiedergabetaste ()
im FM-Radiobetrieb pressen, schaltet sich der Klang ab.
Sie können bis zu 20 Radiosender auf dem Radioempfänger vorprogrammieren.
DEUTSCH
42
3796new1.qxd 4/1/05 5:56 PM Page 42
Page 47

43
Eingabe in den Speicher
Alle zugänglichen Radiosender mit einem starken Signal können automatisch in den
Speicher eingetragen werden.
- Pressen Sie über 2 Sekunden lang die Taste Bandmarkierung (B.MARK), um den
automatischen Abtastungsbetrieb zu starten.
Speicherung der Radiofrequenzen
1. Wählen Sie im Suchbetrieb der FM-Radiosender
mit den Tasten Übergang/Suche (/ ) die
Frequenz, die Sie speichern wollen.
(Beispiel: Sie programmieren die Frequenz
FM 87.5 MHz).
2. Pressen Sie die Taste Bandmarkierung (B.MARK)
und wählen Sie mit den Tasten Übergang/Suche
(/ ) die Speichernummer, pressen Sie danach
noch einmal die Taste Bandmarkierung (B.MARK).
Die gewählte Nummer wird gespeichert.
3. Wiederholen Sie die Schritte 1-3, um andere Sender zu speichern
Abrufen der gespeicherten Sender
Pressen Sie die Taste Menu, Wählen Sie danach mit den Tasten Übergang/Suche
( /) den vorprogrammierten Sender.
Löschen der vorprogrammierten Sender
Wenn Sie einen vorprogrammierten Sender aus dem Speicher löschen wollen, pressen
Sie im Betrieb der Vorabstimmung der Radiofrequenzen über 1 Sekunde lang die
Taste Bandmarkierung (B.MARK).
Aufnahme vom Radio
1. Wählen Sie den FM-Radiobetrieb.
2. Wählen Sie den Sender, von dem Sie die
Aufnahme machen wollen.
3. Beim Anhören der Sender im FM-Bereich pressen Sie die Taste Aufnahme
( REC). Auf diese Weise erfolgt die Aufnahme von einem Radiosender.
4. Um die Aufnahme anzuhalten, pressen Sie die Wiedergabetaste ( ). Um die
Aufnahme zu stoppen, pressen Sie die Taste Aufnahme ( REC), die Aufahme
vom Radio ist beendet.
Anmerkung
Die aufgenommenen Dateien werden unter den Namen FMRC001 .MP3,
FMRC002.MP3, FMRC003.MP3.... etc. gespeichert.
Wenn auf dem Display die Aufschrift «Voll» ("FULL!!!") erscheint, löschen Sie einige
der Dateien, um Platz für neue Aufnahmen zu befreien.
DEUTSCH
3796new1.qxd 4/1/05 5:56 PM Page 43
Page 48

Öffnen Sie die Directory «Radio», um die Wiedergabe der aufgenommenen Files zu
starten.
STÖRUNGEN
1. Der MP3-Spieler funktioniert nicht oder es wird nichts auf dem Display angezeigt.
- Überprüfen Sie, dass die Polarität beim Einlegen der Batterien eingehalten wurde.
2. Die Tasten funktionieren nicht
- Prüfen Sie nach, ob die Tastensperrfunktion aktiviert ist.
- Die Batterie ist leer oder fehlt.
3. Files lassen sich nicht laden.
- Prüfen Sie die Verbindung des USB-Ports Ihres Computers mit dem USB-Kabel.
- Das Dateiformat passt nicht zu diesem MP3/WMA-Spieler.
SPEZIFIKATION
Speichervolumen 128 MB
Größe (BxHxL) 83x33x23mm
Gewicht 40 g (ohne Batterie)
Dynamik 55dB
Ausgangsleistung der Kopfhörer 5mV+5mV(1kHz,0 dB/16 K)
Signal/Rauschverhältnis 55/80 dB (No Filter/JIS-A Filter)
Kanalteilung 35/40 dB (1 kHz/10 kHz)
Speisequelle 3 V Alkalibatterien Größe AAA X 2
Equalizer Normal/Klassik/Rock/Jazz/Pop
FM-Radio
Bandbereich Europa/Asien (87.50-108.00 MHz, Schritt: 50 KHz)
Japan (76.00-108.00 MHz, Schritt:100 KHz)
USA (87.50-108.00 MHz, Schritt: 100 KHz)
Signal/Rauschverhältnis 40 dB
Kanalteilung 20/25 dB (10 KHz/1 KHz)
Antenne Antenne - Kopfhörer
Aufnahme 128MB: Etwa 15 Stunden (16 kb/sek)
Aufgrund einer ständigen Verbesserung können die Charakteristiken und das Design des
Artikels ohne Vorbescheid geändert werden.
DIE LEBENSDAUER DES GERÄTES BETRÄGT NICHT WENIGER ALS 5 JAHRE
Gewährleistung
Ausführliche Bedingungen der Gewährleistung kann man beim Dealer, der diese Geräte
verkauft hat, bekommen. Bei beliebiger Anspruchserhebung soll man während der Laufzeit
der vorliegenden Gewährleistung den Check oder die Quittung über den Ankauf
vorzulegen.
Das vorliegende Produkt entspricht den Forderungen der elektromagnetischen
Verträglichkeit, die in 89/336/EWG -Richtlinie des Rates und den Vorschriften
23/73/EWG über die Niederspannungsgeräte vorgesehen sind.
DEUTSCH
44
3796new1.qxd 4/1/05 5:56 PM Page 44
Page 49

Пожалуйста, внимательно ознакомьтесь с рекомендациями данной инструкции и
сохраните ее. Конструктивные особенности и технические данные с целью
усовершенствования могут быть изменены без предварительного уведомления.
ВАЖНЫЕ РЕКОМЕНДАЦИИ ПО ТЕХНИКЕ БЕЗОПАСНОСТИ
Не подвергайте устройство воздействию очень высоких или очень низких
температур (свыше 35 или ниже -5) или высокой влажности.
Не кладите тяжелых вещей на устройство.
Не подвергайте прибор воздействию высокого давления.
Не встраивайте в устройство другие устройства.
Не очищайте устройство химическими очистителями, такими как бензин или
растворитель.
Не подвергайте устройство воздействию прямых солнечных лучей и не
оставляйте его около нагревательных приборов.
Не кладите устройство в пыльные места.
Не разбирайте и не пытайтесь отремонтировать устройство самостоятельно.
Если устройство не используется в течение долгого времени, выньте батареи.
Примечание:
Мы не несем ответственности за потерю сохраненной или записанной
информации, произошедшую в результате возникновения неисправностей в
устройстве или ремонта.
МЕРЫ ПРЕДОСТОРОЖНОСТИ
Если Вы планируете не использовать прибор в течение долгого времени,
выньте батареи, чтобы избежать повреждений устройства вследствие утечки
батарей или коррозии.
Не пользуйтесь устройством во время вождения автомобиля или какого-либо
другого транспортного средства.
Не используйте прибор в местах, где очень жарко, очень холодно, высокая
влажность или очень пыльно.
Перед эксплуатацией устройства деактивируйте кнопку HOLD.
Во время использования устройства не роняйте его.
РУССКИЙ
45
3796new1.qxd 4/1/05 5:56 PM Page 45
Page 50

Срок службы батарей
Батарея Воспроизведение MP3/WMA
Щелочная батарея (2EA) Около 8 часов
Время использования батарей (согласно стандарту EIAJ)
Мощность: 5мВт + 5мВт (непрерывное проигрывание компакт-диска при
частоте 1 кГц)
При прослушивании по 4 часа в день с переходом в режим остановки
воспроизведения - суммарное время 16 часов.
Время воспроизведения может меняться в зависимости от условий
эксплуатации устройства.
Зарядите аккумуляторные батареи или замените обычные батареи на новые в
следующих случаях:
Мигает символ " ".
На жидкокристаллическом дисплее появляется надпись "Слабые батареи" и
через секунду пропадает.
Функциональные кнопки не работают.
Во избежание электростатического разряда во время использования
устройства, соблюдайте следующие условия
По возможности не используйте устройство при повышенной сухости
воздуха
Если во время нормальной эксплуатации устройство перестает
функционировать, замените батареи.
РУССКИЙ
46
3796new1.qxd 4/1/05 5:56 PM Page 46
Page 51

ФУНКЦИИ ПЛЕЕРА И ОРГАНЫ УПРАВЛЕНИЯ
Комплектующие
РУССКИЙ
47
Установочный USB кабель Наушники
диск
Футляр Батареи LR03 Линейный аудиокабель
(размер AAA)
Инструкция
по эксплуатации
3796new1.qxd 4/1/05 5:56 PM Page 47
Page 52

ОРГАНЫ УПРАВЛЕНИЯ
Передняя / Задняя панель Боковая панель
РУССКИЙ
48
1. Разъем для шейного ремешка
2. Жидкокристаллический дисплей
3. Функциональный переключатель
(F) (Музыка, Голос, FM радио)
Кнопка скорости SPEED
4. Кнопка Воспроизведение PLAY ( )
Кнопка ПАУЗА/СТОП
PAUSE/STOP (/)
Копка ВКЛЮЧЕНИЕ/ВЫКЛЮЧЕНИЕ
POWER ON/OFF
5. Кнопка ПЕРЕХОД/ПОИСК
SKIP/SEARCH (/ )
6. Крышка отсека для батарей
7. Регулятор громкости (-/+)
8. Кнопка МЕНЮ
9. Кнопка Закладка (B.MARK)
10. Кнопка Запись ( REC)
11. Кнопка блокировки клавиш
управления (HOLD)
3796new1.qxd 4/1/05 5:56 PM Page 48
Page 53

Верхняя/нижняя панель
Жидкокристаллический дисплей
РУССКИЙ
49
12. Микрофон (MIC)
13.Разъем для подключения
наушников ( ): Ø 3,5 мм
14. Разъем для подключения
дополнительных устройств:
Ø 3,5 мм
15.USB разъем
A. Музыка/Голос
B. Текущий трек/Всего треков
C. Закладка
D. Время воспроизведения
E. Режим повтора
F. Блокировка кнопок
G. Индикатор заряда батарей
H. Информация о файле
I. Формат MP3/WMA
J. Частота дискретизации
K. Скорость передачи в битах
I. Уровень громкости
M. Подсветка
3796new1.qxd 4/1/05 5:56 PM Page 49
Page 54

50
Установка батарей
1. Откройте крышку отсека для батарей.
2. Вставьте батареи.
Удостоверьтесь, что обозначения + и на батареях совпадают с соответствующими символами в отсеке батарей.
3. Закройте крышку отсека для батарей
Примечания
Неправильная установка батарей может вызвать утечку батарей и коррозию.
В случае утечки батарей очистите отсек для батарей от вылившейся жидкости
и вставьте новые батареи.
ТРЕБОВАНИЯ К СИСТЕМЕ
Для подключения МP3/WMA плеера к компьютеру, он должен соответствовать
следующим требованиям:
Рабочие характеристики
Операционная система: Windows 98/ME/2000/XP
Компьютер: по меньшей мере, Pentium - 133 МГц
Память: не менее 32 MБ
(рекомендуется более 32MБ)
Пространство на жестком диске: не менее 100 МБ
Видео-карта: режим 640 x 480, не менее High Color
(16 бит)
USB-порт
Устройство CD-ROM
Примечения
Что такое USB?
USB расшифровывается как Universal Serial Bus (универсальная
последовательная шина).
Это новый интерфейс, основанный на новой концепции соединения PC и
периферийных устройств.
Максимальная полоса частот 12 МБ/с, к одному PC могут быть подключены до
127 USB-устройств.
РУССКИЙ
3796new1.qxd 4/1/05 5:56 PM Page 50
Page 55

ИСПОЛЬЗОВАНИЕ MP3/WMA ПЛЕЕРА
Вам необходимы музыкальные файлы в формате МР3/WMA на Вашем
компьютере, USB кабель и Ваш плеер.
Вы можете осуществлять передачу музыкальных файлов с Вашего компьютера на
данный плеер посредством USB-порта и USB кабеля. Кроме того, Вы можете
передавать данные с вашего плеера на компьютер.
ПОДКЛЮЧЕНИЕ USB КАБЕЛЯ
Подключение МР3/WMA плеера к компьютеру
Соедините прилагаемым USB кабелем плеер с компьютером.
СРАВНИТЕ ШТЕКЕРЫ USB КАБЕЛЯ
Подключите один конец USB кабеля к USB-порту
Вашего компьютера, а другой конец - к USB
разъему передачи данных МР3/WMA плеера.
РУССКИЙ
51
3796new1.qxd 4/1/05 5:56 PM Page 51
Page 56

ПЕРЕД ИСПОЛЬЗОВАНИЕМ
Включение/выключение
Для включения нажмите кнопку Включение/Выключение POWER ON/OFF (4) и
удерживайте ее дольше 1 секунды.
Для выключения нажмите кнопку POWER ON/OFF (4) и удерживайте ее более
1.5 секунд в режиме паузы или отключенного воспроизведения.
Использование Наушников
Подключите наушники к разъему для наушников. (13).
Функция блокировки
Данная функция блокирует кнопки плеера, чтобы исключить их случайное
нажатие.
Перед использованием плеера
При включенном устройстве нажмите кнопку блокировки (HOLD), при этом
на дисплее отобразится символ " ".
При выключенном устройстве нажмите кнопку блокировки, при этом на
дисплее будет мигать надпись ""HOLD ON !!!" в течение двух секунд.
РУССКИЙ
52
3796new1.qxd 4/1/05 5:56 PM Page 52
Page 57
Настройка громкости
Вы можете настроить громкость с помощью кнопок (+/-).
Имеется 35 уровней громкости.
Для справки :
В зависимости от уровня громкости на дисплее появляется следующее
обозначение:
ЭКСПЛУАТАЦИЯ ПЛЕЕРА
ВОСПРОИЗВЕДЕНИЕ ФАЙЛОВ
1. Нажмите кнопку Включение/Выключение, чтобы включить устройство.
2. С помощью кнопок Переход/Поиск (/ ) выберите нужный файл.
3. Нажмите кнопку Воспроизведение (), чтобы начать воспроизведение файла.
РУССКИЙ
53
3796new1.qxd 4/1/05 5:56 PM Page 53
Page 58

Пауза при воспроизведении файлов
Нажмите кнопку Пауза/Стоп (/ ) во время воспроизведения файла.
Остановка воспроизведения файлов
Нажмите кнопку Пауза/Стоп (/ ) и удерживайте ее более 2 секунд во время
воспроизведения.
Примечания
Вы можете проигрывать файлы в формате WMA со скоростью 32 КБ/с (или
ниже).
При воспроизведении файлов в формате MP3 на низкой скорости передачи
данных ( 64 КБ/с или ниже) могут наблюдаться задержки при нажатии кнопок.
Переход к следующему или предыдущему файлу
Переход к следующему файлу
С помощью кнопок Переход/Поиск ( ) выберите следующий файл.
Переход к предыдущему файлу
Двойным нажатием кнопки Переход/Поиск ( ) Вы перейдете к предыдущему
файлу.
Возврат к началу текущего файла
Нажмите кнопку Переход/Поиск ( ) один раз.
Быстрый переход или поиск файлов
Нажмите кнопку Переход/Поиск (/ ) и удерживайте ее в течение 2 секунд во
время воспроизведения.
Выбор функционального режима
Нажимайте кнопку FUNCTION (F) коротким нажатием более 1 секунды.
Вы можете выбрать один из режимов: Музыка, Голос, FM радио, нажимая
кнопку Переход/Поиск ( /), а затем нажмите кнопку ( ), чтобы
подтвердить выбранный режим.
Во время записи Вы не можете выбрать функциональный режим.
РУССКИЙ
54
3796new1.qxd 4/1/05 5:56 PM Page 54
Page 59

Скорость воспроизведения
Нажимайте кнопку скорости SPEED отрывисто несколько раз.
Вы можете выбрать скорость воспроизведения файла (-30%, -15% или +15%
от обычной скорости воспроизведения файла)
ДОПОЛНИТЕЛЬНЫЕ ФУНКЦИИ
Закладки
Если во время воспроизведения файла Вы активируете функцию Закладка, Вы
сможете автоматически находить нужный момент в композиции.
1. Выберите нужный момент в композиции во время ее воспроизведения,
нажмите и удерживайте в течение 2 секунд кнопку Закладка (B.MARK). На
жидкокристаллическом дисплее появится символ " ".
2. Нажмите кнопку Закладка отрывисто один раз во время воспроизведения
другого файла. Плеер автоматически осуществит поиск и начнет
воспроизводить композицию с момента, запрограммированного кнопкой
Закладка.
3. Чтобы отменить функцию Закладка, нажмите кнопку Закладка (B.MARK) и
удерживайте ее в течение 2 секунд. При этом символ " " исчезнет с дисплея.
Функция повтора определенной части композиции
Повторить определенную часть композиции Вы можете нажатием кнопки
Закладка (B.MARK). Данная функция не предназначена для повтора части
композиции, которая длится менее трех секунд. Чтобы выбрать начало
определенной части композиции, нажмите один раз кнопку Закладка во время
воспроизведения файла.
1. На дисплее появится символ “A".
2. Чтобы выбрать окончание определенной части композиции, снова нажмите эту
кнопку во время воспроизведения файла. На дисплее появится символ "A B".
3. Чтобы отменить функцию повтора определенной части композиции, нажмите
кнопку Закладка. При этом символ “A B” исчезнет с дисплея.
Примечание
В режиме радио (диапазон FM) функция Закладка и функция повтора
определенной части композиции не предусмотрены.
РУССКИЙ
55
3796new1.qxd 4/1/05 5:56 PM Page 55
Page 60

Эквалайзер
Вы можете выбрать один из пяти режимов звучания.
1. Нажмите кнопку МЕНЮ и
удерживайте ее в течение двух
секунд, затем с помощью
функционального переключателя
выберите функцию «ЭКВАЛАЙЗЕР».
2. С помощью кнопок Переход/Поиск
(/ ) найдите нужный режим звучания (обычный, классика, рок, джаз, поп)
3. Выберите нужный режим звучания нажатием кнопки Воспроизведение ( ),
а затем снова нажмите кнопку МЕНЮ, чтобы выйти из режима эквалайзера.
Примечания
Функция Эквалайзер недоступна в режиме радио (диапазон FM).
Язык
Вы можете выбрать нужный язык из четырех.
1. Нажмите кнопку Меню и удерживайте ее в
течение двух секунд, затем с помощью
функционального переключателя выберите
функцию «Язык».
2. С помощью кнопок Переход/Поиск (/ )
найдите нужный язык и выберите его нажатием кнопки Воспроизведение ().
-"ITA" - Итальянский
-"NLD" - Голландский
-"ESP" - Испанский
РУССКИЙ
56
3796new1.qxd 4/1/05 5:56 PM Page 56
Page 61

-"ENG" - Английский
-"FRA" - Французский
3. Нажмите кнопку Меню, чтобы выйти из режима «Язык»
Примечания
Эта функция недоступна при прослушивании радиостанций диапазона FM.
Функция Язык ID3
(«MP3 текст: название альбома и песни, имя исполнителя»)
Вы можете выбрать нужный язык из пяти.
1. Нажмите кнопку Меню и удерживайте ее
в течение двух секунд, затем с помощью
функционального переключателя
выберите меню "Язык ID3”.
2.
С помощью кнопок Переход/Поиск (/)
найдите нужный язык и выберите его нажатием кнопки Воспроизведение ().
-"ITA" - Итальянский
-"NLD" - Голландский
-"ESP" - Испанский
-"ENG" - Английский
-"FRA" - Французский
3. Нажмите кнопку Меню, чтобы выйти из режима «Язык»
Примечания
Эта функция недоступна при прослушивании радиостанций диапазона FM.
Если в файле не содержится информации ID3, на дисплее будет отображаться
только название файла.
Подсветка
Нажмите кнопку Меню и удерживайте ее в течение двух секунд, затем выберите
меню «Подсветка». С помощью этой функции Вы можете изменить цвет
подсветки дисплея.
РУССКИЙ
57
3796new1.qxd 4/1/05 5:56 PM Page 57
Page 62
1. Выберите нужный цвет (красный, синий, голубой, зеленый, фиолетовый,
белый, желтый) подсветки дисплея с помощью кнопок Переход/Поиск (/ ).
2. Нажатием кнопки Воспроизведение () запрограммируйте нужный цвет, а
затем нажмите кнопку Меню, чтобы выйти из режима «Подсветка».
3. Включите подсветку, нажав кнопку «Увеличение уровня громкости» "VOL +" и
удерживая ее более 2 секунд. Нажмите кнопку «Увеличение уровня
громкости» "VOL +" и удерживайте ее в течение двух секунд, чтобы выключить
подсветку.
Функция диктофона
Перед тем, как записывать что-либо на МР3/WMA плеер, Вы можете установить
функцию активации диктофона голосом (VAD).
1. Нажмите кнопку Меню и удерживайте
ее в течение двух секунд, затем с
помощью функционального
переключателя выберите меню «MIC
VAD".
2. С помощью кнопок Переход/Поиск (/ ) выберите позицию «Включить» или
«Отключить», затем нажмите кнопку Воспроизведение (), чтобы
запрограммировать выбранную позицию.
3. Нажмите кнопку Меню, чтобы выйти из режима "MIC VAD".
РУССКИЙ
58
3796new1.qxd 4/1/05 5:56 PM Page 58
Page 63

Функция повтора
Нажмите кнопку Запись ( REC) (10), чтобы выбрать один из пяти режимов
повтора.
Режим
Символ на дисплее
Описание
Обычный Воспроизведение композиций
один раз по порядку .
Ознакомление Воспроизведение каждой композиции
в течение первых 10 секунд для
ознакомления
В произвольном Воспроизведение композиций в
порядке произвольном порядке
Повтор всех Повторное воспроизведение всех
композиций композиций файла
Повтор одной Повторное воспроизведение
композиции выбранной текущей композиции
Примечания
Функция Повтор недоступна при прослушивании радиостанций диапазона FM.
После 10-секундного воспроизведения один раз всех композиций файла в
режиме Ознакомление устройство отключается автоматически.
Вы можете выбрать один из вышеперечисленных режимов повтора только в
режиме воспроизведения.
Скорость передачи голосовых данных в битах
Перед тем, как записывать что-либо на MP3/WMA плеер, Вы можете выбрать
скорость передачи голосовых данных.
1. Нажмите кнопку Меню и удерживайте
ее в течение двух секунд, а затем с
помощью функционального
переключателя выберите меню
«Скорость передачи голосовых данных в битах» (VOICE B/R).
2. С помощью кнопок Переход/Поиск (/) найдите нужный уровень скорости и
выберите его кнопкой Воспроизведение ().
РУССКИЙ
59
3796new1.qxd 4/1/05 5:56 PM Page 59
Page 64

3. Нажмите кнопку Меню, чтобы выйти из меню «Скорость передачи голосовых
данных в битах».
Cкорость записи данных с линейного входа
Перед тем, как записывать что-либо на MP3/WMA плеер, выберите линейную
скорость передачи данных в битах.
1. Нажмите кнопку Меню и удерживайте
ее в течение двух секунд, затем с
помощью функционального
переключателя выберите меню
«Скорость записи данных с линейного
входа» ("LINE IN B/R").
2. С помощью кнопок Переход/Поиск (/ ) найдите нужный уровень скорости и
выберите его нажатием кнопки Воспроизведение ().
3. Нажмите кнопку Меню, чтобы выйти из режима «Скорость записи данных с
линейного входа».
Удаление файлов на MP3/WMA плеере
1. Нажмите кнопку Меню и удерживайте ее
в течение двух секунд, затем с помощью
функционального переключателя
выберите меню «Удалить» ("ERASE").
2. С помощью кнопок Переход/Поиск (/ ) выберите позицию «Да» («YES») и
нажмите кнопку Воспроизведение ().
РУССКИЙ
60
3796new1.qxd 4/1/05 5:56 PM Page 60
Page 65

3. С помощью кнопок (+/-) выберите файлы, которые хотите удалить.
4. Нажмите кнопку Воспроизведение ( ), чтобы удалить выбранные файлы,
затем кнопку (F), а затем кнопку Меню, чтобы выйти из меню «Удалить».
Примечания
Данная функция доступна только в режиме остановки воспроизведения или в
режиме паузы.
При прослушивании радиостанций диапазона FM или во время воспроизведе-
ния файлов в формате МР3 файлы не удаляются.
Форматирование файлов на MP3/WMA плеере
1. Нажмите кнопку Меню и удерживайте
ее в течение двух секунд, а затем с помощью функционального переключателя выберите меню «Форматирование».
2. На дисплее отобразится «обычный» и
«быстрый» форматы, с помощью кнопок Переход/Поиск (/ ) выберите нужный формат, затем нажмите кнопку
Воспроизведение ( ) для установки нужного формата, а затем нажмите
кнопку (F), чтобы выйти из меню.
РУССКИЙ
61
3796new1.qxd 4/1/05 5:56 PM Page 61
Page 66

62
«Обычный» формат
«Быстрый» формат
Выбор скорости записи голосовых данных
1. Перед записью голосовых данных на плеер МР3 выберите скорость записи
голосовых данных.
Проверка объема памяти и данных о версии программного обеспечения
Нажмите кнопку Меню и удерживайте ее в течение двух секунд, а затем с по-
мощью функционального переключателя выведите на экран следующую
информацию:
Диапазон FM
1. Нажмите кнопку Меню и удерживайте ее в течение двух секунд, а затем
с помощью функционального переключателя выберите меню «Диапазон
FM» ("FM BAND").
РУССКИЙ
3796new1.qxd 4/1/05 5:56 PM Page 62
Page 67

2. С помощью кнопок Переход/Поиск (/ ) выберите нужную позицию, а затем
нажмите кнопку Воспроизведение ().
3. Чтобы выйти из режима «Диапазон FM», нажмите и удерживайте кнопку функционального переключателя (F) в течение двух секунд, а затем с помощью кнопок Переход/Поиск ( / ) выберите другой режим.
Запись голосовых данных
1. Нажмите кнопку функционального переключателя и удерживайте ее более од-
ной секунды, а затем выберите меню «Запись» ("RECORD") и нажмите кнопку
Воспроизведение ().
2. Установите скорость передачи голосовых данных в битах . Настройка установок записи завершена.
3. Нажмите кнопку Запись ( REC) один раз в режиме пауза/отключенное воспроизведение.
4. Записывайте голосовые данные с помощью микрофона (MIC) на основном
устройстве.
5. ЧТОБЫ ПРЕКРАТИТЬ ЗАПИСЬ ГОЛОСОВЫХ ДАННЫХ, НАЖМИТЕ КНОПКУ ЗАПИСЬ. Запись голосовых данных завершена.
Примечания
Записанные файлы сохранены под названиями VORC001 .MP3, VORC002.MP3,
VORC003.MP3....и далее по порядку.
Если на дисплее появится надпись «Заполнено» ("FULL!!!"), удалите некоторые
файлы, чтобы сэкономить доступное время для записи голосовых данных.
РУССКИЙ
63
3796new1.qxd 4/1/05 5:56 PM Page 63
Page 68

Войдите в режим «Голос» ("Voice"), чтобы начать воспроизведение записанных
файлов.
Запись с дополнительных устройств
1. Установите скорость передачи в битах для линейного входа.
2. Выберите режим записи, нажав на функциональный переключатель (F) и удер-
живая его более одной секунды. Плеер подготовлен для записи с внешних аудио-устройств.
3. Подсоедините линейный аудио-кабель одним концом к разъему линейного вы-
хода на внешнем аудио-устройстве, а другим концом к разъему линейного выхода на плеере.
4. Нажмите кнопку Запись ( REC) коротким нажатием в режиме отключенного
воспроизведения и включите воспроизведение на дополнительном устройстве.
Таким образом, происходит запись данных с дополнительного устройства.
5. Чтобы приостановить запись, нажмите кнопку Воспроизведение ( ). Чтобы
остановить запись данных, нажмите кнопку Запись ( REC), запись с линейного входа закончена.
Примечания
Записанные файлы сохраняются под именами LINI001 .MP3, LINI002.MP3, LI-
NI003.MP3... и далее по порядку.
Если на дисплее появится надпись «Заполнено» ("FULL!!!"), удалите некоторые
файлы, чтобы освободить место для новых записей.
Войдите в папку "LINE IN" для воспроизведения записанных файлов.
РУССКИЙ
64
3796new1.qxd 4/1/05 5:56 PM Page 64
Page 69

ИСПОЛЬЗОВАНИЕ РАДИОПРИЕМНИКА
Прослушивание радиостанций
1. Нажмите на функциональный переключатель (F) И УДЕРЖИВАЙТЕ ЕГО БОЛЕЕ
ОДНОЙ СЕКУНДЫ, ЗАТЕМ НАЖАТИЕМ НА КНОПКИ (/ ) выберите режим
Радио FM и нажмите кнопку Воспроизведение (). Радиоприемник готов к эксплуатации.
2. Нажатием на функциональный переключатель (F) выберите нужный режим
(ST: Стерео, МО: Моно)
3. Настройте нужную частоту с помощью кнопок Переход/Поиск ( /).
Настройка радиостанций в ручном режиме
Настройте нужную радиостанцию нажатием кнопок Переход/Поиск (/ ).
Настройка радиостанций в автоматическом режиме
Нажмите кнопку Переход/Поиск (/ ) и удерживайте ее более одной се-
кунды (Поиск прекратится, как только приемник настроится на радиостанцию)
Примечания
При прослушивании радиостанций диапазона FM подключите наушники
к соответствующему гнезду. Наушники также являются частью антенны.
Если Вы нажмете кнопку Воспроизве-
дение () во время прослушивания
радиостанций диапазона FM, звук
отключится.
Вы можете запрограммировать до 20 радиостанций на радиоприемнике.
Внесение в память
Все доступные радиостанции с сигналом хорошего качества могут вноситься в
память автоматически.
РУССКИЙ
65
3796new1.qxd 4/1/05 5:56 PM Page 65
Page 70

Нажмите кнопку Закладка (B.MARK) и удерживайте ее более двух секунд, что-
бы начать процесс автоматического сканирования.
Сохранение настроек частоты радиостанций
1. С помощью кнопок Переход/Поиск (/ )
выберите частоту, которую Вы желаете сохранить, в режиме поиска радиостанций диапазона FM. (Пример: Вы программируете частоту FM 87.5 МГц).
2. Нажмите кнопку Закладка (B.MARK) и с помощью кнопок Переход/Поиск
(/ ) выберите номер для сохранения, затем снова нажмите кнопку Заклад-
ка (B.MARK). Выбранный номер внесен в память.
3. Для программирования других частот повторите действия 1-2
Вызов запрограммированных радиостанций
Нажмите кнопку Меню, а затем с помощью кнопок Переход/Поиск ( / ) выберите запрограммированную радиостанцию.
Удаление запрограммированной радиостанции
Если вы хотите удалить сохраненную частоту из памяти, нажимайте кнопку
Закладка (B.MARK) более 1 секунды в режиме Предварительной настройки радиочастот.
РУССКИЙ
66
3796new1.qxd 4/1/05 5:56 PM Page 66
Page 71

Запись с радио
1. Выберите режим FM радио.
2. Выберите станцию, с которой Вы хотите сделать запись.
3. При прослушивании радиостанции диапазона FM нажмите кнопку Запись
( REC). Таким образом, происходит запись с радиостанции.
4. Чтобы приостановить запись, нажмите кнопку Воспроизведение ( ). Чтобы
остановить запись, нажмите кнопку Запись ( REC), запись с радио закончена.
Примечания
Записанные файлы сохраняются под именами FMRC001 .MP3, FMRC002.MP3,
FMRC003.MP3.... и далее по порядку.
Если на дисплее появится надпись «Заполнено» ("FULL!!!"), удалите некоторые
файлы, чтобы освободить место для новых записей.
Войдите в папку «Радио» для воспроизведения записанных файлов.
Неисправности
1. МР3 плеер не работает или на дисплее ничего не отображается.
- Проверьте соблюдение полярности при установке батарей.
2. Кнопки не работают
- Проверьте, не активирована ли функция блокировки кнопок.
- Батарея отсутствует или вышла из срока.
3. Файлы не скачиваются.
- Проверьте связь между USB-портом Вашего компьютера и USB-кабелем.
- Формат файлов не подходит для данного MP3/WMA плеера.
РУССКИЙ
67
3796new1.qxd 4/1/05 5:56 PM Page 67
Page 72

Технические характеристики
Объем памяти 128 MБ
Размеры (ШxВxД) 83x33x23мм
Масса 40 г (без батареи)
Динамический диапазон 55дБ
Мощность на выходе наушников 5мВ+5мВ (1кГц,0 дБ/16 К)
Отношение сигнал/шум 55/80 дБ (No Фильтр/JIS-A Фильтр)
Разделение каналов 35/40 дБ (1 кГц/10 кГц)
Источник питания 3 В щелочные батареи размера AAA X 2
Эквалайзер Обычный/Классик/Рок/Джаз/Поп
Радио FM
Частотный диапазон Европа/Азия (87.50-108.00 МГц, шаг: 50 КГц)
Япония (76.00-108.00 МГц, шаг:100 КГц)
США (87.50-108.00 МГц, шаг:100 КГц)
Отношение сигнал/шум 40 дБ
Разделение каналов 20/25 дБ (10 КГц/1 КГц)
Антенна Антенна - наушники
Запись 128 MБ : Около 15 часов (16 кб/с)
Из-за постоянных улучшений, характеристики и дизайн изделия могут
изменяться без предварительного уведомления.
Срок службы прибора - не менее 5-ти лет
Данное изделие соответствует всем требуемым европейским и
российским стандартам безопасности и гигиены.
Производитель: АН-ДЕР ПРОДАКТС ГмбХ, Австрия
Йеневайнгассе, 10/10, 1210, Вена, Австрия
РУССКИЙ
68
3796new1.qxd 4/1/05 5:56 PM Page 68
 Loading...