

Page 1
3534.qxd 22.09.2004 15:22 Page 2
Page 2
ИНСТРУКЦИЯ ПО ЭКСПЛУАТАЦИИ
MANUAL INSTRUCTION
МОДЕЛЬ VT-3534
ALARM CLOCK / WIRELESS THERMO STATION
ЧАСЫ-БУДИЛЬНИК / БЕСПРОВОДНАЯ ТЕРМОСТАНЦИЯ
3534.qxd 22.09.2004 15:22 Page 3
Page 3
OWNER’S MANUAL
Congratulations on your purchase of this alarm/clock/weather station set,
VT-3534. Please take the time to read and understand this manual so you
can begin to enjoy the convenience and features this product has to offer.
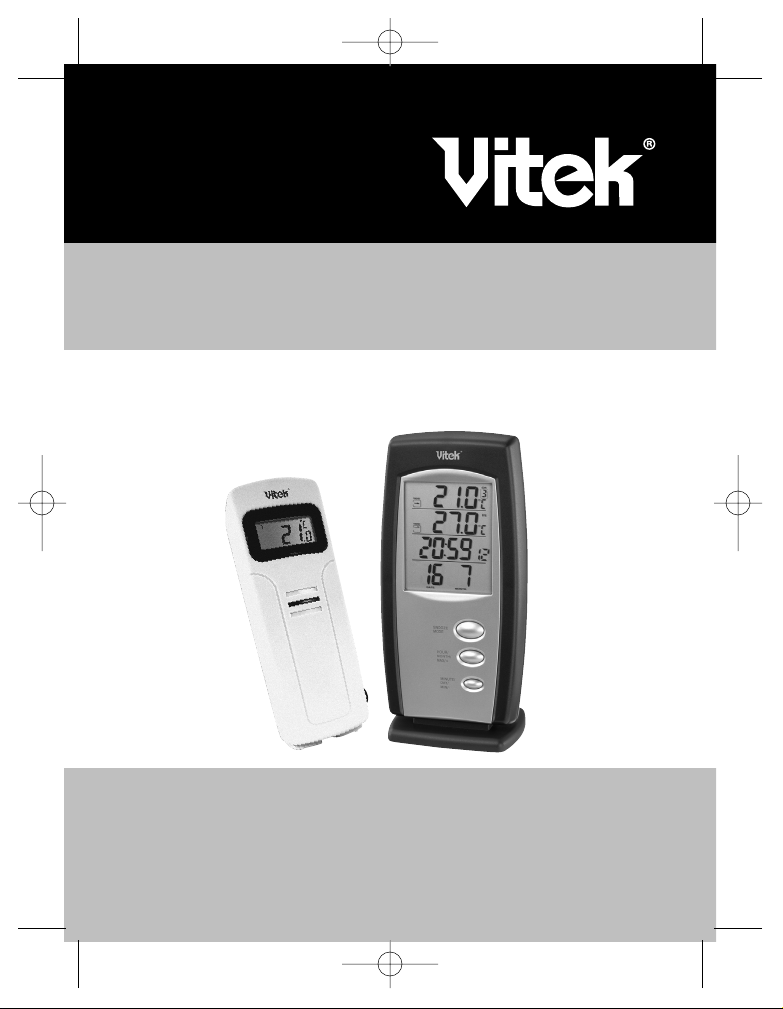
Remote Transmitter VT-3534
• drip-proof design with LCD
• socket of external sensor probe
• temperature display in user-selectable °C or °F
• transmission range: up to 40 meters in open area
• battery type: 2 x AA size
ENGLISH
2
FEATURES
Main Display Unit:
• 12/ 24 hour clock and alarm
• local temperature display
• receives and displays temperature
readings from up to 4 remote
transmitter via RF technology of
433MHz
• minimum and maximum tempera-
ture record
• high/ low temperature alarm func-
tion
• temperature trend indicator
• user-selectable °C or °F
• backlight illumination
• battery type: 2 x AA
VT-3534
receiver
VT-3534
transmitter
3534.qxd 22.09.2004 15:22 Page 2
Page 4

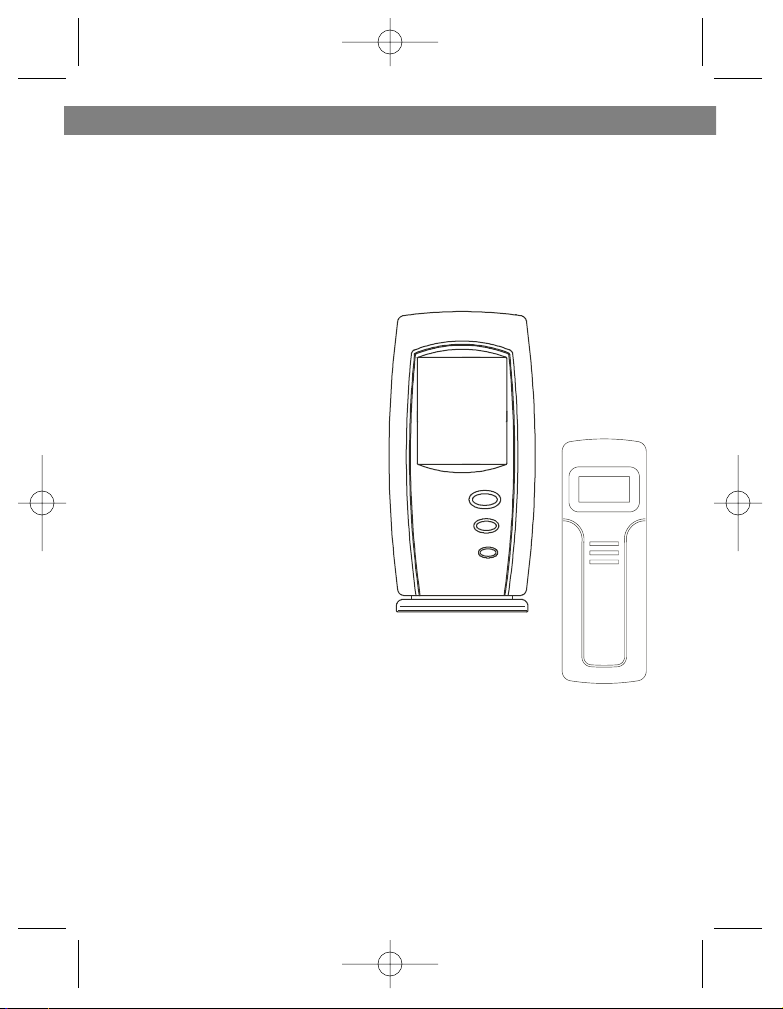
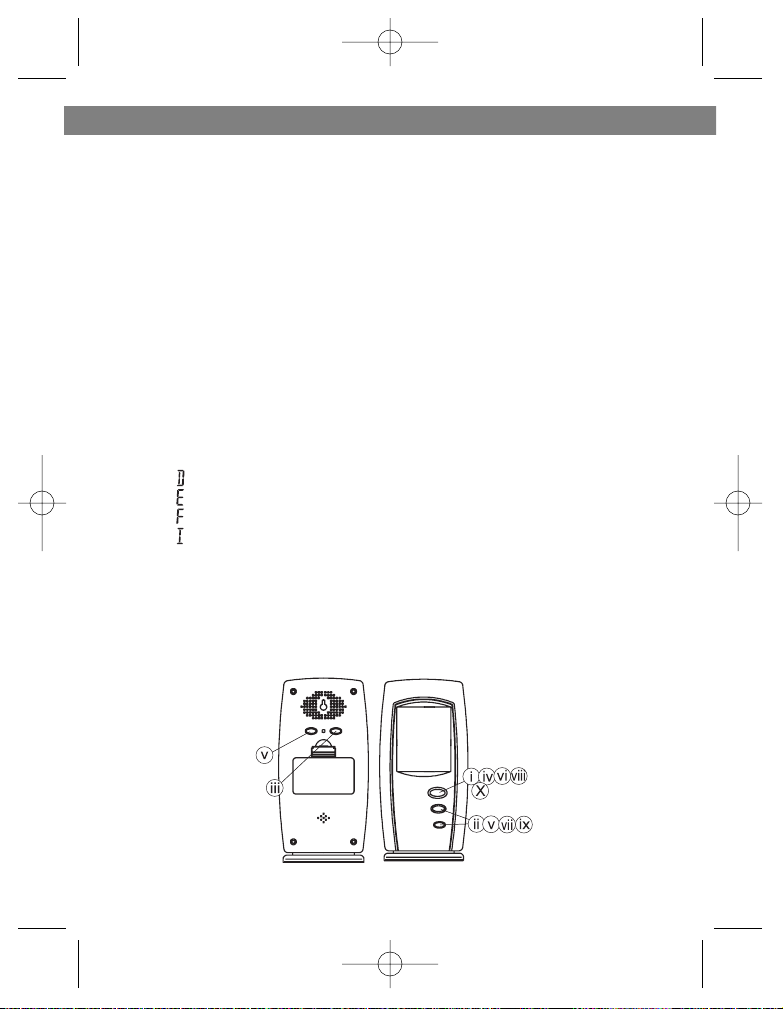
GETTING STARTED
1. CHANNEL/WEEKDAY - scrolls
through remote channels 1-4; scrolls
through weekday
2. ALARM/(C/F) - toggles between C
and F; 12 and 24 hour format, turns alarm
on/off; clears temperature alarm presets
3. SNOOZE/MODE - scrolls through
time, weekday, language, time zone,
alarm and temperature alarm set points
(high/low); activates alarm snooze
4. HOUR/MONTH/MAX/+ - scrolls
through hours, months and languages;
shows maximum temperature
5. MINUTE/DAY/MIN/- - scrolls
through minutes, days and languages;
show minimum temperature
6. R - reset the receiver
7. SET: enter to House code and Channel setting mode
8. C/F: change between C or F, change channel and house code
9. Battery compartment
10.Socket for external sensor probe.
11. Wall Mount Holder & Table Stand
12. LCD display
ENGLISH
3
3534.qxd 22.09.2004 15:22 Page 3
Page 5
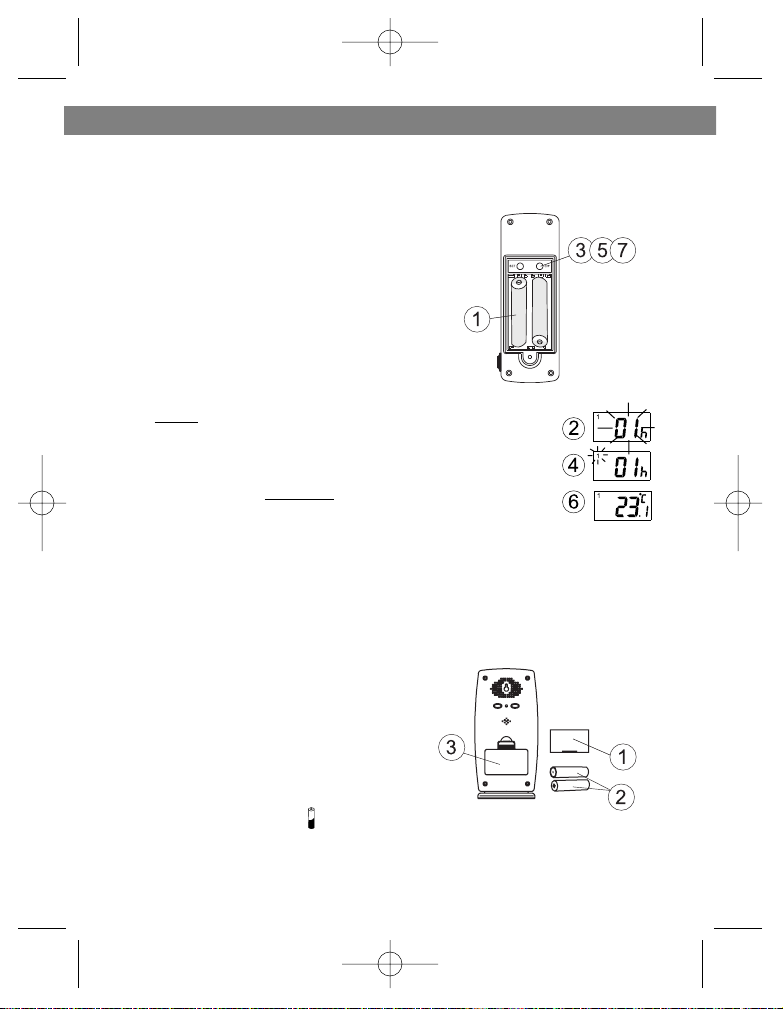
SETTING UP
• Set up the transmitter(s) before set-
ting up the receiver
1. Remove battery cover and insert batteries
to start setup 2 AA size batteries (included)
Insert batteries into compartment observing
proper polarity
2. HOUSE CODE will flash for 8 seconds
3. Select HOUSE CODE (1-15) by pressing
C/F and pressing SET to CHANNEL setting
If you have multiple transmitters for a single
receiver, set each transmitter
to the same
House code
4. CHANNEL will flash for 8 seconds
5. Select CHANNEL (1-4) by pressing C/F
If you have multiple transmitters for a single receiver, set
each transmitter to a different
Channel code
6. Humidity & Temperature will alternatively display on LCD
screen
7. Select °C or °F of Temperature by pressing C/F
• Use a different house code if your weather station detects other signals
from neighboring sources
• Factory default: house code = 01 and channel = 01
1. Remove battery cover
2. 2 AA size batteries (included)
3. Insert batteries into compartment,
observing proper polarity; replace cover
REPLACING BATTERIES: symbol on
receiver will appear when batteries need to be changed.
Transmitter: Lo bat will be displayed
ENGLISH
4
SETTING UP TRANSMITTER(S)
SETTING UP RECEIVER
3534.qxd 22.09.2004 15:22 Page 4
Page 6
CLOCK/DATE/LANGUAGE SETTING
Clock Setting:
i. Press and hold MODE for 3 seconds to enter the clock setting mode
(the Clock display will flash)
ii. Press HOUR to set the hour and MINUTE to set the minute
iii. Press ALARM/(C/F) during clock setting, to change between 12 and 24
hour display.
Date Setting:
iV. Press MODE or enter the date setting
V. Press MONTH to set the month, press DAY to set the day and press
WEEKDAY to set the weekday
Language Setting:
Vi. Press MODE or enter the language setting
Vii.Press + or - to select the language for displaying day of the week:
-“ ” German
-“ ” English
-“ ” French
-“ ” Italian
Time Zone Setting:
Viii. Press MODE or enter the time zone setting
iX. Press + or - set the value
X. Press MODE or complete the setting
ENGLISH
5
3534.qxd 22.09.2004 15:22 Page 5
Page 7

ALARM SETTING
i. Select Alarm 1 ( 1) or Alarm 2 ( 2) by pressing MODE
ii. Press HOUR to set the hour and MINUTE to set the minute
iii. Press ALARM/(C/F) to enable or disable
the alarm function
• The alarm clock is last for 2 minutes and will
be repeated 5 minutes later when
MODE/SNOOZE key is pressed.
SETUP
Automatic Learn Function:
1. Learn function executes automatically and runs for approximately 3 min-
utes when batteries are first installed in the receiver.
2. Within these 3 minutes, receiver picks up the temperature & humidity sig-
nals from remote transmitter and displays the readings.
Manual-Learn (Searching for Remote Signals):
If a new remote transmitter is added or if signal is lost (outdoor display blinking), learn function must be executed again.
1. Press & hold CHANNEL for 3 seconds to
start.
2. Beep sound indicates that learn function
has started.
3. Channel symbol will flash and unit will beep
as each remote sensor is detected.
4. Temperature readings of remote transmitter
displays on the receiver.
ENGLISH
6
3534.qxd 22.09.2004 15:22 Page 6
Page 8

WEATHER DISPLAY
Check Local Temperature
* Local temperature displays instantly after batteries
are inserted.
Local temperature and humidity readings will alternate
display on the receiver.
Check Remote Temperature
A. Press CHANNEL to toggle between Channel 1, 2, 3 and 4.
Temperature readings will alternate display on the receiver.
C or F Temperature Display
B. Toggle between °C and °F by pressing ALARM/(C/F) in clock mode.
Min and Max Temperature
C. Press MAX in Clock mode to display minimum
temperature record
D. Press MIN again in Clock mode to display maximum temperature record
TEMPERATURE ALARM
The temperature alarm function allows you to have an
alarm sound if the temperature rises above or drops
below a particular set point.
Local Temperature Alarm
1. Select local temperature alarm mode using SNOOZE/MODE
The symbol will display.
2. Press ALARM/(C/F) to set high temperature alarm ( ),
low temperature alarm ( ) or disable alarm function (blank)
3. Press +/- to set temperature value
4. Press MODE again to finish setting
Remote Temperature Alarm
1. Select local temperature alarm mode using SNOOZE/MODE
The symbol will display.
2. Select channel (1, 2, 3, 4 or local) using CHANNEL
3. Press ALARM/(C/F) to set high temperature alarm ( ), low temperature
alarm ( ) or disable alarm function (blank)
4. Press +/- to set temperature value
5. Press MODE again to finish setting
* When alarm sounds, the sounding channel is displayed,
and or flashes to indicate whether it is the high or low temperature alarm. Press any button to shut off alarm.
ENGLISH
7
3534.qxd 22.09.2004 15:22 Page 7
Page 9

DIFFERENT CLOCK DISPLAY MODE
There are 3 different modes to display 2 Time, Date and Month display by
pressing MODE:
COUNTDOWN TIMER FUNCTION
1. Select countdown timer mode using
MODE/SNOOZE The symbol will display
2. Press HOUR to set hour, press MINUTE to
set minute, and press WEEKDAY to the second
3. Press ALARM(C/F) to start the countdown function
* Press ALARM(C/F) to stop the countdown function; press
ALARM(C/F) again to restore the pre-set time; press ALARM(C/F) one
more to start the countdown function
BACKLIGHT
This Weather Station is equipped with Backlight function.
Pressing any key will turn on the backlight function.
To save energy, you can select to Turn Off the backlight by executing the
following steps:
1. Press MODE key for 3 seconds
2. Press MODE key twice
3. Press CHANNEL key to enable /disable this feature.
ENGLISH
8
3534.qxd 22.09.2004 15:22 Page 8
Page 10

TROUBLESHOOTING
SPECIFICATIONS
The manufacturer reserves the right to change the characteristics of
the device without prior warning
SERVICE LIFE OF THE UNIT NOT LESS 3 YEARS
ENGLISH
9
problem
Temperature reading between the
transmitter and receiver does not
match.
Temperature reading of the outdoor
transmitter seems too high.
Receiver is no longer receiving the
transmitter signals or the display
reads “Lo”.
solution
Re-synchronize receiver by holding
CHANNEL for 3 seconds until a beep
is heard.
Ensure the transmitter is out of direct
sunlight, and away from sources of
heat.
• Repeat the ‘learn’ procedure
• Temperature may be below -30°C.
• Batteries in transmitter may need
changing.
• Move transmitter closer to the
receiver.
• Make sure transmitter is away from
sources of electrical disturbance.
Weather Station Receiver
Battery Type: 2 X 1.5V AA batteries
Temp. Range: -9.9°C to +55°C
Weather Station Transmitter
Battery Type: 2 X 1.5V AA batteries
Temp. Range: -30°C to +70°C
Humidity Range: 15 to 95%
Transmission Frequency:433.92 MHz
Transmission Range: up to 40 meters
in open area
3534.qxd 22.09.2004 15:22 Page 9
Page 11

ЧАСЫ - БУДИЛЬНИК/БЕСПРОВОДНАЯ МЕТЕОСТАНЦИЯ
Убедительная просьба прочесть данную инструкцию по эксплуатации, чтобы Вы
могли полностью использовать все возможности, предоставляемые данным
устройством, и оценить удобство его эксплуатации.
Дистанционный датчик
• влагозащищенный корпус с ЖК дисплеем
• проводной сенсор
• отображение данных о температуре в °C/Цельсию или
°F/Фаренгейту
• дальность передачи: до 40 метров на открытом пространстве
• тип батарей: размер 2 X AA
РУССКИЙ
10
ХАРАКТЕРИСТИКИ
Основной блок
• 12/ 24 часовой режимы отображения
времени
• дисплей внутренней температуры
• получение и отображение данных по
температуре от дистанционного
датчика (до 4 передатчиков), способ
передачи - РЧ (радиочастотная)
технология на частоте 433 МГц
• запись минимальных и
максимальных температур
• функция предупреждения о высокой/
низкой температуре
• индикатор изменения температуры
• подсветка дисплея
• отображение данных о температуре
â °C èëè °F
• тип батарей: размер 2 X AA
Главный
индикаторный блок
VT-3534
transmitter
3534.qxd 22.09.2004 15:22 Page 10
Page 12

ИНСТРУКЦИЯ ПО ИСПОЛЬЗОВАНИЮ
1. CHANNEL/WEEKEND (КАНАЛ/ДЕНЬ
НЕДЕЛИ) - переключение между каналами
работы дистанционных датчиков от 1 до 4;
перебор дней недели.
2. ALARM/ (AM/до полудня/PM/после
полудня)/ (C/Цельсий/F/Фаренгейт) переключатель между C/Цельсий и
F/Фаренгейт, 12 и 24 часовым форматом,
включение/выключение будильника;
удаление значений температурного
оповещения.
3. SNOOZE/MODE (РЕЖИМ) - переключение
между установками времени, будильника и
сигнализатора высокой/низкой температуры,
включения будильника.
4. HOUR/MONTH/MAX+
(ЧАС/MЕСЯЦ/МАКСИМУМ) - переключение
установок часа, месяца, языка; отображение максимальной температуры.
5. MINUTE/DAY/MIN (МИНУТЫ/ДЕНЬ/МИНИМУМ) - переключения установок
минут; дня, языка; отображение минимума температуры.
6. R - перезагрузка основного блока
7. SET (УСТАНОВКА): вход в режим установки House code/Домашнего кода и
Channel/Канала
8. C/F (ЦЕЛЬСИЙ/ФАРЕНГЕЙТ): переключение между отображением данных по
C/Цельсию или F/Фаренгейту, переключение между channel/каналом и house
code/домашним кодом
9. Отдел для батарей
10.Разъем для подключения внешнего сенсора
11.Крепеж для монтажа на стену и штатив для
настольной установки
12.ЖК дисплей
11
РУССКИЙ
3534.qxd 22.09.2004 15:22 Page 11
Page 13

УСТАНОВКА
Установите передатчик(и) до установки
основного блока (ресивера)
1. Снимите крышку отдела батарей и вставьте
батареи для начала настройки. Две батареи
размера АА прилагаются. Соблюдайте
полярность.
2. HOUSE CODE (ДОМАШНИЙ КОД) загорится
на 8 секунд
3. Выберите HOUSE CODE (ДОМАШНИЙ КОД)
(1-15), нажав C/F (ЦЕЛЬСИЙ/ФАРЕНГЕЙТ),
нажмите SET (УСТАНОВКА) для установки
CHANNEL /КАНАЛА. В случае подключения к одному ресиверу
нескольких дистанционных датчиков, установите каждый
датчик на общий House code/Домашний код
4. CHANNEL (КАНАЛ) загорится на 8 секунд
5. Выберите CHANNEL (КАНАЛ) (1-4), нажав C/F
(ЦЕЛЬСИЙ/ФАРЕНГЕЙТ). В случае подключения к одному
ресиверу нескольких дистанционных датчиков, установите
каждый датчик на разные Channel code (КОДЫ КАНАЛА).
6. Показатели температуры появятся на ЖК дисплее
7. Выберите вариант отображения погоды по °C/Цельсию
или °F/Фаренгейту, нажав C/F (ЦЕЛЬСИЙ/ФАРЕНГЕЙТ)
• Выберете другой house code/домашний код, если устройство принимает разные
сигналы от соседних дистанционных датчиков
• По заводским установкам: house code/домашний код = 01 и channel/канал = 01
УСТАНОВКА ОСНОВНОГО БЛОКА
Снимите крышку отделения для батарей. Соблюдая полярность, вставьте две
батареи размера АА (прилагаются), закройте
крышку.
ЗАМЕНА БАТАРЕЙ:
Когда на основном блоке появится символ ,
необходима замена элементов питания. На
дистанционном датчике появится надпись
Lo bat (батареи разражены).
РУССКИЙ
12
3534.qxd 22.09.2004 15:22 Page 12
Page 14

УСТАНОВКА ЧАСОВ / ДАТЫ / ЯЗЫКА
Установка часов
i. Нажмите и удерживайте кнопку MODE (РЕЖИМ) для входа в режим настройки
времени. Индикатор времени начнет мигать.
ii. Установите часы, используя кнопку HOUR (ЧАСЫ) и минуты, используя MINUTE
(МИНУТЫ)
iii. Нажмите ALARM (C/F) для переключения между 12 и 24 часовым форматами
Установка даты
iv. Нажмите MODE (РЕЖИМ) для входа в режим настройки даты.
v. Установите месяц, используя кнопку MONTH (МЕСЯЦ), день, используя кнопку
DAY (ДЕНЬ), день недели - WEEKDAY (ДЕНЬ НЕДЕЛИ)
Установка языка
vi. Нажмите MODE (РЕЖИМ) для входа в режим настройки языка.
vii. Нажимая кнопки "+","-" установите язык отображения дня недели:
- "D" Немецкий
- "E" Английский
- "F" Французский
- "I" Итальянский
Установка временного пояса
viii.Нажмите MODE (РЕЖИМ) для входа в режим настройки временного пояса.
ix. Нажимая кнопки "+", "-" выберите необходимое значение.
x. Нажмите MODE (РЕЖИМ) для выхода из режима настройки.
13
РУССКИЙ
3534.qxd 22.09.2004 15:22 Page 13
Page 15

УСТАНОВКА БУДИЛЬНИКА
i. А) Выберите Будильник 1( 1) или Будильник 2 ( 2), используя кнопку MODE
(РЕЖИМ)
ii. Б) Установите часы, используя кнопку HOUR (ЧАСЫ) и минуты, используя
MINUTE (МИНУТЫ)
iii. Г) Нажмите кнопку ALARM (БУДИЛЬНИК) для
включения или выключения функции будильника.
• Будильник будет подавать сигнал в течение
2-х минут. Нажмите кнопку SNOOZE (КОРОТКИЙ
СОН) для повтора сигнала через 5 минут.
При нажатии на ЛЮБУЮ другую кнопку сигнал будет отключен.
НАСТРОЙКА
Автоматическая настройка:
1. Данная функция позволяет производить автоматическую настройку ресивера
и происходит в течение 3 минут после первой установки батарей питания.
2. В течение этого времени ресивер принимает информацию о температуре от
дистанционного датчика и отображает данные.
Ручная настройка (Прием сигнала датчика):
В случае подключения нового дистанционного датчика или в случае потери
сигнала (мерцание внешнего дисплея), функция настройки должна быть
запущенна повторно.
1. Нажмите и удерживайте кнопку CHANNEL
(КАНАЛ) в течение 3 секунд для запуска.
2. Звуковой сигнал оповестит о начале
настройки.
3. Загорится знак Channel (Канал) и блок будет
подавать сигнал при обнаружении каждого
передатчика.
4. Информация о температуре передаваемая
дистанционными датчиками отобразится на экране
основного блока.
РУССКИЙ
14
3534.qxd 22.09.2004 15:22 Page 14
Page 16

ТЕМПЕРАТУРНЫЙ ДИСПЛЕЙ
Локальная температура (IN)
* Локальная температура отображается постоянно с момента
установки батарей.
Показания дистанционных датчиков (OUT)
А. Нажмите CHANNEL (КАНАЛ) для переключения между каналами с 1 по 4.
Показатели температуры будут отображаться поочередно на дисплее основного
блока.
Отображение температуры C/F (ЦЕЛЬСИЙ/ФАРЕНГЕЙТ)
B. Переключение между температурным режимом по С/ЦЕЛЬСИЮ и по
F/ФАРЕНГЕЙТУ производится нажатием кнопки C/F в
режиме часов.
Минимальная и Максимальная температуры
C. Нажмите кнопку MIN (МИНИМУМ) в режиме часов для
отображения минимальной температуры
D. Нажмите кнопку MAX (МАКСИМУМ) в режиме часов для
отображения максимальной температуры
СИГНАЛ ОБ ИЗМЕНЕНИИ ТЕМПЕРАТУРЫ
Функция оповещения об изменении температуры
позволяет получать сигнал в случае, если температура опустится ниже или
поднимется выше определенного уровня.
Оповещение о локальной температуре
1. Выберите режим сигнала о локальной температуре, используя кнопку MODE
(РЕЖИМ). На дисплее появится символ .
2. Нажмите кнопку ALARM/C/F для сигнала о повышении
температуры ( ), понижении температуры ( ) или отмены
функции.
3. Нажмите +/- для установки критического значения
температуры.
4. Нажмите кнопку MODE (РЕЖИМ) для завершения настройки.
Оповещение о низкой температуре
1. Выберите режим сигнала о локальной температуре, используя кнопку MODE
(РЕЖИМ). На дисплее появится символ .
2. Выберите канал (1, 2, 3, 4 или локальный) используя кнопку CHANNEL (КАНАЛ)
3. Нажмите кнопку ALARM/C/F для сигнала о повышении температуры ( ),
понижении температуры ( ) или отмены функции.
4. Нажмите +/- для установки критического значения
температуры.
5. Нажмите кнопку MODE (РЕЖИМ) для завершения настройки.
При сигнале, отображается соответствующий канал, и/или
отображается тип оповещения: сигнализация о низкой или высокой температуре.
Для отключения сигнала нажмите любую кнопку.
15
РУССКИЙ
3534.qxd 22.09.2004 15:22 Page 15
Page 17

ДРУГИЕ ХАРАКТЕРИСТИКИ
Имеется три режима отображения данных о времени, дате и месяце, которые
переключаются нажатием кнопки MODE (РЕЖИМ):
ФУНКЦИЯ ТАЙМЕРА
1. Нажатием кнопки MODE (РЕЖИМ) выберите режим
таймера. На экране появится символ .
2. Установите часы, используя кнопку HOUR (×ÀÑÛ),
минуты - кнопка MINUTE (МИНУТЫ), секунды - кнопкой
WEEKDAY (ДНИ НЕДЕЛИ)
3. Нажмите кнопку ALARM (C/F) для запуска отсчета времени.
• Нажмите кнопку ALARM (C/F) для остановки отсчета времени; нажмите кнопку
ALARM (C/F) еще раз для восстановления предустановленного времени; нажмите
кнопку ALARM (C/F) еще раз для запуска отсчета времени.
ПОДСВЕТКА
Для активации подсветки необходимо нажать любую кнопку. Для сохранения
энергии Вы можете отключить данную функцию:
1. Нажмите и удерживайте кнопку MODE (РЕЖИМ) 3 секунды
2. Дважды нажмите кнопку MODE (РЕЖИМ)
3. Нажмите кнопку CHANNEL (КАНАЛ) для включения/выключения функции
подсветки.
РУССКИЙ
16
Ч:МИН:сек
Дата: Месяц
Ч:МИН:день недели
Дата: Месяц
(Второй часовой пояс)
Ч:МИН:день недели
Дата: Месяц
3534.qxd 22.09.2004 15:22 Page 16
Page 18

НЕПОЛАДКИ
17
РУССКИЙ
НЕИСПРАВНОСТЬ МЕТОДЫ УСТРАНЕНИЯ
• Различаются показания
температуры передатчика и
ресивера.
• Температурные показателя
передатчика превышают
объективные.
• Ресивер не принимает сигнал
от дистанционного датчика или
на дисплее появилось
обозначение "Lo"/ "низкая"
• Повторно синхронизировать ресивер,
нажав и удерживая кнопку CHANNEL (КАНАЛ)
на протяжении 3 секунд до звукового сигнала.
• Убедитесь, что дистанционный датчик не
находится под прямыми солнечными лучами
или вблизи источников тепла.
- Повторно произвести процедуру настройки.
- Температура ниже -30 C.
- Необходима замена батарей в передатчике.
- Переместить передатчик ближе к основному
блоку.
- Убедитесь, что передатчик находится вне
зоны электропомех.
3534.qxd 22.09.2004 15:22 Page 17
Page 19

ТЕХНИЧЕСКИЕ ХАРАКТЕРИСТИКИ
Основной блок
Тип батарей: 2 x 1.5V AA
Температурные ограничения: îò -20 °C äî +55 °C
Дистанционный датчик
Тип батарей: 2 x 1.5V AA
Температурные ограничения: от -30 °C до +70 °C
Ограничения по влажности: от 15 до 95%
Частота передачи: 433.92 МГц
Дальность передачи: до 40 метров на открытом
пространстве
В ПРОЦЕССЕ ПОСТОЯННОГО УСОВЕРШЕНСТВОВАНИЯ ПРОДУКЦИИ,
ПРОИЗВОДИТЕЛЬ ОСТАВЛЯЕТ ЗА СОБОЙ ПРАВО ВНОСИТЬ ИЗМЕНЕНИЯ В
ТЕХНИЧЕСКИЕ ХАРАКТЕРИСТИКИ ПРИБОРА БЕЗ ПРЕДВАРИТЕЛЬНОГО
УВЕДОМЛЕНИЯ ПОТРЕБИТЕЛЕЙ
СРОК СЛУЖБЫ ПРИБОРА НЕ МЕНЕЕ 3 ЛЕТ
РУССКИЙ
18
3534.qxd 22.09.2004 15:22 Page 18
Page 20

3534.qxd 22.09.2004 15:22 Page 19
 Loading...