

Page 1
vacuum cleaner
Паровой пылесос
4
12
21
30
39
VT-1888
Steam
48
1
VT-1888.indd 1 10/20/20 3:24 PM
Page 2
11
10
12
23 24
13
25 26
9
14
8
15
7
16
6
5
17
18 18
4
19
3
20
2
21
1
22
27 28
29 30 31
32 33 34
35
36
37
38
39
40
VT-1888.indd 2 10/20/20 3:24 PM
Page 3
1 32 4
5 6 7 8
9
10 11 12
13 14 15 16
17 18 19
C
D
B
A
21 22 23 24
25 26 27 28
20
29 30 31
VT-1888.indd 3 10/20/20 3:24 PM
Page 4

ENGLISH
STEAM VACUUM CLEANER VT-1888
Multi-functional vacuum cleaner with 3 cleaning modes for
different surfaces: vacuum cleaner with «cyclone» technology, steam disinfection of the floor and surface treatment with a portable steam cleaner.
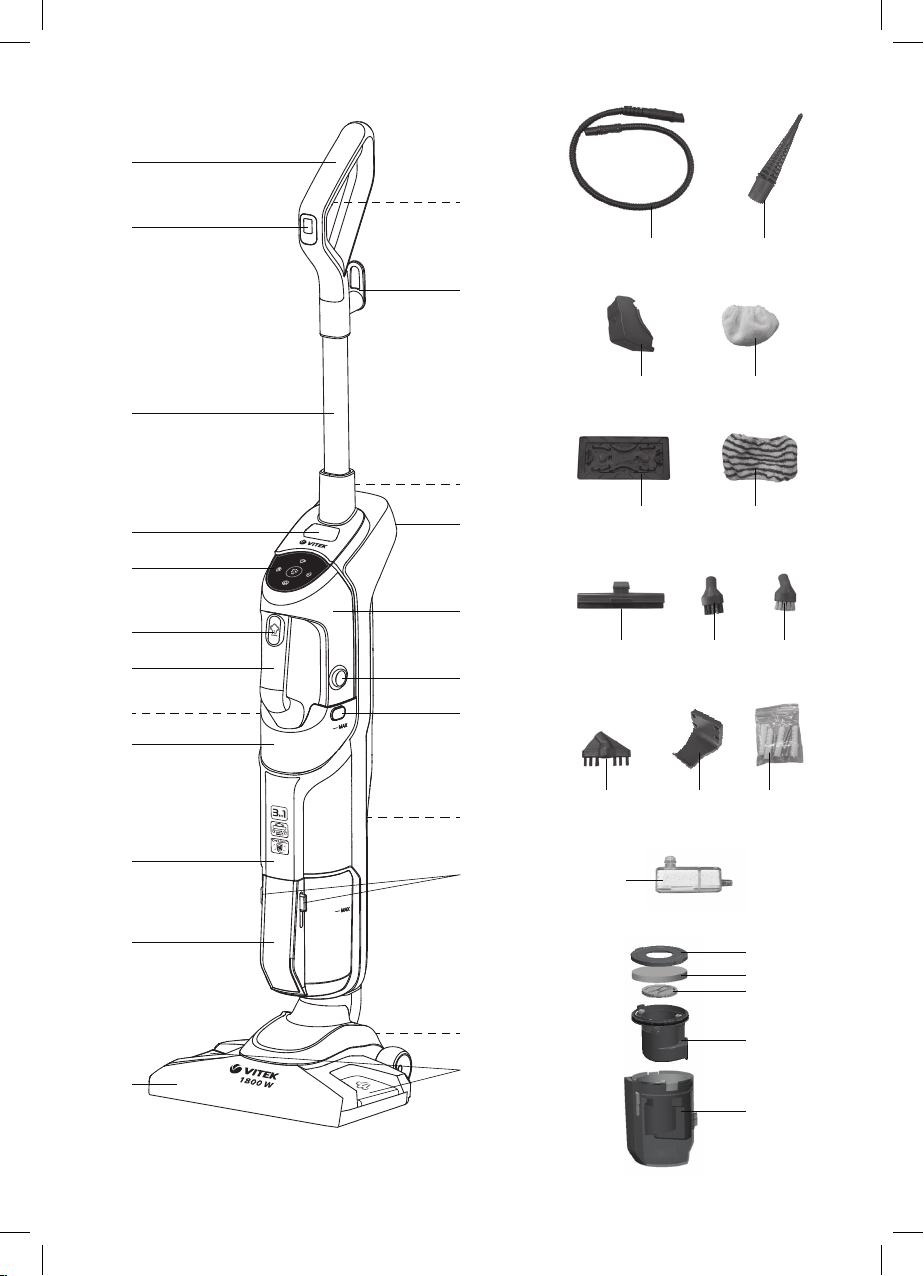
DESCRIPTION
1.
Universal brush
2.
Dust container
3.
Body
4.
Water tank
5.
Handle for handheld steam cleaner
6.
Steam delivery button
7.
Control panel
8.
Handheld steam cleaner release button
9.
Extension pipe
10.
Vacuum cleaner power switch (I/0)
11.
Vacuum cleaner handle
12.
Steam delivery button
13.
Upper hook for cord winding
14.
Handle fixing screw
15.
Carrying handle
16.
Handheld steam cleaner
17.
Handheld steam cleaner power switch (I/0)
18.
Water tank clamp buttons
19.
Lower hook for cord winding
20.
Dust container locks
21.
Universal brush removal button
22.
Mop nozzle removal pedals
23.
Flexible steam hose
24.
Hard-to-reach concentrator nozzle
Steaming accessories:
25.
Steaming nozzle
26.
Fabric steaming nozzle cover
Floor cleaning accessories:
27.
Mop nozzle
28.
Fabric mop nozzle cover
29.
Window cleaning nozzle
30.
Small round brush with nylon bristle
31.
Small round brush with brass bristle
32.
Grouting seams nozzle
33.
Storage hook
34.
Hook attachment kit
35.
Additional anti-scale filter
Dust container
36.
НЕРА filter
37.
Foam filter
38.
Cyclone filter lid
39.
Cyclone filter
40.
Dust container canister
ATTENTION!
For additional protection it is reasonable to install a residual current device (RCD) with nominal operation current not
exceeding 30 mA, to install RCD, contact a specialist.
SAFETY SYMBOLS:
WARNING: High temperature. Danger of burns!
If indicated on the product, do not touch it, as
the parts may be extremely hot.
WARNING: STEAM!
Danger of burns!
The unit reaches very high temperatures.
Improper use of the unit can result in burns.
SAFETY MEASURES AND OPERATION
RECOMMENDATIONS
Before using the unit, read this instruction manual carefully
and keep it for future reference.
•
Use the unit for its intended purpose only, as specified in this manual. Mishandling the unit may lead to
its breakage and cause harm to the user or damage to
his/her property.
•
Make sure that the operating voltage of the unit indicated on the label corresponds to your home mains
voltage.
•
The power plug has a grounding contact, connect it to
the socket with reliable grounding contact.
•
Unwind the power cord completely before connecting the unit to the mains and before use. Always use
the product with the power cord completely unwound.
•
To avoid fire, do not use adapters for connecting the
unit to the mains.
•
Do not touch the unit body, the operating surface, the
power cord and the power plug with wet hands.
•
Switch the unit off and unplug it from the mains when
the water in the tank of the portable steam cleaner
runs out.
•
Never leave the unit connected to the mains unattended.
•
Steam should not be directed towards equipment containing electrical components, such as the interior
parts of ovens.
•
Do not use the unit near heating appliances, heat
sources or open flame.
•
Do not use the unit in proximity to the kitchen sink, in
bathrooms, near swimming pools or other containers
filled with water.
•
If the unit is dropped into water, unplug it immediately,
and only then you can take the unit out of water. Apply
to the service center for testing or repairing the unit.
•
Do not use the unit in places where aerosols are used
or sprayed, in proximity to inflammable liquids and in
places where such liquids are stored and where there
is the danger of explosions or in the presence of toxic
substances.
•
Do not fill the reservoir with toxic substances, acids,
solvents, detergents, corrosive substances and/or
explosives or perfume additives.
•
Do not vacuum and do not direct the steam jet towards
toxic substances, acids, solvents, detergents or corrosive substances. Hazardous substances must be
handled and disposed of in accordance with the
instructions of the manufacturers of these substances.
•
Do not vacuum and do not direct the steam jet towards
explosive powders or liquids, hydrocarbons, open
flames, or very hot objects.
•
Keep all parts of your body away from the suction nozzle and from any moving or rotating parts.
•
Do not use the suction function on people and / or
animals.
•
Use the special carrying handle. Do not pull on the
power cord. Do not use the power cord as a handle.
Do not lift the unit with the power cord or steam / vacuum hoses.
4
VT-1888.indd 4 10/20/20 3:24 PM
Page 5

ENGLISH
•
Do not place the unit near heat sources such as fireplaces, stoves and ovens.
•
Do not install the unit near electromagnetic fields such
as induction hobs.
•
Wind the power cord back onto the winding hooks when
you do not intend to use the unit.
•
Do not block openings and grills on the product.
•
When cleaning stairs, place the unit on the steps below
the user’s level.
•
Do not direct the steam jet at any part of the body of
people or animals.
•
Do not direct the steam jet towards clothing while wearing it.
•
Items and cloths that have been deeply steam treated
reach very high temperatures - over 100°C. Wait a few
minutes and make sure they have cooled down before
handling them. Therefore, avoid contact of such items
with skin if they have just been steamed.
•
Place the steam cleaner vertically on an even, dry,
moisture- and heat-resistant surface, do not place it
horizontally and do not turn it over during the operation.
•
Use only the attachments supplied.
•
Before using the unit, make sure that the attachments
are set and fixed properly.
•
It is recommended to fill the water tank with tap water
which was additionally cleaned with domestic filters.
Do not use carbonated water or any perfume additives.
•
Ensure that water level is not above the maximum level
mark «MAX».
•
Do not block the steam release openings and do not
insert any foreign objects into the openings.
•
During the operation the upper part of the unit body
and the operating surface of the steam cleaner become
very hot, do not touch the operating surface and the
upper part of the unit body to avoid getting burns.
•
Avoid getting burns by hot steam.
•
Unplug the unit after usage or before cleaning.
•
When unplugging the unit hold the power plug and
remove it from the mains socket, do not pull the
power cord – this can lead to its damage and cause
short circuit.
•
For child safety reasons do not leave polyethylene bags
used as packaging unattended.
Attention! Do not allow children to play with polyethylene
bags or packaging film. Danger of suffocation!
•
The unit is not intended for usage by children.
•
Do not leave children unattended to avoid them using
the unit as a toy.
•
Do not allow children to touch the operating surface,
unit body, power cord or power plug during operation
of the unit.
•
Be especially careful if children or disabled persons are
near the operating unit.
•
During the unit operation and breaks between operation cycles, place the unit out of reach of children.
•
The unit is not intended to be used by people with physical, sensory or mental disabilities (including children)
or by persons lacking experience or knowledge if they
are not under supervision of a person who is responsible for their safety or if they are not instructed by this
person on the usage of the unit.
•
From time to time check the power cord integrity.
•
If the power cord is damaged, it should be replaced
by the manufacturer, a maintenance service or similar
qualified personnel to avoid danger.
•
Do not use the unit if the power cord or the power plug
is damaged, if the unit works improperly and after it
was dropped.
•
Do not repair the unit by yourself. Do not disassemble
the unit by yourself, if any malfunction is detected or
after it was dropped, unplug the unit and apply to any
authorized service center at the contact addresses
given in the warranty certificate and on the website
www.vitek.ru.
•
To avoid damages, transport the unit in the original
package only.
•
Keep the unit in a dry cool place out of reach of children
and disabled persons.
THIS UNIT IS INTENDED FOR HOUSEHOLD USE ONLY.
ITS COMMERCIAL USE AND USE IN PRODUCTION AND
WORKING AREAS ARE PROHIBITED.
BEFORE THE FIRST USE
After unit transportation or storage at low temperature
keep it for at least three hours at room temperature.
•
Unpack the unit and remove any packaging materials
and advertising stickers.
•
If there is a protective film on the operating surface,
remove it.
•
Keep the original package.
•
Read the safety measures and operating recommendations.
•
Check the delivery set.
•
Examine the unit for damages; if the unit is damaged,
do not plug it into the mains.
•
Make sure that the indicated specifications of the
power supply voltage of the unit correspond to the
specifications of your mains. When the unit is used
in the mains with an alternating current frequency of
60 Hz, it does not need any additional settings.
•
To remove dust clean the unit with a slightly damp cloth,
and then wipe it dry.
PROPER USE OF THE UNIT
The unit is intended for indoor household use, for sucking up liquids and dust, for removing of dry and / or wet
materials (dirt) from surfaces using steam in accordance
with the descriptions and instructions given in this manual.
Please read these instructions carefully and save them.
This manual can be viewed and / or downloaded from the
website www.vitek.ru.
Vacuum only the household dirt. Do not vacuum directly
from containers filled with water or other liquids. Collect
only a small amount of water, sprayed on surfaces, observing the maximum amount indicated in the Instructions.
Regularly check the fill level of the dry and wet dirt trap,
making sure that the maximum levels haven’t been exceeded. Do not use on chalk, cement or other debris from
construction or masonry. Do not use on earth and sand /
soil, etc.
Do not use on ash, soot and combustion residues (fireplaces, barbecues, etc.).
Do not use on printer, copier or fax (toner and ink powder).
5
VT-1888.indd 5 10/20/20 3:24 PM
Page 6

ENGLISH
Do not vacuum sharp or rigid objects. The manufacturer
reserves the right to make aesthetic, technical and design
changes without prior notice.
Before leaving the production, all products are thoroughly tested. This is why your unit may contain some water in the tank.
The correct use of the product is described only in this instruction manual. Any other use may damage the unit and
void the warranty.
WHAT WATER TO USE
The unit has been designed to work with normal tap water between 8°C and 20°C. If your tap water contains a lot
of limescale, use a commercially available mix of 50% tap
water and 50% demineralized water.
Replace the anti-scale filter periodically as described in
section 13. Never use rainwater or water containing perfume
additives (such as perfume), or water produced by other
household appliances, water softeners or filters. Do not add
chemical or natural detergents or descaling agents, etc.
Before using bottled drinking water, find out its total mineralization (usually indicated on the label) and compare
it with indicators for tap water (they can be found on the
water supply organization’s website, or by the Internet
search). Typically, bottled water salinity is 100-400 mg / l.
It may turn out that the water from the tap has a salinity
several times lower, so that the use of bottled water will
increase the formation of scale. With constant use of the
vacuum cleaner, it is periodically recommended to completely refresh the water in the tank and rinse the tank itself
in order to avoid stagnation of water and the appearance of
an extraneous smell.
ATTENTION! If the scale forms in the boiler, this case
will be recognized as a non-warranty.
Steam vacuum cleaner VT-1888: 3 PRODUCTS IN 1
It is a handy vertical steam unit that combines three products in one, as it can be used as a vacuum cleaner, steam
mop, and portable steam cleaner. It can perform many
cleaning functions and treat a variety of surfaces: floors
with various finishes (tiles, porcelain stoneware, parquet),
kitchen work surfaces, hoods, bathrooms, taps, grouting,
windows and mirrors, upholstery, sofas, armchairs, mattresses, cushions, car interiors), interior doors and cabinet
doors, heating radiators and roller shutters, curtains and
clothes, green plants. Third party tests, conducted by an
independent laboratory, confirm that the steam cleaner removes 99.9% of germs and bacteria when used according
to the instructions included in this manual with a microfiber
cloth attached for a 30 second runtime.
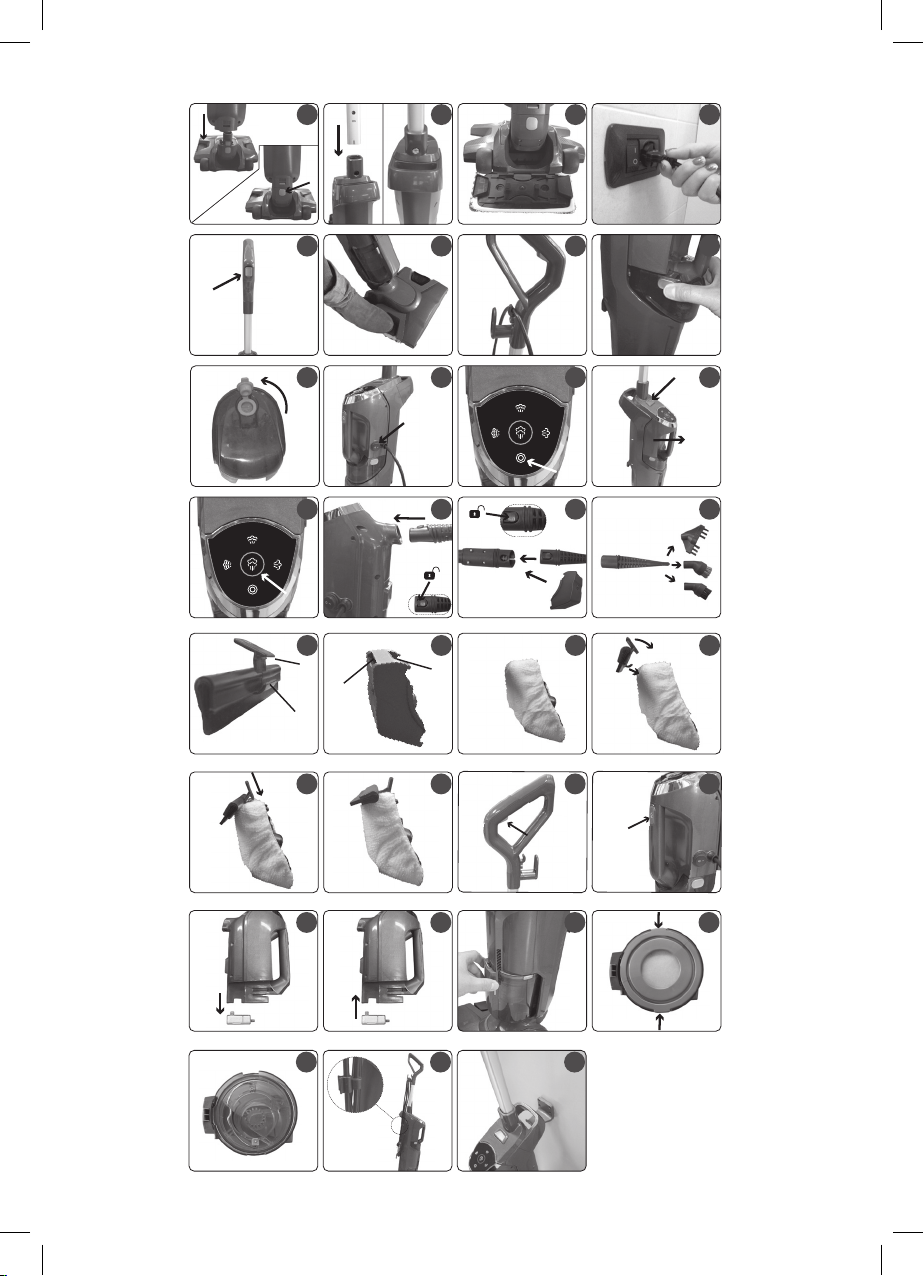
1. ASSEMBLING THE UNIT AS A VACUUM
CLEANER / STEAM MOP
1.1. Remove the unit from the packaging making sure the
product is not damaged and that all parts are included
in the package.
1.2. Connect the unit body (3) to the universal brush (1)
(fig. 1).
To remove the universal brush, place your foot on the
brush, press the button (21) and pull the device straight up
by the carrying handle (15).
NOTE: before assembling the device, please note that the
screw (14), when packing the device, can be screwed into
the extension tube (9).
1.3. Unscrew the screw (14) on the extension tube (9) with
a slotted screwdriver. Place the extension tube into
the seat on the unit body and tighten the screw (fig. 2).
WARNING: check from time to time to see if the screw
is tightened.
1.4. Place the fabric cover (28) on the mop nozzle (27) and
connect it to the bottom of the universal brush (1) so
that the clamps on the mop nozzle fit into the corresponding grooves of the universal brush (fig. 3) (for
steam cleaning only).
NOTE: to remove the mop nozzle (27) from the universal
brush (1), press one of its two side pedals (22) and pull the
device vertically upwards by the handle (15).
2. USING THE UNIT AS A VACUUM CLEANER
Verify that section 1 requirements are met
2.1. Unwind the power cord completely and connect it to
an electrical outlet that has a reliable earthing connection (fig. 4). Always use the product with the power
cord completely unwound.
2.2. Move the button of the power switch (10) located on
the handle of the vacuum cleaner (11) to position (I)
(fig. 5). Move the universal brush (1) to the working
position from the parking position, for this place your
foot on the brush and tilt the vacuum cleaner by the
carrying handle (15) (fig. 6). Vacuum cleaner is ready
for operation.
To keep the power cord out of the way during cleaning,
pass it through the upper hook (13) (fig. 7).
3. PREPARATION FOR USE OF THE UNIT AS A MOP
AND A HANDHELD STEAM CLEANER
3.1. Remove the water tank (4), to do this press the side
buttons of the clamps (18) and pull it towards you
(fig. 8). Turn the water tank over and open the rubber stopper by pulling the tab upwards (fig. 9). Fill the
water tank with clean water.
Do not add other substances or additives to the water
tank.
3.2. Close the plug of the water tank tightly and reinstall
it. Always carry out this operation with the power cord
unplugged.
WARNING: make sure the water tank (4) is installed correctly to avoid leakage.
3.3. Place the fabric cover (28) on the mop nozzle (1) and
connect it to the bottom of the universal brush (fig. 3).
3.4. Unwind the power cord completely and connect it to
an electrical outlet that has a reliable earthing connection (fig. 4). Always use the product with the power
cord completely unwound.
3.5. Press the button of the power switch (17) of the steam
cleaner located on the side of the unit (fig. 10). The
power indicator on the control panel (7) will blink ( )
green.
Wait 30 seconds until the indicator on the control panel
glows continuously (fig. 11).
The unit is then ready for use.
HANDHELD STEAM CLEANER (16)
3.6. For separate use of the handheld steam cleaner (16),
detach it from the unit body (3) by pressing the upper
button (8) and pulling it outwards by the handle (5)
(fig. 12).
6
VT-1888.indd 6 10/20/20 3:24 PM
Page 7

ENGLISH
4. ADJUSTING THE STEAM OUTPUT INTENSITY
The unit has 3 levels of steam output intensity. By successively pressing the button ( ) of the steam regulator (fig. 13) located on the control panel (7) set the intensity of the steam output depending on the intended
use. The indicator of the selected intensity level will glow
constantly.
Here are some guidelines for choosing the level of steam
output intensity:
•
Maximum level ( ): for removing scale, stains, grease;
•
Medium level ( ): for washing windows and floors.
•
Minimum level ( ): for cleaning parquet and laminate,
delicate fabrics, upholstery, sofas, mattresses, etc.
5. CONNECTING THE ACCESSORIES
Accessories can be connected directly to the handheld
steam cleaner (16) or to the flexible hose (23) for more
freedom of movement.
5.1. Flexible hose (23)
Connect the flexible hose (23) to the portable steam cleaner (16) until you hear the clamp click (fig. 14). To remove
the flexible hose, press on the release button located at the
base of the flexible hose and pull it out (fig. 14).
5.2. Concentrator nozzle (24)
The concentrator nozzle (24) can be connected directly
to the handheld steam cleaner (16) or to the flexible hose
(23). To remove the nozzle, press the release button located on the base of the nozzle and pull it out.
Connect the flexible hose (23) to the handheld steam
cleaner (16) until you hear the clamp click (fig. 15).
The brushes (30, 31) and the grouting nozzle (32) can be
attached to the concentrator nozzle (24). Insert them at the
end of the concentrator nozzle (24) all the way in (fig. 16).
Pull them out to remove.
5.3. Steaming accessories (25, 26)
Connect the steaming nozzle (25) directly to the handheld
steam cleaner (16) by pressing lightly until it snaps into
place. For greater freedom of movement, the nozzle can
be connected using the flexible hose (23) (fig. 15).
To clean sofas, cushions, armchairs and mattresses, slide
the fabric cover (26) over the nozzle (25) (fig. 19).
5.4. Window cleaning nozzle (29)
Attach the window cleaning nozzle (29) to the steaming nozzle (25) by inserting hook A (fig. 17) under slot B
(fig. 18, 20), then turn the nozzle (fig. 21) so that hook C
(fig. 17) fits into slot D (fig. 18, 22).
Before attaching the window cleaning nozzle to the
steaming nozzle, put the fabric cover over the nozzle.
Do not install the nozzle without the cover!
6. CLEANING OF THE FLOORS
Before using the unit on delicate or glossy surfaces, make sure that the surface of contact
area is free from foreign bodies that could cause
scratches.
The steam vacuum cleaner is a combined product, it can
be used as a vacuum cleaner or a steam vertical cleaner,
for washing and disinfecting floors, or in combination with
a suction action to save cleaning time.
SUCTION ONLY
Ensure that the requirements of section 1 are met and proceed as described in section 2.
STEAM ONLY
Ensure that the requirements of section 1-3 are met.
6.1. Adjust the intensity of the steam output depending on
the type of the floor (fig. 13);
•
for hard floors (tiles, porcelain stoneware, etc.), a
medium steam level is recommended;
•
for delicate floors (parquet, laminate, ceramic tiles,
etc.) a low steam level is recommended.
6.2. Move the universal brush (1) to the working position
from the parking position, for this place your foot on
the brush and tilt the unit by the carrying handle (15)
(fig. 6). Vacuum cleaner is ready for operation.
Then press the steam button (12) (fig. 23) located on
the handle (11) and start cleaning by moving the brush
back and forth. To stop dispensing steam, release the
button (12).
6.3. The brush (1) has a flexible connection making it easy
to clean corners and edges of furniture and walls.
COMBINED MODE: STEAM / SUCTION
The combined use of steam and suction allows you to
remove dust and disinfect the floor at the same time.
Proceed as described in sections 1-2-3.
To keep the power cord out of the way during cleaning,
pass it through the upper hook (13) (fig. 7).
During cleaning operations, the use of the fabric
cover (28) allows the floors to be washed and disinfected so that the steam softened dirt is collected by
the cloth.
Wait a few minutes to allow the fabric to cool before removing the mop nozzle (27) with the fabric cover (28)
from the universal brush (1). Then place your foot on
one of the two side pedals (22) of the mop nozzle (27)
and pull the unit straight up using the handle (15).
WARNING: for steam cleaning, do not use the mop
nozzle without the fabric cover.
WARNING: for added safety, before using test for exposure to steam on a hidden part, wait to be sure that
there is no discoloration or deformation.
7. CLEANING OF WINDOWS, MIRRORS
AND TILE WALLS
WARNING: to clean windows in cold weather, preheat the
glass, starting steaming at a distance of about 50 cm from
the surface.
Use only the handheld steam cleaner (16).
Verify that section 3 requirements are met.
7.1. Connect the flexible hose (23) to the handheld steam
cleaner (16), then attach the steam nozzle (25), and to
it, the window cleaning nozzle (29) (follow the requirements of paragraphs 5.3-5.4).
7.2. Adjust the steam output intensity as described in section 4 (fig. 13).
A medium steam output is recommended for this type of
surface.
7.3. To clean windows and mirrors, press the steam button
(6) on the portable steam cleaner to thoroughly steam
the surface and dissolve the dirt (fig. 24). Then treat
across the surface again, holding the nozzle downward to remove dirt and moisture.
7.4. To clean the tiles, use the steaming nozzle (25) with
the fabric cover (26) attached to the flexible hose
(23). Work the steam evenly over the tile surface while
7
VT-1888.indd 7 10/20/20 3:24 PM
Page 8

ENGLISH
pressing the steam button (6) on the handheld steam
cleaner (fig. 24) to remove the dirt.
8. CLEANING UPHOLSTERED FURNITURE,
ARMCHAIRS, CUSHIONS
(mattresses, sofas, car interiors, etc.)
WARNING: before steam cleaning leather or fabrics, read
the manufacturer’s instructions and always first conduct a
test on a hidden area or sample of material. Wait for some
time to make sure that there are no color changes or deformations.
Use only the handheld steam cleaner (16).
Verify that section 3 requirements are met.
Switch the unit on according to the instructions given in
paragraph 2.4 and connect the accessories as described
in section 3.
8.1. Adjust the steam output intensity as described in section 4 (fig. 13).
A minimum steam level is recommended for this type of
surface.
8.2. Connect the steaming accessories (25, 26) to the
flexible hose (23) of the handheld steam cleaner (16)
as described in section 5.3. Treat the surface creating steam using the steam button (6) (fig. 24) to remove dirt.
9. CLEANING OF SANITARY WARE, GROUTING
SEAMS AND KITCHEN WORKTOPS, BBQ
Use only the handheld steam cleaner. Verify that section 3
requirements are met.
9.1. Connect the concentrator nozzle (24) to the handheld
steam cleaner (16) as described in Section 5.2 (the
concentrator nozzle can be connected to the flexible
hose for treatment of hard-to-reach places).
9.2. Connect the most suitable accessory as required:
•
the concentrator nozzle (24), for treatment of hardto-reach places and obtaining a more concentrated
jet of steam.
•
the small round brush with nylon bristle (30), to
remove dry dirt and scale.
•
the small round brush with brass bristles (31), to
remove stubborn dried grease and dirt (barbecue,
car or motorcycle wheels, etc.).
•
the nozzle (32), for cleaning grout joints between
tiles and removing dirt from very narrow surfaces.
WARNING: when using the brushes (30), (31) and the
nozzle (32), do not use excessive force to avoid breaking
the tip of the concentrator nozzle (24).
Attention! The tip of the concentrator nozzle heats up
during use. Wait at least 5 minutes for the tip to cool
down before attaching / detaching additional accessories.
9.3. Adjust the steam output intensity (fig. 13).
A maximum steam level is recommended for this type of
surface.
9.4. Press the steam button (6) on the handheld steam
cleaner (fig. 24), then steam the surfaces.
10. CLEANING OF FURNITURE
AND DELICATE SURFACES
WARNING: before steam cleaning of fabrics, read the
manufacturer’s instructions and always first conduct a test
on a hidden area or sample of material.
Use only the handheld steam cleaner (16). Verify that section 3 requirements are met.
10.1. Connect the concentrator nozzle (24) to the handheld steam cleaner (16) as described in section 5.2
(fig. 14).
10.2. Adjust the steam output intensity (fig. 13).
A minimum steam level is recommended for this type of
surface.
10.3. Press the steam button (6) on the handheld steam
cleaner (fig. 24) and direct the jet towards the cloth.
WARNING: do not aim the steam jet directly at the
surface.
10.4. Use a pre-steamed cloth to clean the surface, avoiding prolonged use in the same place.
11. OTHER GENERAL USES
Warning: before cleaning the surface, always do the test
on a hidden area and see how it reacts.
11.1. Cleaning of curtains and drapes
Mites and dust can be removed from curtains and drapes
by steaming the fabric directly from the handheld steam
cleaner. The steam can remove unpleasant odors and
freshen the colors, which allows to wash the fabric less
often.
A minimum steam level is recommended for this type of
surface.
11.2. Removing stains from carpets and upholstery
WARNING: STEAM!
Danger of burns!
Direct the steam directly onto the stain at the maximum
possible angle (never perpendicular to the surface to be
cleaned) and place cloth behind the stain to collect any dirt
that has been “blown away” by the steam pressure.
A minimum steam level is recommended for this type of
surface.
11.3. Plant care and room humidification
To care for your indoor plants, use steam to remove dust
from the leaves.
Use the handheld steam cleaner with the flexible hose to
easily direct the jet (to attach it, see section 3). Steam the
surface at a distance of 50 cm, adjust the steam to the minimum level. Plants will breathe better and will be cleaner
and brighter. Steam can also be used to freshen the air in
the rooms, especially those frequented by smokers: steam
the room by directing the jet towards the ceiling, evenly
distributing it.
11.4. Surface disinfection
To disinfect, hold the steam jet of the concentrator nozzle
(24) no more than 1.5 cm from the surface and steam it for
at least 5 seconds. This treatment is the most effective in
killing germs and bacteria.
PRACTICAL TIPS
Vacuum cleaner usage tips
When cleaning the floor, move the vacuum cleaner in an
even back and forth motion, pushing it away from you and
pulling it back.
When vacuum cleaner was not in use for a long time, be
sure to drain all the water from the water tank.
When cleaning the floor, do not hold the vacuum cleaner
in one position for a long time, in order to avoid surface
damage. Also, do not park the vacuum cleaner upright with
8
VT-1888.indd 8 10/20/20 3:24 PM
Page 9

ENGLISH
a wet cloth on the floors, they can get soaked and deteriorate.
Steam mop usage tips
Before cleaning the floor, it is recommended to sweep or
vacuum it to remove dust and dirt particles.
When washing the floor, move the unit in an even back and
forth motion, pushing it away from you and pulling it back.
Move back to avoid stepping on the already washed floor.
The microfiber cloth collects water when washing the floor.
However, depending on the characteristics of the floor
surface and the set steam intensity, some moisture may
remain on the floor. In this case, it is recommended to let
the floor dry naturally. Drying can be accelerated by using
a fan directed to the desired area.
To make the floor less damp after washing, select the minimum steam supply with the “Steam” button.
Remove the mop nozzle from the universal brush after
cleaning.
Then the floor under the unit will not get soaked from a
damp cloth.
The handheld steam cleaner usage tips
Surface cleaning
The material to be cleaned must withstand moisture and
high temperature. Make sure of this before starting the
cleaning.
Some types of floors (like tile) have grooves or cemented
surfaces. For a more thorough cleaning, we recommend
using the round nylon brush.
Use the concentrator nozzle to clean the gaps (slots) between the tiles.
It is not recommended to use pile brushes for these purposes, because they can remove grout.
Bring the concentrator nozzle at an angle of 30-60° up to
the slot, turn the steam supply on and slowly move it forward along the slot. After cleaning, remove any dirt from
the surrounding surface with a cloth. In the same way,
clean the gaps between the floor tiles, as well as any other
crevices and narrow spaces.
The closer the steam nozzle is to the dirty area, the better
the cleaning effect, since the highest steam temperature is
obtained at the outlet of the steam nozzle. Therefore, when
cleaning, try to position the steam nozzle of the nozzles as
close as possible to the surface to be cleaned.
When cleaning with steam, wipe the steam-treated surface
with a cloth or sponge to remove loose dirt. It is recommended to wipe the surface while it is still wet. Be careful
when wiping metal surfaces as they can be hot after steam
treatment.
To remove stubborn dirt, the force of the steam jet alone
may not be enough; use the bristle brush or brass brush to
enhance the mechanical effect. When using the brushes,
do not use excessive force to avoid breaking off the tip of
the concentrator nozzle.
Heavy scale can be sprinkled with vinegar before steam
cleaning. Let the vinegar work for about 5 minutes, and
then steam the surface.
When cleaning clothes or upholstered furniture, put a rag
on the steaming nozzle, then the dirt will be absorbed into
the rag, and not into clothes or upholstery.
You can use the steaming nozzle to remove old wallpaper
from the walls.
The steam will swell the wallpaper glue and make the wallpaper easier to remove.
Cleaning of windows and mirrors
When using the window cleaning nozzle, first thoroughly
clean the entire window or mirror with steam, then turn
the steam off. Then press the rubber scraper of the nozzle
against the top of the window or mirror and gradually lower
the nozzle downward. Move from one side of the surface to
the other to clean the entire window or mirror. Place a rag
or tissue underneath the window frame or mirror stand to
collect the scraped water.
Dealing with negative temperatures outside (in winter), before cleaning the window glass, warm it up so that it does
not crack from a sharp temperature drop.
After warming it up, you can easily steam the entire surface.
Steaming of clothes
To steam your clothes, hang them on a stainless steel
hanger. Connect the steaming nozzle to the handheld
steam cleaner. Take the steam cleaner in one hand, with
the other hand, hold the bottom of the garment, creating a
slight tension. Bring the nozzle to the surface of the fabric,
lightly pressing the working part to it, and start steaming in a
reciprocating motion (from top to bottom). We recommend
starting with the areas with the most wrinkles, as well as with
items of clothing that are denser (collar and sleeve cuffs).
12. WATER LEVEL
The water level is always visible thanks to the transparent
water tank (4).
When the water is used up, steam will no longer be generated.
To resume operation, refill the water tank with water as described in section 3.
WARNING: this operation should always be performed after disconnecting the unit from the mains.
13. REPLACING OF THE DESCALING FILTER
The unit has a filter containing special resins that can stop
the lime scale and extend the life of your product.
It is recommended to change the filter once a year.
13.1. Disconnect the unit from the mains.
13.2. Remove the water tank (4) from the handheld steam
cleaner (16) by pressing the side release buttons (18)
and pulling it out (fig. 8).
13.3. Remove the old filter (fig. 25) by pulling it down.
13.4. Insert a new filter (35), press gently and make sure it
is perfectly seated (fig. 26), then fit the water tank.
NOTE: The filter may darken, become brown or rusty during use, this is normal and not a malfunction.
14. CLEANING OF THE DUST CONTAINER
AND FILTERS
14.1. Turn the unit off completely, to do this, move the
power switch (10) located on the handle of the vacuum cleaner (11) to position (0) and press the power
switch (I /0) of the steam cleaner (fig. 10), then remove the power cord plug from an electrical outlet.
14.2. Remove the dust container (2) from the unit body (4)
by pressing the two lock buttons of the dust container (20) (fig. 27).
14.3. Remove the HEPA filter (36) with the inserted foam
filter (37) from the dust container, by the side guides
9
VT-1888.indd 9 10/20/20 3:24 PM
Page 10
ENGLISH
(fig. 28), remove the cyclone filter (39) (fig. 29) by
pulling it upwards using the folding metal handle.
14.4. Remove the cyclone filter cover (38) by turning it
counterclockwise, then clean the cyclone filter (39)
from dust.
14.5. Clean the dust container canister (40) from dirt.
14.6. Assemble the dust container and reinstall it in its
original place, performing the above steps in reverse
order (see paragraphs 14.2-14.4).
It is recommended to clean the dust container (2) after
each use.
WARNING: do not use the unit without the installed dust
container complete with filters.
15. GENERAL MAINTENANCE
Make sure the unit is turned off and unplugged.
Use only a cloth and tap water to clean the outside of
the unit.
All steam cleaning accessories can be cleaned with
running water and allowed to dry completely before
next use. After using the brushes, allow the bristles to
cool in their natural position to avoid deformation. Do
not use detergents and abrasives. The fabric nozzle
covers can be washed by following the instructions on
the label.
The filters and canisters of the dust container can be
cleaned under running water to ensure they are com-
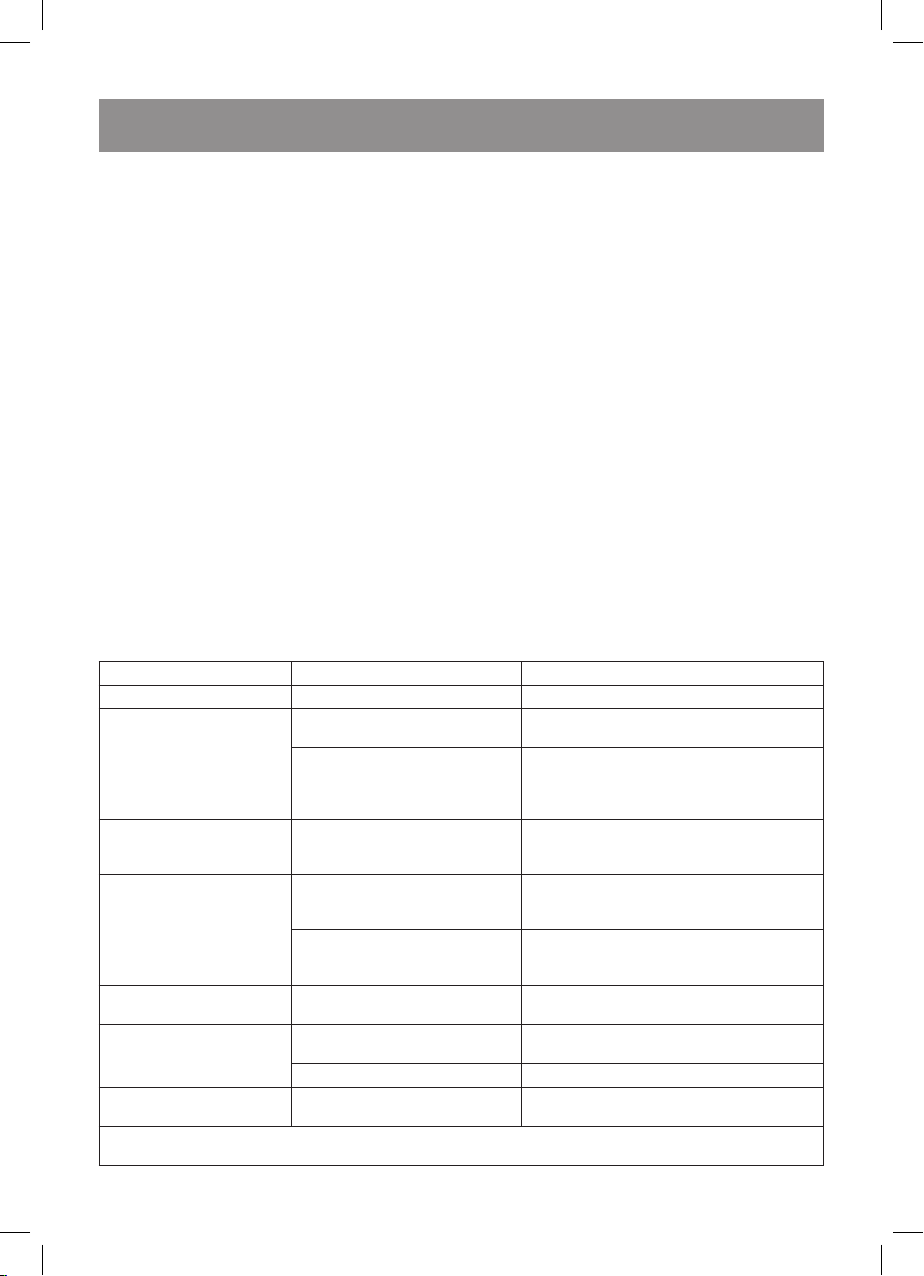
17. DIAGNOSTICS OF FAULTS
Problem Cause Solution
The unit is not switched on. No electricity. Check that the unit is connected to the mains.
No steam comes out. The water has run out. Unplug the unit, fill the water tank and then
The device is turned off. Make sure the unit is connected to a power
The unit is switched on but
produces little steam.
The unit spills too much
water onto the floor.
The suction power drops
during operation.
Dust comes out of the unit
during suction.
The dust container cannot
be removed.
If problems persist or are not listed above, please contact an authorized service center (www.vitek.ru or contact
Customer Support.
The steam supply is set to the
minimum level.
The steam supply is set to the
maximum level.
Steam button is pressed and /
or held.
The dust container is full. Empty the dust container.
The dust container is not inserted
correctly.
The dust container is full. Empty the dust container.
Filter not inserted correctly Insert the filter correctly
pletely dry before next use. Rinse the canisters of the
cyclone filter and the dust container with running water and shake to remove excess dirt or water. Allow the
filters to get completely dry naturally before installing
them into the unit, away from heat sources for at least
24 hours. The HEPA filter should be completely cleaned
approximately every four months.
16. STORAGE LOCATION
16.1. Switch the unit off and unplug it.
16.2. Empty the remaining water from the water tank to
avoid leaks.
16.3. Before removing fabric covers from the nozzles wait a
few minutes for them to cool down.
16.4. Wind the power cord around the special winding
hooks (13, 19) (fig. 30).
Complete the requirements of section 14.
Be sure to completely unwind the power cord before using the unit again. The upper power cord winding hook (13)
rotates at 180° to quickly unwind the cord.
WARNING: do not keep the unit connected to the mains
with the power cord wound.
16.5. The unit storage hook (33) can be wall-mounted
using 4 holes and the included hook attachment
kit (34).
The unit is fixed to the storage hook (33) by the carrying
handle (15) (fig. 31).
use the unit again.
source, the power switch of the handheld
steam cleaner is in position (I) and the steam
button (6 or 12) is held down.
Press the regulation button
Steam dispensing to increase the amount of
steam dispensed (see section 4).
Reduce steam supply to the minimum. If
necessary, temporarily stop dispensing
steam while continuing to brush the surface.
Do not keep the steam button (6 or 12)
constantly pressed, but release it to stabilize
the temperature.
Insert the dust container correctly.
10
VT-1888.indd 10 10/20/20 3:24 PM
Page 11
ENGLISH
PRODUCT INCLUDES
Steam vacuum cleaner with a set
of filters installed – 1 pc.
Universal brush – 1 pc.
Flexible steam hose – 1 pc.
Furniture brush – 1 pc.
Fabric nozzle cover – 1 pc.
Mop nozzle – 1 pc.
Fabric mop nozzle cover – 1 pc.
Window cleaning nozzle – 1 pc.
Concentrator nozzle (for hard-to-reach places) – 1 pc.
Small round brush with nylon bristles – 1 pc.
Small round brush with brass bristle – 1 pc.
Grouting seams nozzle – 1 pc.
Additional descaling filter – 1 pc.
Storage hook – 1 pc.
Hook attachment kit – 1 pc.
TECHNICAL SPECIFICATIONS
Power supply: 220-240 V ~ 50-60 Hz
Rated input power: 1800 W
Steam mop power: 1200 W
Vacuum cleaner power: 600 W
Suction power: 12 kPa
Warm-up time: 25-30 seconds
Steam output intensity: from 15 to 25 g/min depending
on the selected level
Steam time: 14-22 min depending on the selected level
Dust container capacity: 0.4 L
Water tank capacity: 0.5 L
Cleaning area: up to 30 m2 without adding water
Power cord length: 5 m
RECYCLING
For environment protection do not throw out the unit and the
batteries (if included), do not discard the unit and the batteries with usual household waste after the service life expiration; apply to specialized centers for further recycling.
The waste generated during the disposal of the unit is subject to mandatory collection and consequent disposal in
the prescribed manner.
For further information about recycling of this product
apply to a local municipal administration, a disposal service
or to the shop where you purchased this product.
The manufacturer preserves the right to change design,
structure and specifications not affecting general principles of the unit operation without a preliminary notification
due to which insignificant differences between the manual
and product may be observed. If the user reveals such differences, please report them via e-mail info@ vitek.ru for
receipt of an updated manual.
Unit operating life is 3 years
Guarantee
Details regarding guarantee conditions can be obtained
from the dealer from whom the appliance was purchased.
The bill of sale or receipt must be produced when making
any claim under the terms of this guarantee.
This product conforms to the EMC Directive
2014/30/EU and to the Low Voltage Directive
2014/35/EU.
11
VT-1888.indd 11 10/20/20 3:24 PM
Page 12

РУССКИЙ
ПАРОВОЙ ПЫЛЕСОС VT-1888
Многофункциональный пылесос с 3 режимами
очистки поверхностей: пылесос с технологией «циклон», функция дезинфекции пола паром и обработка
поверхностей с помощью портативного пароочистителя.
ОПИСАНИЕ
1. Универсальная щётка
2. Контейнер-пылесборник
3. Корпус
4. Резервуар для воды
5. Ручка ручного пароочистителя
6. Кнопка подачи пара
7. Панель управления
8. Кнопка снятия ручного пароочистителя
9. Удлинительная трубка
10. Клавиша выключателя питания пылесоса (I/0)
11. Ручка пылесоса
12. Кнопка подачи пара
13. Верхний крючок для намотки сетевого шнура
14. Винт крепления ручки
15. Ручка для переноски
16. Ручной пароочиститель
17. Клавиша выключателя питания ручного
пароочистителя (I/0)
18. Кнопки фиксаторов резервуара для воды
19. Нижний крючок для намотки сетевого шнура
20. Фиксаторы контейнера-пылесборника
21. Кнопка для снятия универсальной щётки
22. Педали для снятия насадки-швабры
23. Гибкий паровой шланг
24. Насадка-концентратор для труднодоступных
мест
Аксессуары для отпаривания
25. Насадка для отпаривания
26. Тканевый чехол насадки для отпаривания
Аксессуары для мытья пола
27. Насадка-швабра
28. Тканевый чехол насадки-швабры
29. Насадка для мытья окон
30. Малая круглая щётка с нейлоновой щетиной
31. Малая круглая щётка с латунной щетиной
32. Насадка для обработки затирочных швов
33. Крюк для хранения
34. Комплект для крепления крюка
35. Дополнительный фильтр от накипи
Контейнер-пылесборник
36. HEPA-фильтр
37. Поролоновый фильтр
38. Крышка циклонного фильтра
39. Циклонный фильтр
40. Ёмкость контейнера-пылесборника
ВНИМАНИЕ!
Для дополнительной защиты в цепи питания целесообразно установить устройство защитного отключения (УЗО) с номинальным током срабатывания, не
превышающим 30 мА, для установки УЗО обратитесь
к специалисту.
СИМВОЛЫ БЕЗОПАСНОСТИ:
ПРЕДУПРЕЖДЕНИЕ: Высокая температура.
Риск ожога!
Если это указано на изделии, не прикасайтесь к нему, так как детали могут быть очень
горячими.
ВНИМАНИЕ: ПАР!
Риск ожога!
Прибор достигает очень высоких температур.
Неправильное использование прибора может привести к ожогу.
МЕРЫ БЕЗОПАСНОСТИ И РЕКОМЕНДАЦИИ
ПО ЭКСПЛУАТАЦИИ
Перед началом эксплуатации прибора внимательно
прочитайте настоящее руководство по эксплуатации
и сохраните его для использования в качестве справочного материала.
• Используйте устройство только по его прямому
назначению, как изложено в данном руководстве.
Неправильное обращение с устройством может
привести к его поломке, причинению вреда пользователю или его имуществу.
• Убедитесь, что рабочее напряжение устройства,
указанное на этикетке, соответствует напряжению
электросети.
• Вилка сетевого шнура имеет контакт заземления,
вставляйте её в электрическую розетку, имеющую
надёжный контакт заземления.
• Полностью размотайте сетевой шнур перед под-
ключением прибора к сети и перед использованием. Всегда используйте изделие с полностью
размотанным сетевым шнуром.
• Во избежание риска возникновения пожара не
используйте переходники при подключении устройства к электрической розетке.
• Не прикасайтесь к корпусу устройства, рабочей
поверхности, сетевому шнуру и к вилке сетевого
шнура мокрыми руками.
• Выключайте устройство и отключайте его от элек-
трической сети после окончания воды в резервуаре
портативного пароочистителя .
• Не оставляйте устройство, включённое в сеть, без
присмотра.
• Пар не должен быть направлен на оборудование,
содержащее электрические компоненты, такие как
внутренняя часть духовок.
• Не используйте устройство в непосредственной
близости от нагревательных приборов, источников
тепла или открытого пламени.
• Не используйте устройство вблизи от кухонной
раковины, в ванных комнатах, около бассейнов или
других ёмкостей, наполненных водой.
• Если устройство упало в воду, немедленно выньте
вилку сетевого шнура из электрической розетки,
и только после этого можно достать устройство из
воды. Обратитесь в сервисный центр для осмотра
или ремонта устройства.
• Запрещается использовать устройство в местах,
где используются или распыляются аэрозоли,
а также вблизи от легковоспламеняющихся жидкостей, запрещается использовать устройство
12
VT-1888.indd 12 10/20/20 3:24 PM
Page 13

РУССКИЙ
в местах хранения таких жидкостей, где существует
опасность взрывов или в присутствии токсичных
веществ.
• Не заливайте в резервуар токсичные вещества,
кислоты, растворители, моющие средства, агрессивные вещества и/или взрывчатые вещества или
парфюмерные добавки.
• Не пылесосьте и не направляйте струю пара на ток-
сичные вещества, кислоты, растворители, моющие
средства или агрессивные вещества. Обращение с
опасными веществами и их удаление должны осуществляться в соответствии с указаниями изготовителей этих веществ.
• Не пылесосьте и не направляйте струю пара на
взрывоопасные порошки или жидкости, углеводороды, открытое пламя и очень горячие предметы.
• Держите все части вашего тела подальше от всасы-
вающего сопла и от любых движущихся или вращающихся частей.
• Не используйте функцию всасывания на людях и /
или животных.
• Используйте специальную ручку для транспорти-
ровки. Не тяните за сетевой шнур. Не используйте
сетевой шнур в качестве ручки. Не поднимайте прибор с помощью сетевого шнура или паровых шлангов / вакуумных трубок.
• Не размещайте изделие вблизи источников тепла,
таких как камины, печи и духовки.
• Не устанавливайте изделие вблизи электромагнит-
ных полей, таких как индукционные панели.
• Повторно намотайте сетевой шнур на крючки для
намотки, когда прибор не используется.
• Не загораживайте отверстия и решетки на изделии.
• При уборке лестниц прибор должен располагаться
на ступеньках ниже уровня пользователя.
• Не направляйте струю пара на какую-либо часть
тела людей или животных.
• Не направляйте струю пара на одежду во время ее
ношения.
• Вещи и ткани, подвергнутые глубокой обработке
паром, достигают очень высоких температур - выше
100 °C. подождите несколько минут и убедитесь,
что они остыли, прежде чем обращаться с ними.
Поэтому избегайте контакта с кожей, если они
только что были отпарены.
• Устанавливайте пароочиститель вертикально на
ровной сухой влагостойкой и термостойкой поверхности, не кладите его горизонтально и не переворачивайте во время работы.
• Используйте только насадки, входящие в комплект
поставки.
• Перед началом использования устройства, убеди-
тесь в том, что насадки установлены правильно и
надёжно зафиксированы.
• Рекомендуется заливать в резервуар водопрово-
дную воду, прошедшую дополнительную очистку
бытовыми фильтрами. Не используйте газированную воду и парфюмерные добавки.
• Следите, чтобы уровень воды был не выше макси-
мальной отметки «MAX».
• Не закрывайте отверстия выхода пара, запреща-
ется вставлять в отверстия посторонние предметы.
• Во время работы верхняя часть корпуса и рабо-
чая поверхность пароочистителя сильно нагревается, во избежание получения ожогов, не
прикасайтесь к рабочей поверхности и к верхней
части корпуса.
• Остерегайтесь получения ожогов горячим паром.
• Отключайте устройство от электросети после
использования или перед чисткой.
• При отключении устройства от электрической сети
держитесь за вилку сетевого шнура и выньте её
из электрической розетки, не тяните за сетевой
шнур – это может привести к его повреждению и
вызвать короткое замыкание.
• Из соображений безопасности детей не оставляйте
полиэтиленовые пакеты, используемые в качестве
упаковки, без надзора.
Внимание! Не разрешайте детям играть с полиэтиленовыми пакетами или упаковочной плёнкой.
Опасность удушья!
• Устройство не предназначено для использования
детьми.
• Дети должны находиться под присмотром для
недопущения игр с прибором.
• Не разрешайте детям прикасаться к рабочей
поверхности, к корпусу устройства, к сетевому
шнуру или к вилке сетевого шнура во время работы
устройства.
• Будьте особенно внимательны, если поблизости от
работающего устройства находятся дети или лица с
ограниченными возможностями.
• Во время работы и в перерывах между рабочими
циклами размещайте устройство в местах, недоступных для детей.
• Прибор не предназначен для использования
лицами (включая детей) с пониженными физическими, сенсорными или умственными способностями, или при отсутствии у них жизненного опыта
или знаний, если они не находятся под присмотром
или не проинструктированы об использовании прибора лицом, ответственным за их безопасность.
• Периодически проверяйте целостность шнура
питания.
• При повреждении шнура питания его замену, во
избежание опасности, должны производить изготовитель, сервисная служба или подобный квалифицированный персонал.
• Запрещается использовать устройство при нали-
чии повреждений вилки шнура питания или шнура
питания, если устройство работает с перебоями,
а также после его падения.
• Запрещается самостоятельно ремонтировать при-
бор. Не разбирайте прибор самостоятельно, при
возникновении любых неисправностей, а также
после падения устройства отключите прибор от
электросети и обратитесь в любой авторизованный
(уполномоченный) сервисный центр по контактным
адресам, указанным в гарантийном талоне и на
сайте www.vitek.ru.
• Во избежание повреждений перевозите устройство
только в заводской упаковке.
• Храните устройство в сухом прохладном месте,
недоступном для детей и людей с ограниченными
возможностями.
13
VT-1888.indd 13 10/20/20 3:24 PM
Page 14

РУССКИЙ
ДАННЫЙ ПРИБОР ПРЕДНАЗНАЧЕН ДЛЯ ИСПОЛЬЗОВАНИЯ ТОЛЬКО В БЫТОВЫХ УСЛОВИЯХ. ЗАПРЕЩАЕТСЯ КОММЕРЧЕСКОЕ ИСПОЛЬЗОВАНИЕ И ИСПОЛЬЗОВАНИЕ УСТРОЙСТВА В ПРОИЗВОДСТВЕННЫХ ЗОНАХ И РАБОЧИХ ПОМЕЩЕНИЯХ
ПЕРЕД ПЕРВЫМ ИСПОЛЬЗОВАНИЕМ
После транспортировки или хранения устройства
при пониженной температуре необходимо выдержать его при комнатной температуре не менее
трёх часов.
• Распакуйте устройство и удалите все упаковочные
материалы и рекламные наклейки.
• При наличии защитной плёнки на рабочей поверх-
ности снимите её.
• Сохраните заводскую упаковку.
• Ознакомьтесь с мерами безопасности и рекомен-
дациями по эксплуатации.
• Проверьте комплектацию.
• Осмотрите устройство на наличие повреждений
при наличии повреждений не включайте его в электрическую сеть.
• Убедитесь, что указанные параметры напряжения
питания устройства соответствуют параметрам
электрической сети. При использовании устройства в электрической сети c частотой переменного тока 60 Гц никаких дополнительных действий
не требуется.
• Для удаления пыли протрите прибор слегка влаж-
ной тканью, после чего вытрите насухо.
ПРАВИЛЬНОЕ ИСПОЛЬЗОВАНИЕ ПРИБОРА
Прибор, предназначен для внутреннего бытового
использования, для всасывания жидкостей и пыли,
удаления сухих и/или влажных материалов (грязи) с
поверхностей с использованием пара в соответствии
с описаниями и инструкциями, приведенными в данном руководстве. Пожалуйста, внимательно прочтите
эти инструкции и сохраните их. С этим руководством
можно ознакомиться и/или загрузить его с веб-сайта
www.vitek.ru.
Пылесосьте только бытовую грязь. Не пылесосьте непосредственно из емкостей наполненных водой или
другими жидкостями. Собирайте лишь небольшое
количество воды, распыленное по поверхностям, соблюдая максимальное количество, указанное в Инструкции.
Регулярно проверяйте уровень заполнения сухого и
влажного грязеуловителя, следя за тем, чтобы максимальные уровни не превышались. Не используйте на
меле, цементе или других остатках от строительства
или кирпичной кладки. Не используйте на земле и песке/почве и т. д.
Не используйте на золе, саже и остатках горения (камины, барбекю и т.д.).
Не используйте на принтере, ксероксе или факсе (тонер и порошок чернил).
Не пылесосьте острые или жесткие предметы. Производитель оставляет за собой право вносить эстетические, технические и конструктивные изменения без
предварительного уведомления.
Перед тем как покинуть производство, все изделия
проходят тщательную проверку. Именно поэтому ваше
устройство может содержать некоторое количество
воды в резервуаре.
Правильное использование продукта описано только
в данном руководстве по эксплуатации. Любое другое
использование может привести к повреждению прибора и аннулированию гарантии.
КАКУЮ ВОДУ ИСПОЛЬЗОВАТЬ
Прибор был разработан для работы с обычной водопроводной водой от 8°С до 20°С. Если водопроводная
вода содержит много известкового налета, используйте смесь из 50% водопроводной воды и 50% деминерализованной воды, доступной для покупки.
Периодически заменяйте фильтр от накипи, как описано в разделе 13. Никогда не используйте, дождевую
воду, или воду, содержащую парфюмерные добавки
(например, духи), или воду, произведенную другими
бытовыми приборами, умягчителями воды или фильтрами. Не добавляйте химические, натуральные, моющие или удаляющие известковый налет вещества и т.д.
Перед использованием бутилированной питьевой
воды узнайте её общую минерализацию (обычно указывается на этикетке) и сравните её с показателями
для водопроводной воды (их можно найти на сайте организации водоснабжения, или поиском в интернете).
Как правило, минерализация бутилированной воды
составляет 100-400 мг/л.
Может оказаться, что вода из-под крана имеет минерализацию в несколько раз меньшую, так что использование бутилированной воды увеличит образование
накипи. При постоянном использовании пылесоса
периодически рекомендуется полностью обновлять
воду в резервуаре и промывать сам резервуар во избежание застаивания воды и появления постороннего
запаха.
ВНИМАНИЕ! Если в бойлере образуется накипь,
данный случай будет признан не гарантийным
Паровой пылесос VT-1888: 3 ПРОДУКТА В 1
Это удобный паровой вертикальный прибор, который
включает в себя три продукта в одном, потому что его
можно использовать в качестве пылесоса, паровой
швабры и портативного пароочистителя. Он может
выполнять множество очистительных функций и обрабатывать различные поверхности: пол с различной
отделкой (плитка, керамогранит, паркет), кухонные рабочие поверхности, вытяжки, ванные, краны, затирки,
окна и зеркала, обивку, диваны, кресла, матрасы, подушки, интерьеры автомобилей), межкомнатные двери
и двери шкафов, радиаторы отопления и рольставни,
шторы и одежду, зеленые растения. Испытания, проведенные третьей стороной, независимой лабораторией, подтверждают, что пароочиститель удаляет
99,9% микробов и бактерий, при использовании его в
соответствии с инструкциями, включенными в данное
руководство, с приложенной салфеткой из микрофибры с продолжительностью работы в 30 секунд.
1. СБОРКА ПРИБОРА В ВИДЕ ПЫЛЕСОСА /
ПАРОВОЙ ШВАБРЫ
1.1. Извлеките прибор из упаковки, убедившись, что
изделие не повреждено и что все детали включены
в комплект поставки.
14
VT-1888.indd 14 10/20/20 3:24 PM
Page 15
РУССКИЙ
1.2. Подсоедините корпус прибора (3) к универсальной щетке (1) (рис.1).
Для снятия универсальной щётки поставьте ногу на
щетку, нажмите на кнопку (21) и потяните прибор за
ручку для переноски (15) вертикально вверх.
ПРИМЕЧАНИЕ: перед сборкой прибора обратите внимание на то, что то винт (14), при упаковке прибора может быть вкручен в удлинительную трубку (9).
1.3. Отвинтите винт (14) на удлинительной трубке (9)
с помощью шлицевой отвёртки. Установите удлинительную трубку в посадочное место на корпусе
прибора и закрутите винт (рис. 2).
ПРЕДУПРЕЖДЕНИЕ: время от времени проверяйте, плотно ли затянут винт.
1.4. Наденьте тканевый чехол (28) на насадку-швабру
(27) и подсоедините её к нижней части универсальной щётки (1) таким образом, чтобы фиксаторы насадки-швабры вошли в соответствующие
пазы универсальной щётки (рис. 3) (только для
очистки паром).
ПРИМЕЧАНИЕ: для снятия насадки-швабры (27) с
универсальной щётки (1) нажмите на одну из двух её
боковых педалей (22) и потяните устройство вертикально вверх за ручку (15).
2. ИСПОЛЬЗОВАНИЕ ПРИБОРА
В КАЧЕСТВЕ ПЫЛЕСОСА
Убедитесь, что требования раздела 1 выполнены
2.1. Полностью размотайте сетевой шнур и подсоедините его к электрической розетке имеющей
надёжный контакт заземления (рис. 4). Всегда
используйте изделие с полностью размотанным
сетевым шнуром.
2.2. Переместите клавишу выключателя питания (10),
расположенного на ручке пылесоса (11), в положение (I) (рис. 5). Переведите универсальную щётку
(1) в рабочее положение из положения парковки,
для этого поставьте ногу на щетку и наклоните пылесос за ручку для переноски (15) (рис. 6). Пылесос готов к работе.
Чтобы сетевой шнур не мешал во время уборки, проложите его через верхний крючок (13) (рис. 7).
3. ПОДГОТОВКА К ИСПОЛЬЗОВАНИЮ
ПРИБОРА В КАЧЕСТВЕ ШВАБРЫ И РУЧНОГО
ПАРООЧИСТИТЕЛЯ
3.1. Снимите резервуар для воды (4), для этого нажмите на боковые кнопки фиксаторов (18) и потяните
его на себя (рис. 8). Переверните резервуар для
воды и откройте резиновую пробку, потянув её за
язычок вверх (рис. 9). Наполните резервуар чистой водой.
Не добавляйте в резервуар другие вещества или
добавки.
3.2. Плотно закройте пробку резервуара для воды и
установите его обратно. Всегда выполняйте эту
операцию с отключенным от сети сетевым шнуром.
ПРЕДУПРЕЖДЕНИЕ: убедитесь, что резервуар (4)
установлен правильно, чтобы избежать утечки.
3.3. Наденьте тканевый чехол (28) на насадку-швабру
(1) и соедините её с нижней частью универсальной
щётки (рис. 3).
3.4. Полностью размотайте сетевой шнур и подсоедините его к электрической розетке имеющей
надёжный контакт заземления (рис. 4). Всегда
используйте изделие с полностью размотанным
сетевым шнуром.
3.5. Нажмите на клавишу выключателя питания (17)
пароочистителя, расположенную сбоку прибора
(рис. 10). Индикатор включения на панели управления (7) при этом будет мигать ( ) зелёным цветом.
Подождите 30 секунд, пока индикатор на панели
управления не начнёт гореть постоянно (рис. 11).
После этого прибор готов к работе.
РУЧНОЙ ПАРООЧИСТИТЕЛЬ (16)
3.6. Для отдельного использования ручного пароочистителя (16) отсоедините его от корпуса прибора
(3), для этого нажмите на верхнюю кнопку (8) и потяните его наружу за ручку (5) (рис. 12).
4. РЕГУЛИРОВКА ИНТЕНСИВНОСТИ ВЫХОДА ПАРА
Прибор имеет 3 уровня интенсивности выхода пара.
Последовательно нажимая кнопку ( ) регулятора
пара (рис. 13), расположенную на панели управления
(7) установите интенсивность выхода пара в зависимости от предполагаемого использования. Индикатор
выбранного уровня интенсивности при этом будет гореть постоянно.
Вот некоторые рекомендации по выбору уровня интенсивности выхода пара:
• Максимальный уровень ( ): для удаления накипи,
пятен, жира;
• Средний уровень ( ): для мытья окон и полов.
• Минимальный уровень ( ): для чистки паркета
и ламината, деликатных тканей, обивки мебели,
диванов, матрасов и др.
5. ПОДСОЕДИНЕНИЕ АКСЕССУАРОВ
Аксессуары можно подсоединить непосредственно
к ручному пароочистителю (16) или к гибкому шлангу
(23) для большей свободы передвижения.
5.1. Гибкий шланг (23)
Подсоедините гибкий шланг (23) к портативному пароочистителю (16), пока не услышите щелчок фиксатора
(рис. 14). Чтобы снять гибкий шланг, нажмите на кнопку фиксатора, расположенную на основании гибкого
шланга, и вытяните его наружу (рис. 14).
5.2. Насадка-концентратор (24)
Насадку-концентратор (24) можно подсоединить непосредственно к ручному пароочистителю (16) или к гибкому шлангу (23). Для снятия насадки нажмите на кнопку фиксатора расположенную на основании насадки и
вытяните её.
Подсоедините гибкий шланг (23) к ручному пароочистителю (16), пока не услышите щелчок фиксатора
(рис. 15).
Щетки (30, 31) и насадка для затирки (32) могут быть
прикреплены к насадке-концентратору (24). Вставьте их на конец насадки-концентратора (24) до упора
(рис. 16). Чтобы снять, вытяните их.
5.3. Аксессуары для отпаривания (25, 26)
Подсоедините насадку для отпаривания (25) непосредственно к ручному пароочистителю (16), слегка
нажав на неё, чтобы она встала на место. Для большей
15
VT-1888.indd 15 10/20/20 3:24 PM
Page 16

РУССКИЙ
свободы передвижения насадку можно подсоединить
с помощью гибкого шланга (23) (рис. 15).
Для очистки диванов, подушек, кресел и матрасов наденьте тканевый чехол (26) на насадку (25) (рис. 19).
5.4. Насадка для мытья окон (29)
Прикрепите насадку для мытья окон (29) к насадке для
отпаривания (25), вставив крючок А (рис. 17) под прорезь В (рис. 18, 20), затем поверните насадку (рис. 21)
так, чтобы крючок С (рис. 17) поместился в прорезь D
(рис. 18, 22).
Перед тем как прикрепить насадку для мытья окон
к насадке для отпаривания, наденьте тканевый
чехол на насадку. Не устанавливайте насадку без
чехла!
6. ЧИСТКА ПОЛОВ
Перед использованием прибора на деликатных
или глянцевых поверхностях убедитесь, что область контакта с поверхностью свободна от инородных тел, вызывающих царапины.
Паровой пылесос комбинированный продукт, его
можно использоваться в качестве пылесоса, парового вертикального очистителя, для мытья и дезинфекции полов или в комбинированном режиме
с всасывающим действием для экономии времени
очистки.
ТОЛЬКО ВСАСЫВАНИЕ
Убедитесь, что требования раздела 1 выполнены, и
действуйте, как описано в разделе 2.
ТОЛЬКО ПАР
Убедитесь, что требования раздела 1-3 выполнены.
6.1. Отрегулируйте интенсивность выход пара в зависимости от типа пола (рис. 13);
• для твердых полов (плитка, керамогранит и т.д.)
рекомендуется средний уровень пара;
• для деликатных полов (паркет, ламинат, кера-
мическая плитка и т.д.) рекомендуется низкий
уровень пара.
6.2. Переведите универсальную щётку (1) в рабочее
положение из положения парковки, для этого
поставьте ногу на щетку и наклоните прибор за
ручку для переноски (15) (рис. 6). Пылесос готов
к работе.
Затем нажмите кнопку подачи пара (12) (рис. 23) расположенную на ручке (11) и начните уборку, перемещая
щетку вперед и назад. Чтобы остановить подачу пара,
отпустите кнопку (12).
6.3. Щетка (1) имеет гибкое соединение, что позволяет легко очищать углы и края мебели и стен.
КОМБИНИРОВАННЫЙ РЕЖИМ ПАР / ВСАСЫВАНИЕ
Комбинированное использование пара и всасывания
позволяет удалять пыль и дезинфицировать пол одновременно.
Действуйте так, как описано в разделах 1-2-3.
Чтобы сетевой шнур не мешал во время уборки, проложите его через верхний крючок (13) (рис. 7).
Во время операций по очистке использование тканевого чехла (28) позволяет мыть и дезинфицировать
полы таким образом, чтобы грязь, размягчённая паром, собиралась тканью.
Прежде чем снять насадку-швабру (27) с тканевым
чехлом (28) с универсальной щетки (1), подождите несколько минут, чтобы дать ткани остыть. Затем поставьте ногу на одну из двух боковых педалей (22) насадки
швабры (27) и потяните устройство вертикально вверх
за ручку (15).
ПРЕДУПРЕЖДЕНИЕ: для паровой очистки не используйте насадку-швабру без тканевого чехла.
ПРЕДУПРЕЖДЕНИЕ: для дополнительной безопасности проверьте воздействие пара перед использованием на скрытой детали, подождите, чтобы убедиться,
что не произошло никаких изменений цвета или деформации.
7. ЧИСТКА ОКОН, ЗЕРКАЛ И КАФЕЛЬНЫХ СТЕН
ПРЕДУПРЕЖДЕНИЕ: чтобы очистить окна в холодную
погоду, предварительно нагрейте стёкла, начиная отпаривание на расстоянии около 50 см от поверхности.
Используйте только ручной пароочиститель (16).
Убедитесь, что требования раздела 3 выполнены.
7.1. Подсоедините гибкий шланг (23) к ручному пароочистителю (16), затем присоедините насадку для
отпаривания (25), и к ней, насадку для мытья окон
(29) (выполните требования пунктов 5.3-5.4).
7.2. Отрегулируйте интенсивность выхода пара, как
описано в разделе 4 (рис. 13).
Для этого типа поверхности рекомендуется средний
уровень выхода пара.
7.3. Для очистки окон и зеркал нажмите кнопку подачи
пара (6) на портативном пароочистителе, чтобы
тщательно пропарить поверхность и растворить
грязь (рис. 24). Затем снова пройдите по поверхности, удерживая насадку вниз, чтобы удалить
грязь и влагу.
7.4. Для очистки плитки используйте насадку для отпаривания (25) с тканевым чехлом (26), прикрепленную к гибкому шлангу (23). Пройдите по поверхности плитки, равномерно распределяя пар, нажимая при этом кнопку подачи пара (6) на ручном
пароочистителе (рис. 24), чтобы удалить грязь.
8. ЧИСТКА МЯГКОЙ МЕБЕЛИ, КРЕСЕЛ, ПОДУШЕК
(матрасы, диваны, автомобильные салоны и т.д.)
ПРЕДУПРЕЖДЕНИЕ: перед чисткой кожи или тканей
паром ознакомьтесь с инструкциями производителя и
всегда проводите тест на скрытом участке или на образце материала. Немного подождите, чтобы убедиться, что не произошло никаких изменений цвета или
деформаций.
Используйте только ручной пароочиститель (16).
Убедитесь, что требования раздела 3 выполнены.
Включите прибор в соответствии с инструкциями, приведенными в пункте 2.4, и подсоедините аксессуары,
как описано в разделе 3.
8.1. Отрегулируйте интенсивность выхода пара, как
описано в разделе 4 (рис. 13).
Для этого типа поверхности рекомендуется минимальный уровень пара.
8.2. Подсоедините аксессуары для отпаривания (25,
26) к гибкому шлангу (23) ручного пароочистителя
(16), как описано в разделе 5.3. Пройдите по поверхности, создавая пар с помощью кнопки подачи пара (6) (рис. 24), чтобы удалить грязь.
16
VT-1888.indd 16 10/20/20 3:24 PM
Page 17

РУССКИЙ
9. ЧИСТКА САНТЕХНИКИ, ЗАТИРОЧНЫХ ШВОВ
И КУХОННЫХ СТОЛЕШНИЦ, БАРБЕКЮ
Используйте только ручной пароочиститель. Убедитесь, что требования раздела 3 выполнены.
9.1. Подсоедините насадку-концентратор (24) к ручному
пароочистителю (16), как описано в разделе 5.2 (насадку-концентратор можно подсоединить к гибкому
шлангу для обработки труднодоступных мест).
9.2. Подсоедините наиболее подходящий аксессуар
в зависимости от необходимости:
• насадку-концентратор (24), для обработки труд-
нодоступных мест и получения более концентрированной струи пара.
• малую круглую щетку с нейлоновой щетиной
(30), для удаления сухой грязи и известкового
налета.
• малую круглую щетку с латунной щетиной (31),
для удаления стойкого засохшего жира и грязи
(барбекю, авто или мотоциклетные колеса и т.д.).
• насадку (32), для очистки затирочных швов
между плитками и удаления грязи с очень узких
поверхностей.
ПРЕДУПРЕЖДЕНИЕ: при использовании щёток (30),
(31) и насадки (32) не прилагайте чрезмерных усилий,
чтобы не сломать кончик насадки-концентратора (24).
Внимание! Наконечник насадки концентратора нагревается во время работы. Перед тем как подсоединять/отсоединять дополнительные аксессуары
подождите как минимум 5 минут, пока наконечник
остынет.
9.3. Отрегулируйте интенсивность выхода пара
(рис. 13).
Для этого типа поверхности рекомендуется максимальный уровень пара.
9.4. Нажмите кнопку подачи пара (6) на ручном пароочистителе (рис. 24), затем пропарьте поверхности.
10. ЧИСТКА МЕБЕЛИ И ДЕЛИКАТНЫХ
ПОВЕРХНОСТЕЙ
ПРЕДУПРЕЖДЕНИЕ: перед чисткой тканей паром ознакомьтесь с инструкциями производителя и всегда проводите тест на скрытом участке или образце материала.
Используйте только ручной пароочиститель (16). Убедитесь, что требования раздела 3 выполнены.
10.1. Подсоедините насадку-концентратор (24) к руч-
ному пароочистителю (16), как описано в разделе
5.2 (рис. 14).
10.2. Отрегулируйте интенсивность выхода пара
(рис. 13).
Для этого типа поверхности рекомендуется минимальный уровень пара.
10.3. Нажмите кнопку подачи пара (6) на ручном пароо-
чистителе (рис. 24) и направьте струю на ткань.
ПРЕДУПРЕЖДЕНИЕ: не направляйте струю пара непосредственно на поверхность.
10.4. Используйте предварительно пропаренную ткань
для очистки поверхности, избегая длительного
использования на одном и том же месте.
11. ДРУГИЕ ОБЩИЕ ИСПОЛЬЗОВАНИЯ
Предупреждение: перед очисткой поверхности всегда
делайте тест на скрытом участке и смотрите, как он реагирует.
11.1. Очистка штор и портьер
Клещей и пыль можно удалить со штор и портьер, пропарив ткань непосредственно из ручного пароочистителя. Пар способен удалять неприятные запахи и освежать цвета, что позволяет стирать ткань реже.
Для этого типа поверхности рекомендуется минимальный уровень пара.
11.2. Удаление пятен с ковров и обивки мебели
ВНИМАНИЕ: ПАР!
Риск ожога!
Направьте пар непосредственно на пятно под максимально возможным углом (никогда не перпендикулярно очищаемой поверхности) и поместите ткань за
пятно, чтобы собрать грязь, которая была “сдута” давлением пара.
Для этого типа поверхности рекомендуется минимальный уровень пара.
11.3. Уход за растениями и увлажнение помещений
Чтобы ухаживать за комнатными растениями, удалите
пыль с листьев с помощью пара.
Используйте ручной пароочиститель с гибким шлангом, чтобы легко направлять струю (чтобы прикрепить
его, см. раздел 3). Пропарьте поверхность на расстоянии 50 см, отрегулируйте пар до минимального уровня.
Растения будут лучше дышать и будут чище и ярче. Пар
можно также использовать для освежения помещений,
особенно тех, которые часто посещают курильщики:
пропаривайте помещение, направляя струю к потолку,
равномерно распределяя ее.
11.4. Дезинфекция поверхности
Для дезинфекции удерживайте паровое сопло насадки-концентратора (24) на расстоянии не более 1,5 см
от поверхности и обрабатывайте её паром в течение
как минимум 5 секунд. Такая обработка наиболее эффективно убивает микробы и бактерии.
ПРАКТИЧЕСКИЕ СОВЕТЫ
Советы по использованию пылесоса
При уборке пола перемещайте пылесос равномерными возвратно-поступательными движениями, отталкивая его от себя и притягивая обратно.
При долгом перерыве в использовании обязательно
слейте всю воду из резервуара.
При уборке пола не задерживайте пылесос в одном положении долго, во избежание
повреждения поверхности. А также не паркуйте вертикально пылесос с неснятой мокрой тряпкой на полах,
которые могут размокнуть и испортиться.
Советы по использованию паровой швабры
Перед мытьем пола рекомендуется его подмести или
пропылесосить для удаления пыли и частиц грязи.
При мытье пола перемещайте прибор равномерными
возвратно-поступательными движениями, отталкивая
его от себя и притягивая обратно. Двигайтесь назад,
чтобы не наступать на уже вымытый пол.
Тряпка из микрофибры собирает воду при мытье пола.
Однако в зависимости от особенностей поверхности
пола и заданной интенсивности подачи пара на полу
может остаться немного влаги. В этом случае рекомендуется дать полу высохнуть естественным путем.
Высыхание можно ускорить с помощью вентилятора,
направив его на требуемую область.
17
VT-1888.indd 17 10/20/20 3:24 PM
Page 18

РУССКИЙ
Чтобы после мытья пол был менее влажным, выбирайте кнопкой «Пар» минимальную подачу пара.
По окончании уборки снимайте насадку-швабру с универсальной щётки.
Тогда пол под прибором не будет отсыревать от влажной тряпки.
Советы по использованию ручного пароочистителя
Чистка поверхностей
Очищаемый материал должен выдерживать влагу и высокую температуру. Убедитесь в этом перед началом
очистки.
Некоторые типы полов (например, плиточный) имеют
канавки или зацементированные поверхности. Для более тщательной очистки рекомендуем воспользоваться круглой нейлоновой щёткой.
Для чистки промежутков (щелей) между кафельной
плиткой используйте насадку-концентратор.
Использовать для этих целей ворсовые щетки не рекомендуется, т.к. они могут удалить затирку.
Поднесите насадку-концентратор под углом в 30-60°
вплотную к щели, включите подачу пара и медленно
передвигайте её вперед вдоль щели. По окончании
чистки удалите с помощью тряпки загрязнения с окружающей поверхности. Таким же образом производите
чистку промежутков между напольной плиткой, а также
любых других щелей и узких мест.
Чем ближе паровое сопло к загрязненному месту, тем
лучше чистящий эффект, поскольку наивысшая температура пара обеспечивается на выходе из парового сопла. Поэтому при чистке старайтесь располагать
паровое сопло насадок как можно ближе к очищаемой
поверхности.
При чистке паром протрите обработанную паром поверхность тряпкой или губкой, чтобы удалить отставшую грязь. Рекомендуется протереть поверхность,
пока она еще не высохла. Соблюдайте осторожность,
протирая металлические поверхности, так как после
обработки паром они могут быть горячими.
Для удаления стойких загрязнений силы только струи
пара может быть недостаточно, используйте ворсовые
или латунную щётки для усиления механического воздействия. При использовании щёток не прилагайте
чрезмерного усилия, чтобы не отломить кончик насадки-концентратора.
Сильный известковый налет перед чисткой паром
можно сбрызнуть уксусом, дать уксусу подействовать
в течение примерно 5 минут, а затем обработать поверхность паром.
При чистке одежды или обивки мягкой мебели наденьте на насадку для отпаривания тряпку, тогда загрязнения будут впитываться в тряпку, а не в одежду или
ткань обивки.
Насадку для отпаривания можно использовать для
снятия со стен старых обоев.
Обойный клей под воздействием пара набухнет, и обои
будет легче снять.
Чистка окон и зеркал
При использовании насадки для мытья окон сначала
тщательно очистите с помощью пара всю поверхность
окна или зеркала, а затем отключите подачу пара.
После этого прижмите резиновый скребок насадки
к верхней части окна или зеркала и постепенно опу-
скайте насадку вниз. Двигайтесь по направлению от
одной стороны поверхности к другой, чтобы очистить
все окно или зеркало. Внизу рамы или подставки зеркала подстелите тряпку или салфетку для сбора сгоняемой скребком воды.
При отрицательных температурах снаружи (зимой) перед чисткой оконного стекла прогрейте его, чтобы оно
не треснуло от резкого перепада температур.
После прогрева вы легко сможете обработать паром
всю поверхность.
Отпаривание одежды
Для отпаривания одежды повесьте её на нержавеющую вешалку. Подсоедините к ручному пароочистителю насадку для отпаривания. Возьмите пароочиститель в одну руку, другой рукой придерживайте
нижнюю часть одежды, создавая небольшое натяжение. Поднесите насадку к поверхности ткани, слегка
прижимая к ней рабочую её часть, и возвратно-поступательными движениями (сверху вниз) начните
отпаривание. Рекомендуем начинать с участков, на
которых больше всего складок, а также с элементов
одежды, которые являются более плотными (воротник и манжеты рукавов).
12. УРОВЕНЬ ВОДЫ
Уровень воды всегда виден благодаря прозрачному
резервуару (4).
Когда вода будет израсходована, пар перестанет выделяться.
Чтобы возобновить работу, снова заполните резервуар водой, как описано в разделе 3.
ПРЕДУПРЕЖДЕНИЕ: эту операцию всегда следует
выполнять после отключения прибора от сети.
13. ЗАМЕНА ФИЛЬТРА ОТ НАКИПИ
Прибор имеет фильтр, содержащий специальные смолы, способные остановить известковый налет и продлить срок службы вашего продукта.
Рекомендуется менять фильтр 1 раз в год.
13.1. Отключите прибор от электросети.
13.2. Снимите резервуар для воды (4) с ручного пароочистителя (16), нажав боковые кнопки фиксаторов (18) и потянув его наружу (рис. 8).
13.3. Снимите старый фильтр (рис. 25), потянув его
вниз.
13.4. Вставьте новый фильтр (35), осторожно нажмите и убедитесь, что он идеально установлен
(рис. 26), затем установите резервуар для воды.
ПРИМЕЧАНИЕ: В процессе использования прибора
фильтр может потемнеть, стать коричневым или ржавым, это нормально и не является неисправностью.
14. ОЧИСТК А КОНТЕЙНЕРА-ПЫЛЕСБОРНИКА
И ФИЛЬТРОВ
14.1. Полностью выключите прибор, для этого переместите клавишу выключателя питания (10), расположенного на ручке пылесоса (11), в положение
(0) и нажмите на клавишу выключателя питания
(I/0) пароочистителя (рис. 10), затем извлеките
вилку сетевого шнура из электрической розетки.
14.2. Извлеките контейнер-пылесборник (2) из корпуса
устройства (4), нажав на две кнопки фиксаторов
контейнера-пылесборника (20) (рис. 27).
18
VT-1888.indd 18 10/20/20 3:24 PM
Page 19

РУССКИЙ
14.3. Выньте из контейнера-пылесборника HEPAфильтр (36) с вложенным в него поролоновым
фильтром (37), за боковые направляющие
(рис. 28), снимите циклонный фильтр (39)
(рис. 29), потянув его вверх за откидную металлическую ручку.
14.4. Снимите крышку циклонного фильтра (38), повернув её против часовой стрелки, затем очистите циклонный фильтр (39) от пыли.
14.5. Очистите ёмкость контейнер-пылесборника (40)
от грязи.
14.6. Соберите контейнер-пылесборник и установите его
на прежнее место, выполнив вышеперечисленные
действия в обратном порядке (см. п. 14.2-14.4).
Рекомендуется чистить контейнер-пылесборник (2)
после каждого использования.
ПРЕДУПРЕЖДЕНИЕ: не используйте прибор без
установленного контейнера-пылесборника в комплекте с фильтрами.
15. ОБЩЕЕ ОБСЛУЖИВАНИЕ
Убедитесь, что прибор выключен и отсоединен от сети.
Для очистки внешней поверхности прибора используйте только ткань и водопроводную воду.
Все принадлежности для чистки паром можно очистить
с помощью проточной воды, и дать им полностью высохнуть перед следующим использованием. После использования щеток дайте щетинкам остыть в их естественном положении, чтобы избежать деформации. Не
используйте моющие средства любого типа. Тканевые
чехлы для насадок можно стирать, следуя инструкциям, приведенным на этикетке.
17. ДИАГНОСТИКА НЕСИПРАВНОСТЕЙ
Проблема Причина Решение
Прибор не включается. Нет электричества. Проверьте, что прибор подключен к электрической
Никакого пара не выходит. Закончилась вода. Отключите прибор от сети, заполните резервуар для
Прибор выключен. Убедитесь, что прибор подключен к источнику
Прибор включен, но выпускает
мало пара.
Прибор выпускает слишком
много воды на пол.
Во время работы пылесоса
мощность всасывания падает.
Во время всасывания из
прибора выходит пыль.
Подача пара
установлена на
минимальный уровень.
Подача пара
установлена на
максимальный уровень.
Нажата и/или
удерживается кнопка
пар.
Контейнер-пылесборник
полон.
Пылесборник вставлен
неправильно.
Контейнер-пылесборник
полон.
Фильтры и ёмкости пылесборника можно чистить проточной водой, гарантируя полное высыхание перед
следующим использованием. Промойте ёмкости циклонного фильтра и контейнера-пылесборника проточной водой и встряхните, чтобы удалить излишки грязи
или воду. Перед установкой фильтров в прибор дайте
им полностью высохнуть естественным путем, вдали
от источников тепла, по крайней мере, 24 часа. HEPAфильтр должен быть полностью очищен примерно каждые четыре месяца.
16. МЕСТО ХРАНЕНИЯ
16.1. Выключите прибор и отключите его от электросети.
16.2. Вылейте остатки воды из резервуара для воды,
чтобы избежать протечек.
16.3. Прежде чем снять тканевые чехлы с насадок, подождите несколько минут, чтобы они остыли.
16.4. Намотайте сетевой шнур на специальные крючки
для намотки (13, 19) (рис. 30).
Выполните требования 14 раздела.
Перед повторным использованием прибора не забудьте полностью размотать сетевой шнур. Верхний крючок для намотки сетевого шнура (13) поворачивается
на 180°, чтобы быстро размотать сетевой шнур.
ПРЕДУПРЕЖДЕНИЕ: не держите прибор подключенным к электрической сети с намотанным сетевым
шнуром.
16.5. Крюк для хранения прибора (33) может быть установлен на стену с помощью 4 отверстий и прилагаемого комплекта для крепления (34).
Прибор фиксируется на крюке для хранения (33) за
ручку для переноски (15) (рис. 31).
сети.
воды и затем вновь используйте прибор.
питания, клавиша выключателя питания ручного
пароочистителя находится в положении (I) и что
кнопка подачи пара (6 или 12) удерживается нажатой.
Нажмите кнопку регулировки
Подачи пара, чтобы увеличить количество
подаваемого пара (см. раздел 4).
Уменьшите подачу пара до минимума. При
необходимости, на некоторое время прекратите
подачу пара, продолжая чистить поверхность щеткой.
Не держите кнопку подачи пара (6 или 12) постоянно
нажатой, а отпустите её, чтобы температура
стабилизировалась.
Очистите контейнер-пылесборник.
Правильно вставьте пылесборник.
Очистите контейнер-пылесборник.
19
VT-1888.indd 19 10/20/20 3:24 PM
Page 20

РУССКИЙ
Проблема Причина Решение
Пылесборник не снимается. Фильтр неправильно
вставлен
Если проблемы сохраняются или не перечислены выше, пожалуйста, обратитесь в авторизованный сервисный
центр (www.vitek.ru или обратитесь в Службу поддержки клиентов.
КОМПЛЕКТНОСТЬ ИЗДЕЛИЯ
Паровой пылесос с установленным комплектом
фильтров – 1 шт.
Универсальная щётка – 1 шт.
Гибкий паровой шланг – 1 шт.
Насадка для чистки мебельной обивки – 1 шт.
Тканевый чехол для насадки – 1 шт.
Насадка-швабра – 1шт.
Тканевый чехол для насадки-швабры – 1 шт.
Насадка для мытья окон – 1 шт.
Насадка-концентратор
(для труднодоступных мест) – 1 шт.
Малая круглая щётка с нейлоновой щетиной – 1 шт.
Малая круглая щётка с латунной щетиной – 1 шт.
Насадка для обработки затирочных швов – 1 шт.
Дополнительный фильтр от накипи – 1 шт.
Крюк для хранения – 1 шт.
Комплект для крепления крюка – 1 шт.
ТЕХНИЧЕСКИЕ ХАРАКТЕРИСТИКИ
Электропитание: 220-240 В ~ 50-60 Гц
Номинальная потребляемая мощность: 1800 Вт
Мощность паровой швабры: 1200 Вт
Мощность пылесоса: 600 Вт
Мощность всасывания: 12 кПа
Время разогрева: 25-30 секунд
Интенсивность выхода пара: от 15 до 25 г/мин
в зависимости от выбранного уровня
Время подачи пара: 14-22 мин в зависимости
от выбранного уровня
Объём контейнера-пылесборника: 0,4 л
Объём резервуара для воды: 0,5 л
Площадь уборки: до 30 м2 без долива воды
Длина сетевого шнура: 5 м
УТИЛИЗАЦИЯ
В целях защиты окружающей среды, после окончания срока службы прибора и элементов питания
(если входят в комплект), не выбрасывайте их вместе
с обычными бытовыми отходами, передайте прибор
и элементы питания в специализированные пункты
для дальнейшей утилизации.
Вставьте фильтр правильно
Отходы, образующиеся при утилизации изделий, подлежат обязательному сбору с последующей утилизацией в установленном порядке.
Для получения дополнительной информации об утилизации данного продукта обратитесь в местный муниципалитет, службу утилизации бытовых отходов или
в магазин, где Вы приобрели данный продукт.
Производитель сохраняет за собой право изменять
дизайн, конструкцию и технические характеристики,
не влияющие на общие принципы работы устройства,
без предварительного уведомления, из-за чего между
инструкцией и изделием могут наблюдаться незначительные различия. Если пользователь обнаружил такие
несоответствия, просим сообщить об этом по электронной почте info@vitek.ru для получения обновленной
версии инструкции.
Срок службы устройства – 3 года
Данное изделие соответствует всем требуемым европейским и российским стандартам безопасности и гигиены.
ИЗГОТОВИТЕЛЬ: СТАР ПЛЮС ЛИМИТЕД
(STAR PLUS LIMITED)
МЕСТОНАХОЖДЕНИЕ И ПОЧТОВЫЙ АДРЕС
ДЛЯ СВЯЗИ: ЮНИТ БИ ЭНД СИ, 15Й ЭТАЖ,
КЭЙСИ АБЕРДИН ХАУС, №38, ХЁНГ ИП РОУД,
ВОНГ ЧУК ХАНГ, ГОНКОНГ, КНР
ИМПОРТЕР И УПОЛНОМОЧЕННОЕ
ИЗГОТОВИТЕЛЕМ ЛИЦО: ООО «ВИТЕК.РУС»
МЕСТОНАХОЖДЕНИЕ И ПОЧТОВЫЙ
АДРЕС ДЛЯ СВЯЗИ: РФ, 117452, Г. МОСКВА,
ЧЕРНОМОРСКИЙ БУЛЬВАР, ДОМ 17, КОРП.1,
ЭТАЖ 4, ОФИС 401, КАБ.1.
Тел.: +7 (499) 685-48-18, e-mail: info@vitek.ru
Ответственность за несоответствие продукции
требованиям технических регламентов Таможенного
союза возложена на уполномоченное изготовителем
лицо.
www.vitek.ru
ТЕЛЕФОН ДЛЯ СПРАВОК: 8-800-100-18-30
СДЕЛАНО В КНР
20
VT-1888.indd 20 10/20/20 3:24 PM
Page 21

ҚАЗАҚША
БУ ШАҢСОРҒЫШЫ VT-1888
Беттерді тазалаудың 3 режимі бар көп функциялы
шаңсорғыш: «циклон» технологиясы бар шаңсорғыш,
еденді бумен дезинфекциялау функциясы және
портативті бу тазартқыштың көмегімен беттерді
өңдеу.
СИПАТТАМАСЫ
1. Әмбебап қылшақ
2. Шаңжинағыш-контейнер
3. Корпусы
4. Суға арналған сұйыққойма
5. Қолмен бу тазартқышының тұтқасы
6. Бу жіберетін батырма
7. Басқару панелі
8. Қолмен бу тазартқышын шешіп алу батырмасы
9. Ұзартқыш түтік
10. Шаңсорғыш қуаттандыруын сөндіргіш пернесі (I/0)
11. Шаңсорғыш сабы
12. Бу жіберетін батырма
13. Желі бауын орауға арналған жоғарғы ілгек
14. Тұтқаны бекіту бұрандасы
15. Тасымалдауға арналған тұтқа
16. Қолмен бу тазартқышы
17. Қолмен бу тазартқыштың қуаттандыру сөндіргіш
пернесі (I/0)
18. Суға арналған сұйыққойманы бекіту батырмалары
19. Желі бауын орауға арналған төменгі ілгек
20. Шаңжинағыш-контейнер бекіткіші
21. Әмбебап қылшақты шешіп алуға арналған батырма
22. Қондырма-швабраны алып тастауға арналған
педальдер
23. Иілгіш бу құбыршегі
24. Қол жетпейтін жерлерге арналған
қондырма-швабра
Булауға арналған аксессуарлар
25. Булауға арналған қондырма
26. Булауға арналған қондырманың мата чехолы
Еден жууға арналған аксессуарлар
27. Қондырма-швабра
28. Қондырма-швабраға арналған мата чехол
29. Терезе жууға арналған қондырма
30. Нейлон қылшықтары бар шағын дөңгелек қылшақ
31. Жез қылшықтары бар шағын дөңгелек қылшақ
32. Ысқылау жіктерін өңдеуге арналған қондырма
33. Сақтауға арналған ілгек
34. Ілгекті бекітуге арналған жиынтық
35. Қаққа арналған қосымша сүзгі
Шаңжинағыш-контейнер
36. HEPA-сүзгі
37. Поролон сүзгі
38. Циклон сүзгінің қақпағы
39. Циклон сүзгі
40. Шаңжинағыш-контейнердің сыйымдылығы
НАЗАР АУДАРЫҢЫЗ!
Қосымша қорғаныс үшін қуаттандыру тізбегінде
номиналды іске қосылу тоғы 30 мА-дан аспайтын
қорғаныс сөндіру құрылғысын (ҚСҚ) орнатқан жақсы,
ҚСҚ-ны орнату үшін маманға жүгініңіз.
ҚАУІПСІЗДІК ТАҢБАСЫ:
ЕСКЕРТУ: Жоғары температура. Күйік алу қаупі!
Егер бұл өнімде көрсетілсе, оған қол тигізбеңіз,
өйткені бөлшектер өте ыстық болуы мүмкін.
НАЗАР АУДАРЫҢЫЗ: БУ!
Күйік алу қаупі!
Аспап өте жоғары температураларға жетеді.
Аспапты дұрыс пайдаланбау күйікке әкелуі мүмкін.
ҚАУІПСІЗДІК ШАРАЛАРЫ ЖӘНЕ ПАЙДАЛАНУҒА
БЕРУ ЖӨНІНДЕГІ НҰСҚАУЛЫҚ
Аспапты пайдаланбас бұрын, осы пайдалану бойынша
нұсқаулықты мұқият оқып шығыңыз да, оны анықтамалық
материал ретінде пайдалану үшін сақтап қойыңыз.
•
Құрылғыны осы басшылықта баяндалғандай
тікелей мақсаты бойынша ғана пайдаланыңыз.
Құрылғыны дұрыс пайдаланбау оның бұзылуына,
пайдаланушыға немесе оның мүлкіне зиян келтіруіне
әкелуі мүмкін.
•
Заттаңбада көрсетілген құрылғының жұмыс кернеуі
электр желісінің кернеуіне сәйкес екеніне көз
жеткізіңіз.
•
Желілік бау ашасының жерге тұйықталу байланысы
бар, оны тұйықтандырудың сенімді байланысы бар
электр розеткасына салыңыз.
•
Аспапты желіге қоспас бұрын және қолданар алдында
желілік бауды толығымен тарқатыңыз. Әрқашан
бұйымды желілік бауы толығымен тарқатылған
күйінде қолданыңыз.
•
Өрт шығу қаупін болдырмау үшін құрылғыны электр
розеткаға қосудың алдында жалғастырғыштарды
пайдаланбаңыз.
•
Құрылғы корпусына, жұмыс бетіне, желі бауына және
желілік бау ашасына дымқыл қолмен тиіспеңіз.
•
Портативті бу тазартқыш сұйыққоймасында су
біткеннен кейін құрылғыны өшіріп, оны электрлік
желіден ажыратыңыз.
•
Желіге қосылған құрылғыны, қараусыз қалдырмаңыз.
•
Бу пештің ішкі бөлігі сияқты электрлік компоненттері
бар жабдыққа бағытталмауы керек.
•
Құрылғыны жылу көздерінің, жылыту аспаптарының
немесе ашық оттың тікелей жанында
пайдаланбаңыз.
•
Құрылғыны ас үй раковинасына жақын, жуынатын
бөлмеде, бассейндер немесе басқа да су
толтырылған сыйымдылықтарға жақын жерде
пайдаланбаңыз.
•
Егер құрылғы суға құлап кетсе, дереу желілік баудың
ашасын электр розеткасынан суырыңыз, осыдан
кейін ғана құрылғыны судан алып шығуға болады.
Құрылғыны тексерту немесе жөндету үшін сервис
орталығына жүгініңіз.
•
Құралды аэрозольдар шашырылатын немесе
пайдаланылатын жерде, сонымен қатар оңай
тұтанатын сұйықтықтарың маңында пайдалануға
тыйым салынады, сондай сұйықтықтарды сақтайтын
жерде немесе улы заттар бар жерде пайдалануға
тыйым салынады.
•
Сұйыққоймаға улы заттарды, қышқылдарды,
еріткіштерді, жуғыш заттарды, агрессивті заттарды
және/немесе жарылғыш заттарды немесе
парфюмерлік қоспаларды құймаңыз.
21
VT-1888.indd 21 10/20/20 3:24 PM
Page 22

ҚАЗАҚША
•
Бу ағынын улы заттарға, қышқылдарға, еріткіштерге,
жуғыш заттарға немесе агрессивті заттарға
бағыттамаңыз және шаңсорғышпен сормаңыз.
Қауіпті заттармен жұмыс істеу және оларды жою осы
заттарды дайындаушылардың нұсқауларына сәйкес
жүзеге асырылуы тиіс.
•
Бу ағынын жарылғыш ұнтақтарға немесе
сұйықтықтарға, көмірсутектерге, ашық жалынға
және өте ыстық заттарға бағыттамаңыз және
шаңсорғышпен сормаңыз.
•
Денеңіздің барлық бөліктерін сорғыш саптамасынан
және қозғалатын немесе айналатын бөліктерден
алыс ұстаңыз.
•
Адамдарға және / немесе жануарларға сору
функциясын қолданбаңыз.
•
Тасымалдау үшін арнайы тұтқаны пайдаланыңыз.
Желілік баудан тартпаңыз. Желілік бауды тұтқа
ретінде пайдаланбаңыз. Аспапты желілік баудан
немесе бу құбыршегінен/ вакуумдық түтіктерінен
ұстап көтермеңіз.
•
Бұйымды каминдер, пештер мен тұмша пештер
сияқты жылу көздеріне жақын қоймаңыз.
•
Бұйымды индукциялық панельдер сияқты
электромагниттік өрістерге жақын орнатпаңыз.
•
Аспап қолданылмаған кезде желілік бауды орау
ілмектеріне қайта ораңыз.
•
Бұйымдағы тесіктер мен торларды бөгеттемеңіз.
•
Баспалдақтарды тазалау кезінде аспап пайдаланушы
деңгейінен төмен баспалдақтарда орналасуы керек.
•
Бу ағынын адамдар немесе жануарлар денесінің кез
келген бөлігіне бағыттамаңыз.
•
Бу ағынын адамның үстіндегі киімге бағыттамаңыз.
•
Терең бумен өңделген заттар мен маталар өте
жоғары температураға жетеді-100 °C-ден жоғары
бірнеше минут күтіңіз және оларды қолданар
алдында, салқындағанына көз жеткізіңіз. Сондықтан,
егер олар жаңа ғана буландырылған болса, теріге
тиюінен аулақ болыңыз.
•
Бу тазартқышты тігінен тегіс құрғақ, ылғалға төзімді
және термотөзімді бетке орнатыңыз, оны жұмыс
уақытында көлденеңінен және аударып қоймаңыз.
•
Жеткізілім жиынтығына кіретін қондырмаларды ғана
пайдаланыңыз.
•
Құрылғыны пайдалануды бастаудың алдында
қондырмалардың дұрыс орнатылғанына және сенімді
бекітілгеніне көз жеткізіңіз.
•
Сұйыққоймаға тұрмыстық сүзгіштерден қосымша
тазалаудан өткен су құбырының суын құю
ұсынылады. Газдалған су мен парфюм қоспаларын
пайдаланбаңыз.
•
Су деңгейі «MAX» белгісінен асып кетпеуін
қадағалаңыз.
•
Бу шығатын тесікті жаппаңыз, тесіктерге бөтен
заттарды салуға тыйым салынады.
•
Жұмыс істеген кезде корпустың жоғарғы бөлігі мен
бу тазартқыштың жұмыс беті қатты қызады, күйіп
қалмау үшін жұмыс бетіне және корпустың жоғарғы
бөлігіне тиіспеңіз.
•
Ыстық будан күйіп қалудан сақ болыңыз.
•
Құрылғыны пайдаланып болғаннан кейін немесе
тазалау алдында электр желісінен ажыратыңыз.
•
Құрылғыны электр желісінен ажыратқан кезде
тек желілік баудың ашасынан ұстаңыз және оны
электр розеткасынан шығарыңыз, желі бауынан
тартпаңыз – бұл оның зақымдануына әкелуі және
қысқа тұйықталуын тудыруы мүмкін.
•
Балалардың қауіпсіздігі үшін қаптама ретінде
пайдаланылатын полиэтилен пакеттерді
қадағалаусыз қалдырмаңыз.
Назар аударыңыз! Балаларға полиэтилен пакеттерімен немесе қаптама үлдірімен ойнауға рұқсат
етпеңіз. Тұншығу қаупі!
•
Құрылғы балалардың пайдалануына арналмаған.
•
Аспаппен ойнауларына жол бермеу үшін балаларды
қадағалау керек.
•
Құрал жұмыс істеп тұрғанда балалардың жұмыс
бетін, құралдың корпусын, желілік бауды немесе
желілік баудың ашасын ұстауына рұқсат етпеңіз.
•
Егер жұмыс істеп тұрған құралдың маңында балалар
немесе мүмкіндіктері шектеулі адамдар болса, онда
ерекше назарда болыңыз.
•
Жұмыс істеу уақытында және жұмыс циклдері
арасындағы үзілістерде құрылғыны балалардың қолы
жетпейтін жерде орналастырыңыз.
•
Дене, сенсорлық немесе ақыл-сана мүмкіндіктері
төмендетілген тұлғалардың (балаларды қоса
алғанда) немесе оларда өмірлік тәжірибесі
немесе білімі болмаса, егер олар бақыланбаса
немесе олардың қауіпсіздігі үшін жауап беретін
тұлғамен аспапты пайдалану туралы нұсқаулықтар
берілген болмаса, аспап олардың пайдалануына
арналмаған.
•
Қуаттандыру бауының бүтіндігін жүйелі түрде
тексеріп отырыңыз.
•
Қуаттандыру бауы зақымданғанда қауіп тудырмау
үшін оны дайындаушы, сервистік қызмет немесе
баламалы білікті маман ауыстыруы тиіс.
•
Қуаттандыру бауы немесе қуаттандыру бауының
ашасы зақымданған болса, егер құрал кідіріспен
жұмыс істесе, сондай-ақ ол құлаған болса құрылғыны
пайдалануға тыйым салынады.
•
Аспапты өз бетіңізбен жөндеуге тыйым салынады.
Аспапты өз бетіңізбен бөлшектемеңіз, кез-келген
ақаулықтар пайда болғанда, сондай-ақ құрылғы
құлаған болса, аспапты электр желісінен ажыратыңыз
және кепілдік талоны мен www.vitek.ru сайтында
көрсетілген байланыс мекен-жайлары бойынша кезкелген авторландырылған (өкілетті) қызмет көрсету
орталығына жүгініңіз.
•
Зақымдануға жол бермеу үшін құрылғыны тек
зауыттық қаптамада тасымалдаңыз.
•
Құрылғыны салқын құрғақ жерде, балалардың және
мүмкіндігі шектеулі адамдардың қолы жетпейтін
жерде сақтаңыз.
ОСЫ АСПАП ТЕК ТҰРМЫСТЫҚ ЖАҒДАЙЛАРДА ПАЙДАЛАНУҒА АРНАЛҒАН. ҚҰРЫЛҒЫНЫ КОММЕРЦИЯЛЫҚ
ПАЙДАЛАНУҒА ЖӘНЕ ӨНДІРІСТІК АЙМАҚТАР МЕН
ЖҰМЫС ҮЙ-ЖАЙЛАРЫНДА ПАЙДАЛАНУҒА ТЫЙЫМ
САЛЫНАДЫ
АЛҒАШҚЫ ПАЙДАЛАНАР АЛДЫНДА
Құрылғыны төмен температура жағдайында
тасымалдаған немесе сақтағаннан кейін, оны
бөлме температурасында үш сағаттан кем емес
уақыт бойы ұстау керек.
22
VT-1888.indd 22 10/20/20 3:24 PM
Page 23

ҚАЗАҚША
•
Бу шаңсорғышы VT-1888: 3 ӨНІМ 1-ДЕ
Құрылғыны қаптамасынан шығарыңыз және
барлық қаптама материалдары мен жарнамалық
жапсырмаларды алып тастаңыз.
•
Жұмыс бетінде қорғаныс үлдірі бар болған жағдайда,
оны шешіп тастаңыз.
•
Зауыт қаптамасын сақтап қойыңыз.
•
Қауіпсіздік шаралары мен пайдалану нұсқауларымен
танысыңыз.
•
Жинақталымын тексеріңіз.
•
Құрылғыны зақымдануына қатысты байқаңыз
зақымдануы болған жағдайда оны электр желіге
қоспаңыз.
•
Құрылғының көрсетілген қуаттандыру кернеуі
параметрлері электр желісінің параметрлеріне сәйкес
келетініне көз жеткізіңіз. Құрылғыны 60 Гц жиілікті
электрлік желіде пайдаланған кезде ешқандай
қосымша әрекет талап етілмейді.
•
Шаңды кетіру үшін аспапты сәл дымқыл матамен
сүртіңіз, содан кейін құрғатып сүртіңіз.
АСПАПТЫ ДҰРЫС ПАЙДАЛАНУ
Осы нұсқаулықта келтірілген сипаттамалар мен
нұсқаулықтарға сәйкес ішкі тұрмыстық пайдалануға,
сұйықтықтар мен шаңды соруға, буды қолдана отырып,
құрғақ және/немесе дымқыл материалдарды (кірді) кетіруге
арналған аспап. Осы нұсқауларды мұқият оқып шығыңыз
және оларды сақтап қойыңыз. Бұл нұсқаулықты вебсайттан www.vitek.ru табуға және/немесе жүктеуге болады.
Тек тұрмыстық кірді ғана сорғызыңыз. Сумен немесе
басқа сұйықтықтармен толтырылған сұйыққоймалардан
тікелей шаңсормаңыз. Нұсқаулықта көрсетілген
максималды мөлшерді сақтай отырып, беттерге
шашыраған судың аз мөлшерін ғана жинаңыз.
Мезгілімен құрғақ және ылғалды кір аулағыштың
толу деңгейін тексеріп отырыңыз, максималды
деңгейінен аспауын тесеріп отырыңыз. Борға, цемент
немесе құрылыстың немесе қаланған кірпіштің басқа
қалдықтарына пайдаланбаңыз. Жерге және құмға/
топыраққа және т. б. қолданбаңыз.
Күлге, күйеге және жану қалдықтарына (каминдер,
барбекю және т.б.) пайдаланбаңыз.
Принтерге, ксерокске немесе факске (тонер және сия
ұнтағы) қолданбаңыз.
Өткір немесе қатты заттарды сорып алмаңыз. Өндіруші
алдын ала ескертусіз эстетикалық, техникалық және
құрастырылымдық өзгерістер енгізу құқығын өзіне
қалдырады.
Өндірістен шықпас бұрын, барлық бұйымдар мұқият
тексеруден өтеді. Сондықтан сіздің құрылғыңыздың
суқоймасында біраз мөлшерде су болуы мүмкін.
Өнімді дұрыс пайдалану тек осы пайдалану
нұсқаулығында ғана сипатталған. Кез-келген басқа
пайдалану құрылғының зақымдалуына және кепілдіктің
жойылуына әкелуі мүмкін.
ҚАНДАЙ СУДЫ ПАЙДАЛАНУ КЕРЕК
Аспап 8°C-ден 20°C-ге дейінгі кәдімгі суқұбыры
суымен жұмыс істеу үшін өңделген. Егер суқұбыры су
құрамында әктас көп болса, 50% суқұбыры су мен 50%
деминерализацияланған, сатып алуға болатын судың
қоспасын пайдаланыңыз.
13-бөлімде сипатталғандай қаққа қарсы сүзгіні мезгілімен
ауыстырып отырыңыз. Ешқашан жаңбыр суын немесе
парфюмерлік қоспалары бар суды (мысалы, иіссу)
немесе басқа тұрмыстық техникамен жасалған, су
жұмсартқыштары немесе сүзгілер шығарған суды
пайдаланбаңыз. Химиялық, табиғи, жуғыш немесе әк
қабатын кетіретін заттарды және т. б. қоспаңыз.
Бөтелкедегі ауыз суды қолданар алдында оның жалпы
минералдануын біліп алыңыз (әдетте затбелгіде
көрсетілген) және оны ағынды судың көрсеткіштерімен
салыстырыңыз (оларды сумен жабдықтау ұйымының
сайтынан немесе интернеттен табуға болады). Әдетте,
бөтелкедегі судың минералдануы 100-400 мг/л құрайды.
Краннан аққан судың минералдануы бірнеше есе аз
болуы мүмкін, сондықтан бөтелкедегі суды пайдалану
қақтану мөлшерін арттырады. Шаңсорғышты үнемі
қолданған кезде сұйыққоймадағы суды толығымен
жаңартып, судың тоқырауына және бөтен иістің пайда
болуына жол бермеу үшін Сұйыққойманың өзін жуып
отыру ұсынылады.
НАЗАР АУДАРЫҢЫЗ! Егер бойлерде қақ пайда
болса, бұл жағдай кепілдік жағдайы болып
табылмайды
Бұл ыңғайлы булағыш тік аспап, ол үш өнімді біреуінде
құрайды, өйткені оны шаңсорғыш, бу швабрасы және
портативті бу тазартқыш ретінде пайдалануға болады.
Ол көптеген тазарту функцияларын орындай алады және
әртүрлі беттерді өңдей алады: әр түрлі әрленген еден
(плитка, керамогранит, паркет), ас үйдің жұмыс беттері,
сорғыштар, ванналар, крандар, ысырмалар, терезелер
мен айналар, қаптамалар, дивандар, креслолар,
матрастар, жастықтар, автомобиль интерьерлері), ішкі
есіктер мен шкафтардың есіктері, жылыту радиаторлары
мен рольқақпалар, перделер мен киім, жасыл өсімдіктер.
Осы нұсқаулыққа енгізілген басшылыққа сәйкес
пайдалану кезінде микрофибрадан жасалған майлықпен
ұзақтығы 30 секунд жұмыс істегенде, үшінші тараптан,
тәуелсіз зертхана жүргізген сынақтар бу тазартқыш
микробтар мен бактериялардың 99,9%- ын жоятынын
растайды.
1. ШАҢСОРҒЫШ / БУ ШВАБРАСЫ АСПАБЫ
ТҮРІНДЕ ҚҰРАСТЫРУ
1.1. Аспапты қаптамадан шығарып, өнімнің
бүлінбегеніне және барлық бөлшектер жеткізілім
жиынтығына кіргеніне көз жеткізіңіз.
1.2. Аспаптың корпусын (3) әмбебап қылшаққа (1)
қосыңыз (сур. 1).
Әмбебап қылшақты шешіп алу үшін аяғыңызды
қылшаққа қойыңыз, батырманы (21) басыңыз және
аспапты тасымалдау тұтқасынан (15) тігінен жоғары
қарай тартыңыз.
ЕСКЕРТПЕ: аспапты жинамас бұрын, бұранда (14),
аспапты орау кезінде ұзартқыш түтікке (9) бұралуы
мүмкін екеніне назар аударыңыз.
1.3. Бұранданы (14) ұзартқыш түтіктен (9) шлицалы
бұрағышпен бұрап шешіңіз. Ұзартқыш түтікті
аспап корпусындағы орнату орнына қойыңыз және
бұранданы бұраңыз (сур. 2).
ЕСКЕРТУ: уақыт өткен сайын бұранданың тығыз
тартылып тұрғандығын тексеріп отырыңыз.
1.4. Мата чехолды (28) швабра-қондырғыға (27)
кигізіңіз және оны әмбебап қылшақтың төменгі
23
VT-1888.indd 23 10/20/20 3:24 PM
Page 24

ҚАЗАҚША
бөлігіне (1) қосыңыз, швабра-қондырманың
бекіткіштері әмбебап қылшақтың тиісті
ойықтарына енетіндей етіп қосыңыз (сур. 3) (тек
бумен тазарту үшін).
ЕСКЕРТПЕ: әмбебап қылшақтан (1) швабра-
қондырманы (27) шешіп алу үшін оның екі бүйірлік
педальдарының бірін (22) басыңыз және құрылғыны
тұтқасынан (15) тігінен жоғары қарай тартыңыз.
2. АСПАПТЫ ШАҢСОРҒЫШ РЕТІНДЕ ПАЙДАЛАНУ
1-бөлімнің талаптары орындалғанына көз жеткізіңіз.
2.1. Желілік бауды толығымен тарқатыңыз, оны сенімді
жерге қосу байланысы бар электр розеткасына
қосыңыз (сур. 4). Әрқашан бұйымды желілік бауы
толығымен тарқатылған күйінде қолданыңыз.
2.2. Шаңсорғыштың тұтқасында (11) орналасқан
қуаттандуру сөндіргіші(10) пернесін (I) күйіне
жылжытыңыз (сур. 5). Әмбебап қылшақты (1) тұрақ
орнынан жұмыс жағдайына ауыстырыңыз, ол
үшін аяғыңызды қылшаққа қойып, шаңсорғышты
тасымалдау тұтқасынан (15) ұстап еңкейтіңіз
(сур. 6). Шаңсорғыш жұмысқа дайын.
Тазалау кезінде желілік бау кедергі келтірмеу үшін,
оны жоғарғы ілмек (13) арқылы салыңыз (сур. 7).
3. АСПАПТЫ ШВАБРА ЖӘНЕ ҚОЛМЕН БУ
ТАЗАРТҚЫШ РЕТІНДЕ ПАЙДАЛАНУҒА ДАЙЫНДАУ
3.1. Суға арналған сұйыққойманы (4) шешіп алыңыз,
ол үшін бекіткіштердің бүйірлік батырмаларын
(18) басыңыз және оны өзіңізге тартыңыз (сур. 8).
Суға арналған сұйыққойманы төңкеріп, резеңке
тығынды тілден жоғары қарай тартып ышыңыз
(сур. 9). Сұйыққойманы сумен толтырыңыз.
Сұйыққоймаға басқа заттар немесе қоспалар
қоспаңыз.
3.2. Суға арналған суқойманың тығынын мықтап
жабыңыз және оны қайтадан орнатыңыз.
Бұл әрекетті әрқашан желілік бауы желіден
ажыратылған күйінде орындаңыз.
ЕСКЕРТУ: ағып кетуді болдырмас үшін,
сұйыққойманың (4) дұрыс орнатылғанына көз
жеткізіңіз.
3.3. Матаның чехолды (28) швабра-қондырмаға (1)
кигізіңіз және оны әмбебап қылшақтың төменгі
бөлігіне қосыңыз (сур. 3).
3.4. Желілік бауды толығымен тарқатыңыз, оны сенімді
жерге қосу байланысы бар электр розеткасына
қосыңыз (сур. 4). Әрқашан бұйымды желілік бауы
толығымен тарқатылған күйінде қолданыңыз.
3.5. Аспаптың бүйірінде орналасқан бу тазартқыштың
қуаттандыру сөндіргішінің пернесіне (17)
басыңыз (сур. 10). Басқару панеліндегі қосу
индикаторы (7) осы ретте жасыл түспен жыпылықтайды ( ).
Басқару панеліндегі индикатор тұрақты жанғанша
30 секунд күтіңіз (сур. 11).
Осыдан кейін аспап жұмысқа дайын.
ҚОЛМЕН БУ ТАЗАРТҚЫШ (16)
3.6. Қолмен бу тазартқышты (16) бөлек пайдалану
үшін оны аспаптың (3) корпусынан ажыратыңыз,
ол үшін жоғарғы батырмаға (8) басыңыз және оны
тұтқадан (5) сыртқа қарай тартыңыз (сур. 12).
4. БУ ШЫҒАРУ ҚАРҚЫНДЫЛЫҒЫН РЕТТЕУ
Аспапта будың шығу қарқындылығының 3 деңгейі бар.
Басқару тақтасында орналасқан (7) бу реттегішінің
( ) батырмасын дәйектеп басу арқылы (сур. 13)
болжамды пайдалануға байланысты бу шығысының
қарқындылығын орнатыңыз. Таңдалған қарқындылық
деңгейінің индикаторы тұрақты жанып тұрады.
Міне, бу шығуының қарқындылық деңгейін таңдауға
арналған кейбір ұсыныстар:
•
Максималды деңгей ( ): қақтан, дақтан, майдан
тазарту үшін;
•
Орташа деңгей ( ): терезелер мен едендерді жуу
үшін.
•
Минималды деңгей ( ): паркет пен ламинатты,
нәзік маталарды, жиһаз қаптауын, дивандарды,
матрастарды және т. б. тазалау үшін.
5. АКСЕССУАРЛАРДЫ ҚОСУ
Аксессуарларды қолмен бу тазалағышқа (16) тікелей
қосуға немесе қозғалыс еркіндігіне көп мүмкіндік беру
үшін иілгіш құбыршекке (23) қосуға болады.
5.1. Иілгіш құбыршек (23)
Иілгіш құбыршекті (23) портативті бу тазартқышқа (16)
бекіткіштің шертпесі естілгенге дейін қосыңыз (сур. 14).
Иілгіш құбыршекті шешіп алу үшін иілгіш құбыршектің
негізінде орналасқан бекіткіш батырмасына басып, оны
сыртқа қарай тартыңыз (сур. 14).
5.2. Қондырма-концентраттаушы (24)
Қондырма-концентраттаушыны (24) қолмен бу
тазартқышқа (16) иілгіш құбыршекке (23) тікелей
қосуға болады. Қондырманы шешіп алу үшін қондырма
негізінде орналасқан бекіткіш батырмасын басып, оны
созыңыз.
Иілгіш құбыршек (23) қолмен бу тазартқышқа (16)
бекіткіштің шертпесі естілгенге дейін қосыңыз (сур. 15).
Қылшақтар (30, 31) және ысқылауға арналған қондырма
(32) қондырма-конценттаушыға (24) бекітілуі мүмкін.
Оларды қондырма-концентраттаушы соңына (24)
тірелгенге дейін салыңыз (сур. 16). Шешіп алу үшін,
оларды созыңыз.
5.3. Буландыруға арналған аксессуарлар (25, 26)
Буландыруға арналған қондырманы (25) тікелей қолмен
бу тазартқышқа (16) тікелей қосыңыз, ол шін оны орнына
келтіріп, сәл басыңыз. Қозғалыс еркіндігі көбірек болу
үшін қондырманы иілгіш құбыршек (23) арқылы қосуға
болады (сур. 15).
Дивандарды, жастықтарды, креслоларды және
матрастарды тазалау үшін мата чехолды (26)
қондырмаға (25) кигізіңіз (сур. 19).
5.4. Терезе жууға арналған қондырма (29)
Терезені жууға арналған қондырманы (29) буландыруға
арналған қондырмаға (25) А ілгегін (сур. 17) тілік
астында (сур. 18, 20) орналастырып бекітіңіз, содан
кейін қондырманы бұраңыз (сур. 21), ілмек С (сур. 17) D
тілігіне сәйкес келгендей етіңіз (сур. 18, 22).
Терезелерді жууға арналған қондырманы
буландыруға арналған қондырмаға бекітпес бұрын,
қондырмаға мата чехолды кигізіңіз. Қондырманы
чехолсыз орнатпаңыз!
6. ЕДЕНДІ ТАЗАЛАУ
Аспапты нәзік немесе жылтыр беттерде қолданар
алдында, бетімен жанасу аймағының сызаттар
24
VT-1888.indd 24 10/20/20 3:24 PM
Page 25

ҚАЗАҚША
туғызатын бөгде заттардан бос екеніне көз
жеткізіңіз.
Бу шаңсорғышы құрамдастырылған өнім, оны
шаңсорғыш, булағыш тік тазартқыш ретінде, едендерді
жуу және дезинфекциялау үшін немесе тазарту уақытын
үнемдеу үшін сору әрекеті бар құрамдастырылған
режимде пайдалануға болады.
СОРҒЫЗУ ҒАНА
1-бөлімнің талаптары орындалғанына көз жеткізіңіз және
2-бөлімде сипатталғандай әрекет етіңіз.
БУ ҒАНА
1-3 бөлімнің талаптары орындалғанына көз жеткізіңіз.
6.1. Еден түріне байланысты бу шығысының
қарқындылығын реттеңіз (сур. 13);
•
қатты едендер үшін (плитка, керамогранит және
т. б.) орташа бу деңгейі ұсынылады;
•
нәзік едендер үшін (паркет, ламинат, керамикалық
плитка және т.б.) төмен бу дегейі ұсынылады.
6.2. Әмбебап қылшақты (1) тұрақ орнынан жұмыс
жағдайына ауыстырыңыз, ол үшін аяғыңызды
қылшаққа қойып, аспапты тасымалдауға арналған
тұтқасынан (15) ұстап еңкейтіңіз (сур. 6). Шаңсорғыш
жұмысқа дайын.
Содан кейін бу беру батырмасын (12) басыңыз (сур. 23)
ол тұтқада (11) орналасқан және қылшақты алға-артқа
жылжыту арқылы тазалауды бастаңыз. Бу беруді тоқтату
үшінбатырманы (12) босатыңыз.
6.3. Қылшақтың (1) қосылысы иілгіш, бұл жиһаз бен
қабырғалардың бұрыштары мен шеттерін оңай
тазартуға мүмкіндік береді.
ҚҰРАМДАСТЫРЫЛҒАН РЕЖИМ БУ / СОРҒЫЗУ
Бу мен сорғызуды құрамдастырып қолдану бір уақытта
шаңды кетіруге және еденді зарарсыздандыруға
мүмкіндік береді.
1-2-3 бөлімдерде сипатталғандай әрекет етіңіз.
Тазалау кезінде желілік бау кедергі келтірмеу үшін, оны
жоғарғы ілмек (13) арқылы салыңыз (сур. 7).
Тазалау жұмыстары кезінде мата чехолды (28)
пайдалану едендерді бумен жұмсартылған кір матамен
жиналатындай етіп жууға және зарарсыздандыруға
мүмкіндік береді.
Мата чехолы (28), әмбебап қылшағы (1) бар швабрақондырманы (27) шешіп алмас бұрын, матаның
салқындауына уақыт беру үшін бірнеше минут күтіңіз.
Содан кейін аяғыңызды швабра қондырмасының (27)
екі бүйірлік педальдарының (22) біріне қойыңыз және
құрылғыны тұтқадан (15) ұстап тігінен жоғары қарай
тартыңыз.
ЕСКЕРТУ: бумен тазарту үшін мата чехолсыз швабрақондырманы пайдаланбаңыз.
ЕСКЕРТУ: қосымша қауіпсіздік үшін, қолданар алдында
жасырын бөлікке будың әсерін тексеріңіз, түсі
өзгермегенін немесе деформация болмағанына көз
жеткізіңіз.
7. ТЕРЕЗЕЛЕРДІ, АЙНАЛАРДЫ ЖӘНЕ КАФЕЛЬ
ҚАБЫРҒАЛАРЫН ТАЗАЛАУ
ЕСКЕРТУ: суық ауа-райында терезелерді тазарту
үшін әйнектерді алдын-ала қыздырыңыз, булауды
бетінен 50 см қашықтықтан бастаңыз.
Қолмен бу тазартқышты (16) ғана қолданыңыз.
3-бөлімнің талаптары орындалғанына көз жеткізіңіз.
7.1. Иілгіш құбыршекті (23) қолмен бу тазартқышқа (16)
қосыңыз, содан кейін булауға арналған қондырманы
(25) қосыңыз және оған терезе жууға арналған
қондырманы (29) қосыңыз (5.3-5.4 тармақтардың
талаптарын орындаңыз).
7.2. 4-бөлімде сипатталғандай, будың шығу қарқындылығын реттеңіз (сур. 13).
Беттің бұл түрі үшін будың орташа деңгейі ұсынылады.
7.3. Терезелер мен айналарды тазарту үшін бетті
мұқият буландырып, кірді еріту үшін портативті бу
тазартқыштағы бу беру батырмасын (6) басыңыз
(сур. 24). Содан кейін кірді және ылғалды кетіру
үшін қондырманы төмен қаратып, қайтадан бетінен
жүргізіп өтіңіз.
7.4. Плиткаларды тазарту үшін иілгіш құбыршекке
(23) бекітілген мата чехолы (26) бар булауға
арналған қондырманы (25) қолданыңыз. Қолмен
бу тазартқышта (6) бу беру батырмасын басып,
кірді кетіру үшін, буды біркелкі таратып, плитканың
бетінен жүргізіп өтіңіз (сур. 24).
8. ЖҰМСАҚ ЖИҺАЗДАРДЫ, КРЕСЛОЛАРДЫ,
ЖАСТЫҚТАРДЫ ТАЗАЛАУ
(матрастар, дивандар, автомобиль салондары және т. б.)
ЕСКЕРТУ: теріні немесе маталарды бумен тазаламас
бұрын, өндірушінің нұсқауларын оқып шығыңыз және
әрқашан жасырын жерде немесе материал үлгісінде
тест өткізіңіз. Түсінің өзгерістері немесе деформациялар
болмағанына көз жеткізу үшін біраз күтіңіз.
Қолмен бу тазартқышты (16) ғана қолданыңыз.
3-бөлімнің талаптары орындалғанына көз жеткізіңіз.
Аспапты 2.4-тармақта келтірілген нұсқауларға
сәйкес қосыңыз және 3-бөлімде сипатталғандай
аксессуарларды қосыңыз.
8.1. 4-бөлімде сипатталғандай, будың шығу қарқындылығын реттеңіз (сур. 13).
Беттің бұл түрі үшін будың минималды деңгейі
ұсынылады.
8.2. Булауға арналған аксессуарларды (25, 26) қолмен
бу тазартқыштың (16) иілгіш құбыршегіне (23)
5.3-бөлімде сипатталғандай қосыңыз. Кірді кетіру
үшін, буды беру батырмасы (6) арқылы буландырып
беттердің үстінен жүргізіп өтіңіз (сур. 24).
9. САНТЕХНИКАНЫ, ЫСҚЫЛЫАНҒАН ЖІКТЕРДІ
ЖӘНЕ АС ҮЙ ҮСТЕЛДЕРІН, БАРБЕКЮДІ ТАЗАЛАУ
Қолмен бу тазартқышты ғана қолданыңыз. 3-бөлімнің
талаптары орындалғанына көз жеткізіңіз.
9.1. Қондырма-концентраттаушыны (24) қолмен бу
тазартқышқа (16) 5.2-бөлімде сипатталғандай
қосыңыз (қондырма-концентраттаушыны қол
жетпейтін жерлерді өңдеу үшін иілгіш құбыршекке
қосуға болады).
9.2. Қажеттілікке байланысты ең қолайлы аксессуарды
қосыңыз:
•
қондырма-концентраттаушыны (24), жетуі қиын
жерлерді өңдеуге және будың көп шоғырланған
ағынын алу үшін қолданылады.
•
құрғақ кір мен әк қабаттарын кетіру үшін
нейлон қылшықтары бар кішкентай дөңгелек
қылшақты (30).
25
VT-1888.indd 25 10/20/20 3:24 PM
Page 26

ҚАЗАҚША
•
қатайып кеуіп қалған май мен кірді (барбекю, авто
немесе мотоцикл дөңгелектері және т.б.) кетіруге
арналған жез қылшықтары бар шағын дөңгелек
қылшақты (31).
•
плиткалар арасындағы ысқылау тігістерін
тазалау үшін және өте тар беттерден кірді
кетіруге арналған қондырманы (32).
ЕСКЕРТУ: қылшақтарды (30), (31) және
қондырмаларды (32) қолданған кезде, қондырмаконценттаушы (24) ұшын сындырып алмау үшін көп
күш салмаңыз.
Назар аударыңыз! Концентраттаушы қондыр
маларыны ұшы жұмыс кезінде қызады. Қосымша
аксессуарларды қосу/ажырату алдында, ұшы
салқындағанша кем дегенде 5 минут күтіңіз.
9.3. Будың шығу қарқындылығын реттеңіз (сур. 13).
Беттің бұл түрі үшін будың максималды деңгейі
ұсынылады.
9.4. Қолмен бу тазартқыштағы бу беру батырмасын (6)
басыңыз (сур. 24), содан кейін беттерді булап өтіңіз.
10. ЖИҺАЗ БЕН НӘЗІК БЕТТЕРДІ ТАЗАЛАУ
ЕСКЕРТУ: матаны бумен тазаламас бұрын,
өндірушінің нұсқауларын оқып шығыңыз және әрқашан
жасырын жерде немесе материал үлгісінде тест
өткізіңіз.
Қолмен бу тазартқышты (16) ғана қолданыңыз.
3-бөлімнің талаптары орындалғанына көз жеткізіңіз.
10.1. Қондырма-концентраттаушыны (24) қолмен бу
тазартқышқа (16) 5.2-бөлімде сипатталғандай
қосыңыз (сур. 14).
10.2. Будың шығу қарқындылығын реттеңіз (сур. 13).
Беттің бұл түрі үшін будың минималды деңгейі
ұсынылады.
10.3. Қолмен бу тазартқыштағы бу беру батырмасын (6)
басыңыз (сур. 24) және ағынды матаға бағыттаңыз.
ЕСКЕРТУ: бу ағынын тікелей бетке бағыттамаңыз.
10.4. Бір жерде ұзақ уақыт пайдаланбай, бетті тазарту
үшін алдын-ала буланған матаны қолданыңыз.
11. БАСҚА ЖАЛПЫ ПАЙДАЛАНУЛАР
Ескерту: бетті тазаламас бұрын, әрқашан жасырын
жерде тест жасаңыз және оның қалай әрекет
ететінін көріңіз.
11.1. Перделер мен портьерлерді тазалау
Кенелер мен шаңды перделер мен портьерлерден алып
тастауға болады, ол үшін матаны тікелей қолмен бу
тазартқыштан буландыру керек. Бу жағымсыз иістерді
кетіруге және түстерді жаңартуға қабілетті, бұл матаны
сирегірек жууға мүмкіндік береді.
Беттің бұл түрі үшін будың минималды деңгейі
ұсынылады.
11.2. Кілемдер мен жиһаз төсеніштерінен
дақтарды кетіру
НАЗАР АУДАРЫҢЫЗ: БУ!
Күйік алу қаупі!
Буды тікелей даққа мүмкіндігінше бұрышпен бағыттаңыз
(ешқашан тазартылатын бетке перпендикуляр
бағыттамаңыз) және будың қысымымен «жойылған»
кірді жинау үшін матаны дақтың астына қойыңыз.
Беттің бұл түрі үшін будың минималды деңгейі
ұсынылады.
11.3. Өсімдіктерге күтім жасау және үй-жайларды
ылғалдандыру
Бөлме өсімдіктеріне күтім жасау үшін, жапырақтарынан
шаңды будың көмегімен жойыңыз.
Ағынды оңай бағыттау үшін, иілгіш құбыршегі бар қолмен
бу тазартқышты қолданыңыз (оны бекіту үшін 3-бөлімді
қараңыз). Бетті 50 см қашықтықта буландырыңыз,
буды минималды деңгейге дейін реттеңіз. Өсімдіктер
жақсы дем алады, таза және жарқын болады. Буды үйжайлардың ауасын тазарту үшін де қолдануға болады,
әсіресе темекі шегушілер жиі келетін жерлерді: бөлмені
буландыруда, ағынды төбеге бағыттап, оны біркелкі
таратыңыз.
11.4. Бетті дезинфекциялау
Дезинфекциялау үшін қондырма-концентраттаушыны
(24) беттен 1,5 см-ден аспайтын қашықтықта ұстаңыз
және оны кемінде 5 секунд бойы бумен өңдеңіз. Бұндай
өдеу микробтар мен бактерияларды тиімді өлтіреді.
ПРАКТИКАЛЫҚ КЕҢЕСТЕР
Шаңсорғышты пайдалану бойынша кеңестер
Еденді тазалау кезінде шаңсорғышты біркелкі қайтарымды-жылжытпалы қозғалыстармен еденде жүргізіңіз,
өзіңізден кері итеріп және қайта тартып қозғалтыңыз.
Ұзақ үзіліс болғанда, сұйыққоймадағы барлық суды
міндетті түрде төгіп тастаңыз.
Беттің зақымдануын болдырмау үшін, еденді тазалау
кезінде шаңсорғышты ұзақ уақыт
бір қалыпта ұстамаңыз. Сондай-ақ, едендерде дымқыл
шүберегін шешіп алмай шаңсорғышты тігінен қоймаңыз,
ол ылғалданып, бүлінуі мүмкін.
Бу швабрасын пайдалану бойынша кеңестер
Еденді жуар алдында шаң мен кір бөлшектерін кетіру
үшін оны сыпыру немесе сору ұсынылады.
Еденді жуу кезінде шаңсорғышты біркелкі қайтарымдыжылжытпалы қозғалыстармен жүргізіңіз, өзіңізден кері
итеріп және қайта тартып қозғалтыңыз. Жуылған еденге
баспау үшін артқа жылжыңыз.
Микрофибрадан жасалған шүберек еденді жуу кезінде
суды жинайды. Алайда, еден бетінің ерекшеліктеріне
және бу берудің берілген қарқындылығына байланысты
еденде аздап ылғал қалуы мүмкін. Бұл жағдайда еденді
табиғи түрде кептіру ұсынылады. Кептіруді желдеткіштің
көмегімен оны қажетті аймаққа бағыттау арқылы
жеделдетуге болады.
Жуғаннан кейін еден ылғалдылығы азырақ болуы
үшін «Бу» батырмасымен будың минималды берілуін
таңдаңыз.
Тазалау аяқталғаннан кейін әмбебап қылшақтан
қондырма-швабраны шешіп алыңыз.
Сонда аспаптың астындағы еден дымқыл шүберектен
ылғалданбайды.
Қолмен бу тазартқышты пайдалану бойынша
кеңестер
Беттерді тазалау
Тазаланатын материал ылғал мен жоғары температураға
төзімді болуы керек. Тазалау алдында мұны тексеріңіз.
Едендердің кейбір түрлерінде (мысалы, плиткалар)
ойықтары немесе цементтелген беттер бар. Мұқият
тазалау үшін дөңгелек нейлон қылшақты қолдануды
ұсынамыз.
26
VT-1888.indd 26 10/20/20 3:24 PM
Page 27

ҚАЗАҚША
Кафель плиткаларының арасындағы бос жерлерді
(саңылауларды) тазарту үшін қондырма-концентраттаушыны қолданыңыз.
Осы мақсаттар үшін түкті қылшақтарды пайдалану
ұсынылмайды, өйткені олар тегістеуді жойып тастауы
мүмкін.
Қондырма-концентраттаушыны саңылауға жақын 3060° бұрышпен әкеліңіз, бу беруді қосыңыз және оны
саңылау бойымен баяу алға жылжытыңыз. Тазалаудың
соңында бетінің айналасындағы кірді шүберекпен сүртіп
алыңыз. Сол сияқты, еден плиткалары арасындағы бос
жерлерді, сондай-ақ кез-келген басқа саңылаулар мен
тар жерлерді тазалаңыз.
Бу шүмегі ластанған жерге неғұрлым жақын болса,
тазарту әсері соғұрлым жақсы болады, өйткені будың
ең жоғары температурасы бу шүмегінен шыққан
кезде қамтамасыз етіледі. Сондықтан тазалау кезінде
қондырмалардың бу шүмегін тазаланатын бетке
мүмкіндігінше жақын орналастыруға тырысыңыз.
Бумен тазалаған кезде, қалған кірді кетіру үшін бумен
өңделетін бетті шүберекпен немесе губкамен сүртіңіз.
Бетті толық құрғамай тұрып сүрту ұсынылады. Металл
беттерін сүрту кезінде абай болыңыз, өйткені бумен
өңдегеннен кейін олар ыстық болуы мүмкін.
Тұрақты ластануды кетіру үшін тек бу ағынының
күші жеткіліксіз болуы мүмкін, механикалық әсерді
күшейту үшін түкті немесе жез қылшақтарды
қолданыңыз. Қылшақтарды қолданған кезде қондырмаконцентраттаушының ұшын сындырып алмау үшін көп
күш жұмсамаңыз.
Бумен тазалаудан бұрын күшті әк жабынына сірке
суын себілеуге болады, сірке суына шамамен 5 минут
жұмыс істеуге мүмкіндік беріңіз, содан кейін бетті бумен
өңдеңіз.
Киімді немесе жұмсақ жиһазды тазалаған кезде, буға
арналған қондырмаға шүберекті уигізіңіз, сонда кір
киімге немесе төсенішке емес, шүберекке сіңеді.
Буландыратын қондырманы ескі тұсқағазды
қабырғалардан алып тастау үшін пайдалануға болады.
Бу әсерінен тұсқағаз желімі жібиді, және тұсқағазды
алып тастау оңай болады.
Терезелер мен айналарды тазалау
Терезе жууға арналған қондырманы қолданған кезде,
алдымен терезенің немесе айнаның бүкіл бетін
будың көмегімен мұқият тазалаңыз, содан кейін бу
беруді өшіріңіз. Осыдан кейін, қондырманың резеңке
қырғышын терезенің немесе айнаның жоғарғы жағына
басып, қондырманы біртіндеп төмен түсіріңіз. Бүкіл
терезені немесе айнаны тазарту үшін беттің бір
жағынан екінші жағына қарай жылжытыңыз. Айна
жақтауының немесе тұғырының төменгі жағына
қырғышпен шығарылатын суды жинау үшін шүберек
немесе майлық қойыңыз.
Сыртта (қыста) төмен температурада, терезе әйнегін
тазаламас бұрын, температураның күрт өзгеруінен
оның шытынауына жол бермеу үшін оны қыздырыңыз.
Қыздырғаннан кейін сіз бүкіл бетті бумен оңай өңдей
аласыз.
Киімді булау
Киімді булау үшін оны тот баспайтын ілгішке іліңіз.
Қолмен бу тазартқышқа буландырғыш қондырмасын
қосыңыз. Бір қолыңызбен бу тазартқышты алыңыз,
екінші қолыңызбен киімнің төменгі бөлігін ұстап, аздап
керіңіз. Қондырманы матаның бетіне апарыңыз, оған
жұмыс бөлігін сәл басып, алға-артқа қозғалыстармен
(жоғарыдан төменге) булауды бастаңыз. Ең көп
қатпарлары бар учаскелерден, сондай-ақ тығыз киім
элементтерінен (жең манжеттері мен жаға) бастауды
ұсынамыз.
12. СУ ДЕҢГЕЙІ
Су деңгейі әрдайым мөлдір сұйыққойманың (4)
арқасында көрініп тұрады.
Су жұмсалып біткенде, бу шығуын тоқтатады.
Жұмысты жалғастыру үшін сұйыққойманы 3-бөлімде
сипатталғандай сумен толтырыңыз.
ЕСКЕРТУ: бұл операция әрқашан құрылғыны желіден
ажыратқаннан кейін ғана орындалуы керек.
13. ҚАҚ СҮЗГІСІН АУЫСТЫРУ
Аспапта әк жабындысын тоқтатуға және өнімнің қызмет
ету мерзімін ұзартуға қабілетті құрамына арнайы
шайырлар салынған сүзгі бар.
Сүзгіні жылына 1 рет өзгерту ұсынылады.
13.1. Аспапты электр желісінен ажыратыңыз.
13.2. Суға арналған сұйыққойманы (4) қолмен бу
тазартқыштан (16) шешіп алыңыз, ол үшін
бекіткіштердің бүйірлік батырмаларын (18) басып,
оны сыртқа қарай тартыңыз (сур. 8).
13.3. Ескі сүзгіні шешіп алыңыз (сур. 25), ол үшін оны
төмен қарай тартыңыз.
13.4. Жаңа сүзгіні (35) салыңыз, мұқият басыңыз
және оның жақсы орнатылғанына көз жеткізіңіз
(сур.26), содан кейін суға аоналған сұйыққойманы
орнатыңыз.
ЕСКЕРТПЕ: Аспапты пайдалану кезінде сүзгі қараюы
мүмкін, қоңыр немесе тот басқан болады, бұл қалыпты
жағдай және ақаулық емес.
14. ШАҢЖИНАҒЫШ-КОНТЕЙНЕР МЕН
СҮЗГІЛЕРДІ ТАЗАЛАУ
14.1. Аспапты толығымен өшіріңіз, ол үшін шаңсорғыштың тұтқасында (11) орналасқан қуаттандыру
сөндіргішінің пернесін (10) (0) күйіне жылжытыңыз
және бу тазартқышы қуаттандыру сөндіргішінің
пернесін (I/0) басыңыз (сур. 10), содан кейін
электр розеткасынан желілік бау ашасын суырып
алыңыз.
14.2. Шаңжинағыш-контейнерді (2) құрылғы корпусынан
(4) алып тастаңыз, ол үшін шаңжинағышконтейнердің бекіткіштерінің екі батырмасына (20)
басыңыз (сур. 27).
14.3. Шаңжинағыш-контейнерден поролон сүзгісі (37)
салынған, HEPA-сүзгісін (36) бүйірлік бағыттағыштарынан ұстап алып шығыңыз (сур. 28), циклон
сүзгісін (39) шешіп алыңыз (сур. 29) ол үшін оны
жиналмалы металл тұтқасынан жоғары қарай
тартыңыз.
14.4. Циклон сүзгісінің қақпағын (38) сағат тіліне қарсы
бұрап шешіп алыңыз, содан кейін циклон сүзгісін
(39) шаңнан тазалаңыз.
14.5. Шаңжинағыш-контейнердің сыйымдылығын (40)
кірден тазалаңыз.
14.6. Шаңжинағыш-контейнерді жинап, жоғарыда аталған әрекеттерді кері ретпен орындап (14.2-14.4
т.қараңыз), оны бұрынғы орнына орнатыңыз.
27
VT-1888.indd 27 10/20/20 3:24 PM
Page 28
ҚАЗАҚША
Шаңжинағыш-контейнерді (2) әр пайдаланғаннан кейін
тазалап отыру ұсынылады.
ЕСКЕРТУ: сүзгілер жиынтығы шаңжинағыш-контейнерде орнатылмаған аспапты пайдаланбаңыз.
15. ЖАЛПЫ ҚЫЗМЕТ КӨРСЕТУ
Аспап өшіріліп, желіден ажыратылғанына көз жеткізіңіз.
Аспаптың сыртқы бетін тазарту үшін тек мата мен ағын
суды ғана пайдаланыңыз.
Бумен тазалауға арналған барлық керек-жарақтарды
ағын сумен тазартуға болады және келесі қолданар
алдында толық құрғатыңыз. Қылшықтарды қолданғаннан
кейін деформацияны болдырмау үшін қылшықтарды
табиғи күйінде салқындатыңыз. Кез келген типтегі жуғыш
заттарды пайдаланбаңыз. Қондырмаларға арналған
мата чехолдарды затбелгіде көрсетілген нұсқауларды
орындау арқылы жууға болады.
Шаң жинағыштың сүзгілері мен сыйымдылықтары
келесі қолданар алдында толығымен құрғақ болуын
қамтамасыз ету үшін оларды ағын сумен тазартуға
болады. Циклон сүзгісіндегі сыйымдылықтарды және
шаңжинағыш-контейнерін ағын сумен шайып, артық
ластану немесе суды кетіру үшін шайқаңыз. Аспапқа
сүзгілерді орнатпас бұрын, оларды кем дегенде 24 сағат
бойы жылу көздерінен алшақтатып, табиғи жолмен
17. АҚАУЛЫҚТАР ДИАГНОСТИКАСЫ
Қиындық Себебі Шешімі
Аспап іске қосылмайды. Электр қуаты жоқ. Құрылғының электр желісіне қосылғанын
Ешқандай бу шықпайды. Су таусылды. Аспапты желіден ажыратыңыз, суға арналған
Аспап өшірулі. Аспап қуат көзіне қосылғанына көз жеткізіңіз,
Аспап қосулы, бірақ аз бу
шығарады.
Құрылғы еденге тым көп су
шығарады.
Шаңсорғыштың жұмысы
кезінде сору қуаты
төмендейді.
Сору кезінде аспаптан шаң
шығады.
Шаң жинағыш алынбайды. Сүзгі дұрыс салынбаған Сүзгіні дұрыс салыңыз
Егер проблемалар сақталса немесе жоғарыда көрсетілмеген болса, уәкілетті қызмет көрсету орталығына
жүгінііз (www.vitek.ru немесе Клиенттерді қолдау қызметіне жүгінііз.
Бу беру минималды
деңгейге белгіленген.
Бу беру максималды
деңгейге орнатылған.
Бу батырмасы басылып тұр
және / немесе ұсталып тұр.
Шаңжинағыш-контейнер
толған.
Шаң жинағыш қате
салынған.
Шаңжинағыш-контейнер
толған.
кептіріңіз. HEPA-сүзгісін шамамен төрт айда бір рет
тазалап отыру керек.
16. САҚТАУ ОРНЫ
16.1. Аспапты сөндіріңіз және оны электр желісінен
ажыратыңыз.
16.2. Ағып кетуді болдырмау үшін, суға арналған
сұйыққоймадағы қалған суды төгіңіз.
16.3. Матадан жасалған чехолдарды қондырмадан
шығармас бұрын, олар суығанша бірнеше минут
күтіңіз.
16.4. Желілік бауды орауға арналған арнайы ілгектерге
ораңыз (13, 19) (сур. 30).
14 бөлімнің талаптарын орындаңыз.
Аспапты қайта пайдаланбас бұрын, желілік бауды
толығымен тарқатуды ұмытпаңыз. Желілік бауды (13)
орауға арналған жоғарғы ілмек 180° бұрылады, бұл
желілік бауды тез тарқатады.
ЕСКЕРТУ: оралған желілік бауымен аспапты электр
желісіне қоспаңыз.
16.5. Аспапты сақтауға арналған ілмек (33) қабырғаға
4 тесік пен бекітілген бекіту жиынтығы (34) арқылы
орнатылуы мүмкін.
Аспап сақтауға арналған ілгекке (33) тасымалдауға
арналған тұтқа (15) арқылы бекітіледі (сур. 31).
тексеріңіз.
сұйыққойманы толтырыңыз, содан кейін аспапты
қайтадан қолданыңыз.
қолмен бу тазартқыштың қуат қосқышының
пернесі (I) және бу беру батырмасы (6 немесе 12)
басылып тұрғанына көз жеткізіңіз.
Реттеу батырмасын басыңыз
Берілетін бу мөлшерін көбейту үшін, бу беру
(4-бөлімді қараңыз).
Бу беруді минимумға дейін азайтыңыз. Қажет
болса, бетті қылшақпен тазартуды жалғастыра
отырып, бу беруді біраз уақытқа тоқтатыңыз.
Бу беру батырмасын (6 немесе 12) үнемі басып
тұрмаңыз, температурасы тұрақтануы үшін оны
босатыңыз.
Шаңжинағыш-контейнерді тазартыңыз.
Шаң жинағышты дұрыс салыңыз
Шаңжинағыш-контейнерді тазартыңыз.
28
VT-1888.indd 28 10/20/20 3:24 PM
Page 29

ҚАЗАҚША
БҰЙЫМ ЖИНАҚТАЛЫМЫ
Орнатылған сүзгілер жиынтығы бар
бу шаңсорғышы – 1 дн.
Әмбебап қылшақ – 1 дн.
Иілгіш бу құбыршегі – 1 дн.
Жиһаз қаптауын тазартуға арналған қондырма – 1 дн.
Қондырмаға арналған мата чехол – 1 дн.
Швабра-қондырма – 1 дн.
Швабра-қондырмаға арналған мата чехол – 1 дн.
Терезелерді жууға арналған қондырма – 1 дн.
Қондырма-концентраттаушы
(жетуге қиын жерлер үшін) – 1 дн.
Нейлон қылшықтары бар шағын
дөңгелек қылшақ – 1 дн.
Жез қылшықтары бар шағын дөңгелек қылшақ – 1 дн.
Ысқылау жіктерін өңдеуге арналған қондырма – 1 дн.
Қаққа қарсы қосымша сүзгі – 1 дн.
Сақтауға арналған ілгек – 1 дн.
Ілгекті бекітуге арналған жиынтық – 1 дн.
ТЕХНИКАЛЫҚ СИПАТТАМАЛАРЫ
Электр қуаттандыру: 220-240 В ~ 50-60 Гц
Номиналдық тұтыну қуаты: 1800 Вт
Бу швабрасының қуаты: 1200 Вт
Шаңсорғыш қуаты: 600 Вт
Сору қуаты: 12 кПа
Қыздыру уақыты: 25-30 секунд
Бу шығару қарқындылығы: таңдалған деңгейге
байланысты 15-тен бастап 25 г/мин-қа дейін
Бу беру уақыты: таңдалған деңгейге
байланысты 14-22 мин
Шаңжинағыш-контейнердің көлемі: 0,4 л
Суға арналған сұйыққойманың көлемі: 0,5 л
Жинау ауданы: суды қосымша құймай 30 м2 дейін
Желілік бау ұзындығы: 5 м
ҚАЙТА ӨҢДЕУ
Қоршаған ортаны қорғау мақсатында, аспаптың және
қуаттандыру элементтерінің (егер жинақтың құрамына кірсе)
қызмет ету мерзімі аяқталғаннан кейін, оларды күнделікті
тұрмыстық қалдықтармен бірге тастауға болмайды, аспап
пен қуаттандыру элементтерін ары қарай кәдеге асыру үшін
мамандандырылған орындарға өткізу керек.
Бұйымдарды қайта өңдеу кезінде пайда болатын
қалдықтар белгіленген тәртіп бойынша келесі қайта
өңделетін міндетті жинауға жатады.
Берілген өнімді қайта өңдеу туралы қосымша ақпаратты
алу үшін жергілікті муниципалитетке, тұрмыстық
қалдықтарды қайта өңдеу қызметіне немесе берілген
өнімді Сіз сатып алған дүкенге хабарласыңыз.
Дайындаушы аспапты жақсарту мақсатында,
алдын-ала хабарламай, аспаптың дизайнын, конструкциясы және оның жұмыс қағидатына әсер
етпейтін техникалық сипаттарын өзгерту құқығын
өзіне қалдырады, соған байланысты нұсқаулық пен
бұйымның арасында кейбір айырмашылықтар болуы
мүмкін. Егер пайдаланушы осындай сәйкессіздіктерді
анықтаса, нұсқаулықтың жаңартылған нұсқасын алу
үшін сәйкессіздік туралы info@vitek.ru электрондық
поштасына хабарлауыңызды сұраймыз.
Құралдың қызмет ету мерзімі – 3 жыл
Гарантиялық мiндеттiлiгi
Гарантиялық жағдайдағы қаралып жатқан бөлшектер
дилерден тек сатып алынған адамға ғана берiледi.
Осы гарантиялық мiндеттiлiгiндегi шағымдалған жағдайда
төлеген чек немесе квитанциясын көрсетуi қажет.
29
VT-1888.indd 29 10/20/20 3:24 PM
Page 30

УКРАЇНЬСКА
ПИЛОСОС ПАРОВИЙ VT-1888
Багатофункціональний пилосос з 3 режимами очищення поверхонь: пилосос з технологією «циклон», функція
дезінфекції підлоги парою та оброблення поверхонь за
допомогою портативного пароочисника.
ОПИС
1. Універсальна щітка
2. Контейнер-пилозбірник
3. Корпус
4. Резервуар для води
5. Ручка ручного пароочисника
6. Кнопка подачі пари
7. Панель керування
8. Кнопка зняття ручного пароочисника
9. Подовжувальна трубка
10. Клавіша вимикача живлення пилососа (I/0)
11. Ручка пилососа
12. Кнопка подачі пари
13. Верхній гачок для намотування мережного шнура
14. Гвинт кріплення ручки
15. Ручка для перенесення
16. Ручний пароочисник
17. Клавіша вимикача живлення ручного
пароочисника (I/0)
18. Кнопки фіксаторів резервуара для води
19. Нижній гачок для намотування мережного шнура
20. Фіксатори контейнера-пилозбірника
21. Кнопка для зняття універсальної щітки
22. Педалі для зняття насадки-швабри
23. Гнучкий паровий шланг
24. Насадка-концентратор для важкодоступних
місць
Аксесуари для відпарювання
25. Насадка для відпарювання
26. Тканинний чохол насадки для відпарювання
Аксесуари для миття підлоги:
27. Насадка-швабра
28. Тканинний чохол насадки-швабри
29. Насадка для миття вікон
30. Мала кругла щітка з нейлоновою щетиною
31. Мала кругла щітка з латунною щетиною
32. Насадка для оброблення затиральних швів
33. Гак для зберігання
34. Комплект для кріплення гака
35. Додатковий фільтр від накипу
Контейнер-пилозбірник
36. HEPA-фільтр
37. Поролоновий фільтр
38. Кришка циклонного фільтра
39. Циклонний фільтр
40. Посудина контейнера-пилозбірника
УВАГА!
Для додаткового захисту у колі живлення доцільно
встановити пристрій захисного вимкнення (ПЗВ) з
номінальним струмом спрацьовування, що не перевищує 30 мА, для установлення ПЗВ зверніться до
фахівця.
СИМВОЛИ БЕЗПЕКИ:
ПОПЕРЕДЖЕННЯ: Висока температура. Ризик
опіку!
Якщо це вказано на виробі, не торкайтеся нього, так як деталі можуть бути дуже гарячими.
УВАГА: ПАРА!
Ризик опіку!
Пристрій досягає дуже високих температур.
Неправильне використання пристрою може призвести до опіку.
ЗАХОДИ БЕЗПЕКИ ТА РЕКОМЕНДАЦІЇ
З ЕКСПЛУАТАЦІЇ
Перед початком експлуатації пристрою уважно прочитайте це керівництво з експлуатації та збережіть його
для використання як довідковий матеріал.
• Використовуйте пристрій тільки за його прямим
призначенням, як викладено у цьому керівництві.
Неправильне поводження з пристроєм може призвести до його поломки, спричинення шкоди користувачеві або його майну.
• Переконайтеся, що робоча напруга пристрою, що вказана на етикетці, відповідає напрузі електромережі.
• Вилка мережного шнура має контакт заземлення,
вставляйте її в електричну розетку, що має надійний контакт заземлення.
• Повністю розмотайте мережний шнур перед підмиканням пристрою до мережі та перед використанням. Завжди використовуйте виріб з повністю
розмотаним мережним шнуром.
• Щоб уникнути ризику виникнення пожежі, не використовуйте перехідники при підмиканні пристрою
до електричної розетки.
• Не торкайтеся корпусу пристрою, робочої поверхні,
мережного шнура та вилки мережного шнура мокрими руками.
• Вимикайте пристрій та від’єднуйте його від електричної мережі після закінчення води у резервуарі.
• Не залишайте пристрій, увімкнений у мережу, без
нагляду.
• Пара не має направлятися на обладнання, що містить електричні компоненти, такі як внутрішня частина духовок.
• Не використовуйте пристрій у безпосередній
близькості від нагрівальних приладів, джерел тепла
або відкритого полум’я.
• Не використовуйте пристрій поблизу кухонної раковини, у ванних кімнатах, біля басейнів або інших
посудин, наповнених водою.
• Якщо пристрій упав у воду, негайно вийміть вилку
мережного шнура з електричної розетки, і тільки
після цього можна дістати пристрій з води. Зверніться до сервісного центру для огляду або ремонту
пристрою.
• Ніколи не використовуйте пристрій в місцях, де
використовуються або розпорошуються аерозолі,
а також поблизу від легкозаймистих рідин, забороняється використовувати пристрій в місцях зберігання таких рідин, де існує небезпека вибухів або у
присутності токсичних речовин.
• Не застосовуйте в резервуар токсичні речовини,
кислоти, розчинники, мийні засоби, агресивні ре-
30
VT-1888.indd 30 10/20/20 3:24 PM
Page 31

УКРАЇНЬСКА
човини та/або вибухові речовини або парфумерні
добавки.
• Не пилососьте та не направляйте струмінь пари на
токсичні речовини, кислоти, розчинники, мийні засоби або агресивні речовини. Поводження з небезпечними речовинами та їх видалення мають здійснюватися відповідно до вказівок виробників цих речовин.
• Не пилососьте та не направляйте струмінь пари на
вибухонебезпечні порошки або рідини, вуглеводні,
відкрите полум’я та дуже гарячі предмети.
• Тримайте всі частини вашого тіла подалі від всмоктувального сопла та від будь-яких рухомих або
обертових частин.
• Не використовуйте функцію всмоктування на людях
та/або тваринах.
• Використовуйте спеціальну ручку для транспортування. Не тягніть за мережний шнур. Не використовуйте мережний шнур як ручку. Не піднімайте пристрій за допомогою мережного шнура або парових
шлангів/вакуумних трубок.
• Не розміщайте виріб поблизу джерел тепла, таких
як каміни, печі та духовки.
• Не встановлюйте виріб поблизу електромагнітних
полів, таких як індукційні панелі.
• Повторно намотайте мережний шнур на гачки для
намотування, коли пристрій не використовується.
• Не загороджуйте отвори та решітки на виробі.
• При прибиранні сходів пристрій має розташовуватися на сходинках нижче рівня користувача.
• Не направляйте струмінь пари на будь-яку частину
тіла людей або тварин.
• Не направляйте струмінь пари на одяг під час її носіння.
• Речі та тканини, піддані глибокому обробленню парою, досягають дуже високих температур – вище
100°C. Зачекайте декілька хвилин та переконайтеся,
що вони остигнули, перш ніж поводитися з ними.
Тому уникайте контакту зі шкірою, якщо вони тільки
що були відпарені.
• Встановлюйте пароочисник вертикально на рівній
сухій вологостійкій та термостійкій поверхні, не кладіть його горизонтально та не перевертайте під час
роботи.
• Використовуйте лише насадки, що входять до
комплекту постачання.
• Перед початком використання пристрою переконайтеся в тому, що насадки встановлені правильно
та надійно зафіксовані.
• Рекомендується заливати у резервуар водопровідну воду, що пройшла додаткове очищення побутовими фільтрами. Не використовуйте газовану воду
та парфумерні добавки.
• Наглядайте, щоб рівень води був не вище максимальної позначки «MAX».
• Не блокуйте отвори виходу пари, забороняється
вставляти в отвори сторонні предмети.
• Під час роботи верхня частина корпусу та робоча
поверхня пароочисника сильно нагрівається, щоб
уникнути отримання опіків, не торкайтеся робочої
поверхні та верхньої частини корпусу.
• Остерігайтеся отримання опіків гарячою парою.
• Вимикайте пристрій з електромережі після використання або перед чищенням.
• При вимкненні пристрою з електричної мережі
тримайтеся за вилку мережного шнура та вийміть
її з електричної розетки, не тягніть за мережний
шнур – це може призвести до його пошкодження та
викликати коротке замикання.
• З міркувань безпеки дітей не залишайте поліетиленові пакети, що використовуються як упаковка, без
нагляду.
Увага! Не дозволяйте дітям грати з поліетиленовими
пакетами або пакувальною плівкою. Небезпека за-
душення!
• Пристрій не призначений для використання дітьми.
• Діти мають перебувати під наглядом для недопущення ігор з пристроєм.
• Не дозволяйте дітям торкатися робочої поверхні,
корпусу пристрою, мережного шнура та вилки мережного шнура під час роботи пристрою.
• Будьте особливо уважні, якщо поблизу від працюючого пристрою знаходяться діти або особи з обмеженими можливостями.
• Під час роботи та у перервах між робочими циклами розміщайте пристрій у місцях, недоступних для
дітей.
• Пристрій не призначений для використання особами (включаючи дітей) зі зниженими фізичними,
сенсорними або розумовими здібностями або при
відсутності у них життєвого досвіду або знань, якщо
вони не знаходяться під контролем або не проінструктовані щодо використання пристрою особою,
відповідальною за їх безпеку.
• Періодично перевіряйте цілісність шнура живлення.
• При пошкодженні шнура живлення його заміну, щоб
уникнути небезпеки, мають робити виробник, сервісна служба або подібний кваліфікований персонал.
• Забороняється використовувати пристрій при пошкодженні вилки шнура живлення або шнура живлення, якщо пристрій працює з перебоями, а також
після його падіння.
• Забороняється самостійно ремонтувати пристрій.
Не розбирайте пристрій самостійно, при виникненні будь-яких несправностей, а також після падіння
пристрою вимкніть пристрій з електромережі та
зверніться до будь-якого авторизованого (уповноваженого) сервісного центру за контактними адресами, вказаними у гарантійному талоні та на сайті
www.vitek.ru.
• Щоб уникнути пошкоджень, перевозьте пристрій
тільки у заводській упаковці.
• Зберігайте пристрій у сухому прохолодному місці,
недоступному для дітей та людей з обмеженими
можливостями.
ЦЕЙ ПРИСТРІЙ ПРИЗНАЧЕНИЙ ДЛЯ ВИКОРИСТАННЯ
ЛИШЕ У ПОБУТОВИХ УМОВАХ. ЗАБОРОНЯЄТЬСЯ КОМЕРЦІЙНЕ ВИКОРИСТАННЯ ТА ВИКОРИСТАННЯ ПРИСТРОЮ У ВИРОБНИЧИХ ЗОНАХ ТА РОБОЧИХ ПРИМІЩЕННЯХ.
ПЕРЕД ПЕРШИМ ВИКОРИСТАННЯМ
Після транспортування або зберігання пристрою при зниженій температурі необхідно витримати його при кімнатній температурі не менше трьох годин.
31
VT-1888.indd 31 10/20/20 3:24 PM
Page 32

УКРАЇНЬСКА
• Розпакуйте пристрій та видаліть всі пакувальні матеріали та рекламні наклейки.
• За наявності захисної плівки на робочій поверхні
зніміть її.
• Збережіть заводську упаковку.
• Ознайомтеся з заходами безпеки та рекомендаціями з експлуатації.
• Перевірте комплектацію.
• Огляньте пристрій на наявність пошкоджень, при
наявності пошкоджень не вмикайте його в електричну мережу.
• Переконайтеся, що вказані параметри напруги
живлення пристрою відповідають параметрам
електричної мережі. При використанні пристрою
в електричній мережі c частотою змінного струму
60 Гц ніяких додаткових дій не потрібно.
• Для видалення пилу протріть пристрій злегка вологою тканиною, після чого витріть насухо.
ПРАВИЛЬНЕ ВИКОРИСТАННЯ ПРИСТРОЮ
Пристрій призначений для внутрішнього побутового
використання, для всмоктування рідин та пилу, видалення сухих та/або вологих матеріалів (бруду) з поверхонь з використанням пари відповідно до описів та
інструкцій, наведених у цьому керівництві. Будь ласка,
уважно прочитайте ці інструкції та збережіть їх. З цим
керівництвом можна ознайомитися та/або завантажити його з веб-сайту www.vitek.ru.
Пилососьте тільки побутовий бруд. Не пилососьте безпосередньо з посудин, наповнених водою або іншими
рідинами. Збирайте лише невелику кількість води, розпорошеної по поверхнях, дотримуючись максимальної
кількості, вказаної в Інструкції.
Регулярно перевіряйте рівень заповнення сухого та
вологого шлямовловлювача, наглядаючи за тим, щоб
максимальні рівні не перевищувались. Не використовуйте на крейді, цементі або інших залишках від будівництва або цегляної кладки. Не використовуйте на
землі та піску/грунті і т. ін.
Не використовуйте на золі, сажі та залишках горіння
(каміни, барбекю і т. ін.).
Не використовуйте на принтері, ксероксі або факсі (тонер та порошок чорнила).
Не пилососьте гострі або тверді предмети. Виробник
залишає за собою право вносити естетичні, технічні та
конструктивні зміни без попереднього повідомлення.
Перед тим, як покинути виробництво, всі вироби проходять ретельну перевірку. Саме тому ваш пристрій
може містити деяку кількість води у резервуарі.
Правильне використання продукту описано тільки у
цьому керівництві з експлуатації. Будь-яке інше використання може призвести до пошкодження пристрою
та анулювання гарантії.
ЯКУ ВОДУ ВИКОРИСТОВУВАТИ
Пристрій був розроблений для роботи зі звичайною
водопровідною водою від 8°С до 20°С. Якщо водопровідна вода містить багато вапняного нальоту, використовуйте суміш з 50% водопровідної води та 50% демінералізованої води, доступної для придбання.
Періодично заміняйте фільтр від накипу, як описано у
розділі 13. Ніколи не використовуйте дощову воду або
воду, яка містить парфумерні добавки (наприклад,
духи), або воду, вироблену іншими побутовими приладами, пом’якшувачами води або фільтрами. Не додавайте хімічні, натуральні, мийні або видаляючі вапняний наліт речовини і т.ін.
Перед використанням бутильованої питної води дізнайтеся її загальну мінералізацію (звичайно вказується на етикетці) та порівняйте її з показниками
для водопровідної води (їх можна знайти на сайті
організації водопостачання або пошуком в інтернеті).
Як правило, мінералізація бутильованої води становить 100-400 мг/л.
Може виявитися, що вода з-під крана має мінералізацію в декілька разів меншу, так що використання
бутильованої води збільшить утворення накипу. При
постійному використанні пилососа періодично рекомендується повністю оновлювати воду у резервуарі та
промивати сам резервуар, щоб уникнути застою води
та з’явлення стороннього запаху.
УВАГА! Якщо у бойлері утворюється накип, даний
випадок буде визнаний негарантійним.
Паровий пилососс VT-1888: 3 ПРОДУКТИ У 1
Це зручний парової вертикальний пристрій, який
включає в себе три продукти в одному, тому що його
можна використовувати як пилосос, парову швабру та
портативний пароочисник. Він може виконувати велику кількість очищувальних функцій та обробляти різні
поверхні: підлога з різною обробкою (плитка, керамограніт, паркет), кухонні робочі поверхні, витяжки, ванні, крани, затирання, вікна та дзеркала, оббивку, дивани, крісла, матраци, подушки, інтер’єри автомобілів),
міжкімнатні двері та двері шаф, радіатори опалення
та рольставні, штори та одяг, зелені рослини. Випробування, проведені третьою стороною, незалежною
лабораторією, підтверджують, що пароочисник видаляє 99,9% мікробів та бактерій, при використанні його
у відповідності до інструкцій, включених у це керівництво, з доданою серветкою з мікрофібри з тривалістю
роботи в 30 секунд.
1. СКЛАДАННЯ ПРИСТРОЮ
ЯК ПИЛОСОС/ПАРОВА ШВАБРА
1.1. Вийміть пристрій з упаковки, переконавшись, що
виріб не пошкоджений і що всі деталі включені у
комплект постачання.
1.2. Приєднайте корпус пристрою (3) до універсальної
щітки (1) (мал.1).
Для зняття універсальної щітки поставте ногу на щітку,
натисніть на кнопку (21) та потягніть пристрій за ручку
для перенесення (15) вертикально вгору.
ПРИМІТКА: перед складанням пристрою зверніть увагу на те, що гвинт (14) при упакуванні пристрою може
бути закручений у подовжувальну трубку (9).
1.3. Відгвинтіть гвинт (14) на подовжувальній трубці (9)
за допомогою шліцьової викрутки. Установіть подовжувальну трубку у посадкове місце на корпусі
пристрою та закрутіть гвинт (мал. 2).
ПОПЕРЕДЖЕННЯ: іноді перевіряйте, чи щільно затягнутий гвинт.
1.4. Надягніть тканинний чохол (28) на насадку-швабру (27) та приєднайте її до нижньої частини
універсальної щітки (1) таким чином, щоб фіксатори насадки-швабри увійшли у відповідні пази
32
VT-1888.indd 32 10/20/20 3:24 PM
Page 33

УКРАЇНЬСКА
універсальної щітки (мал. 3) (тільки для очищення парою).
ПРИМІТКА: для зняття насадки-швабри (27) з універ-
сальної щітки (1) натисніть на одну з двох її бічних педалей (22) та потягніть пристрій вертикально вгору за
ручку (15).
2. ВИКОРИСТАННЯ ПРИСТРОЮ ЯК ПИЛОСОС
Переконайтеся, що вимоги розділу 1 виконані
2.1. Повністю розмотайте мережний шнур та приєднайте його до електричної розетки, що має надійний контакт заземлення (мал. 4). Завжди використовуйте виріб з повністю розмотаним мережним
шнуром.
2.2. Перемістіть клавішу вимикача живлення (10), розташованого на ручці пилососа (11), у положення (I)
(мал. 5). Переведіть універсальну щітку (1) у робоче положення з положення паркування, для цього
поставте ногу на щітку та нахиліть пилосос за ручку
для перенесення (15) (мал. 6). Пилосос готовий до
роботи.
Щоб мережний шнур не заважав під час прибирання,
прокладіть його через верхній гачок (13) (мал. 7).
3. ПІДГОТУВАННЯ ДО ВИКОРИСТАННЯ ПРИСТРОЮ
ЯК ШВАБРИ ТА РУЧНОГО ПАРООЧИСНИКА
3.1. Зніміть резервуар для води (4), для цього натисніть на бічні фіксатори (18) та потягніть його на
себе (мал. 8). Переверніть резервуар для води та
відкрийте гумову пробку, потягнувши її за язичок
вгору (мал. 9). Наповніть резервуар чистою водою.
Не додавайте у резервуар інші речовини або добавки.
3.2. Щільно закрийте пробку резервуара для води та
установіть його назад. Завжди виконуйте цю операцію з вимкненим з мережі мережним шнуром.
ПОПЕРЕДЖЕННЯ: переконайтеся, що резервуар (4)
встановлений правильно, щоб уникнути витоку.
3.3. Надягніть тканинний чохол (28) на насадку-швабру
(1) та з’єднайте її з нижньою частиною універсальної щітки (мал. 3).
3.4. Повністю розмотайте мережний шнур та приєднайте його до електричної розетки, що має надійний контакт заземлення (мал. 4). Завжди використовуйте виріб з повністю розмотаним мережним
шнуром.
3.5. Натисніть на клавішу вимикача живлення (17) пароочисника, розташовану збоку пристрою (мал. 10).
Індикатор увімкнення на панелі керування (7) при
цьому блиматиме ( ) зеленим кольором.
Почекайте 30 секунд, поки індикатор на панелі керування не почне світитися постійно (мал. 11).
Після цього пристрій готовий до роботи.
РУЧНИЙ ПАРООЧИСНИК (16)
3.6. Для окремого використання ручного пароочисника
(16) від’єднайте його від корпусу пристрою (3), для
цього натисніть на верхню кнопку (8) та потягніть
його назовні за ручку (5) (мал. 12).
4. РЕГУЛЮВАННЯ ІНТЕНСИВНОСТІ ВИХОДУ ПАРИ
Пристрій має 3 рівня інтенсивності виходу пари. Послідовно натискаючи кнопку ( ) регулятора пари
(мал. 13), розташовану на панелі керування (7), установіть інтенсивність виходу пари залежно від передбачуваного використання. Індикатор вибраного рівня
інтенсивності при цьому світитиметься постійно.
Ось деякі рекомендації з вибору рівня інтенсивності виходу пари:
• Максимальний рівень ( ): для видалення накипу,
плям, жиру;
• Середній рівень ( ): для миття вікон та підлоги.
• Мінімальний рівень ( ): для чищення паркету та
ламінату, делікатних тканин, оббивки меблів, диванів, матраців та ін.
5. ПРИЄДНАННЯ АКСЕСУАРІВ
Аксесуари можна приєднати безпосередньо до ручного пароочисника (16) або до гнучкого шланга (23) для
більшої свободи пересування.
5.1. Гнучкий шланг (23)
Приєднайте гнучкий шланг (23) до портативного пароочисника (16), поки не почуєте клацання фіксатора
(мал. 14). Щоб зняти гнучкий шланг, натисніть на кнопку
фіксатора, розташовану на основі гнучкого шланга, і
витягніть його назовні (мал. 14).
5.2. Насадка-концентратор (24)
Насадку-концентратор (24) можна приєднати безпосередньо до ручного пароочисника (16) або до гнучкого
шланга (23). Для зняття насадки натисніть на кнопку фіксатора, розташовану на основі насадки, та витягніть її.
Приєднайте гнучкий шланг (23) до портативного пароочисника (16), поки не почуєте клацання фіксатора
(мал. 15).
Щітки (30, 31) та насадка для затирання (32) можуть
прикріплюватися до насадки-концентратора (24).
Вставте їх на кінець насадки-концентратора (24) до
упору (мал. 16). Щоб зняти, витягніть їх.
5.3. Аксесуари для відпарювання (25, 26)
Приєднайте насадку для відпарювання (25) безпосередньо до ручного пароочисника (16), злегка натиснувши на неї, щоб вона встала на місце. Для більшої
свободи пересування насадку можна приєднати за допомогою гнучкого шланга (23) (мал. 15).
Для очищення диванів, подушок, крісел та матраців надягніть тканинний чохол (26) на насадку (25)
(мал. 19).
5.4. Насадка для миття вікон (29)
Прикріпіть насадку для миття вікон (29) до насадки
для відпарювання (25), вставивши гачок А (мал. 17)
під проріз В (мал. 18, 20), потім поверніть насадку
(мал. 21) так, щоб гачок С (мал . 17) помістився у проріз D (мал. 18, 22).
Перед тим як прикріпити насадку для миття вікон
до насадки для відпарювання, надягніть тканинний чохол на насадку. Не встановлюйте насадку
без чохла!
6. ЧИЩЕННЯ ПІДЛОГИ
Перед використанням пристрою на делікатних або
глянцевих поверхнях переконайтеся, що зона контакту з поверхнею вільна від сторонніх предметів,
що викликають подряпини.
Паровий пилосос – комбінований продукт, його можна
використовувати як пилосос, паровий вертикальний
очисник, для миття та дезінфекції підлог або у комбі-
33
VT-1888.indd 33 10/20/20 3:24 PM
Page 34

УКРАЇНЬСКА
нованому режимі з всмоктувальною дією для економії
часу очищення.
ТІЛЬКИ ВСМОКТУВАННЯ
Переконайтеся, що вимоги розділу 1 виконані, та дійте,
як описано у розділі 2.
ТІЛЬКИ ПАРА
Переконайтеся, що вимоги розділу 1-3 виконані.
6.1. Відрегулюйте інтенсивність виходу пари залежно
від типу підлоги (мал. 13);
• для твердих підлог (плитка, керамограніт і т. ін.)
рекомендується середній рівень пари;
• для делікатних підлог (паркет, ламінат, кераміч-
на плитка і т. ін.) рекомендується низький рівень
пари.
6.2. Переведіть універсальну щітку (1) у робоче положення з положення паркування, для цього поставте ногу на щітку та нахиліть пилосос за ручку
для перенесення (15) (мал. 6). Пилосос готовий до
роботи.
Потім натисніть кнопку подачі пари (12) (мал. 23), розташовану на ручці (11), та почніть прибирання, переміщаючи щітку вперед та назад. Щоб припинити подачу
пари, відпустіть кнопку (12).
6.3. Щітка (1) має гнучке з’єднання, що дозволяє легко
очищати кути та краї меблів та стін.
КОМБІНОВАНИЙ РЕЖИМ ПАРА/ВСМОКТУВАННЯ
Комбіноване використання пари та всмоктування дозволяє видаляти пил та дезінфікувати підлогу одночасно.
Дійте так, як описано у розділах 1-2-3.
Щоб мережний шнур не заважав під час прибирання,
прокладіть його через верхній гачок (13) (мал. 7).
Під час операцій з очищення використання тканинного
чохла (28) дозволяє мити та дезінфікувати підлоги таким чином, щоб бруд, розм’якшений парою, збирався
тканиною.
Перш ніж зняти насадку-швабру (27) з тканинним чохлом (28) з щітки (1), зачекайте декілька хвилин, щоб
дати тканини остигнути. Потім поставте ногу на одну з
двох бічних педалей (22) насадки швабри (27) та потягніть пристрій вертикально вгору за ручку (15).
ПОПЕРЕДЖЕННЯ: для парового очищення не використовуйте насадку-швабру без тканинного чохла.
ПОПЕРЕДЖЕННЯ: для додаткової безпеки перевірте
вплив пари перед використанням на прихованої деталі,
почекайте, щоб переконатися, що не відбулося жодних
змін кольору або деформації.
7. ЧИЩЕННЯ ВІКОН, ДЗЕРКАЛ І КАХЕЛЬНИХ СТІН
ПОПЕРЕДЖЕННЯ: щоб очистити вікна у холодну погоду, попередньо нагрійте стекла, починаючи відпарювання на відстані близько 50 см від поверхні.
Використовуйте тільки ручний пароочисник (16).
Переконайтеся, що вимоги розділу 3 виконані.
7.1. Приєднайте гнучкий шланг (23) до ручного пароочисника (16), потім приєднайте насадку для відпарювання (25), а до неї - насадку для миття вікон
(29) (виконайте вимоги пунктів 5.3-5.4).
7.2. Відрегулюйте інтенсивність виходу пари, як описано у розділі 4 (мал. 13).
Для цього типу поверхні рекомендується середній рівень виходу пари.
7.3. Для очищення вікон та дзеркал натисніть кнопку
подачі пари (6) на портативному пароочисникові, щоб ретельно пропарити поверхню та розчинити бруд (мал. 24). Потім знову пройдіть по поверхні, утримуючи насадку вниз, щоб видалити
бруд та вологу.
7.4. Для очищення плитки використовуйте насадку
для відпарювання (25) з тканинним чохлом (26),
прикріплену до гнучкого шланга (23). Пройдіть
по поверхні плитки, рівномірно розподіляючи
пару, натискаючи при цьому кнопку подачі пари
(6) на ручному пароочисникові (мал. 24), щоб видалити бруд.
8. ЧИЩЕННЯ М’ЯКИХ МЕБЛІВ, КРІСЕЛ, ПОДУШОК
(матраци, дивани, автомобільні салони і т. ін.)
ПОПЕРЕДЖЕННЯ: перед чищенням шкіри або тканин
парою ознайомтеся з інструкціями виробника та завжди проводіть тест на прихованій ділянці або на зразкові матеріалу. Трохи почекайте, щоб переконатися,
що не відбулося жодних змін кольору або деформацій.
Використовуйте тільки ручний пароочисник (16).
Переконайтеся, що вимоги розділу 3 виконані.
Увімкніть пристрій відповідно до інструкцій, наведених
у пункті 2.4, та підімкніть аксесуари, як описано у розділі 3.
8.1. Відрегулюйте інтенсивність виходу пари, як описано у розділі 4 (мал. 13).
Для цього типу поверхні рекомендується мінімальний
рівень пари.
8.2. Приєднайте аксесуари для відпарювання (25, 26)
до гнучкого шланга (23) ручного пароочисника
(16), як описано у розділі 5.3. Пройдіть по поверхні,
створюючи пару за допомогою кнопки подачі пари
(6) (мал. 24), щоб видалити бруд.
9. ЧИЩЕННЯ САНТЕХНІКИ, ЗАТИРАЛЬНИХ ШВІВ
ТА СТІЛЬНИЦЬ, БАРБЕКЮ
Використовуйте тільки ручний пароочисник. Переконайтеся, що вимоги розділу 3 виконані.
9.1. Приєднайте насадку-концентратор (24) до ручного
пароочисника (16), як описано у розділі 5.2 (насадку-концентратор можна приєднати до гнучкого
шланга для оброблення важкодоступних місць).
9.2. Приєднайте найвідповідніший аксесуар залежно
від необхідності:
• насадку-концентратор (24) – для оброблення
важкодоступних місць та отримання концентрованішого струменя пари.
• малу круглу щітку з нейлоновою щетиною (30) –
для видалення сухого бруду та вапняного нальоту.
• малу круглу щітку з латунною щетиною (31) –
для видалення стійкого засохлого жиру та бруду
(барбекю, авто- або мотоциклетні колеса і т.ін.).
• насадку (32) – для очищення затиральних швів
між плитками та видалення бруду з дуже вузьких
поверхонь.
ПОПЕРЕДЖЕННЯ: при використанні щіток (30), (31) та
насадки (32) не докладайте надмірних зусиль, щоб не
зламати кінчик насадки-концентратора (24).
34
VT-1888.indd 34 10/20/20 3:24 PM
Page 35

УКРАЇНЬСКА
Увага! Наконечник насадки-концентратора нагрівається під час роботи. Перед тим, як приєднувати/від’єднувати додаткові аксесуари, почекайте як
мінімум 5 хвилин, поки наконечник остигне.
9.3. Відрегулюйте інтенсивність виходу пари (мал. 13).
Для цього типу поверхні рекомендується максимальний рівень пари.
9.4. Натисніть кнопку подачі пари (6) на ручному пароочисникові (мал. 24), потім пропарте поверхні.
10. ЧИСТКА МЕБЛІВ ТА ДЕЛІКАТНИХ ПОВЕРХОНЬ
ПОПЕРЕДЖЕННЯ: перед чищенням тканин парою
ознайомтеся з інструкціями виробника та завжди проводіть тест на прихованій ділянці або зразкові матеріалу.
Використовуйте тільки ручний пароочисник (16). Переконайтеся, що вимоги розділу 3 виконані.
10.1. Приєднайте насадку-концентратор (24) до руч-
ного пароочисника (16), як описано у розділі 5.2
(мал. 14).
10.2. Відрегулюйте інтенсивність виходу пари (мал. 13).
Для цього типу поверхні рекомендується мінімальний
рівень пари.
10.3. Натисніть кнопку подачі пари (6) на ручному паро-
очисникові (мал. 24) та направте струмінь на тканину.
ПОПЕРЕДЖЕННЯ: не направляйте струмінь пари безпосередньо на поверхню.
10.4. Використовуйте попередньо пропарену тканину
для очищення поверхні, уникаючи тривалого використання на одному і тому ж місці.
11. ІНШІ ЗАГАЛЬНІ ВИКОРИСТАННЯ
Попередження: перед очищенням поверхні завжди
робіть тест на прихованій ділянці та дивіться, як вона
реагує.
11.1. Очищення штор та портьєр
Кліщів та пил можна видалити зі штор та портьєр, пропаривши тканину безпосередньо з ручного пароочисника. Пара здатна видаляти неприємні запахи та освіжати кольори, що дозволяє прати тканину рідше.
Для цього типу поверхні рекомендується мінімальний
рівень пари.
11.2. Видалення плям з килимів та оббивки меблів
УВАГА: ПАРА!
Ризик опіку!
Направте пару безпосередньо на пляму під максимально можливим кутом (ніколи не перпендикулярно
очищаємої поверхні) та помістіть тканину за пляму,
щоб зібрати бруд, який був «здмуханий» тиском пари.
Для цього типу поверхні рекомендується мінімальний
рівень пари.
11.3. Догляд за рослинами та зволоження
приміщень
Щоб доглядати за кімнатними рослинами, видаліть пил
з листя за допомогою пари.
Використовуйте ручний пароочисник з гнучким шлангом, щоб легко направляти струмінь (щоб прикріпити
його, див. розділ 3). Пропарте поверхню на відстані
50 см, відрегулюйте пару до мінімального рівня. Рослини краще дихатимуть та будуть чистішими і яскравішими. Пару можна також використовувати для освіження
приміщень, особливо тих, які часто відвідують курці:
пропарюйте приміщення, направляючи струмінь до
стелі, рівномірно розподіляючи його.
11.4. Дезінфекція поверхні
Для дезінфекції утримуйте парове сопло насадки-концентратора (24) на відстані не більше 1,5 см від поверхні
та обробляйте її парою протягом як мінімум 5 секунд. Таке
оброблення найефективніше вбиває мікроби та бактерії.
ПРАКТИЧНІ ПОРАДИ
Поради щодо використання пилососа
При прибиранні підлоги переміщайте пилосос рівномірними зворотно-поступальними рухами, відштовхуючи його від себе та притягаючи назад.
При тривалої перерві у використанні обов’язково злийте всю воду з резервуара.
При прибиранні підлоги не затримуйте пилосос в одному положенні довго, щоб уникнути
пошкодження поверхні. А також не паркуйте вертикально пилосос з незнятою мокрою ганчіркою на підлогах,
які можуть розмокнути та зіпсуватися.
Поради щодо використання парової швабри
Перед миттям підлоги рекомендується його підмести
або пропилососити для видалення пилу та частинок
бруду.
При митті підлоги переміщайте пилосос рівномірними
зворотно-поступальними рухами, відштовхуючи його
від себе та притягаючи назад. Рухайтеся назад, щоб не
наступати на вже вимиту підлогу.
Ганчірка з мікрофібри збирає воду при митті підлоги.
Однак залежно від особливостей поверхні підлоги та
заданої інтенсивності подачі пари на підлозі може залишитися трохи вологи. У цьому випадку рекомендується дати підлозі висохнути природним шляхом. Висихання можна прискорити за допомогою вентилятора, направивши його на потрібну зону.
Щоб після миття підлога була менш вологою, вибирайте кнопкою «Пара» мінімальну подачу пари.
Після закінчення прибирання знімайте насадку-швабру
з універсальної щітки.
Тоді підлога під пристроєм не відволожуватиметься від
вологої ганчірки.
Поради щодо використання ручного пароочисника
Чищення поверхонь
Очищуваний матеріал має витримувати вологу та високу температуру. Переконайтеся у цьому перед початком очищення.
Деякі типи підлог (наприклад, плитковий) мають канавки або зацементовані поверхні. Для ретельнішого
очищення рекомендуємо скористатися круглою нейлоновою щіткою.
Для чищення проміжків (щілин) між кахельною плиткою
використовуйте насадку-концентратор.
Використовувати для цих цілей ворсові щітки не рекомендується, тому що вони можуть видалити затірку.
Піднесіть насадку-концентратор під кутом в 30-60°
впритул до щілини, увімкніть подачу пари та повільно
пересувайте її вперед уздовж щілини. Після закінчення
чищення видаліть за допомогою ганчірки забруднення з навколишнього поверхні. Таким же чином робіть
чищення проміжків між підлоговою плиткою, а також
будь-яких інших щілин та вузьких місць.
35
VT-1888.indd 35 10/20/20 3:24 PM
Page 36

УКРАЇНЬСКА
Чим ближче парове сопло до забрудненого місця, тим
краще очисний ефект, оскільки найвища температура
пари забезпечується на виході з сопла. Тому при чищенні намагайтеся розташовувати парове сопло насадок якомога ближче до очищаємої поверхні.
При чищенні парою протріть оброблену парою поверхню ганчіркою або губкою, щоб видалити відсталий
бруд. Рекомендується протерти поверхню, поки вона
ще не висохла. Будьте обережні, протираючи металеві
поверхні, так як після оброблення парою вони можуть
бути гарячими.
Для видалення стійких забруднень сили тільки струменя пари може бути недостатньо, використовуйте ворсові або латунну щітки для посилення механічної дії. При
використанні щіток не докладайте надмірного зусилля,
щоб не відламати кінчик насадки-концентратора.
Сильний вапняний наліт перед чищенням парою можна
скропити оцтом, дати оцту подіяти протягом приблизно 5 хвилин, а потім обробити поверхню парою.
При чищенні одягу або оббивки м’яких меблів надягніть
на насадку для відпарювання ганчірку, тоді забруднення вбиратимуться у ганчірку, а не в одяг або тканину
оббивки.
Насадку для відпарювання можна використовувати для
зняття зі стін старих шпалер.
Шпалерний клей під впливом пари набрякне, і шпалери
буде легше зняти.
Чищення вікон та дзеркал
При використанні насадки для миття вікон спочатку
ретельно очистіть за допомогою пари всю поверхню
вікна або дзеркала, а потім вимкніть подачу пари.
Після цього притисніть гумовий скребок насадки до
верхньої частини вікна або дзеркала та поступово
опускайте насадку вниз. Рухайтеся у напрямку від
одного боку поверхні до іншого, щоб очистити все вікно або дзеркало. Внизу рами або підставки дзеркала
підстеліть ганчірку або серветку для збирання зганяємої скребком води.
При негативних температурах зовні (взимку) перед
чищенням віконного скла прогрійте його, щоб воно не
тріснуло від різкого перепаду температур.
Після прогрівання ви легко зможете обробити парою
всю поверхню.
Відпарювання одягу
Для відпарювання одягу повісьте його на нержавну вішалку. Приєднайте до ручного пароочисника насадку
для відпарювання. Візьміть пароочисник в одну руку,
іншою рукою притримуйте нижню частину одягу, створюючи невеликий натяг. Піднесіть насадку до поверхні
тканини, злегка притискаючи до неї робочу її частину,
та зворотно-поступальними рухами (зверху вниз) почніть відпарювання. Рекомендуємо починати з дільниць, на яких найбільше складок, а також з елементів
одягу, які є щільнішими (комір та манжети рукавів).
12. РІВЕНЬ ВОДИ
Рівень води завжди видний завдяки прозорому резервуару (4).
Коли вода буде витрачена, пара перестане виділятися.
Щоб відновити роботу, знову заповніть резервуар водою, як описано у розділі 3.
ПОПЕРЕДЖЕННЯ: цю операцію завжди слід виконувати після вимкнення пристрою з мережі.
13. ЗАМІНА ФІЛЬТРА ВІД НАКИПУ
Пристрій має фільтр, що містить спеціальні смоли,
здатні зупинити вапняний наліт та продовжити термін
служби вашого продукту.
Рекомендується міняти фільтр 1 раз на рік.
13.1. Вимкніть пристрій з електромережі.
13.2. Зніміть резервуар для води (4) з ручного пароочисника (16), натиснувши бічні фіксатори (18) та
потягнувши його назовні (мал. 8).
13.3. Зніміть старий фільтр (мал. 25), потягнувши його
вниз.
13.4. Вставте новий фільтр (35), обережно натисніть
та переконайтеся, що він ідеально встановлений
(мал. 26), потім установіть резервуар для води.
ПРИМІТКА: У ході використання пристрою фільтр
може потемніти, стати коричневим або іржавим, це
нормально та не свідчить про несправність.
14. ОЧИЩЕННЯ КОНТЕЙНЕРА-ПИЛОЗБІРНИКА
ТА ФІЛЬТРІВ
14.1. Повністю вимкніть пристрій, для цього перемістіть клавішу вимикача живлення (10), розташованого на ручці пилососа (11), у положення (0)
та натисніть на клавішу вимикача живлення (I/0)
пароочисника (мал. 10), потім витягніть вилку мережного шнура з електричної розетки.
14.2. Вийміть контейнер-пилозбірник (2) з корпусу
пристрою (4), натиснувши на дві кнопки фіксаторів контейнера-пилозбірника (20) (мал. 27).
14.3. Вийміть з контейнера-пилозбірника HEPA-фільтр
(36) з вкладеним у нього поролоновим фільтром
(37), за бічні напрямні (мал. 28), зніміть циклонний фільтр (39) (мал. 29), потягнувши його вгору
за відкидну металеву ручку.
14.4. Зніміть кришку циклонного фільтра (38), повернувши її проти годинникової стрілки, потім очистіть циклонний фільтр (39) від пилу.
14.5. Очистіть посудину контейнера-пилозбірника (40)
від бруду.
14.6. Складіть контейнер-пилозбірник та установіть
його на колишнє місце, виконавши вищезазначені
дії у зворотному порядку (див. п. 14.2-14.4).
Рекомендується чистити контейнер-пилозбірник (2)
після кожного використання.
ПОПЕРЕДЖЕННЯ: не використовуйте пристрій без
встановленого контейнера-пилозбірника у комплекті
з фільтрами.
15. ЗАГАЛЬНЕ ОБСЛУГОВУВАННЯ
Переконайтеся, що пристрій вимкнений та від’єднаний
від мережі.
Для очищення зовнішньої поверхні пристрою використовуйте тільки тканину та водопровідну воду.
Все приладдя для чищення парою можна очистити за
допомогою проточної води і дати їм повністю висохнути перед наступним використанням. Після використання щіток дайте щетинкам остигнути в їх природному положенні, щоб уникнути деформації. Не використовуйте
мийні засоби будь-якого типу. Тканинні чохли для насадок можна прати, слідуючи інструкціям, наведеним
на етикетці.
Фільтри та посудини пилозбірника можна чистити
проточною водою, гарантуючи повне висихання пе-
36
VT-1888.indd 36 10/20/20 3:24 PM
Page 37

УКРАЇНЬСКА
ред наступним використанням. Промийте посудини
циклонного фільтра та контейнера-пилозбірника
проточною водою та струсіть, щоб видалити надлишки бруду або воду. Перед установленням фільтрів у
пристрій дайте їм повністю висохнути природним
шляхом, далеко від джерел тепла принаймні 24 години. HEPA-фільтр має повністю очищатися приблизно
кожні чотири місяці.
16. МІСЦЕ ЗБЕРІГАННЯ
16.1. Вимкніть пристрій та від’єднайте його від електромережі.
16.2. Вилийте залишки води з резервуара для води,
щоб уникнути протікання.
16.3. Перш ніж зняти тканинні чохли з насадок, зачекайте декілька хвилин, щоб вони остигнули.
17. ДІАГНОСТИКА НЕСПРАВНОСТЕЙ
Проблема Причина Рішення
Пристрій не вмикається. Немає електрики. Перевірте, що пристрій підімкнутий до
Ніякої пари не виходить. Закінчилася вода. Вимкніть пристрій з мережі, заповніть резервуар
Пристрій вимкнений. Переконайтеся, що пристрій підімкнутий
Пристрій увімкнутий, але
випускає мало пари.
Пристрій випускає занадто
багато води на підлогу.
Під час роботи пилососа
потужність всмоктування
падає.
Під час всмоктування з
пристрою виходить пил.
Пилозбірник не знімається. Фільтр неправильно
Якщо проблеми залишаються або не вказані вище, будь ласка, зверніться до авторизованого сервісного
центру (www.vitek.ru) або зверніться до Служби підтримки клієнтів.
Подача пари встановлена
на мінімальний рівень.
Подача пари встановлена
на максимальний рівень.
Натиснута та/або
утримується кнопка пара.
Контейнер-пилозбірник
заповнений.
Пилозбірник вставлений
неправильно.
Контейнер-пилозбірник
заповнений.
вставлений
16.4. Намотайте мережний шнур на спеціальні гачки
для намотування (13, 19) (мал. 30).
Виконайте вимоги 14 розділу.
Перед повторним використанням пристрою не забудьте повністю розмотати мережний шнур. Верхній
гачок для намотування мережного шнура (13) повертається на 180°, щоб швидко розмотати мережний
шнур.
ПОПЕРЕДЖЕННЯ: не тримайте пристрій підімкнутим до електричної мережі з намотаним мережним
шнуром.
16.5. Крюк для зберігання пристрою (33) може бути
встановлений на стіну за допомогою 4 отворів та
доданого комплекту для кріплення (34).
Пристрій фіксується на гаку для зберігання (33) за ручку для перенесення (15) (мал. 31).
електричної мережі.
для води і потім знову використовуйте пристрій.
до джерела живлення, клавіша вимикача
живлення ручного пароочисника знаходиться у
положенні (I) і що кнопка подачі пари (6 або 12)
утримується натиснутою.
Натисніть кнопку регулювання
подачі пари, щоб збільшити кількість подаваємої
пари (див. розділ 4).
Зменшіть подачу пари до мінімуму. За
необхідністю на деякий час припиніть подачу
пари, продовжуючи чистити поверхню щіткою.
Не тримайте кнопку подачі пари (6 або 12)
постійно натиснутою, а відпустіть її, щоб
температура стабілізувалася.
Очистіть контейнер-пилозбірник.
Правильно вставте пилозбірник.
Очистіть контейнер-пилозбірник.
Вставте фільтр правильно
КОМПЛЕКТНІСТЬ ВИРОБУ:
Паровий пилосос зі встановленим комплектом
фільтрів – 1 шт.
Універсальна щітка – 1 шт.
Гнучкий паровий шланг – 1 шт.
Насадка для чищення меблевої оббивки – 1 шт.
Тканинний чохол для насадки – 1 шт.
Насадка-швабра – 1 шт.
Тканинний чохол для насадки-швабри – 1 шт.
Насадка для миття вікон – 1 шт.
Насадка-концентратор
(для важкодоступних місць) – 1 шт.
Мала кругла щітка з нейлоновою щетиною – 1 шт.
Мала кругла щітка з латунною щетиною – 1 шт.
Насадка для оброблення затиральних швів – 1 шт.
Додатковий фільтр від накипу – 1 шт.
Гак для зберігання – 1 шт.
Комплект для кріплення гака – 1 шт.
37
VT-1888.indd 37 10/20/20 3:24 PM
Page 38

УКРАЇНЬСКА
ТЕХНІЧНІ ХАРАКТЕРИСТИКИ:
Електроживлення: 220-240 В ~ 50-60 Гц
Номінальна споживана потужність: 1800 Вт
Потужність парової швабри: 1200 Вт
Потужність пилососа: 600 Вт
Потужність всмоктування: 12 кПа
Час розігрівання: 25-30 секунд
Інтенсивність виходу пари: від 15 до 25 г/хв залежно
від вибраного рівня
Час подачі пари: 14-22 хв залежно від вибраного рівня
Об’єм контейнера-пилозбірника: 0,4 л
Об’єм резервуара для води: 0,5 л
Площа прибирання: до 30 м2 без доливання води
Довжина мережного шнура: 5 м
УТИЛІЗАЦІЯ
Для захисту навколишнього середовища після закінчення терміну служби пристрою та елементів живлення (якщо входять до комплекту) не викидайте їх
разом зі звичайними побутовими відходами, передайте пристрій та елементи живлення у спеціалізовані пункти для подальшої утилізації.
Відходи, що утворюються при утилізації виробів, підлягають обов’язковому збору з подальшою утилізацією установленим порядком.
Для отримання додаткової інформації про утилізацію
даного продукту зверніться до місцевого муніципалітету, служби утилізації побутових відходів або до
крамниці, де Ви придбали цей продукт.
Виробник зберігає за собою право змінювати
дизайн, конструкцію та технічні характеристики, які
не впливають на загальні принципи роботи пристрою, без попереднього повідомлення, через що
між інструкцією та виробом можуть спостерігатися
незначні відмінності. Якщо користувач виявив такі
невідповідності, просимо повідомити про це по
електронній пошті info@vitek.ru для отримання оновленої версії інструкції.
Термін служби пристрою – 3 років
Гарантія
Докладні умови гарантії можна отримати в дилера,
що продав дану апаратуру. При пред’явленні
будь-якої претензії протягом терміну дії даної
гарантії варто пред’явити чек або квитанцію про
покупку.
Даний продукт відповідає вимогам Директиви
2014/30/ЄС щодо електромагнітної сумісності та Директиви 2014/35/ЄС щодо низьковольтного обладнання.
38
VT-1888.indd 38 10/20/20 3:24 PM
Page 39

КЫРГЫЗ
БУУ МЕНЕН ИШТЕГЕН ЧАҢ СОРГУЧ VT-1888
Бетти тазалоонун 3 режими менен көп функционалдуу
чаң соргуч: «циклон» технологиясы менен чаң соргуч,
жертаманды буу менен дезинфекциялоо функциясы
жана беттерди портативдүү буу-тазалагычтын жардамы
менен тазалоо.
СЫПАТТАМА
1. Универсалдуу щётка
2. Чаң топтогуч контейнери
3. Корпусу
4. Суу куюлуучу чукур
5. Кол менен буу тазалагычтын туткасы
6. Буу берүүчү баскыч
7. Башкаруу панели
8. Кол менен буу тазалагычты чечүү баскычы
9. Узартуучу түтүкчө
10. Чаң соргучтун азыктануу өчүргүчүнүн ачкычы (I/0)
11. Чаң соргучтун туткасы
12. Буу берүүчү баскыч
13. Тармактык боону ороого арналган үстүнкү илмек
14. Тутканын бекитүүчү бууроосу
15. Көтөрүп ташуу үчүн тутка
16. Колдогу буу менен тазалагыч
17. Кол менен буу тазалагычтын азыктануу өчүргүчүнүн
ачкычы (I/0)
18. Суу куюлуучу резевуар үчүн бекитмелердин
баскычтары
19. Тармак боону ороого арналган ылдыйкы илмек
20. Чаң топтогуч контейнердин бекитмелери
21. Универсалдуу щетканы чечүү үчүн баскыч
22. Саптама-швабраны чечүү үчүн педалдар
23. Ийилчээк буу түтүкчөсү
24. Кол жетпеген жерге арналган саптама-концентратор
Буу менен тазалоого арналган аксессуарлар
25. Буу менен тазалоого арналган саптама
26. Буу менен тазалоого арналган саптаманын
кездеме кабы
Жертаман жууганга арналган аксессуарлар
27. Саптама-швабра
28. Саптама-швабраныны кездеме кабы
29. Терезе жууганга арналган саптама
30. Нейлон түктөрү менен кичине тоголок щётка
31. Латун түктөрү менен кичине тоголок щётка
32. Сүртүлүп бириккен тигиштерди тазалоого
арналган саптама
33. Сактоого арналган илмек
34. Илмекти бекитүү үчүн топтом
35. Кебээрден кошумча чыпка
Чаң топтогуч контейнери
36. HEPA-чыпка
37. Поролон чыпкасы
38. Циклондук чыпканын капкагы
39. Циклондук чыпка
40. Чаң топтогуч контейнердин идиши
КӨҢҮЛ БУРУҢУЗ!
Коопсуздук максатында, электр агымынын тизмегине номиналдык ток мааниси 30 мА ашпаган коргоп
өчүрүүчү түзмөктү орнотуу максатка ылайыктуу, аны
орнотуу үчүн атайын адиске кайрылыңыз.
КООПСУЗДУК СИМВОЛДОРУ:
ЭСКЕРТҮҮ: Жогорку температура. Күйүк алуу
нун коркунучу бар!
Эгер буюмда бул көрсөтүлсө, бөлүктөрү
ысык болушу мүмкүн болгондуктан ага тий
генге болбойт.
ЭСКЕРТҮҮ: БУУ!
Күйүк алуунун коркунучу бар!
Шайман абдан жогору температурага жетет.
Шайманды туура эмес колдонгондо күйүп калууга
алып келет.
КООПСУЗДУК ЧАРАЛАР МЕНЕН КОЛДОНУУ
БОЮНЧА КЕҢЕШТЕР
Электр аспапты пайдалануудан мурун пайдалануу боюнчча колдонмону көңүл коюп окуп-үйрөнүп, маалымат
катары сактап алыңыз.
• Түзмөктү ушул колдонмодо көрсөтүлгөндөй тике
дайындоосу боюнча гана колдонуңуз. Шайманды туура эмес пайдалануу анын бузулуусуна, колдонуучуга же колдонуучунун мүлкүнө зыян келтирүүгө алып
келиши мүмкүн.
• Этикеткасында жызылган түзмөктүн иштөө
чыңалуусу электр тармагындагы чыңалуусуна ылайык болгонун текшерип алыңыз.
• Тармактык боонун сайгычында жердетүү контакты
бар, аны ишенимдүү жердетүү контакты бар электр
розеткасына сайыңыз.
• Шайманды тармакка туташтыруунун же колдонуунун
алдында тармактык боону толук бошотуп жазыңыз.
Шайманды ар дайым бош жазылган тармактык боо
менен колдонуңуз.
• Өрт коркунучун жоюу үчүн аспапты электр розеткасына туташтырганда кошуучу түзүлмөлөрдү
колдонбоңуз.
• Түзмөктүн корпусун, иштөө бетин, тармактык боосун
жана тармактык боосунун айрысын суу колуңуз менен тийбеңиз.
• Чукурдагы суу түгөнгөндөн кийин түзмөктү өчүрүп,
электр тармагынан ажыратыңыз.
• Тармагына кошулган шайманды эч качан кароосуз
калтырбаңыз.
• Буу духовканын ички бөлүгү сыяктуу электр компоненттерин камтыган түзмөктү көздөй багытталбашы керек.
• Шайманды жылуулук же ачык от булактардын тикеден-тике жакынчылыкта колдонбоңуз.
• Түзмөктү ашкана раковинанын жанында, ванна
бөлмөсүндө, бассейн же башка суу толтурулган чукурлардын жанында колдонбоңуз.
• Шайман сууга түшкөн болсо, токтоосуз тармактык
боонун айрысын розеткадан суруп, андан кийин
гана шайманды суудан чыгарсаңыз болот. Шайманды текшерүү жана оңдотуу үчүн автордоштурулган
тейлөө борборуна кайрылыңыз.
• Шайманды аэрозолдорду чачкан же колдонгон жерлерде жана жеңил жалындап кетүүчү суюктуктардын
жанында же ошол суктуктар сакталып турган жерлерде колдонууга тыюу салынат.
• Резервуарга уулуу заттарды, кычкылдыктарды, эриткичтерди, жуугуч каражаттарды, агрессивдүү заттарды жана/же жарылуучу заттарда жана парфюмдук
кошулмаларды куйбаңыз.
39
VT-1888.indd 39 10/20/20 3:24 PM
Page 40

КЫРГЫЗ
• Буунун агымын уулуу заттарга, кычкылдыктарга,
эриткичтерге, жуугуч каражатарга же агрессивдүү
заттарга багыттап чаң сордурбаңыз. Кооптуу заттарды колдонуу жана аларды жоюу ошол заттардын
даярдоочуларынын нускамаларына ылайык ишке
ашырылыш керек.
• Буунун агымын уулуу заттарга, жарылуучу
күлмайдаларга же суюктуктарга, көмүрсуутектерге,
ачык отко жана ысык буюмдарга багыттап чаң
сордурбаңыз.
• Денеңиздин бардык бөлүгүн соруучу оозунан жана
бардык кыймылдаган жана айланган бөлүктөрүнөн
алыс кармаңыз.
• Соруу функциясын адамдарга жана/же жаныбарларга колдонбоңуз.
• Ташууда атайын тутканы колдонуңуз. Тармактык
боосунан кармап тартпаңыз. Боону тутка катары
колдонбоңуз. Шайманды тармактык боосунун же
буу ийкем түтүгү/вакуумдук түтүктүн жардамы менен
көтөрбөңүз.
• Буюмду жылуулуктун булактарынын, мисалы
каминдин, мештин жана духовканын жанына
жайгаштырбаңыз.
• Буюмду электр магниттик талаалардын, мисалы индукциялык панелдердин жанына орнотпоңуз.
• Шайман колдонулбай турганда түрдүрүү илмегине
тармактык боосун кайра түрүңүз.
• Буюмдагы тешиктерди жана торлорун тоспоңуз.
• Тепкичтерди тазалоодо шайманды колдонуучунун
ылдый жагында турган тепкичке жайгаштыруу керек.
• Буунун агымын адамдын же жаныбарлардын кандайдыр бир дене бөлүгүнө багыттабаңыз.
• Буунун агымын кийип турган кийимге багыттабаңыз.
• Буунун терең тазалоосуна кабылган буюмдар жана
кездемелер өтө жогору температурага - 100 °C жетет. Аларды колдонуунун алдында бир нече мүнөт
күтүп, муздаганын текшериңиз. Ошондуктан эгер
алар жаңы эле буу менен тазаланган болсо, териге
тийгизбеңиз.
• Бууландыргычты тигинен түз, кургак нымдуулукка
жана жылуулукка чыдамдуу жерде орнотуңуз, иштетип турганда жаткырып же чалкасынан койбоңуз.
• Топтомго кирген саптамаларды гана пайдаланыңыз.
• Шайманды колдонуудан мурун щетка саптамасы туура орнотулуп, бекем бекитилгенин текшерип алыңыз.
• Чукурга турак-жай чыпкасы менен кошумча тазаланган сүүтүтүктөгү сууну куюу кеңештелет. Газдалган
жана жыпар жыттуу кошумчаларды пайдаланбаңыз.
• Суунун деңгээли максималдуу «MAX» белгисинен
өйдө болбогонун байкап туруңуз.
• Буу чыгуучу тешиктерди жаппаңыз, тешиктерге башка орнотууга салууга тыюу салынат.
• Түзмөк иштеп турганда, корпусунун үстү жагы абдан
ысыйт, күйүк болбоо үчүн иштөө бетин же корпустун
үстү жагын тийбеңиз.
• Ысык буудан күйүк алуудан этият болуңуз.
• Колдонгондон кийин же тазалагандан мурун ар дайым түзмөктү электр тармагынан сууруңуз.
• Түзмөктү электр тармагынан өчүргөндө тармактык
боонун сайгычынан кармап, аны электр розеткасынан ажыратыңыз, тармактык боосун тартпаңыз - бул
анын бузулуусунун натыйжасы болуп, чукул туташууга алып келүү мүмкүн.
• Балдардын коопсуздугу үчүн таңгак катары колдонулган полиэтилен баштыктарды кароосуз таштабаңыз.
Көңүл буруңуз! Балдарга полиэтилен баштыктары же таңгактоочу пленка менен ойноого уруксат
бербеңиз. Тумчугуунун коркунучун жаратат!
• Бул түзмөк балдар колдонгону үчүн арналган эмес.
• Балдар түзмөк менен ойногонго жол бербегени үчүн
аларга көз салуу зарыл.
• Түзмөк иштеп турган учурда балдарга иштөө бетине, түзмөктүн корпусуна, тармактык боосуна жана
тармактык боосунун айрысына тийгенге уруксат
бербеңиз.
• Иштеп жаткан шаймандын жанында балдар же
мүмкүнчүлүгү чектелген адамдар жүрсө, өтө этият
болуңуз.
• Шайман иштеп турганда же иштөө циклдердин арасында аны балдар жетпеген жерде сактаңыз.
• Бул шайман дене күчү, сезими же акыл-эси жагынан
жөндөмдүүлүгү чектелген (ошонун ичинде балдар
да) адамдар же колдонуу боюнча тажрыйбасы же
билими жок болгон адамдар, эгерде алардын коопсуздугуна жооптуу адам аларды көзөмөлдөп же
нускамалоо болбосо колдонуу үчүн ылайыкташтырылган эмес.
• Электр шнурунун бүтүндүгүн мезгилдүү түрдө текшерип туруңуз.
• Азык боосу бузук болгондо кооптуулуктарга жол
бербегени үчүн аны өнүктүрүүчү, тейлөө кызмат же
аларга окшогон дасыккан кызматкерлер алмаштырууга тийиш.
• Электр боосунда, тармактык айрысында бузулуулар
пайда болсо, түзмөк иштеп-иштебей турса же кулап
түшкөндөн кийин аны колдонууга тыюу салынат.
• Шайманды өз алдынча оңдогонго тыюу салынат.
Шайманды өз алдынча ажыратпай, ар кыл бузулуулар пайда болгон же шайман кулап түшкөн учурларда аны розеткадан суруп, кепилдик талонундагы же
www.vitek.ru сайтындагы тизмесине кирген автордоштурулган (ыйгарым укуктуу) тейлөө борборуна
кайрылыңыз.
• Бузулуулар пайда болбоо үчүн шайманды заводдук
таңгагында гана транспорттоо зарыл.
• Шайманды балдар жана жөндөмдүүлүгү төмөн болгон адамдар колу жетпеген жерлерде сактаңыз.
БУЛ ТҮЗМӨК ТУРМУШ-ТУРУКТУУ ШАРТТАРДА КОЛДОНГОНУ ҮЧҮН ГАНА АРНАЛГАН. ШАЙМАНДЫ КОММЕРЦИЯЛЫК ПАЙДАЛАНУУГА ЖАНА ӨНДҮРҮШ ЗОНАЛАРДА ЖАНА ЖУМУШЧУ ИМАРАТТАРДА ТҮЗМӨКТҮ
ИШТЕТҮҮГӨ ТЫЮУ САЛЫНАТ.
БИРИНЧИ КОЛДОНУУНУН АЛДЫНДА
Төмөндөгөн температурада түзмөктү транс
порттоодон же сактоодон кийин аны үч сааттан
кем эмес мөөнөткө үй температурасында сактоо
зарыл.
• Шайманды таңгактан чыгарып, таңгак материалдарын жана жарыя чаптамаларды сыйрып алыңыз.
• Иштөө бетинде коргоочу пленкасы бар болсо, аны
сыйрып алыңыз.
• Заводдук таңгагын сактап алыңыз.
• Коопсуздук чаралары менен колдонуу жөнүндөгү
кеңештер менен таанышып алыңыз.
40
VT-1888.indd 40 10/20/20 3:24 PM
Page 41

КЫРГЫЗ
• Жабдыктын жыйынтыгынын толугун текшерип
алыңыз.
• Түзмөктүн бузулуулары жок болгонун текшерип
алыңыз, бузулуулар бар болсо, түзмөктү электр тармагына туташтырбаңыз.
• Түзмөктүн көрсөтүлгөн чыңалуусу электр тармагынын чыңалуусуна ылайык болгонун текшерип
алыңыз. Түзмөктү жыштыгы 60 Гц болгон электр
тармагында колдонууда эч кандай кошумча ишаракеттерди жасоо зарыл эмес.
• Чаңды кетирүү үчүн бууландыргычты жумшак бир аз
нымдуу чүпүрөк менен сүртүп, андан соң кургатып
сүртүңүз.
ШАЙМАНДЫ ТУУРА КОЛДОНУУ
Шайман, ички тиричиликте пайдаланууга, суюктуктарды
жана чаңдарды сорууга, ушул жетекчиликте келтирилген мүнөздөмөлөргө жана нускамаларга ылайык бууну
колдонуу менен кургак жана/же нымдуу материалдарды (кирлерди) жоюуга арналган. Ушул нускамаларды
жакшылап окуп сактап коюңуз. Ушул жетекчилик менен
www.vitek.ru веб-сайты аркылуу таанышып, жана/же
жүктөп алсаңыз болот.
Тиричилик чаңын гана сордуруңуз. Суу же башка суюктук менен толтурулган идиштен түздөн-түз сордурбаңыз.
Нускамада көрсөтүлгөн максималдуу көлөмдү сактап,
бетке чачылган суунун бир гана көлөмүн чогултуңуз.
Максималдуу деңгээлден ашып кетпегендей кылып
кургак жана нымдуу кир чогулткучтун толуп калуусун
улам-улам текшерип туруңуз. Бор, цемент жана курулуштан же кирпич тургузуудан калган башка калдыктарга колдонбоңуз. Жерге жана кумга/топуракка ж.у.с.
колдонбоңуз.
Күлгө, көөгө жана күйүктүн калдыктарына (камин, барбекю ж.у.с.) колдонбоңуз.
Принтерге, ксерокско же факска (тонер жана сыя
күлмайдасы) колдонбоңуз.
Учтуу жана катуу нерселерди сордурбаңыз. Өндүрүүчү
эстетикалык, техникалык жана конструктивдүү өзгөрүүлөрдү алдын ала эскертүүсүз киргизүүгө укугу бар.
Өндүрүштөн чыгуусуна чейин бардык буюмдар кылдат
текшерүүдөн өтөт. Дал ушул себептен түзмөгүңүздүн резервуарында суунун бир аз көлөмү бар болушу мүмкүн.
Өнүмдүн туура колдонулушу ушул пайдалануу боюнча
жетекчиликте гана жазылган. Башкача колдонуу шайманды бузуп, кепилдикти жокко чыгарышы мүмкүн.
КАНДАЙ СУУНУ КОЛДОНУУ КЕРЕК
Шайман кадимки суу өткөрмө түтүгүнөн келген 8°С
баштап 20°С чейинки сууга иштелип чыгарылган. Эгер
суу өткөрмө түтүктөгү сууда акиташ көп камтылса,
ошол суунун 50% жана сатып алууга мүмкүн болгон
деминерализацияланган суунун 50% аралашмасын
пайдаланыңыз.
13- бөлүмдө сүрөттөлгөндөй кебээрден сактаган чыпкасын мезгили менен алмаштырып туруңуз. Жаандын суусун же парфюмдук кошулмаларды (мисалы, атыр) камтыган сууну же башка тиричилик шаймандандары, суу
жумшарткычтары же чыпкалар менен өндүрүлгөн сууну
эч качан пайдаланбаңыз. Химиялык, акиташты табигый
жуучу же кетирүүчү каражаттарды ж.у.с. кошпоңуз.
Бөтөлкөгө куюштурулган ичилчү сууну колдонуунун алдында анын жалпы минерализациясын билиңиз (энбел-
гисинде көрсөтүлөт) жана аны суу өткөрмө түтүгүндөгү
суунун көрсөткүчтөрү менен салыштырыңыз (аларды
суу менен жабдуу уюмунун сайтынан же интернеттен
издеп табууга болот). Адатта, бөтөлкөгө куюштурулган
суунун минерализациясы 100-400 мг/л түзөт.
Крандагы суунун минерализациясы алдан канча азыраак болушу мүмкүн, ошондуктан бөтөлкөгө куюштурулган
суу кебээрдин пайда болуусун жогорулатуусу ыктымал.
Чаң соргучту тынымсыз пайдаланууда резервуардагы
сууну улам-улам жаңыртып жана суунун туруп калуусун
жана жагымсыз жытты болтурбоо үчүн резервуардын
өзүн жууп туруу керек.
КӨҢҮЛ БУРУҢУЗ! Эгер бройлерде кебээр пайда бол
со, ушул учур кепилдикке кирбейт.
Буу менен иштеген чаң соргуч VT-1888:
1 ИЧИНДЕ 3 ӨНҮМ
Бул ыңгайлуу буу менен иштеген вертикалдуу шайман
бирөөсүндө үч өнүм камтыйт жана аны чаң соргуч, буу
менен иштеген швабра жана портативдүү буу менен тазалагыч катары колдонууга болот. Ал көп тазалоо функцияларын аткарып, ар кандай беттерди тазалай алат:
ар кандай жасалгадан жертаман (плитка, керамогранит,
паркет), ашканада иштөө беттерди, тартуулар, ванна,
кран, бириктирүүлөр, терезелер жана күзгүлөр, каптоолор, дивандар, креслолор, матрастар, жаздыктар, унаа
интерьерлери), бөлмө эшиктери жана шкаф эшиктери,
жылытуу радиаторлору жана роллкойгучтар, шторалар
жана кийимдер, жашыл өсүмдүктөр. Үчүнчү жак, көз карандысыз лаборатория тарабынан өткөрүлгөн сыноолор
буу менен тазалагыч микрофибрадан салынган чүпүрөк
менен 30 секунд иштөө узактыгында ушул жетекчиликте
камтылган нускамалардга ылайык колдонууда микроб
жана бактериялардын 99,9% кетирээри ырасталган.
1. ШАЙМАНДЫН ЧАҢ СОРГУЧ/БУУ МЕНЕН ИШТЕГЕН
ШВАБРА ТҮРҮНДӨ ЧОГУЛТУУ
1.1. Буюмда бузуктуктар жок жана бардык бөлүктөрү
жеткирүү топтомунда бар экенин текшерип шайманды таңгагынан чыгарыңыз.
1.2. Шайманын корпусун (3) универсалдуу щеткага
туташтырыңыз (1) (1-сүр.).
Универсалдуу щетканы чечүү үчүн, бутуңузду щеткага
коюп, баскычты басыңыз (21) жана шайманды ташуу
туткасынан (15) тик өйдө тартыңыз.
ЭСКЕРТҮҮ: шайманды чогултуунун алдында буралгы
(14) шаймандын таңгагында киргизилгенде узартылган түтүккө (9) буралып киргизилгенин байкаңыз.
1.3. Буралгынын (14) узартылган түтүктөн (9) шлиц бурагычы менен бурап чыгарыңыз. Узартылган түтүктү
шаймандын корпусундагы отургузула турган жерине
орнотуп буралгыны бекитиңиз (2-сүр.)
ЭСКЕРТҮҮ: мезгилмезгили менен буралгы бекем
бекитилгенин текшерип туруңуз.
1.4. Кездеме кабына (28) саптама-швабрага (27) кийгизип, аны универсалдуу щеткага (1) саптама-швабранын фиксаторлору универсалдуу щетканын (3-сүр.)
тиешелүү оюгуна киргендей кылып туташтырыңыз
(буу менен тазалоо гана үчүн).
ЭСКЕРТҮҮ: саптама-швабраны (27) универсалдуу
щеткадан (1) чечүү үчүн капталындагы педалдарынын (22) бирин басыңыз жана түзмөктү туткасынан (15)
тик өйдө тартыңыз.
41
VT-1888.indd 41 10/20/20 3:24 PM
Page 42

КЫРГЫЗ
2. ШАЙМАНДЫ ЧАҢ СОРГУЧ КАТАРЫ ПАЙДАЛАНУУ
1-бөлүмдүн талаптары аткарылган текшериңиз
2.1. Тармактык боосун толугу менен бошотуп аны туруктуу жердетүү байланышы бар болгон электр айры
тешигине туташтырыңыз (4-сүр.) Шайманды ар дайым бош жазылган тармактык боо менен колдонуңуз.
2.2. Чаң соргучта (11) турган азыктануу өчүргүч баскычын (10) (I) абалына которуңуз (5-сүр.) Универсалдуу щетканы (1) токтотмо абалынан иштөө абалына
которуңуз, ал үчүн бутуңузду щеткага коюп, чаң соргучту (15) ташууга эңкейтиңизи (6-сүр.) Чаң соргуч
иштетүүгө даяр.
Тармактык боону тазалоо учурунда тоскоолдук кылбоосу
үчүн, аны жогорку илмекке (13) киргизип коюңуз (7-сүр.)
3. ШАЙМАНДЫ ШВАБРА ЖАНА КОЛГО БУУ МЕНЕН
ТАЗАЛАГЫЧ КАТАРЫ ПАЙДАЛАНУУГА ДАЯРДОО
3.1. Суу резервуарын (4) чечиңиз, ал үчүн фиксаторлордун каптал баскычтарын (18) басып, аны өзүңүзгө
тартыңыз (8-сүр.) Суу резервуарын которуп, анын
тилин өйдө көтөрүп резина тыгынын ачыңыз (9-сүр.)
Резервуарды таза суу менен толтуруңуз.
Резервуарга башка заттарды жана кошулмаларды
кошпоңуз.
3.2. Суу резервуарынын тыгынын бекем жаап аны кайра орнотуңуз. Ушул иштин баарын тармактык боону
тармактан ажыратып коюп аткарыңыз.
ЭСКЕРТҮҮ: агып калууларды болтурбоо үчүн резервуар (4) туура орнотулган текшериңиз.
3.3. Кездеме кабын (28) саптама-швабрага (1) кийгизиңиз жана анын ылдыйкы бөлүгүн универсалдуу
щетка менен туташтырыңыз (3-сүр.)
3.4. Тармактык боосун толугу менен бошотуп аны туруктуу жердетүү байланышы бар болгон электр айры
тешигине туташтырыңыз (4-сүр.) Шайманды ар дайым бош жазылган тармактык боо менен колдонуңуз.
3.5. Шаймандын капталында жайгашкан буу менен тазалагычтагы азыктануу өчүргүчүнүн баскычын (17)
басыңыз (10-сүр.) Башкаруу панелиндеги күгүзүү
индиктаору (7) ( ) жашыл түс болуп күйүп өчөт.
Башкаруу панелиндеги индикатор үзгүлтүксүз күйүп калгыча 30 секунд күтүңүз (11-сүр.)
Андан соң шайман иштөөгө даяр.
КОЛДОГУ БУУ МЕНЕН ТАЗАЛАГЫЧ (16)
3.6. Колдогу буу менен тазалагычты (16) өзүнчө пайдалануу үчүн аны шаймандын корпусунан (3)
ажыртаңызы, ал үчүн өйдөңкү баскычты (8) басып,
аны сыртты көздөй (5) тартыңыз (12-сүр.)
4. ИНТЕНСИВДҮҮ БУУНУН ЧЫГУУСУН ЖӨНДӨӨ
Шайманда интенсивдүү буунун 3 режими бар. Башкаруу
панелинде (7) жайгашкан буу жөндөгүчүнүн баскычын
( ) ыраттуу басуу менен (13-сүр.) колдонулган бууга
жараша буу чыгуусунун интенсивдүүлүгүн орнотот. Тандалган интенсивдүүлүк деңгээлинин индикатору дайыма
жанып турат.
Буунун чыгуу деңгээлин тандоо боюнча бир нече
көрсөтмөлөр:
• Максималдуу деңгээл ( ): кебээрди, тактарды, май-
ды кетирүү үчүн;
• Орточо деңгээл ( ): терезе жана жертаман жууш
үчүн.
• Минималдуу деңгээл ( ): паркетти, ламинатты, назик кездемелерди, эмерек, диван, матрам ж.у.с. каптоолорун тазалоо үчүн
5. АКСЕССУАРЛАРДЫ ТУТАШТЫРУУ
Кененирээк кыймылдоо үчүн аксессураларды колдогу
буу менен тазалагычка (16) же ийилчээк түтүкчөгө (23)
түздөн-түз туташтырууга болот.
5.1. Ийилчээк түтүкчө (23)
Ийилчээк түтүкчөнү (23) портативдүү буу менен тазалагычка (16) туташтырыңыз, фиксатор чык эткенин
тыңшаңыз (14-сүр.) Ийилчээк түтүкчөнү чечүү үчүн, ийилчээк түтүктөнүн негизинде жайгашкан фиксатордун
баскычын басып аны сыртка тартыңыз (14-сүр.)
5.2. Саптама-коцентратор (24)
Саптама-коцентратор (24) колдогу буу менен тазалагычка (16) же ийилчээк түтүкчөгө (23) түздөн-түз туташтырууга болот. Саптаманы чечүү үчүн саптамнын негизинде
жайгашкан фиксатордун баскычын басып аны тартыңыз.
Ийилчээк түтүкчөнү (23) колдогу буу менен тазалагычка
(16) фиксатор чык эткиче (15-сүр.) туташтырыңыз.
Щеткалар (30, 31) жана бириктирүүлөр үчүн саптама
(32) саптама-концентраторго (24) бириктирилет. Аларды
саптама-концентратордун (24) аягына чейин киргизиңиз
(16-сүр.) Чечүү үчүн аларды тартыңыз.
5.3. Бууландыруу үчүн акссуарлар (25, 26)
Бууландыруу саптамасын (25) колдогу буу менен тазалгычка (16) ордуна коюлуусу үчүн акырын басып түздөнтүз туташтырыңыз. Кененирээк кыймылдоо үчүн саптаманы ийилчээк түтүкчөнүн (23) жардамы менен туташтырууга болот (15-сүр.).
Дивандарды, жаздыктарды, креслолорду жана матрастады тазалоо үчүн кездеме кабын (26) саптамага (25)
кийгизиңиз (19-сүр.).
5.4. Терезе жууганга арналган саптама (29)
Терезе жууган саптаманы (29) бууландыруу саптамасына (25) А илмегин (17-сүр.) В жырыгына (18, 20-сүр.),
коюп бекитиңиз, андан соң саптаманы (21-сүр.) С илмеги
(17-сүр.) D жырыгына (18, 20-сүр.) баткандай кылыңыз
Терез жууган саптаманы бууландыруу саптамасы
на бекитүүнүн алдында, саптамага кездеме кабын
кийгизиңиз. Саптаманы кабы жок орнотпоңуз!
6. ЖЕРТАМАН ТАЗАЛОО
Шайманды назик же жалтыратылган беттер үчүн
пайдалануудан мурда, ошол бетте чие турган
башка нерселердин жок экенин текшериңиз.
Буу менен иштеген чаң соргуч комбинацияланган өнүм,
аны чаң соргуч, буу менен вертикалдуу тазалагыч катары, жертаманды тазалоо жана дезинфекциялоо же тазалоо убакытын үнөмдөө үчүн сордуруу ишин комбинацияанган режимде колдонууга болот.
СОРДУРУУ ГАНА
1-бөлүмдүн талаптары аткарылган текшерип, 2 -бөлүмдө
сүрөттөлгөндөй аракет кылыңыз.
БУУ ГАНА
1-3-бөлүмдөрдүн талаптар аткарылганын текшериңиз.
6.1. Жертамандын түрүнө жараша (13-сүр.) буунун чыга-
руу интенсивдүүлүгүн жөндөңүз;
• катуу жертаманадар (плитка, керамогранит
ж.у.с.) үчүн буунун орточо деңгээли ылайыктуу;
42
VT-1888.indd 42 10/20/20 3:24 PM
Page 43

КЫРГЫЗ
• назик жертамандар (паркет, ламинат, керамикалык плитка ж.у.с.) үчүн буунун төмөн деңгээли
ылайыктуу.
6.2. Универсалдуу щетканы (1) токтотмо абалынан
иштөө абалына которуңуз, ал үчүн бутуңузду щеткага коюп, чаң соргучту (15) ташууга эңкейтиңизи
(6-сүр.) Чаң соргуч иштетүүгө даяр.
Туткасында (11) жайгашкан буу чыгаруу баскычын (12)
басып (23-сүр.) щетканы алдыга жана артка жылдырып
тазалоону баштаңыз. Буу чыгарууну токтотуу үчүн баскычты (12) түшүрүңүз.
6.3. Щеткада (1) ийилчээк туташтыруусу бар, ал бурчтарды жана эмеректер менен дубалдардын кырларын оңой тазалоону камсыз кылат.
КОМБИНАЦИЯЛАНГАН РЕЖИМ БУУ/СОРДУРУУ
Бууну жана сордурууну комбинациялап колдонууда жертаманды бир жле учурда чаңын кетирип дезинцекиялайт.
1-2-3-бөлүмдөрүндө сүрөттөлгөндөй аракет кылыңыз.
Тармактык боону тазалоо учурунда тоскоолдук кылбоосу
үчүн, аны жогорку илмекке (13) киргизип коюңуз (7-сүр.)
Кездеме кабын (28) колдонуу менен иш аткарууда жертамандагы кир бир эле учурда буу менен эзилип кездемеге чогулгандай дезинфекциялайт.
Кездеме кабы (28) менен саптама-швабраны (27) универсалдуу щеткадан (1) чечүүнүн алдында кездеменин муздаганын бир нече мүнөт күтүңүз. Андан кийин
бутуңузду швабранын саптамасындагы (27) эки капталдагы педалдардын бирине (22) орнотуп, тутканы (15)
колдонуп түзмөктү түздөн-түз өйдө тартыңыз.
ЭСКЕРТҮҮ: буулап тазалоо үчүн, швабра-саптаманы
кездеме каптамасы жок колдонбоңуз.
ЭСКЕРТҮҮ: кошумча коопсуздугун жогорулатуу үчүн,
жашырылган бөлүктү колдонуудан мурун, буунун
бууланганын текшерип көрүңүз, эч кандай түсүн
өзгөртүү болбостугуна же деформацияланбастыгына
ынаныңыз.
7. ТЕРЕЗЕЛЕРДИ, КҮЗГҮЛӨРДҮ ЖАНА КАФЕЛДИК
ДУБАЛДАРДЫ ТАЗАЛОО
ЭСКЕРТҮҮ: суук мезгилде терезелерди тазалоо үчүн,
айнекти алдын ала ысытып, бууланып, бетинен болжол менен 50 см алыстыкта буулантып баштаңыз.
Колдогу буу менен тазалагычы пайдаланыңыз (16).
3-бөлүмдүн талаптары аткарылгандыгына ынаныңыз.
7.1. Ийилчээк түтүкчөнү (23) колдогу буу менен тазалгычка (16) туташтырып, андан кийин бууландыруу
саптамасын (25) жана ага терез жууганга саптаманы
(29) туташтырыңыз (5.3-5.4 пункаттарынын талаптарын аткарыңыз).
7.2. Буунун чыгышын 4-бөлүмдө көрсөтүлгөндөй кылып
жөндөңүз (13-сүр.).
Бул типтеги бетке орточо буу чыгаруу деңгээли сунушталат.
7.3. Терезелерди жана күзгүлөрдү тазалоо үчүн, көчмө
буу тазалагычтагы буу баскычын (6) басып, беттин
үстүн буулантып, кирин эриңиз (24-сүр.). Андан кийин кирди жана нымды кетирүү үчүн, саптаманын оозун ылдый каратып, үстүңкү бетти аралап өтүңүз.
7.4. Плитканы тазалоо үчүн бууландыруу саптамасын
(25) ийилчээк түтүкчөгө бекитилген (23) кездеме
кабы менен (26) колдонуңуз. Кирди кетирүү үчүн,
колдук буу тазалагычтагы буу берүү (6) баскычын
басып, бууну плитканын бетине тегиз иштетип
алыңыз (24-сүрөт).
8. ЖУМШАК ЭМЕРЕКТИ, КРЕСЛОЛОРДУ,
ЖАШТЫКТАРДЫ ТАЗАЛОО
(матрастар, дивандар, автомобиль салондору ж.б.)
ЭСКЕРТҮҮ: булгаары же кездемелерди буу менен тазалоодон мурун, өндүрүүчүнүн нускамалары менен
таанышыңыз жана ар дайым материалдын катылган
жерин же үлгүсүн сынап көрүңүз. Түстүн өзгөрүшү же
деформациясы болбогондугуна ынануу үчүн, бир аз
күтө туруңуз.
Колдогу буу менен тазалагычы пайдаланыңыз (16).
3-бөлүмдүн талаптары аткарылгандыгына ынаныңыз.
2.4 пунктундагы нускамаларга ылайык шайманды
күйгүзүп, 3-бөлүмдө баяндалгандай аксессуарларды
туташтырыңыз.
8.1. Буунун чыгышын 4-бөлүмдө көрсөтүлгөндөй кылып
жөндөңүз (13-сүр.).
Бул типтеги бетке минималдуу буу чыгаруу деңгээли сунушталат.
8.2. Бууландыруу үчүн аксессуарларды (25, 26) колдогу
буу менен тазалагычтын (16) ийилчээк түтүкчөсүнө
(23) 5.3-бөлүмүндө сүрөттөлгөндөй туташтырыңыз.
Кирди кетирүү үчүн буу баскычын (6) колдонуп, буу
чыгарып, бетти басып өтүңүз (24-сүр.) .
9. САНИТАРДЫК-ТЕХНИКАНЫ, СҮРҮП ӨЧҮРҮҮ
ТИГИШТЕРИН ЖАНА АШКАНА СТОЛДОРУНУН
ҮСТҮН, БАРБЕКЮНУ ТАЗАЛОО
Колдогу буу менен тазалагычы гана пайдаланыңыз.
3-бөлүмдүн талаптары аткарылгандыгына ынаныңыз.
9.1. Сатама-концентраторду (24) 5.2-бөлүмүндө
сүрөттөлгөндөй колдогу буу менен тазалгычка
(16) туташтырыңыз (кол жетпеген жерлерге саптама-концентраторду ийилчээк түтүкчөгө туташтырса болот).
9.2. Көбүрөөк ылайык келүүчү аксессуарды талапка
ылайык туташтырыңыз:
• жетүүгө кыйын болгон жерлерди тазалоо жана
көбүрөөк концентрацияланган буу алуу үчүн, концентратор саптаманы (24).
• кургак топуракты жана акиташ катмарын кетирүү
үчүн тегерек нейлондон кылкалемди (30).
• өтө кургап калган майды жана кирди (барбекю,
унаа же мотоцикл дөңгөлөктөрү ж.б.) тазалоо
үчүн, латундан жасалган (31) тегерек чакан кыл
калемди.
• плиткалардын ортосундагы сүртүп өчүрүү тигиш-
терин тазалоо жана өтө тар беттердеги кирлерди
кетирүү үчүн саптаманы (32).
ЭСКЕРТҮҮ: кыл калемдерди (30), (31) жана саптаманы
(32) колдонгондо, концентратор саптаманы (24) учу
сынып калбашы үчүн ашыкча күч колдонбоңуз.
Көңүл буруңуз! Пайдалануу учурунда концентра
тор саптаманын учу ысыйт. Кошумча аксессуар
ларды орнотуудан / ажыратуудан мурун, учунун
муздашын кеминде 5 мүнөт күтүңүз.
9.3. Буунун чыгуу интенсивдүүлүгүн жөндөңүз (13-сүр.).
Бул типтеги бетке максималдуу буу чыгаруу деңгээли
сунушталат.
9.4. Колдук буу тазалагычтагы (24-сүрөт) буу баскычын
(6) басыңыз, андан кийин беттерди бууландырыңыз.
43
VT-1888.indd 43 10/20/20 3:24 PM
Page 44

КЫРГЫЗ
10. ЭМЕРЕКТЕРДИ ЖАНА НАЗИК БЕТТЕРДИ
ТАЗАЛОО
ЭСКЕРТҮҮ: кездемелерди буу менен тазалоодон мурун, өндүрүүчүнүн нускамалары менен таанышыңыз
жана ар дайым материалдын катылган жерин же
үлгүсүн сынап көрүңүз.
Колдогу буу менен тазалагычы пайдаланыңыз (16).
3-бөлүмдүн талаптары аткарылгандыгына ынаныңыз.
10.1. Концентратор саптаманы (24) 5.2-бөлүмдө
сүрөттөлгөндөй, колдук буу тазалагычка (16)
туташтырыңыз (сүрөт 14).
10.2. Буунун чыгуу интенсивдүүлүгүн жөндөңүз (13-сүр.).
Бул типтеги бетке минималдуу буу чыгаруу деңгээли
сунушталат.
10.3. Колдук буу тазалагычтагы (24-сүрөт) буу баскычын (6) басыңыз, андан агымды кездемеге
багыттаңыз.
ЭСКЕРТҮҮ: буу агымын түздөн-түз бетине багыттабаңыз.
10.4. Бетин тазалоо үчүн алдын-ала бууланган кездемени колдонуп, бир эле жерде узак убакытка
чейин колдонуудан алыс болуңуз.
11. БАШКА ЖАЛПЫ КОЛДОНУУЛАР
Эскертүү: бетин тазалоодон мурун, ар дайым жашыруун жеринде сыноо жүргүзүп, анын кандай реакция кыларын байкап көрүңүз.
11.1. Пардаларды жана портьерлерди тазалоо
Параларды жана портьерлерди кенелерден жана
чаңдардан тазалоо үчүн, түздөн-түз колдук буу тазалагычтан кездемени буулантып алса болот. Буу жагымсыз жытты кетирип, түстөрдү жаңыртат, демек,
кездемелерди азыраак жууганга мүмкүндүк берет.
Бул типтеги бетке минималдуу буу чыгаруу деңгээли
сунушталат.
11.2. Килемдердеги жана эмерек каптоолорунан
тактарды кетирүү
ЭСКЕРТҮҮ: БУУ!
Күйүк алуунун коркунучу бар!
Бууну мүмкүн болушунча эң жогорку бурчтагы такка түздөн-түз багыттаңыз (тазалануучу бетке эч качан перпендикулярдуу болбоңуз) жана буу басымы
«үйлөгөн» кирди топтоо үчүн кездеменин тагына
коюңуз.
Бул типтеги бетке минималдуу буу чыгаруу деңгээли
сунушталат.
11.3. Өсүмдүктөргө кам көрүү жана бөлмөнү
нымдоо
Бөлмөңүздөгү өсүмдүктөргө кам көрүү үчүн, буу менен жалбырактардагы чаңды тазалаңыз.
Колдогу буу менен тазалагычы ийилчээк түтүкчөсү
менен агымды оңой багыттоо үчүн пайдаланыңыз
(аны бекитүү үчүн 3-бөлүмдү караңыз). Бетти 50 см
алыстыкта буу менен буулап, минималдуу деңгээлге
чейин жөндөңүз. Өсүмдүктөр жакшы дем алып, таза
жана жарык болот. Бууну айрыкча тамеки чеккендер
көп баруучу бөлмөлөрдү сергитүү үчүн пайдаланса
болот: орунжайды булантып, агымды шыпты көздөй,
аны бирдей бүлүштүрүү менен багыттаңыз.
11.4. Бетти дезинфекциялоо
Дезинфекциялоо үчүн, концентратор саптаманын
(24) чоргосун беттен 1,5 см ашык эмес жерде кармап,
кеминде 5 секунд бууландырыңыз. Мындай иштетүү
микробдорду жана бактерияларды жок кылууда эң натыйжалуу.
ПРАКТИКАЛЫК КЕҢЕШТЕР
Чаңсоргучту пайдалануу боюнча кеңештер
Полду тазалап жатканда, чаң соргучту алдыга-артка
жылдырып, өзүңүздөн түртүп, кайра артка тартыңыз.
Узак убакытка чейин колдонулбай калганда, резервуардагы бардык сууну агызып салыңыз.
Пол жууганда,
бетке доо кетпеш үчүн чаң соргучту бир абалда көпкө
кармабаңыз. Ошондой эле, чаң соргучту полго нымдуу чүпүрөк менен тигинен койбоңуз, ал нымдалып,
бузулуп калышы мүмкүн.
Буу швабрасын пайдалануу боюнча кеңештер
Полду тазалоодон мурун, аны чаңдан жана топурактын бөлүкчөлөрүнөн тазалоо үчүн шыпыруу же соруп
алуу сунушталат.
Полду тазалап жатканда,шайманды алдыга-артка
жылдырып, өзүңүздөн түртүп, кайра артка тартыңыз.
Ансыз деле жуулуп калган полго баспай калуу үчүн
артка жылыңыз.
Микрофибрадан чүпүрөк полду тазалоодо суу чогултат. Бирок, полдун бетине жана белгиленген буу
интенсивдүүлүгүнө жараша, жерде нымдуулук бир аз
калышы мүмкүн. Мындай учурда полду табигый жол
менен кургатуу сунушталат. Кургатууну желдеткичти
керектүү аймакка багыттоо аркылуу тездетүүгө болот.
Жуудан кийин полду азыраак нымдуу кылуу үчүн,
«Буу» баскычы менен минималдуу буу берүүнү
тандаңыз.
Тазалоодон кийин швабра саптаманы универсалдуу
кыл калемден алып салыңыз.
Ошондо шайман астындагы пол ным чүпүрөктөн нымдалбайт.
Колдук буу тазалагычты колдонуу боюнча
кеңештер
Беттерди тазалоо
Тазалануучу материал нымга жана ысыкка туруштук
бериши керек. Тазалоону баштоодон мурун буларга
ынаныңыз.
Полдун айрым түрлөрүндө (мисалы, плитка) оюк же
цементтелген бети бар. Тазараак тазалоо үчүн тегерек нейлон кыл калемди колдонууну сунуштайбыз.
Кафель плиткалардын ортосундагы боштуктарды
(жылчыктарды) тазалоо үчүн концентратор саптамасын колдонуңуз.
Бул максаттар үчүн түктүү кылкалемдерди колдонуу
сунушталат, анткени алар сүртүлгөндөрдү алып салышы мүмкүн.
Концентратор саптамасын жылчыкка жакын жерге 3060° бурчка алып келип, буу берүүнү күйгүзүп, жылчыкты бойлото акырындык менен алдыга жылдырыңыз.
Тазалоодон кийин, тегеректеги беттердеги кирлерди
чүпүрөк менен тазалаңыз. Ушул сыяктуу эле, пол
плиткалардын ортосундагы боштуктарды, ошондой эле башка жаракаларды жана тар жерлерди
тазалаңыз.
Буу чоргосу булганган жерге канчалык жакыныраак
болсо, тазалоо натыйжасы ошончолук жогору болот,
44
VT-1888.indd 44 10/20/20 3:24 PM
Page 45

КЫРГЫЗ
анткени буу чоргосунун чыгышында эң жогорку буу
температурасы камсыздалат. Ошондуктан, тазалап
жатканда, саптамалардын буу чоргосун тазалануучу
бетке мүмкүн болушунча жакын жайгаштырууга аракет кылыңыз.
Буу менен тазалап жатканда, буу менен тазаланган
бетин чүпүрөк же губка менен сүртүп, калган кирди
тазалаңыз. Бетин нымдуу бойдон сүртүү сунушталат. Металл беттерин сүртүүдө этият болуңуз, анткени буу менен иштетилгенден кийин ысык болушу
мүмкүн.
Өтө кирлерди кетирүү үчүн, буунун агымынын гана
күчү жетишсиз болушу мүмкүн; механикалык натыйжаны күчөтүү үчүнтүктүү же латундан жасалган кыл
калемди колдонуңуз. Кыл калемдерди колдонууда,
концентратор саптаманын учу сынып калбашы үчүн,
ашыкча күч колдонбоңуз.
Өтө көр акиташ катмарлары үчүн, буу менен тазалоодон мурун уксус чачып, 5 мүнөттөй иштегенче күтүп,
андан кийин бетин буу менен иштетиңиз.
Кийимдерди же эмеректердин каптоосун тазалап жатканда, саптамасына чүпүрөк кийгизип койсоңуз, анда
топурак кийимге же кездемелерге эмес, чүпүрөккө
сиңип калат.
Саптаманы дубалдардан эски туш кагаздарды алып
салуу үчүн колдонсоңуз болот.
Буу туш кагаз желимин көптүрүп, туш кагазды алып
салууну жеңилдетет.
Терезелерди жана күзгүлөрдү тазалоо
Терезени жууганда саптаманы колдонгондо, алгач терезени же күзгүнү толугу менен буу менен тазалап,
андан кийин буусун өчүрүңүз. Андан кийин саптаманын резина кыргычын терезенин же күзгүнүн үстүнө
басып, саптаманы акырындап ылдый түшүрүңүз.
Терезени же күзгүнү толугу менен тазалоо үчүн, бир
бетинен экинчи тарабына жылыңыз. Кыргыч менен
сыгылган суусун чогултуу үчүн күзгүнүн алкагынын же
койгучтун асты жагына чүпүрөк же салфетка коюңуз.
Сырттагы терс температурада (кыш мезгилинде), терезенин айнегин тазалоодон мурун, температуранын
кескин түшүп кетишинен жарака кетпеши үчүн, аны
жылытыңыз.
Жылуу болгондон кийин, бетти толугу менен оңой буулай аласыз.
Кийимди буулантуу
Кийимди буулоо үчүн, дат баспас илгичке илип
коюңуз. Буулантуучу саптаманы колдук буу тазалагычка туташтырыңыз. Буу тазалагычты бир колуңузга
алыңыз, экинчи колуңуз менен бир аз чыңалууну
пайда кылып, кийимдин төмөнкү бөлүгүн кармаңыз.
Саптаманы кездеменин бетине алып келип, жумушчу
бөлүгүн ага бир аз бастырып, алдыга-артка кыймылдоо менен буулантып баштаңыз (жогорудан төмөн).
Эң көп бүгүш түшкөн жерлерден, ошондой эле тыгызыраак элементтерден (жака жана жең манжеттери)
баштоону сунуштайбыз.
12. СУУНУН ДЕҢГЭЭЛИ
Суунун деңгээли ар дайым тунук резервуардан
көрүнүп турат (4) көрүнүп турат.
Суу түгөнгөндө буу чыкпай калат.
Ишти улантуу үчүн, 3-бөлүмдө сүрөттөлгөндөй резервуарга суу куюңуз.
ЭСКЕРТҮҮ: бул иш ар дайым шайманды электр тармагынан ажыраткандан кийин жасалышы керек.
13. КЕБЕРДИН ЧЫПКАСЫН АЛМАШТЫРУУ
Шайманда акиташ катмарын токтото турган жана сиздин өнүмдүн иштөө мөөнөтүн узарта турган атайын
чайырлары менен чыпка бар.
Чыпканы жылына 1 жолу алмаштыруу сунушталат.
13.1. Шайманды электр тармагынан чыгарыңыз.
13.2. Суу резервуарын (4) колдук буу тазалагычтан
(16) чыгарып, бекитмелердин (18) капталдагы баскычтарын басып, сыртка сууруп чечип
алыңыз (8-сүр.).
13.3. Эски чыпканы, төмөн тартып чечип алыңыз
(25-сүрөт).
13.4. Жаңы чыпканы (35) кыстарыңыз, акырын басып,
анын толугу менен отургандыгын текшериңиз
(26-сүр.), андан кийин суу резервуарын
орнотуңуз.
ЭСКЕРТҮҮ: Колдонуу учурунда чыпка карарып, күрөң
же дат басышы мүмкүн, бул кадимки нерсе жана бузук болуп саналбайт.
14. ЧАҢ ЧОГУЛТКУЧ КОНТЕЙНЕРДИ ЖАНА
ЧЫПКАЛАРДЫ ТАЗАЛОО
14.1. Шайманды толугу менен өчүрүп коюңуз, бул
үчүн, чаң соргучтун туткасында (11) жайгашкан азык өчүргүч (10) баскычын (0) абалына
жылдырыңыз жана буу тазалагычтын азык
өчүргүчүнүн (I/0) баскычын басыңыз (10-сүрөт),
андан кийин электр боосунун айрысын электр
розеткасынан чыгарыңыз.
14.2. Чаң чогулткуч контейнерди (2) чаң чогулткуч
контейнердин бекитмелеринин эки баскычын
басып, түзмөктүн корпусунан (4) алып салыңыз
(20) (27-сүр.)
14.3. Чаң чогулткуч контейнеринен поролон чыпкасы
(37) салынган HEPA чыпкасын (36, каптал багыттагычтарынан кармап (28-сүрөт), бүктөлүп турган темир туткасын колдонуп, өйдө карай циклон
чыпкасын (39)тартып алыңыз (29-сүрөт).
14.4. Циклон чыпкасынын капкагын (38) сааттын жебесине каршы буруп алып, андан кийин циклон
чыпкасын (39) чаңдан тазалаңыз.
14.5. Чаң чогулткуч контейнер идишинин (40) кирден
тазалаңыз.
14.6. Чаң чогулткуч контейнерди чогултуп, жогорудагы кадамдарды тескери тартипте аткарып, баштапкы ордуна кайра орнотуңуз, (14.2-14.4-пункттарды караңыз).
Чаң чогулткуч контейнерди (2) ар бир колдонгондон
кийин тазалап туруу сунушталат.
ЭСКЕРТҮҮ: чыпкалар менен комплектте орнотулган чаң чогулткуч контейнери жок шайманы
колдонбоңуз.
15. ЖАЛПЫ ТЕЙЛӨӨ
Шайман өчүрүлүп, розеткадан чыгарылгандыгын
текшериңиз.
Шайманды сыртынан тазалоо үчүн чүпүрөк жана кран
суусун гана колдонуңуз.
Бардык буу менен тазалоочу шаймандарды агын суу
менен тазалап, кийинки колдонуудан мурун толугу
45
VT-1888.indd 45 10/20/20 3:24 PM
Page 46

КЫРГЫЗ
менен кургатса болот. Кыл калемдерди колдонгондон
кийин деформацияны болтурбоо үчүн, кылдарын табигый абалында муздатыңыз. Бардык түрдөгү жуугуч
каражаттарды пайдаланбаңыз. Саптамалардын каптамаларын этикеткадагы келтирилген нускамаларды
сактоо менен жууса болот.
Чаң чогулткучтун чыпкаларын жана идиштерин кийинки колдонуудан мурун толугу менен кургак болушун
камсыз кылып, аларды агын суунун астында тазаласа
болот. Циклон чыпкасынын идиштерин жана чаң идишин агын суу менен чайкап, ашыкча кирди же сууну
кетирүү үчүн силкиңиз. Шайманга чыпканы орнотуудан мурун, аларды жылуулук булактарынан алыс,
табигый жол менен, жок дегенде 24 саат кургатыңыз.
HEPA-чыпкасы болжол менен ар бир төрт айда толугу
менен тазаланып турушу керек.
16. САКТОО ЖЕРИ
16.1. Шайманды өчүрүп, электр тармагынан ажыратыңыз.
17. БУЗУЛУУЛАРДЫ ДИАГНОСТИКАЛОО
Шайман иштебей жатат. Электричество жок. Шайман электр тармагына
Эч кандай буу чыккан жок. Суу бүтүп калган. Шайманды тармактан чыгарып, суу резервуарын
Шайман күйгүзүлгөн, бирок
буу аз чыгат.
Шайман полго өтө эле көп
суу чыгарып жатат.
Соруу кубаттуулугу иштөө
учурунда төмөндөйт.
Соруп жатканда шаймандан
чаң чыгат.
Чаң чогулткуч чечилбейт. Чыпка туура эмес коюлган Чыпка туура коюлган
Эгерде көйгөйлөр кайталана берсе же жогоруда келтирилген эмес болсо, анда ыйгарым укуктуу тейлөө
борборуна (www.vitek.ru) же Кардарларды тейлөө бөлүмүнө кайрылыңыз.
Көйгөй Себеби Чечим
Шайман өчүрүлгөн. Шайман азык булагына туташтырылгандыгын,
Бууну берүү минималдуу
деңгээлге коюлган.
Бууну берүү максималдуу
деңгээлге коюлган.
Буу баскычы басылат жана /
же кармалып турат.
Чаң чогулткуч контейнер
толуп калган.
Чаң чогулткуч туура эмес
коюлган.
Чаң чогулткуч контейнер
толуп калган.
16.2. Агып кетпеши үчүн суу резервуарынан калган
сууну төгүңүз.
16.3. Саптамалардагы кездеме каптамаларын алып
салуудан мурун, аксессуарлардын муздашын
бир нече мүнөт күтүңүз.
16.4. Тармактык боону атайын оролуучу илгичтердин
(13, 19) айланасына ороп коюңуз (30-сүр.).
14-бөлүмдүн талаптарын аткарыңыз.
Шайманды кайрадан колдонуудан мурун, тармактык
боосун толугу менен ачып алыңыз. Тармактык боону
тез ачуу үчүн, жогорку жип оролуучу илгич (13) 180°
айланат.
ЭСКЕРТҮҮ: шайманды оролгон тармактык боо менен электрдик тармакка туташтырылган бойдон
кармабаңыз.
16.5. Шайманды сактоо илгич (33) 4 тешик жана кошо
орнотулган топтом (34) аркылуу дубалга орнотууга болот.
Шайман сактоочу илгичке (33) жылдыруучу туткасынан (15) бекитилет (31-сүр.).
туташтырылгандыгын текшериңиз.
толтуруңуз да, шайманды кайрадан колдонуңуз.
колдук буу тазалагычтын өчүргүч баскычы (I)
абалда экендигин жана буу баскычы (6 же 12)
басылып тургандыгына ынаныңыз.
Жөндөө баскычын басыңыз
Берилүүчү бууну көбөйтүү үчүн буу берүү
(4-бөлүмдү караңыз).
Буу берүүнү минимумга чейин азайтыңыз. Керек
болсо, беттин үстүн тазалап жатып буу берүүнү
убактылуу токтотуңуз.
Буу баскычын (6 же 12) ар дайым басып
турбаңыз, бирок температураны турукташтыруу
үчүн аны коё бериңиз.
Чаң топтогуч контейнерди тазалаңыз.
Чаң чогулткучту туура коюңуз.
Чаң топтогуч контейнерди тазалаңыз.
БУЮМДУН КОМПЛЕКТҮҮЛҮГҮ
Орнотулган чыпкалар топтому бар
буу чаң соргуч – 1 даана.
Универсалдык щетка – 1 даана.
Ийилчээк түтүкчөсү – 1 даана.
Эмерек капталын тазалоо саптамасы – 1 даана.
Саптама үчүн кездеме каптама – 1даана.
Швабра саптама – 1даана.
Швабра саптама үчүн кездеме каптама – 1 даана.
Терезе жууган саптама – 1 даана.
Концентратор саптама (кыйынчылык менен
жеткен жерлер үчүн) – 1 даана.
Нейлон түктөрү менен кичине тоголок
кыл калем – 1 даана.
Латун түктөрү менен кичине тоголок кыл калем.
Сүртүлгөн тигиштерди иштетүү
үчүн саптама – 1даана.
Кепердин кошумча чыпкасы – 1 даана.
Сактоо үчүн илгич – 1 даана.
Илгичти бекитүү үчүн топтом – 1 даана.
46
VT-1888.indd 46 10/20/20 3:24 PM
Page 47

КЫРГЫЗ
ТЕХНИКАЛЫК МҮНӨЗДӨМӨЛӨРҮ
Электр кубаты: 220-240 В ~ 50-60 Гц
Номиналдуу иштетүү кубаттуулугу: 1800 Вт
Буу швабрасынын кубаттуулугу: 1200 Вт
Чаң соргучтун кубаттуулугу: 600 Вт
Сиңирүүнүн кубаттуулугу: 12 кПа
Ысытуу убакыты: 25-30 секунд
Буу чыгуунун интенсивдүүлүгү: тандалган деңгээлине
жараша 15-тен 25 г/мүн чейин
Буу берүү убакыты: тандалган деңгээлине
жараша 14-22 мүн
Чаң чогулткуч контейнердин көлөмү: 0,4 л
Суу куюлуучу идиштин көлөмү: 0,5 л
Жыйноо аянты: суунужеткирбей куюу аянты 30 м²
Тармактык боонун узундугу: 5 м
УТИЛИЗАЦИЯЛОО
Айлана чөйрөөнү коргоо максатында шайман менен
азыктандыруучу элементтердин (эгерде топтомго
кирсе) кызмат мөөнөтү бүткөндөн кийин турмуш-тиричилик калдыктары менен бирге таштабаңыз, шайман
менен азыктандыруучу элементти андан ары утилизациялоо үчүн адистештирлиген пункттарга бериңиз.
Шаймандарды утилизациялоодон пайда болгон калдыктарды милдеттүү түрдө чогултуп, андан соң белгиленген жолунда утилизациялоо зарыл.
Бул шайманды утилизациялоо жөнүндө кошумча маалымыт алуу үчүн жергиликтүү өкмөткө, турмуш-тирчилик калдыктарды утилизациялоо кызматына же бул
шайманды алган дүкөнгө кайрылыңыз.
Өңдүрүүчү шаймандардын жалпы иштөө принциптерине таасир этпеген дизайнин, конструкциясын
жана техникалык мүнөздөмөлөрүн алдын ала эскертпей өзгөртүү укугун сактайт, ошол себептен шайман менен колдонмонун арзыбаган айырмалар болуу
мүмкүн. Колдонуучу ушундай келишпегендиктерди
тапса, ал жөнүндө info@ vitek.ru электрондук почтасына жазып, шаймандын жаңырланган версиясын
алса болот.
Шаймандын кызмат мөөнөтү – 3 жыл
Кепилдик
Кепилдик берүү шарттары тууралуу толук маалыматтар буюмду саткан сатуучудан алууга болот. Кепилдик
шарттарына ылайык талап кылып сатылган товарга
чек же дүмүрчөктү көрсөтүү керек.
47
VT-1888.indd 47 10/20/20 3:24 PM
Page 48

ROMÂNĂ
ASPIRATOR CU ABUR VT-1888
Aspirator multifuncțional cu 3 moduri de curățare a
suprafețelor: aspirator cu tehnologie «ciclon», funcția de
dezinfectare a podelei cu abur și tratarea suprafețelor cu
un curățător cu abur portabil.
DESCRIERE
1. Perie universală
2. Container-colector de praf
3. Corp
4. Rezervor de apă
5. Mânerul curățătorului cu aburi manual
6. Buton de alimentare cu aburi
7. Panou de comandă
8. Butonul de scoatere a curățătorul cu aburi manual
9. Tubul de extensie
10. Tasta comutatorului de alimentare a aspiratorului (I/0)
11. Mânerul aspiratorului
12. Buton de alimentare cu aburi
13. Cârligul superior pentru înfășurarea
cablului de rețea
14. Șurub de fixare a mânerului
15. Mâner de transportare
16. Aspirator cu abur manual
17. Tasta comutatorului de alimentare
a curățătorului cu abur (I/0)
18. Butoanele fixatorului rezervorului de apă
19. Cârligul inferior pentru înfășurarea cablului de rețea
20. Fixatorul containerului-colectorului de praf
21. Buton pentru îndepărtarea periei universale
22. Pedale pentru îndepărtarea duzei-mop
23. Furtun de abur flexibil
24. Duză-hub pentru locuri greu accesibile
Accesorii pentru aburire
25. Duză pentru aburire
26. Husa din țesătură pentru duza pentru aburire
Accesorii pentru spălarea podelei
27. Duză-mop
28. Husă din țesătură pentru duza-mop
29. Duză pentru spălarea ferestrelor
30. Perie rotundă mică cu păr de nailon
31. Perie rotundă mică cu păr din alamă
32. Duză de prelucrare a rosturilor
33. Cârlig pentru depozitare
34. Kit de fixare a cârligului
35. Filtru suplimentar împotriva calcarului
Container- colector de praf
36. Filtru HEPA
37. Filtru din spumă
38. Capacul filtrului ciclonic
39. Filtru ciclon
40. Capacitatea containerului-colectorului de praf
ATENȚIE!
Pentru protecție suplimentară în circuitul de alimentare,
se recomandă instalarea unui dispozitiv de curent rezidual (RCD) cu un curent de funcționare nominal, care nu
depășește 30 mA, pentru instalarea unui RCD, consultați
un specialist.
SIMBOLURI DE SECURITATE:
AVERTIZARE: Temperatură înaltă. Pericol de arsuri!
Dacă acest lucru este indicat pe produs, nu îl
atingeți, deoarece piesele pot fi foarte fierbinți.
ATENȚIE: ABUR!
Pericol de arsuri!
Dispozitivul atinge temperaturi foarte ridicate.
Utilizarea necorespunzătoare a aparatului poate duce
la arsuri.
MĂSURI DE SIGURANȚĂ ȘI RECOMANDĂRI
DE FUNCȚIONARE
Înainte de a utiliza dispozitivul, citiți cu atenție acest manual
și păstrați-l ca material de referință.
• Folosiți dispozitivul numai în scopul prevăzut, așa cum
este descris în acest manual. Manipularea necorespunzătoare poate duce la defectarea dispozitivului sau
poate cauza daune utilizatorului sau bunurilor acestuia.
• Asigurați-vă că tensiunea de funcționare a dispozitivului, indicată pe etichetă, corespunde tensiunii rețelei
electrice.
• Conectorul cablului de alimentare are un contact de
împământare, introduceți-l într-o priză electrică, care
are un contact de împământare fiabil.
• Desfaceți complet cablul de rețea înainte de a conecta
aparatul la rețea și înainte de utilizare. Utilizați întotdeauna produsul cu cablul de rețea complet desfăcut.
• Pentru a evita riscul de incendiu, nu folosiți adaptoare
atunci când conectați dispozitivul la o priză electrică.
• Nu atingeți carcasa dispozitivului, suprafața de lucru, cablul de rețea și ștecherul cablului de rețea cu mâinile ude.
• Opriți dispozitivul și deconectați-l de la rețeaua electrică la terminarea apei din rezervorul curățătorului de
abur portabil.
• Nu lăsați dispozitivul conectat la rețeaua electrică fără
supraveghere.
• Aburul nu trebuie direcționat către echipament, care
conține componente electrice, cum ar fi interiorul cuptoarelor.
• Nu utilizați dispozitivul în nemijlocita apropiere a surselor de căldură sau flacără deschisă.
• Nu folosiți dispozitivul în apropierea chiuvetei de bucătărie, băilor, bazinelor sau altor recipiente umplute
cu apă.
• Dacă dispozitivul a căzut în apă, scoateți imediat
ștecherul cablului de alimentare din priza electrică și
numai după aceea puteți scoate dispozitivul din apă.
Contactați Centrul de service pentru a controla sau repara dispozitivului.
• Nu folosiți dispozitivul în locuri, în care sunt folosiți sau
pulverizați aerosoli sau în apropierea lichidelor inflamabile și nu folosiți dispozitivul în locuri, unde sunt depozitate astfel de lichide unde există pericol de explozie
sau în prezența substanțelor toxice.
• Nu turnați în rezervor substanțe toxice, acizi, solvenți,
detergenți, substanțe agresive și/sau explozivi sau aditivi de parfum.
• Nu aspirați și nu îndreptați jetul de abur către substanțe
toxice, acizi, solvenți, detergenți sau substanțe corozive. Manipularea substanțelor periculoase și îndepărtarea acestora trebuie efectuate în conformitate cu
instrucțiunile producătorului acestor substanțe.
48
VT-1888.indd 48 10/20/20 3:24 PM
Page 49

ROMÂNĂ
• Nu aspirați și nu îndreptați jetul de abur spre pulberi
sau lichide explozive, hidrocarburi, flăcări deschise și
obiecte foarte fierbinți.
• Păstrați toate părțile corpului departe de duza de
aspirație și de orice părți în mișcare sau rotație.
• Nu utilizați funcția de aspirație pe oameni și / sau animale.
• Utilizați un mâner special pentru transportare. Nu
trageți de cablul de alimentare. Nu utilizați cablul de
rețea ca mâner. Nu ridicați aparatul utilizând cablul de
alimentare sau furtunuri de abur / tuburi de vid.
• Nu așezați produsul lângă surse de căldură, cum ar fi
șeminee, sobe și cuptoare.
• Nu instalați produsul în apropierea câmpurilor electromagnetice, cum ar fi panourile de inducție.
• Re-înfășurați cablul de rețea pe cârligele de înfășurare
atunci, când aparatul nu este utilizat.
• Nu blocați găurile și grilele de pe produs.
• Când curățați scările, aparatul trebuie amplasat pe
trepte sub nivelul utilizatorului.
• Nu îndreptați jetul de abur către nici o parte a corpului
oamenilor sau animalelor.
• Nu îndreptați jetul de abur către îmbrăcăminte în timp
ce o purtați.
• Articolele și țesăturile tratate cu abur adânc ajung la
temperaturi foarte ridicate - peste 100 °C., așteptați
câteva minute și asigurați-vă că s-au răcit înainte de
a le folosi. De aceea, evitați contactul cu pielea dacă
tocmai au fost aburite.
• Așezați curățătorul cu abur vertical pe o suprafață plană, uscată, rezistentă la umezeală și rezistentă la căldură, nu-l așezați orizontal și nu-l răsturnați în timpul
funcționării.
• Utilizați doar duzele, care fac parte din setul de livrare.
• Înainte de a utiliza dispozitivul, asigurați-vă ca duzele
sunt montate corect și sunt bine fixate.
• Se recomandă să umpleți rezervorul cu apă de la robinet, care a trecut o curățare suplimentară cu filtre de uz
casnic. Nu folosiți apă gazată și adaosuri de parfumerie.
• Asigurați-vă că nivelul apei nu este mai mare decât
marcajul maxim «MAX».
• Nu acoperiți orificiile de evacuare a aburului, nu
introduceți obiecte străine în găuri.
• În timpul funcționării, partea superioară a carcasei și
suprafața de lucru a curățătorului de abur se încălzesc foarte mult, pentru a evita arsurile, nu atingeți
suprafața de lucru și partea superioară a carcasei.
• Feriți-vă de arsuri cu abur fierbinte.
• Deconectați dispozitivul de la rețeaua electrică după
utilizare și înainte de curățare.
• Când deconectați dispozitivul de la rețeaua electrică, apucați de ștecherul cablului de alimentare și
scoateți–l din priza electrică, nu trageți de cablul de
alimentare - acest lucru poate cauza deteriorarea
acestuia și poate cauza un scurtcircuit.
• Pentru siguranța copiilor, nu lăsați pungile de polietilenă, folosite ca ambalaj, fără supraveghere.
Atenție! Nu permiteți copiilor să se joace cu pungile de
polietilenă sau pelicula de ambalare. Pericol de sufocare!
• Acest dispozitiv nu este destinat utilizării de către copii.
• Copiii trebuie supravegheați pentru a preveni jocul cu
dispozitivul.
• Nu permiteți copiilor să atingă suprafața de lucru, corpul dispozitivului, cablul de alimentare și ștecherul cablului de alimentare în timpul funcționării dispozitivului.
49
• Fiți deosebit de precauți, dacă în apropierea dispozitivului în funcțiune se află copii sau persoane cu dizabilități.
• În timpul funcționării și în timpul pauzelor între ciclurile de lucru plasați dispozitivul în locuri inaccesibile
pentru copii.
• Dispozitivul nu este destinat utilizării de către persoane
(inclusiv copii) cu abilități fizice, senzoriale sau mentale
reduse, sau lipsa de experiență sau cunoștințe, dacă
aceștea nu sunt sub supraveghere sau nu sunt instruiți
cu privire la utilizarea dispozitivului de către persoana
responsabilă de siguranța acestora.
• Verificați periodic integritatea cablului de alimentare.
• În cazul deteriorării cablului de alimentare, pentru a
evita pericolul, înlocuirea acestuia trebuie să fie efectuată de către producător, agentul de service sau de
un personal calificat similar.
• Se interzice utilizarea dispozitivului în cazul deteriorării
ștecherului cablului de alimentare sau a cablului de alimentare, dacă dispozitivul funcționează cu întreruperi,
precum și după căderea acestuia.
• Nu reparați dispozitivul de sine stătător. Nu demontați
dispozitivul de sine stătător, în caz de apariție a oricăror defecțiuni, precum și după căderea dispozitivului,
deconectați-l de la rețeaua electrică și adresați-vă la
orice centru autorizat (împuternicit) de service la adresele de contact specificate în talonul de garanție și pe
site-ul www.vitek.ru.
• Pentru a evita deteriorările transportați dispozitivul
doar în ambalajul original.
• Păstrați dispozitivul la un loc răcoros, inaccesibil pentru copii și persoane cu dizabilități.
PREZENTUL DISPOZITIV ESTE DESTINAT DOAR PENTRU
UZ ÎN CONDIȚII CASNICE. ESTE INTERZISĂ UTILIZAREA
COMERCIALĂ ȘI UTILIZAREA DISPOZITIVULUI ÎN ZONELE
DE PRODUCȚIE ȘI ÎNCĂPERILE DE LUCRU.
ÎNAINTE DE PRIMA UTILIZARE
După transportarea sau depozitarea dispozitivului la
o temperatură scăzută este necesar să-l mențineți la
temperatura camerei timp de cel puțin trei ore.
• Despachetați dispozitivul și îndepărtați toate materialele de ambalare și autocolantele promoționale.
• Dacă există o peliculă de protecție pe suprafața de lucru, scoateți-o.
• Păstrați ambalajul original.
• Citiți măsurile de siguranță și instrucțiunile de utilizare.
• Verificați echipamentul.
• Verificați dispozitivul pentru deteriorări, dacă există deteriorări, nu-l includeți în rețeaua electrică.
• Asigurați-vă, că parametrii specificați ai tensiunii de alimentare a dispozitivului corespund parametrilor rețelei
electrice. La utilizarea dispozitivului într-o rețea electrică cu frecvență de curent alternativ de 60 Hz, nu este
necesară nicio acțiune suplimentară.
• Pentru a îndepărta praful, ștergeți aparatul cu o cârpă
ușor umedă, apoi ștergeți-l uscat.
UTILIZAREA CORECTĂ A DISPOZITIVULUI
Dispozitivul este destinat uzului casnic în interior, pentru
aspirarea lichidelor și a prafului, îndepărtarea materialelor
uscate și / sau umede (murdăriei) de pe suprafețe, folosind abur în conformitate cu descrierile și instrucțiunile,
date în acest manual. Vă rugăm să citiți cu atenție aceste
VT-1888.indd 49 10/20/20 3:24 PM
Page 50

ROMÂNĂ
instrucțiuni și să le păstrați. Acest manual poate fi vizualizat
și / sau descărcat de pe site-ul www.vitek.ru.
Aspirați numai murdăria de uz casnic. Nu aspirați direct din
recipientele umplute cu apă sau cu alte lichide. Strângeți
doar o cantitate mică de apă pulverizată pe suprafețe, respectând cantitatea maximă, specificată în Instrucțiune.
Verificați în mod regulat nivelul de umplere cu nămol uscat și
umed, asigurându-vă că nivelurile maxime nu sunt depășite.
Nu utilizați pe cretă, ciment sau alte reziduuri din construcții
sau zidărie. Nu utilizați pe pământ și nisip / sol etc.
Nu utilizați pe cenușă, funingine și reziduuri de ardere (seminee, gratar, etc).
Nu utilizați pe imprimantă, Xerox sau Fax (toner și pulbere
de cerneală).
Nu aspirați obiecte ascuțite sau dure. Producătorul își rezervă dreptul de a efectua modificări estetice, tehnice și
constructive fără notificare prealabilă.
Înainte de a părăsi producția, toate produsele sunt testate
temeinic. De aceea, dispozitivul dvs. poate conține o anumită cantitate de apă în rezervor.
Utilizarea corectă a produsului este descrisă numai în
acest manual de utilizare. Orice altă utilizare poate duce la
deteriorarea dispozitivului și la anularea garanției.
CE APĂ SĂ UTILIZAȚI
Dispozitivul a fost proiectat să funcționeze cu apă obișnuită
de la robinet de la 8°C la 20°C. Dacă apa de la robinet
conține mult calcar, utilizați un amestec disponibil comercial din 50% apă de la robinet și 50% apă demineralizată.
Înlocuiți periodic filtrul de calcar, așa cum este descris în
secțiunea 13. Nu folosiți niciodată apă de ploaie sau apă
care conține aditivi de parfum (cum ar fi parfum) sau apă
produsă de alte aparate de uz casnic, dedurizatoare de
apă sau filtre. Nu adăugați substanțe chimice, naturale, de
curățare sau de îndepărtare a calcarului, etc.
Înainte de a utiliza apă potabilă îmbuteliată, aflați mineralizarea totală a acesteia (de obicei indicată pe etichetă) și
comparați-o cu indicatorii pentru apa de la robinet (acestea pot fi găsite pe site-ul web al organizației de aprovizionare cu apă sau pe internet). De regulă, mineralizarea apei
îmbuteliate este de 100-400 mg / l.
Se poate dovedi că apa de la robinet are o mineralizare de
câteva ori mai mică, astfel încât utilizarea apei îmbuteliate
va crește formarea calcarului. La utilizarea constantă a aspiratorului, se recomandă periodic reînnoirea completă a
apei din rezervor și spălarea rezervorului în sine pentru a
evita stagnarea apei și apariția mirosului străin.
ATENȚIE! Dacă în boiler se formează calcar, acest caz
nu va fi recunoscut ca garanție
Aspirator cu abur VT-1888: 3 PRODUSE ÎN 1
Este un aparat util de abur vertical, care include trei produse într-unul, deoarece acesta poate fi folosit ca un aspirator, mop cu abur, și curățător cu abur portabil. Poate
îndeplini multe funcții de curățare și poate trata o varietate de suprafețe: podea cu diferite finisaje (gresie, gresie
porțelanată, parchet), suprafețe de lucru pentru bucătărie,
hote, băi, robinete, chituire, ferestre și oglinzi, tapițerie, canapele, fotolii, saltele, perne, interioare auto), uși de interior și dulapuri, radiatoare de încălzire și rulouri, perdele și
haine, plante verzi. Testele, efectuate de terți, de către un
laborator independent, confirmă faptul, că o curățătorul
cu abur indepărteaza 99,9% din germeni și bacterii, atunci
când este utilizat în conformitate cu instrucțiunile incluse
în acest manual, împreună cu o cârpă din microfibră, cu o
durată de funcționare de 30 de secunde.
1. ASAMBLAREA DISPOZITIVULUI SUB FORMĂ
DE ASPIRATOR / MOP CU ABUR
1.1. Scoateți dispozitivul din ambalaj, asigurându-vă că
produsul nu este deteriorat și că toate piesele sunt
incluse în pachet.
1.2. Conectați carcasa dispozitivului (3) la peria universa-
lă(1) (fig.1).
Pentru a scoate peria universală, puneți piciorul pe perie,
apăsați butonul (21) și trageți dispozitivul de mânerul pentru transportare (15) vertical în sus.
NOTĂ: înainte de asamblarea dispozitivului, vă rugăm să
rețineți, că șurubul (14) la ambalarea dispozitivului poate fi
înșurubat în tubul de extensie (9).
1.3. Deșurubați șurubul (14) de pe tubul de extensie (9)
cu o șurubelniță cu fante. Așezați tubul de extensie în
scaunul de pe corpul dispozitivului și răsuciți șurubul
(fig.2).
AVERTIZARE: verificați din când în când pentru a vedea, dacă șurubul este strâns.
1.4. Puneți husa de țesătură (28) pe duza-mop (27) și
conectați-l la partea inferioară a periei universale (1)
astfel, încât clemele de fixare a duzei-mop să intre
în canelurile corespunzătoare ale periei universale
(fig.3) (numai pentru curățarea cu aburi).
NOTĂ: pentru îndepărtarea duzei-mop (27) de pe peria
universală (1), apăsați pe una dintre cele două pedale
laterale (22) și trageți dispozitivul vertical în sus de mâner(15).
2. UTILIZAREA DISPOZITIVULUI CA ASPIRATOR
Asigurați-vă că cerințele secțiunii 1 sunt îndeplinite
2.1. Desfaceți complet cablul de alimentare și conectați-l
la o priză electrică, care are un contact de împămân-
tare fiabil (fig. 4). Utilizați întotdeauna produsul cu ca-
blul de rețea complet desfăcut.
2.2. Mutați butonul comutatorului de alimentare (10), si-
tuat pe mânerul aspiratorului (11) în poziția (I) (fig. 5).
Mutați peria universală (1) în poziția de lucru din poziția
de parcare, pentru aceasta puneți piciorul pe perie și
înclinați aspiratorul de mânerul pentru transportat (15)
(fig. 6). Aspiratorul este gata pentru utilizare.
Pentru ca cablul de rețea să nu interfereze în timpul
curățării, treceți-l prin cârligul superior (13) (fig. 7).
3. PREGĂTIREA PENTRU UTILIZAREA
DISPOZITIVULUI CA MOP ȘI ASPIRATOR
DE ABUR MANUAL
3.1. Scoateți rezervorul de apă (4), pentru a face acest
lucru, apăsați butoanele laterale ale clemelor (18) și
trageți-l spre dvs. (fig. 8). Răsturnați rezervorul de apă
și deschideți dopul de cauciuc, trăgându-l de limbă în
sus (fig. 9). Umpleți rezervorul cu apă curată.
Nu adăugați alte substanțe sau aditivi în rezervor.
3.2. Închideți bine capacul rezervorului de apă și
reinstalați-l. Efectuați întotdeauna această operație
cu cablul deconectat de la rețea.
AVERTIZARE: asigurați-vă că rezervorul (4) este instalat
corect pentru a evita scurgerile.
3.3. Puneți husa de țesătură (28) pe duza-mop (1) și
conectați-o cu partea inferioară a periei universale
(fig.3).
50
VT-1888.indd 50 10/20/20 3:24 PM
Page 51

ROMÂNĂ
3.4. Desfaceți complet cablul de alimentare și conectați-l
la o priză electrică, care are un contact de împământare fiabil (fig. 4). Utilizați întotdeauna produsul cu cablul de rețea complet desfăcut.
3.5. Apăsați tasta de întrerupere a alimentării (17) a
curățătorului cu abur, situat pe partea laterală a dispozitivului (fig. 10). Indicatorul de pornire de pe panoul de control (7) va clipi ( ) în verde.
Așteptați 30 de secunde, până când indicatorul de pe panoul de control începe să ardă continuu (fig. 11).
Dispozitivul este apoi gata spre utilizare.
CURĂȚĂTOR CU ABUR MANUAL (16)
3.6. Pentru utilizarea separată a curățatorului cu abur
manual (16), deconectați-l de la carcasa dispozitivului (3), pentru a efectua acest lucru apăsați butonul superior (8) și trageți-l spre exterior de mâner (5)
(fig.12).
4. REGLAREA INTENSITĂȚII IEȘIRII ABURULUI
Dispozitivul are 3 niveluri de intensitate de ieșire a aburului. Prin apăsarea succesivă a butonului ( ) regulatorului de abur (fig. 13), situat pe panoul de control (7),
setați intensitatea ieșirii aburului în funcție de utilizarea
intenționată. Indicatorul nivelului de intensitate selectat
va arde în mod constant.
Iată câteva recomandări pentru alegerea nivelului de intensitate a ieșirii aburului:
• Nivel maxim ( ): pentru decalcifiere, pete, grăsimi;
• Nivel mediu ( ): pentru spălarea ferestrelor și a pode-
lelor.
• Nivel minim ( ): pentru curățarea parchetului și lami-
natului, țesăturilor delicate, tapițeriei mobilierului, canapelelor, saltelelor etc.
5. CONECTAREA ACCESORIILOR
Accesoriile pot fi conectate direct la curățătorul cu abur
manual (16) sau la un furtun flexibil (23) pentru o mai mare
libertate de mișcare.
5.1. Furtun flexibil (23)
Conectați furtunul flexibil (23) la curățătorul cu abur
portabil (16) până când auziți clicul de blocare (fig. 14).
Pentru a scoate furtunul flexibil, apăsați butonul de fixare, situat pe baza furtunului flexibil și trageți-l spre exterior (fig. 14).
5.2. Duză-concentrator (24)
Duza-hub (24) poate fi conectată direct la curățătorul
cu abur manual (16) sau la furtunul flexibil (23). Pentru a
scoate duza, apăsați butonul de fixare, situat pe baza duzei
și trageți-l afară.
Conectați furtunul flexibil (23) la curățătorul cu abur portabil (16), până când auziți clicul de fixare (fig. 15).
Periile (30, 31) și duza de netezire (32) pot fi atașate la
duza-hub (24). Introduceți-le la capătul duzei-hub (24)
până când se fixează (fig. 16). Pentru a le scoate, tragețile afară.
5.3. Accesorii pentru aburire (25, 26)
Conectați duza pentru aburire (25) direct la curățatorul
cu aburi manual (16), apăsând ușor până, când se
fixează în poziție. Pentru o mai mare libertate de
mișcare, duza poate fi conectată cu un furtun flexibil
(23) (fig.15).
Pentru a curăța canapelele, pernele, scaunele și saltelele, puneți o husă de țesătură (26) pe duza (25) (fig.19).
5.4. Duză pentru spălarea ferestrelor (29)
Atașați duza de spălare a ferestrelor (29) la duza pentru
aburire (25) prin introducerea cârligului A (fig. 17) sub
fantaB (fig. 18, 20), apoi rotiți duza (fig . 21)astfel, încât
cârligul C (fig. 17)să se potrivească în fanta D (fig. 18, 22).
Înainte de a atașa duza pentru spălarea ferestrelor la
duza pentru aburire, îmbrăcați husa din țesătură pe
duză. Nu instalați duza fără husă!
6. CURĂȚAREA PODELELOR
Înainte de a utiliza dispozitivul pe suprafețe delicate sau lucioase, asigurați-vă că zona de contact a
suprafeței este liberă de corpurile străine care provoacă zgârieturi.
Aspiratorul cu abur este un produs combinat, care poate fi folosit ca aspirator, curățător vertical cu abur, pentru
spălarea și dezinfectarea podelelor sau într-un mod combinat cu acțiune de aspirație pentru a economisi timp de
curățare.
NUMAI ASPIRAȚIE
Asigurați-vă, că cerințele secțiunii 1 sunt îndeplinite și
procedați așa, cum este descris în secțiunea 2.
NUMAI ABURI
Asigurați-vă, că cerințele secțiunii 1-3 sunt îndeplinite.
6.1. Reglați intensitatea de ieșire a aburului în funcție de
tipul de podea (fig. 13);
• pentru podele dure (gresie, gresie porțelanată,
etc), se recomandă un nivel mediu de abur;
• pentru podele delicate (parchet, laminat, placi cera-
mice, etc.), se recomandă un nivel scăzut de abur.
6.2. Mutați peria universală (1) în poziția de lucru din
poziția de parcare, pentru aceasta puneți piciorul
pe perie și înclinați dispozitivul de mânerul pentru
transportat (15) (fig. 6). Aspiratorul este gata pentru
utilizare.
Apoi apăsați butonul de alimentare cu abur (12) (fig. 23)
poziționată pe mâner (11) și începeți curățarea prin mutarea periei înainte și înapoi. Pentru a opri alimentarea cu
abur, eliberați butonul (12).
6.3. Peria (1) are o conexiune flexibil, care permite
curățarea ușoară a colțurilor și marginilor mobilierului
și pereților.
MODUL COMBINAT ABUR / ASPIRAȚIE
Utilizarea combinată a aburului și a aspirației permite îndepărtarea prafului și dezinfectarea podelei în același timp.
Procedați așa cum este descris în secțiunile 1-2-3.
Pentru ca cablul de rețea să nu interfereze în timpul
curățării, treceți-l prin cârligul superior (13) (fig. 7).
În timpul operațiilor de curățare, utilizarea husei de
țesătură (28) permite spălarea și dezinfectarea podelelor,
astfel, încât murdăria înmuiată cu abur, să fie colectată cu
o cârpă.
Înainte de a scoate duza-mop (27) cu husa din țesătură
(28) de pe peria universală (1), așteptați câteva minute,
pentru a lăsa țesătura să se răcească. Apoi puneți piciorul
pe una dintre cele două pedale laterale (22) ale duzei-mop
(27) și trageți dispozitivul vertical în sus de mâner (15).
AVERTIZARE: pentru curățarea cu abur, nu utilizați o duză-mop fără husă din țesătură.
AVERTIZARE: pentru o siguranță suplimentară, verificați
impactul aburului înainte de a utiliza pe piesa ascunsă,
51
VT-1888.indd 51 10/20/20 3:24 PM
Page 52

ROMÂNĂ
așteptați să vă asigurați că nu s-au produs modificări de
culoare sau deformare.
7. CURĂȚAREA FERESTRELOR, OGLINZILOR
ȘI PEREȚILOR CU GRESIE
AVERTIZARE: pentru a curăța ferestrele în vreme rece,
preîncălziți geamul, începând aburitul la o distanță de
aproximativ 50 cm de la suprafață.
Utilizați numai curățătorul cu abur manual (16).
Asigurați-vă, că cerințele secțiunii 3 sunt îndeplinite.
7.1. Conectați furtunul flexibil (23) la curățătorul cu abur
manual (16), apoi atașați duza de aburire (25) și la
acesta, duza de spălare a ferestrelor (29) (respectați
cerințele punctelor 5.3-5.4).
7.2. Reglați intensitatea ieșirii aburului așa, cum este descris în secțiunea 4 (fig. 13).
Pentru acest tip de suprafață se recomandă nivelul mediu
de ieșire a aburului.
7.3. Pentru a curăța ferestrele și oglinzile, apăsați butonul de alimentare cu abur (6) pe curățătorul cu abur
portabil, pentru a aburi suprafața și a dizolva murdăria (fig. 24). Apoi, treceți din nou pe suprafață,
ținând duza în jos pentru a îndepărta murdăria și
umiditatea.
7.4. Pentru a curăța gresiile, utilizați duza pentru aburire
(25) cu husa din țesătură (26), atașată la furtunul flexibil (23). Deplasați-vă pe suprafața plăcii, distribuind
uniform aburul, apăsând butonul de alimentare cu
abur (6) pe curățătorul cu abur manual (fig. 24), pentru a elimina murdăria.
8. CURĂȚAREA MOBILIERULUI TAPIȚAT,
SCAUNELOR, PERNELOR
(saltele, canapele, saloane auto, etc)
AVERTIZARE: înainte de a curăța pielea sau
țesăturile cu abur, citiți instrucțiunile producătorului
și efectuați întotdeauna un test pe o zonă ascunsă
sau pe o probă de material. Așteptați puțin pentru a
vă asigura că nu s-au produs modificări de culoare
sau deformări.
Utilizați numai curățătorul cu abur manual (16).
Asigurați-vă, că cerințele secțiunii 3 sunt îndeplinite.
Porniți dispozitivul conform instrucțiunilor din secțiunea
2.4 și conectați accesoriile așa, cum este descris în
secțiunea 3.
8.1. Reglați intensitatea ieșirii aburului așa, cum este descris în secțiunea 4 (fig. 13).
Pentru acest tip de suprafață, se recomandă nivelul minim
de abur.
8.2. Conectați accesoriile de aburire (25, 26) la furtunul
flexibil (23) al curățătorului cu abur de mână (16),
după cum este descris în secțiunea 5.3. Deplasați-vă
pe suprafață, creând abur cu butonul de alimentare
cu abur (6) (fig. 24) pentru a elimina murdăria.
9. CURĂȚAREA INSTALAȚIILOR SANITARE,
A ROSTURILOR DE MORTAR ȘI A BLATURILOR
DE BUCĂTĂRIE, A GRĂTARELOR
Utilizați numai un curățător cu abur manual. Asigurați-vă,
că cerințele secțiunii 3 sunt îndeplinite.
9.1. Conectați duza-hub (24) la curățătorul cu abur manual (16), așa cum este descris în secțiunea 5.2 (duzahub poate fi conectată la furtunul flexibil pentru prelucrarea locurilor greu accesibile).
52
9.2. Conectați accesoriul cel mai potrivit, în funcție de
necesități:
• duză-hub (24), pentru curățarea locurilor greu ac-
cesibile și obținerea unui jet de abur mai concentrat.
• peria rotundă mică cu păr de nailon (30), pentru
îndepărtarea murdăriei uscate și a plăcii de var.
• peria rotundă mică cu păr din alamă (31), pentru
îndepărtarea grăsimii și murdăriei uscate persistente (grătar, roți auto sau motociclete etc.).
• duza (32), pentru curățarea rosturilor de mortar în-
tre plăci și îndepărtarea murdăriei de pe suprafețe
foarte înguste.
AVERTIZARE: atunci când utilizați periile (30), (31) și duzele (32), nu depuneți eforturi excesive pentru a evita ruperea vârfului duzei hubului (24).
Atenție! Vârful duzei concentratorului se încălzește în
timpul utilizării. Înainte de a conecta/deconecta accesoriile suplimentare, așteptați cel puțin 5 minute,
până când vârful se răcește.
9.3. Reglați intensitatea ieșirii aburului (fig. 13).
Pentru acest tip de suprafață, se recomandă un nivel maxim de abur.
9.4. Apăsați butonul de alimentare cu abur (6) pe curățătorul
cu abur manual (fig. 24), apoi aburiți suprafețele.
10. CURĂȚAREA MOBILEI ȘI A SUPRAFEȚELOR
DELICATE
AVERTIZARE: înainte de curățarea țesăturilor cu abur,
citiți instrucțiunile producătorului și efectuați întotdeauna
un test pe o zonă ascunsă sau pe o probă de material.
Utilizați numai curățătorul cu abur manual (16). Asigurațivă, că cerințele secțiunii 3 sunt îndeplinite.
10.1. Conectați duza-concentratorul (24) lacurățătorul
cu abur manual (16), așa cum este descris în
secțiunea5.2 (fig. 14).
10.2. Reglați intensitatea ieșirii aburului (fig. 13).
Pentru acest tip de suprafață, se recomandă nivelul minim
de abur.
10.3. Apăsați butonul de alimentare cu abur (6) pe
curățătorul cu abur manual (fig. 24), apoi îndreptați
jetul spre țesătură.
AVERTIZARE: nu îndreptați jetul de abur direct la suprafață.
10.4. Utilizați o cârpă pre-aburită pentru a curăța suprafața,
evitând utilizarea pe termen lung în același loc.
11. ALTE UTILIZĂRI GENERALE
Avertizare: înainte de curățarea suprafeței, faceți întotdeauna un test pe o zonă ascunsă și urmăriți cum
reacționează.
11.1. Curatarea perdelelor si draperiilor
Acarienii și praful pot fi îndepărtați de la perdele și draperii
prin aburirea țesăturii direct de la un curățător cu aburi de
mână. Aburul este capabil să elimine mirosurile neplăcute și să împrospăteze culorile, ceea ce permite spălarea
țesăturii mai rar.
Pentru acest tip de suprafață, se recomandă nivelul minim
de abur.
11.2. Îndepărtarea petelor de pe covoare
și tapițerie de mobilier
ATENȚIE: ABUR!
Pericol de arsuri!
Îndreptați aburul direct spre pată la cel mai înalt unghi
posibil (niciodată perpendicular pe suprafața curățată) și
VT-1888.indd 52 10/20/20 3:24 PM
Page 53

ROMÂNĂ
plasați cârpa în spatele petei pentru a colecta murdăria,
care a fost «suflată» de presiunea aburului.
Pentru acest tip de suprafață, se recomandă nivelul minim de abur.
11.3. Îngrijirea plantelor și umidificarea spațiilor
Pentru a avea grijă de plantele de interior, folosiți abur
pentru a îndepărta praful de pe frunze.
Utilizați curățătorul cu abur manual cu un furtun flexibil
pentru a direcționa cu ușurință jetul ( pentru al atașa,
consultați secțiunea 3). Aburiți suprafața la o distanță
de 50 cm, reglați aburul la un nivel minim. Plantele vor
respira mai bine și vor fi mai curate și mai strălucitoare.
Aburul poate fi, de asemenea, utilizat pentru a împrospăta spațiile, în special cele frecventate de fumători:
aburiți camera, direcționând jetul spre tavan, distribuindu-l uniform.
11.4. Dezinfectarea suprafeței
Pentru dezinfectare țineți duza de abur a duzei hubului (24) la o distanță de cel mult 1,5 cm de suprafață și
tratați-o cu abur timp de cel puțin 5 secunde. Acest tip
de tratament ucide cel mai eficient germenii și bacteriile.
SFATURI PRACTICE
Sfaturi pentru utilizarea aspiratorului
Când curățați podeaua, mutați aspiratorul într-o mișcare
uniformă înainte și înapoi, împingându-l departe de dvs.
și trăgându-l înapoi.
Când nu îl folosiți mult timp, asigurați-vă că scurgeți toată apa din rezervor.
Când curățați podeaua, nu țineți aspiratorul într-o poziție
mult timp, pentru a evita
daune de suprafață. De asemenea, nu parcați aspiratorul
în poziție verticală cu o cârpă umedă pe podea, care se
poate uda și deteriora.
Sfaturi pentru utilizarea mopului de abur
Înainte de a curăța podeaua, se recomandă să o măturați
sau să o aspirați pentru a îndepărta particulele de praf
și murdărie.
Când curățați podeaua, mutați aspiratorul într-o mișcare
uniformă înainte și înapoi, împingându-l departe de dvs.
și trăgându-l înapoi. Deplasați-vă înapoi pentru a evita
călcarea pe podeaua deja spălată.
Cârpa din microfibră colectează apa la curățarea podelei. Cu toate acestea, în funcție de caracteristicile
suprafeței podelei și de intensitatea predeterminată
a alimentării cu abur, pe podea poate rămâne puțină
umiditate. În acest caz, se recomandă să lăsați podeaua să se usuce în mod natural. Uscarea poate fi
accelerată cu un ventilator, direcționându-l spre zona
dorită.
Pentru ca după spălare, podeaua să fie mai puțin umedă,
alegeți cu butonul «Abur» o cantitate minimă de abur.
După finalizarea curățenie, scoateți duza-mop de pe peria universală.
În acest caz podeaua sub dispozitiv nu va fi umedă de la
cârpă umedă.
Sfaturi pentru utilizarea unui curățător
cu abur manual
Curățarea suprafețelor
Materialul curățat trebuie să reziste umezelii și temperaturii ridicate. Verificați acest lucru înainte de a începe
curățarea.
Unele tipuri de podele (cum ar fi plăcile) au caneluri sau
suprafețe cimentate. Pentru o curățare mai amănunțită,
vă recomandăm să utilizați o perie rotundă de nailon.
Pentru a curăța golurile (crăpăturile) dintre plăci, utilizați
duza-hub.
Nu se recomandă utilizarea periilor de scame în aceste
scopuri, deoarece acestea pot elimina chitul.
Aduceți duza-hub la un unghi de 30-60° aproape de fantă,
porniți alimentarea cu abur și mutați-o încet înainte de-a
lungul fantei. După finalizarea curățeniei, îndepărtați cu o
cârpă murdăria de pe suprafața înconjurătoare. În același
mod, curățați spațiile dintre plăcile de pardoseală, precum
și orice alte fisuri și blocaje.
Cu cât duza de abur este mai aproape de locul contaminat,
cu atât efectul de curățare este mai bun, deoarece cea mai
mare temperatură a aburului este asigurată la ieșirea din
duza de abur. Prin urmare, atunci când curățați, încercați
să poziționați ajutajul de abur a duzelor cât mai aproape
posibil de suprafața curățată.
Când curățați cu aburul, ștergeți suprafața aburită cu o
cârpă sau un burete pentru a îndepărta murdăria rămasă.
Se recomandă ștergerea suprafeței cât este încă umedă.
Aveți grijă când ștergeți suprafețele metalice, deoarece
acestea pot fi fierbinți după tratarea cu abur.
Pentru a îndepărta murdăria persistentă, numai jeturile de
abur pot să nu fie suficiente, utilizați perii de scame sau
alamă pentru a spori efectul mecanic. Atunci când utilizați
perii, nu depuneți eforturi excesive pentru a evita ruperea
vârfului duzei-hubului.
Pentru depunerile grele de calcar, stropiți cu oțet înainte
de curățarea cu abur, lăsați oțetul să acționeze timp de
aproximativ 5 minute, apoi aburiți suprafața.
Când curățați hainele sau mobilierul tapițat, îmbrăcați pe
duză de aburire o cârpă, în acest caz murdăria va fi absorbită în cârpă și nu în haine sau tapițerie.
Duza pentru aburire poate fi utilizată pentru îndepărtarea
de pe pereții a tapetului vechi.
Adezivul de tapet sub influența aburului se va umfla și tapetul va fi mai ușor de îndepărtat.
Curățarea ferestrelor și oglinzilor
Când utilizați duza de spălare a ferestrelor, curățați mai
întâi cu grijă întreaga suprafață a ferestrei sau a oglinzii
cu abur și apoi opriți alimentarea cu abur. După aceea,
apăsați racleta de cauciuc a duzei pe partea superioară a ferestrei sau oglinzii și coborâți treptat duza în jos.
Deplasați-vă de la o parte a suprafeței la alta pentru a
curăța întreaga fereastră sau oglindă. Sub rama sau sub
suportul oglinzii, așezați o cârpă sau un șervețel pentru a
aduna apa mânată de racleta.
La temperaturi negative din exterior (iarna), înainte de
curățarea geamului, încălziți-l astfel, încât să nu se spargă
de la o scădere bruscă a temperaturii.
După încălzire, puteți trata cu ușurință toată suprafața cu abur.
Aburirea îmbrăcămintei
Pentru a vă aburi îmbrăcămintea, agățați-o de un cuier
din oțel inoxidabil. Conectați la curățătorul cu abur manual duza pentru aburire. Luați curățătorul cu abur într-o
mână, cu cealaltă mână țineți partea inferioară a îmbrăcămintei, creând o tensiune mică. Aduceți duza pe suprafața
țesăturii, apăsând ușor pe ea partea de lucru a acesteia și
începeți a aburi cu mișcări înainte- înapoi (de sus în jos).
Vă recomandăm să începeți cu zonele cu cele mai multe
pliuri, precum și cu elemente de îmbrăcăminte care sunt
mai dense (guler și manșetele mânecilor).
53
VT-1888.indd 53 10/20/20 3:24 PM
Page 54

ROMÂNĂ
12. NIVELUL APEI
Nivelul apei este întotdeauna vizibil datorită rezervorului
transparent (4).
Când apa este epuizată, aburul nu va mai fi generat.
Pentru a relua funcționarea, umpleți din nou rezervorul cu
apă, așa cum este descris în secțiunea 3.
AVERTIZARE: această operațiune trebuie efectuată întotdeauna după deconectarea dispozitivului de la rețea.
13. ÎNLOCUIREA FILTRULUI DE CALCAR
Dispozitivul are un filtru, care conține rășini speciale, capabile să oprească placa de var și să prelungească durata de
viață a produsului.
Se recomandă schimbarea filtrului o dată pe an.
13.1. Deconectați dispozitivul de la rețeaua electrică.
13.2. Scoateți rezervorul de apă (4) de la curățătorul cu
abur manual (16), apăsând butoanele laterale ale
clemelor (18) și trăgând-o spre exterior (fig. 8).
13.3. Scoateți filtrul vechi (fig. 25) trăgând-o în jos.
13.4. Introduceți filtrul nou (35), apăsați ușor și asigurațivă, că este perfect setat (fig. 26), apoi instalați rezervorul de apă.
NOTĂ: În procesul de utilizare a dispozitivului, filtrul se
poate întuneca, poate deveni maro sau ruginit, este normal și nu este o defecțiune.
14. CURĂȚAREA RECIPIENTULUI-COLECTORULUI
DE PRAF ȘI A FILTRELOR
14.1. Opriți complet dispozitivul, pentru a face acest lucru,
mutați comutatorul de alimentare (10) situat pe mânerul aspiratorului (11) în poziția (0) și apăsați comutatorul de alimentare (I / 0) al curățătorului cu abur
(fig. 10), apoi scoateți ștecherul cablului de alimentare din priza electrică.
14.2. Scoateți containerul-recipientul pentru praf (2)
din carcasa dispozitivului (4) prin apăsarea a două
butoane de fixare a containerului-recipient pentru
praf (20) (fig. 27).
14.3. Scoateți din containerul-recipient pentru praf filtrul
HEPA (36) cu filtrul spumos introdus (37), de ghidajele
laterale (fig. 28), îndepărtați filtrul ciclon (39) (fig. 29),
trăgându-l în sus, folosind mânerul metalic pliabil.
14.4. Scoateți capacul filtrului de ciclon (38), rotind-o în
sens invers acelor de ceasornic, apoi curățați filtrul
de ciclon (39) de praf.
14.5. Curățați containerul-recipientul pentru praf (40) de
murdărie.
14.6. Asamblați containerul-recipientul pentru praf și
instalați-l pe locul precedent, urmând pașii de mai
sus în ordine inversă (vezi p. 14.2-14.4).
Se recomandă curățarea containerului-recipient pentru
praf (2) după fiecare utilizare.
AVERTIZARE: nu utilizați dispozitivul fără un container-recipient pentru praf instalat complet cu filtre.
15. SERVICII GENERALE
Asigurați-vă că dispozitivul este oprit și deconectat de la
rețea.
Pentru a curăța exteriorul dispozitivului folosiți doar o cârpă și apă de la robinet.
Toate accesoriile pentru curățare cu abur pot fi curățate
cu apă curgătoare și lăsate să se usuce complet înainte
de următoarea utilizare. După utilizarea periilor, lăsați-le
să se răcească în poziția lor naturală, pentru a evita deformarea. Nu utilizați detergenți de orice tip. Husele din
țesut pentru duze pot fi spălate, urmând instrucțiunile de
pe etichetă.
Filtrele și recipientele pentru praf pot fi curățate cu
apă curgătoare, asigurând uscarea completă înainte
de următoarea utilizare. Clătiți recipientele filtrului ciclon și recipientului pentru praf cu apă curgătoare și
scuturați-le, pentru a îndepărta orice exces de murdărie sau apă. Înainte de a instala filtrele în dispozitiv,
lăsați-le să se usuce complet în mod natural, departe
de sursele de căldură timp de cel puțin 24 ore. Filtrul
HEPA trebuie curățat complet la fiecare aproximativ
patru luni.
16. DEPOZITARE
16.1. Opriți aparatul de tuns și deconectați-l de la rețeaua
electrică.
16.2. Goliți apa rămasă din rezer vorul de apă, pentru a evita scurgerile.
16.3. Înainte de a scoate husele din țesături de pe duze,
așteptați câteva minute, pentru ca acestea să se răcească.
16.4. Înfășurați cablul de alimentare în jurul cârligelor speciale de înfășurare (13, 19) (fig. 30).
Îndepliniți cerințele secțiunii 14.
Înainte de a utiliza din nou dispozitivul, nu uitați să
desfaceți complet cablul de rețea. Cârligul superior pentru
înfășurarea cablului de rețea (13) se rotește la 180°, pentru
a desface rapid cablul de rețea.
AVERTIZARE: nu țineți dispozitivul conectat la rețeaua
electrică cu cablu de rețea înfășurat.
16.5. Cârligul de depozitare a dispozitivului (33) poate fi
montat pe perete cu 4 găuri și setul de montare furnizat (34).
Dispozitivul se fixează pe cârligul de depozitare (33) de
mânerul de transportare (15) (fig. 31).
17. DIAGNOSTICAREA DEFECȚIUNILOR
Problema Cauza Rezolvare
Dispozitivul nu se
pornește.
Nici un abur nu iese. S-a terminat apa. Deconectați dispozitivul, umpleți rezervorul de apă și
Lipsește electricitatea. Verificați dacă dispozitivul este conectat la rețeaua
Dispozitivul este oprit. Asigurați-vă că dispozitivul este conectat la sursa de
electrică.
apoi utilizați din nou aparatul.
alimentare, că tasta de întrerupere a alimentării a
curățătorului cu abur manuală este în poziția (I) și că
butonul de alimentare cu abur (6 sau 12) este apăsat.
54
VT-1888.indd 54 10/20/20 3:24 PM
Page 55

ROMÂNĂ
Problema Cauza Rezolvare
Dispozitivul este pornit, dar
produce puțin abur.
Dispozitivul varsă prea
multă apă pe podea.
În timpul funcționării
aspiratorului, puterea de
aspirație scade.
În timpul aspirației, praful
iese din dispozitiv.
Recipientul pentru praf nu
poate fi îndepărtat.
Dacă problemele persistă sau nu sunt enumerate mai sus, vă rugăm să contactați Centrul de service autorizat
(www.vitek.ru sau contactați serviciul clienți.
PRODUSUL INCLUDE
Aspirator cu abur cu set de filtre instalat – 1 buc.
Perie universală – 1 buc.
Furtun flexibil – 1 buc.
Duza pentru curățarea tapițeriei – 1 buc.
Husă din țesătură pentru duza – 1 buc.
Duză-mop – 1 buc.
Husă din țesătură pentru duza-mop – 1 buc.
Duza pentru spălarea ferestrelor – 1 buc.
Duză-hub pentru locuri greu accesibile – 1 buc.
Perie rotundă mică cu păr de nailon – 1 buc.
Perie rotundă mică cu păr din alamă – 1 buc.
Duză de prelucrare a rosturilor – 1 buc.
Filtru suplimentar împotriva calcarului – 1 buc.
Cîrlig pentru depozitare – 1 buc.
Kit de fixare a cârligului – 1 buc.
SPECIFICAȚII TEHNICE
Alimentare electrică: 220-240 V ~ 50-60 Hz
Consum nominal de putere: 1800 W
Putere mop cu abur: 1200 W
Putere aspirator: 600 W
Putere de aspirare: 12 kPa
Timp de încălzire: 25-30 secunde
Intensitatea de ieșire a aburului: de la 15 până
la 25 g / min, în funcție de nivelul selectat
Timpul de alimentare cu abur: 14-22 min, în funcție
de nivelul selectat
Volumul containerului de praf: 0,4 l
Capacitatea rezervorului de apă: 0,5 l
Zona de curățare: până la 30 m² fără adăugare de apă
Lungimea cablului de alimentare: 5 m
Producătorul își rezervă dreptul de a modifica designul,
construcția și caracteristicile tehnice care nu afectează
principiile generale de funcționare ale dispozitivului fără
notificare prealabilă, din cauza cărora între instrucțiune
și produs pot exista diferențe neînsemnate. Dacă utili-
Alimentarea cu abur este
setată la nivelul minim.
Alimentarea cu abur este
setată la nivelul maxim.
Apăsat și/ sau ținut
butonul abur.
Containerul-recipientul
pentru praf este plin.
Recipientul pentru praf
este introdus incorect.
Containerul-recipientul
pentru praf este plin.
Filtru introdus incorect Introduceți corect filtrul
Apăsați butonul de reglare
a alimentării cu abur, pentru a mări cantitatea de abur
distribuită (vezi secțiunea 4).
Reduceți alimentarea cu abur la minimum. Dacă este
necesar, opriți alimentarea cu abur pentru o perioadă de
timp, continuând să curățați suprafața cu peria.
Nu țineți apăsat continuu butonul de alimentare cu abur
(6 sau 12), ci eliberați-l astfel, încât temperatura să se
stabilizeze.
Curățați containerul-recipientul pentru praf.
Introduceți corect recipientul pentru praf.
Curățați containerul-recipientul pentru praf.
zatorul a depistat astfel de neconformități, vă rugăm să
ne informați prin e-mail info@vitek.ru pentru a obține o
versiune actualizată a instrucțiunii.
RECICLAREA
În scopul protejării mediului înconjurător, după finalizarea termenului de exploatare a dispozitivului și a
elementelor de alimentare (dacă sunt incluse în set), nu
le aruncați împreună cu deșeurile menajere obișnuite,
livrați dispozitivul și elementele de alimentare în punctele specializate pentru reciclare ulterioară.
Deșeurile formate în timpul reciclării produselor sunt
supuse colectării obligatorii cu reciclarea ulterioară în
modul stabilit.
Pentru mai multe informații privind reciclarea acestui
produs, contactați primăria locală, serviciul de reciclare a deșeurilor menajere sau magazinul de unde ați
achiziționat acest produs.
Durata de funcționare a dispozitivului este de 3 ani
Garanție
În legătură cu oferirea garanției pentru produsul dat,
rugăm să Vă adresați la distribuitorul regional sau la
compania, unde a fost procurat produsul dat. Serviciul
de garanție se realizează cu condiția prezentării bonului
de plată sau a oricărui alt document financiar, care confirmă cumpărarea produsului dat.
Acest produs respectă cerințele Directivei UE
2014/30/UE privind compatibilitatea electromagnetică și Directiva UE 2014/35/UE privind
produsele de joasă tensiune.
55
VT-1888.indd 55 10/20/20 3:24 PM
Page 56

GB
A production date of the item is indicated in the serial number on the technical data plate. A serial number is
an eleven-unit number, with the first four figures indicating the production date. For example, serial number
0606ххххххх means that the item was manufactured in June (the sixth month) 2006.
RUS
Дата производства изделия указана в серийном номере на табличке с техническими данными. Серийный
номер представляет собой одиннадцатизначное число, первые четыре цифры которого обозначают дату
производства. Например, серийный номер 0606ххххххх означает, что изделие было произведено в июне
(шестой месяц) 2006 года.
KZ
Бұйымның шығарылған мерзімі техникалық деректері бар кестедегі сериялық нөмірде көрсетілген. Сериялық
нөмір он бір саннан тұрады, оның бірінші төрт саны шығару мерзімін білдіреді. Мысалы, сериялық нөмір
0606ххххххх болса, бұл бұйым 2006 жылдың маусым айында (алтыншы ай) жасалғанын білдіреді.
UA
Дата виробництва виробу вказана в серійному номері на табличці з технічними даними. Серійний номер
представляє собою одинадцятизначне число, перші чотири цифри якого означають дату виробництва.
Наприклад, серійний номер 0606ххххххх означає, що виріб був виготовлений в червні (шостий місяць)
2006 року.
KG
Буюм иштеп чыгарылган датасы сериялык номурунда техникалык маалыматтар жадыбалында көрсөтүлгөн.
Сериялык номуру он бир орундуу сан болот, анын биринчи төрт саны өндүрүш датасын көрсөтөт. Мисалы,
сериялык номуру 0606ххххххх болгон буюм 2006 жылдын июнинде (алтынчы айында) өндүрүлгөн.
RO
Data fabricării este indicată în numărul de serie pe tabelul cu datele tehnice. Numărul de serie reprezintă un
număr din unsprezece cifre, primele patru cifre indicînd data fabricării. De exemplu, dacă numărul de serie este
0606xxxxxxx, înseamnă că produsul dat a fost fabricat în iunie (luna a asea) 2006.
ЗАПРЕЩЕНО УТИЛИЗИРОВАТЬ
С БЫТОВЫМ МУСОРОМ.
ОБРАТИТЕСЬ НА СООТВЕТСТВУЮЩИЙ
ПУНКТ ПЕРЕРАБОТКИ ЭЛЕКТРИЧЕСКОГО
И ЭЛЕКТРОННОГО ОБОРУДОВАНИЯ.
VT-1888.indd 56 10/20/20 3:24 PM
 Loading...