

Page 1
Page 2

Table of Contents
2
Table of Contents
Table of Contents ...................................................................................................................... 2
Chapter 1: Getting Started ................................................................................................... 5
Introduction................................................................................................................5
Specifications.............................................................................................................6
Software.................................................................................................................6
Installation ...............................................................................................................12
Package Contents.................................................................................................12
System Requirements ..........................................................................................13
Installation Procedure..........................................................................................13
Chapter 2: Installing the Visonic PowerLink....................................................................... 14
Hardware Installation...............................................................................................14
For PowerMax PRO: ...........................................................................................14
For PowerMax+:..................................................................................................16
Step 1: Connecting the Visonic external PowerLink to the Home Router..........16
Step 2: Connecting the Visonic PowerLink to the PowerMax+..........................16
Router Configuration...............................................................................................17
Step 1: Determining the IP Addresses of Home Router and Visonic PowerLink17
Step 2: Logging In to the Router .........................................................................18
Step 3: Port Forwarding Configuration ...............................................................18
Step 4: Wi-Fi (Wireless Network) Configuration ...............................................18
Step 6: Wi-Fi Encryption Configuration .............................................................19
Visonic PowerLink Configuration...........................................................................19
Step 1: Logging-in to the Visonic PowerLink.....................................................19
Step 2: Connection Setup.....................................................................................19
Step 3: Home Devices Customization.................................................................19
Step 4: Adding Cameras......................................................................................19
Step 5: Adding Users...........................................................................................19
Chapter 3: Logging Into The Visonic PowerLink................................................................ 19
Visonic PowerLink Window ...................................................................................19
Quick View..............................................................................................................19
Home Devices Pane.............................................................................................19
Cameras Pane.......................................................................................................19
Page 3

Table of Contents
3
Security System Pane ..........................................................................................19
Chapter 4: Managing Alerts and Alarms ............................................................................ 19
System Alerts...........................................................................................................19
System Alarms.........................................................................................................19
Viewing Cameras during an Alarm.....................................................................19
Closing the Alarm Mode Screen..........................................................................19
Chapter 5: Managing Home Devices ................................................................................. 19
Viewing Device Information...................................................................................19
Filter by Device Status.........................................................................................19
Filter by Device Type..........................................................................................19
Filter by Location ................................................................................................19
Editing Device Setup...............................................................................................19
Searching for a Specific Device by Name............................................................... 19
Chapter 6: Managing Video Cameras................................................................................ 19
Camera Configuration..............................................................................................19
Adding / Removing Cameras...............................................................................19
Chapter 7: Managing the Security System......................................................................... 19
Arming the PowerMax+ / PowerMax PRO Security System.................................. 19
Security Information................................................................................................19
Detectors..............................................................................................................19
Accessories..........................................................................................................19
Chapter 8: Managing Users ............................................................................................... 19
Adding / Removing Users........................................................................................19
Editing User Profiles................................................................................................19
Chapter 9: Managing System Configuration...................................................................... 19
System Configuration..............................................................................................19
Editing System Configuration .................................................................................19
Management ........................................................................................................19
Network ...............................................................................................................19
Users ........................................................................................................................19
Home Devices......................................................................................................19
Cameras ...............................................................................................................19
Security....................................................................................................................19
Resetting to Factory Settings...................................................................................19
Chapter 10: Cellular Web Interface...................................................................................... 19
Logging into PowerLink......................................................................................19
Viewing the security status..................................................................................19
Page 4

Table of Contents
4
Setting the security mode.....................................................................................19
Controlling Home Devices..................................................................................19
Filtering / Searching Home Devices list..............................................................19
Controlling Your Cameras...................................................................................19
Glossary...................................................................................................................19
Alarm...................................................................................................................19
Alert.....................................................................................................................19
Arming.................................................................................................................19
Central Station.....................................................................................................19
Control Panel ....................................................................................................... 19
Latchkey ..............................................................................................................19
Port Forwarding...................................................................................................19
Home Router........................................................................................................19
Wi-Fi (Wireless LAN).........................................................................................19
Product Limitations .............................................................................................19
Appendix A..............................................................................................................19
Page 5

Getting Started
5
Chapter 1: Getting Started
Introduction
The Visonic PowerLink enables you to view and control the Visonic PowerMax+ /
PowerMax PRO Security System over the Internet.
It provides the following advanced features:
• Event notifications to Email and mobile phones.
• Display of the status of the PowerMax+ / PowerMax PRO Security system
including system mode, detector status and troubled accessories.
• Display of the current status of the home automation devices controlled by the
PowerMax+ / PowerMax PRO Security system.
• In-House video viewing via Wired or Wireless cameras around the house.
• Recorded alarm time video of all cameras from the latest alarm.
• Local storage of video camera images on your computer.
• Remote arming and disarming of the PowerMax+ / PowerMax PRO Security
system.
All control and view options are enabled via a secured Web Interface, accessible from
anywhere around the globe whether connected by a PC or a cellular phone.
The Visonic PowerLink has a built-in Secured Web Server, which ensures that all
private information is fully secured. The web interface does not require any software
to be downloaded into the remote computer, allowing users to operate the browser at
maximum-security level.
Page 6

Getting Started
6
Specifications
Software
Security System
• Commands
o Arm Away
o Arm Home
o Disarm
• Status
o PowerMax+ / PowerMax PRO LCD Status
o Arming Mode
o Zone Information: Zone Number, Zone Type, Zone Status,
Location.
o Accessories Status: Keypads, Keyfobs, Sirens, Commanders.
o Alarm Indication: Burglar, Fire, Flood, Gas, Emergency, Panic,
Tamper.
o Trouble Indication: Inactivity, Low Battery, Tamper Open,
Line Failure, AC Failure, RF Jamming.
o PowerMax+ / PowerMax PRO Log
Home Devices
• X10 Control
o Lamp: On, Off, Dim, Bright
o Heater: On, Off, Warmer, Cooler
o Air conditioner: On, Off, Warmer, Cooler
o Sunshade: Open, Shut, Up, Down
• X10 Attributes
o Location
o Type
o Description
• X10 Filtering
o By Active / Inactive
o By Location
o By Device Type
o By Device Description
Cameras
• Up to 14 cameras can be enrolled (12 Ethernet & WiFi + 2 RS-485)
Page 7

Getting Started
7
• Camera Types:
o Visonic CAM1000 - RS-485
o Visonic CAM2000 - Ethernet
o Visonic CAM2000WL - WiFi / Ethernet
o Visonic CAM3100 - WiFi / Ethernet / IR / 60 degrees FOV
o Visonic CAM3200 - WiFi / Ethernet / Pan Tilt / IR / 60 degrees
FOV
o Vivotek IP7135 - Network Camera
o Vivotek IP7137 - WLAN Network Camera
o Vivotek PT7135 – Pan / Tilt Network Camera
o Vivotek PT7137 – Pan / Tilt WLAN Network Camera
o Vivotek FD7131 – Indoor Dome with While LED
o Vivotek FD6112V / FD6122V – Fixed Dome Network Camera
o Vivotek VS2101 – MJPG Video Server
• Auto enrollment of LAN and WiFi cameras to the home network
• Auto Capture Of 10 Post Alarm Images Per Camera
• Auto Capture Of 5 Pre Alarm Images Per Camera
• Turn On / Off for web view according to the alarm modes
• Flip & Mirror camera images for floor and ceiling installations
• Camera Actions:
o Pan / Tilt
o Save Image to Local HD
o Turn ON, OFF
o Current View / Alarm View
Users
• 1 Master User
• 7 Standard Users
Management
• IP Address: Auto configuration or Manual Configuration
• Reset to Factory Defaults Option
• Remote Firmware Upgrade
Web Server
• Ports: 443 (SSL), 80 (HTTP)
• Ports can be changed by user
• Automatic port forwarding with UPNP support
Page 8

Getting Started
8
• XHTL & WAP support for mobile phone access
Data Security
• 128Bit SSL encryption on all data transmissions to and from the
Internet
• Authentication required by Username and Password
• Login brute force attack protection
• WEP, WPA and no Encryption for WiFi camera in-house image
transfer
Hardware
CPU
• Intel Xscale PXA255 @ 200MHz
OS
• Montavista Linux
Memory
• 64MB Flash
• 64MB SDRAM
PowerMax+ / PowerMax PRO Connection
• RS-232
Power Supply
• Powered From PowerMax+ / PowerMax PRO via RS-232 connection
Size
• PowerLink (For PowerMax+): 200x115x55mm (7-7/8x4-1/2x3-3/16
in.)
• Internal PowerLink (For PowerMax PRO): 96X96X23mm (3-3/4 x 3-
3/4 x 7/8 in.)
Weight
• PowerLink (For PowerMax+): 365g (13 oz.)
• Internal PowerLink (For PowerMax PRO): 122g (4.3 oz.)
Color
• PowerLink (For PowerMax+): Gray,
• Internal PowerLink (For PowerMax PRO): Silver
Operating Temperature
• 0ºC to 49ºC (32ºF to 120ºF)
Storage Temperature
• -20ºC to 60ºC (-4ºF to 140ºF)
Compliance with Standards
• EN 60950, EN 55022, EN 55024
Page 9

Getting Started
9
Cameras
CAM3100
• Image Resolution: up to 640x480
• Effective Image Resolution: 320x240
• Image Frame Rate: QCIF@30fps,CIF@30fps, VGA@30fps
• Sensor Type: 1/4” Low Lux. CMOS sensor
• Lens: f: 4.2mm; F: 2.0, 60 degree field of view
• 6 IR LEDS
• Auto Gain Control
• Auto Exposure
• Auto White Balance
• Communication Format: LAN, 10/100Mbps, Wireless LAN 802.11g
• Power Supply: 5 VDC, 2500mA
• Picture Format: Compressed JPEG
• Color: Two tone, White and Silver
• Operating Temperature: 0˚C to 45˚C
• Storage Temperature: -15˚C to 60˚C
• Humidity: 0% to 90% non-condensing
• Compliance with Standards: FCC/CE class B
CAM3200
• Image Resolution: up to 640x480
• Effective Image Resolution: 320x240
• Image Frame Rate: QCIF@30fps,CIF@30fps, VGA@30fps
• Sensor Type: 1/4” Low Lux. CMOS sensor
• Lens: f: 4.2mm; F: 2.0, 60 degree field of view
• 7 IR LEDS
• PAN / TILT
• Auto Gain Control
• Auto Exposure
• Auto White Balance
• Communication Format: LAN, 10/100Mbps, Wireless LAN 802.11g
• Power Supply: 12 VDC, 1500mA
• Picture Format: Compressed JPEG
• Color: Two tone, White and Silver
Page 10

Getting Started
10
• Operating Temperature: 0˚C to 45˚C
• Storage Temperature: -15˚C to 60˚C
• Humidity: 0% to 90% non-condensing
• Compliance with Standards: FCC/CE class B
CAM2000
• Image Resolution: up to 640x480
• Effective Image Resolution: 320x240
• Image Frame Rate: QCIF@30fps,CIF@25fps, VGA@10fps
• Sensor Type: Color CMOS
• Lens: f: 6.0mm; F: 1.8, 45 degree field of view
• Auto Gain Control
• Auto Exposure
• Auto White Balance
• Communication Format: LAN, 10/100Mbps
• Power Supply: 5 VDC, 700mA
• Picture Format: Compressed JPEG
• Color: Two tone, Silver and Bronze
• Operating Temperature: 5˚C to 40˚C
• Storage Temperature: -25˚C to 50˚C
• Humidity: 5% to 95% non-condensing
• Compliance with Standards: FCC, CE, VCCI Class B
CAM2000WL
• Image Resolution: up to 640x480
• Effective Image Resolution: 320x240
• Image Frame Rate: QCIF@30fps,CIF@25fps, VGA@10fps
• Sensor Type: Color CMOS
• Lens: f: 6.0mm; F: 1.8, 45 degree field of view
• Auto Gain Control
• Auto Exposure
• Auto White Balance
• Communication Format: LAN, 10/100Mbps, Wireless LAN 802.11g
• Power Supply: 5 VDC, 1000mA
• Picture Format: Compressed JPEG
• Color: Two tone, Silver and Bronze
Page 11

Getting Started
11
• Operating Temperature: 5˚C to 40˚C
• Storage Temperature: -25˚C to 50˚C
• Humidity: 5% to 95% non-condensing
• Compliance with Standards: FCC, CE, VCCI Class B
Page 12
Getting Started
12
Installation
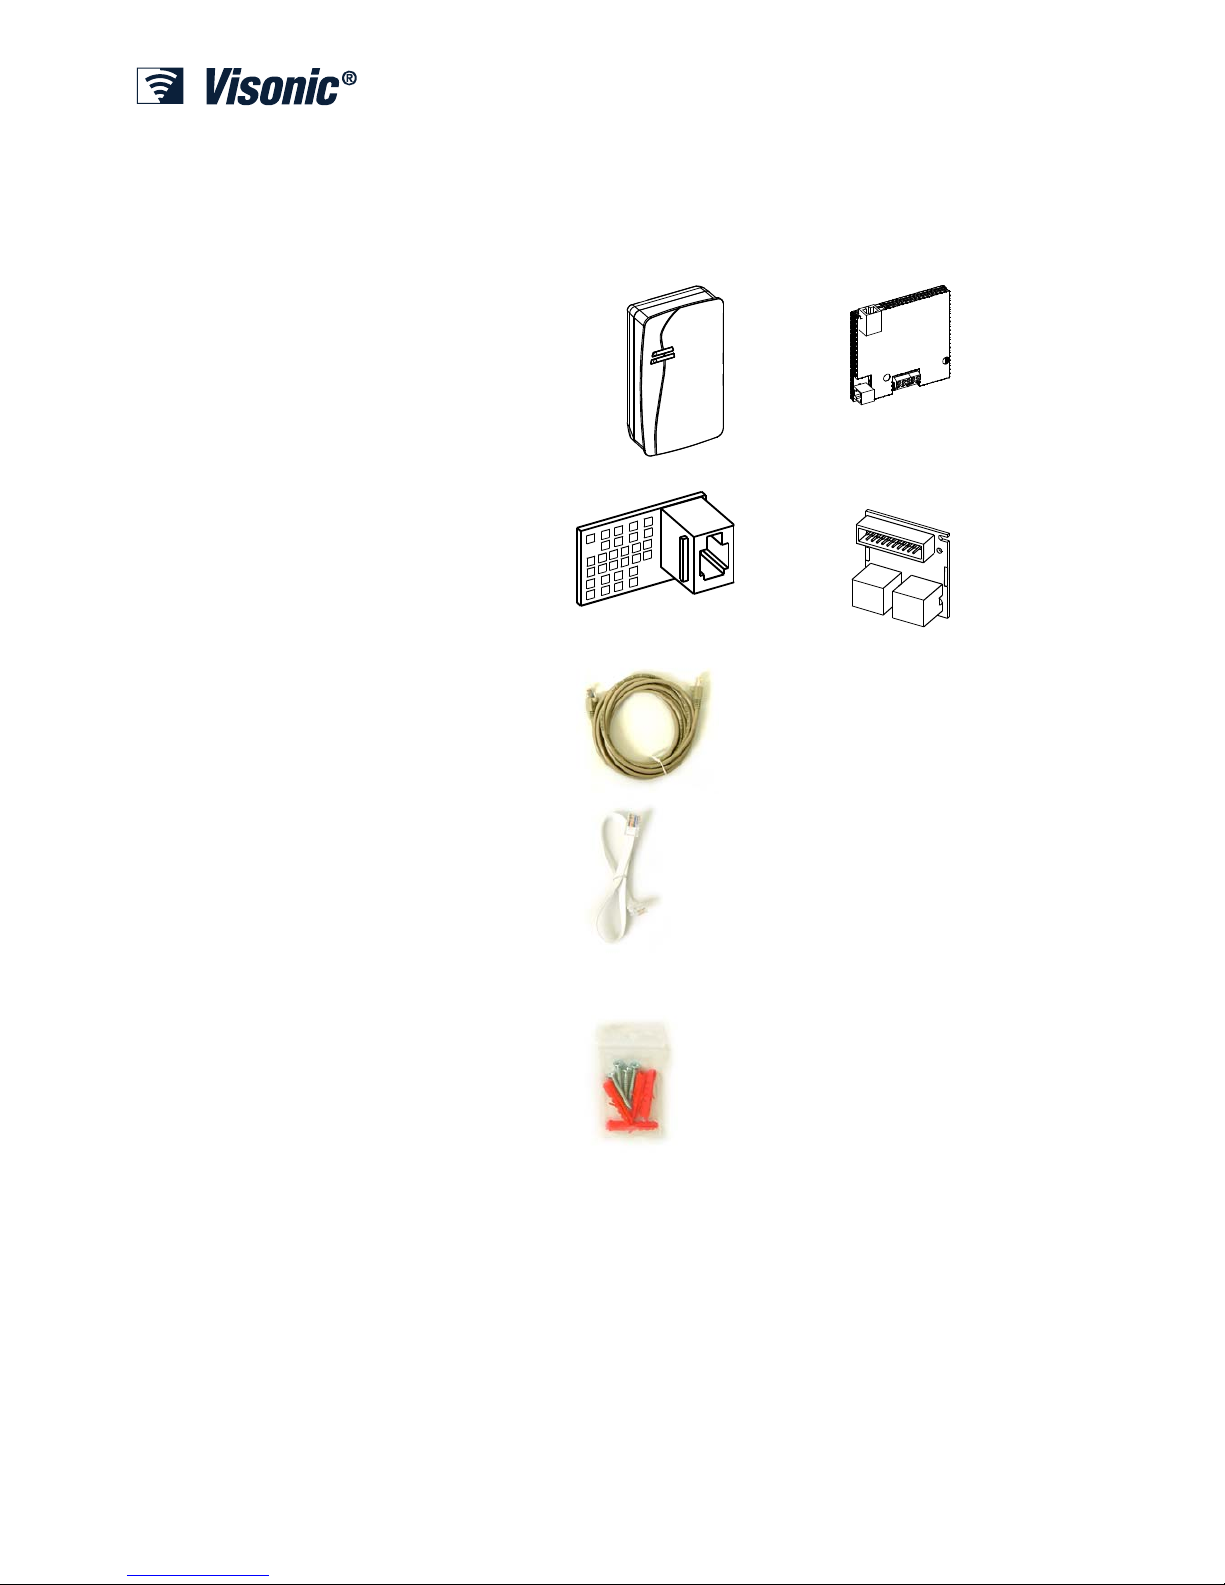
Package Contents
1 x Visonic PowerLink
External PowerLink
(For PowerMax+)
Internal PowerLink
(For PowerMax PRO)
1 x PowerLink RS-232 Interface
Module
For PowerMax+
Dual RS-232
(For PowerMax Pro)
1 x 2m (6.5 feet) Cat-5 Cable
1 x RS-232 Cable
1 x Mounting Kit (for PowerMax+
only)
1 x Resources CD
Page 13

Getting Started
13
System Requirements
• PowerMax+ / PowerMax PRO Security System.
• High-Speed Internet connection (Cable or DSL) enabled via a Home Router
(Ethernet Based).
• One free Ethernet port on the home router for the PowerLink connection.
• One free Ethernet port on the home router for IP based camera enrollment (will
be freed if camera is WiFi).
• One free Ethernet port on the home router for every added Ethernet camera.
• One of the supported browsers:
o Internet Explorer version 6.0 or up
o Firefox version 1.0 or up
o Safari 4
o Opera 9
• PC running Windows® 2000, XP or Vista connected to the home router.
• Optional: WiFi 802.11b or 802.11g Access Point
Installation Procedure
The Visonic PowerLink installation procedure involves three stages:
• Hardware Installation
• Router Configuration
• Visonic PowerLink Configuration
Page 14

Installing the Visonic PowerLink
14
Chapter 2: Installing the V isonic PowerLink
The Visonic PowerLink installation procedure involves the following stages:
· Hardware Installation
· Router Configuration
· Visonic PowerLink Configuration
Hardware Installation
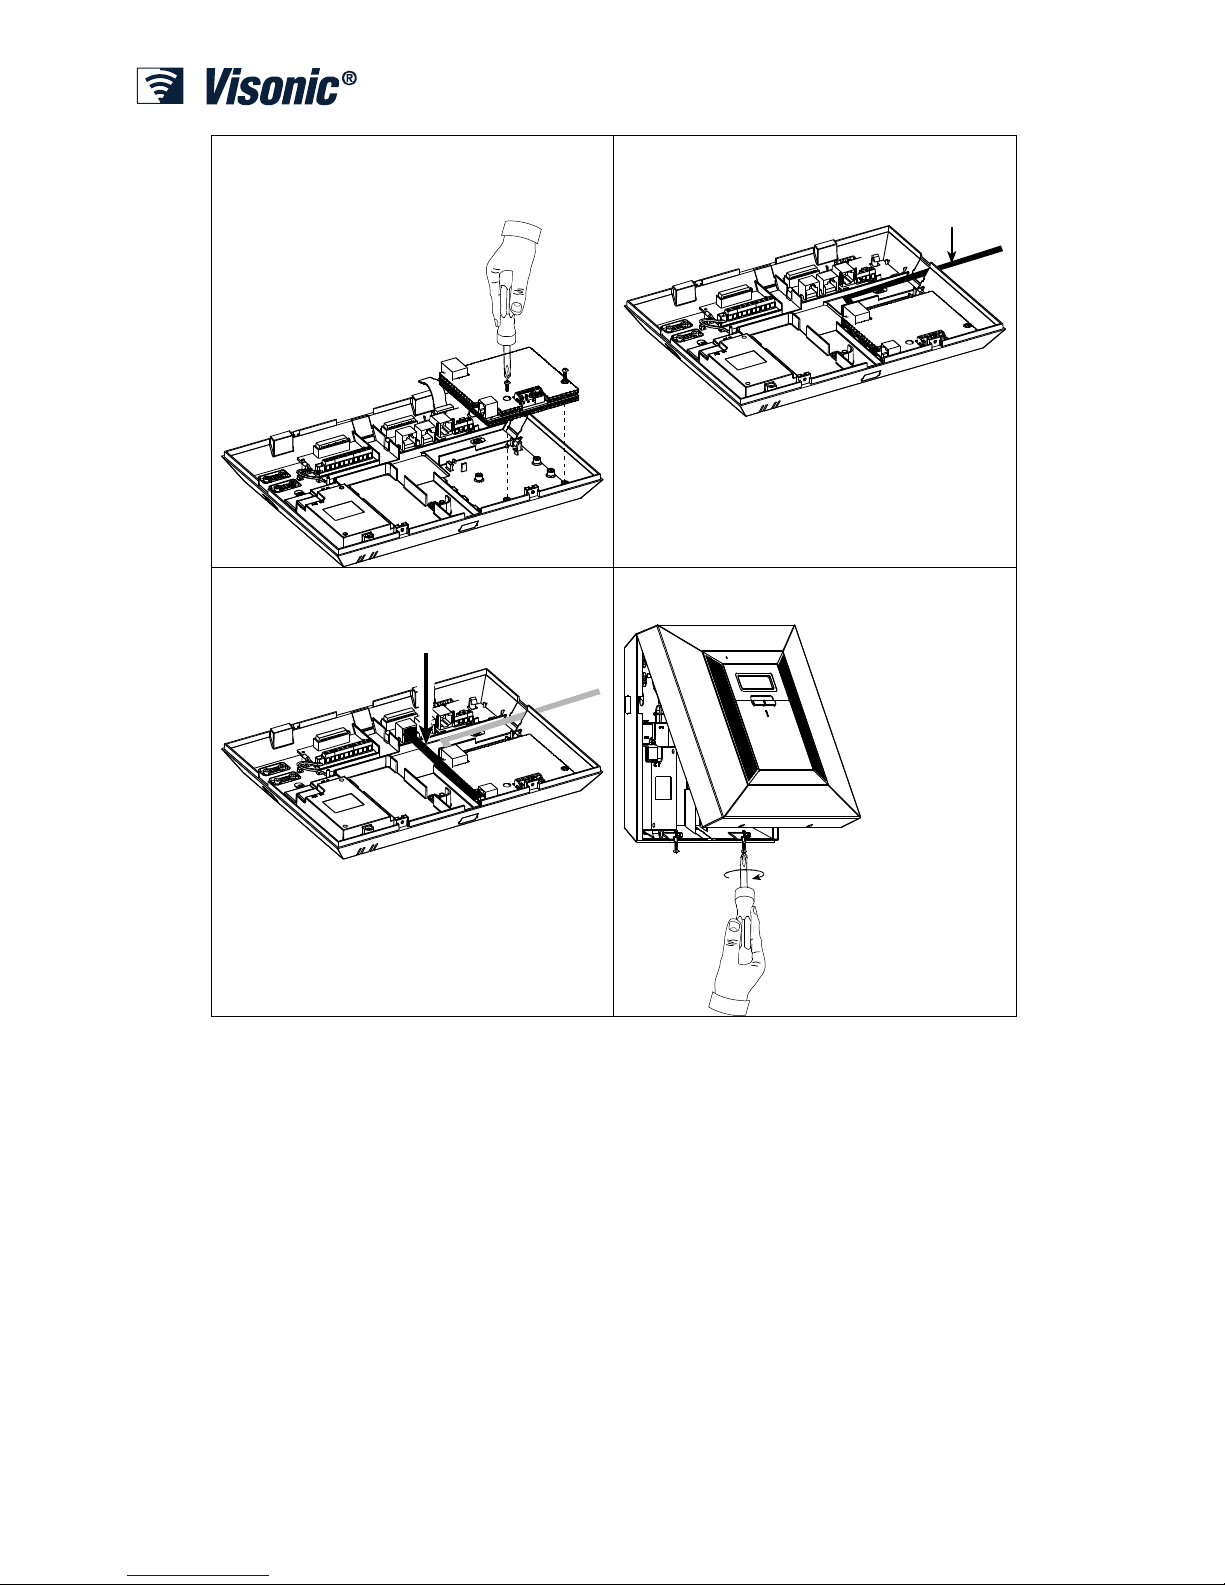
For PowerMax PRO:
Step 1
. Open the PowerMax Pro:
1
2
Release
screws
Step 2. Install the dual RS-232 module and connect its flat cable:
Front
unit
Back
unit
Page 15
Installing the Visonic PowerLink
15
Step 3. Plug in the Internal
PowerLink and fasten it with 2
screws:
Step 4. Connect the PowerMax
PRO to the home router:
Cat-5 Cable
to home router
Step 5. Connect internal
PowerLink to the dual RS-232
module:
Step 6. Close the panel and
secure with 2 screws:
Page 16
Installing the Visonic PowerLink
16
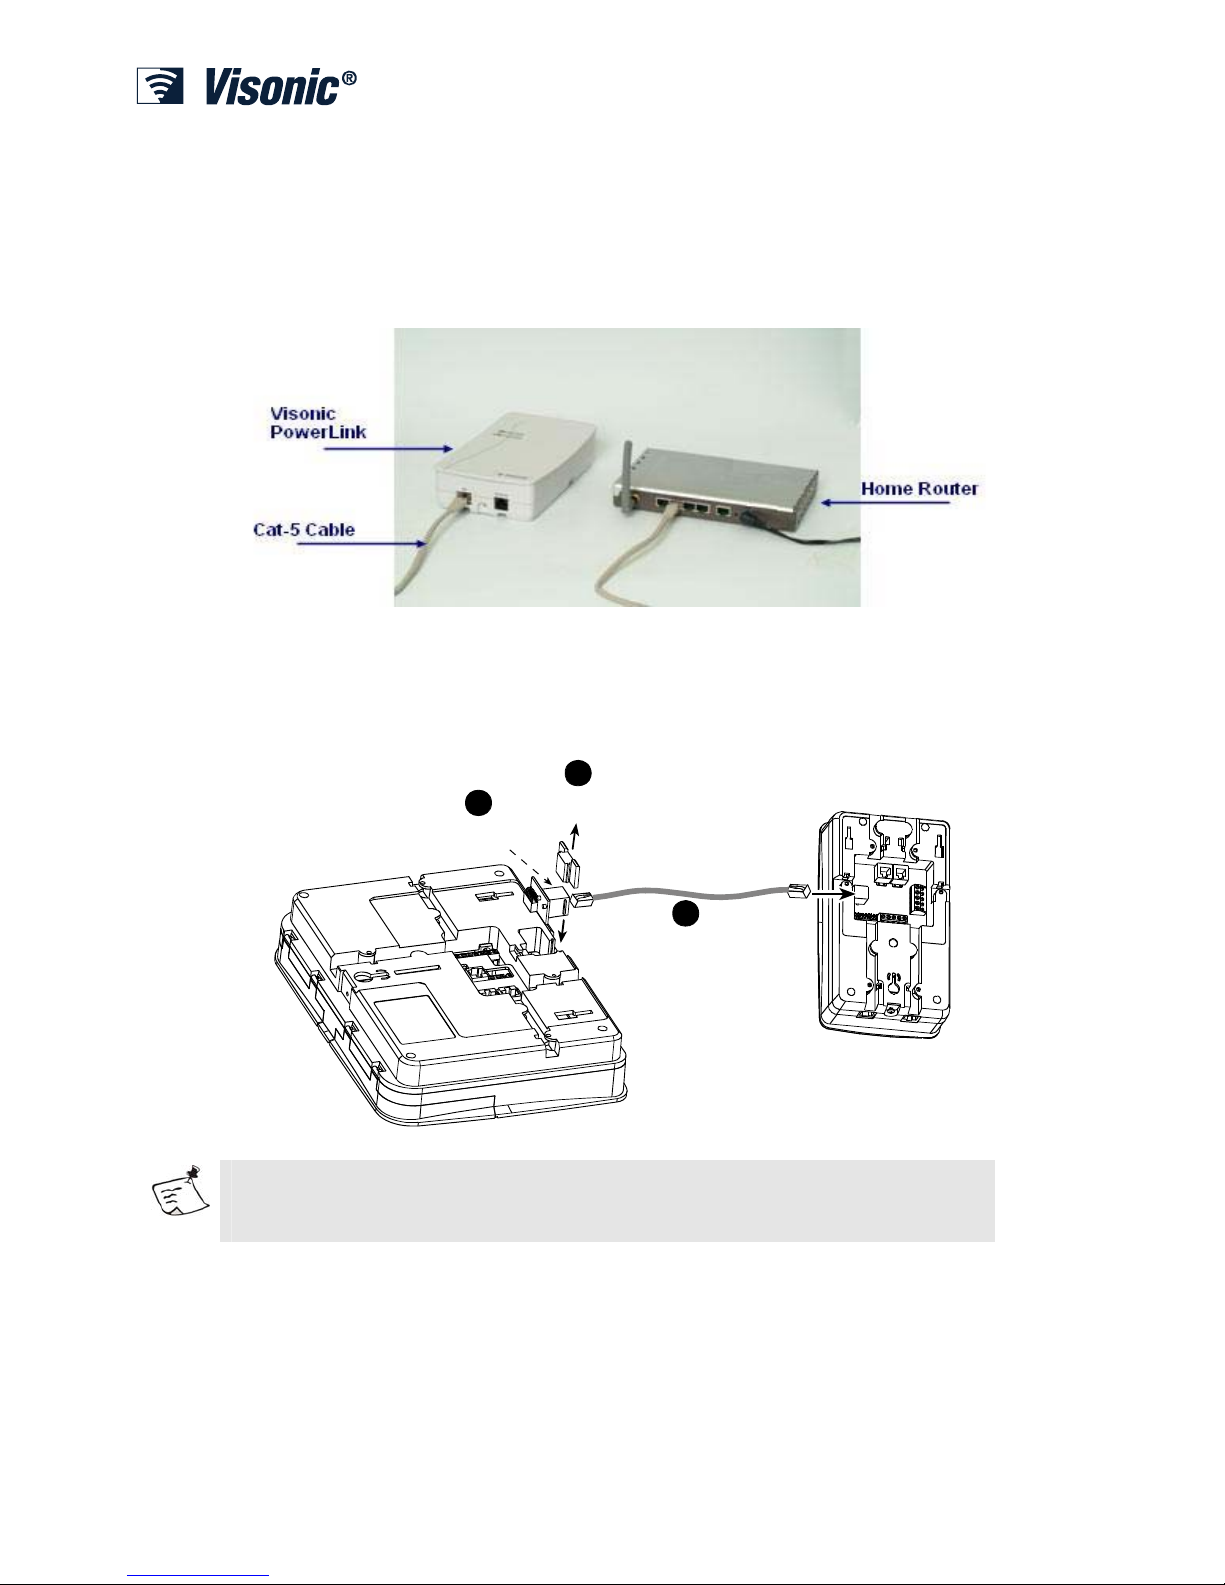
For PowerMax+:
Step 1: Connecting the Visonic external PowerLink to the Home
Router
Use the supplied Cat-5 cable to attach the Visonic PowerLink's LAN port to one of
the free LAN ports of the Home Router.
If an Ethernet infrastructure exists in your house, you can connect the Visonic
PowerLink to the Home Router through a network wall outlet. Use the supplied Cat-5
cable to connect the LAN port of the Visonic PowerLink to the Network wall outlet.
Step 2: Connecting the Visonic PowerLink to the PowerMax+
Remove
plastic cap
PowerMax+
PowerLink
Connect
PowerLink
module
Connect the su pplied
RS-232 cable
2
1
3
Note
Make sure the distance between the Visonic PowerLink and the PowerMax+ Control
Panel does not exceed the length of the cable.
Page 17
Installing the Visonic PowerLink
17
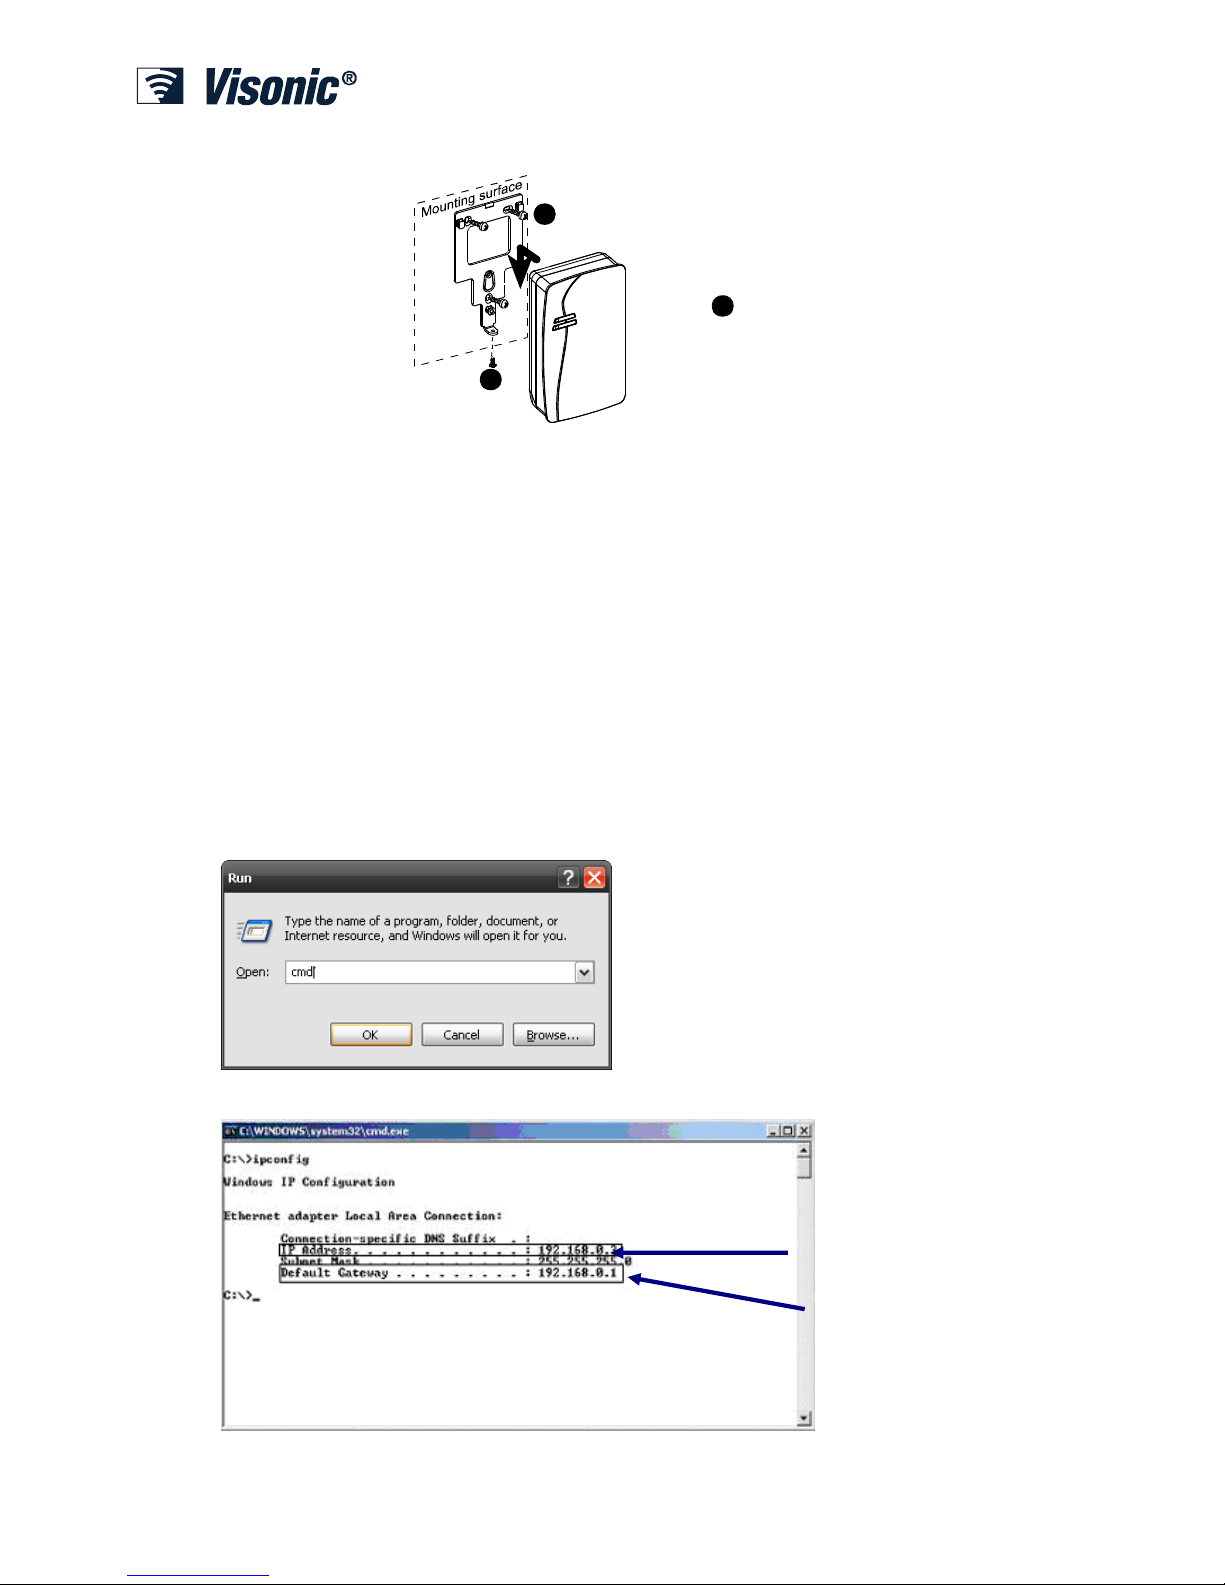
Step 3: Wall Mounting the Visonic PowerLink
Fasten bracket
to the
PowerLink
3
Mark and drill 3 ho les in mounting
surface. Fasten the bracket to the
mounting surface with t he s cre ws.
1
2
Locate PowerLink
on the bracket and
push downward as shown
until a click is heard.
Router Configuration
After installing the hardware you need to configure the Home Router. Different Home
Router models have different login interfaces and configuration. The following
section includes a general description of the procedure and an example of a specific
Home Router model. Router specific instructions and guides for port forwarding can
be found at http://www.portforward.com.
Step 1: Determining the IP Addresses of Home Router and Visonic
PowerLink
1. Make sure you have in front of you the Visonic PowerLink Installation Form -
see appendix A.
2. On your PC click Start > Run.
3. In the Open text box type cmd and click OK.
4. at the Command Prompt type ipconfig and press Enter
Default Gateway
IP Address
Page 18

Installing the Visonic PowerLink
18
5. Copy the Default Gateway IP Address as the Home Router IP Address Value
in the Visonic PowerLink Installation Form (See appendix A).
6. Copy the first three blocks of the IP Address to the Visonic PowerLink IP
Address Value in the Visonic PowerLink Installation Form (the last block of
the IP Address is 200, see Appendix A).
Example: The Default Gateway value is 192.168.0.1:
The Home Router IP Address is 192.168.0.1.
The IP Address value is 192.168.0.3:
The Visonic PowerLink IP Address is 192.168.0.200.
Step 2: Logging In to the Router
You are required to login to your Router configuration interface.
1. Open your Internet Browser and in the Address line type
HTTP://<Home Router IP Address>. Replace <Home Router
IP Address> with the value of "Home Router IP Address" from the
Installation form (see appendix A).
2. Once the Login page appears, type a username and a password to login.
Different Routers have different login interfaces. Refer to your Router's manual for
instructions.
If you are unable to login, call your home router installer or Internet service provider
for assistance.
Step 3: Port Forwarding Configuration
Router port forwarding guides for your router can be found at
http://www.portforward.com.
1. In your Router's window, locate the Port Forwarding configuration screen.
2. Set the Port Forwarding IP Address to the value of Visonic PowerLink IP
Address from the Installation Form (see appendix A).
3. Set Protocol to TCP.
4. Set all port related fields to 443
5. If requested, set the Port Forwarding rule name to PowerLink.
6. Save the information.
7. If requested, restart the router and wait for the router to restart
Step 4: Wi-Fi (Wireless Network) Configuration
Perform this step if you intend to connect wireless cameras to the Visonic PowerLink.
1. In your Router Configuration window, locate the Wireless Network
configuration screen.
2. Set a value for the SSID. Changing the default SSID value is recommended to
ensure a secured wireless network.
Page 19

Installing the Visonic PowerLink
19
3. In the Visonic PowerLink Installation Form (see appendix A), write down the
value of SSID for future reference.
4. Select a Channel. (You can pick any channel. The default channel is usually 6).
5. Mark the selected channel in the Visonic PowerLink Installation Form
(Appendix A).
Step 6: Wi-Fi Encryption Configuration
PowerLink supports three encryption methods:
1. No encryption
2. WEP 64bit / 128bit
3. WPA
Enabling encryption on your Wi-Fi network is highly recommended and ensures that
any information transferred on the Wi-Fi network such as camera images is secured
against unauthorized viewers.
Refer to your router user's manual in order to set up encryption.
Some routers need restart in order to apply the settings. Please make sure to restart the
router if restart is needed.
Page 20
Installing the Visonic PowerLink
20
Visonic PowerLink Configuration
Step 1: Logging-in to the Visonic PowerLink
1. Before logging-in, the PowerLink has to be enrolled to the PowerMax+ /
PowerMax PRO. In order to enroll the PowerLink:
• On the PowerMax+ / PowerMax PRO, enter the "USER SETTING"
menu.
• Choose "DEFINE PWRLNK" -> "Install".
• Press "Show/OK". Wait for the confirmation sound.
• Press "Away". Press "Show/OK".
2. Open your Internet Browser and in the Address line type
HTTP://< Visonic PowerLink IP Address>. Replace
<Visonic PowerLink IP Address> with the value of "PowerLink IP
Address" from the Installation form (see appendix A).
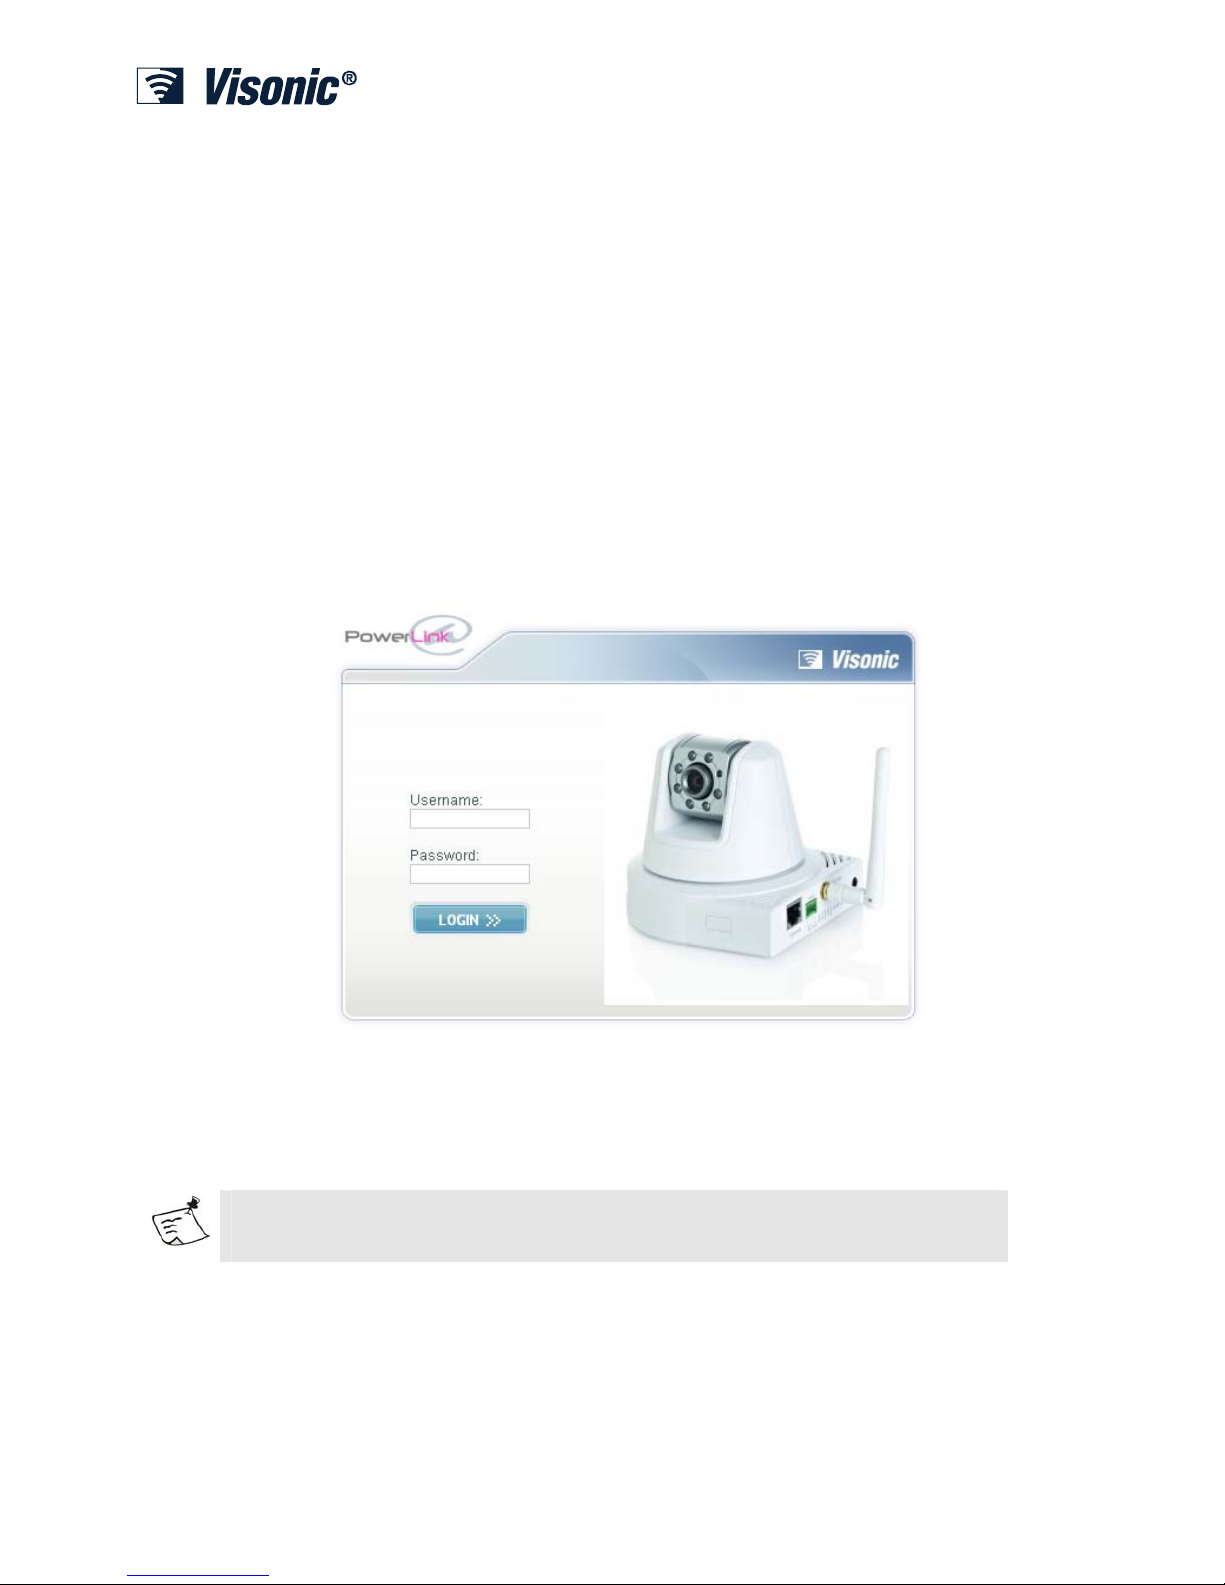
3. In Visonic PowerLink's Login screen: enter the Username and Password.
Default Username and Password values (if not changed by owner or installer):
Username: Admin
Password: Admin123
Note
Username and Password are case-sensitive.
4. Click Login >>.
If you are unable to login, call your Visonic PowerLink service provider for
assistance.
Page 21
Installing the Visonic PowerLink
21
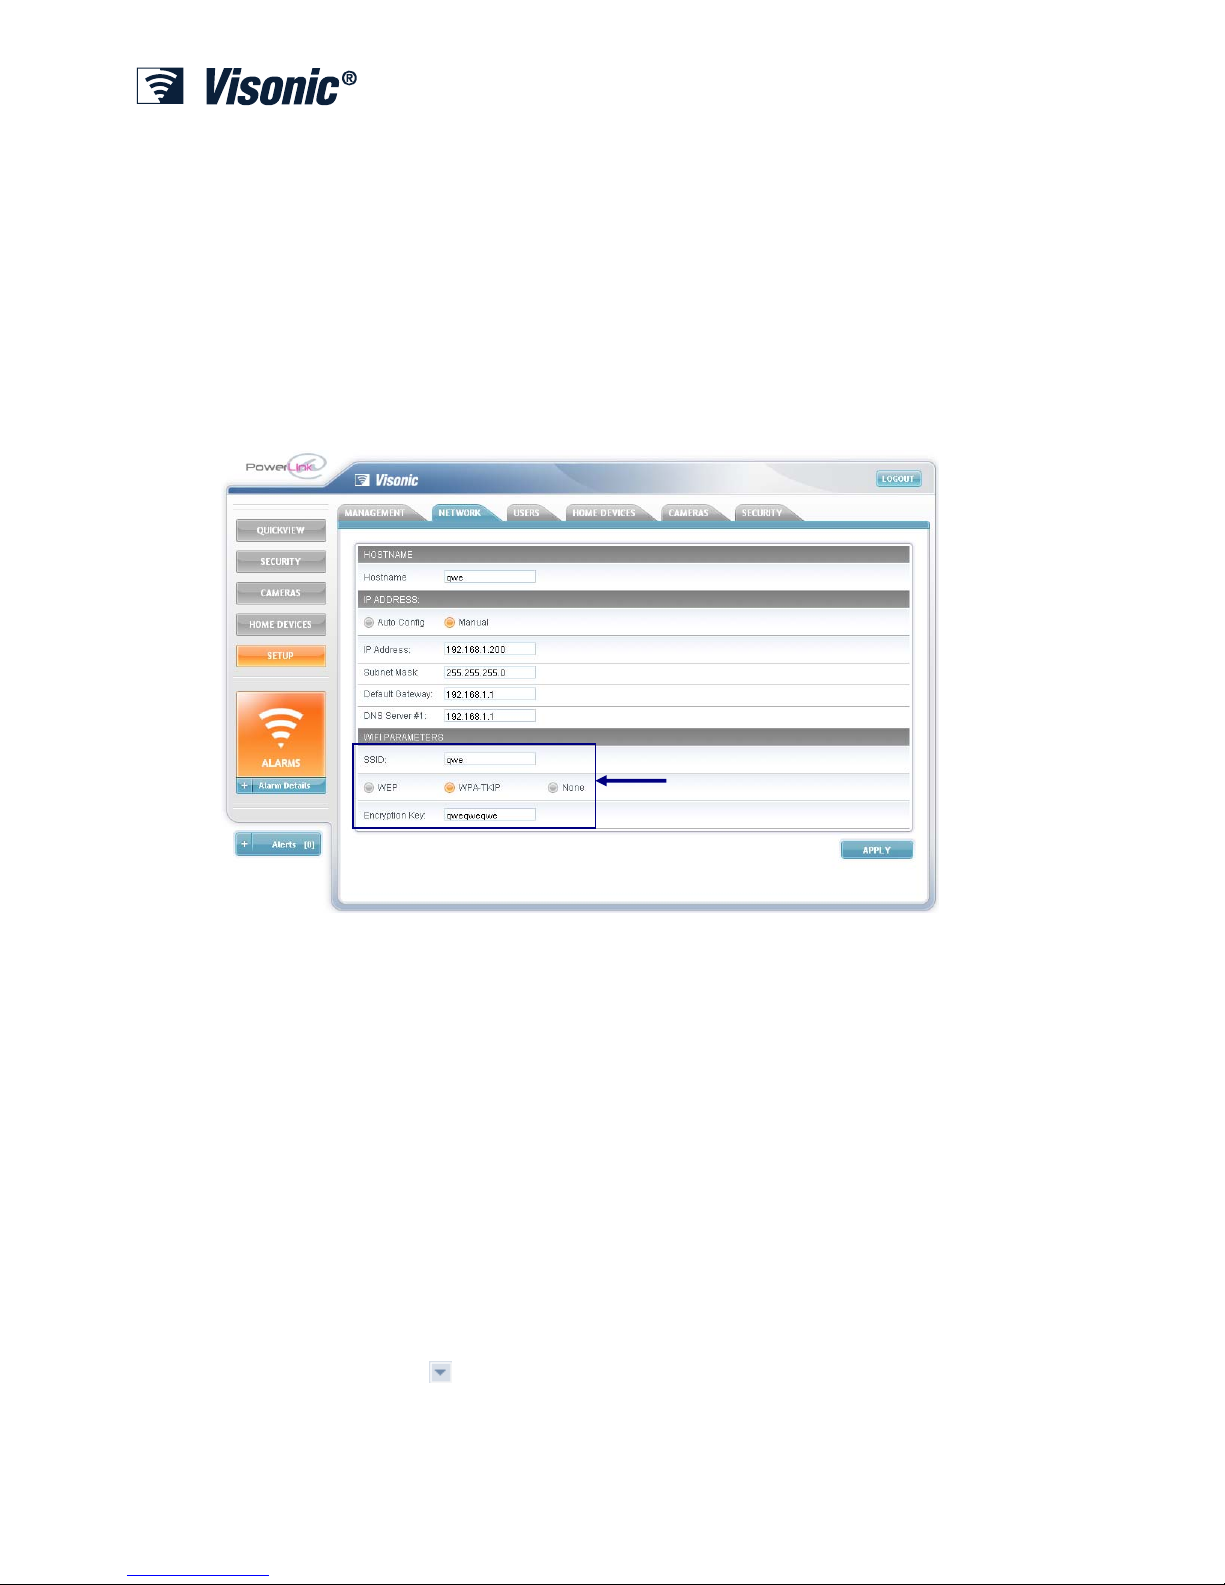
Step 2: Connection Setup
1. In the left frame of the Visonic PowerLink window click SETUP.
2. Click the NETWORK tab.
3. Copy the SSID from the Visonic PowerLink Installation Form (see appendix
A).
4. Choose your wireless encryption method
5. In the Encryption Key field type the Key String according to the Visonic
PowerLink Installation Form (Appendix A).
6. Click Apply.
Step 3: Home Devices Customization
You need to select a type and define a name for each Home Automation device
enrolled in your PowerMax+ / PowerMax PRO Control Panel.
We recommended that you define the name of a device so it helps identifying it.
Skip this step if you do not have any Home Automation devices enrolled into the
system.
1. In the left frame of the Visonic PowerLink window click SETUP.
2. Click the HOME DEVICES tab.
3. In the Set Device Name And Type screen you can:
Type a new name in the DEVICE NAME field.
- or Click the arrow
next to the TYPE field and in the window click a device
type.
Connection Setup
Parameters
Page 22

Installing the Visonic PowerLink
22
4. Click Apply to save your changes.
Step 4: Adding Cameras
If you have cameras connected to the Visonic PowerLink you need to configure the
cameras. This enables viewing the image on a remote computer
1. In the left frame of the Visonic PowerLink window click SETUP.
2. Click the CAMERAS tab.
¾
To add a camera to the Visonic PowerLink:
Note
Wired and Wireless cameras, when added, must be conne cted to the Router one by one.
Please refer to the specifications page for a list of supported cameras
1. Connect the camera to the Home Router (or to an Ethernet wall outlet) using
the supplied Cat-5 cable and to the mains.
2. Wait for the camera to connect to the network
3. Locate the ADD CAMERA area. In the CAMERA TYPE list click
and
select Network.
4. In the Location list click and select a location from the list.
5. You can disable web viewing of the camera by choosing at which arming
mode the camera will be turned off. Clicking an arming mode icon will apply
a small X to it, meaning that at this arming mode the camera will be off.
6. Click
to start the camera enrollment
Page 23

Installing the Visonic PowerLink
23
A message will indicate that enrollment is starting:
You can continue browsing the PowerLink web interface, the enrollment process will
continue at the background.
From this point the enrollment messages will be visible at the alert popup:
Clicking on dismiss will dismiss the message and it will disappear from the popup.
Step 5: Adding Users
The Visonic PowerLink is pre-configured with a Master user called Admin. Only the
Master user can access the SETUP screens of the Visonic PowerLink's interface. We
recommend you first change the username and password of the Master user and save
the username and password in a safe place.
1. In the left frame of the Visonic PowerLink window click SETUP.
2. Click the USERS tab.
¾
To change the Master user's name and password:
1. Click the EDIT button under the PROFILE title.
2. Change the username from Admin to your own user name.
3. Change the password to your own password.
4. Repeat this step in the Confirm Password area.
5. Click APPLY.
Click to open the alerts popu
p
Page 24

Installing the Visonic PowerLink
24
¾
To add a user to the Visonic PowerLink:
1. Click NEW and set the following parameters:
Username - The user name used for logging in to the web interface.
Password – Login password. (You need to re-enter the password to
confirm).
Mobile - The mobile phone number to which notifications are sent.
Email - The email address to which notifications are sent.
PowerMax User# - Attach the PowerLink user name to the PowerMAX
user number.
2. Click APPLY. The user is added to the ADDITIONAL USERS list.
Page 25

Logging Into The Visonic PowerLink
25
Chapter 3: Logging Into The Visonic PowerLink
You log in to the Visonic PowerLink through the Internet Browser.
After you log in the Quick View window is displayed with an overall view of the
security system. Loading time of the Quick View screen may vary due to the heavy
amount of data presented. First time loading is expected to take longer than future
loading times.
¾
To login to your Visonic PowerLink
1. Open your Internet Browser.
2. In the Address line, type the address given to you by the installer.
If you have installed the Visonic PowerLink yourself, use the following addresses:
From within the house:
http://<PowerLink IP Address>. Replace <PowerLink IP Address> with the PowerLink
IP Address value from your installation form (see appendix A).
From a remote computer:
http://myhome.visonic.com/<PowerLink ID> Replace <PowerLink ID> with the
PowerLink ID value from your installation form (Appendix A). By default, your PowerLink
ID is equivalent to your PowerLink Serial Number (displayed in the SETUP menu).
3. A Security Alert message will be displayed:
a. In Microsoft Internet Explorer 6, click Yes:
Page 26

Logging Into The Visonic PowerLink
26
b. In Microsoft Internet Explorer 7 and 8, click on Continue to this
website:
4. Wait for the Login page to load.
5. In Visonic PowerLink's Login screen type the Username and Password.
Default Username and Password values (if not changed by owner or installer):
Username: Admin
Password: Admin123
Note that Username and Password are case-sensitive.
6. Click Login >>.
If you are unable to login, call your Visonic PowerLink service provider or
Installer for assistance.
Once you have logged in, the Quick View screen appears.
Different browsers would display different Security Warnings that might not look similar to
the Internet Explorer examples brought above.
Page 27

Logging Into The Visonic PowerLink
27
Visonic PowerLink Window
The Visonic PowerLink window displays the different views that enable managing the
PowerMax+ / PowerMax PRO Security System, Home automation devices and
Cameras via the Internet:
Quick View: Displays an overall view of the system status including video camera images.
Security View: Gives a detailed overview of the security system including the current
mode and status of the security system, detectors and accessories.
Cameras View: Used to view images from the connected cameras.
Home Devices View: Enables quick and efficient management of the home devices
controlled by the PowerMax+ / PowerMax PRO Security System.
Setup View: Used for system configuration and viewing the PowerMax+ / PowerMax
PRO log.
In all views the Visonic PowerLink window includes the following components:
1 – Side Menu: Click to display the different Views.
2 – Alerts Indicator: Click to display current system alerts. The Alerts Indicator
displays the number of current alerts within the system.
3 – Work Area: Use to display video, system information and configuration data.
4 – Logout: Click to logout.
1
3
4
2
Page 28

Logging Into The Visonic PowerLink
28
Quick View
When you log into the Visonic PowerLink, the application opens in Quick View. The
Quick View screen displays an overall view of the current status of the house
subsystems controlled by the PowerMax+ / PowerMax PRO Security System in three
Information panes:
1 – Home Devices Pane
2 – Cameras Pane
3 – Security Pane
In the following sections each Information pane of the Quick View screen is described
in detail.
1
2
3
Page 29

Logging Into The Visonic PowerLink
29
Home Devices Pane
This pane displays the status and actions of the different home automation devices
enrolled in the system.
The Connected Devices list includes information for all the home automation devices
currently enrolled to the PowerMAX:
• Device name or Type – can be defined in the Home Devices screen accessed
from the SETUP page.
• Device location, as defined in the PowerMax+ / PowerMax PRO Security Control
Panel.
• Available actions for a home automation device. These vary according to the
device type. For example: a lamp can be dimmed and brightened. A heater can be
set to a warmer or cooler temperature. The text on and above the action buttons
describes the functionality for the specific device.
To deactivate an active device: Click the icon of the required device.
To activate an inactive device: Click the icon of the required device.
To jump to the Home Devices page: Click the
icon at the top right of the pane.
Device Location
Device Name
Page 30

Logging Into The Visonic PowerLink
30
Cameras Pane
The Cameras pane displays video from the video cameras enrolled in the system.
Note
Camera location can be defined in the Cameras screen (see Managing Cameras on page
19).
To view a camera: Click the camera name from the list of available
cameras. The view will change to the selected camera and the name of
the camera will be displayed at the top.
To jump to the Cameras page: Click the icon at the top right of the pane.
Camera currently
being viewed
Cameras available
for viewing
Page 31

Logging Into The Visonic PowerLink
31
Security System Pane
This pane displays the system status as seen on the LCD screen of the PowerMax+ /
PowerMax PRO Security System and enables changing the arming mode.
¾
To set an arming mode:
1. Click the required arming mode in order to set the Security System to the
selected mode. Current mode is colored Orange.
To jump to the Security page: Click the icon at the top right pane.
System Status
Arming Modes
Page 32

Managing Alerts and Alarms
32
Chapter 4: Managing Alerts and Alarms
The PowerMax+ / PowerMax PRO Security System distinguish between two major
event types: Alarms and Alerts. Alarms are events that indicate that the security
system is alarmed due to a burglar intrusion, a panic situation, an emergency situation
or any other situation that is declared as an alarm situation.
All trouble events or events that do not put the security system into Alarm mode are
considered Alerts and should be treated as soon as possible. Alerts do not usually
affect the security system immediate behavior.
All Alert and Alarm details are written to the PowerMax+ / PowerMax PRO.
System Alerts
If an Alert situation exists in the system, the Alerts Indicator appears in any Visonic
PowerLink screen. The Alerts Indicator displays how many alerts there are in the
system at the moment.
Alert Indicator
Page 33

Managing Alerts and Alarms
33
Clicking on the alert indicator will open the alert popup. The alert popup displays the
alerts details.
Some alert messages such as Camera Enrollment messages can be dismissed and
removed from the list. This can be done by clicking the dismiss link in the specific
message.
The Visonic PowerLink alert popup displays Alert indications as long as alerts exist in
the security system.
Once an alert is treated the Alert details are removed from the Alert Indicator and alert
popup automatically. If there aren't any alerts in the system, the Alert Indicator would
show the number zero.
Page 34

Managing Alerts and Alarms
34
System Alarms
The Visonic PowerLink treats Alarm situations in a special way. In an Alarm
situation, the whole window changes into the Alarm mode screen.
The Alarm mode screen displays the alarm type, date and time. It includes quickaccess buttons to alarm time actions.
The Quick-access buttons enable you to do the following:
• Mute the security system siren.
• Turn all lights off or on.
• View video cameras.
• Disarm the Security system.
Viewing Cameras during an Alarm
During an alarm you can view video recorded by the cameras from the pre-alarm time
(if pre-alarm time is configured) onward.
You can also choose to view live video from the cameras.
¾
To view video cameras:
1. In the Alarm mode screen click the Video Cameras icon .
The Work area displays the Cameras View in Alarm mode. All cameras titles indicate
Alarm View - recorded video from the alarm period.
QUICKACCESS
ACTIONS
ALARM
DETAILS
Page 35

Managing Alerts and Alarms
35
2. You can now do any of the following:
• Click to display currently viewed video.
Note
You can then click to return to recorded video.
• Click to open the Save As window and save the image as a graphic
file on your computer.
• Use the controls to Play, Pause and move the recording frame by
frame
Note
For a detailed description of Cameras view see Managing Video Cameras on page 19.
Closing the Alarm Mode Screen
You can close the Alarm mode screen. Once the alarm mode screen is closed, an
alarm indication is displayed on all Visonic PowerLink screens. You can click the
Alarm indicator at any time to return to the Alarm mode screen. The alarm indication
disappears only when the alarm is cleared from the security system's memory.
¾
To close the Alarm mode screen:
1. Click the Close Alarm Screen icon .
The normal Visonic PowerLink window re-appears with the Alarm indicator.
Page 36

Managing Alerts and Alarms
36
Note
Click the Alarm Indicator to re-display the Alarm mode screen.
ALARM
INDICATOR
Page 37

Managing Home Devices
37
Chapter 5: Managing Home Devices
The Visonic PowerLink enables PowerMax+ / PowerMax PRO users that have an
X10 transmitter module connected to the PowerMax+ / PowerMax PRO control panel
and X10 enabled appliances around the house to control these home devices over the
Internet. The Visonic PowerLink allows the end-user to manage the different
appliances (Turn On, Off), attach descriptions and locations to each appliance, view
the current status of the appliance (On, Off) as well as the ability to receive
notifications on appliance status changes and troubles.
The Home Devices view enables quick and efficient management of home devices
enrolled in the PowerMax+ / PowerMax PRO security system.
Viewing Device Information
The Home Devices View is separated into four tabs in which the home devices are
displayed filtered by:
• Device Status
• Device Type
• Device Location
• Search
The tabs display relevant information for each home automation device as well as
functionality actions.
Functionality actions for a home automation device vary according to the device type.
For example a lamp can be dimmed and brightened; a heater can be set to a warmer or
cooler temperature. The text on and above an action buttons describes the
functionality for a specific device.
Note
To use the functionality click the and icons of the action.
A search engine enables a direct search of a specific home device by the device name
(see Searching for a Specific Device by Name on page 19).
In the following sections each tab is described in detail.
In each of the filtering tabs you can activate or deactivate the home automation
devices.
¾
To display the Home Devices View:
1. In the side menu of the Visonic PowerLink window click .
The Home Devices view is displayed.
¾
To activate / deactivate a home automation device:
1. Select one of the tabs and locate the required home automation device (see the
following sections for a detailed description of each tab).
Page 38

Managing Home Devices
38
2. You can now do one of the following:
• To deactivate an active device: Click the icon of the required device.
• To activate an inactive device: Click the icon of the required device.
Filter by Device Status
The By Device Status tab displays two lists:
• Active Devices List: Includes all home automation devices currently turned
ON. This list appears on the left side of the Work Area.
• Inactive Devices List: Includes all home automation devices currently turned
OFF.
The lists display the following information for each home automation device:
• Device location as defined in the PowerMax+ / PowerMax PRO security control
Panel.
• Device name or description as defined by the Master user in the SETUP screen.
• Functionality actions according to device type.
• Device status: whether the device is active (ON) or inactive (OFF).
Active
Devices
Inactive
Devices
Page 39

Managing Home Devices
39
Filter by Device Type
The By Device Type tab lists all home automation devices of a selected type.
¾
To display devices according to device type:
1. Switch to Home Devices view and click the By Device Type tab.
2. Click the Device Type icon of the type you require.
All devices of this type are listed with the following information:
• Device location
• Device name or description.
• Functionality actions according to device type.
• Device status: ON / OFF.
Device
Type
Icons
Page 40

Managing Home Devices
40
Filter by Location
The By Location tab lists all home automation devices by their location as defined in
the PowerMax+ / PowerMax PRO security control Panel.
¾
To filter devices according to location:
1. Switch to Home Devices view and click the By Location tab.
2. Click the device location icon of the location you require.
Note
To scroll through the location list use the icons.
All devices of this location are listed with the following information:
• Device type icon
• Device name or description.
• Functionality actions according to device type.
• Device status: ON / OFF.
Editing Device Setup
You can change a device name and type of an existing home automation device
enrolled in the system.
Important
Make sure you configure the device type correctly as the Visonic PowerLink adjusts the
home automation control according to the device type.
¾
To edit the name or type of a device:
1. In the side menu of the Visonic PowerLink window click .
Device
Location
Icons
Page 41

Managing Home Devices
41
2. Click the Home Devices tab.
3. In the Home Devices screen you can:
• Type a new name in the DEVICE NAME field.
• Click the arrow next to the TYPE field and in the window that appears
click a new device type.
4. Click Apply.
Searching for a Specific Device by Name
A search engine enables a direct search of a specific home device by the device name.
¾
To search for a specific device in the Devices View screen:
1. Switch to Home Devices view and click the Search tab.
2. Type a device name, location, type or status in the Find Device text box and
click the button.
Matching results appear in the body of the tab.
Search
Engine
Search
Page 42

Managing Video Cameras
42
Chapter 6: Managing Video Cameras
The Visonic PowerLink supports up to 14 cameras. Cameras can be Wired (RS-485,
Ethernet) or Wireless (Wi-Fi). Users who purchase the Visonic PowerLink along with
cameras can view the camera images on-line over the Internet.
For each connected camera, the Visonic PowerLink stores 5 frames of pre-alarm and
10 frames of post-alarm images. Images are stored at the time of alarm and can be
used to verify the alarm by the user or alarm central station.
PowerLink keeps your privacy by allowing choosing arming modes of the alarm
system in which a camera will be blocked for viewing from the web interface.
The Visonic PowerLink can control a variety of cameras. CAM1000 and CAM2000
are wired. CAM2000WL, CAM3100 and CAM3200 cameras are wireless cameras.
CAM1000 cameras are connected directly to the Visonic PowerLink while
CAM2000, CAM2000WL, CAM3100 and CAM3200 cameras are connected to the
Visonic PowerLink via the Home Router or Wi-Fi Access Point.
Note
The Visonic PowerLink also supports a veriaty of non Visonic cameras. A list is available
at the specification page.
CAM1000
CAM2000
CAM2000WL
CAM3100
CAM3200
¾
To display the Cameras View:
1. In the side menu of the Visonic PowerLink window click .
The Cameras view is displayed.
Page 43

Managing Video Cameras
43
The current view from each of the cameras enrolled in the system is displayed with
the current image time and date.
To view a camera click the desired camera from the Available Cameras pane and it
will open at the Current view pane.
Important
A camera displaying No Data means that the PowerLink can not retrieve the images from
the camera. This might be a short network hiccup or a communication problem.
A camera displaying Not Allowed means that the Master User disabled viewing of this
camera from the web interface at this arming mode.
For each camera you can now do any of the following:
• Click the and icons to switch camera preview ON or OFF.
• Click the
icon to switch the camera view to the stored images from the
last alarm in the house. Clicking on the
icon again returns camera the
current view of the house.
• Click the icon to open the Save Picture window and save the image as a
graphic file to the local hard drive.
• For cameras that support Pan & Tilt, use the
to control the direction to
which the camera is pointing.
Current View
Camera Controls
Available Cameras
Page 44

Managing Video Cameras
44
Camera Configuration
You can enroll new cameras to the PowerLink, remove enrolled cameras and change
the configuration of the cameras enrolled in the system. You can change the location,
the orientation (flip & mirror) and on which arming modes the camera would not be
accessible from the web interface.
¾
To edit the video camera configuration of the system:
1. In the side menu of the Visonic PowerLink window click .
2. Click the Cameras tab.
For each camera you can edit the following:
• Click the arrow
next to the LOCATION field and in the window that
appears click a new Location for the camera:
• Click the icon to invert the camera feed to allow installing the camera
upside down. The color of the icon will change to green when the camera feed is
flipped and mirrored.
Add
Camera
Edit
Cameras
Page 45

Managing Video Cameras
45
• Click the icon to block viewing this camera from the web interface when
the alarm system is in AWAY arming mode (Alarm images will still be
recorded). The icon will change to indicating that this camera is blocked
when alarm system is in AWAY arming mode.
• Click the icon to block viewing this camera from the web interface when
the alarm system is in HOME arming mode (Alarm images will still be
recorded). The icon will change to indicating that this camera is blocked
when alarm system is in HOME arming mode.
• Click the
icon to block viewing this camera from the web interface when
the alarm system is in DISARM arming mode (Alarm images will still be
recorded). The icon will change to
indicating that this camera is blocked
when alarm system is in DISARM arming mode.
• Click button to apply the changes you've made.
Adding / Removing Cameras
If you want to be able to view images from inside your home via the internet, you
need to have at least one supported camera connected to your PowerLink.
¾
To configure a CAM3100 / CAM3200 / CAM2000 / CAM2000WL
camera in the Visonic PowerLink:
1. Connect the camera to the Home Router using the supplied Cat-5 cable and to
the mains.
2. Wait for the camera to connect to the network (about 30 seconds)
3. In the ADD CAMERA area in the click next to the CAMERA TYPE field
and select NETWORK at the window that opened.
4. In the Location list click and select a location from the list.
5. Click the icon if your camera is installed upside down to flip and mirror
the feed from this camera
6. Click the or icons to choose on which arming modes will the
camera be blocked from being viewed through the web interface.
7. Click to start enrollment of the camera. Enrollment messages will be
available at the alert popup.
You can leave this page and continue using the PowerLink while the enrollment is
continuing at the background.
When enrollment finishes successfully the camera will be added to the EDIT
CAMERAS area of the Camera Configuration page.
Page 46

Managing Video Cameras
46
¾
To remove a camera:
1. In the Edit Cameras area locate the camera you want to remove and click the
Remove icon.
The camera is removed from the list.
Important
When removing more than one camera you need to remove the cameras one at a time.
Once a camera is removed, disconnect it from mains. Trying to remove more than one
camera may cause IP conflicts between the removed cameras.
Page 47

Managing the Security System
47
Chapter 7: Managing the Security System
The Security view Work Area displays a detailed overview of the security system
including the current arming mode of the security system, the status of the security
system, the list of detectors and their statuses and a list of other security system
accessories.
It enables you to remotely arm and disarm the security system in different arming
modes.
Arming the PowerMax+ / PowerMax PRO Security System
The Visonic PowerLink enables remote arming and disarming of the PowerMax+ /
PowerMax PRO Security System.
The Security view displays the current status of the PowerMax+ / PowerMax PRO
security system according to the arming mode set.
The following arming modes are available:
• AWAY: All zones are protected
• HOME: Perimeter zones are protected but interior zones are not.
• DISARM: The system is in standby mode
The Security view displays the current arming mode in green.
Current Arming Mode Current Status
Accessories
Detectors Enrolled in the S
y
stem
System Status
Page 48

Managing the Security System
48
¾
To change the arming mode:
1. Click the required arming mode in the list to set the Security System to the new
mode.
The new mode is marked Orange.
Security Information
Detectors
The Security view displays a list of all the detectors enrolled in the system and their
status. For each detector the list displays its Zone Name, Zone Number and Zone
Type.
Accessories
The Security view displays information for system accessories. For each accessory,
the accessory name and status is displayed.
Page 49

Managing Users
49
Chapter 8: Managing Users
The Visonic PowerLink is pre-configured with a Master user called Admin. Only the
Master user can access the Users and Setup views of the Visonic PowerLink.
The Master user can add additional users to the Visonic PowerLink. Users that are
added appear in the ADDITIONAL USERS list. A Master user can also edit or add
information to the Master user or to other users of the Visonic PowerLink.
The Visonic PowerLink enables users to receive home security system, home control
& automation and camera related notifications. The notifications can be sent to a
mobile phone or an email address. The list of notifications can be customized for each
user of the Visonic PowerLink so every user receives only relevant notifications to the
desired phone number or email address. Users can also set up the type of notification
(SMS or email) per each event.
A user profile includes the following information:
• Username - The user name used for logging in to the web interface.
• Password – Login password.
• Mobile – The mobile phone number to which notifications are sent (optional).
• Email – The email address to which notifications are sent.
• PowerMax User# – Attach the user name to the user number. Latchkey
notifications (User entered the house) sent from the Visonic PowerLink (which
by default include a PowerLink user number) now include the user name
attached to this number.
Managing system users is done in Users View.
Tip
Change the username and password of the Master user and save the username and
password in a safe place.
Additional
Users
Page 50

Managing Users
50
¾
To display the Users View:
1. In the side menu of the Visonic PowerLink window click .
2. Click the Cameras tab.
The Users view is displayed.
¾
To change the Master user's name and password:
1. In Users view click the EDIT button under the PROFILE title.
The following window appears.
2. Change the username from Admin to your own user name.
3. Change the password to your own password.
4. Repeat this step in the Confirm Password area.
5. Click APPLY.
Adding / Removing Users
You can add up to seven additional users to the Visonic PowerLink (excluding the
Master user). You can then remove any or all of these users. The Master user cannot
be removed.
¾
To add a new user:
1. Click and set the following parameters:
Username - The user name used for logging in to the web interface.
Page 51

Managing Users
51
Password – Login password. (You need to re-enter the password to
confirm).
Mobile - The mobile phone number to which notifications are sent.
Note
The mobile phone number is optional.
Email - The email address to which notifications are sent.
PowerMax User# - Attach the user name to the user number. Latchkey
notifications (User entered the house) sent from the Visonic PowerLink
(which by default include a PowerLink user number) now include the
user name attached to this number.
2. Click APPLY.
The user is added to the ADDITIONAL USERS list.
¾
To remove a user:
1. In the User view locate the user you want to remove and click the Remove icon.
The user is removed from the ADDITIONAL USERS list.
Editing User Profiles
If you have the proper authorization you can edit the profile of any user.
¾
To change a user's profile:
1. In Users view click the EDIT button under the PROFILE title.
The following window appears.
2. Edit the user profile according to your needs.
3. Click APPLY.
The user profile is updated in Users view.
Page 52

Managing System Configuration
52
Chapter 9: Managing System Configuration
System Configuration
Managing system configuration is done in Setup view.
Setup view includes the following tabs:
• Management: Connection and session related parameters. Factory reset and
PowerLink ID.
• Network: Network and Wi-Fi related parameters.
• Users: Master user and Additional users management.
• Home Devices: Locations and Device names / Descriptions of the home devices
connected to the PowerMax
• Cameras: Enroll new cameras to the PowerLink and Edit existing ones.
• Security: PowerMax security log.
¾
To display the Setup View:
1. In the side menu of the Visonic PowerLink window click .
The Setup view is displayed.
Editing System Configuration
Important
Only the Master user can access the Setup view and manage the system configuration.
Management
If you have the proper authorization (Master User) you can edit these details at any
time.
Page 53

Managing System Configuration
53
The Management tab includes the following:
• PowerLink ID – The nick name of the PowerLink. Allows you to connect to
the PowerLink with the ID instead of serial number.
• Ports - Allows changing the network ports in which PowerLink operates. HTTP
is the port used for accessing your PowerLink from the internal network.
HTTPS is used for access from the internet. If PowerLink is connected to a
router that supports UPNP, checking the Open using UPNP will open the ports
on the router automatically.
• Session Timeout – The amount of minutes until the user will be auto logged out
from the web interface. Setting this to 0 (zero) will disable auto logout.
• Factory Settings – Press the RESET button to restore the PowerLink to it's
factory defaults
Network
The Network tab includes the following:
• Hostname – The hostname that PowerLink will report to the network
• IP Address – The network parameters of the PowerLink:
• IP Address – The IP address of the Visonic PowerLink
• Subnet Mask – The subnet mask used with the IP Address
• Default Gateway – The default gateway of the network
• DNS Server – The IP address of the DNS server
Page 54

Managing System Configuration
54
• WiFi Parameters – The parameters of the WiFi network:
• SSID – Network name.
• WEP / WPA-TKIP/ None – The encryption methods available
• Encryption Key – The key used for encryption. When choosing WEP as
the encryption method, the length of the key will set the strength of the encryption
(64bit or 128bit)
Users
Managing PowerLink users is described at: Chapter 8 – Managing Users
Home Devices
Managing Home Devices is described at: Editing Device Setup
Cameras
Managing the PowerLink cameras is described at Chapter 6 – Managing Video
Cameras
Security
System events, alerts and alarms, are written to the PowerMax+ / PowerMax PRO
log. The PowerMax+ / PowerMax PRO log event information includes the time and
date of the event, event location and a description of the event.
Resetting to Factory Settings
It is possible to reset the Visonic PowerLink to its Factory Settings. Resetting the
Visonic PowerLink to its factory settings will remove all the enrolled cameras,
defined users and defined names and types of Home Devices.
Page 55

Managing System Configuration
55
Upon reset, the Master user is reset to the default username and password of the
Visonic PowerLink.
¾
To reset the Visonic PowerLink to it's factory settings:
1. In the Management TAB, click .
2. Close the Browser and wait for the Visonic PowerLink to restart.
3. Login using the default username (Admin) and password (Admin123) (see
Chapter 3: Logging Into The Visonic PowerLink on page 19).
Page 56

Cellular Web Interface
56
Chapter 10: Cellular Web Interface
The PowerLink has two types of cellular web interfaces: WAP and XHTML. The
XHTML interface is a graphic interface, similar to a regular web interface, and is
intended for new generation cellular phones. The WAP interface is a textual interface
that allows older types of cellular phones to control the PowerLink.
The system will automatically redirect your phone to the appropriate interface and
will display the functions associated with the phone.
Logging into PowerLink
From your cellular phone, browse to your PowerLink address in the same way you
would browse when using the internet. The type of menu that appears upon login is
determined by the type of cellular phone you have and its capabilities.
¾
To login from your cellular phone to your Visonic PowerLink:
1. In the Login screen that appears enter the Username and Password.
If you are unable to login, call your Visonic PowerLink service provider for
assistance.
2. Click Login.
XHTML
Main Menu
WAP
Main Menu
Page 57

Cellular Web Interface
57
Viewing the security status
This allows you to view the status of your alarm system as it appears on the LCD
screen.
¾
To view the status of your alarm system:
1. From the main menu, select Security. The Security screen appears.
Setting the security mode
This allows you to arm or disarm the system using your cellular phone.
¾
To arm or disarm the system:
1. From the main menu, select Security. The Security screen appears.
2. Click on the arming mode to which you desire to set the alarm system.
If the arming mode has several options from which to choose, the menu will expand
and allow you to choose from the list of options. For example, Arm Away will allow
you to choose between Normal and Instant.
3. Choose the option you desire.
Page 58

Cellular Web Interface
58
4. To return to the main menu, click the button on your Visonic
PowerLink or click the button on your cellular phone.
Controlling Home Devices
Controlling Home Devices allows you to turn on and off the home appliances
connected to the alarm system and to apply to them specific actions.
¾
To arm or disarm the system:
1. From the main menu, select Home Devices. The Hom e Devices screen appears.
Click on the desired device to expand its
options.
Use the navigation links to scroll through
the pages of the Home Device. Click on the
desired device to expand its options.
Navigation
Appliances
Search
Search
Appliances
Page 59

Cellular Web Interface
59
2. Click on the desired action you want to apply to the device. The updated action
will appear on the Home Devices screen.
3. To return to the main menu, click the button on your Visonic
PowerLink or click the button on your cellular phone.
Filtering / Searching Home Devices list
This provides a quick way to search for the appliance you want to control.
1. From the main menu, select Home Devices. The Hom e Devices screen appears.
2. Click on the Search button at the bottom of the page
Device
Action
Updated
Search
Page 60

Cellular Web Interface
60
3. Click on the type of Search you want to apply. Select between Status, Location
or Type.
Make your selection from the list.
Make your selection from the drop down
menu and then click on Filter.
4. The list is now filtered according to your selection.
5. To return to the main menu, click the button on your Visonic
PowerLink or click the button on your cellular phone.
Search
Page 61

Cellular Web Interface
61
Controlling Your Cameras
This allows you to control and view enrolled PowerLink cameras from your cellular
phone.
1. From the main menu, select Camera. The Camera screen appears.
Click on the camera name you want to
view.
Click on the zone name where the camera
you want to view is located.
Here you can set the view refresh rate.
The image size link allows you to change
the size of the viewed image.
Start Show enables you to view the
camera.
Alarm View switches to alarm images
viewing mode.
Click on the Mini View to open the larger
camera feed (additional controls are
located here). Click on the camera
numbers at the bottom of the page to
view other cameras in this zone.
Click on the zone name to return to the
zone list.
Mini
View
Additional
Cameras
Refresh
Image Size
Alarm
Images
Page 62

Cellular Web Interface
62
Click on the image to return to the
previous page.
Use the up / down / left / right links to
pan and tilt a camera that supports this
feature (Visonic CAM3200).
Click on the image to return to the
previous page.
Use the Arrows at the lower right side of
the image to pan and tilt a camera
(applicable only to cameras that support
this feature).
Use the orange icon to view alarm images
of the last recorded alarm.
Alarm Images Screen
Click on the image to return to the
previous page.
Alarm Images Screen
Use the left, pause and right buttons to
view the images frame by frame.
Click on the image to return to the
previous page.
Pan/Tilt
Controls
Alarm
Ima
g
es
Page 63

Glossary
63
Glossary
Alarm
An alarm situation is initiated when an alarm trigger is being sent from one of the
detectors attached to the alarm system. Different detectors types can be:
• PIR – Detect motion in the zone (room) where they are installed.
• Door contact – Detects the opening of a door or a window.
• Glass Break – Detects a glass breaking event.
• Fire – Detects a fire situation.
• Flood – Detects a flood situation
• Gas – Detects a leak of gas.
• Emergency / Panic – Two buttons located on the control panel or keypads of
the security system. Once being pressed by the owner, an emergency alarm is
initiated.
Alert
Alerts indicate trouble events in the security system control panel or in the
accessories. Once an alert situation occurs, it will not affect the security system's
behavior immediately but it should be fixed as soon as possible. Alert events include
the following:
• Tamper Open – One of the security system accessories is open or removed
from the wall.
• Inactivity – One or more of the security system accessories has lost
connection with the control panel.
• Low Battery – One of the security system accessories has a low battery
situation.
• Communication Failure – The control panel is disconnected from the phone
line.
• RF Jamming – The RF transmission of the control panel is being jammed.
• Power Fail – The control panel is disconnected from the mains.
Arming
The security system has different arming modes in which the security system acts
differently as a result of a trigger being sent from the detectors:
• Arm Away – The AWAY mode indicates that the house is empty (although
pets may remain in the house if proper detectors are installed). In this arming
mode, any trigger from any of the detectors is immediately treated by the
security system as an Alarm situation.
• Arm Home – The HOME mode indicates that the house is partially occupied.
This mode is usually used during night hours in which some of the detectors
are to be ignored since the house members might move in the areas where
Page 64

Glossary
64
these detectors are installed during the night. In this mode, the security system
threats all the detectors that are assigned to perimeter zones as immediate
alarm initiators and to all detectors assigned to interior zones as non-alarm
initiators.
• Disarm – The DISARM mode is usually used when the house is occupied
during day hours. During this mode, non of the detectors will be treated as
alarm initiators except for detectors that are assigned to a 24 Hour zone (such
as a safe room) in which any trigger must be an alarm initiator.
• Arm Bypass / Home Bypass – The ARM BYPASS and HOME BYPASS
arming modes are used to arm the security system even if some of the
detectors are troubled or in "Open" status that indicates detection. Once armed,
the security system will ignore any triggers from the detectors that were
troubled or "Open" when the security system was armed. Use these arming
modes with caution as when being used, some parts of the house are not
secured even when the security system is armed.
Central Station
A monitoring station capable of receiving alarm indications from security systems.
Central stations usually alert the police or send their own guards to a house that is
alarmed in order to verify the alarm and potentially apprehend the intruder or take
care of the alarm situation (fire, gas, flood, etc.)
Control Panel
The control panel is the main unit of a security system. It collects information from
various detectors and responds in various ways such as sounding a siren or calling the
central station or the home owner.
Latchkey
The Latchkey mode is a special mode in which designated "latchkey users" trigger a
"latchkey message" to be sent to a telephone or a pager when they disarm the system.
For example, if a parent wants to be sure that their child has returned from school and
disarmed the system, they will assign a Latchkey user to the child. Refer to the
security system's user manual in order to find out how to enable the Latchkey
function.
Port Forwarding
IP addresses of computers connected to a LAN are called Unregistered IP Addresses
whereas IP Addresses of computers or devices connected to the WAN are called
Registered IP Addresses. Computers with an Unregistered IP addresses (such as the
Visonic PowerLink) cannot communicate with computers or devices with a
Registered IP addresses (such as the computer in your office) directly.
The Port Forwarding feature enables computers with a Registered IP address (such as
your office computer) to access services on computers with an Unregistered IP
Address (such as the Visonic PowerLink). This is done by mapping ports on the router
so each request arriving to the router at a specific port is routed to the computer that
hosts the service on the LAN.
Page 65

Glossary
65
Not all Home Router manufacturers use the term "Port Forwarding". Alternative
terms you may find in your Home Router can be: "Port Redirection", "Virtual
Servers" and "Applications and Gaming".
Home Router
A router is a device that connects two networks. The network within the house is
considered a LAN (Local Area Network). To enable Internet access from a LAN, a
connection to the WAN (Wide Area Network) has to be established using a router.
Routers enable all users in a network (LAN) to share a single connection to the
Internet or a WAN.
Two main technologies are used to provide high-speed Internet connections to private
houses. The first is called DSL or ADSL and the other is Cable.
In order to provide a Broadband Internet connection to the house, a device called a
Modem is installed in your house. Every device in the house that needs to be
connected to the Internet has to be connected to the DSL/Cable modem. Most
DSL/Cable modems have only one port for connecting a device within the house to
the Internet. In most cases (but not all) your computer is connected to this port.
If you have more than one device within the house that need to be connected to the
Internet you are required to attach a home networking device called a Home Router to
the DSL/Cable Modem. The home router enables connecting multiple devices to the
Internet at the same time via one DSL/Cable modem. The WAN (Wide Area
Network) port of the Home Router connects to the DSL/Cable modem. Devices that
need to be connected to the Internet are connected to the LAN (Local Area Network)
ports of the Home Router. All LAN and WAN ports are called Ethernet ports and are
connected via an RJ-45 connector.
Wi-Fi (Wireless LAN)
Standard home routers require Ethernet cables between the devices connected to the
Internet and the router. The "Wi-Fi" or "Wireless LAN" technology enables a wireless
connection between the devices and the home router. Some routers have the Wi-Fi
features built in. In others, the Wi-Fi feature can be added by attaching a Wi-Fi
"Access Point" to the home router. Routers with Wi-Fi and Wi-Fi access points can be
easily identified by one or two Antennas located on the backside of the home router or
Wi-Fi access point.
Product Limitations
Our wireless systems are very reliable and are tested to high standards. However, due
to their low transmitting power (required by FCC, DTI and other regulating
authorities) there are some limitations to be considered:
A. Receivers may be blocked by radio signals occurring on or near their operating
frequencies, regardless of the code selected.
B. A receiver can only respond to one transmitted signal at a time.
C. Wireless equipment should be tested regularly (at least once a week) to determine if
there are sources of interference and to protect against faults.
Page 66

66
WARNING: Changes or modifications to this unit not expressly approved by the
party responsible for compliance could void the user's authority to operate the
equipment.
NOTE: This equipment has been tested and found to comply with the limits for a
Class B digital device, pursuant to part 15 of the FCC Rules. These limits are
designed to provide reasonable protection against harmful interference in a residential
installation. This equipment generates, uses and can radiate radio frequency energy
and, if not installed and used in accordance with the instructions, may cause harmful
interference to radio communications. However, there is no guarantee that
interference will not occur in a particular installation. If this equipment does cause
harmful interference to radio or television reception, which can be determined by
turning the equipment off and on, the user is encouraged to try to correct the
interference by one or more of the following measures:
-Reorient or relocate the receiving antenna.
-Increase the separation between the equipment and receiver.
-Connect the equipment into an outlet on a circuit different from that to which the
receiver is connected.
-Consult the dealer or an experienced radio/TV technician for help.
Page 67

67
Appendix A
PowerLink Installation Form
Parameter Value
Home Router IP Address
____ . ____ . ____ . ____
PowerLink IP Address
____ . ____ . ____ . 200
SSID
Encryption method
WEP / WPA-TKIP / None
WEP Key String
PowerLink Remote URL
Page 68

68
W.E.E.E. Product Recycling Declaration
For information regarding the recycling of this product you must contact the company from which you orignially purchased it. If you are
discarding this product and not returning it for repair then you must ensure that it is returned as identified by your supplier. This product is
not to be thrown away with everyday waste.
Directive 2002/96/EC Waste Electrical and Electronic Equipment.
VISONIC LTD. (ISRAEL): P.O.B 22020 TEL-AVIV 61220 ISRAEL. PHONE: (972-3) 645-6789, FAX: (972-3) 645-6788
VISONIC INC. (U.S.A.): 65 WEST DUDLEY TOWN ROAD, BLOOMFIELD CT. 06002-1376. PHONE: (860) 243-0833, (800) 223-0020. FAX: (860) 242-8094
VISONIC LTD. (UK): UNIT 6 MADINGLEY COURT CHIPPENHAM DRIVE KINGSTON MILTON KEYNES MK10 0BZ. TEL: (0870) 7300800 FAX: (0870) 7300801
PRODUCT SUPPORT: (0870) 7300830
VISONIC GmbH (D-A-CH): KIRCHFELDSTR. 118, D-40215 DÜSSELDORF, TEL.: +49 (0)211 600696-0, FAX: +49 (0)211 600696-19
VISONIC IBERICA: ISLA DE PALMA, 32 NAVE 7, POLÍGONO INDUSTRIAL NORTE, 28700 SAN SEBASTIÁN DE LOS REYES, (MADRID), ESPAÑA.
TEL (34) 91659-3120, FAX (34) 91663-8468. www.visonic-iberica.es
INTERNET: www.visonic.com
© VISONIC LTD. 2009 POWERLINK USER MANUAL DE5471U (Rev 4, 9/09)
 Loading...