

Page 1

VisionNet 202ER ADSL Ethernet Router User’s Guide
9
1 Introduction
Congratulations on becoming the owner of the VisionNet 202ER
ADSL Ethernet bridge/router. Your LAN (local area network) will
now be able to access the Internet using your high-speed ADSL
connection.
This User Guide will show you how to install and set up the
VisionNet 202ER ADSL Bridge/Router, and how to customize its
configuration to get the most out of your new product.
Features
Internal ADSL modem for high-speed Internet access
10/100Base-T Ethernet router to provide Internet
connectivity to all computers on your LAN
Network address translation (NAT), Firewall, and IP filtering
functions to provide security for your LAN
Network configuration through DHCP Server and DHCP
Relay
Services including IP route and DNS configuration, RIP,
and IP and DSL performance monitoring
Configuration program you access via an HTML browser
System Requirements
In order to use the VisionNet 202ER ADSL/Ethernet router, you
must have the following:
ADSL service up and running on your telephone line, with
at least one public Internet address for your LAN
One or more computers each containing an Ethernet
10Base-T/100Base-T network interface card (NIC)
An Ethernet hub/switch, if you are connecting the device to
more than one computer on an Ethernet network.
For system configuration using the supplied web-based
program: a web browser such as Internet Explorer v5.0 or
later, or Netscape v6.2 or later
Page 2
VisionNet 202ER ADSL Ethernet Router User’s Guide
10
Using this Document
Notational conventions
Acronyms are defined the first time they appear in text and
in the glossary (Appendix D).
For brevity, the VisionNet 202ER is referred to as “the
router.”
The terms LAN and network are used interchangeably to
refer to a group of Ethernet-connected computers at one
site.
Typographical conventions
Italics are used to identify terms that are defined in the
glossary (Appendix D).
Bolded text is used for items you select from menus and
drop-down lists, and to identify field labels you view onscreen.
Special messages
This document uses the following icons to call your attention to
specific instructions or explanations.
Note
Provides clarifying or non-essential information on the current
topic.
Definition
Explains terms or acronyms that may be unfamiliar to many
readers. These terms are also included in the Glossary.
WARNING
Provides messages of high importance, including messages
relating to personal safety or system integrity.
Page 3

VisionNet 202ER ADSL Ethernet Router User’s Guide
11
2 Getting to Know the VisionNet 202ER
Parts Check
In addition to this document, your VisionNet 202ER should arrive
with the following (in picture, clockwise from upper left):
VisionNet 202ER ADSL Ethernet Router
Power adapter and power cord
CD with Manual
Quick Start Guide
Ethernet cable (“straight-through” type)
Standard phone/DSL line cable
Figure 1. VisionNet 202ER ADSL/Ethernet Router Package Contents
Page 4
VisionNet 202ER ADSL Ethernet Router User’s Guide
12
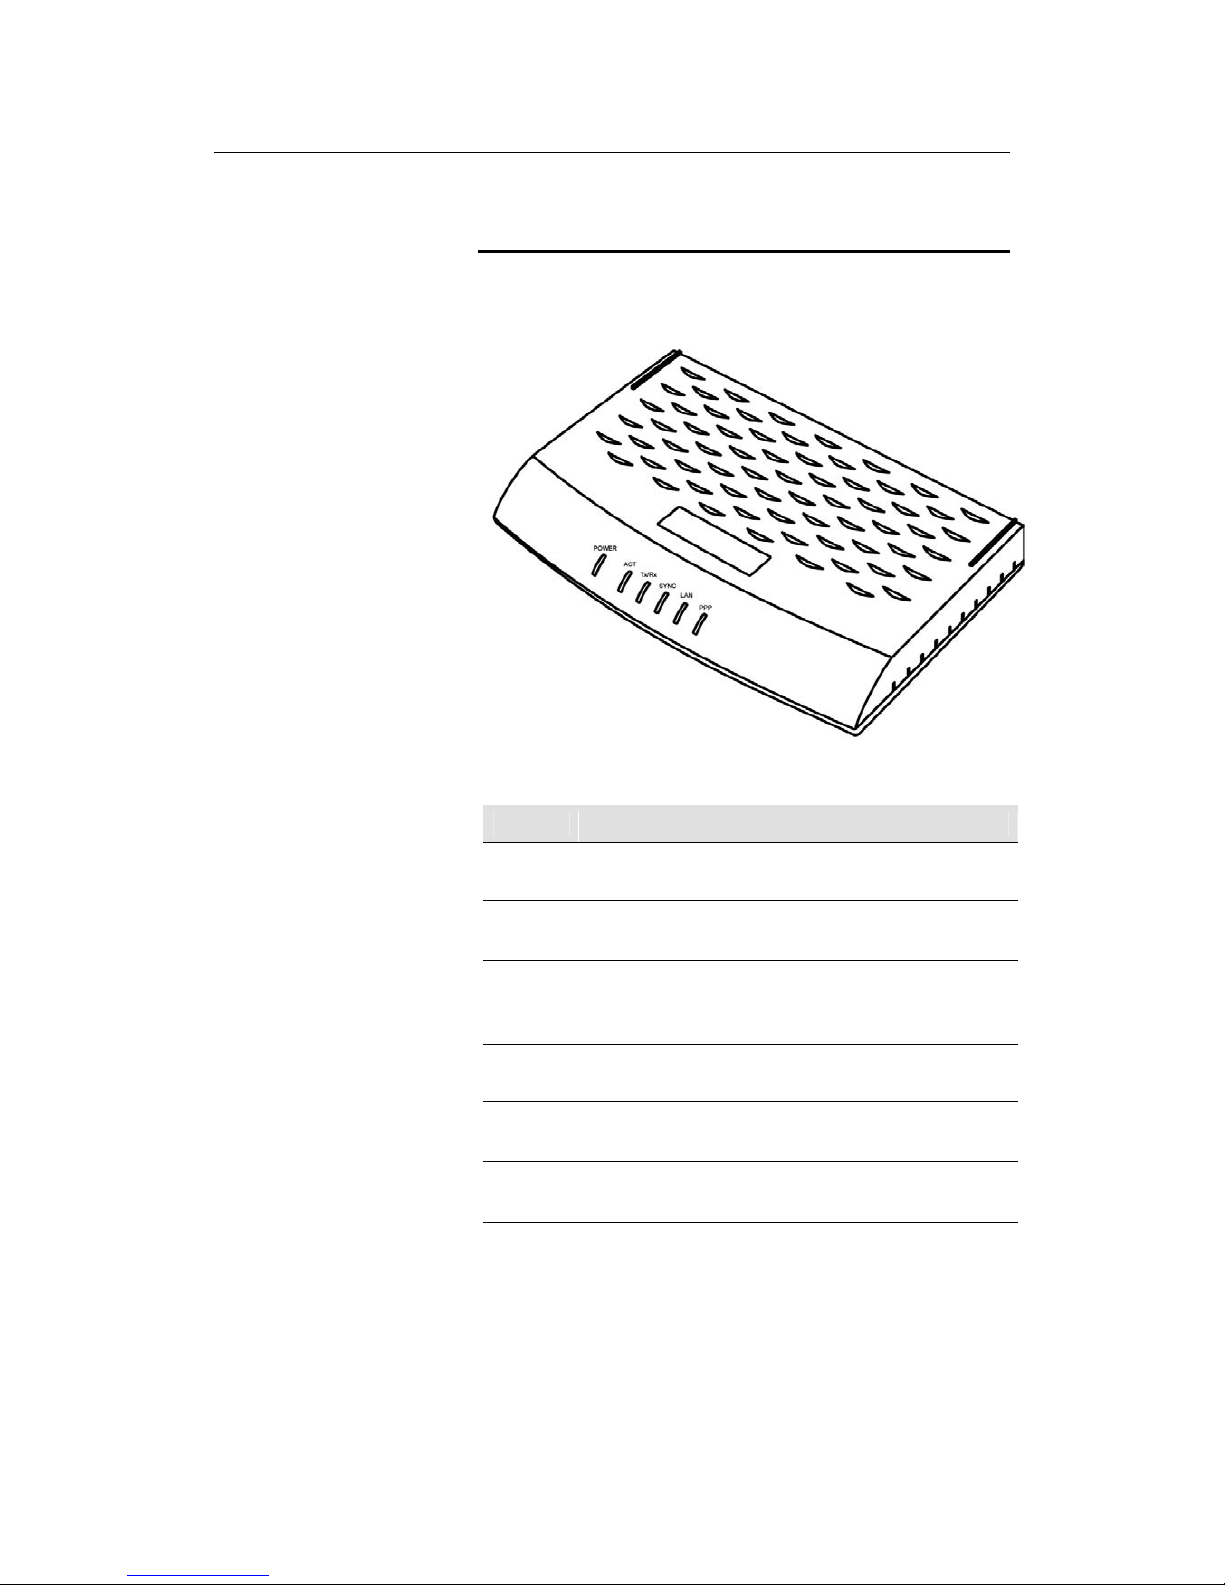
Front Panel
The front panel contains lights called LEDs that indicate the status
of the unit.
Figure 2. Front Panel and LEDs
Label When On
PPP Solid green when using PPPoE or PPPoA, if the user has
authenticated to the ISP’s server.
LAN On: LAN link established and active.
Off: No LAN link
SYNC On: ADSL link established and active
Blinking: DSL signal found
Off: No ADSL link
Tx/Rx Flashes when ADSL data activity occurs.
May appear solid when data traffic is heavy.
ACT On: Device passed self test
Blinking: Device failed self test
POWER On: Unit is powered on
Off: Unit is powered off
Page 5
VisionNet 202ER ADSL Ethernet Router User’s Guid
13
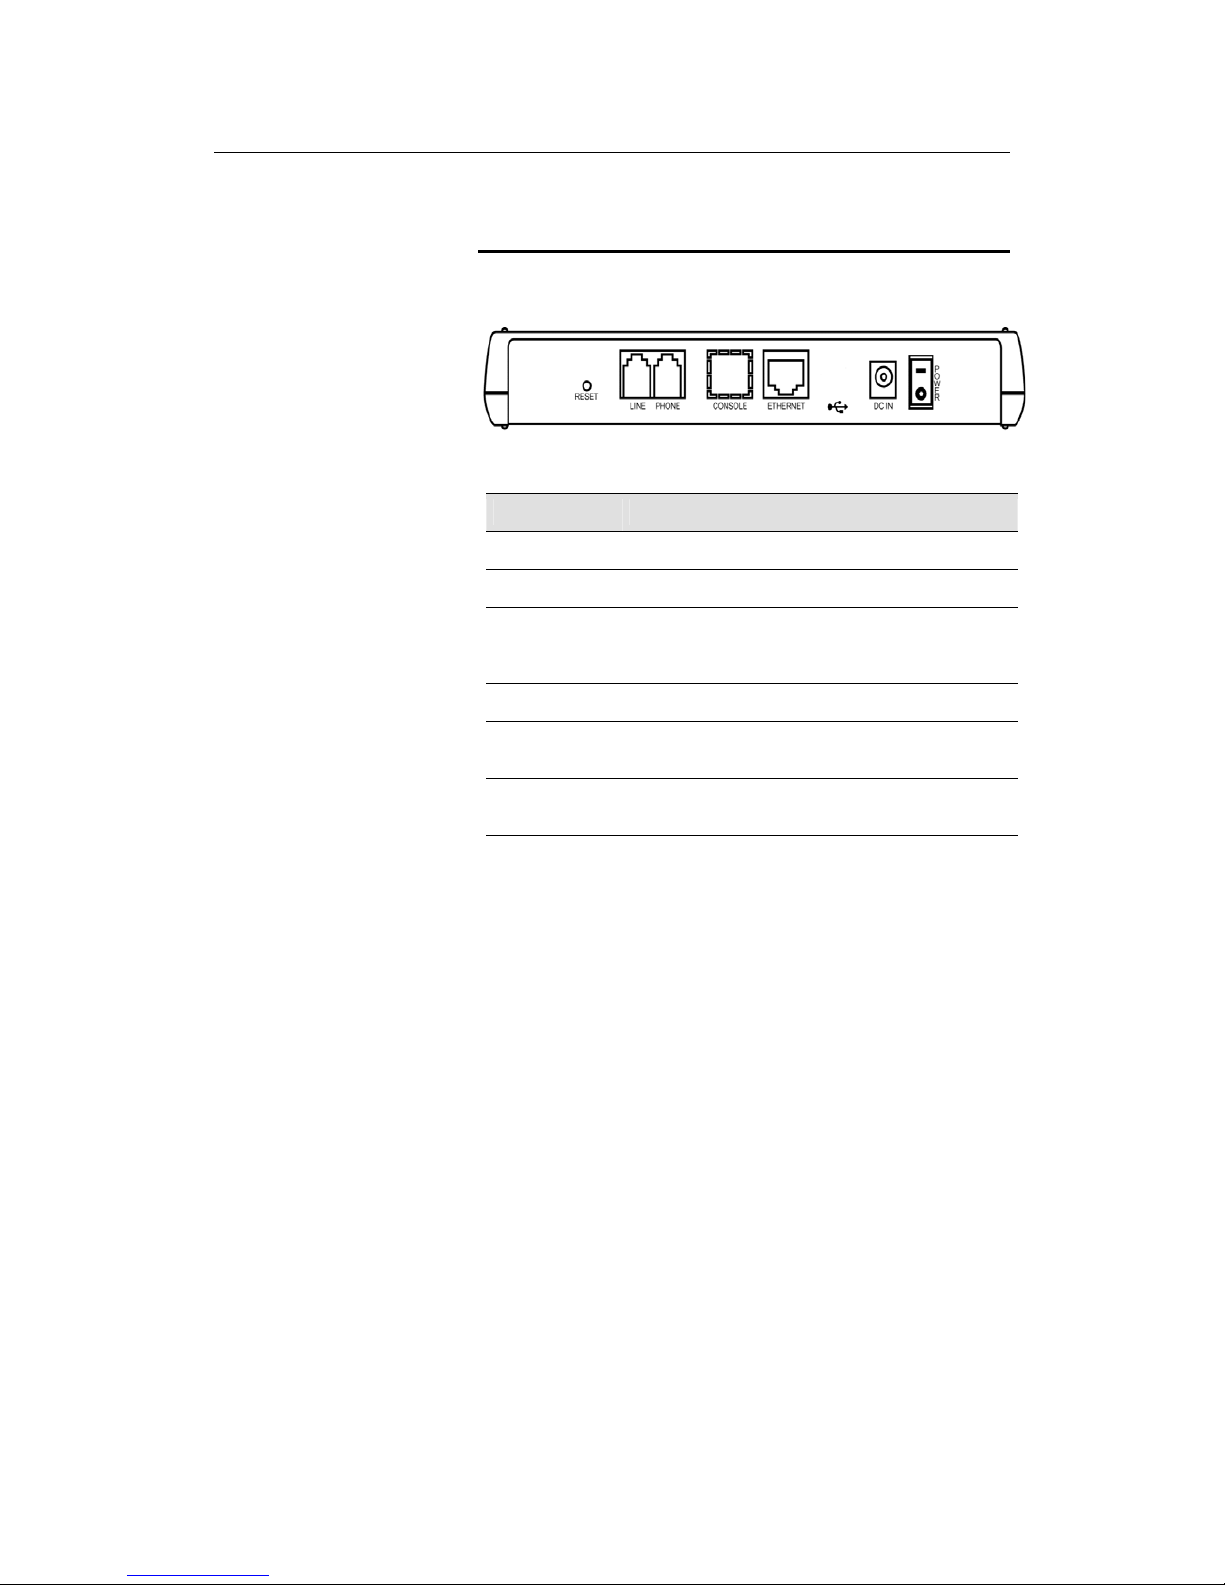
Rear Panel
The rear panel contains the ports for the unit's data and power
connections.
Figure 3. Rear Panel Connections
Label Function
POWER Switches the unit on and off
DC INPUT Connects to the supplied power converter cable
Ethernet Connects the device to your PC's Ethernet port, or to
the uplink port on your LAN's hub, using the cable
provided
PHONE Provides an in-line filter connection to your telephone
LINE Connects the device to a telephone jack for DSL
communication
RESET Resets the device to the DQ’s default configuration
(must be pressed 3 times to reset).
Page 6

VisionNet 202ER ADSL Ethernet Router User’s Guide
15
3 Quick Start
This Quick Start provides basic instructions for connecting the
VisionNet 202ER to a computer or LAN and to the Internet.
Part 1 describes setting up the hardware.
Part 2 shows you how to configure basic settings on the
VisionNet 202ER to get your LAN connected to the Internet.
This Quick Start assumes that you have already established ADSL
service with your Internet service provider (ISP). These instructions
provide a basic configuration that should be compatible with your
home or small office network setup. Refer to the subsequent
chapters for additional configuration instructions.
Part 1 — Connecting the Hardware
In Part 1, you connect the device to the phone jack, the power outlet,
and your computer or network.
WARNING
Before you begin, turn the power off for all devices. These
include your computer(s), your LAN hub/switch (if applicable),
and the VisionNet 202ER.
Figure 4 illustrates the hardware connections. The layout of the
ports on your device may vary from the layout shown. Refer to the
steps that follow for specific instructions.
Page 7

VisionNet 202ER ADSL Ethernet Router User’s Guide
16
Figure 4. Overview of Hardware Connections
Step 1. Connect the ADSL cable and optional telephone.
Connect one end of the provided phone cable to the port labeled
ADSL on the rear panel of the device. Connect the other end to
your wall phone jack.
You can attach a telephone line to the device. This is helpful when
the ADSL line uses the only convenient wall phone jack. If desired,
connect the telephone cable to the port labeled PHONE.
WARNING
Although you use the same type of cable, The ADSL and
PHONE ports are not interchangeable. Do not route the ADSL
connection through the PHONE port.
Page 8

VisionNet 202ER ADSL Ethernet Router User’s Guid
17
Step 2. Connect the Ethernet cable.
If you are connecting a LAN to the VisionNet 202ER ADSL/Ethernet
router, attach one end of a provided Ethernet cable to your PC and
the other to the Ethernet port on the VisionNet 202ER.
If you are using the VisionNet 202ER with a hub/switch, you must
use a “crossover” Ethernet cable (not provided) to attach directly to
the device.
Step 3. Attach the power connector.
Connect the AC power adapter to the PWR connector on the back
of the device and plug in the adapter to a wall outlet or power strip.
Step 4. Turn on the VisionNet 202ER and power up your
systems.
Press the Power switch on the back panel of the device to the ON
position.
Turn on and boot up your computer(s) and any LAN devices such
as hubs or switches.
Page 9

VisionNet 202ER ADSL Ethernet Router User’s Guide
18
Part 2 — Configuring Your Computers
Part 2 of the Quick Start provides instructions for configuring the
Internet settings on your computers to work with the VisionNet
202ER.
Before you begin
By default, the VisionNet 202ER automatically assigns all required
Internet settings to your PCs. You need only to configure the PCs to
accept the information when it is assigned.
Note
In some cases, you may want to assign Internet information
manually to some or all of your computers rather than allow the
VisionNet 202ER to do so. See “Assigning static Internet
information to your PCs” on page 22 for instructions.
If you have connected your PC of LAN via Ethernet to the
VisionNet 202ER, follow the instructions that correspond to
the operating system installed on your PC.
Windows 95, 98 PCs:
First, check for the IP protocol and, if necessary, install it:
1. In the Windows task bar, click the Start button, point to
Settings, and then click Control Panel.
2. Double-click the Network icon.
The Network dialog box displays with a list of currently installed
network components. If the list includes TCP/IP, and then the
protocol has already been enabled. Skip to step 9.
3. If TCP/IP does not display as an installed component, click
.
The Select Network Component Type dialog box displays.
4. Select Protocol, and then click
.
The Select Network Protocol dialog box displays.
5. Click on Microsoft in the Manufacturers list box, and then
click TCP/IP in the Network Protocols list box.
6. Click
to return to the Network dialog box, and
then click
again.
You may be prompted to install files from your Windows 95/98
installation CD. Follow the instructions to install the files.
7. Click to restart the PC and complete the
TCP/IP installation.
Next, configure the PCs to accept IP information assigned by the
VisionNet 202ER:
Page 10

VisionNet 202ER ADSL Ethernet Router User’s Guid
19
8. Open the Control Panel window, and then click the Network
icon.
9. Select the network component labeled TCP/IP, and then
click
.
If you have multiple TCP/IP listings, select the listing associated
with your network card or adapter.
10. In the TCP/IP Properties dialog box, click the IP Address tab.
11. Click the radio button labeled Obtain an IP address
automatically.
12. Click the DNS Configuration tab, and then click the radio
button labeled Obtain an IP address automatically.
13. Click
twice to confirm and save your changes.
You will be prompted to restart Windows.
14. Click
.
Windows NT 4.0 workstations:
First, check for the IP protocol and, if necessary, install it:
1. In the Windows NT task bar, click the Start button, point to
Settings, and then click Control Panel.
2. In the Control Panel window, double click the Network icon.
3. In the Network dialog box, click the Protocols tab.
The Protocols tab displays a list of currently installed network
protocols. If the list includes TCP/IP, then the protocol has
already been enabled. Skip to step 9.
4. If TCP/IP does not display as an installed component, click
.
5. In the Select Network Protocol dialog box, select TCP/IP,
and then click
.
You may be prompted to install files from your Windows NT
installation CD or other media. Follow the instructions to install
the files.
After all files are installed, a window displays to inform you that
a TCP/IP service called DHCP can be set up to dynamically
assign IP information.
6. Click
to continue, and then click if
prompted to restart your computer.
Next, configure the PCs to accept IP information assigned by the
VisionNet 202ER:
7. Open the Control Panel window, and then double-click the
Network icon.
Page 11

VisionNet 202ER ADSL Ethernet Router User’s Guide
20
8. In the Network dialog box, click the Protocols tab.
9. In the Protocols tab, select TCP/IP, and then click
.
10. In the Microsoft TCP/IP Properties dialog box, click the radio
button labeled Obtain an IP address from a DHCP server.
11. Click
twice to confirm and save your changes,
and then close the Control Panel.
Windows 2000 PCs:
First, check for the IP protocol and, if necessary, install it:
1. In the Windows task bar, click the Start button, point to
Settings, and then click Control Panel.
2. Double-click the Network and Dial-up Connections icon.
3. In the Network and Dial-up Connections window, right-click
the Local Area Connection icon, and then select Properties.
The Local Area Connection Properties dialog box displays with
a list of currently installed network components. If the list
includes Internet Protocol (TCP/IP), then the protocol has
already been enabled. Skip to step 10.
4. If Internet Protocol (TCP/IP) does not display as an installed
component, click
.
5. In the Select Network Component Type dialog box, select
Protocol, and then click
.
6. Select Internet Protocol (TCP/IP) in the Network Protocols
list, and then click
.
You may be prompted to install files from your Windows 2000
installation CD or other media. Follow the instructions to install
the files.
7. If prompted, click
to restart your computer with
the new settings.
Next, configure the PCs to accept IP information assigned by the
VisionNet 202ER:
8. In the Control Panel, double-click the Network and Dial-up
Connections icon.
9. In Network and Dial-up Connections window, right-click the
Local Area Connection icon, and then select Properties.
10. In the Local Area Connection Properties dialog box, select
Internet Protocol (TCP/IP), and then click
.
11. In the Internet Protocol (TCP/IP) Properties dialog box, click
the radio button labeled Obtain an IP address
Page 12

VisionNet 202ER ADSL Ethernet Router User’s Guid
21
automatically. Also click the radio button labeled Obtain
DNS server address automatically.
12. Click
twice to confirm and save your changes,
and then close the Control Panel.
Windows Me PCs
1. In the Windows task bar, click the Start button, point to
Settings, and then click Control Panel.
2. Double-click the Network and Dial-up Connections icon.
3. In the Network and Dial-up Connections window, right-click
the Network icon, and then select Properties.
The Network Properties dialog box displays with a list of
currently installed network components. If the list includes
Internet Protocol (TCP/IP), then the protocol has already been
enabled. Skip to step 11.
4. If Internet Protocol (TCP/IP) does not display as an installed
component, click
.
5. In the Select Network Component Type dialog box, select
Protocol, and then click
.
6. Select Microsoft in the Manufacturers box.
7. Select Internet Protocol (TCP/IP) in the Network Protocols
list, and then click
.
You may be prompted to install files from your Windows Me
installation CD or other media. Follow the instructions to install
the files.
8. If prompted, click
to restart your computer with
the new settings.
Next, configure the PCs to accept IP information assigned by the
VisionNet 202ER:
9. In the Control Panel, double-click the Network and Dial-up
Connections icon.
10. In Network and Dial-up Connections window, right-click the
Network icon, and then select Properties.
11. In the Network Properties dialog box, select TCP/IP, and
then click
.
12. In the TCP/IP Settings dialog box, click the radio button
labeled Server assigned IP address. Also click the radio
button labeled Server assigned name server address.
13. Click
twice to confirm and save your changes,
and then close the Control Panel.
Page 13

VisionNet 202ER ADSL Ethernet Router User’s Guide
22
Assigning static Internet information to your PCs
In some cases, you may want to assign Internet information to
some or all of your PCs directly (often called “statically”), rather than
allowing the VisionNet 202ER to assign it. This option may be
desirable (but not required) if:
You have obtained one or more public IP addresses that
you want to always associate with specific computers (for
example, if you are using a computer as a public web
server).
You maintain different subnets on your LAN (subnets are
described in Appendix A).
Before you begin, contact your ISP if you do not already have the
following information:
The IP address and subnet mask to be assigned to each
PC to which you will be assigning static IP information.
The IP address of the default gateway for your LAN. In
most cases, this is the address assigned to the LAN port on
the VisionNet 202ER. By default, the LAN port is assigned
this IP address: 10.0.0.2. (You can change this number, or
another number can be assigned by your ISP. See
Chapter 5 for more information.)
The IP address of your ISP’s Domain Name System (DNS)
server.
On each PC to which you want to assign static information, follow
the instructions on pages 18 through 21 relating only to checking for
and/or installing the IP protocol. Once it is installed, continue to
follow the instructions for displaying each of the Internet Protocol
(TCP/IP) properties. Instead of enabling dynamic assignment of the
IP addresses for the computer, DNS server, and default gateway,
click the radio buttons that enable you to enter the information
manually.
Note
Your PCs must have IP addresses that place them in the same
subnet as the VisionNet 202ER’s LAN port. If you manually assign
IP information to all your LAN PCs, you can follow the instructions in
Chapter 5 to change the LAN port IP address accordingly.
Page 14

VisionNet 202ER ADSL Ethernet Router User’s Guid
23
Part 3 — Configuring the VisionNet 202ER
Logging in to the VisionNet 202ER Quick Setup
The VisionNet 202ER provides a preinstalled software program
called Configuration Manager which enables you to configure the
operation of the device via your Web browser. The settings that you
are most likely to need to change before using the device are
grouped onto a single Quick Start page.
To access the Configuration Manager Quick Start page, open the
Web browser on any PC connected to the VisionNet 202ER. Type
the following URL in the address/location box and press <Return>:
10.0.0.2/hag/pages/home.ssi
Figure 5 shows the Quick Start page:
Figure 5. Quick Start Page—Configuration Manager
Page 15

VisionNet 202ER ADSL Ethernet Router User’s Guide
24
Configure each of the Quick Start settings as instructed by your
ISP:
Operation Mode
Enable? This setting enables or disables the
VisionNet 202ER. When set to “No”, the device cannot be
used to provide Internet connectivity for your network. Set it
to “Yes” now, if necessary.
Encapsulation: This setting determines the type of data
link used to communicate with your ISP: LLC muxed or VC.
Bridge: This setting enables or disables bridging between
the VisionNet 202ER and your ISP. Your ISPs may also
refer to this using “RFC 1483” or “Ethernet over ATM”.
IGMP: This setting enables or disables the Internet Group
Management Protocol, which some ISPs use to perform
remote configuration of your device.
IP Address and Subnet Mask: If your ISP has assigned a
public IP address to your Network, enter the address and
the associated subnet mask in the boxes provided.
WAN Gateway. Enter the gateway IP address for your
ISP’s network.
DNS Settings
DNS Proxy Selection: This setting determines how the
VisionNet 202ER will obtain DNS server addresses. The
DNS server matches the user-friendly website names you
type into your browser with the sites’ numeric IP addresses.
Choose User Configured if you know the DNS server
addresses; otherwise choose AutoDiscovery.
Primary/Secondary DNS: If you selected User Configured
in the DNS Proxy Selection, enter the Primary and
Secondary DNS addresses provided by your ISP. If you
selected Auto Discovery + User Configured, you are not
required to enter addresses here; they will be used in
addition to any addresses discovered automatically.
PPP Settings
Username and Password: Enter the username and
password you use to log in to your ISP.
Disconnect timeout: Enter the number of seconds after
which your ISP connection will time out if there is no activity.
Authentication: Select the user/password authentication
method your ISP uses (PAP or CHAP).
Page 16

VisionNet 202ER ADSL Ethernet Router User’s Guid
25
Default Router Settings
In addition to handling the DSL connection to your ISP, the
VisionNet 202ER ADSL/Ethernet router can provide a variety of
services to your network. The device is preconfigured with default
settings for use with a typical home or small office network.
Table 1 lists some of the most important default settings; these and
other features are described fully in the subsequent chapters. If you
are familiar with network configuration, review the settings in Table
1 to verify that they meet the needs of your network. Follow the
instructions to change them if necessary. If you are unfamiliar with
these settings, try using the device without modification, or contact
your ISP for assistance.
Before you modifying any settings, review Chapter 4 for general
information about accessing and using the Configuration Manager
program. We strongly recommend that you contact your ISP prior to
changing the default configuration.
Table 1. Default Settings Summary
Option Default Setting Explanation/Instructions
DHCP (Dynamic
Host Configuration
Protocol)
DHCP server enabled with two pools of
addresses:
For LAN computers:
10.0.0.3 through 10.0.0.32
The VisionNet 202ER maintains a pool of 30
private IP addresses for dynamic assignment to
your LAN. To use this service, you must have
set up your computers to accept IP information
dynamically, as described in Part 2 of the Quick
Start. See Chapter 7 for an explanation of the
DHCP service.
NAT (Network
Address Translation)
napt rule enabled Your computers’ private IP addresses (see
DHCP above) will be translated to your public
IP address whenever they access the Internet.
See Chapter 8 for a description of the NAT
service.
LAN Port
IP Address
Static IP address: 10.0.0.2
subnet mask: 255.0.0.0
This is the IP address of the LAN port on the
device. The LAN port connects the device to
your Ethernet network. Typically, you will not
need to change this address. See Chapter 5 for
instructions.
Page 17

VisionNet 202ER ADSL Ethernet Router User’s Guide
26
Testing Your Installation
The Quick Start process you just completed should enable any
computer on your LAN to use the VisionNet 202ER’s ADSL
connection to access the Internet.
To test the connection, turn on the device, wait about 30 seconds,
and then verify that its LEDs are illuminated as shown in Table 2.
Table 2. LED Indicators
This LED: ...should be:
PWR
Solid green to indicate that the device is turned on. If this
light is not on, check the power cable attachment.
LINK LAN
Solid green to indicate that the device can communicate
with your LAN.
SYNC
Solid green to indicate that the device has successfully
established a connection with your DSL provider.
Tx/Rx
Flashing when the device is receiving data from the
Internet. It may be unlit, flashing, or appear solid
depending on the current activity.
PPP
When using PPPoE or PPPoA, this LED will become solid
green upon successful authentication.
ACT
Solid green when the unit passes self-diagnostics.
If the LEDs illuminate as expected, test your Internet connection
from a LAN computer : Open your web browser, and type the URL
of any external website (such as http://www.yahoo.com
). The LED
labeled WAN ACT should be blinking rapidly and may appear solid
as the device connects to the site.
Page 18

VisionNet 202ER ADSL Ethernet Router User’s Guid
27
Using VisionNet’s Diagnostic Utilities
If the LEDs do not illuminate as expected or you cannot connect to
the Internet, you can use utilities on the VisionNet 202ER while
working with your ISP to diagnose any problems. You can access
these diagnostic utilities, which are shown in Figure 6, from your
Web browser on any computer connected to the device.
Contact your ISP to determine the URL for displaying and using the
diagnostic utilities.
Figure 6. Diagnostic Utilities
 Loading...