

Page 1

TECHCONNECT TC2-HDMIP
OWNERS MANUAL
www.visionaudiovisual.com/techconnect/tc2-hdmip
TC2-HDMIP_manual_en
1
Page 2
DECLARATION OF CONFORMITY
Where applicable Vision products are certified and co m ply with all known local reg ulations to a
‘CB Certification’ standard. Vision commits to ensure all p r o ducts are fully compliant with all
applicable certification standards for sale in the EU a nd other participating countries.
The product described in th is owner manual is in compliance with RoHS (EU directive
2002/95/EC), and WEEE (EU directive 2002/96/EC) standards. This product should be returned
to the place of purchase at the end of its useful life for rec y cling.
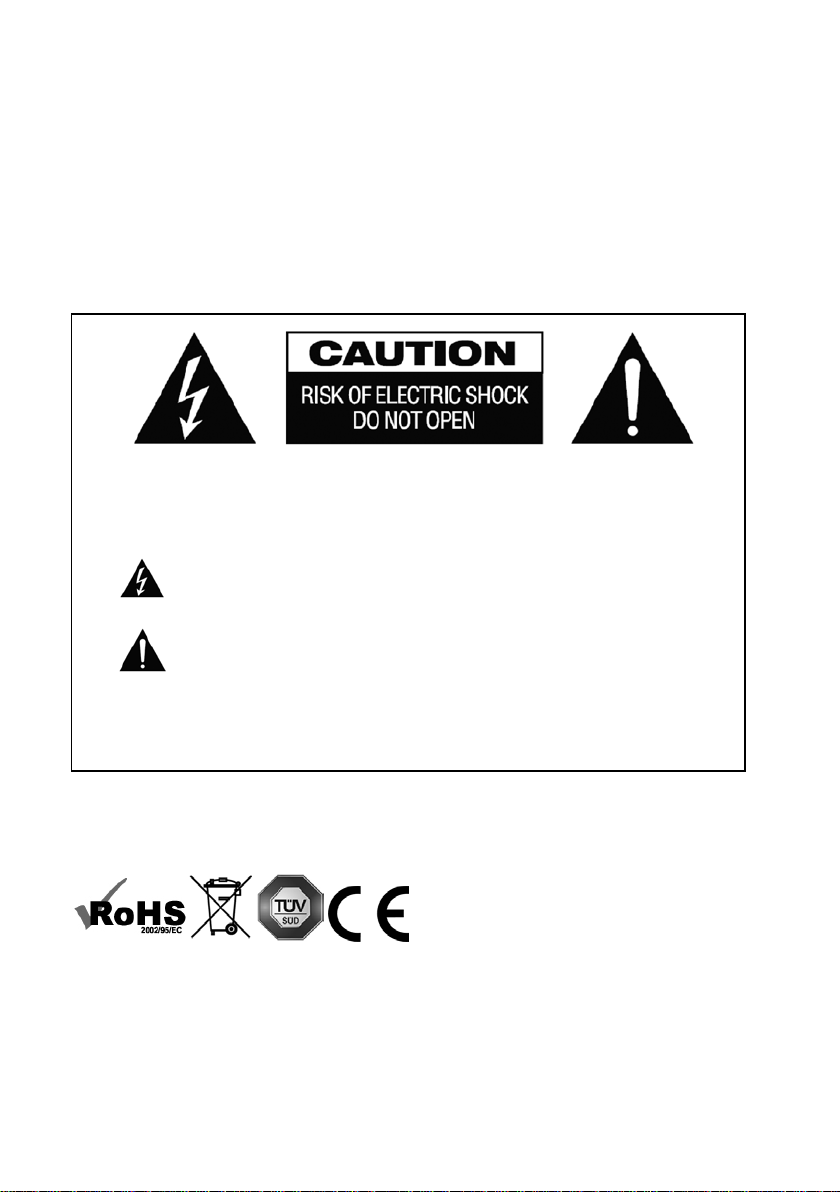
WARNINGS
CAUTION: TO REDUCE THE RISK OF ELECTRIC SHOCK DO NOT REMOVE COVER (OR
BACK). NO USER-SERVICEABLE PARTS INSIDE. REFER SERVICING TO QUALIFIED
SERVICE PERSONNEL.
The lightning flash with arrowhead symbol, within an equilateral triangle, is intended to alert the
user to the presence of uninsulated “dang erous voltage” within the product’s enclosure that may be
of sufficient magnitude to constitute a risk of electric shock to persons.
The exclamation point within an equilateral triangle, is intended to alert the user to the presence of
important operating and maintenance (servicing) instructions in t he li terature accompanying the
appliance.
WARNING: TO REDUCE THE RISK OF FIRE OR ELECTRIC SHOCK, DO NOT EXPOSE
THIS APPLIANCE TO RAIN OR MOISTURE.
All products are designed and imported into the EU by ‘Vision’ wh o is wholly owned by ‘Azlan
Logistics Ltd.’, Registered in England Nr. 04625566 at Lion House, 4 Pioneer Business Park,
Clifton Moor, York, YO30 4GH. WEEE Registration: GD0046SY
DECLARATION OF ORIGIN
All Vision products are mad e in the People’s Republic of China ( PRC).
TC2-HDMIP_manual_en
2
Page 3

USE ONLY DOMESTIC AC OUTLETS
Connecting the unit to an outlet supplying a higher voltage ma y create a fire hazard.
HANDLE THE POWER CORD WITH CARE
Do not disconnect the plug from the AC outlet by pulling the cord; always pull the plug itself.
Pulling the cord may damage it. If you do not in tend to use your unit for any considerable
length of time, unplug the unit. Do not place furniture or other hea vy ob jects on the cord, and
try to avoid dropping heavy objects on it . Do not tie a knot in the power cord. Not only could
the cord be damaged, but a short circuit could also be cause d with a consequent fire ha zard.
PLACE OF INSTALLATION
Avoid installing this produ ct under the following conditions:
• Moist or humid places
• Places exposed to direct sunlight or close to heating equipment
• Extremely cold locations
• Places subject to excessi v e vibration or dust
• Poorly ventilated places
Do not expose this product to dripping or splashing. DO NOT PLACE OBJECTS FILLED WITH
LIQUIDS ON OR NEAR THIS PRODUCT!
MOVING THE UNIT
Before moving the unit, be sure to pull out the power cord from t he AC outlet and disconnect
the interconnection cords with other units.
WARNING SIGNS
If you detect an abnormal smell or smoke, turn this product off immediately and unp lu g the
power cord. Contact your reseller or Vision.
PACKAGING
Save all packing material. I t is essential for shipping in the event the unit ever needs repair.
IF ORIGINAL PACKAGING IS NOT USED TO RETURN THE UNIT TO THE SERVICE CENTRE,
DAMAGE IN TRANSIT WILL NOT BE COVERED BY WARRANTY.
TRADEMARK
HDMI, the HDMI Logo and High-Definition Multimedia Interface are trademarks of HDMI
Licensing LLC.
TC2-HDMIP_manual_en
3
Page 4
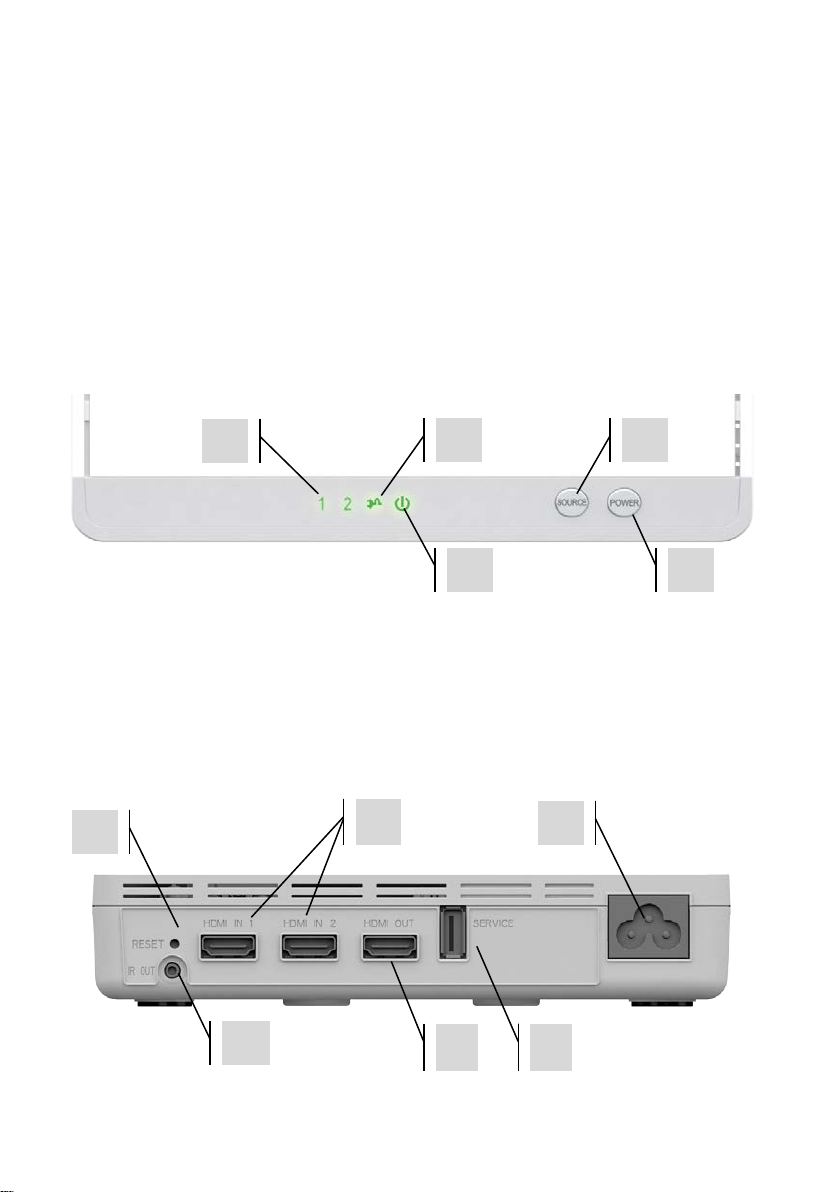
INTRODUCTION
1 2 4
3 5 5 1 1 3 4
2
6
This product transmits 1080p (30 Hz) video and audio content around a building using the
power cables already in place. It uses “Powerline” or “Home plug” technology with a modified
Quality of Service (QoS) to avoid drop-outs.
TRANSMITTER (“Tx”)
1. Source LEDs (lit solid green to show active input)
2. Link LED (Solid green = paired / flashing gre e n = e s ta blishing connection or unable to
connect)
3. Source Select button
4. Power LED (Solid green = on / solid r e d = off)
5. Power button
1. Reset Button (hold down to do factory reset back to defau lt settings)
2. HDMI Inputs (Type A)
3. Power Input (C5 “Cloverleaf”)
4. IR OUT plug IR blaster cable in here
5. HDMI loop-though Output (type A) (source select affe cts this output. Only active when Tx
powered on)
6. Service (USB-A) (plug USB stick i n h e r e to update firmware if instructed)
4
TC2-HDMIP_manual_en
Page 5

RECEIVER (“Rx”)
1 2 4 3 5 4 1 2 3
5
1. Source LEDs (lit solid green to show active input)
2. Link LED (Solid green = paired / flashing green = establishing connection or unable to
connect)
3. Source Select button
4. Power LED (Solid green = on / solid red = off)
5. Power button
1. Reset Button (hold down to do factory reset back to defau lt settings)
2. Power Input (C5 “Cloverleaf”)
3. IR OUT plug IR receiver cable in here (only needed if receiver hidd e n o ut of sight)
4. HDMI output (type A)
5. Service (USB-A) (plug USB stick in here to update firmware if instructed)
5
TC2-HDMIP_manual_en
Page 6

REMOTE CONTROL
2 1 3
141mm / 5.55”
1. Power Button (activates both devices)
2. Source 1 Selection
3. Source 2 Selection
NOTE: remote can be pointed
at Tx or Rx to switch inputs.
WALL MOUNTING
The Tx and Rx can be wall mounted.
DRY WALL INSTRUCTIONS:
1. DRILL 2 X HOLES IN WALL
2. INSERT PLASTIC RAWL PLUGS INTO HOLES
3. INSERT SCREWS INTO PLUGS. LEAVE HEADS PROTRUDING
4. HOOK INTO PLACE
6
TC2-HDMIP_manual_en
Page 7

INSTALLATION
Connecting Rx
1. CONNECT TO DISPLAY with included HDMI cable
2. TURN DISPLAY ON and select correct input
3. PLUG IN TO POWER power light goes green
Connecting Tx
1. CONNECT INPUTS from source devices
2. [OPTIONAL] CONNECT OUTPUT to local display i f there is one
3. PLUG IN TO POWER power light goes green
When the Tx is powered on the Rx will automatically come out o f standby. If the transmitte r is
powered off the receiver w ill switch to Standby after 10 minutes automatically.
TC2-HDMIP_manual_en
7
Page 8

Connecting IR Blasters
It is possible to point your sour c e remote control at the Rx, an d it will relay the IR signal back to
the source/s wirelessly.
1. CONNECT IR EMITTER TO TX Correct cable has
2 x IR emitter diodes inline to control two
source devices. Position t he m directly over the
IR receivers on the source equipment.
2. [OPTIONAL] CONNECT IR RECEIVER TO RX Correct cable has 1 x IR receiver diode. If
receiver will be hidden out of sight use the IR receiver ca ble. Place near display so it can
capture commands from sour ce remote controls/s.
NOTE 1: when receiver cable is
plugged in receiver on rx chassis is
disabled
NOTE 2:
The IR sensors support
36~56kHz signal protocol. Some
devices may not be supported.
8
TC2-HDMIP_manual_en
Page 9

OPERATION
1. CHECK REMOTE CONTROL Ensure the 2 x AAA batteries are loade d into the remote
control.
2. TURN POWER ON When mains power is turned on the Tx and Rx will automatically turn
on.
• They can be powered on in any order
• If both in standby both need to be turned on manually
3. TURN POWER OFF
• Pressing Rx or Remote control p ow e r button turns Rx off, but leaves Tx on so
that the pass-through on Tx continues to work.
As soon as they are both on the green link light will flash for 15-20 seconds w h ile the link is
established, then it will stay on.
NOT WORKING?
If you don’t have an image ensure:
1. The correct input is selected on your display device. Ev e n when there is no link an on
screen display will be output from the receiver .
2. The computer is set to duplicate or extend the desktop (Control Panel\Appearance and
Personalisation\Display\Screen Resolution)
3. Change source on Tx
9
TC2-HDMIP_manual_en
Page 10

TROUBLESHOOTING
Problem
Correction
If your system is not operating properly, please refer to the following information.
Power indicator LED
doesn't light up
No video output
Poor or intermittent
image
No audio or
intermittent audio
IR Blaster not
controlling source
• Check power plugs are properly inserted
• Check another device in the same power outlet to check
that the power outlet i s working
• Check cables connectin g Rx to display. Test with other cables.
• Check correct input is select on display
• Check POWER LED and SOURCE LED indicator o n R x :
o Ensure video resolution and frame rate is supported.
Temporarily reduce resolution on source to see if this he lps.
o Connect source device directly to display to check and
modify video format compatibility.
• Check resolution of source. It should be 1080p, 1080i, 720p,
576p, or 480p. 3D is not supported.
• Check audio system or display has correct input se le cted and
is not muted.
• Check volume on source device
• Re‐connect HDMI cab le to display.
• Disconnecting pow e r cables from Tx and Rx for 5 seconds
then re-connect
• Check location of IR emitter. It shou ld be line-of-sight of receive r
on source device.
10
TC2-HDMIP_manual_en
Page 11

SPECIFICATIONS
PRODUCT DIMENSIONS: 182 x 97 x 32 mm / 7.2″ x 3.8″ x 1.3″ (width x depth x height of
chassis)
PRODUCT WEIGHT: 500 g (set)
CONSTRUCTION MATERIAL: Plastic
COLOUR: White
TECHNICAL DETAILS:
Maximum Video Format Supported: 1920×1200 / 1080P @ 30 Hz
Video: HDMI 1.3 with HDCP (no 3d)
Latency: 30 milliseconds
Audio: Up to 3 Mbps, PCM
Operating Temperature Range: 0-40°C
Operating Humidity Range: < 80 % RH (no condensation)
Power Consumption: tbc watts
Maximum distance: 200m
TRANSMITTER CONNECTIVITY:
2 x HDMI (type A) inputs
1 x HDMI (type A) output
1 x IR OUT Minijack
1 x AC Power (C5 Coverleaf/Mickey Mouse)
RECEIVER CONNECTIVITY:
1 x HDMI (type A) output
1 x IR IN Minijack
1 x AC Power (C5 Coverleaf/Mickey Mouse)
ACCESSORIES INCLUDED:
2 x Euro C5 Coverleaf Power cable 1.2 m (black)
2 x UK C5 Coverleaf Power cable 1.2 m (black)
2 x AU C5 CoverleafPower cable 1.2 m (black)
1 x Remote Control with 2 x AAA batterie s included (black)
1 x IR Emitter cable 2 m – two diodes (black)
1 x IR Receiver cable 2 m – one d iode (black)
2 x HDMI Cable 1.5 m (black)
POWER SUPPLY: 230V Internal Power Supply
WARRANTY: 2-year return to base
COMPLIANCES: RoHS, WEEE, CE/EMC
ORDER PART CODE: TC2-HDMIP [SAP: 3252477
11
TC2-HDMIP_manual_en
Page 12

WARRANTY
This product comes with a 2-year return to base warranty, effective from the date of purchase.
This warranty applies onl y to the original purchaser a nd is not transferable. For th e a v oidance of
doubt, this will be taken from the information held by the appointed national distributor at the
point of sale. If the product is DOA (dead on arrival), you ha ve 21 days from purchase date to
notify the national distributor via your AV reseller. The lia bility of the manufacturer and its
appointed service compan y is limited to the cost of repair and/or replacement of the faulty unit
under warranty, except for death or injury (EU85/374/EEC). This warranty protects you against
the following:
• Failure of any components, including the power supply .
• Damage when the product is f irst removed from its packaging if reported within 24 ho ur s of
purchase.
If you find you do have a problem with this p roduct, you should contact the AV reseller you
purchased this product from . The original purchaser is re sponsible for shipment of the product
to the manufacturer’s appointed service centre for repair.
We will endeavour to return repaired units within 5 working days, however this may not always
be possible, in which case it will be returned as soon as pr a cticably possible. In line with our
WEEE commitments, the manu facturer endeavours to re place the faulty parts of the product
rather than replacing the whole unit. This warranty does not pr otect this product against faults
caused by abuse, misuse, in correct installation, uns table or faulty power input, which might be
caused by ignoring the guidelines set out in this manual.
LEGAL DISCLAIMER: Because we are com mitted to improving our p roducts, the details above
may change without prior warning. This User Manual is published w ithout warranty and any
improvements or changes to the User Manual necessitated by typographical errors, inaccuracies
of current information, or improvements to programs and/or equipment, may be made at any
time and without notice. Such changes will be incorporated into new editions of the User
Manual.
12
TC2-HDMIP_manual_en
 Loading...