

Page 1

viscount
Reference Manual
- English
Ver. USA - 1.10
Physis Organs
Schalmei
4'
8'
Trompete
16'
Posaune
Contra
Bombarde
32'
Clarine
4'
8'
Trompete
Fagott
16'
IV
Mixture
4'
bass
Choral-
Oktavbass
8'
Choir
to
Pedal
8'
Gedackt
16'
Gedackt
8'
Dulciana
Prinzipal
16'
Vox Humana
8’
Tremolo
Clarion
4’
V
Cornet
V
Mixture
2
3
Quinte
Superoktave
2'
4'
Oktave
Spitzflöte
4'
Unda
Maris
8'
8'
Gedackt
Prinzipal
8'
Hohlflöte
8'
4'
Rohrflöte
2
3
Nasard
2'
Blockflöte
3
5
Terz
Tremolo
4'
Gemshorn
Oktave
4'
Gamba
8'
Prinzipal
8'
Vox
Celeste
8'
Tremolo
II
Sesquialtera
1'
Sifflöte
1
3
Larigot
4'
Offenflöte
Prinzipal
8'
4'
Prestant
Doublette
2'
Mixture
IV
Humana
Vox
8'
Oboe
8'
Trompete
8'
16'
Contra
Trompete
Regal
16'
8'
Spanische
Trompete
8'
Krumm-
horn
Swell Swell Great GreatPedal
Cello Chimes Oboe Harps Strings
Choir
Piano
Choir
Harpsich.
On
Reed Mixtur Pedal Swell Great Choir
Console
On
Speaker
Ext.
CRESCENDO
M. BANK
PEDAL SWELL
POWER
0
1
AMPLIFICAT. CANCEL MIDI
SEQUENC.
VOLUMES
FIELD
EXIT
ENTER
FIELD VALUE VALUE
ORCHESTRA
GREAT CHOIR
UNICO 500
viscount
CHOIR SWELL CRESCENDO
MASTER
VOLUME
THRU OUT
MIDI
IN REVERB
VOLUME
USB PHONES
MEM.
BANK
MEM.
BANK
S
HR 1 2 3 4
7 8 9 10
HR 1 2 3 4
5 6
HR 1 2 53 4 6SW/P
HR 1 2 53 4 6G/P
HR 1 2 53 4 65 6 C/P C
T
SWS
A.P
SW/C
SW/G C/G
M.SOLO
M.SOLO
M.SOLO
O.SOLO
PREV NEXT
+-
Great
to
Pedal
Swell
to
Pedal
Swell
to
Great
Choir
to
Great
Swell
to
Choir
Contra
Violone
32'
Open
Wood
16'
Sub
Bass
16'
16'
Double
Diapason
Erzahler
8'
Concert
Flute
8'
Page 2
Page 3

1
Viscount Physis OrgansReference Manual
INDEX
1. Important notes .............................................................................................................................. 3
1.1 Looking after the product .............................................................................................................................. 3
1.2 Notes about the manual.................................................................................................................................. 3
2. Introduction.................................................................................................................................... 5
3. General description ........................................................................................................................ 6
4. Programming section and main screen ........................................................................................ 19
5. Setting the volumes (Volumes function) .......................................................................................20
6. Tuning the instrument (Tuning menu) ........................................................................................ 21
7. The organ styles (Styles menu) ..................................................................................................... 22
8. Selecting and regulating the voices (Voices menu) ......................................................................23
8.1 Regulating the volume (Volume Level function) ....................................................................................... 24
8.2 Regulating the audio parameters (Edit Parameters function) ..................................................................24
8.3 Selecting the alternative voices (Alternative Voice function)................................................................... 26
8.4 Selecting and adjusting the orchestral voices ............................................................................................. 27
8.5 Saving different orchestral voices and parameters in the combinations ................................................ 29
9. Instrument general settings .......................................................................................................... 30
9.1 Adjusting the tremolos (1st Tremolo and 2nd Tremolo functions) ....................................................... 30
9.2 Selecting the reverberation style (Reverberation function) ...................................................................... 31
9.3 Adjusting the internal equalizer (Int. Ampl. Equalizer function) ........................................................... 32
9.4 Arranging the voices in the internal amplification (Int. Amp. Panning function) ................................ 33
9.5 Stereophonic balance of the side speakers (Int. Amp. Tune-Up function)........................................... 37
9.6 Options of the combinations, the Cancel function, the Crescendo and Volume control
(Programmable functions) ............................................................................................................................ 38
9.7 Programming the [SWS] piston function (Sws Programming function) ............................................... 41
9.8 Regulating the rear outputs equalizer (Ext. Out Equalizer function)..................................................... 42
9.9 Regulating the rear output [GEN. SUB] equalizer (Ext. Sub Equalizer function) ............................... 43
9.10 Setting the routing of the voices on the rear audio outputs (Ext. Out Router function) ................ 44
9.11 Regulating the volume of the rear outputs (Ext. Out Volume function) ............................................ 47
9.12 Configuration of the external audio outputs (Ext. Out Config function) .......................................... 48
9.13 Automatic resize of External Routers (Ext. Out Resize function) ...................................................... 49
10. Utilities and MIDI functions (Util. & MIDI menu) ..................................................................50
10.1 Regulating the internal clock (Set Date & Time function) .................................................................... 51
10.2 Controlling the access to the organ settings (Lock Organ function) .................................................. 52
10.3 Restoring factory settings (Restore Fact. Sett. function) ........................................................................ 53
10.4 Upgrading the operating system (Op. Sys. Upgrade function) ............................................................ 55
10.5 MIDI functions............................................................................................................................................ 55
11. File managements functions (File Manag. menu) ......................................................................58
11.1 File management (Dir function) ................................................................................................................ 59
11.2 Loading organ combinations and/or settings (Load function)............................................................. 60
Page 4

2
Viscount Physis Organs Reference Manual
11.3 Saving as file of organ combinations and/or settings (Save function) ................................................ 62
11.4 Copying and duplicating a file (Copy function) ...................................................................................... 63
11.5 Renaming files (Rename function) ............................................................................................................ 65
11.6 Deleting files (Delete funcion)................................................................................................................... 66
11.7 Editing of lists of songs (Songlist function) ........................................................................................... 67
11.8 Operating system version (O. S. Info function) ...................................................................................... 68
11.9 Error messages – File management functions ........................................................................................ 69
12. Playing and recording of musical sequences (Sequencer)......................................................... 71
12.1 Playing back a piece (Play mode)............................................................................................................... 71
12.2 Recording a piece (Record mode) ............................................................................................................. 73
12.3 Play options of the sequencer (Play Options menu) .............................................................................. 78
12.4 Error messages – Sequencer ...................................................................................................................... 78
13. Stop Local Off ..............................................................................................................................80
14. Appendix ......................................................................................................................................80
14.1 Temperament ............................................................................................................................................... 80
14.2 Temperaments in the Physis organs.......................................................................................................... 83
14.3 The windchest in the pipe organs ............................................................................................................. 92
14.4 Content of the .set, .sty, .cmb and .all files .............................................................................................. 94
14.5 What is MIDI ............................................................................................................................................... 96
14.6 Detailed MIDI implementation ................................................................................................................. 98
Page 5

3
Viscount Physis OrgansReference Manual
1. IMPORTANT NOTES
1.1 LOOKING AFTER THE PRODUCT
• Do not apply excessive force to the organ’s structures or the controls (knobs, stops, push-buttons, etc.).
• When possible, do not place the instrument close to units which generate strong interference, such as
radios, TVs, computer videos, etc.
• Do not place the organ close to heat sources, in damp or dusty places or in the vicinity of strong magnetic
fields.
• Do not expose the instrument to direct sunlight.
• Never insert foreign bodies inside the instrument or pour liquids of any kind into it.
• For cleaning, use only a soft brush or compressed air; never use detergents, solvents or alcohol.
• Always use good quality screened cables for connection to amplification or diffusion systems. When
disconnecting cables from sockets, always take hold of the connector and not the cable itself; when
winding cables, do not knot or twist them.
• Before making the connections ensure that the other units (especially amplification and diffusion systems)
you are about to connect are switched off. This will prevent noisy or even dangerous signal peaks.
• Connect the net cable to an earthed socket.
• Check that the voltage corresponds to the voltage shown on the serial number plate of the organ.
• If the organ is to be out of use for lengthy periods, disconnect the plug from the power socket.
1.2 NOTES ABOUT THE MANUAL
• Take good care of this manual.
• This manual is an integral part of the instrument. The descriptions and illustrations in this publication
are not binding.
• While the instrument’s essential characteristics remain the same, the manufacturer reserves the right to
make any modifications to parts, details or accessories considered appropriate to improve the product or
for requirements of a constructional or commercial nature, at any time and without undertaking to
update this publication immediately.
• All rights reserved; the reproduction of any part of this manual, in any form, without the manufacturer’s
specific written permission is forbidden.
• All the trademarks referred to in this manual are the property of the respective manufacturers.
Page 6

4
Viscount Physis Organs Reference Manual
• Read all the information carefully in order to obtain the best performances from your product and waste
no time.
• The codes or numbers in square brackets ([]) indicate the names of the buttons, sliders, trimmers and
connectors on the instrument. For example, [ENTER] refers to the ENTER button.
• Illustrations and screens showed are for information purposes only and may differ from your product.
• The instructions provided in this manual only concern the instrument's operating system version that
was up to date when the document was released. Therefore, such instructions might not describe faithfully
your current operating system release. Please, visit the website http://www.physisorgans.com/
download.asp to check for the newest operating system release and manual.
Page 7
5
Viscount Physis OrgansReference Manual
2. INTRODUCTION
Dear Customer,
Thank you for choosing the organ Viscount.
The Company, a world leader in the construction
of fine classical organs, has installed in this
instrument the latest and most sophisticated
technology dedicated to the high fidelity
reproduction of pipe organ sounds, with
impressive flexibility and remakable quality of
timbre.
After years of research exploring musical synthesis
techniques, our Research and Development unit,
is the FIRST in the world to create the sounds of
a pipe organ by using the “physical modeling
technology” upon which the Physis is based.
Instead of using “sound samples” from pipe
organs (previously the standard method) this
revolutionary sound generation system involves the
real-time calculation of the waveform generated
by a precise mathematical model based on the
sound emission physics of a pipe organ,
incorporating the principal physical parameters ie. construction geometry, materials used, and pertaining air
pressure, etc.
The fact that the simple reproduction of memorized “sound” has been disregarded, permits the achievement
of unimaginable realism, with the level of detail previously only created by a traditional pipe organ.
For example, the mathematical model allows the production of a different sound for each key since it provides
the virtual reproduction of the original instrument by assigning a different pipe to each note, similar to a pipe
organ. Furthermore, it will generate a different sound for each consecutive pressure of the same note, thus
simulating the precise condition of the air volume inside the pipe as it is pressed.
The organ also permits the “physical” editing of the sounds produced, by adjusting the parameters - just as
the organ builder constructs the pipes. If however, “editing” is not your forte, you may choose your sound
from a big library of pre-programmed pipe organ voices already in the instrument’s memory.
To conclude we suggest that you visit our web-sites www.viscount-organs.com and www.physisorgans.com
where you will find information, updates, documents and news about our unique range of instruments.
Page 8

6
Viscount Physis Organs Reference Manual
3. GENERAL DESCRIPTION
UNICO 500
Schalmei
4'
8'
Trompete
16'
Posaune
Contra
Bombarde
32'
Clarine
4'
8'
Trompete
Fagott
16'
IV
Mixture
4'
bass
Choral-
Oktav-
bass
8'
Choir
to
Pedal
8'
Gedackt
16'
Gedackt
8'
Dulciana
Prinzipal
16'
VoxHumana
8’
Tremolo
Clarion
4’
V
Cornet
V
Mixture
2
3
Quinte
Super-
oktave
2'
4'
Oktave
Spitzflöte
4'
Unda
Maris
8'
8'
Gedackt
Prinzipal
8'
Hohlflöte
8'
4'
Rohrflöte
2
3
Nasard
2'
Blockflöte
3
5
Terz
Tremolo
4'
Gemshorn
Oktave
4'
Gamba
8'
Prinzipal
8'
Vox
Celeste
8'
Tremolo
II
Sesquialtera
1'
Sifflöte
1
3
Larigot
4'
Offenflöte
Prinzipal
8'
4'
Prestant
Doublette
2'
Mixture
IV
Humana
Vox
8'
Oboe
8'
Trompete
8'
16'
Contra
Trompete
Regal
16'
8'
Spanische
Trompete
8'
Krumm-
horn
Swell Swell Great GreatPedal
Cello Chimes Oboe Harps Strings
Choir
Piano
Choir
Harpsich.
On
Reed Mixtur Pedal Swell Great Choir
Console
On
Speaker
Ext.
CRESCENDO
M.BANK
PEDAL SWELL
POWER
0
1
AMPLIFICAT. CANCEL MIDI
SEQUENC.
VOLUMES
FIELD
EXIT
ENTER
FIELD VALUE VALUE
ORCHESTRA
GREAT CHOIR
UNICO 500
viscount
CHOIR SWELL CRESCENDO
56789101112
GEN.SUB 1 2 3 4 L(+R) R MIC GAIN
PROG.OUT
PROG.OUT INPUTOUT
MASTER
VOLUME
THRU OUT
MIDI
IN REVERB
VOLUME
USB PHONES
MEM.
BANK
MEM.
BANK
S
HR1234
78910
HR1234
56
HR 1 2 534 6SW/P
HR 1 2 534 6G/P
HR 1 2 534 656 C/P C
T
SWS
A.P
SW/C
SW/G C/G
M.SOLO
M.SOLO
M.SOLO
O.SOLO
PREV NEXT
+-
1 2
6
20
18
13
7
8 10 3 4
21
14 18 1915 16 19 17
23
22
26
25
9 11 12
-
+
EXT.
+12VDC
300mA
-
+
EXT.
+12VDC
300mA
19
13
5
24
Great
to
Pedal
Swell
to
Pedal
Swell
to
Great
Choir
to
Great
Swell
to
Choir
Contra
Violone
32'
Open
Wood
16'
Sub
Bass
16'
16'
Double
Diapason
Erzahler
8'
Concert
Flute
8'
Page 9
7
Viscount Physis OrgansReference Manual
UNICO 400
GT/PD
SW/PD
CHR/PD
TUTTI
SW/CHR
SW/GT
CHR/GT
6
7
8
1
2
3
4
5
NEXT
PREV
10
9
On
Reed Mixtur Pedal Swell Great Choir
Console
On
Speaker
Ext.
CRESCENDO
M.BANK
AMPLIFICAT. CANCEL MIDI
SEQUENC.
VOLUMES
FIELD
EXIT
ENTER
FIELD VALUE VALUE
ORCHESTRA
MASTER
VOLUME
THRU OUT
MIDI
IN REVERB
VOLUME
USB PHONES
Fluit
Celeste
8’
SWELL
Prestant
16’
Prestant
8’
Holpijp
8’
Quint
1/
1
3
Octaaf
4’
Roerfluit
4’
Quint
2/
2
3
Super
Octaaf
2’
Cornet
V
Prestant
16’
Fagot
16’
Trumpet
8’
Vox
Humana
8’
TremoloClarion
4’
PEDAL
Contra
Bourdon
32’
Subbas
16’
Gedekt
16’
Octaaf-
bas
8’
Gedekt
8’
Quint
1/
1
3
Koraal-
bas
4’
Fluit
4’
Contra
Bombarde
32’
Bombarde
16’
Trumpet
8’
Great
to
Pedal
POWER
0
1
Mixtuur
V
Prestant
8’
Quintadeen
8’
Bourdon
8’
Prestant
4’
Open
Fluit
4’
Octaaf
2’
Terts
1/
3
5
Larigot
1/
1
3
Sifflet
1’
Sesquialter
II
Mixtuur
IV
Chamade
Trompete
8’
Tremolo
Swell
to
Choir
UNICO 400
UNICO 400
viscount
CHOIR
CHOIR SWELL CRESCENDO
MIDI
REVERS.
32’FLUTE
REVERS.
32’REED
REVERS.
GREAT
Bourdon
16’
Prestant
8’
Roerfluit
8’
Gamba
8’
Vox
Celeste
8’
Octaaf
4’
Koppel-
fluit
4’
Quint
2/
2
3
Woudfluit
2’
Terts
1/
3
5
Cymbal
III
Regal
16’
Trompet
8’
Hobo
8’
Kromhorn
8’
Tremolo
MEM.
BANK
MEM.
BANK
S
HR1234
78910
HR1234
56
HR 1 2 534 6SW/P
HR 1 2 534 6G/P
HR 1 2 534 65 6 C/P C
T
SWS
A.P
SW/C
SW/G C/G
M.SOLO
M.SOLO
M.SOLO
O.SOLO
PREV NEXT
+-
56789101112
GEN.SUB 1 2 3 4 L(+R) R MIC GAIN
PROG.OUT
PROG.OUT INPUTOUT
25
-
+
EXT.
+12VDC
300mA
-
+
EXT.
+12VDC
300mA
1
2
20
18 14 1915 16 19 17176
13
7
5 8 109 11 12
4
3
21
13
19
22
26
23 24
Clarion
4’
Clarion
4’
Swell
to
Pedal
Choir
to
Pedal
Swell Swell Great GreatPedal
Cello Chimes Oboe Harps Strings
Choir
Piano
Choir
Harpsich.
Swell
to
Great
Choir
to
Great
Page 10
8
Viscount Physis Organs Reference Manual
UNICO 300
GT/ PD
SW/ PD
SW/ GT
TUTTI
1
2
3
4
5
6
MASTER
VOLUME
THRU OUT
MIDI
IN REVERB
VOLUME
USB PHONES
Fluit
Celeste
8’
SWELL
Prestant
16’
Prestant
8’
Holpijp
8’
Quint
1/
1
3
Octaaf
4’
Roerfluit
4’
Quint
2/
2
3
Super
Octaaf
2’
Cornet
V
Prestant
16’
Fagot
16’
Trumpet
8’
Vox
Humana
8’
TremoloClarion
8’
PEDAL
Contra
Bourdon
32’
Subbas
16’
Gedekt
16’
Octaaf-
bas
8’
Gedekt
8’
Quint
1/
1
3
Koraal-
bas
4’
Fluit
4’
Contra
Bombarde
32’
Bombarde
16’
Trumpet
8’
Swell
to
Pedal
Mixtuur
V
Clarion
8’
Clarion
4’
Clarion
4’
GREAT
Bourdon
16’
Prestant
8’
Roerfluit
8’
Gamba
8’
Vox
Celeste
8’
Octaaf
4’
Koppel-
fluit
4’
Quint
2/
2
3
Woudfluit
2’
Terts
1/
3
5
Cymbal
III
Regal
16’
Trompet
8’
Hobo
8’
Kromhorn
8’
Swell
to
Great
Tremolo
On
Reed Mixtur
Console
On
Speaker
Ext.
AMPLIFICAT. CANCEL
SEQUENC.
SEQUENC.
VOLUMES
FIELD
EXIT
ENTER
FIELD VALUE VALUE
ORCHESTRA MIDI
Pedal
Cello
Swell
Harp
Swell
Strings
Great
Chimes
Great
Harpsich.
Pedal Swell Great
UNICO 300
UNICO 300
POWER
0
1
HR123456
S
HR 1 2 534 6SW/P
HR 1 2 534 6G/P
viscount
PREV NEXT
SW/G
C
A.P
MEM.
BANK
MEM.
BANK
+-
SWS
T
SWELL CRESCENDO
PROG.OUT INPUTOUT
GEN.SUB 1 2 3 4 L(+R) R MIC GAIN
-
+
EXT.
+12VDC
300mA
CRESCENDO
M.BANK
HR123456
1
2
20
18 1413 1615 13 196
5 7 8 10 12
3
9
21
11
13
24
22
19
25
23
Clarion
4’
Great
to
Pedal
Kromhorn
8’
Page 11

9
Viscount Physis OrgansReference Manual
UNICO CL / CLV 8
PROG.OUT INPUTOUT
GEN.SUB 1 2 3 4 L(+R) R MIC GAIN
-
+
EXT.
+12VDC
300mA
10
25
1
9
20
6
7 8 2 5 12
3 4
21
viscount
22
24
23
13
26
19
Swell Great Choir
SWELL GREAT
Swell
to
Great
Choir
to
Great
CHOIR
Choir
to
Great
GT/PD
SW/PD
CH/PD
SW/GT
CH/GT
SW/CH
CHOIR SWELL
Great
to
Pedal
Swell
to
Pedal
Choir
to
Pedal
MEM.
BANK
MEM.
BANK
S
HR 1 2 3 4
78910
HR 1 2 3 4
56
HR 1 2 534 6SW/P
HR 1 2 534 6G/P
HR 1 2 534 656 C/P C
T
SWS
A.P
SW/C
SW/G C/G
M.SOLO
M.SOLO
M.SOLO
O.SOLO
PREV NEXT
+-
18 14 1915 16 19 1517
13
Tremolo Tremolo Tremolo
PREV
NEXT
MIDI
REVERS.
32’FLUTE
REVERS.
32’REED
REVERS.
Page 12
10
Viscount Physis Organs Reference Manual
UNICO CL / CLV 7
PROG.OUT INPUTOUT
GEN.SUB 1 2 3 4 L(+R) R MIC GAIN
-
+
EXT.
+12VDC
300mA
25
1 2 5
SEQUENC.
VOLUMES
FIELD
EXIT
ENTER
FIELD VALUE VALUE
24 28 10 8 9 12 3 11
viscount
22
19
21
23
24
13
6
20
27
SWELL
GREAT
Great
to
Pedal
Swell
to
Pedal
Swell
to
Great
Swell Great Swell Great
SW/PD
SW/GT
PREV
SWELL
HR123456
S
HR 1 2 534 6SW/P
HR 1 2 534 6G/P
PREV NEXT
SW/G
C
A.P
MEM.
BANK
MEM.
BANK
+-
SWS
T
HR 1 2 3 4 5 6
18 14
15 16
13
19
13
Swell
Swell
Great
Great
TREMOLO
GT/PD
Page 13
11
Viscount Physis OrgansReference Manual
UNICO CL / CLV 6
CL
6
UNICO
viscount
PROG.OUT INPUTOUT
GEN.SUB 1 2 3 4 L(+R) R MIC GAIN
-
+
EXT.
+12VDC
300mA
MASTER
VOLUME
REVERB
VOLUME
1 2 3 125
6
27
20
21
10
25
GREAT
Tremolo
Swell
to
Great
Great
to
Pedal
Swell
to
Pedal
SWELL
Tremolo
HR 1 2 3 4 5 6
S
HR 1 2 534 6SW/P
HR 1 2 534 6G/P
PREV NEXT
SW/G
C
A.P
MEM.
BANK
MEM.
BANK
+-
SWS
T
HR 1 2 3 4 5 6
18 1413 1615 13 19
GT/ PD
SW/PD
SW/GT
TUTTI
1
2
3
4
5
6
SWELL CRESCENDO
13
24
22
19
23
Page 14

12
Viscount Physis Organs Reference Manual
UNICO CL / CLV 4
viscount
CL
4
UNICO
MASTER
VOLUME
REVERB
VOLUME
PROG.OUT INPUTOUT
GEN.SUB 1 2 3 4 L(+R) R MIC GAIN
-
+
EXT.
+12VDC
300mA
25
5
6
1 2 3 12
21
10
30
20
13 1918
23
SWELL
Tremolo
GREAT
Tremolo
Swell
to
Great
SWELL
GREAT/PEDAL
SWS
Page 15

13
Viscount Physis OrgansReference Manual
UNICO CL / CLV 2
CL
2
UNICO
MASTER
VOLUME
REVERB
VOLUME
viscount
PROG.OUT INPUTOUT
GEN.SUB 1 2 3 4 L(+R) R MIC GAIN
-
+
EXT.
+12VDC
300mA
25
6
27
20
21
10
1 12
13
1918
23
SWELL
GREAT/PEDAL
2
SWELL
Tremolo
3
GREAT
Tremolo
Swell
to
Great
SWS
Great
to
Pedal
Swell
to
Pedal
Page 16

14
Viscount Physis Organs Reference Manual
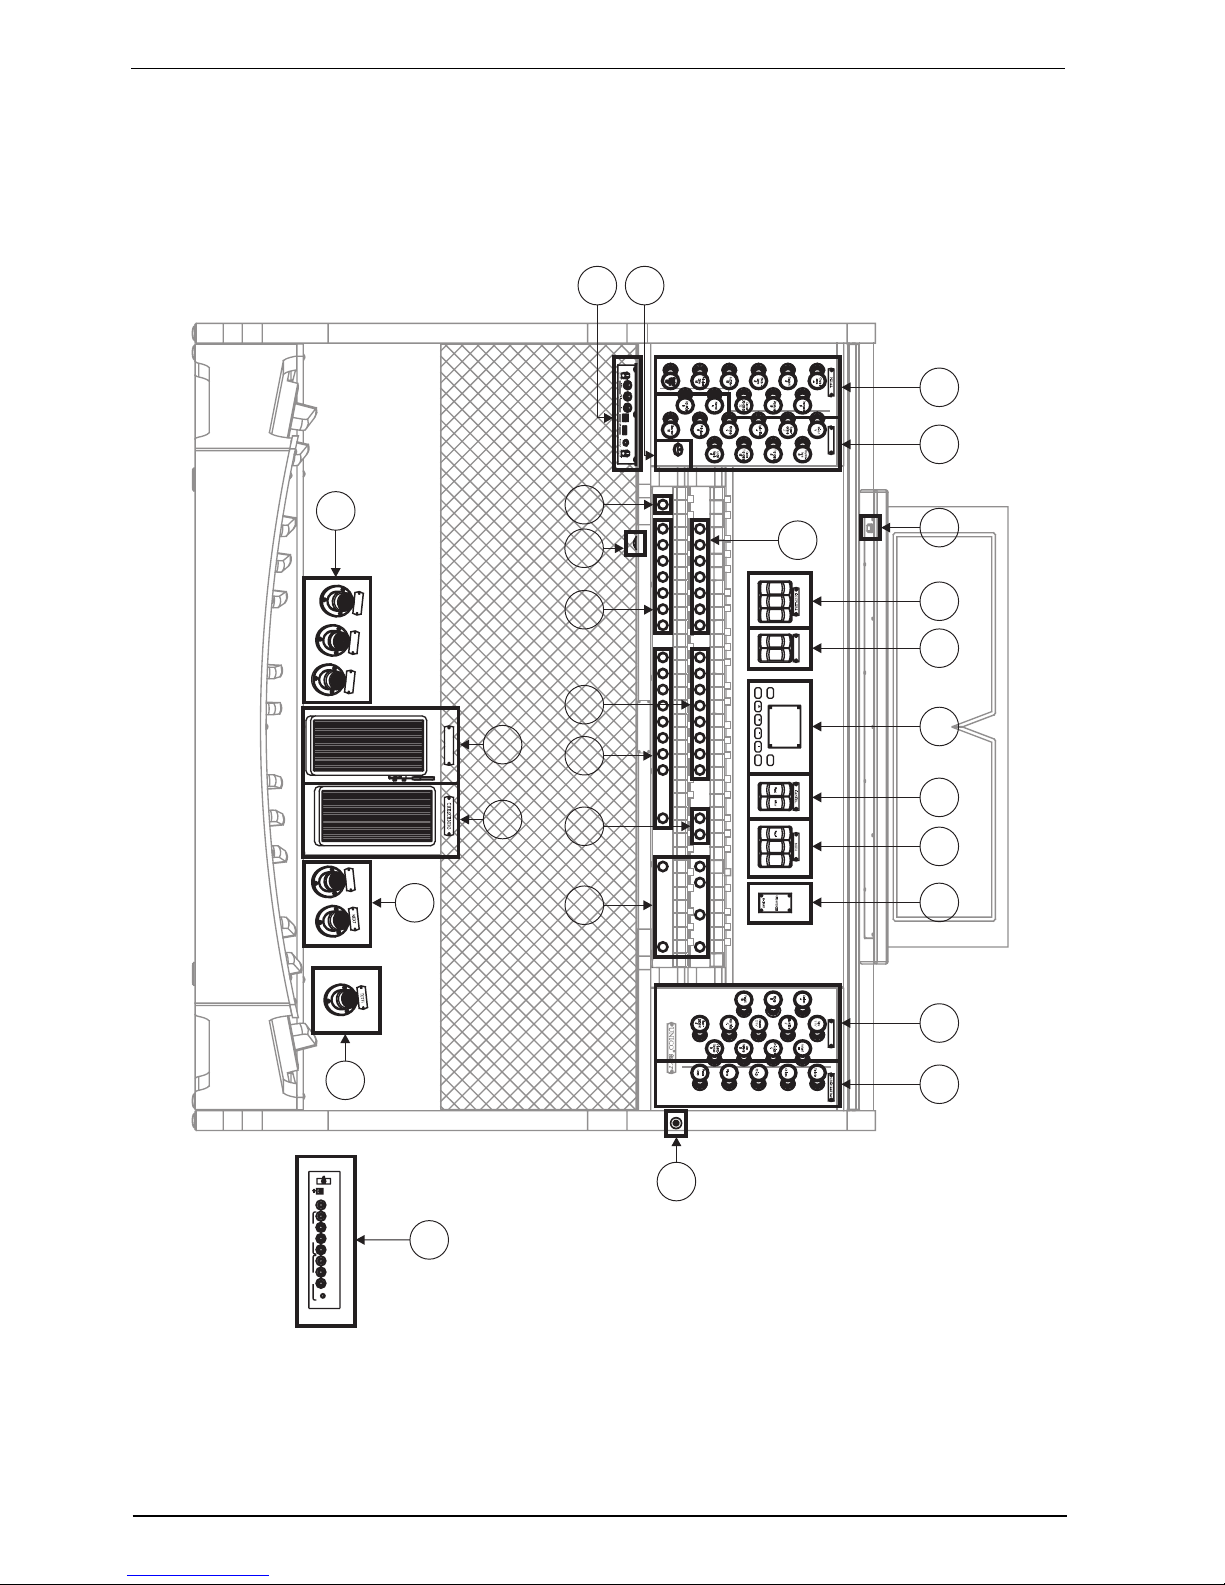
1. PEDAL Section
Contains pedal stops and manual-pedal couplers. The couplers available are:
- Great to Pedal
- Swell to Pedal
- Choir to Pedal
2. SWELL section
Contains stops, couplers and tremolos of Swell.
3. GREAT Section
Contains stops, couplers and tremolos of Great. The couplers available are:
- Swell to Great
- Choir to Great (only three-manual models)
4. CHOIR section.
Stops, manual couplers and tremolos for Swell. The coupler available is:
- Swell to Choir
For each rocker switch a different voice can be selected. You can also adjust the main sound-generation
parameters. Further information can be found on chapter 8.
Two tremolos are available for each section, and both can be activated through the [TREMOLO] stop or
draw-stop. Speed and depth of both tremolos can be adjusted. Further information can be found on paragraph
9.1.
For some models, these sections also contain a [MIDI] control, to transmit MIDI-note codes to the MIDI
[OUT] port. It is also possible to play one or two orchestral voices. To do so, activate the desired voice
through the functions described on chapt. 8.3 and 8.5. The list of stops available to play orchestral voices
may change, according to the sound configuration of the organ. Check the web page www.physisorgans.com/
download.asp for further information.
5. Light switch
On-off button for the music stand and manuals lights.
6. Power switch
Instrument on/off switch.
7. AMPLIFICATION section
Amplification controls.
- [CONSOLE ON] switches on the instrument’s internal amplification system.
- [EXT. SPEAKER ON]: this command activates the PROG.OUT and GEN. SUB outputs, in the rear
panel (point 25), in order to link external speakers to the instrument and use them to diffuse the
sound around the ambience.
8. CANCEL section
Cancel buttons which allow disabling of all the Reed voices ([REEDS] tab) and the Plenum
voices ([MIXTURE] tab). However, when a stop is deactivated through this control, the stop light is still
on.
9. MIDI section.
These controls, provided for each manual and the pedal board, allow transmission of the note MIDIcodes
on the MIDI [OUT] port to be enabled and disabled. All the instrument’s other MIDI messages will
continue to be transmitted, even with the MIDI control off.
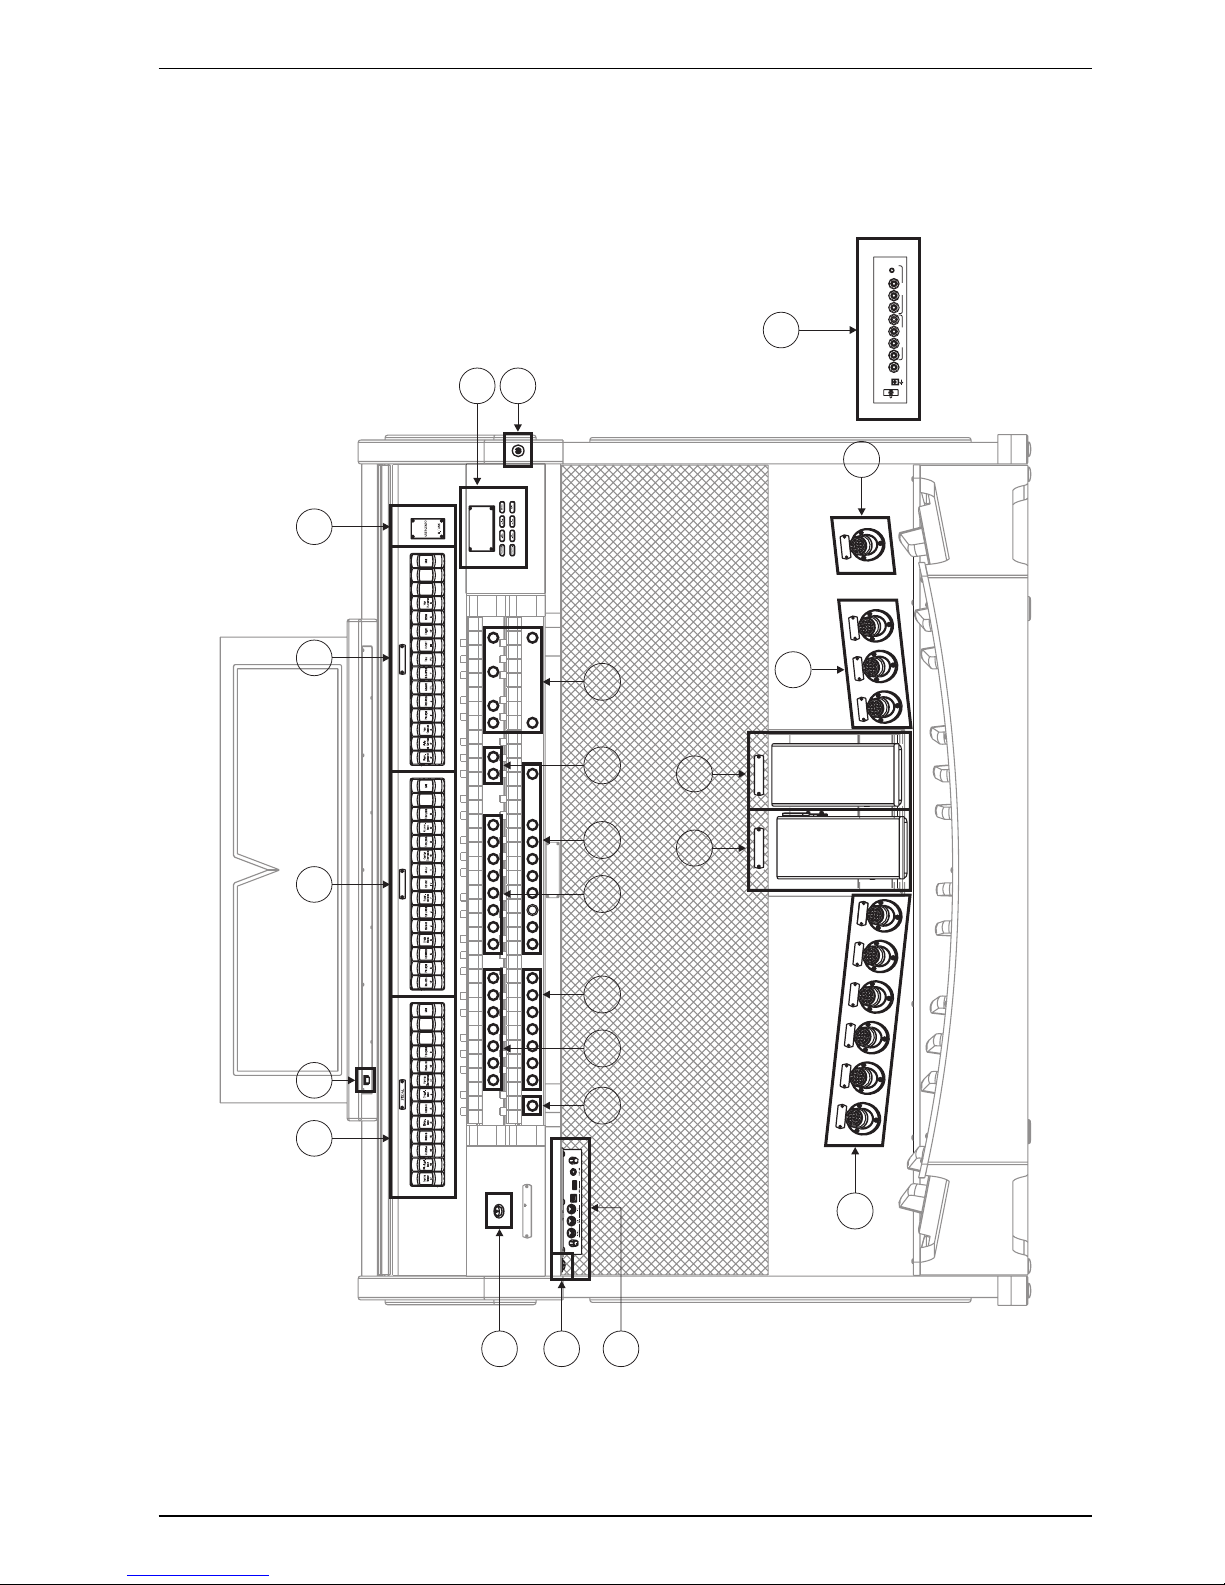
Page 17

15
Viscount Physis OrgansReference Manual
N.B.
When the organ is switched on, it selects automatically the memory bank n.1.
10. Control and programming section.
The buttons and the display in this sections allow the user to program and set up the instrument and the
sequencer. This section is described in chapter 4 and following.
11. ORCHESTRA section.
Contains the orchestral voices. It is possible to select the voice activated by each rocker-switch, and adjust
the main sound generation parameters of each voice. For further information read par. 8.4.
12. Additional displays
- [CRESCENDO]: shows the step currently reached by the [CRESCENDO] pedal (point 24).
- [M. BANK]: displays the memory bank of the combinations (general and divisional), selected using
the [MEM. BANK +] and [MEM. BANK -] pistons, or by holding the [S] piston (p. 18) and using the
[PREV] and [NEXT] buttons (p. 13).
13. General combinations.
- [1] / [10] or [8] or [6]: pistons and (in some models only) toe pistons to recall the combinations saved
in the selected memory bank (several memory banks are available, and can be chosen by pressing
[MEM- BANK +] and [MEM. BANK -]). These combinations can be modified. To do so, follow the
procedure described at point 18.
- [HR]: restores the voice setup prepared in manual mode before a memory was recalled.
- [PREV.] / [NEXT]: general combinations sequencers. [PREV.] displays them in descending order,
[NEXT] in ascending order.
14. Pedal pistons.
- [1] / [6]: pedal divisional combinations. These combinations can be modified. To do so, follow the
procedure described at point 20.
- [HR] (only available for some models): restores the voice setup prepared in manual mode before a
memory was recalled, when the piston is on.
15. Swell pistons
- [1] / [6]: Swell divisional combinations. These combinations can be modified. To do so, follow the
procedure described at point 18.
- [HR] (only available for some models): restores the voice setup prepared in manual mode before a
Swell memory was recalled, when the piston itself is on.
- [SW/P]: Swell to Pedal coupling.
- [M.SOLO] (only available for some models): activates the MIDI SOLO function, which allows mono
transmission of the notes played on this manual on the MIDI [OUT] output, with priority to the
highest note.
16. Great pistons.
- [1] / [6]: Great divisional combinations. These combinations can be modified. To do so, follow the
procedure described at point 18.
- [HR] (only available for some models): restores the voice setup prepared in manual mode before a
Great memory was recalled, when the piston itself is on.
- [G/P]: Great to Pedal coupling.
- [SW/G]: Swell to Great coupling.
- [C/G] (only available for 3-manual models): Choir to Great coupling.
Page 18

16
Viscount Physis Organs Reference Manual
N.B.
If the [S] piston LED light is off, this means that the Lock Organ (see cap. 11.2) function is active.
In this case, saving combinations and visualizing the programming functions will be impossible.
- [M.SOLO] (only available for some models): activates the MIDI SOLO function, which allows mono
transmission of the notes played on this manual on the MIDI [OUT] output, with priority to the
highest note.
- [O.SOLO] (only in certain models): activates the Organ Solo function. By default, you can play the
melody with Swell stops when the Swell to Great coupling is active. Therefore, all the while the
function is active, notes are played with monophonic Swell voices. However the melody can be played
also on other manuals. To do so, access the corresponding options under the PROGRAMMABLE
FUNCTIONS menu (see par. 9.5).
17. Choir pistons.
- [1] / [6]: Choir divisional combinations. These combinations can be modified. To do so, follow the
procedure described at point 18.
- [HR] (only available for some models): restores the voice setup prepared in manual mode before a
memory for Choir was recalled.
- [C/P]: Choir to Pedal coupling.
- [SW/C]: Swell to Choir coupling.
- [M.SOLO] (only available for some models): Activates the MIDI SOLO function, which allows mono
transmission of the notes played on this manual on the MIDI [OUT] output, with priority to the
highest note.
18. [S] piston: piston that saves general and divisional combinations, Tutti and Crescendo steps.
To save a combination or the Tutti, after setting up the voices, press and hold the [S] piston; then press
the piston/toe piston corresponding to the combination you wish to save.
To save a Crescendo step, select it through the Crescendo pedal, press and hold [S], and then press the
general memories [HR] piston. To copy the content of one step to another, first select the step you wish
to copy, then press and hold the [S] piston, select the step in which you wish to paste the content, and
finally press the general memories [HR].
19. General organ controls.
These are the controls that are not dedicated to a single section, but affect the whole instrument.
- [MEM. BANK +] and [MEM. BANK - ]: select the memory bank shown on the additional display
[MEM. BANK] (point 12).
- [SWS]: when the All Swells in Swell or Solo function is active, the main volume can be controlled
through the expression pedal [SWELL].
- [A.P.]:
activates the Automatic Pedal or Pedal Automatic Piano functions. Select the mode of the
piston among the PROGRAMMABLE FUNCTIONS under the SET-UP menu (see par. 9.5).
- [T] or [TUTTI]: piston or toe piston (where available) that recalls Tutti. The Tutti can be modified,
for further information read point 18.
- [C]: cancel piston. Turns off all stops, tremolos, couplers, MIDI controls, and other pistons on the
manuals (except when differently set through the PROGRAMMABLE FUNCTIONS, described in
par. 9.5), then deletes and reboots the general and division HR .
20. Forward connection panel.
In this panel you can find the most frequently used connections and controls.
- [MASTER VOLUME]: regulates the main volume.
- [REVERB VOLUME] regulates the volume of the reverb effect.
Page 19

17
Viscount Physis OrgansReference Manual
N.B.
- For further information about the MIDI interface of the Physis organs, read chapters 10.5, 14.5
and 14.6.
- For further information about the USB devices and internal memory, read chapter 11.
21. Roll top lock.
22. Coupler controls.
Pistons, tabs and stops to enable and disable the couplers.
23. Expression pedals.
The expression pedals control at every time the volume of one or more sections, and can be used to
obtain the most diverse dynamic effects.
The number of the pedals depends on the model and its number of manuals:
- [SWELL]: continuous control of Swell volume.
- [CHOIR]: continuous control of Choir volume.
- [GREAT / PEDAL]: continuous control of Great and pedalboard volume at the same time.
The [GREAT / PEDAL] pedal works also as Crescendo pedal. For further information about this function
read par. 9.5.
One of the pedals is actually equipped with a leverage system and can be used to control the sustain effect
for Orchestral voices.
24. [CRESCENDO] pedal.
With this pedal you can select the Crescendo level. These levels activate a fixed set of stops, linked with
an equal number of loudness, from pianissimo to fortissimo. The current level is shown on the additional
[CRESCENDO] display (see point 13). The Crescendo controls all the registers, and modifies the stops
configuration. Each level of the crescendo can be programmed. To save the Crescendo configuration,
see point 18.
25. Rear connections.
On the rear of the organ, there are various sockets to connect it to an external speaker systems, together
with line and microphone input.
- [EXT. +12V DC] connectors: +12 Volt can be obtained from these connectors to switch-on any
VISCOUNT speaker connected to the PROG. OUT. outputs.
- OUT [GEN. SUB] (General Sub-Woofer): dedicated output for the connection with low-frequency
speakers (sub-woofers).
- PROG. OUT (Programmable Outputs): the instrument’s general line outputs, allowing simulation of
the wind-chests of pipe organs. The signals are distributed over the outputs on the basis of the
EXTERNAL OUTPUT ROUTER settings (see par. 9.8). These settings allow you to select the type
of wind-chest, its size and the position in space of the speakers. Each output also has dedicated level
and equalization controls (see par. 9.9 and 9.6).
- MIDI [IN]: MIDI input port.
- MIDI [OUT]: MIDI output port.
- MIDI [THRU]: sends out the MIDI data received from the [IN] port to additional MIDI units.
- [USB]: two USB ports. The right port links the organ to a computer, in order to run the computer
program “Physis – The Editor”. The left port is dedicated to USB pen drive (not included with the
organ) to use as memory disk, instead of the internal memory.
- [PHONES]: plug for a headphone set.
Page 20

18
Viscount Physis Organs Reference Manual
WARNING!
This group of rear connections is not visible from the outside and the organ’s wooden rear panel has
to be removed to access it. Contact qualified staff for this procedure.
26. Reverse Pistons.
Each of these pistons, when active, deactivates several functions and stops, without acting on the normal
pistons dedicated to these functions and stops. Thanks to the reverse pistons it is possible to switch on/
off several stops and functions quickly and at the same time. When the reverse pistons are deactivated,
the functions will be re-activated.
- [MIDI REVERS.]: turns off all the MIDI controls (see points 9, 1, 2 , 3 ,4).
However, even when MIDI REVERS. is active, it is still possible to program the MIDI controls.
- [32’ FLUTE REVERS.]: deactivates all 32’ flutes.
- [32’ REED REVERS.]: deactivates all 32’ reeds.
27. Power switch for the [EXT +12V DC] connector.
This connector is situated on the rear panel.
28. [TREMULANTS] section: here you will find the Tremolos for both manuals.
- INPUT [L(+R)] / [R]: line inputs which allow other instruments to be played using the
organ’s internal amplification. If the source is monophonic use the [L+(R)] connector only.
- INPUT [MIC]: microphone input allowing amplification of the signal from a microphone.
- [GAIN]: trimmer for regulating the gain of the input signal received at the [MIC] connector.
Page 21
19
Viscount Physis OrgansReference Manual
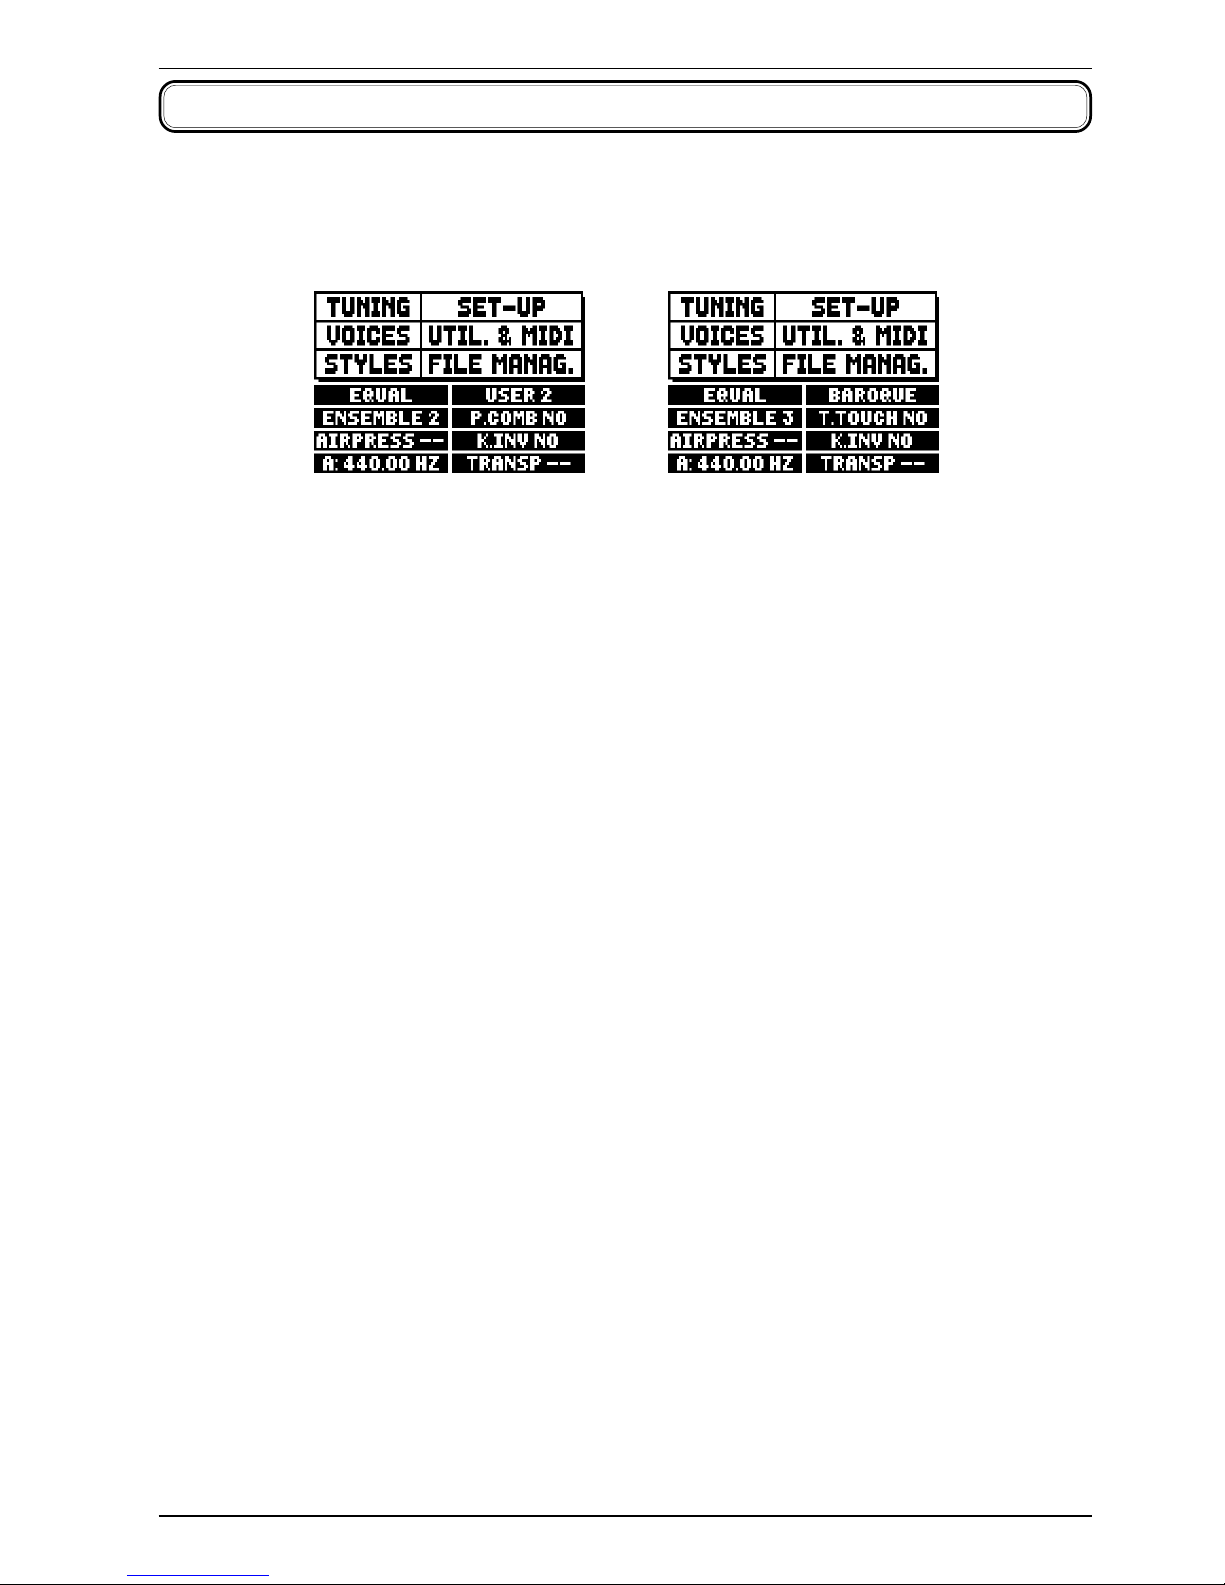
4. PROGRAMMING SECTION AND MAIN SCREEN
When the instrument is turned on, it needs a few second to actually start working. In this stage, the lights on
the manual pistons glow in sequence and the display shows the introduction screen.
When the display shows the main screen, the organ is ready to play.
Models equipped with
divisional combinations
Models not equipped with
divisional combinations
The top of the screen shows the following fields to access the configuration sub-menus:
o TUNING: instrument tuning parameters (chap. 6).
o VOICES: functions relating to all the organ’s voices (chap. 8).
o STYLE: style selection (chap. 7).
o SET-UP: organ general set-up functions (chap. 9).
o UTIL. & MIDI (Utility & MIDI): utility and MIDI functions (chap.10).
o FILE MANAG. (File Manager): management of the files saved in the internal memory or the USB
device (chap.11).
To display the contents of a menu, simply locate the cursor (in reverse mode) on the field required using the
[FIELD S] and [FIELD T] buttons and press [ENTER]. [EXIT] quits the menu and returns to the main
screen.
The bottom of this screen displays the instrument parameters, which are always useful to know:
o [box on top left]: (“Equal” in the screen shown above) displays the temperament currently in use,
selected in the TUNING menu.
o ENSEMBLE: the ENSEMBLE value set in the TUNING menu.
o AIR PRESS: the AIR PRESSURE parameter value set in the TUNING menu.
o A: the instrument’s tuning, expressed as the frequency of A4, set in the TUNING menu.
o [box in top right-hand corner]: (User2 or Baroque in the screen above) contains the style selected (see
STYLE menu).
o P. COMB (in the models equipped with divisional memories): the status of the PISTON COMBINE
function as set in the UTILITY & MIDI menu.
o T. TOUCH (in the models not equipped with divisional memories): the status of the TRACKER TOUCH
function as set in the UTILITY & MIDI menu.
o K. INV: the status of the KEYBOARD INVERSION function (see UTILITY & MIDI menu).
o TRANSP: the transposition set in TUNING.
These are only information fields and cannot be selected or modified. To set the function they describe, enter
the menus listed above.
The buttons to visualize and navigate through all the display screens are located near the display.
Page 22
20
Viscount Physis Organs Reference Manual
- [SEQUENC]: screens for use of the instrument’s internal sequencer.
- [VOLUMES]: screen containing all the instrument’s volumes.
- [FIELD S] and [FIELD T]: buttons used to move the cursor, identified by the field in reverse.
[FIELD
S] moves it in the field above or the previous field, [FIELD T] in the field below or the next
field.
- [VALUE +] and [VALUE -]: buttons which regulate the values of the parameters, whether they are
numerical or alphanumerical. [VALUE +] increases, [VALUE -] decreases.
- [EXIT] and [ENTER]: access and quit the display screens and menus, or confirm or cancel
prompts made by the system. [ENTER] accesses menus/screens and confirms, [EXIT] quits menus/
screens and cancels.
4.1 ERROR MESSAGES - MAIN SCREEN
USB PORT MALFUNCTION - USB PEN IS INACTIVE, PLEASE CALL FOR SERVICE
The USB port is malfunctioning, please contact the technical assistance at the e-mail address
service@viscount.it.
This error message might also appear when accessing the FILE MANAGEMENT functions, the Sequencer
or launching an operating system update.
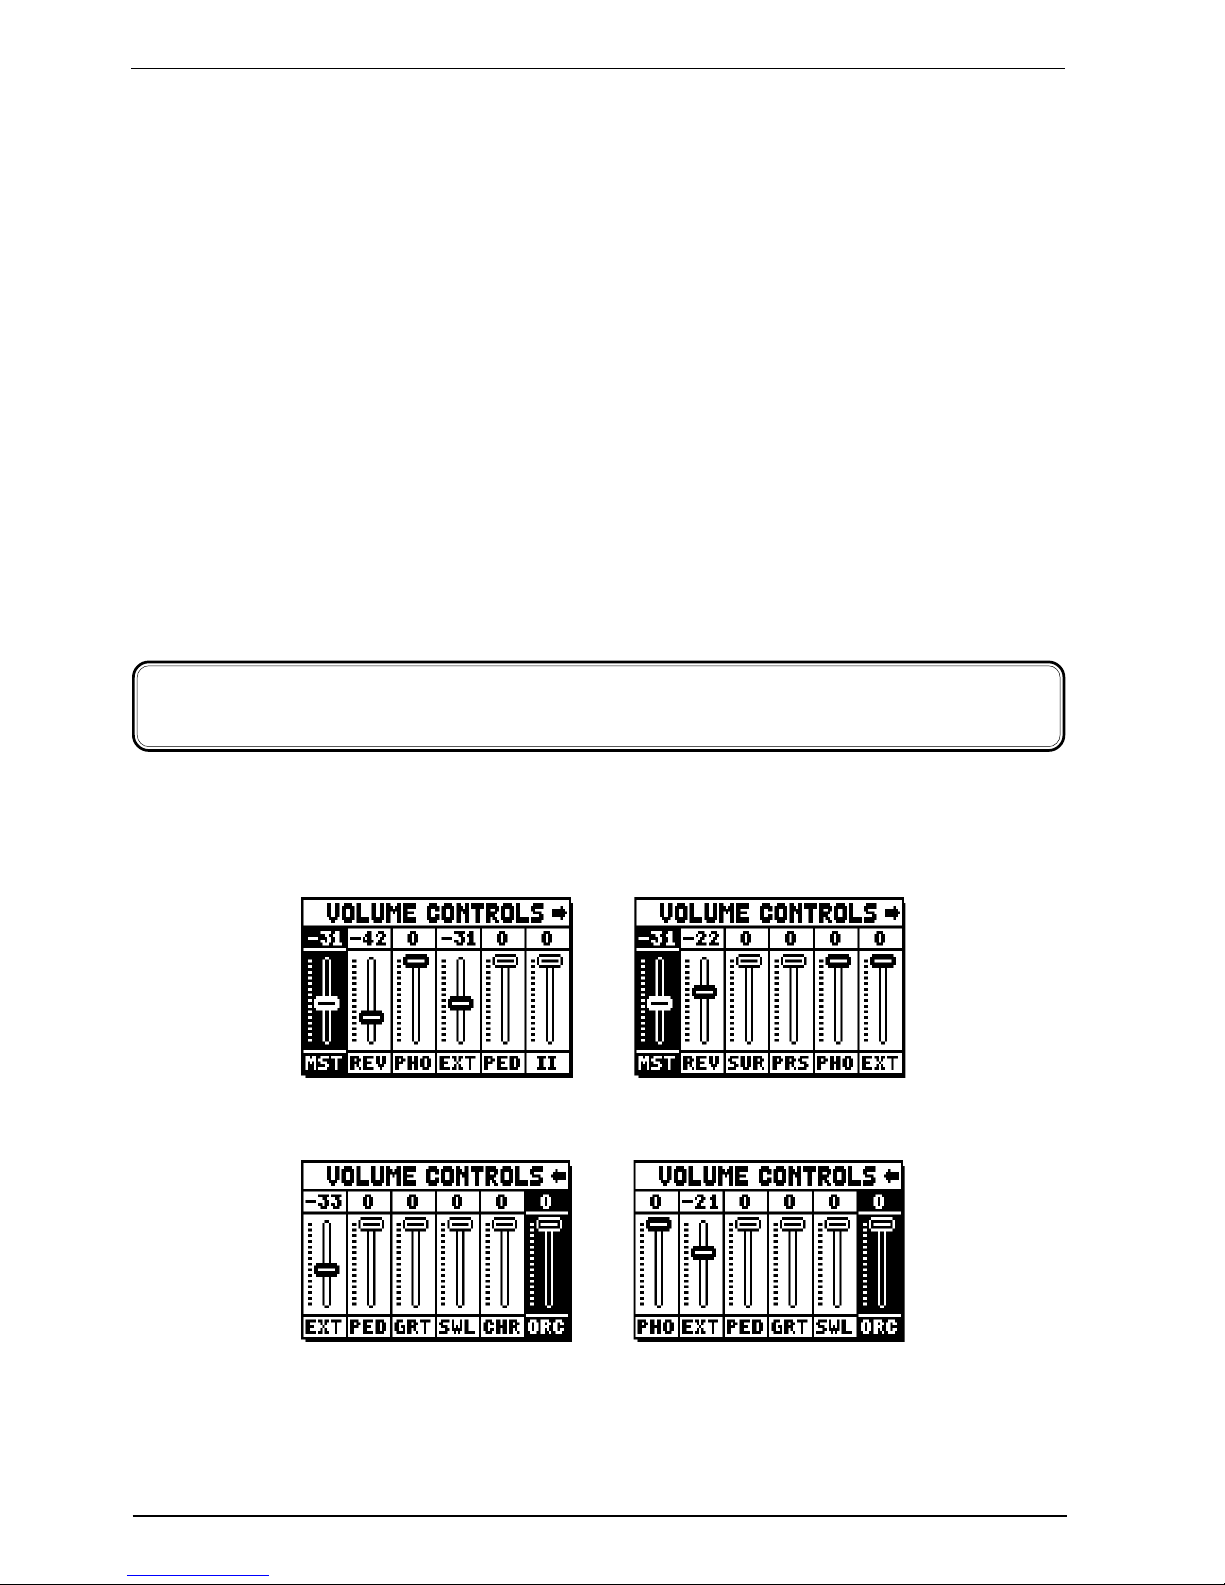
5. SETTING THE VOLUMES
(VOLUMES function)
3 manuals models
2 manuals models
The Physis organs allow the user to adjust all the volumes, in order to obtain a perfect sound balance among
the sections and between internal and external amplifications. To visualize the volume screen, press the
[VOLUMES] button:
o MST (Master): the organ’s overall volume, which can also be adjusted with the [MASTER VOLUME]
trimmer underneath the manuals.
o REV (Reverb): reverb effect, which can also be adjusted with the [REVERB VOLUME] trimmer
underneath the manuals.
models equipped with
front and side speakers
Page 23
21
Viscount Physis OrgansReference Manual
6. TUNING THE INSTRUMENT
(TUNING menu)
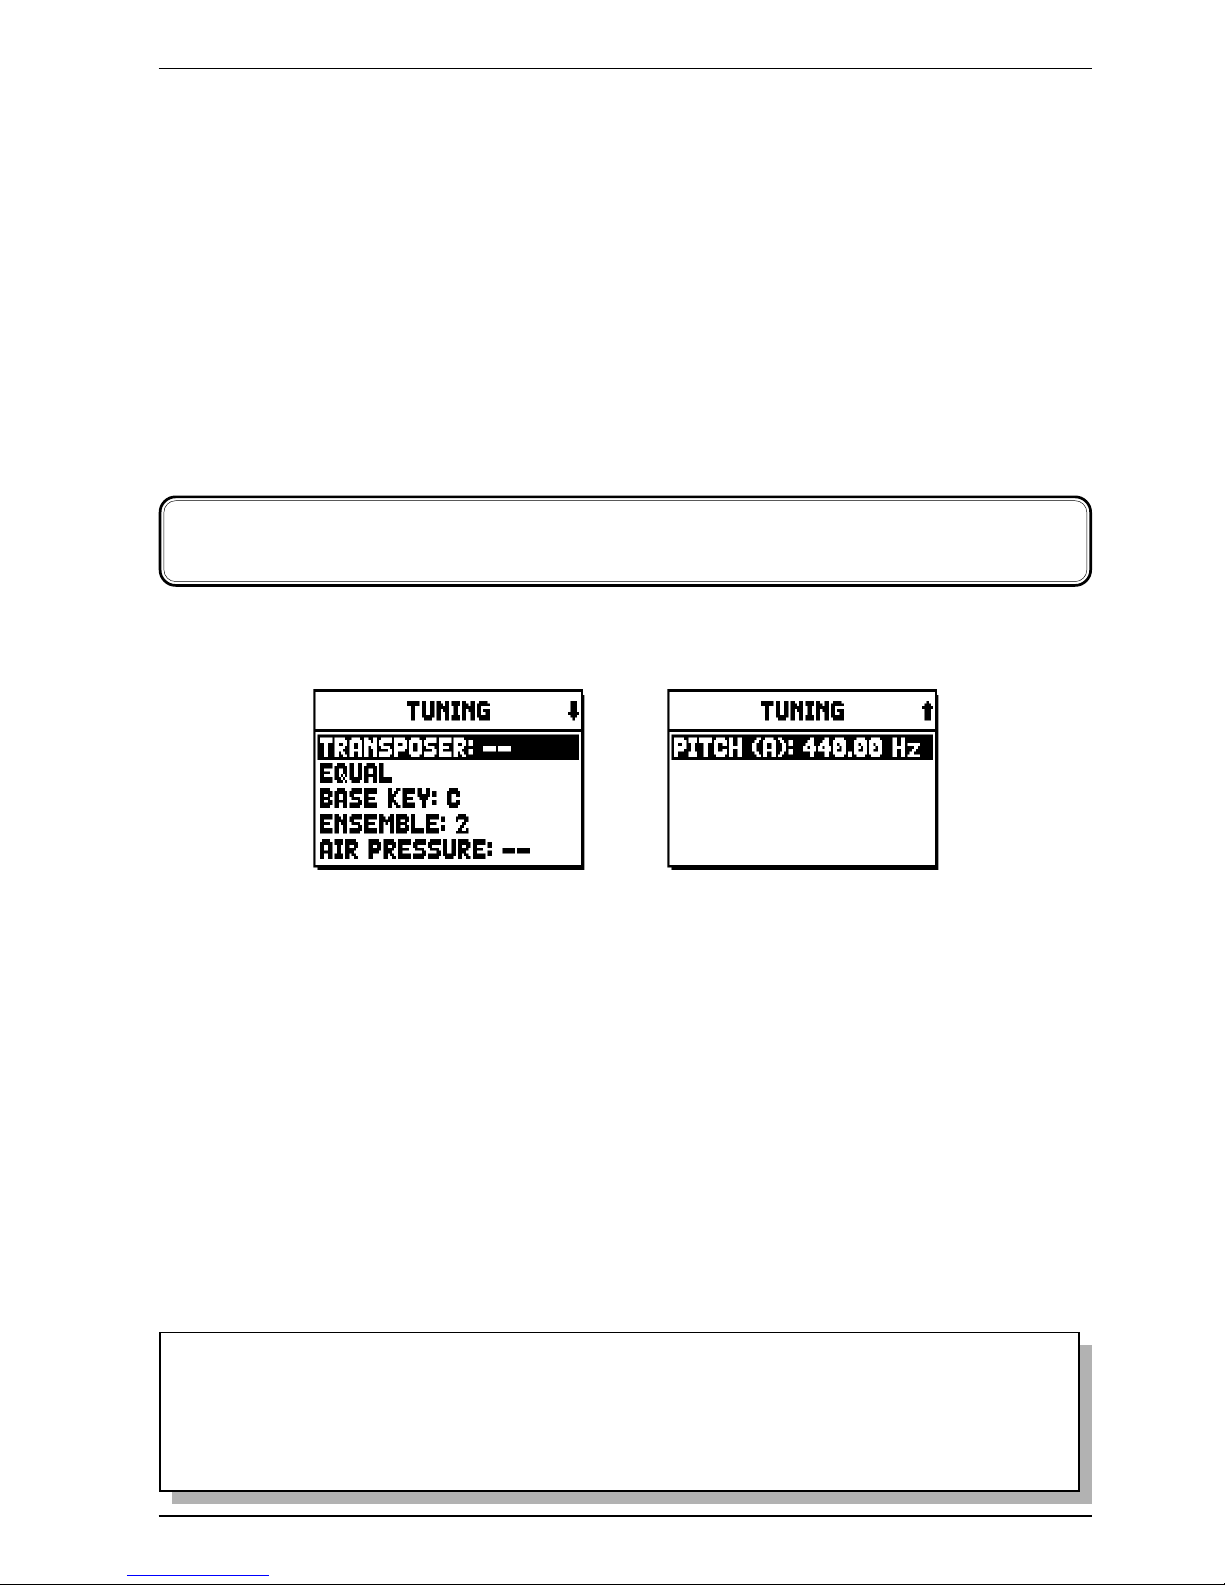
Selecting the TUNING field on the main video page gives access to all the instrument’s tuning parameters.
o TRANSPOSER: transposer with a range of -6 to +5 semitones. When switched on, the organ’s
transposition is always zero.
o [second field on the display]: (Equal in the screen shown) selector for setting historical temperaments
of various periods and countries of origin.
o BASE KEY: the note on which the chain of 12 fifths that make up the temperament starts.
o ENSEMBLE: level of tiny natural differences in pitch between one organ pipe and another, simulating
the tuning error that occurs in the organ’s pipes due to wear over time and variations in temperature.
The values range from – (pipes perfectly tuned) to 8 (maximum pitch instability).
o AIR PRESSURE: simulates the drop in air pressure when a large quantity of air is requested in a short
time (e.g. when large chords are played with the Tutti). This is reflected in a temporary, gradual drop in
pitch, more evident in the longest, widest pipes (flutes, bourdons, principals).
o PITCH (A): fine tuning of the pitch, indicated as the frequency of A4 (an 8’ pipe).
To quit the video page press [EXIT].
NOTES
- When the instrument is switched on, its transposition value is set to zero
- Transposition does not have any effect on playback of pieces with the internal sequencer (unlike
recording, where the notes are acquired with the current transposition). A specific transposer
is provided for this purpose (see point 12.3).
o SUR (Surround): volume of the side speakers expands the sound stage, giving the feeling of being in a
bigger environment. Not present in the organs without side speakers.
o PRS (Presence): volume of the front side speakers makes the sound more natural and detailed, emphasizing
on the dynamic evolution of the pipes sound. Not present in the organs without front speakers.
o PHO (Phones): level of the output signal at the headphone [PHONES] connector underneath the manuals.
o EXT (External outputs): general volume of the PROG. OUT connectors on the rear panel.
o PED (Pedal): pedal board divisional volume.
o GRT (Great): Great divisional volume.
o SWL (Swell): Swell divisional volume.
o CHR (Choir): Choir divisional volume.
o ORC (Orchestra): volume of the orchestra section. Not present in the models without orchestral voices.
Press [EXIT] or wait about 4 seconds to quit the screen and return to the previous video page.
Page 24
22
Viscount Physis Organs Reference Manual
7. THE ORGAN STYLES
(STYLES menu)
The Style identifies the setup of the organ stops, meaning the voice and the relative parameters of each stop,
allowing the use of sounds appropriate to the repertoire to be performed.
The many organ styles allow the musician to use several sound configurations, as if several different instruments
were present at the same time in the same place.
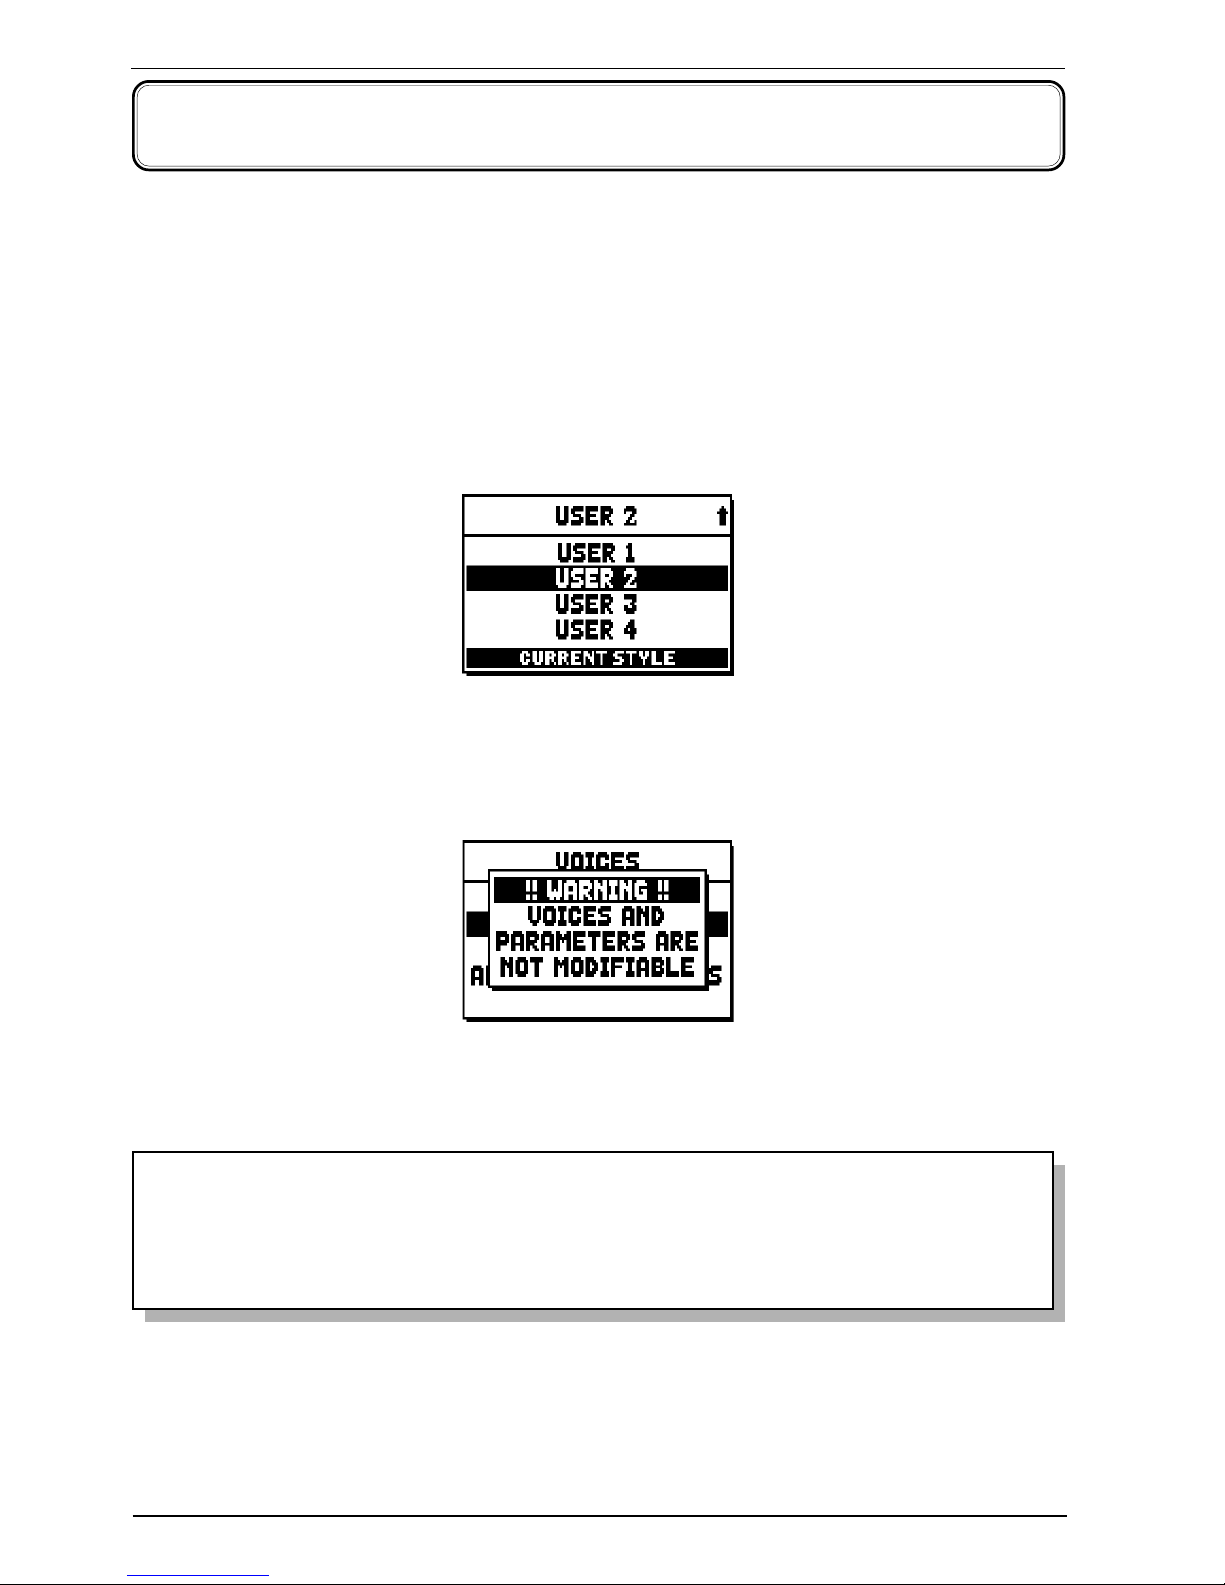
The organ has eight Styles, meaning eight sound setups, in the same console. The first four of them, which
from now on we will also call the Presets or preset styles, are programmed by our laboratories on the basis of
the appropriate organ schools, and cannot be modified by the user. The other four Styles, called User styles,
can be freely modified and customised to personal taste, making the organ extremely flexible. Select the
STYLE field on the main page for the Style selection:
As we have already stated, the styles contain the information regarding each register: that is, which stops to
activate and the sound parameters. Again, the first four Styles cannot be modified, so accessing to the VOICES
function the display shows the following warning message:
However it is possible to display and check the settings of these Styles, to continue press any display button
or wait about three seconds.
NOTE
Please note that in general and divisional combinations, only the state of the stops is saved, and
NOT which voice they activate. Selecting a style might change the voices recalled by the stops, and
therefore a combination may activate stops which were not saved as ‘active’. It is a good practice to
always remember which style was active when saving a combination.
Page 25
23
Viscount Physis OrgansReference Manual
8. SELECTING AND REGULATING THE VOICES
(VOICES menu)
One of the main features of the new Physis synthesis technology used by the organ for sound generation
is that it offers the user a wide array of options for customising the instrument with a very large number of
organ timbres, and also makes available several parameters which can be adjusted to further increase the
setup potential.
The VOICES menu contains all the functions for selecting and regulating the voices’ audio parameters.
NOTES
- The functions described below cannot be edited when a Preset style is selected. Select a User
style to regulate these parameters.
- The voices selected for each rocker switch or draw-stop, and the sound generation parameters
and volume, are automatically saved in the current Style. This means that when another style is
recalled, the voices will be reset with new parameters taken from the last style recalled. The
changes made earlier are not lost, and will be made available when the style in which they were
made is selected again.
- While programming this functions, in order to assign a voice to a rocker switch and to adjust it,
we advice to select the desired voice first and then to adjust its generation parameters. Please
do so, as when a new voice is selected, its parameters are reset to default.
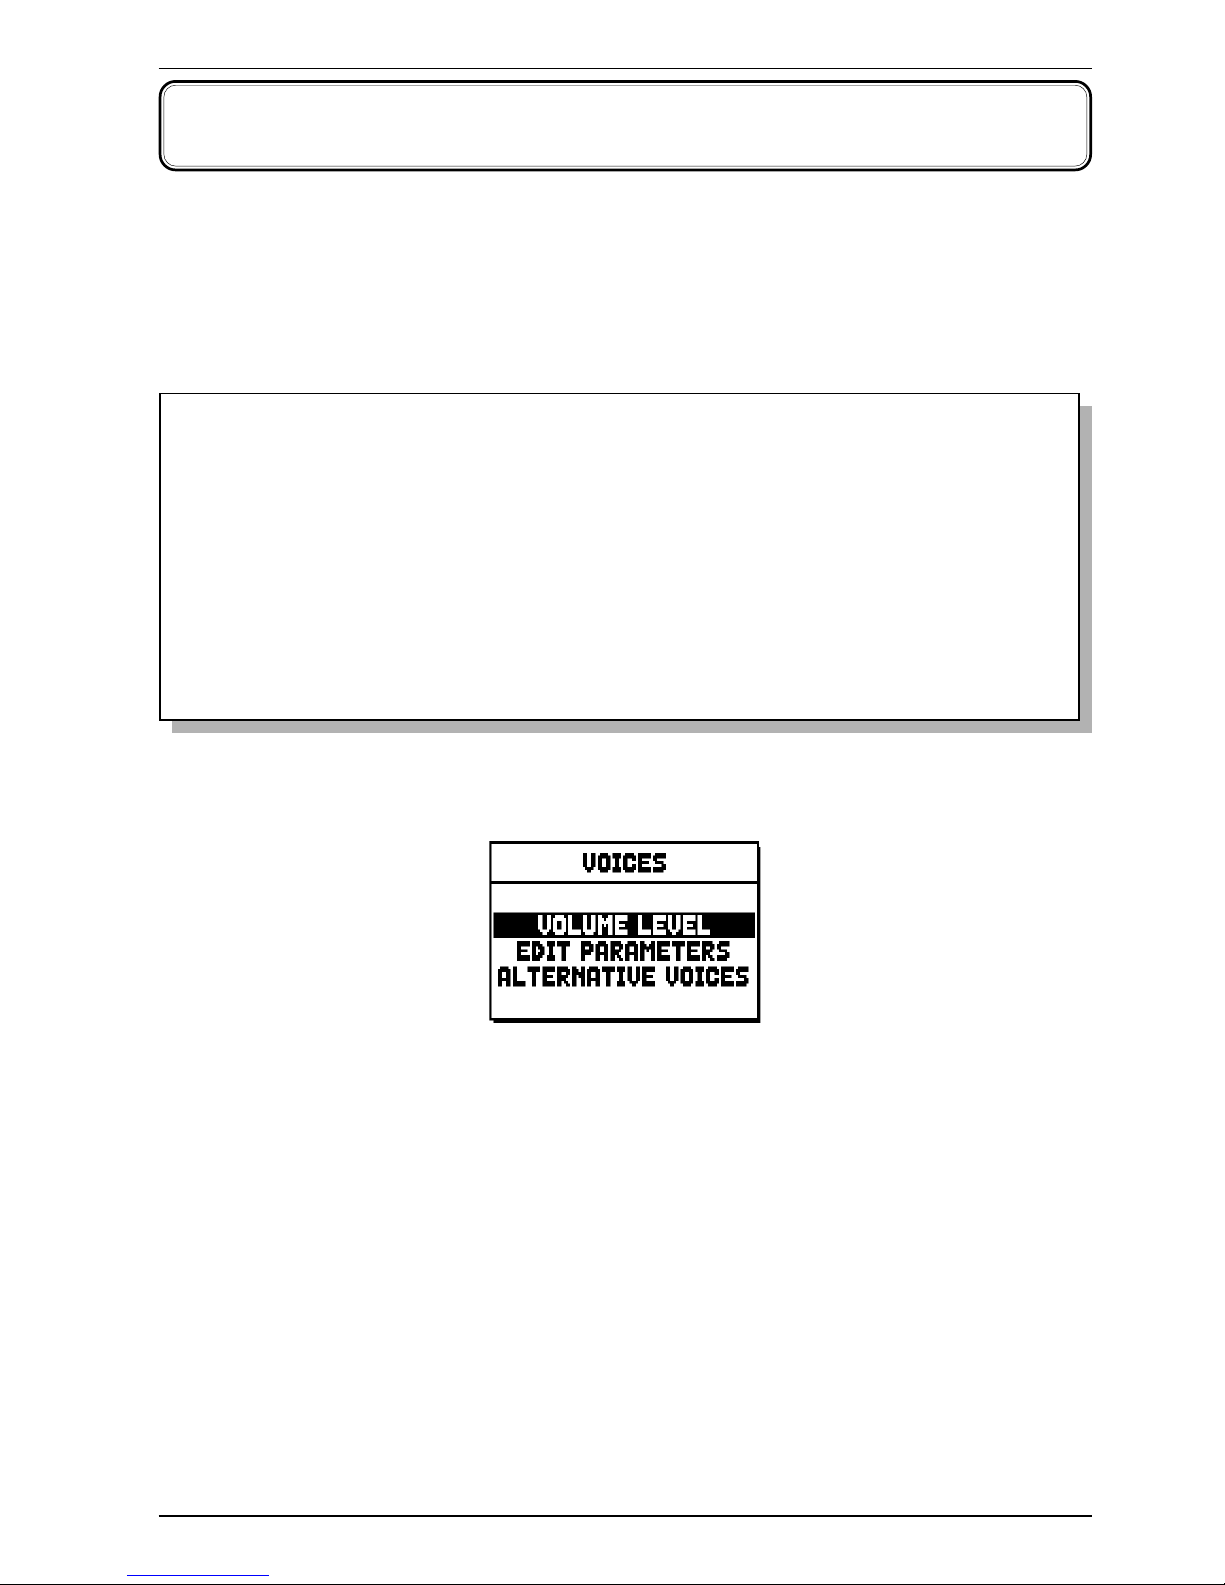
The first video page displayed allows selection of the function to be accessed:
o VOLUME LEVEL: regulation of the volume of each individual voice (par 8.1).
o EDIT PARAMETERS: regulation of the sound generation parameters for each individual voice (par.
8.2).
o ALTERNATIVE VOICES: selection of alterative voices (par. 8.3).
Page 26

24
Viscount Physis Organs Reference Manual
8.1 REGULATING THE VOLUME (VOLUME LEVEL function)
The volumes for each single stop can be adjusted in a range of -9 dB to +6 dB, and allows a perfect balance
of the overall sound of the organ.
Select the VOLUME LEVEL field, in the VOICES menu. The display will show the organ sections, select
the section that contains the voice you wish to adjust:
3 manuals models 2 manuals models
As usual, use the [FIELD S] and [FIELD T] and [ENTER] buttons to select the field on the display.
Another way of displaying and adjusting the volume immediately is to hold out the draw-stop (NOT in
models with electromechanical draw-stops) or hold down the rocker tab for a few moments in the voice on
position, while the cursor is on the VOLUME LEVEL field in the VOICES menu, or in the function itself.
The LED of the stop the volume of which is being adjusted will flash to prevent modification errors; the
stop will be on and can be played for better, quicker adjustment. Other stops can also be switched on to
assess the overall effect of the changes.
To quit the function and save the values press [EXIT]. The changes made will be automatically saved in the
current organ style.
8.2 REGULATING THE AUDIO PARAMETERS (EDIT PARAMETERS function)
Each organ voice can be customized with the sound generation parameters, that control the tone colour.
To view the screens containing the sound generation parameters of each individual voice, select the EDIT
PARAMETERS field in the VOICES menu:
3 manuals models 2 manuals models
Page 27
25
Viscount Physis OrgansReference Manual
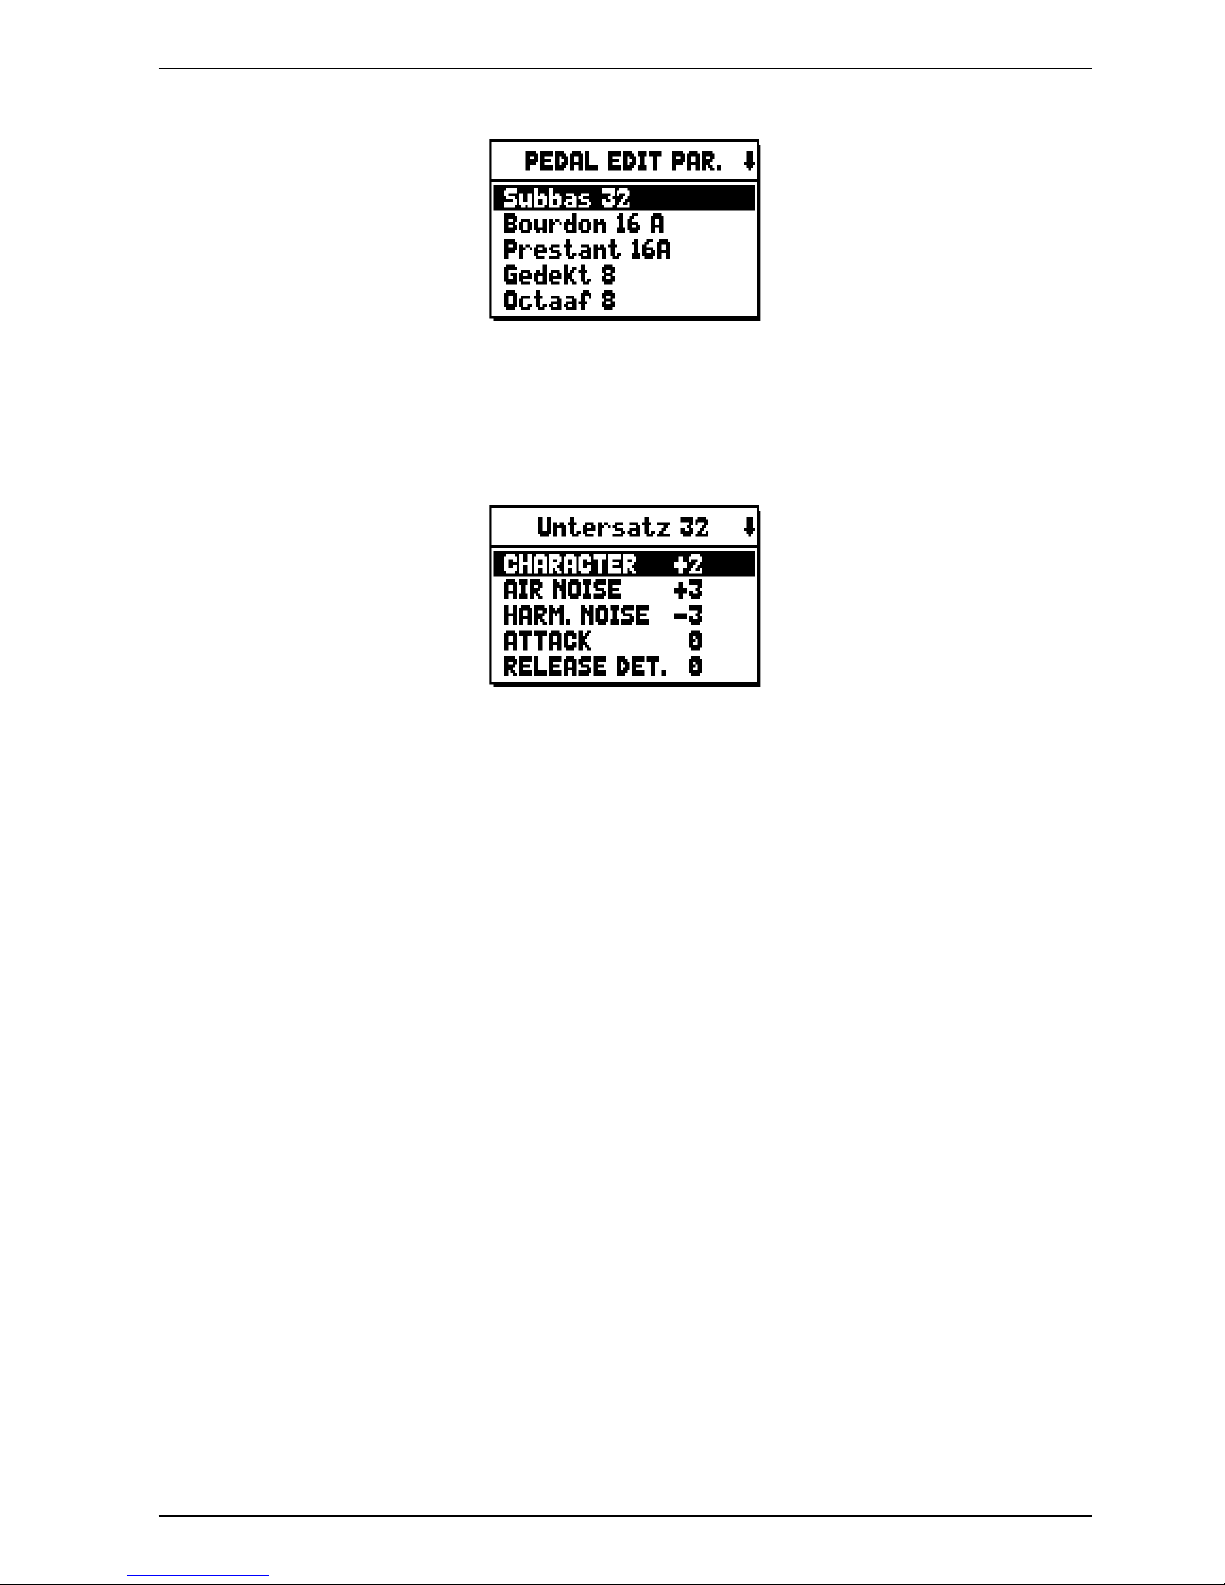
the display shows the organ’s sections, allowing selection of the one containing the voice to be modified:
after which the voice the parameters of which are to be viewed can be displayed.
Another way of viewing the setting screen directly is to hold out the draw-stop or hold down the rocker tab
(except in the models with electromechanical draw-stops) for a few moments in the voice on position
with the cursor on the EDIT PARAMETERS field in the VOICES menu, or in the function itself.
The LED of the stop being modified will flash to prevent modification errors; the stop will be on and can be
played for better, quicker adjustment. Other stops can also be switched on to assess the overall effect of the
changes.
The parameters displayed are not the same for every voice, since some families have specific setting parameters
not required for other types of voice.
The settings which can be made are:
o CHARACTER: harmonic richness.
o AIR NOISE: noise of the air blowing through the pipe.
o REED NOISE: imperfect synchronisation of the reed throb period.
o ATTACK: attack time the sound takes to reach the maximum volume.
o REL. DETUNE: (Release Detune) detuning in the release phase.
o FREQ. SKEW: gradual change in the air’s pitch during the attack and release phases.
o DETUNE: detuning to produce the throb effect in the voices concerned.
o KEYB. LO LEV.: (Keyboard Low Level) gain (positive values) or attenuation (negative values) of the
volume in the low part of the manual.
o KEYB. LO LEV.: (Keyboard High Level) gain (positive values) or attenuation (negative values) of the
volume in the high part of the manual.
o TREMOLO: select the first (1st) or second (2nd) tremolo. The selected tremolo will be applied to the
register when activated through the dedicated stop or draw-stop (see also chap. 9.1).
To quit the function and save the values press [EXIT].
Page 28
26
Viscount Physis Organs Reference Manual
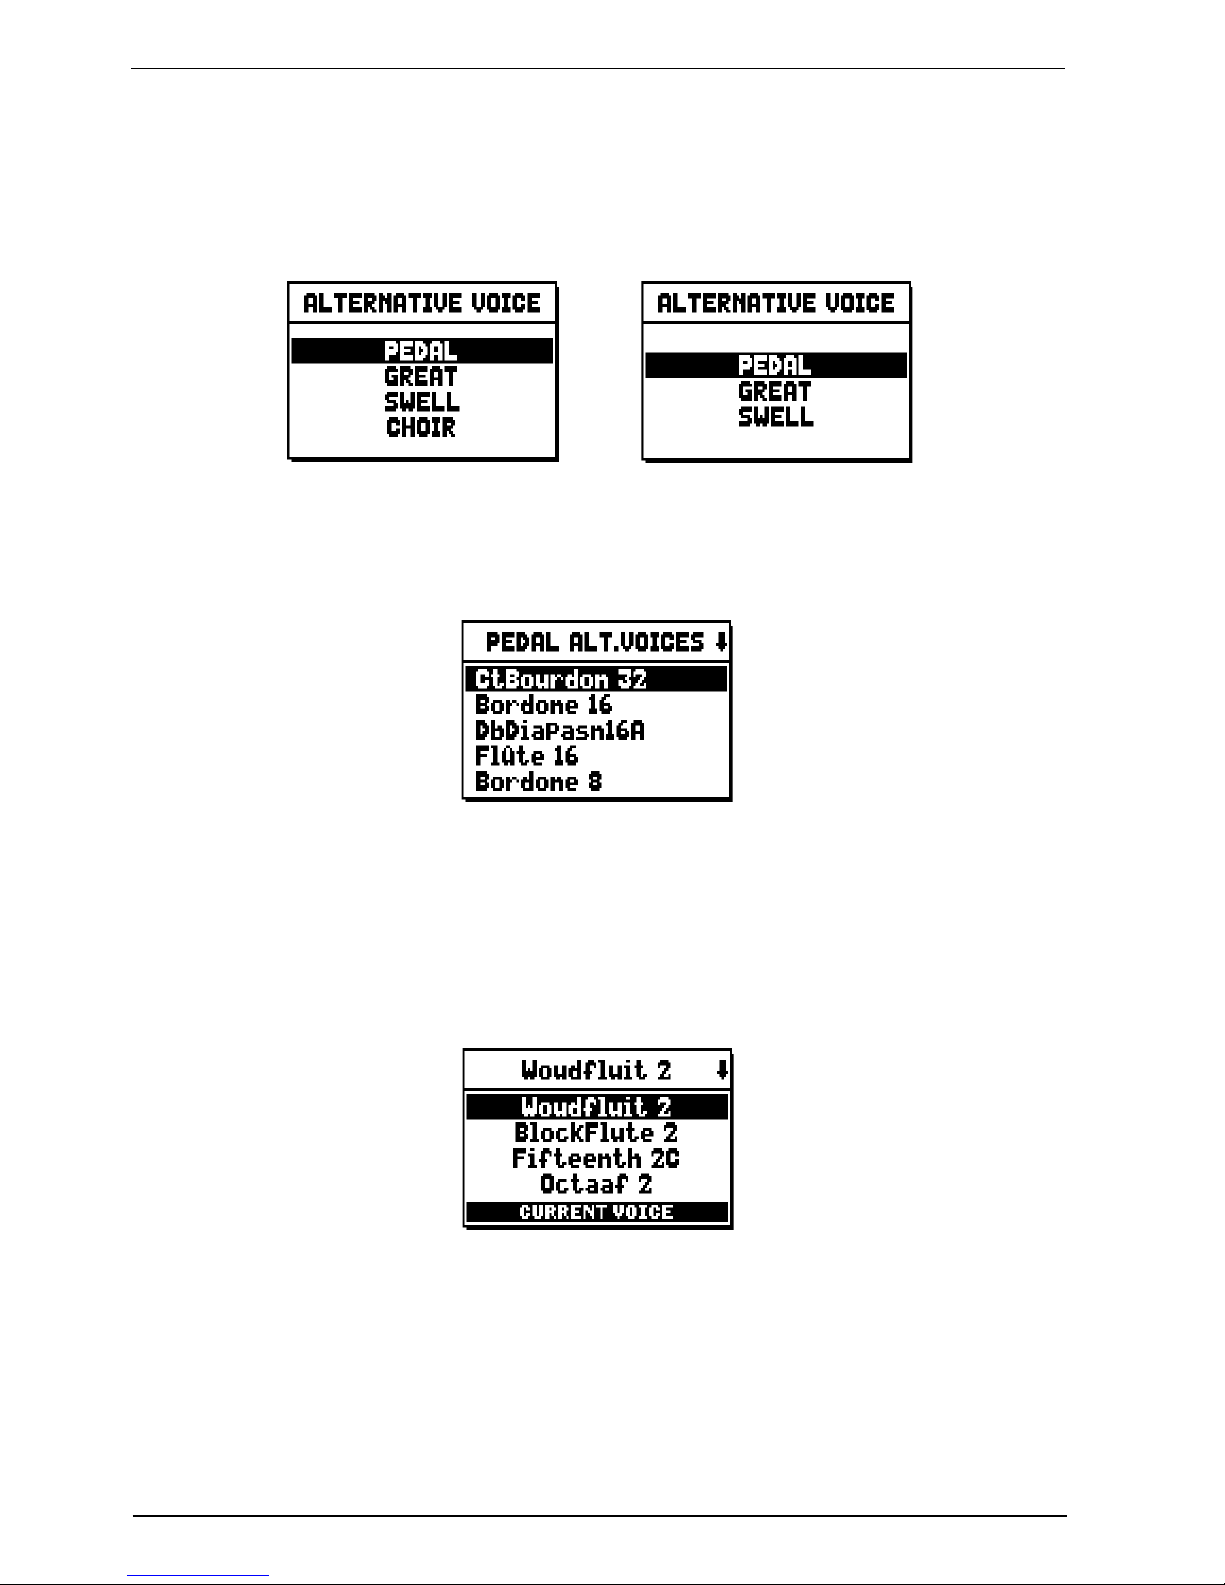
8.3 SELECTING THE ALTERNATIVE VOICES (ALTERNATIVE VOICE
function)
Each stop on the panel has a set of voices, the default voice set by the current Style and the alternative voices,
which are variants on the original. To select an alternative voice, the ALTERNATIVE VOICES function has
to be recalled:
3 manuals models 2 manuals models
As for the other VOICES menu functions, the next step is to select the section of the organ containing the
voice to be modified: this displays the list of the voices present in the chosen section.
Here again, there is the option of displaying the alternative voices screen directly by holding out the drawstop (except in the models with electromechanical draw-stops) or holding down the rocker tab for a few
moments in the voice on position, while the cursor is on the ALTERNATIVE VOICES field in the VOICES
menu, or in the function itself.
The LED of the stop being replaced will flash to prevent modification errors; the stop will be on and can be
played for better, quicker adjustment. The display now shows the list of the alternative voices:
identified as “CURRENT VOICE” in the bottom of the screen.
It should also be remembered that the top of the screen always contains the name screen-printed on the
draw-stop or tab, so that the stop the voice of which is being changed can be identified at all times.
When the [FIELD S] and [FIELD T] buttons are used to move the cursor to other voices, the prompt
changes to “ENTER TO REPLACE”.
Page 29
27
Viscount Physis OrgansReference Manual
instructing you to press [ENTER] to confirm the new voice and render it usable. The voice on which the
cursor is located is available and can be played even before [ENTER] is pressed, allowing the modification
required to be evaluated immediately. Other stops can also be switched on to assess the overall effect of the
changes.
Press [EXIT] to replace other voices or exit the function. The changes made are automatically saved into the
current organ style.
NOTE
When an alternative voice is selected, the sound generation parameters in the EDIT PARAMETERS
function are automatically reset to the default values of the new voice. The volume setting (in the
VOLUME LEVEL function) remains unchanged.
8.4 SELECTING AND ADJUSTING THE ORCHESTRAL VOICES
The same operations described in the chapter above can be performed also with orchestral voices, with a
single exception: the list of alternative voices and audio parameters are the same, regardless of which register
is selected at the moment.
To see the list of alternative voices, access the ALTERNATIVE VOICES function, then press and hold for
a few seconds the ORCHESTRA stop (or the normal organ stop which has orchestral alternative voices as
well) of the desired section, or move the cursor on the orchestral voice that you wish to replace and then
press [ENTER]:
As you may notice, there are three types of orchestral stops:
- Single: a single stop played on the whole manual / pedalboard. This kind of voice is shown with the
name of the single stop.
Orchestral timbre
- Split: two stops (named Left and Right) played in two different halves of the manual / pedalboard.
The split point can be changed. This kind of voice is shown as the names of the two stops hyphenated.
Left orchestral timbre Right orchestral timbre
Split key
Page 30
28
Viscount Physis Organs Reference Manual
- Layer: two stops (named 1 and 2) overlapped along the whole manual / pedalboard. This kind of voice
is shown as the names of the two stops with a “+” in between.
Orchestral timbre 2
Orchestral timbre 1
Use the buttons [FIELD S] and [FIELD T] to move the cursor. The stops is immediately active and ready
to play. To confirm the change and save it in the current organ style, press [ENTER].
Press [EXIT] to cancel the changes and leave the screen.
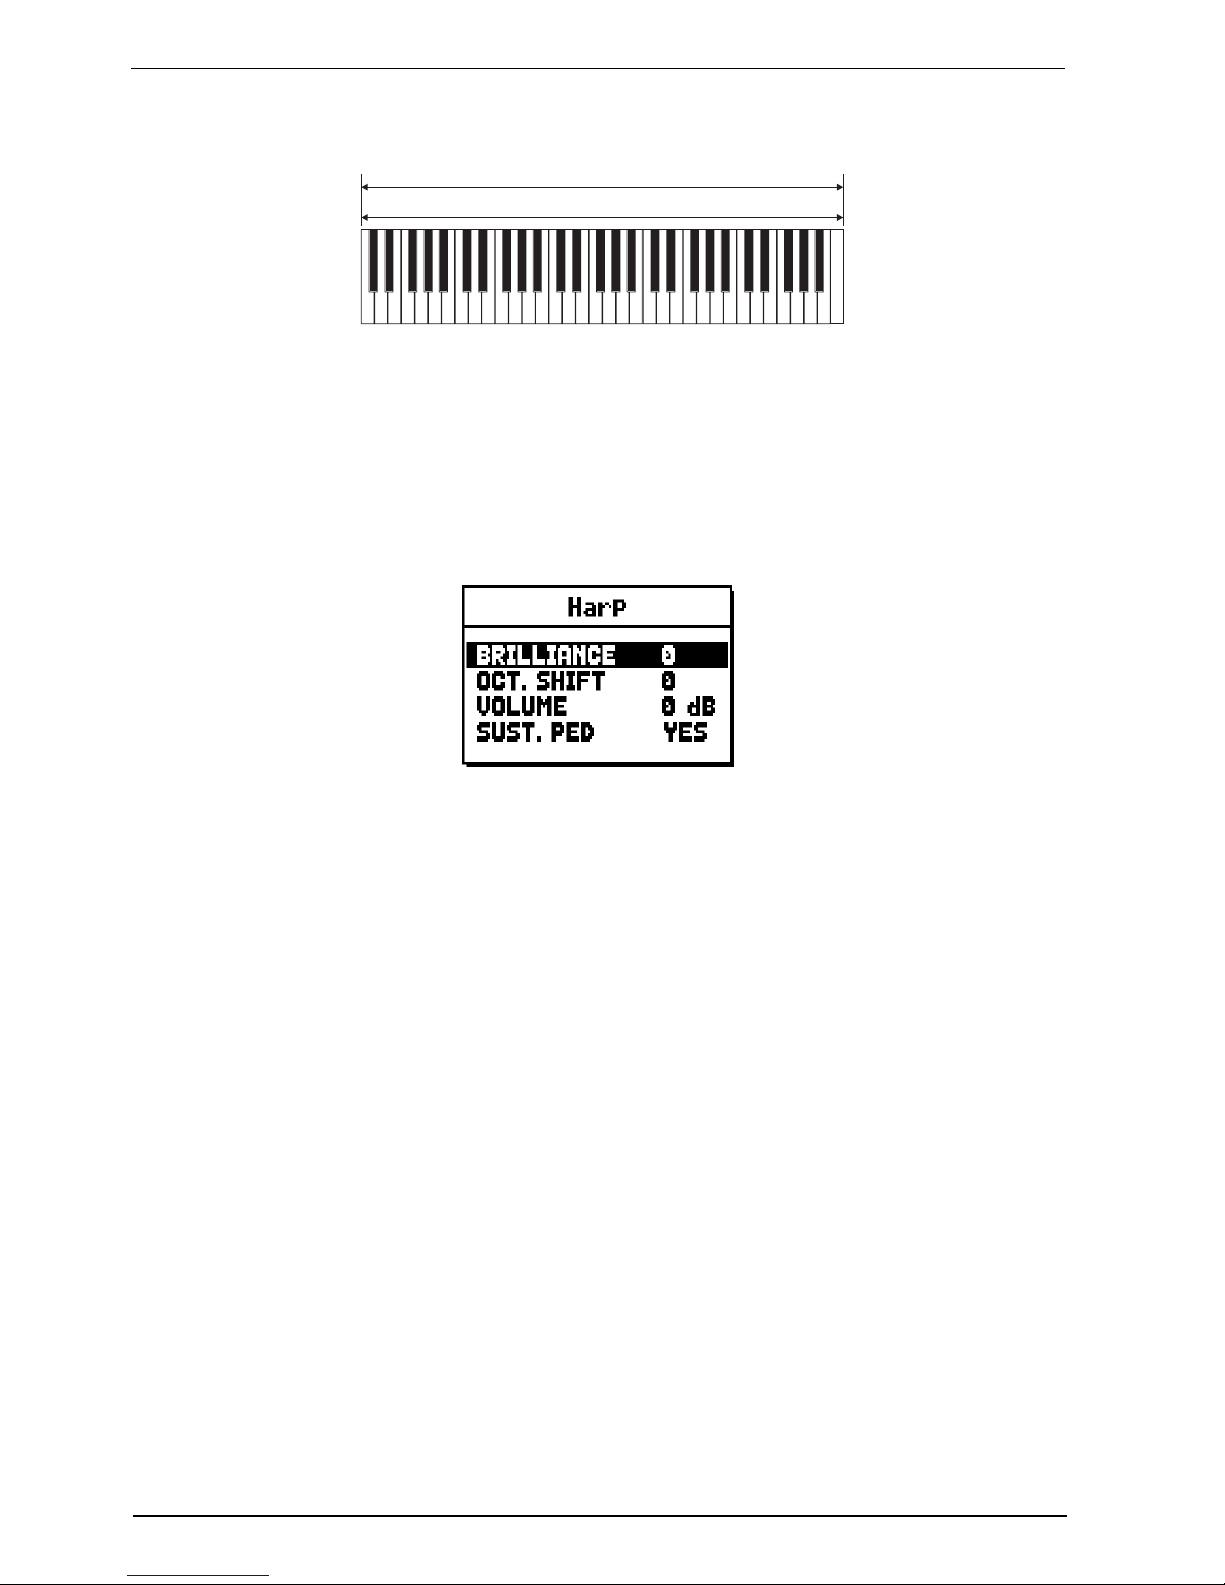
To adjust the audio parameters instead, select the EDIT PARAMETERS function from the VOICES menu.
To see and then adjust the sound parameters of an orchestral voice, push and hold the stop for a few seconds
or move the cursor on the desired orchestral voice and then press [ENTER].
The sound parameters that can be modified are shown in a different manner, according to the kind of voice.
Parameters of the Single voices clearly relate to the single stop.
Parameters of the Split voices identified by an “L” relate to the stop active on the left of the split point, while
parameters identified with an “R” relate to the stop active on the right half of the manual / pedalboard.
Parameters of the Layer voices identified with “1” relate to the first stop of the voice (the one before the
“+” symbol). Parameters identified with “2” relate to the second stop, after the “+” symbol.
o BRILLIANCE: decrease (negative values) or increase (positive values) the brilliance of the stop.
o OCTAVE SHIFT: shift the notes played with the stop one octave higher or lower.
o VOLUME: decrease (negative) or increase (positive) the volume of the stop.
o SUST. PED. (sustain pedal): sets the status of the sustain pedal. This function is useful for those orchestral
voices for which applying a sustain effect is unrealistic. Select NO to prevent the sustain effect from
affecting the stop.
o SPLIT KEY (only for Split voices): modifies the position of the split point.
Once again, press [ENTER] to save the setting into the current organ style or [EXIT] to cancel the operation.
Page 31

29
Viscount Physis OrgansReference Manual
8.5 SAVING DIFFERENT ORCHESTRA VOICES AND PARAMETERS IN THE
COMBINATIONS
General and divisional combinations make possible to save the voice and the settings for each Orchestra
register, so that different voices can be played for each combination (including the Tutti).
For example, recalling a previously programmed combination, the pedal Orchestra voice may be an acoustic
bass, with a 1-octave transposition, while using a second combination the Pedal Orchestra voice may be a
cello, with no transposition, but a bit brighter than the standard setup.
To program combinations with different Orchestra voices, simply select the required voice and/or adjust the
parameters keeping pressed for a few moments the bottom Orchestra register that you desire to edit while
the main video page is displayed:
The first display field (preselected at the access of the video page) shows the selected Orchestra sound. Using
[VALUE +] and [VALUE -] buttons you can select (and play) all the Orchestra sounds.
Others edit parameters are:
o BRILLIANCE: voice brilliance.
o OCTAVE SHIFT: octave transposer of the notes played with the voice.
o VOLUME: voice volume.
o SUST. PED: enable of the Sustain switch to act with this voice.
In addition to the standard voices, there also preset voices composed by two voices in Layer or Split mode.
Selecting these voices the video page shows parameters for each voice, indicated as L (Left) and R (Right) for
the voices in Split mode and 1 and 2 for voices in Layer mode. Split sounds has also the SPLIT KEY
parameter to set the split point note.
To quit the edit menu press the [EXIT] button.
After Orchestra sounds are programmed it is possible to store them in the desired combination. If you wish
to set a different Orchestra sound in a different combination but associate it to the same register, enter the
edit menu, select the voice, adjust the parameters as required and save all the settings in another combination.
Keep in mind that once a different orchestral sound is selected, it will be associated to that stop also when
future combinations are saved, even if the stop is saved as “off”. To restore the initial sound (that is, the one
set by the current Organ Style) press and hold for a while the tab / draw stop in off position, or go back in
HR condition by pressing the [C] piston.
NOTES
- The procedure described above is available only when the main video page is displayed.
- The changes applied to the Orchestra sounds with this procedure are not applied to Orchestra
voices used by the current Organ Style and their settings. Selecting another style or displaying
the video pages of the VOICE menu, will set the Orchestra registers as prescribed by the Organ
Style and not by the combinations.
- Crescendo and HRs do not store Orchestra voices and parameters so it is not possible to play
different Orchestra voices for the same register with these memories.
Page 32

30
Viscount Physis Organs Reference Manual
9. INSTRUMENT GENERAL SETTINGS
(SET-UP menu)
The SET-UP menu contains all the instrument’s general settings except for the settings relating to the MIDI
interface and the accessory and utility functions. To recall this menu, select the SET-UP field from the main
video page:
The functions available are as follows:
o 1st TREMOLO: adjust the speed and depth of the first tremolo for each manual (see chap.9.1).
o 2nd TREMOLO: adjust the speed and depth of the second tremolo for each manual (see chap.9.1).
o REVERBERATION: selection of the type of room for the reverb effect (par. 9.2).
o INT. AMPL. EQUALIZER (Internal amplification equalizer): setting of the 5-band equalizer of the
internal amplifier (par. 9.3).
o INT. AMPL. PANNING (Internal amplification panning): setting of the stereophonic distribution of
the stops of the internal amplification system, to simulate different types of wind- chests for the various
stops (par. 9.4).
o INT. AMPL. TUNE-UP (Internal amplification tune-up): sets the stereophonic distribution of signal
on the side speakers (can be selected only in models equipped with side speakers, par. 9.5).
o PROG. FUNCTION (Programmable functions): settings relating to operation of the combinations,
the pistons, the Crescendo and the trimmers underneath the manuals (par. 9.6).
o SWS. PROGRAMMING (Enclosed programming): program the [SWS] piston function (chap 9.7).
o EXT. OUT EQUALIZER (External outputs equalizer): setting of the equalizers of the PROG. OUT
outputs on the rear (par. 9.8).
o EXT. SUB EQUALIZER (External sub equalizer): equalizer adjustment for the external output on the
back [GEN. SUB.] (par. 9.9).
o EXT. OUT ROUTER (External outputs router): setting of the routing of the stops on the PROG.
OUT outputs on the rear to simulate the position of the wind-chests and the arrangement of the pipes
inside them (par. 9.10).
o EXT. OUT VOLUME: setting of the volumes of the PROG. OUT outputs on the rear (par. 9.11).
o EXT. OUT CONFIG (External Out Config): setting of the PROG. OUT rear outputs (par. 9.12).
o EXT. OUT RESIZE (External Out Resize): Adapts automatically the link between stops and rear
outputs, according to the amount of outputs actually used (par. 9.13).
9.1 ADJUSTING THE TREMOLO (1st TREMOLO and 2nd TREMOLO functions)
In a pipe organ it is of the utmost importance that the air pressure remain constant, so as to obtain a steady
and sustained sound. However, mechanical devices were introduced to generate periodical variations in the
air flow. These variations created the “tremulant” effect on the sound, which made some lead registers (such
as Vox Humana) more pleasant, and the tone of the reeds colourful.
Use the [TREMOLO] plates to activate and deactivate the effect.
Page 33

31
Viscount Physis OrgansReference Manual
9.2 SELECTING THE REVERBERATION STYLE (REVERBERATION function)
Reverberation is the result of a series of sound reflections in a closed environment.
Order and value of each reflection depend on many factors of the environment, such as the size of the
room, the number and material of the objects inside the room, the listener’s position and so on.
The digital processors of the Physis organs can recreate artificially the complex factors affecting the
reverberation of a real pipe organ, generating the right reverberation to complete an already excellent sound
quality.
The REVERBERATION function (in the SET-UP menu) allows to select the kind of reverberation, ranging
from great churches – with wide reflections - to small rooms with short and soft reverberation. There is a
total of eight styles. The quality of the simulated environment and the amount of reflections generated by
the ambience can be adjusted as well.
The [REVERB] potentiometer, on the left panel, modifies the level of reverberation. Through the display
settings it is possible to choose whether this potentiometer should also control the acoustic reflections or
not.
To set the desired effect, select the REVERBERATION field under the SET-UP menu and press [ENTER]:
3 manuals models 2 manuals models
That show the current DPT (depth) and SPD (speed) values of the manuals’ tremolo.
Press [EXIT] to go back to the SET-UP menu and save the new settings.
Physis organs have two tremolos for each section so as to customise further the sound, or to add more
tremolo to certain registers, such as Vox Humana. Access the EDIT PARAMETERS function under the
VOICES menu (see chap. 8.2) to select which tremolo will be applied to each register. To adjust the second
tremolo speed and depth, select the 2nd TREMOLO field under the SET-UP menu. The video pages look
exactly like the ones of the first tremolo. These variations allowed to add a "tremulant" effect to the sound,
which made some registers sound more pleasant, and gave more expression to the reed stops.
NOTE
Tremolo depth and speed can be saved with a different value for each general or divisional
combination and for the Tutti. To do so, activate this function in the PROGRAMMABLE FUNCTIONS
menu (par. 9.5).
The 1st TREMOLO functions adjust the speed and depth of the first tremolo of each manual.
Page 34

32
Viscount Physis Organs Reference Manual
The top field indicates the simulated environment, and thus the reverberation effect generated.
The reverb styles are typical reverberation of a:
o CATHEDRAL:typical reverberation of a cathedral
o BASILICA:typical reverberation of a Basilica
o GOTHIC CHURCH :typical reverberation of a gothic church
o BAROQUE CHURCH :typical reverberation of a baroque church
o ROMANIC CHURCH :typical reverberation of a romanic church
o PARISH :typical reverberation of a parish
o CAPPELLA :typical reverberation of a chapel
The WET/DRY parameter sets another function for the [REVERB] potentiometer, for a more accurate
adjustment of the acoustic effect:
o OFF: the potentiometer only modifies the amount of reverberated signal.
o LOW – MED – HIGH: the potentiometer controls, on thee scales, the level of reverberated signal and
(from the continuous line on, in the VOLUMES screen) the quantity and quality of acoustic reflections
of the environment, simulating an ever deeper and mellow effect.
Wet / Dry = Low
Wet / Dry = Med o Hi
Wet / Dry = Off
Press [EXIT] to go back to the SET-UP menu and save the new settings.
NOTE
The internal reverberation also affects the signal from the [INPUT] ports (rear connection panel).
9.3 ADJUSTING THE INTERNAL EQUALIZER (INT. AMPL. EQUALIZER
function)
The INTERNAL AMPLIFICATION EQUALIZER function (SET UP menu) adjusts the five-band equalizer
and therefore the sound of the organ as a whole.
In the lower part of the screen there are the five central band frequencies. To move the cursor from one band
to the other, use the buttons [FIELD S] and [FIELD T].
The top of the screen shows the increase or decrease of the signal of the selected band. Each band can be
modified from +8 dB (maximum signal gain) to -8 dB (maximum signal dampening).
Page 35

33
Viscount Physis OrgansReference Manual
The following graph shows how the equalizer works.
20 Hz
100 Hz 1 KHz 10 KHz
20 KHz
-8 dB
-7 dB
-6 dB
-5 dB
-4 dB
-3 dB
-2 dB
-1 dB
0dB
+1 dB
+2 dB
+3 dB
+4 dB
+5 dB
+6 dB
+7 dB
+8 dB
Gain
F
320 Hz 3.2 KHz
9.4 ARRANGING THE VOICES IN THE INTERNAL AMPLIFICATION (INT.
AMP. PANNING function)
Another option to customize the sound configuration of the organ is to arrange the voices’ stereophonic
reproduction (this is also called panning).
The organ is equipped with one or more left and right channels. The simultaneous diffusion through both
channels simulates a third, central channel.
models with 7
internal audio
channels
models with 5
internal audio
channels
models with 3
internal audio
channels
L3x R3x
L2x R2x
L1x R1x
Arranging the voices in the two channels simulates the position of the windchests of real pipe organs, since
they were usually placed in different areas. It also simulates the different position of the pipes inside the
windchest, which could vary according to the stop played, the period when the organ was built and the wishes
of the builder.
Select the INT. AMPL. PANNING function under the SET UP menu to access the screen showed in the
next page.
Page 36

34
Viscount Physis Organs Reference Manual
3 manuals models 2 manuals models
As you may notice, the left side of the screen shows the voices in the selected section, while the right side
shows the current internal panning. The following options are available:
- SINGLE CUSP: the tallest, broadest pipes are located in the centre, so the voice’s lowest notes
are played by the most central speakers. As the pitch rises the signal is gradually distributed further and
further to the outside, alternating.
Left Right
50% 48% 50% 52%
Left Right
30% 70% 30% 70%
Left Right
100% 100%
First select the organ section containing the voice you wish to set the panning for. In addition, you can access
the panning set up screen by pulling (or pressing) the draw-stop or stop for a few seconds while the display
cursor is on the INT. AMPL. PANNING field of the SET-UP menu, or while in the panning function screen
already. The LED of the stop the panning of which is being adjusted will flash to prevent modification
errors; the stop will be on and can be played for better, quicker adjustment.
Other stops can also be switched on to assess the overall effect of the changes.
- DOUBLE CUSP: there are two separate cusps, both resembling to the single cusp described
above. The lowest keys sound in an intermediate position, between the centre and the outside, alternating
(one on the right cusp, one on the left cusp). As the pitch rises, rises the signal is gradually distributed
further and further to the outside, alternating.
Left Right
Left Right
70% 30% 30% 70%
Left Right
20% 60% 80% 40% 60% 20% 40% 80%
100% 50% 100% 50%
Page 37

35
Viscount Physis OrgansReference Manual
- DOUBLE WING: the highest notes sound in the centre. As the pitch lowers, the signal is
gradually distributed further and further to the outside, alternating.
Left Right
Left Right
100% 100%
Left Right
48% 50% 52% 50%
30% 70% 30% 70%
- SINGLE WING (from left) : the tallest, broadest pipes are installed on the left, so the lowest
notes are played by the speakers furthest to the left. As the pitch rises the notes are played more and more
to the right.
Left Right
Left Right
100% 2%
Left Right
49% 51% 49% 51%
98%
98%2%
100%
- SINGLE WING (from right): the tallest, broadest pipes are installed on the right, so the lowest
notes are played by the speakers furthest to the right. As the pitch rises the notes are played more and
more to the left.
Left Right
Left Right
Left Right
49% 51% 49% 51%
2%
100% 98%
2%
98% 100%
- C-C# ALTERNATING : the notes sound alternated (one right, one left) from C (left) to C#
(right).
Left Right
Left Right
Left Right
100% 100%
100% 100%
100%100%
Page 38

36
Viscount Physis Organs Reference Manual
- C#-C ALTERNATING : the notes sound alternated (one right, one left) from C (right) to C#
(left).
Left Right
Left Right
100%
100%100%
Left Right
100% 100%
100%
- LEFT MONOPHONIC: all notes play on the left channel.
Left Right
Left Right
Left Right
100%
100%
100% 100%
100%100%
- RIGHT MONOPHONIC: all notes play on the right channel.
Left Right
Left Right
Left Right
100%
100%
100% 100%
100% 100%
- COMPLETE MONOPHONIC: all notes sound on both channels, left and right.
Left Right
Left Right
50% 50% 50% 50%
50% 50% 50% 50%
Left Right
50% 50% 50% 50%
Page 39

37
Viscount Physis OrgansReference Manual
- ALTERNATING POLIPHONIC: the notes are distribute among the audio channels, so as
to avoid having more unison frequencies on the same speaker. This limits the electrical sum of the signal,
so as to favour the “in air” melting of the sound, as in a real pipe organ.
Left 1 Right 1
100%
Left 2 Right 2Left 3 Right 3
100%100%100%100%100%
Left 1 Right 1
100%
Left 2 Right 2Left 3 Right 3
100%100%100%100%100%
NOTE
For further information about the types of windchest and how they work, see the par. 14.3.
9.5 STEREOPHONIC BALANCE OF THE SIDE SPEAKERS (INT. AMPL. TUNE-
UP function)
The stereophonic distribution of signal (panning) of the side speakers can be adjusted. To do so, selec the
INT. AMP. TUNE-UP field on the display. The following page will appear:
Set the SURR. BAL. (surround balance) parameter as 0 to distribute the signal evenly on both sides. The
other parameters are accompanied by an arrow: from { 1 to { 63 the signal is diffused more and more to the
left, while values from } 1 to } 63 send more signal to the right speakers.
NOTE
This function is only available for models equipped with side speakers.
Page 40

38
Viscount Physis Organs Reference Manual
to save the state of the All Swells to Swell and the Automatic Pedal into the general combinations:
9.6 OPTIONS OF THE COMBINATIONS, THE CANCEL FUNCTION, THE
CRESCENDO AND VOLUME CONTROL (PROGRAMMABLE FUNCTIONS)
The PROG. FUNCTIONS sub-menu contains several settings related to the divisional pistons, Crescendo
and potentiometer controls (under the manuals).
In this menu you can decide which additional function to save into the (general and/or divisional) combinations,
and which ones should be deactivated by pressing the Cancel piston.
It is also possible to temporarily deactivate the Crescendo pedal, so as to prevent undesired stops to turn on,
or set the [MASTER] potentiometer not only to control the main volume but also the general volume of the
rear connection panel signals.
Select the PROG. FUNCTIONS field. In the following screens, you can activate or deactivate several functions.
In the first screen you can decide whether you want (select YES) or do not want (NO) to save the manual
couplings to the divisional memories,
on models with sub- and super octave and/or Unison Off, the followings can be saved:
o NONE: no couplers saved
o INTER-DIVISIONS: only couplers (sub and super octave included) between two manuals or manual
and pedalboard (only available for models with intra-divisional couplers)
o INTRA-DIVISIONS: only sub and super octave and Unison Off (only for models with intra-divisionals)
o ALL: all couplings
to save the depth and speed value of the tremolo in general and divisional combinations:
Page 41

39
Viscount Physis OrgansReference Manual
- GREAT/PEDAL: control the swell box of Great and Pedalboard
- CRESCENDO: control the Crescendo steps (displayed in a pop-up window on the display)
Which volume is controlled by the [MASTER VOLUME] potentiomer, placed under the manuals:
to turn off the All Swells to Swell and the Automatic Pedal when the Cancel piston is pressed:
In models equipped with a [CRESCENDO] pedal, the following options are available:
- CRESCENDO: control the Crescendo steps
- GREAT/PEDAL: control the swell box of Great and Pedalboard
- DISABLED: the Crescendo pedal is disabled
In models equipped with both [CRESCENDO] pedal and [GREAT/PEDAL], the following options are
available:
- ENABLED: the [CRESCENDO] pedal is enabled.
- DISABLED: the [CRESCENDO] pedal is disabled.
In models that are not equipped with [CRESCENDO] pedal, the following options for [GREAT/PEDAL]
are available.
Page 42

40
Viscount Physis Organs Reference Manual
NOTES
- As long as the Pedal Automatic Piano function is assigned to the [A.P.] piston, its position will
not be saved in the combination, not even when the SWS AND A.P. INTO GENERAL PISTON
function is active.
- Some of the screens described above appear only in certain models and therefore may not appear
in your instrument.
The [A.P.] piston function:
Select PD/GT MONO to activate the Monophonic Pedal function (with piston on). This function allows to
play pedalboard registers on the Great. When doing this the pedalboard is deactivated and the stops become
monophonic, with priority on the lowest note.
Select PED AUTOM. PIANO to activate the Pedal Automatic Piano function (with piston on). This function
automatically adjusts the sound composition of the pedalboard, according to the manual currently played.
- INT. GEN. VOLUME: only the internal amplification volume
- INT. &EXT. VOLUME: the volume of both the internal amplification and of the signal of the rear
outputs [PROG. OUT] and [GEN. SUB].
- EXT. GEN. VOLUME: only the volume for the signal of the rear outputs [PROG. OUT] and [GEN. SUB]
- NOTHING: do nothing.
To save the state of the MIDI stops and of the [M.SOLO] pistons to combinations (this screen will appear
only in models that allow to transmit MIDI codes).
To switch off the light of MIDI stops and [M.SOLO] pistons, when the Cancel piston is pressed (this screen
is available only in models that allow to transmit MIDI codes).
Page 43

41
Viscount Physis OrgansReference Manual
The section on which to play the melody when the Organ Solo function is active (see point 16, chap. 3):
If the notes generated with couplers are played also by orchestral stops:
in models equipped with sub- and super-octave couplers, and/or with unison off couplers, the user can select
which of these couplers will affect the orchestra stops:
- NONE: no couplers
- STD: only couplings between two manuals, or between manual and pedalboard (though not sub- and
super-octave)
- ALL: all kinds of couplers
9.7 PROGRAMMING THE [SWS] PISTON FUNCTION
(SWS CONFIGURATION function)
This function allows to choose the expression pedal that regulates the volume of each section while the [SWS]
piston is on. To do so, select the SWS. PROGRAMMING field on the display. The following page will appear:
The organ sections can be found on the left side, while on the right the expression pedal can be selected. This
pedal will regulate the volume of the corresponding section while the [SWS] piston is on.
When the FREE option is selected, the section volume will not be affected by any pedal.
N.B.
The GT/PD option can be used (only for models equipped with this expression pedal) also by assigning
the GREAT/PEDAL function to the [CRESCENDO] pedal (see chap. 9.6 - CRESCENDO PEDAL
setting).
3 manuals models 2 manuals models
Page 44

42
Viscount Physis Organs Reference Manual
20 Hz
100 Hz 1 KHz 10 KHz
20 KHz
-8 dB
-7 dB
-6 dB
-5 dB
-4 dB
-3 dB
-2 dB
-1 dB
0dB
+1 dB
+2 dB
+3 dB
+4 dB
+5 dB
+6 dB
+7 dB
+8 dB
Gain
F
320 Hz 3.2 KHz
9.8 REGULATING THE REAR OUTPUTS EQUALIZER (EXT. OUT EQUALIZER
function)
The instrument is equipped with an internal equalizer, to adjust the sound of the internal speakers of the
organ, and also with external equalizer, each one dedicated to one of the output of the rear connection panel.
Adjusting the parameters of each output separately makes the simulation of real wind chests even more
realistic and accurate. These equalizers work in real time and can be adjusted anytime and quickly. For more
sound controls and panning see par. 9.11 and 9.10.
To access this menu, select the EXT. OUT EQUALIZER field under the SET-UP menu.
The screen looks like the one of the internal equalizer (see par. 9.3), with the only difference that on the top
of the display will appear the name of the output that you are setting.
To select a different external equalizer use the [VALUE +] and [VALUE -] buttons, when this field is selected.
In the lower part of the screen you will see the frequencies of the equalizer’s five bands. To move the cursor
from one band to the other, press the [FIELD ] and [FIELD ] buttons.
On the top of the screen the gain value of the selected band is displayed. The bands can be adjusted from +8
dB to -8 dB.
The following graph shows the equalizer functioning.
Page 45

43
Viscount Physis OrgansReference Manual
9.9 REGULATING THE REAR OUTPUT [GEN. SUB] EQUALIZER (EXT. SUB
EQUALIZER function)
The rear output can connect the organ to sub-woofer systems. It is also equipped with an equalizer with lowpass filter. Cut-off frequency and slope can be adjusted; to do so, select the EXT. SUB EQUALIZER field
under the SET-UP menu:
The parameters that can be customized are:
o SLOPE: sets the filter slope to FLAT, 12dB/oct or 24dB/oct.
o FREQ: adjusts the cutoff frequency of the filter, ranging from 80 to 300 Hz.
-14 dB
-12 dB
-10 dB
-8 dB
-6 dB
-4 dB
-2 dB
0dB
+2 dB
+4 dB
+6 dB
+8 dB
+10 dB
+12 dB
+14 dB
Level
F
Freq
-14 dB
-12 dB
-10 dB
-8 dB
-6 dB
-4 dB
-2 dB
0dB
+2 dB
+4 dB
+6 dB
+8 dB
+10 dB
+12 dB
+14 dB
Level
F
Freq
-14 dB
-12 dB
-10 dB
-8 dB
-6 dB
-4 dB
-2 dB
0dB
+2 dB
+4 dB
+6 dB
+8 dB
+10 dB
+12 dB
+14 dB
Level
F
Freq
Slope = Flat Slope = 12 dB / Oct.
Slope = 24 dB / Oct.
Page 46

44
Viscount Physis Organs Reference Manual
9.10 SETTING THE ROUTING OF THE VOICES ON THE REAR AUDIO
OUTPUTS (EXT. OUT ROUTER function)
One of the Physis organs’ key features is the capability of simulating the position of the wind-chests and the
arrangement of the pipes inside them, for every stop. This is achieved by setting the routing of the audio
signals, i.e. the way in which they are distributed, on the rear outputs.
For each stop, the system is able to set an output configuration which reflects the layout of the pipes in real
wind-chests, as follows:
- single or double cusp
- double wing
- left or right wing
- mono
- alternate keys
Moreover, each of these layouts can be further specified with regard to the width of the wind-chest and its
location in space, defined by the number of outputs used.
NOTE
For further information about the types of windchest and how they work, see the par. 14.3.
3 manuals models
2 manuals models
this displays the screen for selection of the section which contains the stop to set up, which has to be chosen
from the list of the stops in a section:
To access the rear audio output setting video page, select the EXT. OUT ROUTER field in the SET-UP
menu:
Here again, there is the option of displaying the set-up screen directly by holding out the draw-stop or
holding down the rocker tab for a few moments in the voice on position with the cursor on the EXT. OUT
ROUTER field in the SET-UP menu, or in the function itself.
The LED of the stop being set up will flash to prevent modification errors; the stop will be on and can be
played for better, quicker adjustment. Other stops can also be switched on to assess the overall effect of the
changes.
Page 47

45
Viscount Physis OrgansReference Manual
the screen comprises four sections:
o MODE: selects the type of wind-chest from:
- C – C# (alternated keys)
1234
PROG. OUT
100% 100%
1234
PROG. OUT
1234
PROG. OUT
100% 100% 100%100%
- MONO: mono
1234
PROG. OUT
1234
PROG. OUT
1234
PROG. OUT
100%100%
100%100% 100%100%
- DOUBLE CUSP: double cuspide
1234
PROG. OUT
55%45% 45%55%
1234
PROG. OUT
100% 100% 100% 100%
1234
PROG. OUT
Page 48

46
Viscount Physis Organs Reference Manual
- DOUBLE WING
1234
PROG. OUT
100% 100%
1234
PROG. OUT
1234
PROG. OUT
50% 50% 50% 50% 55%45%45%55%
1234
PROG. OUT
1234
PROG. OUT
1234
PROG. OUT
100%100%
100%100% 50% 50% 50% 50%
- WING
NOTES
- Although the windchest description features two Wing modes (left and right), in the set-up menu
you will see just one WING option. To set it as “left” or “right” wing, just adjust the parameters
of the limit position “FROM” and “TO”, to set the windchest in the desired configuration.
If the “FROM” value is lower than the “TO” value, the wing will go from right to left (right
wing). If the “FROM” value is higher than the “TO” value, it will be a left wing.
- The examples in the pictures relate to FROM and C values set to 1, TO and C# to 4, POSITION
to 2 and they are to be intended as examples only. The real percentage of the signals may vary,
especially according to the stops selected and the output levels.
- CUSP: cuspide
1234
PROG. OUT
60% 40% 100% 100%40% 60%
1234
PROG. OUT
50% 50% 50% 50%
1234
PROG. OUT
o FROM and TO: they select the limits of the area, set in outputs, within which the wind-chest is to be
located. The value is set as [output number-position between two outputs], bearing in mind that there are
four positions between one output and the next (2-4-6-8 on the display). A value of 40 means that the
end of the range (FROM or TO) is on output [4]; a value of 82 means that the FROM or TO point is
between output [8] and [9], close to [8] since it is in the first fifth of the area between output [8] and
output [9]. The screen previously shown refers to a peaked wind-chest placed between output [1] and a
Page 49

47
Viscount Physis OrgansReference Manual
position between outputs [3] and [4].
o [position indicator]: it consists of small rectangles located above the drawing of the wind-chest and
indicates that the zone is displaying the part below the total number of outputs.
o [wind-chest on outputs]: in the bottom of the screen, it provides a graphic illustration of the wind-
chest with the references to the outputs being used, to give an immediate picture of its position and the
outputs which will carry the notes, in accordance with the wind-chest configuration.
To view the setup of another stop, simply activate the draw-stop / tab or press [EXIT] to quit the function.
In both cases the set-up just created is saved automatically.
For orchestral voices and input signals, only a stereophonic panning is allowed, with left and right signal
rearranged to the PROG. OUT outputs.
Models with 12 outputs on the
rear connections panel
Models with 4 outputs on
the rear connections panel
The LEFT CHANNEL and RIGHT CHANNEL inputs and the orchestral voices can be connected to a
pair of outputs or intermediate positions between the two.
9.11 REGULATING THE VOLUME OF THE REAR OUTPUTS (EXT. OUT
VOLUME function)
The external sound configuration can be customized further by regulating the volume of the rear outputs.
To access these options, select the EXT. OUT VOLUME field. The following screen will appear.
The options available are:
o GEN (general): general volume of the PROG. OUT outputs. It can be also adjusted through the [MASTER
VOLUME] potentiometer (to do so, see Programmable Functions, par. 9.5).
o SUB (general sub): volume of the low frequencies output, [GEN. SUB] connector.
o 1 – 4 / 1 – 12 / 1 – 20: general volumes of the line signal, from the respective output connectors.
Page 50

48
Viscount Physis Organs Reference Manual
9.12 CONFIGURING THE AUDIO OUTPUTS ON THE REAR (EXT. OUT
CONFIG function)
Thanks to this function, the PROGRAMMABLE OUTPUTS can be configured, so as to manage the
Antiphonal signal (controlled through the AMPLIFICATION tabs), the general signal or just the reverberated
signal of the instrument. Select the EXT. OUT CONFIG. field under the SET-UP menu. The following
pop-up message will appear:
which means that the external panning (see par- 9.8) of certain stops might be modified automatically. Stops
placed between outputs [2] and [3] (in models equipped with 4 outputs), [8] and [9] (in models equipped with
12 outputs) or between [16] and [17] (in models equipped with 20 outputs), will be automatically set as Mono
on the first output of the previously configured panning. Press [EXIT] to abort the automatic panning
adjustment and return to the SET-UP menu. Press [ENTER] to confirm - the display will show:
Functioning of different modes is described in the tables below.
Models equipped with 4 audio outputs:
MODE OUTPUTS 1-2 OUTPUTS 3-4
STANDARD
As set in Ext. Router
Conf. function.
As set in Ext. Router
Conf. function.
GENERAL-REVERB General si
g
nal Reverberated signal onl
y
Models equipped with 12 ore more audio outputs:
NOTE
In the models equipped with 4 audio outputs, it is not possible to configure the registers output
router in the EXTERNAL OUT ROUTER function selecting the GENERAL+REVERB outputs mode.
MODE
OUTPUTS 1-8
(or 1-16)
OUTPUTS 9-10
(or 17-18)
OUTPUTS 11-12
(or 19-20)
TAB AMP LIFICAT .
[CONSOLE ON]
TAB AMP LIFICAT .
[EXT. SPEAKER ON]
STANDARD
As set in Ext. Router
Conf. function.
As set in Ext. Router
Conf. function.
As set in Ext. Router
Conf. function.
Internal ampli fication Outputs 1-12 (or 1-20)
GENE RAL-RE VERB
As set in Ext. Router
Conf. function.
General si gnal Reverberated signal only Outputs 1-8 (or 1-16) Output s 9-12 (or 17-20)
ANTIPHONAL
As set in Ext. Router
Conf. function.
As set in Ext. Router
Conf. function.
As set in Ext. Router
Conf. function.
Outputs 1-8 (or 1-16) Outputs 9-12 (or 17-20)
GENE RAL-A NTIPH.
As set in Ext. Router
Conf. function.
General si gnal
As set in Ext. Router
Conf. function.
Outputs 1-8 (or 1-16) Outputs 9-12 (or 17-20)
ANTIPH.-REVERB
As set in Ext. Router
Conf. function.
As set in Ext. Router
Conf. function.
Reverberated signal only Outputs 1-8 (or 1-16) Outputs 9-12 (or 17-20)
Page 51

49
Viscount Physis OrgansReference Manual
9.13 AUTOMATIC RESIZE OF EXTERNAL ROUTERS (EXTERNAL OUT
RESIZE function)
As already shown in par. 9.10, with External Routers, each stop can be channelled to one or more
PROGRAMMABLE rear Outputs; connecting more outputs after the stop channelling has been programmed
may affect some output related features, so that some outputs may not work as intended. The EXTERNAL
OUT RESIZE function sets up the output configuration (concerning the windchest size but not its type)
according to the amount of outputs in use.
To recall the function, selecte the EXT. OUT RESIZE field under the SET-UP menu.
The system will warn you that the external panning of the stops will be modified automatically (according to
the outputs in use). Press [EXIT] to abort and go back to the SET-UP menu. Press [ENTER] to continue:
the following screen will show:
The CURRENT MAIN OUTS USED parameter points out the amount of outputs currently used by the
External Routers, as set in the EXTERNAL OUT ROUTER function.
Instead, the RESIZE TO parameter must be set to the current amount of connected outputs. Press [EXIT]
to cancel the new configuration, or [ENTER] to confirm it.
The repositioning takes place through several adjustments, so as to use the outputs as already configured
before. However, some routers might be placed differently from what you intended. Therefore, at the end of
the procedure, the system will advice to check again the settings through the EXTERNAL OUT ROUTER
function.
Page 52

50
Viscount Physis Organs Reference Manual
10. UTILITIES AND MIDI FUNCTIONS
(UTIL. & MIDI menu)
The UTILITY & MIDI menu, which can be recalled by selecting the field of the same name in the main
video page, contains all the accessory functions and the settings relating to the organ’s MIDI interface. The
menu is displayed on several screens:
Models equipped with
divisional combinations
Models not equipped with
divisional combinations
The first part contains all the additional functions and utilities. Unless stated otherwise, select YES to activate
the function, NO to deactivate it.
o PIST. COMBINE (Piston Combine, only for models with divisional combinations): synchronizes manual
and pedalboard combinations through the following options:
- KB->P: when a manual combination is loaded, the same is activated on the pedalboard.
- P->KB: when a pedalboard combination is loaded, the same is activated on the manual.
- KB+P: when a combination on either pedalboard or manual is loaded, the same is activated on the
other section.
Place the cursor on the PIST.COMBINE field and press [ENTER] to select which manual will be
synchronized.
o KEYBOARDS INV. (Keyboard Inversion): inverts the manuals, so that the stops for one section play
on a selected manual. To select a manual, select this field and then press [ENTER].
o TRACKER TOUCH: simulates the typical tracker touch of mechanical organs that affects the attack
times. Attack time is delayed on flue pipes only, release is delayed on all stops.
o 1st SHORT OCT. (1st Short Octave) makes the first octave on manuals and pedalboard short, so as to
perform pieces written for ancient organs (16th to 18th century) in which the first octave was shortened.
Pressing [ENTER] with the cursor on this field you can select for each manual and the pedalboard if you
want to play with short octave and in what mode (pedalboard only).
Page 53

51
Viscount Physis OrgansReference Manual
o AUTO MAINPAGE: automatic return to the main video page if no display functions are used for 10
seconds.
o LCD CONTRAST: regulates the display contrast.
o SET DATE & TIME: date and time setting (par.10.1).
o LOCK ORGAN: set the code to lock out the organ to prevent access to the instrument’s set-up screens
and the saving of combinations, the Tutti and the Crescendo (par.10.2).
o RESTORE FACT. SET (Restore factory settings): restores the factory settings (par.10.3).
o OP. SYS. UPGRADE (Operating Sytem upgrade): upgrades the operating system (par. 10.4)
The second part of the menu relates to the MIDI interface settings (par. 10.5):
o Tx AND Rx CHANNEL: MIDI transmission and reception channel set-up.
o Tx AND Rx FILTER: MIDI transmission and reception filter set-up.
o PROG. CHANGE SEND (Program Change send): saving of the combinations and transmission of
MIDI Program Change and Bank Select messages.
o KEYBOARD VELOCITY: selection of the dynamic curves of the manuals for use of the Orchestra
voices and the transmission of MIDI notes.
o COUPLED NOTES: links the channels
10.1 REGULATING THE INTERNAL CLOCK (SET DATE & TIME function)
The organ is equipped with an internal clock, mainly to assign date and time to files created with the FILE
MANAGEMENT functions. Select the SET DATE & TIME function from the UTILITY & MIDI menu:
o DAY: set here the current day.
o MONTH: set here the current month.
o YEAR: set here the current year.
o [last field]: adjust the current time.
When the configuration is over, press [ENTER] to save the settings.
As the pop-up says, the time adjustments will be working the next time the organ is switched on.
D
Re
CDoFFaG
SolALaBSiCDoDReEMi
EMiA#
La#
C#
Do#D#Re#
-
--
-
--
-
-----
SHORT
F#
Fa#
EMiFFaG
SolALaBSiCDoDReEMi
G
Sol#A#La#
C#
Do#D#Re#
C
Do
-
--
---D
Re
SHORT CDE
Page 54

52
Viscount Physis Organs Reference Manual
10.2 CONTROLLING THE ACCESS TO THE ORGAN SETTINGS
(LOCK ORGAN function)
When necessary, organ configurations can be locked, so that only authorized users can access them.
The LOCK ORGAN function is designed just for this purpose. When active, combinations, Tutti, Crescendo
steps and Local Off stops cannot be modified. Only volume, tuning and Organ Style options will be available.
The Record function of the sequencer is also locked, so that recorded songs cannot be edited.
To recall this function, select the LOCK ORGAN field under the UTILITY & MIDI menu.
Press [VALUE +] and [VALUE -] to select the characters. Use the [FIELD ] and [FIELD ] buttons to
move the cursor. Press [ENTER] to save the code, and [EXIT] to abort.
When the organ has been succesfully locked, the display shows the following message:
Here you can select which sections will be locked:
o CMB MEMORIES: locks combination memories, Tutti, Crescendo and Plenum.
o USER PARAMS (User Parameters): locks the functions under the menus: VOICES, SETUP, UTILITY
& MIDI, FILE MANAGER and Local Off options.
o SEQ RECORD: locks the sequencer’s Record function.
Now press [ENTER] to set a password:
To unlock the organ, allow the saving of combinations and make the other adjustment functions accessible,
recall the UNLOCK ORGAN function under the UTILITY & MIDI menu (see next page).
Page 55

53
Viscount Physis OrgansReference Manual
otherwise:
N.B.
- The password must be 4 characters long.
- To check the operating system version while the organ is locked, access the UNLOCK ORGAN
function and then select OP-SYS-INFO.
enter the right password with the buttons described above. If the password is correct, the following message
will show:
10.3 RESTORING FACTORY SETTINGS (RESTORE FACT. SET. Function)
The organ has several options to restore the original (factory) settings. To recall this function select the
RESTORE FACT. SET. field under the UTILITY & MIDI menu:
Page 56

54
Viscount Physis Organs Reference Manual
User Style Combination memories
Entire organ Setting parameters
Press [ENTER] again to start the process or [EXIT] to abort it. When the process is complete, the following
message will show:
Entire organ Setting parameters
User Style Combination memories
The following settings can be restored to default:
o ENTIRE ORGAN: all the settings and functions from the TUNING, VOICES (the four User styles),
SET-UP, UTILITY & MIDI menus, general and divisional memories, crescendo steps, Tutti, Local Off
states and mixtures.
o SETTING PARAMETERS: settings from the TUNING, SETUP and UTILITY & MIDI menus.
o USER STYLES: register settings from the VOICES menu, related to the four user styles.
o COMB. MEMORIES: (combination memories): all the general and divisional memories, crescendo
steps and Tutti.
To restore the factory settings, select one of these four modes and press [ENTER]. The display will show the
settings that will be restored and will ask for confirmation.
Page 57

55
Viscount Physis OrgansReference Manual
NOTE
For further information about the MIDI interface of the Physis organs, see par. 14.5 and 14.6.
SELECTING THE INPUT AND OUTPUT CHANNELS (Tx AND Rx CHANNEL function)
To choose the MIDI channels to transmit and receive MIDI signals, select the Tx AND Rx CHANNEL field
under the UTILITY & MIDI menu. The following screen will show:
The SECTION column lists the organ sections; for each section a channel from the Tx Ch and Rx Ch can
be assigned.
Press [EXIT] to leave the screen and save the settings.
FILTERS SETTINGS (MIDI FILTERS function)
A MIDI filter allows to block a particular message on all MIDI channels (if the signal is channelled).
The Control Change filter, for example, blocks these MIDI messages in the [MIDI OUT] port, on all MIDI
channels of the organ. In the same way, the receiving filter blocks CC on all channels received from the
[MIDI IN] port.
To configure the MIDI filters, select the Tx AND Rx FILTER field under the UTILITY & MIDI menu.
10.4 UPGRADING THE OPERATING SYSTEM (OP. SYS. UPGRADE function)
The operating system of the Physis organs can be easily and quickly update. Just copy the update files in an
flash drive and plug it in the USB connector under the manuals, then recall the OP. SYS. UPGRADE function.
To get the installation files and all the necessary information to perform the upgrade, see the “Download”
section of the official Physis website, at the web address http://www.physisorgans.com/download.asp.
10.5 MIDI FUNCTIONS
3 manuals models 2 manuals models
Page 58

56
Viscount Physis Organs Reference Manual
The SECT (Section) column lists the organ section, and the associated Program Change and MSB and LSB
Bank Select messages are shown in the PG, MSB and LSB columns.
Please note that the MIDI messages of this screen are immediately sent to the corresponding section, and
also saved in the general, divisional and Tutti memories. To do so, select the Program Change and Bank
Select and fix the desired memory.
This process might prove useful when, using an external expander, you wish to combine a voice from this
unit with other stops.
When a MIDI message is not necessary, cancel it by selecting the “---” value.
To leave the screen and go back to the UTILITY & MIDI menu press [EXIT].
The MESSAGE column will show the MIDI messages that can be filtered
- CC: Control Change
- PG: Program Change
- SysEx: System Exclusive
- RealTime: Real Time
Through the Tx and Rx colum, the state of filters (transmission and reception) can be modified. Select YES
to activate the filter, NO to deactivate it. When a filter is active, the relating MIDI message is not transmitted/
received.
Press [EXIT] to leave the screen and save the current settings.
TRANSMISSISSION OF PROGRAM CHANGE AND BANK SELECT MESSAGES
(PROG. CHANGE SEND function)
Program Change (PG) MIDI messages can recall, in a connected unit, a particular sound or program (patch).
Thanks to this function you may select a desired voice from external module (such as an expander) connected
to the MIDI [OUT] port.
You can also transmit Bank Select messages MSB (CC n. 0) and LSB (CC n.20) to select stop banks from an
external source.
Select the PROG. CHANGE SEND field under the UTILITY & MIDI menu, then press [ENTER]
3 manuals models 2 manuals models
Page 59

57
Viscount Physis OrgansReference Manual
For each section, set a fixed value (FIXED from 1 to 127) or three dynamic curves: SOFT, NORMAL or
HARD.
Press [EXIT] to leave and save the settings.
The COUPLED NOTES function
The COUPLED NOTES function allows to select the notes to send through MIDI.
Select YES to send both the notes actually played on the manuals and the ones resulting from the coupling
controls.
For example, by playing on the pedalboard while the coupling II/P is active, notes from the pedalboard will
be transmitted both on the pedalboard MIDI Channel AND on the Man.II MIDI Channel.
Select NO to send only the notes physically played (in this example, notes will be transmitted only on the
pedalboard channel).
In models equipped with sub- and super-octave couplers, and/or with unison off couplers, the user can also
select which of these couplings will send out MIDI data:
- NONE: no couplers
- STD: only couplings between two manuals, or between manual and pedalboard (though not sub- and
super-octave)
- ALL: all kinds of couplers
REGULATING THE MIDI VELOCITY (PEDAL/KEYB. TOUCH function)
This function sets the velocity of the notes transmitted through MIDI [OUT] port, played with Orchestra
stops, for each section.
This is the corresponding screen:
3 manuals models 2 manuals models
Page 60

58
Viscount Physis Organs Reference Manual
11. FILE MANAGEMENT FUNCTIONS
(FILE MANAG. menu)
The Physis organs use two different types of mass memory: the internal memory, and a data storage device
for connection to the [USB] slot underneath the manuals (USB pen drive). These data storage units are used
to save organ’s set-up or parts of it, pieces of music and song lists. Saving this file types is useful as it allows
to store large amounts of organ configurations and music pieces, as many as the memory can contain - the
internal memory can store up to several thousands of these files. This chapter will also deal with internal
work memory: this memory is in use whenever the organ is on, and it is not the same as the mass memory
(internal or USB drive), which is used for data storage instead. If a USB pen drive is connected, the system
will use it as the mass memory. However, the internal memory can still be used for copying files (from and to
the USB pen), but it is not possible to load, delete and rename files saved on the internal memory: the USB
stick has to be removed before this can be done. Selecting the FILE MANAGEMENT field in the main
screen accesses the relative menu containing all the file management functions. There is also a screen which
provides information about the firmware versions installed on the organ. As the video page shows, the
bottom of the screen identifies the memory unit currently in use:
As the video page shows, the bottom of the screen identifies the memory unit currently in use:
- INTERNAL MEMORY
- USB STICK DRIVE
The functions available are as follows:
o DIR: displays the contents of the mass memory (par. 11.1).
o LOAD: load files (par.11.2).
o SAVE: save of the set-up of the organ or parts of it in the mass memory (par.11.3).
o COPY: copy files from one memory unit (e.g. internal) to another (par.11.4).
o RENAME: file rename (par.11.5).
o DELETE: file delete (par.11.6).
o SONGLIST: programming of a list of pieces (par.11.7).
o O.S. INFO: display the firmware versions installed in the system (par.11.8).
When connecting a new or just formatted pen drive to the organ, the system will automatically create two
directories in the drive: “v_settings” and “v_songs”. The system needs these two folders to arrange files, and
they must not be deleted or renamed, otherwise the saved files will be lost.
The system will save the organ configuration in the “v_settings” directory. “v_songs” is used for pieces and
song lists storage. The system uses the following files:
- .all: all settings, TUNING, VOICES, SET-UP, UTILITY & MIDI functions, general and divisional
memories, mixtures, crescendo steps, Tutti, local off state (saved in the "v_settings" folder).
-.set: settings from the TUNING, SET-UP and UTILITY & MIDI menus ("v_settings" folder).
- .sty: settings from the VOICES menu related to the current Style ("v_settings" folder).
- .cmb: general and divisional memories, Mixtures, Crescendo steps and Tutti ("v_settings" folder).
- .mid: MIDI songs ("v_songs" folder).
- .lst: lists of MIDI songs ("v_songs" folder).
Page 61

59
Viscount Physis OrgansReference Manual
NOTES
- Once the USB pen is inserted please wait some seconds before displaying the FILE
MANAGEMENT menu. If the instrument still does not detect the drive, press [EXIT] to leave
the menu and then try again.
- To copy a file into a USB pen that has never been used, first use your computer to create manually
two folders: "v_songs" and "v_settings". Files should be placed in the folders according to the
extensions listed above.
- Should you need to rename the files on the USB drive with a computer, please remember that
names can have a maximum length of 12 characters or digits. Letters must be either all capital
or all lower case.
- When using a computer to rename files stored on the USB pen, remember that names can only
contain a maximum of 12 numbers and letters, which must all be lowercase.
- Always use USB pens formatted with FAT or FAT32 file system (no NTFS). We advise to use
dedicated utilities created by the drive producer (usually available on CD-ROM or website).
11.1 FILE MANAGEMENT (DIR function)
In order to visualize what files are in your memory, select the DIR field under the FILE MANAGEMENT
menu:
Then select which files are to be shown:
o ALL TYPES
o SONGS (MID): music pieces, .mid files.
o SONGLISTS (LST): song lists, .lst files.
o COMB.MEM (CMB): memories (of any kind), .cmb files.
o SETTINGS (SET): settings from TUNING, SETUP and UTILITY & MIDI menus, .set files.
o STYLES (STY): organ styles, .sty files.
o ALL ORGAN (ALL): general organ configurations, .all files.
Select one of these options to display a list of files. A field on the top left indicates the position of the
selected file in the list, and the number of files with the same extension (in square brackets):
For a detailed description on the content of the .all, .set, .sty and .cmb files, read par. 14.4.
Page 62

60
Viscount Physis Organs Reference Manual
To manage a file, select it and press [ENTER]:
o COPY: copy the file from one memory unit to the other (USB to internal or the other way around). The
process is described in par. 11.4.
o RENAME: rename file, see par. 11.5.
o DELETE: delete file. See par.11.6
o LOAD: load a file to the work memory of the organ. See par. 11.2.
o SAVE: save again a file in the current memory unit. If a .CMB file is selected, this will be overwritten
with the current organ configurations. See par. 11.3.
NOTE
Load and Save functions are not available for .MID and .LST files.
11.2 LOADING ORGAN COMBINATIONS AND/OR SETTINGS (LOAD function)
The Physis organs can save the current configurations. The LOAD function allows to recall into the work
memory these configurations and combinations already saved to the mass storage memory (internal or external)
and therefore use them.
To load a file, select the LOAD field under the FILE MANAGEMENT menu:
Use the [FIELD ] and [FIELD ] buttons to select the file to load and press [ENTER], or [EXIT] to
cancel the operation. While loading, the display shows this screen:
Page 63

61
Viscount Physis OrgansReference Manual
And then:
LOADING ORGAN STYLE (.STY) FILES
When loading a .sty file, you have to decide in which of the four user slots to place the style.
Use the [FIELD ] and [FIELD ] buttons to select which style will be overwritten and press [ENTER].
Press [EXIT] to quit the screen.
When the procedure is over, the user style will be named after the .sty file just loaded. To rename a user style
you can use the same procedure: save it as .sty files with the new name and then load it again on the organ.
IMPORTANT NOTES
- When a file is loaded, all the related information (settings, memories, styles etc.) currently
present in use on the organ will be lost. To avoid this, first save the current settings (see par.
12.3) and then load a file.
- When the system load a .ALL or .STY file, it might not be able to find the sound described in the
file for a certain register, because the sound is not available in the list of the alternative voices.
In this case, the register will be assigned a similar sound or, when this is impossible, the first one
on the list. In both cases the audio parameters (EDIT PARAMETERS function described at
par.8.2) will be reinitialized. Furthermore, when loading an .ALL or .STY file created with a
different organ model, the system will show this message:
Page 64

62
Viscount Physis Organs Reference Manual
11.3 SAVING AS FILE OF ORGAN COMBINATIONS AND/OR SETTINGS
(SAVE function)
To save settings and combinations into the internal memory or an USB pen drive, select the SAVE field
under the FILE MANAGEMENT menu:
In this screen you can select which options to save. Each set of options corresponds to a file type and therefore a
file extension. You can see the file extension (see description at beginning chap. 11) on the left of the display, and
the content in the middle. Select the file extension field with the cursor and press [VALUE +] and [VALUE -] to
scroll all the possible extensions. To write the file name, move the cursor to the first character with [FIELD ] e
[FIELD ] and then select the character with [VALUE +] and [VALUE -]. Press [ENTER] to start the saving
process.
And then:
If a file with the same name and extension is already present in your memory, decide whether to replace it or not:
NOTE
When a file is overwritten, all its content will be lost.
Page 65

63
Viscount Physis OrgansReference Manual
11.4 COPYING AND DUPLICATING A FILE (COPY function)
Another useful function is duplication. You can copy the same file on two different memories, or duplicate
the file on the same memory.
To recall this function, select the COPY FIELD from the FILE MANAGEMENT menu.
Now select the memory unit (FROM field), which contains the file to copy (from now on named “source”)
and the unit memory you wish to save the file in (TO field, called from now on “destination”).
Once again, the available memories are an external flash drive (“USB PEN DRIVE” in the video page) or
INTERNAL MEMORY. To select, use the [VALUE +] and [VALUE -] buttons.
Copy from internal memory
to pen drive.
Copy from pen drive to
internal memory.
Now press [ENTER] to continue. The display shows all the files inside the source memory.
Use [FIELD ] e [FIELD ] to select the source file, then press [ENTER]:
The system will now ask for a new file name. It needs not to be different from the original name.
To write the file name, move the cursor on the first letter with [FIELD ] and [FIELD ] and then select
the character with [VALUE +] and [VALUE -].
Page 66

64
Viscount Physis Organs Reference Manual
When the copy is complete:
If there is a file with the same name in the same memory, the system will ask you to overwrite (the old file) or
rename (the new file).
Press [ENTER] to start saving:
N.B.:
- The content of an overwritten file will be completely lost.
- The system does not allow two .mid files on the same memory to have names beginning with the
same three characters.
Press [ENTER] to save and overwrite, or [EXIT] to cancel an go back to the name composition screen.
As stated above, the COPY function is also able to create two or more copies of the same file in the same
memory unit. It can be used to create backup files. To do so, select the copy function:
Page 67

65
Viscount Physis OrgansReference Manual
Select the same memory both as source and destination. (e.g FROM INTERNAL MEMORY TO INTERNAL
MEMORY). Now choose a new file name.
This time, you need to give it a new name, as it is impossible to store two files with identical name in the same
memory unit. Also, you cannot change extension.
Write the file name as described above. If a file of the same name is already present, the display will show this
error message:
11.5 RENAMING FILES (RENAME function)
To rename a file, select the RENAME field, under the FILE MANAGEMENT menu. The display will show
all the files in the current memory unit.
Select the file you wish to rename:
To modify a name, use [FIELD ] e [FIELD ] to select the character, and [VALUE +] and [VALUE -] to
change it.
Page 68

66
Viscount Physis Organs Reference Manual
If there is already a file of the same name in your memory unit, the display will show:
Press [ENTER] to overwrite the old file or [EXIT] to quit and return to the file rename screen.
N.B.:
- The content of an overwritten file will be irreparably lost.
- The first three characters of a .mid file name must be digits, followed by “_”.
- The system does not allow two .mid files on the same memory to have names beginning with the
same three characters.
Then press [ENTER] to confirm.
11.6 DELETING FILES (DELETE function)
When you wish to eliminate one or more files from the current memory, recall the DELETE function from
the FILE MANAGEMENT menu.
Press [FIELD ] and [FIELD ] to scroll the file list and select the file you intend to delete, then press
[ENTER] (see next page).
Page 69

67
Viscount Physis OrgansReference Manual
Press [ENTER] again to confirm and delete, or [EXIT] to return to the file list.
NOTA
When a file is deleted, its content is irreparably lost.
11.7 EDITING OF LISTS OF SONGS (SONGLIST function)
The organ function SONGLIST is used to create and save lists of music pieces (MIDI files).
To program a list of pieces, recall the FILE MANAGEMENT menu and select the SONGLIST function;
the system asks whether you wish to create a new one or modify an existing one:
Select the [NEW LIST] field to create a new list, or select an .lst file to modify the list it contains.
In both cases, the first operation is to select the pieces you wish to include in the list:
Use the [FIELD ] and [FIELD ] buttons to select the MIDI file, [VALUE +] to add it to the list and [VALUE
-] to remove it. Its position within the list appears beside the name of the file. Now press [ENTER] to continue
the programming or [EXIT] to abort, in this case the system requests a confirm to proceed with the quit:
Page 70

68
Viscount Physis Organs Reference Manual
Then arrange the pieces within the list (or confirm the previous programming):
To move a piece into a different position, locate the cursor on the relative field of the file with the
[FIELD ] and [FIELD ] buttons and use [VALUE +] to move the position forward or [VALUE -] to set
an earlier position. Finally, press [ENTER] to save the list or [EXIT] to return to the previous video page.
As for MIDI files, the first three characters can only be numbers.
To enter the name, use the [FIELD ] and [FIELD ] buttons to move the cursor and [VALUE +] and
[VALUE -] to select the character.
Press [ENTER] to confirm the name and proceed to save, or [EXIT] to return to the previous video page.
NOTE
When using a computer to rename files stored on the USB pen, remember that names can only
contain numbers and letters, which must all be lowercase.
11.8 OPERATING SYSTEM VERSION (O.S. INFO function)
To check what release of the operating system is currently running in your instrument, select the O.S. INFO
field from the FILE MANAGEMENT menu. To check if there are updates and to install them, see
chap. 10.4.
The upper section of the screen shows the organ model and version (Europe, USA, UK, Standard, Custom
etc.) while the MODEL field shows the identification number of your organ.
Page 71

69
Viscount Physis OrgansReference Manual
The RELEASE field indicates the release of the operating system currently installed.
Since the operating system is divided into several sections, press the [FIELD ] button to see the release of
each section:
o KERNEL: central section of the operating system, it connects the various sections to the hardware.
o MASTER: interface beween Kernel and sections.
o SLAVE: sound generation.
o PMICRO: display and commands (manuals, buttons, stops, pistons).
o DATA: memory management.
11.9 ERROR MESSAGES – FILE MANAGEMENT FUNCTIONS
USB PEN ERROR – CAN’T READ/WRITE PEN’S DIRECTORIES
The system can’t initialize the directory of the pen drive. Check that the pen drive is properly connected, and
formatted according to the instructions in this manual.
FILESYSTEM ERROR
Reading error of the current memory unit. If this occurs with a pen drive, try disconnecting and then
connecting it again shortly thereafter. If this doesn’t work, try formatting the flash drive using a computer. If
this occurs with the internal memory, try again or contact the technical support at the e-mail address
service@viscount..
SOURCE FILE AND NEW FILE COINCIDE – NO OPERATION PERFORMED
For a file to be copied or rename you need to change its name.
NO FILES FOUND
There are no files of that type in the current memory.
If these errors occur, before trying anything else:
- If having problems with an USB pen drive, check that the pen is properly connected, formatted according
to the instructions in this chapter, that it is working and that the file in use is not corrupted.
- If having problems with the internal memory, try again and then, if still having problems, contact the
technical support at the e-mail address service@viscount.it communicating the error message.
NOT ENOUGH FREE MEMORY SPACE - PLEASE DELETE SOME FILE IN USB PEN DRIVE
NOT ENOUGH FREE MEMORY SPACE - PLEASE DELETE SOME FILE IN INTERNAL
MEMORY
There is not enough free memory on the select unit to copy or save the file(s). Erase older files in the internal
memory or use an external USB drive with more free space.
FILE COPY FAILED – CAN’T RENAME SOURCE FILE
The system can’t rename the file.
Please remember that .mid and .lst files need have the first three characters different from any other .mid and
.lst file.
Page 72

70
Viscount Physis Organs Reference Manual
FILE COPY FAILED – CAN’T READ SOURCE FILE’S PROPETIES
The system can’t read the file.
FILE COPY FAILED – SOURCE FILE IS NOT A REGULAR FILE
The copy failed because the file is not standard (it might be a directory or a link).
FILE COPY FAILED – CAN’T OPEN SOURCE FILE
The system can’t open the file that it is trying to copy.
FILE COPY FAILED – CAN’T READ SOURCE FILE
The system can’t read the file that it is trying to copy.
FILE COPY FAILED – CAN’T OPEN DESTINATION FILE
The system failed to create the new file.
FILE COPY FAILED – CAN’T WRITE DESTINATION FILE
The system failed to write the new file.
FILE RENAME FAILED
The system failed to rename the file.
FILE DELETED FAILED – CAN’T REMOVE SELECTED FILE
The system failed to delete the file.
FILE DELETED FAILED – CAN’T REMOVE FILE TO BE REPLACE
The system failed to delete a file while trying to rename or overwrite a file.
FILE SAVE FAILED – CAN’T CREATE FILE
The system failed to save a file, because it could not create a new file.
FILE SAVE FAILED – CAN’T WRITE FILE’S HEADER
The system failed to save a file, it could not write the file’s header.
FILE SAVE FAILED – CAN’T WRITE FILE’S DATA
The system failed to save the file because it couldn’t write the file’s data.
FILE LOAD FAILED – CAN’T OPEN FILE
The system failed to load a file, the desired file could not be opened.
FILE LOAD FAILED – CAN’T READ FILE’S HEADER
The system failed to load a file, its header was impossible to read.
FILE LOAD FAILED – FILE’S LENGTH CHECK FAILED
The file load failed because the actual file length is different from what stated in the header.
FILE LOAD FAILED – INVALID VERSION NUMBER
File load failed because the file has been generated with a newer and not compatible release of the operating
system.
FILE LOAD FAILED – CAN’T READ FILE’S DATA
The system failed to load a file, its data could not be read.
FILE LOAD FAILED – INVALID FILE’S CHECKSUM
The system could not load a file. The checksum test failed.
Page 73

71
Viscount Physis OrgansReference Manual
The organ is equipped with an internal sequencer (digital recorder). The sequencer can record songs played
on the instrument, controls used and MIDI data received through the MIDI [IN] port.
Recordings can then be saved on the USB stick or in the internal memory as MIDI files (Standard MIDI file,
format 1 to 125 beats per minute, 384 ticks per quarter note) and played back at any time.
Song lists can also be played. To program playlists, see per. 11.7.
To recall the sequencer press the [SEQUENC.] button beside the display. The screen for selection of the
system’s three operating modes is displayed:
o PLAY: playback of the performances saved in the internal memory or the USB pen (par.12.1)
o PLAY OPTIONS: options for playing back pieces (par.12.3).
o RECORD: recording of pieces of music (par. 12.2).
The memory unit currently used appears in the bottom of the screen. Remember that the USB stick has
priority over the internal memory; to use the latter, first remove the USB device.
NOTES:
- Once the USB pen is inserted please wait a few seconds before recalling the sequencer.
- Transposition set in the TUNING menu does not have any effect on playback of pieces (unlike
recording, where the notes are acquired transposed). To do this you have to set the transposer
described on par. 12.3.
- If using a pen drive, remember to format it with FAT or FAT32 (no NTFS) file system.
12.1 PLAYING BACK A PIECE (PLAY mode)
In the sequencer mode selection screen described above, select the PLAY field. The display shows the MIDI
files stored in the memory unit currently in use:
12. PLAYING and RECORDING OF MUSICAL SEQUENCES
(SEQUENCER)
Page 74

72
Viscount Physis Organs Reference Manual
Now select the MIDI file you wish to play back:
The new screen provides information about all the controls necessary for use of the sequencer:
- [ENTER]: starts playback of the piece.
- [EXIT]: quits the sequencer function.
- [FIELD ]: selects the previous piece saved in the memory or transferred to a Songlist (see point 11.7).
- [FIELD ]: selects the next piece saved in the memory or transferred to a Songlist (see point 11.7).
- [VALUE -] (press and hold): rewind.
- [VALUE +] (press and hold): fast forward.
- [VALUE -] (press once): slow down play speed. It can be seen on top left as percentage (100 in the
picture above).
- [VALUE +] (press once): increase play speed. It can be seen on top left as percentage (100 in the picture
above).
Once the playback of a song has been started, the display changes to:
as the screen shows, the functions of the [ENTER] and [EXIT] buttons have changed to:
- [ENTER]: pause /restart playback of the piece.
- [EXIT]: stop playback of the piece.
[FIELD ], [FIELD ], [VALUE -], [VALUE +] keep the functions already described.
USING RECORDED AND/OR MODIFIED PIECES WITH DEDICATED SOFTWARE
MIDI files recorded by the internal sequencer can be modified with the most common MIDI editing softwares.
This might prove useful to correct errors of the recording or to generally improve the track. However, we
strongly advice inexperienced users not to do so. When modifying a MIDI file, please follow these rules:
- Do not modify the tracks channel. If it necessary, respect the internal sequencer channelling. The sections
are channelled as follows:
Pedal: 1
Choir: 4
Great: 2
Swell: 3
Page 75

73
Viscount Physis OrgansReference Manual
select [NEW SONG] to start a new recording. Otherwise, a MIDI file can be loaded to overdub it, or in other
words make a new recording which will be added to the performance already recorded.
The internal sequencer also assigns a name to the track while recording, that corresponds to the sections
playing a track. Most computer software can read the track names:
“Pedal” track:
“Choir” track:
“Great” track:
“Swell” track:
§ “Volumes” track: divisional volumes and expression pedals
“Stops” track: stops conditions
There are other tracksfor internal use and future developments only, that should not be altered.
- Divisional modules are recorded as Control Change 7 events. Expression pedals position as Control
Change 11. These Control Change channel are identical to the previous ones.
- The stops settings, together with cancel, enclosed, coupling settings etc. are recorded as Exclusive System.
We advice you not to alter these codes. If you wish to add or remove stops from a recording, you should
know its exclusive system code. To do so, you should monitor the MIDI OUT port of the organ and,
switching on and off a stop, check the MIDI code transmitted. Add or remove this code only from the
“stops” track.
- When saving the MIDI file do not change the resolution of 384 tpqn (tick per quarter note).
The sequencer can also paly non-recorded tracks. Again, keep in mind that:
- The track channelling may not be consistent with the internal sequencer. Reset the channels according to
what described above.
- Stop codes might not be present in a MIDI track. In this case we advice you overdub (see par. 12.2) with
the desired stop combination.
- Divisional volumes and expression pedals may be lacking from a MIDI track. Again, we advice you
overdub the tracks.
12.2 RECORDING A PIECE (RECORD mode)
In the sequencer mode video page, select the RECORD field. The display will show:
Page 76

74
Viscount Physis Organs Reference Manual
As in Play mode, the screen again carries information about the functions of the buttons:
- [ENTER]: starts the recording.
- [EXIT]: quits the sequencer function.
Once recording has started, the functions change to:
- [ENTER]: pause /restart recording.
- [EXIT]: stop recording.
Press [EXIT] to end the session. The display will show the screen allowing the recording just made to be
saved:
The functions displayed allow:
o SAVE: saving of the recording as a MIDI file.
o PLAY: playback of the recoding before saving it.
o OVERDUB: creation of a new recording to be added to the sequence just acquired.
o DISCARD AND EXIT: delete the recording and quit sequencer Record mode.
If the SAVE field is selected, the system prompts the user to assign a name to the MIDI sequence about to
be saved:
When composing the name, use the [FIELD ] and [FIELD ] buttons to move the cursor and [VALUE +]
and [VALUE -] to select the character. The first three characters can only be numbers, since they are required
for future expansions of the instrument.
To confirm the name and proceed to save the data, press the [ENTER] button; use [EXIT] to return to the
Page 77

75
Viscount Physis OrgansReference Manual
OVERDUBBING
The internal sequencer record, play, but also overdub already recorded MIDI tracks. It can be done:
- selecting a MIDI file from the current memory unit, from the RECORD function;
- at the end of a recording session, accessing the OVERDUB function.
The system will ask whether to substitute the settings (stops, coupling, tremulant, MIDI controls, general
controls) recorded in the track with the ones currently selected. Press [ENTER] to use the new settings or
[EXIT] to leave them as they are.
If [EXIT] is pressed while in the save screen (i.e. when the recording has been acquired but not saved), the
system warns that the recording is about to be lost:
and that [ENTER] must be pressed to confirm that you wish to quit and delete the data acquired, or [EXIT]
to return to the save screen.
NOTE
When using a computer to rename files stored on the USB pen, remember that names can only
contain a maximum of 12 numbers and letters, which must all be lowercase. In add of this please
pay attention to do not delete the first three characters and the “_”.
previous screen, aborting the saving operation.
The following message confirms that the file has been saved:
The system will ask the same question, this time regarding the divisional volumes and expression pedals.
Page 78

76
Viscount Physis Organs Reference Manual
Now the sequencer is ready to overdub:
The screen carries information about the functions of the buttons:
- [ENTER]: start recording.
- [EXIT]: leave the sequencer.
- [VALUE -]:(press once): decrease play /recording speed. It can be seen on top left as percentage (100 in
the picture above).
- [VALUE +] :(press once): increase play / recording speed. It can be seen on top left as percentage (100
in the picture above).
- [VALUE -]: (press and hold): rewind.
- [VALUE +]: (press and hold): fast forward.
As the recording begins, the controls change again:
- [ENTER]: pause / start recording.
- [EXIT]: stop recording.
[VALUE +] and [VALUE -] maintain the functions described above.
NOTES
- When overdubbing tracks with changing tempo, it is impossible to rewind or Fast Forward
while recording. However, it can be done when paused.
- After the overdubbing has been started, it is impossible to change the play speed. However, it
can be done when paused or stopped.
Page 79

77
Viscount Physis OrgansReference Manual
ORIGINAL
05:20
OVERDUB
03:10
NEW
05:20
ORIGINAL
05:20
OVERDUB
03:10
NEW
03:10
ACCEPT TRIM AND ACCEPT
ORIGINAL
05:20
OVERDUB
06:00
NEW
06:00
ORIGINAL
05:20
OVERDUB
06:00
NEW
06:00
1 1
2 2
Note that when the original piece ends, the overdubbing does not stop. To warn you of this, the advancement
bar changes to:
Press [EXIT] to quit the recording. The system will ask you to accept the overdubbing:
You can choose one of the following options:
o ACCEPT: accept the overdubbing. In case the overdub track is shorter than the original piece, it will not
be shortened.
o TRIM AND ACCEPT: accept the overdubbing. If the overdub track is shorther than the original piece,
this will be trimmed to end together with the overdubbing.
o PLAY: play the piece with the overdubbing, so as to assess the track. The changes will not be saved yet.
o PLAY FROM LAST OVD (overdub): plays the piece, starting from the first event of last overdubbing,
so as to assess the track. The changes will not be saved yet.
o DISCARD: discards the overdubbing.
Page 80

78
Viscount Physis Organs Reference Manual
Warning you that the overdubbing will be lost. Press [ENTER] to continue – and therefore discard the
recording – or [EXIT] to return to the previous screen.
Select ACCEPT or TRIM AND ACCEPT to move to the saving screen. Now it is possible to save the piece
with a different name.
Selecting PLAY or PLAY FROM LAST OVD will activate the sequencer play mode. Press [EXIT] to return
to the previous screen.
12.3 PLAY OPTIONS OF THE SEQUENCER (PLAY OPTIONS menu)
Select the PLAY OPTIONS field. The menu offers several options:
Press [EXIT] to quit the screen. The display will show:
o TRANSPOSER: sets a semitone transposition on the pieces played by the sequencer.
o SONG LOOP: select YES to automatically loop any song.
o LIST AUTOPLAY: select YES to automatically play the next song when the previous is over, without
pressing the [FIELD ?] button. Only works with song lists.
o LIST LOOP: select YES to automatically loop a song list.
12.4 ERROR MESSAGES – SEQUENCER
FILESYSTEM ERROR
An error occurred while reading from the current memory unit. If the unit is a pen drive, try disconnecting
it and reconnecting it shortly thereafter. If nothing changes, try formatting your pen drive using a computer.
If the error occurs in the internal memory, try again, then get in touch with the technical assistance at e-mail
address service@viscount. Remember to always communicate the error message.
If these errors occur, before trying anything else:
- If having problems with an USB pen drive, check that the pen is properly connected, formatted according
to the instructions in this chapter, that it is working and that the file in use is not corrupted.
- If having problems with the internal memory, try again and then, if still having problems, contact the
technical support at the e-mail address service@viscount.it communicating the error message.
Page 81

79
Viscount Physis OrgansReference Manual
NO FILES FOUND
The current memory unit does not contain files of the requested kind.
NOT ENOUGH FREE MEMORY SPACE - PLEASE DELETE SOME FILE IN USB PEN DRIVE
NOT ENOUGH FREE MEMORY SPACE - PLEASE DELETE SOME FILE IN INTERNAL
MEMORY
There is not enough free memory on the select unit to save the file. Erase older files in the internal memory
or use an external USB drive with more free space.
SONG LOAD FAILED – CAN’T READ FILE’S PROPERTIES
The system failed to load a MIDI file. The system cannot read the file’s properties.
SONG LOAD FAILED – THE MIDI FILE IS TOO BIG
The system failed to load a MIDI file. The instrument cannot read .mid files bigger than 400 Kb.
SONG LOAD FAILED – CAN’T OPEN THE MIDI FILE
The system failed to load a MIDI file. The system cannot read the file.
SONG LOAD FAILED – CAN’T READ THE MIDI FILE
The system failed to load a MIDI file. The system cannot read the file that has to be copied.
SONG SAVE FAILED – CAN’T REMOVE EXISTING SONG
The system failed to save a .mid file. The system wasn’t able to delete the file that has to be removed.
SONG SAVE FAILED – CAN’T OPEN THE MIDI FILE
The system failed to save the .mid file. It could not open the file that has to be overdubbed.
SONG SAVE FAILED – CAN’T WRITE THE MIDI FILE
The system failed to save the .mid file. It could not write the file.
SONGLIST LOAD FAILED – CAN’T OPEN FILE
The system failed to load the .lst file. It could not open the file.
SONGLIST LOAD FAILED – CAN’T READ SONGS’ NUMBER
The system failed to load the .lst file. It could not read the number of .mid files in the list.
SONGLIST LOAD FAILED – CAN’T READ SONG’S FILENAME
The system failed to load a .lst file. The number of .mid files indicated in the song list is different from the
actual number of .mid files present.
SONGLIST LOAD FAILED – EMPTY SONGLIST
The system failed to load the .lst file. The list is empty. It is likely that the file was not created through the
proper function in the FILE MANAGEMENT menu (see par. 11.7).
Page 82

80
Viscount Physis Organs Reference Manual
13. STOP LOCAL OFF
Setting a stop in Local Off mode means that it will not be played by the organ’s internal sound generation
system, but the relative MIDI (System Exclusive code) message will be transmitted, so that it can be turned
on and played on a connected instrument.
To set a stop in Local Off mode press, while the main screen is on the display, the [S] (Set) piston, keep it
pressed and also press the [C] (Cancel) button. The LEDs of all the stops will light up and the display will
show the video page:
To set a voice in Local Off mode, operate its draw-stop or rocker switch so that its light goes out.
After setting the setup required, press [S] and [C] together to save it.
Accessing the Local Off setting function after this will trigger display of the status of the stops as follows:
- Light on: stop in Local On mode (plays with internal generation)
- Light off: stop in Local Off status
14. APPENDIX
14.1 TEMPERAMENT
Tuning a fixed intonation instrument (e.g. organs) consists of creating a chain of twelve fifths, properly
crafted so that at the extremes the interval can be reduced, through division or multiplication, to a perfect
octave. A perfect fifth is achieved when two sounds have a frequency ratio of 3:2. If from any sound we
calculate twelve ascending perfect fifths, the sound obtained is (3/2)12. With 7 octaves instead, the result is a
27 frequency. If we compare these values we find that (3/2)12 is slightly higher than 27. Rounding off after the
fourth decimal, we find that:
(3/2)12=129,7463 , while 27 = 128,0000. The ratio between these two value is called Pythagorean comma.
It can be defined as the surplus of twelve perfect fifth compared to seven octaves, both starting from the
same sound.
Page 83

81
Viscount Physis OrgansReference Manual
This is the Equal Temperament System (with the comma split in twelve parts).
Equal
Pure
Meantone
ETS12
pure: pure 5th
ETS12: Equal Tempered 5th
sc: synthonic comma
pc: pythagorean comma
pure: pure 5th
ETS12:
Equal Tempered 5th
sc:
synthonic comma
pc:
pythagorean comma
The picture is not in scale (otherwise the comma would be almost invisible) but it gives a graphical understanding
of the problem.
Now, dividing the Pythagorean comma in 12 equal parts, and subtracting this value to each pure fifth, the
result is a twelve-fifth chain, ending with the same value as seven octaves.
The Pythagorean comma can be split in larger parts and divided among a few (less than 12) fifths. This leads
to other temperaments, such as the Werckmeister III, which spreads the comma in four, equal parts, between
C-G, G-D, D-A, and B-F#.
A very important interval in the history of tuning is the major third. A chain of four pure fifths makes (3/
2)^4. A major third interval is represented by a 5/4 ratio. Therefore, rounding off, the frequency of a major
third, generated by Pythagorean fifths is 1,2656, while a natural major third is 1,2500. This surplus is called
Syntonic comma.
A series of four fifths, each one reduced by ¼ of Syntonic comma, makes a perfect major third. These fifths
are called “meantone”. If a temperament recovers only one syntonic comma, it still needs to compensate the
small difference between Pythagorean and syntonic comma. This difference is called skisma.
Page 84

82
Viscount Physis Organs Reference Manual
For example, the Kirnberger II temperament is based on the syntonic comma. It spreads the comma equally
between D-A and A-E and the skisma between F# and C#.
A series of three natural major thirds makes a frequency of 5/4^3. The difference between that and the
octave is called enharmonic comma.
When a temperament makes up for more than the Pythagorean comma, usually one fifth is much wider than
the rest and becomes unusable. It is called the wolf fifth.
The circle of fifths of each temperament can start from any key editing the parameter called Base Key.
Follows an explicating graph: in the first half is rapresented Meantone temperament with Base Key set on C,
after on G and finally on B. The second half shows Werkmeister temperament with the same three values of
the Meantone. With the parameter Base Key set to C each temperament is built exactly as shown in the
following circular graphs.
-1/4 sc: a pure fifth narrowed by 1/4 of syntonic comma
-1/4 pc: a pure fifth narrowed by 1/4 of pythagorean comma
Page 85

83
Viscount Physis OrgansReference Manual
14.2 TEMPERAMENTS OF THE PHYSIS ORGANS
KIRNBERGER II
Based on two fifths, reduced by half syntonic comma, and one fifth reduced by a skisma. There are three
pure majors: C, G, D. Therefore, the major triads on C and G are pure. Same goes with the minor triads, on
E and B. The four major thirds on C#, G#, Eb, Bb are Pythagorean. The coexistence of pure and tempered
chords gives a peculiar character to this tuning.
Kirnberger II
Kirnberger II
pure: pure 5th
ETS12: Equal Tempered 5th
sc: synthonic comma
pc: pythagorean comma
pure: pure 5th
ETS12:
Equal Tempered 5th
sc:
synthonic comma
pc:
pythagorean comma
Pure
Meantone
ETS12
WERCKMEISTER III
Based on four fifths, each reduced by ¼ Pythagorean comma – the others are pure. Creates three Pythagorean
major thirds on: C#, F#, G#. As the number of alteration in the piece performed increases, so does the
harmonic tension.
Werckmeister III
Werckmeister III
pure: pure 5th
ETS12: Equal Tempered 5th
sc: synthonic comma
pc: pythagorean comma
pure: pure 5th
ETS12:
Equal Tempered 5th
sc:
synthonic comma
pc:
pythagorean comma
Pure
Meantone
ETS12
Page 86

84
Viscount Physis Organs Reference Manual
PYTHAGOREAN
Based on eleven pure Pythagorean fifths and a wolf fifth on G#. This tuning can be used to play monodies,
and music that does not use thirds in general. Most useful for curiosity and educational ends.
Pythagorean
pure: pure 5th
ETS12: Equal Tempered 5th
sc: synthonic comma
pc: pythagorean comma
pure: pure 5th
ETS12:
Equal Tempered 5th
sc:
synthonic comma
pc:
pythagorean comma
Pure
Meantone
ETS12
VALLOTTI
Based on six fifths, each decreased by 1/6 of Pythagorean comma. The others are pure fifths.
The major thirds on Eb–B, Bb–E, F–A are equivalent, as the ones on C, G and D. Thirds on F#, C# and G#
are Pythagorean instead.
Vallotti
pure: pure 5th
ETS12: Equal Tempered 5th
sc: synthonic comma
pc: pythagorean comma
pure: pure 5th
ETS12:
Equal Tempered 5th
sc:
synthonic comma
pc:
pythagorean comma
Pure
Meantone
ETS12
Page 87

85
Viscount Physis OrgansReference Manual
CHAUMONT
A meantone temperament; the wolf fifth has been improved by enlarging the fifths on Eb and Bb. There are
six pure major thirds: F, C, G, D, A, E. The third major on B, although not very pleasant, can still be used.
Chaumont
pure: pure 5th
ETS12: Equal Tempered 5th
sc: synthonic comma
pc: pythagorean comma
pure: pure 5th
ETS12:
Equal Tempered 5th
sc:
synthonic comma
pc:
pythagorean comma
Pure
Meantone
ETS12
KELLNER 1975
This tuning was created by Kellner, who figured out its structure from the symbols on the first page of the
“Wohltemperierte Klavier” by Bach, 1722. The tuning is based on five fifths, each reduced of 1/5 of
Pythagorean comma. This originates three Pythagorean major thirds, on: C#, F#, G#. None of the thirds is
pure. The major third closer to being pure is on C.
Kellner 1975
Kellner 1975
pure: pure 5th
ETS12: Equal Tempered 5th
sc: synthonic comma
pc: pythagorean comma
pure: pure 5th
ETS12:
Equal Tempered 5th
sc:
synthonic comma
pc:
pythagorean comma
Pure
Meantone
ETS12
Page 88

86
Viscount Physis Organs Reference Manual
KIRNBERGER III
Based on four fifths, each one reduced by ¼ of syntonic comma, and one fifth reduced of the remaining
skisma. There is only one pure major third on C. From most to least pure, they are G, D, A and F, Bb, Eb. E,
B and F# are equivalent one with the other. Pythagorean major thirds are on C# and G#. Pieces with many
alterations are well characterised.
Kirnberger III
Kirnberger III
pure: pure 5th
ETS12: Equal Tempered 5th
sc: synthonic comma
pc: pythagorean comma
pure: pure 5th
ETS12:
Equal Tempered 5th
sc:
synthonic comma
pc:
pythagorean comma
Pure
Meantone
ETS12
WERCKMEISTER IV
Based on five fiths, each reduced of 1/3 of Pythagorean comma, and two more thirds increased of the same
amount. Very pleasant with mostly unaltered tonalities, it becomes “harder” as the alterations increase.
Werckmeister IV
Werckmeister IV
pure: pure 5th
ETS12: Equal Tempered 5th
sc: synthonic comma
pc: pythagorean comma
pure: pure 5th
ETS12:
Equal Tempered 5th
sc:
synthonic comma
pc:
pythagorean comma
Pure
Meantone
ETS12
Page 89

87
Viscount Physis OrgansReference Manual
WERCKMEISTER V
Based on five fiths reduced by 1/5 of Pythagorean comma, and one fifth increased of the same amount.
This tuning is rarely used as there is no tonality that is much euphonic.
Werckmeister V
Werckmeister V
pure: pure 5th
ETS12: Equal Tempered 5th
sc: synthonic comma
pc: pythagorean comma
pure: pure 5th
ETS12:
Equal Tempered 5th
sc:
synthonic comma
pc:
pythagorean comma
Pure
Meantone
ETS12
SILBERMANN
Based on fifths reduced of 1/6 of syntonic comma. Wolf fifth is located on G#. Thirds that in meantone
tuning are pure, here are 1/3 syntonic comma wider. The wolf fifth is less prominent, not cacophonic yet not
completely acceptable.
Silbermann
pure: pure 5th
ETS12: Equal Tempered 5th
sc: synthonic comma
pc: pythagorean comma
pure: pure 5th
ETS12:
Equal Tempered 5th
sc:
synthonic comma
pc:
pythagorean comma
Pure
Meantone
ETS12
Page 90

88
Viscount Physis Organs Reference Manual
MEANTONE 3b - MEANTONE 3#
This tuning is the prototype of all temperaments based on fifths reduced by ¼ of syntonic comma.
This generates eight pure major thirds: Eb, Bb, F, C, G, D, A, E. However, the other thirds are unsuable (B,
F#, G#). The fifths are defined as meantone fifths: shorter than pure fifths but still sounding well. Only one,
G#, fills all the gap created by 11 others and becomes a wolf fifth. Tonalities with little alterations sound very
pleasant. Well characterised chromatic scale. Move the wolf on C# to use the G# key as Ab.
Meantone 3b
Meantone 3b
pure: pure 5th
ETS12: Equal Tempered 5th
sc: synthonic comma
pc: pythagorean comma
pure: pure 5th
ETS12:
Equal Tempered 5th
sc:
synthonic comma
pc:
pythagorean comma
Pure
Meantone
ETS12
Meantone 3#
Meantone 3#
pure: pure 5th
ETS12: Equal Tempered 5th
sc: synthonic comma
pc: pythagorean comma
pure: pure 5th
ETS12:
Equal Tempered 5th
sc:
synthonic comma
pc:
pythagorean comma
Pure
Meantone
ETS12
Page 91

89
Viscount Physis OrgansReference Manual
MEANTONE PURE MINOR 3rd
This temperament is built with fifths narrowed by 1/3 of syntonic comma. The wolf fifth on G# is very
large and completely unusable. The nine minor thirds based on C, G, D, A, E, B, F#, C#, G# are pure.
The eight major thirds based on Eb, Bb, F, C, G, D, A, E, are narrower, with respect to the pure, by 1/3 of
syntonic comma. Again in this temperament the chromatic scale has a particular character.
Meantone Pure
Minor 3rd
Meantone Pure
Minor
3rd
pure: pure 5th
ETS12: Equal Tempered 5th
sc: synthonic comma
pc: pythagorean comma
pure: pure 5th
ETS12:
Equal Tempered 5th
sc:
synthonic comma
pc:
pythagorean comma
Pure
Meantone
ETS12
ZARLINO
Eleven fifths are reduced by 2/7 of syntonic comma. The wolf fifth, very wide and therefore unusable, lies
on G#. Eight third majors are usable and reduced by 1/7 of syntonic comma.
Well characterised chromatic scale.
Zarlino
pure: pure 5th
ETS12: Equal Tempered 5th
sc: synthonic comma
pc: pythagorean comma
pure: pure 5th
ETS12:
Equal Tempered 5th
sc:
synthonic comma
pc:
pythagorean comma
Pure
Meantone
ETS12
Page 92

90
Viscount Physis Organs Reference Manual
SAUVER 1 - SAUVER 2
The Saveur 1 tuning is based on eleven fifths, reduced by 1/5 of syntonic comma. Wolf fifth lies on G#. In
Saveur 2 the fifth on F# is pure. The eight third majors of the meantone are somewhat wider here, so the
“wolf ” is less prominent. Well tuned tonalities are particularly “warm” and pleasant.
Sauver 1
Sauver 1
pure: pure 5th
ETS12: Equal Tempered 5th
sc: synthonic comma
pc: pythagorean comma
pure: pure 5th
ETS12:
Equal Tempered 5th
sc:
synthonic comma
pc:
pythagorean comma
Pure
Meantone
ETS12
Sauver 2
Sauver 2
pure: pure 5th
ETS12: Equal Tempered 5th
sc: synthonic comma
pc: pythagorean comma
pure: pure 5th
ETS12:
Equal Tempered 5th
sc:
synthonic comma
pc:
pythagorean comma
Pure
Meantone
ETS12
Page 93

91
Viscount Physis OrgansReference Manual
BARCA
The Barca temperament is based on six fifths (from C) reduced by 1/6 of syntonic comma each, and one
fifth (on Eb) reduced of the remaining skisma. Therefore there are no Pythagorean thirds, and tonalities with
many alterations still sound well.
Barca
pure: pure 5th
ETS12: Equal Tempered 5th
sc: synthonic comma
pc: pythagorean comma
pure: pure 5th
ETS12:
Equal Tempered 5th
sc:
synthonic comma
pc:
pythagorean comma
Pure
Meantone
ETS12
Page 94

92
Viscount Physis Organs Reference Manual
Double cusp
there are two separate cusps, both resembling to the single cusp described
above. The lowest keys sound in an intermediate position, between the
centre and the outside, alternating (one on the right cusp, one on the left
cusp). As the pitch rises, rises the pipes are gradually distributed further
and further to the outside, alternating (e.g. C right, C# left).
Double wing
The tallest pipes are placed in the centre. As the pitch lowers, the pipes
are gradually distributed further and further to the outside, alternating.
14.3 THE WINDCHEST IN PIPE ORGANS
The wind chest is a crate where the air from a bellows (manual or electric) is spread equally among the pipes.
Usually, each manual has its own wind chest. However, there are different kinds of wind chests: some contain
only one stop, while other have an additional crate filled with air from the bellows that spreads air to all the
stops for each note.
Here you will find a short description of each kind of wind chest simulated by the organ.
Single cusp
The tallest, broadest pipes are located in the centre. As the pitch rises the
pipes are gradually distributed further and further to the outside,
alternating (e.g. C to the right, C# left).
Page 95

93
Viscount Physis OrgansReference Manual
Mono
All the pipes are placed inside the wind chest, so the sound is not affected
by the position of the pipes.
Alternated
The pipes are placed alternating in two positions (e.g. C in one position,
C# in the other).
Single wing (left)
The tallest pipes are placed to the left, and the smaller (with higher pitch)
pipes to the right.
Single wing (right)
This pipe configuration is the opposite of the previous one: the lowest
pitched pipes are placed on the right and the highest pitched ones to the
left.
Page 96

94
Viscount Physis Organs Reference Manual
14.4 CONTENT OF THE .SET, .STY, .CMB and .ALL FILES
FILE .SET
PARAMETER POSITION NOTE
Air Pres sure TUNING menu
Temperament TUNING menu
Bas e Key TUNING menu
Ens emble TUNING menu
Pitch TUNING menu
Reverb SETUP menu, REVERBERATION function
Wet / Dry S ETUP menu, REVERBERATION function
Int. Amp. Equalizer SETUP menu, INT. AMPL. EQUALIZER function
Int. Amp. Tune-up SETUP menu, INT. AMPL. TUNE-UP function
Internal Panning SETUP menu, INT. AMPL. PANNING function
Couplers int o Divisional Piston SETUP menu, PROGR. FUNCTIONS function
Tremulant Depth and Speed in Pis ton or
Tremolo Depth and Speed in Pist on S ETUP menu, PROGR. FUNCTIONS function
Enclosed and A.P. into General P ist ons or
SWS and A.P. int o General Pis tons SETUP menu, PROGR. FUNCTIONS function
Enclosed and A.P. affected by Cancel or
SWS and A.P. affected by Cancel SETUP menu, PROGR. FUNCTIONS function
Crescendo Pedal SETUP menu, PROGR. FUNCTIONS function if [CRESCENDO] swell is present
Man.I/Pedal Swellbox or
Great/Pedal Swellbox SETUP menu, PROGR. FUNCTIONS funct ion
if [CRESCENDO] swell is not present and
[GREAT/PEDAL] or [MAN.I/PEDAL] swell
is present
Link Master V ol. pot entiomet er to SETUP menu, PROGR. FUNCTIONS function
MIDI Out Controls in Combiation Memories SE TUP menu, PROGR. FUNCTIONS function
MIDI Out Controls affected by Canc el SETUP menu, PROGR. FUNCTIONS function
A.P. Mode or S WS Mode SETUP menu, PROGR. FUNCTIONS function
Organ Solo dest . keyboard SETUP menu, PROGR. FUNCTIONS function
Orchestra voices affected by coupler SETUP menu, PROGR. FUNCTIONS function
ENC or SW S configuration
SETUP menu, ENC or SWS CONFIGURATION
function
Ext. Out Equalizers SETUP menu, EXT. OUT EQUALIZER function
Ext. S ub Freq. SETUP menu, EXT. SUB E QUALIZER function
Ext. S ub Slope SETUP menu, EXT. SUB E QUALIZER function
Mode SETUP menu, EXT. OUT ROUTER function
From SETUP menu, EXT. OUT ROUTER function if Mode is not s etted as Mono
To SETUP menu, EXT. OUT ROUTER function if Mode is not s etted as Mono
Position SETUP menu, EXT. OUT ROUTER function if Mode is set ted as Mono
External Input Left Channel SETUP menu, EXT. OUT ROUTER function
External Input Right Channel SETUP menu, EXT. OUT ROUTER function
Orchestral Voices Left Channel SETUP menu, EXT. OUT ROUTER function
Orchestral Voices Right Channel SETUP menu, EXT. OUT ROUTER function
Ext. Out Volumes SETUP menu, E XT. OUT VOLUME function
External Out Config SETUP menu, EXT. OUT CONFIG function
Ext. Out Resize SETUP menu, E XT. OUT RESIZE funct ion
Coupled Notes UTILITY & MIDI menu
Velocity Curves
UTILITY & MIDI menu, PEDAL/KEYB. TOUCH
function if section is not sett ed as Fixed
Fixed Velocity
UTILITY & MIDI menu, PEDAL/KEYB. TOUCH
function if section is setted as Fix ed
Keyboard Inversion modes UTILITY & MIDI menu, KEYB. INV. function
Keyboard Inversion UTILITY & MIDI menu
Auto Mainpage UTILITY & MIDI menu
LCD Contrast UTILITY & MIDI menu
Tx Channels
UTILITY & MIDI menu, TX AND RX CHANNEL
function
Rx Channels
UTILITY & MIDI menu, TX AND RX CHANNEL
function
Tx Filt ers UTILITY & MIDI menu, TX AND RX FILTER function
Rx Filters UTILITY & MIDI menu, TX AND RX FILTER function
Pis ton Combine modes UTILITY & MIDI menu, PIST. COMB. function
Pis ton Combine UTILITY & MIDI menu
1st Short Oc tave UTILITY & MIDI menu
Tracker Touch UTILITY & MIDI menu
IV, III, II, I, PED or SOL, S WL, GRT, CHR,
PED VOLUMES
according to the number of the organ's
sections
EXT VOLUMES e SETUP, EXT. OUT VOLUME
if the parameter is not linked to the
[MASTER VOLUME] potent iometer
PHO VOLUMES
MST VOLUMES
if the parameter is not linked to the
[MASTER VOLUME] potent iometer
Page 97

95
Viscount Physis OrgansReference Manual
FILE .CMB
FILE .STY
FILE .ALL
PARAMETER POS ITION NOTE
Voic e Identifier (ID) Internal data
Range Physis Editor
Lev el Compensat ion Physis E ditor
Pitch Compensation Physis Edit or
Character VOICES m enu, EDIT PARAMETERS funct ion pres ence depending on t he t ype of voice
Air Noise VOICES menu, EDIT PARAME TERS function presence depending on t he t ype of voice
Harmonic Nois e VOICES menu, EDIT PARAMETERS function presenc e depending on the ty pe of v oice
Attack VOICES menu, E DIT PARAMETERS function presence depending on the type of voice
Frequency Skew VOICES m enu, EDIT PARAMETERS funct ion pres ence depending on t he t ype of voice
Release Detune VOICES menu, EDIT PARAMETERS function pres ence depending on the type of voice
Low Scaling V OICES menu, EDIT P ARAMETERS function presenc e depending on the ty pe of voice
High S caling VOICES menu, E DIT PARAMETERS function presence depending on the type of voice
Detune VOICES menu, EDIT PARAMETERS function pr esence depending on the type of voice
Tremulant VOICES menu, EDIT PARAME TERS function
Orchestra v oice 1 Volume V OICES menu, EDIT PARAMETERS function
Orchestra v oice 2 Volume V OICES menu, EDIT PARAMETERS function
Orchestra voice 1 Brilliance VOICES menu, EDIT PARAME TERS function
Orchestra voice 2 Brilliance VOICES menu, EDIT PARAME TERS function
Orchestra v oice 1 Octave Shit VOICES menu, E DIT PARAMETERS function
Orchestra v oice 2 Octave Shit VOICES menu, E DIT PARAMETERS function
Orchestra v oice 1 Sus tain Pedal VOICES menu, E DIT PARAMETERS function
Orchestra v oice 2 Sus tain Pedal VOICES menu, E DIT PARAMETERS function
Orchestra v oice 1 Split Key VOICES menu, E DIT PARAMETERS function presence depending on the type of voice
Orchestra v oice 2 Split Key VOICES menu, E DIT PARAMETERS function presence depending on the type of voice
ORC VOLUMES
SUR VOLUMES
if organ is equipped with the surround
loudspeak ers
PRS VOLUMES
if organ is equipped with the presenc e
loudspeak ers
COMBI NATIONS CONTENT NOTE
Tutti
all st ops, all c ouplers, all t remulants, tremulants
depth and s peed*, Enc /Sws*, MIDI c ontrols * **,
Ap*, Organ Solo**, Sec tion off**, MIDI Program
Change and Bank S elect , Orches tra parameters ***
* if enabled in Programmable Func tions
** if present in t he organ
*** in the USA organs version
General (max 25 per 16 memory banks)
all st ops, all c ouplers, all t remulants, tremulants
depth and s peed*, Enc /Sws*, MIDI c ontrols * **,
Ap*, Organ Solo**, Sec tion off**, MIDI Program
Change and Bank S elect , Orches tra parameters ***
* if enabled in Programmable Func tions
** if present in t he organ
*** in the USA organs version
Divisional (max 25 per 16 memory banks
for each organ sec tion)
for each organ sec tion: s tops , couplers*, tremulant,
tremulants depth and speed*, MIDI controls* **,
MIDI Program Change and Bank Selec t, Orc hestra
parameters ***
* if enabled in Programmable Func tions
** if present in t he organ
*** in the USA organs version
Crescendo (16 steps)
all st ops, all c ouplers, all t remulants, MIDI c ontrols *
* if enabled in Programmable Func tions
Plenum
all st ops, all c ouplers, all t remulants, tremulants
depth and s peed*, Enc /Sws*, MIDI c ontrols * **,
Ap*, Organ Solo**, Sec tion off**, MIDI Program
Change and Bank S elect , Orches tra parameters ***
* if enabled in Programmable Func tions
** if present in t he organ
*** in the USA organs version
Reed
all st ops, all c ouplers, all t remulants, tremulants
depth and s peed*, Enc /Sws*, MIDI c ontrols * **,
Ap*, Organ Solo**, Sec tion off**, MIDI Program
Change and Bank S elect , Orches tra parameters ***
* if enabled in Programmable Func tions
** if present in t he organ
*** in the USA organs version
Ripieno
all st ops, all c ouplers, all t remulants, tremulants
depth and s peed*, Enc /Sws*, MIDI c ontrols * **,
Ap*, Organ Solo**, Sec tion off**, MIDI Program
Change and Bank S elect , Orches tra parameters ***
* if enabled in Programmable Func tions
** if present in t he organ
*** in the USA organs version
CONTENT NOTE
the same of 4 .sty files 1 file for each Preset Sty le
thesameof1.cmbfile
thesameof1.setfile
Local Off of each st op
Tremulants Depth and Speed
Page 98

96
Viscount Physis Organs Reference Manual
14.5 WHAT MIDI IS
The MIDI interface (Musical Instrument Digital Interface) allows instruments of different makes and kinds
to communicate with each other, using this very specific protocol of codes. This allows the creation of
systems of MIDI instruments, offering much greater versatility and control than is possible with single
instruments. To make this communication possible, all MIDI instruments have two or three 5-pin DIN
connectors called:
- MIDI IN: The connector through which the instrument receives the MIDI data transmitted by other
units.
- MIDI OUT: The connector through which the instrument sends the MIDI data it has generated to
other units.
- MIDI THRU: This connector, not always provided on all instruments, is used for connecting several
units in series, since it transmits the MIDI data exactly as they are received by the respective MIDI IN
port.
Most instruments equipped with MIDI interface transmit MIDI messages which specify, for example, which
note has been played and with what dynamic, by means of the MIDI OUT connector. If this connector is
connected to the MIDI IN connector of another MIDI instrument, such as an expander, the second instrument
will respond exactly to the notes played on the transmitter instrument.
The same type of information transfer is used for recording MIDI sequences. A computer or a sequencer
can be used to record the MIDI data generated by the transmitter instrument. If these recorded data are sent
back to the instrument, it automatically repeats the recorded performance.
MIDI is able to transmit a multitude of digital data by means of just one cable, and thus just one connector.
this is thanks to the MIDI channels. There are 16 MIDI channels, and in a similar way as for radio
communications in which two stations can only communicate if they are tuned to the same frequency (or
channel), two MIDI instruments connected together are only able to communicate if the transmitter instrument
channel is the same as the receiver instrument channel.
MIDI messages subdivide into channel messages and system messages. The following is a short description
of these messages:
CHANNEL MESSAGES
NOTE ON
This message is transmitted when a note is depressed on the keyboard. Each Note On message contains the
following information:
Note On: when a key has been struck;
Note Number: the key which has been pressed, and therefore the relative note played;
Velocity: note dynamic (i.e. the force applied when the key was struck).
Note messages are expressed as a number from 0 to 127, with middle C represented by number 60.
NOTE OFF
This message is transmitted when a key struck previously is released.
When it is received, the sound of the note relating to the key is switched off. Each Note On message contains
the following information:
Note Off: a key has been released;
Note Number: which key has been released;
Velocity: dynamic (i.e. how fast the note was released).
N.B.:
A Note On message with Velocity=0 is considered equivalent to a Note Off message.
Page 99

97
Viscount Physis OrgansReference Manual
PROGRAM CHANGE
This message is used to select the programs or sounds of the receiver instrument.
There is also a specific standard called General MIDI which describes which sound should be recalled for
each Program Change received. This association is usually described by means of a table included in the user
manual of the instrument which adopts the standard.
This message contains the following information:
Program Change: voice or program change;
Program Change Number: the number of the program or voice to be activated;
CONTROL CHANGE
These are control messages (often associated to trimmers or pedals) used to add expression to the performance,
allowing you to set (and control in real time if necessary) voice parameters such as volume (CC n.7) or the
position of the swell pedals (CC n.11), etc.
This message contains the following information:
Control Change: a controller has been adjusted
Controller Number: which controller has been adjusted
Controller Position: the position of the controller
SYSTEM MESSAGES
SYSTEM EXCLUSIVE
These messages can only be interpreted by an instrument made by the same producer as the transmitter
device (in some cases only by the same model). They mainly relate to the instrument’s sound generation and
programming parameters. The Unico uses these messages to control all the internal parameters and for
switching the voices on and off.
REAL TIME
These messages are used for the real-time control of specific modules or functions of a connected instrument.
These messages include the Start, Stop, Pause/Continue and Clock commands.
START: the sequencer has started to record or play back a MIDI sequence
STOP: the sequencer has been stopped
PAUSE / CONTINUE: the sequencer has been set in stop status
CLOCK: the sequencer speed
N.B.
The organ does not transmit / receive the messages described above. They are described for your
information only.
The Real Time messages also include the Active Sensing code, sent to keep the dialogue between two MIDI
instruments alive. When the receiver instrument does not receive any MIDI data or the Active Sensing code
in a time interval of about 300 milliseconds, it considers the MIDI connection to have been deactivated, so
it switches off any notes still active. Remember that the transmission and reception of this message is optional,
so not all instruments are equipped to handle it.
Page 100

98
Viscount Physis Organs Reference Manual
CHANNEL MESSAGES
NOTE:
- Using default settings, channel messages are sent
on the following MIDI channels:
Ch.1: Swell notes or controls
Ch.2: Great notes or controls
Ch.3: Choir notes or controls
Ch.4: Pedal notes or controls
- Ch.16 is a reserved channel (system)
Note On
Message which is generated when a key is pressed.
Data format: 9nH kkH vvH
n=channel number :00H – 0EH (1 – 15)
kk=note number :1EH – 65H (30 – 101)
vv=note on velocity :01H – 7FH (1 – 127)
:00H (0) Note Off
Note Off
Message which is generated when a key is released.
Data format: 8nH kkH vvH
9nH kkH 00H
n=channel number :00H-0EH (1 – 15)
kk=note number :1EH – 65H (30 – 101)
vv=note off velocity :00H – 7FH (0 – 127)
ignored
- This message can be also received as Note On
with velocity=0.
Control Change
Messages to control volumes, expressions and other
system controls.
• Bank Select MSB (CC 0)
Controller transmitted in combination of Program
Change and Bank Select LSB in order to select a
specific bank of sound.
Data format: BnH 00H vvH
n=channel number :00H – 0EH (1 – 15)
vv=bank MSB number :00H – 7FH (0 – 127)
• Volume (CC 7)
Message which controls the sections volume.
Data format: BnH 07H vvH
n=channel number :00H – 0EH (1 – 15)
vv=volume value :00H – 7FH (0 – 127)
14.6 DETAILED MIDI IMPLEMENTATION
• Expression (CC 11)
Message which controls the sections expression.
Data format: BnH 0BH vvH
n=channel number :00H – 0EH (1 – 15)
vv=expression value :00H – 7FH (0 – 127)
• Bank Select LSB (CC 32)
Controller transmitted in combination of Program
Change and Bank Select MSB in order to select a
specific bank of sound.
Data format: BnH 20H vvH
n=channel number :00H – 0EH (1 – 15)
vv=bank LSB number :00H – 7FH (0 – 127)
• Sustain (CC 64)
Message which controls the Sustain / Damper effect.
Data format: BnH 40H vvH
n=channel number :00H – 0EH (1 – 15)
vv=switch :00H (0) off
(received as 00H-39H)
:7FH (127) on
(received as 40H-7FH)
• All sounds off (CC 120)
Terminates all voices currently on for the specific
channel.
Data format: BnH 78H 00H
n=channel number :00H – 0EH (1 – 15)
• All notes off (CC 123)
Terminates all notes currently on for the specific
channel.
Data format: BnH 7BH 00H
n=channel number :00H – 0EH (1 – 15)
Program Change
Messages for selecting sounds, timbres or programs.
Data format: CnH mmH
n=channel number :00H – 0EH (1 – 15)
mm=Program Change number :00H – 7FH (0–127)
 Loading...