

Page 1
viscount
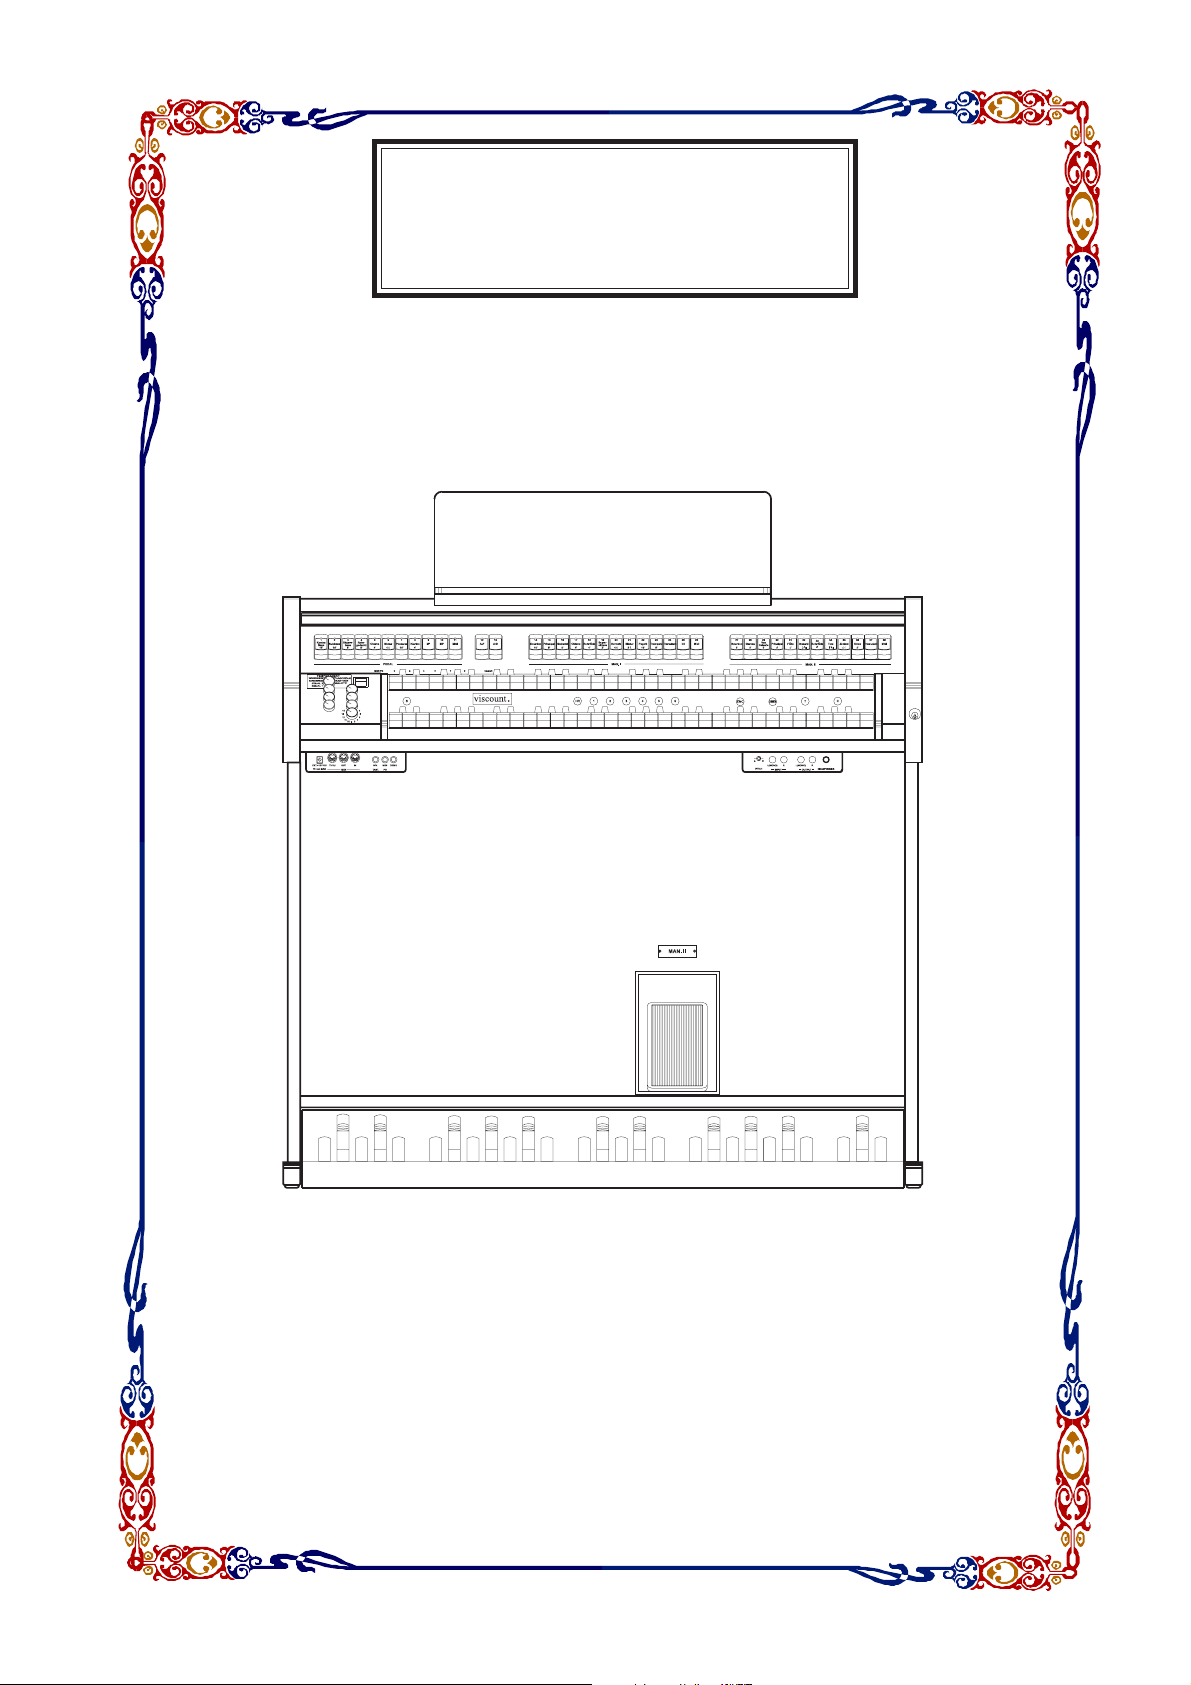
Jubilate 35 - 45 - 227
Manuale Operativo Mode d ' Emploi
Owner's Manual Bedienungsanleitung
Page 2
CAUTION
RISK OF ELECTRIC SHOCK
DO NOT OPEN
WARNING! TO REDUCE THE DANGER OF ELECTRIC SHOCK:
DO NOT EXPOSE THIS APPLIANCE TO RAIN OR MOISTURE
REFER SERVICING TO QUALIFIED SERVICE PERSONNEL
This simbol is intended to
alert the user to the presence
of important operating and
maintenance (servicing)
instructions in the literature
accompanying the appliance.
“INSTRUCTIONS PERTAINING TO A RISK OF FIRE,
“INSTRUCTIONS
ELECTRIC SHOCK, OR INJURY TO PERSONS“
ELECTRIC
IMPORTANT
IMPORTANT SAFETY INSTRUCTIONS
WARNING: When using electric products, basic precautions should always be fallowed,
including the following:
1) Read all instructions before using the product.
2) To reduce risk of injury, close supervision is necessary when product is used near
children.
3) Do not use this product near water – for example, near a batnub, washbowl, kitchen
sink, in a wet basement, or near a swimming pool, or the like.
4) This product, either alone or in combination with an amplifier and headphones or
speakers, may be capable of producing sound levels that could cause permanent
hearing loss. Do not operate for a long period of time in high volume level or at a level
that is unconfortable. If you experience any hearing loss or ringing in the ears, you
should consult an audiologist.
5) This products should be located away from heat sources such as radiators, heat
register, or other products that produce heat.
6) The power supply cord of the instrument should be unplugged from the outlet when left
unused for a long period of time.
7) Care should be taken so that objects do not fall and liquids are not spilled into the
enclosure of the instrument.
8) The products should be serviced by qualified personnel when:
a. The power supply cord or the plug has been demaged; or
b. Objects have fallen, or liquid has been spilled into the product; or
c. The products has been exposed to rain; or
d. The products does not appear to operate normally or exibist a marked
e. The products has been dropped, or the enclosure demaged.
9) Do not attemp to service the product beyond that described in the user-maintenance
instructions. All other servicing should be referred to qualified personnel.
DO NOT REMOVE COVER (OR BACK)
NO USER SERVICEABLE PARTS INSIDE
This simbol is intended to alert
the user to the presence of
uninsulated “dangerous
voltage“ within the product’s
enclouser that may be of
sufficient magnitude to
constitute a risk of electronic
shock to persons.
PERTAINING TO A RISK OF FIRE,
SHOCK, OR INJURY TO PERSONS“
SAFETY INSTRUCTIONS
change in performance; or
Page 3

Viscount JUBILATE 35 – 45 – 227
INDICE
1. COMANDI SUL PANNELLO SINISTRO........................................................................... ...................3
2. COMANDI SUL PANNELLO CENTRALE............................................................................................5
3. COMANDI SUI MANUALI.....................................................................................................................6
4. COMANDI SULLA PEDALIERA ..........................................................................................................7
5. COMANDI E CONNESSIONI SULLE VASCHETTE POSTE SOTTO I MANUALI..............................7
6. RESET – LOCAL OFF..........................................................................................................................9
MIDI IMPLEMENTATION.......................................................................................................................41
1
Page 4

Page 5
Viscount JUBILATE 35 – 45 – 227
1. COMANDI SUL PANNELLO SINISTRO
dell’organo a causa dell’usura con il tempo e la temperatur a (EQUAL1) od un altro temperamento norm ale
perfettamente intonato (EQUAL2), od i classici KIRNBERGER, WERCKMEISTER, PYTHAGOREAN,
MEANTONE, VALLOTTI.
L’ascoltatore, abituato alla uniformità del moderno temperamento equabile, resterà sorpreso e talvolta
sconcertato di fr onte alla irregolarità e alla tensione di c erte relazioni accordali, ac canto alla insolita euf oria e
distensione di altre. La varietà, il marcato colore sonoro ed il senso di identità tonale che questi temperamenti
conferiscono alle pagine musicali degli autori antichi, aiuteranno il musicista a co mprendere più a fondo il
significato espressivo e a penetr arne talvolta le ragioni stes se del process o compos itivo. Naturalmente il loro
uso deve essere guidato da un attento senso storico e da una coerenza stilistica legata all’epoca cui il
compositore appartiene.
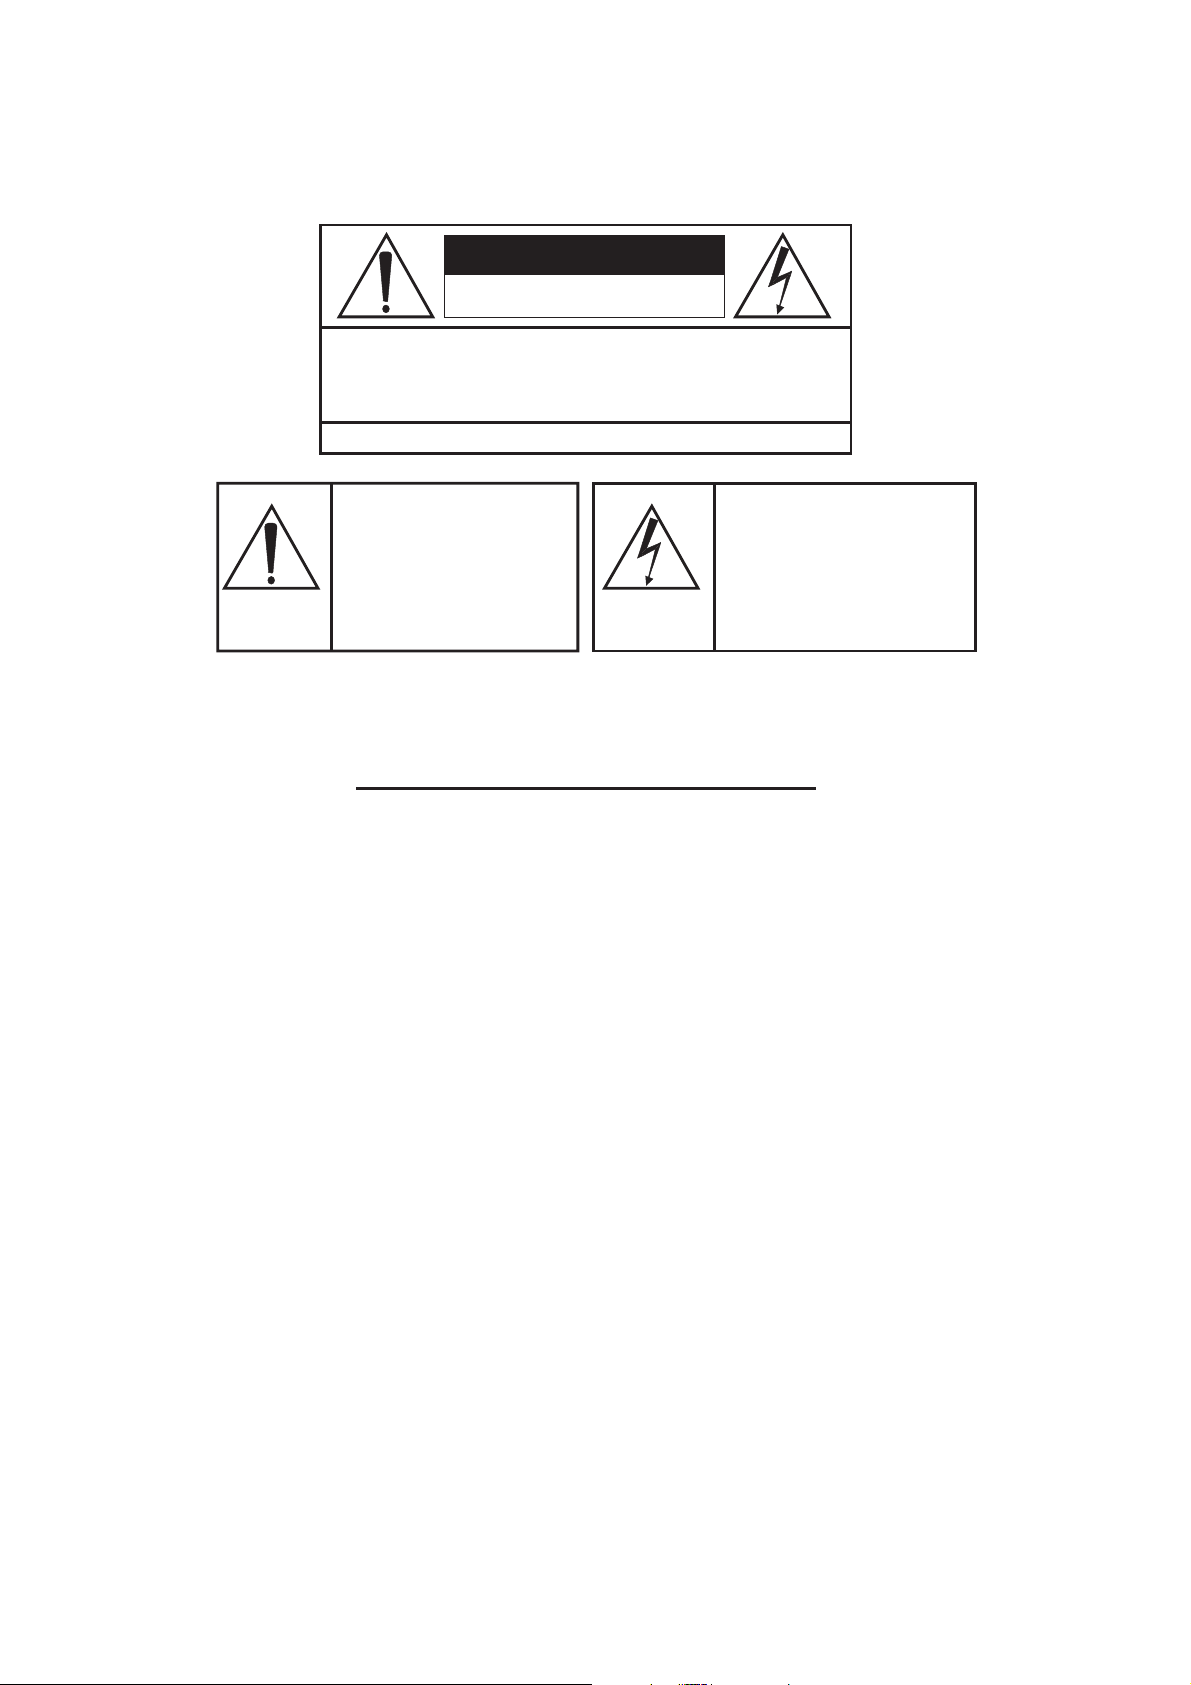
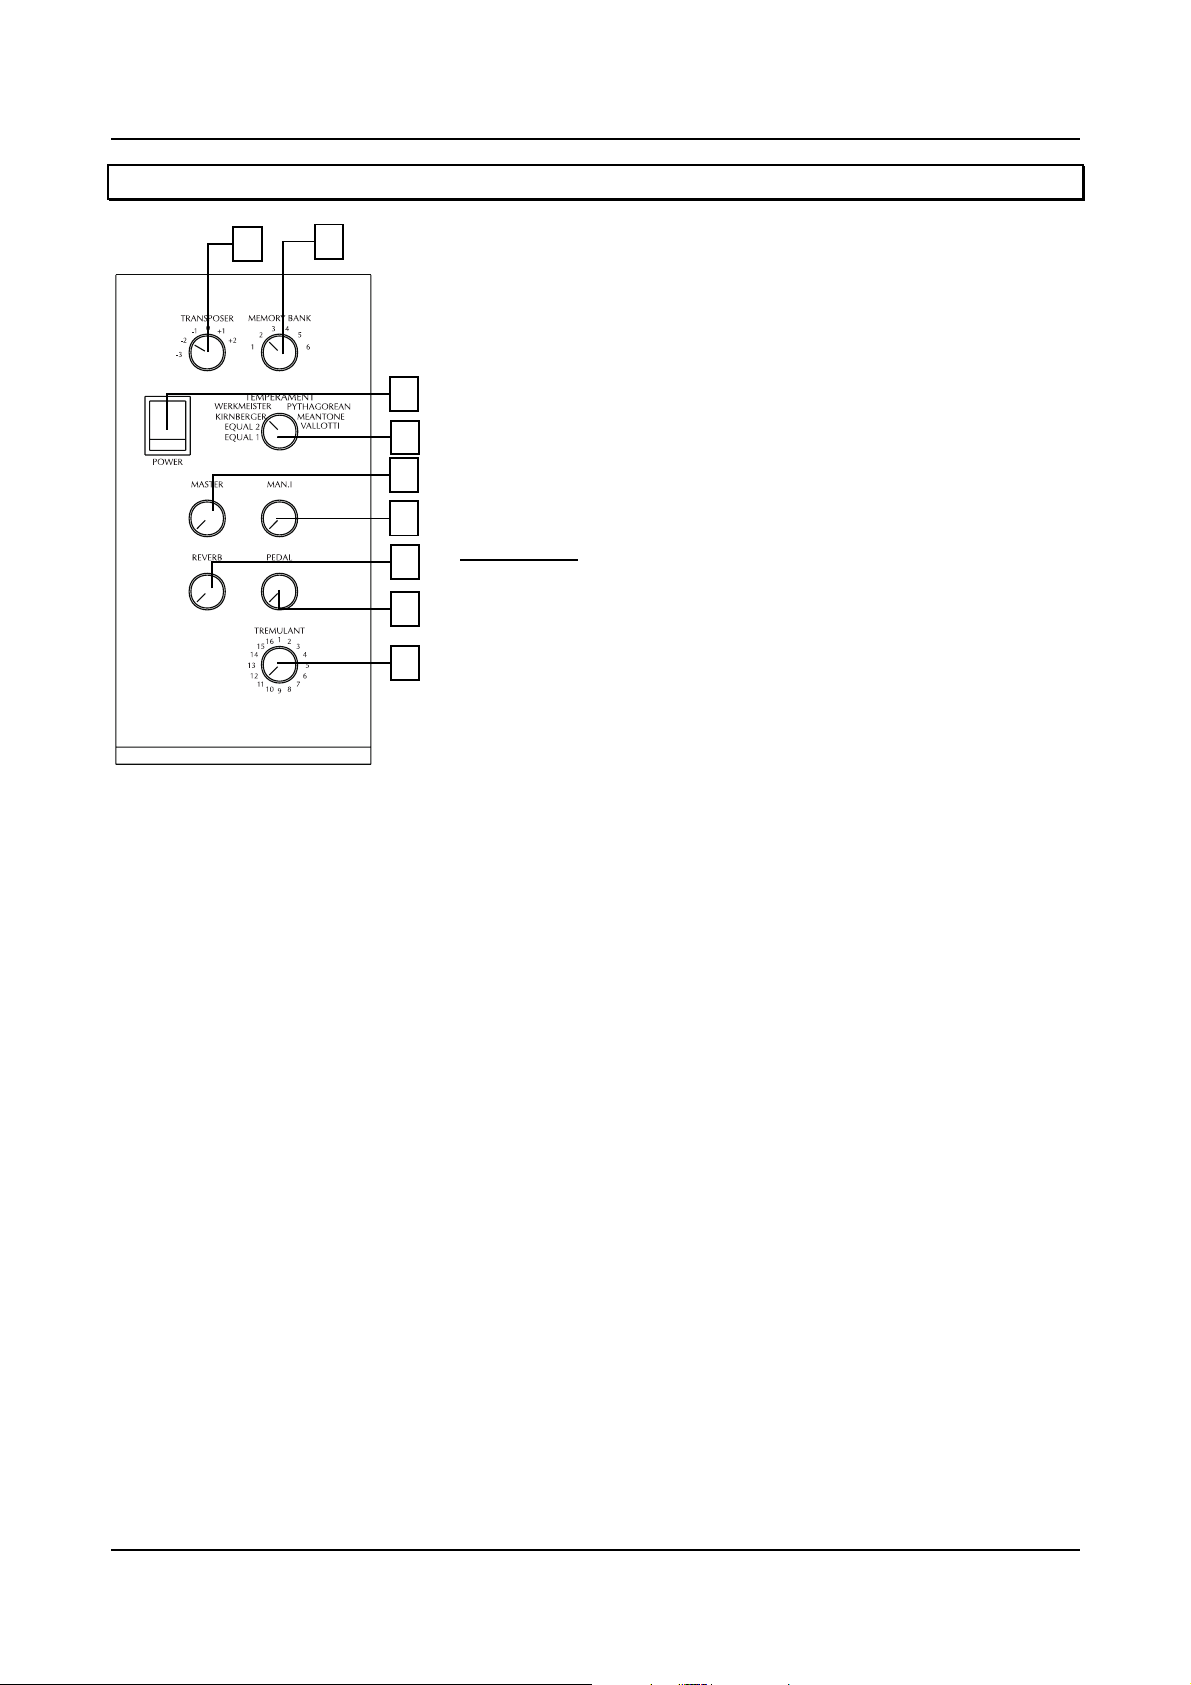
5. Potenziometro Master: Tramite questo potenziometro potrete controllare il volume generale dell’organo.
6. Potenziometro Man.I: Questo potenziometro permette di regolare il volume del primo manuale.
7. Potenziometro Reverb: Tramite questo controllo potrete regolare la quantità dell’eff etto di Reverbero da
immettere nel suono dell’organo. Tramite questo Reverbero Digitale potrete arricc hire la resa sonora del
vostro Jubilate in ambienti piccoli e poco risonanti.
8. Potenziometro Pedal: Tramite questo potenziometro potrete regolare il volume della pedaliera.
9. Selettore Tremulant: Mediante questo controllo potrete scegliere tra 16 tipologie di effetto di Tremolo
differenti per modulazione di ampiezza e modulazione di frequenza del suono.
1
2
3
4
5
6
7
8
9
1. Selettore Transposer: In questa sezione troviamo il selettore
relativo alla trasposizione, che permette di s pos tare l’intonazione della
tastiera nell’ambito di 2 semitoni verso l’acuto e 3 semitoni verso il
grave. La trasposizione della tastiera rende più semplice suonare
nelle tonalità “difficili” e sem plifica l’ac compagnam ento di un cantante
o di un altro strumentista, evitando in tal modo la necessità di
effettuare laboriose trasposizioni.
2. Selettore Memory Bank: Tramite questo selettore è possibile
selezionare uno dei sei banchi di memoria contenenti le memorie
generali.
3. Interruttore On/Off: Interruttore per l’accensione e lo spegnimento
del Jubilate.
ATTENZIONE!!: in caso di temporale si consiglia di disinserire
comunque la spina dalla presa di corrente.
4. Selettore Temperament: Questo controllo offre all’organista
interessato alla realizzazione filologica della m usica antica una serie
di temperam enti s torici di var ie epoche e di var ia origine nazionale. E’
possibile selezionare un temperamento normale con delle
microstonature atte a s imulare le non perf ette intonazioni delle canne
3
Page 6

Viscount JUBILATE 35 – 45 – 227
UN BREVE ACCENNO SUI TEMPERAMENTI
Nel sistema “naturale” di accordatura, bas ato sul fenomeno acustico dei suoni armonici, non è possibile far
coesistere allo stato “puro” (cioè s enza battimenti) due importanti interv alli musicali: la terza maggiore e la
quinta giusta. Pertanto nel corso dei secoli sono state proposte e realizzate numerose soluzioni di
compromesso che vengono chiamate TEMPERAMENTI. Essi privilegiano di volta in volta questo o
quell’intervallo, modificandoli variamente.
Nell’antichità e nel Medioevo, sino agli ultimi decenni del XV secolo, era in uso il sistema di accordatura
“pitagorico” in cui le quinte erano conservate perfettamente pure. L’intervallo di terza maggiore che ne
derivava era partic olarmente sgradev ole e per tanto veniva cons iderato dissonante. La music a dell’epoca era
tuttavia prevalentemente monodica e le prime forme polifoniche vocali e strumentali usavano largamente
l’intervallo di quinta. Col primo Rinascimento e l’inizio della grande fioritura polifonica vocale, l’intervallo di
terza maggiore venne progressivamente sentito come cons onante. Gli strumenti ad accordatura fissa, come
l’organo ed il cembalo, si adeguarono a tale situazione, adottando un sistema di temperamento detto
“mesotonico” che privilegiava l’intervallo di terza maggiore rispetto a quello di quinta. Questo temperamento
riveste un’importanza particolare, in quanto us ato normalmente in Europa nei secoli XVI e XVII, fino ai pr imi
del ‘700. Ecco quindi i sei temperamenti del Jubilate, primo fra tutti il “mesotonico” o MEANTONE.
MEANTONE
-
N. 8 terze maggiori pure: MIb – SOL / SIb – RE / FA – LA / DO – MI / SOL – SI / RE – FA# / LA – DO# /
MI – SOL.
-
N. 4 terze maggiori inutilizzabili (quarte diminuite): SI – RE# / FA# - LA# / DO# - MI# / LAb – DO.
-
N. 1 quinta cosiddetta “del lupo” (quinta crescente, fortemente dissonante): SOL# - MIb.
-
Scala cromatica molto irregolare (di conseguenza le composizioni cromatiche risultano estremamente
caratterizzate).
-
Tonalità utilizzabili con questo temperamento: DO magg. / RE magg. / SOL magg. / LA magg. / SIb
magg. e i relativi minori.
I temperamenti che seguono consentono invece di usar e tutte le tonalità maggiori e minori, anche se quelle
con più alterazioni, contrariamente a quanto avviene con l’attuale temperamento equabile, risultano
variamente caratterizzate.
WERCKMEISTER
Questo temperamento, proposto dall’organista e teorico musicale Andreas Werckmeister, risulta indicato
nell’esecuzione del repertorio musicale tedesco di fine 1600.
KIRNBERGER
Il temperamento elaborato da Johann Philipp Kirnberger, allievo di J.S. Bach, si presta ugualmente
all’esecuzione degli autori barocchi tedeschi e delle opere bachiane.
VALLOTTI
Questo temperamento italiano di Francescantonio Vallotti fu ripres o più tardi in Inghilterra da Thomas Young.
Può essere efficacemente utilizzato per il repertorio settecentesco italiano, ma anc he per quello inglese dello
stesso periodo.
PYTHAGOREAN
Questo temperamento, in cui le quinte erano conser vate perfettamente pure, risale al periodo del Medioevo
sino al 1400, per cui può essere utilizzato per composizioni di quel periodo.
4
Page 7

Viscount JUBILATE 35 – 45 – 227
5
Page 8

Viscount JUBILATE 35 – 45 – 227
3. COMANDI SUI MANUALI
1
3
4
6
N.B.: nel Jubilate 227 i pulsanti qui descritti si trovano sotto il primo manuale.
1. Tastiera Numerica: Questa parte di tas tiera (contraddistinta dai numeri da 0 a 9 e dalla scr itta CLEAR)
permette di comporre, durante la pr ogr ammazione del canale MIDI, il numero del c anale pres c elto, o durante
l’invio di un Program Change, il numer o del programma interessato. Per ulteriori infor mazioni consultate il
capitolo 2 ed il capitolo 5. E’ possibile altresì selezionare uno dei sei brani dimostrativi contenuti nella
memoria del Vostro Jubilate (vedi cap. 5 – Vaschetta laterale sinistra).
2. Pulsante Set: Questo pulsante abilita la funzione di salvataggio delle mem orie o di configurazione del
canale MIDI (vedi cap.3).
3. Memorie generali (HR; 1 - 2 - 3 - 4 - 5 - 6): Tutte le selezioni effettuate sui registri possono venire
memorizzate. Sotto il prim o manuale sono presenti sei mem orie generali. Le memorie includono un pulsante
denominato HR, conosciuto anche col numero 0, il quale memorizza automaticamente la configurazione
presente quando il pistoncino è acceso. In questo modo si evita di perdere configurazioni non memorizzate al
momento del richiamo di una memoria generale o dedicata.
Per memorizzare i registri spingete il pulsante dell'annullatore contrassegnato con la lettera "C". Effettuate
quindi la scelta dei registri sulla sezione desiderata. Spingere il pulsante SET (S) posizionato a sinistra sotto il
primo manuale e, mantenendolo premuto, premete uno dei 6 pulsanti delle memorie dove volete salvare
questa combinazione di registri.
In caso di un utilizzo dell’organo da parte di più organisti, ognuno di loro avrà la possibilità di salvare le
proprie registrazioni su un diverso numero di Memory Bank.
4. Enclosed (ENC): Premendo questo pulsante tram ite il pedale d'espressione si potrà c ontrollare il volume
generale di tutto l'organo.
5. Pulsante Chimes: Mediante questo pulsante potrete inserire nel suono del prim o manuale quello delle
campane tubolari, disabilitando tutti i registri presenti su questo manuale.
6. Pulsante Tutti (T): Il “Tutti” abilita una serie di registri prefissati che danno alla voce una maggiore
intensità abilitando tutti quei registri che formano il ricco suono del "Grand'organo".
•
N.B.: Il “Tutti” non attiva le voci oscillanti, i tremoli e la Vox Celeste.
7. Pulsante Cancel (C) : Premendo questo pulsante tutti i registri attivi verranno disabilitati.
Funzione Set+Cancel: Nel caso di collegamento MIDI con un altro organo VISCOUNT, l’attivazione di un
registro sullo strumento trasmittente causerà (tramite l’invio di un messaggio di sistema esclusivo)
l’abilitazione dello stesso sull’organo ricevente. Qualora si desideri che determinati registri non suonino
sull’organo trasmittente, ma alla loro selezione vengano com unque attivati s ullo s trumento ricevente eseguite
la seguente procedura:
2
- Premere il pulsante Set (S) e contemporaneamente il Cancel (C): tutti i registri vengono accesi.
- Spegnere i registri che si desidera suonino solo sull’organo ricevente.
- Premere nuovamente Set+Cancel.
6
5
7
Page 9
Viscount JUBILATE 35 – 45 – 227
4. COMANDI SULLA PEDALIERA
1
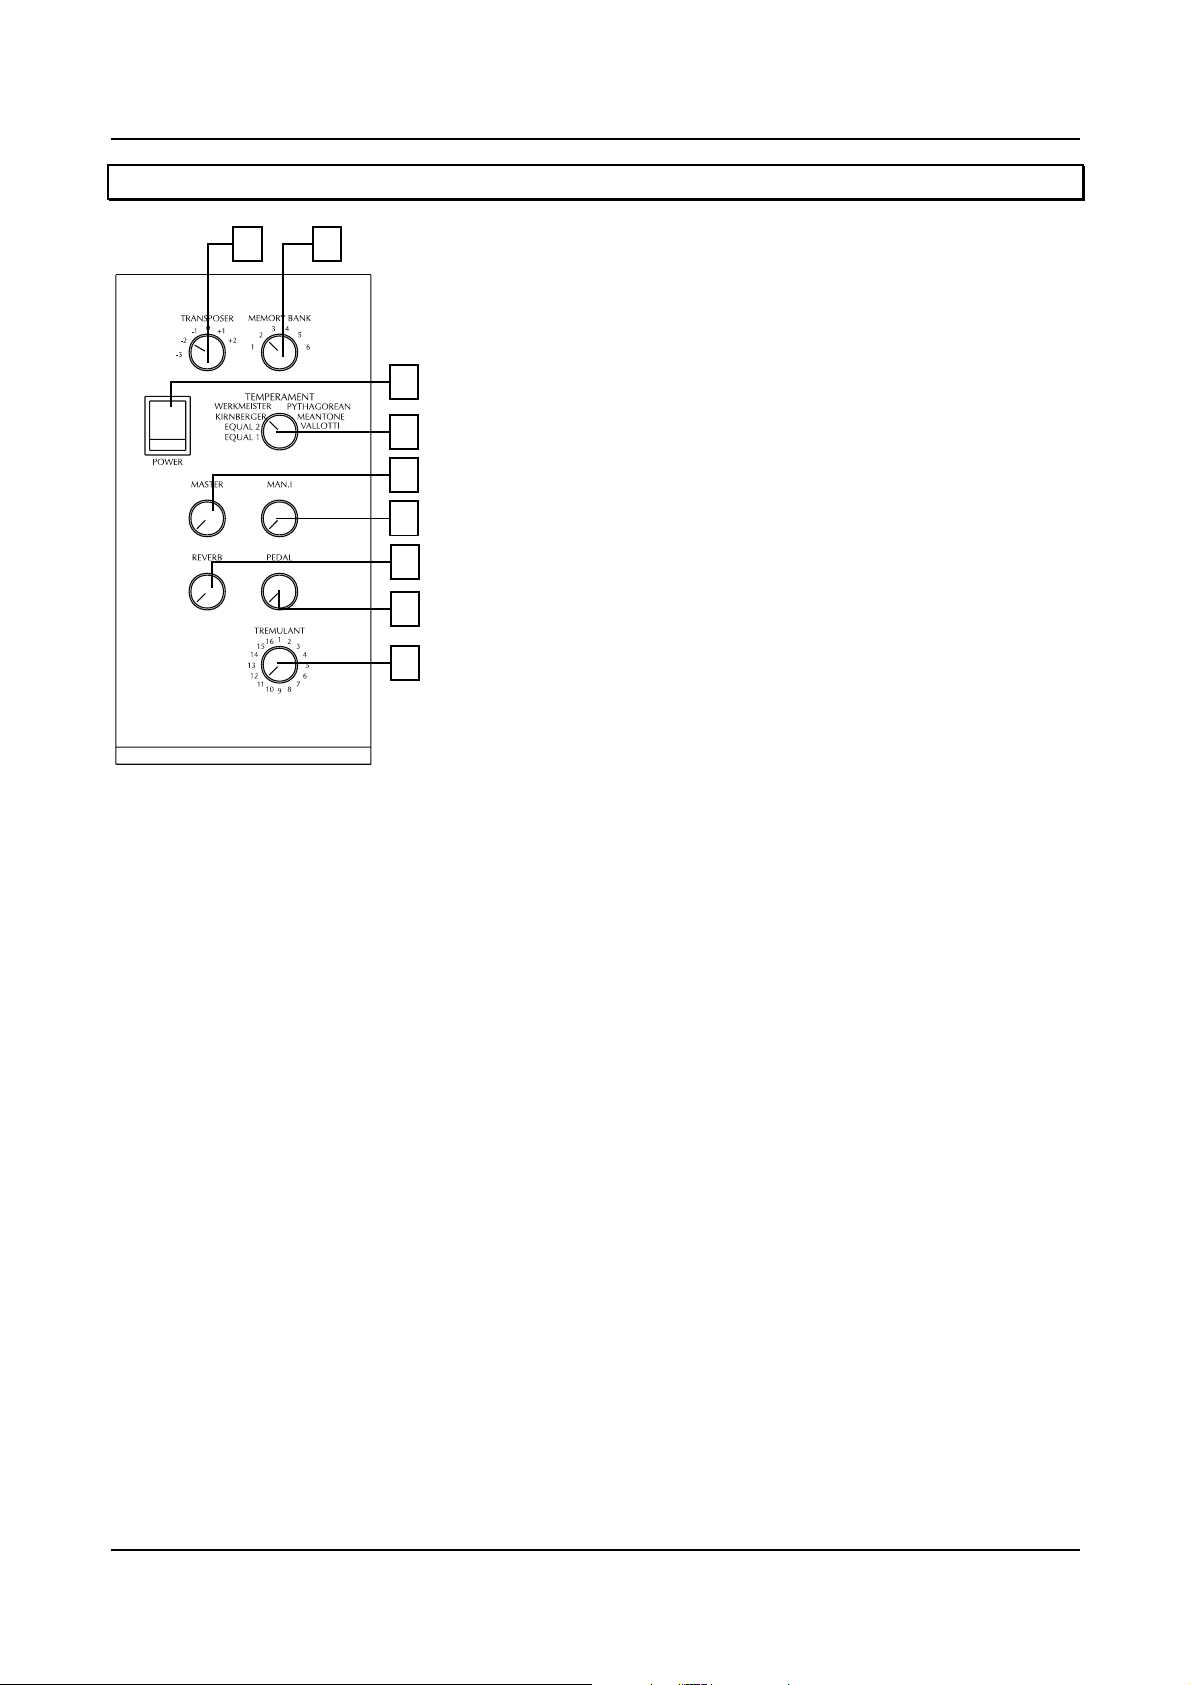
1. Pedale di VOLUME del SECONDO MANUALE: Gli organi Jubilate sono dotati di un pedale per il volume
del secondo manuale.
Se il pulsante “ENC” posizionato sotto il s ec ondo manuale (od il primo nel m odello 227) è in f unzione, tram ite
questo pedale sarà possibile controllare il volume generale dell’organo.
Va inoltre segnalato che sul pedale in questione è presente un piccolo circuito che simula l'azione della cassa
espressiva, riducendo le tonalità acute a bassi volumi.
5. COMANDI E CONNESSIONI SULLE VASCHETTE POSTE SOTTO I MANUALI
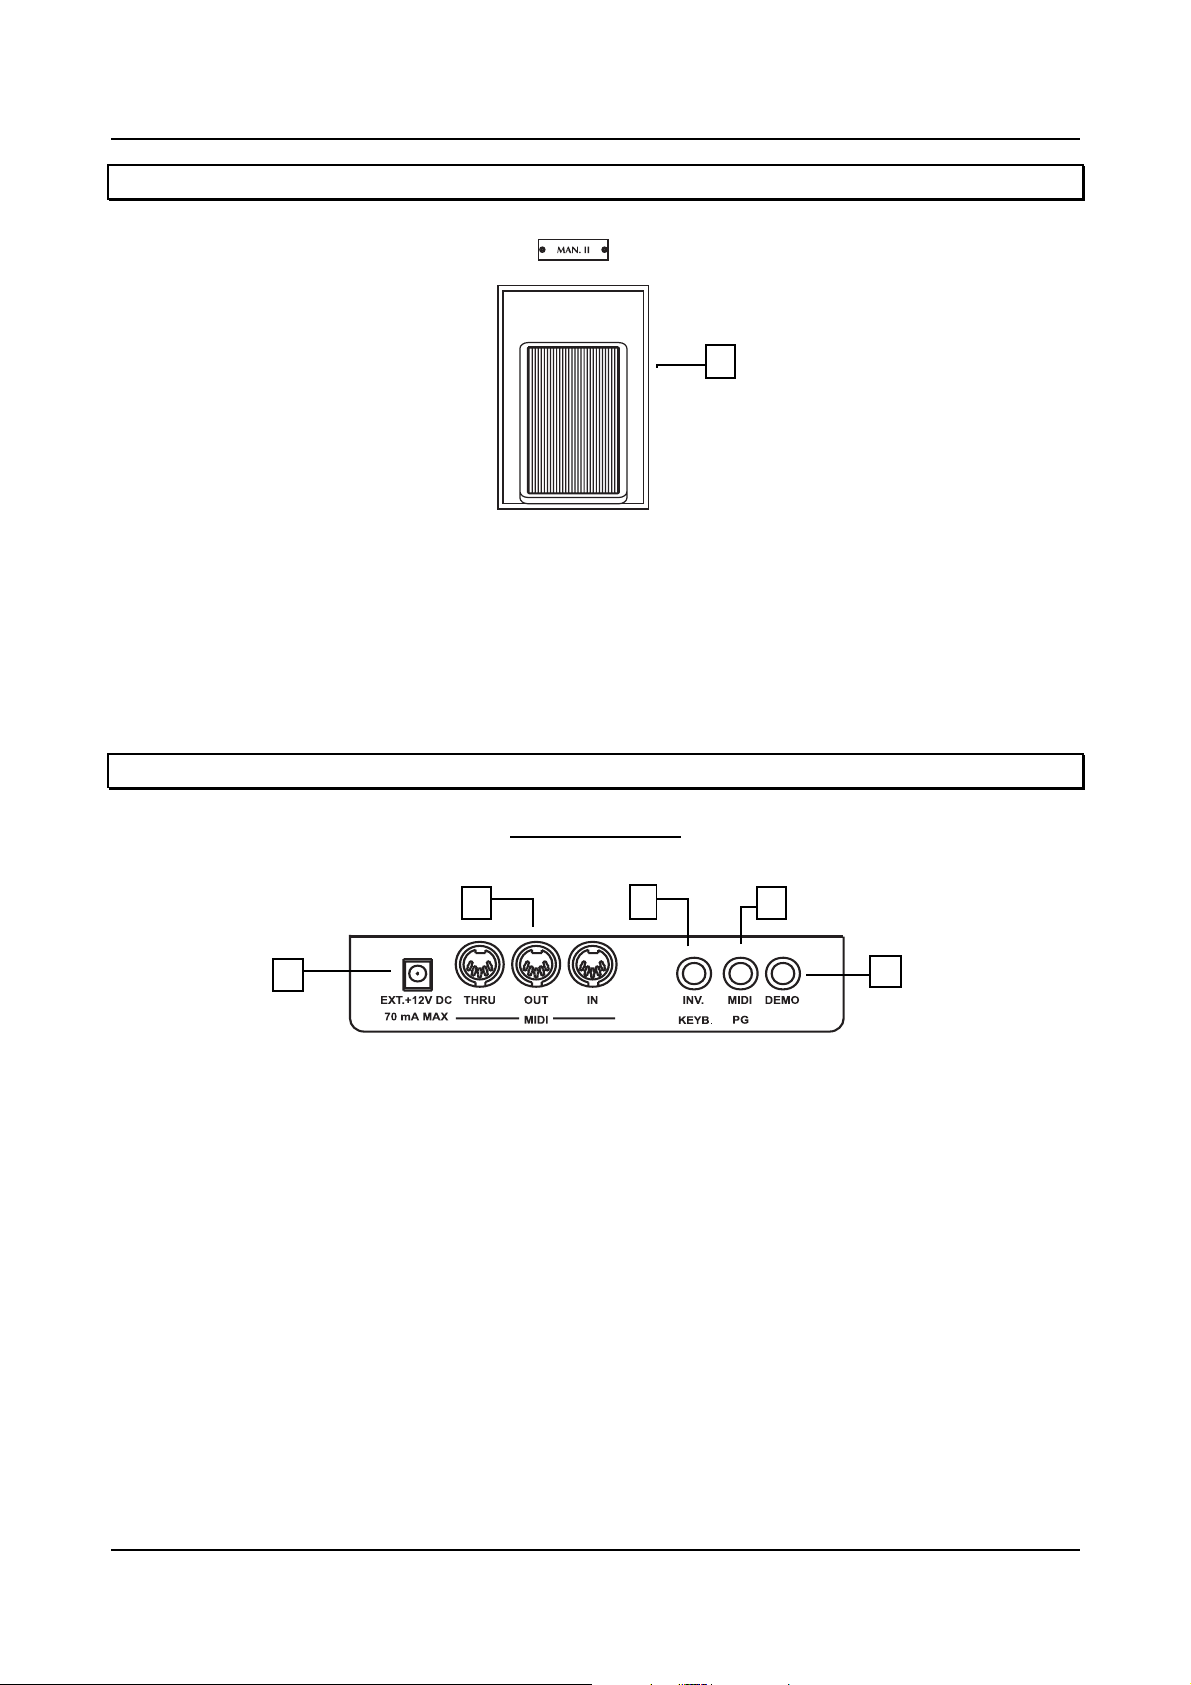
Vaschetta sinistra
2
3
4
1
1. External +12V DC: Da questo connettore è possibile prelevare la tensione +12 Volt. Normalm ente questo
connettore viene utilizzato con funzione di REMOTE ossia per l’accens ione a distanza delle casse opzionali
(tipo Viscount V30 e V28) collegate alle prese OUPUT presenti nella vaschetta laterale sinistra.
2. MIDI IN - OUT - THRU: Prese pentapolari DIN per il collegamento dell’organo con dispositivi dotati di
interfaccia MIDI (expander, computer, sequencer....). Tramite la presa MIDI IN potrete ricevere messaggi
MIDI provenienti da sorgenti MIDI esterne. Tramite la pres a MIDI THRU, in grado di inviare i messaggi MIDI
ricevuti dalla presa MIDI IN, potrete creare un collegamento in serie tra il Vostro Jubilate e altre
apparecchiature MIDI. T ramite la presa MIDI OUT, infine, potrete trasm ettere i messaggi MIDI generati da
Jubilate, e suonare un altro Jubilate per mezzo delle tastiere e della pedaliera del primo.
3. INV. KEYB.: Questo pulsante perm ette di invertire i registri dei due manuali, quindi i registri del primo
manuale suoneranno nel secondo e viceversa.
4. MIDI PG: Pulsante per la trasmissione dei Program Change. Per inviare un Program Change ad un
dispositivo esterno dotato di interfac cia MIDI, premete questo pulsante e contemporaneamente il pulsante
MIDI (situato nella sezione registri) della sezione interessata (Pedal, Man.I o Man.II). Quindi, dopo che tale
pulsante ha iniziato a lampeggiare, componete tr amite la tastiera numerica abilitata per la composizione dei
numeri dei canali o dei programmi (vedi cap.4 – Tastiera numerica) il numero del Program Change
7
5
Page 10

Viscount JUBILATE 35 – 45 – 227
desiderato. Alla pressione del terzo tasto, e quindi del terzo numero, il tasto MIDI della sezione prescelta
smetterà di lampeggiare con conseguente invio del Program Change.
N.B.: L’invio del Program Change e quindi la conc lusione dell’operazione avviene solamente alla pressione
del terzo tasto della tastier a numerica. Ciò vuol dire che se dovete inviare il Program Change numero 30
dovrete premete i tasti 0 - 3 - 0.
Il richiamo di una memoria provoca la trasmissione del Program Change in essa memorizzato.
5. DEMO: Questo pulsante per mette di ascoltare uno f ra i 6 brani dimostrativi m emorizzati nelle memorie di
Jubilate. I brani sono selezionabili premendo contemporaneamente il pulsante DEMO ed un tasto della
tastiera numerica relativo al brano che si desidera ascoltare.
... A PROPOSITO DI MIDI.
La sigla MIDI è l’acronimo di Musical Instrument Digital Interface (interfaccia digitale per strumenti musicali).
Tale interfaccia permette agli strumenti musicali elettronici, anc he di marca e genere diverso, di colloquiare
tra loro o con un computer, per scambiarsi numerose informazioni tramite un ben specifico e dettagliato
protocollo di codici. Sarà così poss ibile ottenere diverse funzioni delle macchine collegate s enza dover agire
su di loro in maniera fisica.
Gli strumenti musicali elettronici dotati di interfaccia MIDI utilizzano uno o più connettori DIN 5 poli che
rappresentano appunto le prese MIDI. Solitamente dette prese sono tre e sono così nominate:
- MIDI IN: Tramite questa presa la macchina riceve i dati MIDI emessi da altre unità.
- MIDI OUT: Tramite questa presa la macchina invia i dati MIDI da lei generati ad altre unità.
- MIDI THRU: Questa presa, utilizzata per il collegamento in serie di più unità riceventi, emette i dati MIDI
tali e quali vengono ricevuti dalla rispettiva porta MIDI IN.
Ma descriviamo brevemente i termini di più frequente utilizzo nel vocabolario del MIDI.
•
Canale MIDI (MIDI channel): il MIDI dispone di 16 canali. Tutti i vari tipi di messaggi possono essere
trasmessi su questi 16 canali separatamente. In ques to modo, attraverso lo stesso cavo, sarà possibile
inviare ad uno o più strumenti una parte di violini (per esempio sul c anale 5) ed una parte di batteria (per
es. sul canale 10). Nonostante tutte le informazioni arrivino allo strumento ricevente, questi riprodurrà
soltanto quelle trasmesse sul canale su cui lo stesso è sintonizzato.
•
Messaggi di nota (note On/Off): sono le informazioni principali in quanto descrivono quali note devono
essere suonate, in quale momento e con quale dinamica e durata.
•
Cambio di programma (Program Change): servono a selezionare un programma, dato che molti
strumenti dispongono di un certo numer o di memorie a ciascuna delle quali corrisponde un determinato
programma. Conoscendo la corrispondenza fra il numero assegnato alla memor ia potremo selezionare il
suono che ci interessa: per esempio abbinando al Progr am Change n.1 l’effetto di reverber o ed al n.49
l’effetto di Delay.
•
Messaggi di controllo (Control Change): sono messaggi che solitamente vengono utilizzati per
aggiungere espressività alla “performance”. A questa categoria appartengono i messaggi di volume
(Control Change n.7), attivazione del pedale del forte (c.c. n.64), regolazione mandata del reverbero (c.c .
n.91), regolazione mandata del Chorus (c.c. n.93), ecc.
•
Messaggi di sistema: sono messaggi indipendenti dal canale MIDI dato che la loro funzione è di controllo
dell’intero sistema. Fra questi sono da segnalare i messaggi definiti di “sistema esc lusivo” ovvero quelle
istruzioni che possono essere interpretate solamente da una macchina uguale a quella che le ha
generate. Di questi mess aggi fanno parte i dati di BULK DUMP ovvero le istruzioni di programmazione
della macchina. Queste istruzioni contengono i parametri di programmazione comunemente salvati in una
locazione di memoria. Vengono utilizzati per trasferire i sopracitati parametri da una macchina ad un’altra
analoga, oppure per essere salvati in una unità di memorizzazione esterna, per esempio un computer o
un sequencer, che ne permetta un ripristino in caso di perdita o di cancellazione accidentale.
8
Page 11
Viscount JUBILATE 35 – 45 – 227
Vaschetta destra
7
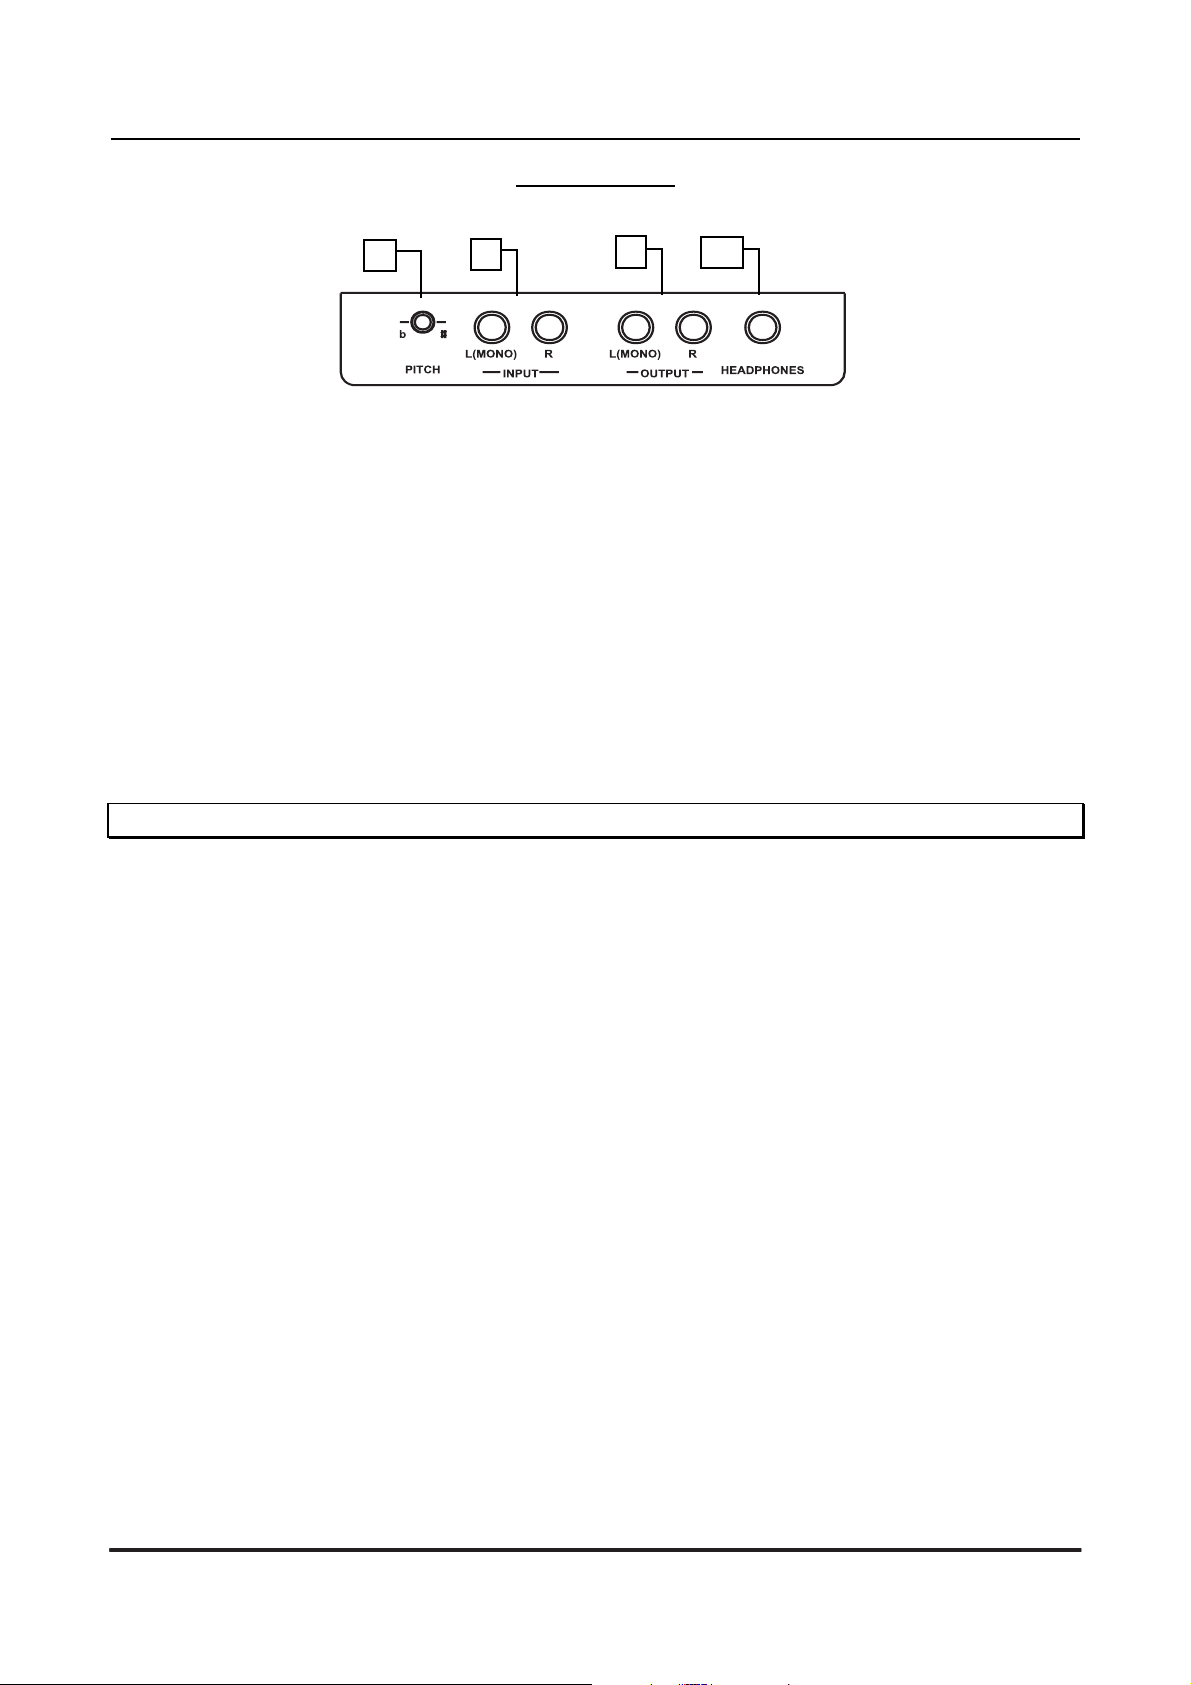
7. Pitch (General): Consente di controllare la regolazione fine dell'accordatura di tutto lo strumento. Alla
consegna l'organo viene intonato dal costruttore con LA=440Hz (alberino del pitch in posizione centrale).
8. Input L(MONO) - R: Prese di ingresso all’amplificazione dell’organo. In caso di sorgente monofonica
utilizzare la presa L(MONO).
9. Output L(MONO) - R: Prese di uscita dell’organo non amplificate. Ques te prese vengono generalmente
usate per il collegamento con casse amplificate esterne (del tipo Viscount V30 e V28) o per effettuare
registrazioni su apparati di registrazione analogica come registratori a cassette. In caso di unità ricevente
monofonica utilizzare solo la presa L(MONO).
10. Headphones: Presa di collegamento per una cuffia stereo. A cuffia inserita l’amplificazione interna
dell’organo verrà automaticamente disabilitata.
8
9
10
6. RESET – LOCAL OFF
RESET
In caso di malfunzionamento dello strumento, prima di richiedere l’intervento di un tecnico specializzato
procedere al reset dell’organo. Per eseguire ques ta procedura premete i pulsanti HR, 1 e 2 delle memorie
generali ed accendete l’organo; dopo qualche secondo rilasciate i pulsanti in questione.
LOCAL OFF DELLA VOCE
Qualora l’organo Jubilate s tia pilotando via MIDI un generatore sonoro es terno, può essere nec essario porr e
in “LOCAL OFF” uno o più voci. Quando una voce s i trova in “LOCAL O FF” agendo sul pr oprio regist ro verrà
generato solo il codice MIDI senza rendere attiva la generazione sonora (voce muta). Per posizionare in
“LOCAL OFF” uno o più voci premere il pistoncino SET (S) posizionato sotto il primo manuale e,
mantenendolo premuto, prem er e il pistoncino CANCEL ( C) posto anc h’esso s otto il primo m anuale. Facendo
ciò tutte le lampade (sui registri) delle voci abilitate si accenderanno; tramite i registri medesimi ssarà
possibile disabilitare (LOCAL OFF) o abilitare (normale funzionamento) le singole voci.
Si tenga presente che in questa modalità di funzionamento la luce del registro spenta stà a significare che la
generazione della voce è disabilitata. Premere nuovamente la combinazione dei pistoncini SET+CANCEL per
tornare al normale funzionamento.
9
Page 12

Page 13

Viscount JUBILATE 35 – 45 – 227
CONTENTS
1. LEFT PANEL CONTROLS.................................................................................................................13
2. CENTRE PANEL CONTROLS...........................................................................................................15
3. CONTROLS FOR MANUALS ............................................................................................................16
4. PEDAL AND CONTROLS .................................................................................................................17
5. CONTROLS AND CONNECTION (LOCATED UNDER THE KEYBOARD)......................................17
6. RESET – LOCAL OFF........................................................................................................................19
MIDI IMPLEMENTATION.......................................................................................................................41
11
Page 14

Page 15
Viscount JUBILATE 35 – 45 – 227
1. LEFT PANEL CONTROLS
VALLOTTI tunings.
The listener acc ustomed to the uniform nature of m odern equal temperament is surprised and som etimes
dismayed when faced with the irregularities and the tension of certain tunings together with the unusual
euphoria and pleasing sounds of others. T he var iety, marked sound colourings and the sense of tonal identity
that these temperaments confer upon the musical works of ancient composers will help the musician to
understand more fully their expressive significance and to gain insight into the mechanics of the
compositional proces s itself . Of course, us e of thes e tem peram ents m us t be acc om panied by an appropriate
understanding of their historic al context and a stylistic coherence with the period in which the com poser was
writing.
5. Master potentiometer: This knob is used to control the overall volume of the organ.
6. Man.I potentiometer: This knob is used to adjust the volume of the first manual.
7. Reverb potentiometer: This k nob can be used to control the amount of reverb you wish to add to the
organ sound. You can use this digital reverb to enhance the sound of your Jubilate in small r oom s with little
resonance.
8. Pedal potentiometer: This knob is used to adjust the volume of the pedal board.
9. Tremulant switch: Use this c ontrol to selec t one of 16 dif fer ent types of Tremolo effect for amplitude and
modulation of the sound.
1
2
3
4
5
6
7
8
9
1. Transposer selector: This section contains the transposer knob
which can be used to shift the instrument tuning 2 semitones higher
or 3 semitones lower. Transposing the instrument tuning makes it
easier to play in “diffic ult” keys and makes accompanying a singer or
other solo instrument much easier, avoiding the need for laborious
musical transpositions.
2. Memory Bank switch: By turning this knob, one of the six m emory
banks can be selected for general memories.
3. On/Off switch: Jubilate On/Off switch.
WARNING!!:
During thunderstorms it is recommended that the
instrument be unplugged at the mains.
4. Temperament selector: T his contr ol of f er s the organis t, interes ted
in recreating authentic ancient music, a series of historical
temperaments f rom different mus ical periods and of various national
origin. It is possible to set a normal temperament with some micro
false note to simulate the unperfect intonation of the organ’s pipe
cause the usury with the time and temper ature (EQUAL1) or another
normal temperament perfectly intonated (EQUAL2) or the classic
KIRNBERGER, WERCKMEISTER, PYTHAGOREAN, MEANTONE,
13
Page 16

Viscount JUBILATE 35 – 45 – 227
A BRIEF NOTE ON TEMPERAMENTS
In the «natural» tuning system, based on the acoustic phenomenon of harmonic sounds, two important
musical intervals cannot co-ex ist in their «pure» state (i.e. without conflic t): these are the major third and the
perfect fifth. Therefore, over the centuries numerous compromises have been proposed which are called
TEMPERAMENTS.
Each of these privileges either this or that interval, modifying them accordingly.
In ancient times and in the middle ages, right up to the last part of the XV century, the «Pythagorean» system
of tuning was used, in which the fifths were left absolutely perfec t. The resulting major third was therefore
particularly unpleasant and therefore came to be cons idered dissonant. Music of those times was however
prevalently monophonic and the first polyphonic vocal and instr umental forms used mainly inter vals of a fifth.
With the coming of the Renaissance and the beginning of florid vocal polyphonic works, the major third
gradually became heard as consonant. Instr uments with fixed tunings, such as the organ and harpsichord,
were adapted to this situation by adopting a system of tuning known as «mesotonic» which favoured the
major third rather than the fifth.
This temperament constitutes an important development as it was then to be used normally throughout
Europe in the XVI and XVII centuries, right up to the beginning of the 1700’s.
Here then are the six temperaments available on Jubilate, first and foremost the «mesotonic» or
MEANTONE.
MEANTONE
-
8 pure major thirds: Eb - G/Bb-D/F-A/C-E/G-B/D-F#/A-C#/E-G.
-
4 unusable major thirds (diminished fourths): B-D#/F#-A#/C#-E#/Ab-C.
-
1 fifth, the so-called «wolf» (augmented fifth, strongly dissonant): G#-Eb.
-
Very irregular chromatic scale (consequently chromatic compositions have an extremely singular
character).
-
Keys used with this temperament: C major/D major/G major/A major/Bb major/ and their relative minors.
The temperaments which follow instead allow the use of all major and minor keys, even those with several
accidentals, contrary to what happens with our normal equal temperament, are all very distinctive indeed.
WERCKMEISTER
This temperament, devised by organist and musical theoretician Andreas Werckmeister, is suitable for
performance of the German musical repertoire up to the end of the 1600’s.
KIRNBERGER
The temperament devised by Johann Philipp Kirnberger, a pupil of J.S. Bach, is equally suited to
performance of works by Bach and German baroque composers in general.
VALLOTTI
This Italian temperament by FrancescoAntonio Vallotti was later taken up in England by Thomas Young. It
can be used with effect for 17th century Italian repertoire, but serves equally well for English music of the
same period.
PYTHAGOREAN
This temperament, in which the fifths were kept absolutely perfect, originates in the period between the
middle ages to 1400, and so may be used for compositions from that period.
14
Page 17

Viscount JUBILATE 35 – 45 – 227
15
Page 18

Viscount JUBILATE 35 – 45 – 227
3. CONTROLS FOR MANUALS
1
3 4
6
N.B.: In model 227 this switches are located under the man.I.
1. Numbered keyboard: This part of the keyboard (mar ked by the numbers 0 to 9 and the word CLEAR) is
used to enter the channel number when programming the MIDI channel, or while sending a Program Change.
2. Set Button: This button turns on the memory function or select the MIDI channel (see cap 2).
3. General memories (HR; 1 - 2 - 3 - 4 - 5 - 6): All r egister s elections made can be stored to memory. Under
the first manual is located 6 general memories. The memories inlcude a push button called HR, also
repre sented by 0. The H R push b utton m emorize temporarely the last configuration present at time when the
piston was switched on. To mem oris e the re giste rs pr ess th e canc el but ton m arke d with a « C». C hoose the
register for the section you want. Press the SET (S) button located on the left under the first manual and,
keeping it down, press one of the 6 memory buttons corresponding to where you want to save this
combination of registers.
In situations where the organ is used by different organists, eac h player can save their own registration in a
different number of memory bank.
4. Enclosed (ENC): By pressing this button the swell pedal can be used to control the volume of the whole
organ.
5. Chimes button: You can use this button to obtain the sound of tubular bells on the second manual, cutting
out all other registers present on this manual.
6. «Tutti» button (T): The «Tutti» button gives access to a series of preset regis ters that give the voice
greater depth, turning on all those registers which go to make up the sound of the «Great Organ».
•
N.B.: “Tutti” does not activate the the oscillating voices, the tremolo and the Vox Celeste.
7. Cancel button (C): When this button is pressed all the registers on the organ are turned off.
Function Set + Cancel: when the MIDI is connected to another VISCOUNT organ, the activation of a register
on the transmitting organ will (through the sending of an ex lusive system message) activate the same register
on the receiving organ. If you wish that some registers will not play on the transmitting organ but, when selected,
will play only on the receiving organ, you have to follow this procedure:
2
- Press Set (S) piston and at the same time Cancel (C) : all tabs will be on.
- Switch off the tabs you do not wish to sound on the receiving organ.
- Press again Set + Cancel.
5
7
16
Page 19

Viscount JUBILATE 35 – 45 – 227
4. PEDAL AND CONTROLS
1
1. SECOND MANUAL PEDAL VOLUME: Models Jubilate organs are equipped with a Volume pedal for
Man.II
If the «ENC» button located under the second m anual (or the firs t manual in the 227 m odel) is on, this pedal
can be used to control the volume of the whole organ.
Please note on this pedal is plac ed a small circuit that simulates the action of a swell box, attenuating the
high frequencies at low volumes.
5. CONTROLS AND CONNECTIONS (LOCATED UNDER THE KEYBOARDS)
Left side panel
2
3
4
1
1. External +12V DC: +12 Volt tension can be obtained from this socket. Norm ally this would be used as a
REMOTE function, that is for turning on at a distance optional speaker s (Viscount V30 or V28, for exam ple)
plugged into the output located in the left side panel.
2. MIDI In - Out - Thru: 5-pin DIN sockets f or connecting the organ to other devices equipped with MIDI
Interface (expanders, com puter s, sequenc ers...) . The MIDI In s ock et is us ed to receive messages from other
MIDI devices. With the MIDI Thru socket your Jubilate can be connected in a chain with other MIDI
instruments or devic es. Finally, the MIDI Out is used to transm it MIDI mes sages originating in the J ubilate or
to play other Jubilate organs using the keyboards and pedal board of the master keyboard.
3. INV. KEYB.: T his button allows the registers for the two manuals to be inverted, therefore the voic es of
Man.I will play on Man.II and viceversa.
4. MIDI PG: Button f or transm itting Program Change data. T o send a Progr am Change to an external devic e
with a MIDI interface, press this button and at the sam e tim e the MIDI button (located in the register s ection)
for the section you want (Pedal, Man.I or Man.II). Then, once the button s tarts flashing, enter the c hannel or
program num bers by using the num bered part of the k eyboard (see chap. 1.4 - Num bered Keyboard). W hen
a third key is pressed, and therefore a third num ber is entered, the MIDI button for the section chosen will
stop flashing and the Program Change message will be sent.
5
17
Page 20

Viscount JUBILATE 35 – 45 – 227
N.B.: A Program Change mes sage will only be sent once a third key is pressed on the num bered keyboard.
This means if you wish to send for exam ple Program Change num ber 30, you will need to press the keys 0 3 – 0.
When a memory is recalled it will automatically send out any Program Change data it contains.
5. DEMO: By pressing this button you can call up one of 6 clas sical dem os stored in Jubilate’s mem ory. You
can choose which one you want to hear by pressing at the same tim e the DEMO button and the key on the
numbered keyboard corresponding to the number you wish to hear.
... ABOUT MIDI.
MIDI stands for “Musical Instrument Digital Interface
”.
instruments, even of different types and by different manufacturer s, to convers e together or with a computer.
They can exchange a whole series of data by means of a st ric t and detailed protoc ol. In this way it is possible
to obtain different functions from the devices connected together without the need for manual intervention.
Electronic musical ins truments equipped with MIDI are linked together by one or more 5-pin DIN connec tors,
known as MIDI connectors. There are usually three different sockets on an instrument and they are the
following:
- MIDI IN: The instrument can receive MIDI data from other units at this socket.
- MIDI OUT: This socket is used to send any MIDI data generated by the instrument to other units.
- MIDI THRU: This socket, used to chain together a series of units, transmits exactly the same MIDI data
received at the MIDI IN port.
Here is a glossary of the most frequently used terms in the MIDI vocabulary.
•
MIDI Channel: MIDI uses 16 channels. All the various data can be transmitted separately on these 16
channels. Even though all the data is sent to the receiving ins trument, it will only reproduce the data s ent
on the MIDI channel it has been set to receive.
•
Note On/Off: this is important information as it tells the instrument which notes to play, when, for how long
and with what dynamics.
•
Program Change: used to select a program. Most instruments have a certain number of memorised
programs all corresponding to a given program number. If we know the number assigned to a given
memory we can select the program we want.
•
Control change: these messages are usually used to add ex pression to a performance. This category
includes volume messages (Control Change no.7) , activ ating the loud pedal (c.c . no.64), amount of reverb
send (c.c. no.91), amount of Chorus send (c.c. no.93), etc.
•
System messages: these are messages which are not dependent on a given MIDI channel as they are
designed to control the whole system. Among these we find messages known as «system exclusive» or
rather instructions that can only be inter preted by a partic ular type of instrument, the same as the one that
generated them. Such messages include BULK DUMP instructions for programming the unit. These
instructions contain programming parameters normally saved in a memory location. They are used to
transfer the above mentioned parameters from one unit to another of the same type, or may be sav ed in
an external memory, for ex ample in a c omputer or sequenc er from wher e the data can be recalled s hould
it be accidentally lost or erased.
7
Right side panel
8
This is a language which allows electronic musical
9
10
7. Pitch (General): Allows the whole instrument tuning to be adjus ted. When your organ is delivered it has
been factory tuned to A = 440 Hz (the pitch adjuster is set in the central position).
18
Page 21

Viscount JUBILATE 35 – 45 – 227
8. Input L (MONO) - R: Organ amplific ation input. When inputting a m ono sound source use the L(MONO)
socket.
9. Output L(MONO) - R: Non am plified organ output. These sockets ar e generally used to connect up to
external powered speakers (Visc ount V30 or V28, for example) or to record directly into analogue recording
equipment such as cass ette recorders. W hen connecting to equipment which only takes a m ono signal use
the L(MONO) socket.
10. Headphones: Output for stereo headphones. With headphones inserted the organ’s internal amplification
is automatically cut off.
6. RESET – LOCAL OFF
RESET
In case of malfunctioning of the instrument and before calling for service, please effect foollowing reset
procedure: press buttons HR, 1 and 2 of gener al memories and pressed switch organ on. After a few second,
release the pressed buttons.
VOICE LOCAL OFF
If the Juilate organ is piloting an external sound generator by MIDI, it may be necessary to switch one or
mode voices to “LOCAL OFF” mode. W hen a voice is in “LOCAL O FF” mode, when its register is operated,
only the MIDI code will be emitted, without activating sound generation (the voice is m ute). To set one or
more voices in “LOCAL OFF” mode, press the SET (S) push-button under the first manual and keep it
pressed while pressing the CANCEL (C) push-button also under the f irst m anual. W hen this is done, alla the
lamps of the enabiled voices will illuminate; the selector can be also used to disabiled LOCAL OFF, or enabile
normal operation of the individual voices. Remember that in this operating mode, when the light of the
selector is off, voice generation is disabled. Press the SET+CANCEL keys again to return to normal
operation.
19
Page 22

Page 23

Viscount JUBILATE 35 – 45 – 227
TABLE DES MATIERES
1. COMMANDES SUR LE PANNEAU DE GAUCHE.............................................................................23
2. COMMANDES SUR LE PANNEAU CENTRAL..................................................................................25
3. COMMANDES ENTRE LES CLAVIERS............................................................................................26
4. COMMANDES AU DESSUS DU PEDALIER.....................................................................................27
.
5
COMMANDES ET CONNEXIONS DES BORNIERS PLACES SOUS LES CLAVIERS...................27
6. RESET – LOCAL OFF........................................................................................................................29
MIDI IMPLEMENTATION.......................................................................................................................41
21
Page 24

Page 25

Viscount JUBILATE 35 – 45 – 227
23
Page 26

Viscount JUBILATE 35 – 45 – 227
UN BREF SIGNE SUR LES TEMPERAMENTS
Dans le système « naturel » d’accord, basé sur le phénomène acoustique des sons harmoniques, il n’est pas
possible de faire coexister à l’état « pur » (c’est-à-dire sans conflit) deux importants intervalles musicaux : la
tierce majeure et la quinte parfaite. Par conséquent, dans le cour s des s iècles ont été proposées et réalisées
de nombreuses solutions de compromis qui s ont appelées TEMPERAMENTS. Ceux-ci privilégient à chaque
fois l’un ou l’autre intervalle en les modifiant de diverses manières.
Dans l’antiquité et au Moyen - Age jusqu’aux dernières décennies du XVème siècle, était en usage le
système d’accord « pythagoricien » où les quintes étaient conservées parfaitement pures. L’intervalle de la
tierce majeure qui en dérivait était particulièrement désagréable et par conséquent était considéré dissonant.
Toutefois, la musique de l’époque était surtout monophonique et les premières formes vocales et
instrumentales polyphoniques utilisaient largement l’intervalle de la quinte. Au début de la Renaissance et de
la grande floraison polyphonique vocale, l’intervalle de tierce majeure devint progressivement entendu
comme consonant. Les inst ruments à ac cor d fix e, comme l’orgue et le clavecin, s ’adaptèrent à cette situation
en adoptant un système de tempérament dénommé « mésotonique » qui privilégiait l’intervalle de tierce
majeure par rapport à celui de la quinte... Ce tempérament revêt une importance particulière, car il était utilisé
normalement en Europe aux XVI et XVII ème siècle jusqu’au début du dix-huitième siècle.
Voici donc les six tempéraments du Jubilate, tout d’abord le « mésotonique » ou MEANTONE :
MEANTONE
- 8 tierces majeur es pures : MIb – SO L / SIb – RE / FA – LA / DO – MI / SOL – SI / RE – FA# / LA – DO# / MI
– SOL.
- 4 tierces majeures utilisables (quartes diminuées): SI – RE# / FA# - LA# / DO# - MI# / LAb – DO.
- 1 quinte (quinte croissante, fortement dissonante): SOL# - MIb.
- Echelle chromatique très irr égulière (par conséquent, les compositions chromatiques interprétées ser ont
extrêmement caractérisées).
- Tonalités utilisables avec ce tempérament: DO maj. / RE maj. / SOL maj. / LA maj. / SIb maj. et les
mineurs correspondants.
Par contre, les tempéraments qui suivent permettent d’utiliser toutes les tonalités majeures et mineures,
même si celles qui possèdent le plus d’altérations donneront des interprétations très caractérisées - à la
différence du tempérament égal contemporain.
WERCKMEISTER
Ce tempérament, proposé par l’organiste et théoricien musical Andreas Werckmeister, est indiqué dans
l’interprétation du répertoire musical allemand de la fin du XVIIe siècle.
KIRNBERGER
Le tempérament élaboré par Johann Philipp Kirnberger, élève de J.S. Bach, se prête également pour
l’interprétation des auteurs baroques allemands et des oeuvres de Bach.
VALLOTTI
Ce tempérament italien de Francescantonio Vallotti fut repris plus tar d en Angleterre par Thomas Young. Il
peut être efficacement utilisé pour le répertoire italien du dix-huitième siècle mais aussi pour le répertoire
anglais de la même époque.
PYTHAGOREAN
Ce tempérament dans lequel les quintes étaient conservées parfaitement pures remonte à la période allant
du Moyen Age jusqu’au XV ème siècle. Il peut donc être utilisé pour des compositions de cette période.
24
Page 27

Viscount JUBILATE 35 – 45 – 227
25
Page 28

Viscount JUBILATE 35 – 45 – 227
3.
COMMANDES ENTRE LES CLAVIER
1
3
4
6
N.B.:
1. Clavier numérique: cette partie du clavier (reperée par les numéros allant de 0 a 9 et pas la touche
CLEAR) permet, pendant la programmation du canal MIDI, de composer le numéro du canal choisi ou,
pendant l’entrée en fonction du Program Change, de composer le numéro du programm e intéressé. Pour
d’autres informations, consulter le chapitre 2.
2. Bouton S (Set):Ce bouton active la fonction de sauvegarde des combinaisons.
3. Combinaisons générales (HR, 1-2-3-4-5-6): Toutes les sélections de registre ou registrations peuvent
être mises en memoire. Les mém oires com prennent un bouton dénomm é HR, connu aussi par le num éro 0
qui permet le retour à la registration manuelle précédente.
Pour mémoriser les registrations, pressez le bouton de l’annulateur repéré par la lettre C. Ensuite,
choisissez les registre de la section desirée. Pressez le bouton S (Set) qui se trouve à gauche sous le
premier clavier et, en le m aintenant appuyé, pressez l’un de 6 boutons correspondant à la c om binaison dans
laquelle vous désirez sauvegarder cette registrations. Notez que dans les combinaisons générales sont
enregistrées les registrations de n’importe quel clavier ainsi que du pédalier.
Dans le cas ou l’orgue devait être utilisé par divers organistes, chacun d’eux aura la possibilité de
sauvegarder ces propres enregistrements sous un numéro différent du Memory Bank..
4. Bouton ENC (Enclosed): Après avoir pressé ce bouton, vous pouvez controler le volum e général de tout
l’orgue par la pédale d’expression.
5. Bouton Chimes: Au moyen de ce bouton, par le premier clavier, vous pourrez jouer un carillon en
annulant tous les registres qui se trouvent sur ce clavier.
6. Bouton T (Tutti): Le “Tutti” sélectionne une série de registres présélectionnés qui appelle toute la
puissance de l’orgue en activant tous les registres qui forment la grande richesse sonore des “Grandes
Orgues”.
2
Dans le mod.227 ces bouton sont situatés dessous du Grand Orgue.
5
7
N.B.: Le “Tutti” n’active pas le vibrato, les jeux tremblants e la Voix Celeste .
7. Bouton Cancel “C”: En pressant ce bouton, tous les registres actifs sont annulés.
Fonction Set + Cancel: Dans le cas ou vous etez branché via Midi avec un autre orgue Viscount, l'activation
d'un registre sur l'orgue qui transmet sera activé aussi sur l'autre instrument ( avec l'envoi d'un message
Sysex).Si vous désirez que certains registres ne jouent pas sur l'orgue qui transmet mais seuelement sur
l'orgue qui reçoit, il faut:
- Pousser le bouton Set (S) et au même temps le bouton Cancel (C):tous les registres seront allumés
- Disactiver les registres qui doivent jouer seulement sur l'orgue qui reçoit.
- Pousser encore une fois Set + Cancel
26
Page 29

Viscount JUBILATE 35 – 45 – 227
4. COMMANDES AU DESSUS DU PEDALIER
1
1. Pédale Man. II: avec cette pédale, vous c ontrôlez le volume du deuxièm e clavier ou le volume général de
l’orgue (en activant le bouton ENC placé sous le troisième clavier).
5. COMMANDES ET CONNEXIONS DES BORNIERS PLACES SOUS LES CLAVIERS
Panneau côté gauche
2
3
4
1
1. Prise EXT. + 12 V. DC: Avec cette pr is e, il est pos s ible d’obtenir un s ignal de s ort ie d’une tension de + 12
Volt. Normalement, ce connecteur est utilisé c omme fonction de télécommande/REMOTE, pour la mise sous
tension à distance des enceintes amplifiées.
2. Prises MIDI THRU - OUT – IN: Prise DIN pour la connexion de l’orgue avec les dispositifs pourvus
d’interface MIDI (module de son, or dinateur, séquenceur...). Par la prise MIDI IN, vous pouvez recevoir des
messages MIDI provenant de sources MIDI externes.
Par la prise MIDI THRU, vous pouvez établir une connexion en série entre votre Jubilate et d’autres appareils
MIDI.
Enfin, par la prise MIDI OUT, vous pouvez transm ettre les messages MIDI émis par votre Jubilate et ainsi
piloter l’appareil connecté.
3. INV. TAST.: Ce bouton vous permêt d’inverser la position du premier et du deuxième clavier. De cette
manière, le premier clavier sera positionné à la place du deuxième et viceversa.
4. MIDI PG: il perm et d’envoyer un Program Change ( changem ent de progr am m e) sur le c anal MIDI associé
à la section (Pedal, Man.I, Man.II et Man.III) désirée. Pour envoyer un Program Change à un dispositif
externe pourvu d’interface MIDI, appuyer ce registre et, sim ultanément, le registre de la section intér essée.
Dès que ce registre com mence à clignoter, com posez le numéro du Program Change désiré au moyen des
touches numérotées des tinées à la com position des num éros des canaux ou des progr amm es (voir Chap. 4
– Touches numérotées). A la pression de la troisième touche et donc du troisième numéro, la touche MIDI de
la section choisie arrêtera de clignoter et le numéro de Program Change composé sera envoyé.
5
27
Page 30

Viscount JUBILATE 35 – 45 – 227
N.B.: L’émission du Program Change et donc la fin de la proc édure interviennent s eulement à la press ion de
la troisième touche du clavier numérique. Cela signifie que si vous devez envoyer le Program Change
numéro 30, vous devrez appuyer les touches 0 – 3 – 0.
Le rappel d’une position mémoire provoque la transmission du Program Change mémorisé.
5. Bouton DEMO: Ce bouton permet d’écouter un des 8 morceaux de démonstration enregistrés dans les
mémoires de J ubilate. Les morceaux peuvent être sélectionnés en appuyant simultanément le bouton DEMO
et une touche du clavier numérique relatif au morceau que l’on désire écouter.
... A PROPOS DU MIDI.
Le terme MIDI est l’acronyme de Musical Instrument Digital Inter face (interface numérique pour ins truments
musicaux). Cette interface permet aux ins truments musicaux élec troniques - même de marques différentes de dialoguer entre eux, ou avec un or dinateur pour échanger de nombreuses informations au moyen
protocole de codes spécifique et détaillé. Il sera ainsi possible d’utiliser les différentes fonctions des
machines connectées sans devoir agir physiquement sur ces dernières.
Les instruments musicaux électr oniques pourvus d’une interface MIDI utilisent un ou plusieurs connecteurs
DIN 5 pôles appelés « prises MIDI ». Normalement ces prises
sont au nombre de trois et elle sont différenciées de la manière suivante :
-
MIDI IN: Par cette prise, la machine reçoit les données MIDI produites par d’autres unités.
-
MIDI OUT: Par cette prise, la machine envoi à d’autres unités les données MIDI qu’elle a généré.
-
MIDI THRU: Cette prise, utilisée pour la connex ion en série de plusieurs unités réceptrices , produit des
données MIDI exactement comme elles sont r eçues par l’entrée MIDI IN. Mais décrivons brièvement les
termes les plus utilisés dans le vocabulaire du MIDI.
•
Canal MIDI (MIDI channel): une interface MIDI dispose de 16 canaux. Tous les différents types de
messages peuvent être transmis s éparément sur ces 16 canaux. De cette manière, à travers le même
câble, il sera pos sible d’envoyer à un ou plus ieurs ins truments une par tie des v iolons (par exemple s ur le
canal 5) et une partie de la batterie (par ex. sur le canal 10) . Bien que toutes les informations arrivent à
l’instrument récepteur, celui-c i reproduira seulement les informations tr ansmises s ur le canal sur lequel il
est réglé.
•
Messages de notes (note On/Off): Ce sont les informations principales car elles déterminent quelles
notes doivent être jouées, à quel moment, avec quelle dynamique et quelle durée.
•
Changement de programme (Program Change) : elles servent à sélectionner un numéro de
programme. La plupart des instruments disposent de nombreuses sonorités ou mémoires à chacune
desquelles correspond un numéro de programme déterminé. En c onnaissant la corr espondance entre le
numéro attribué à la s onorité ou à la mémoire, nous pourrons sélectionner le son qui nous intéres se :
par exemple, en jumelant l’effet de réverbération au Program Change n. 1 et l’effet de Delay au n°49.
•
Messages de commande (Control Change): Ce sont des mes sages qui généralement sont utilisés pour
ajouter de l’expression à l‘interprétation. A cette catégorie appartiennent les messages de volume
(Control Change n°7), l’utilisation de la pédale du forte (c.c. n°64), le réglage de réverbération (c.c.
n°91),le réglage du Chorus (c.c. n°93), etc.
•
Messages du système: ce sont des mes sages du canal MIDI indépendants vu que leur fonction est de
contrôler tout le système.Parmi ceux-ci, il faut signaler les messages appelés « système exclusif », c’està-dire les instructions qui peuvent êtr e interprétées uniquement par une machine identique à celle qui les
a engendrées. De ces messages font partie les données de BULK DUMP, c’est-à-dire les instr uctions de
programmation de la machine. Ces instructions contiennent les paramètres de programmation
normalement sauvegardés dans une partie réservée de la mémoire.Ces messages sont utilisés pour
transférer les susdits paramètr es d’une machine à une autre analogue ou pour être sauvegardés dans
une unité de mémorisation externe, par exemple un ordinateur ou un séquenceur qui puisse per mettre
une récupération des données pour leur restauration en cas de perte ou d’élimination accidentelle.
28
d’un
Page 31

Viscount JUBILATE 35 – 45 – 227
Panneau côté droit
7
7. Commande PITCH (General): elle permet d’aj uster le réglage f in de l’accord de tout l’instrument. Lors de
la livraison, l’orgue est accordé par le constructeur avec LA=440Hz (molette au centre).
8. Prises INPUT L(MONO) - R: Pr ises d’entr ée de l’orgue pour c onnecter des appareils externes et utiliser le
système d’amplification du Jubilate 332. En cas de source monophonique, utiliser la prise L(MONO).
3. Prises OUPUT L(MONO) - R: Prises de sortie de l’orgue, non am plifiées. Ces prises sont généralement
utilisées pour la connexion à un système d’amplification de puissance externe ou pour effectuer des
enregistrements sur des appareils d’enregistrement analogiques com me un magnétophone. En cas d’unité
réceptrice monophonique, utiliser seulement la prise L(MONO).
4. Prise HEADPHONES: Prise de connexion pour casque stéréo. Lorsque le casque est inséré,
l’amplification interne de l’orgue est automatiquement coupée.
8
9
10
6. RESET – LOCAL OFF
RESET
En cas de m alfonctionnem ent et avant de vous adress er à un technicien, veuillez resetter votre orgue avec
la procedure suivante:
Poussez les boutons HR-1-2 et mettez en marc he l’orgue. Tenez poussé les trois boutons pour quelques
secondes.
LOCAL OFF
Si l’orgue Jubilate pilote un générateur de sons externe via MIDI, il peut être nécess aire de commuter un ou
plusieurs appels de jeux en m ode « LOCAL OF F ». Si un appel de jeu es t en mode « LOCAL OFF », lorsqu’il
est activé, seul le code MIDI est émis, sans qu’il y ait de reproduction sonore (le registre est muet).
Pour régler un ou plusieurs appels de jeux en m ode « LOCAL OFF » appuyez sur le bouton SET (S) situé
sous le positif et m aintenez-le enfoncé tout en appuyant sur l’annulateur (C ) situé également s ous le positif.
Lorsque ceci est effectué, tous les appels de jeux activés s’alument: les appels de jeux peuvent aussi servir à
désactiver le mode « LOCAL OFF », c’est à dire: remettre le registre dans un mode de fonctionnement
normal.
N’oubliez pas que dans ce mode de fonctionnem ent, lors que l’appel de jeu est éteint, la reproduc tion sonore
est désactivée.
Appuyez à nouveau sur les touches SET + CANCEL (S + C) pour revenir à un mode de fonctionnement
normal.
29
Page 32

Page 33

Viscount JUBILATE 35 – 45 – 227
INHALTSVERZEICHNIS
1. LINKES BEDIENFELD.......................................................................................................................33
2. MITTLERES BEDIENFELD................................................................................................................35
3. TASTEN VOR DEN MANUALEN.......................................................................................................36
4. BEDIENEINRICHTUNG DES PEDALS..............................................................................................37
.
5
BEDIENEINRICHTUNGEN UND BUCHSEN AUF DEN ANSCHLUSSFELDERN UNTER
DEN MANUALEN...............................................................................................................................37
6. RESET – LOCAL OFF........................................................................................................................39
MIDI IMPLEMENTATION.......................................................................................................................41
31
Page 34

Page 35

Viscount JUBILATE 35 – 45 – 227
33
Page 36

Viscount JUBILATE 35 – 45 – 227
EINE KURZE ANMERKUNG ZU DEN TEMPERATUREN
Beim ”natürlichen” Stimmverfahren, das auf dem akustischen Phänomen der Harmonien beruht, ist es nicht
möglich, daß zwei wichtige Intervalle im ”reinen” Zustand (d.h. ohne Schwebungen) nebeneinander bestehen:
die große Terz und die reine Quinte. Daher wurden im Laufe der Jahrhunderte zahlreiche
Kompromißlösungen vorgeschlagen, die als TEMPERATUREN bezeichnet werden. Sie privilegieren das eine
oder das andere Intervall und variieren sie in vielfältiger Weise.
In der Antike und im Mittelalter bis zu den letzten Jahrzehnten des 16. Jahrhunderts war das
"pythagoreische" Stimmsystem in Gebrauch, bei dem die Quinten vollkommen rein gestimmt wurden. Die
sich hieraus ergebende große Terz klang besonders unangenehm und wurde daher als dissonant
angesehen. Die Musik jener Zeit war jedoch vorwiegend einstimmig und die ersten Formen polyphoner
Vokal- und Instrumentalmusik machten von der Quinte großzügigen Gebrauch. Mit Beginn der Renaissance
und dem Aufblühen des polyphonen Gesangs wurde die große Terz allmählich als konsonant empfunden.
Die Instrumente mit fester Stimmung wie die Orgel und das Cembalo wurden dieser neuen Situation
angepaßt, indem man eine "mitteltönige" Temperatur anwandte, welche die große Terz gegenüber der Quinte
privilegierte. Dieser Temperatur kommt eine besondere Bedeutung zu, da sie ab dem 16. Jahrhundert bis zu
Beginn des 18. Jahrhunderts normalerweise in Europa verwendet wurde. Nachstehend sind die sechs
Temperaturen der Jubilate aufgeführt und zwar zuerst die ”mitteltönige Stimmung” oder MEANTONE.
MEANTONE
-
8 reine große Terzen: Es – G / B – D / F – A / C – E / G – H / D – Fis / A – Cis / E – G.
-
4 unbrauchbare große Terzen (verminderte Quarten): H – Dis / Fis - Ais / Cis - Eis / As – C.
-
1 Quinte, die gemeinhin als ”Wolfquinte” bezeichnet wird (vergrößerte Quinte, stark dissonant): Gis - Es.
-
Sehr unregelmäßige chromatische Tonleiter (folglich er weisen sich die chromatischen Kompositionen als
sehr charakteristisch).
-
Mit dieser Temperatur verwendbare Tonarten: C-Dur / D-Dur / G-Dur / A-Dur / B-Dur und die zugehörigen
Moll-Tonarten.
Die folgenden Temperaturen erlauben hingegen den Gebr auch aller Dur - und Moll-Tonarten, auch wenn s ich
nanche Tonarten im Vergleich zur aktuellen temperierten Stimmung als sehr charakteristisch erweisen..
WERCKMEISTER
Diese vom Organist und Musiktheoretiker Andr eas Werckmeister entwickelte Temperatur empfiehlt sich für
Interpretation des deutschen Musikrepertoires des ausgehenden 17. Jahrhunderts.
KIRNBERGER
Diese von Johann Philipp Kirnberger, einem Schüler von J .S. Bach, erarbeitete Temperatur erweist sich als
geeignet sowohl für die Interpretation der deutschen Barockkomponisten als auch der Werke von Bach.
VALLOTTI
Diese Temperatur des Italieners Francescantonio Vallotti wurde später in England von Thomas Young wieder
aufgenommen. Besonders wirkungsvoll kann s ie für das italienische Repertoire des 18. Jahrhunderts, aber
auch für das englische Repertoire des gleichen Zeitraums verwendet werden.
PYTHAGOREAN
Diese Temperatur, bei der die Quinten vollkommen rein gestimmt werden, geht auf das Mittelalter bis zum 15.
Jahrhundert zurück und kann daher für die Interpretation der Musik jener Zeit verwendet werden.
34
Page 37

Viscount JUBILATE 35 – 45 – 227
2. MITTLERES BEDIENFELD
1. Sektion PEDAL: Hier sind die Registertasten für das Pedal angeordnet sowie die Register für ie
Koppelung zwischen den einzelnen Manualen und dem Pedal.
• I/P: wenn Sie diese Registertaste betätigen, k önnen Sie die Stimm en des ersten Manuals auch m it dem
Pedal spielen.
• II/P: wenn Sie diese Registertaste betätigen, können Sie die Stimmen des zweiten Manuals auch mit
dem Pedal spielen.
Diese Sektion enthält auch ein Midi Ein/Aus Schalter für die Uebertragung und Empfang des program
Change, des Control Change und des SyEx.
Um einen Midi-Kanal zuzuordnen, m üssen Sie gleichzeitig diese Registertaste und die Taste S (Set) unter
dem ersten Manual drücken. Diese Registertaste beginnt zu blinken, was bedeutet, das s Sie die Nummer
des MIDI-Kanals eingeben können.
Das Tastenbereich innerhalb des Man. II (Tasten mit Ziffern von 0 bis 9 und eine T aste mit der Auschrift
CLEAR) dient bei der Programm ierung des MIDI-Kanals zur Eingabe der gewählten Kanalnummer und bei
der Uebertragung eines Program Change zue Eingabe der gewünschten Programmnummer. Wenn die
zweite Ziffer eingegeben wurde, wird die Kanalnummer gespeichert. und die Midi Register hört auf zu
blinken und kehrt wieder in den Zustand vor dem Programmiervorgang zurück.
1
2
Hinweis: Die Übertragung des Program Change und folglich der Abschluß des Vorgangs erfolgen nur bei
Betätigung von zwei Tastne auf der Zifferntastatur. Wollen Sie also zum Beispiel den Program Change mit
der Nummer 6 eingeben, müssen Sie die Tastenziffern 0 und 6 drücken.
2. Taste A.P. (Automativ Pedal) – u. Taste A/B : Wenn die T aste A.P. ak tiviert wird, können die Register
des Pedals mit den unteren Tasten des ersten Manuals gespielt werden. In diesem Fall werden diese
Register einstimmig und die tiefen Töne haben Vorrang.
Mit der Taste A/B können Sie die Klangfarbe aller gewählten Stimmen zwischen den Stilen Romantik und
Barock ändern.
3. Sektion Man. I: In dieser Sektion befinden sich:
- die Registertasten für das erste Manual;
- die Tremolotaste für das Einschlaten des Tremoloeffektes;
- die II/I Regis tertaste womit Sie die Stimmen des zweiten Manual auch mit dem ersten Manual spielen
können;
- die Midi Registertaste.
4. Sektion Man. II: In dieser Sektion befinden sich:
- die Registertasten für das zweite Manual;
- die Tremolotaste für das Einschalten des Tremoloeffektes;
- die Midi Registertaste.
3
4
35
Page 38

Viscount JUBILATE 35 – 45 – 227
3. TASTEN UNTER DEN MANUALEN
1
3
4
6
2
5
7
Hinweis: In dem Mod. 227 diese shalter befinden sich unter Man.I.
1. Zifferntastatur: Dieses T astenbereich innerhalb des Man. III (T asten m it den Ziffern von 0 bis 9 und eine
Taste mit der Aufs chrift CLEAR) dient bei der Program mierung des MIDI- Kanals zur Eingabe der gewählten
Kanalnummer und bei der Übertragung eines Program Change zur Eingabe der gewünschten
Programmnummer.
2. Taste S (Set): Mit dieser Taste wird die Speicherfunktion abgerufen.
3. Allgemeine Speicher- Generalsetzer (HR; 1 - 2 - 3 - 4 - 5 - 6): Alle Einstellungen k önnen gespeichert
werden. Bei den Speichern gibt es auch eine Taste mit der Kennzeichnung HR
Handregister)- auch bekannt mit der Nummer 0. Mit dem HR Schalter geht man an die frühere manuelle
Registrierung zurück.
Zum Speichern der Register in einem Setzer müssen Sie die mit dem Buchstaben C gekennzeichnete
Löschtaste drücken. W ählen Sie dann die Register. Drück en Sie die Taste S (Set) links unter dem ersten
Manual und halten Sie sie gedrückt; drück en Sie dann eine der 6 T as ten der Gener alsetzer, in dem Sie diese
Registerkombination speichern wollen. Es ist zu beachten, daß in den allgem einen Speichern der k om plette
Registersatz aller Werke mit Ausdnahme von A.P. und A/B gespeichert wird.
Wenn die Orgel von mehreren Organisten verwendet werden sollte, hat jeder von ihnen die Möglichkeit,
seine eigenen Registrierungen unter einer anderen Speicherbank-Nummer abzuspeichern .
4. Taste ENC (Enclosed): W enn man diese Taste betätigt, kann m an mit dem Fusschweller die Laustärke
der gesamten Orgel regeln.
5. Taste Chimes: Bei Betätigung dieser T aste können Sie auf dem ersten Manual ein G lockenspiel s pielen.
Alle andere Register dieses Manuales werden disaktiviert.
6. Taste T (Tutti): Die Taste „T utti“ (alles) ak tiviert eine Reihe von vorgegebenen Registern, die den vollen
Ton der „Grossen Orgel“ bilden.
Hinweis: Tutti aktiviert nicht den vibrato, die tremolo Stimmen und die Vox Celeste.
7. Taste C (Cancel): Bei Betätigung dieser Taste werden alle aktuell aktiven Register ausgeschaltet.
Set + Cancel Funktion: Falls Ihre Orgel durch Midi m it einer ander en Vis count O r gel verbunden is t, und Sie
schalten ein Register ein, wird der Register autom atisch auch auf die verbundene Orgel eingeschaltet sein.
Falls Sie wünschen, dass bestimm te Register nicht auf Ihre Orgel spielen sondern nur auf die verbundene
Orgel, müssen Sie:
- Set (S) Schalter und gleichzeitig Cancel (C) Schalter drücken. Alle Register werden beleuchtet sein.
- Schalten Sie die Register aus, die nur auf die verbundene Orgel spielen müssen.
- Drücken Sie nochmal Set + Cancel.
36
Page 39

Viscount JUBILATE 35 – 45 – 227
4. BEDIENEINRICHTUNG DES PEDALES
1
1. Pedal Man. II: Mit diesem Pedal regeln Sie die Laustärke des zweiten Manual oder das Gesamtvolum e
der Orgeln (wenn man die Taste ENC gedrückt hat).
5. BEDIENEINRICHTUNGEN U. BUCHSEN AUF DEN ANSCHLUSSFELDERN
UNTER DEN MANUALEN
Rechtes seitliches Steckfeld
2
3
4
1
1. Steckbuchse Ext. + 12 V.: An diese Buchse kann man eine Spannung von + 12 V. abnehmen.
Normalerweise wird die Steckvorric htung für die FERN-Steuerung verwendet., d.h. zum Einschalten aus der
Ferne der Zusatzlautsprecher.
2. Midi In - Out - Thru: fünfpolige DIN-Steck buchsen für den Anschluss der Orgel an G eräte mit MIDISchnittstelle (Expander, Computer, Sequencer usw). Ueber die Buchse MIDI IN können Sie MIDI
Nachrichten von externen Midi-Quellen empfangen. Ueber die Buchse MIDI THRU werden empfangene
Nachrichten unverzüglich zu anderen MIDI-Geräten weitergeleitet. Ueber die Buc hse MIDI OUT können Sie
schliesslich die mit der Jubilate erzeugten MIDI-Nachrichten übertragen und eine andere Jubilate Orgel mit
den Klaviaturen und dem Pedal der ersten Orgel spielen.
3. Taste Inv. Keyb.: Mit dieser Taste können Sie die Position des ersten und des zweiten Manuals
vertauschen. Auf diese Weise wird das erste Manual an der Stelle des zweiten Manuals positioniert und
umgekehrt.
4. Midi PG : zum Senden eines Program Change auf dem MIDI-Kanal, der dem gewünschten Bereich
(Pedal, Man.I, Man.II) zugeordnet ist. Wenn Sie einen Program Change an ein externes Gerät mit MIDISchnittstelle senden wollen, müssen Sie diese Registertaste und zugleich die Registertaste Midi der
betreffenden Sektion drücken. Wenn diese Registertaste zu blinken begonnen hat, geben Sie über die
Zifferntastatur, die für die Eingabe der Kanal- oder Programmnummern aktiviert wurde (siehe Kap. 4 –
Zifferntastatur), die Num m er des gewünschten Program Change ein. Nachdem die dritte T aste gedrück t und
5
37
Page 40

Viscount JUBILATE 35 – 45 – 227
folglich die dritte Ziffer eingegeben wurde, blink t die MIDI-Taste der gewählten Sektion nicht mehr und der
Program Change wird übermittelt.
Hinweis: Die Übertragung des Program Change und folglich der Abschluß des Vorgangs erfolgen nur bei
Betätigung der dritten Taste auf der Zifferntastatur. Wollen Sie also zum Beispiel den Program Change mit
der Nummer 30 eingeben, müssen Sie die Tasten 0 - 3 - 0 drücken.
Das Aufrufen eines Speichers bewirkt die Übertragung des in ihm gespeicherten Program Change.
5. DEMO: Diese Tas te bietet die Möglichk eit, einen der 8 Demo- Songs, die in der Jubilate gespeichert sind,
abzuspielen. Man kann den Song auswählen, indem man gleichzeitig die Taste DEMO und die Taste der
Zifferntastatur drückt, die der Nummer des gewünschten Demo-Songs entspricht.
WAS BEDEUTET MIDI ?
Die Abkürzung MIDI steht für Musical Instrument Digital Interface (digitale Schnittstelle für Musikinstrumente).
Mit Hilfe dieser Schnittstelle können elektronische Musikinstrumente auch unterschiedlicher Art und Hersteller
miteinander oder mit einem Computer kommunizieren, um zahlreiche Informationen mit Hilfe eines
spezifischen und detaillierten Protokolls auszutauschen. Man kann auf diese Weise die angeschlossenen
Geräte verschiedene Funktionen ausführen lassen, ohne tatsächlich physisch auf sie einzuwirken.
Die elektronischen Musikinstrumente mit einer MIDI-Schnittstelle v erwenden eine oder mehr ere 5- polige DINSteckvorrichtungen als MIDI-Buchsen. Normalerweise handelt es sich hierbei um drei Steckbuchsen mit
folgenden Bezeichnungen:
- MIDI IN: über diese Buchse empfängt das Gerät MIDI-Daten von einem anderen Gerät.
- MIDI OUT: über diese Buchse übermittelt das Ger ät die von ihm erzeugten MIDI-Daten an ein anderes
Gerät.
- MIDI THRU: über dies e Buchse, die für die Reihenschaltung mehrerer Empfangsgeräte verwendet wird,
werden die MIDI-Daten genau so übermittelt, wie sie an der Buchse MIDI IN empfangen
werden.
Nachstehend sollen die am häufigsten im Zusammenhang mit dem MIDI-System verwendeten Begriffe kur z
erläutert werden.
•
MIDI-Kanal (MIDI channel): das MIDI-System verfügt über 16 Kanäle. Die verschiedenen Arten von
Nachrichten können über dies e 16 Kanäle separat übertragen werden. Auf diese Weise kann man über
dasselbe Kabel an eines oder mehrere Instrumente einen Violinsatz (z.B. auf Kanal 5) und einen
Schlagzeugsatz (z.B. auf Kanal 10) übermitteln. Obgleich alle Informationen das empfangende Gerät
erreichen, reproduziert dieses nur die auf dem Kanal, auf den es synchronisiert ist, übermittelten
Informationen.
•
Tasteninformationen (note On/Off): dies sind die wichtigsten Informationen, da sie festlegen, welche
Noten zu welchem Zeitpunkt und mit welcher Dynamik und Dauer gespielt werden müssen.
•
Programmwechsel (Program Change): er dient zur Programmwahl, da viele Instrumente über eine
bestimmte Anzahl von Speichern v erf ügen, denen jeweils ein bes timmtes Progr amm ents pric ht. Wenn Sie
die Entsprechung zwischen der dem Speicher zugewiesenen Nummer und der Program Change Nummer
kennen, können Sie den gewünschten Sound wählen: zum Beispiel können Sie dem Program Change Nr.
1 den Reverb-Effekt und dem Program Change Nr. 49 den Delay-Effekt zuordnen.
•
Steuerinformationen (Control Change): diese Nachrichten werden gewöhnlich dazu verwendet, der
Darbietung Ausdruck zu verleihen. In diese Kategor ie fallen die Lautstärkeinformationen (Contr ol Change
Nr. 7), Aktivierung des Tonhalte-Pedals (c.c. Nr . 64), Regelung des Raumeffekts (c.c. Nr. 91), Regelung
des Chorus (c.c. Nr. 93) usw.
•
Systeminformationen: diese Nachrichten s ind unabhängig vom MIDI-Kanal, da sie zur Steuerung des
gesamten Systems dienen. Hierzu gehören die Nachrichten für ein bestimmtes System (Sys-Exmessages), d.h. jene Anweisungen, die nur von einem Ger ät interpr etiert wer den können, das dem G erät
gleicht, das sie erzeugt hat. Zu diesen Nachrichten gehören die BULK DUMP Daten, d.h. die
Programmanweisungen des Geräts. Diese Anweisungen enthalten die Pr ogrammierungsparameter, die
zusammen in einem Speicherplatz gespeichert sind. Sie werden dazu verwendet, die oben genannten
Parameter von einem Gerät an ein analoges Gerät zu übertragen oder sie in einem externen Speicher,
z.B. einem Computer oder einem Sequencer, zu speichern, damit sie wiederher gestellt werden können,
falls sie versehentlich gelöscht wurden oder in sonst einer Weise verloren gegangen sind.
38
Page 41

Viscount JUBILATE 35 – 45 – 227
39
Page 42

Page 43

Viscount JUBILATE 35 – 45 – 227
MIDI IMPLEMENTATION
Viscount Jubilate 35 – 45 – 227 Version: 1.0
NOTE ON/OFF
NOTE OFF
1000nnnn (8nH) status note off
0ccccccc (00H..7FH) note code
0vvvvvvv (00H..7FH) note velocity
NOTE ON
1001nnnn (9nH) status note on
0ccccccc (00H..7FH) note code
0vvvvvvv (00H..7FH) note velocity
CONTROL CHANGE
1011nnnn (BnH) status
0ccccccc (00H..7FH) control code
0vvvvvvv (00H..7FH) control value
supported controls:
c=07H + v=00H..7FH expression volume, master volume if n=16 (0FH)
c=7BH + v=00H all note off
PROGRAM CHANGE (TX)
1100nnnn (CnH) status
0ccccccc (00H..7FH) program code
ACTIVE SENSING
11111110 (FEH) status
SYSTEM EXCLUSIVE
PROGRAM CHANGE
11110000 (F0H) start SysEx
00110001 (31H) ID INTERCONTINENTAL
0s00nnnn (0nH/4nH) command status (0nH = register OFF, 4nH = register ON)
0ccccccc (00H..7FH) command code (register’s family)
0vvvvvvv (00H..7FH) command value (register code)
11110111 (F7H) end SysEx
41
Page 44

Viscount JUBILATE 35 – 45 – 227
PEDAL SECTION REGISTER
n = MIDI programmable channel
KONTRABBASS 16' F0H 31H 0n/4nH 01H 00H F7H
SUBBASS 16' F0H 31H 0n/4nH 01H 01H F7H
OKTAVEBASS 8' F0H 31H 0n/4nH 02H 00H F7H
ROHRGEDACKT 8' F0H 31H 0n/4nH 02H 02H F7H
OKTAVE 4' F0H 31H 0n/4nH 03H 03H F7H
MIXTUR 4F F0H 31H 0n/4nH 0AH 00H F7H
POSAUNE 16’ F0H 31H 0n/4nH 01H 04H F7H
KLARINE 4' F0H 31H 0n/4nH 03H 04H F7H
GREAT SECTION REGISTER
n = MIDI programmable channel
BOURDON 16' F0H 31H 0n/4nH 01H 02H F7H
PRINZIPAL 8' F0H 31H 0n/4nH 02H 00H F7H
GEDACKT 8' F0H 31H 0n/4nH 02H 02H F7H
OKTAVE 4' F0H 31H 0n/4nH 03H 03H F7H
ROHRFLÖTE 4' F0H 31H 0n/4nH 03H 02H F7H
SUPEROCTAVE 2' F0H 31H 0n/4nH 04H 00H F7H
KORNETT 4F F0H 31H 0n/4nH 0AH 02H F7H
MIXTUR 5F F0H 31H 0n/4nH 0AH 00H F7H
TROMPETE 8' F0H 31H 0n/4nH 02H 0CH F7H
FAGOTT 16’ F0H 31H 0n/4nH 02H 0FH F7H
SWELL SECTION REGISTER
n = MIDI programmable channel
BOURDON 8' F0H 31H 0n/4nH 02H 02H F7H
GAMBA 8' F0H 31H 0n/4nH 02H 03H F7H
PRINZIPAL 4' F0H 31H 0n/4nH 03H 03H F7H
FLÖTE 4' F0H 31H 0n/4nH 03H 02H F7H
NASARD 2 2/3 F0H 31H 0n/4nH 07H 01H F7H
ROHRFLÖTE 2' F0H 31H 0n/4nH 04H 02H F7H
TERZ 1 3/5 F0H 31H 0n/4nH 08H 00H F7H
ZYMBEL 4F F0H 31H 0n/4nH 0AH 00H F7H
VOX CELESTE 8' F0H 31H 0n/4nH 02H 0BH F7H
OBOE 8' F0H 31H 0n/4nH 02H 0DH F7H
CONTROL CHANGE
11110000 (F0H) start SysEx
00110001 (31H) ID INTERCONTINENTAL
0010nnnn (2nH) status command
0ccccccc (00H..7FH) code command
0vvvvvvv (00H..7FH) value command
11110111 (F7H) end SysEx
GEN. CANCEL F0H 31H 2FH 6CH 00H F7H
GENERAL VOLUME F0H 31H 2FH 07H vvH F7H
SECTION VOLUMES F0H 31H 2nH 07H vvH F7H
42
Page 45

Viscount JUBILATE 35 – 45 – 227
OFF
ON
COUPLER I/P F0H 31H 2FH 70H 11H F7H F0H 31H 2FH 70H 01H F7H
COUPLER II/P F0H 31H 2FH 70H 10H F7H F0H 31H 2FH 70H 00H F7H
COUPLER II/I F0H 31H 2FH 70H 13H F7H F0H 31H 2FH 70H 03H F7H
A.P. F0H 31H 2FH 6EH 10H F7H F0H 31H 2FH 6EH 00H F7H
V. VARIATION A/B F0H 31H 2FH 72H 00H F7H F0H 31H 2FH 72H 10H F7H
TREMOLO GREAT F0H 31H 2nH 5CH 00H F7H F0H 31H 2nH 5CH 7FH F7H
TREMOLO SWELL F0H 31H 2nH 5CH 00H F7H F0H 31H 2nH 5CH 7FH F7H
S.W.S. F0H 31H 2FH 6DH 10H F7H F0H 31H 2FH 6DH 00H F7H
43
Page 46

Page 47

CAUTION! This product contains a lithium battery. There is danger of explosion if battery is
incorretly replaced. Replace only with a Maxell CR2032.
Replace only with the correct polarity. Discard used battery according to manufacter’s
instruction’s.
ADVARSEL! Lithiumbatteri – Eksplosjonsfare. V ade utksifting benyttes kun batteri som anbefalt
av apparatfabrikanten. Brukt batteri returneres apparatleverandøren.
ADVARSEL! Lithiumbatteri - Eksplosjonsfare ved fejlagtig håndtering. Udskiftning må kun ske
med batteri av samme fabrikat og type. Levér det brugte batteri tilbage til leverandøren.
VAROITUS! Paristo voi räfähtää, jos se on virheellisesti asennettu. V aihda paristo ainoastaan
laitevalmistajan suosittelemaan tyyppin. Hävitä käytetty paristovalmistajan ohjeiden mukaisesti.
WARNING! Explosionsfar vid felaktigt batteribyte. Anväd samma batterityp eller en ekvivalent
typ som rekommendars av apparatillverkaren. Kassera använt batteri enlight fabrikantens
istructions.
The information contained in this manual is subject to change at any time without notification.
Some information contained in this manual may also be inaccurate due to undocumented
changes in the product or operating system since this version of the manual was completed.
The information contained in this version of the owner’s manual supercedes all previous version.
NOTE: This equipment has been tested and found to comply with the limits for a Class B
digital Device, persuant to Part 15 if the FCC Rules. These limits are designed to provide
reasonable protection against harmful interference in a residential installation. This equipment
generates, uses and can radiate radio frequency energy and, if not installed and used in
accordance with the instruction, may cause harmful interference to radio comunications.
However, there is no guarantee that the interference will not occur in a particular installation. If
this equipment does cause harmful interference to radio or television reception, which can be
determinated by turning the equipment off and on, the user is encuraged to try to correct the
interference by one or more of the following measures:
- Reorient or relocate the receiving antenna.
- Increase the separation between the equipment and receiver.
- Connect the equipment into an outlet on a circuit different from that to which the receiver
is connected.
- Consult the dealer or an experienced Radio/Tv technician for help.
The user is cautioned that any changes or modification not expressly approved by the party
responsable for compliance could void the user’s authority opearate the equipment.
Page 48

Intercontinental Electronics S.p.A.
P.O. BOX 5
Mondaino (RN) - Italy
From Italy: TEL: 0541-981700 FAX: 0541-981052
From all other countries: TEL: +39-0541-981700 FAX: +39-0541-981052
E-MAIL: viscount@omniway.sm
WEB: http://www.viscount-organs.com
 Loading...