

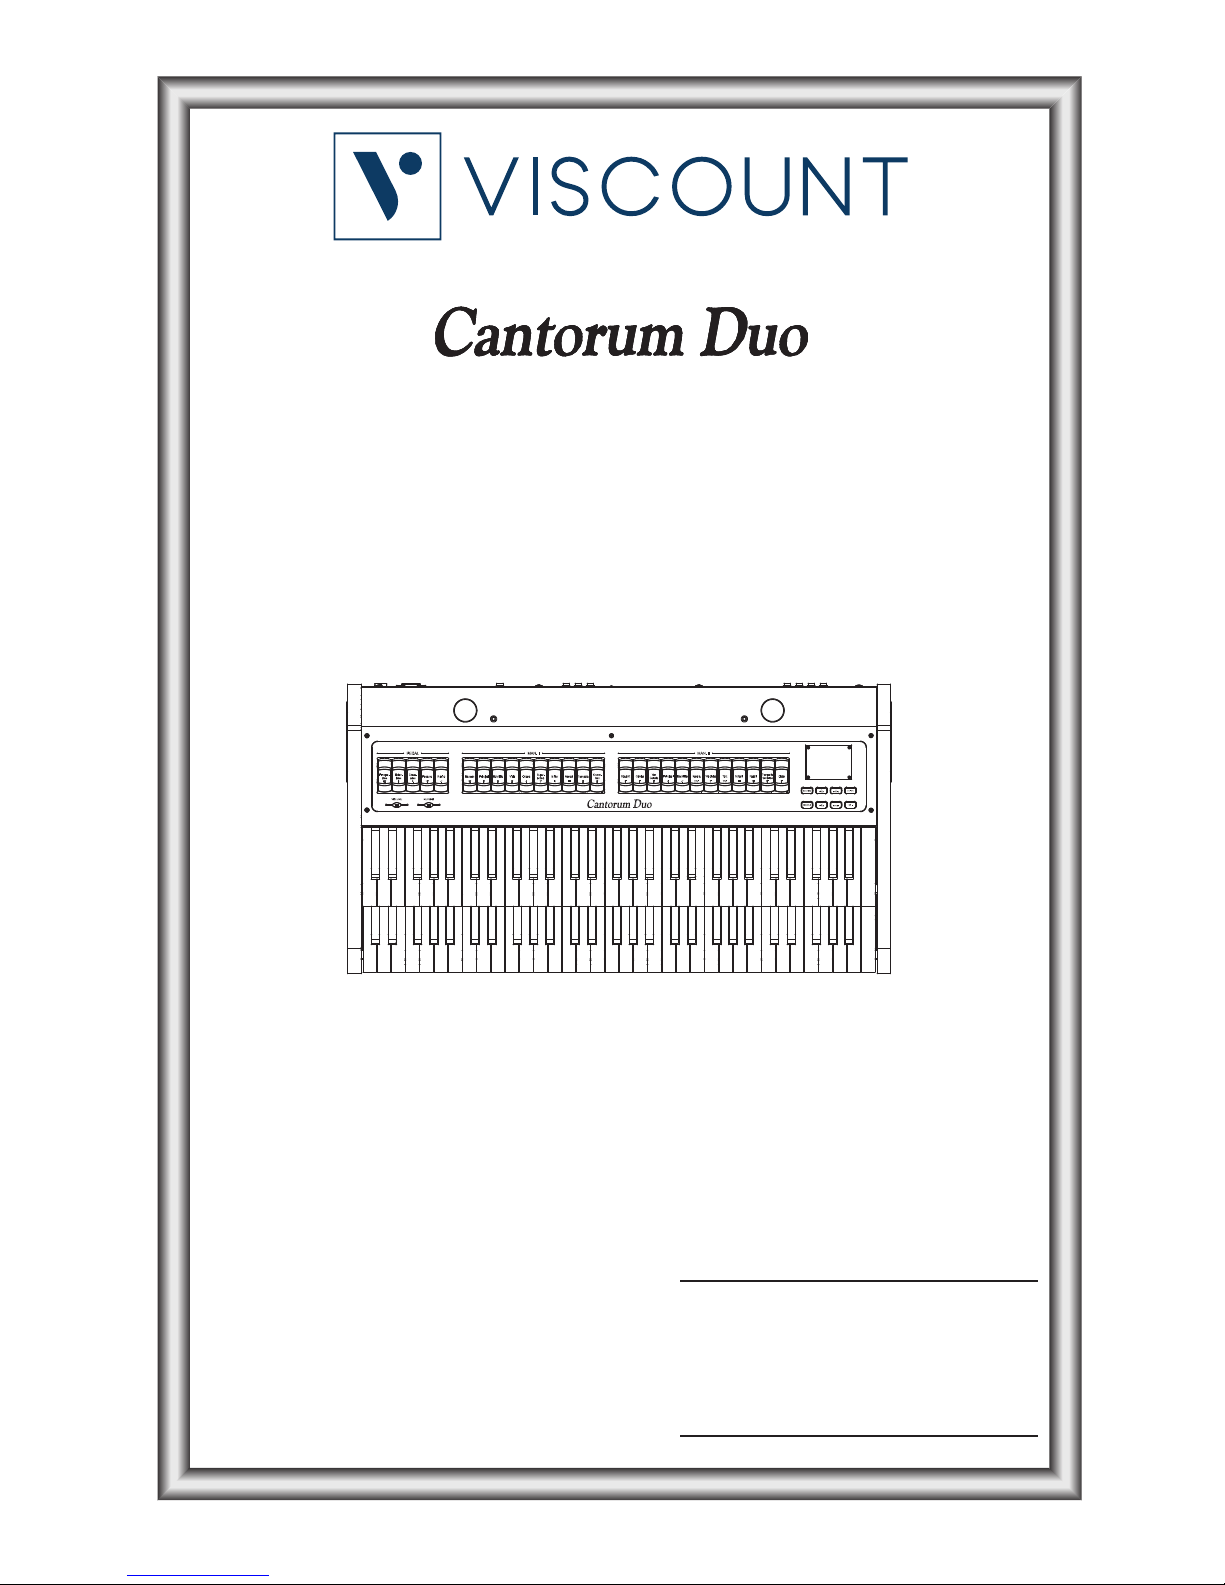
Page 1
Manuale Utente - IT
User Guide - EN
- FRMode d’Emploi
Ver. - 1.0
Page 2
Page 3

IT - 1
Manuale Utente
1. Note importanti ........................................................................................................................................ 2
1.1 Cura del prodotto .......................................................................................................................................................... 2
1.2 Note riguardanti il manuale ......................................................................................................................................... 2
2. Descrizione generale dello strumento..................................................................................................... 4
3. Accensione e videata principale .............................................................................................................. 8
3.1 Il Main Menu ................................................................................................................................................................. 9
4. Regolazione dei volumi (funzione Volumes) ....................................................................................... 10
5. Impostazioni generali dello strumento (menu Settings) ..................................................................... 11
5.1 Selezione del tipo di riverbero (parametro Reverb) ............................................................................................. 12
5.2 Regolazione degli equalizzatori (funzioni Equalizers).......................................................................................... 13
5.3 Canalizzazione dei segnali sulle uscite audio (funzione External Outputs) ..................................................... 14
5.4 Impostazioni MIDI (funzioni MIDI) ..................................................................................................................... 14
5.5 Regolazione della dinamica dei manuali (funzione Velocity Sens.) ................................................................... 17
5.6 Opzioni di funzionamento delle combinazioni (funzione Combinations) ...................................................... 17
5.7 Configurazione dei pedali e della pedaliera MIDI (funzione Pedals) ............................................................... 18
5.8 Salvataggio nelle combinazioni dei messaggi MIDI di cambio programma
(funzione Combination Prg) ...................................................................................................................................... 19
5.9 Blocco di sicurezza alle modifiche (funzione Security) ........................................................................................ 20
5.10 Configurazione del controllo di volume e regolazione del contrasto del display
(funzione Controls) .................................................................................................................................................... 21
5.11 Ripristino delle impostazioni di fabbrica (funzione Factory Settings) ............................................................ 22
5.12 Aggiornamento del sistema operativo (funzione Op.Sys. Upgrade) .............................................................. 23
6. Programmazione degli stili d’organo (menu Style).............................................................................. 25
6.1 Regolazione dei tremoli (funzione Tremulants) .................................................................................................... 26
6.2 Regolazione del volume di ogni voce (funzione Voices Volumes) ................................................................... 26
6.3 Selezione delle voci orchestrali (funzione Orchestra) .......................................................................................... 27
7. Salvataggio su file della configurazione dell’organo (menu File) ........................................................ 28
7.1 Informazioni sulla gestione della penna USB ........................................................................................................ 28
7.2 Caricamento delle combinazioni e/o impostazioni dell’organo (funzione File Load) .................................. 29
7.3 Salvataggio su file delle combinazioni e/o impostazioni dell’organo (funzione File Save) ......................... 30
8. Registrazione e riproduzione di brani musicali (Sequencer)............................................................... 32
8.1 Riproduzione di un brano (modalità Play) ............................................................................................................. 32
8.2 Registrazione di un brano (modalità Record) ........................................................................................................ 34
8.3 Sovraincisione di un brano (modalità Overdub) ................................................................................................... 36
9. Local Off dei registri .............................................................................................................................. 39
10. Appendice ............................................................................................................................................. 39
10.1 Riproduzione dei brani dimostrativi (funzione Demo) ..................................................................................... 39
10.2 Il temperamento ........................................................................................................................................................ 39
10.3 I temperamenti nel Cantorum Duo ...................................................................................................................... 41
10.4 Contenuto dei file .set, .cmb, .sts, .sta e .all .......................................................................................................... 47
10.5 Cosa e’ il MIDI .......................................................................................................................................................... 48
10.6 Detailed MIDI Implementation ............................................................................................................................ 50
INDICE
Page 4

IT - 2
Manuale Utente
1.1 CURA DEL PRODOTTO
• Non applicate eccessiva forza alle strutture ed ai comandi dell’organo (manopole, registri, pulsanti,
ecc…).
• Non collocare, quando possibile, lo strumento in prossimità di unità che producano forti interferenze
come apparecchi radio – TV, monitor, ecc...
• Evitate di posizionare l’organo in prossimità di fonti di calore, in luoghi umidi o polverosi o nelle
vicinanze di forti campi magnetici.
• Evitate di esporre lo strumento all’irradiazione solare diretta.
• Non introdurre per nessuna ragione oggetti estranei o liquidi di qualsiasi genere all’interno dello
strumento.
• Per la pulizia usate solo un pennello morbido od aria compressa, non usate mai detergenti, solventi od
alcool.
• Per il collegamento con impianti di amplificazione e diffusione utilizzate sempre cavi schermati di
buona qualità. Quando scollegate i cavi dalle prese abbiate cura di afferrarli per il connettore e non per
il cavo stesso; avvolgendoli, inoltre, evitate nodi e torsioni.
• Prima di effettuare i collegamenti accertatevi che le altre unità (in particolar modo sistemi di
amplificazione e di diffusione) che state per collegare siano spente. Eviterete rumorosi se non
pericolosi picchi di segnale.
• Collegate il cavo di alimentazione ad una presa di corrente provvista di contatto di terra.
• Accertatevi che la tensione di rete corrisponda a quella indicata sulla targhetta matricola dell’apparato.
• In caso di lunghi periodi di inutilizzo dell’organo scollegate la spina della presa di corrente.
1.2 NOTE RIGUARDANTI IL MANUALE
• Conservate con cura questo manuale.
• Il presente manuale costituisce parte integrante dello strumento. Le descrizioni e le illustrazioni
contenute nella presente pubblicazione si intendono non impegnative.
• Ferme restando le caratteristiche essenziali dello strumento, il costruttore si riserva il diritto di
apportare eventuali modifiche di parti, dettagli ed accessori che riterrà opportune per il miglioramento
del prodotto o per esigenze di carattere costruttivo o commerciale, in qualunque momento e senza
impegnarsi ad aggiornare tempestivamente questa pubblicazione.
• Tutti i diritti sono riservati, è vietata la riproduzione di qualsiasi parte di questo manuale, in qualsiasi
forma, senza l’esplicito permesso scritto del costruttore.
• Tutti i marchi citati all’interno del manuale sono di proprietà delle rispettive case produttrici.
1. NOTE IMPORTANTI
Page 5
IT - 3
Manuale Utente
• Leggete attentamente tutte le informazioni descritte. Eviterete inutili perdite di tempo ed otterrete le
migliori prestazioni dallo strumento.
• Le sigle od i numeri riportati tra parentesi quadre ([ ]) stanno ad indicare i nomi dei pulsanti, sliders,
potenziometri e connettori presenti sullo strumento.
Per esempio la scritta [ENTER] indica il pulsante con scritto ENTER in serigrafia.
• Le illustrazioni e le videate sono puramente a scopo informativo e possono differire dal vostro
prodotto.
• Le informazioni descritte nel presente manuale fanno riferimento alla versione del sistema operativo
dello strumento presente quando il documento è stato redatto e potrebbero non rispecchiare le
funzionalità della versione che state utilizzando. Pertanto consultate il sito internet
www.viscountinstruments.com per conoscere l’ultima versione del sistema operativo e la disponibilità
di un manuale più aggiornato.
Il presente manuale d’uso è aggiornato alla versione 1.0.0 del sistema operativo dello strumento.
Page 6

IT - 4
Manuale Utente
1. Registri [PEDAL]: qui sono raccolti i registri per la sezione Pedal. E’ possibile suonare questi registri
tramite una pedaliera MIDI collegata al connettore [MIDI IN] presente nel pannello posteriore (vedi
punto 19) oppure con il primo manuale attivando la funzione Automatic Pedal (vedi punto 13). In
caso di pedaliera MIDI, questa deve trasmettere le note sul canale di ricezione impostato per la sezione
Pedal (vedi par. 5.4).
2. Registri [MAN. I]: qui sono raccolti i registri per la sezione Manual I.
3. Registri [MAN. II]: qui sono raccolti i registri per la sezione Manual II.
4. Sezione di controllo e programmazione: qui sono presenti i pulsanti ed il display atti alla
visualizzazione e programmazione di tutte le funzioni di configurazione e del sequencer dello
strumento. I pulsanti svolgono le seguenti operazioni:
- [VOLUMES]: accesso alla videata che raccoglie tutti i volumi dello strumento.
- [SEQUENC.]: accesso alle videate per l’utilizzo del sequencer interno dello strumento.
- [FIELD ] e [FIELD ]: tramite questi pulsanti è possibile muovere il cursore indicato dal
campo in reverse. [FIELD ] lo posiziona nel campo soprastante o precedente, [FIELD ] in
quello sottostante o successivo.
- [VALUE +] e [VALUE -]: questi pulsanti regolano i valori dei parametri, siano essi valori
numerici o alfanumerici. [VALUE +] incrementa, [VALUE -] decrementa.
- [EXIT] e [ENTER]: sono pulsanti che permettono di navigare nei menu e nelle videate a
display, o di confermare o annullare le richieste avanzate dal sistema. [ENTER] accede ai menu /
videate e conferma, [EXIT] abbandona i menu / videate e annulla.
5. Slider [VOLUME]: regola il volume generale dell’organo.
6. Slider [REVERB]: regola il livello dell’effetto di riverbero.
2. DESCRIZIONE GENERALE DELLO STRUMENTO
1 2 3
4
5 6
Page 7

IT - 5
Manuale Utente
7. Pistoncini ORCHESTRA: qui si trovano i registri orchestrali dell’organo.
- [ORCH P]: registro orchestrale della sezione Pedal.
- [ORCH I]: registro orchestrale della sezione Manual I.
- [ORCH II]: registro orchestrale della sezione Manual II.
E’ possibile selezionare per qualsiasi registro il timbro che questo attiverà. Per maggiori informazioni
consultare il par. 6.3.
8. Pistoncini delle unioni: qui sono presenti i pistoncini per l’attivazione / disattivazione delle unioni
tra i manuali e pedaliera:
- [I/P]: i registri del Manual I suonano anche in pedaliera.
- [II/P]: i registri del Manual II suonano anche in pedaliera.
- [II/I]: i registri del Manual II suonano anche nel primo manuale.
9. Pistoncino [S]: pistoncino Set (fissatore) per la memorizzazione delle combinazioni generali del Tutti
e dei passi del Crescendo.
Per memorizzare una combinazione od il Tutti, dopo aver impostato lo stato delle voci desiderato
premere [S] e mantenendolo premuto premere il pistoncino della combinazione che si desidera
memorizzare.
Per memorizzare un passo del Crescendo, selezionarlo tramite l’apposito pedale, premere [S] e
tenendolo premuto premere [HR] delle combinazioni generali. Per copiare il contenuto di un passo in
un altro, dopo aver selezionato il passo che si desidera copiare premere e tenere premuto il pistoncino
[S], selezionare il passo in cui si desidera riversare il contenuto quindi premere [HR] delle combinazioni
generali.
In ogni combinazione generale e nel Tutti possono essere memorizzati anche lo Stile d’organo,
velocità e profondità dei tremoli ed i timbri orchestrali presenti al momento della memorizzazione,
così da disporre di combinazioni ulteriormente variegate e personalizzate ed adattabili al brano che si
sta suonando.
Per disporre di queste funzionalità è necessario impostare le varie opzioni di memorizzazione tramite
la funzione COMBINATIONS descritta nel par. 5.6.
7 8
9 10 11 12 13 14 13
N.B.
Qualora il Led del pistoncino [S] risulti spento, ciò sta a significare che la modifica delle
combinazioni, del Tutti e del Crescendo è inibita tramite la funzione SECURITY (vedi par 5.9).
Page 8
IT - 6
Manuale Utente
10. Pistoncini degli Stili: qui sono raccolti i pistoncini per la selezione dello Stile d’organo (vedi cap. 6):
- [BAR]: barocco
- [BRK]: barocco nord europeo
- [ROM]: romantico
- [SYM]: sinfonico
Dopo la selezione, se il display sta visualizzando la videata principale (vedi cap. 3), il nome dello Stile
viene indicato per qualche secondo con un pop-up informativo.
11. Pistoncini dei Tremoli: qui sono presenti i pistoncini per l’attivazione / disattivazione del Tremolo
per ogni divisione:
- [TREM I]: Tremolo del Manual I.
- [TREM II]: Tremolo del Manual II.
12. Combinazioni generali.
- [1] / [6]: pistoncini per il richiamo delle combinazioni generali del banco di memoria selezionato
(vedi punto [PREV] / [NEXT]). Queste combinazioni sono aggiustabili, la procedura di
memorizzazione è descritta al punto 9.
- [HR]: ripristina lo stato dei registri presenti prima del richiamo di una combinazione generale
quando il pistoncino stesso è acceso.
- [PREV] e [NEXT]: sequenziatori di combinazioni generali, [PREV] è in ordine decrescente,
[NEXT] in ordine crescente. Tenendo premuto il pistoncino [S] e agendo su questi comandi è
altresì possibile selezionare il banco di memoria.
13. Comandi generali dell’organo: si tratta di comandi non dedicati alle singole sezioni ma la cui
abilitazione influenza l’intero strumento.
- [A.P]: questo pistoncino controlla lo stato della funzione Automatic Pedal che permette di
suonare i registri di pedaliera tramite le prime 32 note del primo manuale. In questo caso la
pedaliera dell’organo viene disattivata e i registri diventano monofonici con priorità sulla nota più
grave.
- [ENC]: abilita la funzione Enclosed la quale permette di controllare il volume generale dell’organo
agendo sul pedale d’espressione collegato al connettore [EXPR.] presente nel pannello posteriore.
- [C]: pistoncino Cancel (annullatore) il quale spegne tutti i registri, tremoli, unioni e i pistoncini sui
divisori dei manuali, quindi cancella ed accende l’[HR]. Se è stato abilitato il salvataggio dei
pistoncini [ENC] e [A.P.] nelle combinazioni (vedi funzione COMBINATIONS al par. 5.6), questi
non vengono spenti dal Cancel.
14. Pistoncino [T]: pistoncino per il richiamo del Tutti. Il Tutti è programmabile, la procedura di
memorizzazione è descritto al punto 9.
15 16
17
18 20 21 22
18
Page 9
IT - 7
Manuale Utente
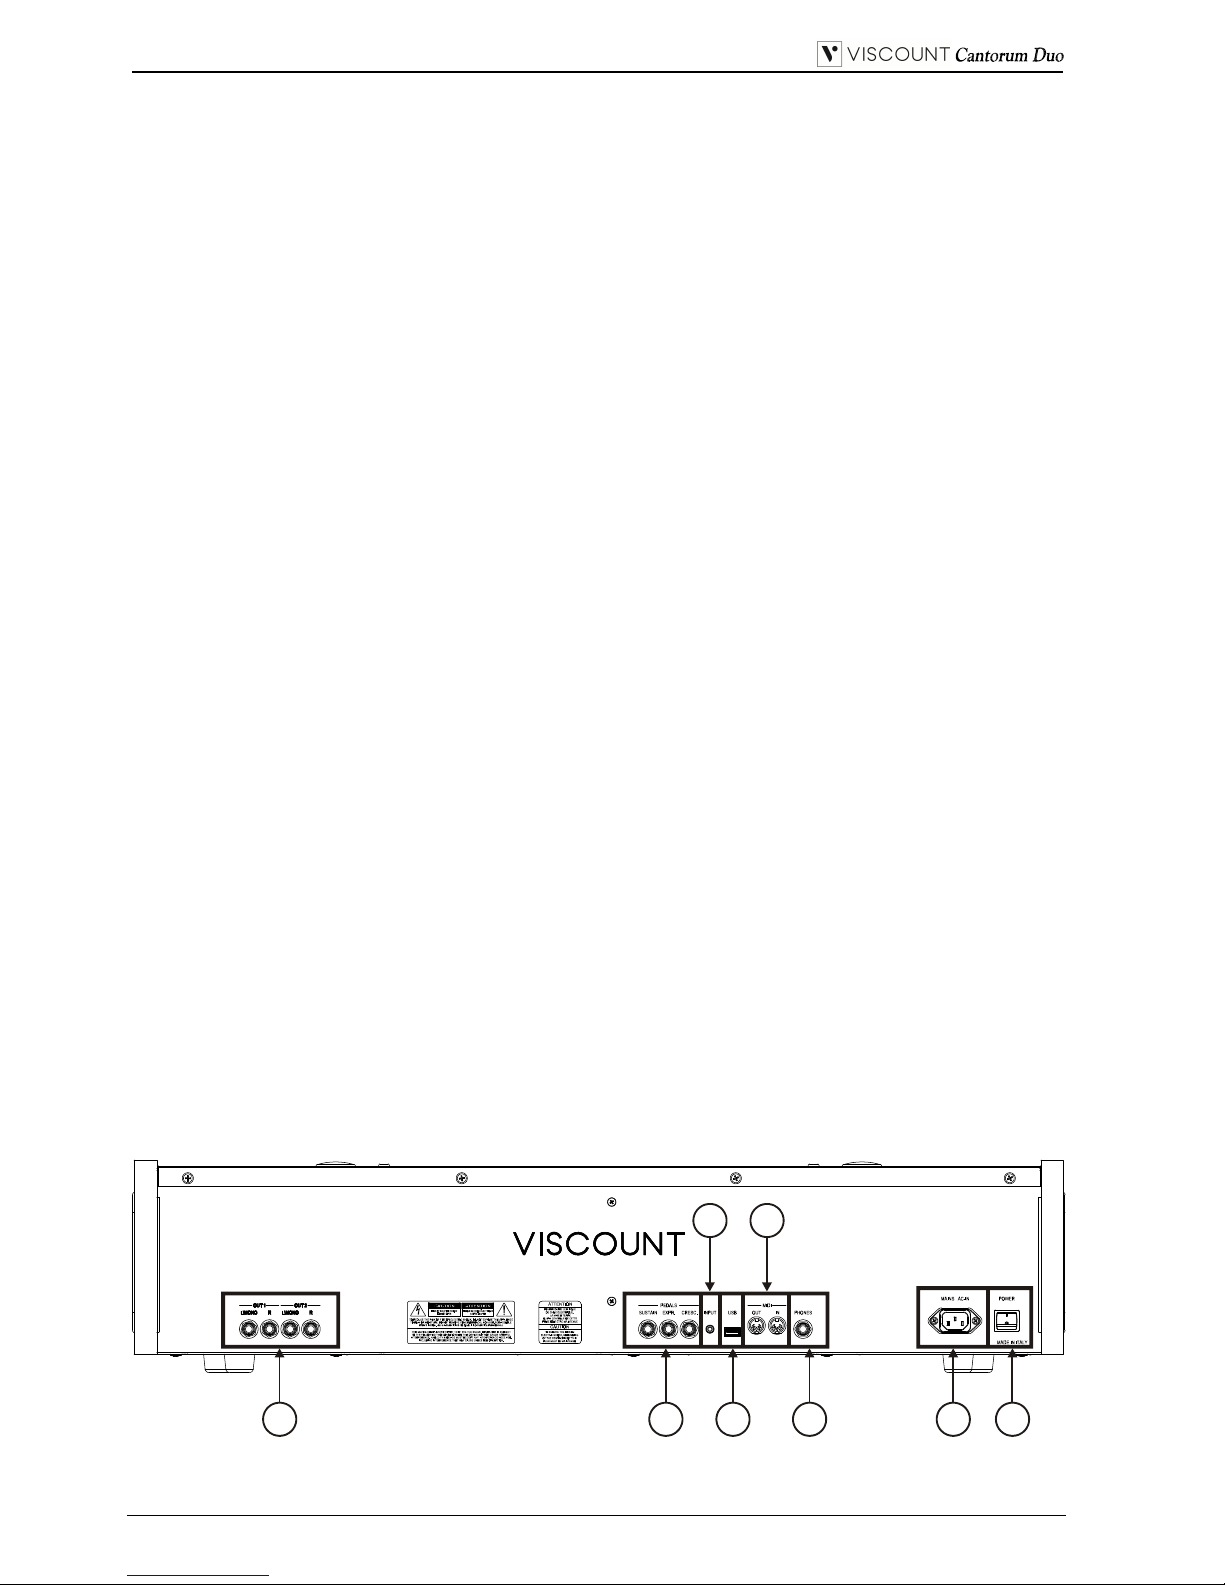
15. Uscite audio [OUT 1] e [OUT 2]: uscite Jack di linea in cui è presente il segnale stereo dell’organo
in base alle impostazioni effettuate nella videata descritta al par. 5.3. Queste uscite inoltre dispongono
del controllo dedicato di livello ed equalizzazione (vedi par. 4 e 5.2). In caso di impianto stereofonico
collegare l’uscita [L/MONO] al canale sinistro e l’uscita [RIGHT] al canale destro. Qualora si utilizzi
un impianto monofonico, collegare il solo connettore [L/MONO].
16. Connettori [PEDALS]: in questi connettori è possibile collegare pedali per il controllo delle seguenti
funzioni:
- [SUSTAIN]: connettore per un pedale di tipo switch con il quale controllare l’effetto Sustain per
le voci orchestrali.
- [EXPR.]: controllo continuo del volume della sezione Manual II.
- [CRESC.]: con questo pedale potrete selezionare i livelli del Crescendo tramite il quale attivare
una serie prefissata di registri equivalenti ad altrettanti livelli di intensità sonora, dal pianissimo al
fortissimo. Il livello attualmente selezionato viene visualizzato dal display nella videata principale
grazie alla casella “CRESCEN”.
Il Crescendo controlla lo stato di tutti i registri dell’organo e si aggiunge alla configurazione dei
registri preparata a mano o tramite combinazione. Ogni livello del Crescendo è programmabile. La
procedura di memorizzazione è descritta al punto 9.
17. Connettore [INPUT]: ingresso mini-jack di linea per segnali audio esterni. Il segnale audio esterno
viene sommato al suono prodotto da Cantorum Duo.
18. Connettore [USB]: connettore per l’utilizzo di una penna USB (non fornita con lo strumento) da
utilizzarsi per il salvataggio delle impostazioni dell’organo e dei brani registrati con il sequencer interno.
19. Connettori [MIDI]: connettori per il collegamento di dispositivi MIDI.
- [IN]: connettore di ingresso per far ricevere al Cantorum Duo i dati trasmessi da un’unità MIDI
esterna. Collegare questa presa all’uscita MIDI del dispositivo trasmittente (per es. un sequencer).
- [OUT]: da questo connettore vengono trasmessi i dati MIDI generati dal Cantorum Duo.
Collegare questa presa all’ingresso MIDI del dispositivo ricevente (per es. un expander).
20. Connettore [PHONES]: presa per collegare un set di cuffie. A cuffia inserita l’amplificazione interna
dell’organo viene disabilitata.
21. Presa [MAINS AC-IN]: connettore per il cavo di alimentazione fornito con lo strumento.
22. Interruttore [POWER]: interruttore di accensione e spegnimento del Cantorum Duo.
N.B.
- Lo strumento, all’accensione, è in grado di rilevare automaticamente la polarità del pedale
switch collegato al connettore [SUSTAIN]. Non premere il pedale quando si accende lo
strumento onde evitare di invertirne il funzionamento.
- Il pedale collegato al connettore [CRESC.] può essere utilizzato, in alternativa, per
controllare il volume delle sezioni Pedal e Manual I. Per maggiori informazioni consultare il
par. 5.7.
N.B.
- Per maggiori informazioni riguardo l’interfaccia MIDI, fare riferimento ai par 5.4, 10.5 e
10.6.
- Per maggiori informazioni riguardo la gestione dei file nelle penne USB, fare riferimento al
par. 7.1.
Page 10
IT - 8
Manuale Utente
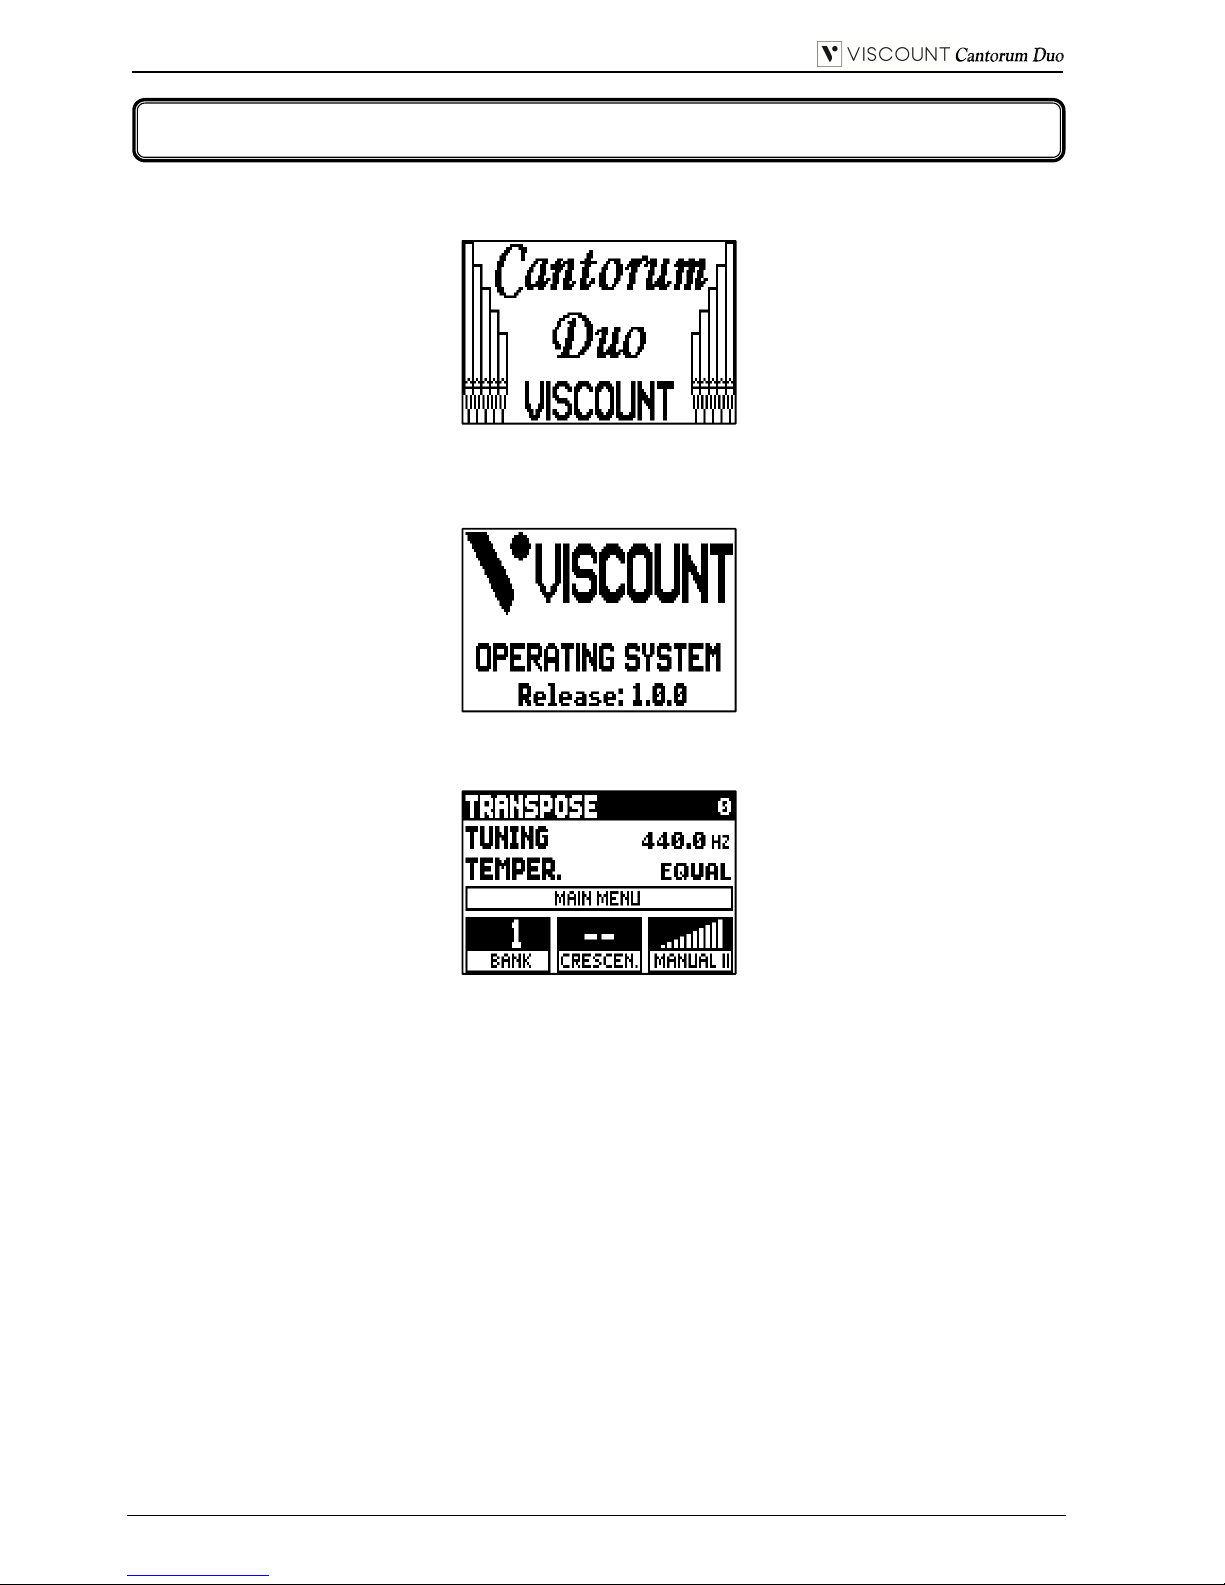
Dopo aver acceso lo strumento il display visualizza la videata di presentazione,
quindi quella in cui si viene informati sulla versione (Release) del sistema operativo attualmente installata
nello strumento,
dopo qualche istante viene visualizzata la videata principale,
Nella parte superiore di questa videata sono presenti i parametri:
o TRANSPOSER: regolazione del traspositore.
o TUNING: regolazione fine dell’intonazione indicata come frequenza del LA3 (di una canna 8’);
o TEMPER. (Temperament): selettore di temperamenti storici di varie epoche (per la descrizione
dettagliata dei temperamenti consultare i par. 10.2 e 10.3).
In questa ed in tutte le altre videate visualizzate dal display, per muovere il cursore, rappresentato dal
campo in negativo, utilizzare i pulsanti [FIELD ] e [FIELD ].
Per regolare i valori del parametro puntato dal cursore, premere i pulsanti [VALUE +] e [VALUE -].
In caso di parametri con valore centrale del range regolabile (es. -6 / 0 / +6), premendo
contemporaneamente i due pulsanti VALUE viene immediatamente selezionato il valore centrale.
Il campo a display MAIN MENU permette di accedere al menu principale in cui sono raggruppate tutte
le funzioni di configurazione dell’organo. Per accedervi posizionare il cursore su questo campo e premere
[ENTER].
Dal MAIN MENU, per tornare alla videata principale premere il pulsante [EXIT].
Nella parte inferiore della videata vengono visualizzate tre box indicanti:
o BANK: il banco di memoria selezionato tramite i pistoncini [S] e [+] o [-];
o CRESC.: il passo di Crescendo attualmente selezionato;
o MANUAL II: il livello di espressione della sezione Manual II.
3. ACCENSIONE E VIDEA
T
A
PRINCIPALE
Page 11

IT - 9
Manuale Utente
3.1 IL MAIN MENU
Il Main Menu, o menu principale, contiene i vari sotto-menu in cui sono raggruppate, in base al loro
scopo, tutte le funzioni di regolazione ed impostazione dello strumento.
Dopo aver selezionato il campo MAIN MENU nella videata principale, il display visualizza la seguente
videata:
Come nella videata principale, per muovere il cursore, rappresentato dal campo in negativo, utilizzare i
pulsanti [FIELD ] e [FIELD ].
In questa ed in tutte le altre videate che verranno d’ora in poi illustrate, quando il cursore si trova su
campo che richiede la pressione del pulsante [ENTER] per accedere alla relativa funzione, nella parte
destra del cursore stesso viene visualizzata la dicitura [ENTER]. Qualora la voce a display sia invece un
parametro di regolazione o impostazione, il valore selezionato viene sempre visualizzato. Per la
regolazione utilizzare i pulsanti [VALUE +] e [VALUE -].
I campi a display visualizzati nel MAIN MENU permettono di accedere alle seguenti funzioni:
o SETTINGS: impostazioni generali di funzionamento dello strumento, equalizzatori, impostazioni
riguardanti l’interfaccia MIDI, impostazioni delle uscite audio del pannello posteriore, ripristino delle
impostazioni di fabbrica ed aggiornamento del sistema operativo. Queste funzioni sono descritte nel
cap. 5.
o STYLE: programmazione degli Stili d’organo. Questa funzione è descritta nel cap. 6.
o COMBIN. PRG (Combination Program Change): inserimento nelle combinazioni dei messaggi
MIDI di cambio programma. Questa funzione è descritta nel par. 5.8.
NOTE
- All’accensione lo strumento ha sempre trasposizione nulla.
- La trasposizione non ha effetto sulla riproduzione dei brani con il sequencer interno (al
contrario della registrazione dove invece le note vengono acquisite trasposte). A tal scopo è
presente un traspositore dedicato (vedi cap. 8).
- Se subito dopo l’accensione viene visualizzato il messaggio di errore “OP.SYS FAILURE
PLEASE INSERT USB PEN WITH RELEASE FILE”, inserire la penna USB contenente il
file di aggiornamento nel connettore [USB] posto sotto i manuali e premere [ENTER], quindi
rieseguire la procedura aggiornamento come descritto nel par. 5.12.
- Se subito dopo l’accensione viene visualizzato il messaggio di errore “RELESE
CHECKSUM ERROR”, contattare il servizio di assistenza tecnica all’indirizzo e-mail
service@viscount.it indicando il tipo di errore riportato nella riga inferiore (SYSTEM o
MODEL) ed i numeri a fianco dei campi “M:”, “V:”, “S:” e “Release” così da ottenere il
file e le informazioni necessarie per ripristinare lo strumento.
- Se subito dopo l’accensione viene visualizzato il messaggio “PERIPHERALS UPDATE
REQUESTED”, premere [ENTER] per eseguire le operazioni necessarie al completamento
dell’aggiornamento del sistema operativo. Qualora il messaggio venisse visualizzato di nuovo
contattare il servizio di assistenza tecnica all’indirizzo e-mail service@viscount.it indicando
le informazioni visualizzate a display così da ottenere il file e le informazioni necessarie per
ripristinare lo strumento.
Page 12
IT - 10
Manuale Utente
o FILE: memorizzazione e caricamento su penna USB dei file contenenti le impostazioni, gli Stili e le
combinazioni dell’organo. Queste funzioni sono descritte nel cap. 7.
o DEMO: riproduzione dei brani dimostrativo presenti nello strumento. Questa funzione è descritta nel
par 10.1.
L’organo Cantorum Duo permette la regolazione di diversi controlli di volume, così da garantire un
perfetto bilanciamento sonoro tra le varie sezioni e tra l’amplificazione interna ed esterna.
Per visualizzare la videata di regolazione premere il pulsante [VOLUMES]:
o PEDAL: volume divisionale della sezione Pedal.
o MAN I: volume divisionale della sezione Manual I.
o MAN II: volume divisionale della sezione Manual II.
o OUT 1: volume della coppia di uscite [OUT 1] del pannello posteriore.
o OUT 2: volume della coppia di uscite [OUT 2] del pannello posteriore.
o INPUT: volume del segnale presente nell’ingresso [INPUT] del pannello posteriore.
Per tornare alla videata visualizzata in precedenza premere [VOLUMES] o [EXIT] od attendere 5 secondi.
4. REGOLAZIONE DEI VOLUMI
(funzione VOLUMES)
Page 13
IT - 11
Manuale Utente
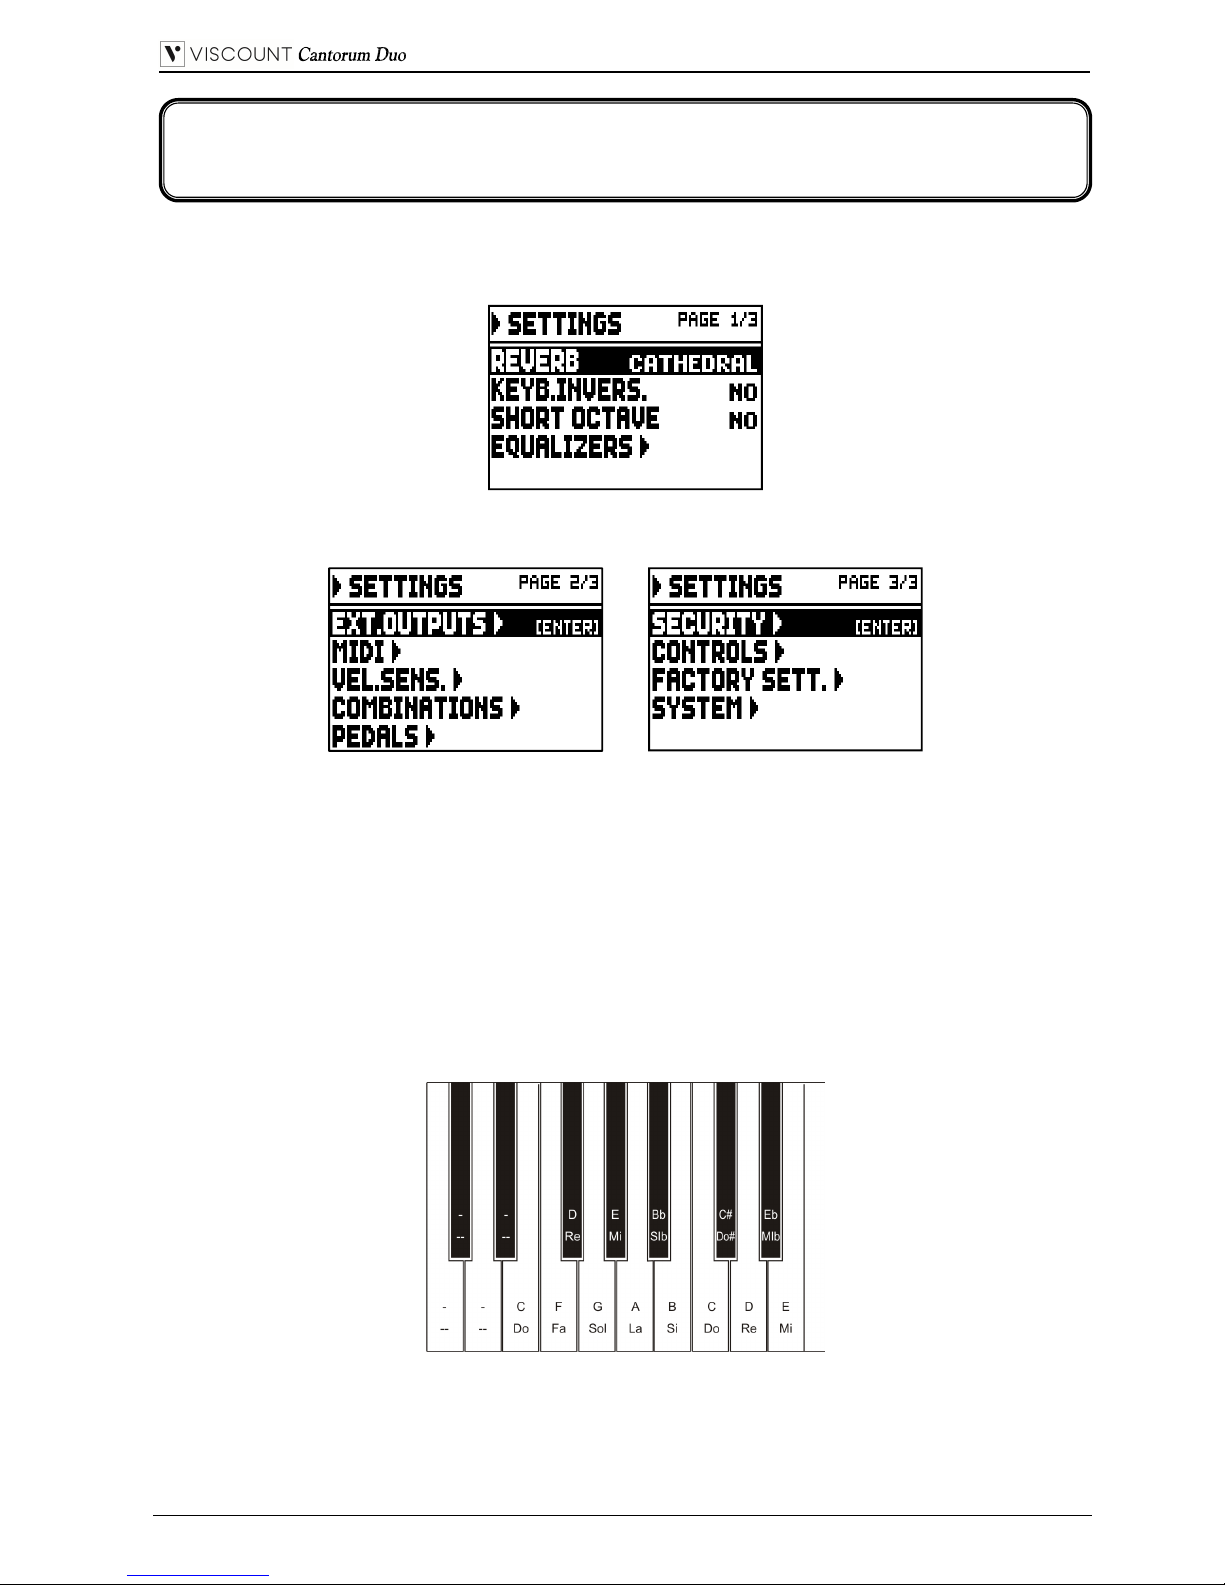
Per accedere al menu SETTINGS, che raccoglie tutte le funzioni atte alla totale configurazione dello
strumento, selezionare la voce SETTINGS nel MAIN MENU, viene visualizzata la prima videata:
utilizzare i pulsanti [FIELD ] e [FIELD ] per muovere il cursore e scorrere tutte le videate del menu:
Le voci a display hanno le seguenti funzioni:
o REVERB: selezione dell’ambiente in cui si trova l’organo, al fine di simularne la riverberazione, che
va dalla grande chiesa molto riverberante e densa di riflessioni acustiche a piccoli ambienti con
riverbero breve ed ovattato. Per una descrizione dettagliata dell’effetto di riverbero, consultare il par.
5.1.
o KEYB.INVERS. (Keyboard Inversion): inversione dei manuali (selezionando YES) in modo che i
registri della sezione Manual I suonino con il secondo manuale e quelli della sezione Manual I con il
primo manuale. Per disattivare la funzione selezionare NO.
o SHORT OCTAVE: attivazione (selezionando YES) dell’ottava corta sulla prima ottava dei manuali e
della pedaliera per poter eseguire partiture originariamente scritte per gli organi antichi (dal XVI al
XVIII secolo) in cui la prima ottava aveva questa disposizione di note:
Per disattivare la funzione selezionare NO.
o EQUALIZERS: accesso alle videate di regolazione degli equalizzatori dell’amplificazione interna e
delle uscite audio del pannello posteriore. Queste funzioni sono descritte nel par. 5.2.
o EXT. OUTPUTS (External Outputs): selezione del segnale audio presente nelle uscite [OUT 1] e
[OUT 2] del pannello posteriore. Questa funzione è descritta nel par. 5.3.
5. IMPOSTAZIONI GENERALI DELLO STRUMENTO
(menu SETTINGS)
Page 14

IT - 12
Manuale Utente
o MIDI: accesso alle funzioni di impostazione dell’interfaccia MIDI. Queste funzioni sono descritte nel
par. 5.4.
o VEL. SENS. (Velocity Sensitivity): regolazione della dinamica dei manuali e della pedaliera per
l’utilizzo con le voci Orchestra e le note trasmesse via MIDI. Questa funzione è descritta nel par. 5.5.
o COMBINATIONS: accesso alle funzioni di personalizzazione del contenuto delle combinazioni.
Queste funzioni sono descritte nel par. 5.6.
o PEDALS: configurazione dei pedali e della pedaliera MIDI eventualmente collegati ai connettori del
pannello posteriore. Queste funzioni sono descritte nel par. 5.7.
o SECURITY: impostazione del codice di blocco dell’organo al fine di evitare modifiche alla
configurazione dello strumento, agli Stili d’organo, alle combinazioni, Tutti e Crescendo. Questa
funzione è descritta nel par. 5.9.
o CONTROLS: configurazione del potenziometro [VOLUME] e regolazione del contrasto del display.
Questa funzione è descritta nel par. 5.10.
o FACTORY SETT. (Factory Settings): ripristino delle impostazioni di fabbrica. Questa funzione è
descritta nel par. 5.11.
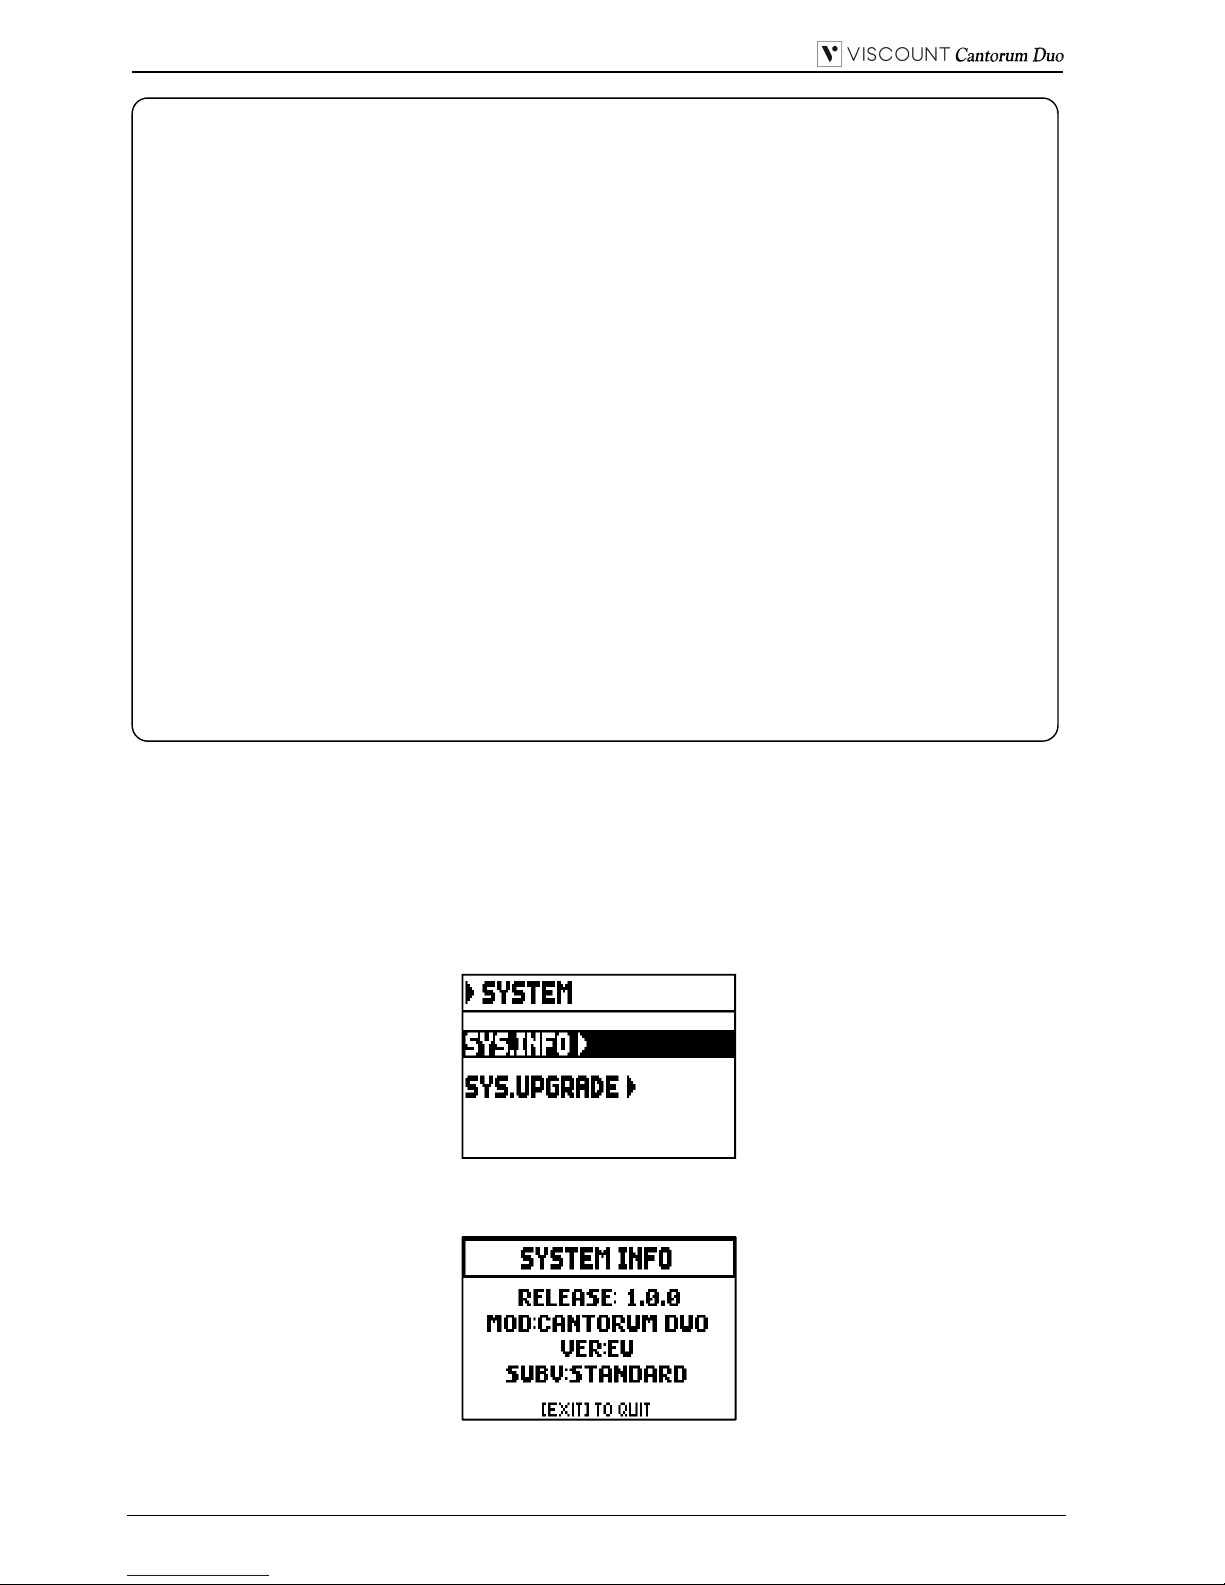
o SYSTEM: informazioni di sistema e aggiornamento del sistema operativo. Queste funzioni sono
descritte nel par. 5.12.
Per accedere ad una funzione, posizionare il cursore sul relativo campo utilizzando i pulsanti [FIELD ] e
[FIELD ] e premere [ENTER]. Per abbandonare il menu SETTINGS premere invece [EXIT].
5.1 SELEZIONE DEL TIPO DI RIVERBERO (parametro REVERB)
Il riverbero è il risultato di una serie di riflessioni sonore che si propagano all’interno di un ambiente
chiuso. L’ordine ed il valore di ciascuna riflessione è fortemente condizionata dai molti fattori che
agiscono all’interno dello stesso ambiente, ad esempio le dimensioni del luogo dove si verifica il fenomeno,
la natura dei materiali che lo compongono e gli oggetti che vi si trovano all’interno, la posizione stessa
dell’ascoltatore, ecc...
I processori digitali di segnale presenti del Cantorum Duo permettono di ricreare artificialmente le
complesse situazioni di riverberazione che si verificano naturalmente negli ambienti tipici dell’organo a
canne e di generare, quindi, il giusto effetto di riverbero a completamento della eccellente qualità timbrica.
Scopo del parametro REVERB presente nel menu SETTINGS è proprio la selezione dell’ambiente in cui
lo strumento si trova, che va dalla grande cattedrale molto riverberante e densa di riflessioni acustiche a
piccole chiese con riverbero breve ed ovattato.
Si ricorda che sul pannello superiore è inoltre presente lo slider [REVERB] che permette di regolare il
livello dell’effetto di riverbero.
Le tipologie disponibili sono:
o CATHEDRAL: riverbero tipico di una cattedrale
o BASILICA: riverbero tipico di una basilica
o GOTHIC CHURCH: riverbero tipico di una chiesa gotica
o BAROQUE CHURCH: riverbero tipico di una chiesa barocca
o ROMANIC CHURCH: riverbero tipico di una chiesa romanica
o MODERN CHURCH: riverbero tipico di una chiesa moderna
o PARISH: riverbero tipico di una chiesa parrocchiale
o CAPPELLA: riverbero tipico di una cappella
Premere [EXIT] per uscire dalla videata e memorizzare le impostazioni correnti.
N.B.
Il riverbero interno dell’organo ha effetto anche sui segnali in ingresso alla presa [INPUT]
p
resente nel pannello posteriore.
Page 15
IT - 13
Manuale Utente
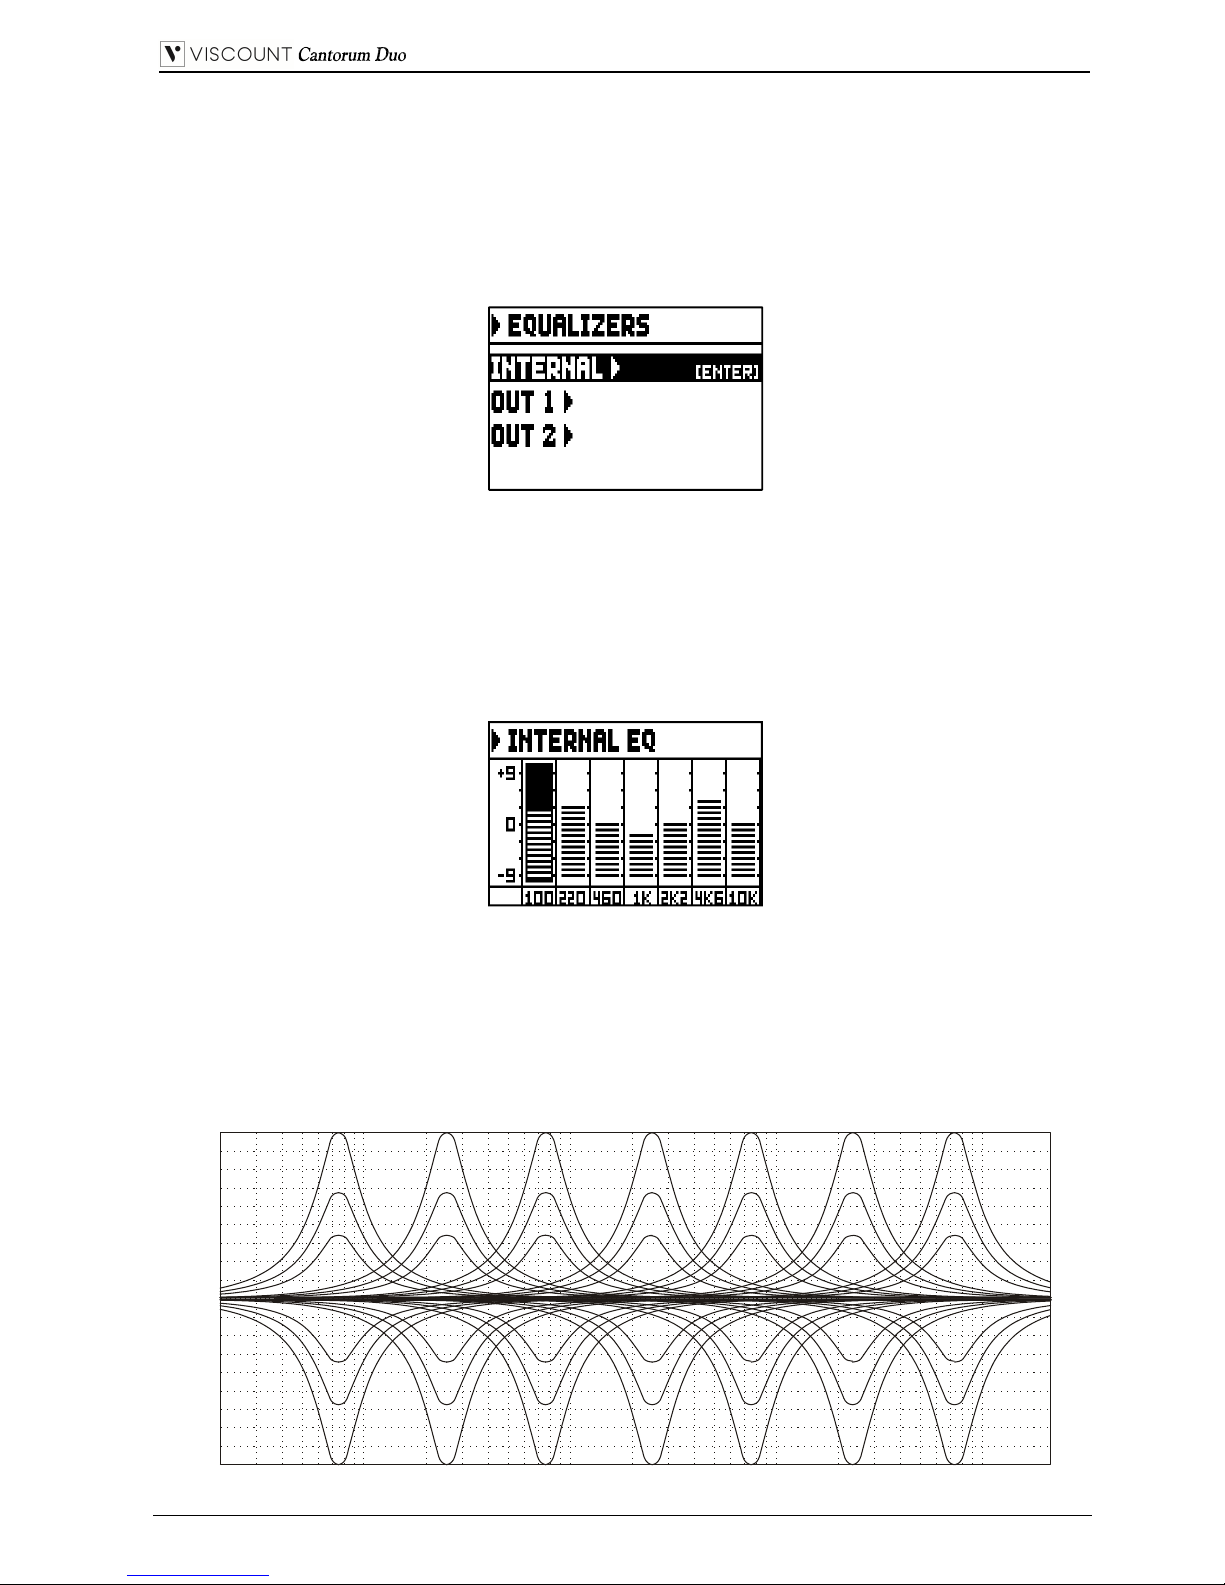
5.2 REGOLAZIONE DEGLI EQUALIZZATORI (funzioni EQUALIZERS)
Il Cantorum Duo è dotato di tre equalizzatori grafici, uno per il suono emesso dagli altoparlanti interni ed
altri due per il segnale presente sulle due coppie di uscite audio [OUT 1] e [OUT 2] del pannello
posteriore. Tramite questi equalizzatori potrete regolare al meglio la timbrica del suono generato dal vostro
organo, adattandolo all’ambiente in cui si trova ed ai propri gusti ed esigenze personali.
Per accedere alle videate di regolazione, selezionare la voce EQUALIZERS nel menu SETTINGS, viene
visualizzata la videata:
in cui sono presenti i campi per l’accesso alle videate di regolazione del:
o INTERNAL: equalizzatore grafico dedicato all’amplificazione interna (e quindi del suono degli
altoparlanti).
o OUT 1: equalizzatore grafico della coppia di uscite audio [OUT 1] presente nel pannello posteriore.
o OUT 2: equalizzatore grafico della coppia di uscite audio [OUT 2] presente nel pannello posteriore.
La videata di regolazione degli equalizzatori grafici è la seguente:
Nella zona inferiore sono riportate le 7 frequenze centrali delle bande di intervento. Per spostare il cursore
da una banda all’altra utilizzare i pulsanti [FIELD ] e [FIELD ]. I valori di guadagno o attenuazione,
regolabili tramite i pulsanti [VALUE +] e [VALUE -], vanno da +9 dB (massimo guadano del segnale) a 9 dB (massima attenuazione del segnale). Il livello di guadagno o attenuazione impostato viene
rappresentato graficamente così da confrontarlo con la scala graduata presente sulla sinistra della videata.
Di seguito un grafico esplicativo del funzionamento degli equalizzatori grafici.
20 Hz
100 Hz 460 Hz 2,2 KHz
20 KHz
-8 dB
-7 dB
-6 dB
-5 dB
-4 dB
-3 dB
-2 dB
-1 dB
0 dB
+1 dB
+2 dB
+3 dB
+4 dB
+5 dB
+6 dB
+7 dB
+8 dB
Gain
F
220 Hz 1 KHz
+9 dB
-9 dB
4,6 KHz 10 KHz
Page 16
IT - 14
Manuale Utente
Premere [EXIT] per uscire dalla videata e memorizzare le impostazioni correnti.
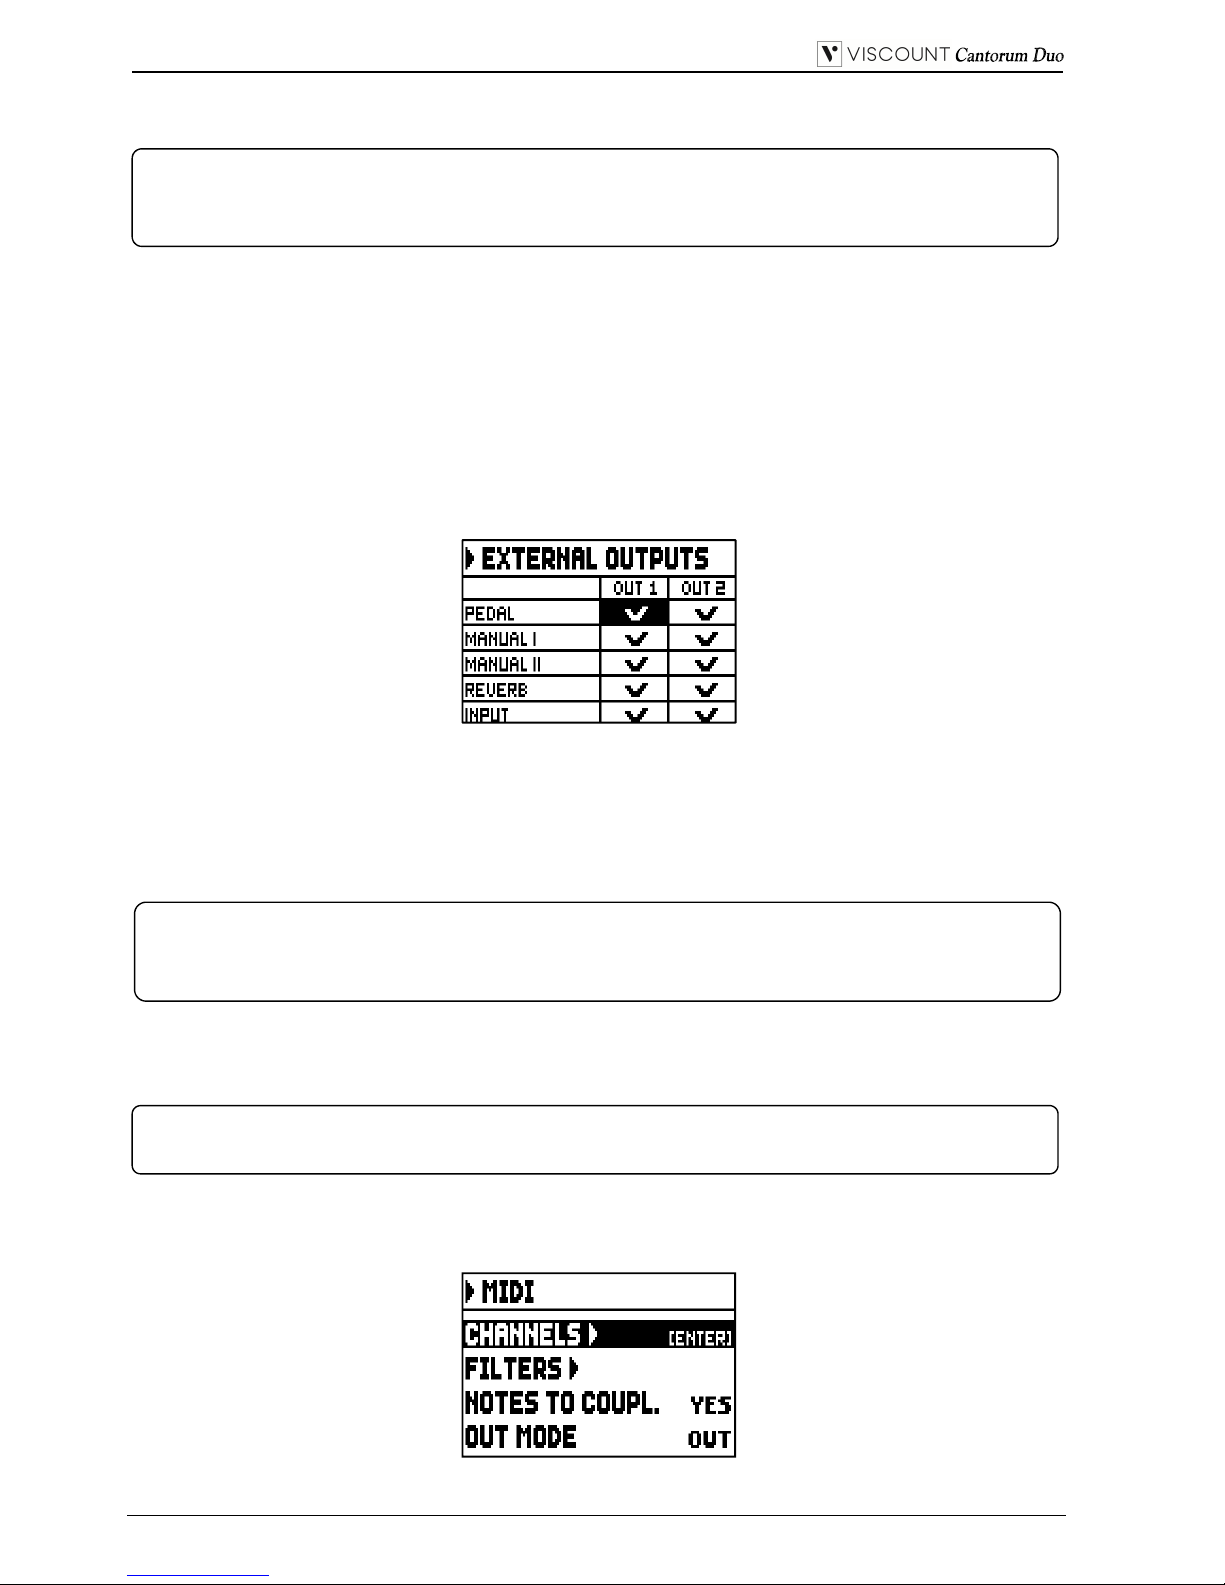
5.3 CANALIZZAZIONE DEI SEGNALI SULLE USCITE AUDIO
(funzione EXTERNAL OUTPUTS)
Un’altra interessante impostazione offerta dal Cantorum Duo è data dalla possibilità di selezionare la
sorgente delle uscite audio del pannello posteriore. Così facendo, sarà possibile simulare il posizionamento
in zone differenti dei somieri allocando i diffusori esterni nella maniera desiderata, oppure scegliere se le
uscite debbano trasmettere solo il segnale riverberato.
Per richiamare la videata di impostazione, selezionare il campo EXT. OUTPUTS del menu SETTINGS:
Come è facile intuire le due colonne indicano le due uscite audio [OUT 1] e [OUT 2].
Per muovere il cursore utilizzare i pulsanti [FIELD ] e [FIELD ].
Per mettere il segno di spunta e quindi selezionare la sorgente sonora utilizzare il pulsante [VALUE +].
Utilizzare il pulsante [VALUE -] per togliere il segno di spunta e quindi deselezionare la sorgente sonora.
Premere [EXIT] per uscire dalla videata e memorizzare le impostazioni correnti.
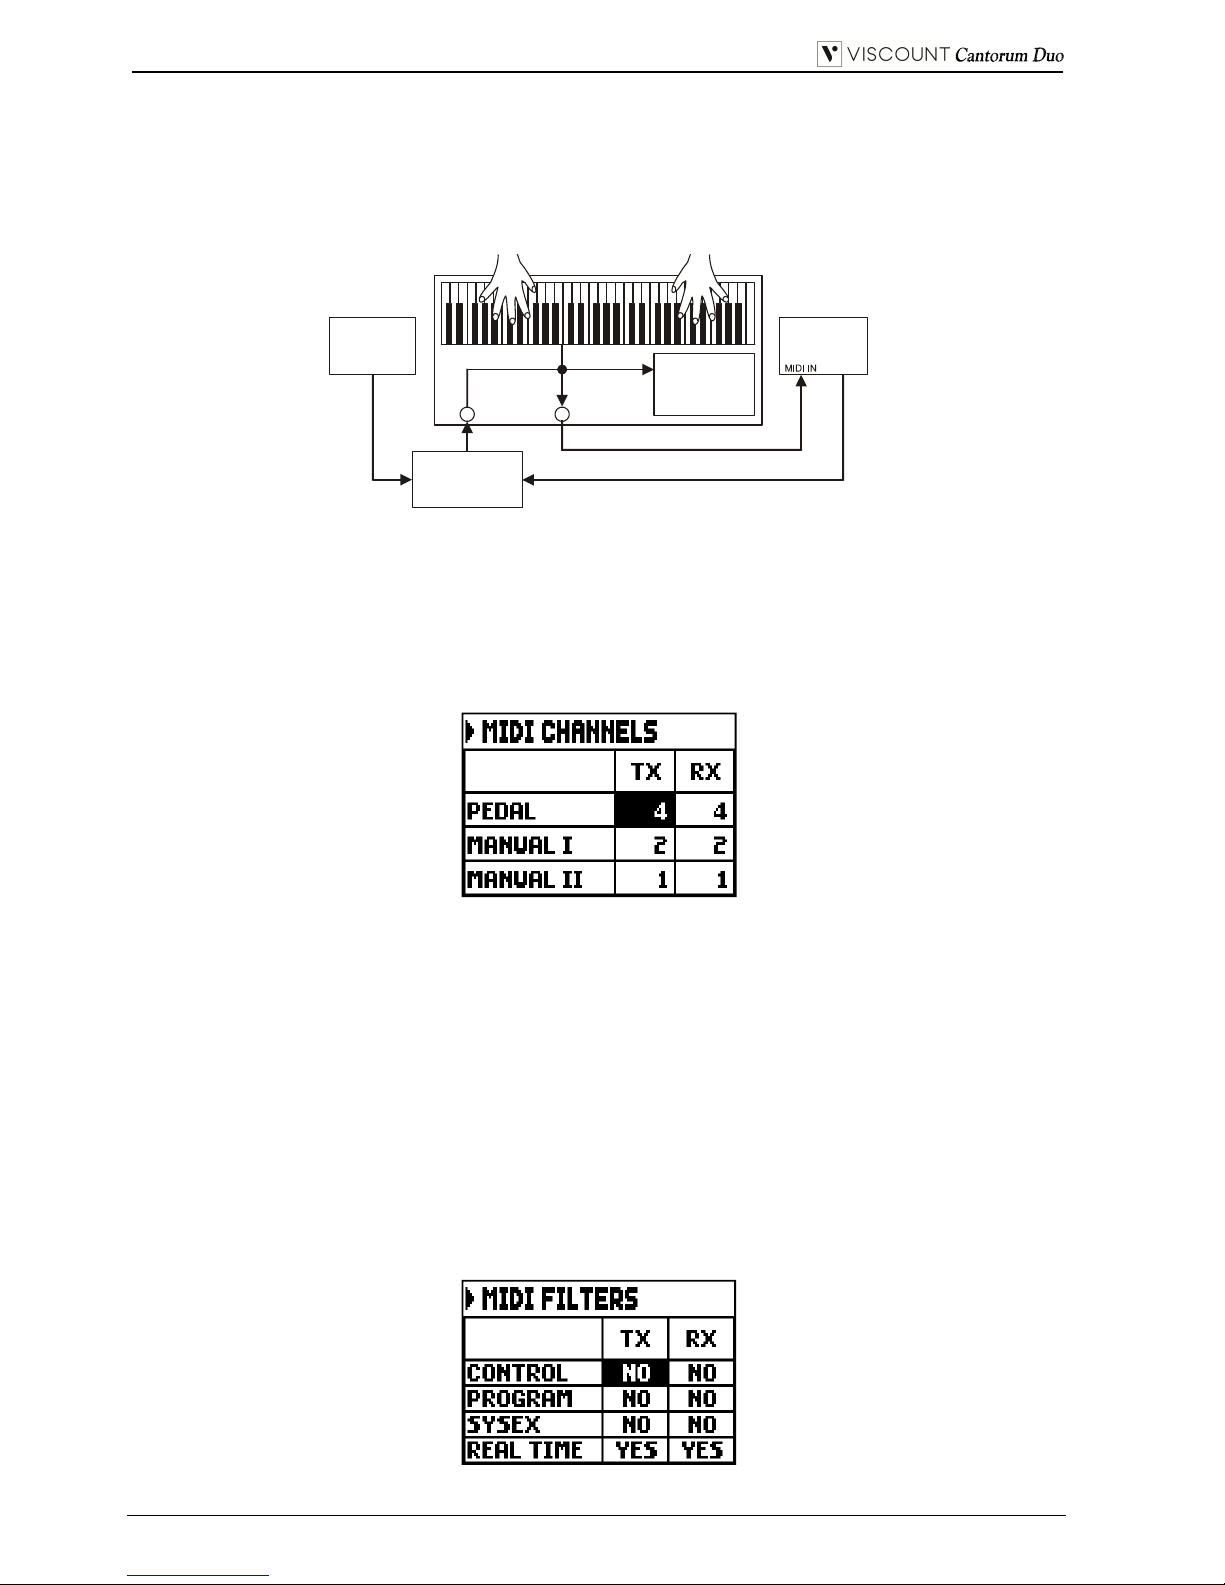
5.4 IMPOSTAZIONI MIDI (funzioni MIDI)
Per accedere alle funzioni di impostazione dell’interfaccia MIDI dell’organo, selezionare il campo MIDI
nel menu SETTINGS, viene visualizzata la prima videata:
N.B.
Gli equalizzatori dell’organo hanno effetto anche sui segnali in ingresso alla presa [INPUT]
p
resente nel pannello posteriore.
N.B.
Il segnale riverberato (REVERB a display) contiene sempre tutte le divisioni dell’organo ed il
se
g
nale in ingresso alla presa [INPUT] presente nel pannello posteriore.
N.B.
Per maggiori informazioni sull’interfaccia MIDI consultare i 10.5 and 10.6.
Page 17

IT - 15
Manuale Utente
in cui sono presenti le seguenti voci a display:
o CHANNELS: accesso alla videata di impostazione dei canali MIDI di ricezione e trasmissione.
o FILTERS: accesso alla videata di impostazione dei filtri MIDI di ricezione e trasmissione.
o NOTES TO COUPL. (Note to Couplers): questa funzione permette di scegliere se trasmettere via
MIDI solo le note fisicamente suonate sui manuali (a funzione disattivata), oppure anche quelle
generate dai vari controlli di unione (a funzione attivata). Selezionando YES e suonando per esempio
sul primo manuale con l’unione II/I attiva, vengono trasmesse le note sui canali delle sezioni Manual I
e Manual II. Selezionando NO le note vengono trasmesse solo sul canale della sezione Manual I.
o OUT MODE: selezione della modalità di funzionamento della porta [MIDI OUT]. E’ possibile
selezionare uno dei seguenti modi operativi:
- OUT: modalità operativa standard in cui vengono trasmessi i dati MIDI a seguito delle operazioni
eseguite sull’organo (note suonate, accensione dei registri, volumi e pedale di espressione,
contenuto delle combinazioni richiamate, ecc...).
- THRU: la porta [MIDI OUT] trasmette esclusivamente i dati MIDI ricevuti dalla porta [MIDI
IN] e non quelli a seguito di operazioni eseguite sull’organo. Questa modalità è da utilizzarsi
qualora l’organo sia inserito in un sistema MIDI in cui lo strumento ad esso collegato e che riceve i
dati non deve rispondere delle operazioni eseguite sul Cantorum Duo ma esclusivamente a quelle
eseguite sullo strumento collegato alla porta [MIDI IN].
- OUT+THRU: la porta [MIDI OUT] trasmette i dati MIDI a seguito delle operazioni eseguite
sull’organo e quelli ricevuti dalla porta [MIDI IN]. Questa modalità è da utilizzarsi qualora l’organo
sia inserito in un sistema MIDI in cui lo strumento ad esso collegato e che riceve i dati debba
rispondere sia alle operazioni eseguite sul Cantorum Duo, sia a quelle eseguite sullo strumento
collegato alla porta [MIDI IN].
- PIPE: la porta [MIDI OUT] trasmette i dati MIDI a seguito delle operazioni eseguite sull’organo e
quelli ricevuti dalla porta [MIDI IN]. Se nel Cantorum Duo viene richiamata una combinazione in
quanto è stato ricevuto un messaggio MIDI Program Change (per maggiori informazioni
Sound
generator
[MIDI IN] [MIDI OUT]
Cantorum Duo
MIDI
player
MIDI OUT
Expander
MIDI IN
Sound
generator
[MIDI IN] [MIDI OUT]
Cantorum Duo
MIDI
player
MIDI OUT
Expander
MIDI IN
Sound
generator
[MIDI IN] [MIDI OUT]
MIDI
player
Cantorum Duo
MIDI OUT
Expander
MIDI IN
Page 18
IT - 16
Manuale Utente
consultare il par. 10.6) trasmesso da un dispositivo esterno come un lettore di sequenze MIDI,
sulla porta [MIDI OUT] viene trasmesso il contenuto (registri, unioni e tremoli) di tale
combinazione. Questa è l’unica modalità da utilizzarsi qualora il Cantorum Duo sia collegato
all’interfaccia digitale per organi a canne VPI (Viscount Pipe Interface), al fine di garantire la
perfetta compatibilità tra i due strumenti.
SELEZIONE DEI CANALI MIDI DI TRASMISSIONE E RICEZIONE
(funzione MIDI CHANNELS)
L’organo può trasmettere e ricevere messaggi MIDI su un singolo canale per sezione. Per impostare i
canali MIDI selezionare il campo CHANNELS nel menu MIDI, viene visualizzata la seguente videata:
Come è facile intuire la prima colonna a sinistra riporta le divisioni dell’organo per le quali assegnare il
canale di trasmissione nella colonna TX e quello di ricezione nella colonna RX. La modalità OFF
disabilita la ricezione e/o trasmissione di tutti i messaggi MIDI gestiti dall’organo per la divisione
interessata. Premere [EXIT] per uscire dalla videata e memorizzare le impostazioni correnti.
IMPOSTAZIONI DEI FILTRI (funzione MIDI FILTERS)
Un filtro MIDI è una particolare funzione che permette di bloccare, in trasmissione e/o ricezione, un
particolare messaggio su tutti i canali MIDI (in caso di messaggio canalizzato). Il filtro in trasmissione
per i Control Change, per esempio, permette di non trasmettere questi messaggi sulla porta [MIDI OUT]
su tutti i canali MIDI gestiti dall’organo. Analogamente, il filtro in ricezione blocca su tutti i canali i CC
ricevuti dall’organo tramite la porta [MIDI IN].
Per configurare i filtri MIDI selezionare la voce FILTERS nel menu MIDI, viene visualizzata la videata:
Sound
generator
[MIDI IN] [MIDI OUT]
Cantorum Duo
VPI
MIDI OUT
MIDI
player
MIDI OUT
MIDI
merger
MIDI OUT
MIDI
IN 2
MIDI
IN 1
Page 19
IT - 17
Manuale Utente
La colonna a sinistra riporta i messaggi MIDI che è possibile filtrare:
- CONTROL: Control Change
- PROGRAM: Program Change
- SYSEX: System Exclusive
- REAL TIME: Real Time
Nelle colonne TX e RX è invece possibile impostare lo stato dei filtri rispettivamente in trasmissione e
ricezione. Selezionando YES il filtro viene attivato, con NO disattivato. Quando un filtro è attivato il
relativo messaggio MIDI non viene trasmesso e/o ricevuto.
Premere [EXIT] per uscire dalla videata e memorizzare le impostazioni correnti.
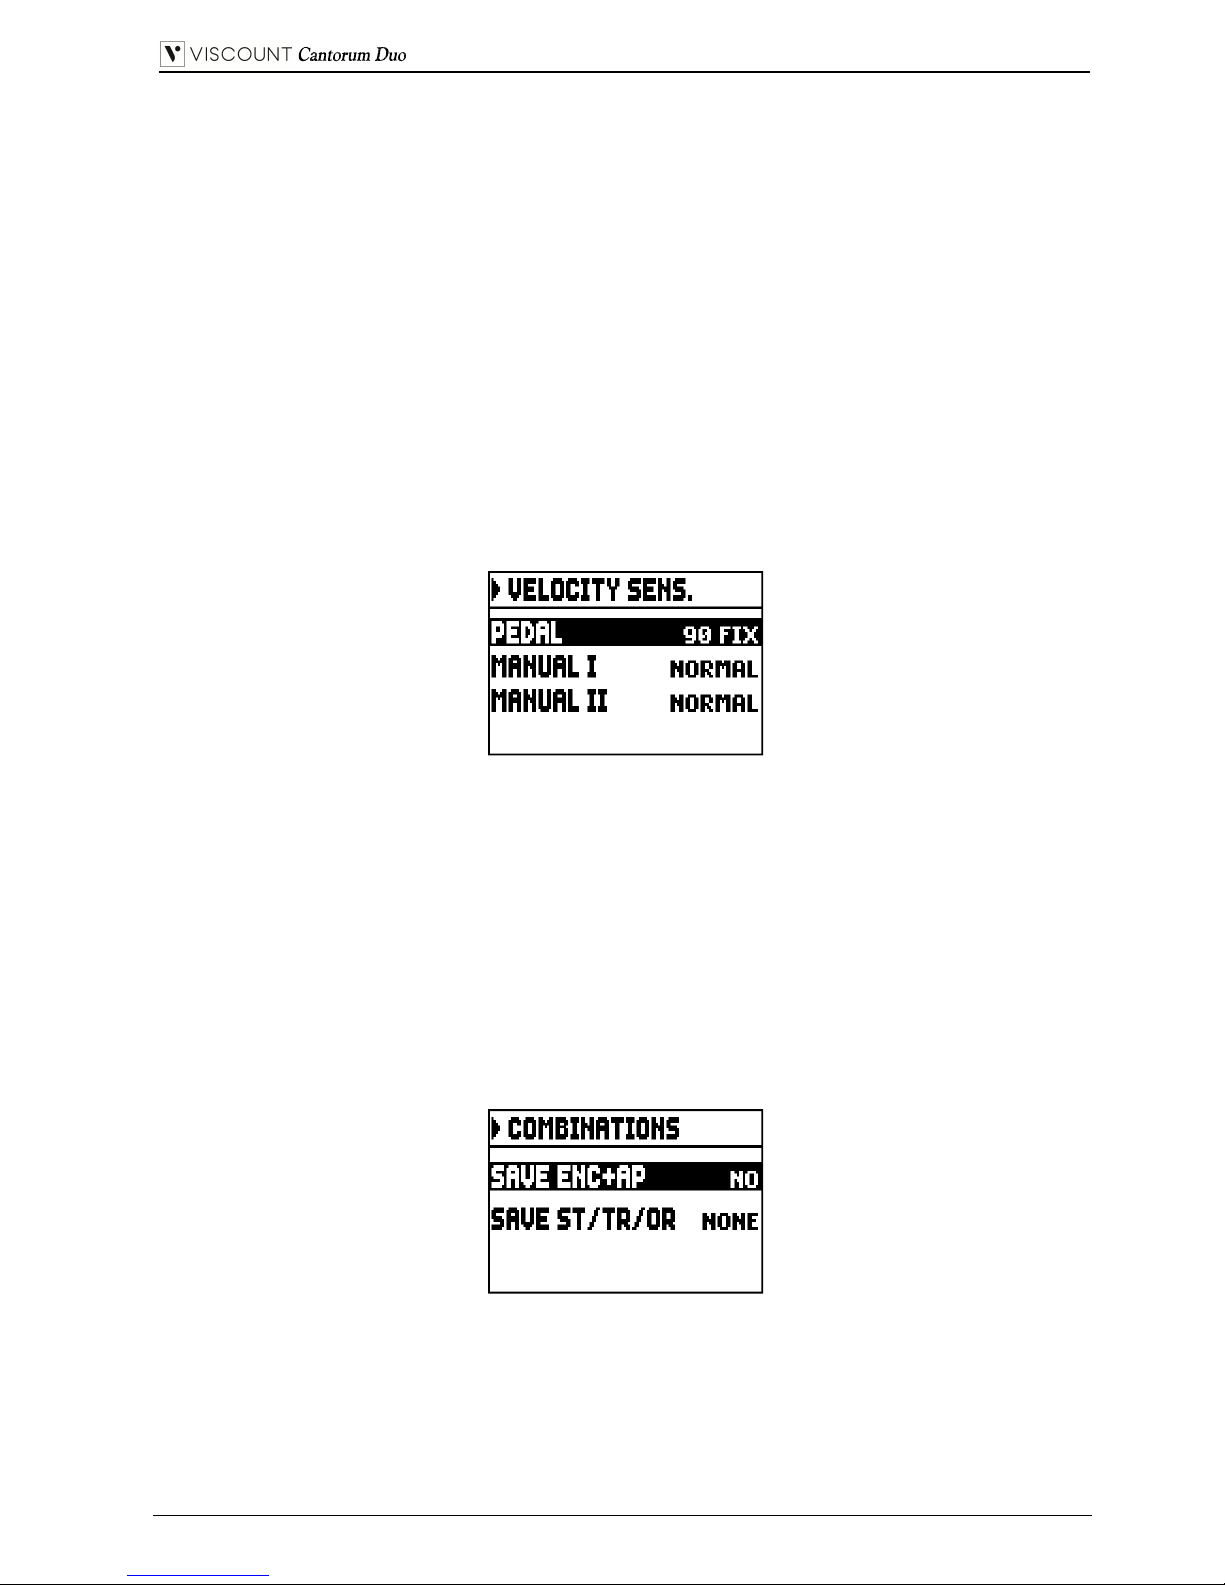
5.5 REGOLAZIONE DELLA DINAMICA DEI MANUALI
(funzione VELOCITY SENS.)
Tramite la funzione VELOCITY SENS. è possibile impostare, per ogni sezione dell’organo, la dinamica
delle note suonate con le voci Orchestra e trasmesse dalla porta [MIDI OUT].
La videata visualizzata è la seguente:
Per ogni sezione è possibile impostare un valore fisso (FIXED da 1 a 127) o tre curve di dinamica:
morbida (LIGHT), lineare (NORMAL) o dura (HARD).
Premere [EXIT] per uscire dalla videata e memorizzare le impostazioni correnti.
5.6 OPZIONI DI FUNZIONAMENTO DELLE COMBINAZIONI
(funzione COMBINATIONS)
La funzione COMBINATIONS del menu SETTINGS permette di scegliere cosa fissare nelle
combinazioni generali e nel Tutti.
Per visualizzare la videata in cui sono presenti le opzioni di funzionamento, nel menu SETTINGS
selezionare la voce COMBINATIONS:
Questi parametri permettono di:
o SAVE ENC+AP: attivare (selezionando YES) o meno (selezionando NO) la memorizzazione dello
stato dei pistoncini [ENC] e [A.P] (vedi punto 12 del cap. 2) nelle combinazioni generali.
o SAVE ST/TR/OR: scegliere di memorizzare gli Stili d’organo, i valori di Depth e Speed dei tremoli e
le voci orchestrali con le seguenti opzioni:
- NONE: nulla fra Stili d’organo, parametri dei tremoli, voci orchestra.
Page 20
IT - 18
Manuale Utente
- STYLE: lo Stile d’organo selezionato al momento della memorizzazione (per la selezione dello
Stile consultare il punto 10 del cap.2) così che possa essere richiamato con le combinazioni generali
ed il Tutti.
- TREM: i valori di Depth e Speed dei tremoli presenti al momento della memorizzazione (per la
regolazione vedi par. 6.1) così che possano essere regolati con le combinazioni generali ed il Tutti.
- ORCH: le voci orchestrale presenti al momento della memorizzazione (per la selezione vedi par.
6.3) così che possano essere richiamate con le combinazioni generali ed il Tutti.
- TR+OR: i valori di Depth e Speed dei tremoli (per la regolazione vedi par. 6.1) e le voci
orchestrali (per la selezione vedi par. 6.3) al momento della memorizzazione, così che possano
essere richiamati con le combinazioni generali ed il Tutti.
Premere [EXIT] per uscire dalla videata e memorizzare le impostazioni correnti.
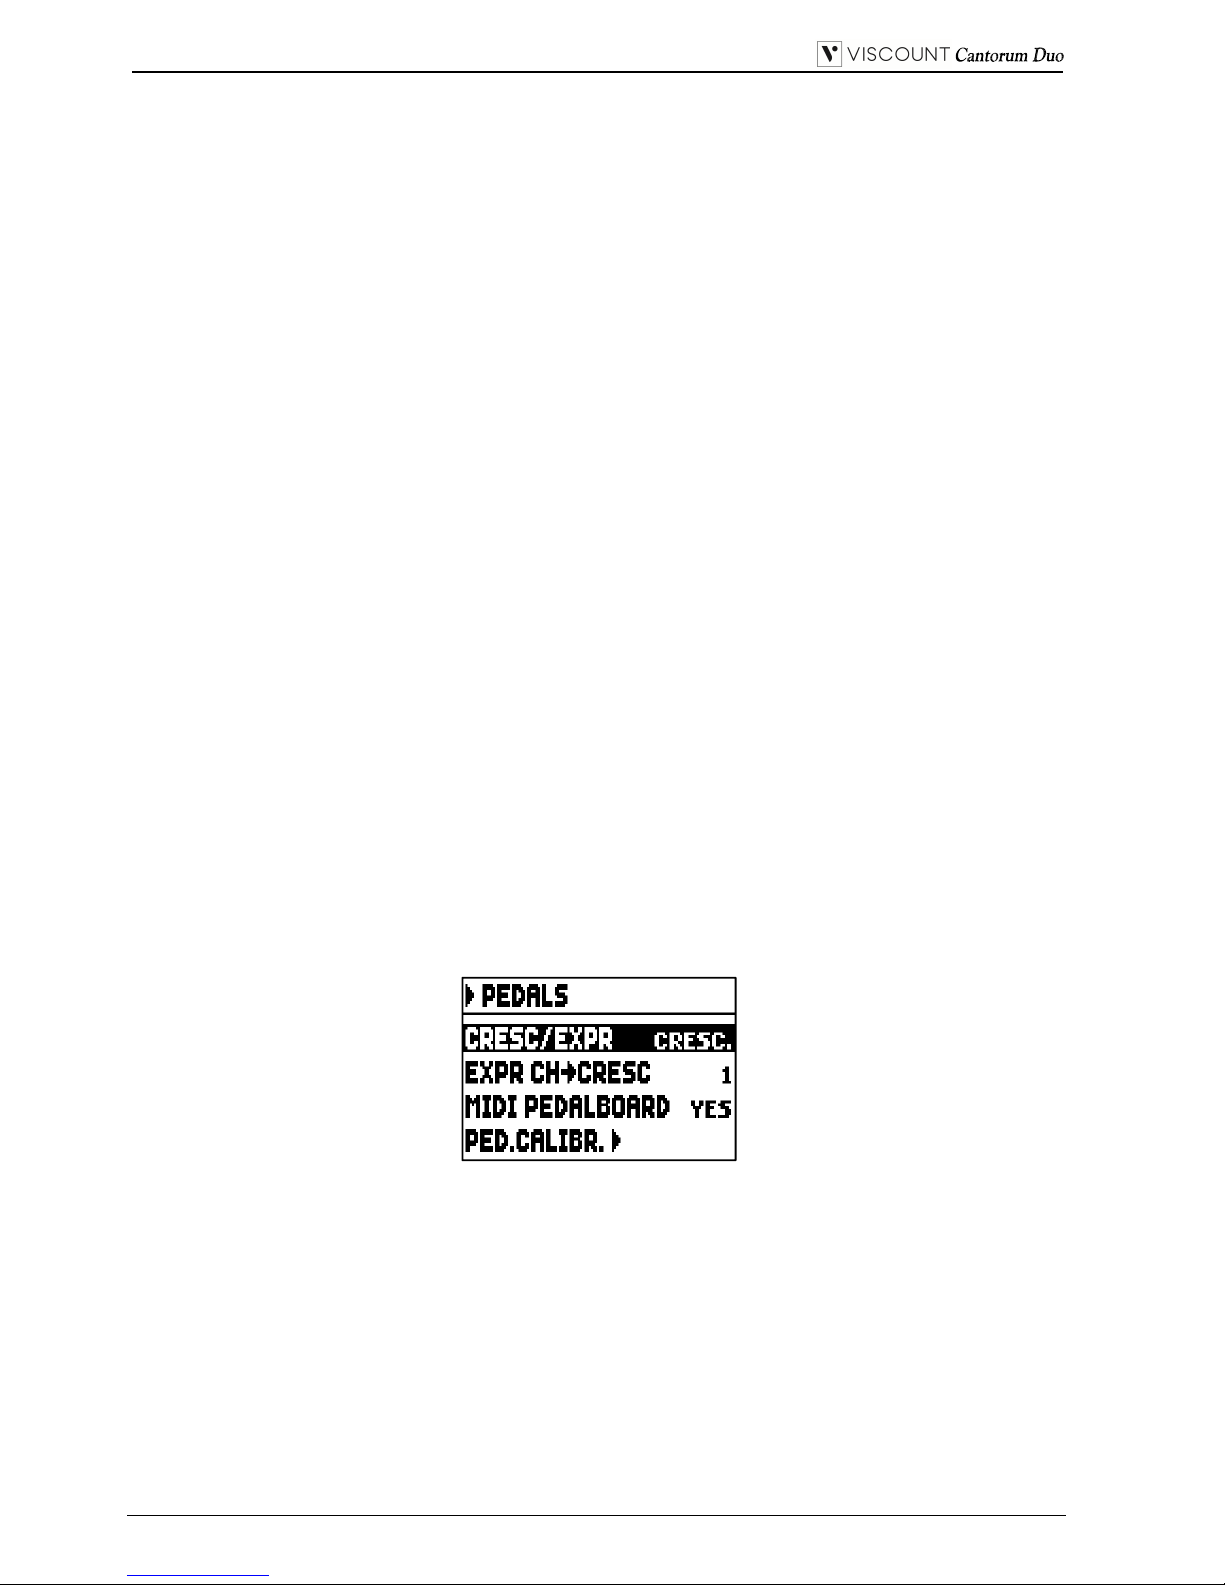
5.7 CONFIGURAZIONE DEI PEDALI E DELLA PEDALIERA MIDI
(funzione PEDALS)
Nella videata PEDALS sono raccolte diverse funzioni per la configurazione dei pedali e della pedaliera
MIDI eventualmente collegati.
E’ possibile selezionare il funzionamento del pedale collegato al connettore [CRESC.] del pannello
posteriore, così come calibrare lo stesso e quello collegato al connettore [EXPR.] qualora il range di
funzionamento non sia completo.
Cantorum Duo permette di controllare il Crescendo anche tramite la ricezione del messaggio MIDI di
Control Change n.11 (Expression) trasmesso da un’unità esterna, come un pedale espressivo di una
pedaliera MIDI. In questa videata è possibile informare il sistema su quale canale MIDI viene ricevuto il
CC11.
Per un corretto funzionamento, inoltre, è necessario informare il Cantorum Duo sulla presenza di una
pedaliera MIDI collegata alla porta [MIDI IN]. In questa condizione infatti le note ricevute sul canale
MIDI assegnato alla sezione Pedals vengono trasposte in base all’impostazione del parametro
TRANSPOSE della videata principale, non vengono suonate se è attivo l’Automatic Pedal, la dinamica
viene ricalcolata in base all’impostazione selezionata nella funzione VELOCITY SENS. (vedi par. 5.5), e
vengono ritrasmesse sulla porta [MIDI OUT] qualora le si desidera inviare ad un’unità MIDI esterna.
Per visualizzare la videata in cui sono presenti le funzioni di configurazione, nel menu SETTINGS
selezionare la voce PEDALS:
Questi parametri permettono di:
o CRESC/EXPR: selezionando la voce CRESC., il pedale collegato al connettore [CRESC.] seleziona
gli step del Crescendo. Selezionando invece la voce M.I/PED il pedale controlla il volume delle
sezioni Manual I e Pedal. In questo caso, nella videata principale, al posto del box CRESCEN. viene
visualizzato il box M.I/PED che visualizza il livello corrente di espressione delle due sezioni.
o EXPR CH->CRESC: selezionare il canale MIDI sul quale viene ricevuto il CC11 per il controllo del
Crescendo.
o MIDI PEDALBOARD: selezionare YES in caso di pedaliera MIDI collegata alla porta [MIDI IN].
In caso contrario selezionare NO.
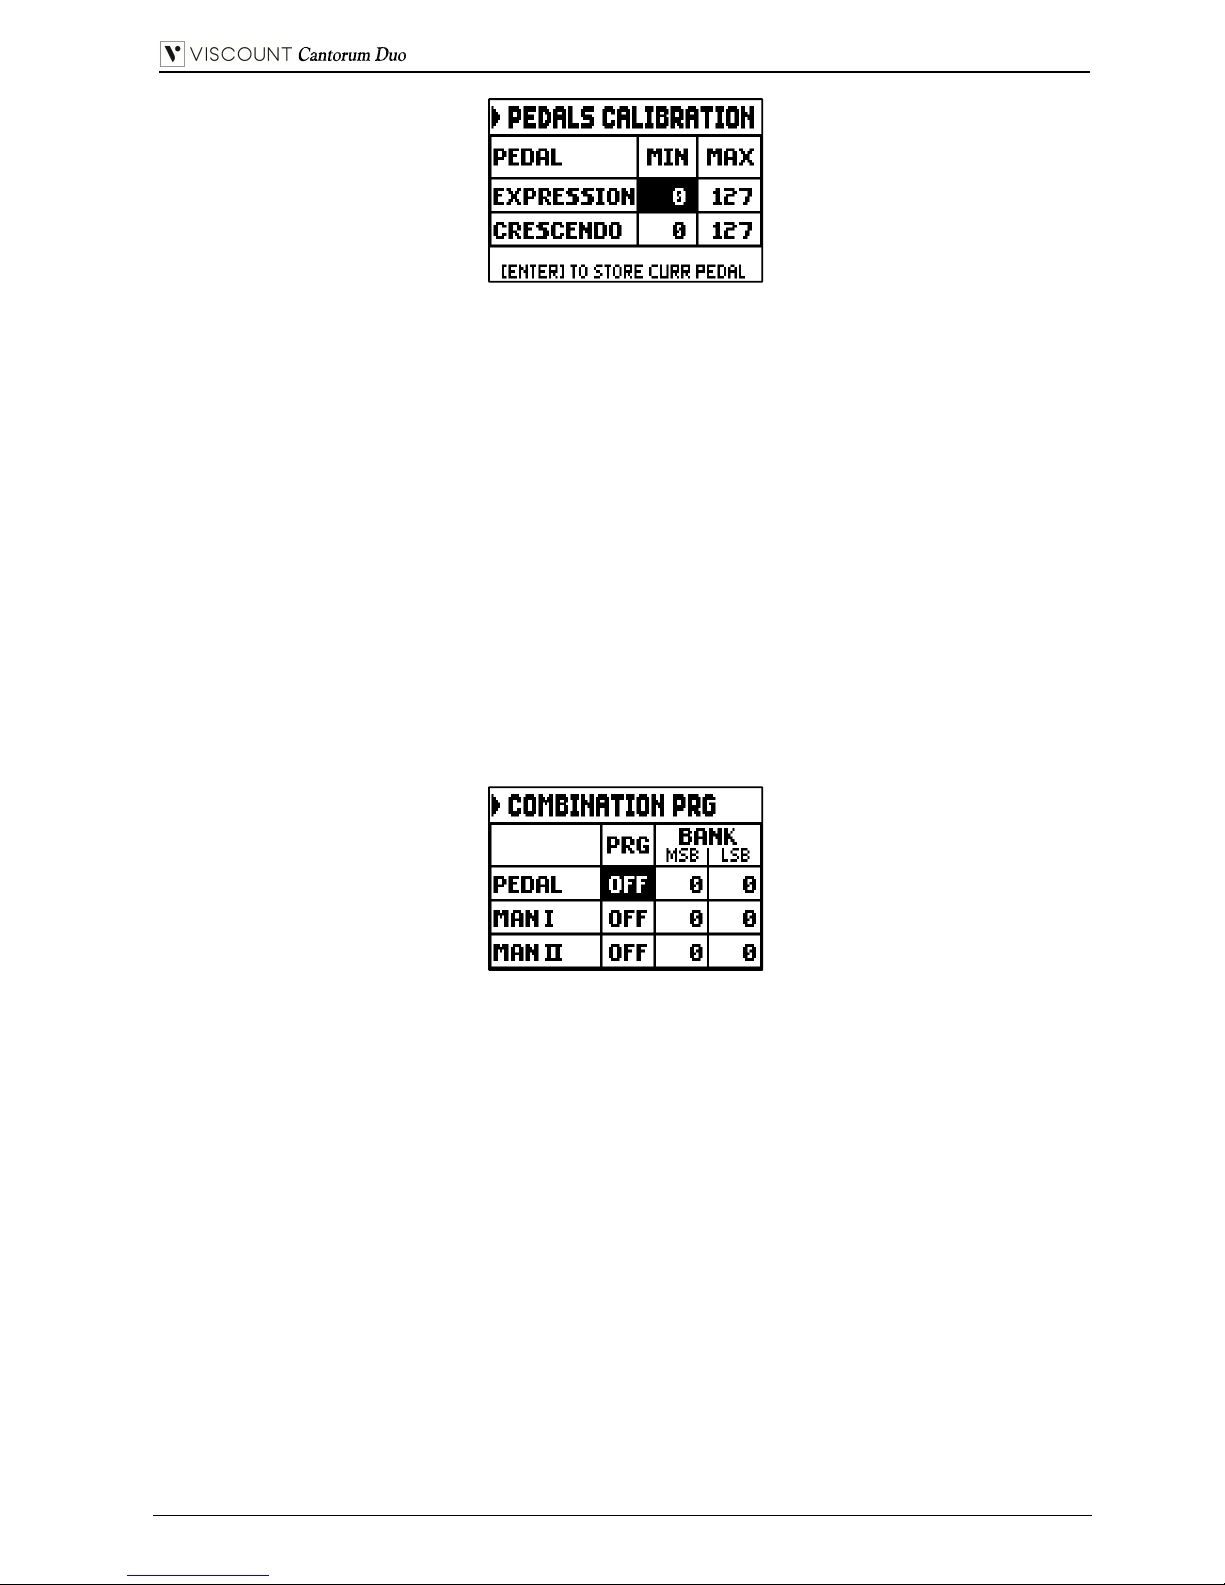
o PED.CALIBR.: posizionare il cursore su questo campo e premere [ENTER] per accedere alla videata
di calibrazione dei pedali:
Page 21
IT - 19
Manuale Utente
Posizionare il pedale alla posizione minima (pedale completamente alzato) o massima (pedale
completamente abbassato) e premere [ENTER]: il valore acquisito viene memorizzato nella
corrispondente casella MIN o MAX. Eseguire la stessa procedura per la posizione ancora non
registrata e per l’eventuale altro pedale collegato.
Premere [EXIT] per uscire dalla videata e memorizzare le impostazioni correnti.
5.8 SALVATAGGIO NELLE COMBINAZIONI DEI MESSAGGI MIDI DI
CAMBIO PROGRAMMA (funzione COMBINATION PRG)
I messaggi MIDI di Program Change permettono di richiamare, in un’unità collegata, un particolare suono
od un determinato programma (patch). Tramite questa funzione pertanto potrete selezionare in un
modulo esterno (un expander per esempio) collegato alla porta [MIDI OUT] il timbro desiderato agendo
direttamente sull’organo.
E’ altresì possibile trasmettere i messaggi di Bank Select MSB (Control Change n. 0) e LSB (CC n. 20) atti
alla selezione dei banchi di timbri qualora lo strumento ricevente ne disponga.
Per visualizzare la videata in oggetto, selezionare la voce COMBIN. PRG nel menu MAIN MENU e
premere [ENTER]:
La colonna a sinistra riporta la sezione dell’organo sul cui canale associato vengono trasmessi i messaggi di
Program Change e Bank Select MSB e LSB impostati rispettivamente nelle colonne PRG, BANK MSB e
BANK LSB.
E’ importante sottolineare che i messaggi impostati in questa videata, oltre ad essere immediatamente
trasmessi alla selezione del Program Change, vengono memorizzati nelle combinazioni generali e nel Tutti.
A tal fine, selezionare i Program Change e Bank Select nella videata sopra descritta e fissare la
combinazione desiderata. Tutto ciò risulta essere particolarmente utile qualora, utilizzando per esempio un
expander esterno, si desidera disporre di un determinato timbro in combinazione con i registri accesi
tramite una combinazione.
Qualora la trasmissione non sia necessaria è possibile annullarne il salvataggio selezionando nella colonna
PRG il valore OFF.
Per uscire dalla videata e tornare a visualizzare il MAIN MENU premere [EXIT].
Page 22
IT - 20
Manuale Utente
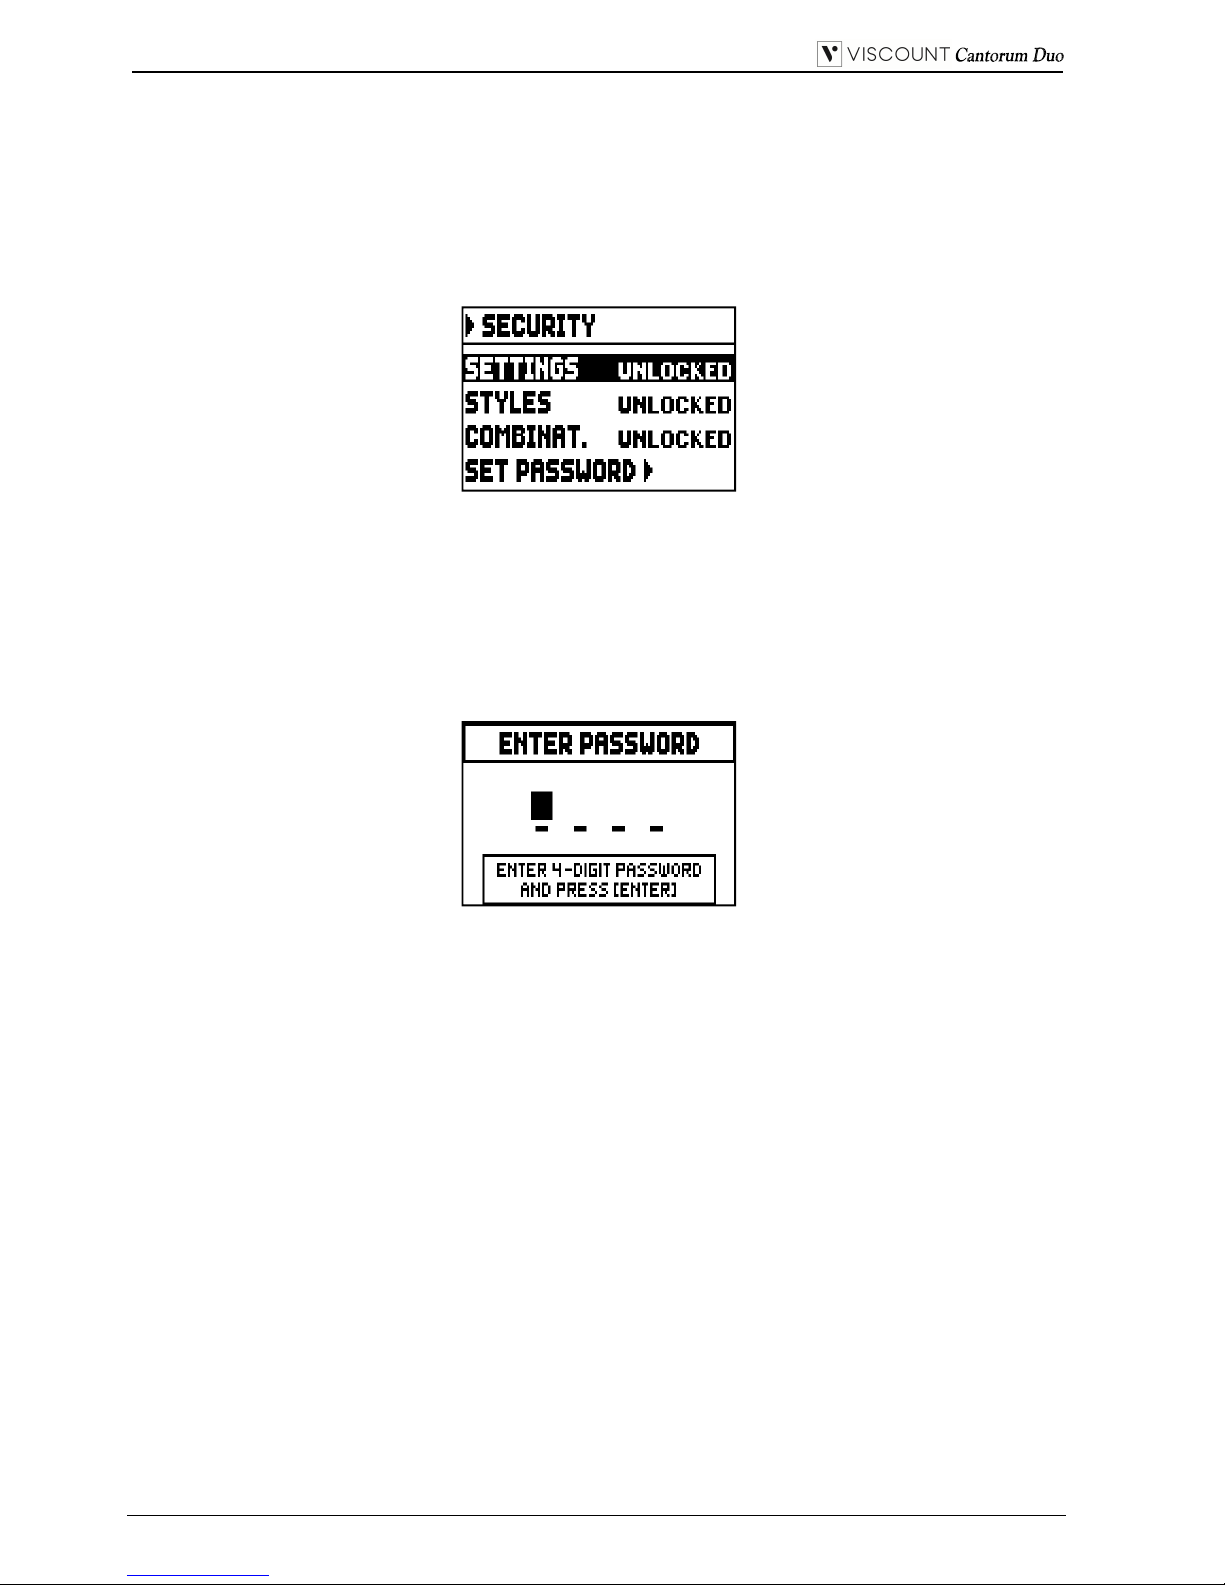
5.9 BLOCCO DI SICUREZZA ALLE MODIFICHE (funzione SECURITY)
Qualora si reputi necessario inibire la modifica della configurazione dell’organo, è presente la funzione
SECURITY. Attivando questa funzione, infatti, non sarà possibile modificare le combinazioni, il Tutti e i
passi del Crescendo, lo stato di Local Off dei registri e le uniche regolazioni possibili saranno quella
relative ai volumi divisionali, ai parametri di intonazione presenti nella videata principale e alla scelta
dell’Organ Style. Per richiamare la funzione in oggetto selezionare il campo SECURITY nel menu
SETTINGS:
in questa prima videata è possibile impostare cosa si desidera bloccare:
o SETTINGS: le impostazioni generali dello strumento (menu SETTINGS).
o STYLES: i parametri di programmazione degli Stili d’organo (menu STYLES).
o COMBINAT. (Combinations): le combinazioni, il Tutti ed il Crescendo.
Per attivare una o più opzioni di blocco, selezionare la voce LOCKED, premere quindi [EXIT] per
inserire il codice di sblocco (password):
Per selezionare i caratteri utilizzare i pulsanti [VALUE +] e [VALUE -], per muovere il cursore usare i
pulsanti [FIELD ] e [FIELD ]. Per memorizzare il codice premere [ENTER], premere invece [EXIT]
per annullare l’operazione. Il codice preimpostato in fabbrica è “0000”.
A conferma dell’avvenuto blocco il display visualizza il messaggio “SECURITY OPTIONS
SUCCESSFULLY CHANGED”.
Quando una o più sezioni sono bloccate, è comunque possibile accedervi, ma vengono visualizzati i
messaggi:
- “SETTINGS ARE LOCKED”: accedendo al menu SETTINGS;
- “STYLES ARE LOCKED”: accedendo al menu STYLES;
indicando appunto che non è possibile modificare le impostazioni contenute all’interno.
In caso di blocco delle combinazioni, Tutti e Crescendo, il pistoncino [F] è spento.
Per rendere di nuovo memorizzabili le combinazioni e/o modificabili le funzioni di configurazione è
necessario accedere alla funzioni SECURITY, sbloccare le opzioni in precedenza bloccate selezionando la
voce UNLOCKED, quindi premere [EXIT] per inserire il codice di sblocco.
Se questo è corretto viene visualizzato il messaggio “SECURITY OPTIONS SUCCESSFULLY
CHANGED”, in caso contrario viene visualizzato “WRONG PASSWORD RETRY”, tramite il quale il
sistema informa appunto che il codice è errato e di inserirlo correttamente.
Page 23

IT - 21
Manuale Utente
E’ inoltre possibile modificare la password quando è già attiva un’opzione di blocco. Per fare ciò
selezionare il campo SET PASSWORD, il sistema dapprima chiede di inserire il codice esistente:
dopodichè il nuovo codice:
a conferma dell’avvenuta modifica viene visualizzata la videata:
Come informa il display, premere [EXIT] per tornare alla videata principale della funzione SECURITY.
5.10 CONFIGURAZIONE DEL CONTROLLO DI VOLUME E REGOLAZIONE
DEL CONTRASTO DEL DISPLAY (funzione CONTROLS)
Tramite questa funzione è possibile selezionare la modalità di funzionamento del potenziometro
[VOLUME] e regolare il contrasto del display.
Per accedere a queste impostazioni, selezionare la voce CONTROLS nel menu SETTINGS:
o LCD CONTRAST: regolazione del contrasto del display.
o VOL. SLIDER: cosa controlla il potenziometro [VOLUME] presente sotto i manuali, ovvero:
- INTERNAL: solo volume dell’amplificazione interna.
- INT+EXT: volume dell’amplificazione interna e delle uscite di linea presenti nel pannello
posteriore.
Premere [EXIT] per tornare alla videata precedente.
Page 24

IT - 22
Manuale Utente
5.11 RIPRISTINO DELLE IMPOSTAZIONI DI FABBRICA
(funzione FACTORY SETTINGS)
L’organo prevede diverse tipologie di ripristino delle impostazioni di fabbrica (Factory Settings) offrendo
così la possibilità di scegliere ciò che si desidera inizializzare.
Per richiamare la procedura, selezionare la voce FACTORY SETT. nel menu SETTINGS:
o ALL: tutto lo strumento, ovvero le impostazioni e le funzioni presenti nel menu SETTING, i 4 Stili
d’organo (ovvero le impostazioni presenti nel menu STYLE per tutti e quattro gli Stili), tutte le
combinazioni generali, il Crescendo, il Tutti, lo stato di Local Off dei registri.
o COMBINATIONS: tutte le combinazioni generali, il Crescendo ed il Tutti.
o STYLE - ALL: i 4 Stili d’organo (ovvero le impostazioni presenti nel menu STYLE per tutti e quattro
gli stili).
o STYLE – CURR.: lo Stile d’organo attualmente selezionato (ovvero le impostazioni presenti nel
menu STYLE per lo Stile attualmente selezionato).
o SETTINGS: le impostazioni e funzioni del menu SETTINGS e lo stato di Local Off dei registri.
Per avviare un Factory Settings, dopo aver posizionato il cursore sulla modalità desiderata premere
[ENTER], il display visualizza ciò che verrà reinizializzato ed una richiesta di conferma.
Premere di nuovo [ENTER] per completare l’inizializzazione o [EXIT] per tornare alla videata precedente.
A procedura completata viene visualizzato il messaggio “FACTORY SETTINGS SUCCESFULLY
RECALLED”.
Se, avviando il Factory Settings, viene visualizzato il messaggio “SOME PARAMETERS ARE
LOCKED”, verificare le opzioni di blocco nella funzione SECURITY (vedi par. 5.9) in quanto non è
possibile procedere con l’operazione di ripristino.
Page 25
IT - 23
Manuale Utente
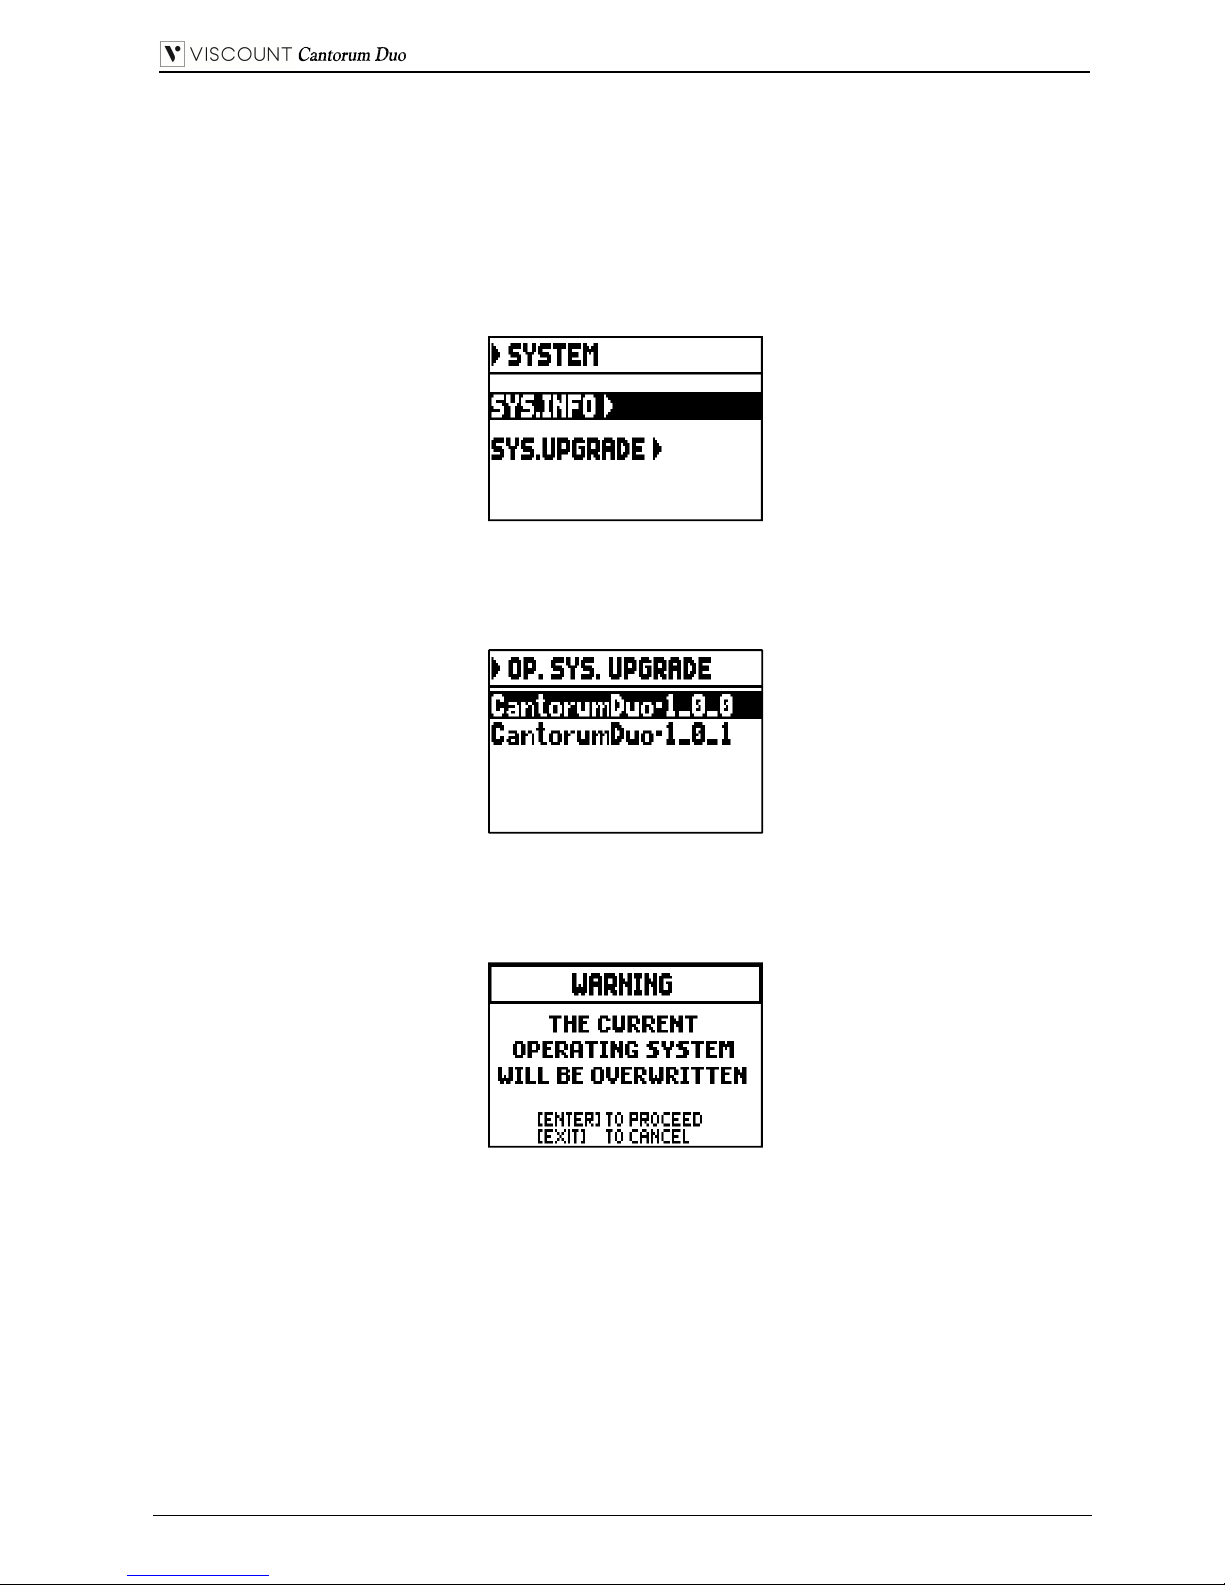
5.12 AGGIORNAMENTO DEL SISTEMA OPERATIVO
(funzione OP.SYS. UPGRADE)
Ogni qualvolta verrà rilasciato un file di aggiornamento del sistema operativo degli organi della serie
Cantorum Duo, questo sarà reso disponibile sul sito web www.viscountinstruments.com.
Dopo aver scaricato il file, copiarlo nella cartella principale (root) di una penna USB, inserire la penna nel
connettore [USB] presente nel pannello posteriore (vedi il punto 18 del cap. 2) e dopo qualche istante
selezionare la voce SYSTEM nel menu SETTINGS.
selezionare ora la voce SYS. UPGRADE, il sistema visualizza il o i file di aggiornamento (dato che
possibile tenere nella penna anche file di diverse versioni e installare quella desiderata) degli organi
Cantorum Duo che sono stati trovati nel dispositivo USB.
utilizzando i pulsanti [FIELD ] e [FIELD ] selezionare il file che si desidera installare e premere
[ENTER]. Il display visualizza un messaggio che informa che il sistema operativo attualmente installato
nell’organo verrà sostituito da quello nella penna.
premere [EXIT] per annullare l’operazione o [ENTER] per procedere con l’installazione: in questo caso
verrà visualizzato un pop-up che indica l’avanzamento dell’operazione, al termine della quale l’organo si
riavvierà automaticamente.
Page 26
IT - 24
Manuale Utente
VERIFICA DELLA VERSIONE DEL SISTEMA OPERATIVO INSTALLATA
(funzione SYS. INFO)
Per conoscere quale versione del sistema operativo è attualmente installata nello strumento e pertanto
verificare se nel sito web www.viscountinstruments.com ne è disponibile una più aggiornata, selezionare il
campo a display SYSTEM nel menu SETTINGS:
selezionare ora la voce a display SYS.INFO:
Il campo RELEASE indica la versione attualmente installata, sotto la quale viene riportata la designazione
del vostro organo. Premere [EXIT] per tornare alla videata precedente.
NOTE IMPORTANTI
- La penna USB che si utilizza per effettuare l’aggiornamento deve essere formattata con file
system FAT o FAT32 (no NTFS o altri) pena il mancato riconoscimento della penna stessa.
- Non spegnere lo strumento od estrarre la penna USB durante la fase di aggiornamento.
- In caso di problemi durante l’aggiornamento (spegnimento improvviso dello strumento o
barra di progressione che rimane ferma per circa un minuto) eseguire una di queste tre
procedure di ripristino:
riaccendere lo strumento con la penna USB inserita e premere [ENTER] nella videata di
richiesta di completare l’aggiornamento.
se non viene visualizzata alcuna richiesta, rieffettuare l’aggiornamento seguendo la
procedura descritta in questo paragrafo.
se alla riaccensione viene visualizzato il messaggio di errore “RELESE CHECKSUM
ERROR”, contattare il servizio di assistenza tecnica all’indirizzo e-mail
service@viscount.it indicando il tipo di errore riportato nella riga inferiore (SYSTEM o
MODEL) ed i numeri a fianco dei campi “M:”, “V:”, “S:” e “Release” così da ottenere il
file e le informazioni necessarie per ripristinare lo strumento.
- Se alla riaccensione viene visualizzato il messaggio “PERIPHERALS UPDATE
REQUESTED” premere [ENTER] per eseguire le operazioni necessarie al completamento
dell’aggiornamento.
- In caso di messaggio di errore “FILE LOAD FAILED – USB PEN ERROR”, cancellare e
ricopiare nella penna il file di aggiornamento. Se il problema persiste, utilizzare un’altra
penna USB.
- Accedendo a questa funzione senza la penna inserita o riconosciuta viene visualizzato il
messaggio di errore “USB PEN NOT PRESENT”.
Page 27
IT - 25
Manuale Utente
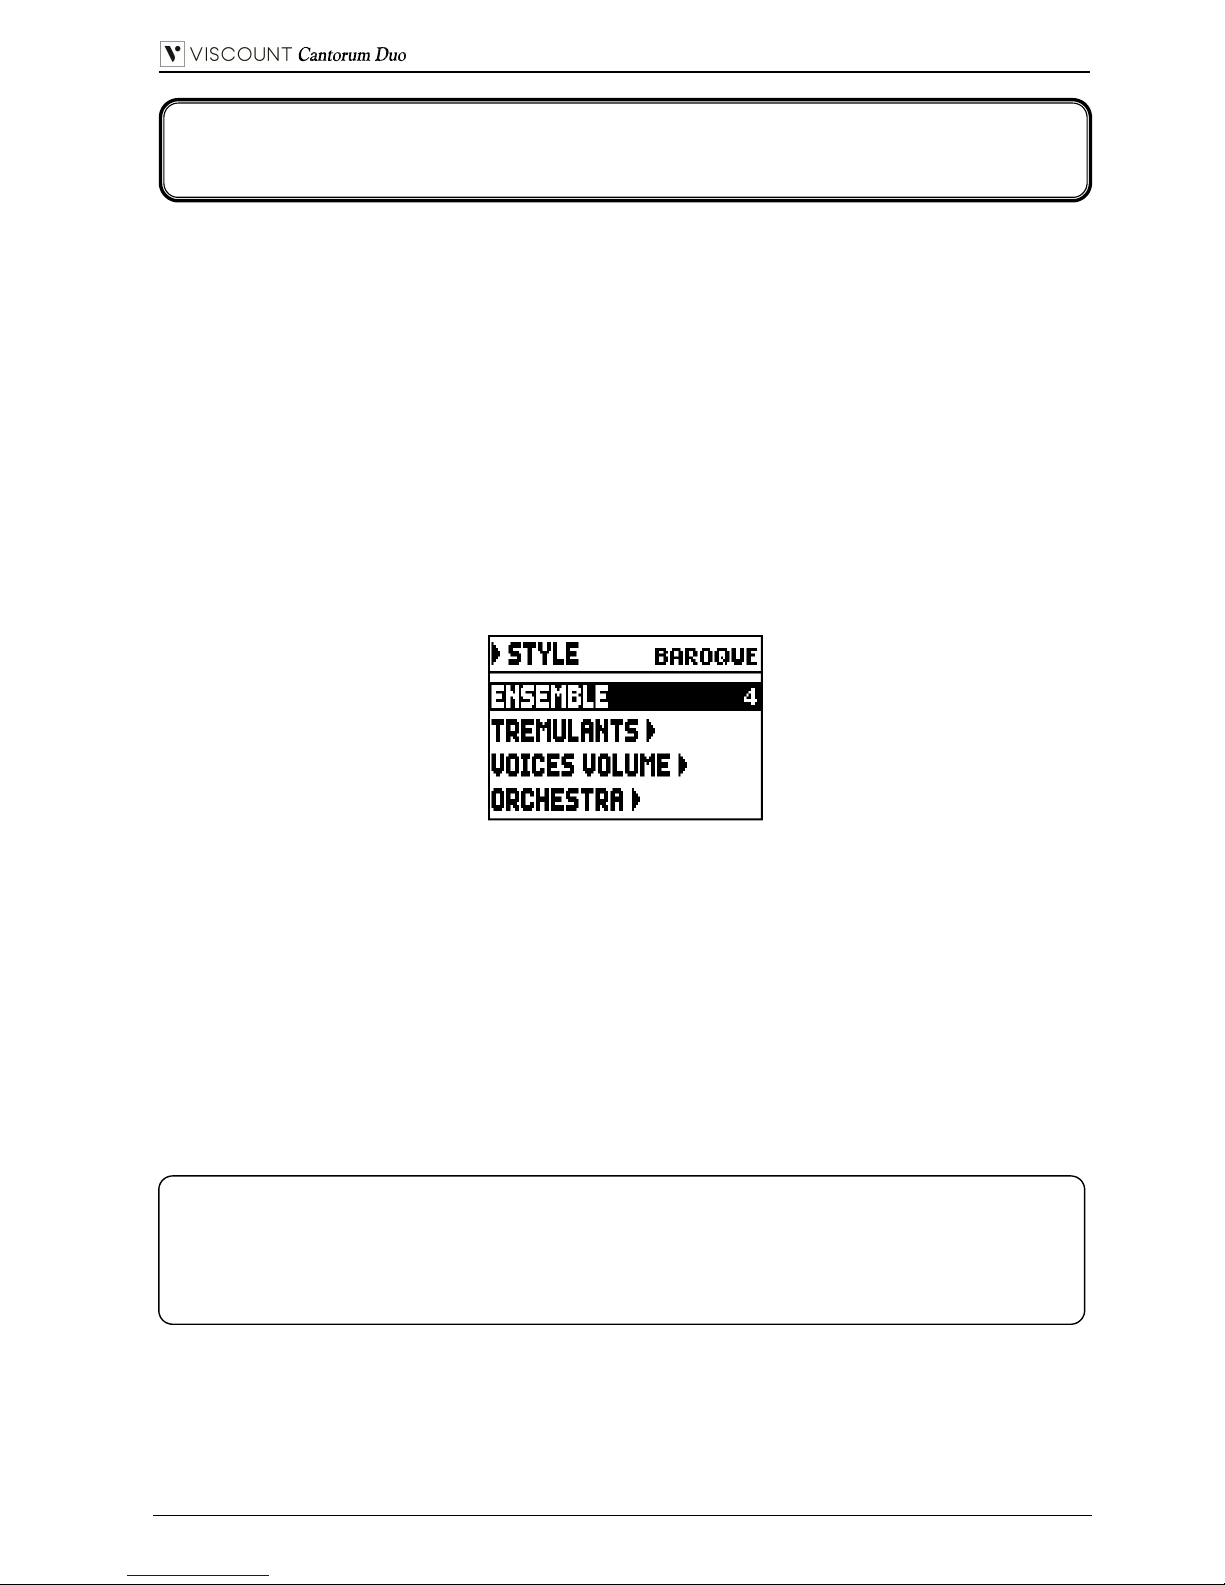
Lo Style identifica la configurazione fonica dell’organo e pertanto la voce attivata per ogni singolo registro.
La presenza di più Stili d’organo offre al musicista la possibilità di utilizzare diverse configurazioni sonore
come se si potesse disporre di più strumenti nello stesso luogo e potendo così utilizzare la fonica adeguata
alla letteratura che si intende eseguire.
Il Cantorum Duo dispone di quattro Stili d’organo, ognuno si rifà ad una particolare estetica del suono:
Barocco, Barocco nord europeo, Romantico e Sinfonico. Come già descritto al punto 10 del cap. 2, è
possibile selezionare uno dei quattro Stili tramite i pistoncini [BAR], [BRK], [ROM] e [SYM], lo Stile
selezionato viene indicato da un messaggio a display quando questo visualizza la videata principale.
Tutti e quattro gli Stili sono personalizzabili dall’utente per quanto concerne la lieve stonatura tra le varie
canne, profondità e velocità di modulazione dei tremoli di ogni sezione, volume delle voci, voci orchestra
richiamate.
Per modificare uno Stile, dopo averlo richiamato selezionare il campo STYLES presente nel MAIN
MENU, viene visualizzata la seguente videata:
I campi presenti in questo menu svolgono le seguenti funzioni:
o ENSEMBLE: regolazione del livello di naturale microstonatura tra una canna ed un’altra così da
simulare le non perfette intonazioni delle canne dell’organo a causa dell’usura con il tempo e la
temperatura.
I valori vanno da 0 (canne perfettamente intonate) a 8 (massima instabilità di intonazione).
o TREMULANTS: regolazione, per singolo manuale, della velocità e profondità dei tremoli (par. 6.1).
o VOICES VOLUMES: regolazione del volume di ogni singola voce (par. 6.2).
o ORCHESTRA: selezione delle voci orchestrali (par 6.3).
Per accedere ad una funzione, posizionare il cursore sul relativo campo utilizzando i pulsanti [FIELD ] e
[FIELD ] e premere [ENTER].
Per abbandonare il menu STYLE premere invece [EXIT].
6. PROGRAMMAZIONE DEGLI STILI D’ORGANO
(menu STYLE)
NOTA IMPORTANTE
Ogni singola combinazione generale ed il Tutti può richiamare lo Stile d’organo selezionato al
momento della memorizzazione così da adattare la configurazione sonora al brano che si sta
suonando. Per disporre di questa funzionalità è necessario attivare la memorizzazione tramite la
funzione COMBINATIONS descritta nel par. 5.6.
Page 28
IT - 26
Manuale Utente
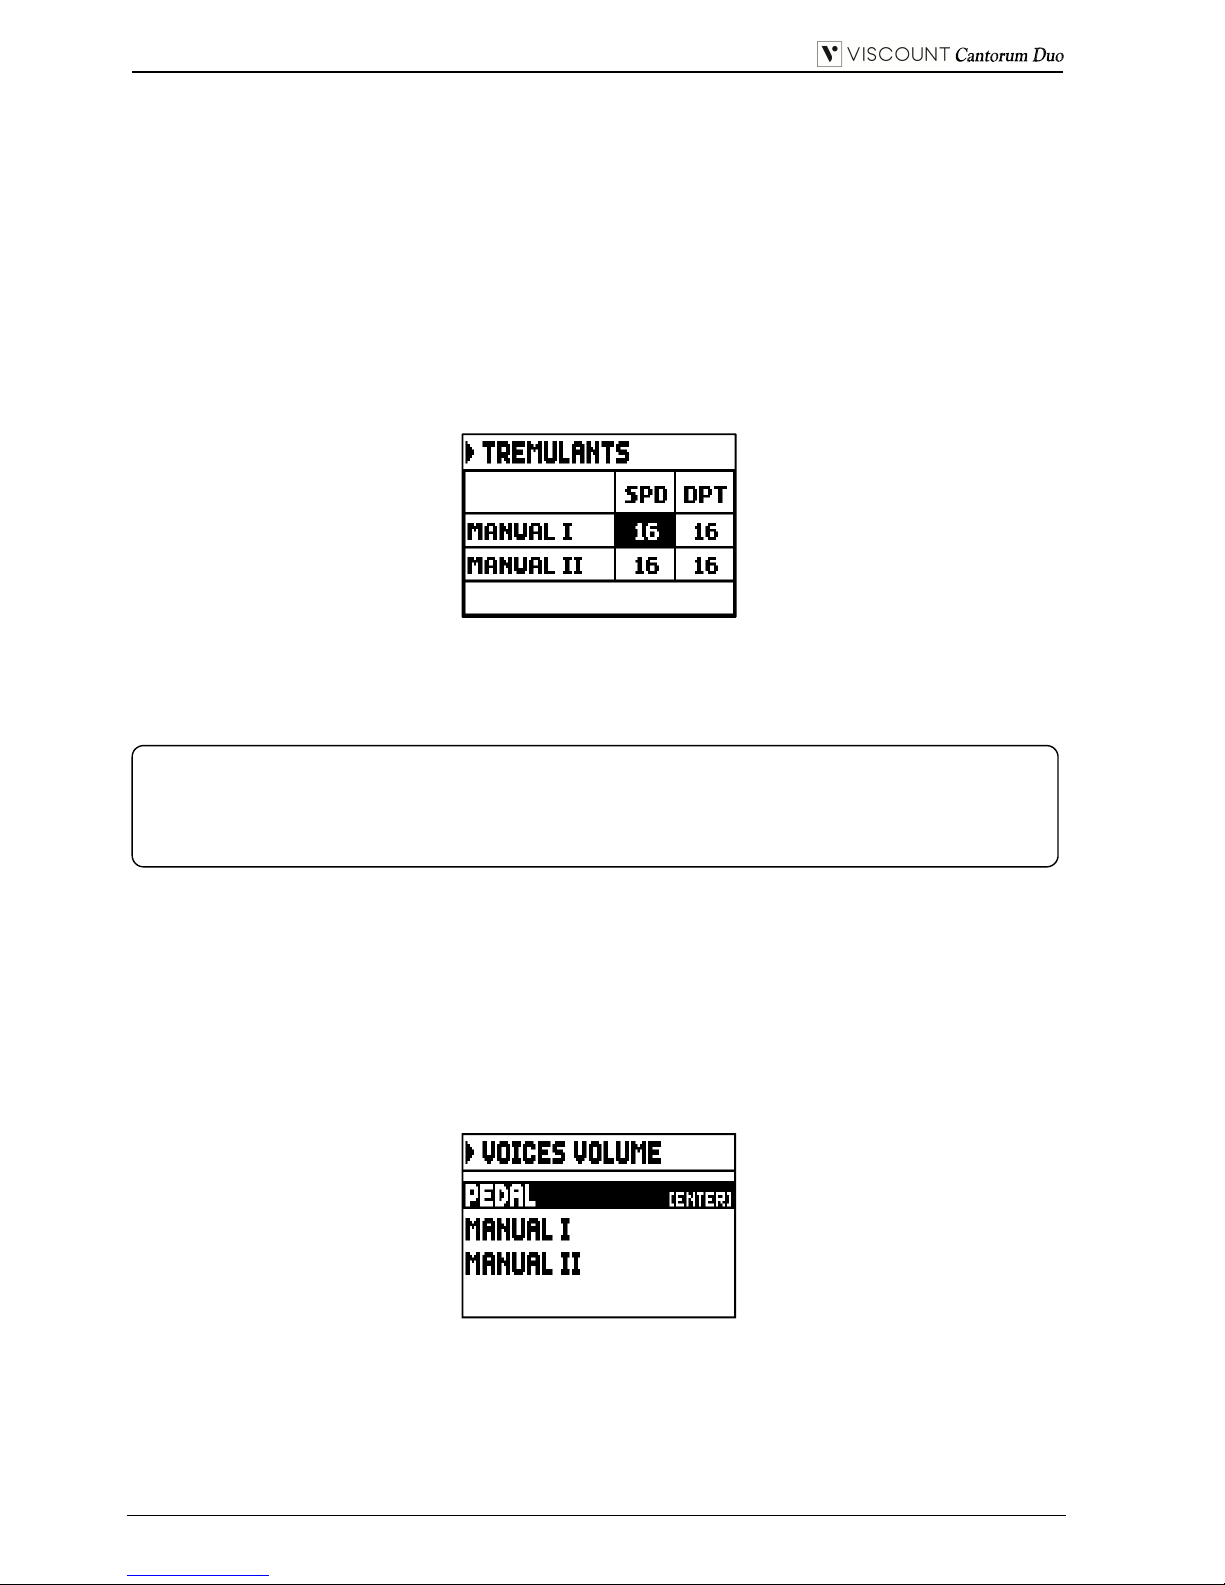
6.1 REGOLAZIONE DEI TREMOLI (funzione TREMULANTS)
Nell’organo a canne è di fondamentale importanza che la pressione dell’aria sia costante per ottenere un
suono regolare e “sostenuto”, tuttavia alcuni dispositivi meccanici vennero introdotti per generare
variazioni periodiche più o meno marcate nel flusso dell’aria. Queste variazioni permettevano di
aggiungere un effetto “tremolante” al suono, effetto che così rendeva più gradevoli alcuni timbri solisti e
più espressive le timbriche delle ance.
Utilizzando i pistoncini [TREM I] e [TREM II] è possibile abilitare e disabilitare l’effetto in questione.
Per ogni Stile è possibile regolare quanto profondamente e velocemente il suono viene modulato. Per
accedere alla videata di regolazione, selezionare il campo a display TREMULANTS presente nel menu
STYLES:
in cui sono riportati i valori attuali di SPD (Speed, velocità di modulazione) e DPT (Depth, profondità di
modulazione) dei tremoli dei manuali.
Premere [EXIT] per tornare a visualizzare il menu STYLES e salvare le nuove impostazioni.
6.2 REGOLAZIONE DEL VOLUME DI OGNI VOCE
(funzione VOICES VOLUMES)
La regolazione del volume di ogni singola voce, fattibile in un range da -12 dB a +6 dB, permette di
bilanciare i livelli delle stesse così da ottenere il perfetto equilibrio sonoro dell’organo.
Dopo aver selezionato il campo VOICES VOLUMES nel menu STYLES il display visualizza le divisioni
dell’organo, seleziona pertanto quella nella quale si trova la voce di cui si desidera regolare il volume:
Come al solito utilizzare i pulsanti [FIELD ] e [FIELD ] ed [ENTER] per selezionare il campo a
display.
Un metodo alternativo per visualizzare e regolare immediatamente il volume è quello di tenere premuta
per qualche istante la bascula in posizione di voce accesa sia in questa videata, sia in quella di regolazione
dei volumi.
NOTA IMPORTANTE
Ogni singola combinazione generale ed il Tutti può richiamare i valori di Depth e Speed presenti
al momento della memorizzazione. Per disporre di questa funzionalità è necessario attivare la
memorizzazione tramite la funzione COMBINATIONS descritta nel par. 5.6.
Page 29
IT - 27
Manuale Utente
Durante la regolazione è anche possibile accendere altri registri al fine di valutare complessivamente le
modifiche. Premere [EXIT] per uscire dalla funzione, le modifiche verranno automaticamente
memorizzate nello Stile corrente.
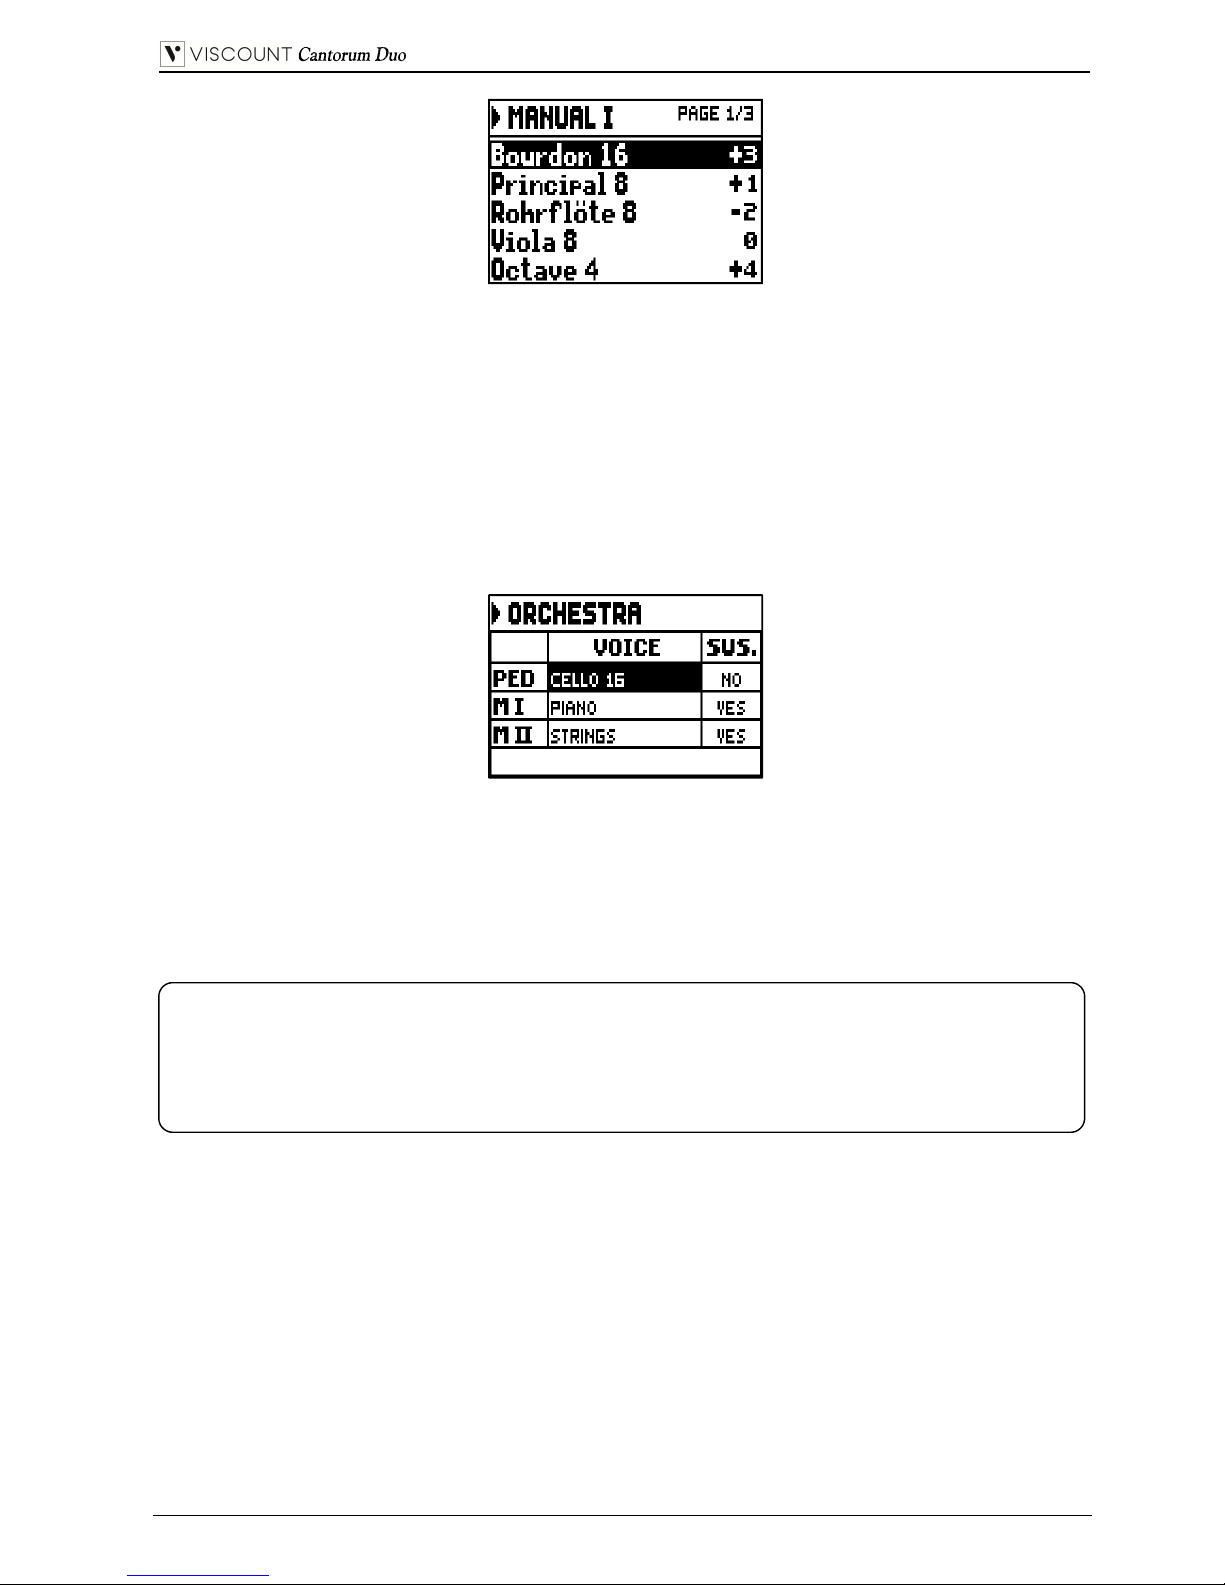
6.3 SELEZIONE DELLE VOCI ORCHESTRALI (funzione ORCHESTRA)
Come descritto nel cap. 2, nel set di voci del Cantorum Duo sono presenti anche una serie di timbri
orchestrali. Per selezionare una voce orchestrale, selezionare nel menu STYLES il campo a display
ORCHESTRA, viene visualizzata la videata:
Per ogni divisione nella colonna VOICE è possibile selezionare la voce orchestrale e nella colonna SUS. è
possibile abilitare o meno il funzionamento del pedale Sustain.
Per una più facile individuazione, il pistoncino che si sta programmando viene acceso in base alla
posizione del cursore a display.
Premere [EXIT] per uscire dalla funzione, le modifiche verranno automaticamente memorizzate nello Stile
corrente.
NOTA IMPORTANTE
Ogni singola combinazione generale ed il Tutti può richiamare i timbri orchestrali presenti al
momento della memorizzazione, così da poter attivare con la stessa bascula voci differenti a
seconda della combinazione e/o Tutti richiamati. Per disporre di questa funzionalità è necessario
attivare la memorizzazione tramite la funzione COMBINATIONS descritta nel par. 5.6.
Page 30
IT - 28
Manuale Utente
Il Cantorum Duo permette di salvare su penna USB la completa configurazione dello strumento o parti
di essa, così da poter essere ricaricate quando desiderato. L’utilità principale di questa funzione è quelle di
disporre di un numero praticamente illimitato di configurazioni dello strumento, così come quella di poter
trasferire su altri organi dello stesso modello la configurazione preparata su uno strumento.
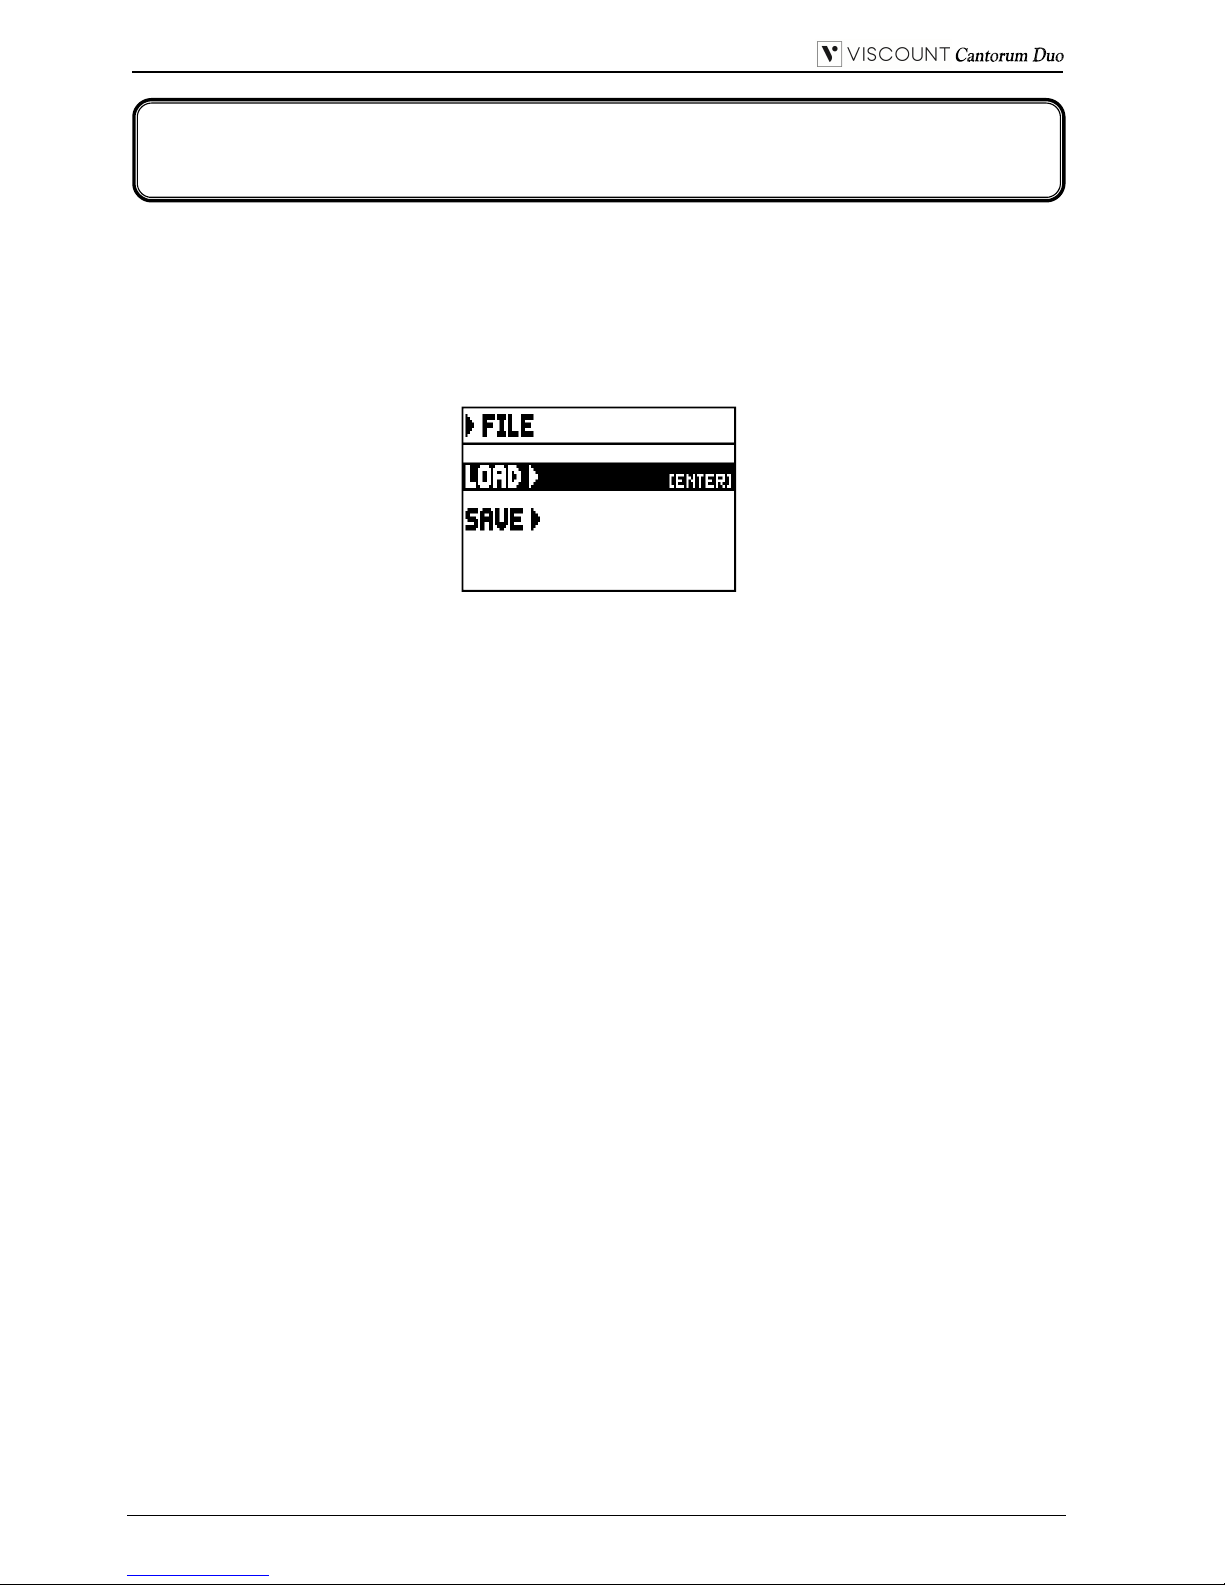
Per accedere alle funzioni di salvataggio e caricamento dei file, selezionare il campo FILE presente nel
MAIN MENU, viene visualizzata la seguente videata:
sono presenti due funzioni:
o LOAD: caricamento dei file da penna (par. 7.2).
o SAVE: memorizzazione su penna della configurazione dell’organo (par 7.3).
Per accedere ad una funzione, posizionare il cursore sul relativo campo utilizzando i pulsanti [FIELD ] e
[FIELD ] e premere [ENTER].
Per abbandonare il menu FILE premere invece [EXIT].
7.1 INFORMAZIONI SULLA GESTIONE DELLA PENNA USB
Utilizzando una penna USB mai inserita nell’organo o appena formattata, all’accesso al menu FILE il
sistema crea automaticamente nella memoria una cartella denominata “organ”. Al suo interno vengono a
loro volta create 5 sotto-cartelle denominate:
- ”alls”: in cui vengono memorizzati i file .all che contengono tutte le impostazioni e le funzioni
presenti nei menu SETTINGS e STYLE (dei quattro Stili), tutte le combinazioni generali, tutti i passi
del Crescendo ed il Tutti, lo stile selezionato e lo stato di Local Off dei registri.
- “combinations”: in cui vengono memorizzati i file .cmb che contengono tutte le combinazioni
generali, tutti i passi del Crescendo ed il Tutti.
- “settings”: in cui vengono memorizzati i file .set che contengono le impostazioni del menu
SETTINGS, lo stile selezionato e lo stato di Local Off dei registri.
- “songs”: in cui vengono memorizzati i file .mid dei brani musicali registrati con il sequencer interno.
- “styles_all”: in cui vengono memorizzati i file .sta riguardanti le impostazioni del menu STYLES di
tutti gli Stili.
- “styles_single”: in cui vengono memorizzati i file .sts riguardanti le impostazioni del menu STYLES
dello Stile selezionato al momento del salvataggio.
Queste sono cartelle di sistema necessarie all’organo per la gestione dei file e non vanno assolutamente
cancellate o rinominate pena il mancato utilizzo dei file in esse memorizzati.
Per una descrizione dettagliata sul contenuto dei file .all, .set, .sta, .sts e .cmb consultare il par. 10.4.
7. SALVATAGGIO SU FILE DELLA CONFIGURAZIONE
DELL’ORGANO (menu FILE)
Page 31

IT - 29
Manuale Utente
7.2 CARICAMENTO DELLE COMBINAZIONI E/O IMPOSTAZIONI
DELL’ORGANO (funzione FILE LOAD)
Come descritto nelle note introduttive di questo capitolo, è possibile salvare su file la configurazione
attuale dello strumento. La funzione FILE LOAD permette di ricaricare nella memoria interna queste
impostazioni e/o combinazioni precedentemente salvate in una penna USB, riconfigurando lo strumento
in base a quanto descritto nel file caricato. Per richiamare questa funzione selezionare il campo LOAD nel
menu FILE:
in questa prima videata selezionare cosa si desidera caricare:
o ALL: la configurazione completa dell’organo.
o COMBINATIONS: tutte le combinazioni generali, tutti i passi del Crescendo, il Tutti.
o STYLE – ALL: i 4 Stili d’organo.
o STYLE – CURR.: un singolo Style.
o SETTINGS: le impostazioni generali dell’organo contenute nel menu SETTINGS.
Una volta selezionato il tipo di caricamento, il display visualizza i file presenti nella penna USB e
contenenti quelle informazioni:
in caso di nessun file presente per il tipo di ricerca effettuato viene visualizzato il messaggio “NO
N.B.
- Una volta inserita la penna USB attendere qualche secondo prima di visualizzare il menu
FILE.
- Accedendo a queste funzioni senza la penna inserita viene visualizzato il messaggio di errore
“USB PEN NOT PRESENT”. Se la penna è invece presente ciò sta a significare che non
viene riconosciuta dal sistema. Verificare che sia formattata correttamente e che non sia
danneggiata.
- Per copiare file con un computer in una penna USB mai utilizzata con l’organo, è dapprima
necessario creare manualmente le cartelle descritte in precedenza. Per conoscere in quale
cartella posizionare i file, seguire le indicazioni sul contenuto delle cartelle.
- La penna USB che si utilizza deve essere formattata con file system FAT o FAT32 (no NTFS o
altri) pena il mancato riconoscimento della penna stessa.
- Le cartelle “alls”, “combinations”, “settings”, “styles_all” e “styles_single” possono
contenere un massimo di 64 file. La cartella “songs” ne può contenere un massimo di 256.
- I nomi dei file non possono essere più lunghi di 30 caratteri (compresa l’estensione).
Page 32

IT - 30
Manuale Utente
FILES”.
Una volta selezionato il file desiderato premere [ENTER, il sistema richiede una conferma a procedere:
A caricamento avvenuto viene visualizzato il messaggio informativo “FILE SUCCESFULLY
LOADED”.
7.3 SALVATAGGIO SU FILE DELLE COMBINAZIONI E/O IMPOSTAZIONI
DELL’ORGANO (funzione FILE SAVE)
La funzione FILE SAVE permette di salvare nella penna USB tutte le combinazioni e/o le impostazioni
dell’organo.
A tal fine selezionare il campo SAVE nel menu FILE:
in questa prima videata selezionare cosa si desidera salvare:
o ALL: la configurazione completa dell’organo.
o COMBINATIONS: tutte le combinazioni generali, tutti i passi del Crescendo, il Tutti.
o STYLE – ALL: i 4 Stili d’organo.
o STYLE – CURR.: lo Stile attualmente selezionato.
o SETTINGS: le impostazioni generali dell’organo contenute nel menu SETTINGS.
N.B.
- In caso di caricamento del singolo Stile, questo può essere posizionato solo in sostituzione di
uno Stile dello stesso tipo (Baroque al posto di Baroque, Romantic al posto di Romantic). Per
una più facile e veloce individuazione del tipo di Stile pertanto, in fase di salvataggio il
sistema pone come scelta iniziale del nome del file proprio il nome dello stile.
- Tenete presente che caricando un file, le informazioni ad esso pertinenti (impostazioni,
combinazioni, stili, ecc...) presenti nell’organo verranno perse. Per evitare ciò si consiglia di
eseguire prima un salvataggio nella penna USB dei dati dell’organo (vedi par. 7.3) e quindi
di procedere con il caricamento desiderato.
- Tentando di caricare un file salvato con un modello d’organo differente viene visualizzato il
messaggio di errore “FILE LOAD FAILED – INCOMPATIBLE MODEL”.
- Tentando di caricare un file salvato con un uno strumento in cui la versione del sistema
operativo è più recente, viene visualizzato il messaggio di errore “FILE LOAD FAILED –
INCOMPATIBLE RELEASE”.
- Il messaggio di errore “FILE LOAD FAILED – CORRUPTED FILE” sta ad indicare che il
file è danneggiato.
Page 33

IT - 31
Manuale Utente
Una volta selezionato il tipo di salvataggio viene visualizzata la videata di composizione del nome del file:
Per selezionare le lettere del nome utilizzare i tasti [VALUE +] e [VALUE -] mentre per muovere il
cursore utilizzare [FIELD ] e [FIELD ]. Una volta composto il nome premere [ENTER] per
concludere la memorizzazione, terminata la quale viene visualizzato il messaggio informativo “FILE
SUCCESFULLY SAVED”.
N.B.
- In caso di caricamento del singolo Stile, questo può essere posizionato solo in sostituzione di
uno Stile dello stesso tipo (Baroque al posto di Baroque, Romantic al posto di Romantic). Per
una più facile e veloce individuazione del tipo di Stile pertanto, in fase di salvataggio il
sistema pone come scelta iniziale del nome del file proprio il nome dello stile.
- Qualora nell’unità nella penna USB sia già presente un file con lo stesso nome ed estensione
il sistema chiede se si desidera sovrascriverlo visualizzando il messaggio “FILE ALREADY
EXISTS”. Come informa la videata premere [ENTER] per continuare l’operazione o [EXIT]
per inserire un nome differente. Si ricorda inoltre che sovrascrivendo un file, i dati in esso
contenuti verranno irrimediabilmente persi.
- Il messaggio di errore “FILE SAVE FAILED” sta ad indicare che il sistema non è riuscito a
salvare il file. Ritentare l’operazione, se il messaggio viene nuovamente visualizzato
controllare che ci sia spazio disponibile nella penna. Se così fosse provare a formattarla con
un computer o utilizzarne un’altra in quanto potrebbe essere danneggiata.
Page 34

IT - 32
Manuale Utente
L’organo è equipaggiato con un sequencer (registratore digitale) interno in grado di acquisire le esecuzioni,
i comandi ed i controlli effettuati sullo strumento, così come i dati MIDI ricevuti dalla porta [MIDI IN].
Le registrazioni vengono salvate nella penna USB come file MIDI (Standard MIDI File formato 1 a 125
beats per minute, 384 ticks per quarter note) e riascoltate in qualsiasi momento.
Per richiamare il sequencer premere il pulsante [SEQUENC.], viene visualizzata la videata di selezione
delle tre modalità operative del sistema:
o PLAY: riproduzione dei brani musicali presenti nella penna USB (par. 8.1).
o TRANSPOSER: imposta una trasposizione in semitoni dei brani riprodotti dal sequencer.
o RECORD: registrazione di brani musicali (par. 8.2).
o OVERDUB: sovraincisione di brani musicali (par. 8.3)
8.1 RIPRODUZIONE DI UN BRANO (modalità PLAY)
Nella videata di selezione della modalità del sequencer precedentemente descritta selezionare il campo
PLAY, il display visualizza i file .mid memorizzati nella penna USB:
in caso di nessun file presente viene riportato il messaggio “NO FILES”.
8. REGISTRAZIONE E RIPRODUZIONE DI BRANI
MUSICALI (SEQUENCER)
N.B.
- Per copiare file con un computer in una penna USB mai utilizzata con l’organo, è dapprima
necessario creare manualmente le cartelle descritte nel par. 7.1. Per conoscere in quale
cartella posizionare i file, seguire le indicazioni sul contenuto delle cartelle.
- La penna USB che si utilizza deve essere formattata con file system FAT o FAT32 (no NTFS o
altri) pena il mancato riconoscimento della penna stessa.
- I file .mid che vengono registrati e/o letti dal sequencer sono memorizzati nella cartella
“songs” e ne possono essere presenti un massimo di 256.
- I nomi dei file .mid non possono essere più lunghi di 30 caratteri (compresa l’estensione).
- La trasposizione regolabile nella videata principale non ha effetto sulla riproduzione dei
brani (al contrario della registrazione dove invece le note vengono acquisite trasposte).
Page 35

IT - 33
Manuale Utente
Selezionare ora il file MIDI che si desidera riprodurre:
La nuova videata informa circa tutti i comandi necessari per l’utilizzo del sequencer:
- [ENTER]: avvia la riproduzione del brano.
- [EXIT]: abbandono del sequencer.
- [FIELD ]: avanzamento veloce (Fast Forward).
- [FIELD ]: riavvolgimento veloce (Rewind).
- [VALUE -]: riduzione della velocità di riproduzione (visualizzata in alto a sinistra come percentuale
del valore originale, 100% nella videata sopra illustrata).
- [VALUE +]: aumento della velocità di riproduzione (visualizzata in alto a sinistra come percentuale
del valore originale, 100% nella videata sopra illustrata).
Avviata la riproduzione di un brano il display cambia in:
e come è possibile notare anche le funzioni dei pulsanti [ENTER] e [EXIT] sono cambiate in:
- [ENTER]: pausa / riavvio della riproduzione del brano.
- [EXIT]: arresto della riproduzione del brano.
UTILIZZO DI BRANI REGISTRATI E/O MODIFICATI TRAMITE SOFTWARE
DEDICATO
Le basi MIDI registrate con il sequencer interno dello strumento possono essere modificate tramite i più
comuni software di editing MIDI per computer. Questo talvolta può risultare utile per correggere
eventuali errori emersi durante la registrazione oppure per migliorie varie. Si consiglia comunque di
eseguire tali operazioni solo ad utenti esperti.
Durante la modifica di una base MIDI è comunque necessario attenersi a queste regole:
N.B.
- Una volta inserita la penna USB attendere qualche secondo prima di richiamare la modalità
PLAY del sequencer.
- Richiamando il PLAY senza la penna inserita viene visualizzato il messaggio di errore “USB
PEN NOT PRESENT”. Se la penna è invece presente ciò sta a significare che non viene
riconosciuta dal sistema. Verificare che sia formattata correttamente e che non sia
danneggiata.
- Il messaggio di errore “FILE LOAD FAILED” sta ad indicare che il file che si sta tentando
di riprodurre è danneggiato o superiore a circa 250 KB (dimensione massima dei file
riproducibili con questo sequencer).
Page 36

IT - 34
Manuale Utente
- Non modificare i canali delle tracce. Se ciò deve essere fatto (per cambiare sezione di esecuzione per
esempio) occorre rispettare la canalizzazione interna del sequencer dell’organo. Le sezioni infatti sono
così canalizzate:
Pedal: 1
Manual I: 2
Manual II: 3
Il sequencer dell’organo in fase di memorizzazione assegna anche un nome alle tracce, nome che
corrisponde alla sezione in cui le note sono state suonate. La maggior parte dei programmi per
computer riconosco i nomi delle tracce, per cui potrete risalire molto velocemente alla sezione:
traccia “Pedal”: Pedal
traccia “Great”: Manual I
traccia “Swell”: Manual II
traccia ”Volumes”: volumi divisionali e pedale di espressione
traccia “Stops”: stato dei registri
Sono inoltre presenti altre tracce per usi interni e sviluppi futuri che non vanno modificate.
- I volumi divisionali sono registrati come eventi di Control Change 7. La posizione del pedale
d’espressione come Control Change 11. I canali di questi Control Change sono identici a quelli
riportati nel punto precedente.
- Lo stato dei registri, così come quello di comandi generali quali il Cancel, tremoli, ecc... vengono
registrati come codici di Sistema Esclusivo. Si consiglia di non modificare questi codici. Se si desidera
aggiungere o eliminare registri da una esecuzione dovete conoscere il codice di Sistema Esclusivo
associato alla voce in oggetto. A tal fine vi consigliamo di monitorare la porta MIDI OUT dell’organo
ed accedendo e spegnendo il registro controllare il codice MIDI trasmesso. Aggiungete o eliminate
questo codice esclusivamente nella traccia “Stops”.
- In fase di salvataggio della file MIDI non modificare la risoluzione di 384 t.p.q.n. (tick per quarter
note, tick per nota della durata di un quarto).
E’ altresì possibile utilizzare sequenze non registrate con il sequencer interno. Anche in questo caso
occorre tenere presente che:
- La canalizzazione delle tracce potrebbe non essere compatibile con il sequencer dell’organo.
Reimpostare quindi i canali mantenendo la canalizzazione descritta nei punti precedenti.
- I codici di gestione dei registri potrebbero non essere presenti all’interno della sequenza MIDI. Si
consiglia pertanto di eseguire una procedura di sovraincisione (vedi par. 8.3), inserendo e spegnendo i
registri ove necessario.
- Anche i volumi divisionali ed i valori di espressione potrebbero mancare. Anche in questo caso vi
consigliamo di aggiungerle tramite una sovraincisione.
8.2 REGISTRAZIONE DI UN BRANO (modalità RECORD)
Nella videata delle modalità del sequencer selezionare il campo RECORD, il display visualizza:
Page 37

IT - 35
Manuale Utente
Come per la modalità Play, anche in Record la videata informa circa le funzioni dei pulsanti:
- [ENTER]: avvia la registrazione.
- [EXIT]: abbandono del sequencer.
Una volta avviata la registrazione le funzioni cambiano in:
- [ENTER]: pausa / riavvio della registrazione.
- [EXIT]: arresto della registrazione.
Premendo [EXIT] per terminare la sessione il display visualizza la videata relativa al salvataggio della
registrazione appena effettuata:
Le funzioni visualizzate permettono di:
o SAVE: salvare la registrazione come file MIDI.
o PLAY: riascoltare la registrazione prima di procedere con il salvataggio.
o OVERDUB: eseguire una nuova registrazione in aggiunta alla sequenza appena acquisita (vedi par. 8.3).
o DISCARD AND EXIT: cancellare la registrazione ed abbandonare la modalità Record del sequencer.
Selezionando il campo SAVE il sistema chiede di assegnare un nome alla sequenza MIDI che si sta per
salvare:
Nella composizione del nome utilizzare i pulsanti [FIELD ] e [FIELD ] per muovere il cursore e
[VALUE +] e [VALUE -] per selezionare il carattere.
Per confermare il nome e procedere con il salvataggio premere il pulsante [ENTER], [EXIT] invece
permette di tornare alla videata precedente ed annullare il salvataggio.
L’avvenuta memorizzazione del file viene confermata dal messaggio “FILE SUCCESFULLY SAVED”:
Premendo invece [EXIT] dalla videata di salvataggio (quindi a registrazione acquisita ma non
memorizzata) il sistema avverte che si sta per perdere la registrazione.
Page 38

IT - 36
Manuale Utente
e di premere [ENTER] per confermare l’abbandono e l’eliminazione dei dati acquisiti o [EXIT] per
tornare alla videata di salvataggio.
8.3 SOVRAINCISIONE DI UN BRANO (modalità OVERDUB)
Il sequencer interno del Cantorum Duo permette, in aggiunta alle normali operazioni di riproduzione e
registrazione, di eseguire sovraincisioni di sequenze registrate in precedenza. Questa operazione è fattibile
richiamando la funzione OVERDUB:
- nel menu principale del sequencer (vedi videata all’inizio del cap. 8);
- al termine di una sessione di registrazione (vedi par. 8.2).
Inizialmente il sistema chiede se si desidera sostituire i comandi a pannello (registri, unioni, tremoli,
comandi MIDI, comandi generali) attualmente registrati nella base con la situazione presente all’avvio della
nuova registrazione (premendo [ENTER]) o lasciarli invariati (premendo [EXIT]):
Identica richiesta per i controlli di volume divisionali e la posizione del pedale di espressione:
N.B.
- Selezionando la funzione SAVE senza la penna inserita viene visualizzato il messaggio di
errore “USB PEN NOT PRESENT”. Se la penna è invece presente ciò sta a significare che
non viene riconosciuta dal sistema. Verificare che sia formattata correttamente e che non sia
danneggiata.
- Il messaggio di errore “FILE SAVE FAILED” sta ad indicare che il sistema non è riuscito a
salvare il file. Ritentare l’operazione, se il messaggio viene nuovamente visualizzato
controllare che ci sia spazio disponibile nella penna. Se così fosse provare a formattarla con
un computer o utilizzarne un’altra in quanto potrebbe essere danneggiata.
Page 39

IT - 37
Manuale Utente
Ora il sequencer è pronto per registrare:
Come informa il display i pulsanti assumono le seguenti funzioni:
- [ENTER]: avvia la registrazione.
- [EXIT]: abbandono del sequencer.
- [VALUE -]: riduzione della velocità di riproduzione / registrazione (visualizzata in alto a sinistra
come percentuale del valore originale, 100% nella videata sopra illustrata).
- [VALUE +]: aumento della velocità di riproduzione / registrazione (visualizzata in alto a sinistra
come percentuale del valore originale, 100% nella videata sopra illustrata).
Una volta avviata la registrazione le funzioni cambiano in:
- [ENTER]: pausa / riavvio della registrazione.
- [EXIT]: arresto della registrazione.
Premendo [EXIT] per terminare la sessione il display visualizza la videata di accettazione della
sovraincisione:
In cui sono presenti le seguenti funzioni:
o ACCEPT: accetta ed inserisce la nuova registrazione senza alterare la lunghezza del brano qualora la si
sia terminata prima della fine originale.
o TRIM AND ACCEPT: accetta ed inserisce la nuova registrazione e modifica la durata del brano
portandola al termine della sovraincisione.
o PLAY: riproduce il brano con la nuova registrazione al fine di valutarne le modifiche ma senza
renderle definitive.
o PLAY FROM OVD (Overdub): riproduce il brano dal primo evento dell’ultima sovraincisione al fine
di valutarne le modifiche ma senza renderle definitive.
o DISCARD: annulla la sovraincisione appena eseguita.
Page 40

IT - 38
Manuale Utente
Selezionando ACCEPT o TRIM AND ACCEPT viene visualizzata la videata di salvataggio della
sequenza a cui è possibile assegnare anche un diverso nome.
Selezionando PLAY o PLAY FROM OVD il sequencer torna nella modalità di esecuzione del brano,
terminato il quale premendo [EXIT] viene visualizzata la videata di cui sopra per rendere definitiva o
meno la sovraincisione.
Premendo [EXIT] il display visualizza il messaggio di avviso:
Indicando che si sta perdendo la sovraincisione appena eseguita. Premere [ENTER] per continuare o
[EXIT] per tornare alla videata precedente.
ORIGINAL
05:20
OVERDUB
03:10
NEW
05:20
ORIGINAL
05:20
OVERDUB
03:10
NEW
03:10
ACC
EPT TRIM AND ACCEPT
ORIGINAL
05:20
OVERDUB
06:00
NEW
06:00
ORIGINAL
05:20
OVERDUB
06:00
NEW
06:00
1 1
2 2
N.B.
- Selezionando la funzione SAVE senza la penna inserita viene visualizzato il messaggio di
errore “USB PEN NOT PRESENT”. Se la penna è invece presente ciò sta a significare che
non viene riconosciuta dal sistema. Verificare che sia formattata correttamente e che non sia
danneggiata.
- Il messaggio di errore “FILE LOAD FAILED” sta ad indicare che il file che si sta tentando
di sovraincidere è danneggiato o superiore a circa 128 KB (dimensione massima dei file che
si possono sovraincidere).
- Il messaggio di errore “FILE SAVE FAILED” sta ad indicare che il sistema non è riuscito a
salvare il file. Ritentare l’operazione, se il messaggio viene nuovamente visualizzato
controllare che ci sia spazio disponibile nella penna. Se così fosse provare a formattarla con
un computer o utilizzarne un’altra in quanto potrebbe essere danneggiata.
Page 41

IT - 39
Manuale Utente
Impostare un registro in Local Off significa fare in modo che questo non suoni tramite la generazione
interna dell’organo ma che ne venga comunque trasmesso il relativo messaggio MIDI (codice di Sistema
Esclusivo) così da poter essere acceso e suonato su uno strumento collegato.
Per impostare il Local Off delle voci è necessario, quando il display visualizza la videata principale,
premere il pistoncino [S] e, mantenendolo premuto, [C]. I Led di tutti i registri verranno accesi ed il display
visualizzerà la videata:
Per posizionare una voce in Local Off agire sul tirante o bascula in modo da spegnerne la luce.
Dopo aver impostato la configurazione desiderata premere contemporaneamente [S] e [C] per
memorizzarla.
Successivi accessi al settaggio del Local Off visualizzeranno lo stato dei registri secondo la regola:
- Luce accesa: registro in Local On (suona con la generazione interna)
- Luce spenta: registro in Local Off
10.1 RIPRODUZIONE DEI BRANI DIMOSTRATIVI (funzione DEMO)
L’organo è provvisto di alcuni brani dimostrativi (demo) per valutare al meglio le qualità timbriche dello
strumento e/o le modifiche apportate dall’utente.
Per richiamare l’esecuzione dei brani dimostrativi selezionare la voce DEMO nel MAIN MENU.
Utilizzare i pulsanti [FIELD ] e [FIELD ] per selezionare il brano desiderato. [ENTER] avvia e arresta
ciclicamente la riproduzione. Per uscire dalla funzione DEMO premere [EXIT].
10.2 IL TEMPERAMENTO
L’accordatura di uno strumento ad intonazione fissa consiste nella creazione di una catena di dodici quinte,
opportunamente dimensionate, affinchè ai due estremi della stessa ci si trovi su un intervallo riconducibile,
mediante opportune moltiplicazioni o divisioni per due, ad una ottava perfetta.
La quinta pura si ha quando due suoni sono in rapporto frequenziale 3:2. Se ad un qualunque suono, che
per facilità di calcolo consideriamo di frequenza unitaria, concateniamo 12 quinte pure ascendenti
otteniamo un altro suono di frequenza (3/2)12.
Concatenando invece ad esso 7 ottave si otterrà un suono di frequenza 27. Paragonando i due valori si
osserva subito che il primo è, seppur di poco, maggiore del secondo. Arrotondando al quarto decimale
abbiamo che: (3/2)12=129,7463 mentre 27 = 128,0000. Il rapporto tra questi due valori è chiamato comma
pitagorico.
9. LOCAL OFF DEI REGISTRI
10. APPENDICE
Page 42

IT - 40
Manuale Utente
Potremmo definire esso come il rapporto che esprime l’esubero di una catena di 12 quinte pure rispetto ad
una catena di 7 ottave, entrambe principianti da un unico suono.
Il disegno soprastante pur non essendo in scala (l’eccedenza a livello grafico sarebbe praticamente
impercettibile) può dare un’idea abbastanza esatta del problema.
Ora, se si divide il comma pitagorico in 12 parti uguali e se ne sottrae ciascuna ad ogni quinta pura, si
otterrà una catena di 12 quinte che termina in coincidenza della settima ottava.
E’ questo il caso del temperamento equabile (Equal Temperament System con divisione dell’ottava in 12
parti uguali).
Il comma pitagorico può essere suddiviso in parti più grandi e ripartito, quindi, solo su alcune quinte. Così
è costruito, ad esempio, il temperamento Werckmeister III che lo recupera, in quattro parti uguali, sulle
quinte C-G, G-D, D-A e B-F#.
Un altro intervallo particolarmente importante nella storia del temperamento è la terza maggiore. Se si
concatenano quattro quinte pure si arriva a (3/2)4. L’intervallo di terza maggiore naturale è invece
rappresentato dalla relazione 5/4. Quindi, sempre arrotondando al quarto decimale, la terza maggiore
generata da quinte pitagoriche ha frequenza 1,2656 mentre quella naturale è 1,2500. Questo esubero è
chiamato comma sintonico.
Se si concatenano quattro quinte ridotte ciascuna di 1/4 di comma sintonico si ottiene una terza maggiore
Page 43

IT - 41
Manuale Utente
pura. Le quinte sottese sono dette quinte mesotoniche; esse sono piuttosto calanti ma ancora accettabili.
Va osservato che se un temperamento recupera un solo comma sintonico per “chiudersi” bene è
necessario compensare ancora la differenza tra comma pitagorico e comma sintonico. Tale rapporto è
detto skisma.
Sul comma sintonico è basato ad esempio il temperamento di Kirnberger II che recupera in due quinte il
comma sintonico (D-A, A-E) e lo skisma tra F#-C#.
Concatenando 3 terze maggiori naturali (5:4 dicevamo) avremo la frequenza (5/4)3. Il rapporto tra l’ottava
e questa è detto comma enarmonico.
Quando un temperamento recupera nell’arco delle sue quinte più del comma pitagorico, in genere, una
sola quinta compensa tutto il gap acquisito e diventa inutilizzabile. Essa è detta lupo o quinta del lupo.
10.3 I TEMPERAMENTI NEL CANTORUM DUO
In aggiunta al temperamento equabile, nel Cantorum
Duo è possibile suonare con altri temperamenti di
seguito descritti.
KIRNBERGER II (KIRNBERGER2 a display)
Si basa su due quinte ridotte di 1/2 comma sintonico ed
una ridotta del rimanente skisma. Si hanno tre terze
maggiori pure: C, G, D. Di conseguenza le triadi
maggiori su C e G sono pure. Stessa cosa dicasi delle
triadi minori su E e su B. Sono pitagoriche le quattro
terze maggiori su: C#, G#, Eb, Bb. La coesistenza di
accordi puri ed altri temperati dà un particolare carattere
a questo temperamento.
WERCKMEISTER III (WERCKMEIST.3 a display)
Si basa su quattro quinte ridotte di 1/4 di comma
pitagorico ciascuna. Tutte le altre ovviamente sono
pure. Da adito a tre terze maggiori pitagoriche: su C#,
F#, G#. All’aumentare delle alterazioni in armatura di
chiave la tensione armonica cresce.
Page 44

IT - 42
Manuale Utente
PYTHAGOREAN
Si basa su undici quinte pure (pitagoriche appunto) ed
un lupo su G#. E’ utilizzabile solo per eseguire musica
monodica o, comunque, che escluda intervalli armonici
di terza. Ha funzione soprattutto didattico-informativa.
MEANTONE 3#, MEANTONE 3b
E’ il prototipo di tutti i temperamenti basati su quinte ridotte di 1/4 di comma sintonico. Esso da adito ad
otto terze maggiori pure: Eb, Bb, F, C, G, D, A, E; di contro le restanti quattro sono inutilizzabili: B, F#,
C#, G#. Le quinte sono caratteristiche al punto da essere definite quinte mesotoniche. Più piccole delle
pure sono ancora sufficientemente consonanti. Una sola, G#, si incarica di colmare tutto il gap acquisito
dalle altre 11 divenendo larghissima ed inutilizzabile: è la cosiddetta quinta del lupo. Le tonalità con
nessuna o poche alterazioni risultano particolarmente piacevoli. La scala cromatica è molto caratteristica.
Spostando il lupo su C# si può usare il tasto apparente G# in funzione di Ab.
Page 45

IT - 43
Manuale Utente
VALLOTTI
Si basa su sei quinte ridotte di 1/6 di comma pitagorico.
Va da sé che le altre sono pure. Equivalenti le coppie di
terze maggiori su Eb e B, Bb ed E, F ed A; equivalenti
tra loro le terze maggiori su C, G e D. Sono invece
pitagoriche quelle su F#, C# e G#.
CHAUMONT
E’ un temperamento mesotonico in cui la quinta del
lupo è resa meno difettosa ingrandendo le quinte su Eb
e Bb. Le terze maggiori pure sono solo sei: F, C, G, D,
A, E. La terza maggiore su B, seppure poco piacevole, è
comunque utilizzabile.
KELLNER 1975
Questo temperamento è stato realizzato da Kellner
desumendone la struttura dallo stemma coronato
apposto sul frontespizio del “Wohltemperierte Klavier”
del 1722. Esso si basa su cinque quinte ridotte ciascuna
di 1/5 di comma pitagorico. Da adito a tre terze
maggiori pitagoriche: su C#, F#, G#. Comunque
nessuna delle altre terze è pura. Massimamente
consonante è la terza maggiore su C.
Page 46

IT - 44
Manuale Utente
KIRNBERGER III (KIRNBERGER3 a display)
Si basa su quattro quinte ridotte di 1/4 di comma
sintonico ed una ridotta del rimanente skisma. L’unica
terza maggiore pura è su C; via via meno pure sono G,
D, A; speculari a queste tre F, Bb ed Eb. Equivalenti tra
loro E, B ed F#; sono invece pitagoriche le due terze
maggiori su C# e G#. Le tonalità con molte alterazioni
sono ben caratterizzate.
WERCKMEISTER IV (WERCKMEIST.4 a display)
Si realizza riducendo cinque quinte di un terzo di
comma pitagorico ed allargandone della stessa quantità
altre due. Particolarmente piacevole nelle tonalità con
poche alterazioni diventa piuttosto “duro” all’aumentare
di queste.
WERCKMEISTER V (WERCKMEIST.5 a display)
Si realizza riducendo cinque quinte di un quarto di
comma pitagorico ed allargandone della stessa quantità
un’altra. Poco utilizzato poichè nessuna tonalità è
particolarmente eufonica.
Page 47

IT - 45
Manuale Utente
SILBERMANN
Si basa su quinte ridotte di 1/6 di comma sintonico. Il
lupo si colloca su G#. Le terze che nel mesotonico
classico sono pure qui sono più larghe di 1/3 di comma
sintonico. Per contro il lupo è meno pronunciato ed al
limite tra accettabile ed inaccettabile.
MEANTONE PURE MINOR 3rd (MEANTONE
3M a display)
Si basa su quinte ridotte di 1/3 di comma sintonico. Il
lupo su G# è molto grande ed inutilizzabile. 9 terze
minori sono pure: C, G, D, A, E, B, F#, C#, G#. 8
terze maggiori sono invece più piccole delle pure di 1/3
di comma sintonico. Esse sono quelle basate su: Eb,
Bb, F, C, G, D, A, E. Anche in questo temperamento la
scala cromatica è molto caratteristica.
ZARLINO
Undici quinte sono ridotte di 2/7 di comma sintonico.
Il lupo, particolarmente ampio e, dunque, inutilizzabile,
si trova su G#. Le otto terze maggiori utilizzabili sono
ridotte di 1/7 di comma sintonico. Anche in questo
temperamento la scala cromatica è assai caratteristica.
Page 48

IT - 46
Manuale Utente
SAUVEUR 1, SAUVEUR 2
Il temperamento di Sauveur 1 si basa su undici quinte ridotte di 1/5 di comma sintonico. Il lupo si trova
su G#. Nel temperamento Sauveur 2 la quinta su F# è pura. Le otto terze maggiori pure del mesotonico
sono qui leggermente più grandi mentre il “lupo” è meno pronunciato. Le tonalità consonanti sono però
particolarmente “calde” e piacevoli.
BARCA
Il temperamento di Barca si basa su sei quinte consecutive (da C) ridotte di 1/6 di comma sintonico ed
una (su Eb) ridotta del rimanente skisma. La presenza di questo comporta la totale assenza di terze
maggiori pitagoriche. Sono quindi bene utilizzabili anche le tonalità con molte alterazioni.
Page 49

IT - 47
Manuale Utente
10.4 CONTENUTO DEI FILE .SET, .CMB, .STS, .STA e .ALL
FILE .SET
PARAMETER POSITION NOTE
SELECTED STYLE system data
Local Off of each stop
PEDAL VOLUMES function
MAN. I VOLUMES function
MAN. II VOLUMES function
OUT 1 VOLUMES function
OUT 2 VOLUMES function
INPUT VOLUMES function
TUNING Main page
TEMPER. Main page
REVERB SETTINGS menu
KEYB. INVERS. SETTINGS menu
SHORT OCTAVE SETTINGS menu
INTERNAL SETTINGS menu, EQUALIZER function
OUT 1 SETTINGS menu, EQUALIZER function
OUT 2 SETTINGS menu, EQUALIZER function
PEDAL OUT 1 - OUT 2 SETTINGS menu, EXTERNAL OUTPUTS function
MANUAL I OUT 1 - OUT 2 SETTINGS menu, EXTERNAL OUTPUTS function
MANUAL II OUT 1 - OUT 2 SETTINGS menu, EXTERNAL OUTPUTS function
REVERB OUT 1 - OUT 2 SETTINGS menu, EXTERNAL OUTPUTS function
INPUT OUT 1 - OUT 2 SETTINGS menu, EXTERNAL OUTPUTS function
PEDAL TX - RX SETTINGS menu, MIDI / MIDI CHANNELS function
MANUAL I TX - RX SETTINGS menu, MIDI / MIDI CHANNELS function
MANUAL II TX - RX SETTINGS menu, MIDI / MIDI CHANNELS function
CONTROL SETTINGS menu, MIDI / MIDI CHANNELS function
PROGRAM SETTINGS menu, MIDI / MIDI FILTERS function
SYSEX SETTINGS menu, MIDI / MIDI FILTERS function
REAL TIME SETTINGS menu, MIDI / MIDI FILTERS function
NOTE TO COUPL. SETTINGS menu, MIDI function
OUT MODE POSITION
PEDAL SETTINGS menu, VELOCITY SENSE function
MANUAL I SETTINGS menu, VELOCITY SENSE function
MANUAL II SETTINGS menu, VELOCITY SENSE function
SAVE ENC+AP SETTINGS menu, COMBINATIONS function
SAVE ST/TR/OR SETTINGS menu, COMBINATIONS function
CRESC/EXPR SETTINGS menu, PEDALS function
EXPR CH->CRESC SETTINGS menu, PEDALS function
MIDI PEDALBOARD SETTINGS menu, PEDALS function
LCD CONTRAST SETTINGS menu, CONTROLS function
VOL. KNOB SETTINGS menu, CONTROLS function
FILE .CMB
COMBINATIONS CONTENT NOTE
Tutti
all stops, all couplers, all tremulants, tremulants depth and
speed*, ENC*, AP*, MIDI Program Change and Bank
Select, Orchestra voices*, Style*
* recalled if enabled in
COMBINATIONS function
all General combinations
all stops, all couplers, all tremulants, tremulants depth and
speed*, ENC*, AP*, MIDI Program Change and Bank
Select, Orchestra voices*, Style*
* recalled if enabled in
COMBINATIONS function
Crescendo (16 steps) all stops, all couplers, all tremulants
FILE .STS
PARAMETER POSITION NOTE
ENSEMBLE STYLE menu
TREMULANTS DEPTH STYLE menu, TREMULANTS function
TREMULANTS SPEED STYLE menu, TREMULANTS function
VOICES VOLUMES STYLE menu, VOICES VOLUME function
ORCHESTRA VOICES STYLE menu, ORCHESTRA function
FILE .STA
CONTENT NOTE
the same of 4 .sts files 1 for each Style
Page 50

IT - 48
Manuale Utente
FILE .ALL
CONTENT NOTE
the same of 1 .sta files
the same of 1 .cmb file
the same of 1 .set file
Local Off of each stop
10.5 COSA E’ IL MIDI
L’interfaccia MIDI (Musical Instrument Digital Interface, Interfaccia Digitale per Strumenti Musicali)
permette a strumenti di marca e genere diverso di comunicare tra loro tramite questo ben specifico
protocollo di codici. Ciò rende possibile creare sistemi di strumenti MIDI che offrono una versatilità ed un
controllo molto migliore di quanto sia possibile con strumenti isolati. Per rendere possibile questa
comunicazione, tutti gli strumenti MIDI sono dotati di due o tre connettori DIN 5 poli denominati:
- MIDI IN: Tramite questa presa la macchina riceve i dati MIDI trasmessi da altre unità.
- MIDI OUT: Tramite questa presa la macchina invia i dati MIDI da lei generati, ad altre unità.
- MIDI THRU: Questa presa, non sempre presente sugli strumenti, viene utilizzata per il collegamento
in serie di più unità dato che trasmette i dati MIDI tali e quali vengono ricevuti dalla rispettiva porta
MIDI IN.
Gli strumenti dotati di interfaccia MIDI trasmettono messaggi MIDI che specificano, per esempio, quale
nota è stata suonata e con quale dinamica attraverso il connettore MIDI OUT. Se questo connettore è
collegato al MIDI IN di un altro strumento MIDI, come un expander, quest’ultimo risponderà
precisamente alle note suonate sullo strumento trasmittente.
Lo stesso tipo di trasferimento di informazioni è utilizzato per la registrazione di sequenze MIDI. Un
computer od un sequencer possono essere usati per registrare i dati MIDI generati dallo strumento
trasmittente. Quando tali dati registrati vengono reinviati allo strumento, automaticamente esso esegue la
“performance” registrata.
Il MIDI è in grado di trasmettere una moltitudine di dati digitali tramite un singolo cavo e quindi un
singolo connettore: questo grazie ai canali MIDI. Esistono 16 canali MIDI e, analogamente a quanto
succede nella radiofonia per cui due stazioni possono comunicare solo se sintonizzate sulla stessa
frequenza (o canale), due strumenti MIDI collegati fra loro sono in grado di comunicare solo se il canale
dello strumento trasmittente coincide con il canale del ricevente.
I messaggi MIDI sono suddivisi in messaggi di canale e messaggi di sistema. Di seguito una breve
descrizione di questi messaggi.
MESSAGGI DI CANALE
NOTE ON
Questo messaggio viene trasmesso quando si preme una nota sulla tastiera. Ogni messaggio di Note On
contiene le informazioni di:
Note On: quando è stato premuto un tasto;
Note Number: il tasto e quindi relativa nota che è stata suonata;
Velocity: dinamica (con quanta forza è stato premuto il tasto) della nota.
I messaggi di nota sono espressi come un numero da 0 a 127, con il DO centrale rappresentato dal
numero 60.
NOTE OFF
Questo messaggio viene trasmesso al rilascio di un tasto della tastiera premuto precedentemente.
Quando viene ricevuto, il suono della nota di quel tasto viene spento. Ogni messaggio di Note On
contiene le informazioni di:
Note Off: un tasto è stato rilasciato;
Note Number: quale tasto è stato rilasciato;
Velocity: dinamica (con quanta forza) è stato rilasciato.
Page 51

IT - 49
Manuale Utente
NOTA
Il messaggio di Note On con Velocity=0 viene equiparato ad un messaggio di Note Off.
PROGRAM CHANGE
Questo messaggio viene usato per la selezione dei programmi o dei suoni sullo strumento ricevente.
Esiste inoltre uno specifico standard chiamato General MIDI che descrive quale suono richiamare per
ogni Program Change che viene ricevuto. Questa associazione viene di solito descritta tramite una tabella
riportata nel manuale d’uso dello strumento che si attiene a questo standard.
Questo messaggio contiene le informazioni di:
Program Change: cambio voce o programma;
Program Change Number: il numero del programma o timbro da attivare;
CONTROL CHANGE
Si tratta di messaggi di controllo (associati spesso ai potenziometri o ai pedali) che vengono utilizzati per
aggiungere espressività alla “performance” permettendo di definire (ed eventualmente controllare in tempo
reale) i parametri della timbrica tra cui ad esempio il volume (CC n.7) o la posizione dei pedali di
espressione (CC n.11), ecc...
Questo messaggio contiene le informazioni di:
Control Change: un controllo è stato regolato
Controller Number: quale controllo è stato regolato
Controller Position: la posizione del controllo
MESSAGGI DI SISTEMA
SYSTEM EXCLUSIVE
Si tratta di messaggi che possono essere interpretati solamente da uno strumento dello stesso produttore
del trasmittente (in alcuni casi solo da un modello analogo) e riguardano principalmente i parametri di
generazione sonora e di programmazione dello strumento. L’organo utilizza questi messaggi per
controllare tutti i parametri interni e per l’accensione / spegnimento delle voci.
REAL TIME
Questi messaggi vengono utilizzati per il controllo in tempo reale di determinati moduli o funzioni di uno
strumento collegato. Fanno parte di questi messaggi i comandi di Start, Stop, Pause/Continue, Clock.
START: il sequencer ha iniziato a registrare o riprodurre una sequenza MIDI
STOP: il sequencer è stato arrestato
PAUSE / CONTINUE: il sequencer è stato posizionato in pausa
CLOCK: la velocità del sequencer
NOTA
I messaggi sopra descritti non vengono trasmessi / ricevuti dall’organo . La descrizione è puramente a scopo informativo.
I messaggi di Real Time comprendono inoltre il codice di Active Sensing il quale viene inviato per
mantenere attivo il dialogo tra due strumenti MIDI. Quando lo strumento ricevente non riceve più nessun
dato MIDI o il codice di Active Sensing in un intervallo di tempo di 300 millisecondi circa considera il
collegamento MIDI disattivato per cui spegne eventuali note ancora accese. Si ricorda che la trasmissione
e ricezione di questo messaggio è opzionale, quindi non tutti gli strumenti sono predisposti per gestirlo.
Page 52

IT - 50
Manuale Utente
10.6 DETAILED MIDI IMPLEMENTATION
CHANNEL MESSAGES
Using default settings, channel messages are sent
and received on the following MIDI channels:
- Ch.1: Manual II notes or controls
- Ch.2: Manual I notes or controls
- Ch.4: Pedal notes or controls
Ch.16 is a reserved channel (system)
Note On
Message which is generated when a key is
pressed.
Data format: 9nH kkH vvH
n=channel number :0H–EH (1–15)
kk=note number :1EH–65H (30–101)
vv=note on velocity :01H–7FH (1–127)
:00H (0) Note Off
Note Off
Message which is generated when a key is
released.
Data format: 8nH kkH vvH
9nH kkH 00H
n=channel number :0H–EH (1–15)
kk=note number :1EH–65H (30–101)
vv=note off velocity :00H–7FH (0–127)
ignored
- This message can be also received as Note
On with velocity=0.
Control Change
Messages to control volumes, expressions and
other system controls.
• Bank Select MSB (CC 0)
Controller transmitted in combination of
Program Change and Bank Select LSB in order
to select a specific bank of sound. It can be
transmitted using the COMBIN. PRG function
and when stored in the combinations and Tutti.
It also can be received on channel 16 to select
the Memory Bank.
Data format: BnH 00H vvH
n=channel number :0H–EH (1–15)
vv=bank MSB number :00H–7FH (0–127)
• Volume (CC 7)
Message which controls the sections volume.
Data format: BnH 07H vvH
n=channel number :0H–EH (1–15)
vv=volume value :00H–7FH (0–127)
• Expression (CC 11)
Message which controls the sections expression.
Data format: BnH 0BH vvH
n=channel number :0H–EH (1–15)
vv=expression value :00H–7FH (0–127)
• Bank Select LSB (CC 32)
Controller transmitted in combination of
Program Change and Bank Select MSB in order
to select a specific bank of sound. It can be
transmitted using the COMBIN. PRG function
and when stored in the combinations and Tutti.
Data format: BnH 20H vvH
n=channel number :0H–EH (1–15)
vv=bank LSB number :00H–7FH (0–127)
• Sustain (CC 64)
Message which controls the Sustain / Damper
effect.
Data format: BnH 40H vvH
n=channel number :0H–EH (1–15)
vv=switch :00H (0) off
(received as 00H-39H)
:7FH (127) on
(received as 40H-7FH)
• All Sounds Off (CC 120)
Terminates all voices currently on for the specific
channel.
Data format: BnH 78H 00H
n=channel number :0H-EH (1–15)
• Reset All Controllers (CC 121)
Controllers are set to the default value.
Data format: BnH 79H 00H
n=channel number :0H–EH (1–15)
- This message is transmitted only.
Page 53

IT - 51
Manuale Utente
• All Notes Off (CC 123)
Terminates all notes currently on for the specific
channel.
Data format: BnH 7BH 00H
n=channel number :0H–EH (1–15)
Program Change
Messages for selecting sounds, timbres or
programs in external modules. It also can be
received by the organ to recall combinations,
Tutti and Crescendo steps.
Data format: CnH mmH
Transmitted:
n=channel number :0H–EH (1–15)
mm=Program Ch. number:00H–7FH (0–127)
Received:
n=channel number :FH (16)
mm=Program Ch. number:
00H (0): general HR
01H-06H (1-6): general combinations 1-6
60H (96): Tutti OFF
61H (97): Tutti ON
6FH (111): Crescendo -- (OFF)
70H–7FH (112-127): Crescendo steps 1-16
STANDARD SYSTEM EXCLUSIVE
MESSAGES
• Device Inquiry
Instrument information sent after switching on
and when a Device Inquiry Request is received.
Data format: F0H 7EH 00H 06H 02H 31H 00H
1CH 20H 00H xxH yyH zzH vvH F7H
F0H: Exclusive status
7EH: Universal Non Realtime message
00H: channel
06H: general information
02H: device ID reply
31H: Viscount ID
00H 1CH: device family code
20H 00H: device family member code
xxH yyH zzH vvH: software version
F7H: End of Exclusive
• Master Fine Tuning
Parameter: Tuning
Video page: Main page
Data format: F0H 7FH 7FH 04H 03H vvH nnH
F7H
F0H: Exclusive status
7FH: Universal Realtime message
7FH: channel (any)
04H: Sub-ID #1=Device Control message
03H: Sub-ID #2=Master Fine tuning
vvH nnH: fine tuning value
00H 00H: A4=415,3 Hz
00H 40H: A4=440 Hz
7FH 7FH: A4=466,2 Hz
F7H: End of Exclusive
• Temperament
Parameter: Temperament
Video page: Main page
Data format: F0H 7EH 7FH 08H 08H 03H 7FH
7FH [ss] ... F7H
F0H: Exclusive status
7EH: Universal Non Realtime message
7FH: channel (any)
08H: Sub-ID #1=MIDI Tuning standard
08H: Sub-ID #2=scale/octave tuning 1-byte
form (Non Real-Time)
03H: channel/options byte 1
7FH: channel byte 2
7FH: channel byte 3
[ss]:12 byte tuning offset of 12 semitones
from C to B
00H: -64 cents
40H: 0 cents
7FH: +64 cents
F7H: End of Exclusive
VISCOUNT SYSTEM EXCLUSIVE
MESSAGES
• Register on/off
Data format: F0H 31H snH xxH yyH F7H
F0H : Exclusive status
31H : Viscount ID
sH : switch
0H=voice off
4H=voice on
nH : channel number (0H – EH)
xxH : voice id – first byte
yyH : voice id – second byte
F7H: End of Exclusive
• Tremulant Speed
Parameter: Spd
Video page: Style/ Tremulants
Data format: F0H 31H 2nH 5AH vvH F7H
F0H : Exclusive status
31H : Viscount ID
2nH : channel number (s=0H–EH)
5AH : tremulant speed
vvH : speed value (04H–20H)
F7H: End of Exclusive
- This message is transmitted when the
Tremulant is switched on.
• Tremulant Depth
Parameter: Dpt
Video page: Style / Tremulant
Data format: F0H 31H 2nH 5CH vvH F7H
F0H : Exclusive status
Page 54

IT - 52
Manuale Utente
31H : Viscount ID
2nH : channel number (s=0H–EH)
5CH : 1st tremulant depth
vvH : depth value (04H–20H)
F7H: End of Exclusive
- This message is transmitted when the
Tremulant is switched on.
- When switched off, the tremulant depth
value is trasmitted as 00H
• Temperament
Parameter: Temper.
Video page: Main page
Data format: F0H 31H 2FH 31H vvH F7H
F0H : Exclusive status
31H : Viscount ID
2FH : system control
31H : temperament
vvH : temperament type
00H=Equal
10H=Kirnberger II
11H=Werckmeister III
12H=Pythagorean
13H=Meantone 3#
14H=Vallotti
15H=Chaumont
16H=Kellner 1975
17H=Kirnberger III
18H=Werckmeister IV
19H=Werckmeister V
1AH=Silbermann
1BH=Meantone 3b
1CH=Meantone 3M
1DH=Zarlino
1EH=Sauveur 1
1FH=Sauveur 2
20H=Barca
F7H: End of Exclusive
• Ensemble
Parameter: Ensemble
Video page: Style
Data format: F0H 31H 2FH 32H vvH F7H
F0H : Exclusive status
31H : Viscount ID
2FH : system control
32H : ensamble
vvH : ensamble value (00H–08H)
F7H: End of Exclusive
• Tuning
Parameter: Tuning
Video page: Main page
Data format: F0H 31H 2FH 67H 00H 0nH 0nH
0nH F7H
F0H : Exclusive status
31H : Viscount ID
2FH : system control
67H : fine tuning
0nH 0nH 0nH: nibblezed data of tuning value
02H 00H 0CH=-50 cents (A=427,47Hz)
04H 00H 00H=0 cents (A=440 Hz)
05H 0FH 04H=+50 cents (A=452,89Hz)
F7H: End of Exclusive
• Cancel
Data format: F0H 31H 2FH 6CH 00H F7H
F0H : Exclusive status
31H : Viscount ID
2FH : system control
6CH : cancel
00H : execute cancel
F7H: End of Exclusive
• Couplers on/off
Data format: F0H 31H 2FH 70H vvH F7H
F0H : Exclusive status
31H : Viscount ID
2FH : system control
70H : coupler
vvH : type and switch
00H=II/P on
10H=II/P off
01H=I/P on
11H=I/P off
03H=II/I on
13H=II/I off
F7H: End of Exclusive
- This message can be only received and
recorded by the internal sequencer. It is not
transmitted.
SYSTEM REAL TIME MESSAGES
FEH: Active Sensing
FEH is transmitted every 300 msec. whenever is
no other MIDI data being transmitted.
Page 55

Smaltimento dei rifiuti elettrici ed elettronici (applicabile nell’Unione Europea e negli altri paesi
europei con servizio di raccolta differenziata)
Ai sensi dell’art. 13 del Decreto legislativo 25 luglio 2005, n. 151 “Attuazione delle Direttive
2002/95/CE, 2002/96/CE e 2003/108/CE”
II simbolo presente sul prodotto o sulla sua confezione indica che il prodotto non verrà trattato come
rifiuto domestico. Sarà invece consegnato al centro di raccolta autorizzato per il riciclo dei rifi uti
elettrici ed elettronici. Assicurandovi che il prodotto venga smaltito in modo adeguato, eviterete un
potenziale impatto negativo sull’ambiente e la salute umana, che potrebbe essere causato da una
gestione non conforme dello smaltimento del prodotto. Il riciclaggio dei materiali contribuirà alla
conservazione delle risorse naturali. Per ricevere ulteriori informazioni più dettagliate Vi invitiamo a
contattare l’uffi cio preposto nella Vostra città, il servizio per lo smaltimento dei rifi uti o il negozio in
cui avete acquistato il prodotto.
Lo smaltimento del prodotto da parte dell’utente comporta l’applicazione delle sanzioni amministrative
previste dalla normativa di legge.
Questo prodotto è conforme ai requisiti delle direttive EMCD 2004/108/EC e LVD 2006/95/EC.
Page 56

Page 57

EN - 1
User Manual
1. Important notes ........................................................................................................................................ 2
1.1 Looking after the product ........................................................................................................................................... 2
1.2 Notes about the manual .............................................................................................................................................. 2
2. General description of the instrument .................................................................................................... 4
3. Switching on and main video page ......................................................................................................... 8
3.1 The Main Menu ............................................................................................................................................................. 9
4. Volume settings (Volumes function) .................................................................................................... 10
5. Instrument general settings (Settings menu) ....................................................................................... 11
5.1 Selecting reverb type (Reverb parameter) .............................................................................................................. 12
5.2 Adjust equalizers (Equalizers functions) ................................................................................................................ 13
5.3 Channeling signals on the audio outputs (External Outputs function)............................................................ 14
5.4 MIDI settings (MIDI functions).............................................................................................................................. 14
5.5 Regulating the notes velocity (Velocity Sens. function) ....................................................................................... 17
5.6 Combinations operating functions (Combinations function) ............................................................................ 17
5.7 Configuration of the pedals and the MIDI pedalboard (Pedals function) ...................................................... 18
5.8 Saving the Program Change MIDI messages in the combinations (Combination Prg function) ............. 19
5.9 Security lock against unwanted changes (Security function) .............................................................................. 19
5.10 Configuring the volume control and adjusting the display contrast (Controls function) ........................... 21
5.11 Restoring factory settings (Factory Settings function) ....................................................................................... 21
5.12 Upgrading the operating system (Op. Sys. upgrade function) ......................................................................... 22
6. Programming organ styles (Style menu) .............................................................................................. 25
6.1 Adjusting the tremulants (Tremulants function) .................................................................................................. 25
6.2 Regulating the volume of each voice (Voices Volumes function) .................................................................... 26
6.3 Selecting the orchestral voices (Orchestra function) ............................................................................................ 27
7. Saving the organ configuration to files (File function) ........................................................................ 28
7.1 Informations concerning the USB pen .................................................................................................................. 28
7.2 Loading organ combinations and/or settings (File Load function) .................................................................. 29
7.3 Saving as file of organ combinations and/or settings (File Save function) ..................................................... 30
8. Playing and recording of musical sequences (Sequencer) .................................................................. 32
8.1 Playing back a songs (Play mode) ............................................................................................................................ 32
8.2 Recording a songs (Record mode) .......................................................................................................................... 34
8.3 Overdubbing a songs (Overdub mode) ................................................................................................................. 36
9. Stop Local Off ........................................................................................................................................ 39
10. Appendix ............................................................................................................................................... 39
10.1 Demonstration songs ............................................................................................................................................... 39
10.2 Temperament ............................................................................................................................................................ 39
10.3 Temperaments of the Cantorum Duo ................................................................................................................. 41
10.4 Content dei file .set, .cmb, .sts, .sta e .all ............................................................................................................... 46
10.5 What MIDI is ............................................................................................................................................................ 47
10.6 Detailed MIDI Implementation ............................................................................................................................ 49
INDE
X
Page 58

EN - 2
User Manual
1.1 LOOKING AFTER THE PRODUCT
• Do not apply excessive force to the organ’s structures or the controls (knobs, stops, push-buttons,
etc.).
• When possible, do not place the instrument close to units which generate strong interference, such as
radios, TVs, computer videos, etc.
• Do not place the organ close to heat sources, in damp or dusty places or in the vicinity of strong
magnetic fields.
• Do not expose the instrument to direct sunlight.
• Never insert foreign bodies inside the instrument or pour liquids of any kind into it.
• For cleaning, use only a soft brush or compressed air; never use detergents, solvents or alcohol.
• Always use good quality screened cables for connection to amplification or diffusion systems. When
disconnecting cables from sockets, always take hold of the connector and not the cable itself; when
winding cables, do not knot or twist them.
• Before making the connections ensure that the other units (especially amplification and diffusion
systems) you are about to connect are switched off. This will prevent noisy or even dangerous signal
peaks.
• Connect the net cable to an earthed socket.
• Check that the voltage corresponds to the voltage shown on the serial number plate of the organ.
• If the organ is to be out of use for lengthy periods, disconnect the plug from the power socket.
1.2 NOTES ABOUT THE MANUAL
• Take good care of this manual.
• This manual is an integral part of the instrument. The descriptions and illustrations in this publication
are not binding.
• While the instrument’s essential characteristics remain the same, the manufacturer reserves the right to
make any modifications to parts, details or accessories considered appropriate to improve the product
or for requirements of a constructional or commercial nature, at any time and without undertaking to
update this publication immediately.
• All rights reserved; the reproduction of any part of this manual, in any form, without the
manufacturer’s specific written permission is forbidden.
• All the trademarks referred to in this manual are the property of the respective manufacturers.
1. IMPORTANT NOTES
Page 59

EN - 3
User Manual
• Read all the information carefully in order to obtain the best performances from your product and
waste no time.
• The codes or numbers in square brackets ([ ]) indicate the names of the buttons, sliders, trimmers and
connectors on the instrument. For example, [ENTER] refers to the ENTER button.
• Illustrations and screens showed are for information purposes only and may differ from your product.
• The instructions provided in this manual only concern the instrument's operating system version that
was up to date when the document was released. Therefore, such instructions might not describe
faithfully your current operating system release.
Please, visit the website www.viscountinstruments.com to check for the newest operating system
release and manual.
This user manual is updated to version 1.0.0 of the instrument's operating system.
Page 60

EN - 4
User Manual
1. [MAN. I] stops: registers for the Bass section are collected here. It is possible to play these registers
through a MIDI pedalboard connected to the [MIDI IN] connector on the rear panel (see point 19) or
with the first manual by activating the Automatic Pedal function (see point 13). In the case of a MIDI
pedal, this must transmit the notes on the reception channel set for the Pedal section (see section 5.4).
2. [MAN. I] stops: here are collected the stops for the Manual I section.
3. [MAN. II] stops: here are collected the stops for the Manual II section.
4. Control and programming section.
The buttons and the display in this sections allow the user to program and set up the instrument and
the sequencer.
- [VOLUMES]: access the video page for all the volumes of the instruments.
- [SEQUENC.]: access the video pages for the use of the internal sequencer of the instrument.
- [FIELD ] and [FIELD ]: buttons used to move the cursor, identified by the field in reverse.
[FIELD ] moves it in the field above or the previous field, [FIELD ] in the field below or the
next field.
- [VALUE +] and [VALUE -]: buttons which regulate the values of the parameters, whether they
are numerical or alphanumerical. [VALUE +] increases, [VALUE -] decreases.
- [EXIT] and [ENTER]: access and quit the display screens and menus, or confirm or cancel
prompts made by the system. [ENTER] accesses menus/screens and confirms, [EXIT] quits
menus/screens and cancels.
5. [VOLUME] slider: controls the overall volume of the organ.
6. [REVERB] slider: controls the amount of reverberation effect.
2. GENERAL DESCRIPTION OF THE INSTRUMENT
1 2 3
4
5 6
Page 61

EN - 5
User Manual
7. ORCHESTRA pistons: pistons for activation and deactivation of orchestral voices.
- [ORCH P]: orchestral voice of Pedal.
- [ORCH I]: orchestral voice of Manual I.
- [ORCH II]: orchestral voice of Manual II.
It is possible to select the voice activated by each piston. For further information read par. 6.3.
8. [S] piston: to save a general combination or the Tutti, after setting up the voices, press and hold the
[S] piston; then press the piston corresponding to the combination you wish to save.
To save a Crescendo step, select it through the Crescendo pedal, press and hold [S], and then press the
general memories [HR] piston. To copy the content of one step to another, first select the step you
wish to copy, then press and hold the [S] piston, select the step in which you wish to paste the content,
and finally press the general memories [HR].
Organ Styles, tremulant Speed and Depth and orchestra voices can be saved to any combination or
Tutti. This allows a wider range of different combinations, adjusting the sound to play different songs.
To use these functions, first you have to set the saving options through the COMBINATIONS
function, described in par. 5.6.
9. Style pistons: here are the style pistons for the selection of the organ style (see also chapt. 6).
- [BAR]: baroque
- [BRK]: barock
- [ROM]: romantic
- [SYM]: symphonic
After the selection, if the display shows the main video page (see chap. 3), a pop-up message appears
for a few seconds, showing the Style name.
10. Tremulant thumb pistons: here are the thumb pistons for the activation / deactivation of the
Tremulant for each section.
- [TREM I]: [TREM I]: Manual I Tremulant.
- [TREM II]: [TREM I]: Manual II Tremulant.
7 8
9 10 11 12 13 14 13
N.B.
If the [S] piston LED light is off, this means that the SECURITY function for the combinations
(see par. 5.9) is active. In this case it is not possible to modify combinations, Tutti and the
Crescendo.
Page 62

EN - 6
User Manual
11. General combinations.
- [1] / [6]: pistons to recall the combinations saved in the selected memory bank (see [PREV] /
[NEXT] point). These combinations can be modified. To do so, follow the procedure described at
point 9.
- [HR]: restores the voice setup prepared in manual mode before a memory was recalled.
- [PREV.] / [NEXT]: general combinations sequencers. [PREV.] displays them in descending order,
[NEXT] in ascending order. Keeping pressed the [S] thumb piston and acting these commands it
is also possible to select the memory bank.
12. General organ controls: these are the controls that are not dedicated to a single section, but affect
the whole instrument.
- [A.P]: enables the Automatic Pedal which allows the pedal voices to be played on the first manual.
In this case, the organ’s pedal board is deactivated and the voices become monophonic, with
priority to the lowest note.
- [ENC]: when the Enclosed function is active, the main volume can be controlled through the
expression pedal connected to the [EXPR.] connector ot the rear panel.
- [C]: Cancel piston. Turns off all stops, tremulants, couplers and all other pistons on the manuals,
then deletes and turns on the HR. In case you have chosen to save into combinations the status of
[ENC] nad [A.P] pistons (see COMBINATIONS function in the par. 5.6), these are not turned off
by Cancel.
13. [T] piston: piston that recalls Tutti. The Tutti can be modified, for further information read point 9.
14. Couplers thumb pistons: here are the thumb pistons for the activation / deactivation of the couplers
between the manuals and the pedalboard:
- [I/P]: coupler of the first manual with the pedal board
- [II/P]: coupler of the second manual with the pedal board.
- [II/I]: coupler of the second manual to the first.
15. [OUT 1] and [OUT 2] audio outputs: Jack line outputs with the organ stereo signal, based on the
settings of the video page described in par. 5.3. These outputs also has dedicated level and equalization
controls (see par. 4 and 5.2). In case of stereo system, connect the [L/MONO] output to the left
channel and the [RIGHT] output to the right channel. If a monophonic system is used, only connect
the[L/ MONO] connector.
16. [PEDALS] connectors: in these connectors it is possibile to connect pedals to control the following
functions:
- [SUSTAIN]: connector for a switch-type pedal to control the Sustain effect for orchestral voices.
- [EXPR.]: continuous control of Man.II volume.
- [CRESC.]: With this pedal you can select the Crescendo level. These levels activate a fixed set of
stops, linked with an equal number of loudness, from pianissimo to fortissimo.
15 16
17
18 20 21 22
18
Page 63

EN - 7
User Manual
The currently selected level is displayed on the main video page inside the "CRESCEN.” box.
The Crescendo controls all the registers, and modifies the stops configuration. Each level of the
crescendo can be programmed. To save the Crescendo configuration, see point 9.
17. [INPUT] connector: stereophonic line input for external audio signals. The external audio signal is
added to the sound produced by Cantorum Duo.
18. Connettore [USB]: USB drive connector (drive not included with the instrument), where the organ
settings and songs recorded with the internals sequencer can be saved.
19. [MIDI] connectors: connectors for connecting MIDI devices.
- [IN]: input connector for receiving data from an external MIDI unit to the Cantorum Duo.
Connect to the MIDI output of the transmitting device (e. g. a sequencer).
- [OUT]: this connector transmits the MIDI data generated by Cantorum Duo. Connect to the
MIDI input of the receiving device (e. g. an expander).
20. [PHONES] connector: jack socket to which a headphone set can be connected. With headphones
connected, the organ’s internal amplification is cut off.
21. [MAINS AC-IN] socket: connector for the power cable supplied with the instrument.
22. [POWER] switch: switches the Cantorum Duo on and off.
N.B.
- When switching on, the instrument automatically detects the polarity of the switch pedal
connected to the [SUSTAIN] connector. Do not hold down the pedal when turning the power
on, to avoid reversing the operation of the pedal.
- The [CRESC.] pedal can control also the volume of Pedal and Manual I. For further
information about this function read par. 5.7.
N.B.
- For further information about the MIDI interface, read par. 5.4, 10.5 and 10.6.
- For further information about the USB devices, read par. 7.1.
Page 64

EN - 8
User Manual
After switching on the instrument, the display shows the introduction page,
then, the current version (Release) of the operating system,
the main video page appears in a few seconds,
On the top of this video page are the following parameters:
o TRANSPOSER: set the transposer.
o TUNING: fine tuning of the pitch, indicated as the frequency of A3 (an 8’ pipe).
o TEMPER. (Temperament): selector for setting historical temperaments of various periods (for a
description of temperaments, see par. 10.2 and 10.3).
Here, as in all video pages, use the [FIELD ] and [FIELD ] buttons to move the cursor. When
selected by the cursor, fields invert colour.
To set the value of a parameter, select it with the cursor, then press use [VALUE +] and [VALUE -].
Some parameters have a central range value (e.g. -6 / 0 / +6); to modify the central value, press
simultaneously the VALUE buttons. This will select the central value.
The display field MAIN MENU allows to access the main menu with all the organ configurations. To
enter the menu, place the cursor on this field and press [ENTER].
To return to the main video page from the MAIN MENU, press [EXIT].
In the lowest part of the video page there are 3 that indicate:
o BANK: the current memory bank, selected through the pistons [S] and [PREV] or [NEXT];
o CRESC.: the currently selected Crescendo step;
o MANUAL II: Manual II expression level;
3. SWITCHING ON AND MAIN VIDEO PAGE
Page 65

EN - 9
User Manual
3.1 THE MAIN MENU
The Main Menu contains several lower-level menus with all the settings of the instrument, divided into
groups.
Select the MAIN MENU field from the main video page. This page will appear:
As in the main video page the cursor is represented by the field with inverted colours. To move it, press
the buttons [FIELD ] and [FIELD ].
Here and in all the following video pages, some fields are used to access different pages. Select one of
these fields and press the [ENTER] button to access the corresponding page; when these fields are
selected, the name of the button appears on the right side of the field. Instead, when a field represents a
parameter that can be adjusted, the display shows the current value. To adjust a value, press the buttons
[VALUE +] and [VALUE -].
The fields of the MAIN MENU allow access to the following functions:
o SETTINGS: general instrument settings, equalizers, MIDI interface settings, audio outputs settings
(rear panel), factory settings reset and operating system update. These functions are described in
chapter 5.
o STYLE: program organ Styles. This function is described in chap. 6.
o COMBIN. PRG (Combination Program Change): add Program Change and Bank Select MIDI
messages to combinations. This function is described in chap. 5.8.
o FILE: save and load files to and from an USB drive. Settings, Styles and combinations can be saved to
an external memory, the procedure is explained in chapter 7.
o DEMO: the instrument plays a demo song. This function is described in par. 10.1.
NOTES
- When the instrument is switched on, its transposition value is set to zero.
- Transposition does not have any effect on playback of songs with the internal sequencer
(unlike recording, where the notes are acquired with the current transposition). A specific
transposer is provided for this purpose (see chapt. 8).
- If after the power on the system displays the error message “OP.SYS FAILURE PLEASE
INSERT USB PEN WITH RELEASE FILE”, please insert the USB drive with the udpate
file in the [USB] connector under the manuals, then press [ENTER] and execute the update as
described in the par. 5.12.
- If after the power on the system displays the error message “RELESE CHECKSUM
ERROR”, contact the technical support at service@viscount.it reporting the error type as it
appears on the second line (SYSTEM or MODEL) and the numbers in the “M:”, “V:”, “S:”
and “Release” fields. You will receive the files and information necessary to restore the
instrument.
- At power up, if you see the message "PERIPHERALS UPDATE REQUESTED", press
[ENTER] to perform the required operations to complete the update. If the message was
displayed again contact the technical support at service@viscount.it, specifying the
information displayed.
Page 66

EN - 10
User Manual
The Cantorum Duo organ allows the regulation of different volume controls, so as to guarantee a perfect
sound balance between the various sections and between the internal and external amplification.
To visualize the volume screen, press the [VOLUMES] button:
o PED (Pedal): pedal board divisional volume.
o MAN I (Manual I): first manual divisional volume.
o MAN II (Manual II): second manual divisional volume.
o OUT 1: volume of the two [OUT 1] outputs on the rear panel.
o OUT 2: volume of the two [OUT 2] outputs on the rear panel.
o INPUT: volume of the signal received by the [INPUT] connector on the rear panel.
To return to the previous video pages, press [VOLUMES] or [EXIT] or wait five seconds.
4. VOLUME SETTINGS
(
VOLUMES function
)
Page 67

EN - 11
User Manual
To access the SETTINGS menu, containing all the configuration options, select the SETTINGS field
from the MAIN MENU; the following page will appear:
Use the [FIELD ] and [FIELD ] buttons to move the cursor and scroll through all the fields:
The following functions are available:
o REVERB: select the ambient, in order to simulate the reverb situation. The options span from a large
church, full of acoustic reflections and with a strong reverb, to small rooms with a shorter and softer
reverb. A detailed description of the reverb effect can be found in par. 5.1.
o KEYB.INVERS. (Keyboard Inversion): inversion of the manuals (activated by selecting YES) so that
the registers of the Manual I section will play with the second manual and those of the Manual II
section will sound with the first manual. To deactivate the function select NO.
o SHORT OCTAVE: select YES to activate the short octave on the first octave of pedalboard and
manuals; this is necessary to play partitures written for ancient organs (between XVI and XVIII
century) where the first octave consisted of these notes:
To deactivate this function, select NO.
o EQUALIZERS: set up equalizer, internal amplification and rear panel outputs. These functions are
described in par. 5.2.
o EXT. OUTPUTS (External Outputs): select the audio signal of the [OUT 1] and [OUT 2] outputs
(rear panel). This function is described in par. 5.3.
o MIDI: MIDI interface settings. These functions are described in par. 5.4.
5. INSTRUMENT GENERAL SETTINGS
(
SETTINGS menu
)
Page 68

EN - 12
User Manual
o VEL. SENS. (Velocity Sensitivity): calibrate the velocity of the manuals and pedalboard when using
Orchestra stops or transmitting MIDI note messages. This function is described in par. 5.5.
o COMBINATIONS: customize combinations in a dedicated video page. These functions are
described in par. 5.6.
o PEDALS: configurazione dei pedali e della pedaliera MIDI eventualmente collegati ai connettori del
pannello posteriore. Queste funzioni sono descritte nel par. 5.7.
o SECURITY: set the code to lock out the organ to prevent modifies at the instrument settings,
combinations, Tutti and Crescendo. These functions are described in par. 5.9.
o CONTROLS: configuration of the [VOLUME] potentiometer and display contrast adjustment. This
function is described in par. 5.10.
o FACTORY SETT. (Factory Settings): restores the factory settings. These functions are described in
par. 5.11.
o SYSTEM: operating system information and update. These functions are described in par. 5.12.
To access a function, place the cursor on the field by using the buttons [FIELD ] and [FIELD ], then
press [ENTER]. To leave the SETTINGS menu, press [EXIT].
5.1 SELECTING REVERB TYPE (REVERB parameter)
Reverberation is the result of a series of sound reflections in a closed environment. Order and value of
each reflection depend on many factors of the environment, such as the size of the room, the number and
material of the objects inside the room, the listener’s position and so on. The digital processors of the
Cantorum Duo organs can recreate artificially the complex factors affecting the reverberation of a real
pipe organ, generating the right reverberation to complete an already excellent sound quality.
The REVERBER parameter in the SETTINGS menu allows to select the kind of reverberation, ranging
from great cathedral – with wide reflections - to small churchs with short and soft reverberation. There is
a total of eight styles.
Please note that the [REVERB] slider is placed on the upper panel. Use the potentiometer to adjust the
reverb effect level.
The reverb styles are typical reverberation of a:
o CATHEDRAL: typical reverberation of a cathedral
o BASILICA: typical reverberation of a Basilica
o GOTHIC CHURCH: typical reverberation of a gothic church
o BAROQUE CHURCH: typical reverberation of a baroque church
o ROMANIC CHURCH: typical reverberation of a romanic church
o MODERN CHURCH: typical reverberation of a modern church
o PARISH: typical reverberation of a parish
o CAPPELLA: typical reverberation of a chapel
Press [EXIT] to exit the video page and save the new settings.
N.B.
The internal reverberation also affects the signal from the [INPUT] port located on the rear
panel.
Page 69

EN - 13
User Manual
5.2 ADJUST EQUALIZERS (EQUALIZERS functions)
The Cantorum Duo is equipped with three graphic equalizers, one for the sound reproduced by the
internal speakers and the other two for the signal present on the two pairs of audio outputs [OUT 1] and
[OUT 2] on the rear panel. The sound generated by the instrument can be calibrated through the
equalizers, in order to adapt to the environment and to the player's needs and personal taste.
To access the calibration page, select the EQUALIZERS field under the SETTINGS menu. The
following video page will appear:
the page contains the following fields:
o INTERNAL: graphic equalizer for the internal amplifier (and therefore for the internal speakers).
o OUT 1: graphic equalizer for the [OUT 1] output pair, on the rear panel.
o OUT 2: graphic equalizer for the [OUT 2] output pair, on the rear panel.
This is the graphic equalizers calibration page:
In the lower part of the screen there are the seven central band frequencies. To move the cursor from one
band to the other, use the buttons [FIELD ] e [FIELD ].
Each band can be modified, using the buttons [VALUE +] and [VALUE -] from +9 dB (maximum signal
gain) to -9 dB (maximum signal dampening). The level of gain or attenuation is graphically represented
and can be compared to the grading scale on the left side of the screen.
The following graph shows how the graphic equalizers works.
20 Hz
100 Hz 460 Hz 2,2 KHz
20 KHz
-8 dB
-7 dB
-6 dB
-5 dB
-4 dB
-3 dB
-2 dB
-1 dB
0 dB
+1 dB
+2 dB
+3 dB
+4 dB
+5 dB
+6 dB
+7 dB
+8 dB
Gain
F
220 Hz 1 KHz
+9 dB
-9 dB
4,6 KHz 10 KHz
Page 70

EN - 14
User Manual
In all the equalizers, press [EXIT] to exit the video page and save the new settings.
5.3 CHANNELING SIGNALS ON THE AUDIO OUTPUTS
(EXTERNAL OUTPUTS function)
Cantorum Duo has one more interesting function: it allows the user to select the sound source
transmitted through the rear panel outputs. Thanks to this function, the external loudspeakers can be
placed so as to simulate the actual position of the windchest in a pipe organ or choose whether outputs
should transmit only the reverberated signal.
To access this function page, select the EXT. OUTPUTS field under the SETTINGS menu:
The two columns clearly represent the two audio outputs, [OUT 1] and [OUT 2].
To move the cursor, use the [FIELD ] and [FIELD ] buttons.
To select the sound source press [VALUE +]. A checkmark will appear on the selected field(s).
Use the [VALUE -] button to delete the checkmark and deselect the sound source.
To quit the page and save the current settings, press [EXIT].
5.4 MIDI SETTINGS (MIDI functions)
To access the MIDI interface settings of the organ, select the MIDI field under the SETTINGS menu.
This first video page will appear:
N.B.
The equalizers also affect the signal from the [INPUT] port located on the rear panel.
N.B.
The reverberated signal (REVERB field) always contains all organ sections and the signal from
the [INPUT] port located on the rear panel.
NOTE
For further information about the MIDI interface, see par. 10.5 and 10.6.
Page 71

EN - 15
User Manual
containing the following fields:
o CHANNELS: set up the receiving and transmitting MIDI channels.
o FILTERS: set up the MIDI filters for data reception and transmission.
o NOTES TO COUPL. (Note to Couplers): this control allows to select the notes to send through
MIDI. By selecting YES and playing, for example, on the first manual with the II/I coupler switched
on, the notes are transmitted on both channels of the Manual I and Manual II sections.
Select NO to send only the notes physically played (in this example, notes will be transmitted only on
the Manual I channel).
o OUT MODE: select the operating mode of the [MIDI OUT] port. The following modes can be
selected:
- OUT: standard operating mode, MIDI data is transmitted after the organ senses an action (e.g.
when keys are played, stops selected, volume and expression pedal used, combinations recalled
etc...).
- THRU: the [MIDI OUT] port transmits only MIDI data received by the [MIDI IN] port and
does not transmit any data about the actions applied on the organ. Use this option when the organ
is part of a MIDI system; the instrument connected to the MIDI output of the organ does not
respond to any action applied to the Cantorum Duo itself, but only receives the data from the
instrument sending data to the Cantorum Duo [MIDI IN] port.
- OUT+THRU: the [MIDI OUT] port transmits MIDI data about actions applied to the organ,
and the data received through the [MIDI IN] port.
Use this function when the organ is part of a MIDI system; the receiving instrument will respond
to data generated by the Cantorum Duo and also to data from the instrument connected to the
[MIDI IN] port.
Sound
generator
[MIDI IN] [MIDI OUT ]
Cantorum Duo
MIDI
player
MIDI OUT
Expander
MIDI IN
Sound
generator
[MIDI IN] [MIDI OUT]
Cantorum Duo
MIDI
player
MIDI OUT
Expander
MIDI IN
Sound
generator
[MIDI IN] [MIDI OUT]
MIDI
player
Cantorum Duo
MIDI OUT
Expander
MIDI IN
Page 72

EN - 16
User Manual
- PIPE: the [MIDI OUT] port transmits MIDI data after actions applied to the organ and also the
data received through the [MIDI IN] port. If a Cantorum Duo combination is recalled by a MIDI
Program Change message received from an external device (for more information read par. 10.6)
such as a MIDI sequencer, Cantorum Duo will transmit the content of the combination (stops,
couplers, tremulant) to the [MIDI OUT] port.
Always use this mode when Cantorum Duo is connected to a digital pipe interface VPI
(Viscount Pipe Interface), to ensure a complete compatibility between the two devices.
SELECTING THE INPUT AND OUTPUT CHANNELS (MIDI CHANNELS function)
The organ can send out and receive MIDI messages on a single channel for each section. To set the MIDI
channels, select the CHANNELS field in the MIDI menu. The following page will appear:
The column on the left lists the organ sections; for each section a channel from the TX (transmission
channel) and RX (receiving channel) can be assigned. Press [EXIT] to leave the screen and save the
settings. OFF mode disables the transmission and/or reception of all MIDI messages for the selected
organ section.
To quit the page and save the current settings, press [EXIT].
FILTERS SETTINGS (MIDI FILTERS function)
A MIDI filter allows to block a particular message on all MIDI channels (if the signal is channelled). The
Control Change filter, for example, blocks these MIDI messages in the [MIDI OUT] port, on all MIDI
channels of the organ. In the same way, the receiving filter blocks PC on all channels (therefore they are
not executed when recalling combinations, Tutti, Crescendo) received from the [MIDI IN] port.
To configure the MIDI filters, select the FILTERS field in the MIDI menu.
Sound
generator
[MIDI IN] [MIDI OUT]
Cantorum Duo
VPI
MIDI OUT
MIDI
player
MIDI OUT
MIDI
merger
MIDI OUT
MIDI
IN 2
MIDI
IN 1
Page 73

EN - 17
User Manual
For each section, set a fixed value (FIXED from 1 to 127) or three dynamic curves: SOFT, NORMAL or
HARD. Press [EXIT] to leave and save the settings.
5.5 REGULATING THE NOTES VELOCITY
(VELOCITY SENS. function)
This function sets the velocity of the notes played with Orchestra stops and transmitted through [MIDI
OUT] port, for each section.
For each section, set a fixed value (FIXED from 1 to 127) or three dynamic curves: SOFT, NORMAL or
HARD.
Press [EXIT] to leave and save the settings.
5.6 COMBINATIONS OPERATING FUNCTIONS
(COMBINATIONS function)
The user can choose the set up of combinations and Tutti. To do so, access the SETTINGS menu and
then select the COMBINATIONS field.
The available parameters are:
o SAVE ENC+AP: activate (select YES) or deactivate (select NO) the option to save the status of the
[ENC] and [A.P] pistons (see point 12 chapt. 2) to general combinations.
o SAVE ST/TR/OR: save organ Styles, tremulant Depth and Speed values, and orchestra stops with
the following options:
- NONE: does not save organ Styles, tremulant parameters, orchestra stops.
- STYLE: save the currently selected organ Style (to select Style see point 10 at chapt. 2) so that it
can be recalled by general combinations and Tutti.
- TREM: save the current tremulant Depth and Speed values (to adjust the tremulant values see
par. 6.1) so that they can be controlled through general combinations and Tutti.
- ORCH: save the currently selected orchestra stops (to select them see par. 6.3) so that they can be
controlled through general combinations and Tutti.
- TR+OR: save the tremulant Depth and Speed values (to adjust the tremulant values see par. 6.1)
and the currently selected orchestra stops (to select them see par. 6.3) so that they can be
controlled through general combinations and Tutti..
Press [EXIT] to leave the screen and save the current settings.
Page 74

EN - 18
User Manual
5.7 CONFIGURATION OF THE PEDALS AND THE MIDI PEDALBOARD
(PEDALS FUNCTION)
In the PEDALS screen several functions are collected for the configuration of the pedals and MIDI
pedalboard eventually connected.
You can select the operation of the pedal connected to the [CRESC.] connector on the rear panel,
calibrate this pedal and the one connected to the [EXPR.] connector, if the operating range is not
complete.
Cantorum Duo allows you to control the Crescendo also by receiving the MIDI message Control Change
n.11 (Expression), transmitted by an external unit, such as an expression pedal of a MIDI pedalboard. On
this screen, you can inform the system on which MIDI channel the CC11 is received.
For a correct operation, it is also necessary to inform the Cantorum Duo about the presence of a MIDI
pedalboard connected to the [MIDI IN] port. In this condition the notes received on the MIDI channel
assigned to the Pedal section are transposed according to the setting of the TRANSPOSE parameter of
the main screen, they are not played if the Automatic Pedal is active, the velocity is recalculated according
to the setting selected in the VELOCITY SENS function (see par. 5.5), and are retransmitted on the
[MIDI OUT] port if you want send to an external MIDI device.
To display the screen containing the configuration functions, select the PEDALS item in the SETTINGS
menu:
These parameters allow:
o CRESC/EXPR: selecting the CRESC. item, the pedal connected to the [CRESC.] connector selects
the steps of the Crescendo. Selecting the M.I/PED item the pedal controls the volume of the Manual
I and Pedal sections. In this case, in the main screen, the M.I/PED box is displayed instead of the
CRESCENDO box. This box displays the current level of expression of the two sections.
o EXPR CH-> CRESC: select the MIDI channel on which the CC11 for Crescendo control is
received.
o MIDI PEDALBOARD: select YES in case of MIDI pedalboard connected to the [MIDI IN] port.
Otherwise select NO.
o PED.CALIBR.: place the cursor on this field and press [ENTER] to access the pedal calibration
screen:
Set the pedal to the minimum position (pedal fully raised) or maximum (pedal completely lowered) and
press [ENTER]: the acquired value is stored in the corresponding MIN or MAX box. Perform the
same procedure for the still unregistered position and any other connected pedal.
Premere [EXIT] per uscire dalla videata e memorizzare le impostazioni correnti.
Page 75

EN - 19
User Manual
5.8 SAVING THE PROGRAM CHANGE MIDI MESSAGES IN THE
COMBINATIONS (COMBINATION PRG function)
Program Change MIDI messages can recall, in a connected unit, a particular sound or program (patch).
Thanks to this function you may select a desired voice from external module (such as an expander)
connected to the [MIDI OUT] port.
You can also transmit Bank Select messages MSB (CC n. 0) and LSB (CC n.20) to select stop banks from
an external source.
Select the COMBIN. PRG field in the MAIN MENU, then press [ENTER]:
The column on the left lists the organ section, and the associated Program Change and MSB and LSB
Bank Select messages are shown in the PRG, BANK MSB and BANK LSB columns.
Please note that the MIDI messages of this screen are immediately sent to the corresponding section, and
also saved in the combinations and Tutti. To do so, select the Program Change and Bank Select and fix
the desired memory. This process might prove useful when, using an external expander, you wish to
combine a voice from this unit with other stops.
When a MIDI message is not necessary, cancel it by selecting the OFF value.
To leave the screen and go back to the MAIN MENU press [EXIT].
5.9 SECURITY LOCK AGAINST UNWANTED CHANGES
(SECURITY function)
In order to prevent any modification to the organ settings, the SECURITY function should be used.
When active, combinations, Tutti, Crescendo steps and Local Off stops cannot be modified. Only the
tuning parameters in the Main Page and Organ Style selection will be available.
To recall this function, select the SECURITY field in the SETTINGS menu.
in this first screen you can set what you want to block:
o SETTINGS: general instrument settings (SETTINGS menu).
o STYLES: organ Styles parameters (STYLES menu).
o COMBINAT. (Combinations): combinations, Tutti and Crescendo.
Page 76

EN - 20
User Manual
To activate one or more lock options select the LOCKED field, then press [EXIT] to enter the unlock
code (password):
Press [VALUE +] and [VALUE -] to select the characters.
Use the [FIELD ] and [FIELD ] buttons to move the cursor. Press [ENTER] to save the code, and
[EXIT] to abort. The factory setting code is "0000".
When the organ has been succesfully locked, the display shows the message “SECURITY OPTIONS
SUCCESSFULLY CHANGED”.
When a section is blocked, it is possible to enter it, but in this case the following messages will appear:
- “SETTINGS ARE LOCKED”: entering the SETTINGS menu;
- “STYLES ARE LOCKED”: entering the STYLES menu;
If combinations, Tutti and Crescendo are blocked, the [S] piston light is off.
To unlock the combination save functions, and/or to unlock the settings you need to access the
SECURITY function, then unlock the locked options by selecting the UNLOCKED field, then press
[EXIT] to enter the unlock code. If the password is correct, the message “SECURITY OPTIONS
SUCCESSFULLY CHANGED” will appear, otherwise “WRONG PASSWORD RETRY” that is the
system requires the right password to proceed.
Furthermore, the password can be modified while a lock function is already active. To do so, select the
SET PASSWORD field. Enter the current password to proceed:
and now enter the new password:
Page 77

EN - 21
User Manual
the following page confirms that the password has been successfully modified:
As written on the display, press [EXIT] to return to the SECURITY main page.
5.10 CONFIGURING THE VOLUME CONTROL AND ADJUSTING THE
DISPLAY CONTRAST (CONTROLS function)
With this function it is possible to select the operation mode of the [VOLUME] slider and adjust the
display contrast. To access these settings, select CONTROLS in the SETTINGS menu:
o LCD CONTRAST: adjust the LCD display contrast.
o VOL. KNOB: select the parameter to be controlled by the [VOLUME] slider. The available options
are:
- INTERNAL: only the internal amplification volume.
- INT+EXT: internal amplification and line outputs volume. Line-out ports are located on the rear
panel.
Press [EXIT] to return to the previous page.
5.11 RESTORING FACTORY SETTINGS (FACTORY SETTINGS function)
The organ has several options to restore the original (factory) settings. To recall this function select the
FACTORY SETT. field in the SETTINGS menu:
o ALL: all the instrument, i.e. the settings and functions of the SETTING menu, the four organ Styles
(in other words the settings of the STYLE menu for all four organ Styles), all general combinations,
Crescendo, Tutti, the Local Off status of stops.
Page 78

EN - 22
User Manual
o COMBINATIONS: all general combinations, Crescendo and Tutti.
o STYLE - ALL: the four organ Styles (i.e. the settings of the STYLE menu for all four organ Styles).
o STYLE – CURR.: the currently selected organ Style (i.e. the settings of the STYLE menu for the
currently selected Style).
o SETTINGS: settings and functions of the SETTINGS menu and the Local Off status of stops.
To restore the factory settings, select one of these five modes and press [ENTER]. The display will show
the settings that will be restored and will ask for confirmation.
Press [ENTER] again to start the process or [EXIT] to abort it. When the process is complete, the
“FACTORY SETTINGS SUCCESFULLY RECALLED” message will appear.
In the previous phase, if the message “SOME PARAMETERS ARE LOCKED” is showed please
check the SECURITY options (par. 5.9) as it is not possible to proceed with the restore operation.
5.12 UPGRADING THE OPERATING SYSTEM (OP. SYS. UPGRADE function)
Every time the Cantorum Duo operating system is updated, the update file will be available on the
website www.viscountinstruments.com. First download the file, then copy it to the main (root) folder of
an USB drive. Connect the pen drive to the [USB] connector of the instrument, located on the rear panel
(see point 18 chap. 2); wait a few seconds then select the SYSTEM field under the SETTINGS menu:
now select the SYS. UPGRADE field. The system displays the Cantorum Duo update file(s) (different
updates can be stored in the same USB pen, when updating select the file you wish to install) on your USB
drive:
use the [FIELD ] and [FIELD ] buttons to select the file you wish to install, then press [ENTER].
Page 79

EN - 23
User Manual
The system informs you that the currently running operating system will be replaced with the version on
your USB drive:
press [EXIT] to abort the operation, or press [ENTER] to proceed with the install procedure: a pop-up
will appear on the display that shows the advancement of the operation; when the procedure is complete,
the organ will automatically restart.
IMPORTANT NOTES
- The USB drive used for the update must be formatted with FAT or FAT32 file system (not
NTFS or other), otherwise the drive will not be recognized by the system.
- Do not switch off the organ or disconnect the USB flash drive during the update phase.
- If a problem occurs during the update procedure (the instrument suddenly shuts down or the
progress bar stops for one minute or longer) try one of these procedures:
switch on or reboot the instrument while the USB drive is connected, then press [ENTER]
when the system requests to complete the update.
if there is no such request, start the update again, following the procedure described in this
paragraph.
if the system displays the error message “RELESE CHECKSUM ERROR” after restarting
the system, write an email to the technical assistance service (service@viscount.it)
reporting the error type as it appears on the second line (SYSTEM or MODEL) and the
numbers in the “M:”, “V:”, “S:” and “Release” fields. You will receive the files and
information necessary to restore the instrument.
- At power up, if you see the message "PERIPHERALS UPDATE REQUESTED", press
[ENTER] to perform the required operations to complete the update.
- If the system displays the error message “FILE LOAD FAILED – USB PEN ERROR”,
delete the update file from your USB drive, then save it again to the pen drive. Should the
problem persist, try with a different USB drive.
- The system displays the error message “USB PEN NOT PRESENT” when accessing the
function without a USB drive connected to the instrument, or when the pen drive has not been
recognized.
Page 80

EN - 24
User Manual
VERIFYING THE OPERATING SYSTEM VERSION (SYS. INFO function)
Use this function to verify the release of the operating system currently running on your instrument, then
look for available updates on the website www.viscountinstruments.com. To do so, select the SYSTEM
field on the display under the SETTINGS menu:
now select the SYS.INFO field:
The RELEASE field indicates the currently installed version, and the organ model is displayed below.
Press [EXIT] to return to the previous page.
Page 81

EN - 25
User Manual
The Style indentifies the sound configuration of the organ, i.e. the actual voice activated by each stop. The
many organ styles allow the musician to use several sound configurations, as if several different
instruments were present at the same time in the same place.
The Cantorum Duo has four organ styles, each one refers to a particular aesthetic of sound: Baroque,
Barock, Romantic and Symphonic. As already described at point 10 of chap. 2, Styles can be selected
through the dedicated pistons: [BAR], [BRK], [ROM] and [SYM]. On the main video page, each time a
Style is selected its name appears on the display. All four styles can be customized: the user can adjust the
tuning difference among pipes, tremulant Speed and Depth for each section, stops volume and orchestra
voices.
To modify a Style, recall the desired Style, then select the STYLES field in the MAIN MENU. The
following page will appear:
The fields on this menu perform the following functions:
o ENSEMBLE: level of tiny natural differences in pitch between one organ pipe and another,
simulating the tuning error that occurs in the organ’s pipes due to wear over time and variations in
temperature.
The values range from 0 (pipes perfectly tuned) to 8 (maximum pitch instability).
o TREMULANTS: adjust the speed and depth of the tremulant for each manual (par. 6.1).
o VOICES VOLUMES: set the volume for each stop (par. 6.2).
o ORCHESTRA: select orchestra voices (par 6.3).
To access a function, use the buttons [FIELD ] and [FIELD ] to place the cursor on the
corresponding field, then press [ENTER].
To quit the STYLE menu, press [EXIT].
6.1 ADJUSTING THE TREMULANTS (TREMULANTS function)
In a pipe organ it is of the utmost importance that the air pressure remain constant, so as to obtain a
steady and sustained sound. However, mechanical devices were introduced to generate periodical
variations in the air flow.
These variations created the “tremulant” effect on the sound, which made some lead registers more
pleasant, and the tone of the reeds colourful.
By using the [TREM I] and [TREM II] thumb pistons it is possible to enable and disable the effect in
question.
6. PROGRAMMING ORGAN STYLES(STYLE menu
)
NB
Any general combination and Tutti can recall the organ Style that was in use when the
combination was saved. However in order to save Styles to combinations, the corresponding
option of the COMBINATIONS function must be activated. For further information see par. 5.6.
Page 82

EN - 26
User Manual
The speed and depth of the modulation can be adjusted for each Style. To access the setting page, select
the TREMULANTS field under the STYLES menu:
That show the current SPD (speed) or DPT (depth) and values of the manuals’ tremulant.
Press [EXIT] to go back to the STYLES menu and save the new settings.
6.2 REGULATING THE VOLUME OF EACH VOICE
(VOICES VOLUMES function)
The volumes for each single stop can be adjusted in a range of -12 dB to +6 dB, and allows a perfect
balance of the overall sound of the organ.
Select the VOICES VOLUMES field, in the STYLES menu. The display will show the organ sections,
select the section that contains the voice you wish to adjust:
Use the buttons [FIELD ], [FIELD ] and [ENTER] to select the field.
A quick alternative to adjust the volumes is pressing and holding the desired stop for a few seconds. This
can be done both on this page or on the volume settings page.
During the edit the stop will be on and can be played for better, quicker adjustment. Other stops can also
be switched on to assess the overall effect of the changes. To quit the function and save the values press
[EXIT]. The changes made will be automatically saved in the current organ style.
IMPORTANT NOTE
Any general combination and Tutti can recall the tremulant Depth and Speed parameters. To save
Depth and Speed to combinations, activate the corresponding option through the
COMBINATIONS function (see par. 5.6).
Page 83

EN - 27
User Manual
6.3 SELECTING THE ORCHESTRAL VOICES (ORCHESTRA function)
As described in chap. 2, in the set of voices of the Cantorum Duo are also present a series of orchestral
timbres.
To select an orchestra voice, access the STYLES menu and then select the ORCHESTRA field. The
display shows:
For each division, in the VOICE column you can select the orchestral voice while in the SUS. column
you can enable or disable the Sustain pedal function.
For easier detection, the thumb piston being programmed is switched on based on the position of the
cursor on the display.
To quit the function press [EXIT]. The changes made will be automatically saved in the current organ
style.
NB
Any general combination and Tutti can recall orchestra voices; this means that the stops can be
used to activate different voices, according to the current combination/Tutti. To save orchestra
voices to combinations or Tutti, the corresponding option must be activated through the
COMBINATIONS function (see par. 5.6).
Page 84

EN - 28
User Manual
The Cantorum Duo can save the complete organ configuration (or parts of it) to a USB drive.
The configuration can then be recalled at any time. The main purpose of this function is to offer an almost
unlimited number of configurations; furthermore, a saved configuration can be used on a different organ
of the same series. To access the save and load function, select FILE on the MAIN MENU.
The video page:
contains two functions:
o LOAD: load files from a pen drive (par. 7.2).
o SAVE: save the organ configuration to a pen drive (par 7.3).
To access a function, place the cursor on the corresponding field using the buttons [FIELD ] and
[FIELD ] then press [ENTER].
To leave the FILE menu press [EXIT].
7.1 INFORMATIONS CONCERNING THE USB PEN
When connecting a new or just formatted pen drive to the organ, access to the FILE menu the system will
automatically create two directories in the drive: “organ”. Inside this folder, five sub-folders are
automatically created. They are:
- ”alls”: this folder contains the .all files, with all the settings and functions of the SETTINGS and
STYLE (the four Styles) menus, all general combinations, Tutti, Crescendo steps, the selected Style
and the Local Off status of stops.
- “combinations”: this folder contains the .cmb files, with all the data on general combinations,
Crescendo steps and Tutti.
- “settings”: this folder contains the .set files, with all the settings from the SETTINGS menu, the
selected Style and the Local Off status.
- “songs”: this folder contains the .mid files of the songs recorded through the internal sequencer.
- “styles_all”: this folder contains the .sta files, with the settings from the STYLES menu regarding all
four styles.
- “styles_single”: this folder contains the .sts files, with the settings (STYLES menu) of the saved style.
These are system folders to arrange files, and they must not be deleted or renamed, otherwise the saved
files will be lost.
For a detailed description on the content of the .all, .set, .sta, .sts and .cmb files, read par. 10.4.
7. SAVING THE ORGAN CONFIGURATION TO FILES
(FILE function)
Page 85

EN - 29
User Manual
7.2 LOADING ORGAN COMBINATIONS AND/OR SETTINGS
(FILE LOAD function)
The Cantorum Duo organs can save the current configurations. The FILE LOAD function allows to
recall into the work memory these configurations and combinations already saved to the USB pen and
therefore use them.
To load a file, select the LOAD field under the FILE menu:
select what you wish to load:
o ALL: the complete organ configuration.
o COMBINATIONS: all general combinations, Tutti, Crescendo steps.
o STYLE – ALL: the 4 organ styles.
o STYLE – CURR.: a single Style.
o SETTINGS: the general organ settings, from the SETTINGS menu.
Once the loading option has been selected, the display shows the corresponding files on the USB drive:
if there are no files for the selected file type, the display shows the message “NO FILES”.
N.B.
- Once the USB pen is inserted please wait some seconds before displaying the FILE
menu.
- The system displays the error message “USB PEN NOT PRESENT” when accessing the
FILE functions without a USB drive connected to the instrument, or when the pen drive has
not been recognized. Should this happen, check that the pen drive is not damaged and has the
correct format.
- To copy files with a computer to a USB drive that has never been used with the organ, it is
necessary to create the folders (described above) manually. Files must be placed in the
dedicated folder; follow the instructions on the folders and their function.
- Always use USB pens formatted with FAT or FAT32 file system (no NTFS).
- The folders “alls”, “combinations”, “settings”, “styles_all” and “styles_single” can contain
up to a maximum of 64 files. The “songs” folder can contain up to 256.
- File names cannot be longer than 30 characters (including the file extension).
Page 86

EN - 30
User Manual
Once the file has been selected, press [ENTER], then confirm to proceed:
When the file has been loaded, the message “FILE SUCCESFULLY LOADED” will appear.
7.3 SAVING AS FILE OF ORGAN COMBINATIONS AND/OR SETTINGS
(FILE SAVE function)
To save settings and combinations into the USB pen drive, select the SAVE field under the FILE menu:
in this first screen you can select what you desire to save:
o ALL: the whole configuration of the organ.
o COMBINATIONS: all the general combination, all the step of Crescendo, the Tutti.
o STYLE – ALL: the 4 Organ Style.
o STYLE – CURR.: the Organ Style currently selected.
o SETTINGS: the general settings under the SETTINGS menu.
N.B.
- When a single Style is loaded, it can only replace a Style of the same type (a Baroque Style
replaces Baroque, Romantic replaces Romantic etc.). To identify Styles easily, the system
always suggests the Style type as file name when saving Styles.
- Please keep in mind that when loading a file, all the corresponding information (settings,
combinations, Styles etc.) currently in use on the organ will be lost. To avoid it, it is
recommended to save the current organ data to a USB drive (see par. 7.3) before loading a
file.
- The system shows the error message “FILE LOAD FAILED – INCOMPATIBLE MODEL”
when attempting to load a file saved with a different organ model.
- The system shows the error message “FILE LOAD FAILED – INCOMPATIBLE
RELEASE" when attempting to load a file saved using a more recent version of the
operating system.
- The error message “FILE LOAD FAILED – CORRUPTED FILE” means that the file is
damaged.
Page 87

EN - 31
User Manual
Once the save option has been selected, the following page appears:
where it is possible to give a name to the saved file. To select the characters, use the buttons [VALUE +]
and [VALUE -], to move the cursor use the buttons [FIELD ] and [FIELD ]. When the name is
complete, press [ENTER] to save the file.
When the saving procedure has been successfully completed, the message “FILE SUCCESFULLY
SAVED” will appear.
N.B.
- When a single Style is loaded, it can only replace a Style of the same type (a Baroque Style
replaces Baroque, Romantic replaces Romantic etc.). To identify Styles easily, the system
always suggests the Style type as file name when saving Styles.
- If there is already a file with the same name and extension in the USB drive, you have the
option to overwrite that file; the system shows the following message: “FILE ALREADY
EXISTS”. Now press [ENTER] to proceed or [EXIT] to enter a different name. Please keep in
mind that overwritten files will be lost and the data contained within cannot be recovered.
- In the case of "FILE SAVE FAILED" error, retry the operation. If the error occurs again,
check that there is enough space in the USB stick. If the error still occurs, the USB stick could
be damaged so try using a different stick or format it with a computer.
Page 88

EN - 32
User Manual
The organ is equipped with an internal sequencer (digital recorder). The sequencer can record songs
played on the instrument, controls used and MIDI data received through the [MIDI IN] port.
Recordings can then be saved on the USB stick as MIDI files (Standard MIDI file, format 1 to 125 beats
per minute, 384 ticks per quarter note) and played back at any time.
To recall the sequencer press the [SEQUENC.] button beside the display. The screen for selection of the
system’s three operating modes is displayed:
o PLAY: playback of the performances saved in the USB pen (par. 8.1).
o TRANSPOSER: applies a semitone transposition to the songs played by the sequencer.
o RECORD: recording of songs of music (par. 8.2).
o OVERDUB: overdub of songs of music (par. 8.3)
8.1 PLAYING BACK A SONGS (PLAY mode)
In the sequencer mode selection screen described above, select the PLAY field. The display shows the
mid files stored in the USB pen:
if there are no files, the message “NO FILES” will appear.
8. PLAYING AND RECORDING OF MUSICAL
SE
Q
UENCES (SEQUENCER
)
N.B.
- To copy files with a computer to a USB drive that has never been used with the organ, it is
necessary to create the folders (described in the par. 7.1) manually. Files must be placed in
the dedicated folder; follow the instructions on the folders and their function.
- Always use USB pens formatted with FAT or FAT32 file system (no NTFS).
- The .mid files recorded and/or played by the sequencer are saved to the "songs" folder. The
folder can contain a maximum of 256 files.
- File names cannot be longer than 30 characters (including the file extension).
- Transposition set in the Main Page does not have any effect on playback of songs (unlike
recording, where the notes are acquired transposed).
Page 89

EN - 33
User Manual
Now select the MIDI file you wish to play back:
The new screen provides information about all the controls necessary for use of the sequencer:
- [ENTER]: starts playback of the songs.
- [EXIT]: quits the sequencer function.
- [FIELD ]: fast forward.
- [FIELD ]: rewind.
- [VALUE -]: slow down play speed. It can be seen on top left as percentage (100% in the picture
above).
- [VALUE +]: increase play speed. It can be seen on top left as percentage (100% in the picture above).
Once the playback of a song has been started, the display changes to:
furthermore, the functions of the buttons [ENTER] and [EXIT] have changed:
- [ENTER]: pause / play the track.
- [EXIT]: stop the reproduction.
[FIELD ], [FIELD ], [VALUE -], [VALUE +] keep the functions already described.
N.B.
- Once the USB pen is inserted please wait some seconds before selecting the PLAY
mode.
- The system displays the error message “USB PEN NOT PRESENT” when selecting the
PLAY mode without a USB drive connected to the instrument, or when the pen drive has not
been recognized. Should this happen, check that the pen drive is not damaged and has the
correct format.
- The error message “FILE LOAD FAILED” means that the file is damaged or bigger than
250 KB (maximum files size that you can play with this sequencer).
Page 90

EN - 34
User Manual
USING RECORDED AND/OR MODIFIED SONGS WITH DEDICATED SOFTWARE
MIDI files recorded by the internal sequencer can be modified with the most common MIDI editing
softwares. This might prove useful to correct errors of the recording or to generally improve the track.
However, we strongly advice inexperienced users not to do so.
When modifying a MIDI file, please follow these rules:
- Do not modify the tracks channel. If it necessary, respect the internal sequencer channelling. The
sections are channelled as follows:
Pedal: 1
Man.I: 2
Man.II: 3
The internal sequencer also assigns a name to the track while recording, that corresponds to the
sections playing a track. Most computer software can read the track names:
“Pedal” track: Pedal
“Great” track: Man.I
“Swell” track: Man.II
“Volumes” track: divisional volumes and expression pedal
“Stops” track: stops conditions
There are other tracks for internal use and future developments only, that should not be altered.
- Divisional modules are recorded as Control Change 7 events. Expression pedals position as Control
Change 11. These Control Change channel are identical to the previous ones.
- The stops settings, together with cancel, enclosed, coupling settings etc. are recorded as System
Exclusive. We advice you not to alter these codes. If you wish to add or remove stops from a
recording, you should know its exclusive system code. To do so, you should monitor the MIDI OUT
port of the organ and, switching on and off a stop, check the MIDI code transmitted. Add or remove
this code only from the “Stops” track.
- When saving the MIDI file do not change the resolution of 384 tpqn (tick per quarter note).
The sequencer can also paly non-recorded tracks. Again, keep in mind that:
- The track channelling may not be consistent with the internal sequencer. Reset the channels according
to what described above.
- Stop codes might not be present in a MIDI track. In this case we advice you overdub (see par. 8.3)
with the desired stop combination.
- Divisional volumes and expression pedal may be lacking from a MIDI track. Again, we advice you
overdub the tracks.
8.2 RECORDING A SONGS (RECORD mode)
In the sequencer mode video page, select the RECORD field. The display will show:
As in Play mode, the screen again carries information about the functions of the buttons:
- [ENTER]: pause /restart recording.
- [EXIT]: stop recording.
Page 91

EN - 35
User Manual
Once recording has started, the functions change to:
- [ENTER]: pause /restart recording.
- [EXIT]: stop recording.
Press [EXIT] to end the session. The display will show the screen allowing the recording just made to be
saved:
The functions displayed allow:
o SAVE: saving of the recording as a MIDI file.
o PLAY: playback of the recoding before saving it.
o OVERDUB: creation of a new recording to be added to the sequence just acquired (see par. 8.3).
o DISCARD AND EXIT: delete the recording and quit sequencer Record mode.
If the SAVE field is selected, the system prompts the user to assign a name to the MIDI sequence about
to be saved:
When composing the name, use the [FIELD ] and [FIELD ] buttons to move the cursor and
[VALUE +] and [VALUE -] to select the character. To confirm the name and proceed to save the data,
press the [ENTER] button; use [EXIT] to return to the previous screen, aborting the saving operation.
The message “FILE SUCCESFULLY SAVED” confirms that the file has been saved.
If [EXIT] is pressed while in the save screen (i.e. when the recording has been acquired but not saved), the
system warns that the recording is about to be lost:
Page 92

EN - 36
User Manual
and that [ENTER] must be pressed to confirm that you wish to quit and delete the data acquired, or
[EXIT] to return to the save screen.
8.3 OVERDUBBING A SONGS (OVERDUB mode)
The internal sequencer record, play, but also overdub already recorded MIDI tracks. It can be done
accessing the OVERDUB function:
- in the Sequencer main page (see the beginning of chapt .8) and selecting a MIDI file;
- at the end of a recording session (see par. 8.2).
The system will ask whether to substitute the settings (stops, coupling, tremulant, MIDI controls, general
controls) recorded in the track with the ones currently selected. Press [ENTER] to use the new settings or
[EXIT] to leave them as they are.
The system will ask the same question, this time regarding the divisional volumes and expression pedal.
Now the sequencer is ready to overdub:
N.B.
- The system displays the error message “USB PEN NOT PRESENT” when trying to save a
MIDI sequence without a USB drive connected to the instrument, or when the pen drive has
not been recognized. Should this happen, check that the pen drive is not damaged and has the
correct format.
- In the case of "FILE SAVE FAILED" error, retry the operation. If the error occurs again,
check that there is enough space in the USB stick. If the error still occurs, the USB stick could
be damaged so try using a different stick or format it with a computer.
Page 93

EN - 37
User Manual
The screen carries information about the functions of the buttons:
- [ENTER]: start recording.
- [EXIT]: leave the sequencer.
- [VALUE -]: decrease play /recording speed. It can be seen on top left as percentage (100% in the
picture above).
- [VALUE +]: increase play / recording speed. It can be seen on top left as percentage (100% in the
picture above).
As the recording begins, the controls change again:
- [ENTER]: pause / start recording.
- [EXIT]: stop recording.
[VALUE -], [VALUE +] maintain the functions described above.
Press [EXIT] to quit the recording. The system will ask you to accept the overdubbing:
You can choose one of the following options:
o ACCEPT: accept the overdubbing. In case the overdub track is shorter than the original songs, it will
not be shortened.
o TRIM AND ACCEPT: accept the overdubbing. If the overdub track is shorther than the original
song, this will be trimmed to end together with the overdubbing.
o PLAY: play the song with the overdubbing, so as to assess the track. The changes will not be saved
yet.
o PLAY FROM OVD (overdub): plays the song, starting from the first event of last overdubbing, so as
to assess the track. The changes will not be saved yet.
o DISCARD: discards the overdubbing.
Select ACCEPT or TRIM AND ACCEPT to move to the saving screen. Now it is possible to save the
song with a different name.
Selecting PLAY or PLAY FROM LAST OVD will activate the sequencer play mode. Press [EXIT] to
return to the previous screen.
Page 94

EN - 38
User Manual
Press [EXIT] to quit the screen. The display will show:
Warning you that the overdubbing will be lost. Press [ENTER] to continue – and therefore discard the
recording – or [EXIT] to return to the previous screen.
ORIGINAL
05:20
OVERDUB
03:10
NEW
05:20
ORIGINAL
05:20
OVERDUB
03:10
NEW
03:10
ACC
EPT TRIM AND ACCEPT
ORIGINAL
05:20
OVERDUB
06:00
NEW
06:00
ORIGINAL
05:20
OVERDUB
06:00
NEW
06:00
1 1
2 2
N.B.
- The system displays the error message “USB PEN NOT PRESENT” when trying to save a
MIDI sequence without a USB drive connected to the instrument, or when the pen drive has
not been recognized. Should this happen, check that the pen drive is not damaged and has the
correct format.
- The error message “FILE LOAD FAILED” means that the file is damaged or bigger than
128 KB (maximum files size that you can overdub).
- In the case of "FILE SAVE FAILED" error, retry the operation. If the error occurs again,
check that there is enough space in the USB stick. If the error still occurs, the USB stick could
be damaged so try using a different stick or format it with a computer.
Page 95

EN - 39
User Manual
Setting a stop in Local Off mode means that it will not be played by the organ’s internal sound generation
system, but the relative MIDI (System Exclusive code) message will be transmitted, so that it can be
turned on and played on a connected instrument.
To set a stop in Local Off mode, while the main screen is on the display, press the [S] (Set) piston, keep it
pressed and also press the [C] (Cancel) button. The LEDs of all the stops will light up and the display will
show the video page:
To set a voice in Local Off mode, operate its draw-stop or rocker switch so that its light goes out.
After setting the setup required, press [S] and [C] together to save it.
Accessing the Local Off setting function after this will trigger display of the status of the stops as
follows:
- Light on: stop in Local On mode (plays with internal generation)
- Light off: stop in Local Off status
10.1 DEMONSTRATION SONGS
The organ has a number of demonstration (demo) tracks to allow you to fully appreciate the quality its
sound qualities and/or those of the changes you have made.
To recall playback of the demo tracks, select the DEMO field from the menu MAIN MENU.
Use the [FIELD ] and [FIELD ] buttons to select each song of music. Press [ENTER] to start and
stop each song. Press [EXIT] to leave the DEMO function.
10.2 TEMPERAMENT
Tuning a fixed intonation instrument (e.g. organs) consists of creating a chain of twelve fifths, properly
crafted so that at the extremes the interval can be reduced, through division or multiplication, to a perfect
octave. A perfect fifth is achieved when two sounds have a frequency ratio of 3:2. If from any sound we
calculate twelve ascending perfect fifths, the sound obtained is (3/2)12. With 7 octaves instead, the result is
a 27 frequency. If we compare these values we find that (3/2)
12
is slightly higher than 27. Rounding off
after the fourth decimal, we find that:
(3/2)12=129,7463 , while 27 = 128,0000. The ratio between these two value is called Pythagorean comma.
It can be defined as the surplus of twelve perfect fifth compared to seven octaves, both starting from the
same sound.
9. STOP LOCAL OFF
10. APPENDI
X
Page 96

EN - 40
User Manual
The picture is not in scale (otherwise the comma would be almost invisible) but it gives a graphical
understanding of the problem.
Now, dividing the Pythagorean comma in 12 equal parts, and subtracting this value to each pure fifth, the
result is a twelve-fifth chain, ending with the same value as seven octaves.
This is the Equal Temperament System (with the comma split in twelve parts).
The Pythagorean comma can be split in larger parts and divided among a few (less than 12) fifths. This
leads to other temperaments, such as the Werckmeister III, which spreads the comma in four, equal parts,
between C-G, G-D, D-A, and B-F#. A very important interval in the history of tuning is the major third.
A chain of four pure fifths makes (3/2)4. A major third interval is represented by a 5/4 ratio. Therefore,
rounding off, the frequency of a major third, generated by Pythagorean fifths is 1,2656, while a natural
major third is 1,2500. This surplus is called Syntonic comma. A series of four fifths, each one reduced by
¼ of Syntonic comma, makes a perfect major third. These fifths are called “meantone”. If a temperament
recovers only one syntonic comma, it still needs to compensate the small difference between Pythagorean
and syntonic comma. This difference is called skisma. For example, the Kirnberger II temperament is
based on the syntonic comma. It spreads the comma equally between D-A and A-E and the skisma
between F# and C#. A series of three natural major thirds makes a frequency of (5/4)3. The difference
between that and the octave is called enharmonic comma. When a temperament makes up for more than
the Pythagorean comma, usually one fifth is much wider than the rest and becomes unusable. It is called
the wolf fifth.
Page 97

EN - 41
User Manual
10.3 TEMPERAMENTS OF THE CANTORUM DUO
In addition to equal temperament, with the Cantorum
Duo you can play other temperaments described below.
KIRNBERGER II (KIRNBERGER2 on display)
Based on two fifths, reduced by half syntonic comma,
and one fifth reduced by a skisma. There are three pure
majors: C, G, D. Therefore, the major triads on C and
G are pure. Same goes with the minor triads, on E and
B. The four major thirds on C#, G#, Eb, Bb are
Pythagorean. The coexistence of pure and tempered
chords gives a peculiar character to this tuning.
WERCKMEISTER III (WERCKMEIST.3 on
display)
Based on four fifths, each reduced by ¼ Pythagorean
comma – the others are pure. Creates three Pythagorean
major thirds on: C#, F#, G#. As the number of
alteration in the piece performed increases, so does the
harmonic tension.
PYTHAGOREAN
Based on eleven pure Pythagorean fifths and a wolf
fifth on G#. This tuning can be used to play monodies,
and music that does not use thirds in general. Most
useful for curiosity and educational ends.
Page 98

EN - 42
User Manual
MEANTONE 3# - MEANTONE 3b
This tuning is the prototype of all temperaments based on fifths reduced by ¼ of syntonic comma.
This generates eight pure major thirds: Eb, Bb, F, C, G, D, A, E. However, the other thirds are unsuable
(B, F#, G#). The fifths are defined as meantone fifths: shorter than pure fifths but still sounding well.
Only one, G#, fills all the gap created by 11 others and becomes a wolf fifth. Tonalities with little
alterations sound very pleasant. Well characterised chromatic scale. Move the wolf on C# to use the G#
key as Ab.
VALLOTTI
Based on six fifths, each decreased by 1/6 of
Pythagorean comma. The others are pure fifths.
The major thirds on Eb–B, Bb–E, F–A are equivalent,
as the ones on C, G and D. Thirds on F#, C# and G#
are Pythagorean instead.
Page 99

EN - 43
User Manual
CHAUMONT
A meantone temperament; the wolf fifth has been
improved by enlarging the fifths on Eb and Bb. There
are six pure major thirds: F, C, G, D, A, E. The third
major on B, although not very pleasant, can still be
used.
KELLNER 1975
This tuning was created by Kellner, who figured out its
structure from the symbols on the first page of the
“Wohltemperierte Klavier” by Bach, 1722. The tuning
is based on five fifths, each reduced of 1/5 of
Pythagorean comma. This originates three Pythagorean
major thirds, on: C#, F#, G#. None of the thirds is
pure. The major third closer to being pure is on C.
KIRNBERGER III (KIRNBERGER3 on display)
Based on four fifths, each one reduced by ¼ of
syntonic comma, and one fifth reduced of the
remaining skisma. There is only one pure major third on
C. From most to least pure, they are G, D, A and F, Bb,
Eb. E, B and F# are equivalent one with the other.
Pythagorean major thirds are on C# and G#. Pieces
with many alterations are well characterised.
Page 100

EN - 44
User Manual
WERCKMEISTER IV (WERCKMEIST.4 on display)
Based on five fiths, each reduced of 1/3 of Pythagorean
comma, and two more thirds increased of the same
amount. Very pleasant with mostly unaltered tonalities,
it becomes “harder” as the alterations increase.
WERCKMEISTER V (WERCKMEIST.5 on display)
Based on five fiths reduced by 1/5 of Pythagorean
comma, and one fifth increased of the same amount.
This tuning is rarely used as there is no tonality that is
much euphonic.
SILBERMANN
Based on fifths reduced of 1/6 of syntonic comma.
Wolf fifth is located on G#. Thirds that in meantone
tuning are pure, here are 1/3 syntonic comma wider.
The wolf fifth is less prominent, not cacophonic yet not
completely acceptable.
 Loading...