

Page 1

Infos – VT7
Version 1.7
August 7, 2007
1 General Informations for Softwareinstallation
Allgemeine Hinweise zur Softwareinstallation
Informations génerales pour l’installation du logiciel
General informations and short description for
softwareinstallation see chapter 1.1 on page 2
In case of problems or any questions, please contact
Allgemeine Informationen und Kurzanleitung zur
Softwareinstallation in Kapitel 1.2 auf Seite 7
Wenn Sie Probleme oder Fragen haben, kontaktieren Sie
bitte [email protected]
Informations génerales et explications brèves pour
l’installation du logiciel dans le chapitre 1.3 sur page 12
En cas de problèmes, ou si vous avez des questions,
contactez svp. [email protected]
1
Page 2
Infos – VT7 – Version 1.7
1.1 General Informations
1.1.1 Documentation
Detailed manuals and descriptions are available in the directory VT7_update\docu:
• VT7_Software_Installation_english.pdf (Installation of Software, english)
• VT7_Software_Installation_deutsch.pdf (Installation of Software, german)
• VT7_manual.pdf (User’s manual for VT7, english)
• VT7_Handbuch.pdf (User’s manual for VT7, german)
You need the Acrobat-reader, version 5.0 or higher, to open these files.
1.1.2 Installation of VT7-Software – Short Description
The installation for the VT7-software is described in detail in the document
VT7_Software_Installation_english.pdf. All WINDOWS-Operating systems from WINDOWS 98SE and higher versions will be supported.
1.) Installation of the USB-Driver (virtual COM-Port-Driver)
Please connect the VT7 via USB-cabel with the PC. (Biasing of VT7 with the
power-supply is not necessary at this step). The PC recognize the new hardware and will start the Installation of the USB-Driver. You should avoid to
install the USB-Driver automatically: On the CD, you will have two USBdrivers for the different WINDOWS operating-systems. During the automatic
installation, the system is not able to choose the correct one.
The following screenshots illustrate the correct procedure
during the USB-driver- installation:
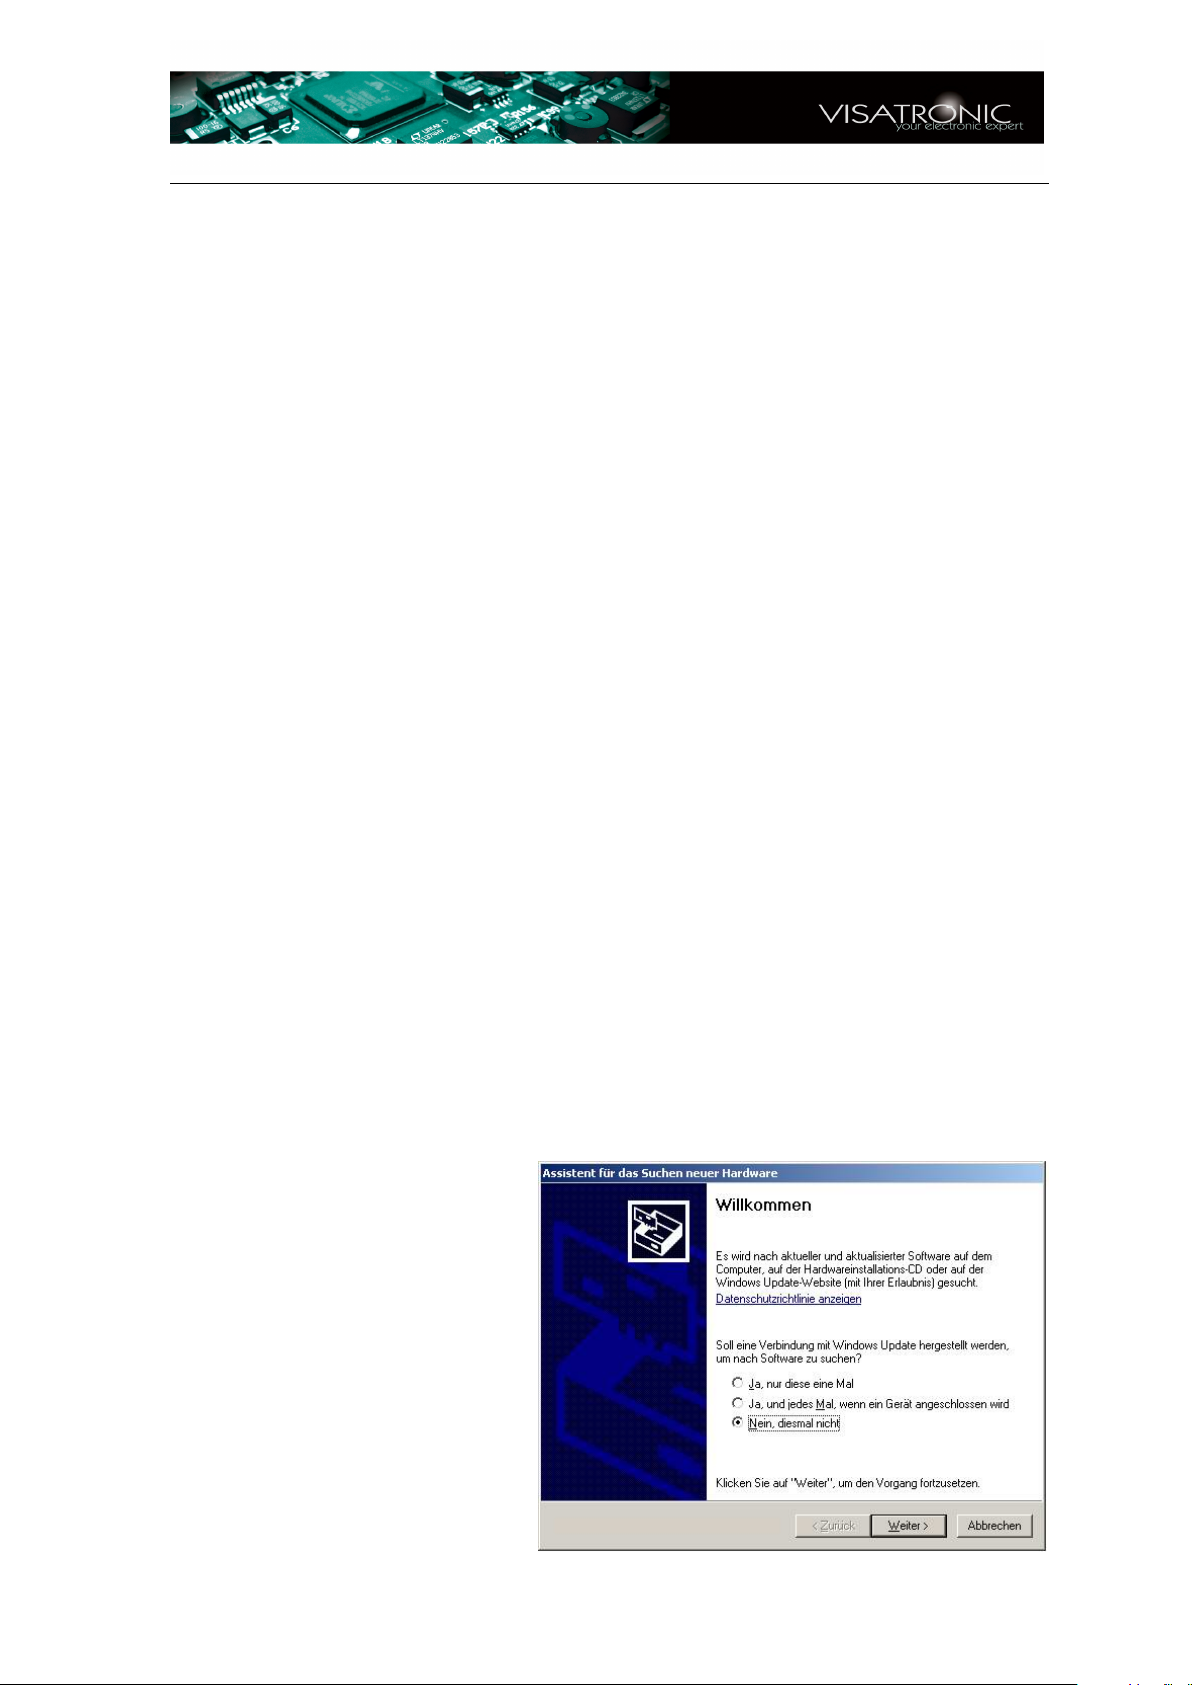
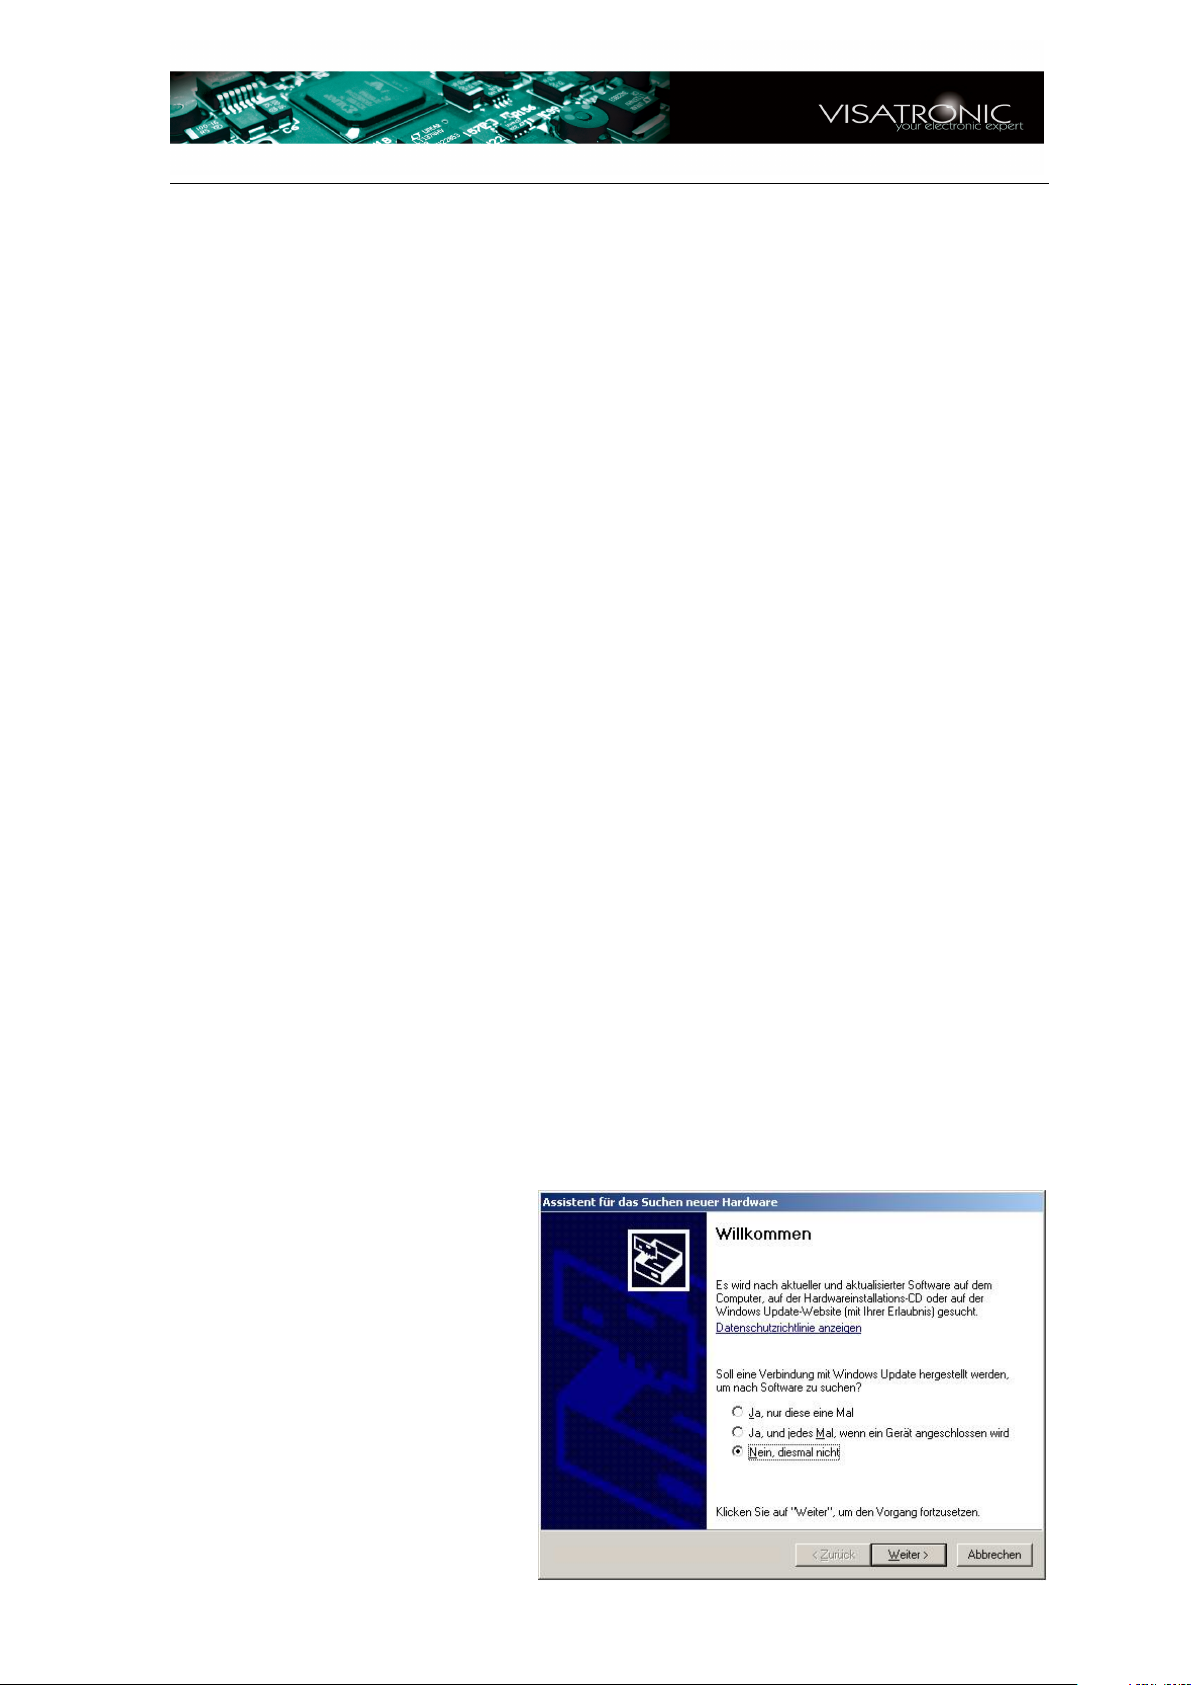
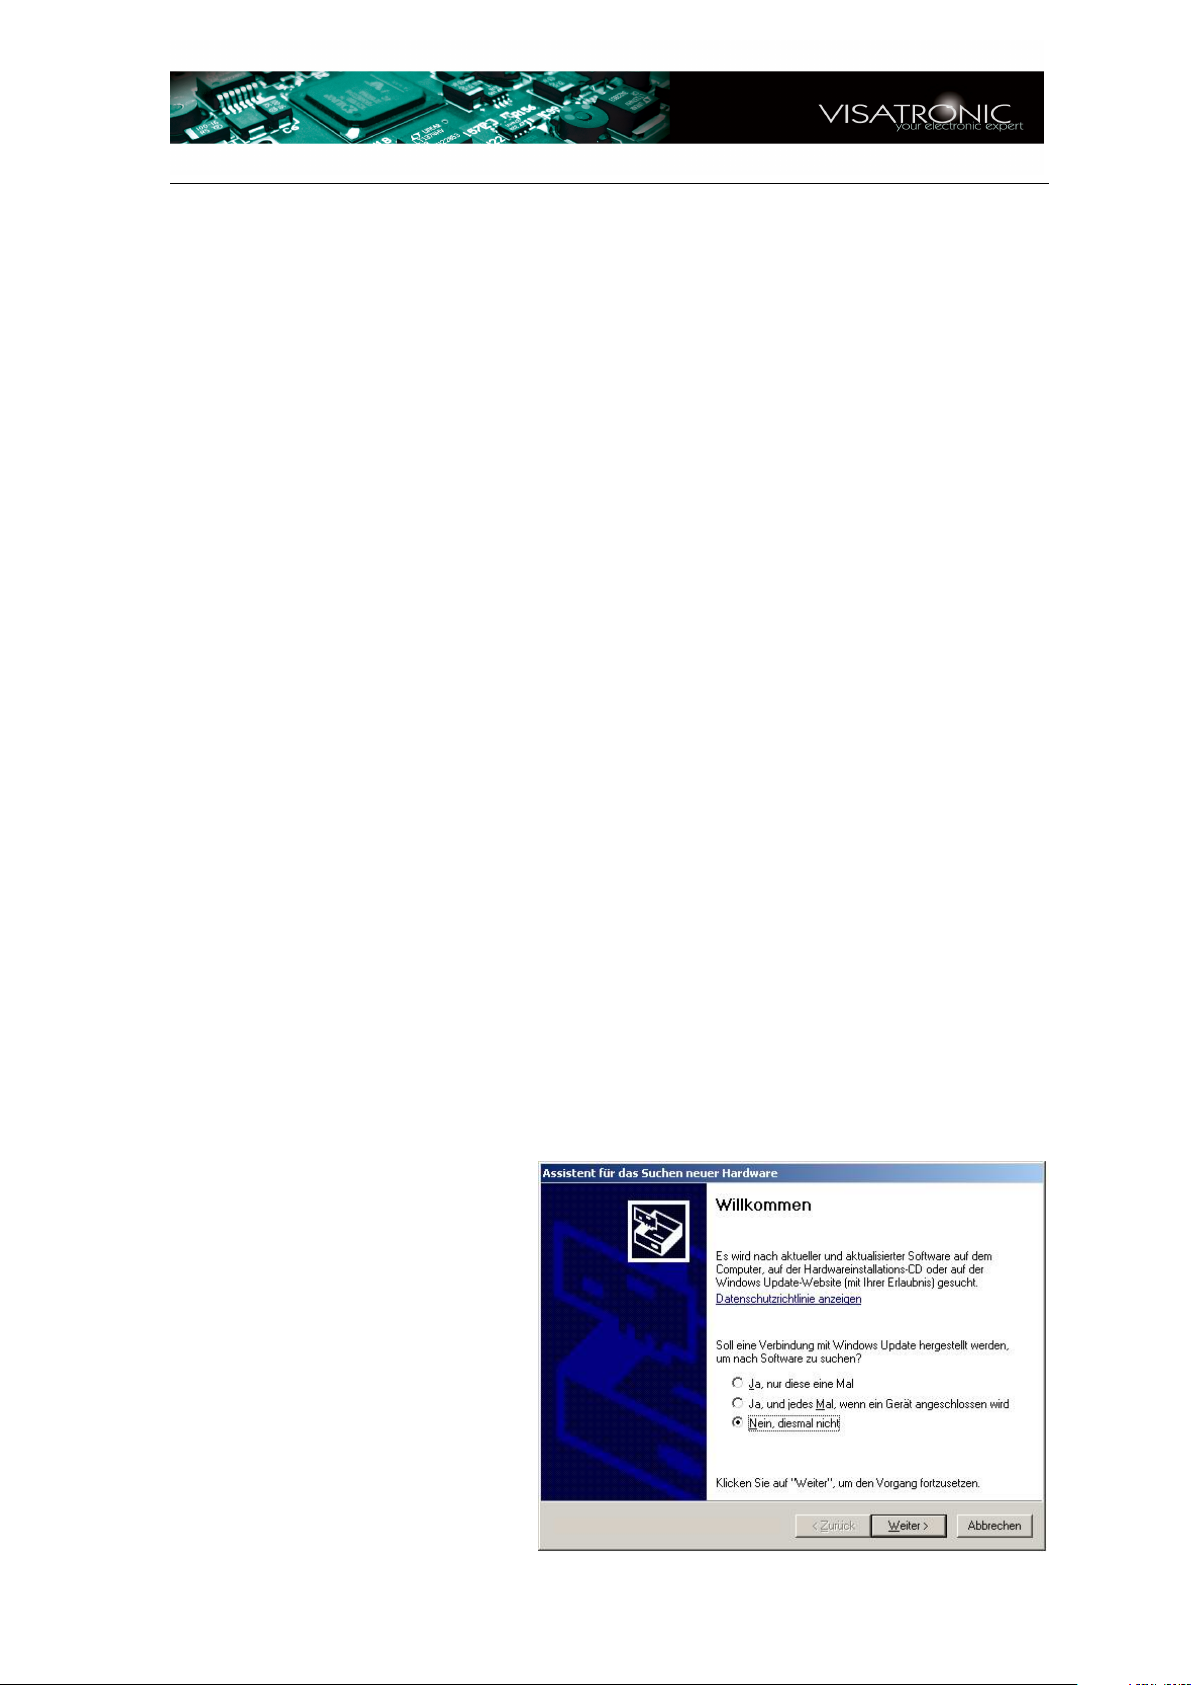
After connecting the VT7 with
the USB-calbe, you will see the
following menu, as shown on
the right hand side.
Pleas choose the lower point.
www.visatronic.de 2
Page 3
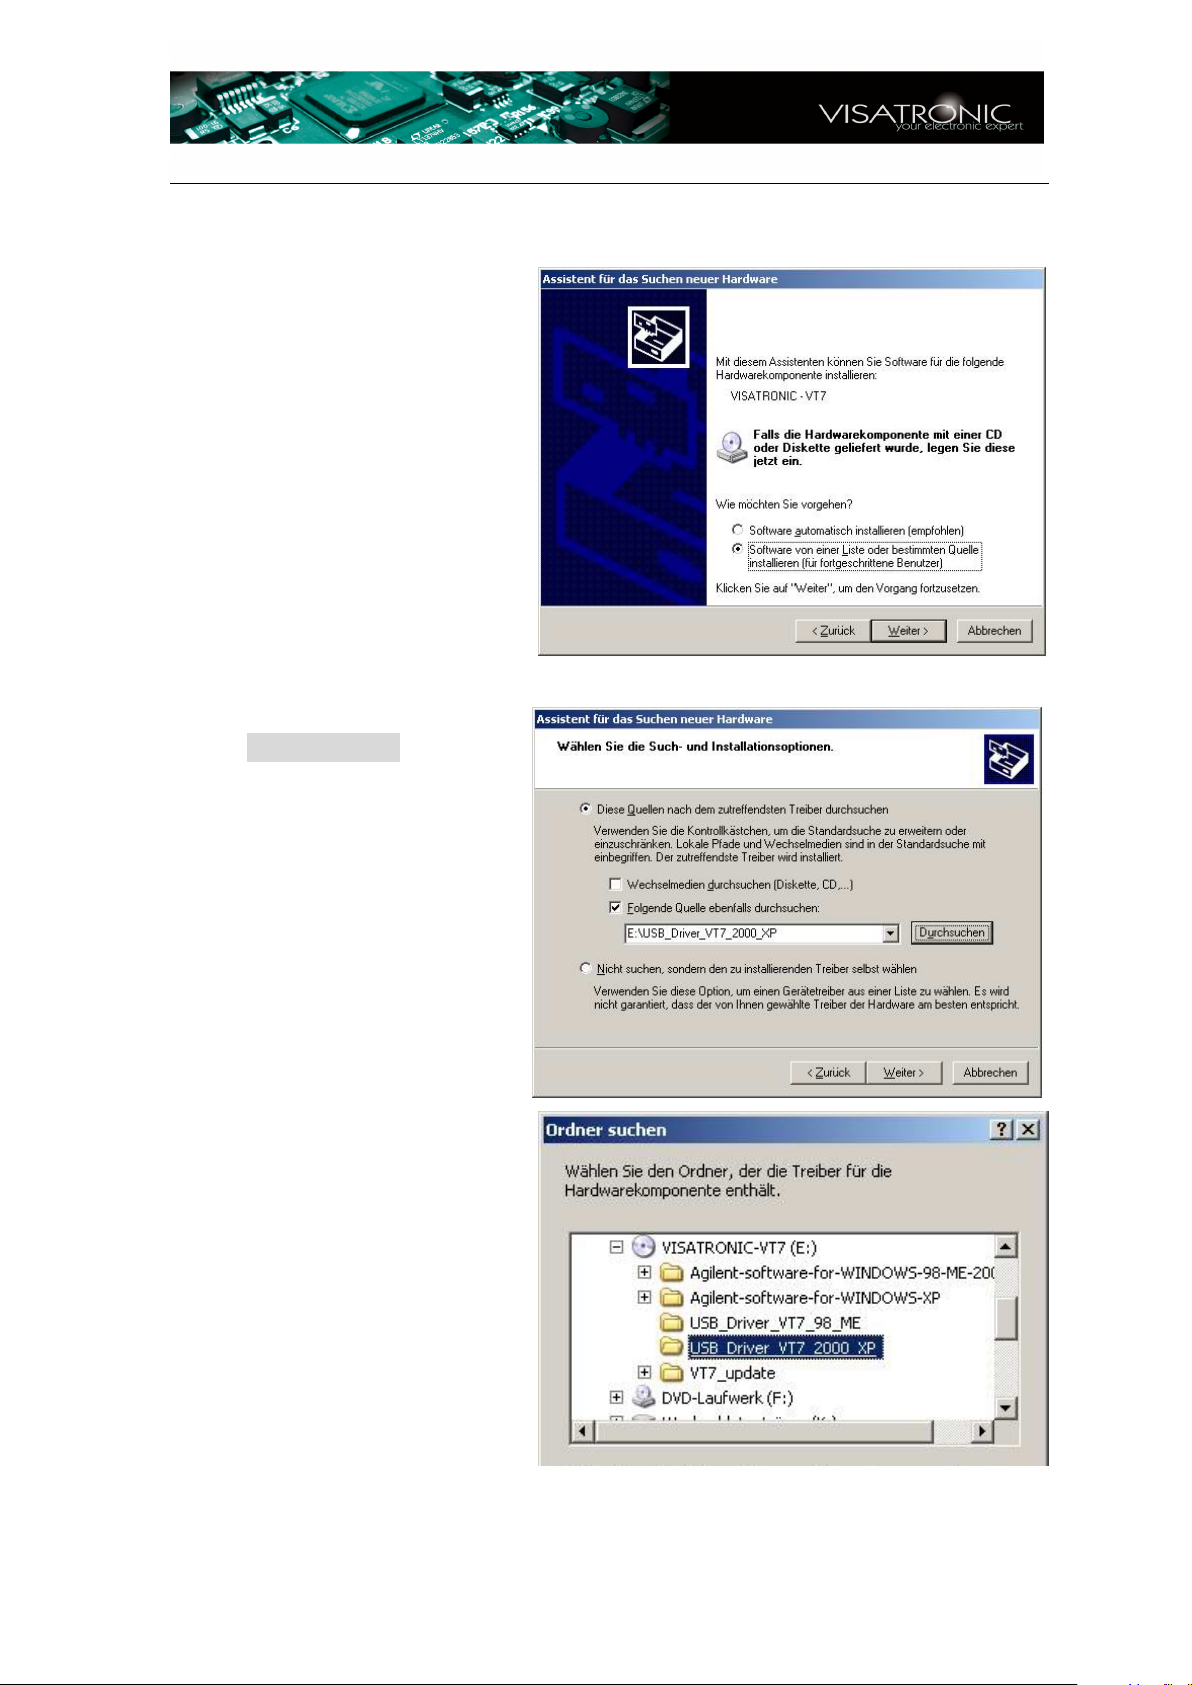
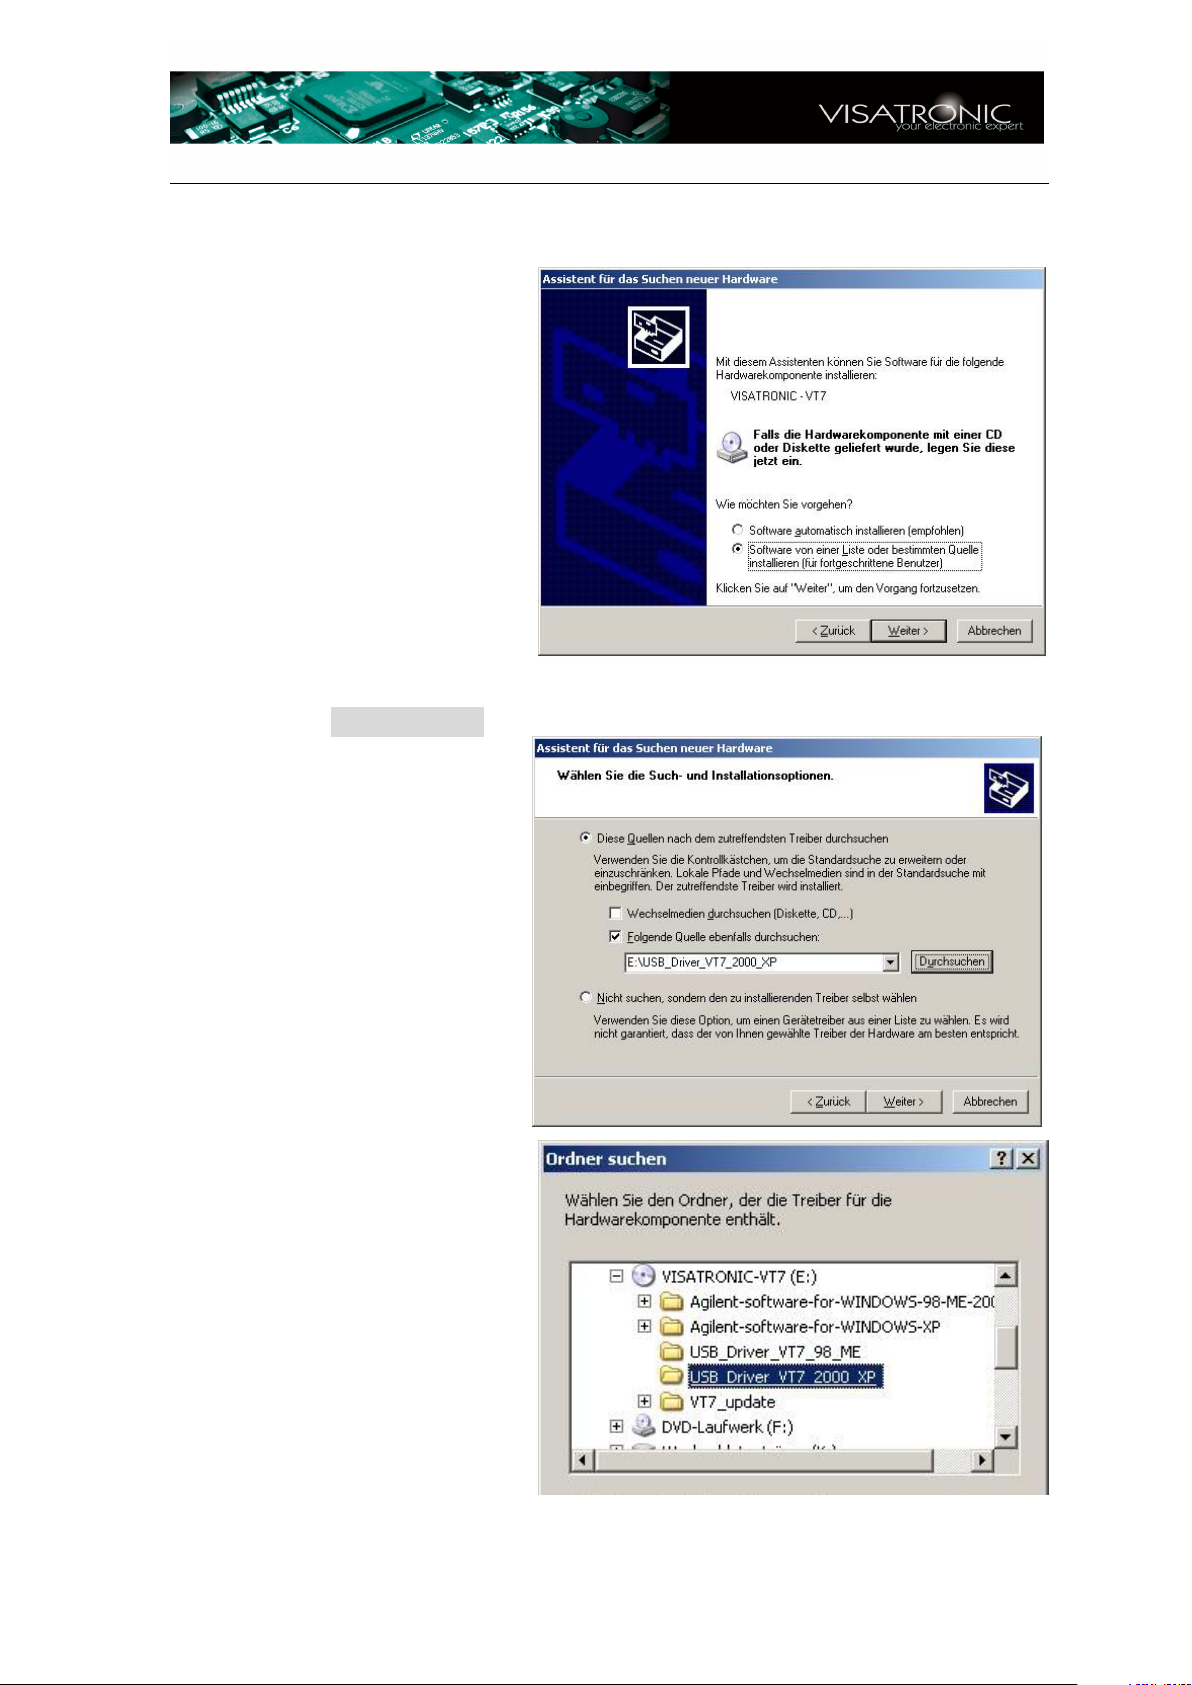
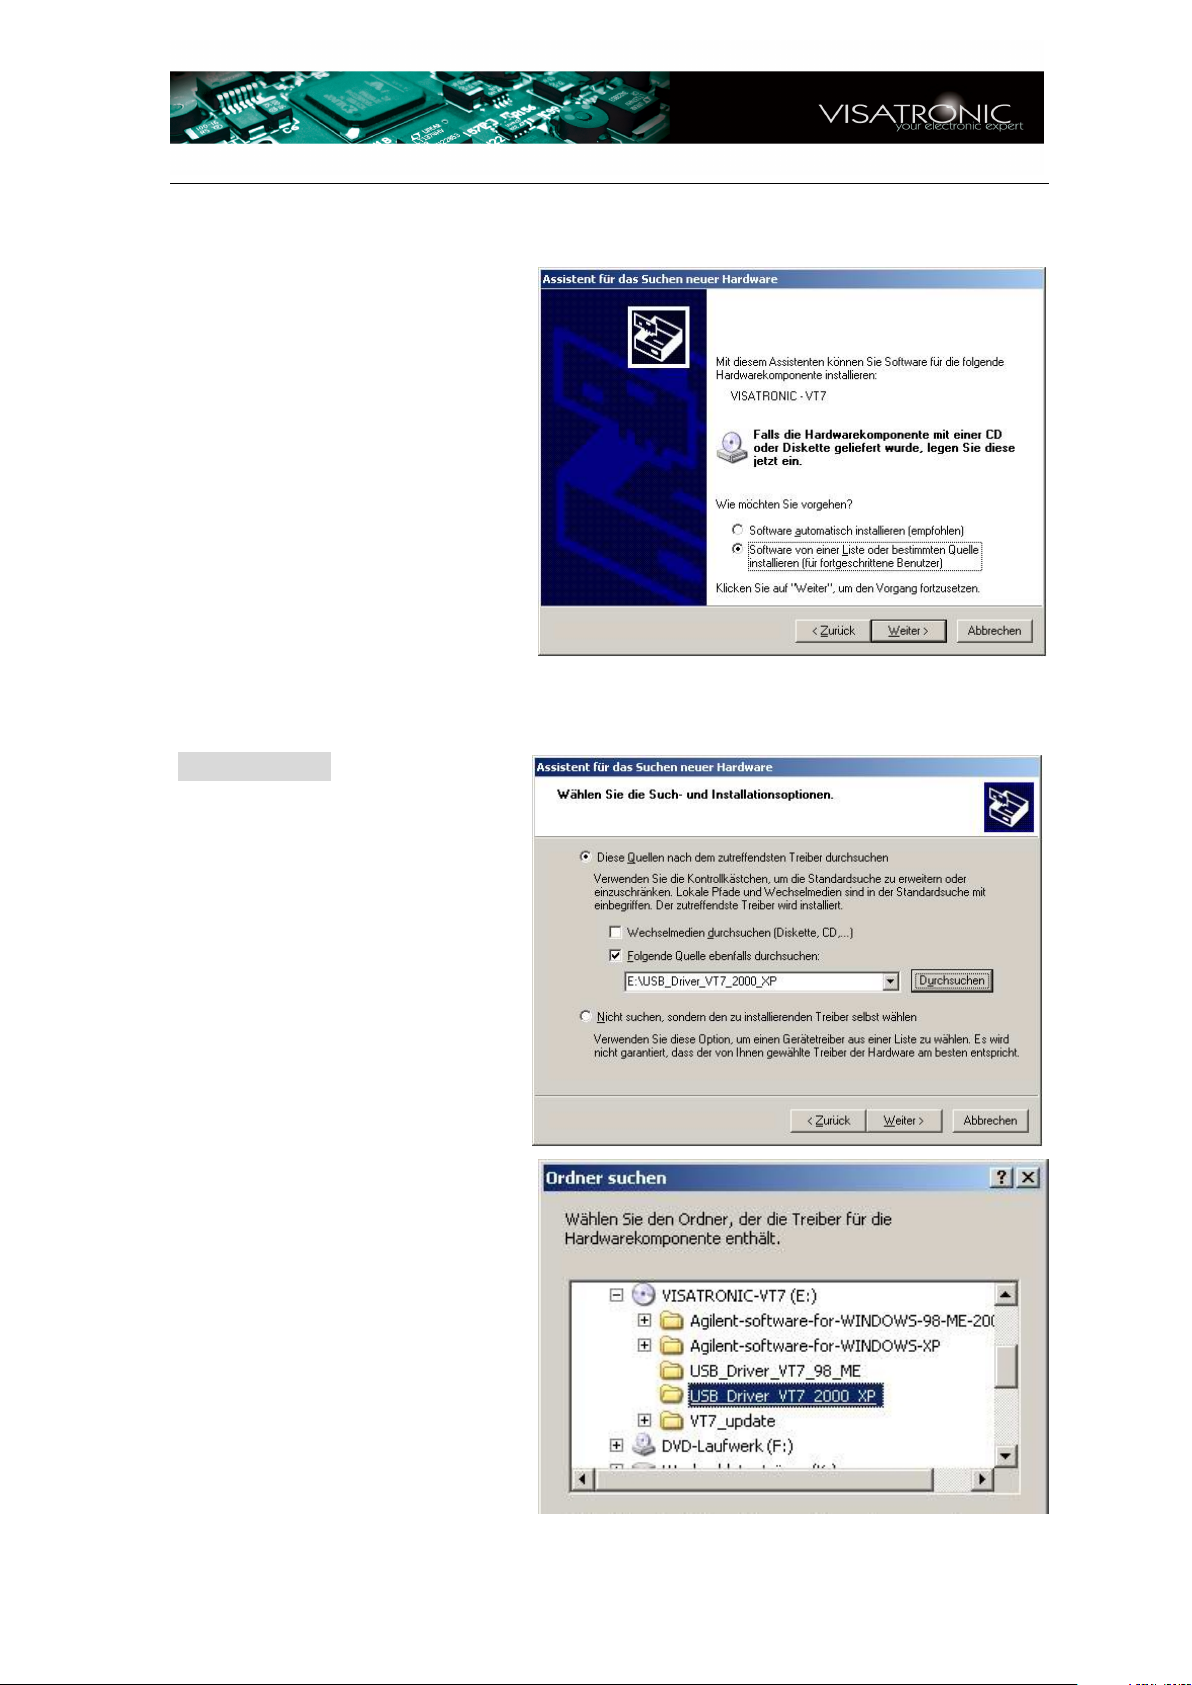
In the next menu You will be
asked, if you want to load the
software from a certain source.
Confirm this point.
In the next menu-point you
have to search for the correct
folder.
Go to Durchsuchen . Now,
you must specify the folder
containing the correct driver.
In the screenshot on the right
side, the folder for
WINDOWS XP has been choosen.
Infos – VT7 – Version 1.7
Depending on the operatingsystem You have to choose:
For
WINDOWS 2000/XP:
the folder
USB_Driver_VT7_2000_XP
For
WINDOWS 98SE/ME:
the folder
USB_Driver_VT7_98_ME
www.visatronic.de 3
Page 4
Infos – VT7 – Version 1.7
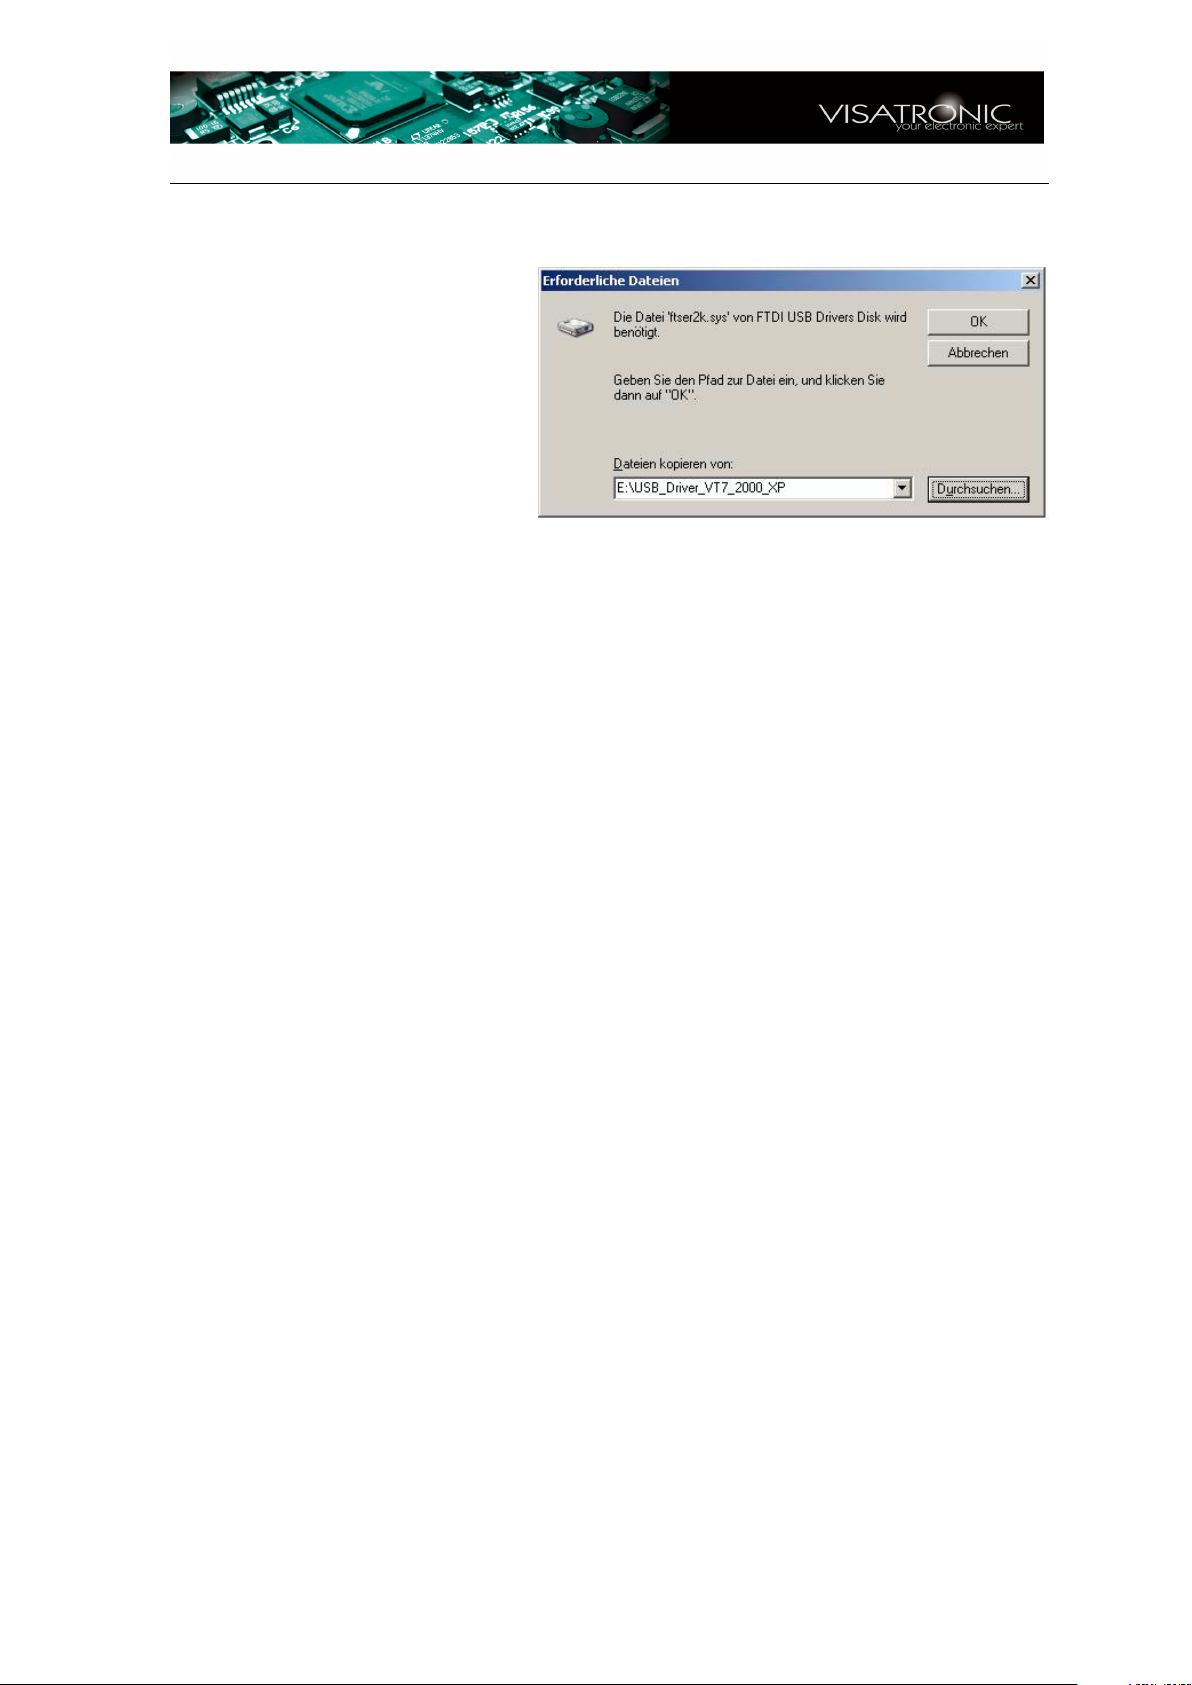
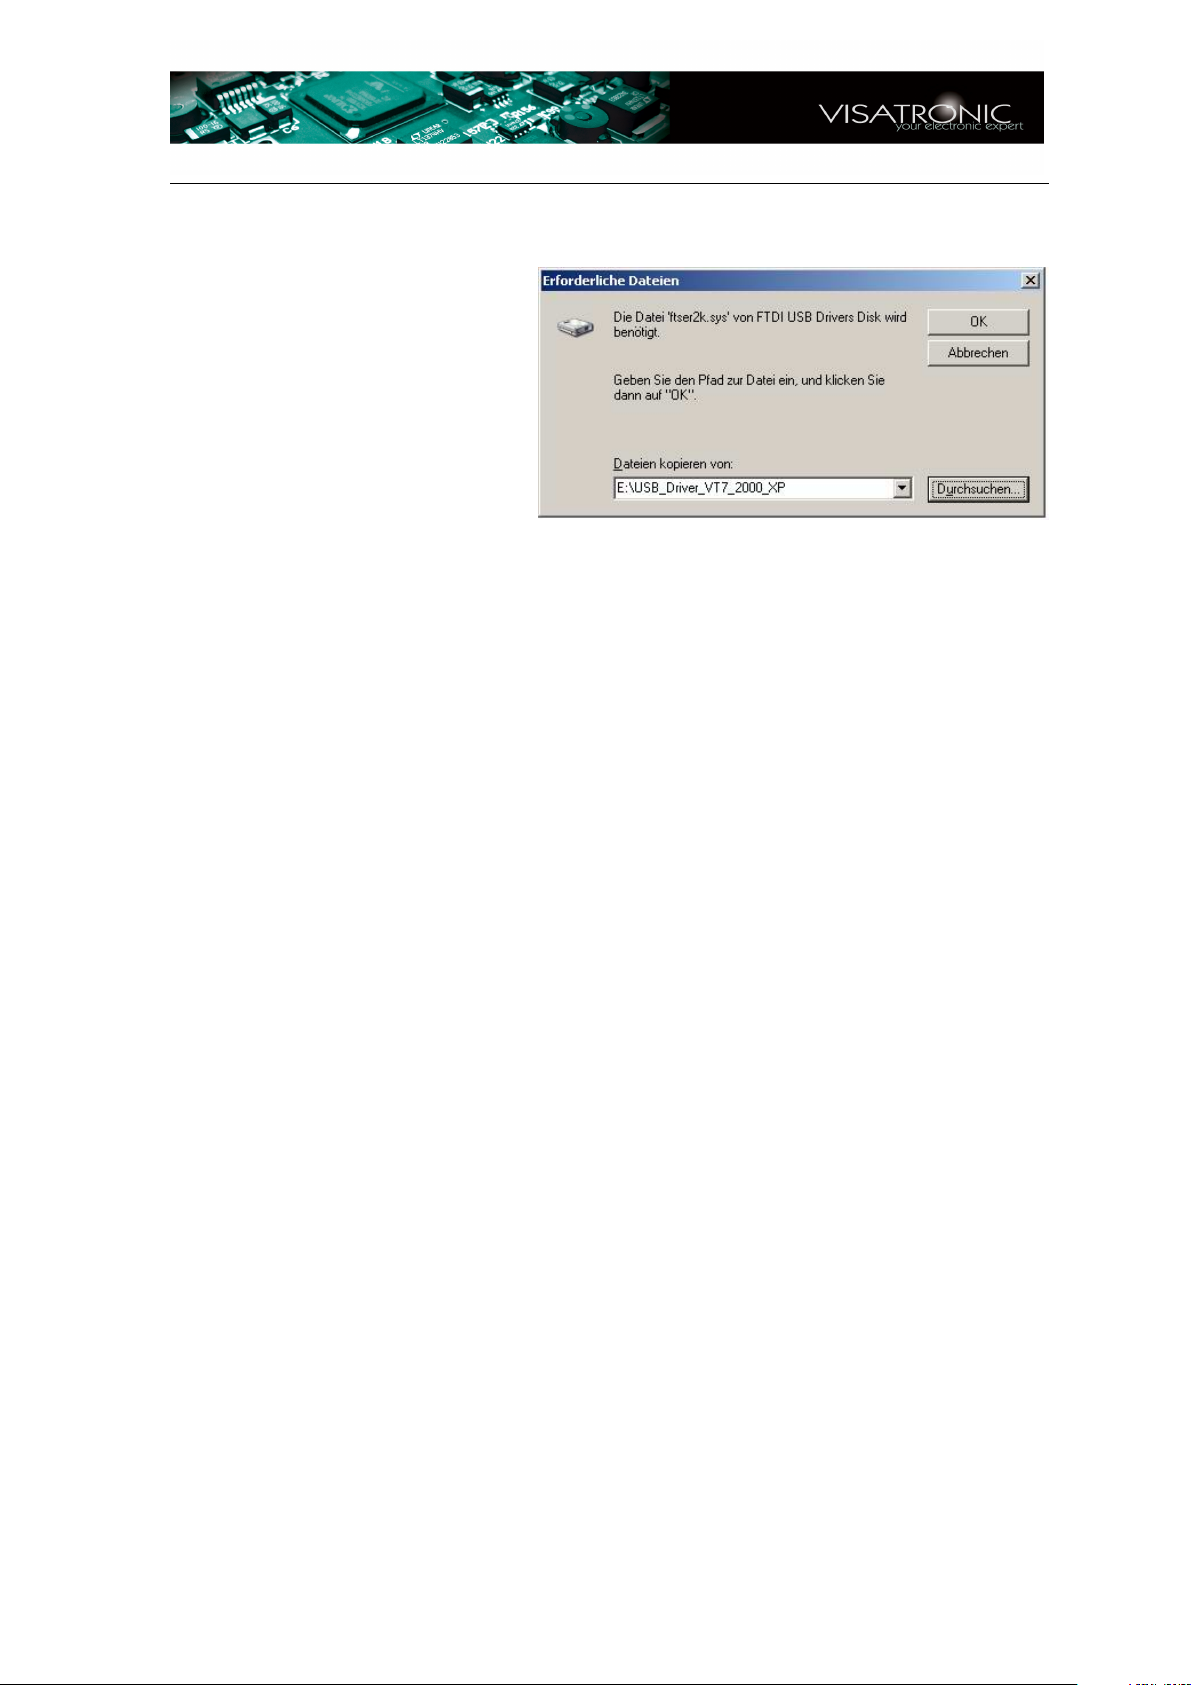
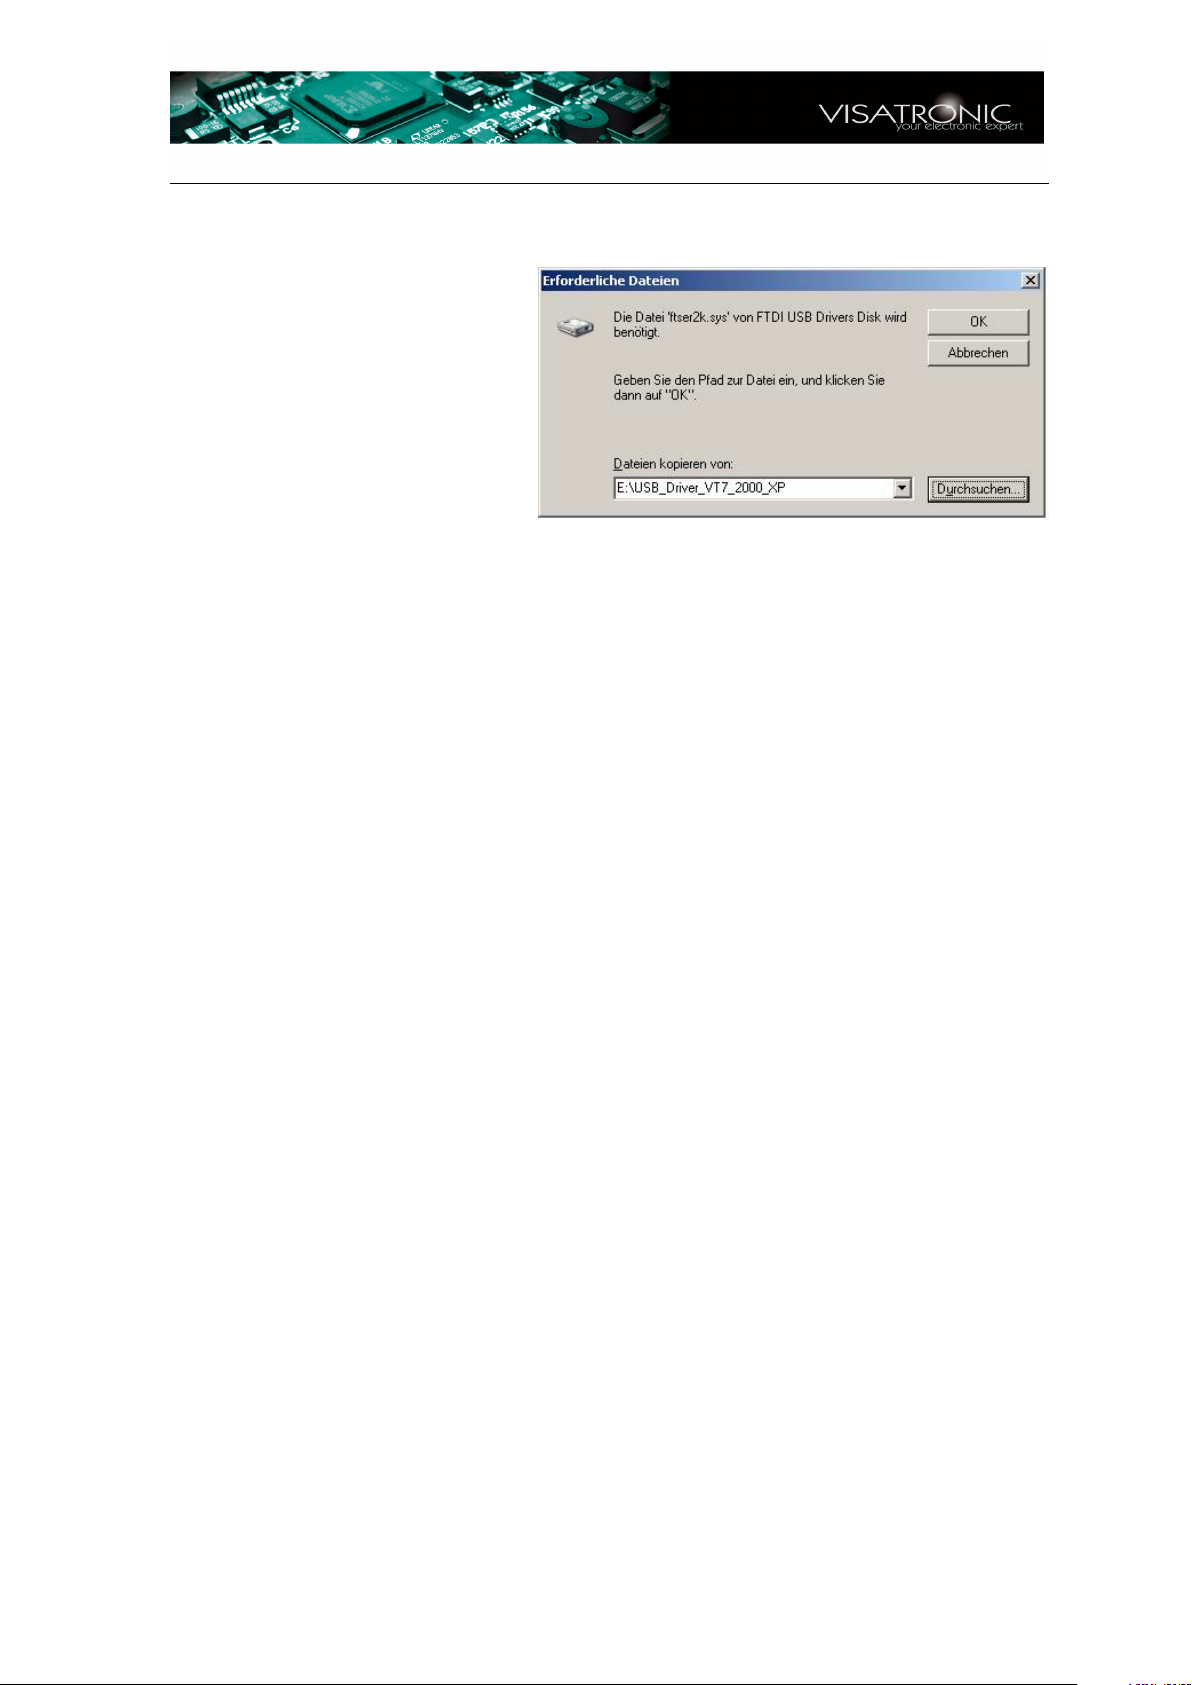
Normally, you will be asked
for the location of the file
FTSER2K.SYS. Please indicate the same folder as given
above. You confirm with OK.
Now, the installation of the USB-Driver has been finished. Depending on the
operating-system, the PC could ask for a second installation. In this case, you have
to repeat the whole procedure. Also in this case, avoid the automatic search for the
driver. You must always specify the folder of the driver manually.
2.) Installation of Agilent IO-Library: You have to install the software corresponding to the operating-system:
WINDOWS XP: Make a double-click on the file
install_XP_1.bat.
If this does not work, go into the subdirectory
Agilent-software-for-WINDOWS-XP\IO_Library. Start the in-
stallation iolibs_suite_14_2_8931_1_multimedia.exe by doubleclicking. Follow the instructions.
WINDOWS 98/ME/2000: Go into the subdirectory
\Agilent-software-for-WINDOWS-98-ME-2000-XP\IO_Library.
You can choose between two programs: IntuiLink_Multimeter.exe
oder iolibs_suite_14_0_7202_1.exe. Normally, the smaller pro-
gram (IntuiLink_Multimeter.exe) is sufficient. Start the installation y
double-clicking. Follow the instructions.
www.visatronic.de 4
Page 5
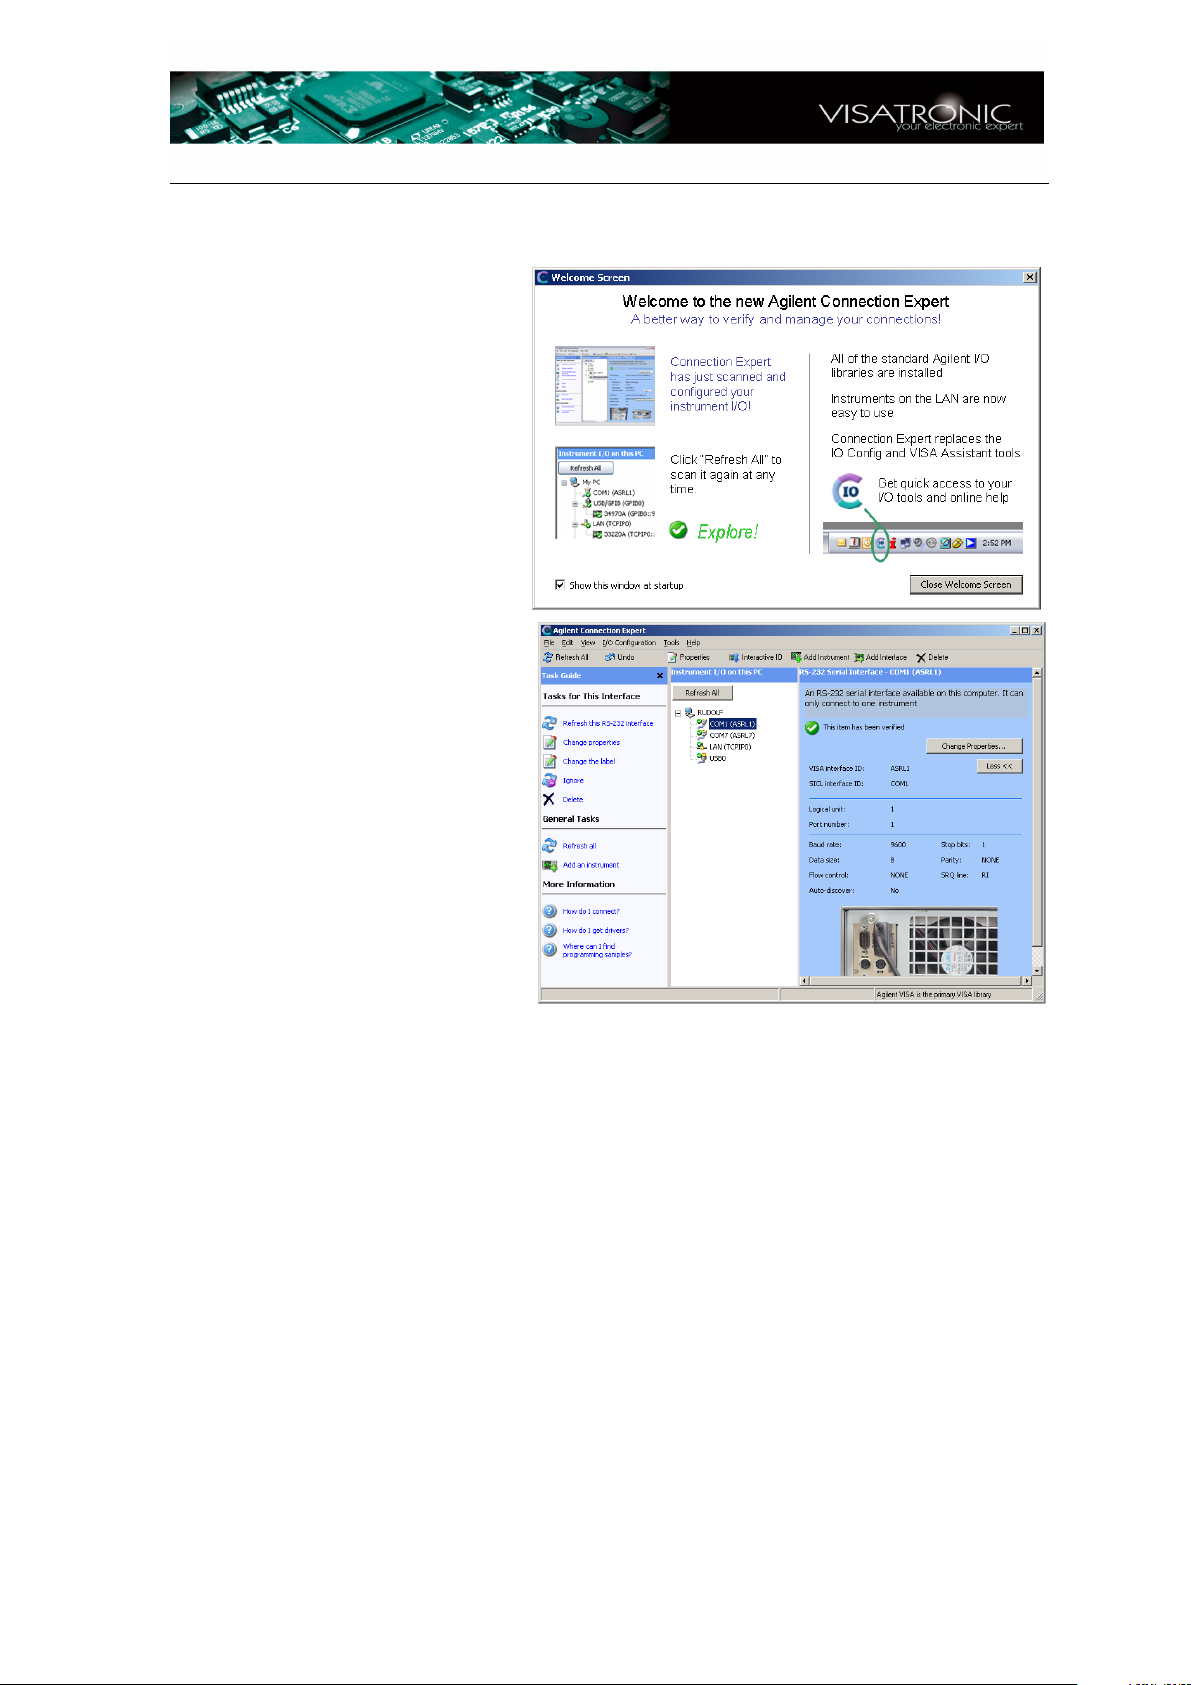
After the installation of the
IO-Library Libraries Suite 14.2
(or 14.0, dependent from the
operating-system) the
Connection-Expert will start.
You obtain the "welcome-screen"
and – after closing this screen
– the main-menu.
You have to close both windows. The VT7-Software organizes all necessary connections automatically.
You must not enter into the
program to make adjustments
and settings manually.
Infos – VT7 – Version 1.7
3.) Installation of Agilent VEE RUNTIME program: Dependent from the operatingsystem, you have to choose the corresponding software:
WINDOWS XP: (Version 8.0) Make a double-click on the file
install_XP_2.bat.
If this does not work, go into the subdirectory
Agilent-software-for-WINDOWS-XP\VEE_Runtime_8.0. Start the
installation VEE_80_Runtime.exe by double-clicking. Follow the instructions.
WINDOWS 98/ME/2000: (Version 7.03) Go into the subdirectory
Agilent-software-for-WINDOWS-98-ME-2000-XP\VEE_Runtime_7.0.
Start the Instalation download_veepro_7_0_runtime.exe by doubleclicking. Follow the instructions. After installation, you have to start teh
two patches: first 70to701veerun.exe and then 701to703veerun.exe.
Thus, you upgrade the Runtime-Version from 7.0 to 7.03.
Remark: for WINDOWS XP you can use the Runtime-Version 7.03 instead of 8.0.
The version 8.0 has the advantage, that it needs no upgrade via patches.
www.visatronic.de 5
Page 6
Infos – VT7 – Version 1.7
4.) Make a double-click on the file install_XP_3.bat.
If this does not work, go into the directory VT7_update\prog. Start the program instguide_5.vxe by double-clicking.
Thus, you install the remaining parts. This Installation is menu-guided. Follow the instructions, and continue step by step with the button NEXT> .
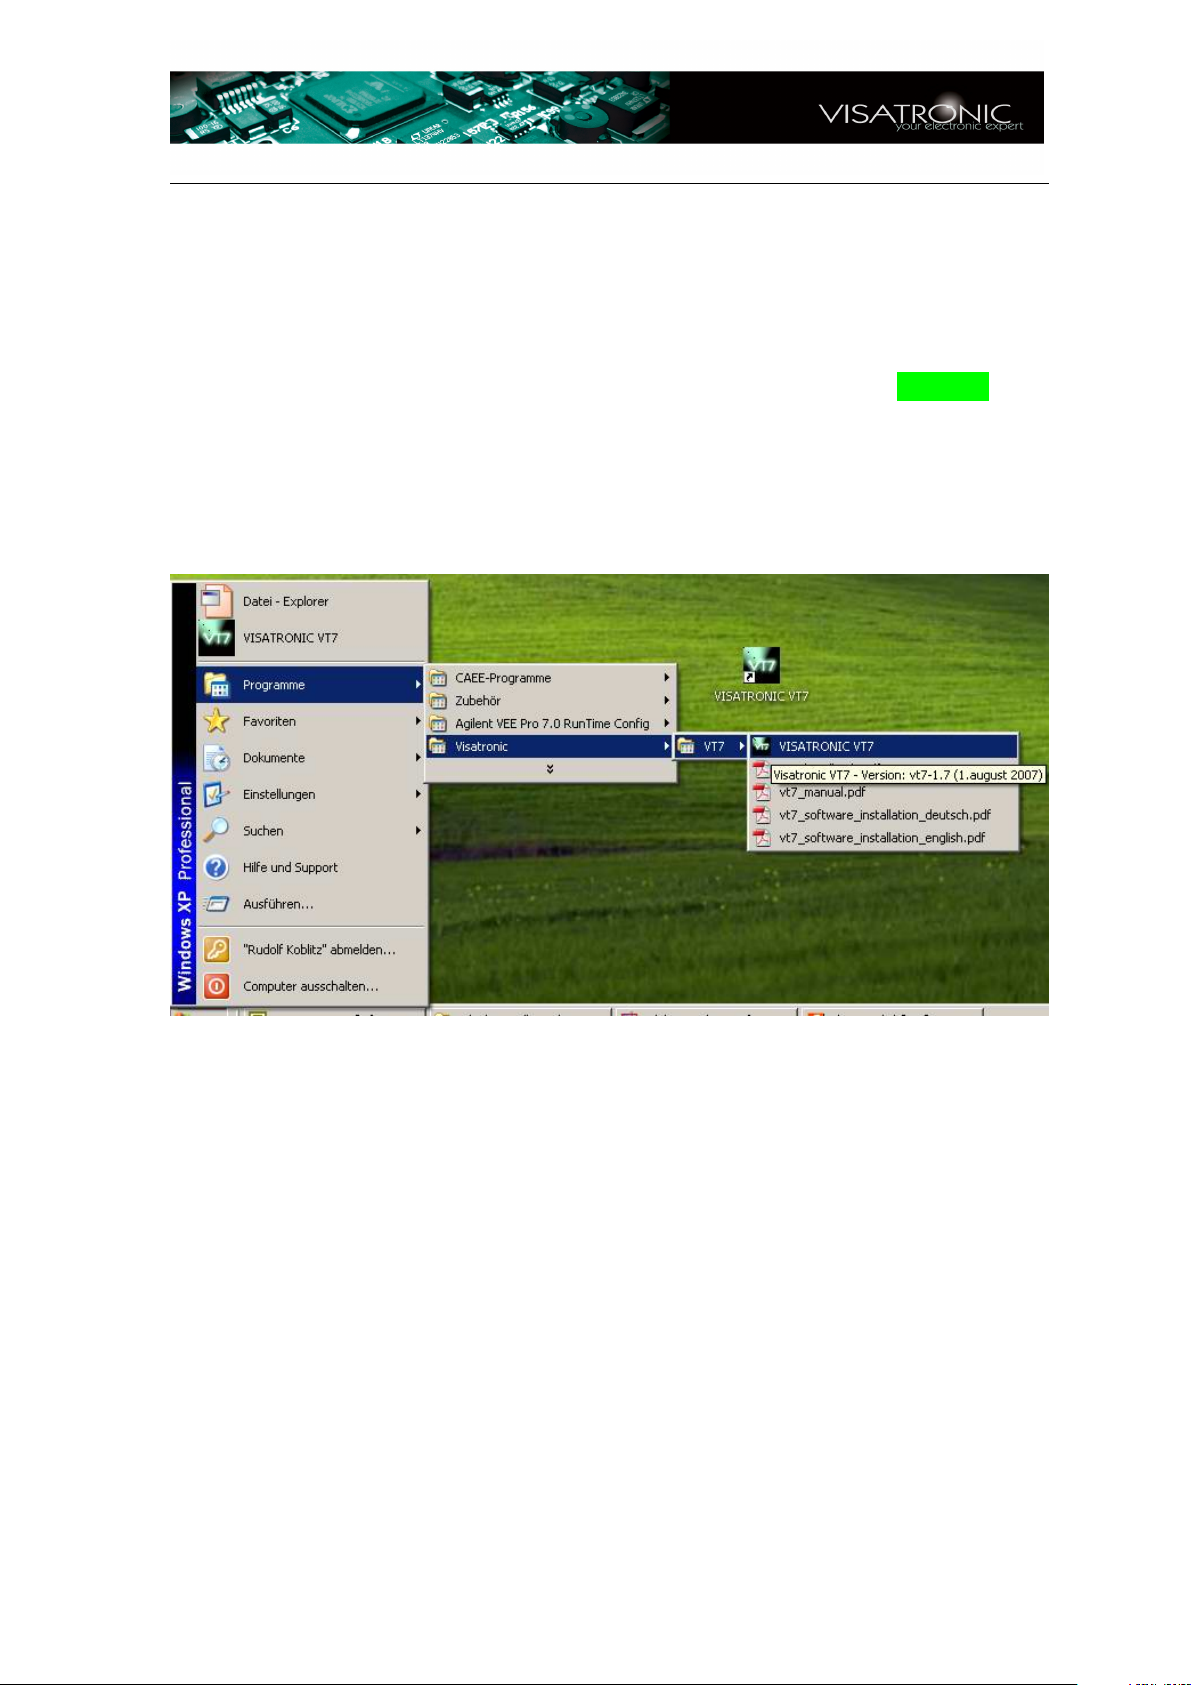
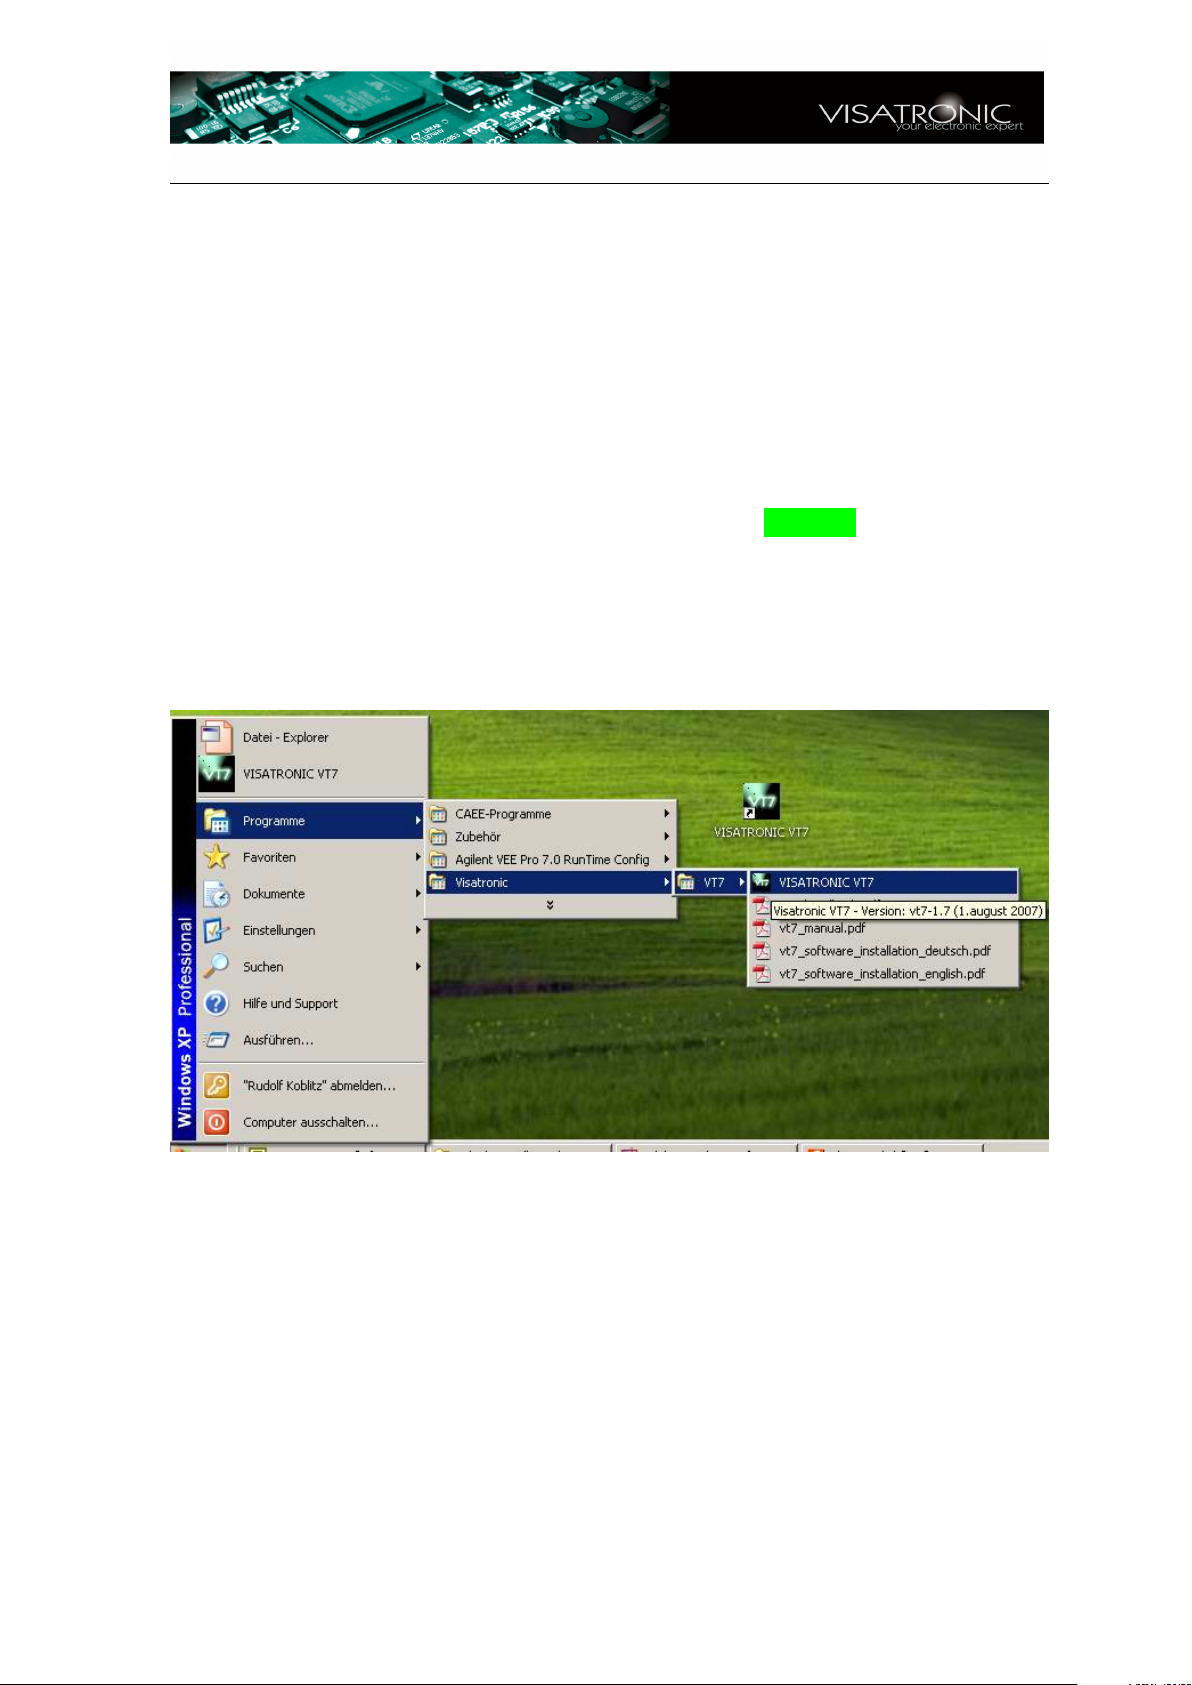
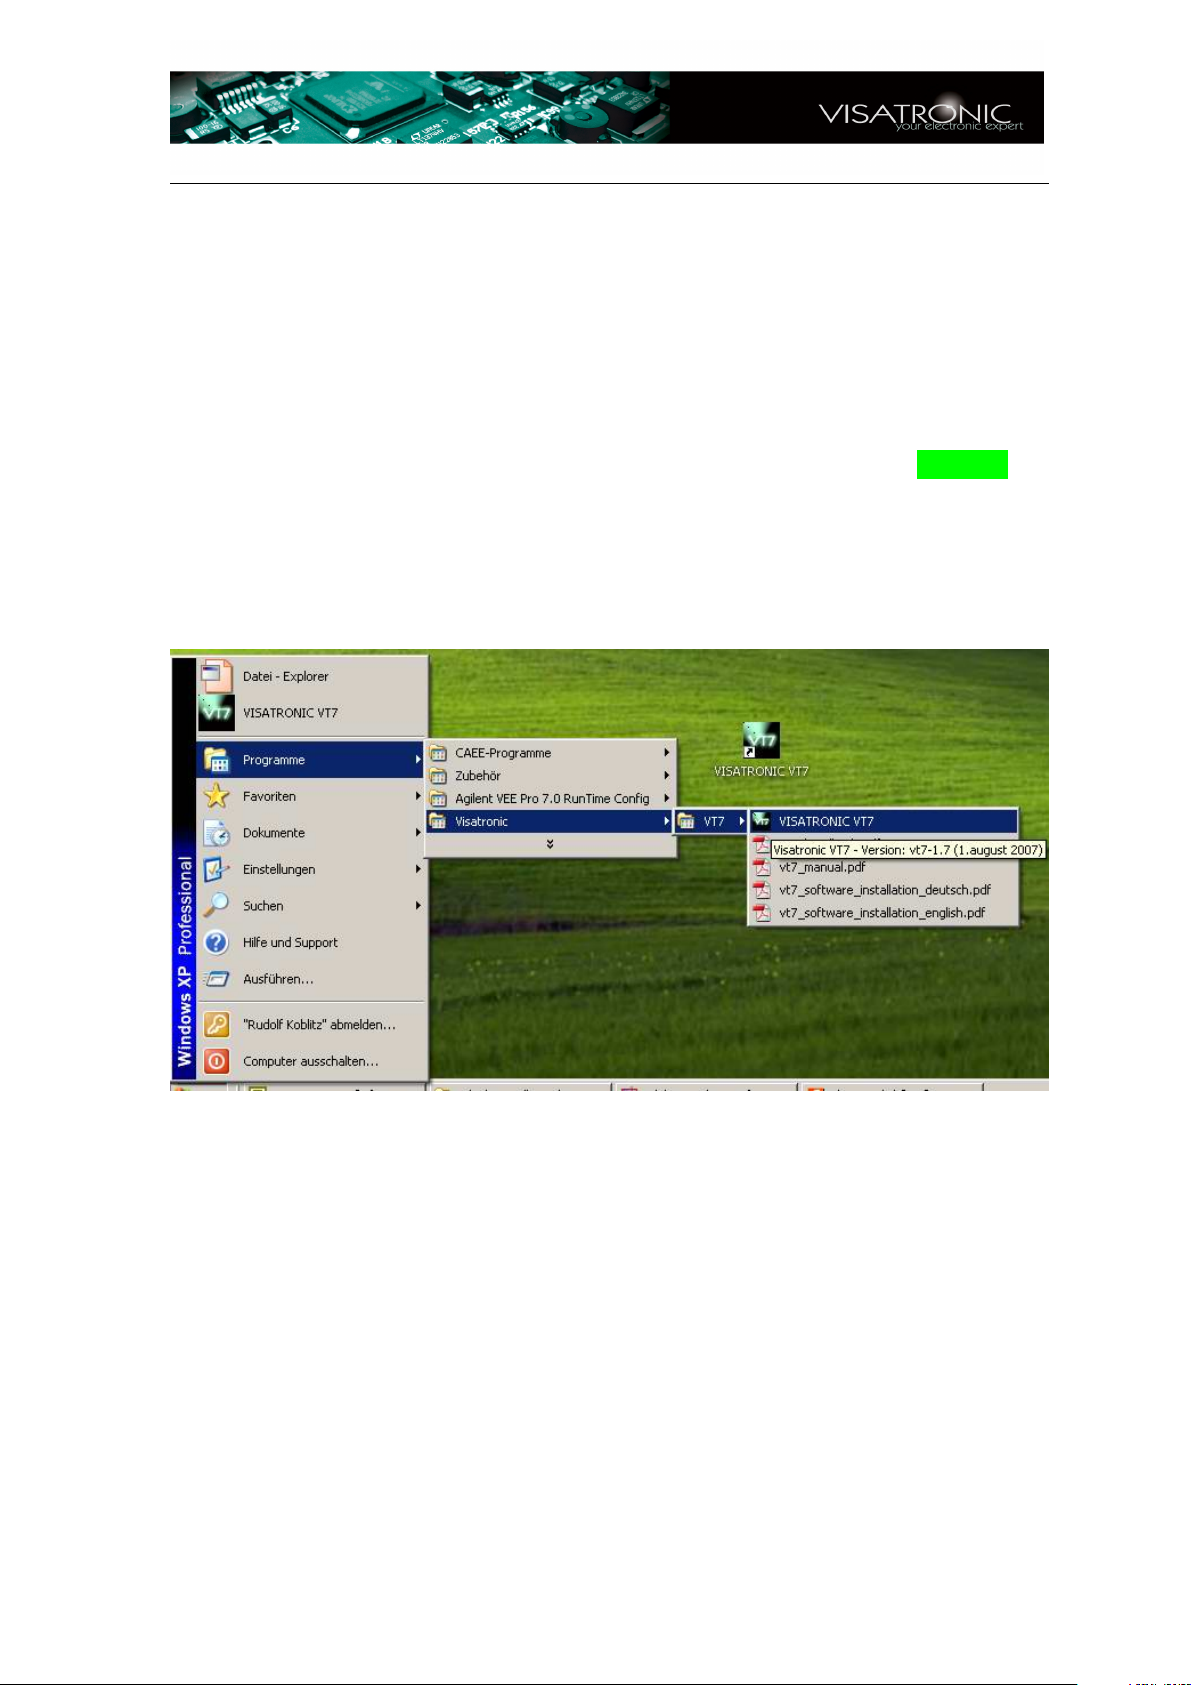
5.) You will find now on the desktop the VT7-ICON and you can start the VT7 by
double-click on this ICON. The same ICON is located also in the programfolder as well as in the Start-menu. In der Program-folder, you will find also
the ICONS für the PDF-documents as you can see in the screenshot below.
www.visatronic.de 6
Page 7
Infos – VT7 – Version 1.7
1.2 Allgemeine Hinweise
1.2.1 Dokumentation
Eine detailierte Beschreibung und Handbücher befinden sich im Ordner
VT7_update\docu:
• VT7_Software_Installation_english.pdf (Installation der Software, english)
• VT7_Software_Installation_deutsch.pdf (Installation der Software, german)
• VT7_manual.pdf (VT7-Handbuch, english)
• VT7_Handbuch.pdf (VT7-Handbuch, german)
Sie benötigen den Acrobat-reader, Version 5.0 oder höher, um diese Dateien zu lesen.
1.2.2 Installation der VT7-Software – Kurzbeschreibung
Im Dokument VT7_Software_Installation_german.pdf ist die Softwareinstallation genauestens beschrieben. Alle WINDOWS-Betriebssysteme ab WINDOWS 98SE werden unterstützt.
1.) Installation des USB-Treibers (virtueller COM-Port-Treiber)
Verbinden Sie das VT7 mit dem PC über das USB-Kabel. (Das VT7 muss jetzt
noch nicht über das Netzteil mit Spannung versorgt werden). Der PC erkennt
die neue Hardware und beginnt mit der Installation des Treibers. Auf keinen
Fall sollten Sie automatisch installieren lassen: Auf der CD befinden sich
zwei Treiber für die verschiedenen Betriebssysteme; beim automatischen Installieren weiss der Treiberassistent nicht, welcher Treiber der richtige ist.
Die folgenden Screenshots sollen
verdeutlichen, wie bei der Installation des Treibers vorgegangen werden muss:
Nach Anschliessen des USBKables wird man folgendes
Menü vorfinden, wie rechts
gezeigt ist. Wählen Sie den
unteren Auswahlpunkt.
www.visatronic.de 7
Page 8
Beim nächsten Menüpunkt müssen
Sie angeben, dass Sie die Software von einer bestimmten
Liste oder Quelle nehmen wollen.
Beim nächsten Menüpunkt
gehen Sie auf Durchsuchen .
Sie müssen genau den Ordner angeben, in dem sich der
gewünschte Treiber befindet.
in den beiden Screenshots , die
Sie rechts sehen, wurde der
Ordner für angegeben, der bei
WINDOSW XP gewählt werden muss.
Infos – VT7 – Version 1.7
Je nach Betriebssystem wählen
Sie
Bei
WINDOWS 2000/XP:
den Ordner
USB_Driver_VT7_2000_XP
Bei
WINDOWS 98SE/ME:
den Ordner
USB_Driver_VT7_98_ME
www.visatronic.de 8
Page 9
Infos – VT7 – Version 1.7
Normalerweise wird jetzt noch
nach der Datei FTSER2K.SYS
gefragt. Auch hier geben Sie
den gleichen Ordner an, in
dem sich der Treiber befindet.
Sie tragen den Pfad ein (Durchsuchen und den Ordner wie
oben angeben). Dann mit OK
bestätigen.
Damit sollte die Treiberinstallation abgeschlossen sein. Je nach Betriebssystem und
Einstellung kann es vorkommen, dass WINDOWS den Treiber nochmal installieren
will. Dann wiederholen Sie die Prozedur. Auch dann ist es wichtig, WINDOWS nie
automatisch nach den Treibern suchen zu lassen, sondern immer wie oben gezeigt
den Pfad angeben.
2.) Installation der Agilent IO-Library: Abhängig vom Betriebssystem müssen Sie
die entsprechende IO-Library installieren:
WINDOWS XP: Machen Sie einen Doppelklick auf die Datei
install_XP_1.bat.
Falls dies nicht funktioniert, gehen Sie in das Verzeichnis
Agilent-software-for-WINDOWS-XP\IO_Library. Starten Sie dort
das Programm iolibs_suite_14_2_8931_1_multimedia.exe durch
Doppelklicken und folgen Sie den Anweisungen.
WINDOWS 98/ME/2000: Gehen Sie in das Verzeichnis
\Agilent-software-for-WINDOWS-98-ME-2000-XP\IO_Library.
Sie können – je nach Wunsch – zwischen den beiden Programmen
IntuiLink_Multimeter.exe oder iolibs_suite_14_0_7202_1.exe
wählen. Normalerweise genügt das (kleinere) Programm
(IntuiLink_Multimeter.exe). Starten Sie das gewünschte Programm durch
Doppelklicken und folgen Sie den Anweisungen.
www.visatronic.de 9
Page 10
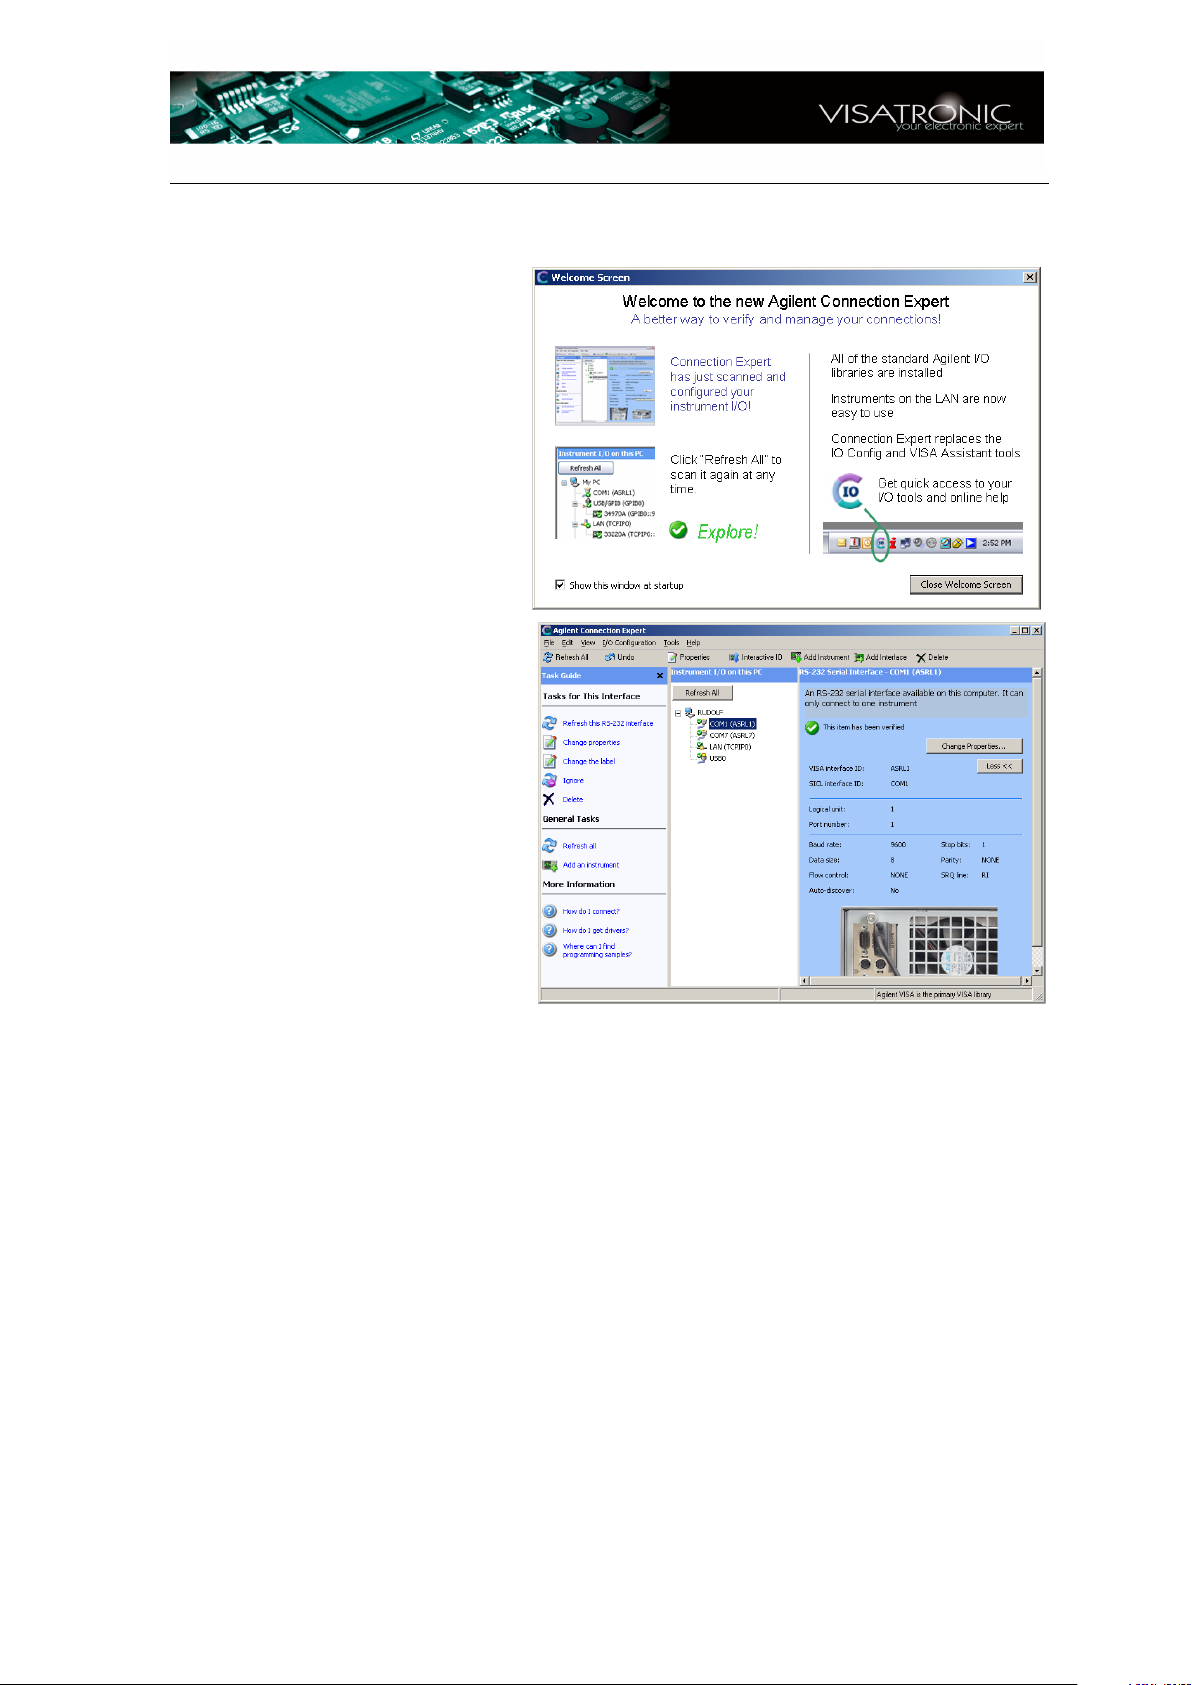
Nach dem Installieren der
IO-Library Libraries Suite 14.2
(oder auch 14.0, je nach Betriebssystem) startet der
"Connection-Expert". Sie erhalten den "welcome-screen"
und nach Schließen dieses
Bildes das Hauptmenü.
Sie müssen beide Fenster
schließen. Die VT7-Software
kümmert sich selbst um die
richtige Zuordnung der Ports
und der Geräte.
Sie selbst müssen hier keinerlei Einstelungen vornehmen.
Infos – VT7 – Version 1.7
3.) Installation des Agilent VEE RUNTIME Programms: Abhängig vom Betriebssystem müssen Sie die entsprechende RUNTIME Version installieren:
WINDOWS XP: (Version 8.0) Machen Sie einen Doppelklick auf die Datei
install_XP_2.bat.
Falls dies nicht funktioniert, gehen Sie in das Verzeichnis
Agilent-software-for-WINDOWS-XP\VEE_Runtime_8.0. Starten
Sie dort das Programm VEE_80_Runtime.exe durch Doppelklicken
und folgen Sie den Anweisungen.
WINDOWS 98/ME/2000: (Version 7.03) Gehen Sie in das Verzeichnis
Agilent-software-for-WINDOWS-98-ME-2000-XP\VEE_Runtime_7.0.
Starten Sie dort das Programm download_veepro_7_0_runtime.exe
durch Doppelklicken und folgen Sie den Anweisungen. Nachdem
das Programm installiert ist, müssen Sie nacheinander noch die beiden Patches: erst 70to701veerun.exe dann 701to703veerun.exe
starten, damit die VEE RUNTIME-Version von der Version 7.0 auf 7.03
aufgerüstet wird.
www.visatronic.de 10
Page 11
Infos – VT7 – Version 1.7
Hinweis: für WINDOWS XP können Sie statt der Version 8.0 auch die Version 7.03
verwenden. Die Version 8.0 hat den Vorteil, dass nach der Installation keine zusätzlichen Patches installiert werden müssen.
4.) Machen Sie einen Doppelklick auf die Datei install_XP_3.bat.
Falls dies nicht funktioniert, gehen Sie in das Verzeichnis VT7_update\prog.
Starten Sie dort das Programm instguide_5.vxe durch Doppelklicken.
Damit wird der Rest installiert. Diese Installation erfolgt menügeführt. Folgen
Sie bitte den entsrechenden Anweisungen. Installieren Sie die einzelnen Teile
Schritt für Schritt durch Betätigen der Schaltfläche NEXT> .
5.) Auf dem Desktop liegt jetzt ein VT7-ICON, mit dem Sie das VT7 starten können.
Dasselbe ICON finden Sie auch in der Programmleiste und im Start-Menü. In
der Programmleiste finden Sie auch die entprechenden ICONS zum Lesen der
PDF-Dokumente, wie im Bild unten gezeigt ist.
www.visatronic.de 11
Page 12
Infos – VT7 – Version 1.7
1.3 Informations Génerales
1.3.1 Documentation
Vous trouverez dans le classeur VT7_update\docu les documentations:
• VT7_Software_Installation_english.pdf (Installation du logiciel, anglais)
• VT7_Software_Installation_deutsch.pdf (Installation du logiciel, allemand)
• VT7_manual.pdf (Guide d’utilisation, anglais)
• VT7_Handbuch.pdf (Guide d’utilisation, allemand)
Vous avez besoin de Acrobat-reader, au moins version 5.0, pour lire ces documents.
1.3.2 Installation du logiciel VT7 – Explanation brève
Dans le document VT7_Software_Installation_english.pdf, vous trouvez
une description detailée pour l’installation du logiciel. Les system d’opération WINDOWS 98SE/ME/2000 et XP sont possible.
1.) Installation du USB-Driver (virtual COM-Port-Driver)
Branchez le VT7 avec le Ordinateur par le cable USB. (Il es pas encore necessarie de brancher le VT7 avec l’alimentation) . L’ordinateur reconnait le nouveau hardware VT7 et commence l’installation du driver. Évitez en tout cas
l’installation automatique: Sur le CD, il y a deux USB-drivers pour des different versions de WINDOWS. Pendant l’installation automatique, le PC ne sait
pas, quel est le driver nécessaire.
les photos suivantes clarifient
la procedure pendant
l’installation.
Après le branchemant de cable USB, vous trouverez le
menu suivante, comme montré à côté. Choisissez le point
dernière.
www.visatronic.de 12
Page 13
Dans le menu suivant, vous
specifiez, que le source de
logiciel est une certain list où
une certaine source:
Dans le menu suivantil faut
chercher le classeur
( Durchsuchen ). Il faut specifier le classeur, dans lequel se
trouve le driver. Dans les deux
photos, vous voyez le classeur,
qui doit être choisi pour
WINDOSW XP.
Infos – VT7 – Version 1.7
Dépendant de la version
WINDOWS, vous devez choisir:
Pour
WINDOWS 2000/XP:
le classeur
USB_Driver_VT7_2000_XP
Pour
WINDOWS 98SE/ME:
le classeur
USB_Driver_VT7_98_ME
www.visatronic.de 13
Page 14
Infos – VT7 – Version 1.7
Normalement, le système demande le fichier FTSER2K.SYS.
Il faut specifier le même classeur,
dans lequel se trouve le driver.
Finalement, yous confirmez
avec OK.
Maintenant, le procedure d’installation est fini. Dépendant de système et de la configuration, il peut arriver, que le système demande l’installation encore une fois.
Aussi dans ce cas, il est necessaire que vous specifiez toujours le classeur de driver
manuellement, utilisez jamais‘l’installation automatique.
2.) Installation de Agilent IO-Library: Dépendant du système d’operation il faut
installer:
WINDOWS XP: Faites un double-click surle fichier
install_XP_1.bat.
Si ça marche pas, dirigez-vous dans le classeur
Agilent-software-for-WINDOWS-XP\IO_Library. Démmarez
l’installation de iolibs_suite_14_2_8931_1_multimedia.exe par
un double-click et suivez les instructions.
WINDOWS 98/ME/2000: Dirigez-vous dans le classeur
\Agilent-software-for-WINDOWS-98-ME-2000-XP\IO_Library.
Vous avez le choix entre deux logiciels: IntuiLink_Multimeter.exe
ou iolibs_suite_14_0_7202_1.exe. Normalement, le plus petit
logiciel (IntuiLink_Multimeter.exe) est suffisant. Démmarez l’installation
par un double-click et suivez les instructions.
www.visatronic.de 14
Page 15
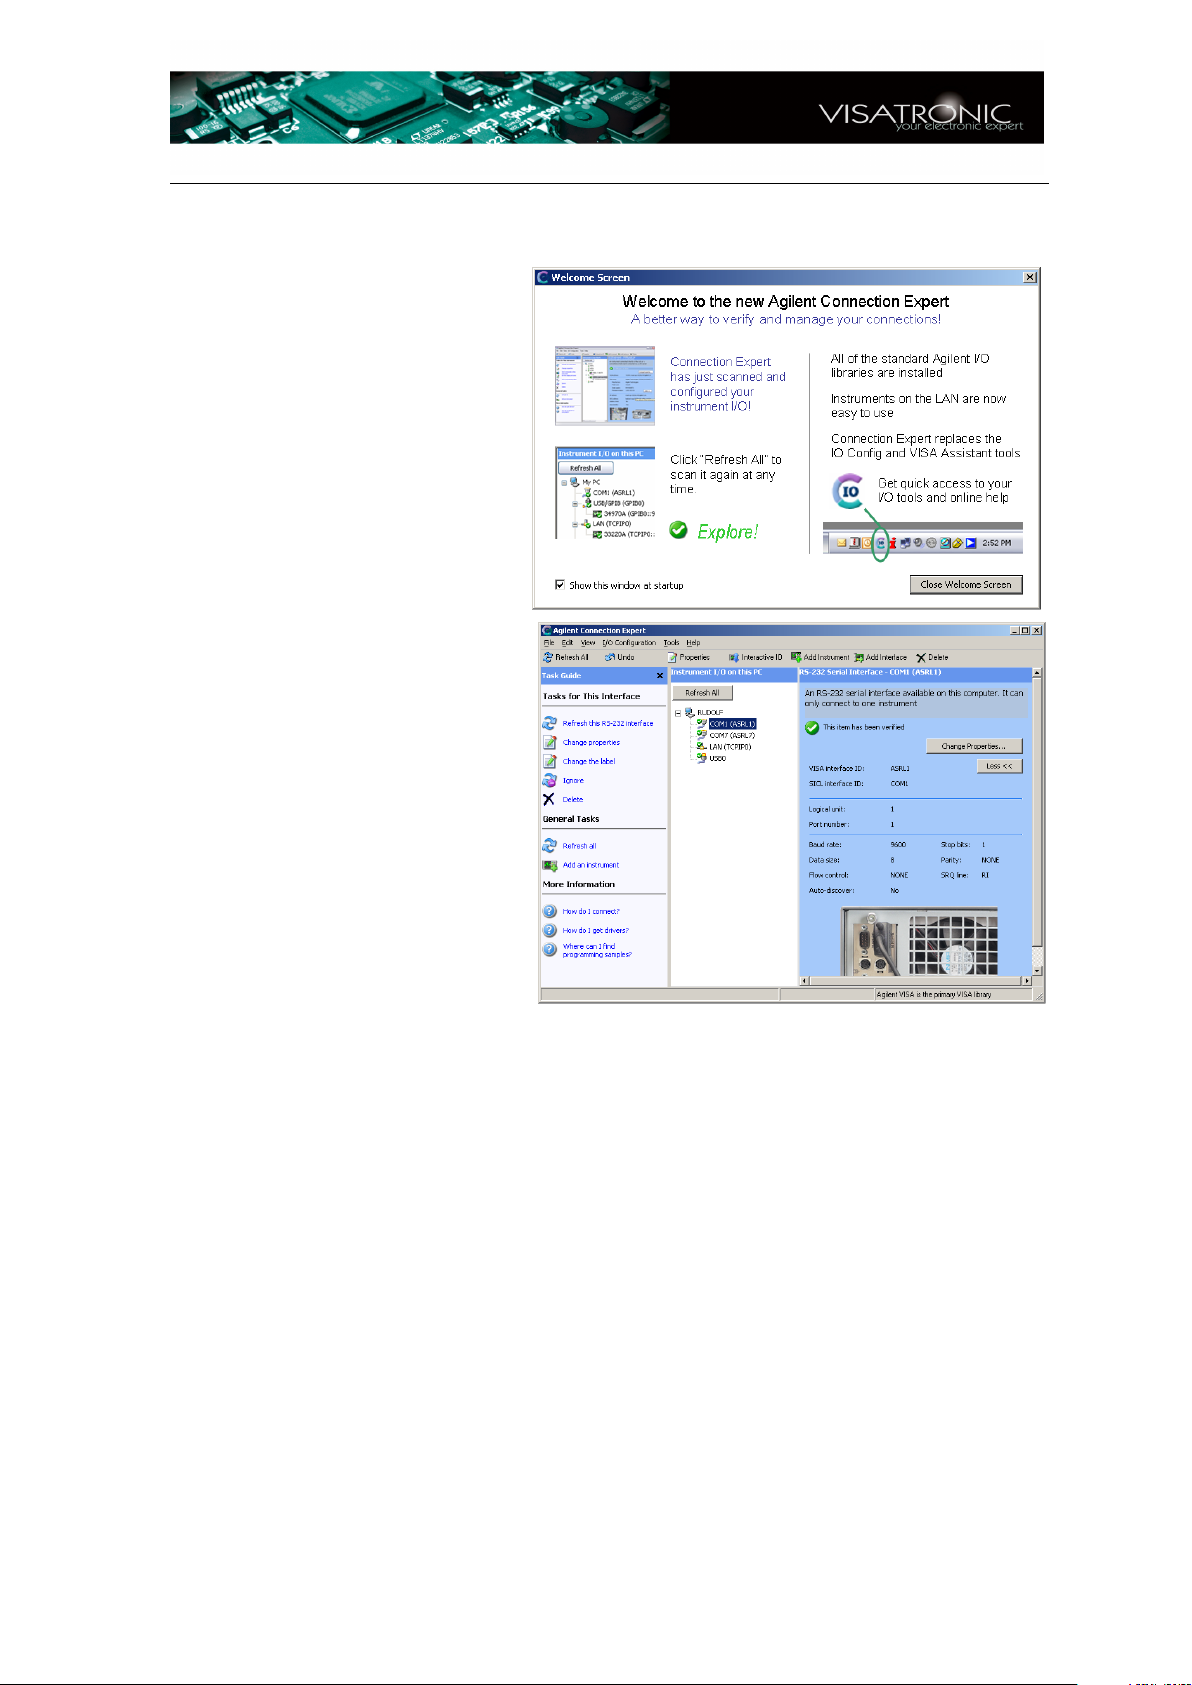
Après l’installation du IOLibrary Libraries Suite 14.2 (où
14.0, dépendant du systèm
d’operation) le "ConnectionExpert" se démarre. Vous
obtenez le "welcome-screen"
et après le menu principale.
Il faut fermer ces deus fenêtres.
Le logiciel VT7 s’ocuppe de
tout connections et adjustements. .
L’utilisateur de VT7 n’a pas
besoin de s’en occuper et
ne doit pas démmarer le
"Connection-Expert".
Infos – VT7 – Version 1.7
3.) Installation de Agilent VEE RUNTIME: Dépendant du système d’operation il
faut installer:
WINDOWS XP: (Version 8.0) Faites un double-click surle fichier
install_XP_2.bat.
Si ça marche pas, dirigez-vous dans le classeur
Agilent-software-for-WINDOWS-XP\VEE_Runtime_8.0. Dém-
marez l’installation de VEE_80_Runtime.exe par un double-click et
suivez les instructions.
WINDOWS 98/ME/2000: (Version 7.03) Dirigez-vous dans le classeur
Agilent-software-for-WINDOWS-98-ME-2000-XP\VEE_Runtime_7.0.
Démmarez l’installation de download_veepro_7_0_runtime.exe par
un double-click et suivez les instructions.. Après l’installation du logiciel,
il faut installer les deux Patches: d’abord 70to701veerun.exe et ensuite 701to703veerun.exe, afin que vous obteniez le VEE RUNTIMEVersion 7.03.
www.visatronic.de 15
Page 16
Infos – VT7 – Version 1.7
Remarque: pour WINDOWS XP vous pouvez utiliser aussi la version 7.03 au lieu de
8.0. La version 8.0 a l’avantage, que on n’a pas besoin de démmarer les deux patches.
4.) Faites un double-click surle fichier install_XP_3.bat.
Si ça marche pas, dirigez-vous dans le classeur VT7_update\prog. Démmarrez le logiciel instguide_5.vxe par un double-click.
Cette installation se fait aussi guidé par menu. Suivez les instructions et installez les different modules pas après pas en utilisant le boutton NEXT> .
5.) Sur le desktop, vous trouverez un VT7-ICON, Avec cet ICON, vous démmarez
le VT7. Vous trouverez le même ICON sur le tableau de programs et dans le
Startmenu. Dans le tableau de programs, vous trouvez aussi les ICON pour la
documentation, comme montré sur le screen-shot en bas.
www.visatronic.de 16
 Loading...