


2
3
Freedom Mini-laptop
User Guide
virginmedia.com
VMFNM0609

Hello there.
Welcome to Virgin Broadband. Thanks to your new
Freedom Mini-laptop, you’ll be able to get online and
explore the web wherever and whenever you want to.
Before you dive in, take a few moments to find out exactly
how it works. This booklet will tell you everything you need
to know.
Contents
1. Get to know your Freedom Mini-laptop 4
2. Safety first 6
2.1 LCD screen 6
2.2 Hard Disk Drive (HDD) 6
2.3 Battery pack 6
2.4 Keyboard 7
2.5 Touchpad 7
3. Taking it with you 8
3.1 Things to remember 8
4. Backing up 9
5. Getting started 10
5.1 Installing the battery 10
5.2 Removing the battery 11
5.3 Connecting the AC adapter 11
6. Using your Freedom Mini-laptop 12
6.1 Turning it on 12
6.2 Adjusting the brightness 12
6.3 Using the keyboard 12
6.4 The touchpad 13
6.5 Using your fingers 14
6.6 ClickLock function 14
6.7 Using the card reader 15
7. Internet connection 16
7.1 Connecting to a local network 16
7.2 Setting the network system 16
7.3 Wireless LAN 17
8. Your Freedom Mini-laptop’s power 18
8.1 The battery pack 18
8.1.1 Checking your battery’s power 18
8.1.2 Charging your battery 19
8.1.3 Low power warning 19
8.1.4 How long will your battery last? 19
8.1.5 Storing your battery 20
8.1.6 Prolonging your battery’s life 20
8.2 Power management 21
8.2.1 Standby mode 21
8.2.2 Hibernate mode 21
8.2.3 Logging off 21
9. Adding external devices to your
Freedom Mini-laptop 22
9.1 External monitors 22
9.1.1 Connecting an external monitor 22
9.2 Connecting a keyboard or mouse 22
9.3 Connecting audio devices 23
9.4 Lock port 23
10. Using BIOS Setup 24
11. Appendix 26
11.1 Troubleshooting 26
11.2 Specifications 28
11.3 Safety precautions 30
12. Freedom Mini-laptop Collect and
Repair Warranty 32
12.1 Customer Services 35
2
3
5
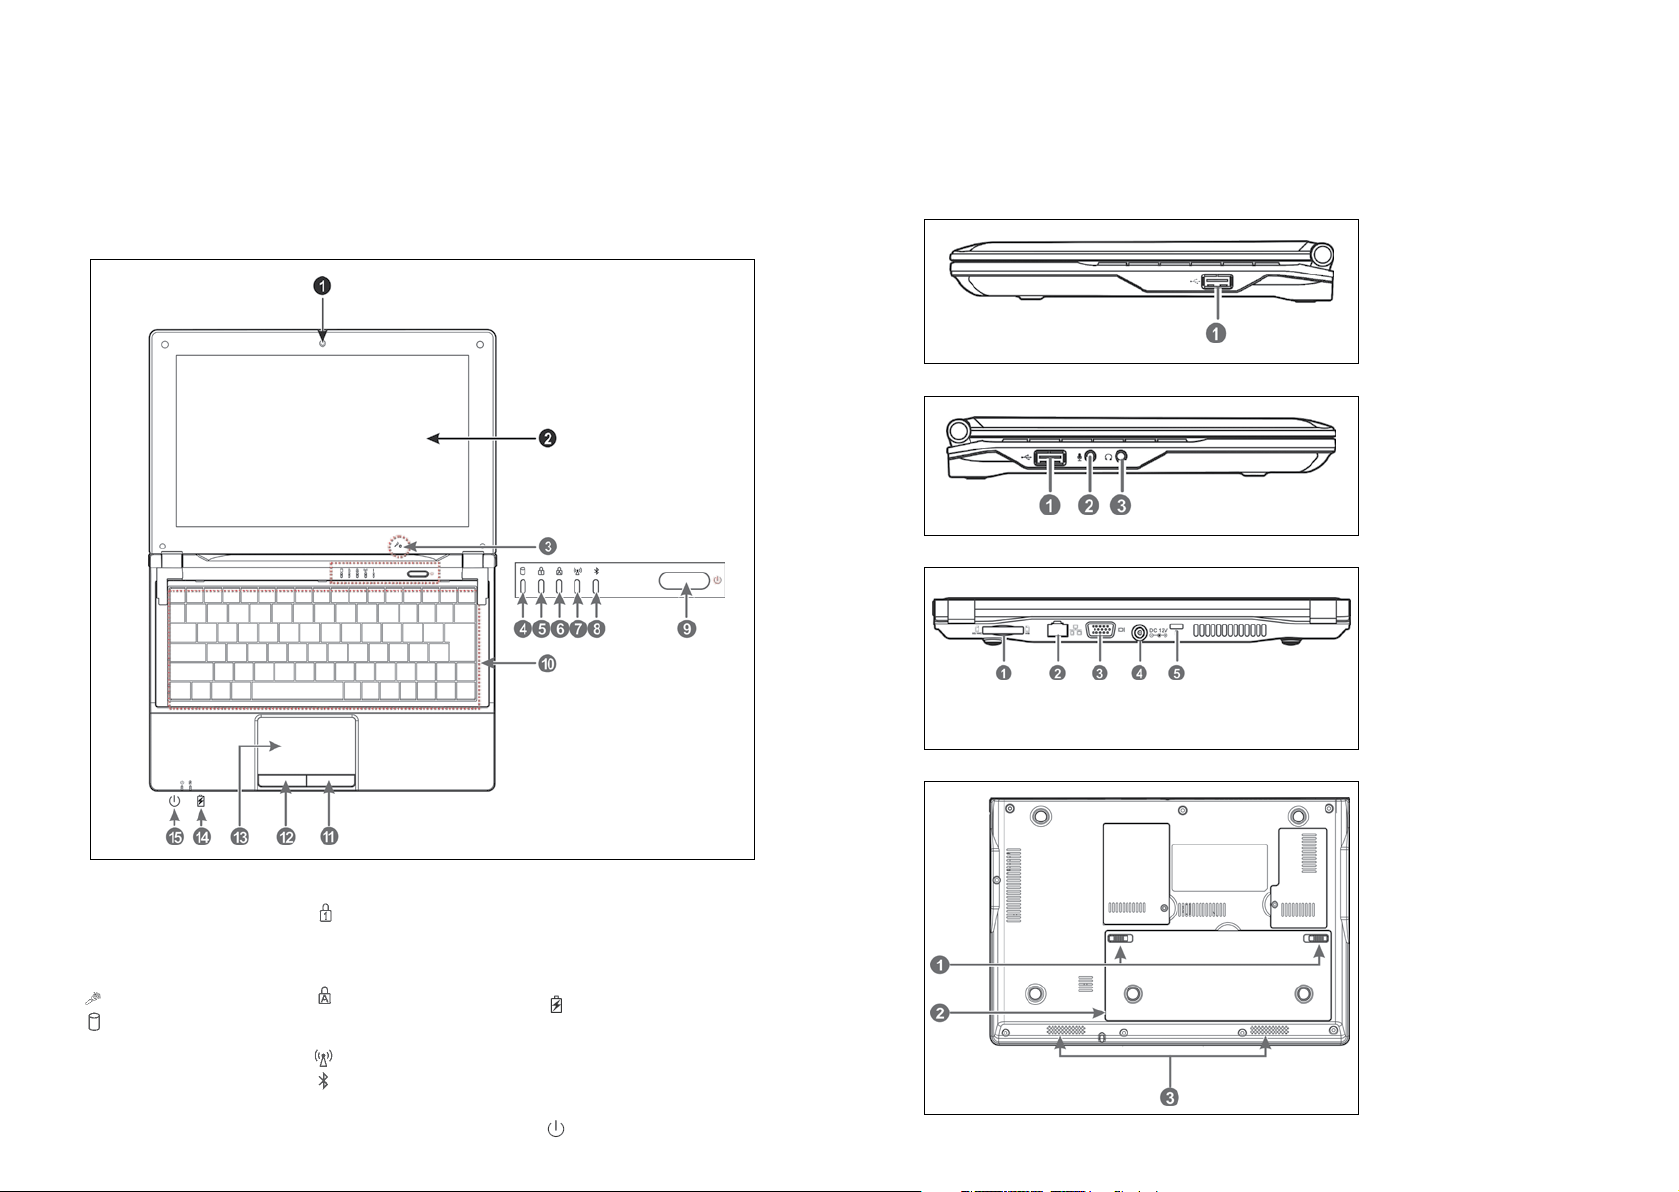
1. Get to know your
Freedom Mini-laptop
Well here she is. Why don’t you two get acquainted.
From above
Built-in Camera 1.
Click Fn+F1 to turn on
or off the camera function.
LCD Screen2.
Microphone3.
4. Hard Disk Drive Status
Indicator Light is green
when the Hard Disk Drive
is in active mode.
4
Numeric Keypad Indicator 5.
Click Fn+NumLk to turn
on the light and the numeric
keypad is unlocked.
Cap Lock Indicator 6.
Light is green when the
cap keypad is unlocked.
Wi-Fi/3G Indicator7.
Bluetooth Indicator 8. (if fitted)
Turn me on here 9.
Keyboard10.
Right key11.
Left key12.
Touch Pad13.
Charge Indicator Light 14.
is orange when being
charged and is green when
the battery is fully charged;
light flashes when the
battery is weak.
Power Indicator15.
Right side
USB Port (2.0)1.
Left side
USB Port (2.0)1.
Microphone Jack2.
Headphone Jack3.
Rear side
SD/MMC/MS Port1.
Ethernet/LAN Port2.
VGA Port3.
Power Jack4.
Lock Port5.
Underneath
Battery Latches1.
Lithium 2.
Rechargeable Battery
Speakers3.
5

7
2. Safety first
All the different parts and how to look after them.
2.1 LCD screen
The screen is acrylic, but it’s one of the most delicate parts of your
Freedom Mini-laptop. Here are a few pointers for looking after it:
Use a clean cloth to wipe the screen, being careful not to scratch it.•
Use a carry case to protect it. •
Open and close your Freedom Mini-laptop gently. •
Be careful not to drop anything on your Freedom Mini-laptop, or spill •
your tea on it.
Don’t use chemical cleaners, or wipe the screen with your hand.•
2.2 Hard Disk Drive (HDD)
The Hard Disk Drive is the bit that stores all your data, look after it by keeping
your Freedom Mini-laptop steady when in use.
2.3 Battery pack
The battery likes temperatures between 20°C-30°C, anything else •
may shorten its life.
The battery will short circuit if punctured or reassembled.•
2.4 Keyboard
It’s easy for your keyboard to get grubby, here are a few tips for a
spring clean:
Use a little brush to remove dust from between the keys, then moisten •
a cloth with water and wipe the keys gently.
Avoid using too much water – if water seeps into the keyboard, •
its circuit board could be damaged.
2.5 Touchpad
The touchpad is pressure sensitive, so be careful not to scratch it or •
rest anything heavy on it.
If it’s dirty, moisten a soft cloth and wipe the pad smoothly.•
Don’t put the battery near or into the fire – it might explode.•
Your Local Authority will be able to tell you how you can •
recycle your battery.
6
7

9
3. Taking it with you
4. Backing up
The great thing about your Freedom Mini-laptop, is that it goes
where you go.
3.1 Things to remember
Don’t forget to charge the battery.1.
Use a carry case to keep it safe.2.
If you’re taking your Freedom Mini-laptop in the car, don’t 3.
leave it in the sun, keep it someplace cool and shady.
If you’re leaving the country, check the voltage type in the 4.
countries you’re visiting. Your Freedom Mini-laptop comes
with a universal AC adapter, so if anything, you’ll only need
a power cord to connect the different outlets.
Got everything you need? Spare battery, AC adapter, 5.
manual? Off you go then.
It’s best not to move the Freedom Mini-laptop while it’s running, this
could disturb the HDD – put it into standby or hibernation mode first.
Look after your data.
While we’ve tested the Freedom Mini-laptop to make sure all your valuable
documents will be safe, always remember to back up your information
because there are many impossible to foresee events that could result in
disaster. What if your Freedom Mini-laptop is stolen for example, or attacked
by a virus?
8
9
11
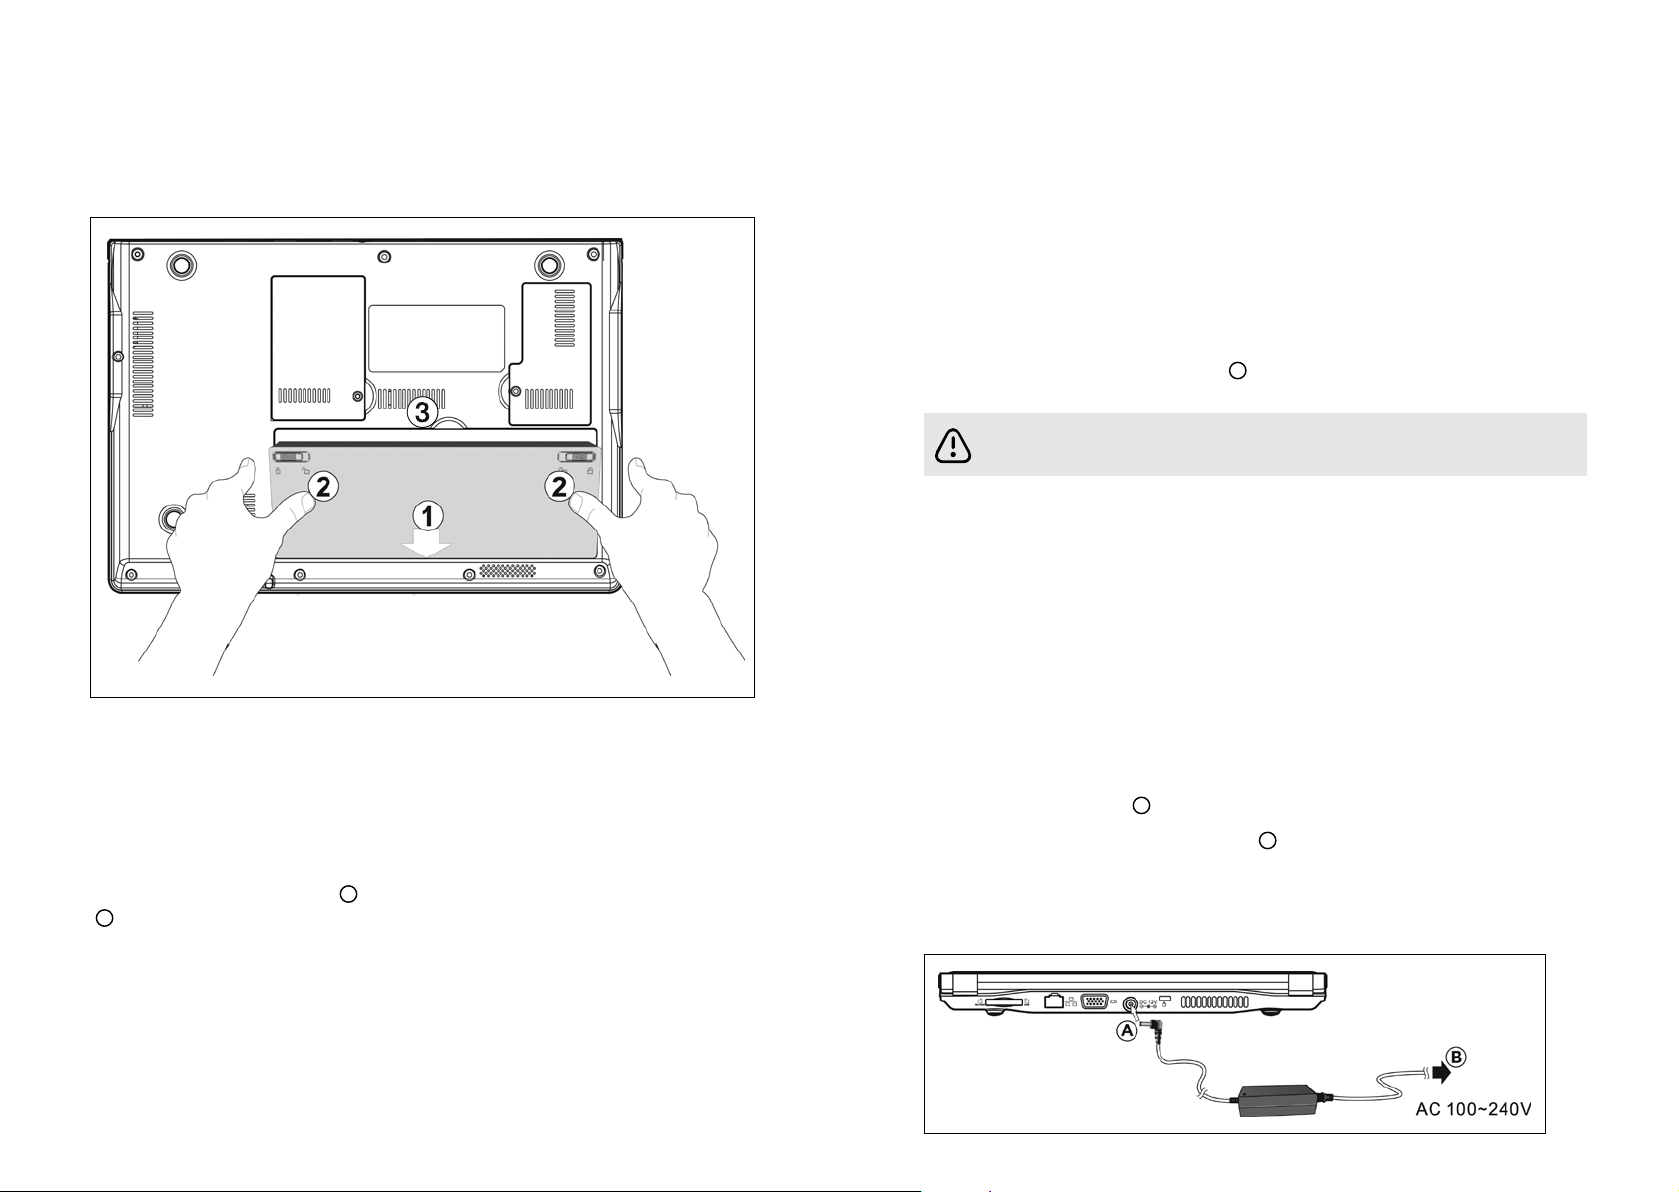
5. Getting started
5.2 Removing the battery
First, turn off and unplug your Freedom Mini-laptop.1.
Turn the computer over on a flat clean surface so you can access the base.2.
Slide the battery latches inwards.3.
3
Pull the battery pack out toward 4.
(as shown on the opposite page).
3
5.1 Installing the battery
Before getting started, you’ll need to charge your Freedom Mini-laptop.
You can power it with the AC adapter or use the removable battery pack.
If your Freedom Mini-laptop doesn’t have its battery pack installed when
you receive it, simply place the battery pack into the slots on the back
of the Freedom Mini-laptop (
2
(
as shown above
).
1
as shown above
) and then press it down
WARNING! For safety reasons, don’t dismantle the battery pack,
or dispose of it in a fire and keep it away from children.
Don’t try and remove the battery pack while the Freedom Mini-laptop is
turned on as this might result in loss of data.
5.3 Connecting the AC adapter
Your Freedom Mini-laptop comes with a universal AC adapter with
an input voltage of 100V to 240V.
Follow the steps below to connect the adapter:
Connect the adapter to the power cord.5.
Plug the DC end of the adapter into the power jack of the 6.
Freedom Mini-laptop
Insert the AC end into a wall socket 7.
Check the connections are correct before you turn on your 8.
Freedom Mini-laptop.
A
.
B
.
10
11

13
6. Using your
P
_
O
6
I
5
U
4
:
; +
L
3
K
2
J
1
7 7&8 8*9 9(0
)
?
/ /
M
0
>
. .
P
_
O
6
I
5
:
; +
L
3
K
2
8 8*9 9(0
)
F1 F2 F3 F4 F5 F6 F7 F8 F9 F10 F11 F12
?
/ /
M
0
>
. .
Freedom Mini-laptop
6.1 Turning it on
Simply open up your Freedom Mini-laptop and hit the power button.
6.2 Adjusting the brightness
You can adjust the brightness of the screen using the following buttons:
Click Function
<Fn>+<F10> Shifts between the screen and an external monitor
<Fn>+<F11> Decreases brightness
<Fn>+<F12> Increases brightness
Function keys
The following functions of these keys will only be activated when you press
one of them at the same time as the <Fn> key. Press <Fn+NumLk> again to
disable the keypad.
Click Function
<Fn>+<F1> Turns the camera window on or off
<Fn>+<F2> Turns the Wi-Fi on or off
<Fn>+<F3> Turns the mute on or off
<Fn>+<F4> Turns the volume down
<Fn>+<F5> Turns the volume up
<Fn>+<F10> Shifts between the screen and an external monitor
<Fn>+<F11> Decreases brightness
<Fn>+<F12> Increases brightness
12
6.3 Using the keyboard
Press <Fn+NumLk> to enable the •
keypad – the light indicates that the
keypad is active.
Press < Fn+NumLk> again to •
disable the keypad.
6.4 The touchpad
Move the cursor by lightly moving your finger across the touchpad.
You’ll soon get used to it.
13

15
6.5 Using your fingers
Your touchpad is highly sensitive and has the ability to understand a number
of finger movements, which you can use for specific functions like zooming
in or out. See below for more examples:
Gesture Function Gesture Function
Move
fingers
apart
Move
fingers
together
Slide
fingers
down
Slide
fingers
up
Zoom out Flick right Forward
Zoom in Flick left Back
Next page Move
Previous
page
fingers
clockwise
Move
fingers
anticlockwise
Rotate
object
clockwise
Rotate
object
anticlockwise
6.6 ClickLock function
ClickLock allows you to highlight or drag without having to keep the mouse
button held down. To activate ClickLock:
Move the cursor to the icon 1.
on the bottom right corner of the
desktop screen, and right click
on it, then select ‘Settings’ to
enter the ‘Mouse Properties’
menu as shown (opposite).
Click the box by ‘Turn on 2.
ClickLock’ and then click ‘Setting’
to adjust the amount of time you
need to hold down the mouse
button before your click is ‘locked’.
Click ‘OK’ to return to the ‘Mouse 3.
Properties’ menu and click ‘Apply’
followed by ‘OK’ to activate the
ClickLock function.
4. Now the function is activated
the mouse will lock after your
designated amount of time,
allowing you to drag this folder,
for example, without holding
down the mouse key. Click the
right button of the mouse to
drop the document or folder in
its new position.
6.7 Using the card reader
Your Freedom Mini-laptop has a built-in memory card reader that’s
compatible with the following cards: Secure Digital, Multi-Media Card,
Memory Stick. Your card manual provides more information.
The card can only be inserted in one direction (with the card’s electrical
contacts facing down). Forcing it may result in damage. To remove the card,
stop its operation and pull it from the port.
14 15

17
7. Internet connection
7.1 Connecting to a local network
When connecting to a network, •
make sure the network system is set
up first, before connecting the LAN
line to your Freedom Mini-laptop.
7.2 Setting the network system
Click on ‘My Network Places’, •
then left click on ‘Properties’ to
enter the ‘Network Connections’
window, as shown left.
Contact your Internet
service provider for more
information about the setting
of IP and DNS.
Right-click on ‘Local Area •
Connections’ then left click
on ‘Properties’ to display the
menu of ‘Local Area Connection
Properties’, as shown left.
On the ‘Local Connections •
Properties’ menu, left click on
‘Internet Protocol (TCP/IP)’, then
left click on ‘Properties’ to enter
the ‘Internet Protocol TCP/IP
Properties’ window.
7.3 Wireless LAN
Click <Fn>+<F2> to switch your •
wireless network on or off. When
your wireless network is on, the
Wi-Fi indicator turns green and
the Wi-Fi icon is displayed on the
bottom right of the desktop.
Right click your mouse on the •
Wi-Fi icon, then left click on ‘View
Available Wireless Networks’ on
the pop-up menu or double left
click on the Wi-Fi icon to enter the
‘Wireless Network Connection’
window as shown left.
To see the available wireless •
networks, simply left click
on ‘Refresh’ and a list will be
displayed. You can find out
more about each of the wireless
networks shown by selecting
them with your mouse. Some
networks are likely to ask you
for a password before you can
connect to them.
Select ‘General’ and enter the •
address of your IP and DNS
(Domain Name), or select ‘Obtain
an IP address automatically’.
16 17

19
8. Your Freedom
Mini-laptop’s power
8.1 The battery pack
Your Freedom Mini-laptop is designed to work wherever and whenever
you need it thanks to its removable, high capability battery pack.
8.1.1 Checking your battery’s power
To see how much power your battery has remaining, click on ‘Start’, then •
on ‘Control Panel’, and then double click on ‘Power Options’. This will
display the ‘Power Options’ window. From there clicking on the ‘Power
Meter’ icon will display how much power your battery has left.
A battery pack can only be recharged so many times and over
time its capacity will decrease. When the time comes to replace
the battery with a new one, you can purchase a replacement
battery by calling 0800 952 2294.
The battery should be fully charged before you use your Freedom
Mini-laptop for the first time, so be sure to check the battery power
before you get started.
Don’t attempt to remove the battery pack while your Freedom
Mini-laptop is switched on, this may result in loss of data or even
damage the Freedom Mini-laptop itself.
8.1.2 Charging your battery
The first time you use your Freedom Mini-laptop, make sure you charge the
battery pack to full capacity before you switch it on.
The battery pack will start charging as soon as your Freedom Mini-laptop is
connected to a power supply, and the charge indicator light will come on.
When the battery pack is fully charged it will stop charging automatically
and the charge indicator light will go out.
18
To create a shortcut so you can always keep an eye on remaining battery •
power, click on ‘Advanced’ in the ‘Power Options Properties’ window,
then select ‘Always show icon on the taskbar’. The battery icon will then
always appear bottom left on your desktop. To see how much battery
power you have, simply move the cursor over this icon.
8.1.3 Low power warning
When battery power is running low your Freedom Mini-laptop will let you
know with an onscreen window advising you to recharge. Don’t forget to save
whatever you’re doing if you don’t have your AC adapter to hand at that point.
8.1.4 How long will your battery last?
The amount of time your battery will last is difficult to say precisely. It depends
on a number of factors, including how you use your Freedom Mini-laptop, and
perhaps most importantly, how you use its power saving features. You can
help it to last longer by switching on its manage power function.
19

21
8.1.5 Storing your battery
8.2 Power management
It’s best not to leave your battery fully discharged in your Freedom Minilaptop for any length of time. If you’re not using your Freedom Mini-laptop
for a while, you should remove the battery and store it separately. Ideally,
the battery should be stored at a temperature between 10°C and 35°C.
Temperatures above or below this range may shorten its life. Exposing
the battery to very high temperatures could result in fire or explosion.
8.1.6 Prolonging your battery’s life
Use the AC adapter whenever an external power source is available. •
Remember to fully charge the battery before you rely on it as a power
source for any length of time.
Your battery is at its most efficient between temperatures of 20°C and •
30°C. Temperatures above and below these figures will shorten the
battery’s actual usage time.
Please charge your battery at least once every three months or damage •
may occur.
The life expectancy of your battery is approximately 300 recharges. •
It’s a good idea to buy an extra battery as a backup ready to replace
the original as soon as necessary.
When removed from your Freedom Mini-laptop, store the battery in a •
cool and dry place, preferably at a temperature between 10°C and 30°C.
Decrease the brightness of your LCD screen. You can also close the •
screen down if you’re not using your Freedom Mini-laptop for a while.
Your battery is likely to short circuit if it’s punctured or you attempt
to take it apart.
8.2.1 Standby mode
In standby mode, your Freedom Mini-laptop is conserving energy, but •
ready to operate again within a few seconds. Current data and status is
stored in its RAM and the screen shut down, while the power indicator
light remains on. Simply press the power button to get it to start up again.
8.2.2 Hibernate mode
In hibernate mode, your Freedom Mini-laptop saves your current status •
and data to the hard disk before shutting down. In this mode the power
indicator light is off. To restart your system, just press the power button.
You can also initiate hibernate mode yourself. Click on ‘Hibernate’ within
the ‘Power Options Properties’ window, then select ‘Enable Hibernate’.
8.2.3 Logging off
To log off from your Freedom Mini-laptop, click on ‘Start’, then select •
‘Turn Off Computer’.
Your Freedom Mini-laptop will log itself off if it’s running on battery power •
and that runs out while it’s in standby mode. If this happens, you won’t
lose any data – this will be stored on the hard disk drive. Your Freedom
Mini-laptop will operate again, once the battery is recharged or it’s
connected to an AC outlet.
If your system crashes at any time, you can turn your Freedom
Mini-laptop off by pressing the Power button for 4 seconds.
Pressing the Power button for over 2 seconds will also turn your
Freedom Mini-laptop off in normal mode.
Remember, that your Freedom Mini-laptop should never be
disposed of as everyday waste. Check with local authorities to see
how to dispose of electrical products. Never place your battery in
or close to a fire, as it may explode.
20 21

23
9. Adding external devices
to your Freedom Mini-laptop
9.1 External monitors
Your Freedom Mini-laptop has a dedicated VGA port for connecting •
an external monitor or other screen.
9.1.1 Connecting an external monitor
Turn off your Freedom 1.
Mini-laptop.
2. Insert the monitor’s 15-pin
D-sub monitor plug into the
VGA port shown left.
3. Turn on your Freedom
Mini-laptop again.
You can shift between viewing on your Freedom Mini-laptop’s
screen and an external monitor by click <Fn>+<F10>.
9.2 Connecting a keyboard or mouse
Your Freedom Mini-laptop has an •
integrated UK standard keyboard
with 82 keys. However, if you prefer
to use an external keyboard or
mouse, you can connect them via
the USB port.
9.3 Connecting audio devices
You can connect headphones, •
speakers and microphones to
your Freedom Mini-laptop via
the connections indicated in the
picture (left).
Your Freedom Mini-laptop’s integral speaker will turn off
automatically when you connect headphones. Take care, though –
sound levels that are comfortable on speakers can be excessively
high in headphones. To avoid any chance of hearing damage, turn
down the volume before putting on headphones and then raise the
volume to a comfortable level once you have them on.
9.4 Lock port
You can secure your Freedom •
Mini-laptop to a desk or other
immovable object by attaching
a security cable to its integral
lock port.
22
When disconnecting an external keyboard or mouse from your
Freedom Mini-laptop, please take care to grasp the connector
itself rather than the cable, and pull firmly but gently to avoid
damaging the cable.
23

25
10. Using BIOS setup
Follow the simple steps below to enter the BIOS Setup Menu:
When you turn on your Freedom 1.
Mini-laptop, click the F2 button
quickly as the system starts
up. You should then access the
‘Setup Utility’ screen.
Use the arrow keys to select 3.
‘Legacy’ and click ‘Enter’ to
get to the menu.
2. Use the arrow keys to select
‘Boot’, then click ‘Enter’
to get to the menu.
Use the arrow keys to select 4.
‘Boot Type Order’ and click
‘Enter’ to get to the menu.
Click ‘Shift’ and the ‘+’ or ‘–’ keys 5.
to remove the option position and
then use the arrow keys to select
where you want the system to
start up from. Once your selection
is highlighted, click F10 to bring
up a pop-up and click on ‘Yes’.
Once you’ve carried out the sequence above you can switch to
your temporary start up option simply by clicking F12 as soon
as you turn on your Freedom Mini-laptop.
24
25

27
11. Appendix
11.1 Troubleshooting
1. My Freedom Mini-laptop’s locked up and I can’t turn it off.
Just press and hold the power button for 4 to 6 seconds and your
Freedom Mini-laptop will shut down.
2. Is there anything I should check if my Freedom Mini-laptop
locks up?
You can try:
checking whether the power is low, and, if it is, connect to an AC outlet•
checking that you haven’t switched the screen to the external monitor mode•
making sure that the indicator light of your AC adapter is on and your •
adapter is working properly
removing any memory cards and any other external device.•
3. What should I do if I spill liquid on my Freedom Mini-laptop?
You should:
turn off your Freedom Mini-laptop by disconnecting the AC adapter •
and detaching its battery pack, rather than using the power button
disconnect all external devices
drain all the liquid you can from your Freedom Mini-laptop and then •
remove any remaining moisture so far as possible with a soft, dry cloth
use a fan, if you have one, to help you dry your Freedom Mini-laptop •
and accessories
ask for further advice at our Customer Support Centre, on 0800 952 2294.•
4. I’m unable to restart my Freedom Mini-laptop after it has entered
standby mode.
If your Freedom Mini-laptop is in standby mode you should be able •
to restart it by pressing the power button. In standby mode the power
indicator light remains on.
Your Freedom Mini-laptop may have entered hibernate mode, indicated •
by the power indicator light flashing. Again, you should be able to restart
it by pressing the power button.
If you’re still unable to restart, please contact our Customer Support •
Centre on 0800 952 2294.
26
5. I can’t get my Freedom Mini-laptop to start up. What might be
causing a problem?
It could be:
damage to your external or built-in memory, perhaps caused when an •
error has been saved to it, corrupting data
an incompatible external device may cause your system to enter standby •
mode until it’s removed
an error in the drive programme or application programme: Your system •
may refuse to operate some files (files with the suffixes: .dll, .sys, .exe
and so on) and enter standby or hibernate mode.
6. Is there anything I can do to recover my Freedom Mini-laptop
when it’s failing to start up?
You can try the following:
remove any external devices and their associated software•
refresh the BIOS Setup (see Section 10)•
refresh the appropriate programme•
remove any application programmes causing problems•
reinstall the operating system.•
If none of the above help, please send your Freedom Mini-laptop to your
local service centre for repair.
7. When I use my Freedom Mini-laptop’s camera the image
is very unclear.
Check the built-in lens. If it’s dirty try cleaning it with a soft, dry cloth.
8. When I use my Freedom Mini-laptop’s video camera function,
the images it produces are jerky and slow-moving.
The video camera requires light to function effectively and the images •
it produces may be adversely affected by poor light conditions. Try
adjusting the position of your Freedom Mini-laptop or of its subject to
make the most of the available light.
The image display may also be slowed down if you have a lot of other •
applications running. Closing any unnecessary applications may improve
the image.
27

28
29
11.2 Specifications
Design and specifications are subject to change without notice.
Main Feature
CPU Intel Atom N270 (1.6GHz, 533MHz FSB)
CPU Power Consumption 2.5W MAX
L1 Cache Size On-die, primary 32-kB instructions cache
and 24-kB, write-back data cache
L2 Cache Size 512-kB on-die second level cache
Memory 1GB
Memory Type DDRII 533MHz
Storage
HDD Capacities (#) 120GB
Screen
Screen Size 10.2"
Screen Type TFT
Description TFT LCD 1024X600 (WSVGA)
Built-in Camera
Resolution 0.3 megapixel
Video/Audio Feature
Video Card Type Intel GMA 950
Video Card Capacity Share Dynamic EMS Memory 128MB (max)
Audio System Built-in speaker
Sound Card Type HD Codec
Note: As a power saving feature the unit defaults to Wi-Fi disabled when starting up
to conserve battery life. To switch it on press F2.
I/O Device
Mouse Touch Pad
Keyboard UK 82-key keyboard
Condition
Operating Temperature 5-35°C
Operating Humidity 35%-85%
Storage Temperature -20-55°C
Storage Humidity 20%-93%
Power
Adapter AC 100~240V; DC 12V
Output Power (maximum) ≤36W
Battery (Type) Lithium rechargeable battery
Voltage 7.4V
Port Standard
LAN LAN Type: 10/100Base-T
Audio Port Headphone Port, Speaker, Built-in Microphone,
USB Port USB-A Port (x2), USB2.0
SD Card Port Support SD/MMC/MS Card
VGA Port D-15 Output
Physical Features
Weight No Battery
With Battery
Wireless Card: 802.11 b/g/n
Microphone Port
About 0.9Kg
About 1.1Kg
Dimensions 266*182*29mm (w*h*d)

30
31
11.3 Safety precautions
Don’t press or touch the LCD screen. You may scratch or damage it. 1.
Keep your Freedom Mini-laptop away from dirty or dusty environments 2.
as dust and other small particles can get inside and cause damage.
Don’t place your Freedom Mini-laptop on uneven or unstable work surfaces.3.
Don’t place or drop heavy objects on top of your Freedom Mini-laptop 4.
or insert any foreign objects into it.
Don’t allow your Freedom Mini-laptop to be exposed to strong 5.
magnetic or electrical fields.
Don’t allow the sun to shine directly onto your LCD screen as it may 6.
damage it.
Your Freedom Mini-laptop should only be used in environments with 7.
ambient temperatures between 5°C (41°F) and 35°C (95°F).
Don’t expose your Freedom Mini-laptop to or use near liquids, rain, 8.
or other moisture.
Caution: there is a risk of explosion if the battery is replaced with an 9.
incorrect type. Dispose of used batteries according to the instructions.
Don’t throw your Freedom Mini-laptop away in a standard rubbish 10.
collection. Check local regulations for the correct disposal of
electrical products.
Please recycle the battery pack. Check with your local authority 11.
or retailer for recycling advice.
Input rating: Refer to the rating label on your Freedom Mini-laptop and 13.
make sure that your AC adapter complies with it. Only use attachments
and accessories specified by the manufacturer.
Check the connections between your Freedom Mini-laptop and 14.
attached devices before turning it on.
Don’t eat while using your Freedom Mini-laptop as dropping food on it 15.
may cause damage.
Always turn your Freedom Mini-laptop off if you want to install or 16.
remove external devices which don’t support hot-plugging.
Disconnect your Freedom Mini-laptop from its AC outlet and remove 17.
any installed batteries before cleaning.
Keep your Freedom Mini-laptop away from younger children.18.
Repairs should only be carried out by a certified service technician 19.
as, otherwise, the manufacturer cannot be held responsible for any
resulting damage.
Only use battery packs approved by the manufacturer or your Freedom 20.
Mini-laptop may be damaged.
Don’t place your Freedom Mini-laptop on soft objects (e.g. bed, sofa 21.
or your lap) as this may block the heat dispersing vents and cause the
computer to overheat and shut down.
Your Freedom Mini-laptop and its AC adapter may produce some heat 12.
when operating or charging. To prevent discomfort or possible injury
from heat exposure, it’s best not to use your Freedom Mini-laptop on
your lap or have it in prolonged contact with any other part of your body.
3130

32
33
12. Freedom Mini-laptop
Collect and Repair Warranty
1. What this warranty covers
1.1 We warrant that each Freedom Mini-
laptop is free from defects in materials
and workmanship under normal use
during the warranty period. The warranty
period for the Freedom Mini-laptop starts
on the original date of delivery to you (the
Customer) for a period of 12 months for
everything except the battery, unless we
inform you otherwise in writing. A 6 month
warranty period is included against the
battery from the original date of delivery
to you.
1.2 This warranty is offered as a collect and
return service. Only the cost of the parts
and labour involved in servicing any eligible
repairs under this warranty are covered.
1.3 This warranty also covers the cost
of shipping to and from mainland UK
and Northern Ireland addresses for all
eligible repairs.
1.4 This warranty also includes a
technical support service via telephone
for the full duration of the warranty. Call
on 0800 952 2294. Support is available
between the hours of 9.00am to 5.30pm
on Business Days. (‘Business Days’
means a day not being Saturday or
Sunday). This technical support service
only provides support on the Freedom
Mini-laptop and software installed on
the Freedom Mini-laptop supplied by us.
2. How to get warranty service
2.1 If the Freedom Mini-laptop does not
function as warranted during the warranty
period, you may obtain warranty services
by dialling the number detailed above.
The warranty service is only available in
the UK, therefore additional charges (for
cost of shipment) may apply for warranty
claims outside of the UK.
3. What we will do to correct problems
3.1 Where a Freedom Mini-laptop received
by you does not work on arrival or within
28 days of the date of delivery, we will
arrange for collection and replacement of
the Freedom Mini-laptop at our cost. We
will supply you with a replacement, or where
there is no branded Freedom Mini-laptops in
stock, with either a functionally equivalent or
superior specification Freedom Mini-laptop.
3.2 We will attempt to diagnose and
resolve your problems over the telephone
or e-mail. We may direct you to download
and install designated software updates.
If you contact us about a software
issue i.e. an issue with the pre-installed
software on the Freedom Mini-laptop, we
shall direct you to the correct third party
software provider for assistance.
3.3 Some problems can be resolved with
a replacement part that you can install
yourself called a “Customer Replaceable
Unit” or “CRU”. If so, we will ship the
CRU to you for you to install. You are
given the opportunity to call us back and
we will take you through the installation
process or arrange for you to send the
Freedom Mini-laptop back to complete
the install.
3.4 If the problem cannot be resolved
over the telephone or remotely, through
your application of software updates
(which we will guide you through) or
the installation of a CRU by you, we will
arrange for service of the Freedom Minilaptop at a third party UK repair centre.
For warranty claims within mainland UK
we will bear the costs of shipment to and
from our warranty repair centre.
3.5 If we determine that we are unable
to repair the Freedom Mini-laptop, we
will replace it with one that is at least
functionally equivalent.
3.6 If we determine that problems are as
a result of Customer misuse, improper
maintenance, accidents, modifications,
unsuitable physical operating environments,
power surges or natural disasters, our third
party repair centre will offer to repair the
Freedom Mini-laptop at a set price to you of
£110 including vat and delivery charges.
Service levels:
3.7 All technical support requests will be
brought to a point of resolution within 24
hours of the initial fault being reported
by you (excluding weekends and bank
holidays). By resolution we mean either
the fault is fixed or a time has been
arranged with you to pick up the Freedom
Mini-laptop to come back in for repair.
3.8 Repairs will be carried out within a
ten (10) Business Day timescale and will
return the Freedom Mini-laptop to you
within such timescale.
4. Replacement of Freedom Mini-
laptop or part
4.1 When the warranty service involves
the replacement of a Freedom Mini-laptop
or part, the replaced Freedom Mini-laptop
or part goes back into the stock holding
and the replacement Freedom Mini-laptop
or part becomes your property.
4.2 Only unaltered Freedom Mini-laptops
and parts are eligible for replacement.
For the purposes of this clause ‘unaltered’
means no hardware alterations have
been made to the Freedom Mini-laptop
by you. The replacement Freedom Minilaptop or part provided may not be new,
but it will be in good working order and
at least functionally equivalent to the
original Freedom Mini-laptop or part The
replacement Freedom Mini-laptop or part
shall be warranted for the balance of the
period remaining on the original Freedom
Mini-laptop.
4.3 Customer Responsibilities: Before we
replace a Freedom Mini-laptop or part,
you agree to:
remove all features, parts, options, 1.
alterations, and attachments not under
warranty service;
ensure that the Freedom Mini-laptop or 2.
part is free of any legal obligations or
restrictions that prevent its replacement;
and
authorise us to service a Freedom 3.
Mini-laptop or part.
5. Additional customer responsibilities
Where applicable, before service is provided,
you agree to:
follow the service request procedures that 1.
we specify;
backup or secure all programs and data 2.
contained in the Freedom Mini-laptop;
provide us with all system keys or 3.
passwords to perform the warranty
service; and
ensure that all information about 4.
identified or identifiable individuals
(“Personal Data”) is deleted from the
Freedom Mini-laptop or that, with
respect to any Personal Data that you do
not delete, you are in compliance with all
applicable laws.
6. Use of personal information
6.1 If you obtain services under this
warranty, we will store, use and process
information about your warranty service
and contact information, including
name, phone numbers, address, and
e-mail address. We will only use this
information to perform service under this
warranty. We will only disclose customer
information where required by law.

34
35
12.1 Customer Services
7. What this warranty does not cover
This warranty does not cover the
following:
uninterrupted or error-free operation •
of a Freedom Mini-laptop;
loss of, or damage to, your data;•
any software programs, that were not •
provided with the Freedom Mini-laptop
by us installed subsequently;
failure or damage resulting from misuse, •
accident, modification, unsuitable
physical or operating environment,
natural disasters, power surges, or
improper maintenance by you;
damage caused by a non-authorised •
warranty service provider;
return shipping costs for non-eligible •
warranty repairs of which you will
be informed
failure of, or damage caused by, any •
third party Freedom Mini-laptop,
software, peripherals or components.
This warranty is voided by removal or
alteration of identification labels on the
Freedom Mini-laptop or its parts.
8. Limitations
8.1 We are only responsible for loss or
damage to the Freedom Mini-laptop while
it is: 1) in our possession; or 2) in transit in
those cases where we are responsible for
the transportation.
8.2 We are not responsible for any
data including confidential, proprietary,
or personal data contained in/on the
Freedom Mini-laptop.
You should remove and/or backup all such
information from the Freedom Mini-laptop
prior to its service or return.
8.3 Under no circumstances shall we
be liable for any of the following even if
informed of their possibility: 1) third party
claims against you for damages; 2) loss
or damage to your data; or 3) special,
incidental, indirect or consequential
damages, including lost profits, business
revenue, goodwill or anticipated savings.
Call 0800 952 2294 to speak to one of our team (phone line open
Monday to Friday 9am to 6pm excluding Bank holidays).
3534
 Loading...