

Page 1
MiFi®2200
Broadband2Go
3G Nationwide Wireless Internet
No Contract
Only Pay For What You Need
Connect Up to 5 Wi-Fi Enabled
Devices at Once
Plans Start at Just $10
VIRGINMOBILEUSA.COM
Page 2

©2010 Novatel Wireless, Inc. All rights reserved. The information contained in this document is subject to change
without notice and should not be construed as a commitment by Novatel Wireless, Inc.
Patents and Licenses
Licensed by QUALCOMM® Incorporated under one or more of the following patents:
4,901,307 5,490,165 5,056,109 5,504,773 5,101,501 7,392,039
5,506,865 5,109,390 5,511,073 5,228,054 5,535,239 7,574,737
5,267,261 5,544,196 5,267,262 5,568,483 5,337,338
5,600,754 5,414,796 5,657,420 5,416,797 5,659,569
5,710,784 5,778,338 5,129,098 6,829,481 7,319,715
Visit www.novatelwireless.com/patents for a complete list of all Novatel Wireless patents.
Software License
Proprietary Rights Provisions:
The software drivers provided with this product are copyrighted by Novatel Wireless and/or Novatel Wireless’ suppliers.
Although copyrighted, the software drivers are unpublished and embody valuable trade secrets proprietary to Novatel
Wireless and/or Novatel Wireless’ suppliers. The disassembly, decompilation, and/or Reverse Engineering of the software
drivers for any purpose is strictly prohibited by international law. The copying of the software drivers, except for a reasonable
number of back-up copies is strictly prohibited by international law. It is forbidden by international law to provide access
to the software drivers to any person for any purpose other than processing the internal data for the intended use of the
software drivers.
U.S. Government Restricted Rights Clause:
The software drivers are classied as “Commercial Computing device Software” and the U.S. Government is acquiring only
“Restricted Rights” in the software drivers and their Documentation.
U.S. Government Export Administration Act Compliance Clause:
It is forbidden by US law to export, license or otherwise transfer the software drivers or Derivative Works to any country where
such transfer is prohibited by the United States Export Administration Act, or any successor legislation, or in violation of the
laws of any other country.
Trademarks and Service Marks
Novatel Wireless is a trademark of Novatel Wireless, Inc., and the other trademarks, logos, and service marks (collectively the
“Trademarks”) used in this user manual are the property of Novatel Wireless or their respective owners. Nothing contained in
this user manual should be construed as granting by implication, estoppel, or otherwise, a license or right of use of Novatel
Wireless or any other Trademark displayed in this user manual without the written permission of Novatel Wireless or its
respective owners.
• MobiLink, Novatel Wireless, and the Novatel Wireless logo are all trademarks of Novatel Wireless, Inc.
• MiFi and the MiFi logo are registered trademarks of Novatel Wireless, Inc.
• Microsoft and Windows are either registered trademarks or trademarks of Microsoft Corporation in the United States and/or
other countries.
• Apple®, Mac®, and Mac OS® are trademarks of Apple, Inc., registered in the U.S. and other countries.
• Linux® is the registered trademark of Linus Torvalds in the U.S. and other countries.
The names of actual companies and products mentioned in this user manual may be the trademarks of their respective
owners.
FCC ID: PKRNVWMiFi2200
PN 90026187 R1 MASTER 062910
Please visit www.novatelwireless.com for the latest information about your device.
Page 3

Contents
Product Overview . . . . . . . . . . . . . . . . . . . . . . . . . . . . . . . . . . . . . . . . . . . . . . . . . . . . . . . 4
MiFi® 2200 Device Overview . . . . . . . . . . . . . . . . . . . . . . . . . . . . . . . . . . . . . . . . . . . . . . . . . . . . . . . . . . . . . . . . . 5
Features . . . . . . . . . . . . . . . . . . . . . . . . . . . . . . . . . . . . . . . . . . . . . . . . . . . . . . . . . . . . . . . . . . . . . . . . . . . . . . . . . 5
Package Contents . . . . . . . . . . . . . . . . . . . . . . . . . . . . . . . . . . . . . . . . . . . . . . . . . . . . . . . . . . . . . . . . . . . . . . . 6
System Requirements. . . . . . . . . . . . . . . . . . . . . . . . . . . . . . . . . . . . . . . . . . . . . . . . . . . . . . . . . . . . . . . . . . . . 6
Your MiFi 2200 Intelligent Mobile Hotspot Device . . . . . . . . . . . . . . . . . . . . . . . . . . . . . . . . . . . . . . . . . . . . . 7
LED States. . . . . . . . . . . . . . . . . . . . . . . . . . . . . . . . . . . . . . . . . . . . . . . . . . . . . . . . . . . . . . . . . . . . . . . . . . . . . . . 8
Caring for Your Device . . . . . . . . . . . . . . . . . . . . . . . . . . . . . . . . . . . . . . . . . . . . . . . . . . . . . . . . . . . . . . . . . . . 8
Power Management . . . . . . . . . . . . . . . . . . . . . . . . . . . . . . . . . . . . . . . . . . . . . . . . . . . . . . . . . . . . . . . . . . . . . . . . . 9
Using the Battery . . . . . . . . . . . . . . . . . . . . . . . . . . . . . . . . . . . . . . . . . . . . . . . . . . . . . . . . . . . . . . . . . . . . . . . . 9
Using Your MiFi 2200 Device . . . . . . . . . . . . . . . . . . . . . . . . . . . . . . . . . . . . . . . . . . . . 10
Using Your MiFi Device for the First Time. . . . . . . . . . . . . . . . . . . . . . . . . . . . . . . . . . . . . . . . . . . . . . . . . . . . . 11
Inserting and Charging the Battery . . . . . . . . . . . . . . . . . . . . . . . . . . . . . . . . . . . . . . . . . . . . . . . . . . . . . . 11
Powering the MiFi 2200 Device On and O . . . . . . . . . . . . . . . . . . . . . . . . . . . . . . . . . . . . . . . . . . . . . . 12
Connect in Wi-Fi Mode. . . . . . . . . . . . . . . . . . . . . . . . . . . . . . . . . . . . . . . . . . . . . . . . . . . . . . . . . . . . . . . . . . . . . . 13
Connecting to the MiFi 2200 Device for the First Time . . . . . . . . . . . . . . . . . . . . . . . . . . . . . . . . . . . . 14
MiFi Device Settings . . . . . . . . . . . . . . . . . . . . . . . . . . . . . . . . . . . . . . . . . . . . . . . . . . . 19
MiFi Device Settings Basics. . . . . . . . . . . . . . . . . . . . . . . . . . . . . . . . . . . . . . . . . . . . . . . . . . . . . . . . . . . . . . . . . . 20
Open MiFi Device Settings . . . . . . . . . . . . . . . . . . . . . . . . . . . . . . . . . . . . . . . . . . . . . . . . . . . . . . . . . . . . . . 20
The Home Page . . . . . . . . . . . . . . . . . . . . . . . . . . . . . . . . . . . . . . . . . . . . . . . . . . . . . . . . . . . . . . . . . . . . . . . . . . . . 21
The Menu Bar . . . . . . . . . . . . . . . . . . . . . . . . . . . . . . . . . . . . . . . . . . . . . . . . . . . . . . . . . . . . . . . . . . . . . . . . . . 21
Home Page Sections . . . . . . . . . . . . . . . . . . . . . . . . . . . . . . . . . . . . . . . . . . . . . . . . . . . . . . . . . . . . . . . . . . . . 22
Internet Connection . . . . . . . . . . . . . . . . . . . . . . . . . . . . . . . . . . . . . . . . . . . . . . . . . . . . . . . . . . . . . . . . 22
Wi-Fi . . . . . . . . . . . . . . . . . . . . . . . . . . . . . . . . . . . . . . . . . . . . . . . . . . . . . . . . . . . . . . . . . . . . . . . . . . . . . . . 23
Password Settings . . . . . . . . . . . . . . . . . . . . . . . . . . . . . . . . . . . . . . . . . . . . . . . . . . . . . . . . . . . . . . . . . . . . . . . . . . 24
Create a New Administrative Password . . . . . . . . . . . . . . . . . . . . . . . . . . . . . . . . . . . . . . . . . . . . . . . . . . 24
Wi-Fi Menu . . . . . . . . . . . . . . . . . . . . . . . . . . . . . . . . . . . . . . . . . . . . . . . . . . . . . . . . . . . . . . . . . . . . . . . . . . . . . . . . . 25
Wi-Fi Proles. . . . . . . . . . . . . . . . . . . . . . . . . . . . . . . . . . . . . . . . . . . . . . . . . . . . . . . . . . . . . . . . . . . . . . . . . . . . 26
Choosing a Prole . . . . . . . . . . . . . . . . . . . . . . . . . . . . . . . . . . . . . . . . . . . . . . . . . . . . . . . . . . . . . . . . . . 27
Setting Security . . . . . . . . . . . . . . . . . . . . . . . . . . . . . . . . . . . . . . . . . . . . . . . . . . . . . . . . . . . . . . . . . . . . 27
Setting Up a Temporary Hotspot . . . . . . . . . . . . . . . . . . . . . . . . . . . . . . . . . . . . . . . . . . . . . . . . . . . . 28
MAC Filter . . . . . . . . . . . . . . . . . . . . . . . . . . . . . . . . . . . . . . . . . . . . . . . . . . . . . . . . . . . . . . . . . . . . . . . . . . . . . . 29
Finding the MAC Address . . . . . . . . . . . . . . . . . . . . . . . . . . . . . . . . . . . . . . . . . . . . . . . . . . . . . . . . . . . 30
Using MAC Filtering. . . . . . . . . . . . . . . . . . . . . . . . . . . . . . . . . . . . . . . . . . . . . . . . . . . . . . . . . . . . . . . . . 30
Status . . . . . . . . . . . . . . . . . . . . . . . . . . . . . . . . . . . . . . . . . . . . . . . . . . . . . . . . . . . . . . . . . . . . . . . . . . . . . . . . . . 31
Wi-Fi Clients . . . . . . . . . . . . . . . . . . . . . . . . . . . . . . . . . . . . . . . . . . . . . . . . . . . . . . . . . . . . . . . . . . . . . . . . 33
Wi-Fi Log . . . . . . . . . . . . . . . . . . . . . . . . . . . . . . . . . . . . . . . . . . . . . . . . . . . . . . . . . . . . . . . . . . . . . . . . . . . 33
WWAN Menu . . . . . . . . . . . . . . . . . . . . . . . . . . . . . . . . . . . . . . . . . . . . . . . . . . . . . . . . . . . . . . . . . . . . . . . . . . . . . . . 34
Diagnostics. . . . . . . . . . . . . . . . . . . . . . . . . . . . . . . . . . . . . . . . . . . . . . . . . . . . . . . . . . . . . . . . . . . . . . . . . . . . . 35
WWAN Connection . . . . . . . . . . . . . . . . . . . . . . . . . . . . . . . . . . . . . . . . . . . . . . . . . . . . . . . . . . . . . . . . . 36
Page 4

WWAN Modem . . . . . . . . . . . . . . . . . . . . . . . . . . . . . . . . . . . . . . . . . . . . . . . . . . . . . . . . . . . . . . . . . . . . . 37
WWAN Event Log . . . . . . . . . . . . . . . . . . . . . . . . . . . . . . . . . . . . . . . . . . . . . . . . . . . . . . . . . . . . . . . . . . . 38
WWAN Status. . . . . . . . . . . . . . . . . . . . . . . . . . . . . . . . . . . . . . . . . . . . . . . . . . . . . . . . . . . . . . . . . . . . . . . . . . . 39
Internet Connection . . . . . . . . . . . . . . . . . . . . . . . . . . . . . . . . . . . . . . . . . . . . . . . . . . . . . . . . . . . . . . . . 40
Trac Counters. . . . . . . . . . . . . . . . . . . . . . . . . . . . . . . . . . . . . . . . . . . . . . . . . . . . . . . . . . . . . . . . . . . . . 41
Connection Log . . . . . . . . . . . . . . . . . . . . . . . . . . . . . . . . . . . . . . . . . . . . . . . . . . . . . . . . . . . . . . . . . . . . 42
Advanced Menu . . . . . . . . . . . . . . . . . . . . . . . . . . . . . . . . . . . . . . . . . . . . . . . . . . . . . . . . . . . . . . . . . . . . . . . . . . . . 43
Advanced Settings. . . . . . . . . . . . . . . . . . . . . . . . . . . . . . . . . . . . . . . . . . . . . . . . . . . . . . . . . . . . . . . . . . . . . . 44
Access Point . . . . . . . . . . . . . . . . . . . . . . . . . . . . . . . . . . . . . . . . . . . . . . . . . . . . . . . . . . . . . . . . . . . . . . . . 45
3G Modem . . . . . . . . . . . . . . . . . . . . . . . . . . . . . . . . . . . . . . . . . . . . . . . . . . . . . . . . . . . . . . . . . . . . . . . . . 45
Router. . . . . . . . . . . . . . . . . . . . . . . . . . . . . . . . . . . . . . . . . . . . . . . . . . . . . . . . . . . . . . . . . . . . . . . . . . . . . . 46
System . . . . . . . . . . . . . . . . . . . . . . . . . . . . . . . . . . . . . . . . . . . . . . . . . . . . . . . . . . . . . . . . . . . . . . . . . . . . . 46
Cong File. . . . . . . . . . . . . . . . . . . . . . . . . . . . . . . . . . . . . . . . . . . . . . . . . . . . . . . . . . . . . . . . . . . . . . . . . . . . . . 47
Cong File Download. . . . . . . . . . . . . . . . . . . . . . . . . . . . . . . . . . . . . . . . . . . . . . . . . . . . . . . . . . . . . . . 47
Cong File Upload . . . . . . . . . . . . . . . . . . . . . . . . . . . . . . . . . . . . . . . . . . . . . . . . . . . . . . . . . . . . . . . . . . 48
Port Filtering . . . . . . . . . . . . . . . . . . . . . . . . . . . . . . . . . . . . . . . . . . . . . . . . . . . . . . . . . . . . . . . . . . . . . . . . . . . 49
Port Filtering for Standard Applications. . . . . . . . . . . . . . . . . . . . . . . . . . . . . . . . . . . . . . . . . . . . . . 50
Port Filtering for Custom Applications . . . . . . . . . . . . . . . . . . . . . . . . . . . . . . . . . . . . . . . . . . . . . . . 50
Port Forwarding . . . . . . . . . . . . . . . . . . . . . . . . . . . . . . . . . . . . . . . . . . . . . . . . . . . . . . . . . . . . . . . . . . . . . . . . 52
Power Management . . . . . . . . . . . . . . . . . . . . . . . . . . . . . . . . . . . . . . . . . . . . . . . . . . . . . . . . . . . . . . . . . . . . 53
TCP/IP. . . . . . . . . . . . . . . . . . . . . . . . . . . . . . . . . . . . . . . . . . . . . . . . . . . . . . . . . . . . . . . . . . . . . . . . . . . . . . . . . . 54
System Status . . . . . . . . . . . . . . . . . . . . . . . . . . . . . . . . . . . . . . . . . . . . . . . . . . . . . . . . . . . . . . . . . . . . . . . . . . 55
Restarting or Resetting Your MiFi Device. . . . . . . . . . . . . . . . . . . . . . . . . . . . . . . . . . . . . . . . . . . . . 56
Troubleshooting . . . . . . . . . . . . . . . . . . . . . . . . . . . . . . . . . . . . . . . . . . . . . . . . . . . . . . . 57
Overview. . . . . . . . . . . . . . . . . . . . . . . . . . . . . . . . . . . . . . . . . . . . . . . . . . . . . . . . . . . . . . . . . . . . . . . . . . . . . . . . . . . 58
Common Problems and Solutions. . . . . . . . . . . . . . . . . . . . . . . . . . . . . . . . . . . . . . . . . . . . . . . . . . . . . . . . . . . 59
Use the Master Reset Button . . . . . . . . . . . . . . . . . . . . . . . . . . . . . . . . . . . . . . . . . . . . . . . . . . . . . . . . . . . . . . . . 62
Technical Support . . . . . . . . . . . . . . . . . . . . . . . . . . . . . . . . . . . . . . . . . . . . . . . . . . . . . . . . . . . . . . . . . . . . . . . . . . 63
Technical Information . . . . . . . . . . . . . . . . . . . . . . . . . . . . . . . . . . . . . . . . . . . . . . . . . . 64
Product Specications . . . . . . . . . . . . . . . . . . . . . . . . . . . . . . . . . . . . . . . . . . . . . . . . . . . . . . . . . . . . . . . . . . . . . . 65
Regulatory Notices . . . . . . . . . . . . . . . . . . . . . . . . . . . . . . . . . . . . . . . . . . . . . . . . . . . . . . . . . . . . . . . . . . . . . . . . . 66
Safety Hazards. . . . . . . . . . . . . . . . . . . . . . . . . . . . . . . . . . . . . . . . . . . . . . . . . . . . . . . . . . . . . . . . . . . . . . . . . . . . . . 68
Limited Warranty and Liability . . . . . . . . . . . . . . . . . . . . . . . . . . . . . . . . . . . . . . . . . . . . . . . . . . . . . . . . . . . . . . 70
Glossary. . . . . . . . . . . . . . . . . . . . . . . . . . . . . . . . . . . . . . . . . . . . . . . . . . . . . . . . . . . . . . . 71
Glossary . . . . . . . . . . . . . . . . . . . . . . . . . . . . . . . . . . . . . . . . . . . . . . . . . . . . . . . . . . . . . . . . . . . . . . . . . . . . . . . . . . . . 72
Page 5

1
Product Overview
MiFi 2200 Device Overview
Your MiFi 2200 Intelligent Mobile Hotspot Device
Power Management
Using the microUSB Cable
Page 6

MiFi® 2200 Device Overview
Thank you for choosing the Novatel Wireless MiFi® 2200 Intelligent Mobile Hotspot Device for
Mobile Broadband and Wi-Fi!
This device operates over high-speed Mobile Broadband networks in the 800/1900 bands enabling
you to connect at high speeds to the Internet, your corporate Intranet, Wi-Fi-enabled devices and
access your email virtually anywhere!
MiFi 2200 Device is an Intelligent Mobile Hotspot, empowering you with high-speed data access on
your wireless data network and Wi-Fi connectivity.
Features
With the MiFi 2200 Device, you can:
• Connect to High-Speed Wireless Data
• Benefit from Wi-Fi Connectivity
• With the MiFi 2200 Intelligent Mobile Hotspot Device, connect via Wi-Fi and access
high-speed mobile broadband service to browse the Internet, access email, run business
applications and more from a computer or most Wi-Fi-compatible devices.
• The MiFi 2200 Device enables multiple Wi-Fi-enabled devices to connect at one time,
such as notebooks, desktops, tablet computers, personal digital assistants, and most
Wi-Fi-enabled consumer devices.
• Typical battery usage time is up to 4 hours active and up to 40 hours standby in Wi-Fi
mode (with one Wi-Fi connected device).
• Manage Wireless Network Activity – MiFi Device Settings
MiFi Device Settings: Allows you to manage, monitor, and customize your Wi-Fi Mobile
Broadband connection through an easy-to-use interface when the device is in Wi-Fi mode
(that is, without the use of the USB cable).
Additional features include:
• Advanced embedded antenna design for Mobile Broadband and Wi-Fi
• VPN capability
• Auto detection and connectivity options
5
Page 7

Package Contents
The MiFi 2200 Device package includes:
• MiFi 2200 Intelligent Mobile Hotspot Device
• AC Wall Charger
• Lithium Ion Battery
• Carry Pouch
• microUSB cable
• Quick Start Guide
Product User Guide available for download at http://www.virginmobileusa.com
System Requirements
• Internet browser (for example, Internet Explorer, Safari, Firefox, Opera, Chrome)
• Wireless interface (802.11b/g)
6
Page 8
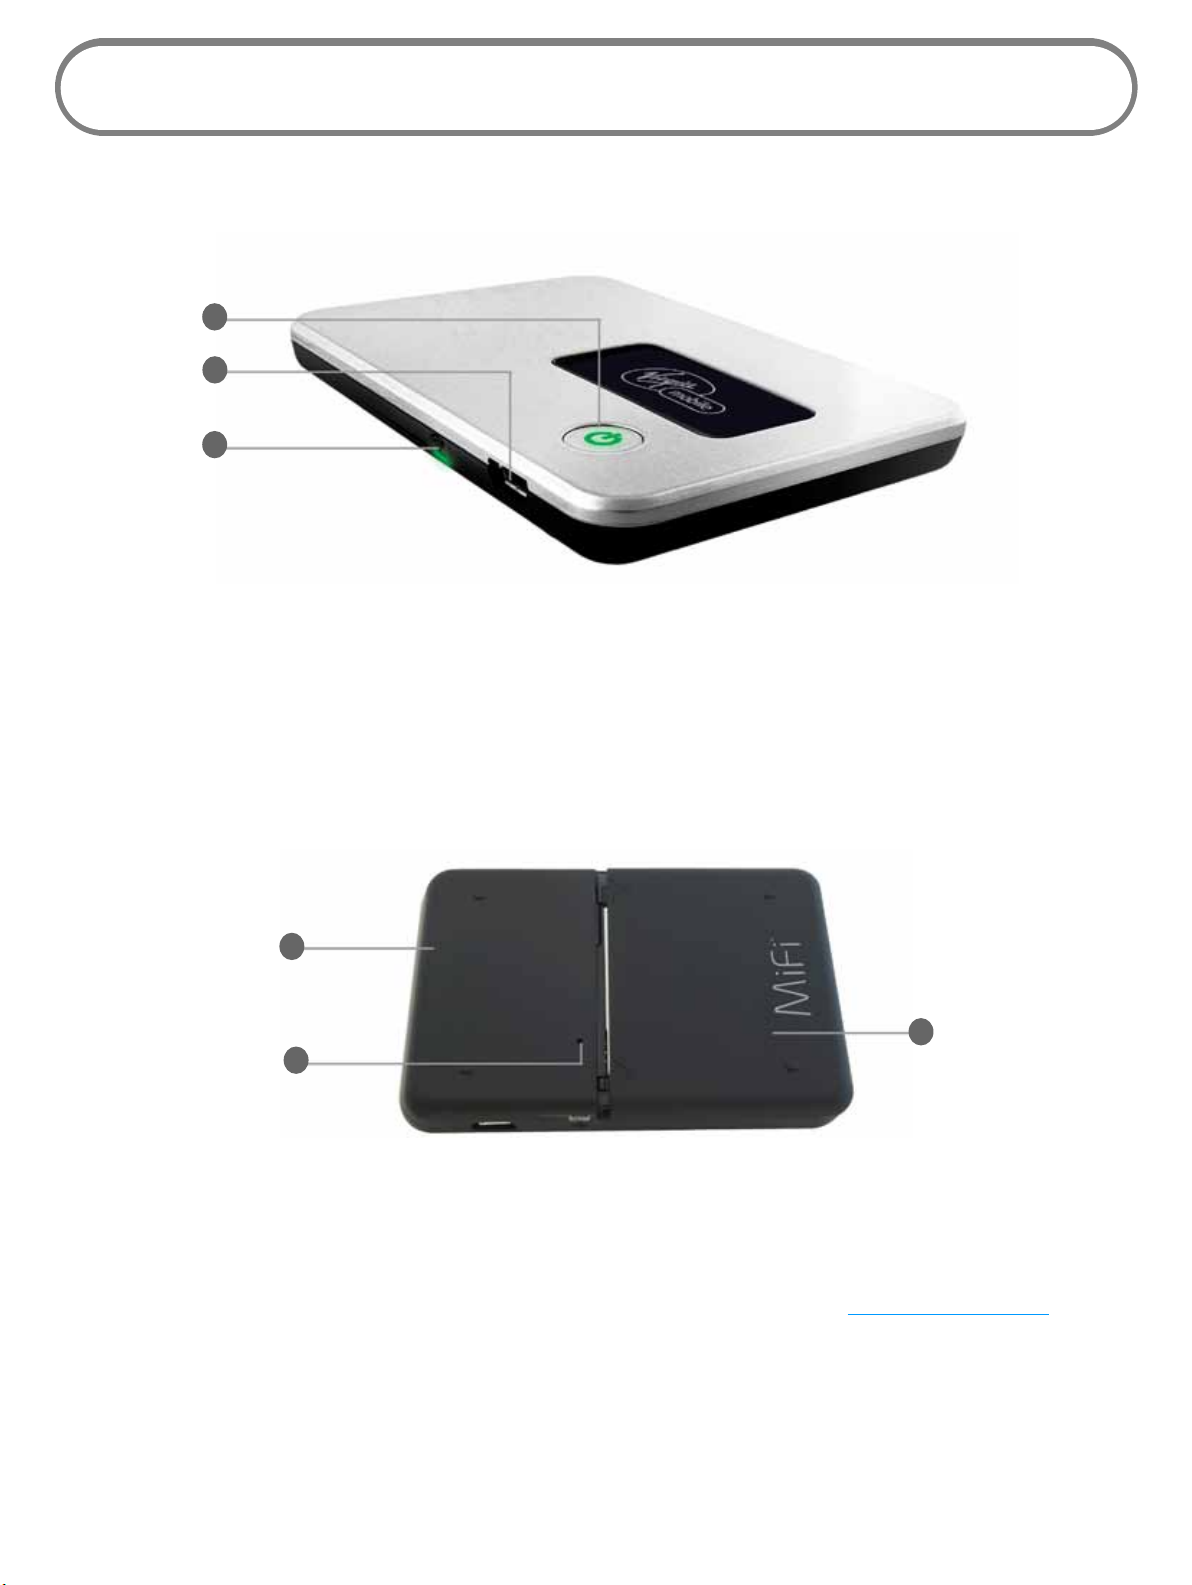
Your MiFi 2200 Intelligent Mobile Hotspot Device
Your MiFi 2200 Device has the following parts:
1
2
3
➊ Power Button / LED: Powers on and o the device. The LED indicates power, battery status,
and roaming activity.
➋ microUSB Connector: The AC charger connects here.
➌ Service Status LED: Provides information about your mobile broadband connection.
4
6
5
➍
Network Name and Password: The precongured name of your network (SSID) and your
network password (also called a network key) will be printed on a label attached to the back
of your MiFi Device .
➎ Master Reset Button: Resets device to factory default settings. [See Master Reset Button
(page 62).]
➏ Battery Compartment: Battery is placed here.
7
Page 9

LED States
The MiFi Device LEDs provide valuable information about the state of the device and connection
Service Status LED
No Light — Device is powered o.
Green
Power Button LED
No Light — Device is powered o.
Green
Red
Solid The MiFi Device is powered on and connected
to a mobile broadband network, but is not
transmitting or receiving data.
Slow Blinking The MiFi Device is powered on but there is no
service.
Intermittent Blinking The MiFi Device is transmitting / receiving
mobile broadband data. The blinking rate is
proportional to the data speed.
Solid
Glowing
Blinking Battery is critically low.
The MiFi Device is powered on and fully
charged.
The MiFi Device is in standby mode (power
saving). Press the power button to wake up the
device.
Amber
Solid
Blinking
Battery is charging.
Error. [See Troubleshooting
(page 57).]
Caring for Your Device
As with any electronic device, the MiFi 2200 Device must be handled with care to ensure reliable
operation. Novatel Wireless recommends the following handling guidelines:
• Do not apply adhesive labels to the MiFi 2200 Device; they may cause the device to
potentially overheat and they may alter the performance of the antenna system.
• The USB connector cable should plug easily into your computer’s Type A USB port. Forcing
the device into a port may damage the connector.
• Protect the MiFi 2200 Device from liquids, dust, and excessive heat.
• Store the MiFi 2200 Device in a safe place, when not in use.
8
Page 10

Power Management
Your device will work from its battery or when plugged into a power source.
• Battery — The battery will last for up to four hours. Charge the battery by plugging in the AC
adapter. While the battery is charging the Power Button LED will be solid amber. When the
battery is fully charged, it will be solid green.
• Wall power — Use the device by plugging it into a wall socket. The MiFi Device battery will
charge while it is plugged in.
Using the Battery
• Do not use sharp objects to access the battery well, as this may damage the device and the
battery.
• Do not use excessive force to remove the battery or to access the battery well.
• Battery life depends on the network, signal strength, temperature, features, and accessories
used.
• New batteries or batteries stored for a long time may take more time to charge.
• When charging your battery, keep it near room temperature.
• When storing your battery, keep it uncharged in a cool, dark, dry place.
• Never expose batteries to temperatures below -10
the device in an unattended vehicle since temperatures may be outside the temperature
range for this device.
• It is normal for batteries to gradually wear down and require longer charging times. If you
notice a change in your battery life, it is probably time to purchase a new battery.
• Some batteries perform best after several full charge/discharge cycles.
o
C (14oF) or above 45oC (113oF). Never leave
IMPORTANT! Whenever you remove or insert either the battery or the SIM card, ensure your
MiFi device is not connected to any device or power source. Never use tools, knives, keys, pens or
any type of object to force the door open or to remove the battery. Using any of these types of
objects could result in puncturing the MiFi battery.
WARNING! Failure to use approved batteries and chargers may increase the risk that your
device will overheat, catch fire, or explode, resulting in serious bodily injury, death, or property
damage. To avoid risk of explosion, never dispose of batteries in a fire.
NOTE Contact your local recycling center for proper battery disposal.
Before using the MiFi 2200 Device, read the battery safety information in the “Safety Hazards”
section of this guide. [See Proper Battery Use and Disposal (page 69).]
9
Page 11

2
Using Your MiFi 2200 Device
Using Your MiFi Device for the First Time
Connect in Wi-Fi Mode
Page 12
Using Your MiFi Device for the First Time
IMPORTANT! The MiFi 2200 Device requires an activated account in order to function.
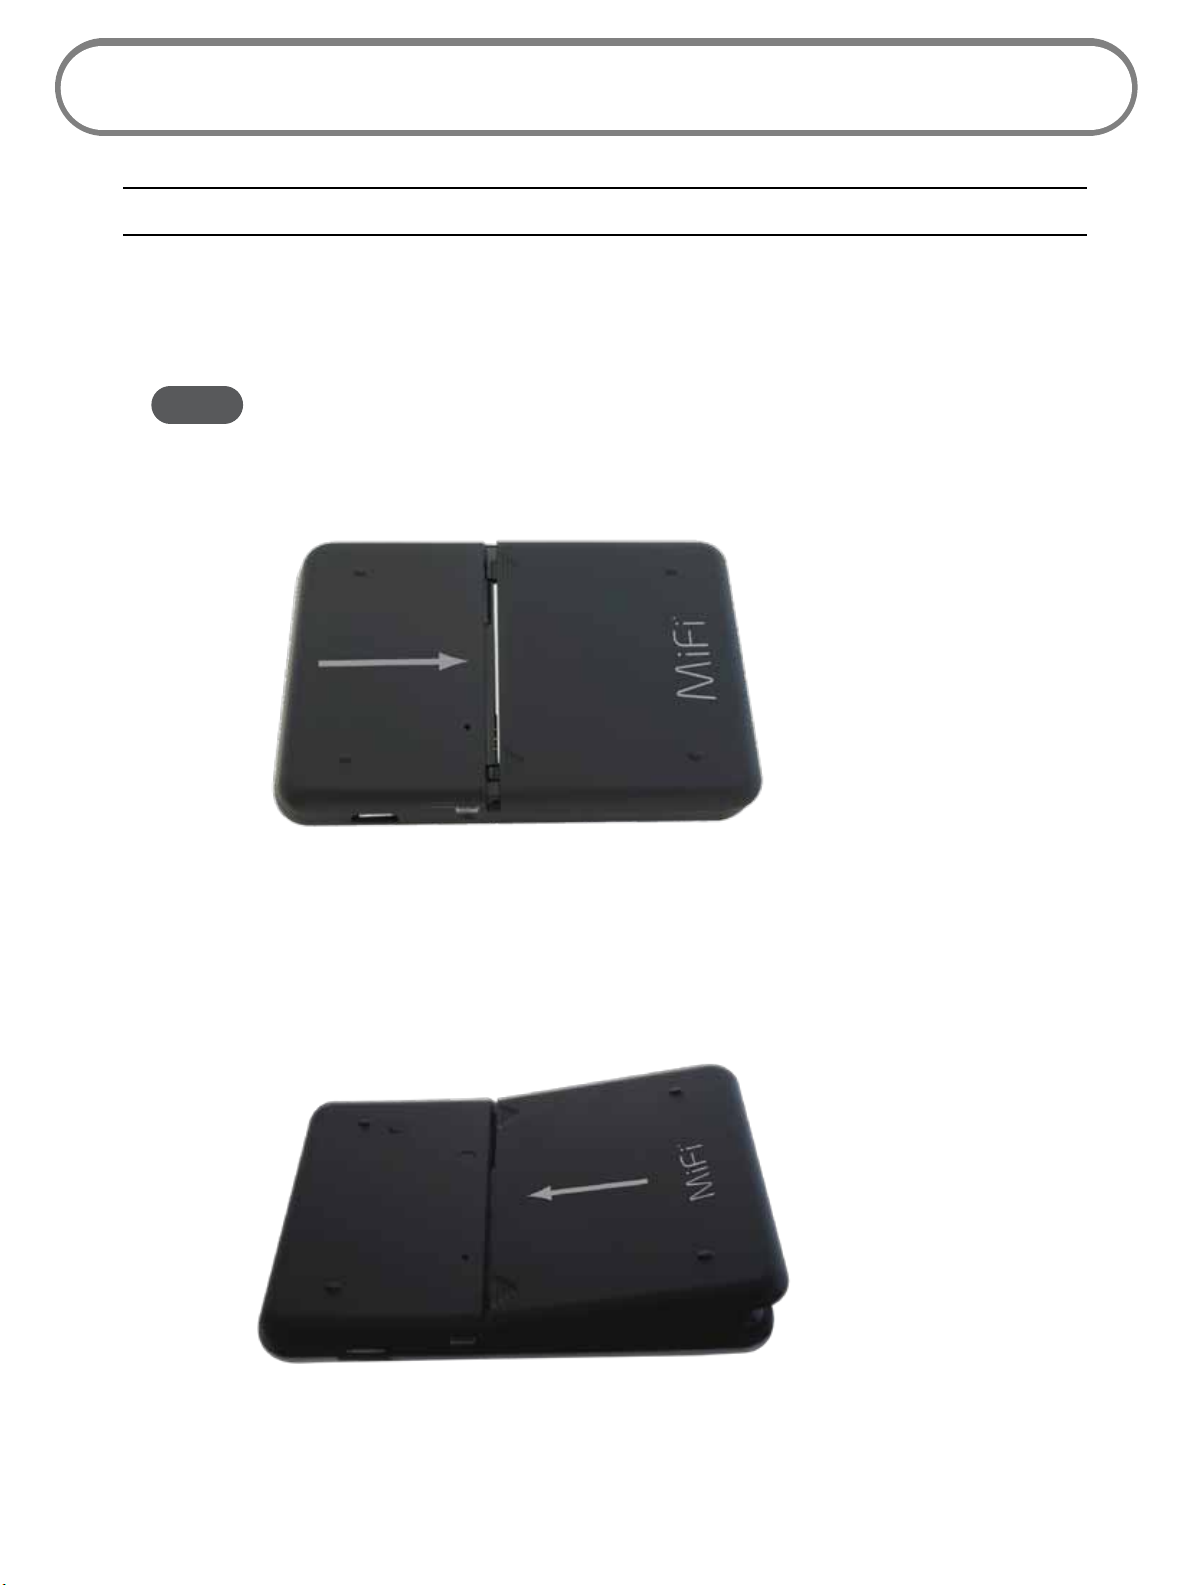
Inserting and Charging the Battery
NOTE The battery should be fully charged before using the MiFi 2200 Device for the first time.
➊ Open the battery compartment, located on the bottom of the device.
➋ Insert the battery by lining up the gold contact points on the battery with the gold contact
points in the battery compartment.
11
Page 13
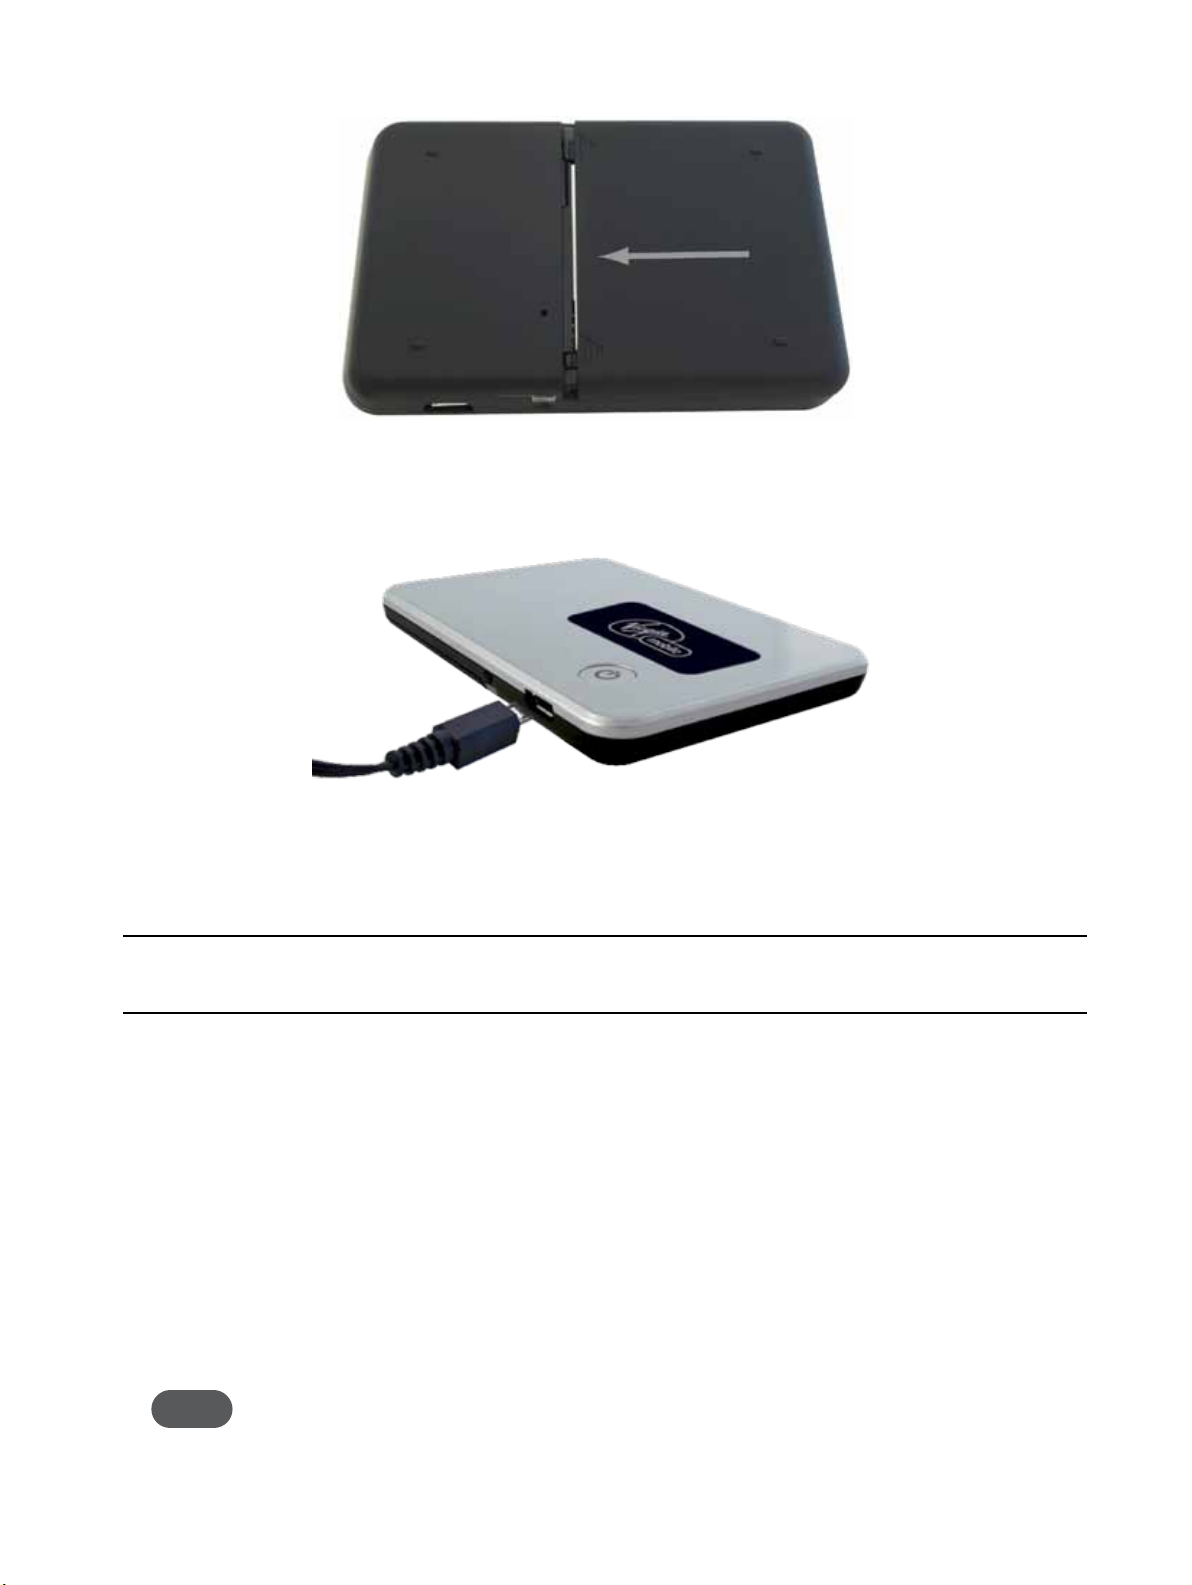
➌ Once the battery is secure, place the battery cover back on the device until it locks into place.
➍ Connect the microUSB end of the AC wall charger to the microUSB port of the device as
shown.
➎ Plug the other end of the AC wall charger into the appropriate electrical outlet. Charge for at
least two and a half hours.
CAUTION! Use only an approved charging accessory to charge your device. Use of an
incompatible charger may cause damage to your device and void the warranty.
Powering the MiFi 2200 Device On and O
To power the device on:
➤ Press the Power button until the Power LED lights up solid green.
To power the device off:
➤ Press and hold the Power button until the Power LED shuts o.
NOTE The device remains on while charging.
12
Page 14

Connect in Wi-Fi Mode
Tip! The default SSID for your MiFi Device is Virgin Mobile MiFi2200 xxx Secure. Your SSID and 11-digit
Network Key are printed on the back of your device. (The ‘xxx’ are the last three characters of your
MiFi Device’s MAC address.)
➊ Use the Wi-Fi manager on your computer to select your Virgin Mobile MiFi2200 xxx Secure
network name (SSID).
» From a Windows PC: Open the Control Panel and select the Network and Sharing Center. Select
the Connect to a network option. Choose Virgin Mobile MiFi2200 xxx Secure from the list of available
networks.
» From a Mac computer: Select System Preferences > Airport. Choose Virgin Mobile MiFi2200 xxx Secure
from the Network Name dropdown menu.
➋ Click Connect.
➌ Enter your 11-digit password when prompted for a security key.
Tip! The steps to connect to a Wi-Fi network vary depending on your operating system and whether you
use the native application or third-party software.
Generally you click an icon (often in the Windows notification area or System Preferences > Network
on a Mac) where you can select “View Available Wireless Networks.” If you are unfamiliar with
wireless networking on your computer, consult the computer help system.
13
Page 15
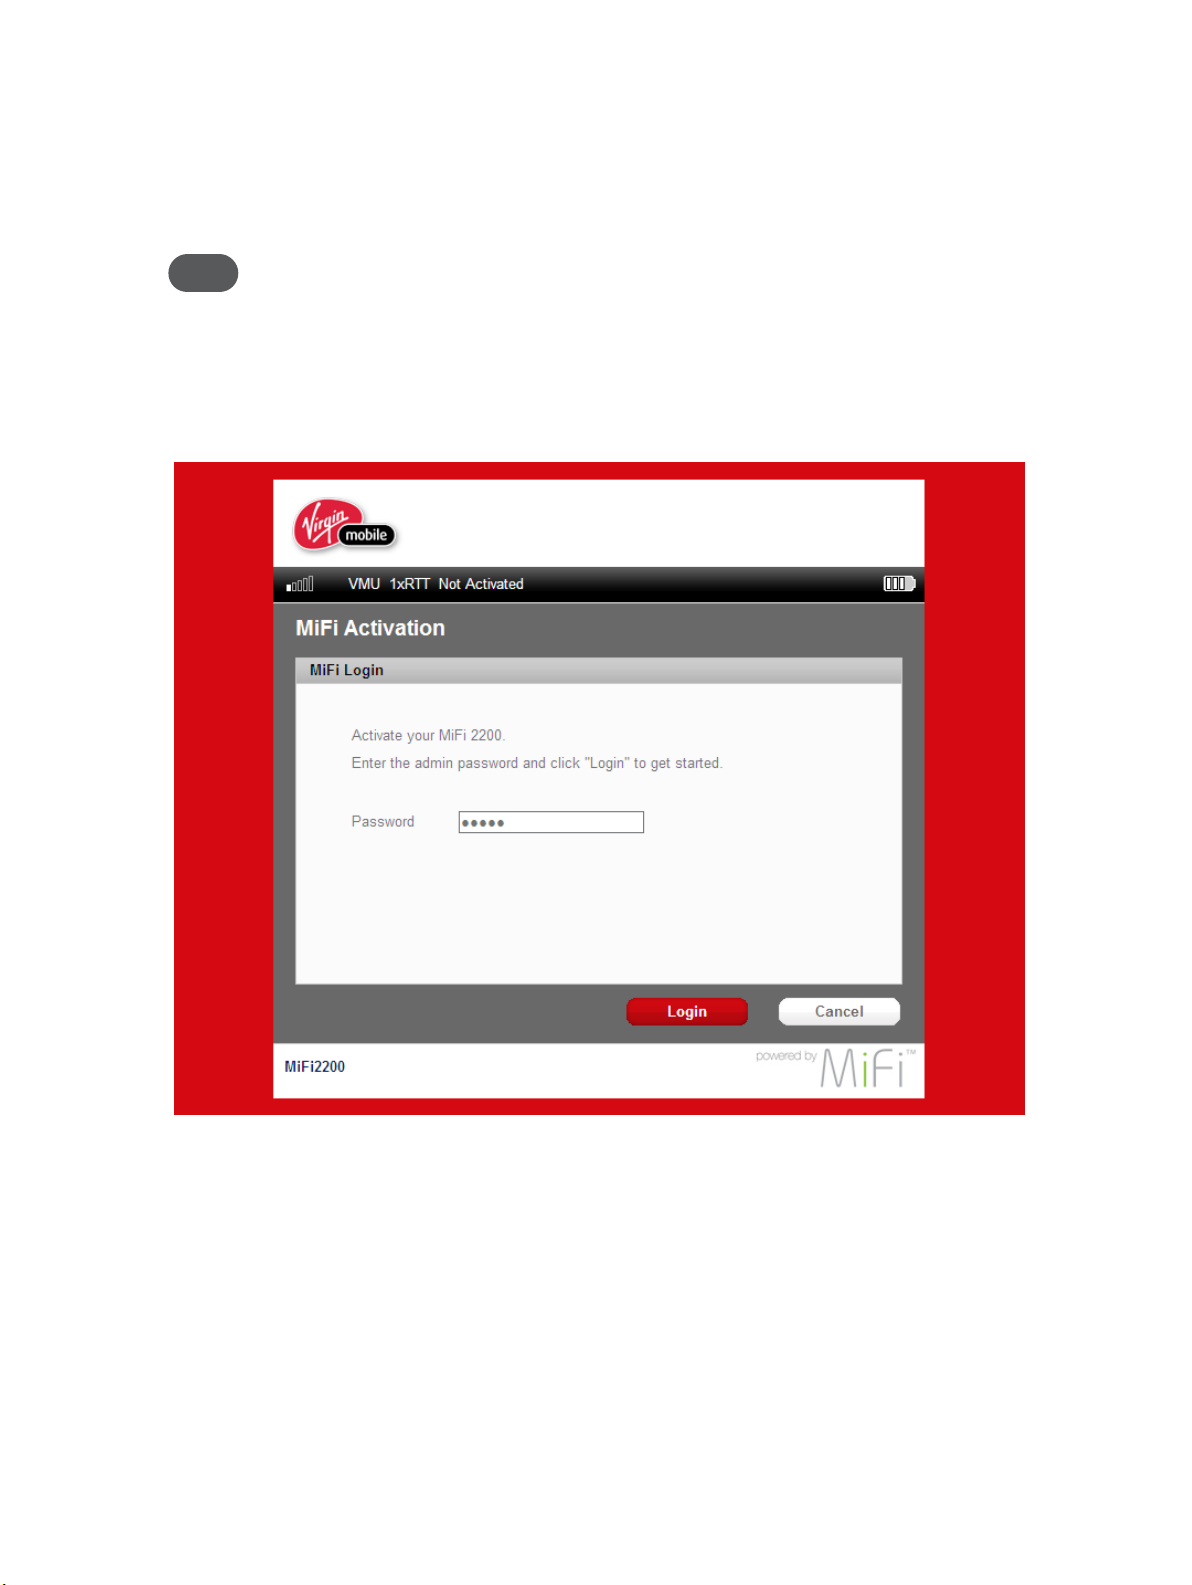
Connecting to the MiFi 2200 Device for the First Time
➊ On your computer launch a new web browser session.
➋ From your computer’s Web browser, enter http://virginmobile.mifi into the address window
and press the Enter or Return key.
Tip! You can use either of these addresses:
http://virginmobile.mifi
http://192.168.1.1
An onscreen wizard launches and guides you through activating your MiFi Device.
➌ Enter the default login password admin when requested. Click Login.
14
Page 16
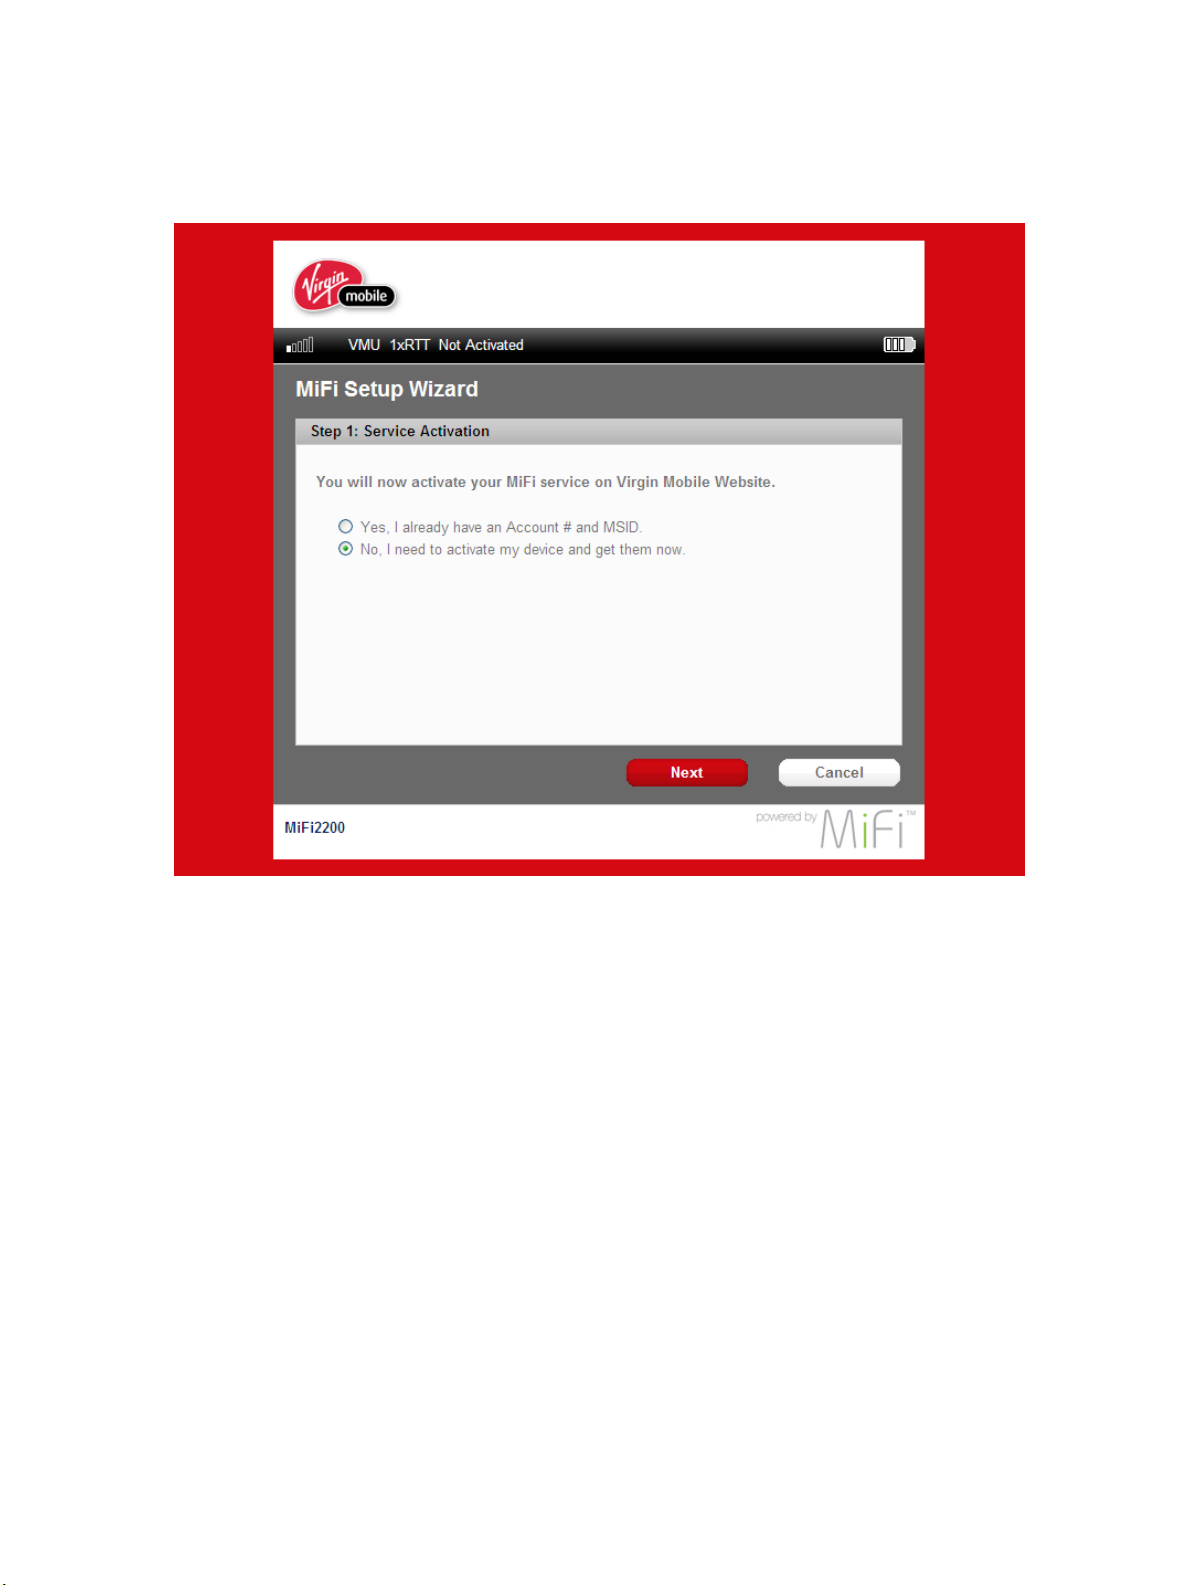
➍ On the MiFi Device Setup Wizard Service Activation screen, click Yes if you already have an
Account# and MSID. Clicking No launches Virgin Mobile’s Account Creation portal where you
are prompted to set up an account.
➎ Click Next.
15
Page 17
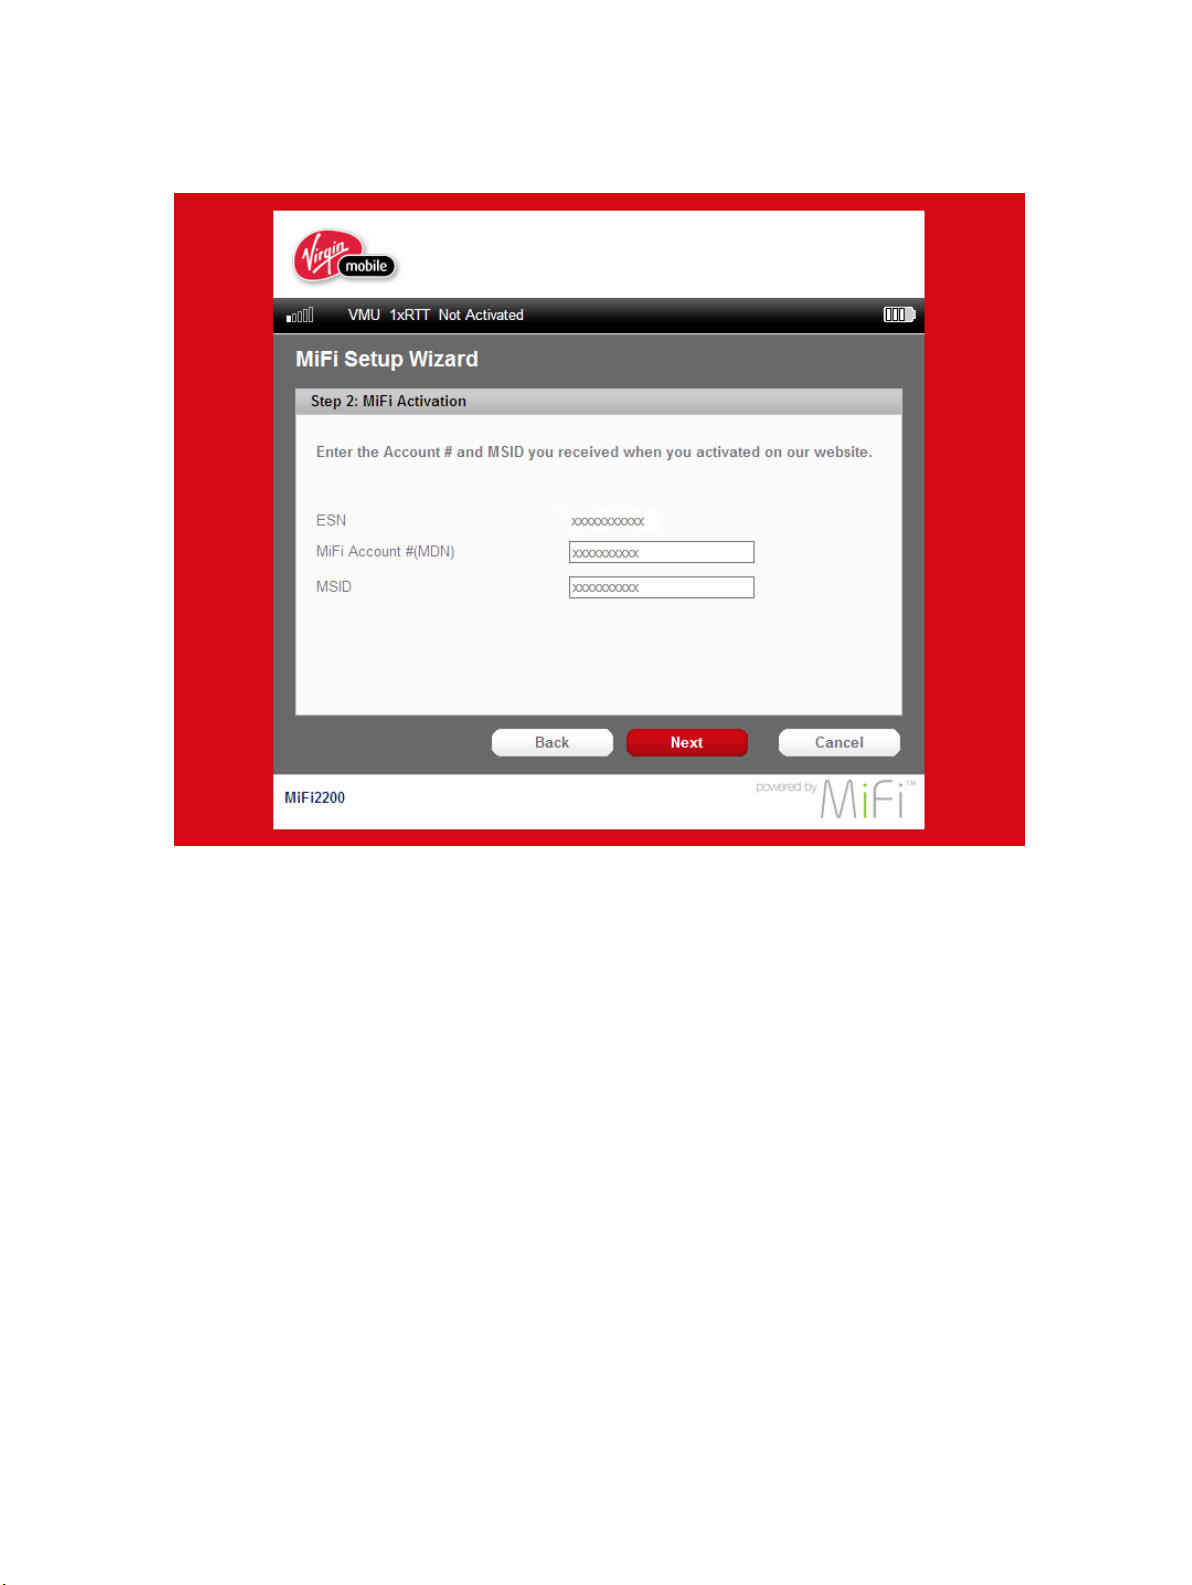
➏ On the MiFi Device Wizard MiFi Device Activation screen, enter the Account # and MSID you
received when you activated your service.
➐ Click Next.
16
Page 18
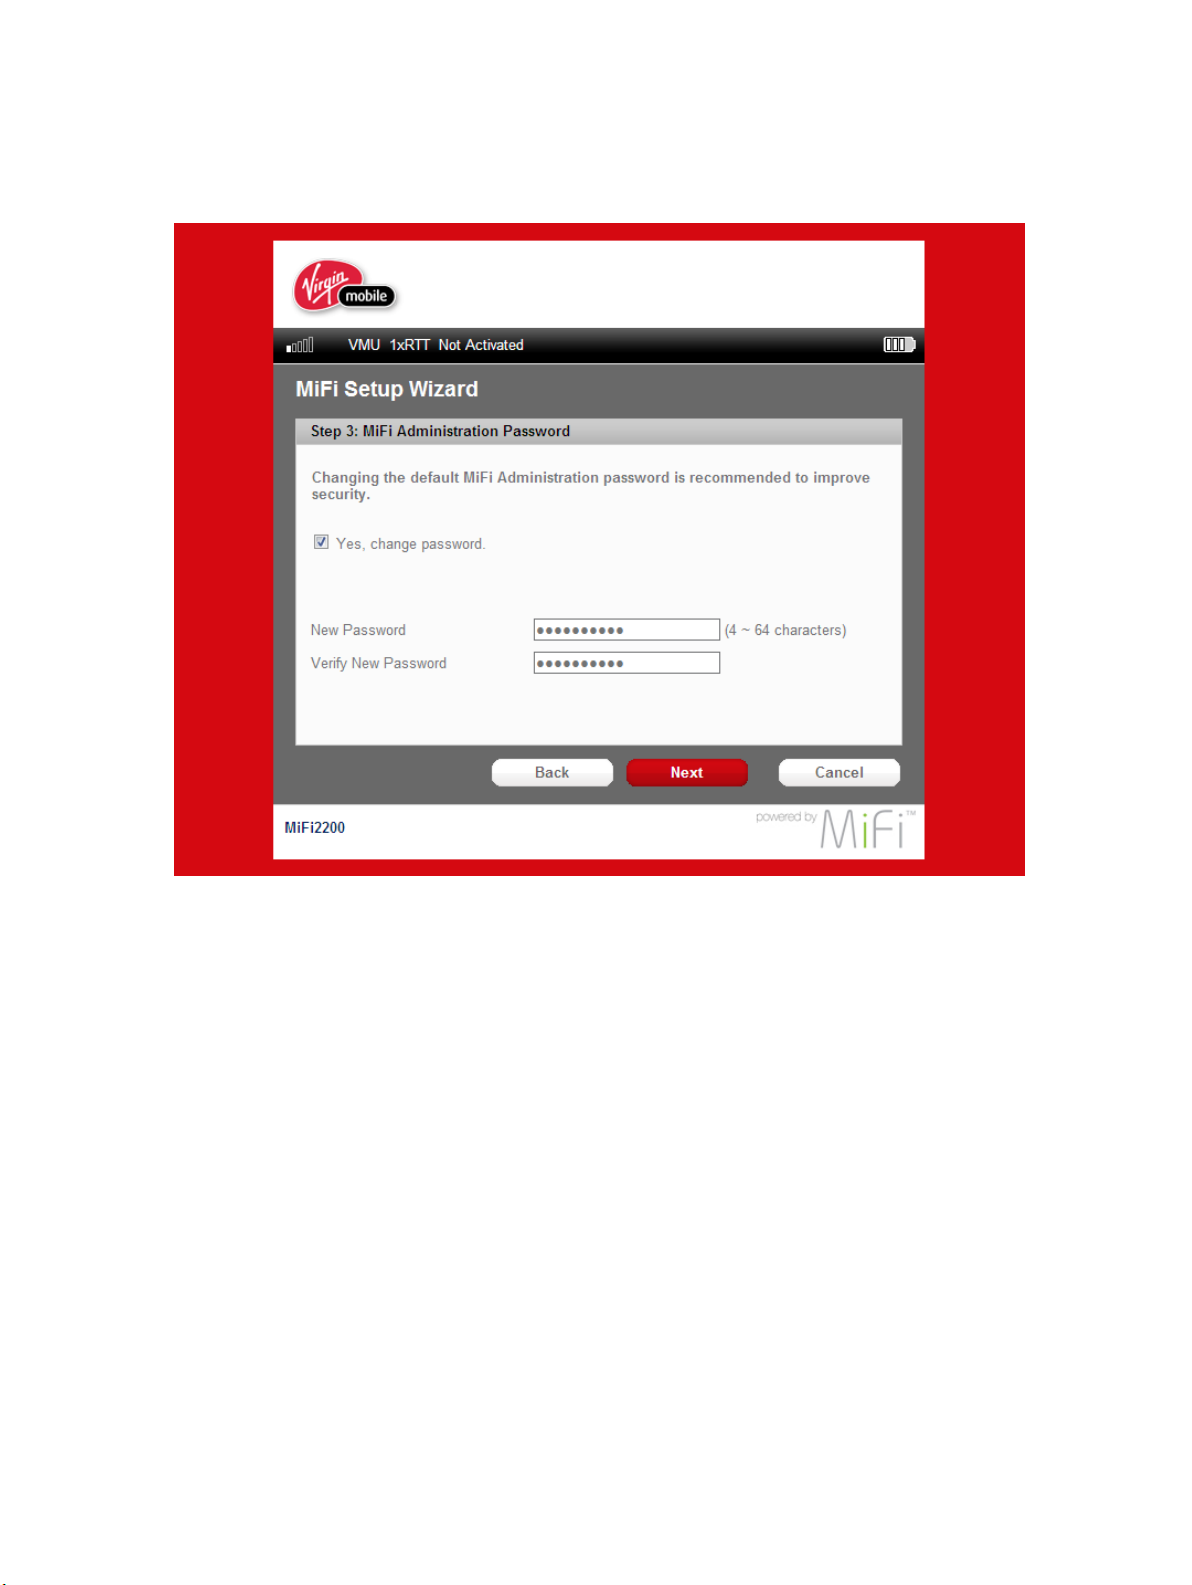
➑ Click Yes, change password, then enter and verify the new password in the appropriate elds.
You have the option to keep the default admin password, but changing the password adds
another level of security for you. We strongly recommned that you change your password.
➒ Click Next.
17
Page 19
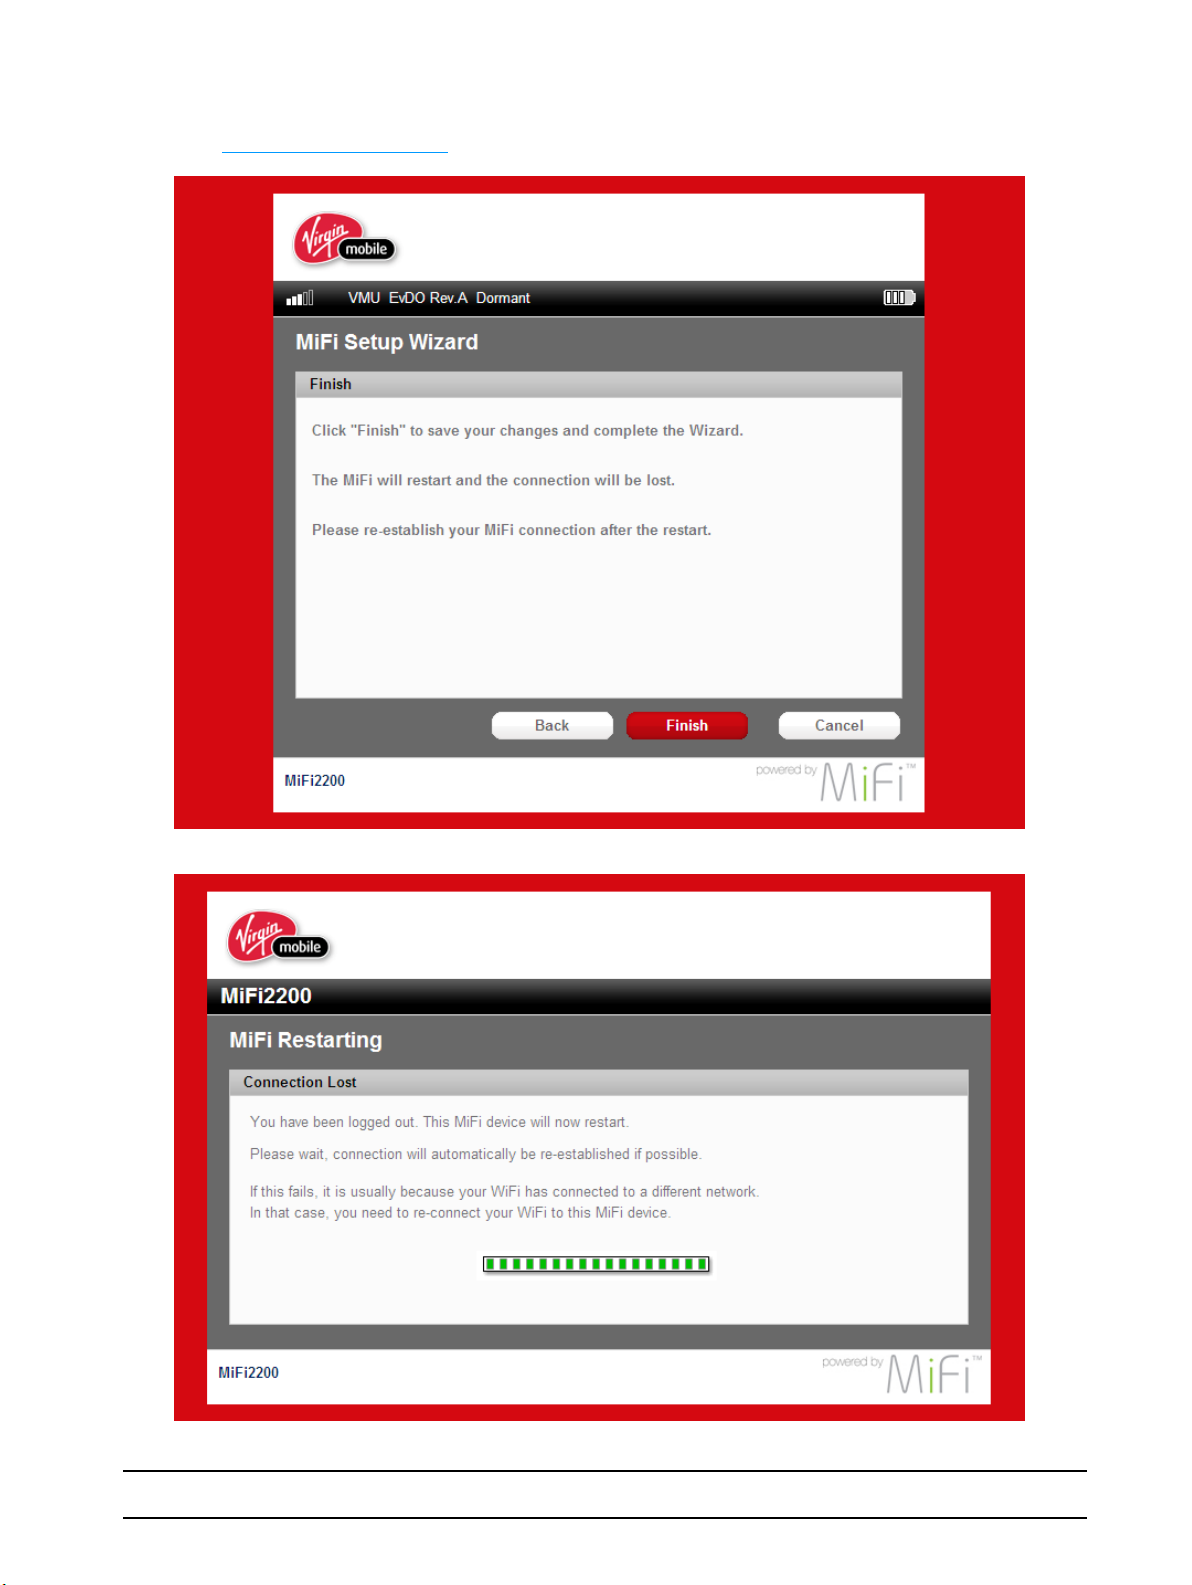
➓ Click Finish and your MiFi Device will restart. If your network does not reconnect
automatically, you can manually reconnect to your MiFi Device using your Wi-Fi manager.
[See Connect in Wi-Fi Mode (page 13).]
IMPORTANT! Be sure to record the new administrative password.
18
Page 20

3
MiFi Device Settings
MiFi Device Settings Basics
Home Page
Password Settings
Wi-Fi Menu
WWAN Menu
Security
Advanced
Page 21
MiFi Device Settings Basics
Open MiFi Device Settings
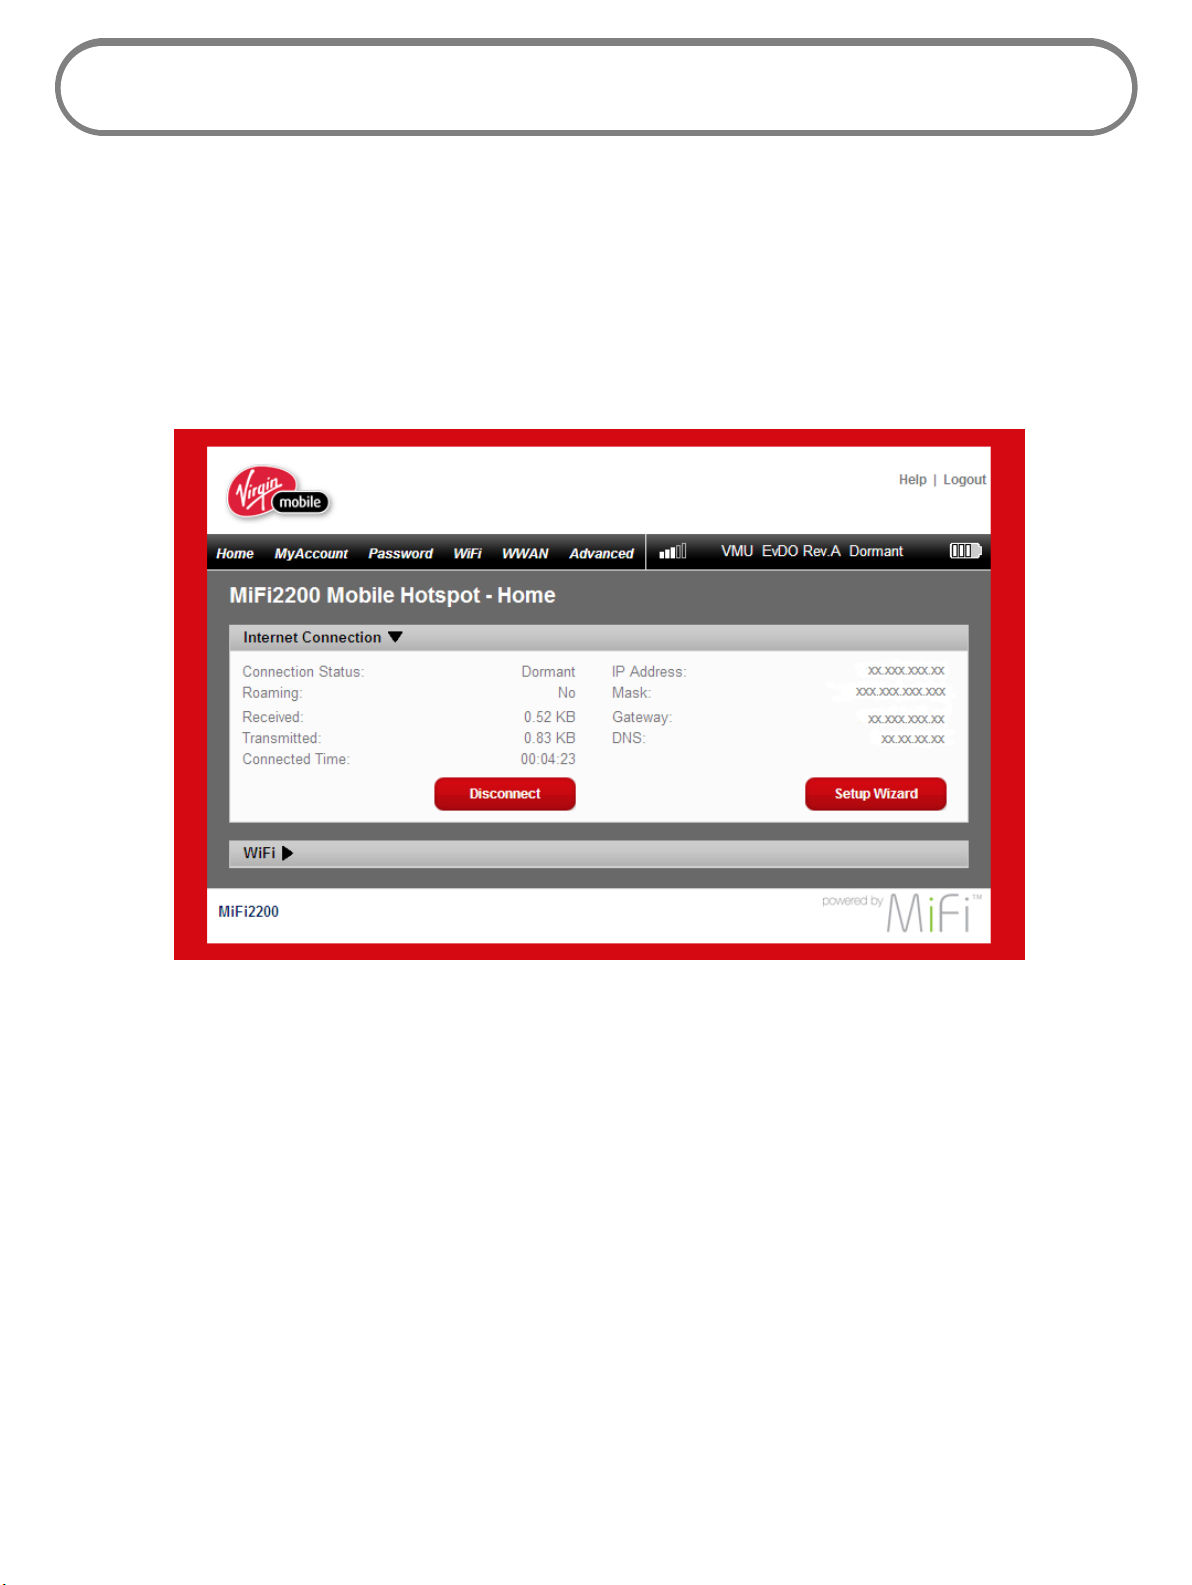
➊ Open your Web browser and enter http://virginmobile.mi into the address window.
➋ Type the administrative password into the Login box in the upper right corner and click Login.
The Home page opens.
20
Page 22
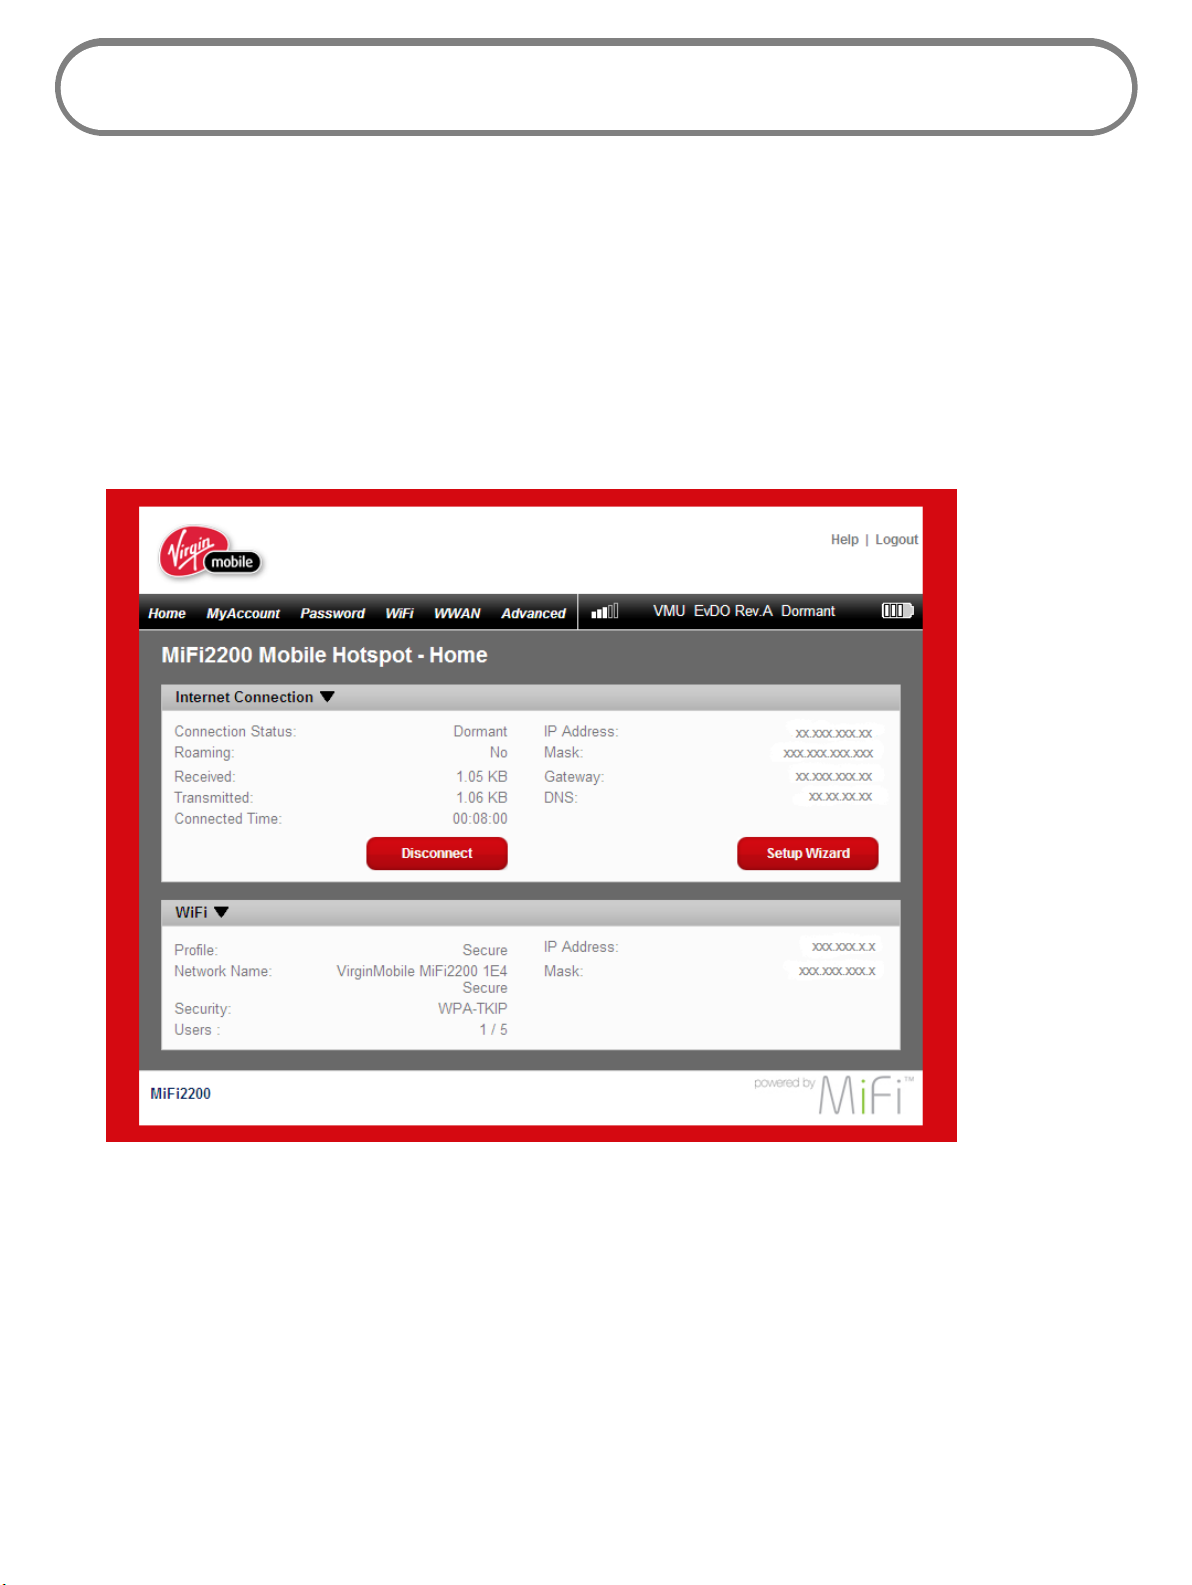
The Home Page
The Home page is the rst screen you see after logging in and is the main point of entry for all your
work.
The Menu Bar
The menu bar runs horizontally along the top of the MiFi Device Settings interface. Besides allowing
you to select menu items, the menu bar also displays information about your MiFi Device’s signal
strength, network connection, and battery level.
21
Page 23
Home Page Sections
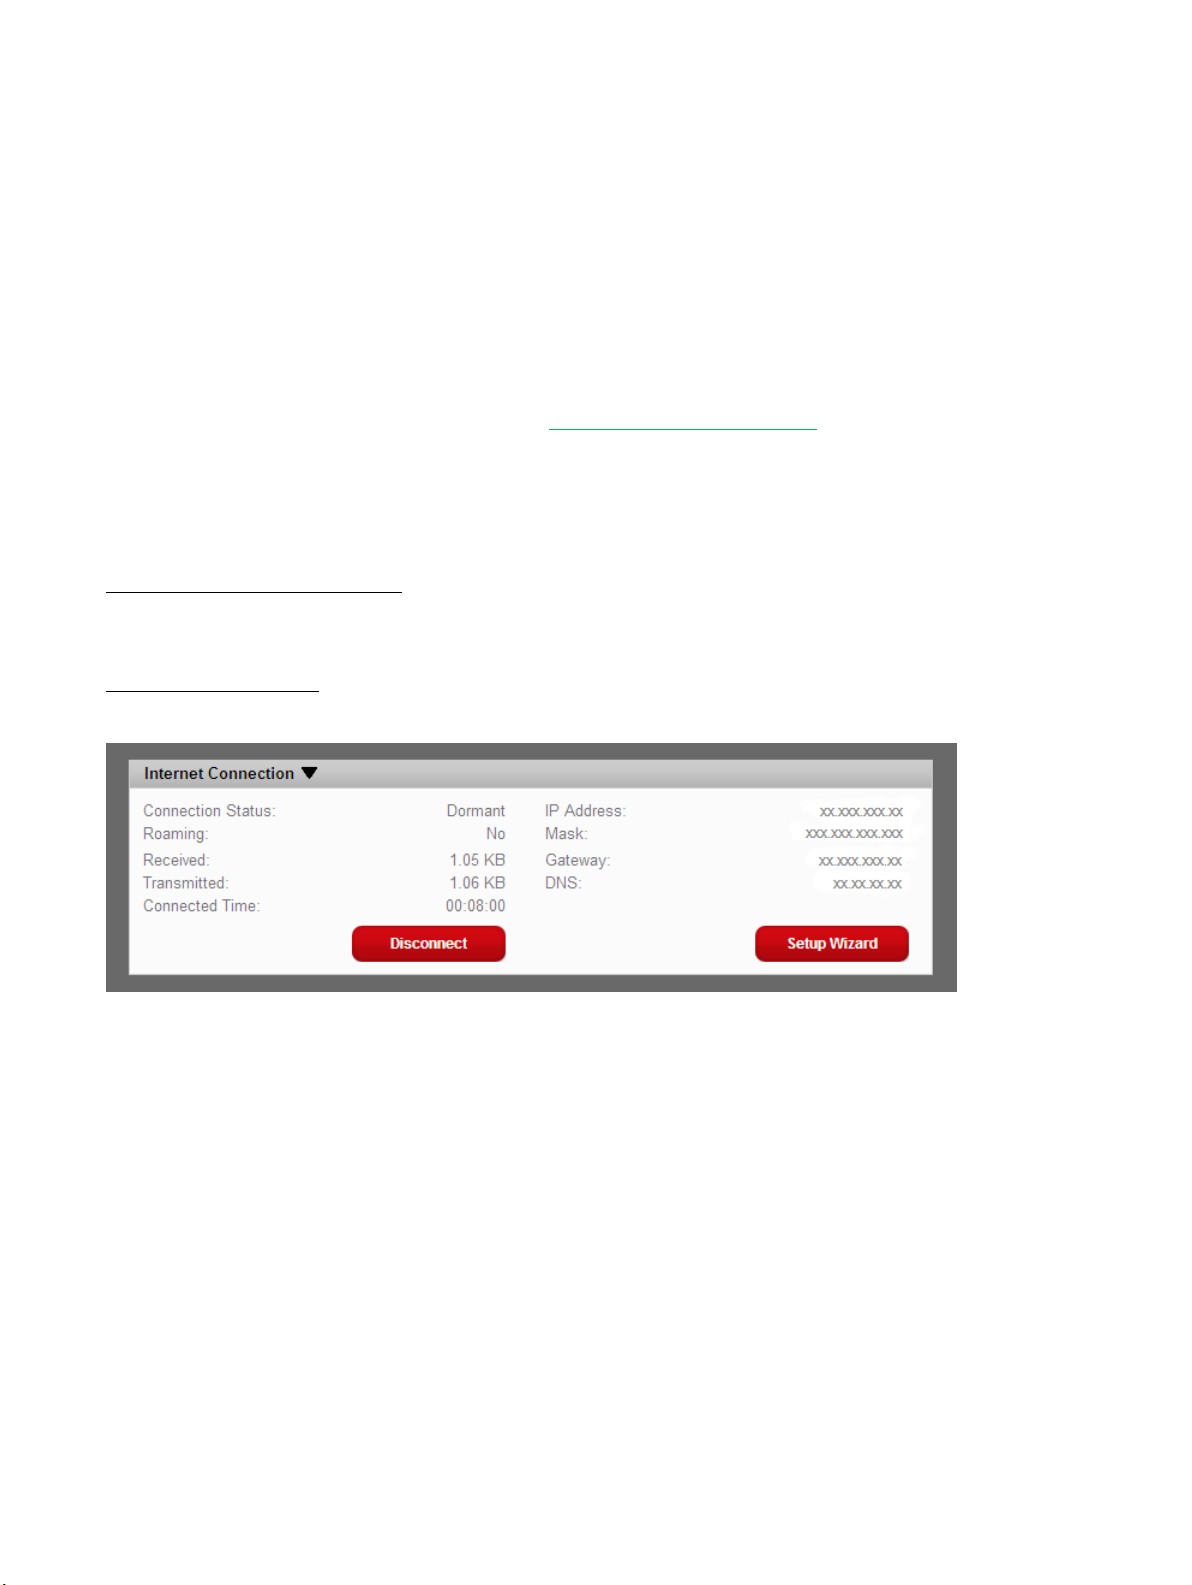
The Home page is divided into two sections that you can expand or collapse. Click the solid black
pointer next to the section title to expand or collapse that section.
Internet Connection
The Internet Connection section tells you:
• Your connection status.
• The number of bytes received and transmitted. This information is for reference only. For an
accurate reading of your usage, go to www.virginmobileusa.com.
• The duration of the current connection.
• The IP address of and subnet mask for your MiFi Device.
Connect / Disconnect Button
Click Connect or Disconnect to connect or disconnect from the network.
Setup Wizard Button
Click Setup Wizard to change the administrative password or your Virgin Mobile Account # setting.
22
Page 24
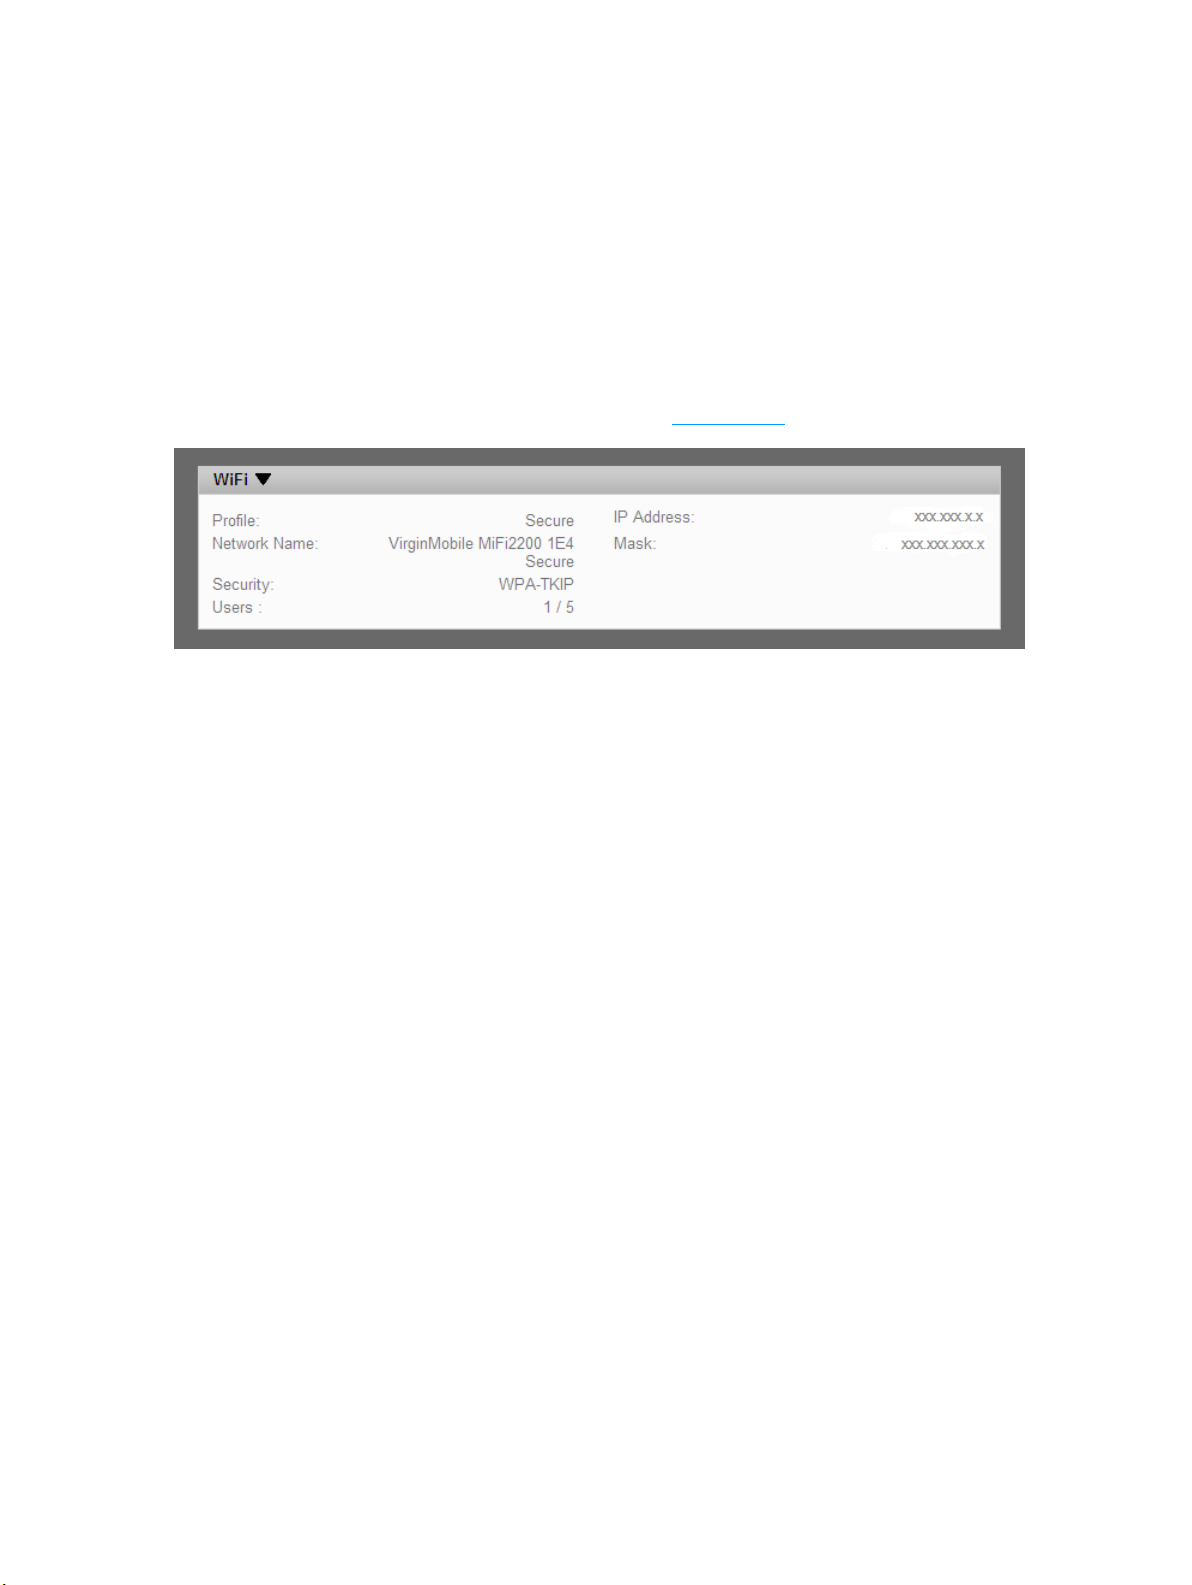
Wi-Fi
The Wi-Fi section tells you:
• The prole currently in use.
• The network name (also known as the SSID).
• The security method in use.
• The number of users currently connected to your MiFi Device.
• The IP address of and subnet mask for the Wi-Fi network.
• To change Wi-Fi settings, use the Wi-Fi menu. [See Wi-Fi Menu
(page 25).]
23
Page 25
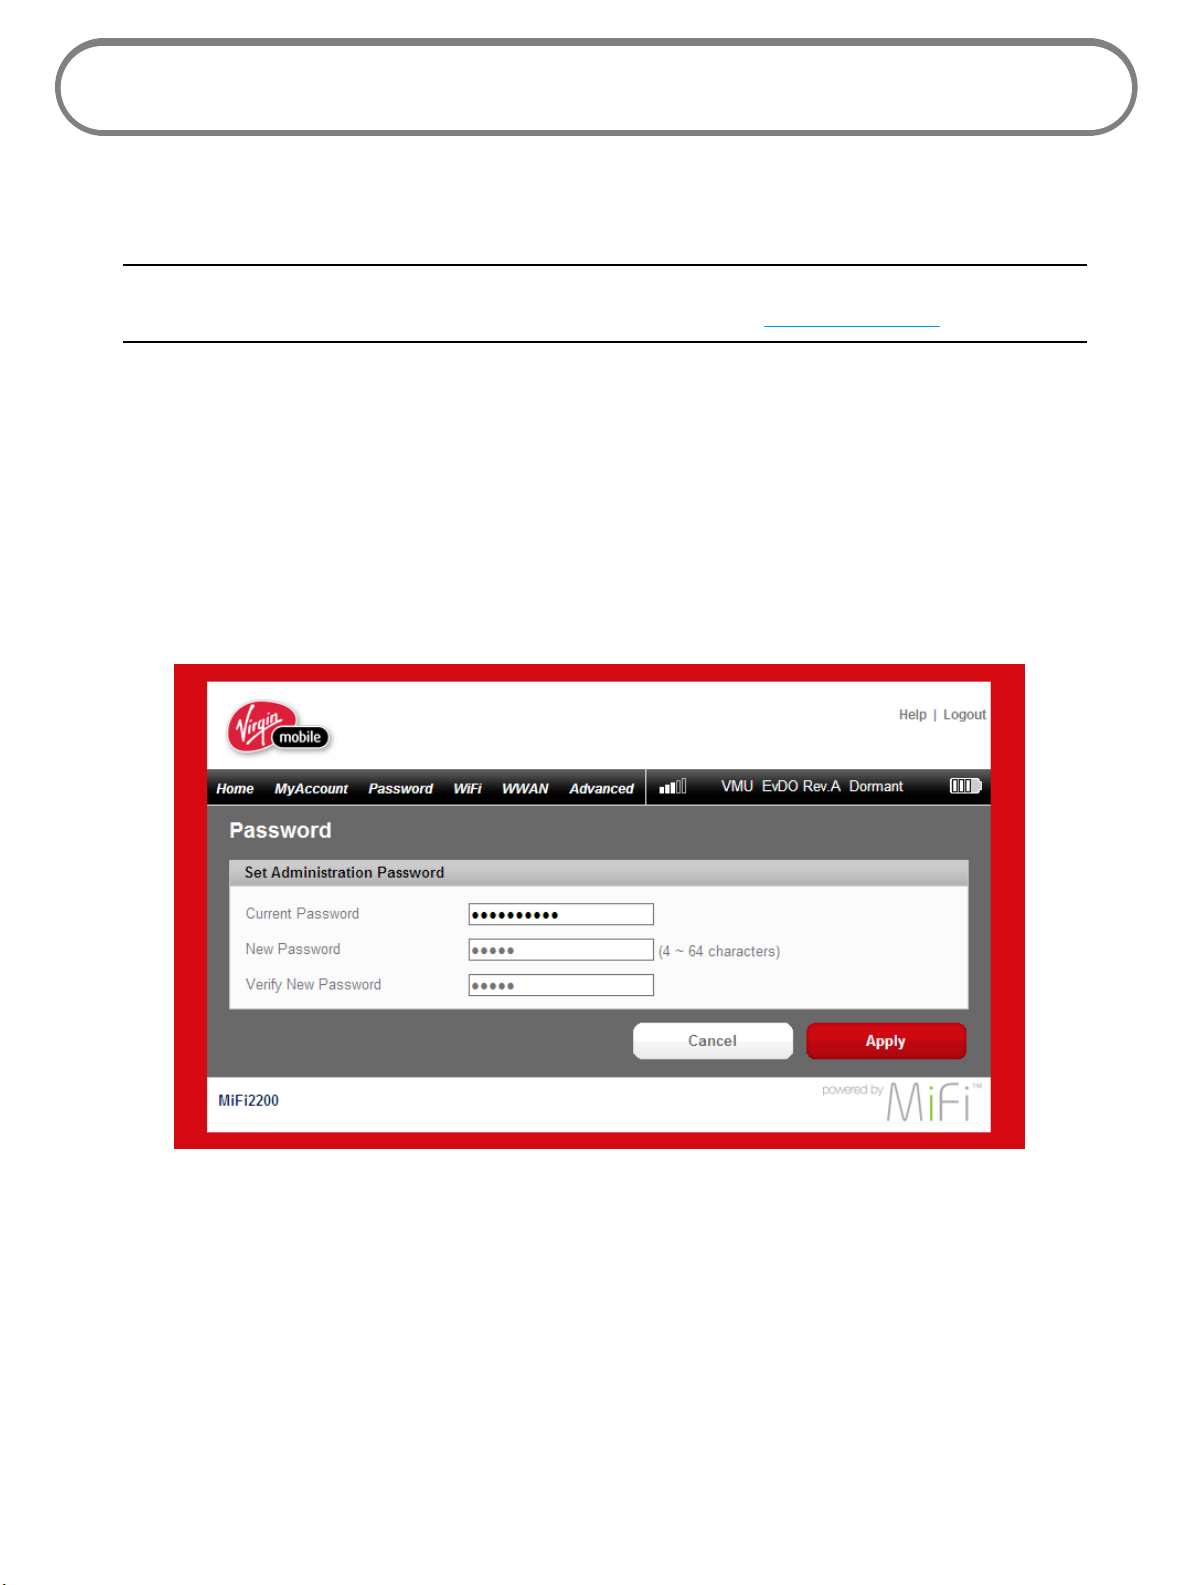
Password Settings
Password settings allow you to change the administrative password that gives access to the browser
interface for your MiFi2200 Device.
IMPORTANT! Record your administrative password. If you forget it, you will have to reset your MiFi
Device before you can use the MiFi Device Settings interface again [See Master Reset Button (page 62).]
Create a New Administrative Password
➊ Type your current MiFi Device administrative password in the Current Password box.
➋ Type the new password (must have 4 to 64 characters) in the New Password box and then
again in the Verify New Password box.
➌ Click Apply.
24
Page 26
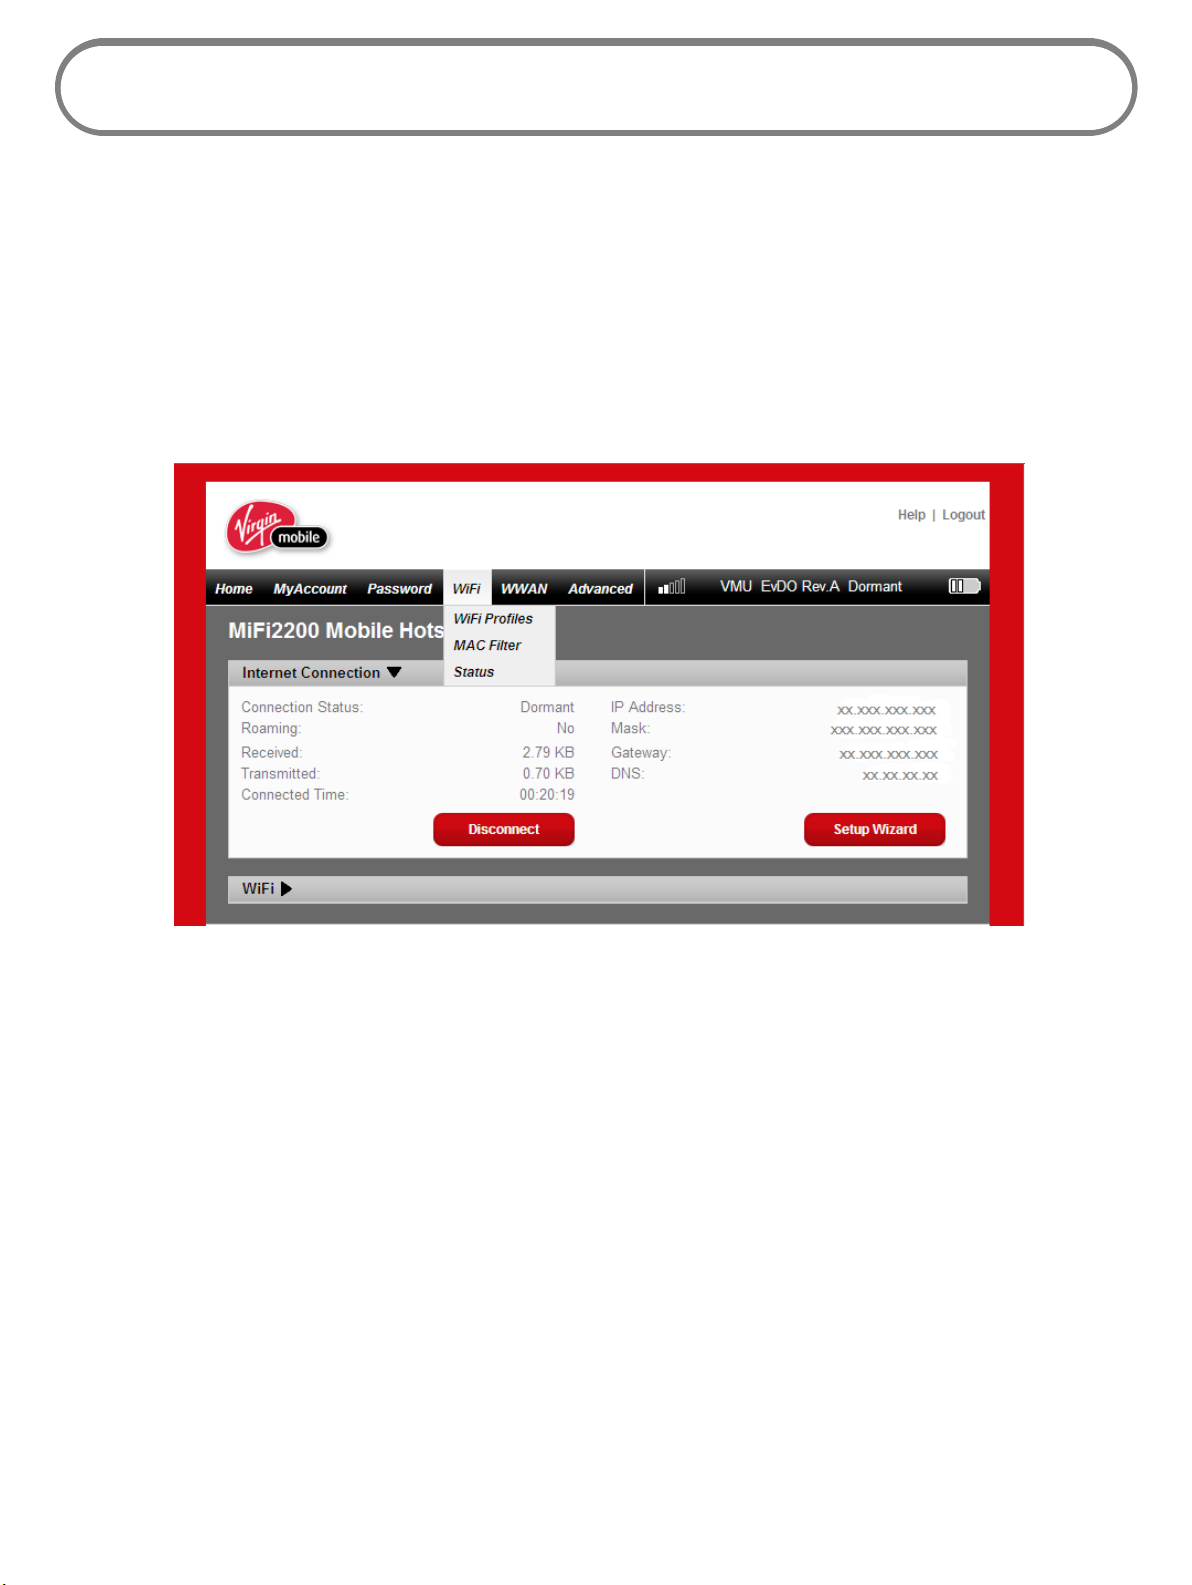
Wi-Fi Menu
The Wi-Fi menu has three components:
• Wi-Fi Profiles — to view or change settings for your secure prole or to set up a temporary
hotspot.
• MAC Filter — to allow only certain devices to connect to your MiFi Device, based on their
MAC addresses.
• Status — to view prole information, see who is connected to your MiFi Device, and view the
Wi-Fi log. You can also retrieve your network key from this page.
25
Page 27
Wi-Fi Proles
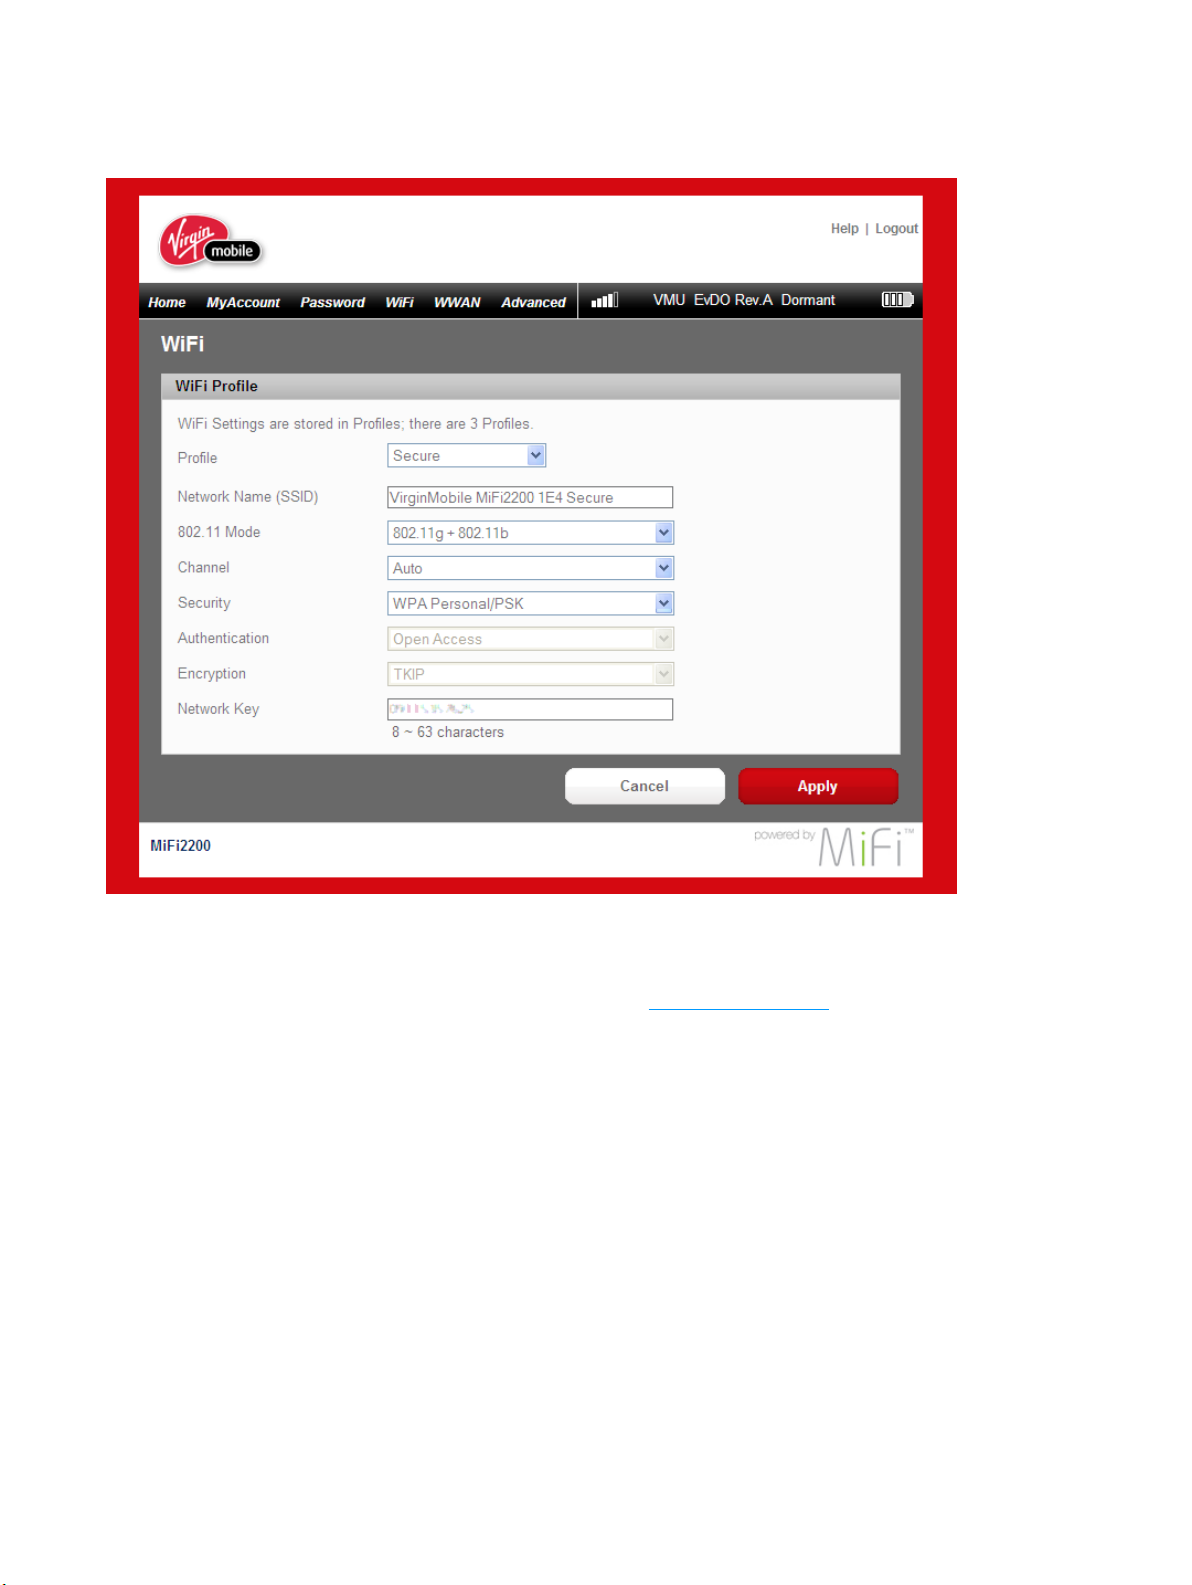
Click Wi-Fi Proles on the Wi-Fi menu to congure your secure prole or set up a temporary hotspot.
The Wi-Fi Prole page displays the following information:
• Profile — The prole currently being used. [See Choosing a Prole
• Network Name (SSID) — Name of the network you are connected to. You can change the
name to something more descriptive if you want, or if other devices are in use within range
of yours. Some examples of network names would be:
• Secure — MiFi2200 754B Secure
• Open — MiFi2200 754B
• Temporary Hotspot — MiFi2200 754B Temp
• 802.11 Mode — The type of wireless networking you are currently using. The available modes
are:
• 802.11g+802.11b
• 802.11g
• 802.11b
26
(page 27.)]
Page 28

• Channel — The radio channel that the device is using. This should be usually set to Auto
(default) and left unchanged. Available channels are 1 through 11.
• Security — The type of security the prole is using. This applies to the secure and the
temporary hotspot proles. [See Setting Security
• Authentication — Locked to Open Access for all proles.
• Encryption — Displays the type of encryption for the security type in use.
• Network Key — Passcode or password used to access the network. The required format varies
by type of security.
(page 27).]
Choosing a Profile
➤ Select a prole from the Prole list:
• Secure — This is the prole you should use most of the time. You can set up this prole
with the security measures you need to use your MiFi Device safely.
• Temporary Hotspot — This prole allows you to set up a secure temporary hotspot to
allow others in your work area (maximum of ve) to go online at the same time.
• Open — This prole does not require a password to connect to your MiFi Device. Any user
who can see your network name (SSID) can connect to your MiFi Device.
Setting Security
You can use WEP (64- or 128-bit), WPA Personal/PSK, WPA2 Personal PSK, or WPA/WPA2 Mixed Mode
security.
Tip! Some Wi-Fi clients become confused if the security is changed and the network name is not. If you
change security settings and do not get asked for the new network key when you try to reconnect,
delete the existing “old” network name from your “Preferred Networks” list. Then you can reconnect
using the new network name.
IMPORTANT Record your network key.
➊ From the Wi-Fi Prole page, select Secure as the Prole.
➋ Select a security protocol from the Security list. (The Encryption box displays the
corresponding encryption level.)
➌ Enter a new network key in the Network Key box. (Permissible characters are listed in gray
just under the box.)
➍ Click Apply. Your device will restart, and you must reconnect to your wireless network using
the new network key.
27
Page 29
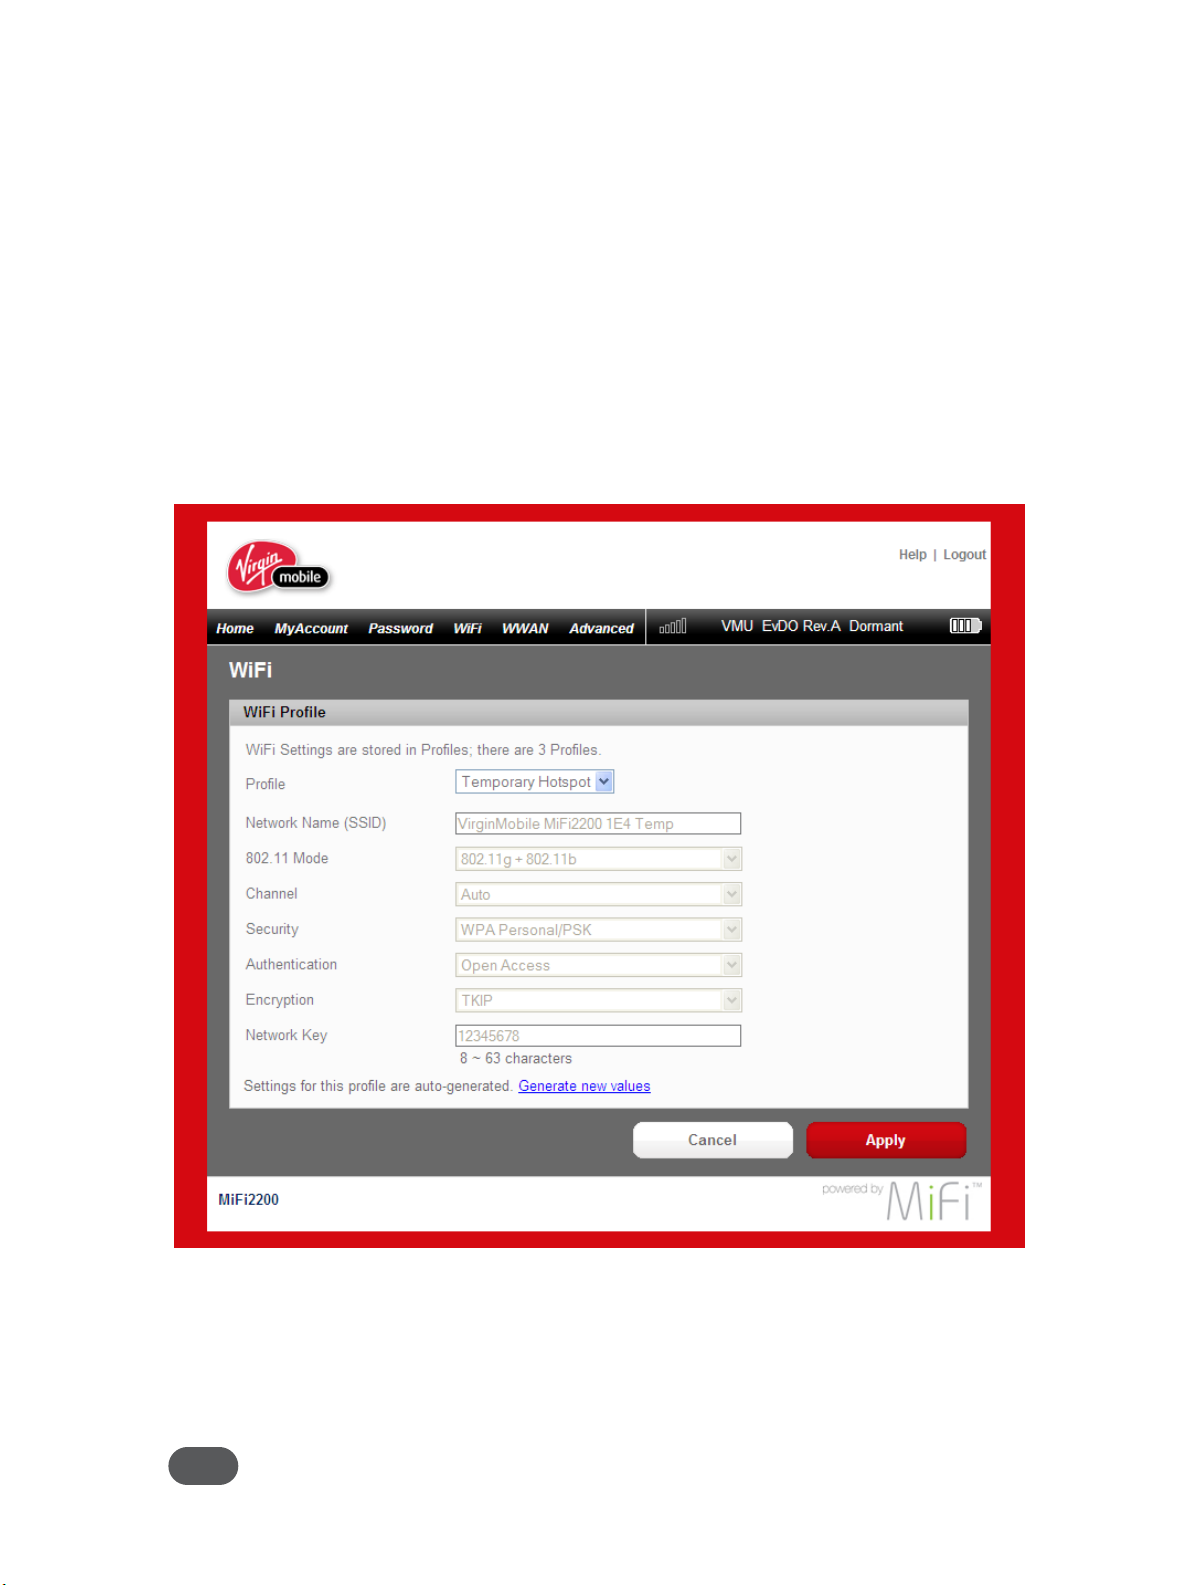
Setting Up a Temporary Hotspot
You can use this prole to create a secure temporary hotspot to allow a maximum of ve
connections to your MiFi Device at one time.
This prole generates a temporary network name and network key that you can use to allow others
to connect to your MiFi Device without your having to change the security settings on your secure
prole.
To set up the temporary hotspot.
➊ From the Wi-Fi Prole page, select Temporary Hotspot as the prole.
You will see a new (temporary) network name (SSID) and network key. In the example shown
below, the temporary network name is “MiFi2200 2FFE Temp” and the temporary network key
is “12345.”
➋ Click Apply. Your device will restart, and you must reconnect to your wireless network with
the temporary network name and network key.
Members of your workgroup can now use the temporary network name and network key to
connect to your device.
Tip! Click “Generate new values” to create a new network name and network key.
28
Page 30
MAC Filter
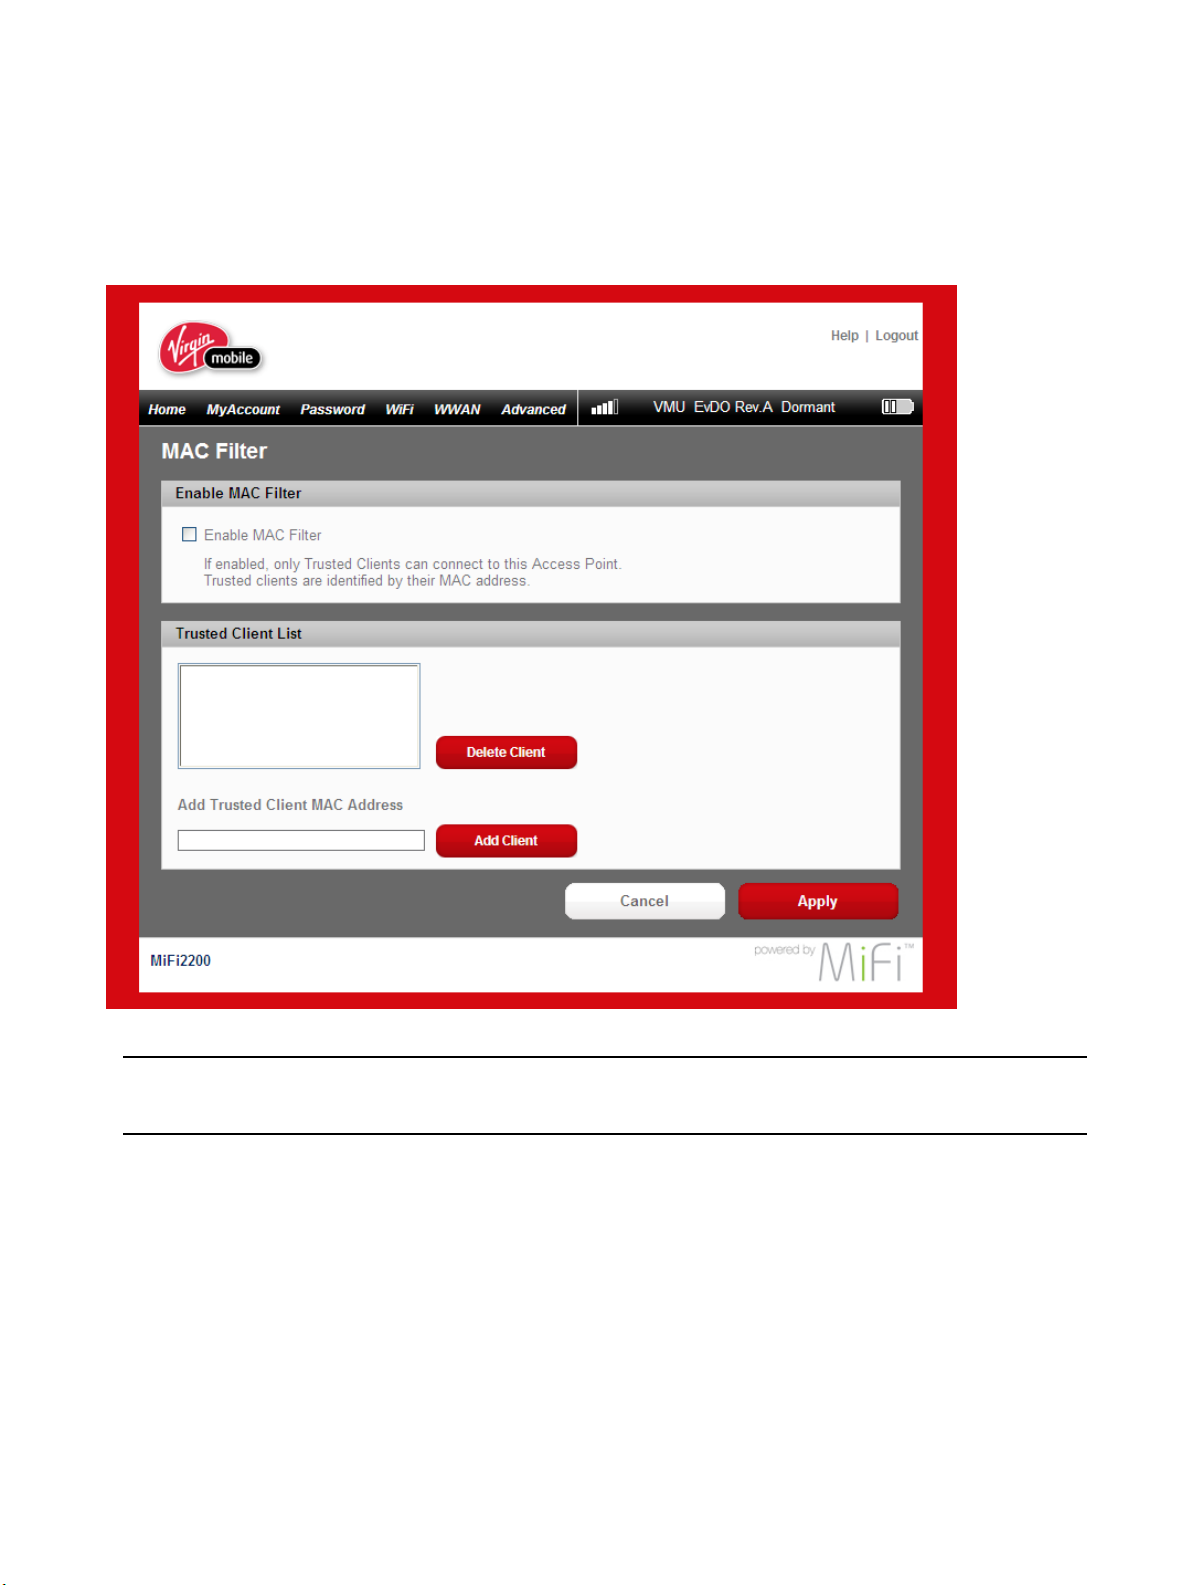
MAC ltering allows you to limit access to your MiFi Device to only those devices with a specied
MAC address (a unique code assigned to hardware such as network adapters).
The MAC Filter page allows you to enable or disable MAC ltering and to add or delete MAC
addresses from the trusted client list.
IMPORTANT! Do not enable MAC filtering unless you have added your own MAC address to
the trusted client list. Otherwise you will be unable to access your MiFi Device.
29
Page 31

Finding the MAC Address
The MAC Address is also known as a hardware or physical address for a device, usually a network
adapter. It consists of six pairs of numbers and letters (for example, 00-21-9B-1C-64-34).
You can view the MAC address for any device connected to your MiFi Device in the Wi-Fi Clients
section of the Wi-Fi Status page. [See Wi-Fi Clients
• On a Windows machine, you can nd the MAC address by running “ipcong /all” from the
Command Prompt window. The MAC address is referred to as the Physical Address. (Select
Start > All Programs (or Programs) > Accessories > Command Prompt to open the Command Prompt
window.)
• On a Mac, open System Preferences > Network. In the Show list, click Airport. The MAC address is
the Airport ID.
(page 33).]
IMPORTANT! Make sure you get the MAC address for the wireless network adapter and not the
Ethernet controller (NIC) if the machine has both.
Using MAC Filtering
➊ From the MAC Filter page, type the MAC address for your computer into the Add Trusted
Client MAC Address box and click Add Client. You can use either “:” or “-” as the separator (for
example, 00:21:9B:1C:64:34 or 00-21-9B-1C-64-34).
Tip! You can cut-and-paste your computer’s address from the Wi-Fi Clients section of the Wi-Fi Status
page. [See Wi-Fi Clients (page33).]
➋ If desired, type the MAC address for other computers into the Add Trusted Client MAC
Address box and click Add Client.
➌ Select the Enable MAC Filter check box and click Apply.
30
Page 32
Status
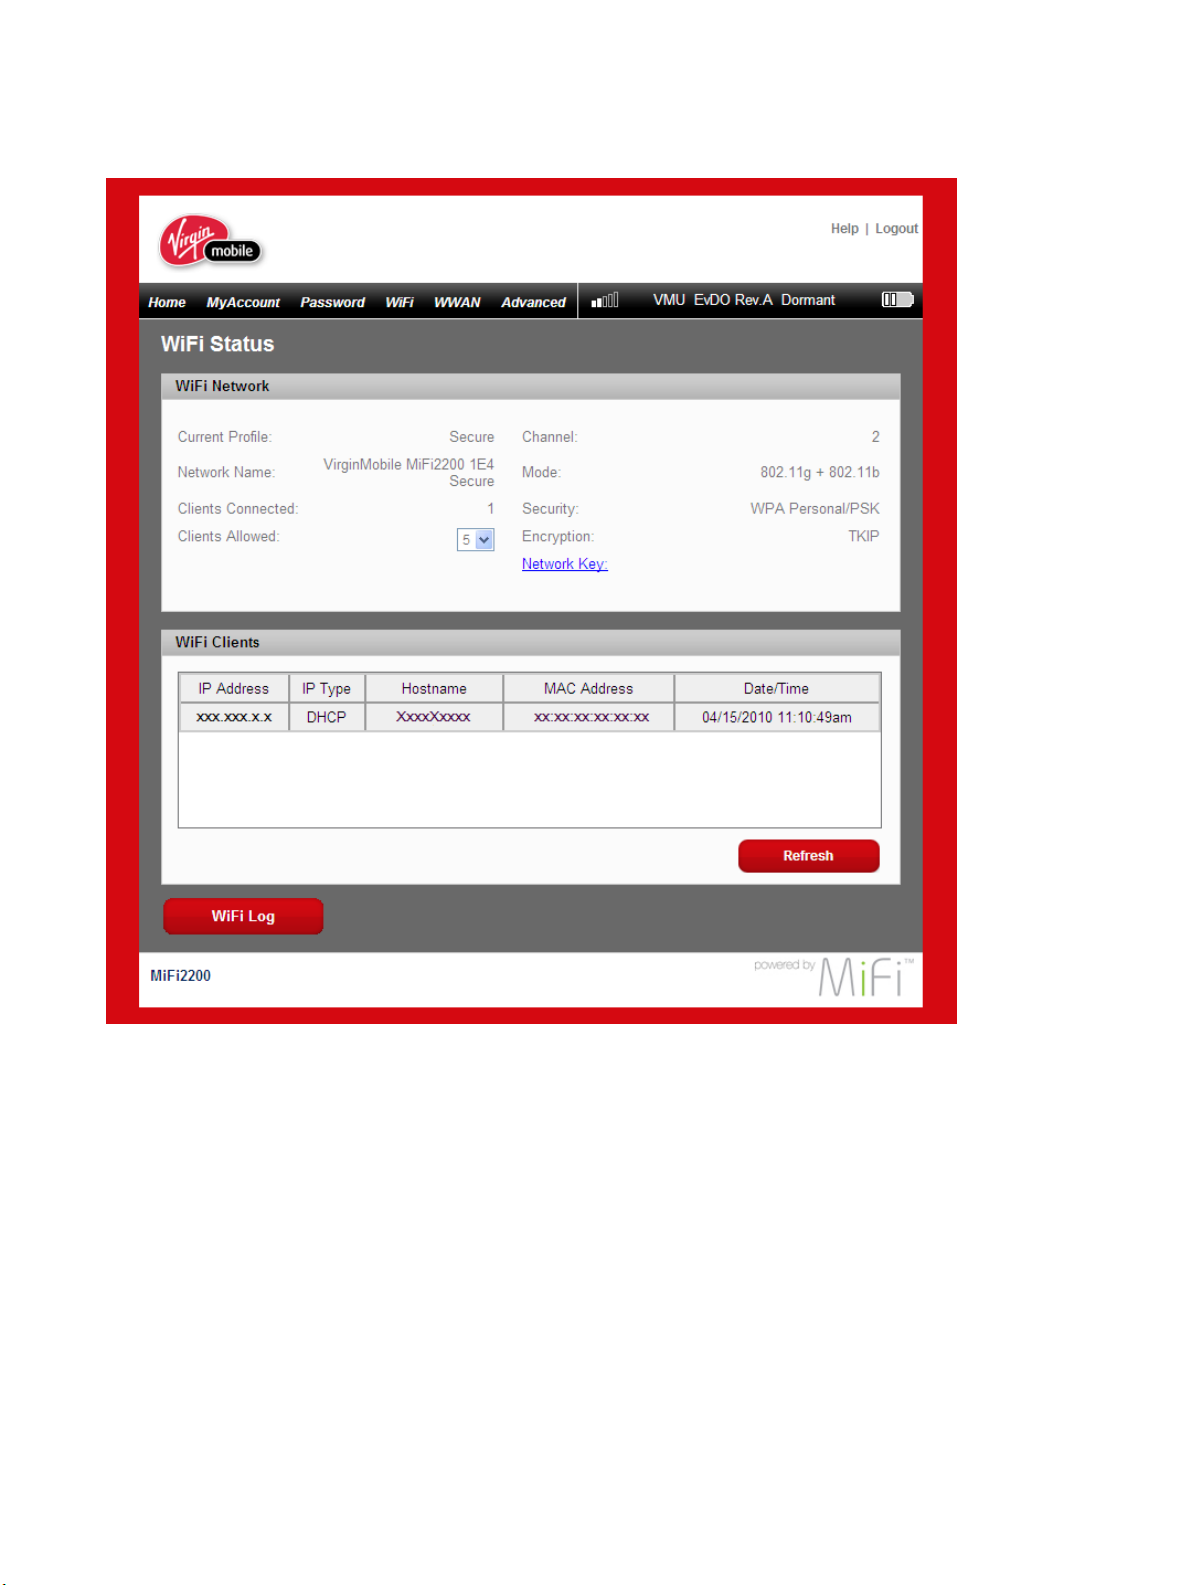
Wi-Fi Status provides you with information about your wireless network.
31
Page 33
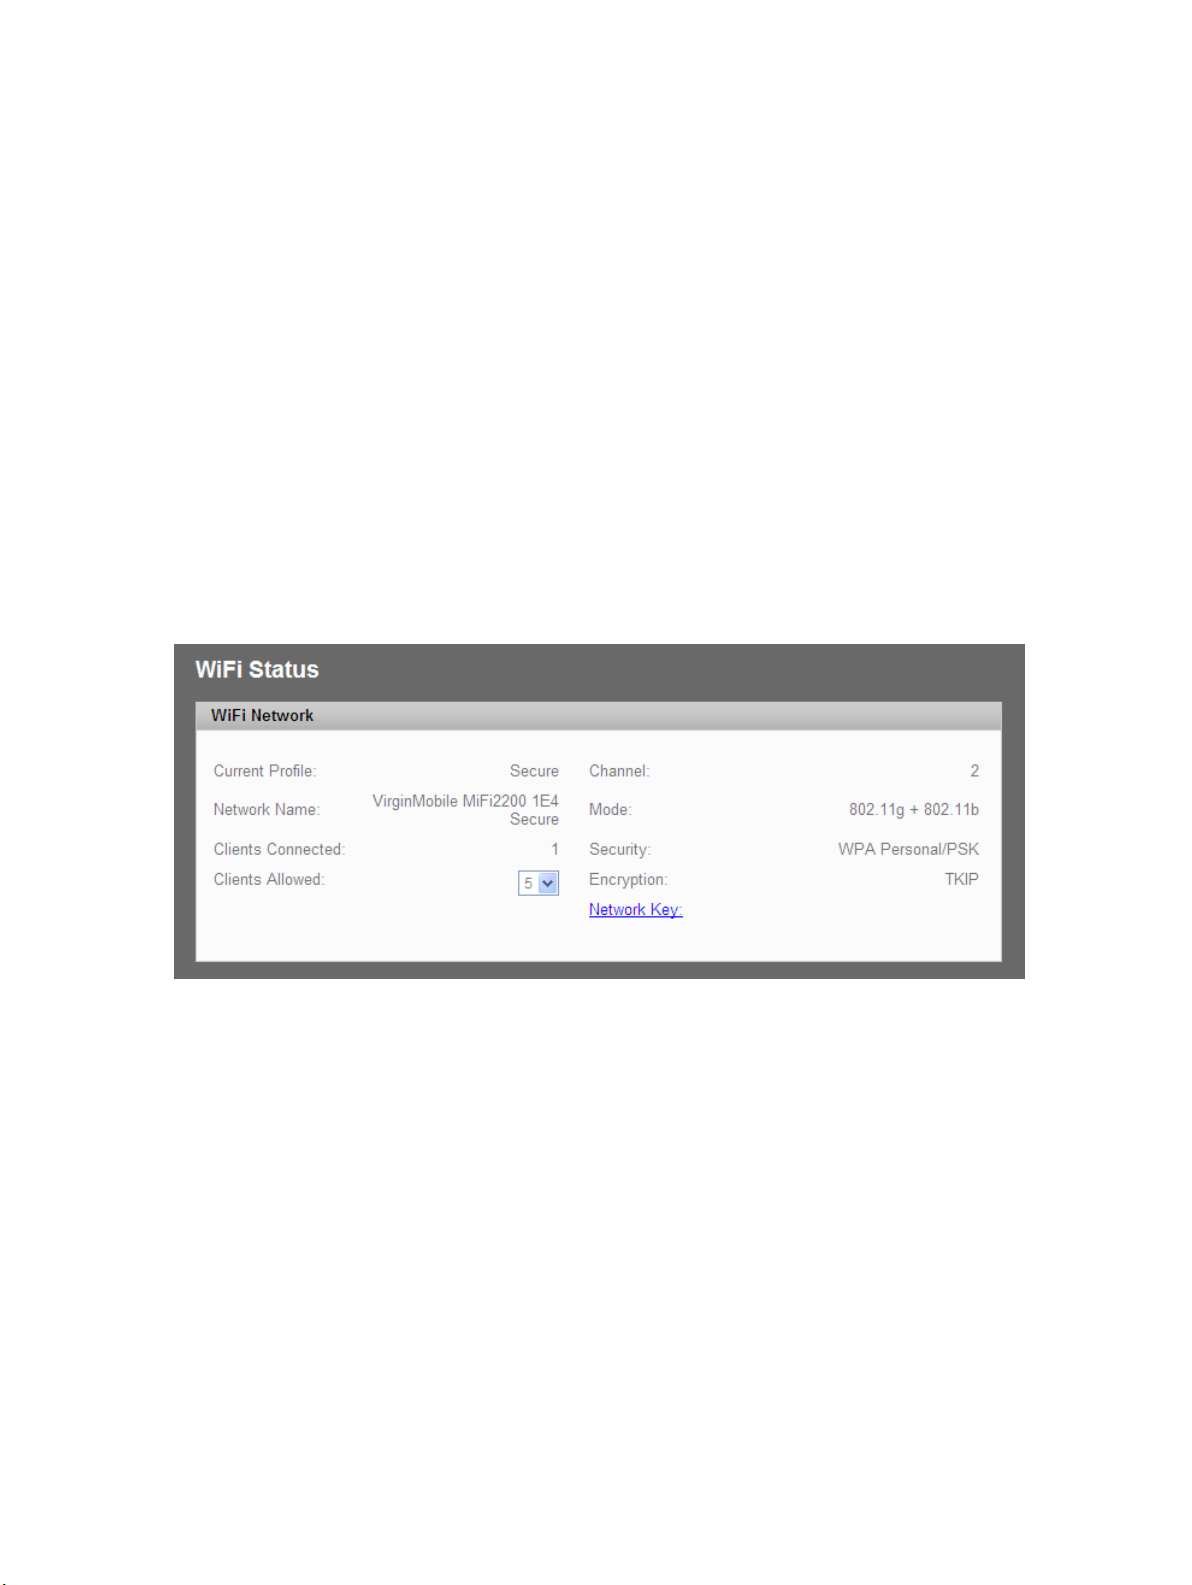
The Wi-Fi Status page is divided into three sections.
Wi-Fi Network
The Wi-Fi Network section of the Wi-Fi Status page displays the following information:
• Prole currently in use.
• Network Name (SSID) for your MiFi Device.
• Number of clients currently connected.
• Maximum number of clients allowed to connect to your MiFi Device. You can select the
maximum number of connections (up to 5) in the Clients Allowed box.
• Channel being used.
• Current wireless mode.
• Security type and encryption for the current prole.
• Network Key link. (Click to retrieve the network key.)
32
Page 34
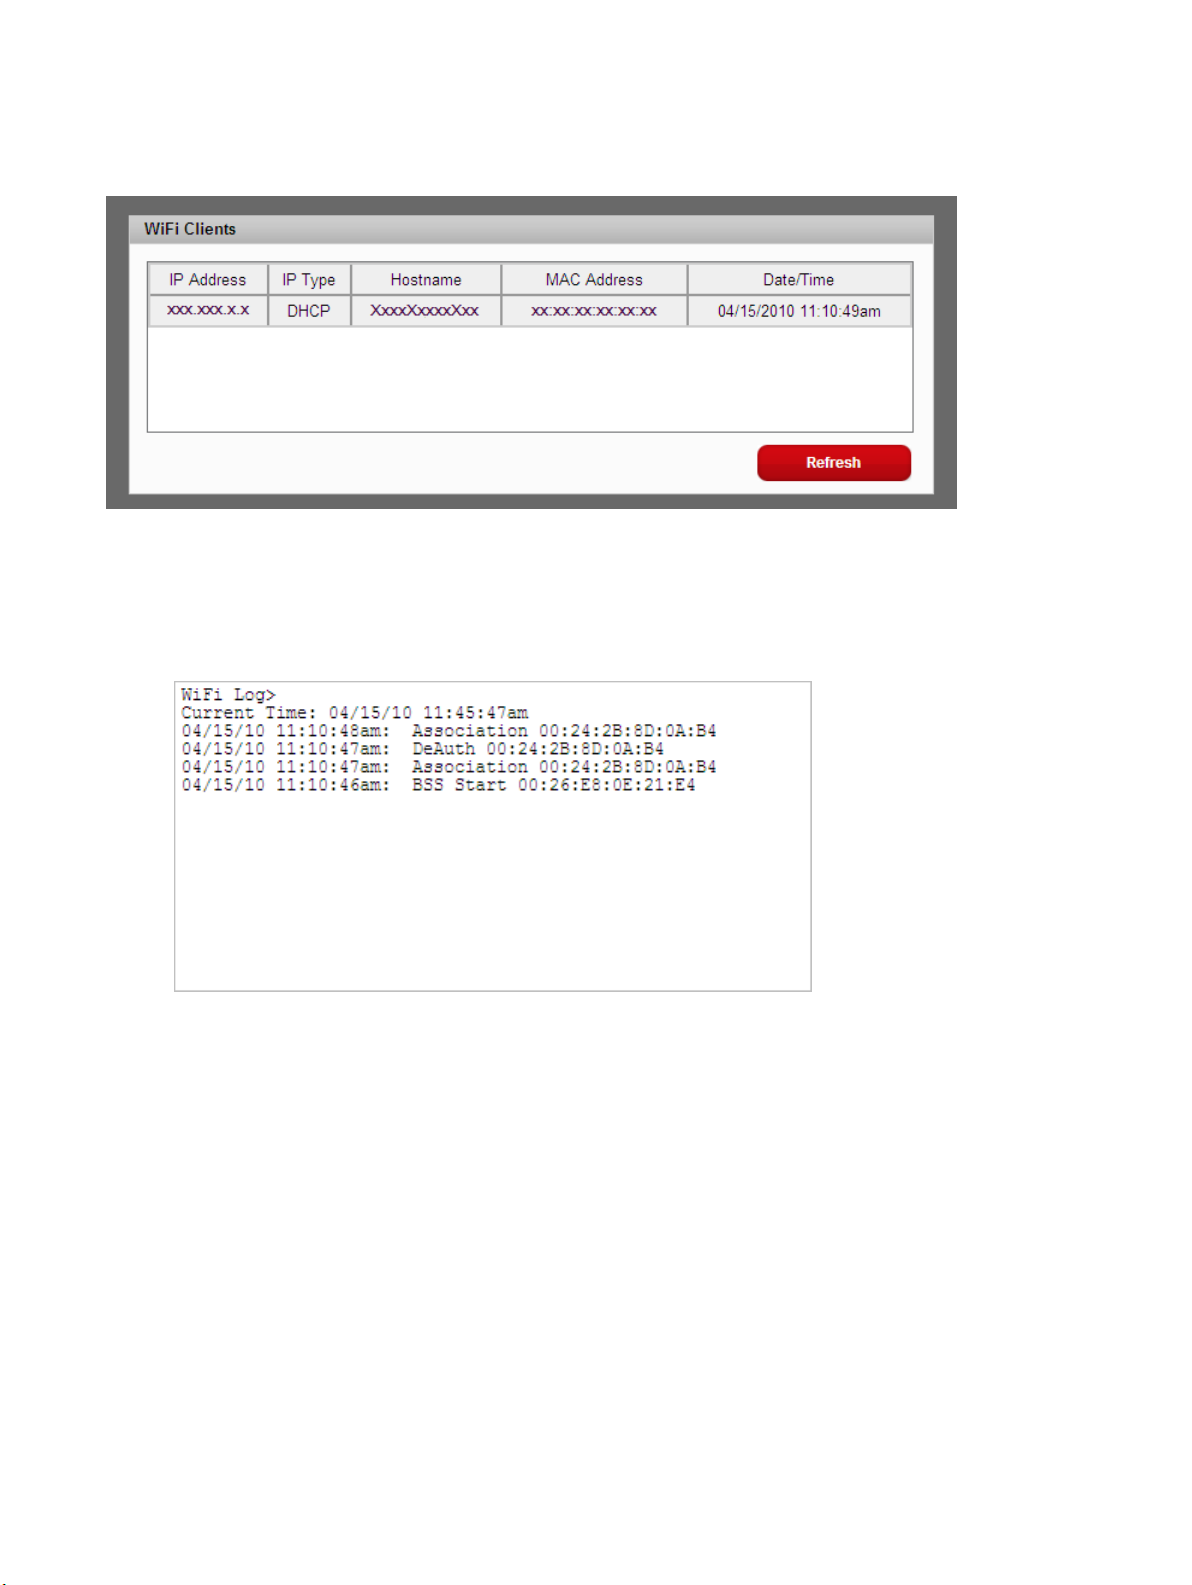
Wi-Fi Clients
The Wi-Fi Clients section of the Wi-Fi Status page shows the clients that are currently connected to
your MiFi Device. This is another way you can nd the MAC address for a particular device.
Wi-Fi Log
➤ Click the Wi-Fi Log button to view a listing of Wi-Fi events (most recent rst).
33
Page 35
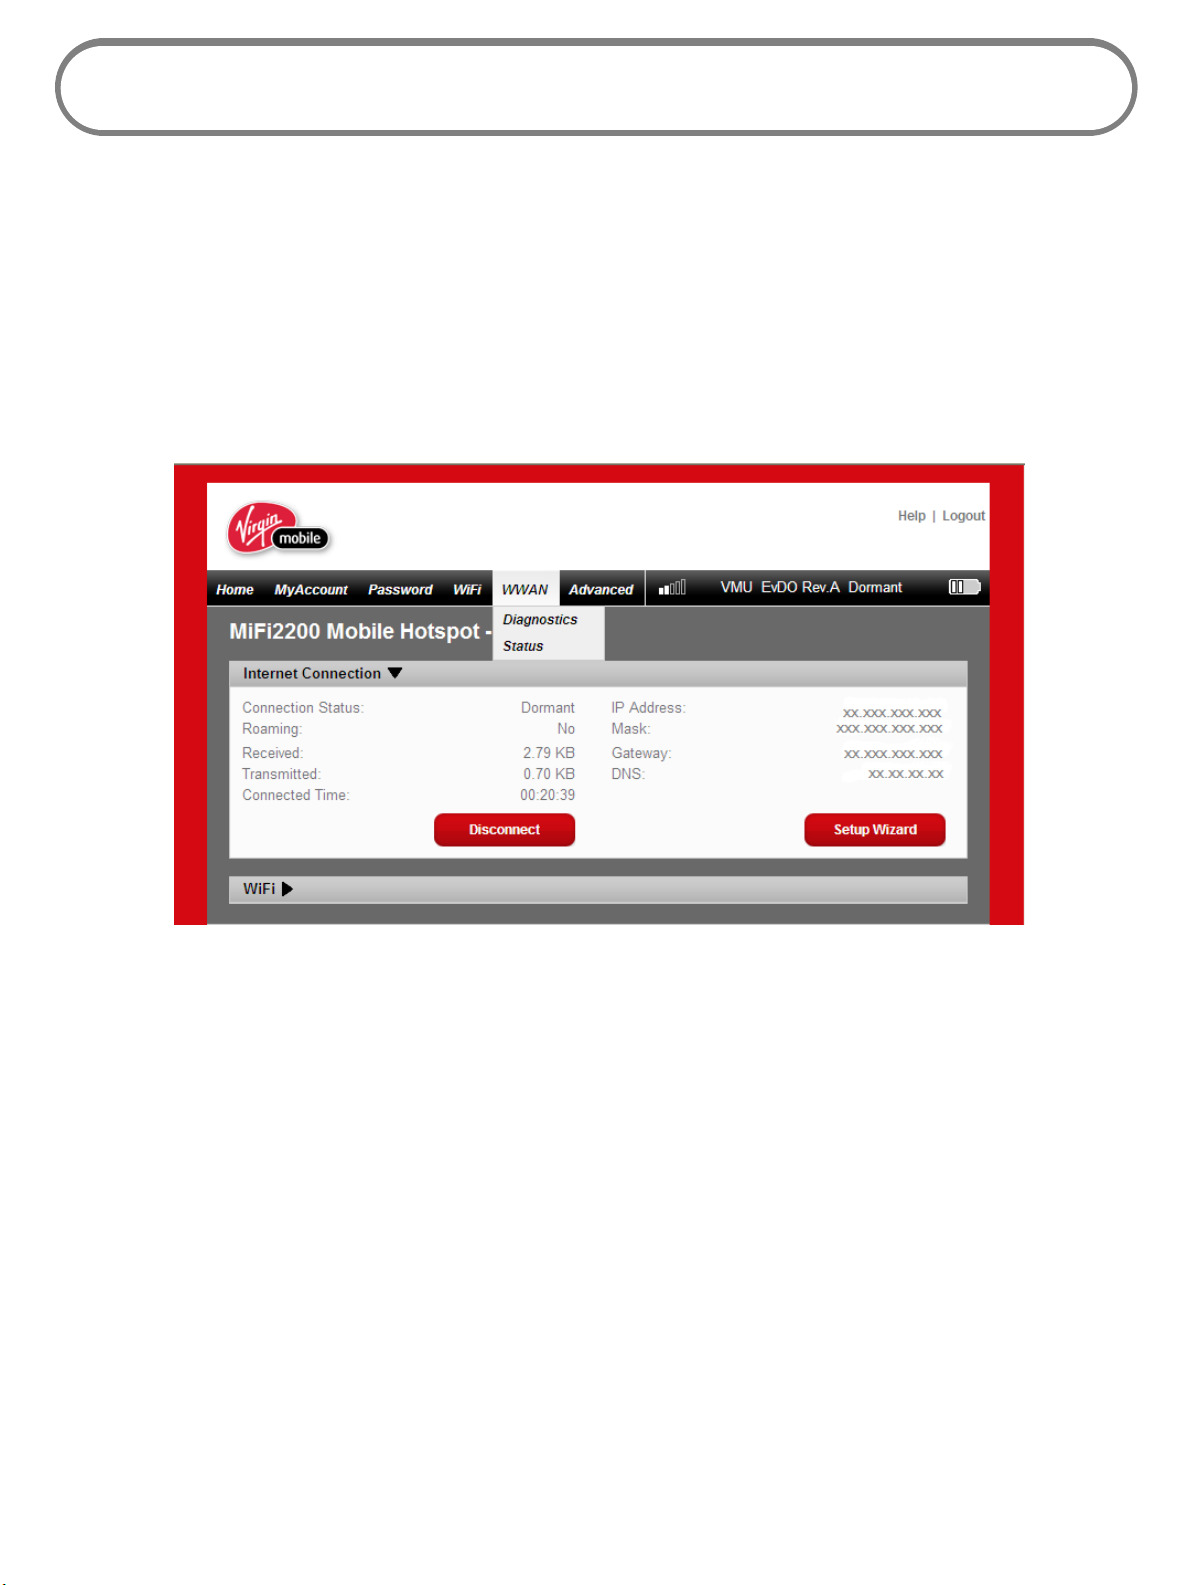
WWAN Menu
The WWAN menu displays information about your 3G Virgin Mobile network connection, and
provides tools for technical support.
The WWAN Menu has two components:
• Diagnostics — use to view the status of your connection to the network, view information
about your MiFi Device, or view an event log about your connections to the network.
• Status — use to view information about your internet connection, to view trac counters, or
to view an Internet connection log.
34
Page 36
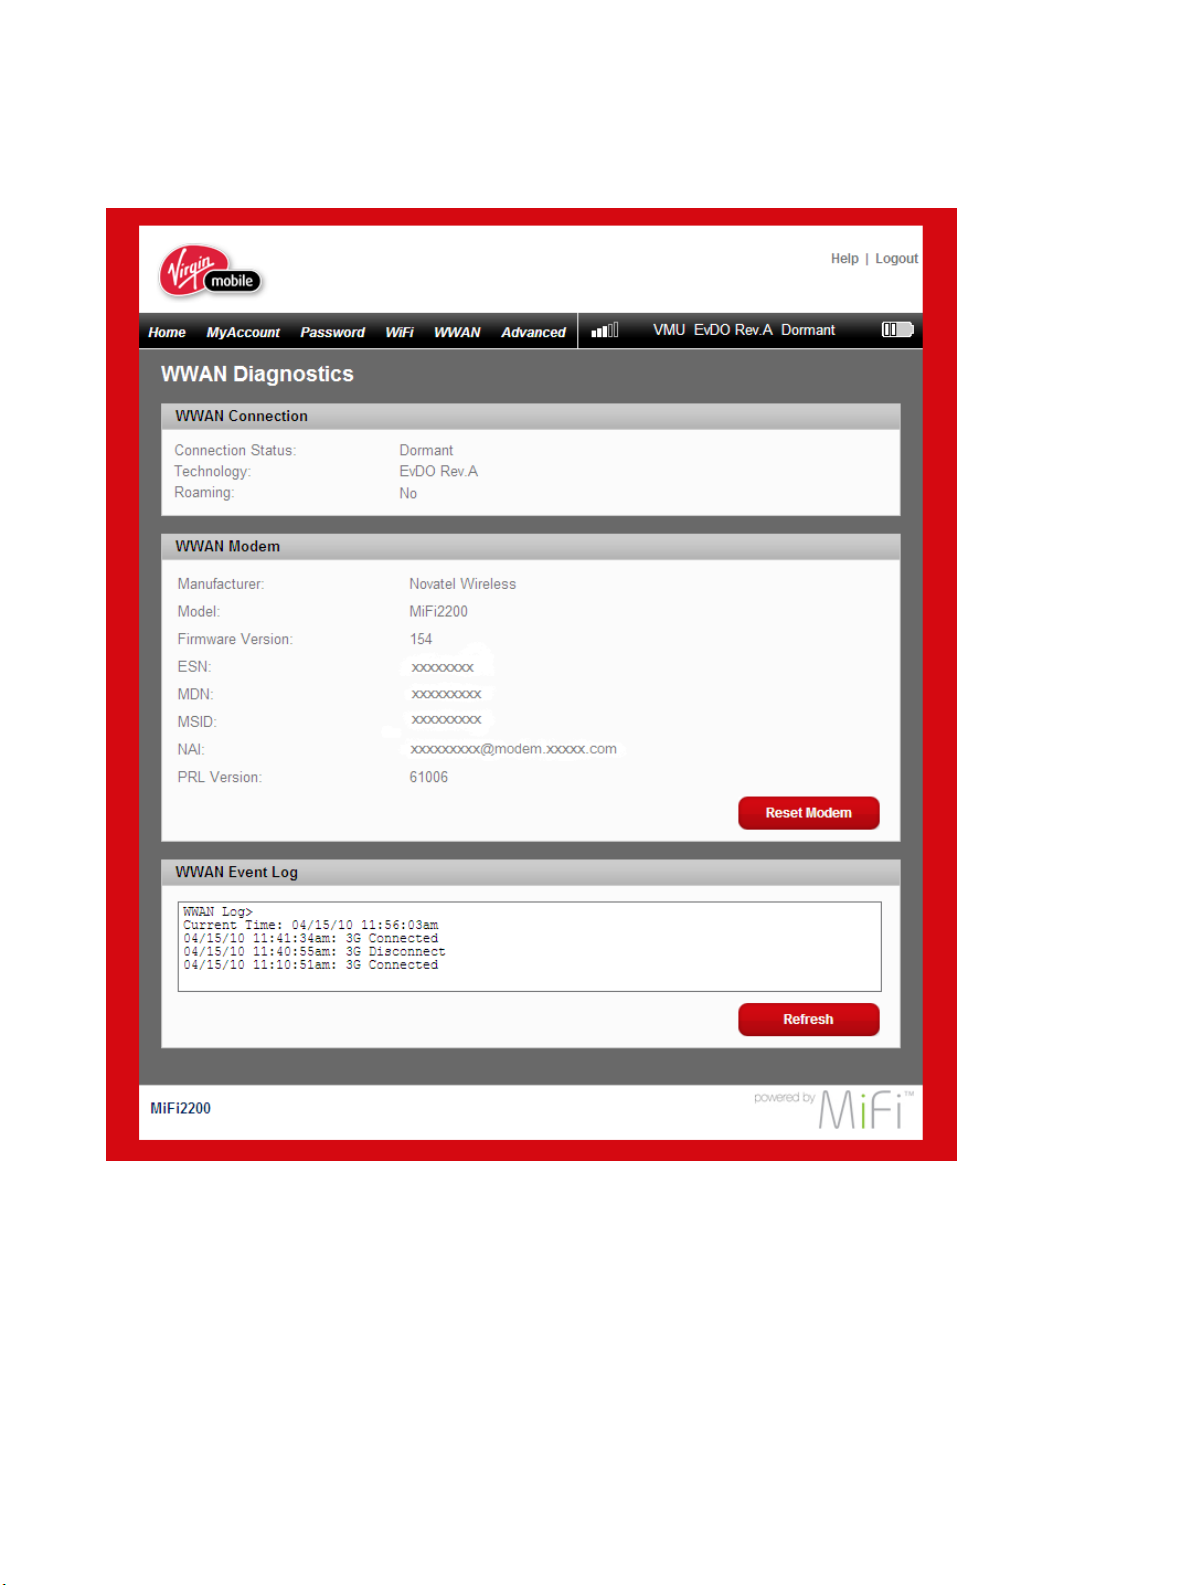
Diagnostics
Click Diagnostics in the WWAN menu to access status information about your Internet connection
and MiFi Device.
35
Page 37
The WWAN Diagnostic page is divided into three sections.
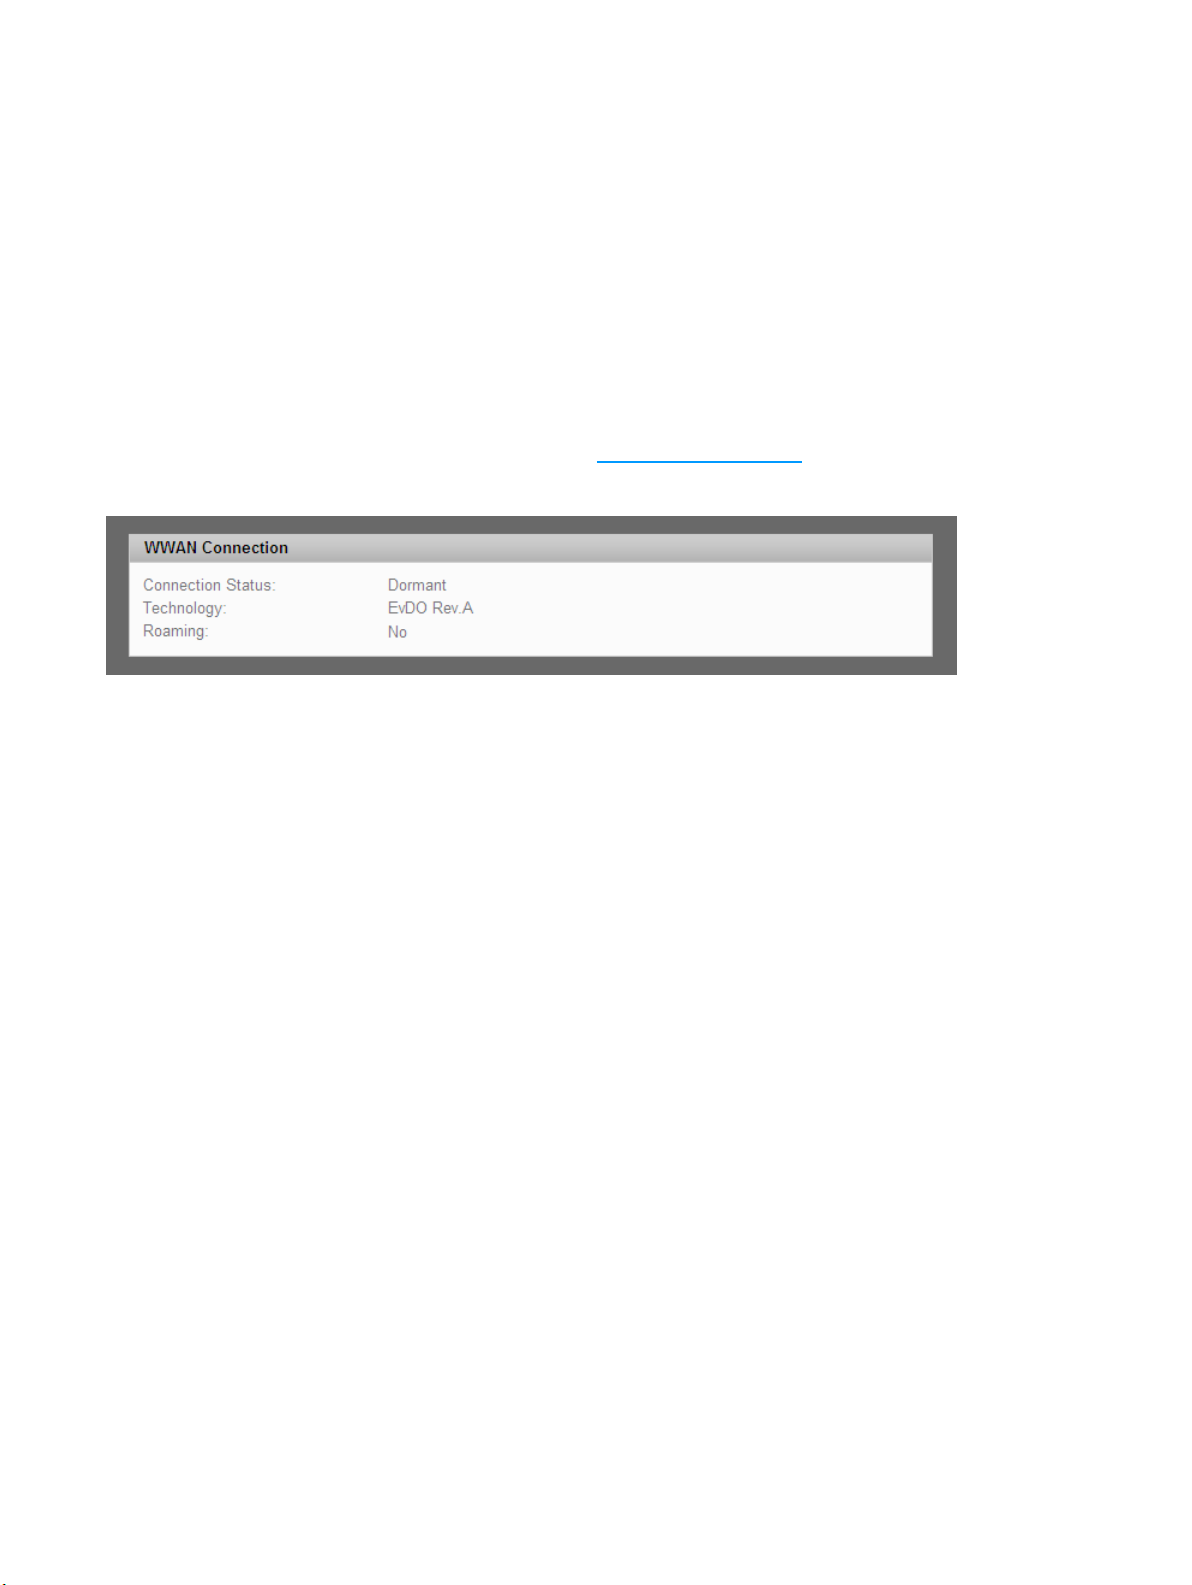
WWAN Connection
The WWAN Connection section displays the following information:
• Connection status:
• Connected — connected and transmitting data
• Dormant — connected but not transmitting data
• Disconnected — not connected to the network
• Not Activated — device is not activated. You will need to run Setup Wizard on the Home
page to activate your MiFi Device. [See Home Page Sections
• Type of network (technology) you are connected to.
(page 22).]
36
Page 38
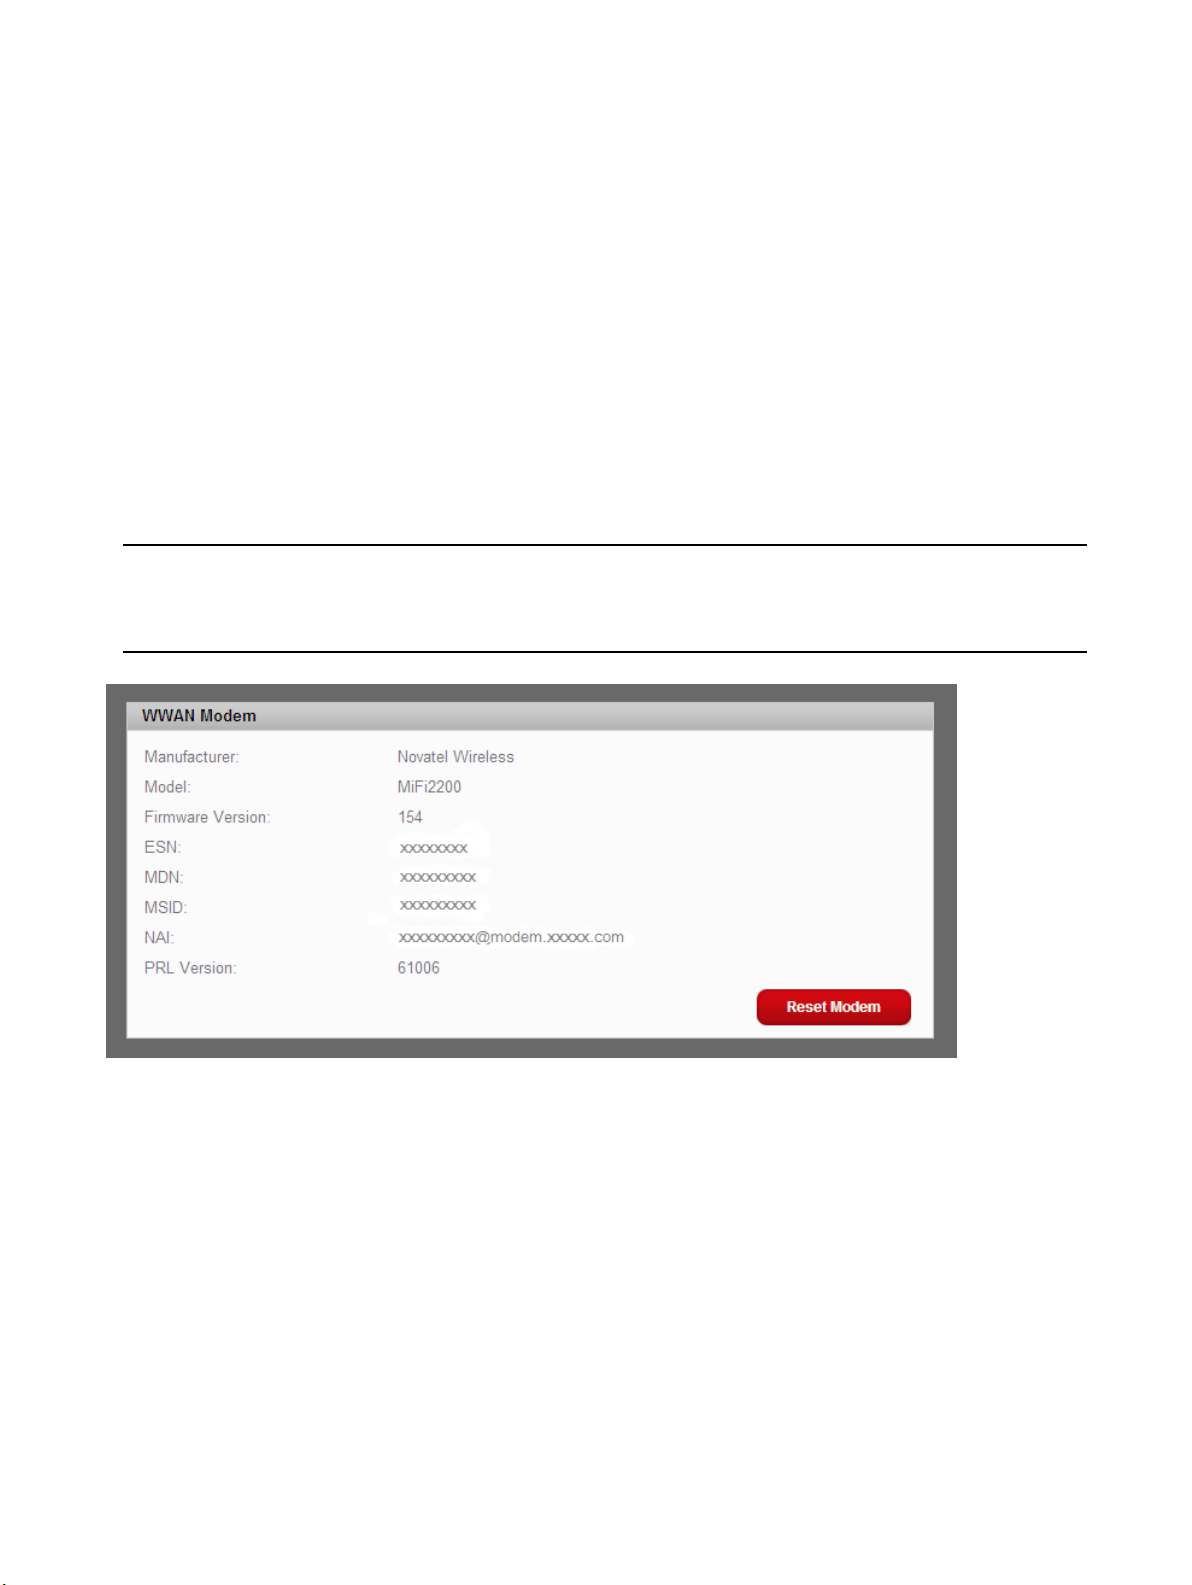
WWAN Modem
The WWAN Modem section displays the following information:
• Manufacturer — manufacturer of your MiFi Device.
• Model — model name or number of your MIFi Device.
• Firmware version — current internal software (rmware) version.
• ESN — unique number the network uses to identify your MiFi Device.
• MDN — public ID for your specic wireless service.
• MSID — internal ID your network uses to identify your account.
• NAI — address of your MiFi Device on the network.
• PRL Version — use to verify that your PRL (preferred roaming list) is the most current.
IMPORTANT! Do not click Reset Modem unless you have received an MSL number from
technical support. Reset Modem clears your network account information and will require
reactivation of your MiFi Device.
37
Page 39
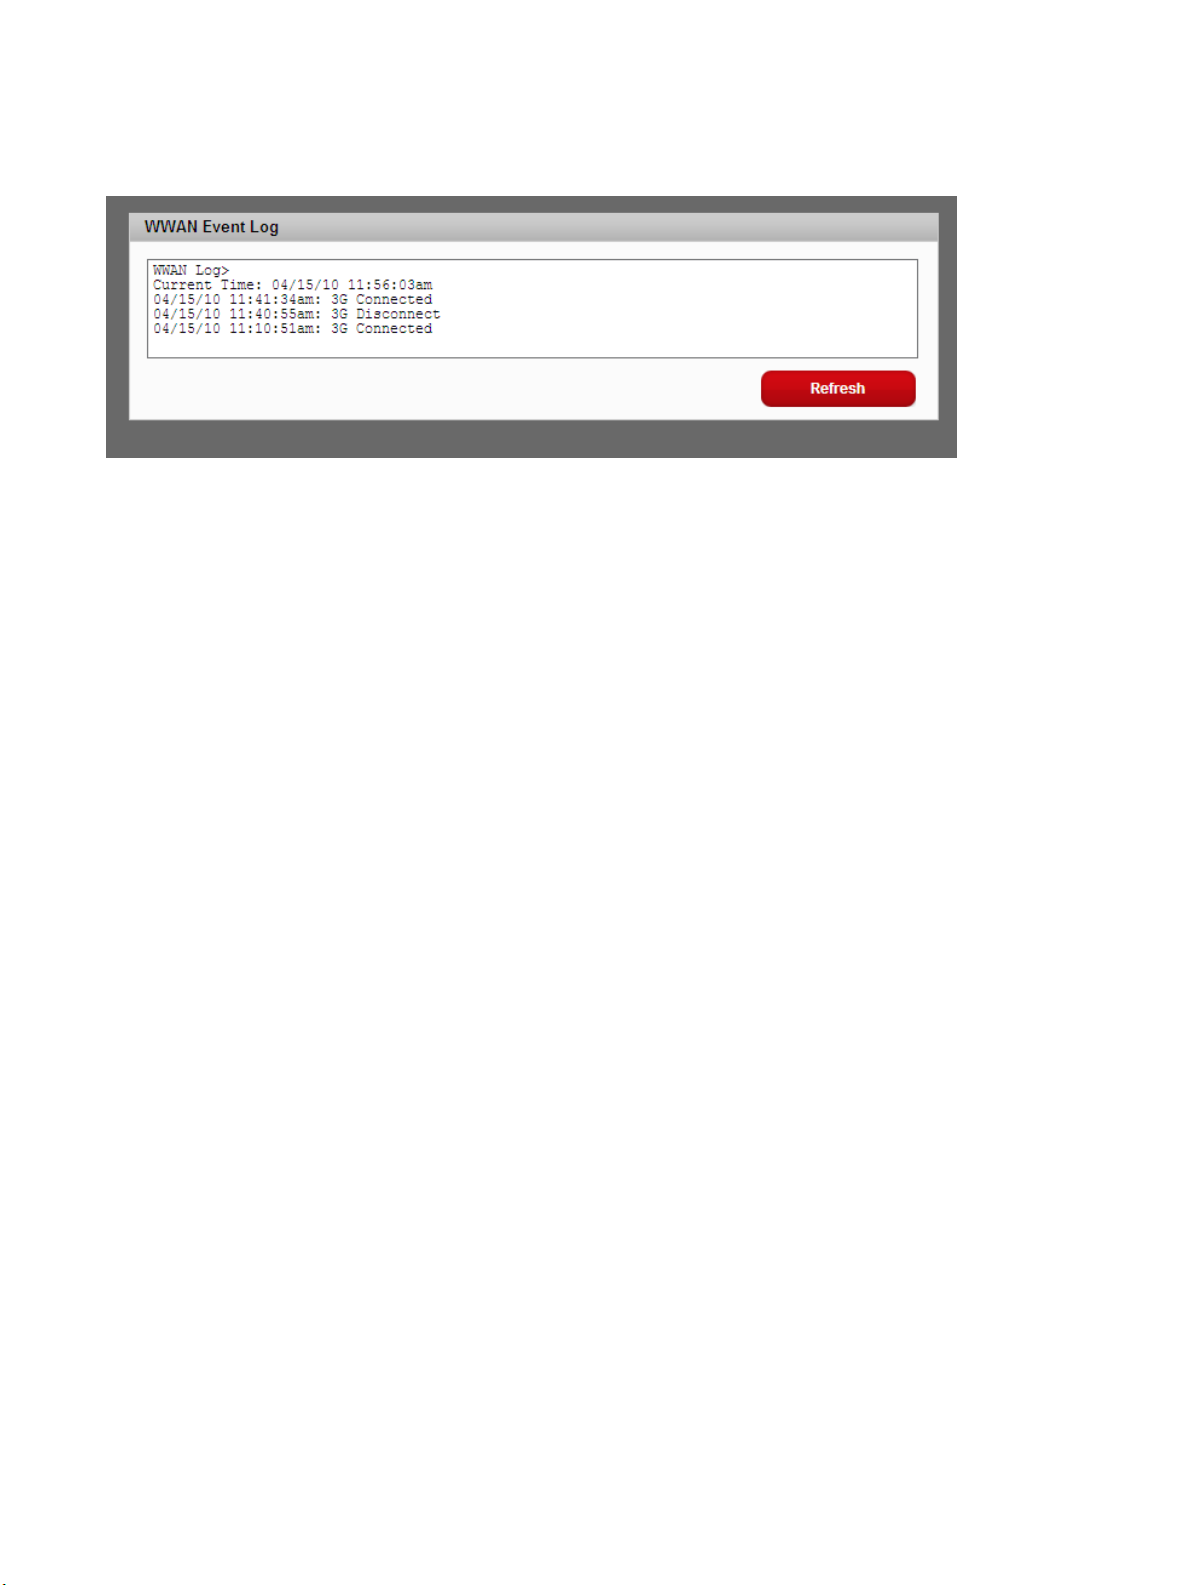
WWAN Event Log
The WWAN Event Log section lists network connection events and times when they occurred.
Technical support uses the log as a troubleshooting tool.
38
Page 40
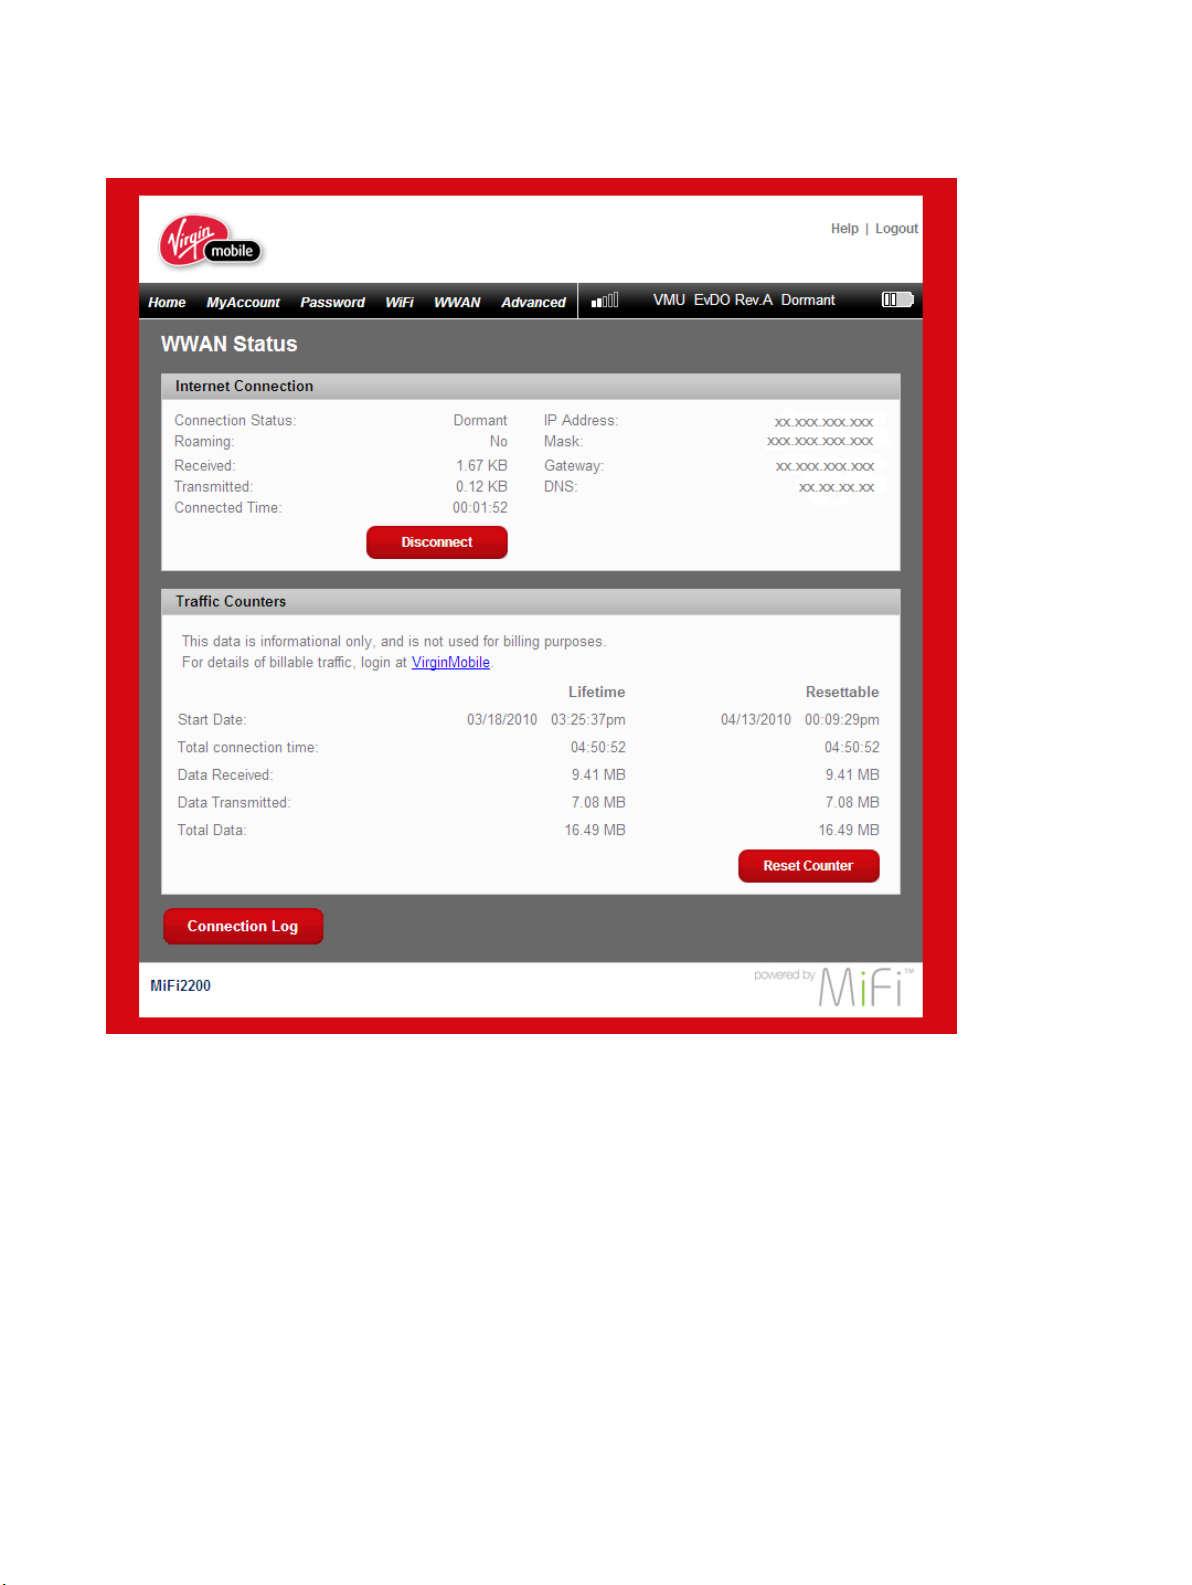
WWAN Status
The WWAN Status page displays information about your internet connection.
39
Page 41
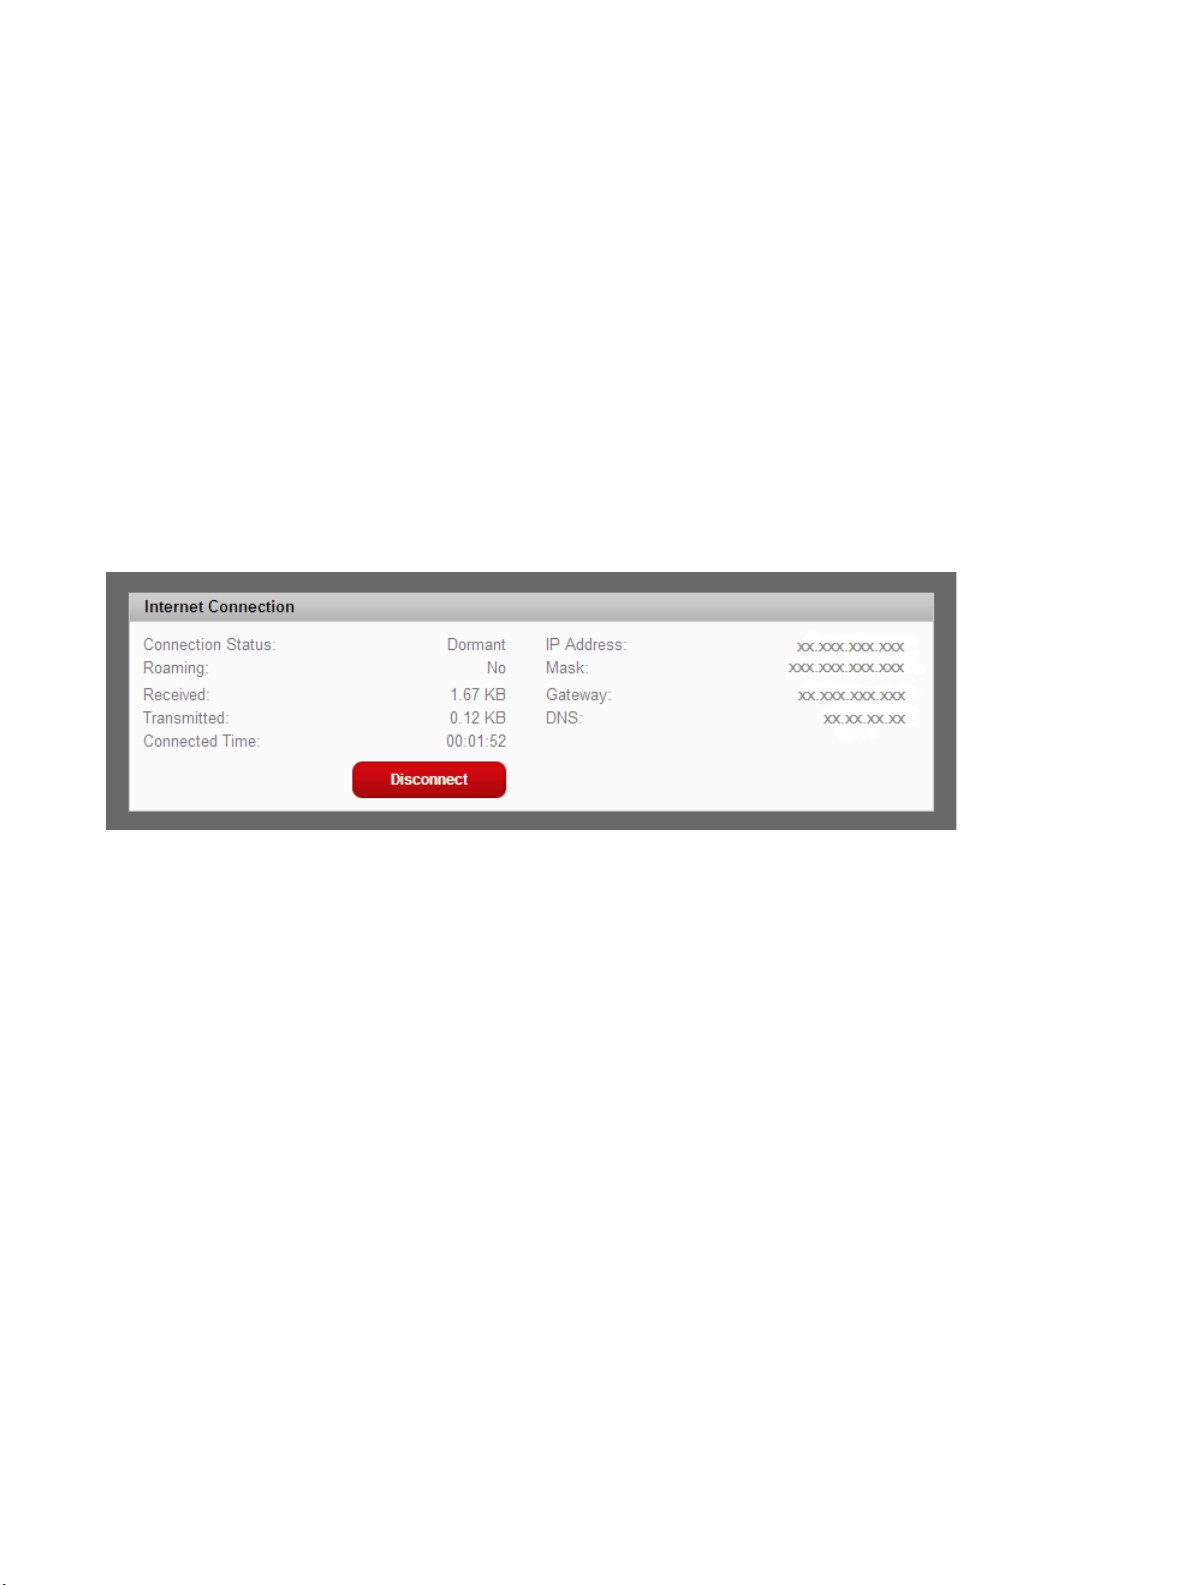
The WWAN Status page is divided into three sections.
Internet Connection
The Internet Connection section displays the following information:
• Status of the connection
• Number of bytes received and transmitted
• Duration of the current connection
• Your MiFi Device’s IP address and subnet mask
• Gateway IP address
• DNS server IP address
➤ Click Disconnect to leave the network or Connect to rejoin the network.
40
Page 42
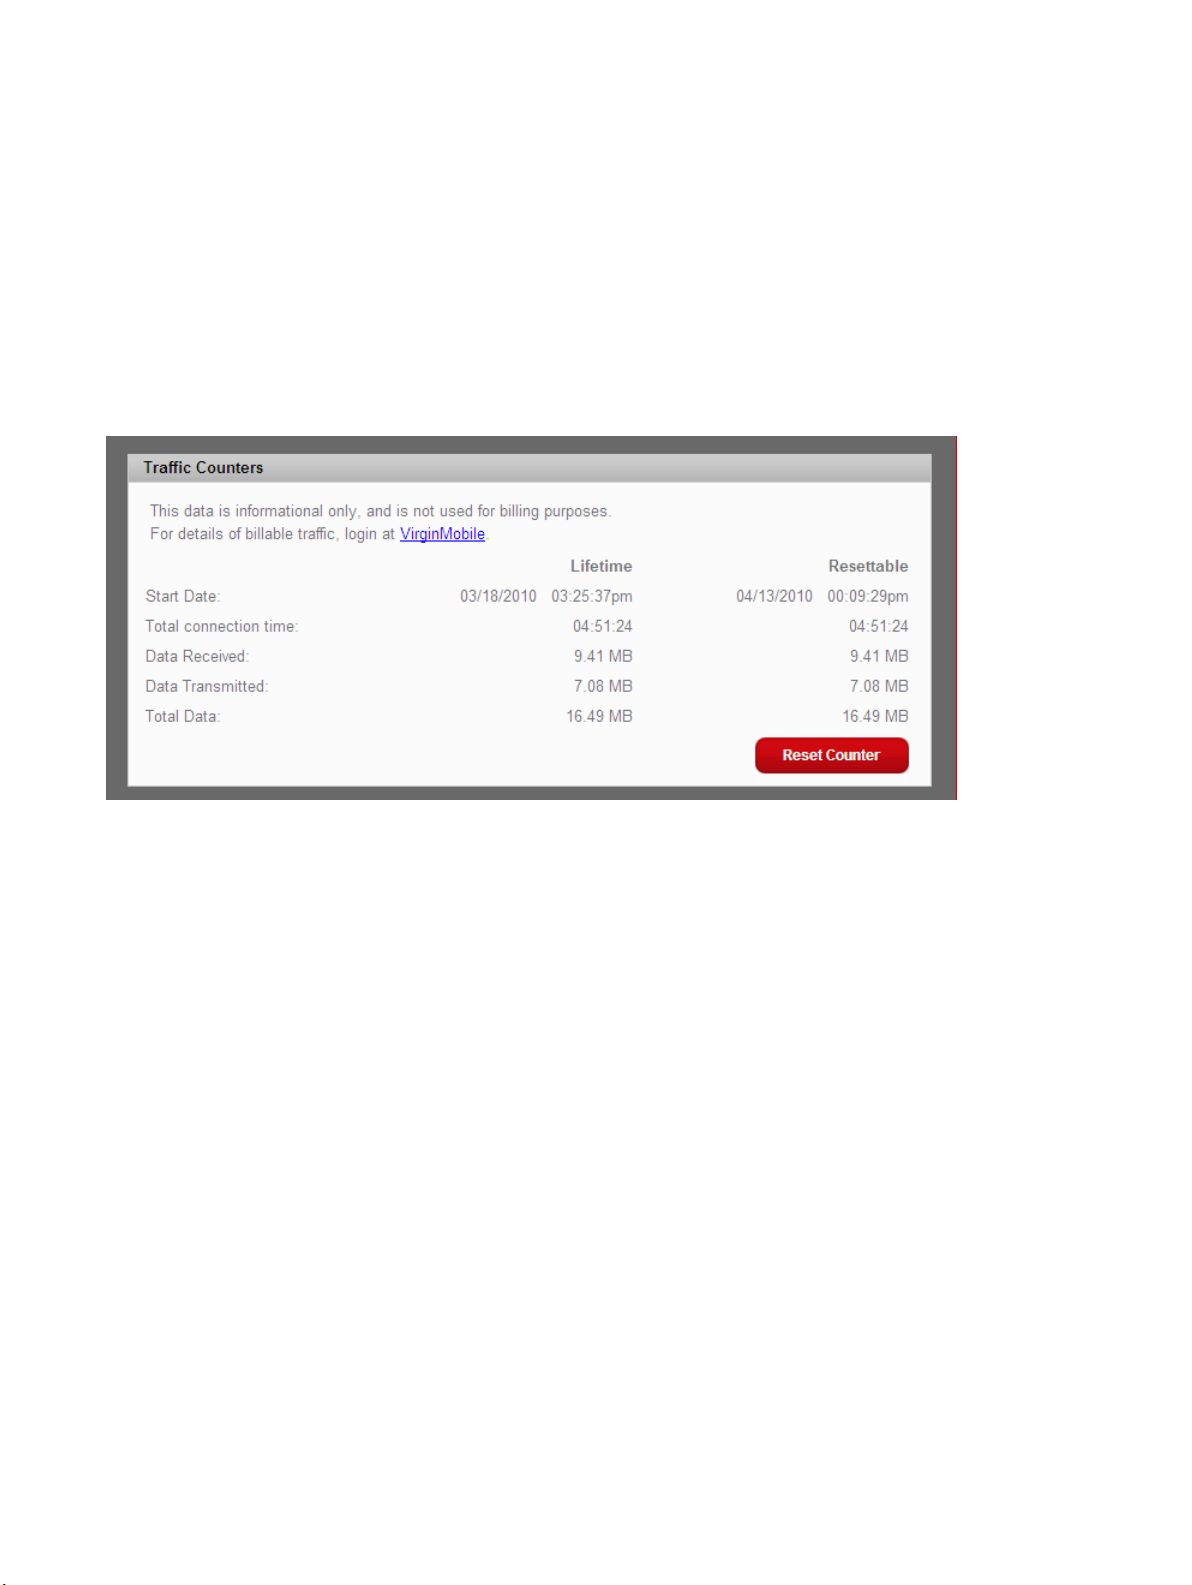
Traffic Counters
The Trac Counters section displays the following:
• Date and time connection was made
• Total duration of connection
• Total data bytes received and transmitted, plus the total for both directions
This section displays both a cumulative (lifetime) count and a count for the current session (which
can be reset).
➤ Click Reset Counter to set all counts back to zero.
41
Page 43
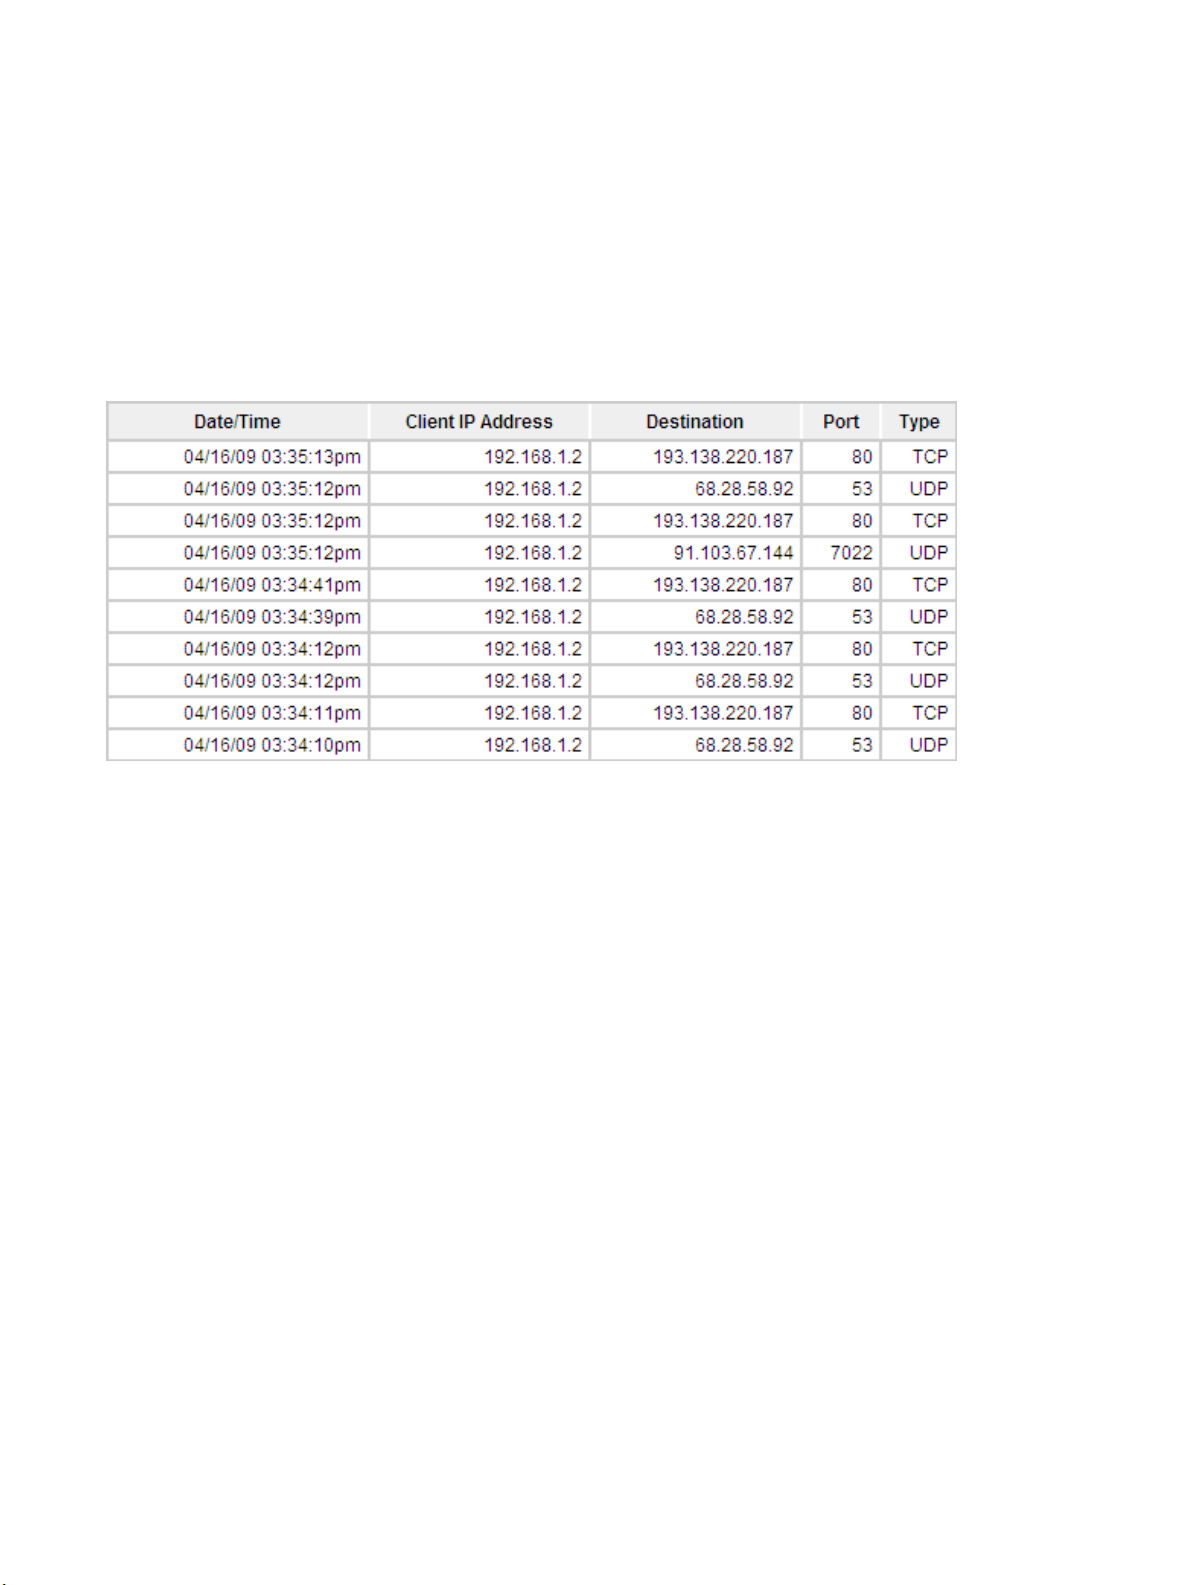
Connection Log
Click Connection Log to display a log of outgoing trac showing these details:
• Date/Time
• Client IP Address (IP address of sender)
• Destination (IP address of recipient)
• Port (computer port through which data was sent)
• Type (connection protocol used)
42
Page 44
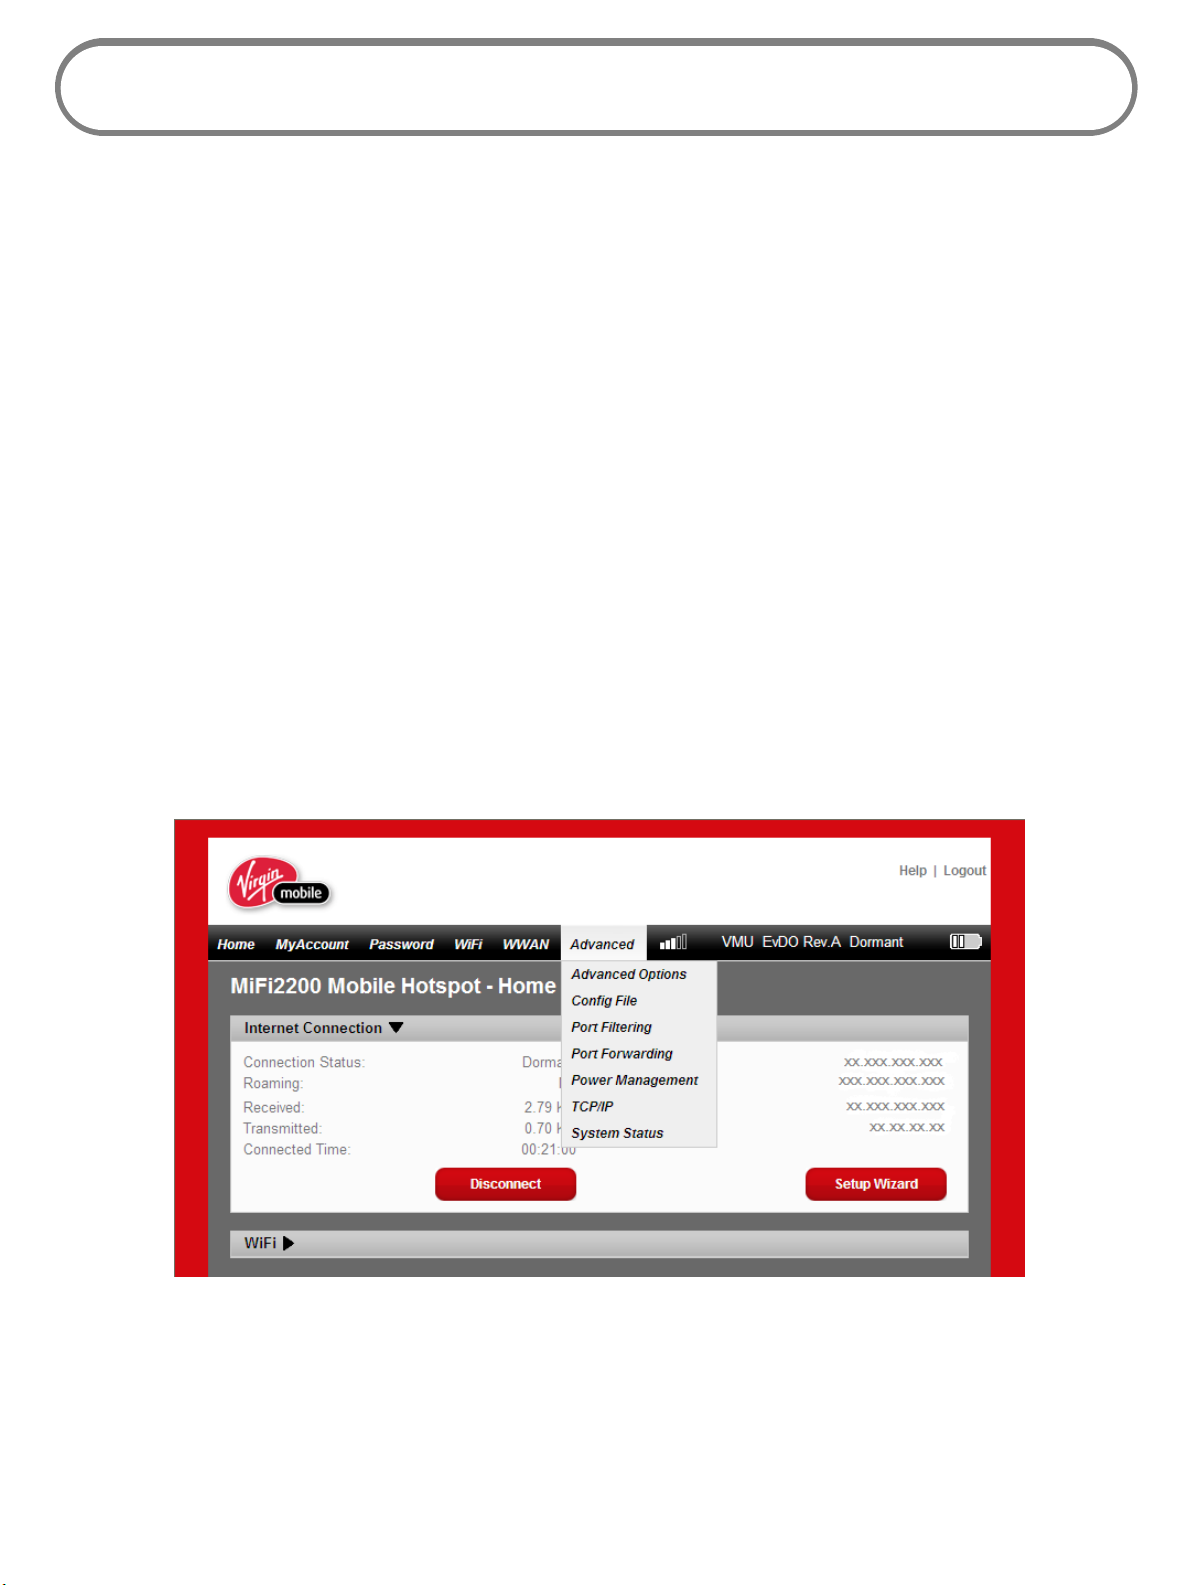
Advanced Menu
The Advanced menu allows you to back up and restore your conguration, specify router settings
such as DHCP, port ltering, and port forwarding, and to customize power management settings.
The Advanced menu has seven components:
• Advanced Options — use to enable SSID broadcast, auto-connect to the network, DHCP, VPN
passthrough, or the system log.
• Config File — use to back up or restore a le containing your MiFi Device settings.
• Port Filtering — use to specify which applications can access the Internet and through which
port(s).
• Port Forwarding — use to specify which applications can access your computer through
the Internet and through which port(s). You might use this if you have an FTP server on your
system or play certain online games.
• Power Management — use to customize your MiFi Device’s power-saving settings.
• TCP/IP — use to view or change the IP address and subnet mask for your MiFi Device, and to
view the MAC address and DHCP address range for your MiFi Device.
• System Status — use to view information about your MiFi Device and to view the system log.
You can also restart your MiFi Device or restore it to its factory default settings.
43
Page 45
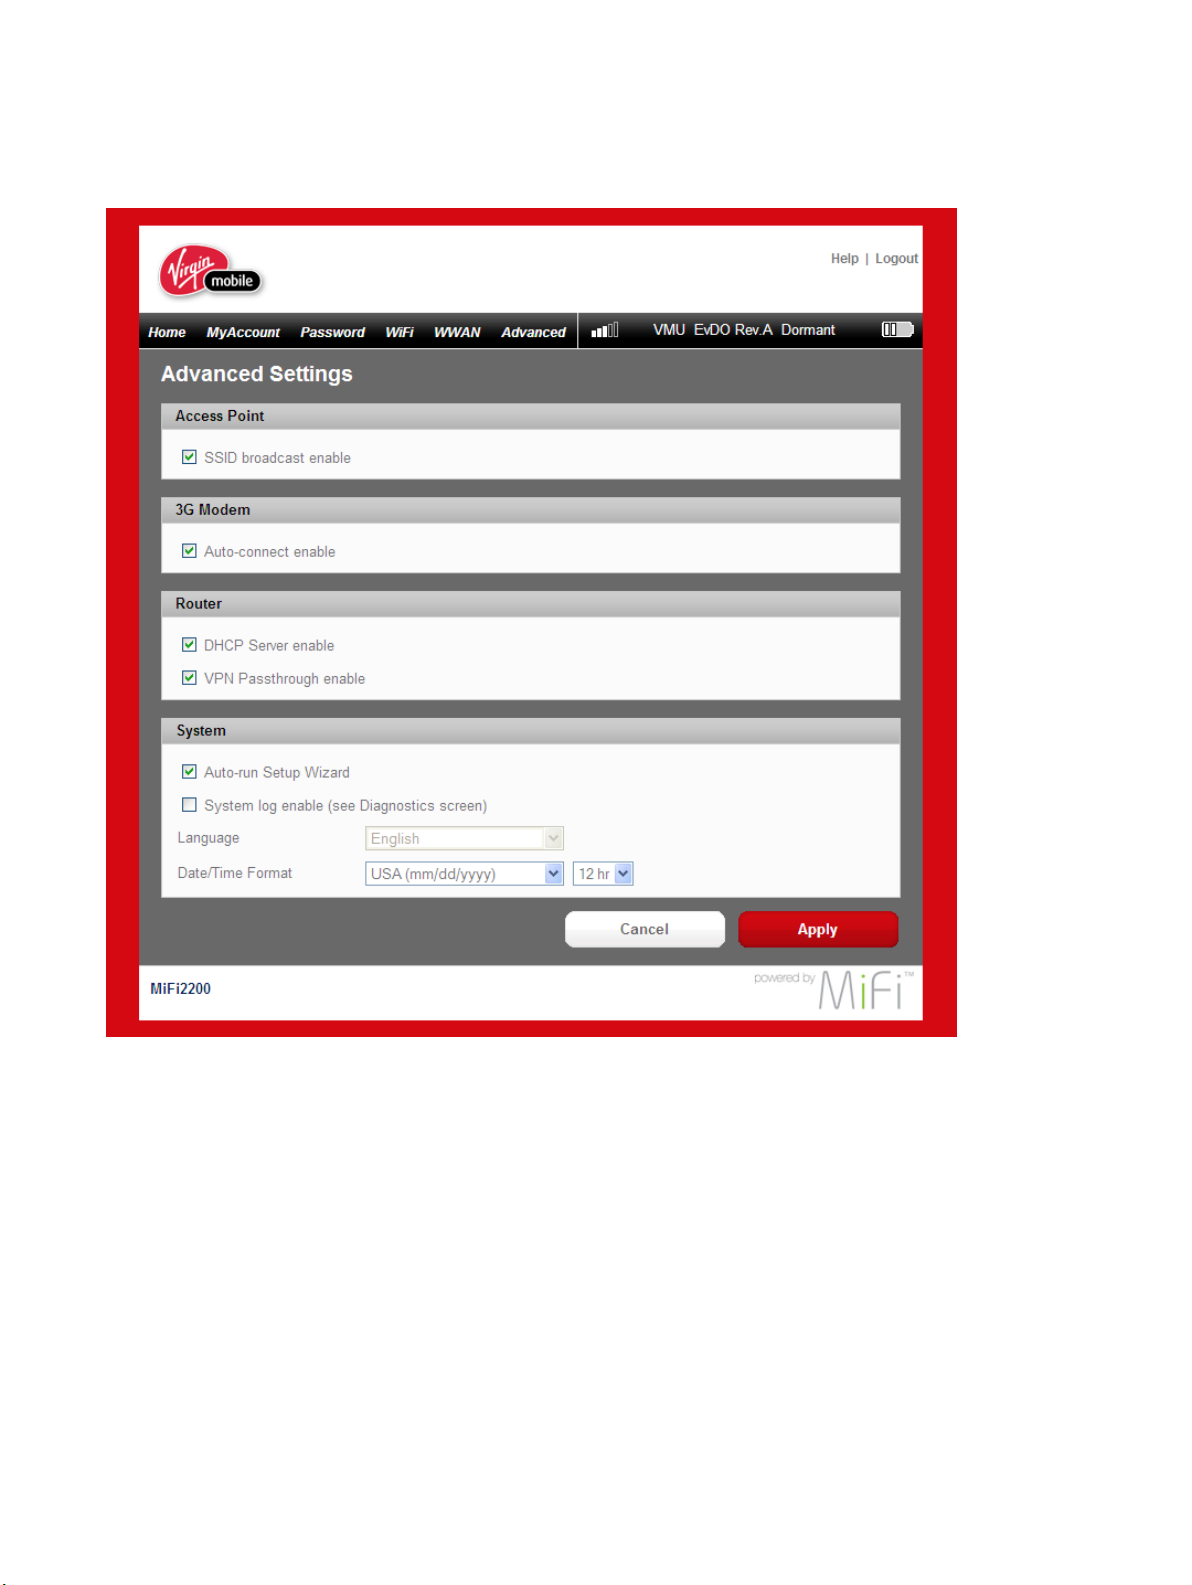
Advanced Settings
Click Advanced Options in the Advanced menu to congure your MiFi Device or to enable the system
log.
44
Page 46
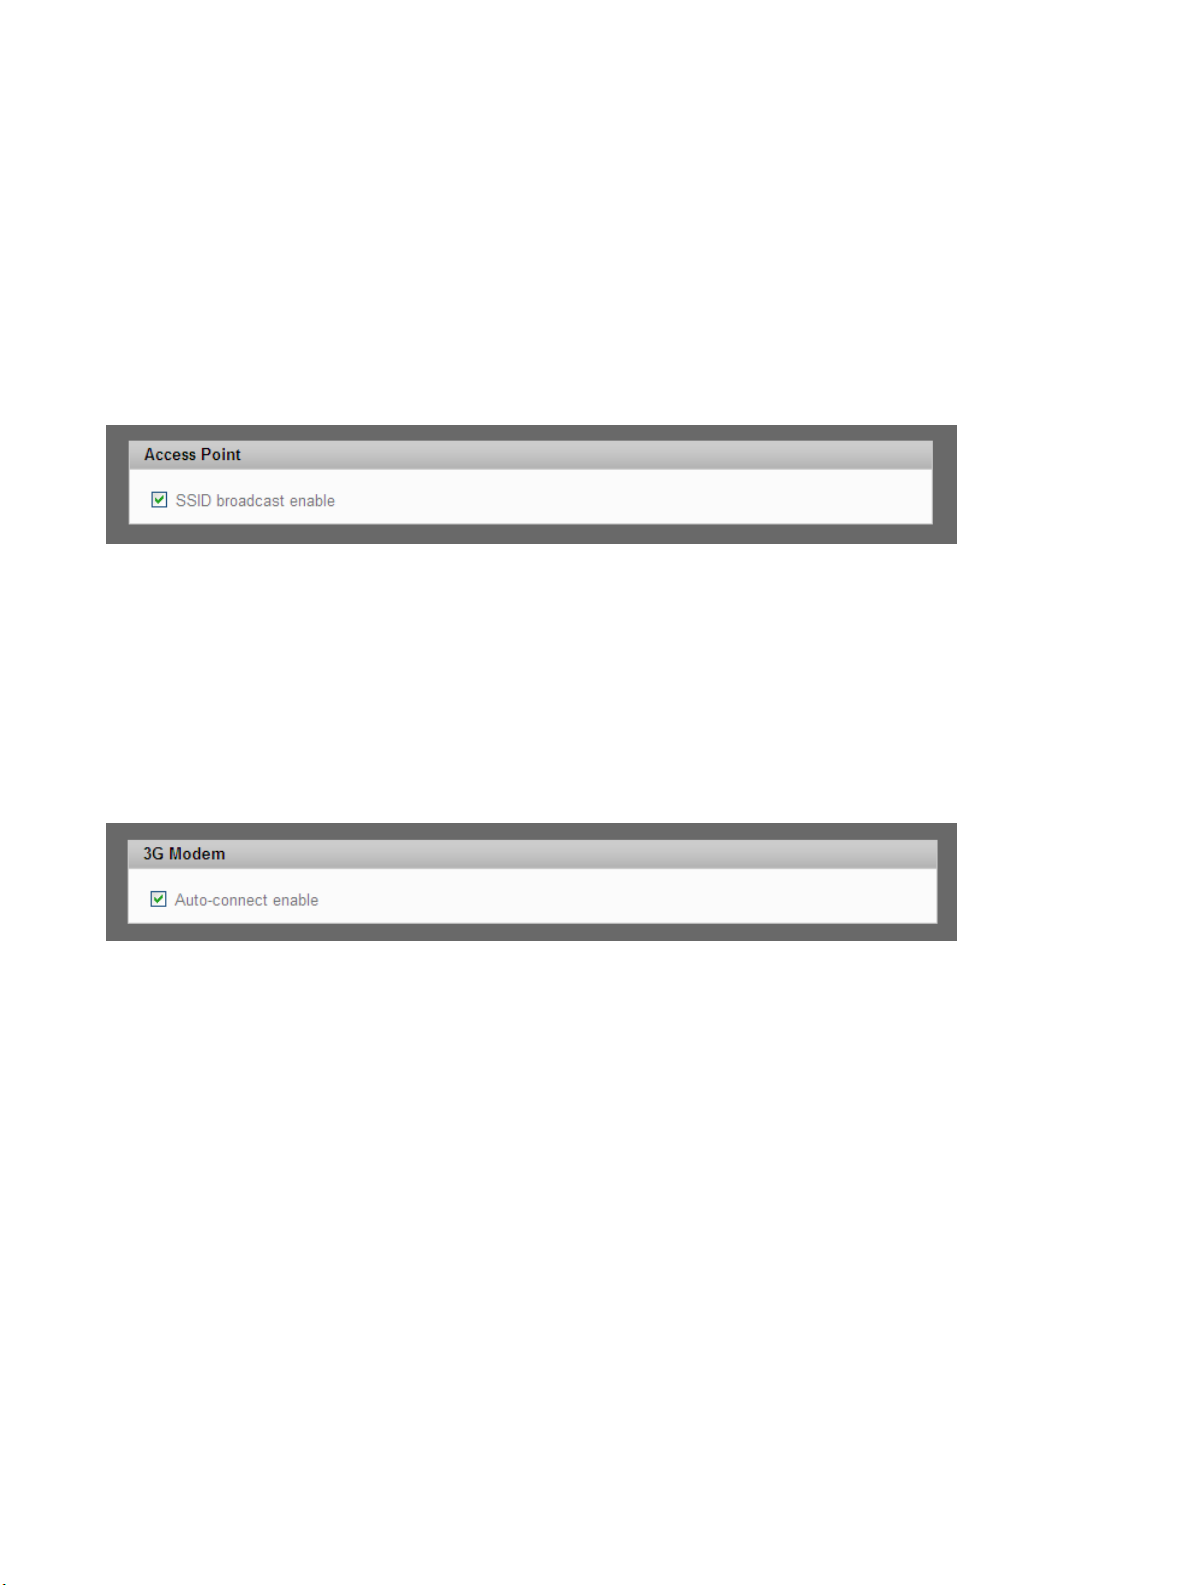
The advanced Settings page is divided into four sections.
Access Point
Enabling SSID broadcasting allows other nearby computers to see your MiFi Device’s network name
(SSID). This is what you see when you select “View Available Wireless Networks.”
Disabling SSID broadcasting provides additional security but you will have to re-enable it if you lose
your automatic connection.
➤ Select the SSID broadcast enable check box to enable SSID broadcasting, or clear the check
box to disable SSID broadcasting, and then click Apply.
3G Modem
Enabling auto-connect allows your MiFi Device to connect to your network automatically when it is
turned on.
➤ Select the Auto-connect enable check box to enable auto-connection, or clear the check box
to disable auto-connection, and then click Apply.
45
Page 47
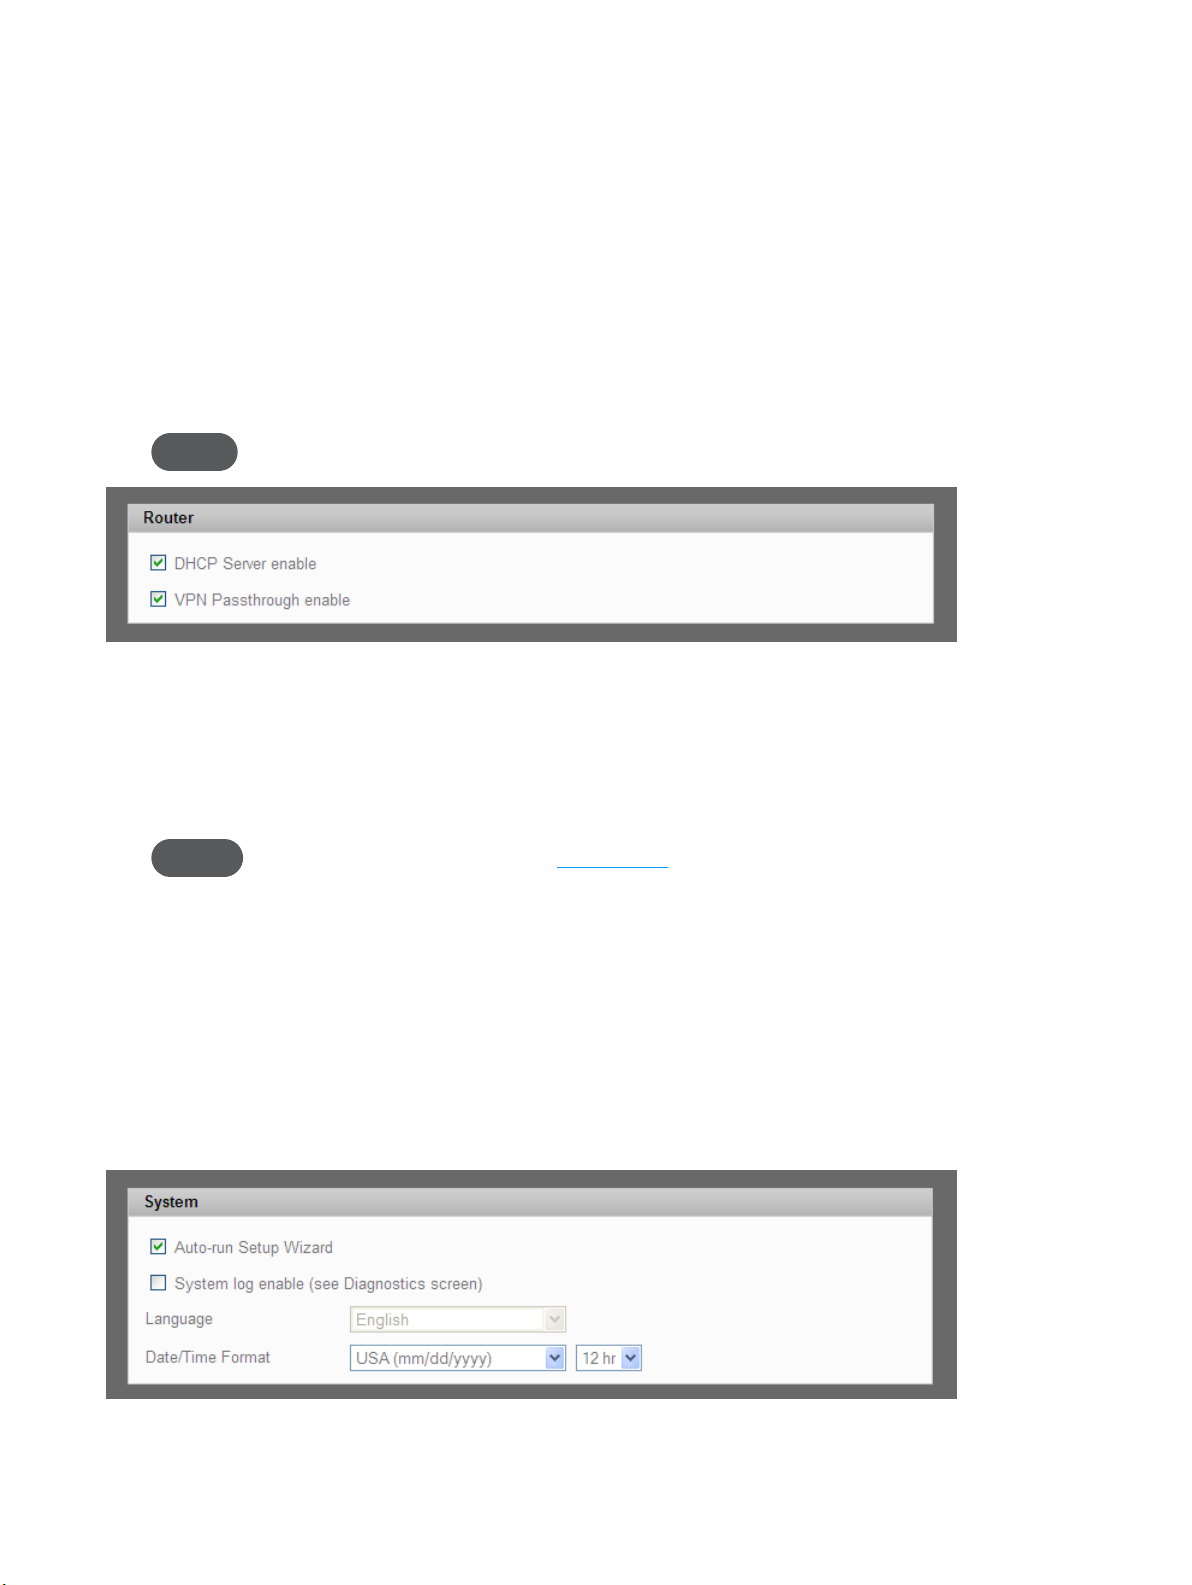
Router
Enabling the DHCP server allows your MiFi Device to automatically assign a local IP address to a new
device joining your network (such as a wireless printer or an additional laptop). When the DHCP
server is disabled, you will have to assign static IP addresses to all devices on your network.
➤ Select the DHCP Server enable check box to enable the DHCP server, or clear the check box to
disable the DHCP server, and then click Apply.
VPN passthrough is required if you are going to connect to a VPN (such as a corporate system).
➤ Select the VPN Passthrough enable check box to enable VPN passthrough, or clear the check
box to disable VPN passthrough, and then click Apply.
NOTE Please check with your Corporate IT department for supported VPN protocols.
System
The System section allows you to select your preferred language, date format, and time format, and
to turn on the system log.
NOTE You can view the system log from the System Status page (see page 55).
➊ In the Language list, click the language you wish to use. (Currently English is the only option,
and this list is disabled [grayed-out]).
➋ In the Date/Time list, click the date format (U.S. or European) and the time system (12-hr or
24-hr) that you want to use.
➌ Optionally, you can select the System log enable check box if you want to create a system
log.
➍ Conrm your selections and click Apply.
46
Page 48
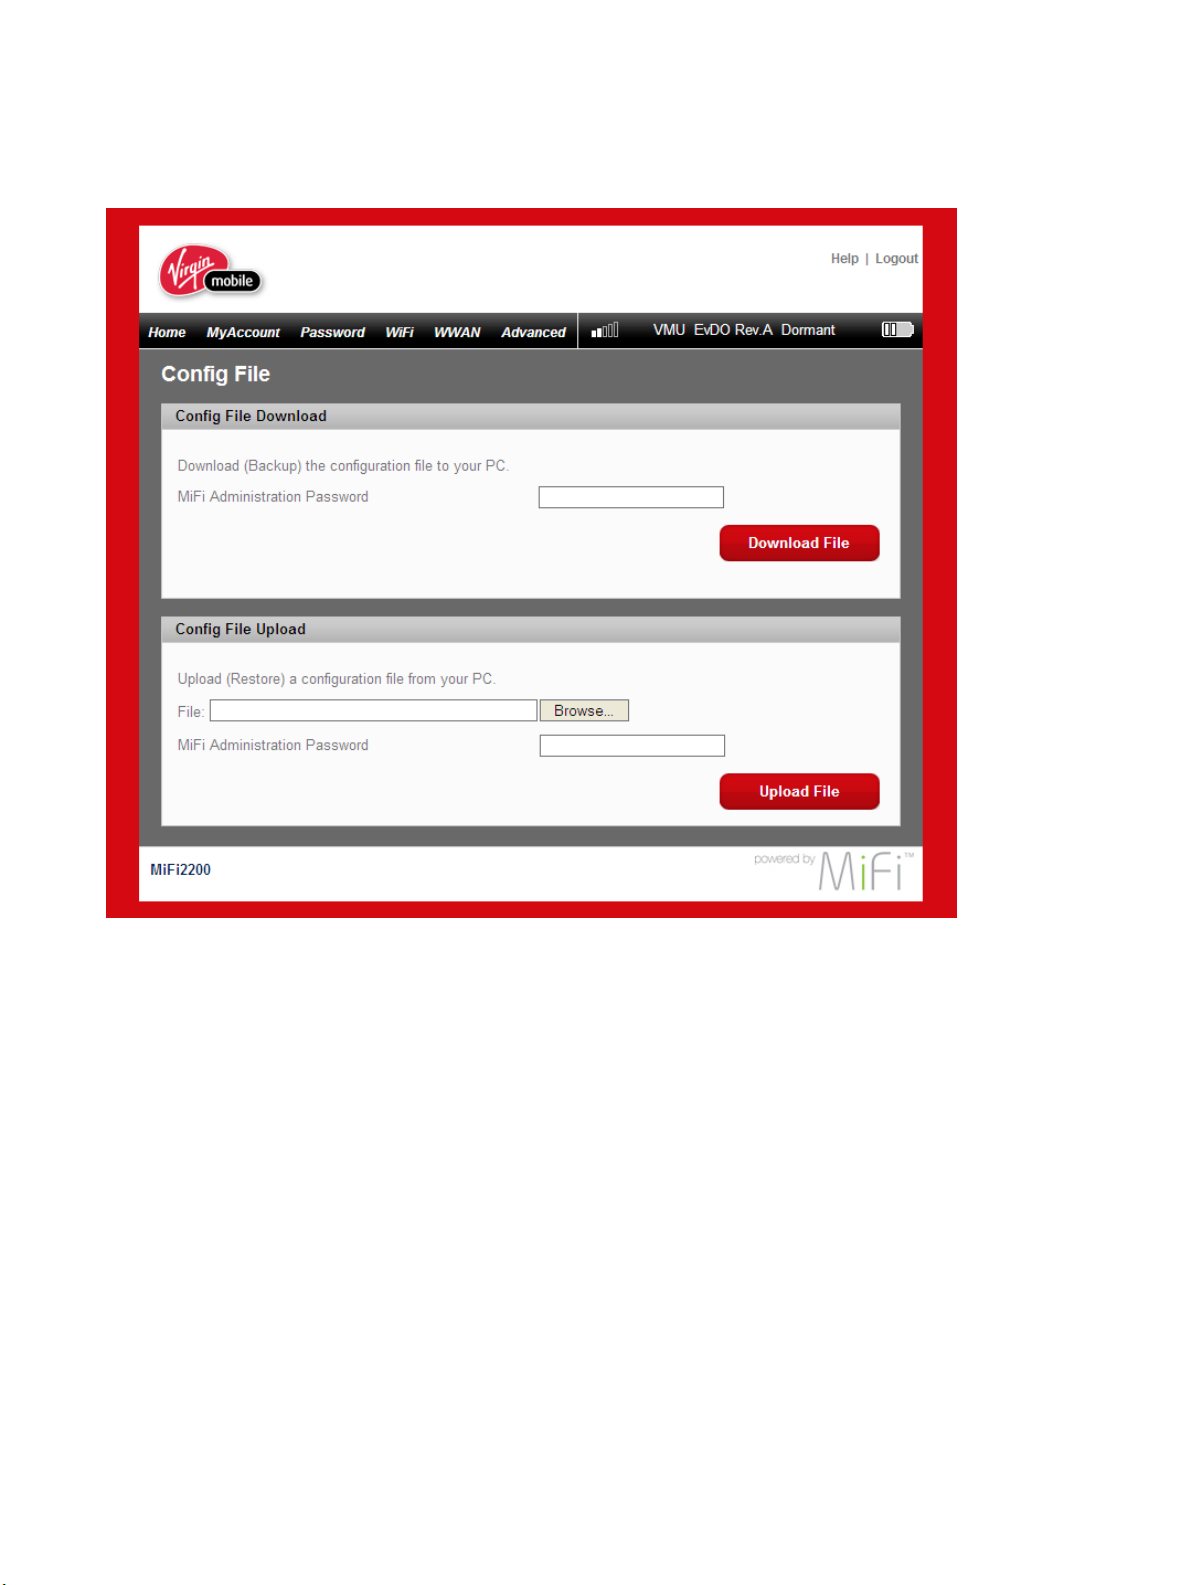
Cong File
Click Cong File in the Advanced menu to back up your conguration le (MiFi Device settings) to
your computer, or to restore a saved conguration le from your computer.
The Cong File page is divided into two sections and allows you to back up and restore your MiFi
Device conguration settings.
Config File Download
Back up your MiFi Device setting file to your computer
➊ Click Download File.
➋ Click Save to place the le “cong.xml.savele” on your computer. You may rename the le. (If
the le opens in your browser instead of downloading, use your browser’s File menu to save
the le to your computer.)
47
Page 49

Config File Upload
Restore your MiFi Device Settings file to MiFi Device
➊ Click Browse and navigate to the backup le on your computer.
➋ Click the le to highlight it and then click Open.
➌ Click Upload File.
➍ Click OK when the “Upload completed” message appears.
IMPORTANT! If your Wi-Fi settings have changed since you created the backup file, you may
lose your connection after restoring from the backup file. You will need to reconnect using your
new (changed) settings.
48
Page 50
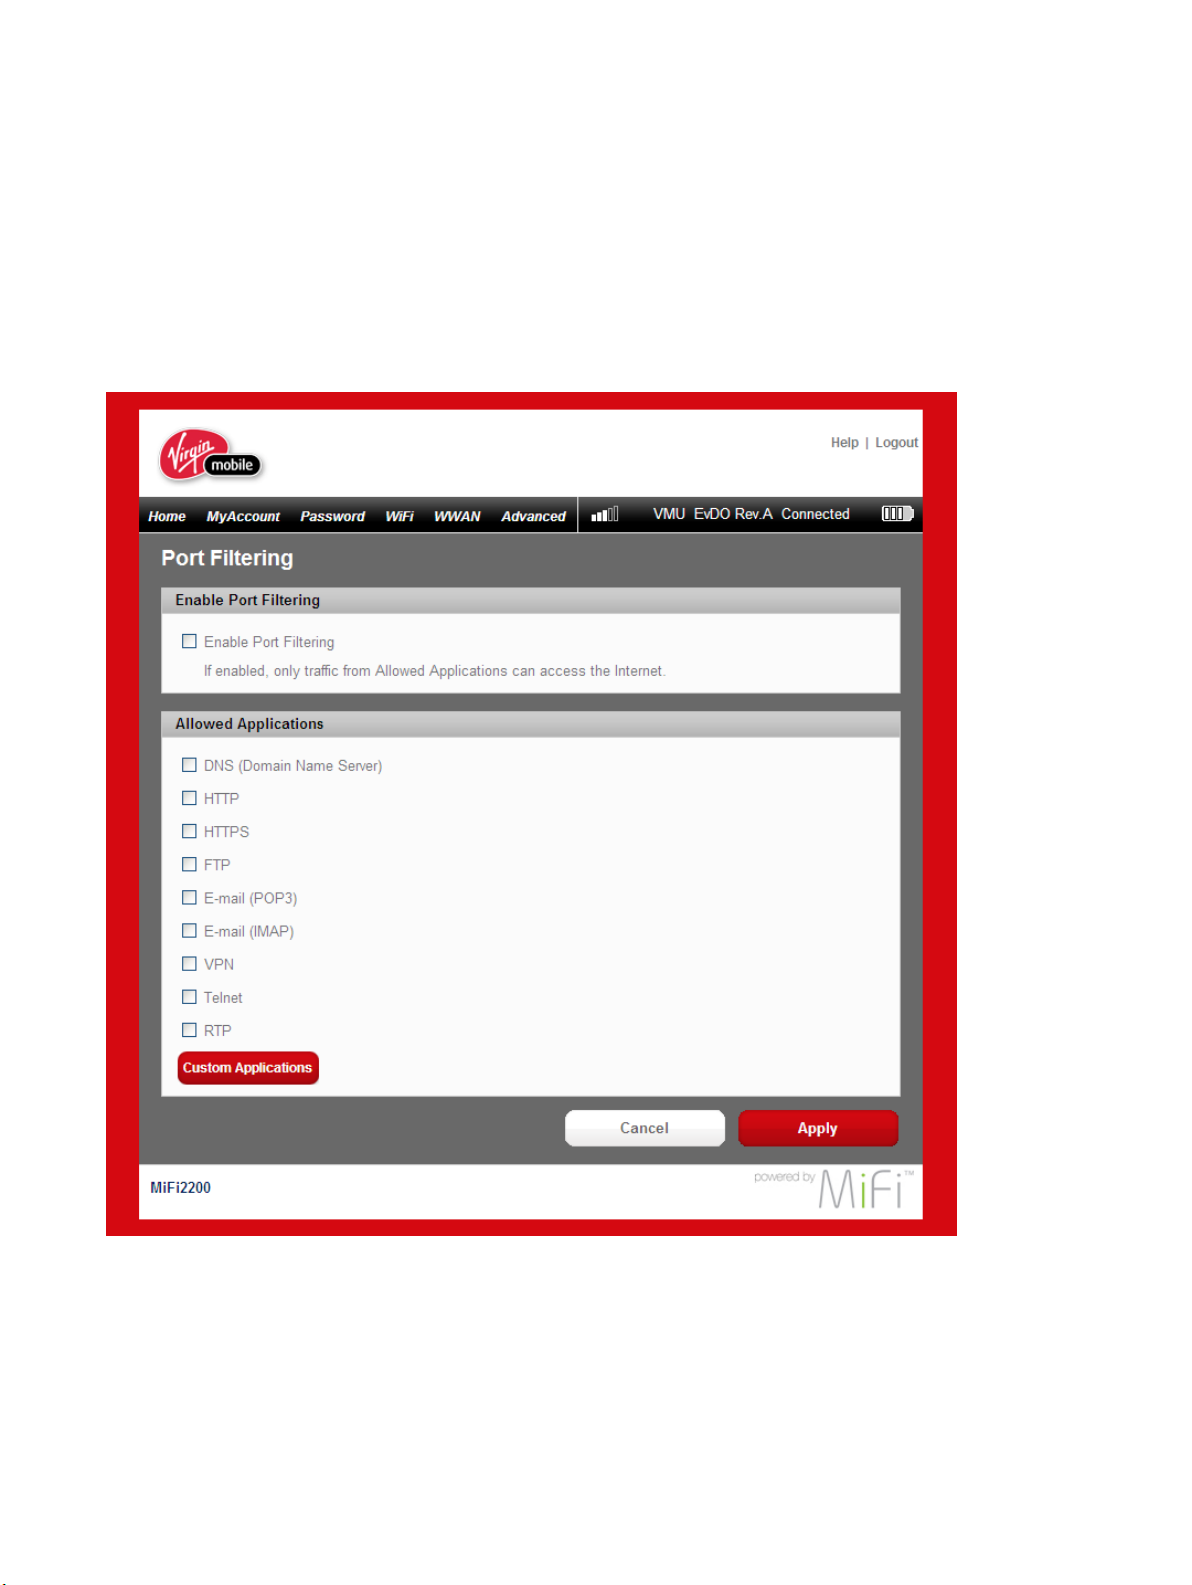
Port Filtering
Click Port Filtering in the Advanced menu to enhance the security of your system by controlling
which applications are allowed to access the Internet.
Port ltering allows you to conserve bandwidth by preventing non-business applications from
accessing the Internet. It can also be used to specically allow certain applications such as games
and video conferencing software to use certain ports to access their online components.
The Port Filtering page allows you to enable port ltering, allow selected applications to access the
Internet, and set up custom applications for access to the Internet.
49
Page 51
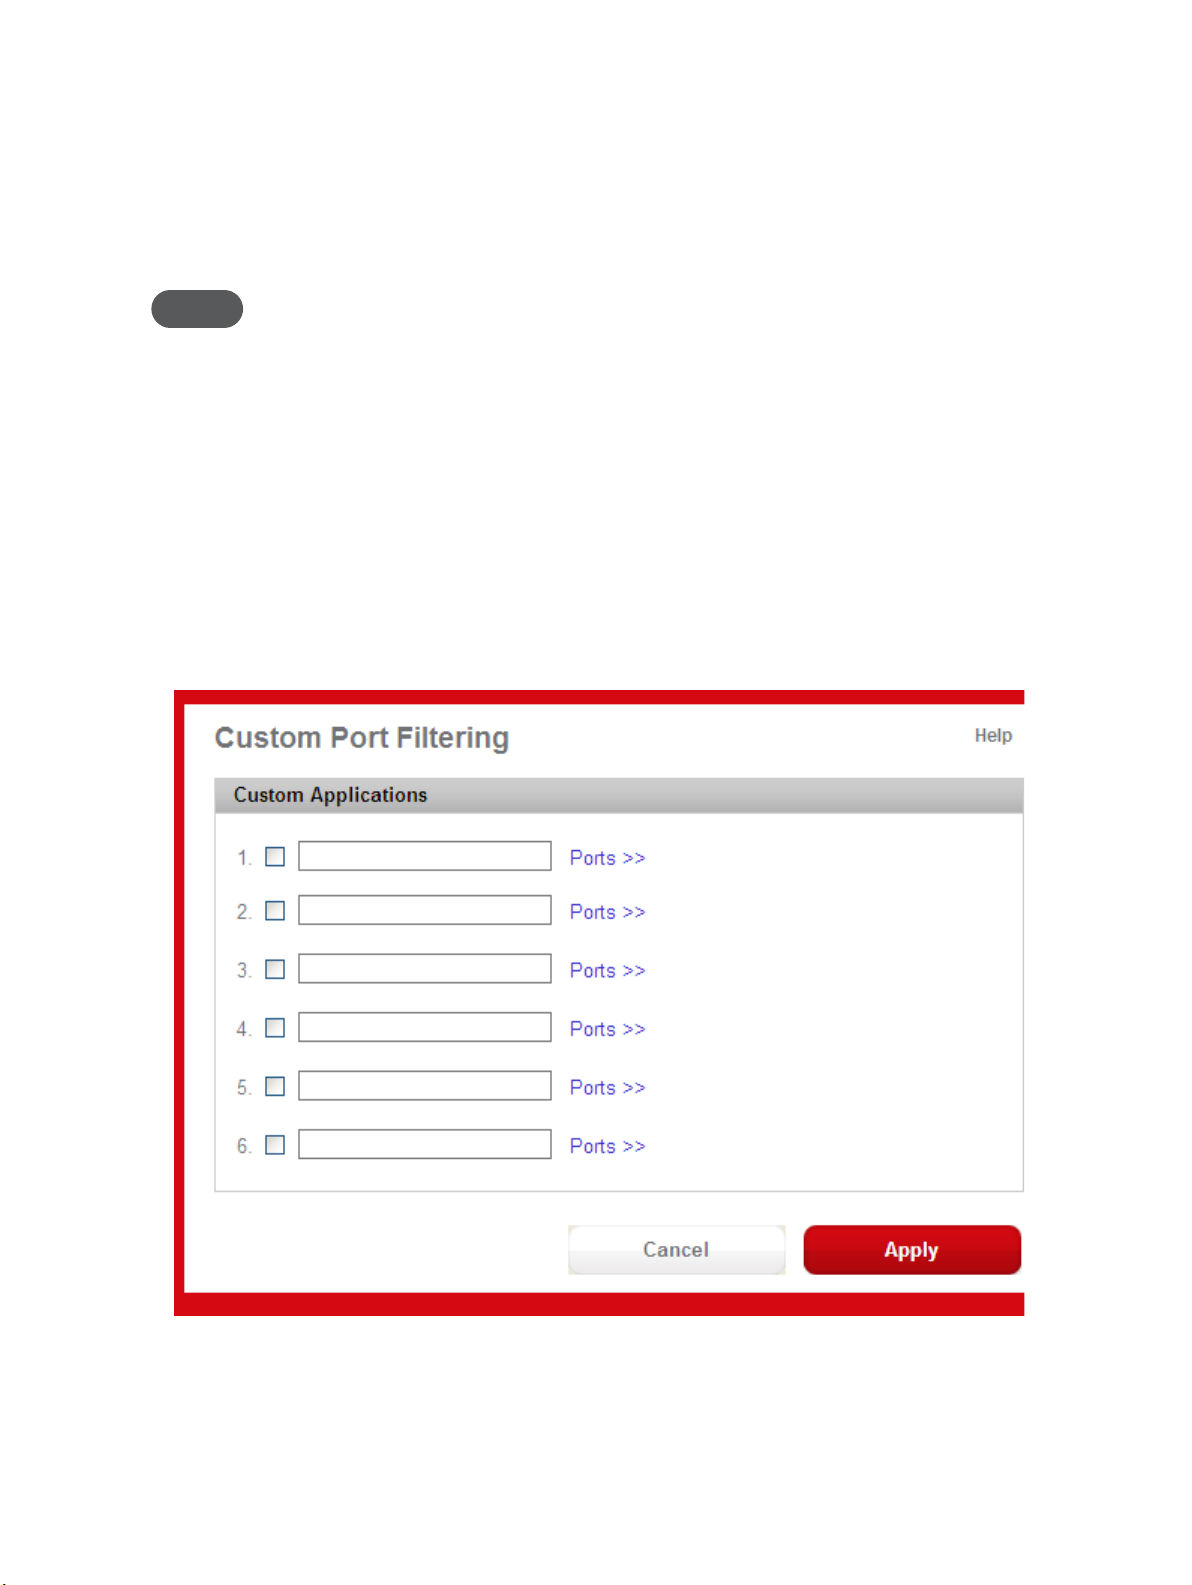
Port Filtering for Standard Applications
➊ From the Port Filtering page, select the Enable Port Filtering check box.
➋ Select the check boxes for the applications for which you want to allow access to the
Internet.
➌ Click Apply.
NOTE MiFi Device uses standard ports for these applications. If you have applications that do not use the
standard ports or that are not listed under Allowed Applications, use Custom Applications.
Port Filtering for Custom Applications
To set up port ltering for a custom application, you will need to know the port numbers (up to
ve ports or port ranges) and the protocol (TCP, UDP, or both) the application uses for its outgoing
trac.
➊ From the Port Filtering page, select the Enable Port Filtering check box.
➋ Click Custom Applications.
➌ Enter a name for the application and click the Ports link.
50
Page 52

➍ Enter the port or port range. You can enter up to ve ports or port ranges.
• Single port — enter the port number in both elds.
• Port range — enter the beginning port number in the left eld and the ending port
number in the right eld.
➎ For each port number or range, select the protocol (TCP, UDP, or both) used by that port or
port range.
➏ Click Hide.
➐ Click Apply.
51
Page 53
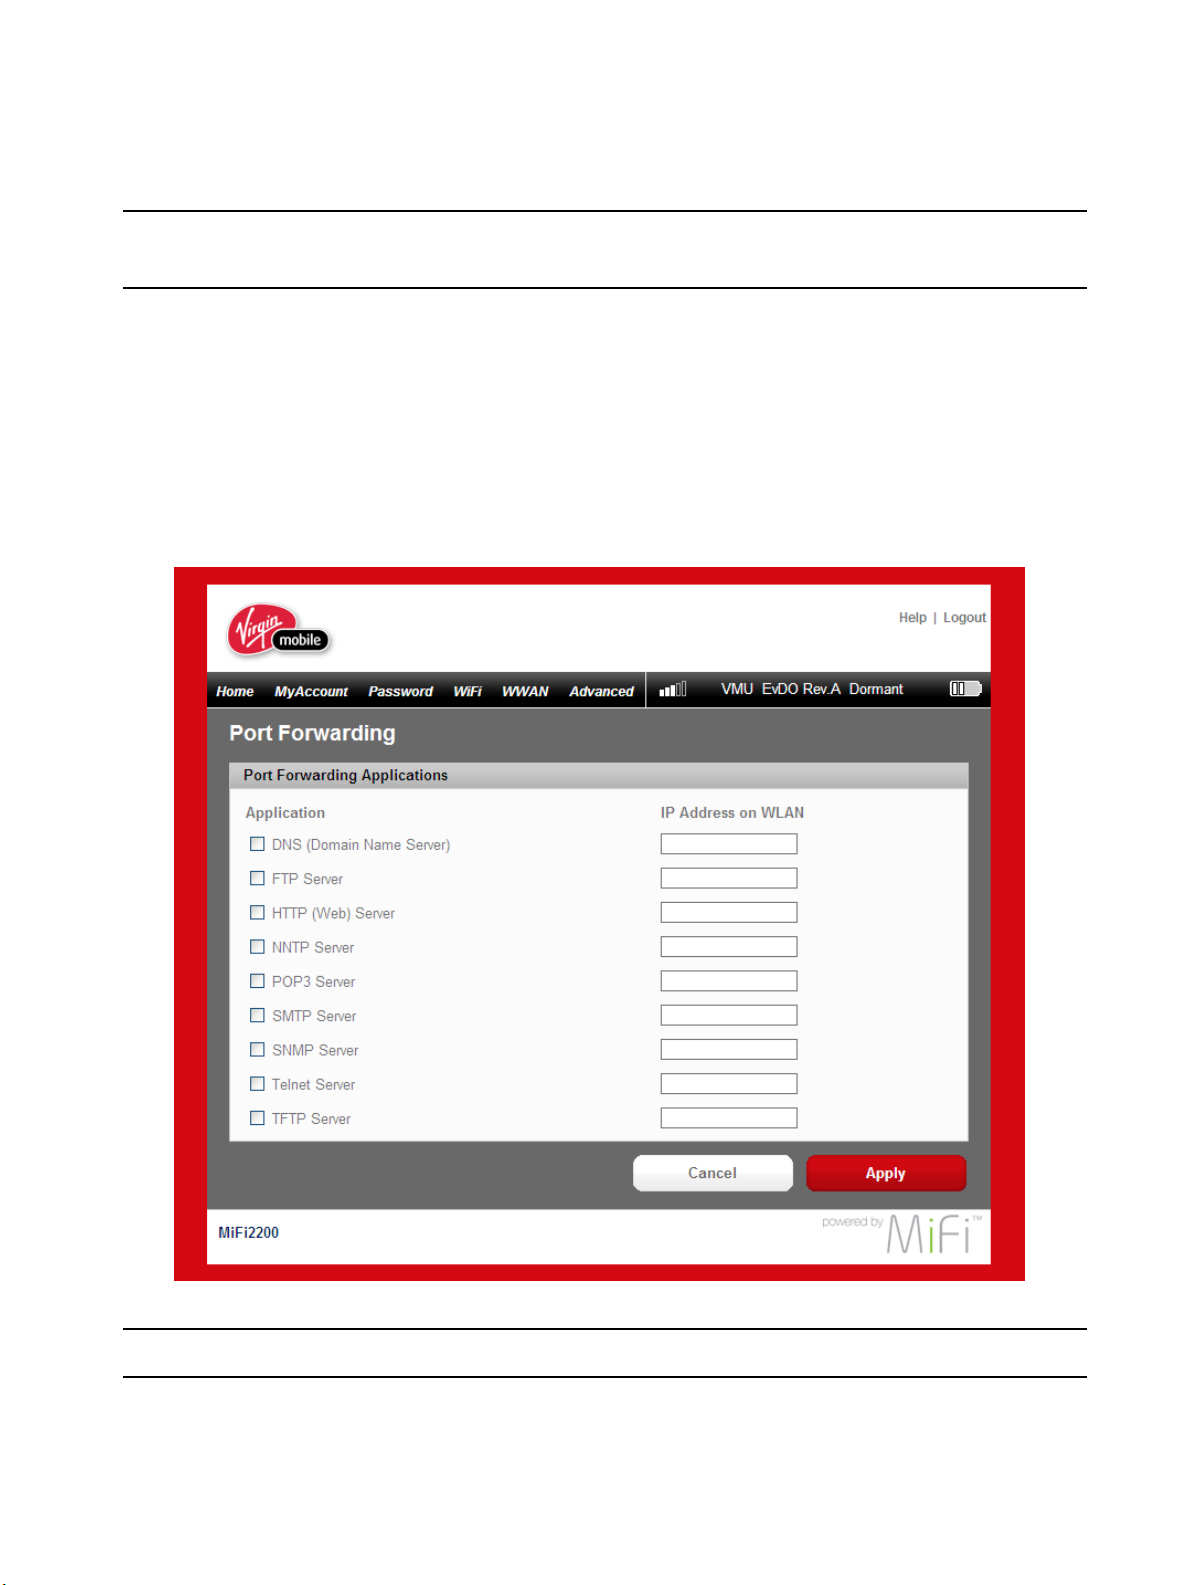
Port Forwarding
Port forwarding allows designated users or applications to reach specied servers, such as FTP and
DNS servers, on your computer. Also, some online games require incoming access to work properly.
IMPORTANT! You will need to set up static IP addresses on your WLAN for each device that
has an application to which you want to forward.
The Port Forwarding page allows you to enter the local static IP address for each application that
you want to receive trac from the Internet.
➊ From the Port Forwarding page, select the check box for the application you want to enable.
➋ Type the local static IP address of the device hosting the application into the IP Address on
WLAN box.
➌ Click Apply when you have nished adding applications.
IMPORTANT! Port forwarding creates a security risk and should be disabled when not needed.
52
Page 54
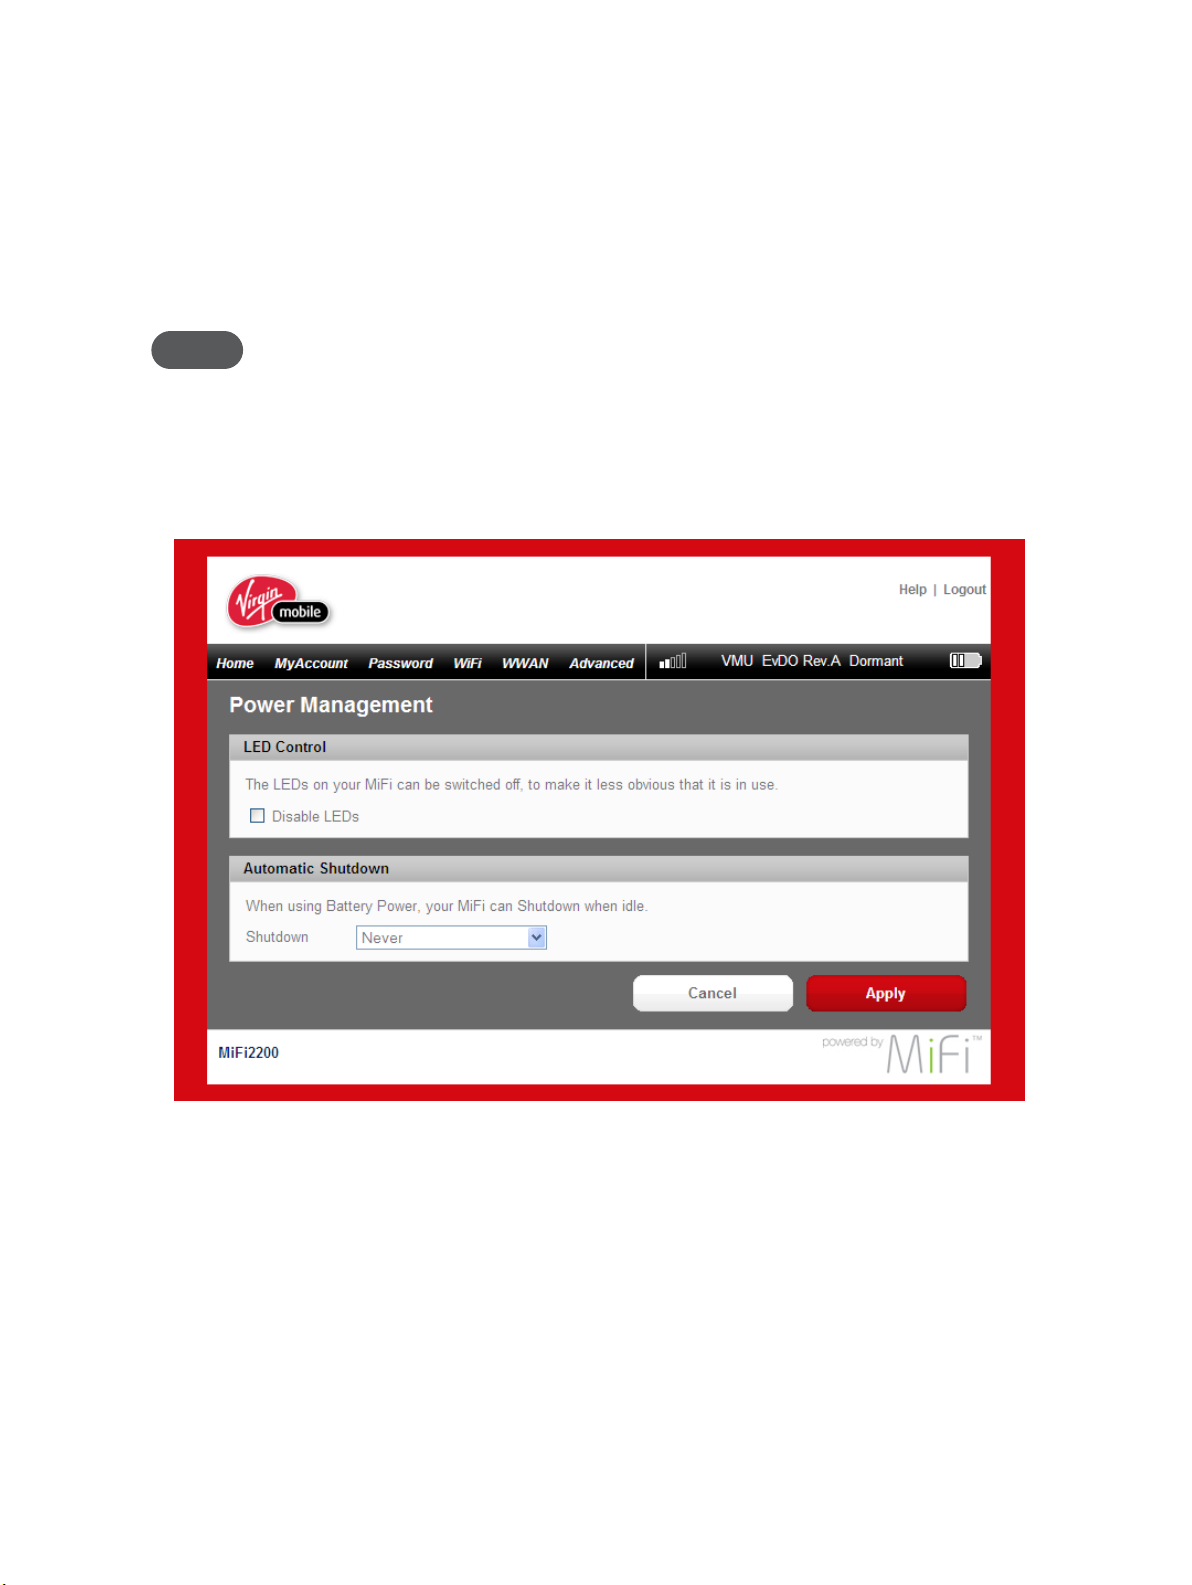
Power Management
When your MiFi Device is on battery power, you can set the length of time before it shuts down. You
can also turn o your MiFi Device’s LEDs to save additional power.
Use the Power Management page to set how long your MiFi Device is idle before it shuts down.
➊ From the Power Management page, select the Disable LEDs check box to disable or clear the
check box to enable your MiFi Device’s LEDs.
NOTE The Disable LEDs option turns off all LEDs except for critical errors and low battery.
➋ In the Battery Power section, click the time that elapses before your MiFi Device will shut
down (2 to 60 minutes); or click Never to disable this feature when your MiFi Device is on
battery power.
➌ Click Apply.
53
Page 55
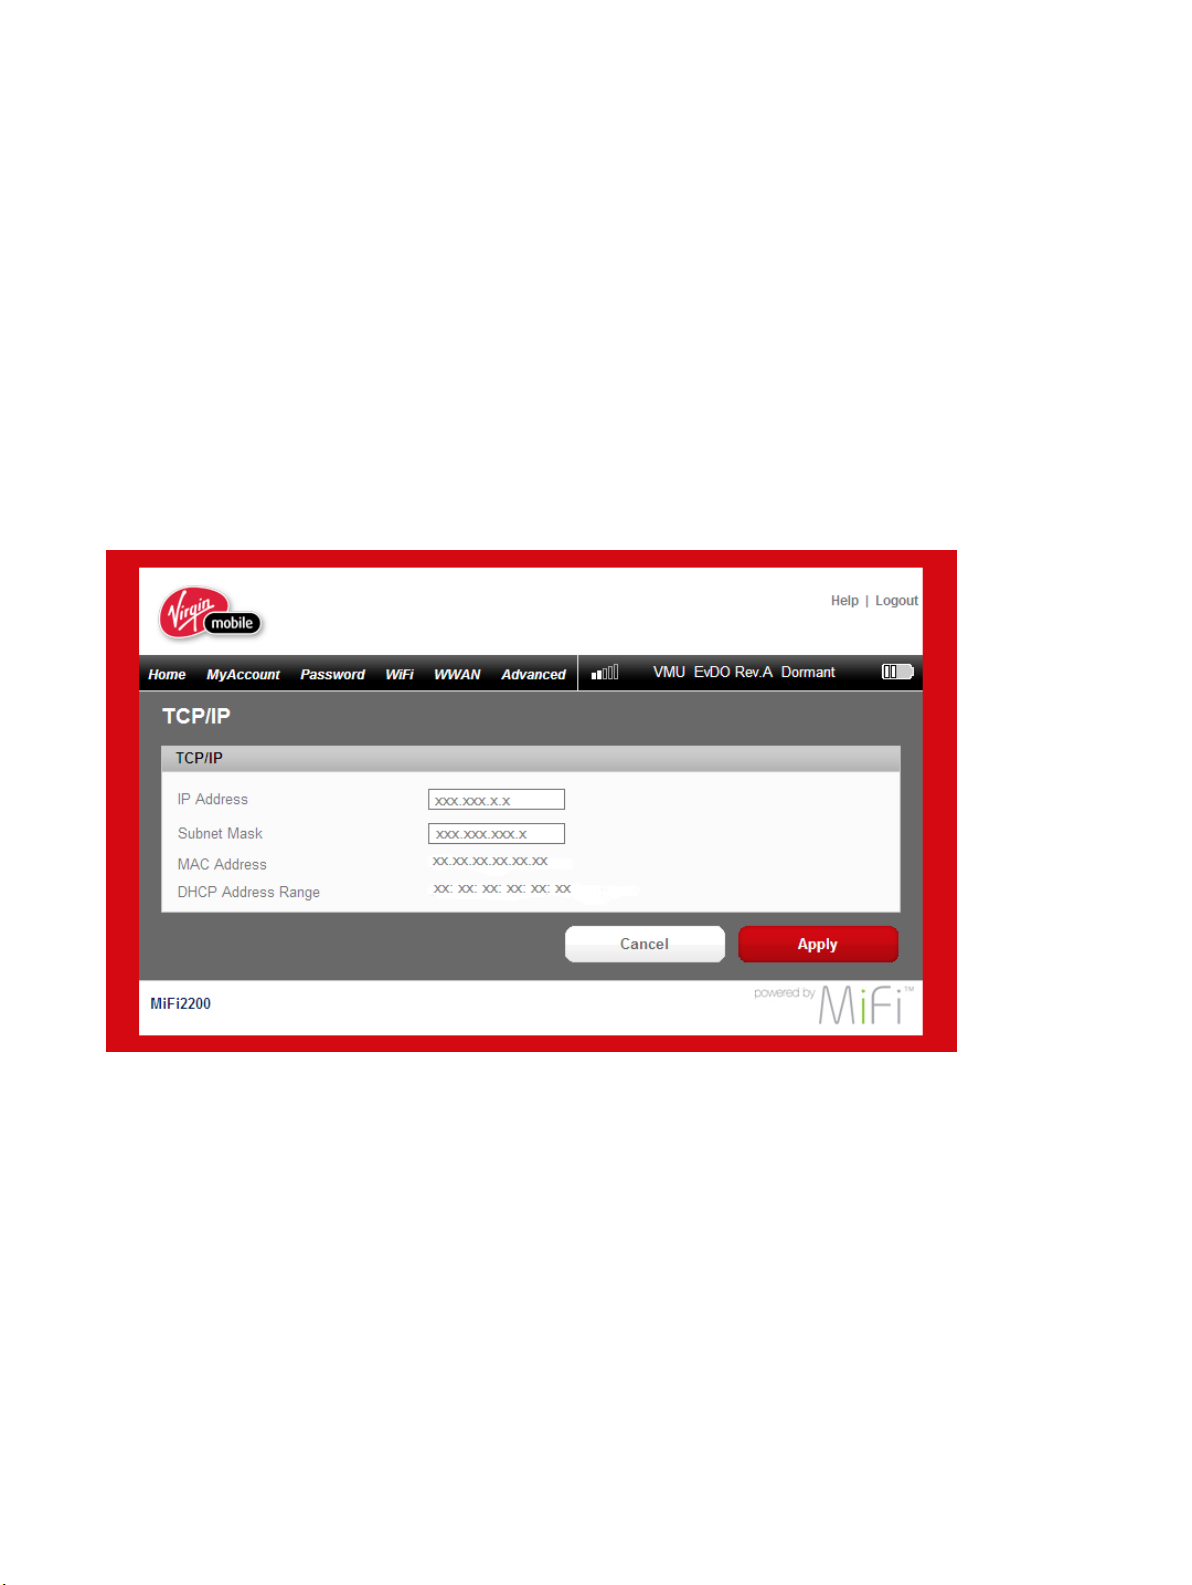
TCP/IP
The TCP/IP page allows you to view the local (WLAN) IP address and the MAC address for your MiFi
Device.
From the Advanced menu, click TCP/IP to display the following information about your MiFi Device:
• Local IP address
• Subnet mask
• MAC address of your MiFi Device
• DHCP address range used by your MiFi Device’s DHCP server
The IP address and subnet mask can be changed by entering new numbers and clicking Apply. If you
have devices on your network with local static IP addresses, those addresses should not be within
the DHCP range.
54
Page 56
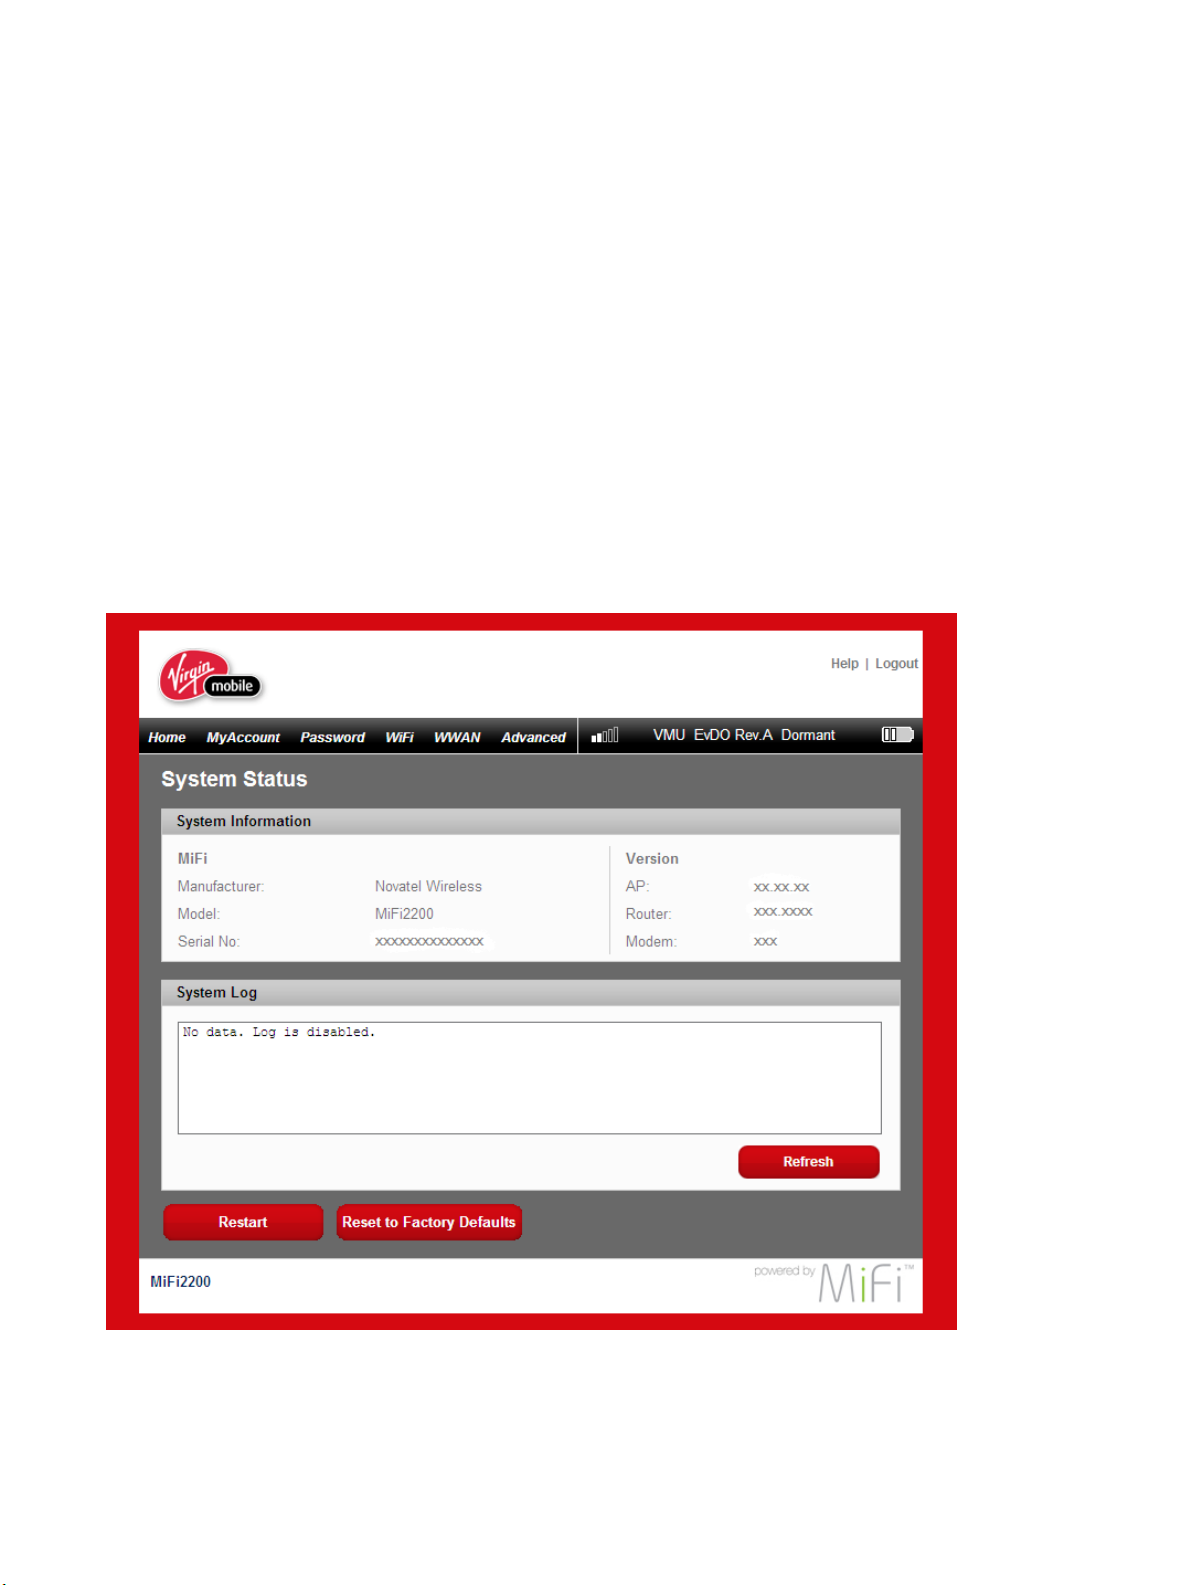
System Status
The System Status page allows you to view real-time system information and the system log, and to
restart your MiFi Device or restore it to factory defaults.
From the Advanced menu, click System Status to display the following information about your MiFi
Device:
• Manufacturer
• Model
• Serial number
• AP (access point) version
• Router version
• Modem version
• System log (if enabled)
55
Page 57

Restarting or Resetting Your MiFi Device
In addition to viewing status information, you can restart your MiFi Device or reset it to factory
defaults from the System Status page.
➤ Click Restart to re-initialize your MiFi Device (same as turning it o and on again).
– or –
➤ Click Reset to Factory Defaults to reset your MiFi Device Wi-Fi settings to the original factory default
settings.
IMPORTANT! After executing either step you may lose your connection and have to
reconnect, and after clicking Reset to Factory Defaults you will need to rerun the startup wizard to
reset your security.
56
Page 58

4
Troubleshooting
Overview
Common Problems and Solutions
Use the Master Reset Button
Technical Support
Page 59

Overview
The following tips will help solve problems that might be encountered while using the MiFi 2200
Device:
• Make sure you are using the MiFi 2200 Device in the correct geographic region.
• Ensure that the wireless network’s coverage extends to your current locations.
• If you are using the MiFi Device in Wi-Fi Mode, power it o and then on again.
When properly installed, the MiFi 2200 Device is a highly reliable product. Most problems are caused
by one of these issues:
• System resources required by the MiFi 2200 Device are being used by other devices.
(Rebooting your computer will often clear this up.)
• Network coverage is not available (either because you are outside the coverage area of your
network operator or because of an account or network problem).
58
Page 60

Common Problems and Solutions
The following are some common problems and solutions.
No service is available.
- OR I get a “Limited or No Connectivity” message.
➤ You are outside of the coverage area.
➤ Check with your network operator — there may be a problem with your account.
➤ Reorient MiFi Device.
➤ If you are inside a building or near a structure that may be blocking the signal, change the
position or location of the device. For example, try moving MiFi Device close to a window.
The device has no power.
The LED indicator is o and does not come on when the Power button is pressed.
➤ Ensure the battery is properly seated in the device.
➤ Ensure the battery is fully charged. Plug in the wall charger for at least 2.5 hours.
My MiFi Device powered off once I plugged it into the wall charger.
This can occur if power settings are activated after it is plugged in.
➤ Press the power button to turn it back on.
My MiFi Device just powered off without my pressing the power button.
This can occur in the following situations.
• Pressing the Master Reset button
• Restarting the device
• Switching proles
• Restoring the conguration settings
• Battery depleted
➤ Press the power button to turn it back on.
I forgot my password.
➤ You can reset the device to factory defaults using the Master Reset button. [See Use the Master
Reset Button (page 62).]
59
Page 61

I cannot connect to MiFi Device in Wi-Fi mode.
➊ Make sure the LEDs are on.
If the LEDs are not on, check your battery.
➋ Make sure your wireless radio / AirPort is turned on. (Check your computer help if you need
assistance.)
➌ Open your wireless network connection list.
• Windows: Right-click icon and select View Available Networks.
• Mac: Pull down list from AirPort icon.
➍ Select the MiFi 2200 Device network name (in Windows, click Connect).
When the MiFi Device is connected to the network, the status LED begins to blink.
My network does not appear in the wireless network list.
➤ Verify that the MiFi Device LEDs are on and are not showing an error condition.
[See LED States (page 8).]
➤ Refresh your network list.
• Windows: Click Refresh Network List on the left side of the Wireless Network Connection
screen. If that does not work you can try the following:
1. Open Network Connections.
2. Right-click Wireless Network Connection and select Properties.
3. Click the Wireless Networks tab.
4. Delete any unused wireless connections from the Preferred Networks list and click OK.
5. Restart your computer.
• Mac: Try rebooting your computer.
How do I disconnect from the network?
➤ Wi-Fi Mode:
• Use your computer network manager.
-OR-
• Login to MiFi Device Settings and click Disconnect.
1. Open your web browser and enter http://192.168.1.1 into the address window.
2. Then retype your administrative password into the login window and click Login.
3. Click the Disconnect button.
How can I find out how many users are connected to the MiFi 2200 Device?
Open MiFi Device Settings (http://192.168.1.1). The number of devices (users) currently connected
to MiFi Device is in the WLAN section at the bottom of the screen.
60
Page 62

How can I check the battery level of MiFi Device?
Open MiFi Device Settings (http://192.168.1.1). The battery status icon is displayed in the menu bar.
Can I backup my configuration settings?
Yes. Login to MiFi Device Settings and choose Advanced>Cong File. Click Download File. [See Cong File
(page 47).]
How do I turn off MiFi Device?
Press and hold the Power button for 5 seconds until the LEDs turn o.
What is the default administrative/login password?
admin
I am having trouble connecting to my office VPN.
Login to MiFi Device Settings and choose Advanced>Settings. Select the VPN Passthrough enable
checkbox and click Apply. [See Advanced Settings (page 44).]
61
Page 63
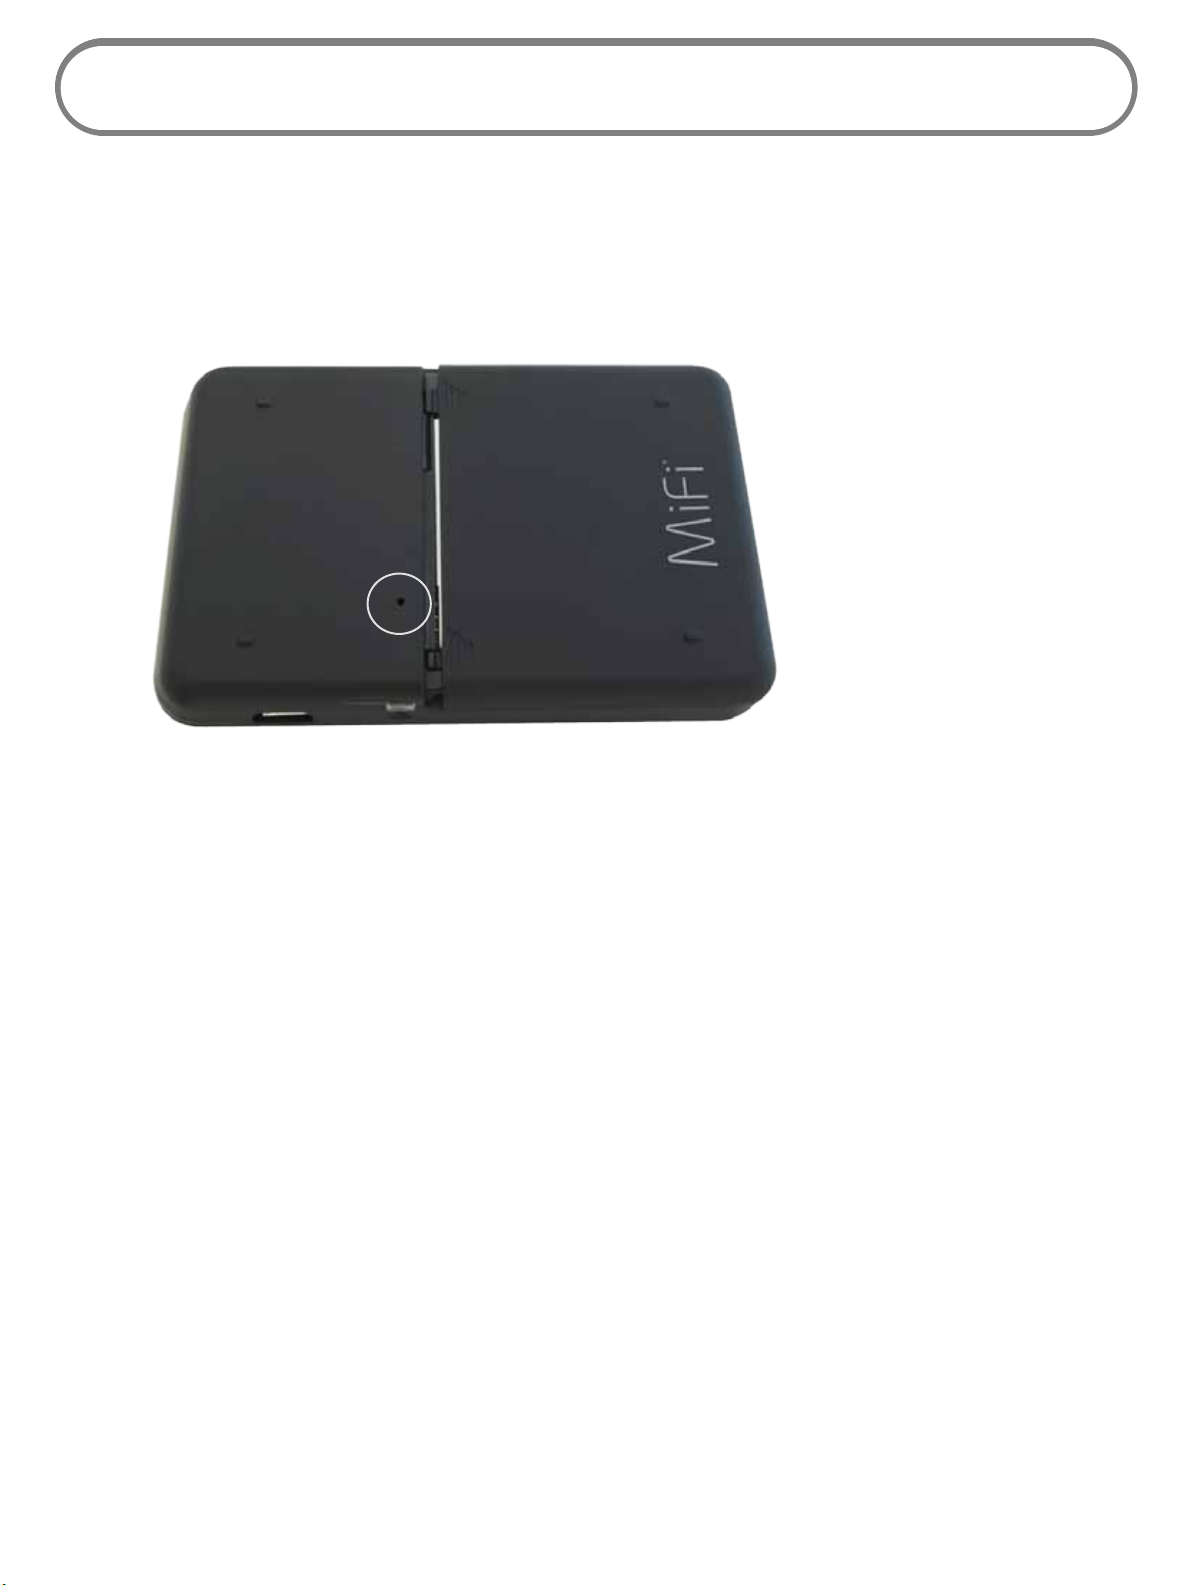
Use the Master Reset Button
The MiFi 2200 Device comes with a Master Reset button that allows you to return it to its factory
default state.
The Master Reset button is recessed in a hold on the back of the device. You will need a paperclip or
similar object to push the button.
➊ Make sure the MiFi Device is powered on.
➋ Locate the Master Reset button on the back of the device.
➌ Insert a paperclip into the hold and hold the button down for 5 seconds until the Power LED
goes o.
Your list of wireless networks will now show the original default network when you rst
congured your device.
➍ Connect to MiFi Device again.
62
Page 64

Technical Support
For additional information and technical support for the MiFi 2200 Device, visit the Virgin Mobile
USA website at:
http://www.virginmobileusa.com
63
Page 65

5
Technical Information
Product Specications
Regulatory Notices
Safety Hazards
Limited Warranty and Liability
Page 66
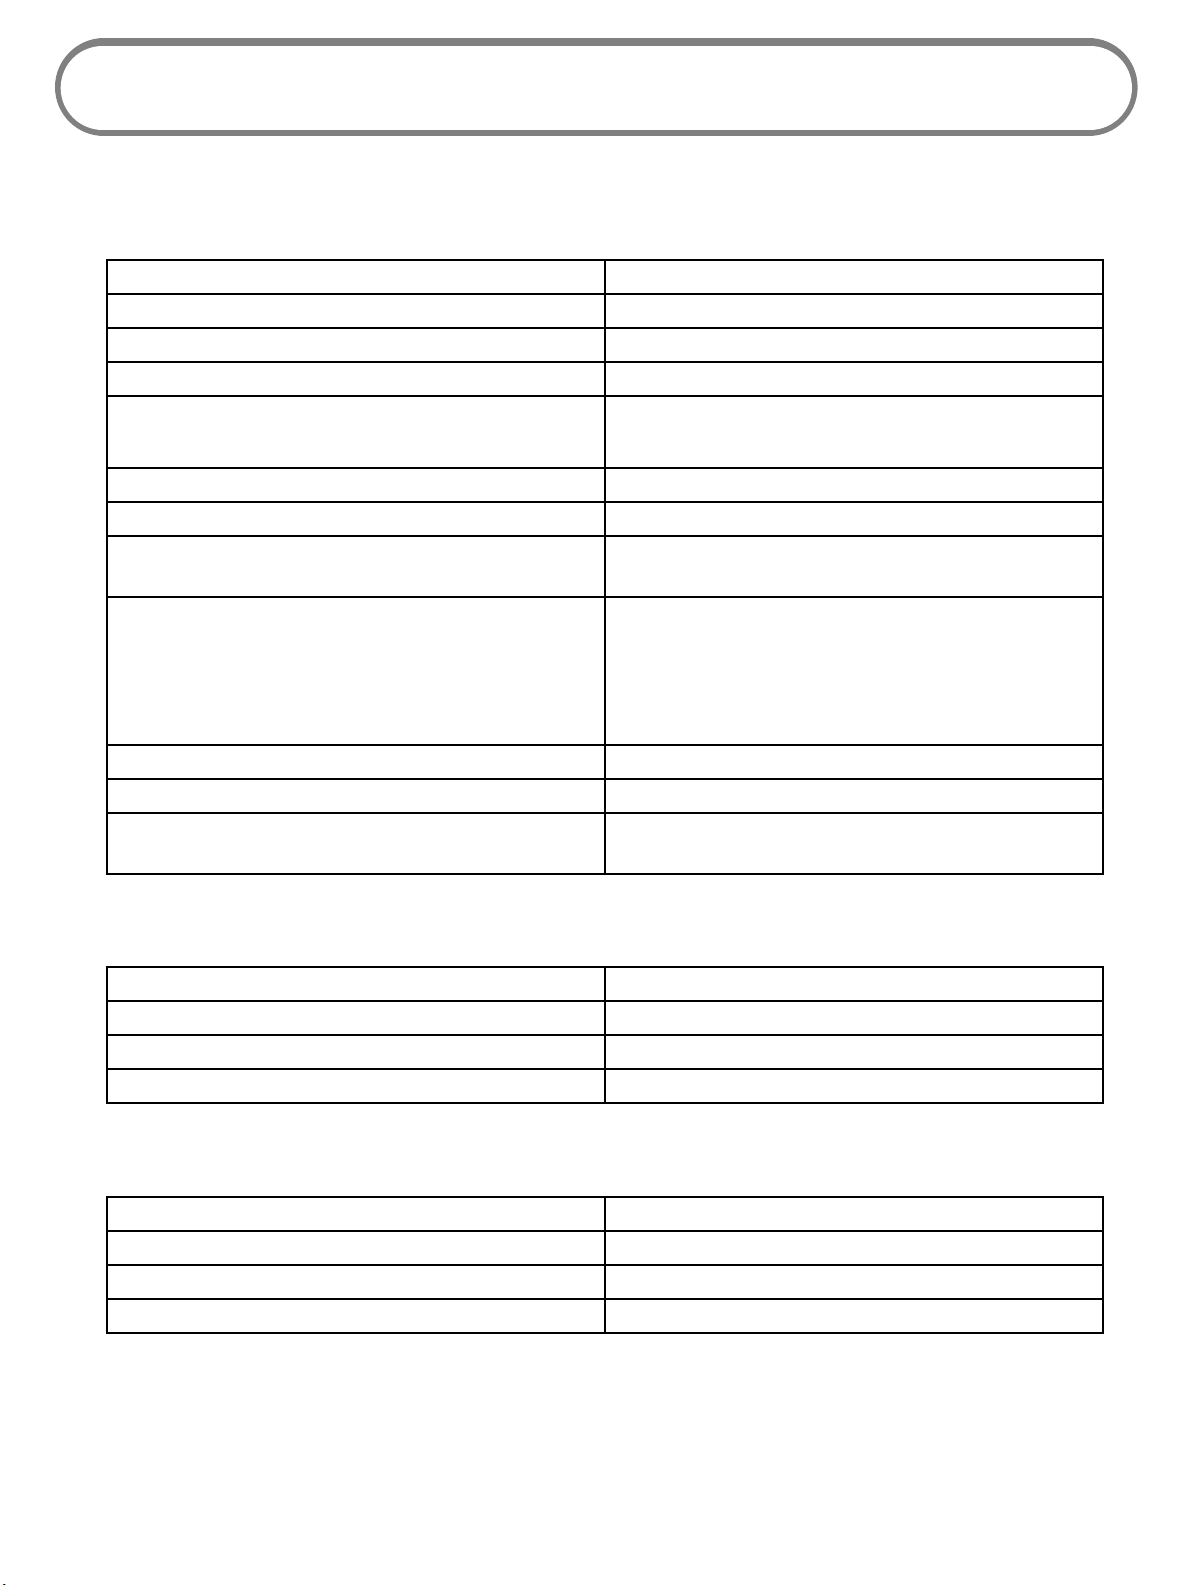
Product Specications
General
Name Novatel Wireless MiFi 2200 Device
Model MiFi 2200
Approvals COFETEL, NOM, CDG
Weight 58 g / 2.05 oz
Dimensions (W x D x H) 59 mm x 9 mm x 89 mm
Wireless Network — Dual Mode CDMA 1X/EV-DO
Wireless Network — Wi-Fi Mode 802.11 b/g
Default SSID VirginMobile MiFi2200 xxx Secure (plus the last
3 digits of the MAC address)
Battery
Size
Time to full charge: AC Charger
Time to full charge: computer USB cable
LED Two: Power and 3G indicators
Chip Set QUALCOMM™ QSC6085
Interface Type Type A USB Port for computer
1150 mAh
2.5 hrs (when not in use)
7-8 hrs (when not in use)
microUSB for device (cable included)
CDMA Technology/Bands
Technology CDMA Rev A, Rev 0, 1XRTT
Band Designation 800/1900 MHz
Transmit Band 824.7 – 848.31 MHz / 1851.25 – 1908.75 MHz
Receive Band 1851.25 – 1908.75 MHz / 1931.25 – 1988.75 MHz
Environmental
Operating Temperature -10o C to 45o C (14o F to 113o F)
o
Storage Temperature -20
Drop 3.28 feet drop, no damage—fully operational
C to 65o C (-4o F to 149o F)
Vibrational Stability 5 Hz to 500 Hz, 0.1 octave/second
65
Page 67
Regulatory Notices
CE Marking
This device has been tested to and conforms to the essential regulatory requirements of the
European Union R&TTE directive 1999/5/EC and has attained CE Marking.
Federal Communications Commission Notice (FCC – United States)
This equipment has been tested to, and found to be within the
acceptable limits for a Class B digital device, pursuant to part
15 of the FCC rules and Industry Canada ICES-003. These limits
are designed to provide reasonable protection against harmful
interference when the equipment is operated in a residential
environment.
This equipment generates radio frequency energy and is designed for use in accordance with the
manufacturer’s user manual. However, there is no guarantee that interference will not occur in any
particular installation. If this equipment causes harmful interference to radio or television reception,
which can be determined by turning the equipment o and on, you are encouraged to try to correct
the interference by one or more of the following measures:
• Reorient or relocate the receiving antenna.
• Increase the separation between the equipment and the receiver.
• Connect the equipment into an outlet on a circuit dierent from that to which the receiver is
connected.
• Consult the dealer or an experienced radio/television technician for help.
This device complies with Part 15 of the Federal Communications Commission (FCC) Rules.
Operation is subject to the following two conditions:
• This device may not cause harmful interference.
• This device must accept any interference received, including interference that may cause
undesired operation.
WARNING: DO NOT ATTEMPT TO SERVICE THE WIRELESS COMMUNICATION DEVICE YOURSELF.
SUCH ACTION MAY VOID THE WARRANTY. THE MiFi 2200 IS FACTORY TUNED. NO CUSTOMER
CALIBRATION OR TUNING IS REQUIRED. CONTACT NOVATEL WIRELESS TECHNICAL SUPPORT FOR
INFORMATION ABOUT SERVICING YOUR WIRELESS COMMUNICATION DEVICE.
66
Page 68

NOTICE TO CONSUMERS: Any changes or modication not expressly approved by the party
responsible for compliance could void the user’s authority to operate this equipment.
NOTE: The Radio Frequency (RF) emitter installed in your modem must not be located or operated
in conjunction with any other antenna or transmitter, unless specically authorized by Novatel
Wireless Technologies.
MODIFICATIONS: The FCC requires that you be notied that any changes or modications made to
this device that are not expressly approved by Novatel Wireless may void your authority to operate
the equipment.
RF Exposure
FCC Equipment Authorization ID: PKRNVWMiFi2200
This device is only authorized for use in Mobile applications. At least 8 inches (20 cm) of separation
between the antenna and the user’s body must be maintained at all times.
67
Page 69

Safety Hazards
Do not use your MiFi 2200 Device in an environment that may be susceptible to radio interference
resulting in danger, specically:
Areas where prohibited by the law
Follow any special rules and regulations and obey all signs and notices. Always turn o MiFi Device
(or the host device and remove the modem from the USB port) when instructed to do so, or when
you suspect that it may cause interference or danger.
Where explosive atmospheres may be present
• Do not operate your modem in any area where a potentially explosive atmosphere may exist.
Sparks in such areas could cause an explosion or re resulting in bodily injury or even death.
Be aware and comply with all signs and instructions.
• Users are advised not to operate the modem while at a refueling point or service station.
Users are reminded to observe restrictions on the use of radio equipment in fuel depots (fuel
storage and distribution areas), chemical plants or where blasting operations are in progress.
• Areas with a potentially explosive atmosphere are often but not always clearly marked.
Potential locations can include gas stations, below deck on boats, chemical transfer or
storage facilities, vehicles using liqueed petroleum gas (such as propane or butane), areas
where the air contains chemicals or particles, such as grain, dust or metal powders, and any
other area where you would normally be advised to turn o your vehicle engine.
Near medical or life support equipment
Do not operate your MiFi 2200 Device in any area where medical equipment, life support
equipment, or near any equipment that may be susceptible to any form of radio interference. In
such areas, the host communications device must be turned o. The MiFi 2200 Device may transmit
signals that could interfere with this equipment.
On an aircraft, either on the ground or airborne
In addition to FAA requirements, many airline regulations state that you must suspend wireless
operations before boarding an airplane. Please ensure that MiFi Device is powered o (if in USB
mode, your MiFi Device is removed from the USB port) prior to boarding aircraft in order to comply
with these regulations. The MiFi 2200 Device can transmit signals that could interfere with various
onboard systems and controls.
While operating a vehicle
The driver or operator of any vehicle should not operate a wireless data device while in control of a
vehicle. Doing so will detract from the driver or operator’s control and operation of that vehicle. In
some countries, operating such communications devices while in control of a vehicle is an oense.
68
Page 70

SAR Levels
The FCC has granted an Equipment Authorization for this wireless modem with all reported SAR
levels evaluated as in compliance with the FCC RF exposure guidelines.
Proper Battery Use and Disposal
WARNING!
• Never dispose of batteries in a re because they might explode.
In the event of a battery leak:
• Do not allow the liquid to come in contact with the skin or the eyes. If contact is made,
wash the aected area with large amounts of water and seek medical advice.
• Seek medical advice immediately if a battery has been swallowed.
Contact your local recycling center for proper battery disposal
Guidelines for Safe and Responsible Battery Use
• Do not disassemble or open, crush, bend or deform, puncture, or shred.
• Do not modify or remanufacture, attempt to insert foreign object into the battery, immerse
or expose to water or other liquids, or expose to re, explosion, or other hazard.
• Only use the battery for the system for which it was specied.
• Only use the battery with a charging system that has been qualied with the system per
this standard. Use of an unqualied battery or charger may present a risk of re, explosion,
leakage, or other hazard.
• Do not short circuit a battery or allow metallic or conductive object to contact the battery
terminals.
• Replace the battery only with another battery that has been qualied with the system per
this standard. Use of an unqualied battery may present a risk of re, explosion, leakage, or
other hazard.
• Promptly dispose of used batteries in accordance with local regulations.
• Battery usage by children should be supervised.
• Avoid dropping the device or battery. If the device or the battery is dropped, especially on a
hard surface, and the user suspects damage, take it to a service center for inspection.
• Improper battery use may result in a re, explosion, or other hazard.
69
Page 71

Limited Warranty and Liability
Novatel Wireless warrants for the 12 month period immediately following receipt of the Product
by Purchaser that the Product will be free from defects in material and workmanship under normal
use. THESE WARRANTIES ARE EXPRESSLY IN LIEU OF ALL OTHER WARRANTIES, EXPRESS OR IMPLIED,
INCLUDING, WITHOUT LIMITATION, ALL IMPLIED WARRANTIES OF MERCHANTABILITY AND FITNESS
FOR A PARTICULAR PURPOSE.
The exclusive remedy for a claim under this warranty shall be limited to the repair or replacement,
at Novatel Wireless’ option, of defective or non-conforming materials, parts or components. The
foregoing warranties do not extend to (I) non conformities, defects or errors in the Products due
to accident, abuse, misuse or negligent use of the Products or use in other than a normal and
customary manner, environmental conditions not conforming to Novatel Wireless’ specication, of
failure to follow prescribed installation, operating and maintenance procedures, (II) defects, errors or
nonconformity’s in the Product due to modications, alterations, additions or changes not made in
accordance with Novatel Wireless’ specications or authorized by Novatel Wireless, (III) normal wear
and tear, (IV) damage caused by force of nature or act of any third person, (V) shipping damage,
(VI) service or repair of Product by the purchaser without prior written consent from Novatel
Wireless, (VII) products designated by Novatel Wireless as beta site test samples, experimental,
developmental, reproduction, sample, incomplete or out of specication Products, or (VIII) returned
products if the original identication marks have been removed or altered.
70
Page 72

6
Glossary
Glossary
Page 73

Glossary
● 3G — Third Generation. 3G refers to the third generation of mobile telephony technology. The
evolution of 3G technology is as follows:
GSM technologies
» GPRS offered speeds up to 48.8 Kbps (began in 2000).
» EDGE reached up to 384 Kbps (2003).
» WCDMA offered downlink speeds up to 1.02 Mbps.
» UMTS supports a theoretical data transfer rate of 21 Mbps.
» HSUPA offered uplink speeds up to 5.76 Mbps and downlink speeds up to 7.2 Mbps.
» HSDPA boosted downlink to 14 Mbps (in 75 countries 2007)
» HSPA+ increased uplink speeds to 11 Mbps and downlink speeds to 42 Mbps.
» LTE Evolved UMTS Terrestrial Radio Access is aiming for 100 Mbps (specifications completed 2008).
CDMA technologies
» 1xRTT offered speeds up to 144 Kbps (2002).
» EV-DO increased downlink speeds up to 2.4 Mbps (2004).
» EV-DO Rev A boosted downlink speeds to 3.1 Mbps (2006).
» EV-DO Rev B can use 2 to 15 channels with each downlink peaking at 4.9 Mbps.
» Ultra Mobile Broadband was slated to reach 288 Mbps but operators might switch to LTE instead.
● 802.11 (b, g, n) — A set of WLAN communication standards in the 2.4, 3.6 and 5 GHz frequency bands.
● Access Point — A device that allows wireless communication devices to connect to a wireless network
using a standard such as Wi-Fi.
● APN — Access Point Name. The APN is an alphanumeric string that identifies the particular network
service that is being accessed. These are used by GPRS and UMTS networks.
● bps — bits per second. The rate of data flow.
● Broadband — High-capacity high-speed, transmission channel with a wider bandwidth than
conventional modem lines. Broadband channels can carry video, voice, and data simultaneously.
● CDMA — Code Division Multiple Access. It is the underlying channel access method used by some
mobile phone standards.
● Computing Device — Any of a variety of computer-like devices (for example, desktop computer,
laptop, tablet PC, smart phone, and PDA).
● DHCP — Dynamic Host Configuration Protocol. Software found in servers and routers that
automatically assigns temporary IP addresses to clients logging into an IP network.
● DHCP Server — A server or service with a server that assigns IP addresses.
72
Page 74

● DNS — Domain Name System. A system for converting host names and domain names into IP
addresses on the Internet or on local networks that use the TCP/IP protocol.
● EDGE — Enhanced Data for GSM Environment or Enhanced Data rates for Global Evolution. A faster
version of GSM wireless service, it allows data to be delivered at rates of 384 Kbps and enables the
delivery of multimedia and other broadband applications. EDGE became available in 2001.
● ESN — Electronic Serial Number. A unique 32-bit number embedded in a wireless device that
identifies the device.
● ExpressCard — PCMCIA’s hardware standard for high-performance expansion of notebook computers.
Intended to replace the PC Card (formerly PCMCIA card) standard.
● Firewall — A hardware or software boundary that protects a network or single computer from
unwanted outside traffic.
● Firmware — A computer program embedded in an electronic device. Firmware usually contains
operating code for the device.
● FTP — File Transfer Protocol. A network protocol for exchanging files over a TCP network.
● Gateway — A network point that acts as an entrance to another network that uses a different
protocol.
● GPRS — General Packet Radio Services. A system used by GSM mobile phones for transmitting IP
packets. It also provides support for WCDMA based 3G networks.
● GSM — Global System for Mobile communication. A digital mobile telephony system widely used in
Europe and other parts of the world. GSM was first launched in 1991 and is the most widely used of
the three digital wireless telephony technologies (TDMA, GSM, and CDMA). GSM uses a variation of
TDMA.
● GPS — Global Positioning System. A radio-based navigation system that allows users to determine
their location. The device uses satellite data to calculate its position. Commonly used in mapping and
navigation systems.
● Host Name — The unique name by which a network-attached device is known on a network.
● Hotspot — A Wi-Fi (802.11) access point or the area covered by an access point. Used for connecting
to the Internet.
● Hot-Swappable — The ability to safely remove and replace a component (for example, a memory card
or USB device) from a device or computer while it is powered on.
● HSDPA — High Speed Downlink Packet Access. HSDPA is an enhanced version of WCDMA that
supports broadband connections with download speeds up to 7.2 Mbps. This enhanced 3G
technology enables the download of high-bandwidth multimedia files, high resolution graphics, and
other complex files, and allows viewing email attachments at broadband-like speeds.
● HSPA — High Speed Packet Access. A family of 3G services that is available to GSM carriers. It is a
major enhancement from WCDMA.
● HSPA+ — HSPA Evolution or HSPA Evolved. A 3G mobile telephony protocol with up-link speeds up to
11 Mbps and downlink speeds up to 42 Mbps.
● HSUPA — High Speed Uplink Packet Access. A 3G mobile telephony protocol with up-link speeds up
to 5.76 Mbps and downlink speeds up to 7.2 Mbps.
73
Page 75

● HTTP — Hypertext Transfer Protocol. An application-level protocol for accessing the World Wide Web
over the Internet.
● IEEE — Institute of Electrical and Electronics Engineers. An international technical/professional society
that promotes standardization in technical disciplines.
● IMAP — Internet Message Access Protocol. An Internet standard protocol for email retrieval.
● IMSI — International Mobile Subscriber Identity. Used in GSM networks to identify the subscriber
Usually embedded in the SIM.
● IP — Internet Protocol. The mechanism by which packets are routed between computers on a
network.
● IP Type — The type of service provided over a network.
● IP address — Internet Protocol address. The address of a device attached to an IP network (TCP/IP
network).
● ISP — Internet Service Provider. Also referred to as the service carrier, an ISP provides Internet
connection service. (See Network Operator)
● Kbps — Kilobits per second. The rate of data flow.
● LAN — Local Area Network. A type of network that lets a group of computers, all in close proximity
(such as inside an office building), communicate with one another. It does not use common carrier
circuits though it can have gateways or bridges to other public or private networks.
● LTE — Long Term Evolution. A set of enhancements to UMTS (moving toward 4G) that will provide
high throughput, low latency, plug and play and seamless connection to existing networks such as
GSM, cdmaOne, etc.
● MAC Address — Media Access Control. A number that uniquely identifies each network hardware
device. MAC addresses are 12-digit hexadecimal numbers.
● MEID — Mobile Equipment IDentifier. A globally unique number for a physical piece of mobile station
equipment.
● Mbps — Megabits per second.
● MSID — Mobile Station IDentifier. A number for a mobile phone that identifies that phone to the
network. These numbers are carrier specific.
● MSL — Master Subsidy Lock. A numeric code for accessing certain phone settings.
● NAI — Network Access Identifier. A standard way of identifying users who request access to a network.
● NDIS — Network Driver Interface Specification. NDIS is a Windows specification for how
communication protocol programs (such as TCP/IP) and network device drivers should communicate
with each other.
● Network Mask — A number that allows IP networks to be subdivided for security and performance.
● Network Operator — The vendor who provides your wireless access. Known by different names in
different regions, some examples are: wireless provider, network provider, and service provider.
● Network Technology — The technology on which a particular network provider’s system is built; such
as GSM, HSPA, CDMA, EDGE, and EVDO.
74
Page 76

● NNTP — Network News Transfer Protocol. An Internet application protocol for reading and posting
Usenet (newsgroup) articles.
● PC Card — PCMCIA’s hardware standard for peripheral devices for laptop computers. Superseded by
the ExpressCard.
● PCMCIA — Personal Computer Memory Card International Association. An international standards
organization of industry-leading companies for the definition of personal computer peripheral device
standards.
● PDA — Personal Digital Assistant. A handheld device used for organization, notes, address books, etc.
● POP — Post Office Protocol. An Internet protocol for retrieving email from a remote server over a TCP/
IP connection.
● Port — A virtual data connection used by programs to exchange data. It is the endpoint in a logical
connection. The port is specified by the port number.
● Port Forwarding — A process that allows remote devices to connect to a specific computer within a
private LAN.
● Port Number — A 16-bit number used by the TCP and UDP protocols to direct traffic on a TCP/IP host.
Certain port numbers are standard for common applications.
● Protocol — A standard that enables connection, communication, and data transfer between
computing endpoints.
● PPP — Point-to-Point Protocol. A method of connecting a computer to the Internet.
● PPTP — Point-to-Point Tunneling Protocol. A method for implementing virtual private networks that
does not provide confidentiality or encryption but relies on the tunneling process for security.
● PRL — Preferred Roaming List. A list that your wireless phone or device uses to determine which
networks to connect with when you are roaming. (Network operator specific)
● Protocol — A standard that enables connection, communication, and data transfer between
computing endpoints.
● Proxy — A firewall mechanism that replaces the IP address of a host on the internal (protected)
network with its own IP address for all traffic passing through it.
● PUK code (Pin Unlock Key) — A PUK is required when you enter an incorrect PIN 3 times. After
entering the wrong PIN 3 times, the SIM card is disabled.
● RAS — Remote Access Service. A Windows NT/2000 Server feature that allows remote users access to
the network from their Windows laptops or desktops via modem.
● Rev A — CDMA EV-DO Rev. A is a leading-edge wireless technology with higher data rates and higher
system capacity. It is a fully backward compatible standard and remains interoperable with deployed
EV-DO networks and devices around the world. The increased data rates on Rev. A’s physical layer
enable richer applications and services. For more information, visit www.cdg.org.
● RFB — Remote Frame Buffer. A protocol for remote access to graphical user interfaces.
● Router — A device that directs traffic from one network to another.
● RTP — Real-time Transport Protocol. A packet format for streaming multimedia over the Internet.
75
Page 77

● SIM — Subscriber Identification Module. Found in GSM network technology, the SIM is a card
containing identification information for the subscriber and their account. The SIM card can be moved
to different devices.
● SMS — Short Message Service. A service for sending short messages of up to 160 (224 in 5-bit mode)
characters to mobile devices. SMS is also known as text messaging.
● SMTP — Simple Mail Transfer Protocol. An Internet standard for email transmission across IP networks.
● SSID — Service Set IDentifier. The name assigned to a Wi-Fi network.
● TCP — Transmission Control Protocol. A core protocol for transmitting and receiving information over
the Internet.
● TCP/IP — Transmission Control Protocol/Internet Protocol. The set of communications protocols used
for the Internet and other similar networks.
● Telnet — Telecommunication Network. A network protocol used on the Internet or on local area
networks.
● TFTP — Trivial File Transfer Protocol. A file transfer protocol with a subset of FTP functionality.
● UA — User Agent. Any device or software used to access a web page. A user agent might be a web
browser, a smart phone, or a screen reader.
● UDP — User Datagram Protocol. A simple transport protocol used to transfer information on the
Internet.
● UI — User Interface. The part of a software application or hardware device that a user sees and
interacts with.
● UMTS — Universal Mobile Telecommunications Service. A third-generation broadband, packet-based
transmission of text, digitized voice, video and multimedia at data rates up to 2 Mbps. UMTS offers
a consistent set of services to mobile users all over the world. UMTS is based on the GSM standard.
Until UMTS is fully implemented, users can use multi-mode devices that switch to currently available
technology.
● USB — Universal Serial Bus. A connection type for computing device peripherals such as a printer,
mobile modem, etc. USB connectors may be used for data transfer or charging.
● USB Port Types — The USB ports on computers and hubs have a rectangular Type A socket, and
peripheral devices have a cable with a Type A plug. Peripherals that do not have an attached cable
have a square Type B socket on the device and a separate cable with a Type A and Type B plug. Ports
and connectors are available in different sizes (for example, standard, mini, and micro).
● USSD — Unstructured Supplementary Service Data. A service found in HSPA/GSM networks that
allows the user to retrieve information or implement certain types of call services.
● VNC — Virtual Network Computing. A graphical desktop sharing system that uses the RFB protocol to
remotely control another computer.
● VPN — Virtual Private Network. A secure private network that runs over the public Internet. Commonly
used to connect to an office network from elsewhere.
● VPN Passthrough — A feature that allows a client to connect to a VPN server.
76
Page 78

● WAN — Wide Area Network. A public network that extends beyond architectural, geographical, or
political boundaries (unlike a LAN, which is usually a private network located within a room, building,
or other limited area).
● WCDMA — Wideband Code-Division Multiple Access. A 3G mobile wireless technology that promises
much higher data speeds to mobile and portable wireless devices. Another name for UMTS.
● WEP — Wired Equivalent Privacy. An IEEE standard security protocol for 802.11 networks. Superseded
by WPA and WPA2.
● Wi-Fi — Wireless Fidelity. Any system that uses the 802.11 standard developed and released in 1997 by
the IEEE.
● Wi-Fi Client — A wireless device that connects to the Internet via Wi-Fi.
● WLAN — Wireless Local Area Network. A typically low-power network that transmits a wireless signal
over a span of a few hundred feet and usually only to stationary devices.
● WPA/WPA2 — Wi-Fi Protected Access. A security protocol for wireless 802.11 networks from the Wi-Fi
Alliance.
● WWAN — Wireless Wide Area Network. Wireless network technologies deployed over a large
geographical area to a large number of users (see WLAN). This service is usually provided through
cellular providers. WWAN connectivity allows a user with a laptop and a WWAN device to surf the
Internet, check email, or connect to a virtual private network (VPN) from anywhere within the
coverage area of the network operator.
77
 Loading...