

Page 1
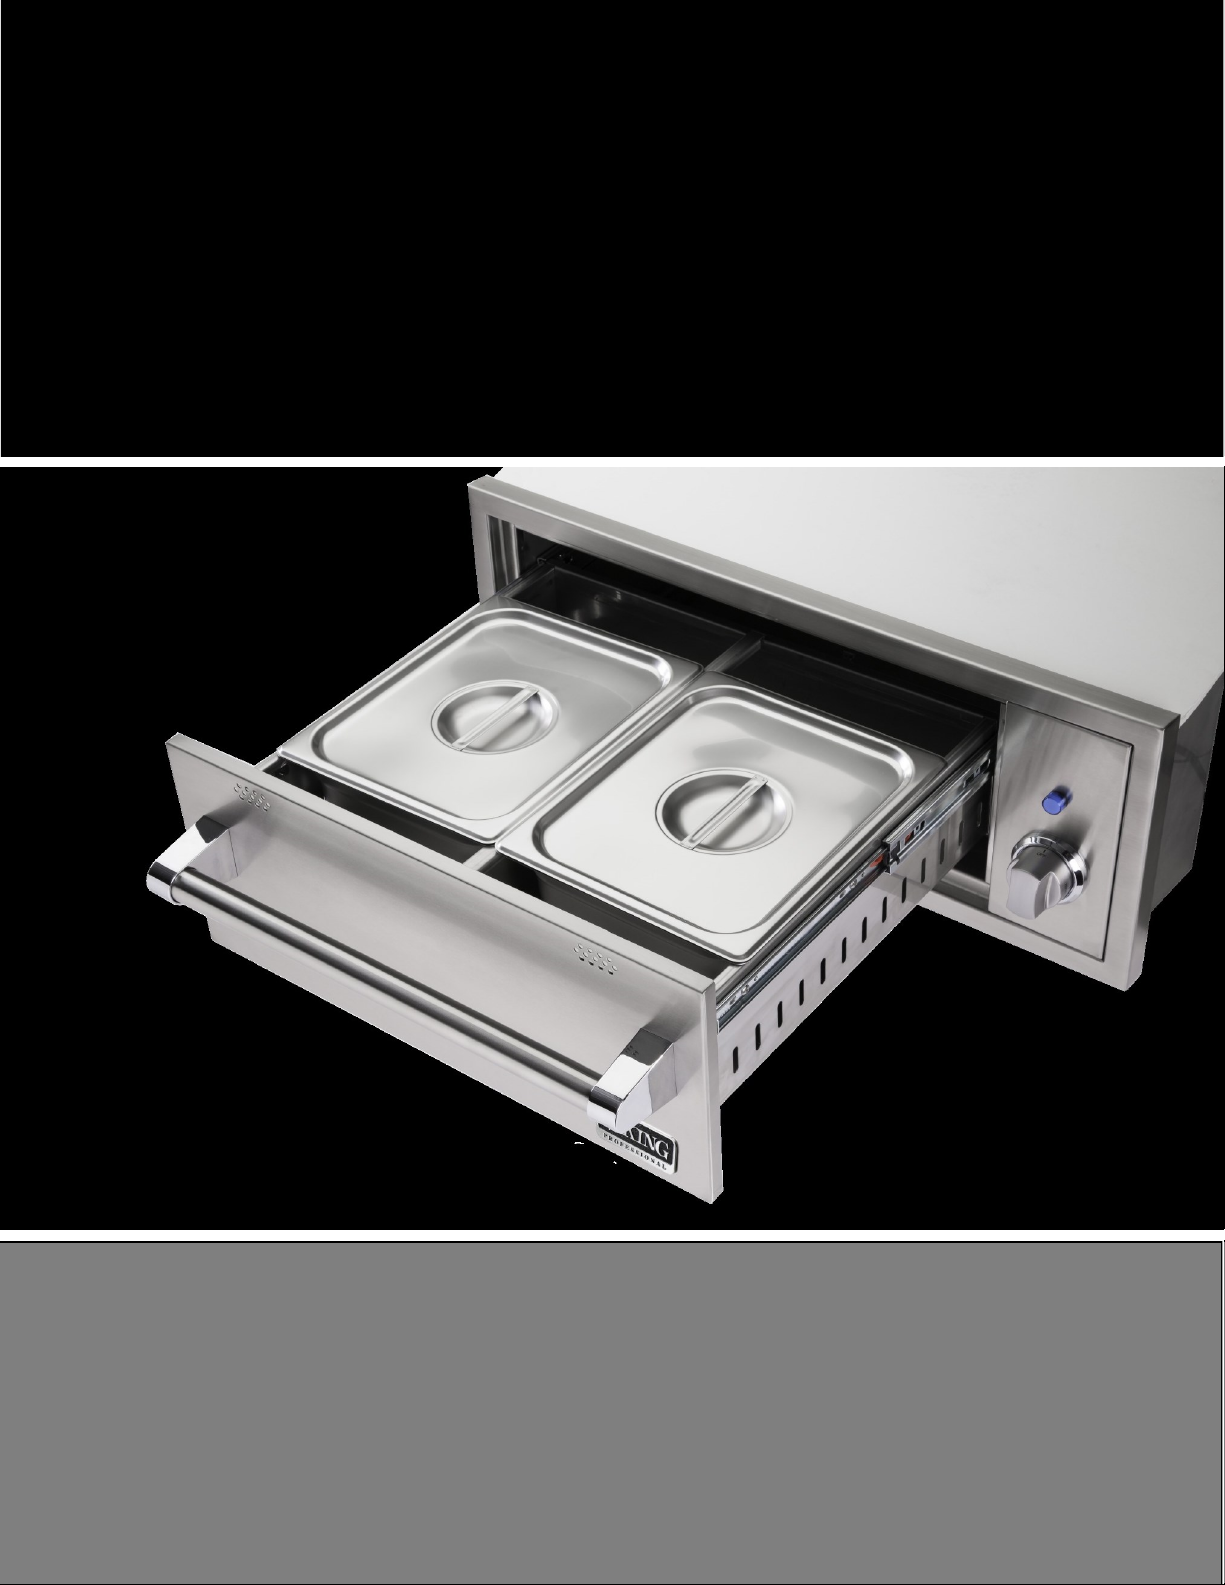
Professional Warming Drawer
and Warming Drawer Cabinet
Care & Use/Installaon Instrucons
Models: (C)VQEWD5300SS
(C)VQEWD5420SS
Page 2

IMPORTANT SAFETY INSTRUCTIONS
WARNING:
Read this manual carefully and completely before using your warming drawer to reduce the risk of:
1. Fire
2. Burn hazard, personal injury or property damage
3. Unapproved installaon or service
This product is designed for indoor or outdoor installaon. Improper installaon, adjustment, alteraon, service or maintenance
can cause personal or property damage and may void the warranty. Read this manual thoroughly before installaon, use or
service.
CAUTION: UNPLUG the warming drawer before beginning any work. Make sure you READ and UNDERSTAND these instrucons
BEFORE installaon. If you have any quesons or concerns prior to, or during service, please call Customer Care/Tech. Support at
888-845-4641.
IMPORTANT: When using electrical appliances, basic safety precauons should always be followed including the
following:
1. Read all instrucons before using the warming drawer
2. Do not store or use gasoline or other ammable vapors and liquids in the drawer or in the vicinity of this or any other
appliance.
3. Do not touch hot surfaces, the heang elements or drawer interior surfaces while the drawer is in use. Only touch handles or
knobs. Use only dry potholders. Using moist or damp pot holders may cause steam burns to your hands.
4. To protect against electrical shock, do not immerse cord, plugs, or base in water or other liquids.
5. Do not use foil to line the interior of the drawers. This traps heat and increases the risk of damage.
6. Close supervision is necessary when the appliance is used by or near children.
7. Do not allow the cord to touch hot surfaces.
8. Do not install on or near a hot gas or an electric burner.
9. Make sure the appliance is turned o before plugging in or removing the plug from the power receptacle.
10. Do not use this appliance for anything other than the intended use.
11. Keep the warming drawer away from water sprinklers.
12. Do not store materials, not recommended by the manufacturer, in the drawer when not in use.
13. Always place steam racks in desired posion while the appliance is cool.
14. Do not obstruct the warming drawer vent ducts while cooking. You may want to close them when the unit is not in use to help
keep rain/water from geng into the drawer.
15. Do not cover food with plasc wraps or use plasc food containers in the drawer while heang. Plascs will melt and damage
the drawer interior.
16. Do not place food in sealed containers in the drawer. Pressure could build up and cause the container to burst resulng in
damage or personal injury.
17. Use care while opening a heated drawer to allow hot air and steam to escape before removing or replacing food.
18. This appliance is designed to be installed by a qualied technician and plugged into a dedicated, properly grounded, GFIC
outlet.
19. ETL listed for indoor and outdoor use.
20. Unplug the unit when not in use and before cleaning. Allow to cool before pung on or taking o parts.
21. Do not operate any appliance with damaged cord or plug, or aer the appliance malfuncons or has been damaged in any
manner. Contact our Preferred Customer Service facility for informaon or addional details.
22. Do not repair or replace any part of this warming drawer. All servicing should be done by an authorized service agency.
Contact Preferred Customer Service at 1-888-845-4641
23. Save these instrucons for future reference.
2
Page 3

Electrical Information
WARNING: ELECTRICAL GROUNDING
1. Warming drawer must be installed in accordance with the local electric code or, in the absence of local codes, the
latest edion of the Naonal Electrical Code ANSI/NFPA No. 70, or the Canadian Electrical Code CGA 1.6b 2005.
2. Use only a Ground Fault Interrupter (GFI) protected circuit with this outdoor appliance. This type of outlet should
be installed by a qualied electrician.
3. This warming drawer is equipped with a three prong (grounded) electric plug for your protecon against shock
hazard and must be plugged directly into a properly grounded three prong outlet. Never cut or remove the
grounding prong from this plug.
4. Use only extension cords with a 3 prong grounding plug rated for the power of the equipment and approved for
outdoor use with a “WA” marking.
5. To protect against electric shock, do not immerse any part of the power cord, extension cord, or any plugs in
water or other liquids.
6. Unplug or shut down the circuit to the warming drawer from the outlet before cleaning or when not in use for
extended periods. Allow the drawer to cool before pung on or taking o parts.
7. Do not use the warming drawer for purposes other than intended.
8. Do not operate the warming drawer with a damaged cord, plug or aer the appliance malfuncons, or has been
damaged in any manner. Contact Preferred Customer Service for repairs. 1-888-845-4641
Connecon to AC:
Installaon requires an outdoor 120 VAC, 15 amp dedicated GFI protected outlet.
The warming drawer is rated as follows; 120 VAC, 60 Hz, 480 W, 4 AMP
IF SHIPMENT ARRIVED DAMAGED:
1. VISIBLE LOSS OR DAMAGE: Be certain this is noted on freight bill or express receipt and signed by person making the
delivery.
2. FILE CLAIM FOR DAMAGES IMMEDIATELY, regardless of extent of damage.
3. CONCEALED LOSS OR DAMAGE: If damage is unnoced unl merchandise is unpacked, nofy transportaon company
or carrier immediately and le a “concealed damage” claim with them. This should be done within (15) days of date
delivery is made to you. Be sure to retain container for inspecon. We cannot assume responsibility for damage or loss
incurred in transit.
3
Page 4
Warming Drawer Installation
(C)VQEWD5300SS
IMPORTANT
Be sure that the warming drawer is properly grounded
and installed by a qualied technician. The electrical
cord has a 3 prong plug. Do not cut any of the prongs.
Make sure that the island is free of cracks that would
allow water or other liquids to get into the electrical
controls.
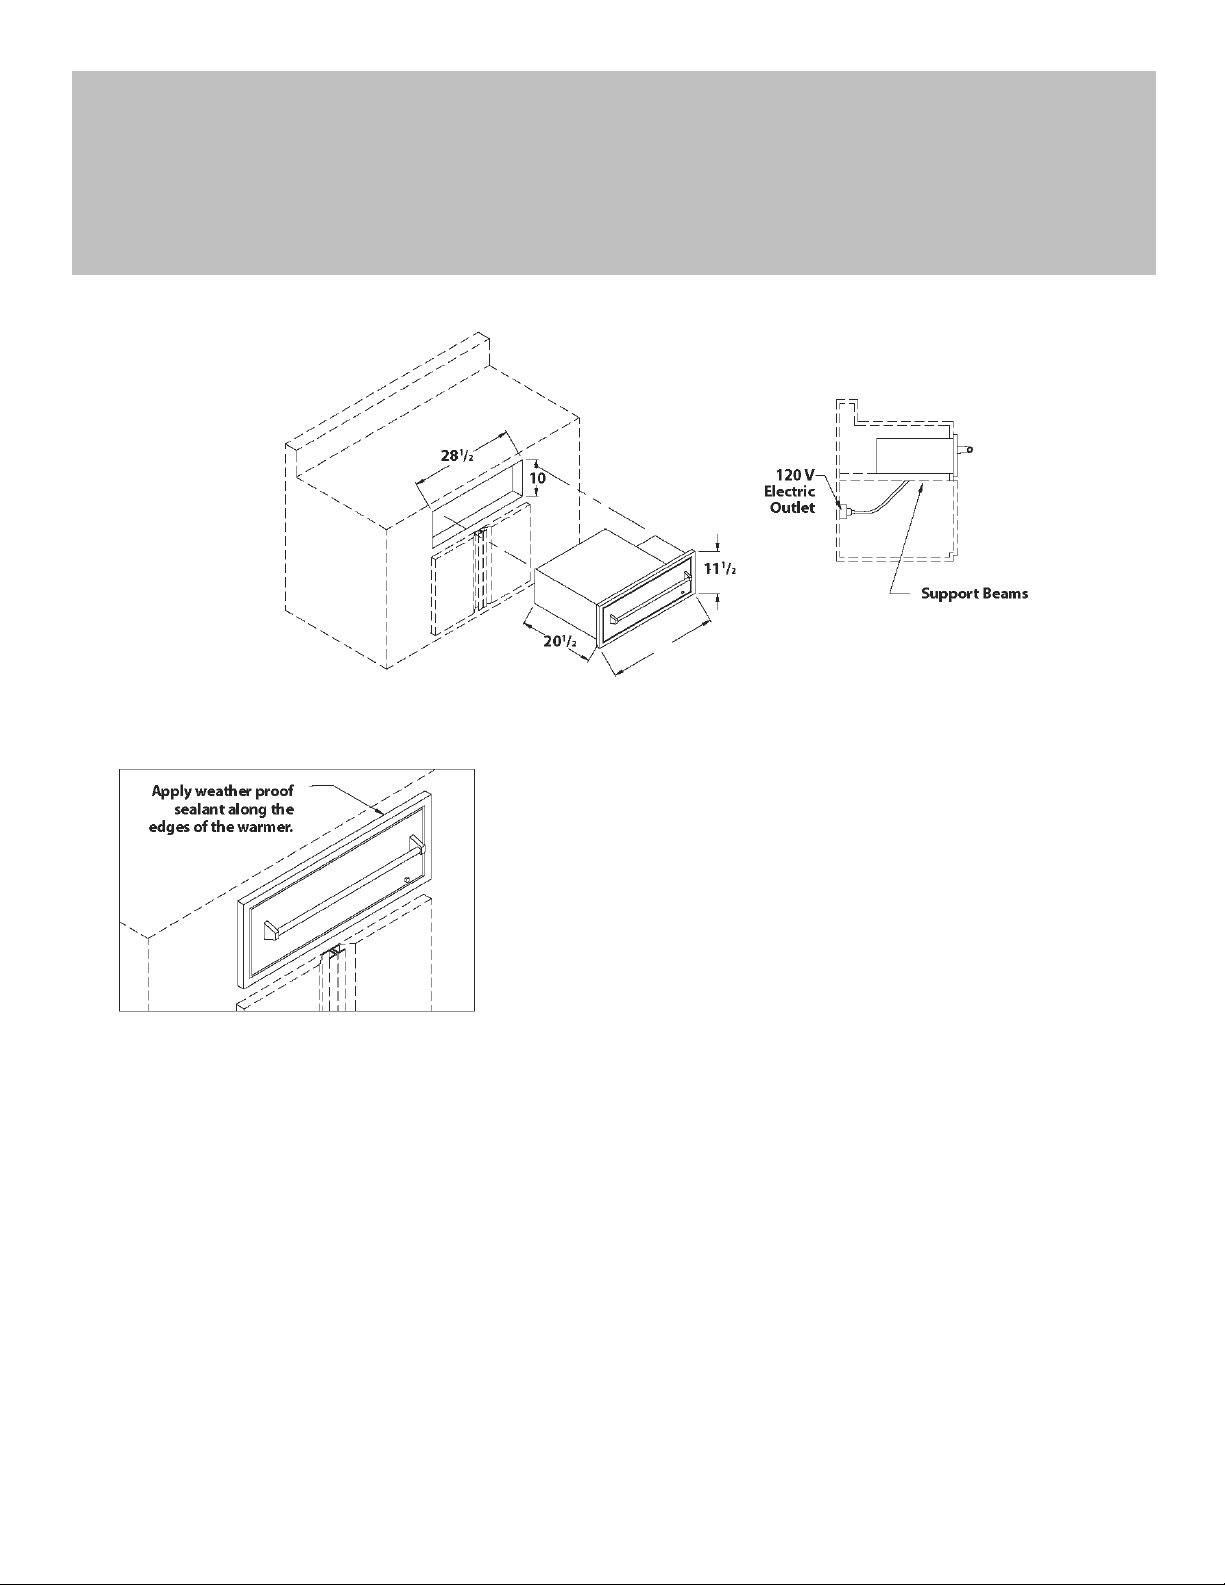
Typical Island Installaon ((C)VQEWD5300)
1) Provide a 10” x 28 ½” cutout to the front of the island.
2) Provide support beams using metal studs.
3) Pull the drawer out of the drawer casing to gain access on the
mounng holder at the front of the casing.
4) Insert the drawer casing into the island opening.
5) Secure the drawer casing with screws at the inside front top and
boom, using the pre-punched mounng holes.
6) Re-assemble the drawer secon into the drawer casing.
7) Apply weather proof sealant along the edges of the warmer.
8) Plug-in the warmer to a weather proof, and properly grounded,
electrical outlet.
9) If installing the unit directly under a grill, please allow 2-3/16"
between the grill cutout boom and the top of the warming
drawer cutout.
Keep the warming drawer away from water sprinklers.
When not in use, cover the island to protect from rain
and harsh weather.
If installing the unit directly under a grill, please allow
2-3/16" between the grill cutout boom and the top of
the warming drawer cutout.
4
Page 5
Warming Drawer Cabinet Installation
(C)VQEWD5420SS
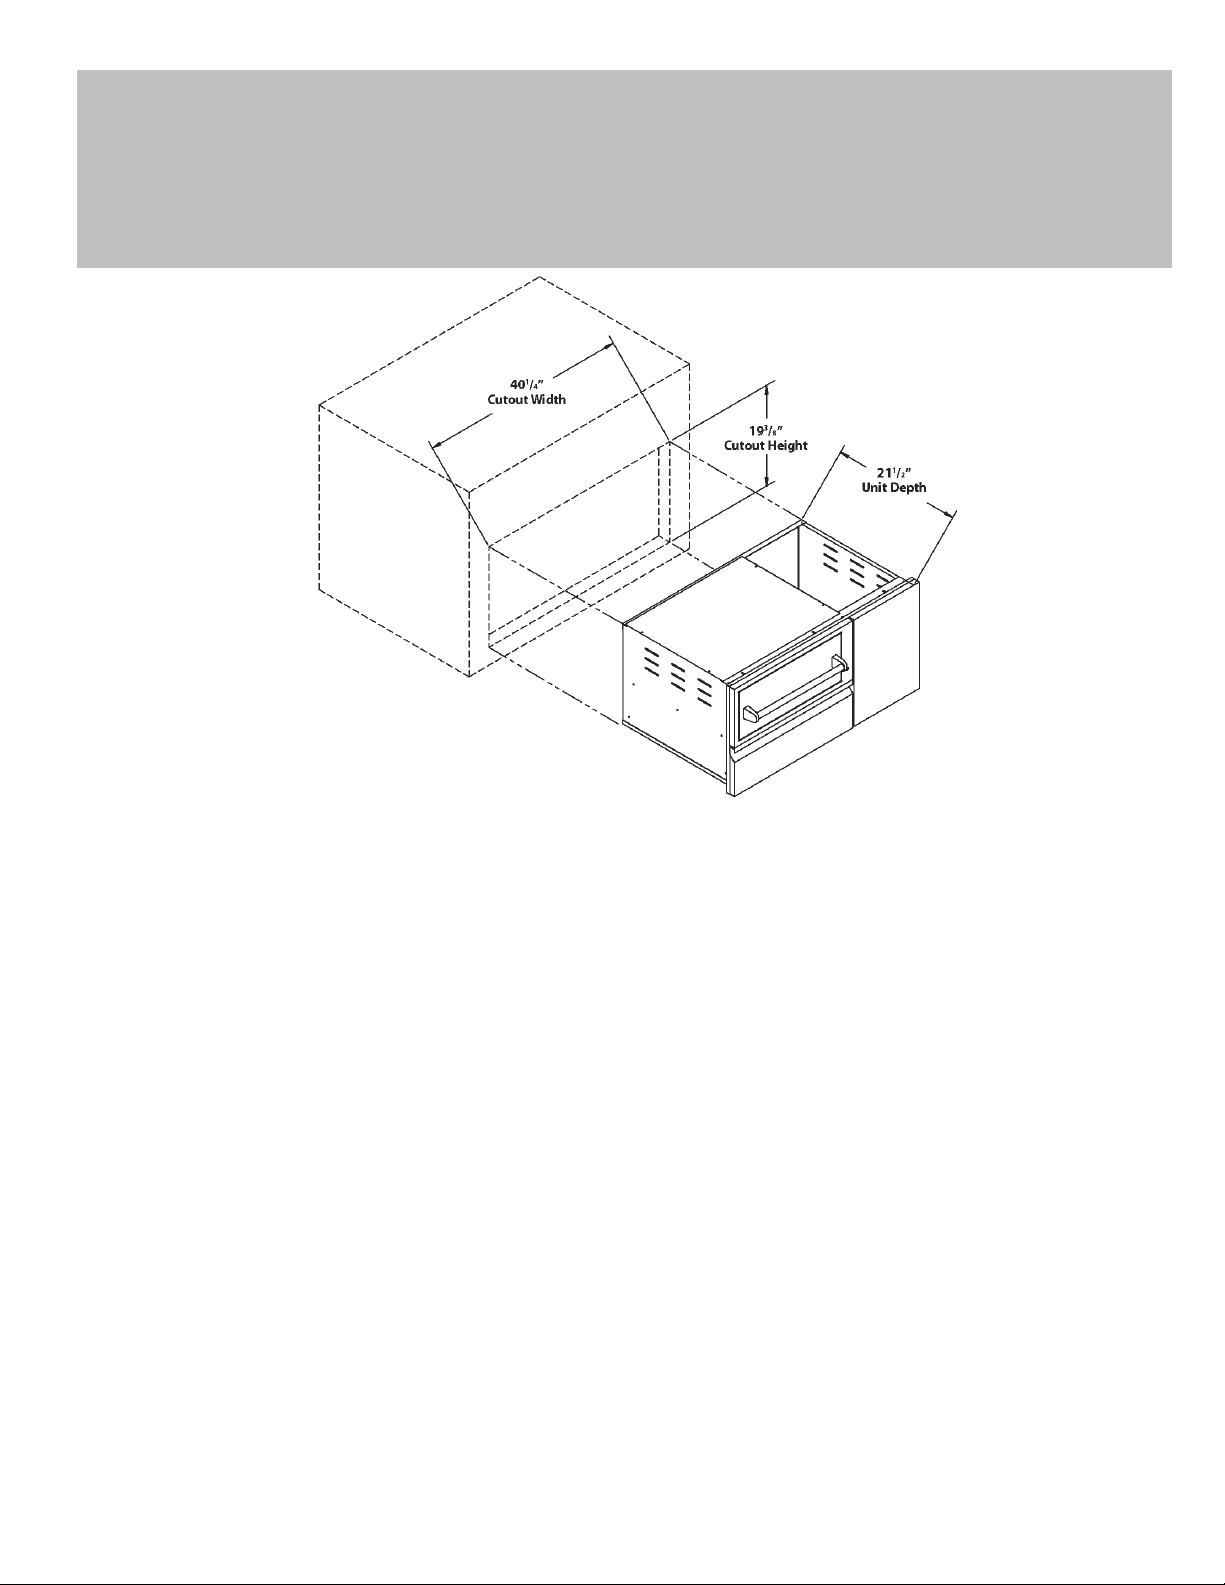
Typical Island Installaon ((C)VQEWD5420)
1) Provide a 19 3/8” x 40 ¼” cutout to the front of the island.
2) Provide support beams using metal studs.
3) Pull the drawer out of the drawer casing to gain access on the mounng holder at the front of the casing.
4) Insert the drawer casing into the island opening.
5) Secure the drawer casing with screws at the inside front top and boom, using the pre-punched mounng
holes.
6) Re-assemble the drawer secon into the drawer casing.
7) Apply weather proof sealant along the edges of the warmer.
8) Plug-in the warmer to a weather proof, and properly grounded, electrical outlet.
9) If installing the unit directly under a grill, please allow 2-3/16" between the grill cutout boom and the top
of the warming drawer cutout.
IMPORTANT
Be sure that the warming drawer is properly grounded
and installed by a qualied technician. The electrical
cord has a 3 prong plug. Do not cut any of the prongs.
Make sure that the island is free of cracks that would
allow water or other liquids to get into the electrical
controls.
Keep the warming drawer away from water sprinklers.
When not in use, cover the island to protect from rain
and harsh weather.
If installing the unit directly under a grill, please allow
2-3/16" between the grill cutout boom and the top of
the warming drawer cutout.
5
Page 6

Warming Drawer Features
(C)VQEWD5300SS
6
Item Descripon Part Number
1 Heang Element 32624
2 Thermostat 33483
3 Heat on Light 32630
4 Chrome Bezel 36001
5 Control Knob 36005
6 Roller Guides 32217
7 Drawer Handle 30013
Item Descripon Part Number
8 Handle Bracket 36007
9 Drawer Assembly 80826
10 Steam Pan Guide 32603
11 Steam Pan 32640
12 Steam Rack 31967
13 Steam Pan Lid 32633
14 Power Cord (not pictured) 32623
Page 7

Warming Drawer Cabinet Features
(C)VQEWD5420SS
Item Descripon Part
Number
1 Heang Element 32624
2 Thermostat 33483
3 Heat on Light 32630
4 Chrome Bezel 36001
5 Control Knob 36005
6 Roller Guides 32217
7 Drawer Handle 30013
Item Descripon Part
Number
8 Handle Bracket 36007
9 Drawer Assembly 80826
10 Steam Pan Guide 32603
11 Steam Pan 32640
12 Steam Rack 31967
13 Steam Pan Lid 32633
14 Storage Drawer 80879
Item Descripon Part
Number
15 Tank Drawer 80164
16 Door Panel 80873
17 Power Cord
(not pictured)
32623
7
Page 8

Temperature Controls
The temperature control dial is used to select the temperature of the warming drawer.
The warming drawer should only be opened when adding or removing food. Connuous opening of the drawer
allows warm air to escape and make the food colder.
Do not use aluminum foil to line the drawer. It is an excellent heat insulator and will trap heat beneath it. This
may aect the performance of the warming drawer and the interior nish.
Heat Light On
The heat-on blue indicator light turns on when the control knob is set and cycles “on” and “o” with the heang
element as temperature is maintained.
Moisture Vent Control
The moisture vent control is located at the top inside of the warming drawer. It can be adjusted in any posion
between “open” and “close” to maintain desired degree of moisture.
1. For crispy foods, slide the moisture vent control inward to open the vents and allow the moisture to escape.
2. For moist food, slide the moisture vent control outward to close the vents and seal the moisture inside the
drawer.
8
Page 9

1. Dry Heat
a) The main funcon of the warming drawer is to maintain food at a desired serving temperature.
b) Place previously prepared foods directly into the empty steam pans (no water) and set the moisture vent
control.
c) Set the temperature control dial. The heat-on blue indicator light will illuminate unl the desired temperature is
reached.
2. Moist Heat
a) The warming drawer also seals moisture within the drawer to keep the food moist.
b) Put just enough of water, approximately ½” high, in the steam pans.
c) Place the steam rack inside the steam pan.
d) Place the food directly on the rack or use a suitable container that will t in the steam pans. Do not use plasc
containers or utensils.
e) Set the temperature control dial. The heat-on blue indicator light will illuminate unl the desired temperature is
reached.
f) Periodically, check the water level in the steam pans and add water when necessary.
Heating Instructions
Cleaning and Maintenance
The Warming Drawer is made of welded #304 stainless steel. It is non-rusng and non-magnec.
1. Allow the warming drawer and its accessories to cool before cleaning.
2. Remove steam pans and all accessories from the warming drawer.
3. Unplug the warming drawer prior to cleaning.
4. Clean all items including the drawer with a mild cleanser. Scrub dirt with a sponge in the direcon of the grain.
5. When cleaning the front panel, always scrub in the direcon of the grain. In order to maintain the luster and highlights of the
polished surface, do not use abrasives when cleaning the polished surfaces.
6. Do not use steel wool to clean the drawer and accessories.
7. Check out the slide rails and make sure they are clean and free from debris.
8. It is recommended to clean the warming drawer aer every use.
9
Page 10

Trouble Shooting Guide and Obtaining Service
Problem What To Do
1. Check if the unit is plugged in to an electrical outlet.
1. Warming drawer will not heat up.
2. Heat-on indicator light does not illuminate.
If service is required:
2. Check to ensure the GFCI has not been tripped.
3. Check if the temperature control dial is set properly.
4. Check if the circuit breaker has not been tripped.
1. Call Preferred Customer Service (888-845-4641)
2. Provide the following informaon:
a. Model Number
b. Serial Number
c. Date of Purchase
d. Name of the Dealer
Please record the following informaon and refer to this informaon when contacng Viking Range, LLC.
This informaon is found on the data plate, which is located on the right rear side panel.
Model Number _____________________________________________________________________________________
Serial Number ______________________________________________________________________________________
Date of Purchase ____________________________________________________________________________________
Place of Purchase ____________________________________________________________________________________
10
Page 11

Viking Range, LLC Limited Warranty
I. Limited Lifetime Warranty
The stainless steel housing is warranted to be free from defects in material and workmanship when subjected to normal domestic use and service
for the lifetime of the original purchaser. This warranty excludes surface corrosion, scratches, and discoloration which may occur during regular
use. This warranty is limited to the replacement of the defective parts, with the owner paying all other cost including labor.
II. Limited Five-Year Warranty
The structural integrity of the interior parts, exterior, and drip pans are warranted to be free from defects in material and workmanship, when
subjected to normal domestic use and service, for a period of five (5) years from the original date of purchase. Viking Range, LLC will replace of
repair parts found to be defective at no cost to the original purchaser.
III. Limited Two-Year Warranty
All other components are warranted to be free from defects in material and workmanship, when subjected to normal domestic use and service, for a
period of two (2) years from the original date of purchase. This warranty is limited to the replacement of the defective parts, with the owner paying
all other costs including labor, shipping and handling.
IV. Limited One-Year Warranty
For a period of one (1) year from the original date of purchase, Viking Range, LLC will replace or repair parts found to be defective at no cost to
the original purchaser. This includes the cost of shipping replacement parts and, where necessary, service labor at prevailing local rates by a Viking
Range, LLC authorized service person. Service will be provided during normal business hours and must be authorized in advance by Viking Range,
LLC.
V. Limitations & Exclusions
1. This Warranty shall apply to products purchased and located in the United States and Canada. Products must be purchased in the country
where service is requested.
2. Warranty applies only to the original purchaser and may not be transferred.
3. Warranty is in lieu of all other warranties expressed or implied and all other obligations or liabilities related to the sale or use of its grill
products.
4. Warranty shall not apply and Viking Range, LLC is not responsible for damage resulting from misuse, abuse, alteration of or tampering with
the appliance, accident, hostile environment, flare-ups, improper installation, or installation not in accordance with the instructions contained
in this manual, or the local codes.
5. Viking Range, LLC shall not be liable for incidental, consequential, special or contingent damages resulting from its breach of this warranty or
any implied warranty.
6. Some states do not allow limitations on how long an implied warranty lasts, or the exclusions of limitations on consequential damages. This
warranty gives you specific legal rights and you may have other rights which vary from state to state.
7. No one has the authority to add to or vary Viking Range, LLC’s warranty, or to create for Viking Range, LLC any other obligation or liability
in connection with the sale or use of its products.
8. Limited to the replacement of defective parts with the owner paying all other costs including labor.
VI. What is not covered: Viking Range, LLC shall not be responsible for and shall not pay for the following:
1. Installation or start-up, damages or problems caused by improper installation or use;
2. Service by an unauthorized service provider;
3. Damage or repair due to service by an unauthorized service provider or use of unauthorized parts;
4. Warranty does not apply to products installed in any commercial or non-residential application. Examples of excluded applications include,
but are not limited to day care centers, schools, bed and breakfast centers, churches, private clubs, fire stations, club housed, common areas in
multi-family dwellings, restaurants, hotels, nursing homes, food service locations, and institutional food service locations.
5. Correcting normal adjustments, settings, improper installation, or commissioning of local gas supply properties.
6. Shipping and handling costs, import/export duties, installation, removal, or re-installation costs.
7. Display models are sold “as is”. If you have purchased a display model, please be advised that it is sold “as is” and that it is subject to the
following warranty exclusions: any exterior of cosmetic damage is non-warrantable; any missing components will be replaced at consumer’s
expense; major handling damage to manifold, valve and ignition system will be serviced at consumer’s expense; all other warranty’s (standard
warranty) will remain in effect.
8. The cost of a service call to diagnose trouble.
11
Page 12

Viking Range, LLC Common Area Limited Warranty
The Viking Range, LLC Limited Warranty covers residential installations only and is not-transferable to any other party. This ‘non-residential’
warranty applies when the product is installed in a common area where more than a single party has the rightful access to its use or in locations
considered beyond normal residential use such as B&Bs, and private clubs.
THIS PROVISION EXCLUDES ALL COMMERCIAL APPLICATIONS, INCLUDING, BUT NOT LIMITED TO RESTAURANTS
AND INSTITUTIONAL FOOD SERVICE LOCATIONS.
I. Limited Five-Year Warranty
The stainless steel housing is warranted to be free from defects in material and workmanship when subjected to normal domestic use and service
for a five (5) year period from the original purchase date. This warranty excludes surface corrosion, scratches, and discoloration which may occur
during regular use. This warranty is limited to the replacement of the defective parts, with the owner paying all other cost including labor.
II. Limited One -Year Warranty
The structural integrity of the interior parts, exterior, and drip pans are warranted to be free from defects in material and workmanship, when
subjected to normal domestic use and service, for a period of one (1) year from the original date of purchase. Viking Range, LLC will replace or
repair parts found to be defective at no cost to the original purchaser.
III. Limited Parts & Labor Warranty
All other components are warranted to be free from defects in material and workmanship for a period of 90 days from the original date of purchase.
Viking Range, LLC will replace or repair parts found to be defective at no cost to the original purchaser. After the 90 day period Viking Range,
LLC will sell parts to the holder of this warranty at Viking Range, LLC contractor prices for an additional 9 months.
IV. Limitations & Exclusions
1. This Warranty shall apply to products purchased and located in the United States and Canada. Products must be purchased in the country
where service is requested.
2. Warranty applies only to the original purchaser and may not be transferred.
3. Warranty is in lieu of all other warranties expressed or implied and all other obligations or liabilities related to the sale or use of its grill products.
4. Warranty shall not apply and Viking Range, LLC is not responsible for damage resulting from misuse, abuse, alteration of or tampering with
the appliance, accident, hostile environment, flare-ups, improper installation, or installation not in accordance with the instructions contained
in this manual, or the local codes.
5. Viking Range, LLC shall not be liable for incidental, consequential, special or contingent damages resulting from its breach of this warranty or
any implied warranty.
6. Some states do not allow limitations on how long an implied warranty lasts, or the exclusions of limitations on consequential damages. This
warranty gives you specific legal rights and you may have other rights which vary from state to state.
7. No one has the authority to add to or vary Viking Range, LLC’s warranty, or to create for Viking Range, LLC any other obligation or liability
in connection with the sale or use of its products.
8. Limited to the replacement of defective parts with the owner paying all other costs including labor.
VI. What is not covered: Viking Range, LLC shall not be responsible for and shall not pay for the following:
1. Installation or start-up, damages or problems caused by improper installation or use;
2. Service by an unauthorized service provider;
3. Damage or repair due to service by an unauthorized service provider or use of unauthorized parts;
4. Warranty does not apply to products installed in any commercial or non-residential application. Examples of excluded applications include,
but are not limited to day care centers, schools, bed and breakfast centers, churches, private clubs, fire stations, club houses, common areas in
multi-family dwellings, restaurants, hotels, nursing homes, food service locations, and institutional food service locations.
5. To correct normal adjustments or settings, sue to improper installation, commissioning of local gas supply properties.
6. Shipping and handling costs, export duties, installation, removal, or re-installation costs.
7. Display models are sold “as is”. If you have purchased a display model, please be advised that it is sold “as is” and that it is subject to the following warranty exclusions: any exterior of cosmetic damage is non-warrantable; any missing components will be replaced at consumer’s
expense; major handling damage to manifold, valve and ignition system will be serviced at consumer’s expense; all other warranty’s (standard
warranty) will remain in effect.
8. The cost of a service call to diagnose trouble.
12
Page 13

Electrical Wiring Diagram
13
Page 14

Viking Range, LLC
111 Front Street
Greenwood, Mississippi 38930
For more informaon, please call:
1-888-845-4641 or visit www.vikingrange.com
In the US or www.brigade.ca in Canada
©Viking Range, LLC.
Made in the USA Viking Range, LLC.
As product improvement is an ongoing process we reserve the right to change specifications and design without notice.
 Loading...