

Viking VEDO265C, VEDO277C, VESO165C, VESO177C, VEDO Use & Care Manual
...
Viking Range Corporation
use & care manual
built-in electric ovens
Congratulations...
Your purchase of this product attests to the importance you place
upon the quality and performance of the major appliances you use. With
minimal care, as outlined in this guide, this product is designed to provide
you with years of dependable service. Please take the few minutes
necessary to learn the proper and efficient use and care of this quality
product.
We appreciate your choosing aViking Range Corporation
product, and hope that you will again select our products for your other
major appliance needs.
Table of Contents
Warnings ................................................ 2
Important Safety Instructions ................................ 3
Basic Functions of Your Oven ................................ 6
Using Your Oven .......................................... 8
Two Element Baking/Convection Baking/Convection Cooking ..... 14
Conventional Broiling ...................................... 27
Convection Broiling ........................................ 27
Convection Dehydrate ..................................... 30
Convection Defrost ........................................ 30
Cleaning and Maintenance .................................. 30
Self-Clean Cycle .......................................... 32
Power Failure ............................................. 34
Service Information ........................................ 35
Warranty ............................................ Rear Cover
I WARNING
If the information in this manual is not followed exactly,
a fire or explosion may result causing property damage,
personal injury or death.
Important Safety Instructions
Read before operating your oven
1. Use this appliance only for its intended use as described in this
manual. Never use your appliance for warming or heating the room.
This is based on safety considerations.
2. Your unit should be installed by a qualified technician. The appliance
must be installed and electrically grounded according to local codes.
.
Do not attempt to repair or replace any part of this appliance unless
specifically recommended in this manual. All servicing should be
referred to a qualified technician. Warranty service must be
performed by an authorized service agency.
4. Children should not be left alone inthe kitchen while the oven is in
use. CAUTION: Do not store items of interest to children over the
unit. Children climbing to reach items could be seriously injured.
.
GREASE- Grease is flammable and should be handled carefully. Do
not use water on grease fires. Flaming grease outside of utensil can
be extinguished with baking soda or, if available, a multipurpose dry
chemical or foam type extinguisher. Let fat cool before attempting to
handle it. Do not allow grease to collect around the oven or in vents.
Wipe up spillovers immediately.
6. Loose-fitting or hanging garments should never be worn while using
the appliance. Do not drape towels or materials on oven door
handles. These items could ignite and cause burns.
7. Use only dry potholders. Moist or clamp pot holders on hot surfaces
may result in burns from steam. Do not let pot holder touch hot
surface areas. Do not use a towel or other bulky cloth.
.
Keep area clean and free from combustible material, gasoline, and
other flammable liquids. Never use your oven as a storage space.
Combustible items (paper, plastic, etc.) may ignite and metallic items
may become hot and cause burns.
2 3
9. Donotheatunopenedfoodcontainers;buildupofpressuremaycause
thecontainerto explodeandresultininjury.
10.Alwayspositionovenracksindesiredlocationwhileoveniscool.If
rackmustbemovedwhileovenishot,donotletpotholdercontact
hotheatingelementinoven.
11. Use care when opening oven door. Let hot air or steam escape
before removing or replacing food. Hot air or steam can cause burns
to hands, face and/or eyes.
12. Keep oven vents unobstructed. The oven vent is located at the front
of the oven and vents into the room.
13. Do not clean door gasket. It is essential for a good tight seal. Care
should be taken not to rub, damage, or move the gasket.
14. No commercial oven cleaner or oven liner protective coating such as
aluminum foil should be used in or around any part of the oven.
Improper oven liners may result in a risk of electric shock or fire.
Keep oven free from grease buildup.
15. Before self-cleaning the oven, remove broiler pan, broiler grid, oven
racks, rack supports, and other utensils. Do not use your oven to
clean other parts. A fan noise should be heard during the cleaning
cycle If not, call service before self-cleaning again.
16. DO NOT TOUCH HEATING ELEMENTS OR INTERIOR SURFACES
OF OVEN. Heating elements may be hot even though they are dark
in color. Interior surfaces of an oven become hot enough to cause
burns. During and after use, do not touch, or let clothing or other
flammable materials contact heating elements or interior surfaces of
oven until they have had sufficient time to cool. Other surfaces of the
oven may become hot enough to cause burns, such as the oven vent
opening, the surface near the vent opening, and the oven door
window.
-SAVE THESE INSTRUCTIONS-
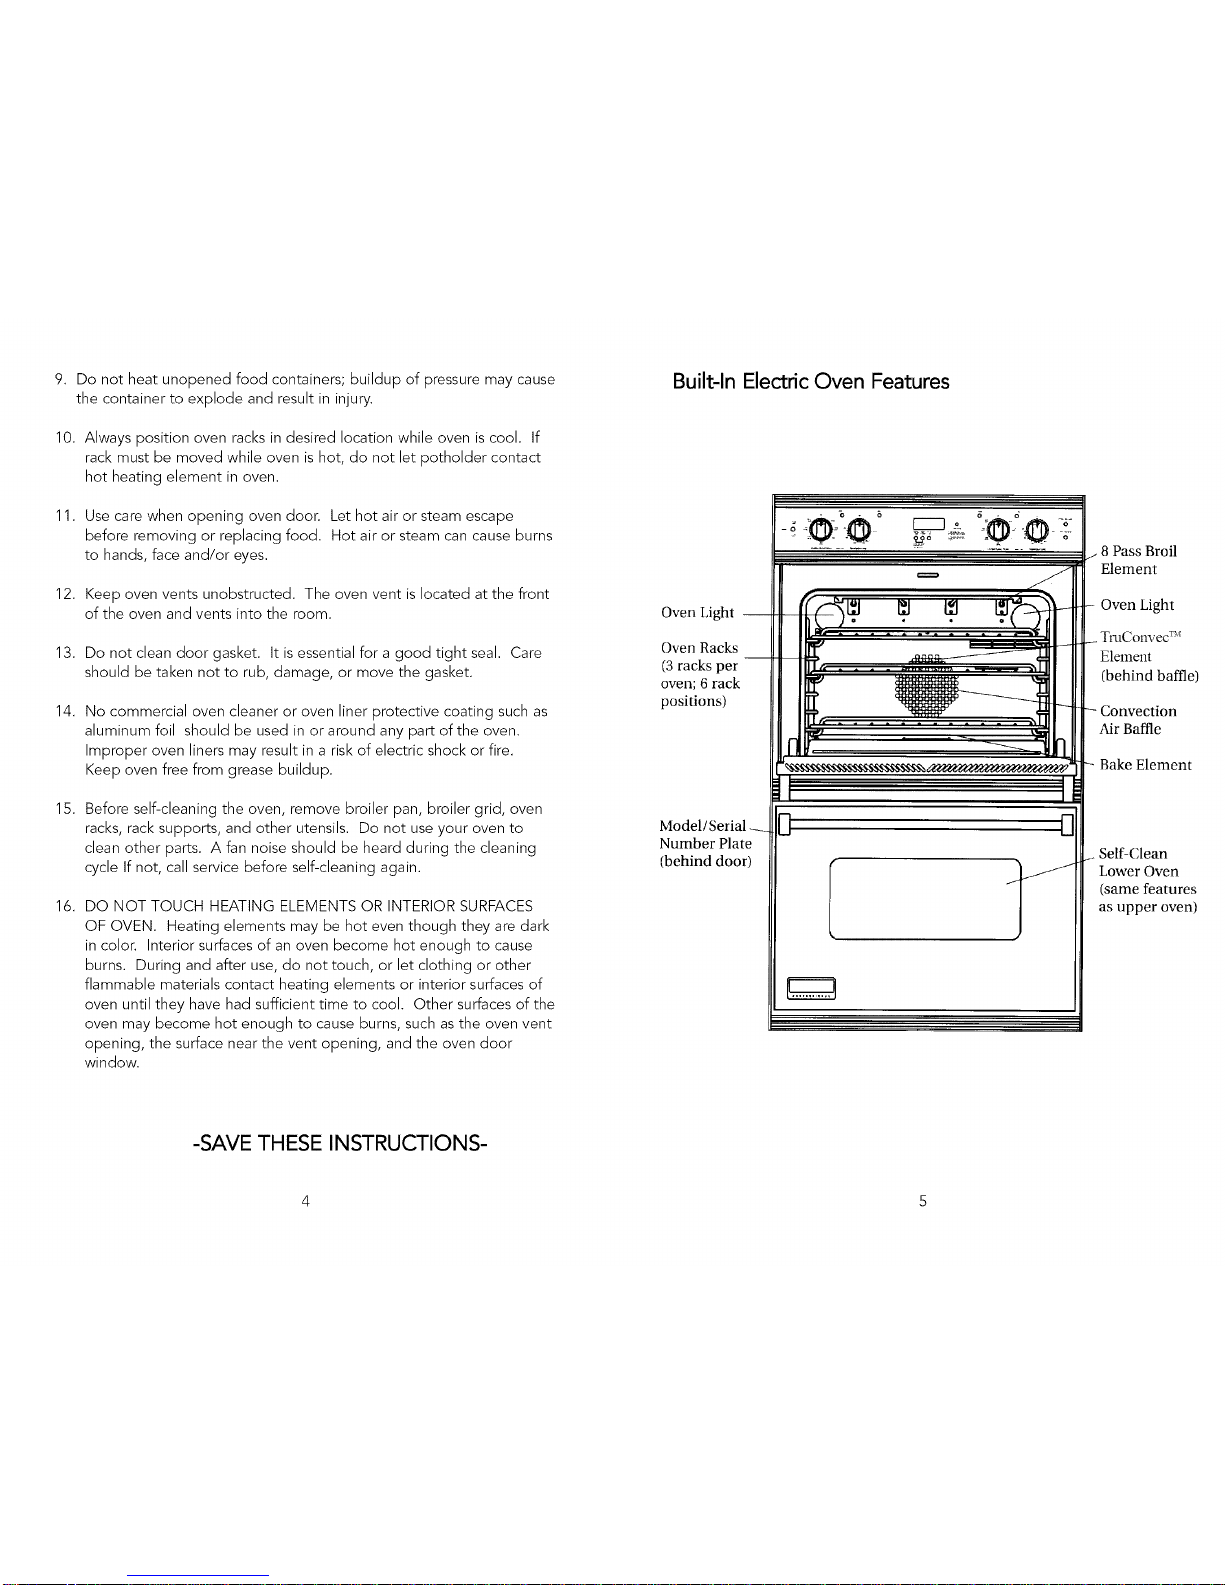
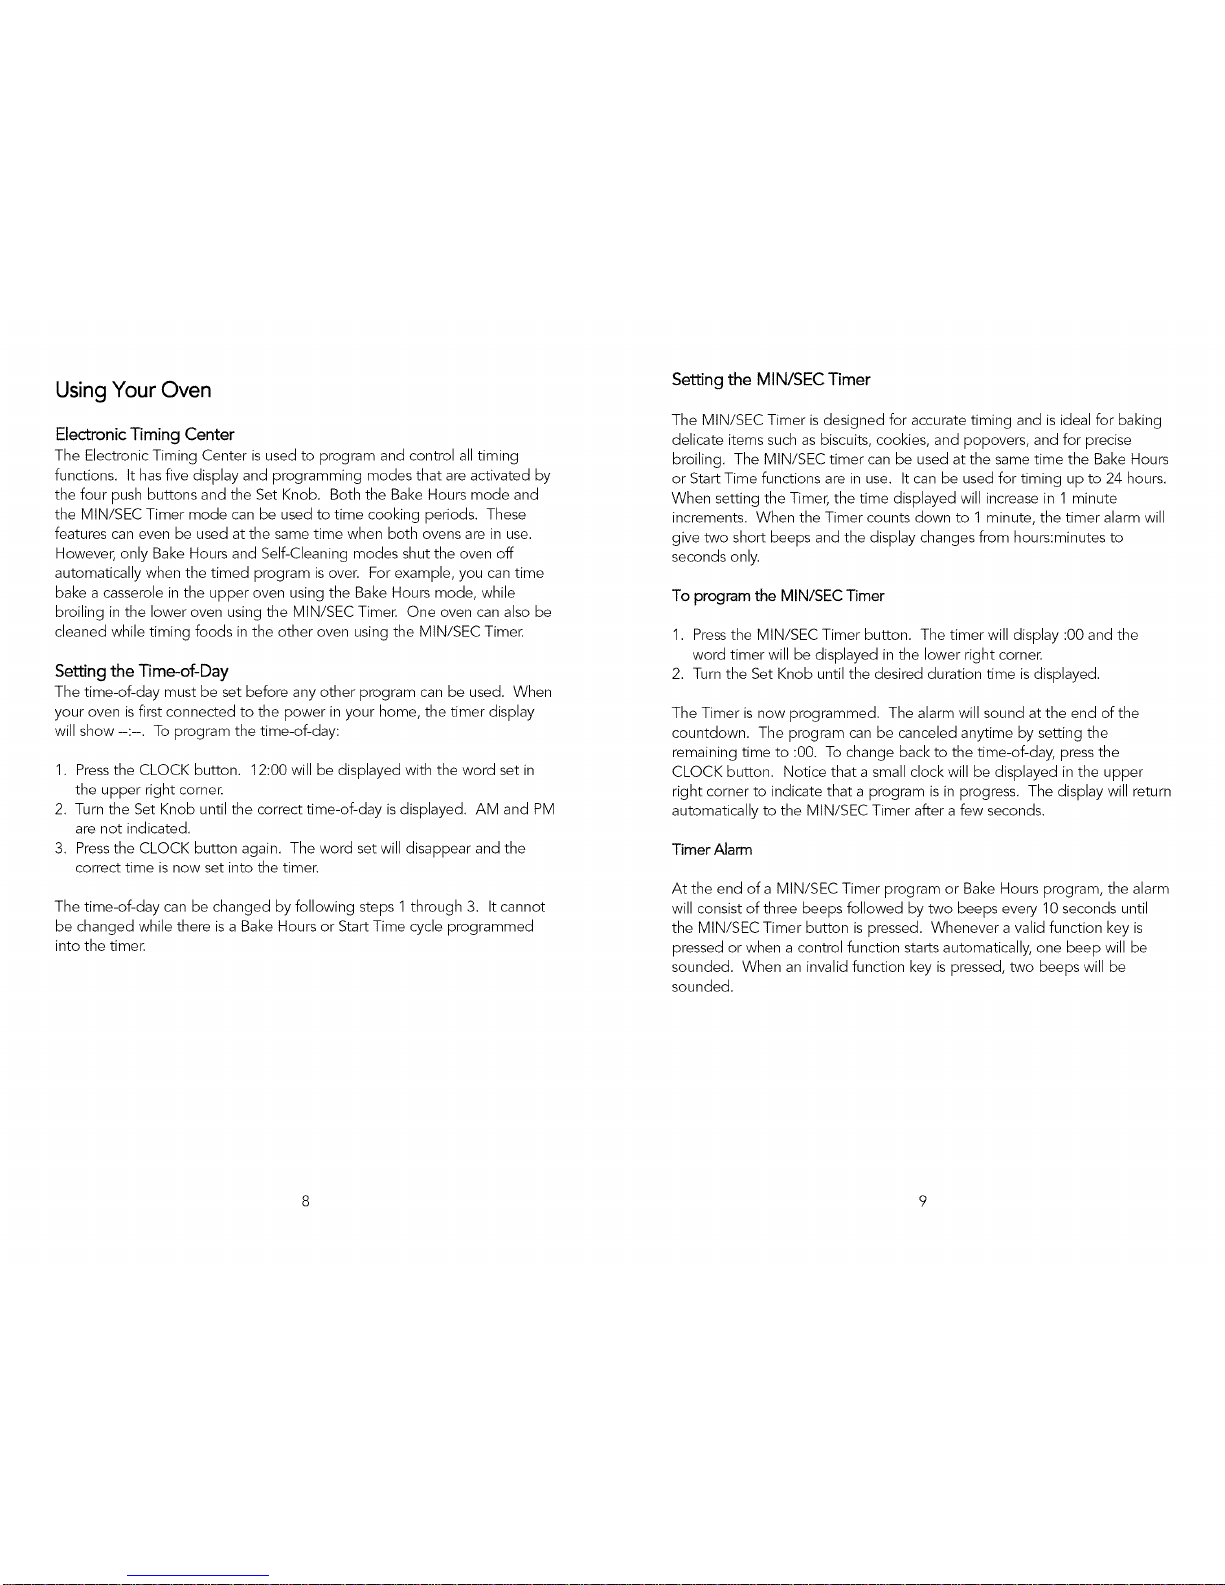
Built-In Electric Oven Features
Oven Light --
Oven Racks
(3 racks per
oven; 6 rack
positions)
.... °'- ,
-
N n
Model/Serial
Number Plate
(behind door)
'/
/
J
Broil
Element
Oven Light
TnlConvec TM
Elelnent
(behind baffle)
Convection
Air Baffle
Bake Element
i Self-Clean
Lower Oven
(same features
as upper oven)
4 5
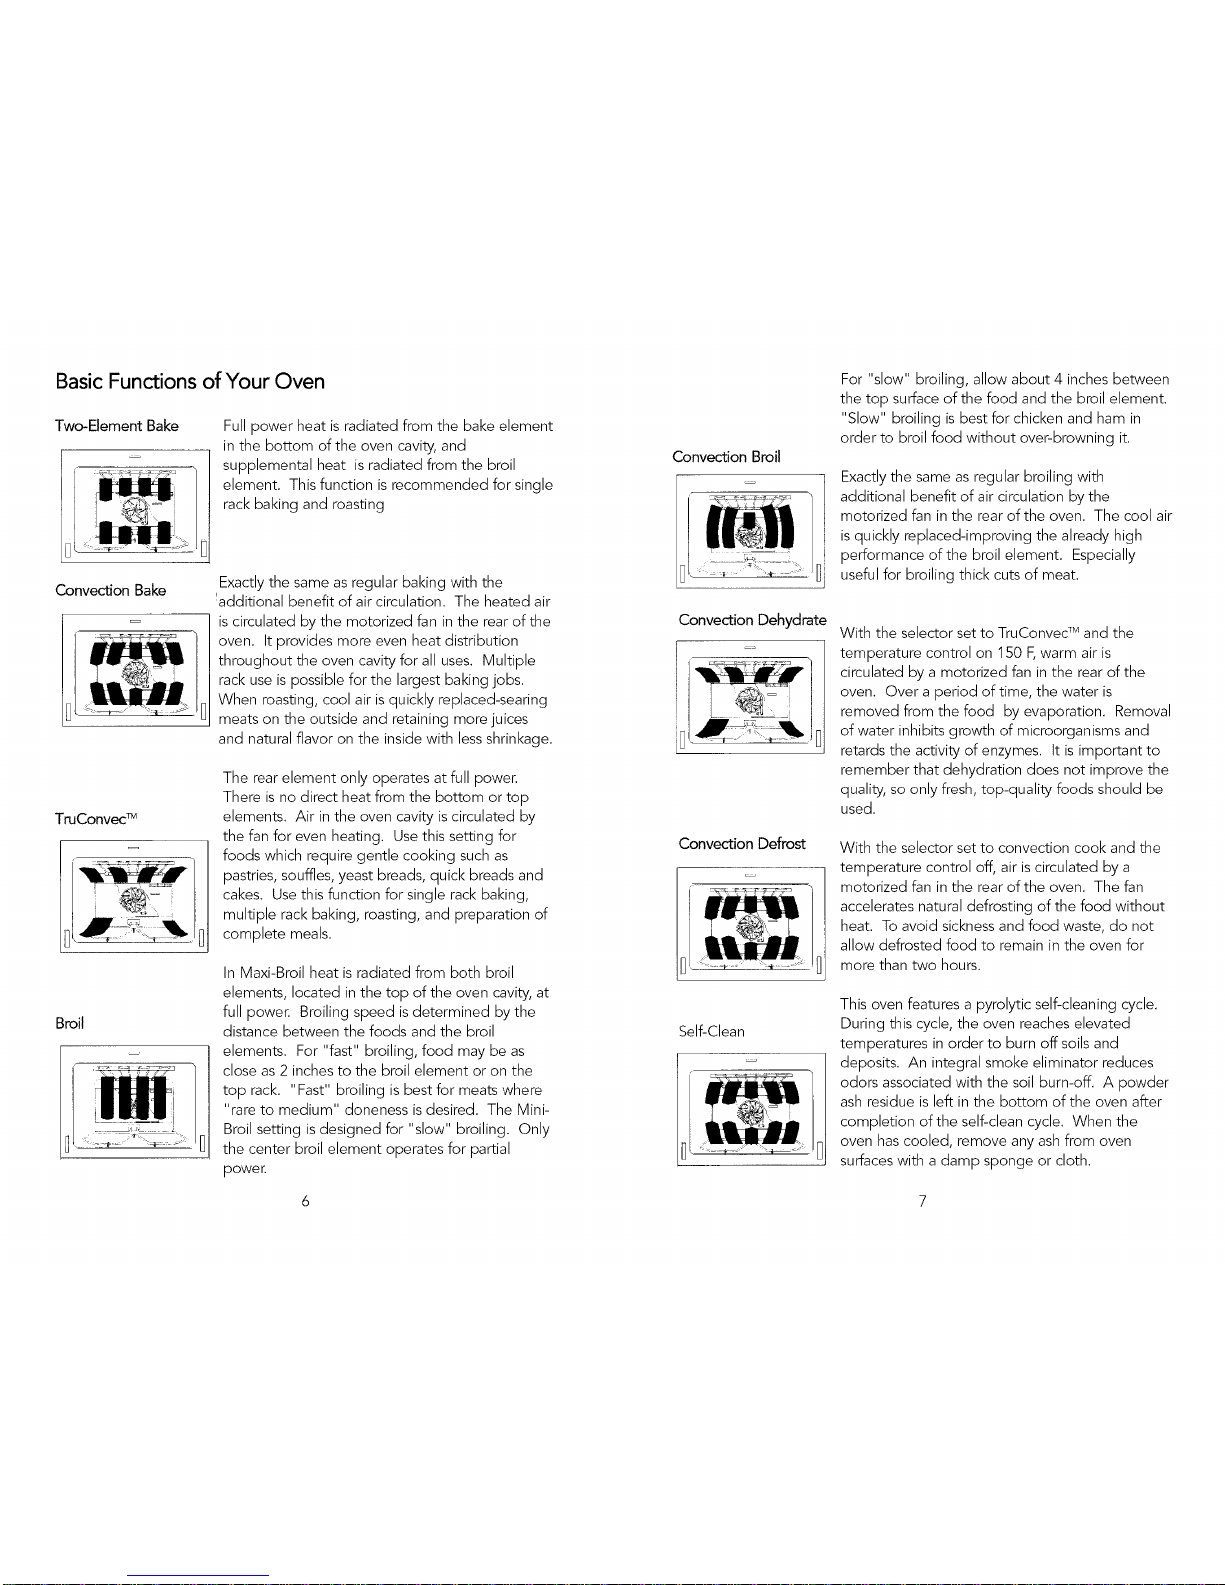
Basic Functions of Your Oven
Two-Element Bake
Convection Bake
TruConvecTM
Broil
Full power heat is radiated from the bake element
in the bottom of the oven cavity, and
supplemental heat is radiated from the broil
element. This function is recommended for single
rack baking and roasting
Exactly the same as regular baking with the
_additional benefit of air circulation. The heated air
is circulated by the motorized fan in the rear of the
oven. It provides more even heat distribution
throughout the oven cavity for all uses. Multiple
rack use is possible for the largest baking jobs.
When roasting, cool air is quickly replaced-searing
meats on the outside and retaining more juices
and natural flavor on the inside with less shrinkage.
The rear element only operates at full power.
There is no direct heat from the bottom or top
elements. Air in the oven cavity is circulated by
the fan for even heating. Use this setting for
foods which require gentle cooking such as
pastries, souffles, yeast breads, quick breads and
cakes. Usethis function for single rack baking,
multiple rack baking, roasting, and preparation of
complete meals.
In Maxi-Broil heat is radiated from both broil
elements, located in the top of the oven cavity, at
full power. Broiling speed isdetermined by the
distance between the foods and the broil
elements. For "fast" broiling, food may be as
close as 2 inches to the broil element or on the
top rack. "Fast" broiling is best for meats where
"rare to medium" doneness is desired. The Mini-
Broil setting is designed for "slow" broiling. Only
the center broil element operates for partial
power.
Convection Broil
Convection Dehydrate
Convection Defrost
Self-Clean
For "slow" broiling, allow about 4 inches between
the top surface of the food and the broil element.
"Slow" broiling is best for chicken and ham in
order to broil food without over-browning it.
Exactly the same as regular broiling with
additional benefit of air circulation by the
motorized fan in the rear of the oven. The cool air
is quickly replaced-improving the already high
performance of the broil element. Especially
useful for broiling thick cuts of meat.
With the selector set to TruConvec TM and the
temperature control on 150 F, warm air is
circulated by a motorized fan in the rear of the
oven. Over a period of time, the water is
removed from the food by evaporation. Removal
of water inhibits growth of microorganisms and
retards the activity of enzymes. It is important to
remember that dehydration does not improve the
quality, so only fresh, top-quality foods should be
used.
With the selector set to convection cook and the
temperature control off, air is circulated by a
motorized fan in the rear of the oven. The fan
accelerates natural defrosting of the food without
heat. To avoid sickness and food waste, do not
allow defrosted food to remain in the oven for
more than two hours.
This oven features a pyrolytic self-cleaning cycle.
During this cycle, the oven reaches elevated
temperatures in order to burn off soils and
deposits. An integral smoke eliminator reduces
odors associated with the soil burn-off. A powder
ash residue is left in the bottom of the oven after
completion of the self-clean cycle. When the
oven has cooled, remove any ash from oven
surfaces with a clamp sponge or cloth.
6 7
Using Your Oven
Electronic Timing Center
The Electronic Timing Center is used to program and control all timing
functions. It has five display and programming modes that are activated by
the four push buttons and the Set Knob. Both the Bake Hours mode and
the MIN/SEC Timer mode can be used to time cooking periods. These
features can even be used at the same time when both ovens are in use.
However, only Bake Hours and Self-Cleaning modes shut the oven off
automatically when the timed program is over. For example, you can time
bake a casserole in the upper oven using the Bake Hours mode, while
broiling in the lower oven using the MIN/SEC Timer. One oven can also be
cleaned while timing foods in the other oven using the MIN/SEC Timer.
Setting the Time-of-Day
The time-of-day must be set before any other program can be used. When
your oven isfirst connected to the power in your home, the timer display
will show --:--. To program the time-of-day:
1, Press the CLOCK button. 12:00 will be displayed with the word set in
the upper right corner.
2, Turn the Set Knob until the correct time-of-day is displayed. AM and PM
are not indicated.
3, Press the CLOCK button again. The word set will disappear and the
correct time is now set into the timer.
The time-of-day can be changed by following steps 1 through 3. It cannot
be changed while there is a Bake Hours or Start Time cycle programmed
into the timer.
Setting the MIN/SEC Timer
The MIN/SEC Timer is designed for accurate timing and is ideal for baking
delicate items such as biscuits, cookies, and popovers, and for precise
broiling. The MIN/SEC timer can be used at the same time the Bake Hours
or Start Time functions are in use. It can be used for timing up to 24 hours.
When setting the Timer, the time displayed will increase in 1 minute
increments. When the Timer counts down to 1 minute, the timer alarm will
give two short beeps and the display changes from hours:minutes to
seconds only.
To program the MIN/SEC Timer
1. Pressthe MIN/SEC Timer button. The timer will display :00 and the
word timer will be displayed in the lower right corner.
2. Turn the Set Knob until the desired duration time is displayed.
The Timer is now programmed. The alarm will sound at the end of the
countdown. The program can be canceled anytime by setting the
remaining time to :00. To change back to the time-of-day, press the
CLOCK button. Notice that a small clock will be displayed in the upper
right corner to indicate that a program is in progress. The display will return
automatically to the MIN/SEC Timer after a few seconds.
Timer Alarm
At the end of a MIN/SEC Timer program or Bake Hours program, the alarm
will consist of three beeps followed by two beeps every 10 seconds until
the MIN/SEC Timer button ispressed. Whenever a valid function key is
pressed or when a control function starts automatically, one beep will be
sounded. When an invalid function key is pressed, two beeps will be
sounded.
8 9
Setting the Bake Hours Program
The Bake Hours program is used of controlled timing of baked or roasted
foods. At the end of the timed cycle, the oven automatically turns off.
Times in the Bake Hours mode are displayed in hours and minutes, with a
setting from 1 minute to 11 hours 50 minutes increasing in 1 minute
increments.
To setthe Bake Hoursprogram
1. Turn the MANUAL/TIMED knob to TIMED UPPER TIMED OR LOWER
TIMED position, depending upon the oven mode and oven being used.
2. Set the Oven Function Selector to the BAKE, CONVECTION BAKE, or
TruConveC Mposition, depending upon the type of baking being used.
3. Set the temperature Control knob to the desired temperature and allow
for preheating.
4. Press the Bake Hours button. The Timer will display :00 with the words
set and cook in the upper right corner.
5. Turn the Set Knob until the desired baking time is displayed in hours and
minutes. The word cook will remain in the display indicating that the
Bake Hours program has been set.
The Timer will automatically compute a stop time and enter it into the timer
memory. The alarm will sound three beeps followed by two beeps every 10
seconds until the Bake Hours button is pressed. The duration time can be
changed anytime during the cooking program by following steps 4 and 5.
Setting the remaining duration time to :00 cancels the Bake Hours program.
To return the Timer to the present time-of-clay, press the CLOCK button. A
small clock will appear in the upper right corner indicating a Bake Hours
program has been set. The Timer will go back to the Bake Hours
automatically after a few seconds.
Setting the Automatic Start Time Bake Program
The Bake Hours and Start Time modes of the Timer can be used to
automatically turn the oven on and off at a preselected time. The
Automatic Time Bake Program is ideal for foods with no danger of spoilage
during the time the oven is left off.
To set the Automatic Time Bake program
1. Turn the MANUAL/TIMED knob to TIMED, UPPERTIMED OR LOWER
TIMED position, depending upon the oven mode and oven being used.
2. Set the Oven Function Selector to the BAKE, CONVECTION BAKE, or
TruConvecTM position, depending upon the type of baking being used.
3. Program the Start Time by pressing the Start Time button and turning
the Set Knob until the desired Start Time is displayed. This is the time-
of-day you want the food to begin cooking.
4. Program the required baking time by pressing the Bake Hours button.
The words set and cook in the upper right corner. Turn the Set Knob
until the desired baking time is displayed in hours and minutes. The
word set will disappear and the word delay will remain in the display
indicating that the Bake Hours program has been set.
5. Set the Temperature Control Knob to the desired temperature.
When the specified start time is reached, the oven will automatically turn
on. The oven then bakes for the length of time programmed into the Bake
Hours mode, turn the oven off, and sounds the alarm. Setting the
remaining duration time to :00 cancels the automatic bake program.
10 11
 Loading...