

Viking VESC530, VESC5304BSS Quick Reference Manual
Surface Operation
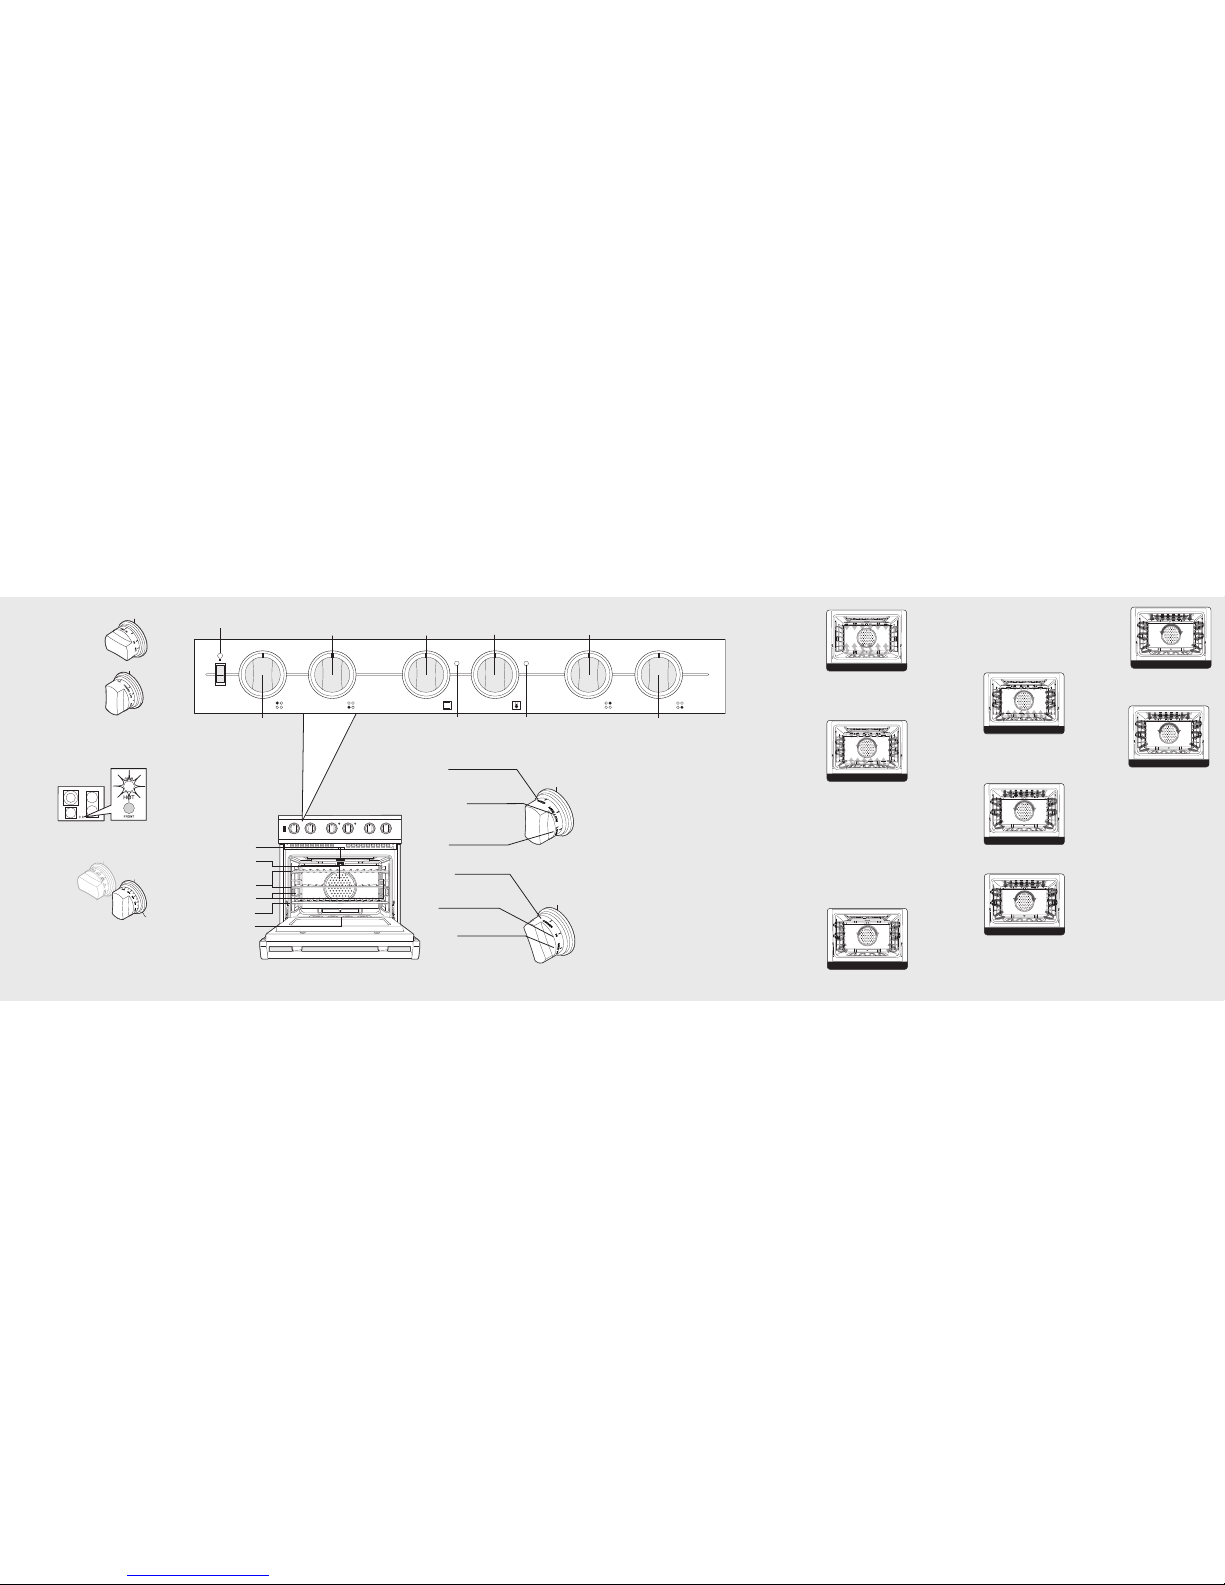
Controls
BAKE (TwoElementBake)
F
ullpower heatis
radiatedfrom thebake
elementin
thebottom ofthe
ovencavity and
s
upplementalheat is
r
adiatedfrom thebroil
e
lement.This functionis recommendedfor singlerack
baking.Many cookbookscontainrecipes tobe cookedin
theconventional manner.Conventional baking/roastingis
particularlysuitablefor dishesthat require ahigh
temperature.Use thissettingfor baking,roasting,
andcasseroles.
CONV BAKE
(Convection
Bake)
Thebottom element
operatesat fullpower,
andthe topbroil
elementoperates at
supplementalpower.
Theheated airis
circulatedby themotorizedfan inthe rearof theoven
providinga moreeven heatdistribution.This even
circulationof airequalizesthe temperaturethroughoutthe
ovencavity andeliminates the hotand coldspots foundin
conventionalovens. Amajor benefitof convectionbakingis
theability toprepare food inquantity using multiple
racks—afeature notpossiblein astandard oven.
Whenroasting usingthis setting, cool airis quickly
replaced,searing meats onthe outside andretainingmore
juicesand naturalflavor onthe inside withless shrinkage.
Withthis heatingmethod, foods canbe bakedand roasted
at the sametime with minimal tastetransfer,even when
differentdishes are involved, suchas cakes, fishor meat.
Thehot airsystem isespecially economicalwhen thawing
frozenfood. Usethis setting forbaking and roasting.
TRU CONV
(TruConvec™)
Therear elementonly
operatesat fullpower.
Thereis nodirect heat
fromthe bottomor top
elements.The
motorizedfan inthe
rearof theoven
circulatesair inthe
ovencavity foreven heating. Usethis setting forfoods that
requiregentle cooking suchas pastries, souffles,yeast
Oven Settings
t
wo-element bake
convection bake
TruConvec
Single Front or Rear Element
P
ush inand turnthe control knob
c
ounterclockwise tothe desired
setting. Theelement willcycle on
and offto maintainthe desired
heat setting.When finished,turn all
controls to“OFF.”
Rear and Bridge Element
P
ush inand turnthe right rear
control knobclockwise tothe
desired setting.The rearelement
and thebridge elementwill cycle
on andoff tomaintain the desired
heat setting.When finished,turn all
controls “OFF.”
Hot Surface Indicator Lights
The rangehas fourhot surface indicatorlights. They
are locatedin thefront center ofthe glassrangetop.
The hotsurface indicatorlight will
glow redwhen thecorresponding
element isheated. Thelight will
remain onafter turningoff the
control knob
until the
corresponding
element has
cooled toa safe
temperature.
Oven Functions
Preheat
For bestresults, itis
extremely important
that youpreheat your
oven tothe desired
cooking temperature
before placingfood items
in theoven tobegin cooking. In
many cookingmodes, partialpower
from thebroiler isused to bringthe
oven tothe preheattemperature.
Therefore, placingfood itemsin the oven
during thepreheat modeis not recommended.The
Viking RapidReady™ PreheatSystem is engineered
so thatthe ovenis brought tothe desiredset
temperature ina mannerwhich will providethe
optimum cookingenvironment basedon the selected
cooking modein theshortest possible time.
OVEN CLEAN
M
agneQuick™Elements
Broil element
TruConvec™ element
(behind baffle)
One TruGlide™ rack
Two tilt-proofracks
Concealed bake
element
Oven lights
Interior Oven
Light Switch
Left Rear Burner
Control Knob
(2,500/1,000 watt)
Left Front Burner
Control Knob
(1,500 watt)
Oven
Function
Selector Knob
Oven
Temperature
Control Knob
Right Rear Burner
Control Knob
(1,800 watt)
Right Front Burner
Control Knob
(1,800 watt)
Oven
Indicator
Light
Self-Clean
Indicator
Light
Surface Heat Settings*
MED
Maintaining slowboil onlarge
quantities, sautéing,browning,
braising, andpan-frying
MED LOW
Simmering largequantities, low
temperature frying(eggs, etc.),
heating milk,cream sauces,
gravies, andpudding
LOW
Melting largequantities
Simmer
Melting andsimmering small
quantities, steamingrice,
and sauces
HI
Boiling waterquickly, deep-fat
frying inlarge cookware
MED HI
Maintaining fastboil onlarge
quantities, hightemperature frying,
and panbroiling
*Note: The above information is given as a guide only.
Youmay need to vary the heat settings to suit your
personal requirements.
Oven Functions
• BAKE (Two-ElementBake)
Use thissetting forbaking, roasting, andcasseroles.
• CONV BAKE (Convection Bake)
Use thissetting tobake and roastfoods atthe same time
with minimaltaste transfer.
• TRU CONV (TruConvec™)
Use thisbake settingfor multi-rack bakingfor
breads, cakes,cookies (upto 6 racksof cookies
at once).
• CONV ROAST (Convection Roast)
Use thissetting forroasting whole turkeys,whole chickens,
hams, etc.
• CONV BROIL (Convection Broil)
Use thissetting tobroil thick cutsof meat.
• HI BROIL
Use thissetting forbroiling dark meatsat 1”thickness or
less whererare ormedium doneness isdesired.
• MED BROIL
Use thissetting forbroiling white meatssuch aschicken or meats
greater than1” thickthat would beover-browned inhigh broil.
• LOW BROIL
Use thissetting fordelicate broiling suchas meringue.
• SELF CLEAN
Use thisfunction toclean oven.
• Convection Dehydration (TRU CONV)
Use thisfunction todehydrate fruits andvegetables.
• Convection Defrost (TRU CONV)
Use thisfunction todefrost foods.
OVEN
F
UN
CTI
ON
OVEN
T
E
M
PER
A
T
U
RE
MED BROIL
I
nnerand outerbroil
e
lementspulse on
andoff toproduce
lessheat forslow
broiling.Allow about
4 inches (10cm)
b
etweenthe top
s
urfaceof thefood
a
nd the broil element. Slowbroilingis bestfor chicken
andham inorder tobroil foodwithout over-browningit.
Usethis settingfor broiling smalland average cuts of
meat.
LOW BROIL
Thismode usesonly
a fraction of the
availablepower to
theinner broil
elementfor delicate
top-browning.The
innerbroil elementis
on for onlypart of
thetime. Usethis settingto gently brownmeringueon
racks3 or4 in 3-4 minutes.
ConvectionDehydration
Thisoven isdesigned notonly tocook, but alsoto
dehydratefruits andvegetables.
1. Preparethe foodas recommended.
2. Arrangethe foodon dryingracks (not included with
theoven; contacta localstore handling speciality
cookingutensils).
3. Setthe appropriatelow temperatureand turnthe
selectorto “TRUCONV”.
ConvectionDefrost
1. Place thefrozenfood ona bakingsheet.
2. Set thetemperaturecontrol to“OFF”.
3. Turnthe selectorto “TRUCONV”.
Self-CleanCycle
Thisrange featuresa self-cleaningcycle. Duringthis cycle,
theoven reacheselevated temperaturesin orderto burn
offsoil anddeposits. Apowder ash residue isleft inthe
bottomof theoven aftercompletionof theself-clean
cycle.See Useand Care Manual for self-clean cycle
instructions.
medium broil
low broil
b
reads,quick breads,and cakes. Breads, cookies, and other
b
akedgoods comeout evenlytexturedwith goldencrusts.
N
o special bakeware is required. Usethis functionfor single
rackbaking, multiplerack baking, roasting,and preparation
of complete meals.This settingis alsorecommendedwhen
bakinglarge quantities ofbaked goods atone time.
CONV ROAST(Convection Roast)
T
he convection
e
lementruns in
conjunctionwith the
innerand outerbroil
elements.The
reversibleconvection
fanruns ata higher
speedin each
direction.This transfer
of heat (mainly from
theconvection element) sealsmoistureinside oflarge
roasts.A timesavings isgained over existing, single fan
convectionroast modes. Usethis setting forwholeturkeys,
wholechickens, hams,etc.
CONV BROIL(Convection Broil)
Thetop element
operatesat fullpower.
Thisfunction isexactly
thesame asregular
broilingwith the
additionalbenefit of
aircirculation bythe
motorizedfan inthe
rearof theoven.
Smokeis reduced
sincethe airflowalso reduces peaktemperatureson the
food.Use thissetting forbroilingthick cutsof meats.
HI BROIL
Heatradiates from
bothbroil elements,
locatedin thetop of
theoven cavity,at full
power.The distance
betweenthe foods
andthe broilelements
determinesbroiling
speed.For fast
broiling,food maybe asclose as2 inches (5cm) tothe
broilelement oron thetop rack.Fast broiling is bestfor
meatswhere rareto mediumdonenessis desired.Use this
settingfor broilingsmall andaverage cutsof meat.
convection roast
convection broil
high broil
F20586AEN (080609J)
VIKING RANGE CORPORATION
111 FrontStreet •Greenwood, Mississippi
38930 USA• (662)455-1200
Warnings (cont.)Warnings (cont.)
Warnings
W
arningand Important SafetyInstructionsappearing
i
n thismanual are notmeant to coverall possible
c
onditionsand situationsthat may occur.Common
sense,caution, and caremust be exercisedwhen
installing,maintaining,or operating theappliance.
ALWAYScontactthe manufacturer aboutproblemsor
c
onditionsyou donot understand.
R
ecognizeSafety Symbols,Words,Labels
Read and follow allinstructions before using this
appliance to preventthe potentialrisk of fire,electric
shock, personalinjury ordamage to theappliance as
a resultof improperusage of theappliance. Use
appliance onlyfor itsintended purpose asdescribed
in thismanual.
Toensure proper and safe operation: Appliance
must beproperly installedand grounded bya
qualified technician.DO NOT attempt toadjust,
repair,service, or replaceany partof your appliance
unless itis specificallyrecommended in thismanual.
All otherservicing shouldbe referred toa qualified
servicer.
W A R N I N G
TIPPING HAZARD
Toreduce the risk of the
appliance tipping, it must be
secured by a properly installed
anti-tip bracket(s).To make sure the bracket has
been installed properly,look behind the range with
a flashlight to verify proper installation engaged in
the rear top left corner of the range.
• THIS RANGE CAN TIP
• INJURIES TO PERSONS CAN RESULT
• INSTALLANTI-TIP DEVICE PACKED WITH
RANGE
• SEE INSTALLATIONINSTRUCTIONS
W A R N I N G
DONOT usecommercial oven cleaners insidethe
oven.Use of these cleanerscan produce hazardous
fumesor can damagethe porcelainfinishes.
W A R N I N G
Toavoid risk of property damage,
personal injury or death; follow
information in this manual exactly to
prevent a fire or explosion. DO NOT
store or use gasoline or other flammable vapors
and liquids in the vicinity of this or any appliance.
W A R N I N G
ELECTRICALSHOCK HAZARD
DO NOT
touch a hot oven light bulb with
a damp cloth as the bulb could break.
Should the bulb break, disconnect power
to the appliance before removing bulb to avoid
electricalshock.
W A R N I N G
ELECTRICALSHOCK HAZARD
Disconnect the electric power at the
main fuse or c ircuit breaker before
replacing bulb.
W A R N I N G
BURN OR ELECTRICAL
SHOCK HAZARD
M
ake sure all controls are OFF and oven
is COOL before cleaning. Failure to do
so can result in burns or electrical shock.
C A U T I O N
Toavoid sickness and food waste, DO NOTallow
defrosted food to remain in the oven for more than
two hours.
N O T I C E
DO NOT turn the Temperature Control on during
defrosting. Turning the convection fan on will
accelerate the natural defrosting of the food
without the heat.
W A R N I N G
BURN HAZARD
The oven door, especially the glass, can
get hot. Danger ofburning: DONOT
t
ouch the glass!
C A U T I O N
Youmust carefully check the food during the
dehydration process to ensure that it does not
catch fire.
C A U T I O N
BURN HAZARD
W
hen self-cleaning, surfaces may get
h
otter than usual. Therefore, children
should be kept away.
C A U T I O N
DO NOT storeitems of interest to children over
the unit. Ch ildren climbing to reach i tems could
be seriously injured.
Viking Quick Reference Guide
Professional Freestanding
30”W. Electric Range
D A N G E R
Hazards or unsafe practiceswhich WILL result in
severe personal injury ordeath
W A R N I N G
Hazardsor unsafe practiceswhich COULD result in
death,severe personal injuryor property damage
C A U T I O N
Hazards or unsafe practiceswhich COULD
result in minor personalinjury.
Allsafety messages will identifythe hazard, tell you
howto reduce the chance of injury,and tell you what
canhappen if the instructions are not followed.
W A R N I N G
NEVER use appliance as a space heater to heat or
warm a room to prevent potential hazard to the user
and damage to the appliance. Also, DO NOT use the
range top or oven as a storage area for food or
cooking utensils.
C A U T I O N
DO NOT heatempty cookware or let cookware boil
dry.The cookware can absorb an excessive
amount of heat very quickly, resulting in possible
damage to the cookware and ceramic glass.
W A R N I N G
This range features a self-cleaning cycle. During
this cycle, the oven reaches elevated temperatures
in order to burn off soil and deposits. A powder ash
residue is left in the bottom of the oven after
completion of the self-clean cycle.
Note:DO NOT use commercial oven cleaners
inside the oven. Use of these cleaners can
produce hazardous fumes or can damage the
porcelain finishes. DO NOT line the oven with
aluminum foil or other materials. These items can
melt or burn during a self-clean cycle, causing
permanent damage to the oven.
Important Safety Noticeand Warning
T
he CaliforniaSafe DrinkingWater andToxic
E
nforcementAct of 1986(Proposition 65)requires the
Governor ofCalifornia topublish alist ofsubstances
known tothe Stateof Californiato causecancer or
reproductiveharm, and requires businessesto warn
customers of potential exposuresto suchsubstances.
U
sers ofthis applianceare herebywarned thatwhen
t
he ovenis engagedin theself-clean cycle,there may
b
e somelow-level exposureto someof thelisted
substances,including carbon monoxide. Exposureto
these substances canbe minimizedby properly
venting the ovento theoutdoors by opening the
windows and/or doorin theroom wherethe appliance
is locatedduring theself-clean cycle.
Important noticeregarding pet birds:
NEVER keeppet birdsin the kitchenor inrooms
where the fumesfrom thekitchen couldreach. Birds
have avery sensitiverespiratory system.Fumes
releasedduring an ovenself-cleaning cyclemay be
harmful orfatal tobirds. Fumesreleased dueto
overheatedcooking oil, fat,margarine andoverheated
non-stick cookwaremay be equallyharmful.
About YourAppliance
• Avoid touchingoven vent areawhile ovenis onand
for several minutesafter ovenis turned off. When
the ovenis inuse, thevent and surrounding area
become hotenough tocause burns.After ovenis
turned off, DONOT touch theoven ventor
surroundingareas untilthey have hadsufficient time
to cool.
• Other potentiallyhot surfaces include rangetop,
areas facing therange top,oven vent,surfaces near
the ventopening, ovendoor, areas aroundthe oven
door andoven window.
• The misuse ofoven doors(e.g. stepping,sitting,
or leaningon them)can resultin potentialhazards
and/or injuries.
Heating Elements and Glass Ceramic
Cooking Surfaces
•
Surface areason oradjacent to theunit maybe hot
enough tocause burns.
• NEVER touch oven heatingelements, areasnear
elements, orinterior surfacesof oven.
• Heating elements maybe hot eventhough theyare
d
ark incolor. Areasnear elementsand interior
s
urfaces ofan ovenmay become hotenough to
c
ause burns.
• During and afteruse, DO NOTtouch or letclothing
or otherflammable materialcontact surface ofunit
or areasnear unit,heating elements, orinterior
surfaces ofoven untilthey have hadsufficient time
to cool.
• DO NOT COOK ON BROKEN COOKING
SURFACE –If cooking surfaceshould break,
cleaning solutionsand spilloversmay penetrate the
broken cookingsurface andcreate a riskof electric
shock. Contacta qualifiedtechnician immediately.
C A U T I O N
DO NOT touch the exterior portions of
the oven after self-cleaning cycle has
begun, since some parts become
extremely hot to the touch!
During the first few times the self-cleaning feature
is used, there may be some odor and smoking
from the “curing” of the binder in the high-density
insulation used in the oven. When the insulation is
thoroughly cured, this odor will disappear. During
subsequent self-cleaning cycles, you may sense
an odor characteristic of high temperatures.
KEEPTHE KITCHENWELL-VENTED DURING
THE SELF-CLEAN CYCLE.
N O T I C E
Avoid any damage to oven vents. The vents need
to be unobstructed and open to provide proper
airflow for optimal oven performance.
N O T I C E
The Cooling Fan should be operating when the
unit is in operation. If you notice the cooling fan is
not operating or you observe unusual or excessive
noise coming from the cooling fan, contact a
VikingAuthorized Service Center before
continuing operation. Failure to do so can result in
damage to the oven or surrounding cabinets.
C A U T I O N
Toprevent possible damage to cabinets and
cabinet finishes, use only materials and finishes
that will not discolor or delaminate and will
withstand temperatures up to 194° F (90° C). Heat
and moisture resistant adhesive must be used if the
product is to be installed in laminated cabinetry.
Check with your builder or cabinet supplier to make
sure that the materials meet these requirements.
 Loading...