How it Works
Log In / Sign Up
Buy Points
How it Works
FAQ
Contact Us
Questions and Suggestions
Users
Viking
Loading...
T
TDCW36AW
TDCW48
TDCW48AW
TDCW48SS
TDCW66
TDR-1
4
TE24CSTSS
TG-1
TG-2
the aes-2000 accessible entry system
TI10201
TINSEB364MRR0
TLPKVGBQ
2
TLPKVGIQ
TMC 148
tms-12a
tms-2
tms-6x
tms-rdma
TNKVGBQ
2
TNKVGIQ
TOP-30
2
TOP-36
TOP-42
TOP-48
TR-1
2
Truck Camper
TruConvec F50031
TruSearTM
TruSear VGIB151T
2
TruSear VGIB242T
2
TS-1
2
Turissa
Turissa 2840
2
Turissa 2841
TVDDP24DB
2
TVDDP24GB
TVDDP524BX
TVDR3602G
TVDR3602GAW
4
TVDR3602GBX
4
TVDR3602GDB
3
TVDR3604B
TVDR3604BAW
4
TVDR3604BBX
4
TVDR3604BDB
TVDR3604BGB
3
TVDR3614B
2
TVDR3614BAB
2
TVDR3614BAW
2
TVDR3614BGB
2
TVDR4802GI
TVDR4802GIAW
4
TVDR4804F
TVDR4804FAW
3
TVDR4804FSS
4
TVDR4804G
TVDR4804GAW
4
TVDR4804GBX
3
TVDR4804GGB
TVDR4804I
3
TVDR4804IDB
4
TVDR4804IGB
2
TVDR4806B
TVDR4806BAW
3
TVDR4806BBX
3
TVDR4806BDB
TVDR4806BGB
TVDR4806BSS
4
TVDR4814G
2
TVDR4814GAB
2
TVDR4814GAW
2
TVDR4814GCY
2
TVDR4814GDB
2
TVDR4814GKA
2
TVDR4814GSM
2
TVDR4814I
2
TVDR4814IAG
2
TVDR4814IAW
2
TVDR4814IBW
2
TVDR4814ICS
2
TVDR4814ICY
2
TVDR4814IFW
2
TVDR4814IGB
2
TVDR4814IKA
TVDR4814IPG
2
TVDR4814IRE
2
TVDR4814ISB
2
TVDR4814ISM
2
TVDR4814IVC
2
TVDR4816B
2
TVDR4816BDB
2
TVDR6606G
TVDR6606GBX
4
TVDR6606GGB
3
TVDR6606I
TVDR6606IBX
4
TVDR6606IGB
3
TVDR6608B
TVDR6608BBX
4
Loading...
Loading...
Nothing found
TVDR3614BGB
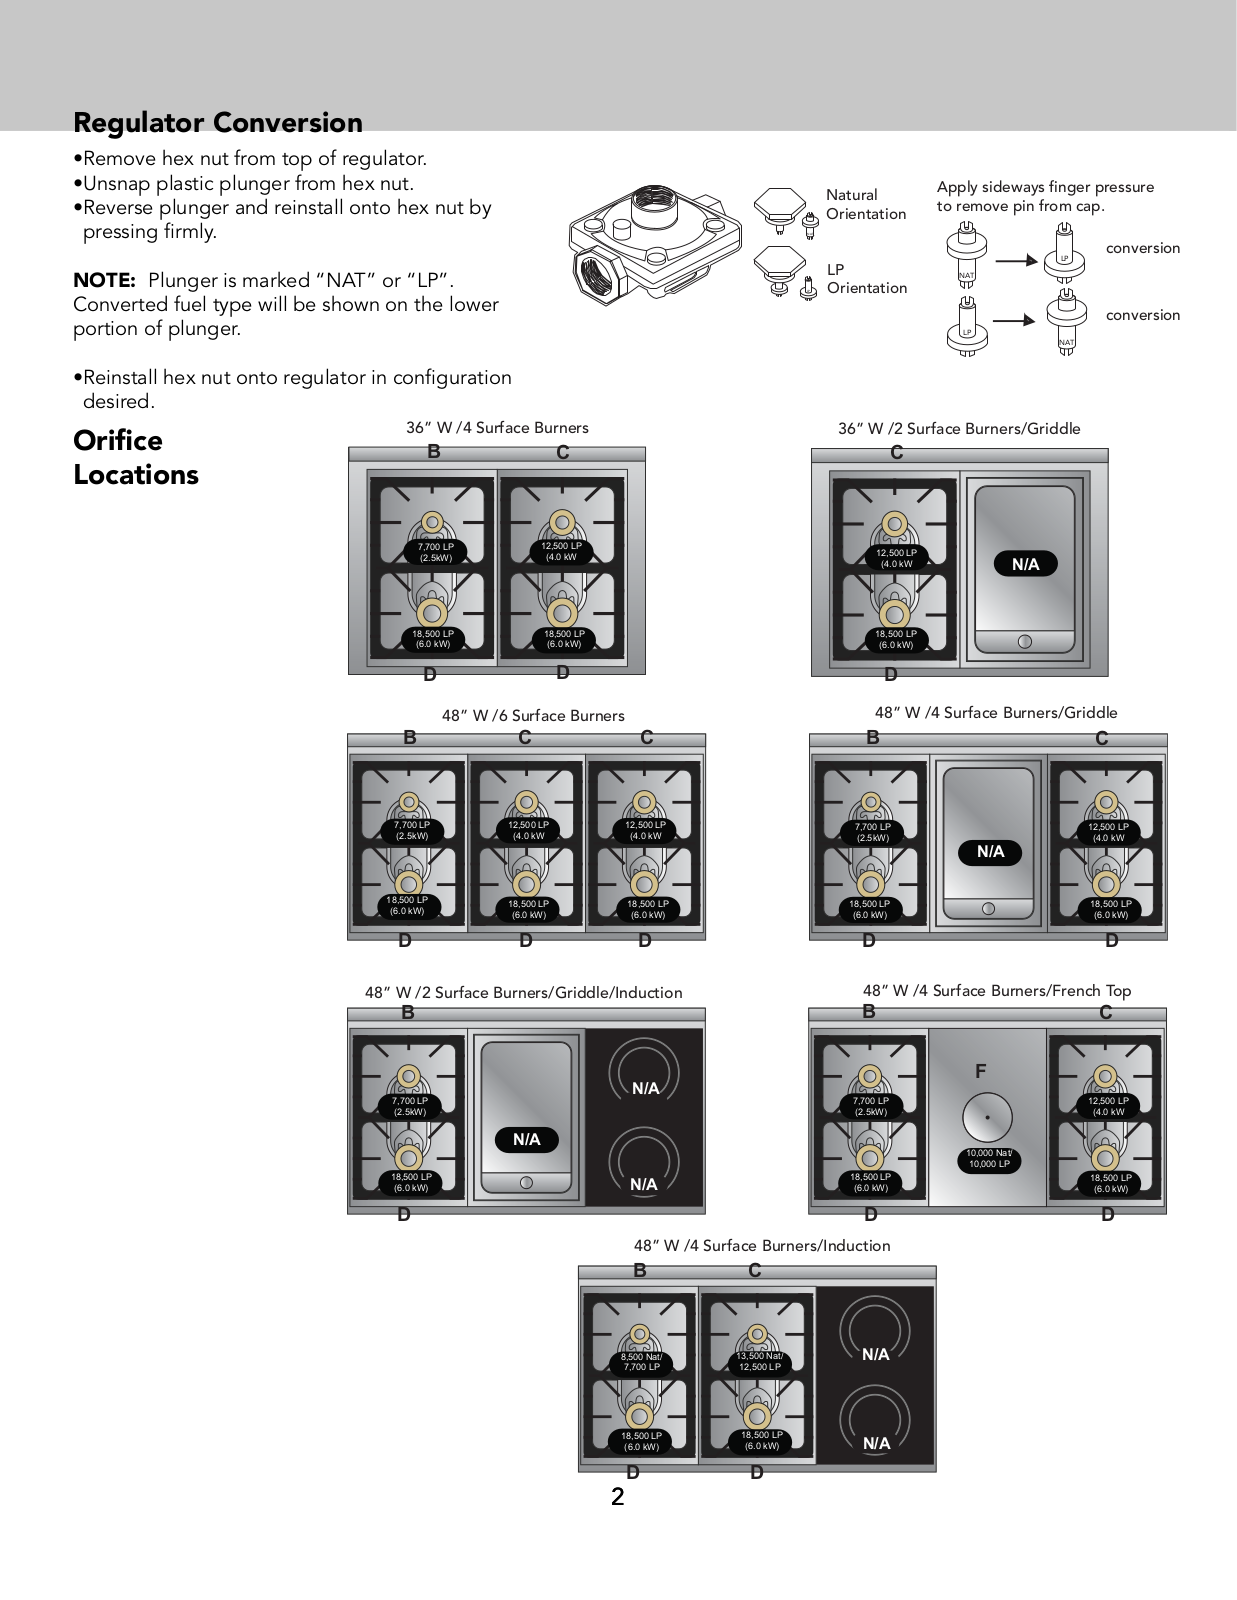
Instruction Manual
8 pgs
2.05 Mb
0
User Manual
8 pgs
1.24 Mb
0
Table of contents
Loading...
Viking TVDR3614BGB, TVDR3614BAW User Manual
...
Viking User Manual
Download
Specifications and Main Features
Frequently Asked Questions
User Manual
Download
Loading...
+
5
hidden pages
Unhide
You need points to download manuals.
1 point = 1 manual.
You can buy points or you can get point for every manual you upload.
Buy points
Upload your manuals
 Loading...