

Page 1

Use, Care, and Installation Guide
Guide d’utilisation, d’entretien et d’installation
Guía de instalación, uso y mantenimiento
READ AND SAVE THESE INSTRUCTIONS
LISEZ CES INSTRUCTIONS ET CONSERVEZ-LES
LEA Y GUARDE ESTAS INSTRUCCIONES
MVLH636SS
Page 2
Description of the hood & Controls
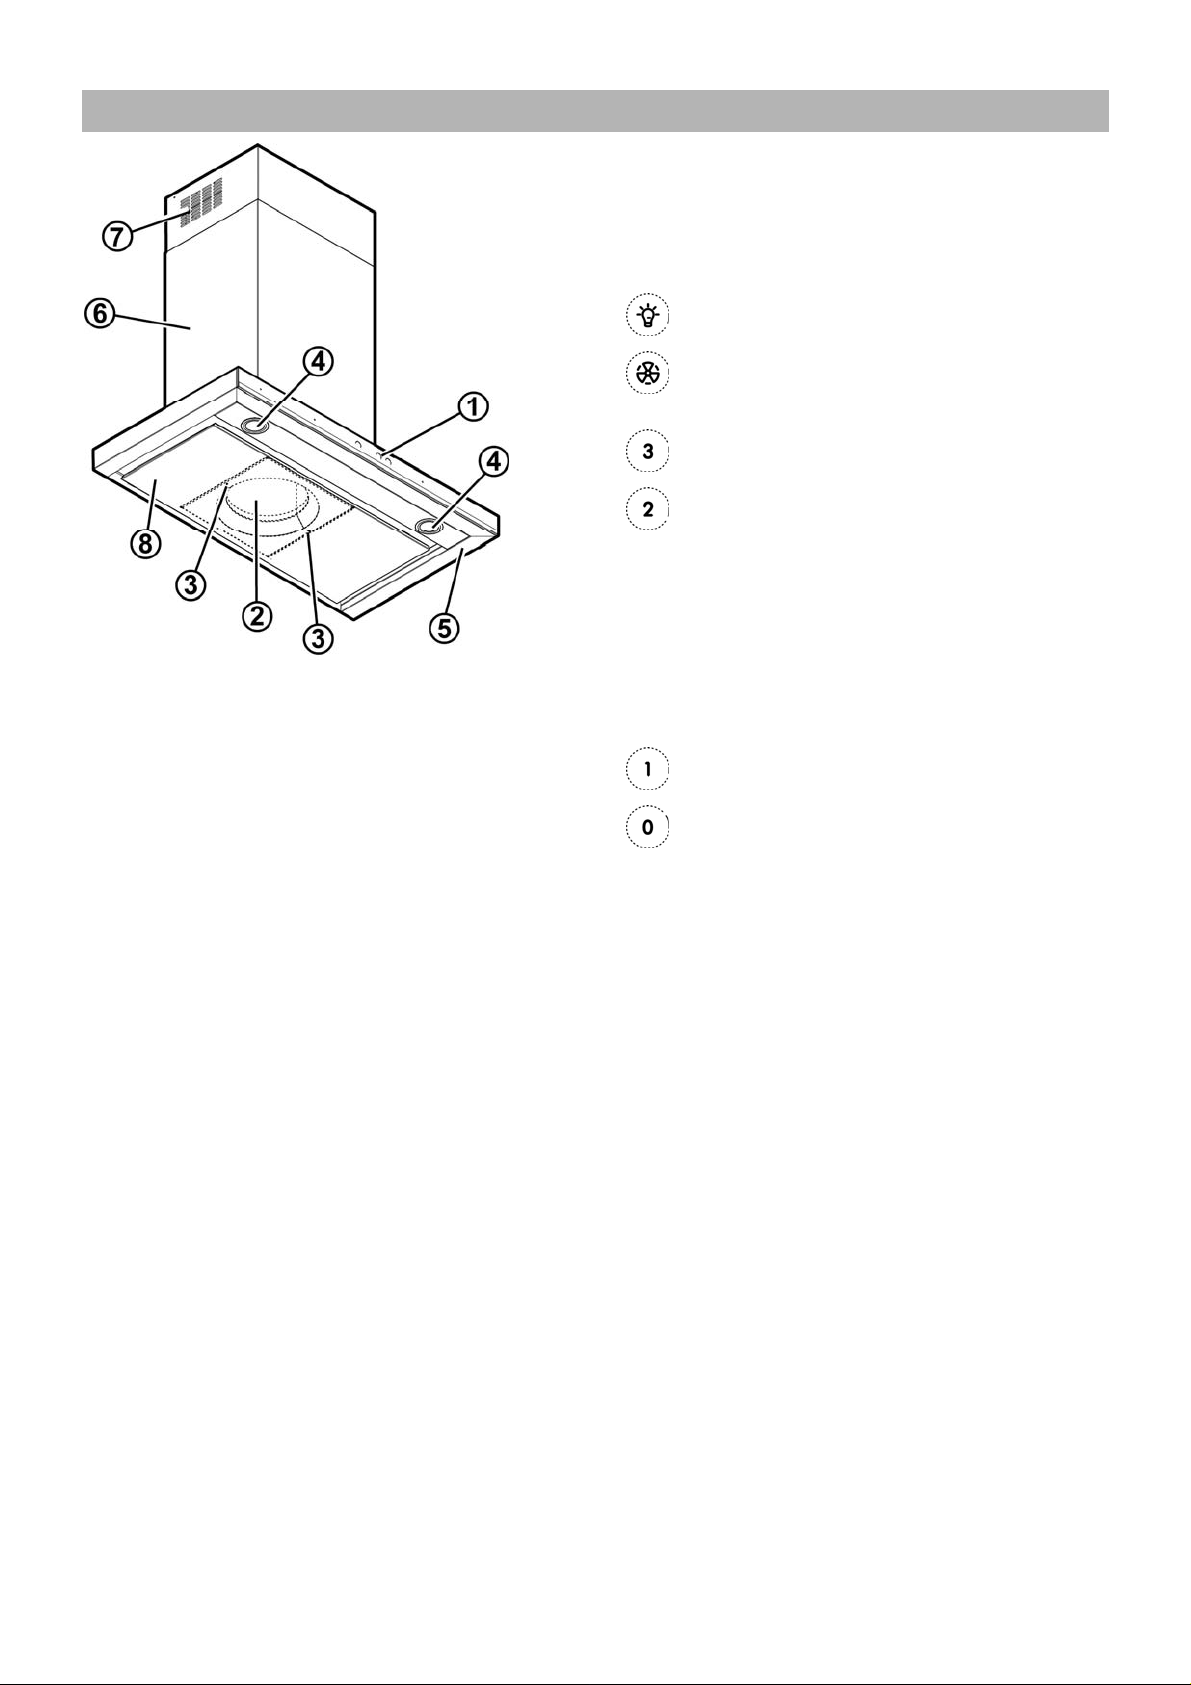
1 Control panel
2 Grease filter (Behind the panel)
3 Grease filter release handle
4 Halogen lamp (Position and number of lamps may vary)
5 Hood canopy
6 Duct cover
7 Louver holes (Ductless configuration)
8. Panel
Controls
Description of control panel
To select the functions of the hood just touch the
commands.
Light key ON/OFF
Intensive speed selection key (suction power) -
duration 5 minutes - press again to return to previous
setting.
High-speed selection key (suction power).
Medium-speed selection key (suction power) -
when flashing it indicates the need to wash or replace
the carbon filter. This signal is normally deactivated.
To activate the alarm, disable the electronic by
pressing the 0 button for 3 seconds.
Next, simultaneously press buttons 1 and 2 for 3
seconds; at first, only button 1 will flash, then both
buttons 1 and 2 will flash to indicate activation.
Repeat the procedure to deactivate the alarm; at first
buttons 1 and 2 will flash and subsequently only
button 1 to indicate deactivation.
Low-speed selection key (suction power) – when
flashing it indicates the need to wash the fats filter.
Motor key OFF (stand by) – excludes the electronics
– reset wash/replace filters signals.
MOTOR OFF
Press briefly to switch the motor off.
RESET FILTERS SIGNALS
In functioning mode, after carrying out filter
maintenance, press the key until hearing the sound
signal. The flashing LED 1 (gr ease filter) or 2 (carbon
filter) stops flashing.
EXCLUDING THE ELECTRONICS
Press the key for 3 seconds. The hood command
electronics will be excluded.
This function can be useful during the product
cleaning operations.
Just repeat the operation to reinsert the electronics.
If the hood fails to operate correctly, briefly disconnect it
from the mains power supply for almost 5 sec. by pulling out
the plug. Then plug it in again and try once more before
contacting the Technical Assistance Service.
16
Page 3
User Servicing and Maintenance Instructions
Cleaning
Clean using ONLY the cloth dampened with neutral liquid
detergent. DO NOT CLEAN WITH TOOLS OR
INSTRUMENTS. Do not use abrasive products. DO NOT
USE ALCOHOL!
Maintenance of the panel
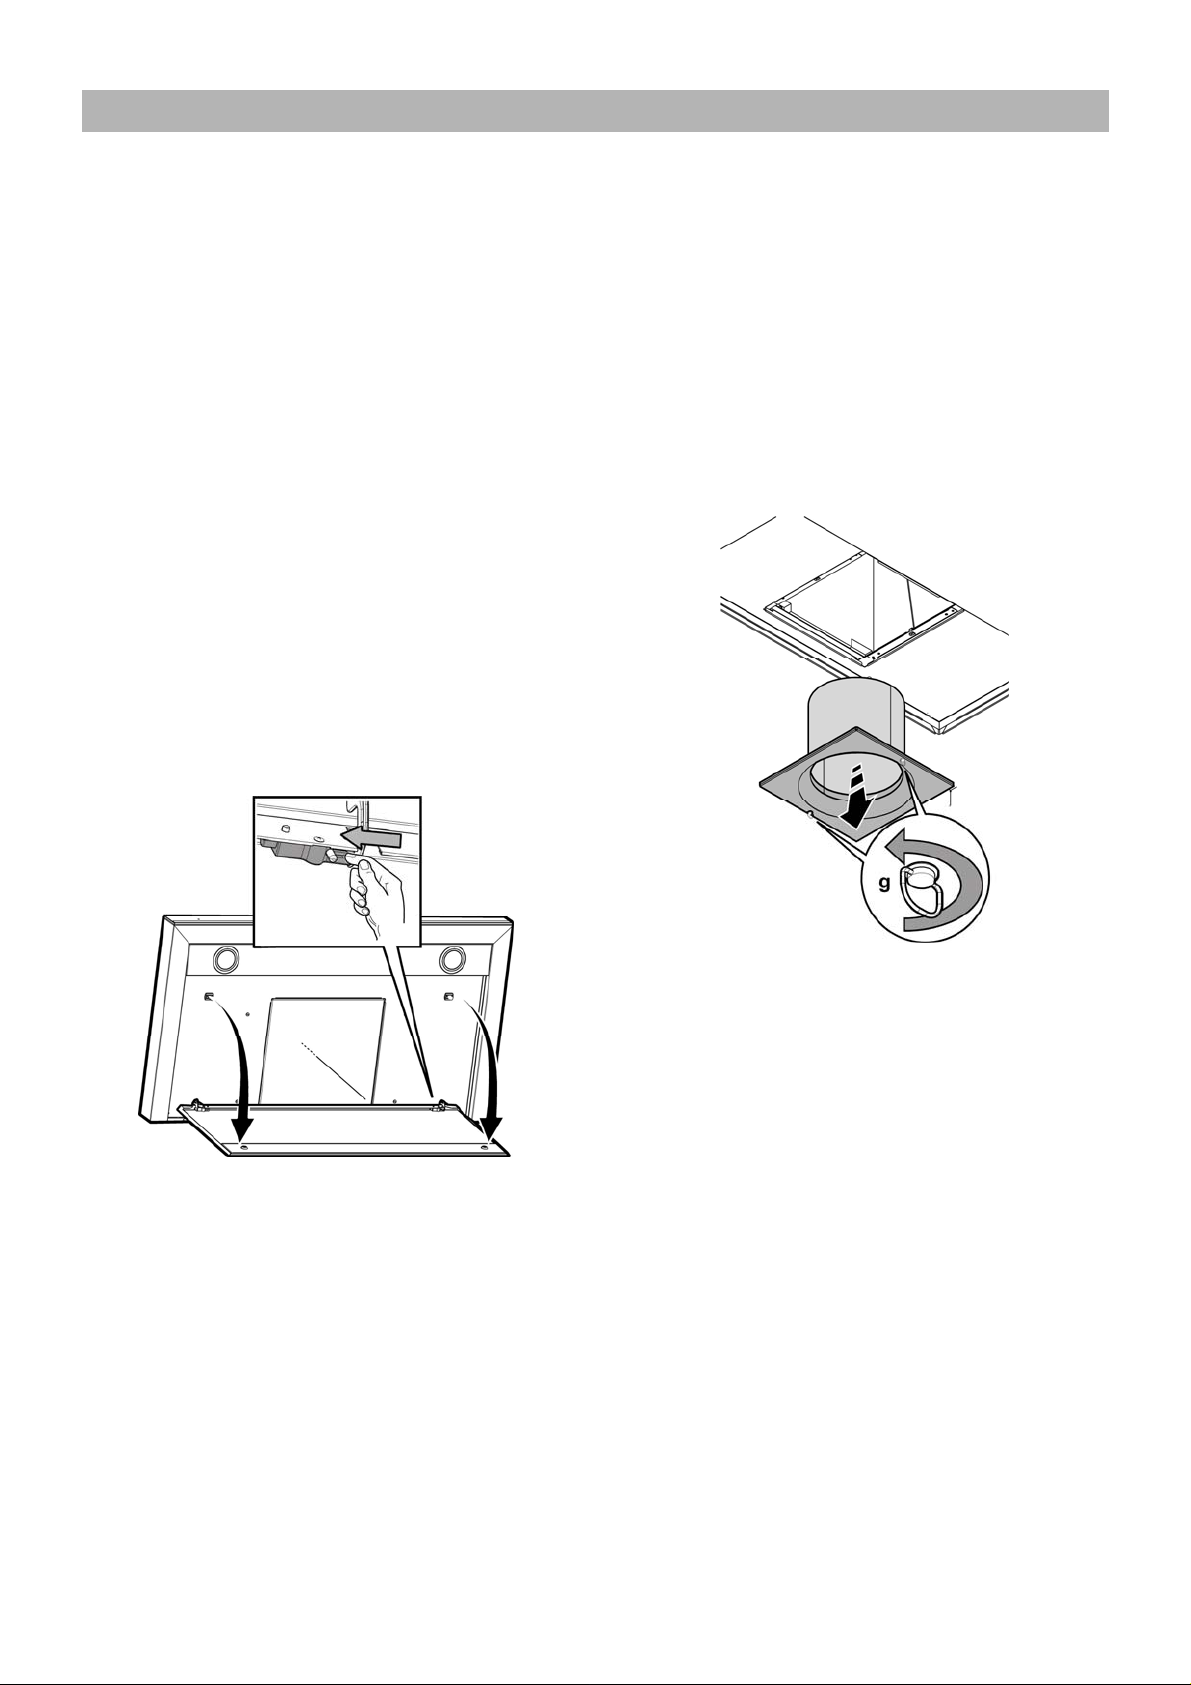
Attention! Hold the panel with both hands when
dismantling and re-mounting in position to avoid it
falling and causing damage to people or things.
Dismantling:
1. pull out firmly (LOWER SIDE) and rotate upwards.
2. push to the left the small lever located on the right side
of the panel..
3. unhook it from the back hinges.
Cleaning:
Clean the suction panel with the same frequency as the fats
filter using a cloth soaked in neutral liquid detergents.
Avoid the use of products containing abrasives. DO NOT
USE ALCOHOLS.
Montage:
The panel must be hooked at the back and fixed in front
fitted into the pins for the purpose on the surface of the
hood.
Attention! always check that the panel is well fixed in its
place.
Grease Filter
Traps cooking grease particles.
The grease filter must be cleaned once a month using non
aggressive detergents, either by hand or in the dishwasher,
which must be set to a low temperature and a short cycle.
When washed in a dishwasher, the grease filter may
discolor slightly, but this does not affect its filtering capacity.
Remove the filter holder frame by turning the knobs (g) 90°
that affix the chimney to the cooker hood.
17
Page 4
Replacing the light bulb
Disconnect the appliance from the electricity.
Warning! Prior to touching the light bulbs ensur e they are
cooled down. Replace the old light bulb with the one of the
same type as specified in the feature label or near the light
lamp on the hood.
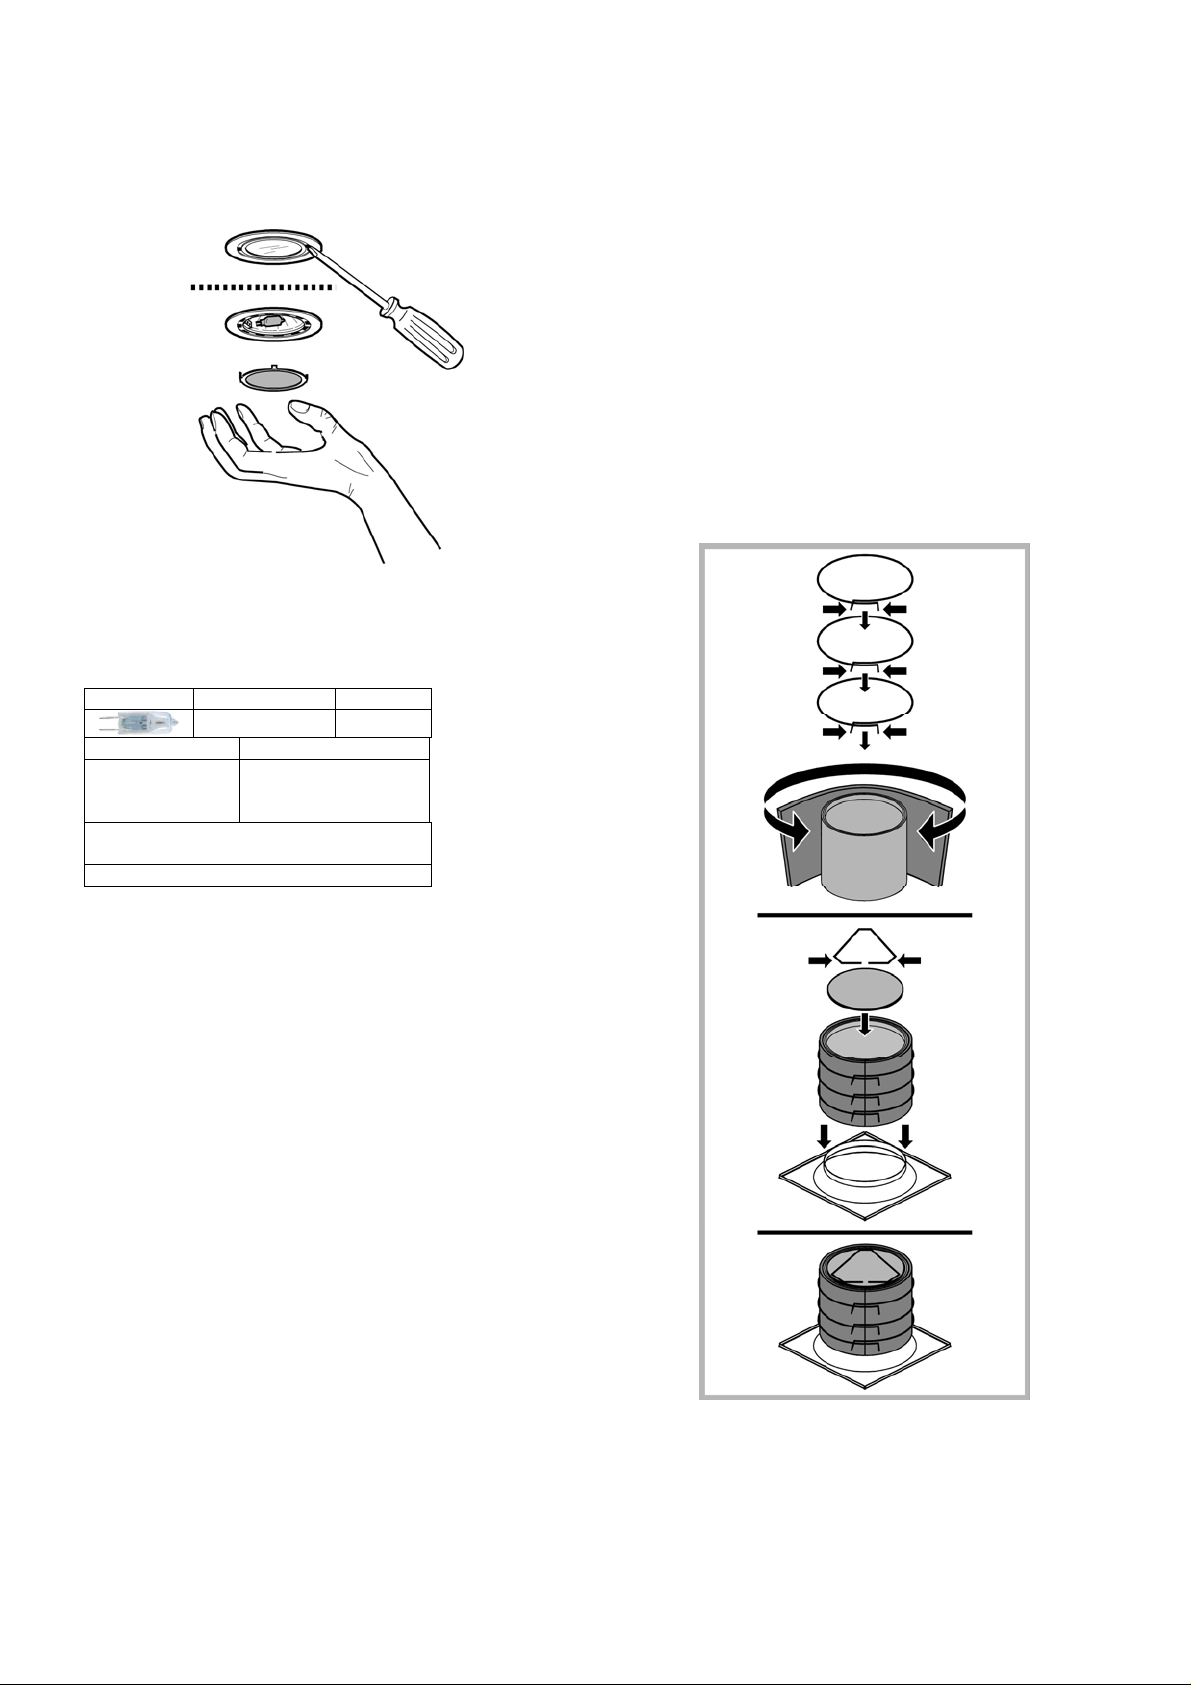
1. Using a flat head screwdriver or equivalent tool, carefully
pry loose the light cover.
2. Remove the damaged light and replace it with a new one
(see the table below):
Lamp Power (W) Socket
Voltage (V) Dimension (mm)
12
(according IEC 61231)
HSGST/C/UB-20-12-G4-10/22
3. Reinstall the light cover. (it will snap shut).
If the lights do not work, make sure that the lamps are fitted
properly into their housings before you call for technical
assistance.
20 G4
10 (Diameter)
22 (Light Center
Length)
ILCOS D Code
Charcoal Filter
It absorbs unpleasant odors caused by cooking.
The charcoal filter can be washed once every two months
(or when the filter saturation indication system – if
envisaged on the model in possession – indicates this
necessity) using hot water and a suitable detergent, or in a
dishwasher at 65°C (if the dishwasher is used, select the full
cycle function and leave dishes out).
Eliminate excess water without damaging the filter, then put
it in the oven for 10 minutes at 100° C to dry completely.
Replace the mattress every 3 years and when t he cloth is
damaged.
Assembly
Place the mat around the grease filter and fix it in place
using the devices provided.
Position the upper cap and fix it in place using the fixing pin.
To disassemble, perform the steps in the reverse order.
18
 Loading...