

Viking DFUD040, DFUD142, DFUD140, DFUD042 User Manual
VIKING RANGE CORPORATION, P. O. DRAWER 956, GREENWOOD, MS.38930 USA

Table of Contents
Index---------------------------------------------------------------------------------------------- 2
DFUD Serial Rating Plate--------------------------------------------------------------------- 3
DFUD 042/142 Control Panel Graphics----------------------------------------------------- 3
DFUD 040/140 Control Panel Graphics----------------------------------------------------- 4
DFUD 040/140 Wash Cycle Options-------------------------------------------------------- 5
DFUD 040/140 Cycle Data------------------------------------------------------------------- 6
DFUD 042/142 Wash Cycle Options-------------------------------------------------------- 7
DFUD 042/142 Cycle Data-------------------------------------------------------------------- 8
INSTALLATION
Water Supply--------------------------------------------------------------------------- 9
Electrical Connections---------------------------------------------------------------- 9
Drain Options--------------------------------------------------------------------------- 10
Toe Kick/Guard Plate------------------------------------------------------------------ 11
DFUD 040 Fault Tracing----------------------------------------------------------------------- 12
DFUD 140 Fault Tracing----------------------------------------------------------------------- 13
DFUD 140 Indication Lamps------------------------------------------------------------------- 14
DFUD 041 Program Sequence------------------------------------------------------------------ 15
DFUD 042/142 Fault Tracing----------------------------------------------------------------17/18
Poor Dishwashing Results--------------------------------------------------------------------19/24
Troubleshooting Guide------------------------------------------------------------------------25/27
DFUD 140 Cycle Sequence Chart------------------------------------------------------------- 28
DFUD 041 Cycle Sequence Chart------------------------------------------------------------- 29
DFUD 140 Wiring Diagram-------------------------------------------------------------------- 30
DFUD 042/142 Wiring Diagram--------------------------------------------------------------- 31
Component Resistance Checks----------------------------------------------------------------- 32
2
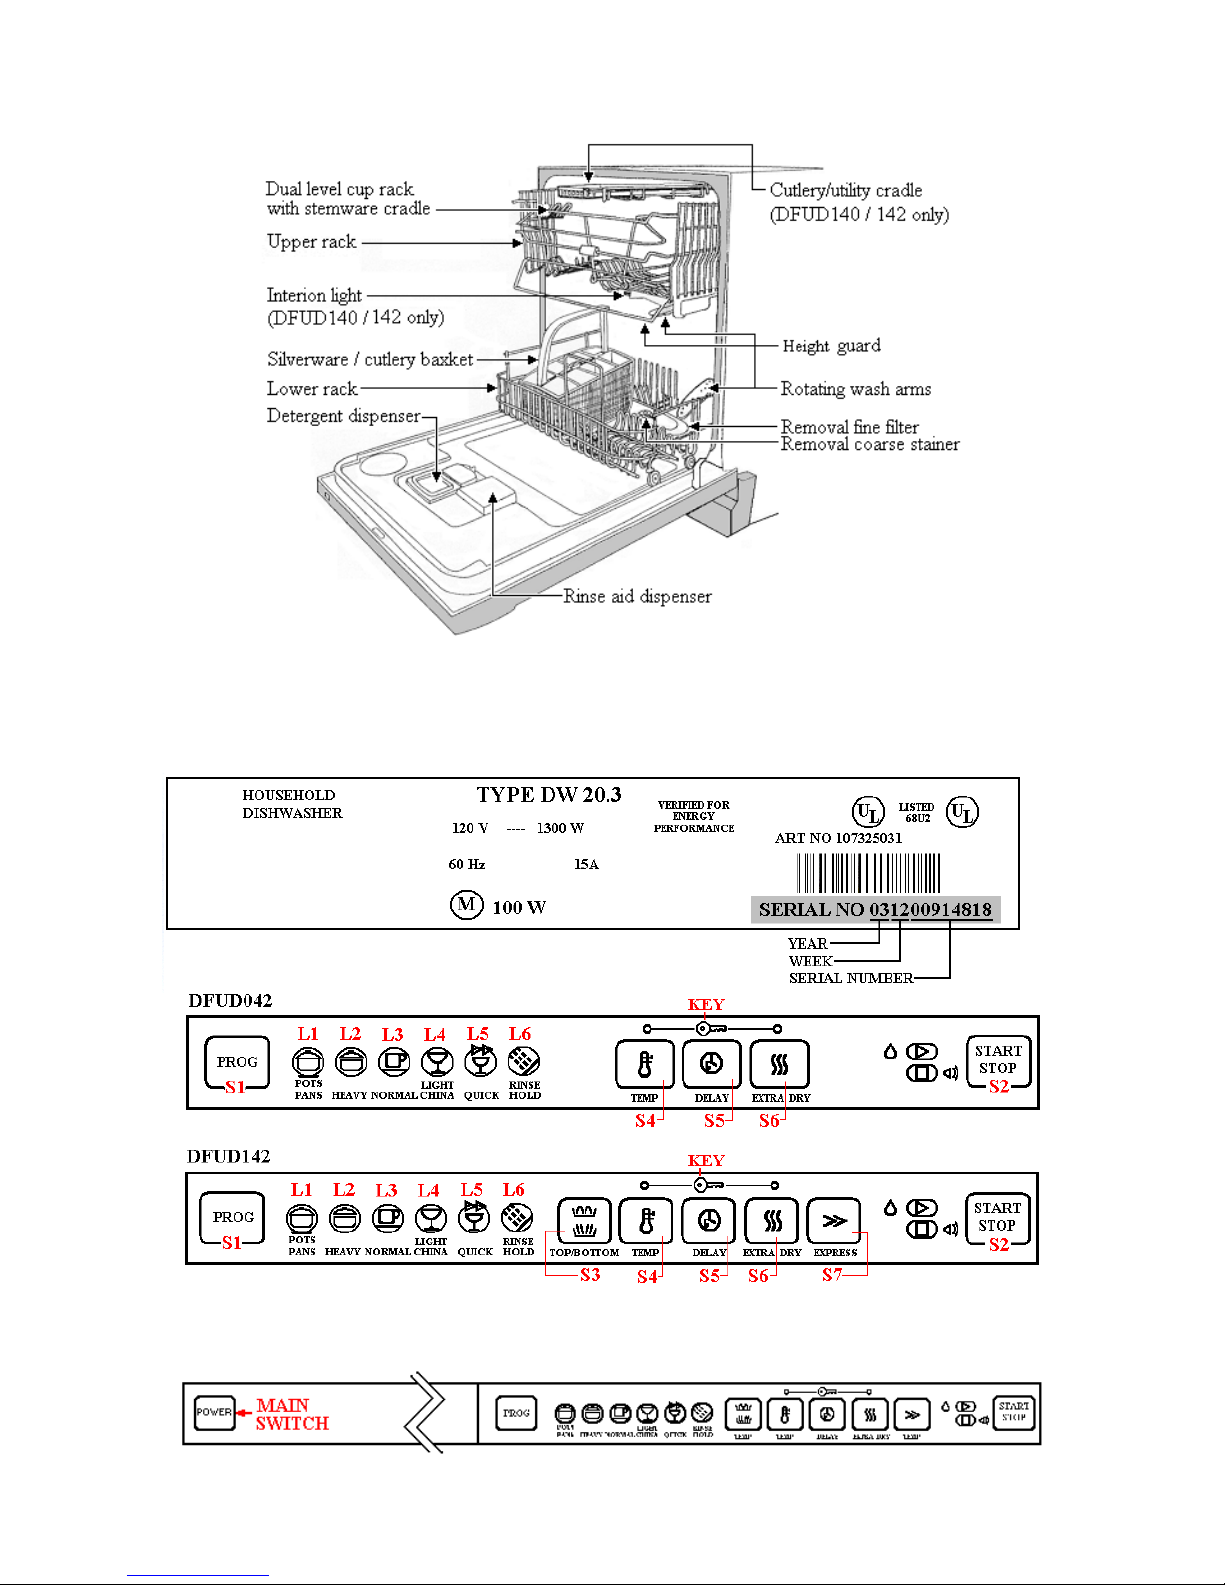
The serial rating plate is located on the right hand side of the inner part of the door.
Serial numbers are located in the lower right corner of the rating plate and give you the
year and week of manufacture. Use complete serial number when referring for service.
The buttons are on the top side of the control unit. The unit has six set programs and is
available in two models, with three or five options.
3
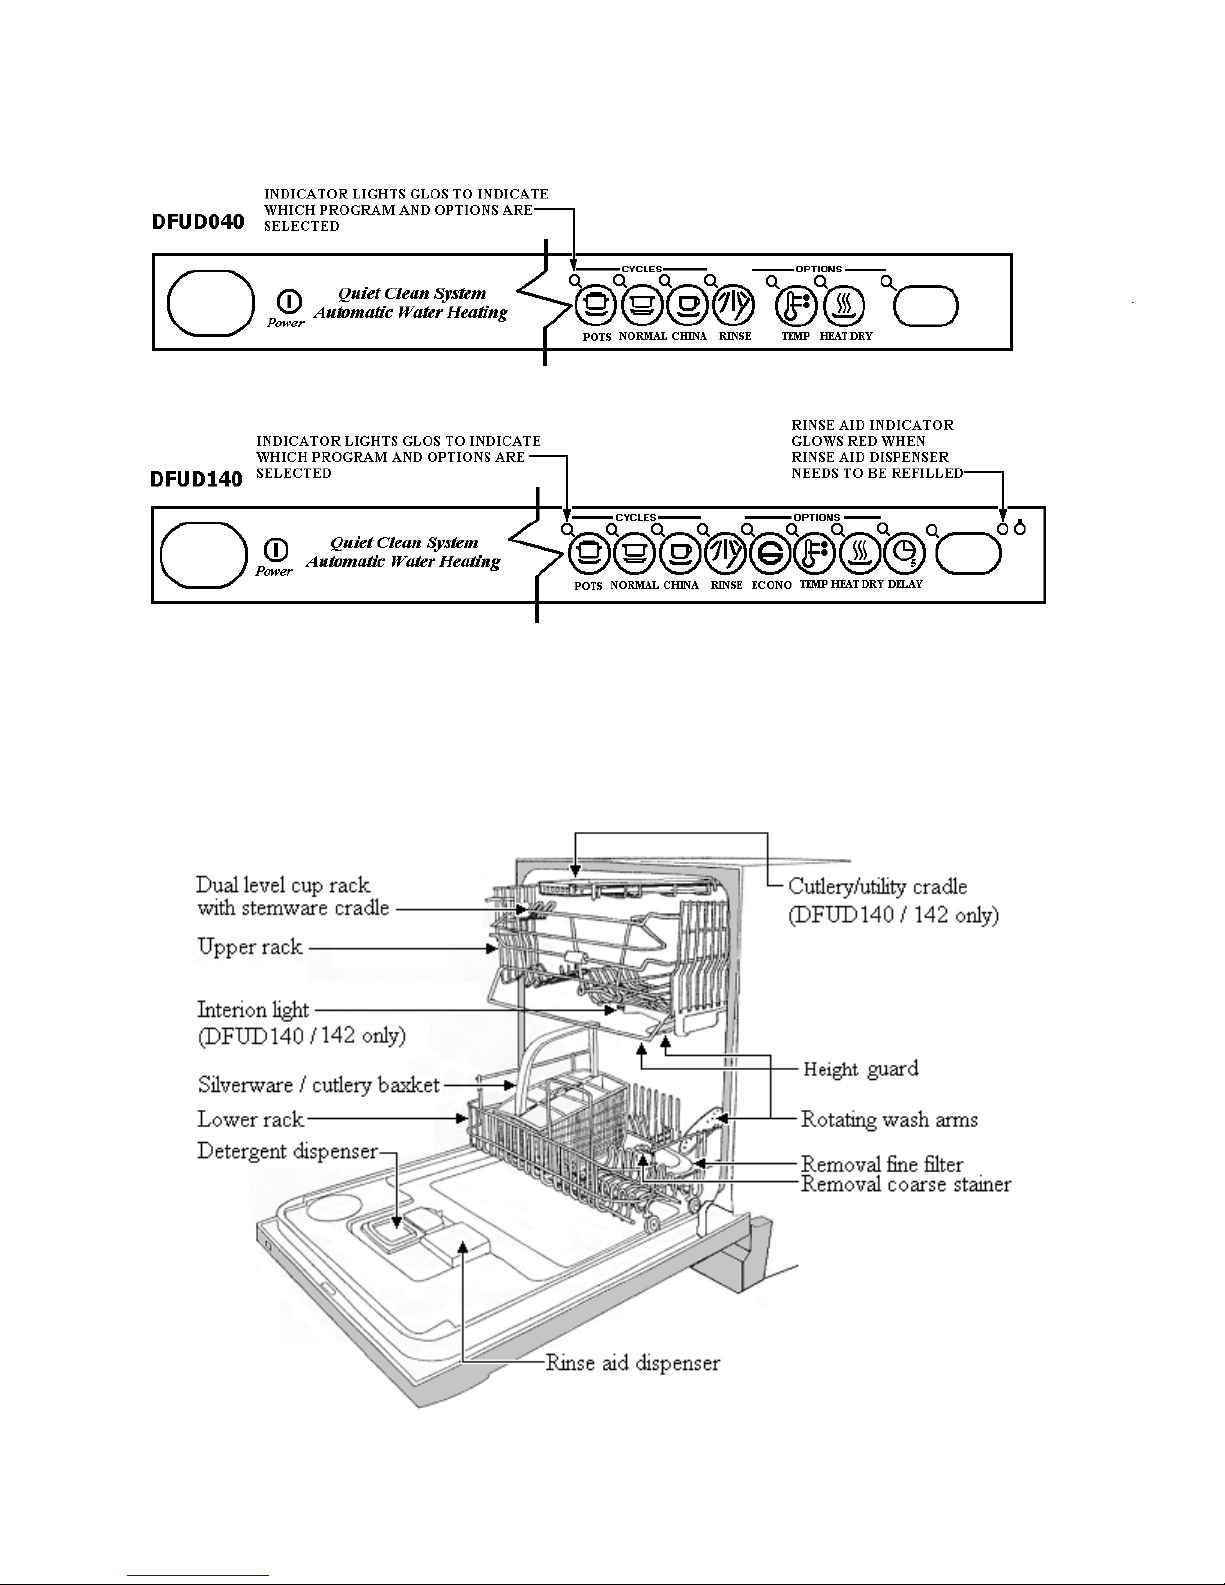
DISHWASHER FEATURES
CONTROL PANELS
4
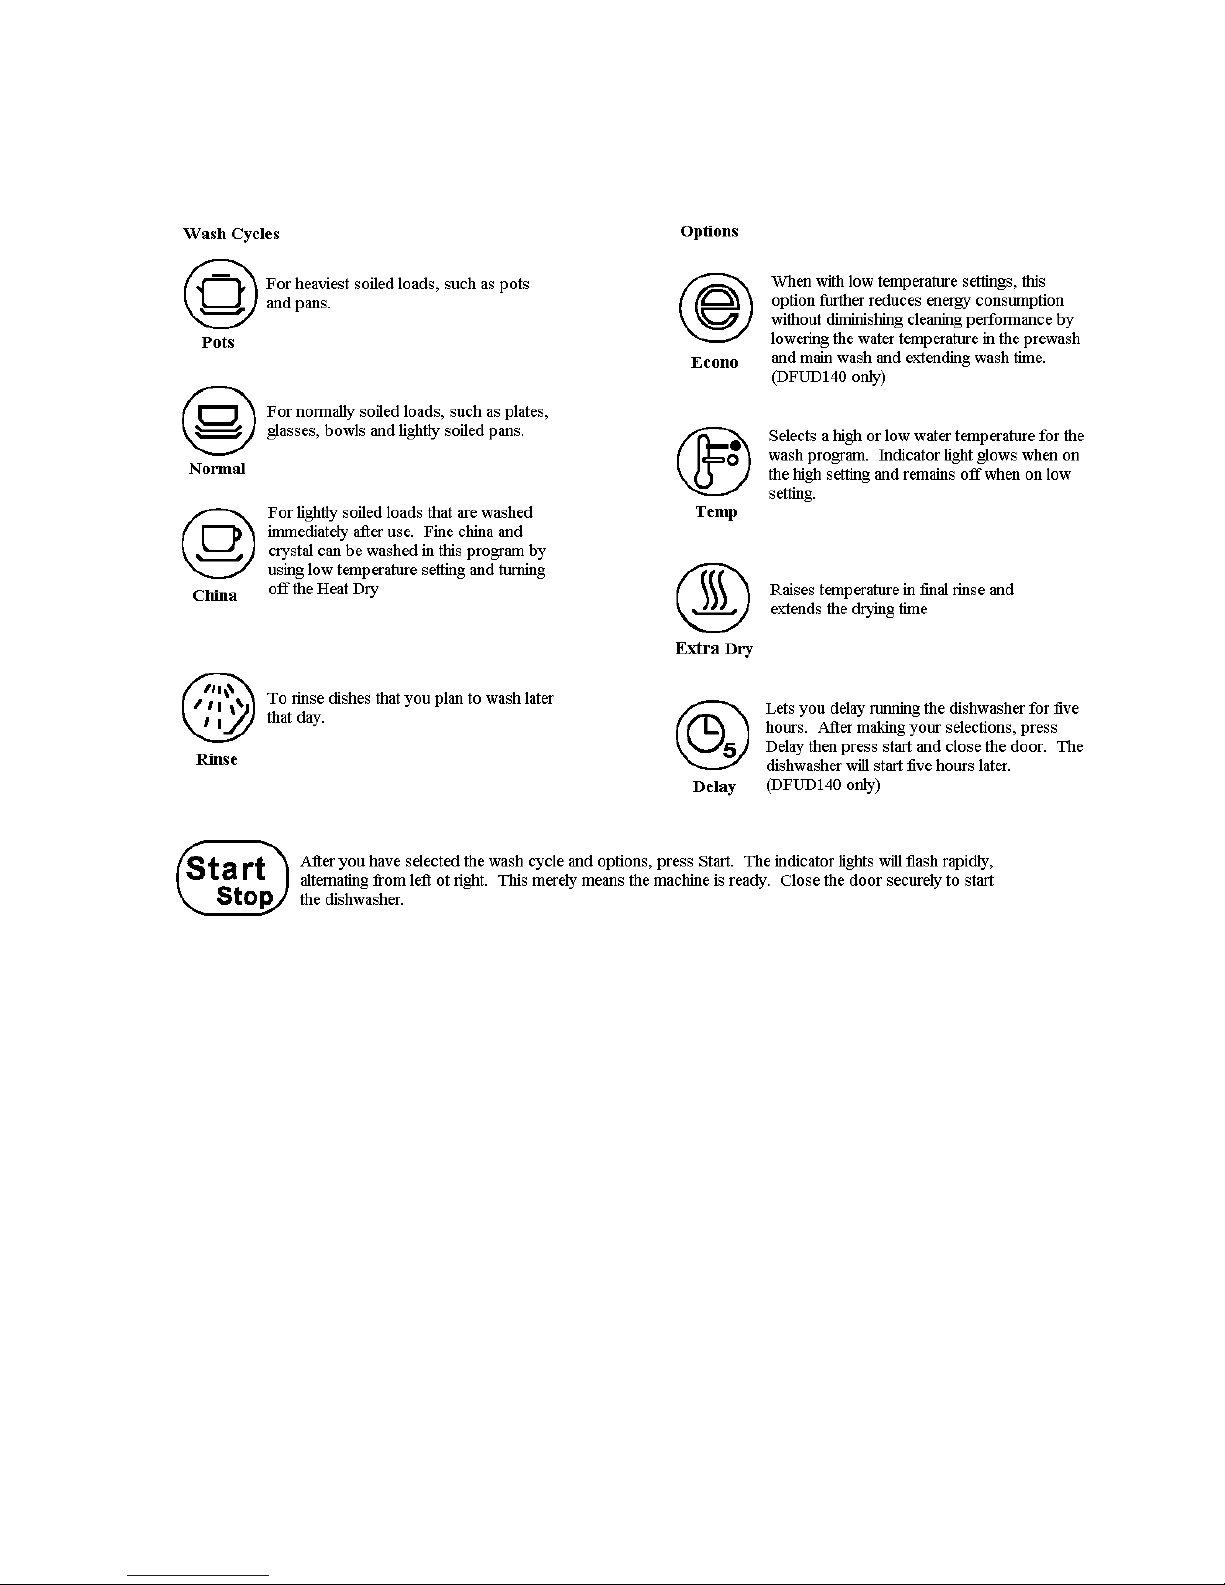
WASH / CYCLE OPTIONS DFUD040 – DFUD140 CHANGING A PROGRAM
AFTER THE UNIT HAS STARTED
The dishwasher is programmed to stop operating if the door is opened during a cycle. If
you want to change a program or option after starting the machine, open the door slightly
to let the spray arms stop rotating and avoid getting sprayed with water. Press and hold
START for three (3) seconds to cancel the current selection then press the touch pad(s)
for your desired selection. Press Start again and close the door. The drain pump will run
to remove any dirty water from the dishwasher before starting the newly selected cycle.
Check to make sure there is still detergent in the detergent dispenser.
WHEN THE WASH IS FINISHED:
The indicator lights will come on for the last wash program and options that you used.
(NOTE: The unit will not retain the Rinse or China program; it will revert to the Normal
or Pots wash program.)
5
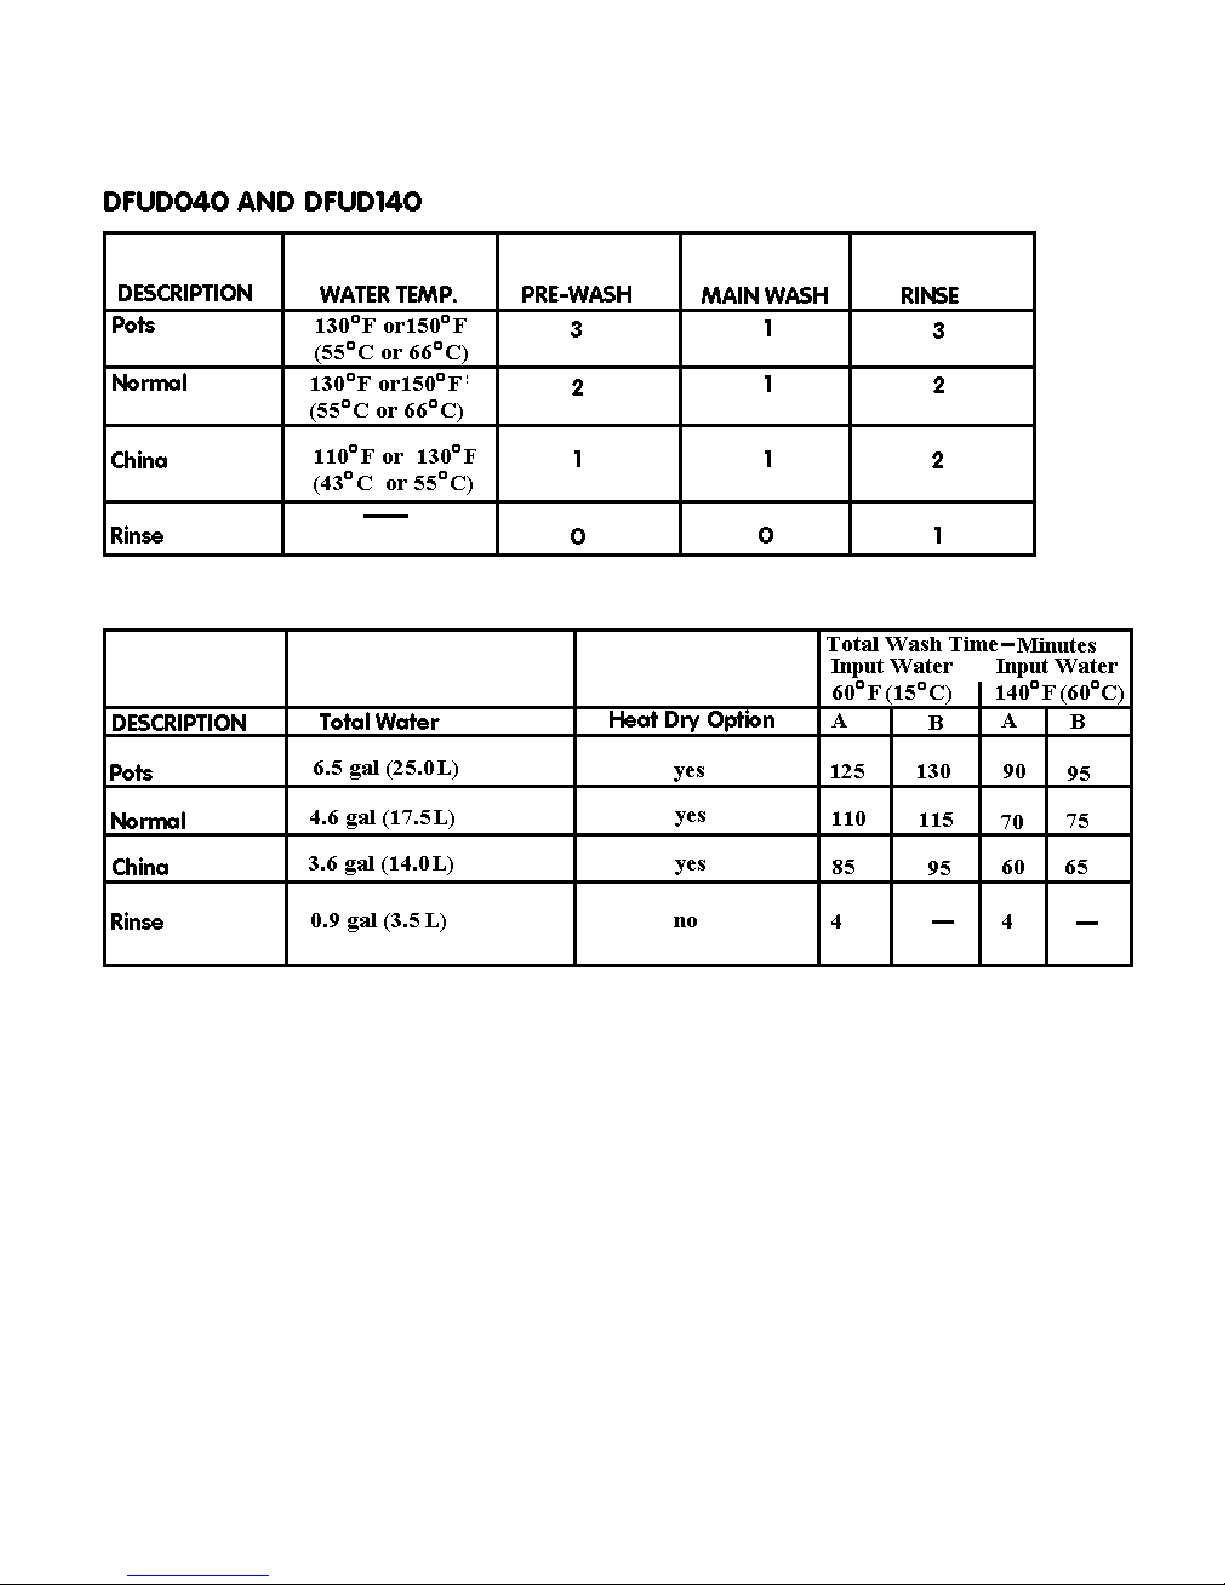
A. Using the lower water temperature setting.
B. Using the higher water temperature setting.
NOTE:
1. Does not include time for dry/heated dry
Econo option available for Pots, Normal, and China cycles on
DFUD140 only.
• Reduces temperature of main wash to 120º F (50º C)
• Extends the duration of the wash cycle by 15 minutes.
2. Fan assists drying process even when Heat Dry is not selected, except
on China cycle.
6
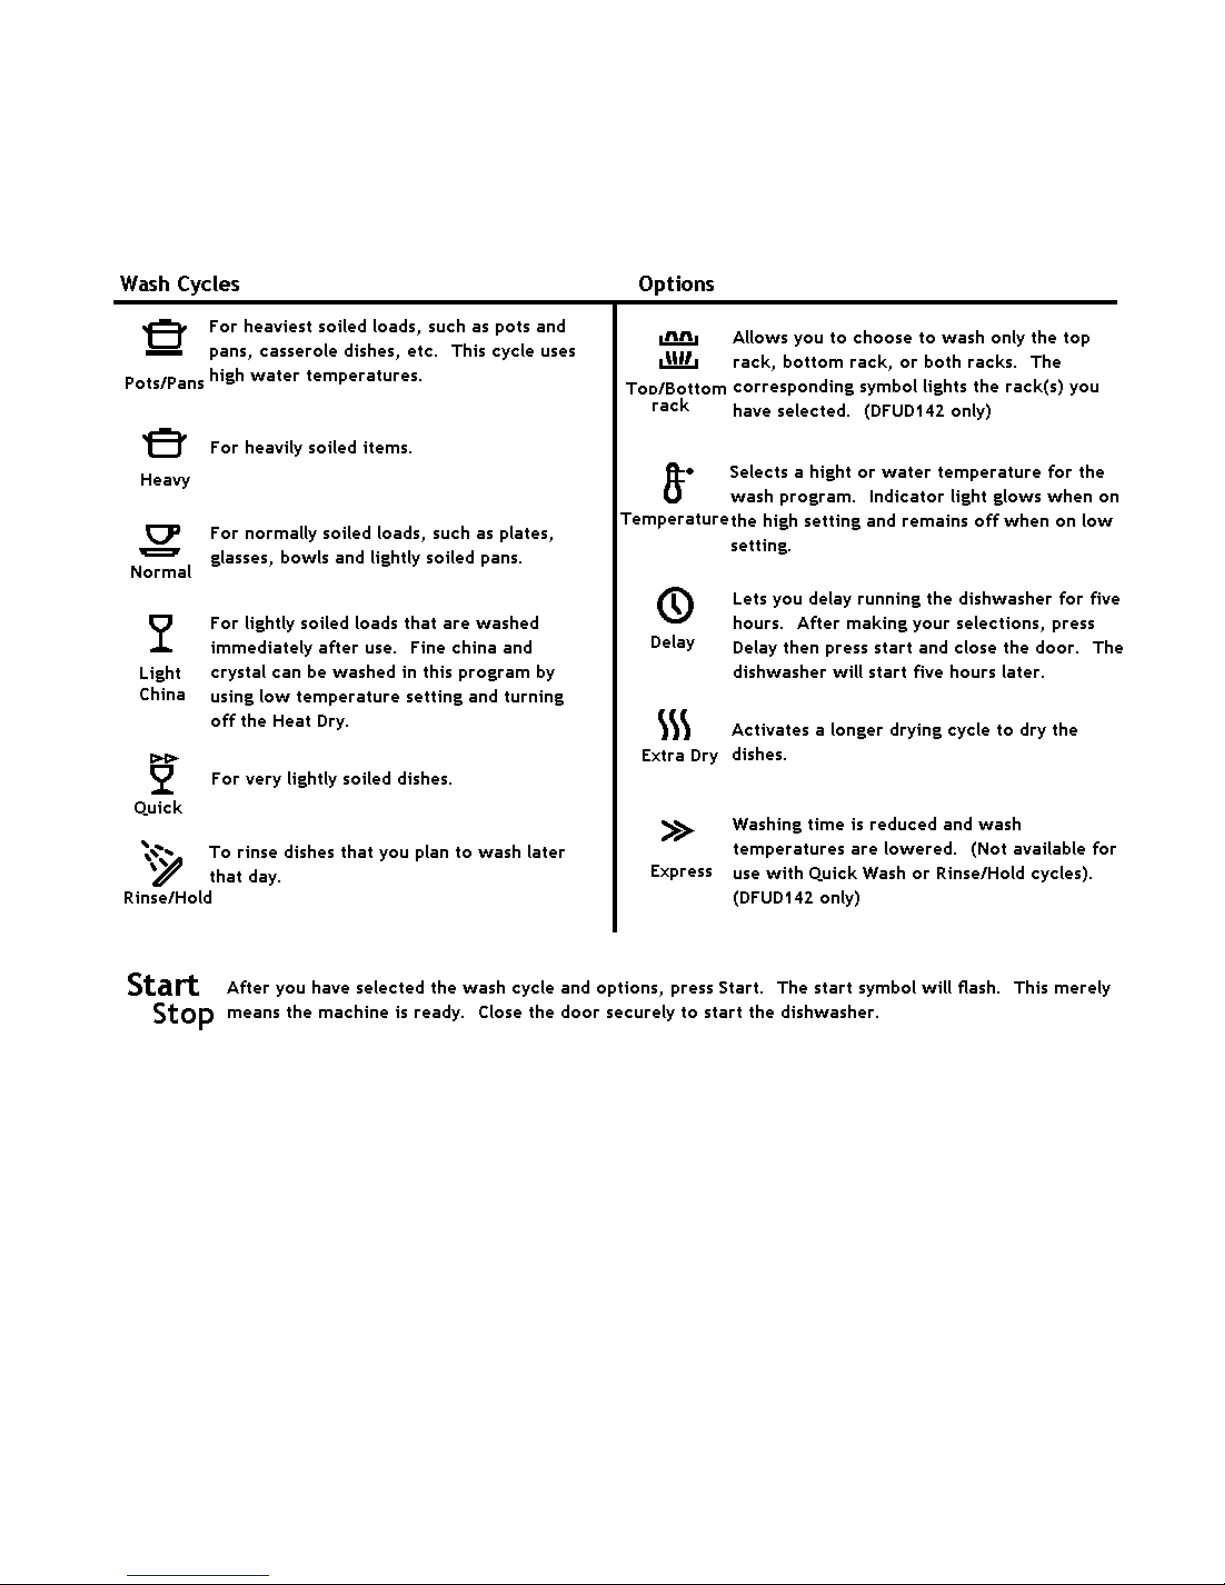
DFUD042 / DFUD142
CHANGING A PROGRAM AFTER THE UNIT HAS STARTED
The dishwasher is programmed to stop operating if the door is opened during a cycle. If
you want to change a program or option after starting the machine, open the door slightly
to let the spray arms stop rotating and avoid getting sprayed with water. Press and hold
START for three (3) seconds to cancel the current selection then press the touch pad(s)
for your desired selection. Press Start again and close the door. The drain pump will run
to remove any dirty water from the dishwasher before starting the newly selected cycle.
Check to make sure there is still detergent in the detergent dispenser.
WHEN THE WASH IS FINISHED:
The indicator lights will come on for the last wash program and options that you used.
(NOTE: The unit will not retain the Rinse/Hold or Quick program.)
7

A. Using the lower water temperature setting.
B. Using the higher water temperature setting.
NOTE: Includes time for dry
8
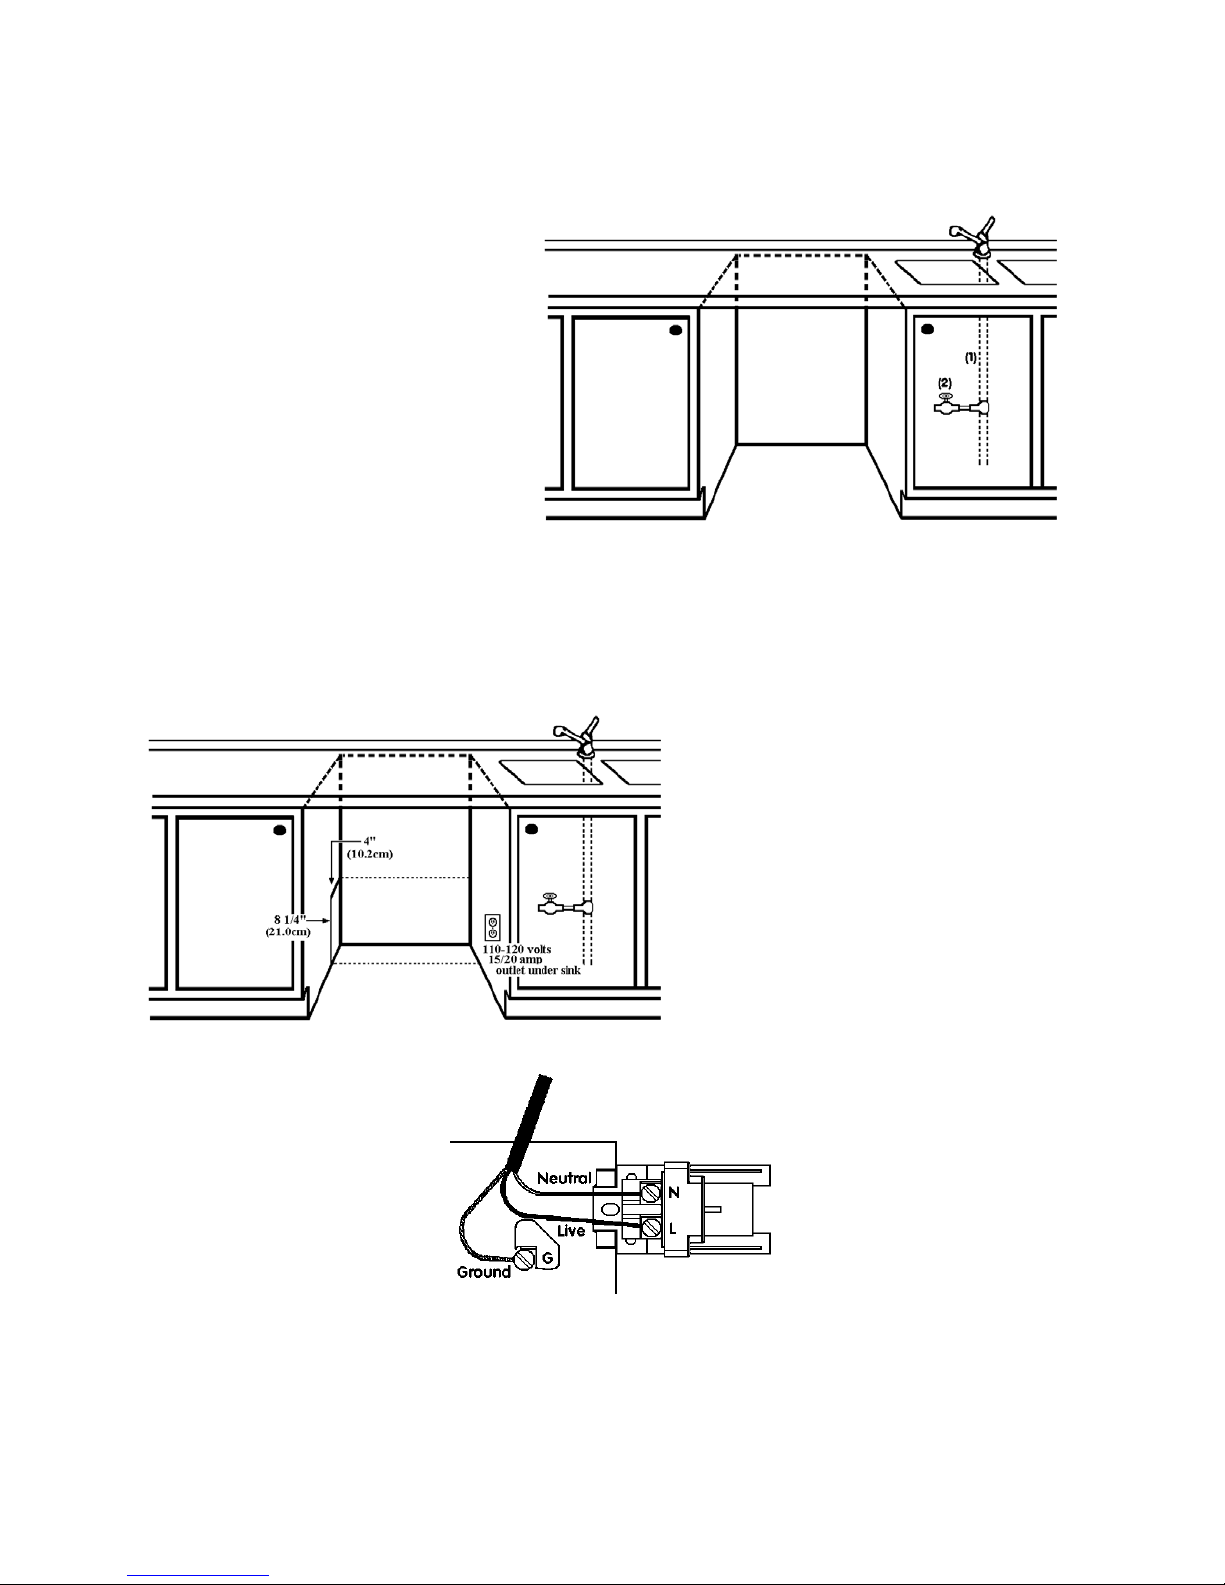
INSTALLATION
WATER SUPPLY: Water
pressure for the water supply
should be minimum 18 to 176 psi.
The water inlet valve is on the
right rear of the machine.
The dishwasher should preferably
be connected to a hot water supply
(2). If cold water supply is used,
the washing times will be longer.
(See Cycle Data page # )
It’s important that the water supply line and shut-off valve have a sufficient flow volume,
at least 3 gallons (12 liters) per minute must be able to pass through the line.
ELECTRICAL CONNECTIONS:
The dishwasher comes with a 6’
(1.8cm) electrical cord for 110-120
volts, 15/20 supply. This cord
should be plugged into the 110-120
volt outlet under the sink. If the cord
is not long enough or if a hard wire
installation is needed, see illustration
below.
9
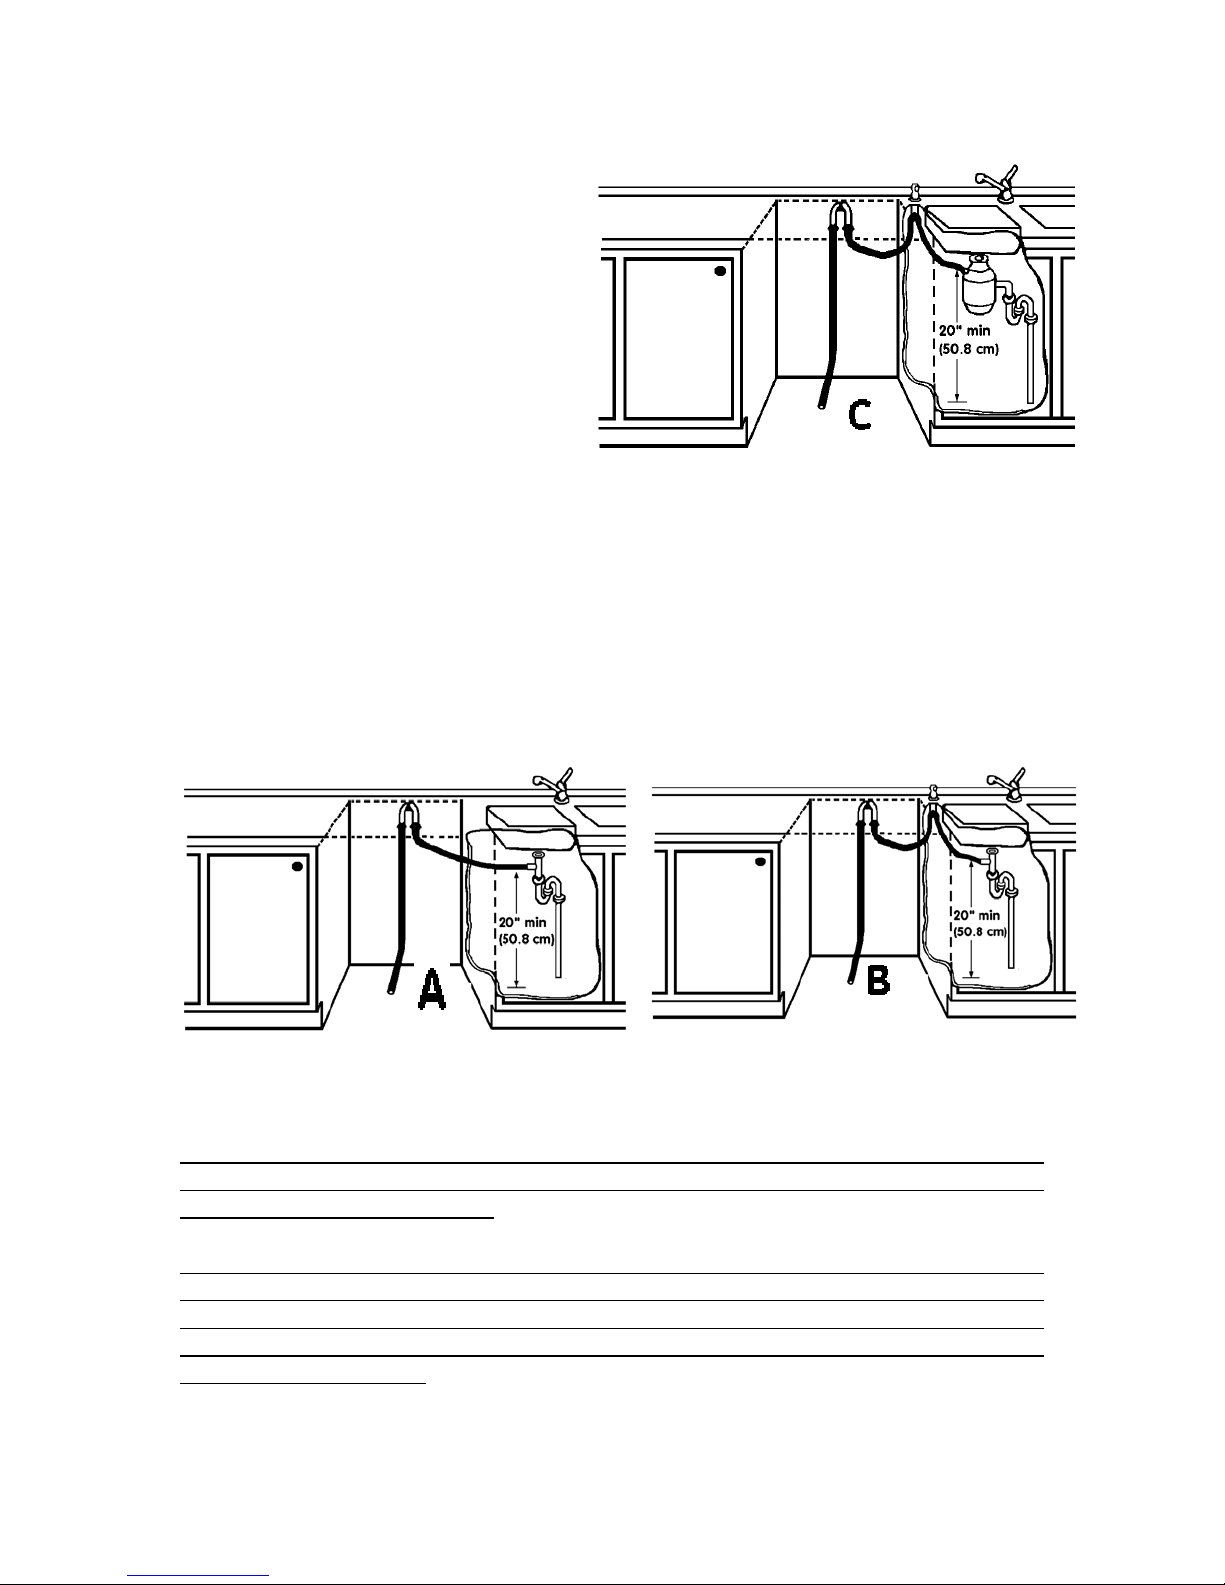
DRAIN: A drain hose is provided with
the dishwasher which is connected to the
back of the unit to form a high loop.
The access hole for the drain line should
be at a minimum of 20” from the flood.
If the hose provided is not long enough,
extend it with a 7/8” copper tube. Do
not use any fittings anywhere in the
drain line that are less than 7/8”. If the
drain line is going to be connected to a
waste disposer, be sure to remove the
knock out pr plug from the fitting on the
disposer before connecting drain line. The dishwasher drain hose has a factory installed
check valve. Do not add an additional check valve.
Different ways to connect the drain line: (A) Typical drain connecting to sink plumbing
before trap (high loop drain). (B) Connection to an air gap, then to the trap. (C)
Connection to a waste disposer with air gap.
CAUTION: Failure to provide either the proper drain connection height above floor
level or a 20” high loop will result in improper draining of the dishwasher, which will
cause damage to the dishwasher.
NOTE: The drainage hose can be extended to a maximum length of 10 feet. Joints and
jointed tubes, if any must have an Inside Diameter (ID) of a least 7/8”. No part of the
drain hose must have a position higher then 35” above the floor. The hose must not be
drawn straight to a floor well or its equivalent. The hose might then function as a siphonemptying the dishwasher.
10
 Loading...