

Viking Designer EPIC User Manual

User’s Guide
KEEPING THE WORLD SEWING™

This household sewing machine is designed to comply with IEC/EN 60335-2-28 and UL1594.
IMPORTANT SAFETY INSTRUCTIONS
When using an electrical appliance, basic safety precautions should always be followed, including the
following:
Read all instructions before using this household sewing machine. Keep the instructions at a suitable
place close to the machine. Make sure to hand them over if the machine is given to a third party.
DANGER –TO REDUCE THE RISK OF ELECTRIC SHOCK:
• A sewing machine should never be left unattended when plugged in. Always unplug this sewing
machine from the electric outlet immediately after using and before cleaning, removing covers,
lubricating or when making any other user servicing adjustments mentioned in the instruction
manual.
WARNING –TO REDUCE THE RISK OF BURNS, FIRE,
ELECTRIC SHOCK, OR INJURY TO PERSON:
• Do not allow to be used as a toy. Close attention is necessary when this sewing machine is used by
or near children.
• Use this sewing machine only for its intended use as described in this manual. Use only
attachments recommended by the manufacturer as contained in this manual.
• Never operate this sewing machine if it has a damaged cord or plug, if it is not working properly, if
it has been dropped or damaged, or dropped into water. Return the sewing machine to the nearest
authorized dealer or service center for examination, repair, electrical or mechanical adjustment.
• Never operate the sewing machine with any air openings blocked. Keep ventilation openings of
the sewing machine and foot control free from the accumulation of lint, dust, and loose cloth.
• Keep fingers away from all moving parts. Special care is required around the sewing machine
needle.
• Always use the proper needle plate. The wrong plate can cause the needle to break.
• Do not use bent needles.
• Do not pull or push fabric while stitching. It may deflect the needle causing it to break.
• Wear safety glasses.
• Switch the sewing machine off (“0”) when making any adjustment in the needle area, such as
threading needle, changing needle, threading bobbin, or changing presser foot, etc.
• Never drop or insert any object into any opening.
• Do not use outdoors.
• Do not operate where aerosol (spray) products are being used or where oxygen is being
administrated.
• To disconnect, turn all controls to the off (“0”) position, then remove plug from outlet.
• Do not unplug by pulling on cord. To unplug, grasp the plug, not the cord.
• The foot control is used to operate the machine. Avoid placing other objects on the foot control.
• Do not use the machine if it is wet.

• If the LED lamp is damaged or broken, it must be replaced by the manufacturer or its service
agent or a similarly qualified person, in order to avoid a hazard.
• If the cord connected with the foot control is damaged, it must be replaced by the manufacturer
or its service agent or a similarly qualified person, in order to avoid a hazard.
• This sewing machine is provided with double insulation. Use only identical replacement parts. See
instructions for Servicing of Double-Insulated Appliances.
SAVE THESE INSTRUCTIONS
FOR EUROPE ONLY:
This appliance can be used by children aged from 8 years and above and persons with reduced
physical, sensory or mental capabilities or lack of experience and knowledge if they have been given
supervision or instruction concerning use of the appliance in a safe way and understand the hazards
involved. Children shall not play with the appliance. Cleaning and user maintenance shall not be made
by children without supervision.
The noise level under normal operating conditions is less than 80dB(A).
The machine must only be used with foot control of type FR5 manufactured by Shanghai Binao
Precision Mould Co., Ltd.
FOR OUTSIDE EUROPE:
This sewing machine is not intended for use by persons (including children) with reduced physical,
sensory or mental capabilities, or lack of experience and knowledge, unless they have been given
supervision or instruction concerning use of the sewing machine by a person responsible for their
safety. Children should be supervised to ensure that they do not play with the sewing machine.
The noise level under normal operating conditions is less than 80dB(A).
The machine must only be used with foot control of type FR5 manufactured by Shanghai Binao
Precision Mould Co., Ltd.
SERVICING OF DOUBLE INSULATED PRODUCTS
In a double-insulated product, two systems of insulation are provided instead of grounding. No
ground means is provided on a double-insulated product, nor should a means for grounding be
added to the product. Servicing of a double-insulated product requires extreme care and knowledge
of the system and should be done only by qualified service personnel. Replacement parts for a
double-insulated product must be identical to those parts in the product. A double-insulated product
is marked with the words ‘DOUBLE INSULATION’ or ‘DOUBLE INSULATED’.

Federal Communication Commission Interference Statement
For the USA and Canada
Responsible party: VSM Group AB (wholly owned subsidiary of SVP Worldwide)
Drottninggatan 2, 56184 Huskvarna, SWEDEN
Product name:
HUSQVARNA VIKING® DESIGNER EPIC™ sewing and
embroidery machine
Model number:
SFV1
This device complies with Part 15 of the FCC Rules. Operation is subject to the following two
conditions: (1) This device may not cause harmful interference, and (2) this device must accept any
interference received, including interference that may cause undesired operation.
This equipment has been tested and found to comply with the limits for a Class B digital device,
pursuant to Part 15 of the FCC Rules. These limits are designed to provide reasonable protection
against harmful interference in a residential installation. This equipment generates, uses and can
radiate radio frequency energy and, if not installed and used in accordance with the instructions, may
cause harmful interference to radio communications. However, there is no guarantee that interference
will not occur in a particular installation. If this equipment does cause harmful interference to radio
or television reception, which can be determined by turning the equipment off and on, the user is
encouraged to try to correct the interference by one of the following measures:
• Reorient or relocate the receiving antenna.
• Increase the separation between the equipment and receiver.
• Connect the equipment into an outlet on a circuit different from that to which the receiver is
connected.
• Consult the authorized HUSQVARNA VIKING® retailer or an experienced radio/TV technician
for help.
The included interface cable should be used in order to ensure compliance with the limits for a Class
B digital device.
Any changes or modifications not expressly approved by the party responsible for compliance could void the
user's authority to operate this equipment.
Declaration of Conformity
For Europe
Hereby, VSM Group AB (wholly owned subsidiary of SVP Worldwide), declares that this sewing and
embroidery machine is in compliance with the essential requirements and other relevant provisions of
Directive 2014/53/EU. To view a copy of the Declaration of Conformity, please seeRC-0234 EU
Declaration .

TABLE OF CONTENTS
1 Introduction .................................................. 9
Machine Overview .... ..... .. ... ..... .. ... ..... ..... .. ... .10
Front .......... . ........... . ........... . .......... . ............ 10
Needle Area .......... ........... . . .......... . ........... . ... 11
Right Side .......... ........... . ........... ............ ....... 11
Rear... . .......... . . .......... . ............ ........... . ......... 11
Accessory Tray .... . ........... ............ . .......... . ..... 12
Storing a Needle Plate . ........... . ........... ............ 12
Embroidery Unit....... ............ . .......... . ........... . 12
Function Buttons... ... ..... ....... ... ..... .. ... ... .. ..... .. .13
Automatic Needle Threader ..... . ........... . .......... 13
Stitch Re-Start ........ . ........... . ........... . .......... . . . 13
Speed – and + . . .......... . ............ ........... . ......... 13
Needle Stop Up/Down .......... . ........... . ........... 13
Cut Function.. . . ........... ............ ........... . ......... 13
Reverse ......... . . .......... . ........... . ........... . ......... 14
Start/Stop.......... . . .......... . ........... . ........... . ..... 14
FIX function.......... . .......... . ........... . ........... . .. 14
STOP function ........... . ........... ............ .......... 14
Presser Foot Down and Pivot........... ............ ... 14
Presser Foot Up and Extra Lift.......... ........... . . . 14
Basic Gestures for the Multi-Touch Screen ....15
Accessories. ..... .. ... ..... ..... .. ... ..... ..... ... .. ..... .. ... .16
Included Accessories ............ ............ ........... . . 16
Included Hoops..... ........... . ........... . ........... .... 16
Presser Feet.. .. ... ....... ... ..... .. ... .. ... ..... .. ... ..... ....17
Stitch Overview. ..... .. ... ..... ..... .. ... ..... ..... ... .. ....19
Utility Stitches ..... . ........... ............ . .......... . ..... 19
Stitch Menu Overview ....... . . .......... . ............ ... 22
Alphabets . .......... . ........... . ........... . .......... . ..... 22
2 Preparations................................................ 23
Unpacking Machine and Embroidery Unit... ...24
Connect the Power Cord and Foot
Control....... .. ..... ... ..... .. ... .. ... ....... ... ..... .. ... .. ... .24
Pack Away After Sewing ........ .. ... ....... ... ..... .. ..25
USB Ports ...... .. ..... ... ..... .. ..... ... ....... ... ..... .. ..... .25
Using a USB device ........... . .......... . . .......... . .... 25
Getting Started with WiFi and
mySewnet
™ Cloud .. ..... .. ... ..... ..... .. ... ..... .. ... ..26
LED Lights .. .. ..... ... ..... .. ... .. ... ....... ... ..... ..... .. ... .26
Free Arm ....... ..... .. ... ... .. ..... .. ... ..... ..... ... .. ..... ...26
Manual Thread Cutter ..... ... .. ..... ... .. ..... ..... ... ..26
Thread Sensor ..... .. ..... ..... ... ....... ... .. ... .. ..... ... ..27
Telescopic Thread Guide ..... ... ..... .. ... ..... ..... .. .27
Spool Pins.. ... .. ..... ..... ... ....... ... .. ... .. ..... ... ..... .. ..28
Spool Caps ...... ..... ... .. ..... .. ... ..... ..... ... ....... ..... .28
Threads ........... ..... ... .. ..... ..... ... .. ..... ... ....... ..... .29
Needles .. ... ..... ..... .. ... ..... .. ... ..... ..... .. ... ..... ..... ..30
Important Needle Information........... ........... . . 30
Changing the Needle. .. ... .. ... ....... ... ..... ..... .. ... .31
Threading .. ....... ... .. ... ....... ... ..... .. ... .. ... ..... .. ... ..32
Threading the Upper Thread .......... . . .......... . .... 32
Automatic Needle Threader ..... . ........... . .......... 34
Threading Tips and Hints .. ............ ........... . ..... 36
Threading for Twin Needle... . ........... . ........... . . 37
Bobbin Winding. ....... ... .. ... ....... ... ..... .. ... .. ... ....39
Winding Through the Needle ............ . ........... . . 41
Inserting the Bobbin... ..... .. ... ..... ..... ... .. ..... ..... .43
Changing the Presser Foot... ... .. ..... ... .. ..... ..... .43
Attaching the Sensor One-Step
Buttonhole Foot ........... ... ....... ... .. ... ....... ... .....44
Attaching the Sensor Q-Foot......... ... .. ..... ..... .44
Dual Feed With Changeable Presser Feet. ... ..45
Changing to Straight Stitch Plate ...... ..... .. ... ....46
3 Embroidery Preparations .......................... 47
Embroidery Unit.... ... ..... ..... .. ... ..... .. ... ... .. ..... ..48
Embroidery Hoop Overview... ..... ..... ... .. ..... ..48
Sensor Q-Foot.... ... .. ..... ... ..... .. ... .. ... ....... ... .....48
Straight Stitch Plate ....... ..... .. ... ..... ..... .. ... ..... .. .49
Designs.. ..... ... ....... ... .. ... .. ..... ... ..... .. ... .. ... ....... .49
DESIGNER EPIC™ Sampler Book ...... . ......... 49
Connect the Embroidery Unit ..... ..... .. ... ..... .. .50
Remove the Embroidery Unit...... ... ..... .. ... .....50
To Hoop the Fabric ...... ... ..... .. ... .. ... ..... .. ... .....51
Slide on/off the Hoop .... ... ..... ..... ... ....... ..... ... .51
4 The Multi-Touch Screen ............................ 53
Multi-Touch Screen..... .. ... ... .. ..... .. ... ..... ..... ... ..54
Gestures .......... . ............ ........... . ........... ........ 54
Smart Toolbox. ..... ... .. ..... ..... ... .. ..... ... .. ... .. ..... .55
Common Functions ....... ... .. ..... ... ....... ... .. ... ....56
OK........... ............ ........... . ........... . ........... . .. 56
Cancel....... . ........... . .......... . ........... . ............ .. 56
Embroidery Edit..... . ........... ............ ............ . . 56
Embroidery Stitch Out....... ............ ........... . .... 56
Touch & Hold ............ . .......... . ........... . .......... 56
Topbar ........ ... ....... ... .. ... .. ..... ... ..... .. ... .. ... ....... .57
WiFi . . ........... . ........... . .......... . ............ .......... 57
mySewnet™ ....... . ........... ............ . .......... . ........ 57
Wireless Firmware Update...... . .......... . . .......... . 58
JoyOS advisor™ feature..... . . ........... ............ ...... 58
Quick Help ........... ............ . .......... . ........... . ... 58
Settings ........... . ........... . ........... . ........... ........ 59
Sewing/Embroidery Mode Toggle ............. ...... 59
5 WiFi & mySewnet™ Services..................... 61
WiFi Introduction ...... ... ..... ..... ... .. ..... .. ... ..... ...62
Getting Started With WiFi ......... . ........... . ........ 62
Hidden Network.. . .......... . ........... . ........... . ..... 62
Firmware Update Using WiFi........ .. ... ..... ..... ..62
Firmware Update Using a USB Device.... ..... ..63
Complimentary Software (PC) ....... ....... ... .....64
mySewnet
™ Services ....... ... ..... ..... ... .. ..... ..... .65
mySewnet™ Account......... . ............ ........... . ..... 65

mySewnet™ Cloud . . .......... . ............ ........... . ..... 65
Used Space in mySewnet™ Cloud ... ............ ....... 66
Installation of mySewnet™ Cloud Sync Tool
for PC.... ........... . ........... ............ ............ ...... 66
mySewnet™ Portal .. ........... . ........... . ........... ..... 67
mySewMonitor App ... .. ..... .. ... ..... ..... ... .. ..... ...68
6 JoyOS advisor™ ............................................ 69
JoyOS advisor
™ Introduction ..... ... ..... .. ... .. ... .70
JoyOS advisor
™ Project Menu .......... ... ..... .. ..70
JoyOS advisor
™ Project Viewer ... .. ... ....... ... ..70
JoyOS advisor™ Project Viewer – Overview .. . ..... 70
Pictures in JoyOS advisor™ Project Viewer . . ........ 71
Animations in JoyOS advisor™ Project Viewer .. . . . 71
Stitch in JoyOS advisor™ Project Viewer .. ........... 71
SEWING ADVISOR™ – Overview.. ... .. ..... ...72
Fabric Selection .. ..... ... .. ..... .. ... ..... ..... ... .. ..... ...73
Woven or Knit...... ............ ........... . ........... ..... 73
Woven Fabrics. .......... . . .......... . ........... . .......... 73
Stretch Fabrics...... . ........... . .......... . . .......... . .... 73
Leather and Vinyl . .......... . ............ ............ ...... 73
Sewing Technique Groups .......... ... .. ..... ... .. ....74
Basic Sewing Techniques ...... ..... ..... ... .. ..... .. ... .75
Seam.. . .......... . . .......... . ............ ........... . ......... 75
Overcast..... . ........... . ........... . ........... . ........... . 75
Seam and Overcast ...... . ........... . .......... . . ........ 75
Baste.......... . ........... ............ . ........... . .......... . . 76
Blind Hem ........... ............ . .......... . . .......... . .... 76
Hem ...... . ........... . ........... ............ ........... . ..... 76
Buttonholes ............ . ........... . ........... . ........... . 76
Programmable Button Sew On .. ............ .......... 77
Start New . .. ..... ... .. ... .. ..... ... ....... ... .. ... ....... ... ..77
Continue .......... ... .. ... .. ..... ... ..... .. ... .. ... ....... ... ..77
Load Smart Save.. .. ... ....... ... ..... ..... .. ... ..... .. ... ..78
EMBROIDERYADVISOR™ – Overview. ..... .79
Background Color.... ... .. ... .. ..... ... ..... .. ... .. ... .....80
Grid Options .. ... ..... .. ... ..... ..... .. ... ..... ..... ... .. ....80
Embroidery Technique Groups.. ... .. ... ....... ... ..80
Start New.. ..... ..... .. ... ..... ..... ... .. ..... .. ... ..... ..... ..80
Continue .......... ... .. ... .. ..... ... ..... .. ... .. ... ....... ... ..81
Load Smart Save.. .. ... ....... ... ..... ..... .. ... ..... .. ... ..81
Knowledge Center – Overview .. ..... .. ... ..... ....82
Stabilizer Guide... ..... ... .. ... .. ..... ... ....... ... .. ... .....83
Quick Start Guide... ..... ... .. ..... ..... ... .. ..... ... .. ... .83
Step-by-Step Workbook.. .. ..... ... ....... ... .. ... .. ...83
Sewing Instructions ..... .. ... ..... .. ... ..... ..... .. ... .....83
Continue .......... ... .. ... .. ..... ... ..... .. ... .. ... ....... ... ..83
7 Sewing.......................................................... 85
Getting Started to Sew .. ..... ... .. ..... ..... ... .. ..... ..86
Sewing Mode – Overview ....... ..... .. ... ..... ..... ..87
What is a Stitch? ..... .. ... ..... ..... .. ... ..... ..... ... .. ....88
Select a Stitch or Letter ...... ... .. ... .. ..... ... ....... ..88
Load a Stitch or Letter From Another
Location ........... ............ . .......... . . .......... . ....... 88
Stitch Settings ........... ... .. ..... ..... ... .. ..... ... .. ... .. ..89
Stitch Width...... ............ ........... . . .......... . ....... 89
Stitch Positioning......... . ........... . ........... . ........ 89
Stitch Length.......... . .......... . ........... . ............ .. 89
Stitch Density.... ............ ........... . ........... ........ 90
Button Size .... . ........... . .......... . ............ .......... 90
Sew On Button . . ........... ............ ........... . ........ 90
Sensor Foot Pressure ......... . ........... . ........... .... 91
deLuxe™ Stitch System. . ........... ............ . ......... 91
Mirroring....... . ........... . .......... . ........... . .......... 92
Balance ..... ............ ........... . ........... . ........... . .. 93
Free Motion Options ....... ... .. ... .. ..... ... ....... ... ..94
Sewing Recommendations. .. ... ..... ..... .. ... ..... .. .95
Save Stitch ... ... ..... ..... ... .. ..... ..... ... .. ..... ... .. ..... ..96
Smart Save .......... .. ... ..... ..... .. ... ..... .. ... ... .. ..... ..96
Dimensional Stitches – Menu L... ... ..... ....... ... .97
Theme Stitches – Menu M ... ..... ..... ... .. ..... ..... .97
Embellished Stitches – Menu N ..... ... .. ..... ..... .98
Tapering Stitches – Menu Q .. .. ... ... .. ..... .. ... ....99
Taper Satin Stitch Exercise... . ........... ............ . .. 99
4-Way Stitches – Menu S..... ... ....... ... .. ... ......100
8-Way Stitches – Menu T ... ..... ... ....... ... .. ... ..101
Special Stitches For Optional Presser
Feet .. ... ..... ..... ... .. ..... .. ... ..... ..... ... .. ..... ..... ... .. .102
Sewing Pop-up Messages... ..... ... .. ..... ..... ... .. .102
8 Embroidery................................................ 105
Getting Started to Embroider .. ..... .. ... ... .. .....106
Embroidery Edit – Overview... ... ....... ... .. ... ..107
Load a Design.. .. ... ..... ....... ... ..... ..... ... .. ..... .. ..108
Load a Stitch... ... ..... .. ... .. ... ....... ... ..... .. ... .. ... ..108
Load a Font .... ....... ... ..... ..... .. ... ..... .. ... ..... .....108
File Manager ...... ... ..... .. ..... ... ....... ... ..... .. ..... ..108
How to Select Designs ...... ..... ... .. ..... ..... ... .. .109
Hoop Selection... ... .. ..... ... ....... ... .. ... .. ..... ... ...110
Toolbox ...... ... .. ..... ... .. ... .. ..... ... ....... ... .. ... .. ....110
Move to Hoop..... . ............ ............ ........... . ...110
Delete .. . ........... . ........... . ........... . ........... ......110
Duplicate...... . ............ ........... . ........... ..........111
Mirror Side to Side and End to End .. ........... . ..111
Stitch Out Design Earlier/Later.. ............ ........111
Group/Ungroup..... . . .......... . ........... . ........... .111
Select All ....... . ........... . .......... . ........... . .........112
Multi-Select... . ............ ........... . ........... ..........112
Touch Functions...... ..... .. ... ..... .. ... ..... ..... .. ... ..113
Position... . ........... . ........... . ........... . .......... . ...113
Rotate .. . ............ ........... . ........... . ........... ......113
Scale ....... ........... . ........... ............ ........... . . ...114
Pan..... . . ........... ............ ........... . ........... .......114
Zoom ....... ..... ... .. ..... ..... ... .. ..... ... .. ..... ..... ... .. .115
Zoom Options . .......... . ........... . ........... . ........115
Undo/Redo..... ... ..... .. ... .. ... ....... ... ..... .. ... .. ... ..115

Design Stitch Out Order ....... ..... ... ....... ... .. ..115
Total Number of Stitches in Design
Combination........ ..... ... .. ..... ... .. ..... ..... ... .......116
Save Design ....... ... ....... ... .. ... .. ..... ... ..... .. ... .. ..116
Smart Save .......... .. ... ..... ..... ... .. ..... .. ... ... .. .....116
GO...... .. ..... ... ..... .. ... ..... ....... ... ..... ..... ... .. ..... .117
Edit an Existing Design or Text...... .. ... .. ..... ...117
Thread Color Edit..... ... ..... .. ... .. ... ....... ... ..... ..119
Program Embroidery Text ....... .. ... .. ... ..... .. ...120
Create a Text ........... . ........... . ........... . .......... .120
Add a Letter ........... ........... . ........... . ........... . .120
Delete a Letter . . ........... . ........... . ........... . .......120
Text Shaping ......... . .......... . . .......... . ............ ..120
Design Shaping .. .. ..... ... ..... .. ... .. ... ....... ... ..... ..123
Select Spacing.......... . ............ ........... . ...........124
Select Line Positioning .... . .......... . ............ ......125
Select Side Positioning .... . ........... . ........... . .....125
Fixed Design Angle ........... . .......... . . ........... ...125
Set Number of Designs ........... ............ ..........126
Design Appliqué ...... ... .. ... .. ..... ... ....... ... .. ... ...127
Embroidery Edit Pop-up Messages..... ..... .....129
9 Embroidery Stitch Out ............................ 131
Embroidery Stitch Out – Overview......... ....132
Welcome to Embroidery Stitch Out...... .. ....133
Color Block List ... .. ... ....... ... ..... .. ... .. ... ..... .. ...135
Zoom ....... ..... ... .. ..... ... .. ... .. ..... ... ....... ... .. ... .. .135
Zoom Options . .......... . ........... . ........... . ........136
Corner Check.......... ... .. ... .. ..... ... ....... ... .. ... ...136
Hoop Position Options.... ... ....... ... .. ... ....... ...136
Current Stitch Position....... . . .......... . ........... . ..136
Park Position . ............ ........... . ........... ...........136
Trim Position ......... . ........... . ............ ........... .137
Center/Remove Hoop Position .. . . .......... . .......137
Design Positioning....... .. ... .. ..... ... ..... .. ... .. ... ...138
Design Positioning Wizard.. . .......... . . .......... . ...139
Zoom to Cursor. . . .......... . ............ ............ .....140
Set Cursor Point ......... . ........... ............ .........140
deLuxe
™ Stitch System.... .. ... .. ... ..... .. ... ..... ..140
Smart Save .......... .. ... ..... ..... ... .. ..... .. ... ... .. .....140
Auto Smart Save ...... ... ..... .. ... .. ... ..... .. ... ..... ..141
Thread Color Spools ... .. ..... ... .. ... .. ..... ... .......141
Return to Embroidery Edit ........ ..... .. ... .. ... ...141
Step Stitch-by-Stitch/Go to Stitch .. ..... .. ... .. ..142
Numbers of Stitches in Current Color
Block... ... .. ... .. ..... ... ....... ... .. ... ....... ... ..... .. ... .. ..142
Number of Stitches in Embroidery
Combination........ ..... ... .. ..... ... .. ..... ..... ... .......142
Color Options ...... ..... ..... .. ... ..... .. ... ..... ..... .. ..142
Color Block Sort ....... ............ . .......... . ...........143
Color Block Merge ........... ............ ........... . ....143
Monochrome ........... ............ ........... . ...........143
Basting Options ........... ... .. ..... ..... ... .. ..... ... .. ..144
Embroidery Stitch Out Pop-up Messages ....145
10 Program ..................................................... 149
Program – Overview ........ .. ..... ... ..... .. ... .. ... ..150
Create New Program .......... ... ..... ..... .. ... ..... .151
To Edit a Created Program ... ..... ..... ... ....... ...152
Edit Stitch or Lettering Program...... ... ..... .. ...152
Adjust the Entire Program ......... . ........... . .......154
Stitch Program Commands.. ..... .. ... ..... ....... ..154
Save Program...... ... .. ..... ... ....... ... .. ... ....... ... ...156
Sew or Embroider Your Stitch Program .......156
Program Pop-Up Messages..... ..... ..... .. ... ..... .157
11 Settings.......................................................159
Temporary Sewing Settings...... ... .. ..... ... .. .....160
deLuxe™ Stitch System. . ........... ............ . ........160
Sensor Presser Foot Lift ............ ............ . .......160
Automatic Thread Cutter..... . ........... ............ ..160
Automatic FIX ... ........... . ........... . ........... ......161
Stitch Limiting Options .......... . .......... . . ..........161
Feed Teeth Options .. . ........... ............ ........... .161
Temporary Embroidery Settings ....... .. ..... .. ..162
deLuxe™ Stitch System. . ........... ............ . ........162
Embroidery Foot Type.......... . ........... . .......... .162
Thread Cut Options ....... . . .......... . ........... . .....163
Twin Needle Options..... . ........... . .......... . .......164
Default Sewing Settings ... ..... ..... .. ... ..... .. ... ...165
deLuxe™ Stitch System – Default...... ............ ..165
Sensor Presser Foot Lift – Default .... . ............ .165
Automatic Thread Cutter – Default......... . .......165
Automatic FIX – Default ....... . .......... . . ..........165
Free Motion Options – Default ....... . ........... ...165
Default Embroidery Settings ....... ... .. ..... .. ... ..166
deLuxe™ Stitch System – Default...... ............ ..166
Thread Cut Options – Default.......... ............ ..166
Embroidery Pivot Height – Default.......... .......166
My Hoops ........... ............ . ........... . .......... . ...166
Machine Settings. ..... .. ... ..... ..... ... .. ..... .. ... ... .. .167
Language ............ . ........... . ........... . .......... . . ...167
Audio Volume .. . ........... . ........... . .......... . .......167
Audio Repeat ........... . ........... . ........... . ..........167
Lock Screen .... . . ........... ............ ........... . .......167
LED Work Light Brightness........... . .......... . . ...167
WiFi Settings.. ... .. ..... .. ... ..... ..... ... .. ..... ..... ... .. .168
mySewnet
™ Settings...... ..... ... ....... ... .. ... .. ....168
Machine Information...... .. ... .. ... ..... .. ... ..... .....168
12 File Manager .............................................. 169
File Manager – Overview.... .. ... ..... ..... ... .. .....170
File Formats ..... ..... ... .. ..... .. ... ... .. ..... ... .. ..... ....171
Browse File Manager.......... .. ... ..... ..... .. ... ..... .171
Open a File or Folder............ ............ ........... .171
Move Up One Folder Level ....... . ........... . .......172
List/Thumbnail View ... .. ... ..... ..... .. ... ..... .. ... ...172
mySewnet
™ Cloud Folder .. ..... ..... ... .. ..... ....172

Built-in Designs .... .. ... ..... .. ... ..... ..... .. ... ..... .. ...172
USB Device .. .. ... .. ..... ... ....... ... .. ... .. ..... ... ..... ..173
Organize........ ... .. ..... ... .. ..... ..... ... ....... ... .. ... .. .174
Create New Folder .......... . ........... . ........... . ....174
Rename a File or Folder ...... . ............ ........... . .174
Move a File or Folder......... . . .......... . ............ ..174
Copy a File or Folder ............ ............ ........... .174
Delete a File or Folder . .......... . ............ ..........174
Filter Files... . ........... ............ . ........... . .......... .175
File Manager Pop-up Messages ....... ..... .. ... ...176
13 Maintenance ..............................................178
Cleaning the Machine Exterior. ..... .. ... ..... .. ...179
Removing the Needle Plate and Cleaning
the Bobbin Area ..... ..... ... .. ..... ..... ... .. ..... ... .. ..179
Cleaning Under the Bobbin Area. .. ... ..... ......179
Replacing the Needle Plate ........ ..... .. ... .. ... ...180
Troubleshooting..... .. ... .. ... ....... ... ..... ..... .. ... ...180
Troubleshooting Connectivity .... . .......... . . .......184
Service . . ............ ........... . ........... ............ ......184
Non-Original Parts and Accessories .. . ........... . .184
Technical specification .. ..... .. ... .. ... ....... ... ..... ..184
14 IMPORTANT............................................. 186
IMPORTANT SAFETY INSTRUCTIONS . ...186
DANGER –TO REDUCE THE RISK OF
ELECTRIC SHOCK:.... ........... . ........... . .......186
WARNING –TO REDUCE THE RISK OF
BURNS, FIRE, ELECTRIC SHOCK, OR
INJURY TO PERSON: ..... . ........... . ........... . ..186
SAVE THESE INSTRUCTIONS. ............ . .....186
SERVICING OF DOUBLE INSULATED
PRODUCTS . ........... . .......... . ........... . ..........187
Licenses ...... ..... .. ... ... .. ..... .. ... ..... ..... ... ....... ....187
RC-0234 EU Declaration .. ... ....... ... ..... ..... .. ..187
Index .......................................................... 189

1 Introduction
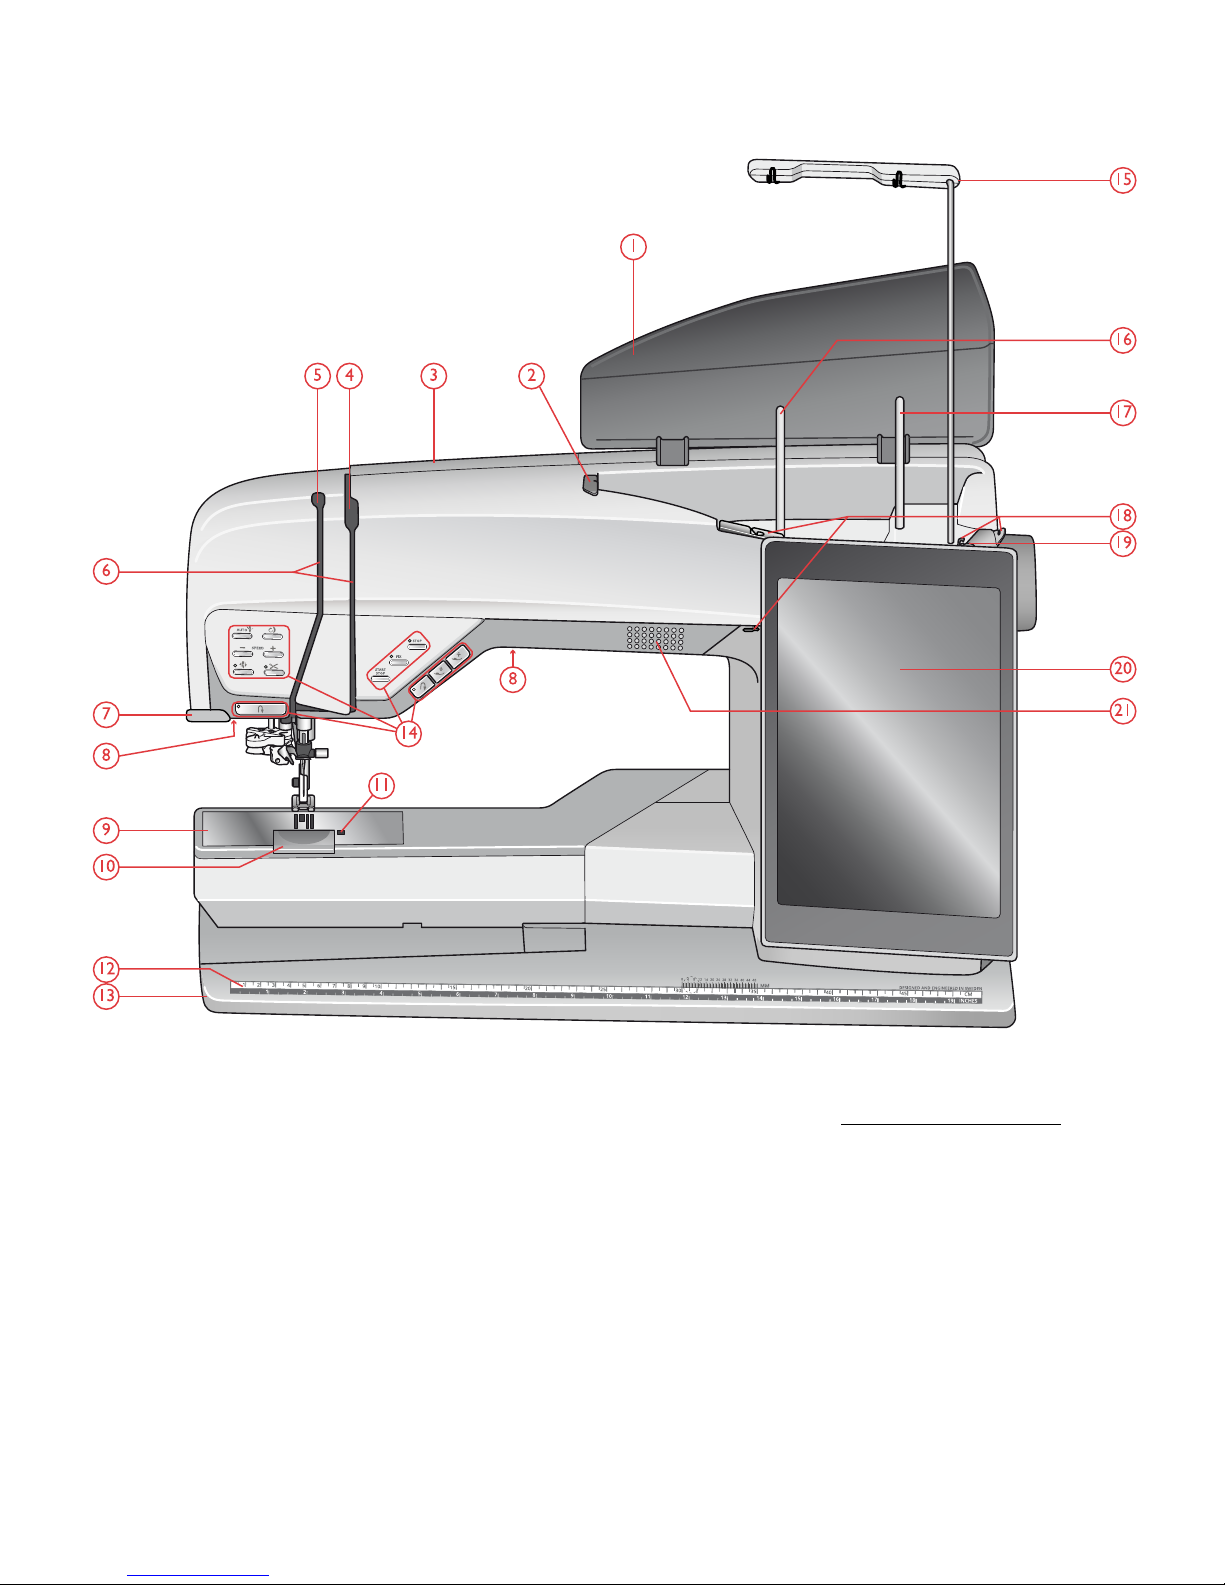
Machine Overview
Front
1. Lid
2. Pre-tension thread guide
3. Threading slot
4. Thread tension discs
5. Thread take-up lever
6. Threading slots
7. Thread cutter
8. LED light
9. Needle plate
10. Bobbin cover
11. Bobbin cover release button
12. Button ruler and built-in tape measure
13. Base plate
14. Function buttons, see Function Buttons, page 13 for
detailed description
15. Telescopic thread guide
16. Main spool pin
17. Auxiliary spool pin
18. Bobbin winding thread guides
19. Thread tension disc for bobbin winding
20. Multi-touch screen
21. Speaker
10 1 Introduction
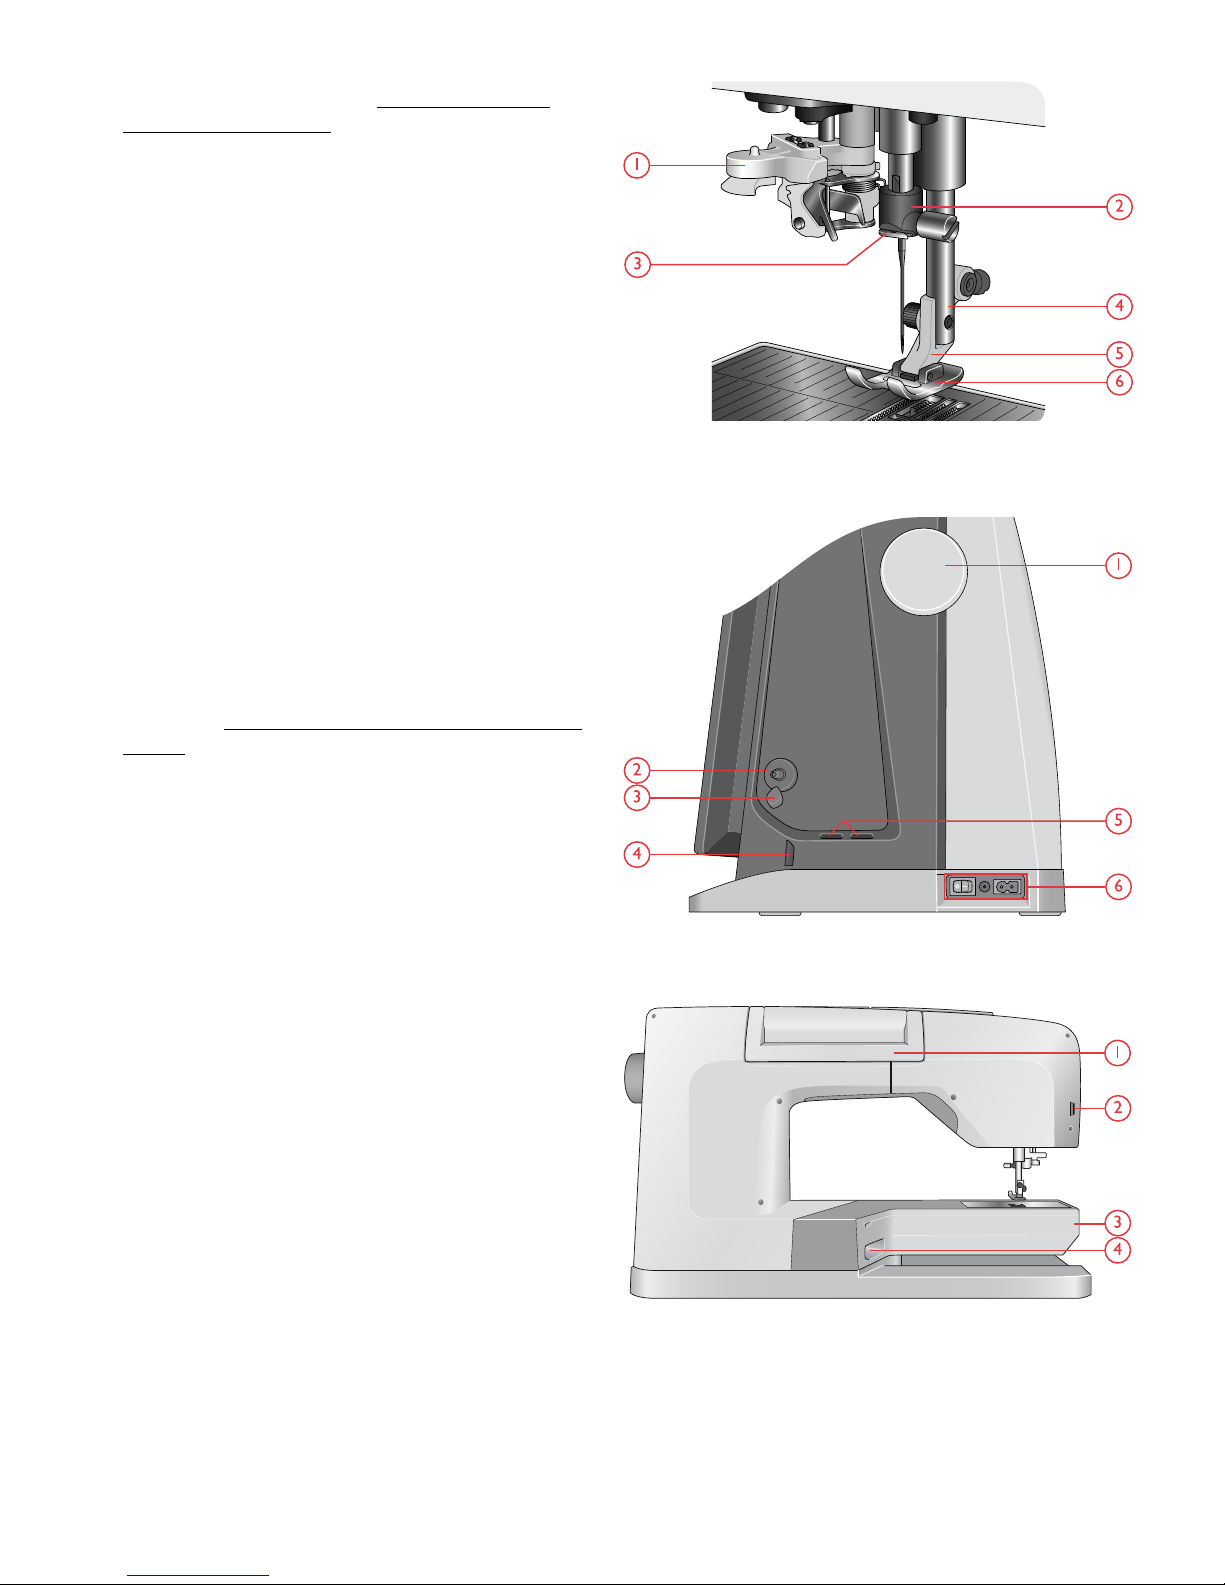
Needle Area
1. Automatic needle threader, see Using the Automatic
Needle Threader, page 35
2. Needle bar with needle clamp screw
3. Needle thread guide
4. Presser foot bar
5. Presser foot ankle
6. Presser foot
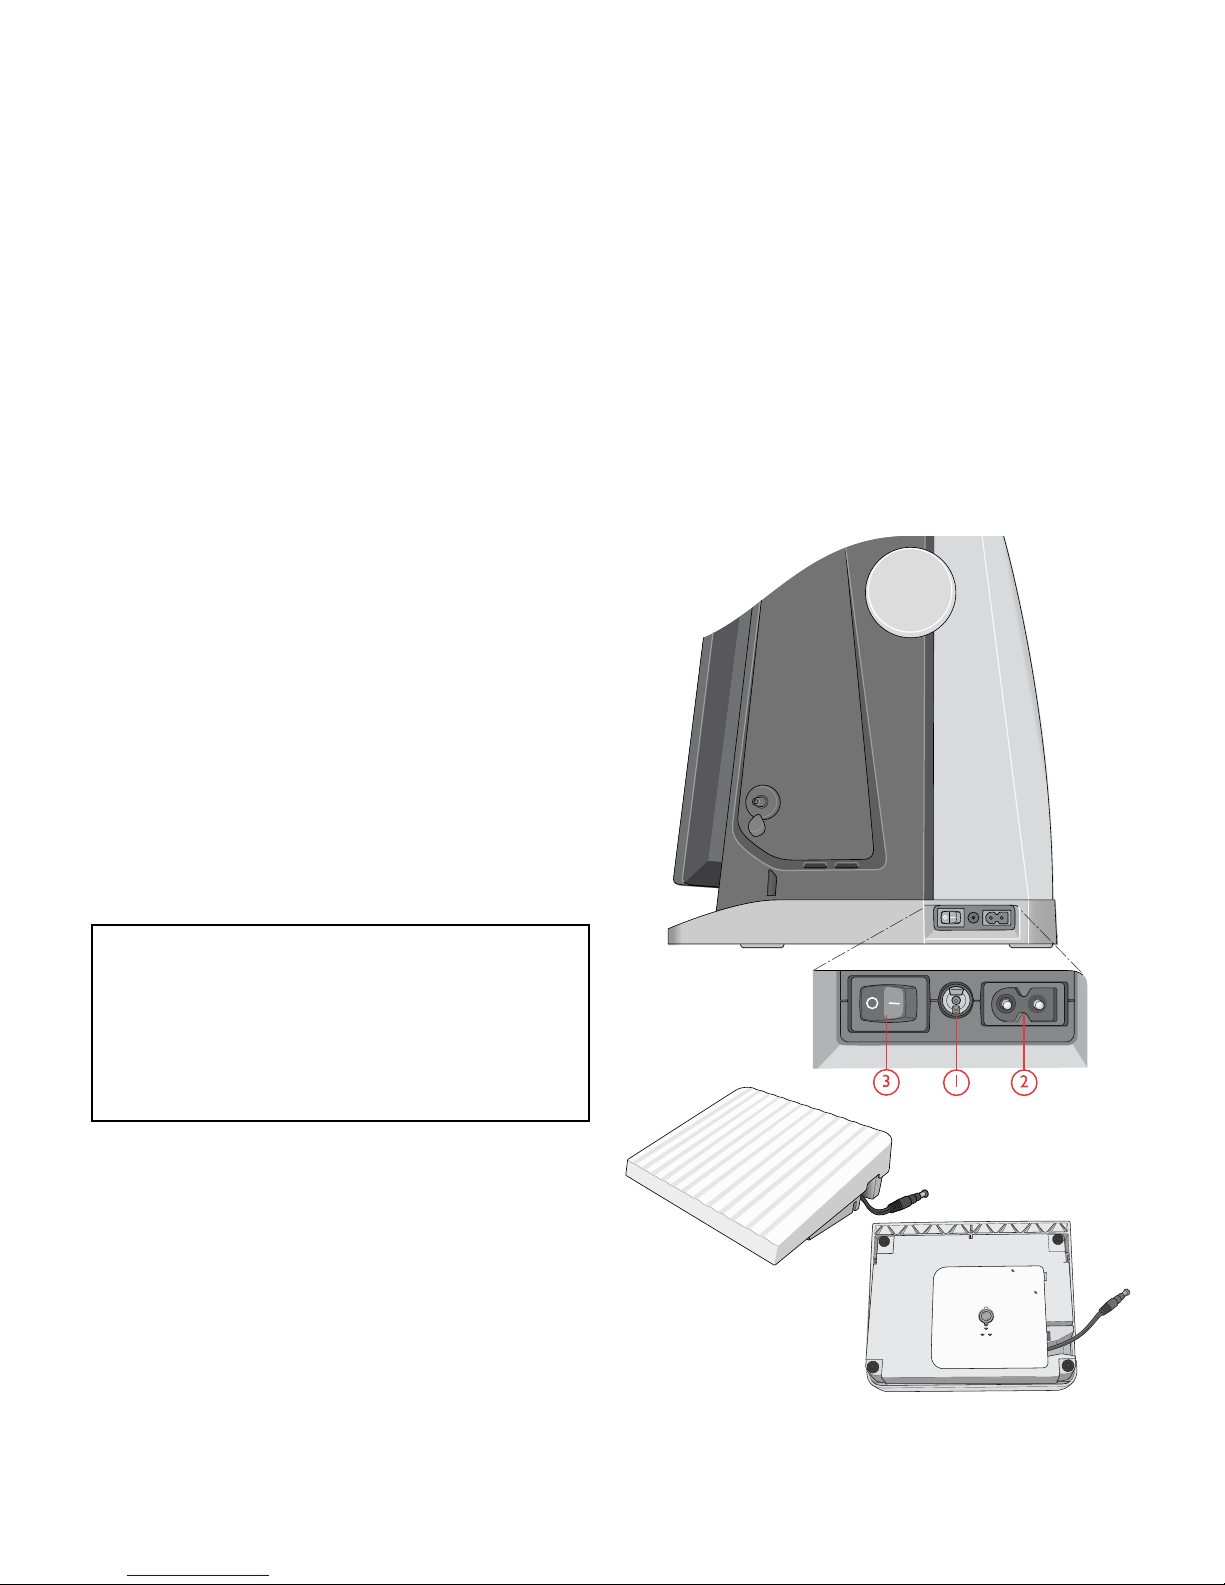
Right Side
1. Handwheel
2. Bobbin winder
3. Bobbin winding lever
4. Thread cutter for bobbin winding
5. Built-in USB ports
6. ON/OFF switch, sockets for power cord and foot
control. See Connect the Power Cord and Foot Control,
page 24.
Rear
1. Handle
2. Accessory socket
3. Free arm
4. Embroidery unit socket
1 Introduction 11
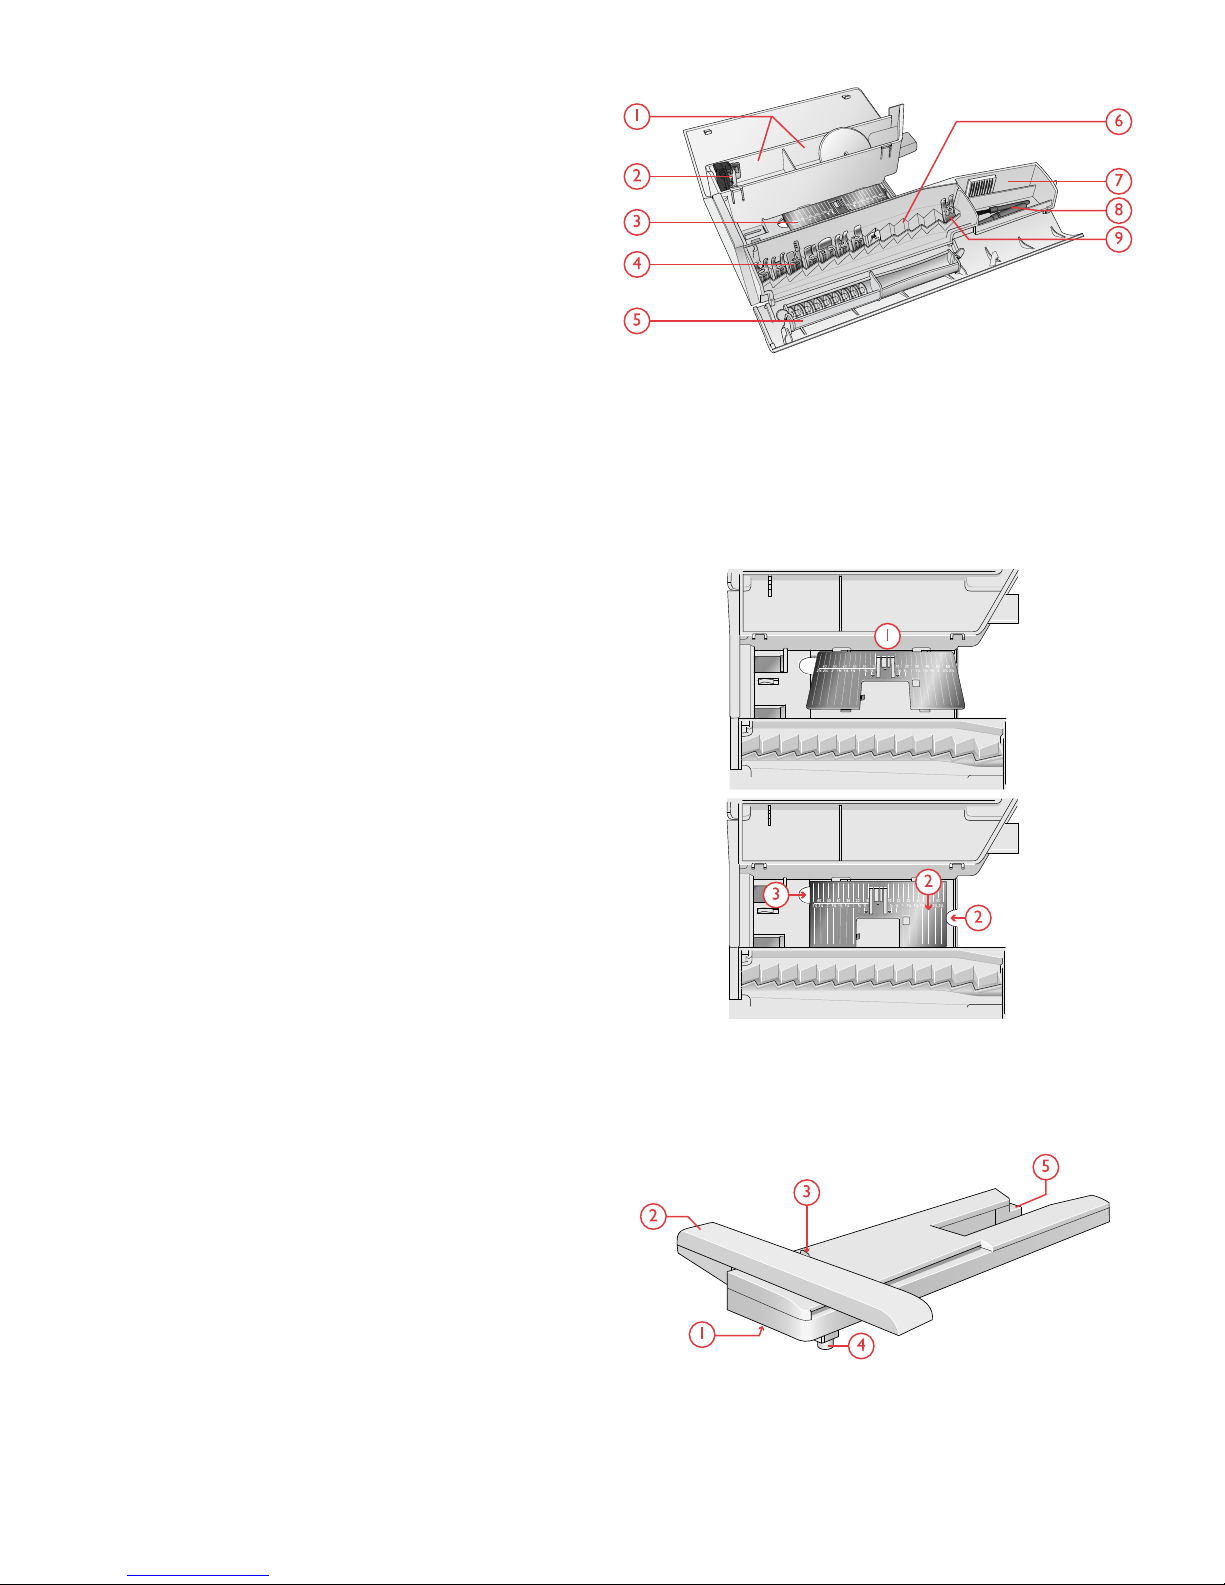
Accessory Tray
The accessory tray features special compartments for presser
feet and bobbins, plus space for needles and other
accessories. Store the accessories in the tray so they are easily
accessible.
1. Space for accessories
2. Hook for storing the Sensor One-Step Buttonhole Foot
3. Space for needle plate
4. Space with hole for Buttonhole Foot C
5. Removable bobbin holder
6. Spaces for presser feet
7. Slot for needle packs
8. Space for seam ripper and brush
9. Extra wide space for Side-Motion Foot S
Storing a Needle Plate
Store the needle plate not in use in the bottom of your
accessory tray.
1. Insert the back of the plate into the assigned holes as
illustrated and lay it down.
2. Push the plate down and to the left to fasten it.
3. To remove the plate, place a finger into the hole by the
top left of the plate, push right and then lift the plate.
Embroidery Unit
(type EU 22)
1. Embroidery unit release button (underside)
2. Embroidery arm
3. Embroidery hoop attachment
4. Level adjustment feet
5. Embroidery unit plug
12 1 Introduction
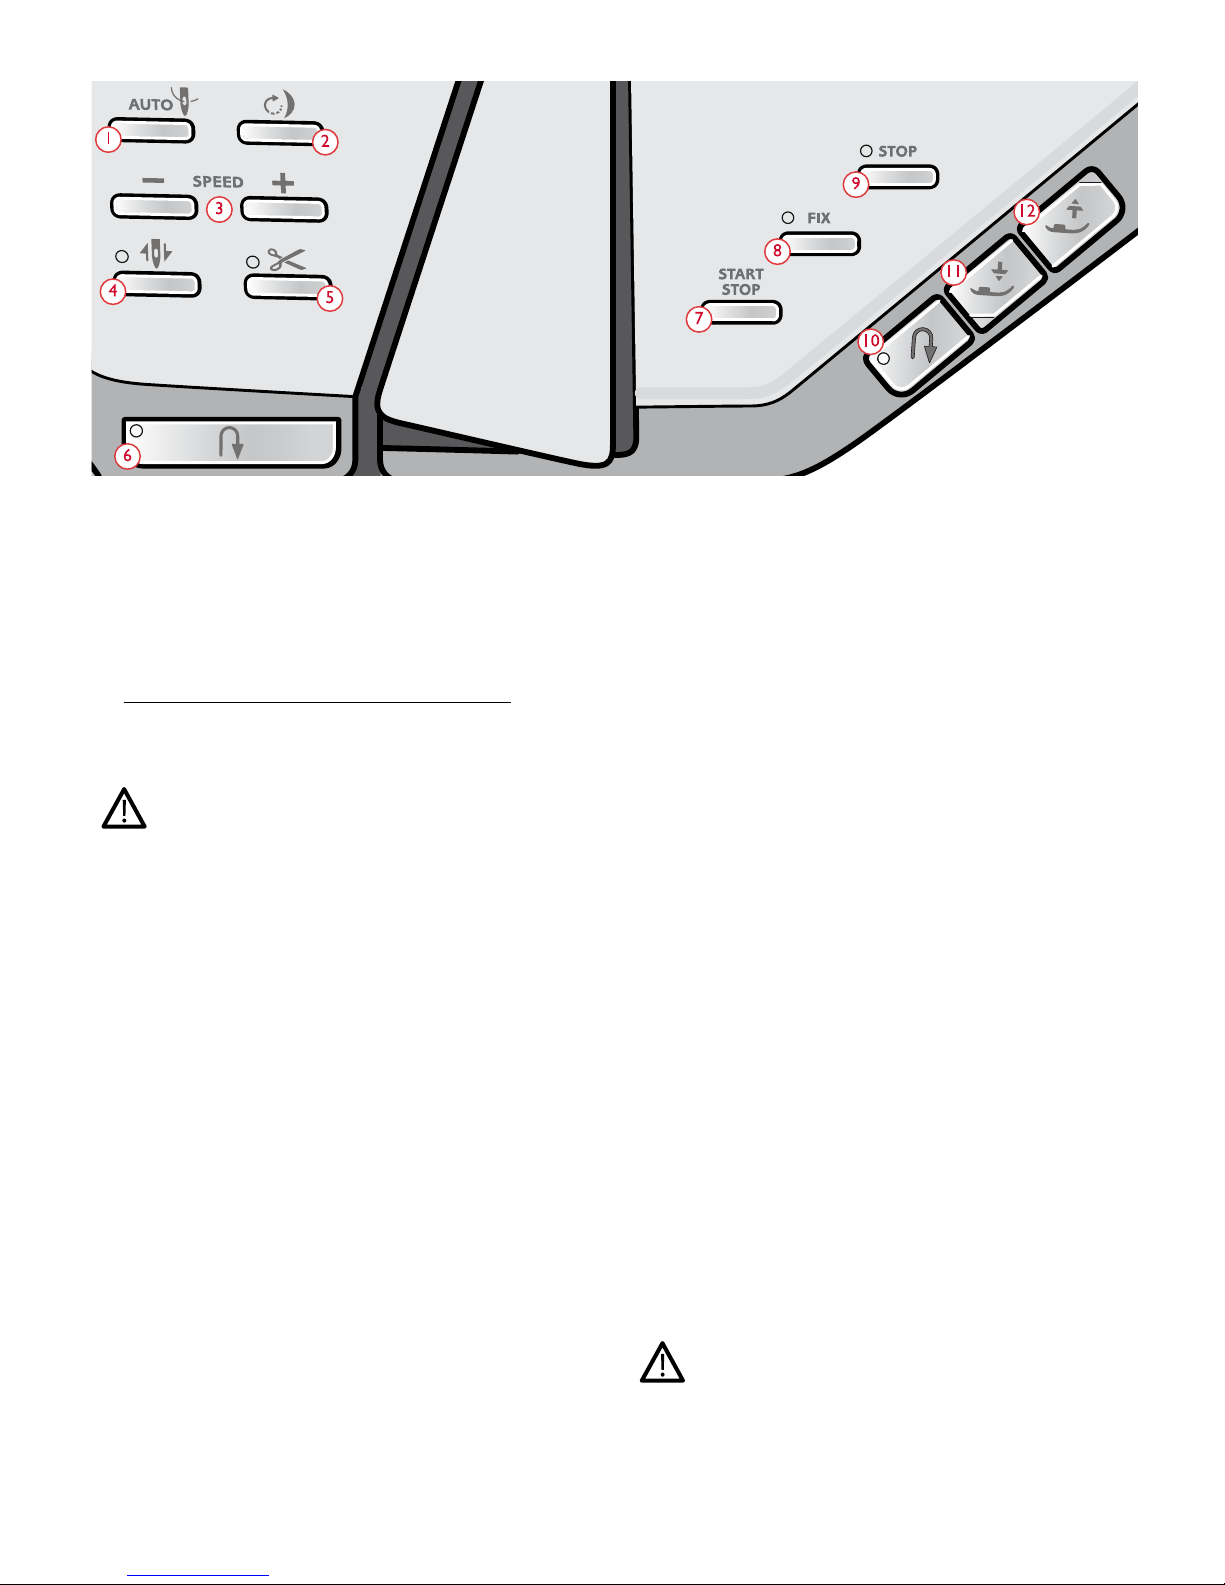
Function Buttons
1. Automatic needle threader
2. Stitch re-start
3. Speed – and +
4. Needle stop up/down
5. Cut function
6. Reverse
7. Start/stop
8. FIX function
9. STOP function
10. Reverse (same functions as #6)
11. Presser foot down and pivot
12. Presser foot up and extra lift
Automatic Needle Threader
See Using the Automatic Needle Threader, page 35 to learn
how to place the thread for automatic needle threading. When
the thread is in place, touch this button to thread the needle
automatically.
To prevent damage to the automatic needle threader, needle,
presser foot or other attached accessories, read the instructions
carefully on how to use the automatic needle threader before
using it.
Stitch Re-Start
When you stop sewing in the middle of a stitch, touch stitch
re-start to begin sewing at the beginning of the stitch. The
stitch or stitch program will remember any special settings
you made.
Speed – and +
All stitches and embroideries in your machine have a pre-set,
maximum allowed sewing speed to provide a good stitch
result.
Touch speed – to decrease the maximum allowed sewing
speed. Touch speed + to increase the maximum allowed
speed again. The machine will never sew faster than the
maximum allowed sewing speed for the selected stitch/
embroidery. Touch speed – or + when the machine is not
running and a pop-up on the screen will indicate the speed
setting. You can set the speed by touching the slider in the
pop-up or by touching the speed – or + buttons. If you
change the speed setting while sewing no pop-up will appear.
Needle Stop Up/Down
Touch needle stop up/down to set the position of the needle
when you stop sewing. The needle will move up or down
when you touch the button. The indicator light is on when
needle stop down is set.
Tip: You can also tap the foot control to raise or lower the needle once
you stop sewing. Tapping the foot control does not change the set stop
position.
Cut Function
Touch the cut function button and your machine cuts the
upper and bobbin threads, raises the presser foot and needle,
and activates the FIX function for the next start.
To cut threads at the end of a stitch or stitch program, touch
the cut function button while sewing. The indicator light will
flash, alerting you that a cut is requested. When the stitch or
stitch program is completed, your machine cuts the upper and
bobbin threads, raises the presser foot and needle, and
activates the FIX function for the next start.
Note: If automatic FIX and selective presser foot lift has been deselected
in temporary sewing settings, FIX function will not be activated and
presser foot will not be raised when using the cut function.
Touch the cut function button when embroidering and your
machine cuts the upper and bobbin threads instantly.
Some optional accessories are attached in the two small
circular holes in the needle plate just above the bobbin cover.
Do not use the cut function when an accessory is attached in
these holes as that may interfere with the automatic thread
cutter located under the needle plate.
1 Introduction 13

Reverse
When reverse is active, the reverse indicator is lit. For
permanent reverse, touch the reverse button once before
starting to sew. The reverse indicator will be lit and the
machine sews in reverse until you touch the button again to
cancel. If you press the reverse button while sewing, the
machine will sew in reverse for as long as you keep the button
pressed.
Reverse is also used when sewing for example manual
buttonholes, darning stitches and tapering stitches to step
between the parts of the stitch.
Start/Stop
Touch the start/stop button to start and stop the machine
sewing or embroidering without using the foot control. Touch
start/stop to begin and touch again to stop.
FIX function
FIX is used to tie off a stitch. Touch the button to turn the
function on/off. The indicator next to the FIX function
button is lit when the FIX function is active. When beginning
to sew with FIX function active, your machine sews a few tieoff stitches and continues with the selected stitch. Touch FIX
while sewing and your machine sews a few tie-off stitches and
stops automatically.
You can activate automatic FIX in settings, see Automatic
FIX.
STOP function
Touch STOP when sewing to conclude a stitch or stitch
program. Your machine fixes the thread and stops
automatically when the stitch or stitch program has been
completed. Touch STOP before starting to sew and your
machine sews only one repetition of the stitch. Only one
stitch is displayed on the screen. The indicator next to the
STOP button is lit when the STOP function is active. To
cancel the function, touch STOP again or select a new stitch.
The STOP function is cancelled when the stitch is completed.
The STOP function is also used to repeat a sewn length when
sewing tapering, (see Tapering Stitches – Menu Q) and when
sewing manual buttonholes.
Presser Foot Down and Pivot
The presser foot is lowered automatically when you start
sewing. To lower the presser foot before starting to sew,
touch the presser foot down and pivot button. The presser
foot will be completely lowered and the machine firmly holds
the fabric. Touch presser foot down again to go to pivot
position.
In embroidery mode touch presser foot down to lower the
presser foot to embroidery position.
Presser Foot Up and Extra Lift
Touch the presser foot up button once to raise the presser
foot. Touch again and the presser foot will raise to extra lift
position, and the feed teeth will be automatically lowered to
make it easier to get heavy fabric under the presser foot.
In embroidery mode, the extra lift makes it easier to insert or
remove the hoop.
14 1 Introduction
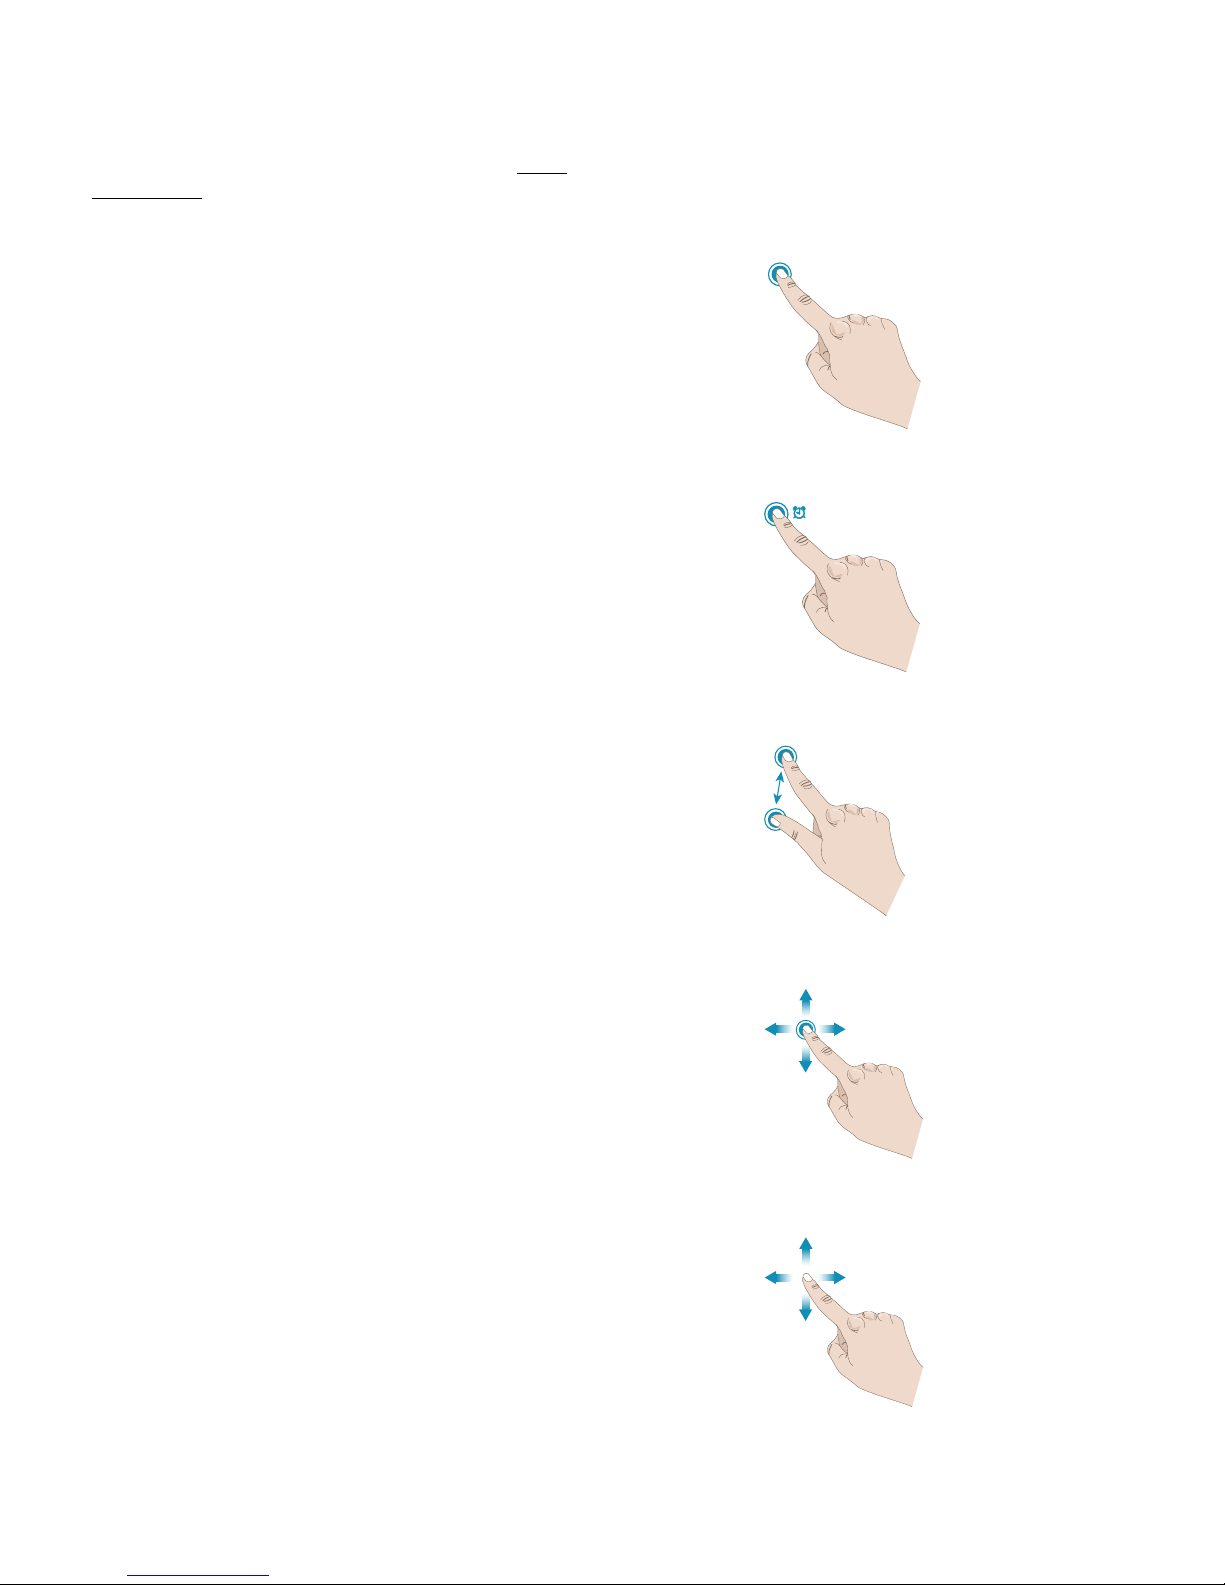
Basic Gestures for the Multi-Touch
Screen
Easily navigate on the multi-touch screen with the gestures
described below. For more detailed information, see MultiTouch Screen.
Touch
Touch once on a button or setting on the screen to select.
Touch & Hold
Touch once without releasing for a few seconds to touch &
hold. Used on some buttons and screen areas to access more
options.
Pinch/Stretch
Touch with two fingers at the same time and without
releasing increase/reduce the distance between the fingers to
stretch (zoom in) or pinch (zoom out).
Touch and Move
Touch once on a selected design and, without releasing,
move your finger to a different position on the screen. Used
e.g. for moving a design in the embroidery area.
Swipe
Touch, move and release your finger in a swift gesture to
swipe. Left-right/right-left swipe is used e.g. to scroll
between stitch menus. Top-bottom/bottom-top swipe is
used e.g. to scroll within a stitch menu.
1 Introduction 15
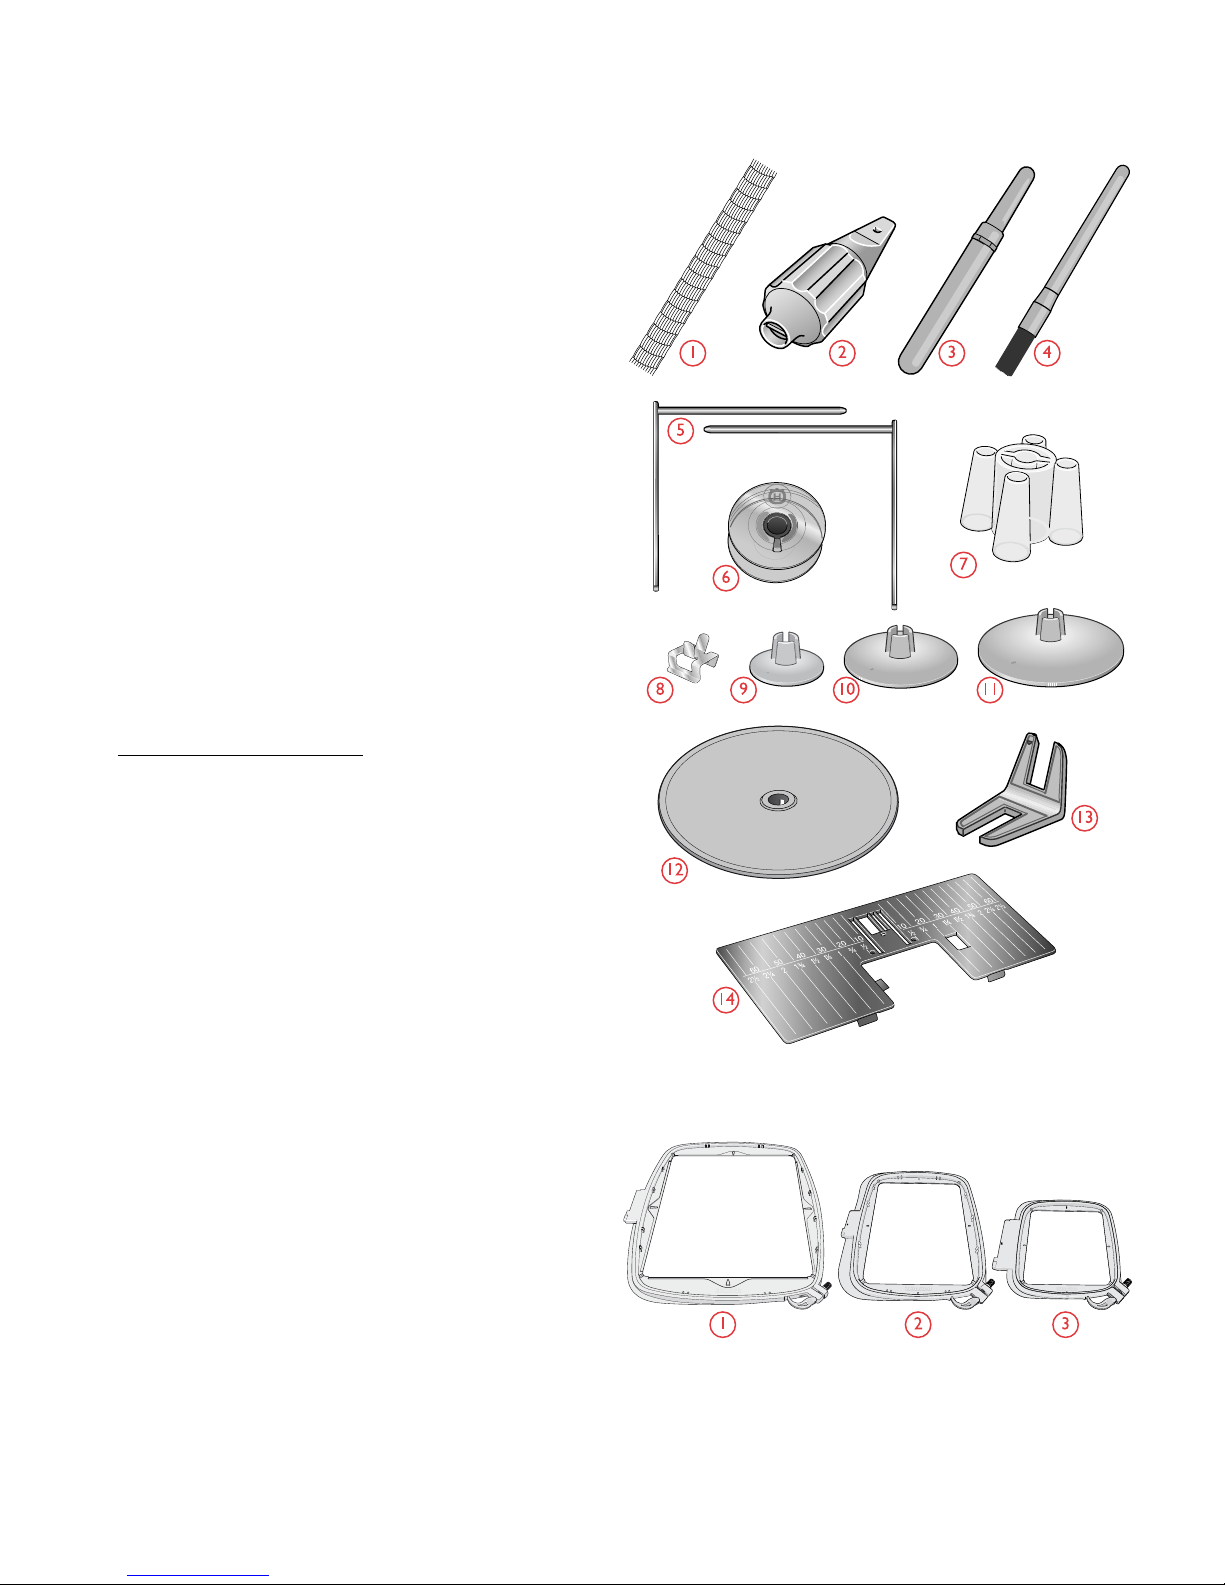
Accessories
Included Accessories
1. Thread net (4)
2. Universal tool
3. Seam ripper
4. Brush
5. Edge/Quilting guides (used attached to presser foot
ankle or together with the Dual Feed Foot)
6. Bobbins (9)
7. Thread cone holder (2)
8. Hoop clips (16)
9. Spool cap, small (2)
10. Spool cap, medium (2)
11. Spool cap, large (2)
12. Large spool holder (2)
13. Multipurpose tool/Button reed
14. Straight Stitch Plate
Included Accessories Not in Picture
• Complimentary software (PC) to download, see
Complimentary Software (PC).
• Soft cover for machine
• Luggage style carrying bag with packing insert for
embroidery unit
• Foot control
• Power cord
• Needles
• DESIGNER EPIC™ sampler book
Included Hoops
1. DESIGNER™ Imperial Hoop (360x260)
2. DESIGNER™ Crown Hoop (260x200)
3. DESIGNER™ Splendid Square Hoop (120x120)
16 1 Introduction
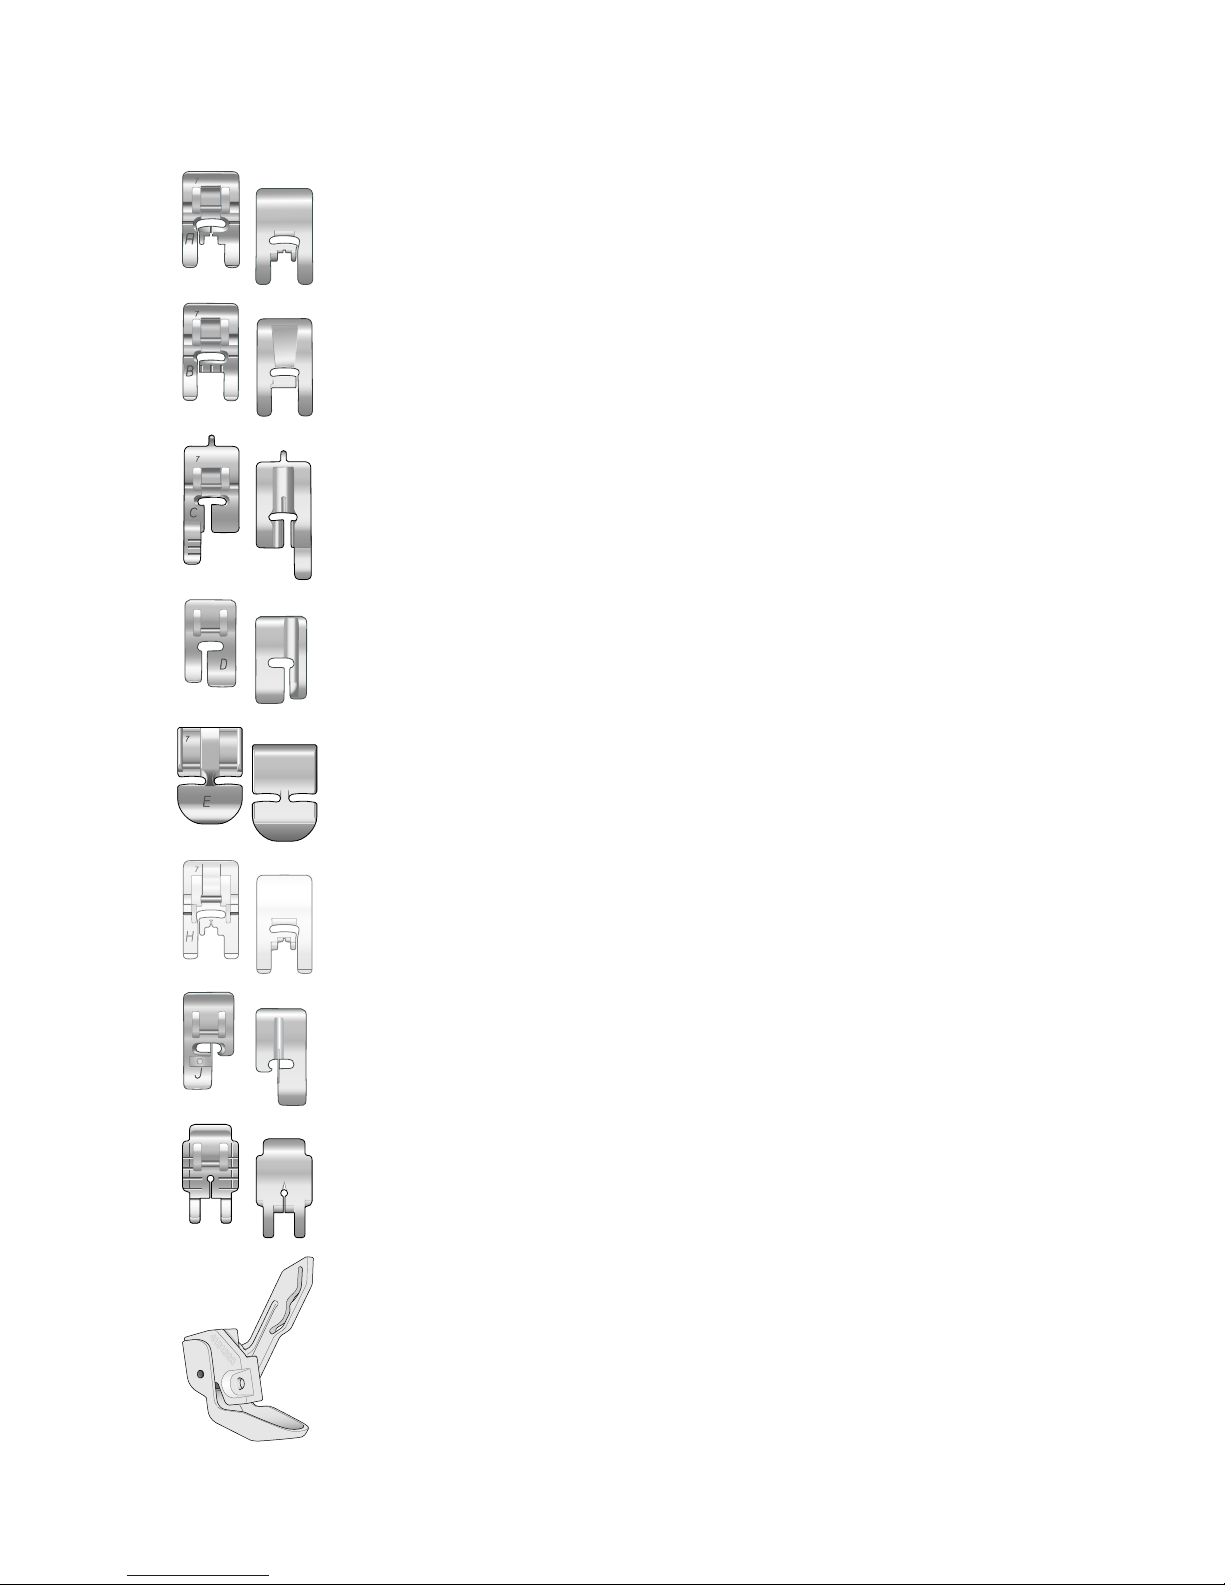
Presser Feet
Note: For the best sewing results, use only presser feet designed for and
compatible with your DESIGNER EPIC™ machine.
Utility Foot A
Snapped onto the machine upon delivery. Used mainly for straight stitching and zigzag
stitching with a stitch length longer than 1.0mm.
Decorative Stitch Foot B
For sewing close zigzag stitches (satin stitches) with less than 1.0mm stitch length,
other utility stitches or decorative stitches, use this foot. The tunnel on the underside of
the foot is designed to feed smoothly over the stitches.
Buttonhole Foot C
For manual buttonholes. This foot has guidelines to determine buttonhole length. The
middle measures ⅝″ (15mm) from the fabric edge. The two tunnels on the underside
of the foot ensure smooth feeding over the buttonhole columns. The finger on the
back of the foot holds cording for corded buttonholes.
Blindhem Foot D
For blindhem stitches. The inner edge of this foot guides the fabric. The right toe of
the foot is designed to ride along the hem edge.
Zipper Foot E
This foot can be snapped on either to the right or to the left of the needle. This makes
it easy to sew both sides of the zipper. Move needle position to right or left to sew
closer to zipper teeth or for covering large cording.
Non-Stick Glide Foot H
This foot, with a non-stick coating underneath, is used when sewing foam, vinyl,
plastic, or leather to keep these materials from sticking to the foot.
Edging Foot J
Used for overcasting and seam/overcasting, with stitches that have a stitch width of 5.0
and 5.5mm. Stitches form over the pin which prevents puckering at the edge of the
fabric.
Quilter’s ¼″ Piecing Foot P
Used when piecing quilt blocks. The foot has distance guideline marks ¼″ (6mm) and
⅛″ (3mm) from the needle.
Sensor Q-Foot
The Sensor Q-Foot is recommended for hoop embroidery.
This foot is also used for free motion sewing, free motion quilting and free motion
embroidering. When using the Sensor Q-Foot for free motion, select free motion
spring action in the free motion options pop-up in sewing mode.
1 Introduction 17
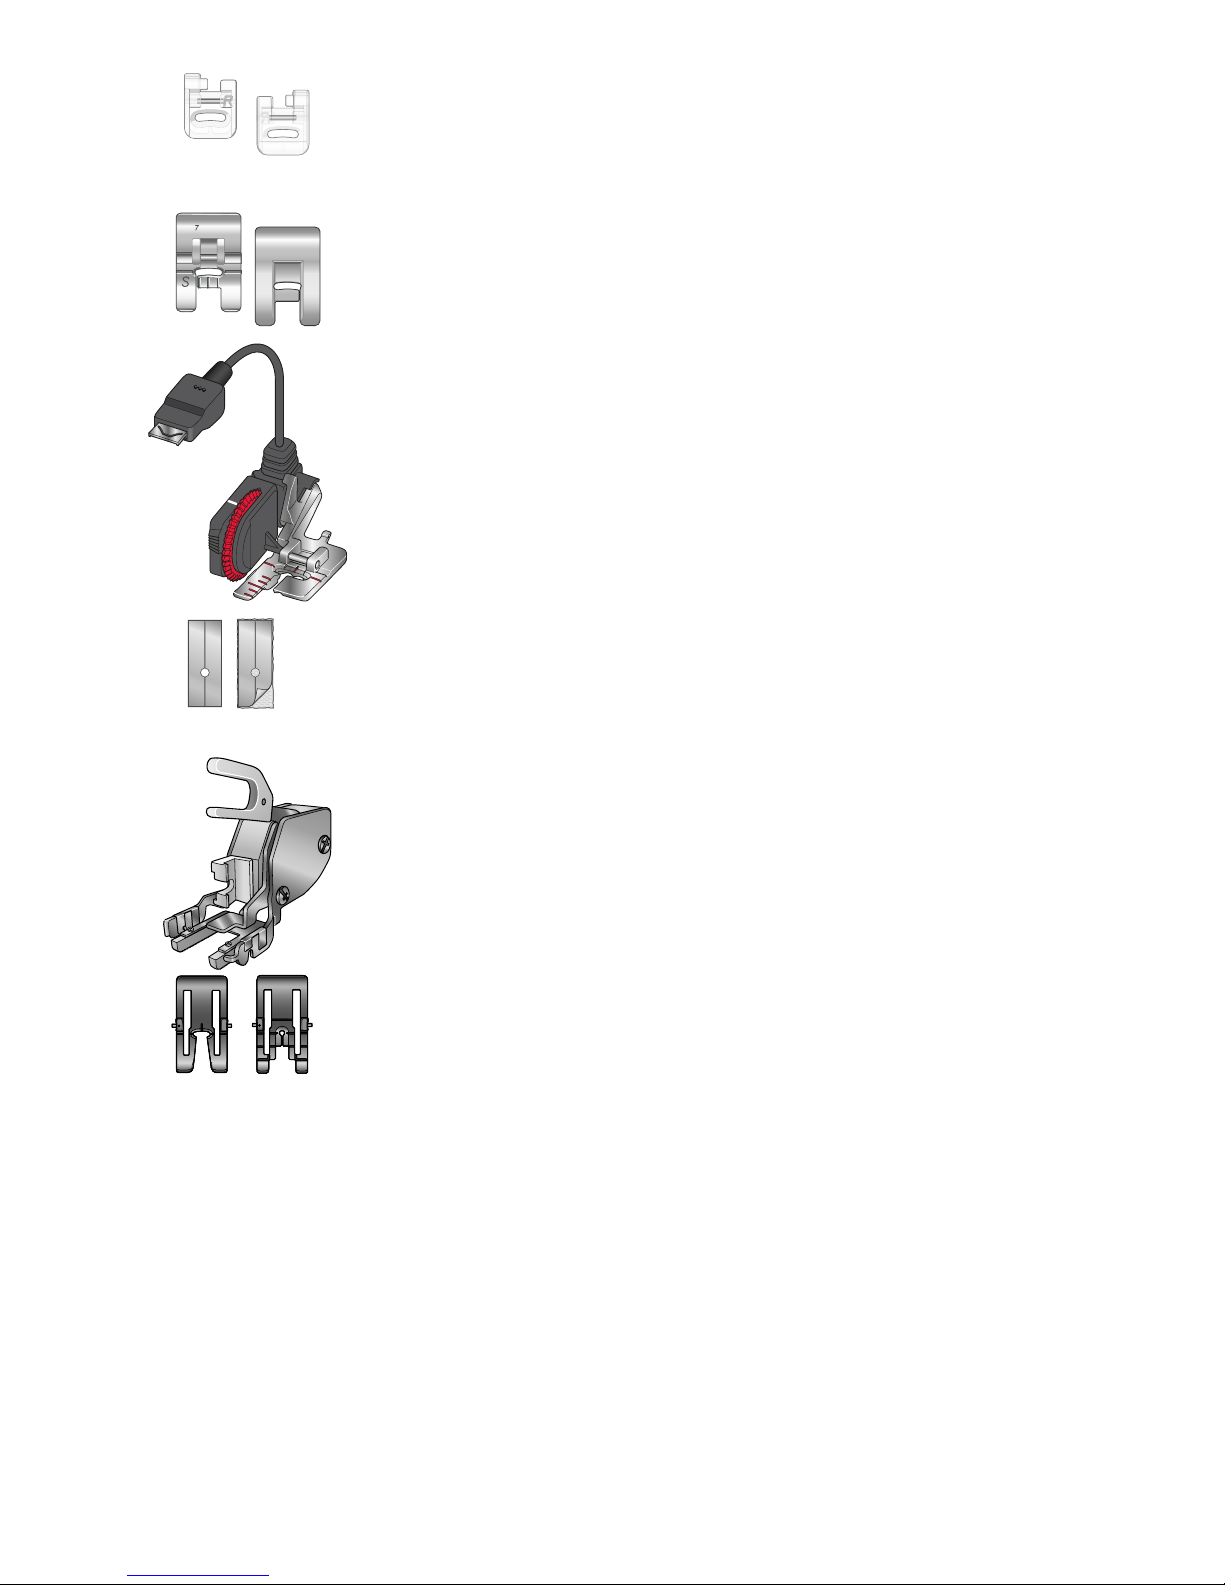
Embroidery/Darning Foot R
Used for free motion embroidery, free motion quilting, free motion stitching and free
motion darning. When using this foot, select free motion floating in the free motion
options pop-up in sewing mode.
This foot can also be used for hoop embroidery.
Side-Motion Foot S
Used for side-motion/omnimotion stitches.
Sensor One-Step Buttonhole Foot
Plug into the machine then enter the desired buttonhole length to sew sensor one-step
buttonholes. The middle mark measures a ⅝″ (15mm) from fabric edge.
Self-Adhesive Glide Plates
If sewing on foam, vinyl, plastic, or leather, the material can stick to the foot and
prevent the sewing machine from feeding properly. When using any of the above
materials, sew on a piece of scrap fabric, to make sure the machine feeds smoothly. If
not, fasten the self-adhesive glide plate to the underside of the presser foot.
Interchangeable Dual Feed
The Dual Feed Foot with changeable presser feet is designed to feed layers of fabric
and/or batting evenly. It is perfect for quilting, sewing velvet, stretch fabrics, imitation
leathers and fabrics that need precise pattern matching. Snap on the Changeable
Straight Stitch Foot when using the straight stitch in the center needle position with a
stitch length up to 6mm. Snap on the Changeable Zigzag Foot when selecting stitches
up to 7mm wide and 6mm long.
18 1 Introduction
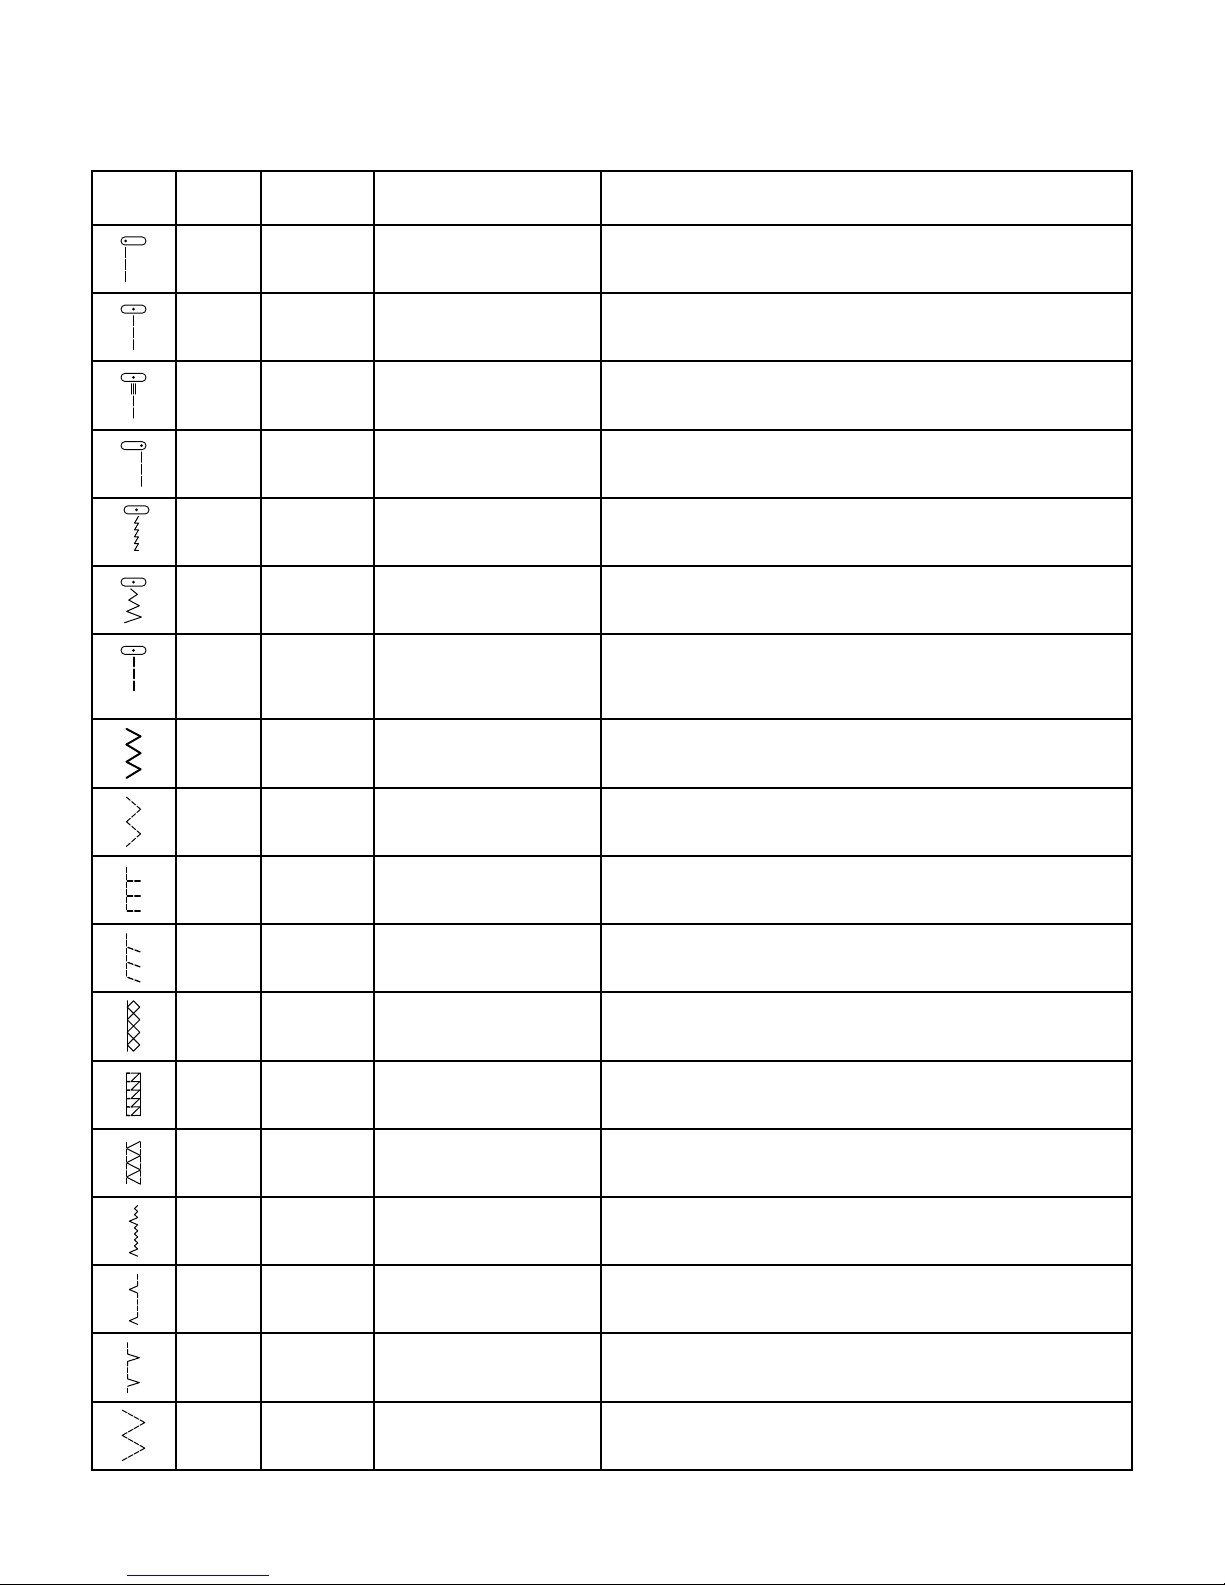
Stitch Overview
Utility Stitches
Stitch № Presser
foot
Name Description
A1 A Straight stitch, left needle
position
For all types of sewing.
A2 A Straight stitch, center
needle position
For all types of sewing.
A3 A Straight stitch with
reinforced tie-off
For all types of sewing. Begins and ends with forward and
reverse stitches.
A4 A Straight stitch, right
needle position
For all types of sewing.
A5, A6,
A7
A Stretch stitch, left, center
and right needle position
For seams in tricot and stretch fabrics.
A8, A9,
A10
A Zigzag, left, center and
right needle position
For sewing on lace, trims and appliqués.
A11,
A12,
A13
A Reinforced straight
stitch, left, center and
right needle position
Triple and elastic, for reinforced seams. For top stitch, increase
the stitch length.
A14
B
Reinforced zigzag stitch For joining fabric edge to edge or overlapping in leather. For
decorative sewing.
A15 A Three-step zigzag For overcasting, mending, sewing on patches and elastic.
Suitable for light and medium weight fabrics.
A16
J
Seam/overcast stitch
Seam and overcast in one step along the edge or trim later. For
light stretch and non-stretch fabrics.
A17
B
Stretch seam/overcast
stitch
Seam and overcast in one step along the edge or trim later. For
medium and heavy stretch fabrics.
A18
B
Double overlock stitch Seam and overcast in one step along the edge or trim later. For
heavy stretch and heavy woven fabrics.
A19
B
Overlock stitch Seam and overcast in one step along the edge or trim later. For
medium stretch fabrics.
A20
B
Flatlock stitch Decorative hems and overlapped seams, belts and bands. For
medium/heavy stretch fabrics.
A21
D
Stretch blind hem stitch Blind hems in medium and heavy stretch fabrics.
A22
D
Woven blind hem stitch Blind hems in medium and heavy woven fabrics.
A23 A Shell edge stitch For edging, sewing over the edge on light woven fabrics. Sew
woven fabrics on bias.
A24 A
Four-step zigzag
For overcasting, mending, sewing on patches and elastics on
loosely woven fabrics.
1 Introduction 19
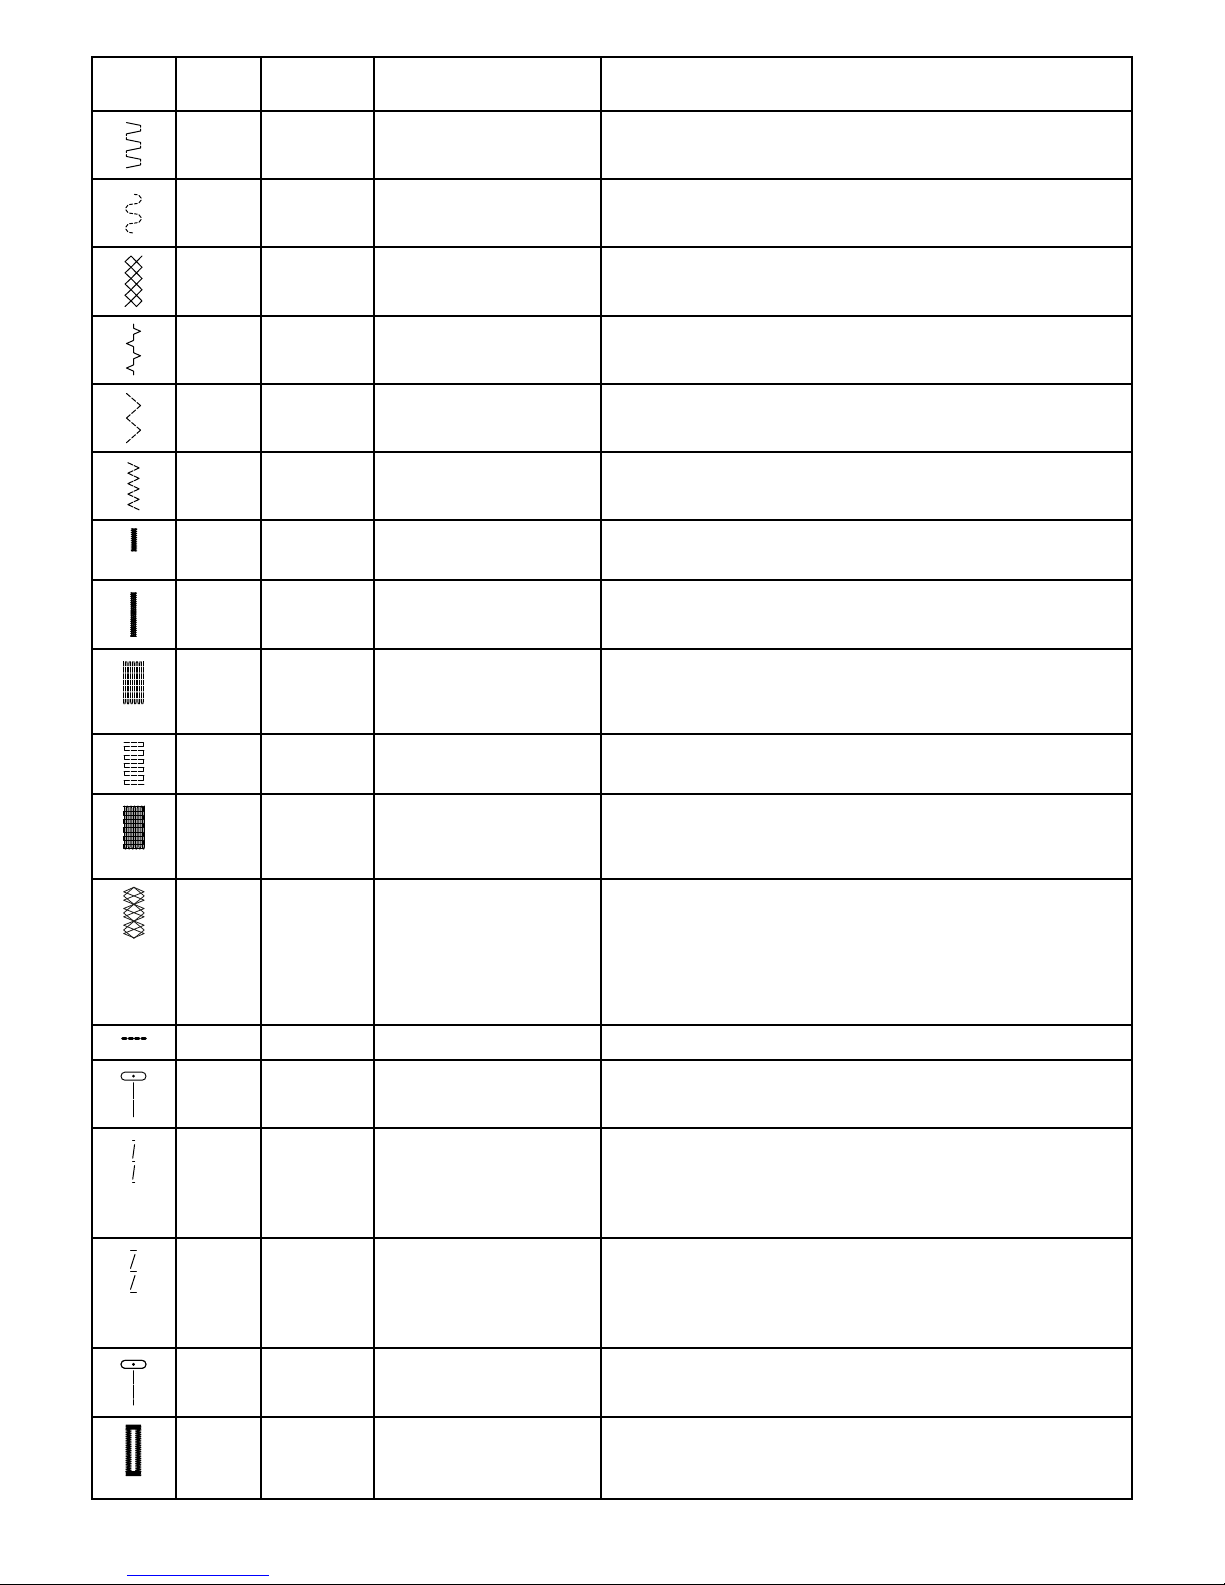
Stitch № Presser
foot
Name Description
A25
B
Elastic/casing stitch
For overlapped seams in tricot. To sew casing over narrow
elastic.
A26 A Serpentine stitch For mending and elastic applications.
A27
B
Elastic or smocking
stitch
Sew over two rows of elastic thread for elastic shirring.
A28
B
Bridging stitch For joining two pieces of fabric with finished edges and for
elastic shirring.
A29
J
Three-step zigzag For overcasting, mending, sewing on patches and elastic.
Suitable for light and medium weight fabrics.
A30 A Two-step zigzag For joining two pieces of lace, and for elastic shirring.
A31
B
Bartack stitch Reinforce pockets, shirt openings, belt loops as well as at lower
end of a zipper.
A32
B
Bartack, manual Reinforce pockets, shirt openings, belt loops as well as at lower
end of a zipper.
A33 A Darning stitch (forward
and backward)
Darn and mend small holes in work clothes, jeans, tablecloths
and linen towels. Stitch over hole, touch reverse for continuous
darning and auto stop.
A34 A Darning stitch (side to
side)
For mending small tears.
A35 A Reinforced darning stitch Darn and mend work clothes, jeans, tablecloths and linen
towels. Stitch over hole, touch reverse for continuous darning
and auto stop.
A36
B
Darning stitch (fourstep)
A group of four stitches perfect for mending small tears. Stitch
#1 and #3 are sewn in a forward motion, stitch #2 and #4 are
sewn backwards. To change stitch and direction touch the
reverse button.
Tip: Press fusible interfacing on the wrong side before mending the tear.
A37 A Belt loop stitch For securing belt loops.
A38 A Basting stitch For temporary seams. The long stitches and reduced tension
make the seams easy to unravel.
A39 A Straight basting stitch To baste, press the foot control and the machine will make two
stitches, stop and raise the foot. When the presser foot lifts,
move the fabric to the next baste position and press the foot
control. Feed teeth lowered automatically.
A40 A Zigzag basting To baste, press the foot control and the machine will make two
stitches, stop and raise the foot. When the presser foot lifts,
move the fabric to the next baste position and press the foot
control. Feed teeth lowered automatically.
A41 A Gathering stitch No fix stitch in the beginning of the seam for easy gathering.
A42 Sensor
Buttonhole
foot/C
Wide bartack buttonhole For medium and heavy fabrics with extra cutting space.
20 1 Introduction

Stitch № Presser
foot
Name Description
A43
Sensor
Buttonhole
foot/C
Bartack buttonhole For most fabric weights.
A44
Sensor
Buttonhole
foot/C
Rounded bartack
buttonhole
For light weight fabrics.
A45
Sensor
Buttonhole
foot/C
Round end buttonhole For blouses and children’s garments.
A46
Sensor
Buttonhole
foot/C
Keyhole buttonhole Square end for tailored jackets, coats, etc.
A47
Sensor
Buttonhole
foot/C
Tapered keyhole
buttonhole
Tapered end for tailored garments.
A48 Sensor
Buttonhole
foot/C
Decorative fashion
buttonhole
For most fabric weights.
A49 Sensor
Buttonhole
foot/C
Decorative fashion
buttonhole
For most fabric weights.
A50 Sensor
Buttonhole
foot/C
Heavy duty buttonhole With reinforced bartacks
A51 Sensor
Buttonhole
foot/C
Heavy reinforced
buttonhole
For utility and heavy fabrics.
A52
C
Medium/heavy
reinforced buttonhole
For medium and heavy fabrics.
A53
C
Medium reinforced
decorative buttonhole
For medium fabrics.
A54 Sensor
Buttonhole
foot/C
Heirloom buttonhole For hand look on fine and delicate fabrics.
Tip: For jeans buttonholes, increase length and width of the buttonhole.
Use thicker thread.
A55 Sensor
Buttonhole
foot/C
Rounded heirloom
buttonhole
For hand look on fine and delicate fabrics.
A56 A Leather buttonhole
(straight stitch)
For leather and suede.
A57 A Bound buttonhole
(straight stitch)
With extra cutting space for bound buttonholes.
A58
-
Automatic button sewing For sewing on buttons.
A59
B
Round eyelet For belts, laces, etc.
A60
B
Teardrop eyelet For laces, embellishments.
A61
B
Oval eyelet For laces, embellishments.
1 Introduction 21

Stitch Menu Overview
There are several different stitch menus with stitches for all
purposes. For detailed description of a stitch, use the quick
help function, see Quick Help.
Stitch Menu Name Description
A — Utility Stitches Stitches for garment sewing and mending.
B — Appliqué Stitches For sewing appliqués with different effects.
C — Heirloom Stitches Decorative stitches for traditional heirloom sewing. Stitches for hemstitching, smocking
and sewing on laces and trims.
D — Quilt Stitches Stitches for all types of quilting techniques.
E — Crafting Stitches Decorative stitches to embellish crafts.
F — Decorative Stitches For decorative sewing.
G — Vintage Stitches A selection of quilt stitches for crazy patch quilting and decorative stitching.
H — Children Stitches Stitches suitable for sewing on children’s clothes and projects.
J — Scallop Stitches Create scallop details and finish edges with beautiful scallop stitches.
K — Omnimotion Stitches Program these stitches into an unlimited number of combinations. Stitches are formed
with side motion. The stitch width can be up to 49mm wide.
L — Dimensional Stitches Includes three types of stitches: appliqué and pop-up stitches, combinations of these two
types, and sequin stitches.
M — Theme Stitches Each stitch number on this menu contains a group of four stitches designed to be sewn
out together in random combinations. Change to the next stitch in the selected group by
touching the reverse button.
N — Embellished Stitches Decorative stitches that can be used as they are, or further embellished after sewing. Use
quick help for detailed information.
O — Single Motif Stitches Single stitches for embellishment. The machine stops after one sewn repetition.
P — Specialty Stitches Sew special techniques including candlewicking, edging and more. Extra accessories may
be needed. Use quick help for detailed information.
Q — Decorative Tapering
Stitches
Decorative stitches with tapering.
R — Pictogram Stitches Pictogram satin elements to program original satin stitch designs.
S — 4–Way Stitches Four directional sewing and patching using the free arm.
T — 8–Way Stitches Straight stitch and reinforced straight stitch in eight different directions without turning
the fabric. Can be programmed with decorative stitches to create unique borders.
Alphabets
Stitch fonts are available in block, outline, brush line, script
and Cyrillic alphabets.
22 1 Introduction

2 Preparations
Unpacking Machine and Embroidery
Unit
After lifting the machine out of the box and removing all
packing material and the plastic bag, wipe the machine,
particularly around the needle and needle plate to remove any
oil before sewing.
When unpacking the embroidery unit, do not throw away the
black styrofoam inside the embroidery unit carrying bag, as
this is designed for storing the embroidery unit when not in
use.
Note: Your DESIGNER EPIC™ machine is adjusted to provide the
best stitch result at normal room temperature. Extreme hot and cold
temperatures can affect the sewn result.
Connect the Power Cord and Foot
Control
Among the accessories you will find the power cord and the
foot control.
Note: Before plugging in the foot control, check to ensure that it is type
"FR5" (see underside of foot control).
1. Pull out the cord from the foot control. Connect the foot
control cord to the front socket on the bottom right side
of the machine.
2. Connect the power cord to the rear socket on the bottom
right side of the machine. Plug the cord into the wall
socket.
3. Press the ON/OFF switch to "I" to turn on power and
light.
For the USA and Canada
This sewing machine has a polarized plug (one blade wider
than the other). To reduce the risk of electric shock, this
plug is intended to fit in a polarized outlet only one way. If
the plug does not fit fully in the outlet, reverse the plug. If
it still does not fit, contact a qualified electrician to install
the proper outlet. Do not modify the plug in any way.
24 2 Preparations

Pack Away After Sewing
1. Press the ON/OFF switch to "O".
2. Unplug the cord from the wall socket and then from the
machine.
3. Unplug the foot control cord from the machine. Pull the
cord gently and release. The cord will retract into the foot
control.
4. Place all accessories in the accessory tray. Slide the tray
on to the machine around the free arm.
5. Place the foot control in the space above the free arm.
6. Put on the soft cover.
Tip: The user’s guide and power cord can be stored in the back pocket of
the soft cover.
USB Ports
Your machine has two USB ports for connecting USB
devices such as a memory stick. USB plugs can only be
inserted one way – do not force them into the ports! To
remove, carefully pull the USB device out straight.
Note: Make sure that the USB stick you use has the format FAT32.
Using a USB device
The external device button in file manager is only active
when a device is connected to a machine USB port.
Note: Do not remove the USB device if a loading spinner is shown on
the screen or while the file manager is shown. Removing the device at
that time can damage the files on your USB device.
Read more in File Manager – Overview.
2 Preparations 25
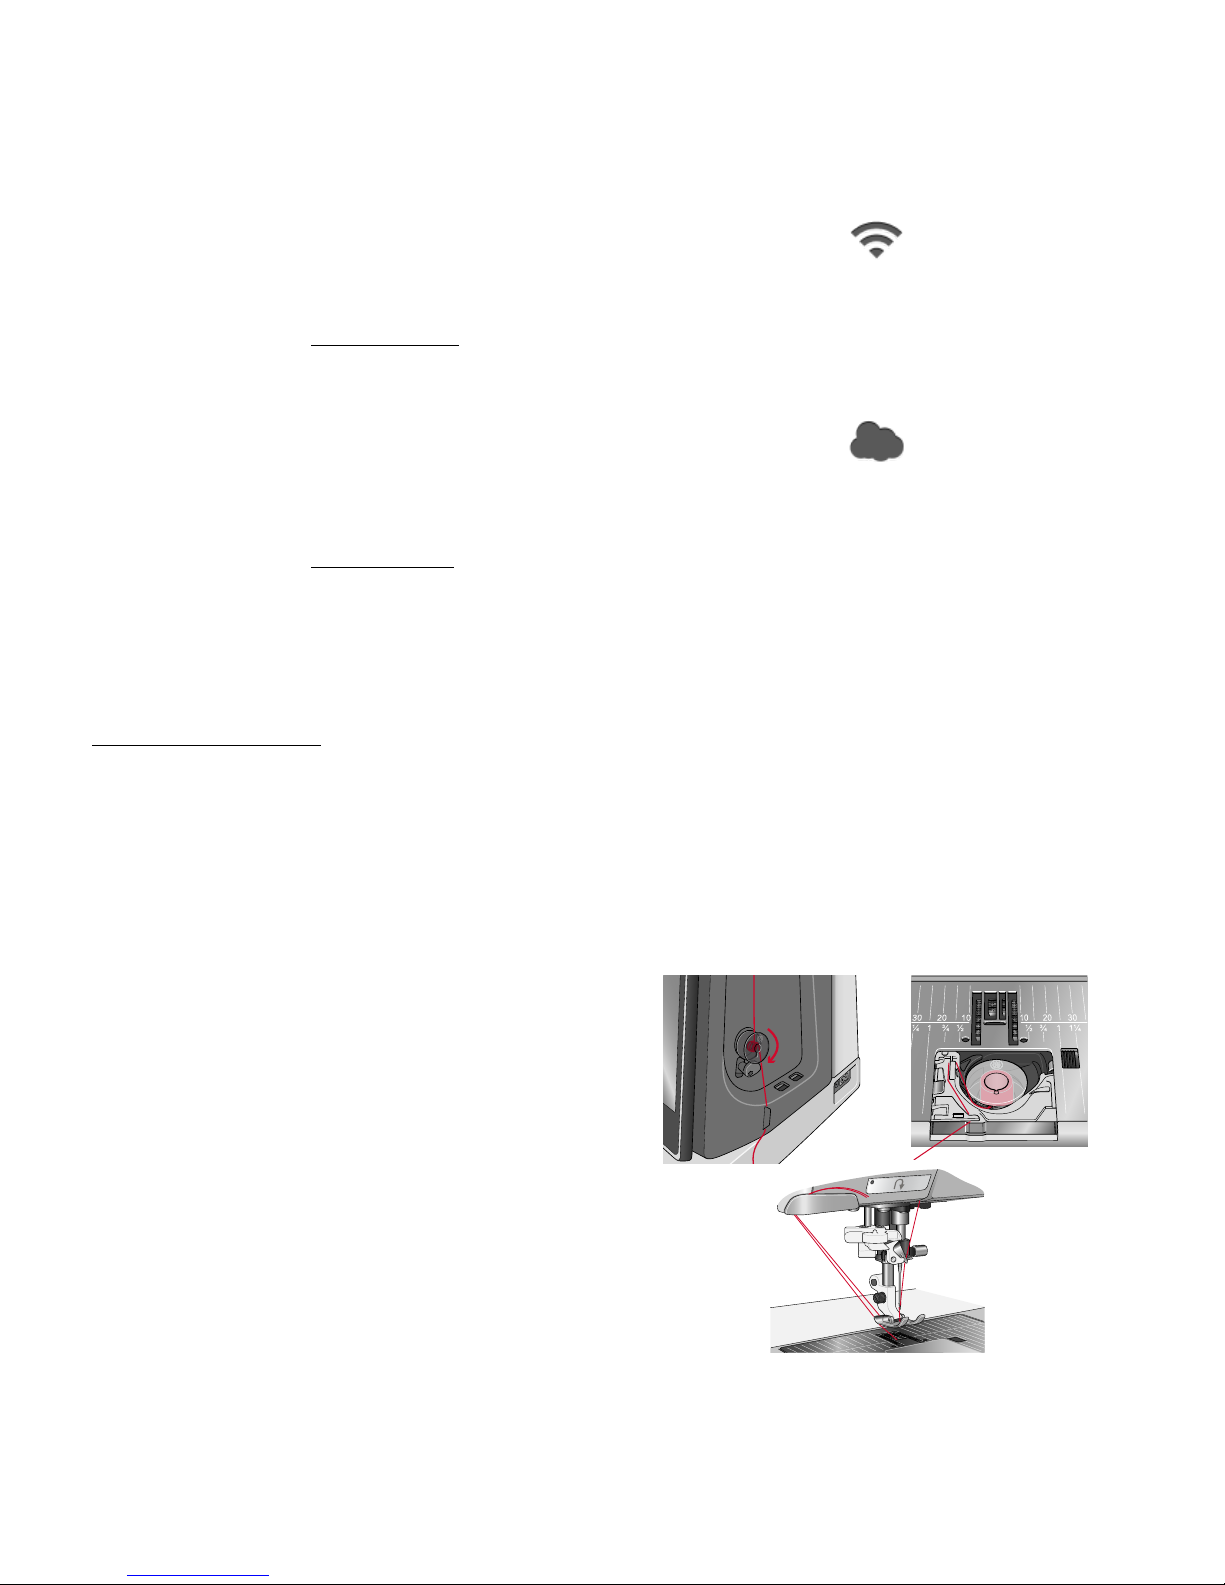
Getting Started with WiFi and
mySewnet™ Cloud
Follow the steps below to connect your machine.
Connect to a Network with WiFi
WiFi button
Touch the WiFi button in the top left corner of the screen.
Select from the list of available networks. If your network is
password protected, you will be prompted to enter the
password to connect.
For more information, see WiFi Introduction.
Connect to mySewnet™ Cloud
mySewnet™ cloud button
When you have established a WiFi connection, touch the
cloud button next to the WiFi button on the screen. Touch
the button to sign in. A web view opens where you can log
in. If you do not have a user name and password, select
Register to create an account.
For more information, see mySewnet™ Cloud.
LED Lights
Your machine has LED lights which distribute the light
evenly over the sewing area and eliminate shadows. You can
adjust the brightness of the light in the settings menu, see
LED Work Light Brightness .
Free Arm
To use the free arm, slide off the accessory tray. When
attached, a hook keeps the accessory tray locked to the
machine. Remove the tray by sliding it to the left.
Manual Thread Cutter
There are three manual thread cutters on your machine. The
first one is close to the bobbin winder spindle for cutting the
thread before and after winding.
The second one is next to the bobbin area for cutting the
bobbin thread after placing the bobbin in the machine.
The third one is on the left side of the machine for manually
cutting top and bobbin threads. Pull both threads into the
cutter from the back to the front and pull down quickly.
26 2 Preparations
Thread Sensor
If the needle thread breaks or bobbin thread is running low,
the machine stops and a pop-up appears on the screen.
If needle thread breaks: Remove the thread completely, rethread the machine and touch OK in the pop-up.
If bobbin thread is running low: You can continue sewing
without closing the pop-up before the bobbin thread runs
out completely. This gives you an opportunity to plan where
to stop and change the bobbin. When the bobbin is replaced
with a full one, touch OK in the pop-up.
Telescopic Thread Guide
The telescopic thread guide is always used when threading
your machine for sewing/embroidery and bobbin winding.
The telescopic thread guide helps straighten the thread,
preventing it from tangling or breaking. The thread guide
together with the vertical spool pins make it possible to
successfully use even very large thread cones.
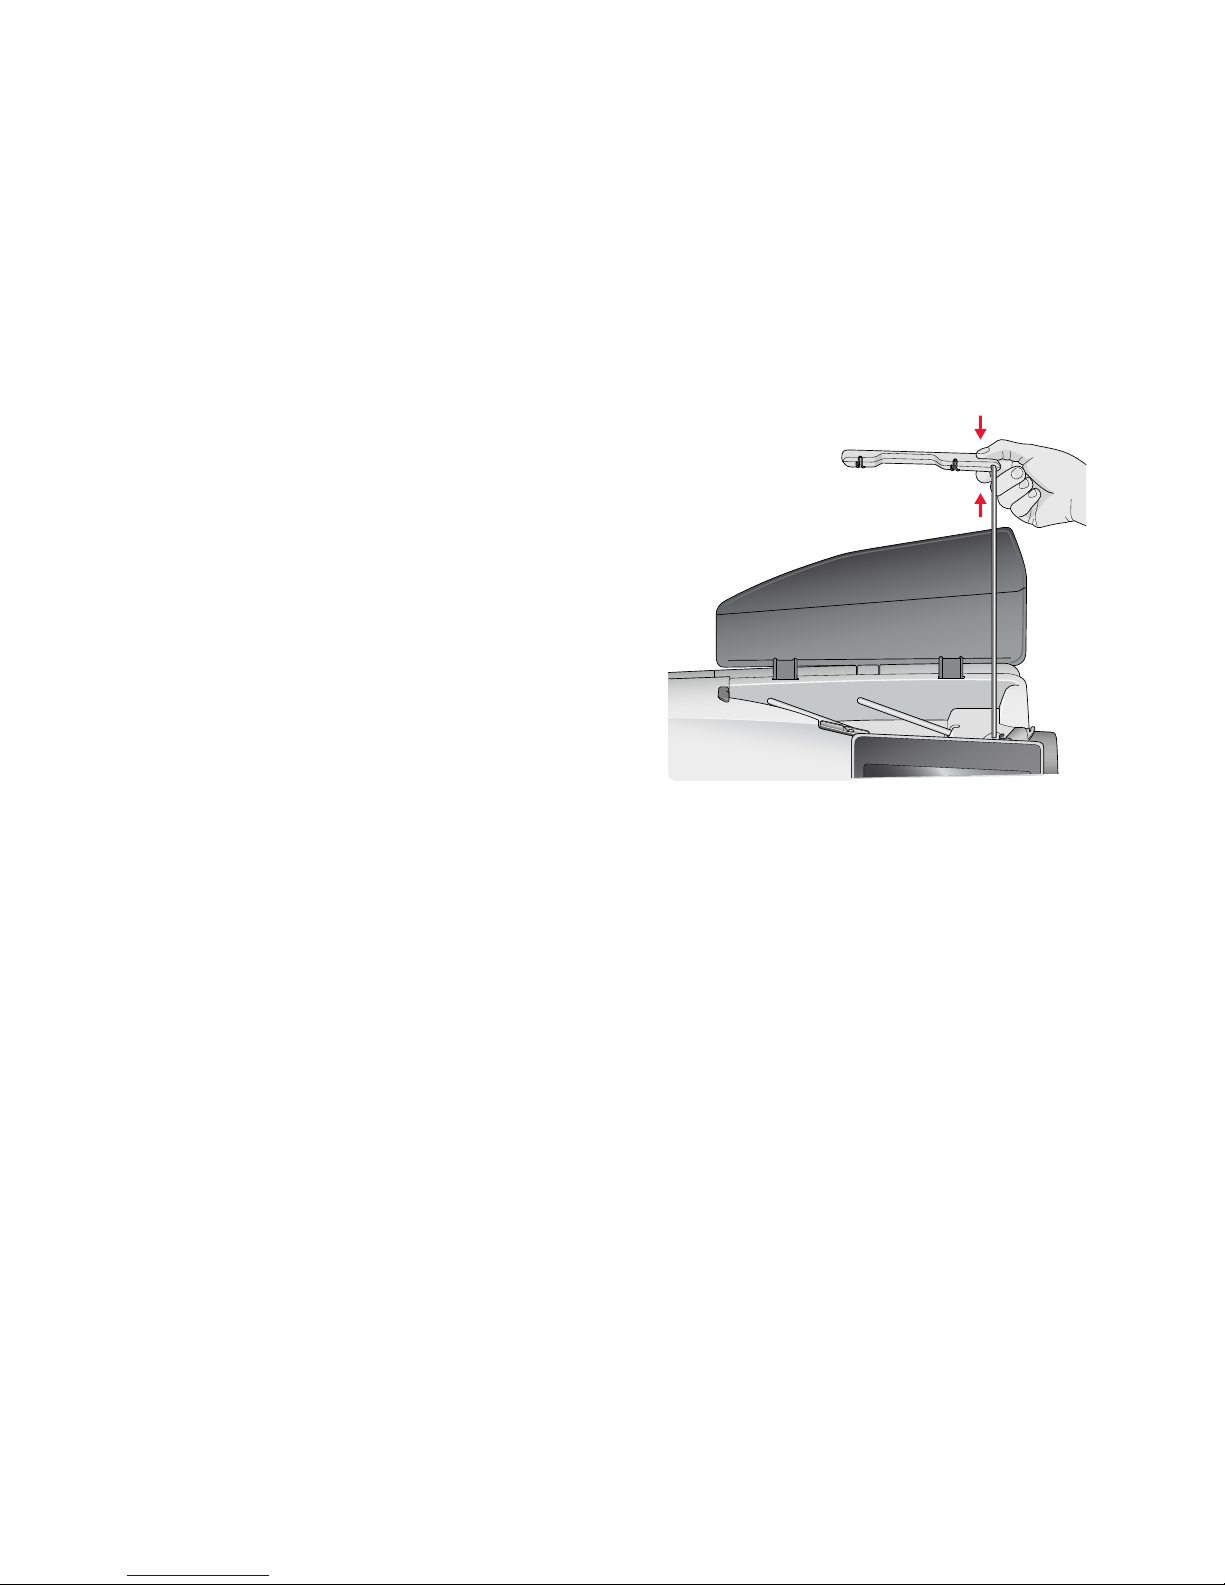
Extending and Retracting the Telescopic Thread Guide
Hold the telescopic thread guide by the markings as
illustrated and pull it straight up until it clicks into place.
To retract, hold the thread guide by the markings and push it
straight down.
2 Preparations 27
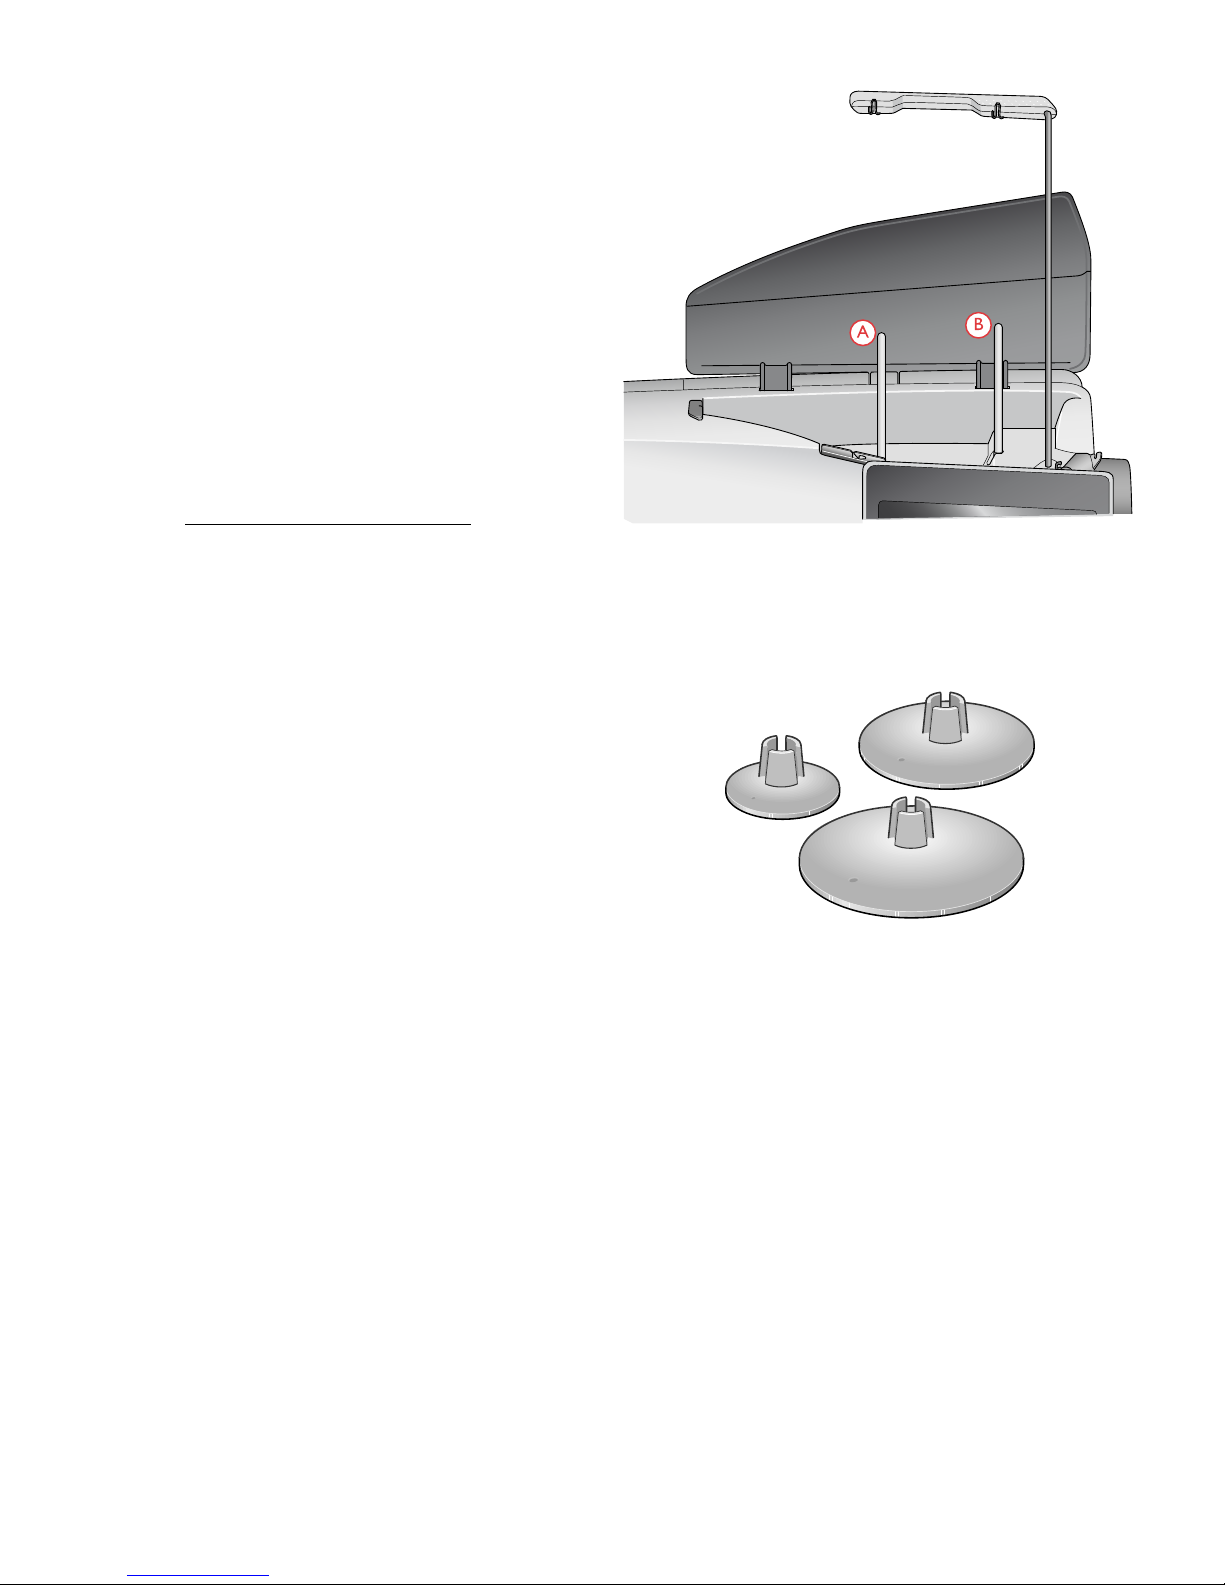
Spool Pins
Main spool pin (A) and auxiliary spool pin (B)
Your machine has two spool pins; a main spool pin and an
auxiliary spool pin. The spool pins are designed for all types
of thread.
Use the main spool pin (A) when threading the upper thread
and for bobbin winding through the needle. For regular
sewing and embroidery thread, use the main spool pin in
vertical position. Place the spool pin in the horizontal
position if you want to keep the machine threaded and close
the lid when you have finished sewing. Remember to place
the spool pin back in the vertical position when you start to
sew/embroider again.
Note: Tilting the spool pins is not possible with large thread spools or
cones.
You may get better results if you tilt the spool pin to the
horizontal position when using small spools of specialty
thread. See Threading Tips and Hints, page 36.
Use the auxiliary spool pin (B) when winding a bobbin from
a second spool of thread or for a second spool when sewing
with a twin needle.
Spool Caps
Spool caps in three sizes are included with your machine. For
most types of thread spools, no spool cap is needed except
when the thread on the spool is running low. If the thread is
snagging on the top of the thread spool, place a spool cap on
top. Always use a spool cap slightly larger than the thread
spool to prevent the thread from snagging. The flat side of
the spool cap should be pressed firmly against the spool.
There should be no space between the spool cap and the
thread spool.
28 2 Preparations
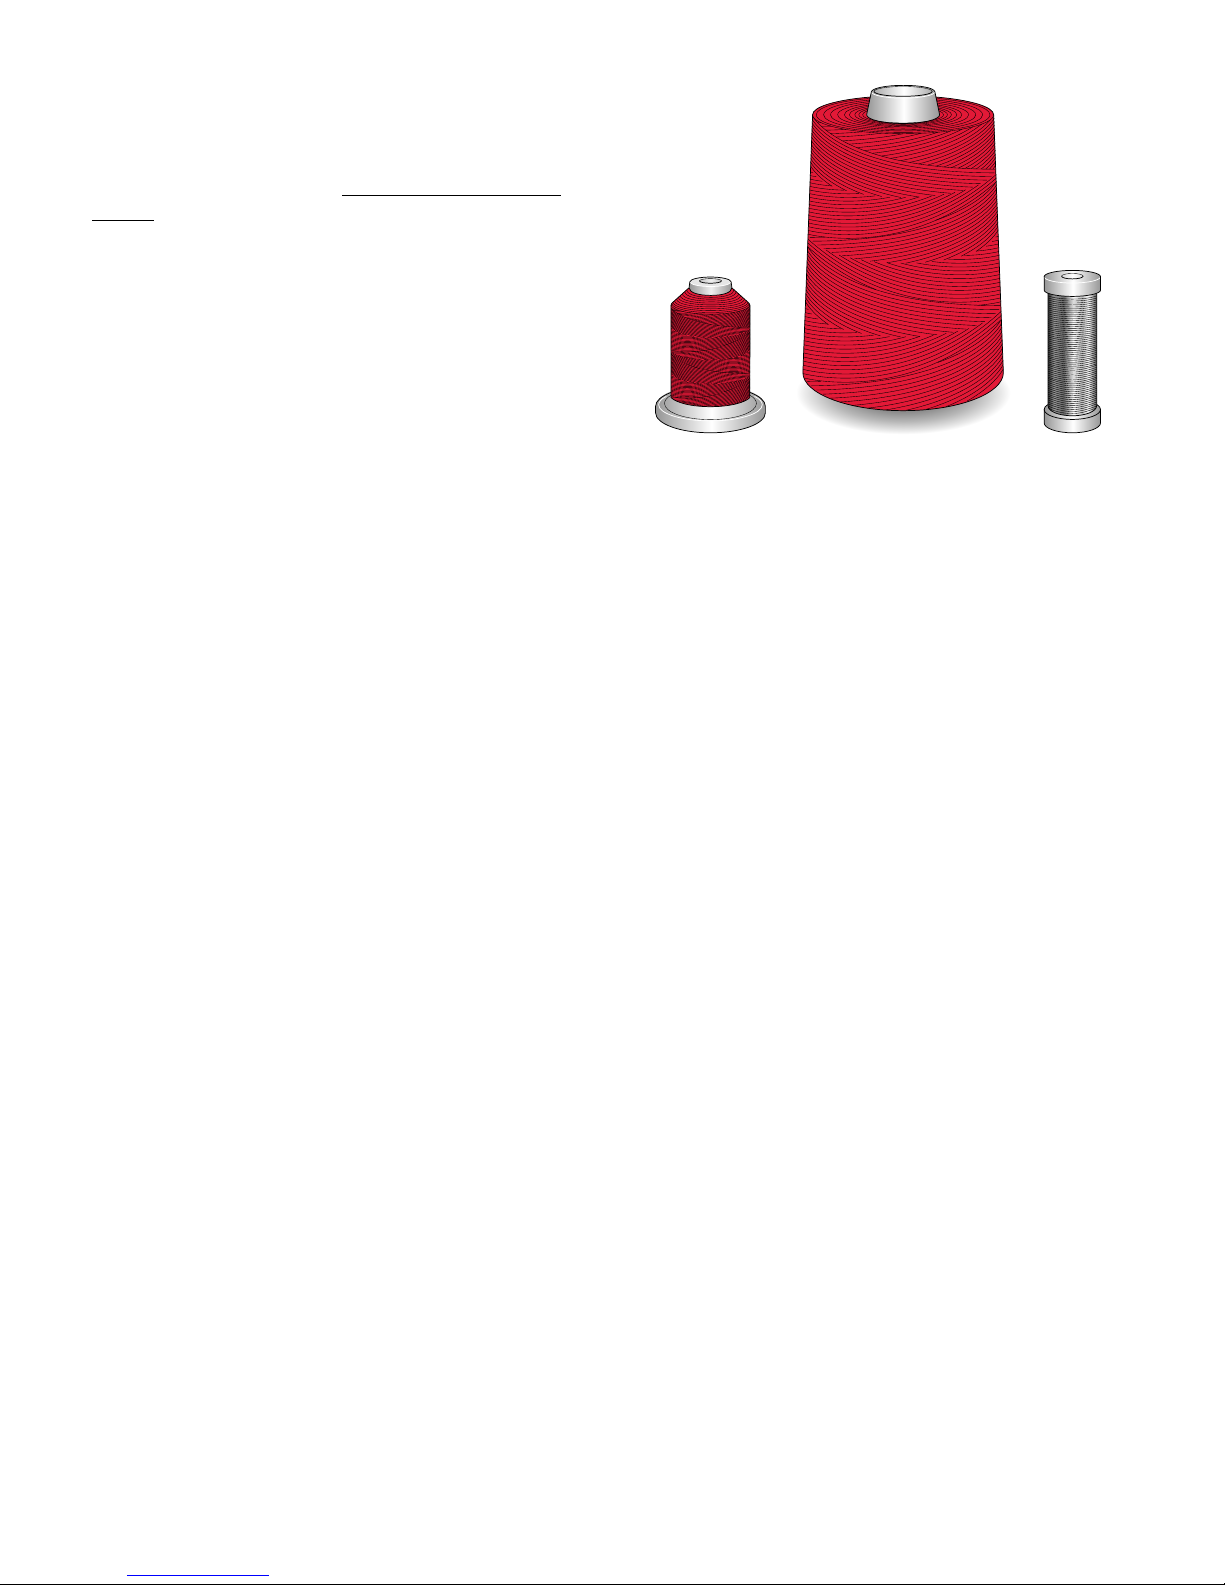
Threads
There are many threads on the market today developed for
different purposes.
Your DESIGNER EPIC™ machine is designed for all types
of threads and spool sizes. See Threading Tips and Hints,
page 36 for information on achieving optimal results with
different types of thread and different sizes/styles of thread
spools.
All Purpose Sewing Thread
All purpose sewing thread is made of synthetic, cotton or
cotton covered polyester. This type of thread is used for
most sewing projects, including garments, home decor, and
quilting.
Embroidery Thread
Embroidery thread is made from a variety of fibers: rayon,
polyester, acrylic or metallic. These threads create a smooth
glossy appearance for embroidery and other decorative
stitching.
Embroidery thread is not typically used in the bobbin unless
both sides of the project will be seen. A light weight,
embroidery bobbin thread is often used in the bobbin
instead. The lighter weight thread does not build up under
the embroidery.
Note: When using a metallic or a flat film thread for embroidery, you
may need to use a needle with a larger eye and lower the embroidery
speed.
Transparent Thread
Transparent thread, also called monofilament thread, is a
single clear synthetic thread. It is used for quilting and other
decorative sewing. When winding a bobbin, wind at half
speed and fill the bobbin half full.
2 Preparations 29
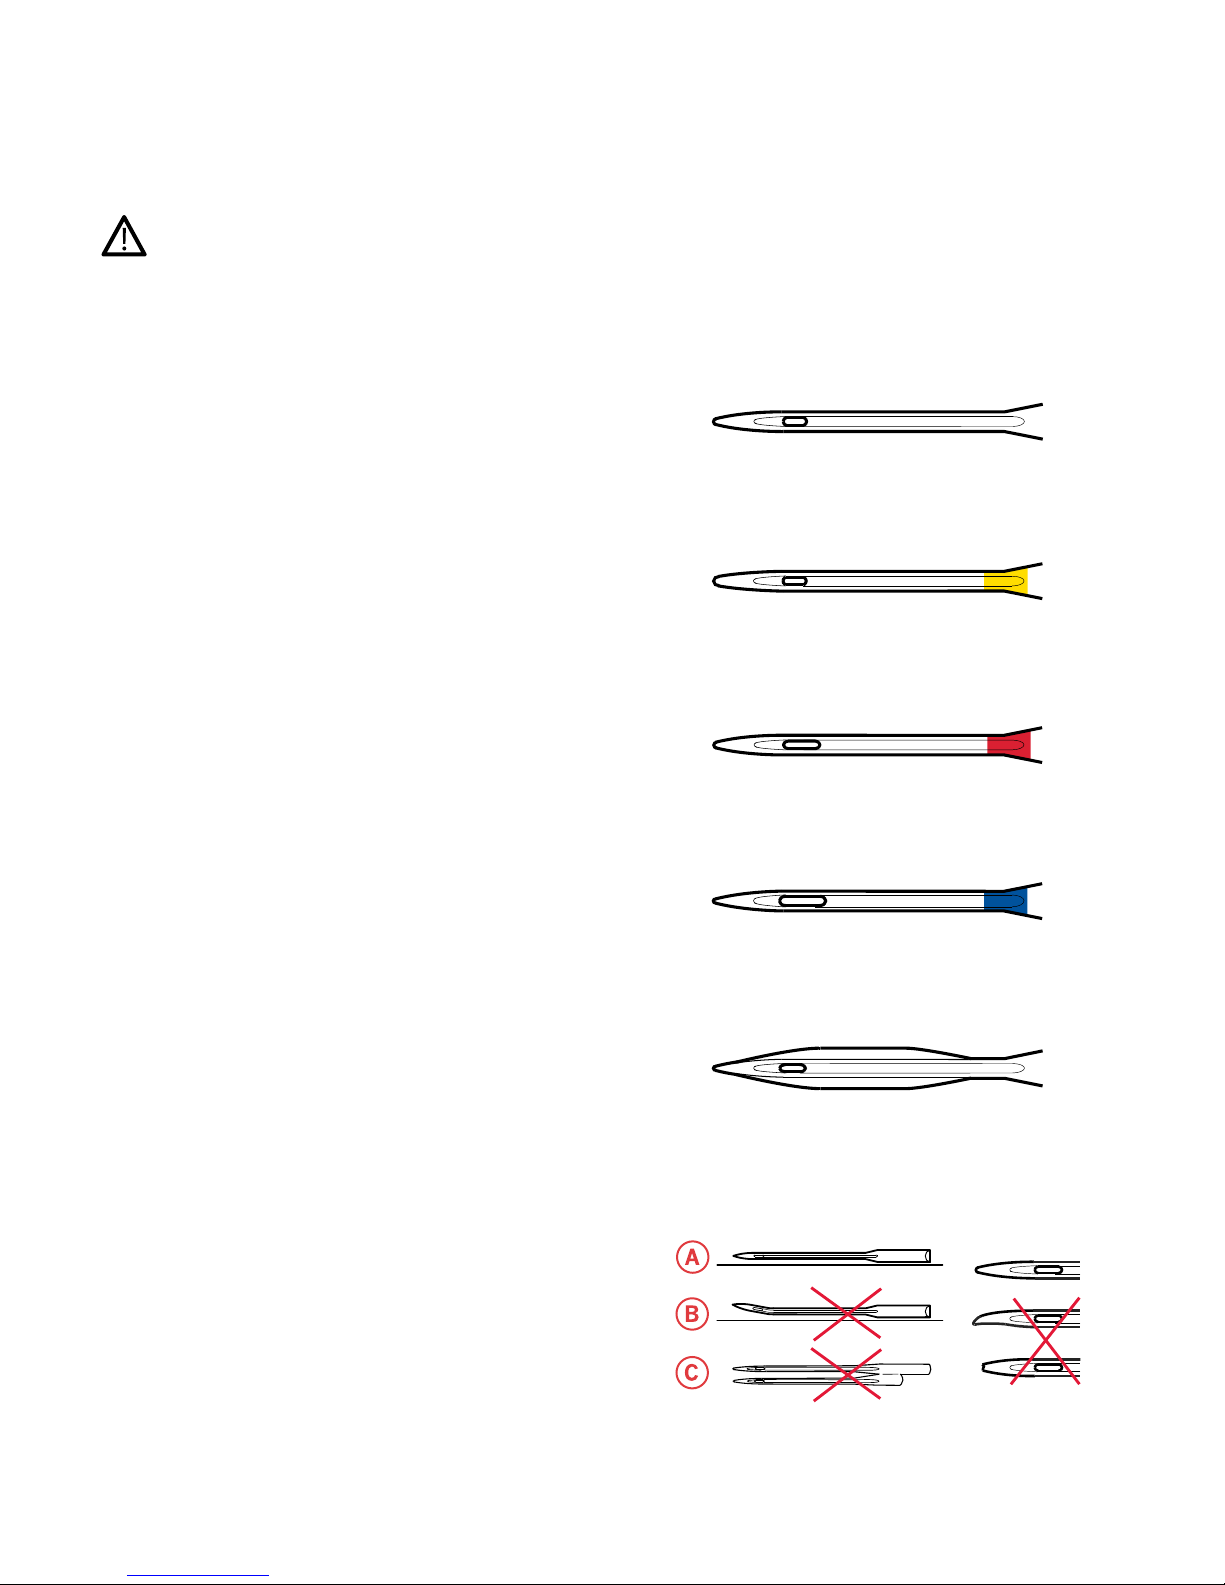
Needles
The sewing machine needle plays an important role in
successful sewing. Use only quality needles. We recommend
needles of system 130/705H. The needle package included
with your machine contains needles of the most frequently
used sizes.
Be sure to match the needle to the thread you are using.
Heavier threads require a needle with a larger needle eye. If
the needle eye is too small for the thread the automatic needle
threader may not work properly.
Universal Needle
Universal needles have a slightly rounded point and come in
a variety of sizes. For general sewing in a variety of fabric
types and weights.
Stretch Needle
Stretch needles have a special scarf to eliminate skipped
stitches when there is a flex in the fabric. For knits,
swimwear, fleece, synthetic suedes and leathers.
Embroidery Needle
Embroidery needles have a special scarf, a slightly rounded
point and a slightly larger eye to avoid damage to thread and
materials. Use with metallic and other specialty threads for
embroidery and decorative sewing.
Denim Needle
Denim needles have a sharp point to penetrate tightly woven
fabrics without deflecting the needle. For canvas, denim,
microfibers.
Wing Needle
Wing needles have wide wings on the side of the needle to
poke holes in the fabric when sewing entredeux and other
hemstitches on natural fiber fabrics.
Important Needle Information
Change the needle often. Always use a straight needle with a
sharp point (A).
A damaged needle (B) can cause skipped stitches, breakage or
snapping of the thread. It can also damage the needle plate.
Do not use asymmetrical twin needles (C), they can damage
your sewing machine.
30 2 Preparations
 Loading...