

Page 1
Viking Installation Guide
Free-Standing Side Panel,
Top Panel and Grille Installation
Viking Range Corporation
111 Front Street
Greenwood, Mississippi 38930 USA
Page 2
2
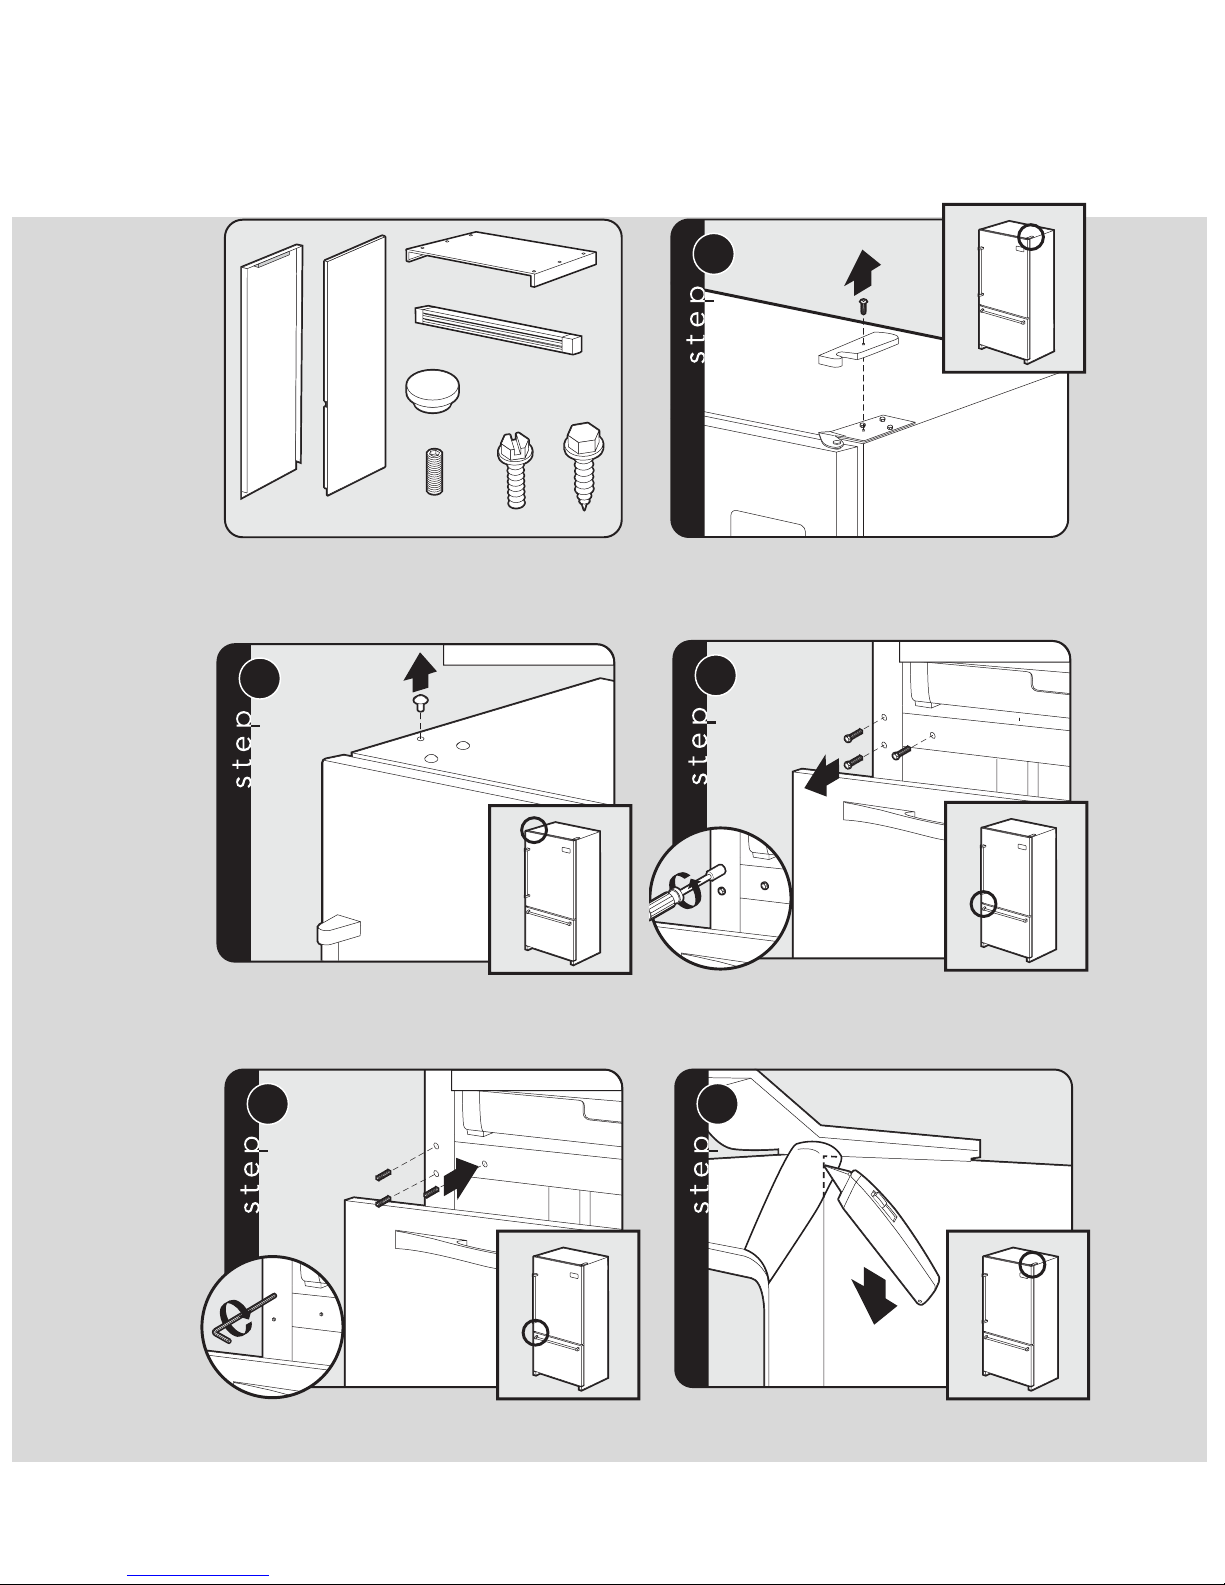
Required Components
Remove and discard screw and hinge cover.
(Repeat if two hinges are used.)
Remove and discard plug button from hole on
non-hinge side.
Remove three screws from mullion area opposite the
center hinge.
Install set screws from bag into holes from
previous step.
Remove edge of corner cover.
Bottom Mount Model Only
2
Bottom Mount Model Only
4
5
Installation
1
Bottom Mount Model Only
3
Top Panel
Front Grille
Left Panel Right Panel
Caps
Set
Screws
Screws
A
B
Page 3

3
6
French Door and Side-by-Side Dispenser Models only
7
French Door and Side-by-Side Dispenser Models only
Unplug harnesses on door.
Remove ground screw from hinge on door. Hold for
replacement.
8
French Door and Side-by-Side Dispenser Models only
9
French Door and Side-by-Side Dispenser Models only
Apply electrical tape to harnesses and ground wire
coming from door.
Plug in proper harness kit to the harness extension
coming from the door.
A
A - Designer Series
B - Pro Series
10
11
With top panel and grille upside down, position grille
assembly in front of top panel. Secure top panel to grille
assembly via four outer holes and three inner holes.
Remove screws on lower back machine cover.
Hold for replacement.
Page 4

4
Remove adhesive backing from the side panel. Fit the
side panel to the front of the unit first. With a center
hinge, the side panel will have a cutout.
Pull the machine cover off and slip back of side panel
between refrigerator cabinet and machine cover. Install
machine cover screws back into refrigerator cabinet.
NOTE: The holes on the side panel are clearance holes.
Remove adhesive backing from other side panel. Fit the
side panel to the front of the unit first. Spacer on top of
side panel needs to sit on top of refrigerator cabinet.
Pull the machine cover and slip back of side panel
between refrigerator cabinet and machine cover. Install
machine cover screws back into refrigerator cabinet.
NOTE: The holes on the side panel are clearance holes.
Install machine cover screws back into
refrigerator cabinet.
NOTE: The holes on the side panel are clearance holes.
12
2
1
13
14
1
2
2
15
16
Feed wire harness and ground wire through the bottom
of the endcap and out through the hole in the rear of
the grille.
French Door and Side-by-Side Dispenser Models only
17
Page 5

5
18
French Door and Side-by-Side Dispenser Models only
19
Connect wire harness to wire harness extension
in cabinet. Connect ground screw. Secure wire harness
to top of the cabinet with a piece of tape.
Align top panel and grille assembly to front door and
position top panel and grille on top of unit.
21
Insert screws through holes of top panel into side
panel.
Insert cap covers into holes.
20
A
complete
Page 6

6
Page 7

7
Page 8

Viking Range Corporation
111 Front Street
Greenwood, Mississippi 38930 USA
(662) 455-1200
For product information,
call 1-888-VIKING1 (845-4641)
or visit the Viking Web site at
vikingrange.com
F20424
(PS0605VR)
 Loading...