

Page 1

9.7-INCH TFT-LED
PUBLIC VIEW MONITOR
INSTRUCTION MANUAL
Please read this manual thoroughly before use, and keep it handy for future reference.
Page 2

Page 3

SAFETY INSTRUCTION ………………………………………………………….…… 2 ~ 3
CAUTIONS …………………………………………………………….......................... 4
FCC RF INTERFERENCE STATEMENT ……………………………....................... 5
CONNECTING WITH EXTERNAL EQUIPMENT …………………………………… 6
REMOTE FUNCTIONS ………………………………………………………………… 7
CONTROLS AND FUNCTIONS ………………………………………………………. 8 ~ 16
CAMERA CONTROLS AND FUNCTIONS ….………………………………………… 17 ~ 22
CARD READER CONTROLS AND FUNCTIONS .…………………………………… 23 ~ 29
MOUNTING GUIDE ………………………………………...………………………….. 30
POWER MANAGEMENT ……………………………………………………………… 31
SPECIFICATIONS ……………………………………………………………………… 32 ~ 34
TROUBLE SHOOTING GUIDE …………………………………………………......... 35
This Monitor was
Manufactured by ISO 9001
Certified Factory
- 1 -
Page 4

1. Read these instructions.
2. Keep these Instructions.
3. Heed all warnings.
4. Follow all instructions.
5. Do not use this apparatus near water.
6. Clean only with dry cloth.
7. Do not block any ventilation openings. Install in accordance with the manufacturer’s
8. Do not install near any heat sources such as radiators, heat registers,stoves, or other
9. Do not defeat the safety purpose of the polarized or grounding-type plug.
Important Safety Instruction
instructions.
apparatus (including amplifiers) that produce heat.
Apolarized plug has two blades with one wider than the other.
Agrounding type plug has two blades and a third grounding prong.
The wide blade or the third prong are provided for your safety.
If the provided plug does not fit into your outlet, consult an electrician for replacement
of the bsolete outlet.
10. Protect the power cord from being walked on or pinched particularly at plugs,
convenience receptacles and the point where they exit from the apparatus.
11. Only use attachment/accessories specified by the manufacturer.
12. Use only with the cart, stand, tripod, bracket or table specified by the manufacturer or
sold with the apparatus. When a cart is used, use caution when moving
the cart/apparatus combination to avoid injury from tip-over.
13. Unplug this apparatus during lightning storms or when unused
for long periods of time.
14. Refer all servicing to qualified service personnel. Servicing is required when the apparatus
has been damaged in any way, such as power-supply cord or plug is damaged, liquid has
been spilled or objects have fallen into the apparatus the apparatus has been exposed to
rain or moisture does not operate normally or has been dropped.
- 2 -
Page 5
- The apparatus shall not be exposed to dripping or splashing and that no objects filled with liquids,
such as vases, shall be placed no the apparatus.
14 Minimum distances(e.g. 10cm) around the apparatus for sufficient ventilation.
“WARNING – To reduce the risk of fire or electric shock, do not expose the apparatus to rain or moisture.”
“The apparatus shall not be exposed to dripping or splashing and no objects filled with liquids,
such as vases, shall be placed on the apparatus.”
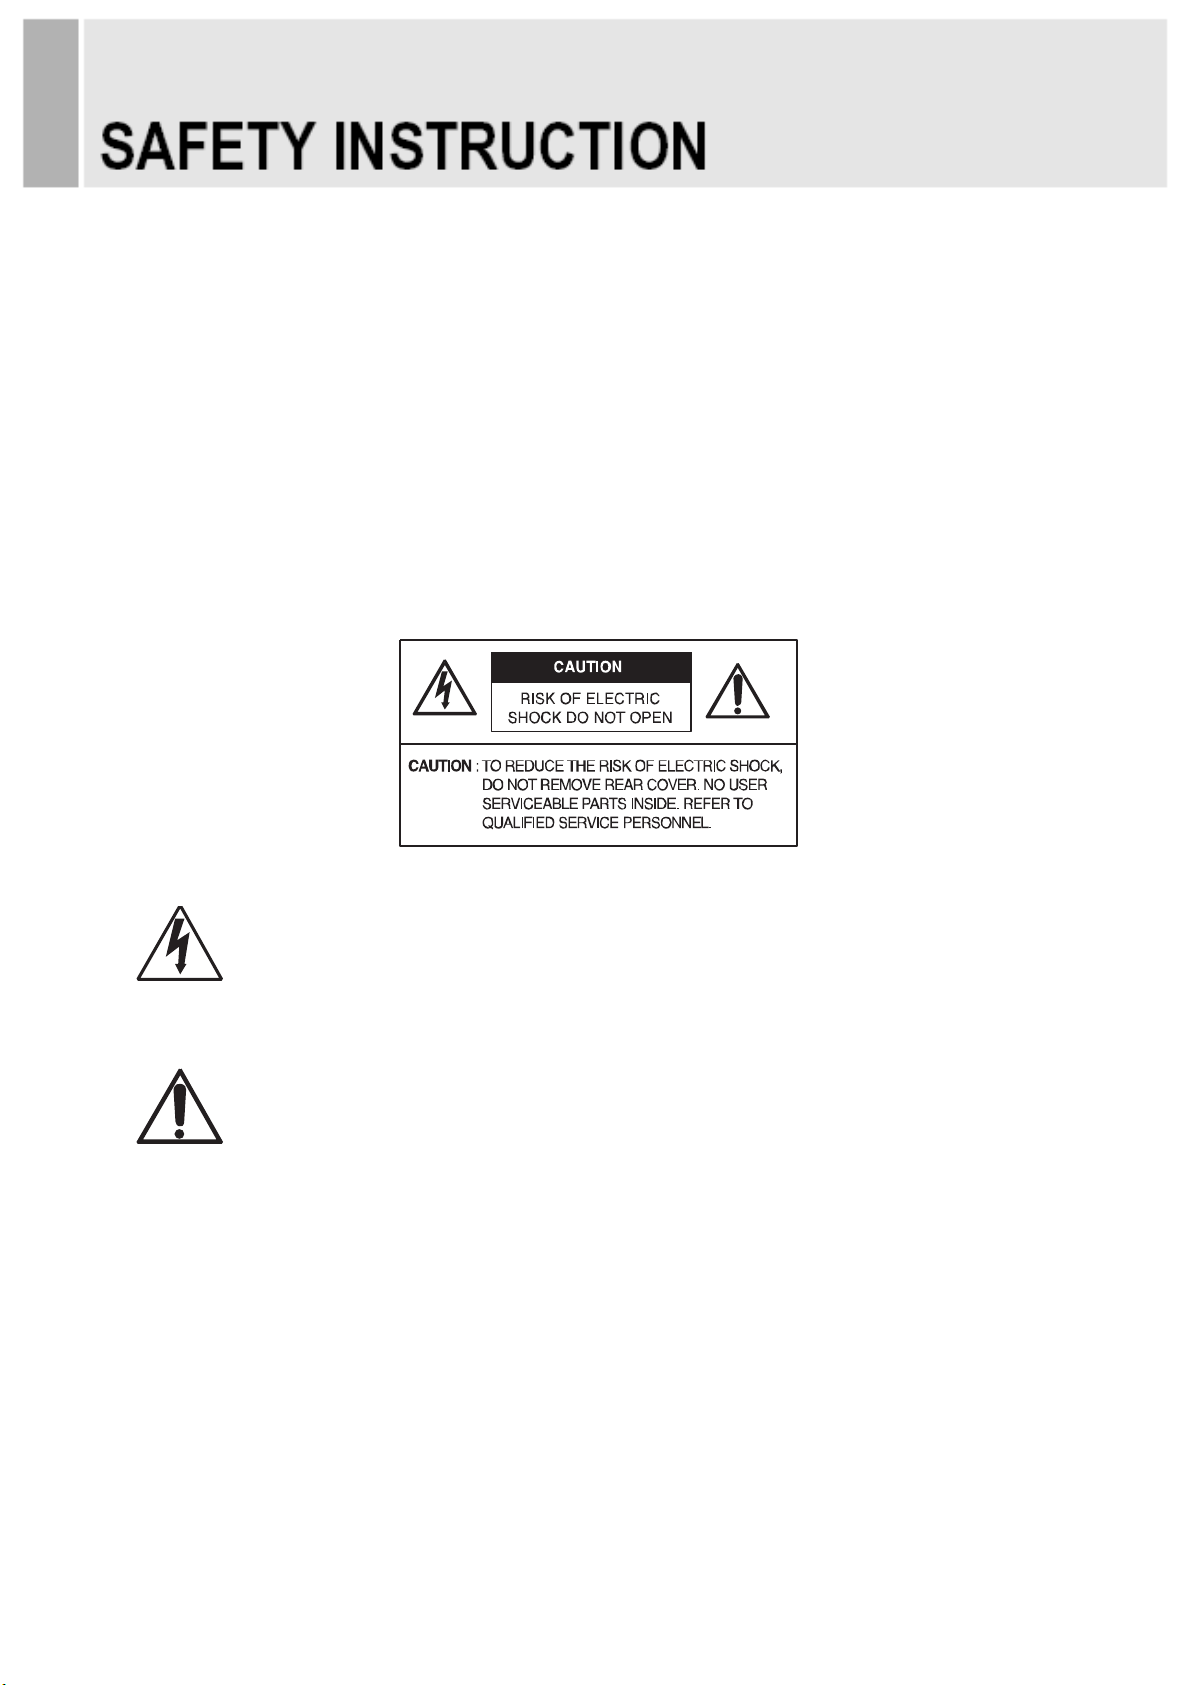
This symbol is intended to alert the user to the presence of uninsulated :
dangerous voltage with in the product’s enclosure that may be of sufficient
magnitude to constitute a risk of electric shock to persons.
This symbol is intended to alert the user to the presence of important operating
and maintenance(servicing) instructions in the literature accompanying the
appliance.
- 3 -
Page 6

CAUTION
The power supply cord is used as the main disconnect device, ensure that the socket-outlet is
located/installed near the equipment and is easily accessible.
ATTENTIONN
Le cordon d`alimentation est utillsé comme interrupteur général. La prise de courant doit être
située ou installée à proximité du matériel et être facile d`accès
NEVER REMOVE ▶ THE BACK COVER
Removal of the back cover should be carried out only by qualified personnel.
DO NOT USE IN HOSTILE ENVIRONMENTS▶
To prevent shock or fire hazard, do not expose the unit to rain or moisture.
This unit is designed to be used in the office or home. Do not subject the unit to vibrations,
dust of corrosive gases.
KEEP IN A WELL VENTILATED PLACE▶
Ventilation holes are provided on the cabinet to prevent the temperature from rising.
Do not cover the unit or place anything on the top of unit.
AVOI▶ D HEAT
Avoid placing the unit in direct sunshine or near a heating appliance.
TO ELIMINATE EYE FATIGUE▶
Do not use the unit against a bright back ground and where sunlight or other light sources will
shine directly on the monitor.
BE CAREFUL OF HEAVY OB▶ JECT
Neither the monitor itself nor any other heavy object should rest on the power cord.
Damage to a power cord can cause fire or electrical shock.
- 4 -
Page 7

NOTE
This equipment has been tested and found to comply with the limits for a Class A digital device,
pursuant to Part 15 of the FCC Rules. These limits are designed to provide reasonable
protection against harmful interference in a residential installation.
This equipment generates, uses and can radiate radio frequency energy and, if not installed and
used in accordance with the instructions, may cause harmful interference to radio
communications. However, there is no guarantee that interference will not occur in a particular
installation.
If this equipment does cause harmful interference to radio or television reception which can be
determined by turning the equipment off and on, the user is encouraged to try to correct the
interference by one or more of the following measures.
- Reorient or relocate the receiving antenna.
- Increase the separation between the equipment and receiver.
- Connect the equipment into an outlet on a circuit different from that to which the receiver is
- Consult the dealer or an experienced radio, TV technician for help.
connected.
- Only shielded interface cable should be used.
Finally, any changes or modifications to the equipment by the user not expressly approved by
the grantee or manufacturer could void the users authority to operate such equipment.
▶ DOC COMPLIANCE NOTICE
This digital apparatus does not exceed the Class A limits for radio noise emissions from digital
apparatus set out in the radio interference regulation of Canadian Department of
communications.
- 5 -
Page 8
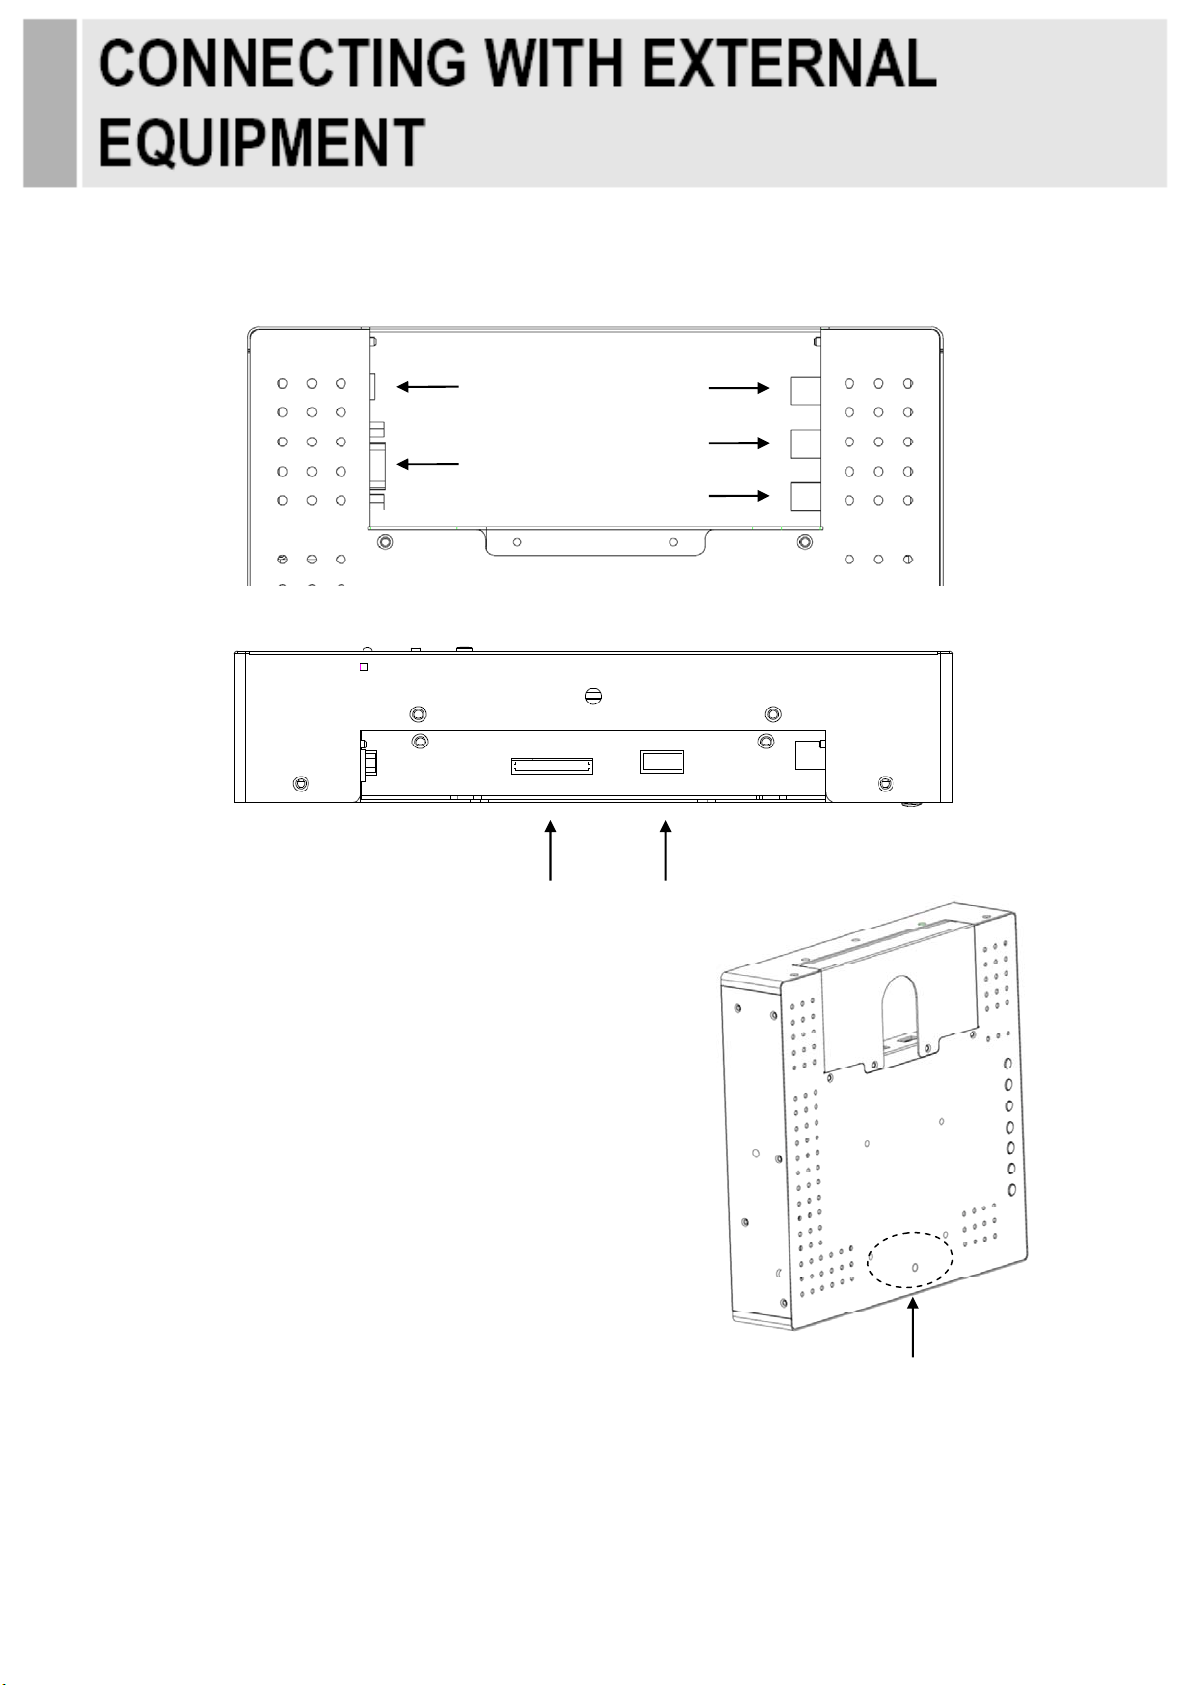
4
8
BACK PANEL CONTROL
1
2
3
5
6 7
1. AC 24V IN
2. VGA IN
3. VIDEO(AV) IN
4. VIDEO (AV) OUT
5. CAM OUT
6. SD CARD READER (Optional)
7. USB 2.0 (Optional)
8. CAMERA OSD CONTROL (Refer to page 17~22 for details.)
- 6 -
Page 9

y
REMOTE CONTROLLER (Optional)
1. POWER( )
Turns the power ON or OFF. There will be a few
seconds delay before the display appears.
2. SOURCE
Selects pc or video(Camera, AV, C/R) sources.
3. AUTO
Auto geometry adjustment in PC Source.
4. HOLD
Stops the Motion Detection & Auto switching functions.
5. MUTE
Not operating.
6. MENU
Activates and exits the On Screen Display.
7. EXIT
Exits the On Screen Display.
8. VOL(◀ & ▶)
Accepts your selection.
9. UP/DOWN
Moves to OSD menu.
10. ENTER
Accepts your selection or displays the current mode.
11. INFO
Input mode information Display.
12. STILL
Not operating.
13. PIP (Picture In Picture)
Not operating.
14. P.INPUT
Not operating.
15. P.POS
Not operating.
16. P.SIZE
Not operating.
17. SWAP
Not operating.
18. ARC (Aspect Ratio Control)
Selects screen ratio.
19. APC (Auto Picture Control)
Selects picture mode.
20. ACC (Auto Color Control)
Selects Color mode.
21. S.SET
Not operating.
22. PC
Selects PC mode(PC,DVI)
23. AV
Selects AV mode.(Camera, AV, C/R)
24. COMP
Not operating.
25. SETUP
It doesn’t have any functions.
26. M/P on/off
Turns the M/P(Media Player) on or off.
27. SEL
Accepts your selection in the menu of M/P (Media Player).
Card Reader
Control Ke
HOLD
Card Reader Control Key
28. ESC
Escapes the menu of M/P (Media Player).
29.
◀ &▲& ▶& ▼
Moves the cursor in the menu of M/P (Media Player).
- 7 -
Page 10
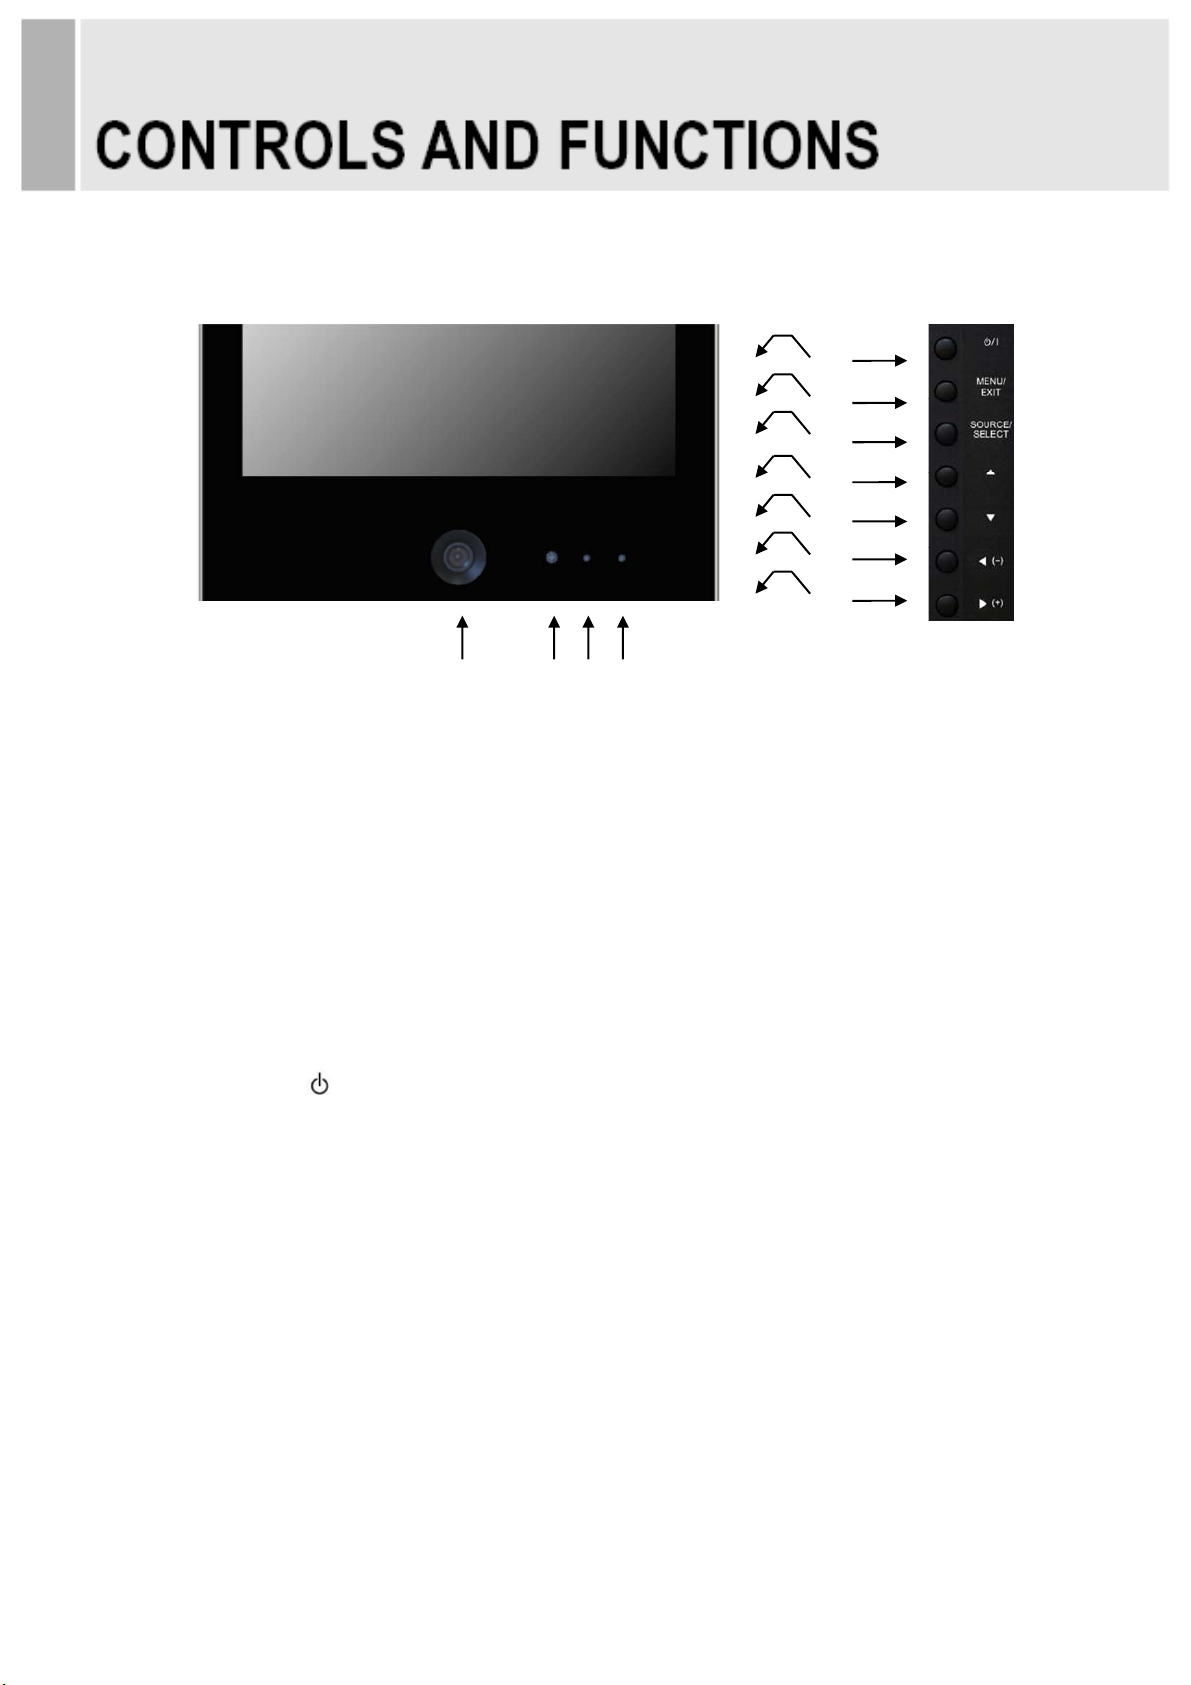
7 8
FRONT & BACK KEY CONTROL
5
6
9
10
11
1 2 3 4
1. BUILT-IN CAMERA
Image of camera.
2. IR Sensor
Remote controller sensor.
3. POWER LED
Turned on: Green color.
Turned off: LED off.
4. RECORDING INDICATOR LED
This LED indicates the recording status by blinking the LED light.
User can choose the LED blink.
5. POWER ON/OFF( / I )
Turns the power ON or OFF. There will be a few seconds delay before the display appears.
6. MENU/EXIT
Activates and exits the On Screen Display.
This button can also be used to move previous menu or status.
7. SOURCE/SELECT
Selects an input source.
Enters a submenu or accepts your selection in the OSD menu.
8 & 9. ▲ & ▼
Moves upwards or downwards in the OSD menu.
The up(▲) button is HOLD function and stop the Auto switching functions.
The down(▼) button is auto adjustment function in the VGA input.
10 & 11.
◀(-) & ▶(+)
Adjust menu settings.
- 8 -
Page 11

OSD Menu Description
All picture, sound settings and setup for the monitor can be adjusted in the OSD menu.
(On Screen Display)
To adjust the OSD screen:
1. Press the MENU button to enter the OSD menu.
2. Press the
3. Press the ▶(+) button to enter the submenu for adjusting items.
4. Change the value you wish to adjust by using the ◀(-) / ▶(+) buttons.
5. Press the ◀(-) button to exit the submenu for adjusting items.
6. Press the MENU button to exit the OSD menu.
▲/▼ buttons to select the desired option. The selected option is highlighted.
A. PICTURE
Option Function Value
CONTRAST Adjusts intensity of the image. 0 ~ 100
BRIGHTNESS Adjusts brightness of the screen. 0 ~ 100
HUE Adjust the hue of picture. 0 ~ 100
SATURATION Adjust the saturation of picture. 0 ~ 100
SHARPNESS Adjusts sharpness of the picture. 0 ~ 100
COLOR TEMP Select the color temp of picture Normal, Warm, Cool
PICTURE MODE Select the picture mode of picture. Standard, Cinema, Vivid
※ Unavailable in RGB-PC Mode.
- 9 -
Page 12
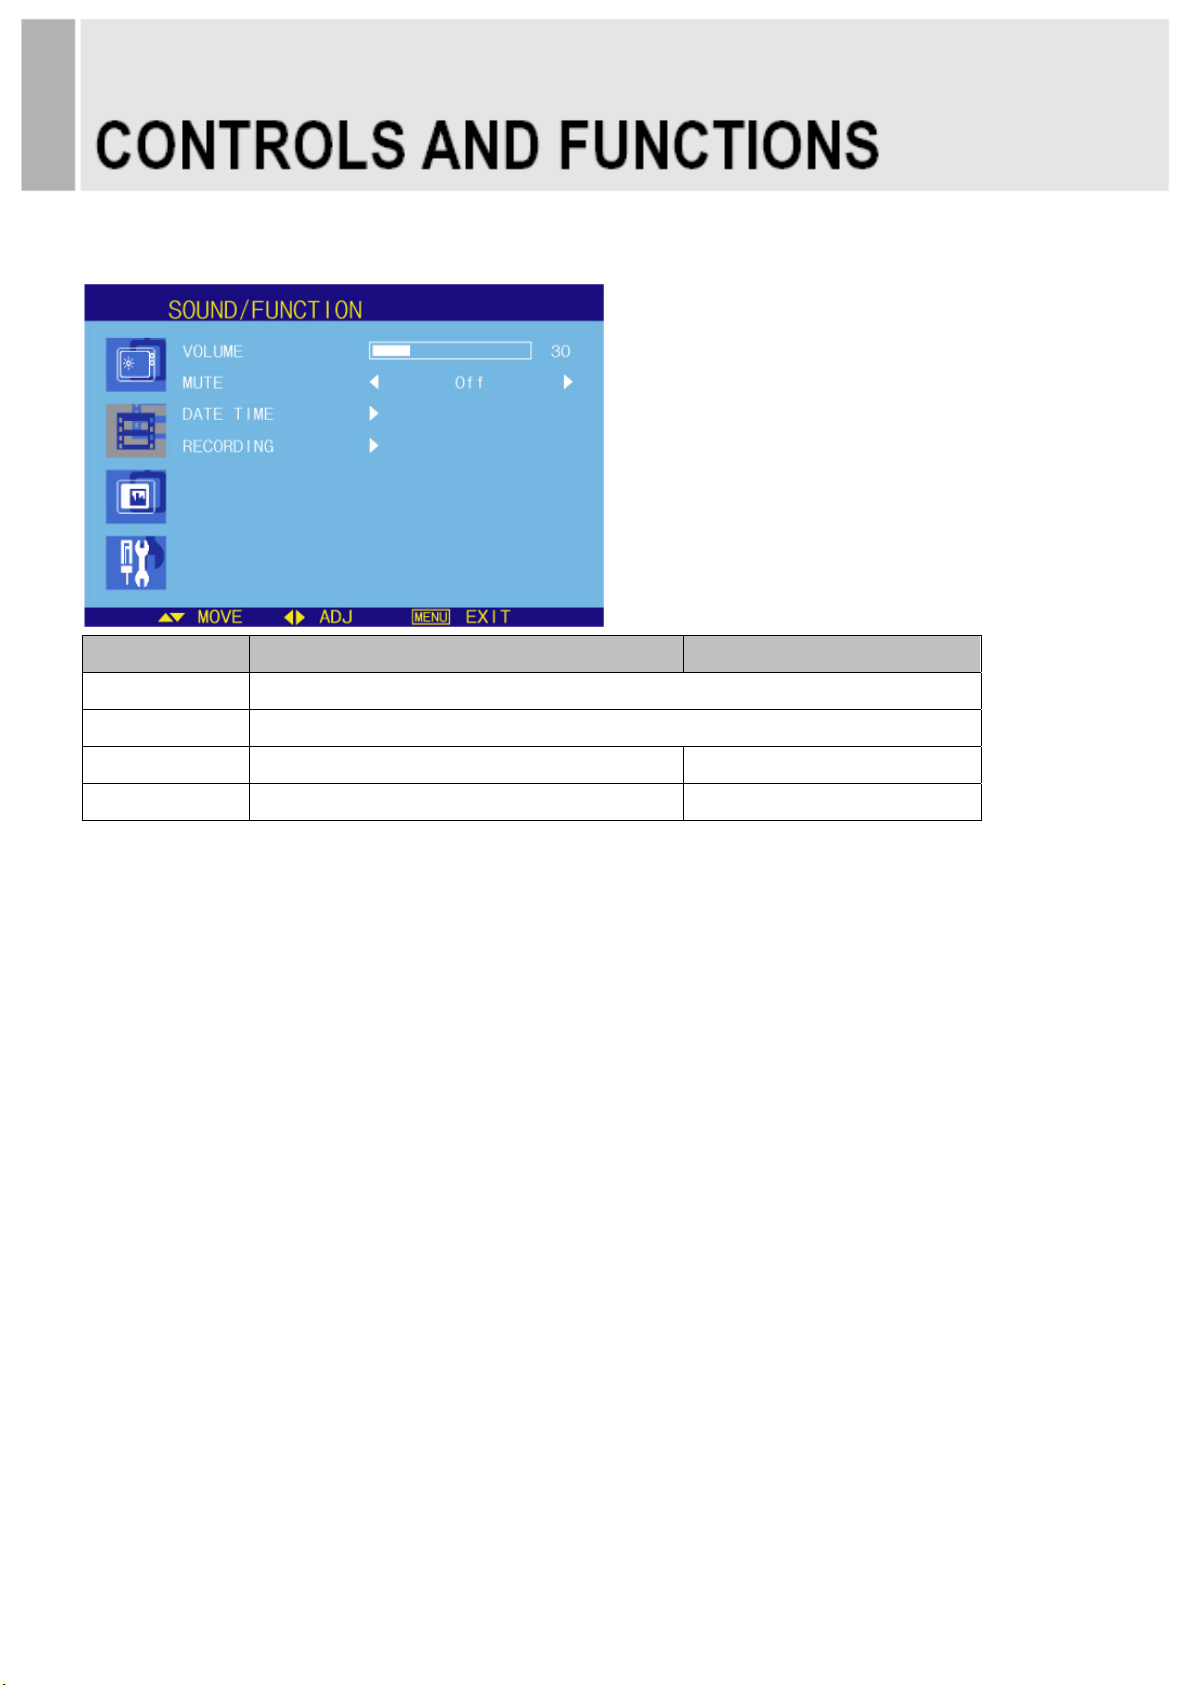
B. SOUND/FUNCTION
VOLUME Not operating.
MUTE Not operating.
DATE TIME Sets the date time on the screen. See the table on Next page.
Option Function Value
RECORDING Sets the recording indication text. See the table on Next page.
- 10 -
Page 13

DATE TIME
DATE TIME Activates the feature of Date Time. Off or On
BLINK This function is for blinking Date & Time texts. Off or On
POSITION Selects the location of Date Time text. Top, Bottom
Option Function Value
YEAR* Selects the wanted year. 2000~2100
MONTH* Selects the wanted month. 1~12
DAY* Selects the wanted day. 1~31
HOUR* Selects the wanted hour. 0~23
MINUTE* Selects the wanted minute. 0~59
* User can set the wanted time (Year, Month, Day, Hour, Minute) by using ◀(-) & ▶(+) key.
- 11 -
Page 14

RECORDING
INDICATOR LED Sets the light color of recoding LED Off or On
TEXT DISPLAY Activates the feature of Recording Text. Off or On
TEXT BLINK This function is for blinking Recording text. Off or On
Option Function Value
TEXT SIZE Selects the size of Recording text. X1, X2, X3
TEXT Selects the wanted phrases. Text1, Text2, Text31)
1) Text phrases
z Text1: Recording
z Text2: Recording in Progress
z Text3: Surveillance in Progress
- 12 -
Page 15

C. PC (Only PC Mode)
CONTRAST Adjusts intensity of the image. 0 ~ 100
BRIGHTNESS Adjusts brightness of the screen. 0 ~ 100
PC ADJUST Adjusts the PC Mode. See the table on Next page.
Option Function Value
COLOR MODE Adjusts the vertically picture position. See the table on Next page.
PICTURE MODE Adjusts the vertical noise of screen image. Standard, Cinema, Vivid
RESOLUTION Not operating.
※ Unavailable in Camera, AV Mode (Only PC Mode).
- 13 -
Page 16

PC ADJUST
AUTO ADJUST Auto geometry adjustment.
H POSITION Adjusts the horizontally picture position. 0 ~ 100
V POSITION Adjusts the vertically picture position. 0 ~ 100
Option Function Value
CLOCK Adjusts the vertical noise of screen image. 0 ~ 100
PHASE Adjusts the number of horizontal picture elements. 0 ~ 100
SEL AUTO Selects the type of auto adjustment. MANUAL1), AUTO
1) Manual: Operating the auto adjustment of the screen only the first time.
2) Auto: Operating the auto adjustment every time the resolution is changed.
COLOR MODE
2)
Cool Gives the white color a bluish tint.
Normal Gives the white color a neutral tint.
Warm Gives the white color a reddish tint.
1)
User
To manually adjust the color tones (Red, Green, and Blue).
1) Unavailable in Camera, AV Mode (Only PC Mode).
- 14 -
Page 17

D.SETUP
Option Function Value
Language Sets the language of the OSD menu.
OSD Sets the OSD. See the table on Next page.
Locks all buttons of the monitor.
Key Lock
ARC Sets the screen ratio.
MOTION DETECTION See the table on Next page.
RECALL Resets the monitor settings to the factory default.
1) How to unlock
① On the front key: Press the MENU and UP button at the same time over 3 seconds.
② On the Remote Controller: The Remote Controller operates well because the Key Lock function is
1)
only allowed for the front key of this product.
Note: Use remote controller to
unlock.
English, German, French,
Italian, Spanish, Nederlands and Korea
Off or On
AV Mode: 16:9, 1:1, 4:3, 14:9, Zoom1,
Zoom2, Under
PC Mode: 4:3
- 15 -
Page 18

OSD
H POSITION Move OSD horizontally on screen right or left. 0 ~ 100
V POSITION Move OSD vertically on screen up or down. 0 ~ 100
OSD TIMER Adjust OSD displaying time. 5 ~ 60
Option Function Value
TRANSPARENT Adjust OSD transparent. Off or On
MOTION DELECTION
Option Function Value
ENABLE Activates the motion detection feature. Off or On
INPUT Selects the input source for the motion detection. Camera, AV, RGB PC, C/R
BUZZER Not operating.
Selects the amount of time, in seconds,
TIME
that the monitor displays the motion detection
0 ~ 100
input image.
OPTION Not operating.
- 16 -
Page 19

Setting up the menu
Settings can be made using the OSD Switch located on the back of
the camera.
1. Press the button to access the SETUP mode.
The SETUP menu is displayed on the monitor.
2. Please select any function you wish to activate
by using the UP/DOWN selections.
The cursor can be moved up or down by using the
UP/DOWN selections.
Position the cursor to point to the function you wish to operate.
* MAIN-menu : Use UP/ DOWN selections. / SUB-menu : Use LEFT/ RIGHT selection
3. Change the status of the selected feature using the LEFT/RIGHT selections.
When the LEFT or RIGHT selection is done, available values and modes are displayed in order. Please
keep the selection until you get to the mode you wish to operate.
4. When completed, move the cursor indicator to ‘EXIT’ position and press the Button to finish
the setting.
1.SET UP MENU
1-1. LENS
(1) Manual Mode
- The level of brightness of a screen is automatically
controlled using the Electronic Shutter, AGC, and Sense-Up.
< SET UP START-UP SCREEN >
(2) DC Iris Mode
- DC IRIS, AGC, and Sense-Up are used to automatically
control the brightness level of a screen.
(3) Video Iris Mode
- VIDEO IRIS, AGC, and Sense-Up are used to automatically
control the brightness level of a screen.
- 17 -
Page 20

1-2. EXPOSURE
(1) SHUTTER
- Shutter speed control (AUTO & FLK level: 1/60~1/100000)
(2) BRIGHTNESS
- Adjust the brightness in 0~255 (Default 50)
(3) AGC (Auto Gain Control)
The higher the gain level is, the brighter the screen becomes.
But the higher gain level causes more noise.
- LOW : Allows automatic gain control from 0 to 20db.
- MIDDLE : Allows automatic gain control from 0 to 30db.
- HIGH : Allows automatic gain control from 0 to 42db.
- OFF
(4) D-WDR (Digital Wide Dynamic Range)
- Color reproduction improvement A low light area could be recognizable without Digital
Wide Dynamic Range but it is impossible to capture a clear image without improving
a color signal processing.
Thanks to the improved color signal processing named as D-WDR, this series unveils the
improved color reproduction.
Clear-cut feature improvement The technology makes the Dynamic Range enlarged by improving
the contrast between low and high lighting areas and does the middle brightening area – the Dynamic
Range cuts a loss - compensated by the clear-cut feature improvement. Contrast improvement
The contrast is improved by D-WDR Image Processing technology with analyzing the information of
the brightness and mapping the different brightness.
- 18 -
Page 21

1-3. WHITE BAL
(1) MANUAL
- In the manual mode, the user can choose the color and balance.
The user can adjust the color and temperature by controlling red
and blue gain.
(2) AWC→SET
- This is used in order not to change the color and temperature
values set for a certain environment. Press for two to three
seconds the “Set Button” on the OSD MENU in order to have
the color and temperature values fixed.
When the value of OPD Block is included in ATW Area, color and temperature are fixed for
that relevant value only. If there is no such value included, the color and temperature are fixed
for the entire image.
(3) ATW 1
- Auto tracking white balance. In certain light conditions the colors are adjusted automatically.
Use this mode when color temp. is between 1800k~10,500k
(4) ATW 2
- Auto tracking white balance. In certain light conditions the colors are adjusted automatically.
Use this mode when color temp. is between 1800k~10,500k
- 19 -
Page 22

1-4. BACK LIGHT
(1) HSBLC : HLC is a function to mask bright areas in order to
prevent the target object from looking dark due to
the backlighting
(2) BLC : Back Light Compensation controls the brightness
Level of the screen in order to be able to distinguish
objects against backlight.
1-5. DAY & NIGHT (Not operating.)
You can display pictures inBW/AUTO/COLOR
(1) B/W Mode
- B/W Mode is used to maintain B/W mode all the time.
- BURST
- IR-SMART
- IR-LEVEL
(2) Auto Mode
- Automatically turns between Day and Night Mode
according to AGC operation.
(3) Color Mode
- COLOR Mode is used to maintain color mode all the time.
- 20 -
Page 23

1-6. IMAGE ADJ
(1) LENS SHADE
- Mounted on the circumference of the lens to the lens mechanism
that prevents the light directly incident (Level Adjustable 0~255)
(2) 2DNR
- Cuts off the noise in low light condition.
(3) MIRROR
- Through ON-OFF on the screen like a mirror.
(4) FONT COLOR
- FONT SIZE LEVEL 0~15
- ID&TITLE SIZW LEVEL 0~15
(5) CONTRAST
- CONTRAST LEVEL 0~255
(6) SHARPNESS
- Edge Enhancement enhances the sharpness of images by enhancing the sharpness around the
edge and reducing the transition time of the edge. Adjusts the SHARPNESS level in 0~31(Default 50)
(7) DISPLAY
- 3 modes of CRT/LCD/USER are available.
(8) NEG.IMAGE
- NEGATIVE IMAGE, Change colors off like film
1-7. DPC (Dead Pixel Compensation)
(1) Cover the lens then press enter key
- 21 -
Page 24

1-8. SPECIAL
(1) CAM TITLE
- We offers the CAM TITLE function and it can configure
a title made up of up to 15 letters.
(2) MOTION
- MD (Motion Detection) consists of the pre-processor that
extracts motion information and the mixer that displays
the motion information on the screen. MD pre-processor
divides the screen into predefined blocks and identifies whether each block has motion information.
(3) PRIVACY
- Privacy masking allows masking a certain spot on the screen.
That offers a total of 8 Privacy Masking Windows.
Priority is allocated to each window so when multiple number of windows is overlapped,
window (Window 7 is given the highest priority) at a higher level is given priority.
For each window, color, boundary (yes/no), image inversion (yes/no), black & white (yes/no)
and transparent level can be adjusted.
Those areas privacy masked are excluded from the areas for motion detection.
(4) PARK.LINE
(5) COMM ADJ
- CAM ID/ BAUD / RATE / PROTOCOL / DISPLAT ID/ ID POS
(6) LANGUAGE
- ENGLISH/CHINESS
(7) VERSION
1-9. RESET
(1) FACTORY
- Resets the camera setting to the factory defaults.
1-10. EXIT
- 22 -
Page 25

A. PHOTO
JPEG File Viewing Options
- When you select Photo in entry menu,
1. Press the USB button and then use ◀/▶ button to select the Photo.
2. Press the SEL button.
3. Press the ▲/▼ button to select photo file.
4. Press the SEL button for 1 picture display for slideshow.
5. Press exit or press the ESC button to return to the USB menu.
Slideshow
1. Press ◀/▶ button to select the Photo.
2. You can choose the slide show effect, frequency and play mode in the USB Setup.
3. Press the SEL button to pause the current image.
5. Press exit or press the ESC button to return to the USB menu.
Using the remote control
SEL Starting photo slideshow displaying
PLAY/PAUSE
PLAY/PAUSE functions use SEL button in slideshow displaying
ESC Stop slideshow and return to photo file list menu
- 23 -
Page 26

B. MUSIC
- Purchased MP3/music files may contain copyright restrictions.
1. Press ◀/▶ button to select the Music.
2. Press the SEL button.
3. Press the ▲/▼ button to select desired music file.
4. Press the SEL button. Then the music starts.
5. Press exit or press the ESC button to return to the USB menu.
Using the remote control
SEL Selected music playing
PLAY/PAUSE
ESC Stop playing music and return the music file list
PLAY/PAUSE functions use SEL button
- 24 -
Page 27

C. MOVIE
- Select the Movie
1. Press ◀/▶ button to select the Movie
2. Press the SEL button.
3. Press the ▲/▼ button to select desired movie file.
4. Press the SEL button. Then the movie starts.
5. Press exit or press the ESC button to return to the USB menu.
Using the remote control
SEL Playing selected movie file
PLAY/PAUSE
ESC Stop playing movie and return to movie file list
PLAY/PAUSE functions use SEL button
- 25 -
Page 28

D. PHOTO MUSIC
-Playing slideshow with music.
1. Press the USB button and then use ◀/▶ button to select the PHOTO MUSIC.
2. Press the SEL button.
3. Press the ▲/▼ button to select photo file.
4. Press the SEL button for picture display for slideshow.
5. Moved to music file list for music playing.
6. Press the SEL button for playing music with photo slide show.
7. Press exit or press the ESC button to return to the USB menu.
Using the remote control
OK Select photo and music file
PLAY/PAUSE
ESC Stop playing slideshow with music and return to movie file list
PLAY/PAUSE functions use SEL button in Music playing
- 26 -
Page 29

E. PHOTO Thumbnail mode
- Thumbnail mode in photo.
- Press ▶ button in Photo File list or ACT button in main menu
1. Press ▲/▼/◀/▶ button to select desired photo file.
2. Press SEL button to start Slideshow
3. Press exit or press the ESC button to return to the USB menu.
Using the remote control
SEL Select desired photo file for slideshow playing
PLAY/PAUSE
ESC Stop Thumbnail mode and return to file list
PLAY/PAUSE functions use SEL button in photo playing
- 27 -
Page 30

F. SETUP
1. SETUP- PHOTO
Select Slideshow Effect
-The picture display effect for the slide show.
1. Press ◀/▶ button to select the Setup.
2. Press the SEL button enter the Setup menu.
3. Press the ▶ and then use ▲/▼ button to select Slideshow EFFECT.
4. Press the ▶ and then use ▲/▼ button to select the desired Effect.
5. Press exit or press the ESC button to return to the USB menu.
Select Slideshow Speed
-The picture display interval for the slide show.
1. Press ◀/▶ button to select the Setup.
2. Press the SEL button to enter the Setup menu.
3. Press the ▲/▼ button to select the PHOTO SETUP.
4. Press the ▶ and then use ▲/▼ button to select.E
5. Press the ▶ and then use ▲/▼ button to select the Speed.
6. Press exit or press the ESC button to return to the USB menu.
- 28 -
Page 31

2. SETUP-SYSTEM
Select SUBTITLE LANG.
- The menus can be shown on the screen in the selected language.
First select your language.
1. Press ◀/▶ button to select the Setup.
2. Press the SEL button to enter the Setup menu.
3. Press the ▲/▼ button to select the SYSTEM SETUP.
4. Press the ▶ and then use ▲/▼ button to select SUBTITLE LANGUAGE.
5. Press the ▶ and then use ▲/▼button to select the desired language.
6. Press exit or press the ESC button to return to the USB menu.
- 29 -
Page 32

a
2▶ 12345
6
(
h
h
l
s
O
c
m
s
B
)
V
s
m
o
p
n
VESA
e
r
5
d
s
d
m
a
s
t
a
s
e
b
e
W
ll mount
Optional
1) Using t
) Using t
to instal
e 75 mm
e VESA
the LCD
75
hol
tandard w
onitor to
7
s.
all mount
the wall.
esign an
the 75m
M4x10
hole pat
crews
ern on th
back sid
※ Atten
You mu
ACCESS
. Power
. User’s
. Remote
. Batterie
. PC RG
. Wall mo
tion!
t use four
RIES
able (Opti
anual.
controller
(Optiona
cable (O
unt (Optio
M4x10 sc
nal).
(Optional)
l).
tional).
al).
ews to as
.
emble thi
s monitor
nd the w
ll mount
racket.
- 30 -
Page 33

POWER CONSUMPTION
MODE POWER CONSUMPTION
ON
POWER OFF
< 16W
< 0.5W
LED INDICATOR
The power management feature of the monitor is comprised of two stages:
ON(GREEN) and POWER OFF(LED Off).
MODE LED COLOR MONITOR OPERATION
GREEN Normal Operation
LED Off Not Operation
POWER OFF
ON
- 31 -
Page 34

1. Monitor Specification
9.7"
9.7˝ Diagonal AM-TFT(Active-Matrix)
Pixel pitch(mm) : 0.192(H) x 0.192(V)
LCD-Type
RESOLUTION
(H x V)
FREQUENCY
INPUT/OUTPUT
SIGNAL
ACTIVE DISPLAY
AREA (H x V)
PACKING DIMENSIONS
(W x H x D)
BRIGHTNESS: 300cd/m² (Typical)
CONTRAST RATIO: 600:1(Typical)
VIEWING ANGLE: 178°/178°(H/V)
RESPONSE TIME: 35msec(Typical)
1024x768 @60Hz
HORIZONTAL: 31~48KHz,
VERTICAL: 56~60Hz
CAMERA OUT
VIDEO (1ch input 1.0Vp-p, 75Ω terminated, loop-through out)
VGA (RGB-PC)
SD CARD REAEDR
USB 2.0
196.608mm x 147.456mm
343 mm x 300 mm x 173 mm (13.50” x 11.81” x 6.81”)
Net: 1.98kg (4.37 Ibs)
WEIGHT
Gross : 2.85kg (6.28 Ibs)
ELECTRICAL RATINGS
AC 24V (50/60Hz)
▶▶ NOTE: Technical specifications are subject to change without notice.
- 32 -
Page 35

2. Camera Specification
ITEM
Image Sensor
Horizontal Resolution
Effective Pixel
Sync. System
Lens
Min. Illumination
Electronic Shutter
S/N Ratio
Gamma
Shutter
AGC
D-WDR
White Balance
Backlight
Built-in PIX CAMERA
NTSC PAL
1/3” Sony Supper HAD II CCD (ICX638/639AKA)
Color Mode: 620TVL; B/W Mode: 680TVL
768(H) X 494(V) 752(H) X 582(V)
Internal
4mm Fixed Lens
0.001 Lux (F1.2)
1/60~1/100,000 1/50~1/110,000
More than 52dB
0.45
Auto / Manual / FLK
OFF / Low / Middle / High
OFF / ON (Level Adjustable 0~63)
ATW / ATW->SET / Manual
OFF / BLC / HLC
Day & Night Selection
Pict Adjust
IR SMART
Motion Det
Peivacy Masking
Lens Shadow
2D-DNR
Camera ID
O.S.D
Video Output
Power Supply
Operation Temperature
AUTO / COLOR / BW / EXT. D&N
Mirror / Brightness / Contrast / Sharpness
OFF / ON (IR GAIN Level Adjustable 0~255)
OFF / ON (Detect sense / 4 Area Sel)
OFF / ON (8 Zone)
OFF / ON Selectable (Level Adjustable 0~255)
OFF / ON
OFF / ON
Option (Built-in & Available)
1 Vp-p / 75 Ohms
DC 12V±10% / Less than 100mA
-10℃ ~ +50℃ RH95% Max
▶▶ NOTE: Technical specifications are subject to change without notice.
- 33 -
Page 36

3. Card Reader Specification (Optional)
MEDIA SUPPOTING SPECIFICATION
ITEM
Movie
Specification
Category
MPEG1 MPEG1 MP3, layer1,2 YES Over 10,240kbps,720x576
MPEG2 MPEG2 MPEG2 NO -
MPEG4 Divx3 MP3 YES Over 10,240kbps,720x576
MS-
MPEG4
Video Audio TECRONY (Maximum bit rate, resolution)
Divx4 MP3 YES Over 10,240kbps,720x576
Divx5 MP3 YES Over 10,240kbps,720x576
Divx6 MP3 YES Over 10,240kbps,720x576
Xvid MP3 YES Over 10,240kbps,720x576
V2 MP3 NO -
V3 MP3 NO
Format Support Remarks
AC3 YES Over 10,240kbps,720x576
AC3 YES Over 10,240kbps,720x576
AC3 YES Over 10,240kbps,720x576
AC3 YES Over 10,240kbps,720x576
AC3 YES Over 10,240kbps,720x576
Extension
Subtitle
WMV7 WMV7 WMV7 NO
WMV8 WMV8 WMV8 NO
WMV9 WMV9 WMV9 NO
H.264 NO
H.263 NO
.mpg MPEG1/2 MP3, layer1,2 YES 1192kbps, 720x576
.3gp H.263 AMR NO
MPEG4 AMR NO
.mp4 MPEG4 AAC NO
.avi MJEG
DivX MP3 YES Over 10,240kbps,720x576
Xvid MP3 YES Over 10,240kbps,720x576
Lossless
avi
.asf NO
*.smi, *.srt, *.sub (Micro DVD), *.ssa
NO
- 34 -
Page 37

WEEE Symbols
Correct Disposal of This Product
(Waste Electrical & Electronic Equipment)
(Applicable in the European Union and other
European countries with separate collection systems)
This marking shown on the product or its literature,
indicates that it should not be disposed with other
household wastes at the end of its working life. To
prevent possible harm to the environment or human
health from uncontrolled waste disposal, please
separate this from other types of wastes and
recycle it responsibly to promote the sustainable
reuse of material resources. Household users should
contact either the retailer where they purchased this
product, or their local government office, for details of
where and how they can take this item for
environmentally safe recycling. Business users
should contact their supplier and check the terms
and conditions of the purchase contract. This product
should not be mixed with other commercial wastes
for disposal.
- 35 -
Page 38

MEMO
Page 39

Page 40

L39ME0300 Rev.1
 Loading...