

Page 1
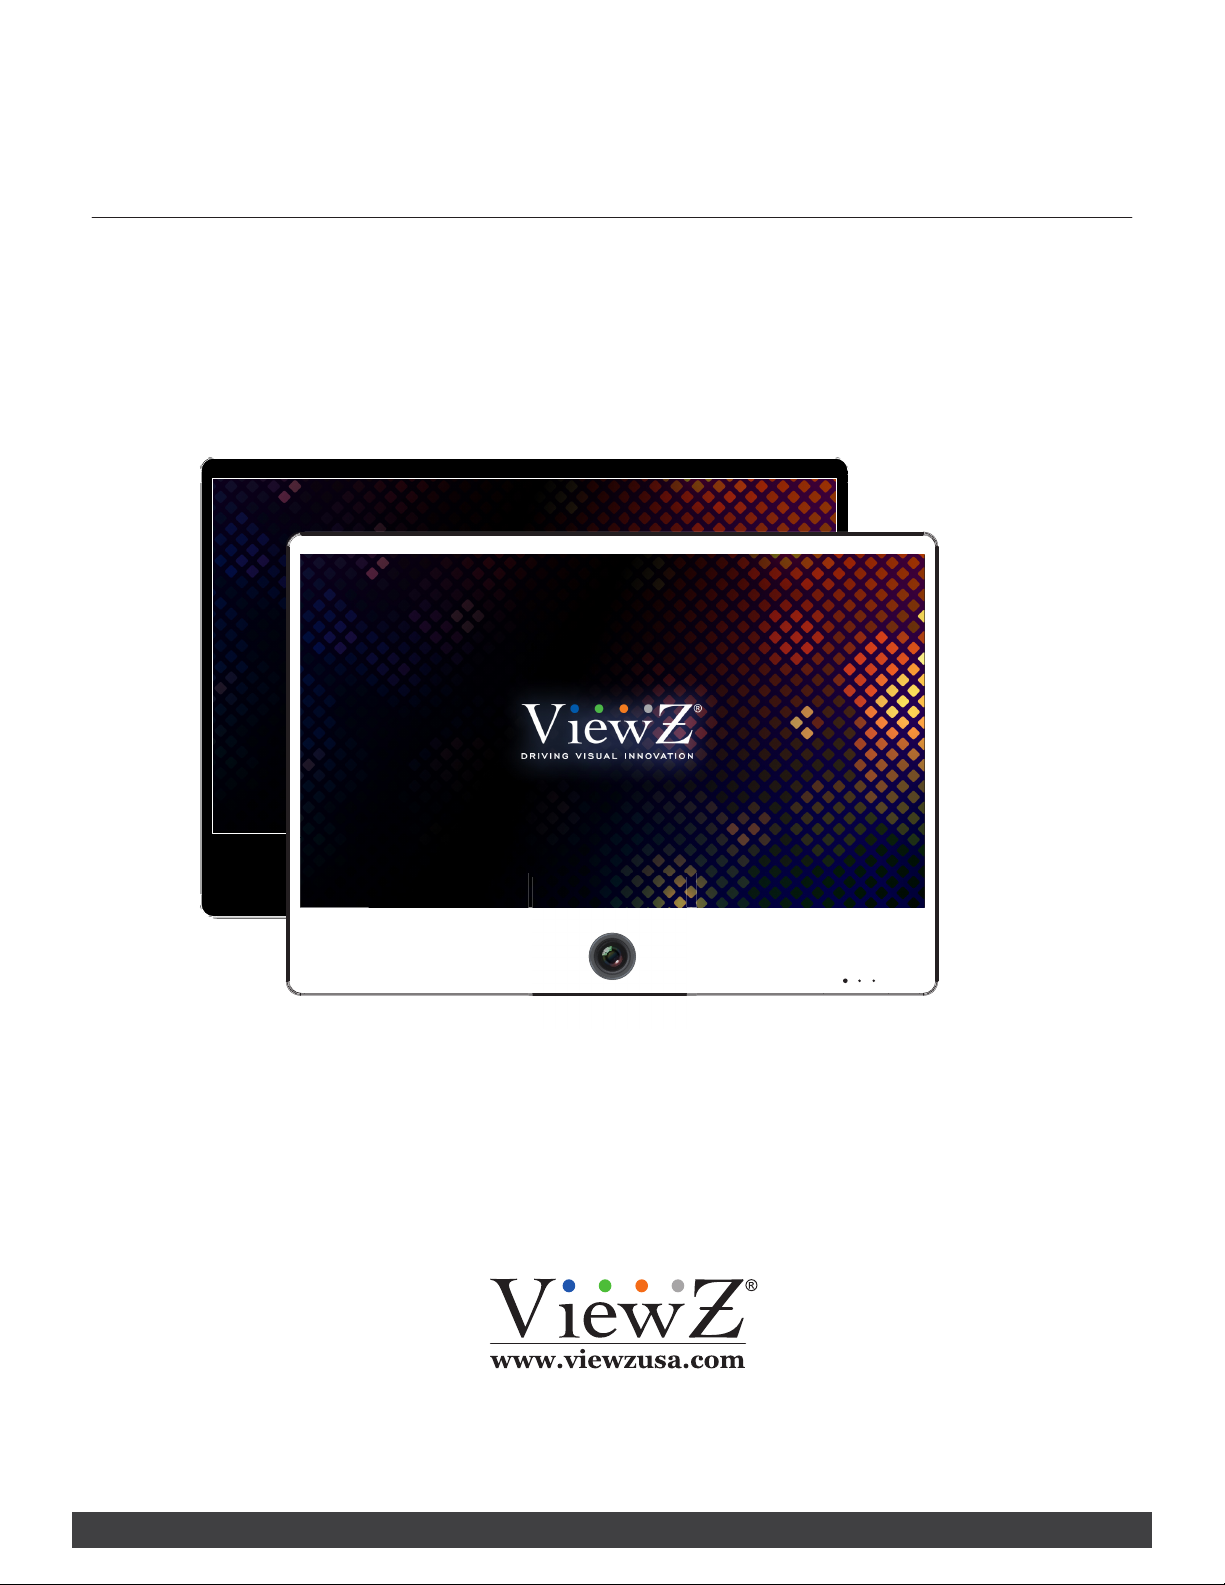
VZ-IP-PVMN SERIES
23", 27" & 32" IP PUBLIC VIEW MONITOR
IP-PVM N USER MANUAL
Please read this manual thoroughly before use, and keep it handy for future reference.
Page 2

CONTENTS
Safety Instrucon
1. Mark Indicaon & Substance
2. Warning
3. Cauon
.......................................................................................................................................................................................
.......................................................................................................................................................
................................................................................................................................................................................................
..................................................................................................................................................................................................
4. Operaonal Temperature & Humidity
5. Dot Defect (dead pixel) of TFT
.....................................................................................................................................................
6. FCC RF INTERFERENCE STATEMENT
7. WIRING (DC 24V)
Installaon
1. Package
2. Interface
.......................................................................................................................................................................................................
................................................................................................................................................................................................ ..
................................................................................................................................................................................................
...............................................................................................................................................................................
.....................................................................................................................................
..........................................................................................................................................
3
4
4
5
5
5
6
7
8
8
9
3. Remote Control Funcon
Funcon
..........................................................................................................................................................................................................
1. Monitor Buon Funcon
2. OSD Control and Funcon
Mounng Guide
Specicaon
Trouble Shoong
RMA
..................................................................................................................................................................................................................
Warranty
............................................................................................................................................................................................
...................................................................................................................................................................................................
..........................................................................................................................................................................................
........................................................................................................................................................................................................
..............................................................................................................................................................
...............................................................................................................................................................
.............................................................................................................................................................
10
11
11
13
21
22
24
25
27
2 User ManualVisit the ViewZ USA website at https://www.viewzusa.com
Page 3
SAFETY INSTRUCTION
Important Safety Instruction
1. Read all warnings.
2. Follow all instrucons to ensure longevity of monitor.
3. Do not place the monitor near water.
4. Clean only with dry cloth.
5. Do not block any venlaon openings. Install in accordance with the manufacturer’s instrucons.
6. Do not install near any heat sources such as radiators, heat registers,stoves, or other heat generang
devices.
7. Do not override the safety purpose of the polarized or grounding-type plug.
8. A polarized plug has two blades with one wider than the other.
9. A grounding type plug has two blades and a third grounding prong.
10. The wide blade and the third prong are provided for your safety.
11. If the provided plug does not t into your outlet, consult with electrician for replacement of the outlet.
12. Protect the power cord from being walked on or pinched parcularly at plugs, convenience receptacles
and the point where it connects to the monitor.
13. Only use aachment/accessories specied by the manufacturer.
14. Use only with the cart, stand, tripod, bracket or table specied by the manufacturer or sold with the
monitor. When a cart is used, use cauon when moving the cart & monitor in combinaon to avoid
injuries.
15. Unplug the monitor during lightning storms or when unused for long periods of me.
16. Refer all servicing to qualied service personnel. Servicing is required when the monitor has been
damaged in any way.
The monitor shall not be exposed to dripping or splashing and objects containing liquids, such as vases
shall not be placed near the monitor.
The monitor should have ample distance (e.g. 10cm) from the wall for sucient venlaon.
3User Manual Visit the ViewZ USA website at https://www.viewzusa.com
Page 4
SAFETY INSTRUCTION
Important Safety Instruction
Mark Indication and Substance
CAUTION : TO REDUCE THE RISK OF ELECTRICAL SHOCK,
DO NOT REMOVE COVER (OR BACK). NO USER
SERVICEABLE PARTS INSIDE. REFER SERVICING TO
QUALIFIED SERVICE PERSONNEL
This symbol is intended to alert the user to the presence of uninsulated & dangerous voltage
within the monitor’s enclosure that may be of sucient magnitude to constute a risk of
electric shock to persons.
This symbol is intended to alert the user to the presence of important operang and
maintenance (servicing) instrucons in the literature accompanying the monitor.
Warning
• Do not use damaged or loose cables and plug.
• Do not pull the plug out by the wire nor touch the plug with wet hands.
• Use only a properly grounded plug and receptacle.
• Do not connect too many extension cords or plugs to one outlet.
• Do not excessively bend the plug and wire.
• Do not disconnect the power cord while it's sll plugged into the monitor.
• Do not place any heavy objects on the power cord. Damage to the cord may cause shock or re.
• Never open the monitor. There are no user-serviceable parts inside and opening will void warranty.
• Removing covers may expose you to dangerous shock hazards or other risks.
• Keep any heang devices away from the power cable and monitor.
• Do not place the monitor near water.
• Do not insert objects of any kind into the monitor's open slots, as they may touch dangerous voltage points.
• Please follow the laws and regulaons of your municipality to dispose the monitor properly.
• Do not use the monitor in high temperature, humid, dusty or oily areas.
• Do not install the monitor where it will be exposed to connual vibraon.
• Keep the plasc packaging out of children’s reach.
• If any damage is detected upon rst opening the box, contact agency from which you bought the monitor directly.
• If your monitor does not operate normally – in parcular, if there is any unusual sound or smell coming from the
monitor – unplug it immediately and contact an authorized dealer or the service center.
4 User ManualVisit the ViewZ USA website at https://www.viewzusa.com
Page 5
SAFETY INSTRUCTION
Important Safety Instruction
Caution
• If the connector between the plug and the pin is dusty or dirty, clean it properly using a dry cloth.
• Make sure to unplug the power cord before cleaning the monitor.
• Make sure to leave a gap between monitor and wall.
• Do not drop the monitor when moving it.
• Place your monitor in a locaon with low humidity and minimum dust.
• Install the monitor base on a showcase or shelf so that the end of the base does not protrude from the
showcase or shelf.
• Do not place the monitor on an unstable or small surface area.
• Do not install inside a vehicle.
• Disconnect the plug from the outlet during storms or lightning or if it has not been used for a long me.
• Do not try to move the monitor by pulling on the power cord.
• Do not cover the vents on the monitor.
• When moving the monitor, turn o and unplug the power cord. Make sure that all cables, including HDMI
cable and cables connected to other devices, are disconnected before moving it.
• Place the monitor out of children’s reach, as they could damage it by hanging onto it.
Available Temperature & Humidity
• Operang Temperature : 32°F ~ 104°F / 0°C ~ 40°C
• Operang Humidity : 20 ~ 70% RH
Dot Defect (dead pixel) of TFT
ViewZ monitors are manufactured using high-end semiconductor technology with precision rangs of 99.9%
and above. However, it may be the case that certain RGB and white pixels seem darker (or enrely unlit i.e.
black).
Modern producon methods cannot guarantee an absolute fault-free monitor. To this eect, no LED
manufacturer can guarantee a defect free panel. A few isolated pixel or sub-pixel faults are considered
tolerable and dierent policies exist that govern the amount of these tolerable values.
While most pixel faults occur in isolated regions, a cluster of dead pixels or sub-pixels can somemes form for
which a separate ruling applies. A cluster is dened as an area of 5x5 pixels. ViewZ’s policy on pixel failure:
either as an isolated fault or in the form of a cluster is outlined on the website: www.viewzusa.com
5User Manual Visit the ViewZ USA website at https://www.viewzusa.com
Page 6

FCC RF INTERFERENCE STATEMENT
Note
This equipment has been tested and found to comply with the limits for a Class A digital device, pursuant to Part 15 of
the FCC Rules. These limits are designed to provide reasonable protecon against harmful interference in a residenal
installaon.
This equipment generates, uses and can radiate radio frequency energy and, if not installed and used in accordance
with the instrucons, may cause harmful interference to radio communicaons. However, there is no guarantee that
interference will not occur in a parcular installaon.
If this equipment does cause harmful interference to radio or television recepon, which can be determined by
turning the equipment o and on, the user is encouraged to try to correct the interference by one or more of the
following measures.
• Reorient or relocate the receiving antenna.
• Increase the separaon between the equipment and receiver.
• Connect the equipment into an outlet on a circuit dierent from that to which the receiver is connected.
• Consult the dealer or an experienced radio, TV technician for help.
• Only shielded interface cable should be used.
Finally, any changes or modicaons to the equipment by the user not expressly approved by the grantee or
manufacturer could void the users authority to operate such equipment.
► DOC COMPLIANCE NOTICE
This digital apparatus does not exceed the Class A limits for radio noise emissions from digital apparatus set out in the
radio interference regulaon of Canadian Department of communicaons.
6 User ManualVisit the ViewZ USA website at https://www.viewzusa.com
Page 7

WIRING
WIRING (DC 24V input only)
1. On the back of the monitor, loosen the thumb screws and lower the access panel.
2. Aach the leads from the power supply (supplied) to the le and right connectors.
3. When nished, secure the access panel.
Table A shows the recommended maximum wiring distances (transformer to load), and are calculated with a
10-percent voltage drop.
Cable Type - 18AWG (Current : 12~19 A)
WARNING: Do not connect a ground to the center post. Please be careful of voltage polarity.
VZ-DC 24-320 ( Power Transformer) Test ResultInput : Power Source output terminal / Output : Set input terminal
23” IP-PVM-N - 3 MONITORS - VZ-PVM-I2B3N & I2W3N
1 Set of IP-PVM -N
2 Set of IP-PVM -N
3 Set of IP-PVM -N
ft / meter
100 ft / 30.48 m
150 ft / 45.72 m
200 ft / 60.9 6 m
250 ft / 76.20 m
300 ft / 91.44 m
350 ft / 106.68 m
Cable Type - 18AWG (Current : 12~19 A)
ft / meter
100 ft / 30.48 m
150 ft / 45.72 m
200 ft / 60.9 6 m
250 ft / 76.20 m
300 ft / 91.44 m
350 ft / 106.68 m
Cable Type - 18AWG (Current : 12~19 A)
ft / meter
100 ft / 30.48 m
150 ft / 45.72 m
200 ft / 60.9 6 m
250 ft / 76.20 m
300 ft / 91.44 m
350 ft / 106.68 m
DC 24V
tested
tested
tested
tested tested tested
DC 27V
tested
tested
tested
tested
tested tested testedtested tested tested
Max. V
tested
tested
tested
tested
tested tested tested
DC 24V
tested
tested
tested
DC 27V
tested
tested
tested
tested
Max. V
tested
tested
tested
tested
DC 24V
tested
tested
tested
27” IP-PVM-N - 3 MONITORS - VZ-PVM-I3B3N & I3W3N
DC 24V
tested
tested
tested
1 Set of IP-PVM -N
DC 27V
tested
tested
tested
tested
Max. V
tested
tested
tested
tested
DC 24V
tested
tested
tested
2 Set of IP-PVM -N
DC 27V
tested
tested
tested
tested
Not Recommended
Max. V
tested
tested
tested
tested
DC 24V
tested
tested
tested
32” IP-PVM-N - 3 MONITORS - VZ-PVM-I4B3N & I4W3N
DC 24V
tested
tested
1 Set of IP-PVM -N
DC 27V
tested
tested
tested
Max. V
tested
tested
tested
DC 24V
tested
tested
2 Set of IP-PVM -N
DC 27V
tested
tested
tested
Not Recommended
Max. V
tested
tested
tested
DC 24V
tested
tested
DC 27V
tested
tested
tested
tested
3 Set of IP-PVM -N
DC 27V
tested
tested
tested
tested
3 Set of IP-PVM -N
DC 27V
tested
tested
tested
Max. V
tested
tested
tested
tested
Max. V
tested
tested
tested
tested
Max. V
tested
tested
tested
7User Manual Visit the ViewZ USA website at https://www.viewzusa.com
Page 8
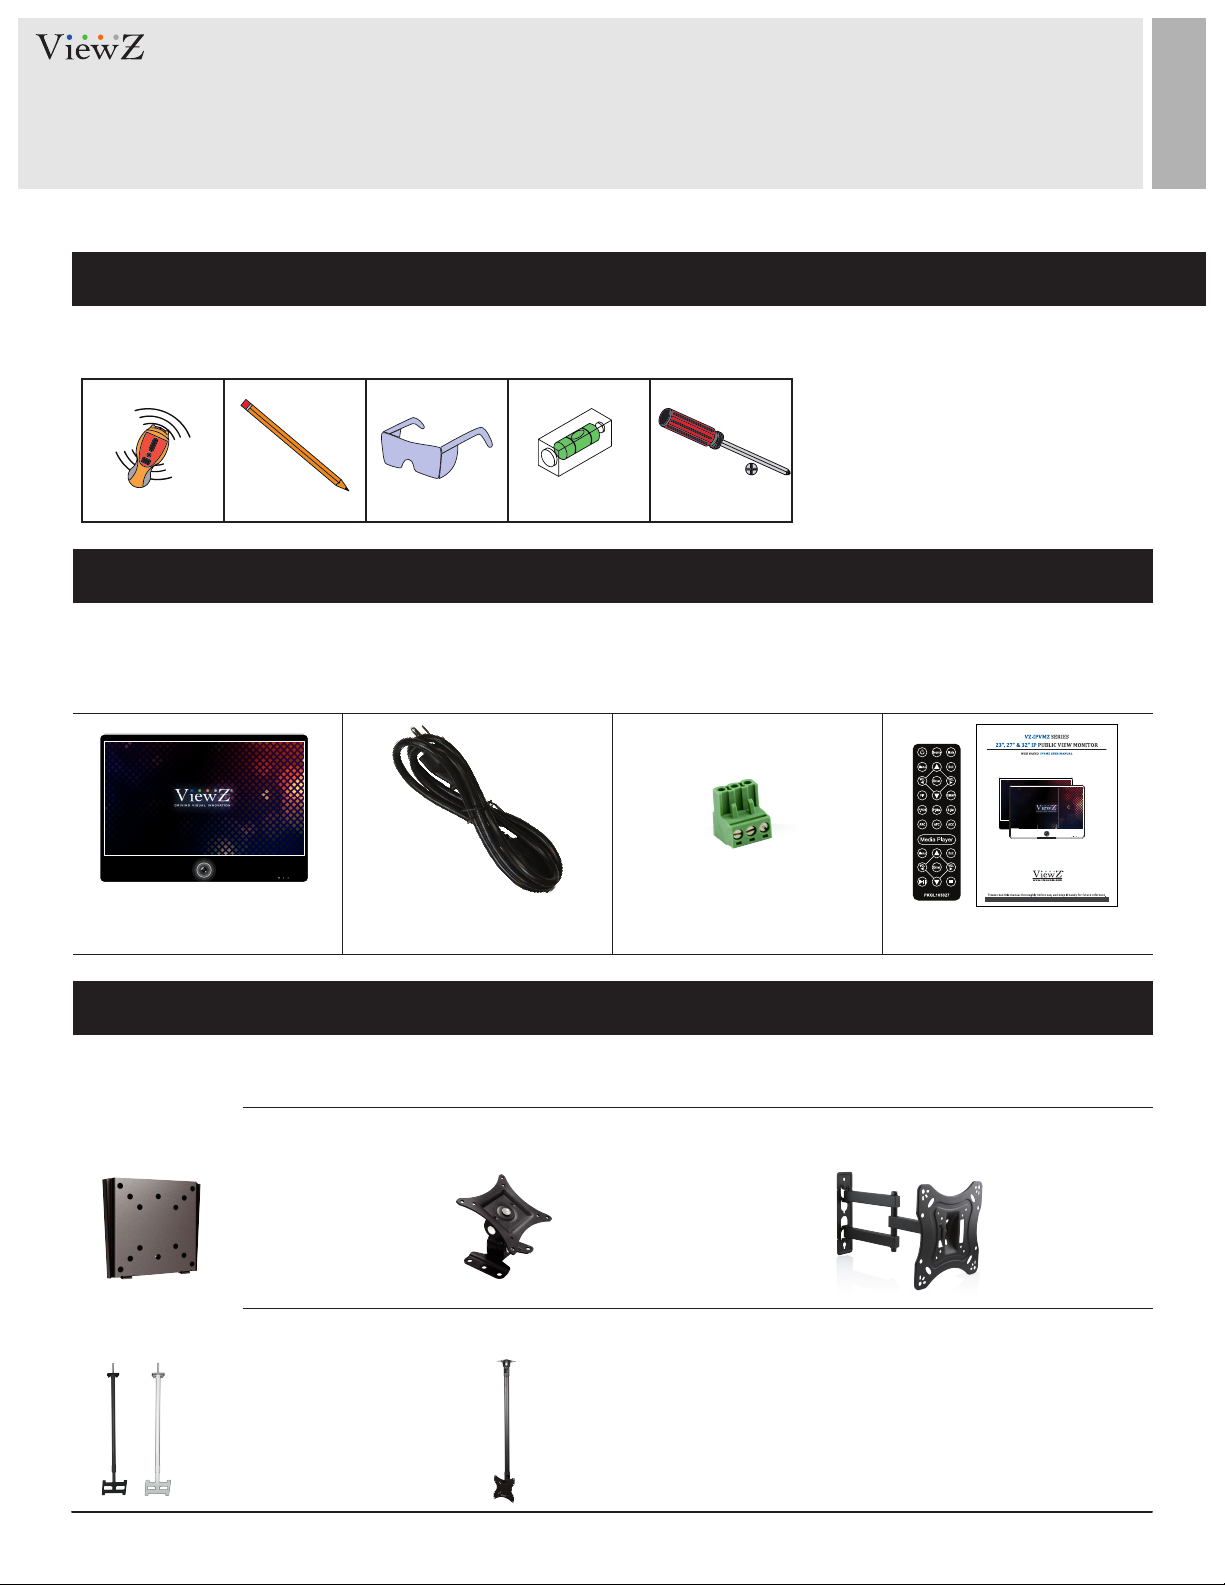
INSTALLATION
Installation Tools
The following tools may be required depending on your installaon.
Electronic Stud Finder Protecve Eye-wearPencil Level Phillips Screwdriver
Assembly Components - provided
Your ViewZ monitor is shipped with all proper installaon hardware and components. If there are parts missing
and/or damaged, please stop the installaon and contact ViewZ USA at (888)-998-4399.
Public View Monitor (Qty 1) 110V Power Cable (Qty 1) DC24V Connector (Qty 1) User Manual (Qty 1)
Remote Controller (Qty 1)
Mounting Option
Your ViewZ monitor is compable with ViewZ monitor mounts. For more informaon, please contact ViewZ USA at (888)-998-4399.
Wall Mount
• Part #
Ceiling Mount
• Part #
WM05
CM-6/18
• Flat Wall Mount
• VESA 50 ~ 100
23" PVM
• Tilng +15°
• Rotaon 360°
• Black / White
• Poll : 6 ~ 18
• Part #
• Part #
WM11
CMKiT-02
• Tilng -45° ~ +45°
• Swivel 180°
• VESA 75 ~ 100
• Tilng -12° ~ +5°
• Rotaon 360°
• Poll : 35" ~ 70"
23,27 & 32" PVM
• Part #
AM02-A
• Tilng -20° ~20°
• Swivel 180°
• VESA 75 ~ 200
23,27 & 32" PVM23 & 27" PVM
V.1.9.
23,27 & 32" PVM
8 User ManualVisit the ViewZ USA website at https://www.viewzusa.com
Page 9
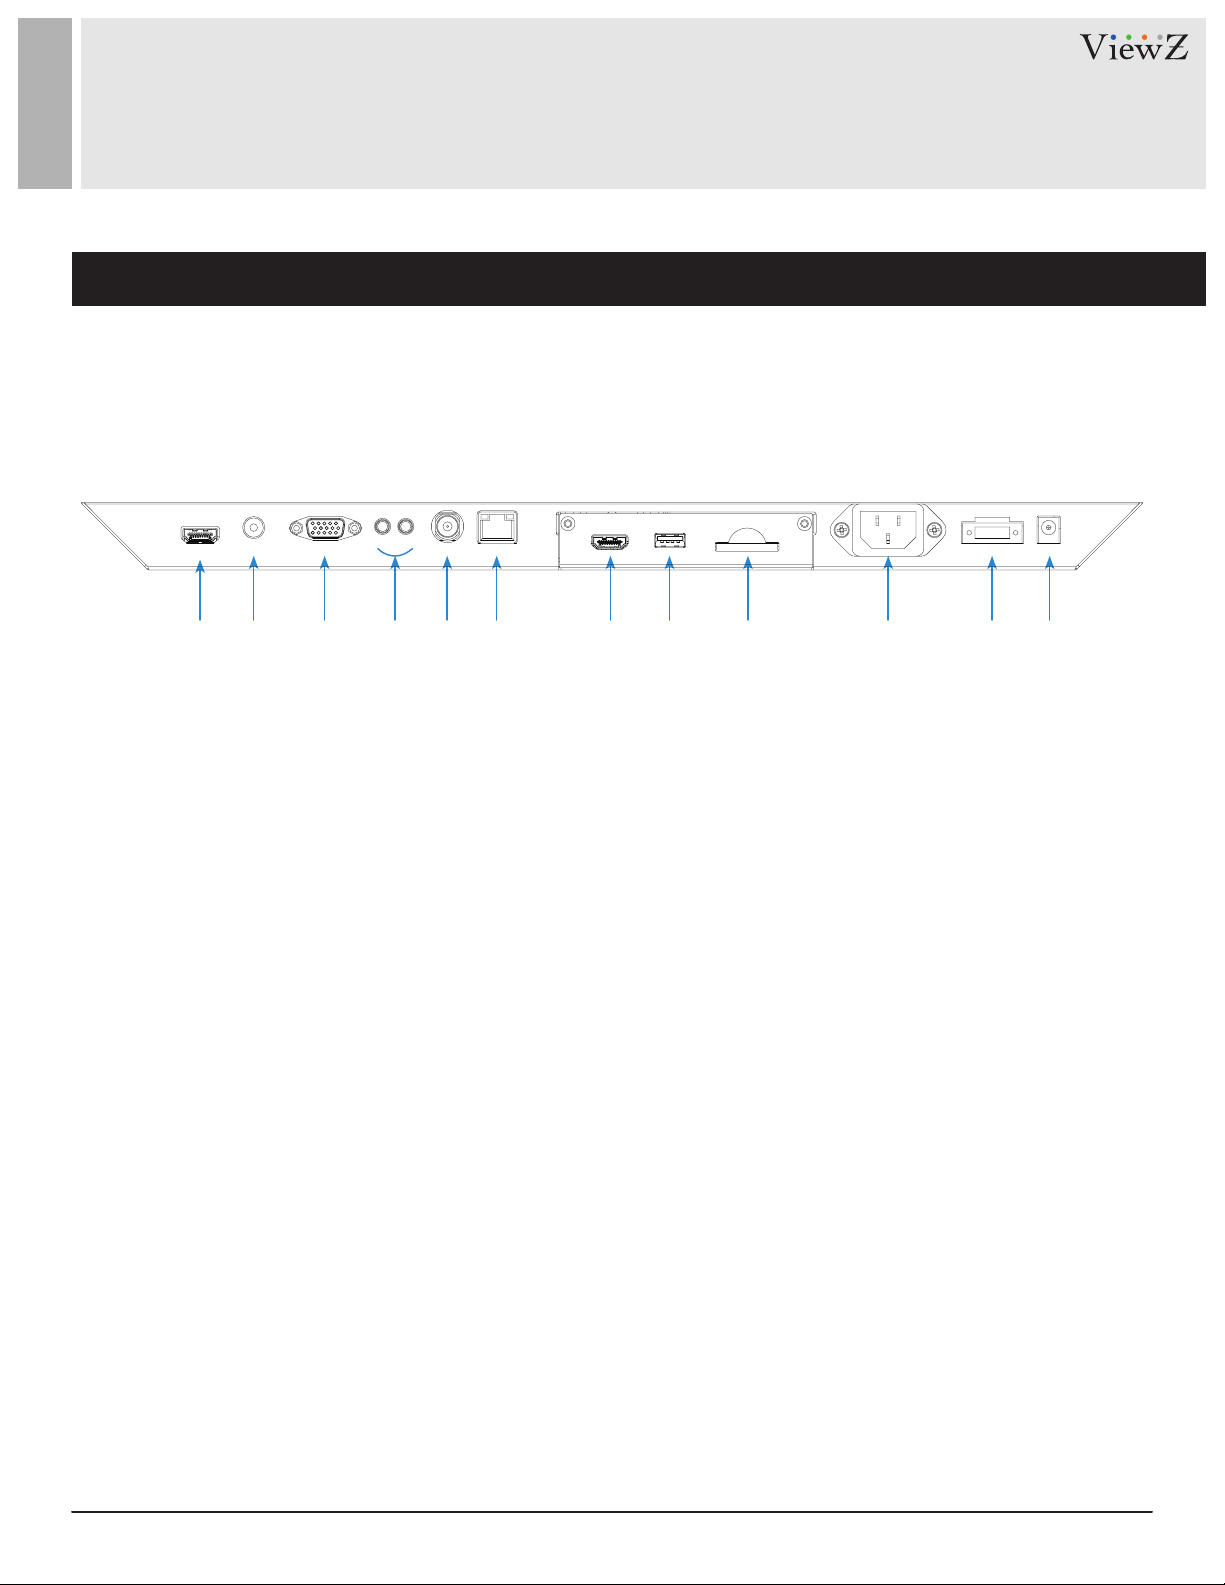
CONNECT EXTERNAL EQUIPMENTS
Interface Input Ports
The following image is the descripon of interface input ports
q w e r t y u i o a s d
1. HDMI IN
2. AV ( BNC ) IN
3. VGA (15 Pin D-Sub) IN
4. AUDIO IN / OUT
5. CAMERA CVBS OUT
6. CAMERA IP(Ethernet) OUT
7. (Oponal) Media Player HDMI OUT
8. (Oponal) Media Player USB
9. (Oponal) Media Player SD Card
10. AC 110V IN
11. DC 24V IN
12. DC 12V OUT
9User Manual Visit the ViewZ USA website at https://www.viewzusa.com
Page 10

REMOTE FUNCTION
Remote Controller
Remote Controller
1. Power
2. Source - Select Input Source
3. Mute - Turn o the sound
4. Menu - Enter / Exit OSD
5. Exit - Exit OSD with saving current value
6. Le & Right ◄(VOL)►, Up & Down ▲▼
7. Enter - Select current seng value on Input source
8. PIP - Launch the PIP (Picture In Picture) mode
9. SWAP - Swap the main & sub on PIP
10. P.POS - Change the sub picture posion on PIP
11. P.Size - Change the main & sub picture size on PIP
12. S.Sat - Not working
13. ARC - Aspect Rao Control
14. APC - Auto Picture Control
15. ACC - Auto Color Control
q
w
r
y
i
a
f
e
t
u
o
s
d
g
h
q
Media Controller
1. Menu - Enter / Exit Media Player Menu
2. Exit - Exit Media Player Menu
3. Le & Right ◄(VOL)►, Up & Down ▲▼
4. Enter - Conrm the selecon
5. Stop & Play - Freeze the media play
6. Stop - Stop the media play
Display image, sound and custom sengs can be adjusted in OSD (On Screen Display) menu by remote controller.
To adjust monitor seng value :
1. Press the 'MENU' buon to enter the OSD menu
2. Press the 'INPUT' buon to select input source
3. Press the ▲ / ▼ buons to select the desired sub-menu. The selected submenu will be highlighted
4. Press the 'ENTER' buon to enter the sub-menu for adjusng items
5. Change the value you wish to adjust by using the ◄ / ► buons
6. Press the 'MENU' buon to conrm / exit for saving adjustment value on sub-menu
7. Without entering OSD MENU, press ◄ / ► buons to adjust the audio volume
8. Press the 'MUTE' buon to on / o audio - audio only works with VGA / AV input
e
t
w
r
y
10 User ManualVisit the ViewZ USA website at https://www.viewzusa.com
Page 11

CONTROL AND FUNCTION
On Monitor, Front Area
q w e r
1. Built-in Camera / Moon Detecon
The monitor will display the built-in camera's video
Built-in camera has the moon detecon funcon
2. IR Sensor
Sensor for the remote controller
3. LED Indicator
Green color: monitor on
Red color : monitor o
4. Recording Indicator LED
User can choose a blinking LED color - red, blue,
purple and no color.
11User Manual Visit the ViewZ USA website at https://www.viewzusa.com
Page 12

CONTROL AND FUNCTION
On Monitor, Button Control
q
w
e
r
t
1. Source
To select an input source
2. Menu
To enter or exit the OSD / Select a menu on OSD
3. Le & Right ◄ (VOL) ►
To change the value on the selected menu
4. Up & Down ▲ ▼
To switch a menu on OSD
5. Power
To turn the monitor power on / o
Monitor Button Function
All picture, sound sengs and setup can be adjusted in OSD (On Screen Display) menu.
To adjust the OSD screen:
1. Press the MENU buon to enter the OSD MENU
2. Press the ◄ / ► buons to select the desired main-MENU. The selected main-MENU is highlighted
3. Press the ▲ / ▼ buons to select the desired sub-MENU. The selected sub-MENU is highlighted
4. Change the value you wish to adjust by using the ◄ / ► buons
5. Press the MENU buon to conrm the adjustment on sub-MENU
6. Press the MENU buon to exit the sub-MENU and go back to the main-MENU
7. Press the MENU buon to exit the OSD MENU
12 User ManualVisit the ViewZ USA website at https://www.viewzusa.com
Page 13

CONTROL AND FUNCTION
Select Input Source
Press 'SOURCE' buon on monitor or 'INPUT' buon on remote controller
VGA
HDMI
CAMERA
AV
MEDIA
Volume
Press ▲ / ▼ buon to change input source and then press
Press ▲ / ▼ buon to change input source and then press
controller
◄ / ►
buon to select input source on monitor
◄ / ►
buon or Enter to select input source on remote
Press◄ / ► buons to adjust volume on monitor
Press◄ / ► buons to adjust volume on remote controller
Detect Source Signal Message
If you connect any input source, monitor will display current input source resoluon and frequency.
13User Manual Visit the ViewZ USA website at https://www.viewzusa.com
Page 14

CONTROL AND FUNCTION
Picture
▲/▼ MOVE ◄/► SELECT(ADJUST) MENU RETURN
MILD
USER
DYNAMIC
STANDARD
Reduces contrast and sharpness
Applies user selected values - brightness, contrast, color and hue
Provides enhanced contrast and sharpness
Provides standard contrast and sharpness
FUNCTION
CONTRAST
BRIGHTNESS
1)
HUE
SATURATION
SHARPNESS
COLOR TEMP
ASPECT RATIO
PICTURE MODE
1) Only available in Composite ( video ) input
Adjust the contrast
Adjust the brightness
Adjust the hue
Adjust the color saturation
Adjust the sharpness
Adjust the color setting
Adjust the video format
Adjust the image color setting
PICTURE MODE
VALUE
0 ~ 100
0 ~ 100
0 ~ 100
0 ~ 100
0 ~ 100
See table below
See table below
See table below
1) 2) 3)
16 : 9
1) 2) 3)
4 : 3
UNDER
ZOOM
1) VGA-input support
2) AV-input support
3) HDMI-input support
2) 3)
3)
Sets the image size to 16 : 9
Sets the image size to 4 : 3
Adjusts the image size based on input resolution
Zooms the image size as factory preset zoom level
COLOR TEMP.
ASPECT RATIO
WARM
NORMAL
COOL
Give the white color a reddish tint
Give the white color a neutral tint
Give the white color a blue-ish tint
14 User ManualVisit the ViewZ USA website at https://www.viewzusa.com
Page 15

CONTROL AND FUNCTION
Sound
▲/▼ MOVE ◄/► SELECT(ADJUST) MENU RETURN
FUNCTION VALUE
VOLUME
BALANCE Adjusts the balance 0 ~ 100
SOUND MODE
LOUDNESS
BASS
MUTE
Adjusts the volume
Selects one of the presets
Adjusts preset sound mode
Adjusts the bass level
Mutes the sound
0 ~ 100
USER / MUSIC / MOVIE / STANDARD
MODE 1 / MODE 2/ MODE 3 / MODE 4 / OFF
ON /OFF / 1 - 12
ON / OFF
15User Manual Visit the ViewZ USA website at https://www.viewzusa.com
Page 16

CONTROL AND FUNCTION
System - OSD SETUP
▲/▼ MOVE ◄/► SELECT(ADJUST) MENU RETURN
OSD LANGUAGE
OSD DURATION
RESTORE DEFAULT
FUNCTION VALUE
Sets the language of the OSD menu
Sets the OSD display time
Resets the monitor settings to the factory default
English, Spanish, French
Russian, Portuguese
0 ~ 60 sec
16 User ManualVisit the ViewZ USA website at https://www.viewzusa.com
Page 17

CONTROL AND FUNCTION
Advance - Adjust Recording Indicator Color / Recording Text
▲/▼ MOVE ◄/► SELECT(ADJUST) MENU RETURN
FUNCTION
RECORDING INDICATOR
RECORDING TEXT
MOTION DETECTION
AUTO SWITCHING
RECORDING TEXT
TEXT BLINK
TEXT SIZE
TEXT SELECT
TEXT COLOR
1) PRESET TEXT - TEXT 1 : Recording / TEXT 2 : Recording in Progress / TEXT 3 : Surveillance in Progress
1)
Sets the color of recording indicator LED
See table below
See table on page 17
See table on page 18
FUNCTION
Enables the recording text
Sets the blinking text interval time
Adjusts the size of text
Selects the preset text
Adjusts the color of text
RECORDING TEXT Option Window
OFF / RED / BLUE / PURPLE
RED / GREEN / BLUE / BLACK / WHITE
VALUE
VALUE
OFF / ON
OFF / ON / 1 ~ 3 sec
x 1 / x 2 / x 3
TEXT 1 / TEXT 2 / TEXT 3
17User Manual Visit the ViewZ USA website at https://www.viewzusa.com
Page 18

CONTROL AND FUNCTION
Advance - Adjust Motion Detection
▲/▼ MOVE ◄/► SELECT(ADJUST) MENU RETURN
DETECTION ENABLE
DETECTION INPUT
DETECTION TIME
DISPLAY TYPE
Enables the MOTION DETECTION function
Selects the input source for Motion Detection
Adjusts the time to display the swapped image
/ video which is trigged by motion detection.
If user selects '10', the monitor will keep
showing the swapped image/videos for 10
seconds whether or not motion detected.
If there is no motion detection for 10 seconds,
monitor will display original image/videos.
Adjusts the display mode of motion detection.
PIP : Displays the motion detection input as
the PIP of the current video input source.
This PIP is set by PIP main menu.
* See the PIP in page 19
MOTION DETECTION Option Window
FUNCTION VALUE
OFF / ON
CAMERA / AV / MEDIA / VGA / HDMI
3 ~ 100 sec
PIP / FULL
FULL : Display the motion detection input as
the full image/video on the monitor
18 User ManualVisit the ViewZ USA website at https://www.viewzusa.com
Page 19

CONTROL AND FUNCTION
Advance - Adjust Auto Switching
▲/▼ MOVE ◄/► SELECT(ADJUST) MENU RETURN
AUTO SWITCHING
TIME
VGA
HDMI
CAMERA
AV
MEDIA
Enables the AUTO SWITCHING function
Adjusts the time which the monitor displays
one input source before switching to the other
* Only selected two input sources can
be displayed
Sets the VGA input source as the switching
display source
Sets the HDMI input source as the switching
display source
Sets the CAMERA input source as the
switching display source
Sets the AV input source as the switching
display source
Sets the MEDIA input source as the switching
AUTO SWITCHING Option Window
FUNCTION VALUE
OFF / ON
3 ~ 100 sec
OFF / ON
OFF / ON
OFF / ON
OFF / ON
OFF / ON
display source
19User Manual Visit the ViewZ USA website at https://www.viewzusa.com
Page 20

CONTROL AND FUNCTION
PIP
▲/▼ MOVE ◄/► SELECT(ADJUST) MENU RETURN
OFF
PIP (Picture in Picture)
PIP / PBP function off
Separates the screen into two parts. One source device is displayed on the main screen
at the same time the another source device is displayed in inset window
PIP
SUB SOURCE
PIP SIZE
PIP-POSITION
SOUND SELECT
SWAP
Selects PIP or OFF
Selects PIP input source
Adjusts PIP window size
Adjusts PIP position
Selects sound source input
Swaps the main display
SUB SOURCE
PIP / PBP input source DVI, YPBPR, HDMI, VGA, AV1, AV2, AV3, AV4, AV5
OFF
SMALL, MEDIUM, LARGE
Display small, medium, large size PIP window on main display
FUNCTION
PIP
PIP SIZE
VALUE
See table below
See table below
See table below
See table below
MAIN, SUB
PIP-POSITION
LEFT UP / LEFT DOWN
RIGHT UP / RIGHT DOWN
Set the position of PIP window on main display
PIP MODE
HDMI
MEDIA (Optional)
VGA
AV
CAMERA
HDMI
X
O
O
O
X
MEDIA (Optional)
O
X
O
O
O
VGA
O
O
X
O
O
20 User ManualVisit the ViewZ USA website at https://www.viewzusa.com
AV
O
O
O
O
CAMERA
X
O
O
X
O
X
Page 21

MOUNTING GUIDE
Wall Mounting (Optional)
VZ-PVM monitors are suitable for VESA wall mount (not included).
M4 x L10 screws for
M4 x L10 screws for
M6 x L8 screws for
1. VZ-PVM-I2B3N/I2W3N, VZ-PVM-I3B3N/I3W3N : VESA WALL MOUNT 100mm x 100mm, 200mm x 200mm
2. VZ-PVM-I4B3N/I4W3N : VESA WALL MOUNT 200mm x 200mm
Aenon!
VZ-PVM-I2B3N/I2W3N (100x100) : You must use 4 * M4 x L10 screws to assemble this monitor and the wall
mount bracket.
VZ-PVM-I3B3N/I3W3N (100x100) : You must use 4 * M4 x L10 screws to assemble this monitor and the wall
mount bracket.
VZ-PVM-I2B3N/I2W3N (200x200), VZ-PVM-I3B3N/I3W3N (200x200), VZ-PVM-I4B3N/I4W3N : You must use 4 *
M6 x L8 screws to assemble this monitor and the wall mount bracket.
WARNING !
If user uses screws longer than
M4 x L10 mm for 100 x 100 - VZ-PVM-I2B3N/I2W3N, VZ-PVM-I3B3N/I3W3N
M6 x L8 mm for 200 x 200 - VZ-PVM-I2B3N/I2W3N, VZ-PVM-I3B3N/I3W3N, VZ-PVM-I3B3N/I3W3N
it may cause damage to the unit. Please use bolt of correct size and length as instructed.
VZ-PVM-I2B3N / I2W3N (23" - 100x100)
VZ-PVM-I3B3N / I3W3N (27" - 100x100)
VZ-PVM-I2B3N / I2W3N (23" - 200x200)
VZ-PVM-I3B3N / I3W3N (23" - 200x200)
VZ-PVM-I4B3N / I4W3N (32")
Mounng Safety !
At least two people are recommended to safely install the mount.
21User Manual Visit the ViewZ USA website at https://www.viewzusa.com
Page 22

SPECIFICATION
Model No. VZ-PVM-I2B3N / I2W3N VZ-PVM-I3B3N / I3W3N VZ-PVM-I4B3N / I4W3N
Size & Type 23.6"
Panel Type
Pixel Pitch
Brightness
LCD
Operating Temperature
Contrast Ratio
Viewing Angle
Display Color
Response Time
Resolution
Case Type
Active Display Area
Aspect Ratio
Frequency
Color Temperature
Speaker
Operating Humidity
23.6'' LED Backlit Monitor
0.2715 (H) x 0.2715 (V) mm
521.28(H) x 293.22(V) mm
30-67.5KHz(H) / 50-75Hz(V)
250 cd/m²
3000 : 1(Typ.)
8.5 ms
27"
27'' LED Backlit Monitor
0.31125 (H) x 0.31125 (V) mm
300 cd/m²
3000 : 1(Typ.)
R/L : 89°/ 89° U/D : 89°/ 89°
16.7 Million Colors
12 ms
1920 (H) x 1080 (V)
Metal
597.9 (H) x 336.3 (V) mm
16 : 9
30-83.8KHz(H) / 50-75Hz(V)
Warm / Normal / Cool
2 x 5W
32°F ~ 104°F / 0°C ~ 40°C
20 ~ 70% RH
32"
32'' LED Backlit Monitor
0.36375 (H) x 0.36375 (V) mm
450 cd/m²
1200 : 1(Typ.)
8 ms
698.4 (H) x 392.85 (V) mm
30-84KHz(H) / 50-75Hz(V)
Weight
INTERFACE
Safety & EMC Certification
Electrical
Ratings
Power Consumption
Accessories
AC IN
DC 24V IN
Net : 22.04 lb / 10.0 kg
Gross : 29.76 lb / 13.5 kg
COMPOSITE VIDEO x 1, HDMI (High Definition Multimedia Interface) , VGA (RGB-PC)
CAMERA OUT ( RJ-45 x 1, CVBS x 1), Audio In / Out
24V 2.0A
≤ 36 W
HDMI cable, Power Supply & Cable, User’s Manual, Remote controller
Net : 28.66 lb / 13.0 kg
Gross : 33.06 lb / 15.0 kg
CE / FCC / UL / ROHS
AC 110-240V, 50/60Hz
24V 3.0A
≤ 46 W
Net : 33.06 lb / 15.0 kg
Gross : 39.68 lb / 18.0 kg
24V 4.0A
≤ 50 W
22 User ManualVisit the ViewZ USA website at https://www.viewzusa.com
Page 23

SPECIFICATION
Camera Specification
Parameters Descripon
Producon Informaon
Main Chipset
Camera
Lens
External interface
Video
Network
WEB applicaon
Product Name
Encode Chipset
Sensor
Resolution
Video System
Product Name
Digital Zoom
Minimum illumination
Day & Night Mode
Removable Optical Filter
Electronic Shutter Speed
Gain Control
White Balance
Wide Dynamic Range (WDR)
BLC
Highlight Compensation
Lens Type
Focal Length of the Lens
Auto Iris
Network Interface
CVBS Output
Reset Button
Video Encode
Video Resolution and Frame Rate
Video Bit Rate
Multi-Stream
Image Correction
Stream Type
S/N Ratio
DNR
Integration Protocol
Network Protocol
Streaming Mode
Concurrent Access (# of Users)
User Rights
Language
Browser
2MP IP module
Amba S233
SONY IMX322
1920 (W) x 1080(H)
NTSC / PAL
2MP IP module
Support
Color: 0.01Lux@ (F1.2, AGC ON) / B&W: 0.001Lux@(F1.2, AGC ON)
Support
Support
1 sec to 1/10000 sec
Support
Auto
Support WDR
Support
Support
Vari-Focal
2.8 ~ 12mm
Support
RJ45 10 /100 Base-T
Support
Support
H.264 BP/HP/MP/MJPEG
NTSC 60Hz:30fps / PAL 50Hz:25fps
Main stream: 1920*1080/1280*720
Sub stream: 1280*720/D1/VGA
1Mbps-8Mpbs,support CBR/VBR
Main stream ,sub stream
corridor mode,saturation,brightness,contrast,sharpness
VBR/CBR
≥ 50 dB (AGC OFF)
Auto/Manual support 3D DNR
ONVIF 2.4 (supported)
TCP/IP,UDP,SMTP,HTTP,FTP,PPPOE,DHCP,DNS,DDNS,UPNP,RTP,RTSP
Unicast
10 users ( Maximum 3ch 1080P )
Two roles: administrator and common users. The administrator
can assign common users different rights.
English default
Windows IE6,7,8,9,11 / Firefox (broken layout) / chrome (error)
23User Manual Visit the ViewZ USA website at https://www.viewzusa.com
Page 24

TROUBLESHOOTING GUIDE
- Check the following before calling for service.
- If the same problems connue aer checking, contact the reseller you purchased the monitor from.
We recommend that you test with dierent input sources when you have trouble with
At start
No image or
Noise on the screen
the current input source. If symptom persists, follow the instrucons below. Aer
following the instrucons below, please contact us at 1-888-99-VIEWZ.
- Make sure the power cable is correctly plugged into the outlet
- Make sure the power cable is correctly plugged into the monitor
- Make sure the cable is correctly connected between monitor & source
- Check brightness and see if brightness is set to 'Ø'
- Check video source
Incorrect display or
Half display
Flickering and
shadow image
The audio funcon is
not working
LED is ickering
or no image
- Check your video source
- Reset video source : connecon, cable replacement, seng & more
- Check your input source setting for resolution and phase (Hz)
- Check the volume and make sure MUTE is not on
- Check HDMI / Audio port cable connection
- Check the interface cable connecon and make sure it's plugged in correctly
- Check the input source
24 User ManualVisit the ViewZ USA website at https://www.viewzusa.com
Page 25

TERMS OF WARRANTY / RMA
- The warranty period for this monitor is 3 years. The warranty will be voided for the scenarios listed below.
- You can also download the manual and informaon at VIEWZ web site: VIEWZUSA.COM
When power feed to the monitor exceeds capacity and causes damage
Accident, Abuse, Misuse, Neglect, Fire, Water/liquids, Lightning or any act of nature
Cases of
Damaged by dropping, throwing and hing the monitor
Non-Warranty
Coverage
* Above informaon can be changed without nocaon - please check our website or
contact ViewZ representave for latest RMA service policy.
* When shipping the monitor for RMA, make sure to pack safely to ensure the monitor is
not damaged during shipping.
Failure caused by users attempt to modify the product
Failure by limited life of parts such as LED Lamps and any other consumables
Damaged by using third party power cable, unstable power input and electric shock
25User Manual Visit the ViewZ USA website at https://www.viewzusa.com
Page 26

NOTE
26 User ManualVisit the ViewZ USA website at https://www.viewzusa.com
Page 27

WARRANTY
ViewZ USA
LIMITED 3 YEAR WARRANTY
What and Who is Covered by this Limited Warranty and for How Long
ViewZ USA warrants this product to be free from defects in material and workmanship for 3 years to the original owner of this
product. The limited warranty is valid only for the original purchaser of the product.
What ViewZ USA Will Do
At the sole discreon of ViewZ USA, ViewZ USA will repair or replace any product or product part that is defecve. If ViewZ USA
chooses to replace a defecve product or part, a replacement product or part will be shipped to you at no charge, but you must pay
any labor costs.
What is Not Covered; Limitaons
ViewZ USA disclaims any liability for damage to mounts, adapters, displays, projectors, other property, or personal injury resulng, in
whole or in part, from improper installaon, modicaon, use or misuse of its products.
ViewZ USA disclaims all other warranes, express or implied, including warranes of merchantability and tness for a parcular
purpose. ViewZ USA is not responsible for incidental or consequenal damages, including but not limited to, inability to use its
products or labor costs for removing and replacing defecve products or parts. Some states do not allow the exclusion or limitaon
of incidental or consequenal damage, so the above limitaon or exclusion many not apply to you.
What Customers Must Do for Limited Warranty Service
If you discover a problem that you think may be covered by the warranty you MUST REPORT it in wring to the address below within
thirty (30) days. Proof of purchase (an original sales receipt) from the original consumer purchaser must accompany all warranty
claims. Warranty claims must also include a descripon of the problem, the purchaser’s name, address, and telephone number.
General inquiries can be addressed to ViewZ USA Customer Service at 1-888-998-4399. Warranty claims will not be accepted over the
phone or by fax.
ViewZ USA
An: Warranty Claim
177 W. Orangethorpe Ave.
Placena, CA 92870
How State Law Applies
This warranty gives you specic legal rights, and you may also have other rights which vary from state to state.
Disclaimer
ViewZ USA intends to make this manual accurate and complete. However, ViewZ USA makes no claim that the informaon contained
herein covers all details, condions or variaons, nor does it provide for every possible conngency in connecon with the
installaon or use of this monitor. The informaon contained in this document is subject to change without noce or obligaon of
any kind. ViewZ USA makes no representaon of warranty, expressed or implied, regarding the informaon contained herein. ViewZ
USA assumes no responsibility for accuracy, completeness or suciency of the informaon contained in this document.
Contact Us
NORTH AMERICA
177 W. Orangethorpe Ave.
Placena, CA 92870
USA and Canada
Phone: 1-888-998-4399
Fax: 1-714-996-1138
Other Locaons
© ViewZ USA
Phone: (001) 888-998-4399
Fax: (001) 714-996-1138
27User Manual Visit the ViewZ USA website at https://www.viewzusa.com
 Loading...