

Page 1
SMART AD PVM SERIES
CMS SERVER & CMS SOF T WA R E SET U P
ANDROID PORTRAIT IP-PVM CMS SETUP MANUAL
Please read this manual thoroughly before use, and keep it handy for future reference.
Page 2

CONTENTS
System Requirements
1. Local and Cloud Server requirements
2. Wireless Connecon
Install CMS SW & Server Setup
1. CMS Server Setup
.................................................................................................................................................................................
.......................................................................................................................................
..........................................................................................................................................................................
.............................................................................................................................................................
............................................................................................................................................................................ ..
2. IP Address and Open-Port Setup for CMS Server
3. Install CMS Soware
4. Setup Port Forwarding on Router
Setup CMS SW
...............................................................................................................................................................................................
1. Create the Group
2. Register Smart AD PVM to CMS SW
.........................................................................................................................................................................
...............................................................................................................................................
...............................................................................................................................................................................
.................................................................................................................................
................................................................................................................
3
3
4
5
5
6
8
11
12
12
15
2 User ManualVisit the ViewZ USA website at https://www.viewzusa.com
Page 3
SYSTEM REQUIREMENTS
Local CMS Server H/W Requirement
1. Hardware Specicaon on local server
Processor: i5 8400 (2.0GHz) or Higher | RAM: DDR4 8G or Higher
HDD: SSD 128/256GB or Higher
Network: Stac IP or xed DHCP address with Gigabit LAN
2. OS Specicaon
- OS: Ubuntu LTS x64 (Latest ver.)
- Operang CMS web browser: Chrome
- CMS port: 50005 or desired number ( do not use common port number such as
80, 8080, 443 and etc.)
Caution
The media contents (images & videos) will be saved into the local server and
ViewZ Smart AD PVM. When updang or changing CMS SW's schedule with media
contents, the saved contents (in Smart AD PVM) will be changed. That is, if user
delete media contents in the CMS SW, the saved media contents will be also deleted
on the Smart ADPVM.
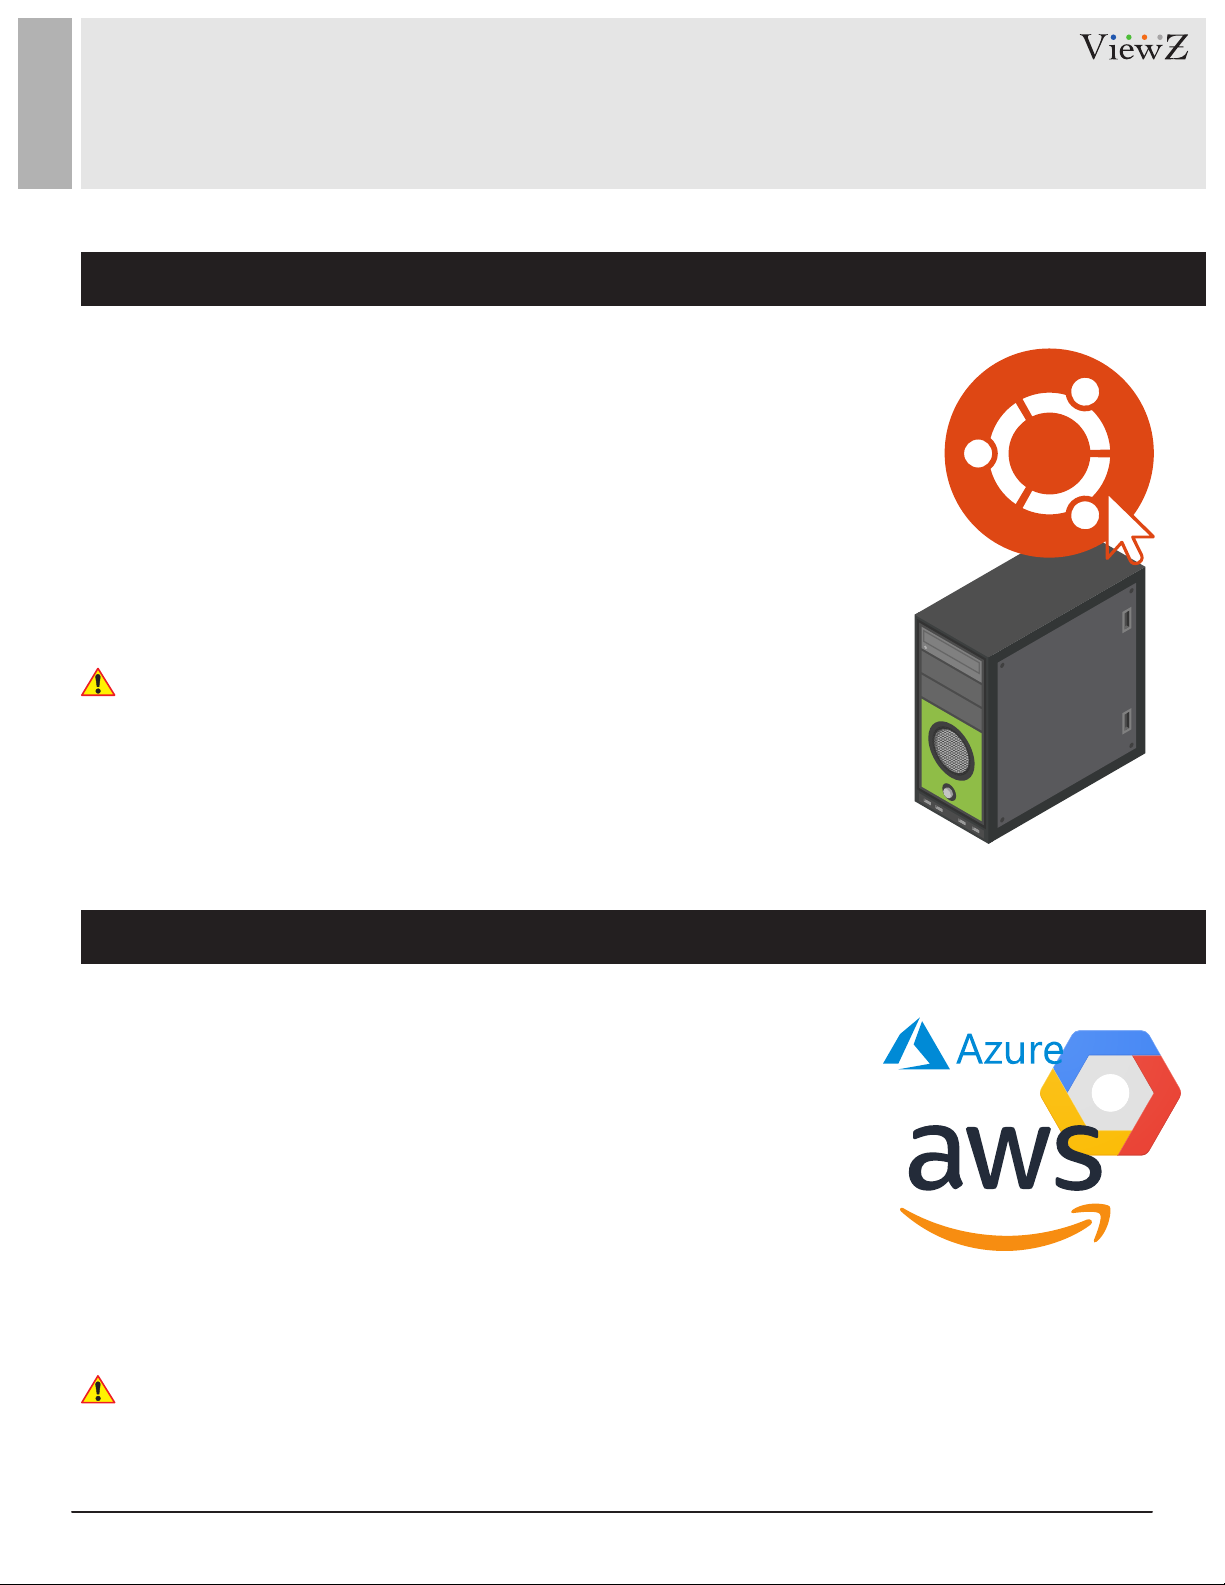
Cloud CMS Server H/W Requirement
1. If you want to use the cloud server, please remember the minimum spec of
the local server when you choose the cloud server spec. Also, the data transfer
capacity is a very important issue.
Based on the result of tesng, ViewZ recommends that customers use over 3 TB for
the data-transfer limit.
ViewZ CMS soware uses approximately 1.8 TB/unit for basic data-transfer
(including log record, device connecon check and etc.)
2. Customers can setup the IP address of the cloud server as CMS SW access point.
3. Customers can also use a domain address for CMS SW access. However, you might
need a network specialist in this case.
Caution
This manual is designed for setup CMS SW on local server. However, you can also
use page 8 to 10 & 12 to 18 for the setup CMS SW on cloud server.
3User Manual Visit the ViewZ USA website at https://www.viewzusa.com
Page 4
SYSTEM REQUIREMENTS
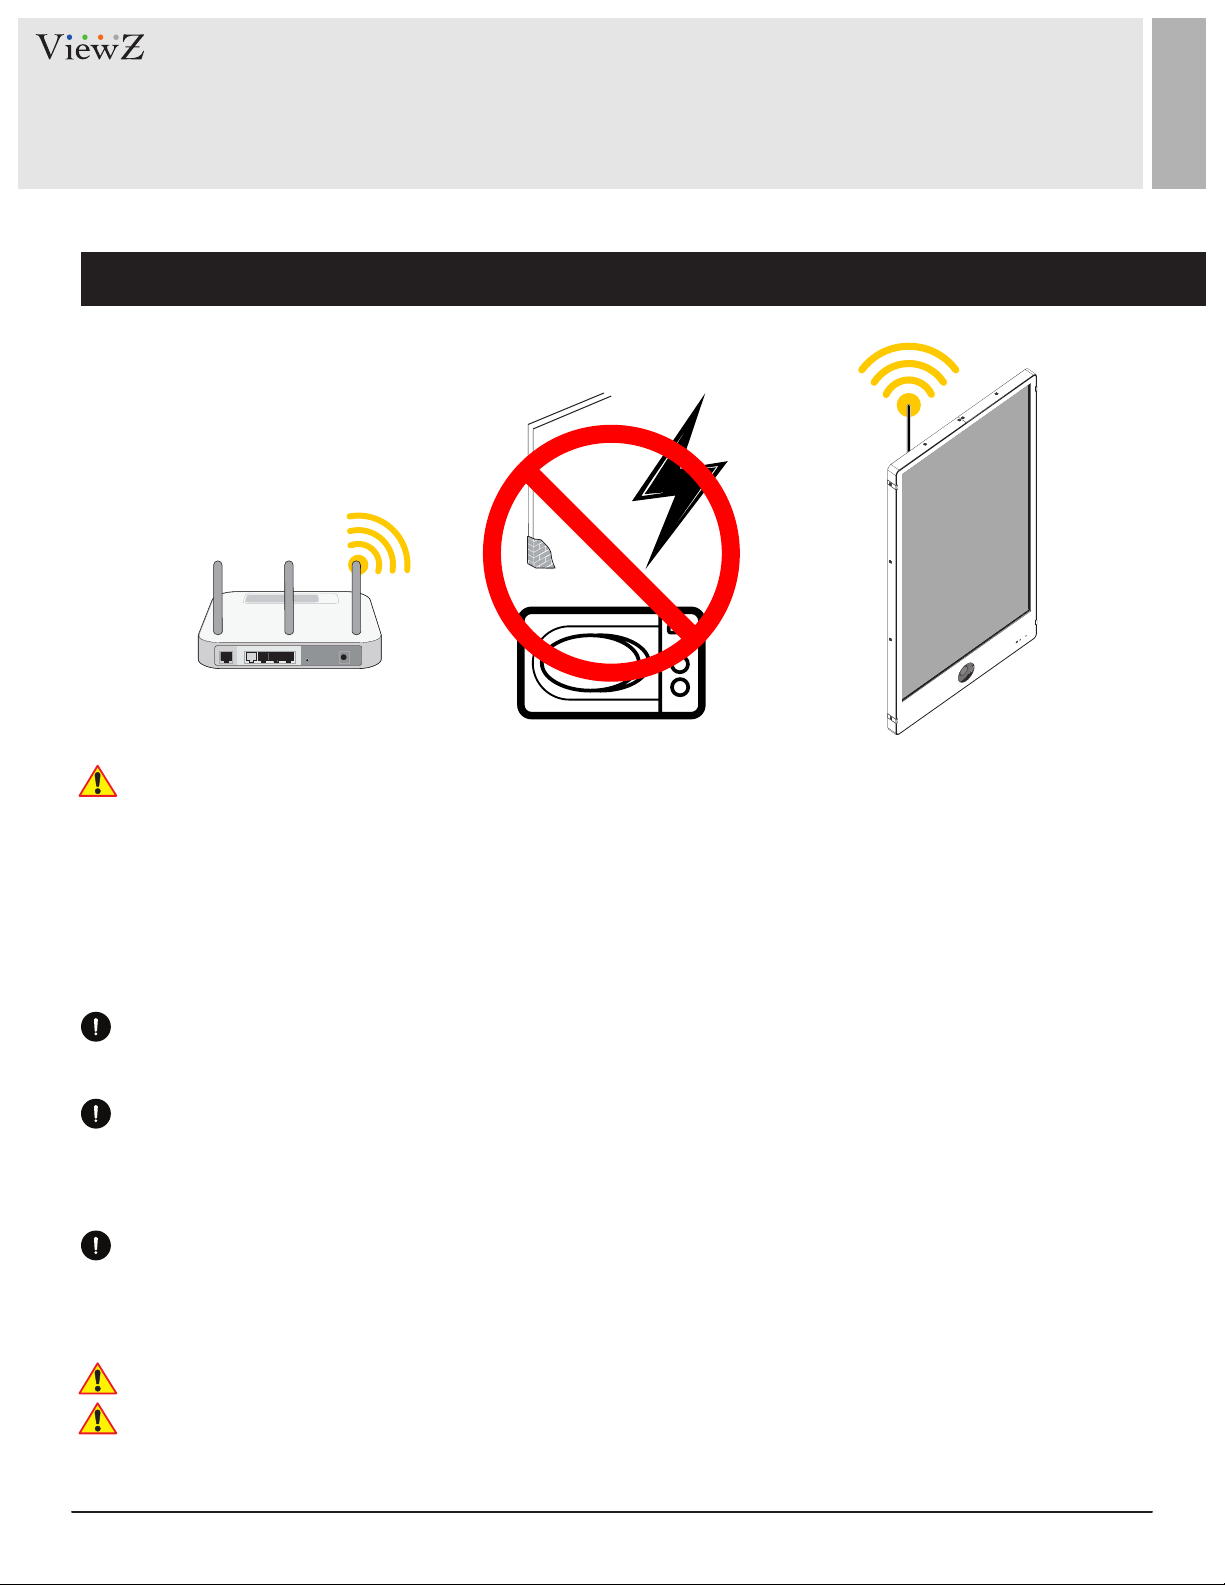
Wireless Connection
ViewZ Smart AD PVM can connect to the internet or intranet via wireless. The wireless router lets you access from
your network anywhere within the operang range of your wireless network. However, the operang distance or
range of your wireless connecon can vary signicantly depending on the physical placement of your router. For
example, the thickness and number of walls the wireless signal passes through can limit the range.
Addionally, other wireless access points in and around your home might aect your router’s signal. Wireless
access points are routers, repeaters, WiFi range extenders, or any other device that emits a wireless signal for
network access.
Place your router near the center of the area where ViewZ Smart AD PVM operate or place the router in an
elevated locaon, minimizing the number walls and ceilings between the router and ViewZ Smart AD PVM.
Place ViewZ Smart AD PVM away from electrical devices such as these:
- Ceiling fans, Home security systems
- Microwaves, Computers
- Base of a cordless phone, 2.4 GHz cordless phone
Place ViewZ Smart AD PVM away from large metal surfaces, large glass surfaces, and insulated walls
such as these:
- Solid metal door, Aluminum studs
- Fish tanks, Mirrors, Brick, Concrete
ViewZ recommends using a wired connecon via RJ-45 for solid connecon speed & reliability.
Please do not use hot-spot device to connect Intenet. It looks like hot-spot device can let you connect Smart AD
PVM to the Internet. However, hot-spot devices can interfere with the normal IP/DNS address.
ViewZ strongly recommends using clean/normal router to connect Internet.
4 User ManualVisit the ViewZ USA website at https://www.viewzusa.com
Page 5
INSTALL CMS SW & SERVER SETUP
Ubuntu Setup
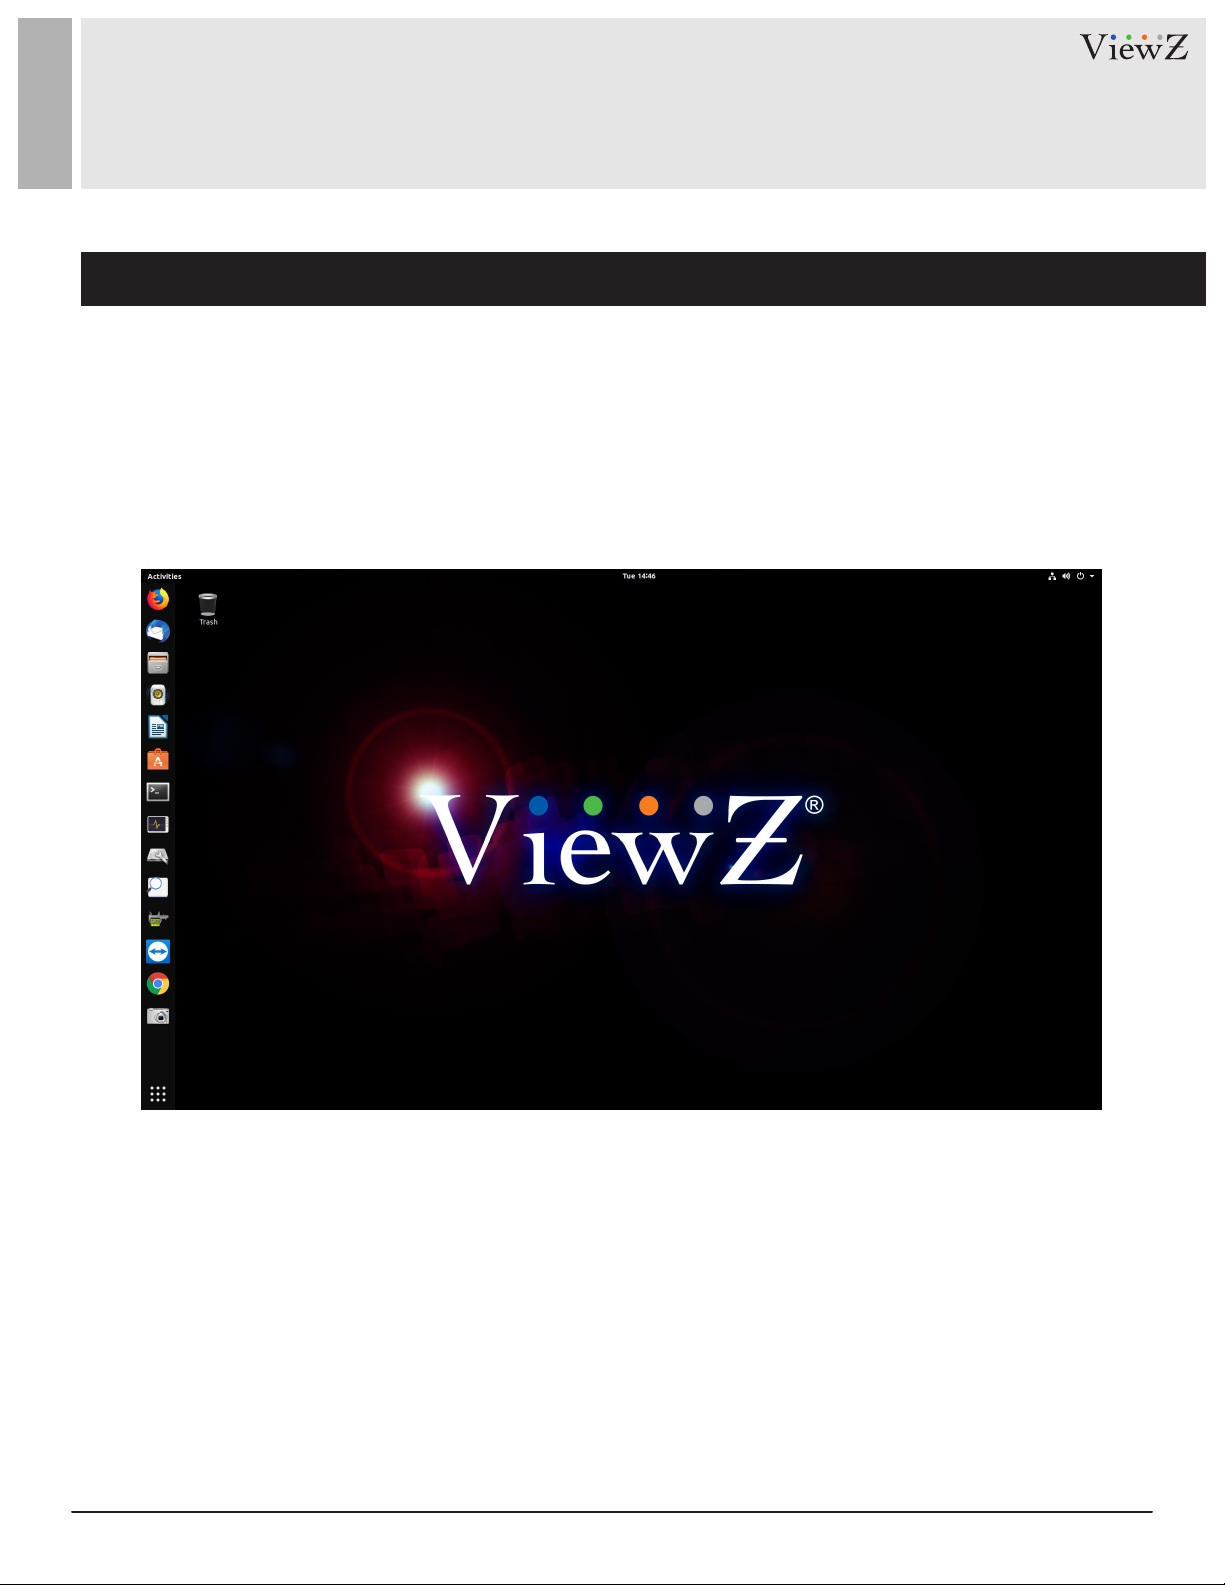
1. Prepare the Ubuntu OS (Latest LTS version) server
• Install Ubuntu (the latest version) on the local server with a stac IP address - Fixed DHCP or public stac IP address
hps://tutorials.ubuntu.com/tutorial/tutorial-install-ubuntu-desktop#0
• Aer installaon of Ubuntu, you can see the below screen when launching terminal.
5User Manual Visit the ViewZ USA website at https://www.viewzusa.com
Page 6
INSTALL CMS SW & SERVER SETUP
Setup IP address and Open the port
1.1. Get the router's public IP address & Open the router's port
If you are using a business router without a stac IP address, you need to follow these next steps.
If you have a stac IP address, you can skip this secon and go to '1.2.'
1. Get the public IP address of your router.
If you do not know how to get the router's public IP address, you can get help from the below site. Or contact your
Internet Service Provider (ISP) - Spectrum, AT&T & etc.
hp://whatsmyrouterip.com/
2. Open the port which you want to use - ex. 50005, 60001, 80001, 9999 and etc.
The process of port-opening/port-forwarding is dierent on the ISP & router model.
So, please nd the manual of router or contact your ISP.
3. Aer you get the router's public IP address and open-port, please check the IP & open-port have internet connecon
on the below site. Or, you can check it aer installaon of CMS SW via your router's public IP address with open-port
number.
hps://www.yougetsignal.com/tools/open-ports/
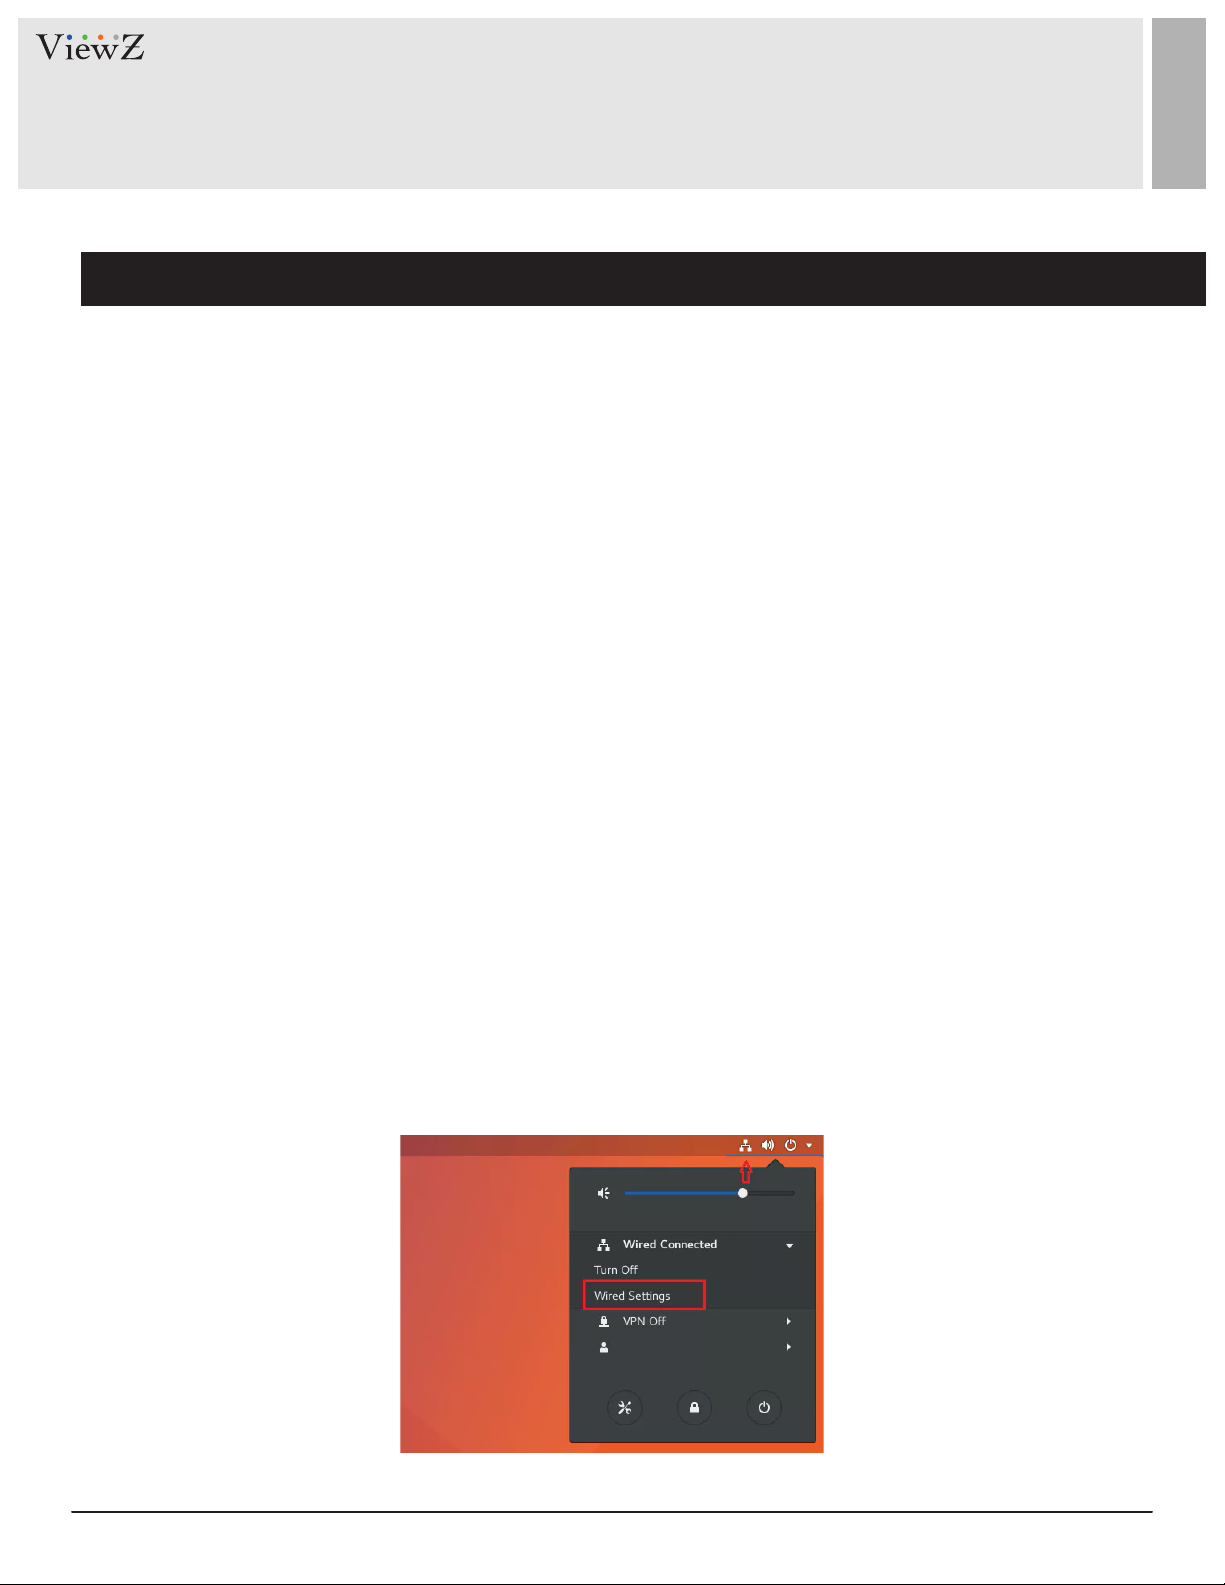
1.2. Setup the router's public IP address or Static IP address
• To access CMS SW, you need to setup the stac IP address or router's public IP address.
Otherwise, you cannot nish the installaon. Because, this is how the CMS server communicates with Smart AD PVM.
• On the Ubuntu desktop, please select the network interface icon and click 'Wired Sengs'.
6 User ManualVisit the ViewZ USA website at https://www.viewzusa.com
Page 7

INSTALL CMS SW & SERVER SETUP
Setup IP address and Open the port
1.2. Setup the router's public IP address
• When the network seng panel opens, on the connecon, click the seng opons buon.
• Change the wired IPv4 Method to Manual. Then type the IP (stac IP or router's public IP) address, subnet mask and
gateway. Don’t forget the DNS server addresses as well.
• When you’re done, click Apply. Aer this, please check that the Ubuntu server can connect Internet.
If the Internet connecon is okay. Now you ready to install the CMS SW.
7User Manual Visit the ViewZ USA website at https://www.viewzusa.com
Page 8

INSTALL CMS SW & SERVER SETUP
Update & Install docker
2. Open a terminal window (or SSH)
3. Update for all of Ubuntu software
• Before the installaon of ViewZ CMS program on Ubuntu, please make sure that the Ubuntu server was properly
installed and update the pre-installed program.
Command: sudo apt-get update
8 User ManualVisit the ViewZ USA website at https://www.viewzusa.com
Page 9

INSTALL CMS SW & SERVER SETUP
Install CMS
4. Install docker
• ViewZ CMS program require the docker system.
Command: sudo apt-get install docker.io
5. Install CMS software
• User can select the CMS soware name (server name).
Ex) viewz, myserver or etc.
• User can select the port number.
If user wants to access the CMS server via specic IP address, user need to setup the port number and
assign the stac IP address (DHCP or public router's IP address) to the Ubuntu server.
Ex) if user makes the port number as 50003 and the stac IP address of Ubuntu is "333.22.11.1",
then, user can access the CMS program via Chrome browser with "333.22.11.1:50003" address.
Command: sudo docker run -dit --name vzds.your_name –p 50005:80 nanappa/vzds
Warning
Please do not use a common port number (ex. 80, 110, 25, 8080 or etc) to avoid any problems.
9User Manual Visit the ViewZ USA website at https://www.viewzusa.com
Page 10
INSTALL CMS SW & SERVER SETUP
Update CMS
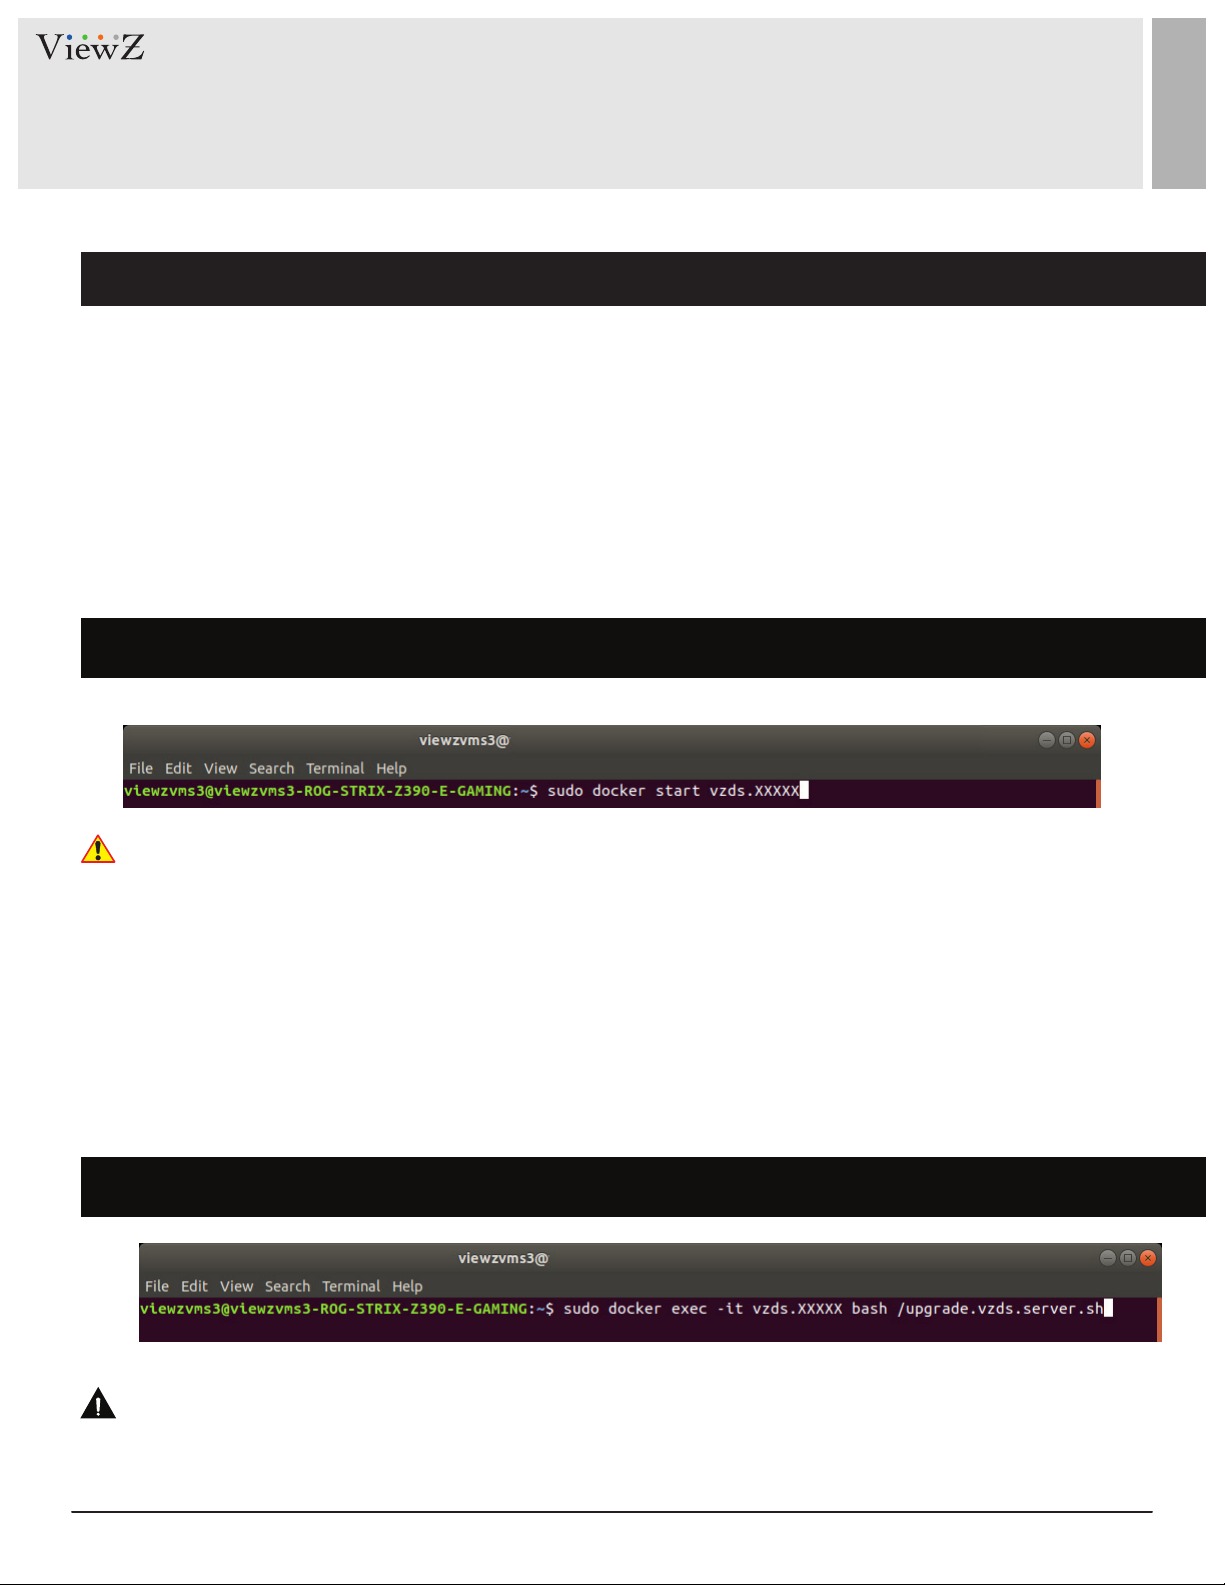
5. Reboot (restart) the Ubuntu server
5.1 Start the CMS software
• When the Ubuntu server was restarted or rebooted, the VZDS (CMS Soware engine) was suspended or stopped.
So, user should manually start the VZDS.
Command: sudo docker start vzds.your_name
Caution
Reboong process is the necessary step to inialize the CMS program.
6. Update the installed CMS software
• Aer restarng of CMS soware, the nal step is to update the installed-CMS soware.
Command: sudo docker exec -it vzds.your_name bash /upgrade.vzds.server.sh
Warning
ViewZ keep updang CMS soware. So, when you install CMS soware, you should update CMS aer installaon
of basic CMS program.
10 User ManualVisit the ViewZ USA website at https://www.viewzusa.com
Page 11

INSTALL CMS SW & SERVER SETUP
Setup Port Forwarding
7. Setup the port forwarding on router
• The port forwarding or port mapping is an applicaon for network address translaon (NAT) that redirects
a communicaon request from one address and port number combinaon to another while the packets are
traversing a network gateway, such as a router or rewall. This technique is most commonly used to make services
on a host, residing on a protected or masqueraded (internal) network, available to hosts on the opposite side of
the gateway (external network), by remapping the desnaon IP address and port number of the communicaon
to an internal host.
• Aer seng up port forwarding, you will have an open port number. The port forwarding setup process diers
depending on the router companies.
• General setup process of port forwarding is;
1) Login to router & open the port forwarding setup page
2) Create the port forwarding number (as you typed on #5). If you setup the specic port number
on step 5, please open that number (as you typed on #5) on your router.
3) Test your port forwarding is working.
4) Open the Chrome web browser and type the IP address with port number (see #5).
5) If you can see the above login window, the CMS installaon is done.
6) The default ID & Password is "admin" & "admin" - case sensive.
11User Manual Visit the ViewZ USA website at https://www.viewzusa.com
Page 12
SETUP CMS SOFTWARE
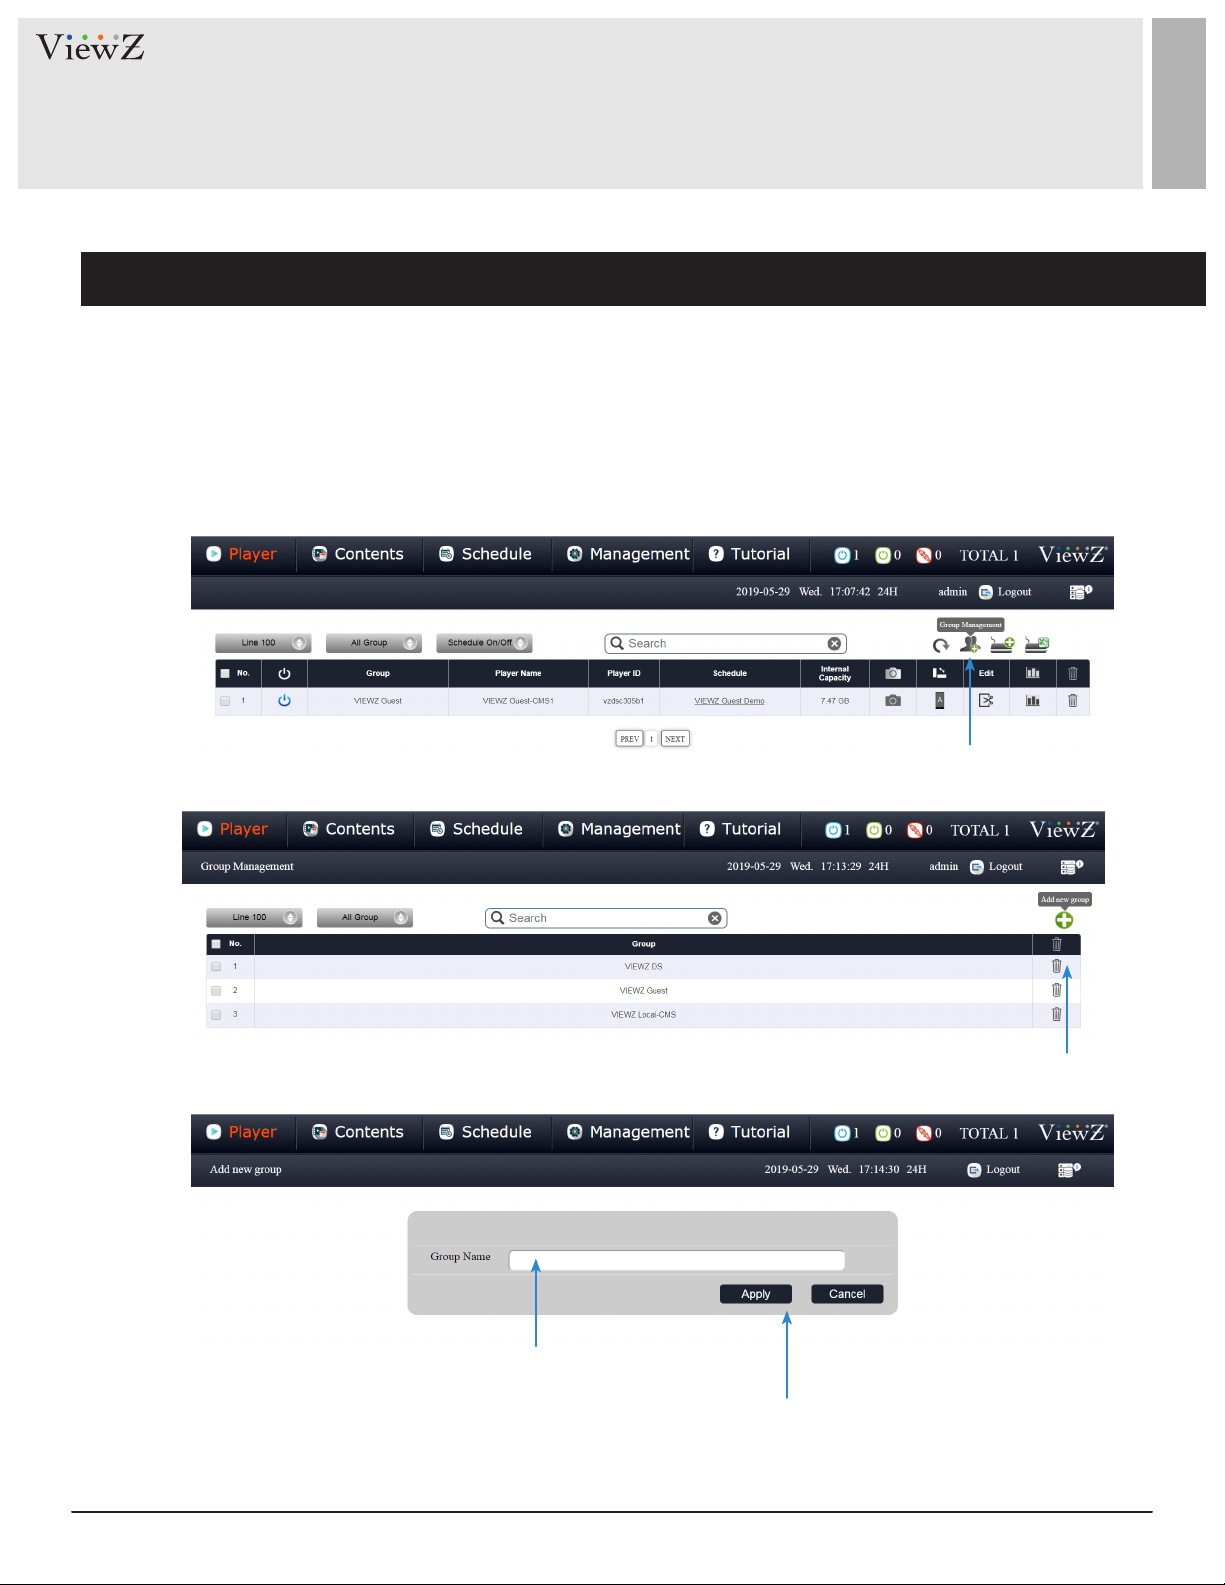
Setup the Group and Synchronize Media-server - Create Group
1. Create the group
• To use ViewZ CMS soware, the user needs to setup "Group", "Device Register" & "Synchronize media server with
CMS soware." Without these 3 steps, users cannot upload, display & manage contents.
• Aer logged in, go to the "Player" secon. Then, click the 'Group Management' buon.
Click the "Group Management" buon
Click the "Add new group" buon
q
w
Type the "Group Name"
e
Click the "Apply" buon
r
In here, I will assign the new group name as "Digital_Creator."
12 User ManualVisit the ViewZ USA website at https://www.viewzusa.com
Page 13
SETUP CMS SOFTWARE
Setup the Group and Synchronize Media-server - Get the Unique ID of PVM
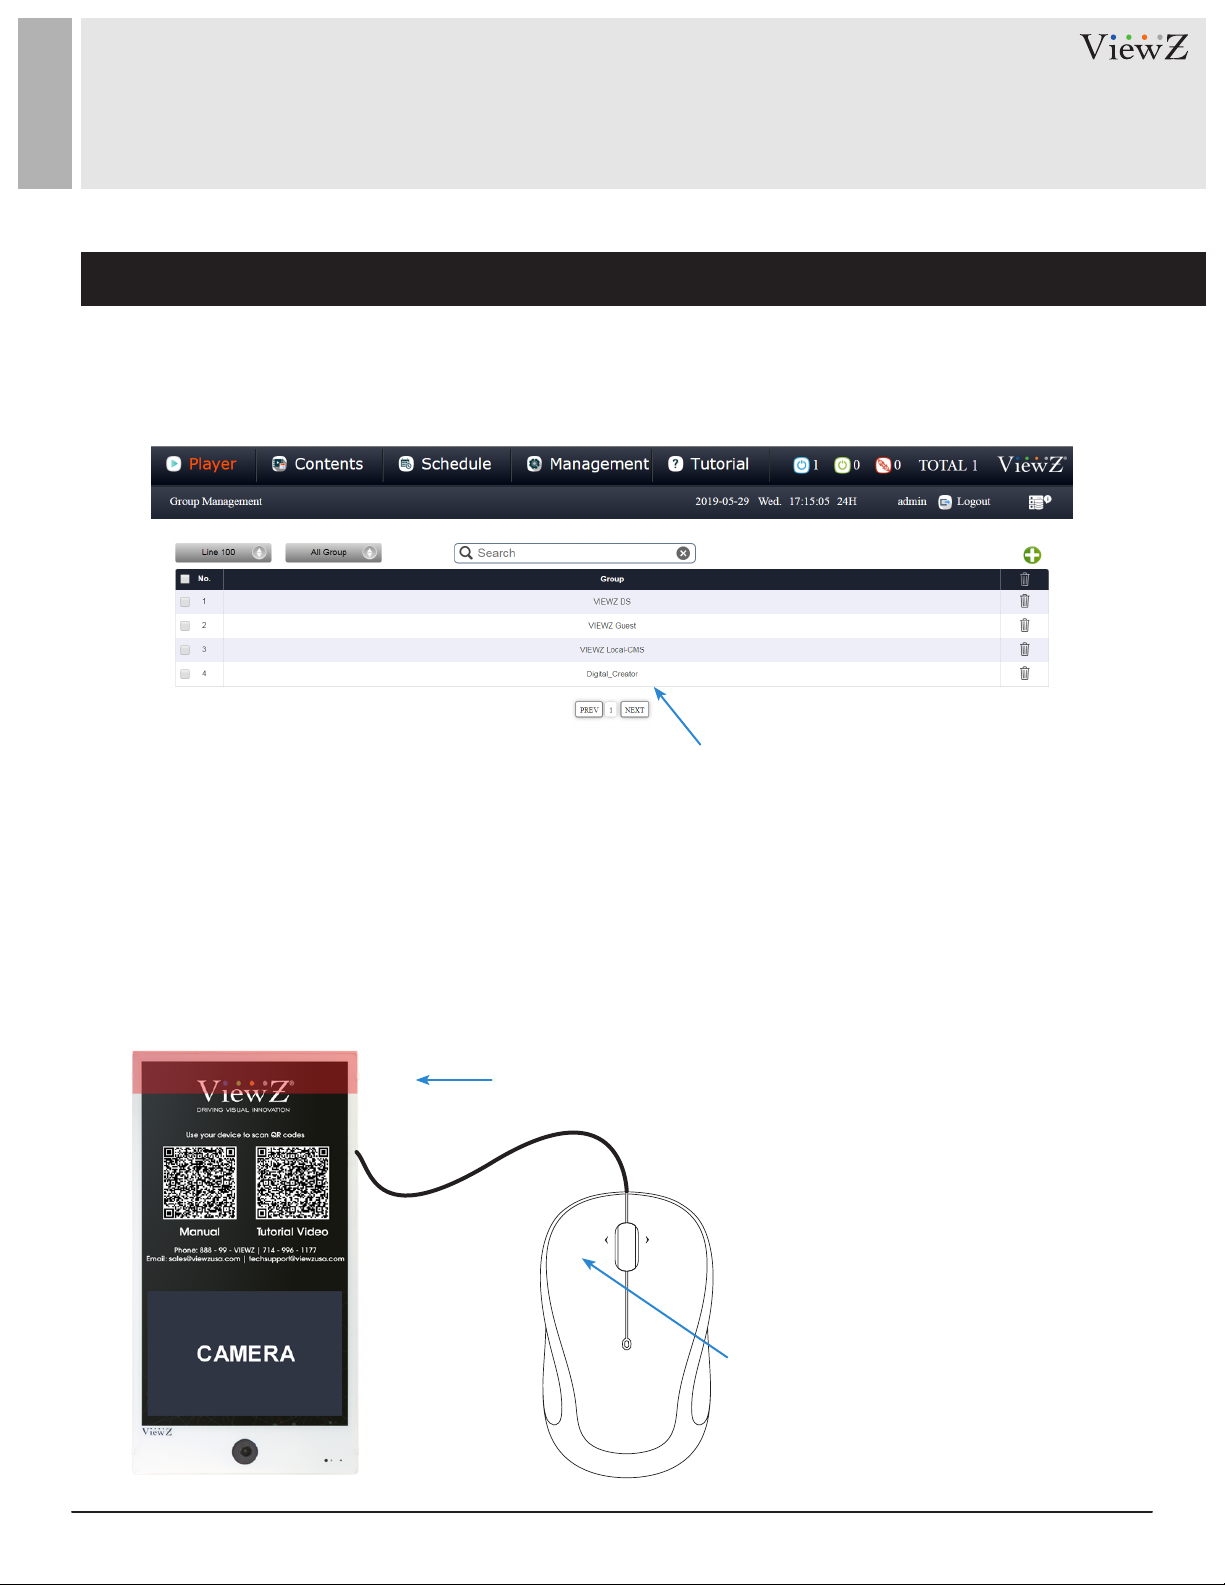
1. Create the group
"Digital Creator" is listed
• Aer creang a group, you are now ready to register the Smart AD PVM on the CMS soware.
• Before registering Smart AD PVM, you need to get the unique ID of the Smart AD PVM.
• To get the unique ID, please follow the below step.
1) Connect the mouse to Smart AD PVM and turn on Smart AD PVM.
2) Wait unl the default CMS content starts running.
3) When default CMS content starts, move the mouse cursor to the top of Smart AD PVM screen and le click.
Move the mouse cursor to the top of screen
q
w
Le click
13User Manual Visit the ViewZ USA website at https://www.viewzusa.com
Page 14

SETUP CMS SOFTWARE
Setup the Group and Synchronize Media-server - Get the Unique ID of PVM
4) When you le click the top area, the DID screen tab will popup on the top bar.
5) Click the Menu icon on the top-le.
6) When the DID Screen Menu slides in, please click the "Informaon" tab.
Click the "Menu" icon
q
Click the "Informaon" tab
w
Copy this ID to use it for registering Smart AD PVM to CMS
e
14 User ManualVisit the ViewZ USA website at https://www.viewzusa.com
Page 15

SETUP CMS SOFTWARE
Setup the Group and Synchronize Media-server - Register portrat PVM
2. Register the ViewZ Smart AD PVM to CMS software
• User is now ready to register Smart AD PVM to CMS soware.
• Login to your CMS soware and go to "Player" tab.
Click the "Manual registraon player" buon
Type the unique ID into "Player ID" space
r
q
Type the Smart AD PVM name
w
as you want
Select the Group to let Smart AD
e
PVM manage under selected
Group
Click the "Apply" buon to save the info
t
15User Manual Visit the ViewZ USA website at https://www.viewzusa.com
Page 16

SETUP CMS SOFTWARE
Setup the Group and Synchronize Media-server - Register portrat PVM
2. Register the ViewZ Smart AD PVM to CMS software
• Aer registraon of Smart AD PVM, you can see the below status on your CMS SW window.
• Now, user needs to synchronize Smart AD PVM with CMS soware
• Go to the "Management/Player" tab
• Type the current CMS sfotware address with port number
Ex. hp://192.168.0.99:55555/mediaserver
• Click the "Group Deploy" buon
Type the IP address with port number
q
(CMS server IP address & assigned port number at page 6)
Click the "Group Deploy" buon
w
16 User ManualVisit the ViewZ USA website at https://www.viewzusa.com
Page 17

SETUP CMS SOFTWARE
Setup the Group and Synchronize Media-server - Register portrat PVM
2. Register the ViewZ Smart AD PVM to CMS software
• When you click 'Group Deploy' buon, a "Group Deploy" window popup.
• Check the created group name and click the "Deploy" buon.
Check the Group Name Click the "Deploy" buon
q w
which you want to assign Smart AD PVM
• When you click the "Deploy" buon, CMS soware will start communicaon with Smart AD PVM.
17User Manual Visit the ViewZ USA website at https://www.viewzusa.com
Page 18

SETUP CMS SOFTWARE
Setup the Group and Synchronize Media-server - Register portrat PVM
2. Register the ViewZ Smart AD PVM to CMS software
• If the connecon between the CMS soware and the device is successful, the Smart AD PVM will show the
popupwindow and ask you if want to change the new media server address (which is the CMS server address).
• Using the mouse of Smart AD PVM, click "YES" to nish the synchronizaon process.
• If the synchronizaon is successful, you can check the status on the CMS SW.
• Go to the "Player" tab and see the status.
• Now, your device should be fully registered and fully synced with the media server
Icon was changed as 'ON'
Caution
If you cannot see the popup message on the Smart AD PVM aer clicking "Deploy", check the following:
1) On Smart AD PVM, please check the Intenet connecon via "App/Chrome browser." Smart AD PVM should
always connect to the Internet via WiFi or wired connecon
2) If you connect the Internet via WiFi and have weak signal, you cannot get a safe-connecon between CMS SW &
Smart AD PVM. In this case, please use wired connecon to resgister Smart AD PVM
18 User ManualVisit the ViewZ USA website at https://www.viewzusa.com
Page 19
NOTE
19User Manual Visit the ViewZ USA website at https://www.viewzusa.com
 Loading...