

Page 1

User Manual
PRO S3 Graphics MaxWall
Page 2

PRO S3 Graphics MaxWall
User Guide
7/7/2014 Page2
2
PRO S3 Graphics Terms and Conditions of Software Use
Please read these Terms and Conditions carefully before you download, install or use any PRO S3 Graphics Software. By installing
the PRO S3 Graphics Software, you accept all the Terms and Conditions of this Agreement. If you do not agree to the Terms and
Conditions of this Agreement, do not use the PRO S3 Graphics Software.
PRO S3 GRAPHICS CO., LTD. PROVIDES THIS DRIVER PACKAGE SO THAT YOU MAY USE PRO S3 GRAPHICS SOFTWARE
WITH A PRO S3 GRAPHICS CHIP AND RECEIVES SUCH UPDATES AND SUPPORT FOR THE PRO S3 GRAPHICS CHIP AS
PRO S3 GRAPHICS MAY ELECT TO PROVIDE. THE SOFTWARE AND ANY UPDATES PRO S3 GRAPHICS MAY ELECT TO
PROVIDE ARE REFERRED TO AS THE "SOFTWARE.". PRO S3 GRAPHICS IS WILLING TO LICENSE THE SOFTWARE TO
YOU ONLY UPON THE CONDITION THAT YOU ACCEPT ALL OF THE FOLLOWING TERMS AND CONDITIONS. IF YOU DO
NOT AGREE WITH THE TERMS AND CONDITIONS, YOU SHOULD PROMPTLY EXIT THIS SERVICE. YOU MAY NOT
DUPLICATE ALL OR ANY PART OF THE ITEMS CONTAINED IN THE SOFTWARE PACKAGE, OR CREATE DERIVATIVE
WORKS BASED IN WHOLE OR IN PART ON THE PRO S3 GRAPHICS ITEMS, EXCEPT AS EXPRESSLY SET FORTH IN THESE
TERMS AND CONDITIONS.
Software License: Except as otherwise provided by an PRO S3 Graphics License Agreement to which you are a party, you (i) may
only use the Software on a single system that contains the PRO S3 Graphics Chip that the Software is designed for, (ii) may not use
the Software for any other purpose or reproduce, decompile, reverse engineer, disassemble or otherwise reduce the Software to
human-readable form, (iii) may make one copy of the Software for backup purposes only, and (iv) acknowledge that all copies of the
Software in whatever form provided are the sole property of PRO S3 Graphics, and that you have no right, title or interest in the
Software or any copies of the Software, except as expressly provided in these Terms and Conditions.
Warranty: YOUR USE OF PRO S3 GRAPHICS ITEMS IS AT YOUR OWN RISK. THE SOFTWARE IS PROVIDED "AS IS"
WITHOUT WARRANTY OF ANY KIND, EXPRESS OR IMPLIED, INCLUDING, BUT NOT LIMITED TO IMPLIED WARRANTIES OF
MERCHANTABILITY, FITNESS FOR A PARTICULAR PURPOSE AND AGAINST INFRINGEMENT. CONDITIONS OF USE OF
THE PRO S3 GRAPHICS ITEMS ARE BEYOND PRO S3 GRAPHICS' KNOWLEDGE AND CONTROL, AND PRO S3 GRAPHICS
ASSUMES NO LIABILITY FOR RESULTS OBTAINED OR LOSS OR DAMAGE INCURRED AS A RESULT OF THE APPLICATION
OF THE DATA, INFORMATION OR SOFTWARE CONTAINED ON THE WEB OR IN PRO S3 GRAPHICS ITEMS.
No Liability for Damages: IN NO EVENT SHALL PRO S3 GRAPHICS BE LIABLE FOR ANY DAMAGES WHATSOEVER
(INCLUDING WITHOUT LIMITATION, DAMAGES FOR LOSS OF BUSINESS PROFITS, CONSEQUENTIAL OR INCIDENTAL
DAMAGES) ARISING FROM THE USE OF OR INABILITY TO USE THE SOFTWARE. IN NO EVENT WILL PRO S3 GRAPHICS
ENTIRE LIABILITY TO YOU FOR ALL DAMAGES, LOSSES AND CAUSES OF ACTION EXCEED THE AMOUNT PAID BY YOU
FOR THE SOFTWARE.
Export Restrictions: You agree that you will not, directly or indirectly, export the PRO S3 Graphics Items including the Software to
any country to which such export is restricted by applicable U.S. export control laws without the prior consent, if required, of the U.S.
Department of Commerce or such other governmental entity as any have jurisdiction over such export.
Complete Agreement: These Terms and Conditions, together with your PRO S3 Graphics License Agreement, if any, constitute the
entire agreement between you and PRO S3 Graphics with respect to the use of the web site and the S3 Items including the Software.
Term: These Terms and Conditions are effective until terminated. These Terms and Conditions will terminate immediately without
any notice from PRO S3 Graphics if you fail to comply with any provision of these Terms and Conditions. Upon termination, you must
destroy PRO S3 Graphics Items including the Software and any related documentation that you may have.
Copyright 2014. ViewZ USA. All rights reserved.
NOTE: This equipment has been tested and found to comply with the limits for a Class B digital device, pursuant to Part 15 of the
FCC Rules. These limits are designed to provide reasonable protection against harmful interference in a residential installation. This
equipment generates, uses and can radiate radio frequency energy and, if not installed and used in accordance with the instructions,
may cause harmful interference to radio communications. However, there is no guarantee that interference will not occur in a
particular installation. If this equipment does cause harmful interference to radio or television reception, which can be determined by
turning the equipment off and on, the user is encouraged to try to correct the interference by one or more of the following measures:
-- Reorient or relocate the receiving antenna.
-- Increase the separation between the equipment and receiver.
-- Connect the equipment into an outlet on a circuit different from that to which the receiver is connected.
-- Consult the dealer or an experienced radio/TV technician for help.
Registered Trademarks used in this document, whether marked as trademarks or not, are declared to belong to their owners.
Page 3

PRO S3 Graphics MaxWall
User Guide
7/7/2014 Page3
3
CHAPTER1 INTRODUCTION ........................................................................................................5
1.1 PURPOSE ...................................................................................................................................5
1.2 ABOUT SOFTWARE .................................................................................................................5
1.3 SYSTEM REQUIREMENTS ......................................................................................................5
1.4 SOFTWARE REQUIREMENTS ...............................................................................................5
1.5 USER GUIDE OVERVIEW ......................................................................................................6
CHAPTER2 INSTALLATION .........................................................................................................7
2.1 SLAVE INSTALLATION ...........................................................................................................7
2.2 SERVER INSTALLATION ...................................................................................................... 10
2.3 MASTER INSTALLATION ..................................................................................................... 13
2.4 PATCH INSTALLATION ........................................................................................................ 15
CHAPTER3 QUICK REFERENCE ................................................................................................ 16
3.1 SLAVE CONFIGURATION ..................................................................................................... 16
3.2 LAUNCH SLAVE ..................................................................................................................... 16
3.3 SERVER CONFIGURATION .................................................................................................. 17
3.4 LAUNCH SERVER .................................................................................................................. 18
3.5 LOG IN MASTER .................................................................................................................... 18
3.6 CREATE A NEW MODEL ....................................................................................................... 19
3.7 CREATE A NEW PLAN ........................................................................................................... 19
3.8 RELEASE MISSIONS .............................................................................................................. 19
3.9 MESSAGE ................................................................................................................................ 19
3.10 OPTIONS ................................................................................................................................ 19
3.11 REVIEW THE RUNNING TASK ........................................................................................... 19
CHAPTER4 SLAVE FEATURE SETTINGS .................................................................................. 20
4.1 SLAVE CONFIGURATION ..................................................................................................... 20
4.2 LAUNCH SLAVE ..................................................................................................................... 24
CHAPTER5 SERVER FEATURE SETTING ................................................................................. 25
5.1 SERVER CONFIGURATION .................................................................................................. 25
5.2 LAUNCH THE SERVER .......................................................................................................... 35
CHAPTER6 MASTER FEATURE GUIDE .................................................................................... 36
6.1 LOG IN ..................................................................................................................................... 36
6.2 MODEL .................................................................................................................................... 48
6.3 PLAN ........................................................................................................................................ 52
Page 4

PRO S3 Graphics MaxWall
User Guide
7/7/2014 Page4
4
6.4 MISSION .................................................................................................................................. 56
6.5 MESSAGE ............................................................................................................................... 58
6.6 OPTIONS ................................................................................................................................ 59
CHAPTER7 RS232TOOLS ............................................................................................................. 60
7.1 SLAVE RS232 SETTING ......................................................................................................... 60
7.2 MASTER RS232 SETTING ...................................................................................................... 62
7.3 USING RS232T ......................................................................................................................... 63
CHAPTER8 SMARTTRANSMITTER ........................................................................................... 65
8.1 SMARTTRANSMITTER INSTALLATION ............................................................................ 65
8.2 RUN SMARTTRANSMITTER ................................................................................................. 68
Page 5

PRO S3 Graphics MaxWall
User Guide
7/7/2014 Page5
5
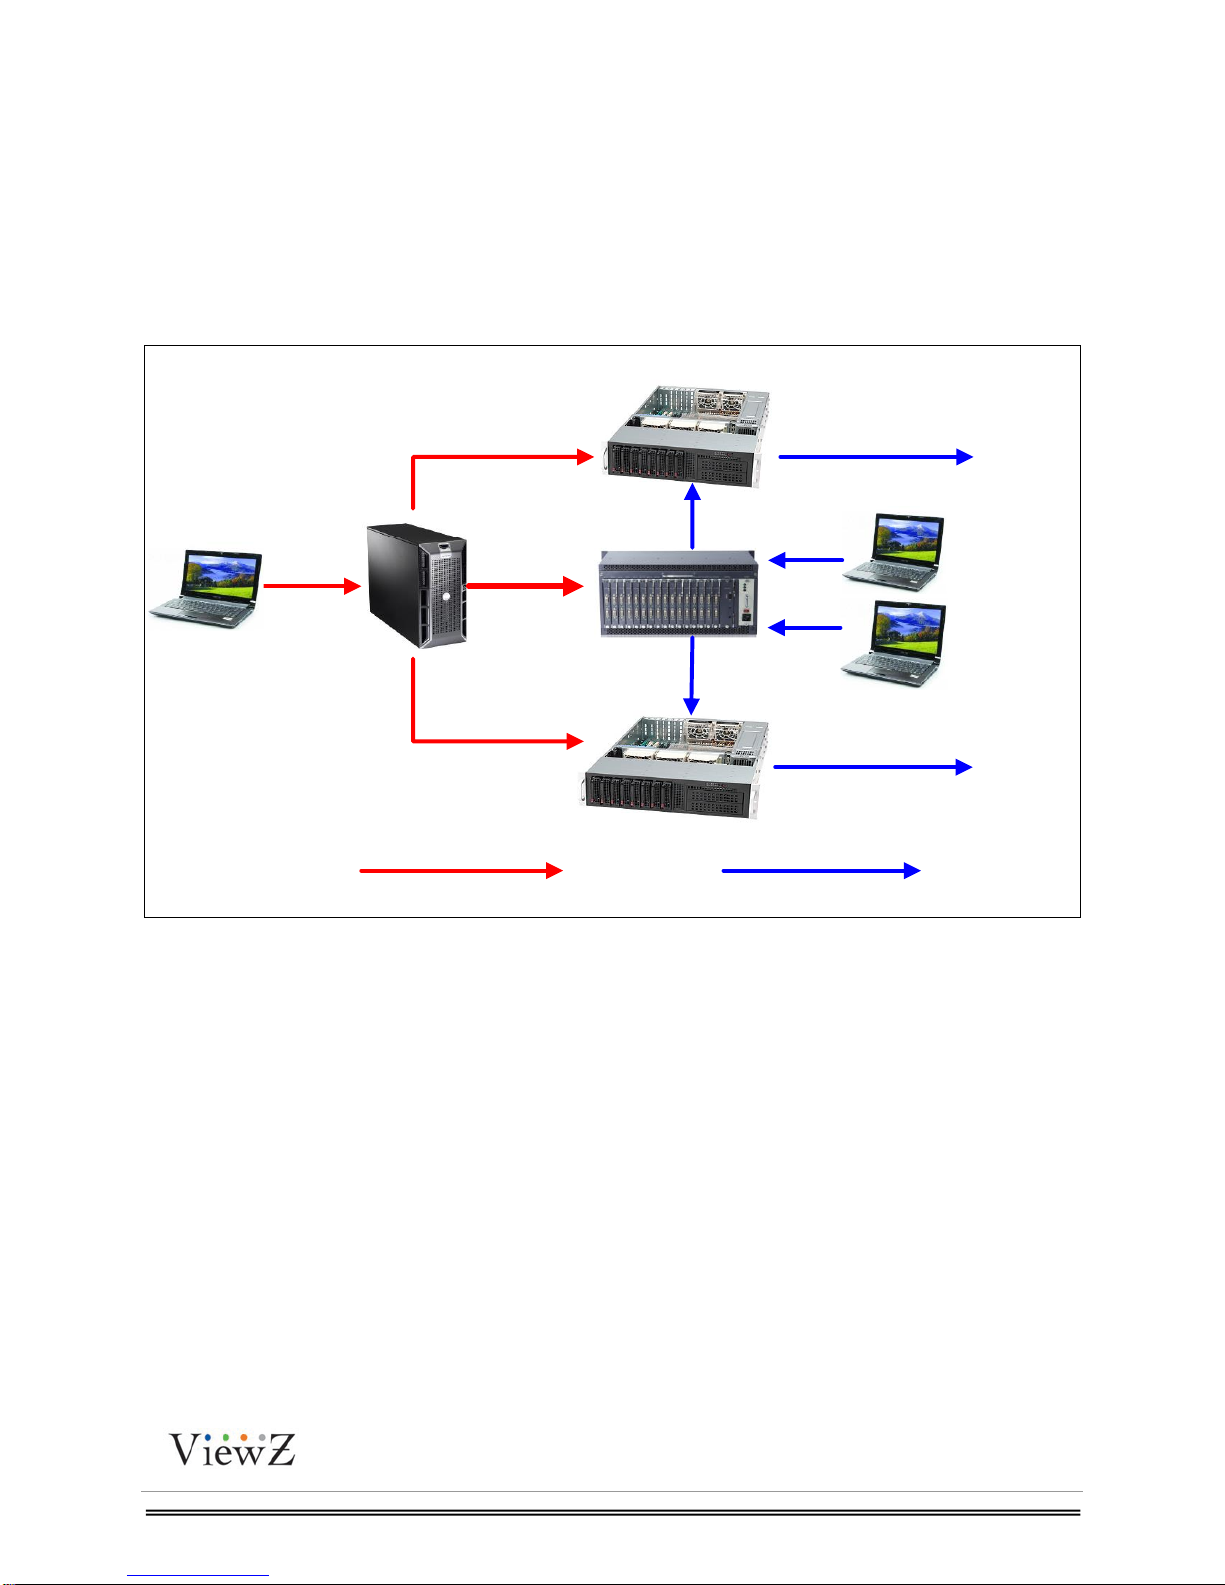
Chapter1 Introduction
Master
Server
Slave
CPU
No special requirements
No special requirements
2.0 GHz Dual Core or
above
System
Memory
1GB DDR or more
1GB DDR or more
2GB DDR or more
Display
Card
No special requirements
No special requirements
uH8 video card or later
OS
Windows XP or new
Windows XP or new
Windows 7 or new
1.1 Purpose
PRO S3 MaxWall is a powerful and user-friendly video surveillance software for Control room.
This user manual provides important information of the PRO S3 Graphics - MaxWall and it helps
user to install and use PRO S3 MaxWall System.
1.2 About Software
PRO S3 Graphics - MaxWall System gives you the benefit of Multi-screen monitoring
system solution at a low cost. PRO S3 MaxWall contains Slave, Master and Server. Slave is
used to be installed on Multi-screen monitor machine which is responsible for displaying all the
monitor signals. Server is used to be installed on other machine which is responsible for
communicating with Slave and Master. User can control Slave machine by Master.
1.3 System requirements
Table1-1
1.4 Software requirements
User needs to install ViewZ embedded or PRO S3 Graphics VideoWall driver on Slave
machine.
Before installing the PRO S3 MaxWall, please install the following software for playing media
files:
PRO S3 Graphics Video Filters: for playing Video files
Runtime:for running MaxWall(need to be installed on Master and Server machine)
Download path: http://search.microsoft.com/en-us/DownloadResults.aspx?q=runtime
Page 6

PRO S3 Graphics MaxWall
User Guide
7/7/2014 Page6
6
1.5 User Guide Overview
This User Guide describes the features of PRO S3 MaxWall and provides instructions on how to
operate it, as well as referencing functions provided by the PRO S3 MaxWall.
The User Guide is divided into two sections:
• Quick Start Section: An overview of the PRO S3 MaxWall. Start at the beginning of this
section if you are a new user with the Server Edition or just want to familiarize yourself with PRO
S3 MaxWall‟s capabilities. [Quick start].
• Component Reference Section: describes all windows, menus, commands and other
functions. Refer to this section to learn more about specific functions in PRO S3 MaxWall.
[Components]
Page 7
PRO S3 Graphics MaxWall
User Guide
7/7/2014 Page7
7
Chapter2 Installation
Master
Slave
Slave
Server Matrix
Output
Output
Source
Source
RS232line
Control line Data line
This chapter will introduce the basic operation of PRO S3 MaxWal-MultiSlave. User can
quickly use PRO S3 MaxWal-MultiSlave after reading this chapter.
Machine1: Install Slave
Machine2: Install Server
Machine3: Install Master
2.1 Slave Installation
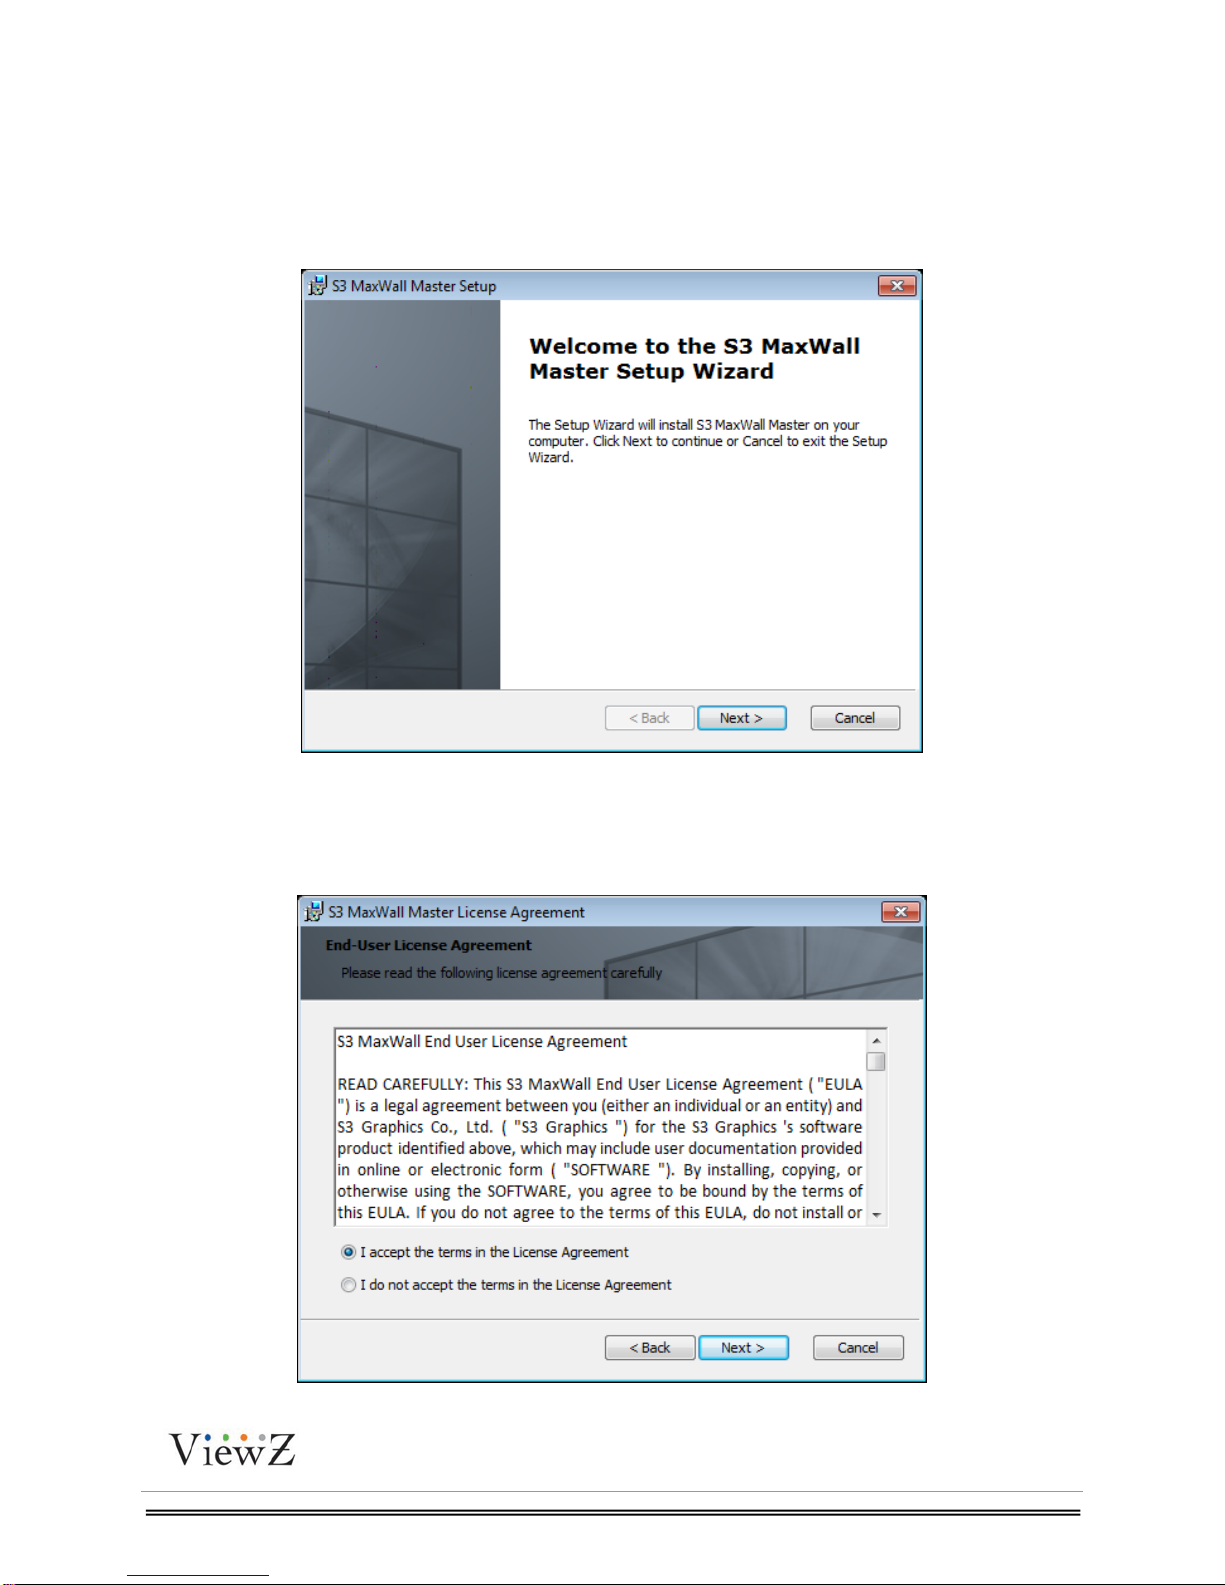
1. Run Slavesetup.msi on Machine1 to start Slave installation.
2. Click the Next button in the Welcome page.
Page 8

PRO S3 Graphics MaxWall
User Guide
7/7/2014 Page8
8
Figure 2.1-1
3. In the End-User License Agreement page, check “I accept the terms in the License
Agreement” and click the Next button.
Figure 2.1-2
Page 9
PRO S3 Graphics MaxWall
User Guide
7/7/2014 Page9
9
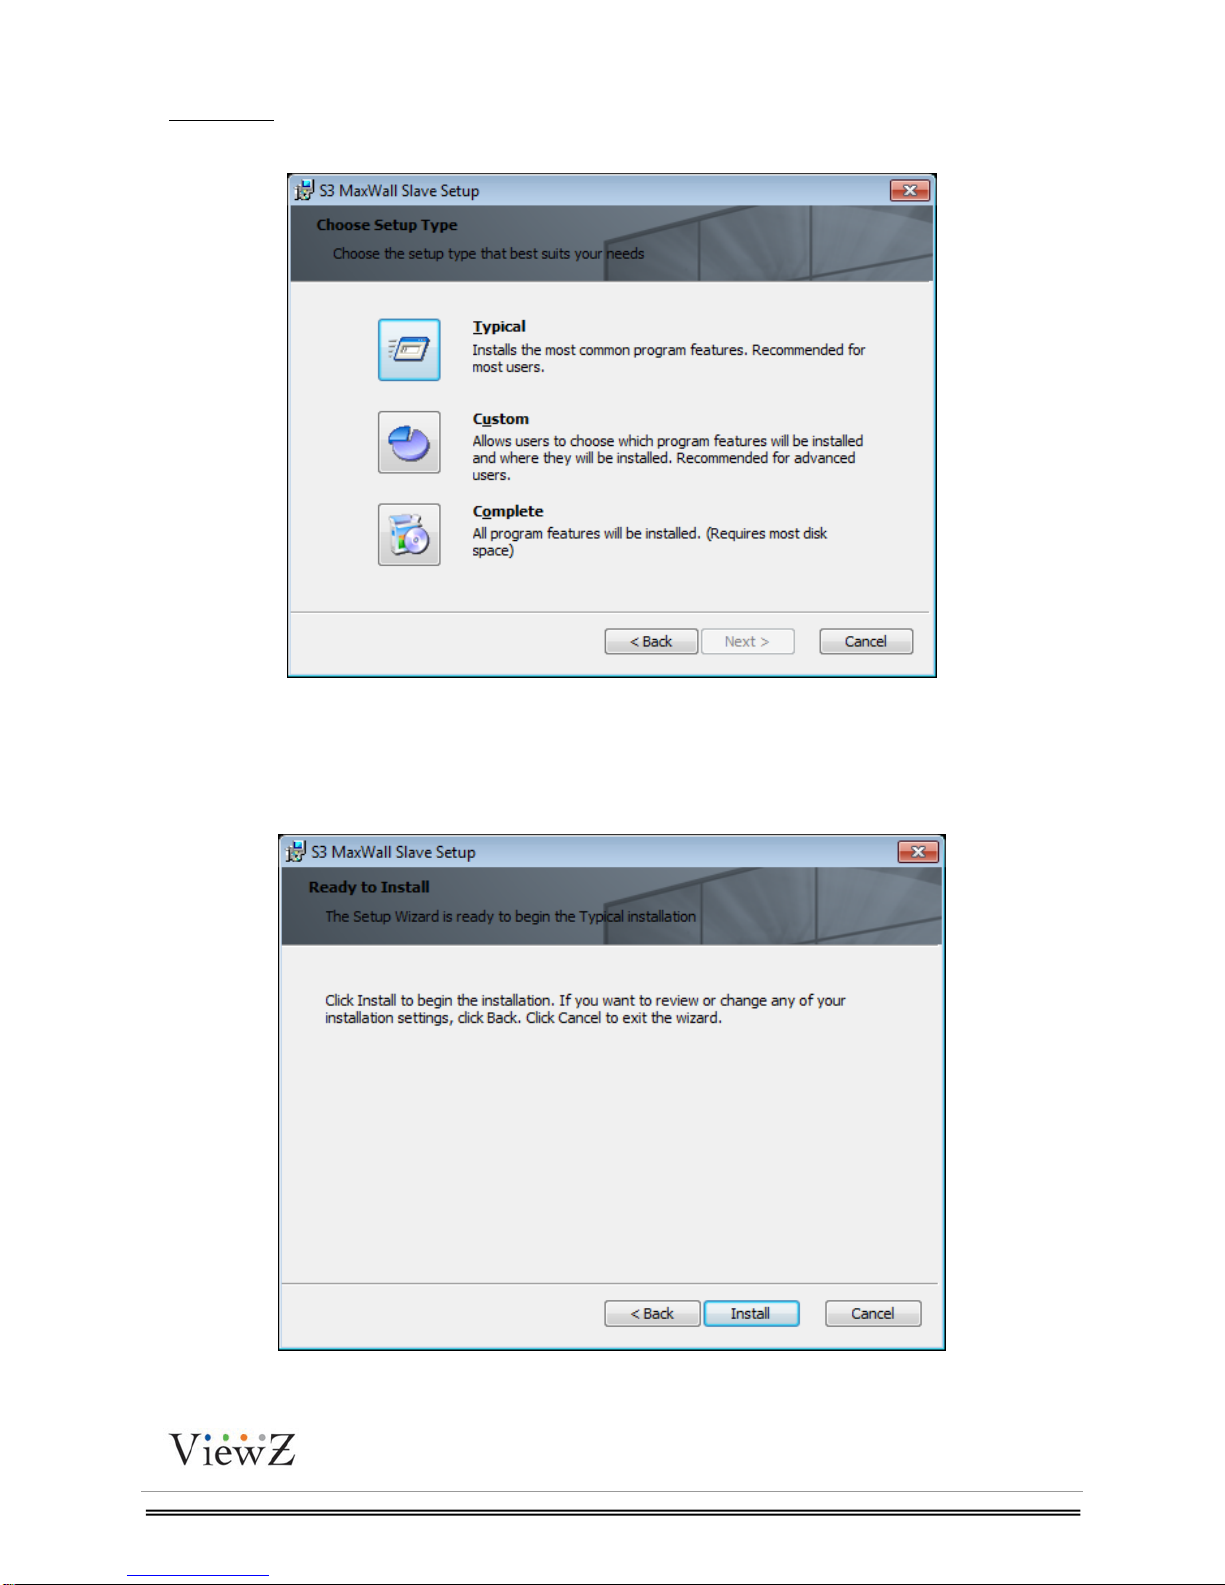
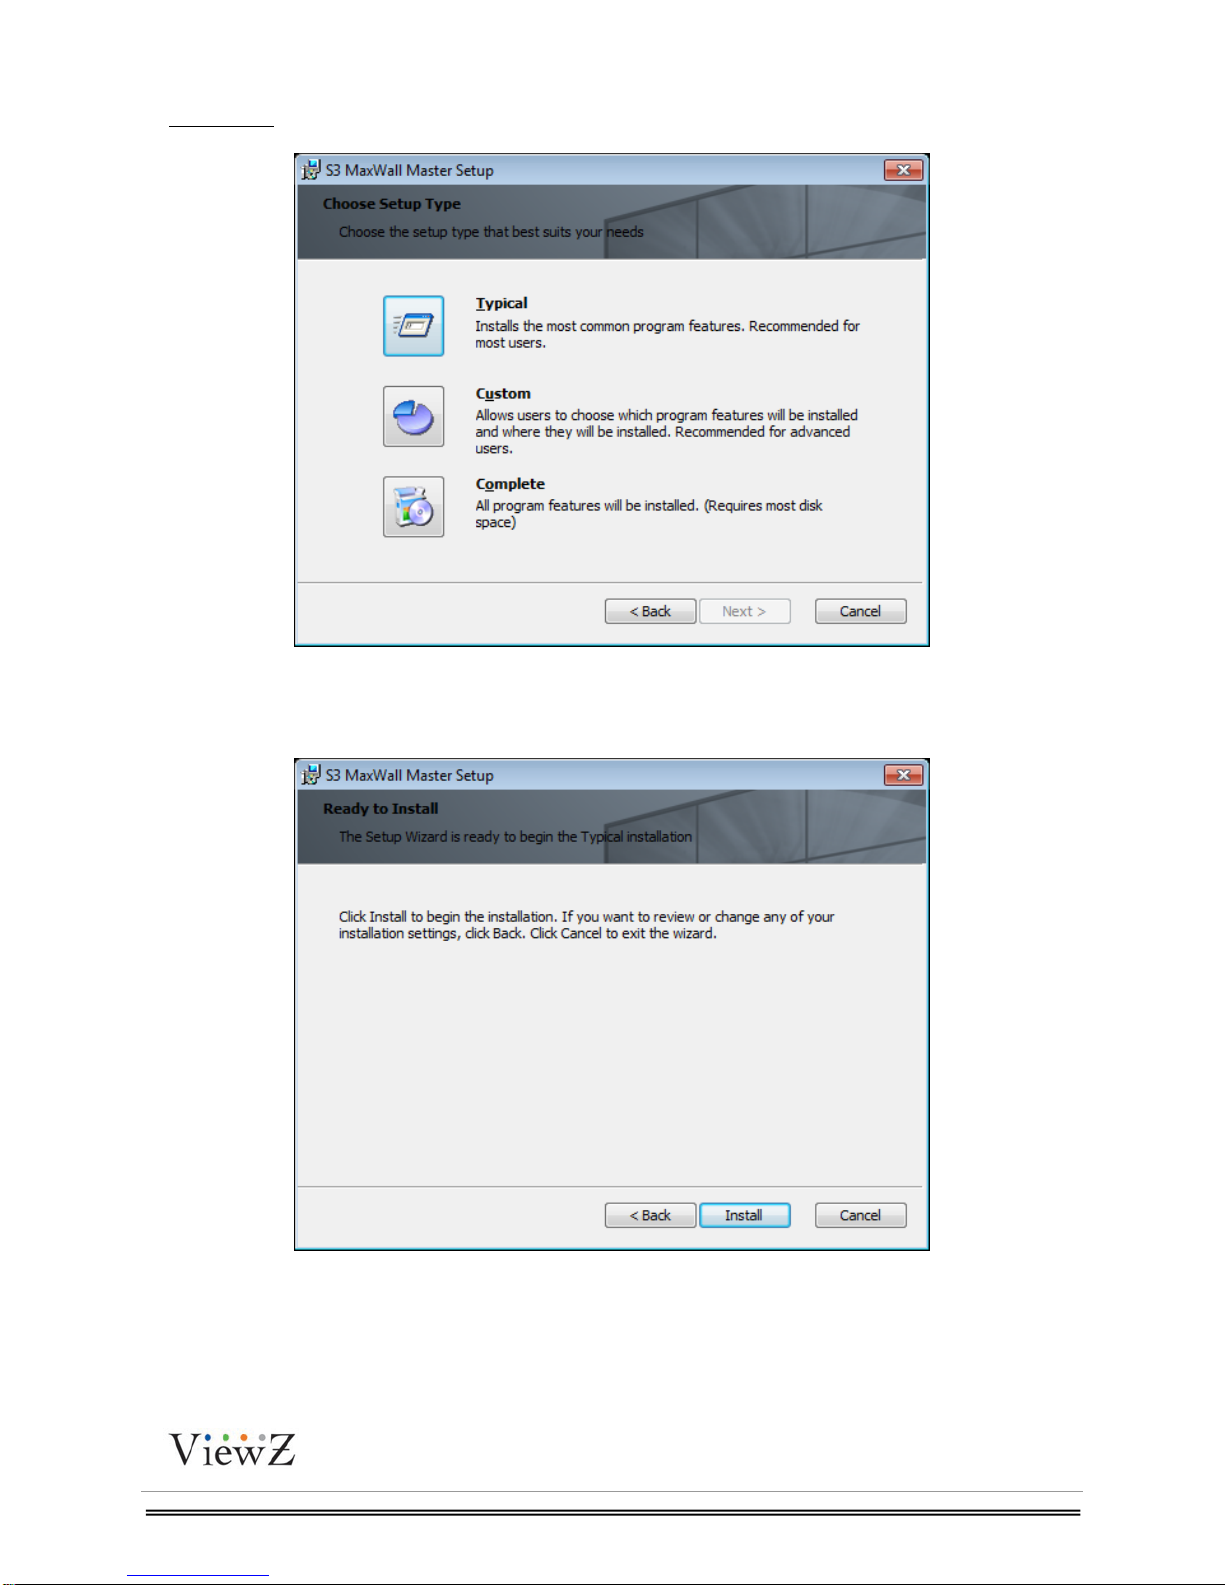
4. Setup type: Choose Typical.
Figure 2.1-3
5. Click the Install button to begin the installation.
Figure 2.1-4
Page 10

PRO S3 Graphics MaxWall
User Guide
7/7/2014 Page10
10
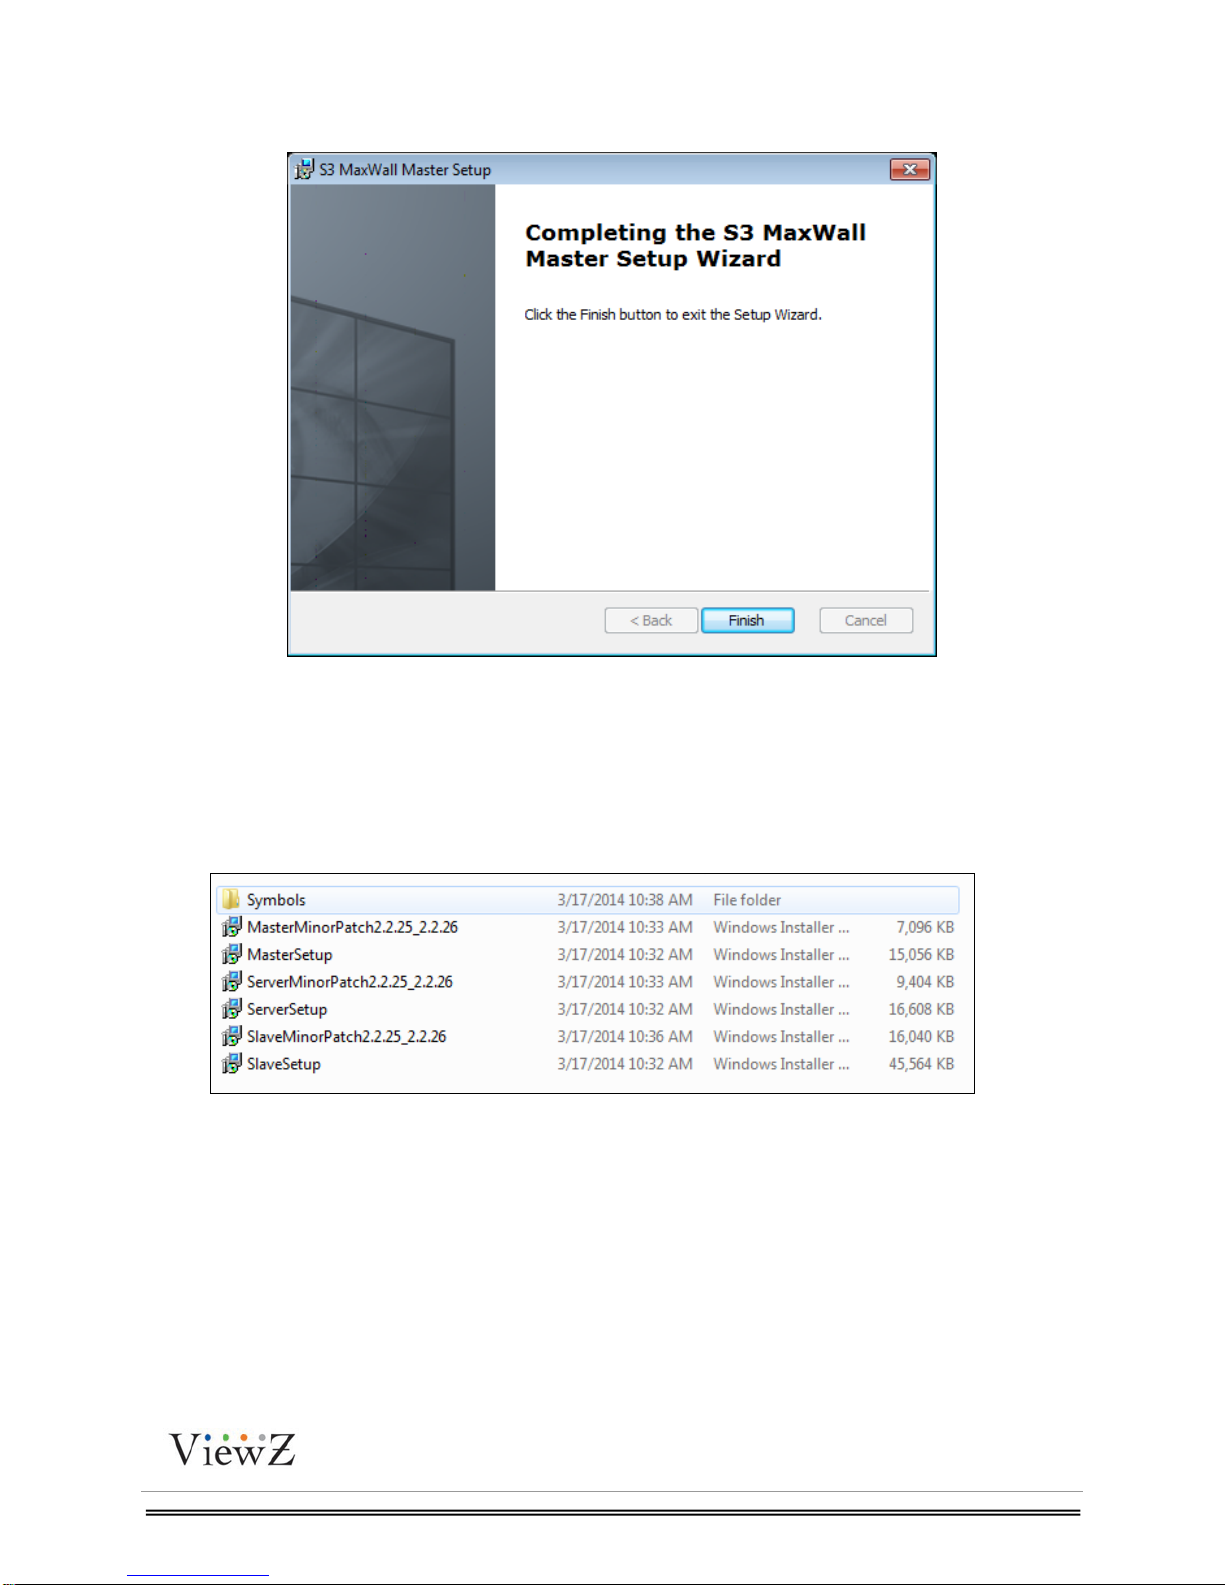
6. Click the Finish button to exit the Setup Wizard and complete the installation.
Figure 2.1-5
After installation, there will be two new icons on the desktop. Slave configuration is used to
change Slave configuration, Slave is used to start Slave.
2.2 Server Installation
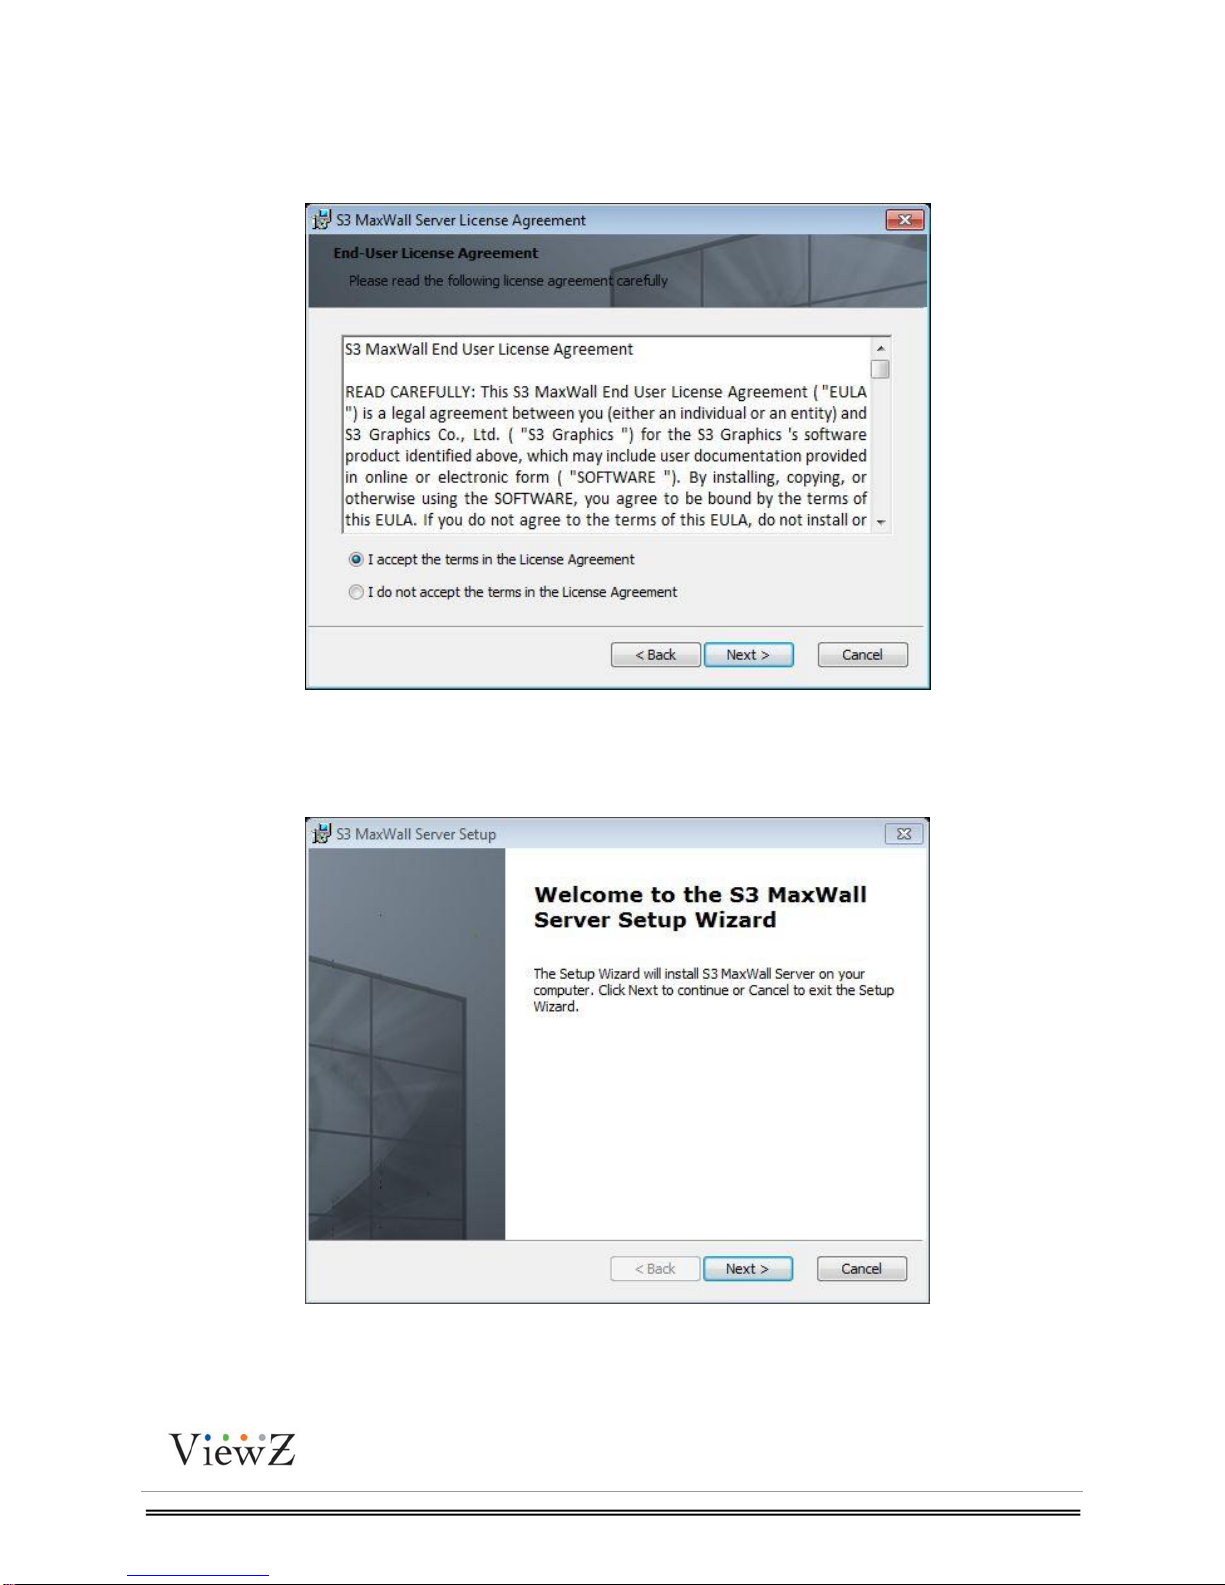
1. Run serversetup.msi on Machine2 to start Slave installation.
2. Click the Next button in the Welcome page.
Page 11
PRO S3 Graphics MaxWall
User Guide
7/7/2014 Page11
11
Figure 2-2-1
3. In the End-User License Agreement page, check “I accept the terms in the License
Agreement” and click the Next button.
4. Click the Next button to continue.
Figure 2-2-2
Figure 2-2-3
Page 12
PRO S3 Graphics MaxWall
User Guide
7/7/2014 Page12
12
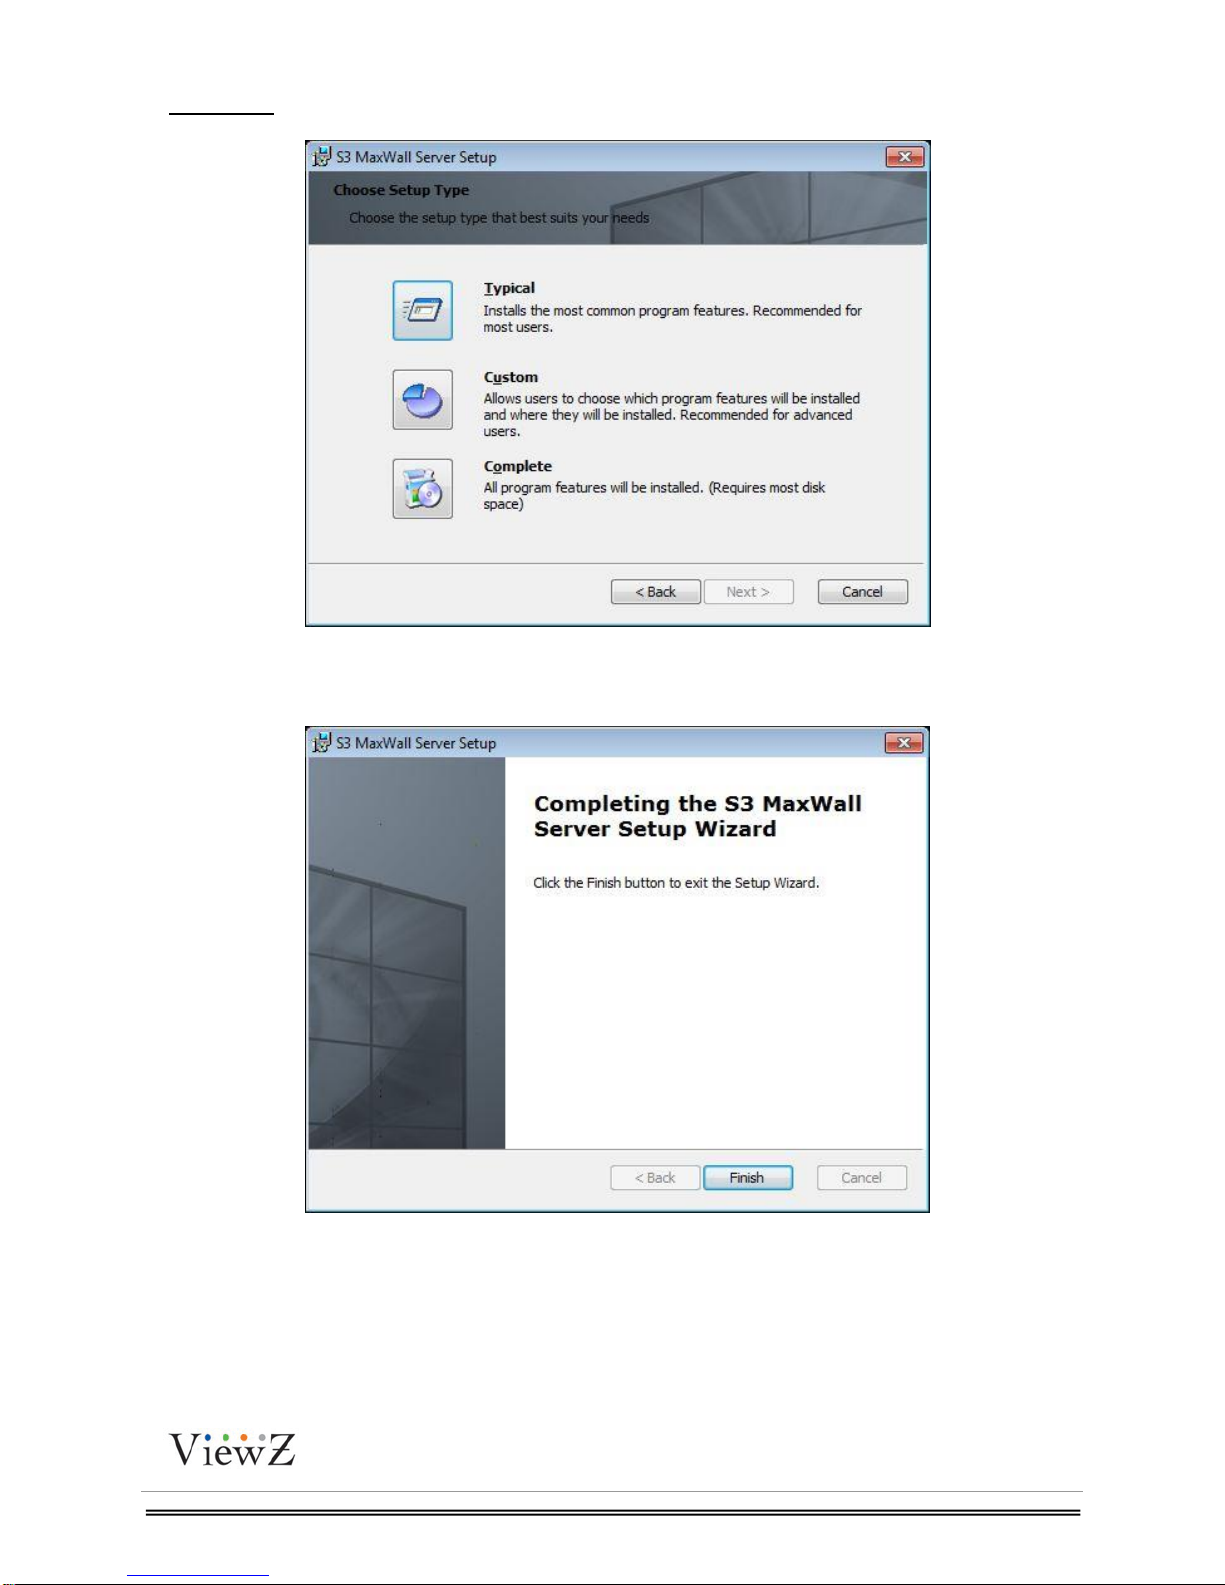
5. Setup type: Choose Typical.
5. Click the Finish button to exit.
Figure 2-2-4
Figure 2.2-5
Page 13
PRO S3 Graphics MaxWall
User Guide
7/7/2014 Page13
13
2.3 Master Installation
1. Run mastersetup.msi on machine3 to start master installation.
2. Click the Next button in the Welcome page.
Figure 2.3-1
3. In the End-User License Agreement page, check „I accept the terms in the License
Agreement’; click the Next button.
Figure 2.3-2
Page 14
PRO S3 Graphics MaxWall
User Guide
7/7/2014 Page14
14
4. Setup type: Click Typical.
Figure 2.3-3
5. Click the Install button to begin the installation.
Figure 2.3-4
Page 15
PRO S3 Graphics MaxWall
User Guide
7/7/2014 Page15
15
6. Click the Finish button to exit the Setup Wizard and complete the installation.
Figure 2.3-5
2.4 Patch Installation
Check whether patch is in package, patch package helps user to update the SW Version
without uninstalling and reinstalling.
Figure 2.4-1
Page 16
PRO S3 Graphics MaxWall
User Guide
7/7/2014 Page16
16
Chapter3 Quick Reference
3.1 Slave Configuration
Before running Slave, user needs to set Slave Configuration.
1. Double click the “SlaveConfig” icon, you can change “Slave” configuration.
2. In Network page, user can change the port.
3. In Password page, user can change the password for Master.
4. In Video page, user can add local video files path into Master interface.
5. In Application page, user can add local applications path into Master interface.
6. In Sensors page, user can set Slave machine hardware info warning value.
7. In Mode page, user can set XRGB, YUY2 color setting.
3.2 Launch Slave
Sentinel HASP Driver/License Key
Plug the USB license key into Slave machine before running the Slave.
Figure 3.1-1
Figure 3.2-1
Page 17
PRO S3 Graphics MaxWall
User Guide
7/7/2014 Page17
17
[Windows 7, Service Pack 1] A USB driver for the license key must be installed if your operating
system is Windows 7. The driver is included in the PRO S3 MaxWall software installation
package and will be installed with PRO S3 MaxWall.
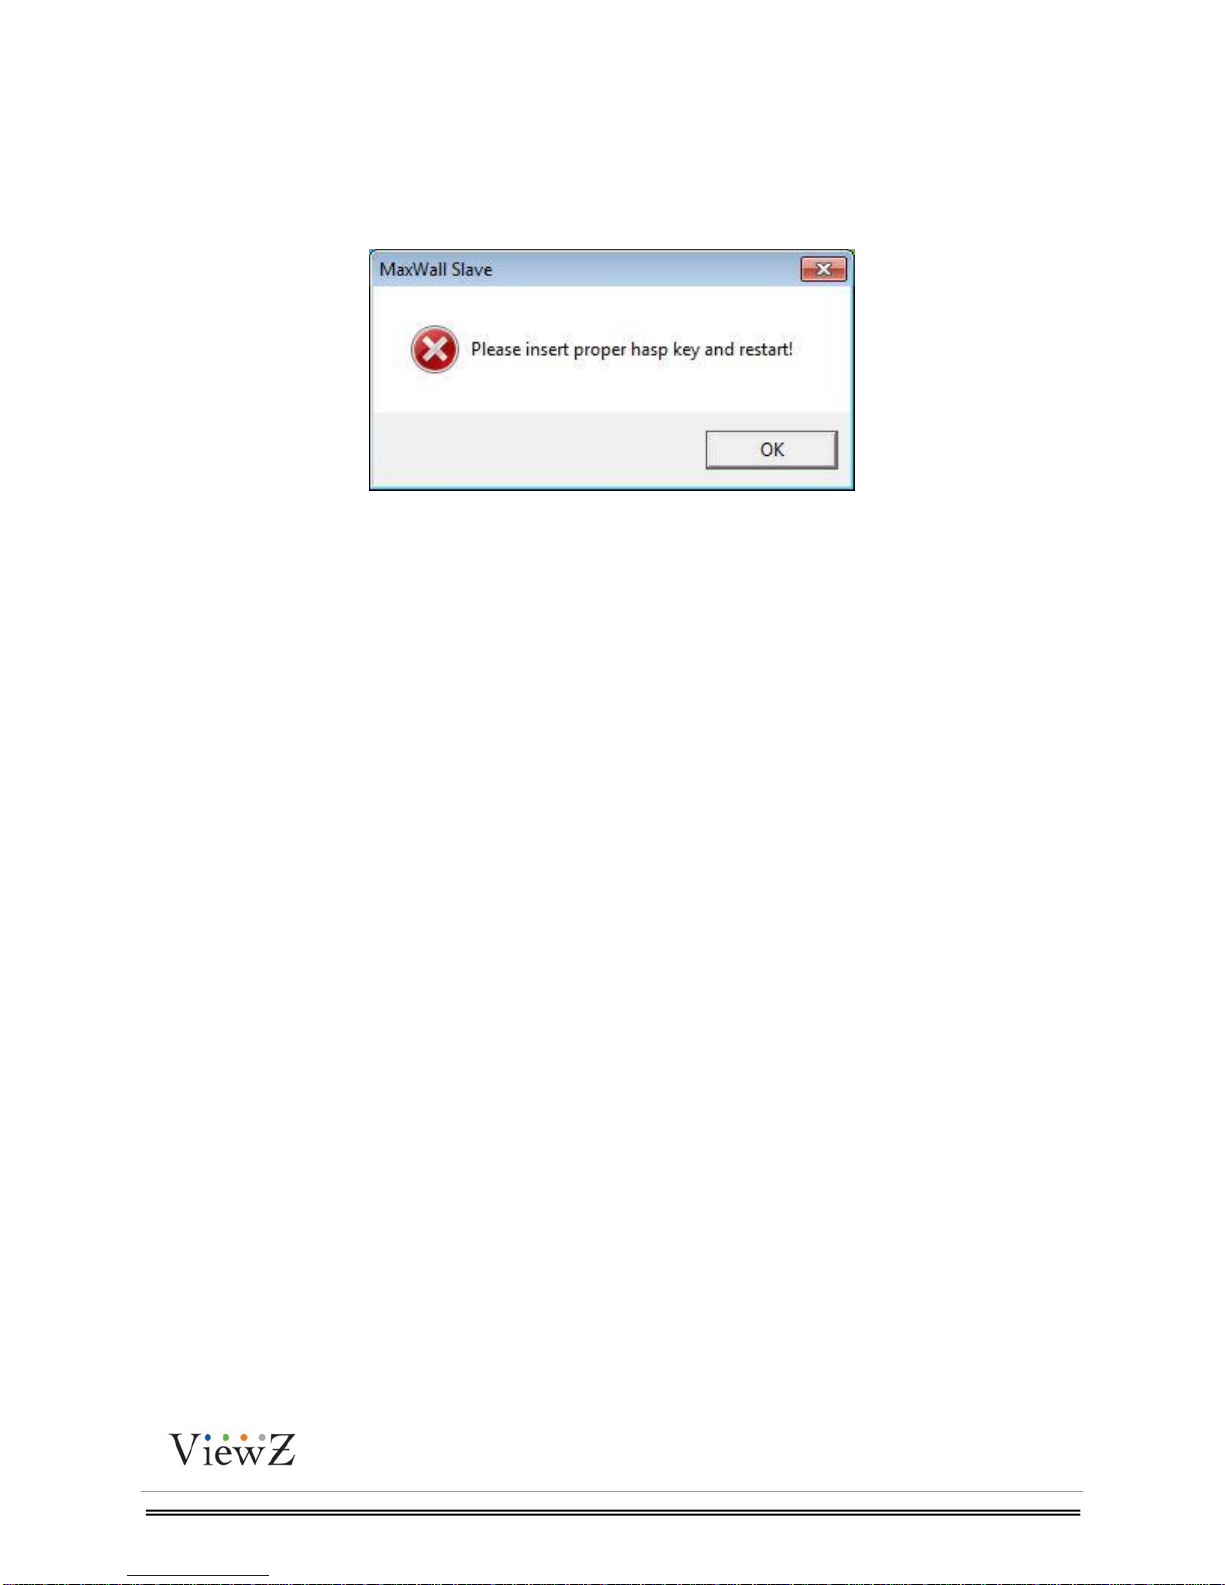
The USB license key must remain plugged into a USB port during the process of running Client.
If the license key is not present when client is launched, the following dialog will appear:
Figure 3.2-2
After completing the settings, double-click the Slave icon on desktop.
Note: You must restart Slave after changing the Slave Configuration.
3.3 Server Configuration
Double-Click ServerConfig icon on machine2 desktop, user can change Server Config.
1. In Network page, user can change the port for Master.
2. In Password page, user can change the password for Master.
3. In Slave page, user can add or delete Slave and set Slave Layout position.
4. In Matrix page, user can use and edit matrix.
5. In Source Group page, user can create and edit Source Group.
6. In Mode page, user can choose Slave running mode on Slave machine.
7. In Import/Export page, user can import or export Slave and Server setting database for use.
Page 18

PRO S3 Graphics MaxWall
User Guide
7/7/2014 Page18
18
Figure 3.3-1
3.4 Launch Server
Double-Click Server icon on machine2 desktop to launch the Server.
3.5 Log in Master
Double-Click Master icon on desktop, input password, address, port, and click the OK button to
log in Master.
Note: The default settings are as follows:
Password: admin
Address: Slave server Computer IP
Port: 2020
Figure 3.5-1
Page 19

PRO S3 Graphics MaxWall
User Guide
7/7/2014 Page19
19
3.6 Create a new model
1. Select the Model page; click the “New model” button on the menu bar to create a new model.
2. Drag a source from the Source list into the model windows. Select the layer, drag the layer
edge to change its sizes.
3. Click “Save model” button to save current model.
4. Click „Run model‟ button to publish the model to slave for playback.
3.7 Create a new plan
1. Select the Plan page; click the “New plan” button on the menu bar to create a new plan
2. Drag the model from the Model list into the Plan windows.
3. Right click model in plan windows, select “Adjust Item” to change its duration time.
4. Click “Save Plan” button to save the current plan.
3.8 Release missions
1. Select the Mission page, drag a “model” or “plan” from the Model list or the Plan list into the left
mission window.
2. Select and drag task in Mission window to change its duration time. Or, right click the task and
select “Adjust Item” to change its duration time.
3. Click “Save mission” to save this schedule.
4. Click “Run mission” to run this schedule.
3.9 Message
1.Select „message‟ section, click the menu of „Create message‟ to make a new message.
2.Save and play the message, it will display on Slave(Videowall)
3.10 Options
1. Click Option page, it shows Slave properties, such as monitor resolution.
2. Double-click “Screen Grid column” and ”Screen Grid Row”, you can change their values.
3.11 Review the running task
1. Select Current page, it shows the content playing on Slave.
2. Left Current Task window shows running task, model window shows the task‟s model that is
running on Slave.
3. Click “Send changes to Slave in realtime” button, you can edit the model that is currently
running.
4. Click “Control Server Remotely”, you can remotely control Slave-side by using a mouse & key
board. Click “Esc” to exit.
Page 20
PRO S3 Graphics MaxWall
User Guide
7/7/2014 Page20
20
Chapter4 Slave Feature Settings
4.1 Slave Configuration
Double-click SlaveConfig icon on desktop.
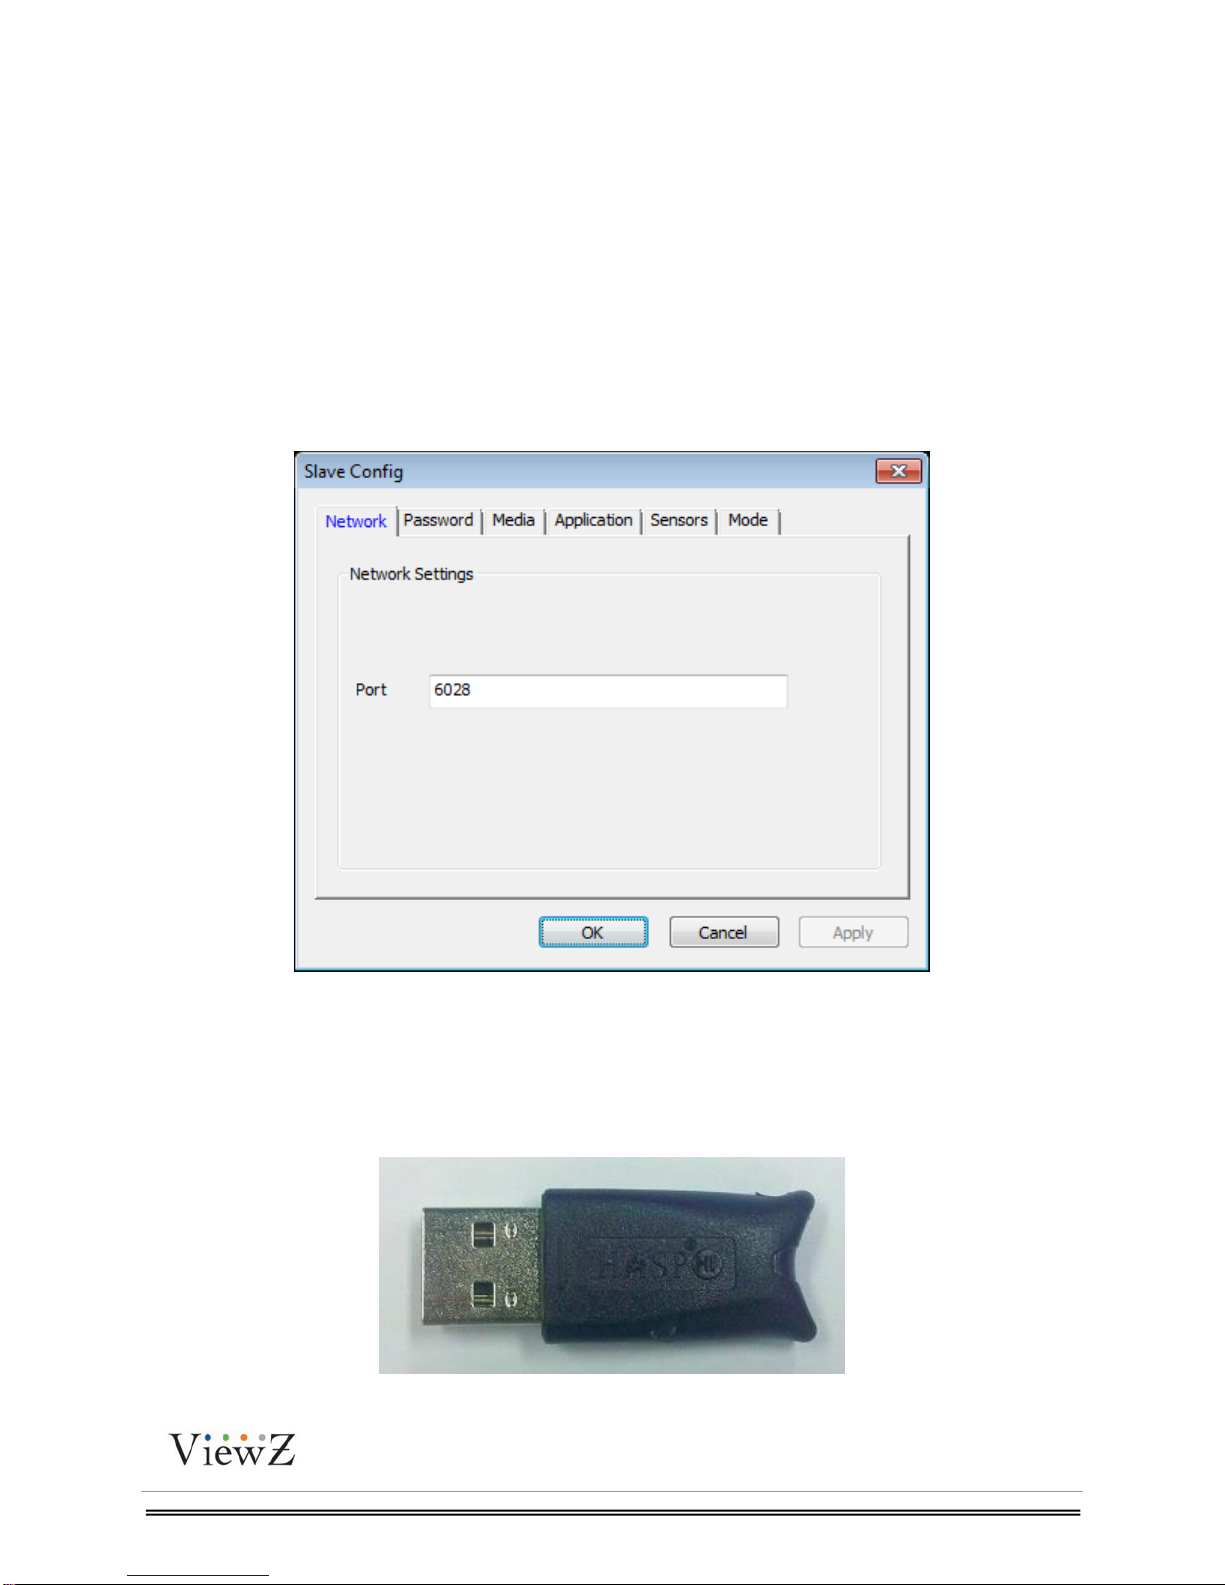
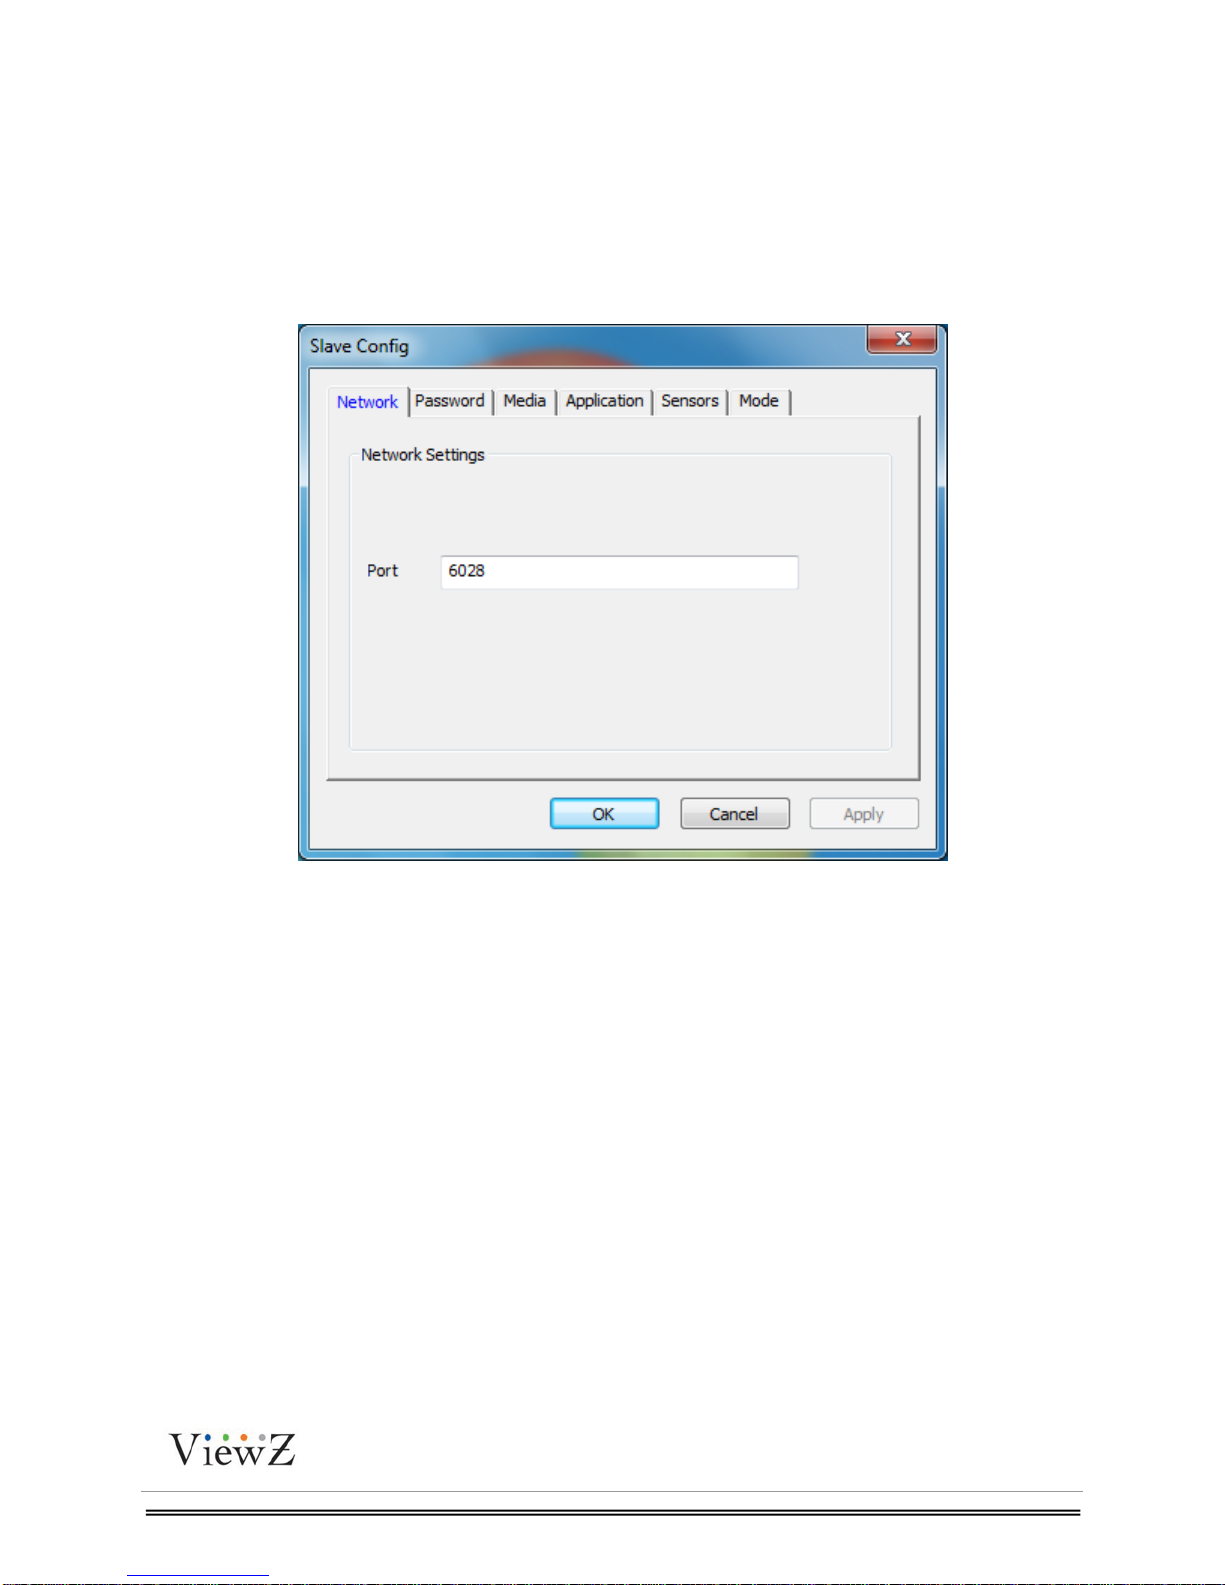
4.1.1 Slave Port Settings
Use this setting to change Slave and Server communication Port. Default Port: 6028.
Figure 4.1-1
User can customize the port, the modified port will be saved and kept for future use.
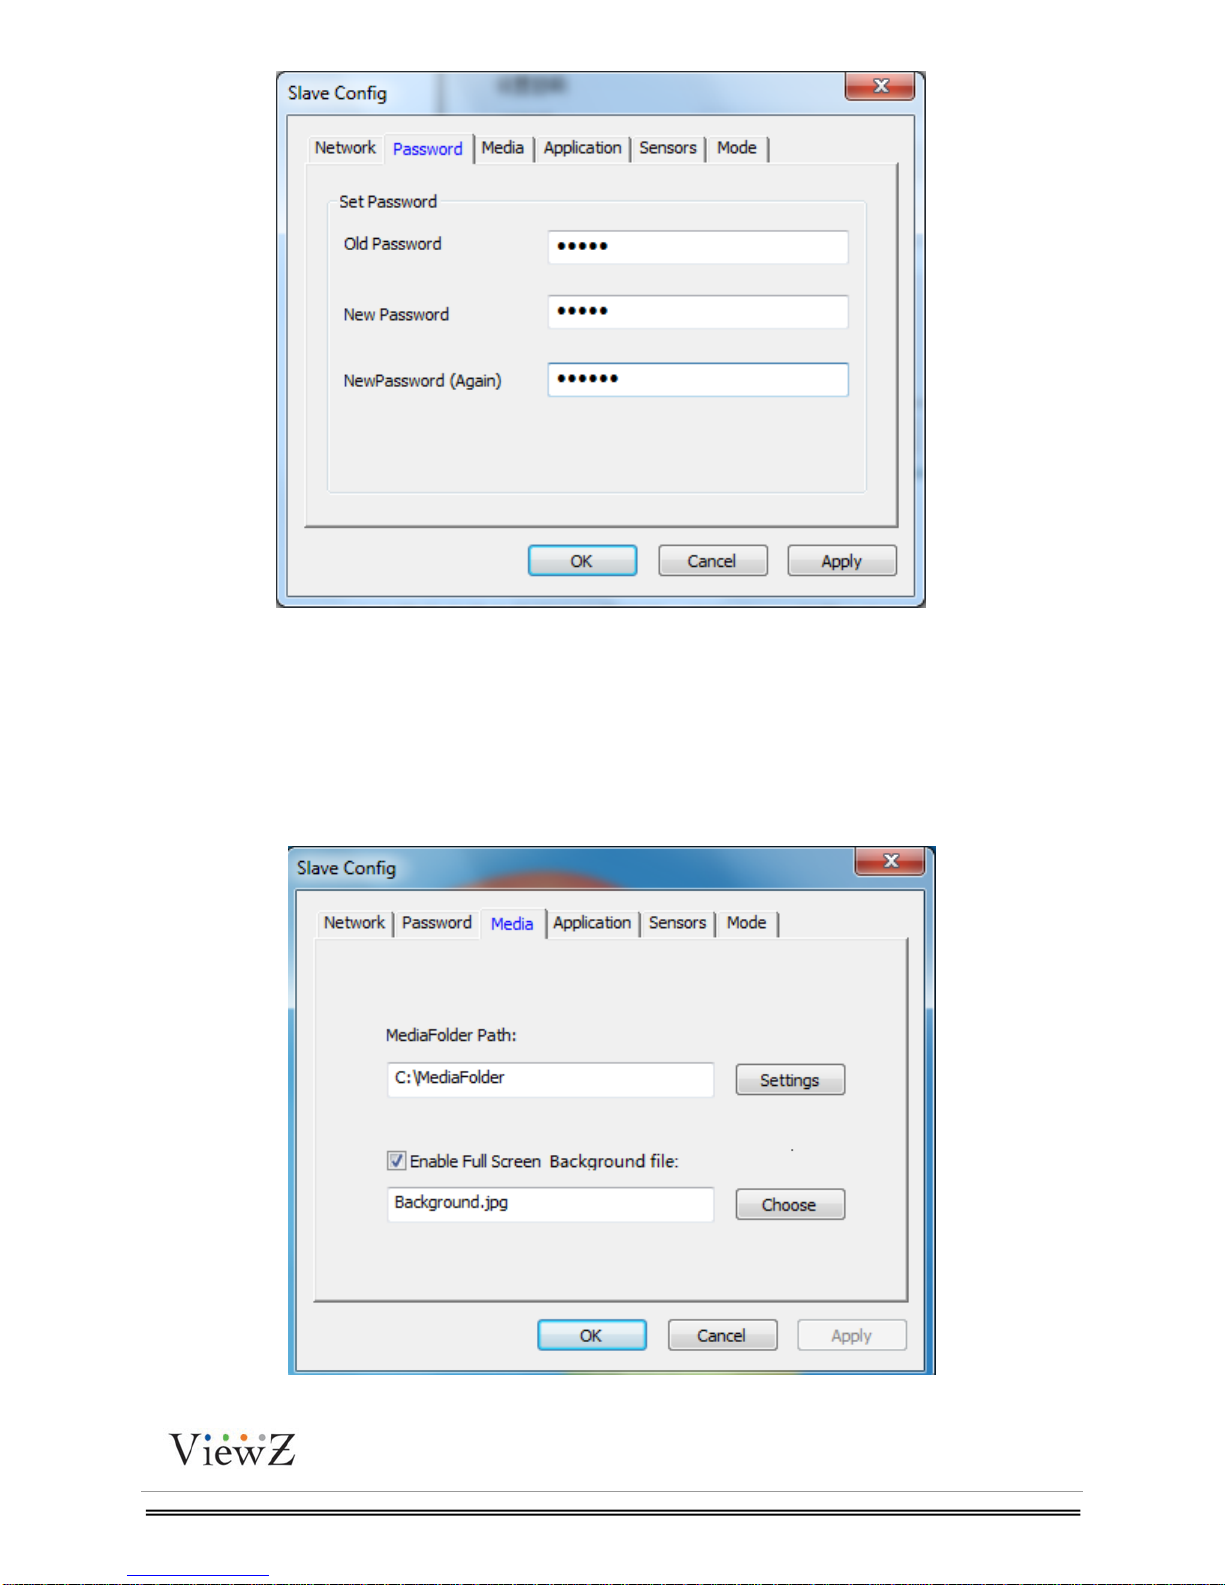
4.1.2 Change Passwords
In Network page, set Slave passwords. Default Password: Admin.
Note: keep passwords in Slave-side.
Page 21
PRO S3 Graphics MaxWall
User Guide
7/7/2014 Page21
21
Figure 4.1-2
4.1.3 Add Media
In Media page, user can set the media upload path, this path will be shown in Master page as
media source. User can set it as sharing to Master account, so that master account can perform
media upload accordingly.
Media page provides a background image setting, this background should be a picture or clip.
Enable this function and the background will be stored there.
Figure 4.1-3
Page 22

PRO S3 Graphics MaxWall
User Guide
7/7/2014 Page22
22
Figure 4.1-4
4.1.4 Add Application
User can add local application. These files will be shown in the application folder of Master
interface.
After adding or deleting the application path, you need to reload Slave on Slave page of
ServerConfig, and then re-launch Slave.
4.1.5 Sensors
User can set hardware range‟s warning value for slave machine. If hardware range‟s warning
value exceeds the limit during running the Slave machine, PRO MaxWall will warn Slave and
Master machine.
Figure 4.1-5
Page 23

PRO S3 Graphics MaxWall
User Guide
7/7/2014 Page23
23
Figure 4.1-6
4.1.6 Mode
Choose the color setting in Mode page, YUY2 is set as default value.
Decode: If a HW decode card is inserted, enable EVR can enhance your CPU
performance.
Debug: For debug purpose only.
Figure 4.1-7
Page 24

PRO S3 Graphics MaxWall
User Guide
7/7/2014 Page24
24
4.2 Launch Slave
Double-click Slave icon on desktop to start Slave server
After launching Slave, the color server icon will appear in the notification area of the taskbar.
After the Slave is running, the icon appears in the notification area of the task bar. When the
Slave stops working, the icon color will change to grey. Move the mouse over Slave icon and tip
information will show Slave status.
To stop Slave, right-click Slave icon in the notification area, as shown in the below dialog box.
Figure 4.2.1
Figure 4.2.2
Start Slave Start Slave and re-play source
Stop Slave Stop Slave
Exit Exit Slave
About PRO S3 MaxWall Slave Show PRO S3 MaxWall version and copyright
Note:When pressing Esc to exit from Slave player, Slave icon still appears in the notification
area, user needs to launch Slave again to play media files.
Page 25

PRO S3 Graphics MaxWall
User Guide
7/7/2014 Page25
25
Chapter5 Server Feature Setting
5.1 Server Configuration
After installing the Server on Machine2, Server and ServerConfig icon will be shown on desktop.
Double-click ServerConfig icon on desktop to start Server Config.
Slave Port Settings
User can change Master and Server communication Port in this page. Default Port: 2020.
Figure 5.1-1
Page 26

Change Password
User can change Server password in this page, the default password is: Admin.
Figure 5.1-2
Add Slave
User can add one or more Slaves to Server in this page,
Password: Admin (user can change this password in SlaveConfig)
Address: Slave machine IP address
Port: 6028 (user can change this password in SlaveConfig)
Click Add Slave button to add Slave, use can add one or more Slaves.
Set Slave Layout
User can set Slave Layout position on Slave machine, as well as select Vertical or Horizontal
position in this page.
Page 27

PRO S3 Graphics MaxWall
User Guide
7/7/2014 Page27
27
Figure 5.1-3
Matrix Setting
1. Select Use Matrix, select Matrix type and add it into Server.
2. Edit Matrix name.
3. Input Matrix Input Size, output Size and Com.
4. Click Auto Config, Server will automatically configure the Capture Source and Output Num.
Figure 5.1-4
Page 28

PRO S3 Graphics MaxWall
User Guide
7/7/2014 Page28
28
Source Group
Grouping and editing inputs
Figure 5.1-5
Page 29

Click ‘Create’ button to make a new group name and write down the descriptions if
needed.
Figure 5.1-6
Page 30

Select sources from the list and import them to right side, edit setting for each source such
as: Pixels, positions, cut edges.
Figure 5.1-7
Page 31

PRO S3 Graphics MaxWall
User Guide
7/7/2014 Page31
31
Figure 5.1-8
Page 32

Super large video grouping
If customer needs to playback super resolutions video, simply split the video to several
videos, group them by position and slave can combine them to one. This split and grouping
will not sacrifice video quality, the frame timing difference between grouping videos will be
less than 16ms.
Figure 5.1-9
Figure 5.1-10
Page 33

PRO S3 Graphics MaxWall
User Guide
7/7/2014 Page33
33
Mode
User can choose from Slave running Mode, Window Mode and Full Screen Mode.
Window Mode: Content running as window mode on Slave computer, user can drag by mouse
to change window sizes.
Full Screen: Content running as Full Screen mode on Slave computer. Click “Esc” key to exit
player and stop Slave Server. Meanwhile user can set fade in and fade out effects, longest time
of the effect is 5000ms.
Figure 5.1-11
Page 34

Import/Export
1. Click Export to export database of Slave and Server configuration
2. Click Import to import database file that have been saved, this function can reduce time to
configure the SlaveConfig and ServerConfig.
Figure 5.1-12
Page 35

PRO S3 Graphics MaxWall
User Guide
7/7/2014 Page35
35
5.2 Launch the Server
Double-click Server icon on desktop to start Server
Figure 5.2-1
After launching the Server, the green server icon will appear on the notification area of the task
bar.
Figure 5.2-2
After the Server is running, the icon appears in the notification area of the task bar. If the Server
is running, the icon color changes to green. When the Server stops working, the icon color will
change to grey. Move mouse over server icon, tip information will show Server status.
To stop Server, right-click Server icon in the notification area, as shown in the below dialog box.
Figure 5.2-3
Start Server Start Server and re-connect Master
Stop Server Stop Server
Exit Exit Server
About PRO S3 MaxWall Server Show PRO S3 MaxWall Serer version and copyright
Page 36

PRO S3 Graphics MaxWall
User Guide
7/7/2014 Page36
36
Chapter6 Master Feature Guide
Master is a standalone application and serves as the main user interface control of PRO S3
MaxWall.
6.1 Log In
Double-click the Master icon on desktop. Input the password, address and port information, click
OK button to log in Master.
Click Wakeup Machine button. User can select wakeup Slave or Server Machine.
Figure 6.1-1
Note:The default settings are as follows:
Address: Slave Machine IP
Port: 2020
Password: Admin (user can change this password on ServerConfig)
Page 37

PRO S3 Graphics MaxWall
User Guide
7/7/2014 Page37
37
Master interface includes five pages: Current, Model, Plan, Mission and Option.
Current page shows the running task on Slave machine. The running contents and layouts can
be edited.
Figure 6.1-2
6.1.1 Tools Bar
Figure 6.1-3
Save Save model with a new name
Delete Remove the selected windows in Model
Align Up Align content to the upper edge of the canvas
Align Down Align content to the lower edge of the canvas
Align Left Align content to the left edge of the canvas
Align Right Align content to the right edge of the canvas
Tile Window Arrange all the content windows in tile
Maximum Maximum model
Extend Extend content
Align Grid Align content to grid
Hide Hide content window
Show Caption Show content window caption
Page 38

PRO S3 Graphics MaxWall
User Guide
7/7/2014 Page38
38
Show Top Bring topmost source except application
Real-time Control Send change to Slave in real-time
Remote Control Control server remotely
Print Screen Print Slave Screen
Disable Disable Hardware Warning
Zoom Zoom workspace
Shut down Remotely Shut down MaxWall Machine
Wakeup Remotely Wakeup MaxWall Machine
Reboot Remotely restart the machine
Stop Stop current models or mission
Note: All buttons can only be used during realtime control.
6.1.2 Current Task List
Figure 6.1-4
The Current Task list shows the plans or missions that will be running on Slave. When running
on Slave-slide, the model will be marked as “ONPLAY”.
Move the mouse cursor over the item in the task list to show the tip information.
Page 39

PRO S3 Graphics MaxWall
User Guide
7/7/2014 Page39
39
6.1.3 Model Window
Figure 6.1-5
Model Window shows the model that is currently running on Slave-side, user can edit it in this
window in real-time. Right-click the Source layer on model window, a dialog box will show as
below:
Figure 6.1-6
Page 40

PRO S3 Graphics MaxWall
User Guide
7/7/2014 Page40
40
Show Property
Selecting this option allows user to check the content information.
Figure 6.1-7
Set Source
These settings allow user to change the Source properties.
Figure 6.1-8
Page 41

PRO S3 Graphics MaxWall
User Guide
7/7/2014 Page41
41
6.1.4 Source List
Source list shows all the sources on Slave. User can directly drag the source into model windows
during real-time control.
Source
Slave machine provides video signal devices including Capture Card, IP Camera, Video files,
and APPS.
Right-click the folder in source list and a menu will appear as shown below:
Figure 6.1-9
Figure 6.1-10
Page 42

PRO S3 Graphics MaxWall
User Guide
7/7/2014 Page42
42
Right click the IPC folder in source list:
Figure 6.1-11
Add new IPC
Click Probe Devices to show the list of IPC in intranet. User can move them to source list.
Figure 6.1-12
Page 43

PRO S3 Graphics MaxWall
User Guide
7/7/2014 Page43
43
Create a new source folder
Create a new folder under IPC
Change the descriptions
Figure 6.1-13
Right click Web browser:
Figure 6.1-14
Figure 6.1-15
Page 44

PRO S3 Graphics MaxWall
User Guide
7/7/2014 Page44
44
Create a New Source
Create a new source; source name will appear in the chosen folder.
Figure 6.1-16
1. Input the new source name.
2. Select the source type in pull-down menu.
3. Add description in Description Window.
4. Click OK button.
Create a Source Filter
Create a new file in Source List.
Figure 6.1-17
Page 45

PRO S3 Graphics MaxWall
User Guide
7/7/2014 Page45
45
Change Source Filter Description
Figure 6.1-18
Right-click the source item in Source List, as shown in below menu:
Figure 6.1-19
Rename Source
Rename the source name.
Delete Source
Delete the selected source.
Figure 6.1-20
Page 46

PRO S3 Graphics MaxWall
User Guide
7/7/2014 Page46
46
Change Description
User can check and update the source description.
Figure 6.1-21
Show Property
Click this option; open the dialog box as shown below to check base description.
Figure 6.1-22
Page 47

PRO S3 Graphics MaxWall
User Guide
7/7/2014 Page47
47
Set Source
User can open this option to change source properties.
Figure 6.1-23
Page 48

PRO S3 Graphics MaxWall
User Guide
7/7/2014 Page48
48
6.2 Model
Model consists of all sources.
Figure 6.2-1
6.2.1 Tools Bar
Figure 6.2-2
Create Create a new model
Open Open a model
Delete Delete a model
Rename Rename a model
Save Save a model
Save as Save model as···
Run Run a model
Delete Content Delete content in model window
Align Up Align content to the upper edge of the canvas
Align Down Align content to the lower edge of the canvas
Align Left Align content to the left edge of the canvas
Page 49

PRO S3 Graphics MaxWall
User Guide
7/7/2014 Page49
49
Align Right Align content to the right edge of the canvas
Tile Window Arrange all the content windows in tile
Maximum Maximum model
Extend Extend content
Align Grid Align content to grid
Zoom Zoom workspace
6.2.2 Model List
Model List shows all the models in the server. Double-click the model to open the model window.
Right click the model to appear the dialog box as shown below:
Figure 6.2-3
Rename
Rename the model name.
Delete
Delete a model.
Change Description
Check and update model description.
Show Property
Click this option to view model properties.
6.2.3 Source List
Source list shows all the sources on Slave-side. User can directly drag the source into model
windows during real-time control.
User can refer to 6.1.4 Source List
Page 50

PRO S3 Graphics MaxWall
User Guide
7/7/2014 Page50
50
6.2.4 Model Pane
Model window is the main user interface for editing the model.
Create a new mode, the grid pane displays monitor‟s topology structure of Slave-side and the
monitor‟s total resolution will be displayed in the upper edge of the pane mode.
Figure 6.2-4
6.2.5 Model Property
Model Property shows the Selected Model Information that is in the Model List.
Figure 6.2-5
Page 51
PRO S3 Graphics MaxWall
User Guide
7/7/2014 Page51
51
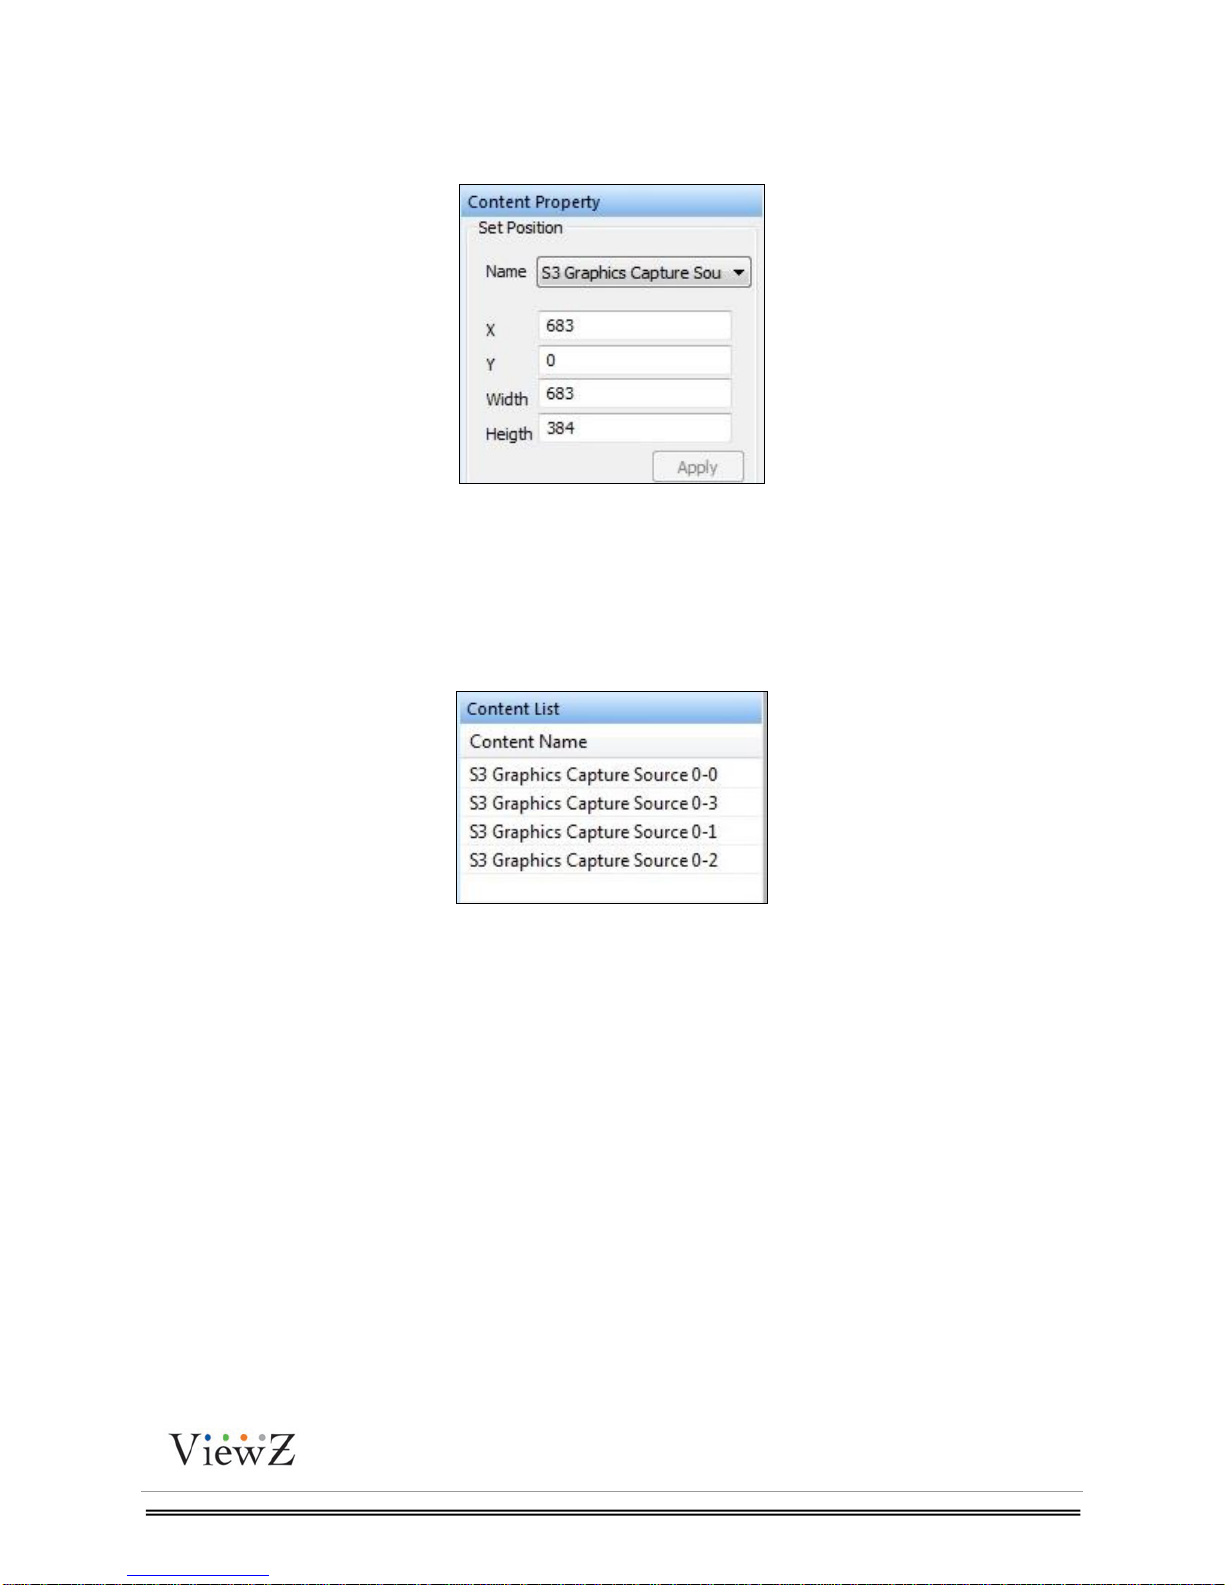
6.2.6 Content Property
Content Property shows the Selected Source Information that is in the Source List.
Figure 6.2-6
6.2.7 Content List
Content list shows the content information that is listed in the Model Window.
Figure 6.2-7
Page 52

PRO S3 Graphics MaxWall
User Guide
7/7/2014 Page52
52
6.3 Plan
Plan consists of models with a playback order and the duration of each layout. There can be no
empty timeslots between the layouts.
Note: Model duration must be more than 10s.
6.3.1 Tools Bar
New Create a new plan
Open Open a plan
Delete Delete a plan
Figure 6.3-1
Figure 6.3-2
Page 53

PRO S3 Graphics MaxWall
User Guide
7/7/2014 Page53
53
Rename Rename a plan
Save Save a plan
Run Run plan one time
Copy Copy plan item
Paste Paste plan item
Cut Cut plan item
Delete Item Delete plan item
Zoom Zoom work space
6.3.2 Plan List
Figure 6.3-3
Plan List consists of all plans in Slave server. Double-click the plan to open it in the main window.
Right-click a plan to appear the dialog box as shown below:
Figure 6.3-4
Rename
Change plan name
Delete
Delete the selected plan.
Change Description
Change the selected plan information.
Show Property
Clicking this option enables user to check the plan properties.
Page 54

PRO S3 Graphics MaxWall
User Guide
7/7/2014 Page54
54
6.3.3 Plan Pane
Figure 6.3-5
Plan window is the main user interface for editing the plan. It lists 24hours, user can drag model
from model list into plan window, and drag plan‟s bottom edge to adjust playback duration time.
User can open several plans to edit at the same time.
Right-click the model in plan window to appear the dialog box as shown below:
Figure 6.3-6
Show Property
Click this option to view the model properties.
Page 55

PRO S3 Graphics MaxWall
User Guide
7/7/2014 Page55
55
.
Figure 6.3-7
Adjust Item
Change the model duration time.
Figure 6.3-8
6.3.4 Model List
Model List shows all the models in Slave Server.
User can refer to 6.2.2 Model List
Page 56

PRO S3 Graphics MaxWall
User Guide
7/7/2014 Page56
56
6.4 Mission
Mission is used to set playback time and playback model or plan to Slave-side.
Figure 6.4-1
6.4.1 Tools Bar
Figure 6.4-2
Save Save a mission
Run Run a mission
Copy Copy mission item
Paste Paste mission item
Cut Cut mission item
Delete Delete mission item
Align Up Align mission item upward
Align Down Align mission item downward
Zoom Zoom workspace
Page 57

PRO S3 Graphics MaxWall
User Guide
7/7/2014 Page57
57
6.4.2 Mission Pane
Figure 6.4-3
Mission window is the main user interface for editing the mission. It lists a week time. User can
drag model or plan into mission window.
6.4.3 Model List
Figure 6.4-4
Page 58

PRO S3 Graphics MaxWall
User Guide
7/7/2014 Page58
58
User can refer to 5.2.2 Model List
6.4.4 Plan List
User can refer to 6.3.2 Plan List
6.5 Message
Message provides scroll message function on Slave
Figure 6.4-5
Figure 6.5-1
Page 59

PRO S3 Graphics MaxWall
User Guide
7/7/2014 Page59
59
6.6 Options
Option shows Slave properties, such as monitor resolution.
Double-click “Screen Grid column” and “Screen Grid Row”, you can change their values.
View current task.
Figure 6.6-1
Page 60
PRO S3 Graphics MaxWall
User Guide
7/7/2014 Page60
60
Chapter7 RS232Tools
This section explains how to control PRO Maxwall slave playback by RS232. We need a
machine with RS232 cable connected to slave.
Note: This machine could not be a master
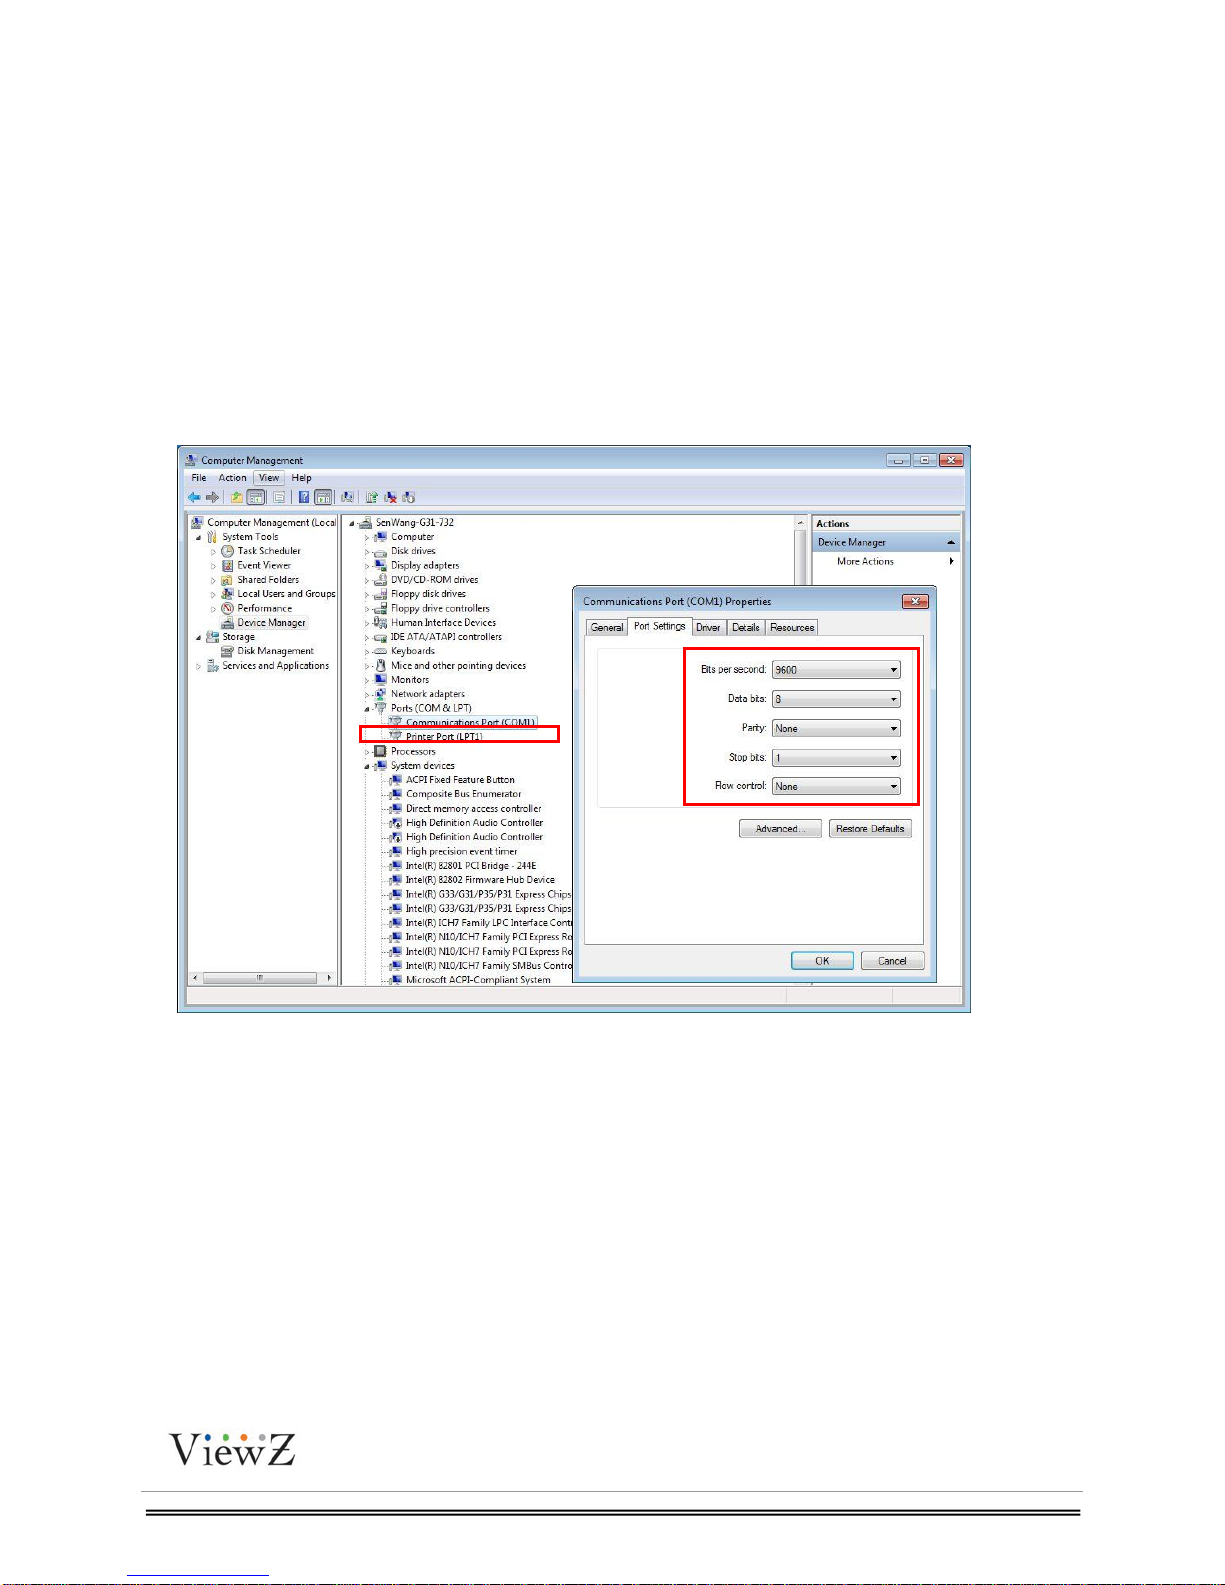
7.1 Slave RS232 setting
RS232 does not need to control the Slave via master, just connect to Slave directly.
1. In slave machine: enter computer management Device managerPort, choose COM
port, setting the property
Figure 7.1-1
Page 61

PRO S3 Graphics MaxWall
User Guide
7/7/2014 Page61
61
2. Open server config, choose ‟Use COM‟
Port: Set COM of the Slave as „1‟
BaudRate means Bits per second in Device Manger COM property, default is 9600
Figure 7.1-2
Page 62

PRO S3 Graphics MaxWall
User Guide
7/7/2014 Page62
62
7.2 Master RS232 setting
1. In Server machine: enter computer management Device managerPort, choose
COM port, setting the property
Figure 7.2-1
Page 63

PRO S3 Graphics MaxWall
User Guide
7/7/2014 Page63
63
2. Open Rs232Tool,set the COM Port as COM3,Baud rate is 9600
7.3 Using RS232T
1. Click connect button to start RS232 control
Figure 7.2-2
Page 64

PRO S3 Graphics MaxWall
User Guide
7/7/2014 Page64
64
Figure 7.3-1
2. Choose Model and click “RunSelectModel”, Slave will run the selected model
Figure 7.3-2
3. Click “RunMission”to run the mission accordingly
Figure 7.3-3
Page 65

Chapter8 SmartTransmitter
S3 SmartTransmitter is designed for uploading Windows desktop to slave for display.
8.1 SmartTransmitter installation
Run SM@RTTransmitteSetup.msi to install the transmitter on which machine you
want to upload its content.
Figure 8.1-1
Figure 8.1-2
Page 66

PRO S3 Graphics MaxWall
User Guide
7/7/2014 Page66
66
Figure 8.1-3
Figure 8.1-4
Page 67

PRO S3 Graphics MaxWall
User Guide
7/7/2014 Page67
67
Figure 8.1-5
Figure 8.1-6
Page 68

PRO S3 Graphics MaxWall
User Guide
7/7/2014 Page68
68
8.2 Run SmartTransmitter
Click SM@RTTransmitter shotcut. Right click SmartTransmitter from the taskbar to list
all the available slaves. Running it will click the tab and it will show your desktop to slave
machine.
Figure 8.2-1
 Loading...