

Page 1
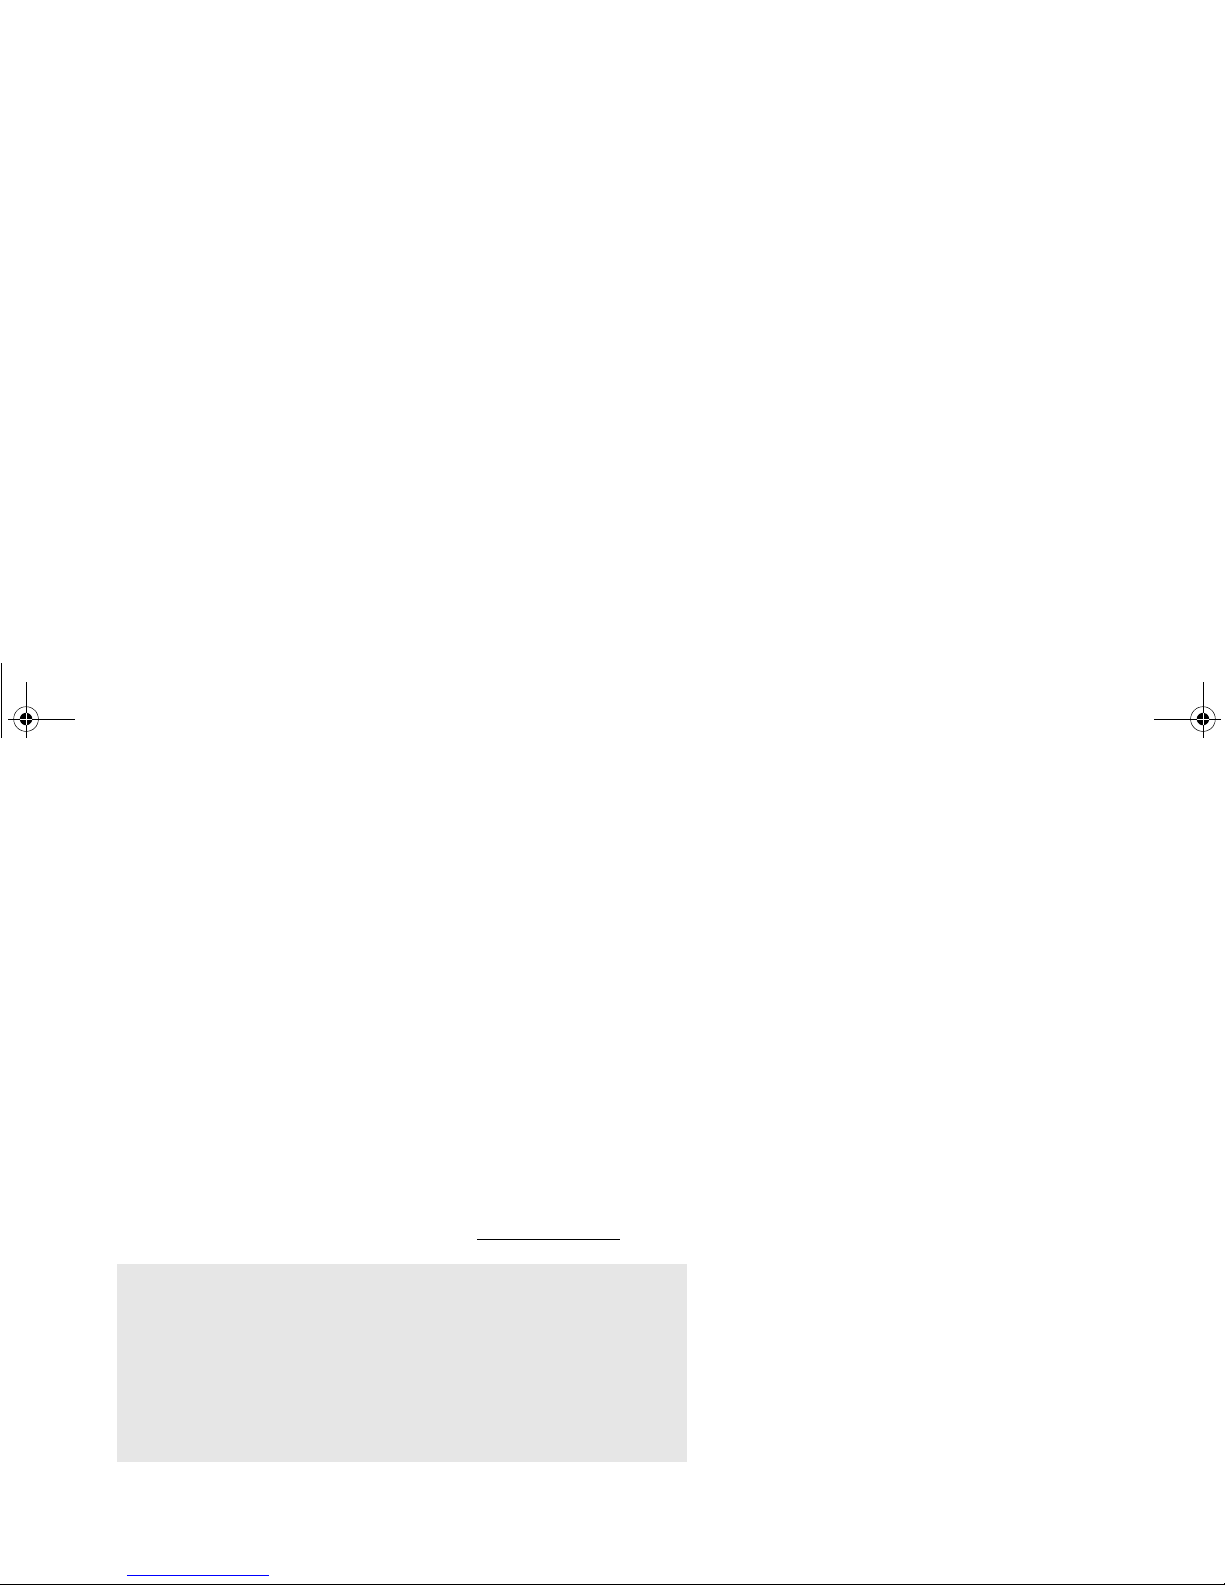
User Guide
802.11g Wireless Media Adapter
WMA100
WMA_UG.book Page 1 Tuesday, October 12, 2004 3:29 PM
Page 2
ViewSonic Wireless Media Adapter i
Copyright © ViewSonic Corporation, 2004. All rights reserved.
ViewSonic
®
and the three birds logo are registered trademarks of ViewSonic
Corporation.
Microsoft and Windows are either registered trademarks or trademarks of Microsoft
Corporation in the United States and/or other countries.
Corporate names and trademarks are the property of their respective companies.
Disclaimer: ViewSonic
Corporation shall not be liable for technical or editorial errors
or omissions contained herein; nor for incidental or consequential damages
resulting from furnishing this material, or the performance or use of this product.
In the interest of continuing product improvement, ViewSonic Corporation reserves
the right to change product specifications without notice. Information in this
document may change without notice.
No part of this document may be copied, reproduced, or transmitted by any means,
for any purpose without prior written permission from ViewSonic Corporation.
Product Registration
T o mee t your future needs and to receive additional product inform ation as it becomes
available, please register your ViewSonic product at: www.viewsonic.com
.
For Your Records
Model Name:
Part Number:
Document Number:
Serial Number:
Purchase Date:
WMA100
ViewSonic 802.11g Wireless Media Adapter
VS10249
A-CD-WMA100-1-UG Rev. 1A 10-12-04
__________________
__________________
WMA_UG.book Page i Tuesday, October 12, 2004 3:29 PM
Page 3
Table of Contents
ViewSonic Wireless Media Adapter ii
Product Registration ................................................................................................................ i
For Your Records .................................................................................................................... i
Chapter 1: WMA100 Overview
Package Contents ..................................................................................................................... 2
Safety Instructions ..................................................................................................................... 2
Product Features ....................................................................................................................... 3
System Requirements ............................................................................................................... 3
Front Panel: Buttons and LEDs ................................................................................................. 5
Rear Panel: Connection Ports ..................................................................................................6
Remote Control .......................................................................................................................... 7
myView Media Guide ............................................................................................................... 10
myView Media Manager .......................................................................................................... 10
Chapter 2: Setting Up Your WMA100
Setup Overview ....................................................................................................................... 11
Step 1: Install Software and User Guide .................................................................................. 12
Step 2: Connect the WMA100 ................................................................................................. 13
WMA_UG.book Page ii Tuesday, October 12, 2004 3:29 PM
Page 4

ViewSonic Wireless Media Adapter iii
Step 3: Install Remote Control Batteries .................................................................................. 15
Step 4: Turn on TV Power and Verify WMA100 Power is ON ................................................. 15
Step 5: Configure Your WMA100 ............................................................................................ 16
Step 6: Adjusting the Screen Image ........................................................................................ 18
Chapter 3: Selecting and Playing Media
Home Screen Features ............................................................................................................ 20
Supported Media Files .............................................................................................................20
Selecting and Playing Media Files ........................................................................................... 21
Remote Control Buttons .......................................................................................................... 22
Play/Pause ........................................................................................................................... 22
Stop ...................................................................................................................................... 22
Replay and Skip ................................................................................................................... 22
Rewind and Fast Forward .................................................................................................... 22
Back ..................................................................................................................................... 22
Shortcut Buttons ................................................................................................................... 22
On-Screen Control Panel Buttons ........................................................................................... 23
Search .................................................................................................................................. 23
Play Shuffle .......................................................................................................................... 24
Play All .................................................................................................................................24
Slide Effects ......................................................................................................................... 24
Viewing Videos ........................................................................................................................ 25
WMA_UG.book Page iii Tuesday, October 12, 2004 3:29 PM
Page 5
ViewSonic Wireless Media Adapter iv
Going to the Next/Previous Video ........................................................................................ 25
Listening to Music .................................................................................................................... 26
Going to the Next/Previous Track ........................................................................................ 26
Viewing Pictures ...................................................................................................................... 27
Going to the Next/Previous Picture ...................................................................................... 27
Viewing a Slideshow with Music ...........................................................................................27
Listening to Internet Radio ....................................................................................................... 28
Chapter 4: Using Setup to Change Settings
Auto-Sync Feature ................................................................................................................... 30
System Settings .......................................................................................................................31
Screen Saver ....................................................................................................................... 31
Image Setting ....................................................................................................................... 31
Sounds ................................................................................................................................. 31
Restore Factory Settings ...................................................................................................... 31
LAN Settings ............................................................................................................................ 32
Auto Mode ............................................................................................................................ 32
Manual Mode ....................................................................................................................... 32
Wi-Fi Settings .......................................................................................................................... 33
Firmware Update ..................................................................................................................... 33
Software Update ......................................................................................................................33
WMA_UG.book Page iv Tuesday, October 12, 2004 3:29 PM
Page 6

ViewSonic Wireless Media Adapter v
Chapter 5: Using the Media Server Software
myView Media Manager Overview .......................................................................................... 34
Launching the Homepage .................................................................................................... 35
Disabling myView Media Manager ....................................................................................... 35
Re-launching myView Media Manager .................................................................................35
System Settings .......................................................................................................................36
Security Settings ......................................................................................................................37
Creating an Access Code for the First Time ........................................................................ 37
Linking Pictures to Music .........................................................................................................39
Removing a pictures-to-music link: ...................................................................................... 40
Linking Music to Pictures ......................................................................................................... 41
Removing a music-to-pictures link: ......................................................................................43
Chapter 6: Troubleshooting and Maintenance
Getting Help Checklist ............................................................................................................. 44
Frequently Asked Questions (FAQs) ....................................................................................... 45
Troubleshooting ....................................................................................................................... 49
Customer Support .................................................................................................................... 53
Maintenance ............................................................................................................................ 54
Firmware Updates ................................................................................................................ 54
Software Updates ................................................................................................................. 54
Cleaning Instructions ............................................................................................................ 55
WMA_UG.book Page v Tuesday, October 12, 2004 3:29 PM
Page 7

ViewSonic Wireless Media Adapter vi
Chapter 7: Appendix
Regulatory Information ............................................................................................................ 56
FCC Statement .................................................................................................................... 56
FCC Caution ........................................................................................................................ 57
PC Power Settings ................................................................................................................... 57
Renaming Your PCs ................................................................................................................ 58
Specifications ........................................................................................................................... 59
Limited Warranty ...................................................................................................................... 60
WMA_UG.book Page vi Tuesday, October 12, 2004 3:29 PM
Page 8
ViewSonic Wireless Media Adapter 1
Welcome
Congratulations on your purchase of your WMA100 ViewSonic 802.11g
Wireless Media Adapter.
This chapter provides an overview to familiarize you with your WMA100:
• Package Contents
• Safety Instructions
• Product Features
• System Requirements
• Front Panel: Buttons and LEDs
• Rear Panel: Connection Ports
• Remote Control
• myView Media Guide software
• myView Media Manager software
Chapter 1: WMA100 Overview
WMA_UG.book Page 1 Tuesday, October 12, 2004 3:29 PM
Page 9
ViewSonic Wireless Media Adapter 2
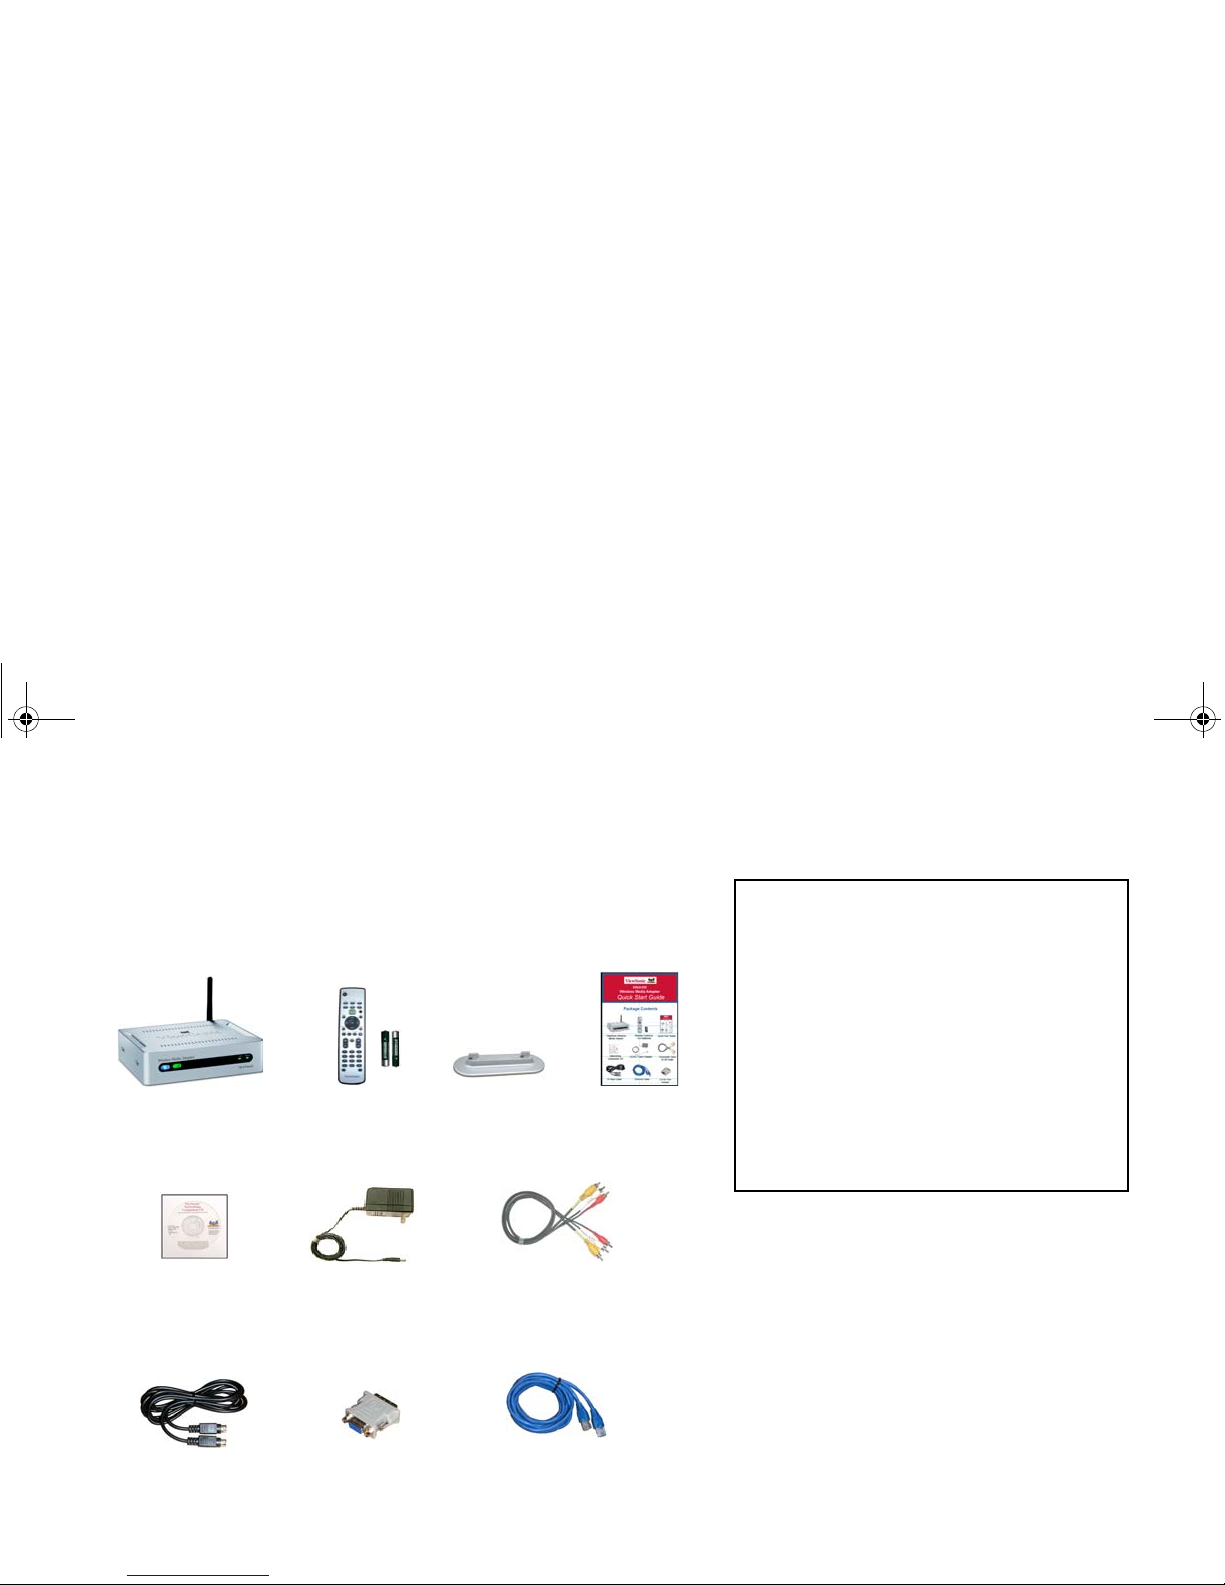
Package Contents
Check to make sure all of the items shown below were included in the
packaging for your WMA100.
ViewSonic WMA100
Wireless Media Adapter
Remote Control
and batteries
AC/DC Adapter
with cable
S-Video Cable
DVI to VGA
Adapter
Composite Video and
L/R Audio Cable
Networking
Companion CD
(with myView Media
Manager software
and User Guide)
RJ45 Ethernet
Cable
Quick Start
Guide
Pedestal
(for vertical
placement)
Safety Instructions
CAUTION:
To reduce the risk of electric shock, do NOT
open the internal compartment of the
WMA100 Wireless Media Adapter.
Opening the Wireless Media Adapter will
void the Limited Warranty.
There are no user-serviceable parts inside.
Any repairs or modifications to the unit must
be performed by ViewSonic or by an
authorized service provider.
WMA_UG.book Page 2 Tuesday, October 12, 2004 3:29 PM
Page 10

ViewSonic Wireless Media Adapter 3
Product Features
General
• 54Mbps 802.11g signaling rate supports up to 5x the speed of 802.11b
• Wireless security includes 64/128-bit WEP keys and 256-bit pre-shared
WPA keys
• Industry-leading I/O support (input/output ports)
Video
• Automatically detects and scales to your TV’s native resolution for best
picture quality
• Allows you to Instantly connect and view your stored movies and video
content from anywhere in your house
• Supports MPEG-1, MPEG-2, MPEG-4, and Xvid video file formats
Music
• Listen to any song, from any artist in your music collection instantly
• Access your music collection with the Remote Control
• Listen to your favorite music through your home theater surround
sound system
• Supports MPEG-1 (Audio layers 1 &2), MP3, WMA CBR, WAV,
unprotected AAC, AC-3 (Dolby Digital 5.1 pass-thru) audio file formats
(continued)
System Requirements
• TV or other display with Composite, S-
Video, Component, DVI, and/or VGA
video ports.
• Wireless or Wired (Ethernet) router or
gateway.
• One or more networked PCs with:
Windows XP or 2000, a Pentium 200
Mhz or faster processor, 64 MB RAM
minimum, an Internet browser, and a
CD-ROM drive.
WMA_UG.book Page 3 Tuesday, October 12, 2004 3:29 PM
Page 11

ViewSonic Wireless Media Adapter 4
Pictures
• Browse and view your digital pictures directly on your television
• Enhance slide shows with background music
• Supports JPG, GIF, and PNG file formats
Internet
• Listen to Internet Radio
WMA_UG.book Page 4 Tuesday, October 12, 2004 3:29 PM
Page 12
ViewSonic Wireless Media Adapter 5
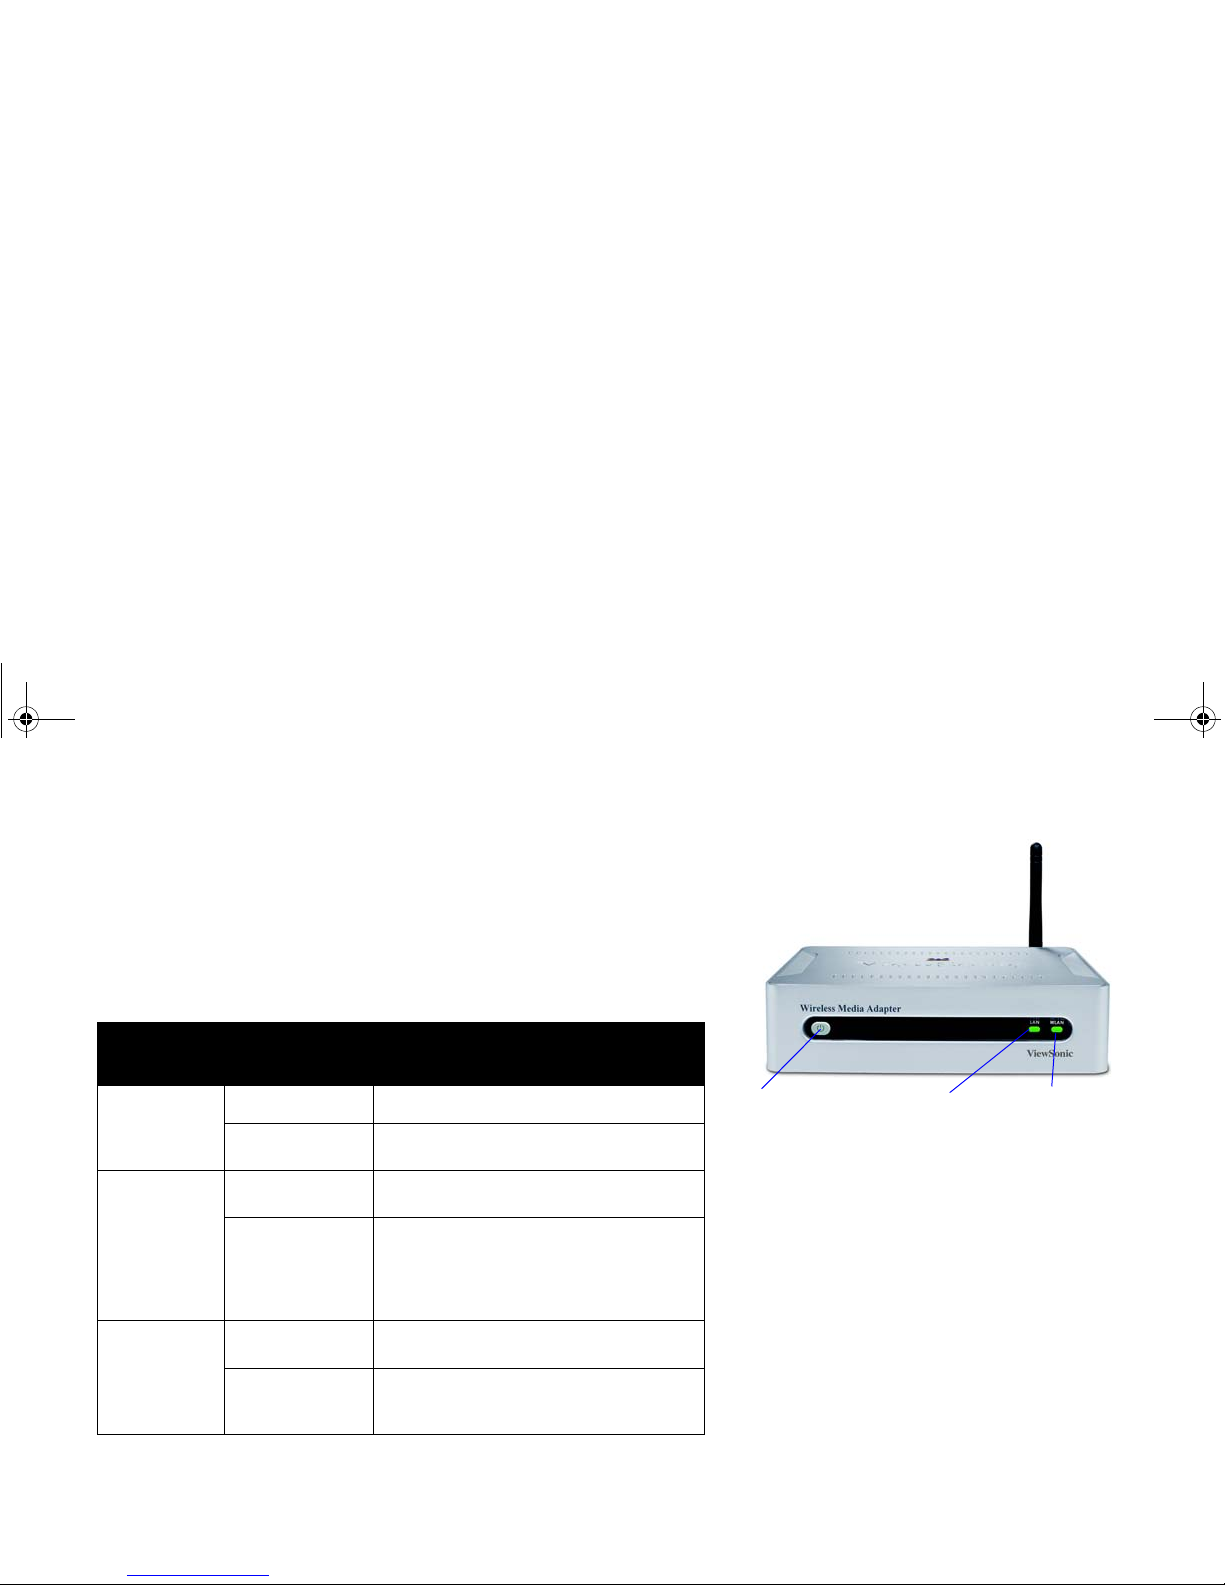
Front Panel: Buttons and LEDs
The Power button, located on the front of the WMA100, has three power
modes: On (blue LED), Standby (amber LED), and Off.
See Chapter 2 for
more information about Auto-Sync.
The other two
LED indicators show network connection (link) status and
activity. See the table below for meaning of LED light codes.
Indicator
(LED)
Light Code Meaning of Code
Power Solid Blue On: Unit is ready to use.
Solid Amber Standby: Unit is in Power Saving
mode.
WLAN
(Wireless
LAN)
Solid Green Link: Successful network
connection.
Blinking Green
Activity:
Data transfer is in process; a
faster blinking light means more WLAN
activity; also indicates WMA100 is
searching for an Access Point or
WLAN connection.
LAN
(Wired LAN)
Solid Green Link: Successful network
connection.
Blinking Green Activity: Data transfer is in process;
a faster blinking light means more
LAN activity.
WLAN
LED
(Wireless
LAN Link &
Activity)
Power Button &
Power LED
Blue = On
Amber = Standby
LAN LED
(Wired
LAN Link &
Activity)
NOTE: Without pressing the Power button,
power is On (blue LED) when you plug in the
WMA100.
• If you press the Power button when the LED
is blue, the WMA100 will go into Standby
Mode (amber LED).
• To return to the Power On mode, press the
Power button again.
WMA_UG.book Page 5 Tuesday, October 12, 2004 3:29 PM
Page 13

ViewSonic Wireless Media Adapter 6
Rear Panel: Connection Ports
For the best video image: Use the best video connection supported by
your TV or other display (listed with the best first):
• DVI
• VGA (with DVI / VGA adapter)
• Component Video (YPbPr)
• S-Video
• Composite Video
S/PDIF
Connects to digital audio port of an AV receiver.
L/R Analog
Audio
Connects to the L/R analog audio ports of your TV or
sound system.
Composite
Video (CVB S)
Connects to your TV, Plasma display, LCD display,
etc.
DVI
Connects to TV or other display; connects to VGA
display with supplied DVI/VGA adapter.
Reset Button
Resets your WMA100 and returns all settings to
factory defaults.
LAN
(wired)
Connects to your wired (Ethernet) network, if
applicable.
Component
Video (YPbPr)
Connects to a TV, Plasma display, etc.
S-Video
Connects to your TV, Plasma display, etc.
DC Power
Connects to the supplied AC Adapter.
See Chapter 2 for complete setup instructions
S-Video
DC power
Component
Video (YPbPr)
Wired LAN
(Ethernet)
DVI or VGA (with
DVI / VGA adapter)
Composite
Video (CVBS)
Analog
Audio
Wi-Fi
Antenna
S/PDIF
(Digital
Audio)
Reset
Button
WMA_UG.book Page 6 Tuesday, October 12, 2004 3:29 PM
Page 14
ViewSonic Wireless Media Adapter 7
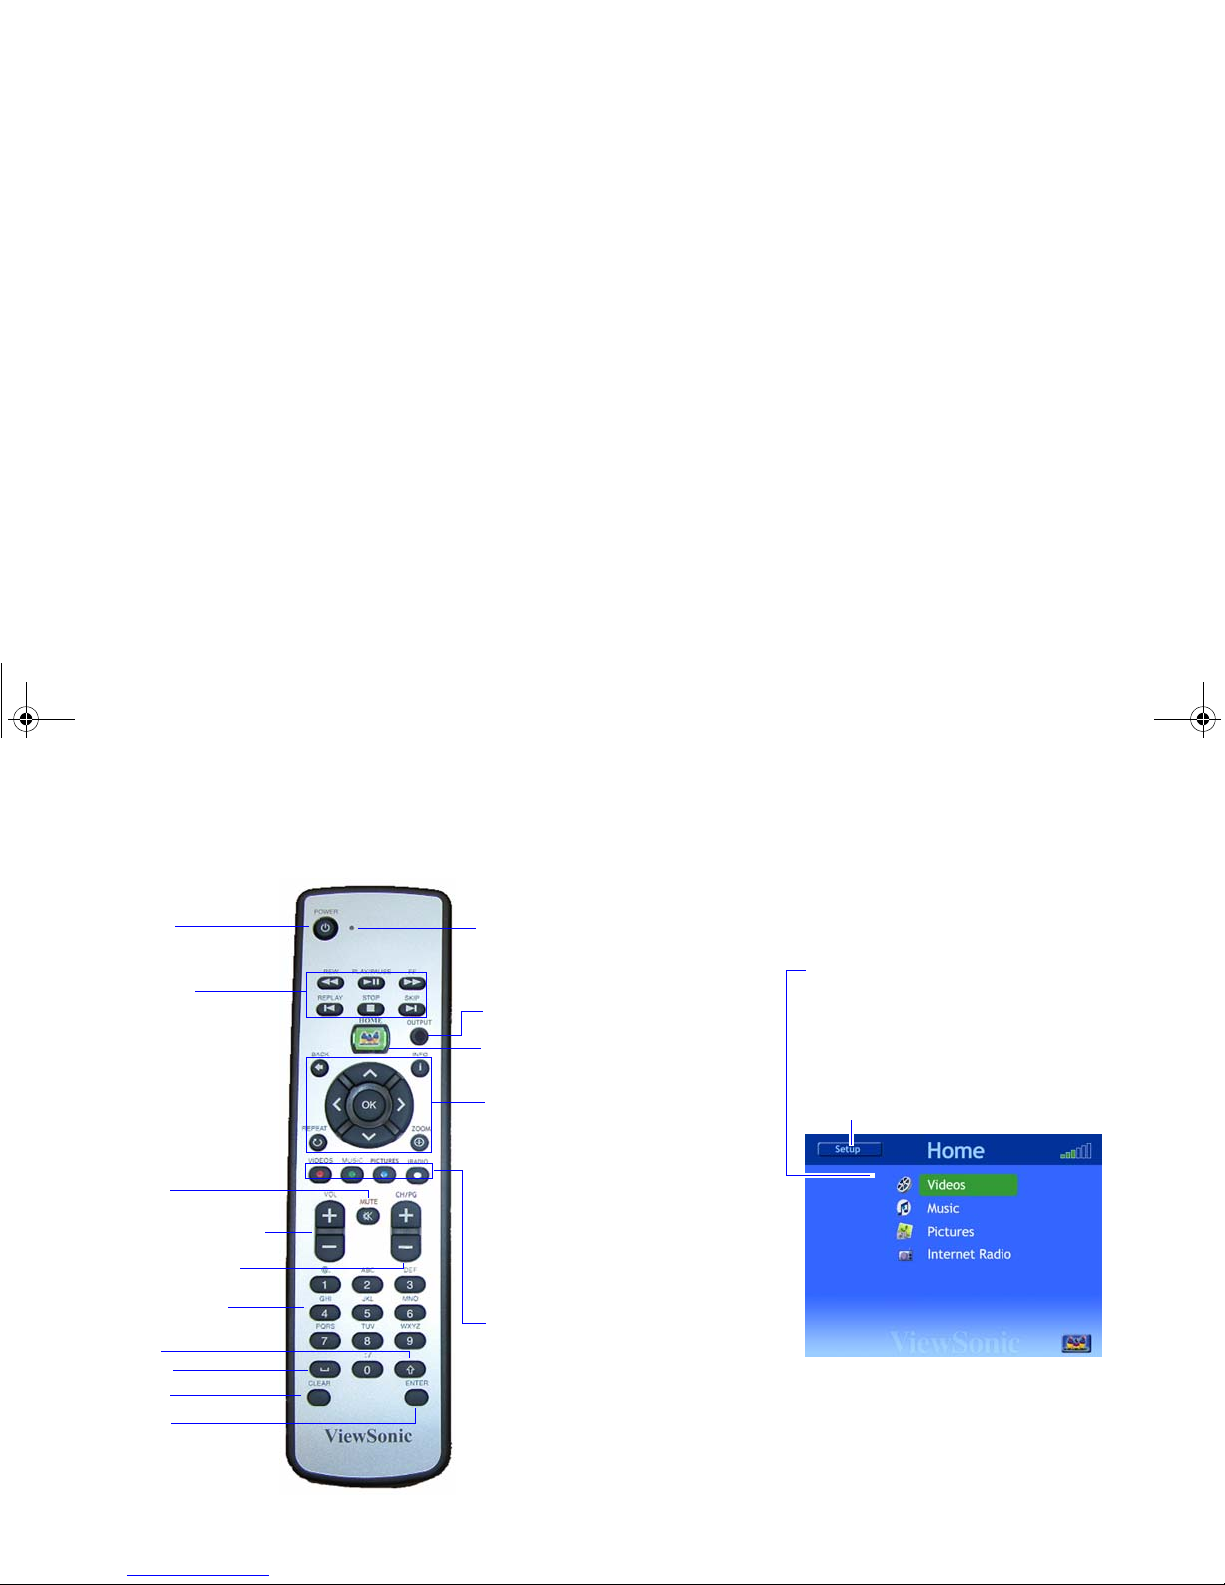
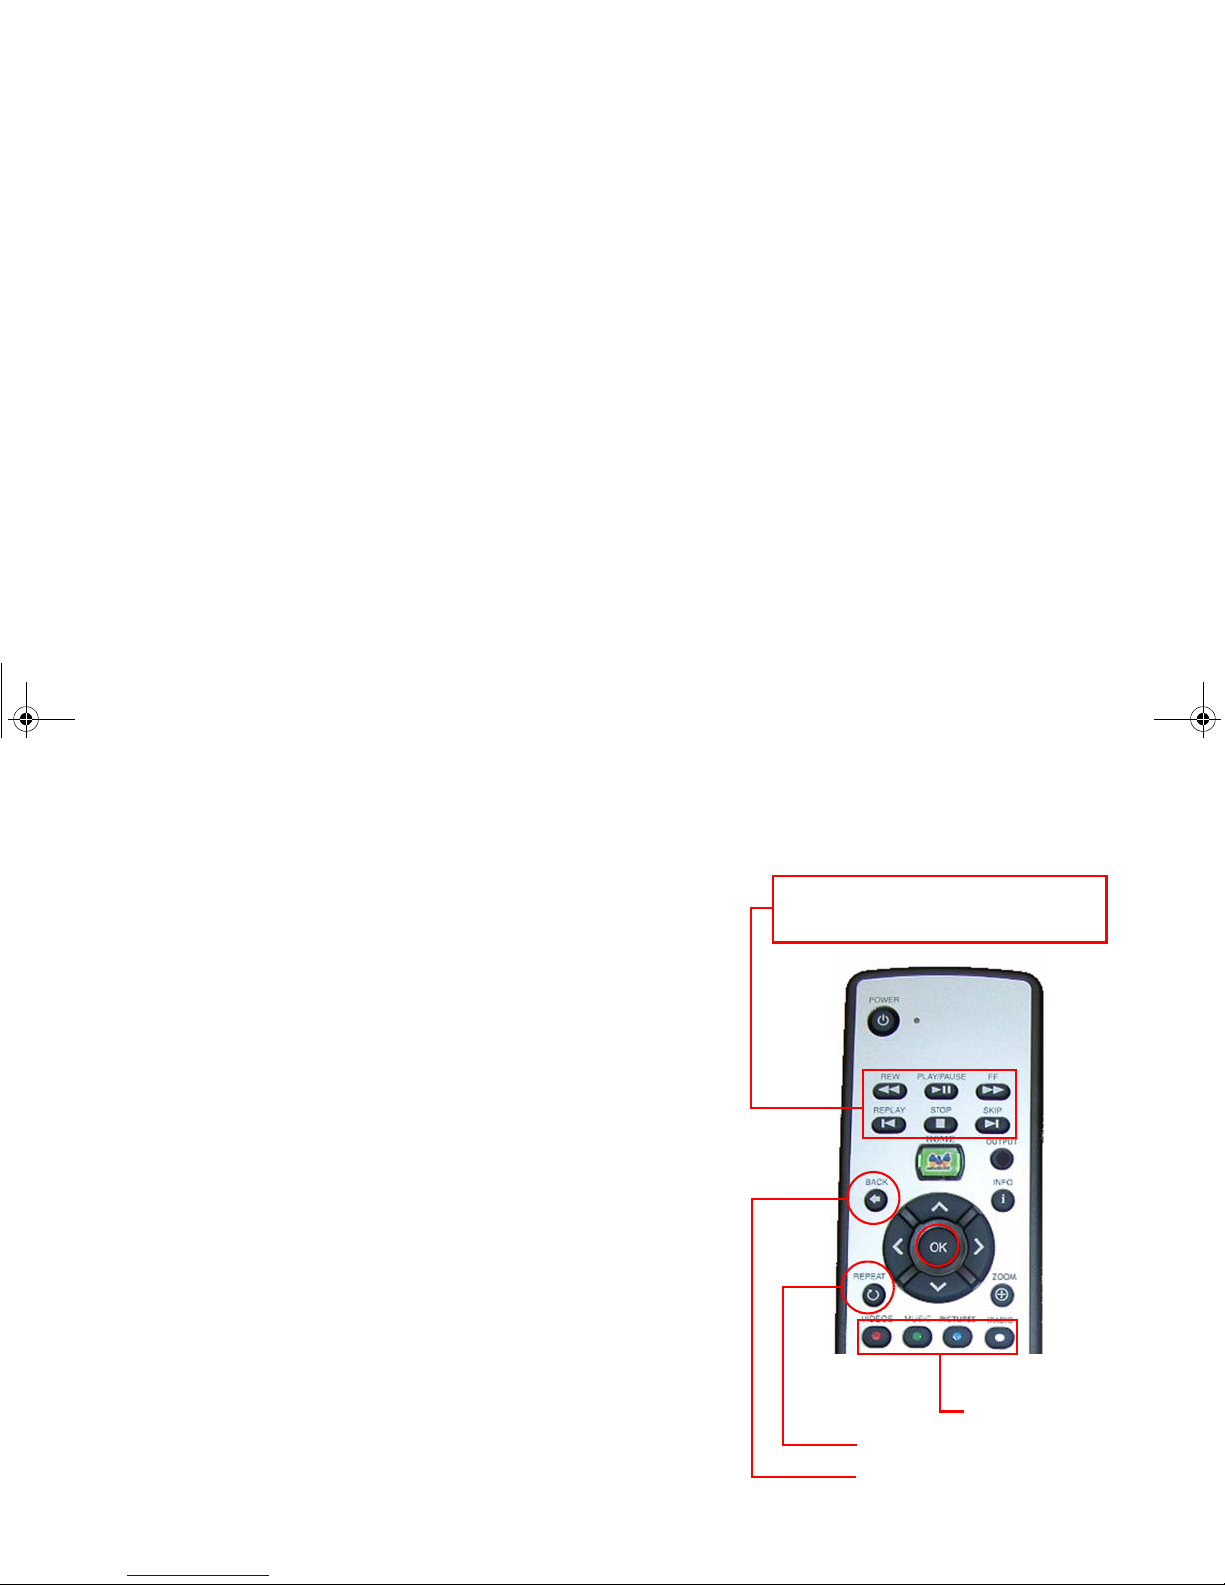
Remote Control
Home (
myView Media Guide)
• Up/Down Arrow
• Left/Right Arrow
• OK
• Back
• Info
• Repeat
• Zoom
Shortcut Buttons:
• Videos
• Music
• Pictures
• Internet Radio
Power
On/Standby
Navigation Buttons:
LED Indicator
Volume Up/D own
Mute
Page Up/Down
Transport
Buttons:
• Rewind
• Play/Pause
• Fast Forward
• Replay
• Stop
• Skip
Output
Space
Shift
Clear
Enter
Alphanumeric
Buttons
To a c c e s s
myView Media Guide,
press
Home,
then do the following:
To access a media file from a PC
connected to your network, use
the
Up/Down Arrow
buttons,
then press
OK.
To access the Setup menu, press
the Left Arrow button, then
press OK.
Home screen of
myView Media Guide
WMA_UG.book Page 7 Tuesday, October 12, 2004 3:29 PM
Page 15

ViewSonic Wireless Media Adapter 8
Remote Control (continued)
Power
Toggles between
Power On
and
Standby
modes.
LED Indicator
Lights when a Remote Control button is pressed.
Transport
Buttons
Rewind, Play/Pause, Fast Forward, Replay, Stop,
and Skip (work like VCR controls).
Home
Displays
Home
screen of
myView Media Guide
.
Output
Changes Image Setting.
After pressing the Output
button, enter the 2-digit Image Setting Code
corresponding to the Preferred Resolution of your TV
or other display. See Image Setting in Chapter 4 for
more information.
Up/Down
Moves Up/Down to select menu items.
Left/Right
Moves Left/Right to select menu items.
OK
Activates selected menu item, or text entered on a
Setup screen.
Back
Returns to previously selected menu or screen.
Info
Shows information about selected media file.
Repeat
Turns Repeat Mode On/Off, for selected media files.
Mute
Silences sound.
Shortcut
Buttons
Provides quick access to
Videos, Music, Pictures
,
and
Internet Radio
.
Volume
Increases/decreases loudness of sound.
Page Up/Down
Moves up/down one screen.
WMA_UG.book Page 8 Tuesday, October 12, 2004 3:29 PM
Page 16
ViewSonic Wireless Media Adapter 9
Remote Control (continued)
Zoom
For video: provides 3 zoom settings:
Full Screen, Fit-
to-Screen
, and
Actual Size
.
For pictures
:
provides variable zoom using the
Up/
Down
or the
Left/Right Arrow
buttons.
Alphanumeric
Buttons
(
Numbers &
Text)
Use these to enter numbers/text characters.
Shortcut: Also use these to select a media file by
item number. Example: music track 6.
Space
Adds a space between numbers or text characters.
Shift
Capitalizes text; toggles On/Off.
Clear
Clears all selections/text entered on screen.
Enter
Activates selected menu item, or text entered on a
Setup screen. (Functions same as
OK
button.)
WMA_UG.book Page 9 Tuesday, October 12, 2004 3:29 PM
Page 17
ViewSonic Wireless Media Adapter 10
myView Media Guide
myView Media Guide is the software application that lets you select and
control media files shared with your networked PCs and/or wireless
gateway. This software also let you change system and network settings,
as well as update WMA100 firmware and software.
NOTE: myView Media Guide does not require installation because the
software is pre-installed inside the WMA100.
See Chapter 3: Selecting and Playing Media for more information.
myView Media Manager
myView Media Manager is media server software that enables your
networked PC(s) to share media files with your WMA100(s).
NOTE: myView Media Manager is installed from the supplied ViewSonic
Networking Companion CD onto your PCs.
You will use this software utility to:
• Add a security lock to any PC connected to your network.
• Specify what pictures will be displayed when you select a particular
music artist or album, and specify what music plays when you select a
certain group of pictures.
• Change the folder names and locations where videos, music, and
pictures will be stored on your networked PCs.
See Chapter 5: Using the Media Server Softw a re for more information.
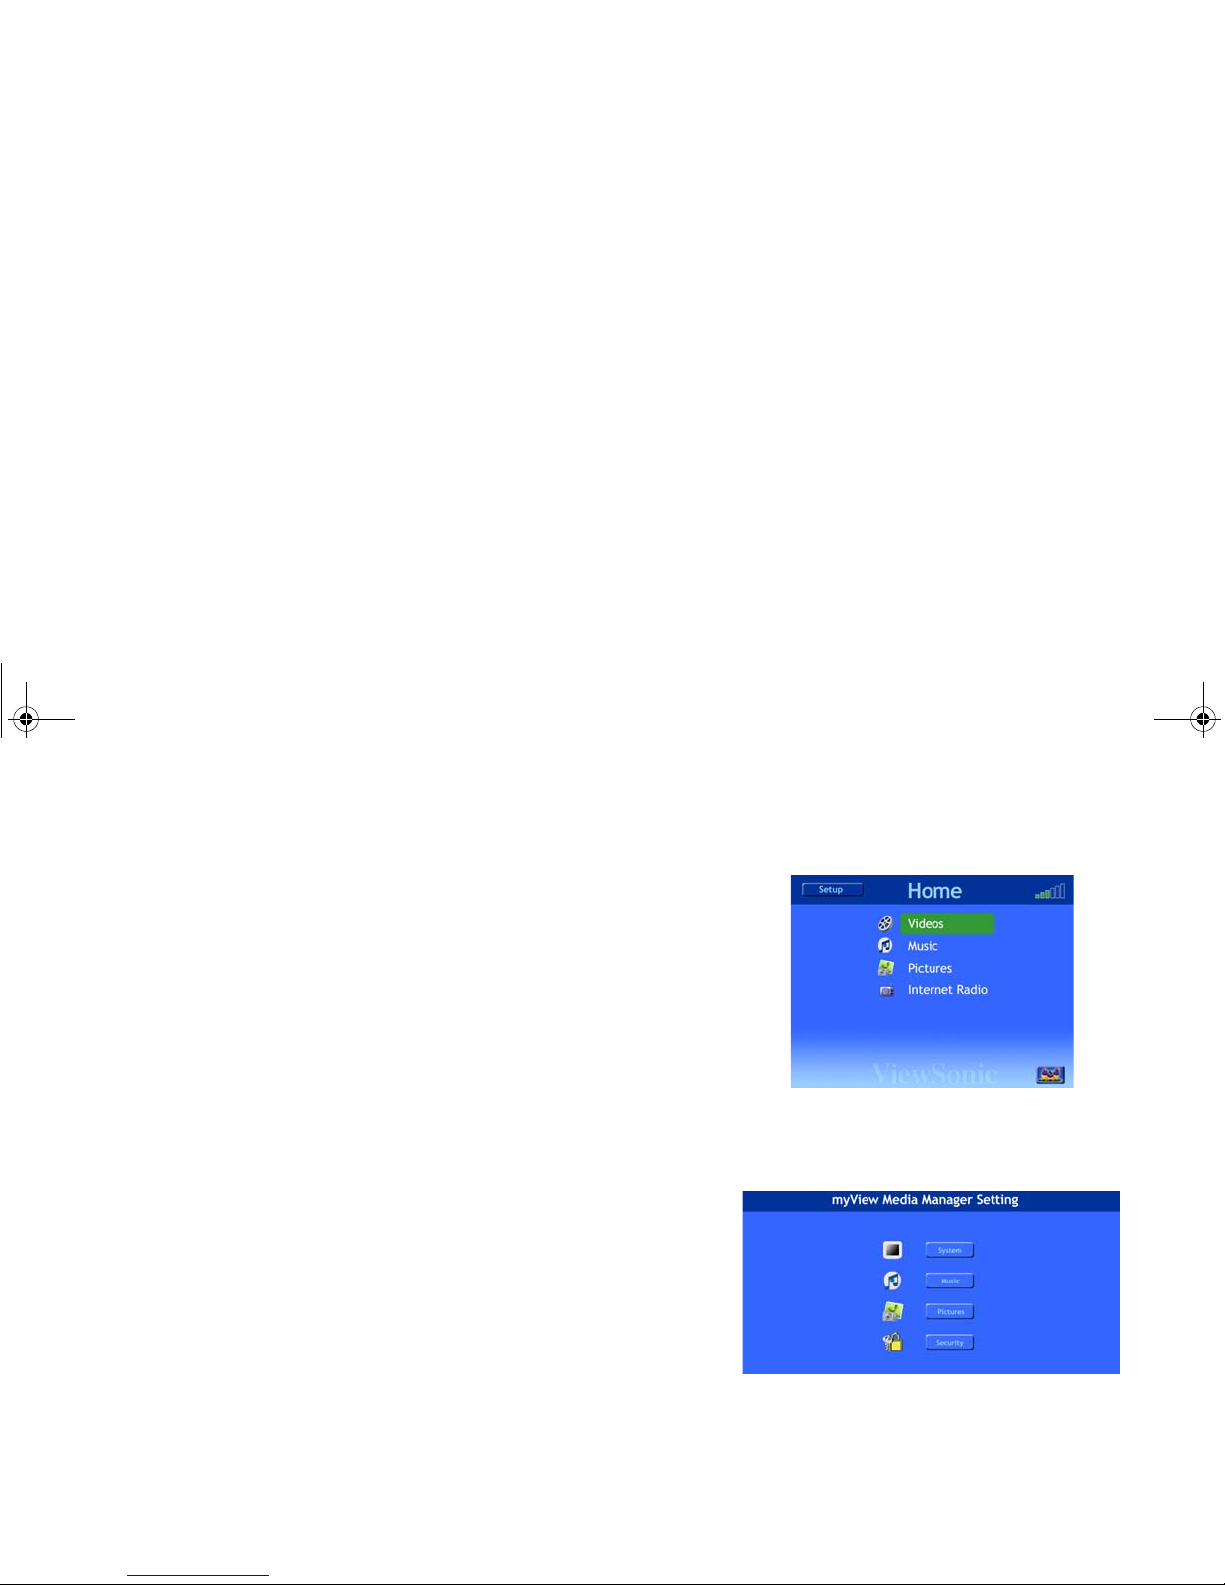
Home screen of myView Media Guide
(pre-installed inside the WMA100)
Home screen of myView Media Manager
(manually installed onto each PC)
WMA_UG.book Page 10 Tuesday, October 12, 2004 3:29 PM
Page 18
ViewSonic Wireless Media Adapter 11
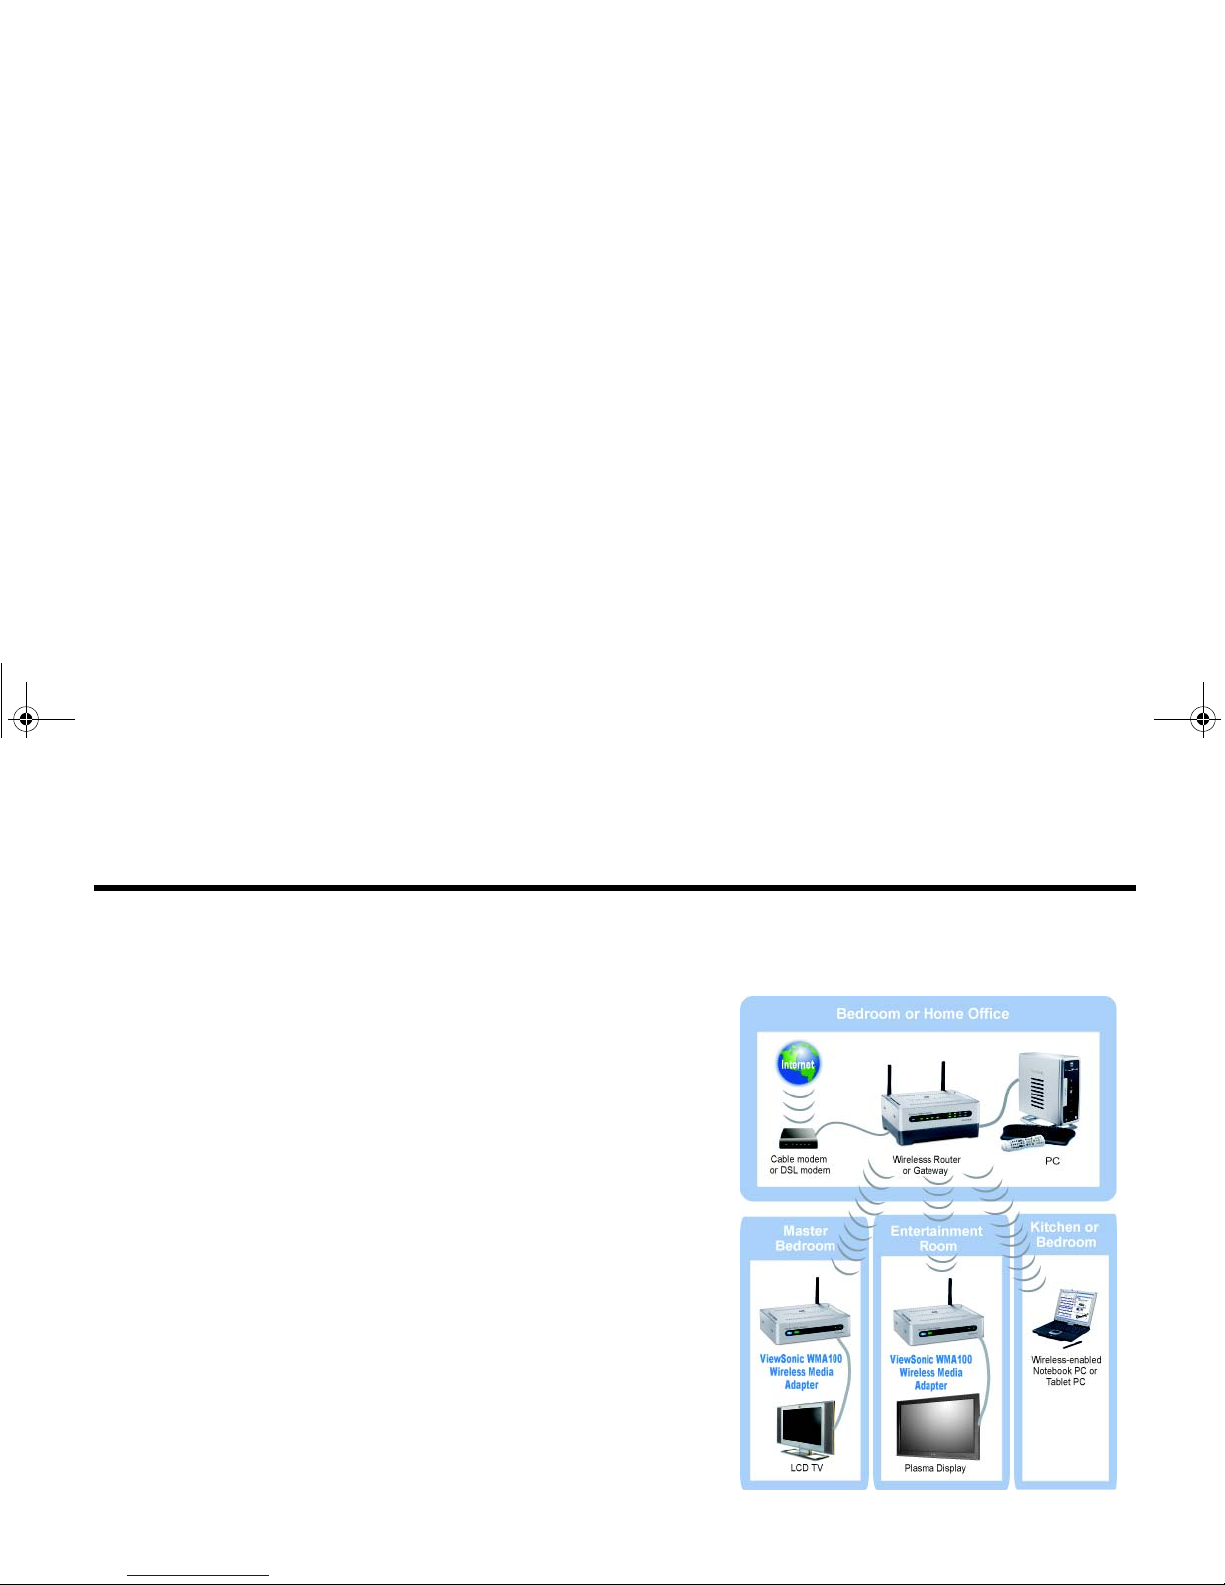
This chapter provides everything you need to know about setting up your
ViewSonic WMA100 Wireless Media Adapter. Setting up your WMA100 is
quick and easy!
Setup Overview
1 Install Software and User Guide
2 Connect your WMA100
3 Install Remote Control Batteries
4 Turn on your TV and sound system and
verify the WMA100 Power is ON
5 Configure your WMA100
6 Optimize your WMA100’s Image Setting
(Optional)
Typical Home Wireless Network
Chapter 2: Setting Up
Your WMA100
WMA_UG.book Page 11 Tuesday, October 12, 2004 3:29 PM
Page 19
ViewSonic Wireless Media Adapter 12
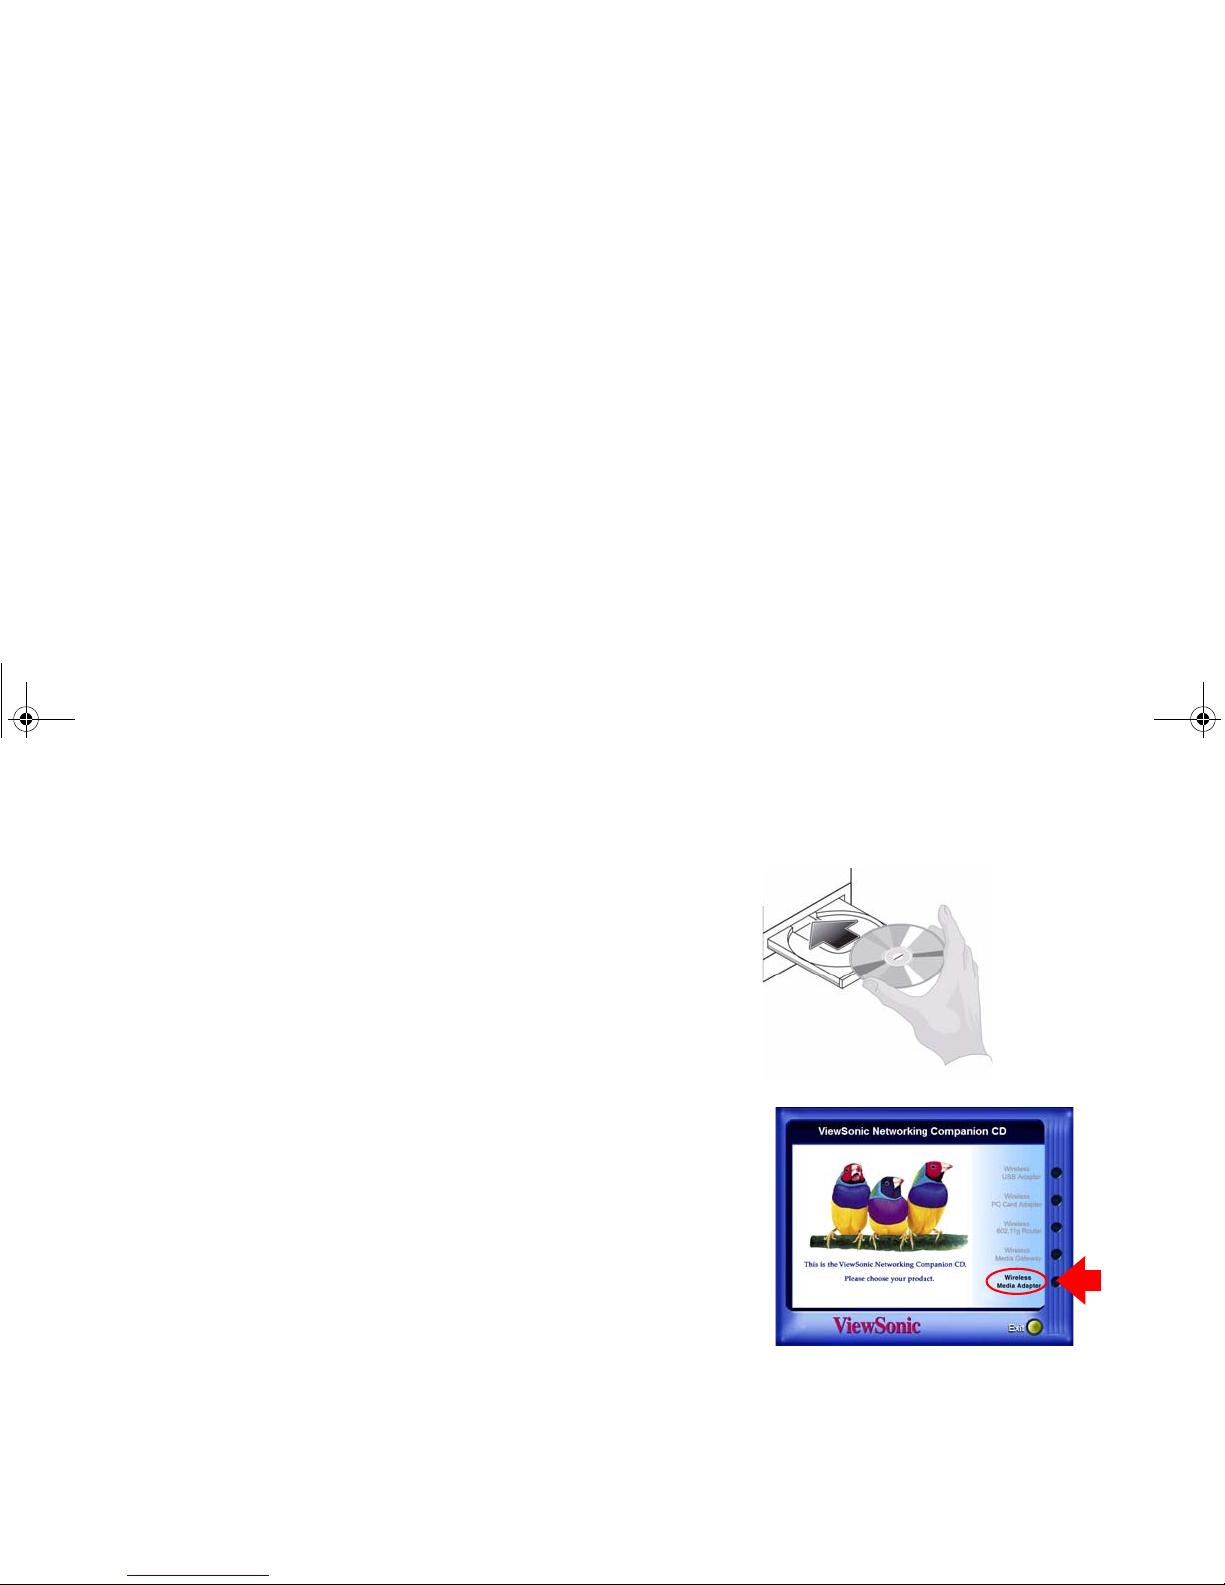
Step 1: Install Software and User Guide
1 Insert the supplied Networking Companion CD into the CD-ROM drive
of the PC connected to your wired or wireless network.
NOTE: If the CD does not auto-start, right-click Start on the Windows
desktop, select Explore, double-click the CD-ROM icon, then doubleclick the Setup icon.
The CD contains myView Media Manager media server software,
which enables each networked PC to share content with your WMA100.
2 From the Home page of the ViewSonic Networking Setup Wizard
(shown to the right), click Wireless Media Adapter, then on the next
screen click Wireless Media Adapter Software.
3 When the InstallShield Wizard displays, follow the on-screen
instructions. After you click Finish, restart your PC.
SUGGESTION:
If you plan to add the WMA100 to a wireless network, write your router’s
Network Name (SSID), the WEP or WPA key, etc. on some paper. You
may need this information later.
PC Power Settings
To ensure that the media server software is able to share content with
your WMA100, it is recommended that you change your PC’s System
Standby and System Hibernate power settings to Never. See PC
Power Settings in the Appendix for more information.
Networking Companion CD Wizard with
“Wireless Media Adapter” selected
WMA_UG.book Page 12 Tuesday, October 12, 2004 3:29 PM
Page 20
ViewSonic Wireless Media Adapter 13
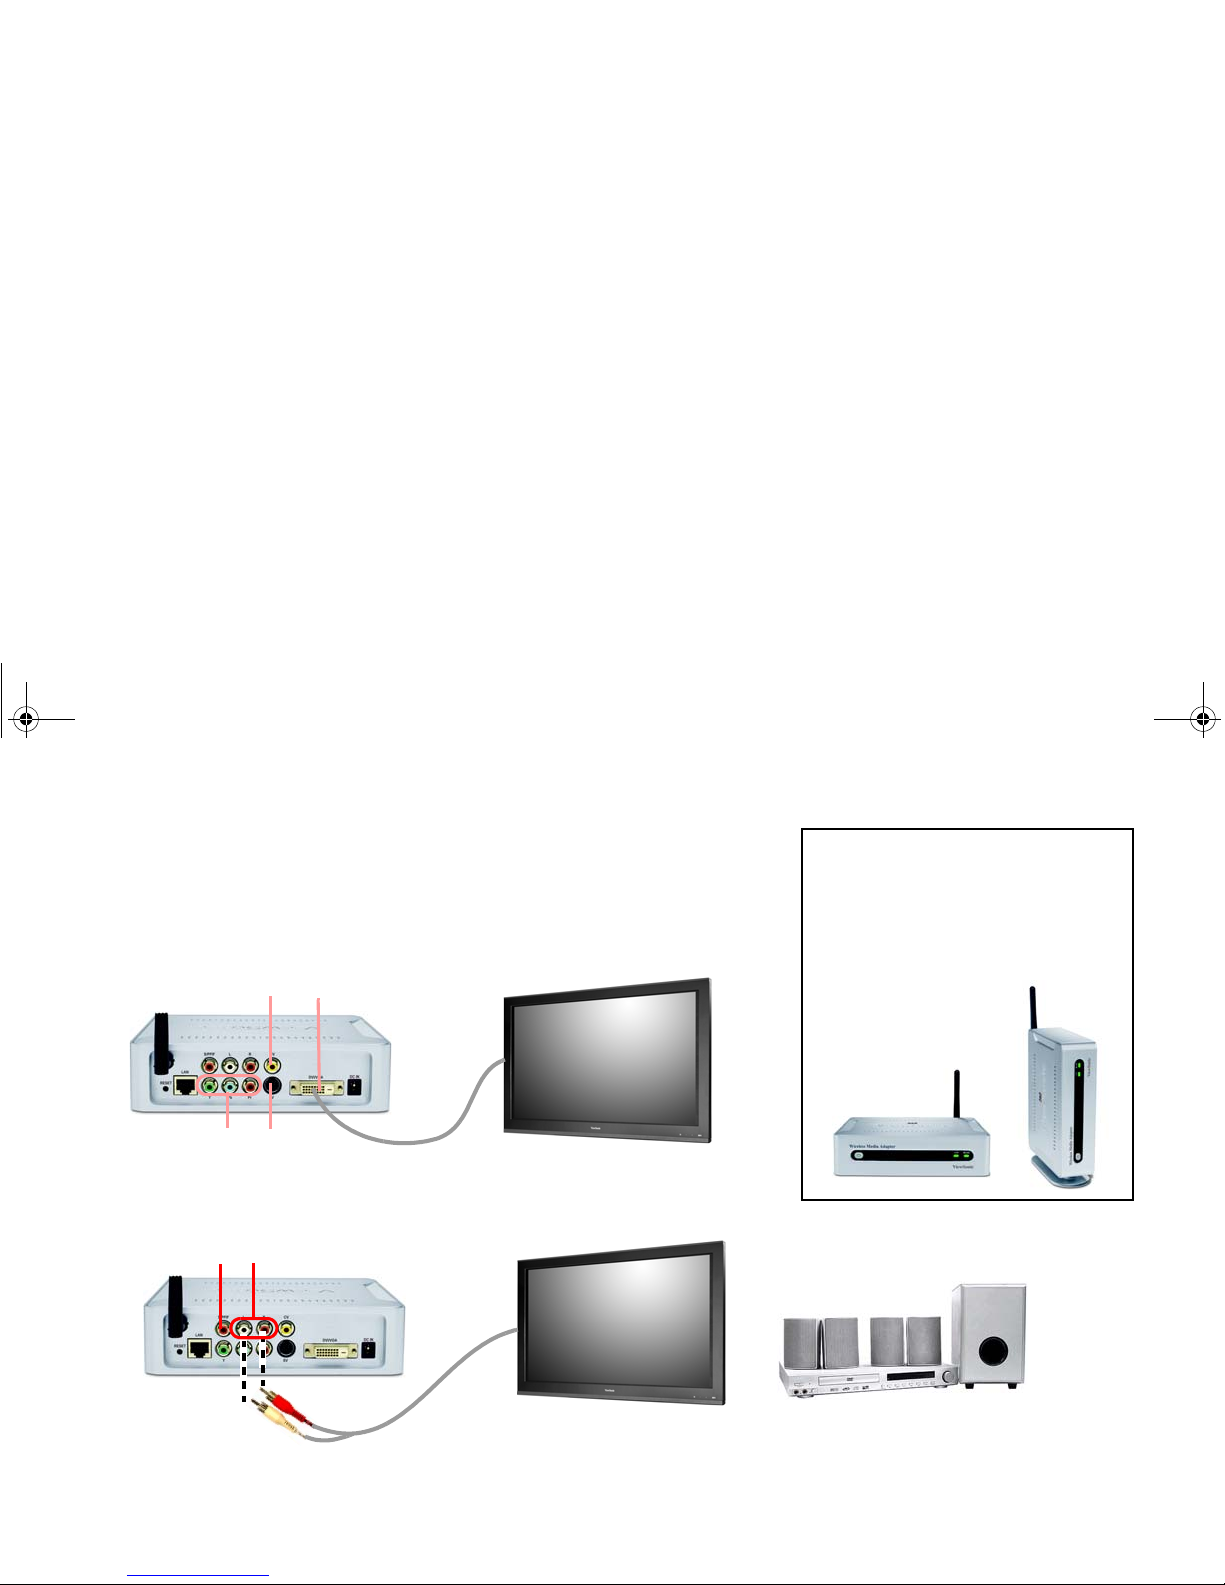
Step 2: Connect the WMA100
1 Connect video. Connect the WMA100 to your TV or other display.
For the best picture quality, use the best video connector(s) supported by
your display: [best signal listed first]
(1) DVI, (2) VGA (with DVI/VGA
adapter)
,
(3) Component Video, (4) S-Video, (5) Composite Video
.
2 Connect audio. Connect the WMA100 to your TV or to an external sound
system.
(1) & (2)
(3) (4)
(5)
Digital Audio
L/R Analog Audio
TV, Plasma, etc.
External Sound System
or
WMA100 Placement
As shown below, you can place your
WMA100 either horizontally or
vertically using the supplied
pedestal.
WMA_UG.book Page 13 Tuesday, October 12, 2004 3:29 PM
Page 21
ViewSonic Wireless Media Adapter 14
Connect audio (continued)
For the best audio quality, use the Digital Audio connector (S/PDIF) if
your sound system supports it. Otherwise, use the L/R Analog Audio
ports.
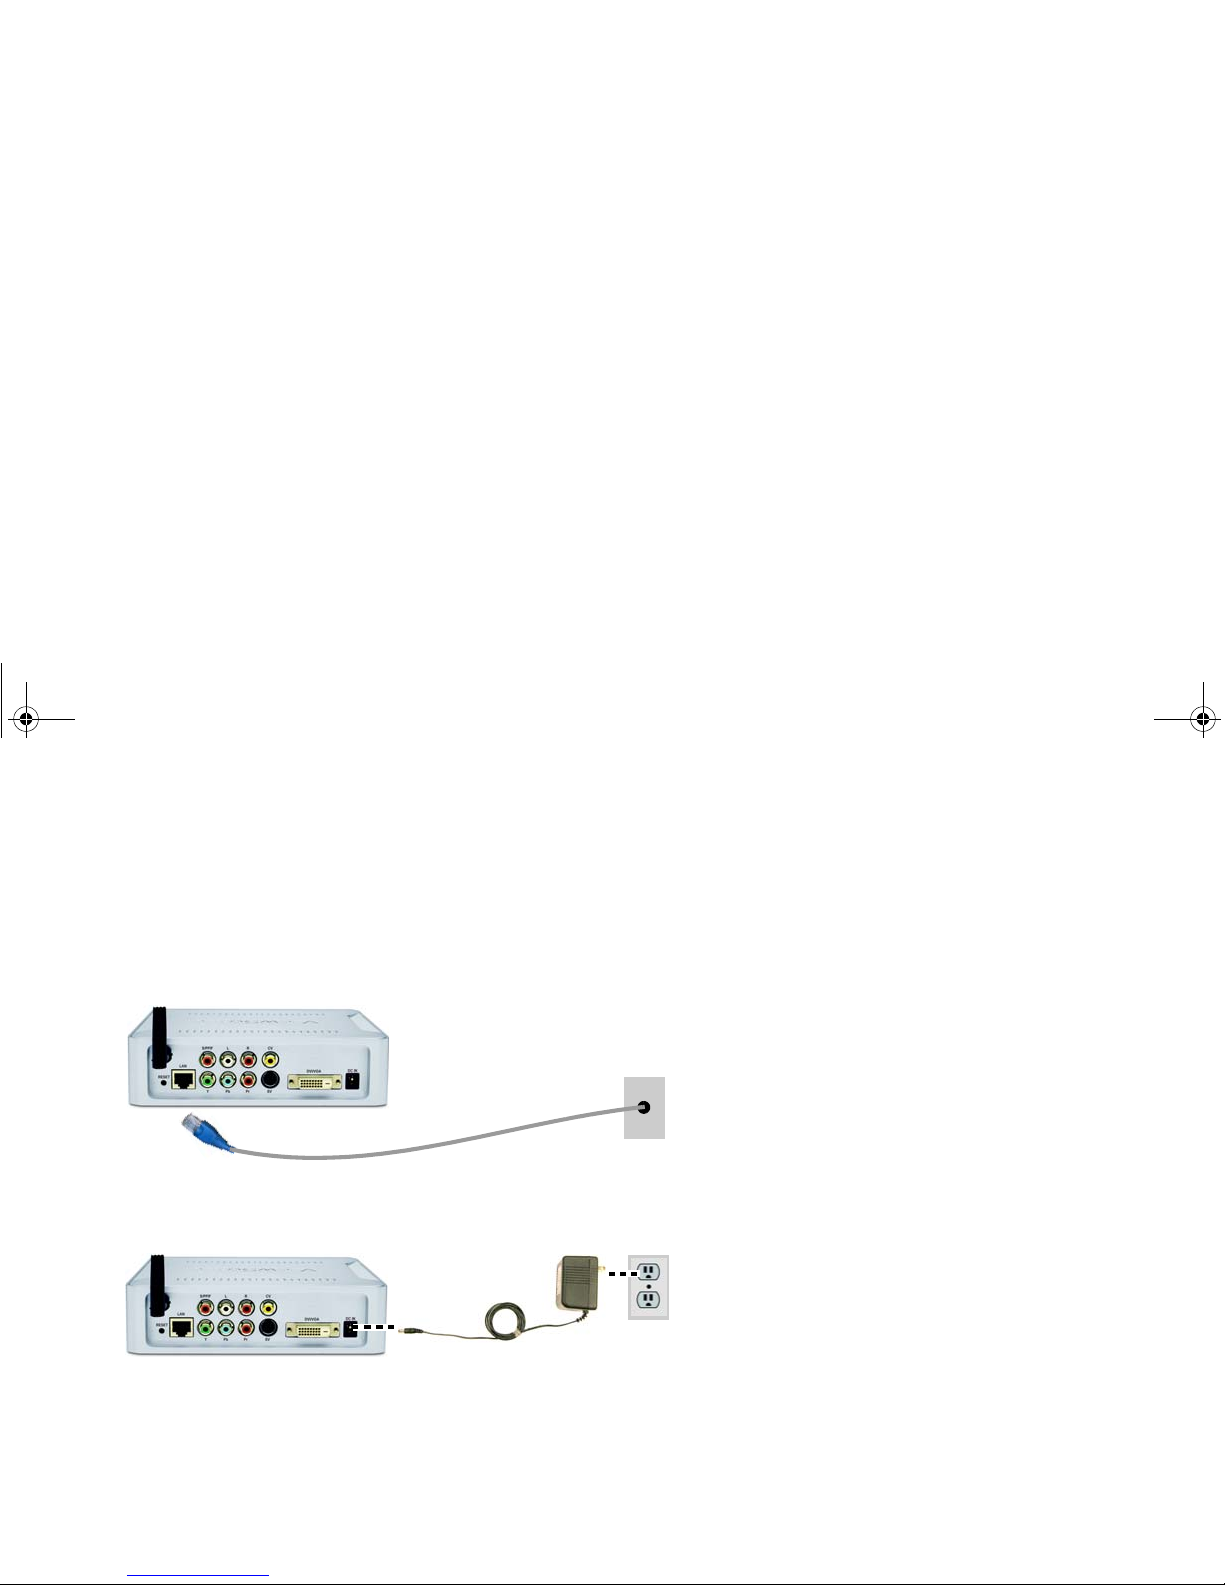
3
Connect Ethernet cable
(wired LAN only). Connect the supplied Ethernet
cable to the WMA100, then to an Ethernet wall outlet or router.
4 Connect power cord. Connect the WMA100 to the supplied AC
Adapter, then connect the AC Adapter to an AC wall outlet.
Ethernet
Wall Outlet
(or router)
AC Power
Outlet
WMA_UG.book Page 14 Tuesday, October 12, 2004 3:29 PM
Page 22

ViewSonic Wireless Media Adapter 15
Step 3: Install Remote Control Batteries
• Remove the Battery Compartment Cover, then insert two (2) supplied
AA batteries into the Remote Control.
• Be sure to match (+) and (-) as shown in the illustration.
Step 4: Turn on TV Power and Verify
WMA100 Power is ON
1 Turn on your TV (or other display) and, if applicable, turn on your
External Sound System.
2 Verify that the WMA100 power is ON (blue LED).
If the LED is Amber, the WMA100 is in Standby Mode.
Press the Power button to change to ON Mode.
NOTE: If there is no screen image
, the screen mage does not look
clear, or if the screen image is shifted to the left or right, see Step 6:
Adjusting the Screen Image for further instructions.
(-) (+)
(+) (-)
(-) (+)
(+) (-)
Back of Remote Control Battery
Compartment
Cover
Power Button &
Power LED Indicator
• Blue = On
• Amber = Standby
WMA_UG.book Page 15 Tuesday, October 12, 2004 3:29 PM
Page 23

ViewSonic Wireless Media Adapter 16
Step 5: Configure Your WMA100
Dynamic or Static IP?
The instructions that follow below assume your network is set to use
Dynamic IP (DHCP). If your network is set to use Static IP, see Chapter 4:
Using Setup to Change Settings > LAN Settings > Manual Mode.
Wired Configuration
If your WMA100 is connected to your network using an Ethernet cable, no
configuration is necessary. This assumes you are using DHCP protocol.
Wireless Configuration with Auto-Sync
Auto-Sync makes wireless configuration easy by automatically detecting
the settings of your router or gateway. And if you added a WEP or WPA
key to your router or gateway, you can easily add that key to your
WMA100.
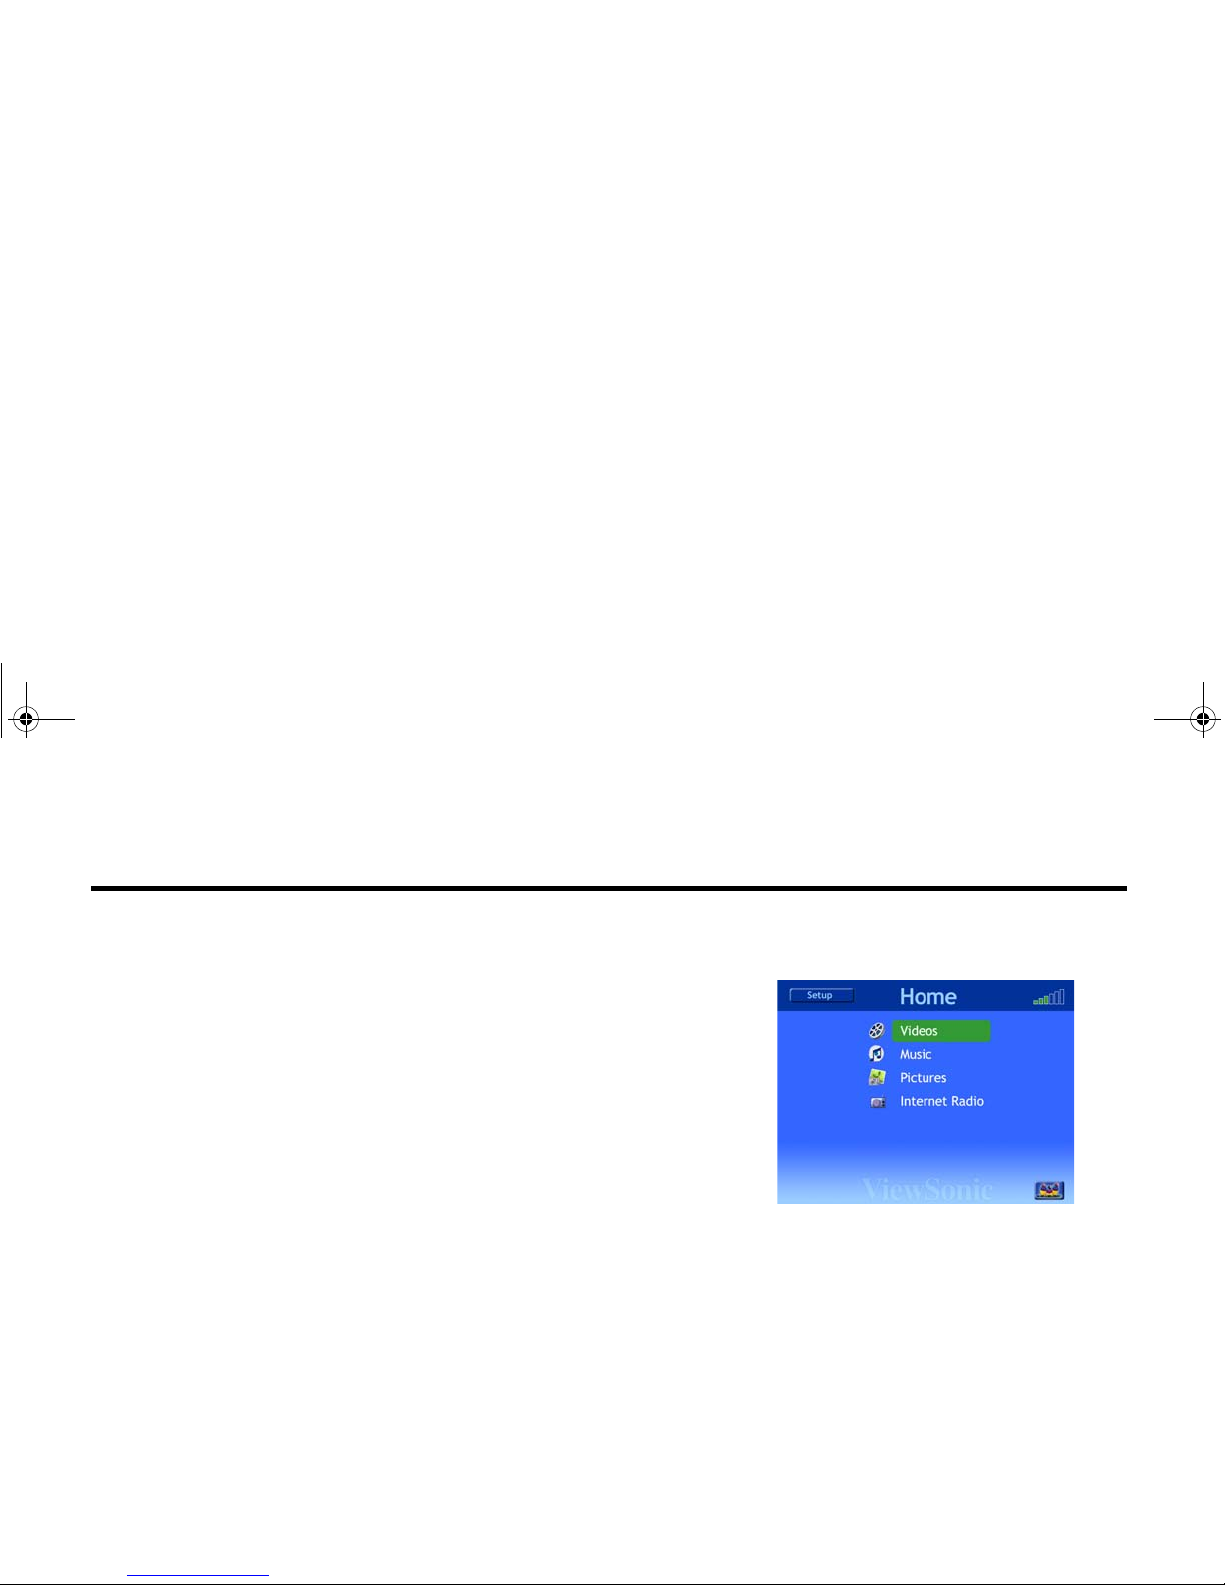
To configure your WMA100, do the following:
1 With your TV and WMA100 powered ON (LED will light blue), press the
Home button on the Remote Control. The Home Screen of the myView
Media Guide menu will display.
NOTE: myView Media Guide does not require installation because the
software is pre-installed inside the WMA100.
2 Press the Left Arrow button on the Remote Control to highlight the
Setup button on Home screen myView Media Guide, then press OK.
The Setup main menu will display. (See the illustration on the next
page.)
WMA_UG.book Page 16 Tuesday, October 12, 2004 3:29 PM
Page 24

ViewSonic Wireless Media Adapter 17
3
With the
Auto-Sync
button highlighted on the Setup main menu (shown
to the right), press
OK
again. Auto-Sync will now begin automatically
synchronizing your WMA100 with your router/gateway.
•
If you see the message
Auto Sync was successful
, configuration is now
complete. You are now ready to start using your WMA100!
• If the SSID Discovery Screen displays (shown to the right), the
WMA100 has recognized more than one network.
NOTE: A maximum of five (5) SSIDs will display. If you do not see the
SSID you are looking for, press the OK. Auto-Sync will re-scan for
available SSIDs.
Use the Up/Down Arrow buttons to select your SSID (network name),
then press OK.
If you select an SSID that does not have a WEP or WPA key,
configuration is now complete. You are ready to start using your
WMA100!
• If you select an SSID that does have a WEP or WPA key, the Wi-Fi
Setup Screen (shown to the right) will automatically display.
1 Use the Down Arrow button to select either “WEP Enabled” or
“WP A-PSK Enabled,” then press OK.
2 Complete the remaining fields according to the settings of your
router/gateway, select Save, then press OK.
Wi-Fi configuration is now compl e te !
Setup Main Menu
SSID Discovery Screen
Wi-Fi Setup Screen
WMA_UG.book Page 17 Tuesday, October 12, 2004 3:29 PM
Page 25

ViewSonic Wireless Media Adapter 18
Step 6: Adjusting the Screen Image
• If you used the WMA100’s Composite Video or S-Video port to connect
to your display, no adjustment is necessary.
• If you used the WMA100’s Component or DVI/VGA port(s) to connect
to your display, adjustment s may be necessary if you see symptoms (a)
or (b) below.
(a) There is no screen image or the screen image does not look clear.
After you turn on the WMA100, press the Output button on the Remote
Control. Wait two (2) seconds and if the image is still not clear, press the
Output button again. If the screen image is still not clear, press Output a
third time. The Output button has a total of three (3) settings.
(b) The screen image is shifted to the left or right.
(For DVI or VGA only) Select your displays’s Auto adjustment control,
which automatically optimizes the size and position of the screen image.
See your display’s user manual for further instructions.
Optimizing the WMA100’s Screen Image
To optimize the screen image, do the following.
(for Component Video or DVI/VGA only)
1 Select Setup from the Home page, then select System from the Setup
menu.
2 Use the Up/Down Arrow buttons on the Remote Control to select an
image setting from the table to the right, then press OK.
NOTE:
For the best screen image, select your display’s Preferred Resolution
(see your display’s user manual)..
Image Setting Screen
DVI/ VGA
Component
Video
Composite
(CVBS) Video
S-Video
Image Settings
(resolutions) for
DVI / VGA
Image Settings for
Component Video
(YPbPr)
640 x 480 480p
800 x 600 720p
1024 x 768 1080i
1280 x 720
1280 x 768
1280 x 1024 S-Video/Composite
852 x 480 NTSC
(Composite = CVBS)
1366 x 768
WMA_UG.book Page 18 Tuesday, October 12, 2004 3:29 PM
Page 26
ViewSonic Wireless Media Adapter 19
This chapter provides
basic information about how to use the myView
Media Guide software to select and play media files (videos, music,
pictures) and play Internet radio:
• Home Screen Features
• Selecting and Playing Media Files
• Remote Control Buttons
• On-Screen Control Panel Buttons
• Viewing Videos
• Listening to Music
• Viewing Pictures
• Listening to Internet Radio
Home screen of myView Media Guide
Chapter 3: Selecting and Playing Media
WMA_UG.book Page 19 Tuesday, October 12, 2004 3:29 PM
Page 27
ViewSonic Wireless Media Adapter 20
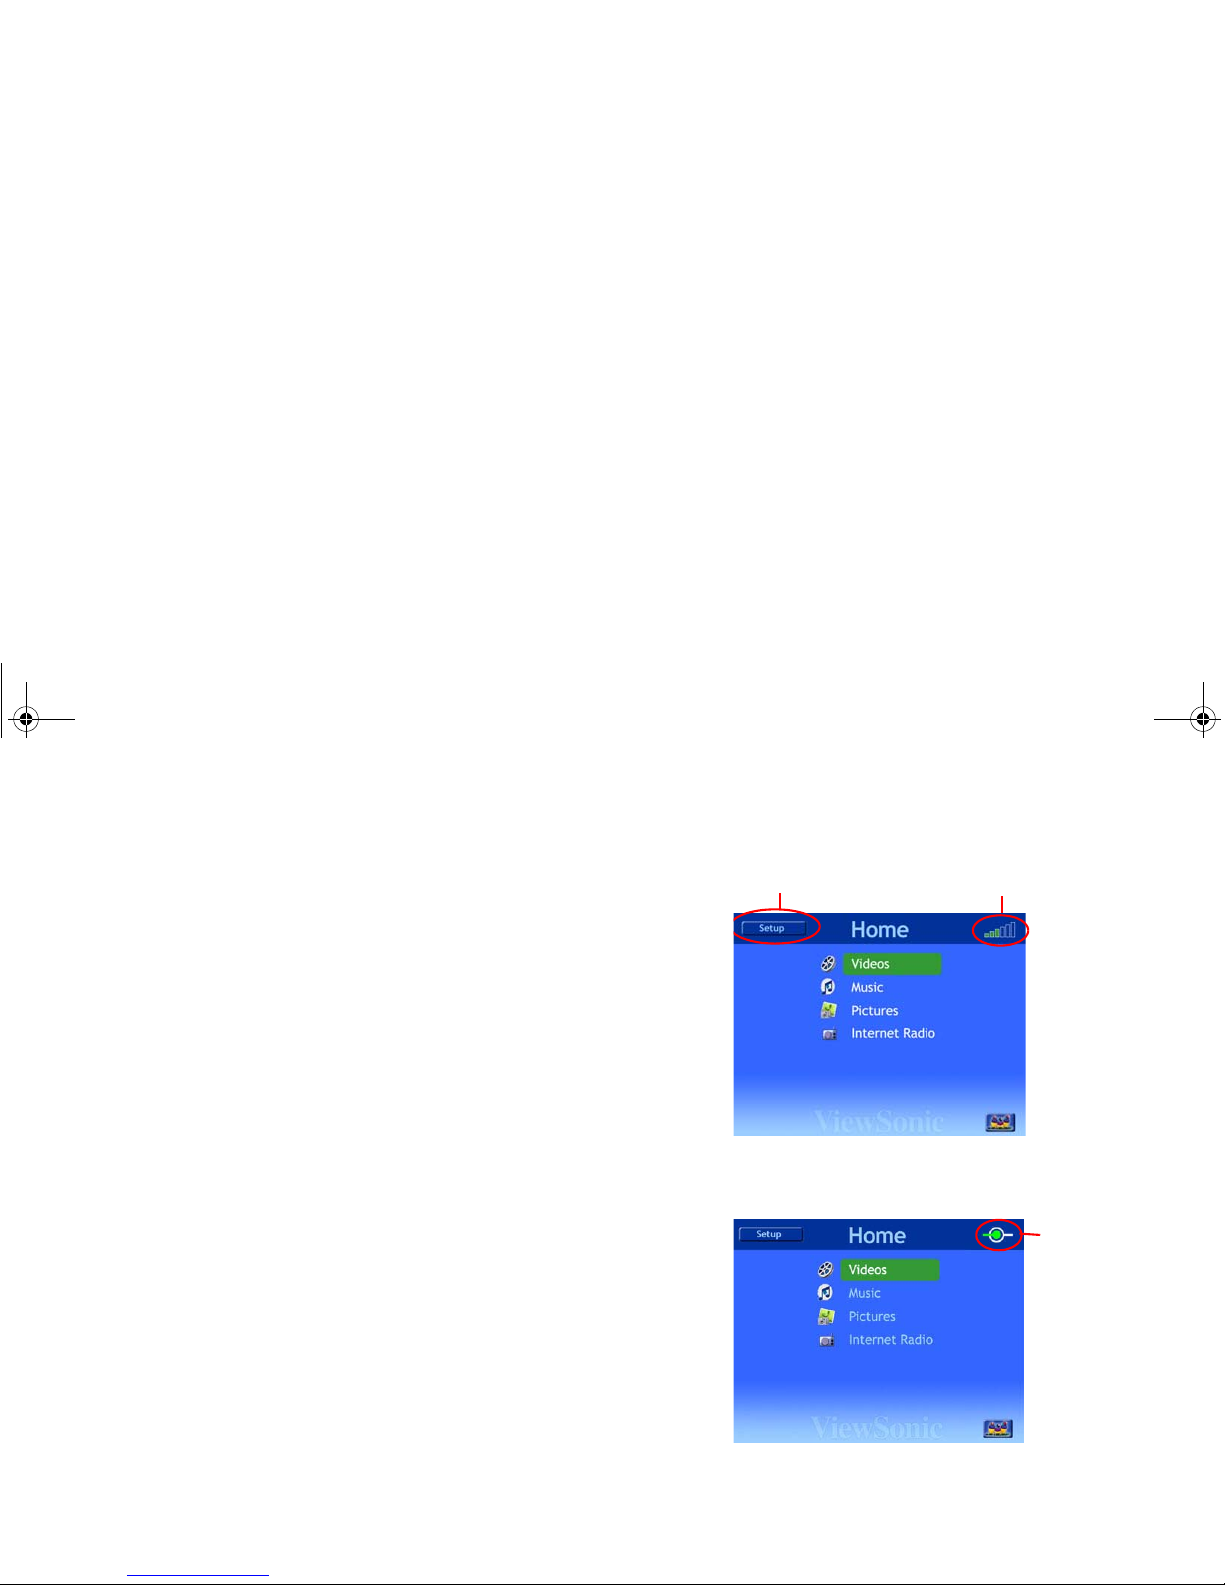
Home Screen Features
• Setup Menu button: The Setup Menu provides severa l op ti o ns fo r
changing audio, video, and network configuration settings.
To access the Setup Menu, press the Left Arrow button to highlight the
Setup Menu button, then press OK.
See Chapter 4: Using Setup to Change Settings for more information.
• Wireless Signal Strength In dicato r: If the WMA100 is connected to a
wireless network, this indicator will tell you the signal strength. Four (4)
or more bars (out of six) indicates a strong wireless signal.
• Wired LAN Connection icon
:
If
the WMA100 is connected to
a wired
network, the Wired LAN Connection icon will be displayed on the upper
right corner of the Home screen.
Supported Media Files
The WMA100 supports the following types of media files:
• Video: MPEG-1, MPEG-2, MPEG-4, Xvid.
• Music: MPEG-1 (Audio layers 1 &2), MP3, WAV, unprotected AAC,
AC-3 (Dolby Digital 5.1 pass-thru), WMA CBR.
• Pictures: JPEG, GIF, PNG.
Wireless WLAN Connection
S
etup Menu
Wireless Signal
Strength Indicator
Wired
LAN
icon
Wired LAN Connection
WMA_UG.book Page 20 Tuesday, October 12, 2004 3:29 PM
Page 28

ViewSonic
Wireless Media Adapter
21
Selecting and Playing Media Files
To select and play media files (videos, music, or pictures) you
will use the
Remote Contro
l to select
myview Media Guide
menu options.
To select and play media files, do the following:
1 Display the Home screen.
Press the
Home
button on the Remote Cont
rol. The Home page of the
MyView Media Guide
will display.
2 Select a media type.
Use the
Up/Down Arrow
buttons to highlight the type of media you
want to access (Videos, Music, Pictures) then press
OK.
Shortcut: Use the Shortcut Buttons on
the Remote Control: Video,
Music, Pictures, or iRadio.
NOTE: If you select Internet Radio, you can skip the remaining ste
ps.
3 Select a server.
Use the
Up/Down Arrow
buttons to select a server (networked PC or
Viewsonic Wireless Gateway Adapter), then press
OK
.
Locked PCs for Parental Control:
A PC is typically locked to prevent
children from accessing inappropriate content. An Access Code
is
needed to open a locked server.
TIP: You may want to rename your networked PCs so that everyo
ne in
your household can easily identify them. See Renaming Your
PCs in the
Appendix
for instructions.
4 Select and play media files.
See the
Viewing Videos
, Listening to Music
, and Viewing Pictures
sections for specif
ic instructions.
NOTE:
A folder with a “
+” indicates that it contains sub-folders.
Server
icons
Active Locked Server
Active Unlocked Server
Inactive Server
Server Selection Screen
NOTE:
To add a security lock to a PC, use the
Security
option in
myView Media Manager
(installed on your networked PC). See
Chapter 5:
Managing Media Content
for instructions.
WMA_UG.book Page 21 Tuesda
y, October 12, 2004 3:29 PM
Page 29
ViewSonic Wireless Media Adapter 22
Remote Control Buttons
Play/Pause
Press once to Play (view/listen to a selected media files). Press again to
Pause.
Stop
Press to Stop media file that is currently playing.
Replay and Skip
Press Skip to go to the next media file. Press Replay to go to the previous
Media File.
Rewind and Fast Forward
Use Rewind and Fast Forward for Video and Music files.
Back
Use Back to return to the previous screen.
Repeat
Press Repeat to turn on the Repeat function, and again to cancel it. This
can also be used together with Play Shuffle and Play All (see the next
section: On-Screen Control Panel Buttons).
Shortcut Buttons
Use these buttons to quickly access Videos, Music, Pictures, or Internet
Radio.
Remote Control Transport Buttons:
Rewind Play/Pause Fast Forward
Replay Stop Skip
Back
Repeat
Shortcut Buttons:
Videos
Music
Pictures
Internet Radio
OK
WMA_UG.book Page 22 Tuesday, October 12, 2004 3:29 PM
Page 30
ViewSonic Wireless Media Adapter 23
On-Screen Control Panel Buttons
After selecting a folder containing medi a fil es (videos, music, or pictures),
you can access the control panel bu ttons by pressi ng the
Left Arrow
on the
Remote Control, highlighting
Search, Play Shuffle
, or
Play All
(see the
illustration to the right). In addition, the Control Panel for
Pictures
has a
fourth button:
Slide Effects
. (See the next page).
NOTE: The Repeat button is located on the Remote Control.
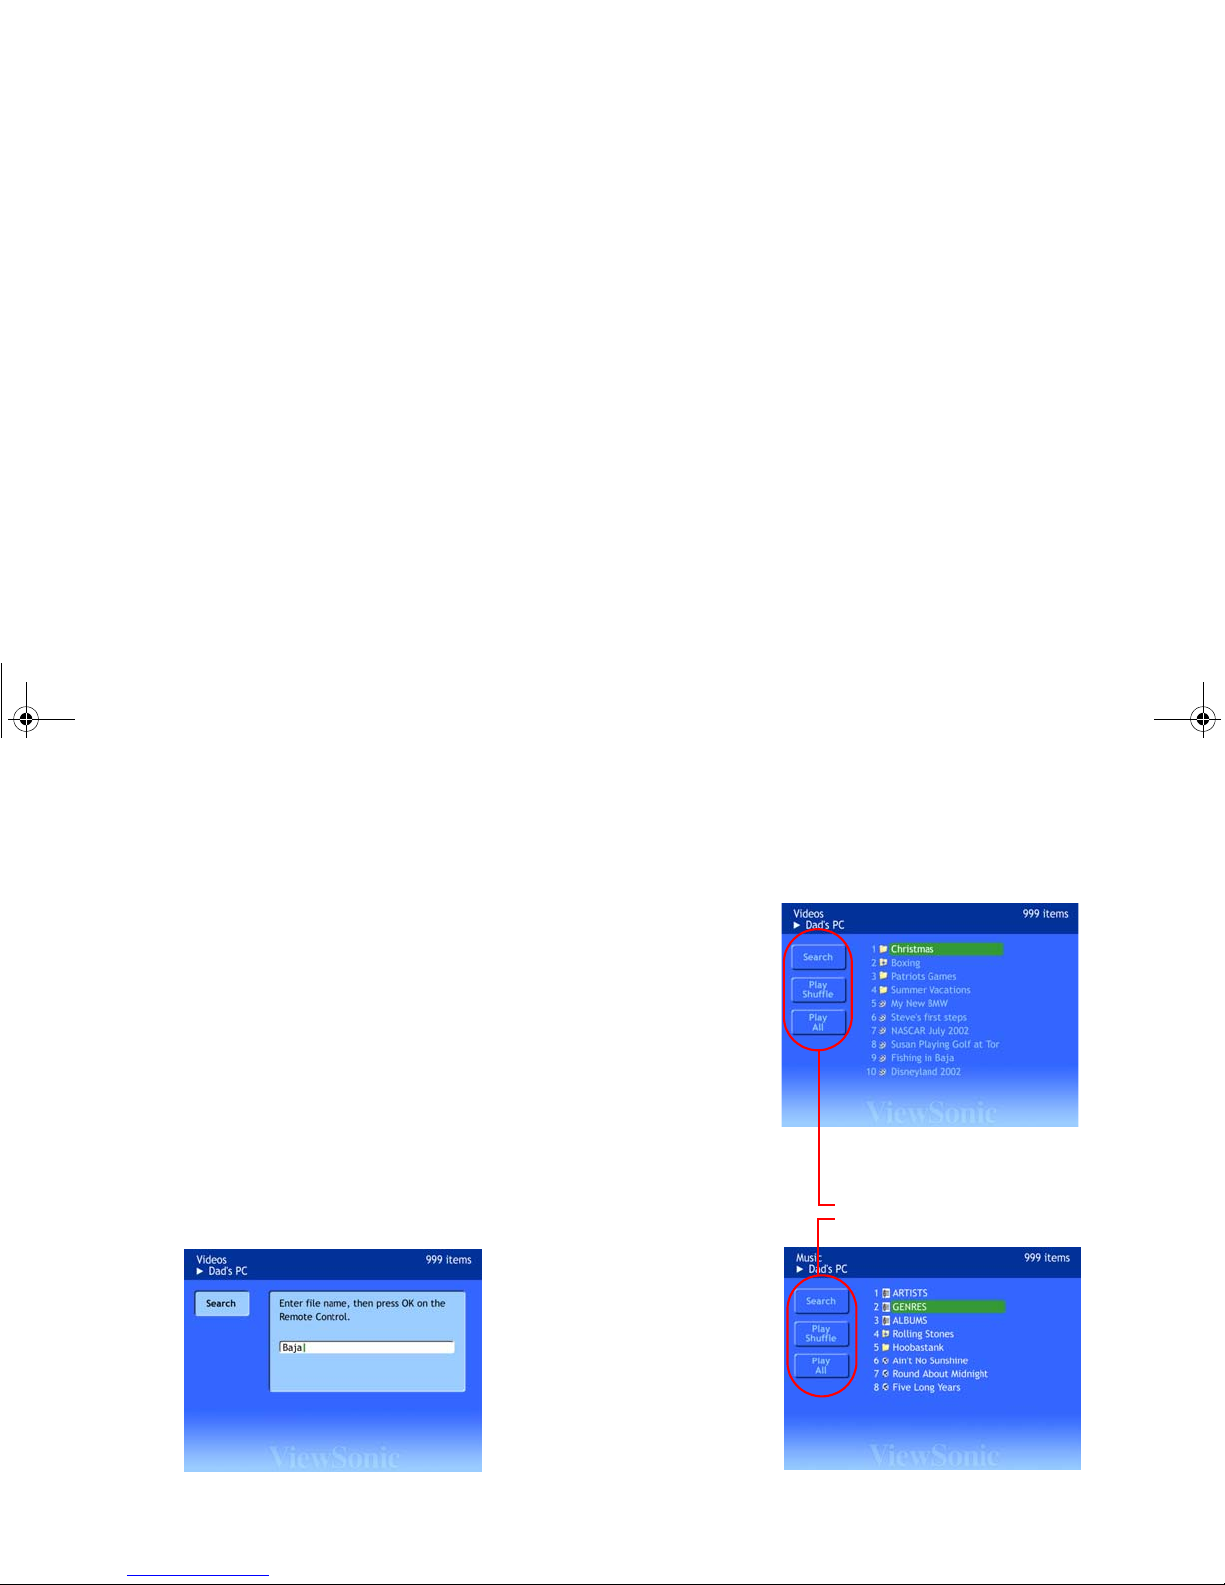
Search
The Search feature allows you to search for a folder or a file of all three
media types: videos, music, and pictures. To search for a media file, do the
following:
1 From a Video, Music, or Pictures selection screen, press the Left Arrow
button on the Remote Control.
2 With the Search button highlighted, press OK. The Search screen
screen will display, as shown below.
3 Enter name of the folder or file you want to find, then press OK.
Video Selection Screen
On-Screen Control Panel Buttons
Music Selection Screen
NOTE:
Repeat
is on the Remote Control.
WMA_UG.book Page 23 Tuesday, October 12, 2004 3:29 PM
Page 31
ViewSonic
Wireless Media Adapter
24
Play Shuffle
With Play Shuffle
selected, all media files displayed on the media
selection screen will play in random or
der (all files, including those inside
folders and nested folders). This is
much like shuffling a deck of cards.
NOTE: For Pictures
, this button is called
View Shuffle
.
•
If you use
Repeat (on the Remote Control) together with
Play Shuffle
,
the play order after each repeat will be the same as the first time
Play
Shuffle
was applied.
•
To re-shuffle, press
Stop
on the Remote Control, then select
Play Shuffle
again, and press
OK
.
Play All
With Play All
selected, all media files displayed on the media selection
screen will play all files, including those inside folders and neste
d folders.
NOTE: For
Pictures, this button is called
View A ll.
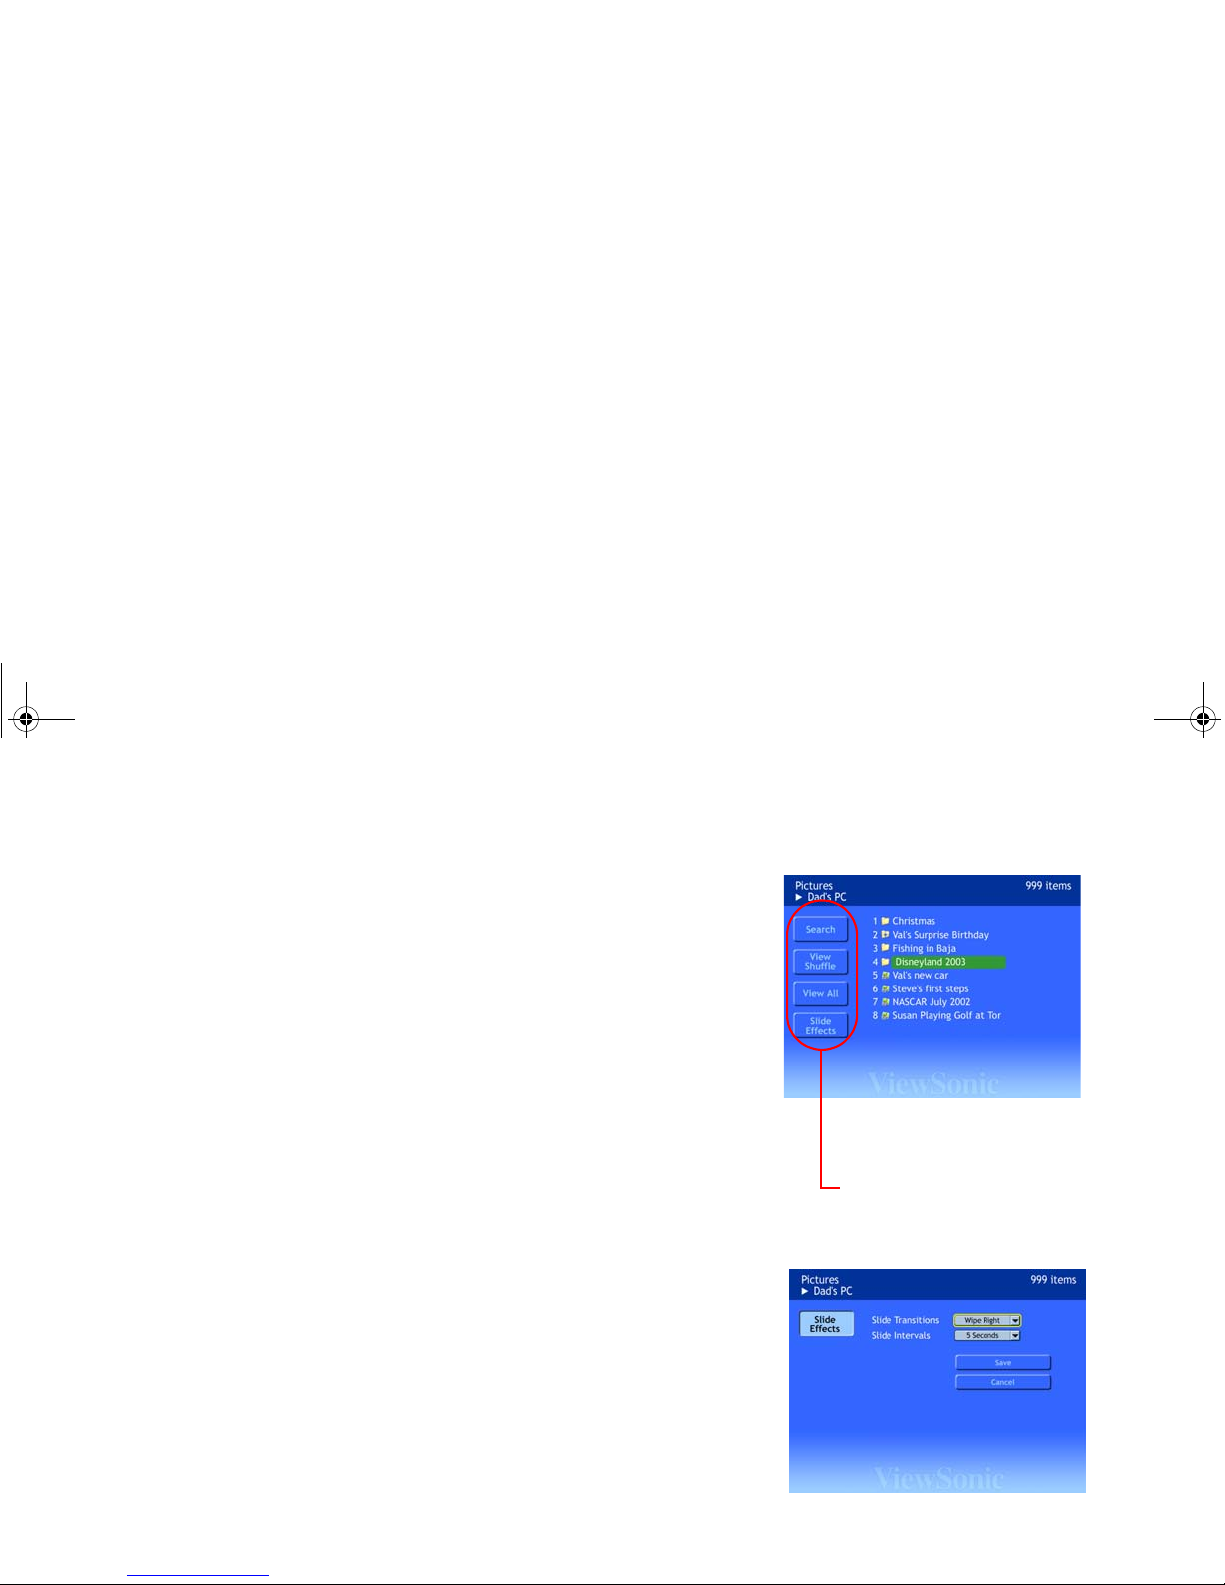
Slide Effects
Two types of
Slide Effects
controls are provided
(for Pictures only)
:
•
Slide Transitions
- provides options for the visual effects that appear
as one slide changes to the next (for example, Wipe or Dissolve
).
•
Slide Intervals
- provides options for time intervals between slides.
NOTE:
Y ou can also set
Slide Transitions
and
Slide Intervals
with myView
Media Manager
software (installed on PCs). If either of these controls is se
t
on both software applications, the setting m ost recently sel
ected is used. For
example, if
Slide Transitions
was previously set with myView Media
Manager
(PC), and sometime later
Slide Transitions
is set with myView
Media Guide
(WMA100), the WMA100 setting will be used.
Picture Selection Screen
On-Screen Control Panel Buttons
Slide Effects
is an additional
button available for Pictures only.
Slide Effects Screen
WMA_UG.book Page 24 Tuesda
y, October 12, 2004 3:29 PM
Page 32

ViewSonic
Wireless Media Adapter
25
Viewing Videos
To watch a video stored on any server (PC or gateway) conn
ected to your
home network, do the following:
1 Select a
Videos from the
Home screen, then press
OK. The Server
Selection screen will display.
Shortcut:
Press the Videos
button on the Remote Control.
2 Select a server, then press
OK.
If the server you selected is locked, you will need to enter an
Access
Code. For information about Access Codes see
Security Settings
in
Chapter 5: Using the Media Server Software
.
3 Select a video you want to watch, then press
Play or OK on the Remote
Control.
•
If you want to play all the videos
in a folder you have highlighted (but
have not opened), press
Play.
•
If you want to play all the videos
in a folder you have opened, press
OK.
Then press the
Left Arrow
button to access the Control Panel,
select Play All
, and press
OK.
NOTE: When a video is playing, to view another video or to sele
ct one
of the on-screen Control Panel
buttons, you must first press
Stop on the
Remote Control.
Going to the Next/Previous Video
If you have selected a folder of videos to play, and a video is
currently
playing:
•
To go to the next video, press
Skip on the Remote Control.
•
To go to the previous video, press
Replay on the Remote Control.
WMA_UG.book Page 25 Tuesda
y, October 12, 2004 3:29 PM
Page 33

ViewSonic
Wireless Media Adapter
26
Listening to Music
To listen to music tracks that are st
ored on any server (PC or gateway)
connected to your home network, do the following:
1 Select
Music on the Home page, then press
OK
. The Server Selection
screen will display.
Shortcut: Press the
Music
button on the Remote Control.
2 Select a server, then press
OK.
If the server you selected is locked, you will need to enter an
Access
Code. For information about Access Codes see
Security Settings
in
Chapter 5: Using the Media Server Software
.
3 Select a music track you want to listen to, then press
Play or OK
on the
Remote Control.
•
If you select ARTISTS, GENRES
(styles), or ALBUMS, a list of
available choices will display for that category.
•
If you want to play all the tracks
in a folder you have highlighted (but
have not opened), press
Play.
•
If you want to play all the tracks
from a folder you have opened, press
OK.
Then press the
Left Arrow
button to access the Control Panel,
select Play All
, and press
OK.
NOTE:
When music is playing, to listen to another track or to select one
of the on-screen Control Panel
buttons, you must first press
Stop
on the
Remote Control.
Going to the Next/Previous Track
If you have selected a folder of tracks to play, and a track is currently pla
ying:
•
To go to the next
track
, press
Skip on the Remote Control.
•
To go to the previous
track
, press
Replay on the Remote Control.
WMA_UG.book Page 26 Tuesda
y, October 12, 2004 3:29 PM
Page 34

ViewSonic
Wireless Media Adapter
27
Viewing Pictures
To view pictures (photo albums), do the following:
1
Select
Pictures
on the
Home
page, and press OK. The Server Selection
screen will display.
Shortcut: Press the
Pictures button on the Remote Control.
2 Select a server, then press
OK.
If the server you selected is locked, you will need to enter an
Access
Code. For information about Access Codes see
Security Settings
in
Chapter 5: Using the Media Server Software
.
3
To view a single picture, with
a picture highlighted, press
OK
.
•
To view a slide show, highlight a picture folder, and press
Play
or OK.
•
Another way to view a slide show:
select a folder,
press OK, select
View
All on the Control Panel, and press
OK
.
Going to the Next/Previous Picture
If you have selected a single picture:
•
To go to the next
picture
, press
Skip on the Remote Control.
•
To go to the previous
picture
, press
Replay on the Remote Control.
Viewing a Slideshow with Music
To view a slideshow with music playing in the background, do
the following:
1 Select the music album you want to hear, then press
OK.
2 Press the
Pictures
shortcut button
on the Remote Control.
3 Select the pictures you want to view, and press
OK or Play.
NOTE: There are two other ways to view a slide show with music. Y
ou can
link specified pictures with
music, or link specified music with pictures. See
Chapter 5: Using the Media Server Software for more information
.
WMA_UG.book Page 27 Tuesda
y, October 12, 2004 3:29 PM
Page 35

ViewSonic Wireless Media Adapter 28
Listening to Internet Radio
To listen an Internet Radio station, do the following:
1 Select Internet Radio on the Home page of myView Media Guide, then
press OK. A list of music genres (styles) will display.
Shortcut: Press the iRadio button on the Remote Control.
2 Select a music genre (style), then press OK. A list of available Internet
radio stations for that genre will display.
3 Select a radio station, and press OK.
WMA_UG.book Page 28 Tuesday, October 12, 2004 3:29 PM
Page 36

ViewSonic Wireless Media Adapter 29
This chapter explains how to use
Setup
control screens in the
myView Media
Guide
software to change image, sound, network, and other settings:
Auto-Sync - use to synchronize the WMA100’s network settings with
the network settings of your router or gateway.
System - use to set the wait time for the Screen Saver, as well as to set
various image and audio adjustments.
Advanced:
• LAN - use to change network settings (DHCP and Static IP).
• Wi-Fi - use to change wireless network and security settings.
• Firmware Update - use to download WMA100 firmware
updates.
• Software Update - use to download myView Media Guide
software updates.
NOTE: For Firmware/Software updates, the WMA100 must be
connected to the Internet.
To access the Setup control screens, us e th e Left Arrow button on the
Remote Control to highlight the Setup button on the Home page of
myView Media Guide, then press OK. The Setup Main Menu displays
with Auto-Sync pre-selected. Then use the Up/Down Arrows buttons to
select a menu option.
Setup Main Menu
Advanced Sub-Menu
Chapter 4: Using Setup to Change Settings
WMA_UG.book Page 29 Tuesday, October 12, 2004 3:29 PM
Page 37

ViewSonic Wireless Media Adapter 30
Auto-Sync Feature
Auto-Sync automatically synchronizes your WMA100 with your router or
gateway. With the Auto-Sync button highlighted on the Setup menu
(shown to the right), press OK on the Remote Control.
•
If you see the message
Auto Sync was successful
, configuration is now
complete. You are now ready to start using your WMA100!
• If the SSID Discovery Screen displays (shown to the right), the
WMA100 has recognized more than one network.
Use the Up/Down Arrow buttons to select your SSID (network name),
then press OK.
If you select an SSID that does not have a WEP or WPA key,
configuration is now complete. You are ready to start using your
WMA100!
• If you select an SSID that does have a WEP or WPA key, the Wi-Fi
Setup Screen (shown to the right) will automatically display.
1 Use the Down Arrow button to select either “WEP Enabled” or
“WP A-PSK Enabled,” then press OK.
2 Complete the remaining fields according to the settings of your
router/gateway, select Save, then press OK.
Wi-Fi configuration is now compl e te !
Setup Main Menu with
Auto-Sync pre-selected
SSID Discovery Screen
WMA_UG.book Page 30 Tuesday, October 12, 2004 3:29 PM
Page 38

ViewSonic Wireless Media Adapter 31
System Settings
To access the System Settings screen, select Setup from the Home
screen, select System, then press OK.
Screen Saver
This setting allows you to set the delay time (settings from 3 to 120
minutes). You can also disable the screen saver by selecting Never.
Image Setting
This setting allows you to optimize the screen image.
NOTE: For the best screen image, select your display’s Preferred
Resolution (see your display’s user manual).
T o change the Image Setting for the video port(s) you used to connect your
WMA100 do the following:
1 Select Setup from the Home page, then select System from the Setup
menu.
2 Use the Up/Down Arrow buttons on the Remote Control to select an
image setting from the table to the right, then press OK.
Sounds
These three settings can be toggled On/Off: Key Input (typing sound),
Navigation Sound (indicates navigation has occurred), and System Alert
Sound (indicates a system problem).
Restore Factory Settings
This setting returns all WMA100 settings to the original factory default
settings.
Image Setting Screen
DVI/ VGA
Component
Video
Composite
(CVBS) Video
S-Video
Image Settings
(resolutions) for
DVI / VGA
Image Settings for
Component Video
(YPbPr)
640 x 480 480p
800 x 600 720p
1024 x 768 1080i
1280 x 720
1280 x 768
1280 x 1024 S-Video/Composite
852 x 480 NTSC
(Composite = CVBS)
1366 x 768
WMA_UG.book Page 31 Tuesday, October 12, 2004 3:29 PM
Page 39
ViewSonic
Wireless Media Adapter
32
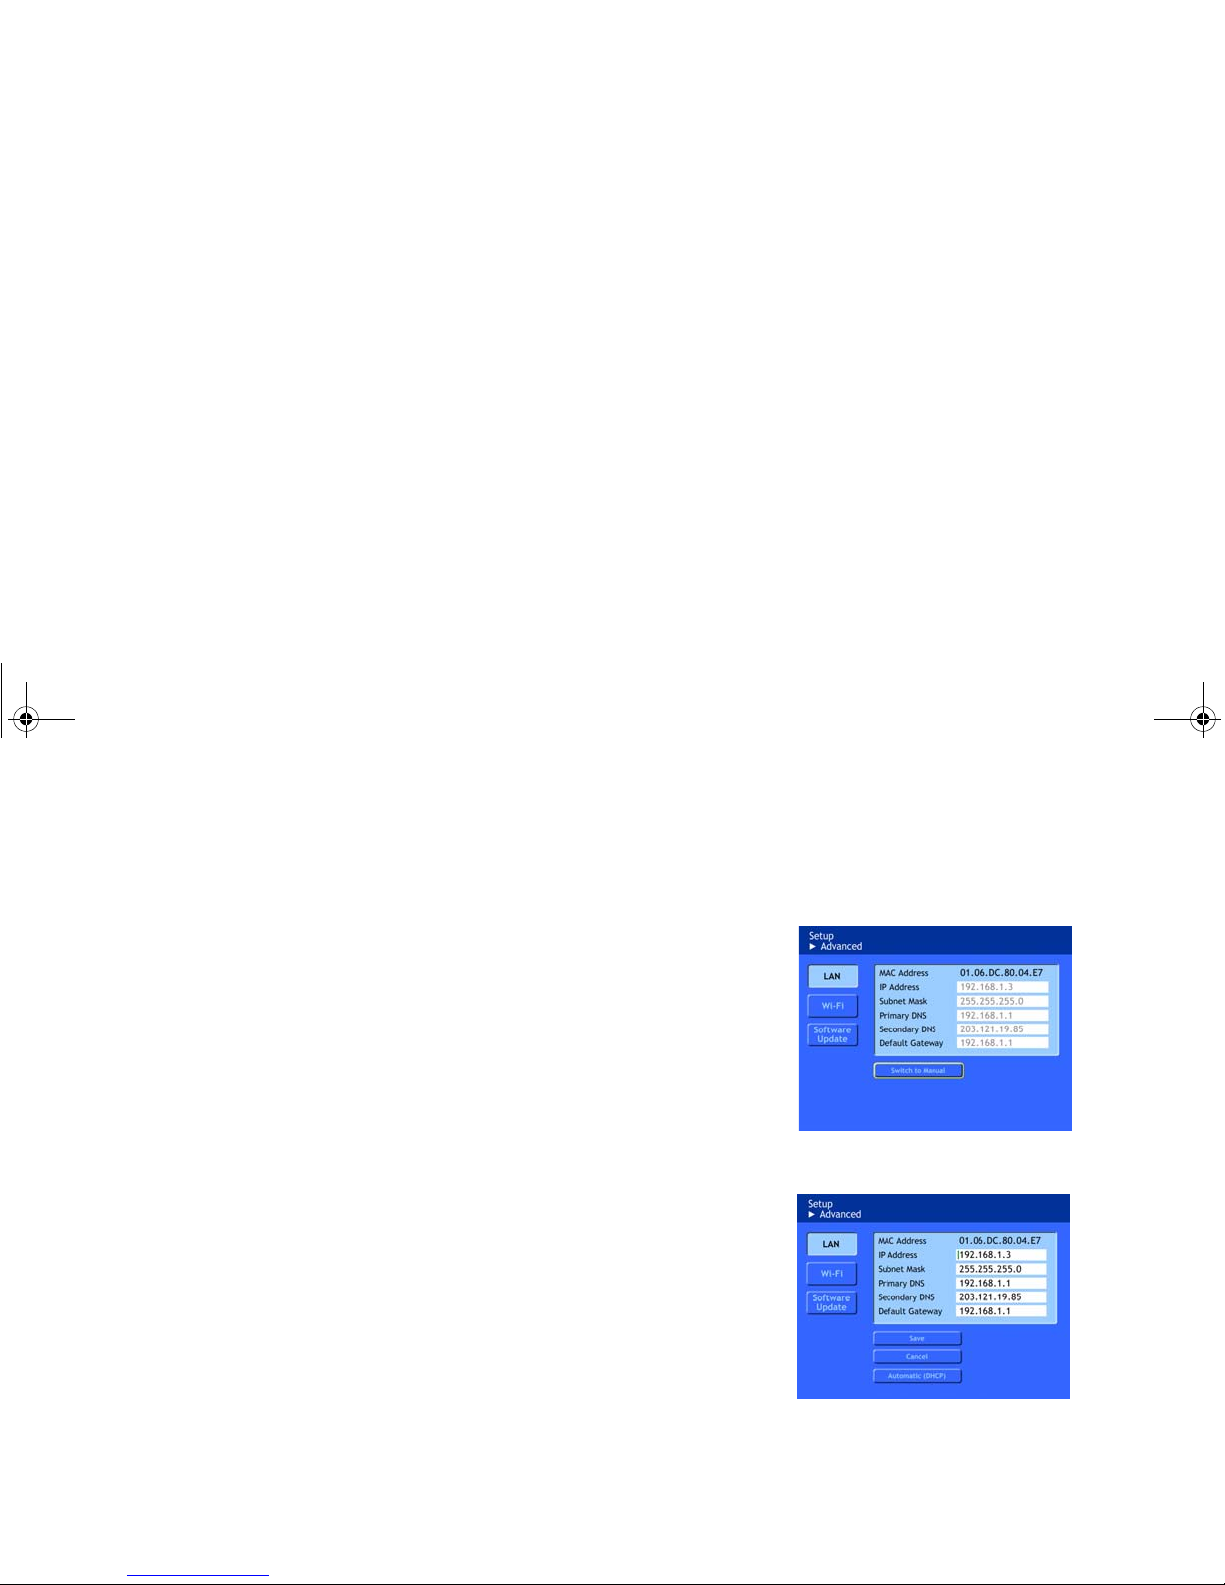
LAN Settings
These settings are both for wired and wireless networks, used
to configure
the WMA100 to match the wired LAN settings of your router or ga
teway. To
access the LAN Settings screen, select
Setup from the
Home screen,
select Advanced
, select
LAN, then press
OK.
Auto Mode
The default screen you will see is for
Auto mode, which automatically sets
the IP protocol to
Dynamic IP (DHCP). In this mode no fields can be
changed. If you want to chang
e any of the fields, select Switch to Manual
on the bottom of the screen.
Manual Mode
Manual Mode lets you enter the IP address, Sub Mask etc. accordin
g to
the requirements of your router or gate
way. To return to Auto Mode, select
Automatic (DHCP) on the bottom of the screen.
NOTE: Use the Manual Mode for settings
Static IP configuration.
LAN Settings Screen (auto mode)
LAN Settings Screen (manual mode)
WMA_UG.book Page 32 Tuesda
y, October 12, 2004 3:29 PM
Page 40

ViewSonic
Wireless Media Adapter
33
Wi-Fi Settings
If the SSID for any router or gateway is “
viewsonic
,” Auto-Sync will
automatically configure all
Wi-Fi settings. If you change the SSID and/or if
your router has a WEP or WPA key for security, you will need to enter th
e
required information. To manually c
onfigure your WMA100 for a wireless
network, do the following:
1 Enter the SSID (Network Name) used for your router/g ateway.
2 If your router does not have a se
curity key, then you are done.
Otherwise, select either
WEP Enabled
or WPA-PSK Enabled
and
press OK.
3 Complete the remain fields according the your settings of you
r router/
gateway.
Firmware Update
Firmware is a series of software instructions stored on a chip
inside the
WMA100 that control all WMA100 functions.To check for upda
ted
firmware, select
Setup
from the Home screen, select
Advanced
, select
Firmware Update, then press
OK. Wait for several seconds for the
WMA100 to search an updated version. You will see a screen me
ssage
informing you of the status of the search or if no firmware update is
available.
Software Update
Here, “software” refers to the
myView Media Guide
software. Like the
WMA100 firmware, the
myView Media Guide
software is stored on a chip
inside the WMA100. To check
for updated soft
ware, select
Setup
from the
Home screen, select
Advanced
, select
Software Update
, then press
OK.
Advanced Sub-Menu
Wi-Fi Settings screen
NOTE:
For Firmware/Software
updates, the WMA100 must be
connected to the Internet.
WMA_UG.book Page 33 Tuesda
y, October 12, 2004 3:29 PM
Page 41
ViewSonic Wireless Media Adapter 34
This chapter explains how to use
myView Media Manager
, the media server
software that enables your networked PC(s) to share media content with your
WMA100(s). This software will enable you to:
• Add a security lock to any PC connected to your network. Typically,
locking a PC is used for Parental Control, preventing young family
members from accessing inappropriate material.
• Link pictures to music (the same pictures are displayed whenever
linked music is played), or link music to pictures (the same music is
played whenever linked pictures are viewed).
• Change the folder names and locations where videos, music, and
pictures are stored on your networked PCs (the default folders are My
Videos, My Music, and My Pictures located on the C: drive).
myView Media Manager Overview
When you select
WMA100
on the supplied Networking Companion CD
installation wizard, myView Media Manager and other files are automatically
installed onto your networked PC. Whenever you turn on that PC, myView
Media Manager will be running in the background (unless you disable it)
.
IMPORTANT: So that all of your networked PCs will be able to share
media content with your WMA100, be sure to install the WMA100 software
on each of them.
Chapter 5: Using the Media Server Software
IMPORTANT:
Follow these steps for each PC on your
network:
1 For PCs that have multiple users, be
sure to log-in as the primary user.
2 Once you are logged-in as the
primary user, be sure to move your
media content into: My Videos, My
Music, and My Pictures.
To find these folders: Click ST ART on
the Windows task bar, then click MY
DOCUMENTS.
WMA_UG.book Page 34 Tuesday, October 12, 2004 3:29 PM
Page 42

ViewSonic Wireless Media Adapter 35
Launching the Homepage
I
t is necessary to launch the
Homepage
in order to
change
myView Media
Manager settings.
To launch the Homepage, do th e following:
1 Verify that
myView Media Manager
is running on your PC by looking for
the icon on the Windows task bar (shown to the right).
2 Click Start on the Windows task bar.
3 Click All Programs, select myView Media Manager, then select
myView Media Manager Setting Homepage (shown to the right).
Disabling myView Media Manager
1 Right-click the myView Media Manger icon on the Windows task bar.
2 Select Stop myView Media Manager.
Re-launching myView Media Manager
1 Click Start on the Windows task bar.
2 Click All Programs, select myView Media Manager, then select
myView Media Manager from the next menu.
Homepage of myViewMedia Manger
myView Media Manger icon
NOTE: For many of the screens in this
software, the button is the word next to an
icon. For example see “Setting” on the next
page.
WMA_UG.book Page 35 Tuesday, October 12, 2004 3:29 PM
Page 43
ViewSonic Wireless Media Adapter 36
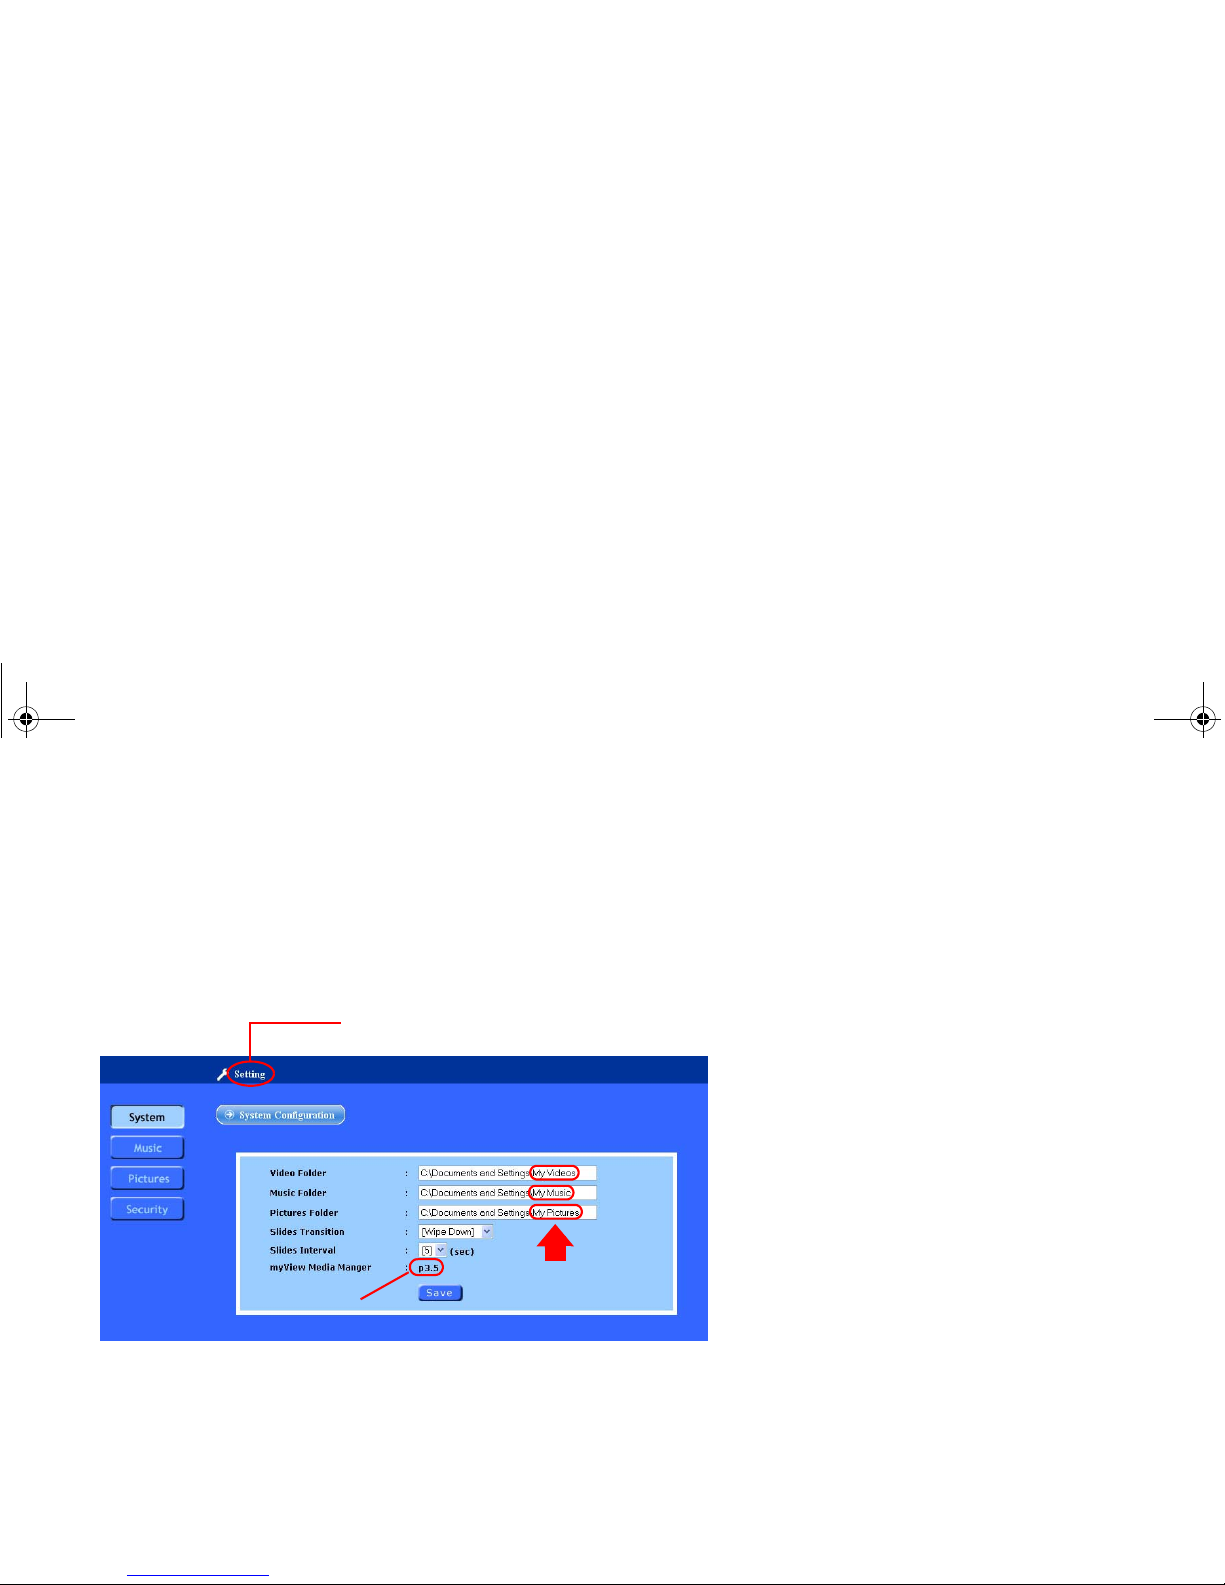
System Settings
The System Settings screen allows you to do the following:
• Change the path/folder where you store your media files.
• Change the Slide Transitions and Slide Interval settings.
• See the version number of the myView Media Manager software.
NOTE:
Y ou can also set
Slide Transitions
and
Slide Intervals
with myView
Media Guide software (on the WMA100). If either of these controls is set on
both software applications, the setting most recently selected is used. For
example, if
Slide Transitions
was previously set with myView Media
Manager (PC), and sometime later
Slide Transitions
was set with myView
Media Guide
(WMA100), the WMA100 setting will be used.
version
default media
folder names
number
System Settings screen
Click on the word “Setting” to return to
the Homepage.
WMA_UG.book Page 36 Tuesday, October 12, 2004 3:29 PM
Page 44

ViewSonic Wireless Media Adapter 37
Security Settings
The Security Settings screen allows you to lock/unlock your networked
PCs, preventing anyone without the Access Code from accessing media
on the locked PC.
Creating an Access Code for the First Time
To create an Access Code for the first time, enter a number (10 digits
maximum), re-enter it in the next field, then click Save.
IMPORTANT: Be sure you write down the Access Code for your reference.
If you cannot remember the Access Code, the only way to re-set it is to
contact ViewSonic Customer Support.
Security Settings screen #1
WMA_UG.book Page 37 Tuesday, October 12, 2004 3:29 PM
Page 45

ViewSonic Wireless Media Adapter 38
Changing and Removing an Access Code
To change an Access Code, do the following:
1 Enter the current Access Code in the indicated field.
2 Enter the New Access Code, in the indicated field, then re-enter it in
Re-Type Access Code field.
3 Click Save.
To remove an Access Code, do the following:
1 Enter the Current Access Code in the indicated field.
2 Select the Disable Access Code checkbox, and click Save.
Security Settings screen #2
WMA_UG.book Page 38 Tuesday, October 12, 2004 3:29 PM
Page 46

ViewSonic Wireless Media Adapter 39
Linking Pictures to Music
When you link pictures to music, the same pictures are displayed
whenever you select a specified music artist or album from the WMA100
myViewMedia Guide menu.
To link pictures to a music selection, do the following:
1 Select the music. Click the [Music Root Folder] and select an artist.
In the example shown below, two artists are displayed: “Hoobastank”
and “Rolling Stones.” We will select Hoobastank.
We will now select the album, The Reason. (see the screen below).
WMA_UG.book Page 39 Tuesday, October 12, 2004 3:29 PM
Page 47

ViewSonic Wireless Media Adapter 40
2 Link the pictures. Click [Default Pictures Folder] then click the Link
button across from the pictures folder your prefer. For this example, we
will click the Link button across from San Francisco.
This pictures-to-music link is now complete, and is saved automatically.
From this point on, whenever we select The Reason music album, the
San Francisco sideshow will be displayed (see below).
Link button
Removing a pictures-to-music link:
1
Click on the
picture
side of the link (
San
Francisco
in the example to the left).
2 On the next screen (not shown), click the
Link button across from [default pictures
folder].
WMA_UG.book Page 40 Tuesday, October 12, 2004 3:29 PM
Page 48
ViewSonic Wireless Media Adapter 41
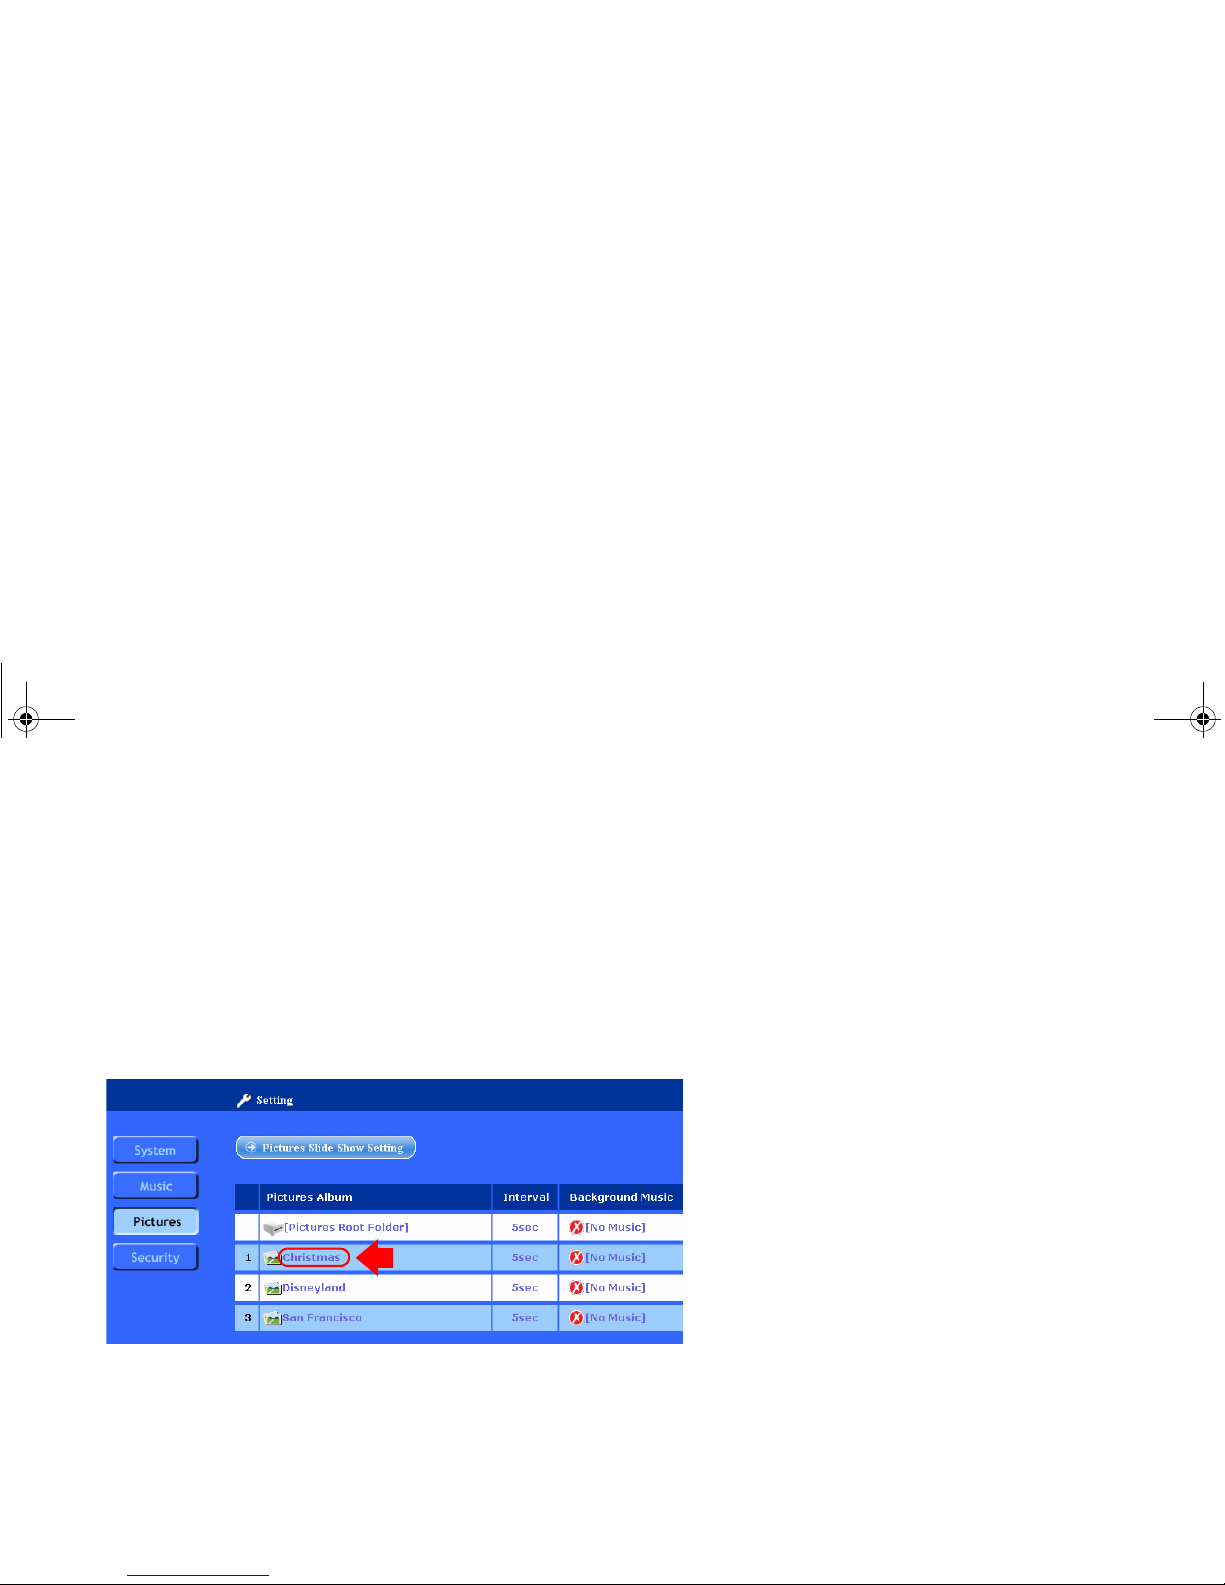
Linking Music to Pictures
When you link music to pictures, the same music artist or album will play
whenever you select a specified group of pictures, or sideshow, from the
WMA100 myViewMedia Guide menu.
To link music to pictures, do the following:
1 Select the pictures. Click the [Pictures Root Folder] and select a
pictures folder. In the example shown below, three picture folders are
displayed: “Christmas,” “Disneyland,” and “San Francisco.” We will
select Christmas.
Next, we will be more specific, and select a sub-folder under. When we
click Christmas, three sub-folders display. (see the screen on the next
page).
WMA_UG.book Page 41 Tuesday, October 12, 2004 3:29 PM
Page 49

ViewSonic Wireless Media Adapter 42
2
Select the music.
For this example we want to link music to the
Christmas 2001
pictures album (sub-folder). To do this, we will select
[No
Music]
across from
Christmas 2001
. (See the screen shown above). Two
music albums display: Hoobastank and Rolling Stones.
3
Select a sub-folder (optional)
. We will now click
Rolling Stones
,
because we want to be more specific, and select a certain Rolling Stones
album,
Beggars Banquet
.
WMA_UG.book Page 42 Tuesday, October 12, 2004 3:29 PM
Page 50

ViewSonic Wireless Media Adapter 43
4 Link the music. Click the Link button across from the music folder
your prefer. For this example, we will click the Link button across from
Beggars Banquet. (See the screen below.)
This music-to-pictures link is now complete, and is saved automatically.
From this point on, whenever we select t he
Christmas 2001
pictures folder,
Beggars Banquet
will play in the background. (See the screen below.)
Link button
Removing a music-to-pictures link:
1
Click on the
music
side of the link (
Beggars
Banquet
in the example to the left).
2 On the next screen (not shown), click the
Link button across from [No Music].
WMA_UG.book Page 43 Tuesday, October 12, 2004 3:29 PM
Page 51

ViewSonic Wireless Media Adapter 44
This chapter provides FAQs and possible solutions to problems you may
encounter while operating your WMA100, as well as provides maintenance
instructions.
• Frequently Asked Questions (FAQs)
• Troubleshooting Solutions
• Customer Support contact information
• Maintenance instructions
> Updating the Firmware
> Updating the Software
> Cleaning Instructions
Chapter 6: Troubleshooting and Maintenance
Getting Help Checklist
1 Refer to the FAQ section in this chapter.
2 Refer to the Troubleshooting section in this
chapter.
3 Refer to the Table of Contents at the front
of this guide and look for the topic you
need help with.
4
Contact ViewSonic Customer Sup por t
(contact information is listed in this chapter.)
WMA_UG.book Page 44 Tuesday, October 12, 2004 3:29 PM
Page 52

ViewSonic Wireless Media Adapter 45
Frequently Asked Questions (FAQs)
What video port(s) do I use to get the best video quality?
For the best video quality, use best port best video ports supported by your
TV or other display.
Listed with best first:
DVI, VGA (with DVI/VGA
Adapter), Component Video (YPbPr), S-Video, or Composite Video (CVBS).
How many WMA100s connected a network can be running
at the same time with good performance?
Wired Network - 8
WMA100s
or more (depending on what your router or
gateway supports).
Wireless Network
- Up to 3
WMA100s if your wireless network includes a
ViewSonic Wireless Me di a G a te w ay. If your network includes a router or a
gateway from another manufacturer, the performance of multiple
WMA100s may vary.
If there are two WMA100s connected to my wireless home
network, can my family access media files on a PC from
both WMA100s at the same time?
Yes,
if your network includes a ViewSonic Wireless Media Gateway. If your
network includes a router or a gateway from another manufacturer,
performance of multiple WMA100s will vary.
Can my WMA100 share copy-protected music and video
files with my networked PC?
No, copy-protected files are not supported.
WMA_UG.book Page 45 Tuesday, October 12, 2004 3:29 PM
Page 53

ViewSonic Wireless Media Adapter 46
When I connect the WMA100 to my display, if there is no
screen image or the screen image not clear, what should I do?
NOTE: This applies to the Component or DVI/VGA ports only.
After you turn on the WMA100, press the Output button on the Remote
Control. Wait two (2) seconds and if the image is still not clear, press the
Output button again. If the screen image is still not clear, press Output a
third time. The Output button has a total of three (3) settings.
To optimize the screen image, do the following:
1 Select Setup from the Home page, then select System from the Setup
menu.
2 Use the Up/Down Arrow buttons on the Remote Control to select an
image setting from the table to the right, then press OK.
NOTE:
For the best screen image, select your display’s Preferred Resolution
(see your display’s user manual).
Can I connect the two displays to the Wireless Media
Adapter (for example, using the S-Video port for the TV and
the DVI port for a PC monitor?
No. The Wireless Media Adapter currently only supports one connected
display.
What Windows operating systems support myView Media
Manager software?
Windows XP and 2000.
Image Settings
(resolutions) for
DVI / VGA
Image Settings for
Component Video
(YPbPr)
640 x 480 480p
800 x 600 720p
1024 x 768 1080i
1280 x 720
1280 x 768
1280 x 1024 S-Video/Composite
852 x 480 NTSC
(Composite = CVBS)
1366 x 768
WMA_UG.book Page 46 Tuesday, October 12, 2004 3:29 PM
Page 54

ViewSonic Wireless Media Adapter 47
Can I connect my WMA100 to a 5.1 Surround Sound
Receiver?
Yes. Use a digital audio coaxial cable (purchased separately) to connect
your Surround Sound system to the WMA100’s SPDIF port.
What types of media files are supported by my WMA100?
Videos: MPEG-1, MPEG-2, MPEG-4, and Xvid.
Music:
MPEG-1 (audio layers 1&2), MP3, unprotected AAC, WMA, WAV, AC-3
(pass-thru).
Pictures: JPEG, GIF, PNG.
Do I need to install the myView Media Manager software on
all of our networked PCs?
Yes, if you want to share media content with your WMA100.
NOTE: If you download an updated version of myView Media Manager
media server software from the ViewSonic website, be sure in install the
new version on all of your networked PCs.
If my PC is set to go into Standby or Hibernation mode, will
this prevent my WMA100 from accessing media files?
Yes. Be sure to change System Standby and System Hibernate to
Never. See PC Power Settings in the Appendix for more information.
NOTE: The ViewSonic Wireless Media Gateway does not have either of
these two power saving modes.
WMA_UG.book Page 47 Tuesday, October 12, 2004 3:29 PM
Page 55

ViewSonic Wireless Media Adapter 48
How do I reset my WMA100?
There are three ways to reset your WMA100 if the screen freezes or the
performance appears choppy, etc.
1 First try pressing the Power button on the front of WMA100 (putting it
into Standby Mode), then press the Power button again.
2 If the previous approach did not work, press the Reset button on the
back of the WMA100.
3 If the previous approach did not work, unplug the power cord from the
WMA100, and plug it in again.
What version of Firmware and Software do I have?
• Firmware: On the Home screen of myView Media Guide, select Setup
and press OK. The first line of text at the bottom of the screen is the
Firmware version.
• Software (myView Media Guide): On the Home screen of myView
Media Guide, select Setup and press OK. The second line of text at the
bottom of the screen is the Software version.
• Software (myView Media Manager): From one of your networked PCs
that is running myView Media Guide media server software, do the
following:
Click Start > All Programs > myView Media Manager > myView
Media Manager Settings Home Page. Then when the main menu
displays, click System. The version number of this software is displayed
on the System screen next to “myView Media Manager.”
WMA_UG.book Page 48 Tuesday, October 12, 2004 3:29 PM
Page 56

ViewSonic Wireless Media Adapter 49
Troubleshooting
The Troubleshooting table below provides possible solutions for WMA100
problems you may encounter. If the problems you are experiencing you
are not able to find a solution, contact ViewSonic Customer Support for
assistance (see page 53).
Symptom
Possible Solutions
I do not see the Home screen when I
turn on my WMA100 for the first time.
• Check to see that your TV or other display is set to show the correct
video source. The video source that is set on your TV may not match
the ports on your TV that the WMA100 is connected to. Refer to the
user guide that came with your TV for more information.
• If you are passing the audio/video signal through a VCR (instead of
connecting directly to your TV and/or sound system), check to see that
the correct Input or Source is selected on your VCR. Refer to your
VCR’s user manual for more information.
• Make sure the cables coming from the WMA100 are connected to the
input ports on your TV or VCR.
• Make sure that all cables are securely connected.
• Make sure that the AC Adapter is firmly connected to the WMA100.
When I first turned on my WMA100,
the screen image is shifted to the left
(or right).
• (For DVI or VGA only) Select your displays’s Auto adjustment control,
which automatically optimizes the size and position of the screen
image. See your display’s user manual for further instructions.
WMA_UG.book Page 49 Tuesday, October 12, 2004 3:29 PM
Page 57

ViewSonic Wireless Media Adapter 50
When I first turned on my WMA100,
the screen image does not look clear.
NOTE: This applies to the Component or DVI/VGA ports only.
• After you turn on the WMA100, press the Output button on the Remote
Control. Wait two (2) seconds and if the image is still not clear, press
the Output button again. If the screen image is still not clear, press
Output a third time. The Output button has a total of three (3) settings.
• To optimize the screen image, do the following:
1 Select Setup from the Home page, then select System from the
Setup menu.
2 Use the Up/Down Arrow buttons on the Remote Control to select
an image setting from the table to the left, then press OK.
NOTE: For the best screen image, select your display’s Preferred
Resolution (see your display’s user manual).
I can’t find the videos, music tracks,
or pictures I want to see/hear.
• Y ou may have selected a server (PC or Gateway) that does not contain
those media files.
• Verify that your PC is turned on and not in Standby or Hibernate
modes, and verify that myView Media Manager is currently running. It
is recommended that you set System Standby and System Hibernate
to Never. See PC Power Settings in the Appendix for more information.
The ViewSonic Wireless Media Gateway does not have either of these
two power saving modes.
• Verify that you selected a media file that is supported by the WMA100.
See Supported Media Files in Chapter 4.
Symptom
Possible Solutions
Image Settings
(resolutions) for
DVI / VGA
Image Settings for
Component Video
(YPbPr)
640 x 480 480p
800 x 600 720p
1024 x 768 1080i
1280 x 720
1280 x 768
1280 x 1024 S-Video/Composite
852 x 480 NTSC
(Composite = CVBS)
1366 x 768
WMA_UG.book Page 50 Tuesday, October 12, 2004 3:29 PM
Page 58

ViewSonic Wireless Media Adapter 51
The Remote Control is not working.
• Make sure the batteries are inserted properly
• Select another input source using the TV’s Remote Control.
• Make sure the Remote Control is pointed directly at the WMA100 and
is not blocked by objects in the room .
• Remove the batteries and re-insert them, being careful not to touch any
button on the Remote Control.
• Put new batteries into the Remote Control.
I can’t hear any sound when I am
playing music or watching a video.
• Press the Mute button on the WMA100’s Remote Control.
• Increase the volume with the [Up] arrow on all Remote Controls (TV’s,
WMA100’s, etc.).
• Check all audio cable connections.
• If the audio cables are connected to an external sound system, make
sure it is turned on and you have selected the right Input Source. Refer
to the user guide that came with your sound system for more
information.
Symptom
Possible Solutions
WMA_UG.book Page 51 Tuesday, October 12, 2004 3:29 PM
Page 59
ViewSonic Wireless Media Adapter 52
The image or sound is choppy or
freezes/stops.
If your WMA100 is connected to a wireless network, interference from
devices like a microwave oven, a 2.4 GHz cordless ph on e , et c. c oul d be
interrupting the wireless signal: Reboot the WMA100 using one of these
methods:
1 Press the Power button on the Remote Control or the button on the
front of the WMA100, then press it again.
2 Press the Reset button on the back of the WMA100.
3 Un-plug the DC Power cable, and plug it in again.
If the interference persists, check to see if someone in your house is
currently using a microwave oven or a 2.4 Ghz cordless phone.
Symptom
Possible Solutions
WMA_UG.book Page 52 Tuesday, October 12, 2004 3:29 PM
Page 60

ViewSonic Wireless Media Adapter 53
Customer Support
Before contacting Customer Support, check the Troubleshooting table on
the previous page for possible solutions to any setup problems you have.
NOTE: For Customer Support or product service you will need to provide
the product’s serial number (on the back of the unit).
.
The websites shown above will provide the most current email addresses
for your Customer Support queries.
Country/Region Website
(with email address)
T = Telephone
F = FAX
United States www.viewsonic.com/support T: (800) 688-6688
F: (909) 468-1202
Canada www.viewsonic.com/support T: (886) 463-4775
F: (909) 468-1202
WMA_UG.book Page 53 Tuesday, October 12, 2004 3:29 PM
Page 61

ViewSonic Wireless Media Adapter 54
Maintenance
Firmware Updates
To ensure optimal WMA100 performance, check periodically for the most
recent firmware.
NOTE: Be sure you have a Internet connection.
• Firmware Update (for the WMA100): check periodically for new
firmware, go to the myView Media Guide Home page, then select
Setup > Advanced > Firmware Update.
Software Updates
To ensure optimal WMA100 performance, also check periodically for the
most recent software.
• myView Media Guide software (for the WMA100): from the myView
Media Guide Home page, go to Setup > Advanced > Software
Update.
• myView Media Manager software (for each networked PC): visit
www.ViewSonic.com and enter “WMA100” in the Search window (top
of the Home page) and click Go. Download the new version of myView
Media Manager software, then install it on each of your networked PCs.
WMA_UG.book Page 54 Tuesday, October 12, 2004 3:29 PM
Page 62

ViewSonic Wireless Media Adapter 55
Cleaning Instructions
To ensure proper ventilation, the WMA100 should periodically be wiped clean
of dust.
• Wipe the WMA100 with a clean, soft, lint-free cloth to remove dust and
other particles.
• If still not clean, apply a small amount of non-ammonia, non-alcohol
based glass cleaner onto a clean, soft, lint-free cloth, and wipe the
WMA100.
• CAUTION:
Before wiping the WMA100 with a cloth containing any liquid,
make sure the power cord is unplugged.
Never spray or pour any liquid directly onto the WMA100.
WMA_UG.book Page 55 Tuesday, October 12, 2004 3:29 PM
Page 63

ViewSonic Wireless Media Adapter 56
Regulatory Information
FCC Statement
This equipment has been tested and found to comply with the limits for a
Class B digital device, pursuant to Part 15 of the FCC Rules. These limits
are designed to provide reasonable protection against harmful interference
in a residential installation. This equipment generates, uses and can
radiate radio frequency energy and, if not installed and used in accordance
with the instructions, may cause harmful interference to radio
communications. However, there is no guarantee that interference will not
occur in a particular installation. If this equipment does cause harmful
interference to radio or television reception, which can be determined by
turning the equipment off and on, the user is encouraged to try to correct
the interference by one of the following measures:
• Reorient or relocate the receiving antenna.
• Increase the separation betw e e n th e e qu i pment and receiver.
• Connect the equipment into an outlet on a circuit different from that to
which the receiver is connected.
• Consult the dealer or an experienced radio/TV technician for help.
Chapter 7: Appendix
WMA_UG.book Page 56 Tuesday, October 12, 2004 3:29 PM
Page 64
ViewSonic Wireless Media Adapter 57
FCC Caution
Any changes or modifications not expressly approved by the party
responsible for compliance could void the user's authority to operate this
equipment.
This device complies with Part 15 of the FCC Rules. Operation is subject
to the following two conditions: (1) This device may not ca use ha rmf ul
interference, and (2) this device must accept any interference received,
including interference that may cause undesired operation.
PC Power Settings
To ensure that your networked PCs will always be available to share content
with your WMA100, be sure to set
System standby
and
System hibernates
to
Never
.
For Windows XP and 2000:
1 Click Start, then select Control Panel.
2 Select Power and Maintenance, then select Power Options.
3 Change System standby and System hibernates to Never, then click
OK.
WMA_UG.book Page 57 Tuesday, October 12, 2004 3:29 PM
Page 65

ViewSonic Wireless Media Adapter 58
Renaming Your PCs
You many want to consider renaming your networked PCs. Using names
everyone in your family understands will make it easier to find media
content on your PCs. For example, you could use names like “Dad’s PC,”
“Mom’s PC,” “Living Room PC,” etc.
For Windows XP:
1 Click Start on the Windows status bar.
2 Right-click My Computer, then select Properties.
3 Click the Computer Name tab, then click the Change button.
4 Type the new Computer Nam e, then click OK.
5 Type your User Name and Password, then click OK.
For Windows 2000
:
1 Right-click My Computer, then select Properties
2 Click the Network Identification tab, then click the Properties button.
3 Type the new Computer Nam e, then click OK.
4 Type your User Name and Password, then click OK.
WMA_UG.book Page 58 Tuesday, October 12, 2004 3:29 PM
Page 66

ViewSonic Wireless Media Adapter 59
Specifications
* Performance varies dependent on environment.
WLAN Standards
IEEE 802.11g
IEEE 802.11b
54, 48, 36, 24, 18, 9, 6 Mbps bit rate
11, 5, 2 Mbps bit rate
Ports Video
Audio
Network
Power
Composite Video, S-Video, Component Video (YPbPr),
DVI with HDCP compliance (includes DVI/VGA adapter)
Stereo Analog L/R, Coaxial S/PDIF Digital Audio
(1) 10/100 Mbps RJ-45 (auto-sensing crossover)
DC Power port
LED Indicators Color LED
Power (On/Standby), Ethernet & Wireless (Link/Activity)
Network
Interface
Ethernet
Wireless
IEEE 802.3 10-base T; IEEE 802.3u 100-base T
IEEE 802.11 g (2.4Ghz-DSS)
Video Decoding Formats MPEG-1, MPEG-2, MPEG-4, Xvid
Audio Decoding Formats MPEG-1 (Audio Layers 1&2), MP3, WMA CBR, WAV,
unprotected AAC, AC-3 (Dolby Digital 5.1 pass-thru)
Image Files Formats JPEG, GIF, PNG
Power Input
Output
Consumption
100-240V~1A (max) @ 50/60Hz
12V@1A (DC)
12W (max)
Antenna Single external antenna; single internal antenna
Output Power
(Transmitted) Max. 100 mW (after antenna)
Coverage Area* Up to 100 meters indoors
Up to 400 meters outdoors
Wireless Security 64/128 bit WEP and WPA Encryption (Windows SP, SPI
and Windows)
Operating
Conditions
Temperature
Humidity
32° F to 104° F (0° C to +40° C)
5% to 95% RH
Storage
Conditions
Temperature
Humidity
-13° F to +167° F (-25° C to +70° C)
0% to 95% RH
Dimensions
(W x H x D)
Product
Packaging
6.8” x 1.8” x 5.5” (180mm x 46mm x 148mm)
10.8” x 4.1” x 8.5” (274mm x 105mm x 217mm)
Weight Net
Gross
1.0 lb. (0.5 kg)
4.0 lb. (1.8 kg)
Regulatory
Compliance
FCC Part 15 class B, IC, UL/c-UL
WMA_UG.book Page 59 Tuesday, October 12, 2004 3:29 PM
Page 67

ViewSonic Wireless Media Adapter 60
Limited Warranty
Wireless Media Adapter Products
What the warranty covers:
ViewSonic
®
warrants its Wireless Media Adapter products to be free from defects in material and
workmanship during the warranty period. If a ViewSonic Wireless Media Adapter product proves
to be defective in material or workmanship during the warranty period, ViewSonic will, at its sole
option, repair or replace the product with a like product. Replacement product or parts may
include remanufactured or refurbished parts or components.
VIEWSONIC AND ITS SUPPLIERS DISCLAIM ALL WARRANTIES AND CONDITIONS, EITHER
EXPRESS OR IMPLIED, INCLUDING, BUT NOT LIMITED TO, IMPLIED WARRANTIES OF
MERCHANTABILITY, FITNESS FOR A PARTICULAR PURPOSE, AND NONINFRINGEMENT.
ANY SOFTWARE THAT MAY BE INCLUDED WITH THIS PRODUCT IS PROVIDED FREE OF
CHARGE AND ON AN "AS IS" BASIS, WITHOUT WARRANTY OF ANY KIND, INCLUDING
WITHOUT LIMITATION ANY WARRANTIES THAT IT IS FREE OF DEFECTS, MERCHANTABLE,
FIT FOR A PARTICULAR PURPOSE, NON-INFRINGING, OR COMPATIBLE WITH ANY OTHER
SOFTWARE. FOR YOUR SPECIFIC RIGHTS AND DUTIES, PLEASE SEE THE END-USER
LICENSE AGREEMENT (EULA) CONTAINED WITHIN THE SOFTWARE FOR YOUR PRODUCT.
How long the warranty is effective:
ViewSonic Wireless Media Adapter products are warranted for one (1) year for all parts and one
(1) year for all labor from the date of the first consumer purchase.
Who the warranty protects:
This warranty is valid only for the first consumer purchaser.
What the warranty does not cover:
1. Software
2. Any product on which the serial number has been defaced, modified or removed.
3. Damage, deterioration or malfunction resulting from:
a. Accident, misuse, neglect, fire, water, lightning, or other acts of nature, unauthorized
product modification, or failure to follow instructions supplied with the product.
b. Repair or attempted repair by anyone not authorized by ViewSonic.
c. Damage to or loss of any programs, data or removable storage media.
d. Software or data loss occurring during repair or replacement.
e. Any damage of the product due to shipment.
f. Removal or installation of the product.
g. Causes external to the product, such as electrical power fluctuations or failure.
h. Use of supplies or parts not meeting ViewSonic's specifications.
i. Normal wear and tear.
j. Any other cause which does not relate to a product defect.
4. Removal, installation, and set-up service charges.
(Page 1 of 2)
WMA_UG.book Page 60 Tuesday, October 12, 2004 3:29 PM
Page 68

ViewSonic Wireless Media Adapter 61
How to get service:
1. For information about receiving service under warranty, contact ViewSonic Customer
Support. You will need to provide your product's serial number.
2. To obtain service under warranty, you will be required to provide (a) the original dated sales
slip, (b) your name, (c) your address, (d) a description of the problem, and (e) the serial
number of the product.
3. Take or ship the product freight prepaid in the original container to an authorized ViewSonic
service center or ViewSonic.
4. For additional information or the name of the nearest ViewSonic service center, contact
ViewSonic.
Limitation of implied warranties:
THERE ARE NO WARRANTIES, EXPRESS OR IMPLIED, WHICH EXTEND BEYOND THE
DESCRIPTION CONTAINED HEREIN INCLUDING THE IMPLIED WARRANTY OF
MERCHANTABILITY AND FITNESS FOR A PARTICULAR PURPOSE.
Exclusion of damages:
VIEWSONIC'S LIABILITY IS LIMITED TO THE COST OF REPAIR OR REPLACEMENT OF
THE PRODUCT. VIEWSONIC SHALL NOT BE LIABLE FOR:
1. DAMAGE TO OTHER PROPERTY CAUSED BY ANY DEFECTS IN THE PRODUCT,
DAMAGES BASED UPON INCONVENIENCE, LOSS OF USE OF THE PRODUCT, LOSS
OF DATA, LOSS OF TIME, LOSS OF PROFITS, LOSS OF BUSINESS OPPORTUNITY,
LOSS OF GOODWILL, INTERFERENCE WITH BUSINESS RELATIONSHIPS, OR
OTHER COMMERCIAL LOSS, EVEN IF ADVISED OF THE POSSIBILITY OF SUCH
DAMAGES.
2. ANY OTHER DAMAGES, WHETHER INCIDENTAL, CONSEQUENTIAL OR OTHERWISE.
3. ANY CLAIM AGAINST THE CUSTOMER BY ANY OTHER PARTY.
Effect of state law:
This warranty gives you specific legal rights, and you may also have other rights which vary from
state to state. Some states do not allow limitations on implied warranties and/or do not allow the
exclusion of incidental or consequential damages, so the above limitations and exclusions may
not apply to you.
ViewSonic Wireless Media Adapter Products Warranty (V1.0)
Release Date: June 3, 2004
(Page 2 of 2)
WMA_UG.book Page 61 Tuesday, October 12, 2004 3:29 PM
Page 69

WMA_UG.book Page 1 Tuesday, October 12, 2004 3:29 PM
 Loading...