

Page 1

VSD224
Smart Display
User Guide
Model No. VS15959
Page 2

Thank you for choosing ViewSonic
With over 25 years as a world leading provider of visual solutions,
ViewSonic is dedicated to exceeding the world’s expectations for
technological evolution, innovation, and simplicity. At ViewSonic, we
believe that our products have the potential to make a positive impact
in the world, and we are condent that the ViewSonic product you have
chosen will serve you well.
Once again, thank you for choosing ViewSonic !
Page 3
Compliance Information
Please read before proceeding
• Use only the batteries and power adapter provided by the manufacturer. The use of
unauthorized accessories may void your warranty.
• Do not store your device in temperatures higher than 50°C (122°F).
• The operating temperature for this device is from 0°C (32°F) to 35°C (95°F).
CE Conformity for European Countries
The device complies with the EMC Directive 2004/108/EC and Low Voltage
Directive 2006/95/EC.
European Union Regulatory Conformance
The equipment complies with the RF Exposure Requirement 1999/519/EC, Council
Recommendation of 12 July 1999 on the limitation of exposure of the general public to
electromagnetic elds (0-300 GHz). This equipment meets the following conformance
standards: EN301489-1, EN301489-17, EN55022/24, EN60950-1, EN300328.
We, hereby, declare that this Wi-Fi & Bluetooth radio is in compliance with the essential
requirements and other relevant provisions of Directive 1999/5/EC.
Following information is only for EU-member states:
The mark shown to the right is in compliance with the Waste Electrical and
Electronic Equipment Directive 2012/19/EU (WEEE).
The mark indicates the requirement NOT to dispose the equipment as unsorted
municipal waste, but use the return and collection systems according to local law.
If the batteries, accumulators and button cells included with this equipment,
display the chemical symbol Hg, Cd, or Pb, then it means that the battery has a
heavy metal content of more than 0.0005% Mercury, or more than 0.002%
Cadmium, or more than 0.004% Lead.
i2
Page 4
Declaration of RoHS2 Compliance
This product has been designed and manufactured in compliance with Directive 2011/65/
EU of the European Parliament and the Council on restriction of the use of certain
hazardous substances in electrical and electronic equipment (RoHS2 Directive) and
is deemed to comply with the maximum concentration values issued by the European
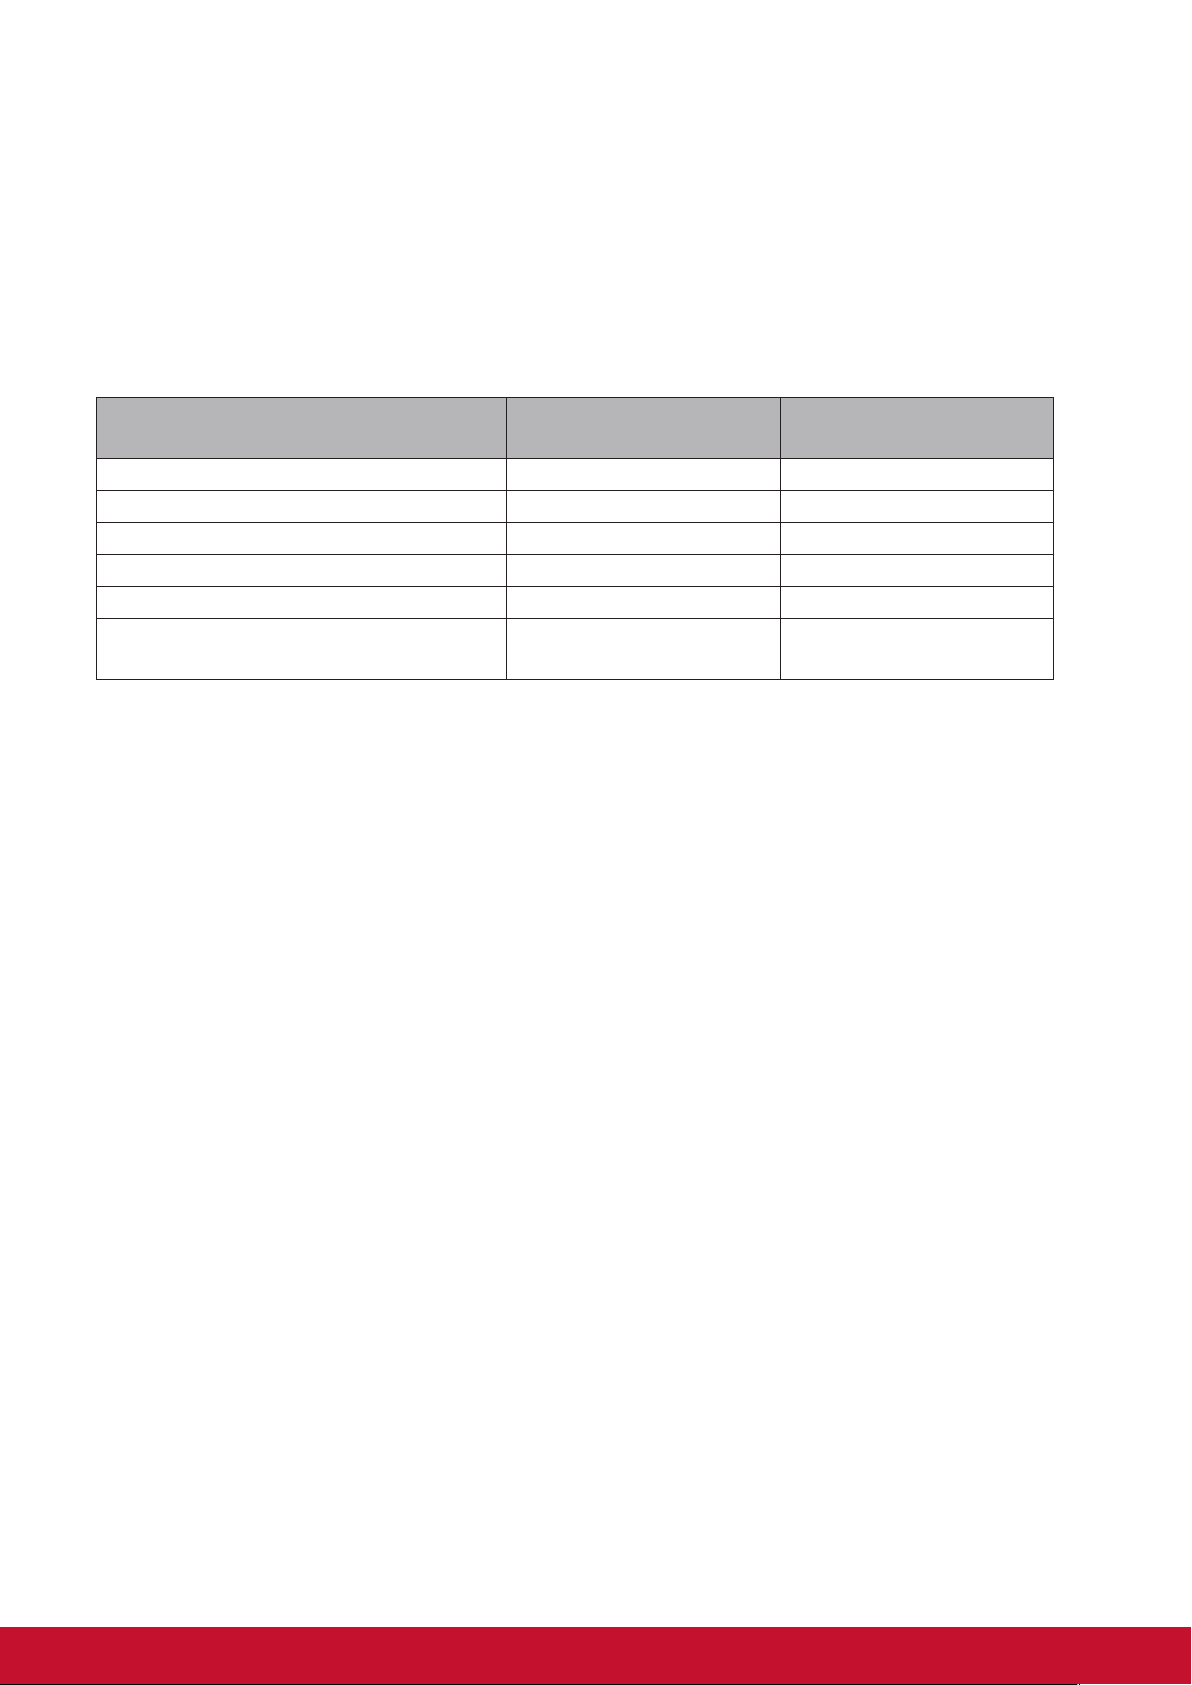
Technical Adaptation Committee (TAC) as shown below:
Substance
Lead (Pb) 0.1% < 0.1%
Mercury (Hg) 0.1% < 0.1%
Cadmium (Cd) 0.01% < 0.01%
Hexavalent Chromium (Cr6+) 0.1% < 0.1%
Polybrominated biphenyls (PBB) 0.1% < 0.1%
Polybrominated diphenyl ethers
(PBDE)
Certain components of products as stated above are exempted under the Annex III of the
RoHS2 Directives as noted below:
Examples of exempted components are:
1. Mercury in cold cathode uorescent lamps and external electrode uorescent lamps
(CCFL and EEFL) for special purposes not exceeding (per lamp):
(1) Short length (≦500 mm): maximum 3.5 mg per lamp.
(2) Medium length (>500 mm and ≦1,500 mm): maximum 5 mg per lamp.
(3) Long length (>1,500 mm): maximum 13 mg per lamp.
Proposed Maximum
Concentration
0.1% < 0.1%
Actual Concentration
2. Lead in glass of cathode ray tubes.
3. Lead in glass of uorescent tubes not exceeding 0.2% by weight.
4. Lead as an alloying element in aluminium containing up to 0.4% lead by weight.
5. Copper alloy containing up to 4% lead by weight.
6. Lead in high melting temperature type solders (i.e. lead-based alloys containing 85% by
weight or more lead).
7. Electrical and electronic components containing lead in a glass or ceramic other than
dielectric ceramic in capacitors, e.g. piezoelectric devices, or in a glass or ceramic
matrix compound.
Page 5

Important Safety Instructions
1. DO NOT place objects on top of the device, as objects may scratch the screen.
2. DO NOT expose the device to dirty or dusty environments.
3. DO NOT place the device on an uneven or unstable surface.
4. DO NOT insert any foreign objects into the device.
5. DO NOT expose the device to strong magnetic or electrical eld.
6. DO NOT expose the device to direct sunlight as it can damage the LCD Screen. Keep
it away from heat sources.
7. DO NOT use the device in the rain.
8. Please check with your Local Authority or retailer for proper disposal of electronic
products.
9. The device and the adapter may produce some heat during normal operation or
charging. To prevent discomfort or injury from heat exposure, DO NOT leave the
device on your lap.
10. POWER INPUT RATING: Refer to the rating label on the device and be sure that
the power adapter complies with the rating. Only use accessories specied by the
manufacturer.
11. DO NOT use a pen or any sharp object to tap the screen.
12. Clean the screen with a soft cloth. If needed, dampen the cloth slightly before
cleaning. Never use abrasives or cleaning solutions.
13. Always power off the device to install or remove external devices that do not support
hot-plug.
14. Disconnect the device from an electrical outlet and power off before cleaning the
device.
15. DO NOT disassemble the device. Only a certied service technician should perform
repair.
16. The device has apertures to disperse heat. DO NOT block the device ventilation, the
device may become hot and malfunction as a result.
17. Users have to use the connection to USB interfaces with USB 2.0 version or higher.
18. PLUGGABLE EQUIPMENT: the socket-outlet shall be installed near the equipment
and shall be easily accessible.
iiiii
Page 6

Copyright Information
Copyright © ViewSonic Corporation, 2015. All rights reserved.
Android™ is a trademark of Google Inc. Use of this trademark is subject to Google
Permissions.
This product has an Android™ platform based on Linux, which can be expanded by a
variety of JME-based application SW.
All products used in this device and trademarks mentioned herein are trademarks or
registered trademarks of their respective owners.
Google™, the Google logo, Android™, the Android logo and Gmail™ are trademarks of
Google Inc. Use of this trademark is subject to Google Permissions.
Wi-Fi and the Wi-Fi CERTIFIED logo are registered trademarks of the Wireless Fidelity
Alliance.
microSD™ is a trademark of SD Card Association.
Java, JME and all other Java-based marks are trademarks or registered trademarks of
Sun Microsystems, Inc. in the United States and other countries.
The actual included applications (apps) may differ from the illustrated screen shots.
VESA
and DDC are trademarks of VESA®.
ENERGY STAR® is a registered trademark of the U.S. Environmental Protection Agency
(EPA).
As an ENERGY STAR® partner, ViewSonic Corporation has determined that this product
meets the ENERGY STAR® guidelines for energy efciency.
Disclaimer: ViewSonic Corporation shall not be liable for technical or editorial errors
or omissions contained herein; nor for incidental or consequential damages resulting
from furnishing this material, or the performance or use of this product.In the interest of
continuing product improvement, ViewSonic Corporation reserves the right to change
product specications without notice. Information in this document may change without
notice.
No part of this document may be copied, reproduced, or transmitted by any means, for
any purpose without prior written permission from ViewSonic Corporation.
®
is a registered trademark of the Video Electronics Standards Association. DPMS
Intellectual Property Right Information
Right to all technologies and products that comprise this device are the property of their
respective owners:
This product has an Android platform based on Linux, which can be expanded by a variety
of Java-Script-based application SW.
Google, the Google logo, Android, the Android logo, Gmail, and YouTube are trademarks
of Google Inc. Java, JME and all other Java-based marks are trademarks or registered
trademarks of Sun Microsystems, Inc. in the United States and other countries.microSD is
a trademark of SD Card Association.
Page 7

Product Registration
To meet your future needs, and to receive any additional product information as it
becomes available, please register your product on the Internet at: www.viewsonic.com.
For Your Records
Product Name:
Model Number:
Document Number:
Serial Number:
Purchase Date:
Product disposal at end of product life
ViewSonic respects the environment and is committed to working and living green. Thank
you for being part of Smarter, Greener Computing. Please visit ViewSonic website to learn
more.
USA & Canada: http://www.viewsonic.com/company/green/recycle-program/
Europe: http://www.viewsoniceurope.com/uk/support/recycling-information/
Taiwan: http://recycle.epa.gov.tw/recycle/index2.aspx
VSD224
ViewSonic Smart Display
VS15959
VSD224_UG_ENG Rev. 1A 03-18-15
_______________________________
_______________________________
viv
Page 8
Table of Contents
Table of Contents
1 VSD224 Smart Display Features
2 Set Up Your VSD224 Smart Display
2.1 Connection ......................................................................... 2
2.2 Get Your Smart Display Ready for Use .............................. 2
2.3 Power on Your Device ........................................................ 3
2.4 Power Off Your Device ....................................................... 4
3 About Your VSD224 Smart Display
3.1 Touch Screen ..................................................................... 5
3.2 Applications, Widgets and Shortcuts .................................. 6
3.3 Home Screen ..................................................................... 6
3.4 Navigation buttons .............................................................. 8
3.5 Status Bar ........................................................................... 9
3.5.1 Managing Status Menu .......................................... 9
3.6 Customizing Your Home Screen ...................................... 10
3.7 Navigating the Applications ...............................................11
3.8 Connecting to HDMI-compliant Devices via HDMI Input .. 13
4 OSD Menu
4.1 Adjustment Bars ............................................................... 14
4.2 Functions items ................................................................ 15
4.3 OSD Notice....................................................................... 16
4.4 OSD and Hot keys setting ................................................ 16
3.6.1 Add an Item (Shortcut) ........................................ 10
3.6.2 Move an Item ..................................................... 10
3.6.3 Delete an Item .................................................... 10
3.6.4 Change the Wallpaper ........................................ 10
3.7.1 Apps screen ..........................................................11
3.7.2 Application Shortcuts ............................................ 11
3.7.3 Recent Applications ............................................. 12
3.7.4 Screen Lock Wallpaper ........................................ 12
5 Troubleshooting
6 Appendix
5.1 Touch Screen Problems ................................................... 17
5.2 Other Problems ................................................................ 17
Specication ............................................................................. 18
Page 9
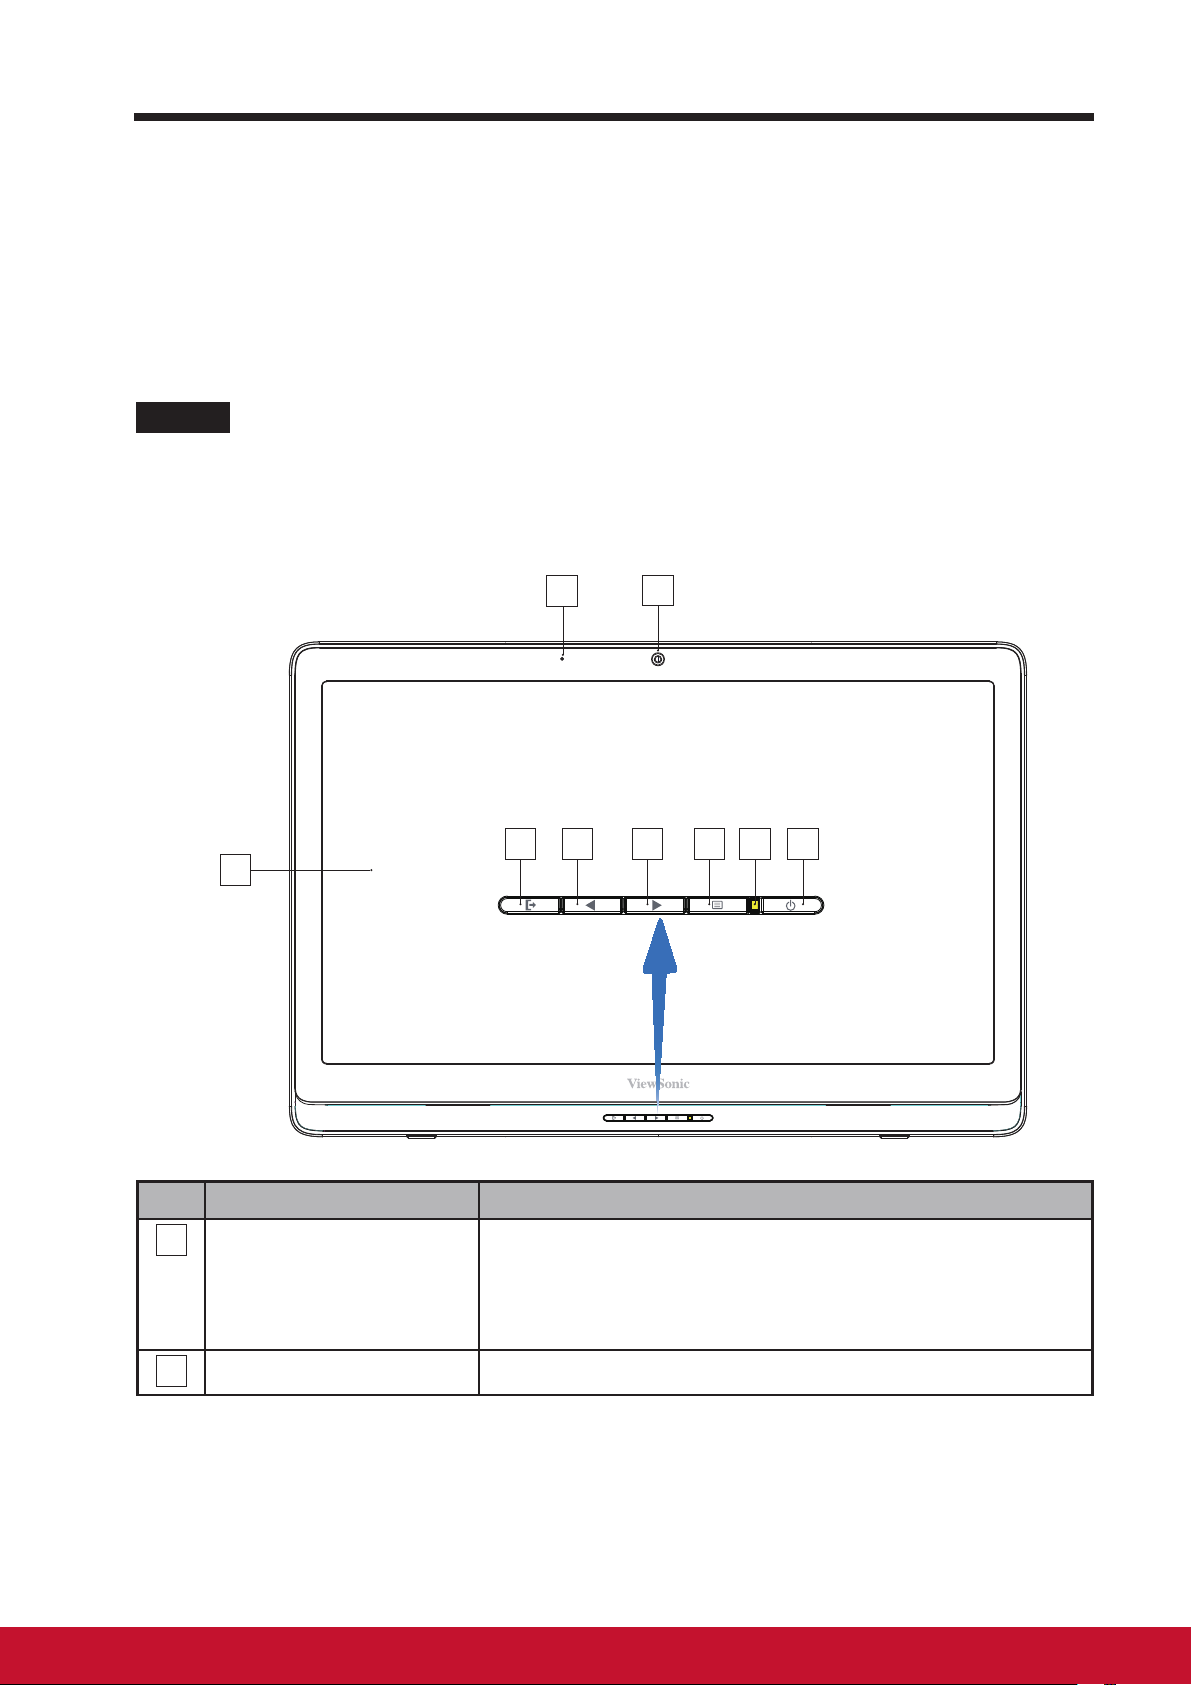
Table of Contents
VSD224 is a Smart Display with 21.5-inch quad-core display running on
Android 4.4 KitKat
. Comes with 1920x1080p HD resolution, allow you to work
with HDMI, full-sized USB connectivity as well.
1 VSD224 Smart Display Features
This section introduces you to the features of your Smart Display.
NOTE
• The features or applications described in this User’s manual may vary depended on the
device model purchased.
Front View
2
3
1
46789 5
No. Components Descriptions
Front-Panel Camera - Used for taking a front picture just the same as a
1
self-portrait.
- Used for making video calls with supportive web
applications.
Microphone Used for receiving audio or audio input.
2
viivi
Page 10
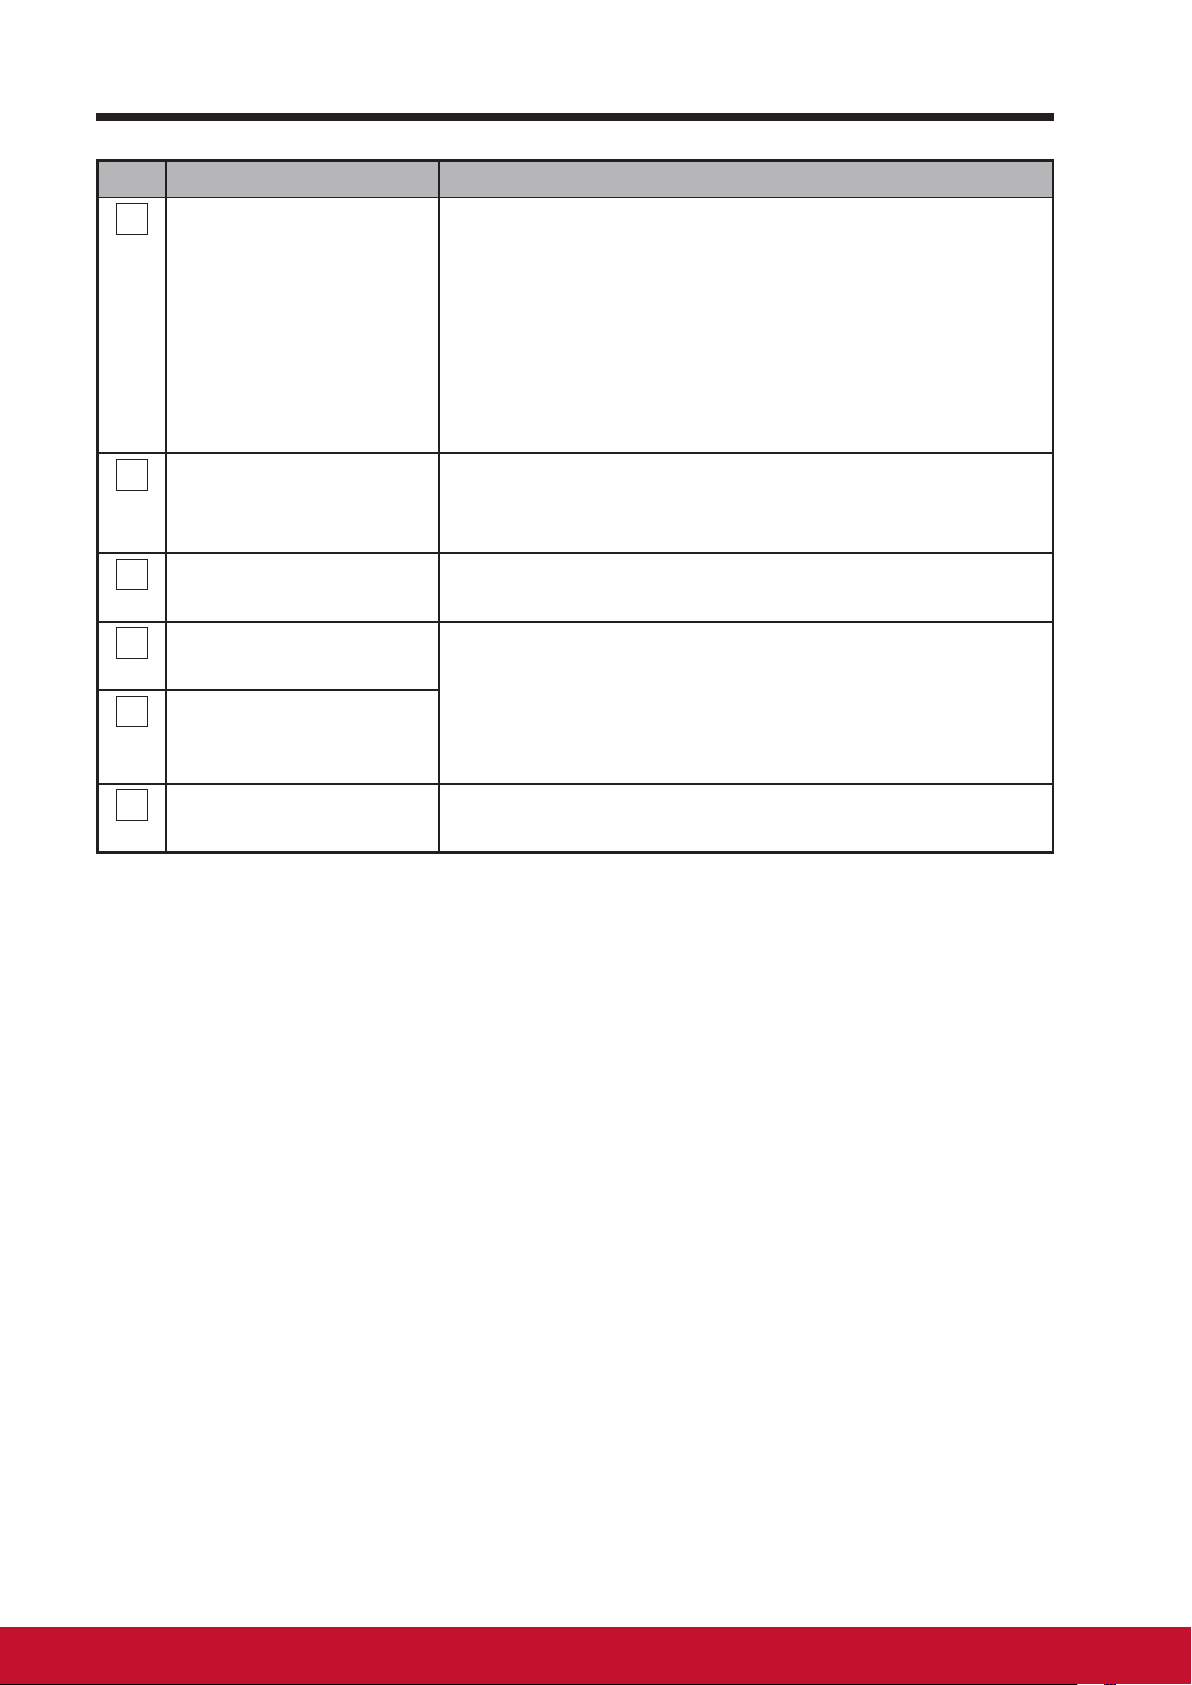
Table of Contents
No. Components Descriptions
Power button Press to power on / lock the smart display.
3
- Press about 0.5 seconds to power on the power.
- Lock the smart display when the display is on.
- Recall the unlock display when the smart display
is locked.
- When the display is on, press this button and
hold for about 3 seconds to shut down the smart
display (under Android mode).
LED indicator - LED in blue when power on.
4
- LED turns into amber when smart display be
locked.
OSD Menu / Exit Press this button to launch the OSD conguration
5
menu and press again to exit.
Arrow Button
6
(Down / Left)
Arrow Button
7
(Up / Right)
Input Signal Switch
8
OSD Menu Select
Use the arrow buttons (Up / Right and Down / Left)
to move through OSD menus. You can highlight a
menu item by pressing the arrow buttons. You can
also use the arrow buttons to adjust the values to
each item of OSD menu.
Press to switch Input signal (Android/HDMI)
Select function in OSD menu.
Page 11
Back View
VSD224 Smart Display Features
1
1
MicroSD
Micro
HDMI
DC IN
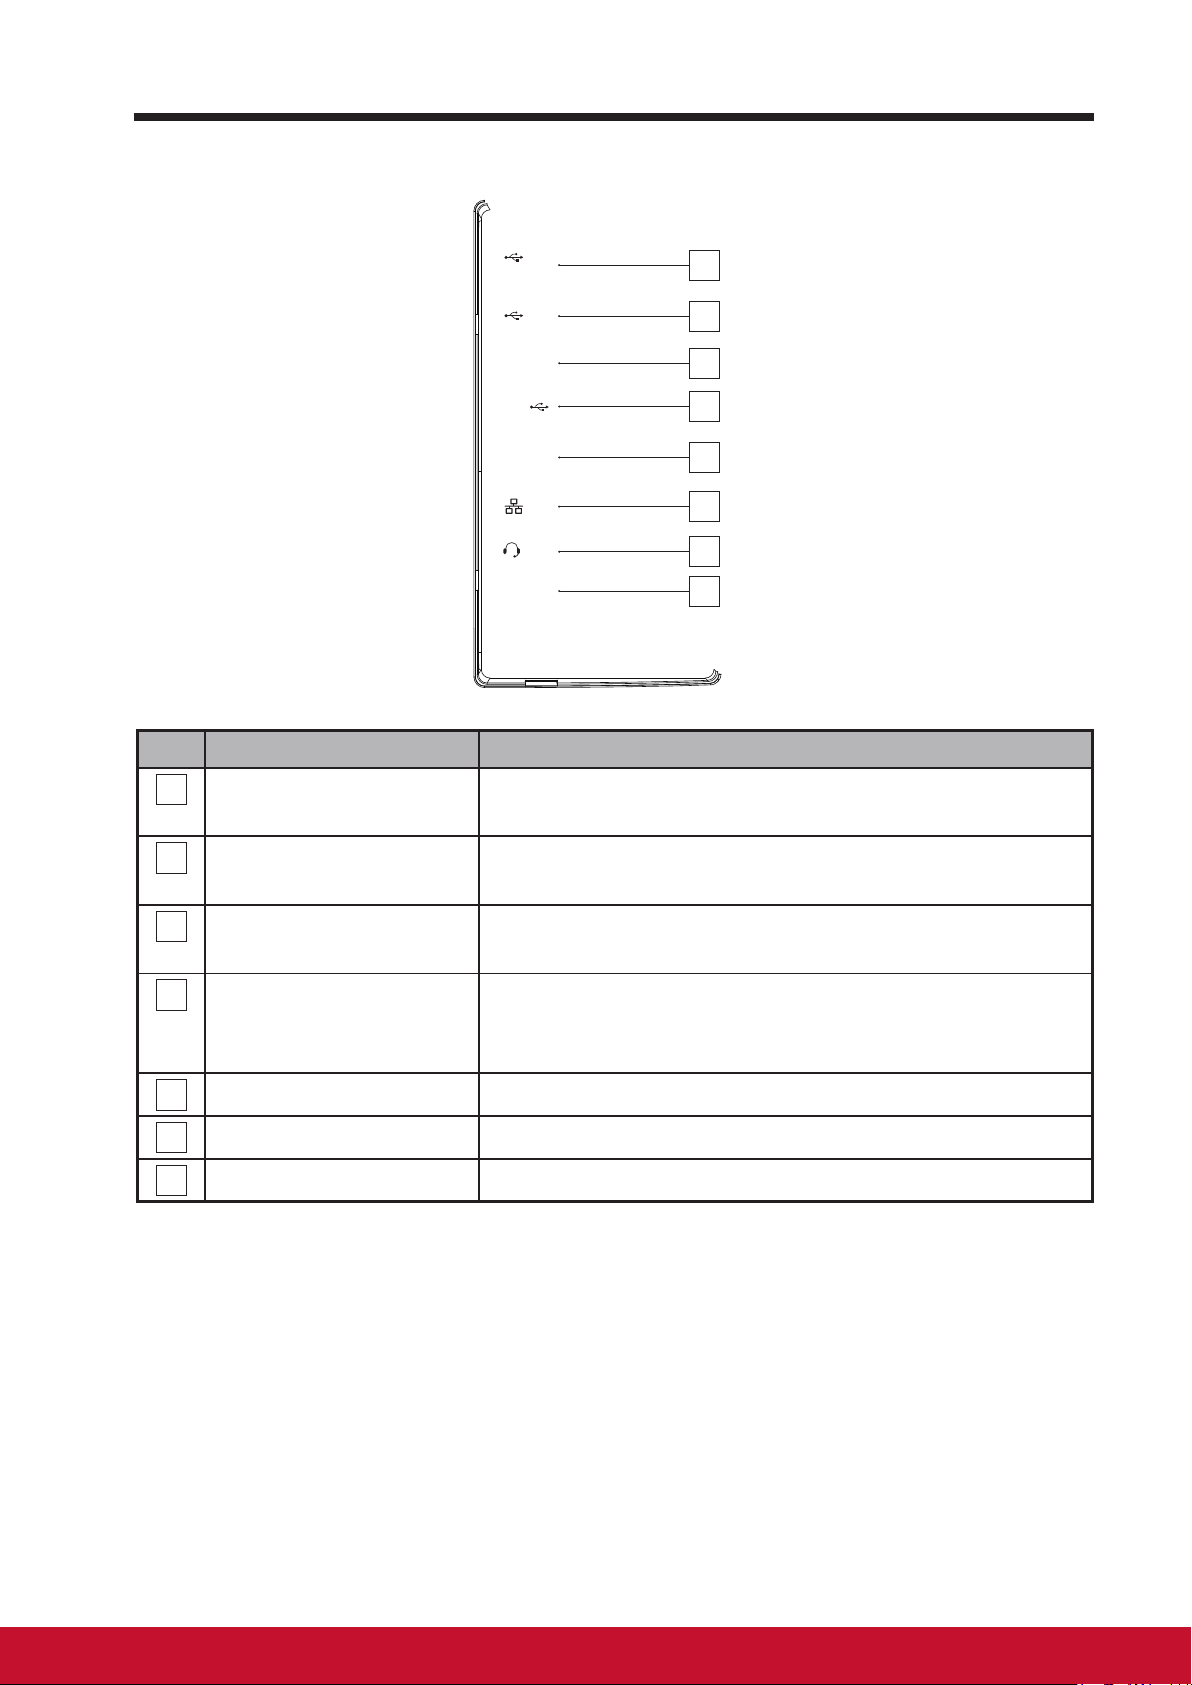
No. Components Descriptions
USB Ports 2.0 x2
1
Used for keyboard, mouse, ash disk ( supports
FAT32 format only) or printer connections.
MicroSD Card Slot
2
Input SD card to extend storage capacity. (Up to
32 GB)
Micro USB Port
3
Connect to windows computer for data transferring.
(Need MTP driver)
2
3
4
5
6
7
HDMI IN
4
RJ45 Connector
5
Earphone Jack
6
DC in Port
7
Connect to digital high quality device for video and
audio congurations (e.g. DVD Player, BD Player
VPG or Notebook).
Connect to a RJ45 cable for network connection.
Connect to earphone or headset.
Connect to power adaptor.
1viii 1viii
Page 12
Set Up Your VSD224 Smart Display
2 Set Up Your VSD224 Smart Display
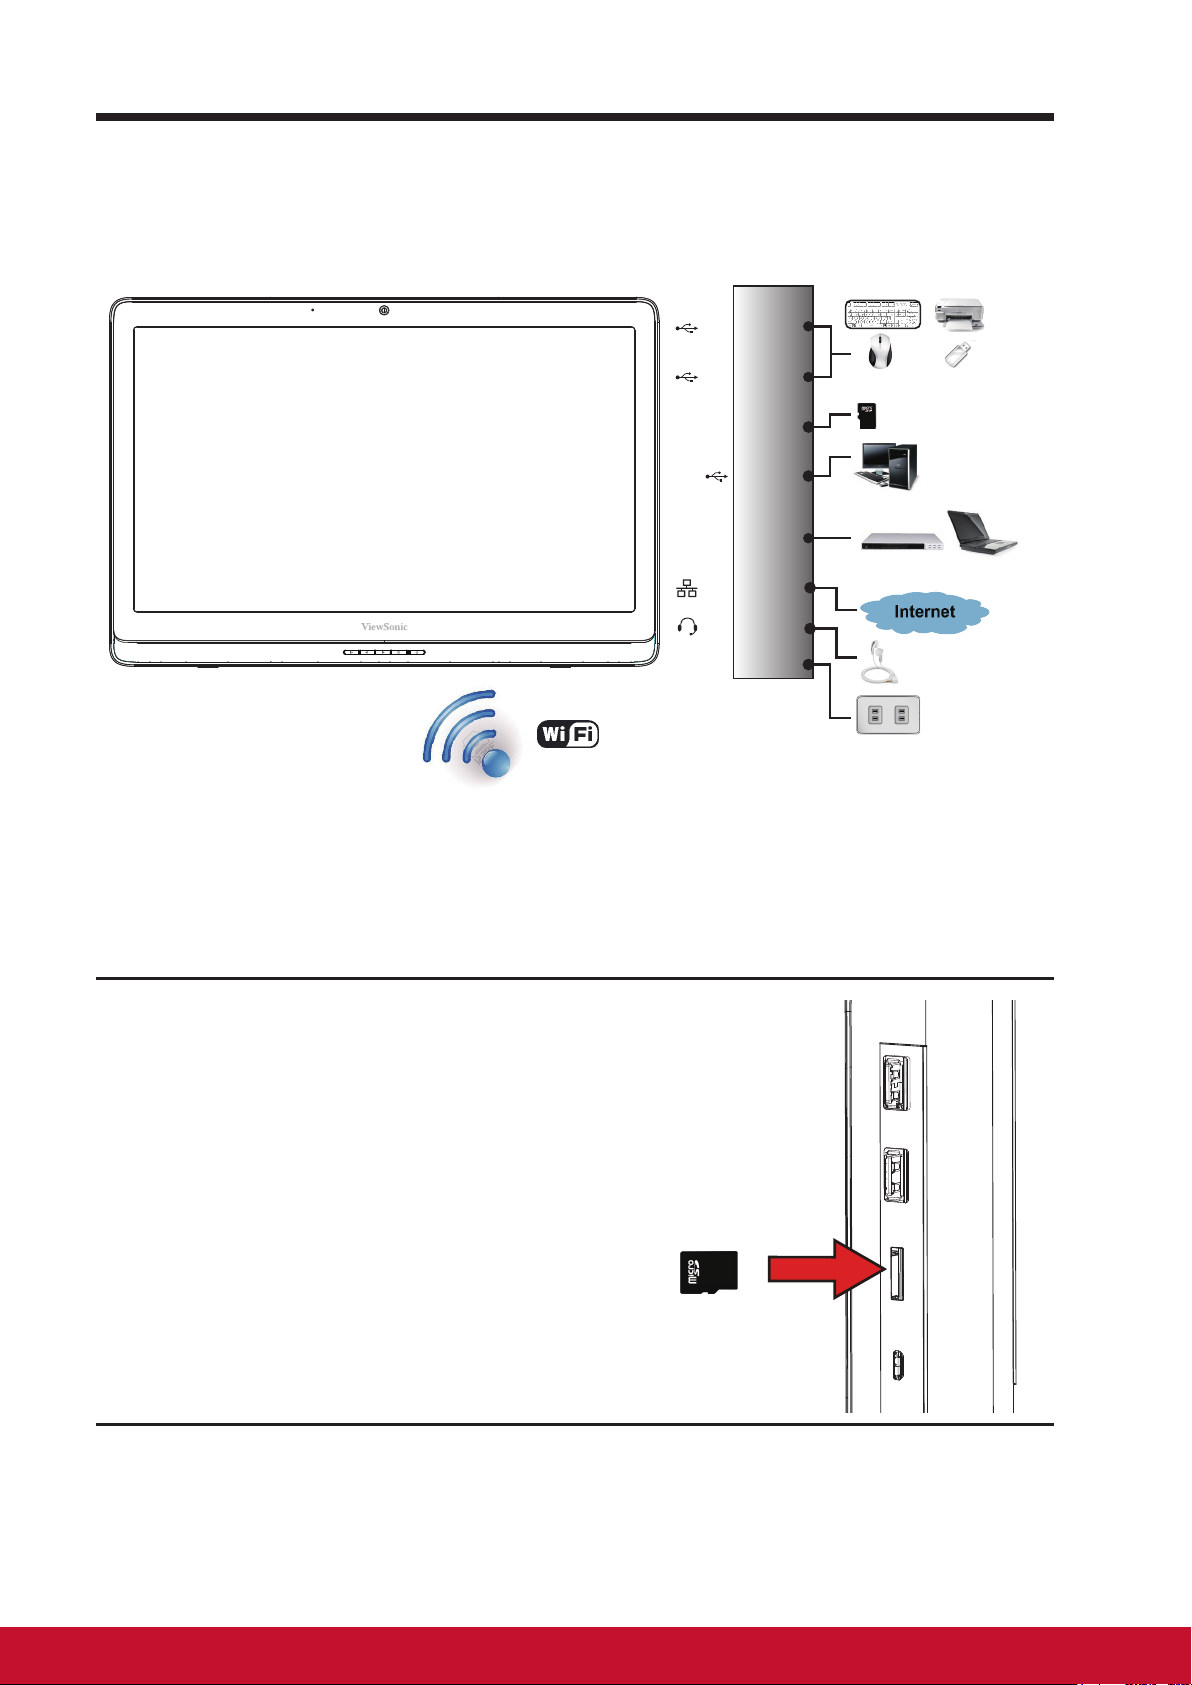
2.1 Connection
USB
Keyboard Printer
USB
MicroSD
Micro
HDMI
DC IN
Wi-Fi Devices
MicroSD
MicroUSB
HDMI
LAN
Earphone
Power
2.2 Get Your Smart Display Ready for Use
Insert the SD card
Mouse USB Storage
Micro SD card
External
Computer
DVD Player
Notebook
Earphone
Outlet
Insert a Micro SD card if desired and /
1
or available on the back of your smart
display.
Page 13
Connect the Power Cord
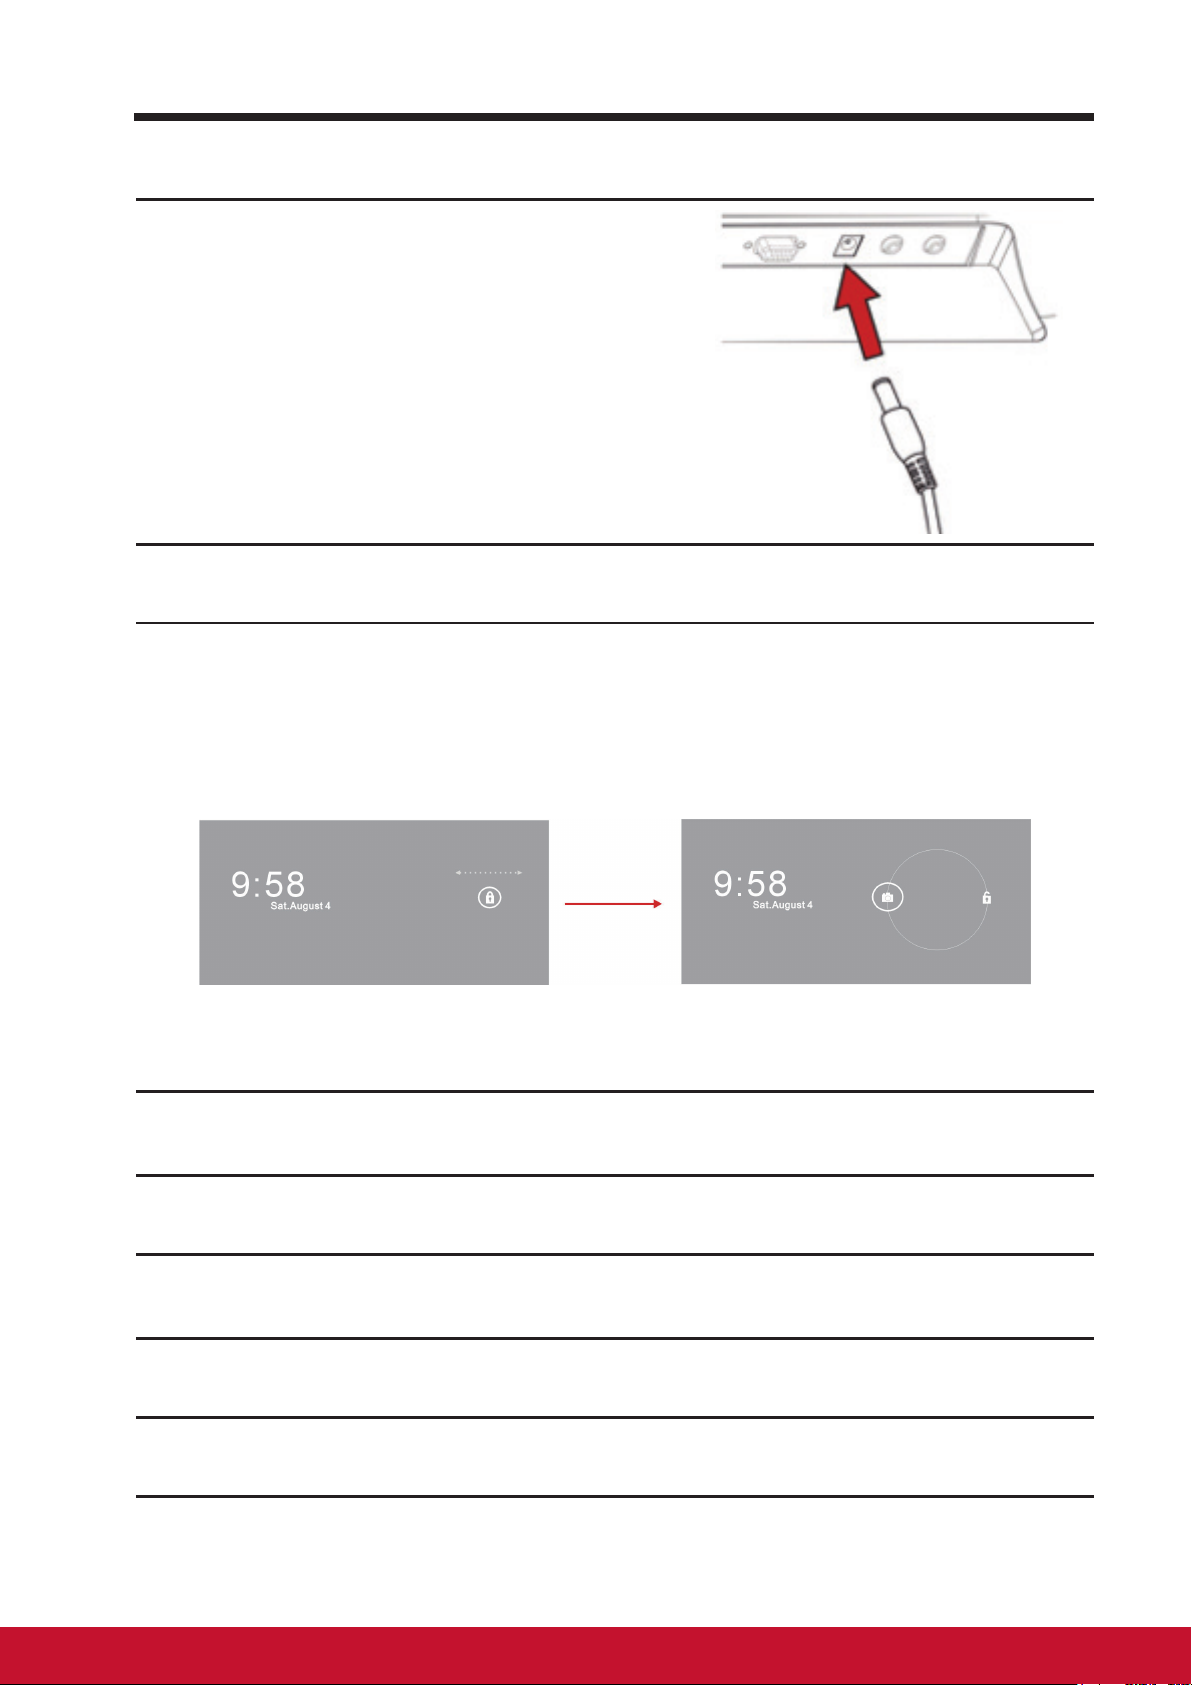
Connect the included power cord to
1
the power jack.
Connect the other end of the power cord to a suitable power outlet.
2
Set Up Your VSD224 Smart Display
2.3 Power on Your Device
Press the power button gently to power on your device
Slide the lock icon to unlock the screen
(if the lock screen function with slide is enabled)
After connecting the power cord, you can press the power button about
1
0.5 seconds to power on your device.
Once powered-up, the LED indicator will show solid Blue.
2
The unlock display will appear after a short boot-up period. (If the lock
3
screen function is enabled).
Touch and slide the lock icon to unlock the screen if necessary.
4
The device is ready for use when the Home screen is displayed.
5
32
Page 14
Set Up Your VSD224 Smart Display
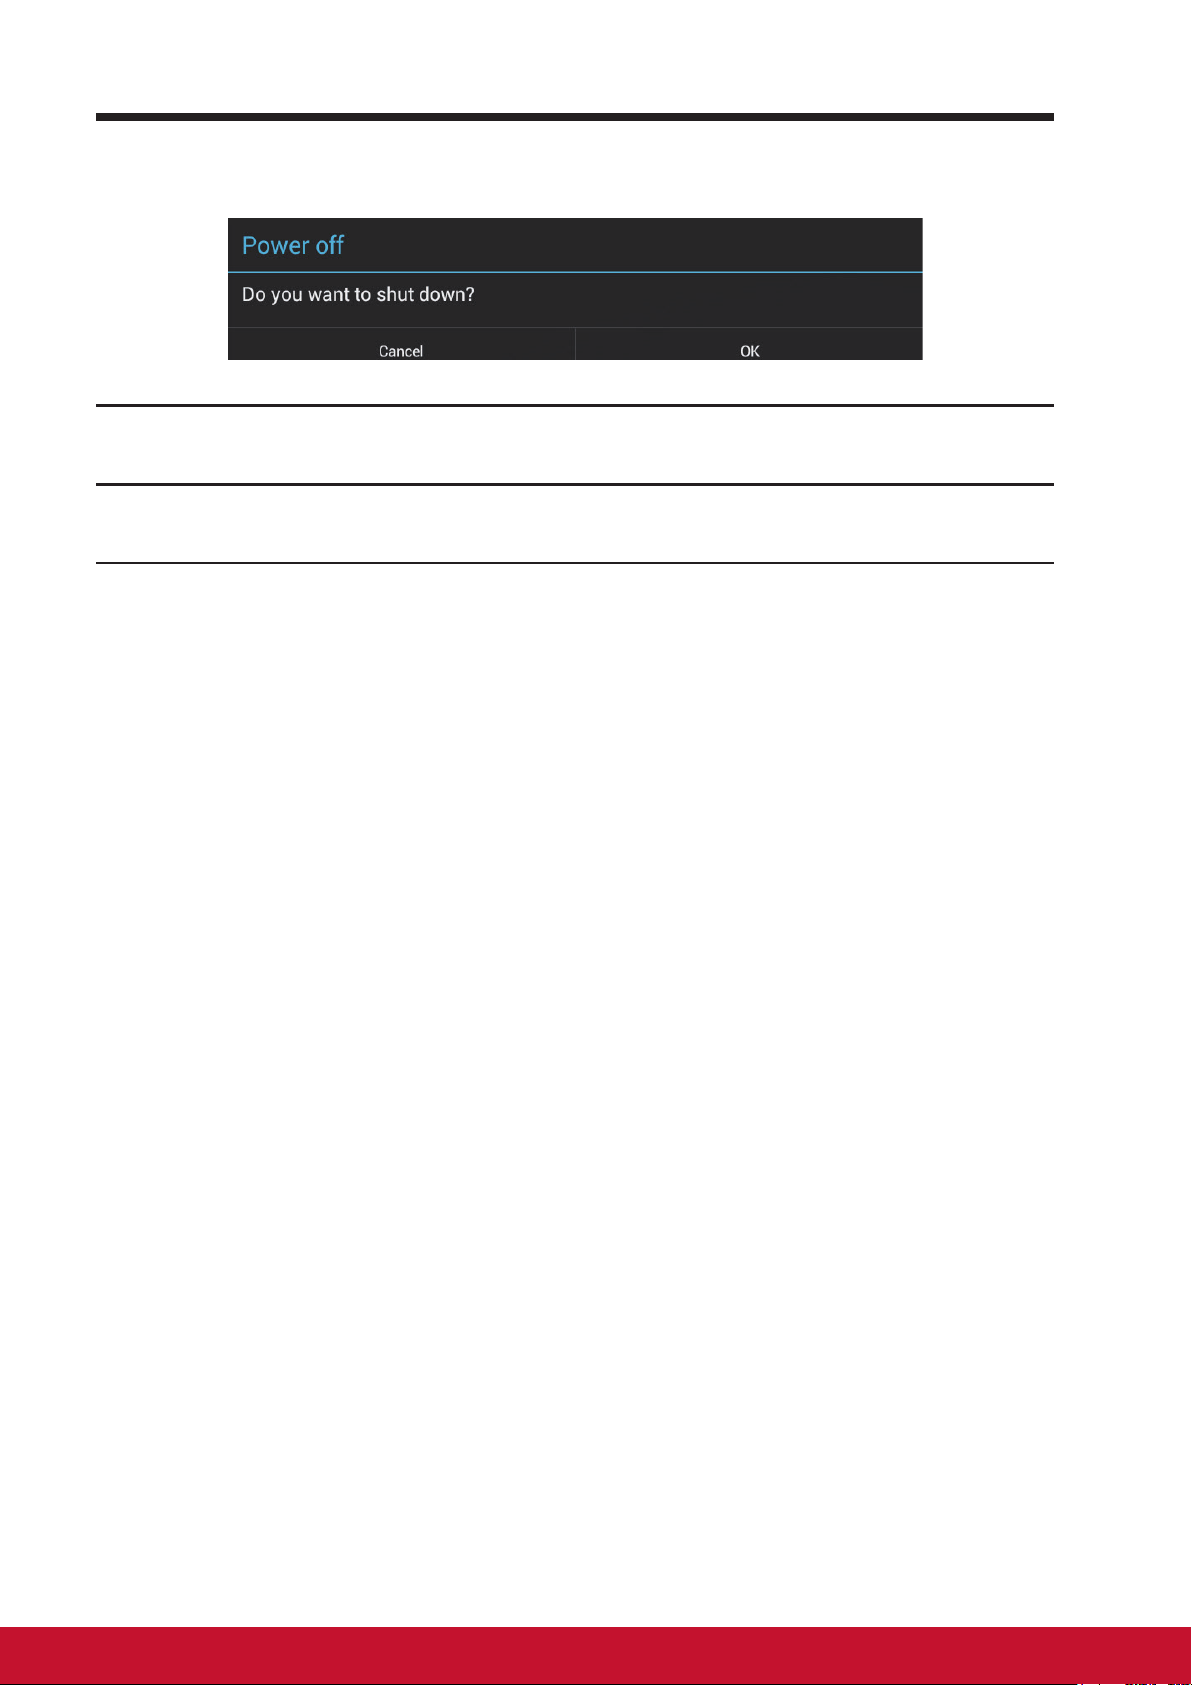
2.4 Power Off Your Device
Press and hold the power button for about 3 seconds.
1
When the power off menu appears, touch OK.
2
Page 15
About Your VSD224 Smart Display
3 About Your VSD224 Smart Display
3.1 Touch Screen
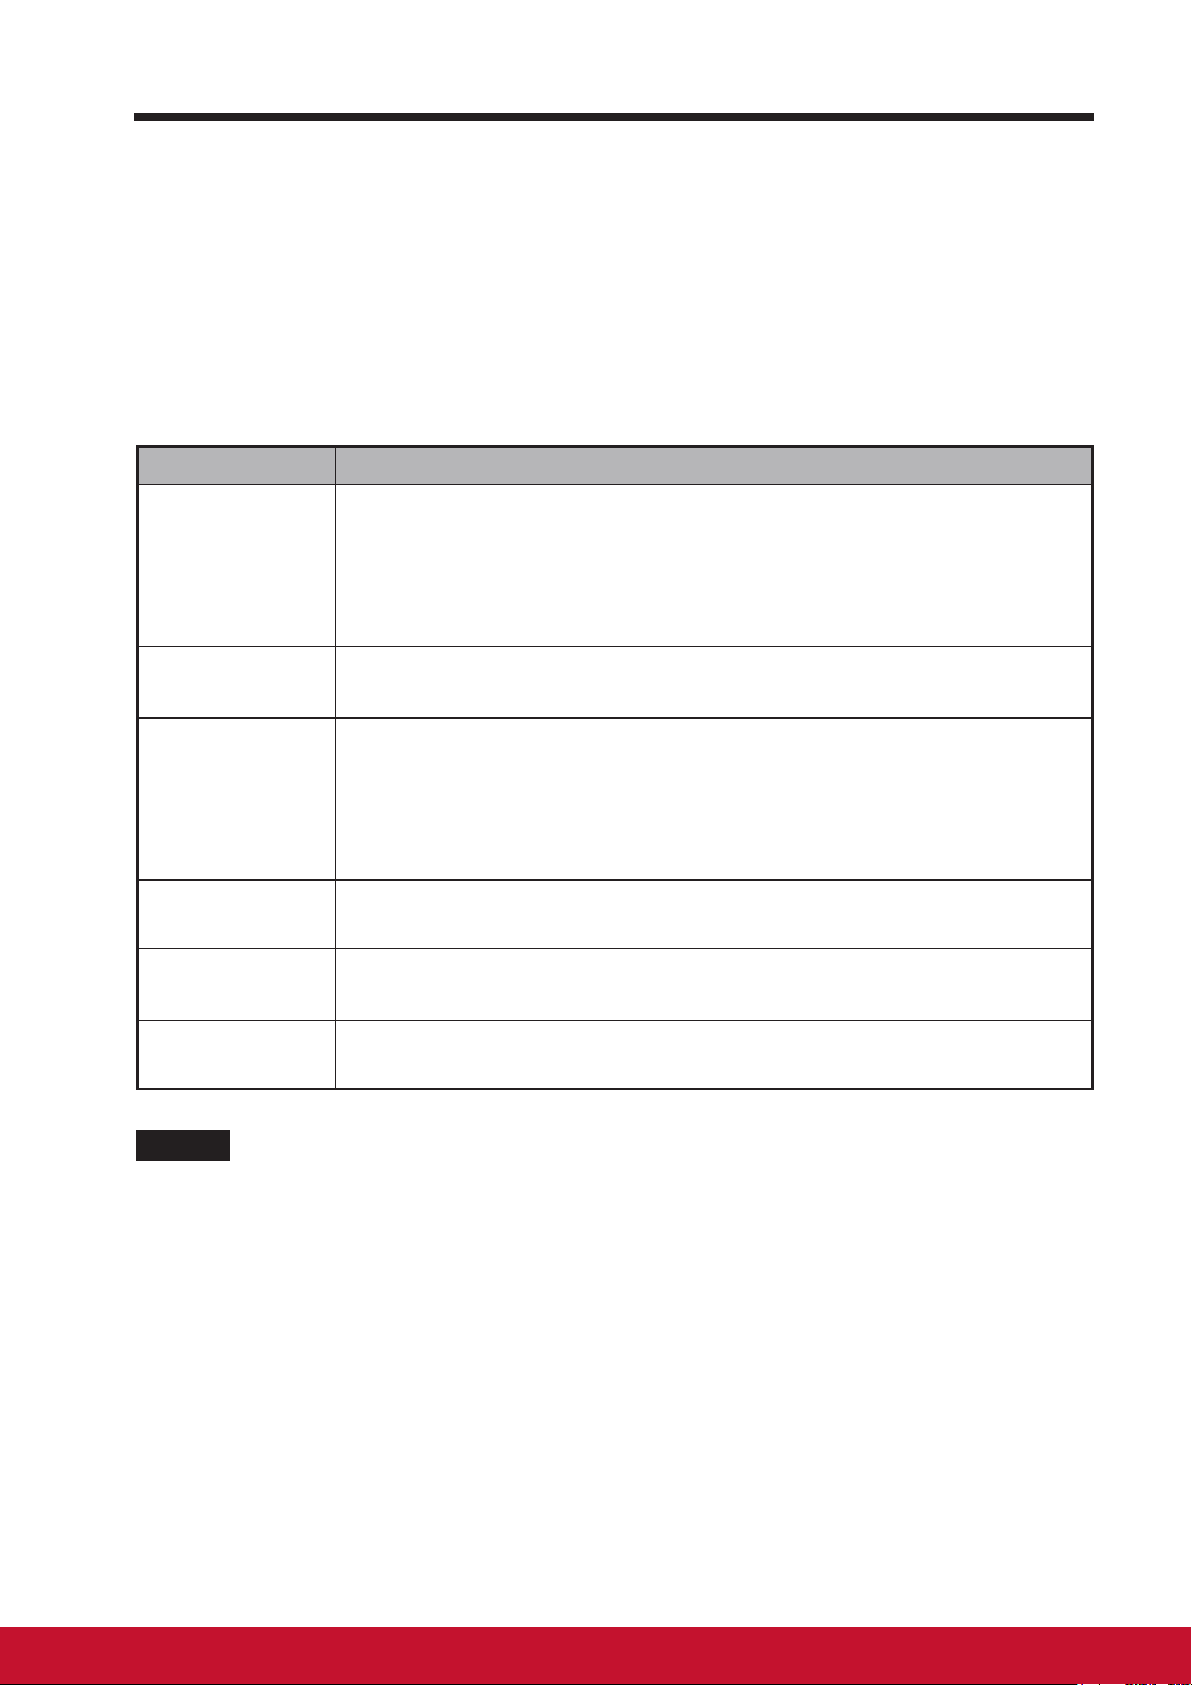
The main way to control the device is using your nger to touch the sensitive
surface of the screen directly. You can manipulate icons, buttons, menu
items, on-screen keyboard and other items on the touch screen with below
methods:
Methods Descriptions
Touch Simply touch the items with you nger.
- Act on items on the screen including application and settings
icons.
- Type letters and symbols using the on-screen keyboard.
- Press the on-screen buttons.
Touch and
Hold
Drag Touch and hold an item then move the item with your nger until
Swipe or Slide Quickly move your nger across the surface of the screen
Zoom Out Move two ngers close together on the screen to reduce the
Zoom In Move two ngers apart on the screen to enlarge the view of an
NOTE
• You can connect the dots three to zoom the entire display frequency, also with two
ngers to rotate and zoom the display for ex. Google map, as well as voice output
designed specically for blind users and gesture mode navigation features.
Touch and hold an item on the screen by touching it without
lifting your nger until an action occurs.
reaching the target position.
- Move an item on the screen.
- Scroll through Home screens, web pages, lists, entries, photo
thumbnails, contacts and so on.
without pausing when you rst touch it.
view of an image or web page.
image or web page.
54
Page 16

About Your VSD224 Smart Display
3.2 Applications, Widgets and Shortcuts
The soft buttons or icons offer a variety of functions and shortcuts. On the
Home screen, it is your starting point to access all the features on your
device. It displays application icons, widgets, shortcuts and so on.
Applications: Software allows you to perform a specic task. Power on your
device, it is preloaded with a variety of applications already. You can also
download additional applications from the Google Play Store.
Widgets: Widgets are applications that you can use directly on the Home
screen. Example: Analog clock, Bookmark, Picture frame, the Google search
bar and so on.
Shortcuts: A link that you can create on your Home screen to provide
quicker access to applications you have installed.
3.3 Home Screen
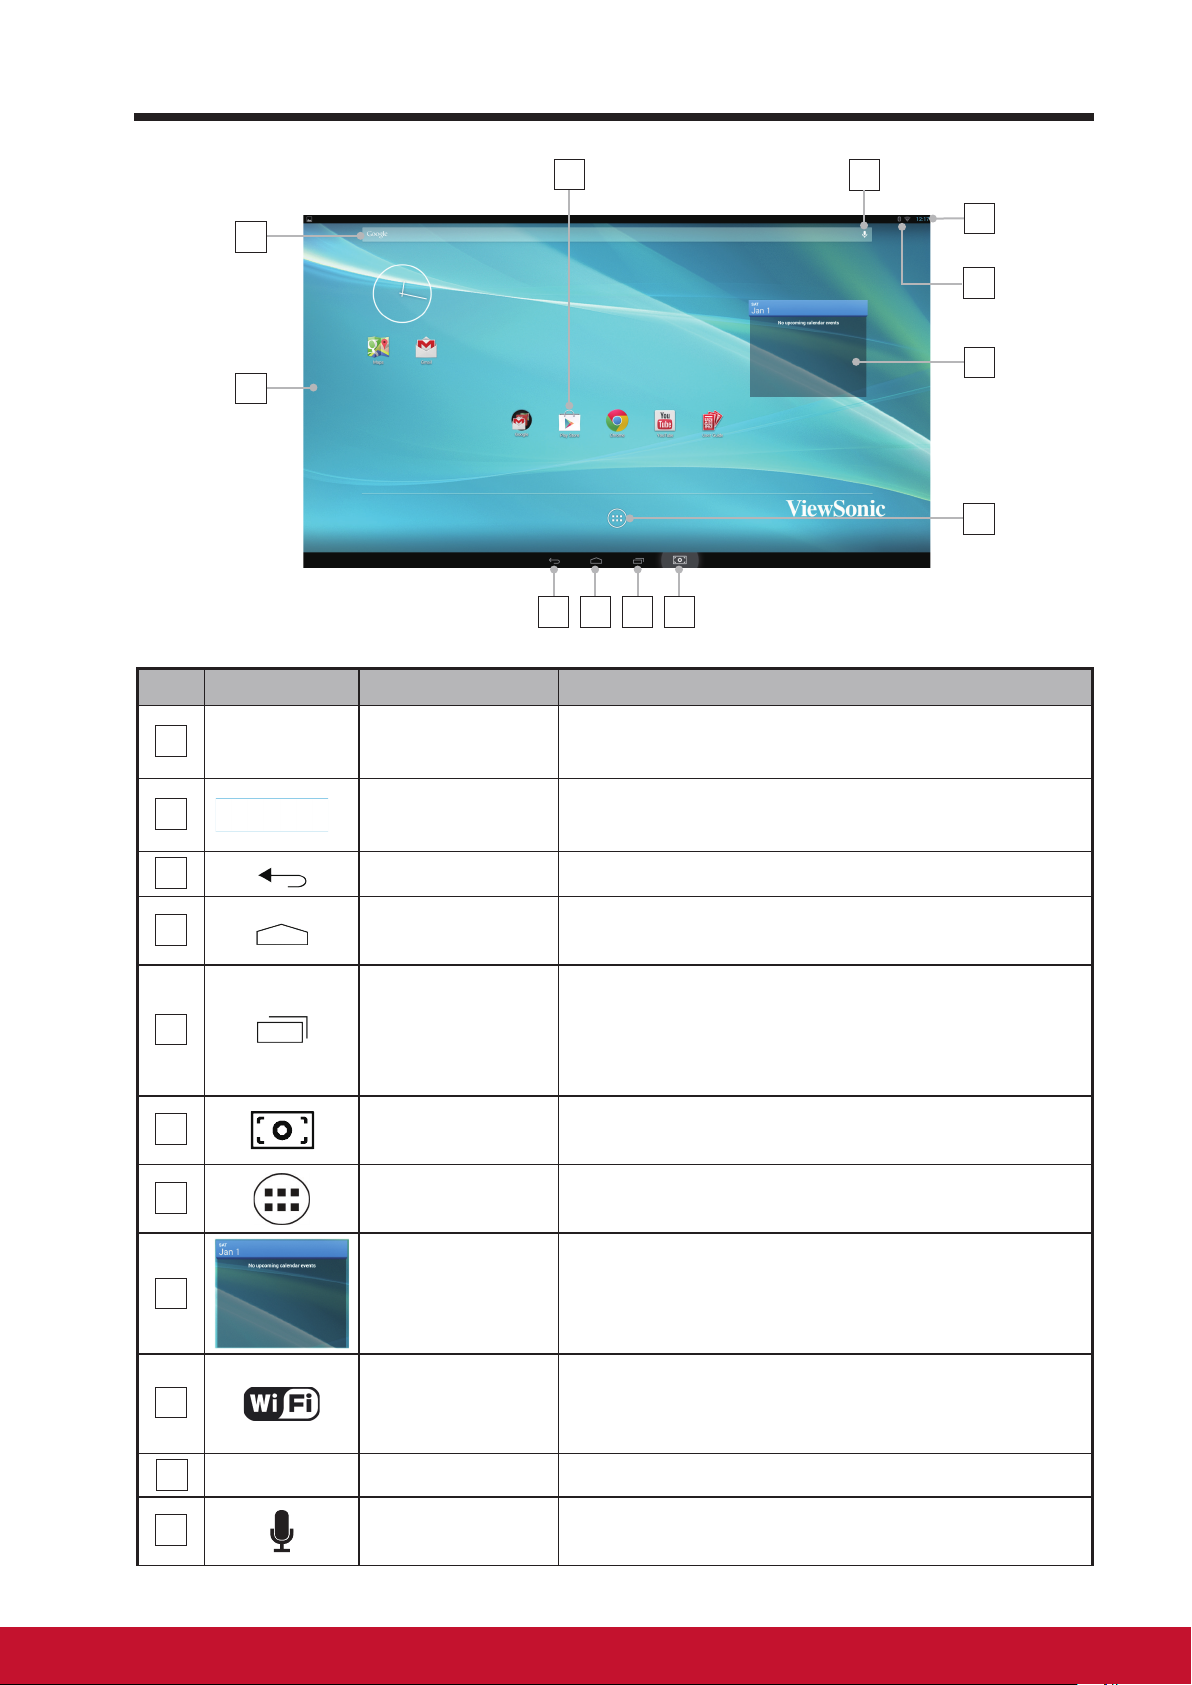
Once you power on your device, and unlock your screen, the central Home
screen will display rstly. You can also touch the Home button to go to
Home screen. On the Home screen, it allows you to access all the features
installed in your device.
The Home screen is composed of ve screen panels. You can slide your
nger to left or right across the central Home screen to view more widgets,
shortcuts, and other items located on each screen panel. You can also add
shortcuts, widgets or change the desktop wallpaper on each screen panel.
Page 17
About Your VSD224 Smart Display
12
1
2
3 4 5 6
No. Items Descriptions
Google
1
Search
Google
Use the Google Search application to search
the web faster and easier from Google.
11
10
9
8
7
2
Area
Navigation
3
4
Back
Home
Recent
5
Applications
6
7
8
9
Screehshot
Apps
Widgets
Wi-
Flick and drag the screen horizontally until
the desired Home screen is displayed.
Return to the previous screen or option.
This button will indicate you to go back to
central Home screen at any time.
Touch this button to show you a list of
images about the applications you have
accessed recently. You can touch the listed
image to open the applications.
Tap this button to capture an image of your
screen.
Touch the Apps button to launch all of the
applications installed on your device.
Widgets are small applications that reside
on the Home screen to provide quick access
to information.
The Wi- icon will appear on the upper right
corner of the screen when you enable the
Wi- function.
10
11
12:17
Time
Voice Input
Display the current time.
Use voice input as an alternative to text
entry via keyboard.
76
Page 18
About Your VSD224 Smart Display
No. Items Descriptions
You can add an application shortcut to the
12
Shortcuts
Home screen and move it freely by touching
and holding the specied icon. This icon
allows you to open a shortcut item quickly.
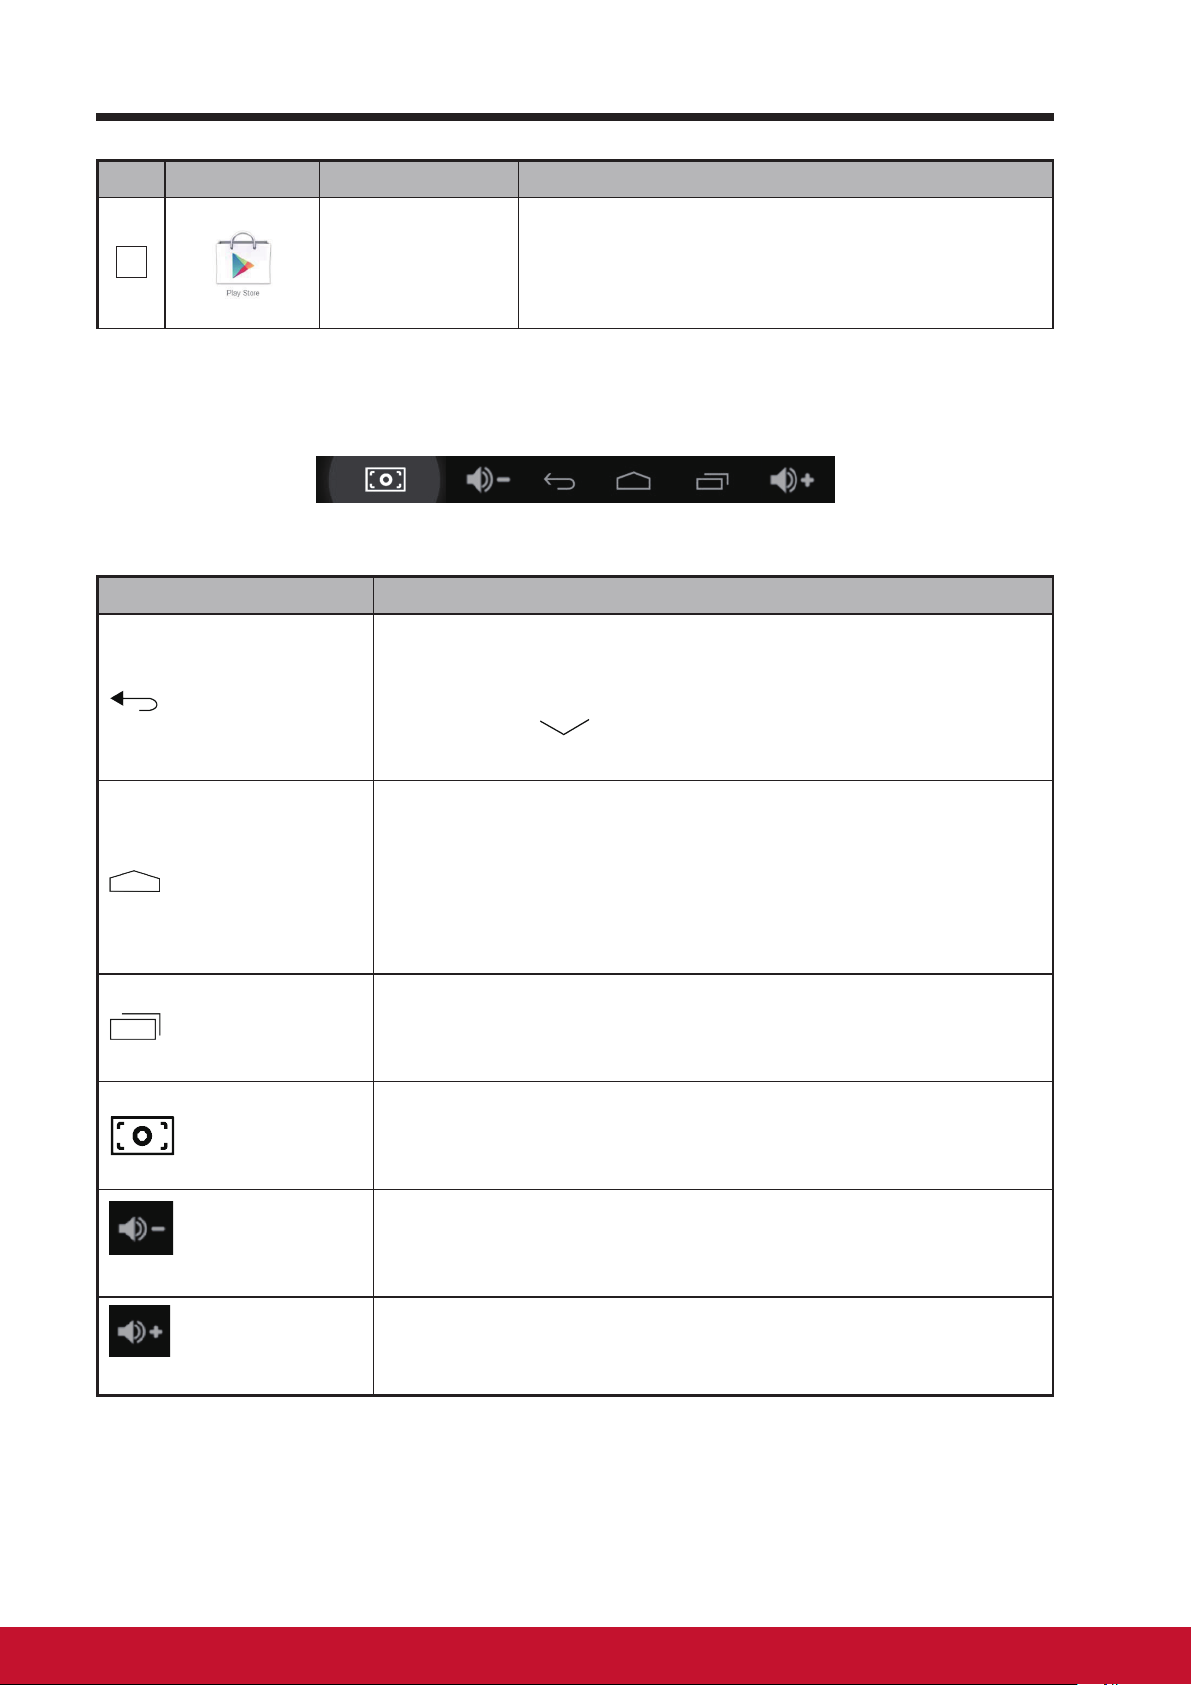
3.4 Navigation buttons
On the bottom of the screen (system bar), you can nd the navigation buttons
described as below:
Buttons Descriptions
- Touch this button to go back to the previous screen or
option.
Back
- If the on-screen keyboard is displayed, the button
changes to . Touch it to close the on-screen
keyboard.
- Touch this button to go to the central Home screen
when viewing other Home screens.
Home
Recent Apps.
Screehshot Tap this button to capture an image of your screen.
Decreased
volume button
Increased
volume button
- Touch this button to go back to the last Home screen
you have viewed when launching any functions on the
device. Or touch this button again to go back to central
Home screen.
A short-cut way for you to open recent application you
have accessed. Select and touch one of the images from
the list to open the application directly.
To adjust the volume (-) setting on the OSD menu.
To adjust the volume (+) setting on the OSD menu.
Page 19
About Your VSD224 Smart Display
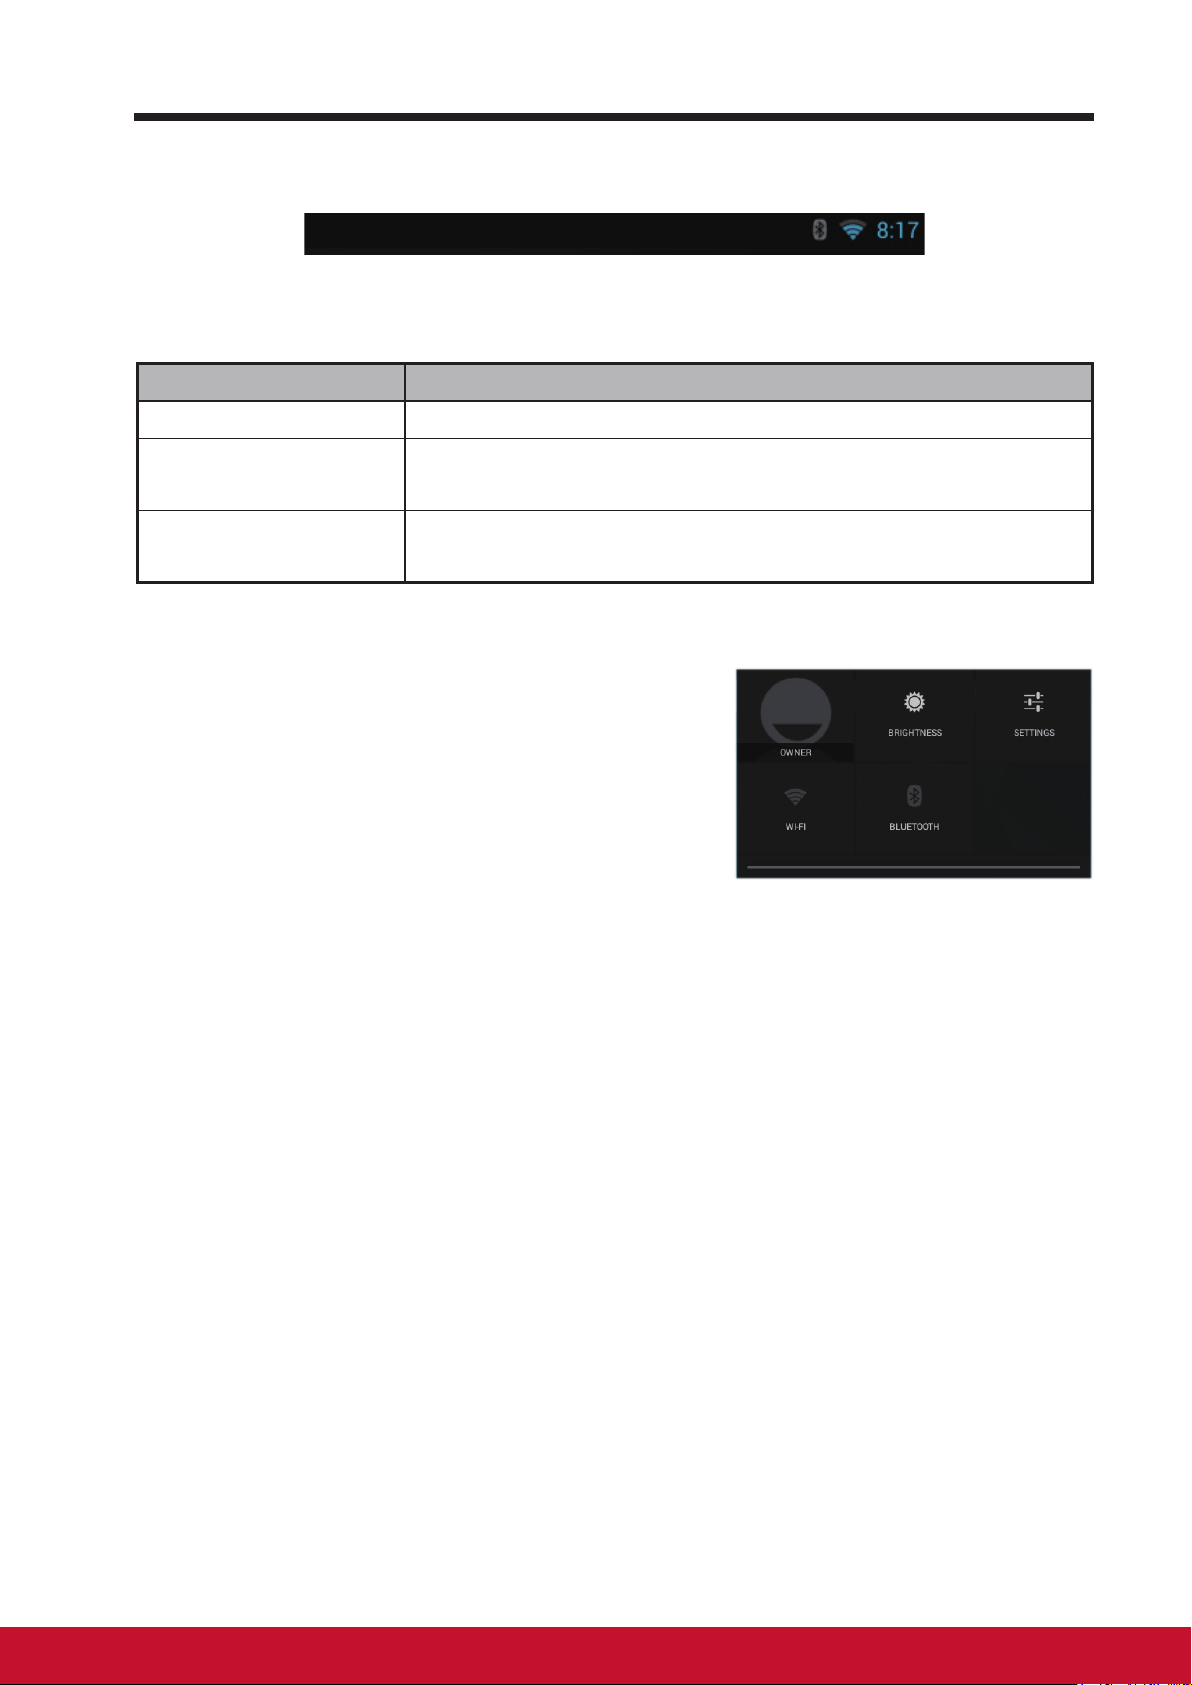
3.5 Status Bar
The upper right corner of the screen displays current time, and specied icon
(status bar).
Items Descriptions
Time Displays the current time.
Specied Icon Show you the enabled icon.
Status Menu
Show you the current state of your device just like Owner,
Brightness, Settings, and WIFI Settings.
3.5.1 Managing Status Menu
You can touch and drag down the Time area
on the status bar to appear the status menu.
• Touch OWNER item to view people saved on your system.
• Touch BRIGHTNESS item to adjust light level.
• Touch SETTINGS item to enter Settings menu that allows you to change
the display settings. For more information, please Refer to 6 Customizing
Your VSD224 Smart Display.
• Touch WI-FI item to enter WIRELESS & NETWORKS conguration menu
that allows you to enable/disable and congure Wi-Fi function.
Touch any other area of the screen to close the Status Menu.
98
Page 20
About Your VSD224 Smart Display
3.6 Customizing Your Home Screen
3.6.1 Add an Item (Shortcut)
• Touch the Home button to go back the central Home screen.
• Drag on the screen horizontally to select a Home screen where you want
to add the item.
• Touch the Apps button
• On the Apps screen, touch APPS or WIDGETS tab to enter APPS or
WIDGETS conguration screen.
• Select one of APPS or WIDGETS item that you want to add.
• Touch and hold the item to add it onto the selected Home screen.
located on the bottom of your screen.
3.6.2 Move an Item
• On the Home screen, touch and hold the item that you want to move.
• Move the item to the specied position.
• Then release your nger to add the item to the new position.
3.6.3 Delete an Item
• On the Home screen, touch and hold the item that you want to delete such
as a widget or shortcut.
• An “X Remove” will soon be displayed at the top of the Home screen.
• Drag the item over the “X Remove”.
• Then release your nger to delete the item.
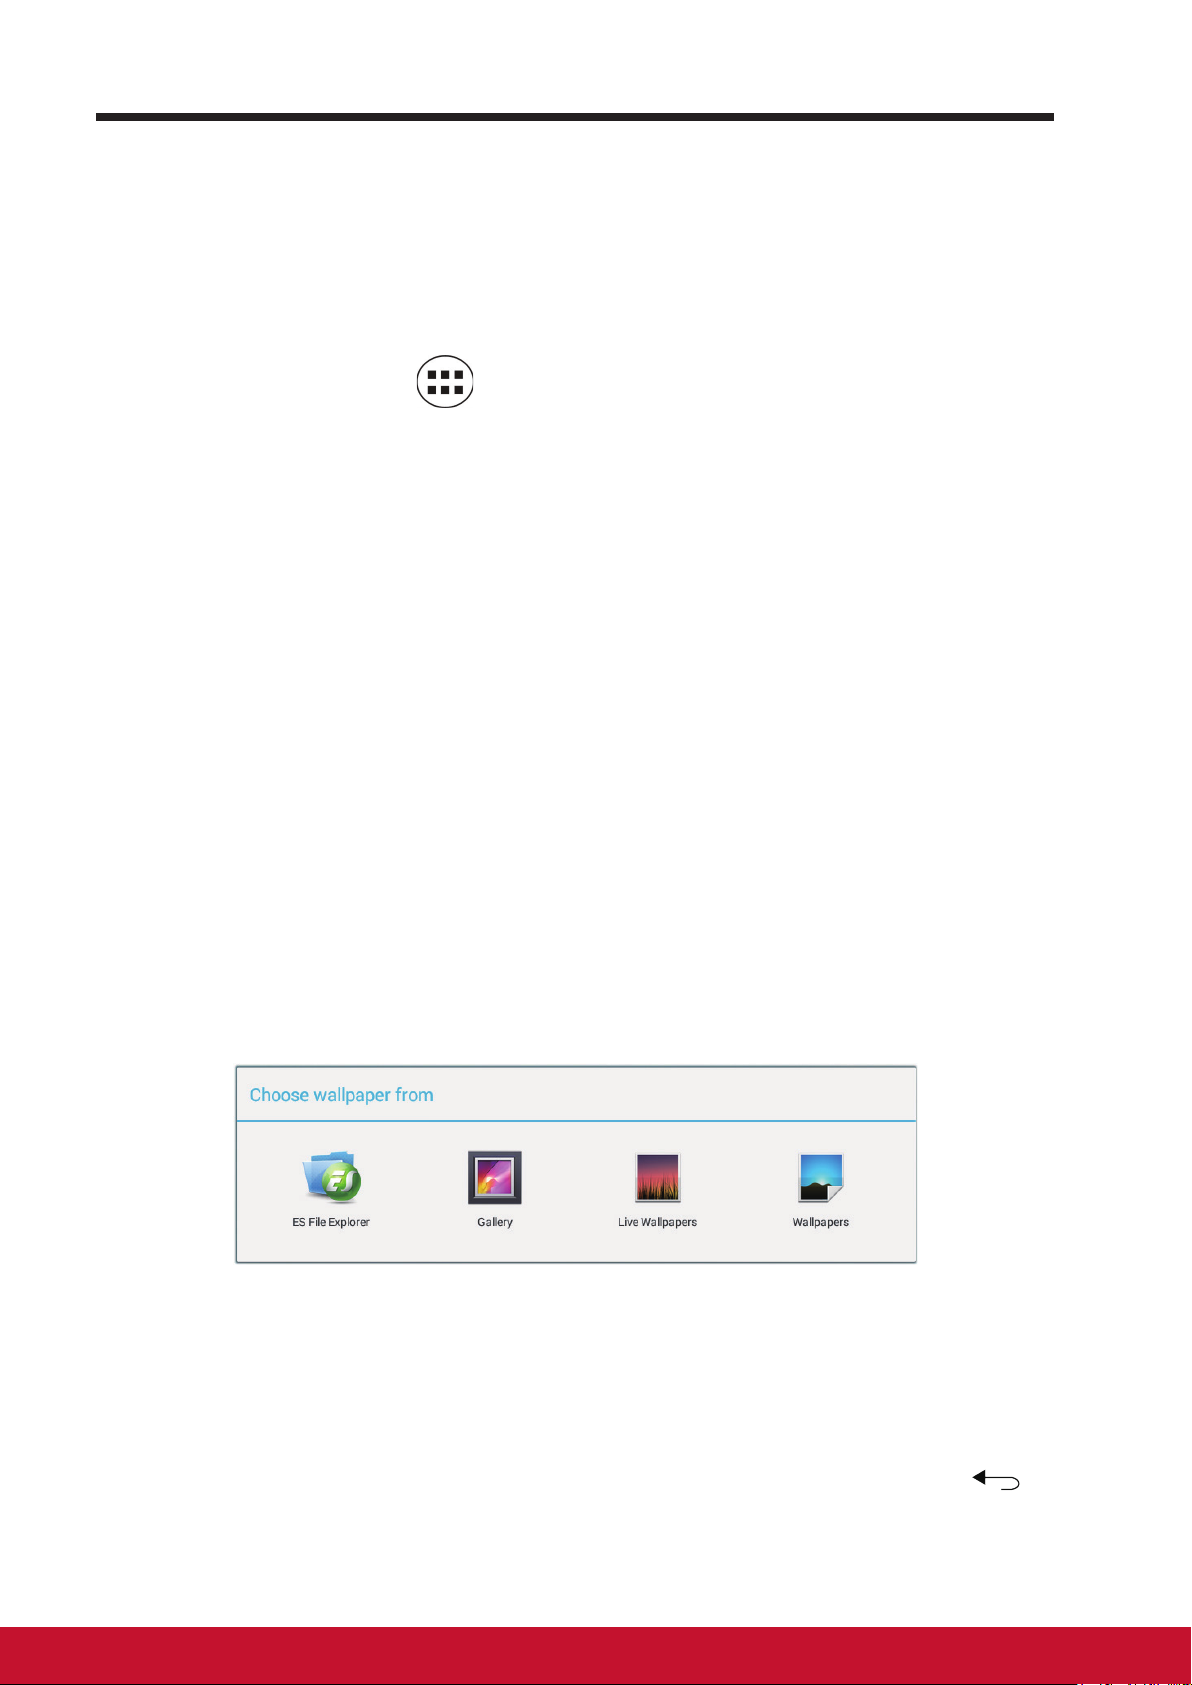
3.6.4 Change the Wallpaper
• Long Touch (touch and hold) an empty space on the screen.
• A “Choose wallpaper from” conguration screen will appear.
• Select one of the wallpaper sources by touching the specied icon.
(Wallpaper sources: ES File Explorer, Gallery, Live Wallpapers and
Wallpapers)
• Tap on the desired wallpaper image. You can always exit by tapping .
• Once nishing the wallpaper selection, touch “Set wallpaper” to renew the
wallpaper of Home screen.
Page 21
About Your VSD224 Smart Display
• Some wallpaper allows you to change the wallpaper color, ex. Magic
Smoke. If “Settings…” displays during the changing wallpaper. Touch it ,
and on the top of screen will display “Tap to change”, touch the screen to
congure the wallpaper color. Tap the screen to cycle through the different
colors.
• You can touch Back button to go back previous screen without renew any
changed settings.
NOTE
• All Home Screens share the same background. You cannot set different wallpapers to
individual Home Screen panel.
3.7 Navigating the Applications
You can nd applications available on your device in the all Apps menu:
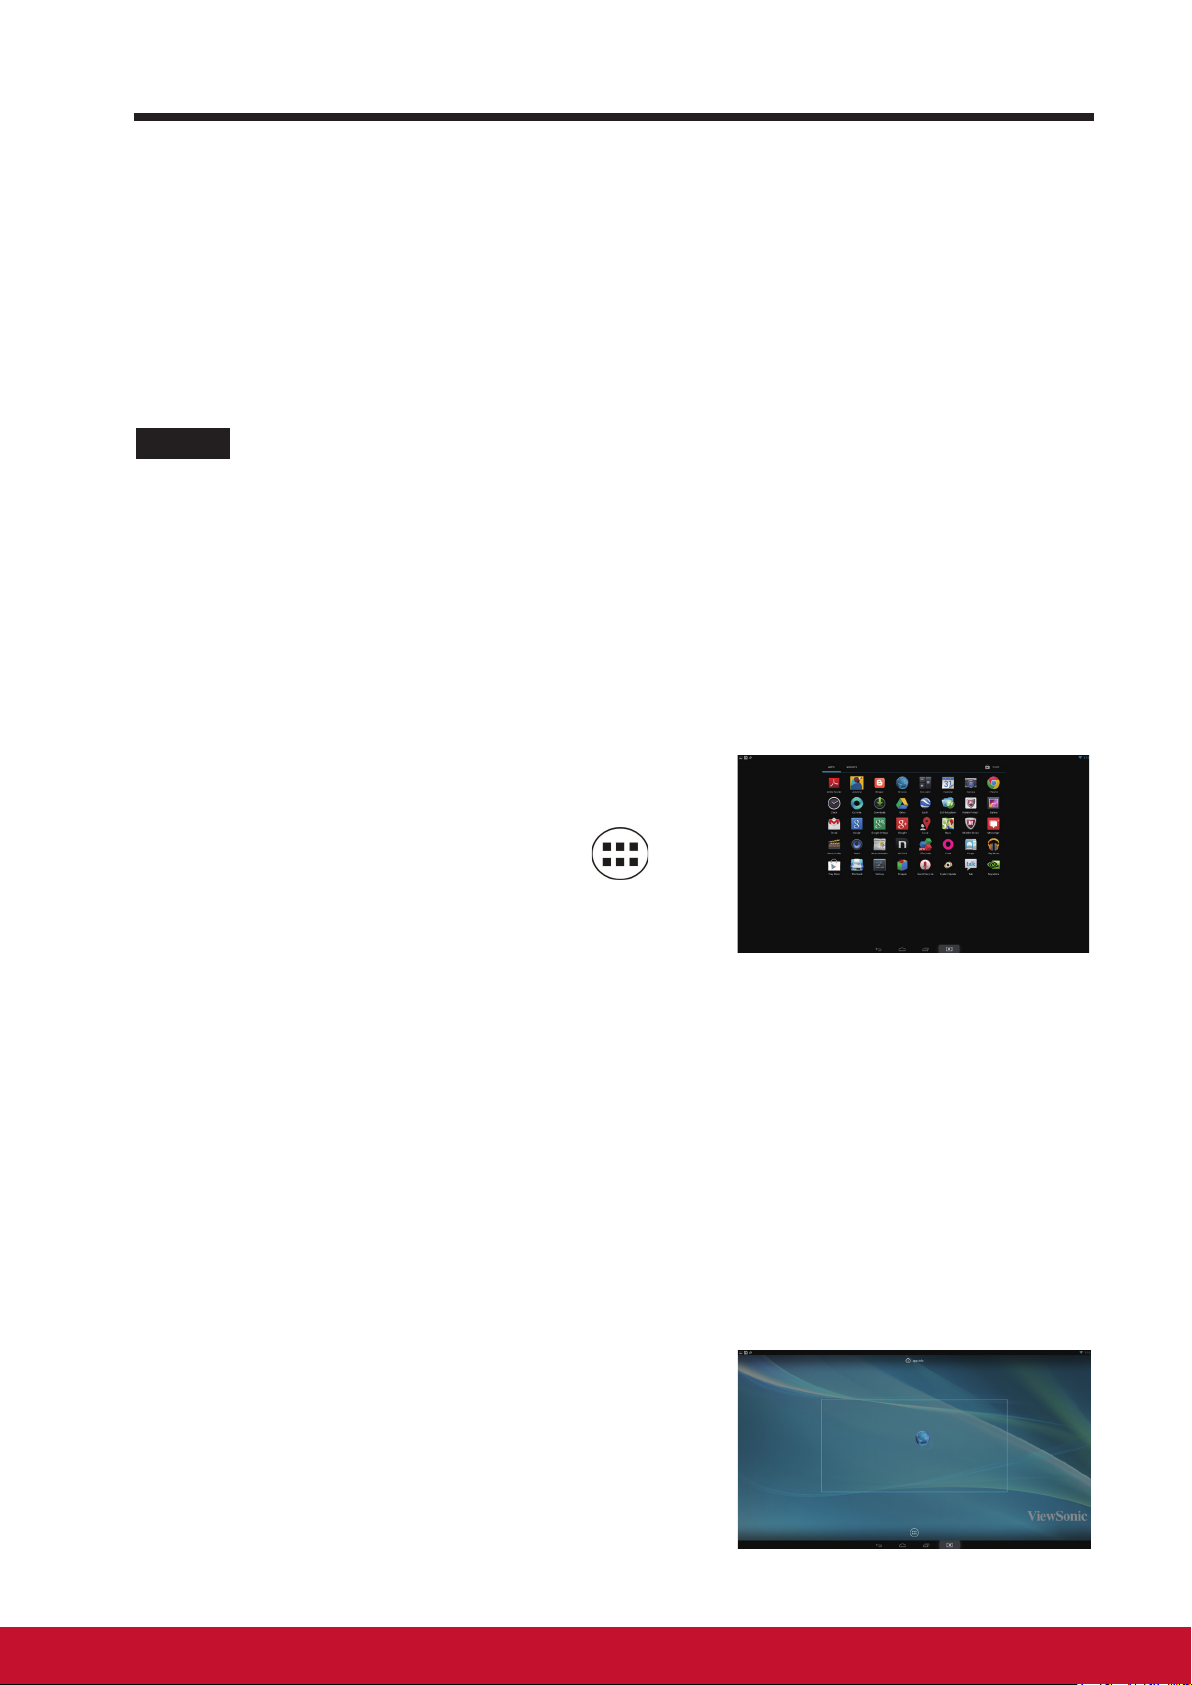
3.7.1 Apps screen
Open the Apps screen
You can access Apps screen from any Home
screen by touching the Apps button
located on the bottom of your screen. The
Apps screen contains all of the applications
installed on the device including those you
have downloaded.
Navigate pages of applications
Flick the Apps screen horizontally and touch an application to launch it.
Close the Apps Screen
Touch the Home button on the system bar to go back the central Home
screen.
3.7.2 Application Shortcuts
To quickly launch applications on the Home
screen, you can add shortcuts for frequentlyused application to the Home screen.
For more information, please Refer to 3.6
Customizing Your Home Screen.
1110
Page 22
About Your VSD224 Smart Display
Use the shortcut to open an application
Touch the Home button on the system bar.
1
If the desired application shortcut displays on the Home screen, touch
2
the shortcut to launch the application.
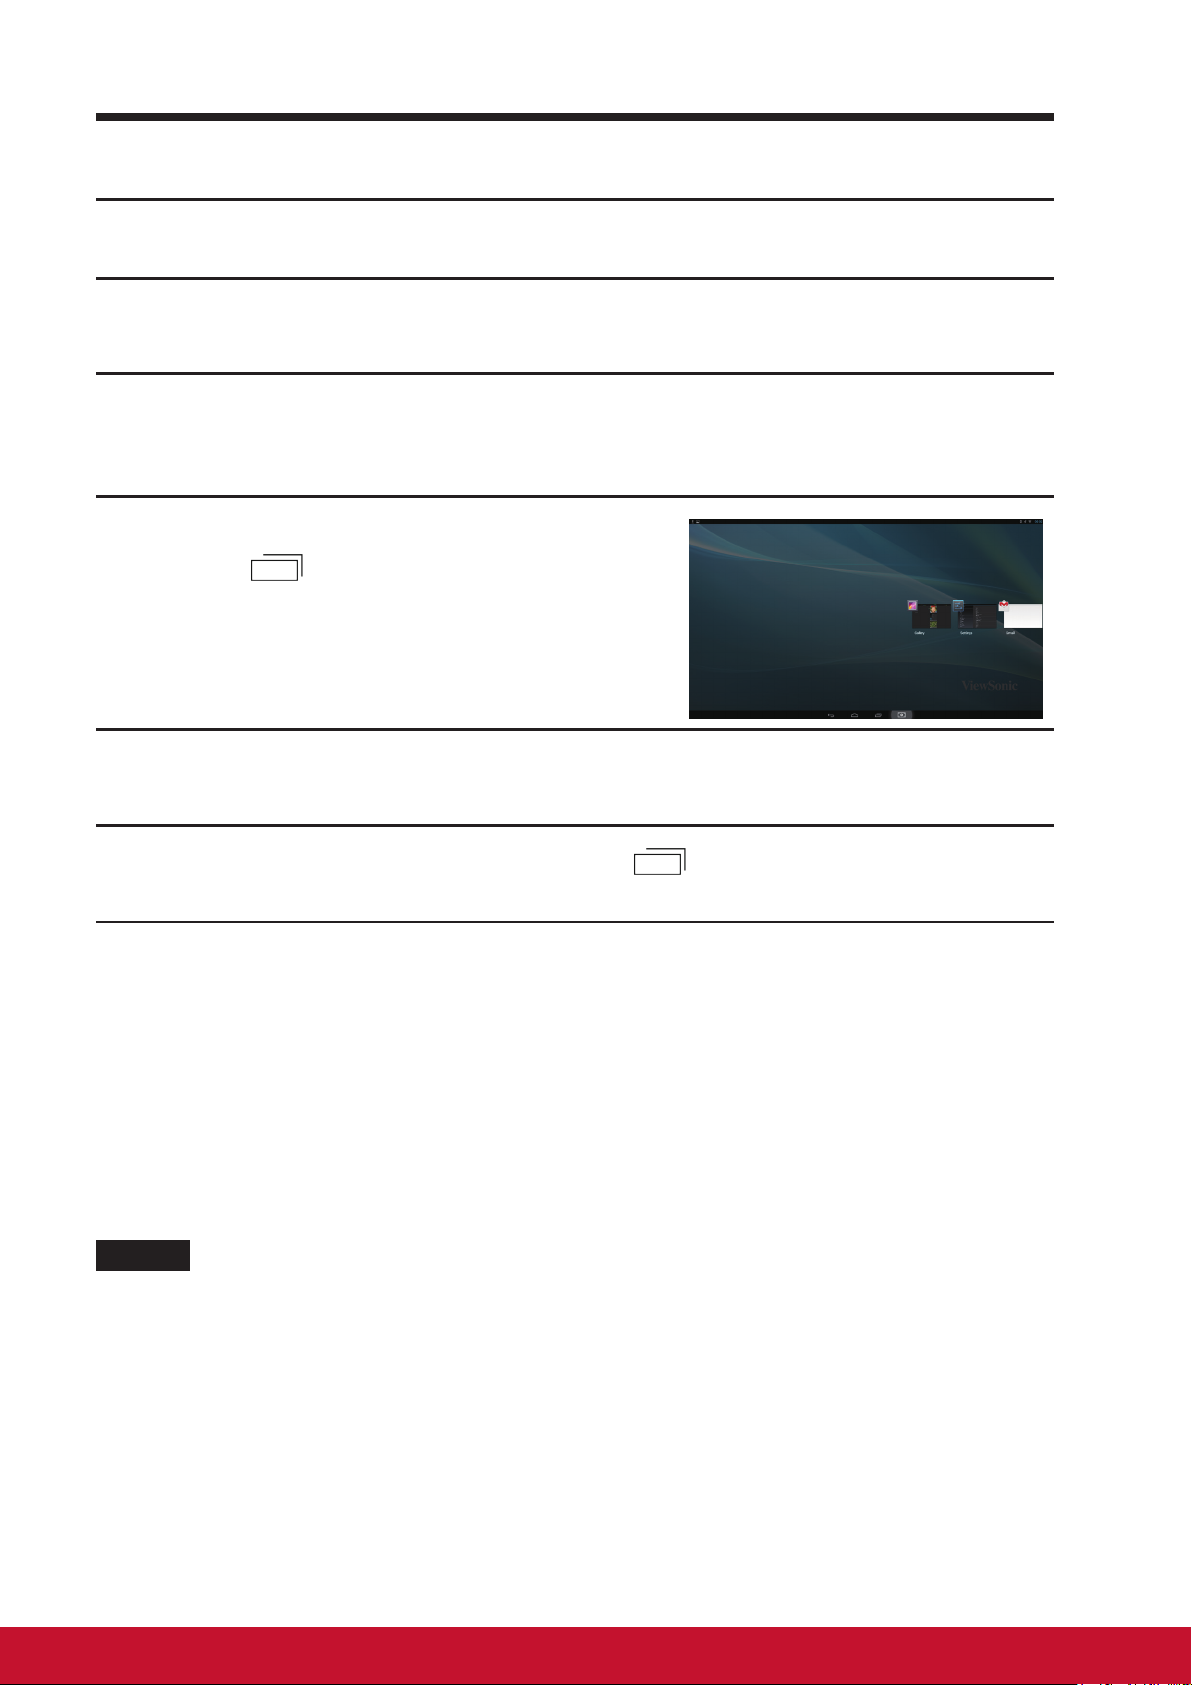
3.7.3 Recent Applications
Open a recently used application
Touch the Recent Applications
1
button
applications.
to view the recently used
Scroll the list of recently used applications, and touch the desired
2
application thumbnail to launch the application.
Touch the Recent Applications button again to close the list of
3
recently used applications.
3.7.4 Screen Lock Wallpaper
You can set the display to turn off automatically after a timeout period of
inactivity, or power it off manually by touching Power button. When you touch
the Power button to wake up the display, the screen lock wallpaper appears
to avoid unintentional touch of the screen. When the screen lock wallpaper
appears, touch and hold the lock icon, drag it to the edge of the larger circle
that surrounds it to unlock the screen. Refer to 2.3 Turn On Your Device.
NOTE
• Set the duration of screen to remain on before entering sleeping mode, touch the Home
button│Apps button│Settings│Display│Sleep.
Page 23
About Your VSD224 Smart Display
3.8 Connecting to HDMI-compliant Devices via HDMI
Input
HDMI (High-Denition Multimedia Interface) is a compact audio/video
interface for transferring uncompressed digital audio/video data. You can
obtain the best user experience for video playback and gaming via HDMI.
VSD224 is equipped with a HDMI input for connection to an external HDMIcompliant device. You can connect your PC, notebook, Blu-ray player or any
other HDMI-compliant device to VSD224 for high-denition video display.
How to begin
A type A (HDMI) to type A (HDMI) HDMI cable must be available.
1
Connect the Type A connector of the HDMI cable to the desired HDMI
2
compliant device.
Connect the Type A connector of the HDMI cable to the HDMI port
3
located on the back of your VSD224. Tap the SELECT
switch to Display mode.
For PC or notebook connection, always set the appropriate resolution.
4
VSD224 supports with max. resolution of 1920*1080.
icon to
1312
Page 24
OSD Menu
4 OSD Menu
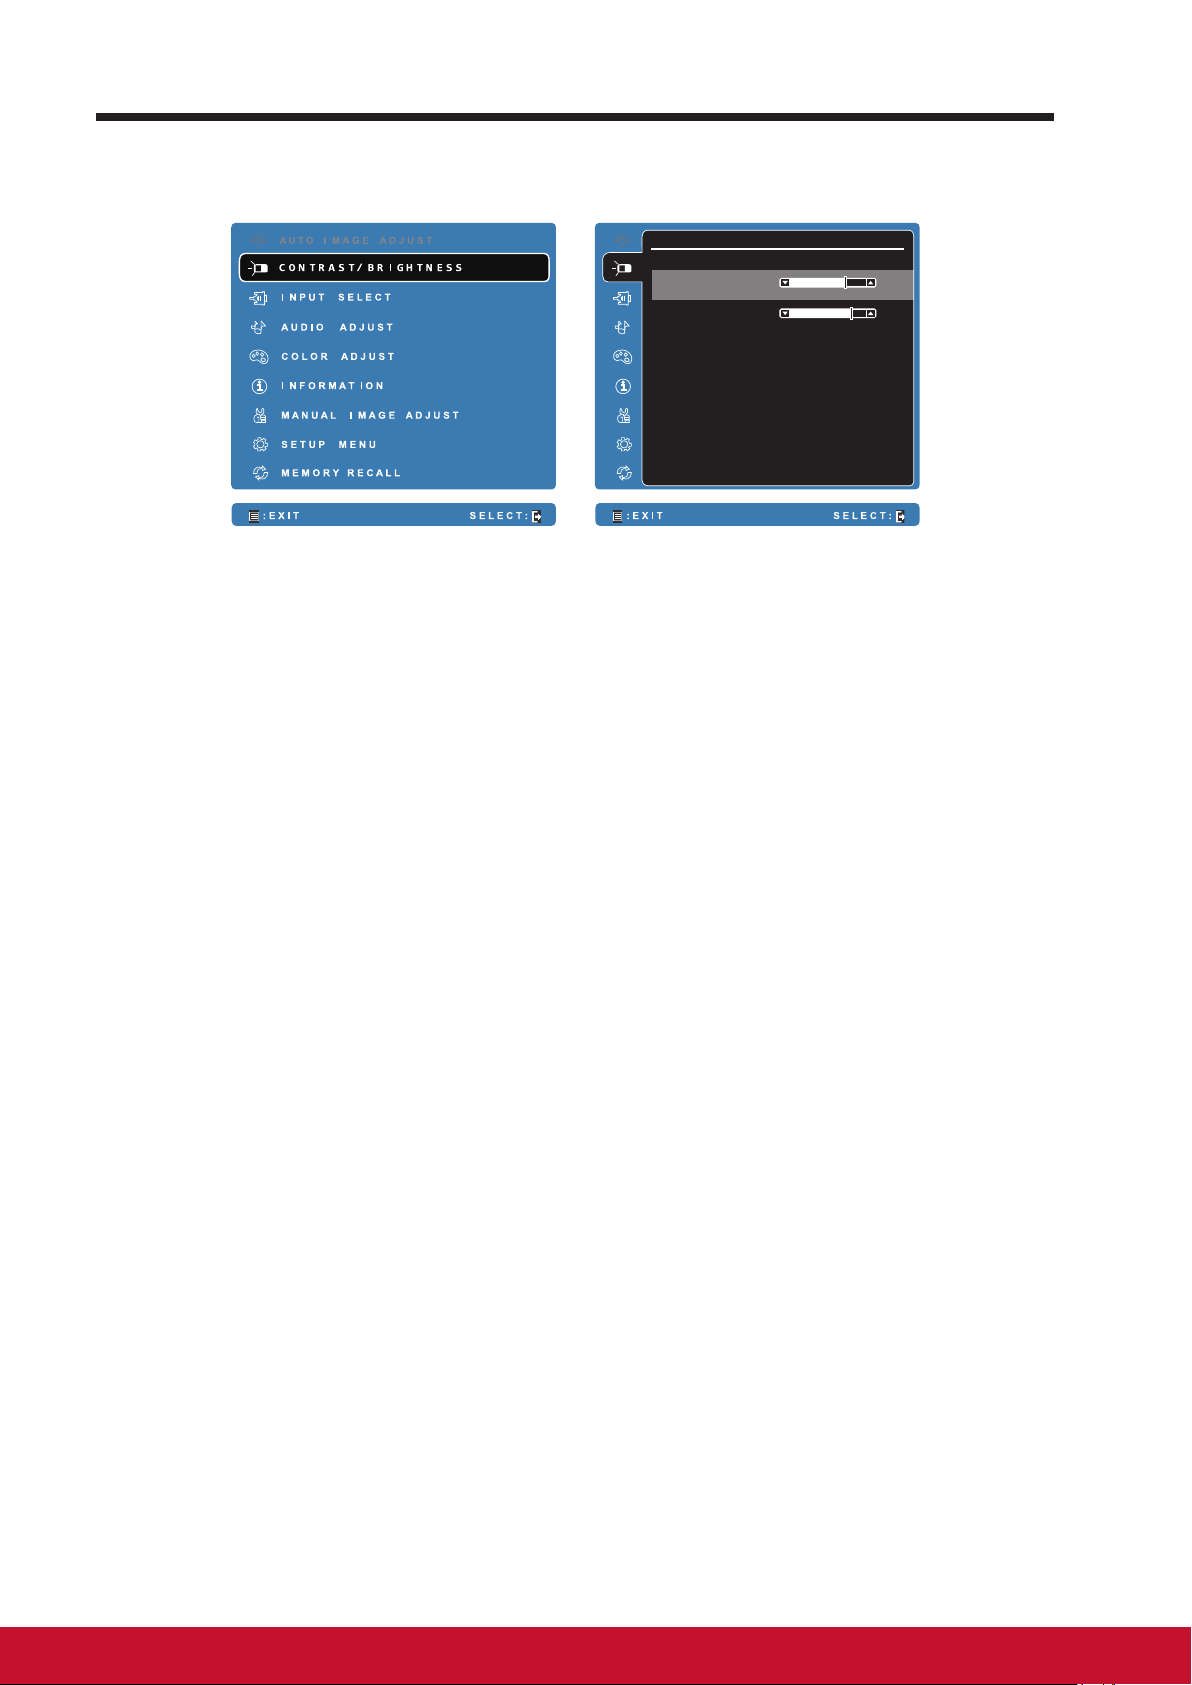
C O N T R A S T / B R I G H T N E S S
C O N T R A S T
B R I G H T N E S S 8 0
7 0
Select the Menu/Exit button on side of your VSD224 to launch OSD
conguration screen. The OSD conguration screen can be used to congure
the Contrast/Brightness, Input Select, Audio Adjust, Color Adjust, Information,
Manual Image Adjust, Setup Menu and Memory Recall.
4.1 Adjustment Bars
Contrast/Brightness:
Contrast: Select and drag the slider on the Contrast bar to adjust the
contrast of screen display. Drag the slider to the right, the contrast is larger.
By default, the contrast is set to 70.
Brightness: Select and drag the slider on the Brightness bar to adjust the
brightness of your screen. Drag the slider to the right, the screen is brighter.
By default, the brightness is set to 100.
Audio Adjust:
Select and drag the slider on the Volume bar to adjust the volume. Drag the
slider to the right, the volume is louder. By default, the volume is set to 50.
Here you can also set the volume to Mute or View other sounds.
Page 25
OSD Menu
4.2 Functions items
Input Select: Select the input source comes from HDMI or Android.
Remember to check the HDMI connection is successful before you select the
or HDMI item.
Color Adjust: Include sRGB, Bluish, Cool, Native, Warm and user color
items.
Information: Select this item to show you the information about your
VSD224 including the Resolution, H.Frequency, V.Frequency, Pixel Clock,
Model Number and Website.
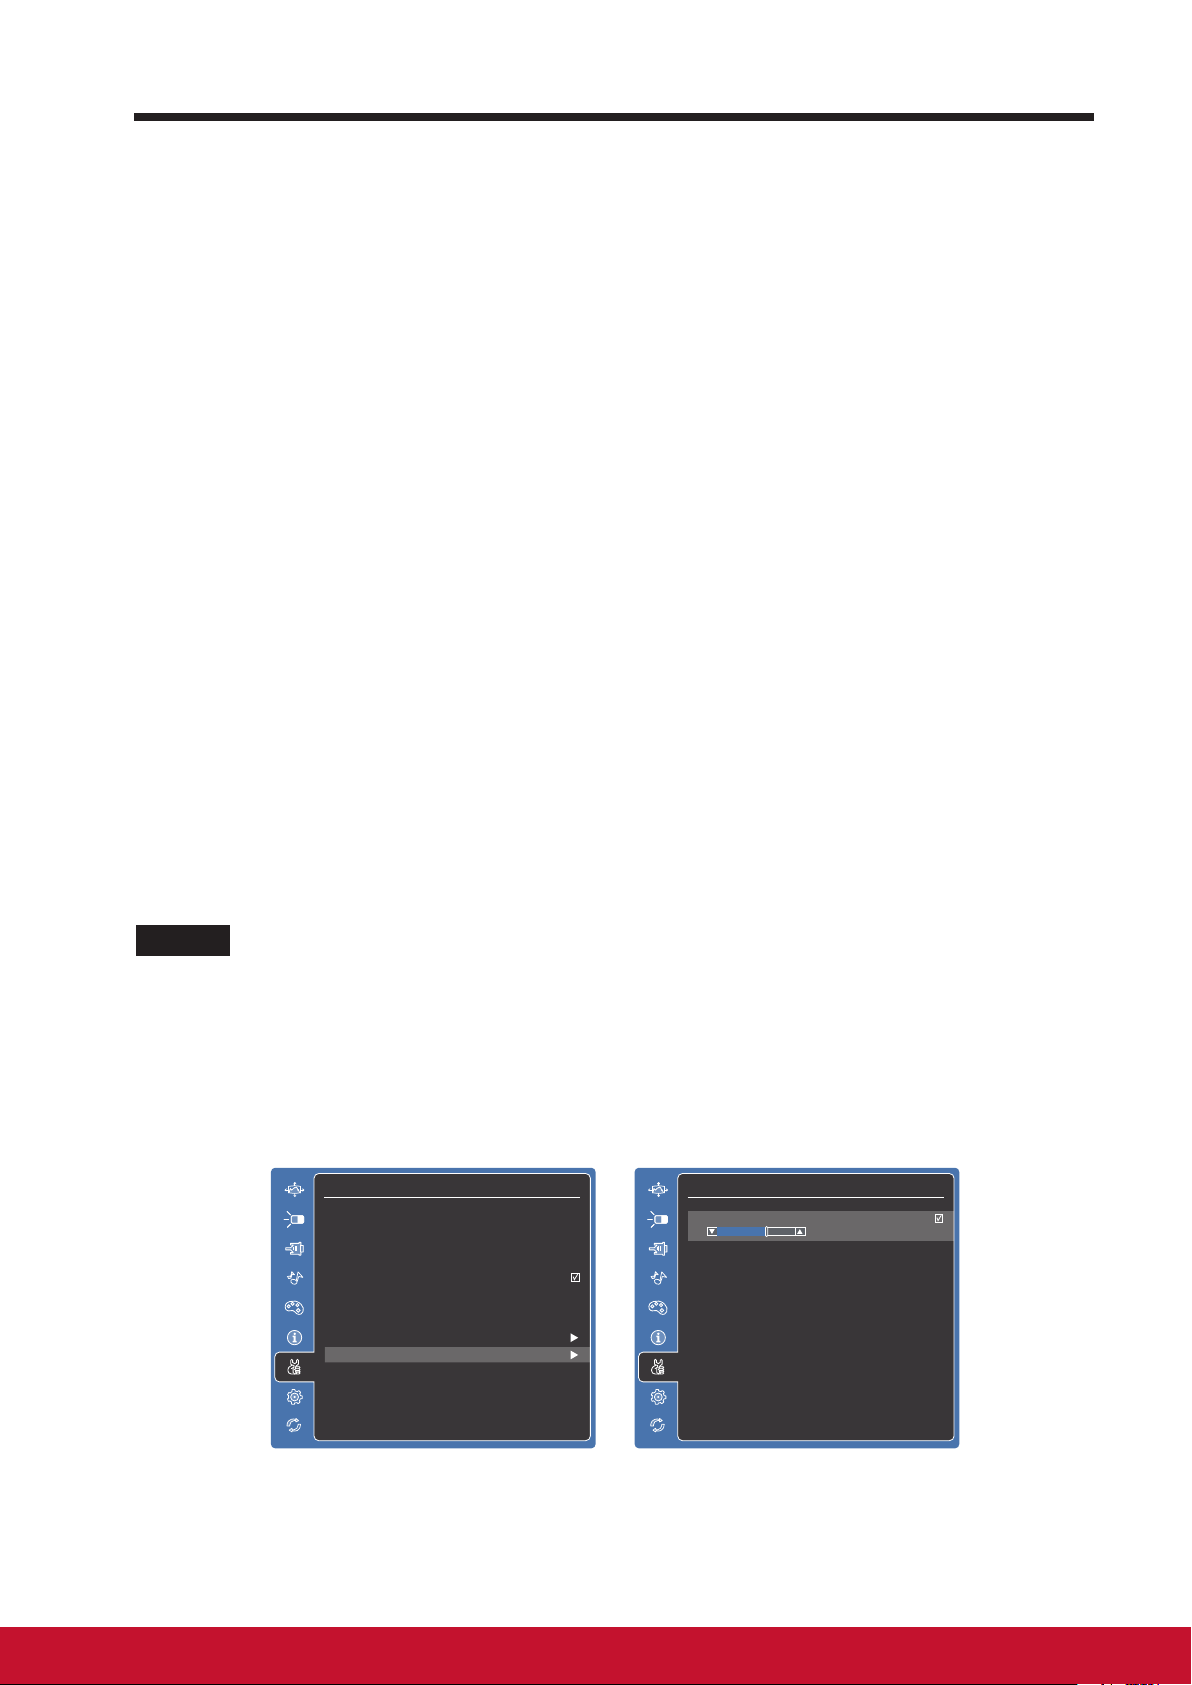
Manual Image Adjust: Include Sharpness, Dynamic Contrast, Aspect Ratio,
Overscan, ECO Mode, ViewMode and Blue Light Filter.
Setup Menu: Include Language Select, Resolution Notice, OSD Position,
OSD Time Out, OSD Background, Power Indicator, and Sleep.
Memory Recall:
Select the Memory Recall function to return the OSD congurations back to
factory settings.
NOTE
• OSD language supports English, Deutsch (German), Francais (French), Italian,
Spanish, Japanese, Simplied Chinese and Traditional Chinese.
• ViewMode provides for “Standard, Game, Movie, Web, Text, and Mono” mode settings
for optimum image quality.
• The Blue Light Filter setting allows for the user adjustable reduction of high energy blue
light for reduced eye strain.
M N U L IA M A G E A D J U S TA
A T O I M A G E A D J U S TU
H V P O S I T I O N/
C N T A S TR / B R I G H T N E S SO
H R I Z O N T A L S I Z EO
F N E T U N EI
I P U S ET L E C TN
S A R P N E S SH
D N A M I C C OY N R A S TT
A D I A DO J U S TU
R S P O N S E TE I EM
A P E C T T I OR AS
C L O A DR J U S TO
D S P L A Y M OI D E
E O M O D EC
I F O A TR M I O NN
V E W M O D EI
M N U A L I M A G E A D J U S TA
B U E L I G H T F I L T EL R
S T U P M E N UE
M M O R Y R E C A L LE
M N U L IA M A G E A D J U S TA
A T O I M A G E A D J U S TU
B U E L I G H T F I L T EL R
C N A S TR / B R I GHT N E S SO
I P U S ET L E C TN
A D I A DO J U S TU
C L O A DR J U S TO
I F O A TR M I O NN
M N U A L I M A G E A D J U S TA
S T U P M E N UE
M M O R Y R E C A L LE
06
1514
Page 26
OSD Menu
4.3 OSD Notice
idling:
The OSD menu will close and go back to the original processing screen
automatically during your OSD menu is idling that reached to the OSD time
out value.
No signal:
• The HDMI connection is not ready.
• The HDMI connection device and your smart display is not normalization.
4.4 OSD and Hot keys setting
OSD Lock: Press and hold [ ] and the up arrow [▲] for 10 seconds. If any
buttons are pressed the message OSD Locked will display for 3 seconds.
OSD Unlock: Press and hold [
seconds.
Power Button Lock: Press and hold [
seconds. If the power button is pressed the message Power Button Locked
will display for 3 seconds. With or without this setting, after a power failure,
your LCD display’s power will automatically turn ON when power is restored.
Power Button Unlock: Press and hold [
for 10 seconds.
DDC/CI enable/disable: Press [
SSC/CI and DDC/2B (DDC/CI enable/disable) to allow the computer to send
specific Monitor Control Command Set (MCCS) to command the devices, as
well as receive sensor data from the devices, over a bidirectional link.
] and the up arrow [▲] again for 10
] and the down arrow [▼] for 10
] and the down arrow [▼] again
] and [▼] keys at the same time to toggle
Page 27
5 Troubleshooting
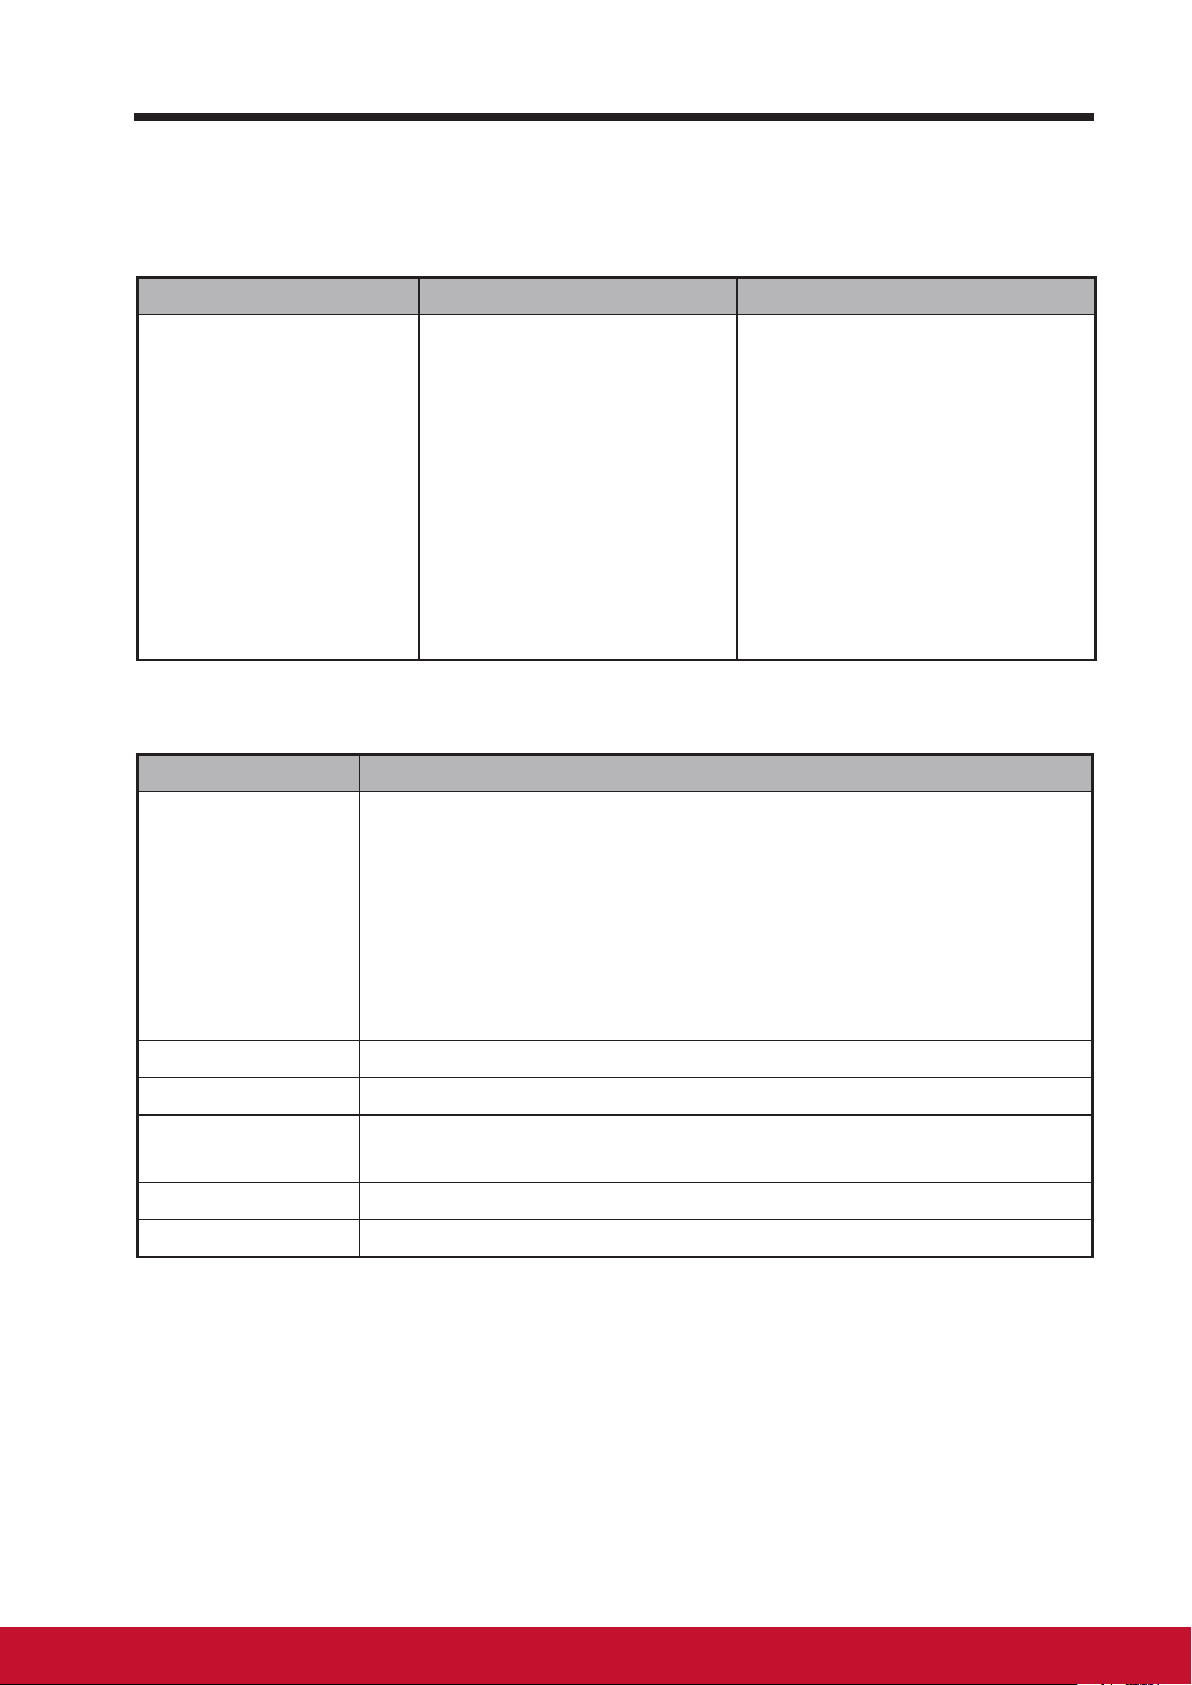
5.1 Touch Screen Problems
Problems Causes Solutions
Troubleshooting
Touch screen does
not respond to hand
gestures or render
them properly.
Dust, particles or any
foreign material on the
camera’s or reector’s
surface may affect image
quality and the display’s
touch function.
1. Remove any dust or
particles from the reector
and camera using
compressed air.
2. Gently clean the cameras
and reector surface
carefully with a soft
antistatic brush to avoid
scratches.
3. Clean any remaining dust
with a clean, dry dust-free
cloth.
5.2 Other Problems
Problems Solutions
No power If the LED does not light blue with the device booting-up then:
-
Ensure that the power adaptor is plugged-in to a suitable
power socket
-
Ensure that the DC connector is fully inserted into the correct
socket on the rear of the VSD224 located under the cover
-
Check the power socket with another device (i.e. table lamp)
-
If there is still no power then contact ViewSonic support or
the Reseller from whom the device was purchased
No display Check external HDMI device and connections.
Lock-up Restart VSD224 device.
App doesn't
function
No network Check WiFi settings, try Ethernet if available.
No audio Check volume level setting.
Check with App author.
1716
Page 28

Appendix
6 Appendix
Specication
LCD Spec.
Size 54.61cm (21.5”)
Resolution 1920x1080
Brightness 250 cd/m
Backlight LED
Thickness 10.5 mm
Touch screen Optical touch type, with glass
Hardware
Buttons Power button *1
2
Control keys *4
Power LED Indicator Blue (on) / Amber (saving)
I/O ports HDMI *1
USB type A x 2, Micro USB x 1 (OTG)
3.5mm Headphone-out *1
LAN (RJ45, supports 10/100 Mbps) *1
DC-In Jack *1
MicroSD only *1
Camera 1.3 MP FF camera
Mic location Right side of webcam
Card reader Micro SD card
Speakers 2 Watt *2
Adaptor
Physical 530.4mm (W) x 356mm (H) x 76.75mm (D)
Input: 100V~240V
Output: 19V, 2.1A (40W)
Weight
SW
OS Android 4.4 KitKat
System
CPU/SoC Rockchip RK3188
Speed 1.6GHz
3.64Kg (Net)
5.35Kg (Gross)
Page 29

Cores Quad-core
Graphic Embedded
Memory DDR3 1GB, Speed to 800Mbps
Storage eMMC (NAND), 8GB
WLAN 802.11 b/g/n
Environment
Temperature &
Humidity
Operation: 20%~90% @ 35
Storage: 90% R.H.
o
C Non-condensing
Altitude 0~2,000m
Accessories
Power cord (by region)
Appendix
Power adaptor *1
Quick Start Guide *1
1918
Page 30
Customer Support
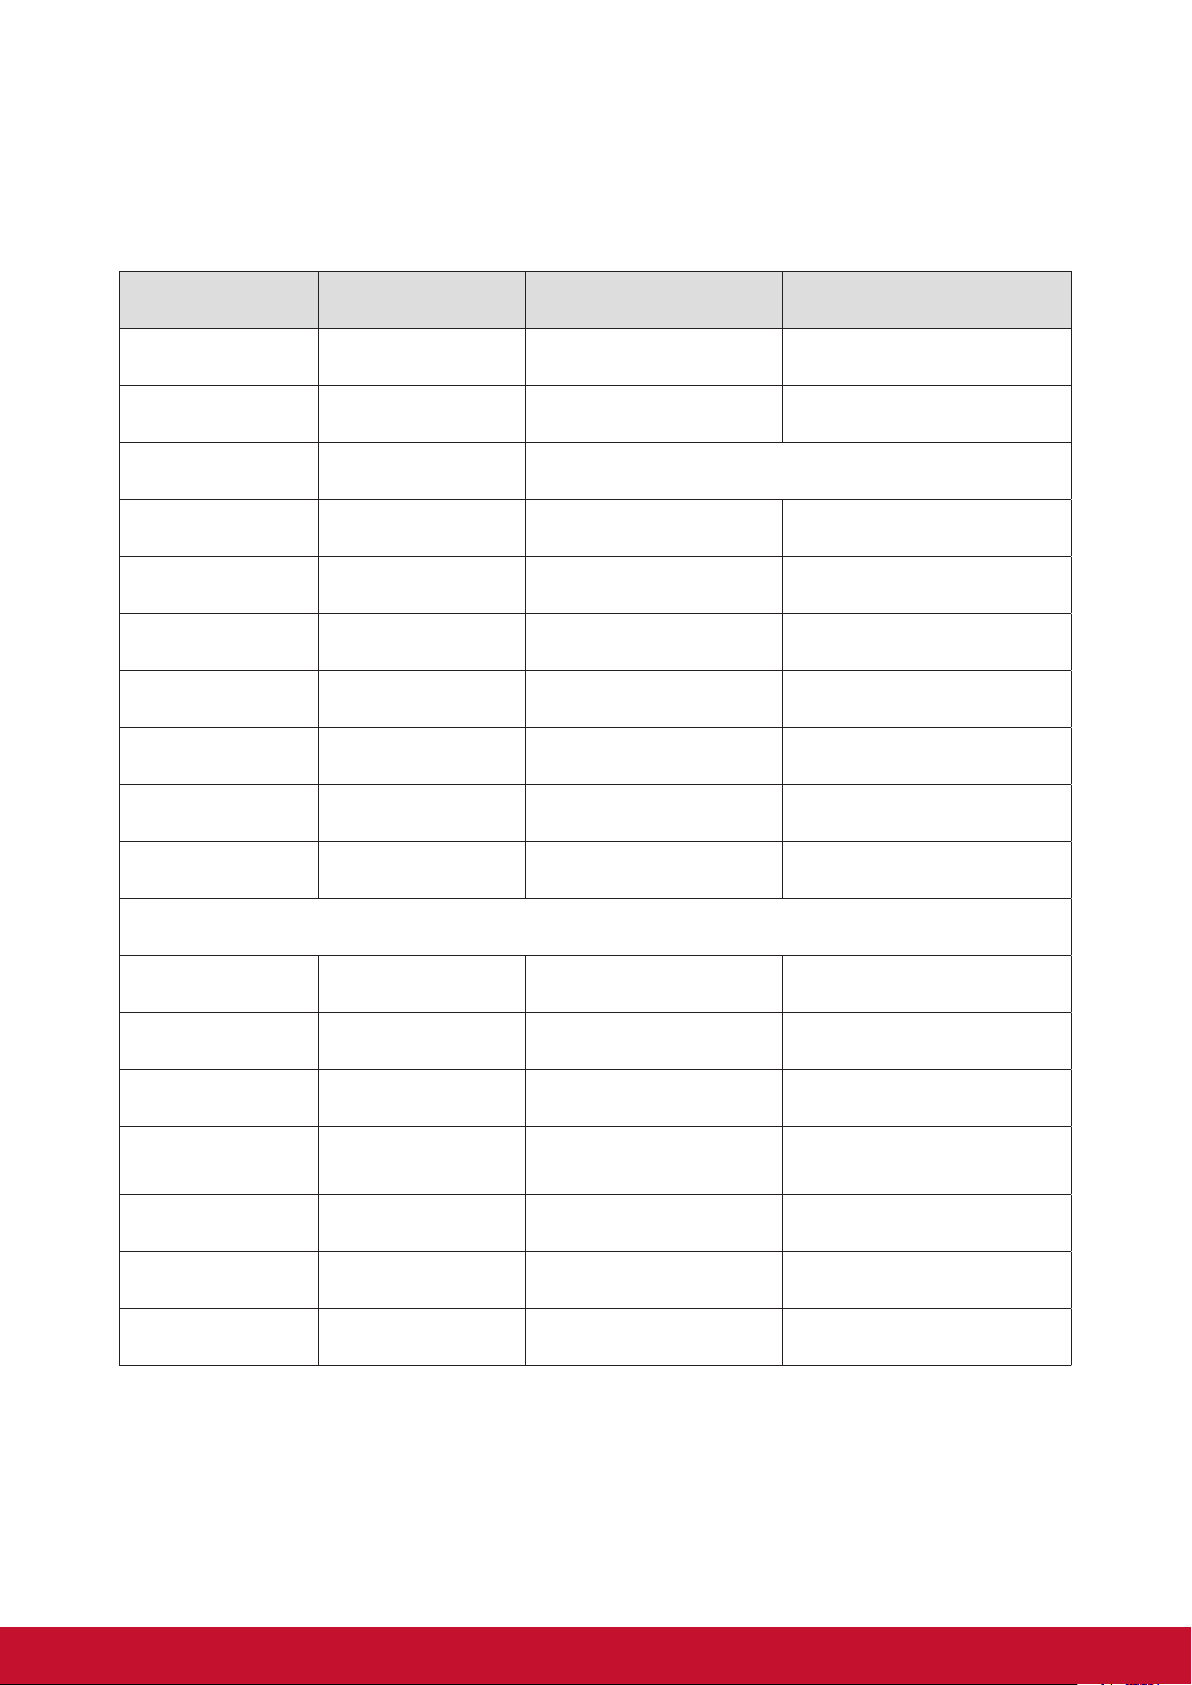
For technical support or product service, see the table below or contact your reseller.
NOTE: You will need the product serial number.
Country/Region Website
Australia/New Zealand www.viewsonic.com.au
Canada www.viewsonic.com
Europe www.viewsoniceurope.com www.viewsoniceurope.com/uk/support/call-desk/
Latin America
(Argentina)
Latin America (Chile) www.viewsonic.com/la/
Latin America
(Columbia)
Latin America (Mexico) www.viewsonic.com/la/
www.viewsonic.com/la/
www.viewsonic.com/la/
T= Telephone
C = CHAT ONLINE
AUS= 1800 880 818
NZ= 0800 008 822
T (Toll-Free)= 1-866-463-4775
T (Toll)= 1-424-233-2533
C= http://www.viewsonic.com/la/
soporte/servicio-tecnico
C= http://www.viewsonic.com/la/
soporte/servicio-tecnico
C= http://www.viewsonic.com/la/
soporte/servicio-tecnico
C= http://www.viewsonic.com/la/
soporte/servicio-tecnico
Email
Nexus Hightech Solutions, Cincinnati #40 Desp. 1 Col. De los Deportes Mexico D.F. Tel: 55) 6547-6454 55)6547-6484
Other places please refer to http://www.viewsonic.com/la/soporte/servicio-tecnico#mexico
Latin America (Peru) www.viewsonic.com/la/
Puerto Rico & Virgin
Islands
Singapore/Malaysia/
Thailand
United States www.viewsonic.com
www.viewsonic.com
C= http://www.viewsonic.com/la/
soporte/servicio-tecnico
T= 1-800-688-6688 (English)
C = http://www.viewsonic.com/la/
soporte/servicio-tecnico
T (Toll-Free)= 1-800-688-6688
T (Toll)= 1-424-233-2530
Page 31

Limited Warranty
ViewSonic® Smart Display
What the warranty covers:
ViewSonic warrants its products to be free from defects in material and workmanship,
under normal use, during the warranty period. If a product proves to be defective in
material or workmanship during the warranty period, ViewSonic will, at its sole option,
repair or replace the product with a like product. Replacement product or parts may
include remanufactured or refurbished parts or components. The replacement unit will be
covered by the balance of the time remaining on the customer’s original limited warranty.
ViewSonic provides no warranty for the third-party software included with the product or
installed by the customer.
How long the warranty is effective:
ViewSonic Smart Display products are warranted for between 1 years, depending on your
country of purchase, for all parts including the light source and for all labor from the date
of the rst consumer purchase.
User is responsible for the backup of any data before returning the unit for service.
ViewSonic is not responsible for any data loss.
Who the warranty protects:
This warranty is valid only for the rst consumer purchaser.
What the warranty does not cover:
1. Any product on which the serial number has been defaced, modied or removed.
2. Damage, deterioration or malfunction resulting from:
a. Accident, misuse, neglect, re, water, lightning, or other acts of nature,
unauthorized product modication, or failure to follow instructions supplied with
the product.
b. Repair or attempted repair by anyone not authorized by ViewSonic.
c. Causes external to the product, such as electric power uctuations or failure.
d. Use of supplies or parts not meeting ViewSonic’s specications.
e. Normal wear and tear.
f. Any other cause which does not relate to a product defect.
3. Any product exhibiting a condition commonly known as “image burn-in” which results
when a static image is displayed on the product for an extended period of time.
4. Removal, installation, insurance, and set-up service charges.
How to get service:
1. For information about receiving service under warranty, contact ViewSonic Customer
Support (Please refer to the web site and Customer Support pages). You will need to
provide your product’s serial number.
2. To obtain warranty service, you will be required to provide (a) the original dated sales
slip, (b) your name, (c) your address, (d) a description of the problem, and (e) the
serial number of the product.
3. Take or ship the product freight prepaid in the original container to an authorized
ViewSonic service center or ViewSonic.
4. For additional information or the name of the nearest ViewSonic service center,
contact ViewSonic.
2120
Page 32

Limitation of implied warranties:
There are no warranties, express or implied, which extend beyond the description
contained herein including the implied warranty of merchantability and tness for a
particular purpose.
Exclusion of damages:
ViewSonic’s liability is limited to the cost of repair or replacement of the product.
ViewSonic shall not be liable for:
1. Damage to other property caused by any defects in the product, damages based
upon inconvenience, loss of use of the product, loss of time, loss of prots, loss of
business opportunity, loss of goodwill, interference with business relationships, or
other commercial loss, even if advised of the possibility of such damages.
2. Any other damages, whether incidental, consequential or otherwise.
3. Any claim against the customer by any other party.
4. Repair or attempted repair by anyone not authorized by ViewSonic.
OTA update disclaimer:
ViewSonic Corporation assumes no liability for any errors or omissions in the information
displayed. This rmware update is intended for ViewSonic
®
smart display. ViewSonic
assumes no liability for data loss or any damages caused as a result of any updates
made on any device or damage to or failure of other equipment to which the products
are connected, whether incidental, consequential or otherwise. You agree to take full
responsibility for all les and data and to maintain all appropriate backup of les and data
stored on any device prior to performance of any update. Users shall be responsible
for obtaining the necessary rights to access and use any third party content. ViewSonic
assumes no liability for the performance, availability and use of third party products and
services. Corporate names and trademarks mentioned herein are the property of their
respective companies. Copyright © 2015 ViewSonic Corporation. All rights reserved.
4.3: ViewSonic Smart Display Warranty SD_LW01 Rev. 1A 08-21-12
Page 33

2322
 Loading...