

Page 1

ViewSonic
VNB109
NoteBook
®
Model No. : VS13756
Page 2

Important Safety Instructions
1. DO NOT press or touch the LCD Screen. DO NOT place the Notebook PC with small items,
they may scratch LCD Screen or enter the Notebook PC.
2. DO NOT expose the Notebook PC to dirty or dusty environment. Keep the environment clean
and dry.
3. DO NOT place the Notebook PC on uneven or unstable work surface.
4. DO NOT place or drop objects on the top of the Notebook PC. DO NOT shove any foreign
objects into the Notebook PC. DO NOT cover the LCD Screen strongly.
5. DO NOT expose the Notebook PC to strong magnetic or electrical fields; DO NOT place the
floppy disk near or on the Notebook PC, that may loss the data of the floppy disk.
6. DO NOT leave the Notebook PC facing the sun as it can damage the LCD Screen, especially
in the car.
7. SAFE TEMP: This Notebook PC should only be used in environments with ambient
temperatures between 5° C (41° F) and 35° C(95° F).
8. DO NOT expose the Notebook PC to or use near liquids, rain, or moisture.
9. Caution: risk of explosion if battery is replaced by an incorrect type. Dispose of used batteries
according to the instructions.
10. DO NOT throw the Notebook PC in municipal waste. Check local regulations for disposal of
electronic products. Please recycle the Battery Pack, and check with your Local Authority or
retailer for recycling advice.
ViewSonic VNB109 1
Page 3

11. The Notebook PC and the Adapter may occur some heat during operating or charging. DO
NOT leave the Notebook PC on your lap or any part of the body in order to prevent discomfort
or injury from heat exposure.
12. INPUT RATING: Refer to the rating label on the Notebook PC and be sure that the by the
manufacturer.
13. Checking the connections between the main unit and attachments before turning on the
Notebook PC.
14. DO NOT use the Notebook PC during eating food avoid dirtying the Notebook PC.
15. DO NOT insert anything into the Notebook PC that may result in short circuit or damage the
circuit.
16. Powering off the Notebook PC, if you want install or remove some external devices, which are
not support hot-plug.
17. Disconnect the Notebook PC from the electrical outlet and remove any installed batteries
before cleaning. And Keep it away from children.
18. DO NOT disassemble the Notebook PC, only a certified service technician should perform
repairs on your computer. Otherwise, problem may result and the manufacturer should not
hold responsibility for the damage.
19. Only use Battery Packs approved by the manufacturer or else damage may occur.
20. The Notebook PC has some little metal flake to disperse heat. DO NOT place the Notebook
PC on soft objects (e.g.: bed, sofa, your lap), or else the Notebook PC may become hot and
halt the system operating.
ViewSonic VNB109 2
Page 4
Declaration of RoHS Compliance
This product has been designed and manufactured in compliance with Directive 2002/95/EC of
the European Parliament and the Council on restriction of the use of certain hazardous
substances in electrical and electronic equipment (RoHS Directive) and is deemed to comply
with the maximum concentration values issued by the European Technical Adaptation
Committee (TAC) as shown below:
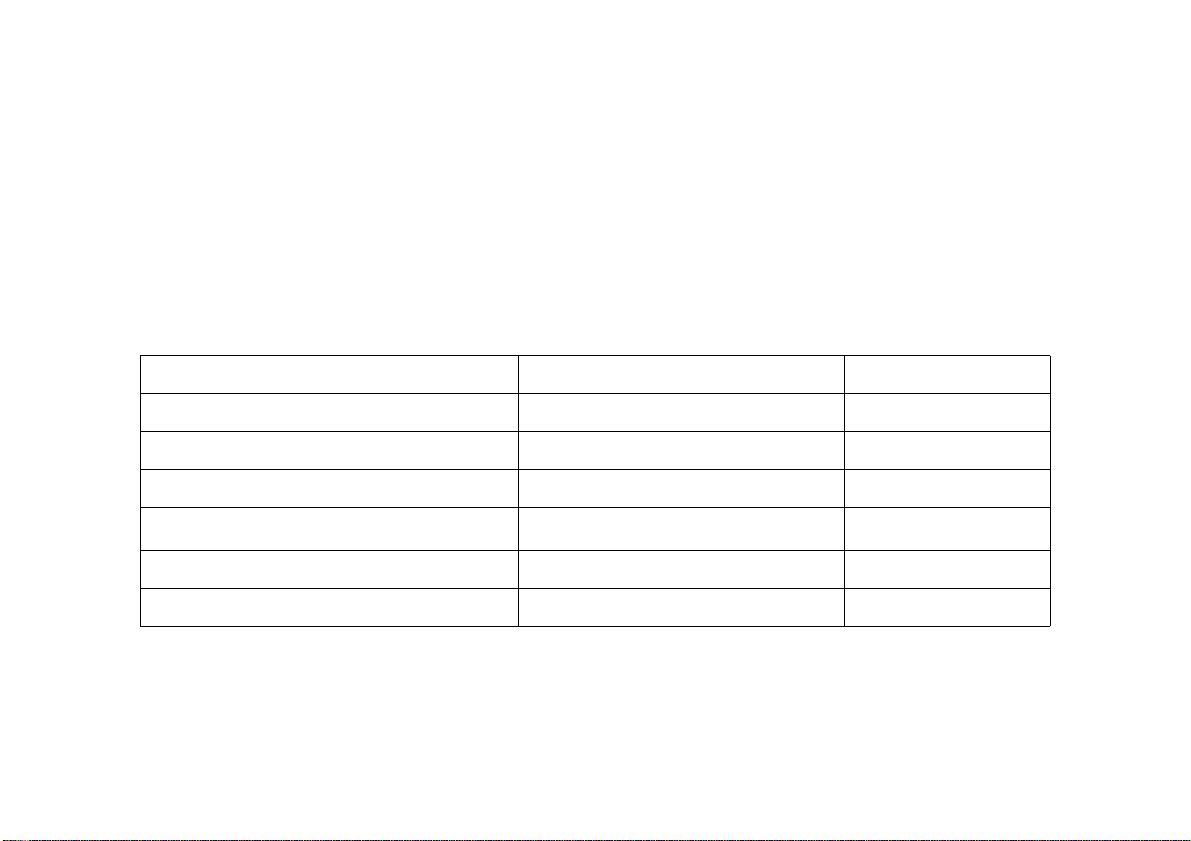
Substance Proposed Maximum Concentration Actual Concentration
Lead (Pb) 0.1% < 0.1%
Mercury (Hg) 0.1% < 0.1%
Cadmium (Cd) 0.01% < 0.01%
Hexavalent Chromium (Cr
Polybrominated biphenyls (PBB) 0.1% < 0.1%
Polybrominated diphenyl ethers (PBDE) 0.1% < 0.1%
ViewSonic VNB109 3
6+
)
0.1% < 0.1%
Page 5

Certain components of products as stated above are exempted under the Annex of the RoHS
Directives as noted below:
Examples of exempted components are:
1. Mercury in compact fluorescent lamps not exceeding 5 mg per lamp and in other lamps not
specifically mentioned in the Annex of RoHS Directive.
2. Lead in glass of cathode ray tubes, electronic components, fluorescent tubes, and electronic
ceramic parts (e.g. piezoelectronic devices).
3. Lead in high temperature type solders (i.e. lead-based alloys containing 85% by weight or
more lead).
4. Lead as an allotting element in steel containing up to 0.35% lead by weight, aluminium
containing up to 0.4% lead by weight and as a cooper alloy containing up to 4% lead by
weight.
ViewSonic VNB109 4
Page 6

Copyright Information
Copyright © ViewSonic® Corporation, 2009. All rights reserved.
Microsoft®, Windows®, Windows NT®, and the Windows® logo are registered trademarks of
Microsoft® Corporation in the United States and other countries.
ViewSonic®, the three birds logo, OnView , V iewMatch, and V iewMeter are registered trademarks
of ViewSonic® Corporation.
Intel®, Pentium®, Celeron®, and Centrino® are registered trademarks of Intel Corporation.
Award® is a registered trademark of Phoenix Technologies Ltd.
AMI® is a registered trademark of American Megatrends Inc.
Disclaimer: ViewSonic® Corporation shall not be liable for technical or editorial errors or
omissions contained herein; nor for incidental or consequential damages resulting from
furnishing this material, or the performance or use of this product.
In the interest of continuing product improvement, ViewSonic® Corporation reserves the right to
change product specifications without notice. Information in this document may change without
notice.
No part of this document may be copied, reproduced, or transmitted by any means, for any
purpose without prior written permission from ViewSonic® Corporation.
ViewSonic VNB109 5
Page 7

Product Registration
To meet your future needs, and to receive any additional product information as it becomes
available, please register your product on the Internet at: www.viewsonic.com. The ViewSonic
Wizard CD-ROM also provides an opportunity for you to print the registration form, which you
may mail or fax to ViewSonic.
For Your Records
Product Name:
Model Number:
Document Number:
Serial Number:
Purchase Date:
ViewSonic VNB109 6
VNB109
ViewSonic NoteBook
VS13756
VNB109_UG_ENG Rev. 1B 10-20-10
_________________________________
_________________________________
Page 8

Product disposal at end of product life
ViewSonic is concerned about the preservation of our environment. Please dispose of this
product properly at the end of its useful life. For the recycling information, please refer to our
website:
USA & Canada: http://www.viewsonic.com/company/green/recycle-program/
Europe: http://www.viewsoniceurope.com/uk/support/recycling-information/
Taiwan: http://recycle.epa.gov.tw/recycle/index2.aspx
ViewSonic VNB109 7
Page 9

About this Quick Guide
This quick guide is a brief introduction to getting your system started. This is a s upplement, and not a substitute for the
expanded English language User’s Manual in Adobe Acrobat format on the Device Drivers & Utilities + User’s Manual
disc supplied with your computer. This disc also contains the drivers and utilities necessary for the proper oper ation of
the computer (Note: The company reserves the right to revise this publication or to change its contents without notice).
Some or all of the computer’s features may already have been setup. If they aren’t, or you are planning to re-configure
(or re-install) portions of the system, refer to the expanded User’s Manual. The Device Drivers & Utilities + User’s
Manual disc does not contain an operating system.
System Startup
1. Remove all packing materials.
2. Place the computer on a stable surface.
3. Securely attach any peripherals you want to use with the
computer (e.g. keyboard and mouse) to their ports.
4. Attach the AC/DC adapter to the DC-In jack on the left of
the computer, then plug the AC power cord into an outlet,
and connect the AC power cord to the AC/DC adapter.
5. Use one hand to raise the
angle
(do not exceed 120 degrees); use the other hand (as
illustrated in Figure1) to support the base of the computer
(Note: Never lift the computer by the lid/LCD).
6. Press the power button to turn the computer “on”.
lid/LCD to a comfortable viewing
Figure 1 - Opening the
Lid/LCD/Computer
with AC/DC Adapter
Plugged-In
System Software
Your computer may already come with system software pre-installed. Where this is not the case, or where you are reconfiguring your computer for a different system, you will find this manual refers to Microsoft Windows 7.
System Map: Front View with LCD Panel Open
ViewSonic VNB109 1
Page 10

1
LED Indicators
The LED indicators on the computer display helpful information about the current status of the computer.
2
3
4
6
Figure 2 - Front View with LCD Panel Open
1. Built-In PC Camera
2. LCD
3. Keyboard
5
4. Built-In Microphone
5. Touchpad & Buttons
6. LED Indicators
Icon Color Description
Orange DC Power is Plugged In
Green The Computer is On
Blinking Green The Computer is in Sleep Mode
Orange The Battery is Charging
Green The Battery is Fully Charged
Blinking
Orange
Green Hard Disk Activity
Green
Orange
Table 1 - LED Indicators
System Map: Front, Left, Right, & Rear Views
6
The Battery Has Reached Criti-
cally Low Power Status
The Wireless LAN Module is
Powered On
The Bluetooth Module is Powered
On
ViewSonic VNB109 2
Page 11

Front
1
Left
2
3
8
Figure 3 - Front, Left, Right & Rear Views
1. LED Indicators
2. Security Lock Slot
3. DC-In Jack
4. Vent
5. 3 * USB 2.0 Ports
6. Microphone-In Jack
4
Right
5
5
Rear
7. Headphone-Out Jack
8. 3-in-1 Card Reader
9. RJ-45 LAN Jack
10. External Monitor Port
11 . Power Button
12. Battery
3-in-1 Card Reader
The card reader allows you to use the most popular digital storage card formats:
6
5
7
MMC (MultiMedia Card) / RS MMC
SD (Secure Digital) / Mini SD / SDHC/ SDXC
MS (Memory Stick) / MS pro / MS Duo
11
10
9
The color is for reference only. It would be differ-
12
ent by actual model.
Overheating
To prevent your computer from overheating make sure nothing
blocks any vent while the computer is in use.
ViewSonic VNB109 3
Page 12

Figure 4
Bottom View
1. Battery
2. Component Bay Cover
3. Vent
4. Speakers
System Map: Bottom View
1
To prevent your computer from
overheating make sure nothing
blocks any vent while the computer is in use.
3
2
The CPU is not a user serviceable part. Opening this compartment, or accessing the CPU
4
4
in any way, may violate your
warranty.
Battery Information
Always completely discharge, then fully charge , a new b attery before u sin g i t. Compl et ely discharge and charge the battery at least once every 30 days or afte r about 20 p artial discharge s
(see the expanded User’s Manual on the Device Drivers & Utilities + User’s Manual disc).
Overheating
CPU
ViewSonic VNB109 4
Page 13

Keyboard & Function Keys
The keyboard has a numeric keypad for easy numeric data
input. Pressing the Fn + NumLk keys turns on/off the numeric keypad. It also features function keys to allow you to
change operational features instantly. The function keys
(F1 - F12 etc.) will act as hot keys when pressed while the
Fn key is held down. In addition to the basic function key
combinations, visual indicators are available when the hot
key driver is installed.
Keys Function/Visual Indicators Keys Function/Visual Indicators
Function Keys
Fn Key
Figure 5 - Keyboard
Numeric
Keypad
3.75G/HSPA
Module Power Toggle
NumLk &
ScrLk
Fn + ~ Play/Pause (in Audio/Video Programs) Fn + F8/F9
Fn + F1 Touchpad Toggle Fn + F10
Fn + F2
Fn + F3 Mute Toggle Fn + F12
Fn + F4 Sleep Toggle Fn + NumLk
Fn + F5/F6
Fn + F7 Display Toggle Caps Lock Caps Lock Toggle
(Press a key to or use Touchpad to turn on)
Volume Decrease/
Turn LCD Backlight Off
Increase
Fn + F11
Fn + ScrLk Scroll Lock Toggle
Brightness
Decrease/Increase
PC Camera Power
Toggle
WLAN Module
Power Toggle
Bluetooth Module
Power Toggle
Numeric Keypad
Toggle
Table 2 - Function Keys & Visual Indicators
ViewSonic VNB109 5
Page 14

Driver Installation General
Guidelines
As a general guide follow the
default on-screen instructions for each driver (e.g.
Next > Next > Finish) unless
you are an advanced user. In
many cases a restart is required to install the driver.
Make sure any modules (e.g.
PC Camera, WLAN are ON
before installing the appropriate driver.
Windows Update
After installing all the drivers
make sure you enable Windows Update in order to get
all the latest security updates
etc. (all updates will include
the latest hotfixes from Microsoft).
Driver Installation
The Device Drivers & Utilities + User’s Manual disc contains the drivers and utilities
necessary for the proper operation of the computer. This setup will probably have already been done for you. If this is not the case, insert the disc and click Install Driv-
ers (button), or Option Drivers (button) to access the Optional driver menu. Install
the drivers in the order indicated in
install (you should note down the drivers as you install them). Note: If you need to
reinstall any driver, you should uninstall the driver first.
If the Found New Hardware wizard appears during the installation procedure, click
Cancel to close the window, and follow the installation procedure as directed.
Figure6. Click to select the drivers you wish to
Figure 6 - Install Drivers
ViewSonic VNB109 6
Page 15

Wireless Device
Operation Aboard
Aircraft
The use of any portable
electronic transmission
devices aboard aircraft is
usually prohibited. Make
sure the wireless modules are OFF if you are
using the computer
aboard aircraft.
Use the key combinations to toggle power to
the 3.75G/HSPA/WLAN/
Bluetooth modules, and
check the LED indicator/
visual indicator to see if
the modules are powered
on or not (see Table 1 on
page2 and Table 2 on
page5 ).
Troubleshooting
Problem Possible Cause - Solution
The Wireless LAN
indicators
show
that the WLAN module
is powered on,
however the module
does not connect.
The Bluetooth module
is off after resuming
from Sleep.
The captured video
files from the PC
Camera are taking up
too much disk space.
The WLAN module is turned off in the Windows Mobility Center. The
computer’s wireless function keys will not function properly if Wireless
is turned OFF in the Windows Mobility Center control panel. Make
sure that Wireless is ON in the Windows Mobility Center to ensure
proper function key behavior.
The Bluetooth module’s default state will be off after resuming from the
Sleep power-saving state. Use the key combination (Fn + F12) to power
on the Bluetooth module after the computer resumes from Sleep.
Note that capturing high resolution video files requires a substantial
amount of disk space for each file.
Note that the Windows system requires a minimum of 15GB of free
space on the C: drive system partition. It is recommended that you save
the capture video file to a location other than the C:drive, limit the file
size of the captured video or reduce video resolution (Options > Vide o
Capture Pin... > Output Size).
ViewSonic VNB109 7
Page 16

Specifications
Latest Specification Information
The specifications listed in this here
are correct at the time of going to
press. Certain items (particularly processor types/speeds) may be
changed, delayed or updated due to
the manufacturer's release schedule.
Check with your service center for detail.
Processor
Intel® Atom™ Processor N455
1.66 GHz, 512KB L2 Cache, 667MHz FSB,
TDP:5.5W
Display
10.1” (25,6cm) WSVGA TFT LCD
Core Logic
Intel® NM10 Express Chipset
Memory
One 200 Pin SO-DIMM Socket Supporting
DDR2 667MHz Memory
Memory Expandable up to 2GB
Video Adapter
Intel GMA 3150
Shared Memory Architecture (DVMT) up to
384MB
MS DirectX® 9.0 compatible
Storage
One Changeable 2.5" 9.5mm (h) SA TA
Hard Disk Drive
BIOS
One 8Mb SPI Flash ROM
Phoenix™ BIOS
Audio
High Definition Audio Compliant Interface
2 * Built-In Speakers
Built-In Microphone
Security
Kensington Lock Slot
BIOS Password
Interface
Three USB 2.0 Ports
One Headphone-Out Jack
One Microphone-In Jack
One External Monitor Port
One RJ-45 LAN Jack
One DC-in Jack
Keyboard
“WinKey” keyboard (with embedded
numeric keypad)
Pointing Device
Built-in Touchpad
ViewSonic VNB109 8
Page 17

Communication
10Mb/100Mb Ethernet LAN
300K Pixel USB PC Camera Module
(Factory Option) Bluetooth 2.1 + EDR
Module
802.11b/g/n Wireless LAN Half Mini-Card
Module
Card Reader
Embedded 3-in-1 Card Reader
MMC (MultiMedia Card) / RS MMC
SD (Secure Digital) / Mini SD / SDHC/
SDXC
MS (Memory Stick) / MS pro / MS Duo
Power
Full Range AC/DC Adapter
AC Input: 100 - 240V, 50 - 60Hz
DC Output: 19V, 1.57A/ 1.58A (30W)
Removable 3 Cell Smart Lithium-Ion Battery
Pack, 24.42WH
Environmental Spec
Temperature
Operating: 5
Non-Operating: -20°C - 60°C
Relative Humidity
Operating: 20% - 80%
Non-Operating: 10% - 90%
°C - 35°C
Dimensions & Weight
266mm (w) x 185mm (d) x 19.7 - 27.1mm
(h)
0.93kg (with 24.42WH Battery)
ViewSonic VNB109 9
Page 18

Customer Support
For technical support or product service, see the table below or contact your reseller.
NOTE: You will need the product serial number.
Country/Region Website
Australia/New Zealand www.viewsonic.com.au
Canada www.viewsonic.com
Europe www.viewsoniceurope.com www.viewsoniceurope.com/uk/Support/Calldesk.htm
Hong Kong www.hk.viewsonic.com T= 852 3102 2900 service@hk.viewsonic.com
India www.in.viewsonic.com T= 1800 11 9999 service@in.viewsonic.com
Ireland (Eire) www.viewsoniceurope.com/uk/
Korea www.kr.viewsonic.com T= 080 333 2131 service@kr.viewsonic.com
Latin America (Argentina) www.viewsonic.com/la/ T= 0800-4441185 soporte@viewsonic.com
Latin America (Chile) www.viewsonic.com/la/ T= 1230-020-7975 soporte@viewsonic.com
Latin America (Columbia) www.viewsonic.com/la/ T= 01800-9-157235 soporte@viewsonic.com
T = Telephone
F = FAX
AUS= 1800 880 818
NZ= 0800 008 822
T (Toll-Free)= 1-866-463-4775
T (Toll)= 1-424-233-2533
F= 1-909-468-3757
www.viewsoniceurope.com/uk/
support/call-desk/
Email
service@au.viewsonic.com
service.ca@viewsonic.com
service_ie@viewsoniceurope.com
ViewSonic VNB109 10
Page 19

Country/Region Website
Latin America (Mexico) www.viewsonic.com/la/ T= 001-8882328722 soporte@viewsonic.com
Renta y Datos, 29 SUR 721, COL. LA PAZ, 72160 PUEBLA, PUE. T el: 01.222.891.55.77 CON 10 LINEAS
Electroser, Av Reforma No. 403Gx39 y 41, 97000 Mérida, Yucatán. Tel: 01.999.925.19.16
Other places please refer to http://www.viewsonic.com/la/soporte/index.htm#Mexico
Latin America (Peru) www.viewsonic.com/la/ T= 0800-54565 soporte@viewsonic.com
Macau www.hk.viewsonic.com T= 853 2870 0303 service@hk.viewsonic.com
Middle East ap.viewsonic.com/me/ Contact your reseller service@ap.viewsonic.com
Puerto Rico & Virgin
Islands
Singapore/Malaysia/
Thailand
South Africa ap.viewsonic.com/za/ Contact your reseller service@ap.viewsonic.com
United Kingdom www.viewsoniceurope.com/uk/
United States www.viewsonic.com
www.viewsonic.com
www.viewsonic.com.sg T= 65 6461 6044 service@sg.viewsonic.com
T = Telephone
F = FAX
T= 1-800-688-6688 (English)
T= 1-866-379-1304 (Spanish)
F= 1-909-468-3757
www.viewsoniceurope.com/uk/
support/call-desk/
T (Toll-Free)= 1-800-688-6688
T (Toll)= 1-424-233-2530
F= 1-909-468-3757
Email
service.us@viewsonic.com
soporte@viewsonic.com
service_gb@viewsoniceurope.com
service.us@viewsonic.com
ViewSonic VNB109 11
Page 20

Limited Warranty
VIEWSONIC® NOTEBOOK
What the warranty covers:
ViewSonic warrants its products to be free from defects in material and workmanship during the wa rranty
period. If a product proves to be defective in material or workmanship during the warranty period,
ViewSonic will, at its sole option, repair or replace the product with a similar product. Replacement
Product or parts may include remanufactured or refurbished parts or components. The replacement unit
will be covered by the balance of the time remaining on the customerís original limited warranty.
ViewSonic provides no warranty for the third-party software included with the product or installed by the
customer.
How long the warranty is effective:
ViewSonic NoteBook products are warranted for (1) year from the first consumer purchase for parts and
labor.
User is responsible for the back up of any data before returning the unit for service. ViewSonic is not
responsible for any data lost.
Who the warranty protects:
This warranty is valid only for the first consumer purchaser.
What the warranty does not cover:
1. Any product on which the serial number has been defaced, modified or removed.
2. Damage, deterioration or malfunction resulting from:
ViewSonic VNB109 12
Page 21

a. Accident, misuse, neglect, fire, water, lightning, or other acts of nature, unauthorized product
modification, or failure to follow instructions supplied with the product.
a. Any damage of the product due to shipment.
a. Removal or installation of the product.
a. Causes external to the product, such as electrical power fluctuations or failure.
a. Use of supplies or parts not meeting ViewSonicís specifications.
a. Normal wear and tear.
a. Any other cause which does not relate to a product defect.
3. Any product exhibiting a condition commonly known as ìimage burn-inî which results when a static
image is displayed on the product for an extended period of time.
4. Removal, installation, one way transportation, insurance, and set-up service charges.
How to get service:
1. For information about receiving service under warranty, contact ViewSonic Customer Support
(Please refer to Customer Support page). You will need to provide your productís serial number.
2. To obtain warranty service, you will be required to provide (a) the original dated sales slip, (b) your
name, (c) your address, (d) a description of the problem, and (e) the serial number of the product.
3. Take or ship the product freight prepaid in the original container to an authorized ViewSonic service
center or ViewSonic.
4. For additional information or the name of the nearest ViewSonic service center, contact ViewSonic.
ViewSonic VNB109 13
Page 22

Limitation of implied warranties:
There are no warranties, express or implied, which extend beyond the description contained herein
including the implied warranty of merchantability and fitness for a particular purpose.
Exclusion of damages:
ViewSonicís liability is limited to the cost of repair or replacement of the product. ViewSonic shall not be
liable for:
1. Damage to other property caused by any defects in the product, damages based upon inconvenience, loss of use of the product, loss of time, loss of profits, loss of business opportunity, loss of
goodwill, interference with business relationships, or other commercial loss, even if advised of the
possibility of such damages.
2. Any other damages, whether incidental, consequential or otherwise.
3. Any claim against the customer by any other party.
4. Repair or attempted repair by anyone not authorized by ViewSonic.
Effect of state law:
This warranty gives you specific legal rights, and you may also have other rights which vary from state to
state. Some states do not allow limitations on implied warranties and/or do not allow the exclusion of
incidental or consequential damages, so the above limitations and exclusions may not apply to you.
ViewSonic VNB109 14
Page 23

Sales outside the U.S.A. and Canada:
For warranty information and service on ViewSonic products sold outside of the U.S.A. and Canada,
contact ViewSonic or your local ViewSonic dealer.
The warranty period for this product in mainland China (Hong Kong, Macao and Taiwan Excluded) is
subject to the terms and conditions of the Maintenance Guarantee Card.
For users in Europe and Russia, full details of warranty provided can be found in
www.viewsoniceurope.com under Support/Warranty Information.
4.3: ViewSonic NoteBook Warranty NB_LW01 Rev. 1a 02-11-09
ViewSonic VNB109 15
Page 24

 Loading...