

Page 1
PJ250
User Guide
Page 2

ViewSonic PJ250 i
Contents
For Your Records .................................................................................................1
Accessories Included ................................................................................... 2
Projector Components ................................................................................. 3
Remote Control Components ...................................................................... 4
Connections with the Personal Computer.................................................... 5
Connections with Video Equipment ............................................................. 6
Operating the Projector................................................................................ 7
Turning the projector Off .............................................................................. 8
Using the Quick Menu.................................................................................. 9
Menu Operation ......................................................................................... 10
STATUS Indicator Light ............................................................................. 13
Replacing the Lamp Cartridge ................................................................... 14
Specifications............................................................................................. 16
Distance Chart ....................................................................................................17
Cabinet Dimensions............................................................................................18
Customer Support...................................................................................... 19
WARRANTY .............................................................................................. 20
Appendix .................................................................................................... 21
Power Cord Safety Guidelines............................................................................21
IMPORTANT SAFETY INFORMATION..................................................... 22
Important Safeguards .........................................................................................22
Compliance Information for U.S.A. .....................................................................23
Compliance Information for Canada ...................................................................23
Compliance Information for European Countries................................................23
User Information for all Countries .......................................................................23
Page 3

1 ViewSonic PJ250
Copyright © ViewSonic Corporation, 2002. All rights reserved.
Apple, Mac and ADB registered trademarks of Apple Computer, Inc.
Microsoft, Windows, Windows NT, and the Windows logo are registered trademarks of Microsoft
Corporation in the United States and other countries.
ViewSonic, the three birds logo and OnView are registered trademarks of ViewSonic Corporation.
VESA and SVGA are registered trademarks of the Video Electronics Standards Association.
DPMS and DDC are trademarks of VESA.
PS/2, VGA and XGA are registered trademarks of International Business Machines Corporation.
ViewSonic Corporation has determined that this product meets the E
NERGY STAR
®
guidelines for
energy efficiency.
Disclaimer: ViewSonic Corporation shall not be liable for technical or editorial errors or omissions
contained herein; nor for incidental or consequential damages resulting from furnishing this material,
or the performance or use of this product.
In the interest of continuing product improvement, ViewSonic Corporation reserves the right to
change product specifications without notice. Information in this document may change without
notice.
No part of this document may be copied, reproduced, or transmitted by any means, for any purpose
without prior written permission from ViewSonic Corporation.
Electronic Warranty Registration
To meet your future needs, and to receive any additional product
information as it becomes available, please register your projector's
warranty on the Internet at:
http://www.viewsonic.com
For Your Records
Product Name:
Model Number:
Document Number:
PJ250
VPROJ26264-1W
Serial Number:
Purchase Date:
B16___________
______________
Page 4
ViewSonic PJ250 2
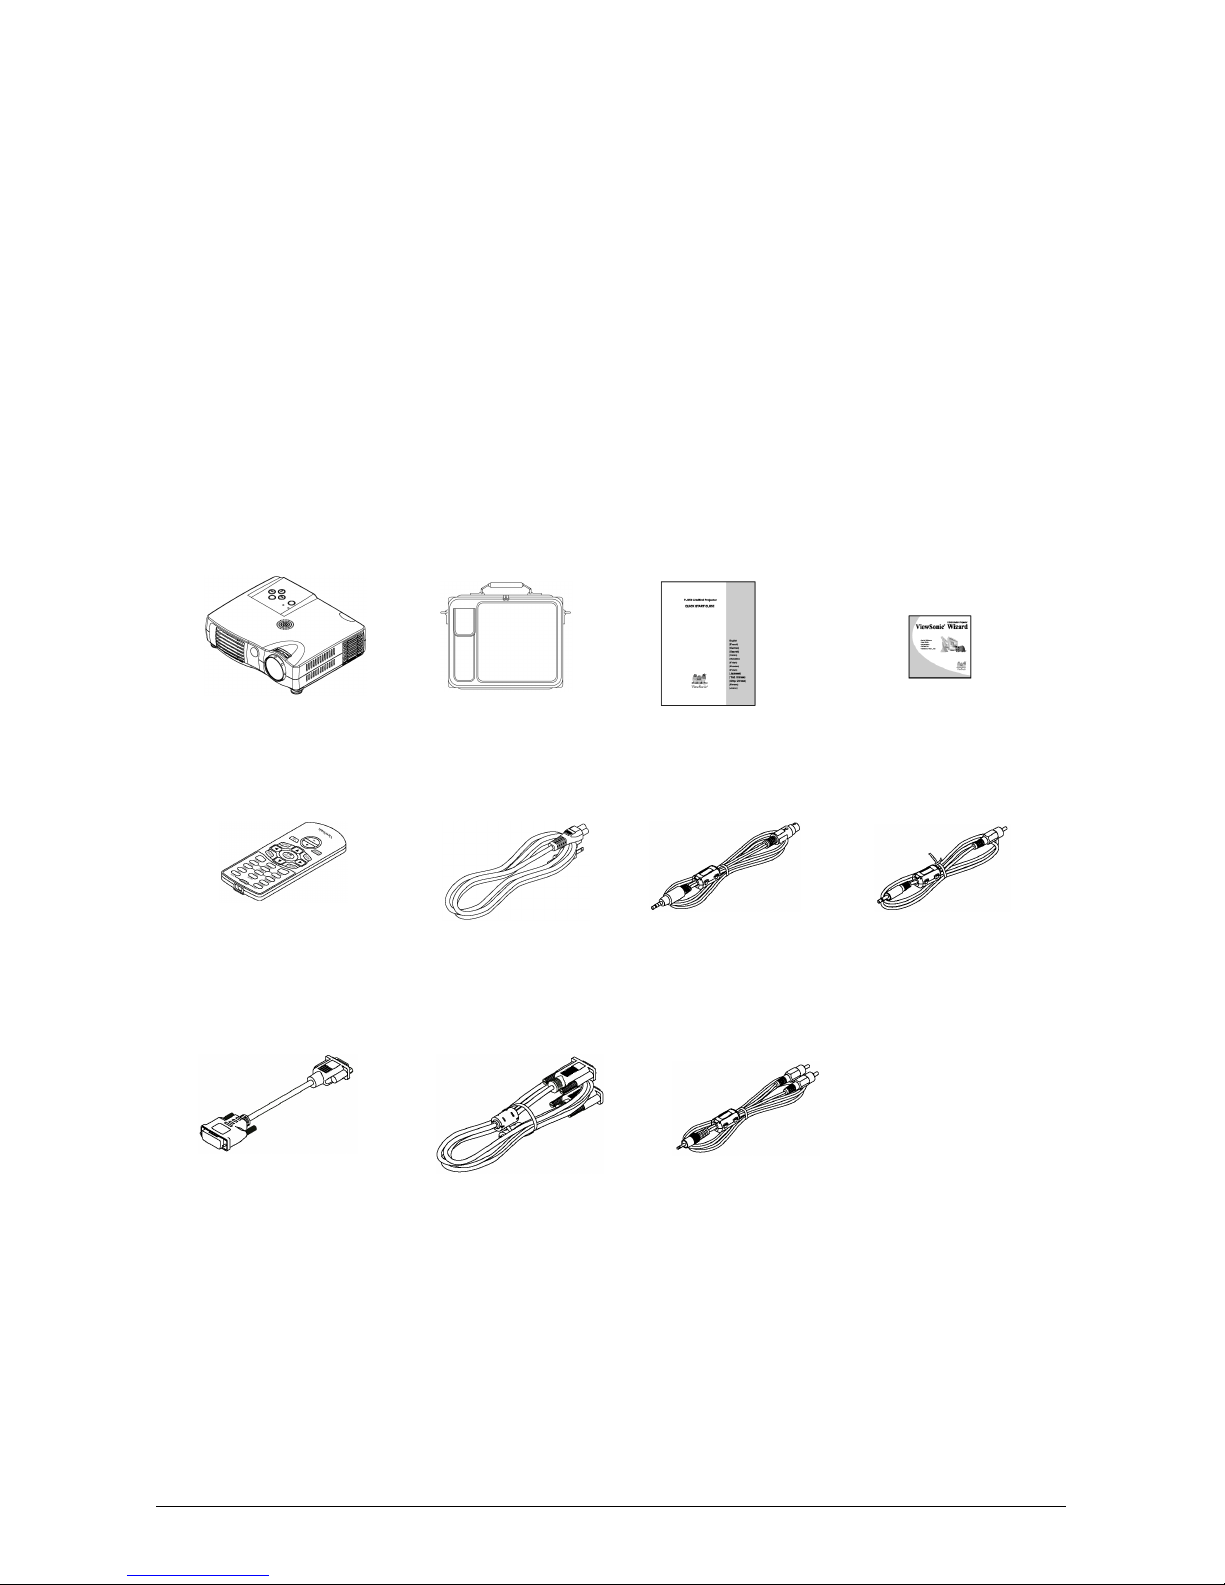
Accessories Included
Remove the main unit and the accessories from the box and check that the following items are
included.
• Quick Start Guide
• ViewSonic wizard CD
• Lens cap (affixed to the projector)
• Remote control (includes one button battery)
• Power cable (1.8 m / 5.9 ft)
• DVI / Mini D-sub 15-pin conversion cable (19 cm / 7.5 in )
• RGB signal cable (Mini D-sub 15-pin, 2 m / 6.6 ft )
• S-Video cable (3.5 mm diameter plug / Mini DIN 4-pin plug, 1.5 m / 4.9 ft )
• Video cable (3.5 mm diameter plug / RCA pin plug, 1.5 m / 4.9 ft )
• Audio cable (2.5 mm diameter plug / RCA pin plug, 1.5 m / 4.9 ft )
• Soft carry case
Quick Start Guide
ViewSonic Wizard CD
S-Video cable (3.5 mm
diameter plug / Mini DIN
4-pin plug, 1.5 m / 4.9 feet)
Video cable (3.5 mm
diameter plug / RCA pin
plug, 1.5 m / 4.9 feet)
Projector
Carrying case
Remote control
(includes one button battery)
Power cable
(1.8 m / 5.9 feet)
RGB signal cable
(Mini D-sub 15-pin, 2 m /
6.6 feet)
DVI / Mini D-sub 15-pin
conversion cable
(19 cm / 0.6 feet)
Audio cable (2.5 mm
diameter plug / RCA pin
plug, 1.5 m / 4.9 feet)
Page 5

3 ViewSonic PJ250
Projector Components
1. Lens
2. Lens cap
3. Focus ring
4. Remote control sensor
5. Speaker
6. Front Adjustment button
7. Front Adjustment Foot
8. Exhaust vents
9. Ventilation slots
10. POWER button
11. POWER indicator
12. STATUS indicator
13. MENU button
14. SOURCE button / Cursor button
15. AUTO button / Cursor button
16. QUICK MENU button / Cursor button
17. PC connector
18. VIDEO jack
19. AUDIO jack
20. AC IN connector
21. Rear Adjustment Foot
Page 6
4 ViewSonic PJ250
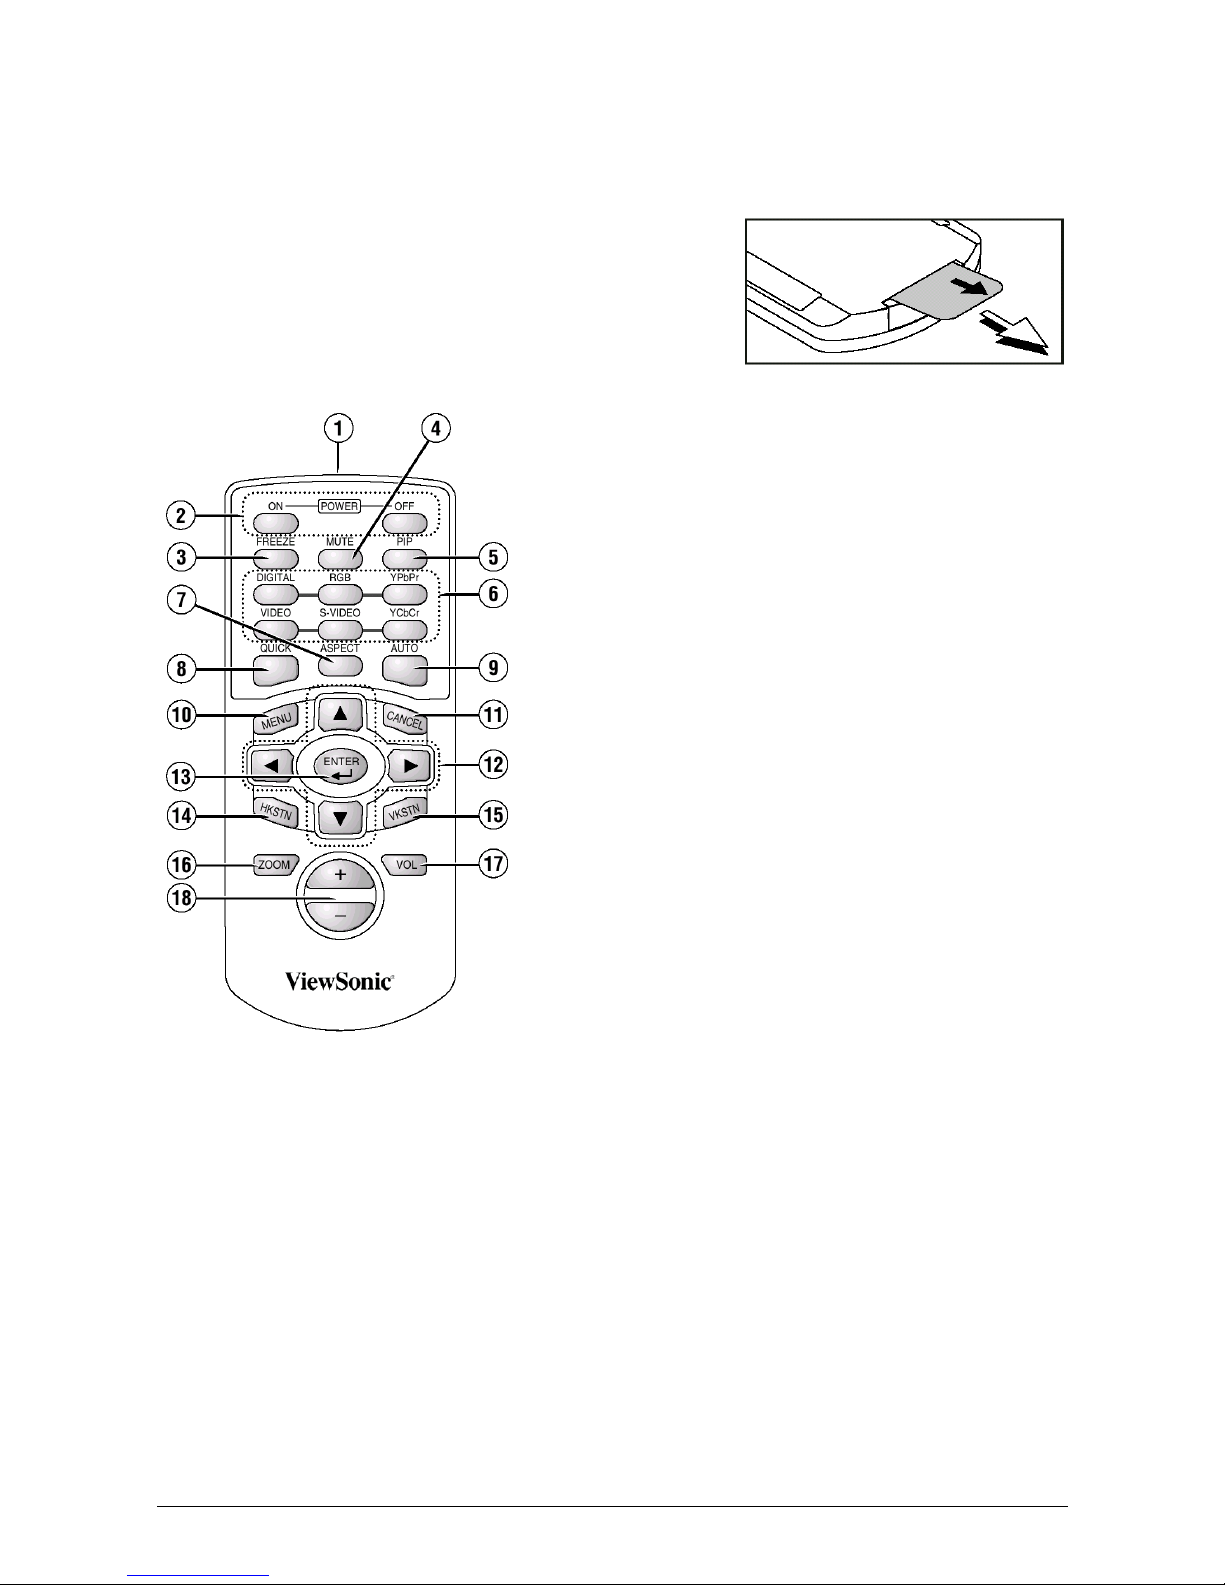
Remote Control Components
Before use, pull out and remove the transportation insulation
sheet which is inserted in the battery compartment.
1.Infrared transmitter
2.POWER ON and OFF buttons
3.FREEZE button
4.MUTE button
5.PIP button
6.Input selection Buttons
7.ASPECT button
8.QUICK button
9.AUTO button
10.MENU button
11.CANCEL button
12.Cursor Buttons
13.ENTER button
14.HKSTN button
15.VKSTN button
16.ZOOM button
17.VOL button
18.+/- Buttons
CAUTION
• Danger of explosion if battery is incorrectly replaced.
Replace only with the same or equivalent type (CR2025) recommended by the manufacturer.
Dispose of used batteries according to your local regulations.
Precautions
Handling of the Remote Control
• Do not expose the remote control to water or other liquids. Should the remote control become
wet, wipe it dry immediately.
• Please keep button batteries out of the reach of children. If a battery is swallowed, promptly
obtain the medical care of a doctor.
• Some operations are available only through the use of the remote control and attention should be
given to its careful handling.
Page 7
5 ViewSonic PJ250
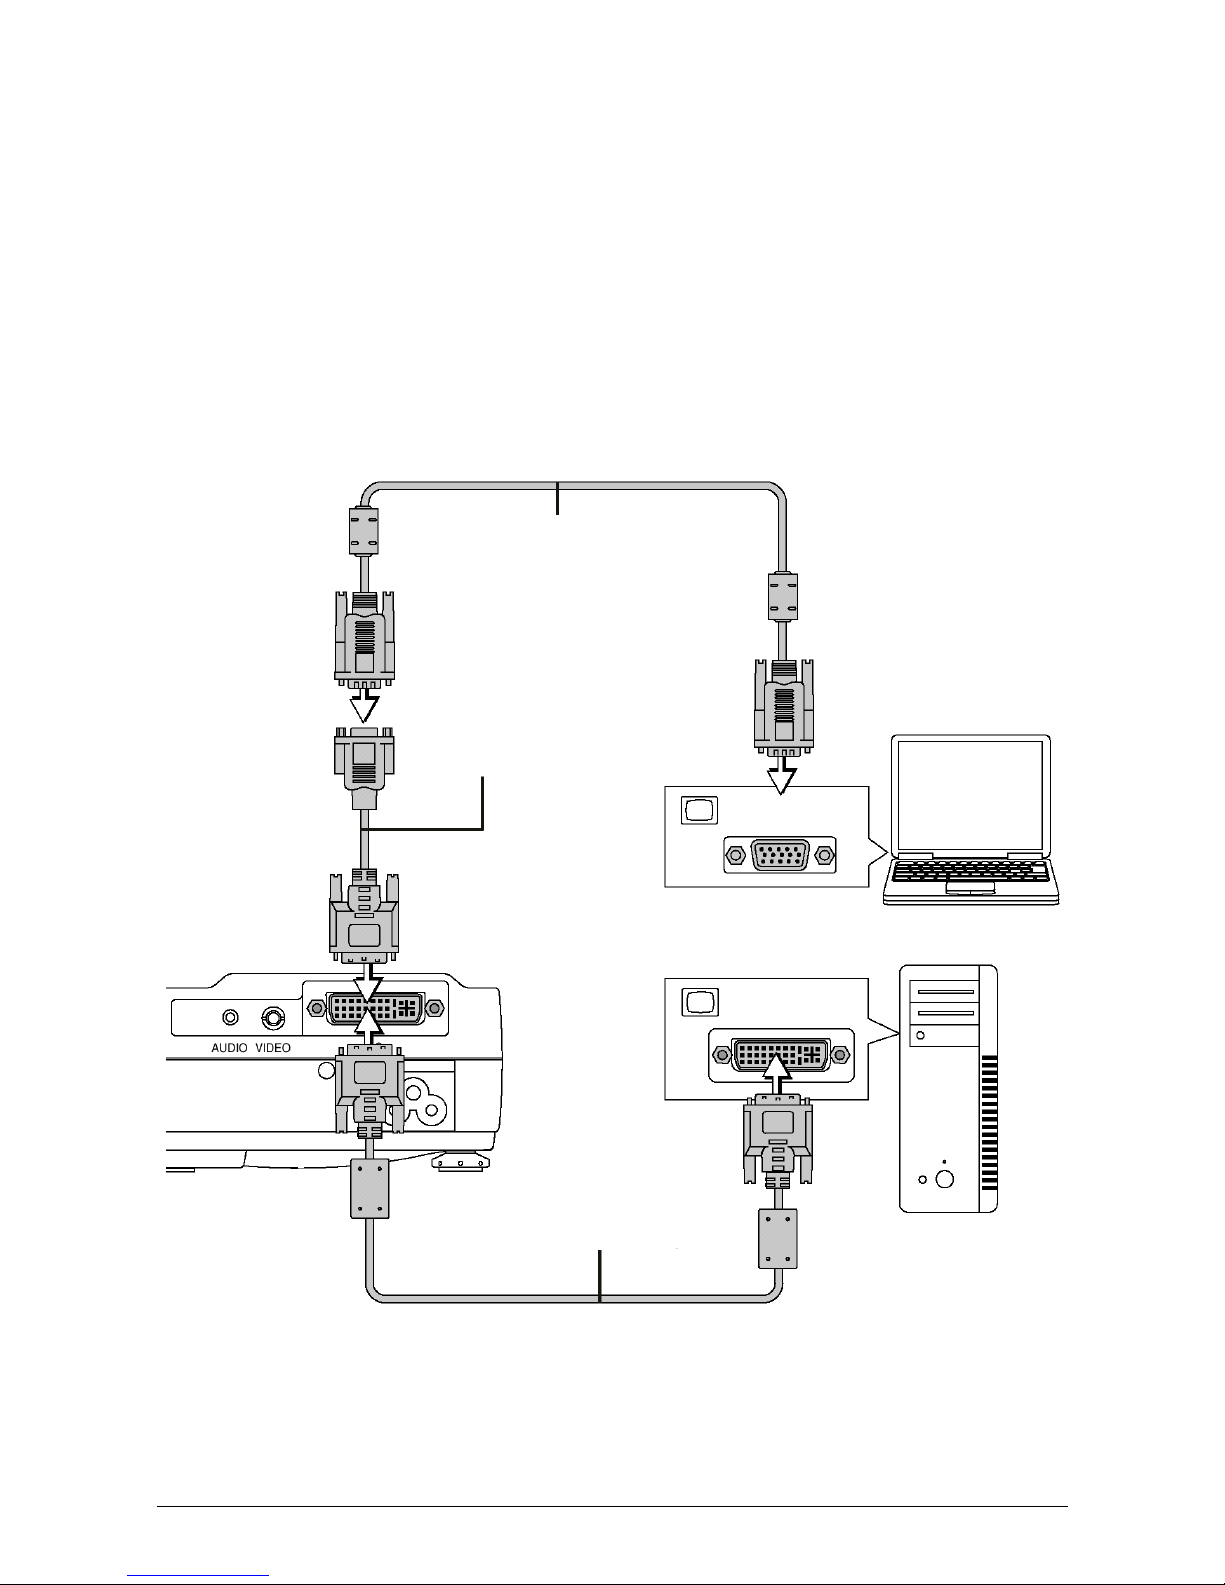
Connections with the Personal Computer
• The projectors native resolution is 1024 X 768 pixels XGA,scalable to 1280 X 1024 pixels
SXGA.
Note that input of a resolution that exceeds the displayable resolution will cease to be projected
and should this be the case, you will need to change the resolution to a displayable resolution on
the computer.
• The setting method of the personal computer will differ depending on the personal computer that
you are using. For more information, read the instruction manual for your personal computer, or
contact the manufacturer of your personal computer.
RGB signal cable (Supplied item)
DVI/mini D-sub 15-pin conversion
cable (Supplied item)
DVI-D cable (Available as an option)
Monitor out
Monitor out
Page 8

ViewSonic PJ250 6
Connections with Video Equipment
Note:
• This projector's video cable and S-video cable are unique cables. To purchase extension cables,
please contact your dealer.
• The AUDIO jack of the projector is a 2.5 mm diameter stereo mini jack. Connection is not
possible using the common (3.5 mm diameter) stereo mini jack cable from the headphone jack of
the personal computer or video equipment.
Component cable (Available as an option)
(3.5 mm diameter, 4 Pde, Plug to RCA X 3)
Video cable (Supplied item)
S-Video cable (Supplied item)
DVI/mini D-sub 15-pin
conversion cable
(Supplied item)
Component
Green
Blue
Red
White
Audio cable (Supplied item)
Component cable (Available as an option)
(D-sub 15-pin to RCA 3)
Red
Blue
Green Red
Component
Page 9

7 ViewSonic PJ250
Operating the Projector
1
Set up the screen and the projector
See the affixed "Projection Distance Table" for the desired distance between the screen and the
projector.
2
Connect the personal computer or video equipment to the projector.
3
Connect the AC IN connector of the projector and the power outlet using the supplied power
cable.
The POWER indicator will light amber, the cooling fan will rotate at low speed, and the unit will
enter the standby mode.
4
Switch the projector power on.
Main unit operation: Press and hold the POWER button for several seconds.
Remote control operation: Press the POWER ON button.
The POWER indicator changes to a flashing green and lights steadily after about 60 seconds. The
projection screen brightens after about 40 seconds.
The projector is now capable of regular projection.
5
Switch the power of the connected equipment on.
6
Select the input
Main unit operation: Press the SOURCE button.
Remote control operation: Press the desired button from among the input selection buttons.
To wall outlet
Firmly plug in all the way
Flashes green
(Approximately
60 seconds)
Lit green
Power is on
Page 10

ViewSonic PJ250 8
Turning the projector Off
1
Switch the power button off.
Main unit operation: Press and hold the POWER button for several seconds.
Remote control operation: Press the POWER OFF button.
The "Power off" indication will appear.
When the red bar extends fully (approximately 5
seconds), the projection screen will turn off and the
unit will enter the power off operation.
Note
• The operation can be cancelled by pressing a button other than the POWER button.
• One more press of the POWER (POWER Off) button will switch off the power.
When the unit enters the standby mode the POWER
indicator changes from a flashing amber and lights a
steady amber after about 90 seconds.
2
Unplug the power cable.
Check that the POWER indicator is lit amber and then unplug the power cable.
The POWER indicator will go off when the power cable is unplugged.
WARNING:
Do not unplug the power cable while the POWER indicator is flashing amber. Doing so may shorten
the life of the lamp or damage the projector.
Flashes amber
(Approximately
90 seconds)
Lit amber
Standby mode
Page 11

9 ViewSonic PJ250
Using the Quick Menu
Note that the Quick Menu will not be displayed unless the signal of the connected equipment is
detected. Please select the input that you wish to adjust.
Main unit operation
(1) Press the QUICK MENU button to access the Quick Menu.
Press again to select the desired adjustment display.
(2) Press the or button to adjust.
(3) To close the display immediately, press the MENU button.
In the absence of operations for a period of about 10 seconds,
the display will close automatically.
Remote control operation
(1) Press the QUICK MENU button to access the Quick
Menu. Further presses cause the adjustment display to
change in sequence.
The adjustment display can be selected with use of either
the cursor S or T button.
(2) Press the cursor W or X button to make the adjustment.
(3) To close the display immediately, press the CANCEL
button.
In the absence of operations, the display will close
automatically in a period of about 10 seconds.
Content of Adjustments and Settings
Example: Brightness adjustment display
Display Item Adjustment/Setting
Brightness
Adjusts the brightness of the image.
Contrast
Adjusts the contrast of the image.
V Keystone
Corrects (vertical) keystone distortion of the screen.
Adjusts the left and right edges of the screen so that they are parallel.
H Keystone
Corrects (horizontal) keystone distortion of the screen.
Adjusts the upper and lower edges of the screen so that they are parallel.
Picture in Picture
The picture from the VIDEO jack is displayed as a sub-picture on the input screen
from the PC connector. This function selects either the size of the sub-picture (i.e.
large, medium, or small) or off (i.e. no display). (Neither the adjustment display
nor the picture will be output unless the signal is input to the PC connector.)
Vol u m e
This function adjusts the volume of the built-in speaker.
Page 12

ViewSonic PJ250 10
Menu Operation
Remote Control
Projector
MENU button
Used for menu display and menu closure.
CURSOR(
STWX
) button
Selects menu names and item names as well as in setting
and adjusting the item contents.
CANCEL button
Returns to menu name selection as well as to close the
menu (and the sub menu display).
ENTER button
Sets the verification display.
MENU button
Displays menu, to return to menu name selections, and to
close menus (i.e. closing sub menu displays).
(AUTO) button
Advances the selection of menu names. Advances the
setting/adjustment values of the item contents. Also serves
the function of the remote control ENTER button.
(QUICK MENU) button
Selects of item names.
(SOURCE) button
Returns to the selection of menu names. Advances the
setting/adjustment values of the item contents.
Page 13

11 ViewSonic PJ250
On Screen Display
• The remote control should be pointed toward the remote control sensor of the projector and
operated.
• When no signal is detected, only "Color" , "Setup", and "Info." can be selected.
("Color" can be selected for Video and S-Video source only.)
• The menu will close automatically if no buttons are pushed within 30 seconds.
Menu Display
1
Press the MENU button to display the menu
Note :
Pressing the main unit MENU button will change the function of the SOURCE button,
AUTO button, and QUICK MENU button to that of cursor buttons.
Cursor
The setting/adjustment of the cursor position can
be adjusted.
Menu Selections
(Item name)
Sub Selections
(Item name)
Adjustment bar setting contents
Adjustment bar: Indicates the adjustment condition by
increasing or decreasing in bar length setting contents:
Displays the set contents
Icon: Displays the sub menu or setting contents
Menu title
Page 14

ViewSonic PJ250 12
Menu Selection
2
Press the cursor (WX) button to select the menu item you wish to adjust.
Each press of the cursor (X) button advances the selection one step in the sequence of "Color"
→"View" →"Setup" →"Info." →"Image".
Each press of the cursor (W) button causes a return of one step.
The selected menu name will appear in red.
Note :
To cancel the display of the cursor, press the CANCEL button on the remote control or
the MENU button on the projector.
Displaying the Cursor
3
Press the cursor (T) button to display the cursor.
Selection of the Item Name
4
Press the cursor (ST) button to align the cursor with the item name.
Main unit operation: Press the (QUICK MENU) button. When the cursor has moved to the
very bottom of the items, another press will move it to the very top of the items.
When the icon is displayed and depending on the item contents, a press of the cursor (X)
button will result in the sub menu, the setting display, a resetting of the adjustment value, or a
resetting verification display.
Making Adjustments/Settings
5
Press the cursor (WX) button and make the adjustment (or setting) while viewing the image.
When a button is pressed, the image will also change.
Closing the Menu
6
Press the MENU button and close the menu display.
Main unit operation: Press the MENU button and delete the cursor. The operation will differ
depending on the display contents when a sub menu is displayed. Should a sub menu be
displayed, press the MENU button until the MENU display closes.
Page 15

13 ViewSonic PJ250
STATUS Indicator Light
Note:
Should the projector not project properly, see the Troubleshooting section of the User Guide.
STATUS
Indicator
POWER
Indicator
Problem
Flashes red
(0.5 s lit /0.5 s
off)
Lit red
The temperature has become abnormally high.
The thermal protector is activated. if the room temperature is high,
move the projector to a cool location. If the internal temperature of the
projector is high, check the ventilation holes of the cooling fan and
clean them if they are obstructed.
When the thermal protector is activated, the power is switched off and
even if the power is soon switched back on, the power might not actually be supplied to the projector. Should this happen, wait one minute
and then switch the power on again.
Flashes red
(1 s lit / 1 s off)
When the lamp
burns out during
operation:
Flashes
amber for 90 seconds and then stays
lit
When the lamp
does not turn on:
Lit amber
The lamp will not turn on
Wait one minute or longer while the lamp lighting voltage irregularity
detection protector is activated and switch the power on again. If the
problem still persists, unplug the power cable and contact ViewSonic.
Flashes red
(0.5 s lit /0.5 s
off)
Lit amber
The fan has stopped.
Unplug the power cable and contact ViewSonic.
Flashes red
(1 s lit / 1 s off)
Lit red
The lamp cover is open.
The lamp cover is not attached properly.
Attach it properly.
Lit red
Lit amber after 90
seconds of flashing in amber
The lamp will not turn on.
The lamp has reached end of life. Contact your reseller or ViewSonic
for a replacement lamp.
STATUS indicator
POWER indicator
Page 16

ViewSonic PJ250 14
Replacing the Lamp Cartridge
PREPARATION
To prevent scratches place the lamp on a soft cloth.
1
Disconnect the power cable.
2
Turn the projector upside down.
3
Remove the lamp cover.
(1) Turn the screw that fastens the lamp cover
counterclockwise until it turns freely. (The screw
will not come out.)
(2) Lift the lamp cover a little and pull it off in the direction of the arrow.
WARNING
• The Lamp Cartridge should only be replaced after the unit has been turned off, cooled down for
60 minute and the power cord has been unplugged. Replacement of the lamp cartridge during
operation or immediately after operation stops may cause burns due to high temperature.
• Do not remove any screws other those specified.
• Do not touch the lamp with bare hands. Doing so could shorten the life of the lamp.
• If the lamp has reached the end of its usable life, the lamp bulb may shatter. If the lamp
shatters, contact ViewSonic Customer Support center immediately.
Page 17

15 ViewSonic PJ250
4
Remove the lamp cartridge.
(1) Turn the 2 screws that fasten the lamp cartridge
counterclockwise until they turn freely. (The screws
will not come out.)
(2) Grasp the handle of the lamp cartridge, pull it upward
and remove the lamp cartridge.
5
Install the new lamp cartridge.
(1) Slowly push in the lamp cartridge with the socket facing forward. (Align the lamp cartridge
screw with the screw hole of the projector.)
(2) Turn the 2 screws of the lamp cartridge clock-wise to tighten.
6
Install the lamp cover.
(1) First insert the front edge of the lamp cover into the groove, then close the lamp cover.
(2) Turn the screw of the lamp cover clockwise to tighten.
7
Reset the lamp timer to zero.
Plug in the power cable and switch on the power before resetting.
Select [Info.] →[Lamp Timer Reset] and then reset the hours indication.
Page 18

ViewSonic PJ250 16
Specifications
Optical
DMD Single Chip Digital Micro Device (DMD)
1024 x 768 dots, scaling to 1280 x 1024
Lamp 120 W high-pressure mercury lamp
Image size 36 inch to 200 inch
Electrical
Inputs Video (NTSC3.58/NTSC4.43/PAL/PAL_N/PAL_M/PAL60/SECAM)
RGB (Horizontal :15 to 85 kHz, Vertical 50 to 120 Hz)
Color Reproduction Full color (16,770,000 colors)
Resolution SXGA (Compression), XGA(True), SVGA/VGA (Expansion/True)
Input Current 1.8 A
Power Requirement 100-240 V AC, 50/60 Hz
Power Consumption 180 watts
Mechanical
Dimensions Excluding Stand 18.0 cm (W) x 4.5 cm (H) x 14.1 cm (D)
7.1 in.(W) x 1.8 in.(H) x 5.6 in.(D)
Weight Approximately 1.0 kg / 2.20 lbs
Operational Temperatures Data projector: 5° to 35°C (41° to 95°F), 30 to 85% humidity
Regulations UL Approved (UL 1950, CSA 950)
Meets FCC Class A requirements
Meets EMC Directive (EN55022, EN55024)
Meets Low Voltage Directive (EN60950)
* Specifications and design are subject to change without notice.
Page 19

17 ViewSonic PJ250
Distance Chart
Screen Size
Projector distance from screen
(D) (W) x (H) (L) (B)
inch mm
mm mm
inch inch
mm
inch
mm
inch
36 914
732 x 549
28.8 x 26.1
1200
47.2
95
3.7
40 1016
813 x 610
32 x 24
1320
52.0
105
4.1
60 1524
1219 x 914
48 x 36
1990
78.3
157
6.2
80 2032
1626 x 1219
64 x 48
2650
104.3
209
8.2
100 2540
2032 x 1524
80 x 60
3310
130.3
262
10.3
120 3048
2438 x 1829
96 x 72
3970
156.3
314
12.3
150 3810
3048 x 2286
120 x 90
4970
195.7
393
15.5
180 4572
3658 x 2743
144 x 108
5960
234.6
472
18.6
200 5080
4064 x 3048
160 x 120
6620
260.6
524
20.6
Width
Screen Bottom
Lens Center
Throwing Distance
Height
Diagonal
Page 20

ViewSonic PJ250 18
Cabinet Dimensions
Page 21

19 ViewSonic PJ250
Customer Support
For technical support or product service, please contact ViewSonic.
NOTE:
You will need the product serial number.
Country/Region Web site T = Telephone
F = FAX
Email
United States
Canada
viewsonic.com/
support
viewsonic.com/
support
T:
(800) 688-6688
F:
(909) 468-1202
T:
(800) 688-6688
F:
(909) 468-1202
service.us@
viewsonic.com
service.ca@
viewsonic.com
United Kingdom viewsoniceurope.com
T:
0800 833 648
F:
(01293) 643910
service.eu@
viewsoniceurope.com
Europe, Middle East, Baltic
countries, and North Africa
viewsoniceurope.com Contact your reseller service.eu@
viewsoniceurope.com
Australia and New Zealand viewsonic.com.au
T:
+61 2 9929 3955
F:
+61 2 9929 8393
service.au@
viewsonic.com
Singapore/India and
Southeast Asia
viewsonic.com.sg
T:
65 273 4018
F:
65 273 1566
service.sg@
viewsonic.com
Other Asia/Pacific countries viewsonic.com.tw
T:
886 2 2246 3456
F:
886 2 8242 3668
service.ap@
viewsonic.com
South Africa viewsonic.com/asia
T:
886 2 2246 3456
F:
886 2 8242 3668
service.ap@
viewsonic.com
Page 22

ViewSonic PJ250 20
WARRANTY
VIEWSONIC PROJECTOR
What the warranty covers:
ViewSonic
®
warrants its products to be free from defects in material and workmanship during the warranty period. If a
product proves to be defective in material or workmanship during the warranty period,
ViewSonic
will at its sole option
repair or replace the product with a like product. Replacement product or parts may include remanufactured or refurbished
parts or components.
How long the warranty is effective:
ViewSonic projectors are warranted for three (3) years for all parts excluding the lamp and three (3) years for all labor from
the date of the first consumer purchase. Projector lamps are warranted separately.
Who the warranty protects:
This warranty is valid only for the first consumer purchaser.
What the warranty does not cover:
1. Any product on which the serial number has been defaced, modified or removed.
2. Damage, deterioration or malfunction resulting from:
a. Accident, misuse, neglect, fire, water, lightning, or other acts of nature, unauthorized product modification, or failure to follow
instructions supplied with the product.
b. Repair or attempted repair by anyone not authorized by ViewSonic.
c. Any damage of the product due to shipment.
d. Removal or installation of the product.
e. Causes external to the product, such as electric power fluctuations or failure.
f. Use of supplies or parts not meeting ViewSonic’s specifications.
g. Normal wear and tear.
h. Any other cause which does not relate to a product defect.
3. Removal, installation, and set-up service charges.
How to get service:
1. For information about receiving service under warranty, contact ViewSonic Customer Support. You will need to provide your
product’s serial number.
2. To obtain warranted service, you will be required to provide (a) the original dated sales slip, (b) your name, (c) your address, (d) a
description of the problem, and (e) the serial number of the product.
3. Take or ship the product freight prepaid in the original container to an authorized ViewSonic service center or ViewSonic.
4. For additional information or the name of the nearest ViewSonic service center, contact ViewSonic.
Limitation of implied warranties:
THERE ARE NO WARRANTIES, EXPRESS OR IMPLIED, WHICH EXTEND BEYOND THE DESCRIPTION
CONTAINED HEREIN INCLUDING THE IMPLIED WARRANTY OF MERCHANTABILITY AND FITNESS FOR A
PARTICULAR PURPOSE.
Exclusion of damages:
VIEWSONIC LIABILITY IS LIMITED TO THE COST OF REPAIR OR REPLACEMENT OF THE PRODUCT. VIEWSONIC
SHALL NOT BE LIABLE FOR:
1. DAMAGE TO OTHER PROPERTY CAUSED BY ANY DEFECTS IN THE PRODUCT, DAMAGES BASED UPON
INCONVENIENCE, LOSS OF USE OF THE PRODUCT, LOSS OF TIME, LOSS OF PROFITS, LOSS OF BUSINESS
OPPORTUNITY, LOSS OF GOODWILL, INTERFERENCE WITH BUSINESS RELATIONSHIPS, OR OTHER COMMERCIAL LOSS,
EVEN IF ADVISED OF THE POSSIBILITY OF SUCH DAMAGES.
2. ANY OTHER DAMAGES, WHETHER INCIDENTAL, CONSEQUENTIAL OR OTHERWISE.
3. ANY CLAIM AGAINST THE CUSTOMER BY ANY OTHER PARTY.
Effect of state law:
This warranty gives you specific legal rights, and you may also have other rights which vary from state to state. Some
states do not allow limitations on implied warranties and/or do not allow the exclusion of incidental or consequential
damages, so the above limitations and exclusions may not apply to you.
Sales outside the U.S.A. and Canada:
For warranty information and service on ViewSonic products sold outside of the U.S.A. and Canada, contact ViewSonic or
your local ViewSonic dealer.
Projector Warranty (V3.0) Release Date: May 1, 2002
Page 23

21 ViewSonic PJ250
Appendix
Power Cord Safety Guidelines
Caution:
Use a power cable that is properly grounded. Always use an AC power cord that meets your
country’s safety standard.
AC PLUG CORD PRECAUTIONS FOR THE UNITED KINGDOM
FOR YOUR SAFETY PLEASE READ THE FOLLOWING TEXT CAREFULLY.
IF THE FITTED MOULDED PLUG IS UNSUITABLE FOR THE SOCKET OUTLET THEN THE PLUG
SHOULD BE CUT OFF AND DISPOSED OF SAFELY.
THERE IS A DANGER OF SEVERE ELECTRICAL SHOCK IF THE CUT OFF PLUG IS INSERTED INTO AN
APPROPRIATE SOCKET.
If a new plug is to be fitted, please observe the wiring code as shown below.
If in any doubt, please consult a qualified electrician.
WARNING:
THIS APPLIANCE MUST BE EARTHED.
IMPORTANT:
The wires in this mains lead are coloured in accordance with the following code:
Green-and-Yellow: Earth
Blue: Neutral
Brown: Live
If the coloured wires of the mains lead of this appliance do not correspond with the coloured markings
identifying the terminals in your plug, proceed as follows:
The wire which is coloured GREEN-AND-YELLOW must be connected to the terminal in the plug which is
marked by the letter E or by the Earth symbol or coloured GREEN or GREEN-AND-YELLOW.
The wire which is coloured BLUE must be connected to the terminal in the plug which is marked with the letter
N or coloured BLACK. The wire which is coloured BROWN must be connected to the terminal in the plug
which is marked with the letter L or coloured RED.
IMPORTANT NOTICE CONCERNING POWER CORD SELECTION
The power cord set for this unit has been enclosed and has been selected according to the country of
destination and must be used to prevent electric shock. Use the following guidelines if it is necessary to
replace the original cord set, or if the cord set is not enclosed.
The female receptacle of the cord set must meet CEE-22 requirements and may look like (Figure A1 below):
For the United States and Canada
In the United States and Canada the male plug is a NEMA5-15 style (Figure A2), UL Listed, and CSA
Labeled. For units which are mounted on a desk or table, type SVT cord sets may be used. The cord set must
be selected according to the current rating for your unit. Please consult the table below for the selection
criteria for power cords used in the United States and Canada.
For European Countries
In Europe you must use a cord set which is appropriate for the receptacles in your country. The cord set is
HAR-Certified, and a special mark that will appear on the outer sheath, or on the insulation of one of the inner
conductors.
If you have any questions concerning which proper power cord to use, please consult with the dealer from
whom you have purchased the product.
USA .............................. UL
Canada......................... CSA
Germany....................... VDE
Switzerland ...................SEV
Britain............................BASE/BS
Cord Type Size of Conductors in Cord Maximum Current Rating of Unit
SVT 18 AWG 10 Amps
Figure 1
Figure 2
Page 24

ViewSonic PJ250 22
IMPORTANT SAFETY INFORMATION
Important Safeguards
These safety instructions are to maximize the long life of the unit and prevent fire and shock. Please read
carefully.
Installation
• Place the unit on a flat, level surface in a dry area away from dust and moisture.
• Do not place the unit in direct sunlight, near heaters or heat radiating appliances.
• Exposure to direct sunlight, smoke or steam can harm internal components.
• Handle the unit carefully. Dropping or jarring can damage internal components.
• Do not place heavy objects on top of the unit.
Power Supply
• The unit is designed to operate on a power supply of 100-240 V 50/60 Hz AC. Ensure that your power
supply fits these requirements before attempting to use the unit.
• Handle the power cable carefully and avoid excessive bending. A damaged cord can cause electric shock
or fire.
• Disconnect the power cable from the power outlet after using the unit.
Before disconnecting the power cable, make sure that the POWER indicator lights in amber (not blinking or
in green).
Cleaning
• Disconnect the power cable from the unit.
• Clean the cabinet of the unit periodically with a damp cloth. If heavily soiled, use a mild detergent. Never
use strong detergents or solvents such as alcohol or thinner.
• Use a blower or lens paper to clean the lens, and be careful not to scratch or mar the lens.
• Clean the ventilation slots and speaker grills on the unit periodically using a vacuum cleaner. If
accumulated dust blocks the ventilation slots, the unit will overheat, which may cause the unit to
malfunction.
Use a soft brush attachment when using the vacuum cleaner. Do not use a hard attachment, such as a
crevice tool, to prevent the damage to the unit.
Lamp Replacement
• Replace the lamp when the Status indicator comes on.
• Lamp may shatter at end of useful life. If lamp shatters contact ViewSonic immediately.
Fire and Shock Precautions
• Ensure that there is sufficient ventilation and that vents are unobstructed to prevent the buildup of heat
inside the unit. Allow at least 10 cm (3 inches) of space between the unit and walls.
• Prevent foreign objects, such as paper clips and bits of paper, from falling into the unit. Do not attempt to
retrieve any objects that fell into the unit. Do not insert any metal objects such as a wire or screwdriver into
the unit. If something should fall into the unit, immediately disconnect the power cable from the unit and
have the object removed by a qualified service technician.
• Do not place any liquids on top of the unit.
• Do not look into the lens while the unit is on, or serious damage to your eyes may result.
Portability
• When carrying the unit around, please use the carrying case included and, to protect the lens from
scratches, always use the lens cap. Also, do not subject the unit to strong mechanical shock.
Page 25

23 ViewSonic PJ250
Compliance Information for U.S.A.
This equipment has been tested and found to comply with the limits for a Class A digital device, pursuant to
part 15 of the FCC Rules. These limits are designed to provide reasonable protection against harmful interference. This equipment generates, uses, and can radiate radio frequency energy, and if not installed and used
in accordance with the instructions, may cause harmful interference.
WARNING
This is a class A product. In a domestic environment this product may cause radio interference in which case the user may
be required to take adequate measures.
RF Interference WARNING
The Federal Communications Commission does not allow any modifications or changes to the unit EXCEPT those specified by ViewSonic in this manual. Failure to comply with this government regulation could void your right to operate this
equipment. This equipment has been tested and found to comply with the limits for a Class A digital device, pursuant to
Part 15 of the FCC Rules. These limits are designed to provide reasonable protection against harmful interference when
the equipment is operated in a commercial environment. This equipment generates, uses, and can radiate radio frequency
energy and, if not installed and used in accordance with the instruction manual, may cause harmful interference to radio
communications. Operation of this equipment in a residential area is likely to cause harmful interference in which case the
user will be required to correct the interference at his own expense.
FCC Warning
To assure continued FCC compliance, the user must use grounded power supply cord and the provided
shielded video interface cable with bonded ferrite cores. If a BNC cable is going to be used, use only a
shielded BNC(5) cable. Also, any unauthorized changes or modifications not expressly approved by the party
responsible for compliance could void the user's authority to operate this device.
Instructions to Users
This equipment complies with the requirements of FCC (Federal Communication Commission) equipment provided that
the following condition is met. Use the cables which are included with the projector or specified.
Compliance Information for Canada
Notice:
This class A digital apparatus complies with Canada ICES-003.
Compliance Information for European Countries
CE Conformity
The device complies with the requirements of the EEC directive 89/336/EEC as amended by 92/
31/EEC and 93/68/EEC Art.5 with regard to “Electromagnetic compatibility,” and 73/23/EEC as
amended by 93/68/EEC Art.13 with regard to “Safety.”
User Information for all Countries
NOTICE:
Use the cables which are included with the projector or specified.
 Loading...