

Page 1

PLED-W500
LED Projector
User Guide
IMPORTANT: Please read this User Guide to obtain important information on installing
and using you r product in a safe manner, as well as registering your product for future
service. Warranty in formation contai ned in this User Guide will describ e y our limit ed
coverage from ViewSonic Corporation, which is also found on our web site at http://www.
viewsonic.com in English, or in specic languages using the Regional selection box in the
upper right corner of our website. “Antes de operar su equipo lea cu idadosamente las
instrucciones en este manual”
Model No. VS14048
Page 2
Compliance Information
FCC Statement
This device complies with part 15 of FCC Rules. Operation is subject to the following two
conditions: (1) this device may not cause harmful interference, and (2) this device must accept
any interference received, including interference that may cause undesired operation.
This equipment has been tested and found to comply with the limits for a Class B digital
device, pursuant to part 15 of the FCC Rules. These limits are designed to provide reasonable
protection against harmful interference in a residential installation. This equipment generates,
uses, and can radiate radio frequency energy, and if not installed and used in accordance with
the instructions, may cause harmful interference to radio communications. However, there is
no guarantee that interference will not occur in a particular installation. If this equipment does
cause harmful interference to radio or television reception, which can be determined by turning
the equipment off and on, the user is encouraged to try to correct the interference by one or
more of the following measures:
y Reorient or relocate the receiving antenna.
y Increase the separation between the equipment and receiver.
y Connect the equipment into an outlet on a circuit different from that to which the
receiver is connected.
y Consult the dealer or an experienced radio/TV technician for help.
Warning: You are cautioned that changes or modications not expressly approved by the
party responsible for compliance could void your authority to operate the equipment.
For Canada
y This Class B digital apparatus complies with Canadian ICES-003.
y Cet appareil numérique de la classe B est conforme à la norme NMB-003 du Canada.
CE Conformity for European Countries
The device complies with the EMC Directive 2004/108/EC and Low Voltage
Directive 2006/95/EC.
Following information is only for EU-member states:
The mark is in compliance with the Waste Electrical and Electronic Equipment Directive
2002/96/EC (WEEE).
The mark indicates the requirement NOT to dispose the equipment including any spent
or discarded batteries or accumulators as unsorted municipal waste, but use the return
and collection systems available.
If the batteries, accumulators and button cells included with this equipment, display
the chemical symbol Hg, Cd, or Pb, then it means that the battery has a heavy metal
content of more than 0.0005% Mercury or more than, 0.002% Cadmium, or more than
0.004% Lead.
i
Page 3

Important Safety Instructions
1. Read these instructions.
2. Keep these instructions.
3. Heed all warnings.
4. Follow all instructions.
5. Do not use this unit near water.
6. Clean with a soft, dry cloth.
7. Do not block any ventilation openings. Install the unit in accordance with the manufacturer’s instructions.
8. Do not install near any heat sources such as radiators, heat registers, stoves, or other
devices (including ampliers) that produce heat.
9. Do not defeat the safety purpose of the polarized or grounding-type plug. A polarized plug
has two blades with one wider than the other. A grounding type plug has two blades and a
third grounding prong. The wide blade and the third prong are provided for your safety. If
the provided plug does not t into your outlet, consult an electrician for replacement of the
obsolete outlet.
10. Protect the power cord from being walked on or pinched particularly at plugs. Convenience
receptacles and the point where they exit from the unit. Be sure that the power outlet is
located near the unit so that it is easily accessible.
11. Only use attachments/accessories specied by the manufacturer.
12. Use only with the cart, stand, tripod, bracket, or table specied by the manufacturer, or sold with the unit. When a cart is used, use caution when moving the cart/
unit combination to avoid injury from tipping over.
13. Unplug this unit when unused for long periods of time.
14. Refer all servicing to qualied service personnel. Servicing is required when the unit has
been damaged in any way, such as: if the power-supply cord or plug is damaged, if liquid
is spilled onto or objects fall into the unit, if the unit is exposed to rain or moisture, or if the
unit does not operate normally or has been dropped.
ii
Page 4
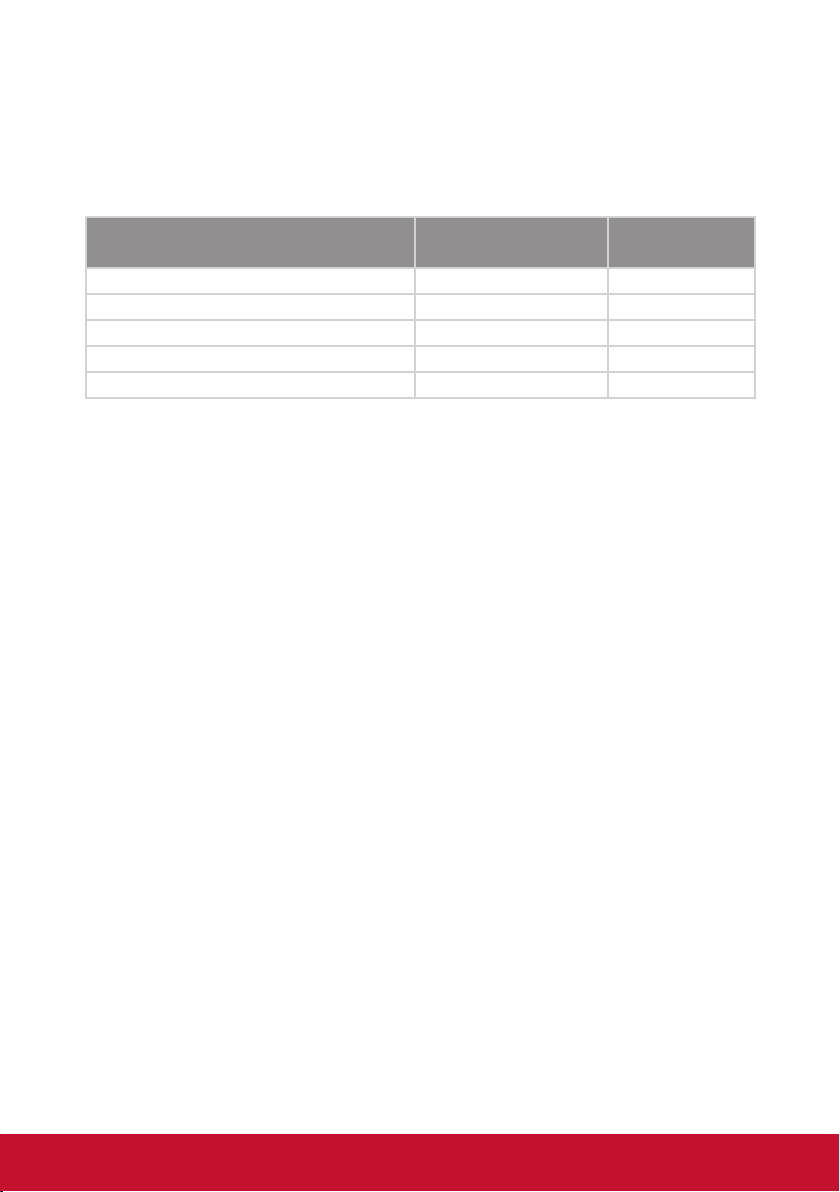
Declaration of RoHS Compliance
This product has been designed and manufactured in compliance with Directive 2002/95/EC
of the European Parliament and the Council on restriction of the use of certain hazardous substances in electrical and electronic equipment (RoHS Directive) and is deemed to comply with
the maximum concentration values issued by the European Technical Adaptation Committee
(TAC) as shown below:
Substance
Lead (Pb) 0.1% < 0.1%
Cadmium (Cd) 0.01% < 0.01%
Hexavalent Chromium (Cr6+) 0.1% < 0.1%
Polybrominated biphenyls (PBB) 0.1% < 0.1%
Polybrominated diphenyl ethers (PBDE) 0.1% < 0.1%
Proposed Maximum
Concentration
Actual
Concentration
Certain components of products as stated above are exempted under the Annex of the RoHS
Directives as noted below:
Examples of exempted components are:
1. Lead in glass of cathode ray tubes, electronic components, uorescent tubes, and electronic ceramic parts (e.g. piezoelectronic devices).
2. Lead in high temperature type solders (i.e. lead-based alloys containing 85% by weight or
more lead).
3. Lead as an allotting element in steel containing up to 0.35% lead by weight, aluminium
containing up to 0.4% lead by weight and as a cooper alloy containing up to 4% lead by
weight.
iii
Page 5

Copyright Information
Copyright © ViewSonic® Corporation, 2012. All rights reserved.
Macintosh and Power Macintosh are registered trademarks of Apple Inc.
Microsoft, Windows, Windows NT, and the Windows logo are registered trademarks of Microsoft
Corporation in the United States and other countries.
ViewSonic, the three birds logo, OnView, ViewMatch, and ViewMeter are registered trademarks
of ViewSonic Corporation.
VESA is a registered trademark of the Video Electronics Standards Association. DPMS and
DDC are trademarks of VESA.
PS/2, VGA and XGA are registered trademarks of International Business Machines Corporation.
Disclaimer: ViewSonic Corporation shall not be liable for technical or editorial errors or omissions contained herein; nor for incidental or consequential damages resulting from furnishing
this material, or the performance or use of this product.
In the interest of continuing product improvement, ViewSonic Corporation reserves the right to
change product specications without notice. Information in this document may change without
notice.
No part of this document may be copied, reproduced, or transmitted by any means, for any
purpose without prior written permission from ViewSonic Corporation.
Product Registration
To meet your future needs, and to receive any additional product information as it becomes
available, please register your product on the Internet at: www.viewsonic.com. The ViewSonic®
Wizard CD-ROM also provides an opportunity for you to print the registration form, which you
may mail or fax to ViewSonic.
For Your Records
Product Name: PLED-W500
ViewSonic LED Projector
Model Number: VS14048
Document Number: PLED-W500_UG_ENG Rev. 1C 07-31-12
Serial Number: _______________________________
Purchase Date: _______________________________
Product disposal at end of product life
The lamp in this product contains mercury which can be dangerous to you and the environment.
Please use care and dispose of in accordance with local, state or federal laws.
ViewSonic respects the environment and is committed to working and living green. Thank you
for being part of Smarter, Greener Computing. Please visit ViewSonic website to learn more.
USA & Canada: http://www.viewsonic.com/company/green/recycle-program/
Europe: http://www.viewsoniceurope.com/uk/kbase/article.php?id=639
Taiwan: http://recycle.epa.gov.tw/recycle/index2.aspx
iv
Page 6
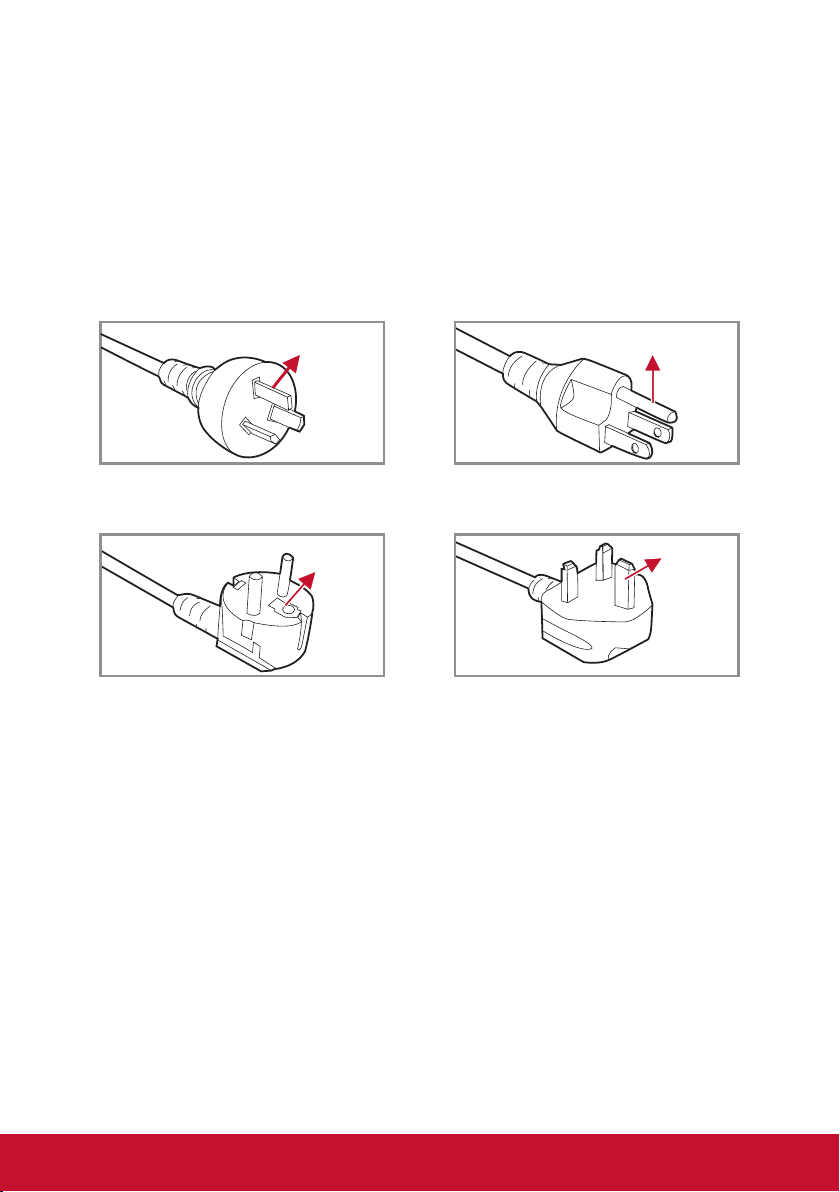
Notes on the AC Power Cord
AC Power Cord must meet the requirement of countries where you use this projector. Please
conrm your AC plug type with the graphics below and ensure that the proper AC Power Cord
is used. If the supplied AC Power Cord does not match your AC outlet, please contact your
sales dealer. This projector is equipped with a grounding type AC line plug. Please ensure
that your outlet ts the plug. Do not defeat the safety purpose of this grounding type plug. We
highly recommend using a video source device also equipped with a grounding type AC line
plug to prevent signal interference due to voltage uctuations.
Ground Ground
For Australia and Mainland China For the U.S.A and Canada
GroundGround
For Continental Europe For the U.K.
v
Page 7

Table of Contents
Introduction 7
Package Overview ................................. 7
Product Overview ................................... 8
Main Unit ............................................ 8
Control Panel ..................................... 9
Connection Ports ............................. 10
Remote Control .................................11
Installation 12
Connecting to Computer/Notebook ...... 12
Connecting to Video Sources ............... 13
Connecting to Multi-media Devices ...... 14
Powering On/Off the Projector ............. 15
Powering On the Projector ............... 15
Powering Off the Projector ............... 16
LED Indicator Messages .................. 16
Adjusting the Projected Image ............. 17
Adjusting the Projector’s Height ....... 17
Adjusting the Projector’s Focus ....... 18
Adjusting Projection Image Size ...... 18
User Controls 19
Using the Control Panel ....................... 19
Using the Remote Control .................... 20
On-screen Display Menus .................... 22
How to operate ................................ 22
Structure .......................................... 23
PICTURE ......................................... 24
PICTURE | Advanced ...................... 26
PICTURE | Advanced | Input ........... 27
SCREEN .......................................... 28
SETTING ......................................... 29
SETTING | Signal (RGB) ................. 31
SETTING | Advanced ....................... 32
SETTING | Advanced | Security ....... 33
OPTIONS ......................................... 35
OPTIONS | LED Settings ................. 37
OPTIONS | Advanced ...................... 38
Media Arena ......................................... 39
How to operate ................................ 39
Structure .......................................... 42
SETUP ............................................. 42
SETUP | Photo Setting .................... 43
SETUP | Music Setting .................... 44
SETUP | Video Setting ..................... 45
SETUP | Firmware Upgrade ............ 46
Internal Memory ............................... 47
File Transfer ..................................... 47
Projection with Wireless Presentation .. 48
Projection with MobiShow .................... 49
MobiShow Utility for iPhone ............. 49
MobiShow Utility for Android ............ 50
Using the MobiShow ........................ 50
MobiShow | Photo Viewer ................ 51
MobiShow | PtG2 ............................. 52
Using the PtG2 Converter ................ 53
Appendices 54
Troubleshooting .................................... 54
Image Problems ............................... 54
Projector Problems .......................... 57
Multi-media Problems ...................... 57
On Screen Messages ...................... 58
Piscel Support Languages, Character
Encodings and Fonts ............................ 59
Compatibility Modes ............................. 64
Multi-media Format Supported ............. 68
Ceiling Mount Installation ..................... 70
Specications ....................................... 71
6
Page 8
Introduction
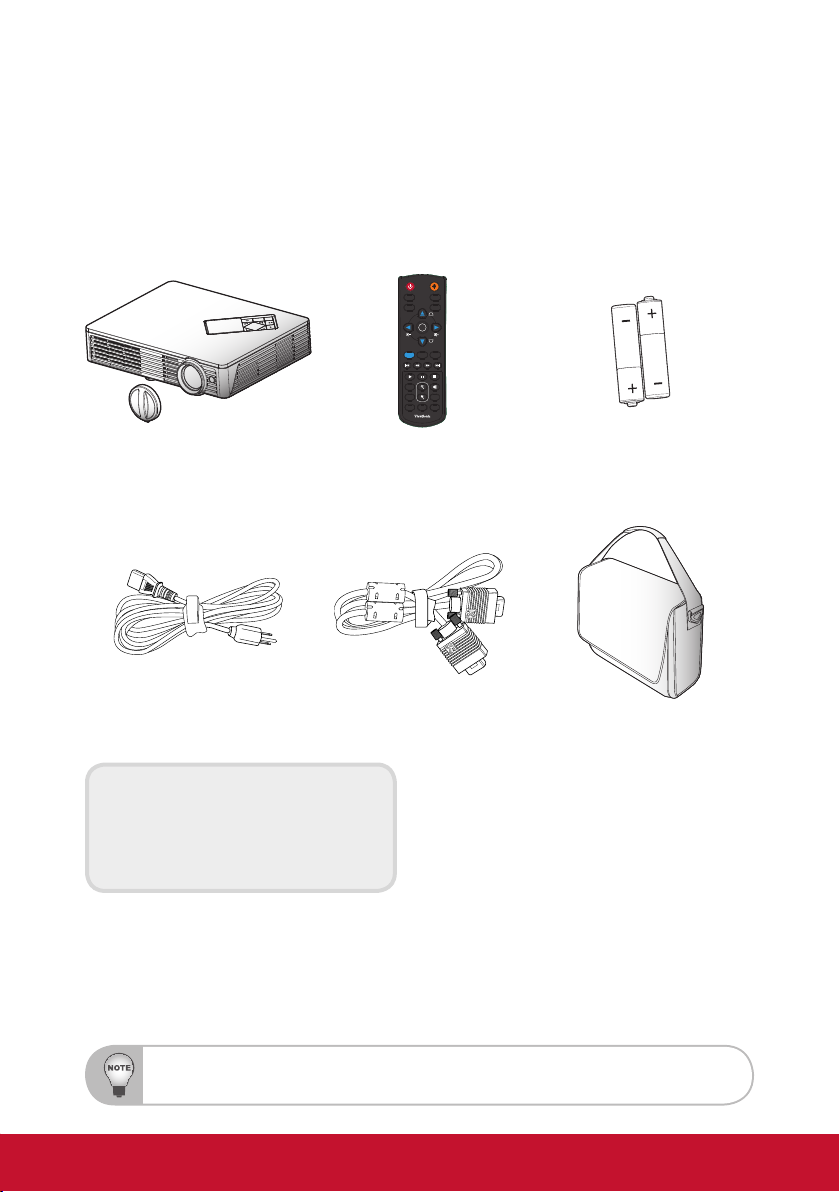
Package Overview
Unpack and inspect the box contents to ensure all parts listed below are in
the box. If something is missing, please contact our customer service.
Power Laser
HDMI PC
Video
SOURCE
TEMP
MENU
LAMP
ViewSonic
SD/USB
Enter
My
Menu
Exit
Button
Freeze
Magnify
Aspect
Blank
Auto
Color
Source
Sync
Mode
AAA
AAA
Projector with lens cap Remote Control
AC Power Cord
VGA Cable Soft Carrying Bag
Documentation:
y User’s Guide (DVD)
y Quick Start Card
y Warranty Card
AAA Batteries x 2
(For remote control)
Due to different applications in each Country, some regions may have different accessories.
7
Page 9
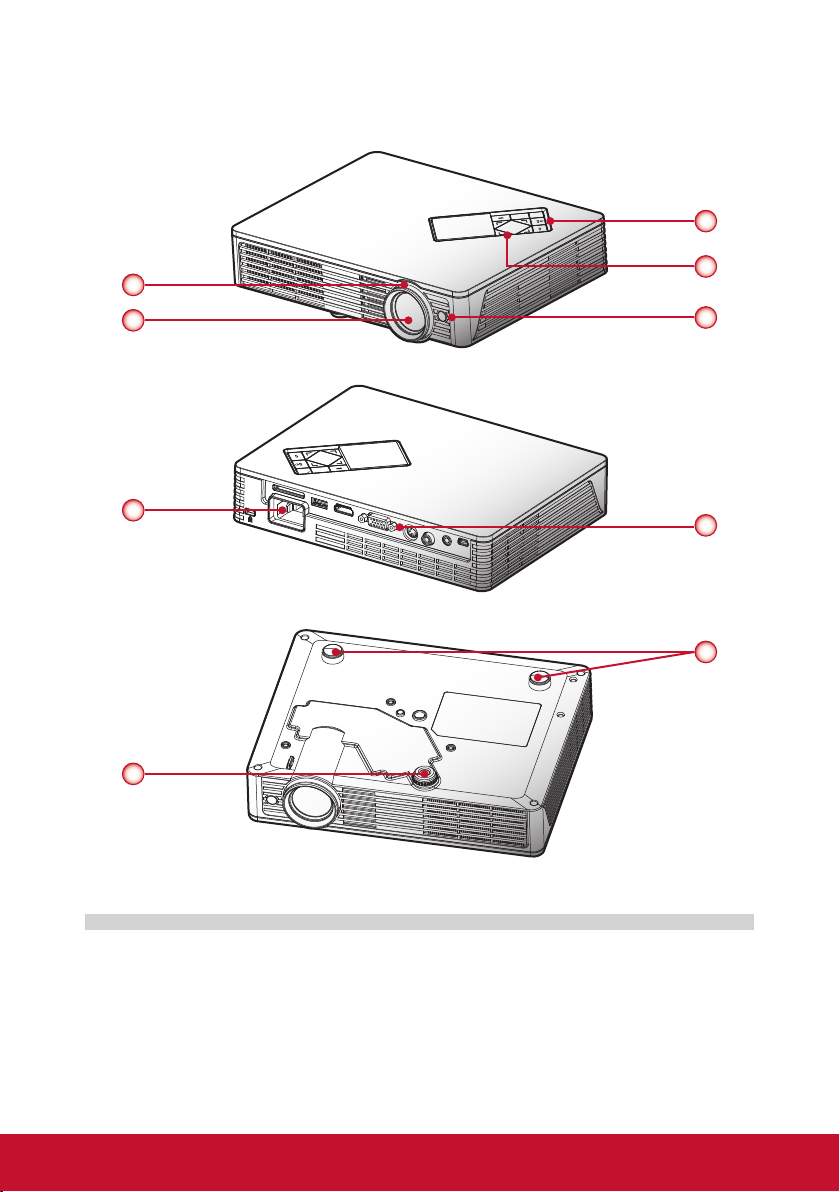
Product Overview
Main Unit
ViewSonic
SOURCE
TEMP
MENU
LAMP
3
1
4
2
5
(Front View)
ViewSonic
LAMP
MENU
TEMP
SOURCE
SD CARD
6
USB
HDMI
S-VIDEO
VIDEO
VGA
AUDIO OUT
USB display
7
(Rear View)
9
8
1. Focus Ring
2. Zoom Lens
3. Power Button / LED Indicators
4. Control Panel
5. IR Receiver
(Bottom View)
6. Power Socket
7. Input / Output Connection Ports
8. Elevator Foot
9. Rubber Feet
8
Page 10
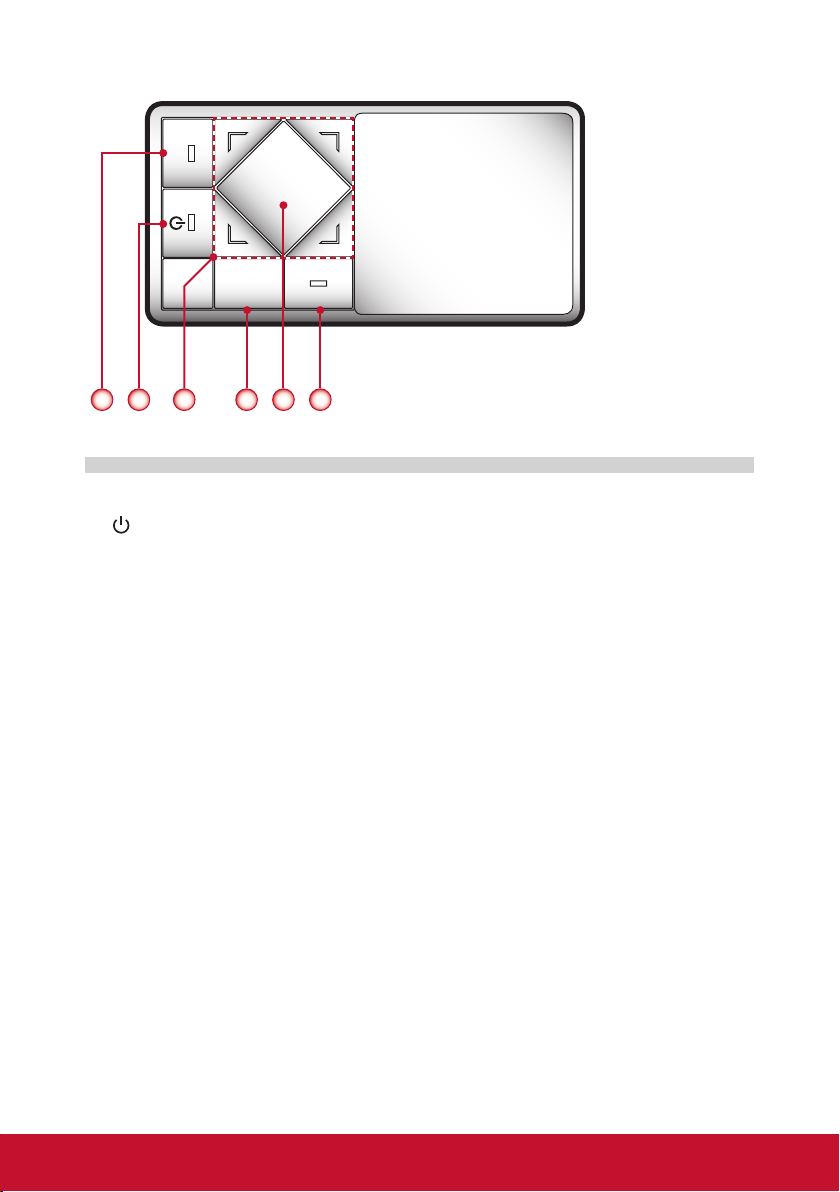
Control Panel
LAMP
MENU
SOURCE TEMP
1 2 4 63 5
1. Lamp LED
/ Power LED
2.
3. Four directional select keys
4. Source
5. Menu
6. Temp LED
ViewSonic
9
Page 11
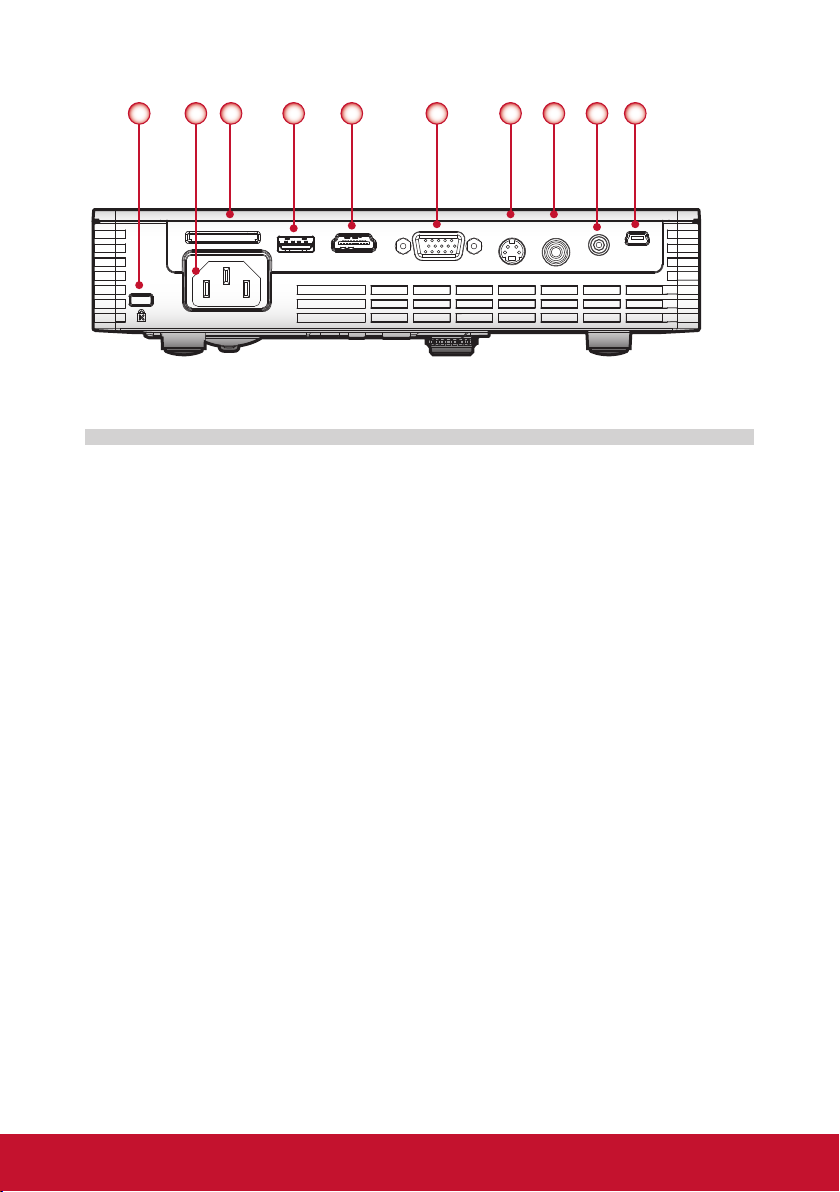
Connection Ports
321 4 5 6 7 8 9
VIDEO
SD CARD
VGAHDMIUSB
S-VIDEO
AUDIO OUT
1. Kensington™ Lock Port
2. Power Socket
3. SD Card Reader
4. USB Connector
5. HDMI Connector
6. VGA Connector (PC analog signal/HDTV/component video input)
7. S-Video Connector
8. Composite Video Input Connector
9. Audio Output Connector
10. Mini USB Connector
10
USB display
10
Page 12
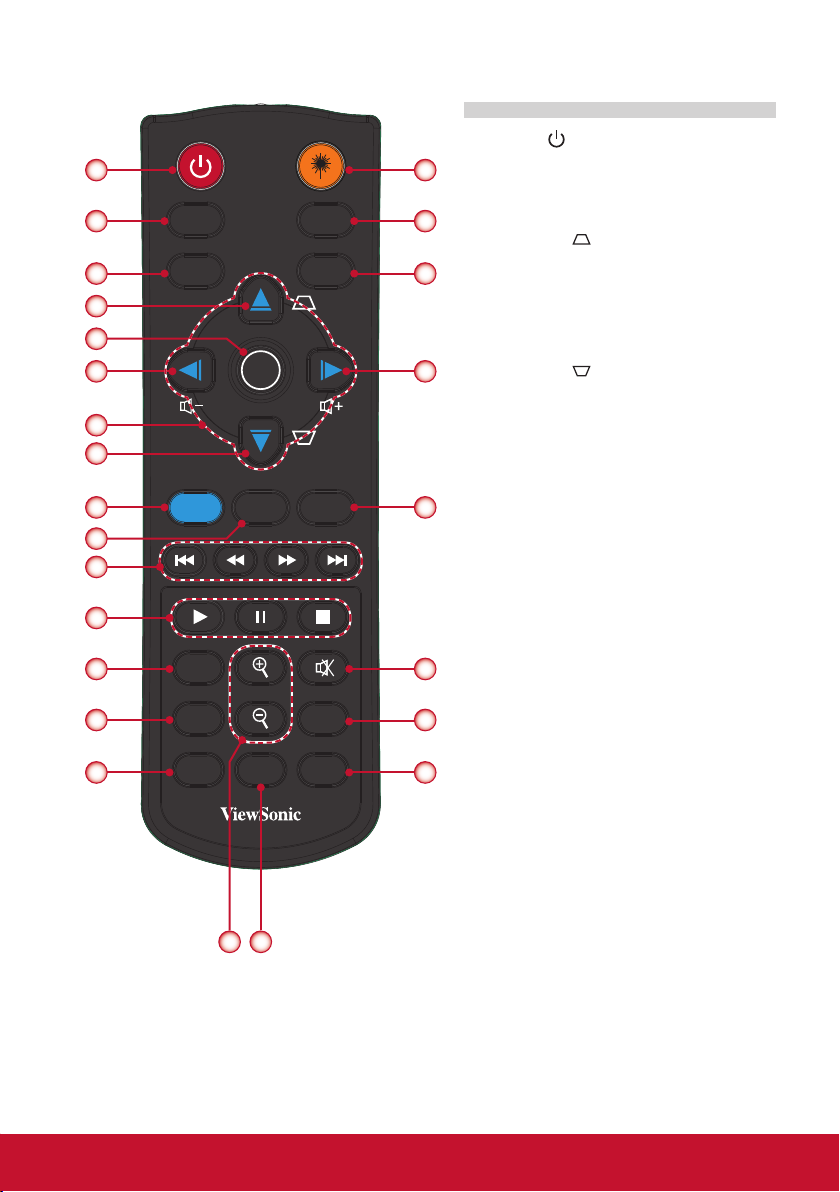
Remote Control
Power La ser
1
2
HDMI PC
25
24
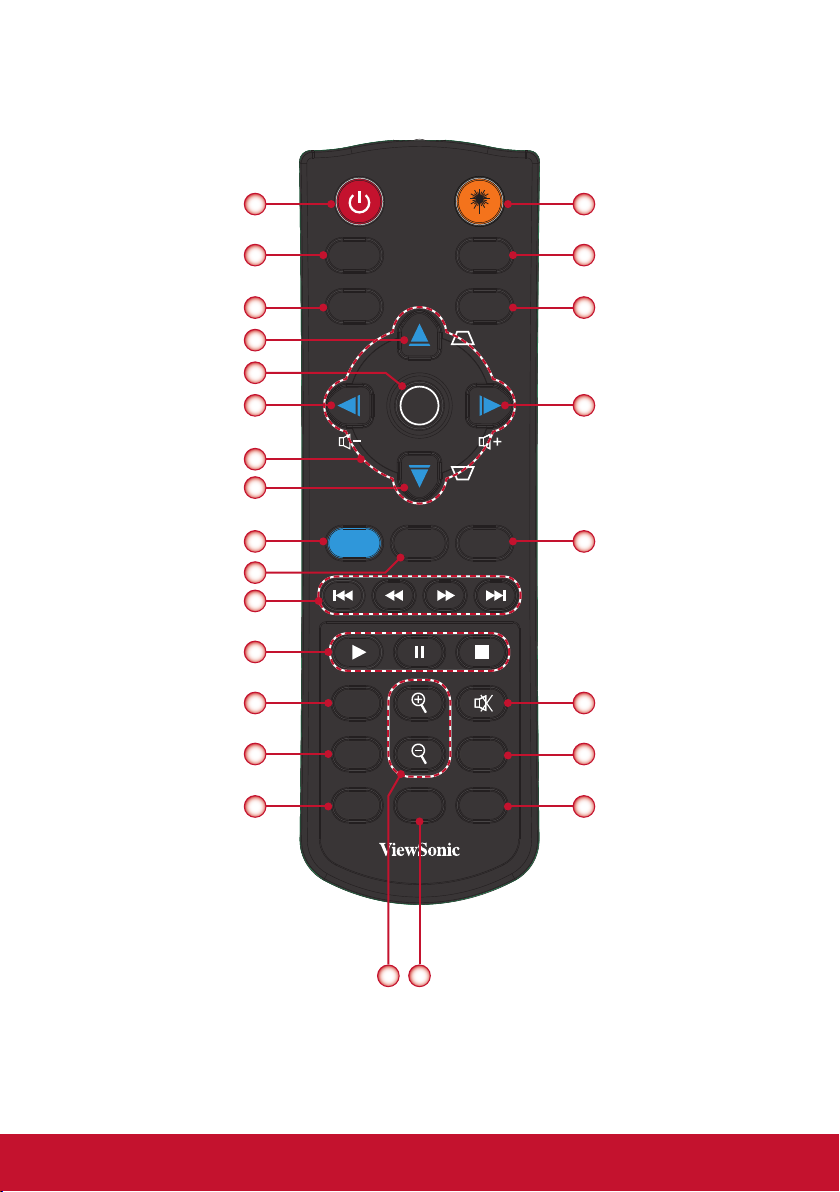
1. Power
2. HDMI
3. SD/USB
4. Keystone
3
4
5
6
SD/US B
Enter
Vid eo
23
5. Enter
6. Volume -
7. Four Directional Select Keys
22
8. Keystone
9. Menu
7
8
10. My Button
11. Previous/Rewind/Fast Forward/
9
10
11
Menu
My
Butto n
Exit
21
Next
12. Play/Pause/Stop
13. Freeze
14. Blank
12
13
14
15
Freez e
Blank
Auto
Sync
Magni fy
Color
Mode
Aspec t
Sourc e
15. Auto Sync
16. Magnify +/-
20
17. Color Mode
19
18. Source
19. Aspect
18
20. Mute
21. Exit
22. Volume +
23. Video
24. PC
16 17
25. Laser
11
Page 13
Installation
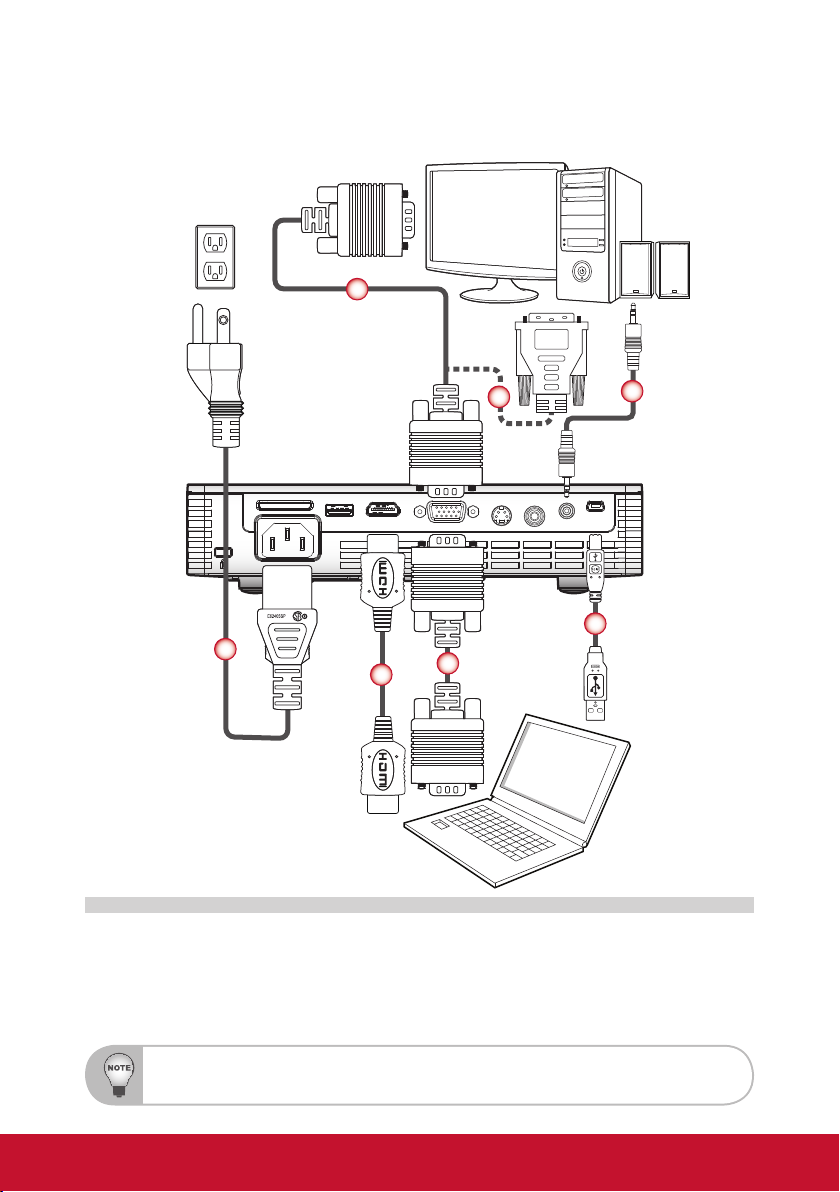
Connecting to Computer/Notebook
Computer
Power socket
1
SD CARD
Audio output
3
4
VIDEO
S-VIDEO
VGAHDMIUSB
2
3
AUDIO OUT
5
USB display
6
1. Power Cord
2. HDMI Cable *
3. VGA Cable
Due to the difference in applications for each country, some regions may have different accessories.
* Optional accessory
Notebook
4. VGA to DVI-A Cable *
5. Audio Cable *
6. USB Cable * (Mini B type to A type)
12
Page 14
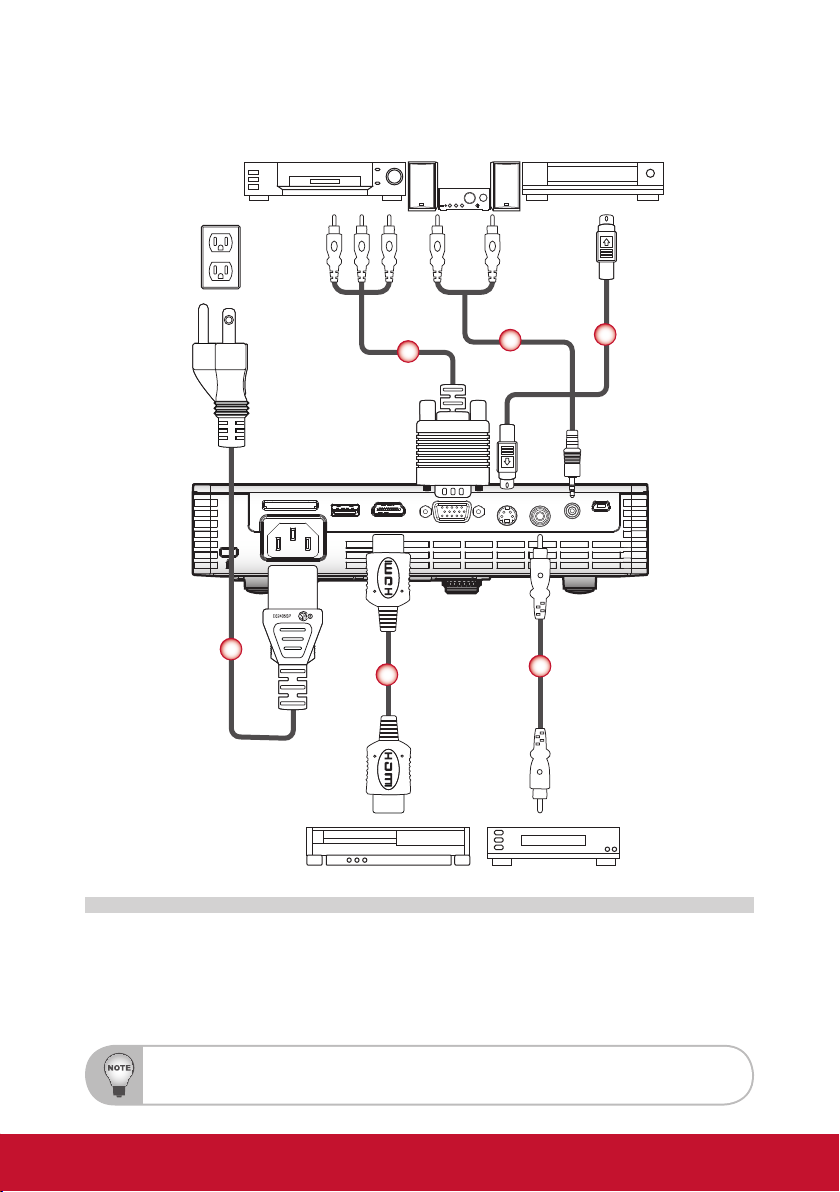
Connecting to Video Sources
Power socket
1
DVD player, Set-top box,
HDTV receiver
SD CARD
2
Audio output
3
S-Video output
AUDIO OUT
5
USB display
4
VIDEO
S-VIDEO
VGAHDMIUSB
6
1. Power Cord
2. HDMI Cable *
3. VGA to HDTV (RCA) Cable *
Due to the difference in applications for each country, some regions may have different accessories.
* Optional accessory
DVD player Video output
4. Audio Cable *
5. S-Video Cable *
6. Composite Video Cable *
13
Page 15
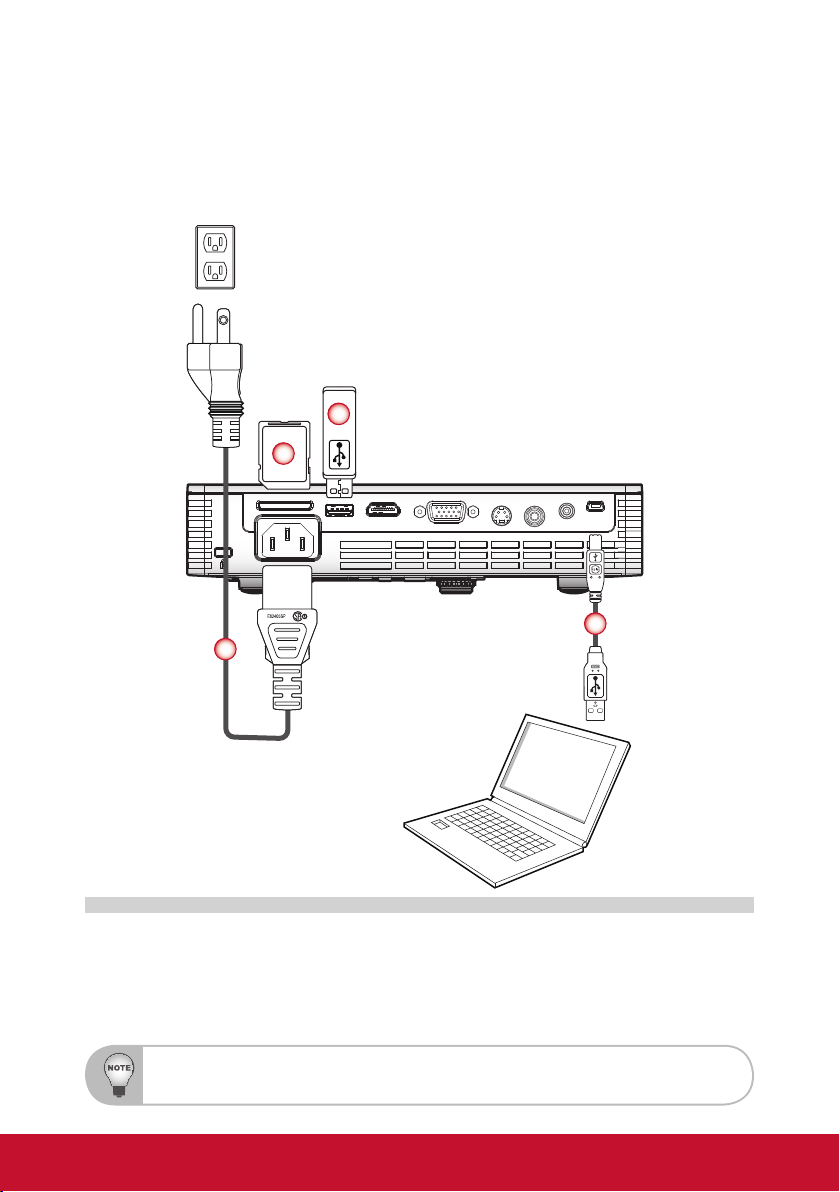
Connecting to Multi-media Devices
Power socket
3
2
VIDEO
SD CARD
1
S-VIDEO
VGAHDMIUSB
AUDIO OUT
USB display
4
1. Power Cord
2. SD Card *
Due to the difference in applications for each country, some regions may have different accessories.
* Optional accessory
Notebook
3. USB Flash Drive *
4. USB Cable * (Mini B type to A type)
14
Page 16
Powering On/Off the Projector
ViewSonic
MENU
LAMP
SOURCE TEMP
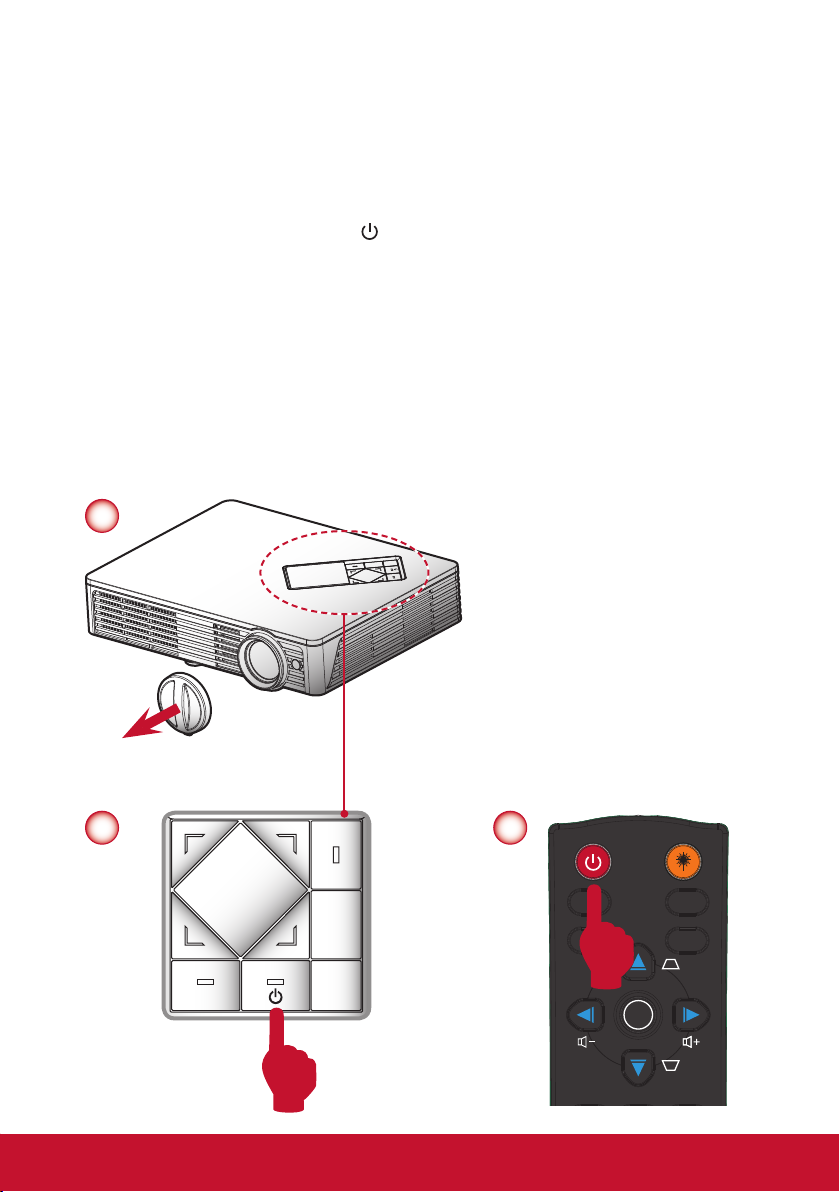
Powering On the Projector
1. Remove the lens cap.
2. Securely connect the power cord and signal cable. When connected, the Power
LED will ash red.
3. Turn on the lamp by pressing “
control. The Power LED will turn blue.
4. Turn on your source that you want to display on the screen (computer, notebook, video player, etc). The projector will detect the source automatically and
will display on the screen.
5. If you connected multiple sources at the same time, press the “Source” button
on the remote control to switch between inputs.
1
” button on the control panel or on the remote
SOURCE
TEMP
MENU
ViewSonic
LAMP
2
15
2
or
Pow er Las er
HDM I PC
SD/ USB
Vid eo
Ent er
Page 17
Powering Off the Projector
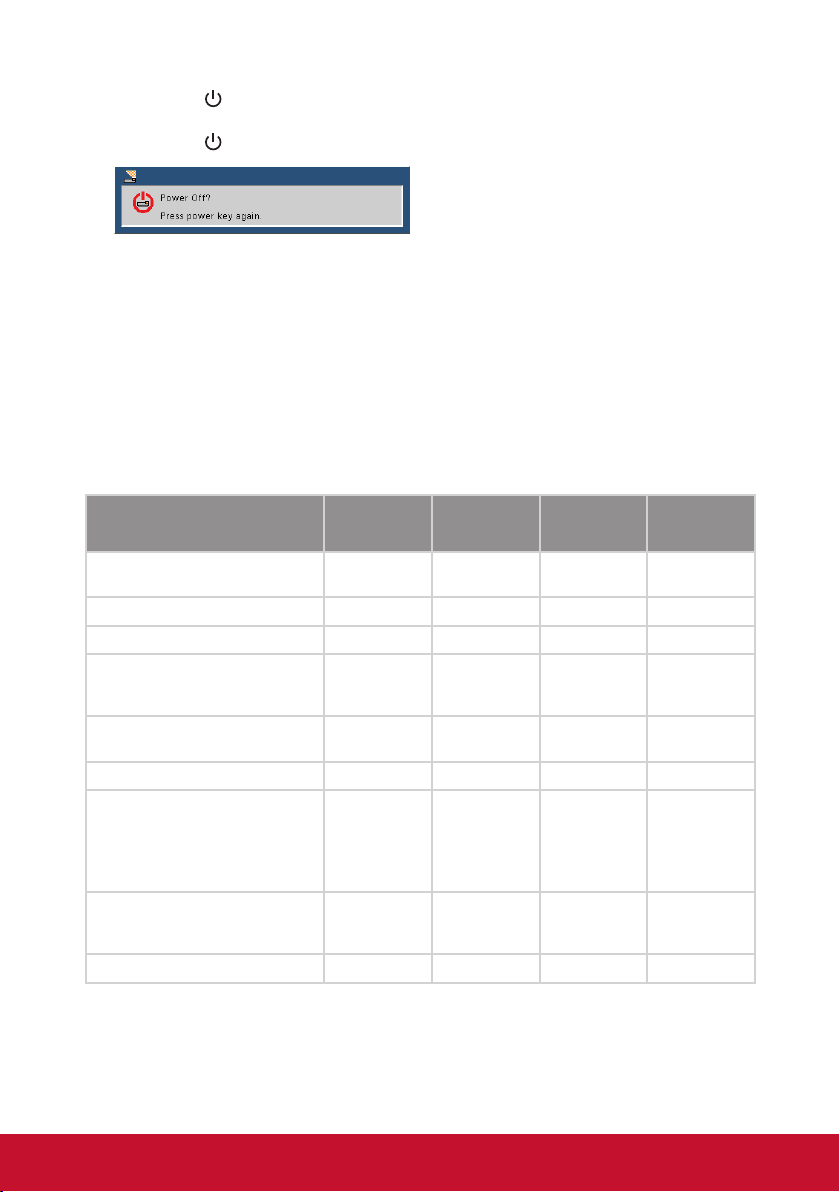
1. Press the “ ” button on the control panel or on the remote control to turn off
the projector. The following message will be displayed on the screen.
Press the “ ” button again to conrm.
2. The Power LED will turn red and blink rapidly after the projector is turned off.
And the fans will continue to operate for about 30 seconds to ensure that the
system cools properly.
3. Once the system has nished cooling, the Power LED will stop blinking and turn
solid red to indicate standby mode.
4. It is now safe to unplug the power cord.
LED Indicator Messages
Message
Power Plug
Standby - - ON -
Power button ON - - - ON
Cooling state - -
Power button OFF:
Cooling completed; Standby Mode
Firmware download ON ON ON -
Thermal sensor error, OSD showing as
below:
1. Make sure air in and outlets are not
blocked.
2. Make sure the environment temperature
is under 40 degree C.
Fan lock error, OSD showing as below:
The projector will switch off automatically.
Lamp error (LED, LED driver, Light sensor) ON - - ON
Lamp LED
(Red)
Flash ON to OFF
100ms
- - ON -
- ON - ON
-
Temp LED
(Red)
Flash ON to OFF
100ms
0.5 second H(On),
0.5 second L(Off)
ashing
Power LED
(Red)
Flash ON to OFF
100ms
0.5 second H(ON),
0.5 second L(OFF)
ashing
- ON
Power LED
(Blue)
-
-
16
Page 18
Adjusting the Projected Image
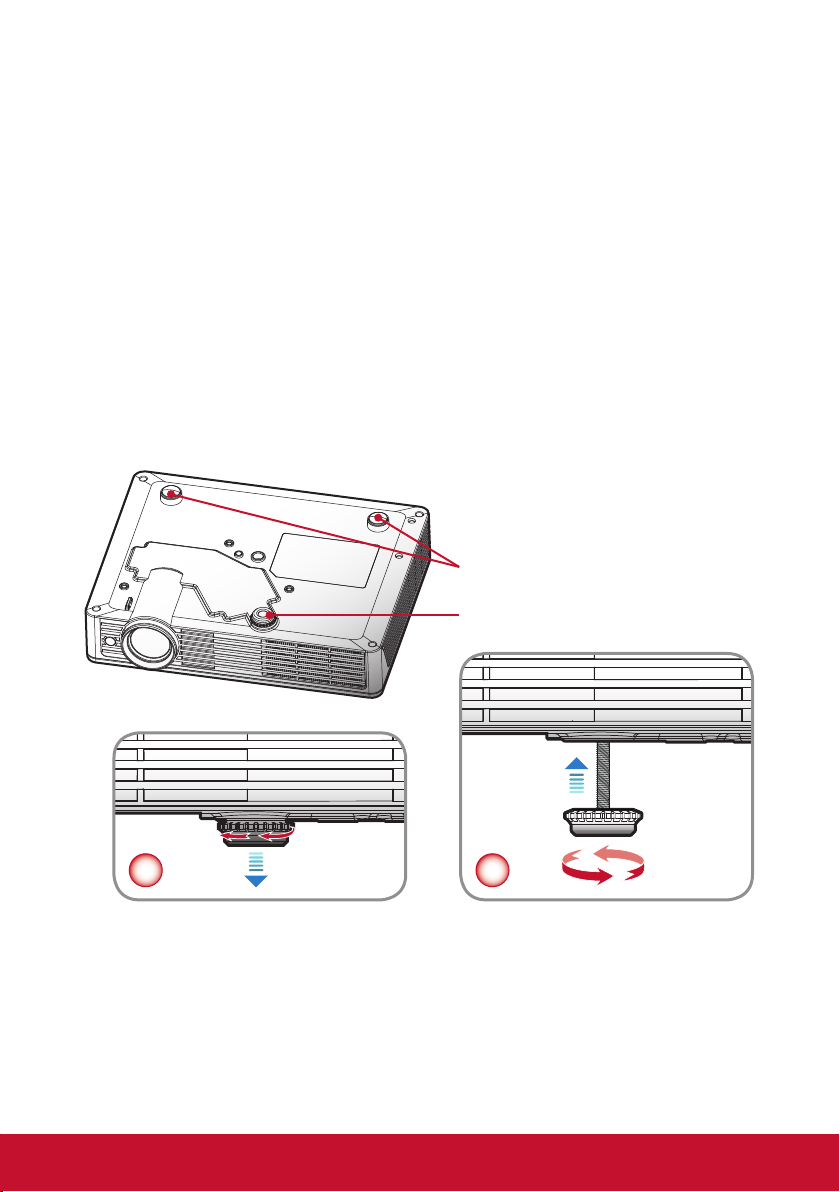
Adjusting the Projector’s Height
The projector is equipped with elevator foot for adjusting the image height.
y To raise the image:
Use screw in foot to raise the image to the desired height angle and ne-tune
the display angle.
y To lower the image:
Use screw in foot to lower the image to the desired height angle and ne-tune
the display angle.
Rubber Feet
Elevator Foot
1 2
17
Page 19
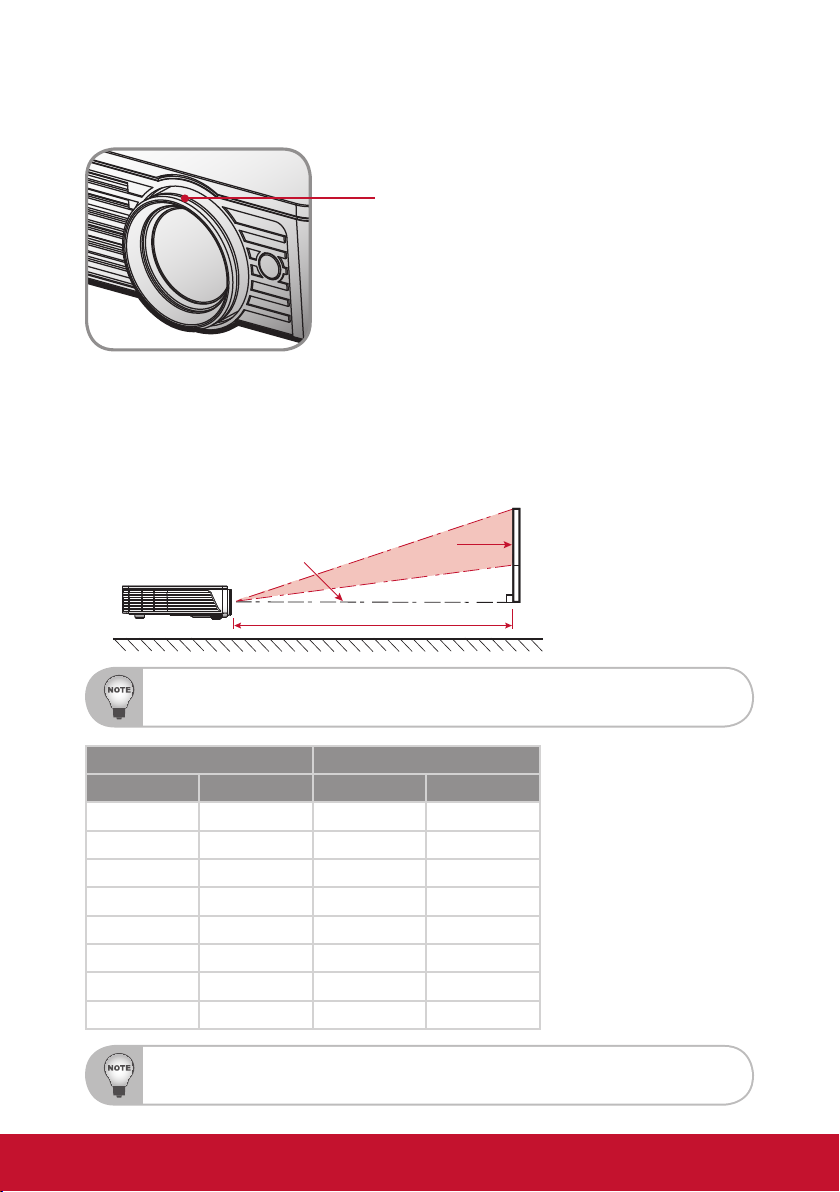
Adjusting the Projector’s Focus
ViewSonic
MENU
LAMP
SOURCE
TEMP
To focus the image, rotate the focus ring until the image is clear.
Focus Ring
Adjusting Projection Image Size
Refer to the graphics and table show as below to determine the screen size and
projection distance.
y Adjusting the vertical image position
Lens Center
Projection Distance
Projection distance (m) = 1.4 x Screen size (m) x 0.848
Ex.: Projection distance (0.9m)=1.4 x Screen size (0.76) x 0.848
Tolerance is around 5%
Projection Distance Screen Size (16:10)
Inch m Inch m
35.4 0.9 30 0.76
39.4 1.0 33 0.84
47.2 1.2 40 1.02
51.2 1.3 43 1.09
63 1.6 53 1.35
74.8 1.9 63 1.60
86.6 2.2 73 1.85
94.5 2.4 80 2.03
This table is for user’s reference only.
Screen
18
Page 20

User Controls
Using the Control Panel
LAMP
MENU
SOURCE TEMP
ViewSonic
Name
Power
Menu Launch the on-screen display (OSD).
Source Select an input signal.
Four Directional
Select Keys
Lamp LED Indicate the projector’s lamp status.
Power LED Indicate the projector’s status.
Temp LED Indicate the projector’s temperature status.
Turn the projector on/off.
Use ▲▼◄► to select items or make adjustments to your
selection.
Description
19
Page 21
Using the Remote Control
Power La ser
1
2
3
4
5
6
7
8
9
10
11
12
13
HDMI PC
SD/US B
Vid eo
Enter
Menu
My
Butto n
Exit
Freez e
25
24
23
22
21
20
Magni fy
14
Blank
Aspec t
19
15
Auto
Sync
Color
Mode
16 17
Sourc e
18
20
Page 22
Name
Description
1
Power
Turn the projector on/off.
2 HDMI Choose HDMI source.
3 SD/USB Choose SD/USB sources.
4 Keystone
Adjust image distortion caused by tilting the projector.
5 Enter Conrm your item selection.
6 Volume - Decrease the volume level.
Four Directional
7
Select Keys
8 Keystone
Use ▲▼◄► to select items or make adjustments to
your selection.
Adjust image distortion caused by tilting the projector.
9 Menu Launch the on-screen display (OSD).
10 My Button User denable key for customized function.
Previous/Rewind/
11
Fast Forward/Next
Control the multimedia le to previous, rewind, fast
forward or next.
12 Play/Pause/Stop Control the multimedia le to play, pause and stop.
13 Freeze
Freeze the screen image. Press this button again to
unlock.
14 Blank Hide the screen picture.
15 Auto Sync
Automatically synchronizes the projector to the input
source.
16 Magnify +/- Magnies or reduces the projected picture size.
17 Color Mode
Select the color mode from Brightest, PC, Movie, Picture and User.
18 Source Select an input signal.
19 Aspect Select the display aspect ratio.
20 Mute Momentarily turns off/on the sound.
21 Exit Leave current page or items or to close OSD.
22 Volume + Increase the volume level.
23 Video Choose composite/S-Video source.
24 PC Choose PC source.
25 Laser Press to use laser pointer.
21
Page 23
On-screen Display Menus
The Projector has multilingual On-screen Display menus that allow you to
make image adjustments and change a variety of settings. The projector
will automatically detect the source.
How to operate
1. To open the OSD menu, press the “Menu” button on the remote control or on the
control panel.
2. When OSD is displayed, use the ◄► buttons to select any item in the main
menu. While making a selection on a particular page, press the ▼ button to
enter sub menu.
3. Use the ▲▼ buttons to select the desired item and adjust the settings by the
◄► buttons.
4. If the setting has
menu. Press the “Menu” button to close the sub menu after adjustment.
5. After adjusting the settings, press the “Menu” button to go back to the main
menu.
6. To exit, press the “Menu” button again. The OSD menu will be closed and the
projector will automatically save the new settings.
icon, you could press the ► button to enter another sub
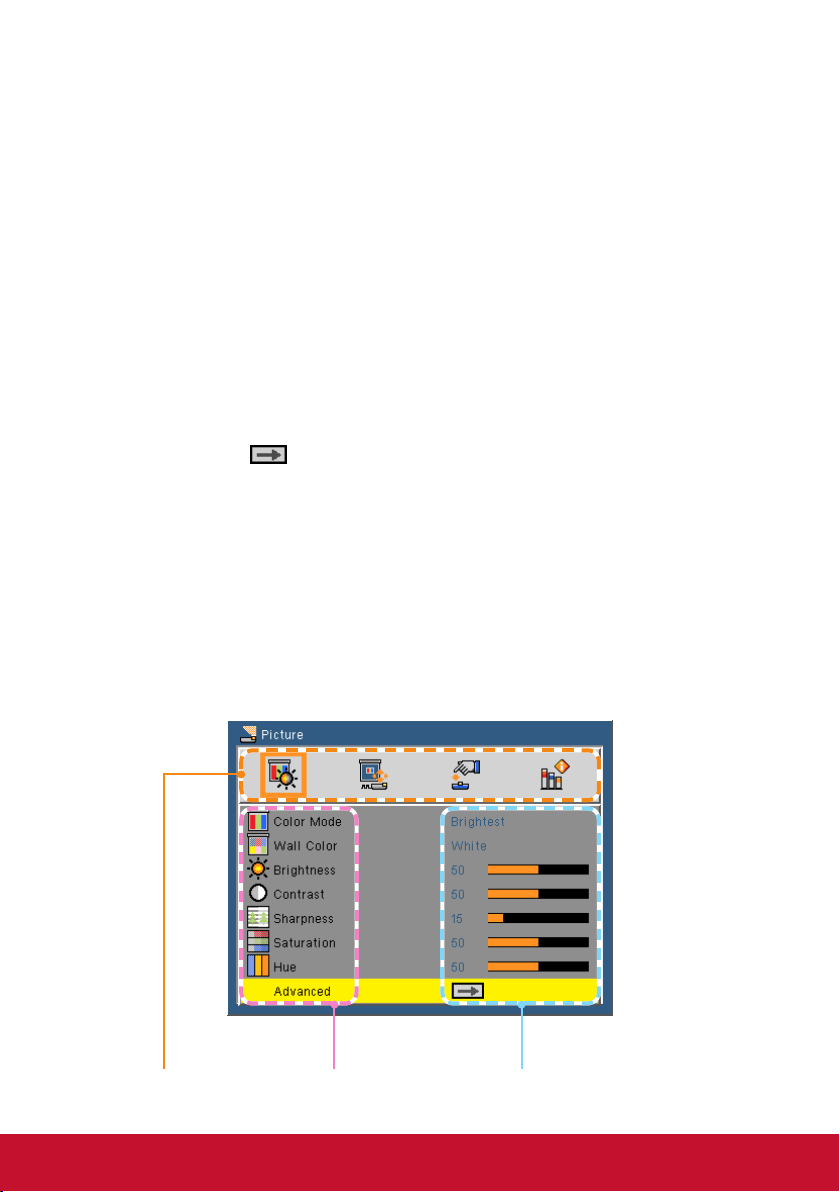
Main Menu Sub Menu Settings
22
Page 24
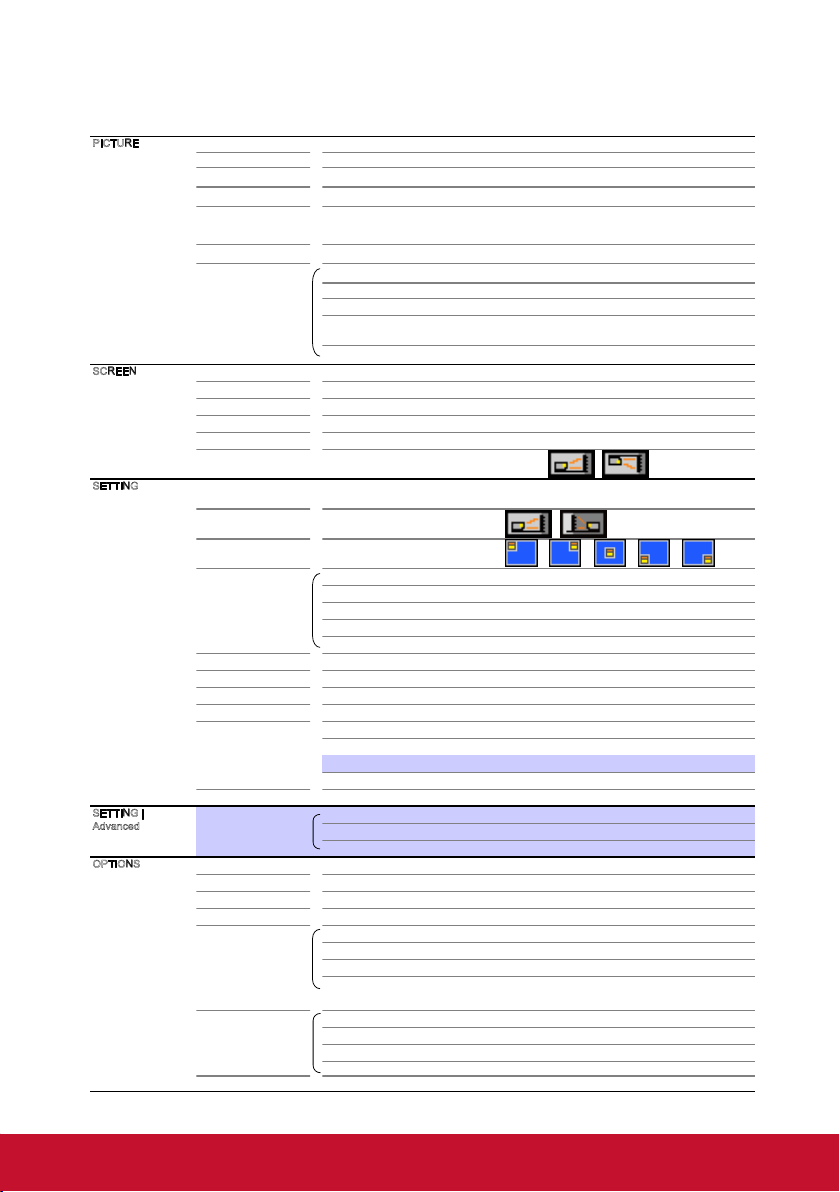
Structure
Main Menu Sub Menu Settings
P
ICTURE
SCREEN
SETTING
S
ETTING |
dvanced
A
OPTIONS
Color Mode Brightest / PC / Movie / Picture / User
Wall Color White / Light Yellow / Light Blue / Pink / Dark Green
Brightness 0~100
Contrast 0~100
Sharpness 0~31
Saturation 0~100
Hue 0~100
Advanced Gamma 0 / 1 / 2
Aspect Ratio AUTO / 4:3 / 16:9 / 16:10
Overscan Off / On
Digital Zoom -5~25 (80%~200%)
Auto Keystone Off / On
V Keystone -40~40
Ceiling Mount AUTO /
Language
Orientation
Menu Location
Signal Phase 0~31
Mute Off / On
Volume 0~100
3D Off / On
3D Invert Off / On
Advanced Logo On / Off
Reset No / Yes
Security Security Off / On
Auto source Off / On
Fan Mode AUTO / High Altitude
Information Hide Off / On
Background Color Black / Blue
LED Settings LED Hours Used
Information
Advanced Direct Power On Off / On
LED Calibration No / Yes
Color Temp. Low / Middle / High
Color Space AUTO / RGB / YUV
Input HDMI / VGA / COMPOSITE / S-Video / USB
Exit
English / Deutsch / Français / Italiano / Español / Português / Polski
/ Русский / Svenska / Norsk / 简体中文 / 日本語 / 한국어 / Türkçe / 繁體中文
Clock -5~5
H. Position -10~10
V. Position -10~10
Exit
Closed Caption Off / CC1 / CC2 / CC3 / CC4
Security
Exit
Change Password
Exit
ECO Mode Off / On
Clear LED Hours
Exit
Auto Power Off (min) 0~180
Keypad Lock Off / On
Exit
Display / Exit
23
Page 25

PICTURE
Color Mode
There are many factory presets optimized for various types of images. Use the ◄ or
► button to select the item.
`Brightest: Maximum brightness from PC input.
`PC: For computer or notebook.
`Movie: For home theater.
`Picture: For graphic picture.
`User: User dened settings.
Wall Color
Use this function to choose a proper color according to the wall. It will compensate
the color deviation due to the wall color to show the correct image tone.
Brightness
Adjust the brightness of the image.
`Press the ◄ button to darken image.
`Press the ► button to lighten the image.
Contrast
The contrast controls the degree of difference between the lightest and darkest
parts of the picture. Adjusting the contrast changes the amount of black and white in
the image.
`Press the ◄ button to decrease the contrast.
`Press the ► button to increase the contrast.
24
Page 26

Sharpness
Adjust the sharpness of the image.
`Press the ◄ button to decrease the sharpness.
`Press the ► button to increase the sharpness.
Saturation
Adjust a video image from black and white to fully saturated color.
`Press the ◄ button to decrease the amount of saturation in the image.
`Press the ► button to increase the amount of saturation in the image.
Hue
Adjust the color balance of red and green.
`Press the ◄ button to increase the amount of green in the image.
`Press the ► button to increase the amount of red in the image.
“Sharpness”, “Saturation” and “Hue” functions are only supported under video mode.
Advanced
Refer to page 26.
25
Page 27

PICTURE | Advanced
Gamma
Effects the representation of dark scenery. With greater gamma value, dark scenery
will look brighter.
Color Temp.
Adjust the color temperature. At higher temperature, the screen looks colder; at
lower temperature, the screen looks warmer.
Color Space
Select an appropriate color matrix type from AUTO, RGB or YUV.
Input
Refer to page 27.
26
Page 28

PICTURE | Advanced | Input
Use this option to enable/disable input sources. Press ► button to enter the sub
menu and select which sources you require. Press the “Enter” button to nalize the
selection. The projector will not search for inputs that are not selected.
SD card and USB A are not in the auto source route, please manually select them.
`USB Display (display over USB) can be easily operated to project a computer's
screen by using a single USB cable (mini B type to A type) without any other
drivers.
1. Choose source: Press the “PC” button on the remote control to choose
source from the mini USB connector.
2. Connection: Connect the USB cable to the mini USB of projector and USB
type A of the computer.
3. Automatically projected: When detecting the computer, the screen will be
automatically projected out.
4. End the projection: When unplugging the USB cable, the projection will be
stopped.
Only one computer can be connected at one time.
27
Page 29

SCREEN
Aspect Ratio
`AUTO: Automatically selects the appropriate display format.
`4:3: This format is for 4×3 input sources.
`16:9: This format is for 16×9 input sources, like HDTV and DVD enhanced for
Wide screen TV.
`16:10: This format is for 16×10 input sources, like widescreen laptops.
Overscan
Overscan function removes the noise in a video image. Overscan the image to
remove video encoding noise on the edge of video source.
Digital Zoom
Press the ◄ button to reduce the size of an image.
Press the ► button to magnify an image on the projection screen.
Auto Keystone
`Choose “On” to automatically start the keystone adjustment.
`Choose “Off” to manually adjust the keystone.
V Keystone
Press the ◄ or ► button to adjust image distortion vertically. If the image looks
trapezoidal, this option can help make the image rectangular.
Ceiling Mount
`AUTO: Automatically inverts the image when the projector is mounted on the
ceiling.
`
`
Desktop Front: The image is projected straight on the screen.
Ceiling Front: When selected, the image will turn upside down.
28
Page 30

SETTING
Language
Choose the multilingual OSD menu. Press the ◄ or ► button into the sub menu
and then use the ▲ or ▼ button to select your preferred language. Press “Enter” on
the remote control to nalize the selection.
Orientation
`
`
Desktop Front: This is the default selection. The image is projected straight
on the screen.
Desktop Rear: When selected, the image will appear reversed.
Menu Location
Choose the menu location on the display screen.
29
Page 31

Signal
Refer to page 31.
Mute
`Choose “On” to turn mute on.
`Choose “Off” to turn mute off.
Volume
`Press the ◄ button to decrease the volume.
`Press the ► button to increase the volume.
3D
`Choose “On” to enable 3D function.
`Choose “Off” to disable 3D function.
The 3D display performance will depend on the 3D glasses you applied.
3D Invert
`Choose “On” to invert left and right frame contents.
`Choose “Off” to display default frame contents.
Advanced
Refer to page 32.
Reset
Choose “Yes” to return the parameters on all menus to the factory default settings.
30
Page 32

SETTING | Signal (RGB)
Phase
Synchronize the signal timing of the display with the graphic card. If the image
appears to be unstable or ickers, use this function to correct it.
Clock
Change the display data frequency to match the frequency of your computer’s
graphic card. Use this function only if the image appears to icker vertically.
H. Position
`Press the ◄ button to move the image left.
`Press the ► button to move the image right.
V. Position
`Press the ◄ button to move the image down.
`Press the ► button to move the image up.
“H. Position” and “V. Position” ranges will depend on input source.
31
Page 33

SETTING | Advanced
Logo
Use this function to set the desired startup screen. If changes are made they will
take effect the next time the projector is powered on.
`On: The default startup screen.
`Off: No logo is displayed.
Closed Caption
Use this function to enable close caption and activate the closed caption menu.
Select an appropriate closed captions option: Off, CC1, CC2, CC3, CC4.
Security
Refer to page 33.
32
Page 34

SETTING | Advanced | Security
Security
`On: Choose “On” to use security verication when turning on the projector.
`Off: Choose “Off” to be able to switch on the projector without password
verication.
Change Password
`First time:
yPress the ► button to set the password.
yThe password has to be 6 digits.
yUse number buttons on the remote control to enter your new password and
then press “Enter” to conrm it.
`Change Password:
yPress the ► button to input the old password.
yUse number buttons to enter the current password and then press “Enter” to
conrm it.
yEnter a new password (6 digits in length) using the number buttons on the
remote control, then press “Enter” to conrm it.
yEnter the new password again and press “Enter” to conrm it.
`If the incorrect password is entered for 3 times, the projector will automatically
shut down.
`If you have forgotten your password, please contact your local ofce for support.
33
Page 35

Password default value is “123456” (rst time).
When you input the password, you must press the “Enter” button and other number button on the remote
control at the same time.
34
Page 36

OPTIONS
Auto Source
`On: The projector will search for other signals if the current input signal is lost.
`Off: The projector will only search current input connection.
Fan Mode
`AUTO: The built-in fans automatically run at a variable speed according to the
internal temperature.
`High Altitude: The built-in fans run at high speed. The built-in fans run at a high
speed. Select this option when using the projector at altitudes approximately
2500 feet/760 meters or higher.
Information Hide
`On: Choose “On” to hide the info message.
`Off: Choose “Off” to show the “searching” message.
Background Color
Use this feature to display a “Black”or “Blue” screen when no signal is available.
LED Settings
Refer to page 37.
35
Page 37

Information
Display the projector information for source, resolution, software version, color
space and aspect ratio on the screen.
Advanced
Refer to page 38.
LED Calibration
Use this function to adjust LED color performance. Please wait for 10 seconds to
nish the white color ne tune process.
This function will start to work after the LED used hour being greater than 500 and
you continues using the projector for more than 2 hours.
If you didn’t implement the LED calibration after the LED used hour being greater than 500 and you contin-
ues using the projector for more than 2 hours, it will pop up the message to remind you.
36
Page 38

OPTIONS | LED Settings
LED Hours Used
Display the projection time.
ECO Mode
Choose “On” to dim the projector lamp which will lower power consumption and
extend the lamp life. Choose “Off” to return to normal mode.
Clear LED Hours
Reset the lamp hour counter after replacing the lamp.
37
Page 39

OPTIONS | Advanced
Direct Power On
Choose “On” to activate Direct Power mode. The projector will automatically power
on when AC power is supplied, without pressing the “ ” buton on the projector
control panel or on the remote control.
Auto Power Off (min)
Sets the countdown timer interval. The countdown timer will start, when there is no
signal being sent to the projector. The projector will automatically power off when
the countdown has nished (in minutes).
Keypad Lock
When the keypad lock function is “On”, the control panel will be locked. However,
the projector can be operated by the remote control. By selecting “Off”, you will be
able to reuse the control panel.
38
Page 40

Media Arena
Media Arena is an interactive PC-less presentation solution. Through SD
card reader, USB connector and internal memory, you can easily access
various photo, video and music media formats (See format supported
table). The stylish user interface gives you the best experience while playing media les.
How to operate
1. To open the Media Arena, insert a SD card/USB ash drive to the SD card
reader /USB connector on the rear of the projector.
2. When the main menu is displayed, use the ◄► buttons on the remote control
to select a source device. Press the “Enter” button or ▼ buttons on the control
panel to make a selection.
3. Use the ◄► buttons on the remote control to select any item in the main menu.
Press the “Enter” button or ▼ buttons on the control panel to make a selection.
4. Use the ▲▼ buttons to select the desired le and open/play it by the ► button.
5. Press the “Exit” button to back the main menu or previous folder.
The tool bar displayed on the bottom will disappear in three seconds if there is no action.
The tool bar will disappear in three seconds if you play a media le with full screen.
39
Page 41

Source Main Menu
Source
File Transfer
Internal Memory USB SD Card
Photo Music Video
Main Menu
File Transfer
Ofce Reader Setup
Connect PC File Transfer
40
Page 42

Main Menu
Sub Menu
Settings
Ofce Reader:
1. All IPR, including but not limited to copyright, in the Picsel Products is owned by Picsel suppliers.
2. The End User may not:
y Make copies of the Picsel Products or make them available for use by third parties.
y Reverse engineer, disassemble, reverse translate, or in any way decode the Picsel Products
or any copy or part of it in order to derive any source code, save only as is permitted by any
applicable law.
3. Picsel make no representations or warranties whether express or implied (by statute or otherwise)
relating to the performance, quality, merchantability or tness for a particular purpose of the Picsel
Products or otherwise and all such representations or warranties are specically disclaimed and
excluded.
4. Picsel agrees and acknowledges that Picsel and the Picsel Products will not be specically mentioned
in the end user license agreement.
Diverse format, font and graphic in your original MS Ofce les might affect the decoding speed and
display result.
41
Page 43

Structure
Main Menu
Photo File List
M
usic File List
V
ideo File List
O
ffice Reader File List
S
etup
Sub Menu Settings
Photo Setting Display Ratio Auto / Full
Music Setting Play Mode Once / Repeat Once / Repeat / Random
Video Setting Display Ratio Auto / Original Size
Firmware Upgrade
SETUP
Slideshow Duration 5 Sec. / 15 Sec. / 30 Sec. / 1 Min. / 5 Min. / 15 Min.
Slideshow Repeat On / Off
Slideshow Effect Random / Snake / Partition / Erase / Blinds / Lines /
Show Spectrum On / Off
Auto Play Off / On
Play Mode Once / Repeat Once / Repeat / Random
Auto Play Off / On
GridCross / Cross / Spiral / Rect / Off
Photo Setting
Access the photo settings.
Music Setting
Access the music settings.
Video Setting
Access the video settings.
Firmware Upgrade
To do rmware upgrade.
42
Page 44

SETUP | Photo Setting
Display Ratio
Press ◄ or ► to select the display ratio.
`Auto: Fit full screen without keeping the original aspect ratio.
`Full: Keep original aspect ratio and resize to t horizontal or vertical direction of
the screen.
Slideshow Duration
Press ◄ or ► to select the slideshow duration.
Slideshow Repeat
`Choose “On” to repeat slideshow always.
`Choose “Off” to stop slideshow when it goes to the last page.
Slideshow Effect
Press ◄ or ► to select what slideshow effect you want. There are various kinds:
Random, Snake, Partition, Erase, Blinds, Lines, GridCross, Cross, Spiral, Rect and
Off.
43
Page 45

SETUP | Music Setting
Play Mode
Press ◄ or ► to select the play mode.
`Once
`Repeat One
`Repeat
`Random
Show Spectrum
Choose “On” to show the spectrum plot while music is playing.
Auto Play
Choose “On” to play the music automatically while entering the le list.
44
Page 46

SETUP | Video Setting
Display Ratio
Press ◄ or ► to select the display ratio.
`Auto: Fit full screen without keeping the original aspect ratio.
`Full: Keep original aspect ratio and resize to t horizontal or vertical direction of
the screen.
Play Mode
Press ◄ or ► to select the play mode.
`Once
`Repeat One
`Repeat
`Random
Auto Play
Choose “On” to play the video automatically while entering the le list.
45
Page 47

SETUP | Firmware Upgrade
Firmware upgrade needs to be operated via SD card. Please download the latest
rmware version of “PLED_W500_MM.bin” and save in your SD card.
Step
`Step 1: Insert the SD card to the SD card reader of the projector.
`Step 2: Move the bar to “Firmware Upgrade” and click on “Enter”.
`Step 3: Click on “Yes” to start rmware upgrade.
`Step 4: Wait until the upgrade process complete.
`Step 5: The projector will automatically restart after upgrade complete.
46
Page 48

Internal Memory
Internal memory is a form of computer data storage.
File Transfer
File Transfer can transfer your computer’s data to the projector’s internal memory
by using a single USB cable (mini B type to A type). Your computer will detect the
projector’s “Internal Memory” as a storage device.
1. Press the “Enter” to select “File Transfer”.
2. Connection: Connect the USB cable to the mini USB of projector and USB type
A of the computer.
3. After the projector’s memory is recognized by your computer, you can move
your mouse to copy your movie/music/le to the projector’s memory.
47
Page 49

Projection with Wireless Presentation
1. Plug in an USB WiFi adapter (WPD-100) in USB type A slot of projector.
2. Press the “SD/USB” button on the remote control to choose the source to USB A
and press “Enter”.
3. Follow the instructions to nish the installation.
Operating System:
1. For Windows: Windows XP SP2/SP3 (32 and 64-bit) / Vista (32 and 64-bit) / Windows 7 (32 and
64-bit).
2. For Macintosh: Mac OS X 10.5, 10.6, 10.7
y Recommended Models: MacBook after 2009-01-21 / All series of MacBook Pro / MacBook Air
Enable your WLAN of Notebook and select the access point labeled PLED-W500 to connect wirelessly.
after 2010-06-08.
The Server IP indicates the IP address (192.168.100.10) which your projector uses to connect to the
wireless network.
4. Execute the shortcut on desktop and you will see the UI shown as below.
48
Page 50

Projection with MobiShow
MobiShow allows content projection from a Wi-Fi-enabled smartphone (Android, iPhone). Install application - MobiShow on smartphone and connect
to wireless projector.
Windows Mobile is not supported.
MobiShow Utility for iPhone
1. Turn on WiFi on your phone.
2. Connect your phone to internet network.
3. Launch the App Store
and download the MobiShow application.
4. Follow the instructions to nish the installation.
5. Remember to synchronize your picture or PTG2 le with your iPhone or iPad.
Synchronize Files with iTunes
1. Click “iTunes” icon
2. Connect your iPhone/iPod/iPad to PC/Laptop.
3. Click the iPhone/iPod/iPad device under “Devices” on the left-hand side. (Step 1)
4. Click the “Apps” tab to show the application list. (Step 2)
y Some tabs may not appear if you do not have corresponding content in your library.
5. Click “MobiShow” item and you can see everything uploaded by MobiShow. (Step 3)
6. Click “Add” button and select the le to upload to your iPhone/iPod/iPad. (Step 4)
Step 1 Step 3 Step 4Step 2
to launch the application on PC/Laptop.
For more information, please visit
http://www.viewsonic.com/download.php?assetId=24433
49
Page 51

MobiShow Utility for Android
1. Turn on WiFi on your phone.
2. Connect your phone to internet network.
3. Open the Android Market
4. Follow the instructions to nish the installation.
and download the MobiShow application.
Using the MobiShow
1. Enable the WiFi and connect to the Access Point where the MobiShow compatible device connected.
2. Select “MobiShow” icon
3. MobiShow client will start to search for MobiShow compatible devices automatically.
4. Select “Photo” icon to project the photo les.
5. Select “PtG” icon
(PtG)
to launch the client software.
to do a PC-less presentation with Presentation-to-Go.
50
Page 52

MobiShow | Photo Viewer
You can use MobiShow to project photos stored on your phone to big screen. The
photos will be prepared for playback on big screens rather than for the tiny screens
of your phone.
Open and select the photo le, then project it on the big screen through MobiShow
compatible device.
For Android system For iPhone/iPod/iPad
`Prev/Next: Tap to go to the previous or next item on the slide.
`Pause/Stop: Pause or stop playing photo.
`Rotate L/R: Rotate photo to left or right.
“Photo Viewer” supports Jpeg format only.
51
Page 53

MobiShow | PtG2
You can use MobiShow to do the PC-less interactive presentation by PtG2
(Presentation to Go). When the PtG2 le is open, the PtG2 slides will be projected,
and the following screen is displayed on your phone for you to control your PtG2
presentation.
You need to use “PtG2 converter” to convert the PowerPoint le to the PtG2 le rst.
For Android system For iPhone/iPod/iPad
`Prev/Next: Tap to go to the previous or next item on the slide.
`PgUp/ PgDn: Tap to go to previous or next slide.
`Stop: Tap to stop projecting the le. The icon will become “Play” if the le is not
being played. Tap “Play” again to play the le if it is stopped.
`Home: Tap to go to the rst slide.
`Jump: Tap and MobiShow client will show thumbnails of every slide in the PtG
le. You can select and go to any slide.
`Open: Tap to select another PtG2 le.
PtG/PtG2 converts the le to 800x600 or 1024x768 resolutions.
52
Page 54

Using the PtG2 Converter
1. Download the “PtG2-setup-v2.0.1.2.exe” from your PLED-W500 projector with
connecting the USB cable to your computer/laptop via le transfer.
For more information of File Transfer, please refer to page 47.
2. Install “PtG2-setup-v2.0.1.2.exe” in your computer/laptop.
3. Open “Programs -> PtG Utility -> PtG2 Converter” from the Start menu. The following control panel is displayed on your desktop when it is launched.
Icon Item Description
Select a PowerPoint le and start conversion.
Convert
Preview Expand or collapse the preview pane.
PtG2 Converter will open the PowerPoint le and
convert it to PtG2 format. You can see the conversion process on your desktop.
Play Playback the selected PtG2 le.
Open Select a PtG2 le.
Please close PowerPoint program before conversion.
53
Page 55

Appendices
Troubleshooting
If you experience a problem with your projector, please refer to the following information. If a problem persists, please contact your local reseller or
service center.
Image Problems
No image appears on-screen
`Ensure all the cables and power connections are correctly and securely
connected as described in the “Installation” section.
`Ensure the pins of connectors are not crooked or broken.
`Check if the projection lamp has been securely installed.
`Make sure you have removed the lens cap and the projector is switched on.
Partial, scrolling or incorrectly displayed image
`Press “Auto” on the remote control or on the control panel.
If you are using a PC:
y
- For Windows 95, 98, 2000, XP, Windows 7:
1. Open the “My Computer” icon, the “Control Panel” folder, and
then double click on the “Display” icon.
2. Select the “Settings” tab.
3. Verify that your display resolution setting is lower than or equal to
1080p.
4. Click on the “Advanced Properties”.
- For Windows Vista:
1. From the “My Computer” icon, open the “Control Panel” folder,
and double click the “Appearance and Personalization”
2. Select “Personalization”.
3. Click “Adjust screen resolution” to display “Display Settings”.
Click on the “Advanced Settings”.
54
Page 56

- If the projector is still not projecting the whole image, you will also
need to change the monitor display you are using. Refer to the
following steps.
1. Select the “Change” under the “Monitor” tab.
2. Click on “Show all devices”. Next, select “Standard monitor types”
under the SP box; choose the resolution mode you need under
the “Models” box.
3. Verify that the resolution setting of the monitor display is lower
than or equal to 1080p.
If you are using a Notebook:
y
- First, follow the steps above to adjust resolution of the computer.
- Press the toggle output settings. example: [Fn]+[F4]
Notebook Brand Function Keys
Acer [Fn]+[F5]
Asus [Fn]+[F8]
Dell [Fn]+[F8]
Gateway [Fn]+[F4]
IBM/Lenovo [Fn]+[F7]
HP/Compaq [Fn]+[F4]
NEC [Fn]+[F3]
Toshiba [Fn]+[F5]
Mac Apple
If you experience difculty changing resolutions or your monitor freezes,
y
System Preference -> Display ->
Arrangement -> Mirror display
restart all equipment including the projector.
The screen of the Notebook or PowerBook computer is not displaying
your presentation
Some Notebook PCs may deactivate their own screens when a second display
device is in use. Each has a different way to be reactivated. Refer to your computer’s documentation for detailed information.
Image is unstable or ickering
`Adjust the “Phase” to correct it. Refer to the “SETTING | Signal” section for
more information.
`Change the monitor color setting from your computer.
55
Page 57

Image has vertical ickering bar
`Use “Clock” to make an adjustment. Refer to the “SETTING | Signal” section
for more information.
`Check and recongure the display mode of your graphic card to make it
compatible with the product.
Image is out of focus
`Make sure the lens cap is removed.
`Adjust the “Focus Ring” on the projector lens.
`Make sure the projection screen is within the required distance of 1.71-9.84
feet (0.52-3.00 meters) from the projector.
The image is stretched when displaying 16:9 DVD title
When you play anamorphic DVD or 16:9 DVD, the projector will show the best
image in 16: 9 format on projector side.
`If you play 4:3 format DVD title, please change the format as 4:3 in projector
OSD.
`If the image is still stretched, you will also need to setup the display format
as 16:9 (wide) aspect ratio type on your DVD player.
Image is too small or too large
`Move the projector closer to or further from the screen.
`Press “Menu” on the remote control or on the control panel. Go to “SCREEN”
--> “Aspect Ratio”and try the different settings.
Image has slanted sides:
`If possible, reposition the projector so that it is centered on the screen and
below the bottom of the screen.
`Use “SCREEN” --> “V Keystone” from the OSD to make an adjustment.
Image is reversed
`If the projector is mounted on the ceiling, select “SCREEN” --> “Auto Ceil
Mount” from the OSD and adjust the projection direction.
`If the projector is placed on the desk, select “SETTING” --> “Orientation”
from the OSD and adjust the projection direction.
56
Page 58

Projector Problems
The projector stops responding to all controls
` If possible, turn off the projector, then unplug the power cord and wait at
least 20 seconds before reconnecting power.
Multi-media Problems
USB/SD read fail
` Please make sure the USB device or SD card is good and well inserted.
Remove to try for several times if necessary.
USB drive fail
` USB does not support USB hub function and which power consumption is
over 500mA.
Media le not found or can’t be opened in le list
` The les by un-supported codec won’t be shown on le list. Please check
the media support table again in this manual.
57
Page 59

On Screen Messages
1. Office reader language supported (Picsel’s font):
1 Czech 6 Germany 11 Polish 16 Thai
2 Danish 7 Hungarian 12 Iberian Portuguese 17 Turkish
3 Dutch 8 Italian 13 Russian 18 Vietnamese
4 English 9 Japanese 14 Spanish 19 Traditional Chinese
5 French 10 Korea 15 Swedish 20 Simplified Chinese
2. Internationalization and languages
Feature Support Notes
International language formatting Partial
Some local date formats, special layout
styles.
Vertical text (as used in Chinese) No
Local numbering sequence formats No
3. Font
Feature Support Notes
Fonts embedded in MS Office documents No
Fonts linked and downloaded with documents (eg
HTML)
No
Compressed TrueType fonts for MS Windows
Mobile
No
Bitmap fonts No
Hinting of glyph shapes No
Vertical reading or vertical cursor advance No
Multiple colours within font glyphs No
4. Autoshapes
Feature Support Notes
Gradient fill Most
Vertical, horizontal, diagonal, centre-square
two colour gradients.
Line dash style No Shown as solid lines
Arrowhead end styles Partial Not all line ending shapes
Shape control point Most
The control points of most shapes behave
consistently with MS Office.
Text within autoshapes Partial
Text can appear in autoshapes in Excel and
PowerPoint.
Action button images No
y Power off conrm
y Fan lock error
y No source found
y Out of display range
y Mute
y Thermal sensor error
58
Page 60

Piscel Support Languages, Character Encodings
and Fonts
1. Office reader language supported (Picsel’s font):
1 Czech 6 Germany 11 Polish 16 Thai
2 Danish 7 Hungarian 12 Iberian Portuguese 17 Turkish
3 Dutch 8 Italian 13 Russian 18 Vietnamese
4 English 9 Japanese 14 Spanish 19 Traditional Chinese
5 French 10 Korea 15 Swedish 20 Simplified Chinese
2. Internationalization and languages
Feature Support Notes
International language formatting Partial
Vertical text (as used in Chinese) No
Local numbering sequence formats No
3. Font
Feature Support Notes
Fonts embedded in MS Office documents No
Fonts linked and downloaded with documents (eg
HTML)
Compressed TrueType fonts for MS Windows
Mobile
Bitmap fonts No
No
No
Some local date formats, special layout
styles.
Hinting of glyph shapes No
Vertical reading or vertical cursor advance No
Multiple colours within font glyphs No
4. Autoshapes
Feature Support Notes
Gradient fill Most
Line dash style No Shown as solid lines
Arrowhead end styles Partial Not all line ending shapes
Shape control point Most
Text within autoshapes Partial
Action button images No
Vertical, horizontal, diagonal, centre-square
two colour gradients.
The control points of most shapes behave
consistently with MS Office.
Text can appear in autoshapes in Excel and
PowerPoint.
59
Page 61

5. MS Word
6. MS Excel
Feature Support Notes
Supports page size No
Not meaningful as view shows
worksheet, not print view
Supports headers and footers:
z Workbook name
z Current date
z Current time
z Page number plus/minus n
z Total pages in workbook
z Ampersand character
No
Displays cell row and column headings No
Retains “frozen titles” for rows and columns when
scrolling
No
Displays page breaks within a worksheet (both
horizontal and vertical breaks)
No Not needed as sheet is not printed
Supports background image on worksheets No
Supports cell background fill pattern No
Provides facility to either hide or display rows,
columns or sheets that are hidden
No
Supports scenarios, displays names of scenarios
contained in worksheet
No Displays only the default scenario
Provides facility to select scenario and display cell
contents accordingly
No
Supports all number formats:
z Number
z Currency
z Accounting
z Date
z Time
z Percentage
z Fraction
z Scientific
z Special
z Custom
Partial
Individual number format support is
detailed in the section “Number format
support”
Bold text Partial
When used with a bold font installed.
Not supported in Chinese Simple font.
Indentation No
Displays comments associated with a cell No
Supports hyperlinks to other files and web pages No
Supports hyperlinks attached to graphics and
images
No
Displays screen tips associated with hyperlinks No
Animated GIF images contained in Excel
documents.
No
Line styles Most
Only solid line styles are supported. All
line weights are supported
Line dash styles Some
Only solid dash styles are supported.
Dashed and dotted lines are rendered
as solid lines
Text boxes Partial
Including vertical alignment of text
within box, but not text formatting or
styling.
Autoshapes Most
Refer to the section on ‘Autoshapes’ for
more information.
Feature Support Notes
Bold text Partial Not supported in Simple Chinese font.
Text alignment:
z Fully Justified
Tab stops Partial
Tables with Indentation, Bullets, Numbering and
style changes
Table border styles Partial
Nested tables Partial
Vertical cell merging No
Page margins and borders Partial
Document Views Partial
Comments No
Footnotes/endnotes No
Change tracking No
Continuous sections No
Fields and equations No
“Ruby” Kanji and Kana No
Line styles Most
Line dash styles Some
Gradient fill colours in autoshapes Most Horizontal, vertical, diagonal, centre-square
Supports Word Art No
Flows text around positioned images according to
rules set within the original Word document
z Square wrapping style
z Tight wrapping style
Flows text around positioned images according to
rules set within the original Word document
z Variable (edited) wrap points
No Displayed as left aligned text.
Partial
Partial
No Image will appear with square wrapping.
Supports default tab stops and custom
position tab stops. Supports left aligned tab
stops only. Tabs with leader characters are
not supported.
Multiple numbered lists in different columns,
and some style features are not supported
Supports
- single solid line
- double solid line
Some nested tables are incorrectly
displayed
Page margins are supported, but we do not
display page borders
ePAGE always opens up a document in
‘print’ view format.
Continuous section breaks will be shown as
“next page breaks”. If a document has
multiple continuous section breaks within a
page, FileViewer will display this as multiple
pages.
Only solid line styles are supported. All line
weights are supported
Only solid dash styles are supported.
Dashed and dotted lines are rendered as
solid lines
Image is positioned either to left or right
margin, and text flowed to one side.
60
Page 62

6. MS Excel
Feature Support Notes
Supports page size No
Supports headers and footers:
z Workbook name
z Current date
z Current time
z Page number plus/minus n
z Total pages in workbook
z Ampersand character
No
Displays cell row and column headings No
Retains “frozen titles” for rows and columns when
scrolling
Displays page breaks within a worksheet (both
horizontal and vertical breaks)
No
No Not needed as sheet is not printed
Supports background image on worksheets No
Supports cell background fill pattern No
Provides facility to either hide or display rows,
columns or sheets that are hidden
Supports scenarios, displays names of scenarios
contained in worksheet
Provides facility to select scenario and display cell
contents accordingly
No
No Displays only the default scenario
No
Supports all number formats:
z Number
z Currency
z Accounting
z Date
z Time
z Percentage
z Fraction
z Scientific
z Special
z Custom
Partial
Bold text Partial
Indentation No
Not meaningful as view shows
worksheet, not print view
Individual number format support is
detailed in the section “Number format
support”
When used with a bold font installed.
Not supported in Chinese Simple font.
Displays comments associated with a cell No
Supports hyperlinks to other files and web pages No
Supports hyperlinks attached to graphics and
images
No
Displays screen tips associated with hyperlinks No
Animated GIF images contained in Excel
documents.
No
Line styles Most
Line dash styles Some
Text boxes Partial
Autoshapes Most
61
Only solid line styles are supported. All
line weights are supported
Only solid dash styles are supported.
Dashed and dotted lines are rendered
as solid lines
Including vertical alignment of text
within box, but not text formatting or
styling.
Refer to the section on ‘Autoshapes’ for
more information.
Page 63

Feature Support Notes
Feature Support Notes
Supports Chart data tables No
Displays chart embedded within a chart which is a
separate page
No
Error bars No
Line markers No
Bitmap fill patterns No
3D effects in any chart No
8. MS PowerPoint
Feature Support Notes
Bold text Partial Not supported in Simple Chinese font.
Numbered lists No
Line dash styles Some
Only solid dash styles are supported.
Dashed and dotted lines are rendered
as solid lines
Animations and slide transitions No
Hyperlinks and actions No
Smart Art diagrams No
9. Adobe PDF
Feature Support Notes
Supports later PDF documents using backwards
compatible features
Partial
The PDF format has been carefully
designed to encourage backwards
compatibility, allowing older applications
to read newer files in many cases. This
is supported where feasible.
Bold text Partial Not supported in Simple Chinese font.
Table border styles Partial
Supports
- single solid line
- double solid line
Transformed images Partial
Supports image rotation by 90, 180,
270 degrees, flipped images
Monochrome and Colour content
z DeviceGray
z DeviceRGB
z DeviceCMYK
z CalGray*
z CalRGB*
z Indexed
z DeviceN
Most
Calgray and CalRGB are treated as
DeviceGray and DeviceRGB
Gradient fill colours in autoshapes Most
Supports WordArt No
Marks cells that have been changed using the
Excel Highlight Changes command
Displays lists according to any filters that are
applied
Supports pivot tables No
Displays form controls (buttons, check boxes,
listboxes etc)
Runs macros or scripts associated with form
controls
No
No
Partial
No
Horizontal, vertical, diagonal, centresquare
Displays ActiveX Controls, not ‘regular’
Form Controls. Also, ActiveX Controls
are only displayed as static (noninteractive) objects.
Displays phonetic guides for Japanese text:
z Hiragana
z Full width katakana
z Half width katakana
7. MS Excel Chart
Feature Support Notes
Supports Excel 95 (BIFF7) charts No
Supports Excel 5 (BIFF5) format charts No
Chart Legends Partial
Data Labels No
Grid Lines Partial
Tickmarks on lines Partial
Rotated text in charts No
No
Supports Organisation charts No
Supports Radar charts No
Supports Scatter charts No
Supports Area charts No
Supports Surface charts No
Supports Bubble charts No
Supports Doughnut charts No
Supports Stock charts No
Supports Combination charts No
62
Page 64

Feature Support Notes
Supports Chart data tables No
Displays chart embedded within a chart which is a
separate page
No
Error bars No
Line markers No
Bitmap fill patterns No
3D effects in any chart No
8. MS PowerPoint
Feature Support Notes
Bold text Partial Not supported in Simple Chinese font.
Numbered lists No
Only solid dash styles are supported.
Line dash styles Some
Dashed and dotted lines are rendered
as solid lines
Animations and slide transitions No
Hyperlinks and actions No
Smart Art diagrams No
9. Adobe PDF
Feature Support Notes
The PDF format has been carefully
Supports later PDF documents using backwards
compatible features
Partial
Bold text Partial Not supported in Simple Chinese font.
Table border styles Partial
Transformed images Partial
Monochrome and Colour content
z DeviceGray
z DeviceRGB
z DeviceCMYK
z CalGray*
z CalRGB*
z Indexed
z DeviceN
Most
designed to encourage backwards
compatibility, allowing older applications
to read newer files in many cases. This
is supported where feasible.
Supports
- single solid line
- double solid line
Supports image rotation by 90, 180,
270 degrees, flipped images
Calgray and CalRGB are treated as
DeviceGray and DeviceRGB
63
Page 65

Compatibility Modes
y VGA Analog
- PC signal
Modes Resolution V. Frequency [Hz] H. Frequency [Hz]
640x480 60 31.5
VGA
SVGA
XGA
SXGA
QuadVGA
SXGA+ 1400x1050 60 65.3
640x480 72 37.9
640x480 75 37.5
640x480 85 43.3
800x600 56 35.1
800x600 60 37.9
800x600 72 48.1
800x600 75 46.9
800x600 85 53.7
1024x768 60 48.4
1024x768 70 56.5
1024x768 75 60.0
1024x768 85 68.7
1280x1024 60 64.0
1280x1024 72 77.0
1280x1024 75 80.0
1280x960 60 60.0
1280x960 75 75.2
64
Page 66

- Extended wide timing
Modes Resolution V. Frequency [Hz] H. Frequency [Hz]
1280x768 60 47.8
1280x720 60 44.8
WXGA
WSXGA+ 1680x1050 60 65.3
1280x800 60 49.6
1366x768 60 47.7
1440x900 60 59.9
- Component signal
Modes Resolution V. Frequency [Hz] H. Frequency [Hz]
480i 720x480(1440x480) 59.94(29.97) 15.7
576i 720x576(1440x576) 50(25) 15.6
480p 720x480 59.94 31.5
576p 720x576 50 31.3
720p 1280x720 60 45.0
720p 1280x720 50 37.5
1080i 1920x1080 60(30) 33.8
1080i 1920x1080 50(25) 28.1
1080p 1920x1080 23.97/24 27.0
1080p 1920x1080 60 67.5
1080p 1920x1080 50 56.3
65
Page 67

y HDMI Digital
- PC signal
Modes Resolution V. Frequency [Hz] H. Frequency [Hz]
640x480 60 31.5
VGA
SVGA
XGA
SXGA
QuadVGA
SXGA+ 1400x1050 60 65.3
640x480 72 37.9
640x480 75 37.5
640x480 85 43.3
800x600 56 35.1
800x600 60 37.9
800x600 72 48.1
800x600 75 46.9
800x600 85 53.7
1024x768 60 48.4
1024x768 70 56.5
1024x768 75 60.0
1024x768 85 68.7
1280x1024 60 64.0
1280x1024 72 77.0
1280x1024 75 80.0
1280x960 60 60.0
1280x960 75 75.2
66
Page 68

- Extended wide timing
Modes Resolution V. Frequency [Hz] H. Frequency [Hz]
1280x768 60 47.8
1280x720 60 44.8
WXGA
WSXGA+ 1680x1050 60 65.3
1280x800 60 49.6
1366x768 60 47.7
1440x900 60 59.9
- Video signal
Modes Resolution V. Frequency [Hz] H. Frequency [Hz]
480i 720x480(1440x480) 59.94(29.97) 15.7
576i 720x576(1440x576) 50(25) 15.6
480p 720x480 59.94 31.5
576p 720x576 50 31.3
720p 1280x720 60 45.0
720p 1280x720 50 37.5
1080i 1920x1080 60(30) 33.8
1080i 1920x1080 50(25) 28.1
1080p 1920x1080 23.97/24 27.0
1080p 1920x1080 60 67.5
1080p 1920x1080 50 56.3
Graphic source monitor range limits
Horizontal scan rate: 30k - 100kHz
Vertical scan rate: 50 - 85Hz
Max. pixel rate 150MHz
67
Page 69

Multi-media Format Supported
Supports JPEG picture formats
JPEG Decode
Video Decode and
Movie Formats
Music Formats
Card Reader Interface
USB Interface
Thumbnails preview
Supports BMP picture formats
Supports MJPEG
Supports H263, H264
Supports AVI, MOV movie formats
Supports 3gp movie format
Supports PCM, ADPCM audio formats
Supports WMA/OGG/MP3
Supports SD memory card
Supports SDHC memory card
Supports mass storage class
Supports USB2.0
y Photo Format
Image type (ext name) Sub type Encode type Max pixels
YUV420
Baseline
YUV422
No Limitation
YUV440
Jpeg / Jpg
Progressive
BMP No Limitation
YUV444
YUV420
YUV422
5120 X 3840
YUV440
YUV444
68
Page 70

y Video Format
File
format
AVI
MKV
DIVX
TS
DAT
VOB
MPG
MPEG
MOV
MP4
3GP
RM
RMVB
WMV WMV3 1080P 20Mbps 30fps
Video
format
DIVX4/5/6
XVID
MPEG-2/4
H.264
M-JPEG
WMV3
MPEG-2
H.264
MPEG-1
MPEG-2
MPEG-4
H.264
H.263
RV3
RV4
MAX
resolution
1080P 20Mbps 30fps
1080P 20Mbps 30fps
1080P 20Mbps 30fps
1080P 20Mbps 30fps
720P 5Mbps 30fps
MAX
bit rate
Frame
rate
Audio
format
AC3
DTS
MPEG1/2/3
PCM
ADPCM
AAC
AC3
DTS
MPEG1/2/3
LPCM
AAC
MPEG1/2/3
AC3
DTS
LPCM
AC3
AMR
PCM
AAC
Cook
(RA6)
AAC (RA9)
RACP
(RA10)
WMA2
WMA3
Remark
No support VC-1 AP
H. 264 support less
than 4 reference
frames
H. 264 support less
than 4 reference
frames
-
H. 264 support less
than 4 reference
frames
-
No support VC-1 AP
Doesn’t support B-Frame function.
y Music Format
Music type (ext name) Sample rate (KHz) Bit rate (Kbps)
MP3 8-48 8-320
WMA 22-48 5-320
OGG 8-48 64-320
ADPCM-WAV 8-48 32-384
PCM-WAV 8-48 128-1536
AAC 8-48 8-256
69
Page 71

Ceiling Mount Installation
If you wish to use a third party ceiling mount kit, please ensure the screws which
are used to attach a mount to the projector meet the following specications:
y Screw type: M3
- Diameter: 3 mm
- Length: 25 mm
Please note that damage resulting from incorrect installation will invalidate the warranty.
78.63
25.89
170.60
51.20
53.13 61.88
ViewSonic
MENU
LAMP
SOURCE TEMP
214.00
41.00
Unit: mm
61.00
70
Page 72

Specications
Projection system DLP
Resolution WXGA (1280 x 800)
Computer compatibility IBM PC and compatibles, Apple Macintosh, iMac and VESA
Video compatibility NTSC (3.58/4.43), PAL (B/D/G/H/I/M/N), SECAM (B/D/G/ K/
Aspect ratio Auto, 4:3, 16:9, 16:10
Displayable colors 1.07 billion colors
Projection lens F# 1.5, f = 13.92 mm
Projection screen size 30” - 80”
Projection distance 0.9 m - 2.4 m
Throw ratio 1.4
Horizontal scan rate 30 k - 100 kHz
Vertical refresh scan rate 50 - 85 Hz
Keystone correction +/- 40 degrees
Weight 1.2 Kg (2.6 lbs)
Dimensions (W x D x H) 214mm x 164mm x 42.5mm
Power supply AC 100 - 240 V, 50 - 60 Hz
®
standards: SXGA, XGA, SVGA, VGA, WXGA
K1/L), HDTV (480i, 576i, 480p, 576p, 720p, 1080i, 1080p)
Power consumption yNormal mode: 120W +/- 20% @ 110Vac (Bright mode @
Operating temperature 5ºC to 35ºC / 41ºF to 95ºF
I/O connectors yPower socket x 1
full power)
yECO mode: 60W +/-20% @ 110Vac (Video mode @ eco
power)
yStandby < 0.5 W
ySD card reader x 1
yUSB A x 1
yHDMI x 1
yVGA x 1
yS-Video x 1
yComposite x 1
yAudio output x 1
yMini USB B x 1
71
Page 73

Standard package contents yAC power cord x 1
yVGA cable x 1
yRemote control x 1
yAAA Batteries (for remote control) x 2
ySoft carrying bag x 1
yUser’s guide (DVD) x 1
yQuick start card x 1
yWarranty card x 1
Design and specications are subject to change without prior notice.
72
Page 74

Customer Support
For technical support or product service, see the table below or contact your
reseller.
Note : You will need the product serial number.
Country/Region Website
Australia/New Zealand www.viewsonic.com.au
Canada www.viewsonic.com
Europe
Hong Kong www.hk.viewsonic.com T= 852 3102 2900 service@hk.viewsonic.com
India www.in.viewsonic.com T= 1800 266 0101 service@in.viewsonic.com
Ireland (Eire)
Korea www.kr.viewsonic.com T= 080 333 2131 service@kr.viewsonic.com
Latin America
(Argentina)
Latin America (Chile) www.viewsonic.com/la/ T= 1230-020-7975 soporte@viewsonic.com
Latin America
(Columbia)
Latin America (Mexico) www.viewsonic.com/la/ T= 001-8882328722 soporte@viewsonic.com
Renta y Datos, 29 SUR 721, COL. LA PAZ, 72160 PUEBLA, PUE. Tel: 01.222.891.55.77 CON 10 LINEAS
Electroser, Av Reforma No. 403Gx39 y 41, 97000 Mérida, Yucatán. Tel: 01.999.925.19.16
Other places please refer to http://www.viewsonic.com/la/soporte/index.htm#Mexico
Latin America (Peru) www.viewsonic.com/la/ T= 0800-54565 soporte@viewsonic.com
Macau www.hk.viewsonic.com T= 853 2870 0303 service@hk.viewsonic.com
Middle East ap.viewsonic.com/me/ Contact your reseller service@ap.viewsonic.com
Puerto Rico & Virgin
Islands
Singapore/Malaysia/
Thailand
South Africa ap.viewsonic.com/za/ Contact your reseller service@ap.viewsonic.com
United Kingdom
United States www.viewsonic.com
www.viewsoniceurope.
com
www.viewsoniceurope.
com/uk/
www.viewsonic.com/la/ T= 0800-4441185 soporte@viewsonic.com
www.viewsonic.com/la/ T= 01800-9-157235 soporte@viewsonic.com
www.viewsonic.com
www.viewsonic.com.sg T= 65 6461 6044 service@sg.viewsonic.com
www.viewsoniceurope.
com/uk/
T = Telephone
F = FAX
AUS= 1800 880 818
NZ= 0800 008 822
T (Toll-Free)= 1-866-4634775
T (Toll)= 1-424-233-2533
F= 1-909-468-3757
www.viewsoniceurope.com/uk/Support/Calldesk.htm
www.viewsoniceurope.
com/uk/support/call-desk/
T= 1-800-688-6688
(English)
T= 1-866-379-1304
(Spanish)
F= 1-909-468-3757
www.viewsoniceurope.
com/uk/support/call-desk/
T (Toll-Free)= 1-800-6886688
T (Toll)= 1-424-233-2530
F= 1-909-468-3757
Email
service@au.viewsonic.com
service.ca@viewsonic.com
service_ie@
viewsoniceurope.com
service.us@viewsonic.com
soporte@viewsonic.com
service_gb@
viewsoniceurope.com
service.us@viewsonic.com
73
Page 75

Limited Warranty
VIEWSONIC® PROJECTOR
What the warranty covers:
ViewSonic warrants its products to be free from defects in material and workmanship, under normal use, during
the warranty period. If a product proves to be defective in material or workmanship during the warranty period,
ViewSonic will, at its sole option, repair or replace the product with a like product. Replacement product or
parts may include remanufactured or refurbished parts or components.
Limited Three (3) year General Warranty
Subject to the more limited one (1) year warranty set out below, North and South America: Three (3) years
warranty for all parts excluding the lamp, three (3) years for labor, and one (1) year for the original lamp from
the date of the rst consumer purchase; Europe except Poland: Three (3) years warranty for all parts excluding
the lamp, three (3) years for labor, and ninety (90) days for the original lamp from the date of the rst consumer
purchase; Poland: Two (2) years warranty for all parts excluding the lamp, two (2) years for labor, and ninety (90)
days for the original lamp from the date of the rst consumer purchase.
Limited One (1) year Heavy Usage Warranty:
Under heavy usage settings, where a projector’s use includes more than fourteen (14) hours average daily
usage, North and South America: One (1) year warranty for all parts excluding the lamp, one (1) year for labor,
and ninety (90) days for the original lamp from the date of the rst consumer purchase; Europe: One (1) year
warranty for all parts excluding the lamp, one (1) year for labor, and ninety (90) days for the original lamp
from the date of the rst consumer purchase.
Other regions or countries: Please check with your local dealer or local ViewSonic ofce for the warranty
information.
Lamp warranty subject to terms and conditions, verication and approval. Applies to manufacturer’s installed
lamp only. All accessory lamps purchased separately are warranted for 90 days.
Who the warranty protects:
This warranty is valid only for the rst consumer purchaser.
What the warranty does not cover:
1. Any product on which the serial number has been defaced, modied or removed.
2. Damage, deterioration, failure, or malfunction resulting from:
a. Accident, abuse, misuse, neglect, re, water, lightning, or other acts of nature, improper
b. Operation outside of product specications.
c. Operation of the product for other than the normal intended use or not under normal conditions.
d. Repair or attempted repair by anyone not authorized by ViewSonic.
e. Any damage of the product due to shipment.
f. Removal or installation of the product.
g. Causes external to the product, such as electric power uctuations or failure.
h. Use of supplies or parts not meeting ViewSonic’s specications.
i. Normal wear and tear.
j. Any other cause which does not relate to a product defect.
3. Removal, installation, and set-up service charges.
How to get service:
1. For information about receiving service under warranty, contact ViewSonic Customer Support (please
2.
3. Take or ship the product freight prepaid in the original container to an authorized ViewSonic service center
4. For additional information or the name of the nearest ViewSonic service center, contact ViewSonic.
Limitation of implied warranties:
There are no warranties, express or implied, which extend beyond the description contained herein including
the implied warranty of merchantability and tness for a particular purpose.
maintenance, unauthorized product modication, or failure to follow instructions supplied with the
product.
refer to “Customer Support” page). You will need to provide your product’s serial number.
To obtain warranted service, you will be required to provide (a) the original dated sales slip, (b) your name, (c)
your address, (d) a description of the problem, and (e) the serial number of the product.
or ViewSonic.
74
Page 76

Exclusion of damages:
ViewSonic’s liability is limited to the cost of repair or replacement of the product. ViewSonic shall not be
liable for:
1. Damage to other property caused by any defects in the product, damages based upon inconvenience,
loss of use of the product, loss of time, loss of prots, loss of business opportunity, loss of goodwill,
interference with business relationships, or other commercial loss, even if advised of the possibility of
such damages.
2. Any other damages, whether incidental, consequential or otherwise.
3. Any claim against the customer by any other party.
Effect of state law:
This warranty gives you specic legal rights, and you may also have other rights which vary from state to state.
Some states do not allow limitations on implied warranties and/or do not allow the exclusion of incidental or
consequential damages, so the above limitations and exclusions may not apply to you.
Sales outside the U.S.A. and Canada:
For warranty information and service on ViewSonic products sold outside of the U.S.A. and Canada, contact
ViewSonic or your local ViewSonic dealer.
The warranty period for this product in mainland China (Hong Kong, Macao and Taiwan Excluded) is subject
to the terms and conditions of the Maintenance Guarantee Card.
For users in Europe and Russia, full details of warranty provided can be found in www.viewsoniceurope.com
under Support/Warranty Information.
4.3: Projector Warranty PRJ_LW01 Rev. 1h 06-25-07
75
Page 77

Mexico Limited Warranty
VIEWSONIC® PROJECTOR
What the warranty covers:
ViewSonic warrants its products to be free from defects in material and workmanship, under normal
use, during the warranty period. If a product proves to be defective in material or workmanship during
the warranty period, ViewSonic will, at its sole option, repair or replace the product with a like product.
Replacement product or parts may include remanufactured or refurbished parts or components &
accessories.
How long the warranty is effective:
3 years for all parts excluding the lamp, 3 years for labor, 1 year for the original lamp from the date of the rst
consumer purchase.
Lamp warranty subject to terms and conditions, verication and approval. Applies to manufacturer’s installed
lamp only.
All accessory lamps purchased separately are warranted for 90 days.
Who the warranty protects:
This warranty is valid only for the rst consumer purchaser.
What the warranty does not cover:
1. Any product on which the serial number has been defaced, modied or removed.
2. Damage, deterioration or malfunction resulting from:
a. Accident, misuse, neglect, re, water, lightning, or other acts of nature, unauthorized product
modication, unauthorized attempted repair, or failure to follow instructions supplied with the
product.
b. Any damage of the product due to shipment.
c. Causes external to the product, such as electrical power uctuations or failure.
d. Use of supplies or parts not meeting ViewSonic’s specications.
e. Normal wear and tear.
f. Any other cause which does not relate to a product defect.
3. Any product exhibiting a condition commonly known as “image burn-in” which results when a
static image is displayed on the product for an extended period of time.
4. Removal, installation, insurance, and set-up service charges.
How to get service:
For information about receiving service under warranty, contact ViewSonic Customer Support (Please
refer to the attached Customer Support page). You will need to provide your product’s serial number, so
please record the product information in the space provided below on your purchase for your future use.
Please retain your receipt of proof of purchase to support your warranty claim.
For Your Records
Product Name: ________________________ Model Number: __________________________
Document Number: ____________________ Serial Number: ___________________________
Purchase Date: ________________________ Extended Warranty Purchase? _______________(Y/
N)
If so, what date does warranty expire? _________
1. To obtain warranty service, you will be required to provide (a) the original dated sales slip, (b) your
name, (c) your address, (d) a description of the problem, and (e) the serial number of the product.
2. Take or ship the product in the original container packaging to an authorized ViewSonic service
center.
3. Round trip transportation costs for in-warranty products will be paid by ViewSonic.
Limitation of implied warranties:
There are no warranties, express or implied, which extend beyond the description contained herein
including the implied warranty of merchantability and tness for a particular purpose.
Exclusion of damages:
ViewSonic’s liability is limited to the cost of repair or replacement of the product. ViewSonic shall not be
liable for:
1. Damage to other property caused by any defects in the product, damages based upon inconvenience,
loss of use of the product, loss of time, loss of prots, loss of business opportunity, loss of goodwill,
interference with business relationships, or other commercial loss, even if advised of the possibility
of such damages.
2. Any other damages, whether incidental, consequential or otherwise.
3. Any claim against the customer by any other party.
4. Repair or attempted repair by anyone not authorized by ViewSonic.
76
Page 78

ContactInformationforSales&AuthorizedService(CentroAutorizadodeServicio)withinMexico:
Name, address, of manufacturer and importers:
México, Av. de la Palma #8 Piso 2 Despacho 203, Corporativo Interpalmas,
Col. San Fernando Huixquilucan, Estado de México
Tel: (55) 3605-1099 http://www.viewsonic.com/la/soporte/index.htm
NÚMEROGRATISDEASISTENCIATÉCNICAPARATODOMÉXICO:001.866.823.2004
Hermosillo:
Distribuciones y Servicios Computacionales SA
de CV.
Calle Juarez 284 local 2
Col. Bugambilias C.P: 83140
Tel: 01-66-22-14-9005
E-Mail: disc2@hmo.megared.net.mx
Puebla, Pue. (Matriz):
RENTA Y DATOS, S.A. DE C.V. Domicilio:
29 SUR 721 COL. LA PAZ
72160 PUEBLA, PUE.
Tel: 01(52).222.891.55.77 CON 10 LINEAS
E-Mail: datos@puebla.megared.net.mx
Chihuahua
Soluciones Globales en Computación
C. Magisterio # 3321 Col. Magisterial
Chihuahua, Chih.
Tel: 4136954
E-Mail: Cefeo@soluglobales.com
Distrito Federal:
QPLUS, S.A. de C.V.
Av. Coyoacán 931
Col. Del Valle 03100, México, D.F.
Tel: 01(52)55-50-00-27-35
E-Mail : gacosta@qplus.com.mx
Guerrero Acapulco
GS Computación (Grupo Sesicomp)
Progreso #6-A, Colo Centro
39300 Acapulco, Guerrero
Tel: 744-48-32627
MERIDA:
ELECTROSER
Av Reforma No. 403Gx39 y 41
Mérida, Yucatán, México CP97000
Tel: (52) 999-925-1916
E-Mail: rrrb@sureste.com
Tijuana:
STD
Av Ferrocarril Sonora #3780 L-C
Col 20 de Noviembre
Tijuana, Mexico
Villahermosa:
Compumantenimietnos Garantizados, S.A. de C.V.
AV. GREGORIO MENDEZ #1504
COL, FLORIDA C.P. 86040
Tel: 01 (993) 3 52 00 47 / 3522074 / 3 52 20 09
E-Mail: compumantenimientos@prodigy.net.mx
Veracruz, Ver.:
CONEXION Y DESARROLLO, S.A DE C.V. Av. Americas # 419
ENTRE PINZÓN Y ALVARADO
Fracc. Reforma C.P. 91919
Tel: 01-22-91-00-31-67
E-Mail: gacosta@qplus.com.mx
Cuernavaca
Compusupport de Cuernavaca SA de CV
Francisco Leyva # 178 Col. Miguel Hidalgo
C.P. 62040, Cuernavaca Morelos
Tel: 01 777 3180579 / 01 777 3124014
E-Mail: aquevedo@compusupportcva.com
Guadalajara, Jal.:
SERVICRECE, S.A. de C.V.
Av. Niños Héroes # 2281
Col. Arcos Sur, Sector Juárez
44170, Guadalajara, Jalisco
Tel: 01(52)33-36-15-15-43
E-Mail: mmiranda@servicrece.com
Monterrey:
Global Product Services
Mar Caribe # 1987, Esquina con Golfo Pérsico
Fracc. Bernardo Reyes, CP 64280
Monterrey N.L. México
Tel: 8129-5103
E-Mail: aydeem@gps1.com.mx
Oaxaca, Oax.:
CENTRO DE DISTRIBUCION Y
SERVICIO, S.A. de C.V.
Murguía # 708 P.A., Col. Centro, 68000, Oaxaca
Tel: 01(52)95-15-15-22-22
Fax: 01(52)95-15-13-67-00
E-Mail. gpotai2001@hotmail.com
FOR USA SUPPORT:
ViewSonic Corporation
381 Brea Canyon Road, Walnut, CA. 91789 USA
Tel: 800-688-6688 (English); 866-323-8056 (Spanish);
Fax: 1-800-685-7276
E-Mail: http://www.viewsonic.com
4.3: ViewSonic Mexico Limited Warranty PRJ_LW03 Rev. 1A 06-25-07
77
Page 79

 Loading...