

Page 1
LS510W/LS510WH/LS510WH-2/LS560W/LS560WH/LS560HDH
Projector
User Guide
IMPORTANT: Please read this User Guide to obtain important information on installing and using your product
in a safe manner, as well as registering your product for future service. Warranty information contained in this
User Guide will describe your limited coverage from ViewSonic Corporation, which is also found on our web site at
http://www.viewsonic.com in English, or in specific languages using the Regional selection box in the upper right
corner of our website. “Antes de operar su equipo lea cu idadosamente las instrucciones en este manual”
Model No. VS19167/VS19170/VS19172
Model Name: LS510W/LS510WH/LS510WH-2/LS560W/LS560WH/LS560HDH
Page 2

Thank you for choosing ViewSonic®
As a world-leading provider of visual soluons, ViewSonic® is dedicated to exceeding the
world’s expectaons for technological evoluon, innovaon, and simplicity. At ViewSonic®,
we believe that our products have the potenal to make a posive impact in the world, and
we are condent that the ViewSonic® product you have chosen will serve you well.
Once again, thank you for choosing ViewSonic®!
Page 3

Safety Precautions - General
Please read the following Safety Precautions before you start using the projector.
• Keep this user guide in a safe place for later reference.
• Read all warnings and follow all instructions.
• Allow at least 20“ (50 cm) clearance around the projector to ensure proper
ventilation.
• Place the projector in a well-ventilated area. Do not place anything on the
projector that prevents heat dissipation.
• Do not place the projector on an uneven or unstable surface. The projector may
fall over, causing personal injury or projector malfunction.
• Do not use if the projector is tilted at an angle of more than 10° degrees left or
right, nor at an angle of more than 15° degrees forwards or backwards.
• Do not look straight at the projector lens during operation. The intense light
beam may damage your eyes.
• Always open the lens shutter or remove the lens cap when the projector lamp is
on.
• Do not block the projection lens with any objects when the projector is under
operation as this could cause objects to become heated and deformed or even
cause a fire.
• The lamp becomes extremely hot during operation. Allow the projector to
cool for approximately 45 minutes prior to removing the lamp assembly for
replacement.
• Do not use lamps beyond the rated lamp life. Excessive use of lamps beyond the
rated life could cause them to break on rare occasions.
• Never replace the lamp assembly or any electronic component unless the
projector is unplugged.
• Do not attempt to disassemble the projector. There are dangerous high voltages
inside which may cause death if you should come into contact with live parts.
• When moving the projector, be careful not to drop or bump the projector on
anything.
• Do not place any heavy objects on the projector or connection cables.
• Do not stand the projector on end vertically. Doing so may cause the projector
to fall over, causing personal injury or projector malfunction.
• Avoid exposing the projector to direct sunlight or other sources of sustained
heat. Do not install near any heat sources such as radiators, heat registers,
stoves, or other devices (including amplifiers) that may increase the
temperature of the projector to dangerous levels.
3
Page 4

• Do not place liquids near or on the projector. Liquids spilled into the projector
may cause it to fail. If the projector does become wet, disconnect it from the
power supply and call your local service center to have the projector serviced.
• When the projector is under operation, you may sense some heated air and
odor from its ventilation grill. It is a normal operation and not a defect.
• Do not attempt to circumvent the safety provisions of the polarized or
grounding-type plug. A polarized plug has two blades with one wider than the
other. A grounding-type plug has two blades and a third grounding prong. The
wide and third blade are provided for your safety. If the plug does not fit into
your outlet, obtain an adapter and do not attempt to force the plug into the
outlet.
• When connecting to a power outlet, DO NOT remove the grounding prong.
Please ensure grounding prongs are NEVER REMOVED.
• Protect the power cord from being treaded upon or pinched, particularly at the
plug, and at the point where it emerges from the projector.
• In some countries, the voltage is NOT stable. This projector is designed to
operate safely within a voltage between 100 to 240 volts AC, but could fail if
power cuts or surges of ±10 volts occur. In areas where voltage may fluctuate
or cut out, it is recommended that you connect your projector through a power
stabilizer, surge protector, or uninterruptable power supply (UPS).
• If smoke, an abnormal noise, or a strange odor is present, immediately switch
the projector off and call your dealer or ViewSonic®. It is dangerous to continue
using the projector.
• Use only attachments/accessories specified by the manufacturer.
• Disconnect the power cord from the AC outlet if the projector is not being used
for a long period of time.
• Refer all servicing to qualified service personnel.
CAUTION: Possibly hazardous optical radiation is emitted from this product. As
with any bright light source, do not stare into the beam,
RG2 IEC 62471-5:2015.
4
Page 5

Safety Precautions - Ceiling Mounting
Please read the following Safety Precautions before you start using the projector.
If you intend to mount the projector on the ceiling, we strongly recommend
that you use a proper fitting projector ceiling mount kit and that you ensure it is
securely and safely installed.
If you use an inappropriate projector ceiling mount kit, there is a safety risk that the
projector may fall from the ceiling due to an improper attachment through the use
of the wrong gauge or length screws.
You can purchase a projector ceiling mount kit from the place you purchased your
projector. We recommend that you also purchase a separate security cable and
attach it securely to both the anti-theft lock slot on the projector and the base of
the ceiling mount bracket. This will perform the secondary role of restraining the
projector should its attachment to the mounting bracket become loose.
5
Page 6

Contents
Safety Precautions - General ....................................... 3
Safety Precautions - Ceiling Mounting ......................... 5
Introduction ................................................................ 9
Package Contents ...................................................................................................9
Product Overview ................................................................................................. 10
Projector ................................................................................................................ 10
Controls and Functions ............................................................................................... 10
Connection Ports ......................................................................................................... 11
Remote Control ..................................................................................................... 13
Controls and Functions ............................................................................................... 13
Remote Control Effective Range ................................................................................. 14
Replacing the Remote Control Batteries ..................................................................... 15
Initial Setup ............................................................... 16
Choosing a Location ..............................................................................................16
Projection Dimensions ..........................................................................................17
16:10 Image on a 16:10 Screen ............................................................................. 17
LS510W/LS510WH/LS510WH-2 .................................................................................. 17
LS560W/LS560WH ...................................................................................................... 18
16:10 Image on a 4:3 Screen ................................................................................. 18
LS510W/LS510WH/LS510WH-2 .................................................................................. 18
LS560W/LS560WH ...................................................................................................... 19
LS560HDH .............................................................................................................. 19
16:9 Image on a 16:9 Screen ....................................................................................... 20
16:9 Image on a 4:3 Screen ......................................................................................... 20
Mounting the Projector ........................................................................................ 21
Preventing Unauthorized Use...............................................................................22
Using the Security Slot .......................................................................................... 22
Using the Password Function ................................................................................ 23
Setting a Password ...................................................................................................... 23
Changing the Password ............................................................................................... 24
Disabling the Password Function ................................................................................ 24
Forgetting the Password ............................................................................................. 25
Password Recall Procedure ......................................................................................... 25
Locking the Control Keys ....................................................................................... 26
6
Page 7

Making Connections .................................................. 27
Connecting to Power ............................................................................................27
Connecting to Computer Sources ......................................................................... 28
VGA Connection .................................................................................................... 28
VGA Out Connection ............................................................................................. 28
Connecting to Video/Computer Sources .............................................................. 28
HDMI Connection .................................................................................................. 28
Connecting to Audio ............................................................................................. 28
Operation .................................................................. 30
Turning the Projector On/Off ...............................................................................30
Starting Up the Projector ...................................................................................... 30
First Time Activation ................................................................................................... 30
Shutting Down the Projector ................................................................................. 31
Selecting an Input Source .....................................................................................32
Adjusting the Projected Image .............................................................................33
Adjusting the Projector's Height and Projection Angle ............................................... 33
Auto-Adjusting the Image ........................................................................................... 33
Fine-Tuning the Image Size and Clarity ................................................................. 33
Correcting Keystone .............................................................................................. 34
Adjusting 4 corners ............................................................................................... 35
Hiding the Image ..................................................................................................35
Controlling the Projector through a LAN Environment ........................................36
Configuring the LAN Control Settings .................................................................... 36
Menu Functions ........................................................ 38
General On-Screen Display (OSD) Menu Operation .............................................38
On-Screen Display (OSD) Menu Tree .................................................................... 39
DISPLAY Menu ......................................................................................................46
IMAGE Menu ........................................................................................................49
POWER MANAGEMENT Menu .............................................................................52
BASIC Menu .......................................................................................................... 55
ADVANCED Menu .................................................................................................58
SYSTEM Menu .......................................................................................................61
INFORMATION Menu ...........................................................................................63
7
Page 8

Appendix ................................................................... 64
Specifications ........................................................................................................64
Projector Dimensions ............................................................................................ 65
Timing Chart .........................................................................................................66
Analog RGB ............................................................................................................ 66
HDMI (PC) .............................................................................................................. 67
HDMI (Video) ......................................................................................................... 69
Component video .................................................................................................. 69
Troubleshooting ...................................................................................................70
Common Problems ................................................................................................ 70
LED Indicators ........................................................................................................ 71
Maintenance.........................................................................................................72
General Precautions .............................................................................................. 72
Cleaning the Lens .................................................................................................. 72
Cleaning the Case .................................................................................................. 72
Storing the Projector ............................................................................................. 72
Disclaimer .............................................................................................................. 72
Light Source Information ...................................................................................... 73
Light Source Hour .................................................................................................. 73
Extending Light Source Life ................................................................................... 73
Regulatory and Service Information .......................... 74
Compliance Information ....................................................................................... 74
FCC Compliance Statement ................................................................................... 74
Industry Canada Statement ................................................................................... 74
CE Conformity for European Countries ................................................................. 74
Declaration of RoHS2 Compliance......................................................................... 75
Indian Restriction of Hazardous Substances ......................................................... 76
Product Disposal at End of Product Life ................................................................ 76
Copyright Information ..........................................................................................77
Customer Service .................................................................................................. 78
Limited Warranty .................................................................................................. 79
Mexico Limited Warranty ...................................................................................... 82
8
Page 9
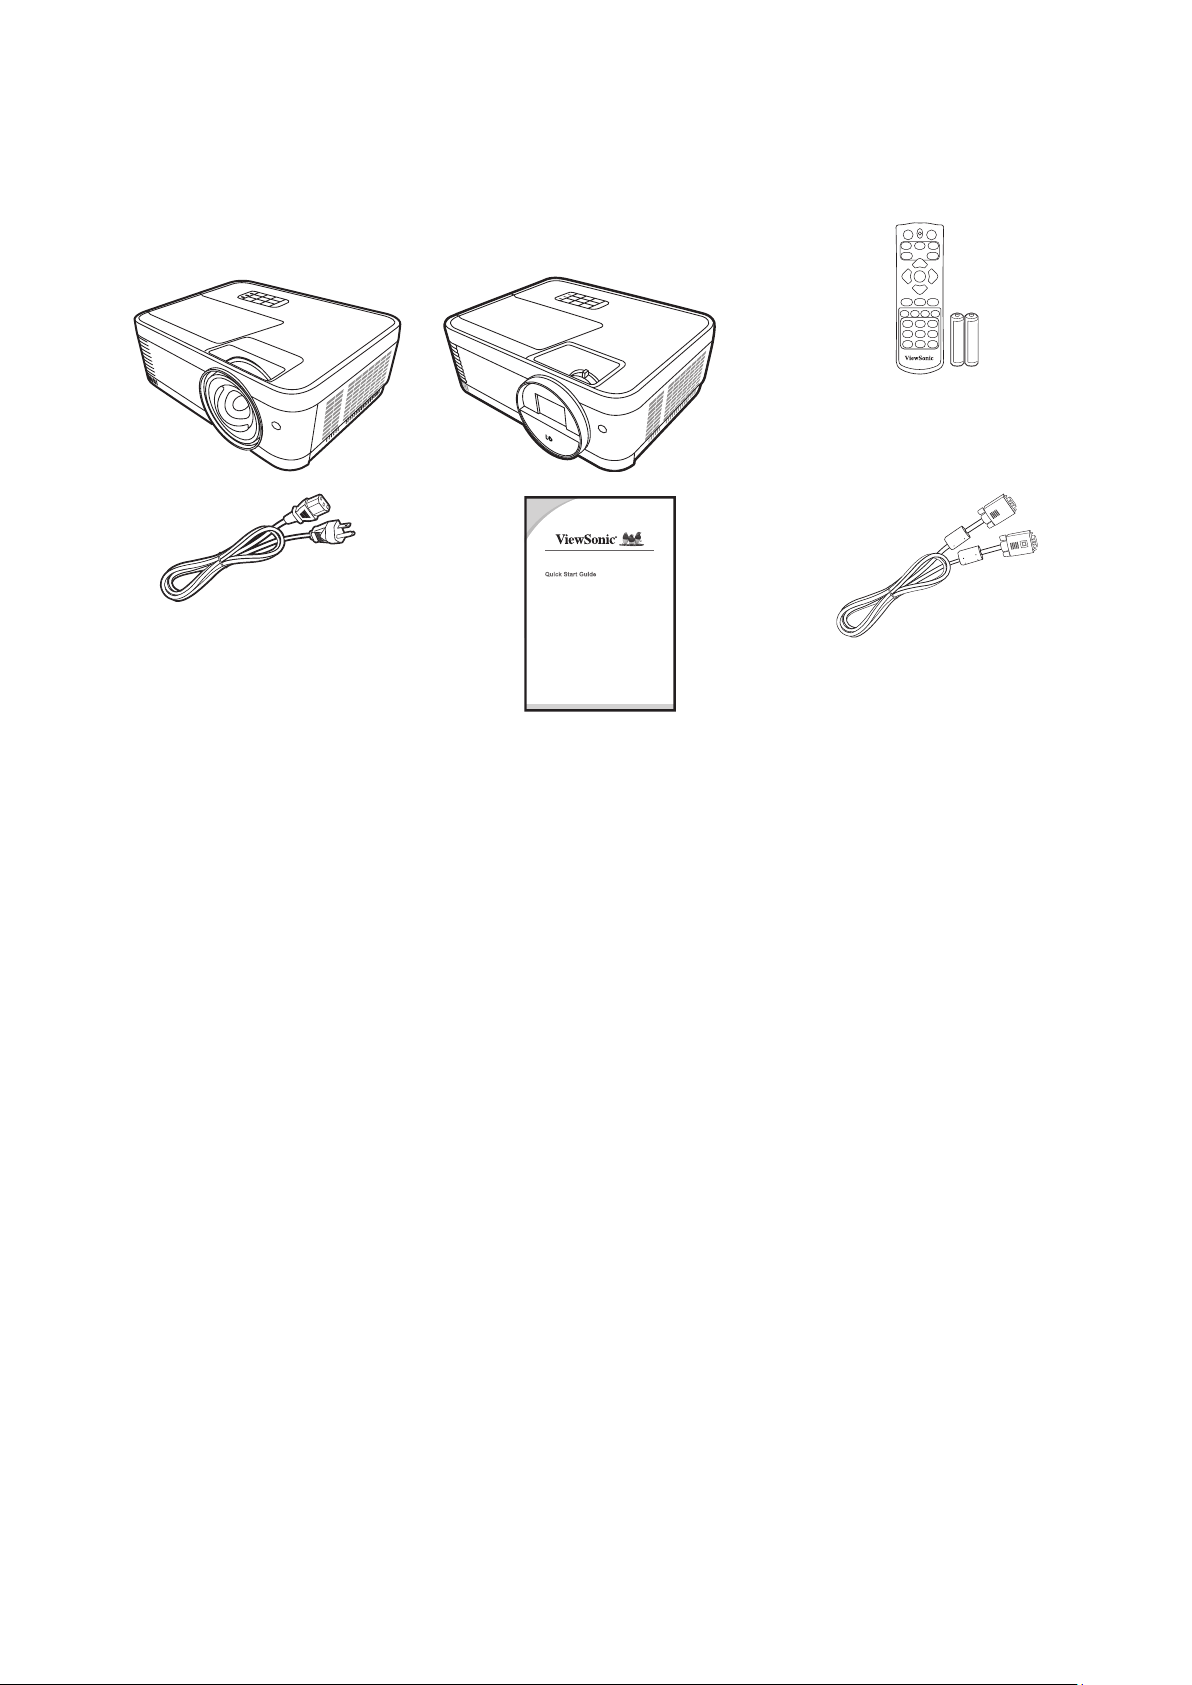
LS510W / LS510WH /
LS560W / LS560WH /
Introduction
Package Contents
LS560HDH
LS510WH-2
(LS510W/LS560W only)
NOTE: The power cord and video cables included in your package may vary depending
on your country. Please contact your local reseller for more informaon.
9
Page 10
Product Overview
Projector
Controls and Functions
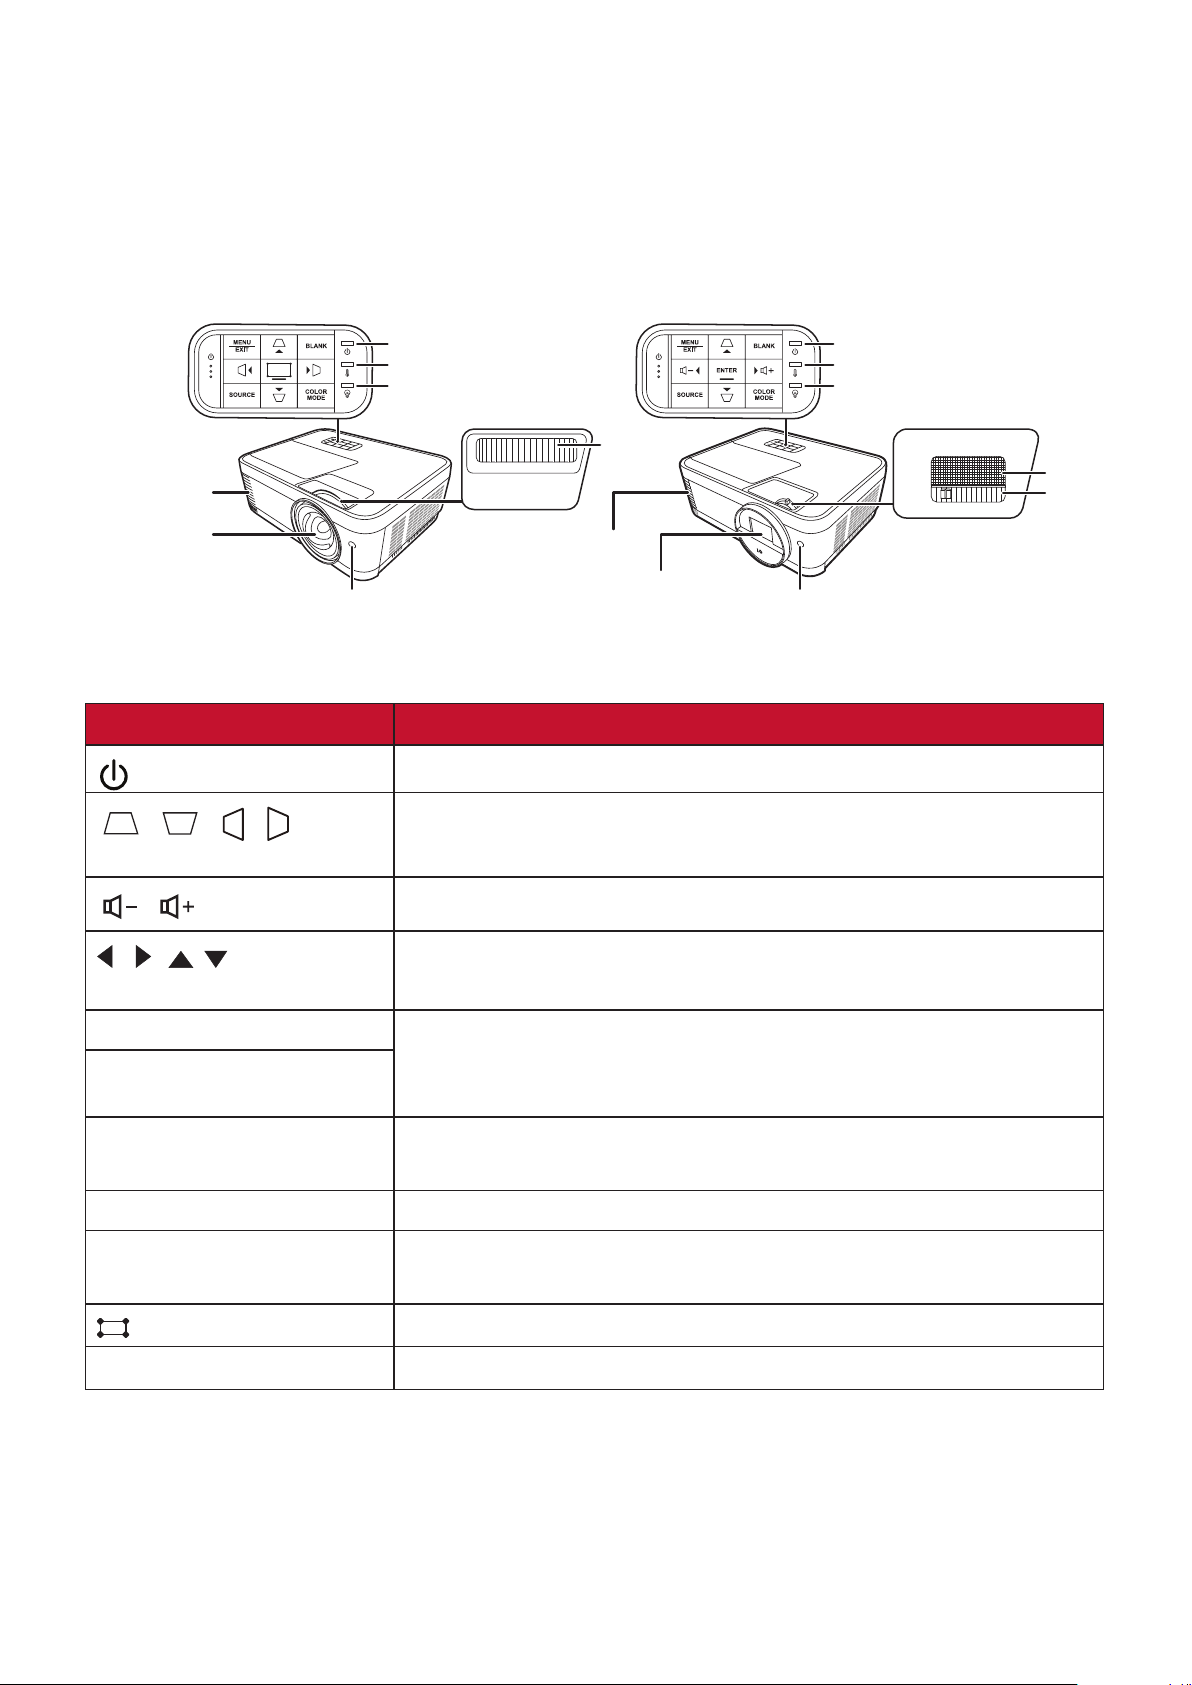
LS510W / LS510WH / LS510WH-2LS560W / LS560WH / LS560HDH
Power Indicator Light
ENTER
Vent (heated
air exhaust)
Projection Lens
Remote IR sensor
Temperature Indicator Light
Light Source Indicator Light
Vent (heated air exhaust)
Key Description
[ ] Power
[
/ / / ]
Keystone Keys
[
/ ] Volume Keys
Toggles the projector between standby mode and Power On.
Manually corrects distorted images resulting from an angled
projection.
Decreases/Decreases the volume level.
Power Indicator Light
Temperature Indicator Light
Light Source Indicator Light
Focus Ring
Focus Ring
Zoom Ring
Projection Lens
Remote IR sensor
[
/ / / ]
Left/Right/Up/Down
Selects the desired menu items and makes adjustments
when the On-Screen Display (OSD) Menu is activated.
Menu • Turns on or off the On-Screen Display (OSD) Menu.
Exit
• Goes back to previous OSD menu, exits and saves menu
settings.
Source • Displays the input source selection bar.
• Displays the HELP menu by a long press for 3 seconds.
Blank Hides the screen picture.
Enter Enacts the selected On-Screen Display (OSD) Menu item
when the OSD Menu is activated.
[
] Corner Adjustment
Displays the Corner Adj. menu.
Color Mode Displays the color mode selection bar.
10
Page 11
Connection Ports
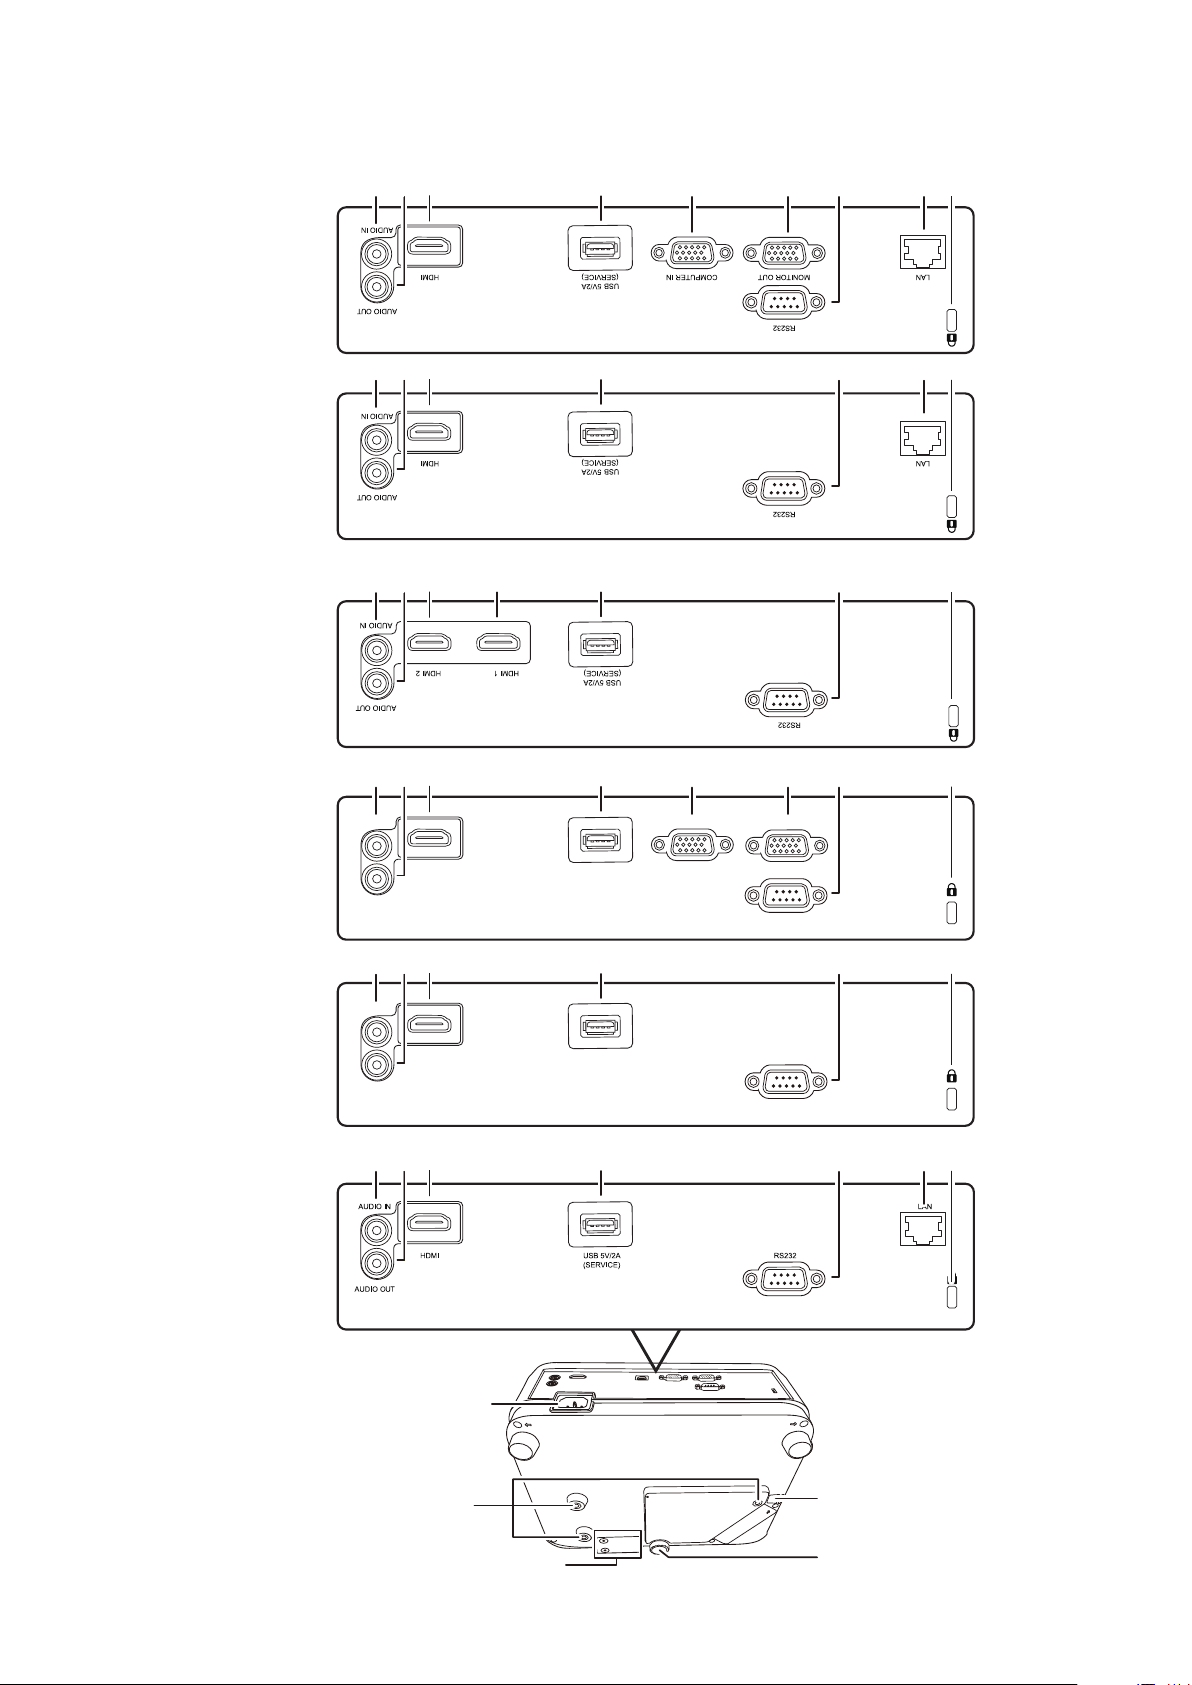
2 31 5
6
7
9
108
LS560W
LS560WH
LS560HDH
231 5 108 9
2 3 41 5 108
2 31 5
AUDIO IN
6
COMPUTER IN
7 108
MONITOR OUT
LS510W
LS510WH
LS510WH-2
HDMI
AUDIO OUT
2 31 5 108
AUDIO IN
HDMI
AUDIO OUT
231 5 108 9
AC Power Cord Inlet
USB 5V/2A
(SERVICE)
USB 5V/2A
(SERVICE)
RS232
RS232
Ceiling Mount Holes
Interactive module mounting
Security Bar
Adjuster Foot
1111
Page 12
Port Description
[1] AUDIO IN
[2] AUDIO OUT Audio signal output socket.
[3] HDMI; HDMI 2 HDMI port.
[4] HDMI 1 HDMI port.
[5] USB 5V/2A (SERVICE) USB Type A port for power supply.
[6] COMPUTER IN RGB (PC)/Component video (YPbPr/YCbCr) signal input
[7] MONITOR OUT RGB signal output socket.
[8] RS232 RS232 control port.
[9] RJ-45 LAN port.
[10]
Audio signal input socket.
socket.
Kensington anti-theft lock slot
12
Page 13
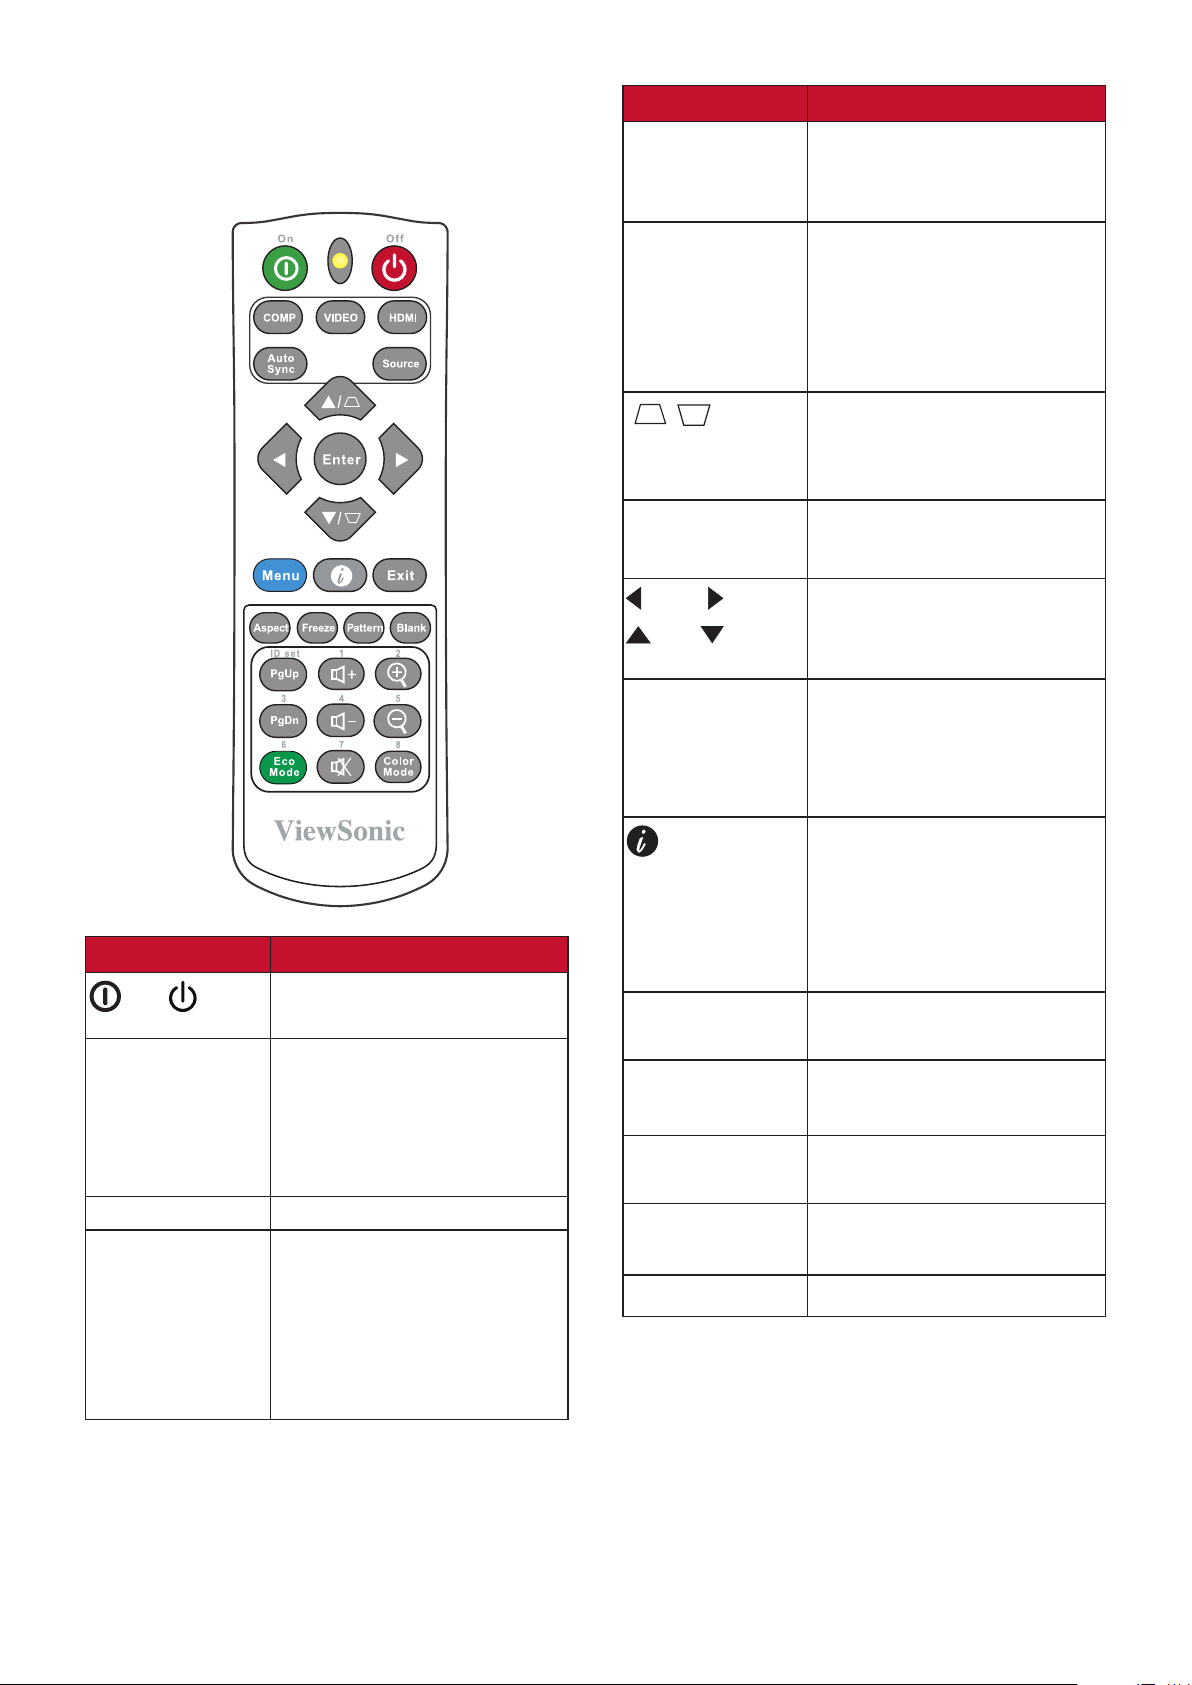
Remote Control
Controls and Functions
Button Description
Auto Sync
Automatically determines
the best picture timings
for the displayed image.
Source
[
/ ]
Keystone Keys
Enter
Left/ Right
Up/ Down
Menu
• Displays the source
selection bar.
• Displays the HELP
menu by a long press
for 3 seconds.
Manually corrects
distorted images resulting
from an angled projection.
Enacts the selected OSD
Menu item.
Selects the desired
menu items and makes
adjustments.
Turns on/off the OnScreen Display (OSD)
Menu or goes back to
previous OSD Menu.
Button Description
On/ Off
COMP
Toggles between standby
mode and Power On.
Selects the source from
the COMPUTER IN port for
display.
NOTE: Only available for
LS510W/LS560W.
VIDEO
HDMI
Not available.
Selects the source from
the HDMI port(s) for
display. Press this button
again to switch between
the two (2) ports if
available.
(INFORMATION)
Exit
Aspect
Freeze
Pattern
Blank
• Displays the
INFORMATION
• Displays the HELP
menu by a long press
for 3 seconds.
Exits and saves menu
settings.
Displays the aspect ratio
selection bar.
Freezes the projected
image.
Displays embedded test
pattern.
Hides the screen picture.
menu.
NOTE: The corner adjustment (P35) and horizontal keystone (P34) functions are
available on LS560W/LS560WH/LS560HDH only.
13
Page 14
Button Description
PgUp (Page
Up)/
PgDn (Page
Down)
Operates your display
software program
(on a connected PC) which
responds to
page up/down commands
(like Microsoft
PowerPoint).
NOTE: Only available
when a PC input
signal is selected.
Eco Mode
(Volume
Selects the Eco mode.
Increases the volume level.
Up)
(Volume
Decreases the volume
level.
Down)
(Mute)
Color Mode
Toggles audio between on
and off.
Magnifies the projected
picture size.
Reduces the projected
picture size.
Displays the color mode
selection bar.
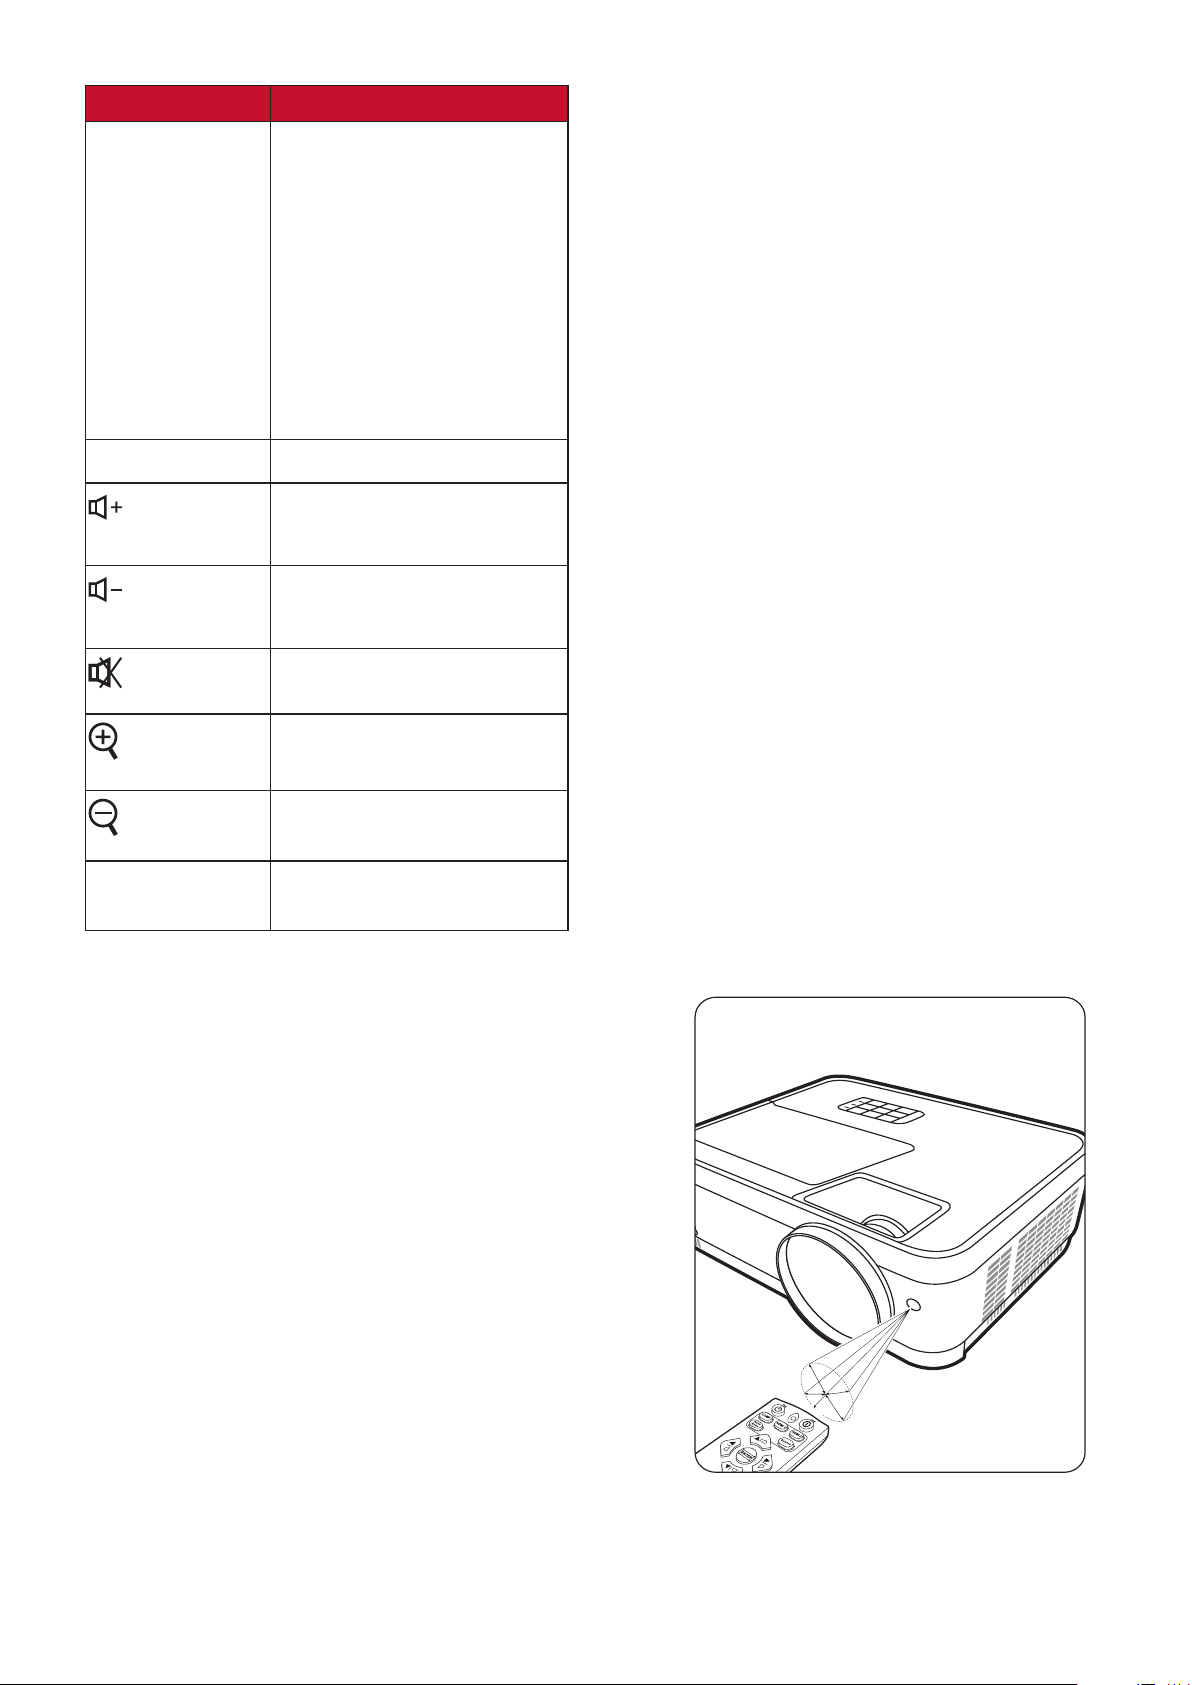
Remote Control Effective Range
To ensure proper function of the remote control
follow the steps below:
1. The remote control must be held at an angle
within 30° perpendicular to the projector’s IR
remote control sensor(s).
2. The distance between the remote control and
the sensor(s) should not exceed 8 m (26 ft.)
NOTE:
Refer to the illustration for the location of
the infrared (IR) remote control sensor(s).
14
Approx. 30°
Page 15
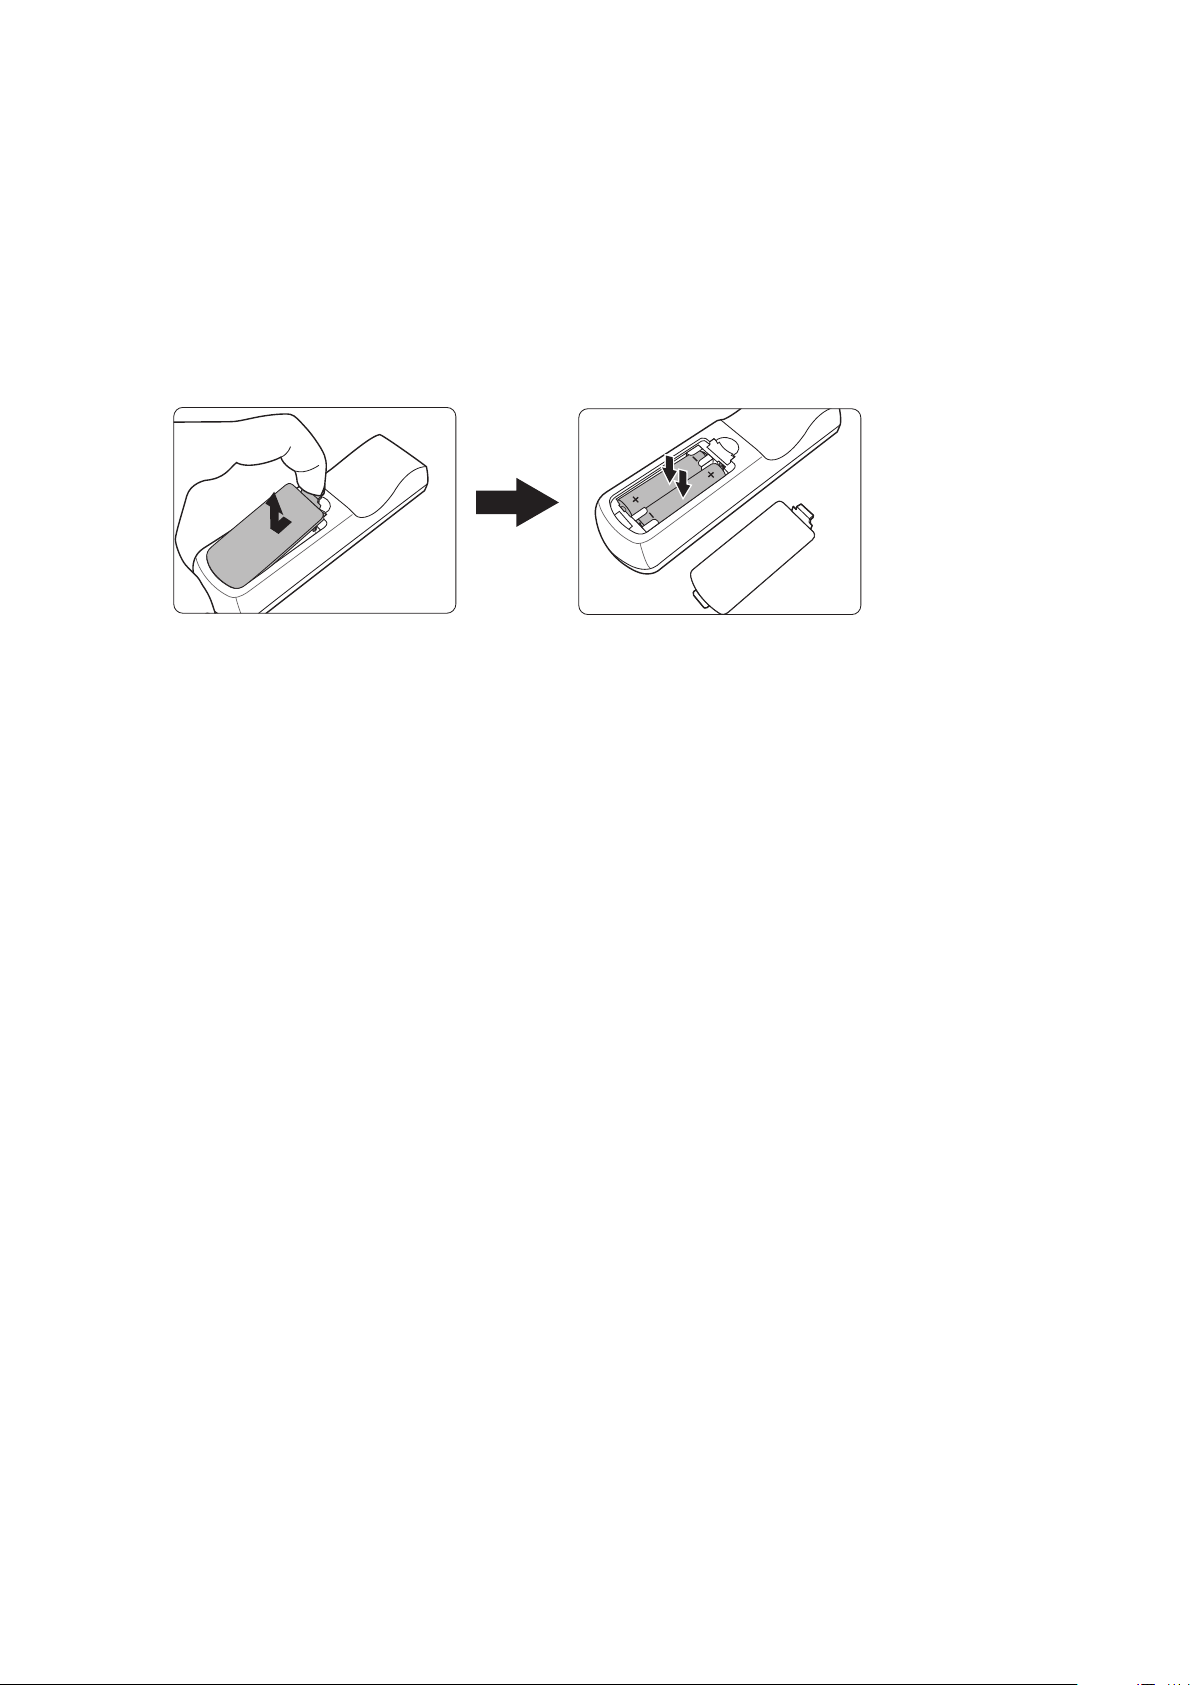
Replacing the Remote Control Batteries
1. Remove the battery cover from the rear of the remote control by pressing the
finger grip and sliding it down.
2. Remove any existing batteries (if necessary) and install two AAA batteries.
NOTE: Observe the battery’s polarities as indicated.
3. Replace the battery cover by aligning it with the base and pushing it back into
position.
NOTE:
• Avoid leaving the remote control and batteries in excessive heat or a humid
environment.
• Replace only with the same or equivalent type recommended by the battery
manufacturer.
• Dispose of the used batteries according to the manufacturer’s instructions and
local environment regulations for your region.
• If the batteries are drained or if you will not be using the remote control for an
extended period of time, remove the batteries to avoid damage to the remote
control.
15
Page 16
Initial Setup
This section provides detailed instructions for setting up your projector.
Choosing a Location
Personal preference and room layout will decide the installation location. Consider
the following:
• Size and Position of your screen.
• Location of a suitable power outlet.
• Location and Distance between the projector and other equipment.
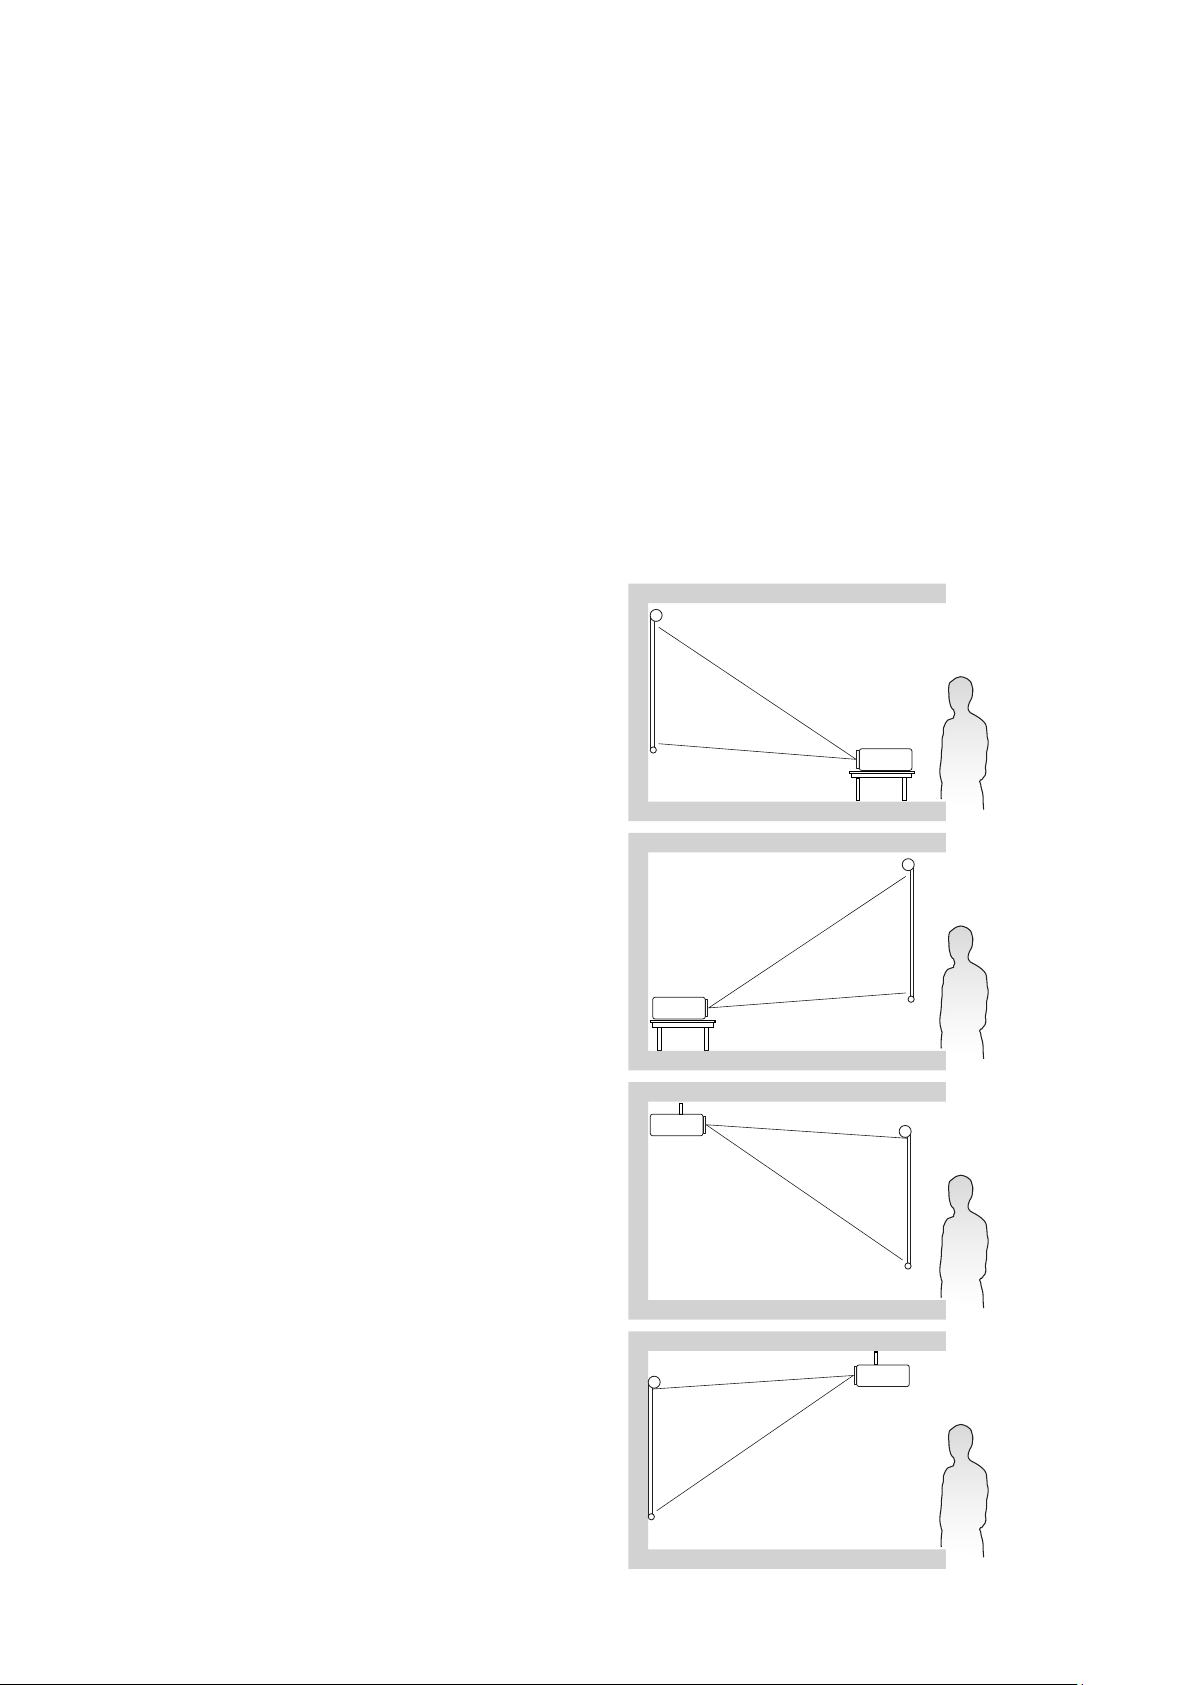
The projector is designed to be installed in one of the following locations:
1. Front Table
The projector is placed near the floor in
front of the screen.
2. Rear Table
The projector is placed near the floor
behind the screen.
NOTE:
3. Rear Ceiling
The projector is suspended upside-down
from the ceiling behind the screen.
NOTE:
4. Front Ceiling
The projector is suspeneded upsidedown from the ceiling in front of the
A special rear projection screen
is required.
A special rear projection screen
is required.
screen.
16
Page 17
Projection Dimensions
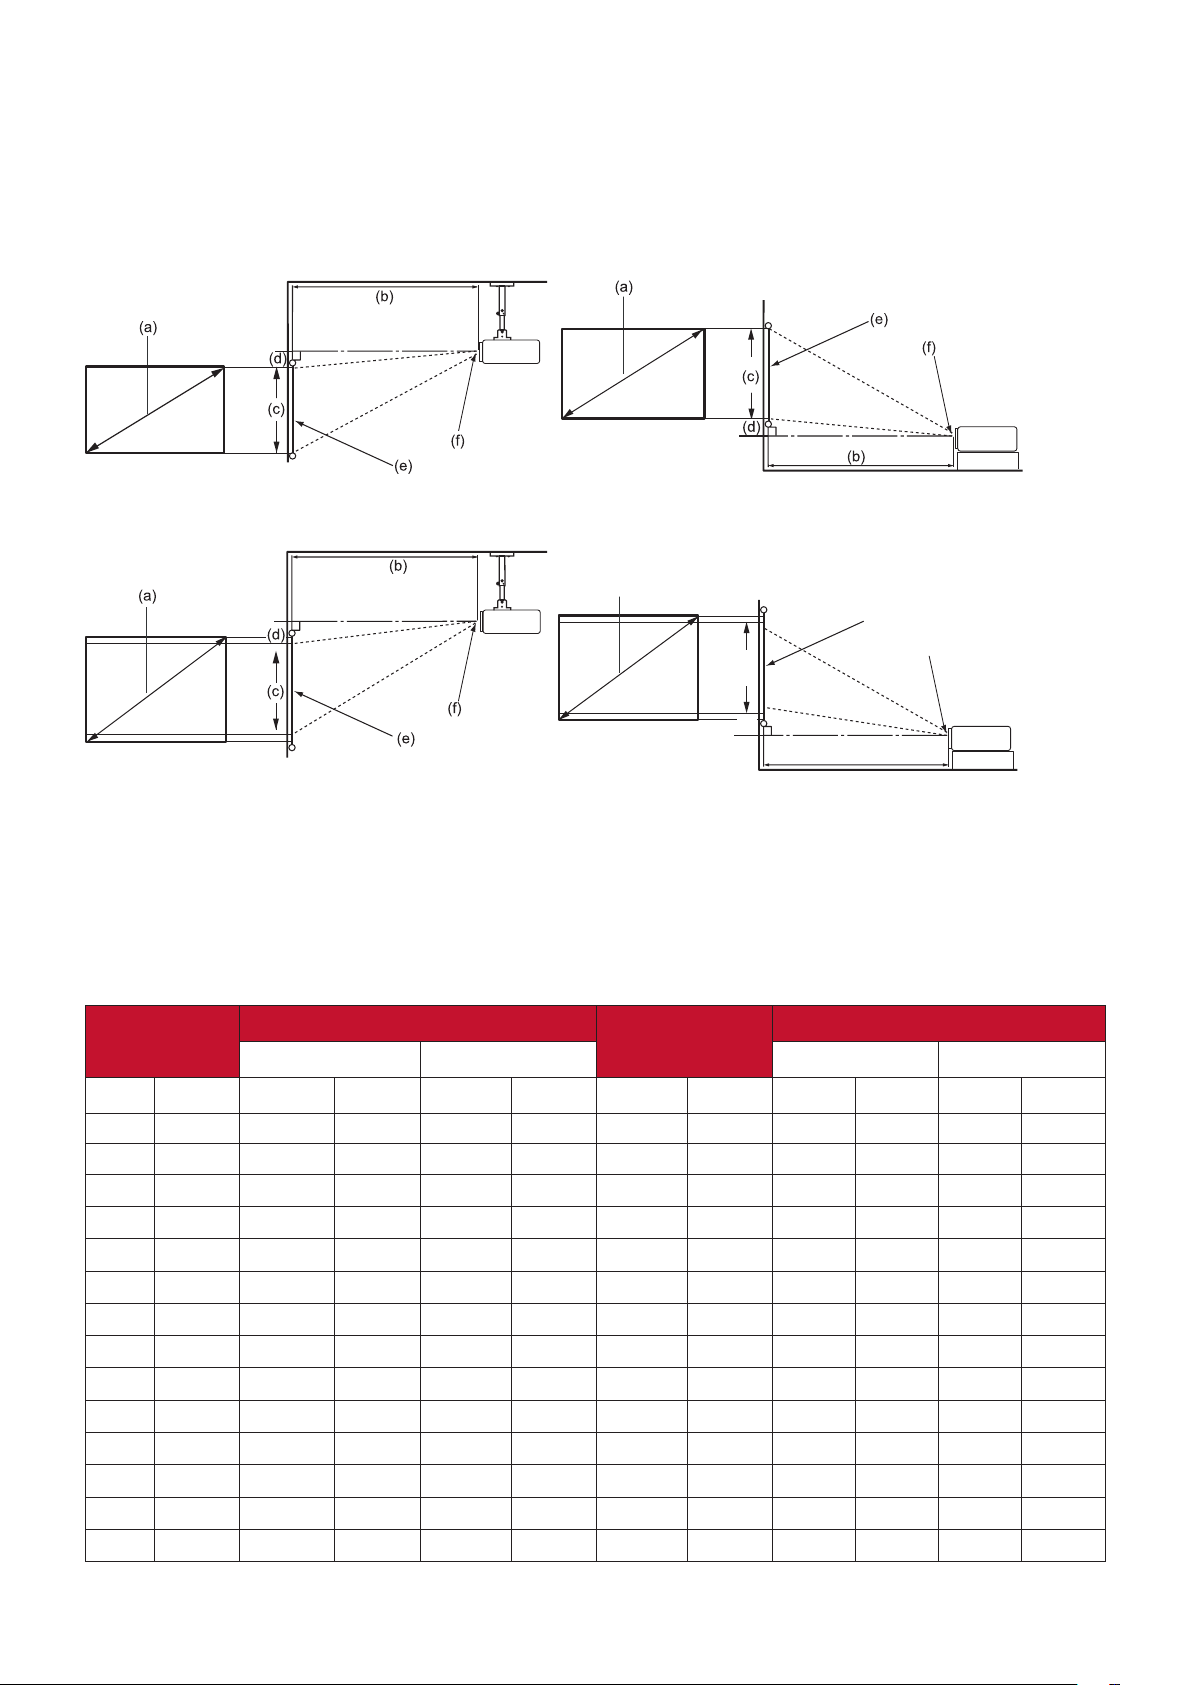
(a)
NOTE: See “Specifications” on page 64 for the native display resolution of this
projector.
• 16:10 Image on a 16:10 Screen
• 16:10 Image on a 4:3 Screen
(e)
(c)
(f)
(d)
(b)
NOTE: (e) = Screen
(f) = Center of Lens
16:10 Image on a 16:10 Screen
LS510W/LS510WH/LS510WH-2
(a) Screen
Size
(b) Projection Distance (c) Image
minimum maximum minimum maximum
Height
(d) Vertical Offset
inch mm inch mm inch mm inch mm inch mm inch mm
30 762 39.37 1000 43.31 1100 15.90 404 0.00 0 0.00 0
60 1524 78.74 2000 86.61 2200 31.80 808 0.00 0 0.00 0
70 1778 91.86 2333 101.05 2567 37.10 942 0.00 0 0.00 0
80 2032 104.99 2667 115.49 2933 42.40 1077 0.00 0 0.00 0
90 2286 118.11 3000 129.92 3300 47.70 1212 0.00 0 0.00 0
100 2540 131.23 3333 144.36 3667 53.00 1346 0.00 0 0.00 0
110 2794 144.36 3667 158.79 4033 58.30 1481 0.00 0 0.00 0
120 3048 157.48 4000 173.23 4400 63.60 1615 0.00 0 0.00 0
130 3302 170.60 4333 187.66 4767 68.90 1750 0.00 0 0.00 0
140 3556 183.73 4667 202.10 5133 74.20 1885 0.00 0 0.00 0
150 3810 196.85 5000 216.54 5500 79.50 2019 0.00 0 0.00 0
200 5080 262.47 6667 288.71 7333 106.00 2692 0.00 0 0.00 0
250 6350 328.08 8333 360.89 9167 132.50 3365 0.00 0 0.00 0
300 7620 393.70 10000 433.07 11000 159.00 4039 0.00 0 0.00 0
17
Page 18
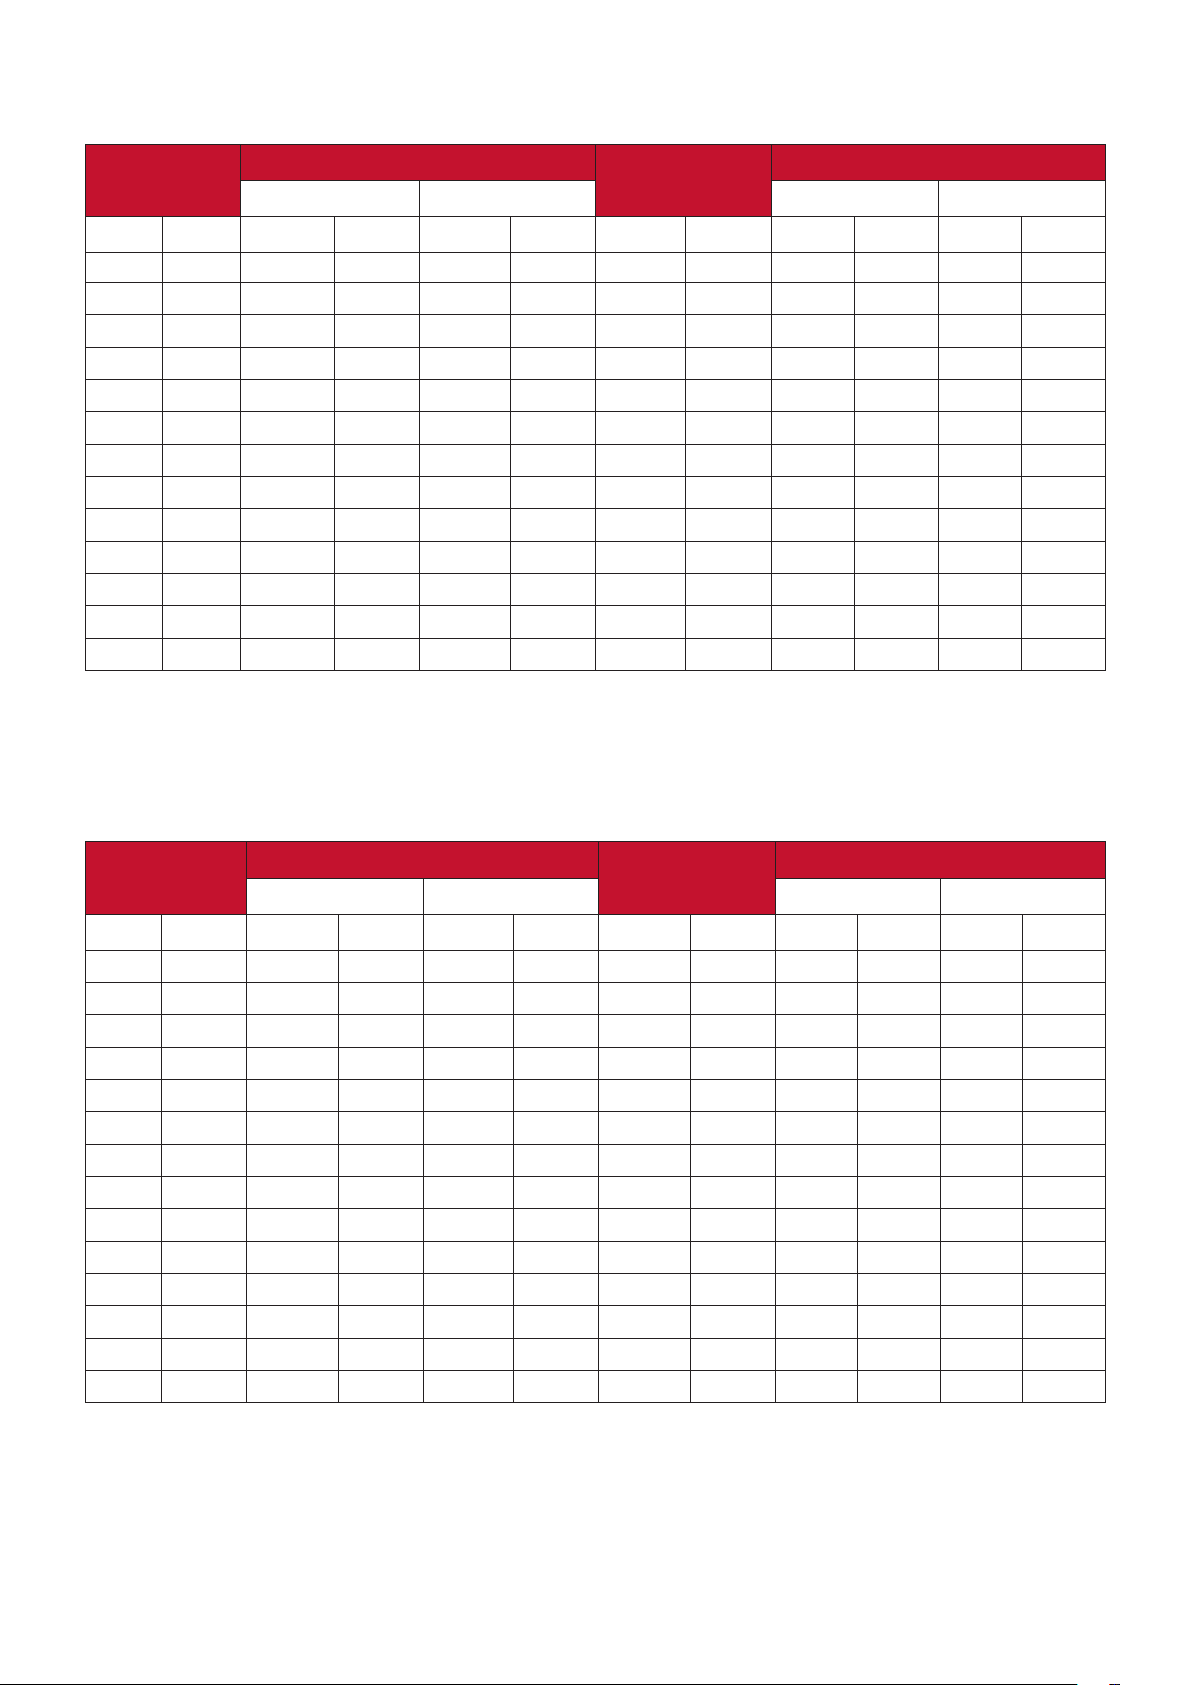
LS560W/LS560WH
(a) Screen
Size
(b) Projection Distance (c) Image
minimum maximum minimum maximum
Height
(d) Vertical Offset
inch mm inch mm inch mm inch mm inch mm inch mm
60 1524 24.84 631 24.84 631 31.80 808 3.18 81 3.18 81
70 1778 28.98 736 28.98 736 37.10 942 3.71 94 3.71 94
80 2032 33.13 841 33.13 841 42.40 1077 4.24 108 4.24 108
90 2286 37.27 947 37.27 947 47.70 1212 4.77 121 4.77 121
100 2540 41.41 1052 41.41 1052 53.00 1346 5.30 135 5.30 135
110 2794 45.55 1157 45.55 1157 58.30 1481 5.83 148 5.83 148
120 3048 49.69 1262 49.69 1262 63.60 1615 6.36 162 6.36 162
130 3302 53.83 1367 53.83 1367 68.90 1750 6.89 175 6.89 175
140 3556 57.97 1472 57.97 1472 74.20 1885 7.42 188 7.42 188
150 3810 62.11 1578 62.11 1578 79.50 2019 7.95 202 7.95 202
200 5080 82.81 2103 82.81 2103 106.00 2692 10.60 269 10.60 269
250 6350 103.52 2629 103.52 2629 132.50 3365 13.25 337 13.25 337
300 7620 124.22 3155 124.22 3155 159.00 4039 15.90 404 15.90 404
16:10 Image on a 4:3 Screen
LS510W/LS510WH/LS510WH-2
(a) Screen
Size
(b) Projection Distance (c) Image
minimum maximum minimum maximum
Height
(d) Vertical Offset
inch mm inch mm inch mm inch mm inch mm inch mm
30 762 37.14 943 40.86 1038 15.00 381 0.00 0 0.00 0
60 1524 74.28 1887 81.71 2075 30.00 762 0.00 0 0.00 0
70 1778 86.66 2201 95.33 2421 35.00 889 0.00 0 0.00 0
80 2032 99.04 2516 108.95 2767 40.00 1016 0.00 0 0.00 0
90 2286 111.42 2830 122.57 3113 45.00 1143 0.00 0 0.00 0
100 2540 123.81 3145 136.19 3459 50.00 1270 0.00 0 0.00 0
110 2794 136.19 3459 149.80 3805 55.00 1397 0.00 0 0.00 0
120 3048 148.57 3774 163.42 4151 60.00 1524 0.00 0 0.00 0
130 3302 160.95 4088 177.04 4497 65.00 1651 0.00 0 0.00 0
140 3556 173.33 4403 190.66 4843 70.00 1778 0.00 0 0.00 0
150 3810 185.71 4717 204.28 5189 75.00 1905 0.00 0 0.00 0
200 5080 247.61 6289 272.37 6918 100.00 2540 0.00 0 0.00 0
250 6350 309.51 7862 340.47 8648 125.00 3175 0.00 0 0.00 0
300 7620 371.42 9434 408.56 10377 150.00 3810 0.00 0 0.00 0
18
Page 19
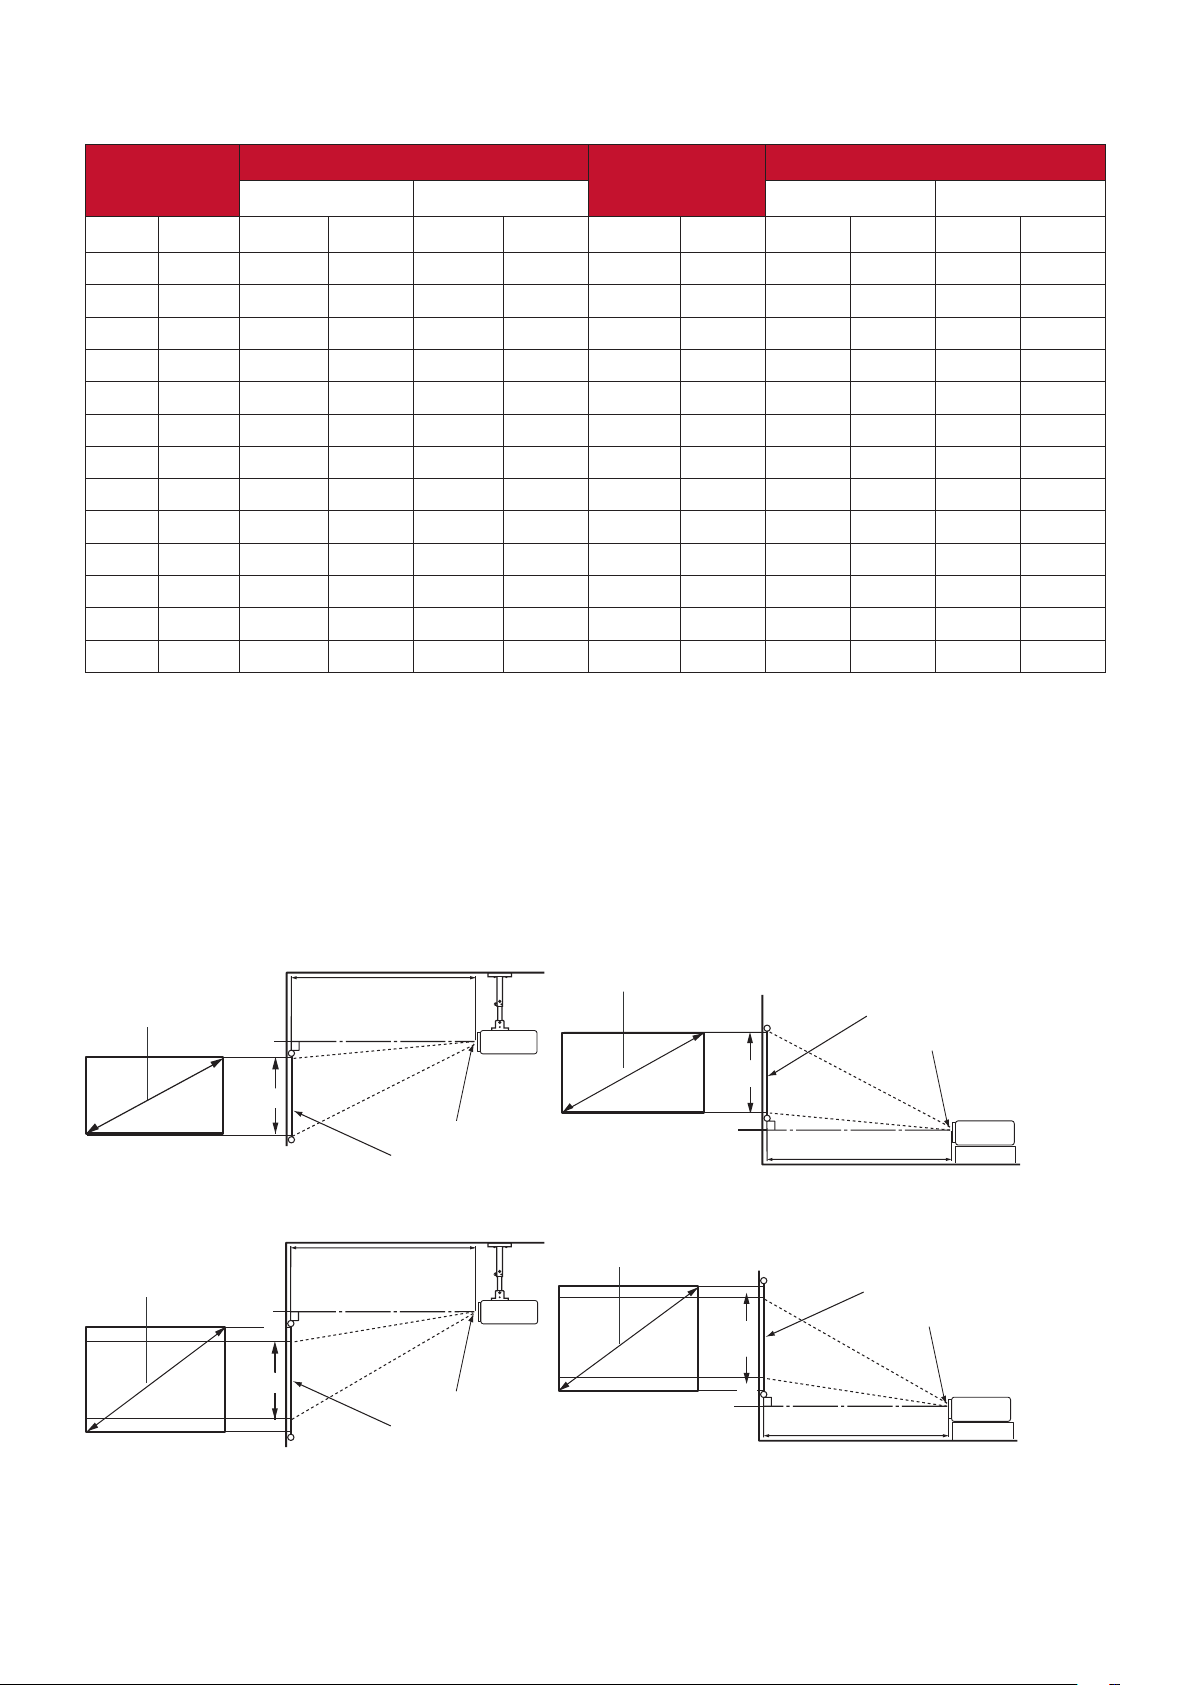
LS560W/LS560WH
(a) Screen
Size
(b) Projection Distance (c) Image
minimum maximum minimum maximum
Height
(d) Vertical Offset
inch mm inch mm inch mm inch mm inch mm inch mm
60 1524 23.44 595 23.44 595 30.00 762 3.00 76 3.00 76
70 1778 27.34 695 27.34 695 35.00 889 3.50 89 3.50 89
80 2032 31.25 794 31.25 794 40.00 1016 4.00 102 4.00 102
90 2286 35.16 893 35.16 893 45.00 1143 4.50 114 4.50 114
100 2540 39.06 992 39.06 992 50.00 1270 5.00 127 5.00 127
110 2794 42.97 1091 42.97 1091 55.00 1397 5.50 140 5.50 140
120 3048 46.88 1191 46.88 1191 60.00 1524 6.00 152 6.00 152
130 3302 50.78 1290 50.78 1290 65.00 1651 6.50 165 6.50 165
140 3556 54.69 1389 54.69 1389 70.00 1778 7.00 178 7.00 178
150 3810 58.59 1488 58.59 1488 75.00 1905 7.50 191 7.50 191
200 5080 78.13 1984 78.13 1984 100.00 2540 10.00 254 10.00 254
250 6350 97.66 2480 97.66 2480 125.00 3175 12.50 318 12.50 318
300 7620 117.19 2977 117.19 2977 150.00 3810 15.00 381 15.00 381
NOTE:
It is recommended that if you intend to permanently install the projector,
please physically test the projection size and distance using the actual
projector in situ before you permanently install it.
LS560HDH
• 16:9 Image on a 16:9 Screen
(b)
(a)
(d)
(c)
(e)
• 16:9 Image on a 4:3 Screen
(b)
(a)
(d)
(c)
(e)
(a)
(e)
(f)
(c)
(f)
(d)
(b)
(a)
(e)
(f)
(f)
(c)
(d)
(b)
NOTE: (e) = Screen
(f) = Center of Lens
19
Page 20
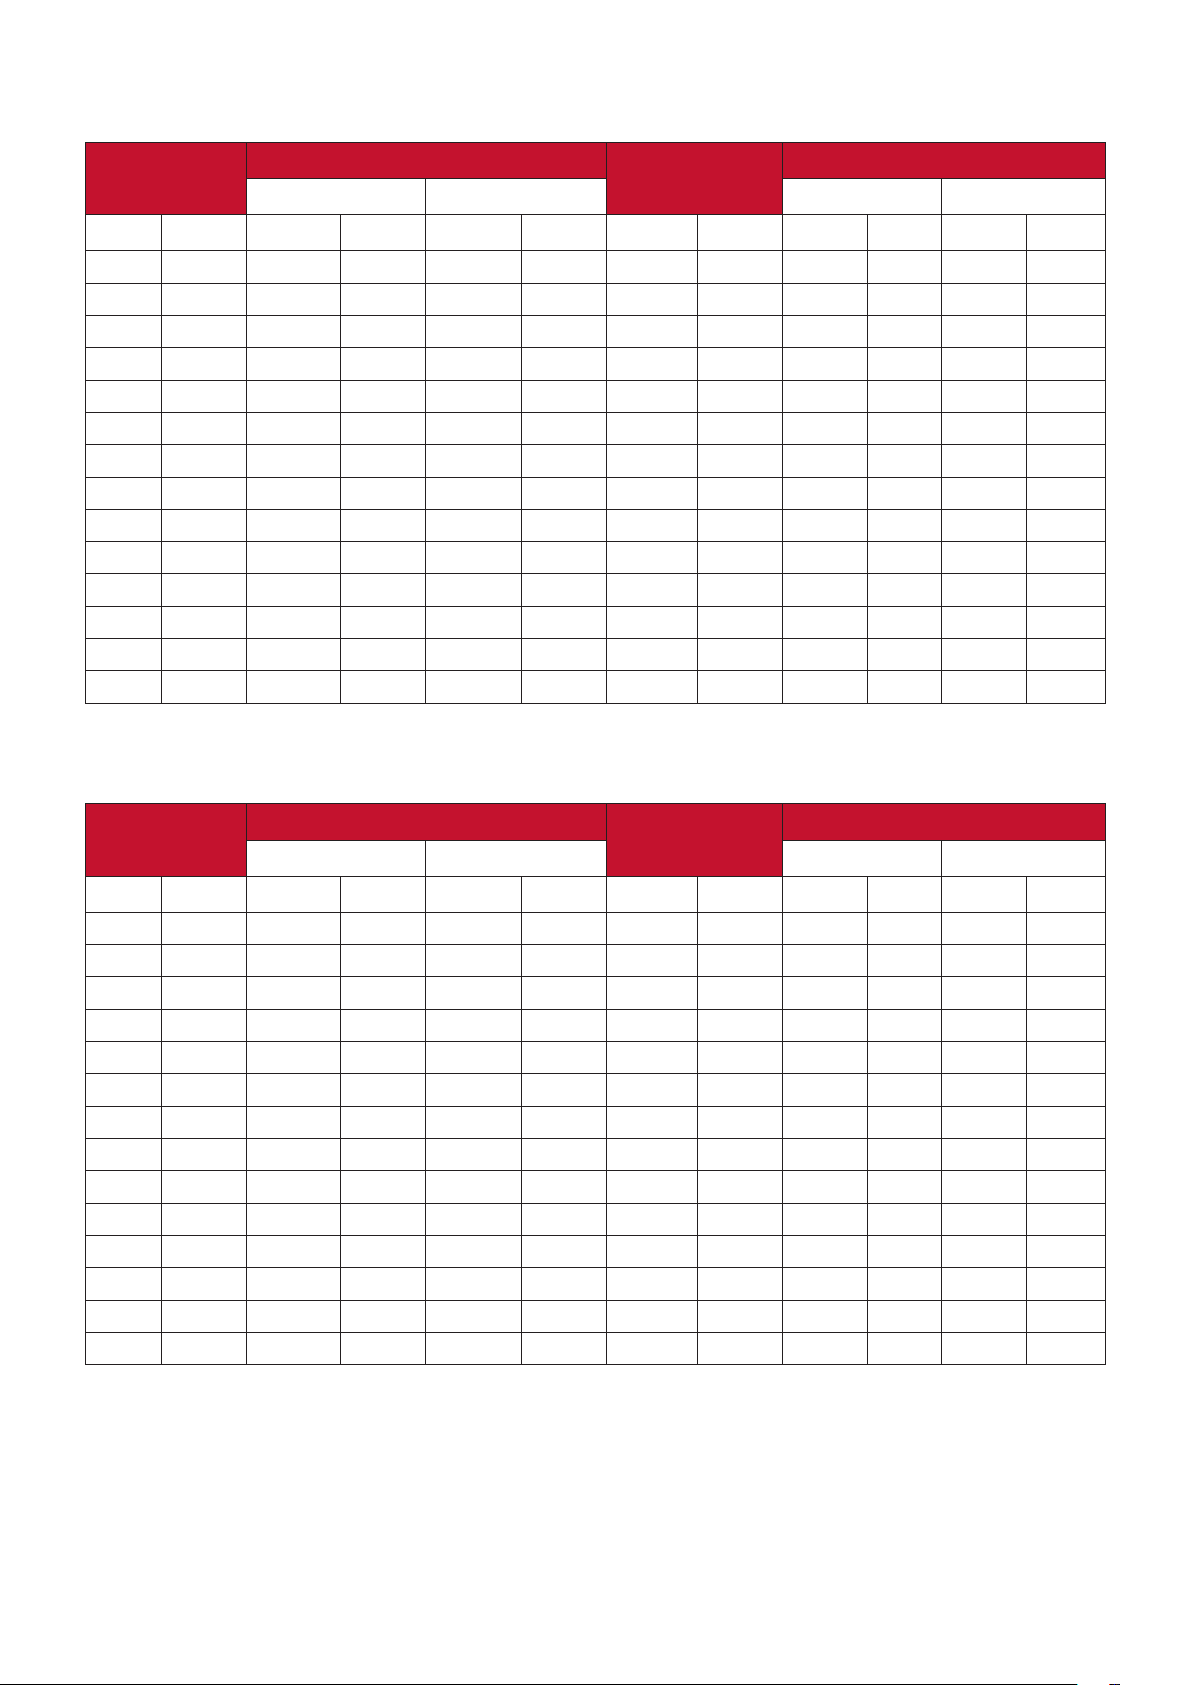
16:9 Image on a 16:9 Screen
(a) Screen
Size
(b) Projection Distance (c) Image
minimum maximum minimum maximum
Height
(d) Vertical Offset
in. mm in. mm in. mm in. mm in. mm in. mm
30 762 12.16 309 12.16 309 14.71 374 2.35 60 2.35 60
60 1524 24.32 618 24.32 618 29.42 747 4.71 120 4.71 120
70 1778 28.37 721 28.37 721 34.32 872 5.49 139 5.49 139
80 2032 32.42 824 32.42 824 39.22 996 6.28 159 6.28 159
90 2286 36.48 927 36.48 927 44.12 1121 7.06 179 7.06 179
100 2540 40.53 1029 40.53 1029 49.03 1245 7.84 199 7.84 199
110 2794 44.58 1132 44.58 1132 53.93 1370 8.63 219 8.63 219
120 3048 48.64 1235 48.64 1235 58.83 1494 9.41 239 9.41 239
130 3302 52.69 1338 52.69 1338 63.73 1619 10.20 259 10.20 259
140 3556 56.74 1441 56.74 1441 68.64 1743 10.98 279 10.98 279
150 3810 60.80 1544 60.80 1544 73.54 1868 11.77 299 11.77 299
200 5080 81.06 2059 81.06 2059 98.05 2491 15.69 398 15.69 398
250 6350 101.33 2574 101.33 2574 122.57 3113 19.61 498 19.61 498
300 7620 121.59 3088 121.59 3088 147.08 3736 23.53 598 23.53 598
16:9 Image on a 4:3 Screen
(a) Screen
Size
(b) Projection Distance (c) Image
minimum maximum minimum maximum
Height
(d) Vertical Offset
in. mm in. mm in. mm in. mm in. mm in. mm
30 762 11.16 283 11.16 283 13.50 343 2.16 55 2.16 55
60 1524 22.32 567 22.32 567 27.00 686 4.32 110 4.32 110
70 1778 26.04 661 26.04 661 31.50 800 5.04 128 5.04 128
80 2032 29.76 756 29.76 756 36.00 914 5.76 146 5.76 146
90 2286 33.48 850 33.48 850 40.50 1029 6.48 165 6.48 165
100 2540 37.20 945 37.20 945 45.00 1143 7.20 183 7.20 183
110 2794 40.92 1039 40.92 1039 49.50 1257 7.92 201 7.92 201
120 3048 44.64 1134 44.64 1134 54.00 1372 8.64 219 8.64 219
130 3302 48.36 1228 48.36 1228 58.50 1486 9.36 238 9.36 238
140 3556 52.08 1323 52.08 1323 63.00 1600 10.08 256 10.08 256
150 3810 55.80 1417 55.80 1417 67.50 1715 10.80 274 10.80 274
200 5080 74.40 1890 74.40 1890 90.00 2286 14.40 366 14.40 366
250 6350 93.01 2362 93.01 2362 112.50 2858 18.00 457 18.00 457
300 7620 111.61 2835 111.61 2835 135.00 3429 21.60 549 21.60 549
NOTE:
It is recommended that if you intend to permanently install the projector,
please physically test the projection size and distance using the actual
projector in situ before you permanently install it.
20
Page 21
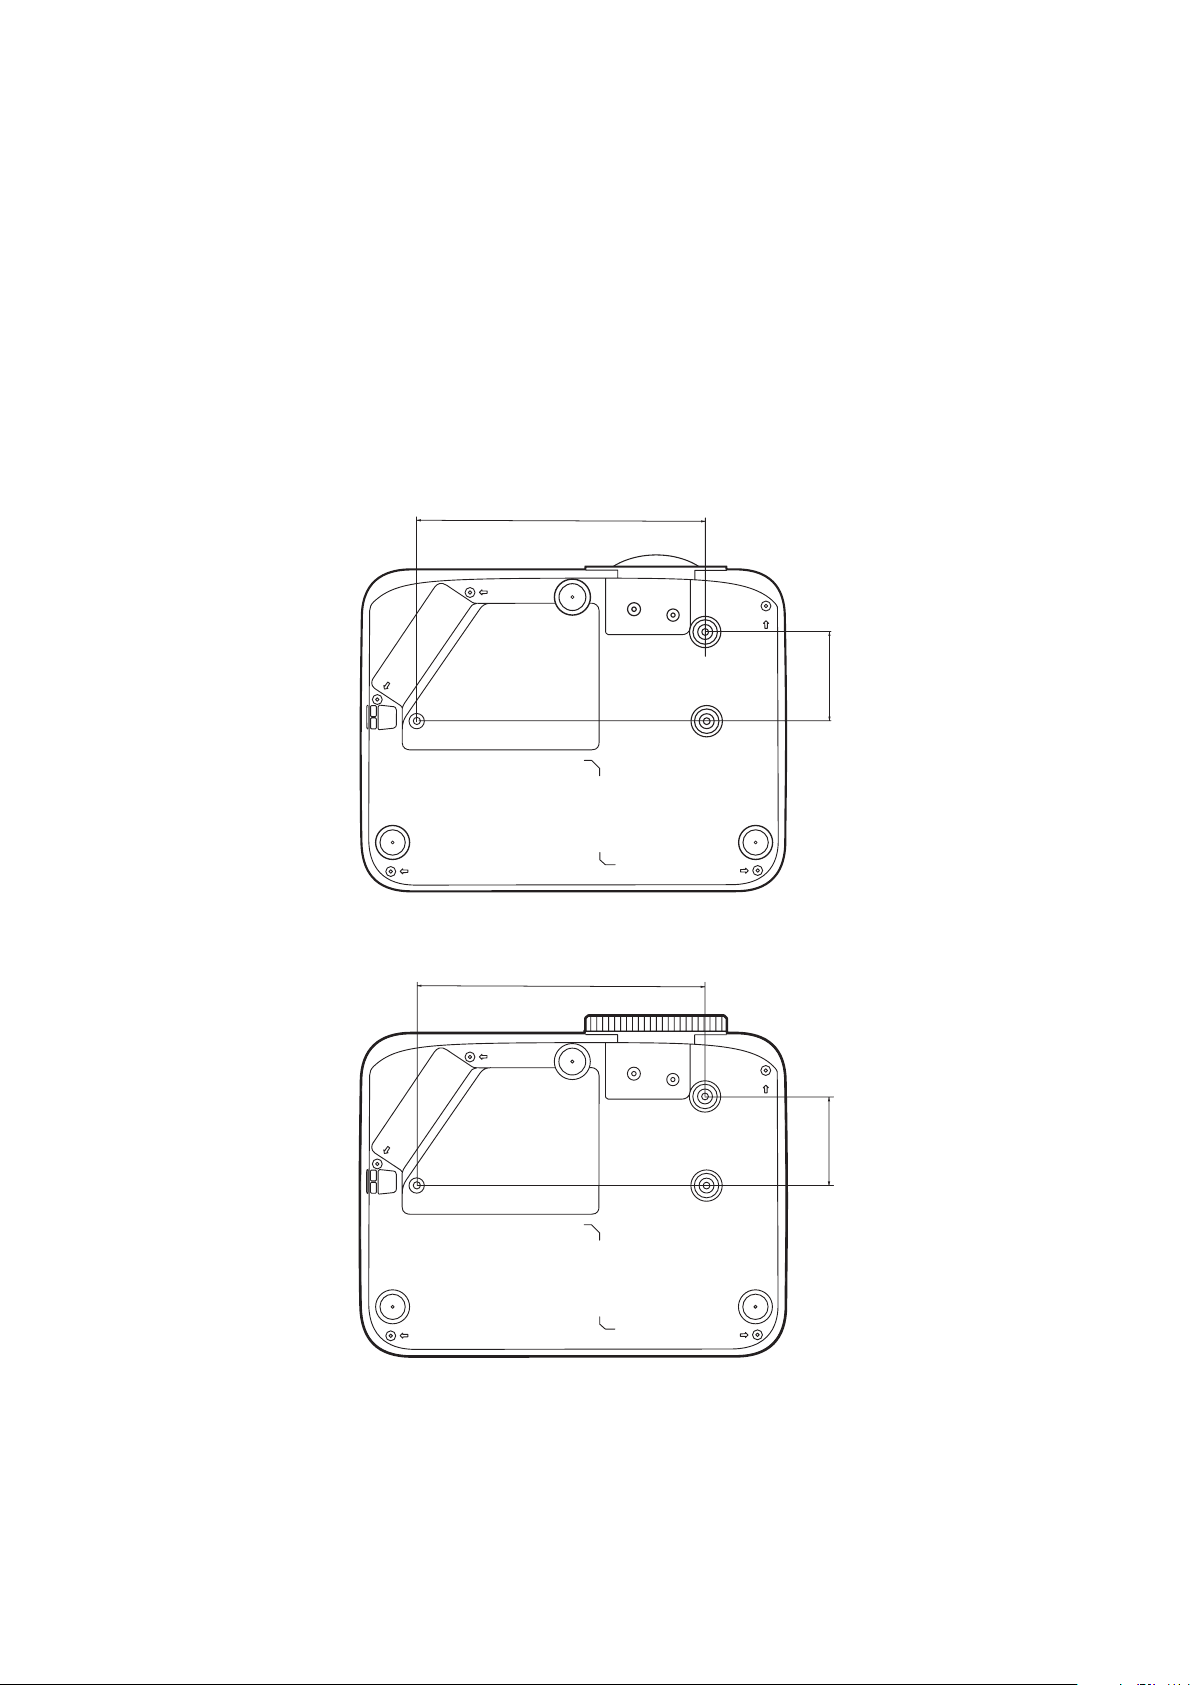
Mounting the Projector
LS510W / LS510WH / LS510WH-2
LS560W / LS560WH / LS560HDH
NOTE: If you buy a third-party mount, please use the correct screw size. Screw size
can vary depending on the thickness of the mounting plate.
1. To ensure the most secure installation, please use a ViewSonic® wall or ceiling
mount.
2. Ensure the screws used to attach a mount to the projector meet the following
specifications:
• Screw type: M4 x 8
• Maximum Screw length: 8 mm
199
61
199
61
NOTE:
• Avoid installing the projector near a heat source.
• Keep at least a 10 cm gap between the ceiling and the bottom of the
projector.
21
Page 22
Preventing Unauthorized Use
The projector has several built-in security features to prevent theft, access, or
accidental setting changes.
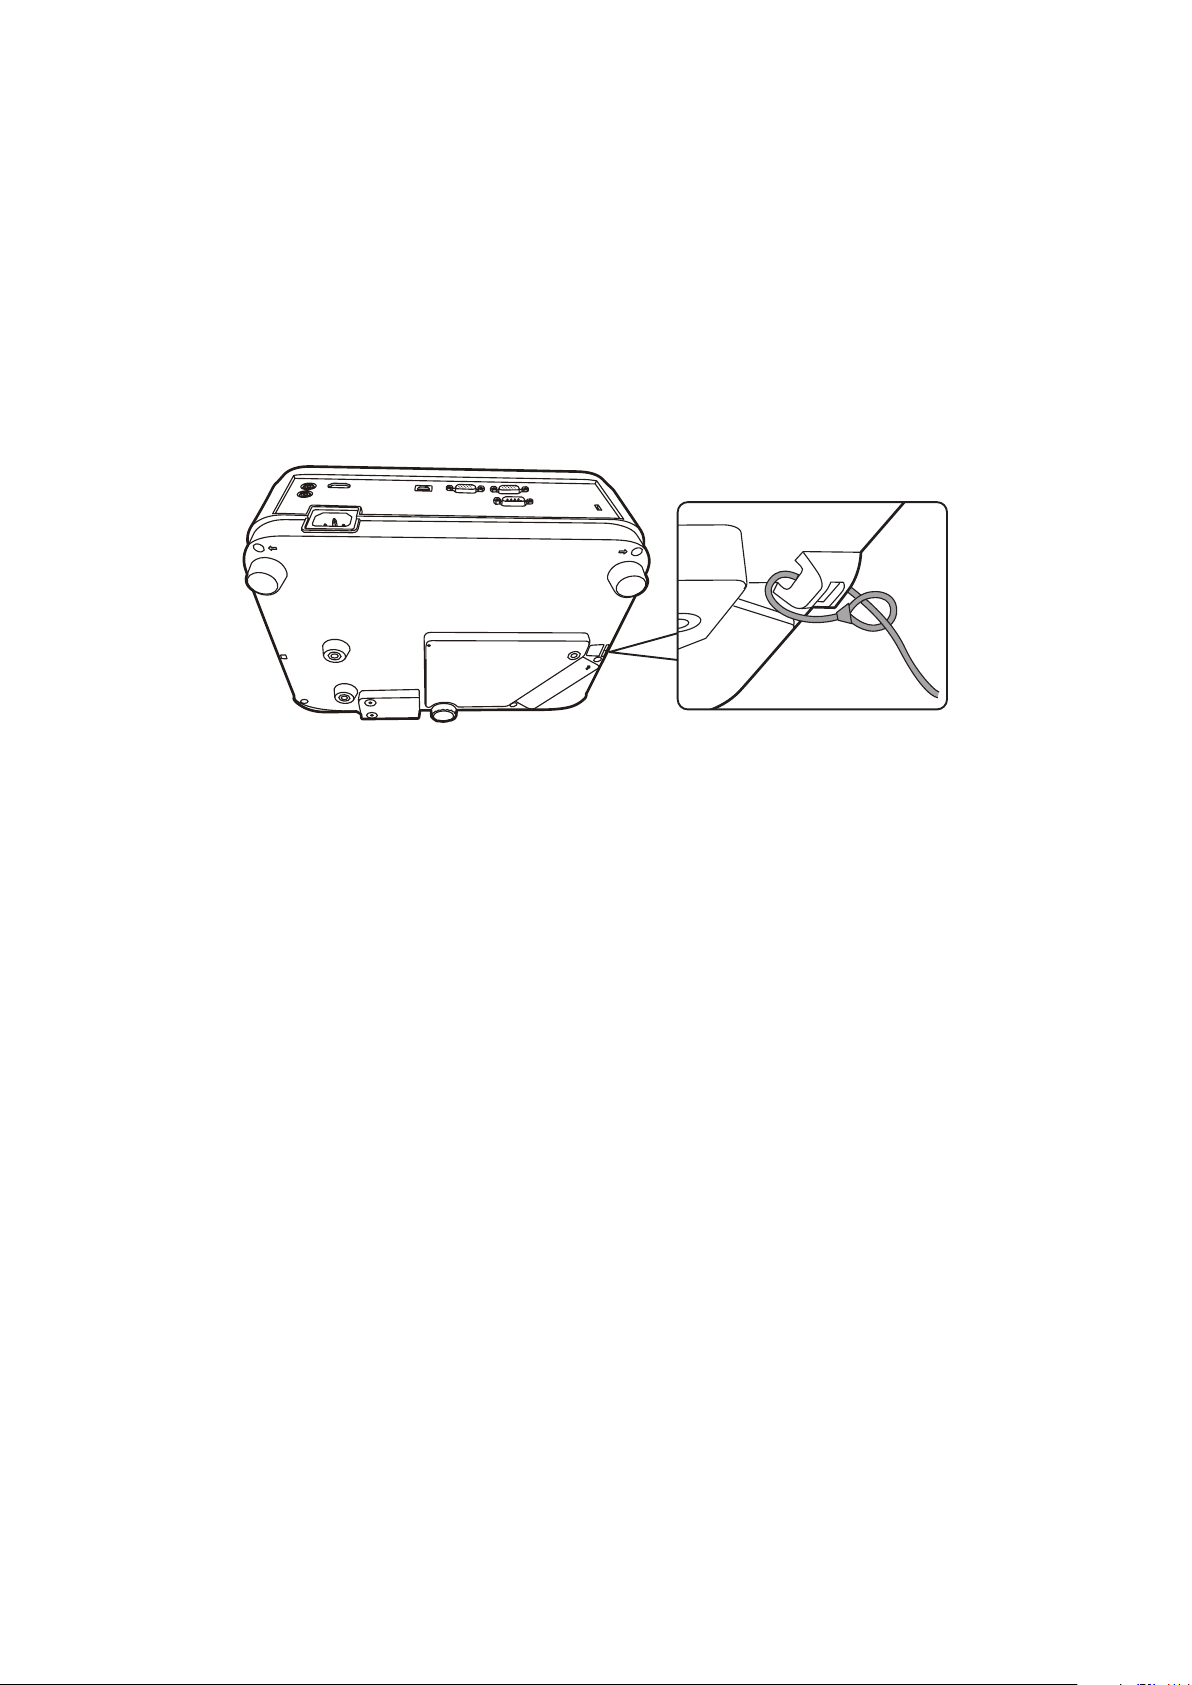
Using the Security Slot
To help prevent the projector from being stolen, use a security slot locking device
to secure the projector to a fixed object.
Below is an example of setting up a security slot locking device:
NOTE: The security slot can also be used as a safety anchor if the projector is
mounted to the ceiling.
22
Page 23
Using the Password Function
To help prevent unauthorized access or use, the projector offers a password
security option. The password can be set through the On-Screen Display (OSD)
Menu.
NOTE:
Make note of your password, and keep it in a safe place.
Setting a Password
1. Press Menu to open the OSD Menu and go to: SYSTEM > Security Settings and
press Enter.
2. Highlight Power On Lock and select
On by pressing
/ .
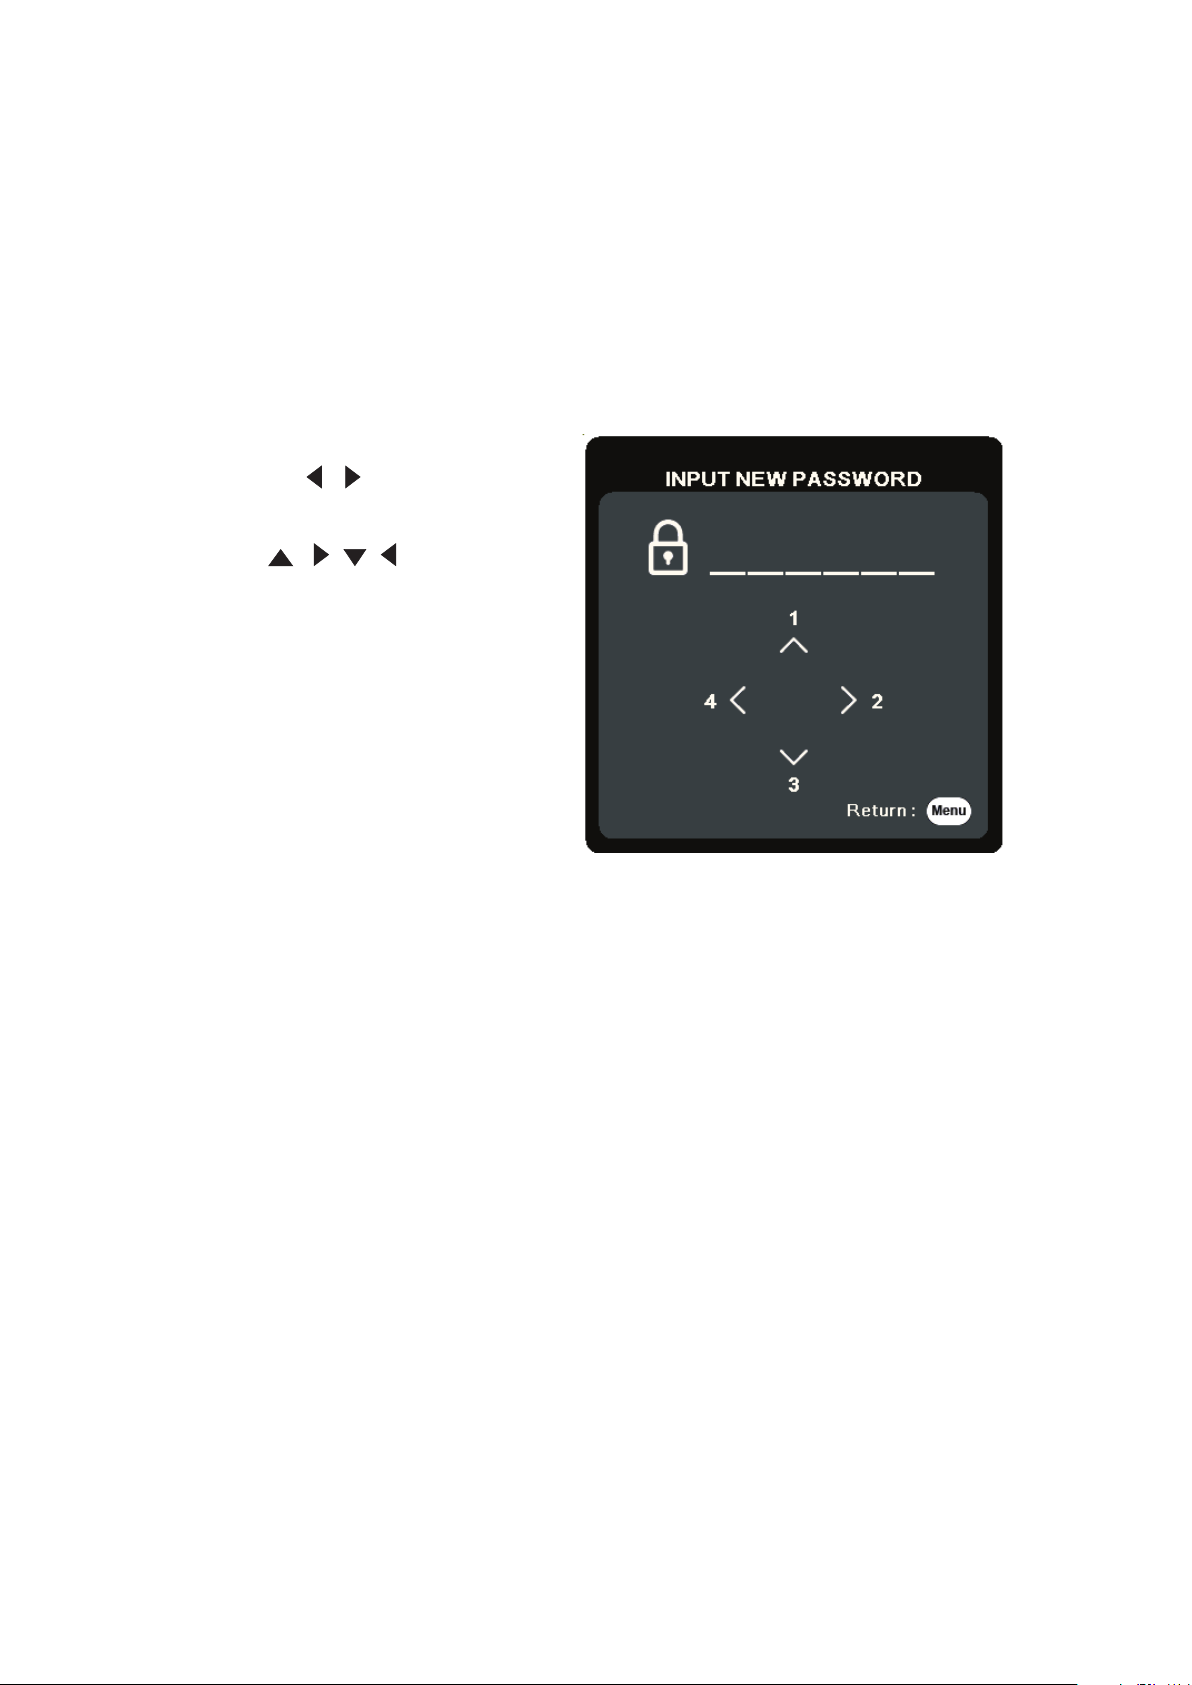
3. As pictured to the right, the four
arrow keys (
, , , ) represent
4 digits (1, 2, 3, 4). Press the arrow
keys to enter a six digit password.
4. Confirm the new password by re-entering the new password. Once the password
is set, the OSD Menu will return to the Security Settings page.
5. Press Exit to leave the OSD Menu.
NOTE:
Once set, the correct password must be entered every time the projector is
started.
23
Page 24

Changing the Password
1. Press Menu to open the OSD Menu and go to: SYSTEM > Security Settings >
Change Password.
2. Press Enter, the message, ‘INPUT CURRENT PASSWORD’ will appear.
3. Enter the old password.
If the password is correct, the message, ‘INPUT NEW PASSWORD’ will
appear.
If the password is incorrect, a password error message will appear for 5
seconds followed by the message, ‘INPUT CURRENT PASSWORD’. You can
try again or press Exit to cancel.
4. Enter a new password.
5. Confirm the new password by re-entering the new password.
6. To leave the OSD Menu, press Exit.
NOTE:
The digits being input will display as asterisks(*).
Disabling the Password Function
1. Press Menu to open the OSD Menu and go to: SYSTEM > Security Settings >
Power On Lock.
2. Press
/ to select Off.
3. The message, “Input Password” will appear. Enter the current password.
If the password is correct, the OSD Menu returns to the Password page with
“Off” shown in the row of Power On Lock.
If the password is incorrect, a password error message will appear for 5
seconds followed by the message, ‘INPUT CURRENT PASSWORD’. You can
try again or press Exit to cancel.
NOTE:
Please keep the old password, as you will need it to reactivate the password
function.
24
Page 25
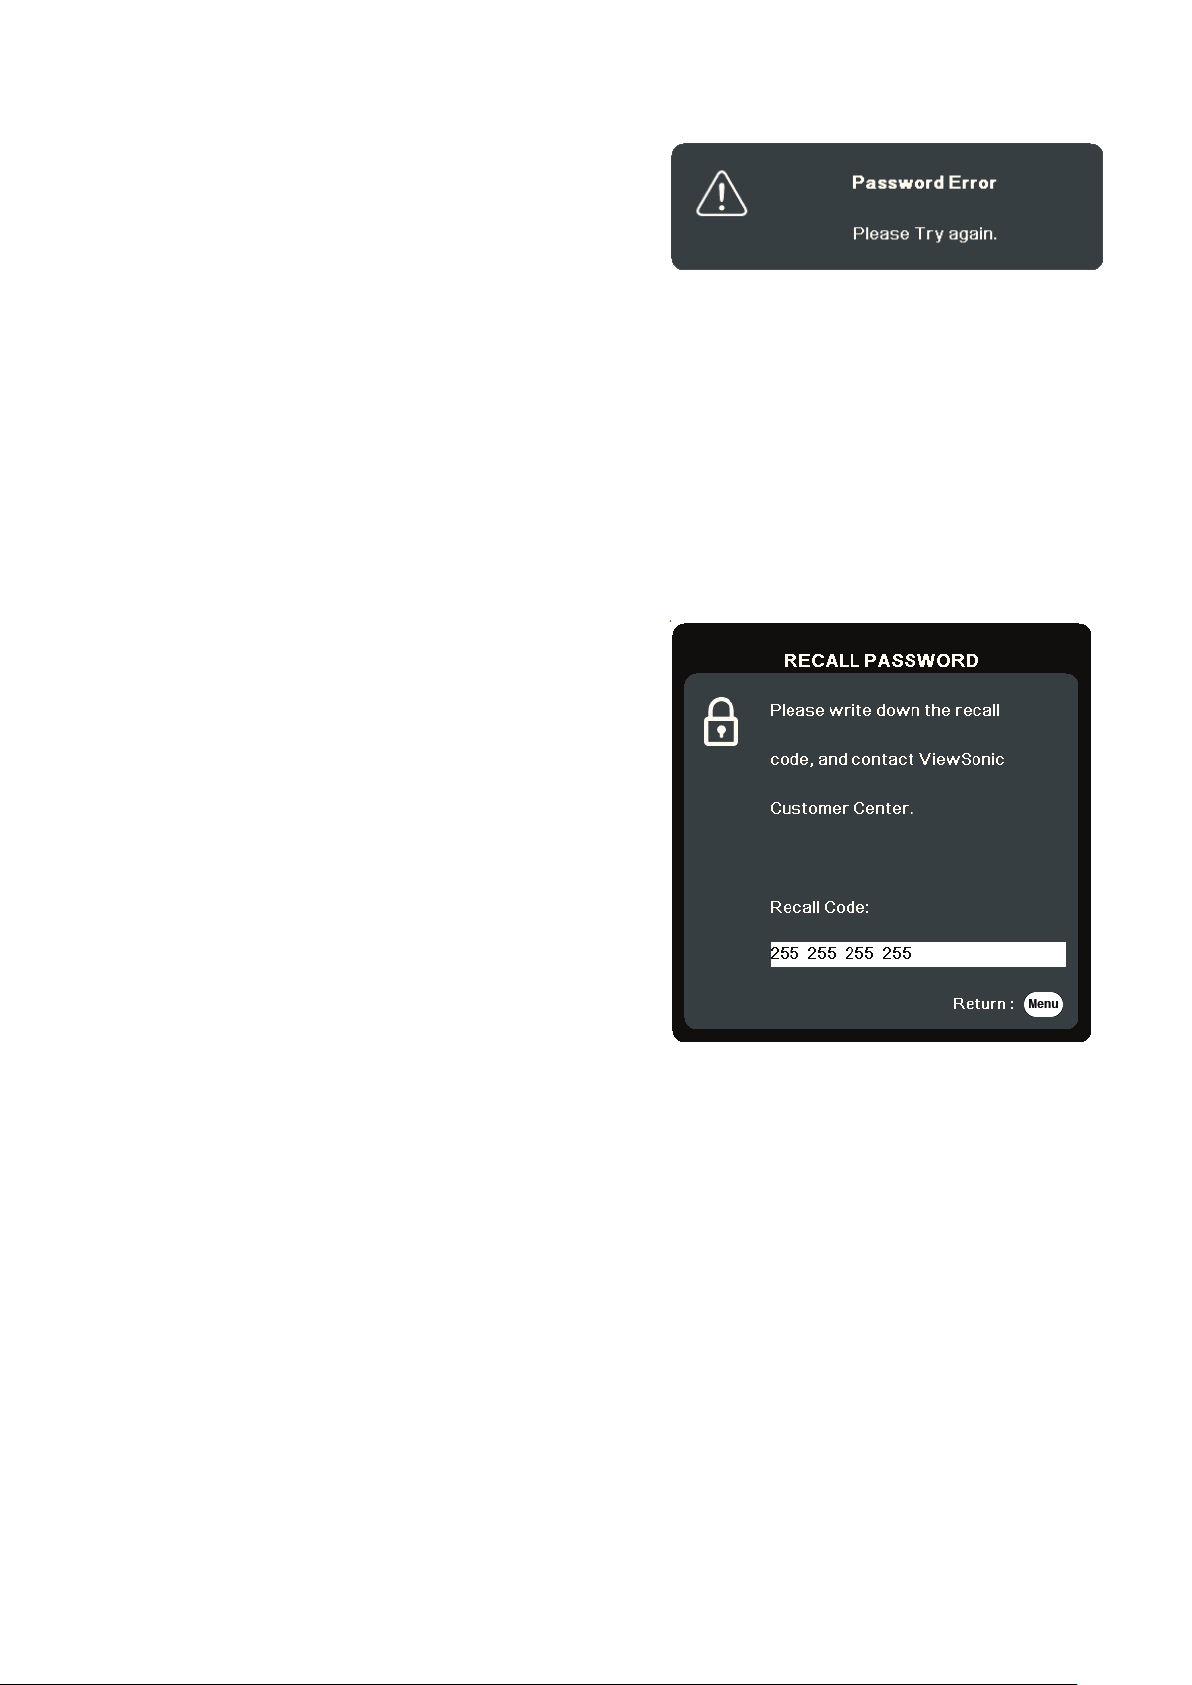
Forgetting the Password
If the password function is activated, you will
be asked to enter the six-digit password every
time you turn on the projector. If you enter the
wrong password, the password error message,
as pictured to the right, will appear for 5
seconds, and the message ‘INPUT PASSWORD’
follows.
You can retry or if you do not remember, you can use the “Password Recall
Procedure”.
NOTE:
If you enter an incorrect password 5 times in succession, the projector will
automatically shut down for a short time.
Password Recall Procedure
1. When the message ‘INPUT CURRENT
PASSWORD’ appears, press and hold
Auto Sync for 3 seconds. The projector will
display a coded number on the screen.
2. Write down the number and turn off your
projector.
3. Seek help from the local service center to
decode the number. You may be required to
provide proof of purchase documentation to
verify that you are an authorized user of the
projector.
25
Page 26

Locking the Control Keys
With the control keys on the projector locked, you can prevent your settings from
being changed accidentally (by children, for example).
NOTE:
When the Panel Key Lock is On, no control keys on the projector will operate
except Power.
1. Press Menu to open the OSD Menu and go to: SYSTEM > Panel Key Lock.
2. Press
/ to select On.
3. Select Yes and press Enter to confirm.
4. To release panel key lock, press and hold
NOTE:
You can also use the remote control to enter the SYSTEM > Panel Key Lock
menu and select Off.
on the projector for 3 seconds.
26
Page 27
Making Connections
AUDIO IN
AUDIO OUT
HDMI
This section guides you on how to connect the projector with other equipment.
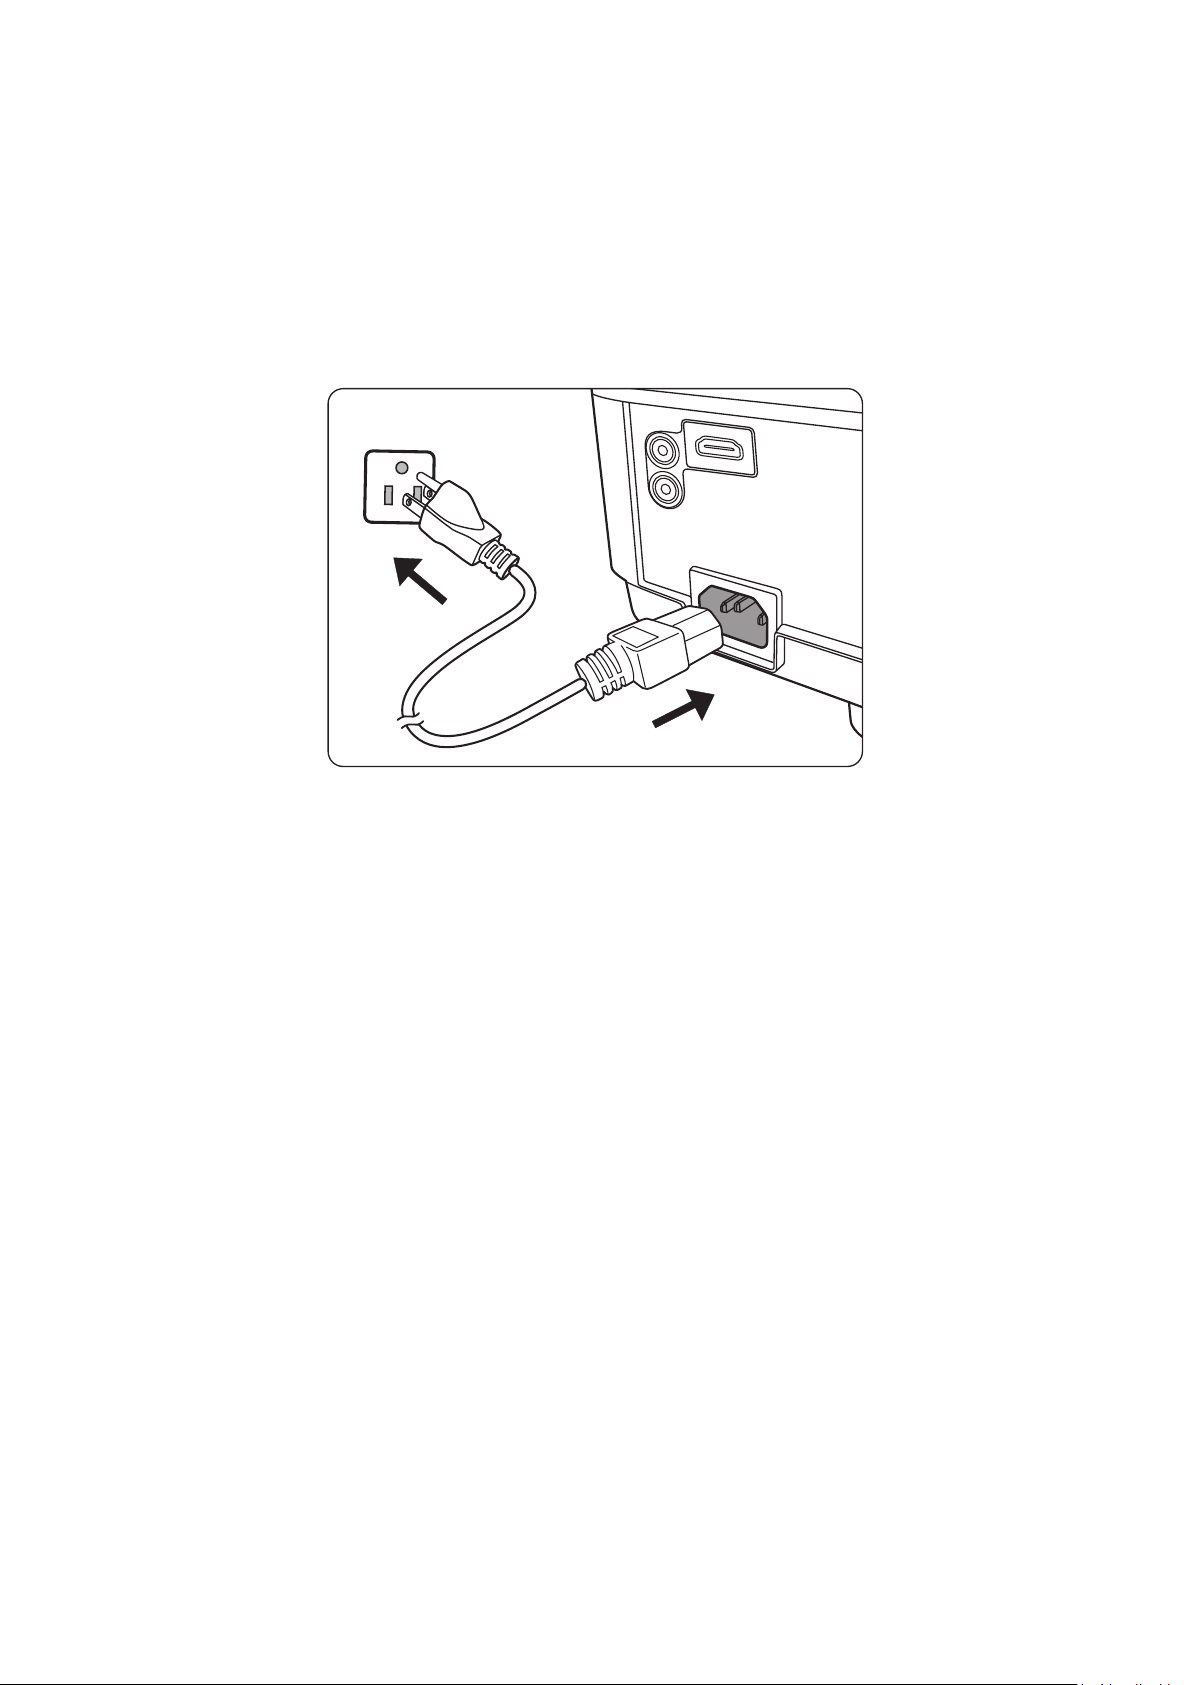
Connecting to Power
1. Connect the power cord to the AC IN jack at the rear of the projector.
2. Plug the power cord into a power outlet.
NOTE: When installing the projector, incorporate a readily accessible disconnect
device in the xed wiring, or connect the power plug to an easily accessible
outlet near the unit. If a fault should occur during operaon of the projector,
use the disconnect device to switch o the power supply, or disconnect the
power plug.
27
Page 28

Connecting to Computer Sources
NOTE: This funcon is only available for LS510W/LS560W.
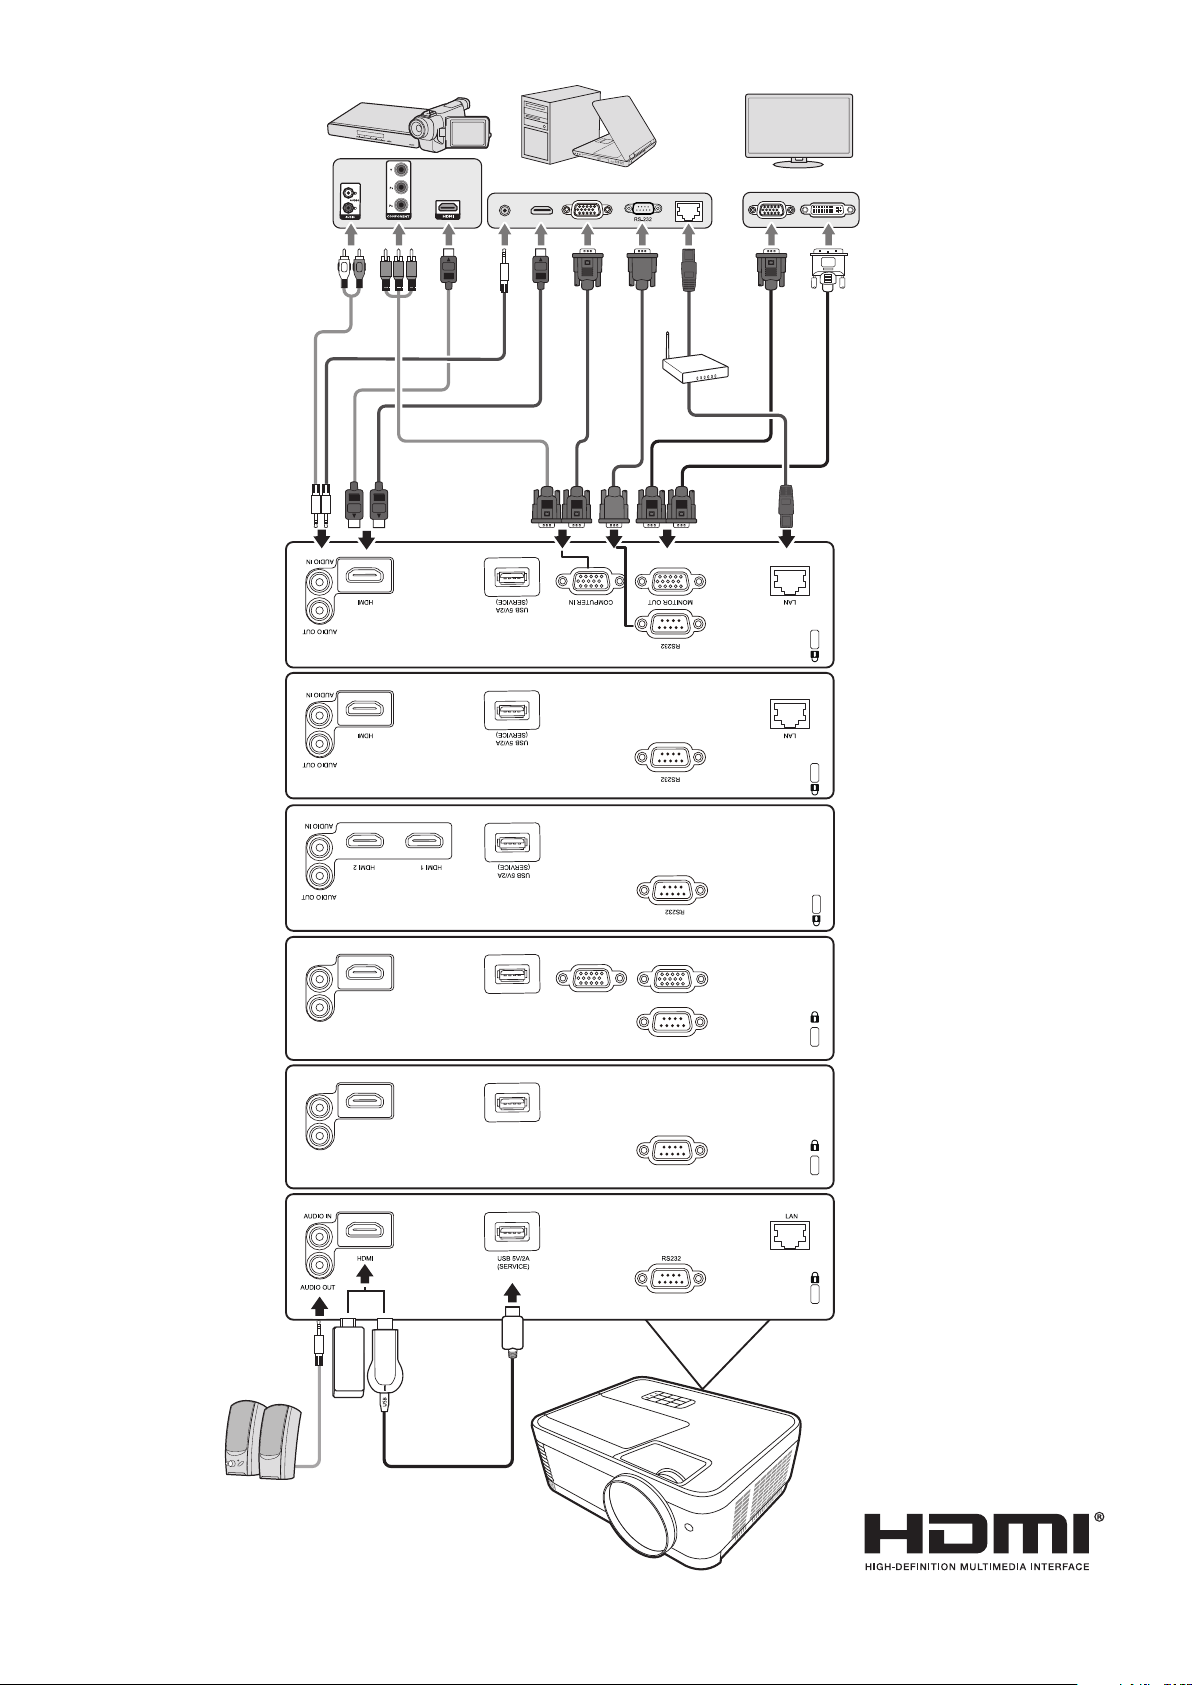
VGA Connection
Connect one end of a VGA cable to the VGA port of your computer. Then connect
the other end of the cable to the COMPUTER IN port of your projector.
NOTE:
VGA Out Connection
After establishing the VGA Connection, connect one end of a VGA cable to the VGA
port of your monitor. Then connect the other end of the cable to the MONITOR
OUT port of your projector.
Some notebooks do not turn on their external displays automacally when
connected to a projector. You may have to adjust your notebook’s projecon
sengs.
Connecting to Video/Computer Sources
HDMI Connection
Connect one end of an HDMI cable to the HDMI port of your video/computer
device. Then connect the other end of the cable to the HDMI port of your
projector.
Connecting to Audio
The projector is equipped with speakers, however, you can also connect external
speakers to the AUDIO OUT port of the projector.
NOTE:
NOTE: For a DVI to HDMI digital signal, if the DVI signal is not standard, the AUDIO IN
The connection illustrations below are for reference only. The connecting jacks
available on the projector vary with each projector model. Some cables may not
be included with the projector. They are commercially available from electronics
stores.
The audio output is controlled by the projector’s Volume and Mute sengs.
jack may not work.
28
Page 29
LS560W
LS560WH
LS560HDH
LS510W
LS510WH
LS510WH-2
AUDIO IN
AUDIO OUT
AUDIO IN
AUDIO OUT
HDMI
HDMI
USB 5V/2A
(SERVICE)
USB 5V/2A
(SERVICE)
COMPUTER IN
MONITOR OUT
RS232
RS232
29
Page 30
Operation
Turning the Projector On/Off
Starting Up the Projector
1. Press the Power buon to turn on the projector.
2. The light source will light up, and a “Power On/O Ring Tone” will play.
3. The Power Indicator Light stays green when the projector is On.
NOTE:
• If the projector is sll hot from previous use, it will run the cooling fan for 90
• To maintain light source life, once you turn the projector On, wait at least ve (5)
4. Turn on all of the connected equipment, i.e. notebook, and the projector will
start to search for an input source.
NOTE:
First Time Activation
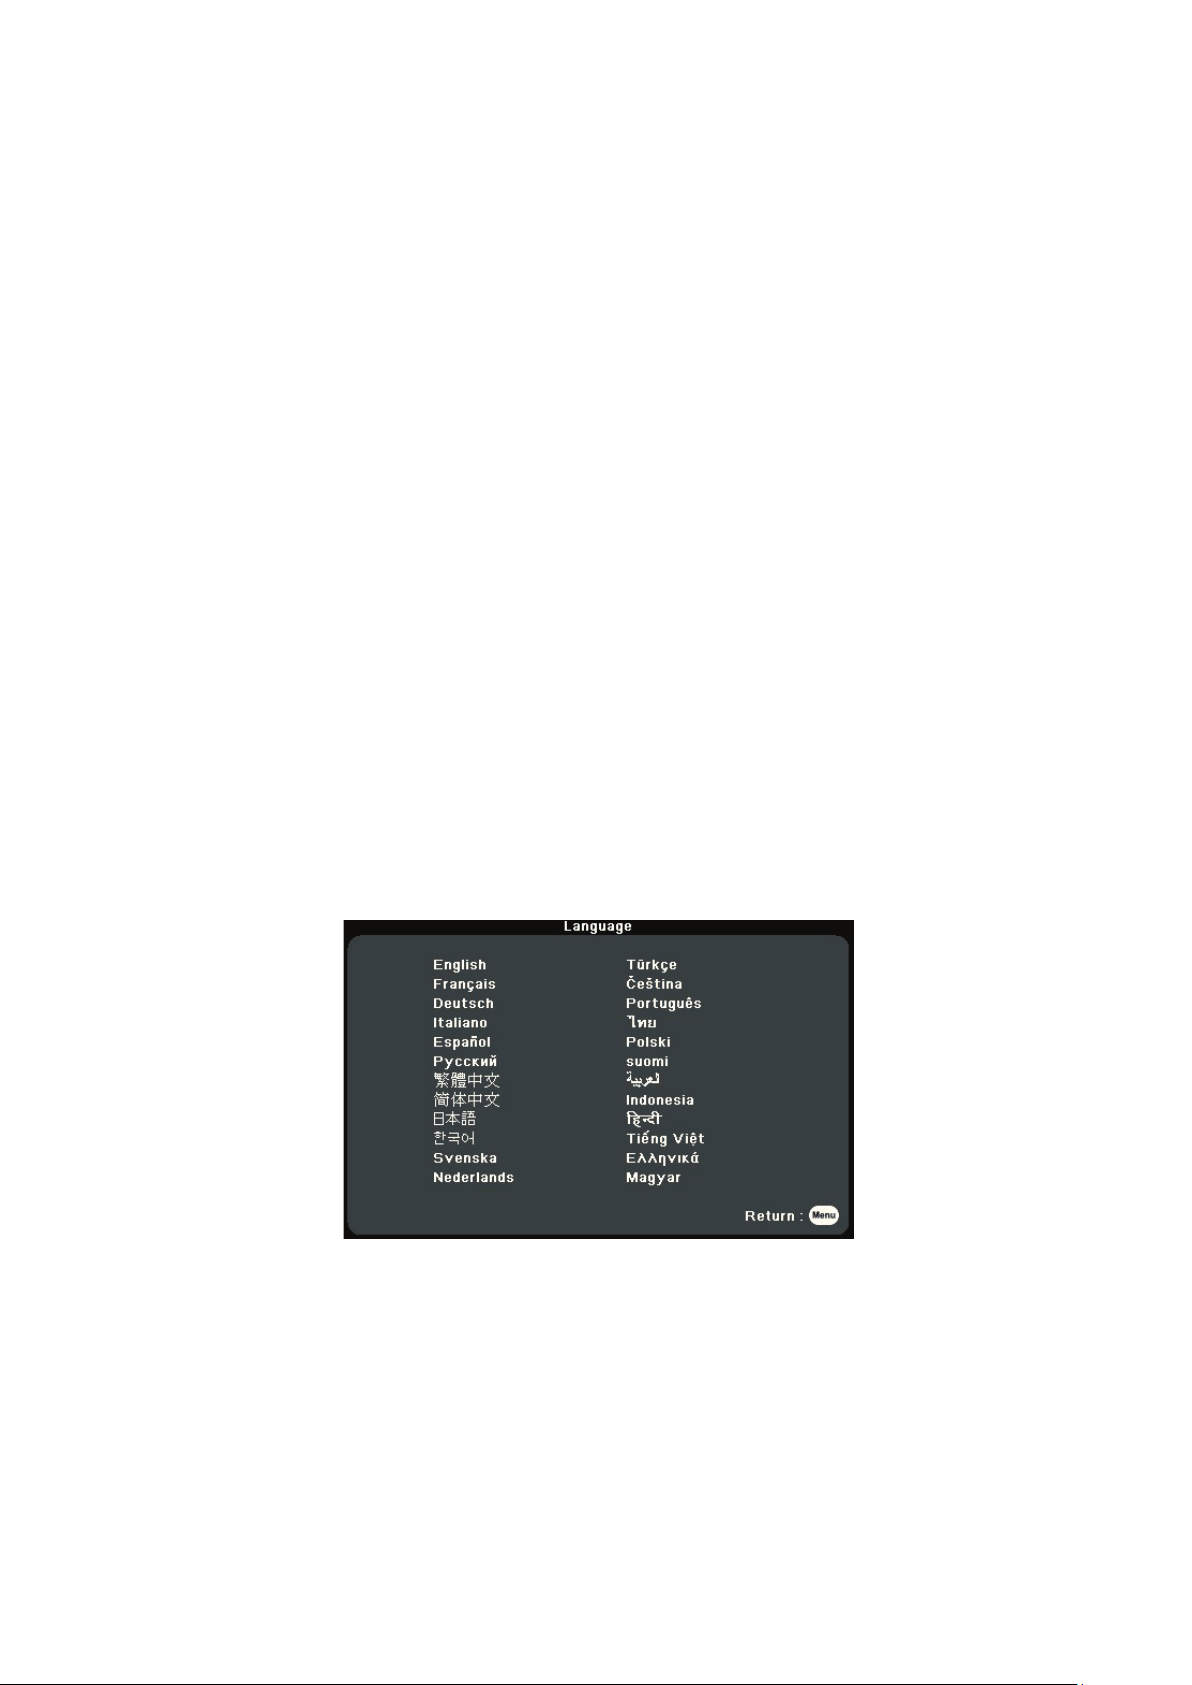
If the projector is activated for the first time, select your OSD language following
the on-screen instructions.
seconds before acvang the light source.
minutes before turning it o.
If the projector detects an input source, the Source Selecon Bar will appear. If
an input source is not detected, the message, ‘No Signal’ will appear.
30
Page 31

Shutting Down the Projector
1. Press the Power or O buon and a conrmaon message will appear to prompt
you to press the Power or O buon a second me. Addionally you can press
any other buon to cancel.
NOTE:
If you do not respond in a few seconds aer the rst press, the message will
disappear.
2. Once the cooling process nishes, a “Power On/O Ring Tone” will play.
3. Disconnect the power cord from the power outlet if the projector will not be
used for an extended period of me.
NOTE:
• To protect the light source, the projector will not respond to commands during
the cooling process.
• Do not unplug the power cord before the projector completely shuts down.
31
Page 32
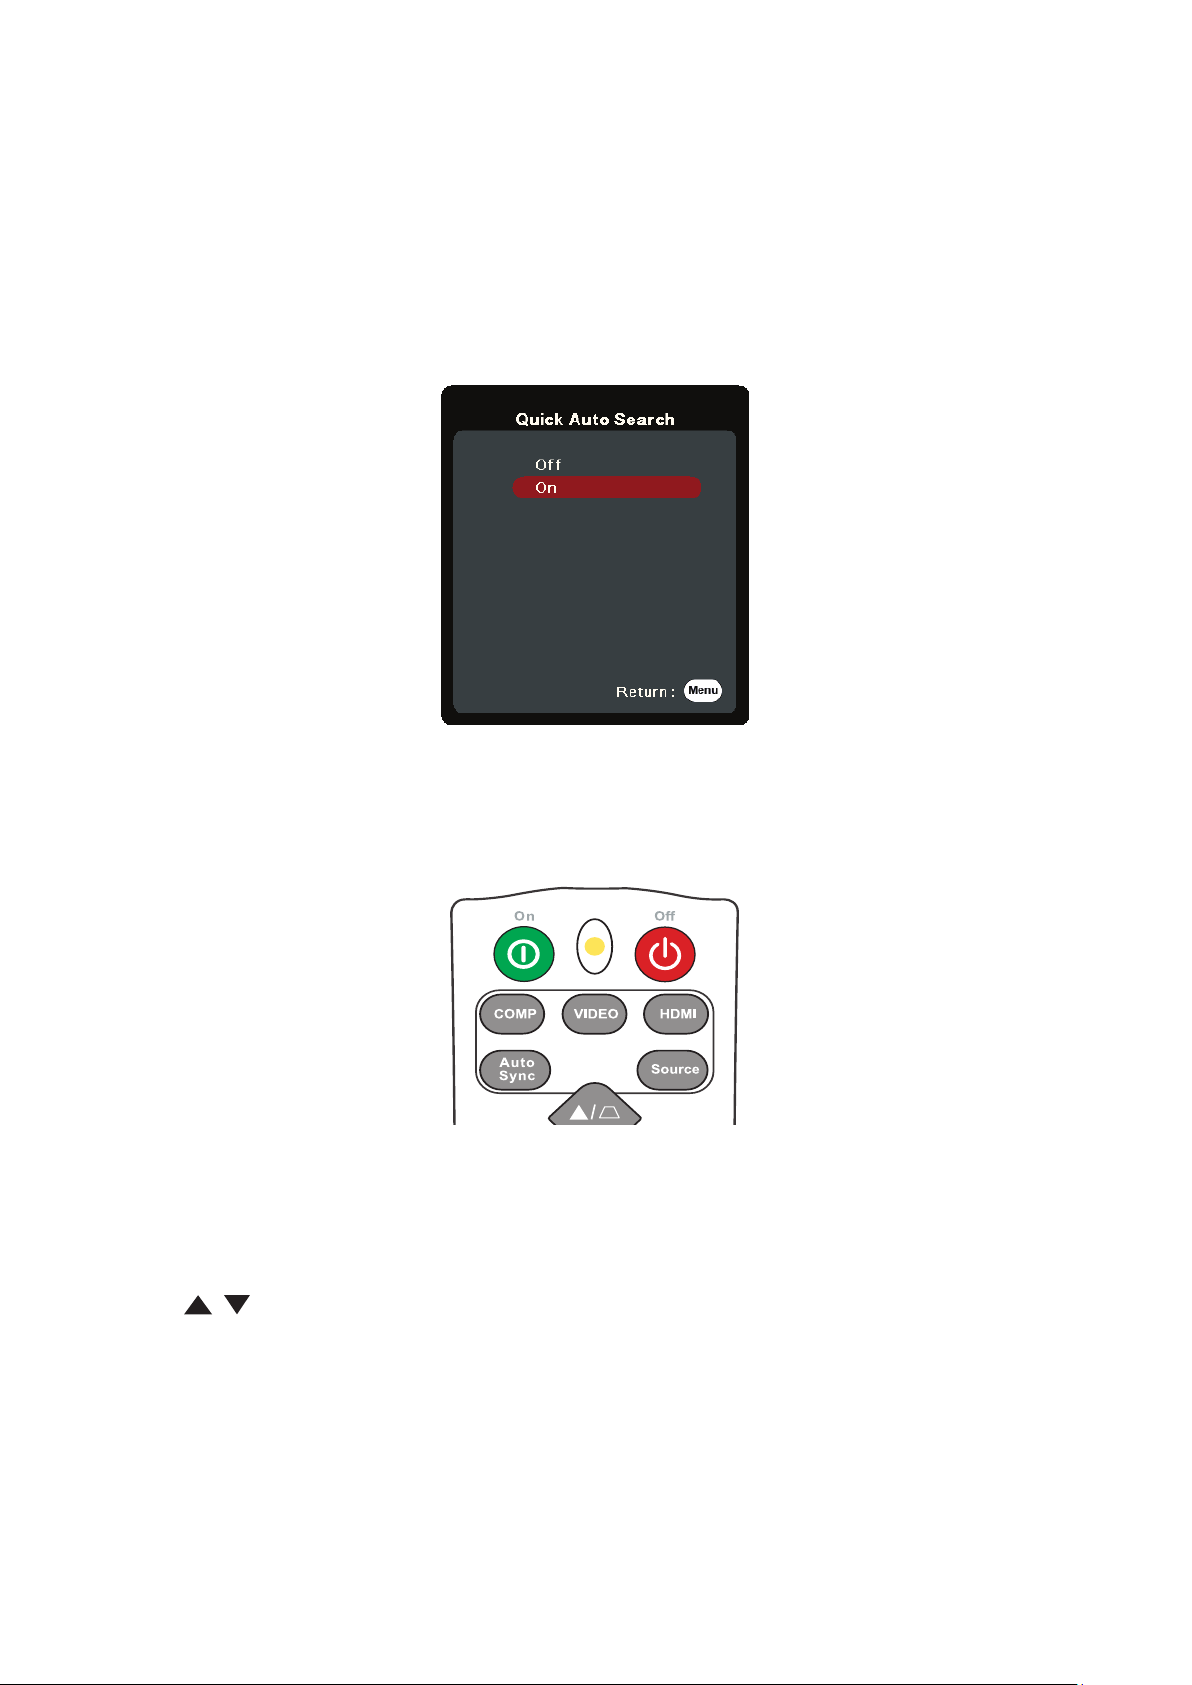
Selecting an Input Source
The projector can be connected to multiple devices at the same time. However, it
can only display one full screen at a time.
If you want the projector to automatically search for the input source,
ensure the Quick Auto Search function in the SYSTEM menu is On. (Only for
LS510W/LS560W/LS560HDH)
The Input Source can also be manually selected by pressing one of the source
selection buttons on the remote control, or by cycling through the available input
sources.
To manually select the input source do the following:
1. Press Source, and a source selecon menu will appear.
2. Press
3. Once detected, the selected source informaon will be displayed on the screen
/ unl your desired signal is selected and press Enter.
for a few seconds.
NOTE:
If there are mulple devices connected to the projector, repeat steps 1-2 to
search for another source.
32
Page 33
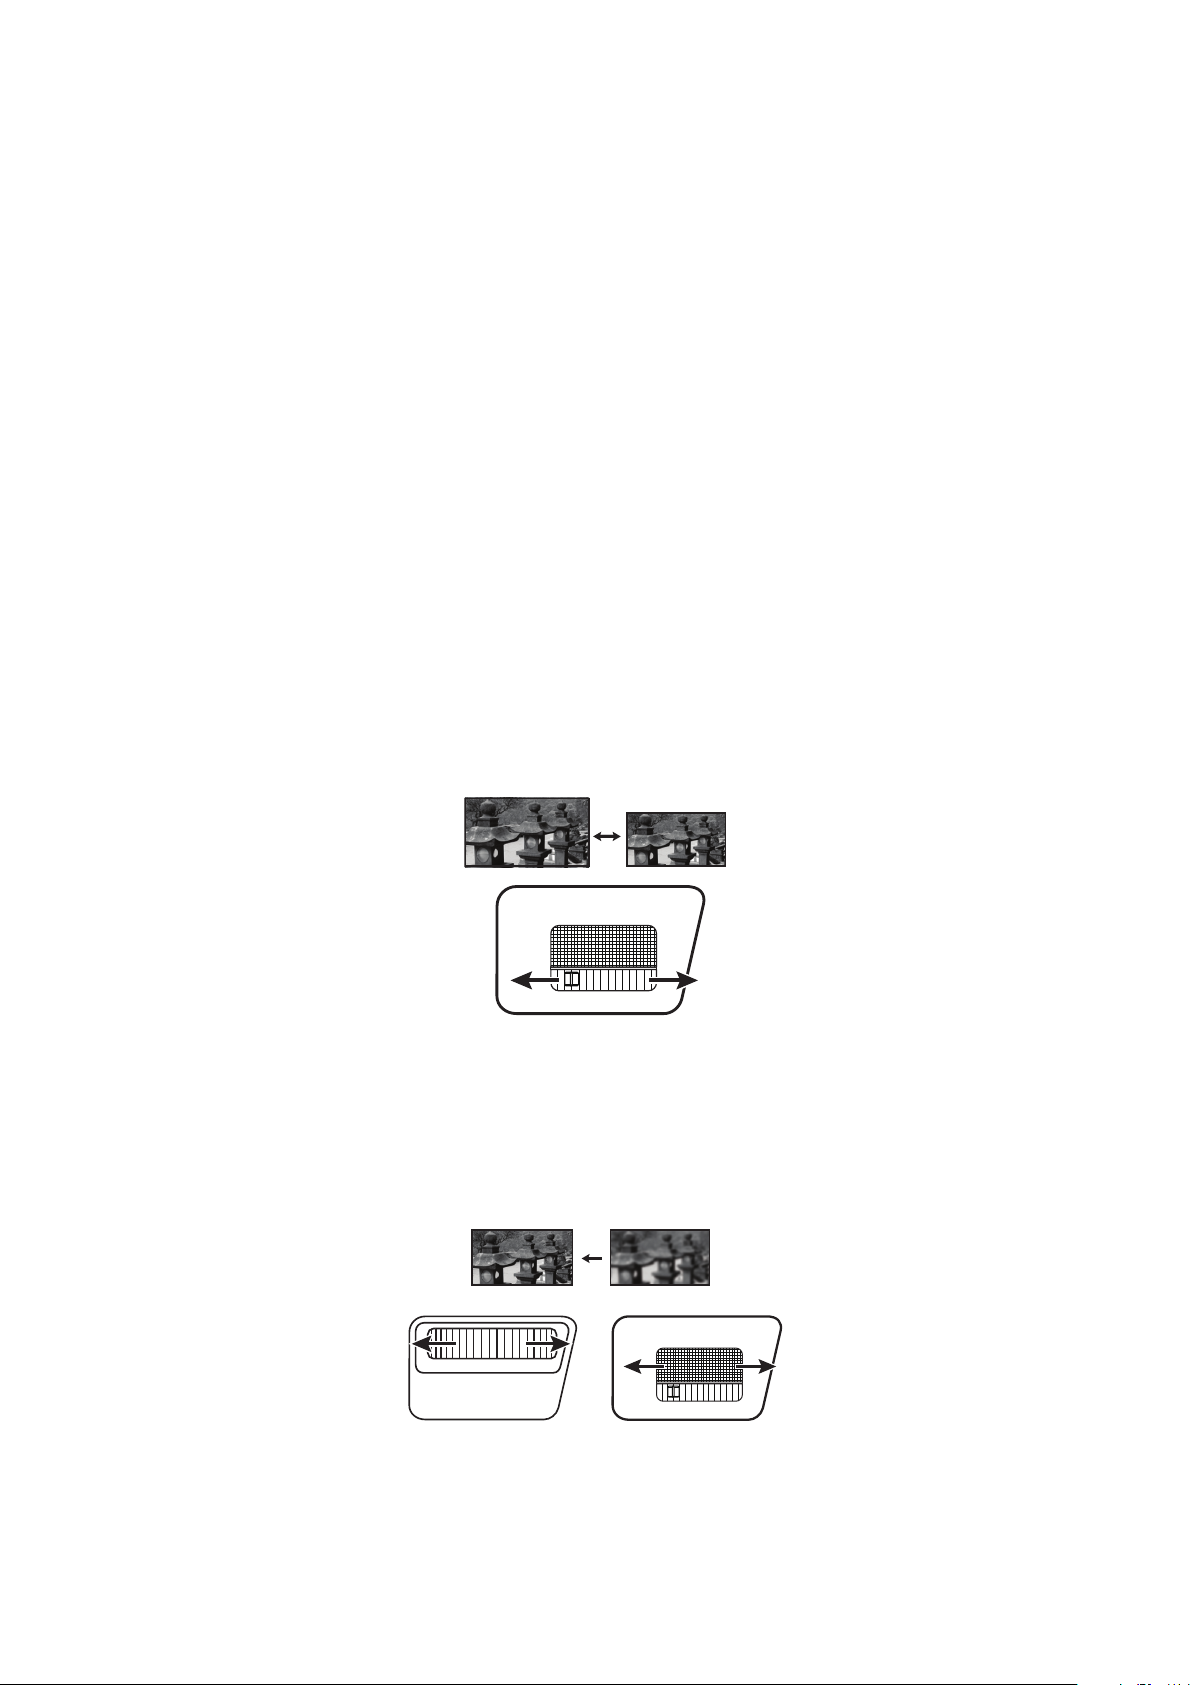
Adjusting the Projected Image
LS510WH-2
LS560HDH
LS510WH-2
Adjusting the Projector's Height and Projection Angle
The projector is equipped with one (1) adjuster foot. Adjusting the foot will change
the projector’s height and the vertical projection angle. Carefully adjust the feet to
fine tune the projected image’s position.
Auto-Adjusting the Image
Sometimes, you may need to improve the picture quality. To do this, press Auto
Sync on the remote control. Within five (5) seconds, the built-in Intelligent Auto
Adjustment function will re-adjust the Frequency and Clock values to provide the
best picture quality.
Upon completion, the current source information will appear in the upper left
corner for three (3) seconds.
NOTE:
This funcon is only available when the PC D-Sub input source (analog RGB/
COMPUTER IN) is selected.
Fine-Tuning the Image Size and Clarity
To adjust the projected image to the size that you need, rotate the Zoom Ring.
LS510W /
LS510WH /
To improve the clarity of the image, rotate the Focus Ring.
LS560W /
LS560WH /
LS510W /
LS510WH /
33
Page 34
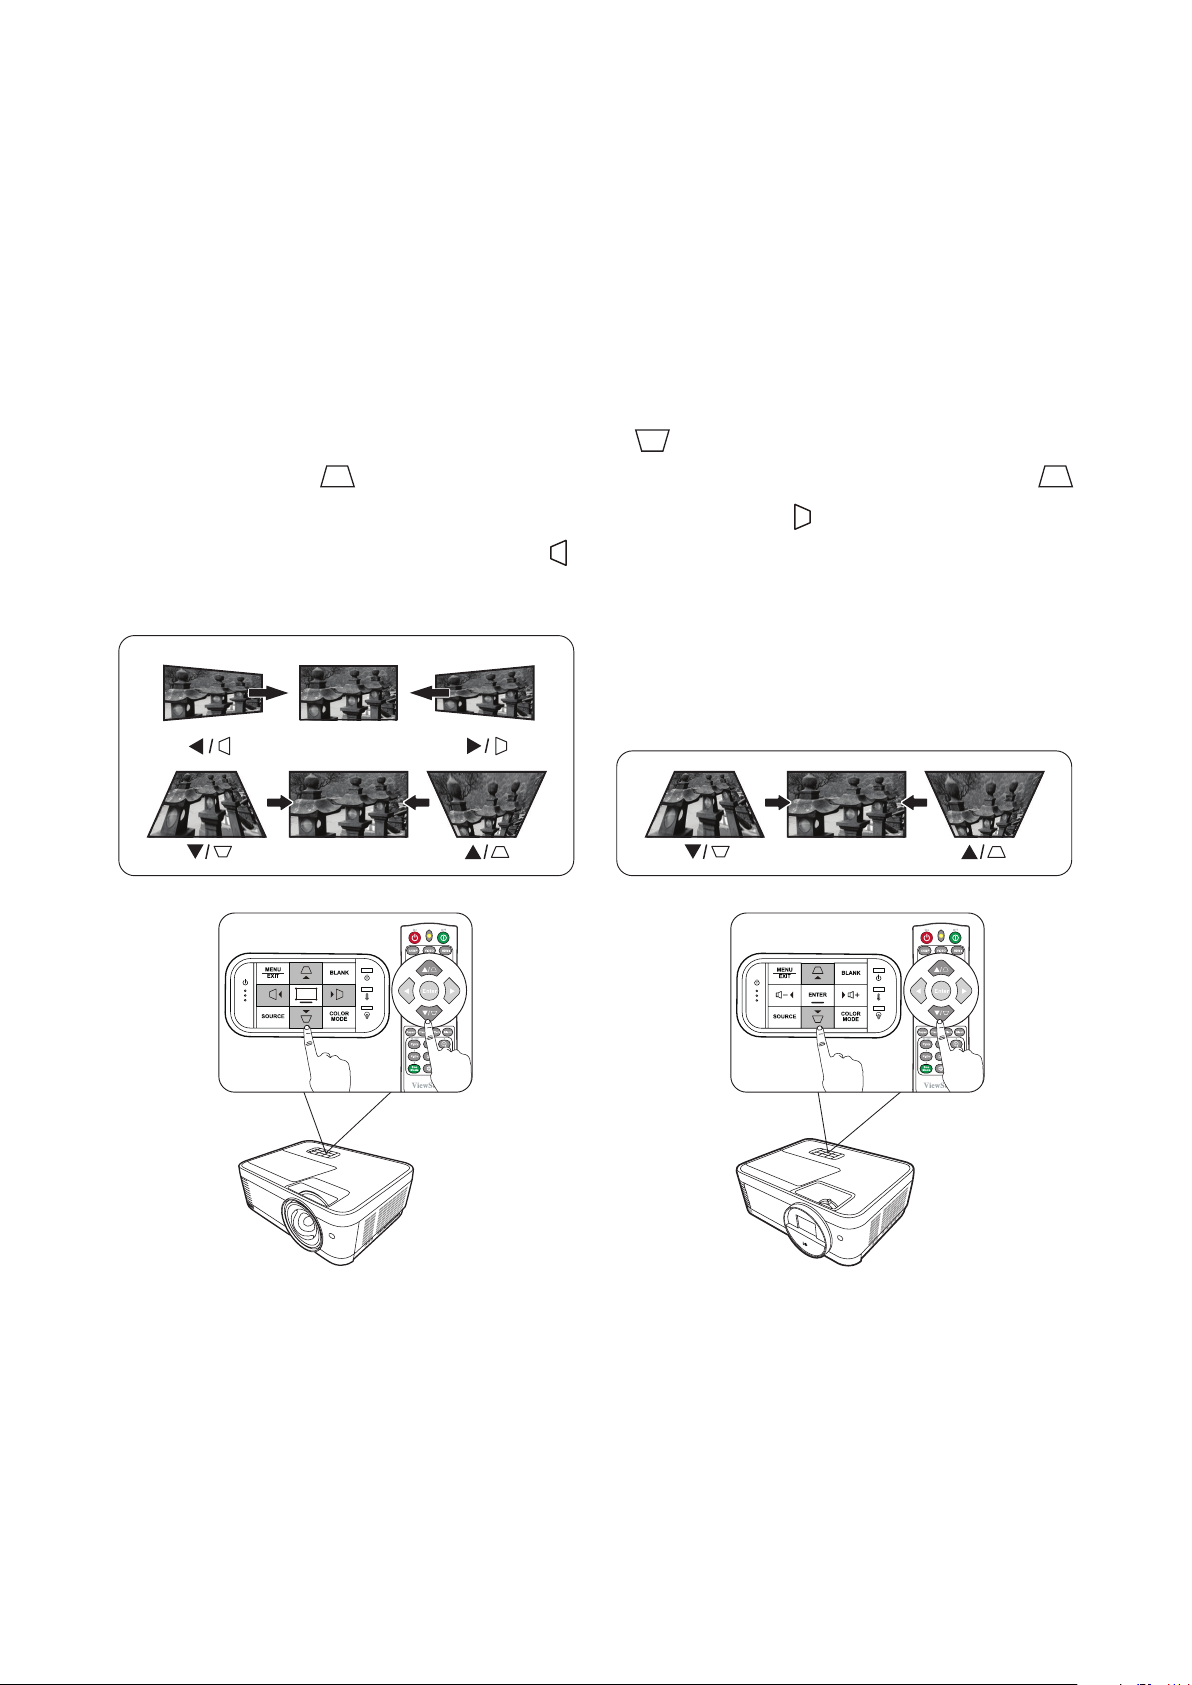
Correcting Keystone
ENTER
Keystoning refers to the situation where the projected image becomes a trapezoid
due to angled projection.
To correct this, besides adjusting the height of the projector, you may also:
Perform automatic keystone correction by enabling the
Auto V Keystone function.
(only available for LS560W/LS560WH/LS560HDH)
Or manually correct keystone following the below steps:
1. Use the keystone keys on the projector or remote control to display the keystone
page.
2. Aer the keystone page is displayed, press
to correct keystoning at the top of
the image. Press to correct keystoning at the boom of the image. Press
to correct keystoning at the boom of the image. Press to correct keystoning
at the right side of the image. Press to correct keystoning at the le side of the
image.
LS510W / LS510WH / LS510WH-2LS560W / LS560WH / LS560HDH
34
Page 35
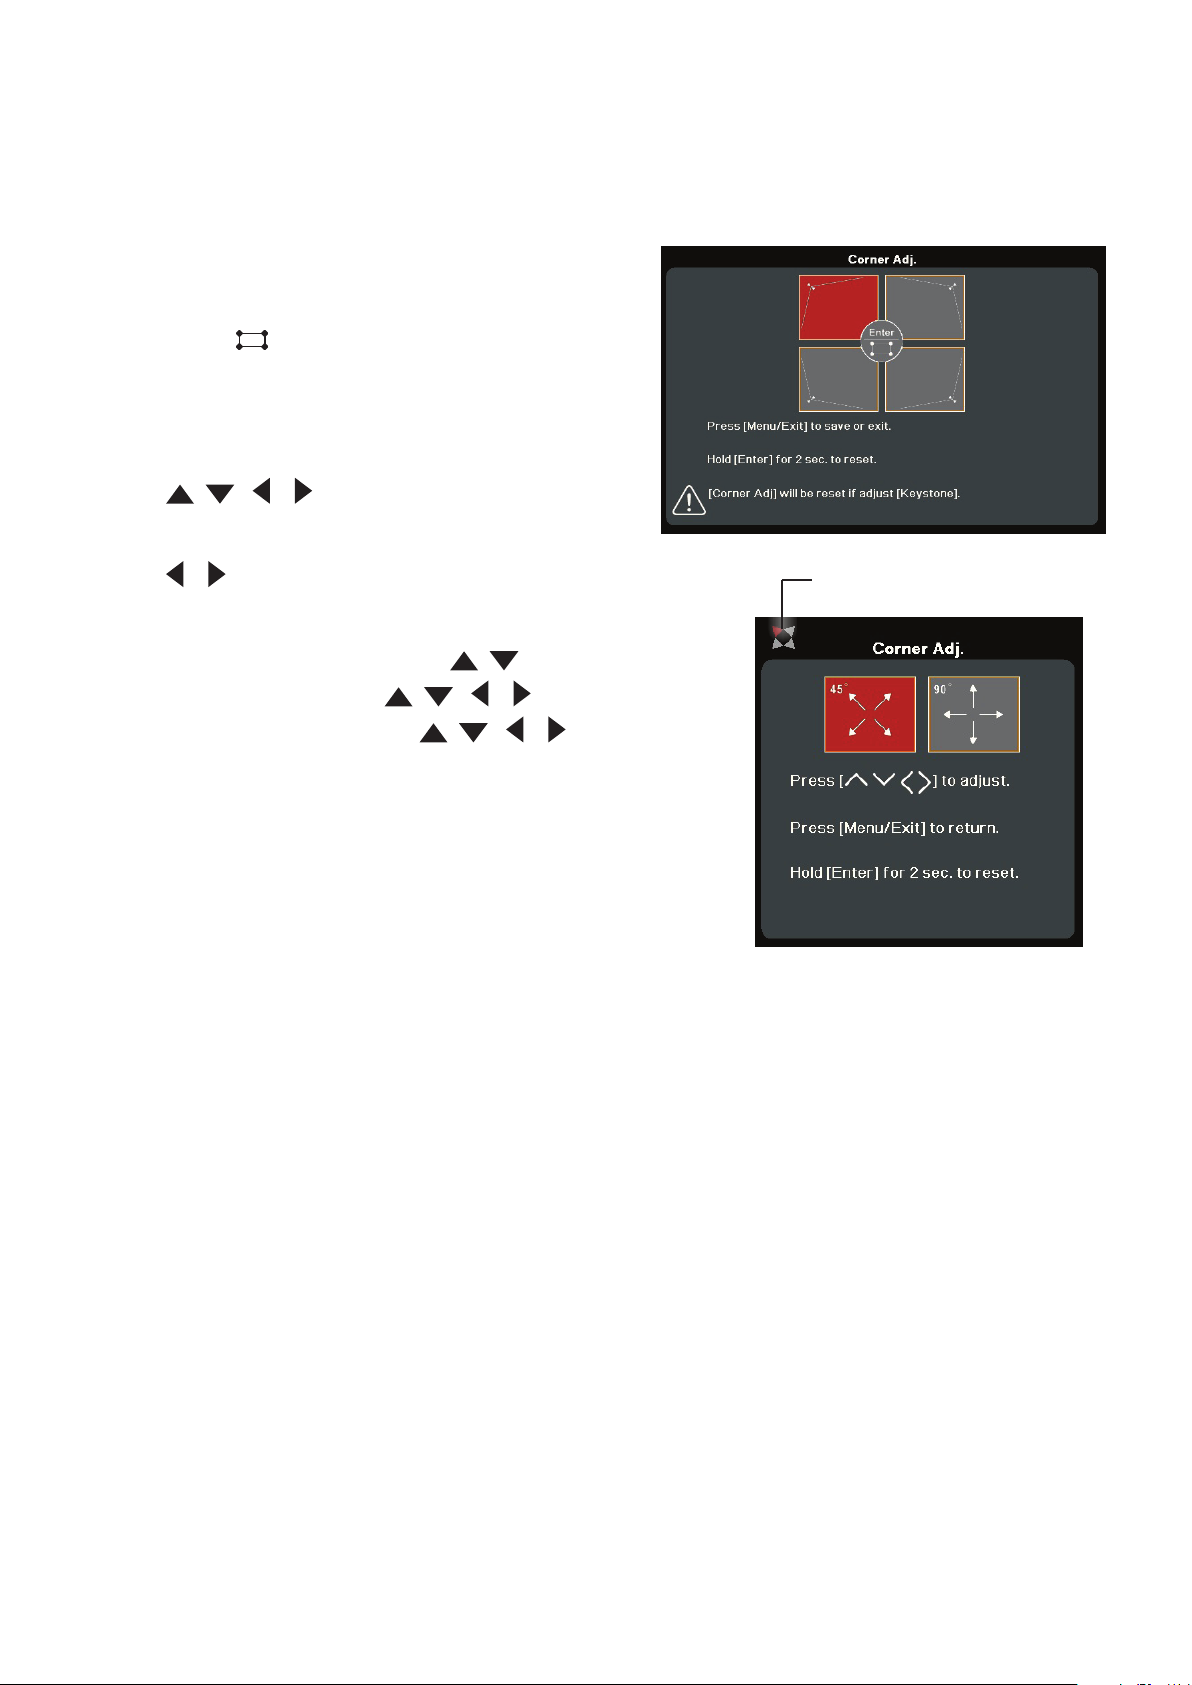
Adjusting 4 corners
NOTE:
This funcon is only available for LS560W/LS560WH/LS560HDH.
You can manually adjusts the shape and size of an image that is unevenly
rectangular on all sides.
1. To display the Corner Adj. page, you can do
one of the followings:
• Press .
• Open the OSD menu and go to the
DISPLAY > Corner Adj. menu and press
Enter. The Corner Adj. page is displayed.
2. Use / / / to select the corner you
wish to adjust and press Enter.
3. Use
/ to select an adjustment method that suits
Indicates the corner you seleted.
your need and press Enter.
4. As indicated on the screen (
/ for a 45-degree
angle adjustment and / / / for a 90-degree
angle adjustment), press / / / to adjust its
shape and size. You can press Menu or Exit to go
back to a previous step. A long press for 2 seconds
on Enter will reset the sengs on the corner that
you chose.
NOTE:
• Adjusng keystone will reset the Corner Adj.
• Aer the Corner Adj. sengs have been modied, some aspect raos or mings
sengs.
are not available. When that happens, reset the sengs on all 4 corners.
Hiding the Image
In order to draw the audience’s full attention to the presenter, you can press Blank
on the projector or remote control to hide the screen image. Press any key on the
projector or remote control to restore the image.
CAUTION:
Do not block the projecon lens as this could cause the blocking object to
become heated and deformed or even cause a re.
35
Page 36
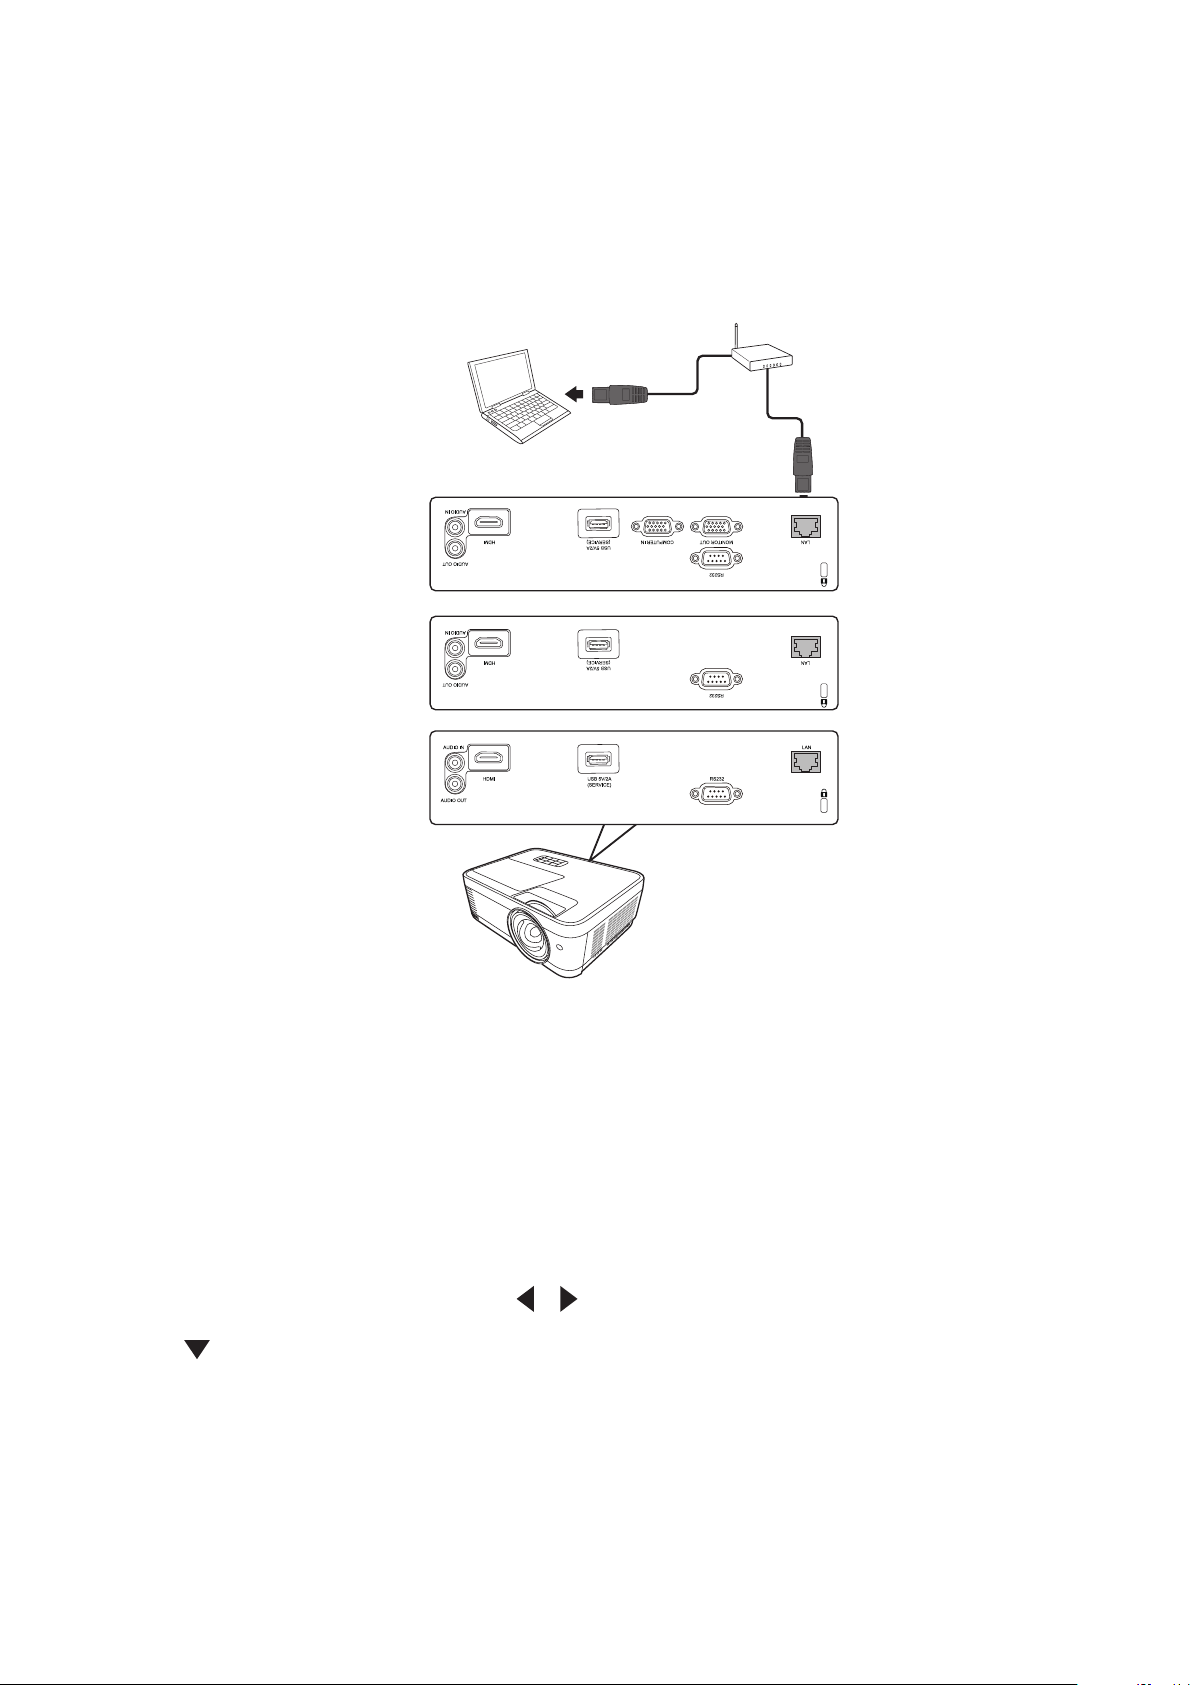
Controlling the Projector through a LAN Environment
LS560WH
LS560W
LS510WH-2
NOTE: This funcon is only available for LS560W/LS560WH/LS510WH-2.
The projector supports Crestron® software. With correct settings for the LAN
Control Settings menu, you can manage the projector from a computer using a web
browser when the computer and the projector are properly connected to the same
local area network.
Configuring the LAN Control Settings
• If you are in a DHCP environment:
1. Take a RJ45 cable and connect one end to the RJ45 LAN input jack of the
projector and the other end to the RJ45 port.
2. Open the OSD menu and go to the ADVANCED > LAN Control Settings menu.
Press Enter to display the LAN Control Settings page. Or you can press Network
to open the LAN Control Settings menu directly.
3. Highlight LAN Settings and press
4. Press
to highlight Apply and press Enter.
/ to select DHCP ON.
5. Please wait for around 15 - 20 seconds, and then re-enter the LAN Settings
page. The Projector IP Address, Subnet Mask, Default Gateway, DNS Server
sengs will be displayed. Make note of the IP address displayed in the
Projector IP Address row.
36
Page 37

NOTE:
• If the Projector IP Address sll does not appear, contact your network
• If the RJ45 cables are not properly connected, the Projector IP Address,
• If you need to connect to the projector in its standby mode, set
administrator.
Subnet Mask, Default Gateway and DNS Server sengs will display 0.0.0.0. Make
sure the cables are properly connected and perform the procedures above again.
Standby LAN Control to On in the ADVANCED > LAN Control Settings menu.
• If you are in a non-DHCP environment:
1. Repeat steps 1-2 above.
2. Highlight LAN Settings and press
/ to select Static IP.
3. Contact your ITS administrator for informaon on the Projector IP Address,
Subnet Mask, Default Gateway, DNS Server sengs.
4. Press to select the item you want to modify and press Enter.
5. Press
/ to move the cursor and the press / to enter the value.
6. To save the sengs, press Enter. If you do not want to save the sengs, press
Exit.
7. Press
NOTE:
• If the RJ45 cables are not properly connected, the Projector IP Address,
• If you wish to connect to the projector in its standby mode, be sure you
to highlight Apply and press Enter.
Subnet Mask, Default Gateway, DNS Server sengs will display 0.0.0.0. Make
sure the cables are properly connected and perform the procedures above again.
have selected Static IP and obtained the Projector IP Address, Subnet Mask,
Default Gateway and DNS Server informaon when the projector is on.
37
Page 38
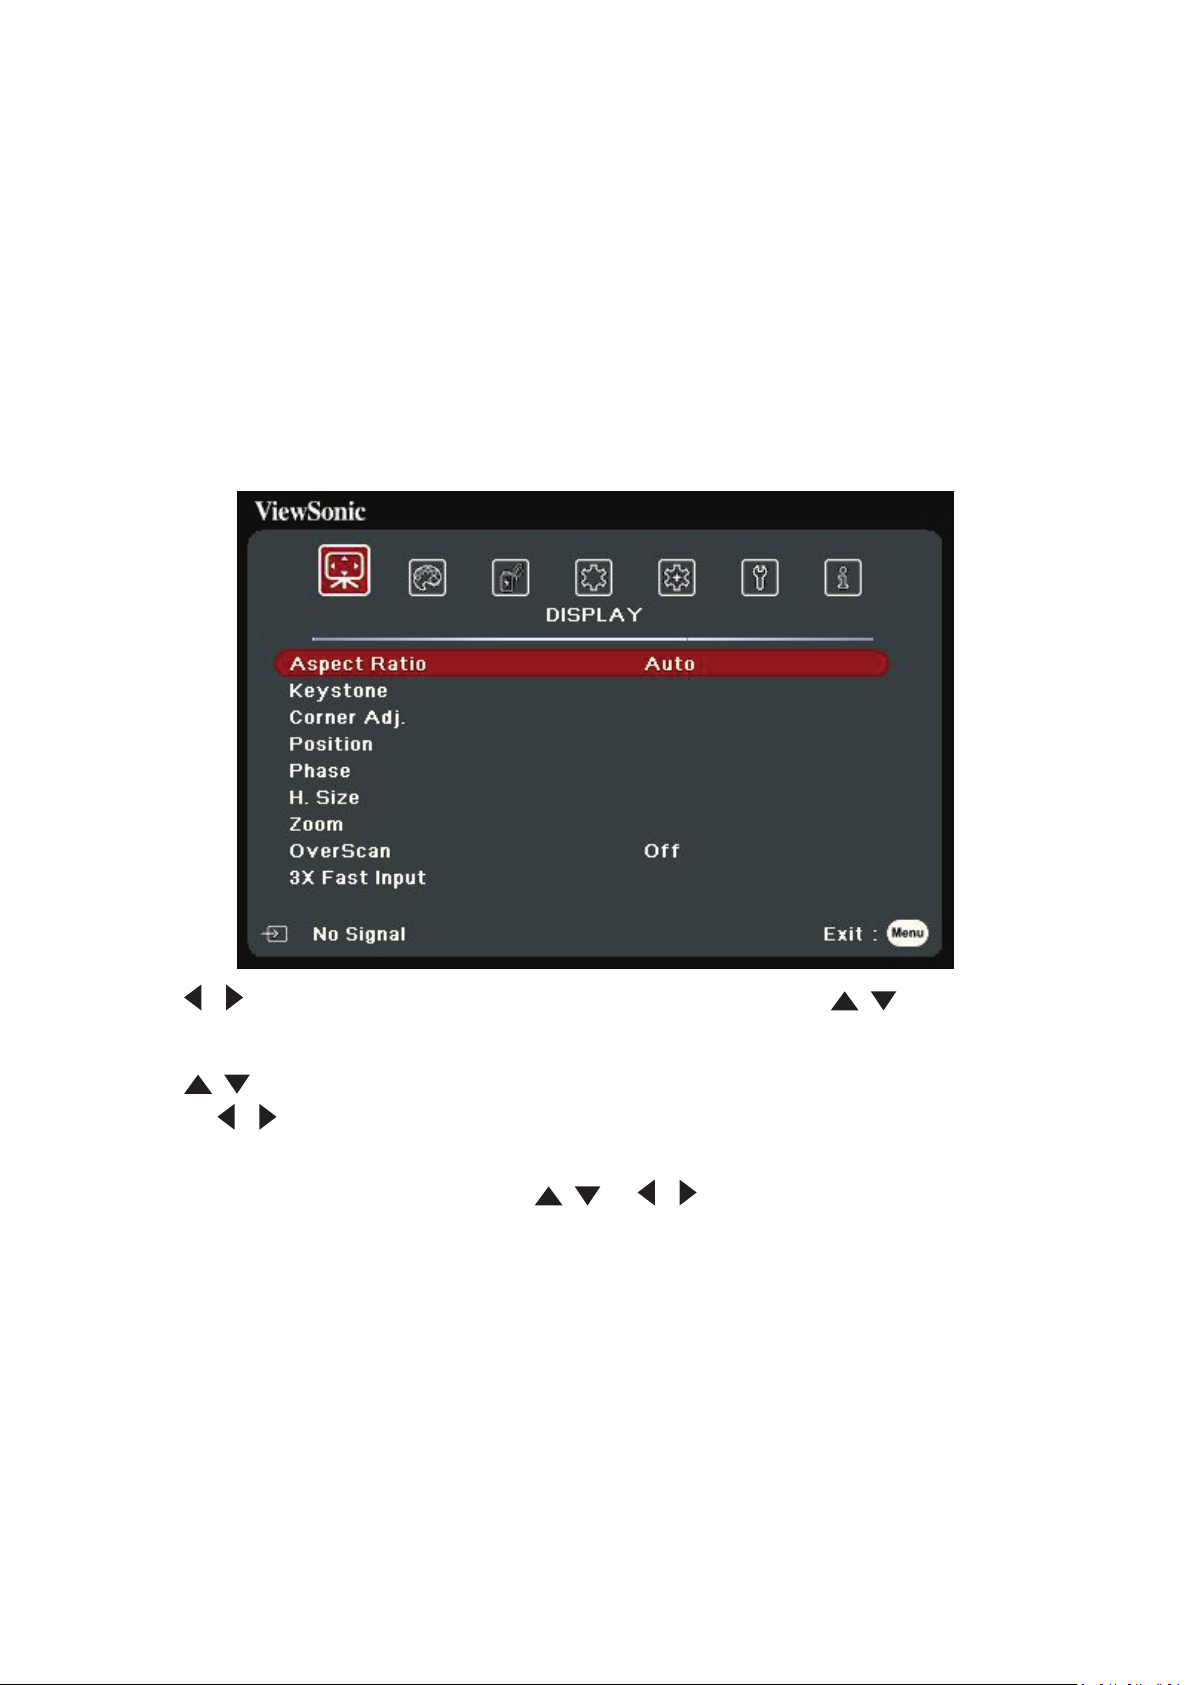
Menu Functions
This section will introduce the On-Screen Display (OSD) Menu and its options.
General On-Screen Display (OSD) Menu Operation
NOTE: The OSD screenshots in this manual are for reference only and may dier from
the actual design. Some of the following OSD sengs may not be available.
Please refer to the actual OSD of your projector.
The projector is equipped with an On-Screen Display (OSD) Menu for making
various adjustments. It can be accessed by pressing Menu on the projector or
remote control.
1. Press / to select a main menu. Then press Enter or use / to access the
sub-menu list.
2. Press
or press / to adjust/select the seng.
NOTE:
/ to select the menu opon. Then press Enter to display its sub-menu,
Some sub-menu opons may have another sub-menu. To enter the respecve
sub-menu, press Enter. Use / or / to adjust/select the seng.
38
Page 39
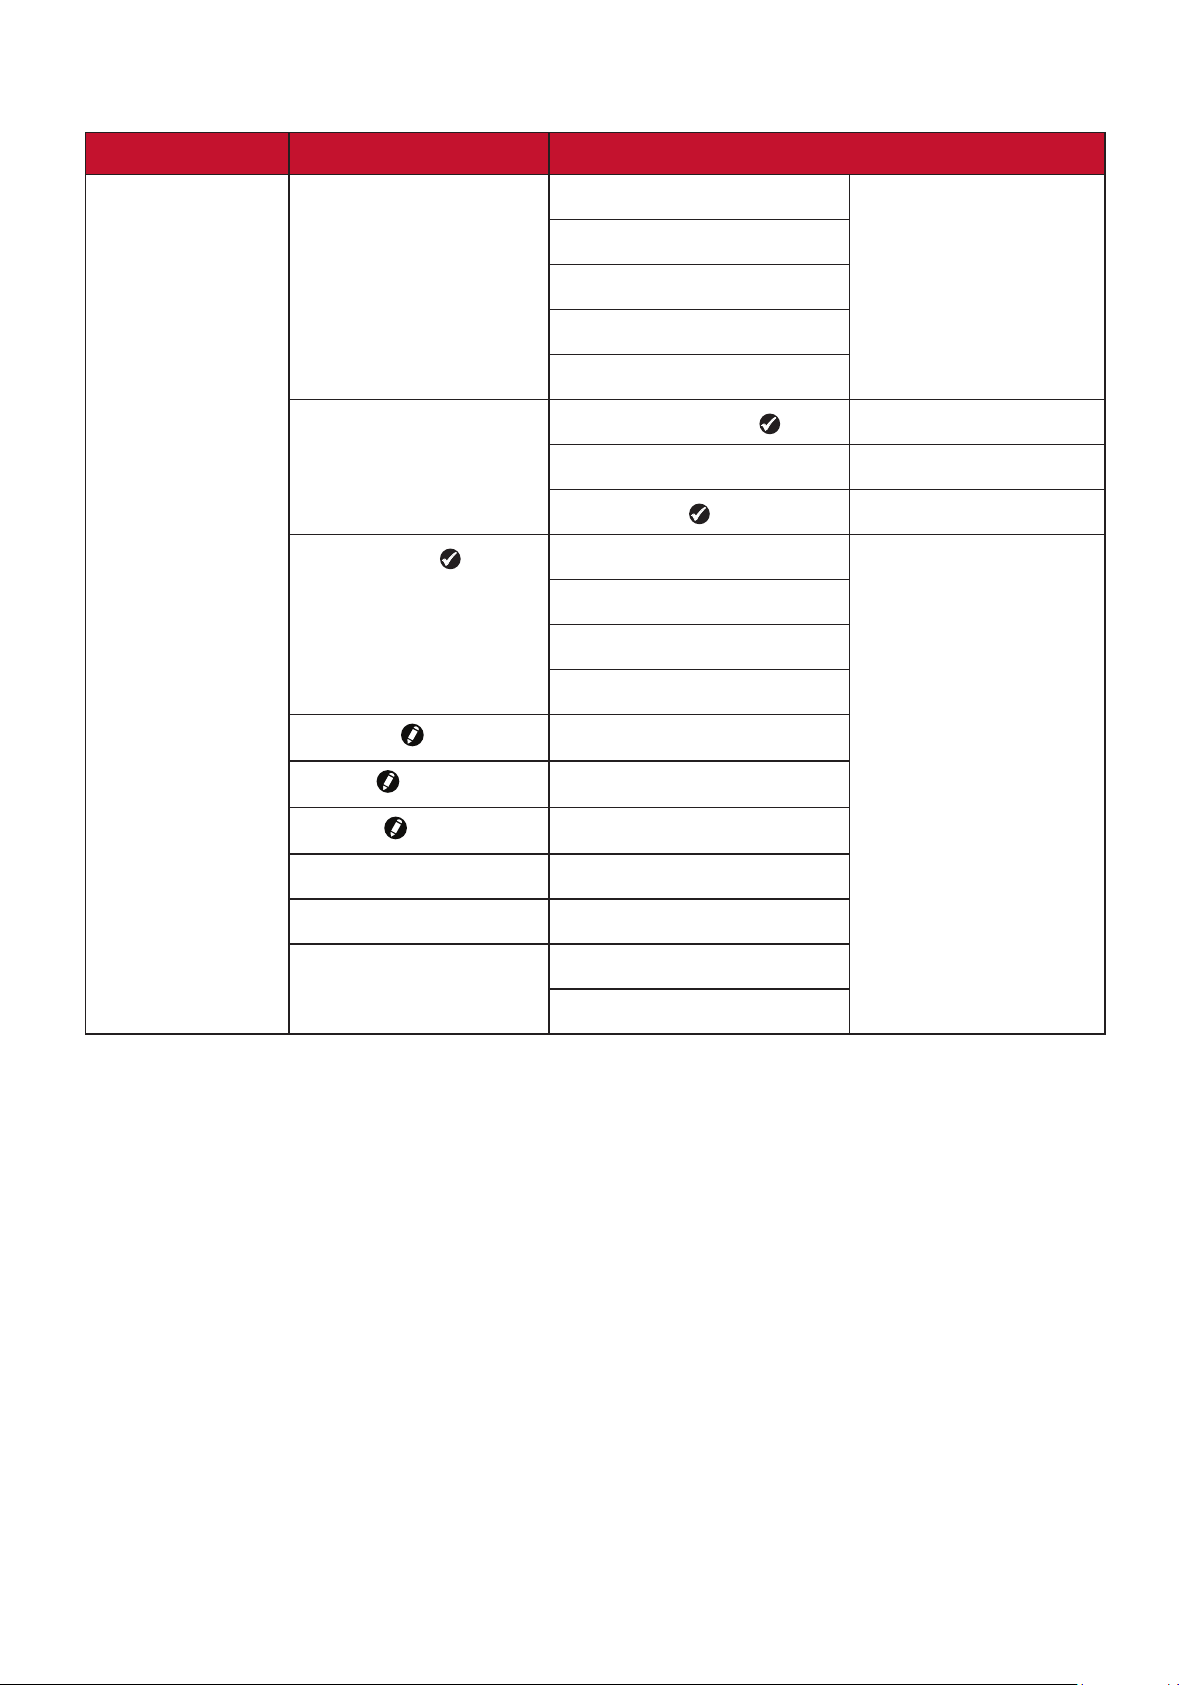
On-Screen Display (OSD) Menu Tree
Main Menu Sub-menu Menu Opon
DISPLAY
Aspect Ratio Auto
4:3
16:9
16:10
Native
Keystone Auto V Keystone
Vertical +40~-40
Horizontal
Corner Adj.
Position
Top-Right
Top-Left
Bottom-Right
Bottom-Left
X: -5 ~ 5, Y: - 5 ~ 5
Off/On
+40~-40
Phase
H. Size
Zoom 0.8X ~2.0X
OverScan Off/1/2/3/4/5
3X Fast Input Inactive
0~31
-15~15
Active
39
Page 40
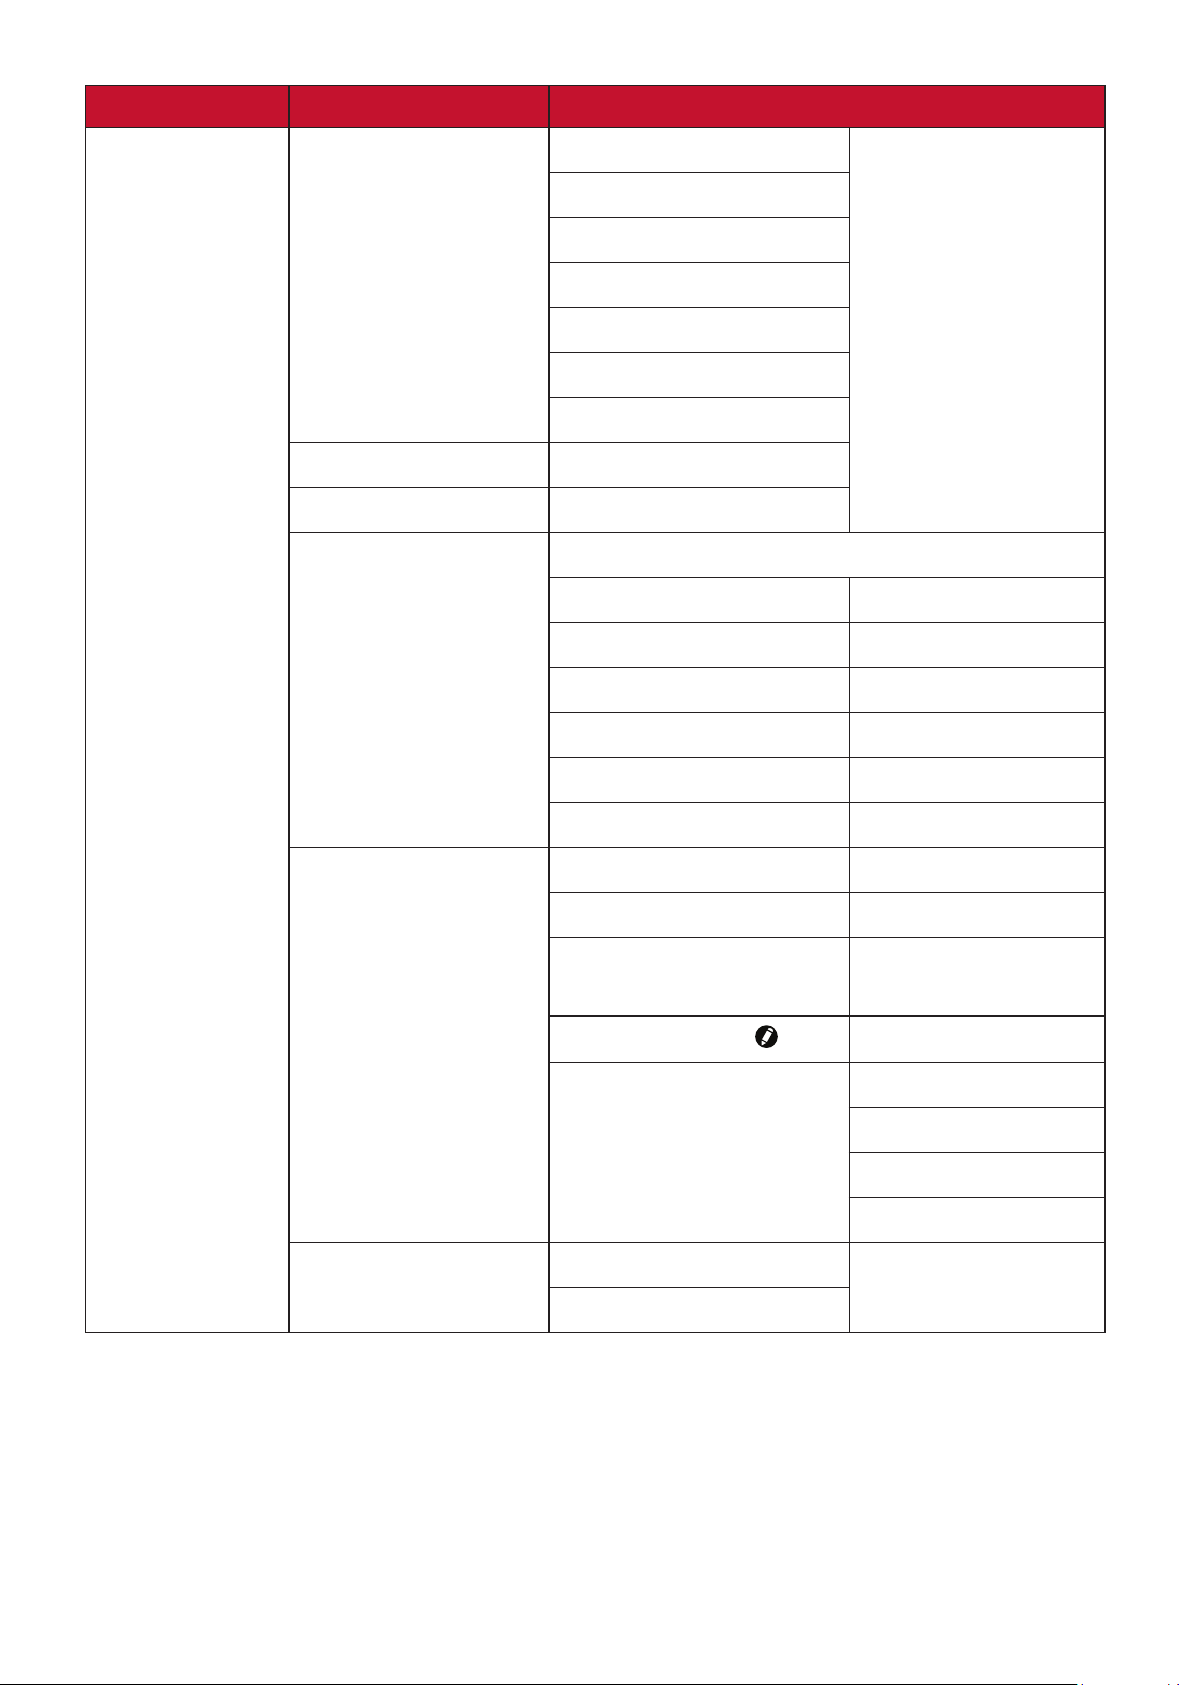
Main Menu Sub-menu Menu Opon
IMAGE
Color Mode Brightest
Presentation
Standard
Photo
Movie
User 1
User 2
Brightness 0~100
Contrast -50~50
Color Temp. 9300K/7500K/6500K
Red Gain 0~100
Green Gain 0~100
Blue Gain 0~100
Red Offset -50~+50
Green Offset -50~+50
Blue Offset -50~+50
Advanced Color -50~50
Sharpness 0~31
Gamma 1.8/2.0/2.2/2.35/
2.5/Cubic/sRGB
Noise Reduction
Color Management Primary Color
Reset Color Settings Reset
Cancel
0~31
Hue
Saturation
Gain
40
Page 41
Main Menu Sub-menu Menu Opon
Auto Power On Signal
CEC Disable/Enable
Direct Power On Disable/Enable
Smart Energy Auto Power Off Disable/10 min/20
Sleep Timer Disable/30 min/1
Power Saving Disable/Enable
Standby Settings
USB A Power On
VGA Loop Through
Audio Pass Through Off/On
Off
Disable/VGA
/HDMI /All
min/30 min
hr/2hr/3 hr/4 hr/ 8
hr/12 hr
Off/On
41
Page 42
Main Menu Sub-menu Menu Opon
BASIC
Audio Settings Mute Off/On
Audio Volume 0~20
Power On/Off Ring Tone Off/On
Presentation Timer Timer Period 1~240 m
Timer Display Always/1 min/2
min/
3 min/Never
Timer Position Top-Left/Bottom-Left/
Top-Right/Bottom-Right
Timer Counting Direction Count Down/Count Up
Sound Reminder Off/On
Start Counting/Off
Pattern Off
Test Card
Blank Timer Disable/5 min/10 min/15 min/20 min/25
min/30 min
Message Off
On
Splash Screen Black
Blue
ViewSonic
42
Page 43
Main Menu Sub-menu Menu Opon
ADVANCED
3D Settings 3D Format Auto
Off
Frame Sequential
Frame Packing
Top-Bottom
Side-by-Side
3D Sync Invert Disable/Invert
Save 3D Settings Yes/No
HDMI Settings HDMI Format Auto/RGB/YUV
HDMI Range Auto/Enhanced/
Normal
LAN Control Settings
LAN Settings DHCP ON/Static IP
Projector IP Address
Subnet Mask
Default Gateway
DNS Server
Standby LAN Control Off/On
Apply
Light Source Settings Light Source Mode Normal/Eco/
Dynamic Black 1/
Dynamic Black 2
Reset Light Source Hours Reset/Cancel
Light Source Hours Information Light Source Usage Time
Normal
Eco
Dynamic Black 1
Dynamic Black 2
Reset Settings Reset
Cancel
43
Page 44
Main Menu Sub-menu Menu Opon
SYSTEM
Language Multi-Language OSD Selection
Projector Position Front Table
Rear Table
Rear Ceiling
Front Ceiling
Menu Settings Menu Display Time 5 sec/10 sec/15
sec/20 sec/25
sec/30 sec
Menu Position Center/Top-Left/
Top-Right/
Bottom-Left/
Bottom-Right
High Altitude Mode Off
On
Quick Auto Search
Off
On
Security Settings Change Password
Power On Lock Off/On
Panel Key Lock Off
On
Remote Control Code 1/2/3/4/5/6/7/8
Control Method RS-232
USB
Baud Rate 2400/4800/9600/14400/19200/
38400/57600/115200
44
Page 45
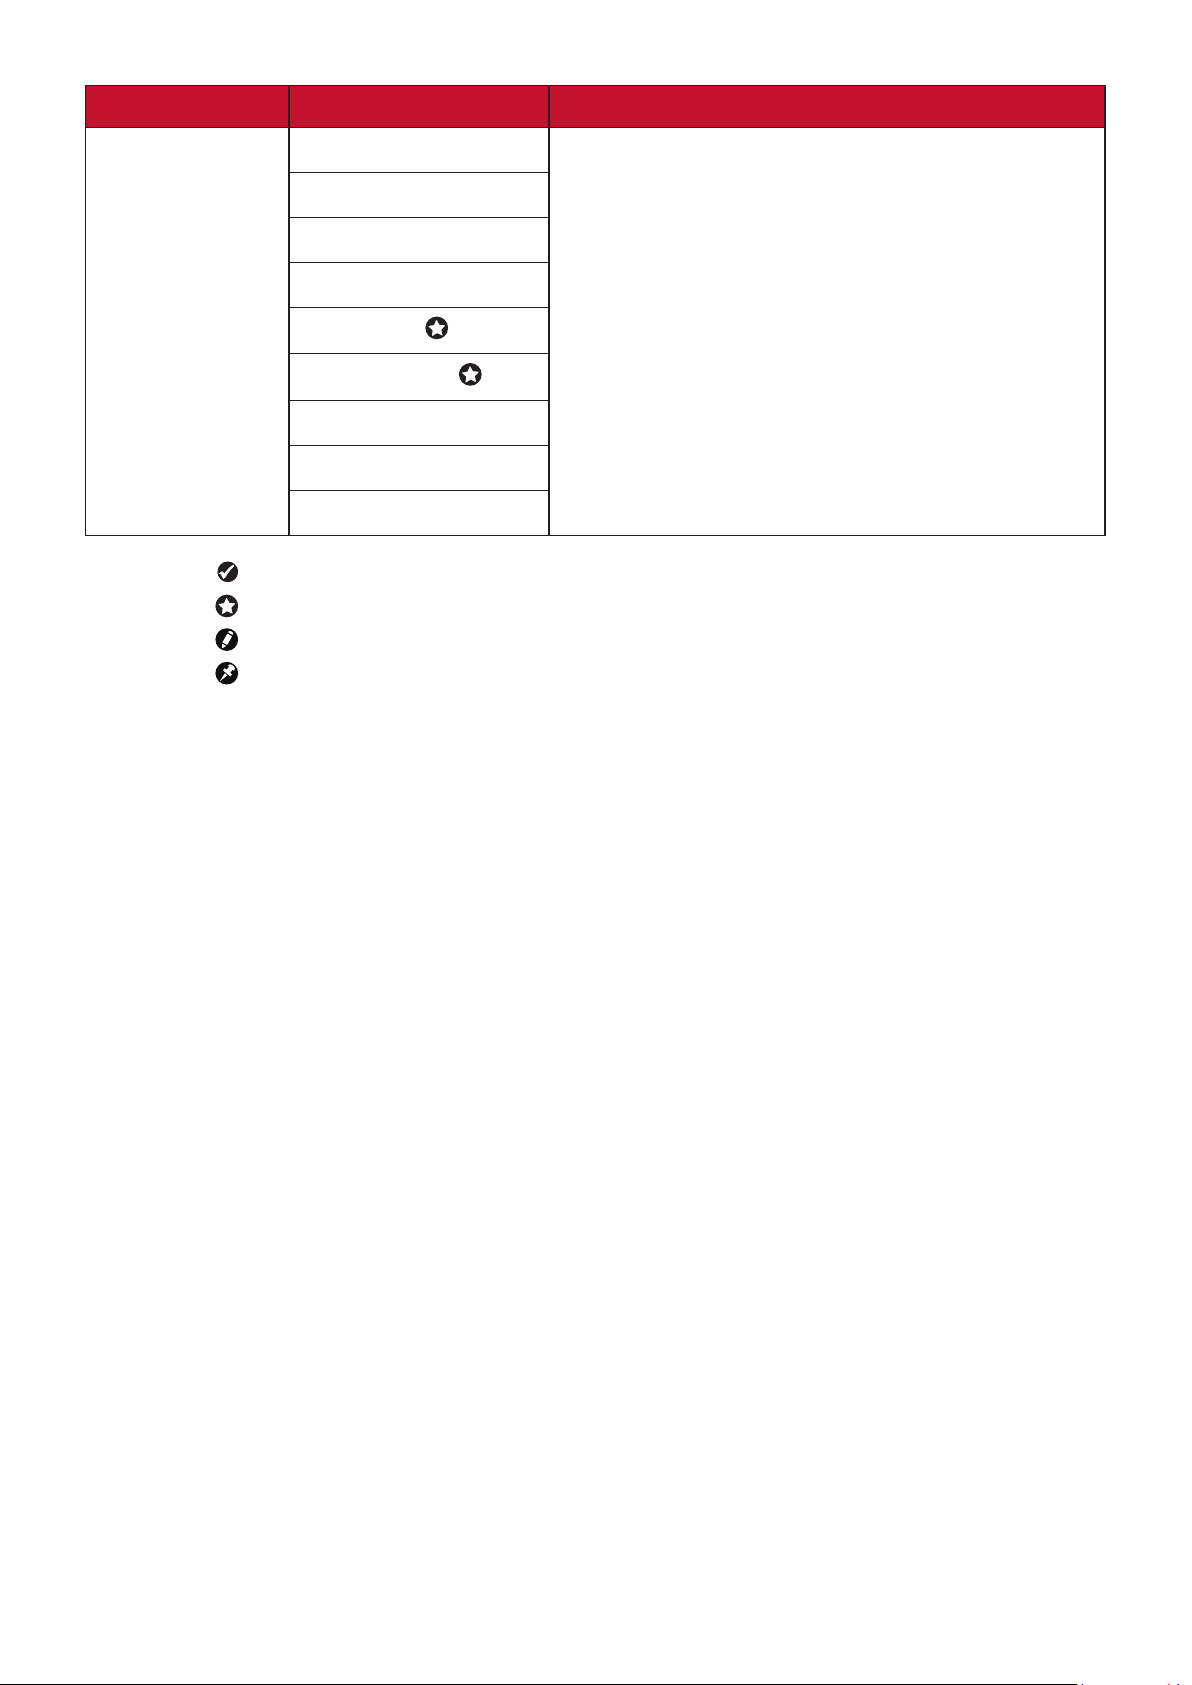
Main Menu Sub-menu Menu Opon
INFORMATION
Source
Color Mode
Resolution
Color System
IP address
MAC address
Firmware Version
3X Fast Input
S/N
NOTE: The funcons are available on LS560W/LS560WH/LS560HDH.
The funcons are available on LS560W/LS560WH/LS510WH-2.
The funcons are available on LS510W/LS560W.
The funcons are available on LS510W/LS560W/LS560HDH.
45
Page 46
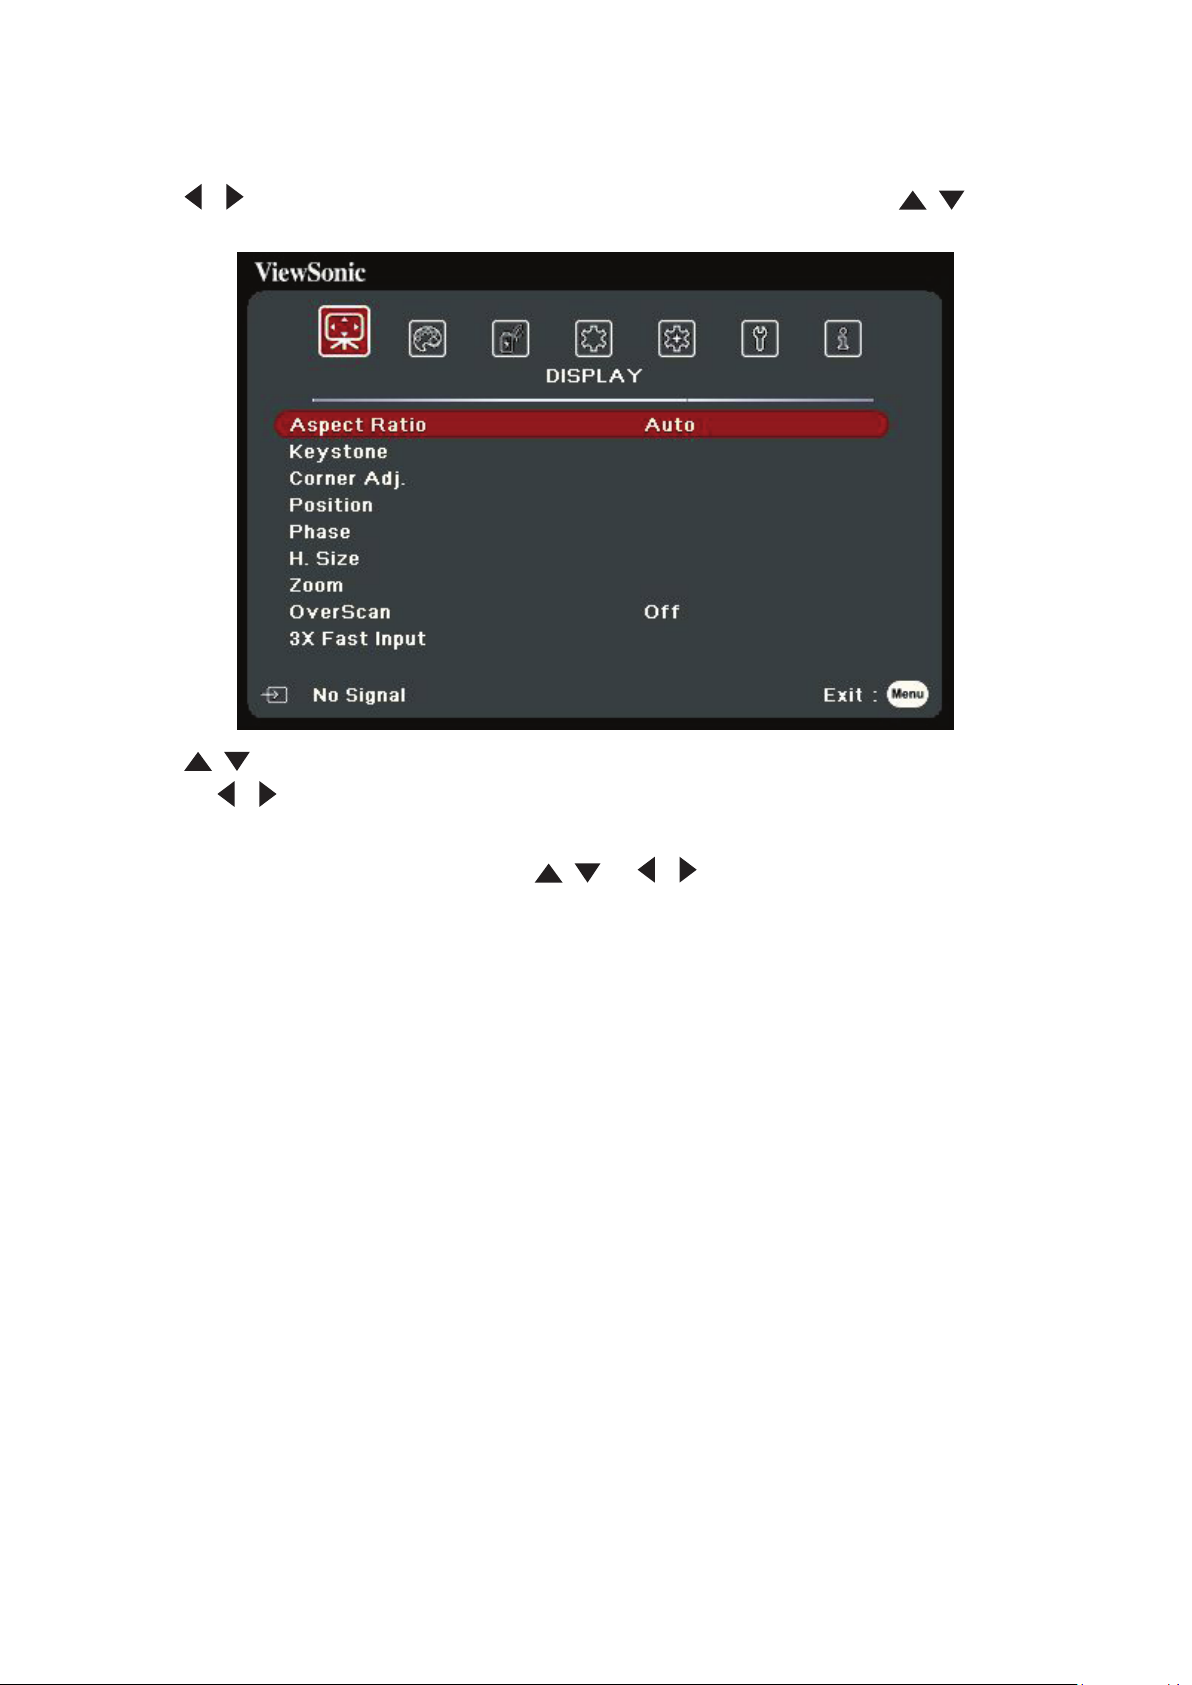
DISPLAY Menu
1. Press the Menu buon to display the On-Screen Display (OSD) Menu.
2. Press
the DISPLAY menu.
3. Press / to select the menu opon. Then press Enter to display its sub-menu,
/ to select the DISPLAY menu. Then press Enter or use / to access
or press / to adjust/select the seng.
NOTE:
Some sub-menu opons may have another sub-menu. To enter the respecve
sub-menu, press Enter. Use / or / to adjust/select the seng.
46
Page 47
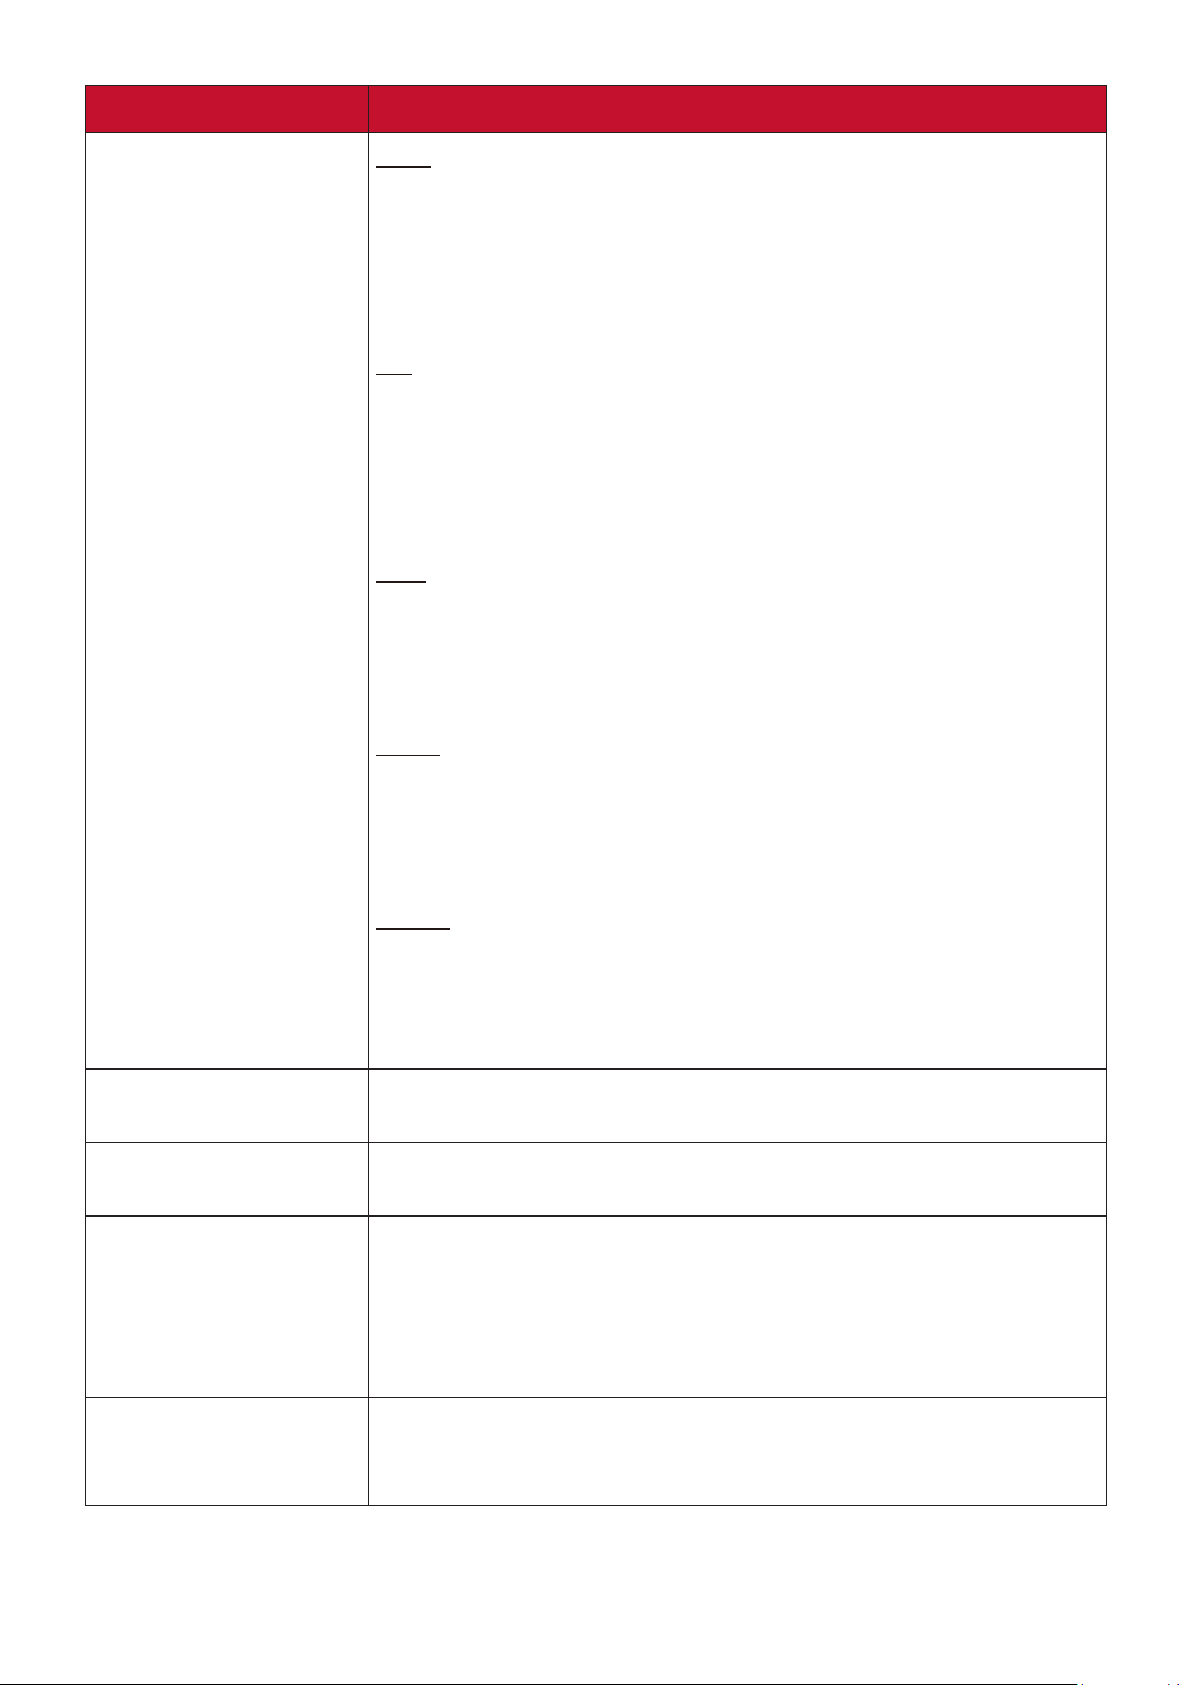
Menu Option Description
Aspect Ratio
Auto
Scales an image proportionally to fit the projector’s native
resolution in its horizontal width. This is suitable for the
incoming image which is neither in 4:3 nor 16:9 and you want
to make most use of the screen without altering the image’s
aspect ratio.
4:3
Scales an image so that it is displayed in the center of the
screen with a 4:3 aspect ratio. This is most suitable for 4:3
images like computer monitors, standard definition TV, and
4:3 aspect DVD movies, as it displays them without aspect
alteration.
16:9
Scales an image so that it is displayed in the center of the
screen with a 16:9 aspect ratio. This is most suitable for images
which are already in a 16:9 aspect, like high definition TV, as it
displays them without aspect alteration.
Keystone
Corner Adj.
Position
16:10
Scales an image so that it is displayed in the center of the
screen with a 16:10 aspect ratio. This is most suitable for
images which are already in a 16:10 aspect, as it displays them
without aspect alteration.
Native
Projects an image as its original resolution and resizes it
to fit within the display area. For input signals with lower
resolutions, the projected image will be displayed in its original
size.
Adjusts the keystoning situation where the projected image
becomes a trapezoid due to angled projection.
Adjusts the shape and size of an image that is unevenly
rectangular on all sides.
Adjust the position of the projected image.
NOTE:
• This funcon is only available when a PC input signal is
selected.
Phase
• The adjustment range may vary under dierent mings.
Adjusts the clock phase to reduce image distortion.
NOTE: This funcon is only available when a PC input signal is
selected.
47
Page 48
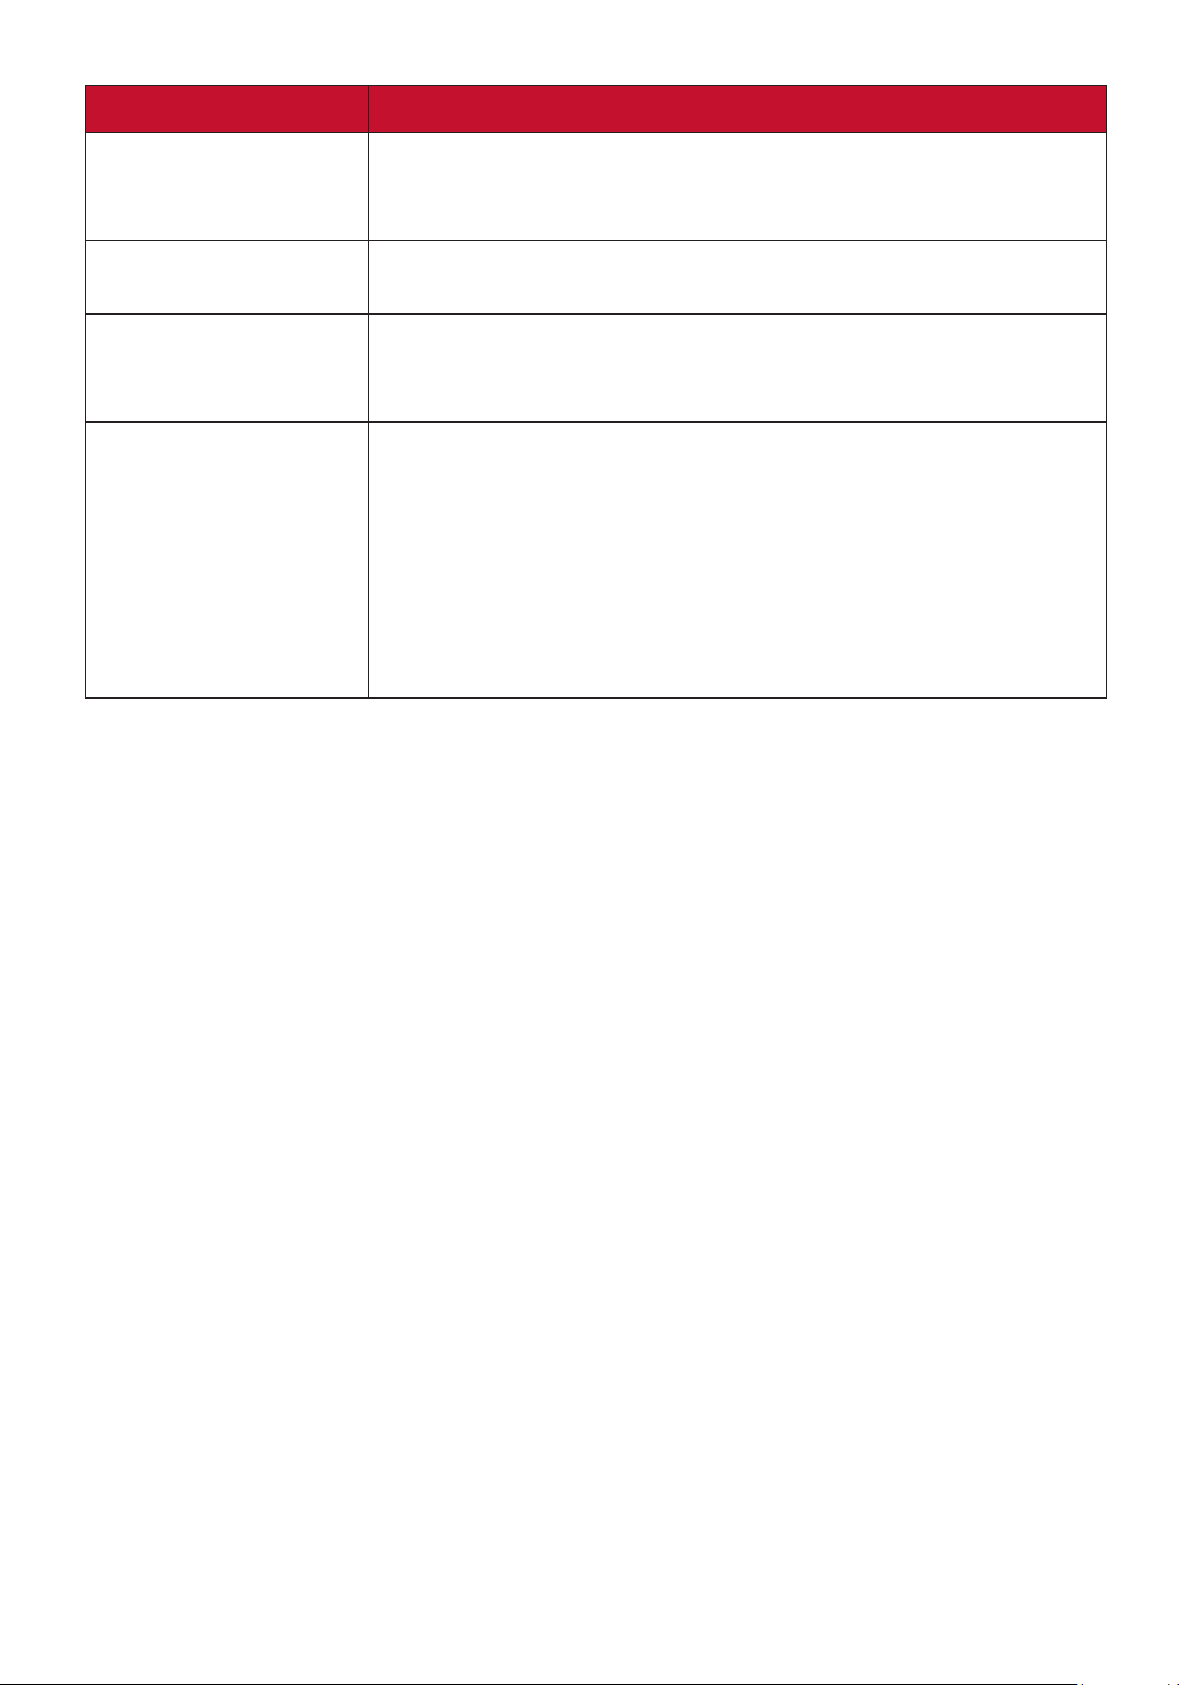
Menu Option Description
H. Size
Zoom
OverScan
3X Fast Input
Adjusts the horizontal width of the image.
NOTE: This funcon is only available when a PC input signal is
selected.
Magnifies the projected image and allows you to navigate the
image.
Adjusts the overscan rate from 0 to 5.
NOTE: This funcon is only available when a Composite Video or
HDMI input signal is selected.
This function is favorable to frame rate reducing. Quick
response time in native timing can be achieved. When enabled,
the following settings will return to factory preset values:
Keystone, Corner Adj. (LS560W/LS560WH/LS560HDH only),
Aspect Ratio, OverScan, Zoom, Position (LS510W/LS560W
only).
NOTE: This funcon is only available when a nave ming input
signal is selected.
48
Page 49
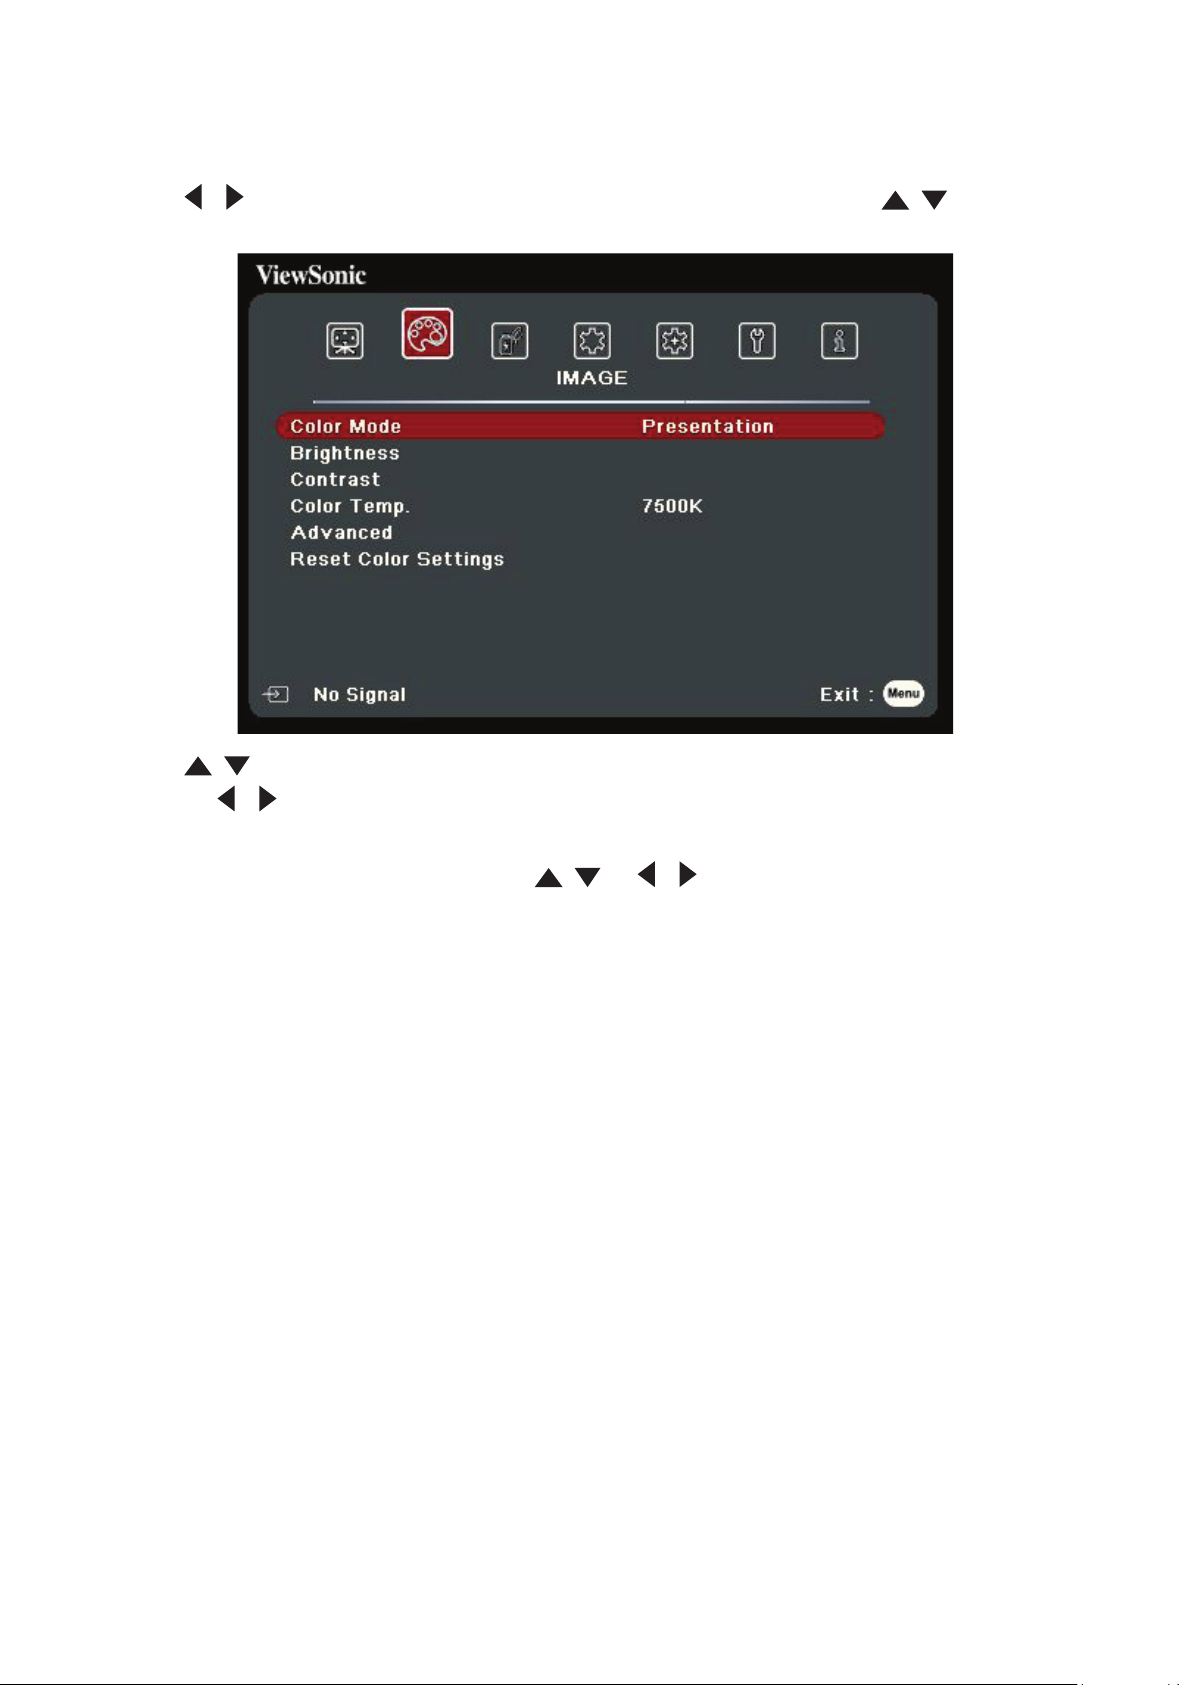
IMAGE Menu
1. Press the Menu buon to display the On-Screen Display (OSD) Menu.
2. Press
the IMAGE menu.
3. Press / to select the menu opon. Then press Enter to display its sub-menu,
/ to select the IMAGE menu. Then press Enter or use / to access
or press / to adjust/select the seng.
NOTE:
Some sub-menu opons may have another sub-menu. To enter the respecve
sub-menu, press Enter. Use / or / to adjust/select the seng.
49
Page 50
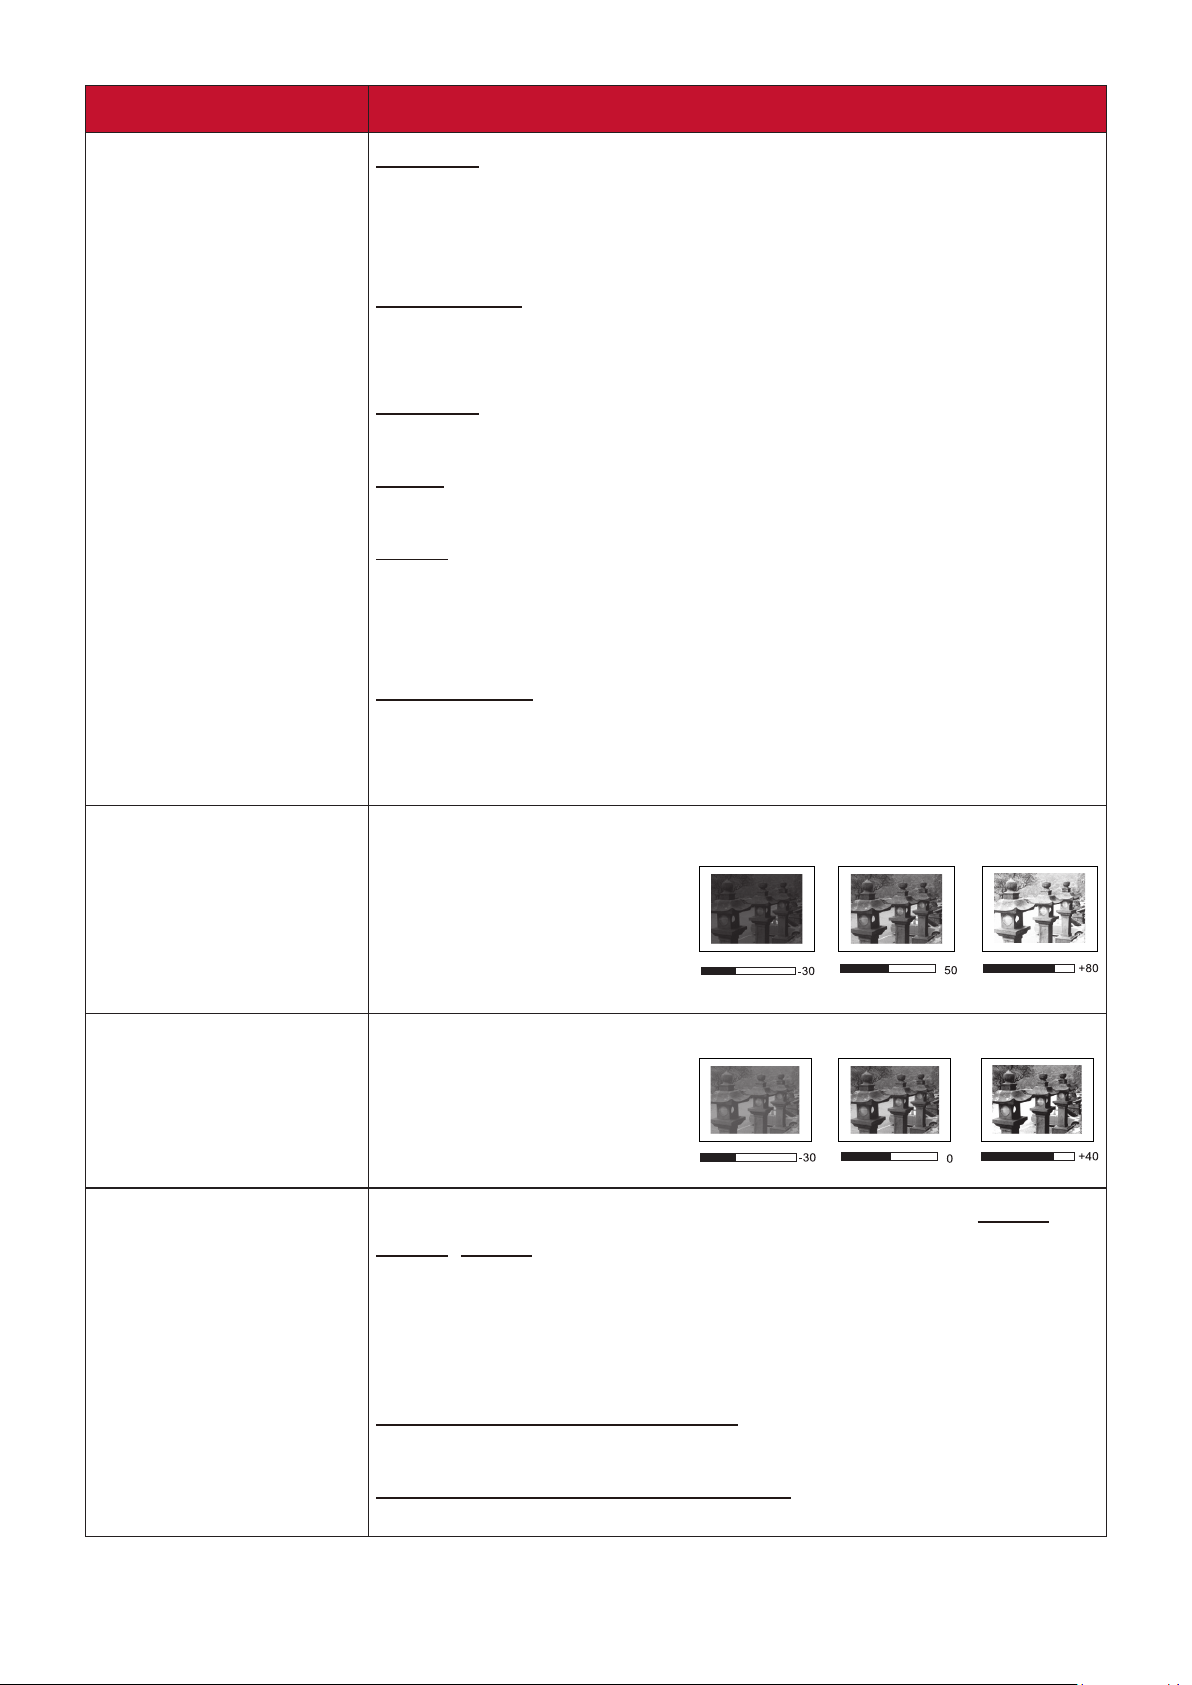
Menu Option Description
Color Mode
Brightest
Maximizes the brightness of the projected image. This mode
is suitable for environments where extra-high brightness is
required, such as using the projector in well lit rooms.
Presentation
Designed for presentations under daylight environment to
match PC and notebook coloring.
Standard
Designed for normal circumstances in a daylight environment.
Photo
Designed for photo viewing.
Movie
For playing colorful movies, video clips from digital cameras or
DVs through the PC input for best viewing in a blackened (little
light) environment.
User 1/User 2
Recalls the customized settings. After User 1/User 2 is selected,
some of the sub-menus under the IMAGE menu can be
adjusted, according to your selected input source.
Brightness
Contrast
Color Temp.
The higher the value, the brighter the image.
Adjust this option so the
black areas of the image
appear just as black and
details in the dark area are
more visible.
Use this to set the peak white level after you have
previously adjusted the
Brightness setting.
There are several preset color temperature settings (9300K,
7500K, 6500K) available. The available settings may vary
according to the personal preferences.
To set a custom color temperature, you can further adjust the
following items:
Red Gain/Green Gain/Blue Gain
Adjusts the Contrast levels of Red, Green, and Blue.
Red Offset/Green Offset/Blue Offset
Adjusts the Brightness levels of Red, Green, and Blue.
50
Page 51
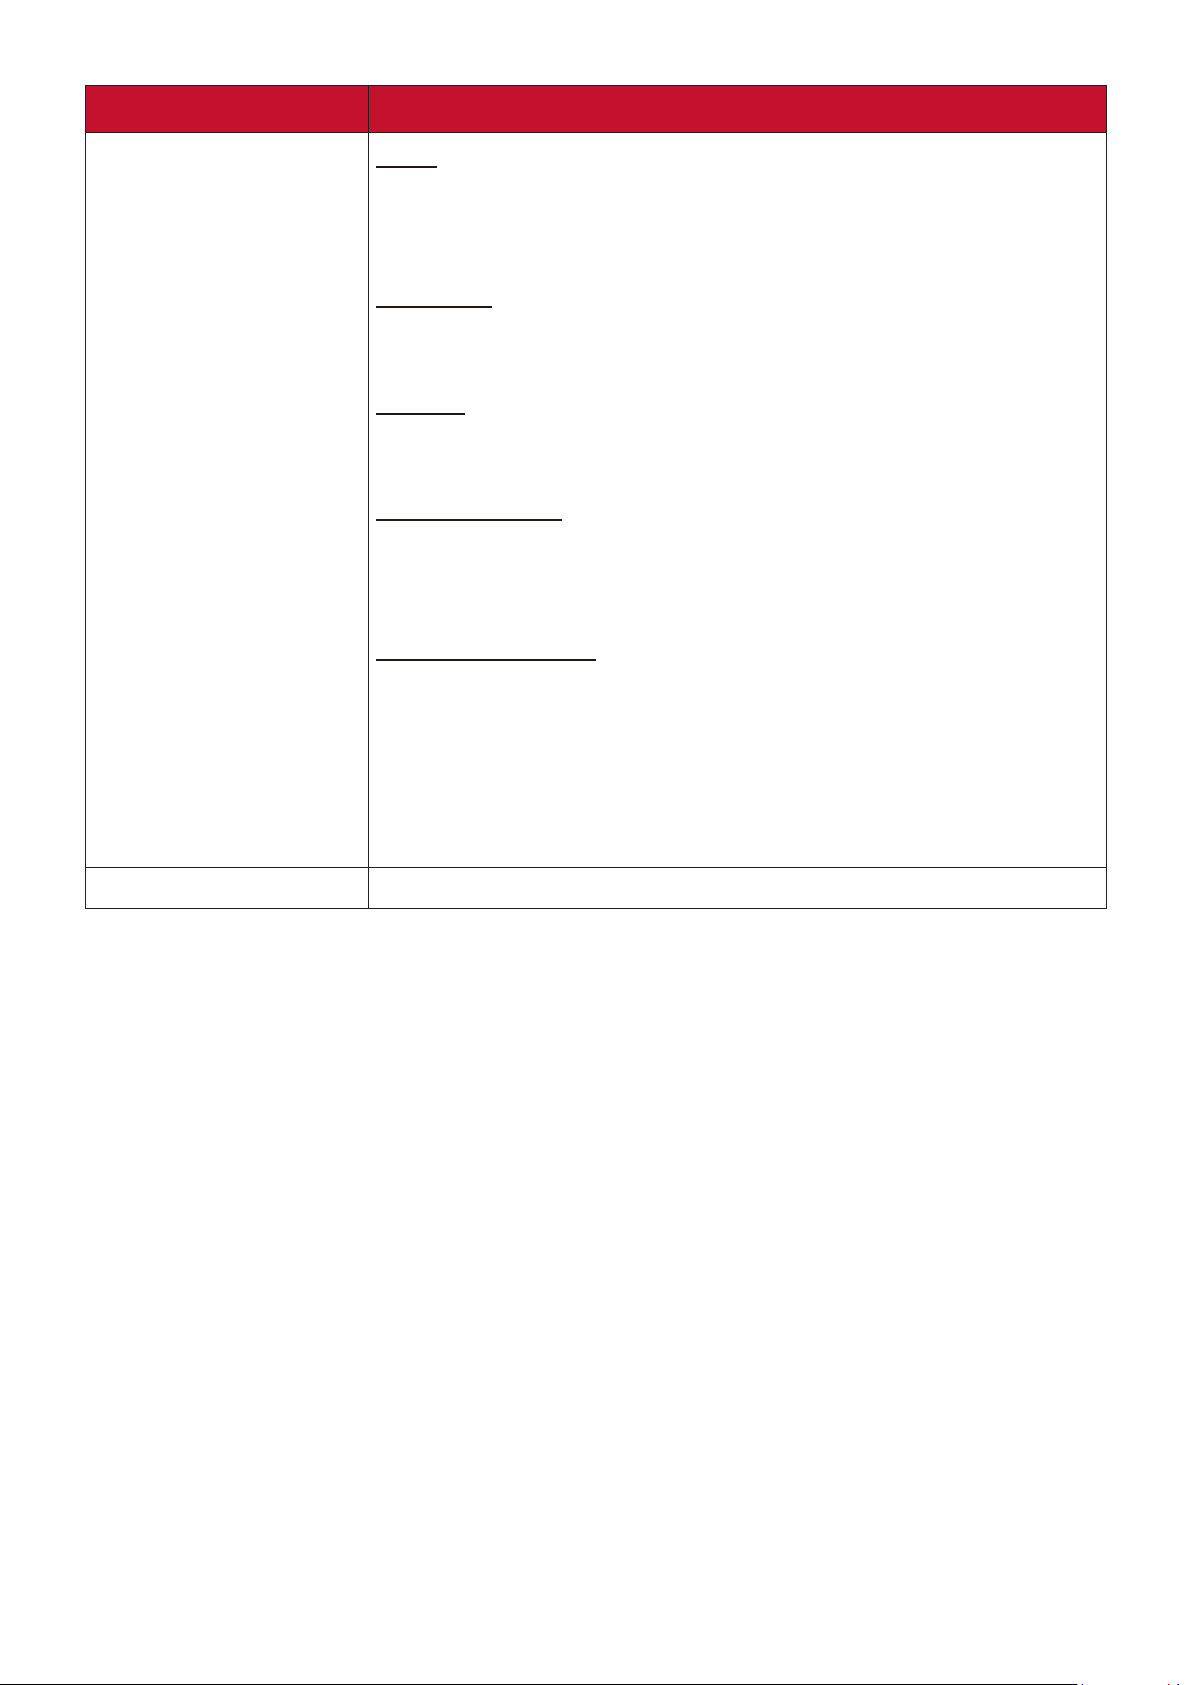
Menu Option Description
Advanced
Color
A lower setting produces less saturated colors. If the setting
is too high, colors will be overpowering and may appear
unrealistic.
Sharpness
A higher value will sharpen the image, while a lower value will
soften the image.
Gamma
Gamma refers to the brightness level of the projector’s
grayscale levels.
Noise Reduction
This function reduces electrical image noise caused by different
media players. The higher the setting, the less the noise. (Not
available when input signal is HDMI.)
Color Management
Only in permanent installations with controlled lighting levels
such as boardrooms, lecture theaters, or home theaters,
should color management be considered. Color management
provides fine color control adjustment to allow for more
accurate color reproduction. Select Primary Color first and
adjust its range/values in Hue, Saturation and Gain.
Reset Color Settings
Returns current image settings to the factory preset values.
51
Page 52
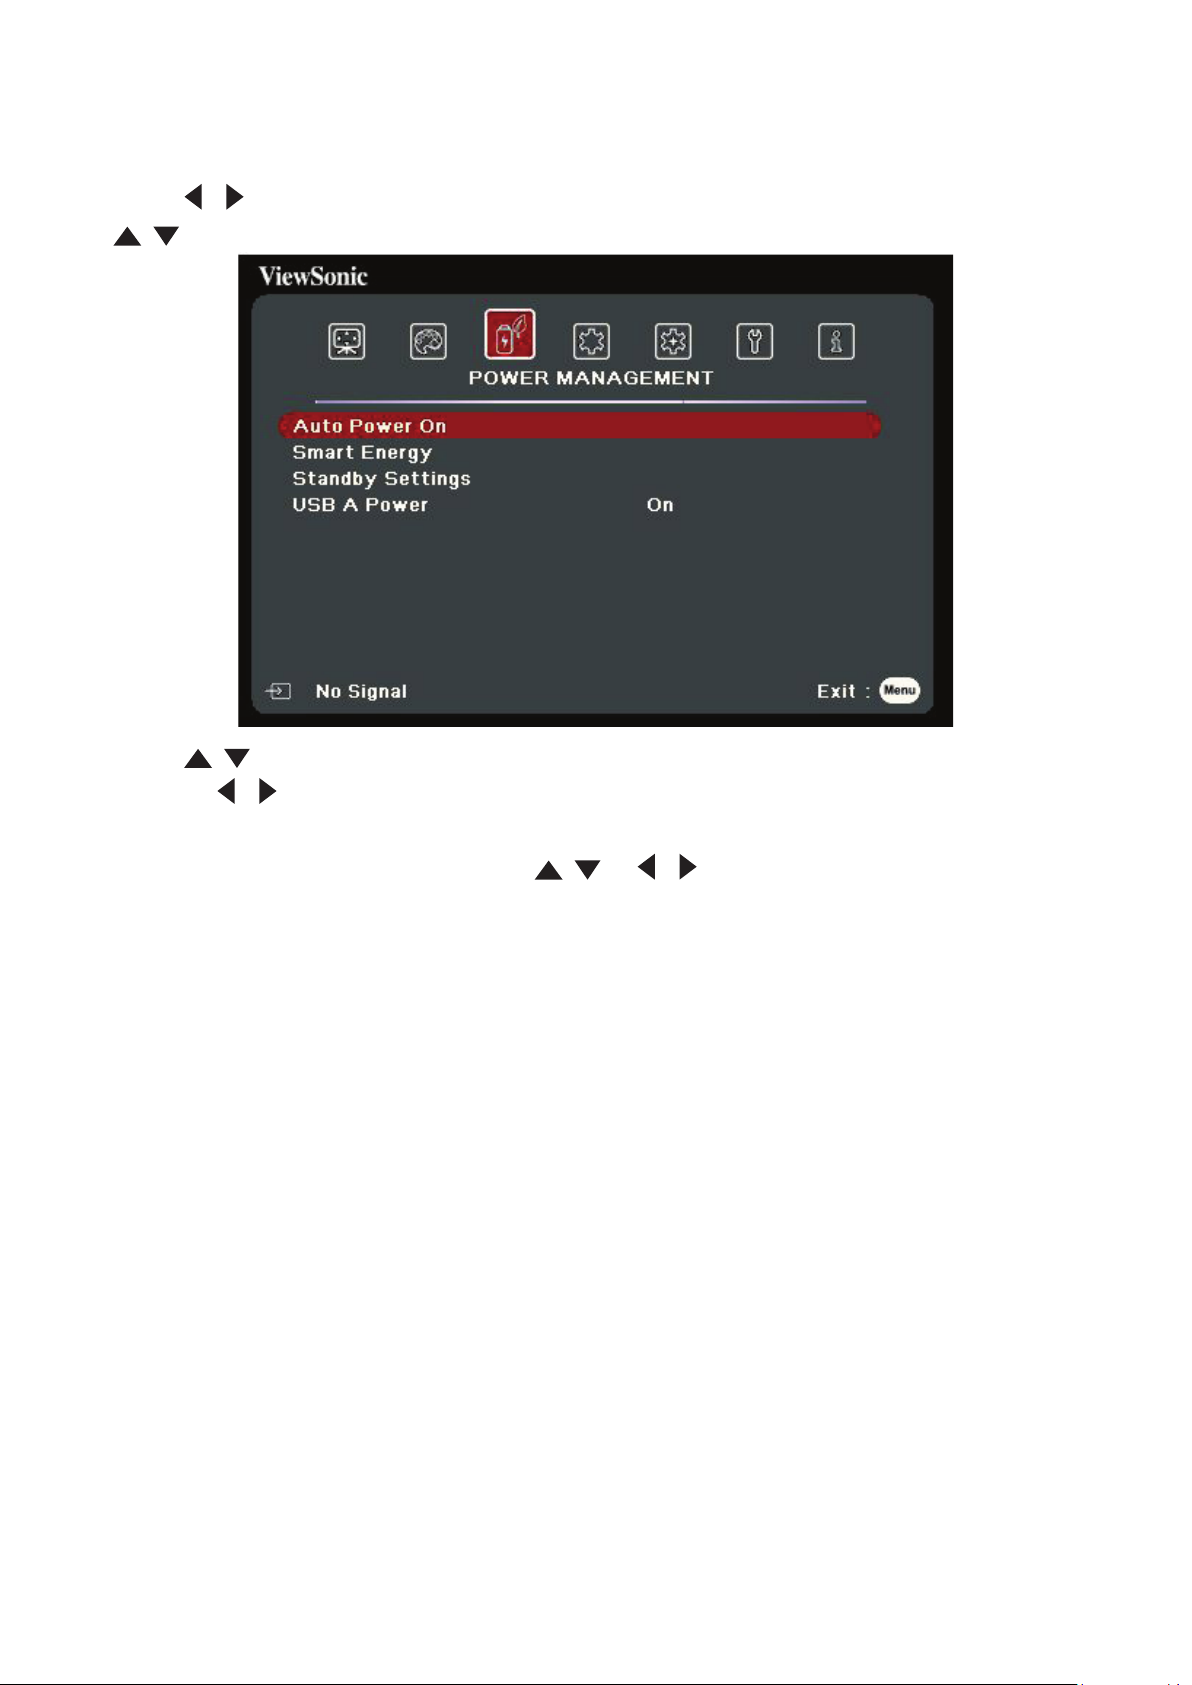
POWER MANAGEMENT Menu
1. Press the Menu buon to display the On-Screen Display (OSD) Menu.
2. Press
3. Press / to select the menu opon. Then press Enter to display its sub-menu,
/ to select the POWER MANAGEMENT menu. Then press Enter or use
/ to access the POWER MANAGEMENT menu.
or press / to adjust/select the seng.
NOTE:
Some sub-menu opons may have another sub-menu. To enter the respecve
sub-menu, press Enter. Use / or / to adjust/select the seng.
52
Page 53
Menu Option Description
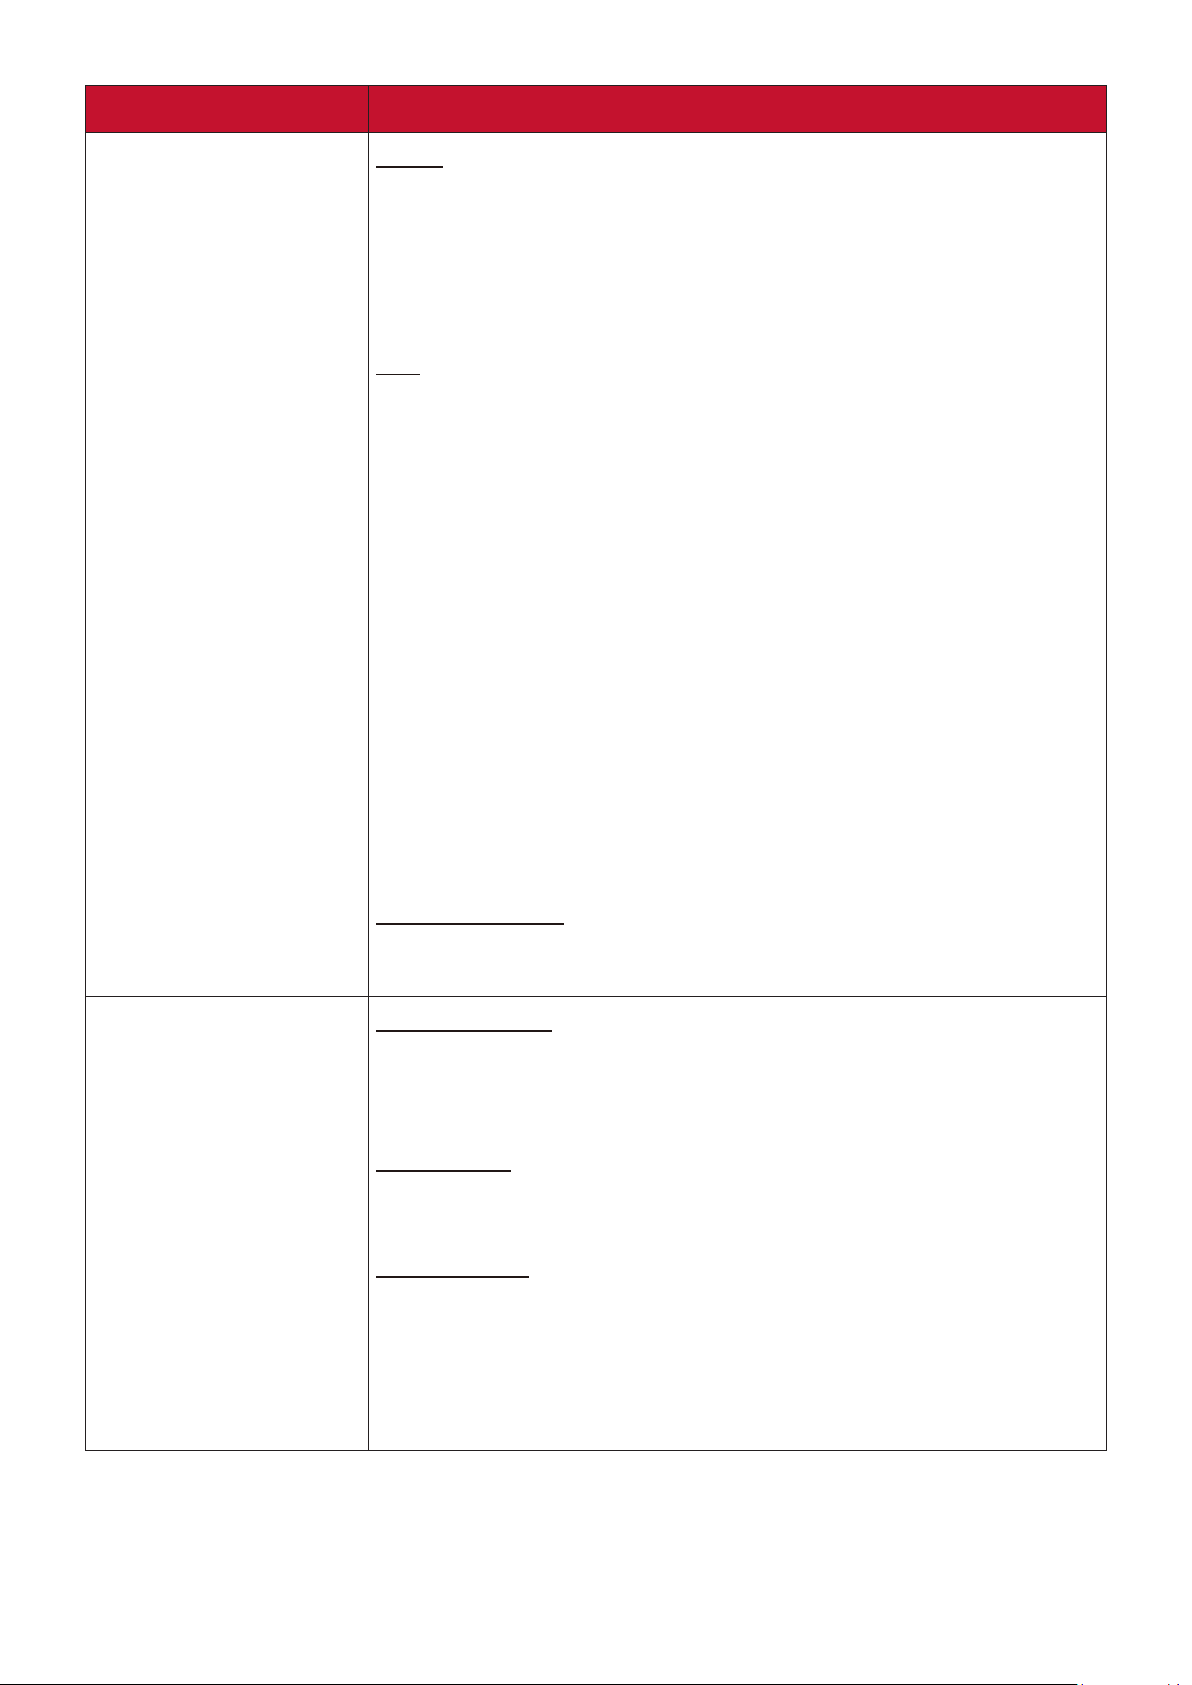
Auto Power On
Signal
Selecting VGA/HDMI allows the projector to turn on
automatically once the VGA/HDMI signal is fed through the
VGA/HDMI cable. You can also select All and the projector will
turn on automatically upon receiving either a VGA or HDMI
signal.
CEC
This projector supports CEC (Consumer Electronics Control)
function for synchronized power on/off operation via HDMI
connection. That is, if a device that also supports CEC function
is connected to the HDMI input of the projector, when the
projector’s power is turned off, the power of the connected
device will also be turned off automatically. When the power
of the connected device is turned on, the projector’s power
will be turned on automatically.
NOTE:
• In order for the CEC funcon to work properly, make sure
that the device is correctly connected to the HDMI input
of the projector via an HDMI cable, and its CEC funcon is
turned on.
Smart Energy
• Depending on the connected device, the CEC funcon may
not work.
Direct Power On
Allows the projector to turn on automatically once power is fed
through the power cord.
Auto Power Off
Allows the projector to turn off automatically after a set
period of time once no input source is detected to prevent
unnecessary waste of light source life.
Sleep Timer
Allows the projector to turn off automatically after a set period
of time to prevent unnecessary waste of light source life.
Power Saving
Lowers power consumption if no input source is detected.
When Enable is selected, the projector light source mode will
change to SuperEco mode after no signal is detected for five (5)
minutes. This will also help prevent any unnecessary waste of
light source life.
53
Page 54
Menu Option Description
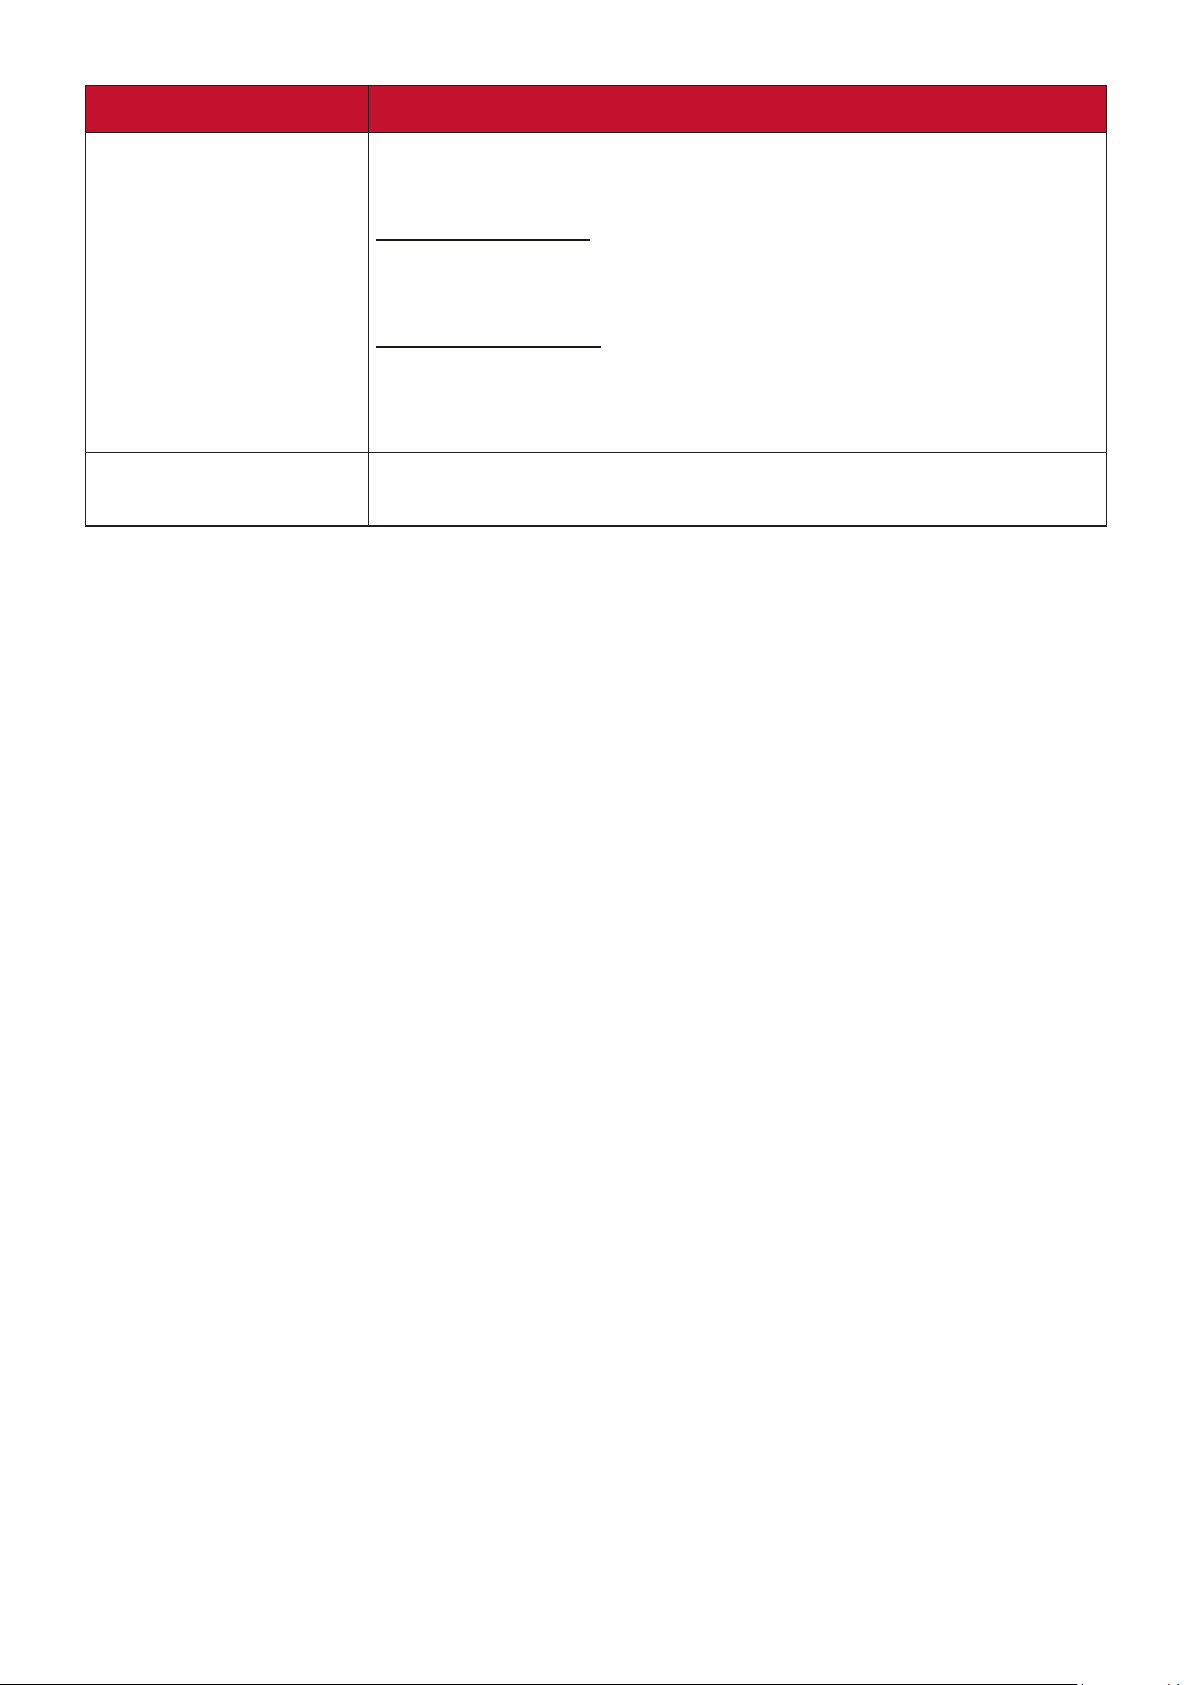
Standby Settings
USB A Power
The functions below are available in standby mode (plugged in,
but not turned on).
VGA Loop Through
When selecting On, the projector outputs the signal received
only from COMPUTER IN.
Audio Pass Through
When selecting On, the projector outputs an audio signal when
the Audio In and Audio Out sockets are correctly connected to
a proper device.
When On, the USB Type A port can supply power, and the
Control Method will automatically switch to RS-232.
54
Page 55
BASIC Menu
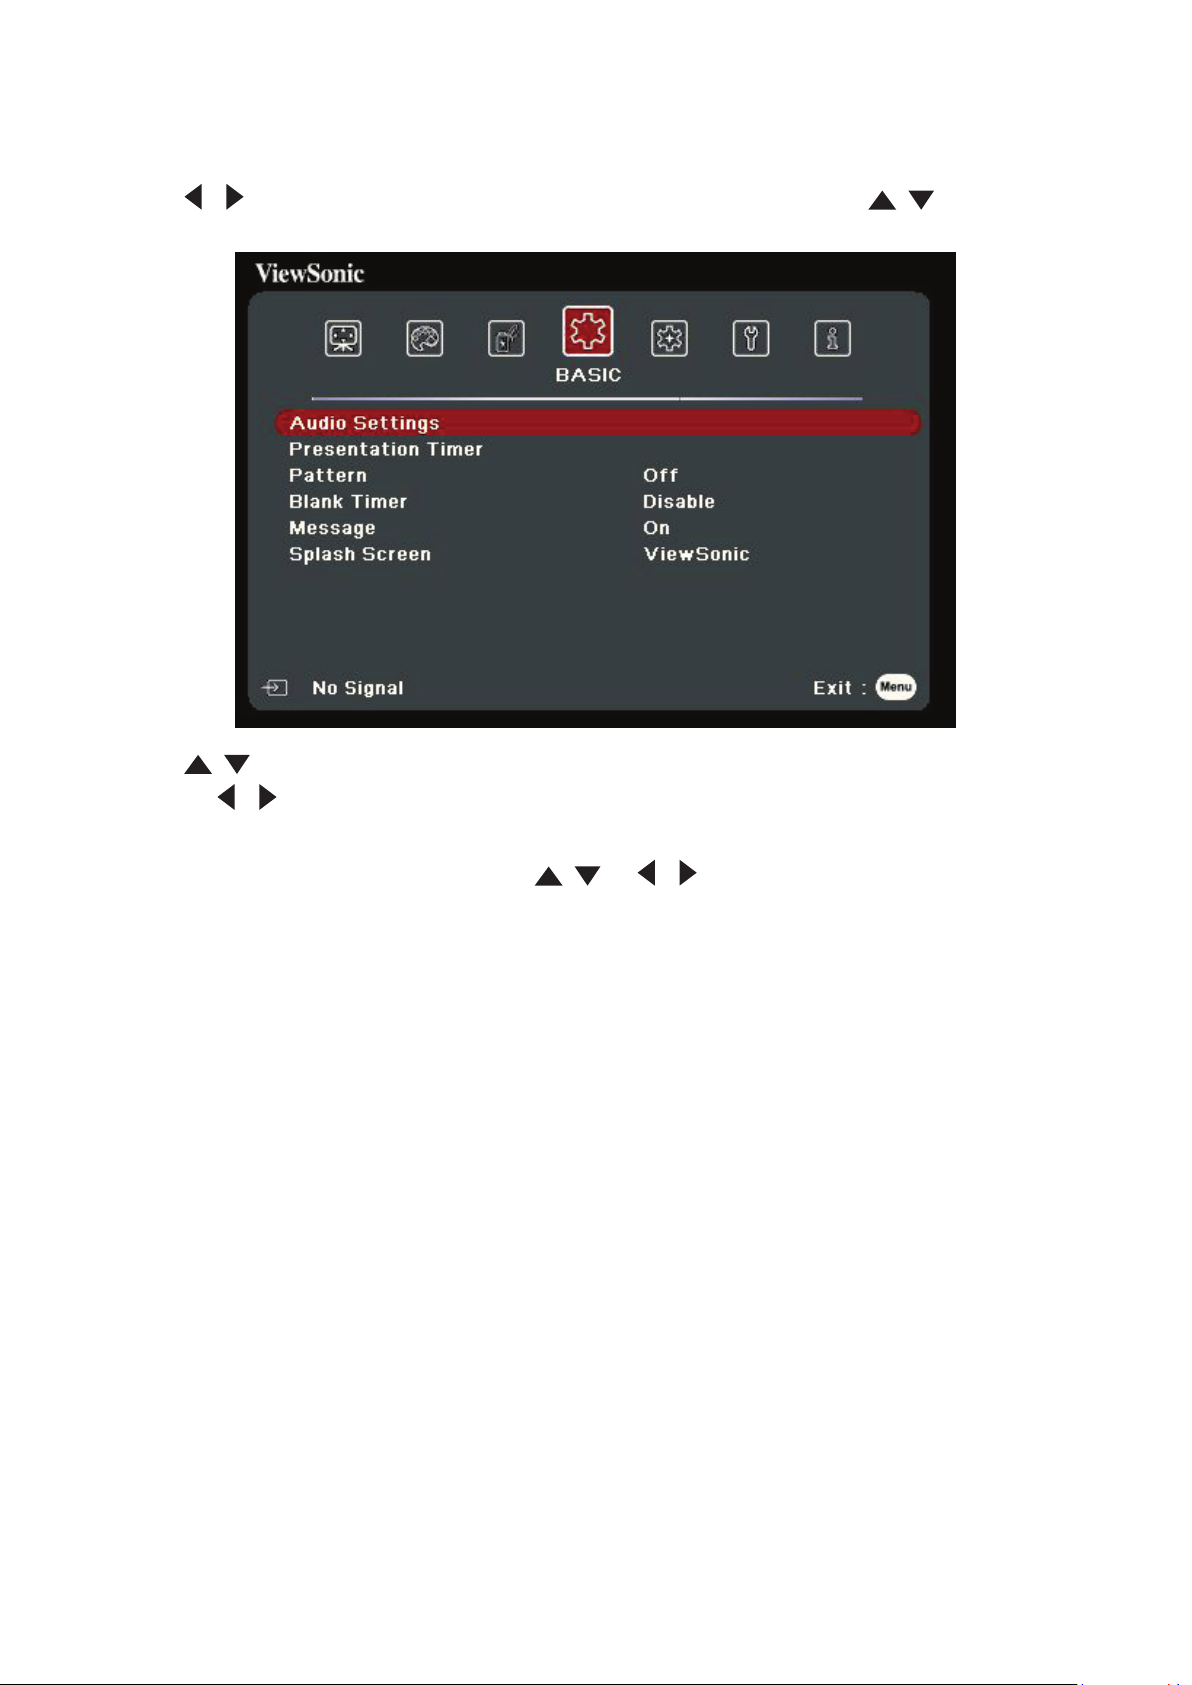
1. Press the Menu buon to display the On-Screen Display (OSD) Menu.
2. Press
BASIC menu.
3. Press / to select the menu opon. Then press Enter to display its sub-menu,
/ to select the BASIC menu. Then press Enter or use / to access the
or press / to adjust/select the seng.
NOTE:
Some sub-menu opons may have another sub-menu. To enter the respecve
sub-menu, press Enter. Use / or / to adjust/select the seng.
55
Page 56
Menu Option Description
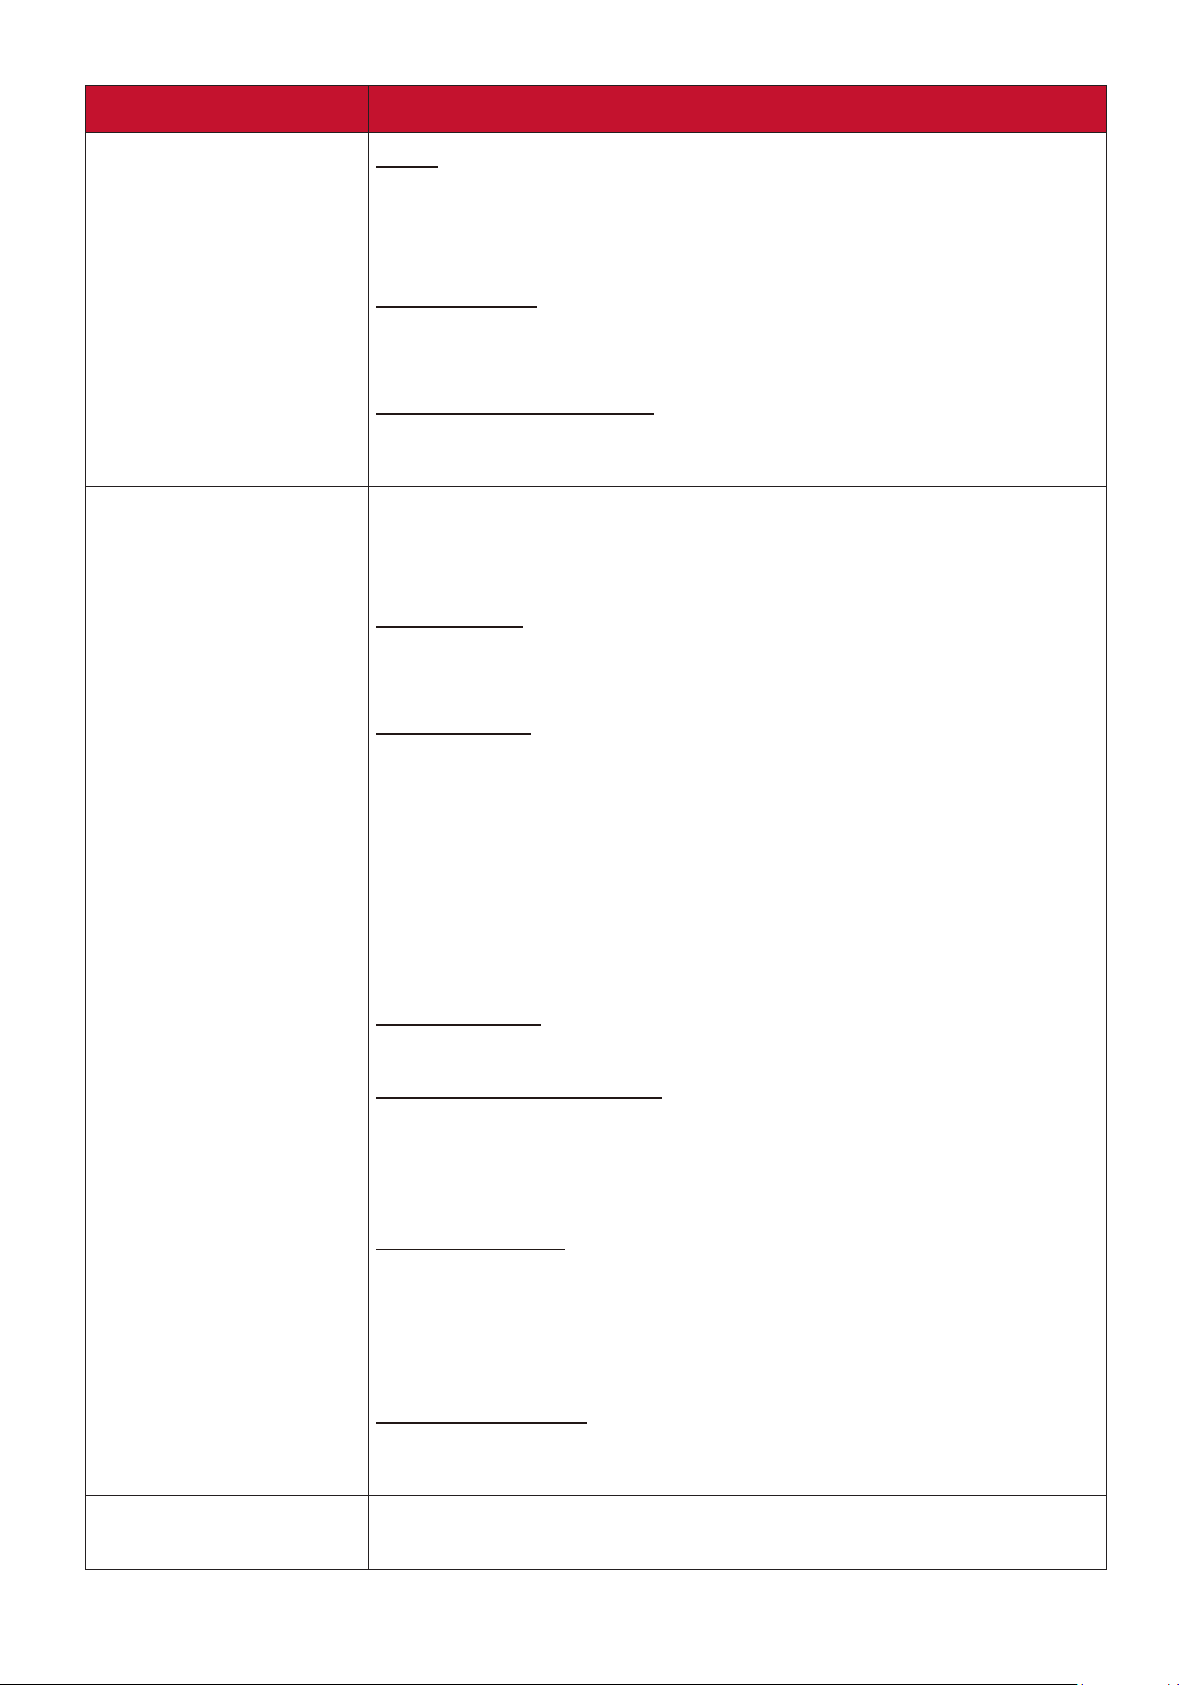
Audio Settings
Presentation Timer
Mute
Select On to temporarily turn off the projector’s internal
speaker or the volume being output from the audio output
jack.
Audio Volume
Adjusts the volume level of the projector’s internal speaker or
the volume being output from the audio output jack.
Power On/Off Ring Tone
Turns on/off the ring tone during the starting up and shutting
down process.
Presentation timer can indicate the presentation time on the
screen to help you achieve better time management when
giving presentations.
Timer Period
Sets the time period. If the timer is already on, the timer will
restart whenever the Timer Period is reset.
Timer Display
Allows you to decide if you want the timer to show up on the
screen for one of the following time periods:
Always: Displays the mer on screen throughout the
presentaon me.
1 min/2 min/3 min: Displays the mer on screen in the
last 1/2/3 minute(s).
Never: Hides the mer throughout the presentaon me.
Timer Position
Sets the timer position.
Timer Counting Direction
Sets your desired counting direction between:
Count Down: Decreases from the preset me to 0.
Count Up: Increases from 0 to the preset me.
Sound Reminder
Allows you to decide if you want to activate a sound reminder.
Once enabled, a double beep sound will be heard at the last 30
seconds of counting down/up, and a triple beep sound will be
produced when the timer is up.
Start Counting/Off
Select Start Counting to activate the timer. Select Off to cancel
it.
Pattern
Helps adjust the image size and focus, and checks for distortion
in the projected image.
56
Page 57

Menu Option Description
Blank Timer
Message
Splash Screen
Allows the projector to return the image automatically after a
period of time when there is no action taken on the blank
screen. To display the blank screen, press Blank on the projector
or remote control.
NOTE: Do not block the projecon lens as this could cause the
blocking object to become heated and deformed or even
cause a re.
Sets reminder messages On or Off.
Selects which logo screen will appear during projector start-up.
57
Page 58
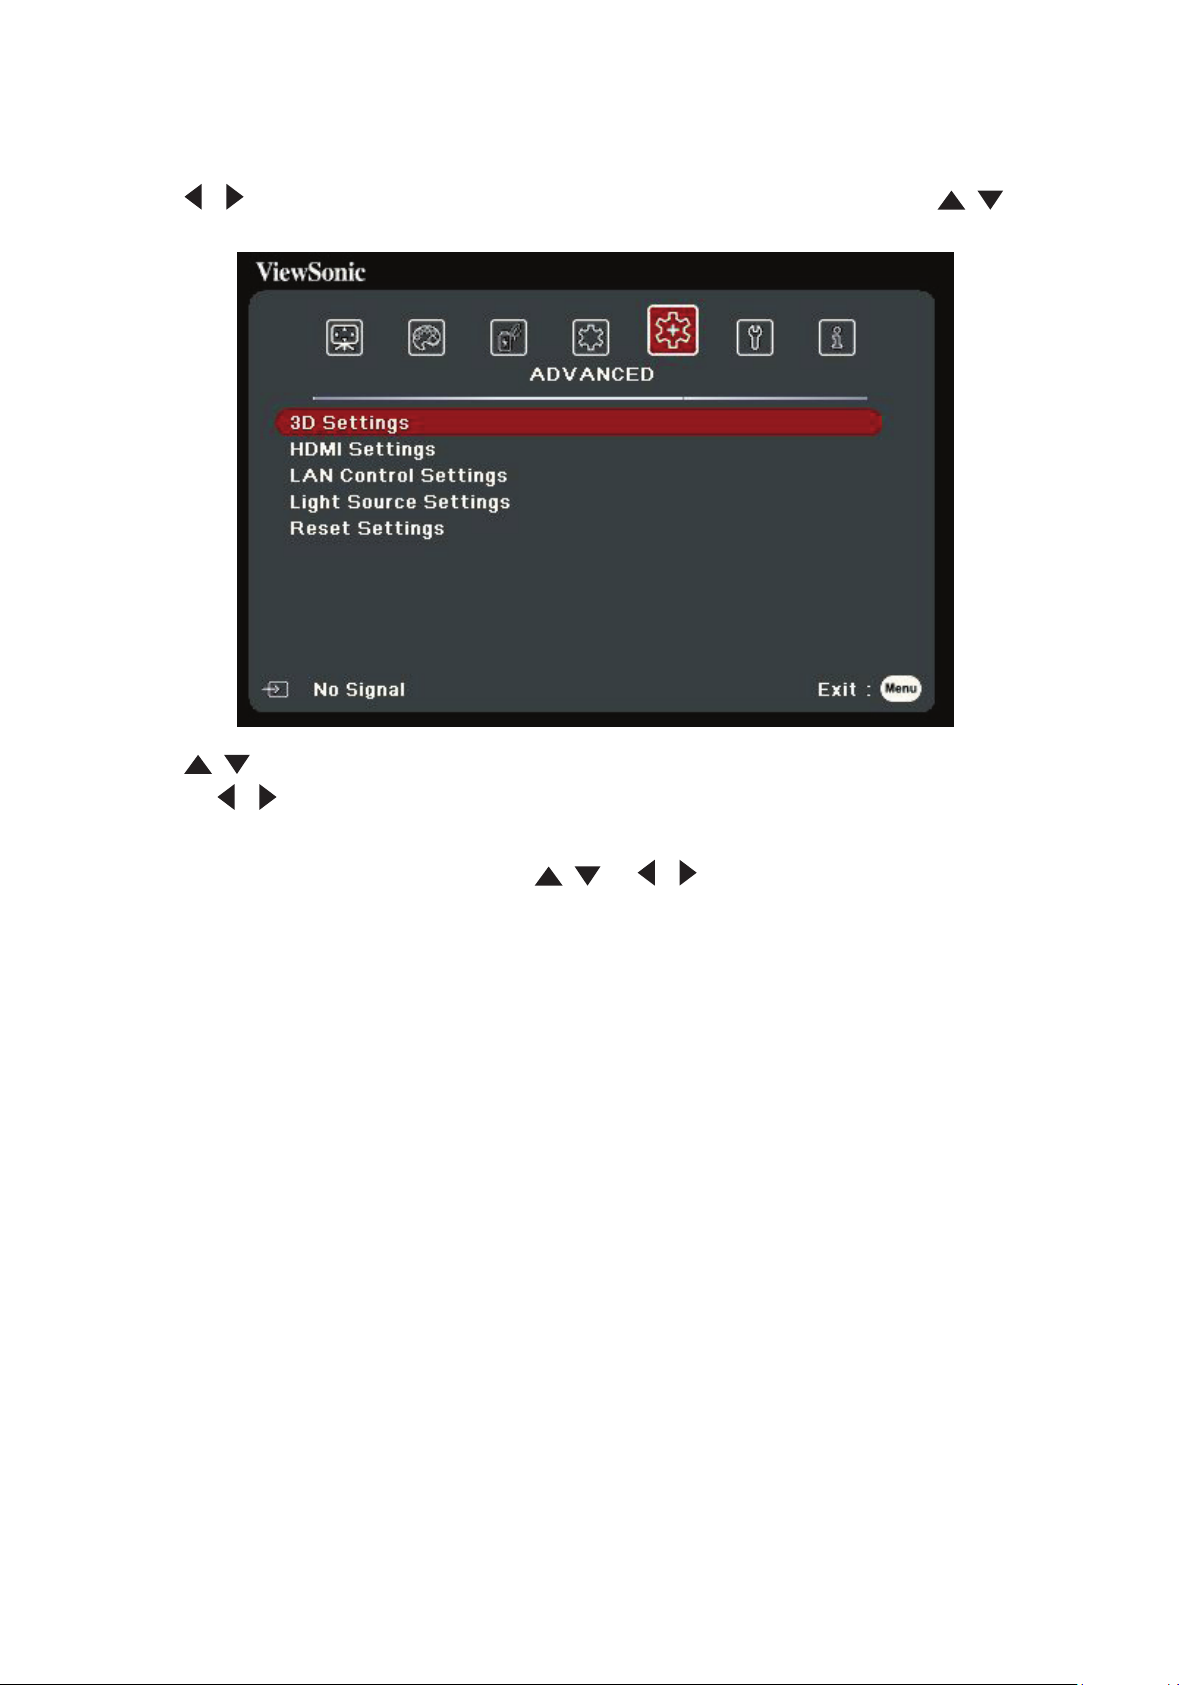
ADVANCED Menu
1. Press the Menu buon to display the On-Screen Display (OSD) Menu.
2. Press
access the ADVANCED menu.
3. Press / to select the menu opon. Then press Enter to display its sub-menu,
/ to select the ADVANCED menu. Then press Enter or use / to
or press / to adjust/select the seng.
NOTE:
Some sub-menu opons may have another sub-menu. To enter the respecve
sub-menu, press Enter. Use / or / to adjust/select the seng.
58
Page 59
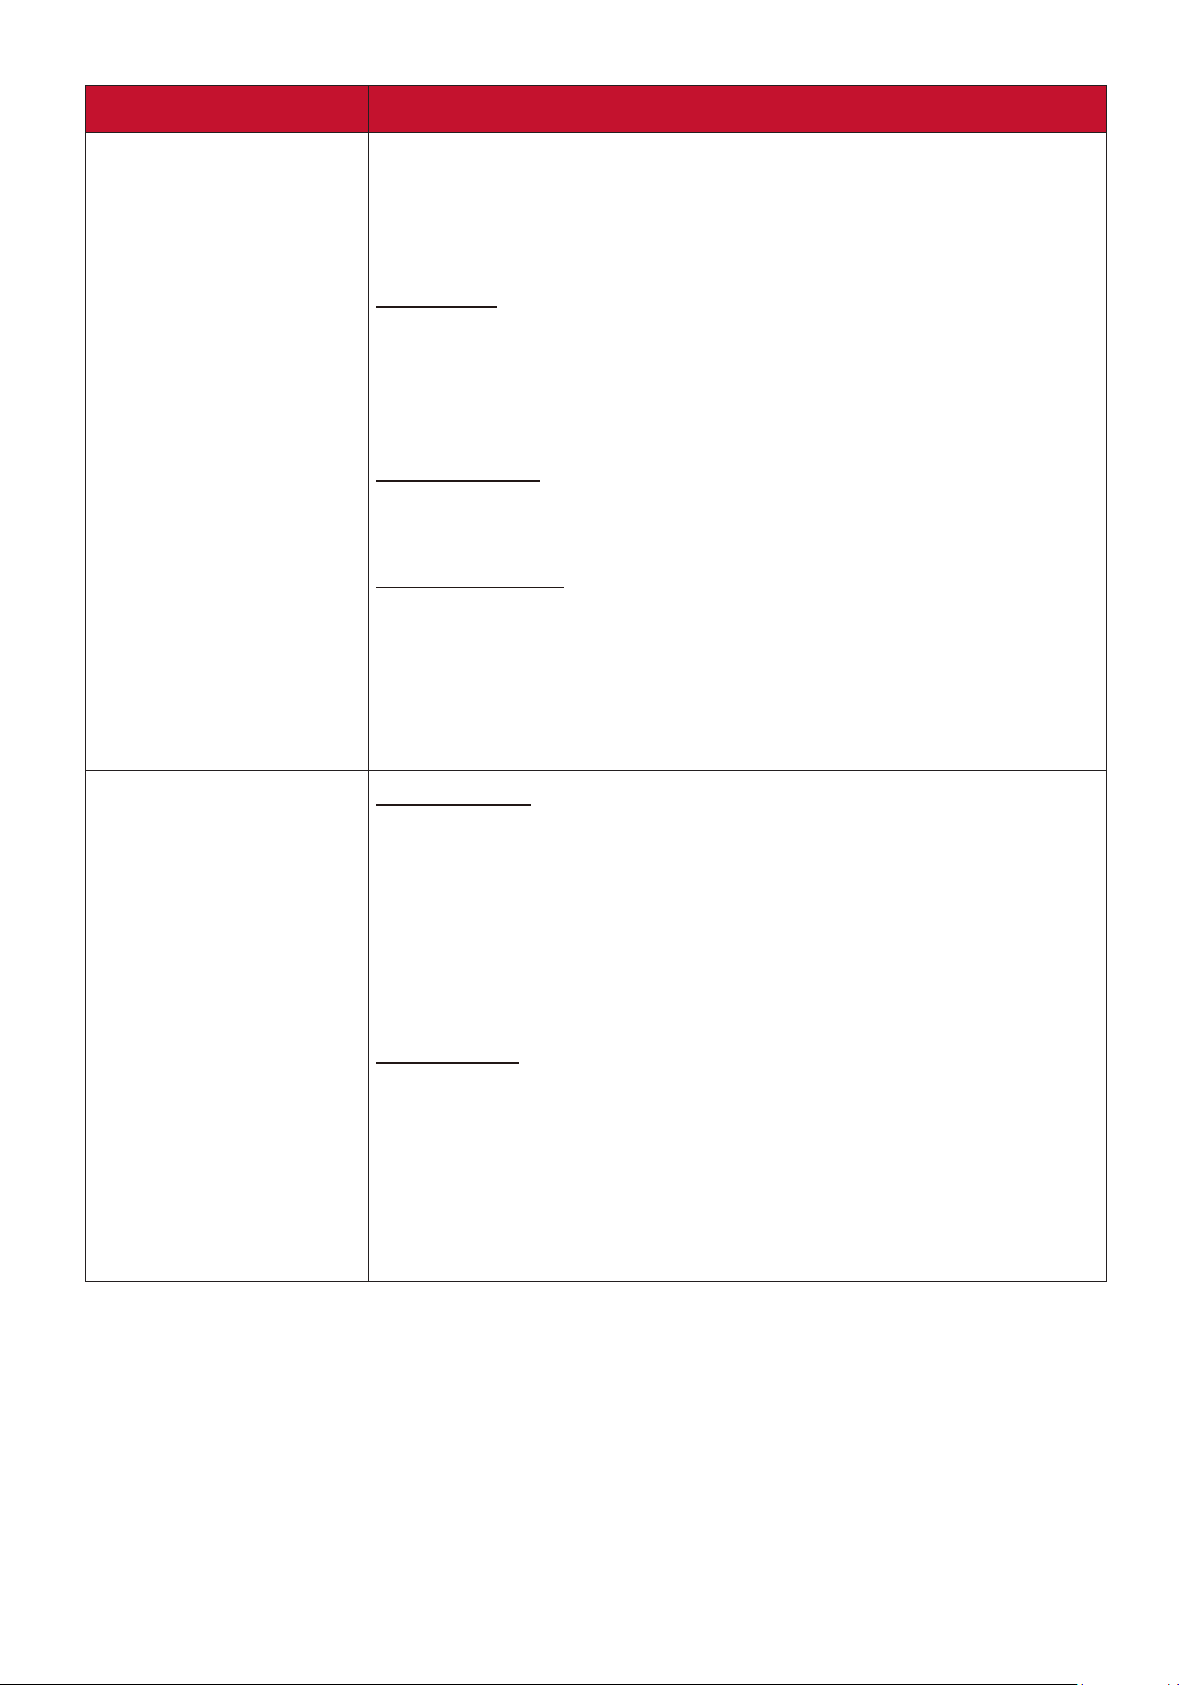
Menu Option Description
3D Settings
This projector features a 3D function which enables you to
enjoy 3D movies, videos, and sporting events in a more realistic
way by presenting the depth of the images. You need to wear a
pair of 3D glasses to view 3D images.
3D Format
The default setting is Auto and the projector automatically
chooses an appropriate 3D format when detecting 3D
contents. If the projector cannot recognize the 3D format,
choose a 3D mode.
3D Sync Invert
When you discover the inversion of the image depth, enable
this function to correct the problem.
Save 3D Settings
Saves current 3D settings. 3D settings will automatically be
applied if the same resolution and input source are selected.
NOTE: When the 3D Sync funcon is on:
• The brightness level of the projected image will decrease.
HDMI Settings
• The Color Mode, Zoom, and OverScan cannot be adjusted.
HDMI Format
Select a suitable color space according to the color space
setting of the output device connected.
Auto: Sets the projector to detect the color space seng
of the input signal automacally.
RGB: Sets the color space as RGB.
YUV: Sets the color space as YUV.
HDMI Range
Select a suitable HDMI color range according to the color range
setting of the output device connected.
Auto: Sets the projector to detect the HDMI range of the
input signal automacally.
Enhanced: Sets the HDMI color range as 0 - 255.
Normal: Sets the HDMI color range as 16 - 235.
59
Page 60
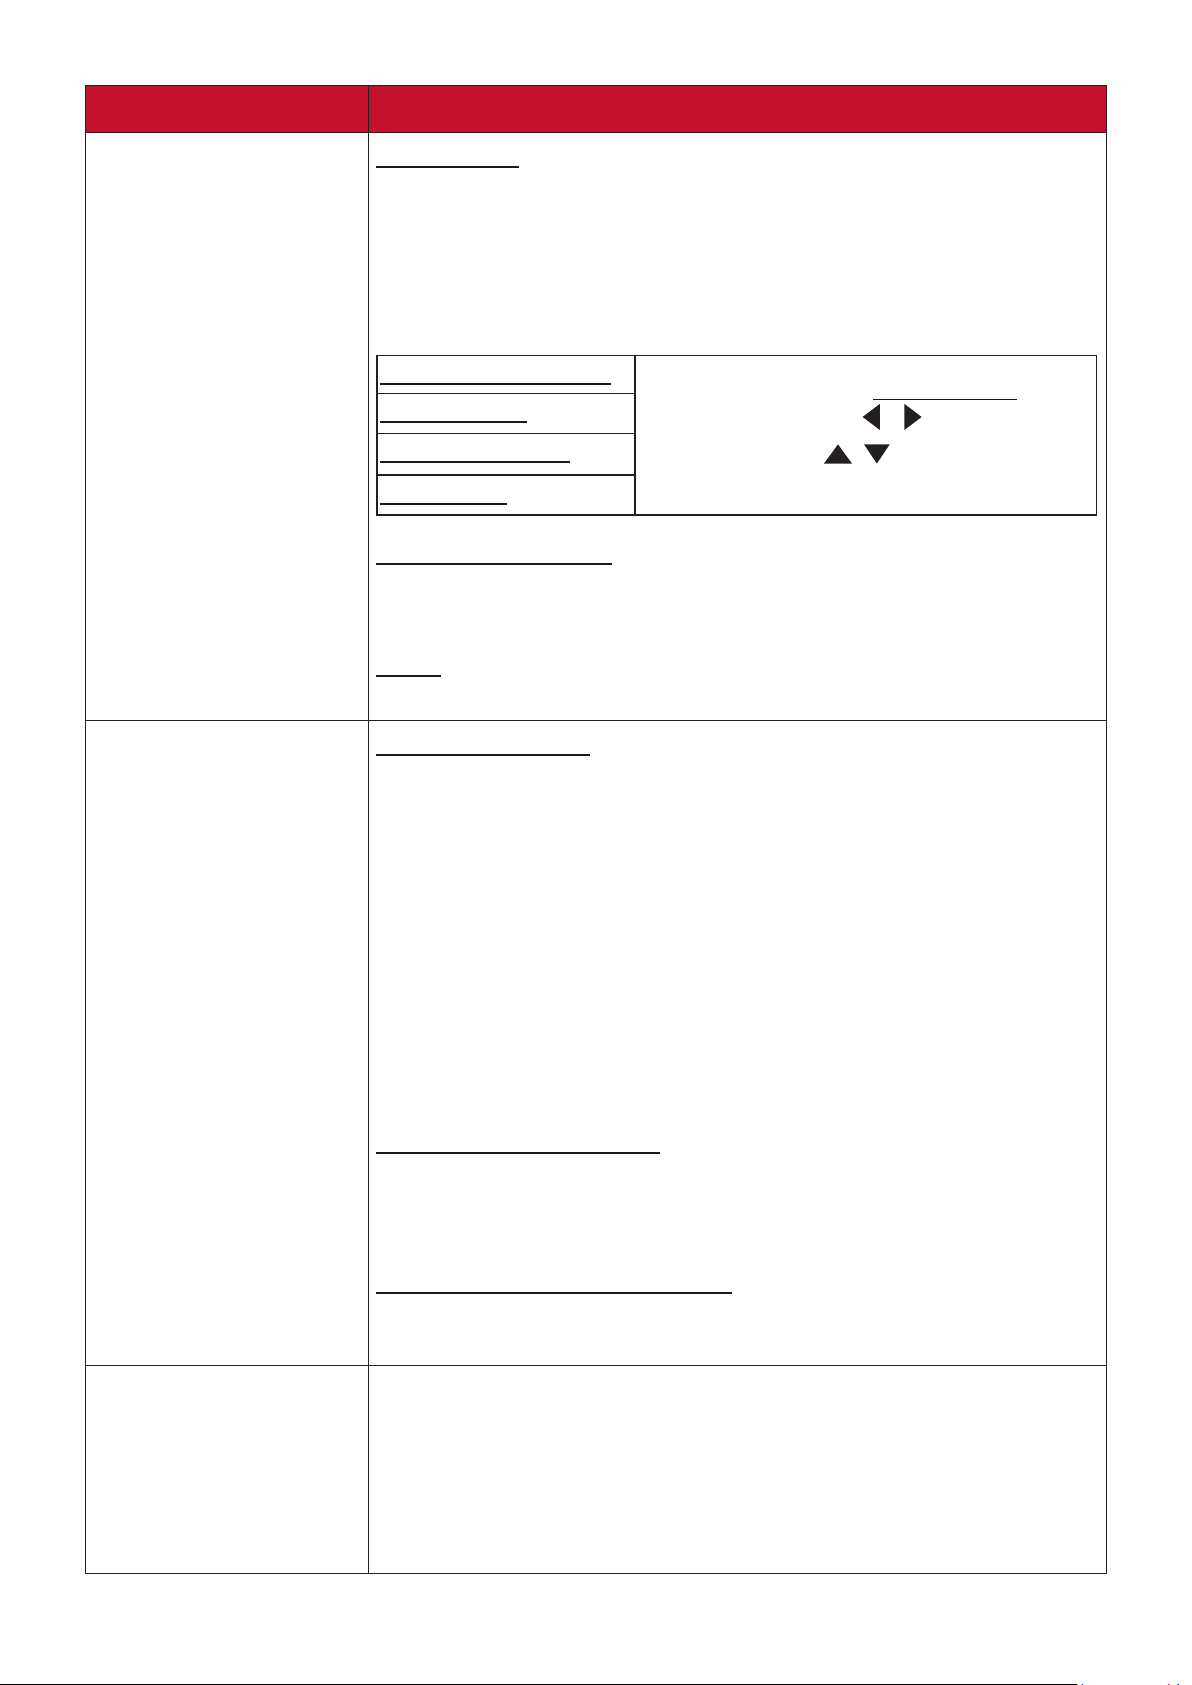
Menu Option Description
LAN Control Settings
LAN Settings
DHCP ON: Select this if you are in a DHCP environment
and Projector IP Address, Subnet Mask, Default Gateway,
DNS Server settings will be automatically retrieved.
Static IP: Select this if you are in a non-DHCP environment
and make adjustments to below settings.
Projector IP Address
Subnet Mask
Default Gateway
DNS Server
Standby LAN Control
Allows the projector to provide the network function in
standby mode.
Apply
Enacts the settings.
Only available when LAN Settings is
set to Static IP. Use
column and use / to adjust the
value.
/ to select a
Light Source Settings
Light Source Mode
Normal: Provides full light source brightness.
Eco: Reduces light source power consumpon by 20%
and lowers brightness to extend the light source life and
decreases the fan noise.
Dynamic Black 1: Reduces light source power
consumpon by up to 70% depending on the content
brightness level.
Dynamic Black 2: Reduces light source power
consumpon by up to 50% depending on the content
brightness level.
Reset Light Source Hours
Resets the light source timer after a new light source is
installed. For changing the light source, please contact qualified
service personnel.
Light Source Hours Information
Light Source Usage Time: Displays the number of hours
the light source has been used.
Reset Settings
Returns all settings to the factory preset values. When
using Reset Settings, the following settings will still remain:
Zoom, Keystone, Language, Projector Position, USB A Power,
High Altitude Mode, Security Settings, Remote Control Code,
Control Method, Baud Rate, Corner Adj., LAN Control Settings,
Light Source Hours Information.
60
Page 61
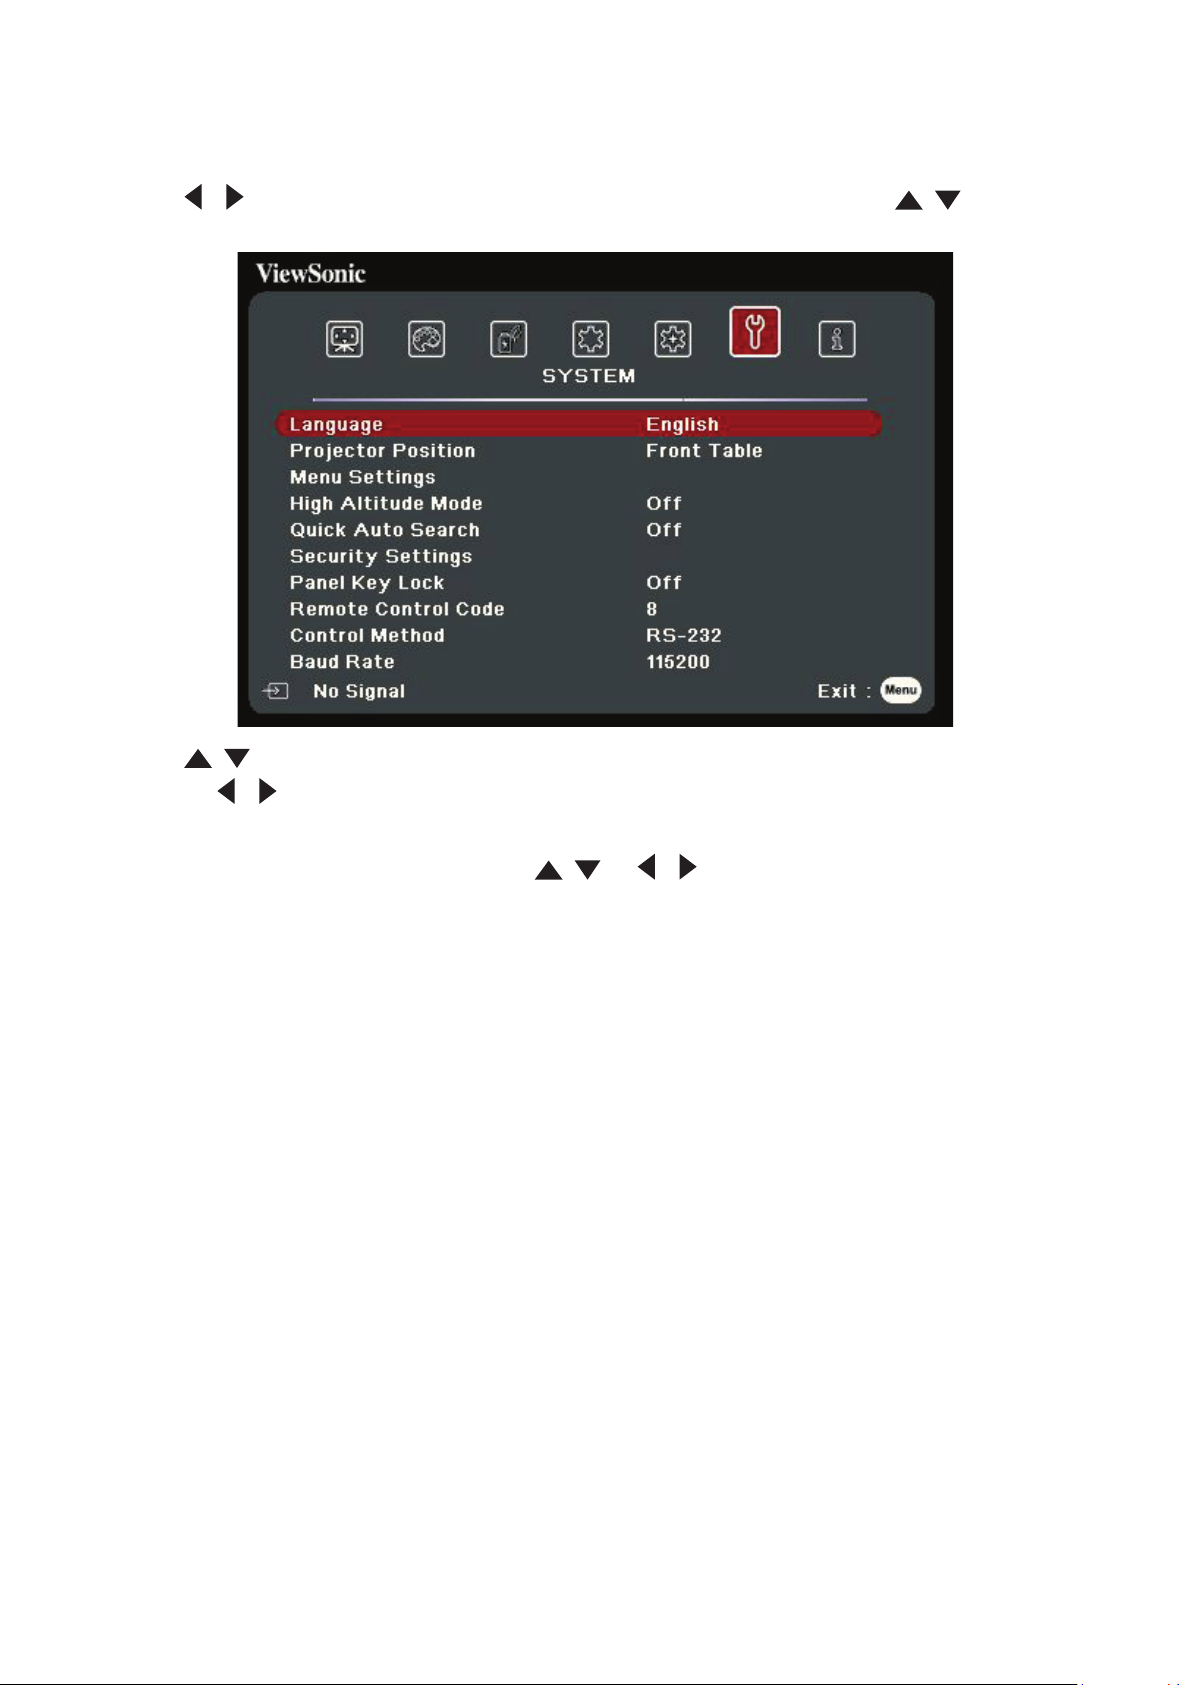
SYSTEM Menu
1. Press the Menu buon to display the On-Screen Display (OSD) Menu.
2. Press
the SYSTEM menu.
3. Press / to select the menu opon. Then press Enter to display its sub-menu,
/ to select the SYSTEM menu. Then press Enter or use / to access
or press / to adjust/select the seng.
NOTE:
Some sub-menu opons may have another sub-menu. To enter the respecve
sub-menu, press Enter. Use / or / to adjust/select the seng.
61
Page 62
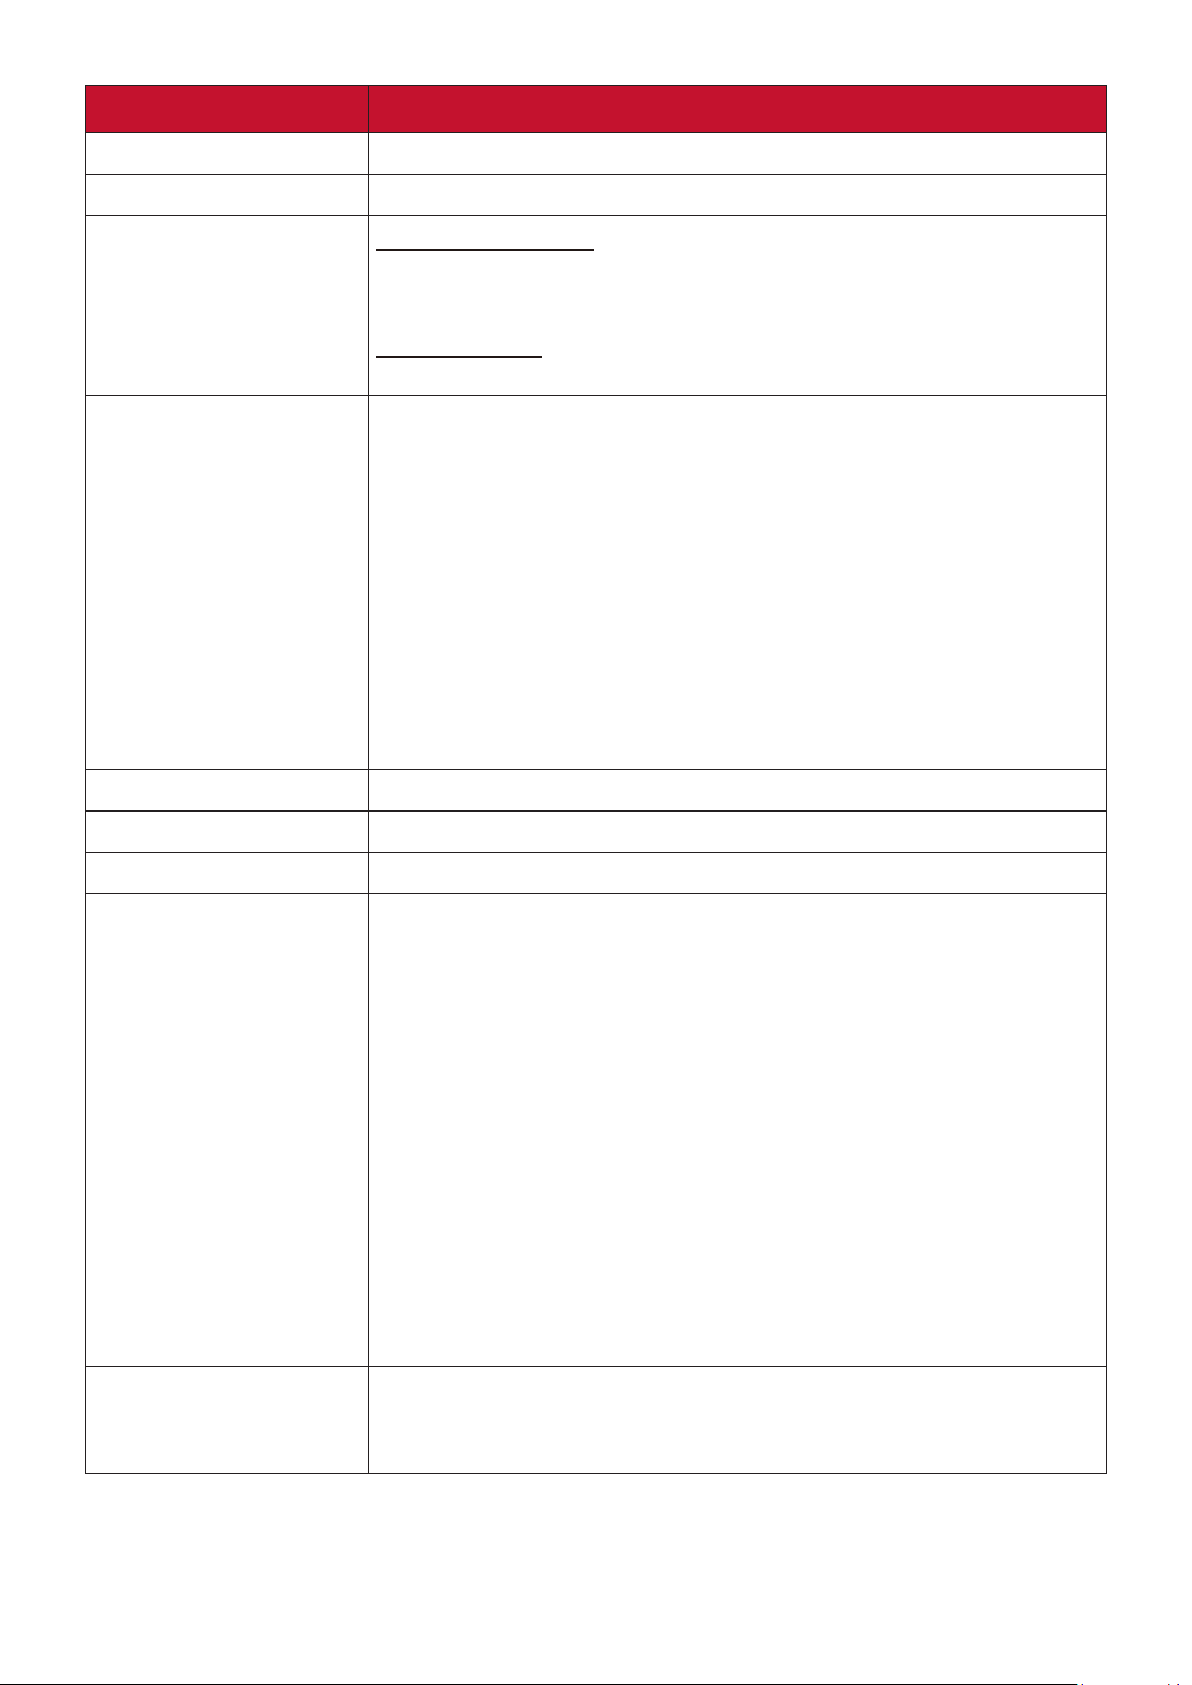
Menu Option Description
Language
Projector Position
Menu Settings
High Altitude Mode
Sets the language for the On-Screen Display (OSD) Menu.
Selects a proper position for the projector.
Menu Display Time
Sets the length of time the OSD Menu will remain active after
your last interaction.
Menu Position
Sets the OSD Menu’s position.
We recommend you use the High Altitude Mode when your
environment is between 1,500 m to 3,000 m above sea level,
and ambient temperature is between 0°C–30°C.
NOTE:
• Do not use High Altude Mode if your environment is
between 0 to 1,499 m, and the temperature is between
0°C to 35°C. If used, the projector will become over
cooled.
• Using “High Altude Mode” may cause more operang
noise, as the fan speed will be increased to improve
cooling and performance.
Quick Auto Search
Security Settings
Panel Key Lock
Remote Control Code
Allows the projector to automatically search for the signals.
See “Using the Password Function” on page 23.
Locks the control keys on the projector.
Sets the remote control code for this projector (between 1~8).
When multiple adjacent projectors are in operaon at the same
me, switching the codes can prevent interference from other
remote controls. Aer the remote control code is set, switch to
the same ID for the remote control to control this projector.
To switch the code for the remote control, press ID set and
the number buon corresponding to the remote control code
together for 5 seconds or more. The inial code is set to 1.
When the code is switched to 8, the remote control can control
every projector.
NOTE: If dierent codes are set on the projector and remote
control, there will be no response from the remote
control. When that happens, a message will display to
remind you to switch the code for the remote control.
Control Method
Allows you to select a preferred control port: through the
RS-232 port or the USB port. When selecting USB, USB A Power
will be switched to Off automatically.
62
Page 63
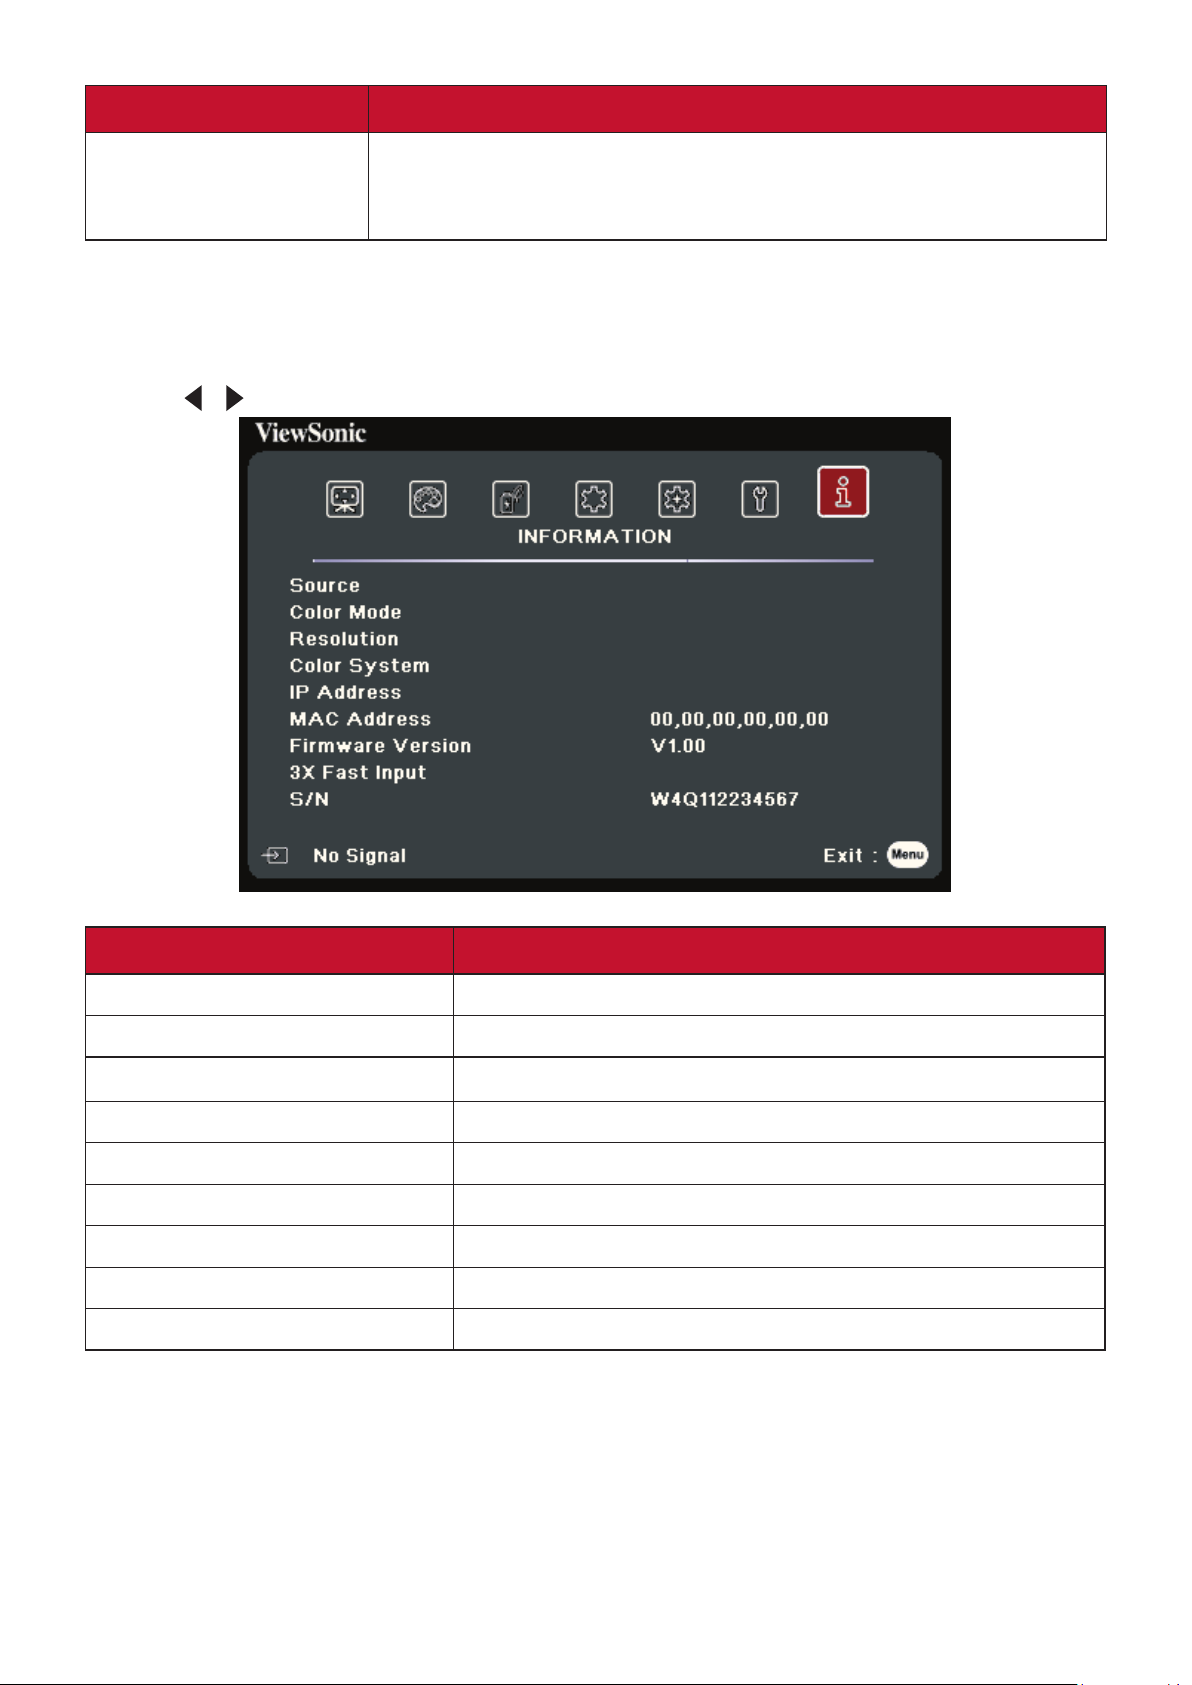
Menu Option Description
Baud Rate
Selects a baud rate that is identical with your computer’s so
that you can connect the projector using a suitable RS-232
cable and control the projector with RS-232 commands
INFORMATION Menu
1. Press the Menu buon to display the On-Screen Display (OSD) Menu.
2. Press
/ to select the INFORMATION menu and display its contents.
Menu Option Description
Source
Color Mode
Resolution
Color System
IP address
MAC address
Firmware Version
3X Fast Input
S/N
Shows the current input source.
Shows the selected mode in the IMAGE menu.
Shows the native resolution of the input source.
Shows input system format.
Shows the IP address of your projector.
Shows the MAC Address of your projector.
Shows the current firmware version.
Shows whether the function is activated or not.
Shows the serial number for this projector.
63
Page 64
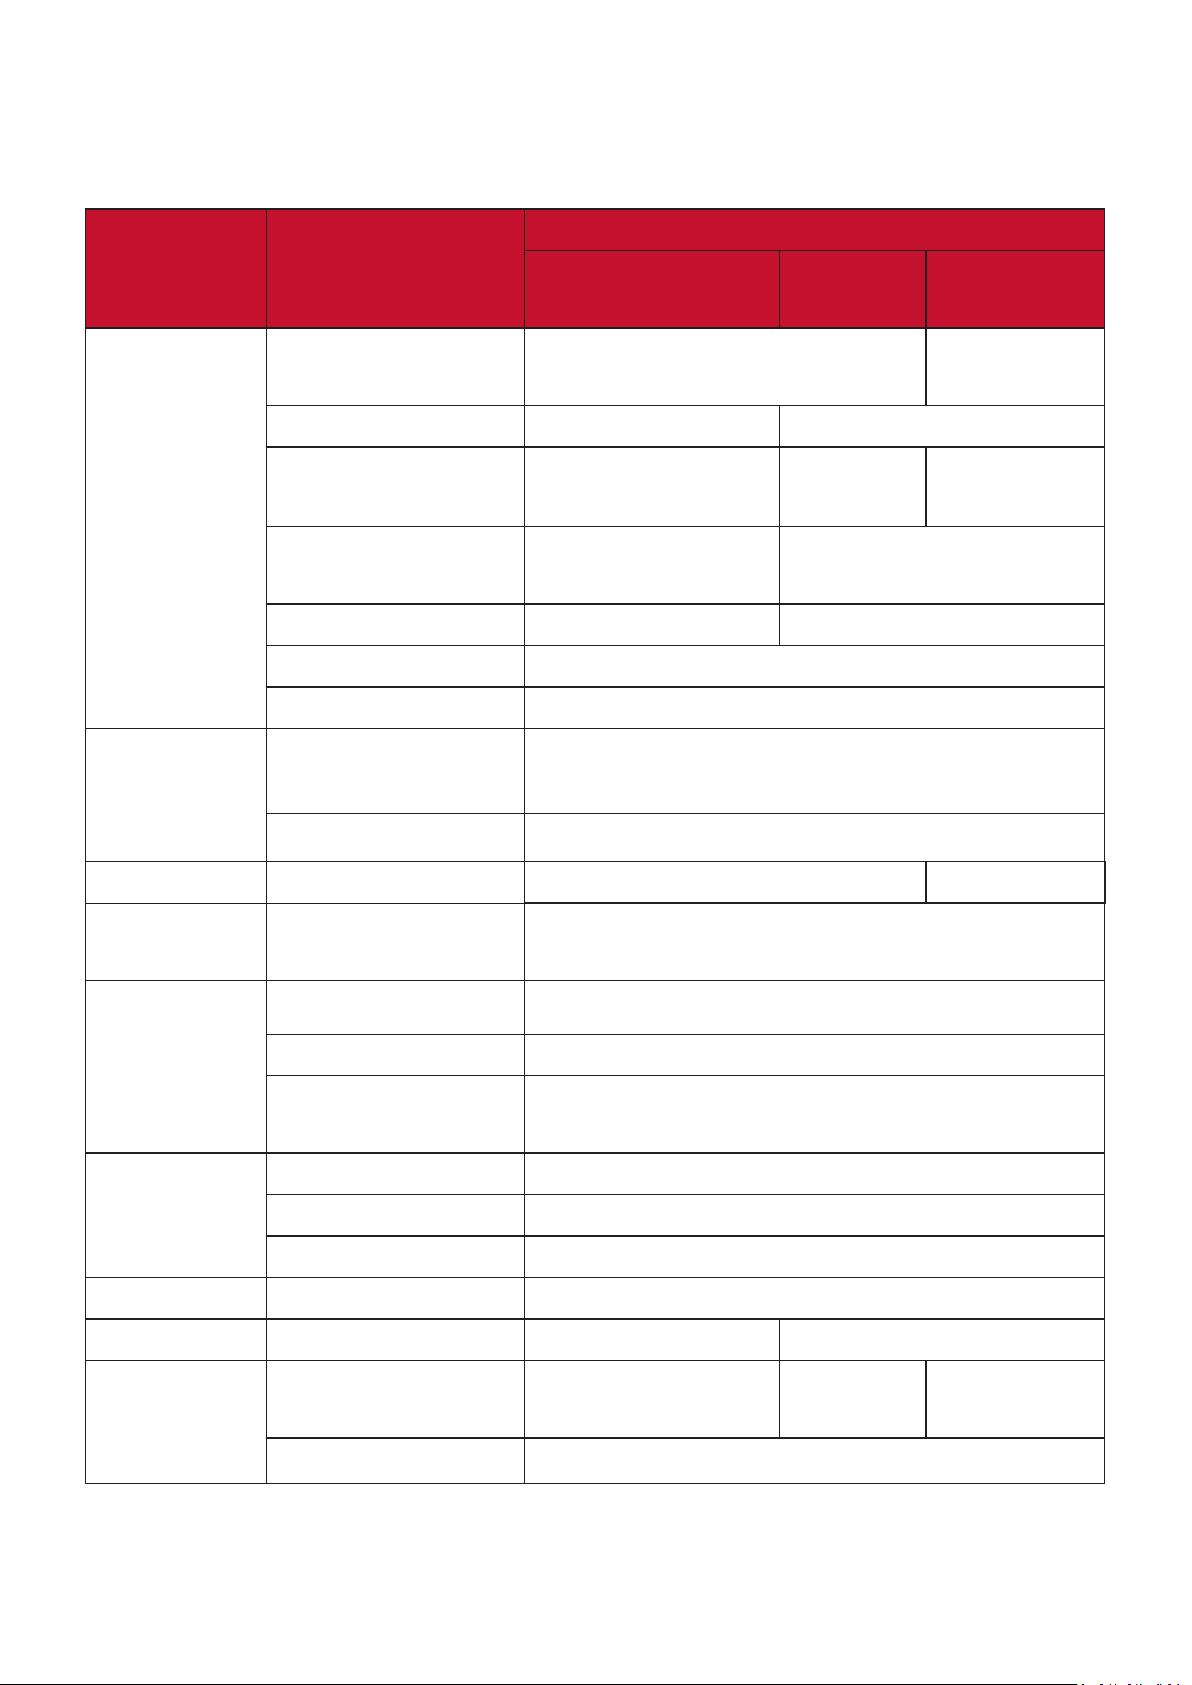
Appendix
Specifications
Item Category Specifications
LS510W/LS510WH/
LS510WH-2
LS560W/
LS560WH
LS560HDH
Projector Type 0.65” WXGA, LED 0.65” 1080P,
LED
Display Size 30”~300” 60”~300”
Throw Ratio 1.55~1.7
(87”@2.9m)
Lens F = 2.56–2.68,
f = 22–24.1 mm
0.49 (87”
@0.915m)
F = 2.6,
f = 6.9 mm
0.46 (95”
@0.967m)
Optical Zoom 1.1x Fixed
Light Source Type LED
Display System 1-CHIP DMD
Input signal VGA (Only for
: 15K~129KHz, fv:48~120Hz,
f
h
LS510W/LS560W)
HDMI f
: 15K~129KHz, fv:23~120Hz,
h
Resolution Native 1280 x 800 1920 x 1080
Power
Input Voltage AC 100-240V, 50/60 Hz (auto switch)
adapter
Operating
Temperature 0°C to 40°C (32°F to 104°F)
conditions
Humidity 0% to 90% (non-condensing)
Altitude 0 to 1,499 m at 0°C to 35°C
1,500 to 3,000 m at 0°C to 30°C
Storage
conditions
Temperature -20°C to 60°C
Humidity 0% to 90%
Altitude 0 to 12,200 m at 30°C
Dimensions Physical (W x H x D) 293 x 115 x 221 mm (11.5” x 4.5” x 8.7”)
Weight Physical 2.65 kg (5.84 lb) 2.85 kg (6.28 lb)
Power
consumption
On
1
240 W (Typical) 229 W
(Typical)
245 W
(Typical)
Off < 0.5W (Standby)
1
The test condition follows EEI standards.
64
Page 65
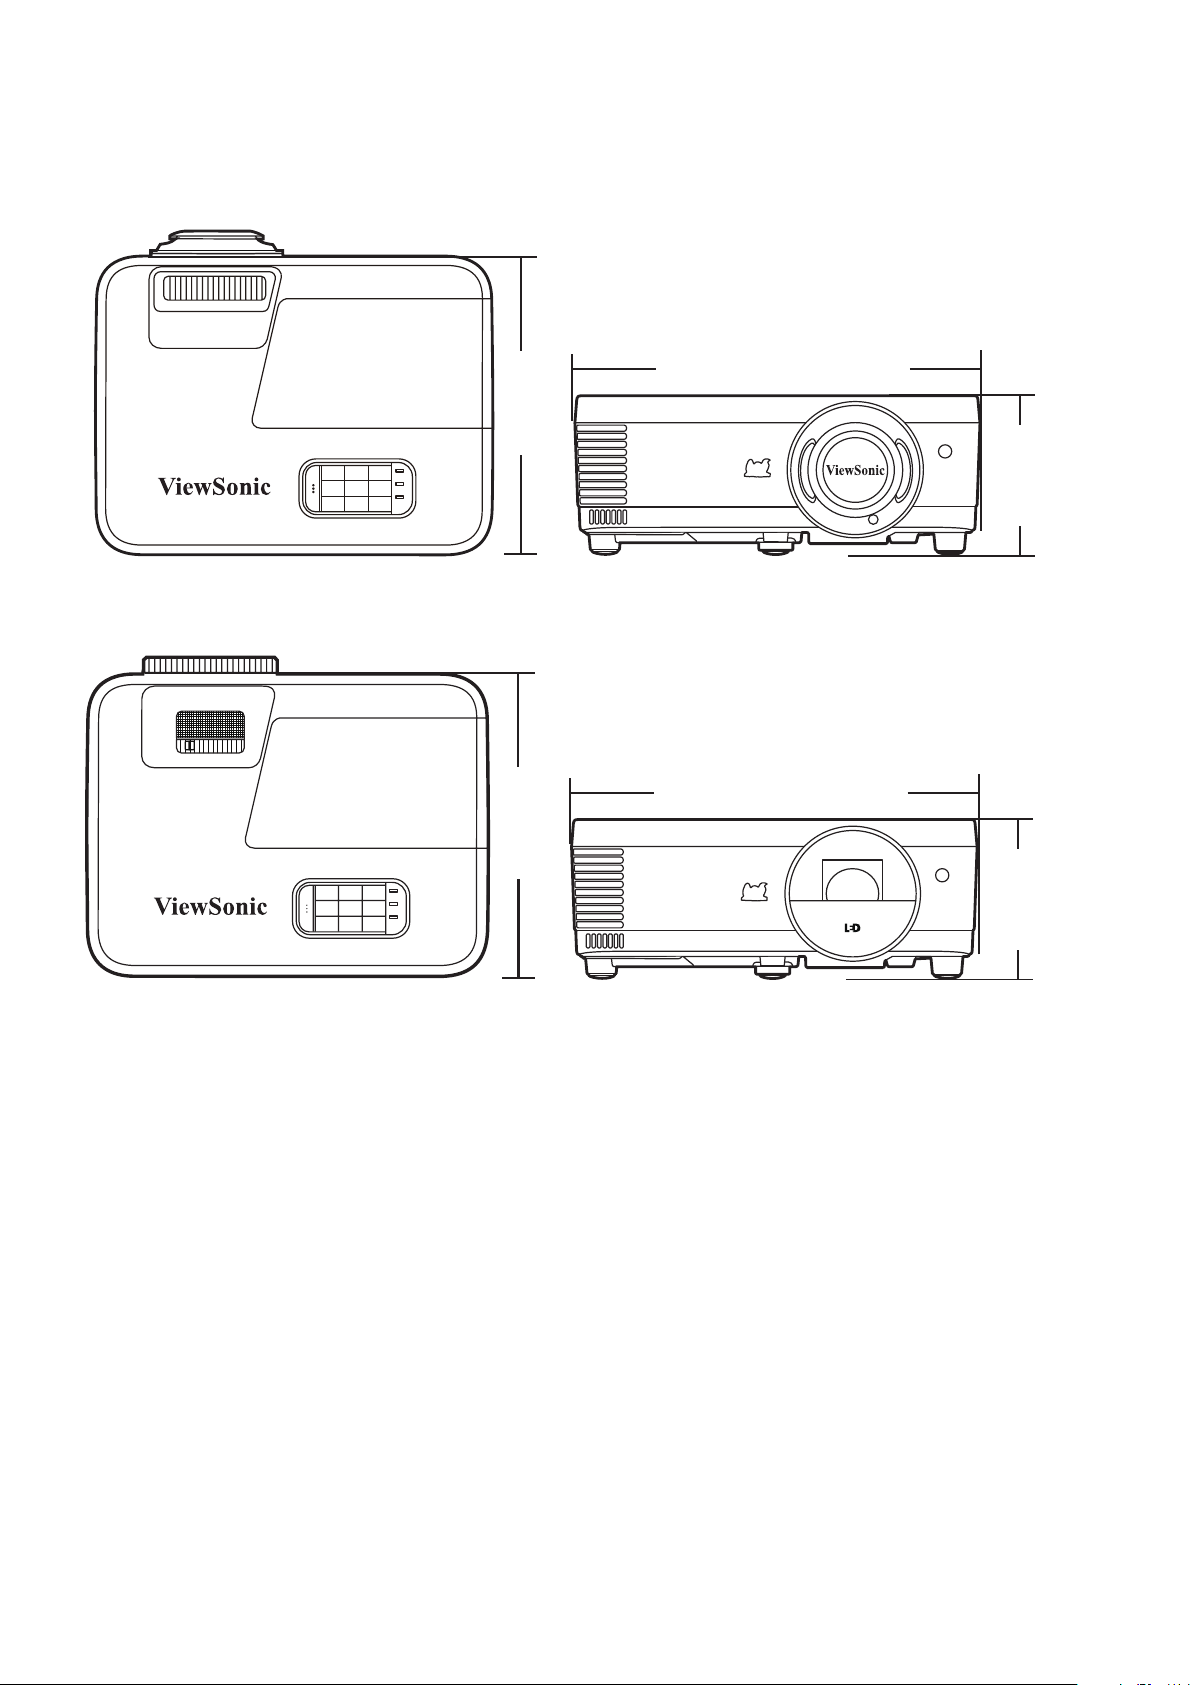
Projector Dimensions
LS510W / LS510WH / LS510WH-2
LS560W / LS560WH / LS560HDH
293 mm (W) x 115 mm (H) x 221 mm (D)
221
mm
221
mm
293 mm
115 mm
293 mm
115 mm
65
Page 66
Timing Chart
Analog RGB
Resolution Mode Refresh
rate (Hz)
720 x 400 720 x 400_70 70.087 31.469 28.3221
640 x 480 VGA_60 59.94 31.469 25.175 Supported Supported Supported
VGA_72 72.809 37.861 31.5
VGA_75 75 37.5 31.5
VGA_85 85.008 43.269 36
800 x 600 SVGA_60 60.317 37.879 40 Supported Supported Supported
SVGA_72 72.188 48.077 50
SVGA_75 75 46.875 49.5
SVGA_85 85.061 53.674 56.25
SVGA_120 (Reduce
Blanking)
1024 x 768 XGA_60 60.004 48.363 65 Supported Supported Supported
XGA_70 70.069 56.476 75
XGA_75 75.029 60.023 78.75
119.854 77.425 83 Supported
H-
frequency
(kHz)
Clock
(MHz)
3D Sync
Frame Sequential Top-Bottom Side-by-Side
XGA_85 84.997 68.667 94.5
XGA_120 (Reduce
Blanking)
1152 x 864 1152 x 864_75 75 67.5 108
1024 x 576 NB Timing 60 35.82 46.966
1024 x 600 NB Timing 64.995 41.467 51.419
1280 x 720 1280 x 720_60 60 45 74.25 Supported Supported Supported
1280 x 720_120 120 90 148.5 Supported
1280 x 768 1280 x 768_60
(Reduce Blanking)
1280 x 768_60 59.87 47.776 79.5 Supported Supported Supported
1280 x 800 WXGA_60 59.81 49.702 83.5 Supported Supported Supported
WXGA_75 74.934 62.795 106.5
WXGA_85 84.88 71.554 122.5
WXGA_120 (Reduce
Blanking)
1280 x 1024 SXGA_60 60.02 63.981 108 Supported Supported Supported
119.989 97.551 115.5 Supported
60 47.396 68.25 Supported Supported Supported
119.909 101.563 146.25 Supported
SXGA_75 75.025 79.976 135
SXGA_85 85.024 91.146 157.5
1280 x 960 1280 x 960_60 60 60 108 Supported Supported Supported
1280 x 960_85 85.002 85.938 148.5
66
Page 67
Resolution Mode Refresh
rate (Hz)
1360 x 768 1360 x 768_60 60.015 47.712 85.5 Supported Supported Supported
1366 x 768 1366 x 768_60 59.790 47.712 85.5 Supported Supported Supported
H-
frequency
(kHz)
Clock
(MHz)
3D Sync
Frame Sequential Top-Bottom Side-by-Side
1440 x 900 WXGA+_60 (Reduce
Blanking)
WXGA+_60 59.887 55.935 106.5 Supported Supported Supported
1400 x 1050 SXGA+_60 59.978 65.317 121.75 Supported Supported Supported
1600 x 1200 UXGA 60 75 162 Supported Supported Supported
1680 x 1050 1680 x 1050_60
(Reduce Blanking)
1680 x 1050_60 59.954 65.29 146.25 Supported Supported Supported
640 x 480@67Hz MAC13 66.667 35 30.24
832 x 624@75Hz MAC16 74.546 49.722 57.28
1024 x 768@75Hz MAC19 74.93 60.241 80
1152 x 870@75Hz MAC21 75.06 68.68 100
1920 x 1080 (VESA) 1920 x 1080_60 60 67.5 148.5 Supported Supported Supported
1920 x 1200 1920 x 1200_60
(Reduce Blanking)
60 55.496 88.75 Supported Supported Supported
59.883 64.674 119 Supported Supported Supported
59.950 74.038 154.000 Supported Supported Supported
HDMI (PC)
Resolution Mode Refresh
rate (Hz)
H-
frequency
(kHz)
Clock
(MHz)
3D Sync
Frame Sequential Top-Bottom Side-by-Side
640 x 480 VGA_60 59.94 31.469 25.175 Supported Supported Supported
VGA_72 72.809 37.861 31.5
VGA_75 75 37.5 31.5
VGA_85 85.008 43.269 36
720 x 400 720 x 400_70 70.087 31.469 28.3221
800 x 600 SVGA_60 60.317 37.879 40 Supported Supported Supported
SVGA_72 72.188 48.077 50
SVGA_75 75 46.875 49.5
SVGA_85 85.061 53.674 56.25
SVGA_120 (Reduce
Blanking)
1024 x 768 XGA_60 60.004 48.363 65 Supported Supported Supported
XGA_70 70.069 56.476 75
XGA_75 75.029 60.023 78.75
XGA_85 84.997 68.667 94.5
XGA_120 (Reduce
Blanking)
1152 x 864 1152 x 864_75 75 67.5 108
119.854 77.425 83 Supported
119.989 97.551 115.5 Supported
67
Page 68
Resolution Mode Refresh
rate (Hz)
1024 x 576 NB Timing 60 35.82 46.966
1024 x 600 NB Timing 64.995 41.467 51.419
1280 x 720 1280 x 720_60 60 45 74.25 Supported Supported Supported
1280 x 720_120 120 90 148.5 Supported
H-
frequency
(kHz)
Clock
(MHz)
3D Sync
Frame Sequential Top-Bottom Side-by-Side
1280 x 768 1280 x 768_60
(Reduce Blanking)
1280 x 768_60 59.87 47.776 79.5 Supported Supported Supported
1280 x 800 WXGA_60 59.81 49.702 83.5 Supported Supported Supported
WXGA_75 74.934 62.795 106.5
WXGA_85 84.88 71.554 122.5
WXGA_120 (Reduce
Blanking)
1280 x 1024 SXGA_60 60.02 63.981 108 Supported Supported Supported
SXGA_75 75.025 79.976 135
SXGA_85 85.024 91.146 157.5
1280 x 960 1280 x 960_60 60 60 108 Supported Supported Supported
1280 x 960_85 85.002 85.938 148.5
1360 x 768 1360 x 768_60 60.015 47.712 85.5 Supported Supported Supported
1366 x 768 1366 x 768_60 59.79 47.712 85.5 Supported Supported Supported
1440 x 900 WXGA+_60 (Reduce
Blanking)
WXGA+_60 59.887 55.935 106.5 Supported Supported Supported
60 47.396 68.25 Supported Supported Supported
119.909 101.563 146.25 Supported
60 55.496 88.75 Supported Supported Supported
1400 x 1050 SXGA+_60 59.978 65.317 121.75 Supported Supported Supported
1600 x 1200 UXGA 60 75 162 Supported Supported Supported
1680 x 1050 1680 x 1050_60
(Reduce Blanking)
1680 x 1050_60 59.954 65.29 146.25 Supported Supported Supported
1920 x 1200 1920 x 1200_60
(Reduce Blanking)
640 x 480@67Hz MAC13 66.667 35 30.24
832 x 624@75Hz MAC16 74.546 49.722 57.28
1024 x 768@75Hz MAC19 74.93 60.241 80
1152 x 870@75Hz MAC21 75.06 68.68 100
1920 x 1080 (VESA) 1920 x 1080_60 60 67.5 148.5 Supported Supported Supported
59.883 64.674 119 Supported Supported Supported
59.95 74.038 154 Supported Supported Supported
68
Page 69
HDMI (Video)
Video
mode
480i 720(1440) x 480 15.73 59.94 27 Supported
480p 720 x 480 31.47 59.94 27 Supported Supported Supported
576i 720(1440) x 576 15.63 50 27 Supported
576p 720 x 576 31.25 50 27 Supported Supported Supported
720/50p 1280 x 720 37.5 50 74.25 Supported Supported Supported
720/60p 1280 x 720 45 60 74.25 Supported Supported Supported
1080/50i 1920 x 1080 28.13 50 74.25 Supported Supported
1080/60i 1920 x 1080 33.75 60 74.25 Supported Supported
1080/24P 1920 x 1080 27 24 74.25
1080/50P 1920 x 1080 56.25 50 148.5 Supported Supported Supported
1080/60P 1920 x 1080 67.5 60 148.5 Supported Supported Supported
Resolution Horizontal
frequency
(KHz)
Vertical
frequency
(Hz)
Dot Clock
frequency
(MHz)
3D Sync
Frame Sequential Frame Packing Top-Bottom Side-by-Side
Component video
Video mode Resolution Horizontal
frequency
(KHz)
Vertical frequency
(Hz)
Clock (MHz) 3D Sync
Frame Sequential
480i 720 x 480 15.73 59.94 13.5 Supported
480p 720 x 480 31.47 59.94 27 Supported
576i 720 x 576 15.63 50 13.5 Supported
576p 720 x 576 31.25 50 27 Supported
720/50p 1280 x 720 37.5 50 74.25
720/60p 1280 x 720 45 60 74.25
1080/50i 1920 x 1080 28.13 50 74.25
1080/60i 1920 x 1080 33.75 60 74.25
1080/50P 1920 x 1080 56.25 50 148.5
1080/60P 1920 x 1080 67.5 60 148.5
69
Page 70

Troubleshooting
Common Problems
This section describes some common problems that you may experience when
using the projector.
Problem Possible Solutions
The projector does not turn on • Ensure the power cord is properly aached to the
projector and to the power outlet.
• If the cooling process has not completed, please
wait unl it has nished then try to turn on the
projector again.
• If the above does not work, try another power outlet
or another electrical device with the same power
outlet.
There is no picture • Ensure the video source cable is connected properly,
and that the video source is turned on.
• If the input source is not selected automacally,
select the correct source with the Source key on
either the projector or the remote control.
The image is blurred • Adjusng the Focus Ring will help correctly focus the
projecon lens.
• Ensure the projector and screen are aligned properly.
If necessary, adjust the height of the projector as
well as the projecon angle and direcon.
The remote control does not
work
The image abnormal • Ensure the video source cable is connected properly,
• Ensure there are no obstacles between the remote
control and projector; and that they are within 8 m
(26 ) of each other.
• The baeries may be out of power, please check and
replace if necessary.
and that the video source is turned on.
• If the above does not work, check the air intake or
exhaust not block.
70
Page 71
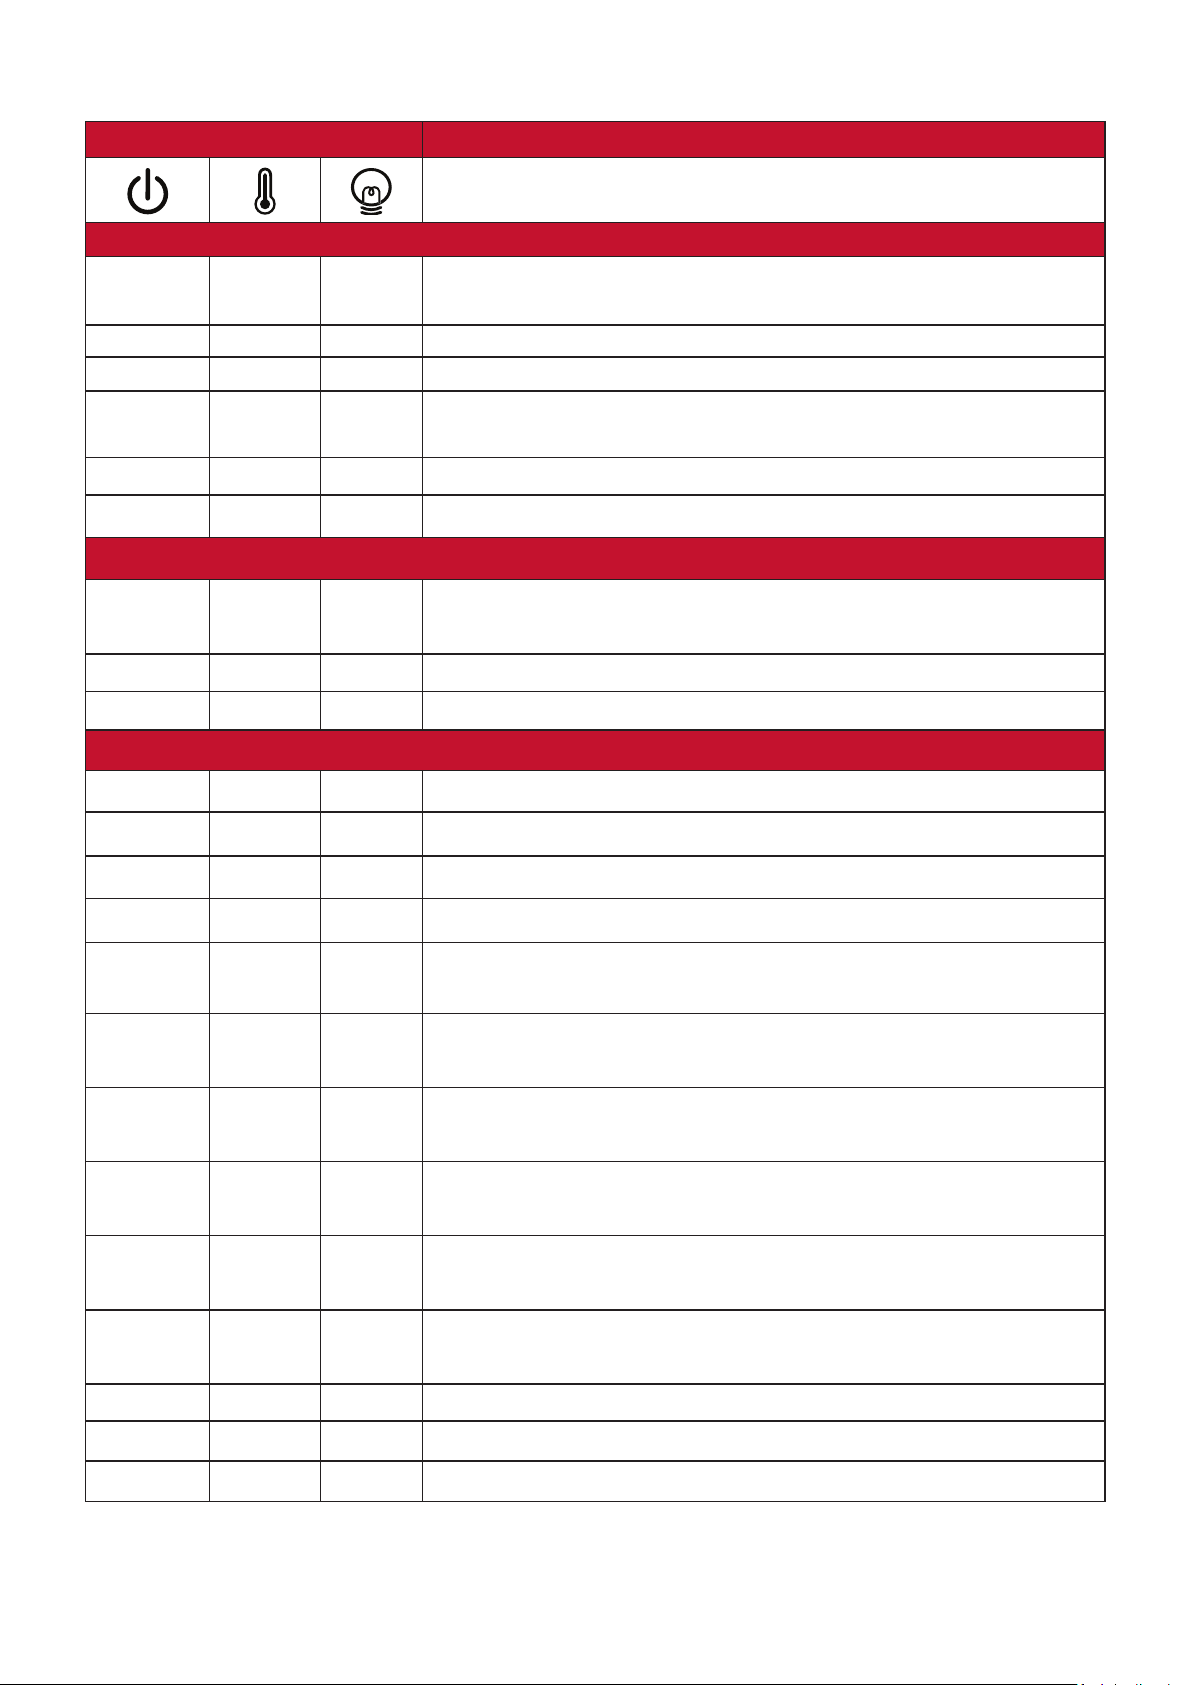
LED Indicators
Light Status and Description
Power
Green
Flashing
Green Off Off Powering up
Green Off Off Normal operation
Off Off Stand-by mode
Green
Flashing
Red Off Off Downloading
Green Green Green Burn in off
Off Off Normal power-down cooling
Light source
Green
Flashing
Off Off Red Light source error in normal operation
Green Off Red Color wheel start has failed
Off Red First light source-lit error cooling
Heating/Cooling
Off Red Off Fan 1 error (actual fan speed is outside the desired speed).
Off Red Red Fan 2 error (actual fan speed is outside the desired speed).
Off Red Green Fan 3 error (actual fan speed is outside the desired speed).
Off Red Orange Fan 4 error (actual fan speed is outside the desired speed).
Red
Flashing
Red Off Fan 5 error (actual fan speed is outside the desired speed).
Red
Flashing
Red Red Red Thermal sensor 1 open error (the remote diode has an
Red Red Green Thermal sensor 2 open error (the remote diode has an
Green Red Red Thermal sensor 1 short error (the remote diode has an
Off Red Green Thermal sensor 2 short error (the remote diode has an
Orange Red Red Temperature 1 error (over limited temperature).
Orange Red Green Temperature 2 error (over limited temperature).
Off Green Red Fan IC #1 I2C connection error.
Red
Flashing
Off Fan 6 error (actual fan speed is outside the desired speed).
open-circuit condition).
open-circuit condition).
open-circuit condition).
open-circuit condition).
71
Page 72

Maintenance
General Precautions
• Make sure the Projector is turned o and the power cable is unplugged from the
power outlet.
• Never remove any parts from the Projector. Contact ViewSonic® or a reseller
when any part of the Projector needs replacing.
• Never spray or pour any liquid directly onto the case.
• Handle the Projector with care, as a darker-colored projector, if scued, may
show marks more clearly than a lighter-colored projector.
Cleaning the Lens
• Use a canister of compressed air to remove dust.
• If the lens is sll not clean, use lens-cleaning paper or moisten a so cloth with
lens cleaner and gently wipe the surface.
CAUTION:
Cleaning the Case
• Use a so, lint-free, dry cloth to remove dirt or dust.
• If the case is sll not clean, apply a small amount of non-ammonia, non-alcohol
based, mild non-abrasive detergent onto a clean, so, lint-free cloth, then wipe
the surface.
CAUTION:
Storing the Projector
If you intend to store the Projector for an extended period of time:
• Ensure the temperature and humidity of the storage area are within the
recommend range.
• Retract the adjuster foot completely.
• Remove the baeries from the Remote Control.
• Pack the Projector in its original packaging or equivalent.
Never rub the lens with abrasive materials.
Never use wax, alcohol, benzene, thinner, or other chemical detergents.
Disclaimer
• ViewSonic® does not recommend the use of any ammonia or alcohol-based
cleaners on the lens or case. Some chemical cleaners have been reported to
damage the lens and/or case of the projector.
• ViewSonic® will not be liable for damage resulng from use of any ammonia or
alcohol-based cleaners.
72
Page 73
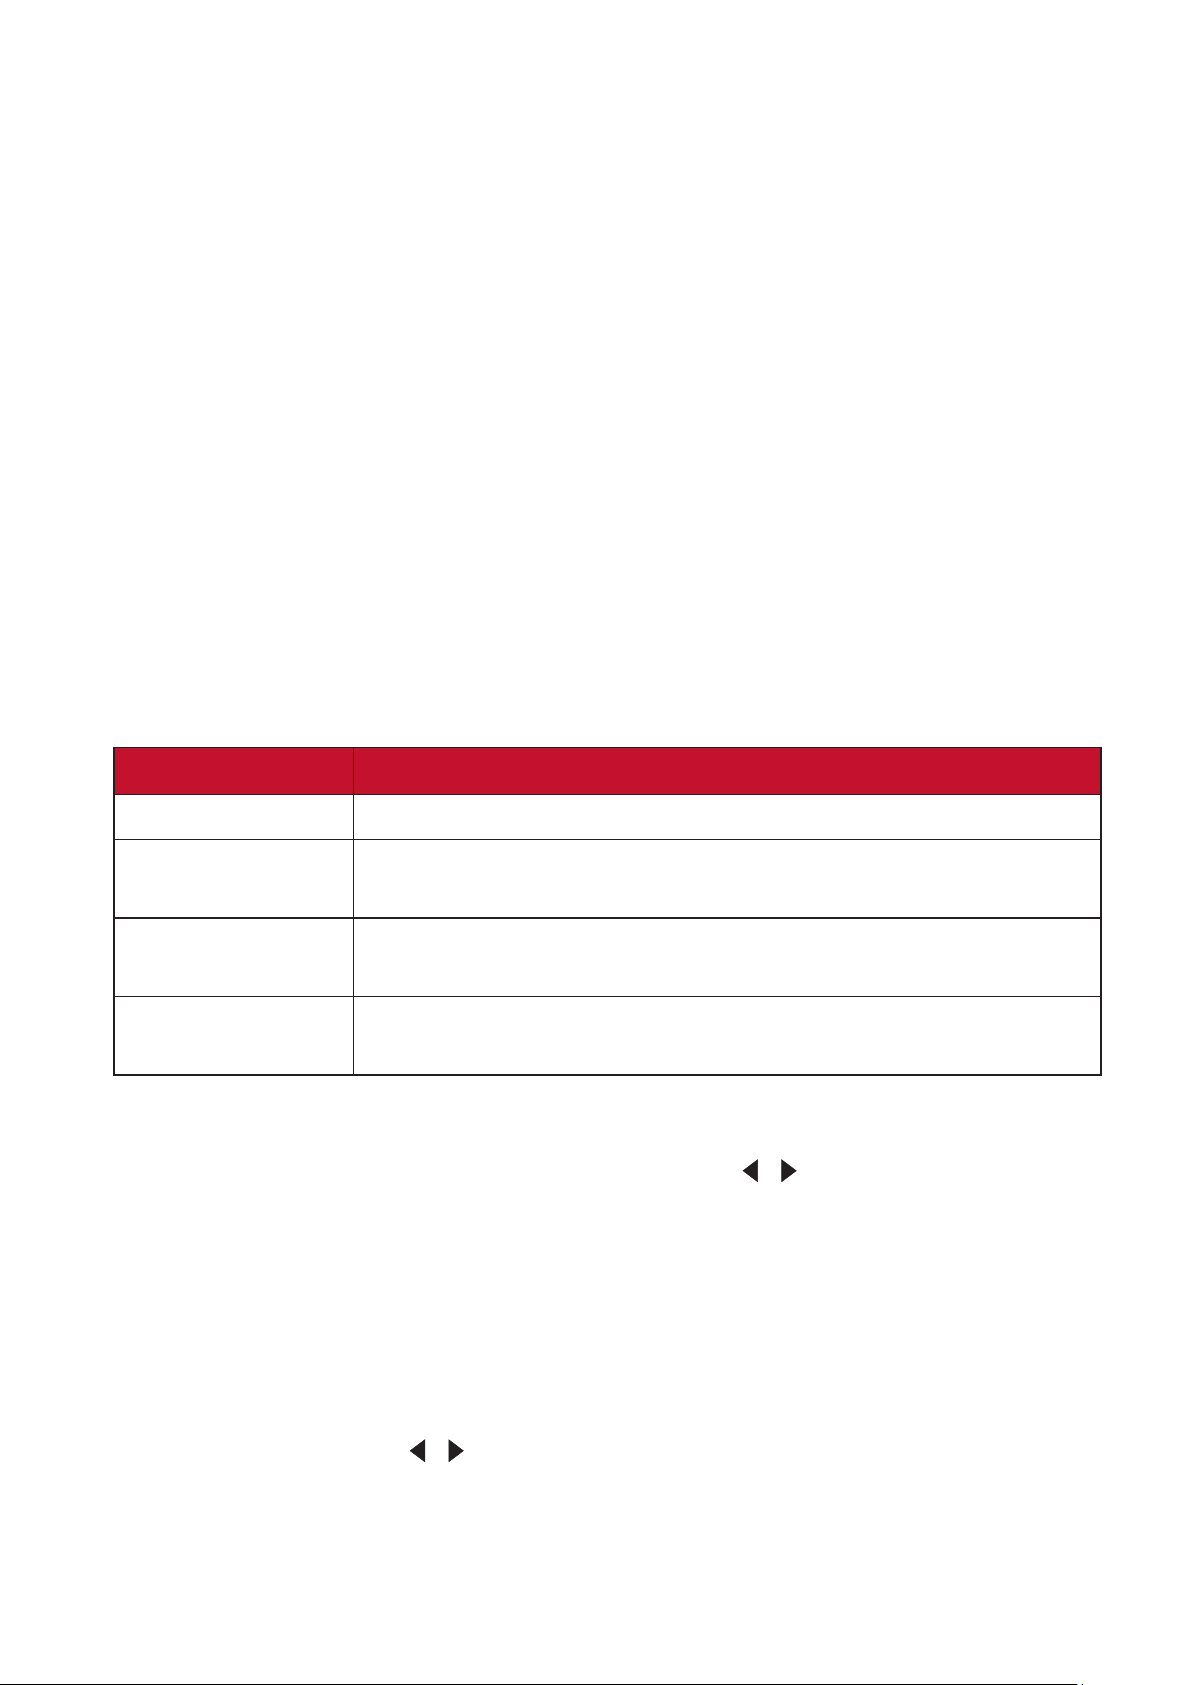
Light Source Information
This section will provided a better understanding of your projector’s light source.
Light Source Hour
When the projector is being used, the duration (in hours) of light source usage is
automatically calculated by the built-in timer.
To obtain the light source hour information:
1. Press Menu to open the OSD Menu and go to: Advanced > Light Source Settings
> Light Source Hours Information.
2. Press Enter and the Light Source Hours Information page will appear.
3. Press Exit to leave the menu. Extending Light Source Life
To prolong light source life, you can adjust the following settings in the OSD Menu.
Setting Light Source Mode
Setting the projector in any mode other than Normal reduces system noise, power
consumption, and extends the light sources operational life.
Light Source Mode Description
Normal Provides full light source brightness.
Eco
Dynamic Black 1
Dynamic Black 2
Reduces light source power consumption by 20% and lowers
brightness, and decreases fan noise.
Reduces light source power consumption by up to 70%
depending on the content's brightness level.
Reduces light source power consumption by up to 50%
depending on the content's brightness level.
To set the Light Source Mode, open the OSD Menu and go to: Advanced >
Light Source Settings > Light Source Mode and press / to select and press
Enter.
Setting Auto Power Off
This allows the projector to turn off automatically after a set period of time once no
input source is detected.
Open the OSD Menu and go to: POWER MANAGEMENT > Smart Energy >
/
Auto Power Off and press
to disable or adjust the time.
73
Page 74

Regulatory and Service Information
Compliance Information
This section addresses all connected requirements and statements regarding
regulations. Confirmed corresponding applications shall refer to nameplate labels
and relevant markings on the unit.
FCC Compliance Statement
This device complies with part 15 of FCC Rules. Operation is subject to the following
two conditions: (1) this device may not cause harmful interference, and (2) this
device must accept any interference received, including interference that may
cause undesired operation. This equipment has been tested and found to comply
with the limits for a Class B digital device, pursuant to part 15 of the FCC Rules.
These limits are designed to provide reasonable protection against harmful
interference in a residential installation. This equipment generates, uses, and
can radiate radio frequency energy, and if not installed and used in accordance
with the instructions, may cause harmful interference to radio communications.
However, there is no guarantee that interference will not occur in a particular
installation. If this equipment does cause harmful interference to radio or television
reception, which can be determined by turning the equipment off and on, the user
is encouraged to try to correct the interference by one or more of the following
measures:
• Reorient or relocate the receiving antenna.
• Increase the separation between the equipment and receiver.
• Connect the equipment into an outlet on a circuit different from that to which
the receiver is connected.
• Consult the dealer or an experienced radio/TV technician for help.
WARNING: You are cauoned that changes or modicaons not expressly
approved by the party responsible for compliance could void your
authority to operate the equipment.
Industry Canada Statement
CAN ICES-003(B) / NMB-003(B)
CE Conformity for European Countries
The device complies with the EMC Directive 2014/30/EU and Low Voltage
Directive 2014/35/EU and Ecodesign Directive 2009/125/EC.
74
Page 75
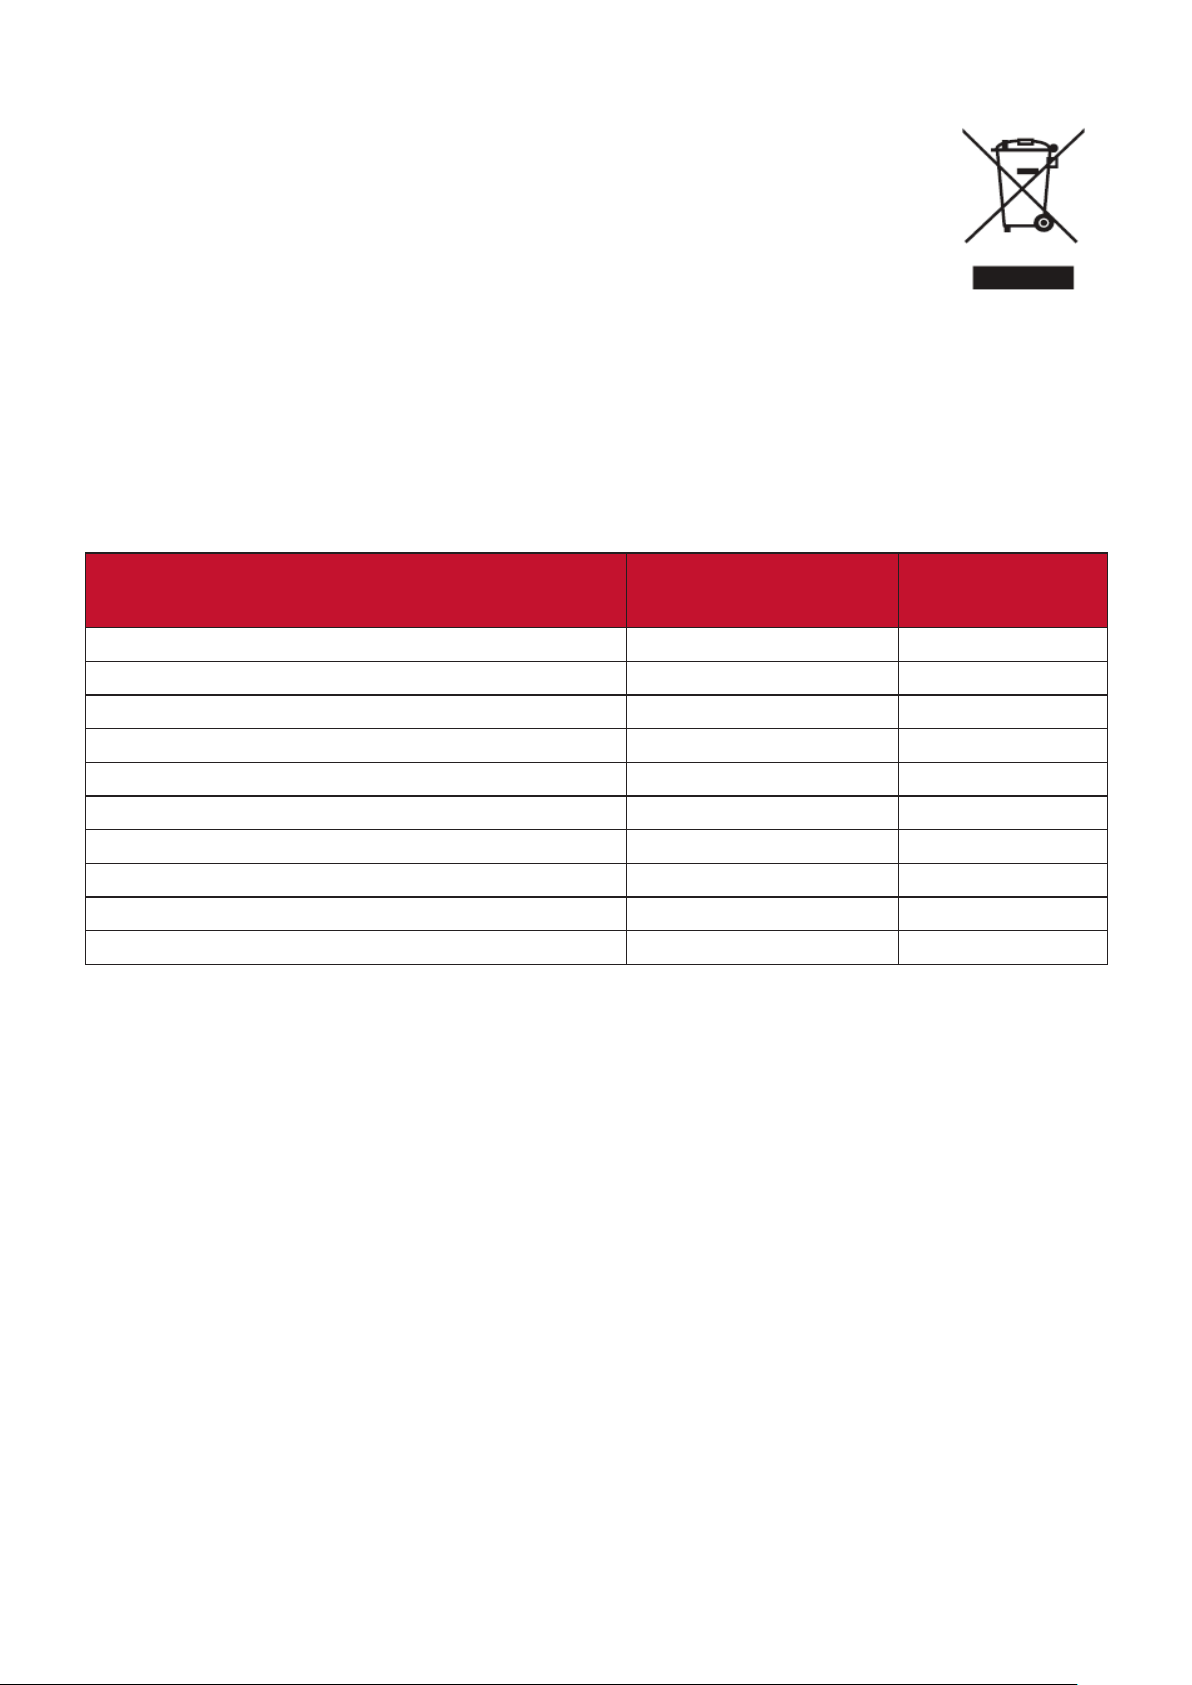
The following information is only for EU-member states:
The mark shown to the right is in compliance with the Waste Electrical
and Electronic Equipment Directive 2012/19/EU (WEEE). The mark
indicates the requirement NOT to dispose of the equipment as
unsorted municipal waste, but use the return and collection systems
according to local law.
Declaration of RoHS2 Compliance
This product has been designed and manufactured in compliance with Directive
2011/65/EU of the European Parliament and the Council on restriction of the use
of certain hazardous substances in electrical and electronic equipment (RoHS2
Directive) and is deemed to comply with the maximum concentration values issued
by the European Technical Adaptation Committee (TAC) as shown below:
Substance Proposed Maximum
Concentration
Cadmium (Cd) 0.01% < 0.01%
Lead (Pb) 0.1% < 0.1%
Mercury (Hg) 0.1% < 0.1%
Hexavalent Chromium (Cr6+) 0.1% < 0.1%
Polybrominated biphenyls (PBB) 0.1% < 0.1%
Polybrominated diphenyl esthers (PBDE) 0.1% < 0.1%
Bis(2-Ethylhexyl) phthalate (DEHP) 0.1% < 0.1%
Benzyl butyl phthalate (BBP) 0.1% < 0.1%
Dibutyl phthalate (DBP) 0.1% < 0.1%
Diisobutyl phthalate (DIBP) 0.1% < 0.1%
Actual
Concentration
Certain components of products as stated above are exempted under the Annex
III of the RoHS2 Directives as noted below:
• Mercury in cold cathode fluorescent lamps and external electrode fluorescent
lamps (CCFL and EEFL) for special purposes not exceeding (per lamp):
» Short length (500 mm): maximum 3.5 mg per lamp.
» Medium length (> 500 mm and 1,500 mm): maximum 5 mg per lamp.
» Long length (> 1,500 mm): maximum 13 mg per lamp.
• Lead in glass of cathode ray tubes.
• Lead in glass of fluorescent tubes not exceeding 0.2% by weight.
• Lead as an alloying element in aluminum containing up to 0.4% lead by weight.
• Copper alloy containing up to 4% lead by weight.
• Lead in high melting temperature type solders (i.e. lead-based alloys containing
85% by weight or more lead).
• Electrical and electronic components containing lead in a glass or ceramic other
than dielectric ceramic in capacitors, e.g. piezoelectronic devices, or in a glass or
ceramic matrix compound.
75
Page 76

Indian Restriction of Hazardous Substances
Restriction on Hazardous Substances statement (India). This product complies
with the “India E-waste Rule 2011” and prohibits use of lead, mercury, hexavalent
chromium, polybrominated biphenyls or polybrominated diphenyl ethers in
concentrations exceeding 0.1 weight % and 0.01 weight % for cadmium, except for
the exemptions set in Schedule 2 of the Rule.
Product Disposal at End of Product Life
ViewSonic® respects the environment and is committed to working and living
green. Thank you for being part of Smarter, Greener Computing. Please visit the
ViewSonic® website to learn more.
USA & Canada:
https://www.viewsonic.com/us/company/green/go-green-with-viewsonic/#recycle-program
Europe:
http://www.viewsoniceurope.com/uk/support/recycling-information/
76
Page 77

Copyright Information
Copyright© ViewSonic® Corporation, 2023. All rights reserved.
Microsoft, Windows, and the Windows logo are registered trademarks of Microsoft
Corporation in the United States and other countries.
ViewSonic® and the three birds logo are registered trademarks of ViewSonic®
Corporation.
VESA is a registered trademark of the Video Electronics Standards Association.
DPMS and DDC are trademarks of VESA.
Disclaimer: ViewSonic® Corporation shall not be liable for technical or editorial
errors or omissions contained herein; nor for incidental or consequential damages
resulting from furnishing this material, or the performance or use of this product.
In the interest of continuing product improvement, ViewSonic® Corporation
reserves the right to change product specifications without notice. Information in
this document may change without notice.
No part of this document may be copied, reproduced, or transmitted by any means,
for any purpose without prior written permission from ViewSonic® Corporation.
LS510W_LS510WH_LS510WH-2_LS560W_LS560WH_LS560HDH_UG_ENG_1a_20221213
77
Page 78
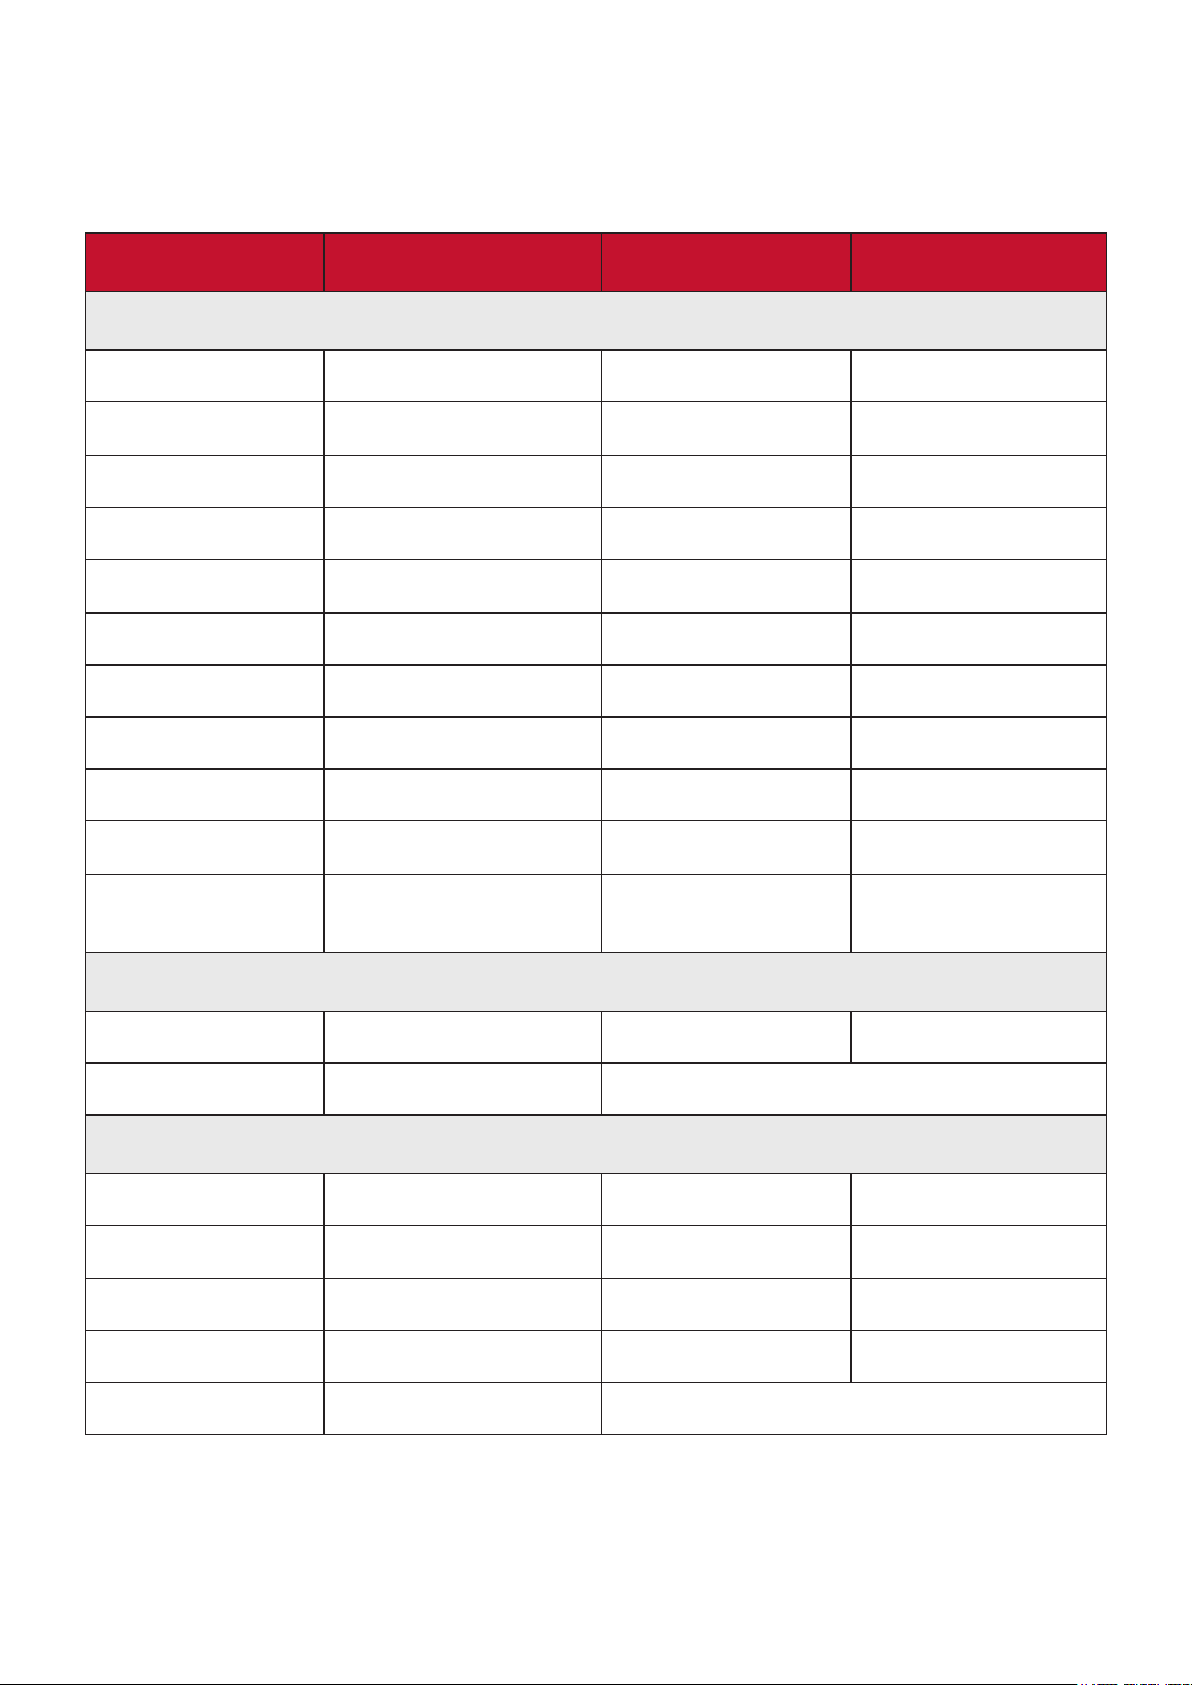
Customer Service
For technical support or product service, see the table below or contact your
reseller.
NOTE: You will need the product’s serial number.
Country/ Region Website Country/ Region Website
Asia Pacific & Africa
Australia
中国 (China)
Hong Kong (English)
Indonesia
日本 (Japan)
Malaysia
Myanmar
New Zealand
Philippines
臺灣 (Taiwan)
Việt Nam
www.viewsonic.com/au/
www.viewsonic.com.cn
www.viewsonic.com/hk-en/
www.viewsonic.com/id/
www.viewsonic.com/jp/
www.viewsonic.com/my/
www.viewsonic.com/mm/
www.viewsonic.com/nz/
www.viewsonic.com/ph/
www.viewsonic.com/tw/
www.viewsonic.com/vn/
Bangladesh
香港 (繁體中文)
India
Israel
Korea
Middle East
Nepal
Pakistan
Singapore
ประเทศไทย
South Africa &
Maurius
www.viewsonic.com/bd/
www.viewsonic.com/hk/
www.viewsonic.com/in/
www.viewsonic.com/il/
www.viewsonic.com/kr/
www.viewsonic.com/me/
www.viewsonic.com/np/
www.viewsonic.com/pk/
www.viewsonic.com/sg/
www.viewsonic.com/th/
www.viewsonic.com/za/
Americas
United States
Lan America
Europe
Europe
Deutschland
Россия
Türkiye
United Kingdom
www.viewsonic.com/us
www.viewsonic.com/la
www.viewsonic.com/eu/
www.viewsonic.com/de/
www.viewsonic.com/ru/
www.viewsonic.com/tr/
www.viewsonic.com/uk/
Canada
France
Қазақстан
España
Україна
www.viewsonic.com/us
www.viewsonic.com/fr/
www.viewsonic.com/kz/
www.viewsonic.com/es/
www.viewsonic.com/ua/
78
Page 79

Limited Warranty
ViewSonic® Projector
What the warranty covers:
ViewSonic warrants its products to be free from defects in material and
workmanship, under normal use, during the warranty period. If a product
proves to be defective in material or workmanship during the warranty period,
ViewSonic will, at its sole option, repair or replace the product with a like product.
Replacement product or parts may include remanufactured or refurbished parts or
components.
Limited Three (3) year General Warranty
Subject to the more limited one (1) year warranty set out below, North and South
America: Three (3) years warranty for all parts excluding the lamp, three (3) years
for labor, and one (1) year for the original lamp from the date of the first consumer
purchase.
Other regions or countries: Please check with your local dealer or local ViewSonic
office for the warranty information.
Limited One (1) year Heavy Usage Warranty:
Under heavy usage settings, where a projector’s use includes more than fourteen
(14) hours average daily usage, North and South America: One (1) year warranty
for all parts excluding the lamp, one (1) year for labor, and ninety (90) days for the
original lamp from the date of the first consumer purchase; Europe: One (1) year
warranty for all parts excluding the lamp, one (1) year for labor, and ninety (90)
days for the original lamp from the date of the first consumer purchase.
Other regions or countries: Please check with your local dealer or local ViewSonic
office for the warranty information.
Lamp warranty subject to terms and conditions, verification and approval. Applies
to manufacturer’s installed lamp only. All accessory lamps purchased separately are
warranted for 90 days.
Who the warranty protects:
This warranty is valid only for the first consumer purchaser.
7979
Page 80

What the warranty does not cover:
1. Any product on which the serial number has been defaced, modied or removed.
2. Damage, deterioration, failure, or malfunction resulting from:
a. Accident, abuse, misuse, neglect, fire, water, lightning, or other acts of nature,
improper maintenance, unauthorized product modification, or failure to follow
instructions supplied with the product.
b. Operation outside of product specifications.
c. Operation of the product for other than the normal intended use or not under
normal conditions.
d. Repair or attempted repair by anyone not authorized by ViewSonic.
e. Any damage of the product due to shipment.
f. Removal or installation of the product.
g. Causes external to the product, such as electric power fluctuations or failure.
h. Use of supplies or parts not meeting ViewSonic’s specifications.
i. Normal wear and tear.
j. Any other cause which does not relate to a product defect.
3. Removal, installation, and set-up service charges.
How to get service:
1. For informaon about receiving service under warranty, contact ViewSonic
Customer Support (please refer to “Customer Support” page). You will need to
provide your product’s serial number.
2. To obtain warranted service, you will be required to provide (a) the original
dated sales slip, (b) your name, (c) your address, (d) a description of the problem,
and (e) the serial number of the product.
3. Take or ship the product freight prepaid in the original container to an authorized
ViewSonic service center or ViewSonic.
4. For additional information or the name of the nearest ViewSonic service center,
contact ViewSonic.
Limitation of implied warranties:
There are no warranties, express or implied, which extend beyond the description
contained herein including the implied warranty of merchantability and fitness for
a particular purpose.
80
Page 81

Exclusion of damages:
ViewSonic’s liability is limited to the cost of repair or replacement of the product.
ViewSonic shall not be liable for:
1. Damage to other property caused by any defects in the product, damages based
upon inconvenience, loss of use of the product, loss of me, loss of prots, loss of
business opportunity, loss of goodwill, interference with business relaonships,
or other commercial loss, even if advised of the possibility of such damages.
2. Any other damages, whether incidental, consequential or otherwise.
3. Any claim against the customer by any other party.
Effect of local law:
This warranty gives you specific legal rights, and you may also have other rights
which vary from local authority. Some local governances do not allow limitations on
implied warranties and/or do not allow the exclusion of incidental or consequential
damages, so the above limitations and exclusions may not apply to you.
Sales outside the U.S.A. and Canada:
For warranty information and service on ViewSonic products sold outside of the
U.S.A. and Canada, contact ViewSonic or your local ViewSonic dealer.
The warranty period for this product in mainland China (Hong Kong, Macao and
Taiwan Excluded) is subject to the terms and conditions of the Maintenance
Guarantee Card.
For users in Europe and Russia, full details of warranty provided can be found in
www.viewsoniceurope.com under Support/Warranty Information.
Projector Warranty Term Template In UG
VSC_TEMP_2005
81
Page 82

Mexico Limited Warranty
ViewSonic® Projector
What the warranty covers:
ViewSonic warrants its products to be free from defects in material and
workmanship, under normal use, during the warranty period. If a product
proves to be defective in material or workmanship during the warranty period,
ViewSonic will, at its sole option, repair or replace the product with a like product.
Replacement product or parts may include remanufactured or refurbished parts or
components & accessories.
How long the warranty is effective:
3 years for all parts excluding the lamp, 3 years for labor, 1 year for the original
lamp from the date of the first consumer purchase.
Lamp warranty subject to terms and conditions, verification and approval. Applies
to manufacturer’s installed lamp only.
All accessory lamps purchased separately are warranted for 90 days.
Who the warranty protects:
This warranty is valid only for the first consumer purchaser.
What the warranty does not cover:
1. Any product on which the serial number has been defaced, modied or removed.
2. Damage, deterioration or malfunction resulting from:
a. Accident, misuse, neglect, fire, water, lightning, or other acts of nature,
unauthorized product modification, unauthorized attempted repair, or failure to
follow instructions supplied with the product.
b. Any damage of the product due to shipment.
c. Causes external to the product, such as electrical power fluctuations or failure.
d. Use of supplies or parts not meeting ViewSonic’s specifications.
e. Normal wear and tear.
f. Any other cause which does not relate to a product defect.
3. Any product exhibiting a condition commonly known as “image burn-in” which
results when a static image is displayed on the product for an extended period of
time.
4. Removal, installation, insurance, and set-up service charges.
82
Page 83

How to get service:
For information about receiving service under warranty, contact ViewSonic
Customer Support (Please refer to the attached Customer Support page). You
will need to provide your product’s serial number, so please record the product
information in the space provided below on your purchase for your future use.
Please retain your receipt of proof of purchase to support your warranty claim.
For Your Records
Product Name: ________________________ Model Number: ____________________________
Document Number: ____________________ Serial Number: ____________________________
Purchase Date: ________________________ Extended Warranty Purchase? _____________(Y/N)
If so, what date does warranty expire? __________
1. To obtain warranty service, you will be required to provide (a) the original dated
sales slip, (b) your name, (c) your address, (d) a descripon of the problem, and
(e) the serial number of the product.
2. Take or ship the product in the original container packaging to an authorized
ViewSonic service center.
3. Round trip transportation costs for in-warranty products will be paid by
ViewSonic.
Limitation of implied warranties:
There are no warranties, express or implied, which extend beyond the description
contained herein including the implied warranty of merchantability and fitness for
a particular purpose.
Exclusion of damages:
ViewSonic’s liability is limited to the cost of repair or replacement of the product.
ViewSonic shall not be liable for:
1. Damage to other property caused by any defects in the product, damages based
upon inconvenience, loss of use of the product, loss of me, loss of prots, loss of
business opportunity, loss of goodwill, interference with business relaonships,
or other commercial loss, even if advised of the possibility of such damages.
2. Any other damages, whether incidental, consequential or otherwise.
3. Any claim against the customer by any other party.
4. Repair or attempted repair by anyone not authorized by ViewSonic.
83
Page 84

Contact Informaon for Sales & Authorized Service (Centro Autorizado de Servicio) within Mexico:
Name, address, of manufacturer and importers:
México, Av. de la Palma #8 Piso 2 Despacho 203, Corporavo Interpalmas,
Col. San Fernando Huixquilucan, Estado de México
Tel: (55) 3605-1099 hp://www.viewsonic.com/la/soporte/index.htm
NÚMERO GRATIS DE ASISTENCIA TÉCNICA PARA TODO MÉXICO: 001.866.823.2004
Hermosillo:
Distribuciones y Servicios Computacionales SA de CV.
Calle Juarez 284 local 2
Col. Bugambilias C.P: 83140
Tel: 01-66-22-14-9005
E-Mail: [email protected]
Villahermosa:
Compumantenimietnos Garanzados, S.A. de C.V.
AV. GREGORIO MENDEZ #1504
COL, FLORIDA C.P. 86040
Tel: 01 (993) 3 52 00 47 / 3522074 / 3 52 20 09
E-Mail: [email protected]
Puebla, Pue. (Matriz):
RENTA Y DATOS, S.A. DE C.V. Domicilio:
29 SUR 721 COL. LA PAZ
72160 PUEBLA, PUE.
Tel: 01(52).222.891.55.77 CON 10 LINEAS
E-Mail: [email protected]
Chihuahua
Soluciones Globales en Computación
C. Magisterio # 3321 Col. Magisterial
Chihuahua, Chih.
Tel: 4136954
E-Mail: [email protected]
Distrito Federal:
QPLUS, S.A. de C.V.
Av. Coyoacán 931
Col. Del Valle 03100, México, D.F.
Tel: 01(52)55-50-00-27-35
E-Mail : [email protected]
Guerrero Acapulco
GS Computación (Grupo Sesicomp)
Progreso #6-A, Colo Centro
39300 Acapulco, Guerrero
Tel: 744-48-32627
Veracruz, Ver.:
CONEXION Y DESARROLLO, S.A DE C.V. Av. Americas # 419
ENTRE PINZÓN Y ALVARADO
Fracc. Reforma C.P. 91919
Tel: 01-22-91-00-31-67
E-Mail: [email protected]
Cuernavaca
Compusupport de Cuernavaca SA de CV
Francisco Leyva # 178 Col. Miguel Hidalgo
C.P. 62040, Cuernavaca Morelos
Tel: 01 777 3180579 / 01 777 3124014
E-Mail: [email protected]
Guadalajara, Jal.:
SERVICRECE, S.A. de C.V.
Av. Niños Héroes # 2281
Col. Arcos Sur, Sector Juárez
44170, Guadalajara, Jalisco
Tel: 01(52)33-36-15-15-43
E-Mail: [email protected]
Monterrey:
Global Product Services
Mar Caribe # 1987, Esquina con Golfo Pérsico
Fracc. Bernardo Reyes, CP 64280
Monterrey N.L. México
Tel: 8129-5103
E-Mail: [email protected]
MERIDA:
ELECTROSER
Av Reforma No. 403Gx39 y 41
Mérida, Yucatán, México CP97000
Tel: (52) 999-925-1916
E-Mail: [email protected]
Tijuana:
STD
Av Ferrocarril Sonora #3780 L-C
Col 20 de Noviembre
Tijuana, Mexico
Projector Mexico Warranty Term Template In UG
VSC_TEMP_2006
84
Oaxaca, Oax.:
CENTRO DE DISTRIBUCION Y
SERVICIO, S.A. de C.V.
Murguía # 708 P.A., Col. Centro, 68000, Oaxaca
Tel: 01(52)95-15-15-22-22
Fax: 01(52)95-15-13-67-00
E-Mail. [email protected]
FOR USA SUPPORT:
ViewSonic Corporation
14035 Pipeline Ave. Chino, CA 91710, USA
Tel: 800-688-6688
E-Mail: http://www.viewsonic.com
Page 85

 Loading...