

Page 1
Page 2

Page 3

Language
1English
20Deutsch
39Français
58Italiano
77Español
97日本語
Page 4

Page 5

Content
Foreword
Product Introduction
Installation Guide
Waterproof Case Open&Close
Dust-proof Cover Replacement
Battery Charging and Installation
SD Card Insertion and Formatting
Mode Operation Instructions
Settings Table
Wifi Connecting
Computer Connecting
TV Connecting
Specifications
Warranty
2
3
4
4
5
6
7
9
11
15
16
17
18
19
1
Page 6

Foreword
Thank you for your purchase of Victure AC800 and welcome to Victure’s
world of photography. The AC800 Series action camera adopted 6-layers
optical lens to record 4K / 24fps FHD videos and shoot maxim 20MP high
quality pictures. With Gyroscope or Anti-shake function ON, the AC800
can reduce the impact of shake on the screen significantly.
Victure consistently attaches great importance to product quality and high
customer satisfaction. We sincerely hope you can make a few suggestions
during your use to help us improve our products. Your precious
suggestions will help us shape our products to perfectly fit your standards.
If you encountered any problem during your use, please contact us via:
support@govicture.com. Please be assured that seller support is just a
mail away from you in case you find any difficulty. Do not hesitate to write
to us by email if you need any kind of help. There will be seller support
reaching to you as soon as we can. Please note that all items purchased
from Victure are covered by 1 year warranty from the date of purchase.
We thank you infinitely for choosing our camera. We wish you all the best.
Kind regards,
Victure Support Team
2
Page 7
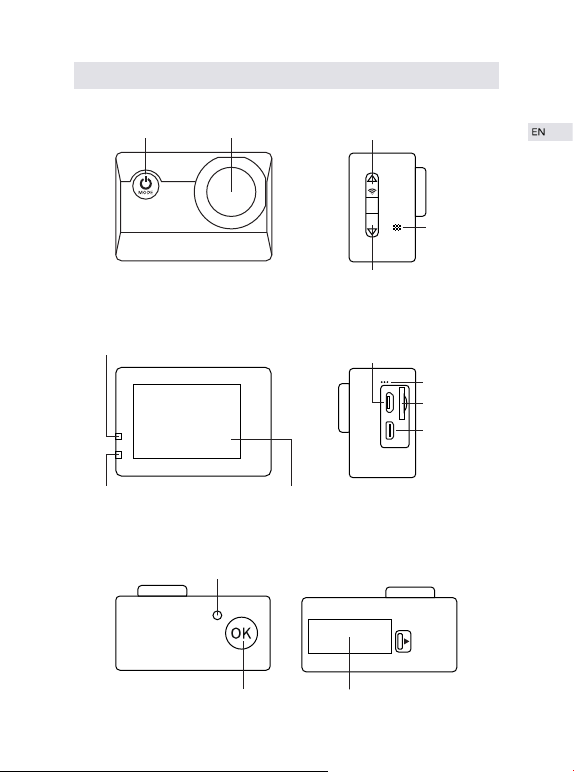
Product Introduction
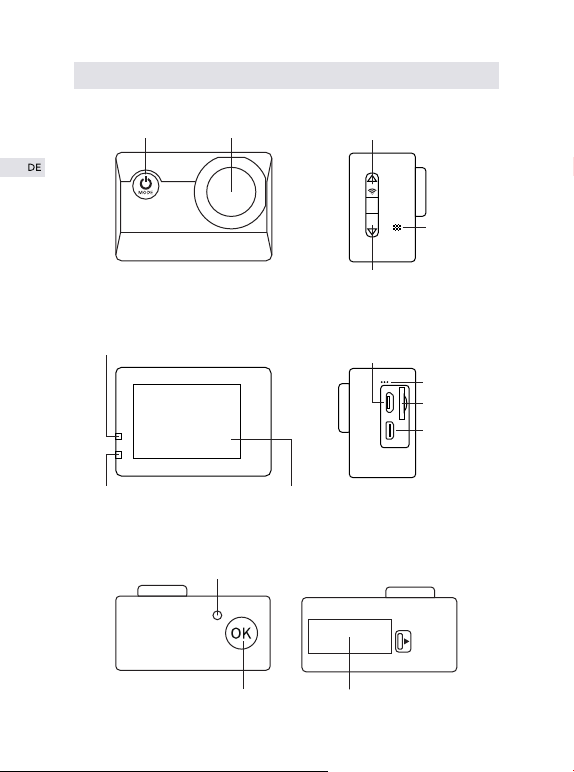
Power/MODE Button Lens
Working Indicator
(Flashes BLUE during working)
Charging Indicator
(Flashes RED during charging)
Wifi Indicator
(Flashes ORANGE when wifi is ON)
LCD Screen
Battery coverOK Button
3
Up/Wi-Fi
Down/Audio
Recording Switch
MICRO USB
Speaker
MIC
MICRO SD
MICRO
HDMI
Page 8
Installation Guide
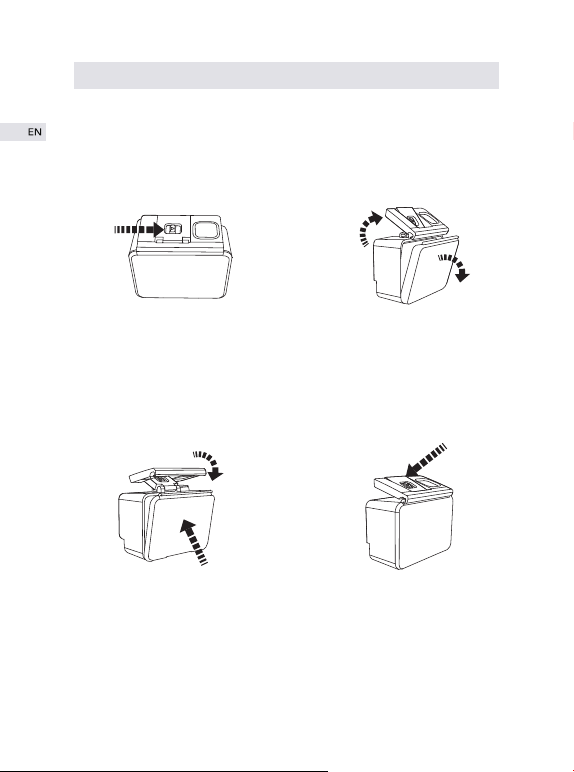
Waterproof Case Open&Close
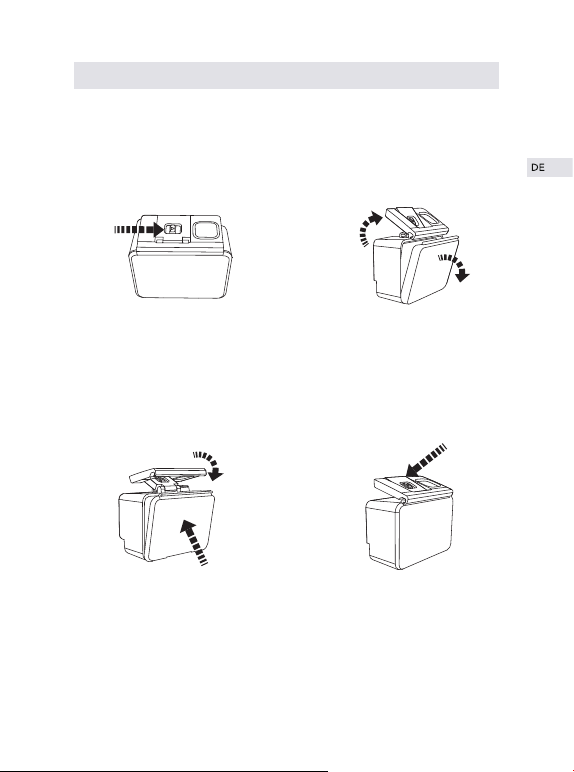
Waterproof Case Open:
①
②
③
1. To open the waterproof case,
firstly take the switch on the top
to right as indicated by the arrow.
Waterproof Case Close:
②
①
1. To close the waterproof case.
Firstly please compress the back
cover of the waterproof case as
arrow 1 shows;
2. Please pull down the buckle,
and connects it to the back cover
as arrow 2 shows.
2. Pull up the buckle of waterproof case;
3. Open the back cover of the
waterproof case.
③
3. Pull down the buckle of the
waterproof case as arrow 3
shows.
4
Page 9
Tips:
1. Please tear the protective films on the waterproof case lens before
shoot/record;
2. To achieve better waterproof performance, the voice record within
waterproof case will be weakened.
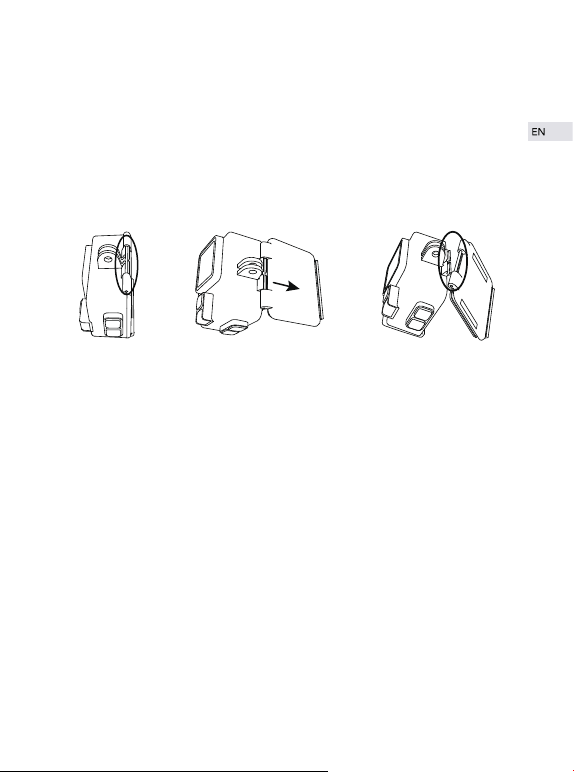
Dust-proof Cover Replacement:
Step 1 Step 2 Step 3
1. To replace the dust proof case, first please find the slot of the waterproof
case as circled place showed in step 1.
2. Hold the case with your hands as step 2 picture shows, face the slot on the
case front, tear the waterproof back cover off.
3. Find the dust proof back cover in your accessories, which has two
inter-spaces in left and right side. Insert the lower half of the cover in the slot,
then push the upper half into the slot until the whole back cover being totally
installed.
Tips:
1. This usage can be operated based on your own needs.
2. The dust proof case can not be used under water.
5
Page 10
Battery Charging and Installation
The battery and the camera are packaged separately, so please make sure
that the battery is charged with power, inserted into the camera before
getting the camera started.
Battery Charging:
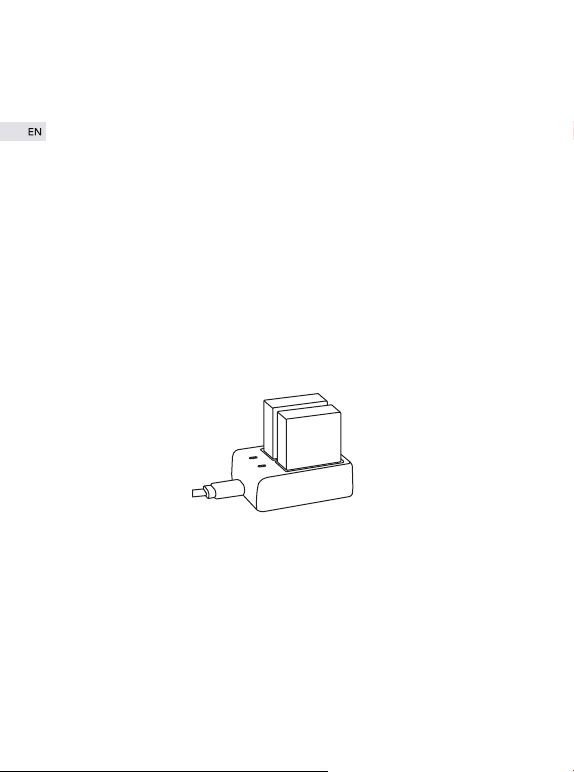
The battery charging steps are as below:
1. Find the dual USB battery charger in the camera’s accessories.
2. Connecting the charger with USB cable, you can charge it with power plug
or with computer. Charging with computer may be slower than using a power
adapter due to lower power output of computer USB ports.
3. Insert the two batteries into the charging compartment. When the charger
is on working, the red light means its charging, the blue light means it has
been fully charged.
Battery Installation:
After the batteries have been fully charged, please install one battery into the
camera to get the camera’s power working. The battery installation steps are
as below:
1. Find the battery compartment part in the camera. Open the battery cover
as below picture shows. First, use your right thumb’s fingernail to push the
switch into right as arrow 1 shows. Second, lift the battery cover with your left
thumb’s fingernails as arrow 2 shows.
6
Page 11
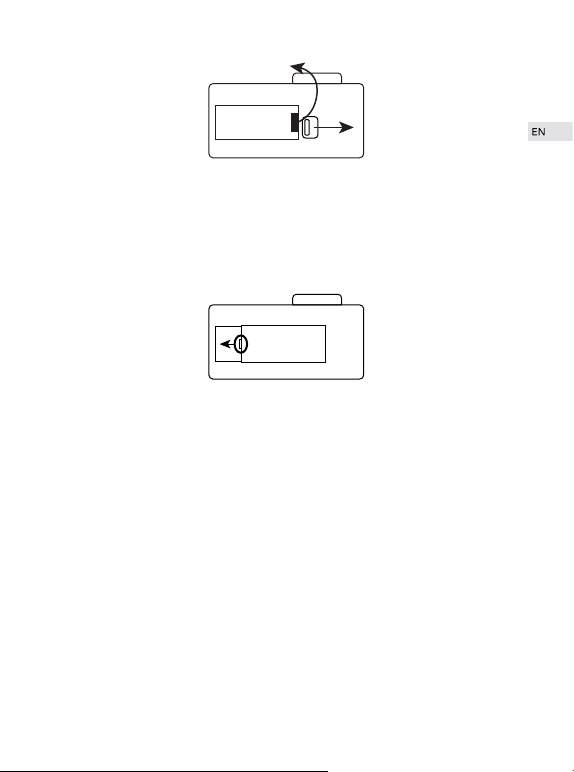
②
①
2. Install the battery cover after the battery has been inserted. Please note
the extended part of the battery cover should be inserted to the left of the
battery compartment first as below picture shown. Then press the right half
of the battery cover down into the battery compartment.
Tips:
Please note the directions of the battery and battery cover.
SD Card Insertion and Formatting
After the batteries fulled charged with power, a SD card is needed to get
the camera working. Our camera supports Class 10 micro SD card, maxim
support 64GB. Please note the SD card is NOT INCLUDED in the camera.
SD Card Insertion and Out :
1. Find the Micro SD card slot in the camera, inserting the card into the
camera as the direction mark shows on the camera until you hear a
insertion sound.
2. SD card out: Press down the SD card until you’ve heard a insertion
sound; Then the SD card will pop out along with a poping sound.
7
Page 12

Tips: Please use your fingernails to push the SD card since the slot is a
little bit deep.
Formatting:
Considering the compatibility of the SD card, it should be formatted
before using. Formatting steps are as below:
1. Short press the “MODE” button to start up the camera. Press the
“MODE" button thrice to enter the settings mode;
2. Press “DOWN” button until you find “format” setting then press OK
button to confirm, the memory card will be formatted at once.
Tips:
1. Please make sure the SD card is class 10 micro card, and the memory
maxim supports 64 GB;
2. Please transfer your valuable files into other place to store before
format the SD card.
8
Page 13

Mode Operation Instructions
The AC800 series has four kinds of mode: Video Mode, Photo Mode,
Playback Mode, Settings Mode. Below are the function instructions of
each button under these modes.
Turn ON/OFF
Short press「Power/MODE Button」: Turn on the camera;
Extended press「Power/MODE button」: Turn off the camera.
※Under each mode.
Video Mode
「OK Button」: Begin&Stop recording
「Up Button」(Short Press): Wifi switch
「Up button」(Extended Press) : Enlarge the focal length(Maxim 4X)
「Down Button」(Short Press): Audio recording switch
「Down button」(Extended Press): Narrow focal length
「Power/MODE Button」(Short Press): Shoot pictures(During recording)
Photo Mode
「OK Button」: Shoot picture
「Up Button」: Enlarge the focal length(Maxim 4X)
「Down button」: Narrow focal length
「Power/MODE Button」(Short Press): Mode switch(Video→Photo→
Playback→Settings)
Playback Mode
Under Playback
「OK Button」(Short Press): Play&Pause video
「Up Button」: Fast forward( Maxim 8X)
「Down button」: Rewind( Maxim 8X)
9
Page 14

Non-playback time
「Up Button」: Page up
「Down button」: Page down
「Power/MODE Button」(Short Press): Mode switch(Video→Photo→
Playback→Settings)
Settings Mode
「Up Button」: Page up
「Down button」: Page down
「OK Button」: Confirm
「Power/MODE Button」(Short Press): Mode switch(Video→Photo→
Playback→Settings)
10
Page 15

Settings Table
Camera Settings Page Explanation Table
※V=Video Mode; P=Settings which effective under photo mode
Setting
Video
Resolution
Loop
Recording
Gyroscope
WDR
Time-lapse
Record
Motion
detection
Audio
Recording
Value
4K/2K/1080P/
720P/480P/240P
Off/3 Minutes/
5 Minute/
10 Minutes
Off/On
Off/On
Off /
0.1 Second/
0.2 Seconds/
0.5 Seconds/
1 Second/
5 Seconds
Off/On
Off/On
V P Explanation
To set the video’s resolution.
○
The file will be record by
segment based on the time
○
unit you’ve set.
This setting can counteract
○
the hand-shake and vibration’s
effect to the recording.
Wide Dynamic Range
○
It can automatically adjust the
darkness in the image.
Time-lapse photography is a
technique whereby the frequency at which film frames
are captured (the frame rate)
is much lower than that used
○
to view the sequence. When
played at normal speed, time
appears to be moving faster
and thus lapsing.
※This function can not be
used under 4K video resolution.
Under standby mode, the
camera will record and save
○
a 10 seconds video when it
detects a moving object.
It decides whether there is an
audio record into the video.
○
※ Use down button to turn on/
off the audio during recording.
11
Page 16

Angle
Night Scene
Interval Timer
Shooting
Image
Resolution
Continuous
Shooting
Image
Quality
Sharpness
Level
White
Balance
Color
ISO
Sensitivity
Exposure
Value
170°/140°/
110°/70°
Off/On
Off/2s Timer/5s
Timer/10s Timer
20M /16M /
12M /10M /8M /
5M/3M /VGA
Off/On
High Quality /
Good/Normal
Strong/
Standard/Soft
Auto/Daylight/
Cloudy/
Tungsten light/
Fluorescent
Normal/
Black & white/
Brown
Auto/100/
200/400
+2.0/+1.7/+1.3/
+1.0/+0.7/+0.3/
0/-0.3/-0.7/-1.0/
-1.3/-1.7/-2.0
Date stamp on the videos or
○○○Off/OnDate Stamp
pictures.
The angle of the camera’s
lens is adjustable.
The camera will adjust the
white balance automatically
○
○Diving Mode Off/On
when record/shoot under
water.
The screen brightness will be
○○○
automatically adjusted when
the camera shoot night scenes.
The camera will take a picture
○
after the set interval timer.
○
To set the image’s resolution.
Press OK button without stop
to continuously shoot pictures
○
under photo mode.
To adjust the image quality
○
of the pictures.
To adjust the object’s edge
○
pixels within the image.
To set the camera’s white
○
balance.
○ ○
To set the image’s color.
To adjust the light
○ ○
sensitiveness.
To adjust the exposure value
○○
※+(Brightness)/-(Darkness)
adjustment.
12
Page 17

To counteract the hand-
○Anti-Shaking Off/On
shake/vibration‘s influence
to taking pictures.
Delete
Protect
WIFI Off/On
WIFI SSID To set the name of the Wifi.
WIFI
Password
Date&Time
Automatic
Shutdown
Key Volume Off/On
Voice Prompts Off/On
OSD Off/On
Delete Current
File/Delete All
Lock Current File/
Unlock Current File/
Lock All the Files/
Unlock All the Files
Off/
1 Minute/
3 Minutes/
5 Minutes /
10 Minutes
To delete the files.
To prevent files overwriting
caused by loop recording
under car mode.
Press up button to turn on/
off the wifi with one key
button.
WIFI Password
To set the system’s date.
※ 1. Please note to set the
date during first time using.
2.It will be changed into
default date after you
exchanged the battery.
The camera will enter into a
screen saver mode then
○ ○
automatically shutdown under
no operation.
※Except in video mode.
The key volume during
○○○
operation.
The camera will voice
prompting video start/video
stop when doing its operations.
The display of the function
○ ○
menu parameters on the screen.
13
Page 18

Connect to the car charger,
the camera will automatically
start recording once the en-
○Car Mode Off/On
gine is turned on. And automatically saving recording files
and shut down once the engine
is turned off.
English / Français /
Español / Polski /
Language
TV mode NTSC/PAL Video output format.
TV
Screen Saver
Power
Frequency
Format SD card
Default
Settings
Hardware
information
Deutsch / Italiano /
繁體中文 /
Pусский / 日本語 /
한국어 / Cesky /
Português
Off/On FPV function
Off/
30 Seconds/
1 Minute/
3 Minutes
50 Hz/60 Hz
Settings
Model:
Victure AC800
Version: 1.0
○○○
To set the system’s language.
To set the screen saver’s time
interval.
○ ○
※ Short press any key button
to wake up the screen under
this setting.
To set the power frequency
○ ○
Europe: 50Hz/
North America: 60Hz
To format the SD card.
※When you confirm OK,
the memory card will be
formatted shortly.
To restore the camera into
default settings
The display of the model of
the product and the hardware
version.
14
Page 19

Wifi Connecting
Download the App
Download the ‘OKCAM’ app from the App Store(iOS)/ Google Play(Android).
Wifi Connecting
After the download step finished,you can use your phone to control the
camera through App, view the video or pictures on your phone, and
download the recordings from the camera. The connecting steps are as
following:
1. Short press MODE button to turn on the camera;
2. Short press Up button to turn on the wifi(when the camera under Video
mode);
3. Find and connect the wifi through your phone with the wifi’s name and
password displayed on the camera;
4. Enter the app after the wifi is connected, you’ll find the camera is
controlled by your phone.
5. To disconnect wifi, short press Up button again.
Tips:
1. The wifi information display will be shorten into a wifi mark in the lower
left of camera’s screen once the wifi is connected with your phone;
2. The camera can only connect to one device at a time;
3. The wifi connection is a little bit power consuming, so please avoid
connecting wifi when the camera is low in battery.
15
Page 20

Computer Connecting
There are two options when you use the included micro-USB cable to
connect to a computer: Mass Storage and PC Camera. Press Up/Down
button to switch between these two modes.
Mass Storage: Access to the files which stored in camera’ s micro SD card
to copy or view them on a computer. This function can also achieved by a
micro SD card reader.
PC Camera: Use as a web cam for video chats and video recording on your
computer. You may need to allow Adobe Flash Player to run in your video
chat software before display the video.
16
Page 21

TV Connecting
With HDMI output, you can display the movies and images recorded by
this camera on large screens of TV, projector, etc.
1. Turn off the camera.
2. Connect the camera and TV with a commercially available Micro HDMI
cable (NOT INCLUDED).
3. Turn on the camera and turn on the HDMI setting on the device which
you intended to input.
※ 1. The HDMI input device should supports 1080P.
2. When outputting HDMI, the display of the camera turns black. The
screen is displayed on the HDMI input device, but the operation is
operated with the camera.
17
Page 22

Specifications
Model
Chip
Sensor
Screen
Lens
Video Compression Format
Video Format
Image Format
Wifi Connection
SD Card
Ports
Charging Time
Recording Time
Battery
Power Input
Waterproof Case Depth Rating
Weight
Dimensions
AC800
NT96660
SONY IMX078
2” LCD
170° Wide angle lens(Adjustable)
H.264
MOV
JPG
Android / iOS supported
Class 10 Micro SD card, maxim
supports 64 GB.
Micro USB / Micro HDMI
About 3 hours
1080P 120 minutes/ 4K 60 minutes
Rechargeable 1050mAh Li-ion
battery
5V/1A
40M/131.2ft
78g/ 2.75oz (with battery)
60*25*40mm / 2.36*0.98*1.57 inch
18
Page 23

Warranty
All Victure products come with a limited warranty of 12 months from the
date of purchase. And we have professional customer service team for your
support as soon as we can.
If you have any questions or confusions about our product or the warranty,
please feel free to contact us via: support@govicture.com. We will do our
best to help you solve the problem until you are satisfied.
19
Page 24

Inhalt
Vorwort
Produktvorstellung
Inbetriebnahme
Wasserdichtes Gehäuse öffnen & schließen
Ersatz des staubdichten Gehäuses
Aufladen und Batterieinbetriebnahme
SD Karte einsetzen und formatieren
Bedienungsanleitung
Einstellungen Tabelle
Verbinden mit einem Drahtlosnetzwerk (WIFI)
Verbinden mit einem Computer
TV Verbindung
Technische Daten
Garantie
21
22
23
23
24
25
26
28
30
34
35
36
37
38
20
Page 25

Vorwort
Danke für ihren Kauf der Victure AC800 Actionkamera und willkommen in
Victure’s Welt der Fotografie. Die AC800 Actionkamera hat 6-lagige
optische Linsen um 4K / 24fps FHD Videos aufzunehmen, und schießt
Fotos mit maximal 20 Megapixel in höchster Qualität. Mit eingeschaltetem
Gyroskop und Anti-Shake verfügt die AC800 über eine signifikante
Bildstabilisierung. Mit der Time Lapse Funktion (Zeitraffer) ist es möglich
Naturschauspiele wie den Sonnenlauf oder den Sternenhimmel mit der
AC800 aufzunehmen.
Victure legt größten Wert auf höchste Produktqualität und Kundenzufriedenheit. Wenn Sie Wünsche oder Vorschläge haben, würden wir uns
freuen, wenn sie uns diese mitteilen. Sie helfen uns so, unsere Produkte zu
verbessern. Ihre Anregungen unterstützen unsere Entwicklung, und dienen
der Verbesserung unserer Standards.
Falls Probleme während des Gebrauchs auftauchen, kontaktieren Sie uns
bitte unter support@govicture.com. Unser Support Team wird sich umgehend um eine Lösung Ihres Problems bemühen. Bitte beachten Sie, dass
Sie auf alle Geräte von Victure ein Jahr Garantie haben.
Nochmals herzlichen Dank, dass Sie sich für ein Produkt von Victure
entschieden haben.
Mit freundlichen Grüßen,
Ihr Victure Support Team
21
Page 26
Produktvorstellung
Power/MODE Schalter Linse
Indikator LED
(Blinkt BLAU während der Aufzeichnung)
Ladeindikator
(Blinkt ROT während des Ladevorgangs)
Wifi Indikator
(Blinkt ORANGE wenn WIFI aktiv)
LCD Display
22
Batterie AbdeckungOK Taste
Auf/Wi-Fi
Ab/ Audio
Aufnahme Taste
MICRO USB
Lautsprecher
Mikrofon
MICRO SD
Kartenslot
HDMI
Page 27
Inbetriebnahme
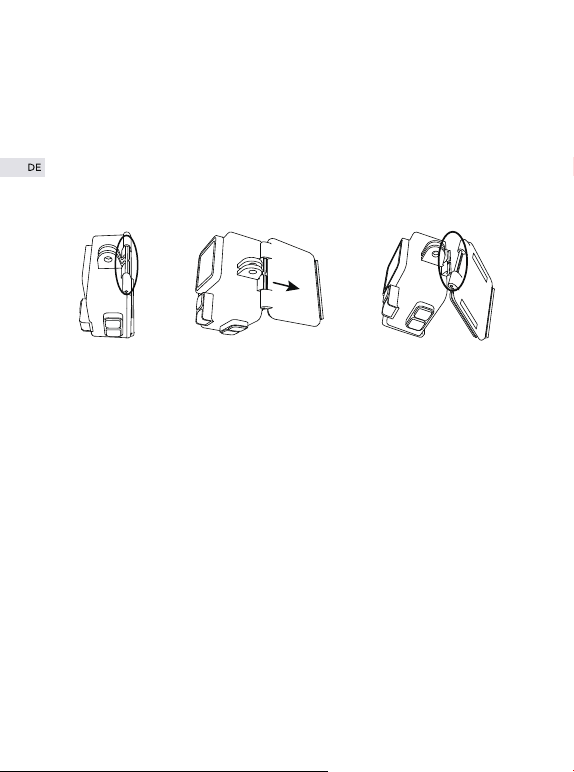
Wasserdichtes Gehäuse öffnen & schließen
Wasserdichtes Gehäuse öffnen:
①
②
③
1.Um das wasserdichte Gehäuse
zu öffnen, schieben sie zuerst den
Schalter oben nach rechts (siehe
Pfeil).
Wasserdichtes Gehäuse schließen:
②
①
1.To close the waterproof case.
Firstly Drücken Sie die hintere
Abdeckung wie abgebildet an
das Gehäuse;
2. Schließen Sie die Schnalle, und
verbinden sie mit der hinteren
Abdeckung (wie abgebildet).
2.Drücken Sie die Schnalle
nach oben;
3.Öffnen Sie die hintere
Abdeckung.
③
3.Drücken Sie die Schnalle nach
unten.
23
Page 28
Hinweise:
1.Bitte entfernen Sie die Schutzfolien vom wasserdichten Gehäuse, bevor sie
mit der Aufnahme beginnen.
2.Durch die Dichtheit des Gehäuses wird die Qualität der Tonaufnahme
verringert.
Ersatz des staubdichten Gehäuses
Schritt 1 Schritt 2 Schritt 3
1.Um die staubdichte Hülle zu ersetzen, finden Sie zuerst den Schlitz der
wasserdichten Hülle, wie in Schritt 1 gezeigt.
2.Halten Sie die Hülle mit Ihren Händen, wie Schritt 2 Bild zeigt, Gesicht
der Schlitz an der Vorderseite der Hülle, reißen Sie die wasserdichte
Rückseite ab.
3.Finden Sie die staubdichte Rückabdeckung in Ihrem Zubehör, das zwei
Zwischenräume auf der linken und rechten Seite hat. Setzen Sie die untere
Hälfte der Abdeckung in den Steckplatz ein und drücken Sie die obere
Hälfte in den Steckplatz, bis die gesamte hintere Abdeckung vollständig
installiert ist.
Hinweise:
1.Die Benutzung kann basierend auf Ihren eigenen Wünschen stattfinden.
2.Das Gehäuse ist staubgeschützt, aber nicht für den Gebrauch unter Wasser
geeignet.
24
Page 29
Aufladen und Batterieinbetriebnahme
Die Kamera und die Batterie wird seperat verpackt geliefert. Bitte laden Sie
die Batterie vor dem ersten Gebrauch ganz auf, und legen sie erst dann in
die Kamera ein.
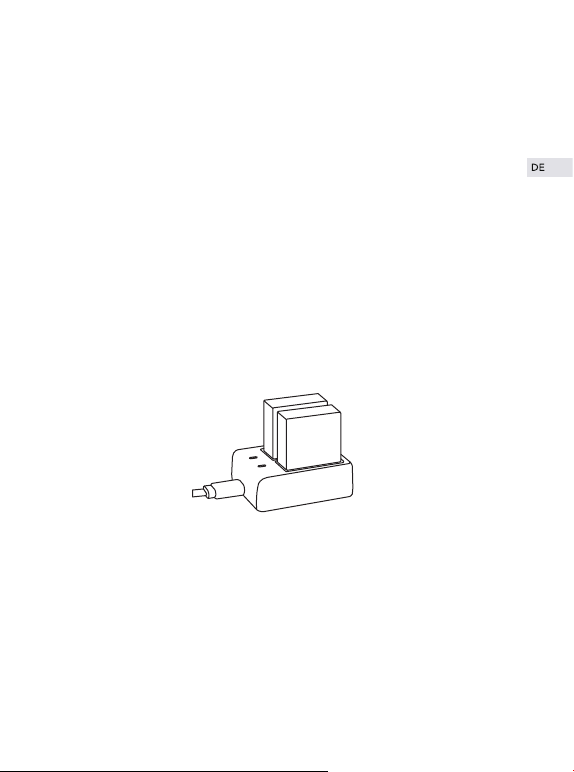
Aufladen:
Hier die Schritte zum Aufladen:
1.Entnehmen Sie das USB Ladegerät ihrem Zubehör (siehe Bild).
2.Sie können zum Laden einen USB Trafo oder ihren Computer verbinden .
Wegen der geringen Ladespannung am USB Port des Computers dauert das
Aufladen länger. Wir empfehlen daher die Verwendung eines Ladegerätes.
3.Setzen sie beide Batterien ein, achten Sie bitte darauf, den Plus und
Minuspol richtig einzusetzen. Die Ladeanzeige leuchtet während des
Ladevorgangs rot, und wechselt zu blau, wenn die Batterien voll sind.
Batterie einsetzen:
Nachdem die Batterien voll geladen sind setzen sie diese bitte in die Kamera
ein. Das funktioniert wie folgt:
1.Auf der Unterseite der Kamera finden Sie das Batteriefach mit dem
Öffnungsschalter auf der rechten Seite. Öffnen Sie das Batteriefach wie
abgebildet. Drücken Sie den Schalter mit ihrem rechten Daumennagel nach
rechts (Siehe 1) und öffnen dann das Batteriefach mit den Fingernagel
(Abbildung 2).
25
Page 30
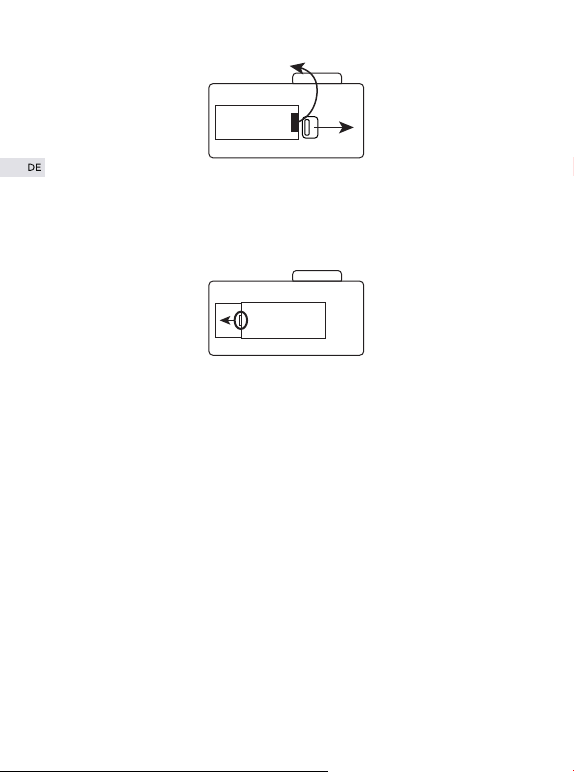
②
①
2.Nach dem Einsetzen der Batterie setzten Sie bitte die Batterieabdeckung ein. Achten Sie bitte darauf, den vorstehenden Teil der Abdeckung
links einzusetzen (siehe Abbildung). Anschließend drücken sie die rechte
Seite der Batterieabdeckung in das Batteriefach.
Hinweise:
Achten Sie dabei bitte auf die richtige Polung und darauf, dass die
Batterieabdeckung richtig eingesetzt ist.
SD Karte einsetzen und formatieren
Nachdem Sie die Batterie voll aufgeladen haben, benötigen Sie noch eine
SD Karte für Ihre Kamera.Die Kamera unterstützt Class 10 SDHC Karten mit
maximal 64 GB. ACHTUNG – die SD Karte ist NICHT IM LIEFERUMFANG
enthalten.
SD Karte einsetzen und entnehmen:
1.Wenn Sie die SD Karte einsetzen, achten Sie darauf, daß der beschriftete
Teil der Karte in Richtung Bildschirm zeigt. Beim Einsetzen klickt die Karte,
wenn sie einrastet.
2.Drücken sie leicht auf die SD Karte, bis es klickt, Die SD Karte wird mit
Federmechanismus aus dem Halter geschoben.
26
Page 31

Hinweise: Halten Sie Ihren Daumen vor den Kartenschlitz, damit die Karte
nicht herausfällt.
Formatieren:
Eine neue SD Karte muss vor dem ersten Gebrauch formatiert werden.
Folgende Schritte sind nötig:
1.Drücken Sie kurz die “MODE” Taste um die Kamera einzuschalten;
Drücken Sie die "MODE" Taste drei mal um in die Einstellungen zu
gelangen;
2.Drücken Sie die “DOWN” Taste bis sie “format” finden und drücken
OK; Die Speicherkarte wird formatiert.
Hinweise:
1.Achten Sie darauf, daß sie Class 10 SDHC Karten verwenden, die nicht
größer als 64 GB sind.
2.Sichern Sie Ihre Dateien auf einem anderen Laufwerk, bevor Sie die
Karte formatieren.
27
Page 32

Bedienungsanleitung
Die AC800 Serie hat vier Betriebsmodi: Video Modus, Foto Modus,
Playback Modus und den Settings Modus (Einstellungen). Hier finden Sie
alle Tastenfunktionen für jeden Modus beschrieben.
Ein- / Ausschalten
Drücken Sie kurz die 「Power/MODE Taste」um die Kamera einzuschalten;
Ein langer Druck auf die「Power/MODE Taste」schaltet die Kamera aus.
※funktioniert in jedem Modus.
Video Modus
「OK Taste」: Start / Stop Aufnahme
「Up Taste」(kurz drücken): Wifi Schalter
「Up Taste」(lange drücken) : vergrößert den Fokus (Maximal 4fach)
「Down Taste」(kurz drücken): Tonaufnahme Ein / Aus
「Down Taste」(lange drücken): verkleinert den Fokus
「Power/MODE Taste」(kurz drücken): Fotos aufnehmen (während der
Videoaufnahme)
Foto Modus
「OK Taste」: Foto aufnehmen
「Up Taste」: vergrößert den Fokus (Maximal 4fach)
「Down Taste」: verkleinert den Fokus
「Power/MODE Taste」(kurz drücken): Cut Over Modus (Video→Photo→
Playback→Settings)
Wiedergabe (Playback) Modus
Während der Wiedergabe
「OK Taste」(kurz drücken): Play & Pause Video
「Up Taste」: Schneller Vorlauf ( Maximal 8fach)
「Down Taste」: Rücklauf ( Maximal 8fach)
28
Page 33

Außerhalb der Wiedergabe
「UP Taste」: Seite vorwärts
「Down Taste」: Seite rückwärts
「Power/MODE Taste」(kurz drücken): Cut Over Modus (Video→Photo→
Playback→Settings)
Einstellungen (Settings) Modus
「UP Taste」: Seite vorwärts
「Down Taste」: Seite rückwärts
「OK Taste」: Bestätigen
「Power/MODE Taste」(kurz drücken): Cut Over Modus (Video→Photo→
Playback→Settings)
29
Page 34

Einstellungen
Beispieltabelle für Kameraeinstellungen
※V=Video Modus; P=Einstellungen für den Fotomodus
Einstellung
Video
Auflösung
LoopAufnahme
Gyroskop
WDR
Zeitraffer
Bewegungserkennung
Ton
Aufnahme
Wert
4K/2K/1080P/
720P/480P/240P
Aus / 3 Minuten /
5 minuten /
10 Minuten
Ein/Aus
Ein/Aus
Aus /
0.1 Sekunde/
0.2 Sekunden/
0.5 Sekunden/
1 Sekunde/
5 Sekunden
Ein/Aus
Ein/Aus
V P Erklärung
Legen Sie die Auflösung des
○
Videos fest.
Die Datei wird in eingestellten
○
Segmenten gespeichert.
Diese Einstellung interagiert
○
mit der eingebauten
Bildstabilisierung.
Wide Dynamic Range
○
Erhöht die Bildqualität bei
Nachtaufnahmen und Dunkelheit.
Zeitraffer ist eine Aufnahmetechnik, bei der Bilder im eingestellten Abstand geschossen
warden, woraus ein Film entsteht.
Wird dieser mit normaler
○
Geschwindigkeit abgespielt,
scheint die Zeit schneller
abzulaufen. Das nennt man
Zeitraffer
※Diese Funktion arbeitet NICHT unter UHD Videoauflösung.
Im Standby Modus mit Motion
Detection nimmt die Kamera
einen Film mit 10 Sekunden
○
auf, wenn sie eine Bewegung
wahrnimmt.
Tonspur für das Video mitaufzeichnen oder nicht.
※ Während der Videoaufnah-
○
me kann man mit der “Down”
Taste die Aufnahme ein /
ausschalten.
30
Page 35

Datumsanzeige
winkel
Tauchmodus Ein/Aus
Nachtszene
Selbstauslöser
Timer
Bildauflösung
Serienaufnahmen
Bildqualität
Schärfe
Weißabgleich
Farbe Normal/S/W/Sepia
ISO Auto/100/200/400
Belichtung
Stabilisierung Ein/Aus
170°/140°/
110°/70°
Ein/Aus
Aus/2s Timer/5s
Timer/10s Timer
20M /16M /
12M /10M /8M /
5M/3M /VGA
Ein/Aus
Hohe Qualität /
Gut/Nomal
Stark/Standard/
Weich
Auto/Tageslicht/
Bewölkt/Kunstlicht/
Fluoroszierend
+2.0/+1.7/+1.3/
+1.0/+0.7/+0.3/
0/-0.3/-0.7/-1.0/
-1.3/-1.7/-2.0
Zeitstempel im Video oder auf
○○○Ein/Aus
Fotos ein- oder ausschalten.
Aufnahmewinkel der Kamera
einstellen.
Die Kamera stellt auomatisch
den Weissabgleich für Unte-
○
○
rwasseraufnahmen ein.
Die Kamera stellt sich für
Nachtaufnahmen selbstständig
○○○
optimal ein.
Selbstauslösefunktion nach der
○
eingestellten Zeit.
○
Fotoauflösung einstellen.
In diesem Fotomodus drücken
○
Sie die OK Taste dauerhaft, um
Serienaufnahmen zu machen.
○
Einstellung der Bildqualität.
Schärfeeinstellung bei
○
Aufnahme.
Weißabgleich für die Kamera.
○
Farbeinstellung für die
○ ○
Aufnahme.
Einstellung der
○ ○
Lichtempfindlichkeit.
Einstellung der Belichtung
○○
※+(Helligkeit)/- (Dunkelheit)
einstellen .
Diese Einstellung interagiert
mit der eingebauten
○
Bildstabilisierung.
31
Page 36

Löschen
Datei-Schutz
WIFI Ein/Aus
WIFI SSID
WIFI
Passwort
Datum und
Uhrzeit
Abschaltautomatik
Tastentöne Ein/Aus
Sprachsteuerung
OSD Ein/Aus
Lösche aktuelle
Datei/Lösche alle
Aktuelle Datei
sperren/Entsperren
aktuelle Datei/
Sperren alle
Dateien/Entsperren
alle Dateien
Aus/1 Minute/
3 Minuten/
5 Minuten /
10 Minuten
Ein/Aus
Dateien löschen.
Schreibschutz für Dateien im
Loop oder Car Modus.
Mit der “UP” Taste schalten
sie WIFI aus oder ein.
Namen des WIFI einstellen.
OK Taste bestätigt (Bewegung),
Auf/Ab Taste Tasten um die
Werte einzustellen.
WIFI Passwort
Systemdatum einstellen.
1. Bitte legen Sie das Datum
vor der ersten Benutzung fest.
2. Es würde sich auf das
Standartdatum zurücksetzen
wenn Sie die Batterie wechseln.
Die Kamera schaltet nach der
eingestellten Zeit in einen
○ ○
Bildschirmschonermodus, und
schaltet nach einiger Zeit ab
※funktioniert nicht während
der Aufnahme.
Tastentöne ein- oder
○○○
ausschalten.
Mit der Sprachsteuerung kann
die Kamera mit Sprache ein
und ausgeschaltet werden.
Anzeige der Menüparameter
○ ○
auf dem Bildschirm.
32
Page 37

Wenn die Kamera im Car
Modus an das Autoladegerät
angeschlossen ist, startet sie
○Automodus Ein/Aus
die Videoaufnahme sobald
der Wagen gestartet wird,
und stoppt, wenn das Auto
English / Français /
Español / Polski /
Sprache
TV Modus NTSC/PAL Video Ausgabeformat.
TV
Bildschirmschoner
Frequenz 50 Hz/60 Hz
Formatieren SD Karte SD Karte formatieren.
Standardeinstellungen
Hardwareinformationen
Deutsch / Italiano /
繁體中文 /
Pусский / 日本語 /
한국어 / Cesky /
Português
Ein/Aus FPV Funktion
Off/30 Sekunden/
1 Minute/
3 Minuten
Settings
Model:
Victure AC800
Version: 1.0
wieder abgestellt wird.
○○○
Systemsprache einstellen.
Einstellung der Anzeigedauer
des Bildschirmschoners.
○ ○
※Mit einem kurzen Druck auf
eine beliebige Taste schalten
Sie den Bildschirmschoner aus.
Einstellung der Stromfrequenz
Europa: 50Hz/
Nordamerika: 60Hz
○ ○
Ost Japan:50Hz/
West Japan:60Hz
Kamera auf Werkseinstellungen
setzen.
Anzeigen des Models und der
Hardwareversion.
33
Page 38

Verbinden mit einem Drahtlosnetzwerk (WIFI)
Die App downloaden
Laden Sie die App ‘OKCAM’ aus dem App Store (iOS) oder von Google
Play(Android) auf ihr Mobiltelefon herunter.
Wifi verbinden
Nachdem sie die OKCAM App heruntergeladen haben, können sie sich
über ein Drahtlosnetzwerk mit ihrem Telefon verbinden. Nachdem Sie ihr
Telefon mit der Kamera verbunden haben, können sie ihr Telefon zur
Bedienung der Kamera verwenden, Videos und Bilder auf Ihrem Telefon
ansehen, und die Aufnahmen auf Ihr Telefon herunterladen. Zur Verbindung gehen Sie wie folgt vor:
1.Drücken Sie die MODE Taste um die Kamera einzuschalten;
2.Drücken Sie die “UP” Taste um WIFI einzuschalten (die Kamera muss im
Video Modus sein);
3.Finden sie das WIFI und verbinden Sie sich über ihr Telefon mit dem WIFI
Namen und dem Passwort, das auf der Kamera angezeigt wird;
4.Öffnen Sie die App, und ihre Kamera kann über das Telefon gesteuert
werden;
5.Um sich vom WIFI abzumelden drücken sie kurz die “UP” Taste.
Hinweise:
1.Die Anzeige der WIFI Information wird automatisch auf ein kleines
Symbol in der linken unteren Ecke des Displays verkleinert, sobald sich die
Kamera mit dem Netzwerk verbunden hat.
2.Die Kamera kann sich immer nur mit einem Gerät verbinden.
3.Die WIFI Verbindung braucht etwas mehr Strom. Vermeiden Sie daher
die WIFI Verbindung, wenn die Kamera geringe Akkuspannung anzeigt.
34
Page 39

Verbinden mit einem Computer
Sie können die Kamera in zwei verschiedenen Modi mit dem Computer
über das beiliegende Micro USB Kabel verbinden : als Speicherlaufwerk
oder als PC Kamera. Mit den Up / DOWN Tasten schalten sie zwischen
diesen Modi hin und her. Das Laden des Akkus funktioniert in beiden Modi,
ist aber effizienter wenn die Kamera abgeschaltet ist (Langer Druck auf die
MODE Taste). Aufgrund der geringeren Stromstärke an Computer USB
Ports empfehlen wir das effektivere Laden am Netzgerät.
Speicherlaufwerk: Sie haben über das USB Kabel und das Computer
Dateisystem Zugriff auf die SD Karte der Kamera. Neben der Verbindung
mit dem USB Kabel können Sie die SD Karte aber auch in einen Micro SD
Kartenleser einlegen und am Computer anstecken.
PC Kamera: Verwenden Sie die Kamera als Webcam oder zur Videoaufnahme an ihrem Computer. Um Videos in der Videochat Software anzuzeigen, aktivieren sie bitte den Adobe Flash Player.
35
Page 40

TV Verbindung
Mit dem HDMI-Ausgang können Sie die von dieser Kamera aufgenommenen Filme und Bilder auf großen Bildschirmen, wie Fernsehern, Projektoren
usw. wiedergeben.
1. Schalten Sie die Kamera aus.
2. Verbinden Sie Kamera mit dem Fernseher durch ein handelsübliches
Micro-HDMI-Kabel (NICHT INKLUSIVE).
3. Schalten Sie die Kamera ein und wählen Sie danach den HDMI-Eingang
Ihres Endgerätes aus.
※ 1.Der HDMI-Input unterstützt bis zu 1080P.
2.Wenn Sie die Kamera über HDMI an ein externes Anzeigegerät
anschließen, wird der Bildschirm der Kamera automatisch ausgeschaltet.
Sie sehen das Display auf dem HDMI-Display. Dann können Sie mit der
Kamera arbeiten.
36
Page 41

Technische Daten
Modell
Chip
Fühler
Bildschirmgrösse
Optik
Video kompressions format
Video Format
Foto Format
Drahtlosverbindung
SD Karte
Anschlüsse
Ladedauer
Aufnahmedauer max.
Batterie
Stromeingang
Wasserdicht (mit Gehäuse) bis
Gewicht
Dimensionen
AC800
NT96660
SONY IMX078
2” LCD
170°/140°/110°/70° HD Fish-Eye
Optik
H.264
MOV
JPG
Android / iOS unterstützt
Class 10 Micro SD Karte, unterstützt
maximal 64 GB.
USB 2.0 / HDMI
Circa 3 Stunden
1080P 120 Minuten/ 4K 60 Minuten
Austauschbare 1050mAh Li-ion
Batterie
5V / 1A
40M/131.2ft
78g/ 2.75oz (mit Batterie)
60*25*40mm / 2.36*0.98*1.57 inch
37
Page 42

Garantie
Alle Victure Produkte haben eine eingeschränkte 12 monatige Garantie ab
Kaufdatum. Unser professionelles Support Team bemüht sich, ihre
Anfragen in kürzester Zeit zu bearbeiten.
Falls Sie Fragen zu Produkt oder Garantie haben, kontaktieren Sie uns bitte
via support@govicture.com. Wir werden uns bemühen, Ihr Problem so
schnell wie möglich zu lösen
38
Page 43

Catalogue
Avant-propos
Introduction de produit
Guide d'installation
Boîtier étanche ouvert et ferme
Remplacement de porte de rechange
Installation et Chargement de la batterie
Installation et Formatage de la carte SD
Mode d'opération instructions
Paramètres Liste
Connexion Wifi
Connexion à l’ordinateur
Connexion TV
Spécifications
Garantie
40
41
42
42
43
44
45
47
49
53
54
55
56
57
39
Page 44

Avant-propos
Merci pour votre soutien de Victure AC800. Bienvenue dans Victure monde
de la photographie.
Caméra sport de la série AC800 a adopté l'objectif optique à 6 couches
pour enregistrer des vidéos FHD 4K / 24fps et tirer des images de qualité
supérieure de 20MP. Avec les fonctions Gyroscope et Anti-vibration,
AC800 peut réduire considérablement l'impact du tremblement sur
l'écran.
Victure attache toujours une grande importance à la qualité du produit et
à la satisfaction du client. Lors de votre utilisation, nous espérons
sincèrement que vous pouvez faire des suggestions pour nous aider à
améliorer nos produits, qui nous également assistons à mieux répondre à
vos besoins.
Si vous avez rencontré des problèmes lors de votre utilisation, veuillez nous
contacter via : support@govicture.com. Notre équipe de support vous
fournira des solutions satisfaisantes dès que possible.
Tous les articles achetés chez Victure bénéficient d'une garantie d'un an.
Nous vous remercions infiniment pour avoir choisi Victure. Nous espérons
que vous l'aimez et la profitez.
Cordialement,
Victure
40
Page 45

Introduction de produit
Démarrage/MODE Objectif
Indicateur de fonction
(Clignote BLEU pendant le fonctionnement)
Indicateur de charge
(Clignote ROUGE en charge)
Indicateur de Wifi
(Clignote ORANGE lorsque le Wi-Fi est activé)
Écran LCD
Couvercle de la batterieOK Bouton
Haut/Wi-Fi
Bas/Audio
enregistrement
MICRO USB
Haut-parleur
MIC
MICRO SD
HDMI
41
Page 46

Guide d'installation
Boîtier étanche ouvert et ferme
Boîtier étanche ouvert :
①
②
③
1. Pour ouvrir le boîtier étanche,
passez d'abord l'interrupteur
vers la droite, comme indiqué
par la flèche.
Boîtier étanche ferme :
②
①
1. Pour fermer le boîtier étanche.
Premièrement, veuillez comprimer
le couvercle arrière du boîtier étanche
comme la figure 1 ;
2. Veuillez tirer la boucle vers le bas et
la connecter avec le couvercle arrière
comme la figure 2.
2. Tirez la boucle du boîtier
étanche ;
3. Ouvrez le couvercle arrière
du boîtier étanche.
③
3. Abaissez la boucle du boîtier
étanche comme la figure 3.
42
Page 47

Remarque :
1. Déchirez les films de protection sur la lentille du boîtier étanche avant
l'enregistrement ;
2. L'enregistrement vocal dans le boîtier étanche sera affaibli pour obtenir de
meilleurs résultats étanches.
Remplacement de porte de rechange :
Étape 1 Étape 2 Étape 3
1. Pour remplacer la porte, d'abord s'il vous plaît trouver la fente du boîtier
étanche comme étape 1 ;
2. Tenez le boîtier avec vos mains comme étape 2, faites face à la fente sur
le devant, et puis détachez le couvercle arrière ;
3. Trouvez la porte arrière rechange dans vos accessoires, qui a deux
espaces dans les côtés gauche et droit. Ensuite, insérez la moitié inférieure
de la porte dans la fente, puis y poussez la moitié supérieure jusqu'à ce
que toute la porte arrière soit totalement installée.
Conseils :
1. Cette utilisation peut être exploitée en fonction de vos propres besoins.
2. La porte avec deux espaces ne peut pas être utilisée dans l'eau.
43
Page 48

Installation et Chargement de la batterie
Comme la batterie et la caméra sont emballées séparément, chargez d'abord
la batterie, puis insérez-la dans la caméra avant de la démarrer.
Charge de puissance :
Les étapes de charge sont comme ci-dessous :
1. Trouvez le double USB chargeur de batterie dans les accessoires ;
2. Connectez le chargeur avec un câble USB, vous pouvez le charger avec la
prise d'alimentation ou avec l'ordinateur. La charge avec l'ordinateur peut
être plus lente que d'un adaptateur d'alimentation en raison de la faible
puissance de sortie des ports USB de l'ordinateur.
3. Insérez les deux batteries dans le compartiment de chargement. Lorsque
le chargeur est en fonctionnement, le voyant rouge signifie qu'il est en
charge, le voyant bleu signifie qu'il a été complètement chargé.
Installation de la batterie :
Une fois les batteries complètement chargées, en installez une dans la
caméra pour qu'elle fonctionne correctement. Les étapes d'installation de la
batterie sont comme ci-dessous :
1. Trouvez le couvercle de batterie au bas de la caméra. Ouvrez le couvercle
de la batterie comme indiqué ci-dessous. D'abord, utilisez l'ongle de votre
pouce droit pour pousser l'interrupteur vers la droite. Deuxièmement,
soulevez le couvercle avec les ongles de votre pouce gauche.
44
Page 49

②
①
2. Réinstallez le couvercle après avoir inséré la batterie. Veuillez noter que
la partie étendue du couvercle doit d'abord être insérée à gauche du
compartiment de la batterie, puis y enfoncez la partie droite du couvercle.
Remarque :
S'il vous plaît noter la direction de la batterie et le couvercle de la batterie.
Installation et Formatage de la carte SD
Une fois les batteries complètement chargées, une carte SD est nécessaire
pour faire fonctionner la caméra. La caméra supporte la carte SD de Classe
10, maxime 64 Go. Veuillez noter que la carte SD n'est PAS INCLUSE dans
la caméra.
Insertion et extraction de carte SD :
1. Insertion : Trouvez la fente pour carte Micro SD dans la caméra, poussez
la carte dans la fente jusqu'à ce que vous entendiez un son Kata, il signifie
qu'elle est installée.
2. Extraction : Appuyez sur la carte SD jusqu'à ce que vous entendiez un
son Ka ; Ensuite, la carte SD sortira avec un son Ta.
45
Page 50

Remarque : S'il vous plaît utilisez vos ongles pour pousser la carte SD, car
la fente est un peu profonde.
Formatage de carte SD :
Compte tenu de la compatibilité de la carte SD, elle doit être formatée
avant de l'utiliser. Les étapes de formatage sont les suivantes :
1. Appuyez sur le bouton «Mode» trois fois pour entrer dans l'interface
des paramètres après avoir démarré la caméra ;
2. Appuyez sur le bouton Bas jusqu'à ce que vous trouviez le réglage
«Formater», puis appuyez sur OK, la carte mémoire sera formatée
immédiatement.
Remarque :
1. Veuillez vous assurer que la carte SD est une carte de classe 10, et que
la mémoire n'excède pas 64 Go ;
2. Veuillez transférer vos fichiers dans un autre endroit pour stocker avant
de formater la carte SD.
46
Page 51

Mode d'opération instructions
La série AC800 dispose de quatre modes : Mode Vidéo, Mode Photo,
Mode Lecture, Mode Paramètres. Vous trouverez ci-dessous les
instructions de chaque bouton sous chaque mode.
Démarrage/Arrêté
Appuyez brièvement sur le bouton「Power / MODE」: Allumez la caméra ;
Appuyez longuement sur le bouton「Power / MODE」: Éteignez la caméra.
※Sous chaque mode.
Mode Vidéo
「Bouton OK」: Commencer ou arrêter l'enregistrement
「Bouton Haut」(appui court) : Commutateur Wifi
「Bouton Haut」(appui longue) : Agrandir la distance focale (Maxim 4X)
「Bouton Bas」(appui court) : Commutateur d'enregistrement audio
「Bouton Bas」(appui long) : Réduire la distance focale
「Bouton Alimentation / MODE」(appui court) : Prendre des photos
(Pendant l'enregistrement)
Mode Photo
「Bouton OK」: Prender des photos
「Bouton Haut」: Agrandir la distance focale (Maxim 4X)
「Bouton Bas」: Réduire la distance focale
「Bouton Alimentation / MODE」(appui court) : Mode commuté (Vidéo →
Photo → Lecture → Paramètres)
Mode de lecture
En cours de lecture
「Bouton OK」(appui court) : Mettre la lecture en pause
「Bouton Haut」: Avance rapide (Maxim 8X)
「Bouton Bas」: Rembobinage (Maxim 8X)
47
Page 52

Non-lecture
「Bouton Haut」: Précédent
「Bouton Bas」: Suivant
「Bouton Alimentation / MODE」(appui court) : Mode commuté (Vidéo →
Photo → Lecture → Paramètres)
Mode Paramètres
「Bouton Haut」: Précédent
「Bouton Bas」: Suivant
「Bouton OK」: Confirmer
「Bouton Alimentation / MODE」 (appui court) : Mode commuté (Vidéo →
Photo → Lecture → Paramètres)
48
Page 53

Paramètres Liste
Page explication des paramètres de la caméra
※V=Mode vidéo ; P=Mode photo
Paramètres
Résolution
vidéo
Vidéo
cyclique
Gyroscope
WDR
Time-lapse
Détection de
mouvement
Enregistrement audio
Option
4K/2K/1080P/
720P/480P/240P
Off / 3 Minutes /
5 Minutes/
10 Minutes
Désactivé / Activé
Désactivé / Activé
Désactivé/
0.1 Seconde /
0.2 Seconde /
0.5 Seconde /
1 Seconde /
5 Secondes
Désactivé / Activé
Désactivé / Activé
V P Explication
Pour définir la résolution de la
○
vidéo
Le fichier sera enregistré par
○
segment en fonction de temps
que vous avez définie.
Ce réglage peut réduire
l'influence de tremblement
○
de la main et de vibration sur
l'enregistrement.
Wide Dynamic Range
○
Il peut régler automatiquement
l'obscurité de l'image.
La photographie time-lapse est
une technique par laquelle la
fréquence de prise de vue est
beaucoup plus faible que la
fréquence de visionnage d'une
séquence. Quand il est joué à
○
une vitesse normale, le temps
semble se déplacer plus vite.
※ Cette fonction ne peut pas
être utilisée avec une résolution
vidéo UHD.
En mode veille, la caméra
enregistra une vidéo de 10
○
secondes lorsqu'elle détecte
un obeject en mouvement.
Il décide s'il y a un enregistrement audio dans la vidéo.
○
※ Utilisez le bouton Bas pour
activer / désactiver l'audio
pendant l'enregistrement.
49
Page 54

Angle
Mode de
plongée
Scène de nuit
Minuteur
Résolution
photo
Photos en
rafale
Qualité
Netteté
Balance du
blanc
Couleur
Sensibilité
ISO
Exposition
Désactivé / ActivéFiligrane
170°/140°/
110°/70°
Désactivé / Activé
Désactivé / Activé
Désactivé
/Intervalle de 2s
/Intervalle de 5s
/Intervalle de 10s
20M /16M /
12M /10M /8M /
5M/3M /VGA
Désactivé / Activé
Haute / Normale /
Économie
Fort / Standard /
Douce
Auto / Lumière du
jour / Nuageux /
Lumière de
tungstène /
Fluorescent
Normale / Noir et
blanc / marron
Auto/100/200/400
+2.0/+1.7/+1.3/
+1.0/+0.7/+0.3/
0/-0.3/-0.7/-1.0/
-1.3/-1.7/-2.0
Filigrane sur les vidéos ou les
○○○
photos.
L'angle de l'objectif de la
caméra est réglable.
La caméra ajustera automatiquement la balance des blancs
○
○
lors de l'enregistrement / prise
de vue sous l'eau.
La luminosité de l'écran sera
automatiquement ajustée
○○○
lorsque la caméra prendra des
scènes de nuit.
La caméra prendra une photo
après la minuterie d'intervalle
○
définie.
Pour définir la résolution de
○
l'image.
Appuyez sur le bouton OK sans
○
arrêt pour prendre des photos
en continu en mode photo.
Pour ajuster la qualité des
○
images.
Pour ajuster les pixels du bord
○
de l'objet dans l'image.
Pour régler la balance des
○
blancs de la caméra.
Définissez la couleur de
○ ○
l'image.
Réglez la sensibilité à la
○ ○
lumière.
Pour ajuster la valeur
d'exposition.
○○
※Réglage + (Luminosité) / (Obscurité).
50
Page 55

Stabilisation Désactivé / Activé
Supprimer
Protection
WIFI Désactivé / Activé
WIFI SSID Pour définir le nom du Wifi
WIFI
Password
Date / Heure
Arrêt auto
Bip Sonore Désactivé / Activé
Messages
vocaux
OSD Désactivé / Activé
Supprimer celui-ci
/Supprimer tout
Vérouiller celui-ci /
Déverrouiller celuici / Vérouiller tout /
Déverrouiller tout
Désactivé /
1 Min / 3 Mins /
5 Mins / 10 Mins
Désactivé / Activé
Contrecarrer l'influence du
tremblement de main /
○
vibration en prenant des photos.
Supprimer les fichiers.
Pour éviter l'écrasement des
fichiers causé par l'enregistrement en boucle en mode
voiture.
Appuyez sur le bouton Haut
pour allumer / éteindre le wifi
WIFI Password
Pour définir la date du système.
※1.S'il vous plaît régler la date
lors de la première utilisation.
2. Il sera changé en date par
défaut après que vous avez
échangé la batterie.
La caméra entrera en mode
économie d'écran puis s'éteindra automatiquement en
○ ○
l'absence d'opération.
※Sauf dans l'enregistrement.
Le volume des Boutons
○○○
pendant le fonctionnement.
La caméra émettra une tonalité
«démarrage vidéo / arrêt vidéo»
pendant le fonctionnement.
L'affichage des paramètres du
○ ○
menu de fonction sur l'écran.
51
Page 56

Après avoir connecté au
chargeur de voiture, une fois
le moteur allumé, la caméra
Car Mode Désactivé / Activé
English / Français /
Español / Polski /
Langue
TV mode NTSC/PAL Format de sortie vidéo.
TV
Économie
d'écran
Fréquence 50 Hz/60 Hz
Formater Carte SD Formater la carte SD.
Regl. par
défaut
Informations
sur le matériel
Deutsch / Italiano /
繁體中文 /
Pусский / 日本語 /
한국어 / Cesky /
Português
Désactivé / Activé Fonction FPV.
Désactivé /
30 Secondes /
1 Min / 3 Mins
Réglage
Modèle :
Victure AC800
Version : 1.0
commencera automatiquement
○
à enregistrer et conserver les
fichiers d'enregistrement,
arrêtera une fois le moteur
est éteint.
Pour définir la langue du
○○○
système.
Définissez l'intervalle de temps
de l'économiseur d'écran.
※Appuyez brièvement sur
○ ○
n'importe quelle touche pour
réveiller l'écran sous ce réglage.
Réglez la fréquence de
puissance
Europe : 50Hz /
○ ○
Amérique du Nord : 60Hz
Japon de l'Est : 50 Hz /
Ouest Japon : 60 Hz
Restaurer les paramètres par
défaut de la caméra.
L'affichage du modèle du produit et la version du matériel.
52
Page 57

Connexion Wifi
Télécharger l'application
Téléchargez l'application OKCAM dans l'App Store (iOS 1.0.8 ou
supérieur) ou Google Play (iOS 1.0.8 ou supérieur).
Connexion Wifi
Avoir terminé le téléchargement , vous pouvez utiliser votre téléphone
pour contrôler la caméra via l'application, afficher la vidéo ou les images
sur votre téléphone et télécharger les enregistrements. Les étapes de
connexion sont les suivantes :
1. Appuyez brièvement sur le bouton MODE pour allumer la caméra ;
2. Appuyez brièvement sur le bouton Haut pour allumer le wifi (lorsque la
caméra est en mode Vidéo) ;
3. Trouvez et connectez le wifi via votre téléphone avec le nom et le mot de
passe du wifi affichés sur la caméra ;
4. Entrez l'application après que le wifi est connecté, vous trouverez que la
caméra est contrôlée par votre téléphone.
5. Pour déconnecter le wifi, appuyez de nouveau brièvement sur le bouton
Haut.
Remarque :
1. L'affichage des informations wifi sera raccourci comme une marque wifi
dans le coin inférieur gauche de l'écran une fois que le wifi est connecté
avec votre téléphone ;
2. La caméra peut uniquement se connecter à un périphérique à la fois ;
3. La connexion Wi-Fi est un peu gourmande en énergie, donc évitez de se
connecter au wifi lorsque la batterie est faible.
53
Page 58

Connexion à l’ordinateur
Lorsque vous utilisez le câble micro-USB fourni pour le connecter à
l'ordinateur, Il dispose deux options : Stockage de masse et Caméra PC.
Stockage de masse : Accès aux fichiers stockés dans la carte micro SD de
la caméra pour les copier ou les afficher sur un ordinateur, qui est
également réalisable avec un lecteur de carte SD.
Caméra PC : vous pouvez utiliser Adobe Flash Player pour exécuter des
chats vidéo et enregistrer des vidéos sur votre ordinateur.
54
Page 59

Connexion TV
Avec la sortie HDMI, vous pouvez afficher les films et les images enregistrés sur de grands écrans de télévision, projecteur, etc.
1. Éteignez la caméra ;
2. Connectez la caméra et le téléviseur avec un câble Micro HDMI
disponible dans le commerce (NON INCLUS) ;
3. Allumez la caméra et activez le paramètre HDMI de l'appareil que vous
avez l'intention d'entrer ;
※ 1. Le périphérique d'entrée HDMI doit prendre en charge 1080P ;
2. Lors de la sortie HDMI, l'affichage de la caméra devient noir. L'écran est
affiché sur le périphérique d'entrée HDMI, mais l'opération est effectuée
sur la caméra.
55
Page 60

Spécifications
Modèle
Puce
Capteur
Taille de l'écran
Lens
Format de compression vidéo
Format vidéo
Format photo
Connexion wifi
Carte SD
Ports
Temps de charge
Temps d'enregistrement
Batterie
Entrée d'alimentation
Profondeur de la caisse étanche
Poids
Dimensions
AC800
NT96660
SONY IMX078
2” LCD
170° grand angle (réglable)
H.264
MOV
JPG
Android / iOS
Carte Micro SD Class 10,
maxime 64 Go.
USB 2.0 / HDMI
3 heures environ
1080P 120 minutes/ 4K 60 minutes
Batterie Li-ion amovible 3.7V
1050mAh
5V/1A
40M/131.2ft
78g / 2.75oz (avec batterie)
60*25*40mm / 2.36*0.98*1.57 inch
56
Page 61

Garantie
À partir de l'achat, vous jouissez d'une garantie de 12 mois pour ce produit
de Victure . Si vous avez des questions ou des conseils à propos de ce
produit, veuillez nous contacter par e-mail : support@govicture.com
Nous vous remercions de votre confiance et votre soutien !
57
Page 62

Catalogo
Prefazione
Introduzione al Prodotto
Guida all’istallazione
Apertura Custodia Impermeabile
Sostituzione Cover Anti-polvere
Ricarica della Batteria e Installazione
Inserimento e Formattazione Scheda SD
Istruzioni Modalità d’uso
Tavola dei Settaggi
Connessione Wifi
Connessione al Computer
Connessione alla TV
Specifiche Tecniche
Garanzia
59
60
61
61
62
63
64
66
68
72
73
74
75
76
58
Page 63

Prefazione
Grazie per l'acquisto della Victure AC800 e benvenuto nel mondo della
fotografia di Victure. La serie di action camere AC800 ha adottato lenti
ottiche a 6 strati per registrare filmati in FHD a 4K / 24fps e per scattare foto
di qualità elevata fino a 20 MP. Con la funzione Giroscopio e l’Anti-vibrazione attiva, l'AC800 può ridurre in modo significativo l'impatto dello
scuotimento sullo schermo.
Victure attribuisce costantemente grande importanza alla qualità del
prodotto e all'elevata soddisfazione del cliente. Speriamo sinceramente
che tu ci possa dare alcuni suggerimenti durante il tuo utilizzo per aiutarci
a migliorare i nostri prodotti. I tuoi preziosi suggerimenti ci aiuteranno a
modellare i nostri prodotti per adattarla perfettamente ai tuoi standard.
Se hai riscontrato problemi durante l'utilizzo, ti preghiamo di contattarci
tramite: support@govicture.com. Il nostro team di supporto fornirà la
soluzione migliore al tuo problema non appena possibile. Notate inoltre
che tutti gli articoli acquistati da Victure sono coperti da 1 anno di garanzia
dalla data di acquisto.
Ti ringraziamo infinitamente per aver scelto la nostra fotocamera. Ti
auguriamo tutto il meglio.
Cordiali saluti,
Team di Supporto Victure
59
Page 64

Introduzione al Prodotto
Accensione/
Tasto MODE Lente
Indicatore di funzionamento
(Lampeggia Blu durante il funzionamento)
Su/Wi-Fi
Altoparlante
Giù/Switch
Registrazione Audio
MICRO USB
Microfono
MICRO SD
HDMI
Indicatore di carica
(Lampeggia Rosso solo durante la ricarica)
Indicatore WiFi
(Lampeggia Arancione quando il Wifi è acceso)
Schermo LCD
Copri BatteriaTasto OK
60
Page 65

Guida allistallazione
Apertura e chiusura custodia impermeabile
Apertura custodia impermeabile:
①
②
③
1. Per aprire la custodia, prima
spostare il tasto in alto verso
destra, come indicato dalla
freccia.
Chiusura della custodia impermeabile:
②
①
1. Per chiudere la custodia prima
premere lo sportello posteriore
della custodia come indicato dalla
freccia 1;
2. Abbassare la chiusura ed agganciarla
allo sportello posteriore come mostrato
dalla freccia 2.
61
2. Sollevare la fibbia della
custodia impermeabile;
3. Aprire lo sportello posteriore.
③
3. Spingere giù la chiusura della
custodia impermeabile come
mostrato dalla freccia 3.
Page 66

Consigli:
1. Togli la pellicola protettiva sulla lente della custodia prima di fare
fotografie/registrar video;
2. La registrazione dei suoni può essere attenuata per raggiungere risultati
migliori sott’acqua.
Sostituzione dello Sportello Anti-polvere:
Passo 1 Passo 2 Passo 3
1. Per cambiare la cover anti-polvere, per prima cosa cerca lo slot della
custodia, così come cerchiato in rosso nel passo 1.
2. Stringi la custodia con le tue mani come mostrato nel passo 2, rivolta con
lo slot della custodia di fronte, preparati a rimuovere la cover posteriore.
3. Cerca la cover posteriore antipolvere tra i tuoi accessori, la cover ha due
spazi interni sul lato destro e sul lato sinistro. Inserire la metà inferiore del
coperchio nello slot, quindi spingere la metà superiore nello slot fino a
quando l'intero cover posteriore è completamente installato.
Consigli:
1. Può essere operata in base alle tue esigenze.
2. La sportello anti-polvere non può essere utilizzata sott'acqua.
62
Page 67

Ricarica della Batteria e Installazione
Visto che la batteria e la fotocamera sono confezionate separatamente,
ricarica prima la batteria, poi inseriscila nella fotocamera prima di accendere
la fotocamera.
Ricarica della Batteria:
Il processo di ricarica è il seguente:
1. Cerca il caricabatterie USB tra gli accessori della fotocamera.
2. Collegando il caricatore con il cavo USB, è possibile caricarlo con la spina
di alimentazione o con il computer. La ricarica con il computer potrebbe
essere più lenta rispetto all'utilizzo di un adattatore di alimentazione a causa
della minore potenza in uscita delle porte USB del computer.
3. Inserisci le due btterie nello scompartimento di ricarica. Quando il
caricabatteria è in funzione, la luce rossa indicherà che sta ricaricando, la luce
blu indicherà che la ricarica è completa.
Installazione della batteria:
Dopo che la batteria è completamente, inserisci una batteria nella fotocamera per permettere alla fotocamera di funzionare.
1. Trova la parte del vano batteria nella fotocamera. Apri lo sportello della
batteria come mostrato nella fotografia sottostante. Usa il tuo pollice destro
per spostare il tasto a destra come mostrato dalla freccia 1. Poi, alza lo
sportello della batteria come mostrato dalla freccia 2.
63
Page 68

②
①
2. Inserisci lo sportello dopo che hai inserito la batteria. Fai attenzione che
la parte sporgente dello sportellino sia inserita nell’alloggiamento a
sinistra come mostrato dalla fotografia. Premi poi la parte destra dello
sportellino nello scompartimento.
Consigli:
Fai attenzione che il polo postivo e quello negative della batteria siano
allineati con quelli dello scompartimento della batteria.
Inserimento e formattazione della scheda SD
Dopo aver ricaricato le batterie , è necessaria la scheda SD per far
funzionare la fotocamera. Nota bene che la scheda SD non è inclusa nella
confezione della fotocamera.
Inserimento e rimozione della scheda SD:
1. Cerca lo slot per la Micro SD nella fotocamera. Premi la scheda nella
fotocamera fino a sentire il suono che indica il successo dell’istallazione.
2. Premi la scheda SD fino a sentire il suono. La scheda SD uscirà fuori con
un suono “Cha”.
64
Page 69

Consigli: Usa il tuo pollice per bloccare la scheda SD al momento dell’uscita.
Formattare la scheda SD:
Una scheda Sd nuova deve essere formattata prima dell’uso. Per
formattarla segui le istruzioni:
1. Premi il tasto “MODE” per accendere la fotocamera. Quindi premi il
tasto "MODE" tre volte per entrare nella modalità di settaggio;
2. Premi il tasto “GIÙ’ fino a trovare l’opzione “formatta” e poi premi OK;
la scheda di memoria verrà formattata in una sola volta.
Consigli:
1. Fai attenzione che la scheda SD sia una Classe 10 di tipo SDHC, e che
la sua memoria non sia superiore a 64 GB;
2. Trasferisci I tuoi files importanti in un altro posto prima di formattare la
scheda SD.
65
Page 70

Istruzioni per la Modalità d’uso
La serie AC800 ha 4 modalità d’uso: Video, Foto, Riproduzione, Settaggi.
In basso ci sono le istruzioni per ogni tasto in ogni modalità d’uso.
Accensione ON/OFF
Pressione breve tasto「Accensione/MODE」quando la fotocamere è
spenta: Accende la fotocamera;
Pressione lunga tasto「Accensione/MODE」quando la camera è accesa:
Spegne la fotocmaera
※In ogni modalità
Modalità Video
「Tasto OK」: Inizia/ferma la registrazione
「Tasto SU」(pressione breve): Accende il Wifi
「Tasto SU」(pressione lunga) : Allarga la visuale della lente (Massimo 4X)
「Tasto GIÙ」(pressione breve): Accende la registazione audio
「Tasto GIÙ」(pressione lunga): Restringe la visuale della lente
「Tasto accensione/MODE」(pressione breve): Scatta foto (Durante la
registrazione)
Modalità Foto
「Tasto OK」: Scatta una foto
「Tasto SU」: Allarga la visuale della lente (Massimo 4X)
「Tasto GIÙ」: Restringe la visuale della lente
「Tasto accensione/MODE」(pressione breve): Cambia modalità (Video→
Foto→Riproduzione→Settaggi)
Modalità Riproduzione
Durante la riproduzione
「Tasto OK」(Pressione breve): Play&Pausa video
「Tasto SU 」: Vai Avanti veloce ( Massimo 8X)
「Tasto GIÙ 」: Torna indietro ( Massimo 8X)
66
Page 71

Durante la non riprodzione
「Tasto OK 」: Pagina us
「Tasto GIÙ」: Pagina giù
「Tasto Power/MODE」(pressione breve ): Cambia modalità (Video→Foto
→Riproduzione→Settaggi)
Modalità Settaggi
「Tasto SU」: Pagina su
「Tasto GIÙ」: Pagina giù
「Tasto OK」: Conferma
「Tasto accensione/MODE」(Pressione breve): Cambia modalità (Video→
Foto→Riproduzione→Settaggi)
67
Page 72

Tavola dei Settaggi
Tavola dei settaggi della fotocamera
※V=Modalità Video; P=Settaggi nella modalità Foto
Settaggi
Risoluzione
Video
Registrazione
in Loop
Gyroscopio
WDR
Time lapse
Rilevazione
del movimento
Registrazione
audio
Valori
4K/2K/1080P/
720P/480P/240P
Off//3 Minuti/
5 Minuti/
10 Minuti
Off/On
Off/On
Off/ 0.1Secondo/
0.2 Secondi/
0.5 Secondi/
1 Secondo/
5 Secondi
Off/On
Off/On
V P Spiegazione
○
Per settare la risoluzione video
Il file sarà registrato a seconda
○
del tempo che avrai impostato
Questo settaggio può
attenuare l’effetto tremolio
○
e la vibrazione della
registrazione
Wide Dynamic Range
○
Regola automaticamente la
luminosità dell’immagine
La fotografia Time-lapse è una
tecnica in cui la frequenza alla
quale gli scatti sono catturati è
molto più bassa di quella usata
per vedere la sequenza. Quando
○
osservata alla velocità normale,
il tempo sembra muoversi più
veloce
※Questa funzione non può
essere usata in modalità 4K
UHD
In questa modalità la fotocamera registrerà e salverà video
○
di 10 secondi quando identificherà un soggetto in movimento
Decidere se attivare la registrazione audio nel video
○
※ Usa il tasto giù per accendere/spegnere l’audio durante
la registrazione
68
Page 73

Off/OnTimbro ora
Angolo
Modalità
Subacquea
Scena
notturna
Autoscatto
Risoluzione
Foto
Scatto
continuo
Qualità
immagine
Nitidezza
Bilanciamento
bianco
Colore
ISO Auto/100/200/400 Regola la sensibilità alla luce
Esposizione
170°/140°/
110°/70°
Off/On
Off/On
Off/
2s temporizzatore/
5s temporizzatore/
10s temporizzatore
20M /16M /
12M /10M /8M /
5M/3M /VGA
Off/On
Superba/ Buona/
Normale
Forte/ Standard/
Morbido
Auto/Giorno/
Nuvoloso/
Luce al tungsteno/
Fluorescente
Normale/Nero e
bianco/Marrone
+2.0/+1.7/+1.3/
+1.0/+0.7/+0.3/
0/-0.3/-0.7/-1.0/
-1.3/-1.7/-2.0
Data impressa sulle foto o sui
○○○
video
L’angolazione della lente può
essere regolata
La fotocamera regolerà il
bilanciamento del bianco
○
○
automaticamente quando
registri/scatti foto sottacqua
La luminosità dello schermo
si regolerà automaticamtne
○○○
quando la fotocamerà scatterà
foto di notte
La fotocamera scatter una foto
○
dopo intervallo impostato
Per settare la risoluzione
○
dell’immagine
Premi il tasto OK senza
○
fermarti per scattare foto
continuamente
Per regolare la qualità
○
dell’immagine.
Per aggiustare i pixel del bordo
○
dell'oggetto all'interno
dell'immagine
Per regolare il bilanciamento
○
del bianco
Per regolare il colore
○ ○
dell’immagine
○ ○
Per regolare il valore di
○○
esposizione
※+(Luminosità)/-(Scurezza).
69
Page 74

Stabilizzatore Off/On
Cancellare
Protezione
WIFI Off/On
WIFI SSID Per impostare il nome del Wifi
Password
WIFI
Data e ora
Spegnimento
Auto
Chiave
Volume
Comandi
Vocali
OSD Off/On
Cancellare questo
file/Cancellare tutto
Bloccare questo file/
Sbloccare questo file/
Bloccare tutti i file/
Sbloccare tutti i file
Off/1 Min/3 Min/
5 Min/10 Min
Off/On
Off/On
Attenua l’effetto del tremolio
della mano e delle vibrazioni
○
durante lo scatto delle foto.
Cancella I files
Previene la sovrascrittura
causata dalla registrazione
continua nella modalità auto
Premi il tasto su per
accendere/spegenre il wifi
con un solo tasto
Password WIFI
Per impostare la data del
sistema
※
1. Si prega di notare per
impostare la data durante la
prima volta utilizzando.
2. Sarà cambiato in data
predefinita dopo aver sostituito
la batteria.
La fotocamera entrerà in modalità screen saver e automaticamente si spegnerà se non
○ ○
vengono fatte operazioni
※Tranne in modalità registrazione
La chiavo con volume durante
○○○
le operazioni.
La fotocamera farà partire/
fermare il video con con i
comandi vocali
Mostra il le funzioni parametro
○ ○
del menu sullo schermo
70
Page 75

Se connessa al caricatore da
auto, la fotocamera comincerà
Modalità
auto
Lingua
Modalità TV NTSC/PAL Formato di uscita video
TV
Salvaschermo
Frequenza 50 Hz/60 Hz
Formattazione Scheda SD
Impostazioni
predefinite
Informazioni
sull'hardware
Off/On
English / Français /
Español / Polski /
Deutsch / Italiano /
繁體中文 /
Pусский / 日本語 /
한국어 / Cesky /
Português
Off/On Funzioni FPV
Off/30 Secondi/
1 Min/3 Min
Impostazioni
Modello:
Victure AC800
Versione: 1.0
automaticamente a registare
loffe una volta che il motore
○
sarà acceso. E salverà automaticamente il file spegnendosi
quando il motore si fermerà
○○○
Imposta la lingua di sistema
Imposta l’intervallo dello
screen saver
※Premi brevemente qualsiasi
○ ○
tasto per riaccendere lo
schermo in questa modalità
Imposta la frequenza di
alimentazione
○ ○
Europa: 50Hz/
Nord America: 60Hz
Formatta la scheda SD
※Quando si conferma OK, la
scheda di memoria verrà
formattata in una sola volta
Riporta la fotocamera alle
impostazioni di fabbrica
Mostra il modello del prodotto
e la versione hardware
71
Page 76

Connessione Wifi
Scaricare l’ App
Scarica l’App ‘OKCAM’ dall’ App Store o dal Google Play.
Connessione Wifi
Dopo aver scarica l’App OKCAM, puoi connetterti in modalità WIfi
attraverso l’Applicazione. Dopo aver connesso il tuo telefono alla fotocamera, puoi usarlo per controllare la cam, vedere le foto o I video e scaricare
le registrazioni direttamente sul tuo telefono.I passaggi per connettere il
telefono alla fotocamera sono I seguenti:
1.Premi brevemente il tasto MODE per accendere la fotocamera;
2.Premi brevemente il tasto SU per accendere il wifi (quando la fotocamera
è in modalità Video)
3.Cerca il nome della rete wifi e la password mostrata sul display della
fotocamera e connettiti col cellulare
4.Entra nell’App dopo che il wifi è connesso, potrai così controllare la
fotocamera con il tuo smartphone
5.Per disconnetterti dal WiFi, premi brevemente il tasto SU di nuovo
Consigli:
1.Le informazioni del wifi saranno minimizzate nel simbolo del wifi nell’angolo in basso a sinistra dello schermo della fotocamera, quando la camera
è connessa col tuo smartphone
2.La fotocamera può connettersi con un solo device per volta
3.La connessione wifi consuma leggermente più batteria, cercate di evitare
di connettere il wifi quando la carica della batteria è bassa.
72
Page 77

Connessione al Computer
Ci sono due opzioni quando si utilizza il cavo micro-USB incluso per
connettersi ad un computer: Archiviazione di massa e PC Camera. Premere
il pulsante Su / Giù per alternare queste due modalità.
Archiviazione di massa: Puoi accedere ai file memorizzati nella scheda
micro SD della fotocamera per copiarli o visualizzarli sul computer. Oltre
alla connessione USB per trasferire i file, esiste un altro metodo per
ottenere questa funzione che è quello di prendere la scheda micro SD
dalla fotocamera e di inserirla in un lettore di schede micro SD.
PC telecamera: Puoi utilizzare la fotocamera come webcam per le chat
video e la registrazione dei video sul computer. N.B. Potrebbe essere
necessario consentire ad Adobe Flash Player di essere eseguito prima che
il video venga visualizzato.
73
Page 78

Connessione alla TV
Con l'uscita HDMI puoi visualizzare i video e le immagini registrate con
questa fotocamera sullo schermo della TV, con un proiettore, ecc...
1) Spegni la fotocamera
2) Connetti la fotocamera e la tv con un cavo mini HDMI (non incluso)
3) Accendi la fotocamera e avvia la modalità HDMI sul device di ingresso
che intendi utilizzare.
※ 1.Il device di ingresso deve supportare la risoluzione 1080P
2.Quando utilizzi l'HDMI, lo schermo della fotocamera diventa nero. Lo
schermo della fotocamera è mostrato sul device di ingresso dell'HDMI,
ma le operazioni sono svolte dalla fotocamera
74
Page 79

Specifiche Tecniche
Modello
Chip
Sensore
Dimensioni Schermo
Lente
Formato di Compressione Video
Formato Video
Formato Immagini
Connessione WiFi
Scheda SD
Porte
Tempo di Ricarica
Tempo di Registrazione
Batteria
Ingresso Alimentazione
Profondità Sopportata Custodia
Impermeabile
Peso
Dimensioni
AC800
NT96660
SONY IMX078
2” LCD
170° grandangolo (regolabile)
H.264
MOV
JPG
Android / iOS supportati
Classe 10 Micro SD card,
supportati massimo 64 GB
Micro USB / Micro HDMI
Circa 3 ore
1080P: 120 minuti/ 4K: 60 minuti
Batteria ricaricabile agli ioni di litio
da 1050 mAh
5V/1A
40M/131.2ft
78g/ 2.75oz (con la batteria)
60*25*40mm / 2.36*0.98*1.57 inch
75
Page 80

Garanzia
Tutti i prodotti Victure sono coperti da 12 di garanzia a partire dalla data di
acquisto. Il nostro team di Customer Service si prenderà cura e fornirà
assistenza professionale senza ritardo alcuno.
Se avete qualsiasi domanda aul nostro prodotto o sulla garanzia,
contattateci liberamente al: support@govicture.com. Faremo del nostro
meglio per aiutarvi a risolvere il problema finchè non sareti soddisfatti.
76
Page 81

Contenido
Introducción
Información del producto
Guía de instalación
Apertura de la carcasa sumergible
Reemplazo de la tapa trasera
Instalación de la batería y carga
Instalación de la SD y su formateo
Instrucciones de funcionamiento
Tabla de ajustes
Conexión WIFI
Conexión al PC
Conexión a la TV
Especificaciones
Garantía
78
79
80
80
81
82
83
85
87
92
93
94
95
96
77
Page 82

Presentación
Gracias por comprar Victure AC800 y bienvenido al mundo de la
fotografía de Victure. La serie AC800 posee 6 lentes para grabar videos
FHD de 4K / 24fps y grabar imágenes de máxima calidad de 20MP.
A nosotros nos importa tanto la calidad del producto como la satisfacción
de los clientes. Esperamos sinceramente que pueda hacer algunas
sugerencias durante su uso para ayudarnos a mejorar nuestros productos.
Sus valiosas sugerencias nos ayudarán a configurar nuestros productos
para que se ajuste perfectamente a sus estándares.
Si encuentra algún problema durante su uso, contáctenos a través de:
support@govicture.com. Nuestro equipo de soporte le ofrecerá las
mejores soluciones lo antes posible. Tenga en cuenta que todos los
artículos comprados en Victure están cubiertos por 1 año de garantía.
Le agradecemos infinitamente por elegir su cámara. Te deseamos lo
mejor.
Un cordial saludo
Equipo de soporte de Victure
78
Page 83

Información del producto
On/Off Modo Lente
Indicador de grabado
(Parpadeo azul durante el trabajo)
Indicador de carga
(Parpadeo rojo (Cargando))
Indicador WIFI
(Parpadeo Naranja (ON))
Subir/WI-FI
Altavoz
Abajo/Grabación de audio
Micro USB
Micrófono
MICRO SD
HDMI
Pantalla LCD
Protector de la batería Botón OK
79
Page 84

Guía de instalación
Apertura y cerrado de la carcasa sumergible
Apertura de la carcasa:
①
②
③
1. Para abrir la carcasa impermeable,
primero deslice la pestaña ubicada
en la parte superior a la derecha,
como lo indica la flecha de la imagen.
Cerrado de la carcasa:
②
①
1. Empuje la tapa posterior hacia
delante.
2. Tire hacia abajo de la hebilla y
conéctela y baje la cubierta como
se indica en la imagen 2.
2. Estire de la parte frontal hacia
la trasera de la pieza negra.
3. Abra la tapa posterior de la
carcasa estanca.
③
3. Tire hacia abajo la hebilla de
la carcasa impermeable como lo
muestra la flecha 3.
80
Page 85

Consejos:
1. Se recomienda quitar los plásticos protectores de la lente, así como de la
tapa posterior para una mayor calidad me imagen.
2. Para un mayor funcionamiento, el micrófono dejará de funcionar con la
carcasa.
Reemplazo de la tapa de la carcasa:
Paso 1 Paso 2 Paso 3
1. Para retirar la tapa, ubicaremos la unión de la tapa con la carcasa, como
se muestra en la imagen.
2. Sostenga la carcasa con las manos como muestra la imagen de arriba,
una vez ubicada la unión, estire hacia usted
3. Encuentre la cubierta posterior en los accesorios, la cubierta tiene dos
espacios intermedios en el lado izquierdo y derecho. Busque la ranura en
la carcasa de nuevo, primero inserte la mitad inferior de la cubierta en la
ranura, luego inserte la mitad superior en la ranura hasta que toda la
cubierta posterior esté totalmente instalada.
Consejos:
1. Este uso puede ser operado según sus propias necesidades.
2. La funda a prueba de polvo no se puede usar bajo el agua.
81
Page 86

Carga e instalación de la batería
La batería suministra energía a la cámara, pero la batería tiene poca energía
cuando la recibe, así que asegúrese de que la batería esté cargada antes de
ser utilizarla por primera vez.
Bateria cargando:
Los pasos de carga de energía son los siguientes:
1. Encuentre el cargador de batería dual USB en los accesorios de la cámara
2. Al conectar el cargador con un cable USB, puede cargarlo con un enchufe
o a un ordenador
3. Inserte las dos baterías en el compartimiento de carga. Cuando el cargador
está funcionando, la luz roja significa que se está cargando, la luz azul
significa que se ha cargado por completo
Instalación de la batería:
Una vez que las baterías se hayan cargado por completo, instale una batería
en la cámara para que la cámara funcione. Los pasos de instalación de la
batería son los siguientes:
1. Abra la tapa de la batería como se muestra en la imagen siguiente. Primero,
use la uña de su pulgar derecho para presionar el bloqueador hacia la
derecha como lo muestra la flecha 1. Segundo, levante la tapa de la batería.
82
Page 87

②
①
2. Instale la tapa de la batería después de haberla insertado. Tenga en
cuenta que la parte extendida de la tapa de la batería debe insertarse a la
izquierda del compartimiento de la batería primero como se muestra en la
imagen siguiente. Luego presione la mitad derecha de la tapa de la batería
hacia abajo en el compartimiento de la batería.
Consejos:
Tenga en cuenta la dirección de la batería y la tapa de la batería.
Inserción y formateo de la SD
Después de que las baterías estén cargadas , se necesita una tarjeta SD
para que la cámara funcione. Tenga en cuenta que la tarjeta SD NO ESTÁ
INCLUIDA en la cámara. Y nuestra cámara es compatible con la tarjeta SD
de clase 10 SDHC, máxima compatibilidad con 64 GB.
Inserción de la micro SD:
1. Busque la ranura para tarjeta Micro SD en la cámara, insertando la tarjeta
en la cámara como muestra la marca de dirección en la cámara hasta que
escuche un sonido de inserción.
2. Tarjeta SD: presione la tarjeta SD hasta que haya escuchado un sonido
de inserción; Luego, la tarjeta SD saltará junto con un sonido emergente.
83
Page 88

Consejos: Utilice sus uñas para empujar la tarjeta SD ya que la ranura es un
poco profunda.
Formateo de la SD:
1. Presione brevemente el botón "MODE" para iniciar la cámara;Presione
el botón "MODE" tres veces para ingresar al modo de configuración;
2. Presione el botón "ABAJO" hasta que encuentre la configuración de
"formato" y luego presione OK;la tarjeta de memoria se formateará a la
vez.
Consejos:
1. Esta cámara es compatible con la tarjeta SD SDHC clase 10, compatibilidad máxima de 64 GB.
2. Transfiera sus valiosos archivos a otro lugar para almacenarlos antes de
formatear la tarjeta SD.
84
Page 89

Instrucciones de modo de operación:
La serie AC800 tiene cuatro tipos de modos: Modo de video, Modo de
foto, Modo de reproducción, Modo de configuración. A continuación se
encuentran las instrucciones de función de cada botón debajo de cada
modo.
Encendido/Apagado
Pulsaciónón corta 「Botón de encendido / MODO」: Enciende la cámara;
Presione prolongadamente la 「Botón de encendido / MODO」: Apague
la cámara.
Modo de video
「Botón OK」: Iniciar y detener la grabación
「Botón arriba」 (Pulsación corta): Interruptor wifi
「Botón arriba」 (Pulsación larga): Aumenta la distancia focal (Maxim 4X)
「Botón Abajo」 (Pulsación corta): Interruptor de grabación de audio
「Botón Abajo」 (Pulsación larga): Distancia focal estrecha
「Botón de Encendido / MODE」 (Pulsación corta): Toma de imágenes
(Durante la grabación)
Modo de foto
「Botón OK」: Disparar imagen
「Botón arriba」: Aumenta la distancia focal (Maxim 4X)
「Botón Abajo」: Distancia focal estrecha
「Botón de encendido / MODE」 (Pulsación corta): Modo de corte (Video
→ Foto → Reproducción → Configuración)
Modo de reproducción
Under Playback
「Botón OK」(Pulsación corta): Reproducir y pausar video
「Botón arriba」: Avance rápido( Maxim 8X)
「Botón Abajo」: Rebobinar( Maxim 8X)
85
Page 90

Non-playback time
「Botón arriba」: Página arriba
「Botón Abajo」: Página abajo
「Botón de encendido / MODE」(Pulsación corta): Modo de corte (Video
→ Foto → Reproducción → Configuración)
Modo de configuración
「Botón UP」: Repetición de página
「Botón Abajo」: Página abajo
「Botón OK」: Confirmar
「Botón de encendido / MODE」 (Pulsación corta): Modo de corte (Video
→ Foto → Reproducción → Configuración)
86
Page 91

Tabla de ajustes
Tabla de explicación de la página de configuración de la cámara
※ V = Modo de video; P = Configuración que efectiva bajo el modo
de fotografía
Ajuste
Resolución
de video
Grabación en
bucle
Giroscopio
WDR
Registro
Time-lapse
Detección de
movimiento
Valor
4K/2K/1080P/
720P/480P/240P
Desactivado /
3 minutos /
5 minutos /
10 minutos
Off/On
Off/On
Apagado /
0.1 Segundo /
0.2 Segundos /
0.5 Segundos /
1 Segundo /
5 Segundos
Off/On
V P Explicación
Para establecer la resolución
○
del video.
El archivo se grabará por
segmento en función de
○
la unidad de tiempo que ha
establecido.
Esta configuración puede
contrarrestar el efecto de
○
sacudida de la mano y la
vibración de la grabación.
Amplio rango dinámico
○
Puede tratar automáticamente
con la oscuridad en la imagen.
La fotografía de lapso de
tiempo es una técnica
mediante la cual la frecuencia
con la que se capturan los
fotogramas de película
(la velocidad de fotogramas)
○
es mucho más baja que la
utilizada para ver la secuencia.
Cuando se juega a velocidad
normal, parece que el tiempo
se mueve más rápido y por lo
tanto caduca.
En el modo de espera, la
cámara grabará y guardará
○
un video de 10 segundos
cuando detecte un objeto en
movimiento.
87
Page 92

Grabación de
audio
Sello de la
fecha
Ángulo
Modo de
buceo
Escena
nocturna
Disparo con
temporizador
de intervalos
Resolución
de imagen
Disparo
continuo
Calidad de la
imagen
Nivel de
nitidez
Balance de
blancos
Color
Off/On
170°/140°/
110°/70°
Off/On
Off/On
Off/
2s Timer/
5s Timer/
10s Timer
20M /16M /
12M /10M /8M /
5M/3M /VGA
Off/On
Alta calidad /
Bueno / Normal
Fuerte / Estándar /
Suave
Automático / Luz
de día / Nublado /
Luz de tungsteno /
Fluorescente
Normal / Negro y
blanco / Marrón
Decide si hay un registro de
audio en el video.
※ Use el botón de bajar para
○Off/On
encender / apagar el audio
durante la grabación.
Marca de fecha en los videos
○○○
o fotos
El ángulo de la lente de la
cámara es ajustable.
La cámara ajustará el balance de blancos automátic-
○
○
amente cuando grabe /
dispare debajo del agua.
El brillo de la pantalla se
ajustará automáticamente
○○○
cuando la cámara tome
escenas nocturnas.
La cámara tomará una foto
después del temporizador de
○
intervalo establecido.
Para establecer la resolución
○
de la imagen.
Presione el botón OK sin
detenerse para tomar fotos
○
continuamente en el modo
de fotografía.
Para ajustar la finura de las
○
imágenes.
Para ajustar los píxeles del
borde del objeto dentro de la
○
imagen.
Para establecer el balance de
○
blancos de la cámara.
Normal / Negro y blanco /
○ ○
Marrón
88
Page 93

Sensibilidad
ISO
Ajusta la
sensibilidad
a la luz…
Anti-temblor Off/On
Borrar
Proteger
WIFI Off/On
WIFI SSID
Contraseña
de wifi
Fecha y hora
Apagado
automático
Volumen
clave
Auto/100/200/400 Ajusta la sensibilidad a la luz.
+2.0/+1.7/+1.3/
+1.0/+0.7/+0.3/
0/-0.3/-0.7/-1.0/
-1.3/-1.7/-2.0
Eliminar archivo
actual / Eliminar
todo
Bloquear archivo
actual / Desbloquear archivo actual /
Bloquear todos los
archivos / Desbloquear todos los
archivos
Desactivado /
1 minuto /
3 minutos /
5 minutos /
10 minutos
Off/On
○ ○
Para ajustar el valor de
exposición
○○
※ + (Brillo) / - (Oscuridad)
ajuste.
Contrarrestar la influencia del
temblor de la mano / vibración
○
para tomar imágenes.
Eliminar los archivos.
Para evitar la sobrescritura de
archivos causada por la grabación de bucle en el modo de
automóvil.
Presione el botón arriba para
encender / apagar el wifi con
un botón de tecla.
Para establecer el nombre del
Wifi.
Botón OK confirmar (Mover),
botón Arriba / Abajo para
elegir el valor establecido.
Contraseña de wifi
Para establecer la fecha del
sistema.
La cámara entrará en un modo
de protector de pantalla y
luego se apagará automátic-
○ ○
amente sin ninguna operación.
※Excepto en modo video.
El volumen clave durante la
○ ○
operación.
89
Page 94

Indicaciones
de voz
OSD Off/On
Modo de
coche
Idioma
Modo de TV NTSC/PAL Formato de salida de video
TV
Salvapantallas
Frecuencia
de poder
Off/On
Off/On
English / Français /
Español / Polski /
Deutsch / Italiano /
繁體中文 /
Pусский / 日本語 /
한국어 / Cesky /
Português
Off/On Función FPV
Desactivado / 3
0 Segundos /
1 Minuto /
3 Minutos
50 Hz/60 Hz
La cámara emitirá una señal
de inicio de video / parada de
○
video cuando realice sus
operaciones.
La visualización de los
parámetros del menú de
○ ○
funciones en la pantalla.
Conéctese al cargador del
automóvil, la cámara
comenzará a grabar
automáticamente una vez que
el motor esté encendido.
○
Y guardando automáticamente
los archivos de grabación y se
apaga una vez que el motor
está apagado,
Establecer el idioma del
○○○
sistema.
Establezca el intervalo de tiempo del protector de pantalla.
※ Presione brevemente cual-
○ ○
quier tecla para reactivar la
pantalla con esta configuración.
Establecer la frecuencia de
potencia
Europa: 50Hz /
○ ○
Norteamérica: 60Hz
Japón del este: 50Hz /
Oeste Japón: 60Hz
90
Page 95

Formato SD card
Configuración
por defecto
Información
de hardware
Configuraciones
Model:
Victure AC800
Version: 1.0
Formatea la tarjeta SD.
※ Cuando confirme que está
bien, la tarjeta de memoria se
formateará brevemente.
Restaure la cámara en la
configuración predeterminada
La pantalla del modelo del
producto y la versión de
hardware.
91
Page 96

Conexión Por WIFI
Descarga la APP:
Descargue la aplicación 'OKCAM' de App Store (iOS) o Google Play
(Android).
Conexión Wifi
Después de descargar la aplicación OKCAM, puede conectar Wifi a través
de la aplicación. Después de conectar su teléfono a la cámara, puede usar
su teléfono móvil para controlarlo, ver el video o las imágenes de su
teléfono y descargar las grabaciones de la cámara a su teléfono. Los pasos
de conexión son los siguientes:
1. Presione brevemente el botón MODE para encender la cámara;
2. Presione brevemente el botón Arriba para encender el wifi (cuando la
cámara está en modo Vídeo);
3. Encuentre y conecte el wifi a través de su teléfono con el nombre y la
contraseña del wifi que se muestran en la cámara;
4. Ingrese la aplicación después de que se conecte el wifi, verá que la
cámara está controlada por su teléfono.
5. Para desconectar wifi, presione brevemente el botón Arriba nuevamente.
Consejos:
1. La pantalla de información wifi se acortará en una marca wifi en la
esquina inferior izquierda de la pantalla una vez que el wifi esté conectado
con su teléfono;
2. La cámara solo se puede conectar a un dispositivo a la vez;
3. La conexión wifi consume un poco de energía, por lo tanto, evite
conectar wifi cuando la cámara tiene poca batería.
92
Page 97

Conexión al ordenador
Hay dos opciones cuando utiliza el cable micro-USB incluido para conectar
a una computadora: Almacenamiento masivo y Cámara para PC. Presione
el botón Arriba / Abajo para cambiar entre estos dos modos.
Almacenamiento masivo: Acceda a los archivos que se almacenan en la
tarjeta micro SD de la cámara para copiarlos o verlos en una computadora.
Esta función también se puede lograr con un lector de tarjetas micro SD.
Cámara para PC: utilícela como cámara web para videoconferencias y
grabación de video en su computadora. Es posible que deba permitir que
Adobe Flash Player se ejecute en su software de video chat antes de que
se muestre el video.
93
Page 98

Conexión de TV
Con salida HDMI, puede visualizar las películas e imágenes grabadas por
esta cámara en pantallas grandes de TV, proyector, etc.
1. Apague la cámara.
2. Conecte la cámara y el televisor con un cable Micro HDMI disponible
comercialmente (NO INCLUIDO).
3. Encienda la cámara y active la configuración HDMI en el dispositivo que
desea ingresar.
※ 1. El dispositivo de entrada HDMI debe ser compatible con 1080P.
2. Al emitir HDMI, la pantalla de la cámara se vuelve negra. La pantalla se
muestra en el dispositivo de entrada HDMI, pero la operación se opera
con la cámara.
94
Page 99

Especificaciones
Modelo
Chip
Sensor
Screen
Pantalla
Formato de compresión de video
Formato de video
Formato de imagen
Conexión Por WIFI
Tarjeta SD
Puertos
Tiempo de carga
Tiempo de grabación
Batería
Entrada de alimentación
Calificación de profundidad de la
caja impermeable
Peso
Dimensiones
AC800
NT96660
SONY IMX078
2” LCD
170° Wide angle lens(Adjustable)
H.264
MOV
JPG
Android / iOS supported
Class 10 Micro SD card,
maxim supports 64 GB.
Micro USB / Micro HDMI
About 3 hours
1080P 120 minutes/ 4K 60 minutes
Rechargeable 1050mAh Li-ion
battery
5V/1A
40M/131.2ft
78g/ 2.75oz (with battery)
60*25*40mm / 2.36*0.98*1.57 inch
95
Page 100

Garantía
Todos los productos de Victure vienen con una garantía limitada de 12
meses a partir de la fecha de compra. Y contamos con un equipo de
servicio al cliente profesional para su apoyo sin demora.
Si tiene alguna pregunta sobre nuestro producto o la garantía, no dude en
ponerse en contacto con nosotros a través de: support@govicture.com.
Haremos nuestro mejor esfuerzo para ayudarlo a resolver el problema
hasta que esté satisfecho.
96
 Loading...