

Page 1
VICTORIO
Aluminum
STEAM JUICER
VKP1148
Instruction Manual
Page 2

Table of Contents
Steam Juicer Breakdown ......................................................................1
Operating Precautions .......................................................................... 2
Product Overview ................................................................................. 2
Care Instructions ...................................................................................3
Preparing Fruit for Juicing ................................................................... 4
Preparing Specic Fruit Types ............................................................4
Assembly and Use Instructions .......................................................... 5
Jar Sterilization .......................................................................................8
Juice Preservation .................................................................................. 8
Recipes ..................................................................................................10
Notes ....................................................................................................17
Warranty/Contact Info ......................................................Back Cover
*For the most up-to-date manual, or for more information regarding
this product, visit our website: www.Victorio.info.
© Copyright 2013 Victorio Kitchen Products, Inc. All rights reserved.
Page 3
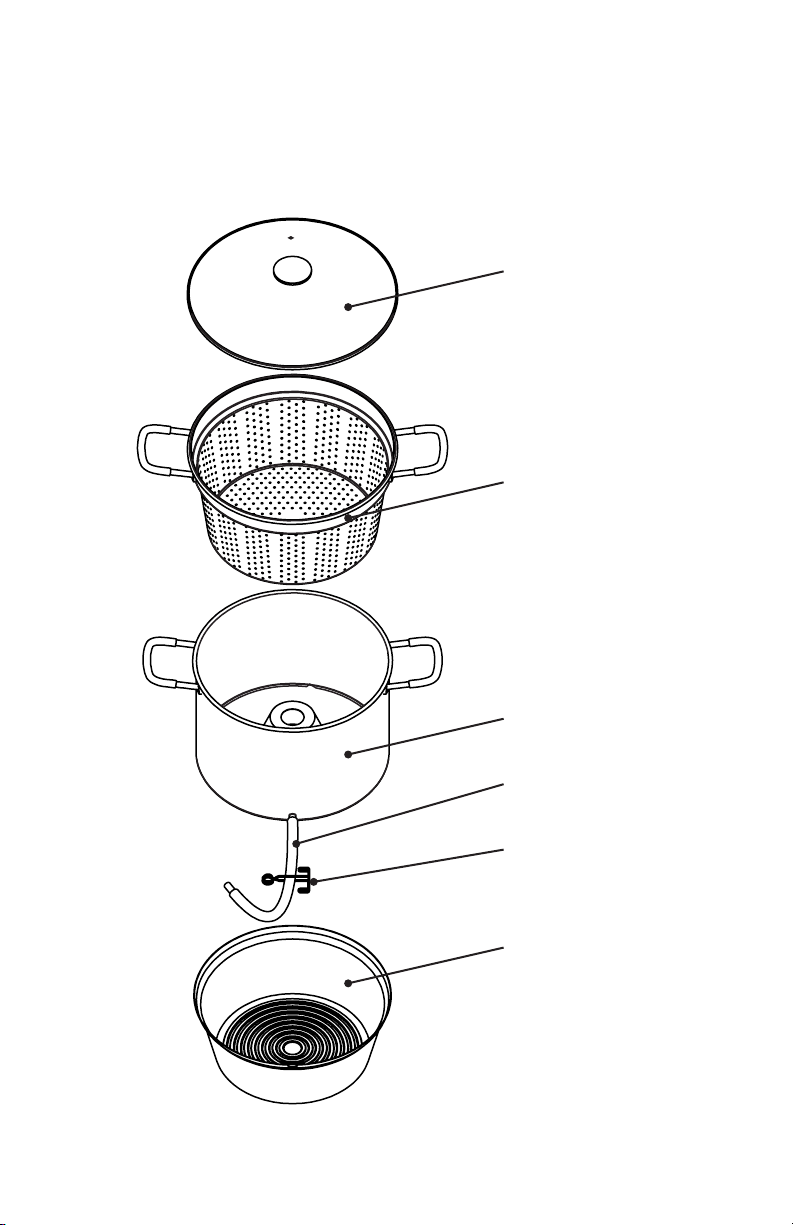
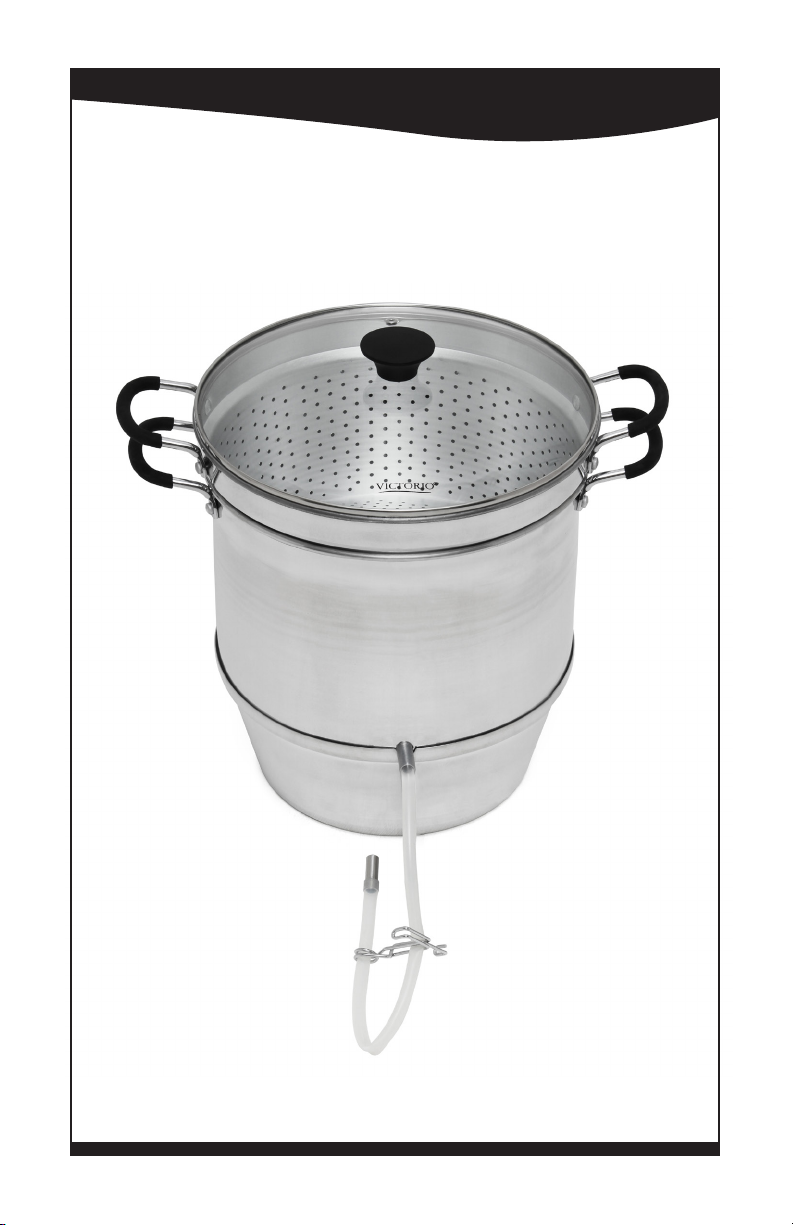
Victorio Aluminum Steam Juicer
Model VKP1148
Your complete Steam Juicer includes everything shown below:
Lid
Colander
Juice Kettle
Juice Hose
Spring Clamp
Water Pot
1
Page 4

Operating Precautions
TO PREVENT PERSONAL INJURY AND TO PREVENT
DAMAGE TO YOUR STEAM JUICER, PLEASE READ AND
FOLLOW ALL OF THE FOLLOWING INSTRUCTIONS AND
WARNINGS:
• Always use heat protective gloves or mitts when handling any
part of your juicer.
• When removing the lid from the steam juicer, be sure to always
tilt it away from you to avoid steam burns.
• Any steam produced will be hot and can cause a serious burn
injury. Use extreme caution while using your juicer.
• Check the water pot water level often. DO NOT LET THE
WATER POT BOIL DRY. This will cause serious damage
and warping to your juicer and may render it unusable. Your
stove top could also be damaged if this happens.
• Never leave your steam juicer unattended while in use.
• Do not use by or near children.
• For household use only.
• Do not put any portion of the steam juicer in a
dishwasher.
Product Overview
Congratulations on your purchase of a Victorio Steam Juicer! You
will denitely nd this to be a useful addition to your kitchen. It is
a helpful tool, in creating healthy juices, jellies and syrups right at
home. If you are concerned about how to use your juicer, don’t
worry. This manual will give you step by step instructions to guide
you through the process.
In this manual you will nd assembly instructions, how to prepare
specic types of fruit for juicing, how to use your juicer, and a
recipes section.
To give you a good idea of the basic procedure, you will start by
washing and assembling your juicer and selecting good quality fruit.
Next, ll the water pot with water, and once the fruit is properly
prepared, you will add it to the colander portion of the juicer. As the
water boils, the hot steam will rise up through the colander, heat the
fruit and begin the extraction process.
2
Page 5

The juice will drip down into the juice kettle, and in approximately
one hour, you can start to drain healthy, vitamin-rich juice into a pot
to be used for juice concentrates, jellies, syrups and more.
Remember, this process will be described in depth as you go through
the manual. So keep reading and you’ll be on your way to juicing like
a pro in no time.
Steam Juicer Liquid Capacities:
• Water Pot - 6 Qt
• Juice Kettle - 4.5 Qt
• Colander - 10 Qt
Care Instructions
Use a soft cloth and warm, soapy water to wash your Victorio Steam
Juicer by hand before the initial use (never put any portion of
your steam juicer in a dishwasher). This will help to remove any
particles or residue from the factory. Then follow these simple care
instructions for keeping your steam juicer clean:
• Whenever you wash your juicer, be sure to use a soft cloth to
keep from scratching the surface.
• If hard water builds up on any portion of your steam juicer,
those are easily cleaned by soaking the affected portion in a
diluted vinegar solution. Use ½ c. vinegar to 1 qt of water
and let soak for 30-60 minutes. Use a dishcloth to wash off
any remaining hard water, rinse and dry. You may need to
increase the soak time and/or the amount of vinegar used
for tough buildup.
• Once clean, dry the juicer with a soft dishtowel to keep water
spots from forming.
• Keep the juicer in its original packaging material when not in
use. This will keep it protected and free from dust or other
particles.
• *NOTE - Avoid using harsh chemicals on the aluminum
surface. Some discoloration or staining will occur once
the aluminum has been exposed to heat. This is normal
and cannot be reversed. However, this will not effect the
functionality of your steam juicer.
3
Page 6

Preparing Fruit for Juicing - General
Select fruit that is of the appropriate ripeness for the recipe you will
be using, is rm, has a good color and texture, and is of ideal quality
for eating fresh or cooking. Any fruit that has molded, is bruised,
split or has otherwise been compromised should be discarded, or the
damaged section cut away. Using fruit that is overripe will cause
your juice to have a watery avor. Quartering larger fruit, like
apples and peaches, can help accelerate the overall juicing process
because it allows the fruit to release its liquid more quickly. For
fruit with stems, thicker rinds and pits that would not normally be
consumed when eating fresh, you will need to remove these portions
beforehand, otherwise you may end up with bitter or unwanted
avors in your juice.
Preparing Specic Fruit Types
• Berries & Grapes – To prepare this type of fruit, you will
need to remove all stems and discard any damaged fruit.
Wash the fruit thoroughly, then place in the colander of the
steam juicer.
• Fruits with Cores – These are fruits containing a core
like apples and pears. Once the fruit has been washed and
checked for blemishes, you will need to remove the stems,
cut into quarters, and place in the colander of the steam
juicer. There is no need to remove cores and seeds from this
type of fruit.
• Stone Fruit - When preparing fruit that has stones like
peaches, plums, apricots, nectarines, etc, you should remove
the stones before juicing. Once the produce has been
washed and checked for blemishes, you will need to remove
the stone. Cut fruit into halves or quarters, depending on
size, and place in the colander portion of the steam juicer.
• If you are juicing any fruit that doesn’t fall within these
three categories, the main thing to remember is if there
are portions you would not normally consume while eating
fresh, then do not put that into the juicer. This could result
4
in the nished juice having an undesirable avor.
Page 7

Assembly & Use Instructions
Please make sure you have read through the sections -
Operating Precautions (p. 2) and Preparing Specic Fruit
Types (p. 4) - before assembling and using your juicer.
Juicer Assembly & Use:
1. Remove your new Victorio Steam Juicer from the box and
packaging and check that all items are there and in good
condition. Refer to the diagram on p. 1 for help, if needed.
2. Wash all parts of the juicer thoroughly by hand, including
the hose and clamp, in warm soapy water and rinse carefully.
3. Once clean, take the water pot and ll it with 5 quarts of
fresh water and place it on your stove top.
4. Next, place the juice kettle on top of the water pot so the
juice hose can fall lower than the juice kettle. If the hose is
raised too high, the juice will not drain properly.
5. Squeeze the clamp and slide it to the center of the hose.
(See diagram below.)
6. Then, place the colander on top of the juice kettle and ll
it to the top with previously prepared fruit. (Refer to p. 4
for proper fruit preparation methods). The colander hold
approximately 8-9 quarts of fruit pieces. Make sure the
fruit does not overow the colander.
5
Page 8

7. Put the lid on top of the colander, making sure it ts securely in
place. If it does not, you may need to remove any excess fruit.
8. After correctly assembling your juicer, turn on the burner unit
to the high position. BE SURE TO ALWAYS USE HEAT
PROTECTIVE GLOVES OR MITTS WHILE WORKING
WITH YOUR JUICER. THE STEAM IS VERY HOT
AND WILL BURN YOU.
9. Once the water has come to a rapid boil, begin turning down
your burner temperature until the water remains at a consistent
rolling boil, but not too vigorous. Depending on your stove, this
will be anywhere between medium-high to high heat.
10. DO NOT LET THE WATER POT BOIL DRY. CHECK
THE WATER LEVEL OFTEN AND ADD MORE
WATER AS NEEDED. DO NOT LEAVE YOUR STEAM
JUICER UNATTENDED WHILE IT IS IN USE.
11. You will need a saucepot ready for the juice to drain into. Place it
slightly below the juicer so the juice hose hangs down into the pot
by 3-4 inches. (See diagram below). It will take approximately 1
hour before there is enough juice in the juice kettle to drain.
6
Page 9

12. It will take approximately 2-3 hours for one batch of fruit to
go through the entire juicing process. However, times may vary
depending upon your burner temperature, altitude and the type
of fruit you use.
13. Stirring the fruit is not recommended as that will result in
cloudy juice. For clean, clear-looking juice it is best to leave the
fruit untouched during the juicing process.
14. You can check for juice one of two ways: First, carefully squeeze
open the hose clamp and juice will automatically begin draining
into the saucepot if there is enough. Second, lift the juice hose
straight up by holding onto the clamp. DO NOT TOUCH
THE HOSE AS IT WILL BE VERY HOT. If you do not see
any juice in the hose, then there is not enough juice in your juice
kettle to be measured, using this method. (See diagram below).
15. If you will be juicing several batches of fruit in a row, be sure to
juice one colander full at a time and remove waste before adding
another batch for optimal performance. Be sure you do not
wait too long before draining the juice kettle, as the juice could
overow into the water pot below. The juice kettle holds up to
4.5 quarts of juice.
7
Page 10

Jar Sterilization
According to the USDA, all jams, jellies, juices and pickled products
processed for less than 10 minutes in a water bath canner should be
lled into sterile empty jars.
To sterilize empty jars after washing in soap and rinsing thoroughly,
submerge them, right side up, in a boiling-water canner with the rack
in the bottom. Fill the canner with enough warm water so it is 1
inch above the tops of the jars. Bring the water to a boil, and boil 10
minutes at altitudes of less than 1,000 ft. At higher elevations, boil 1
additional minute for each additional 1,000 ft elevation. Reduce the
heat under the canner, and keep the jars in the hot water until it is
time to ll them. Remove and drain hot sterilized jars one at a time,
saving the hot water in the canner for processing lled jars. Fill the
sterilized jars with food, add lids, and tighten screw bands.
Juice Preservation
Once you have nished the juicing process you can use your juice
for several different things. You can consume it immediately and
store the remaining amount in your refrigerator for up to 1 week.
You can preserve it by freezing it in containers, or canning it in a
water-bath canner. Or, you can use the juice for syrups and jellies
(see recipe section on p. 10). The information in the following three
sections was taken from the University of Georgia’s book, So Easy to
Preserve, section on “Freezing,” pp. 239-248.
Preserving Juice by Freezing is one of the easiest, most
convenient, and least time-consuming methods of preserving
foods. Freezing does not sterilize foods; the extreme cold simply
retards the growth of microorganisms and slows down the chemical
changes that affect food quality or cause food to spoil. To maintain
top quality, frozen fruits and vegetables should be stored at 0°F or
lower. A freezer thermometer can help you determine the actual
temperature of your freezer. Do not freeze fruits and vegetables
in containers with a capacity over one-half gallon. Foods in larger
containers freeze too slowly to result in a satisfactory product.
8
Page 11

Freezer Pointers:
• Freeze foods at 0°F or lower. To facilitate more rapid
freezing, set the temperature control at -10°F or lower about
24 hours in advance.
• Freeze foods as soon as they are packed and sealed.
• Do not overload your freezer with unfrozen food. Add only
the amount that will freeze within 24 hours, which is usually
2 to 3 pounds of food per cubic foot of storage space.
Overloading slows down the freezing rate, and foods that
freeze too slowly may lose quality.
• Place packages (or containers) in contact with refrigerated
surfaces in the coldest part of the freezer.
• Leave a little space between packages (or containers) so air
can circulate freely. Then, when the food is frozen, store the
packages (or containers) close together.
Headspace for Liquid Packs:
(crushed or pureed fruit, or fruit juice)
Wide-Mouth Containers
Narrow or Regular Mouth
Containers
Pints Quarts Pints Quarts
1/2 inch 1 inch 3/4 inch 1-1/2 inch
Preserving Juice by Water-Bath Canning: For instructions on
how to properly and safely use a water-bath canner, please consult
the USDA’s Complete Guide to Home Canning, “Guide 1, Principles of
Home Canning.” You can also nd this information on the National
Center for Home Food Preservation website at:
http://nchfp.uga.edu. Click on the ‘Publications’ link then on ‘U.S.
Department of Agriculture.’
9
Page 12

Recipes
These recipes are for fruit juices, syrups and jellies that can be made
with the nished product from your steam juicer. All recipes were
taken from USDA approved sources: USDA’s Complete Guide to Home
Canning, the University of Georgia’s So Easy to Preserve, and Ball’s
Blue Book, Guide to Preserving. While some of the wording has been
changed to adapt them for use with your Victorio Steam Juicer, the
ingredient amounts and processing times are the same.
Apple Juice
Quantity: For a canner load of 7 quarts, you will need about 28-30
pounds of apples. Approximately 4 pounds of fruit yield 1 quart (4
cups) of juice.
Quality: Good quality apple juice is made from a blend of varieties.
For best results, use apples that are rm, have a good color, and are
at the peak of their sweetness. Overripe fruit of any kind will result
in watery juice.
Procedure: Once you have nished juicing your apples (refer to
p. 5 for juicing instructions) measure the amount you would like to
preserve and pour into a large, heavy bottom saucepan. Heat quickly,
stirring occasionally until juice begins to boil. Fill immediately
into hot, sterile quart or half-gallon jars (refer to p. 8 for proper
sterilization instructions), leaving ¼-inch headspace. Wipe rims of
jars with a dampened clean paper towel. Adjust lids and tighten
rings nger-tip tight ONLY. Then, process in a water-bath canner
according to your altitude. If you are unsure of your altitude level,
please contact your local extension ofce.
Processing Times:
Altitude Quarts Half-Gallon
0-1,000 . 5 min 10 min
1,001-6,000 . 10 min 15 min
Above 6,000 . 15 min 20 min
*This recipe has been adapted from the apple juice recipe in the
USDA’s Complete Guide to Home Canning, section 2-6
10
Page 13

Grape Juice
Quantity: An average of 24-1/2 pounds of grapes are needed per
canner load of 7 quarts; an average of 16 pounds per canner load of
9 pints. A lug weighs 26 pounds and yields 7-9 quarts of juice – an
average of 3-1/2 pounds per quart.
Quality: Select sweet, well-colored, rm, mature fruit of ideal
quality for eating fresh or cooking.
Procedure: Once you have nished juicing your grapes (refer to
p. 5 for juicing instructions), measure the amount you would like
to preserve and pour into a large, heavy bottom saucepan. Then
sweeten to taste. Heat and stir until sugar is dissolved. Continue
heating with occasional stirring until juice begins to boil. Fill
immediately into hot, sterile quart or half-gallon jars (refer to p. 8 for
proper sterilization instructions), leaving ¼-inch headspace. Wipe
rims of jars with a dampened clean paper towel. Adjust lids and
tighten rings nger-tip tight ONLY. Then, process in a water-bath
canner according to your altitude. If you are unsure of your altitude
level, please contact your local extension ofce.
Processing Times:
Altitude Quarts Half-gallon
0-1,000 5 min 10 min
1,001-6,000 10 min 15 min
Above 6,000 15 min 20 min
*This recipe has been adapted from the grape juice recipe in the
USDA’s Complete Guide to Home Canning, section 2-15
11
Page 14

Apple-Cinnamon Syrup
Yield: About 6 pints.
Ingredients:
6 c. Apple Juice 4 c. Water
3 Cinnamon Sticks, broken 3 c. Corn Syrup
5 c. Sugar ¼ c. Lemon Juice
Procedure: Once you have nished juicing your apples (refer
to page 5 for juicing instructions) measure 6 cups of juice into a
medium saucepot, then add the cinnamon sticks. Simmer 5 minutes;
set aside. Combine sugar and water in a medium saucepot; boil to
230° F (adjust for altitude). Add apple juice, cinnamon sticks and
corn syrup to sugar syrup. Boil 5 minutes. Remove cinnamon sticks.
Stir in lemon juice. Ladle hot syrup into sterile jars, (refer to p. 8 for
proper sterilization instructions), leaving ¼-inch headspace. Wipe
rims of jars with a dampened clean paper towel. Adjust lids and
tighten rings nger-tip tight ONLY. Then, process in a water-bath
canner according to your altitude. If you are unsure of your altitude
level, please contact your local extension ofce.
Processing Times:
Altitude Half-pints or Pints
0-1,000 10 min
1,001-6,000 15 min
Above 6,000 20 min
*This recipe has been adapted from the apple-cinnamon syrup recipe
in Ball’s Blue Book, Guide to Preserving, 100th Anniversary Edition, p.
82.
12
Page 15

Berry Syrup
Yield: About 9 half-pints.
Ingredients:
5 c. Berry Juice
6 ¾ c. Sugar
Procedure: Once you have nished juicing the berries of your
choice (refer to p. 5 for juicing instructions), measure 5 cups of
juice into a large, heavy bottom saucepan. Combine the juice with
6-3/4 cups of sugar, bring to a boil, and simmer 1 minute, stirring
occasionally. Remove from heat, skim off foam, and ll into sterile
half-pint jars, (refer to p. 8 for proper sterilization instructions),
leaving 1/2-inch headspace. Remove air bubbles and adjust
headspace if needed. Wipe rims of jars with a dampened, clean
paper towel. Adjust lids and tighten rings nger-tip tight ONLY.
Then, process in a water-bath canner according to your altitude.
If you are unsure of your altitude level, please contact your local
extension ofce.
Processing Times:
Altitude Half-pints or Pints
0-1,000 10 min
1,001-6,000 15 min
Above 6,000 20 min
*This recipe has been adapted from the berry syrup recipe in the
USDA’s Complete Guide to Home Canning, section 2-10.
13
Page 16

Blueberry Jelly
Yield: 7-8 half-pint jars.
Ingredients:
4 c. Blueberry Juice
7 ½ c. Sugar
2 Pouches Liquid Pectin
Procedure: Once you have nished juicing your blueberries (refer
to p. 5 for juicing instructions), measure 4 cups of juice into a large
saucepot. Stir in sugar. Place on high heat; stir constantly and bring
to a full rolling boil that cannot be stirred down. Add the liquid
pectin and heat again to a full rolling boil. Boil hard for 1 minute.
Remove from heat; quickly skim off foam. Pour jelly immediately
into sterile half-pint jars, (refer to p. 8 for proper sterilization
instructions), leaving ¼-inch headspace. Wipe rims of jars with a
dampened clean paper towel. Adjust lids and tighten rings nger-tip
tight ONLY. Then, process in a water-bath canner according to your
altitude. If you are unsure of your altitude level, please contact your
local extension ofce.
Processing Times:
Altitude Half-pints or Pints
0-1,000 5 min
1,001-6,000 10 min
Above 6,000 15 min
*This recipe has been adapted from the blueberry jelly with liquid
pectin recipe from The University of Georgia’s So Easy to Preserve, p.
199.
14
Page 17

Grape Jelly
Yield: Approx. 5 half-pints
Ingredients:
3 c. Grape Juice
1 Package Powdered Pectin
4 ½ c. Sugar
Procedure: Once you have nished juicing your grapes (refer to
p. 5 for juicing instructions), measure 4 cups of juice into a large
saucepot. Add powdered pectin to juice and bring to a boil over high
heat. Add sugar, stirring until dissolved. Return to a boil. Boil hard
for 1 minute, stirring constantly. Remove from heat and quickly skim
off foam. Ladle jelly immediately into sterile half-pint jars, (refer to
p. 8 for proper sterilization instructions), leaving ¼-inch headspace.
Wipe rims of jars with a dampened clean paper towel. Adjust lids
and tighten rings nger-tip tight ONLY. Then, process in a waterbath canner according to your altitude. If you are unsure of your
altitude level, please contact your local extension ofce.
Processing Times:
Altitude Half-pints or Pints
0-1,000 10 min
1,001-6,000 15 min
Above 6,000 20 min
*This recipe has been adapted from the quick grape jelly recipe in
Ball’s Blue Book, Guide to Preserving, 100th Anniversary Edition, p. 37.
15
Page 18

Peach Jelly
Yield: 5-6 half-pint jars.
Ingredients:
3 c. Peach Juice
5 c. Sugar
½ c. Lemon Juice
1 Box Powdered Pectin
Procedure: Once you have nished juicing your peaches (refer to
p. 5 for juicing instructions), measure 3 cups of juice into a large
saucepot. Measure sugar and set aside. Add powdered pectin and
lemon juice to previously measured juice in saucepot. Bring to a full
boil over high heat, stirring constantly. Immediately, stir in sugar.
Bring to a full rolling boil that cannot be stirred down. Boil hard for
1 minute, stirring constantly. Remove from heat and quickly skim off
foam. Ladle jelly immediately into sterile half-pint jars, (refer to p. 8
for proper sterilization instructions), leaving ¼-inch headspace. Wipe
rims of jars with a dampened clean paper towel. Adjust lids and
tighten rings nger-tip tight ONLY. Then, process in a water-bath
canner according to your altitude. If you are unsure of your altitude
level, please contact your local extension ofce.
Processing Times:
Altitude Half-pints or Pints
0-1,000 5 min
1,001-6,000 10 min
Above 6,000 15 min
*This recipe has been adapted from the peach jelly with powdered
pectin recipe from The University of Georgia’s So Easy to Preserve,
p.202.
16
Page 19

Notes
17
Page 20

Product Warranty
Model VKP1148 - Aluminum Steam Juicer Warranty: 2 years
We are condent in the quality of our products and back each
one with a limited warranty for the length of time specied above.
Should you experience any problems with your product, please
contact our customer service department.
All warranty claims must be accompanied by a proof of purchase
and are only valid if the appliance has been operated within the U.S.
or Canada and used for its intended purposes. This product is for
household use only.
Items Not Covered:
• Return shipping costs or returned items lost in transit.
• Damages to the product due to accident, misuse, abuse,
negligence, or if the appliance has been altered in any way.
• Products used outside of the United States or Canada.
Victorio Kitchen Products
1804 Sandhill Rd
Orem UT, 84058
By Phone: 866-257-4741
By Email: Help@Victorio.info
www.Victorio.info
© Copyright 2013 Victorio Kitchen Products, Inc. All rights reserved.
 Loading...