

Victorinox SWISS AIR FORCE THREE HAND, SWISS AIR FORCE FA-18, SWISS AIR FORCE AirBoss Mach 2, SWISS AIR FORCE AirBoss Mach 3, SWISS AIR FORCE AirBoss Mach 4 User Manual
...
SWISS AIR FORCE

In 1897 the Original Swiss Army™Knife was created in the small village of Ibach,
Switzerland. Since that time, Victorinox®has become known in more than
100 countries for precision, quality, functionality and versatility.
This century old heritage has been extended to Swiss Army Watches and Timepieces.
Each reflects the ingenious design and outstanding durability we’ve come to stand
for over the years. Uncompromising craftsmanship makes these watches worthy
to carry the cross and shield emblem that symbolizes the legend of Victorinox and
the Swiss Army Brand.
Whether you’re going around the corner or around the globe, this specially designed
Swiss Air Force Watch—its choice of materials and technology—will make sure that
you’re equipped for life’s adventures. No matter what those adventures might be.
QUALITY FEATURES—SWISS AIR FORCE WATCHES
Made in Switzerland.
Precision Swiss Movements.
Individually tested for water resistance of 100M (330 feet) or greater .
Solid stainless steel cases and/or bracelets on most models.
Scratch-resistant sapphire and anti-reflective crystals on most models.
Swiss Army Brand Watches are covered by a three-year limited warranty. Only our
watches are authorized by the Swiss government to carry the name “Swiss Army.”

- 1 -
TABLE OF CONTENTS
Three Hand Analog Quartz. . . . . . . . . . . . . . . . . . . . . . . . . . . . . . . . . . . . . . 2
SeaPlane Strap Replacement System . . . . . . . . . . . . . . . . . . . . . . . . . . . . 5
SeaPlane Chronograph . . . . . . . . . . . . . . . . . . . . . . . . . . . . . . . . . . . . . . . . . 8
SeaPlane XL Mechanical. . . . . . . . . . . . . . . . . . . . . . . . . . . . . . . . . . . . . . . 14
FA-18 Mechanical Chronographs . . . . . . . . . . . . . . . . . . . . . . . . . . . . . . . 16
AirBoss Mach 2/3/4 – Using the Visual Countdown . . . . . . . . . . . . . . . . 25
AirBoss Mach 2 – Mechanical Self-Winding . . . . . . . . . . . . . . . . . . . . . . 27
AirBoss Mach 3 – Quartz Chronograph . . . . . . . . . . . . . . . . . . . . . . . . . . 29
AirBoss Mach 4 – Mechanical Manual Winding . . . . . . . . . . . . . . . . . . 35
AirBoss Mach 5 GMT – Mechanical Self-Winding . . . . . . . . . . . . . . . . . xx
AirBoss Mach 6 – Mechanical Self-Winding . . . . . . . . . . . . . . . . . . . . . . xx
Hunter Mach 2 Flyback Analog Chronograph. . . . . . . . . . . . . . . . . . . . 36
Hunter Mach 3 Analog/Digital Chronograph . . . . . . . . . . . . . . . . . . . . . 48
Tachymeter . . . . . . . . . . . . . . . . . . . . . . . . . . . . . . . . . . . . . . . . . . . . . . . . . . . xx
Battery . . . . . . . . . . . . . . . . . . . . . . . . . . . . . . . . . . . . . . . . . . . . . . . . . . . . . . . 74
Warranty . . . . . . . . . . . . . . . . . . . . . . . . . . . . . . . . . . . . . . . . . . . . . . . . . . . . . 75
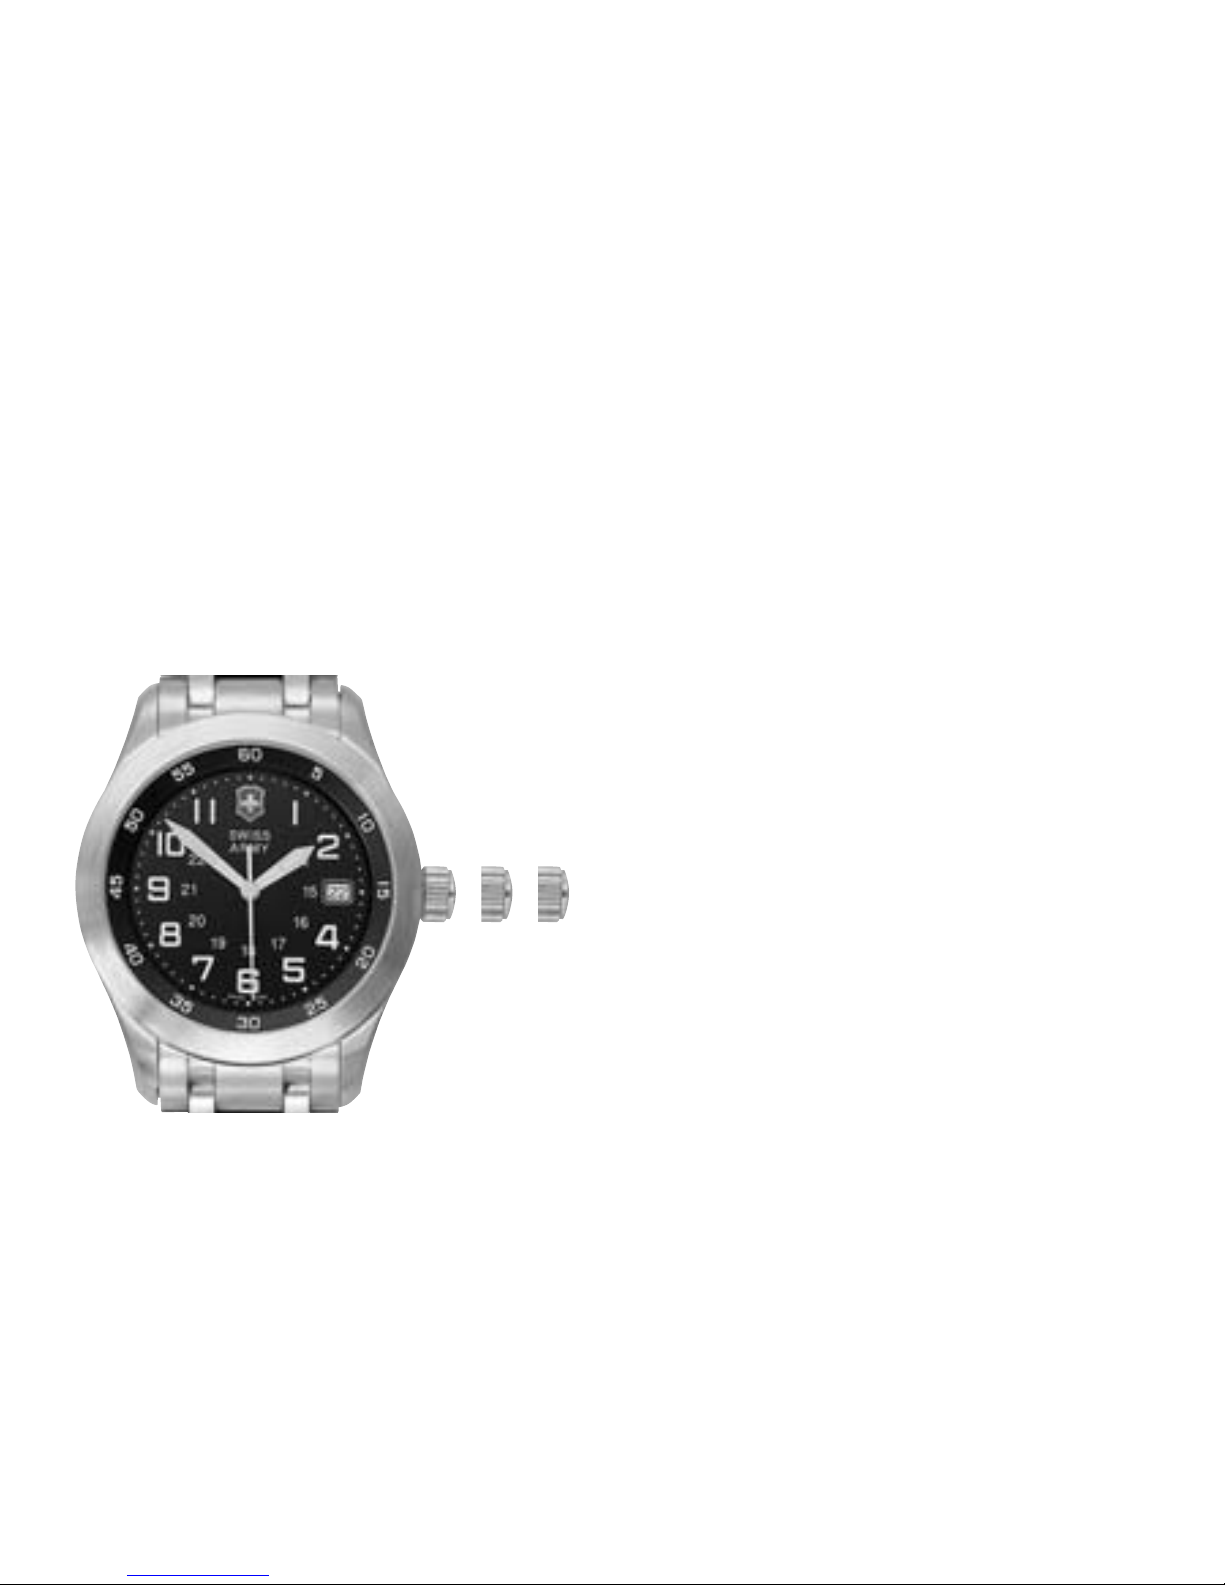
THREE HAND ANALOG QUARTZ
The crown (C) has three positions:
• Position 1: Running position (neutral).
• Position 2: Quick correction of the date.
• Position 3: Time setting, interruption of circuit for motor
(in case of long term storage-to conserve battery life).
- 2 -
THREE HAND ANALOG QUARTZ
The crown (C) has three positions:
• Position 1: Running position (neutral).
• Position 2: Quick correction of the date.
• Position 3: Time setting, interruption of circuit for motor
(in case of long term storage-to conserve battery life).
(Image illustrates positions 1, 2, & 3 only.
See specific instructions for your watch model).
12 3
C

- 3 -
SETTING THE DATE & TIMEPull-Out Crown (AirBoss Mach 1 & 2)
A. Pull out the crown to position (2).
B. Rotate the crown away from you until the date showing is the
day before the desired setting.
C. Pull out the crown to position (3) and rotate toward you. When
midnight is reached, the date will advance to the desired date.
Continue to turn the crown until the desired time is set. Remember,
the date advances at 12:00 midnight, not 12:00 noon.
D. Push in the crown, returning it to position (1). The date and time
are now set.
To Set Time Alone
Refer to instructions “C”.
NOTE: Gently pull on crown to determine if your crown is a
screw-down or pull out.

- 4 -
SETTING THE DATE & TIME - Screw Down Crown (SeaPlane, FA-18,
and Hunter watches)
A. Using the thumb and forefinger, apply mild pressure on crown while
rotating toward you until crown releases.
B. Pull out crown to position (2). Turn the crown away from you
until the date showing is the day before the desired setting.
C. Pull out the crown to the fully extended position (3) and rotate toward
you. When midnight is reached, the date will advance
to the desired date. Continue to turn the crown until the desired time
is set. Remember, the date advances at 12:00 midnight,
not 12:00 noon.
D. After setting, push in the crown then press and screw down away
from you until it is sealed tight into position (1). The date and time
are now set.
To Set Time Alone
Release crown (refer to “A’) and then follow instruction “D”.
- 5 -
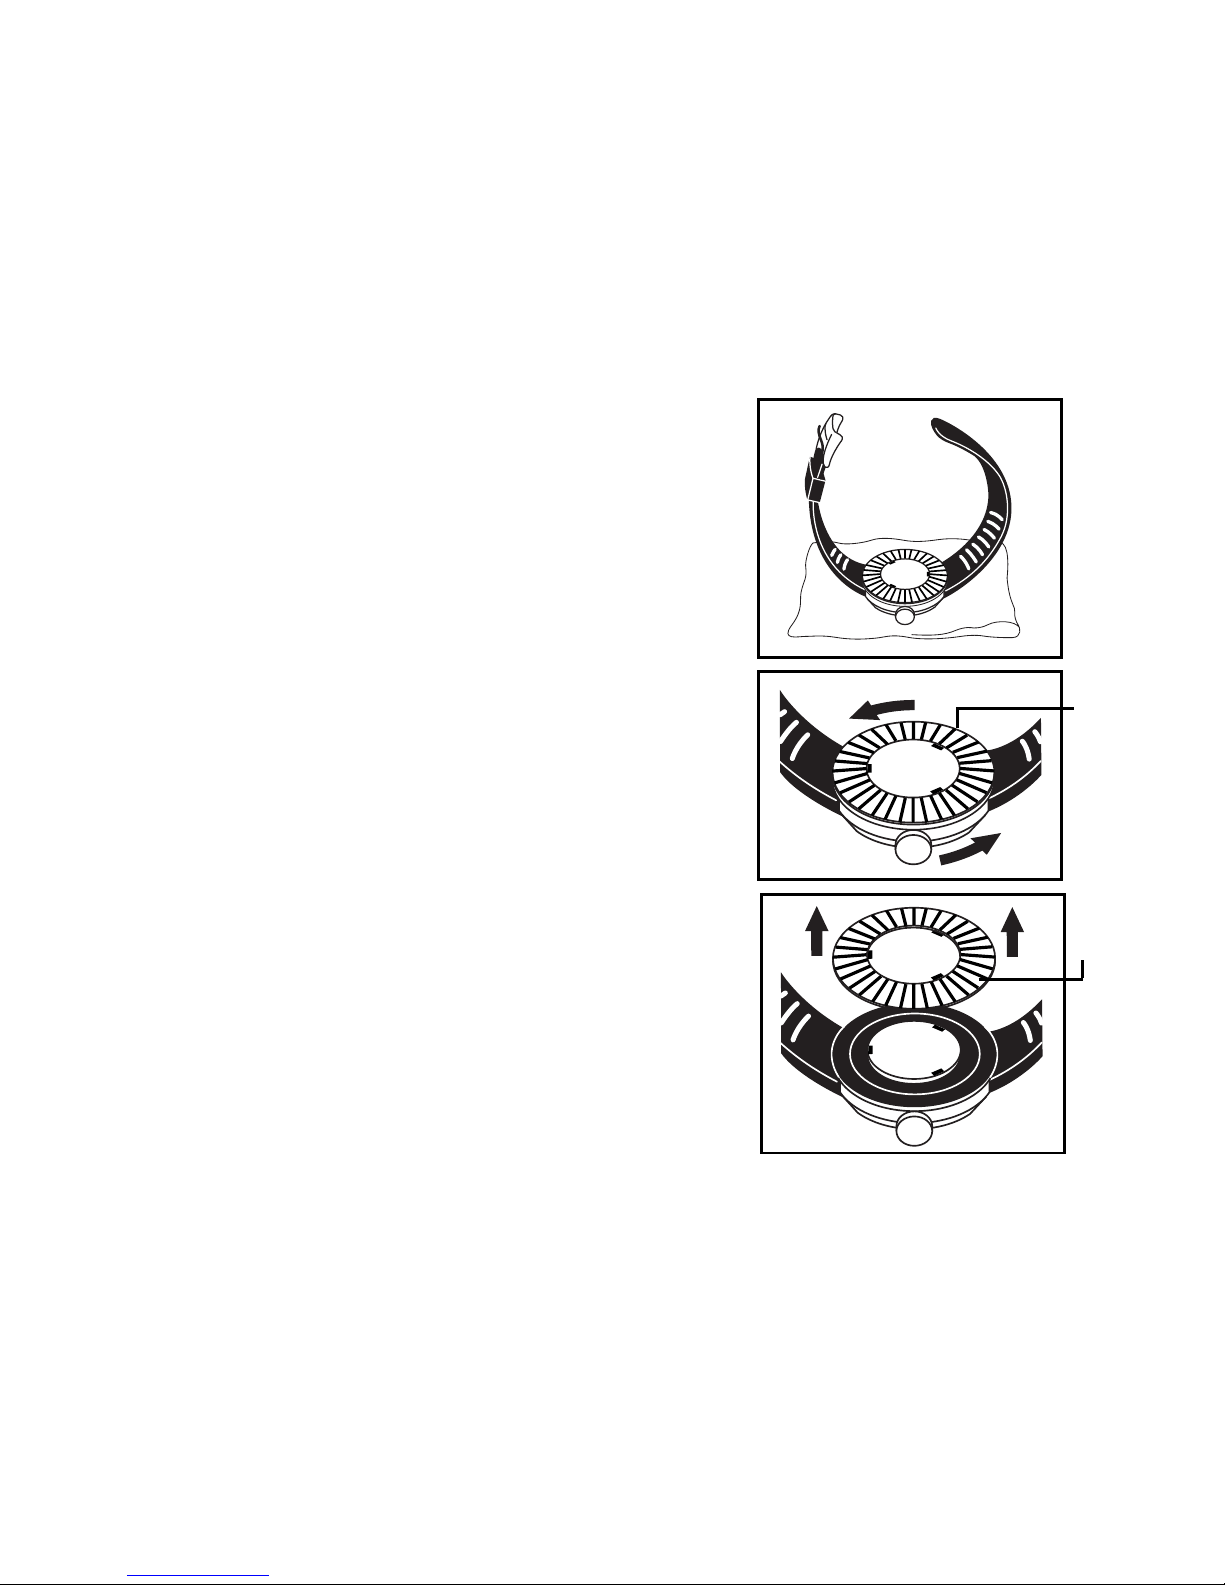
SEAPLANE CHANGING STRAPS
Step 1
Place watch face crystal-side down
on a soft cushion surface.
Step 2
Place thumb and forefinger on
the fluted ring. Press down and
turn counter-clockwise until fluted
ring stops.
Step 3
Lift off fluted ring and place to the
side, exposing strap below.
FLUTED
RING
FLUTED
RING
▼
▼
- 6 -
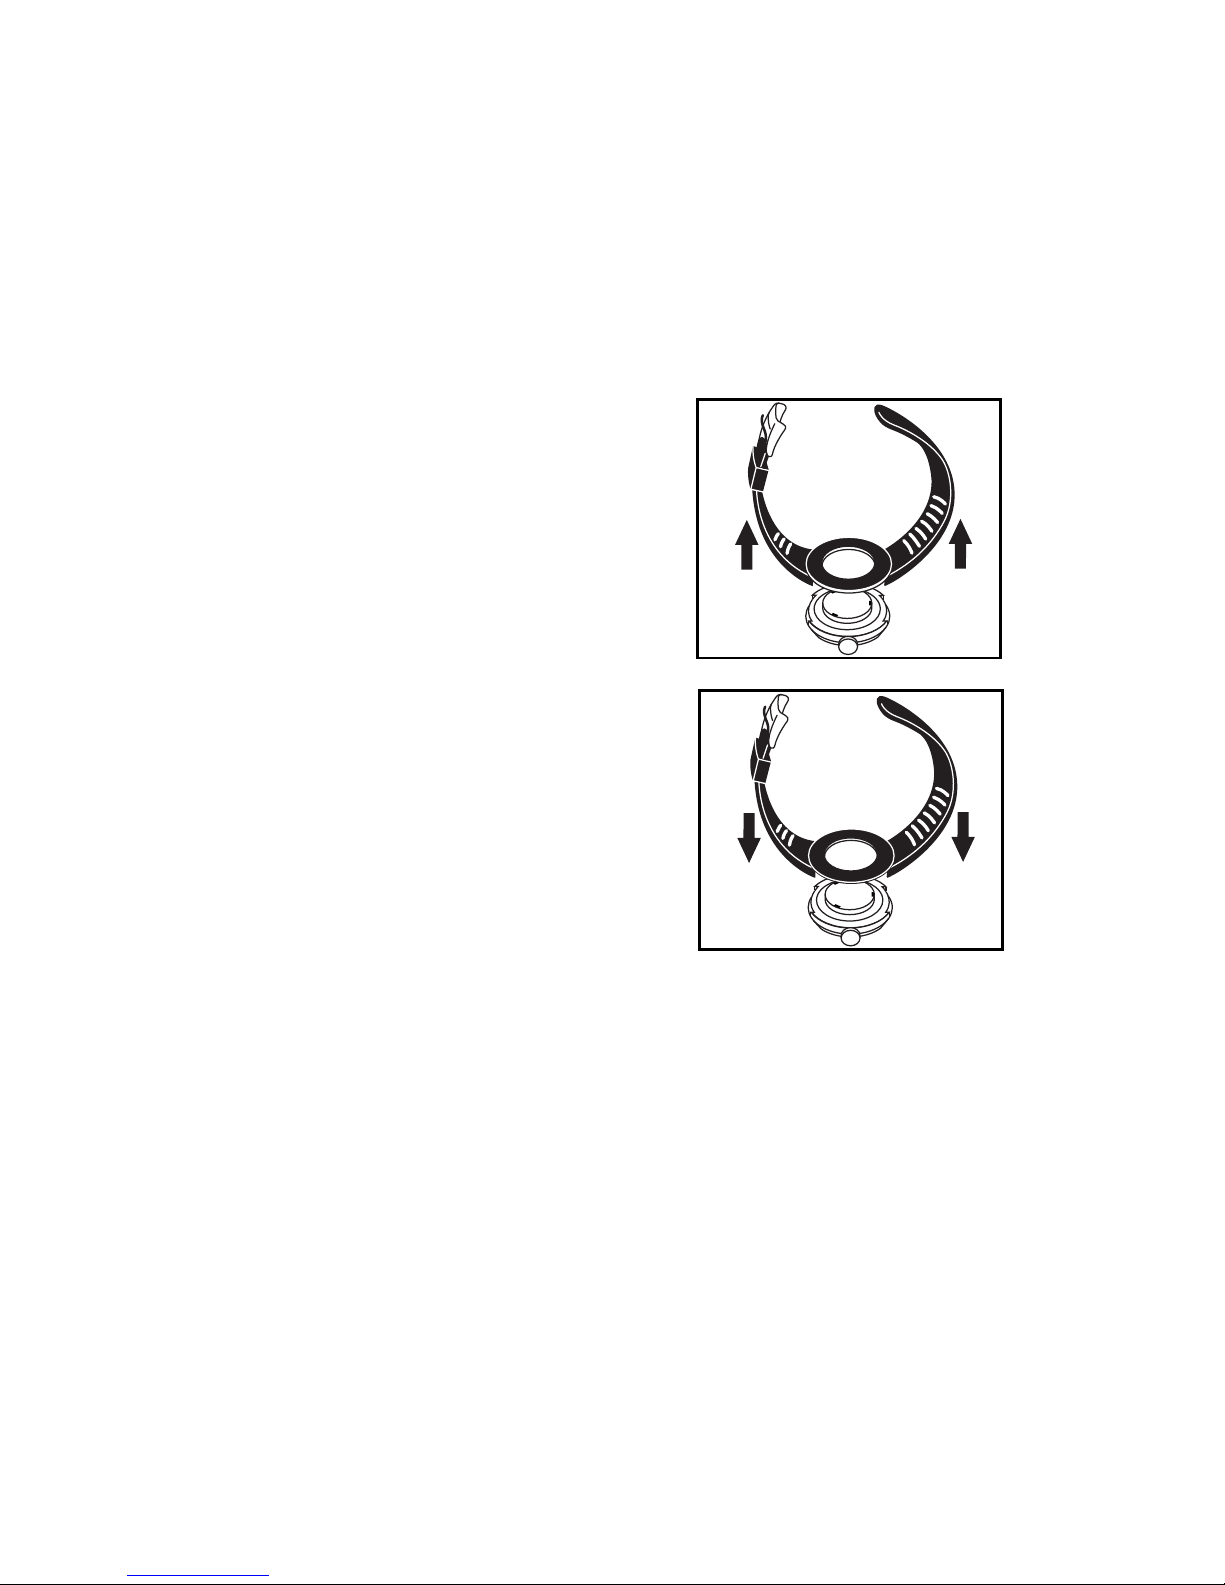
Step 4
Separate strap from watch back
by carefully lifting strap upward.
Step 5
Place alternate band onto watch
back, making sure that band is
securely seated. The band’s buckle
should be on the left side of the
watch with the crown facing you
(see illustration).
- 7 -
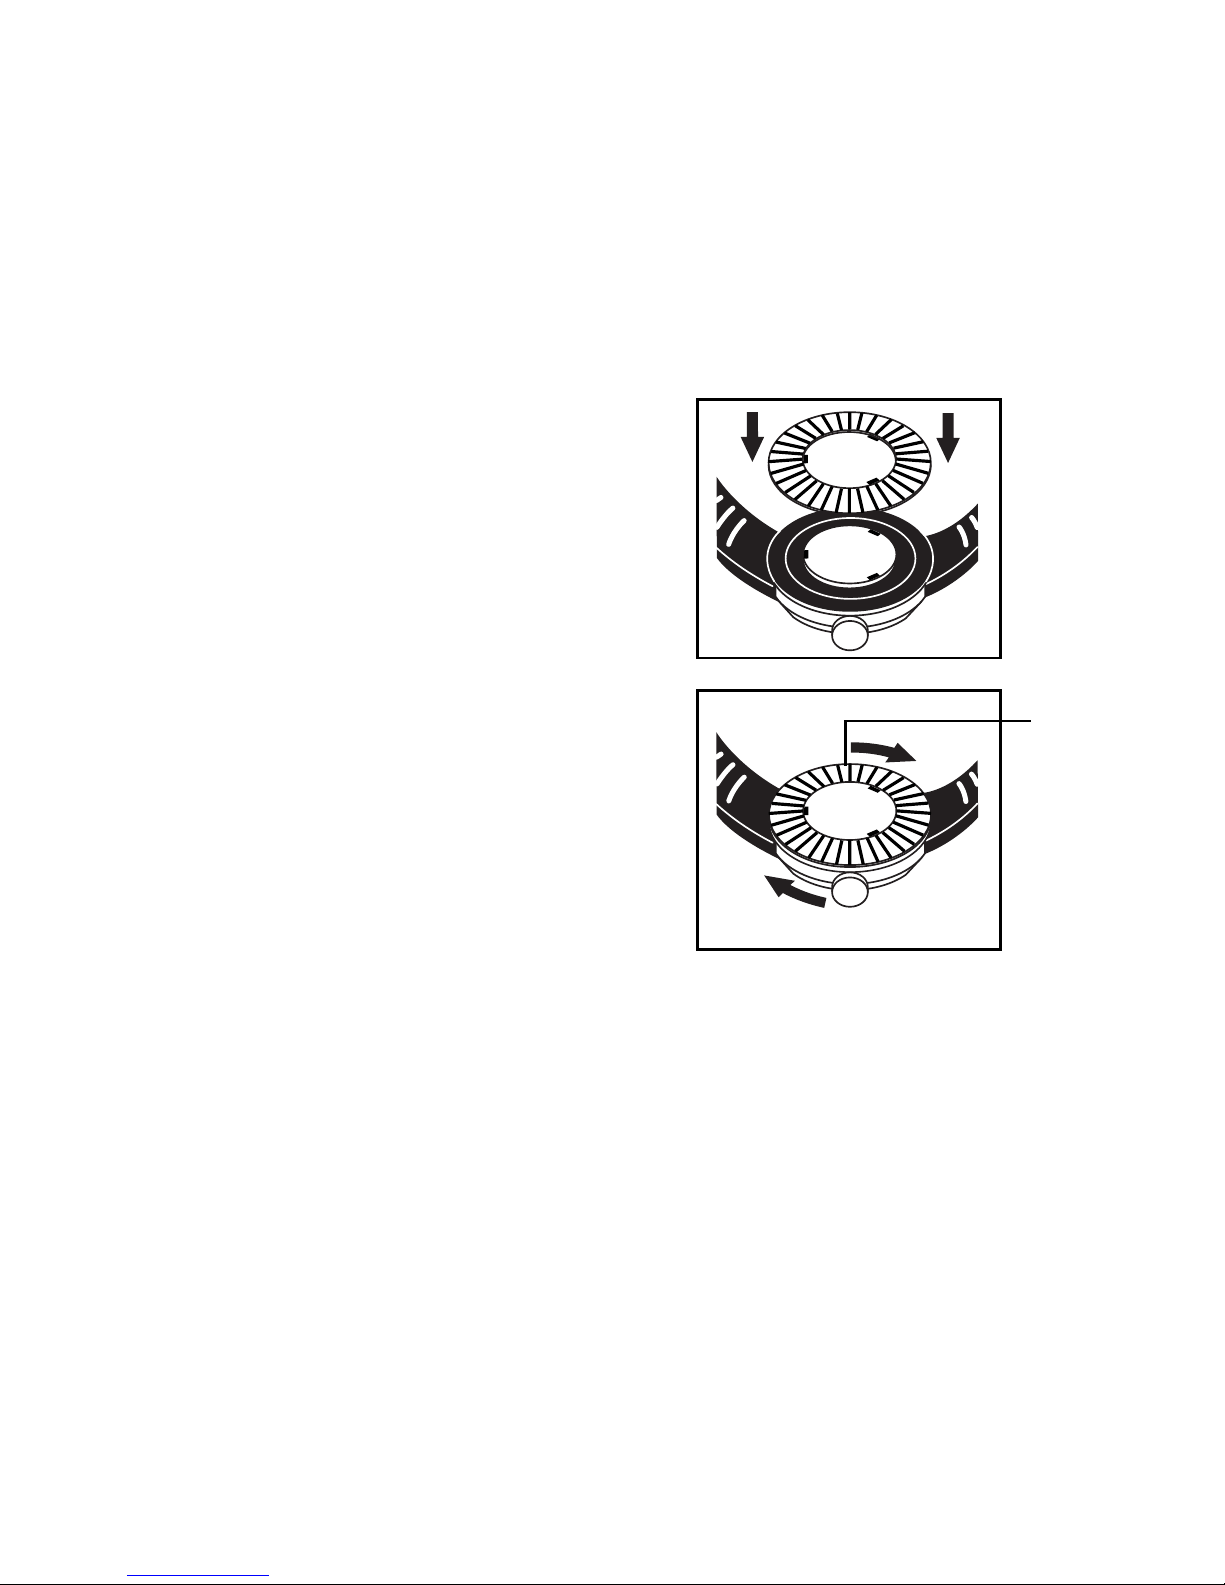
Step 6
Replace fluted ring by lining
up the three notches.
Step 7
Place thumb and forefinger on fluted
ring. Press down and turn clockwise
until fluted ring stops, locking strap
into place on watch back.
FLUTED
RING
▼
- 8 -
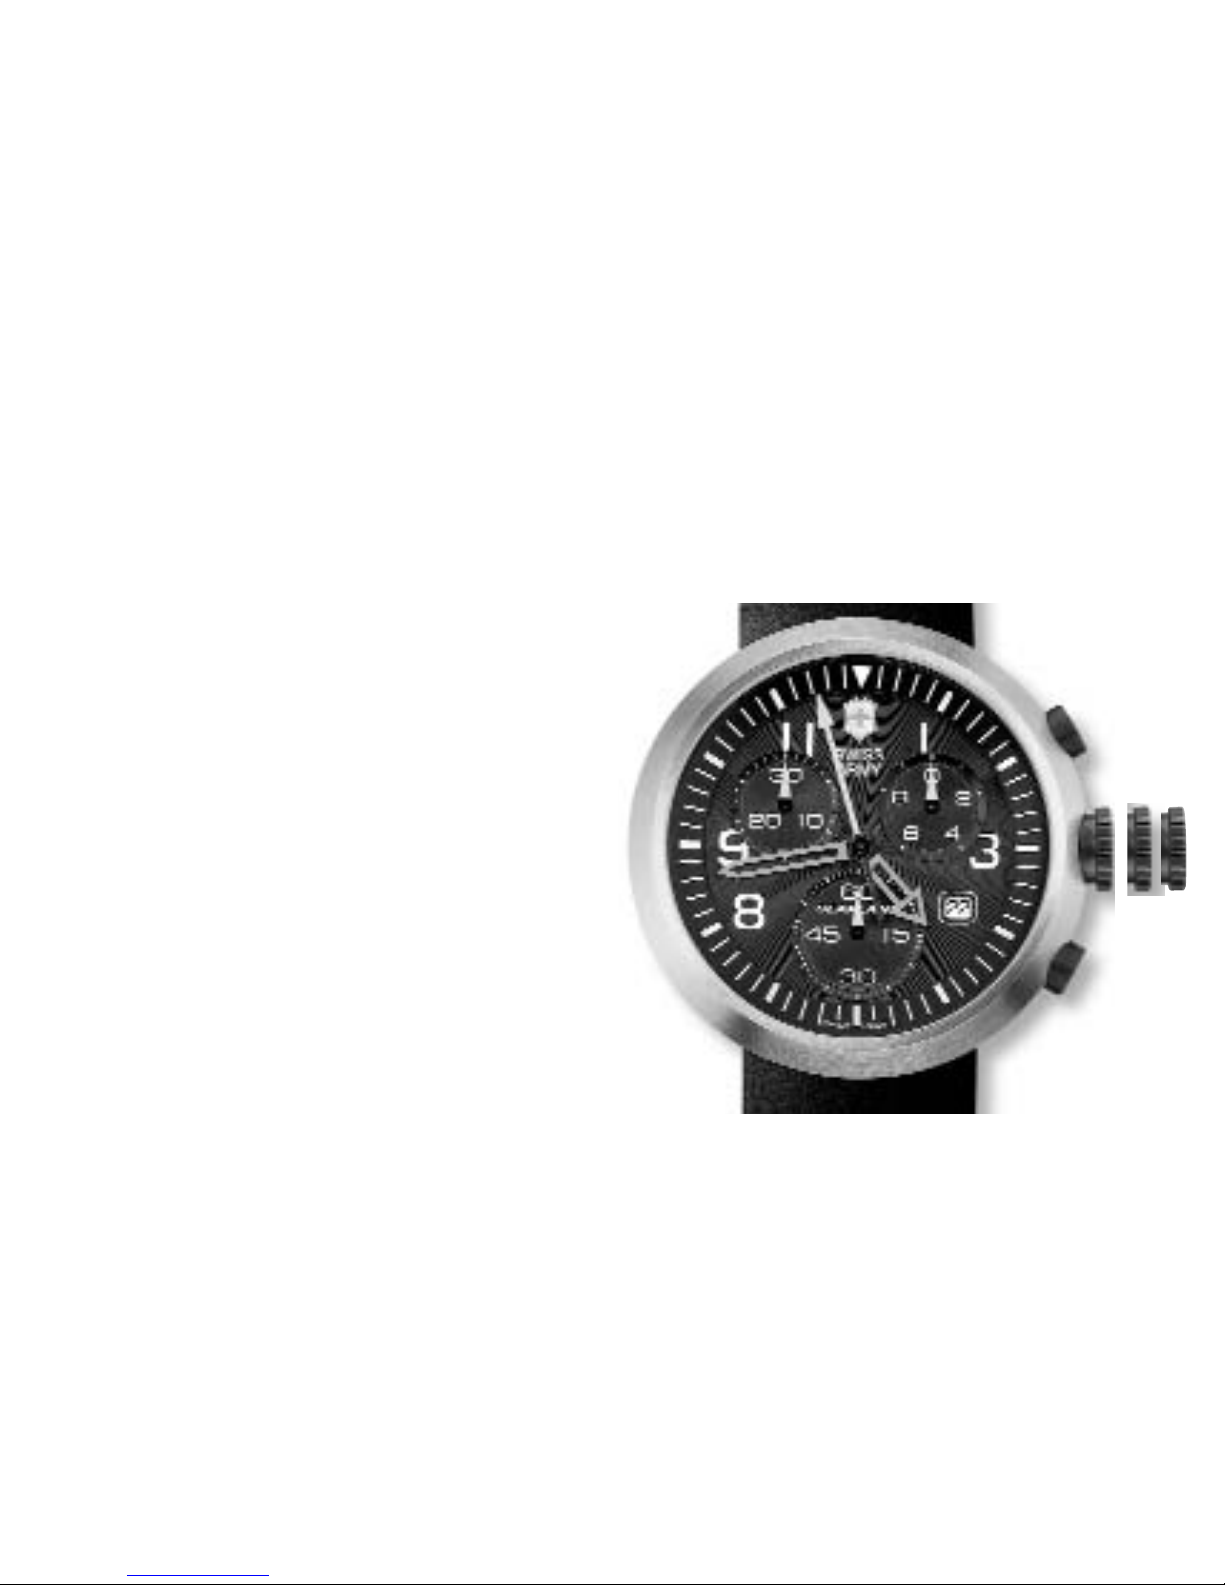
SEAPLANE CHRONOGRAPH
This chronograph movement features a 30-minute counter,
1
⁄10th second timer,
sweep second hand and date calendar. It enables short times to be measured to an accuracy of one tenth of a second in a 30- minute totalizer.
The crown C has three positions:
• Position 1: Neutral and winding
position (mechanical movement
only)
• Position 2: Correction of the date
• Position 3: Setting the time,
seconds stop
IMPORTANT: The SeaPlane
Chronograph is fitted with a
screw-down crown which must be
released before use. Turn crown
towards you to release. After use,
push the crown back to position 1,
then press and screw down the crown (to ensure a tight seal).
1 2 3

- 9 -
SETTING THE TIME
• Pull out the crown to position 3. The second hand now stops.
• Turn the crown to pre-position the hour and minute hands to the
desired time.
• Push the crown back into its normal position (1). The watch
will begin to run again instantly.
SETTING THE DATE
• Pull out the crown to position 2.
• Rotate the crown away from you advancing the hour hand until
the date showing is the day before the desired setting.
• Pull out the crown to position 3 and rotate away from you.
When midnight is reached, the date will advance to the desired
date. Continue to turn the crown until the desired time is set.
Remember, the date advances at 12:00 midnight, not 12:00 noon.
• Push in the crown, returning it to position 1. The date and time are now set.
NOTE: You must always push in and screw down the crown to form a
water resistant seal with the case. Never operate the crown when the
watch is wet.

- 10 -
CHRONOGRAPH FUNCTIONS
Start-Stop Function
A. Press Push-piece A once to start the timing operation; press again
to stop.
Restart Timing
A. Press Push-piece A again to restart timing.
Zero Reset
A. Once the timing operation has stopped, press Push-piece B.
The chronograph and totalizer hands will reset to zero.
Measurement of Partial Times (Addition Function)
A. Press Push-piece A again to restart timing. Further pressure on
Push-piece A will stop the timing operation. The chronograph will
indicate the final time.
B. Once the timing operation has been stopped, press Push-piece B.
The chronograph and totalizer hands will be reset to zero.

- 11 -
Measurement of Intermediate (Split) Times
A. Press Push-piece A to start timing.
B. Press Push-piece B to read off the first split time without interrupting
the measurement of the total time.
C. Press Push-piece B to continue timing. The chronograph will continue
its measurement by reverting the 1/10th hand to zero and “flying back”
the other hands to recover the elapsed time.
D. Press Push-piece B again to read the second split time.
E. Repeat this procedure until the action to be timed has been completed.
F. Press Push-piece A to stop timing.
G. Once the timing operation has been stopped, press Push-piece B.
The chronograph and totalizer hands will be reset to zero.
Measurement of Two Times at Very Short Intervals
A. This function enables two times separated by a very short interval
to be measured.
B. Press Push-piece A to start timing.
C. Press Push-piece B to stop the first time without interrupting
measurement of the second time.

- 12 -
D. Press Push-piece A to stop measurement of the second time.
E. The chronograph will indicate the first time.
F. Press Push-piece B to display the second time.
G. Press Push-piece B again. The chronograph and totalizer hands
will reset to zero.
WARNING: Do not activate the Push-pieces under water.
REINITIALIZING THE CHRONOGRAPH HANDS
Following an incorrect activate, violent impact or exposure to a strong
magnetic field, one of the chronograph counter hands may fail to
revert to its original position (zero). To reinitialize the hands, proceed
as follows:
Zero Reset of the Hour Counter Hand
A. Pull out the crown to position (2).
B. Press Push-piece A briefly until the hand reverts to the original
position (on 12).

- 13 -
ZERO RESET OF THE MINUTES COUNTER HAND
• Pull the crown out to position 2.
• Press Pusher B briefly until the hand reverts
to the original position.
ZERO RESET OF THE SECONDS COUNTER HAND
• Pull the crown out to position 3.
• Press Pusher A briefly until the hand reverts
to the original position.
ZERO RESET OF THE TENTHS OF A SECOND COUNTER HAND
• Pull the crown out to position 3.
• Press Pusher B briefly until the hand reverts
to the original position.
NOTE: You must always push in and screw down the crown to form a
water resistant seal with the case. Never operate the crown when the
watch is wet.
- 14 -
1 2 3
IMPORTANT:
The SeaPlane XL
Mechanical is fitted
with a screw-down
crown which must
be released before
use. Turn crown
towards you to
release. After use,
push the crown
back to position 1,
then press and
screw down the
crown (to ensure
a tight seal).
SEAPLANE XL MECHANICAL (MANUAL WINDING)

- 15 -
Manual Winding
• Leaving the crown in position 1, wind the watch by turning it away
from you until fully wound (approximately 20 times). Do not overwind.
The watch will run continuously for approximately 56 hours.
NOTE: This operation should be done consistently every day at
the same time (for example, every morning or evening).
Setting the Time
• Pull out the crown to the fully extended position and rotate toward
you until the desired time is set.
• Push the crown back in to its normal position. The time is now set.
NOTE: You must always push in and screw down the crown to form a
water resistant seal with the case. Never operate the crown when the
watch is wet.

- 16 -
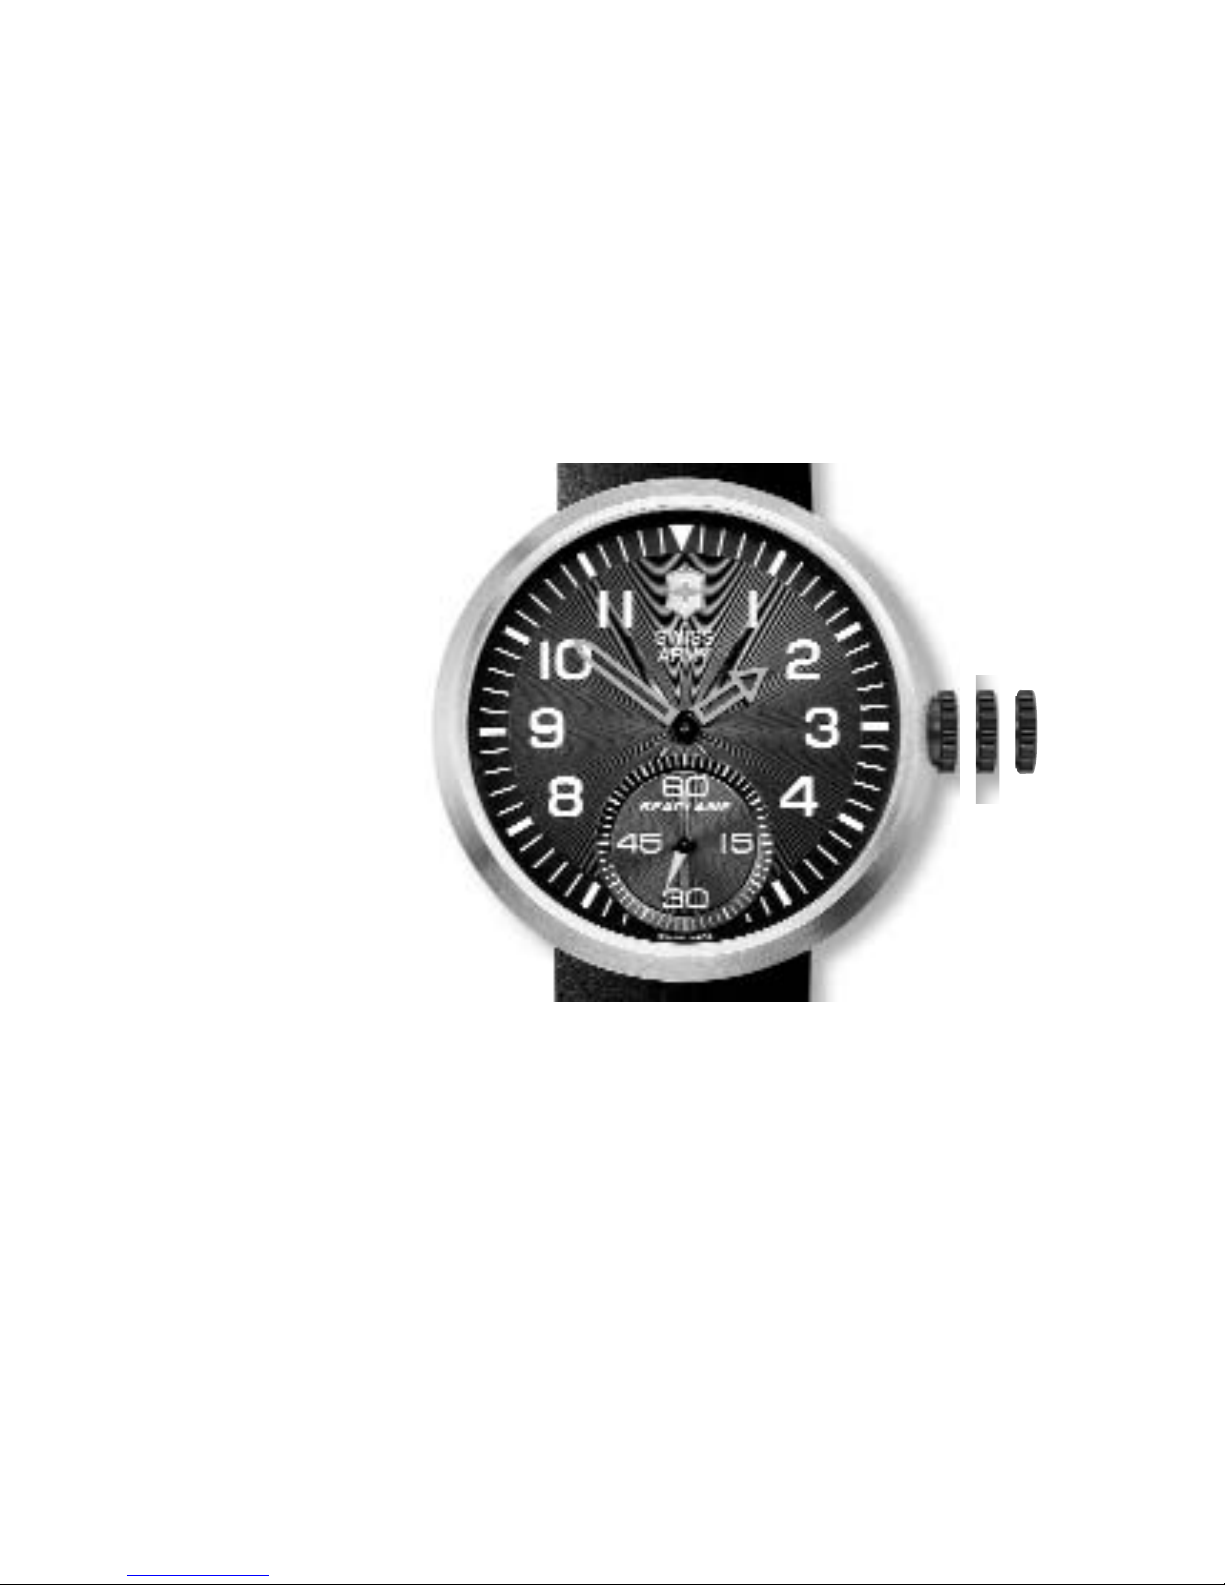
FA-18 MECHANICAL CHRONOGRAPH
(SELF-WINDING MECHANICAL WATCH)
IMPORTANT: Each FA-18 watch is fitted with a screw-down crown which
must be released before use. Turn crown towards you to release. After
use, push the crown back to position 1, then press and screw down the
crown (to ensure a tight seal).
Winding
Your watch is wound automatically when you wear it on your wrist. If the
watch is not worn often enough, the movement will have to be wound manually by turning the crown at least twenty times in position 1.
Setting the Time
• Wind the movement if necessary.
• Unscrew the crown by turning it toward you. Then pull out the crown
into position 3. The seconds hand will stop.
• Make sure that the position of the hands corresponds to a change of date
at midnight and not at noon.

- 17 -
• Turn the crown to pre-position the hands on the desired time.
• Push the crown back down firmly against the case in position 1,
the watch will begin to run again instantly.
NOTE: For precise time setting, it is advisable to pass the desired minute,
then turn the crown counterclockwise to position the minute hand on the
relevant mark.
SETTING THE DAY/DATE
• First turn the crown (in position 1) away from you approximately ten
times to activate the automatic movement. The sweep second hand will
be moving.
• Pull the crown out into position 3 (completely out). Set the correct time
by moving the hands clockwise. When you reach 12 PM, the calendar
date will jump and then set the correct time. Push the crown back to
position 1.
• Set the crown in position 2 (intermediate position). Adjust the date by
turning the crown away from you. Turn the crown toward you to adjust
the day setting (select the appropriate language). Then set the crown
back to position 1 and your watch is adjusted.

- 18 -
The chronograph movement indicates the hours, minutes, seconds and
date and enables short times to be measured to an accuracy of 1/5th of
a second in a 12 hour period.
The crown C has three positions:
• Position 1: Neutral and winding position
• Position 2: Correction of the date
• Position 3: Setting the time, seconds stop
NOTE: You must always push in and screw down the crown to form a
water resistant seal with the case. Never operate the crown when the
watch is wet.
- 19 -
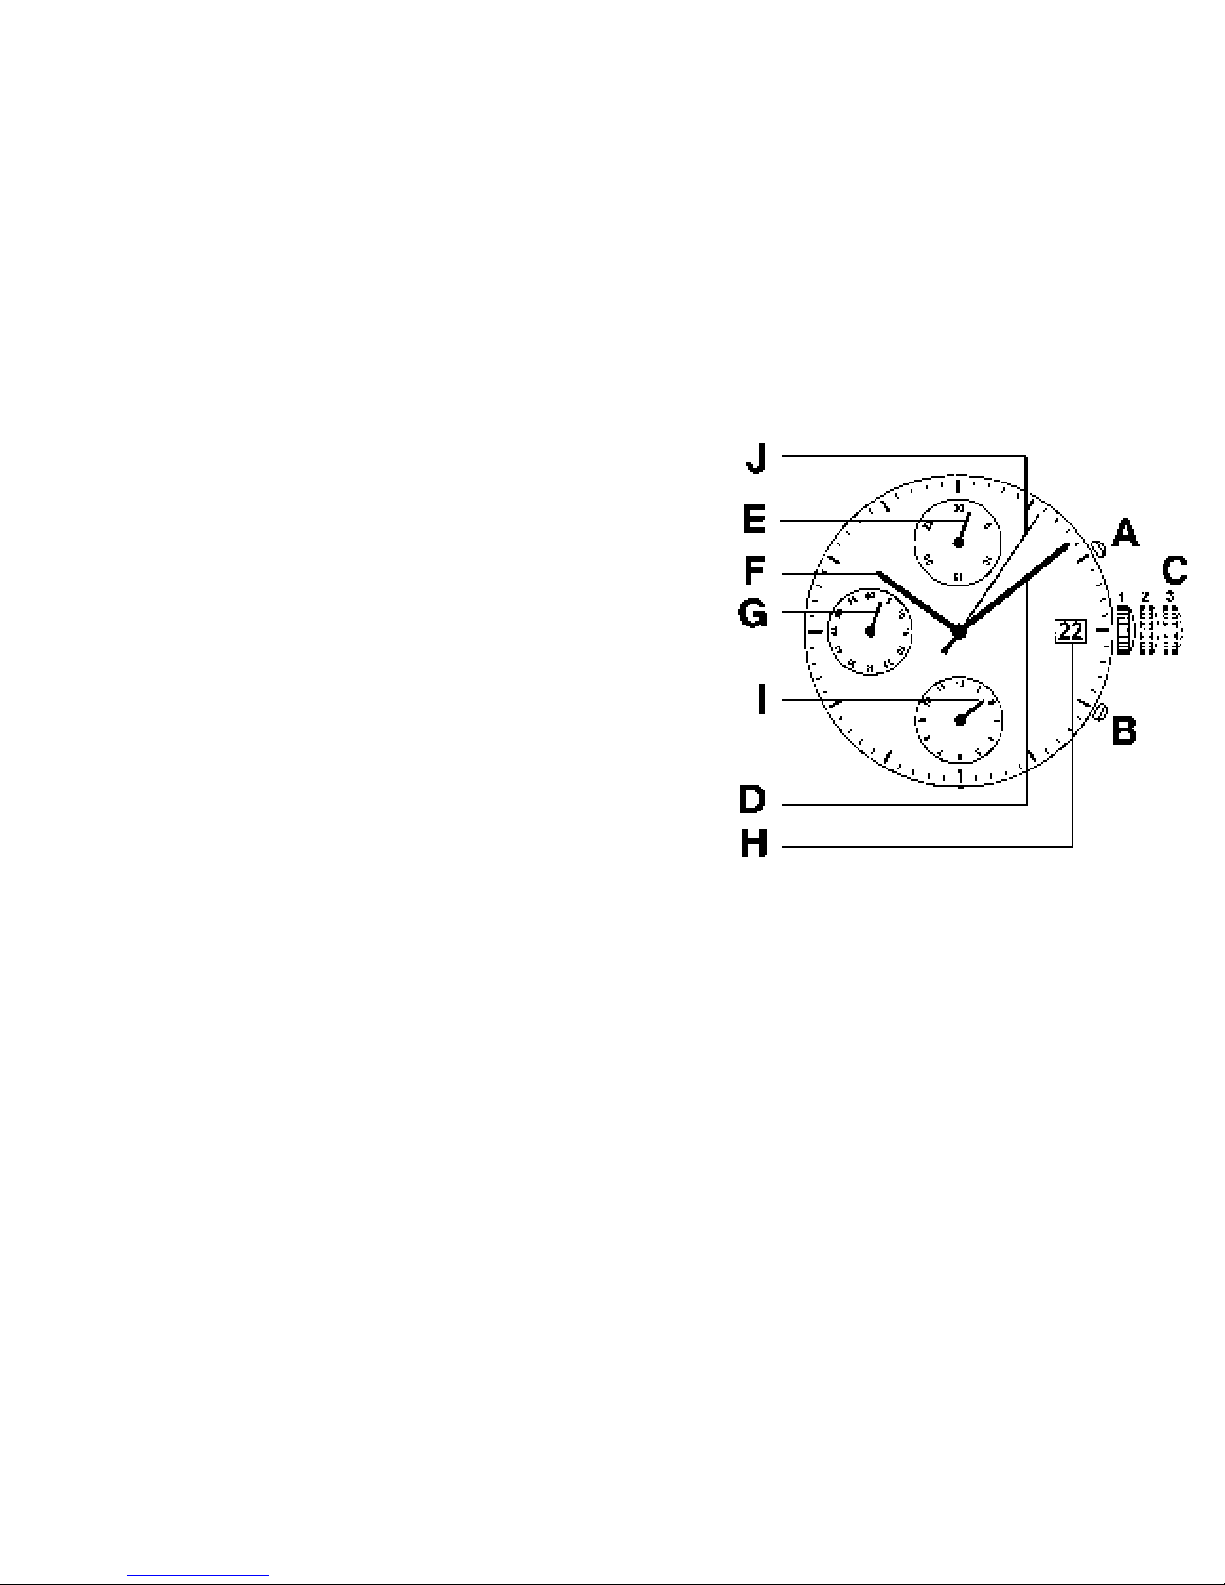
Push-pieces
• Push-piece A: Chronograph start/stop
• Push-piece B: Intermediate times
Chronograph zero reset
Watch Indications
F Hours
D Minutes
G Seconds
H Date
Chronograph Indications
I 12-hour counter
E 30-minute counter
J 60-second counter

- 20 -
CHRONOGRAPH FUNCTIONS
Start-Stop Function
A. Press Push-piece A once to start the timing operation; press again
to stop.
Restart Timing
A. Press Push-piece A again to restart timing.
Zero Reset
A. Once the timing operation has stopped, press Push-piece B.
The chronograph and totalizer hands will reset to zero.
Measurement of Partial Times (Addition Function)
A. Press Push-piece A again to restart timing. Further pressure on
Push-piece A will stop the timing operation. The chronograph will
indicate the final time.
B. Once the timing operation has been stopped, press Push-piece B.
The chronograph and totalizer hands will be reset to zero.

Measurement of Intermediate (Split) Times
A. Press Push-piece A to start timing.
B. Press Push-piece B to read off the first split time without interrupting
the measurement of the total time.
C. Press Push-piece B to continue timing. The chronograph will continue
its measurement by reverting the 1/10th hand to zero and “flying back”
the other hands to recover the elapsed time.
D. Press Push-piece B again to read the second split time.
E. Repeat this procedure until the action to be timed has been completed.
F. Press Push-piece A to stop timing.
G. Once the timing operation has been stopped, press Push-piece B.
The chronograph and totalizer hands will be reset to zero.
Measurement of Two Times at Very Short Intervals
A. This function enables two times separated by a very short interval
to be measured.
B. Press Push-piece A to start timing.
C. Press Push-piece B to stop the first time without interrupting
measurement of the second time.
- 21 -

- 22 -
D. Press Push-piece A to stop measurement of the second time.
E. The chronograph will indicate the first time.
F. Press Push-piece B to display the second time.
G. Press Push-piece B again. The chronograph and totalizer hands
will reset to zero.
WARNING: Do not activate the Push-pieces under water.
REINITIALIZING THE CHRONOGRAPH HANDS
Following an incorrect activate, violent impact or exposure to a strong
magnetic field, one or the other of the chronograph counter hands
may fail to revert to its original position (zero). To reinitialize the hands,
proceed as follows:
Zero Reset of the Hour Counter Hand
A. Pull out the crown to position (2).
B. Press Push-piece A briefly until the hand reverts to the original
position (on 12).

- 23 -
Zero Reset of the Minute Counter Hand
A. Pull out the crown to position (2).
B. Press Push-piece B briefly until the hand reverts to the original
position (at noon.)
Zero Reset of the Seconds Counter Hand
A. Pull out the crown to position (3).
B. Press Push-piece A briefly until the hand reverts to the original
position (on 60).
Zero Reset of the 1/10th Second Counter
A. Pull out the crown to position 3.
B. Press Push-piece B briefly until the hand reverts to the original
position (on 0).
C. Push the crown back down firmly against the case to position (1).
NOTE: You must always push in and screw down the crown to form a
water resistant seal with the case. Never operate the crown when the
watch is wet.

- 24 -
USING THE VISUAL COUNTDOWN (AIRBOSS MACH 2 - 3 - 4)
*See diagram on page 26
To determine if you have the visual countdown feature, look at the
watch dial. You will see an inner bezel. If it has a yellow triangle with
numbers counting down clockwise from 60, you have the visual
countdown feature. The bi-directional visual countdown is easy to use:
A. When rotating the visual countdown turner, simply align minutes
on the inner bezel to be counted down with the minute hand
(i.e. 20 minutes).
B. When the minute hand reaches the yellow triangle (0 minutes),
20 minutes will have been counted down.
C. The countdown feature works for a duration between
60 minutes and one minute.
 Loading...