

Victorinox SWISS AIR FORCE THREE HAND, SWISS AIR FORCE FA-18, SWISS AIR FORCE AirBoss Mach 2, SWISS AIR FORCE AirBoss Mach 3, SWISS AIR FORCE AirBoss Mach 4 User Manual
...Page 1

SWISS AIR FORCE
Page 2

In 1897 the Original Swiss Army™Knife was created in the small village of Ibach,
Switzerland. Since that time, Victorinox®has become known in more than
100 countries for precision, quality, functionality and versatility.
This century old heritage has been extended to Swiss Army Watches and Timepieces.
Each reflects the ingenious design and outstanding durability we’ve come to stand
for over the years. Uncompromising craftsmanship makes these watches worthy
to carry the cross and shield emblem that symbolizes the legend of Victorinox and
the Swiss Army Brand.
Whether you’re going around the corner or around the globe, this specially designed
Swiss Air Force Watch—its choice of materials and technology—will make sure that
you’re equipped for life’s adventures. No matter what those adventures might be.
QUALITY FEATURES—SWISS AIR FORCE WATCHES
Made in Switzerland.
Precision Swiss Movements.
Individually tested for water resistance of 100M (330 feet) or greater .
Solid stainless steel cases and/or bracelets on most models.
Scratch-resistant sapphire and anti-reflective crystals on most models.
Swiss Army Brand Watches are covered by a three-year limited warranty. Only our
watches are authorized by the Swiss government to carry the name “Swiss Army.”
Page 3

- 1 -
TABLE OF CONTENTS
Three Hand Analog Quartz. . . . . . . . . . . . . . . . . . . . . . . . . . . . . . . . . . . . . . 2
SeaPlane Strap Replacement System . . . . . . . . . . . . . . . . . . . . . . . . . . . . 5
SeaPlane Chronograph . . . . . . . . . . . . . . . . . . . . . . . . . . . . . . . . . . . . . . . . . 8
SeaPlane XL Mechanical. . . . . . . . . . . . . . . . . . . . . . . . . . . . . . . . . . . . . . . 14
FA-18 Mechanical Chronographs . . . . . . . . . . . . . . . . . . . . . . . . . . . . . . . 16
AirBoss Mach 2/3/4 – Using the Visual Countdown . . . . . . . . . . . . . . . . 25
AirBoss Mach 2 – Mechanical Self-Winding . . . . . . . . . . . . . . . . . . . . . . 27
AirBoss Mach 3 – Quartz Chronograph . . . . . . . . . . . . . . . . . . . . . . . . . . 29
AirBoss Mach 4 – Mechanical Manual Winding . . . . . . . . . . . . . . . . . . 35
AirBoss Mach 5 GMT – Mechanical Self-Winding . . . . . . . . . . . . . . . . . xx
AirBoss Mach 6 – Mechanical Self-Winding . . . . . . . . . . . . . . . . . . . . . . xx
Hunter Mach 2 Flyback Analog Chronograph. . . . . . . . . . . . . . . . . . . . 36
Hunter Mach 3 Analog/Digital Chronograph . . . . . . . . . . . . . . . . . . . . . 48
Tachymeter . . . . . . . . . . . . . . . . . . . . . . . . . . . . . . . . . . . . . . . . . . . . . . . . . . . xx
Battery . . . . . . . . . . . . . . . . . . . . . . . . . . . . . . . . . . . . . . . . . . . . . . . . . . . . . . . 74
Warranty . . . . . . . . . . . . . . . . . . . . . . . . . . . . . . . . . . . . . . . . . . . . . . . . . . . . . 75
Page 4
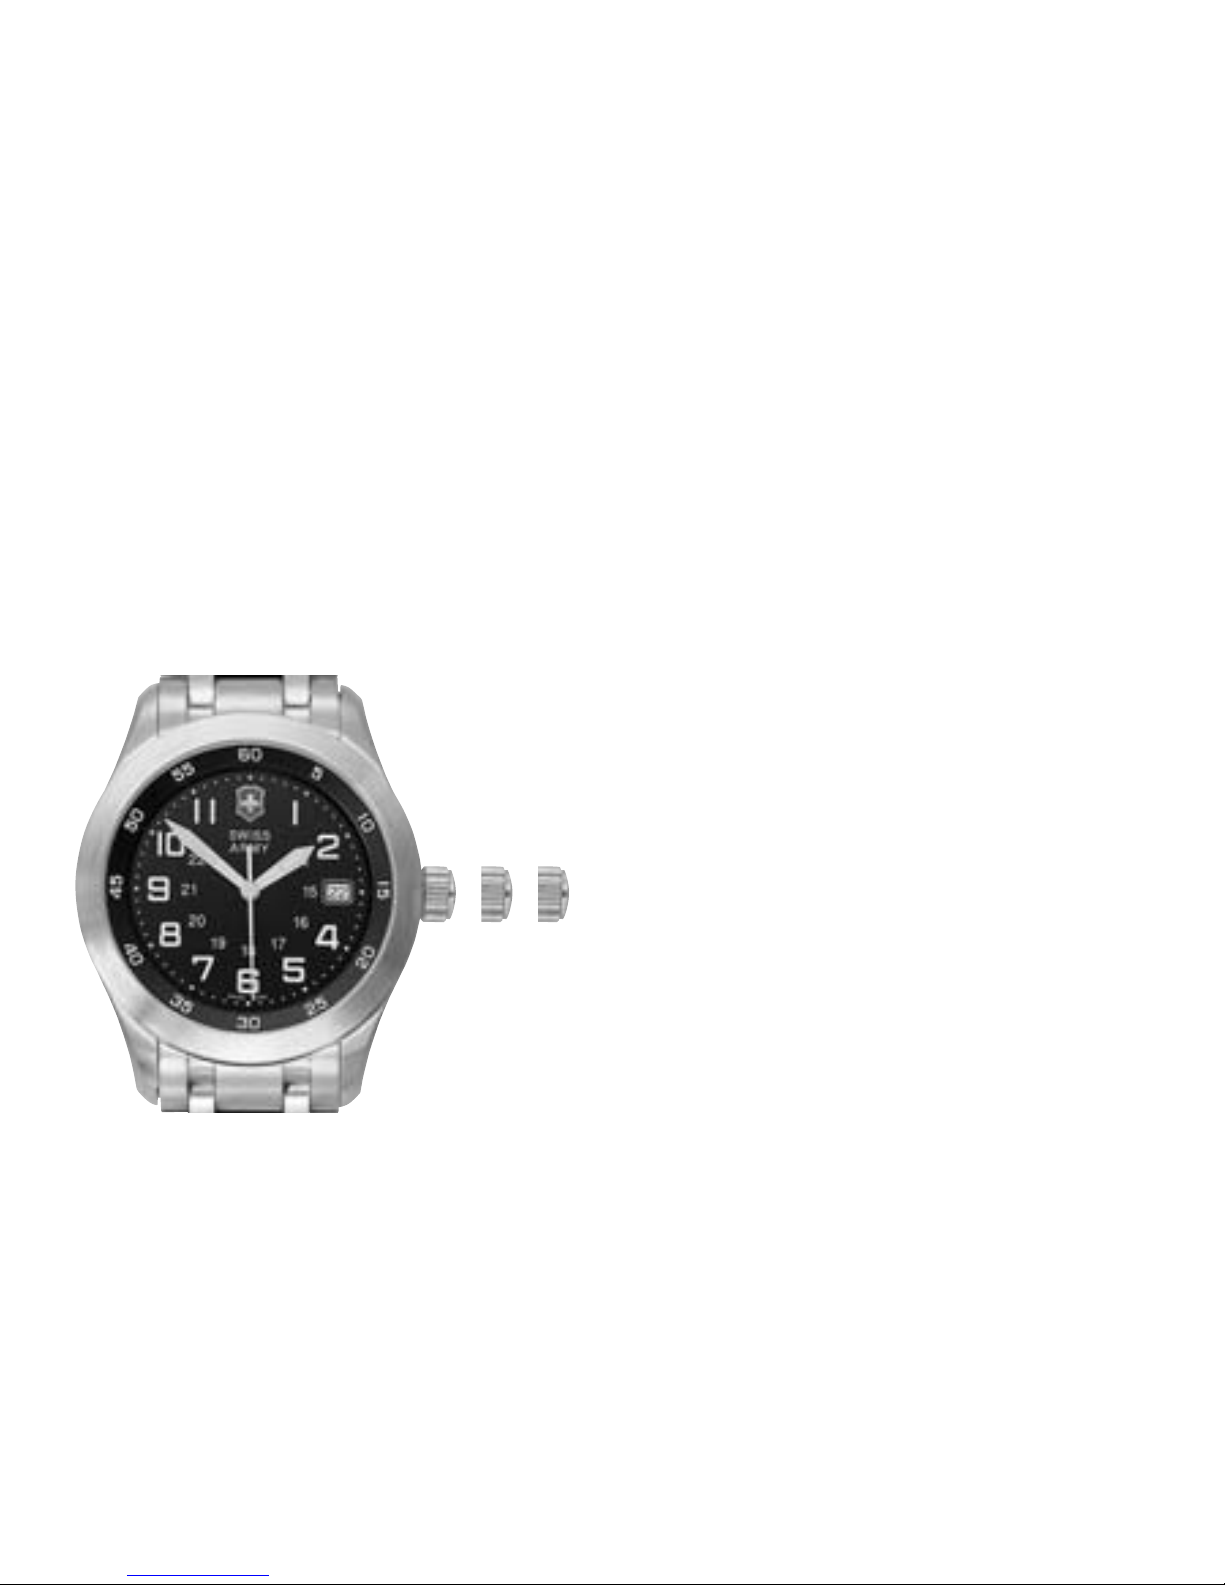
THREE HAND ANALOG QUARTZ
The crown (C) has three positions:
• Position 1: Running position (neutral).
• Position 2: Quick correction of the date.
• Position 3: Time setting, interruption of circuit for motor
(in case of long term storage-to conserve battery life).
- 2 -
THREE HAND ANALOG QUARTZ
The crown (C) has three positions:
• Position 1: Running position (neutral).
• Position 2: Quick correction of the date.
• Position 3: Time setting, interruption of circuit for motor
(in case of long term storage-to conserve battery life).
(Image illustrates positions 1, 2, & 3 only.
See specific instructions for your watch model).
12 3
C
Page 5

- 3 -
SETTING THE DATE & TIMEPull-Out Crown (AirBoss Mach 1 & 2)
A. Pull out the crown to position (2).
B. Rotate the crown away from you until the date showing is the
day before the desired setting.
C. Pull out the crown to position (3) and rotate toward you. When
midnight is reached, the date will advance to the desired date.
Continue to turn the crown until the desired time is set. Remember,
the date advances at 12:00 midnight, not 12:00 noon.
D. Push in the crown, returning it to position (1). The date and time
are now set.
To Set Time Alone
Refer to instructions “C”.
NOTE: Gently pull on crown to determine if your crown is a
screw-down or pull out.
Page 6

- 4 -
SETTING THE DATE & TIME - Screw Down Crown (SeaPlane, FA-18,
and Hunter watches)
A. Using the thumb and forefinger, apply mild pressure on crown while
rotating toward you until crown releases.
B. Pull out crown to position (2). Turn the crown away from you
until the date showing is the day before the desired setting.
C. Pull out the crown to the fully extended position (3) and rotate toward
you. When midnight is reached, the date will advance
to the desired date. Continue to turn the crown until the desired time
is set. Remember, the date advances at 12:00 midnight,
not 12:00 noon.
D. After setting, push in the crown then press and screw down away
from you until it is sealed tight into position (1). The date and time
are now set.
To Set Time Alone
Release crown (refer to “A’) and then follow instruction “D”.
Page 7
- 5 -
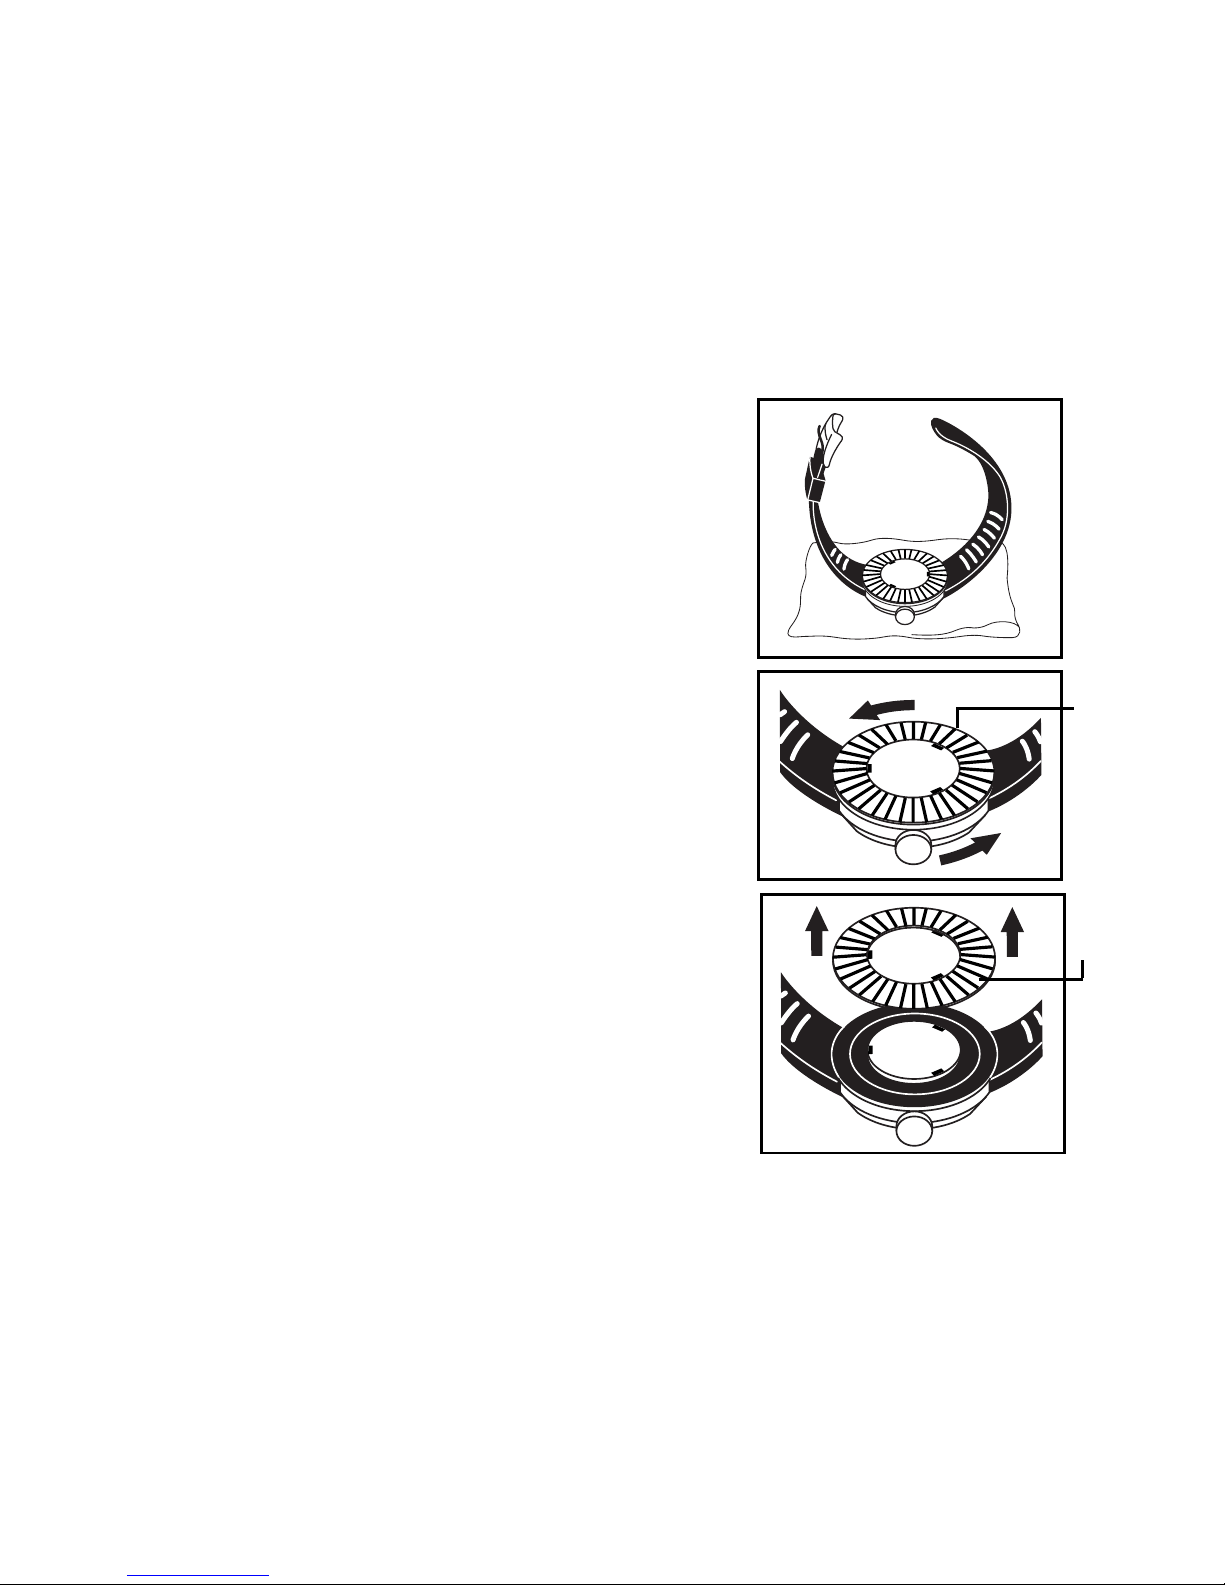
SEAPLANE CHANGING STRAPS
Step 1
Place watch face crystal-side down
on a soft cushion surface.
Step 2
Place thumb and forefinger on
the fluted ring. Press down and
turn counter-clockwise until fluted
ring stops.
Step 3
Lift off fluted ring and place to the
side, exposing strap below.
FLUTED
RING
FLUTED
RING
▼
▼
Page 8
- 6 -
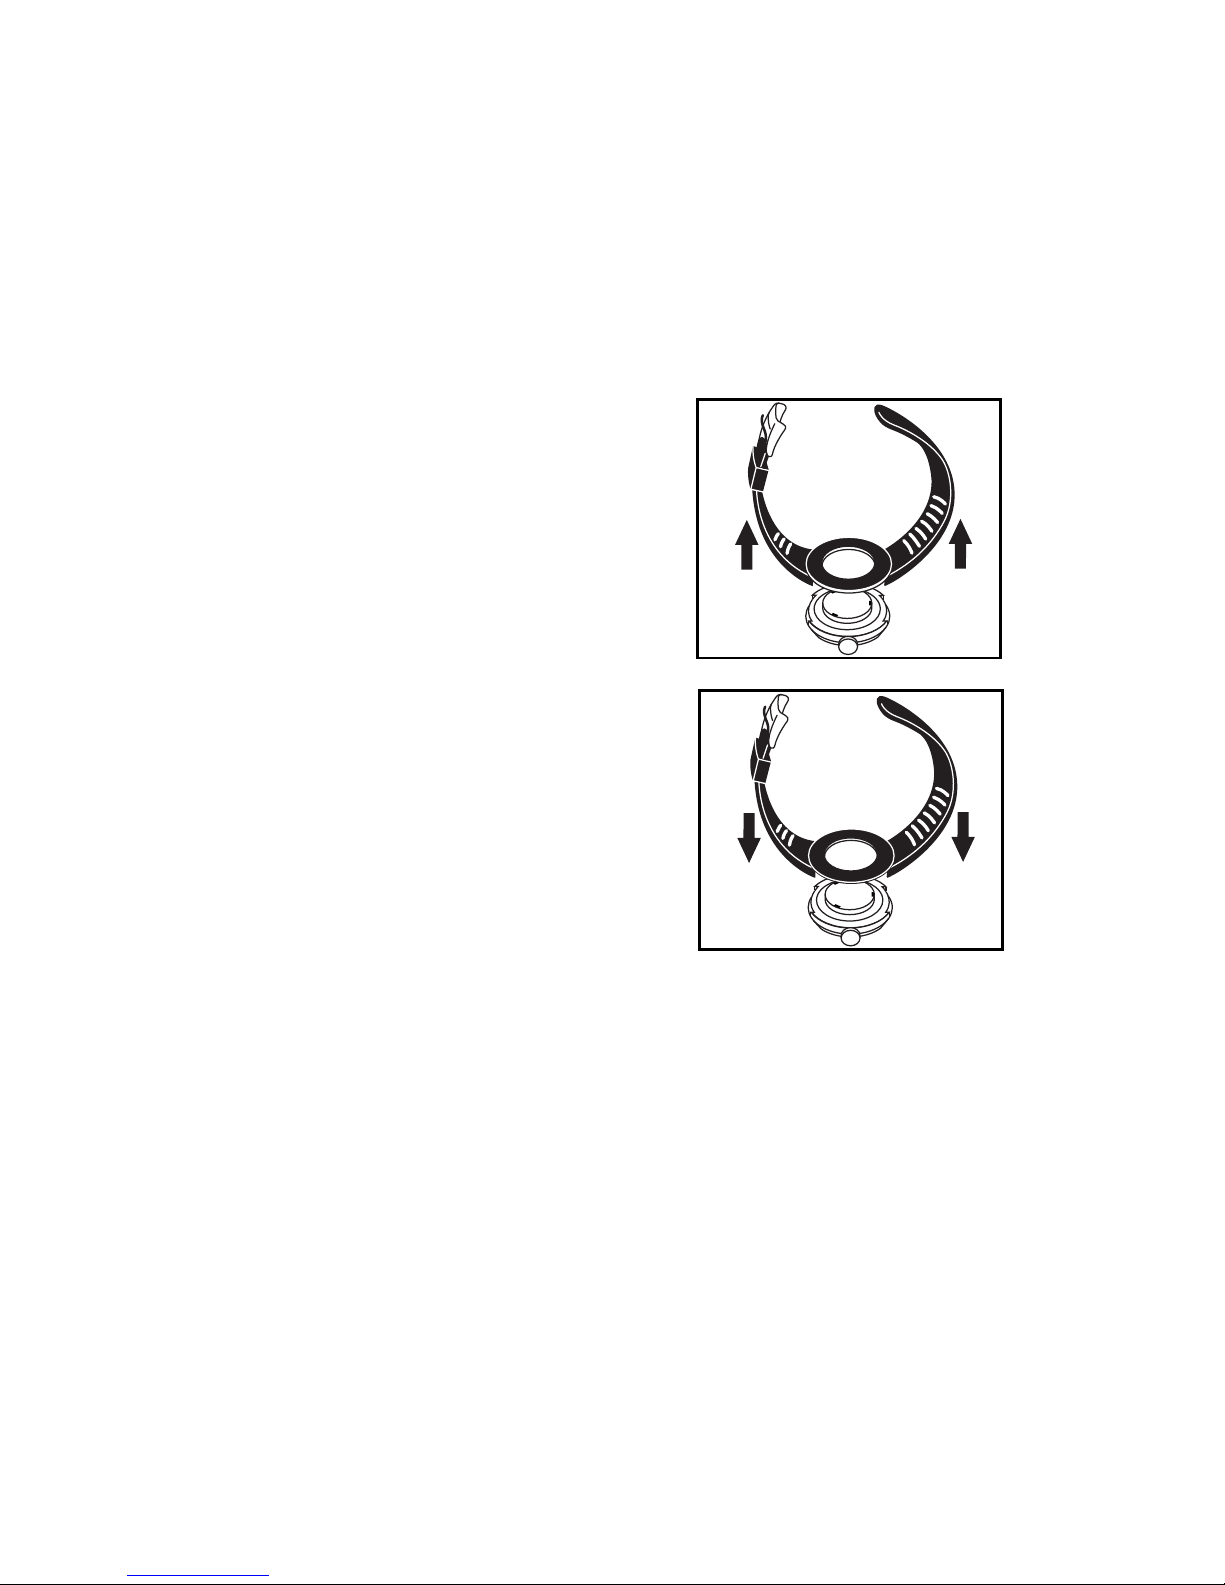
Step 4
Separate strap from watch back
by carefully lifting strap upward.
Step 5
Place alternate band onto watch
back, making sure that band is
securely seated. The band’s buckle
should be on the left side of the
watch with the crown facing you
(see illustration).
Page 9
- 7 -
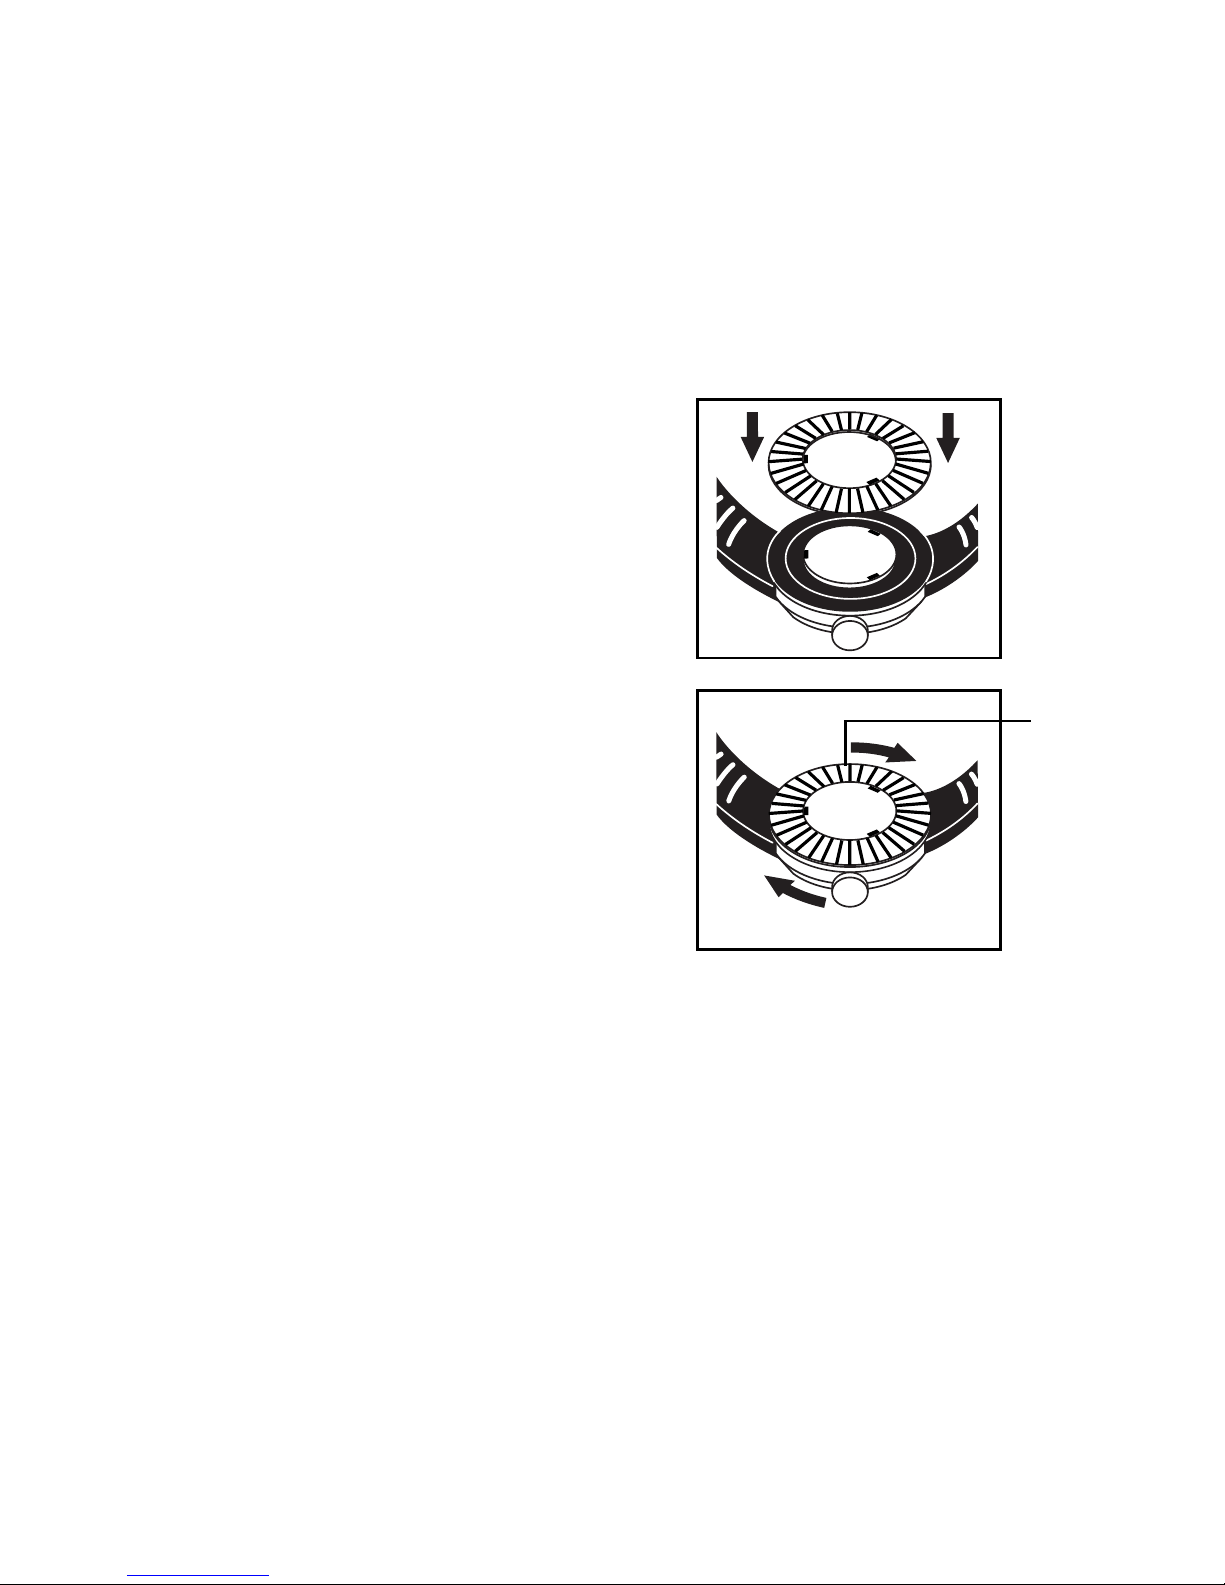
Step 6
Replace fluted ring by lining
up the three notches.
Step 7
Place thumb and forefinger on fluted
ring. Press down and turn clockwise
until fluted ring stops, locking strap
into place on watch back.
FLUTED
RING
▼
Page 10
- 8 -
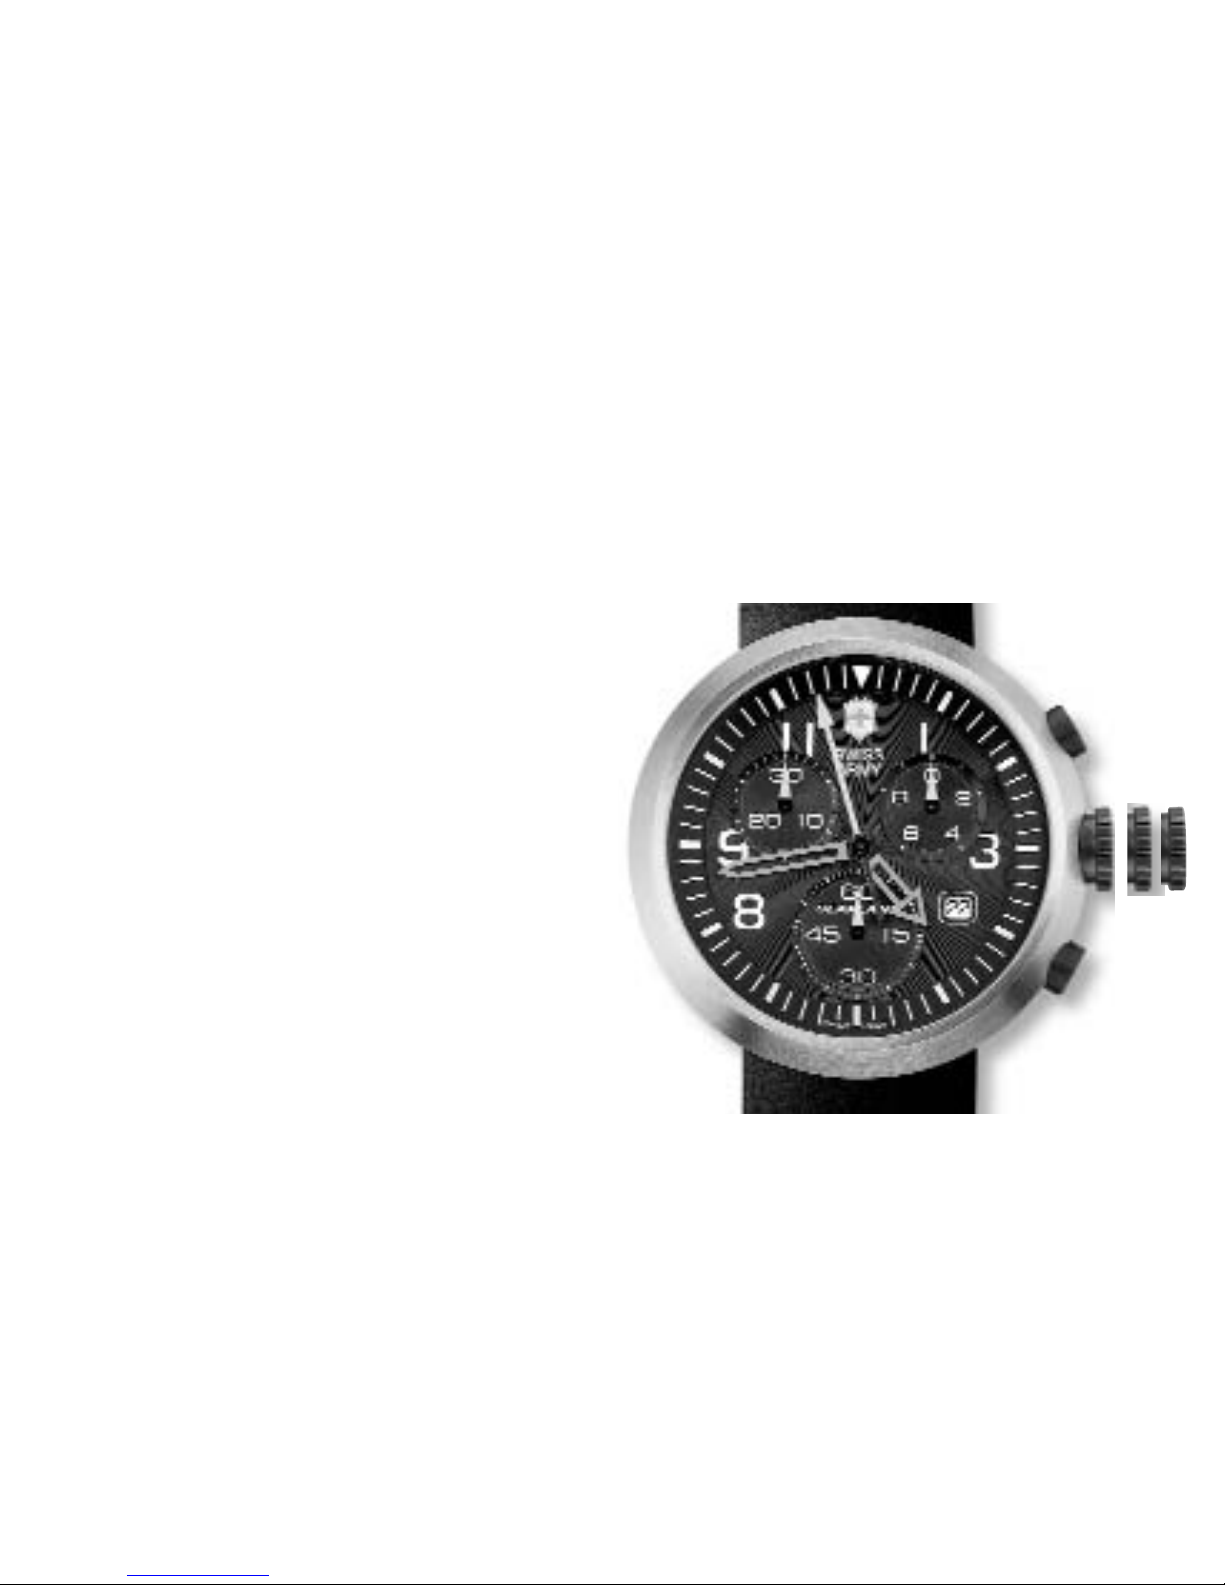
SEAPLANE CHRONOGRAPH
This chronograph movement features a 30-minute counter,
1
⁄10th second timer,
sweep second hand and date calendar. It enables short times to be measured to an accuracy of one tenth of a second in a 30- minute totalizer.
The crown C has three positions:
• Position 1: Neutral and winding
position (mechanical movement
only)
• Position 2: Correction of the date
• Position 3: Setting the time,
seconds stop
IMPORTANT: The SeaPlane
Chronograph is fitted with a
screw-down crown which must be
released before use. Turn crown
towards you to release. After use,
push the crown back to position 1,
then press and screw down the crown (to ensure a tight seal).
1 2 3
Page 11

- 9 -
SETTING THE TIME
• Pull out the crown to position 3. The second hand now stops.
• Turn the crown to pre-position the hour and minute hands to the
desired time.
• Push the crown back into its normal position (1). The watch
will begin to run again instantly.
SETTING THE DATE
• Pull out the crown to position 2.
• Rotate the crown away from you advancing the hour hand until
the date showing is the day before the desired setting.
• Pull out the crown to position 3 and rotate away from you.
When midnight is reached, the date will advance to the desired
date. Continue to turn the crown until the desired time is set.
Remember, the date advances at 12:00 midnight, not 12:00 noon.
• Push in the crown, returning it to position 1. The date and time are now set.
NOTE: You must always push in and screw down the crown to form a
water resistant seal with the case. Never operate the crown when the
watch is wet.
Page 12

- 10 -
CHRONOGRAPH FUNCTIONS
Start-Stop Function
A. Press Push-piece A once to start the timing operation; press again
to stop.
Restart Timing
A. Press Push-piece A again to restart timing.
Zero Reset
A. Once the timing operation has stopped, press Push-piece B.
The chronograph and totalizer hands will reset to zero.
Measurement of Partial Times (Addition Function)
A. Press Push-piece A again to restart timing. Further pressure on
Push-piece A will stop the timing operation. The chronograph will
indicate the final time.
B. Once the timing operation has been stopped, press Push-piece B.
The chronograph and totalizer hands will be reset to zero.
Page 13

- 11 -
Measurement of Intermediate (Split) Times
A. Press Push-piece A to start timing.
B. Press Push-piece B to read off the first split time without interrupting
the measurement of the total time.
C. Press Push-piece B to continue timing. The chronograph will continue
its measurement by reverting the 1/10th hand to zero and “flying back”
the other hands to recover the elapsed time.
D. Press Push-piece B again to read the second split time.
E. Repeat this procedure until the action to be timed has been completed.
F. Press Push-piece A to stop timing.
G. Once the timing operation has been stopped, press Push-piece B.
The chronograph and totalizer hands will be reset to zero.
Measurement of Two Times at Very Short Intervals
A. This function enables two times separated by a very short interval
to be measured.
B. Press Push-piece A to start timing.
C. Press Push-piece B to stop the first time without interrupting
measurement of the second time.
Page 14

- 12 -
D. Press Push-piece A to stop measurement of the second time.
E. The chronograph will indicate the first time.
F. Press Push-piece B to display the second time.
G. Press Push-piece B again. The chronograph and totalizer hands
will reset to zero.
WARNING: Do not activate the Push-pieces under water.
REINITIALIZING THE CHRONOGRAPH HANDS
Following an incorrect activate, violent impact or exposure to a strong
magnetic field, one of the chronograph counter hands may fail to
revert to its original position (zero). To reinitialize the hands, proceed
as follows:
Zero Reset of the Hour Counter Hand
A. Pull out the crown to position (2).
B. Press Push-piece A briefly until the hand reverts to the original
position (on 12).
Page 15

- 13 -
ZERO RESET OF THE MINUTES COUNTER HAND
• Pull the crown out to position 2.
• Press Pusher B briefly until the hand reverts
to the original position.
ZERO RESET OF THE SECONDS COUNTER HAND
• Pull the crown out to position 3.
• Press Pusher A briefly until the hand reverts
to the original position.
ZERO RESET OF THE TENTHS OF A SECOND COUNTER HAND
• Pull the crown out to position 3.
• Press Pusher B briefly until the hand reverts
to the original position.
NOTE: You must always push in and screw down the crown to form a
water resistant seal with the case. Never operate the crown when the
watch is wet.
Page 16
- 14 -
1 2 3
IMPORTANT:
The SeaPlane XL
Mechanical is fitted
with a screw-down
crown which must
be released before
use. Turn crown
towards you to
release. After use,
push the crown
back to position 1,
then press and
screw down the
crown (to ensure
a tight seal).
SEAPLANE XL MECHANICAL (MANUAL WINDING)
Page 17

- 15 -
Manual Winding
• Leaving the crown in position 1, wind the watch by turning it away
from you until fully wound (approximately 20 times). Do not overwind.
The watch will run continuously for approximately 56 hours.
NOTE: This operation should be done consistently every day at
the same time (for example, every morning or evening).
Setting the Time
• Pull out the crown to the fully extended position and rotate toward
you until the desired time is set.
• Push the crown back in to its normal position. The time is now set.
NOTE: You must always push in and screw down the crown to form a
water resistant seal with the case. Never operate the crown when the
watch is wet.
Page 18

- 16 -
FA-18 MECHANICAL CHRONOGRAPH
(SELF-WINDING MECHANICAL WATCH)
IMPORTANT: Each FA-18 watch is fitted with a screw-down crown which
must be released before use. Turn crown towards you to release. After
use, push the crown back to position 1, then press and screw down the
crown (to ensure a tight seal).
Winding
Your watch is wound automatically when you wear it on your wrist. If the
watch is not worn often enough, the movement will have to be wound manually by turning the crown at least twenty times in position 1.
Setting the Time
• Wind the movement if necessary.
• Unscrew the crown by turning it toward you. Then pull out the crown
into position 3. The seconds hand will stop.
• Make sure that the position of the hands corresponds to a change of date
at midnight and not at noon.
Page 19

- 17 -
• Turn the crown to pre-position the hands on the desired time.
• Push the crown back down firmly against the case in position 1,
the watch will begin to run again instantly.
NOTE: For precise time setting, it is advisable to pass the desired minute,
then turn the crown counterclockwise to position the minute hand on the
relevant mark.
SETTING THE DAY/DATE
• First turn the crown (in position 1) away from you approximately ten
times to activate the automatic movement. The sweep second hand will
be moving.
• Pull the crown out into position 3 (completely out). Set the correct time
by moving the hands clockwise. When you reach 12 PM, the calendar
date will jump and then set the correct time. Push the crown back to
position 1.
• Set the crown in position 2 (intermediate position). Adjust the date by
turning the crown away from you. Turn the crown toward you to adjust
the day setting (select the appropriate language). Then set the crown
back to position 1 and your watch is adjusted.
Page 20

- 18 -
The chronograph movement indicates the hours, minutes, seconds and
date and enables short times to be measured to an accuracy of 1/5th of
a second in a 12 hour period.
The crown C has three positions:
• Position 1: Neutral and winding position
• Position 2: Correction of the date
• Position 3: Setting the time, seconds stop
NOTE: You must always push in and screw down the crown to form a
water resistant seal with the case. Never operate the crown when the
watch is wet.
Page 21
- 19 -
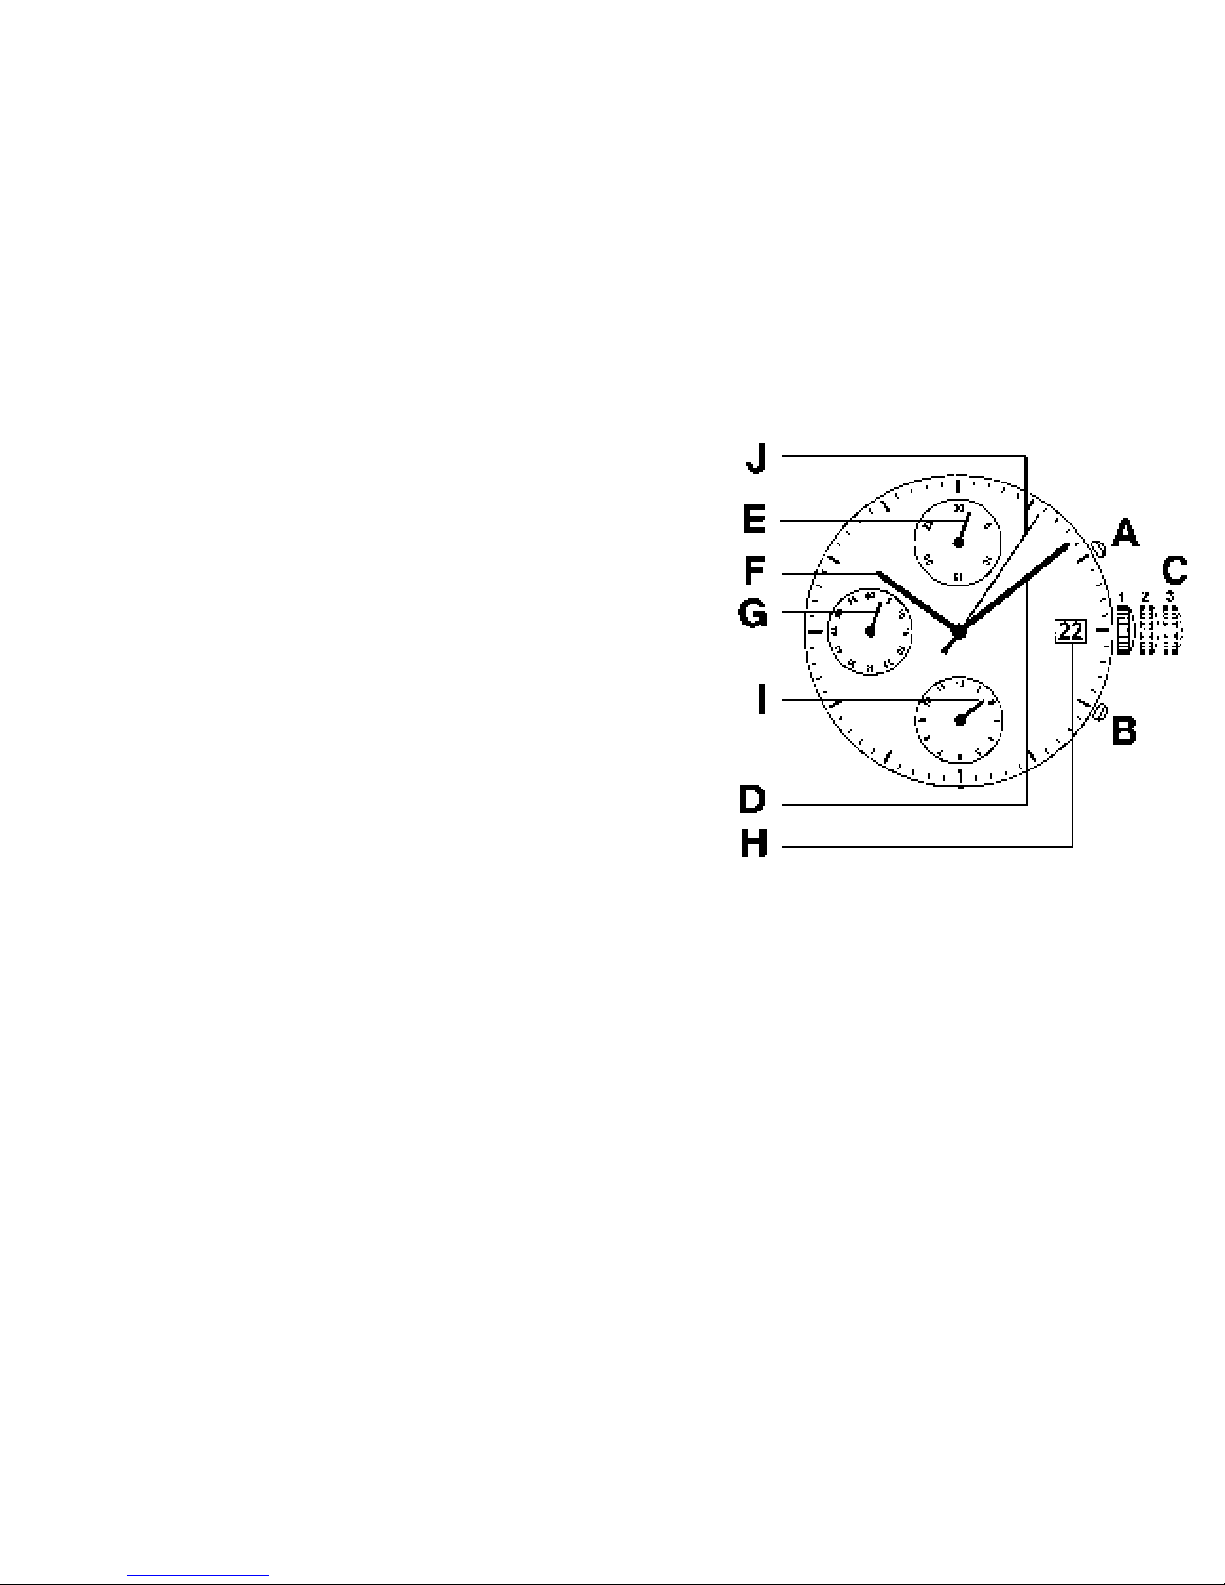
Push-pieces
• Push-piece A: Chronograph start/stop
• Push-piece B: Intermediate times
Chronograph zero reset
Watch Indications
F Hours
D Minutes
G Seconds
H Date
Chronograph Indications
I 12-hour counter
E 30-minute counter
J 60-second counter
Page 22

- 20 -
CHRONOGRAPH FUNCTIONS
Start-Stop Function
A. Press Push-piece A once to start the timing operation; press again
to stop.
Restart Timing
A. Press Push-piece A again to restart timing.
Zero Reset
A. Once the timing operation has stopped, press Push-piece B.
The chronograph and totalizer hands will reset to zero.
Measurement of Partial Times (Addition Function)
A. Press Push-piece A again to restart timing. Further pressure on
Push-piece A will stop the timing operation. The chronograph will
indicate the final time.
B. Once the timing operation has been stopped, press Push-piece B.
The chronograph and totalizer hands will be reset to zero.
Page 23

Measurement of Intermediate (Split) Times
A. Press Push-piece A to start timing.
B. Press Push-piece B to read off the first split time without interrupting
the measurement of the total time.
C. Press Push-piece B to continue timing. The chronograph will continue
its measurement by reverting the 1/10th hand to zero and “flying back”
the other hands to recover the elapsed time.
D. Press Push-piece B again to read the second split time.
E. Repeat this procedure until the action to be timed has been completed.
F. Press Push-piece A to stop timing.
G. Once the timing operation has been stopped, press Push-piece B.
The chronograph and totalizer hands will be reset to zero.
Measurement of Two Times at Very Short Intervals
A. This function enables two times separated by a very short interval
to be measured.
B. Press Push-piece A to start timing.
C. Press Push-piece B to stop the first time without interrupting
measurement of the second time.
- 21 -
Page 24

- 22 -
D. Press Push-piece A to stop measurement of the second time.
E. The chronograph will indicate the first time.
F. Press Push-piece B to display the second time.
G. Press Push-piece B again. The chronograph and totalizer hands
will reset to zero.
WARNING: Do not activate the Push-pieces under water.
REINITIALIZING THE CHRONOGRAPH HANDS
Following an incorrect activate, violent impact or exposure to a strong
magnetic field, one or the other of the chronograph counter hands
may fail to revert to its original position (zero). To reinitialize the hands,
proceed as follows:
Zero Reset of the Hour Counter Hand
A. Pull out the crown to position (2).
B. Press Push-piece A briefly until the hand reverts to the original
position (on 12).
Page 25

- 23 -
Zero Reset of the Minute Counter Hand
A. Pull out the crown to position (2).
B. Press Push-piece B briefly until the hand reverts to the original
position (at noon.)
Zero Reset of the Seconds Counter Hand
A. Pull out the crown to position (3).
B. Press Push-piece A briefly until the hand reverts to the original
position (on 60).
Zero Reset of the 1/10th Second Counter
A. Pull out the crown to position 3.
B. Press Push-piece B briefly until the hand reverts to the original
position (on 0).
C. Push the crown back down firmly against the case to position (1).
NOTE: You must always push in and screw down the crown to form a
water resistant seal with the case. Never operate the crown when the
watch is wet.
Page 26

- 24 -
USING THE VISUAL COUNTDOWN (AIRBOSS MACH 2 - 3 - 4)
*See diagram on page 26
To determine if you have the visual countdown feature, look at the
watch dial. You will see an inner bezel. If it has a yellow triangle with
numbers counting down clockwise from 60, you have the visual
countdown feature. The bi-directional visual countdown is easy to use:
A. When rotating the visual countdown turner, simply align minutes
on the inner bezel to be counted down with the minute hand
(i.e. 20 minutes).
B. When the minute hand reaches the yellow triangle (0 minutes),
20 minutes will have been counted down.
C. The countdown feature works for a duration between
60 minutes and one minute.
Page 27

AIRBOSS MACH 2
AIRBOSS MACH 3
- 25 -
C
C (recessed crown)
Visual
Countdown
turner
Visual
Countdown
turner
Page 28

- 26 -
AIRBOSS MACH 2 MECHANICAL (SELF-WINDING)
The watch is wound automatically when worn on the wrist. If the watch is
not worn on a daily basis, the movement will have to be wound manually
by turning the crown away from you at least twenty times in position (1).
Setting the Date and Time
•
Wind the movement if necessary.
• Pull out the crown into position 3. The seconds hand will stop.
• Make sure that the position of the hands corresponds to a change
of date at midnight and not at noon.
• Turn the crown to pre-position the hands on the desired time.
• Push the crown back down firmly against the case in position (1).
Page 29

- 27 -
To Set Time Alone
• Wind the movement if necessary.
• Pull out the crown to position (3). The seconds hand will stop.
• Turn the crown to pre-position the hands on the desired time.
• Push the crown back down firmly against the case in position (1),
and the watch will begin to run again instantly.
NOTE: For precise time setting, it is advisable to pass the desired minute
and position the hand in the counterclockwise direction.
Page 30

- 28 -
AIRBOSS MACH 3 - SPECIAL QUARTZ CHRONOGRAPH
*See diagram on page 30
To facilitate the use of the AirBoss Mach 3, two original
features have been developed:
A. Enlargement of the two subdials for easier legibility
B. Placement of the chrono pushers on the left side of the case
for easy Start/Stop by the thumb.
Setting the date and time
The crown (C) has three positions which affect Push button functions:
• Position 1: Normal position. Push-buttons: chronograph functions.
• Position 2: Quick correction of time-zones (hour hand). Date corrections
by passing through 24 hours. Push-button B (at 10 o’clock): Initialization
of the timer hand (60-minute counter). Push-button A (at 8 o’clock)
Initialization of the 12-hour counter.
• Position 3: Time setting, stopping of the movement (storage). Push-button
B: Initialization of the 1/10 seconds counter. Push-button A: Initialization
of the 60-second counter.
Page 31

- 29 -
C
(recessed crown)
3 positions
B
4
8
1 2
5
6
7
3
A
Visual Countdown turner
Watch Indications
1 Date
2 Minutes
5 Hours
8 Visual
Countdown ring
Push-pieces
• Push-piece A:
Chronometer
start/stop
• Push-piece B:
Intermediate times.
Chronograph zero
reset.
• Crown C:
Recessed, three
positions
Chronograph
Indications
3 60 second counter
4 60 minute counter
6 12 hour totalizer
7 1/10th second
counter
3 2 1
Page 32

CHRONOGRAPH OPERATING PROCEDURE
This chronograph movement features a 60-minute counter-hand (yellow),
a 60-second counter-hand (white), one tenth second indicator, and a
12-hour totalizer.
Measurement of elapsed times
• Press Pusher A (at 8 o’clock) with the thumb once to start
the timing operation.
• Press again to stop timing.
These two operations may be repeated several times,
to add short time measurements.
• Once the timing operation has been completed, press Pusher B
(at 10 o’clock) briefly until the hands revert to the original position.
Measurement of Lap Times
A. Press Pusher A again to restart timing. Further pressure
on Pusher A stops the timing operation. The chronograph indicates
the final time.
B. Once the timing operation has been stopped, press Pusher B. The
chronograph and totalizer hands are now reset to zero.
- 30 -
Page 33

- 31 -
Measurement of Intermediate (Split) Times
A. Press Pusher A to start timing.
B. Press Pusher B to read off the first split time without interrupting
the measurement of the total time.
C. Press Pusher B to continue timing. The chronograph will continue its
measurement by reverting the 1/10th hand to zero and “flying back”
the other hands to recover the elapsed time.
D. Press Pusher B again to read the second split time.
E. Repeat this procedure until the action to be timed has been completed.
F. Press Pusher A to stop timing.
G. Once the timing operation has been stopped, press Pusher B
(at 10 o’clock) briefly until the hands revert to the original position.
The chronograph and totalizer hands will be reset to zero.
Page 34

REINITIALIZING THE CHRONOGRAPH HANDS
Following an incorrect activate, violent impact or exposure to
a strong magnetic field, one of the chronograph counter hands
may fail to revert to its original position (zero). To reinitialize the hands,
proceed as follows:
Zero Reset of the Hour Counter Hand
A. Pull out the crown to position (2).
B. Press Push-piece A briefly until the hand reverts to the original
position (on 12).
Zero Reset of the Minute Counter Hand
A. Pull out the crown to position (2).
B. Press Push-piece B briefly until the hand reverts to the original
position (at noon.)
Zero Reset of the Seconds Counter Hand
A. Pull out the crown to position (3).
B. Press Push-piece A briefly until the hand reverts to the original
position (on 60).
- 32 -
Page 35

- 33 -
Zero Reset of the 1/10th Second Counter
A. Pull out the crown to position 3.
B. Press Push-piece B briefly until the hand reverts to the original
position (on 0).
C. Push the crown back down firmly against the case to position (1).
NOTE: You must always push in and screw down (if applicable)
the crown to form a water resistant seal with the case. Never operate
the crown when the watch is wet.
Page 36

- 34 -
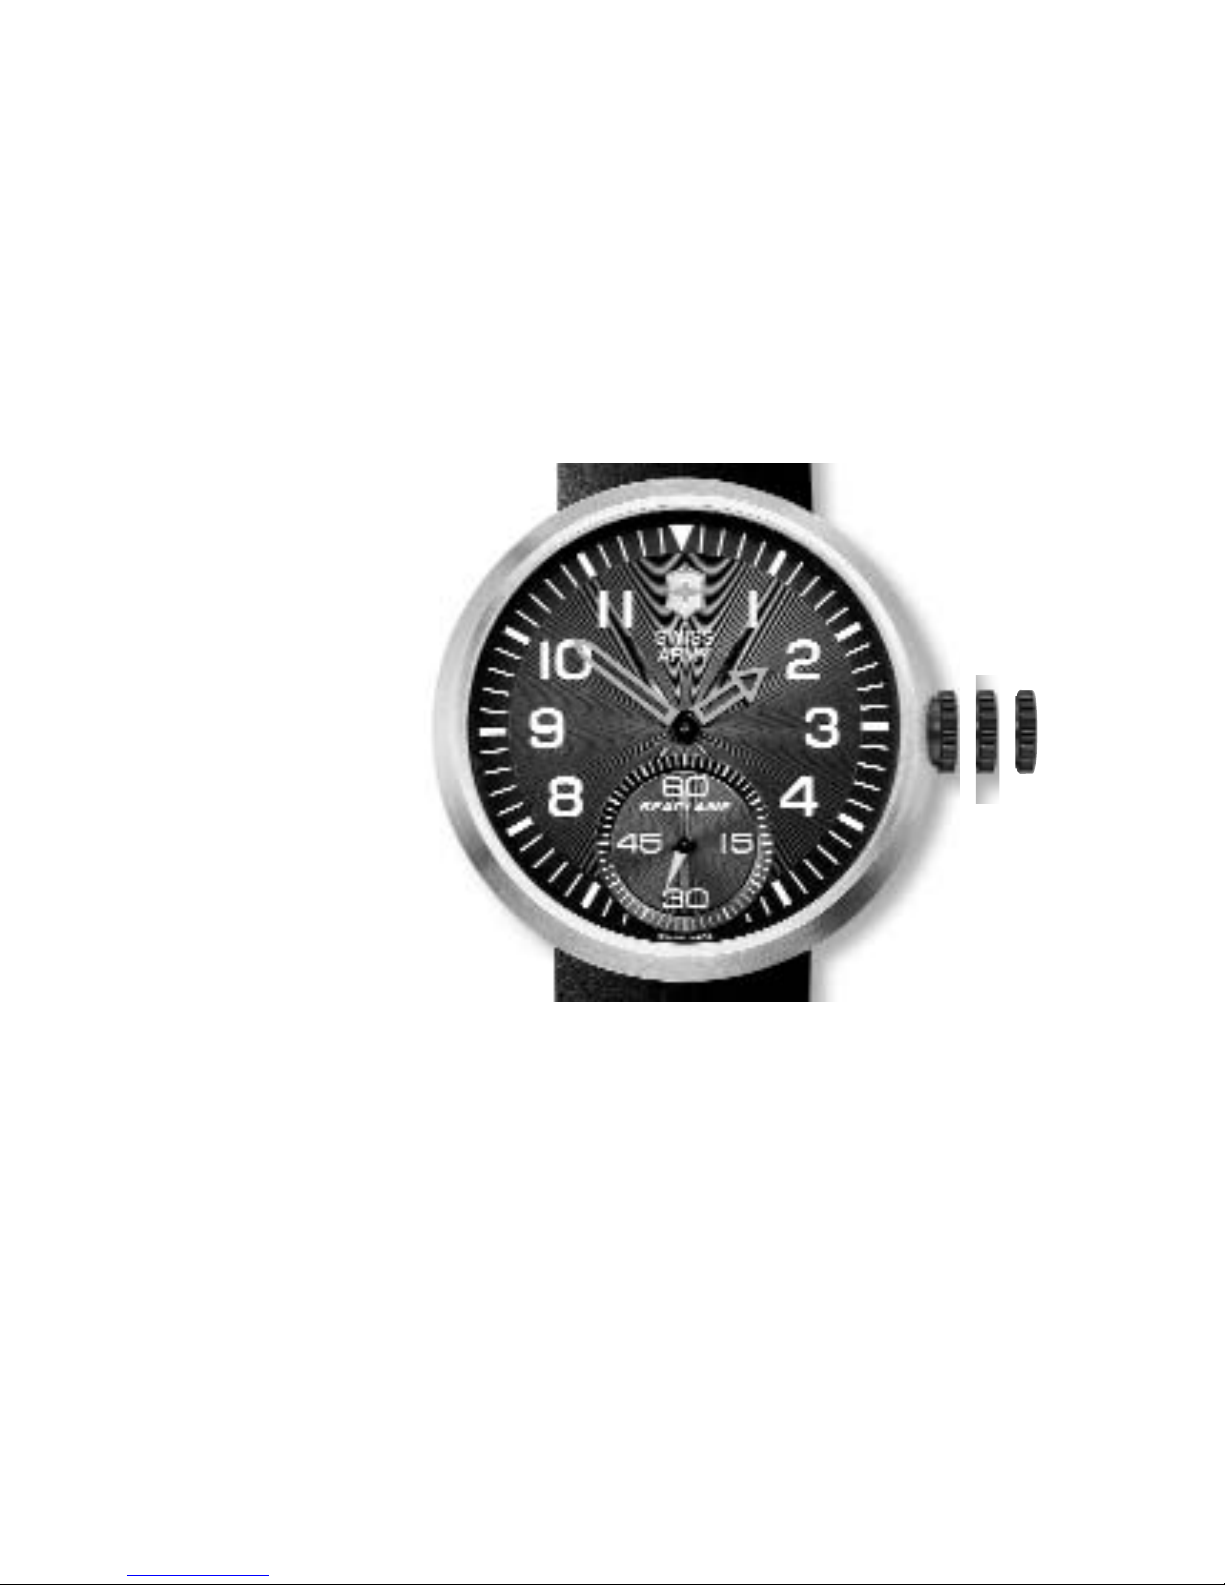
AIRBOSS MACH 4 - MECHANICAL MANUAL WIND
Setting of the time and winding the watch.
• Position 1: Normal position.
The best way to wind your watch
is to do it everyday at the same
time, (i.e. every morning).
This way, your watch is working
at its best and will never stop.
Turn the crown (C) away from you,
until you meet a resistance of the
mechanism. The power reserve
will be 56 hours minimum.
• Position 2: Setting the time.
Turn the crown to set the hour
and the minute.
1
2
C
Visual
Countdown
turner
Page 37

- 35 -
AIR BOSS MACH V GMT ANALOG QUARTZ
Step 1: Using the rotating crown A
(see Figure 1), rotate inner bezel to
select the time zone where you
currently are and align it with
“City” marking at 12 o'clock.
Step 2: Setting the Date & Time:
Remember, when setting the date
it advances at 12 midnight,
not 12 noon.
A
Rotating
Crown
Pull Out
Crown to Set
Time & Date
GMT Military
Time Scale on
Inner Bezel
Line Up Current Time
Zone with ‘City’
Marking at 12 O’clock
Figure 1
B
1
2
3
Page 38

- 36 -
A. Pull crown B (see Figure 1) out to Position 2 (middle position), rotate
the crown toward you until the date showing is the day before the
desired date.
B. Pull crown B (see Figure 1) out to Position 3 (fully extended) and
rotate toward you. When midnight is reached, the date will advance
to the desired date. Continue to turn the crown until the desired time
is set. Push in crown, returning it to Position 1.
Step 3: Setting the GMT time (Hand with Red Arrow):
NOTE: GMT time is on a 24 hour military time scale (see Figure 1).
A. Pull crown B out to Position 2 (middle position) and rotate away
from you to adjust the GMT arrow hand to your local time.
(Example - 7pm is 19 hours military time).
B. Push in crown B, returning it to Position 1.
Page 39

- 37 -
Step 4: How to Read GMT Time in Other Cities:
NOTE: GMT time is on a 24 hour military time scale (see Figure 1).
A. Select any time zone
or city on the bezel
and rotate crown A
until it is aligned with
“City” marking at 12
o'clock. The GMT
hand (Red Arrow)
will indicate the time
in this zone.
Time in AKL is 6 am
City Codes:
AKL - Aukland
ANC - Anchorage
AZO - Azores
BKK - Bangkok
CAI - Cairo
CCS - Caracas
CHI - Chicago
DAC - Dacca
DEN - Denver
DKR - Dakar
DUB - Dubai
HAW - Hawaii
HKG - Hong Kong
KHI - Karachi
LA - Los Angeles
LON - London
MOW - Moscow
MWY - Midway
NYC - New York City
NOU - Noumea
PAR - Paris
RIO - Rio De Janiero
SYD - Sydney
TYO - Tokyo
Page 40

- 38 -
12
Pusher A
Pusher B
G
H
F
I
F
J
Crown
D
Watch indications
D - Hours
E - Minutes
F - Seconds
G- Date
Chronograph
Indications
H - 12 Hr Counter
I - 30-minute Counter
J - 60-second Counter
AIRBOSS MACH 6 - MECHANICAL CHRONOGRAPH
Page 41

- 39 -
Setting the Date and Time:
The crown has 2 positions:
• Position 1: Running position and manual winding.
• Position 2: Time setting and stopping of the movement.
Your watch is wound automatically when you wear it on your wrist. If the
watch is not worn often enough, the movement will have to be wound
manually by turning the crown at least twenty times in Position 1.
To Set Date and Time:
A. Wind the movement if necessary.
B. Pull out the crown to Position 2 (fully extended) and rotate toward you
until the date showing is the correct date. When midnight is reached,
the date will advance. Continue to turn the crown until the desired
time is set. Remember, the date advances at 12:00 midnight, not 12:00
noon.
Page 42

- 40 -
C. Push in the crown, returning it to Position 1. The date and time
are now set.
CHRONOGRAPH OPERATING PROCEDURE
This chronograph movement features a 12 hour counter-hand, a 30
minute counter hand and one second counter (located on center post).
How to Measure Elapsed Times
• Press Pusher A (at 2 o'clock) to start the timing operation.
• Press again to stop timing.
These two operations may be repeated several times, to add short time
measurements.
• Once the timing operation has been completed, press Pusher B
(at 4 o'clock) briefly until the hands revert to the original position.
Page 43

- 41 -
HUNTER MACH 2 FLYBACK ANALOG CHRONOGRAPH
Display–Watch Hands
NOTE:
Screw-down crown.
Page 44

- 42 -
HUNTER MACH 2 FLYBACK ANALOG CHRONOGRAPH
Setting the Timers to Zero
Page 45

- 43 -
HUNTER MACH 2 FLYBACK ANALOG CHRONOGRAPH
Setting the Time and Correction
Page 46

- 44 -
HUNTER MACH 2 FLYBACK ANALOG CHRONOGRAPH
Timing Mode–Simple Timing Function
Page 47

- 45 -
HUNTER MACH 2 FLYBACK ANALOG CHRONOGRAPH
Timing Mode–Add Function
Page 48

- 46 -
HUNTER MACH 2 FLYBACK ANALOG CHRONOGRAPH
Timing Mode–Split TIme
Page 49

- 47 -
HUNTER MACH 2 FLYBACK ANALOG CHRONOGRAPH
Timing Mode–Split TIme (cont.)
The time captured can be 30 minutes at max.
(Exclusive worldwide function).
Page 50

- 48 -
HUNTER MACH 2 FLYBACK ANALOG CHRONOGRAPH
Timing Mode–Split TIme (cont.)
Page 51

- 49 -
HUNTER MACH 2 FLYBACK ANALOG CHRONOGRAPH
Timing Mode–Memo Function
Page 52

- 50 -
HUNTER MACH 2 FLYBACK ANALOG CHRONOGRAPH
Timing Mode–Memo Function (cont.)
Page 53

- 51 -
HUNTER MACH 2 FLYBACK ANALOG CHRONOGRAPH
Timing Mode–Memo Function (cont.)
Page 54

- 52 -
HUNTER MACH 2 FLYBACK ANALOG CHRONOGRAPH
Timing Mode–Fly-Back Function
Page 55

- 53 -
HUNTER MACH 3 ANALOG/DIGITAL CHRONOGRAPH
(PULL-OUT CROWN)
FUNCTION AND DISPLAYS
Lighting
– Dial lighting
Hands and Date Only
– Analog hour, minute and second display (hands)
– Digital display of date only.
T1-Digital Local Time and Date
– Digital display of hours, minutes, seconds and date.
T
1
10:10:40
31
31
L
U
1
3
29:09:99
Page 56

- 54 -
T2-Second Time
– Digital display of a second time:
–another time zone
–hour time
–summer/winter time
Week Number
– Digital display of day, week number (may also
be hidden), date, month and year.
AL-Daily Alarm
– Alarm time may be programmed in hours
and minutes.
L
U
5
2
31:12:99
31
A
L
06:15:on
31
T
2
11:10:40
31
Page 57

- 55 -
AG-Annual Alarm
– Calendar alarm; digital display of
annual alarm, showing date, month,
year alternating with the hour, minutes and alarm activation.
CHR-Chronograph
– Chronograph in hours, minutes,
seconds, hundredths of a second up
to 24 hours and in days, hours and
minutes over 24 hours up to 99 days.
C
H
R
’
0
0
00:00:00
31
A
G
08:00:on
31
31:12:99
08:00:on
Page 58

- 56 -
TM-Timer
– Programmable in days, hours, minutes
and seconds up to 99 days.
EOL-Battery End of Life Indicator
– This indicator shows that the battery should be
replaced (within 2 weeks). The EOL is shown in
the neutral selection by the appearance of “EOL”
or by other functions flashing when the crown is
in the neutral position.
E
O
L
T
M
0
0
00:00:00
31
Page 59

- 57 -
2. SETTINGS
The various functions are selected
by turning the crown. There are three
crown positions:
–pushed in (Pos. 0)
–neutral (Pos. 1)
–pulled-out (Pos. 2)
In the neutral position, you can select various functions
by rotating the crown. In the pulled-out position, function
data may be adjusted by turning the crown. The crown
may be turned in both directions.
In addition to the crown, the watch has two buttons A and B
the action of which depends on the function selected.
Depending on the action required, choose either:
–brief press
or
–long press (1 to 2 seconds)
(Pos. 0) (Pos. 1) (Pos. 2)
Page 60

- 58 -
Button A
– Selects the special functions AM/PM, ON/OFF,
START/STOP.
– Date display (Date-Month/Month-Date)
– Activation or deactivation of the week number
and the date.
Button B
– Selects the digits for adjustment (H-MIN-SEC...)
– Audible confirmation, alarm sound test.
– Selecting the T2 “addition functions” and calendar
alarm. Resetting the chronograph.
Crown
– Dial lighting by pressing (0) the crown (position1).
– Selecting the functions by turning (position1).
– Adjusting the functions or language choice by
turning (position 2).
31
31
31
Page 61

- 59 -
3. AUTOMATIC HELP FOR FUNCTION
ADJUSTMENT
The operation required for function adjustment are assisted by the automatic display
of arrows on the dial; e.g., to change
the alarm time, the length of the timer or
the choice of a second time zone, etc.
These arrows indicated which button
should be pressed, if the crown should be
turned, or even if a setting error causes
a “No Operation” message to appear.
4. DIAL LIGHTING
Pressing the crown (O) briefly will light
up the dial for approximately 6 seconds
in each function. All the hands stop
momentarily. The exact time is reset
automatically at the end of lighting.
Press button
A briefly
Press and hold
button A
Turn the crown up
or down
Press button
B briefly
The operation which you have just
carried out has no effect on the
function (“NO OPERATION”).
N
O
O
P
E
R
A
T
I
O
N
L
U
1
3
31:03:99
Page 62

- 60 -
5. ENERGY-SAVING MODE
It is possible to set the watch to “energy-saving”
mode if you do not intend to use it for several days.
In this mode, power consumption is reduced to
conserve energy in the battery.
Select display neutral position (as described in 6.3,
see page 57), then pull the crown out to position 2.
Synchronization mode is activated.
“Energy-saving” mode will be activated by pressing
and holding button A until the “BAT” (battery)
message disappears.
To reactivate normal operation, simply push the
crown back to position 1. The time which has
elapsed since the hands stopped is automatically
regained.
B
R
T
R
10:10:40
31
Page 63

- 61 -
6. SELECTING AND PROGRAMMING DISPLAY MODES
6.1 Synchronizing the hands and digital
time
The hour shown by the hands and the digital
time should be in perfect synchronization.
Any possible loss of synchronization between
the two (battery change, violent impact) will
require the hands to be adjusted to match
the digital time displayed.
Proceed as follows: Select the neutral display
position (as described in 6.3), then pull the
crown to position 2. The letter “R” will be
displayed as described in 6.3, (page 57)
Press the B button briefly; the hour, minute
and second figures are selected and will flash
successively.
R
10:10:40
31
Page 64

- 62 -
The hands are successively synchronized by
turning the crown.
The second hand can only be adjusted in a
clockwise direction (crown turning upwards).
Push the crown back into position 1 when the
position of the three hands corresponds to the
digital time displayed.
This synchronization only adjusts the time
displayed by the hands to local time (T1).
For perfect synchronization between analog time
(hands) and digital time (figures), first adjust
the hands to the digital time displayed (in synchronization mode “R”) and then adjust the exact
time in “Setting” mode as shown on page 50.
R
10:10:40
31
Page 65

- 63 -
6.2 Setting
Select the T1 (TIME) function, then pull the crown to
position 2.
6.2.1 Selecting the 24 hour or AM/PM system.
The digital time (figures) can be changed to display in
either 24 hour or AM/PM mode by briefly pressing
button A.
6.2.2 Setting the digital hours, minutes and
seconds
Press button B briefly; the hour, minute and second
figures are selected and will flash successively. The hour,
minute and second figures can be successively adjusted
by rotating the crown. Push the crown back to position
1 after adjustment.
T
1
22:10:40
31
T
1
P
m
10:10:40
31
T
1
P
m
10:10:40
31
Page 66

- 64 -
6.3 Neutral display, with or without date
Neutral display, selected by turning the crown,
allows only the hands to appear; the digital
date may be displayed or hidden.
The date display may be activated or deactivated
in this mode by pressing button A briefly.
6.4 Selecting and setting the full date
Instructions starting page 46.
31
L
U
1
2
22:03:99
Page 67

- 65 -
6.4.1 Setting Day/Month (D-M)
or Month/Day (M-D)
Select full date display by turning the crown.
– Pull the crown to position 2
– Briefly press button A to select date
display mode
Day (D) / Month (M)
or
Month (M) / Day (D).
6.4.2 Setting the date, month and year
The date (D), month (M) and year are changed
by rotating the crown. The day of the week is
automatically selected according to the date.
Press button B briefly to confirm date setting (D),
then confirm the month (M) and year.
D
-
M
31:12:99
0
D
-
M
31:12:99
0
Page 68

- 66 -
6.4.3 Choosing and setting one of the four languages for day name display
Select one of four languages available for the day
display by pressing and holding button A. Turn the
crown (in position 2) to display the name of the day in
either (F) French, (E) English, (D) German, (S) Spanish.
All date settings as described in 6.4.1 to 6.4.3 are
confirmed by pushing the crown back to position 1.
6.4.4 Deactivating the week number display
The week number display is deactivated by pressing
button A briefly (crown in position 1). It will reappear
after another function is selected by turning the
crown. Repeat if necessary.
L
U
F
22:03:99
Page 69

- 67 -
6.5 Setting a second time zone (or home
time or summer/winter time)
In “local time” (T1) display, select the second
time zone (T2) function by briefly pressing
button B then pulling the crow to position 2.
The time of the second time zone (T2) may be
changed to display in the 24 hour or AM/PM
system by briefly pressing button A.
The hours and minutes are set by turning the
crown. Briefly press button B to confirm setting
of the T2 hour, then adjust the T2 minutes and
confirm again. Briefly press button B again to
set the date for the second time zone chosen.
31
T
2
10:10:40
T
2
10:10:40
31
T
2
10:10:40
31
Page 70

- 68 -
6.5.1 Date of the second time zone option
If you wish, you may set the date of the second time
zone with a variation of plus or minus 1 day to local
time (T1). E.g., If the date in the local time is the
25th, the date of the second time zone is either the
24th or 26th (maximum difference between two time
zones is one day).
6.5.2 Setting the date of the second time zone
After you have pressed button B a third time
as described in 6.5, you may set the date of the
second time zone by turning the crown. The
message “NO OPERATION” shows that it is not
possible to adjust the date by more than plus
or minus 1 day.
Push the crown back to position 1 after
adjustment.
D
-
M
26:12:99
26
N
O
O
P
E
R
A
T
I
O
N
Page 71

6.6 SETTING THE ALARM (DAILY ALARM)
6.6.1 Starting the alarm
Select the alarm function (AL) by turning the crown and pressing and
holding button A. The letters “ON” will appear on the dial and a “beep”
will be heard.
6.6.2 Alarm sound
At the chosen alarm time, a first alarm will sound.
After 10 seconds, the alarm will sound intermittently for 50 seconds and then stop automatically.
6.6.3 Stopping the alarm
The alarm may be stopped at any moment
by pressing either of the buttons or the crown.
6.6.4 Testing the alarm sound (applicable to all alarms)
When the alarm (AL) function is selected, the alarm sound may be tested
by pressing and holding button B. The same test may be used for
“Timer” and “Diary” alarms.
- 69 -
31
A
L
07:10:on
Alarm
ON/OFF
Striking
mechanism
test:
Press and
hold button B
Page 72

- 70 -
6.6.5 Setting the alarm time
The hours and minutes of the alarm can be set.
First select the alarm function (AL) by turning
the crown and then pulling it to position 2.
Briefly press button B, thus selecting the
figures for the hours and minutes successively.
Turn the crown to set the hours and then
the minutes. Push the crown back to position
1 after carrying out all the adjustments. The
alarm is activated automatically on “ON”
If its values have been modified since the
last setting. “OF” display: alarm is deactivated.
Refer to 6.6.1 to reactivate.
A
L
06:10
31
A
L
07:10
31
A
L
07:10
31
Page 73

- 71 -
6.7 PROGRAMMING AN ALARM (CALENDARALARM)
6.7.1 Selecting the calendar-alarm function
The calendar-alarm function (AG) is selected by
briefly pressing button B when the alarm function
(AL) is displayed, by turning the crown in position 1.
This allows display of the calendar alarm stored
or programming of a different alarm. The digital
display located at the bottom of the dial alternately
indicates the day, month and year and the hours,
minutes and “ON/OF” display.
To test the alarm sound:
press and hold button B.
A
G
08:00:on
31
31:12:99
08:00:on
Page 74

- 72 -
6.7.2 Setting the calendar-alarm function
Pull the crown to position 2. Briefly press button B to
select and flash the figures of the hours, minutes, date,
month and year successively. New data is set by turning the crown and confirming by briefly pressing button
B. The new date for the annual alarm (AG) is confirmed
by pushing the crown back to position 1 and confirmed
by the appearance of the “ON” message. In the example opposite, the calendar-alarm will be programmed
to 29/01/99 at 12:00. Push the crown back to position 1:
the alarm is automatically switched on (ON)*.
*The calendar-alarm will only be switched on if
the date you have programmed is a date in the
future. There will be no ON display if the date
you have entered is in the past.
The alarm sound is stopped by pressing one of the
buttons or the crown.
Pressing and holding button A activates (ON)
or deactivates (OF) the calendar-alarm.
29:01:99
12:00:on
A
G
29:01:99
31
A
G
29:01:99
31
Page 75

6.8 CHRONOGRAPH
Select the chronograph (CHR’) function by turning the crown.
6.8.1 Measuring one single time or adding several
times with automatic subtraction of intermediate
stops (ADD)
–
START timing by briefly pressing button A
–
STOP timing by briefly pressing button A
–Reading the measurement: the 2 figures positioned to the
right of the letters Add’ show the number of hundredths
of a second.
Example of reading a time: 00:01:59 Add’ 36 shows that the
event timed has lasted for 0 hours,1 minute 59 seconds
and 36 hundredths of a second.
–Reset the chronograph by pressing button B briefly.
–Add mode allows several timings to be added while
automatically subtracting the duration of intermediate
events by pressing Start-Stop-Start-Stop-etc.
Total reading time–resetting. For example, total duration of
journey from town A to town D with subtraction of stops in towns B and C.
- 73 -
C
H
R
’
0
0
00:00:00
31
A
d
d
3
6
00:01:59
31
Page 76

6.8.2 Measuring the total time with intermediate time reading
(SPLIT or fly-back hand)
This function allows, for example, the total duration of a race and the
individual time taken by each individual runner to be measured.
–
START of timing by briefly pressing button A.
–
SPLIT X of timing by briefly pressing button B when run-
ner X finishes. In the example opposite (SPL’), the time
taken by runner X is 0 hours, 3 minutes, 40 seconds and
85 hundredths of a second.
–
RESTART timing by briefly pressing button B. The
chronograph flies back to the time passed since
Split X and continues measurement (CHR’).
–
SPLIT Y of timing by briefly pressing button B at the
finish of runner Y (SPL’).
–
RESTART timing by briefly pressing button B. The
chronograph flies back to the time passed since
Split Y and continues timing (CHR’).
–
STOP Z by briefly pressing button A. Reading time of last runner Z and the
total race time: 0 hours, 5 minutes, 20 seconds and 56 hundredths (Add’).
–
RESET by briefly pressing button B (CHR’).
- 74 -
C
H
R
’
1
8
00:04:50
31
S
P
L
’
8
5
00:03:40
31
Page 77

- 75 -
6.8.3 Displaying a chronograph time
exceeding 24 hours
(Possible duration up to 99 days). The timing for a
chronograph duration of up to 24 hours is displayed
in hours, minutes and seconds and hundredths of a
second. For any time exceeding 24 hours, the result is
displayed in days (instead of hundredths of a second,
max. 99 days), hours (max. 23 hours), minutes
(max. 59 minutes) and seconds (max. 59 seconds).
A
d
d
’
5
6
00:05:20
31
Page 78

- 76 -
6.9 PROGRAMMING THE TIMER DURATION
The timer may be programmed from 1 second
up to 99 days, 23 hours, 59 minutes and 59
seconds.
–Select the Timer (TM) function by turning
the crown and then pulling it to position 2.
The number of days flashes on the right of
the display “TM”
(TM 00 - 00:00:00 in example shown opposite).
–Turn the crown forwards or backwards to choose
the required duration in days and confirm by
briefly pressing button B. The hour figures start
to flash.
(TM 99 - 00:00:00 in the example shown
opposite).
31
T
M
0
0
00:00:00
31
T
M
9
9
00:00:00
Page 79

- 77 -
6.9 (continued)
–Turn the crown forwards or backwards to choose
the required duration in hours (max. 23 hours) and
confirm by briefly pressing button B.
The minute figures begin to flash.
(TM 99 - 23:00:00 in the example shown opposite).
–Turn the crown forwards or backwards to choose
the required duration in minutes (max. 59 minutes)
and confirm by briefly pressing button B.
The second figures begin to flash.
(TM 99 - 23:59:00 in the example shown opposite).
–Turn the crown forwards or backwards to choose
the required duration in seconds (max. 59 seconds)
and confirm by briefly pressing button B.
(TM 99 - 23.59:59 in the example shown opposite).
31
T
M
9
9
23:00:00
31
T
M
9
9
23:59:00
31
T
M
9
9
23:59:59
Page 80

- 78 -
6.9 (continued)
–Confirm by briefly pressing button B and push the
crown back to position 1.
(TM 99 23:59:59 in the example shown opposite).
–Briefly press button A to start the timer.
–Pressing button A a second time will stop the timer
without resetting it.
–The TIMER may be restarted after it has been
stopped by pressing button A.
Pressing and holding button A resets all the
information programmed into the TIMER.
31
T
M
9
9
23:59:59
31
T
M
9
9
23:59:58
31
T
M
9
9
23:59:57
Page 81

- 79 -
TACHYMETER
The tachymeter scale enables the speed of a moving
body to be read off in km/h (or in some other unit of
measurement). Measure the time taken to travel one
kilometer (or a different unit) and read the result on
the tachymeter scale. For example, the time taken is
40 seconds, equivalent to a speed of 90 km/h.
TELEMETER
The telemeter scale is situated between the dial and the
bezel of the watch. This scale enables the distance of
an object in kilometers to be measured. Calibration is
based on the speed with which sound travels through
the air — approximately 340 meters or 1,115 feet per
second. As an example, upon a flash of lightning start
the stop watch. Stop the chrono when the thunder clap
is heard. The telemeter scale will indicate the distance of the lightning
bolt in kilometers. If the 60-second counter indicates an elapsed time of 5
seconds between the lightning bolt and the thunder clap, the lightning
in this case is 1700 meters or 1.7 kilometers away.
Page 82

- 80 -
BATTERY
Your Swiss Army Brand timepiece may be powered by a 1.55 volt silver
oxide watch battery. When the battery is low, the seconds hand will effect
four second jumps. Worn Batteries should be replaced immediately.
Substituting interchangeable batteries is not recommended. Battery change
should be performed by an authorized technician who should also check
the condition of the gaskets and the O-ring at the same time. Battery is
not covered by the warranty.
Page 83

- 81 -
THREE-YEAR LIMITED WARRANTY:
Swiss Army Brands, Inc. warrants, for a period of three years from the date of original
purchase, the face, hands and movement of this Swiss Army Brand Watch to be free
from defects in material and workmanship. If any of the aforementioned parts are
defective we will, at our option, either repair or replace the watch, without charge.
Visit our website to find a Swiss Army Authorized Repair Center
or call us at 1-800-442-2706.
While there is no charge for repair or replacement of the watch during the warranty
period, a check in the amount of $10.00, payable to Swiss Army Brands, Inc., must accompany the watch to cover postage, handling, insurance and related costs. As a condition
to this warranty, either the enclosed warranty repair coupon, completed in its entirety
and date stamped by the retailer from whom the watch was purchased, or the original
retail purchase receipt, must be presented with the watch upon return. Alternatively, if
you purchase the watch in California, you may return the watch to the retailer from
whom it was purchased and the return postage will be processed without charge.
Please include your name, street address and phone number to ensure proper return.
This warranty does not apply to any part of the watch not expressly warranted herein
or damage to the watch while in the possession of the consumer or damage or defect
caused by abnormal or unreasonable use (including repairs or alterations by a person
other than Swiss Army Brands, Inc.). This warranty gives you specific legal rights and
you may also have other rights which vary from state to state.
The foregoing warranty is exclusive and in lieu of all other warranties
of quality and
performance, written, oral or implied, and all other warranties, including any implied
Page 84

- 82 -
warranties of merchantability or fitness for a particular purpose, are hereby disclaimed.
In no event shall Swiss Army Brands, Inc. or its affiliates be liable for special, indirect,
incidental or consequential damages whether in contract, tort, negligence, strict
liability or otherwise. Some states do not allow limitations on how long an implied
warranty lasts and/or the exclusion or limitation of incidental or consequential damages,
so the above limitations and exclusions may not apply to you.
Page 85

- 77 -
THREE-YEAR LIMITED WARRANTY REPAIR COUPON
Name ______________________________________________________
Address ____________________________________________________
City ________________________________________________________
State ________Zip______________Date of Purchase ____________
Purchased from______________________________________________
Repair Coupon. To be detached and submitted with watch only when watch
is returned for repair covered by the warranty.
Page 86

SWISS ARMY BRANDS, INC.
One Research Drive, P.O. Box 874
Shelton, CT 06484-0874
Consumer Department: 800 442 2706
www.swissarmy.com
SAF05253 6/15
 Loading...