

Page 1
1
IMPORTANT!
READ AND SAVE THESE INSTRUCTIONS
VWM845
Series
USE AND CARE MANUAL
Humidifier
This humidifier adds water vapor to the surrounding air, enabling the user to breathe better.
If you have any questions about the operation of your Vicks Warm Mist Humidifier, call our
toll-free Consumer Relations line at 1-800-VAPOR-1-2 or e-mail us at Consumerrelations@kaz.com.
Auto Shut off when empty
Medicine Cup for use with inhalants
Wide tank opening for easy filling & cleaning
WarmMist
Page 2
2 3
Vicks® Warm Mist Humidifier (Model VWM845)
How it Works:
The Vicks Warm Mist Humidifier is designed to quietly provide visible warm moisture. The tank
feeds water into the boiling chamber where it is heated to a steam vapor. The steam vapor mixes
with dry air in the mist chimney and warm moist air is released into the room.
1. The humidifier should ALWAYS be placed
on a firm, flat, waterproof surface at least
four feet (1.2m) away from bedside, 12
inches (30cm) from the wall and out of
reach of children and pets. Be sure the
humidifier is in a stable position and the
power cord is away from heated surfaces
and out of the way to prevent the humidifier
from being overturned.
2. The humidifier should not be left
unattended, especially in a closed room
since air could become saturated and
leave condensation on walls and furniture.
If room becomes saturated, open the door
and turn the humidifier off or down.
3. Before using the humidifier, extend the
cord and inspect for any signs of damage.
DO NOT use the unit if the cord has been
damaged. DO NOT operate with power
cord coiled or with twist tie in place.
4. The humidifier has a polarized plug (one
blade is wider than the other) as a safety
feature. This plug will fit into a polarized
outlet only one way. If the plug does not
fit fully into the outlet, reverse the plug.
If it still does not fit, contact a qualified
electrician. DO NOT attempt to defeat
this safety feature.
5. CAUTION: To avoid fire or electric
shock hazard, plug the humidifier directly
into a 120V AC electrical outlet. To avoid
risk of fire, electric shock, or personal
injury, DO NOT use an extension cord
or power strip.
6. The humidifier should ALWAYS be
unplugged and emptied when not in
operation or while being cleaned. Shut
off and unplug humidifier before moving.
DO NOT move or tilt humidifier while it
is in operation. Plug and unplug unit with
dry hands. NEVER pull by cord.
7. DO NOT operate the humidifier without
water. Turn off and unplug unit when
tank is empty and the reset light is on.
8. Humidifier requires regular cleaning. Refer
to and follow cleaning instructions.
9. DO NOT operate outdoors; this humidifier
is intended for indoor residential use only.
10. DO NOT cover or insert objects into any
openings on the unit. DO NOT block intake
or output vents.
11. DO NOT attempt to repair or adjust any
electrical or mechanical functions on this
humidifier. Doing so will void your warranty.
12. DO NOT add any essential oils or
medications (e.g. Kaz Inhalant or Vicks
VapoSteam®) into Chimney, Reservoir,
or Water Tank.
13. DO NOT touch the steam vapor. Steam
can cause burns. DO NOT operate without
the Medicine Cup in place on top of the
Mist Chimney.
14. DO NOT touch skin with exposed
VapoPad® or place VapoPad® on
furniture, fabric, bedding, or plastic.
15. For Residential Use Only
SAVE THESE INSTRUCTIONS
Important Safety Instructions
READ AND SAVE THESE IMPORTANT SAFETY INSTRUCTIONS
BEFORE USING THIS HUMIDIFIER
WHEN USING ELECTRICAL APPLIANCES, BASIC PRECAUTIONS SHOULD
ALWAYS BE FOLLOWED TO REDUCE THE RISK OF FIRE, ELECTRIC SHOCK,
AND INJURY TO PEOPLE, INCLUDING THE FOLLOWING:
The following accessories work great with your humidifier:
Accessories
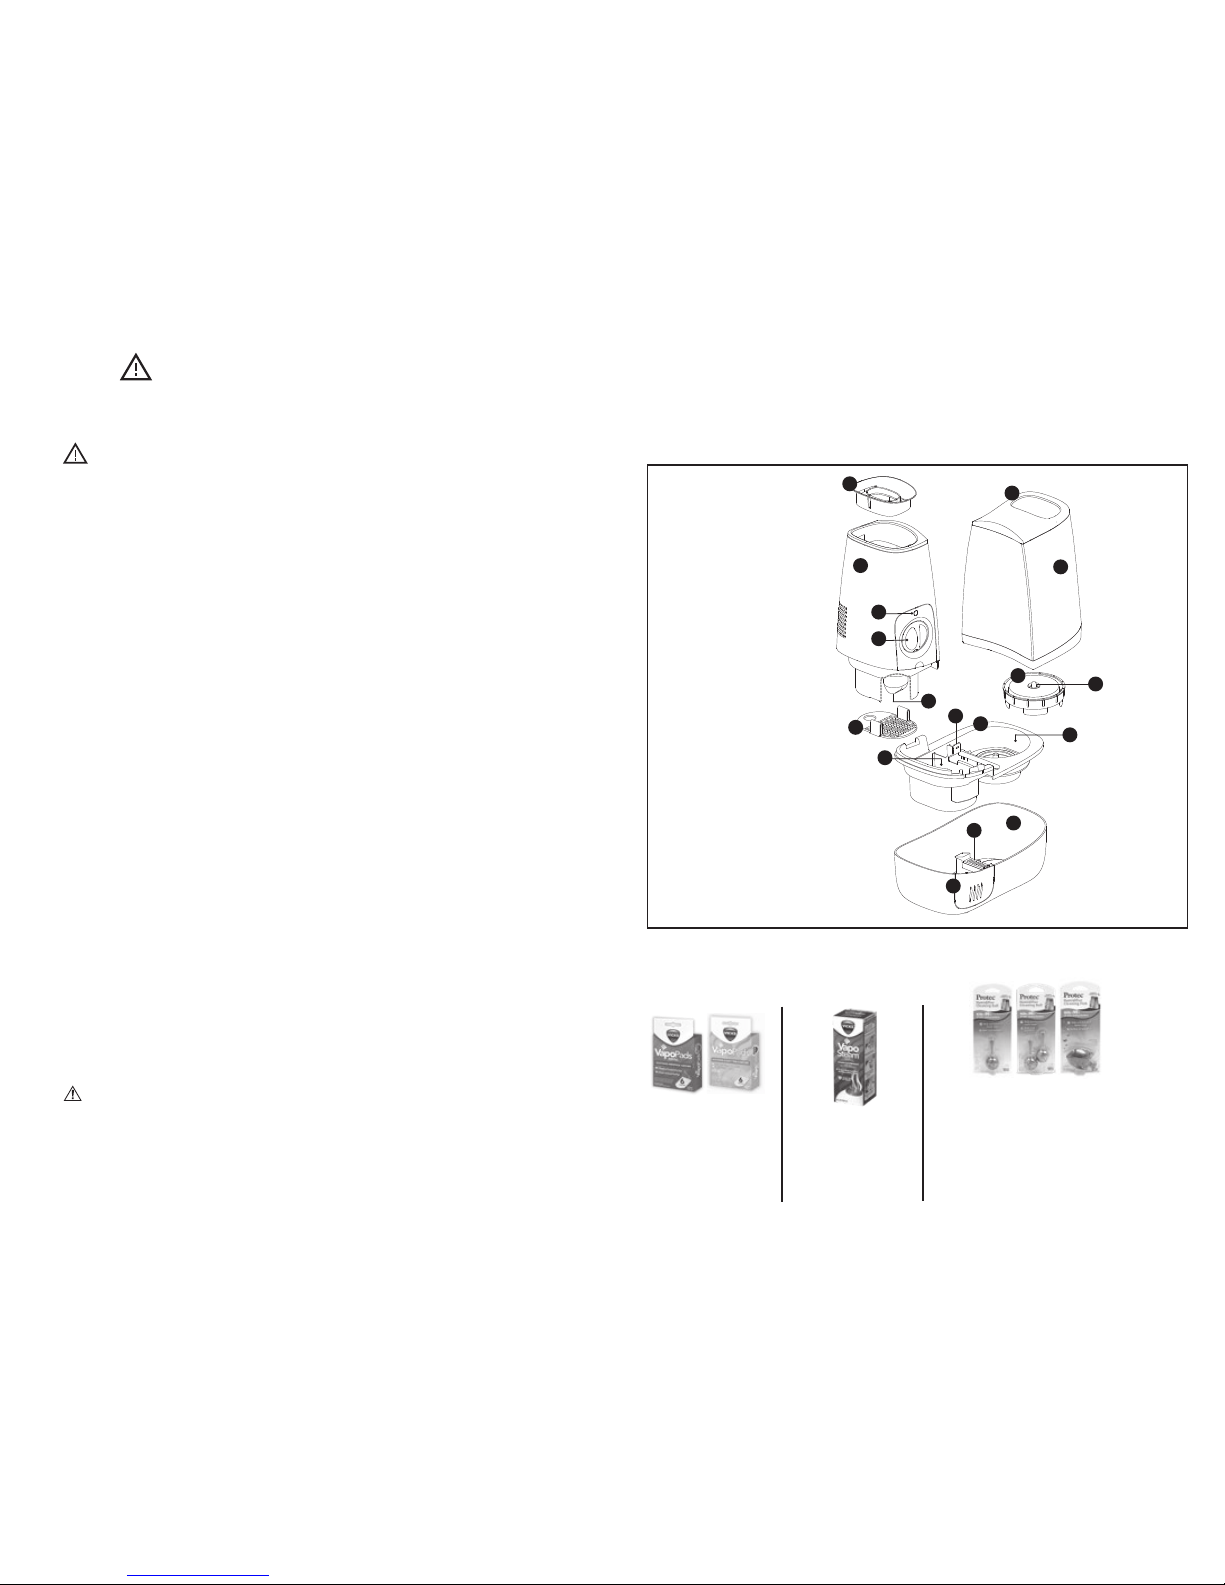
1 Medicine Cup
2 Mist Chimney
3 Reset Light
4 Power Knob
5 Heating Element
6 Heating Element Cover
7 Water Tray
8 Water Tray Tab
9 Heating Chamber
10 Reservoir
11 Base
12 Locking Latch
13 Scent Pad Door
14 Water Tank Handle
15 Water Tank
16 Tan k Cap
17 Plunger
Components
Vicks VapoPads
®
(One Menthol VapoPad Sample
Included). Use Vicks VapoPads
with your humidifier for soothing
vapors. Enjoy up to 8 hours of
soothing comfort per pad.
Protec® Antimicrobial Cleaning Products
(PC1, PC2 and PC1F)
The Protec Cleaning Products feature an antimicrobial, Aquastat
®
,
that helps keep your humidifier cleaner, longer. Simply drop in the
tank for fresh, clean mist! Benefits of using these products include:
• Kills up to 99% of odor causing bacteria
• Keeps cleaning for 30 days
• Contains no harmful chemicals
Vicks
VapoSteam
®
When added to the medicine
cup, it produces soothing
menthol vapors to help provide
comfort for coughs and colds.
Accessories available at retailers and at www.vickshumidifiers.com.
11
10
1
2
12
9
7
6
16
17
15
8
14
13
4
3
5
Page 3
4 5
1. Remove packaging materials. Keep this Instruction Manual for reference.
2. Remove twist tie from power cord and extend power cord full length.
3. Ensure Proper Assembly. Make sure Mist Chimney, Medicine Cup,
and Water Tray are securely in place and that Heating Element Cover
is secured. See Reassembling instructions for reference.
4. Place humidifier on a firm, level, water resistant surface a minimum
of 12 inches (30 cm) from walls. Steam should be directed away
from any walls, bedding, or furniture.
1 Tbsp
Filling / Refilling
WARNING : KEEP OUT OF REACH OF CHILDREN. THIS PRODUCT PRODUCES HOT
STEAM AND SHOULD BE PLACED IN AN AREA NOT ACCESSIBLE TO CHILDREN OR
PETS, WITH THE POWER CORD OUT OF REACH.
Using Your Humidifier
Setting Up Your Vicks Warm Mist Humidifier
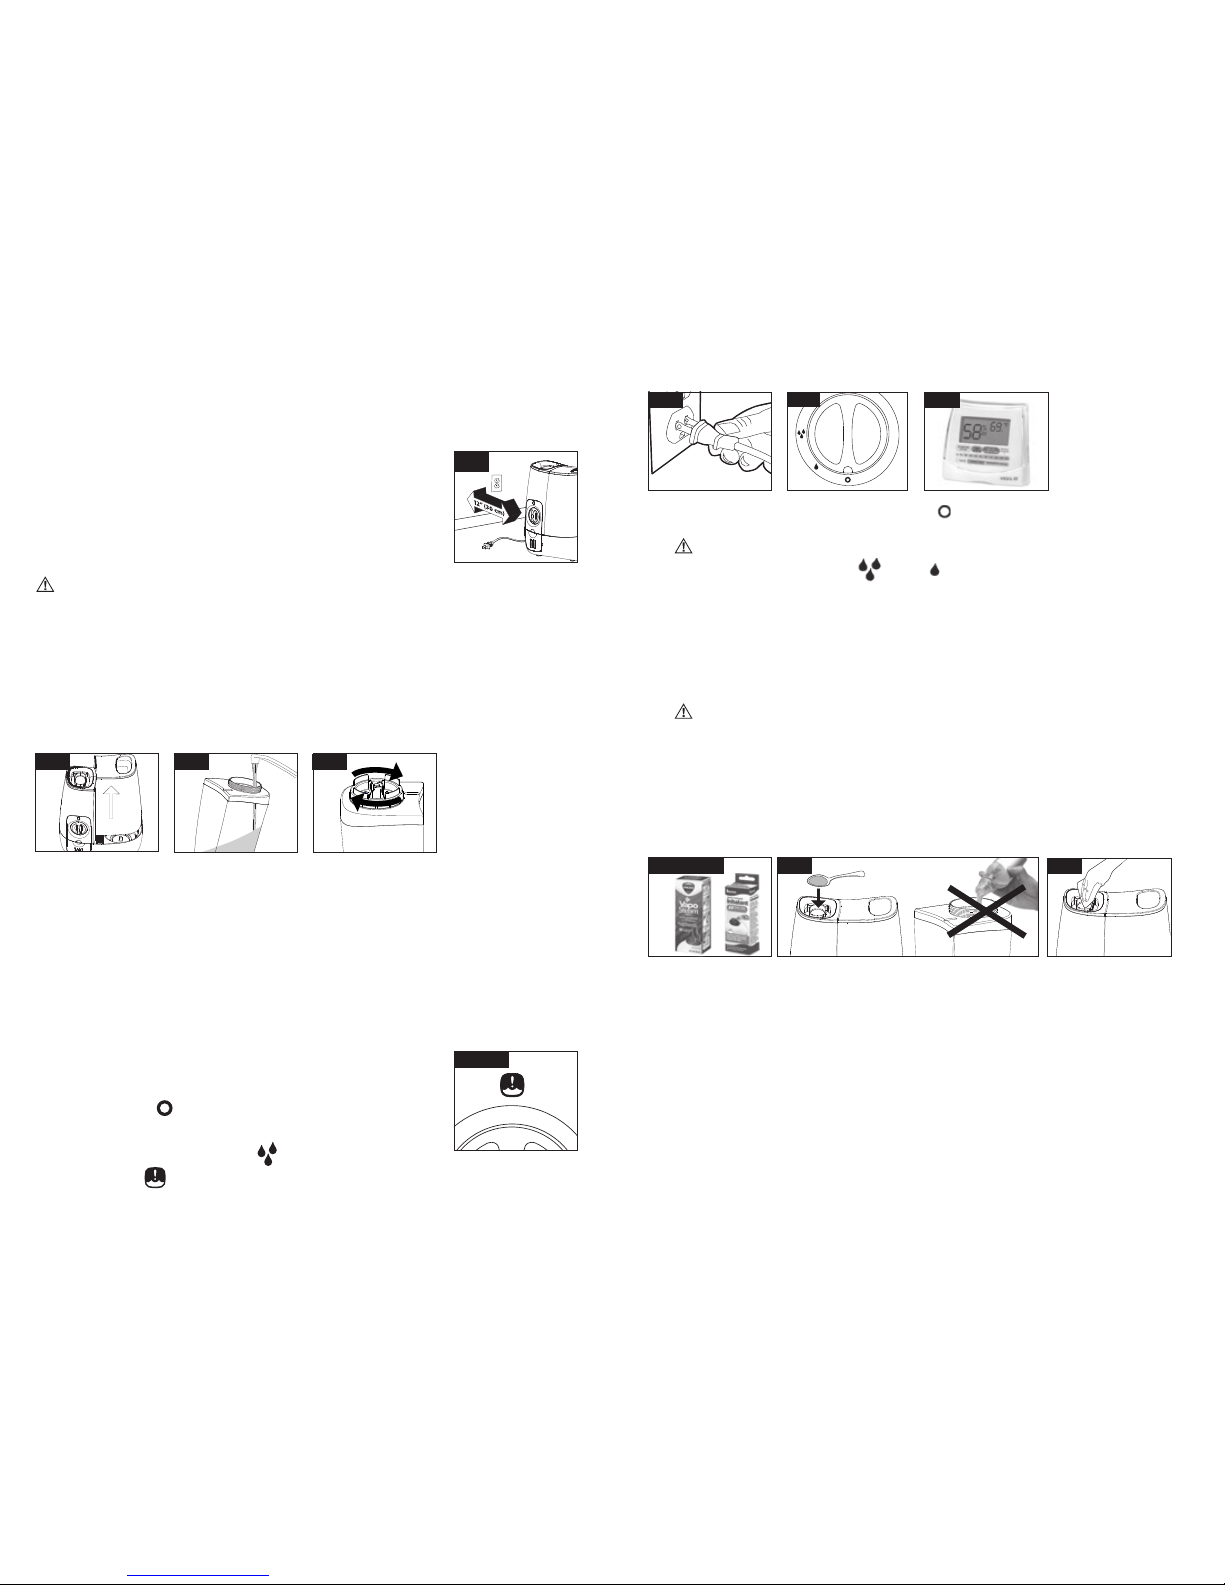
1. Remove Water Tank by grasping Handle and pulling up. Remove Tank Cap by turning counter
clockwise. (to left)
2. Fill Tank with cool water. DO NOT fill with warm or hot water.
DO NOT ADD ESSENTIAL OILS, MEDICATIONS, OR INHALANT LIQUIDS such as Vicks®
VapoSteam® or Kaz Inhalant to the Water Tank. Doing so could cause damage to the humidifier
and void the warranty.
3. Replace Tank Cap by turning clockwise (to right) to screw back in place. DO NOT over-tighten.
Place Tank back on humidifier Base.
Resetting When Reset Light Illuminates
When your humidifier is out of water, the Reset Light will illuminate. To reset:
1. Turn power OFF ( )
2. Refill and replace Water Tank.
3. Wait 5 minutes and turn power ON ( )
Note: If Reset Light ( ) is still on, clean Heating Element (see cleaning instructions)
Liquid Inhalants such as Vicks VapoSteam® or Kaz Inhalant can be used in the Medicine Cup.
ONLY USE LIQUIDS THAT ARE RECOMMENDED FOR THIS TYPE OF HUMIDIFIER.
1. Add 1 Tablespoon of inhalant to the Medicine Cup. ONLY pour inhalant into Medicine Cup.
DO NOT pour into Mist Chimney. DO NOT ADD LIQUID INHALANTS, ESSENTIAL OILS, OR
ANY ADDITIVES TO THE WATER. DOING SO CAN HAVE ADVERSE EFFECTS ON THE
HUMIDIFIER AND VOID THE WARRANTY.
2. Note: Some residue from inhalant may be left in Medicine Cup after use. To clean, ensure
the humidifier is off, unplugged, and cooled for at least 20 minutes and gently wipe residue
from Medicine Cup.
The Medicine Cup can also be used with essential oils. Add a few drops to the medicine cup
for added enjoyment. NEVER add to the Water Tank or Reservoir.
Using Liquid Inhalant
Step 1 Step 2
$
Step 1
Step 2
Step 3
Step 3
Reset Light
Step 2
Step 1 Liquid Inhalant
1. Power: With the Power Knob in the OFF position ( ), plug the filled humidifier into a polarized
120V outlet.
CAUTION: To avoid electric shock, DO NOT plug in humidifier with wet hands.
2. Output: Turn Power Knob to high ( ) or low ( ). A green light will indicate the humidifier
is working, but it will take 3-4 minutes for visible steam to appear.
3. Humidity Level: Once a comfortable humidity level has been reached, turn to the low setting.
A comfortable humidity level is between 40-60%.
Consider using a humidity monitor such as the Vicks V70 Humidity Monitor to display current
room humidity and temperature. If condensation forms on walls, windows, or around unit, turn
humidifier off; the humidity level is too high.
CAUTION: TURN HUMIDIFIER OFF, UNPLUG AND WAIT 20-30 MINUTES FOR
UNIT TO COOL BEFORE MOVING OR CLEANING. DO NOT OPERATE YOUR HUMIDIFIER
WITHOUT THE TANK IN PLACE OR IF THE UNIT IS EMPTY. DO NOT OPERATE YOUR
HUMIDIFIER WITHOUT THE MIST CHIMNEY, WATER TRAY, HEATING ELEMENT
COVER, OR MEDICINE CUP PROPERLY ASSEMBLED.
Step 4
$
NOTE: WATER TANK SHOULD BE CARRIED USING TWO HANDS; ONE HAND ON THE TANK HANDLE
AND THE OTHER SUPPORTING THE BOTTOM OF THE TANK.
Kaz USA, Inc. will not accept responsibility for property damage caused by water spillage.
Page 4
6 7
2C
V
Cleaning Your Humidifier (Continued)
Using Vicks® VapoPads
®
Cleaning Your Humidifier
To keep your humidifier running efficiently, clean it regularly. Weekly cleaning is recommended. All
maintenance should be done in the kitchen or bathroom on a water-resistant surface near a faucet.
To properly clean your humidifier, we recommend the separate processes of Scale Removal
and Disinfecting. These two processes must be performed separately.
Before Cleaning:
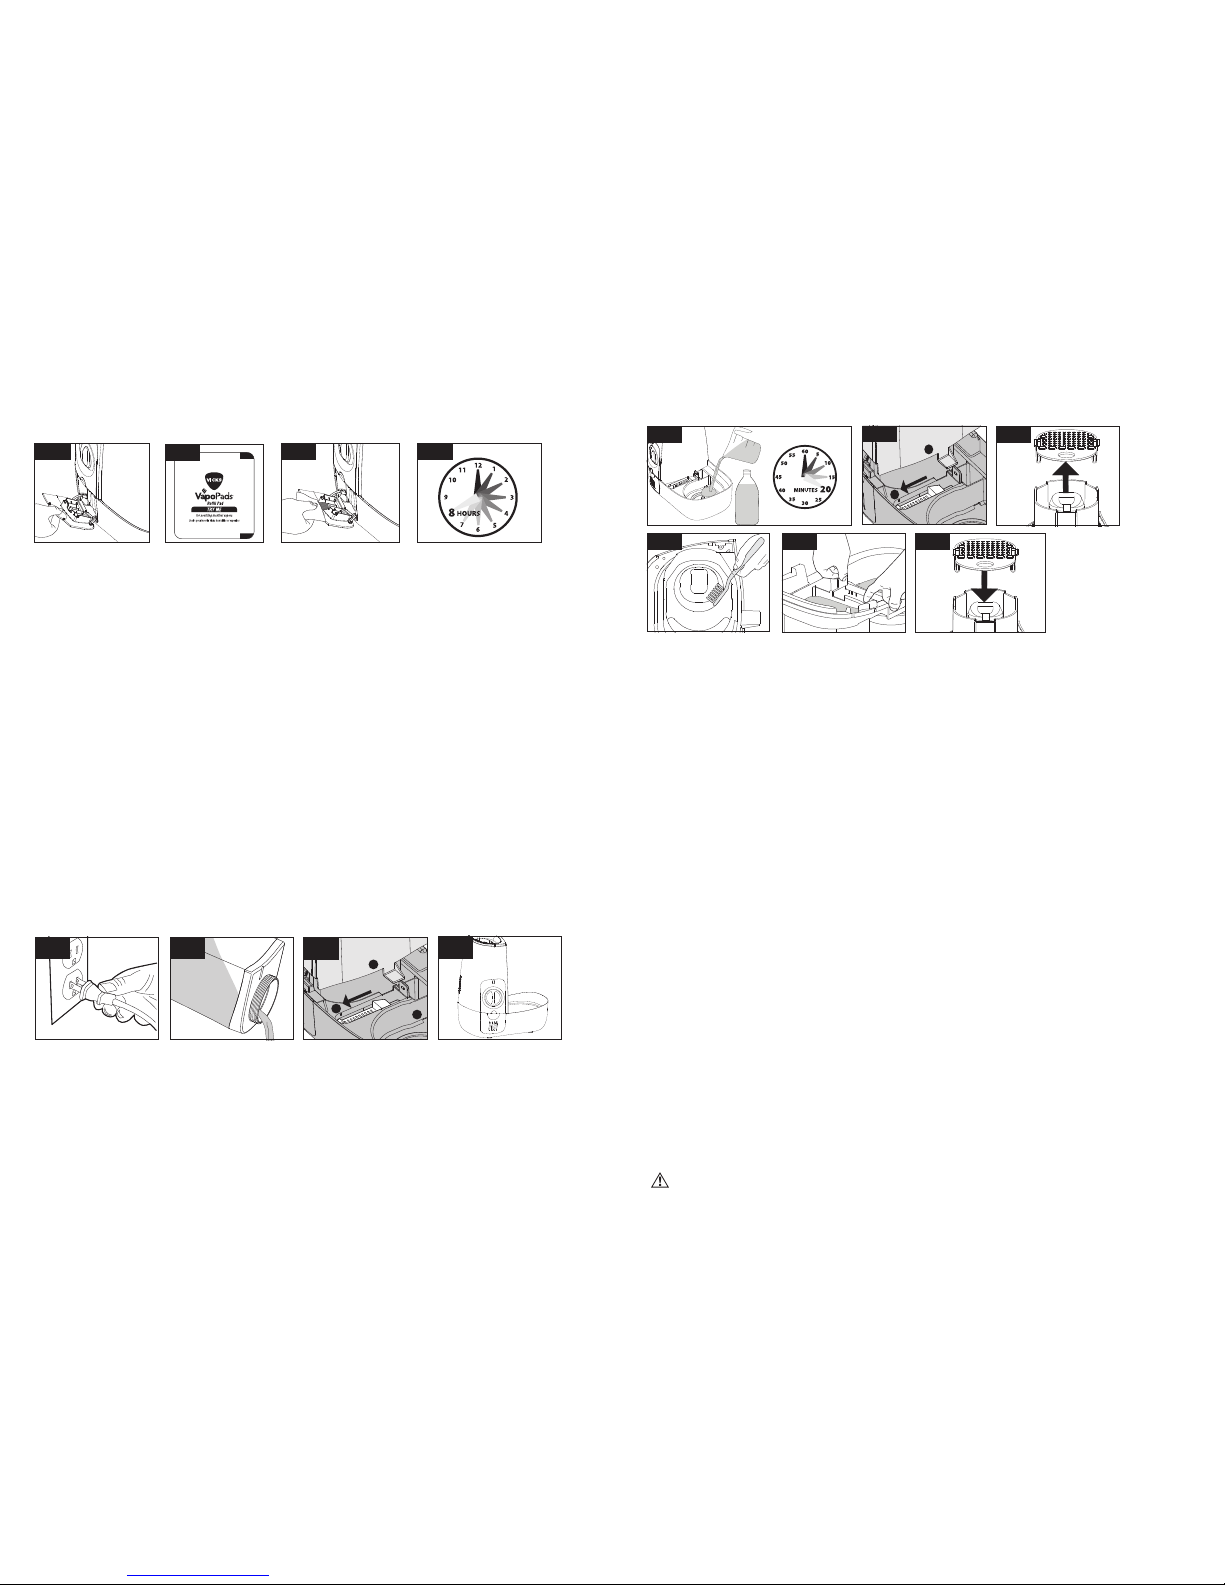
1.
Remove Water Tank and slowly pour 2 cups (.5 liters) of undiluted, distilled white vinegar
into the Reservoir on the Water Tray. DO NOT pour vinegar over the blue Locking Latch.
Only pour into the deep Reservoir. Note: Pour slowly to give enough time for vinegar
to flow from the Reservoir into the Heating Chamber. The vinegar will slowly begin
to fill the Heating Chamber, located under the Mist Chimney. Let soak for 20 minutes to
loosen scale on the Heating Element.
Water Tank scale removal steps:
Pour additional vinegar into the Water Tank, replace Cover and swish to coat inside of Tank.
Use a cloth dampened with vinegar to wipe away any scale on the inside of the Tank and Cap.
2. Remove the Mist Chimney by gently sliding blue Locking Latch towards the front of the
unit (a) and lifting Chimney upwards (b).
3. Remove Heating Element Cover by lifting from the large round opening and pulling away
from the Chimney.
4. Wet the bristles of a soft brush with vinegar from the Water Tray and gently scrub
the surface of the Heating Element, Heating Element Cover, Reservoir, and Heating
Chamber to remove mineral deposits.
DO NOT USE HARD BRUSHES, STEEL WOOL, OR OTHER HARD ABRASIVES ON THE
HEATING ELEMENT. DOING SO WILL DAMAGE THE HEATING ELEMENT.
DO NOT POUR VINEGAR DIRECTLY ONTO THE HEATING ELEMENT.
NOTE: If scale is still visible on the Heating Element, moisten a paper towel with vinegar, and
wrap it around the Heating Element. Let it sit for 30 minutes or until scale loosens.
IMPORTANT: Remove paper towel from the Heating Element before proceeding to the next step.
5. Remove Water Tray by gently lifting from the Tab and the opening in front of the Latch, and
empty vinegar in sink. Rinse Water Tray and Heating Element Cover with water until the
smell of vinegar is gone.
6. With a soft damp cloth, wipe Heating Element to remove any excess scale. Snap Heating
Element Cover back on the bottom of the Mist Chimney. It will only fit one way.
CAUTION: DO NOT RINSE HEATING ELEMENT OR MIST CHIMNEY IN SINK OR UNDER
RUNNING WATER AS WATER CAN GET INTO INTERNAL PARTS. DOING SO WILL DAMAGE
THE HUMIDIFIER AND VOID THE WARRANTY. ONLY USE A WET CLOTH OR PAPER TOWEL
TO CLEAN THIS PART.
Step 1 Step 3
Step 5 Step 6
Step 3 Step 4 Step 1
Your Vicks Warm Mist Humidifier can be used with Vicks VapoPads® to provide up to 8 hours
of soothing vapors. One free sample of the menthol VapoPad is included with your humidifier.
To use your unit with scent pads:
VapoPads® Recommended Usage:
• Not recommended for infants under 10 lbs (4.5 kg).
• For children between 10-22 lbs (4.5-10 kg ), DO NOT use more than 2 pads in a 24 hr period.
Scent Pad Ingredients (VSP-19, VSP19FP, VSP19VPC, VSP-19 CAN): Eucalyptus Oil, Menthol,
Glycol,Cedar Leaf Oil, & Others.
1. Open Scent Pad Door.
2. Open Scent Pad by tearing notch on pad bag. DO NOT touch pad with hands. If pad is touched,
DO NOT rub face or eyes as it may cause irritation.
3. Insert Vicks Scent Pad with angled end facing towards the product. Up to two scent pads can
be inserted. Close door.
4. After 8 hours, discard scent pad. To continue using scent pads, repeat steps 1-4.
Step 2
$
Step 1
Step 2
A
$
B
$
C
Step 3
Step 4
Scale Removal:
Keeping the Heating Element free of scale will help the humidifier to run efficiently.
1. Turn off and unplug humidifier. NEVER clean the humidifier when it is running. If the
humidifier has recently been in use, wait at least 20-30 minutes for unit to cool
before beginning cleaning process.
2. Remove any accessories, and empty medicine from Medicine Cup. Then remove and empty
Water Tank and set aside.
3. Pull blue Locking Latch toward front of unit (a) and lift Mist Chimney up (b) to remove. Remove
Water Tray from Base by pulling up from the Tab (c) and the opening in front of the Latch, then
empty Water Tray.
4. Replace Water Tray and Mist Chimney. These must be in place for cleaning. See
Reassembling section.
Step 4
A
$
B
Step 2
Page 5

8 9
1. Mix ½ gallon (1.9 L) of water with ½ teaspoon of bleach. Pour the bleach solution into
the Water Tank. Replace Tank Cap and gently swish to coat the entire inside.
NOTE: Using more than ½ teaspoon of bleach to ½ gallon (1.9 L) of water may result
in damage to the humidifier.
2. Place Water Tank on Base. Bleach solution will drain into the Water Tray. Let soak
for 20 minutes.
3. Remove Tank and slowly empty bleach solution into sink. Rinse with water until
the smell of bleach is gone.
4. Remove the Mist Chimney by gently sliding blue Locking Latch towards the front of the
unit (a) and pulling Chimney upwards (b).
5. Remove Heating Element Cover by lifting from the large round opening and pulling away
from the Chimney, and rinse with Water. With a soft damp paper towel, wipe Heating
Element until the smell of bleach is gone.
CAUTION: DO NOT RINSE HEATING ELEMENT OR MIST CHIMNEY IN SINK OR UNDER
RUNNING WATER AS WATER CAN GET INTO INTERNAL PARTS. DOING SO WILL
DAMAGE THE HUMIDIFIER AND VOID THE WARRANTY. ONLY USE A WET CLOTH OR
PAPER TOWEL TO CLEAN THIS PART.
6. Carefully remove Water Tray by lifting from the Water Tray Tab and the opening in front of the
Latch, and empty bleach solution into sink. Rinse Water Tray and Heating Element Cover with
water until the smell of bleach is gone. Wipe Water Tray to dry.
Cleaning Your Humidifier (Continued)
Disinfecting:
Before starting the disinfecting process, follow Steps 1-4 in Before Cleaning section.
NOTE: Bleach may stain clothes. It is recommended that you wear rubber gloves during this
process to protect your hands.
Run the dishwasher on the light duty or normal cycle. DO NOT wash with soiled articles/dishes.
DO NOT use detergents.
Note: DO NOT place parts on lower rack of dishwasher. Doing so could cause damage to the
humidifier parts and dishwasher.
Dishwasher Safe:
The following parts are TOP RACK dishwasher safe for residential dishwashers operating at
temperatures below 70°C/158°F.
Heating Element Cover
Water Tray
Medicine Cup
THE MIST CHIMNEY, BASE, AND WATER TANK ARE NOT DISHWASHER SAFE.
Placing these parts in the dishwasher will damage your humidifier and render it unable to
operate properly.
To clean the scent pad area, gently wipe out scent pad heater area with a soft damp cloth.
DO NOT USE VINEGAR OR BLEACH SOLUTION TO CLEAN THIS AREA.
Step 3
Step 2
Step 5
Step 1
B
½ Tsp.
W
½ Gal.
(1,9 l)
MINUTES
Step 6
1. Place Water Tray back in Base.
2. Ensure Heating Element Cover is
secured back on the bottom of the
Mist Chimney by snapping in place.
3. Slide blue Locking Latch toward the
front of the unit (a) and secure
Mist Chimney to Base (b).
Ensure Mist Chimney is secured to the
Base and the Locking Latch is in the
closed position.
4. Press Medicine Cup back in place.
5. Put Tank Cap back on Water Tank
and place back on unit.
Reassembling
1
2
5
4
3b
3a
A
$
B
Step 4
Page 6

10 11
Troubleshooting
Solution
• Plug unit in
• Check circuits, fuses, test outlet
• Wait 3-4 minutes after
turning on
• Fill Water Tank
• Place on a level surface
• Follow Cleaning Instructions
• Refill Water Tank
• Follow Reset Procedure
• See Cleaning Instructions
• Check the Tank for leaks and
replace if necessary
• Tighten Tank Cap
• Check Water Tray and
secure onto Base
• Decrease mist output to
low setting or open door
to the room
If your Humidifier is not working properly, refer to the following:
Problem
• Power Knob is set to
“On” and Power Knob
light is off
• Power is “On” and no
mist appears
• Little or no mist
is produced
• Reset Light illuminated
• Water overflows from
Reservoir
• Condensation forms around
humidifier or windows
Possible Cause
• Unit not plugged in
• No power at outlet
• Water has not heated to
boiling to produce steam
• No water in Tank
• Unit is not level
•
Mineral deposits on Heater
Element or Water Tray
• Water Tank is empty
• Unit not reset after refill
• Heating Element is
covered in scale
• Tank may be damaged
• Tank Cap is not tight
• Water Tray not
seated properly
• Mist Intensity is set too high
for room size or
pre-existing humidity level
NOTE: Failure to keep this unit clean from mineral deposits normally contained in any water supply
will affect the efficiency of operation of this unit. Customer failure to follow these instructions may
void the warranty.
For questions, technical support or to order replacement parts, contact Consumer Relations.
Call us toll-free at: 1-800-VAPOR-1-2 (1-800-827-6712)
Hours: Mon-Fri 8:00AM-7:00PM EST
E-mail: consumerrelations@kaz.com
Or visit our website at: www.vickshumidifiers.com
Please be sure to specify Model number VWM845.
Consumer RelationsEnd-Of-Season Care And Storage
Follow the cleaning instructions when the humidifier will not be used for at least one week, or at the
end of the season. At the end of the season, remove any accessories from the humidifier.
Dry the humidifier completely before storing. DO NOT store with water inside the Water Tray or
Water Tank. Pack unit in original carton and store in a cool, dry location.
Electrical rating: 120V, 60 Hz.
Capacity: 1 gallons (3.7 L)
If you experience a problem, please contact Consumer Relations. Do not return this humidifier to
the original place of purchase.
Do not attempt to open the motor housing or tamper with the Power Knob yourself. Doing so may
void your warranty and cause personal injury or damage to the product.
Specifications
Page 7

12 13
IMPORTANT!
LIRE ET CONSERVER CES INSTRUCTIONS
Série
VWM845
Arrêt automatique lorsque l’appareil est vide
Gobelet pour médicaments à utiliser avec des produits pour inhalation
Large ouverture du réservoir pour faciliter le remplissage et l’entretien
Manuel d’utilisation et d’entretien
Humidificateur à
vapeur tiède
Cet humidificateur rétablit le niveau d’humidité de l’air ambiant, permettant à l’utilisateur de mieux
respirer. Pour toute question au sujet du fonctionnement de l’humidificateur à vapeur tiède Vicks,
communiquez avec notre Service à la clientèle en composant le numéro sans frais
1 800 VAPOR-1-2 (1 800 827-6712), ou envoyez un courriel à Consumerrelations@kaz.com.
3 Year Limited Warranty
YOU SHOULD FIRST READ ALL INSTRUCTIONS BEFORE ATTEMPTING TO USE THIS
PRODUCT.
A. This 3 year limited warranty applies to repair or replacement of product found to be
defective in material or workmanship. This warranty does not apply to damage resulting
from commercial, abusive, unreasonable use or supplemental damage. Defects that are
the result of normal wear and tear will not be considered manufacturing defects under this
warranty. KAZ IS NOT LIABLE FOR INCIDENTAL OR CONSEQUENTIAL DAMAGES
OF ANY NATURE, ANY IMPLIED WARRANTY OF MERCHANTABILITY OR FITNESS
FOR A PARTICULAR PURPOSE ON THIS PRODUCT IS LIMITED IN DURATION TO
THE DURATION OF THIS WARRANTY. Some jurisdictions do not allow the exclusion
or limitation of incidental or consequential damages or limitations on how long an implied
warranty lasts, so the above limitations or exclusions may not apply to you. This warranty
gives you specific legal rights, and you also may have other rights which vary from
jurisdiction to jurisdiction. This warranty applies only to the original purchaser of this product
from the original date of purchase.
B. At its option, Kaz will repair or replace this product if it is found to be defective in
material or workmanship.
C. This warranty does not cover damage resulting from any unauthorized attempts to
repair or from any use not in accordance with the instruction manual.
D. This warranty does not cover the filters, pre-filters, UV bulbs or other accessories
(if included) except for material or workmanship defects.
Call us toll-free at 1-800-827-6712 or e-mail: consumerrelations@kaz.com
Please be sure to specify a model number.
NOTE: IF YOU EXPERIENCE A PROBLEM, PLEASE CONTACT CONSUMER RELATIONS
FIRST OR SEE YOUR WARRANTY. DO NOT RETURN THE PRODUCT TO THE ORIGINAL
PLACE OF PURCHASE. DO NOT ATTEMPT TO OPEN THE MOTOR HOUSING YOURSELF,
DOING SO MAY VOID YOUR WARRANTY AND CAUSE DAMAGE TO THE PRODUCT OR
PERSONAL INJURY.
Page 8

14 15
Vicks VapoPads
MD
(Un échantillon de VapoPad
au menthol est inclus). Utilisez
les tampons Vicks VapoPads
avec votre humidificateur pour
obtenir des vapeurs apaisantes.
Jusqu’à 8 heures de confort
apaisant par tampon.
Produits d’entretien antimicrobiens Protec
MD
(PC1, PC2 and PC1F)
Les produits d’entretien Protec sont dotés d’un agent antimicrobien,
Aquastat
MD
, qui aide à garder votre appareil propre, plus longtemps.
Il suffit de le déposer dans le réservoir pour obtenir une vapeur
fraîche et propre! Avantages d’utiliser ces produits :
• Éliminent jusqu’à 99 % des bactéries causant des odeurs
• Nettoient continuellement pendant 30 jours
• Ne contiennent aucun produit chimique nocif
Vicks VapoSteam
MD
Si vous ajoutez ce produit au
gobelet pour médicaments,
vous obtiendrez des vapeurs
mentholées apaisantes pour vous
aider à ressentir du confort lorsque
vous avez le rhume ou la grippe.
Accessoires disponibles dans les magasins et au www.vickshumidifiers.com.
Accessoires
Les accessoires suivants conviennent très bien à votre humidificateur :
Humidificateur à vapeur tiède VicksMD (Modèle VWM845)
Fonctionnement :
Cet humidificateur Vicks est conçu pour produire silencieusement de la vapeur d’eau tiède et
visible. Approvisionnée par le réservoir, la chambre d’ébullition chauffe l’eau qui devient vapeur.
La vapeur se mélange à l’air sec dans la cheminée puis l’air réhydraté est renvoyé dans la pièce.
1 Gobelet pour médicaments
2 Cheminée pour la vapeur
3 Voyant de réinitialisation
4 Bouton de mise en marche
5 Élément chauffant
6 Couvercle de l’élément chauffant
7 Cuvette d’eau
8 Languette de la cuvette d’eau
9 Chambre d’ébullition
10 Cavité
11 Base
12 Loquet de verrouillage
13 Porte du tampon aromatique
14 Poignée du réservoir d’eau
15 Réservoir d’eau
16 Bouchon du réservoir
17 Piston
Composantes
1. L’humidificateur doit TOUJOURS être
placé sur une surface ferme, plane et
étanche à au moins quatre pieds (1,2
m) du lit, 12 pouces (30 cm) du mur
et hors de la portée des enfants et des
animaux de compagnie. Assurez-vous que
l’appareil est en position stable et que
le cordon d’alimentation est éloigné des
surfaces chauffantes et hors d’atteinte afin
d’empêcher de renverser l’appareil.
2. L’humidificateur ne doit pas être laissé
sans surveillance, surtout dans une pièce
fermée puisque l’air pourrait devenir saturé
et laisser de la condensation sur les murs
et les meubles. Si la pièce devient saturée,
ouvrez la porte et éteignez l’humidificateur.
3. Avant d’utiliser l’appareil, déroulez le cordon
et examinez-le avec soin pour déceler tout
signe de dégradation. Ne vous servez
PAS de l’appareil si le cordon est abîmé.
4. Cet appareil est muni d’une fiche polarisée
(une branche est plus large que l’autre) qui
ne s’insère dans les prises polarisées que
dans un sens. Si la fiche ne pénètre pas
totalement dans la prise, retournez la fiche.
Si elle ne rentre toujours pas complètement
dans la prise, ayez recours aux services
d’un électricien agréé. N’essayez PAS de
contourner cette mesure de sécurité.
5. MISE EN GARDE : Pour éviter les
risques d’incendie ou de choc électrique,
branchez l’humidificateur directement dans
une prise électrique de 120V CA. Pour éviter
les risques d’incendie, de choc électrique
ou de blessure corporelle, n’utilisez PAS de
rallonge ou de barre d’alimentation.
6. L’humidificateur doit TOUJOURS être
débranché et vide entre les utilisations et
pour le nettoyer. Éteignez-le et débranchez-
le avant de le déplacer. Ne le déplacez PAS
et ne l’inclinez pas pendant qu’il fonctionne.
Ayez les mains sèches pour le brancher et le
débrancher. Ne tirez JAMAIS sur le cordon.
7. Ne faites PAS fonctionner cet appareil sans
eau. Éteignez-le et débranchez-le lorsque
le réservoir est vide et que le voyant de
réinitialisation est allumé.
8. L’humidificateur doit être nettoyé
régulièrement. Suivez les instructions
d’entretien.
9. Ne faites PAS fonctionner l’appareil à
l’extérieur; cet humidificateur n’est conçu
que pour un usage résidentiel à l’intérieur.
10. Ne recouvrez PAS et n’insérez pas d’objets
dans aucune ouverture de l’appareil. Ne
bloquez PAS les fentes d’entrée ou de
sortie d’air.
11. N’essayez PAS de réparer ou d’ajuster les
fonctions électriques ou mécaniques de
cet humidificateur. Le cas échéant, vous
risqueriez d’annuler votre garantie.
12. N’ajoutez PAS d’huiles essentielles ou de
médicaments (par ex. Kaz Inhalant ou Vicks
VapoSteamMD) dans la cheminée, la cavité
ou le réservoir d’eau.
13. Ne touchez PAS à la vapeur puisqu’elle
peut causer des brûlures. Ne faites PAS
fonctionner l’appareil sans le gobelet pour
médicaments en place au-dessus de la
cheminée pour la vapeur.
14. Ne touchez PAS au VapoPad
MD
exposé
avec la peau nue et ne placez pas de
VapoPadMD sur un meuble, du tissu, un lit
ou du plastique.
15. Est réservé à l’utilisation résidentielle.
CONSERVEZ CES INSTRUCTIONS
Consignes de sécurité importantes
LISEZ ET CONSERVEZ CES MESURES DE SÉCURITÉ IMPORTANTES
AVANT D’UTILISER L’APPAREIL.
LORSQUE VOUS UTILISEZ DES APPAREILS ÉLECTRIQUES, VOUS
DEVEZ TOUJOURS PRENDRE CERTAINES PRÉCAUTIONS ÉLÉMENTAIRES
POUR RÉDUIRE LES RISQUES D’INCENDIE, DE CHOC ÉLECTRIQUE ET
DE BLESSURE CORPORELLE, NOTAMMENT LES SUIVANTES :
11
10
1
2
12
9
7
6
16
17
15
8
14
13
4
3
5
Page 9

16 17
Utilisation de votre humidificateur
$
Étape 1
Étape 2
Étape 3
1. Mise en marche : Le bouton de mise en marche à la position OFF ( ), plug the filled
humidifier branchez l’humidificateur rempli dans une prise polarisée de 120 V.
MISE EN GARDE : Pour éviter les chocs électriques, ne branchez PAS
l’humidificateur si vous avez les mains mouillées.
2. Sortie : Tournez le bouton de mise en marche à Élevé ( ) ou Bas ( ). Une lumière verte
indiquera que l’humidificateur fonctionne, mais il faut compter 3-4 minutes avant que de la
vapeur visible apparaisse.
3. Taux d’humidité : Lorsqu’un taux d’humidité confortable est atteint, tournez le bouton au
réglage Bas. Un taux d’humidité confortable se situe entre 40 et 60 %.
Envisagez d’utiliser un hygromètre comme le Vicks V70 pour afficher le taux d’humidité et la
température actuels de la pièce. Si de la condensation se forme sur les murs, les fenêtres ou
autour de l’appareil, éteignez l’humidificateur; le taux d’humidité est trop élevé.
MISE EN GARDE : ÉTEIGNEZ L’HUMIDIFICATEUR, DÉBRANCHEZ-LE ET ATTENDEZ
20 À 30 MINUTES POUR QUE L’APPAREIL REFROIDISSE AVANT DE LE DÉPLACER
OU DE LE NETTOYER. NE FAITES PAS FONCTIONNER VOTRE HUMIDIFICATEUR SANS
QUE LE RÉSERVOIR SOIT EN PLACE OU SI L’APPAREIL EST VIDE. NE FAITES PAS
FONCTIONNER VOTRE HUMIDIFICATEUR SANS QUE LA CHEMINÉE POUR LA VAPEUR,
LA CUVETTE D’EAU, LE COUVERCLE DE L’ÉLÉMENT CHAUFFANT ET QUE LE GOBELET
POUR MÉDICAMENTS SOIENT BIEN ASSEMBLÉS.
Installation de votre humidificateur à vapeur tiède Vicks
MD
1. Retirez l’emballage. Conservez ce livret d’instructions pour référence.
2. Enlevez l’attache du cordon d’alimentation et étirez le cordon à sa pleine longueur.
3. Vérifiez si l’assemblage est adéquat. Assurez-vous que la cheminée pour la vapeur, le gobelet
pour médicaments et la cuvette d’eau sont bien en place et que
le couvercle de l’élément chauffant est bien fixé. Voir les instructions
d’assemblage pour référence.
4. Placez l’humidificateur sur une surface ferme, plane et étanche à au
moins 12 pouces (30 cm) de tout mur. La vapeur ne doit pas être
orientée vers les murs, le lit ou les meubles.
MISE EN GARDE : GARDER HORS DE LA PORTÉE DES ENFANTS.
CET APPAREIL PRODUIT UNE VAPEUR CHAUDE ET DOIT ÊTRE PLACÉ
À UN ENDROIT QUI N’EST PAS ACCESSIBLE AUX ENFANTS ET AUX ANIMAUX
DE COMPAGNIE; LE CORDON D’ALIMENTATION DOIT ÊTRE HORS D’ATTEINTE.
Étape 4
Remplissage
1. Enlevez le réservoir d’eau en saisissant la poignée et en soulevant. Enlevez le bouchon du réservoir
en le tournant dans le sens contraire des aiguilles d’une montre. (vers la gauche)
2. Remplissez le réservoir d’eau fraîche. Ne le remplissez PAS d’eau tiède ou d’eau chaude.
N’ajoutez PAS D’HUILES ESSENTIELLES, DE MÉDICAMENTS OU DE LIQUIDES POUR
INHALATION tels que VicksMD VapoSteamMD ou Kaz Inhalant au réservoir d’eau. Vous pourriez
endommager l’humidificateur et annuler la garantie
3. Replacez le bouchon du réservoir en le tournant dans le sens des aiguilles d’une montre
(vers la droite) pour le visser en place. Ne le serrez PAS trop. Replacez le réservoir sur la
base de l’appareil.
Voyant de Réinitialisation
Le voyant de réinitialisation s’allume lorsqu’il n’y a plus d’eau dans
l’humidificateur. Pour réinitialiser l’appareil :
1. Éteignez l’appareil ( )
2. Remplissez le réservoir d’eau et replacez-le
3. Attendez 5 minutes et allumez l’appareil ( )
Remarque : Si le voyant de réinitialisation ( ) demeure allumé, nettoyez l’élément chauffant
(voir les instructions liées à l’entretien)
Étape 1 Étape 2
Étape 3
$
REMARQUE : UTILISEZ VOS DEUX MAINS POUR TRANSPORTER LE RÉSERVOIR D’EAU : UNE MAIN
SUR LA POIGNÉE DU RÉSERVOIR ET L’AUTRE QUI TIENT LE FOND DU RÉSERVOIR.
Kaz USA, Inc. décline toute responsabilité liée aux dommages à la propriété causés par un
déversement d’eau.
Voyant de réinitialisation
Page 10

18 19
1. Enlevez le réservoir d’eau et versez lentement 2 tasses (0,5 litre) de vinaigre blanc distillé, non
dilué dans le réservoir sur la cuvette d’eau. Ne versez PAS le vinaigre sur le loquet de verrouillage
bleu. Ne versez le vinaigre que dans le grand réservoir. Remarque : Versez lentement le
vinaigre pour lui laisser suffisamment de temps pour s’écouler du réservoir dans la
chambre d’ébullition. Le vinaigre commencera lentement à remplir la chambre d’ébullition,
située sous la cheminée pour la vapeur. Laissez tremper le vinaigre pendant 20 minutes pour
détacher le tartre sur l’élément chauffant.
Étapes à suivre pour détartrer le réservoir d’eau :
Versez du vinaigre dans le réservoir d’eau, replacez le couvercle et secouez le réservoir
pour répandre le vinaigre à l’intérieur. Utilisez un chiffon imbibé de vinaigre pour enlever le tartre
à l’intérieur du réservoir et du bouchon.
2. Enlevez la cheminée pour la vapeur en faisant glisser doucement le loquet de verrouillage
bleu vers le devant de l’appareil (a) et en soulevant la cheminée vers le haut (b).
3. Enlevez le couvercle de l’élément chauffant en le soulevant de la grande ouverture ronde et
en le retirant de la cheminée.
2t
V
Étape 1
Étape 3
Détartrage :
En gardant l’élément chauffant exempt de tartre, vous aiderez l’humidificateur à fonctionner efficacement.
Entretien de votre humidificateur
Pour que votre humidificateur fonctionne de manière efficace, nettoyez-le régulièrement. Il est
recommandé de le nettoyer chaque semaine. Effectuez tout entretien dans la cuisine ou la salle de
bain sur une surface étanche près du robinet.
Pour bien nettoyer votre humidificateur, nous vous recommandons d’effectuer les processus distincts
de détartrage et de désinfection. Ces deux processus doivent être effectués séparément.
Avant de nettoyer votre humidificateur :
$
Étape 1
Étape 4
1. Éteignez et débranchez l’humidificateur. Ne nettoyez JAMAIS l’humidificateur pendant qu’il
fonctionne. Si l’humidificateur a été utilisé récemment, attendez au moins 20 à 30
minutes pour que l’appareil refroidisse avant de commencer à le nettoyer.
2. Retirez les accessoires et videz le gobelet pour médicaments de tout produit. Puis enlevez et
videz le réservoir d’eau et mettez-le de côté.
3. Tirez le loquet de verrouillage vers le devant de l’appareil (a) et soulevez la cheminée pour la
vapeur vers le haut (b) pour l’enlever. Enlevez la cuvette d’eau de la base en le soulevant de la
languette (c) et de l’ouverture devant le loquet, puis videz la cuvette d’eau.
4. Replacez la cuvette d’eau et la cheminée pour la vapeur. Ces deux pièces doivent être en place
pour effectuer l’entretien. Voir la section Assemblage.
Utilisation de VicksMD VapoPads
MD
Votre humidificateur à vapeur tiède Vicks peut être utilisé avec les tampons Vicks VapoPadsMD
procurant jusqu’à 8 heures de vapeurs apaisantes. Un échantillon gratuit de VapoPad au menthol est
inclus avec votre humidificateur. Si vous utilisez des tampons aromatiques avec votre humidificateur :
Utilisation recommandée des VapoPadsMD :
• Déconseillé pour les bébés de moins de 4,5 kg / 10 lb.
• Pour les enfants de 4,5 à 10 kg / 10 à 22 lb, Ne dépassez PAS 2 tampons toutes les 24 heures.
Ingrédients des tampons aromatiques (VSP-19, VSP19FP, VSP19VPC, VSP-19 CAN) : huile
d’eucalyptus, menthol, glycol, huile de feuilles de cèdre et autres.
1. Ouvrez la porte du compartiment pour tampons aromatiques.
2. Ouvrez le tampon aromatique en déchirant l’encoche sur le sac du tampon. Ne touchez
PAS
au tampon avec vos mains. Si vous avez touché au tampon, ne frottez
PAS
votre visage ou
vos yeux puisque le tampon peut causer de l’irritation.
3. Insérez le tampon aromatique Vicks avec l’extrémité en biais face à l’appareil. Vous pouvez
insérer jusqu’à deux tampons aromatiques. Fermez la porte.
4. Après 8 heures d’utilisation, jetez le tampon aromatique. Pour continuer d’utiliser des tampons
aromatiques, répétez les étapes 1 à 4.
Étape 3 Étape 4Étape 1
Étape 2
Étape 2
A
$
B
A
$
B
$
C
Étape 3
Étape 2
1 table
Vous pouvez utiliser des produits pour inhalation liquides tesl que Vicks VapoSteamMD ou Kaz Inhalant
dans le gobelet pour médicaments.
N’UTILISEZ QUE DES LIQUIDES RECOMMANDÉS POUR CE TYPE D’HUMIDIFICATEUR.
1.
Ajoutez 1 cuillère à table de produit pour inhalation au gobelet pour médicaments. Ne versez que des
produits pour inhalation dans le gobelet pour médicaments.
Ne les versez PAS dans la cheminée pour la vapeur. N’ajoutez PAS de PRODUITS LIQUIDES POUR
INHALATION, D’HUILES ESSENTIELLES OU TOUT AUTRE ADDITIF À L’EAU PUISQUE CES PRODUITS
POURRAIENT AVOIR DES EFFETS NÉGATIFS SUR L’HUMIDIFICATEUR ET ANNULER LA GARANTIE.
2.
Remarque : Certains résidus du produit pour inhalation peuvent être restés dans le gobelet pour
médicaments après utilisation. Pour nettoyer, assurez-vous que l’humidificateur est éteint, débranché
et refroidi depuis au moins 20 minutes; essuyez les résidus du gobelet pour médicaments.
Le gobelet pour médicaments peut aussi servir pour les huiles essentielles. Ajoutez quelques gouttes
ans le gobelet pour un plaisir supplémentaire. N’ajoutez JAMAIS d’huiles essentielles dans le réservoir
d’eau ou dans la cuve.
Étape 2
Étape 1 Inhalant liquide
Utilisation de produits pour inhalation liquide
Page 11

20 21
Faites fonctionner le lave-vaisselle au cycle délicat ou normal. Ne lavez PAS ces pièces avec des
articles ou de la vaisselle souillés.
N’utilisez PAS de détergents.
Remarque : Ne placez PAS les pièces sur le plateau inférieur du lave-vaisselle. Vous pourriez
endommager les pièces de l’humidificateur et le lave-vaisselle.
Lave-vaisselle :
Les pièces suivantes vont au lave-vaisselle (PLATEAU DU HAUT) résidentiel fonctionnant à des
températures inférieures à 70 °C/158 °F.
Couvercle de l’élément chauffant
Cuvette d’eau
Gobelet pour médicaments
LA CHEMINÉE POUR LA VAPEUR, LA CUVETTE DU FOND ET LE RÉSERVOIR D’EAU NE VONT PAS AU
LAVE-VAISSELLE.
Si vous mettez ces pièces au lave-vaisselle, vous risquez d’endommager votre humidificateur et il
ne pourrait plus fonctionner adéquatement.
Pour nettoyer la section du tampon aromatique, essuyez-la doucement avec un linge humide.
N’UTILISEZ PAS DE VINAIGRE OU DE JAVELLISANT POUR NETTOYER CETTE PARTIE.
Désinfection :
Avant de commencer le processus de désinfection, suivez les étapes 1 à 4 dans la section
Avant l’entretien.
REMARQUE : Le javellisant pouvant tacher les vêtements, nous vous recommandons de porter
des gants de caoutchouc durant ce processus pour vous protéger les mains.
1. Mélangez ½ gallon (1,9 L) d’eau à ½ cuillère à thé de javellisant. Versez la solution javellisante
dans le réservoir d’eau. Replacez le bouchon du réservoir et secouez doucement le réservoir
pour répandre la solution partout à l’intérieur.
REMARQUE : Si vous utilisez plus que ½ cuillère à thé de javellisant dans ½ gallon (19 L)
d’eau, vous risquez d’endommager l’humidificateur.
2. Placez le réservoir d’eau sur la base. La solution javellisante s’écoulera dans la cuvette d’eau.
Laissez tremper pendant 20 minutes.
Étape 3
Étape 5
B
½ càthé
E
½ Gal.
(1,9 l)
Étape 2Étape 1
MINUTES
Étape 6
3. Enlevez le réservoir et videz doucement la solution javellisante dans l’évier. Rincez le réservoir
avec de l’eau jusqu’à ce que l’odeur de javellisant ait disparu.
4. Enlevez la cheminée pour la vapeur en faisant glisser le loquet de verrouillage vers le
devant de l’appareil (a) et en soulevant la cheminée vers le haut (b).
5. Enlevez le couvercle de l’élément chauffant en le soulevant de la large ouverture ronde et en
le tirant de la cheminée, et rincez-le sous l’eau courante. Essuyez l’élément chauffant avec un
essuie-tout humide jusqu’à ce que l’odeur de javellisant ait disparu.
MISE EN GARDE : Ne rincez PAS l’élément chauffant ou la cheminée pour la vapeur
dans l’évier OU SOUS L’EAU COURANTE puisque l’eau pourrait pénétrer dans les
parties internes. Ce faisant, vous pourriez endommager l’humidificateur et annuler
la garantie. Utilisez un linge humide ou un essuie-tout pour nettoyer cette partie
de l’appareil.
6. Enlevez délicatement la cuvette d’eau en la soulevant de la languette et de l’ouverture devant le
loquet, et videz la solution javellisante dans l’évier. Rincez la cuvette d’eau et le couvercle
de l’élément chauffant avec de l’eau jusqu’à ce que l’odeur de javellisant ait disparu. Essuyez
la cuvette d’eau pour la sécher.
Entretien de votre humidificateur (suite)
Désinfection :
(suite)
Entretien de votre humidificateur (suite)
Étape 5 Étape 6
Étape 4
Détartrage : (suite)
4. Mouillez les poils d’une brosse douce avec du vinaigre de la cuvette d’eau et frottez doucement la surface de
l’élément chauffant, du couvercle de l’élément chauffant, du réservoir et de la chambre d’ébullition pour enlever
les dépôts de minéraux.
N’UTILISEZ PAS DE BROSSES DURES, DE LAINES D’ACIER OU D’AUTRES ABRASIFS SUR
L’ÉLÉMENT CHAUFFANT. VOUS RISQUERIEZ D’ENDOMMAGER L’ÉLÉMENT CHAUFFANT.
NE VERSEZ PAS LE VINAIGRE DIRECTEMENT SUR L’ÉLÉMENT CHAUFFANT.
REMARQUE : Si le tartre est encore visible sur l’élément chauffant, mouillez un essuie-tout avec du
vinaigre et enroulez-le autour de l’élément chauffant. Laissez-le reposer pendant 30 minutes ou
jusqu’à ce que le tartre se détache.
IMPORTANT : Enlevez l’essuie-tout de l’élément chauffant avant de passer à l’étape suivante.
5. Enlevez la cuvette d’eau en la soulevant doucement de la languette et de l’ouverture devant
le loquet, et videz le vinaigre dans l’évier. Rincez la cuvette d’eau et le couvercle de
l’élément chauffant sous l’eau courante jusqu’à ce que l’odeur de vinaigre ait disparu.
6. À l’aide d’un linge mouillé, essuyez l’élément chauffant pour enlever l’excédent de tartre. Enclenchez
le couvercle de l’élément chauffant au fond de la cheminée. Le couvercle ne s’enclenche que d’une
seule façon.
MISE EN GARDE : NE RINCEZ PAS L’ÉLÉMENT CHAUFFANT ET LA CHEMINÉE POUR LA
VAPEUR DANS L’ÉVIER OU SOUS L’EAU COURANTE PUISQUE L’EAU POURRAIT PÉNÉTRER
DANS LES PARTIES INTERNES. VOUS POURRIEZ ENDOMMAGER L’HUMIDIFICATEUR ET
ANNULER LA GARANTIE. N’UTILISEZ QU’UN LINGE MOUILLÉ OU UN ESSUIE-TOUT POUR
NETTOYER CES PIÈCES.
A
$
B
Étape 4
Page 12

22 23
Dépannage
Solution
• Brancher l’appareil
• Vérifier circuits et fusibles,
essayer la prise de courant
•
Attendez 3-4 minutes après avoir
mis l’appareil en marche
• Remplir le réservoir d’eau
• Mettre l’appareil d’aplomb
• Suivre les instructions
d’entretien
• Remplir le réservoir d’eau
• Suivre les instructions
de réinitialisation
• Voir les instructions d’entretien
• Examiner le réservoir et
le remplacer s’il fuit
• Serrer le bouchon
• Vérifiez la cuvette d’eau et fixezla sur la base
• Réduire le débit au niveau bas
ou ouvrir la porte de la pièce
Si l’humidificateur ne fonctionne pas convenablement, voyez les suggestions ci-dessous.
Problème
• Le bouton de mise en marche
est réglé à « On » et le voyant
du bouton de bouton de mise
en marche est éteint
•
L’appareil est en marche
(« On ») et aucune vapeur
n’apparaît
• Il se produit peu ou pas
de vapeur
• Le voyant de
réinitialisation est allumé
• De l’eau déborde du
réservoir
• De la condensation
se forme autour de
l’humidificateur ou
sur les fenêtres
Cause possible
• Appareil non branché
• Prise de courant non
alimentée
•
L’eau n’a pas chauffé jusqu’au
point d’ébullition pour produire
de la vapeur
• Réservoir vide
• Appareil instable
•
Des dépôts de minéraux sur
l’élément chauffant ou la
cuvette d’eau
• Réservoir vide
• Appareil n’ayant pas été
réinitialisé après son
remplissag
• L’élément chauffant est
couvert de tartre
• Le réservoir peut
être endommagé
• Bouchon pas assez serré
• La cuvette d’eau n’est pas
bien placée
• Débit trop élevé soit pour
la grandeur de la pièce,
soit pour le taux d’humidité
préexistant de l’air ambiant
REMARQUE: les minéraux en suspension dans l’eau forment une incrustation qui nuit au
bon fonctionnement de l’appareil. Il incombe au client de respecter les instructions fournies et
d’entretenir l’appareil tel que préconisé, sous peine d’annulation de la garantie.
Si vous avez des questions, besoin d’un soutien technique ou pour commander des pièces de
rechange, communiquez avec le Service à la clientèle.
Appelez-nous sans frais au : 1 800 VAPOR-1-2 (1 800 827-6712)
Heures : Lundi au vendredi de 8 h à 19 h HNE
courrieller consumerrelations@kaz.com ou visiter notre site Web au www.vickhumidifiers.com
Prière de préciser le numéro de modèle VWM845.
Service à la clientèle
1. Replacez la cuvette d’eau dans la base.
2. Assurez-vous que le couvercle de l’élément chauffant est bien fixé au fond de la
cheminée pour la vapeur en l’enclenchant.
3. Faite glisser le loquet de verrouillage bleu vers le devant de l’appareil (a) et fixez
la cheminée pour la vapeur à la base (b). Assurez-vous que la cheminée est fixée
à la base et que le loquet de verrouillage est en position fermée.
4. Enfoncez le gobelet pour médicaments en place.
5. Mettez le bouchon sur le réservoir d’eau et remettez-le dans l’appareil.
Assemblage
1
2
5
4
3b
3a
Entretien de fin de saison et rangement
Suivez les instructions d’entretien lorsque vous prévoyez ne pas utiliser l’humidificateur
pendant au moins une semaine, ou à la fin de la saison. À la fin de la saison, enlevez les
accessoires de l’humidificateur.
Laissez sécher l’humidificateur complètement avant de le ranger. Ne le rangez PAS avec de
l’eau à l’intérieur de la cuvette d’eau ou du réservoir d’eau. Rangez l’appareil dans sa boîte
originale dans un endroit frais et sec.
Page 13

24 25
¡IMPORTANTE!
LEA Y GUARDE ESTAS INSTRUCCIONES
Series
VWM845
MANUAL DE USO Y CUIDADO
Humidificador de
Este humidificador agrega vapor de agua al aire circundante, ayudando al usuario a respirar mejor.
Si usted tiene alguna pregunta acerca de la operación de su Humidificador de Vapor Tibio Vicks,
llame lada gratuita a nuestra línea de Servicio al Consumidor al 1-800-VAPOR-1-2 ó envíe un correo
electrónico a Consumerrelations@kaz.com.
VaporTibio
Apagado automático cuando está vacío
Dosificador de Medicina para uso con inhalantes
Abertura amplia del tanque para llenar y limpiar fácilmente
Caractéristiques électriques : 120 V, 60 Hz.
Capacité : 1 gallon (3,7 L)
Si vous avez un problème, veuillez communiquer avec le Service à la clientèle. Ne retournez pas
l’humidificateur à l’endroit où vous l’avez acheté.
N’essayez pas d’ouvrir le boîtier du moteur ou de crocheter le bouton de mise en marche vous-même,
car ce faisant vous risquez d’annuler la garantie, d’endommager l’appareil ou de vous blesser.
Spécifications
GARANTIE LIMITÉE DE 3 ANS
VOUS DEVRIEZ D’ABORD LIRE LES INSTRUCTIONS AU COMPLET AVANT
DE TENTER D’UTILISER LE PRODUIT.
A. Cette garantie limitée de 3 ans s’applique à la réparation ou au remplacement d’un
produit qui s’avère défectueux en raison d’un vice de matériau ou de main-d’oeuvre.
Cette garantie ne couvre pas les dommages résultant d’une utilisation commerciale,
abusive ou excessive, ni les dommages associés. Les dommages qui résultent de l’usure
normale ne sont pas considérés comme des défectuosités en vertu de cette garantie.
KAZ DÉCLINE TOUTE RESPONSABILITÉ EN CAS DE DOMMAGES ACCESSOIRES
OU INDIRECTS DE QUELQUE NATURE QUE CE SOIT. TOUTE GARANTIE IMPLICITE
DE COMMERCIABILITÉ OU DE PERTINENCE À DES FINS PARTICULIÈRES SUR
CE PRODUIT EST LIMITÉE À LA DURÉE DE CETTE GARANTIE. Certains États
n’autorisent pas l’exclusion ou la limitation des dommages accessoires ou indirects, ou
la limitation de la durée d’une garantie implicite, de sorte que les limites ou exclusions
ci-dessus peuvent ne pas s’appliquer à vous. Cette garantie vous accorde des droits
légaux particuliers, et vous pouvez avoir en plus d’autres droits qui varient selon les
États. Cette garantie ne s’applique qu’à l’acheteur initial de ce produit, à partir de la date
d’achat.
B. Kaz peut, à son gré, réparer ou remplacer ce produit s’il s’avère défectueux en raison
d’un vice de matériau ou de main-d’oeuvre.
C. Cette garantie ne couvre pas les dommages résultant d’une tentative non autorisée de
réparer cet appareil, ni d’une utilisation non conforme à ce manuel d’instructions.
D. Cette garantie ne couvre pas les filtres, préfiltres, ampoules UV et autres accessoires (si
compris) excepté pour les défauts de matériau ou de main-d’oeuvre.
Téléphonez-nous sans frais au : 1 800 477-0457
ou Courriel : consumerrelations@kaz.com
N’oubliez pas d’indiquer le numéro de modèle.
REMARQUE : SI VOUS AVEZ UN PROBLÈME, VEUILLEZ COMMUNIQUER AVEC
NOTRE SERVICE À LA CLIENTÈLE OU RELIRE LA GARANTIE. NE RETOURNEZ PAS
LE PRODUIT AU MAGASIN OÙ VOUS L’AVEZ ACHETÉ INITIALEMENT. N’ESSAYEZ
PAS D’OUVRIR LE BOÎTIER DU MOTEUR, CAR CE FAISANT VOUS RISQUEZ
D’ANNULER LA GARANTIE, D’ENDOMMAGER L’APPAREIL OU DE VOUS BLESSER.
Page 14

26 27
Importantes Instrucciones de Seguridad
LEA Y GUARDE ESTAS IMPORTANTES INSTRUCCIONES
DE SEGURIDAD ANTES DE USAR EL APARATO
CUANDO USE APARATOS ELÉCTRICOS, SIEMPRE DEBE SEGUIR
PRECAUCIONES BÁSICAS PARA REDUCIR EL RIESGO DE FUEGO, DESCARGA
ELÉCTRICA, Y LESIONES A PERSONAS, INCLUYENDO LO SIGUIENTE:
1. El humidificador debe colocarse SIEMPRE
sobre una superficie firme, plana y
resistente al agua y al menos a 1.2 m
(4 pies) de la cama, 30 cm (12 pulgadas)
de la pared y fuera del alcance de los
niños y mascotas. Asegúrese que el
humidificador esté en una posición estable
y el cable de corriente esté alejado de
superficies calientes y fuera del paso para
evitar que el humidificador sea derribado.
2. El humidificador no debe dejarse sin
supervisión, especialmente en una
habitación cerrada, ya que se podría
saturar el aire y dejar condensación
en paredes y muebles. Si la habitación
se satura, abra la puerta y apague el
humidificador o baje el ajuste.
3. Antes de utilizar el aparato, extienda
el cable de corriente e inspecciónelo
en busca de alguna señal de daño.
NO use la unidad si el cable de corriente
se encuentra dañado.
4. Como característica de seguridad, el
aparato cuenta con un enchufe polarizado
(una clavija es más ancha que la otra).
Este enchufe entrará en una sola posición
en un tomacorriente polarizado. Si el
enchufe no entra completamente en el
tomacorriente, gire el enchufe. Si aún
no encaja, contacte a un electricista
calificado. NO intente anular esta
característica de seguridad.
5. PRECAUCIÓN: Para evitar el riesgo
de incendio o descarga eléctrica, enchufe
el humidificador directamente en un
tomacorriente eléctrico de 120 V~ de CA.
Para evitar el riesgo de incendio, descarga
eléctrica o lesiones personales, NO use un
cable de extensión o contacto múltiple.
6.
El aparato SIEMPRE debe estar desconectado y
vacío cuando no esté en uso o mientras lo esté
limpiando. Apague y desconecte el humidificador
antes de moverlo. NO mueva o incline el
humidificador mientras esté en operación.
Conecte y desconecte la unidad con las manos
secas. NUNCA estire del cable de corriente.
7. NO opere el aparato sin agua. Apague
y desconecte la unidad cuando el
tanque se vacíe y la luz de reinicio
esté encendida.
8. El humidificador requiere limpieza regular.
Consulte y siga las instrucciones de limpieza.
9. NO opere en el exterior; este humidificador está
hecho sólo para uso residencial en interiores.
10. NO cubra o inserte objetos en ninguna de
las aberturas de la unidad. NO obstruya las
ventilaciones de entrada o salida.
11. NO intente reparar o ajustar ninguna
función eléctrica o mecánica en este
humidificador. Hacerlo anulará la garantía.
12. NO agregue aceites esenciales o
medicamentos (p. ej. Inhalante Kaz o
VapoSteam® de Vicks) en la Chimenea,
Depósito o Tanque de Agua.
13. NO toque el vapor. El vapor puede causar
quemaduras. NO opere sin el Dosificador
de Medicina en su lugar, en la parte
superior de la Chimenea de Vapor.
14. NO toque con la piel las VapoPad
®
expuestas o las coloque sobre los muebles,
telas, sábanas o plásticos.
15. Sólo para Uso Residencial.
GUARDE ESTAS INSTRUCCIONES
Humidificador de Vapor Tibio Vicks® (Modelo VWM845)
Cómo Funciona:
El Humidificador de Vapor Tibio Vicks está diseñado para proporcionar silenciosamente de
humedad tibia visible. El Tanque alimenta agua a la cámara de calentamiento donde se calienta
para transformase en vapor. El vapor se mezcla con el aire seco en la chimenea de vapor. Aire
húmedo y tibio es liberado en la habitación.
11
10
1
2
12
9
7
6
16
17
15
8
14
13
1 Dosificador de Medicina
2 Chimenea de Vapor
3 Luz de Reinicio
4 Perilla de Encendido
5 Elemento Térmico
6 Cubierta del Elemento Térmico
7 Bandeja del Agua
8 Lengüeta de la Bandeja del Agua
9 Cámara de Calentamiento
10 Depósito
11 Base
12 Pestillo de Cierre
13 Puerta de la Almohadilla Aromática
14 Asa del Tanque de Agua
15 Tanque de Agua
16 Tapa d el Tan que
17 Émbolo
Componentes
4
3
5
Accesorios
VapoPads
®
de Vicks
(Una Muestra de VapoPad de
Mentol Incluida). Use VapoPads
de Vicks con su humidificador
para vapores relajantes. Disfrute
hasta 8 horas de confort
relajante por almohadilla.
Productos de Limpieza Antimicrobianos
de Protec® (PC1, PC2 y PC1F)
Los Productos de Limpieza Protec cuentan con un antimicrobiano,
Aquastat
®
, que ayuda a mantener su humidificador más limpio,
por más tiempo. ¡Simplemente coloque en el tanque para un vapor
fresco y limpio! Los beneficios de usar estos productos incluyen:
• Mata hasta el 99% de la bacteria causante del mal olor
• Mantiene la limpieza durante 30 días
• No contiene químicos dañinos
VapoSteam
®
de Vicks
Cuando se agrega al
dosificador de medicina,
produce vapores relajantes
de mentol, para ayudar a
proporcionar confort para la
tos y el resfriado.
Accesorios disponibles en las tiendas y en www.vickshumidifiers.com.
Los siguientes accesorios funcionan adecuadamente con su humificador:
Page 15

28 29
$
Instalación de Su Humidificador de Vapor Tibio Vicks
1. Retire los materiales de embalaje. Guarde este Manual de Instrucciones para referencia.
2. Retire la atadura de alambre del cable de corriente y extiéndalo completamente.
3. Asegúrese de Ensamblar Correctamente. Asegúrese que la Chimenea de Vapor, el Dosificador
de Medicina y la Bandeja de Agua estén firmemente en su lugar y que
la Cubierta del Elemento Térmico esté bien colocada. Consulte las
instrucciones de Reensamblaje para referencia.
4. Coloque el humidificador sobre una superficie firme, nivelada y
resistente al agua, al menos a 30 cm (12 pulgadas) de las paredes.
El vapor debe ser dirigido lejos de las paredes, sábanas o muebles.
Paso 4
ADVERTENCIA : MANTENGA FUERA DEL ALCANCE DE LOS NIÑOS. ESTE PRODUCTO
PRODUCE VAPOR CALIENTE Y DEBE COLOCARSE EN UN ÁREA NO ACCESIBLE PAR A
NIÑOS O MASCOTAS, CON EL CABLE DE CORRIENTE FUERA DEL ALCANCE.
Llenado / Rellenado
1. Retire el Tanque de Agua sujetando el Asa y tirando hacia arriba. Quite la Tapa del Tanque girando
en sentido contrario de las manecillas del reloj (hacia la izquierda).
2. Llene el Tanque con agua fría. NO llene con agua tibia o caliente.
NO AGREGUE ACEITES ESENCIALES, MEDICAMENTOS, O INHALANTES LÍQUIDOS como
VapoSteam® de Vicks
®
o Inhalantes Kaz en el Tanque de Agua. Hacerlo podría causar daño
al humidificador o anular la garantía.
3. Vuelva a colocar la Tapa del Tanque girando en el sentido de las manecillas del reloj (hacia
la derecha) para volver a enroscar en su lugar. NO apriete de más.
Coloque el Tanque en la Base del humidificador.
Paso 1 Paso 2
Paso 3
Luz de Reinicio
NOTA: EL TANQUE DE AGUA DEBE LLEVARSE UTILIZANDO LAS DOS MANOS; UNA MANO EN EL
ASA DEL TANQUE Y LA OTRA SOSTENIENDO LA PARTE INFERIOR DEL TANQUE.
Kaz USA, Inc. no asumirá responsabilidad por daños a la propiedad causados por derrames de agua.
1 Cda.
Usar Su Humidificador
Los inhalantes líquidos como el VapoSteam® Vicks o el Inhalant Kaz pueden usarse en el
dosificador de medicina. SÓLO USE LOS LÍQUIDOS QUE SON RECOMENDADOS PARA ESTE
TIPO DE HUMIDIFICADOR.
1.
Agregue 1 Cucharada de inhalante al Dosificador de Medicina. SOLO vierta inhalante en el Dosificador
de Medicina. NO vierta en la Chimenea de Vapor. NO AGREGUE INHALANTES LÍQUIDOS, ACEITES
ESENCIALES, O NINGÚN ADITIVO AL AGUA. HACERLO PUEDE TENER EFECTOS ADVERSOS EN EL
HUMIDIFICADOR Y ANULAR LA GARANTÍA.
2. Nota:
Algún residuo del inhalante puede permanecer en el Dosificador de Medicina después de su
uso. Para limpiar, asegúrese que el humidificador esté apagado, desconectado y enfriado al menos
20 minutos, y limpie con cuidado el residuo en el Dosificador de Medicina.
El Dosificador de Medicina se puede utilizar también con aceites esenciales. Agregue unas cuantas
gotas en el dosificador de medicina para disfrutar aún más. NUNCA agregue en el Tanque de Agua
o en el Depósito.
$
Paso 1
Paso 2
Paso 3
Paso 2
Paso 1
Inhalante Líquido
Usar Inhalante Líquido
Luz de Reinicio
Cuando se acabe el agua de su humidificador, la Luz de Reinicio se iluminará.
Para restablecer:
1. APAGUE ( ) el dispositivo.
2. Rellene y vuelva a colocar el Tanque de Agua.
3. Espere 5 minutos y ENCIÉNDALO. ( )
Nota: Si la Luz de Reinicio ( ) todavía está encendida, limpie el
Elemento Térmico (vea las instrucciones de Limpieza).
1. Encendido: Con la Perilla de Encendido en la posición de APAGADO ( ), enchufe el
humidificador lleno en un tomacorriente polarizado de 120 V~.
PRECAUCIÓN: Para evitar descargas eléctricas, NO enchufe el humidificador con
las manos mojadas.
2. Salida: Gire la Perilla de Encendido a alto ( ) o bajo ( ). Una luz verde indicará que el
humidificador está funcionando, pero tardará 3-4 minutos para que aparezca el vapor visible.
3. Nivel de Humedad: Una vez que se ha alcanzado un nivel de humedad cómodo, gire al ajuste
bajo. Un nivel de humedad cómodo es entre 40-60%.
Considere utilizar un monitor de humedad como el Monitor de Humedad V70 de Vicks para
mostrar la temperatura y humedad actuales de la habitación.Si se forma condensación en
paredes, ventanas, o alrededor de la unidad, apague el humidificador; el nivel de humedad
es muy alto.
PRECAUCIÓN: APAGUE EL HUMIDIFICADOR, DESCONÉCTELO Y ESPERE 20-30
MINUTOS PARA QUE LA UNIDAD SE ENFRÍE ANTES DE MOVERLA O LIMPIARLA. NO
OPERE SU HUMIDIFICADOR SIN EL TANQUE EN SU LUGAR O SI LA UNIDAD ESTÁ
VACÍA. NO OPERE SU HUMIDIFICADOR SIN LA CHIMENEA DE VAPOR, LA BANDEJA
DEL AGUA, LA CUBIERTA DEL ELEMENTO TÉRMICO, O EL DOSIFICADOR DE
MEDICINA DEBIDAMENTE ENSAMBLADOS.
Page 16

30 31
A
$
B
$
C
El Humidificador de Vapor Tibio de Vicks se puede utilizar con las VapoPads® de Vicks para
proporcionar hasta 8 horas de vapores relajantes. Una muestra gratis de VapoPad de mentol se
incluye con su humidificador. Para usar su unidad con almohadillas aromáticas:
2T
V
MINUTOS
Usar VapoPads® de Vicks
®
Paso 1
Paso 3
Paso 5 Paso 6
Paso 3
HORAS
Paso 4
Paso 1
Paso 2
$
Paso 1
Paso 2
Paso 3
Paso 4
Paso 4
Para mantener su humidificador funcionando de manera eficiente, limpie regularmente. Se
recomienda limpieza semanal. Todo el mantenimiento debe realizarse en la cocina o el cuarto de
baño, sobre una superficie resistente al agua, cerca de un grifo.
Para limpiar adecuadamente su humidificador, le recomendamos los procesos separados de
Eliminación de Sarro y Desinfección. Estos dos procesos deben realizarse por separado.
Uso Recomendado de las VapoPads®:
• No recomendado para bebés de menos de 4.5 kg (10 lb).
• Para niños entre 4.5-10 kg (10-22 lb). NO use más de 2 almohadillas en un período de 24 horas.
Ingredientes de la Almohadilla Aromática (VSP-19, VSP19FP, VSP19VPC, VSP-19 CAN): Aceite de
Eucalipto, Mentol, Glicol, Aceite de Hoja de Cedro y Otros.
1. Abra la Puerta de la Almohadilla Aromática.
2. Abra la Almohadilla Aromática rasgando la muesca en la bolsa de la almohadilla. NO toque la
almohadilla con las manos. Si toca la almohadilla, NO frote la cara o los ojos ya que puede causar irritación.
3. Inserte la Almohadilla Aromática de Vicks con al extremo angular orientado hacia el producto.
Se pueden insertar hasta dos almohadillas aromáticas. Cierre la puerta.
4. Después de 8 horas, deseche la almohadilla aromática. Para continuar usando las almohadillas
aromáticas, repita los pasos 1-4.
Limpieza del Humidificador
Antes de Limpiar:
1.
Apague y desconecte el humidificador. NUNCA limpie el humidificador mientras esté operando.
Si se ha usado el humidificador recientemente, espere 20-30 minutos para que la
unidad se enfríe antes de empezar el proceso de limpieza.
2. Quite cualquier accesorio, y vacíe la medicina del Dosificador de Medicina. Luego retire y vacíe
el Tanque de Agua y deje a un lado.
3. Jale el Pestillo de Cierre azul hacia el frente de la unidad (a) y levante la Chimenea de
Vapor (b) para retirarla. Quite la Bandeja del Agua de la Base tirando hacia arriba de la
Lengüeta (c) y de la abertura en la parte delantera del Pestillo, luego vacíe la Bandeja del Agua.
4. Vuelva a colocar la Bandeja del Agua y la Chimenea de Vapor. Estos deben estar en su lugar
para la limpieza. Vea la sección Reensamblaje.
Limpieza del Humidificador (Continuación)
Eliminación de Sarro:
Mantener el Elemento Térmico libre de sarro ayudará al humidificador a operar eficientemente.
1. Retire el Tanque y vierta lentamente 2 tazas (.5 litros) de vinagre blanco destilado, sin diluir en
el Depósito de la Bandeja de Agua. NO vierta vinagre sobre el Pestillo de Cierre azul. Solo vierta
en el Depósito profundo. Nota: Vierta lentamente para dar suficiente tiempo para que el
vinagre fluya del Depósito a la Cámara de Calentamiento. El vinagre comenzará
lentamente a llenar la Cámara de Calentamiento, ubicada debajo de la Chimenea de Vapor.
Permita que remoje durante 20 minutos para suavizar el sarro en el Elemento Térmico.
Pasos para la eliminación de sarro en el Tanque de Agua:
Vierta vinagre adicional en el Tanque de Agua, vuelva a colocar la Cubierta y agite para
cubrir el interior del Tanque. Use un paño humedecido con vinagre para eliminar el sarro en el
interior del Tanque y la Tapa.
2. Retire la Chimenea de Vapor deslizando suavemente el Pestillo de Cierre azul hacia la parte
delantera de la unidad (a) y levantando la Chimenea (b).
3. Retire la Cubierta del Elemento Térmico levantándola de la abertura redonda grande y alejándola
de la Chimenea.
4. Moje las cerdas de un cepillo suave con vinagre de la Bandeja del Agua y limpie suavemente la
superficie del Elemento Térmico, la Cubierta del Elemento Térmico y la Cámara de Calentamiento
para remover los depósitos minerales.
NO USE CEPILLOS DUROS, LANA DE ACERO U OTROS ABRASIVOS DUROS EN EL
ELEMENTO TÉRMICO. HACERLO DAÑARÁ EL ELEMENTO TÉRMICO. NO VIERTA
VINAGRE DIRECTAMENTE SOBRE EL ELEMENTO TÉRMICO
NOTA: Si el sarro aún es visible en el Elemento Térmico, humedezca una toalla de papel con vinagre, y
envuélvala alrededor del Elemento Térmico. Deje reposar durante 30 minutos o hasta que el sarro se afloje.
IMPORTANTE: Retire la toalla de papel del Elemento Térmico antes de proceder al siguiente paso.
5. Retire la Bandeja del Agua levantándola suavemente de la Lengüeta y de la abertura en la parte
delantera del Pestillo, y vacíe el vinagre en el fregadero. Enjuague la Bandeja del Agua y la Cubierta
del Elemento Térmico con agua hasta que desaparezca el olor a vinagre.
6. Con un paño suave y húmedo, limpie el Elemento Térmico para eliminar cualquier exceso de sarro.
Vuelva a colocar la Cubierta del Elemento Térmico en la parte inferior de la Chimenea de Vapor. Sólo
se ajustará de una manera.
PRECAUCIÓN: NO ENJUAGUE EL ELEMENTO TÉRMICO O LA CHIMENEA DE VAPOR EN EL
FREGADERO O BAJO AGUA CORRIENTE, YA QUE EL AGUA PUEDE ENTRAR EN LAS PARTES
INTERNAS. HACERLO DAÑARÁ EL HUMIDIFICADOR Y ANULARÁ LA GARANTÍA. SOLO USE
UN UNA TOALLA DE PAPEL O PAÑO MOJADO PARA LIMPIAR ESTA PARTE.
A
$
B
Paso 2
Page 17

32 33
A
$
B
Paso 3
Paso 2
Paso 5
1
2
5
4
3b
3a
Paso 4
Paso 1
C
½ Ctda.
A
½ Gal.
(1,9 l)
Paso 6
1. Mezcle ½ galón (1.9 L) de agua con ½ cucharadita de cloro. Vierta la solución de cloro en
el Tanque de Agua. Vuelva a colocar la Tapa del Tanque y agítelo suavemente para cubrir
todo el interior.
NOTA : Usar más de ½ cucharadita de cloro en ½ galón (1.9 L) de agua puede resultar en
daños al humidificador.
2. Coloque el Tanque de Agua en la Base. La solución de cloro se drenará en la Bandeja de
Agua. Deje remojar durante 20 minutos.
3. Retire el Tanque y vacíe lentamente la solución de cloro en el fregadero. Enjuague con
agua hasta que desaparezca el olor a cloro.
4. Quite la Chimenea de Vapor deslizando suavemente el Pestillo de Cierre azul hacia la parte
delantera de la unidad (a) y jalando la Chimenea hacia arriba (b).
5. Retire la Cubierta del Elemento Térmico levantándola de la abertura redonda grande
y alejándola de la Chimenea, y enjuague con Agua. Con una toalla de papel suave y
húmeda, limpie el Elemento Térmico hasta que desaparezca el olor a cloro.
PRECAUCIÓN: NO ENJUAGUE EL ELEMENTO TÉRMICO O LA CHIMENEA DE VAPOR EN
EL FREGADERO O BAJO AGUA CORRIENTE, YA QUE EL AGUA PUEDE ENTRAR EN LAS
PARTES INTERNAS. HACERLO DAÑARÁ EL HUMIDIFICADOR Y ANULARÁ LA
GARANTÍA. SOLO USE UN TOALLA DE PAPEL O PAÑO MOJADO PARA LIMPIAR
ESTA PARTE.
6. Retire cuidadosamente la Bandeja de Agua levantándola por la Lengüeta de la Bandeja de Agua
y de la abertura en frente del Pestillo, y vacíe la solución de cloro en el fregadero. Enjuague la
Bandeja del Agua y la Cubierta del Elemento Térmico con agua hasta que desaparezca el olor
a cloro. Seque la Bandeja del agua.
Limpieza del Humidificador (Continuación)
Desinfección:
Antes de iniciar el proceso de desinfección, siga los Pasos 1-4 en la sección Antes de Limpiar.
NOTA: El cloro puede manchar la ropa. Se recomienda que use guantes de goma durante el
proceso para proteger sus manos
Opere el lavavajillas en el ciclo de trabajo ligero o normal. NO lave con artículos/platos sucios.
NO use detergentes.
Nota: NO coloque las piezas en la rejilla inferior del lavavajillas. Hacerlo podría dañar las piezas del
humidificador y del lavavajillas.
Seguro para el Lavavajillas:
Las siguientes piezas son seguras para la REJILLA SUPERIOR de lavavajillas residenciales que
funcionan en temperaturas inferiores a 70°C/158°F.
Cubierta del Elemento Térmico
Bandeja del Agua
Dosificador de Medicina
LA CHIMENEA DE VAPOR, LA BANDEJA INFERIOR Y EL TANQUE DE AGUA NO SON SEGUROS PARA
EL LAVAVAJILLAS.
Colocar estas piezas en el lavavajillas dañará su humidificador y no podrá operar correctamente.
Para limpiar el área de la almohadilla aromática, limpie suavemente el área de calefacción de la
almohadilla aromática con un paño suave y húmedo.
NO USE VINAGRE NI SOLUCIÓN DE CLORO PARA LIMPIAR ESTA ÁREA.
1. Vuelva a colocar la Bandeja del Agua
en la Base.
2. Asegúrese que la Cubierta del Elemento
Térmico esté bien colocada en la parte
inferior de la Chimenea de Vapor,
encajándola en su lugar.
3. Deslice el Pestillo de Cierre azul hacia
la parte delantera de la unidad (a) y
asegure la Chimenea de Vapor a la
Base (b). Asegúrese que la Chimenea
de Vapor esté bien colocada en la Base
y el Pestillo de Cierre esté en la posición
de cerrado.
4. Presione el Dosificador de Medicina
nuevamente en su lugar.
5. Coloque la Tapa del Tanque en el
Tanque de Agua y vuelva a colocarlo
en la unidad.
Reensamblaje
Cuidado y Almacenaje
al Final de Temporada
Siga las instrucciones de limpieza cuando el humidificador no se utilice por lo menos en una semana,
o al final de la temporada. Al final de la temporada, quite todos los accesorios del humidificador.
Seque completamente el humidificador antes de guardarlo. NO almacene con agua dentro de la Bandeja
del Agua o del Tanque de Agua. Guarde la unidad en la caja original y almacene en un lugar fresco y seco.
Page 18

34 35
NOTA: El incumplimiento de mantener esta unidad limpia de depósitos minerales, normalmente
contenidos en cualquier suministro de agua afectará la eficiencia de operación de esta unidad. Si el
cliente no sigue estas instrucciones puede anular la garantía.
Solución de Problemas
Solución
• Conecte la unidad
• Revise los circuitos, fusibles
y el tomacorriente.
• Espere 3-4 minutos después
de encenderlo
• Llene el Tanque de Agua
• Coloque en superficie nivelada
• Siga las Instrucciones
de Limpieza
• Rellene el Tanque de Agua
• Siga el Procedimiento de
Reinicio
• Vea las Instrucciones de
Limpieza
• Revise si el Tanque tiene fugas
y reemplace si es necesario
• Apriete la Tapa del Tanque
• Revise la Bandeja del Agua
y asegúrela a la Base
• Disminuya la salida de vapor
al ajuste bajo o abra la puerta
de la habitación
Si su Humidificador no está funcionando adecuadamente, consulte lo siguiente:
Problema
• La Perilla de Encendido está
colocada en “Encendido”
y la luz de la Perilla de
Encendido está apagada
• El dispositivo está
“Encendido” y no sale vapor
• Se produce poco o nada
de vapor
• Luz de Reinicio encendida
• El agua se desborda
del Depósito
• Se forma condensación
alrededor del humidificador
o de las ventanas alrededor
del humidificador o de las
ventanas
Causa Posible
• La unidad no está
conectada
• Tomacorriente sin energía
• El agua no se ha calentado
a hervir para producir vapor
• No hay agua en el Tanque
• La unidad no está nivelada
•
Depósitos minerales en el
Elemento Térmico o en la
Bandeja del Agua
• Tanque de Agua vacío
• La unidad no se reinicia
después de rellenarla
• El Elemento Térmico está
cubierto de sarro
• El Tanque puede
estar dañado
• La Tapa del Tanque no
está apretada
• La Bandeja del Agua no está
colocada correctamente
• La Intensidad del Vapor
está muy alta para el
tamaño de la habitación o
Para preguntas, soporte técnico o para ordenar partes de reemplazo, contacte Servicio al Cliente.
Llámenos lada gratuita al: 1-800-VAPOR-1-2 (1-800-827-6712)
Horas: Lun-Vi 8:00AM-7:00PM EST
Correo Electrónico: consumerrelations@kaz.com
O visite nuestro sitio web en: www.vickshumidifiers.com
Por favor asegúrese de especificar el número de Modelo VWM845.
Servicio al Cliente
Clasificación Eléctrica: 120 V~, 60 Hz.
Capacidad: 1 galón (3.7 L)
Si tiene algún problema, por favor contacte Servicio al Cliente. No devuelva este humidificador al
lugar original de compra.
No intente abrir la carcasa del motor o manipular la Perilla de Encendido usted mismo. Hacerlo
podría anular su garantía y causar lesiones personales o daños al producto.
Especificaciones
Garantía Limitada de tres años
ANTES DE USAR ESTE PRODUCTO, POR FAVOR LEA COMPLETAMENTE LAS
INSTRUCCIONES.
A. La presente garantía limitada de 3 años cubre la reparación o reemplazo del producto si éste
presenta un defecto de fábrica o de mano de obra. Esta garantía excluye todo daño resultante
del uso comercial, abusivo o inadecuado del producto, o de daños asociados. Los defectos
resultantes del desgaste normal no se consideran defectos de fábrica en virtud de la presente
garantía. KAZ NO SERÁ CONSIDERADA RESPONSABLE DE DAÑOS FORTUITOS O INDIRECTOS
DE NINGÚN TIPO. TODA GARANTÍA IMPLÍCITA DE CALIDAD COMERCIAL O DE CONVENIENCIA
CON UN FIN ESPECÍFICO RELACIONADA CON ESTE PRODUCTO TENDRÁ LA MISMA VIGENCIA
QUE LA PRESENTE GARANTÍA.
En ciertos lugares no se permite la exclusión o limitación de
daños fortuitos o indirectos, ni los límites de duración aplicables a una garantía implícita. Por
consiguiente, es posible que estas limitaciones o exclusiones no se apliquen en su caso. Esta
garantía le confiere ciertos derechos legales específicos. Es posible que usted también tenga
otros derechos legales, los que varían según la jurisdicción. La presente garantía sólo es
válida para el comprador inicial del producto a partir la fecha de compra.
B. A su discreción, Kaz reparará o reemplazará el presente producto si se constata que presenta
un defecto de fábrica o de mano de obra.
C. Esta garantía no cubre los daños ocasionados por tentativas de reparación no autorizadas
o por todo uso que no esté en concordancia con el presente manual.
D. Esta garantía no cubre los filtros, prefiltros, bombillas UV u otros accesorios (si se incluyen)
excepto por defectos de material o mano de obra.
Llámenos lada gratuita al: 1-800-477-0457
Correo Electrónico: consumerrelations@kaz.com
Por favor asegúrese de especificar el número de modelo.
NOTA: SI TIENE PROBLEMAS, POR FAVOR LLAME PRIMERO A SERVICIO AL CLIENTE
O CONSULTE SU GARANTÍA. NO DEVUELVA AL LUGAR ORIGINAL DE COMPRA. NO
INTENTE ABRIR LA CARCASA DEL MOTOR USTED MISMO, HACERLO PODRÍA ANULAR SU
GARANTÍA Y CAUSAR DAÑO AL PRODUCTO O DAÑOS CORPORALES.
Page 19

36
A001738R0
26FEB18
© 2018 Todos los Derechos Reservados
Kaz USA, Inc., una Empresa de Helen of Troy
400 Donald Lynch Blvd., Suite 300, Marlborough, MA 01752
Este producto es fabricado bajo licencia de The Procter & Gamble Company.
VICKS y otras marcas registradas asociadas son propiedad de The Procter & Gamble Company
Protec es una marca registrada de Helen of Troy Limited.
Aquastat es una marca registrada de K2 Concepts Inc., Atlanta GA
Distribuido por Kaz Canada Inc., una Empresa de Helen of Troy
6700 Century Ave., Suite 210, Mississauga, ON L5N 6A4
Contáctenos al teléfono 1-800-VAPOR-1-2 (1-800-827-6712) o al sitio web www.vickshumidifiers.com
Hecho en China
For Responsible recycling, please visit:
www.RecycleNation.com
Para reciclar responsablemente, por favor visite:
www.RecycleNation.com
© 2018 Tous droits réservés.
Kaz USA, Inc., une société de Helen of Troy
400 Donald Lynch Blvd., Suite 300, Marlborough, MA 01752
Ce produit est fabriqué sous licence de la société Procter & Gamble.
VICKS et les marques de commerce connexes appartiennent à la société Procter & Gamble.
Protec est une marque déposée de Helen of Troy Limited.
Aquastat est une marque déposée de K2 Concepts Inc., Atlanta GA.
Distribué par Kaz Canada, Inc., une société de Helen of Troy
6700 Century Ave., Suite 210, Mississauga, ON L5N 6A4
Pour nous joindre : Composez le 1 800 VAPOR 1 2 (1 800 827-6712) ou visitez notre site
Web à www vickshumidifiers.com
Fabriqué en Chine
© 2018 All Rights Reserved.
Kaz USA, Inc., a Helen of Troy Company
400 Donald Lynch Blvd., Suite 300, Marlborough, MA 01752
This product is manufactured under license from The Procter & Gamble Company.
VICKS and other associated trademarks are owned by The Procter & Gamble Company.
Protec is a registered trademark owned by Helen of Troy Limited.
Aquastat is a registered trademark of K2 Concepts Inc., Atlanta GA
Distributed by: Kaz Canada Inc., a Helen of Troy Company, 6700 Century Ave., Suite 210, Mississauga, ON L5N 6A4
To contact us call 1-800-VAPOR-1-2 (1-800-827-6712) or visit our website at www.vickshumidifiers.com
Made in China
Page 20

Brand: Vicks
Category: Humidifier
Model:
VWM845
Subject: Owners Manual
Artwork Part #: A001738R0
Die Line Part #: N/A
Region: US
Flat Size:
IN: W11 x H8.5
MM: W279.4 x H215.9
Folded Size:
IN: W5.5 x H8.5
MM: W139.7 x H215.9
Material:
Page count: 36 (English, French, Spanish)
70g wood paper
Revision: 9
Release Date:
Date:
26FEB18
Scale: 1/1
Re-release Date:
Colors:
Special Instructions:
Black
100%
Kaz USA, Inc., a Helen of Troy Company
Creative Services
Marlborough, 01752 MA, USA
+1 508 490 7000
Quality Requirement of Artwork and Quality
Clarification Process of Artwork Printing:
Meet Eng-QS-06&02
26FEB18
CREATIVE DEPARTMENT ARTWORK SPECIFICATIONS
 Loading...