

Page 1

VUL520
Series
Use And Care Manual
This humidifier adds water vapor to the surrounding air helping the user to breathe better. If you have
any questions about the operation of your Vicks Mini FilterFree Cool Mist Humidifier, call our toll-free
Consumer Relations line at 1-800-VAPOR-1-2 or e-mail us at Consumerrelations@kaz.com.
Ultra Quiet Operation
Auto shut-off
Scent Pads for soothing scent
MiniFilterFree
Cool Mist Humidifier
IMPORTANT!
READ AND SAVE THESE INSTRUCTIONS
Page 2

2
1. The appliance should always be placed on
a firm, flat, waterproof surface at least four
feet (1.2 m) away from bedside, 12 inches
(30 cm) from the wall and out of reach
of patients, children and pets. Be sure the
appliance is in a stable position and the
power cord is away from heated surfaces
and out of the way to prevent
the humidifier from being tipped over.
2. The appliance should not be left
unattended in a closed room since air
could become saturated and leave
condensation in front of unit, on walls
and furniture. Leave room door partly
open. Do not aim Mist Outlet directly at
children, walls or furniture.
3. Before using the appliance, extend the
cord and inspect for any signs of damage.
Do not use the unit if the cord has been
damaged. Do not operate with power
cord coiled or twist tie in place.
4. The appliance has a polarized plug (one
blade is wider than the other) as a safety
feature. This plug will fit into a polarized
outlet only one way. If the plug does not
fit fully into the outlet, reverse the plug.
If it still does not fit, contact a qualified
electrician. Do not attempt to defeat this
safety feature.
5. To avoid fire or shock hazard, plug
the appliance directly into a 120V AC
electrical outlet. To avoid risk of fire,
shock or personal injury, do not use
an extension cord or power strip.
6. The appliance should always be unplugged
and emptied when not in operation or
while being cleaned. Shut off and unplug
humidifier before moving. Do not move or
tilt humidifier while it is in operation. Plug
and unplug unit with dry hands. Never pull
by cord.
7. Do not operate the appliance without
water. Turn off and unplug unit when tank
is empty.
8. Appliance requires regular cleaning. Refer
to and follow cleaning instructions.
9. Do not operate outdoors; this appliance
is intended for indoor residential use only.
10. Do not cover or insert objects into any
openings on the unit.
11. Do not attempt to repair or adjust any
electrical or mechanical functions on this
appliance. Doing so will void your warranty.
12. Do not place in direct sunlight, high
temperature areas or near computers
or sensitive electronic equipment.
13. Do not touch the nebulizer while the unit
is plugged in as burns could result.
14. Do not touch skin with exposed VapoPad
®
or place VapoPad® on furniture, fabric,
bedding or plastic.
15. Do not add any medications (e.g. Kaz
Inhalant or Vicks VapoSteam®) into
Mist Outlet, Base, Water Reservoir or
Water Tank.
Important Safety Instructions
READ AND SAVE THESE IMPORTANT SAFETY INSTRUCTIONS
BEFORE USING THIS APPLIANCE
WHEN USING ELECTRICAL APPLIANCES, BASIC PRECAUTIONS SHOULD ALWAYS
BE FOLLOWED TO REDUCE THE RISK OF FIRE, ELECTRICAL SHOCK AND INJURY TO
PERSONS, INCLUDING THE FOLLOWING:
Page 3
3
This device complies with Part 18 of the FCC rules.
Warning: Changes or modifications to this unit not expressly approved by the party responsible
for compliance could void the user’s authority to operate the equipment. This equipment has
been tested and found to comply within the limits for Consumer ISM equipment, pursuant to Part
18 of the FCC rules. These limits are designed to provide reasonable protection against harmful
interference in a residential installation. This equipment generates, uses and can radiate radio
frequency energy, and if not installed and used in accordance with the instructions, may cause
harmful interference with radio communications. However, there is no guarantee that interference
will not occur in a particular installation. If this equipment does cause harmful interference to radio
or television reception, which can be determined by turning the equipment off and on, the user is
encouraged to try to correct the interference by one or more of the following measures:
• Reorient or relocate the receiving antenna.
• Increase the separation between equipment and receiver.
• Connect the equipment into an outlet on a circuit different from that to which the
receiver is connected.
• Consult the dealer or an experienced radio TV technician for help.
Vicks VUL520 Series Humidifier
Page 4
4
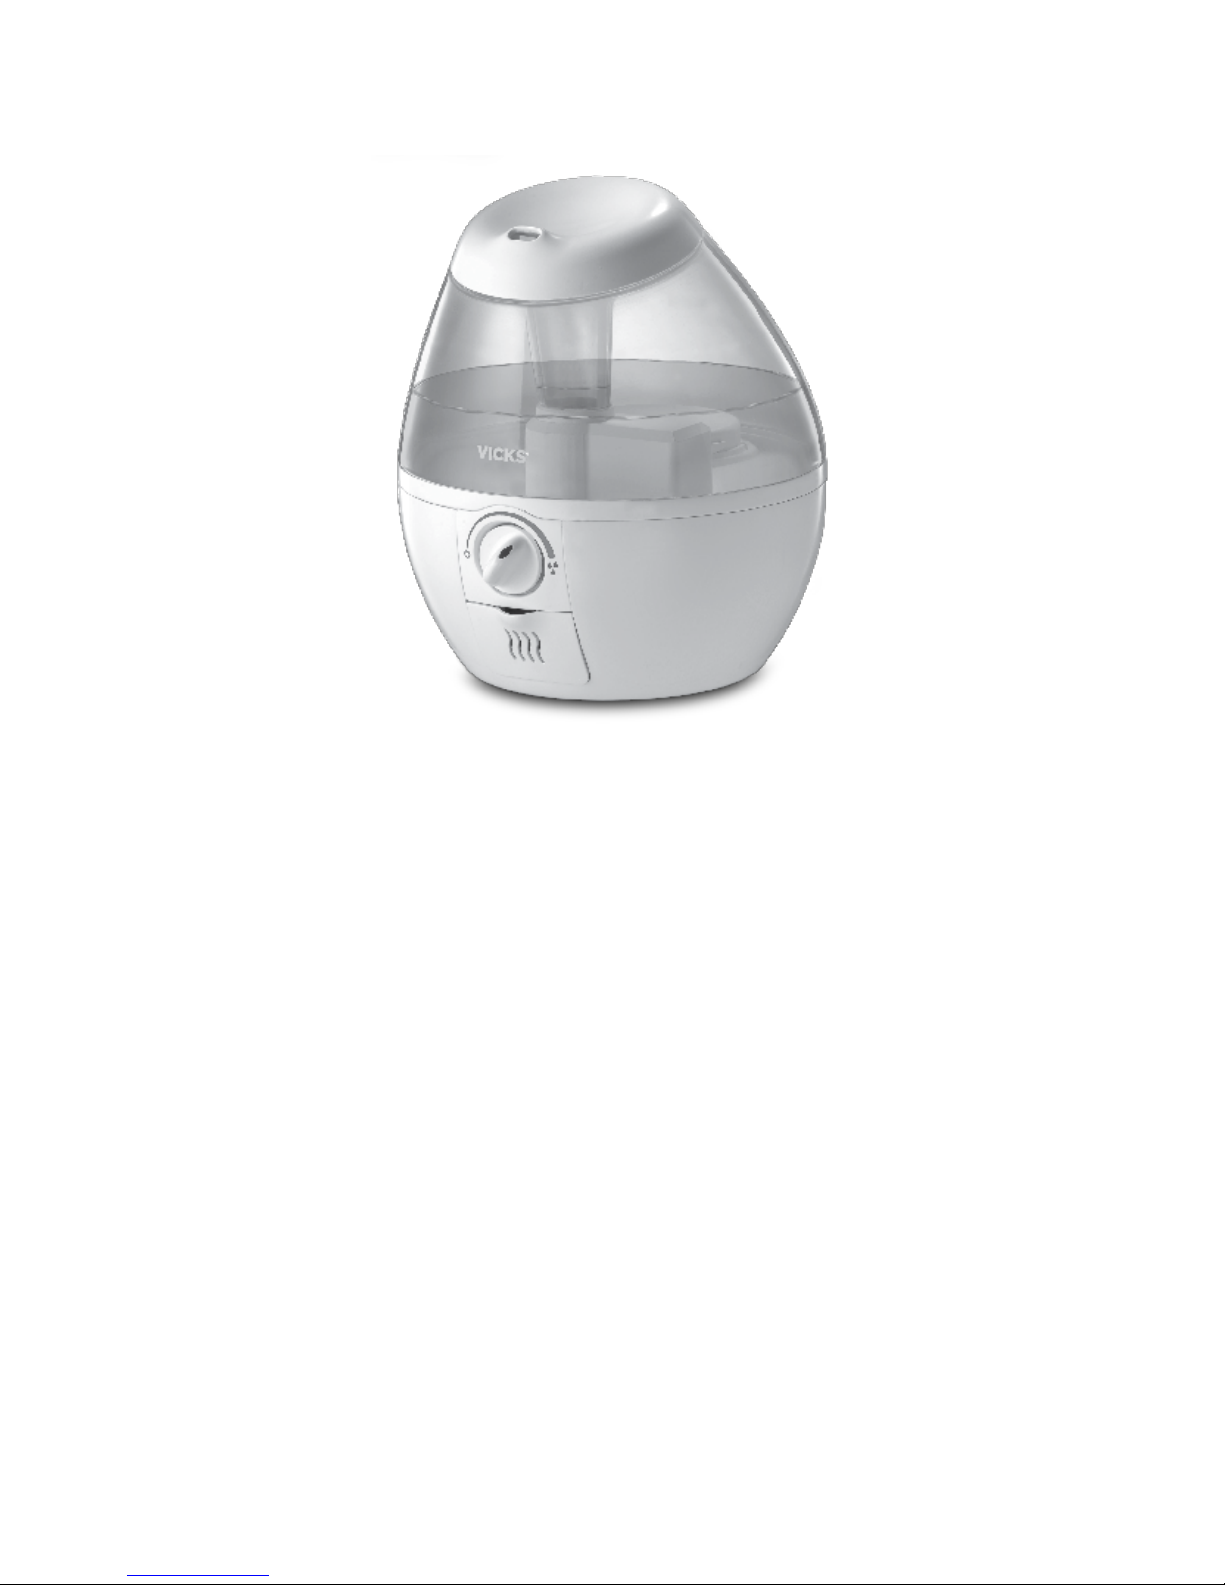
Vicks® Mini FilterFree Cool Mist Humidifier (Model VUL520)
The following optional accessories work great with your humidifier.
VUL520 Series Accessories
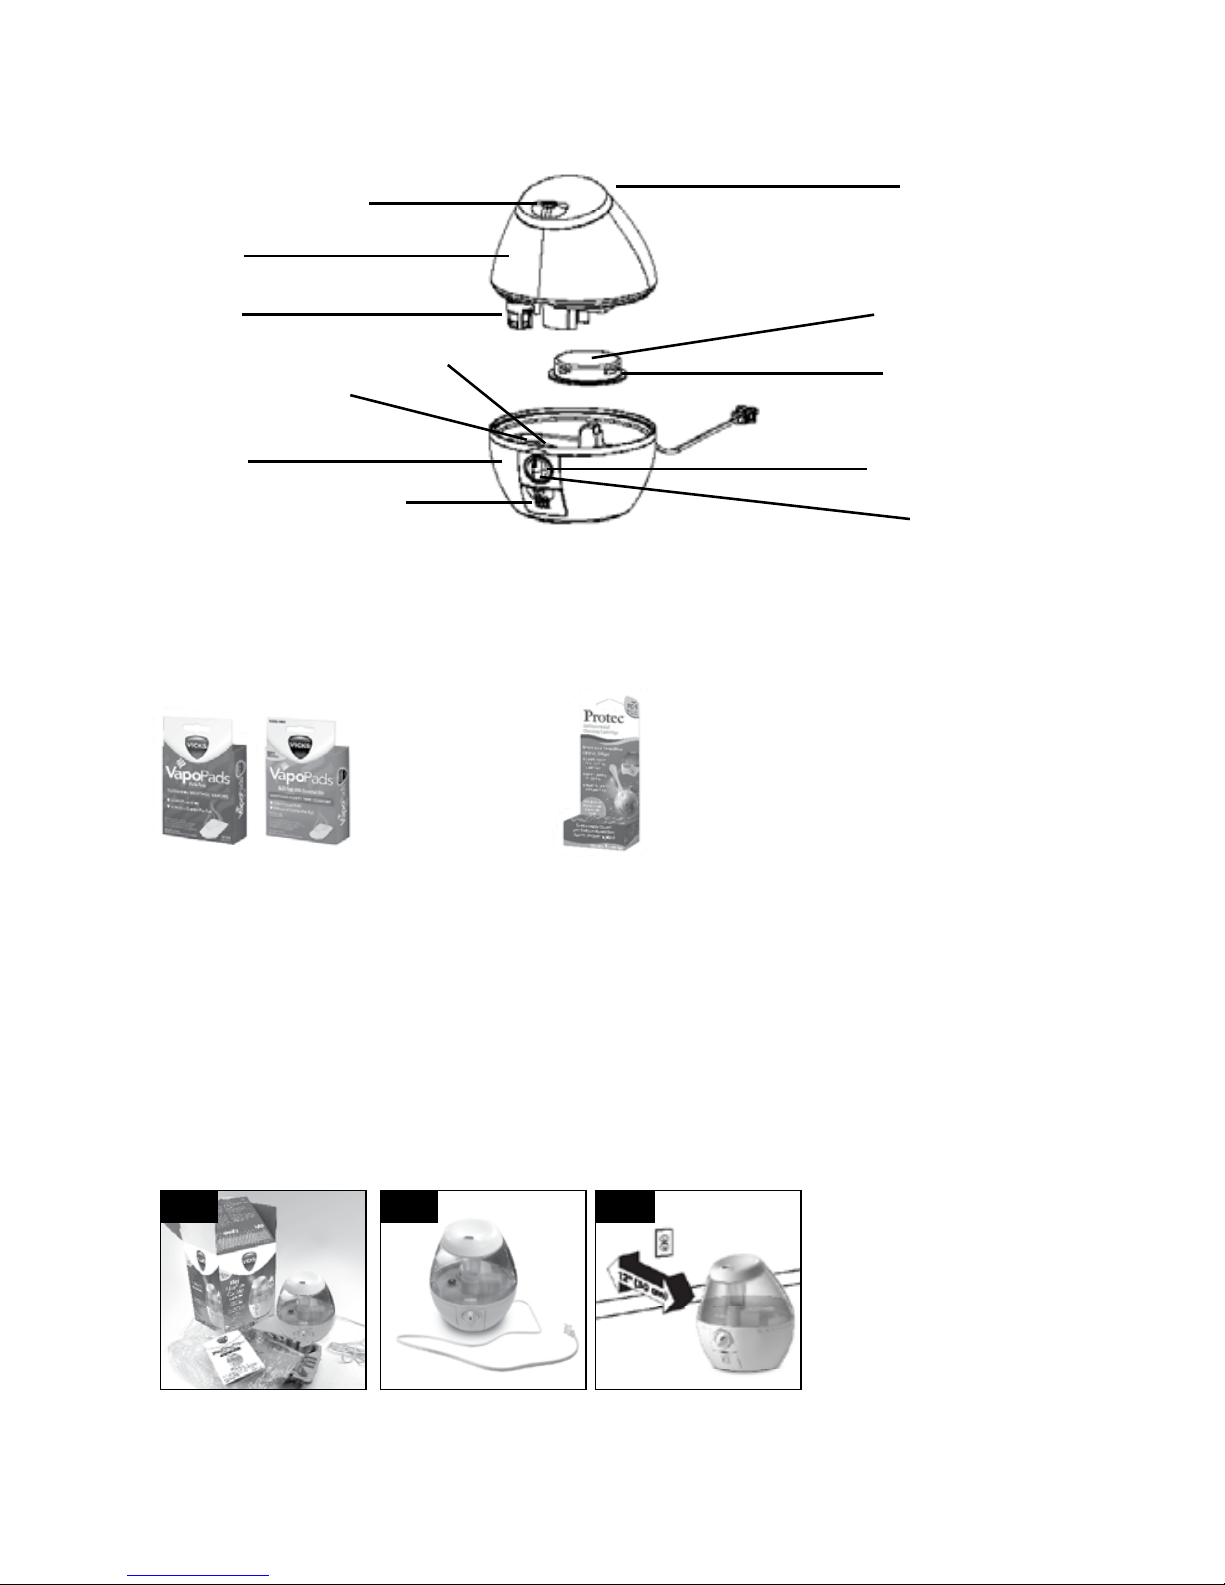
Vicks VapoPads
Provide soothing menthol (VSP-19 or
VSP-19-CAN) or lavender/rosemary
(VBR-5, US only) vapors.
(one menthol VapoPad® included)
Protec Cleaning Cartridge, PC-1,
PC-1C or PC-2
Helps keep your humidifier cleaner,
longer. It also continuously cleans and
protects humidifiers against bacteria &
mold. Keeps cleaning for 30 days.
1. Remove packging materials. Keep instructions.
2. Remove twist tie and extend power cord.
3. Place on a firm, level, water resistant surface a minimum of 12” (30cm) from any walls.
Setting Up Your Humidifier
Step 2 Step 3 Step 1
Carrying
Handle
Tank
Cap Seal
Tank Cap
Float
Scent Pad Door
Night Light
Power Knob
Base
Nebulizer
Water
Reservoir
Mist Outlet
Page 5
5
NOTE: Tank should be carried using two hands. One hand using carrying handle located on tank top
and other hand supporting the base of the tank.
Kaz will not accept responsibility for property damage caused by water spillage.
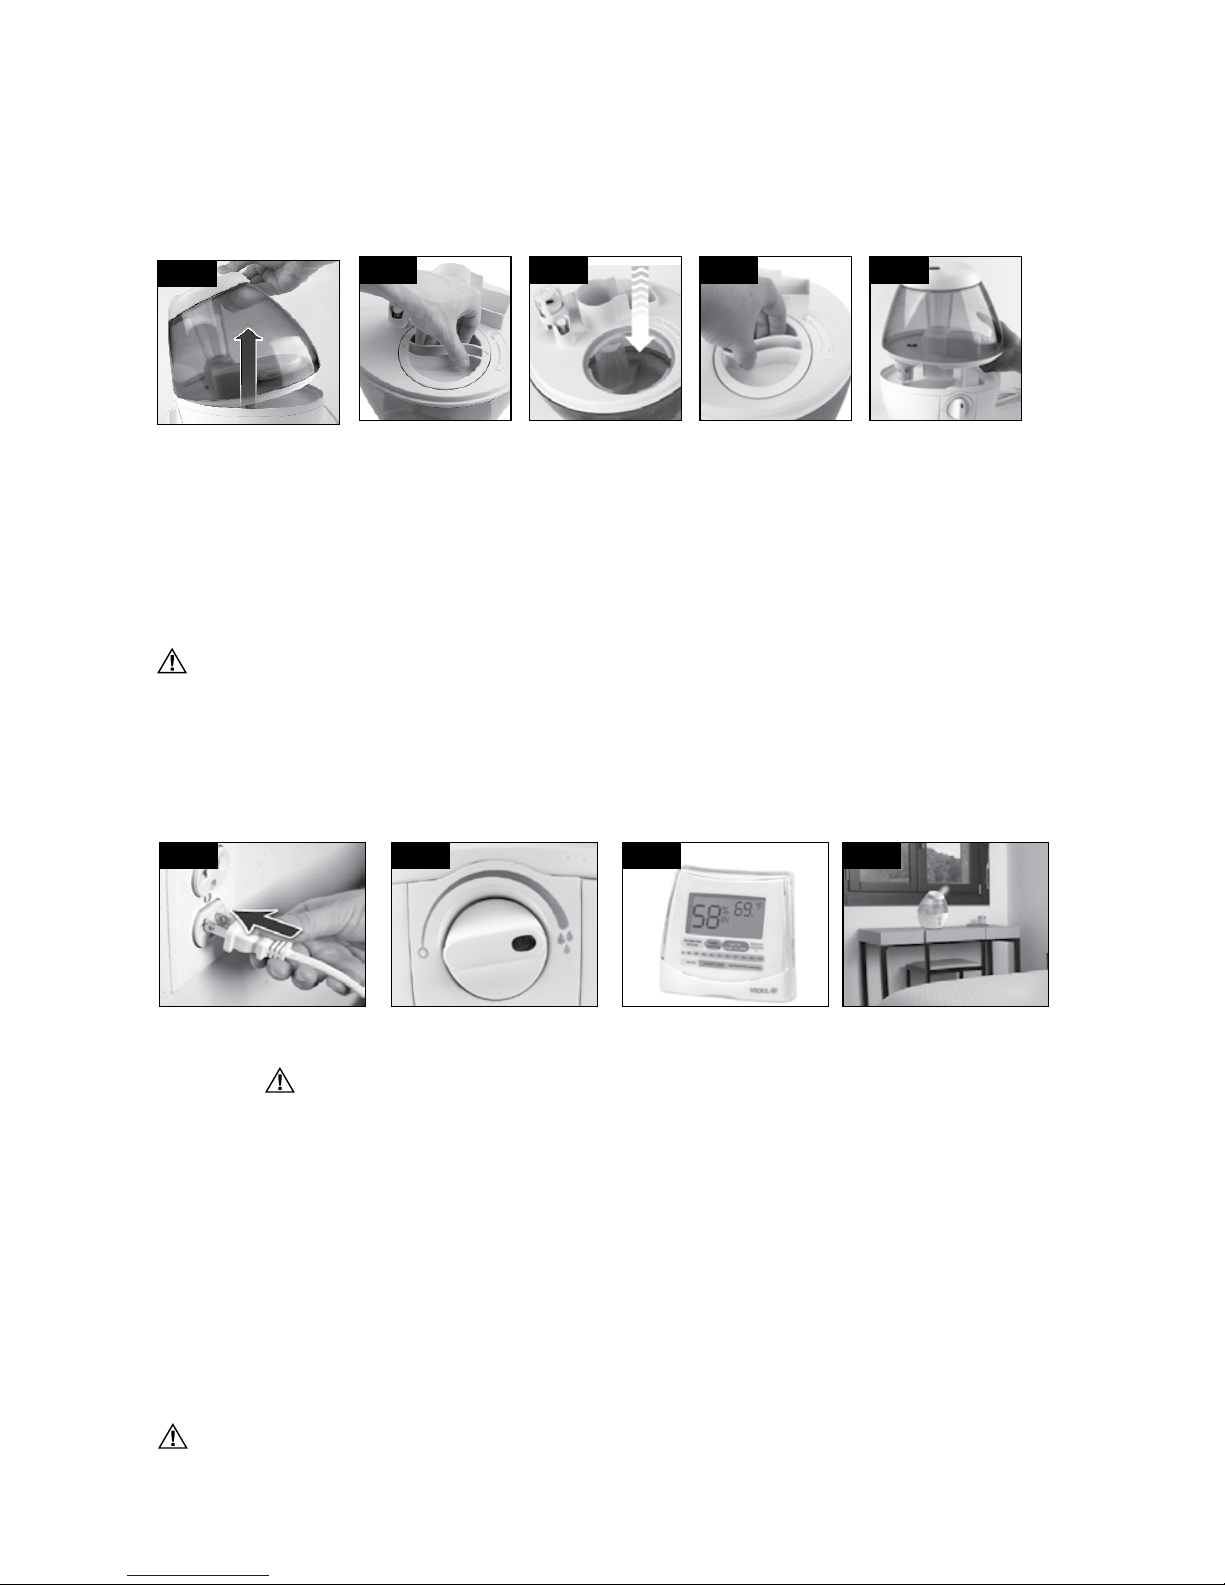
Filling/Refilling
Operating
1. Remove Tank and turn upside down.
2. Remove Tank Cap in the direction of the open lock sign to remove cap.
3. Fill Tank with cool water. Do not fill with warm or hot water.
4. Securely replace Tank Cap, aligning arrow to lock symbol.
5. Place Tank back on Base
CAUTION: USE CARE WHEN HANDLING WATER TANK TO AVOID UNNECESSARY
IMPACT. BANGING OR DROPPING THE WATER TANK COULD RESULT IN DAMAGE
TO THE TANK THAT WILL CAUSE LEAKING.
Step 1
Step 2 Step 3
1. Power: With the Power Knob in the off position, plug humidifier into a polarized 120V
outlet. CAUTION: TO AVOID ELECTRIC SHOCK DO NOT PLUG HUMIDIFIER INTO
OUTLET WITH WET HANDS.
2. Output: Turn the Power Knob to highest setting.
3. Humidity Level: When a comfortable humidity level is reached turn Power Knob
to a lower setting. A comfortable humidity level is between 40-60%.
To monitor your humidity level use a humidity monitor such as the Vicks V70 or
V70-CAN model.
If you notice condensation on the walls, windows or around unit, your humidity level is too high.
Turn humidifier off.
4. Direct mist output away from walls, furniture and bedding.
CAUTION: BEFORE MOVING HUMIDIFIER, TURN OFF, UNPLUG AND EMPTY THE
HUMIDIFIER.
Step 1 Step 2 Step 3
Step 4 Step 5
Step 4
4
Page 6
6
Step 2
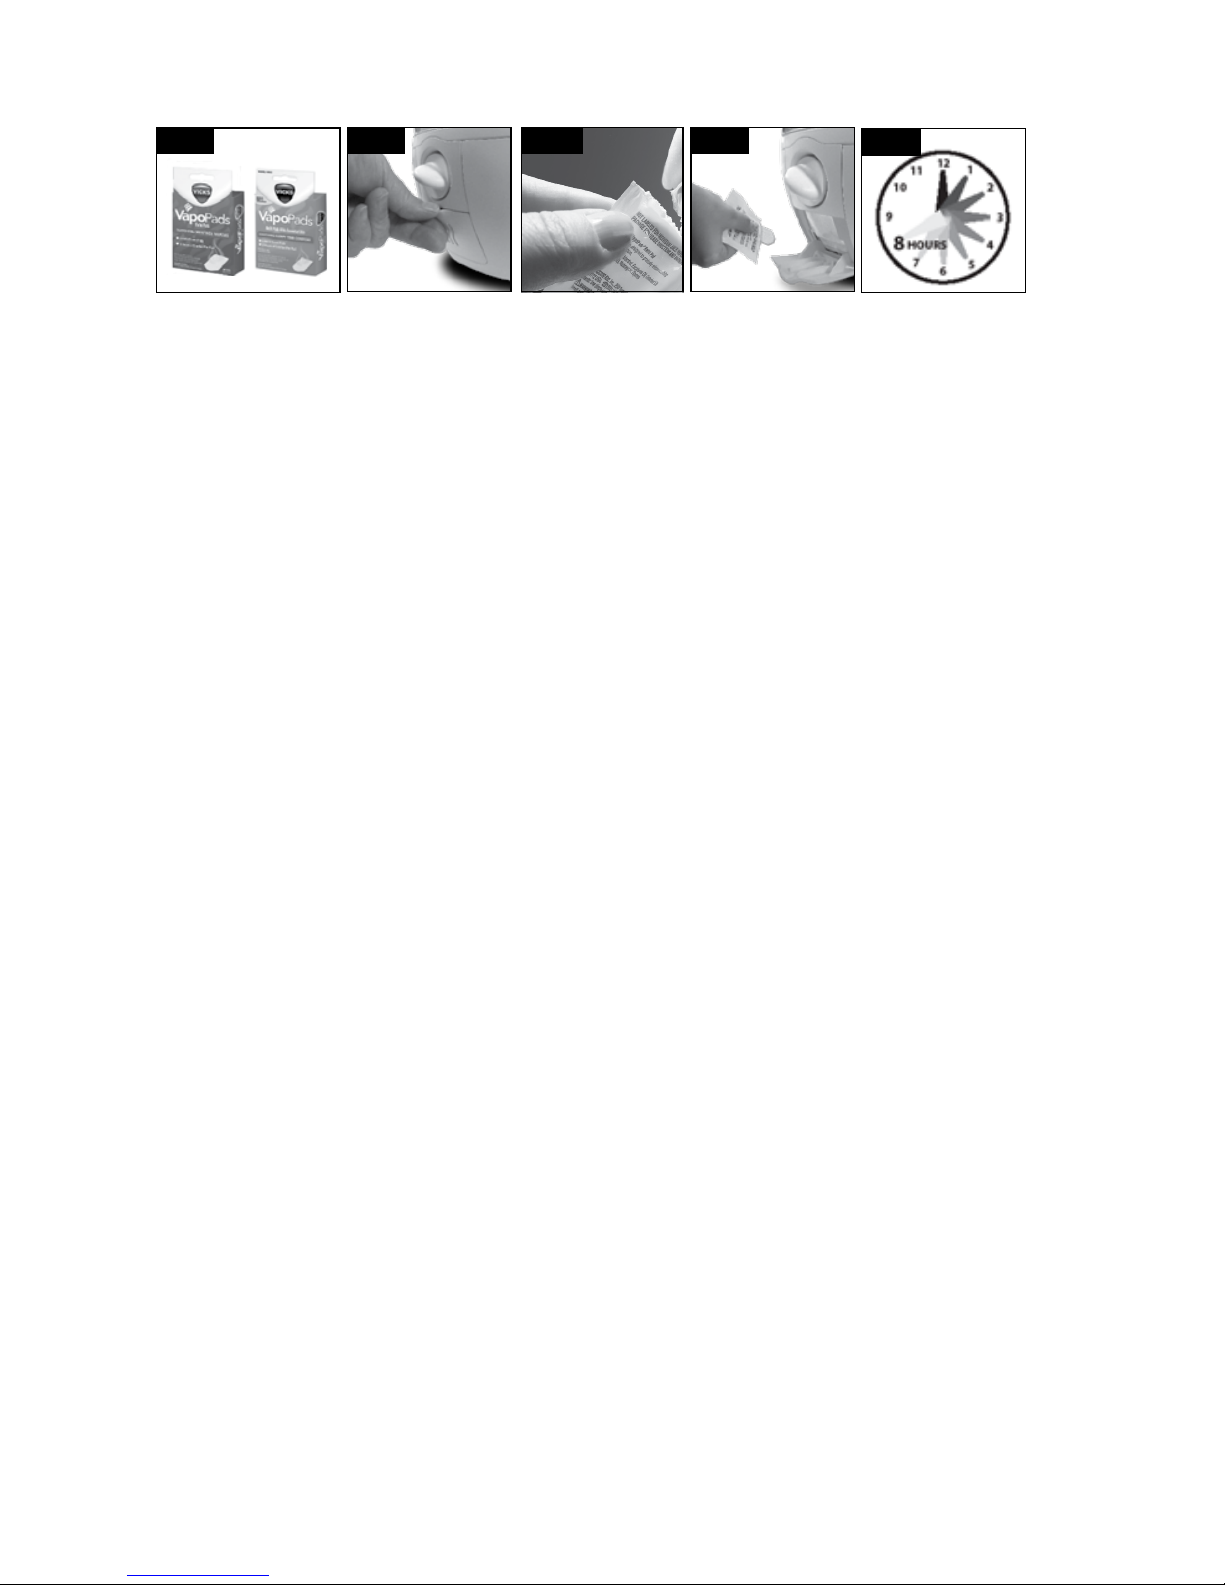
1. Use Vicks VapoPads
®
, VSP-19 series or VBR-5 series with your humidifier to provide up
to 8 hrs of soothing vapors.
2. Open Scent Pad Door.
3. Open VapoPad
®
by tearing notch on pad bag. Do not touch pad with hands.
If pad is touched do not rub face or eyes as it may cause irritation.
4. Insert VapoPad
®
with angled end facing towards the product and close door.
5. After 8 hrs discard scent pad. To continue using scent pads, repeat steps 1-4.
VapoPad® Recommended Usage:
• Not recommended for infants under 10 lbs (4.5 kg).
• For children between 10-22 lbs (4.5-10 kg ) do not use more than 2 pads in a 24 hr period.
Scent Pad Ingredients: VSP-19, VSP-19-CAN: Eucalyptus Oil, Menthol, Glycol,
Cedar Leaf Oil & Others
Using Scent Pads
Step 1
Step 3
Step 4
Step 5
Water Quality and Your Humidifier
High mineral content in your water, also known as “hard water” may cause a white mineral residue
to accumulate on surfaces in the room near the humidifier. This mineral residue is commonly referred
to as “White Dust.” The higher the mineral content or hardness of your water, the greater the
potential that you may have white dust.
“White Dust” is not a result of a defect or flaw in the humidifier. It is a result of the amount of
minerals suspended in the water you are using.
If you live in a hard water area the use of distilled water will minimize the production of white dust.
Page 7
To properly clean your humidifier we recommend the separate processes of Scale Removal and
Disinfecting shown below. These two processes must be performed separately.
All maintenance should be done in the kitchen or bathroom on a water resistant surface near
a faucet. DO NOT wash any components of this humidifier in the dishwasher.
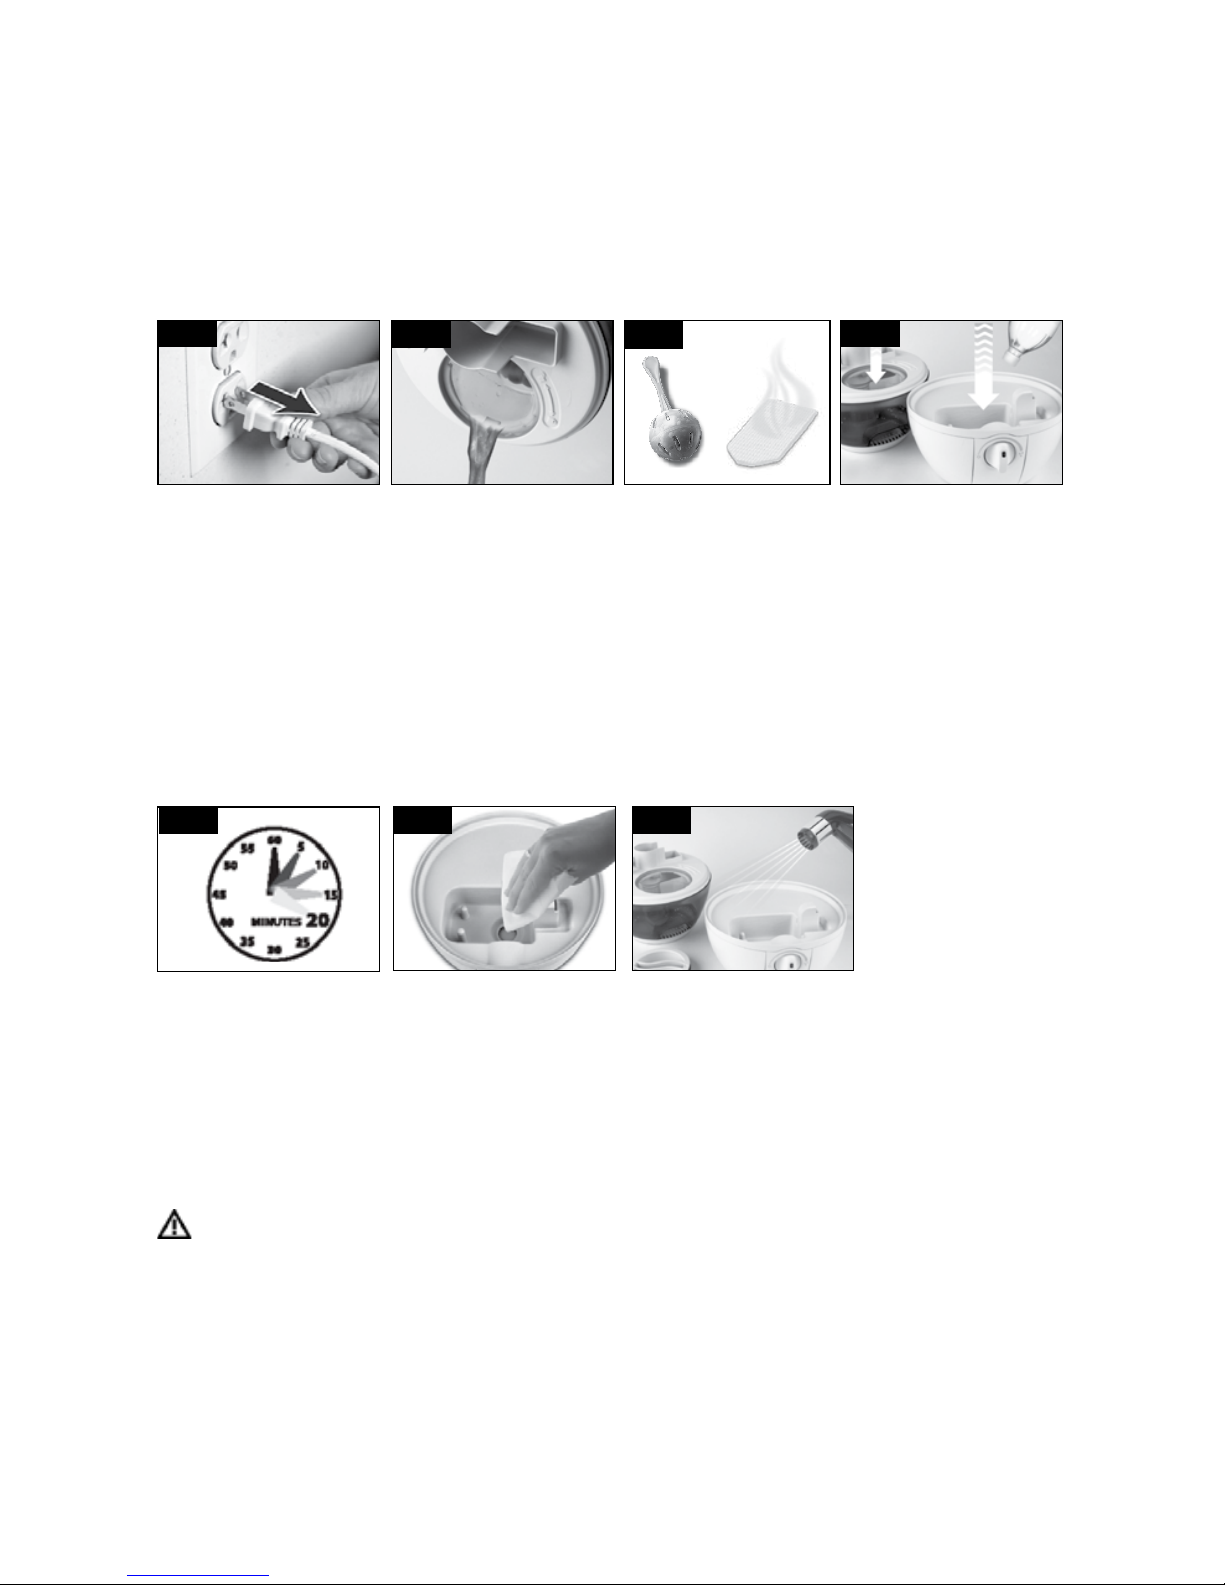
Instructions for Scale Removal
1.
Turn off and unplug the humidifier.
2. Remove Water Tank from Base. Remove Tank Cap, taking care that black rubber Cap Seal
does not come off. Empty water from Water Tank and Base.
3. If accessory is installed, remove accessory and set aside. DO NOT clean accessory.
This will damage the accessory.
4. Add 2 cups of undiluted distilled white vinegar to Water Tank. Replace Tank Cap and swish
vinegar solution around in Tank. Place Tank on Base. Vinegar solution will drain into Water
Reservoir and loosen mineral buildup (scale) on Nebulizer and Float as they soak in the
solution. It will also loosen scale on bottom of Water Tank.
5. Soak for 15-20 minutes.
6. After soaking, unlock Tank Cap and pour solution out in sink. Pour solution from
Water Reservoir out in sink. Wipe Nebulizer and Float with soft cloth to remove loosened
mineral deposits.
7. Rinse Water Reservoir and Water Tank until smell of vinegar (for Scale Removal process)
or bleach solution (for Disinfecting process) is gone. Make sure water does not enter the
fan opening (vented opening in back of base) or Power Knob.
CAUTION: DO NOT submerge base in water. Doing so will damage the humidifier and
void the warranty.
Step 6 Step 5 Step 8
Step 3
Step 2
Step 1 Step 4
2 cups
7
Weekly Cleaning
Page 8
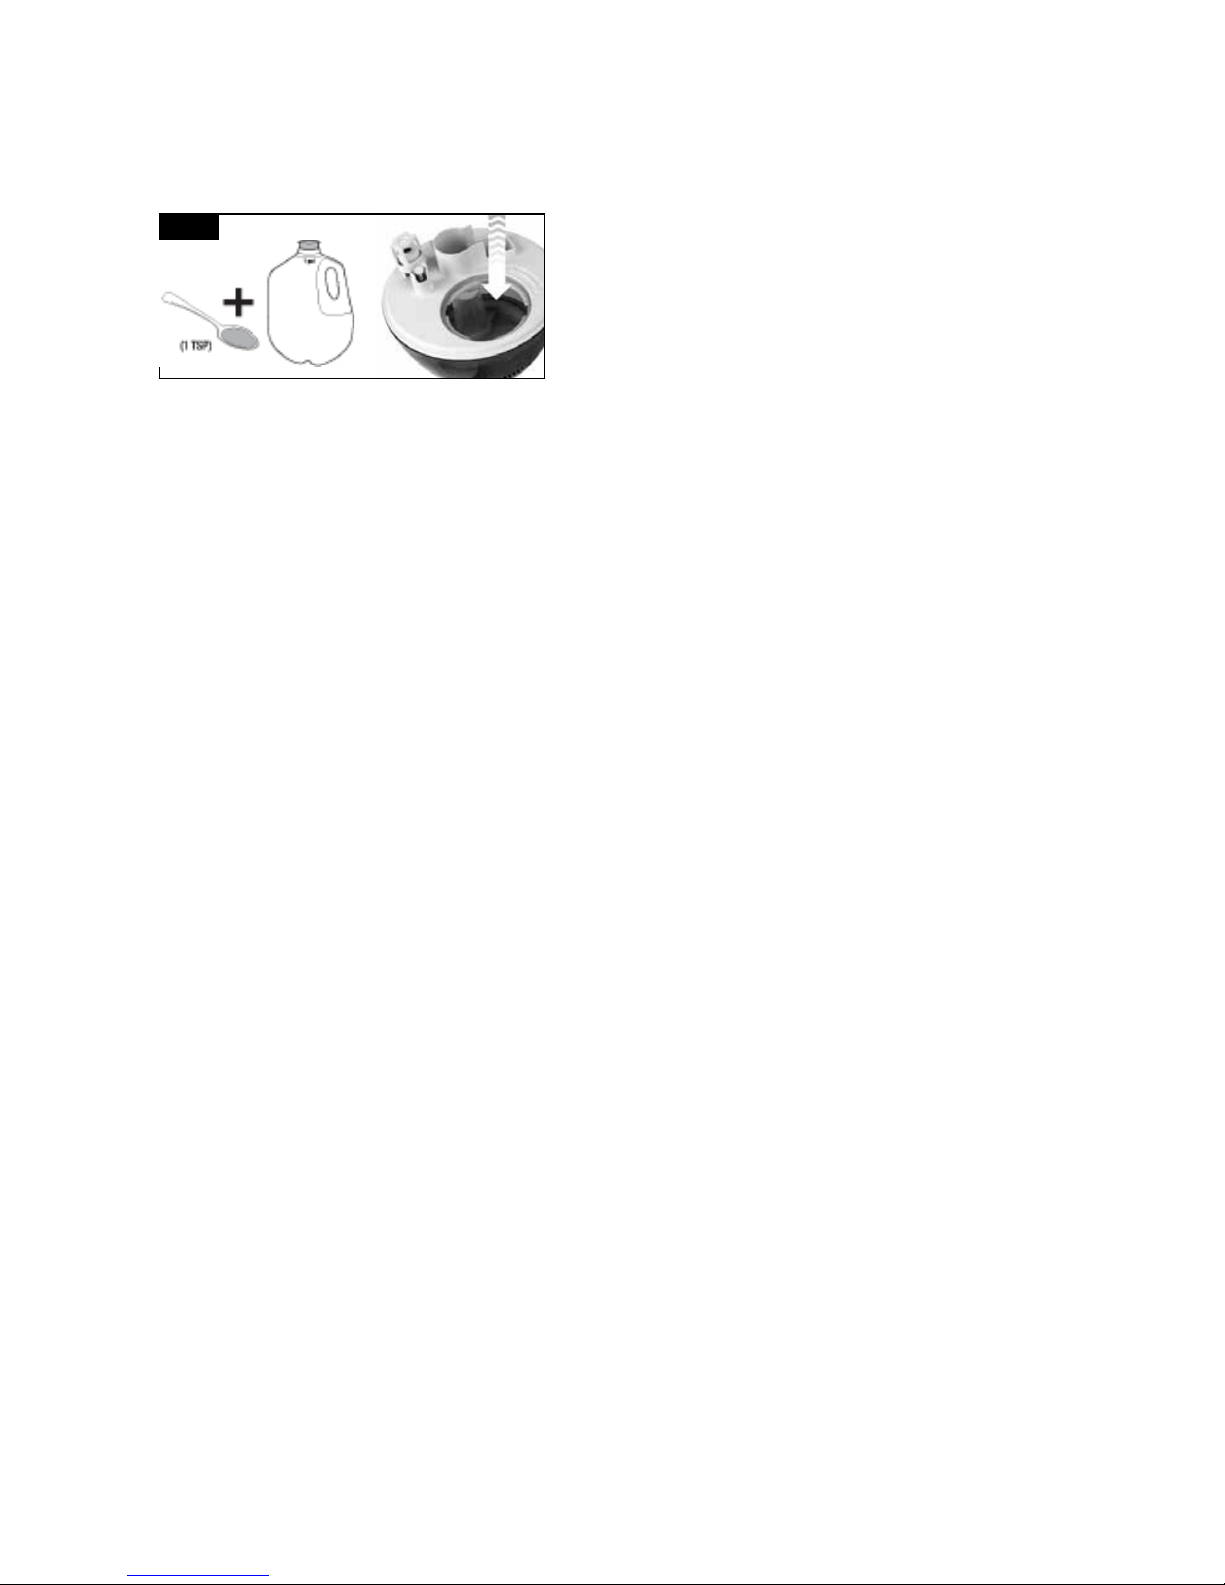
Instructions for Disinfecting
Follow Steps 1-3 in Scale Removal Instructions in previous section.
For Step 4: Add ½ tsp of bleach to ½ gallon (1.9L) of water and add to Water Tank. Replace
Tank Cap. Swish solution around in Tank. Place Tank on Base. Bleach solution will drain into
Water Reservoir and will disinfect Water Reservoir and other components as they soak.
NOTE: Using more than 1 tsp. of bleach per gallon of water may result in damage to your humidifier.
See steps 5-7 in Scale Removal Instructions in previous section to complete Disinfecting process.
NOTE: DO NOT mix vinegar and bleach solutions together. Scale Removal and Disinfecting
must be done separately.
Step 4
8
Follow the CLEANING instructions when the humidifier will not be used for at least one week,
or at the end of the season.
At the end of the season, remove any accessories used with the humidifier and allow the humidifier
and accesories to dry completely before storing.
DO NOT store with water inside the Base, Water Reservoir or Tank.
Pack unit safely and store in a cool, dry location.
TO ORDER REPLACEMENT PARTS CONTACT CONSUMER RELATIONS
Call us toll-free at: 1-800-VAPOR-1-2
E-mail: consumerrelations@kaz.com
Or visit our website at: www.vickshumidifiers.com
Please be sure to specify model number.
Consumer Relations
End-Of-Season Care And Storage
Weekly Cleaning (Continued)
Page 9

9
The Vicks VUL520 Series model is rated at 120V, 60 Hz.
NOTE: IF YOU EXPERIENCE A PROBLEM, PLEASE CONTACT CONSUMER RELATIONS FIRST OR SEE
YOUR WARRANTY. DO NOT RETURN THE HUMIDIFIER TO THE ORIGINAL PLACE OF PURCHASE.
DO NOT ATTEMPT TO OPEN THE BASE OR TAMPER WITH POWER KNOB YOURSELF, DOING SO MAY
VOID YOUR WARRANTY AND CAUSE DAMAGE TO THE PRODUCT OR PERSONAL INJURY.
Electrical Ratings
Troubleshooting
Solution
• Plug unit in
• Check home circuits, fuses,
test outlet
• Fill Water Tank with cool water
• Place on a level surface
• Clean Nebulizer (refer to
Weekly Care & Cleaning
instructions)
• Turn the Power Knob to
increase output
• Rinse thoroughly with clean
water until there is no foam
or smell of cleaning solution
• Check the Tank for any cracks
or damage. and replace if
necessary
• Close Tank Cap to lock position
• Check to see if Cap Seal is
attached to Tank Cap. If not,
contact Consumer Relations
• Decrease mist output to
lower setting or open door
to the room
• Move humidifier away from
wall or point Mist Outlet away
from wall or window
If your humidifier is not working properly, refer to the following:
Problem
Power Knob is turned
“on (o)” and the power
light is off
Power is on and little or
no mist is produced
Water overflows
from Reservoir
Condensation forms around
humidifier or on windows
and walls
Possible Cause
• Unit not plugged in
• No power at outlet
• No water in tank
• Unit is not level
• Mineral deposits on Nebulizer
• Power setting may be too low
• Water Tank or Base were
washed with detergent
• Tank may be damaged
• Tank Cap is not tight
• Tank Cap Seal may be missing
• Mist Intensity is set too high
for room size or
pre-existing humidity level
• Humidifer may be too close
to wall or window
NOTE: Failure to keep this unit clean from mineral deposits normally contained in any water supply
will affect the efficiency of operation of this unit. Customer failure to follow these instructions may
void the warranty.
Page 10

10
2 Year Limited Warranty
YOU SHOULD FIRST READ ALL INSTRUCTIONS BEFORE ATTEMPTING TO USE
THIS PRODUCT.
A. This 2 year limited warranty applies to repair or replacement of product found to be
defective in material or workmanship. This warranty does not apply to damage resulting
from commercial, abusive, unreasonable use or supplemental damage.
Defects that are
the result of normal wear and tear will not be considered manufacturing defects under
this warranty. KAZ IS NOT LIABLE FOR INCIDENTAL OR CONSEQUENTIAL DAMAGES OF
ANY NATURE, ANY IMPLIED WARRANTY OF MERCHANTABILITY OR FITNESS FOR A
PARTICULAR PURPOSE ON THIS PRODUCT IS LIMITED IN DURATION TO THE DURATION
OF THIS WARRANTY. Some jurisdictions do not allow the exclusion or limitation of incidental
or consequential damages or limitations on how long an implied warranty lasts, so the above
limitations or exclusions may not apply to you. This warranty gives you specific legal rights,
and you also may have other rights which vary from jurisdiction to jurisdiction. This warranty
applies only to the original purchaser of this product from the original date of purchase.
B. At its option, Kaz will repair or replace this product if it is found to be defective in material
or workmanship.
C. This warranty does not cover damage resulting from any unauthorized attempts to repair or
from any use not in accordance with the instruction manual.
D.
This warranty does not cover the filters, pre-filters, UV bulbs or other accessories (if included)
except for material or workmanship defects.
Call us toll-free at 1-800-477-0457 or e-mail: consumerrelations@kaz.com
Please be sure to specify a model number.
NOTE: IF YOU EXPERIENCE A PROBLEM, PLEASE CONTACT CONSUMER RELATIONS FIRST
OR SEE YOUR WARRANTY.
DO NOT RETURN THE PRODUCT TO THE ORIGINAL PLACE OF
PURCHASE.
DO NOT ATTEMPT TO OPEN THE MOTOR HOUSING YOURSELF, DOING SO MAY
VOID YOUR WARRANTY AND CAUSE DAMAGE TO THE PRODUCT OR PERSONAL INJURY.
Page 11

11
Série
VUL520
Guide d’utilisation
et d’entretien
Cet humidificateur rétablit le niveau d’humidité de l’air ambiant, ce qui aide l’utilisateur à respirer
plus librement. Pour toute question concernant le fonctionnement du Minihumidificateur à vapeur
froide Vicks, sans filtre, communiquer avec notre Service à la clientèle en composant le numéro sans
frais 1-800-VAPOR-1-2 (1-800-827-6712), ou envoyer un courriel à Consumerrelations@kaz.com.
Fonctionnement très silencieux
Arrêt automatique
Tampons aromatiques apaisants
Minihumidificateur
à vapeur froide, sans filtre
IMPORTANT!
LIRE ET GARDER CES INSTRUCTIONS
Page 12

12
1. Toujours placer l’appareil sur une surface
rigide, plane, d’aplomb et insensible à
l’humidité, à au moins 1,2 m (4 pi) d’un
chevet, 30 cm (12 po) des murs et hors
de portée des malades, enfants et animaux
de compagnie. Veiller à ce qu’il soit stable,
que son cordon soit éloigné des surfaces
chaudes et n’entrave pas le passage,
afin que l’appareil ne risque pas d’être
renversé.
2. Assurer une surveillance assidue dans les
pièces fermées car l’air pourrait devenir
saturé et la condensation, perler
devant l’appareil, sur les murs et les
meubles. Entr’ouvrir la porte de la pièce.
Ne pas orienter la sortie de vapeur vers
les enfants, les murs ou les meubles.
3. Dérouler le cordon et l’examiner avec soin
avant l’emploi, pour déceler tout signe de
dégradation. Ne pas se servir de l’appareil
si le cordon est abîmé, enroulé ou lié.
4. Cet appareil est équipé d’une fiche
polarisée (une branche est plus large
que l’autre) qui n’enfonce dans les prises
polarisées que dans un sens. Si la fiche
ne pénètre pas totalement dans la prise,
retourner la fiche. Si elle ne rentre toujours
pas complètement dans la prise, avoir
recours aux services d’un électricien
agréé. Ne pas essayer de contourner
cette mesure de sécurité.
5. Pour éviter incendie ou choc électrique,
brancher l’appareil directement sur la
prise de courant alternatif de 120 volts.
Ne pas se servir de cordon prolongateur
afin d’éviter tout risque d’incendie, de choc
électrique ou de blessures corporelles.
6. Toujours débrancher l’appareil et le vider
entre utilisations et pour le nettoyer.
L’éteindre et le débrancher avant de le
déplacer. Ne pas le bouger ou l’incliner
quand il fonctionne. Le brancher et le
débrancher avec les mains sèches.
Ne jamais tirer sur le cordon.
7. Ne pas l’utiliser sans eau – si le
réservoir est vide, éteindre l’appareil
et le débrancher.
8. Nettoyer régulièrement l’appareil. Consulter
et observer les instructions fournies.
9. Ne pas l’employer au grand air, il est
réservé à l’usage résidentiel, à l’intérieur.
10. Ne couvrir aucun orifice de l’appareil
et ne rien insérer dans les orifices.
11. Ne pas essayer de réparer ou d’ajuster
une fonction électrique ou mécanique
quelconque de l’appareil, sous peine
d’annulation de la garantie.
12. Ne pas placer l’appareil au soleil, dans un
lieu très chaud ou à proximité d’ordinateurs
ou de matériel électronique fragile.
13. Ne pas toucher le nébuliseur si l’appareil
est branché, sous peine de brûlures.
14. Ne pas effleurer la peau avec le tampon
aromatique VapoPadsMD déballé et ne pas le
placer sur meuble, textile, literie ou plastique.
15. Ne pas mettre de produit médicamenteux
(inhalant Kaz ou Vicks VapoSteamMD, par
exemple) dans la sortie de vapeur, la base,
le réservoir à eau ou la cavité du fond.
Consignes de sécurité importantes
LIRE CES MESURES DE SÉCURITÉ IMPORTANTES AVANT DE
COMMENCER À EMPLOYER CET APPAREIL
L’UTILISATION D’APPAREILS ÉLECTRIQUES NÉCESSITE DES PRÉCAUTIONS
ÉLÉMENTAIRES POUR MINIMISER LES RISQUES D’INCENDIES, DE CHOCS
ÉLECTRIQUES ET DE BLESSURES CORPORELLES, DONT LES SUIVANTES:
Page 13

13
Cet appareil est conforme à la partie 18 du règlement de la
Commission fédérale des communications des États-Unis (FCC).
Avertissement: tous changements ou toutes modifications apportés, quels qu’ils soient, n’étant
pas expressément approuvés par le parti responsable de la conformité risquent, pour l’utilisateur,
d’annuler son droit d’employer l’appareil. Cet appareil a été soumis aux tests d’usage et déclaré
conforme aux limites établies pour appareils générateurs de fréquences ISM, selon la partie 18
du règlement de la FCC. Ces limites ont pour but de procurer une protection raisonnable contre
le brouillage préjudiciable dans un immeuble d’habitation. L’appareil produit, utilise et peut
émettre des fréquences radioélectriques; s’il n’est pas posé et employé selon les instructions,
il peut causer des parasites nuisant aux radiocommunications. Rien ne garantit que le brouillage
ne se produira pas dans certains immeubles. Si l’appareil cause des parasites nuisibles à la
réception des radiocommunications ou des signaux de télévision – ce qui peut être établi en
le mettant hors tension puis sous tension – l’utilisateur peut essayer de rectifier la situation
en adoptant une ou plusieurs des mesures suivantes:
• modifier l’orientation ou la position de l’antenne réceptrice;
• augmenter l’écart entre l’appareil et le récepteur;
• brancher l’appareil sur un circuit autre que celui sur lequel est connecté le récepteur;
ou enfin
• consulter le détaillant ou bien un spécialiste en radio et télévision expérimenté.
Humidificateur Vicks de la série VUL520
Page 14

14
Minihumidificateur à vapeur froide VicksMD, sans filtre (modèle VUL520)
Ces accessoires optionnels conviennent parfaitement à l’humidificateur.
Accessoires pour les appareils de la série VUL520
Tampons Vicks VapoPads
Tampons aromatiques procurant des
vapeurs mentholées (VSP-19 ou
VSP-19-CAN) ou lavande/romarin
(VBR-5, uniquement aux États-Unis).
(L’appareil vient avec un tampon
mentholé VapoPadsMD)
Cartouche nettoyante
Protec – PC-1, PC-1C ou PC-2
Garde l’humidificateur propre plus
longtemps. La cartouche purifie sans
cesse l’eau, freine la prolifération des
bactéries et des moisissures; son
efficacité est de 30 jours.
1. Retirer les matériaux d’emballage. Garder les instructions.
2. Enlever le lien et dérouler le cordon.
3. Poser l’appareil sur une surface rigide, plane et insensible à l’humidité, à au moins 30 cm (12 po) du mur.
Mise en place de l’humidificateur
Étape 2
Étape 3
Étape 1
Poignée
Réservoir
Joint du bouchon
Bouchon du
réservoir
Flotteur
Porte du compartiment
à tampon
Veilleuse
Interrupteur
Base
Nébuliseur
Réservoir
à eau
Sortie de
vapeur
Page 15

15
REMARQUE: porter le réservoir des deux mains – une main qui tient la poignée du haut du
réservoir et l’autre qui soutient le fond du réservoir.
Kaz n’assume aucune responsabilité pour les dommages matériels dus à l’eau.
Remplissage
Mode d’emploi
1. Retirer le réservoir et le mettre sens dessus dessous.
2. Tourner le bouchon du réservoir dans la direction du cadenas ouvert pour l’enlever.
3. Remplir le réservoir d’eau froide – ne pas le remplir d’eau tiède ou chaude.
4. Reboucher sûrement le réservoir, en faisant concorder la flèche et le symbole de verrouillage.
5. Remettre le réservoir en place sur la base.
ATTENTION: MANIPULER LE RÉSERVOIR AVEC SOIN AFIN DE NE PAS LE COGNER
INUTILEMENT. LE TAPER OU L’ÉCHAPPER RISQUERAIT DE L’ENDOMMAGER ET DE
PROVOQUER DES FUITES.
Étape 1
Étape 2 Étape 3
1. Alimentation: l’interrupteur étant à l’arrêt, brancher l’humidificateur sur une prise de
courant alternatif polarisée de 120 volts. ATTENTION: POUR ÉVITER TOUT CHOC
ÉLECTRIQUE, NE PAS BRANCHER L’HUMIDIFICATEUR AVEC LES MAINS MOUILLÉES.
2. Débit: tourner l’interrupteur au réglage le plus haut.
3. Taux d’humidité: lorsque le niveau d’humidité est confortable dans la pièce, baisser le
réglage de l’interrupteur. Un degré d’humidité confortable se situe entre 40 et 60 %.
Un hygromètre – modèle V70 ou V70-CAN Vicks – est idéal pour mesurer le taux d’humidité.
Si de la condensation perle sur les murs, les fenêtres ou autour de l’appareil, c’est que l’air
est saturé et que le taux d’humidité est trop élevé. Éteindre l’appareil.
4. Ne pas orienter le débit de vapeur vers les murs, les meubles ou la literie.
ATTENTION: ÉTEINDRE, DÉBRANCHER PUIS VIDER LE RÉSERVOIR DE
L’HUMIDIFICATEUR AVANT DE DÉPLACER L’APPAREIL.
Étape 1 Étape 2
Étape 3
Étape 4 Étape 5
Étape 4
4
Page 16

16
Étape 2
1. Utiliser les tampons aromatiques Vicks VapoPads
MD
des séries VSP-19 et VBR-5 dans cet
humidificateur; ils procurent jusqu’à 8 heures d’émanations calmantes.
2. Ouvrir la porte du compartiment à tampon aromatique.
3. Déchirer le sachet du tampon VapoPads
MD
à l’échancrure prévue au haut. Ne pas toucher au
tampon déballé. En cas de contact avec les doigts, ne pas se frotter le visage ou les yeux sous
peine d’irritation oculaire.
4. Insérer le tampon VapoPads
MD
en orientant l’extrémité en diagonale vers l’appareil.
5. Jeter le tampon après 8 heures d’utilisation. Pour employer un autre tampon aromatique,
observer tout simplement les instructions des paragraphes 2 à 5.
Conseils concernant les tampons aromatiques VapoPads
MD
• L’emploi des tampons est déconseillé pour les bébés de moins de 4,5 kg / 10 lb.
• Pour les enfants de 4,5 à 10 kg / 10 à 22 lb, ne pas dépasser 2 tampons toutes les 24 heures.
Composants des tampons VSP-19 et VSP-19-CAN: huile essentielle d’eucalyptus, menthol, glycol,
huile essentielle de cèdre, et autres
Utilisation des tampons aromatiques
Étape 3
Étape 4
Étape 5
Effets de la qualité de l’eau sur l’humidificateur
La haute teneur en minéraux de l’eau, communément appelée «eau dure» ou «eau calcaire» peut
provoquer le dépôt de poussière blanche sur les diverses surfaces de la pièce qui se trouvent à
proximité de l’humidificateur. Plus l’eau de la région contient de minéraux, plus il y a de chances
qu’il se produise de la poussière blanche.
La poussière blanche ne provient pas d’un défaut de l’humidificateur, mais des minéraux qui sont
en suspension dans l’eau employée.
Dans les régions où l’eau est très dure ou calcaire, l’utilisation d’eau distillée minimisera la quantité
de poussière blanche.
Étape 1
Page 17

Afin de nettoyer convenablement l’humidificateur, nous recommandons de le détartrer et de le
désinfecter tel que décrit ci-dessous. Procéder au détartrage et à la désinfection séparément.
Tout entretien devrait être effectué dans la cuisine ou la salle de bains, sur une surface qui résiste
à l’humidité, près d’un robinet. NE passer AUCUNE pièce de l’humidificateur au lave-vaisselle.
Instructions de détartrage
1. Éteindre puis débrancher l’humidificateur.
2. Séparer le réservoir de la base. Enlever le bouchon en veillant à ce que son joint de caoutchouc
noir reste en place. Vider l’eau du réservoir et de la base.
3. Si un accessoire est employé, le retirer et le mettre de côté. NE PAS détartrer l’accessoire,
le détartrage l’abîmerait irrémédiablement.
4. Verser 500 mL (2 tasses) de vinaigre blanc distillé dans le réservoir. Reboucher celui-ci
et l’agiter. Poser le réservoir sur la base. Du vinaigre s’écoulera et désagrégera le tartre
qui s’est formé sur le nébuliseur, sur le flotteur ainsi qu’au fond de la cavité.
5. Laisser agir le vinaigre de 15 à 20 minutes.
6. Après ce délai, déboucher le réservoir et vider le vinaigre restant dans l’évier. Vider également
celui qui se trouve dans la cavité dans l’évier. Essuyer le nébuliseur et le flotteur avec un chiffon
doux pour enlever les particules de tartre effritées.
7. Rincer le réservoir ainsi que la cavité jusqu’à ce que toute trace d’odeur de vinaigre (provenant
du détartrage) ou d’eau de Javel (provenant de la désinfection) ait disparu. Veiller à ce qu’il ne
s’infiltre pas d’eau par l’orifice de ventilation (à l’arrière de la base) ou à l’interrupteur.
ATTENTION: ne pas plonger la base dans l’eau, ceci endommagerait l’humidificateur
et annulerait la garantie.
Étape 6 Étape 5
Étape 7
Étape 3
Étape 2
Étape 1
Étape 4
500 mL
17
Entretien hebdomadaire
Page 18

Instructions de désinfection
Suivre les étapes de 1 à 3 du détartrage, à la section précédente.
Étape 4: ajouter 3 mL (½ cuill. à thé) d’eau de Javel à 1,9 litre (½ gallon US) d’eau et verser
dans le réservoir. Refermer avec le bouchon et agiter la solution javellisée dans le réservoir.
Poser le réservoir sur la base. En coulant, la solution désinfectera la cavité et les autres éléments.
REMARQUE: utiliser plus de 5 mL (1 cuill. à thé) d’eau de Javel par 3,8 litres (1 gallon US) d’eau
risque d’endommager l’humidificateur.
Observer les étapes de 5 à 8 du détartrage (section précédente) pour terminer le processus.
REMARQUE: NE PAS mélanger le vinaigre et l’eau de Javel. Détartrer et désinfecter séparément.
Étape 4
18
Observer les instructions d’ENTRETIEN préconisées quand l’humidificateur ne doit pas servir
pendant une semaine ou plus, ainsi qu’à la fin de la saison d’utilisation.
En fin de saison, sortir tous les accessoires de l’appareil, s’il y a lieu, et laisser totalement sécher
l’humidificateur ainsi que les accessoires avant de les ranger.
NE PAS ranger l’humidificateur avec de l’eau dans la base, la cavité ou le réservoir.
Emballer soigneusement l’appareil et le ranger dans un endroit frais et sec.
Questions ou commentaires
Téléphonez-nous sans frais au : 1 800 477-0457
Courriel : consumerrelations@kaz.com
Ou visitez notre site Web au : www.vickshumidifiers.com
N’oubliez pas d’indiquer le numéro de modèle.
Service à la clientèle
Entretien de fin de saison et rangement
Entretien hebdomadaire (suite)
Page 19

19
Le modèle Vicks de la série VUL520 a ces caractéristiques assignées: 120 volts, 60 hertz.
REMARQUE: EN CAS DE PROBLÈME, COMMUNIQUER AVEC LE SERVICE À LA CLIENTÈLE OU
CONSULTER LA GARANTIE. NE PAS RETOURNER L’HUMIDIFICATEUR AU LIEU D’ACHAT. NE PAS
ESSAYER D’OUVRIR LA BASE OU D’ALTÉRER L’INTERRUPTEUR, SOUS PEINE D’ANNULATION DE LA
GARANTIE, D’ENDOMMAGEMENT DE L’APPAREIL OU DE BLESSURES CORPORELLES.
Caractéristiques électriques
Dépannage
Solution
• Brancher l’appareil
• Vérifier circuits et fusibles,
essayer la prise de courant
• Remplir le réservoir
• Mettre l’appareil d’aplomb
• Nettoyer le nébuliseur (voir
les instructions d’entretien
hebdomadaire)
• Régler l’interrupteur de façon
à augmenter le débit
• Rincer à l’eau claire jusqu’à ce
qu’il n’y ait plus de mousse ou
de trace d’odeur de solution
• Examiner le réservoir et le
remplacer s’il est fêlé ou abîmé
• Verrouiller le bouchon
•
Vérifier que le bouchon est muni
de son joint d’étanchéité – s’il ne
l’est pas, appeler le Service à la
clientèle
• Réduire le débit ou ouvrir la
porte de la pièce
• Éloigner l’humidificateur du
mur ou orienter la buse à
l’écart du mur ou de la fenêtre
Consulter les suggestions ci-dessous en cas d’anomalie de fonctionnement.
Problème
L’interrupteur est en position
de marche (O) mais son
voyant est éteint
L’appareil est sous tension
mais il se produit peu ou
pas de vapeur
De l’eau déborde
du réservoir
De la condensation se forme
autour de l’humidificateur ou
sur les fenêtres et murs
Cause possible
• Appareil non branché
• Prise non alimentée
• Réservoir vide
• Appareil instable
• Incrustation de minéraux sur
le nébuliseur
• Réglage peut-être trop bas
• Réservoir ou base ayant été
lavé au détergent
• Réservoir pouvant être
endommagé
• Bouchon pas assez serré
• Joint du bouchon du réservoir
manquant
• Débit trop élevé pour la
grandeur de la pièce ou pour
le taux d’humidité préexistant
• Humidificateur peut-être trop
près du mur ou de la fenêtre
REMARQUE: faute d’entretien convenable, les minéraux en suspension dans l’eau forment une
incrustation qui nuit au bon fonctionnement de l’appareil. Il incombe au client de respecter les
instructions fournies et d’entretenir l’appareil tel que préconisé, sous peine d’annulation de la garantie.
Page 20

20
GARANTIE LIMITÉE DE 2 ANS
VOUS DEVRIEZ D’ABORD LIRE LES INSTRUCTIONS AU COMPLET AVANT DE TENTER
D’UTILISER LE PRODUIT.
A. Cette garantie limitée de 2 ans s’applique à la réparation ou au remplacement d’un produit qui
s’avère défectueux en raison d’un vice de matériau ou de main-d’oeuvre. Cette garantie ne
couvre pas les dommages résultant d’une utilisation commerciale, abusive ou excessive, ni les
dommages associés. Les dommages qui résultent de l’usure normale ne sont pas considérés
comme des défectuosités en vertu de cette garantie. KAZ DÉCLINE TOUTE RESPONSABILITÉ
EN CAS DE DOMMAGES ACCESSOIRES OU INDIRECTS DE QUELQUE NATURE QUE CE SOIT.
TOUTE GARANTIE IMPLICITE DE COMMERCIABILITÉ OU DE PERTINENCE À DES FINS
PARTICULIÈRES SUR CE PRODUIT EST LIMITÉE À LA DURÉE DE CETTE GARANTIE. Certains
États n’autorisent pas l’exclusion ou la limitation des dommages accessoires ou indirects, ou la
limitation de la durée d’une garantie implicite, de sorte que les limites ou exclusions ci-dessus
peuvent ne pas s’appliquer à vous. Cette garantie vous accorde des droits légaux particuliers,
et vous pouvez avoir en plus d’autres droits qui varient selon les États. Cette garantie ne s’applique
qu’à l’acheteur initial de ce produit, à partir de la date d’achat.
B. Kaz peut, à son gré, réparer ou remplacer ce produit s’il s’avère défectueux en raison d’un vice
de matériau ou de main-d’oeuvre.
C. Cette garantie ne couvre pas les dommages résultant d’une tentative non autorisée de réparer
cet appareil, ni d’une utilisation non conforme à ce manuel d’instructions.
D. Cette garantie ne couvre pas les filtres, préfiltres, ampoules UV et autres accessoires (si compris)
excepté pour les défauts de matériau ou de main-d’oeuvre.
REMARQUE : SI VOUS AVEZ UN PROBLÈME, VEUILLEZ COMMUNIQUER AVEC NOTRE SERVICE
À LA CLIENTÈLE OU RELIRE LA GARANTIE. NE RETOURNEZ PAS LE PRODUIT AU MAGASIN
OÙ VOUS L’AVEZ ACHETÉ INITIALEMENT. N’ESSAYEZ PAS D’OUVRIR LE BOÎTIER DU MOTEUR,
CAR CE FAISANT VOUS RISQUEZ D’ANNULER LA GARANTIE, D’ENDOMMAGER L’APPAREIL
OU DE VOUS BLESSER.
Page 21

21
Series
VUL520
Manual de Uso y Cuidado
Este humidificador agrega vapor de agua al aire circundante ayudando al usuario a respirar mejor.
Si tiene preguntas sobre la operación de su Humidificador de Vapor Frío Mini Sin Filtro Vicks,
llame lada gratuita a la línea de Servicio al Consumidor al 1-800-VAPOR-1-2 ó envíenos un correo
electrónico a Consumerrelations@kaz.com.
Operación Ultra Silenciosa
Apagado Automático
Almohadillas Aromáticas para aroma relajante
MiniSinFiltro
Humidificador de Vapor Frío
¡IMPORTANTE!
LEA Y GUARDE ESTAS INSTRUCCIONES
Page 22

22
1. El aparato siempre debe ser colocado en una
superficie firme, plana, resistente al agua y
al menos a 1.2 m (4 pies) de la orilla de la
cama, 30 cm (12 pulg.) de la pared y fuera
del alcance del paciente, niños o mascotas.
Asegúrese que el aparato esté en una posición
estable y el cable de corriente esté lejos de
superficies calientes y fuera del tránsito para
evitar que el humidificador sea derribado.
2. El aparato no se debe dejar desatendido
en una habitación cerrada ya que se puede
saturar el aire y crearse condensación
enfrente de la unidad, en las paredes
y muebles. Deje la puerta de la habitación
parcialmente abierta. No apunte la Salida del
Vapor directamente en los niños, paredes
o muebles.
3. Antes de usar el aparato, extienda el cable de
corriente e inspecciónelo en busca de alguna
señal de daño. No use la unidad si el cable de
corriente se encuentra dañado. No opere con
el cable de corriente enrollado o con el lazo
de torcedura en su lugar.
4. El aparato cuenta con un enchufe polarizado
(una clavija es más ancha que la otra)
como una característica de seguridad. Este
enchufe entrará unidireccionalmente en un
tomacorriente polarizado. Si el enchufe no
entra completamente en el tomacorriente,
gire el enchufe. Si aún no encaja, contacte
a un electricista calificado. No intente anular
esta característica de seguridad.
5. Para evitar riesgos de incendio o descarga
eléctrica, enchufe el aparato directamente
en un tomacorriente eléctrico de 120V~ de
CA. Para evitar riesgo de incendio, descarga
eléctrica o lesiones personales no use un
cable de extensión.
6. El aparato siempre debe estar desconectado
y vacío cuando no esté en uso o mientras
lo esté limpiando. Apague y desconecte el
humidificador antes de moverlo. No mueva
o incline el humidificador mientras esté en
operación. Conecte y desconecte la unidad
con las manos secas. Nunca estire el cable.
7. No opere el aparato sin agua. Apague
y desconecte la unidad cuando el tanque
se vacíe.
8. El aparato requiere limpieza regular. Consulte
y siga las instrucciones de limpieza.
9. No opere en exteriores; este aparato
está diseñado sólo para uso en interiores
residenciales.
10. No cubra o introduzca objeto alguno en
ninguna de las aberturas de la unidad.
11. No intente reparar o ajustar ninguna función
eléctrica o mecánica de este aparato.
Si lo hace perderá su garantía.
12. No coloque en luz solar directa, áreas de
alta temperatura o cerca de computadoras
o equipo electrónico sensible.
13. No toque el nebulizador mientras la unidad
esté conectada ya que podría provocar
quemaduras.
14. No toque la piel con el VapoPad
®
expuesto
o lo coloque sobre los muebles, telas, sábanos
o plásticos.
15. No agregue ningún medicamento (p.ej.
Inhalante Kaz o VapoSteam® Vicks)
en la Salida del Vapor, Base, Depósito
de Agua o Tanque de Agua.
Importantes Instrucciones de Seguridad
LEA Y GUARDE ESTAS IMPORTANTES INSTRUCCIONES DE SEGURIDAD
ANTES DE UTILIZAR ESTE APARATO
CUANDO SE UTILIZA APARATOS ELÉCTRICOS, SIEMPRE DEBE SEGUIR
PRECAUCIONES BÁSICAS PARA REDUCIR EL RIESGO DE INCENDIO, DESCARGA
ELÉCTRICA Y LESIONES A PERSONAS, INCLUYENDO LAS SIGUIENTES:
Page 23

23
Este dispositivo cumple con la Parte 18 de las Reglas de la Comisión Federal de
Comunicaciones (FCC).
Advertencias: Cambios o modificaciones a esta unidad, no aprobados expresamente por la parte
responsable del cumplimiento podrían anular la autoridad del usuario para operar el equipo. Este
equipo ha sido probado y se comprobó que cumple con los límites para equipo de Consumidor
ISM, conforme a la Parte 18 de las reglas de la FCC. Estos límites están diseñados para
proporcionar protección razonable contra las interferencias dañinas en una instalación residencial.
Este equipo, usa y puede irradiar energía de radiofrecuencia y si no se instala y utiliza de acuerdo
con las instrucciones, puede causar interferencias dañinas con comunicaciones de radio. Sin
embargo, no existe garantía que la interferencia no ocurrirá en una instalación en particular.
Si este equipo causa interferencia dañina a la recepción de la radio o la televisión, que puede
determinarse apagando o encendiendo el equipo se recomienda al usuario que intente corregir
la interferencia por una o más de las siguientes medidas:
• Reorientar o reubicar la antena receptora.
• Aumente la separación entre el equipo y el receptor.
• Conecte el equipo a un tomacorriente en un circuito diferente al cual está conectado
el receptor.
• Consulte al distribuidor o a un técnico experimentado de radio y televisión para obtener
ayuda.
Humidificador Vicks de las Series VUL520
Page 24

24
Humidificador de Vapor Frío Mini Sin Filtro Vicks® (Modelo VUL520)
Los siguientes accesorios opcionales funcionarán adecuadamente con su humidificador.
Accesorios de las Series VUL520
VapoPads Vicks
Proporciona vapores relajantes de
mentol (VSP-19 o VSP-19-CAN) o
lavanda/romero (VBR-5, sólo en EUA).
(un VapoPad® de mentol incluido)
Cartucho de Limpieza Protec, PC-1,
PC-1C o PC-2
Ayuda a mantener su humidificador
más limpio por más tiempo. También
limpia y protege continuamente a los
humidificadores contra bacterias y moho.
Mantiene la limpieza durante 30 días.
1. Retire el material de empaque. Conserve las instrucciones.
2. Retire el lazo de torcedura y extienda el cable de corriente.
3. Coloque en una superficie firme, nivelada y resistente al agua por lo menos a
30 cm (12 pulg) de cualquier pared.
Instalación de su Humidificador
Paso 2 Paso 3 Paso 1
Asa de
Transporte
Tanque
Empaque de
la Tapa
Tapa del Tanque
Flotador
Puerta de la Almohadilla
Aromática
Luz de Noche
Perilla de
Encendido
Base
Nebulizador
Depósito
de Agua
Salida de
Vapor
Page 25

25
NOTA: El Tanque debe cargarse con las dos manos. Use una mano en el asa de transporte ubicada
en la parte superior del tanque y la otra sosteniendo la base del tanque.
Kaz no aceptará responsabilidad por daños a la propiedad causados por derrames de agua.
Llenado/Rellenado
Operación
1. Retire el Tanque y voltee hacia abajo.
2. Quite la Tapa del Tanque en la dirección de la señal de candado abierto para retirar la tapa.
3. Llene el Tanque con agua fría. No llene con agua tibia o caliente.
4. Firmemente vuelva a colocar la Tapa del Tanque, alineando la flecha al símbolo de candado.
5. Coloque el Tanque en la Base.
PRECAUCIÓN: TENGA CUIDADO CUANDO MANIPULE EL TANQUE DE AGUA PARA
EVITAR IMPACTOS INNECESARIOS. GOLPEAR O DEJAR CAER EL TANQUE DE AGUA PODRÍA
RESULTAR EN DAÑOS AL TANQUE LO QUE CAUSARÁ FUGAS.
Paso 1
Paso 2 Paso 3
1. Encendido: Con la perilla de encendido en la posición de apagado, conecte el
humidificador en un tomacorriente polarizado de 120V~. PRECAUCIÓN: PARA EVITAR
DESCARGA ELÉCTRICA NO CONECTE EL HUMIDIFICADOR EN EL TOMACORRIENTE CON
LAS MANOS MOJADAS.
2. Salida: Coloque la Perilla de Encendido en el ajuste más alto.
3. Nivel de Humedad: Una vez que ha alcanzado un nivel de humedad cómodo gire la Perilla
de Encendido al ajuste más bajo. Un nivel de humedad cómodo es entre el 40-60%.
Para controlar el nivel de humedad use un monitor de humedad como el modelo V70
o V70-CAN Vicks.
Si observa condensación en las paredes, ventanas o alrededor de la unidad, su nivel de
humedad es muy alto. Apague el humidificador.
4. Apunte la salida de vapor lejos de las paredes, muebles y camas.
PRECAUCIÓN: ANTES DE MOVER EL HUMIDIFICADOR, APAGUE, DESCONECTE
Y VACÍE EL HUMIDIFICADOR.
Paso 1 Paso 2 Paso 3
Paso 4 Paso 5
Paso 4
4
Page 26

26
Paso 2
1. Use con su humidificador VapoPads
®
Vicks, de las series VSP-19 o de las series VBR-5 para
proporcionar hasta 8 horas de vapores relajantes.
2. Abra la Puerta de la Almohadilla Aromática
3. Abra el VapoPad
®
rasgando la muesca de la bolsa de la almohadilla. No toque la almohadilla
con las manos. Si toca la almohadilla, no frote la cara o los ojos ya que puede causar irritación.
4. Introduzca el VapoPad
®
con el extremo angulado hacia el producto.
5. Después de 8 horas deseche la almohadilla aromática. Para continuar usando almohadillas
aromáticas, repita los pasos 2-5.
Uso Recomendado de VapoPad®:
• No se recomienda para niños menores de 4.5 kg (10 lb).
• Para niños de entre 4.5-10 kg (10-22 lb) no use más de 2 almohadillas en un período
de 24 horas.
Ingredientes de la Almohadilla Aromática: VSP-19, VSP-19-CAN: Aceite de Eucalipto, Mentol,
Glicol, Aceite de Hoja de Cedro y Otros
Uso de Almohadillas Aromáticas
Paso 3 Paso 4
Paso 5
Calidad del Agua y Su Humidificador
El alto contenido de minerales en su agua, también conocido como “agua dura” puede provocar
acumulación de un residuo mineral blanco en las superficies de la habitación cerca del
humidificador. Este residuo mineral es comúnmente llamado “Polvo Blanco”. Cuanto mayor sea
el contenido mineral o la dureza del agua, mayores son las probabilidades que usted pueda tener
polvo blanco.
El “Polvo Blanco” no es el resultado de un defecto o imperfección en el humidificador. Es el resultado
de la cantidad de minerales suspendidos en el agua que utiliza.
Si vive en una zona de agua dura el uso de agua destilada minimizará la producción de polvo blanco.
Paso 1
Page 27

Para limpiar adecuadamente su humidificador le recomendamos los procesos de Eliminación del Sarro
y Desinfección mostrados a continuación. Estos dos procesos deben ser realizados por separado.
Todo el mantenimiento debe hacerse en la cocina o el baño, sobre una superficie resistente
al agua cerca de un grifo. NO lave ningún componente de este humidificador en el lavavajillas.
Instrucciones para Eliminación del Sarro
1.
Apague y desconecte el humidificador.
2. Retire el Tanque de Agua de la Base. Retire la Tapa del Tanque, teniendo cuidado de que no se
desprenda el Empaque negro de goma de la Tapa. Vacíe el agua del Tanque de Agua y la Base.
3. Si un accesorio está instalado, retírelo y deje a un lado. NO limpie el accesorio.
Esto dañará el accesorio.
4. Agregue 2 tazas de vinagre blanco sin diluir al Tanque de Agua. Vuelva a colocar la Tapa del
Tanque y agite la solución de vinagre alrededor del Tanque. Coloque el Tanque en la Base.
La solución de vinagre se drenará al Depósito de Agua y suavizará la acumulación de minerales
(escala) en el Nebulizador y el Flotador al remojarse en la solución. También suavizará
el sarro en la parte inferior del Tanque de Agua.
5. Remoje durante 15-20 minutos.
6. Después del remojo, abra la Tapa del Tanque y vacíe la solución en el fregadero. Vierta la
solución del Depósito de Agua en el fregadero. Limpie el Nebulizador y el Flotador con un paño
suave para remover los depósitos minerales suavizados.
7. Enjuague el Depósito de Agua y el Tanque de Agua hasta que desaparezca el olor a vinagre
(para el proceso de Eliminación de Sarro) o a solución de cloro (para el proceso de
Desinfección). Asegúrese de que el agua no entre en la abertura del ventilador (abertura
de ventilación en la parte posterior de la base) o en la Perilla de Encendido.
PRECAUCIÓN: NO sumerja la base en agua. Hacerlo dañará el humidificador y anulará la garantía.
Paso 6 Paso 5 Paso 8
Paso 3
Paso 2
Paso 1 Paso 4
2 tazas
27
Limpieza Semanal
Page 28

Instrucciones para Desinfección
Siga los Pasos 1-3 en las Instrucciones de Eliminación de Sarro en la sección anterior.
Para el Paso 4: Agregue ½ cucharadita de cloro a ½ galón (1.9L) de agua y agregue al Tanque
de Agua. Vuelva a colocar la Tapa del Tanque. Agite la solución alrededor del Tanque. Coloque
el Tanque en la Base. La solución de cloro se drenará en el Depósito de Agua y desinfectará el
Depósito de Agua y los otros componentes a medida que se remojen.
NOTA: Utilizar más de 1 cucharadita de cloro por galón de agua puede ocasionar daños
a su humidificador.
Consulte los pasos 5-8 en las Instrucciones de Eliminación de Sarro en la sección anterior para
completar el proceso de Desinfección.
NOTA: NO mezcle las soluciones de vinagre y cloro. La Eliminación de Sarro y la Desinfección
deben realizarse por separado.
Paso 4
28
Siga las instrucciones de LIMPIEZA cuando el humidificador no esté en uso por al menos una
semana, o al final de la temporada.
Al final de la temporada, retire todos los accesorios usados con el humidificador y permita que
sequen completamente antes de almacenar.
NO almacene con agua dentro de la Base, Depósito de Agua o Tanque.
Empaque la unidad de manera segura y guárdela en un lugar fresco y seco.
Preguntas o comentarios
Llámenos lada gratuita al: 1-800-477-0457
Correo Electrónico: consumerrelations@kaz.com
O visite nuestro sitio web: www.vickshumidifiers.com
Por favor asegúrese de especificar el número de modelo.
Servicio al Consumidor
Cuidado y Almacenaje Fuera de Temporada
Limpieza Semanal (Continuación)
Page 29

29
El modelo Vicks de las Series VUL520 es especificado en 120V~, 60 Hz.
NOTA: SI EXPERIMENTA ALGÚN PROBLEMA, POR FAVOR PRIMERO CONTACTE SERVICIO AL
CONSUMIDOR O CONSULTE LA GARANTÍA. NO REGRESE EL HUMIDIFICADOR AL LUGAR ORIGINAL
DE COMPRA. NO INTENTE ABRIR LA BASE O MANIPULAR CON LA PERILLA DE ENCENDIDO
USTED MISMO, HACERLO PUEDE ANULAR SU GARANTÍA Y PUEDE PROVOCAR DAÑOS AL
PRODUCTO O LESIONES PERSONALES
Rangos Eléctricos
Solución de Problemas
Solución
• Conecte la unidad
• Verifique los circuitos y fusibles en
el hogar, revise el tomacorriente
• Llene el Tanque de Agua.
• Coloque en una superficie
nivelada
• Limpie el nebulizador (consulte
las Instrucciones de Limpieza y
Cuidado Semanal)
• Gire la Perilla de Encendido
para aumentar la salida
• Enjuague a fondo con agua
limpia hasta que desaparezca
la espuma o el olor a la solución
• Revise si el Tanque tiene
grietas o daños, y cambie si
es necesario
• Cierre la Tapa del Tanque en la
posición de cerrado
• Revise si el Empaque de la Tapa
está en la Tapa del Tanque. Si
no es así, contacte Servicio al
Consumidor
• Disminuya la salida a un ajuste
más bajo o abra la puerta de la
habitación
• Aleje el humidificador de la pared
o apunte la Salida de Vapor lejos
de la pared o ventanas
Causa Posible
• La unidad no está conectada
• El tomacorriente no tiene energía
• El tanque no tiene agua.
• La unidad no está nivelada
• Depósitos minerales en el
nebulizador
• El ajuste de potencia puede ser
muy bajo
• El Tanque de Agua o la Base
fueron lavados con detergente
• El Tanque puede estar dañado
• La Tapa del Tanque no está
apretada
• No está el Empaque de la Tapa
• La intensidad del vapor es
demasiado alta para el tamaño
de la habitación o el nivel de
humedad existente
• El humidificador puede estar
muy cerca de la pared o la
ventana
Si su humidificador no está funcionando adecuadamente, consulte lo siguiente:
Problema
La Perilla de Encendido está
en “Encendido (o)” y la luz
de encendido está apagada
La unidad está encendida
y se produce poco o nada
de vapor
El agua se desborda
del depósito
Se forma condensación
alrededor del humidificador o
en las ventanas y paredes
NOTA: No mantener esta unidad limpia de depósitos minerales normalmente contenidos en
cualquier suministro de agua afectará la eficiencia de operación de esta unidad. El incumplimiento
del cliente en seguir estas instrucciones podría anular la garantía.
Page 30

30
Garantía Limitada de dos años
ANTES DE USAR ESTE PRODUCTO, POR FAVOR LEA COMPLETAMENTE LAS
INSTRUCCIONES.
A. La presente garantía limitada de 2 años cubre la reparación o reemplazo del producto si éste
presenta un defecto de fábrica o de mano de obra. Esta garantía excluye todo daño resultante del
uso comercial, abusivo o inadecuado del producto, o de daños asociados. Los defectos resultantes
del desgaste normal no se consideran defectos de fábrica en virtud de la presente garantía. KAZ
NO SERÁ CONSIDERADA RESPONSABLE DE DAÑOS FORTUITOS O INDIRECTOS
DE NINGÚN TIPO. TODA GARANTÍA IMPLÍCITA DE CALIDAD COMERCIAL O DE
CONVENIENCIA CON UN FIN ESPECÍFICO RELACIONADA CON ESTE PRODUCTO
TENDRÁ LA MISMA VIGENCIA QUE LA PRESENTE GARANTÍA. En ciertos lugares no
se permite la exclusión o limitación de daños fortuitos o indirectos, ni los límites de duración
aplicables a una garantía implícita. Por consiguiente, es posible que estas limitaciones o exclusiones
no se apliquen en su caso. Esta garantía le confiere ciertos derechos legales específicos. Es posible
que usted también tenga otros derechos legales, los que varían según la jurisdicción. La presente
garantía sólo es válida para el comprador inicial del producto a partir la fecha de compra.
B. A su discreción, Kaz reparará o reemplazará el presente producto si se constata que presenta un
defecto de fábrica o de mano de obra.
C. Esta garantía no cubre los daños ocasionados por tentativas de reparación no autorizadas o por
todo uso que no esté en concordancia con el presente manual.
Llámenos lada gratuita al: 1-800-477-0457
Correo Electrónico: consumerrelations@kaz.com
Por favor asegúrese de especificar el número de modelo.
D. Esta garantía no cubre los filtros, prefiltros, bombillas UV u otros accesorios (si se incluyen)
excepto por defectos de material o mano de obra.
NOTA: SI TIENE PROBLEMAS, POR FAVOR LLAME PRIMERO A SERVICIO AL
CLIENTE O CONSULTE SU GARANTÍA. NO DEVUELVA AL LUGAR ORIGINAL
DE COMPRA. NO INTENTE ABRIR LA CARCASA DEL MOTOR USTED MISMO,
HACERLO PODRÍA ANULAR SU GARANTÍA Y CAUSAR DAÑO AL PRODUCTO
O DAÑOS CORPORALES.
Page 31

31
Page 32

32
A001202R0
112116
© 2017 Todos los derechos reservados.
Kaz USA, Inc., una Empresa de Helen of Troy
400 Donald Lynch Blvd., Suite 300, Marlborough, MA 01752
Distribuido por Kaz Canada Inc., una Empresa de Helen of Troy
6700 Century Avenue, Suite 210, Mississauga, Ontario L5N 6A4
www.vickshumidifiers.com
Este producto es fabricado bajo licencia de The Procter & Gamble Company.
VICKS y otras marcas registradas asociadas son propiedad de The Procter & Gamble Company.
Hecho e Impreso en China.
Para reciclar responsablemente, por favor visite:
www.RecycleNation.com
© 2017 All rights reserved.
Kaz USA, Inc., a Helen of Troy Company
400 Donald Lynch Blvd., Suite 300, Marlborough, MA 01752
In Canada: Distributed by Kaz Canada, Inc., a Helen of Troy Company
6700 Century Avenue, Suite 210, Mississauga, Ontario L5N 6A4
www.vickshumidifiers.com
This product is manufactured under license from The Procter & Gamble Company.
VICKS and other associated trademarks are owned by The Procter & Gamble Company.
Made and printed in China.
For Responsible recycling, please visit:
www.RecycleNation.com
© 2017 Tous droits réservés.
Kaz USA, Inc., une société de Helen of Troy
400 Donald Lynch Blvd., Suite 300, Marlborough, MA 01752
Distribué par Kaz Canada, Inc., une société de Helen of Troy
6700 Century Avenue, Suite 210, Mississauga, Ontario L5N 6A4
www.vickshumidifiers.com
Ce produit est fabriqué sous licence de la société Procter & Gamble.
Vicks et les marques de commerce connexes appartiennent à la société Procter & Gamble.
Fabriqué et imprimé en Chine.
 Loading...