

Page 1
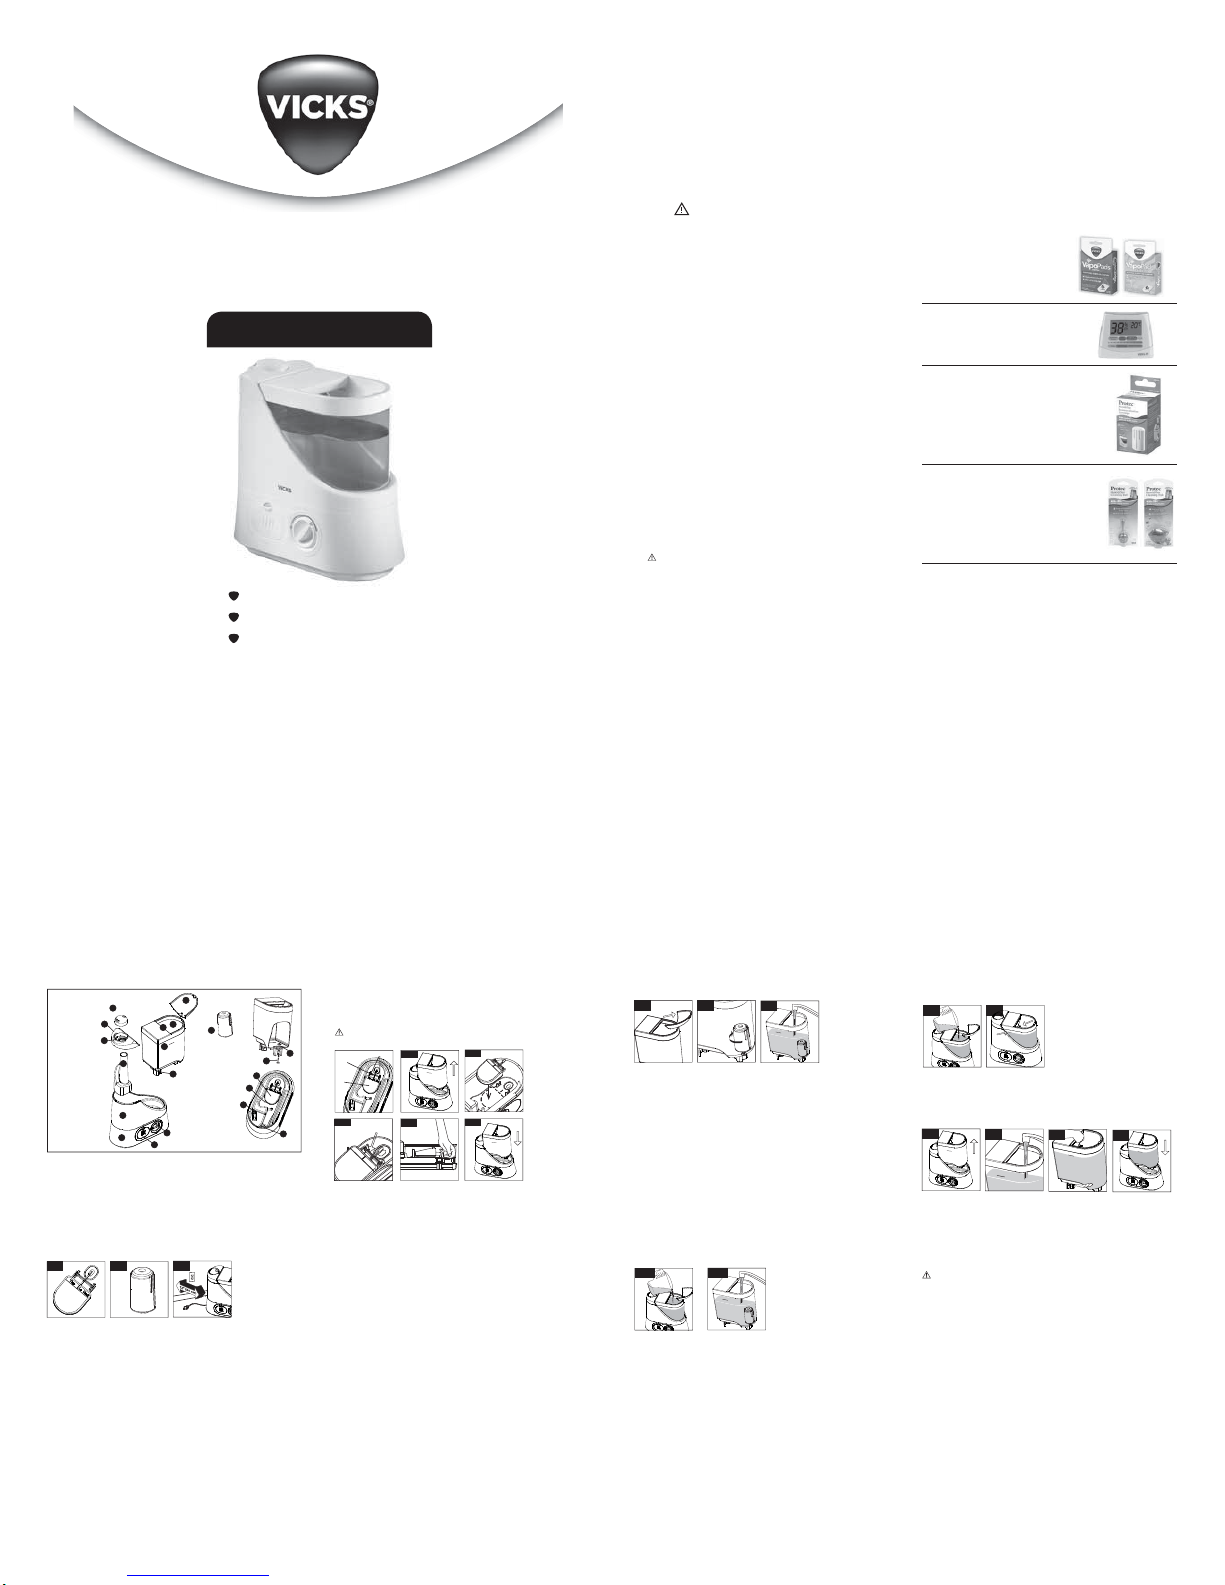
EasyFill
Cool Mist Humidifier
Use and Care Manual
Adjustable mist control
No filters to replace
Easy to clean
Important Safety Instructions
READ AND SAVE THESE IMPORTANT SAFETY INSTRUCTIONS
WHEN USING ELECTRICAL APPLIANCES, BASIC PRECAUTIONS SHOULD ALWAYS
BE FOLLOWED TO REDUCE THE RISK OF FIRE, ELECTRICAL SHOCK AND INJURY
1. The humidifier should always be placed
on a firm, flat, waterproof surface at least
four feet (1.2m) away from bedside, 12
inches (30 cm) from the wall and out of
reach of patients, children and pets. Be
sure the humidifier is in a stable position
and the power cord is away from heated
surfaces and out of the way to prevent the
humidifier from being tipped over.
2. The humidifier should not be left
unattended in a closed room since air
could become saturated and leave
condensation in front of unit, on walls
and furniture. Leave room door partly
open. Do not aim Mist Outlet directly at
children, walls or furniture.
3. Before using the humidifier, extend the
cord and inspect for any signs of damage.
Do not use the unit if the cord has been
damaged. Do not operate with power cord
coiled or with twist tie in place.
4. The humidifier has a polarized plug (one
blade is wider than the other) as a safety
feature. This plug will fit into a polarized
outlet only one way. If the plug does not
fit fully into the outlet, reverse the plug.
If it still does not fit, contact a qualified
electrician. Do not attempt to defeat this
safety feature.
5. CAUTION: To avoid fire or shock
hazard, plug the humidifier directly into
a 120V AC electrical outlet. To avoid risk
of fire, shock or personal injury, do not
use an extension cord or power strip.
BEFORE USING THIS HUMIDIFIER
TO PEOPLE, INCLUDING THE FOLLOWING:
6. The humidifier should always be unplugged
and emptied when not in operation or
while being cleaned. Shut off and unplug
humidifier before moving. Do not move or
tilt humidifier while it is in operation. Plug
and unplug unit with dry hands. Never pull
by cord.
7. Do not operate the humidifier without
water. Turn off and unplug unit when tank
is empty.
8. Humidifier requires regular cleaning. Refer
to and follow cleaning instructions.
9. Do not operate outdoors; this humidifier is
intended for indoor residential use only.
10. Do not cover or insert objects into any
openings on the unit.
11. Do not block intake or output vents.
12. Do not attempt to repair or adjust any
electrical or mechanical functions on this
humidifier. Doing so will void your warranty.
13. Do not place in direct sunlight, high
temperature areas or near computers or
sensitive electronic equipment.
14. Do not touch the nebulizer while the unit is
plugged in as burns could result.
15. Do not touch skin with exposed VapoPad
or place VapoPad
bedding or plastic.
16. Do not add any medications (e.g. Kaz
Inhalant or Vicks VapoSteam
into Mist Outlet, Base, Water Reservoir
or Water Tank.
SAVE THESE INSTRUCTIONS
®
on furniture, fabric,
®
or oils)
Accessories
The following accessories work great with your humidifier:
®
Vicks VapoPads
(One Menthol VapoPad Sample Included)
Menthol scent: VSP-19, VSP19FP, VSP19VPC or VSP-19-CAN
Lavender/rosemary scent: VBR-5 and VBR-5FP (US only)
Use Vicks VapoPads with your humidifier for soothing vapors.
Enjoy 8 hours of soothing comfort per pad.
Humidity Monitor
(V70 or V70-CAN)
Displays relative humidity and room temperature so you can maintain
a comfortable humidity level in your home. The ideal humidity level
is between 40-60%.
Protec® Demineralization Cartridge (included in some models)
(TWT500)
This humidifier works with a Demineralization Cartridge that helps remove
minerals from the water. This helps prevent the build up of minerals
(“white dust”) that can occur in hard water areas. If you live in a hard water
area, we recommend the use of this demineralization cartridge if not using
distilled water. For best results, replace your Demineralization Cartridge every
20-30 fillings, or when you begin to notice white dust forming. The effective
time will vary depending on the mineral content of the water used.
Protec Antimicrobial Cleaning Products
(Protec Cleaning Ball: PC1 and PC2 or Protec Cleaning Fish: PC1F)
The Protec Cleaning Products feature an antimicrobial, Aquastat
helps keep your humidifier cleaner, longer. Simply drop in the tank for
fresh, clean mist! Benefits of using these products include:
• Kill up to 99% of odor causing bacteria
®
• Keep cleaning for 30 days
• Contain no harmful chemicals
Accessories available at retailers and at www.vickshumidifiers.com.
®
, that
2 3
This humidifier adds water vapor to the surrounding air helping the user to breathe better. If you have
any questions about the operation of your Vicks
Relations line at 1-800-VAPOR-1-2 (1-800-827-6712) or e-mail us at consumerrelations@kaz.com.
IMPORTANT!
READ AND SAVE THESE INSTRUCTIONS
Vicks® EasyFill Cool Mist Humidifier (Model VUL570)
Components
1
1 Mist Outlet
2
2 Outlet Cover
3 Outlet Gasket
3
4 Tank Handle
5 Tank Opening
6 Tank Cover
7 Water Tank
8 Auto Shut-Off Float
9 Housing
10 Base
11 Power Knob
12 Scent Pad Door
13 Mist Chamber
Getting to Know Your Humidifier
How It Works
Water is released into the Reservoir when the Float Paddle engages the Plunger at the bottom of the Water
Tank. A Nebulizer vibrates at ultrasonic frequency, breaking the water into a fine mist. The mist is quietly
propelled by a fan up a vertical Mist Chamber to the Mist Outlet where the cool, visible mist enters the room.
This humidifier will shut off when the water level is low or when the tank is removed from the base.
Setting Up Your Humidifier
Unpack the Humidifier
Step 1
Keep this instruction manual for reference.
1. Remove packaging materials. Locate Float Paddle and set aside. This is required for operation.
2. Locate the Demineralization Cartridge (included in some models) and set aside. This is
optional for operation.
3. Remove twist tie and extend power cord. Place on a firm, level, water resistant surface
a minimum of 12 inches (30 cm) from walls.
4 5
13
9
10
Step 2
6
MAX
5
4
14
MAX
7
14 Demineralization
Cartridge
8
(included in some models)
15 Plunger
16 Tank Gasket
17 Float Paddle
18 Air Outlet
19 Water Reservoir
11
20 Nebulizer
12
Step 3
®
EasyFill Cool Mist Humidifier, call our toll-free Consumer
VUL570
Series
Setting Up Your Humidifier (Continued)
Float Paddle Installation – required for humidifier to operate
This humidifier uses a float system to regulate the water flow from the Tank to the Reservoir. The Float
Paddle must be properly installed for the unit to operate. If not properly installed, water may not flow into
the Reservoir or it may leak from the Base. The Float Paddle is designed to be easy to install and remove.
CAUTION: Improper placement of the Float Paddle could result in leaking or water
not feeding to the Reservoir.
16
15
17
19
18
Float
Rod
Float
Paddle
Step 3
20
Remove Water Tank.
1.
2. Line up Float Paddle with the float paddle shape on the bottom of the Reservoir.
3. Place Float Rod over both Brackets and press firmly until you hear it click into both Brackets.
4. Pull gently up on the Float Rod to be sure it doesn’t pop out of the Brackets.
5. Replace Tank in Base.
If using the optional demineralization cartridge, see next section Installing Demineralization Cartridge.
Hard Water and White Dust
High mineral content in your water, also known as hard water, may cause a white mineral residue to
accumulate on surfaces in the room near the humidifier. This mineral residue is commonly referred to
as white dust. The higher the mineral content (hardness) of your water, the greater the potential that an
ultrasonic humidifier may produce white dust.
White dust is not a result of a defect or flaw in the humidifier. It is a result of the amount of minerals
suspended in the water you are using.
Step 1
Brackets
Step 4
“Click”
Top
Le Haut
Step 2
Top
MAX
MAX
Le Haut
Step 5
MAX
MAX
Setting Up Your Humidifier
Installing the Demineralization Cartridge - (Optional)
Step 1
If you live in a hard water area, the use of distilled water or a demineralization cartridge with tap water
will help minimize the production of white dust. A Protec Demineralization Cartridge (Model # TWT500)
is included in some models. To install it:
1. Remove Tank Cover.
2. Press the Cartridge into the recessed area inside the Water Tank and twist to secure.
3. Fill Tank with water according to instructions in the next section, Filling/Refilling the Water Tank.
Note:
With a new, dry cartridge, there may be a delay of a few minutes while the water begins to
pass through the cartridge.
For best results, replace your Demineralization Cartridge every 20-30 fillings, or when you begin
to notice white dust forming. For your convenience, write the month and day you installed the new
cartridge on the top with a permanent marker.
To replace, twist the Cartridge and lift to remove. Dispose of in household trash. Replace with a new
Protec Demineralization Cartridge (Model # TWT500). (Not available in Canada).
Filling/Refilling the Water Tank
This humidifier holds a maximum of 1.25 gallons (4.7 liters) of water.
The Tank Cover is removable. You can fill the Tank with the Cover in place or with the Cover removed.
Be sure to replace the Cover before using the humidifier to keep objects and debris out of the water.
The Tank can be filled in two ways:
Option 1: At the Humidifier Option 2: At the Sink
Option 1
MAX
Both filling options can be performed with or without the Tank Cover in place.
Note: Ensure the Float Paddle has been placed correctly in the Reservoir before filling.
See Float Paddle Installation instructions if necessary
Manufacturer will not accept responsibility for property damage caused by water spillage.
(Continued)
Step 2
Step 3
MAX
Option 2
MAX
Filling/Refilling The Water Tank (Continued)
Option 1: To Fill Tank at the Humidifier
Step 1
1. Pour cool water from a pitcher or jug directly into Water Tank.
2. Fill to the MAX line marked on the outside of the Tank or to the MAX indicator on the
Option 2: To Fill Tank at the Sink
Step 1
1.
2. Fill Tank with cool water to the MAX line marked on the outside of the Tank or to the MAX
indicator on the Tank Cover. Replace the Tank Cover if it was removed.
NOTE: The Tank should be carried using two hands; one hand on the Handle located on top of the
Tank and other hand supporting the bottom of the Tank.
3. Carry Water Tank back to humidifier.
4. Replace the full Tank on the Base.
or dropping the Water Tank could result in damage to the Tank that may cause leaking.
Step 2
MAX
MAX
MAX
Tank Cover. Replace the Tank Cover if it was removed for filling.
MAX
Grasp Tank Handle and lift Water Tank to remove from Base. Carry Tank to sink.
CAUTION: Use care when handling Water Tank to avoid unnecessary impact. Banging
Step 2
MAX
Step 3
MAX
Step 4
AX
M
MAX
MAX
6 7
Page 2

Using Your Humidifier
How to Use
Step 1
1. Power: With the Power Knob in the OFF position ( O ), plug humidifier into a polarized
WITH WET HANDS.
2. Output: Turn the Power Knob clockwise to highest setting.
3. Position humidifier to direct mist output away from walls, furniture and bedding. Mist Outlet
4. Humidity Level: When a comfortable humidity level is reached, turn Power Knob to a lower
CONDENSATION: If you notice condensation on the walls, windows or around unit,
your humidity level is too high. Turn humidifier off and open door to room.
To monitor your humidity level, use a humidity monitor such as the Vicks Humidity Monitor
(V70) available at retailers or at www.vickshumidifiers.com.
Note: Auto shut off feature will activate when water runs out of the Tank or the Tank is removed
from the unit. The auto shut off will not turn off the Power Knob light; it will just turn off the fan
and nebulizer.
8 9
Step 2
120V outlet.
CAUTION: TO AVOID ELECTRIC SHOCK DO NOT PLUG HUMIDIFIER INTO OUTLET
can rotate 180° and is removable for cleaning.
setting. A comfortable humidity level is between 40-60%.
Step 3
Step 4
Using Vicks® VapoPads
Step 1
Your EasyFill Cool Mist Humidifier can be used with Vicks VapoPads®, VSP-19 or VBR-5 series, to
provide up to 8 hours of soothing vapors. One free sample of the methol VapoPad is included with
your humidifier. To use your unit with scent pads:
1. Open Scent Pad Door.
2. Open Scent Pad by tearing notch on pad bag. Do not touch pad with hands. If pad is touched
do not rub face or eyes as it may cause irritation.
3. Insert Vicks Scent Pad with angled end facing towards the product. Up to two scent pads can
be inserted. Close door.
4. After 8 hours, discard scent pad.
To continue using scent pads, repeat steps 1-4.
VapoPads® Recommended Usage:
• Not recommended for infants under 10 lbs (4.5 kg).
• For children between 10-22 lbs (4.5-10 kg ) do not use more than 2 pads in a 24 hr period.
Scent Pad Ingredients: VSP-19, VSP19FP, VSP19VPC, VSP-19 CAN: Eucalyptus Oil, Menthol,
Glycol,Cedar Leaf Oil & Others.
Daily Maintenance
Step 1
1.
Turn off, unplug and remove Tank Cover. Empty Water Tank.
2. Empty Reservoir by slowly pouring from the low side of the Housing on the opposite side from
the Mist Outlet and away from Power Knob. Wipe outside of housing to dry any water that
may have escaped between Base and Housing.
3. Rinse Tank, wipe clean and dry with a soft cloth or paper towel.
4. Refill Water Tank with cool water according to Filling/Refilling the Water Tank instructions.
Note: Ensure Float Paddle remains installed correctly. For detailed instructions, refer to
Float Paddle Installation section.
CAUTION: Improper placement of the Float Paddle could result in leaking or water
not feeding into the Reservoir.
®
Step 2
Step 4
Step 3 Step 2
12
1
11
2
10
9
3
HOURS
4
8
7
5
6
Step 3
Step 4
MAX
Cleaning Your Humidifier
To keep your humidifier running efficiently, clean it regularly. Weekly cleaning is recommended. All
maintenance should be done in the kitchen or bathroom on a water resistant surface near a faucet.
To properly clean your humidifier we recommend the separate processes of Scale Removal
and Disinfecting. These two processes must be performed separately.
Before Cleaning
Step 1
Step 2
Step 3
Step 4 Step 5
1. Turn off and unplug humidifier. Never clean the humidifier when it is running.
2. Remove Water Tank and Tank Cover. Empty water from Tank.
3. Remove accessories, including Demineralization Cartridge, from the Tank if being used.
Do not clean accessories.
4. Remove Mist Outlet, Outlet Cover, Mist Chamber, and Tank Cover.
Note: These four components are dishwasher safe. They may be cleaned in the Top Rack of
the dishwasher or by hand as noted in following instructions. Do not place in the bottom
rack of dishwasher.
5. Holding the Base, empty water from Reservoir by slowly pouring from the low side of the
Housing on the opposite side from the Mist Outlet and away from the Power Knob. The
Float Paddle should remain firmly attached to the brackets in the Reservoir.
Do not clean
Cleaning Your Humidifier (Continued)
Scale Removal
Follow steps 1-5 in Before Cleaning section, then follow the additional steps below.
Step 1
2C
Step 4
1. Pour a minimum of 2 cups (.5 liters) of undiluted distilled white vinegar in the Water Tank.
Gently swish vinegar around in the Tank to wet entire inside of Tank.
2. Place Tank on Base. Vinegar will drain into the Water Reservoir and loosen mineral buildup
(scale) in the Reservoir and bottom of the Water Tank. There should be enough vinegar to
cover the bottom of the Tank. If not using a dishwasher, the four removable components can
be soaked in the Tank. Just add enough vinegar to cover the components in the Water Tank.
3. Soak for 20 minutes, then remove Water Tank and slowly empty vinegar into sink. Remove
components placed in Tank. Rinse Tank and components with tap water until the smell of
vinegar is gone.
4. Remove Float Paddle from Reservoir by lifting up on Float Rod and set aside.
Wipe Nebulizer and Reservoir area with a soft cloth to remove loosened minerals.
5. Empty vinegar from the Reservoir by slowly pouring from the low side of the Housing on the
opposite side from the Mist Outlet and away from Power Knob. Pour 1.5 cups of water into
Reservoir, lightly swish water and pour out. Repeat until smell of vinegar is gone. Avoid
getting water into any openings in the Reservoir area by pouring from the low side of the
Housing on the opposite side from the Mist Outlet and away from Power Knob.
humidifier and void the warranty.
6. Place Float Paddle back in Reservoir, ensuring Float Rod is secured in brackets.
For detailed instructions, refer to the Float Paddle Installation section.
water not feeding to the Reservoir.
Wipe outside of housing to dry any water that may have escaped between Base and Housing.
Step 2
V
Step 5
CAUTION: Do not submerge the Base in water. Doing so may damage the
CAUTION: Improper placement of the Float Paddle could result in leaking or
Step 3
X
A
M
MAX
MINUTES
Step 6
“Click”
1.5 C
Top
Le Haut
10 11
Cleaning Your Humidifier (Continued) Cleaning Your Humidifier (Continued)
Disinfecting
Follow steps 1-5 above in Before Cleaning section, then follow the additional steps below.
NOTE: Bleach may stain clothes. It is recommended that you wear rubber gloves during this process
to protect your hands.
W
1 Gal.
B
(3,8 l)
1 tsp
Step 3
MINUTES
1. Mix 1 gallon (3.8 L) of water with 1 teaspoon of bleach. Pour the bleach solution into the Tank.
Note: Using more than 1 teaspoon of bleach to 1 gallon (3.8L) of water may result in damage
to the humidifier.
2. Place Tank on Base. Bleach solution will drain into the Water Reservoir. If not using
a dishwasher, the Mist Outlet, Outlet Cover, Mist Chamber and Tank Cover can be soaked
in the Tank. Just add additional bleach solution to cover the components in the Water Tank.
3. Soak for 20 minutes, then remove the Water Tank and slowly empty bleach solution into
sink. Remove components placed in Tank. Rinse Tank and components with tap water until
the smell of bleach is gone.
4. Remove Float Paddle from Reservoir by lifting up on Float Rod and set aside.
5. Empty bleach solution from the Reservoir by pouring from the low side of the Housing on the
opposite side from the Mist Outlet and away from Power Knob. Pour 1.5 cups of water into
Reservoir, lightly swish water and pour out. Repeat until smell of bleach is gone. Avoid
getting water into any openings in the Reservoir area by pouring from the low side of the
Housing on the opposite side from the Mist Outlet and away from Power Knob.
CAUTION: Do not submerge the Base in water. Doing so may damage the humidifier
and void the warranty.
Wipe outside of housing to dry any water that may have escaped between Base and Housing.
Step 2 Step 1
MAX
MAX
Step 4
Step 5
1.5 C
Reassembling
After descaling and disinfecting, follow these steps to reassemble the unit:
Step 1
Step 4 Step 5
1. Replace Mist Chamber over Air Outlet.
2. Place Outlet Cover on top of Mist Chamber and lightly press down until it clicks into place
and sits fully seated on the Housing.
3. Place Mist Outlet into the recess in the Outlet Cover, lining up the opening in the Outlet
with the circle graphic on the Outlet Cover. Press down until you hear a click. This ensures
Mist Outlet is positioned properly.
4. Ensure Float Paddle is installed correctly. Line up Float Paddle with the float paddle shape
on the bottom of the Reservoir. Place Float Rod over both Brackets and press firmly
until you hear it click into both Brackets. Pull gently up on the Float Rod to be sure it
doesn’t pop out of the Brackets.
not feeding to the Reservoir.
5. Replace Tank Cover and place Tank back onto Base.
End of Season Cleaning and Storage
Follow the cleaning instructions when the humidifier will not be used for at least one week, or at the
end of the season.
At the end of the season, remove any accessories and discard. Allow the humidifier and all components to dry completely before storing.
DO NOT store humidifier with water inside the Reservoir or Water Tank.
Pack unit safely and store in cool, dry location.
Step 2
“Click”
Top
Le Haut
CAUTION: Improper placement of the Float Paddle could result in leaking or water
Step 3
“Click”
MAX
MAX
12 13
Troubleshooting
If your humidifier is not working properly, refer to the following:
Problem Possible Cause Solution
Water is not draining
into Reservoir
Power light is on but little
or no mist is released
Water leaking from Base
or Reservoir
NOTE: Keeping this unit clean from mineral deposits normally contained in water supply will improve
the efficiency and operation of this unit.
*Note: It is normal to see some mist escape around the Mist Outlet when the unit first star ts and the
Mist Outlet is dry.
For additional troubleshooting help, call Consumer Relations at 1-800-VAPOR-1-2 (1-800-827-6712).
Plunger is stuck
Float Paddle not installed
correctly
Demineralization Cartridge not
allowing water to flow
Water Tank is empty
Power Knob is set too low
Hardened minerals on
the Nebulizer
Mist Chamber is not installed
Float Paddle not placed
correctly
Plunger is damaged
Plunger is sticking
Tank is cracked
Plunger may have foreign
material stuck under the
Tank Gasket
Push and release Plunger to be
sure it is moving freely
Check Float Paddle and ensure
it is placed securely
in brackets
Uninstall Demineralization
Cartridge, shake a few times,
and re-install
Fill Water Tank
Turn the Power Knob clockwise
(right) to increase output
Clean Nebulizer (refer to
Cleaning instructions)
Verify that all components are
installed properly
Ensure Float Rod is secured
in Brackets
Contact Consumer Relations
Push and release Plunger to be
sure it is moving freely
Inspect Tank for damage;
contact Consumer Relations
At sink, push and release
Plunger system so water
may flow.
Troubleshooting (Continued)
If your humidifier is not working properly, refer to the following:
Problem Possible Cause Solution
Mist is coming out from
bottom of Mist Outlet*
Outlet Cover will not sit
securely on Housing
when reassembling after
cleaning
Mist is escaping from
the area between the
tank and housing, in
addition to the mist
outlet
Humidifier shuts off Water Tank is empty
White Dust accumulating
on surrounding surfaces
Condensation on
windows and walls or
area around humidifier
is damp
Mist Outlet not properly
installed
Outlet Gasket is missing
Outlet Gasket was removed
for cleaning and not securely
replaced in Outlet Cover
Outlet Gasket is missing Replace Gasket if it was
Float Paddle is not installed
properly
Using tap water in your
humidifier in hard water areas
If using, Demineralization
Cartridge has reached life
expectancy
Mist intensity is set too high
for room size or pre-existing
humidity level
Humidifier may be too close
to wall or window
Remove and replace Mist
Outlet into the recess in the
Outlet Cover and press down
until you hear a click
Contact Consumer Relations
Be sure Gasket fits tightly in
Outlet Cover
removed for cleaning or
contact consumer relations
for a replacement
Fill the Tank with Water
Check that the Float Paddle
is secured in Brackets
Use distilled water or
use a Protec TWT500
Demineralization Cartridge
Replace Demineralization
Cartridge
Decrease mist output to a
lower setting or open door
to the room
Move humidifier away from
wall or point Mist Outlet away
from wall or window
14 15
Page 3

© 2016 All Rights Reserved.
Kaz USA, Inc., a Helen of Troy Company
Marlborough, MA 01752
This product is manufactured under license from The Procter & Gamble Company.
VICKS and other associated trademarks are owned by The Procter & Gamble Company.
Protec is a registered trademark owned by Helen of Troy Limited.
Aquastat is a registered trademark of K2 Concepts Inc., Atlanta GA.
Imported by: Kaz Canada, 510 Bronte St. S., Milton, ON L9T 2X6
To contact us call 1-800-VAPOR-1-2 (1-800-827-6712) or visit our website at www.vickshumidifiers.com
For Responsible recycling, please visit:
www.RecycleNation.com
© 2016 Tous droits réservés.
Kaz USA, Inc., une société de Helen of Troy
Marlborough, MA 01752
Ce produit est fabriqué sous licence de la société Procter & Gamble.
VICKS et les marques de commerce connexes appartiennent à la société Procter & Gamble.
Protec est une marque déposée propriété de Helen of Troy Limited.
Aquastat est une marque déposée de K2 Concepts Inc., Atlanta GA.
Importé par : Kaz Canada, 510 Bronte St. S., Milton, ON L9T 2X66
Pour nous joindre : Composez le 1 800 VAPOR 1 2 (1 800 827-6712) oou visitez notre site Web à
www.vickshumidifiers.com
© 2016 Todos los Derechos Reservados
Kaz USA, Inc., a Helen of Troy Company
Marlborough, MA 01752
Este producto es fabricado bajo licencia de The Procter & Gamble Company.
VICKS y otras marcas registradas asociadas son propiedad de The Procter & Gamble Company.
Protec es una marca registrada propiedad de Helen of Troy Limited.
Aquastat es una marca registrada de K2 Concepts Inc., Atlanta GA.
Importado por Kaz Canada, 510 Bronte St. S., Milton, ON L9T 2X6
Contáctenos al teléfono 1-800-VAPOR-1-2 (1-800-827-6712) o al sitio web www.vickshumidifiers.com
Para reciclar responsablemente, por favor visite:
www.RecycleNation.com
52
P/N: A000112R0
219APR16
CREATIVE DEPARTMENT ARTWORK SPECIFICATIONS
Brand: Vicks
Category: Humidifier
Model:
Subject:
Region: US
Flat Size:
Scale: 1/1
Material:
Revision: 4
Date:
VUL570
KAZ Artwork,,VUL570
Owners Manual
IN: W11 x H8.5
MM: W279.4 x H215.9
IN: W5.5 x H8.5
MM: W139.7 x H215.9
50# gloss text throughout.
21APR16
21APR16
Artwork Part #: A000112R0
Die Line Part #: N/A
Description : OWNER'S MANUAL,
Folded Size:
Page count: 52 (English, French, Spanish)
Release Date:
Re-release Date:
Colors:
Black
100%
Special Instructions:
Quality Requirement of Artwork and Quality
Clarification Process of Artwork Printing:
Meet Eng-QS-06&02
Kaz USA, Inc., a Helen of Troy Company
Creative Services
Marlborough, 01752 MA, USA
+1 508 490 7000
 Loading...