

Vibe SEK10, SEK50, SEK60, SEK69 Instruction Manual

Instruction Manual
To ensure maximum performance and safety,
please follow this manual. Please retain the
manual for future reference after installation
Model: SEK10, 50, 60 & 69

Congratulations on purchasing your SEK speakers, please read this manual in
order to fully understand how to get the best results from your speakers and
ensure that all advice on how to look after your speakers is followed.
Thank you for buying VIBE, we hope you enjoy listening to your product as
much as we enjoyed creating it. (VIBE R&D Division)
OWNERS MANUAL
Model: SEK10, 50, 60 & 69
Introduction
This instruction manual is for your safety and must be adhered to at all times. Please read and ensure that you fully understand the
installation and set up procedures as explained and if you are unclear on the installation or set up of your VIBE SE-K Series speakers
please contact your nearest authorised VIBE dealer.
Contents
WARNING
DO NOT EXPOSE THIS PRODUCT TO DAMP OR MOISTURE - doing so may result in fire, shock or damage to the product.
BEFORE WIRING DISCONNECT THE CABLE FROM THE POSITIVE BATTERY TERMINAL - failure to do so may result in electric shock or
injury.
ENSURE GOOD AND CORRECT CONNECTIONS - failure to make the correct connections may result in fire or damage to the product.
DO NOT USE FUNCTIONS OF THIS EQUIPMENT THAT MAY TAKE YOUR CONCENTRATION AWAY FROM DRIVING YOUR VEHICLE - do
not set up your amplifier whilst driving, doing so may result in an accident. For prolonged setting up, make sure that your vehicle is stationary and in a safe location.
KEEP THE VOLUME AT A LEVEL SO YOU CAN STILL HEAR OUTSIDE NOISE - failure to do this may result in an accident. VIBE equipment is capable of producing sound levels that can permanently damage your hearing. VIBE recommends caution when listening at
high volume. For safe and enjoyable listening the sound should be comfortable and clear without distortion.
CAUTION
Never connect any speaker lead to the car chassis. This can cause severe damage to your speaker /car radio /amplifier.
Before drilling or cutting any holes, investigate the layout of your vehicle thoroughly.
Use caution when working near the fuel / hydraulic lines and electrical wiring.
Observe the correct polarity when wiring, improper phasing may cause a loss of bass response.
Ensure that no moving parts catch on the speaker or grill (e.g. window or door handles, or window glass inside the door)
Installation
The quality of the installation will affect the system performance and reliability.
Contact your nearest authorised VIBE dealer if you are unsure on the installation of this product.
Please mount this unit away from any potential hazards.
Minimising the length of wires will provide higher audio output from the system.
The speaker should be securely fastened to the mounting position using the screws provided.
Pre drill your mounting holes using a drill and position with the template provided.
Be sure to investigate your mounting area thoroughly for electrical wires, brake or fuel lines or fuel tank to prevent causing any damage.
Firstly make sure that the speakers will fit in your chosen location. This may involve the removal of the standard vehicle speakers.
Please use the mounting depth and hole cut dimensions as detailed in this manual for guidance.
Woofer installation. - SEK 50 / 60 /69
If necessary cut any material away to allow the speaker to sit correctly.
Cut out the mounting hole and pre-drill any other fixing holes.
If the grill is to be fitted, place it over the speaker and screw through both grill and speaker using the screw provided until the speaker
is securely fastened.
If no grill is fitted then securely screw the speaker into place using the screws provided.
SE-K series speakers SEK10 SEK50 SEK60 SEK69
Tweeters and mounting pods. Y Y Y N
SE-K crossover units. Y Y Y N
Grills. N/A Y Y Y
Fixing screws. Y Y Y Y
Cut out template. Y Y Y Y
Lengths of speaker cable. Y Y Y Y
Surface mount tweeter installation.
Locate a suitable position for the tweeter. Many positions will provide good sound quality. For optimum staging, position tweeter higher
than woofer but within 5” to 10" of the woofer.
Carefully unscrew the tweeter casing and remove the tweeter.
Using the base of the casing mark the two mounting holes and a hole for passing the wire through.
Cut out these holes.
Pass the tweeter cable through the bottom of the case and into the previously drilled holes.
Securely fix the base of the tweeter in place using the screws provided.
Select whether the standard casing or the slightly angled casing is to be used and carefully screw the tweeter casing back together,
ensuring that no cable gets trapped.
The tweeter direction should then be adjusted so that the tweeter is focused towards the listener.
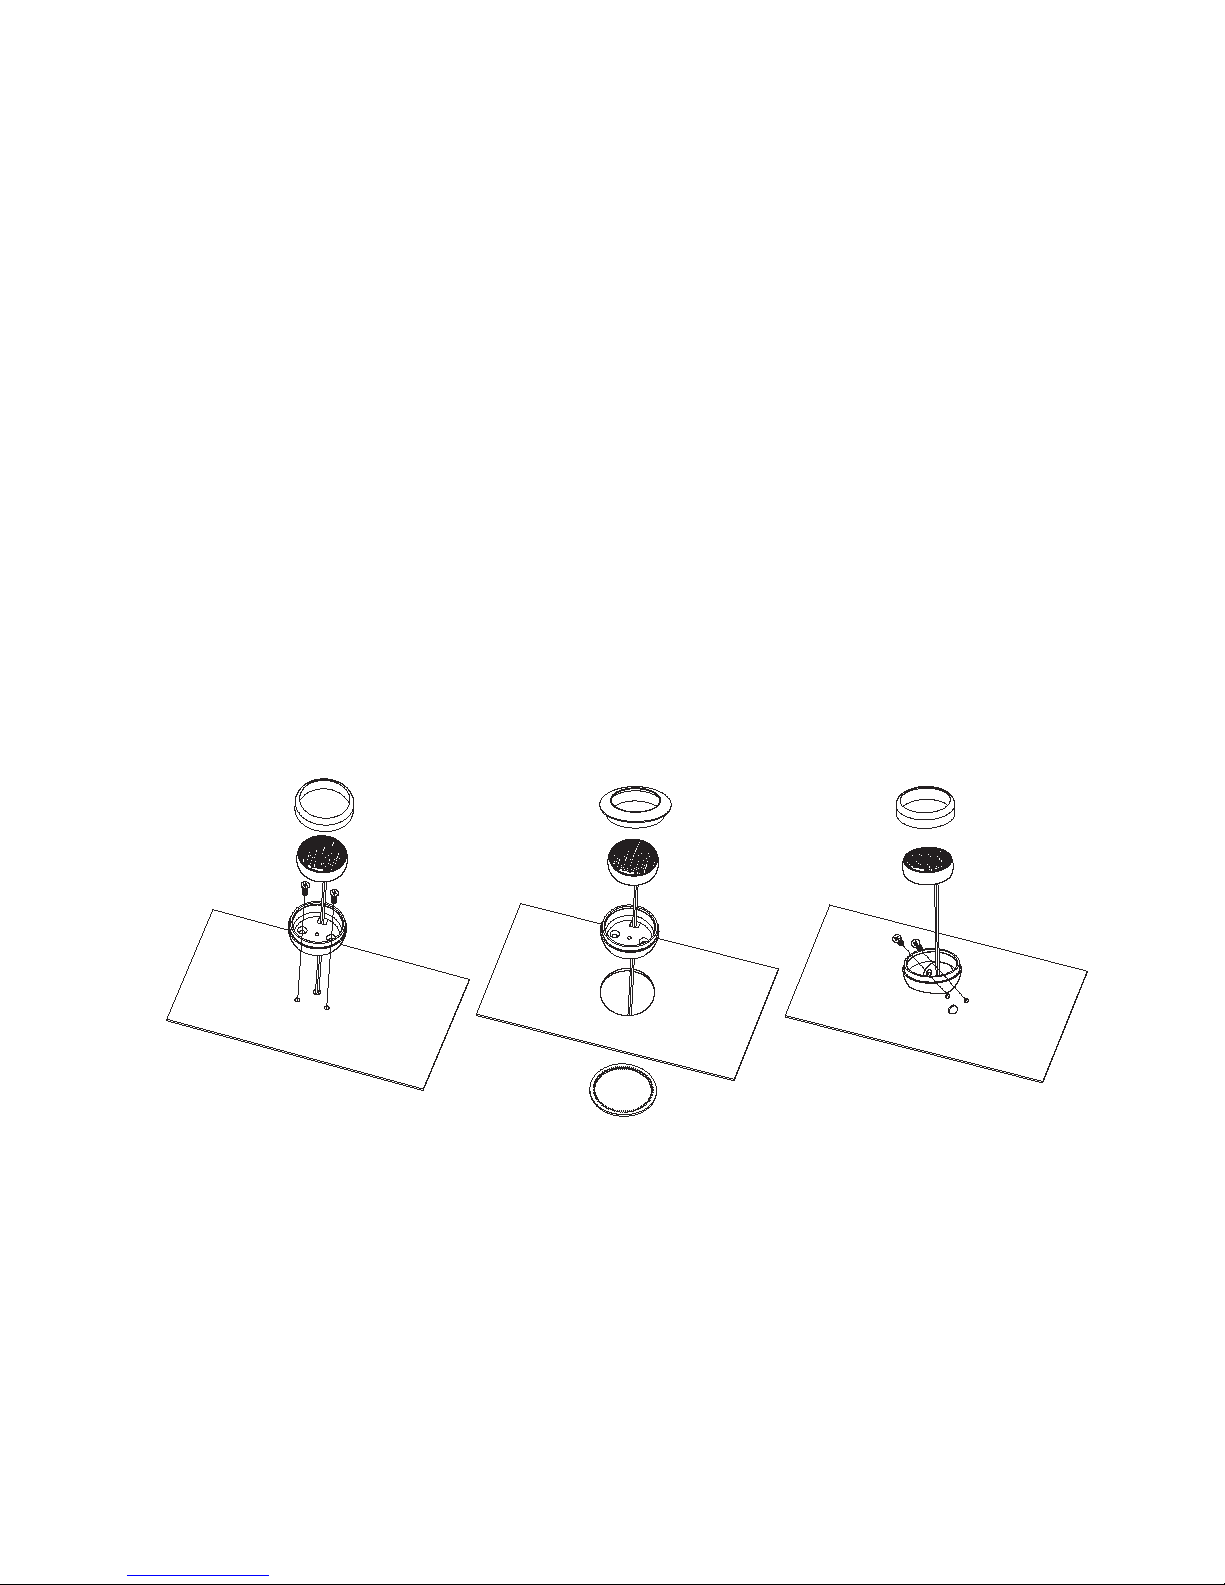
Flush mount tweeter installation
Locate a suitable position for the tweeter. Many positions will provide good sound quality. For optimum staging, position tweeter higher
than woofer but within 5 to 10" of the woofer.
Use the cut out template and mark and cut out the hole for the tweeter to sit into.
Place the entire tweeter pod into the hole.
From the rear of the tweeter. Slide the grooved locking device over the tweeter cable and then over the back of the tweeter case to
firmly hold it in place.
The Tweeter direction should then be adjusted so that the tweeter is focused towards the listener.
Crossover installation SEK 50 / 60
The crossover units are designed to be mounted as close to the woofers as possible.
Locate a suitable mounting place for them.
Remove the lid by using the finger hole in the top of the cover.
Mark the two mounting holes inside the crossover unit.
Cut these holes out.
Secure the crossovers with the screw provided.
Check the glow fuse is not damaged before refitting the cover. If it is please ensure it is replaced with one of exactly the same specification.
 Loading...