

Viavi OneExpert ONX CATV 620 Quick Start Manual

Extended Quick Start Guide v7
August 2017
OneExpert
ONX CATV 620

© 2017 Viavi Solutions, Inc. | Viavi Confidential and Proprietary Information
2
Table of Contents – OneExpert CATV
ONX CATV - Interfaces and Controls
ONX CATV - SW Upgrade and Data Synchronization
ONX CATV – Engineering Mode
ONX CATV - Ethernet Testing
ONX CATV – CATV Testing
ONX CATV - StrataSync

ONX CATV - Overview
© 2017 Viavi Solutions, Inc. | Viavi Confidential and Proprietary Information
4
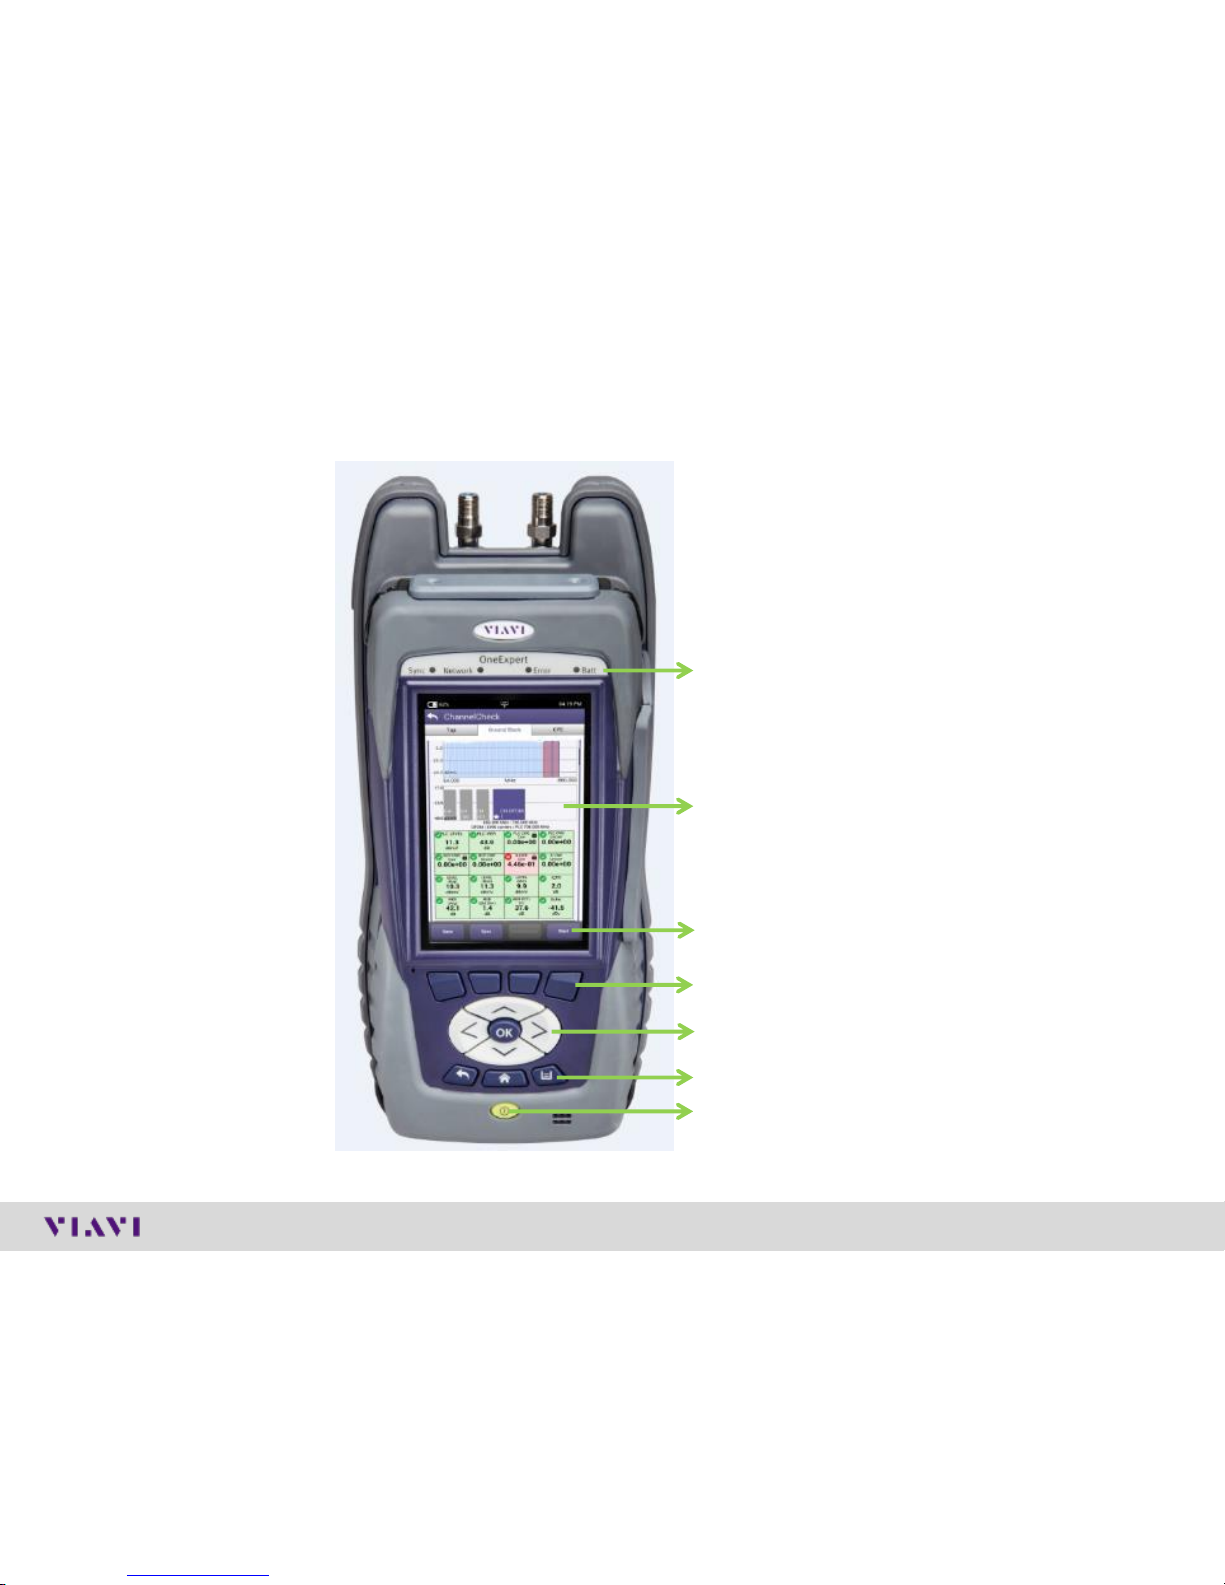
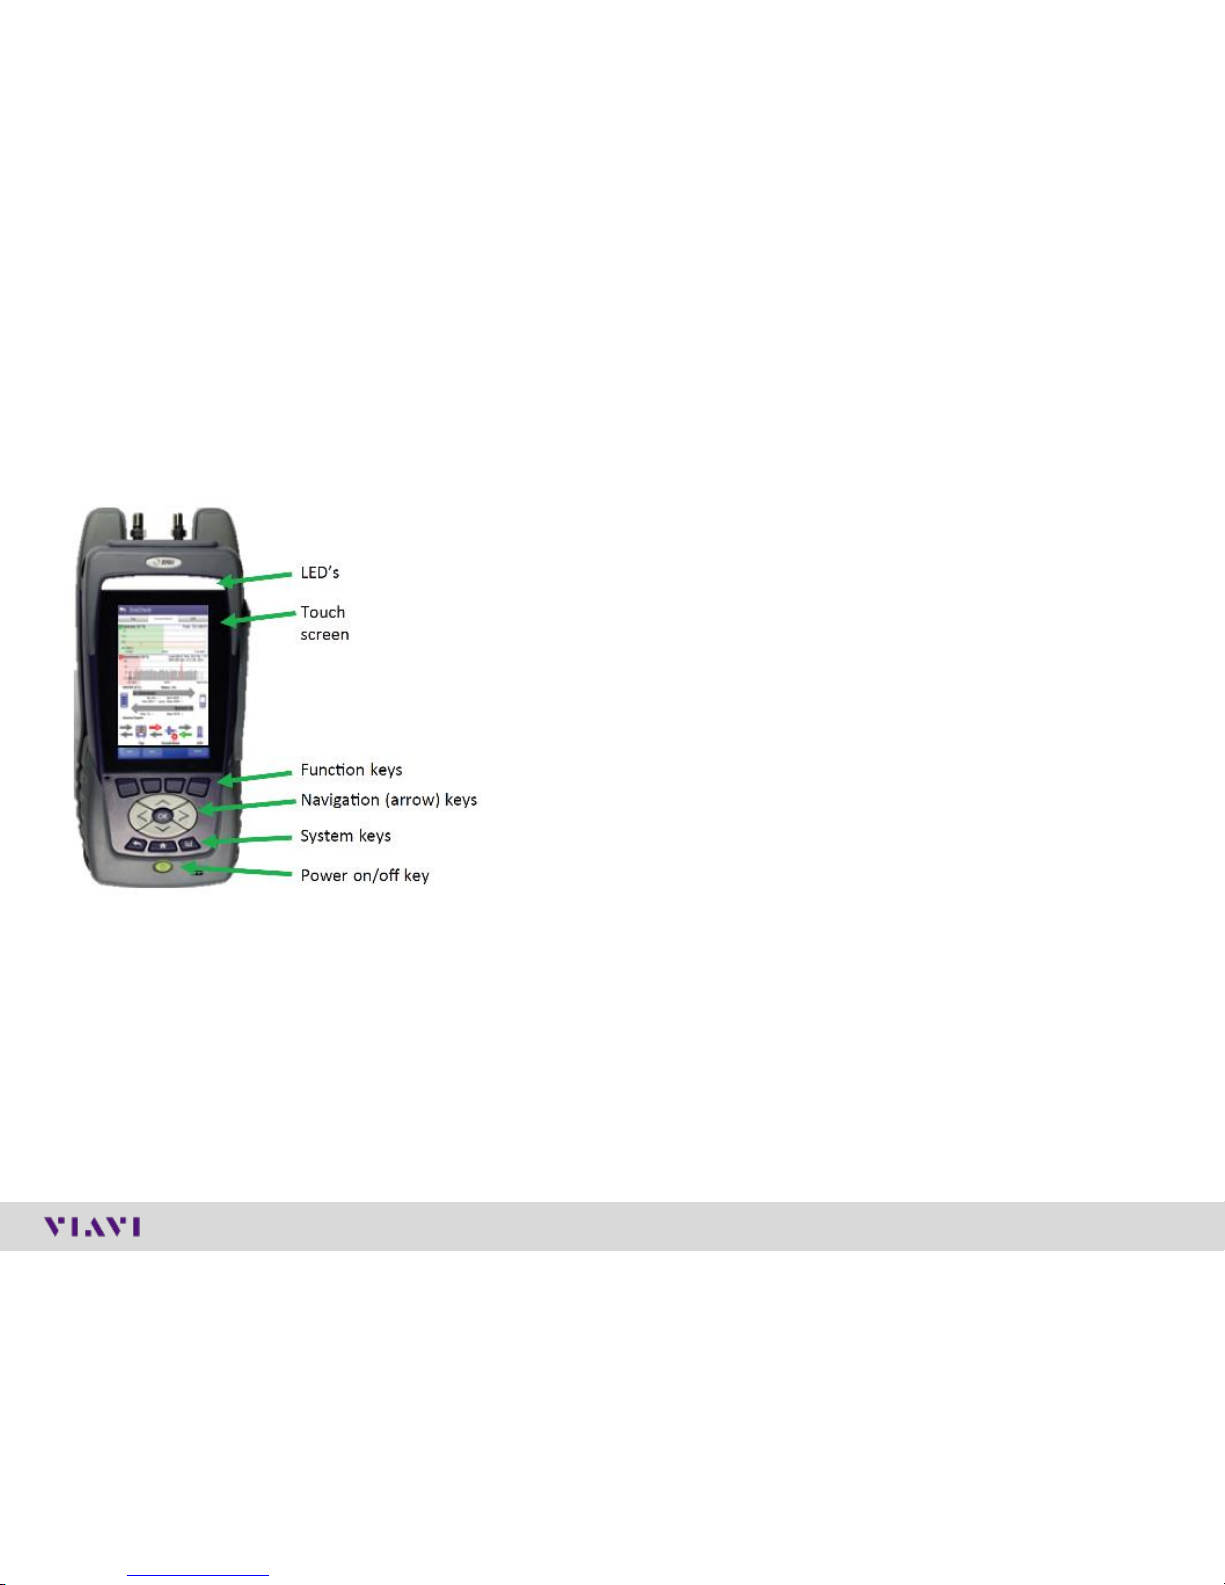
ONX Controls keys
Network Indicator LEDs
High Sensitivity Touch Screen
Shortcut Buttons
Short Cut Hard keys – Functions keys
Navigation Directional Buttons
Back, Home Screen, and Utility Buttons
Power On/Off Button

© 2017 Viavi Solutions, Inc. | Viavi Confidential and Proprietary Information
5
ONX Interfaces
Port 2 – RF Ingress Port
Connect to
upstream from house
for Ingress Scan
Port 1 – RF US/DS Analysis
DOCSIS,
QAM
D-Ring
Dual 10/100/1000
RJ45 Ports
Dual USB 2.0 Ports
Battery Charger Port (under flap)
© 2017 Viavi Solutions, Inc. | Viavi Confidential and Proprietary Information
6
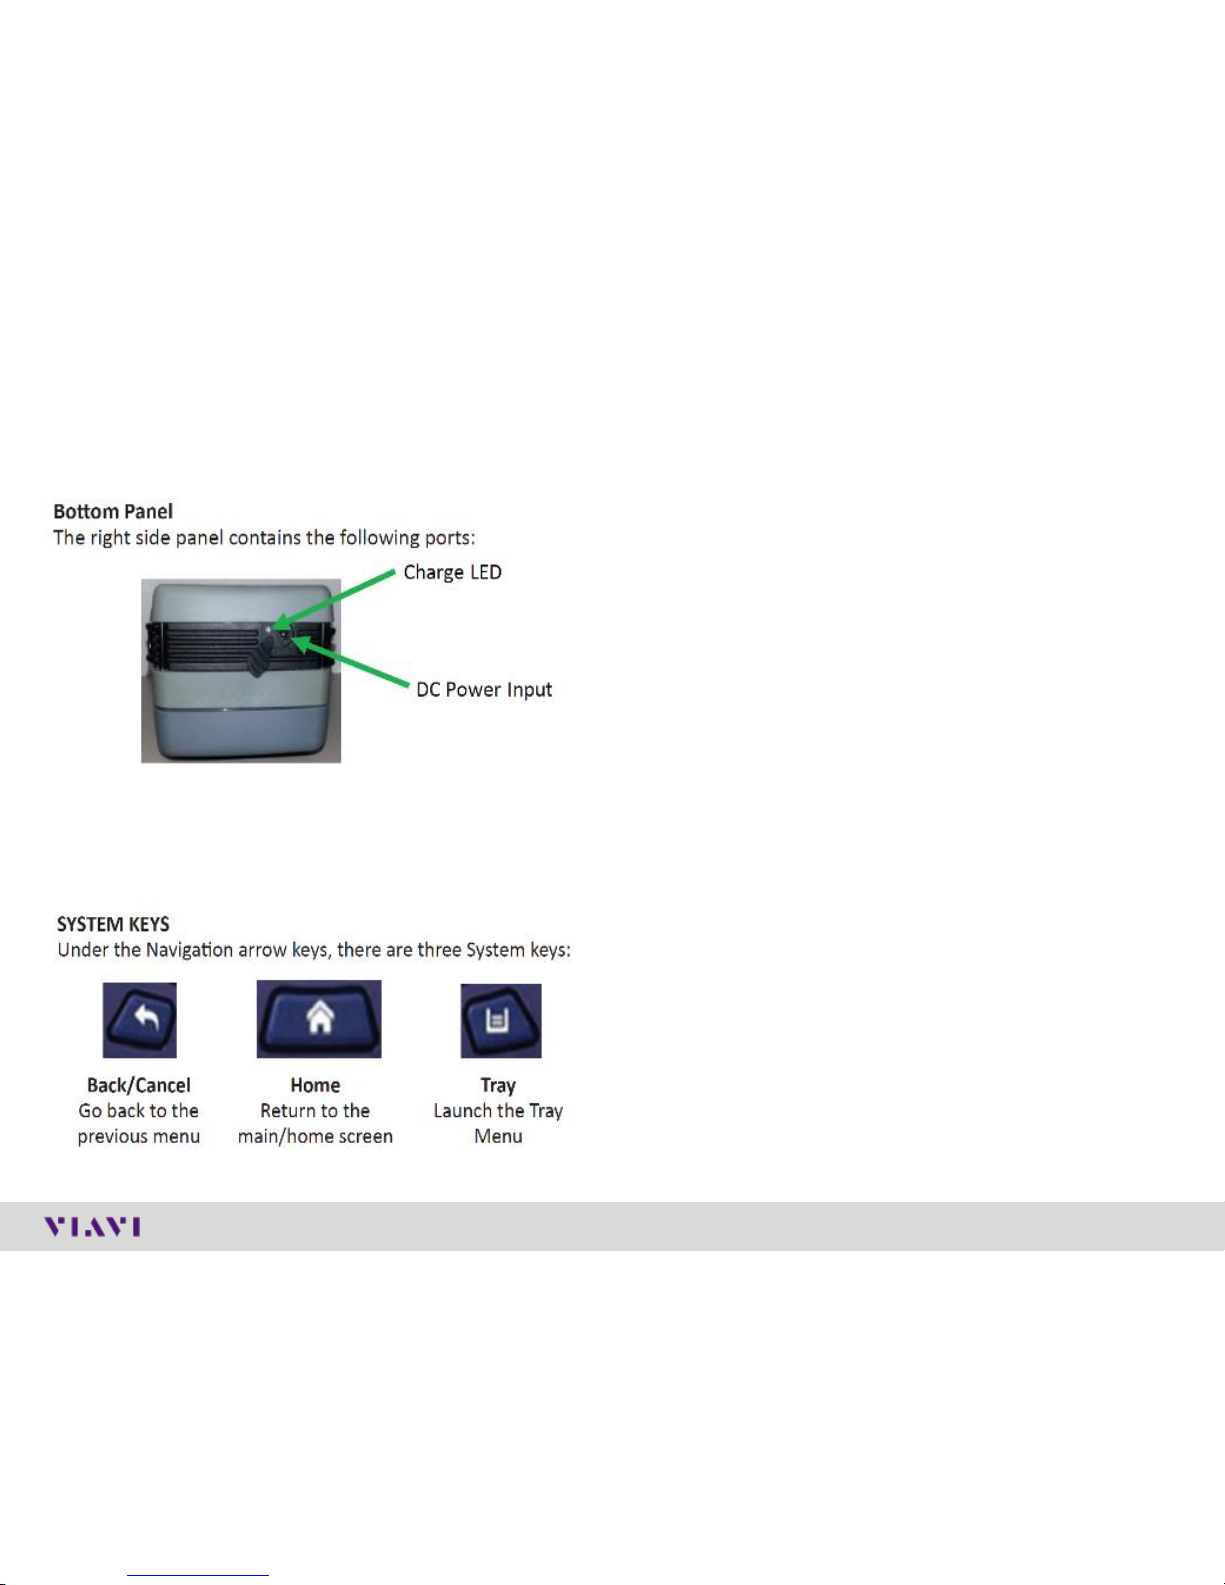
Power LED - Systems Keys
The DC Power Input, located on the bottom of
the instrument, is used to connect the AC
adapter.
The Charge LED located next to the power input
indicates that the adapter is connected.
✓ Solid green indicates that charging is
complete.
✓ Slow flashing red indicates that the battery
charge is critically low, and less than 10%.
✓ Fast flashing red indicates that the charging
was suspended due to a fault and user
intervention is necessary (for example, an
incorrect charger is attached).
✓ Solid red indicates that the charging was
suspended due to overheating. The unit can
continue to run, and no user intervention
necessary.
✓ Solid amber indicates that the battery is
charging.
© 2017 Viavi Solutions, Inc. | Viavi Confidential and Proprietary Information
7
LED’s
Sync – Reports the status of modem synchronization.
✓ Blinking green indicates that the modem is ranging.
✓ Solid green indicates that the modem has
successfully ranged.
Network – Indicates the status of network
connectivity.
✓ Blinking green indicates that the unit is acquiring
an IP address.
✓ Solid green indicates that an IP address has been
acquired.
✓ Blinking amber indicates a timeout – the unit was
unable to acquire an IP address.
✓ If the LED is not illuminated, the network is not
active – either the unit is not connected or it is
logged off.
Batt – A multi-color LED that indicates the battery
status.
✓ Solid green indicates that either the battery charge
is higher than 30%, or that an external source is
powering the unit.
✓ Solid red indicates that the battery charge is
critically low, and less than 10%.
✓ Solid amber indicates that the battery is getting
low, and the charge is between 10% and 30%.
Error – Solid red indicates error and
alarm conditions. The type of error
varies and depends on the
application.

© 2017 Viavi Solutions, Inc. | Viavi Confidential and Proprietary Information
8
Tray Menu
SAVE TO JOB – Saves the results to job ticket.
SAVE TO REPORT – Saves the results to a
report. Formats
available: XML, PDF, or HTML.
VIEW REPORT – Views a saved report. Select
View Report and
then select the saved report to view. If there are
no saved reports, the text will be grayed out.
SCREENSHOT – Takes a screen capture of the
current menu (the screen you were viewing
when you launched the tray menu).
NETWORK – Enables or disables the
home/Ethernet network.
BLUETOOTH – Enables or disables Bluetooth.
VOLUME – Control the device volume.
HELP – Provides TAC phone numbers.
USING THE TRAY MENU
The tray menu allows access to
commonly used functions. It can
be accessed either by pressing the
Tray system key or by swiping
downward from the top of the LCD.
Hint:
A long push on TRAY key will
automatically start a screen capture. It is
useful when a short Tray key push
doesn’t open the Tray menu (when for
example a function key menu is open)
© 2017 Viavi Solutions, Inc. | Viavi Confidential and Proprietary Information
9
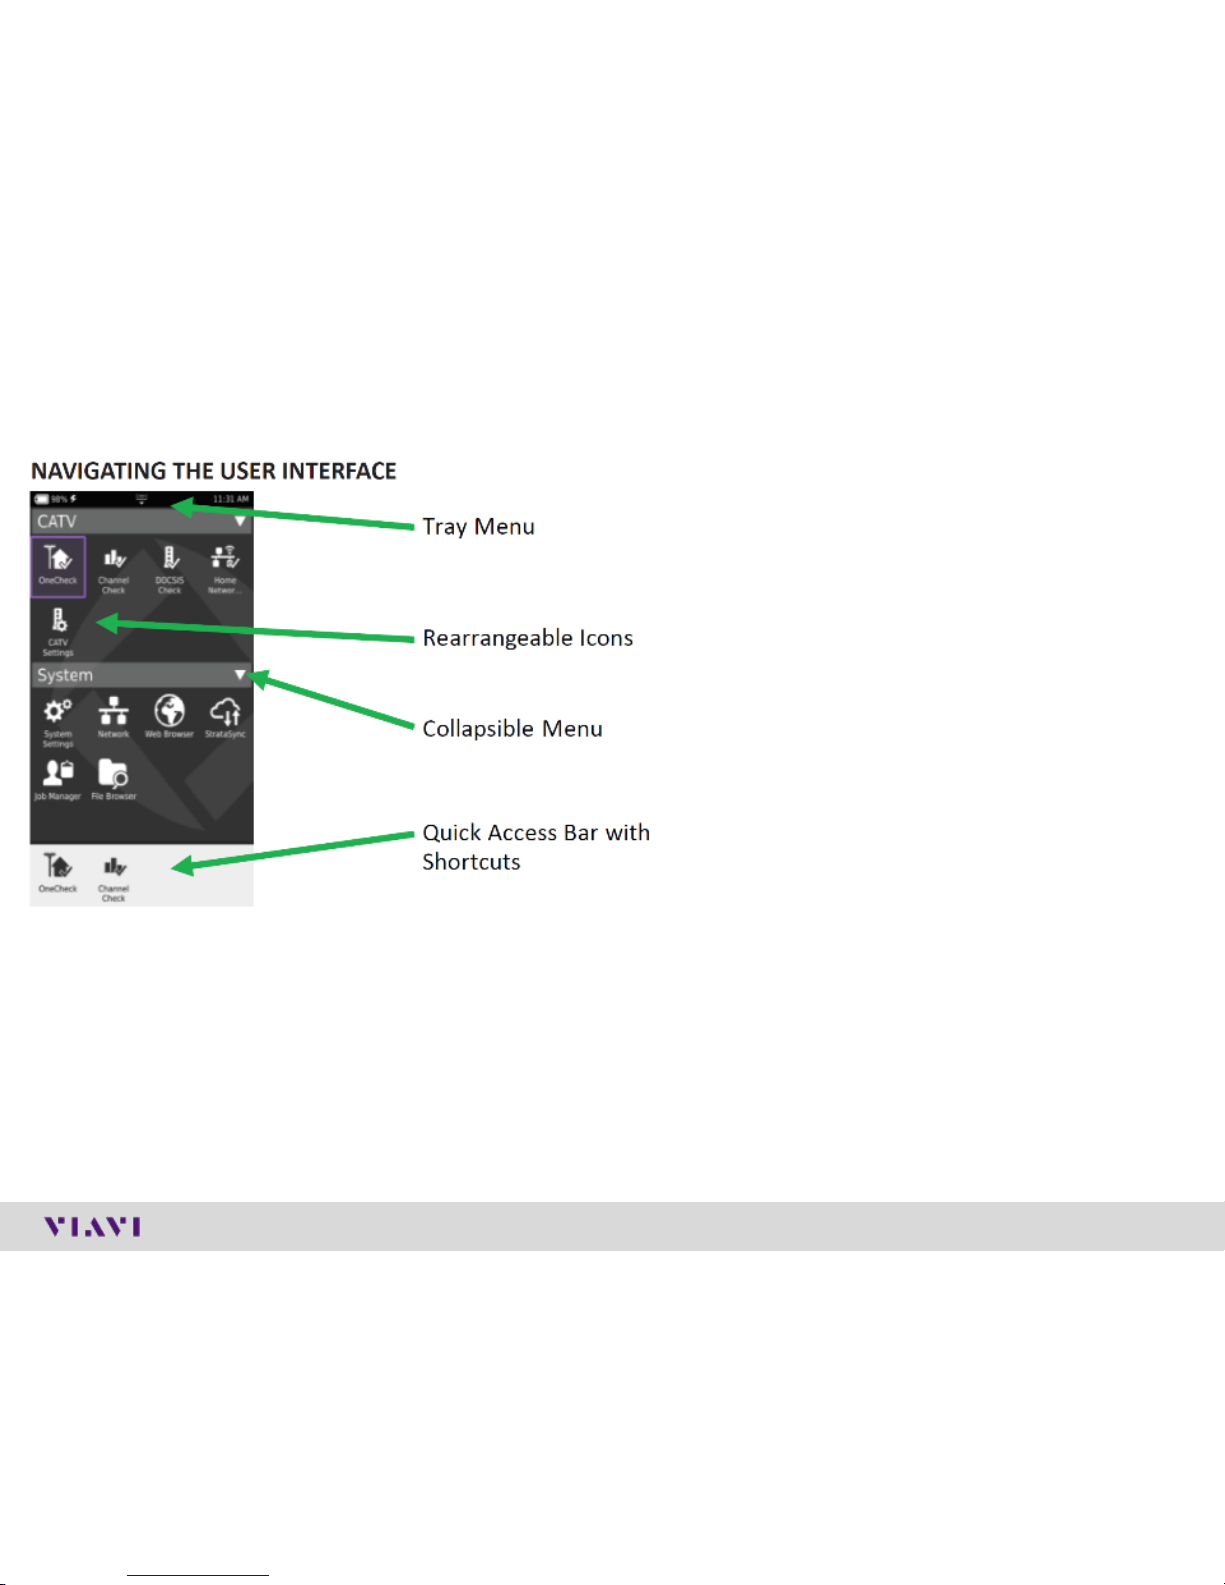
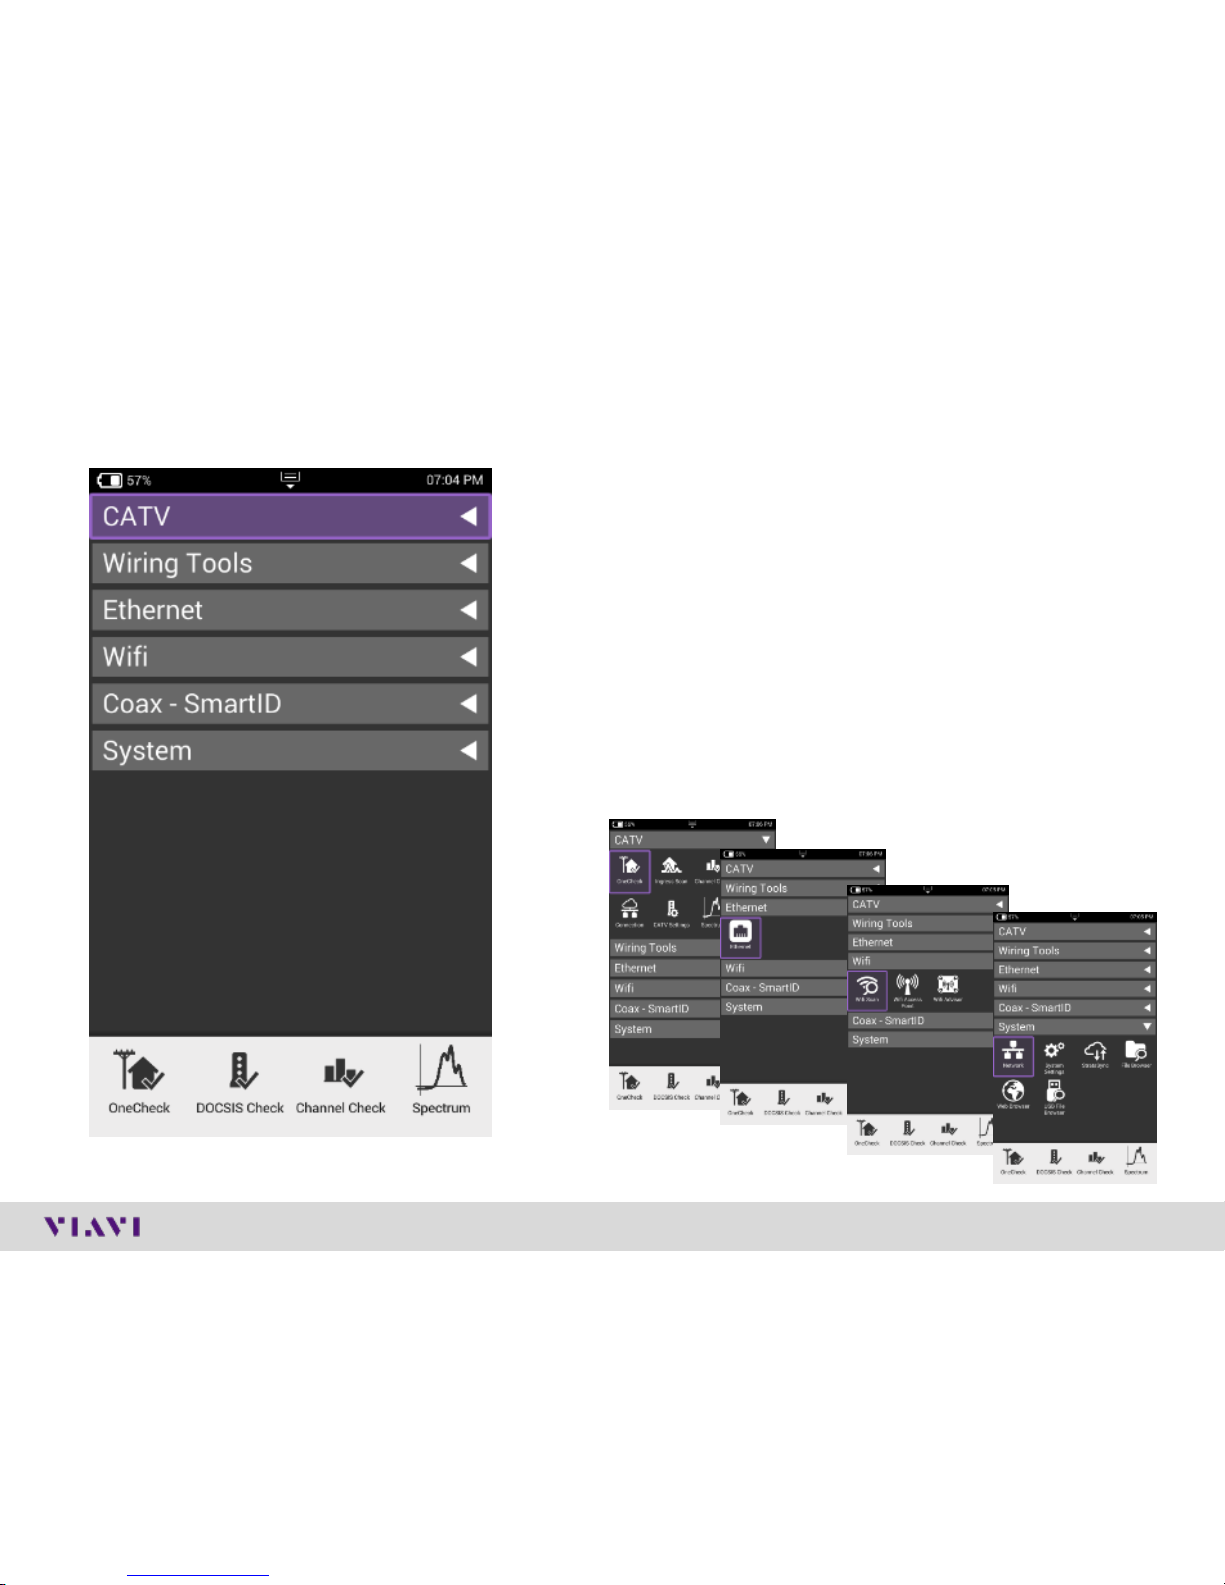
User interface
SELECTING A MENU
To select a menu, either touch the item or use the arrow
navigation keys to highlight the desired menu item and
then press the OK key.
SHORTCUTS
✓ If you have a test or function that you use frequently
you can make it a shortcut.
✓ Touch and hold the icon for the function and then
drag it to the bottom of the screen to create a
shortcut.
✓ You can create up to four shortcuts.
✓ To remove the shortcut, drag it off the shortcut bar.
REARRANGING ICONS
✓ You can rearrange icons within a menu for tests
or functions you use frequently.
✓ To rearrange icons inside a menu, touch and
hold the icon and then drag it to the new
location.
COLLAPSIBLE MENUS
Each main item is a collapsible menu. Touch the
triangle on the right (the triangle rotates from
pointing left to pointing down) or use the arrow
keys to highlight the menu item and then press
the OK key.
© 2017 Viavi Solutions, Inc. | Viavi Confidential and Proprietary Information
10
Home Screen
Home Screen is default when ONX is turned on
✓ It can be reached by selecting the Home Screen
button above the On/Off Button
✓ Back Button also returns the user to the Home
Screen
Each Menu option is labeled and can be opened or
collapsed by the triangle buttons to the right
Shortcuts are located across the bottom and can be
customized by selecting an icon and dragging it to the
shortcut bar
© 2017 Viavi Solutions, Inc. | Viavi Confidential and Proprietary Information
11
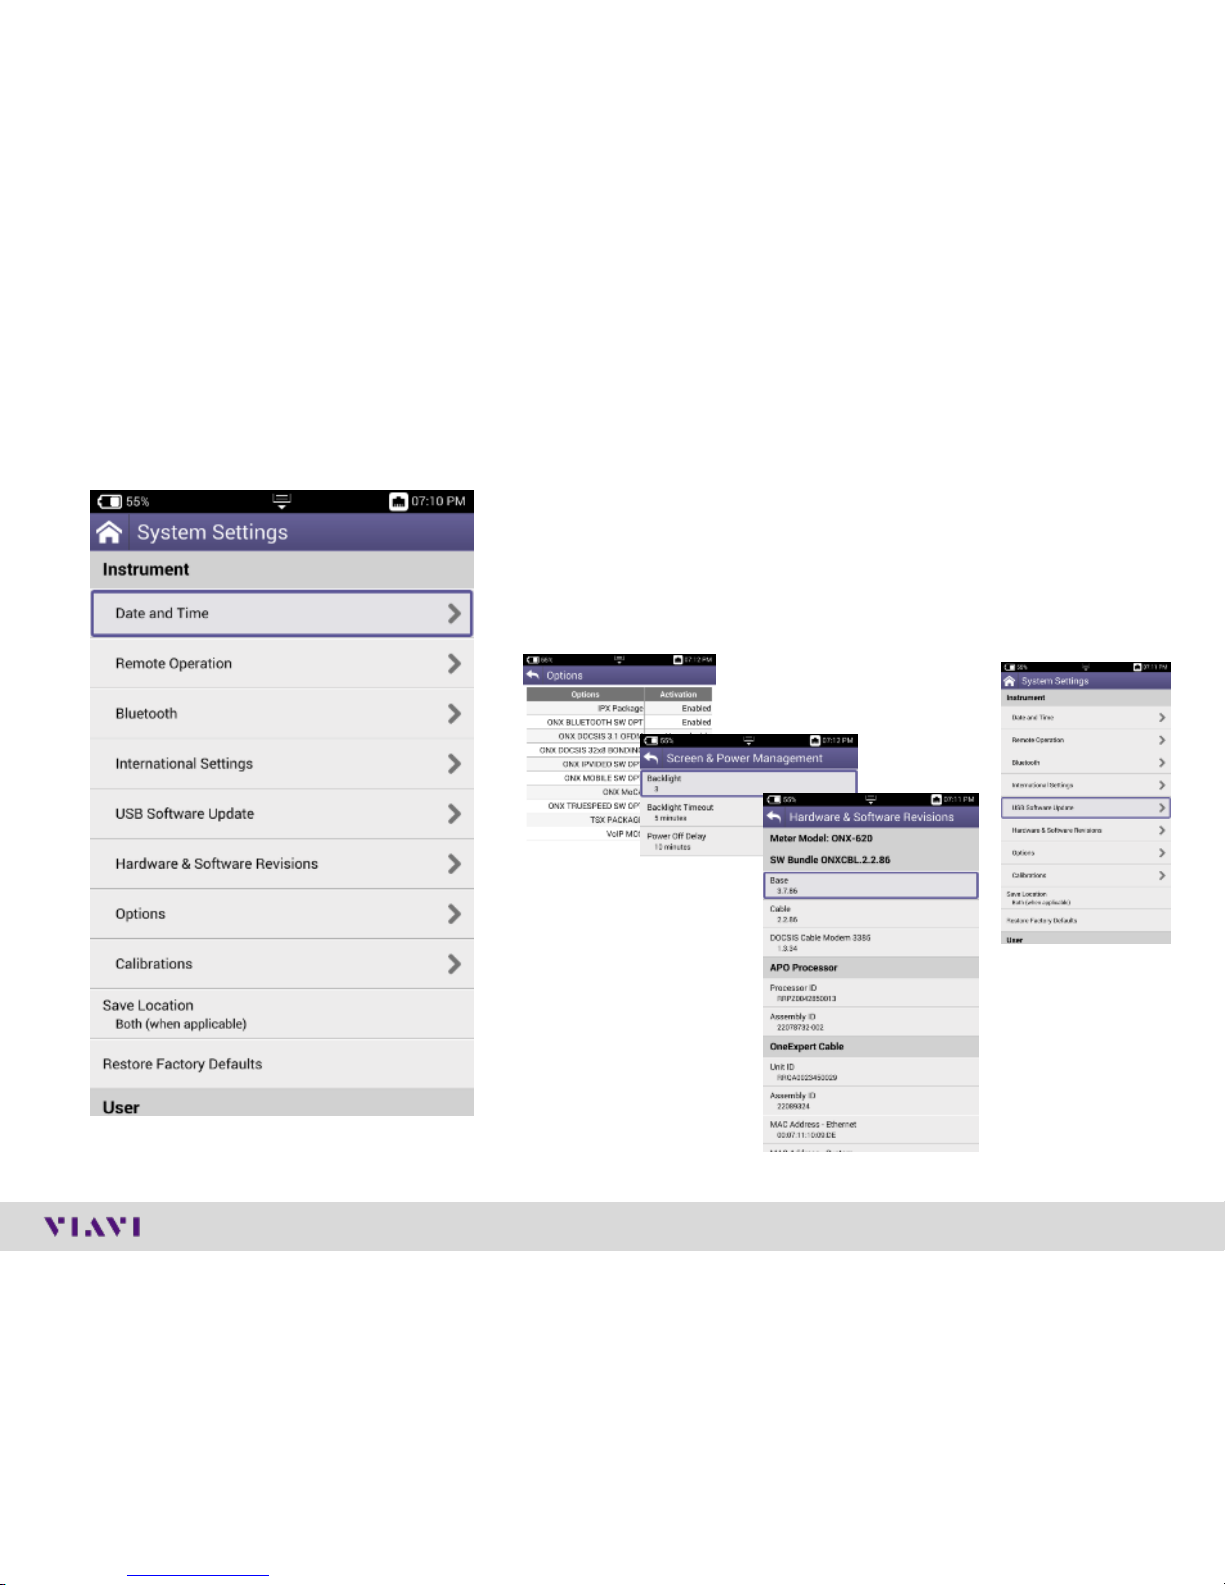
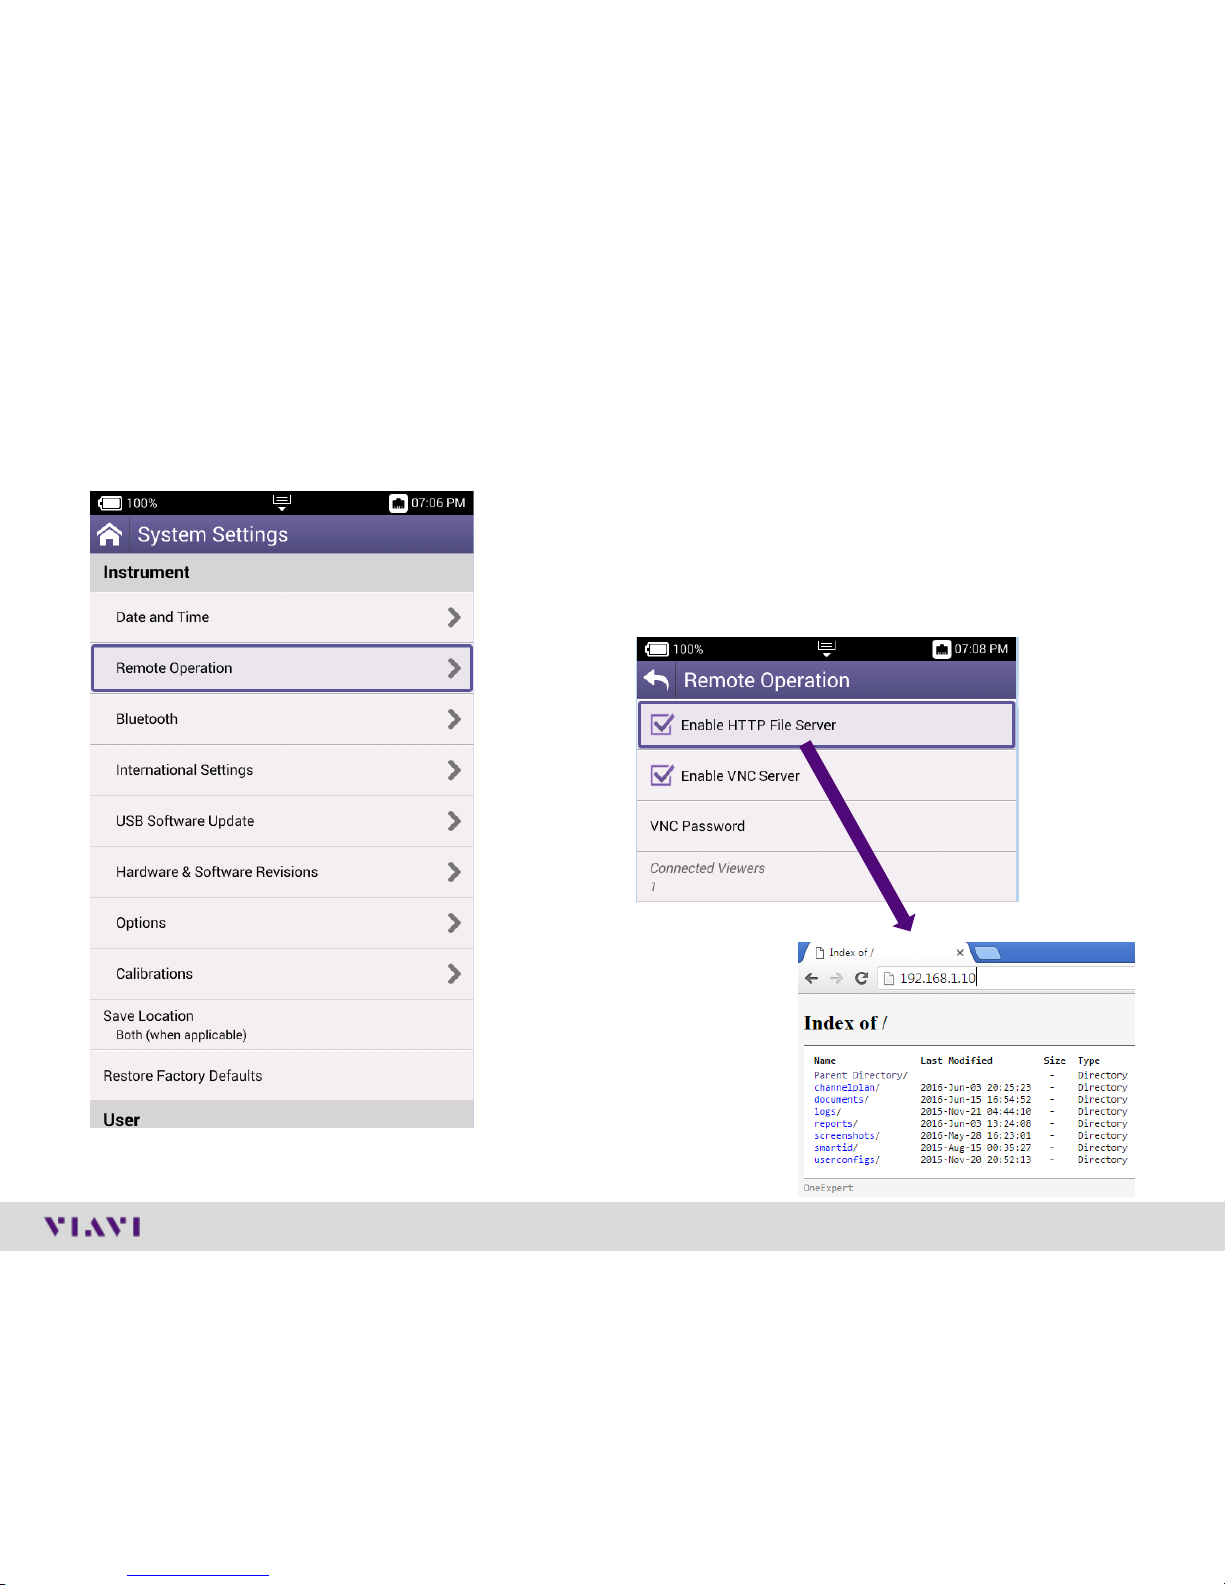
System Settings
System Settings menu offers the ability to
✓turn on Remote Operation (via VNC Viewer),
✓change power and screen settings,
✓view Hardware and Software versions,
✓view Options purchased with ONX 620 meter and
✓ complete USB Software updates
© 2017 Viavi Solutions, Inc. | Viavi Confidential and Proprietary Information
12
System Settings − Remote Operation of ONX
✓The ONX CATV support interoperability Via IP
connection such as Tight VNC or VNC Viewer
✓Under Systems Settings is Remote Operation
allowing IP connection and control and also remote
file browsing over HTTP
© 2017 Viavi Solutions, Inc. | Viavi Confidential and Proprietary Information
13
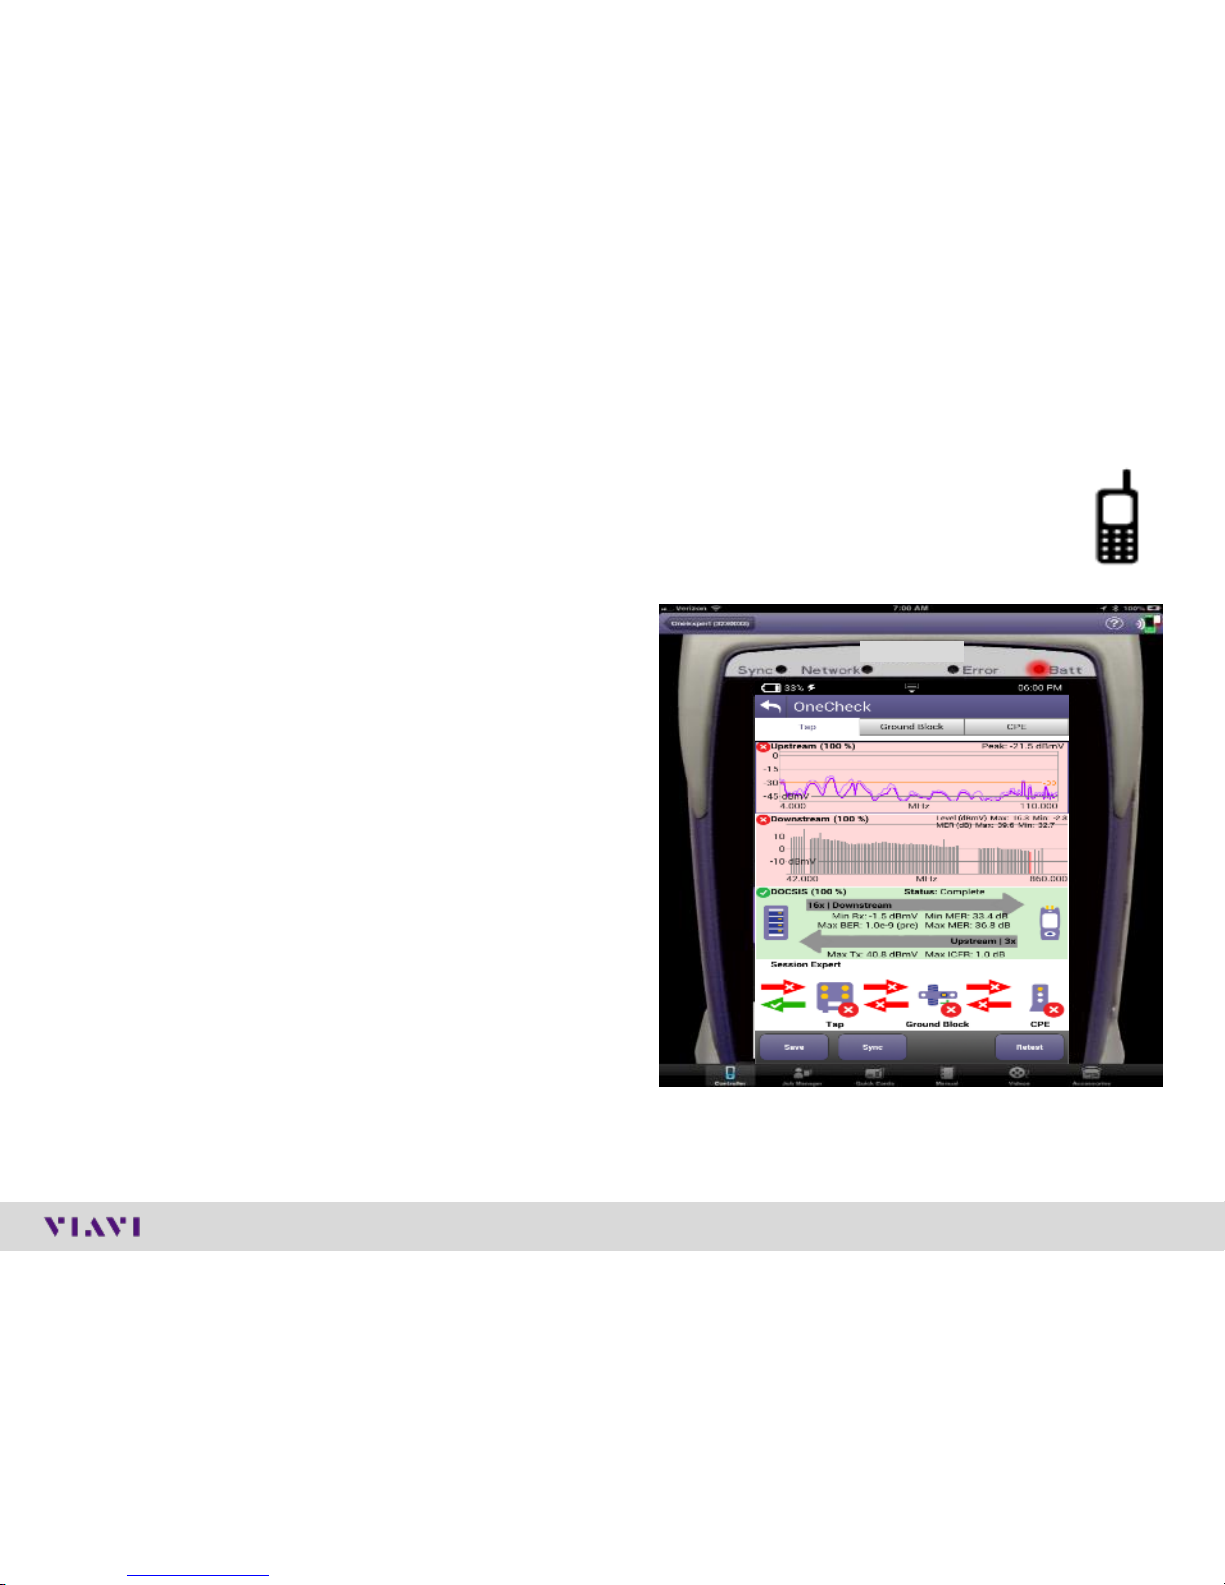
• Remote Operations
• All under one screen
• Troubleshoot faster & more efficiently
• Fault & test point often at different
locations
• Integrate with StrataSync
• Technician Aids On App
• Tutorials, videos, manuals
• Accessory guide
OneExpert CATV – Mobile App
ONX-620
© 2017 Viavi Solutions, Inc. | Viavi Confidential and Proprietary Information
14
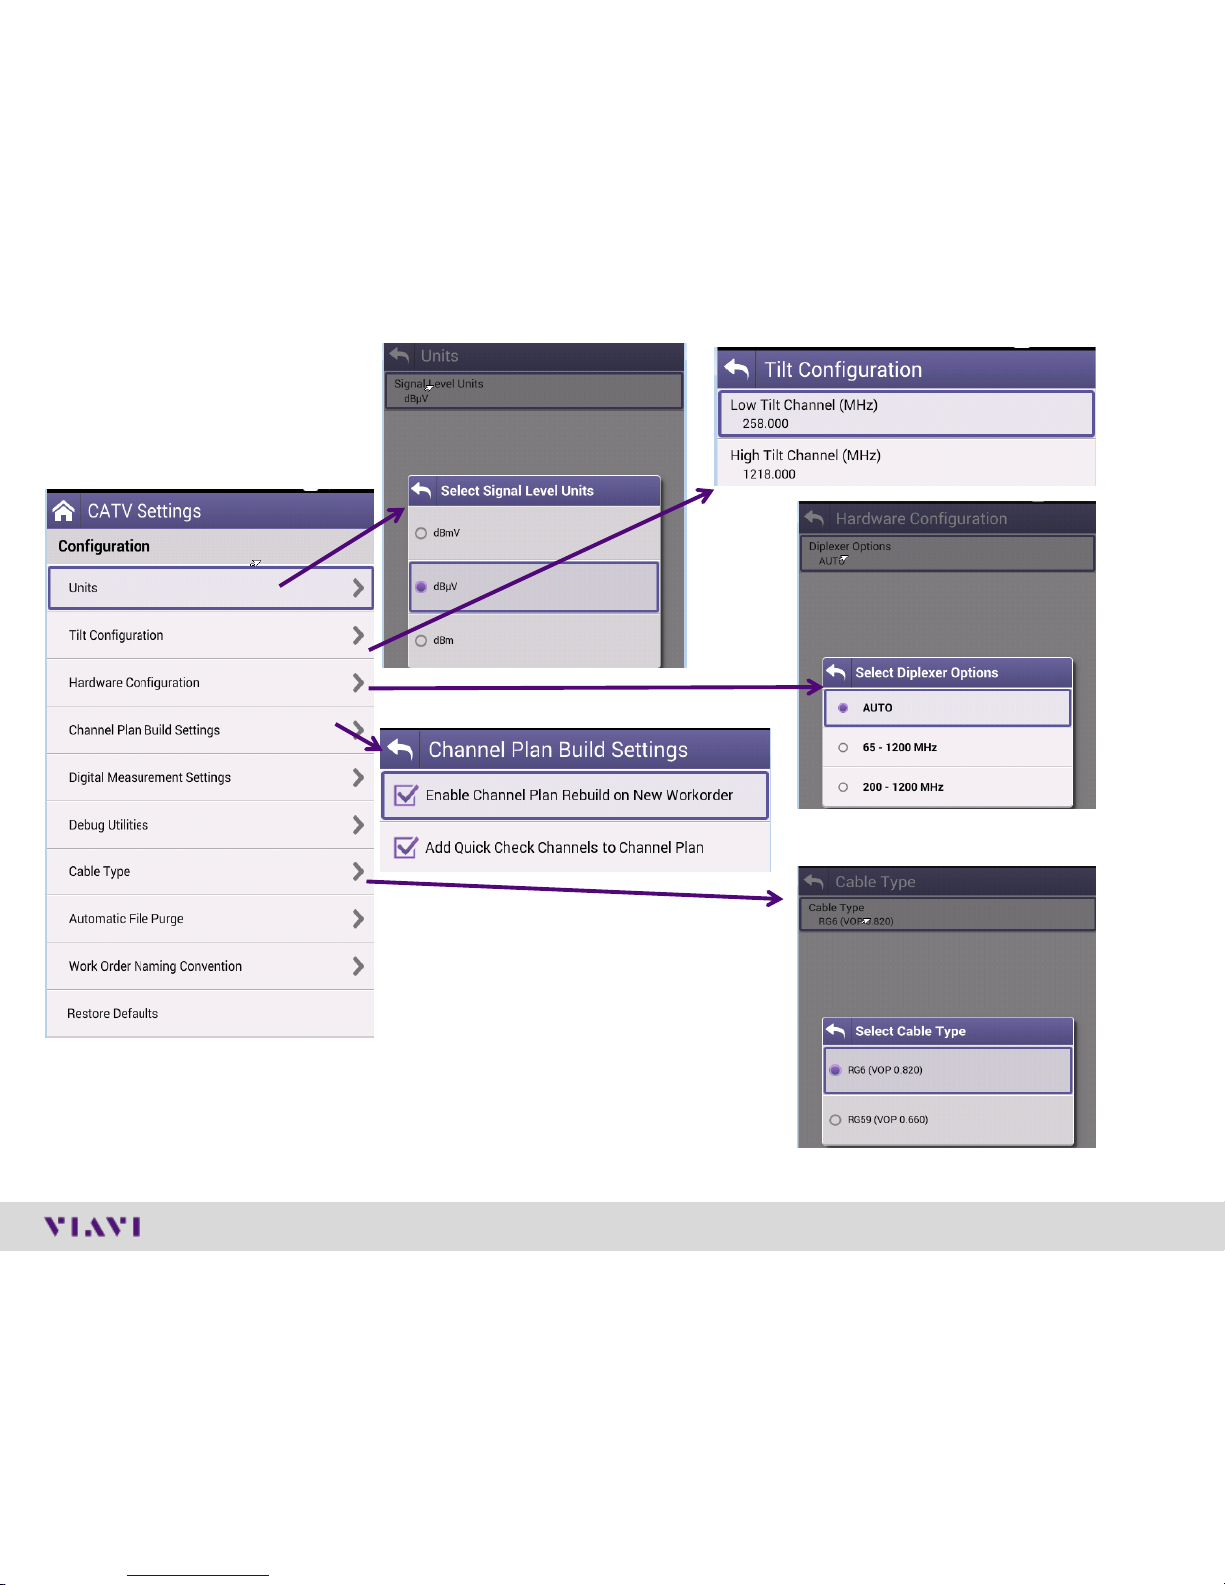
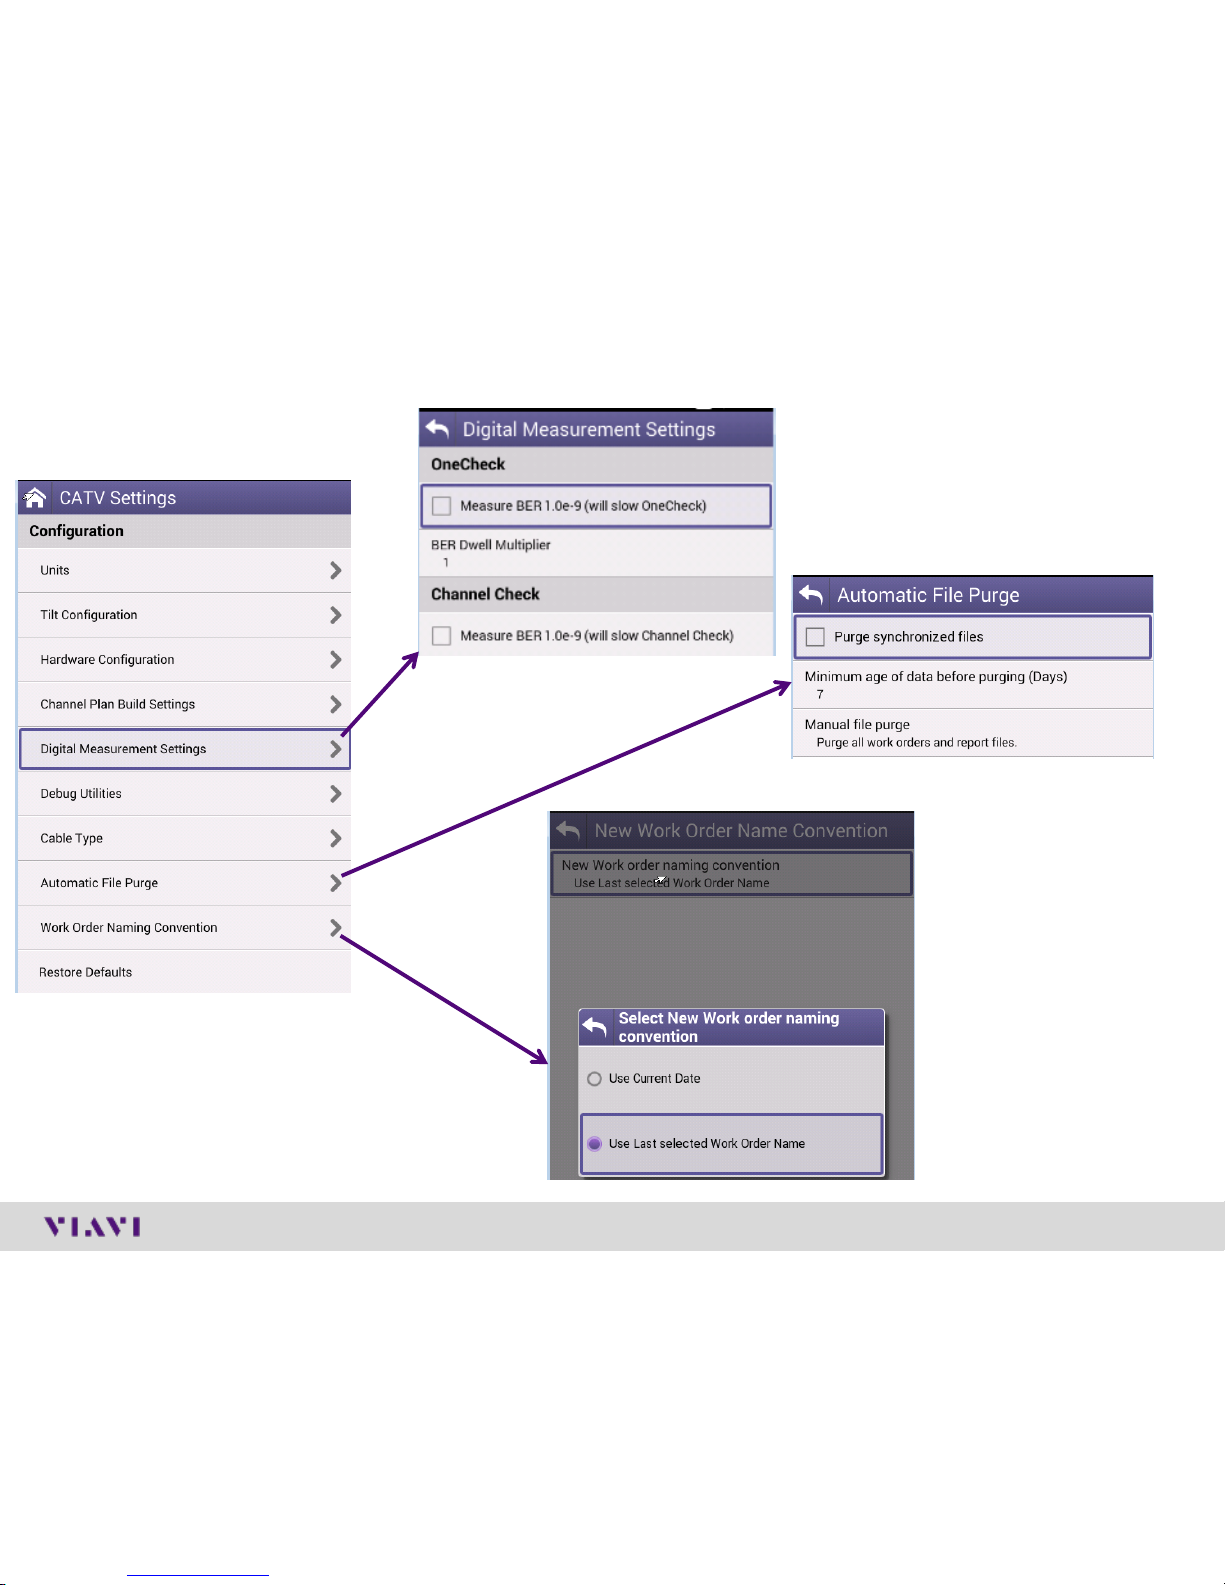
If the applicable setting is enabled,
Quick Check CW channels are
added to the channel plan build
process. This should assist with
discovery of any CW channels that
are being missed or misidentified.
CATV Settings
© 2017 Viavi Solutions, Inc. | Viavi Confidential and Proprietary Information
15
✓ CATV Settings now
provides the option for
default work order ID to be
the last selected work order
instead of “Work Order” with
date/time stamp.
CATV Settings
OneCheck
✓ Measure BER 1.0e-9 setting can now
be locked.
✓ BER dwell multiplier configuration has
been added to make BER dwell time 1 10 times as long as normal.
ChannelCheck
✓ Measure BER 1.0e-9 setting has been
added to ChannelCheck.
✓ StrataSync Workflow - Auto-purge functionality is now supported
© 2017 Viavi Solutions, Inc. | Viavi Confidential and Proprietary Information
16
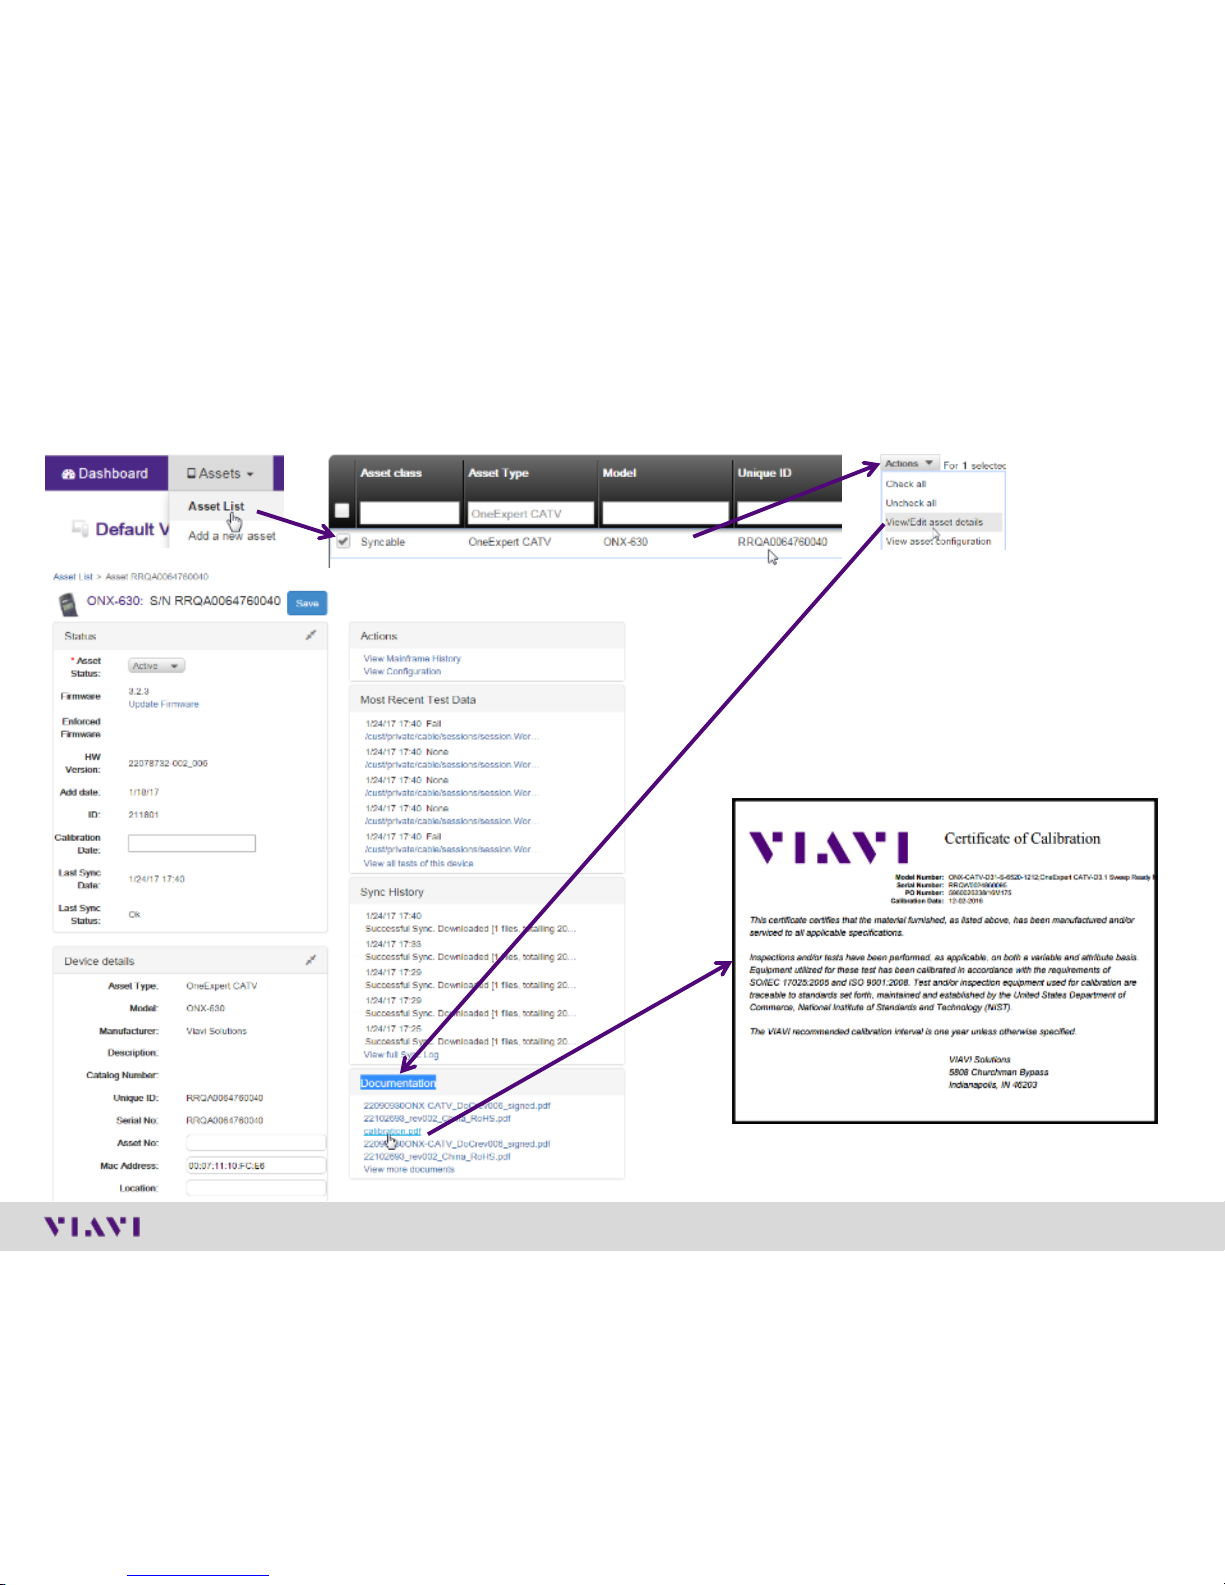
ONX Calibration Certificate (StrataSync)

ONX CATV - SW Upgrade and Data Synchronization

© 2017 Viavi Solutions, Inc. | Viavi Confidential and Proprietary Information
18
ONX Software / Firmware Upgrades
• Software (SW) and Firmware (FW) releases are the best way to ensure your VIAVI
OneExpert ONX is functioning at its best.
• VIAVI delivers SW and FW easily via StrataSync and USB Stick
• All ONX units should be upgraded to the latest production software release – available
through StrataSync (or your Viavi representative)
• New SW Version offer substantial operational improvements and enhancements over earlier
software releases including the version that shipped with the units initially.
• The software will be deployed to the units by the StrataSync Administrator, but each unit
needs to be configured to connect with StrataSync.
• Follow these steps to ensure your meter is configured correctly and you can connect to
StrataSync to receive the latest updates.
© 2017 Viavi Solutions, Inc. | Viavi Confidential and Proprietary Information
19
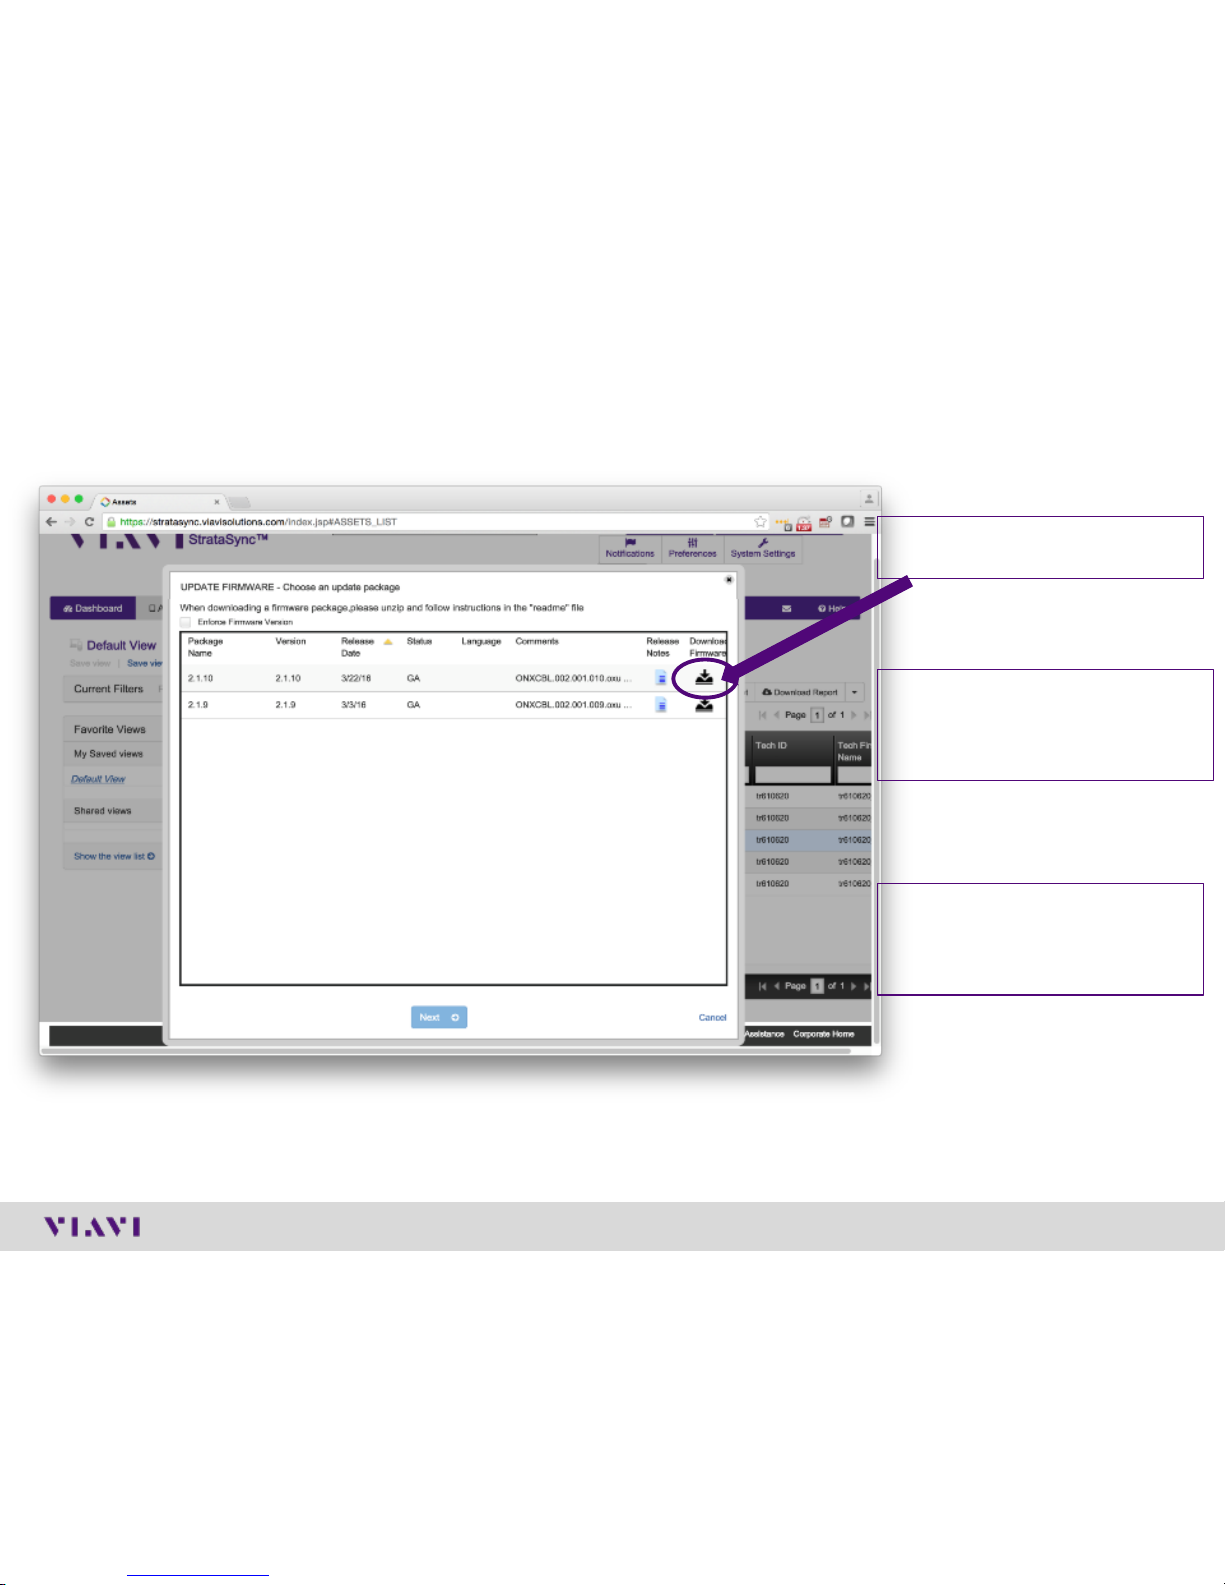
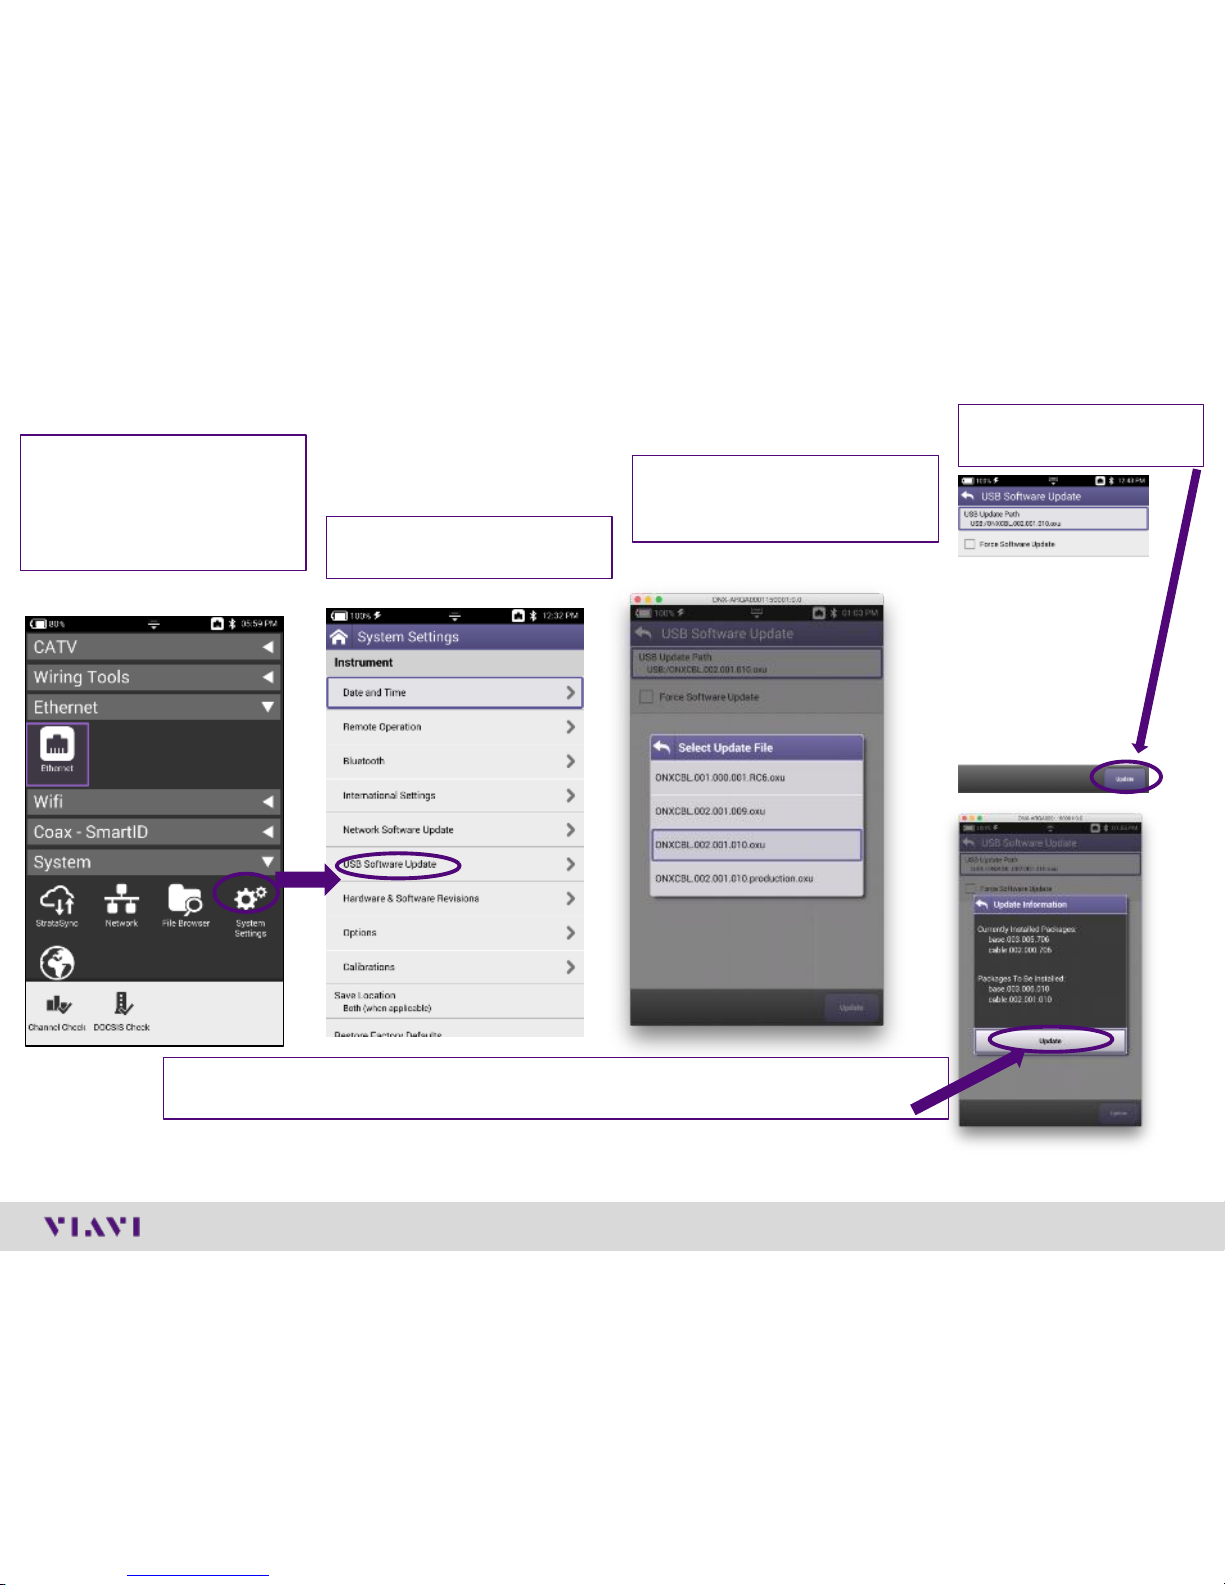
USB Upgrade Process
1) Click here to download the
newest firmware
2) Copy the downloaded file
ONXCBL.xxx.xxx.xxx.oxu to
the root directory of a USB
thumb drive.
3) Press Cancel once the
download has completed
and you have placed the file
on the USB thumb drive.
Note: Firmware must be downloaded from StrataSync first
© 2017 Viavi Solutions, Inc. | Viavi Confidential and Proprietary Information
20
USB Upgrade Process
1) Insert the thumb drive
into either USB port on
the side of the ONX.
Then start System
Settings
2) Select USB Software
Update
3) At the popup, select the
firmware image you wish
to select for upgrade.
4) Press Update to
start the upgrade
5) Press Update to confirm and start the upgrade. The meter will power off when
the update is complete.
Note: Make sure you do not have an Ethernet cable plugged in when upgrading by USB
© 2017 Viavi Solutions, Inc. | Viavi Confidential and Proprietary Information
21
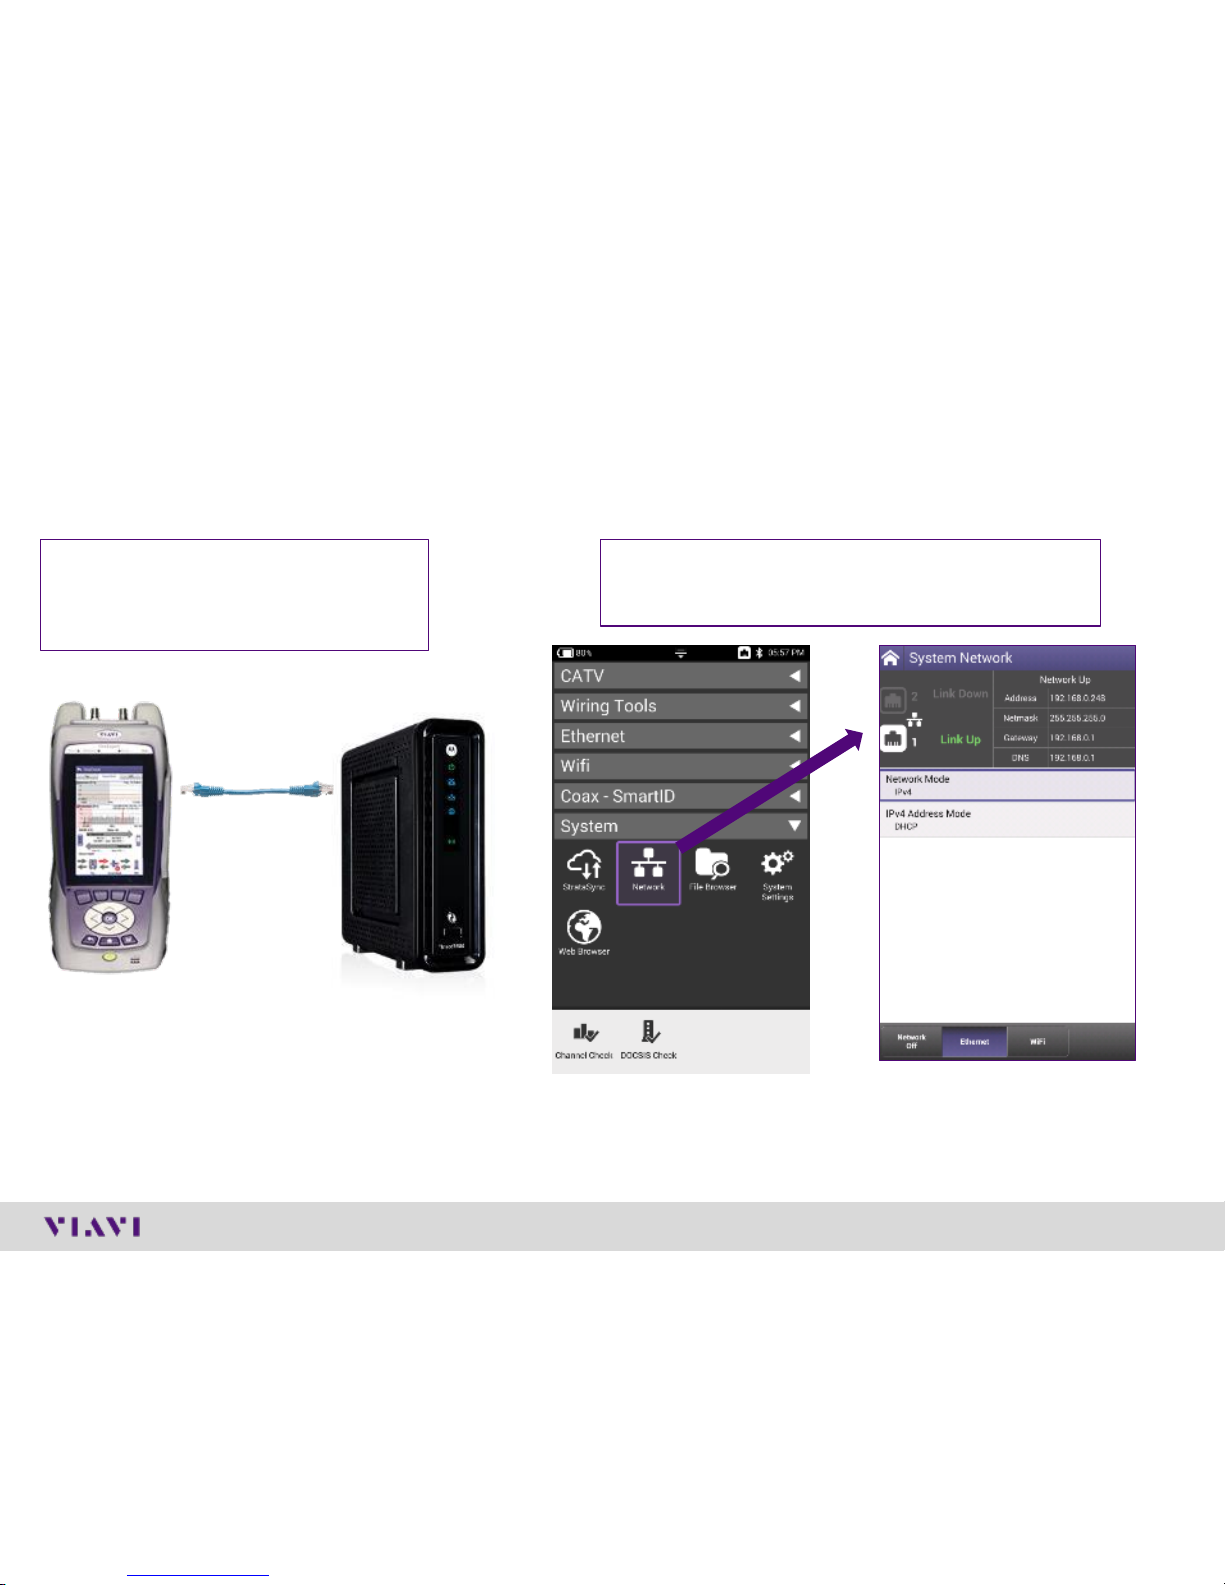
StrataSync Synchronization
Note - You can synchronize to StrataSync via RF or WiFi, but this is ONLY for sending test files, receiving
configuration information like limit plans, etc. - not for SW/FW upgrades
1) Connect an Ethernet cable from an
active internet connection (Cable
Modem or router/gateway) to Port
1 on the ONX
2) From the ONX home screen navigate to
System Menu and select Network - Verify the
ONX has a valid IP address*
© 2017 Viavi Solutions, Inc. | Viavi Confidential and Proprietary Information
22
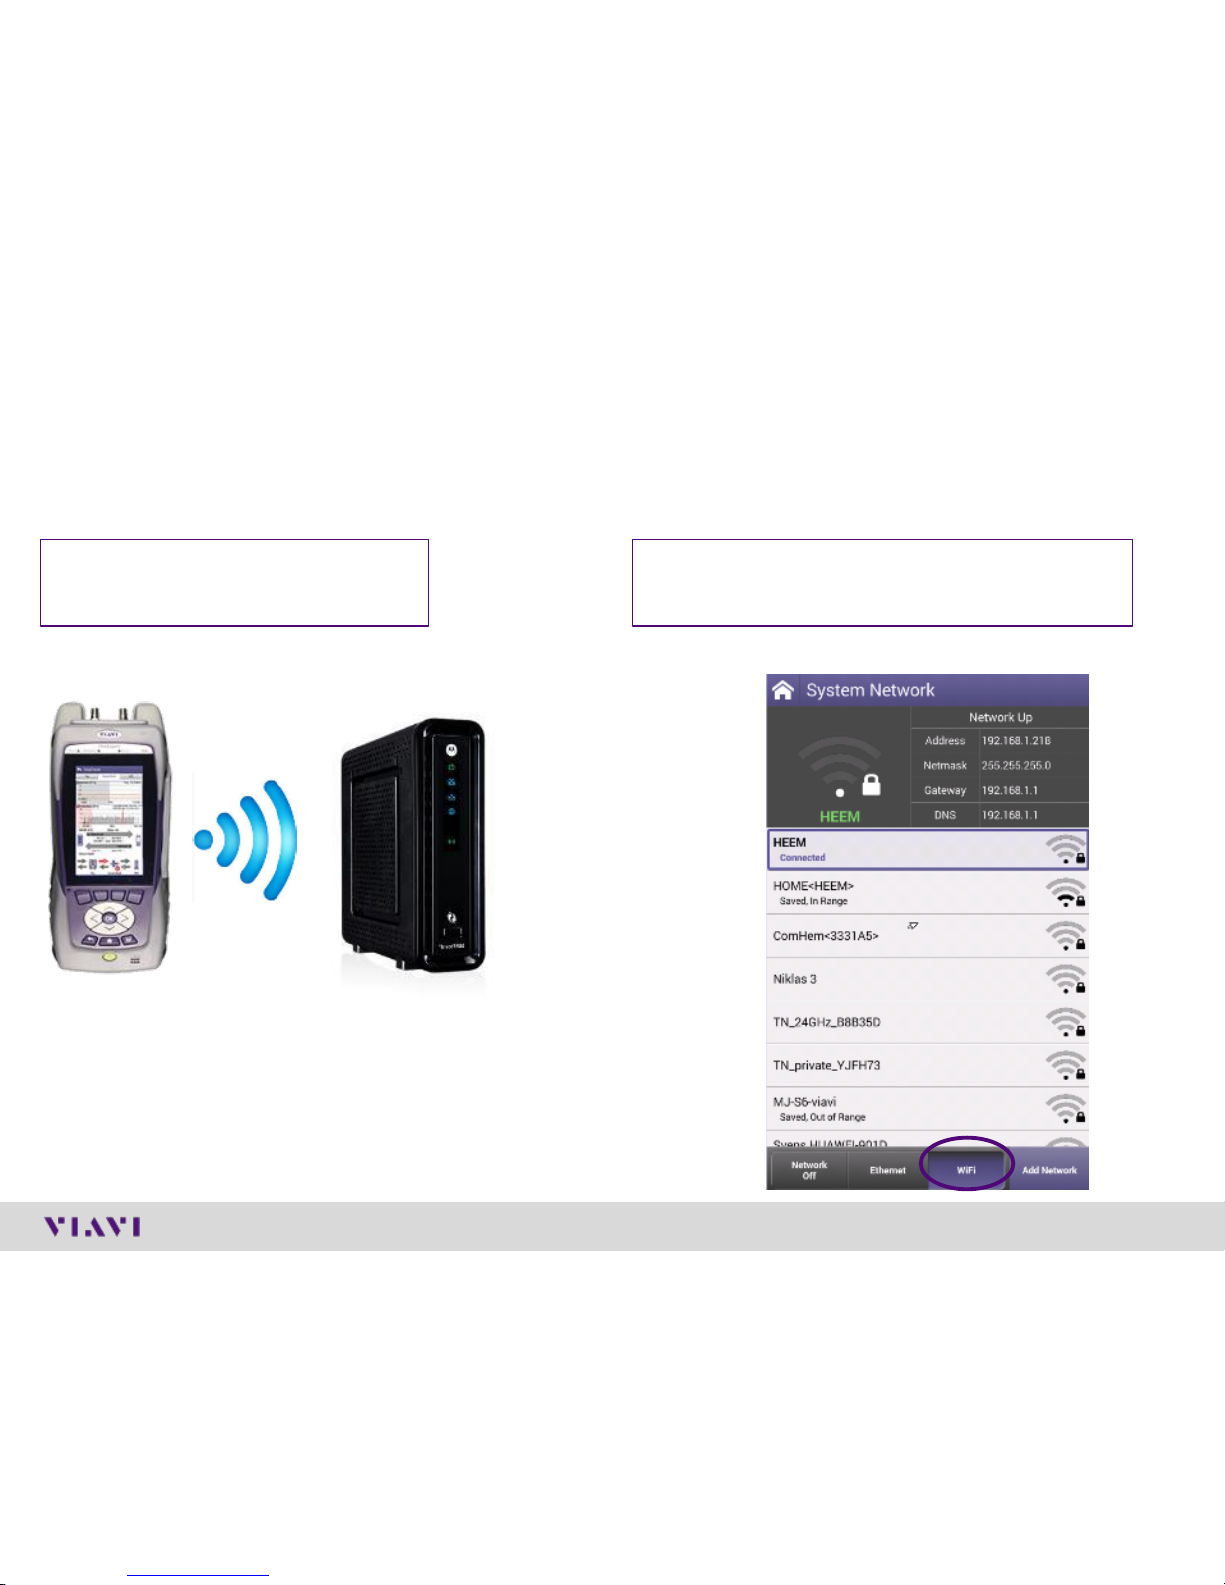
StrataSync Synchronization
▪ Note - Sync via WiFi is now supported. Use Network Settings app to configure and join a WiFi network prior to performing
sync.You can synchronize to StrataSync via WiFi, but this is ONLY for sending test files, receiving configuration information
like limit plans, etc.
1) Connect with WiFi from an active
internet connection (Cable Modem
or router/gateway)
2) From the ONX home screen navigate to
System Network / WiFi- Verify the ONX has a
valid IP address
© 2017 Viavi Solutions, Inc. | Viavi Confidential and Proprietary Information
23
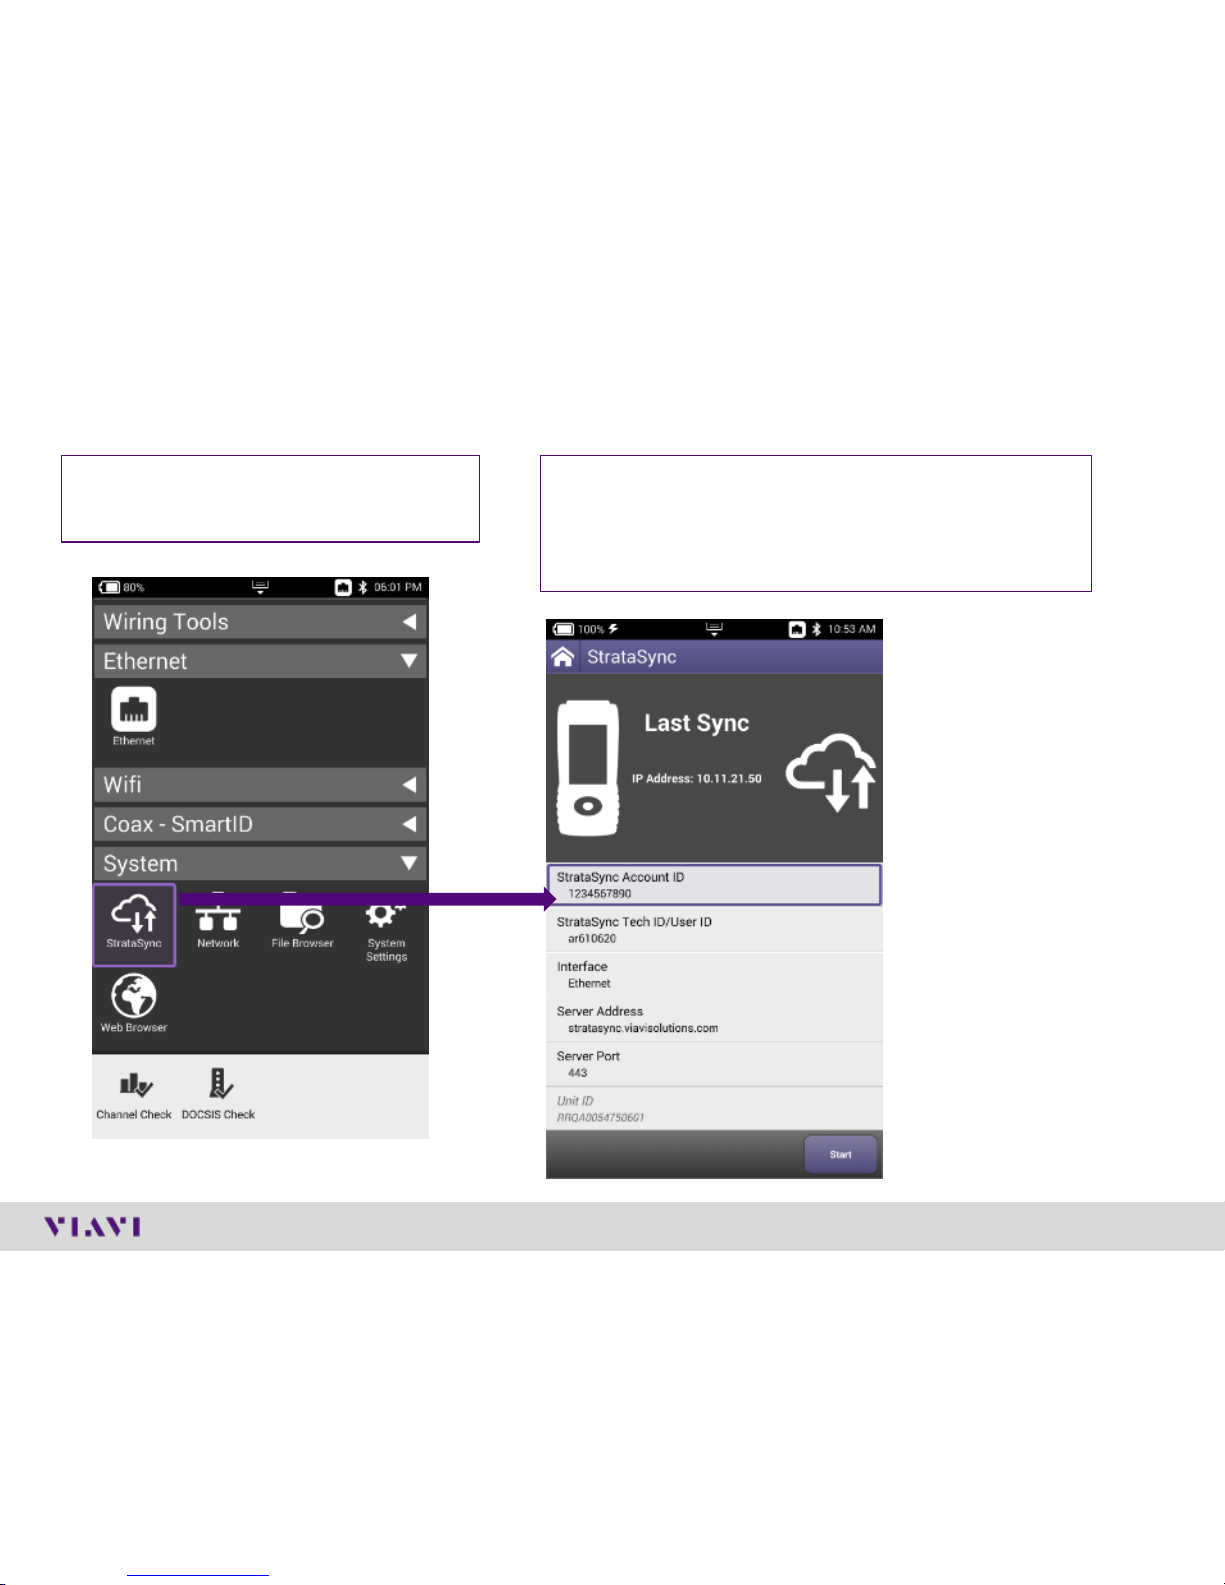
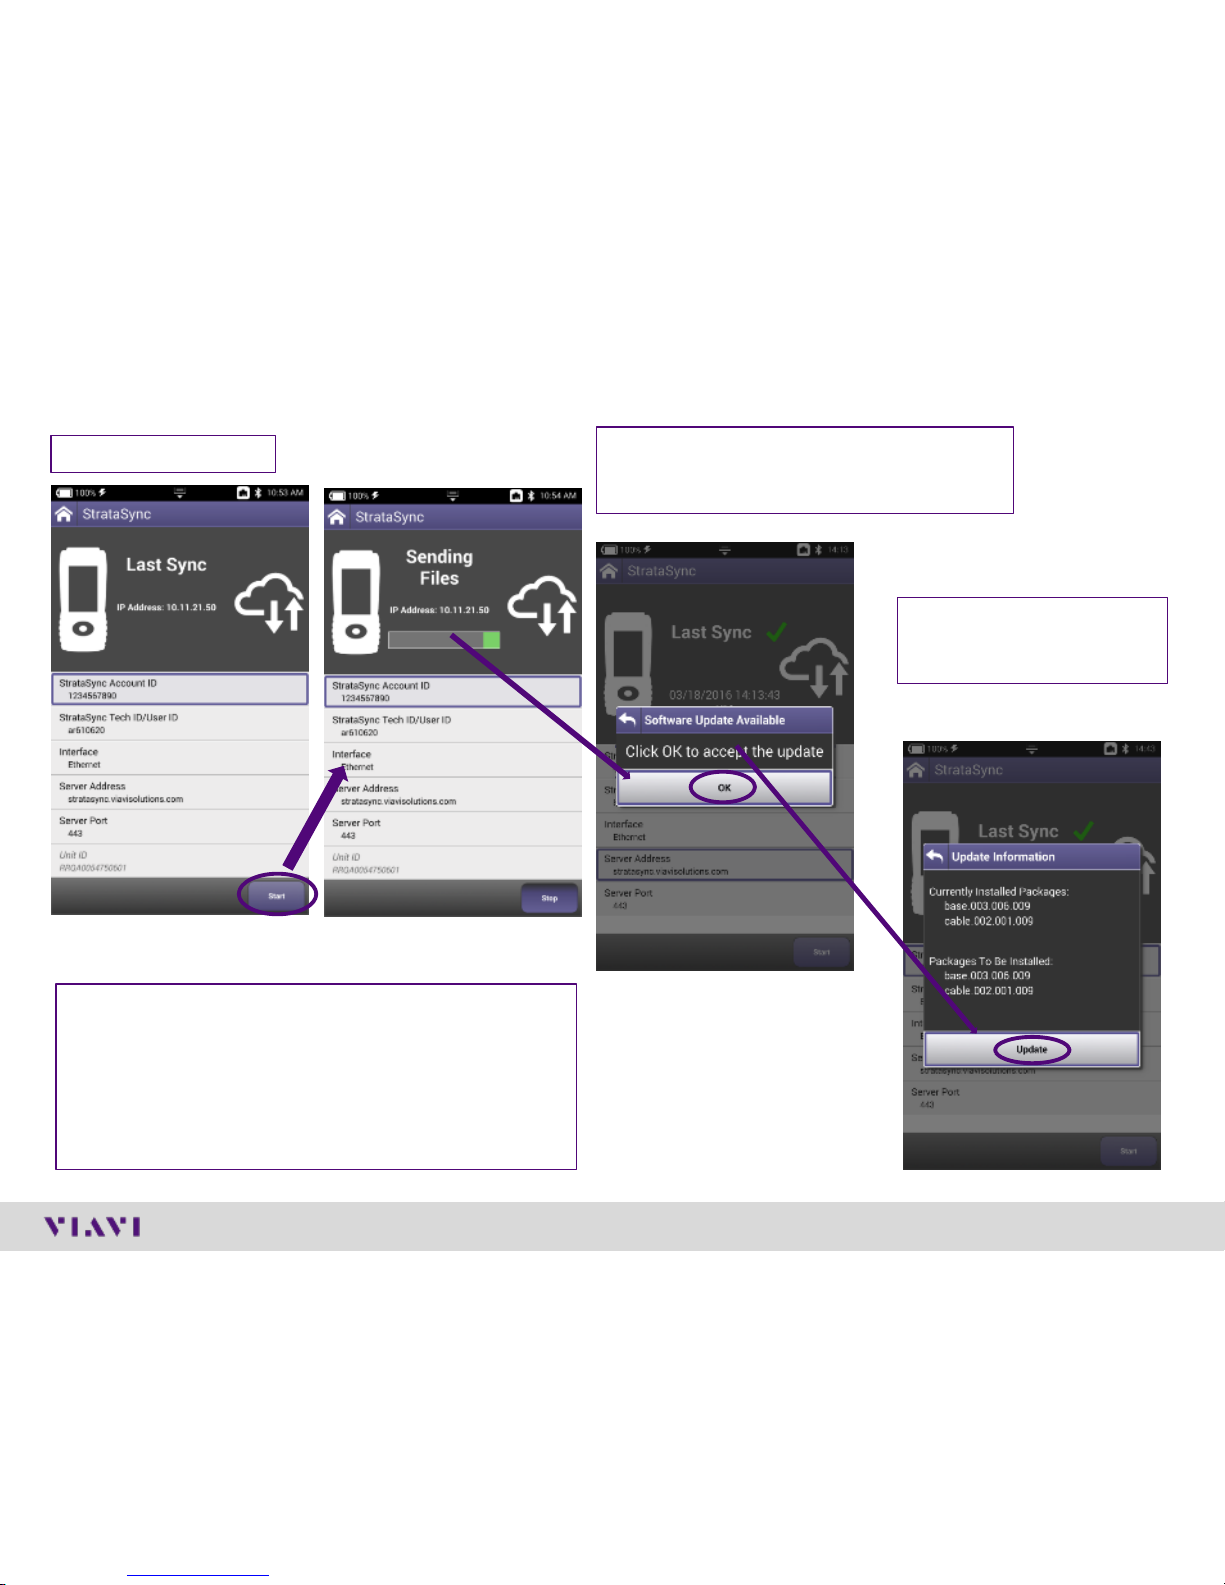
StrataSync Synchronization
3) Back to the ONX Home Screen –
navigate to the System Menu and
select StrataSync
4) StrataSync Account ID = xxxxxxxxx
Interface* = Ethernet
Server Address = stratasync.jdsu.com
(stratasync.viavisolutions.com also works)
Server Port = 443
*If the “Interface” is set to DOCSIS
the firmware update will be
skipped with no other warning.
Also this “Interface” selection does
not determine if the StrataSync
communication is performed over
the Ethernet or RF/DOCSIS. To
Sync via RF Port 1 please use the
“Connection” app in the CATV
section at the top of the Home
screen to establish a live
connection with the CMTS prior to
syncing to StataSync.
© 2017 Viavi Solutions, Inc. | Viavi Confidential and Proprietary Information
24
5) Select Start
6) ONX will connect to StrataSync and
determine there is a “Software Update
Available” - Select OK.
NOTE: SW update will proceed. The unit will Power off
completely after completion. Update process will take
10-15 minutes based on the size of the update file and
connection speed
The ONX will require that it is plugged into AC power
or above 50% battery life prior to updating
Firmware Update Via StrataSync
7) Software packages
will be confirmed –
Select Update
© 2017 Viavi Solutions, Inc. | Viavi Confidential and Proprietary Information
25
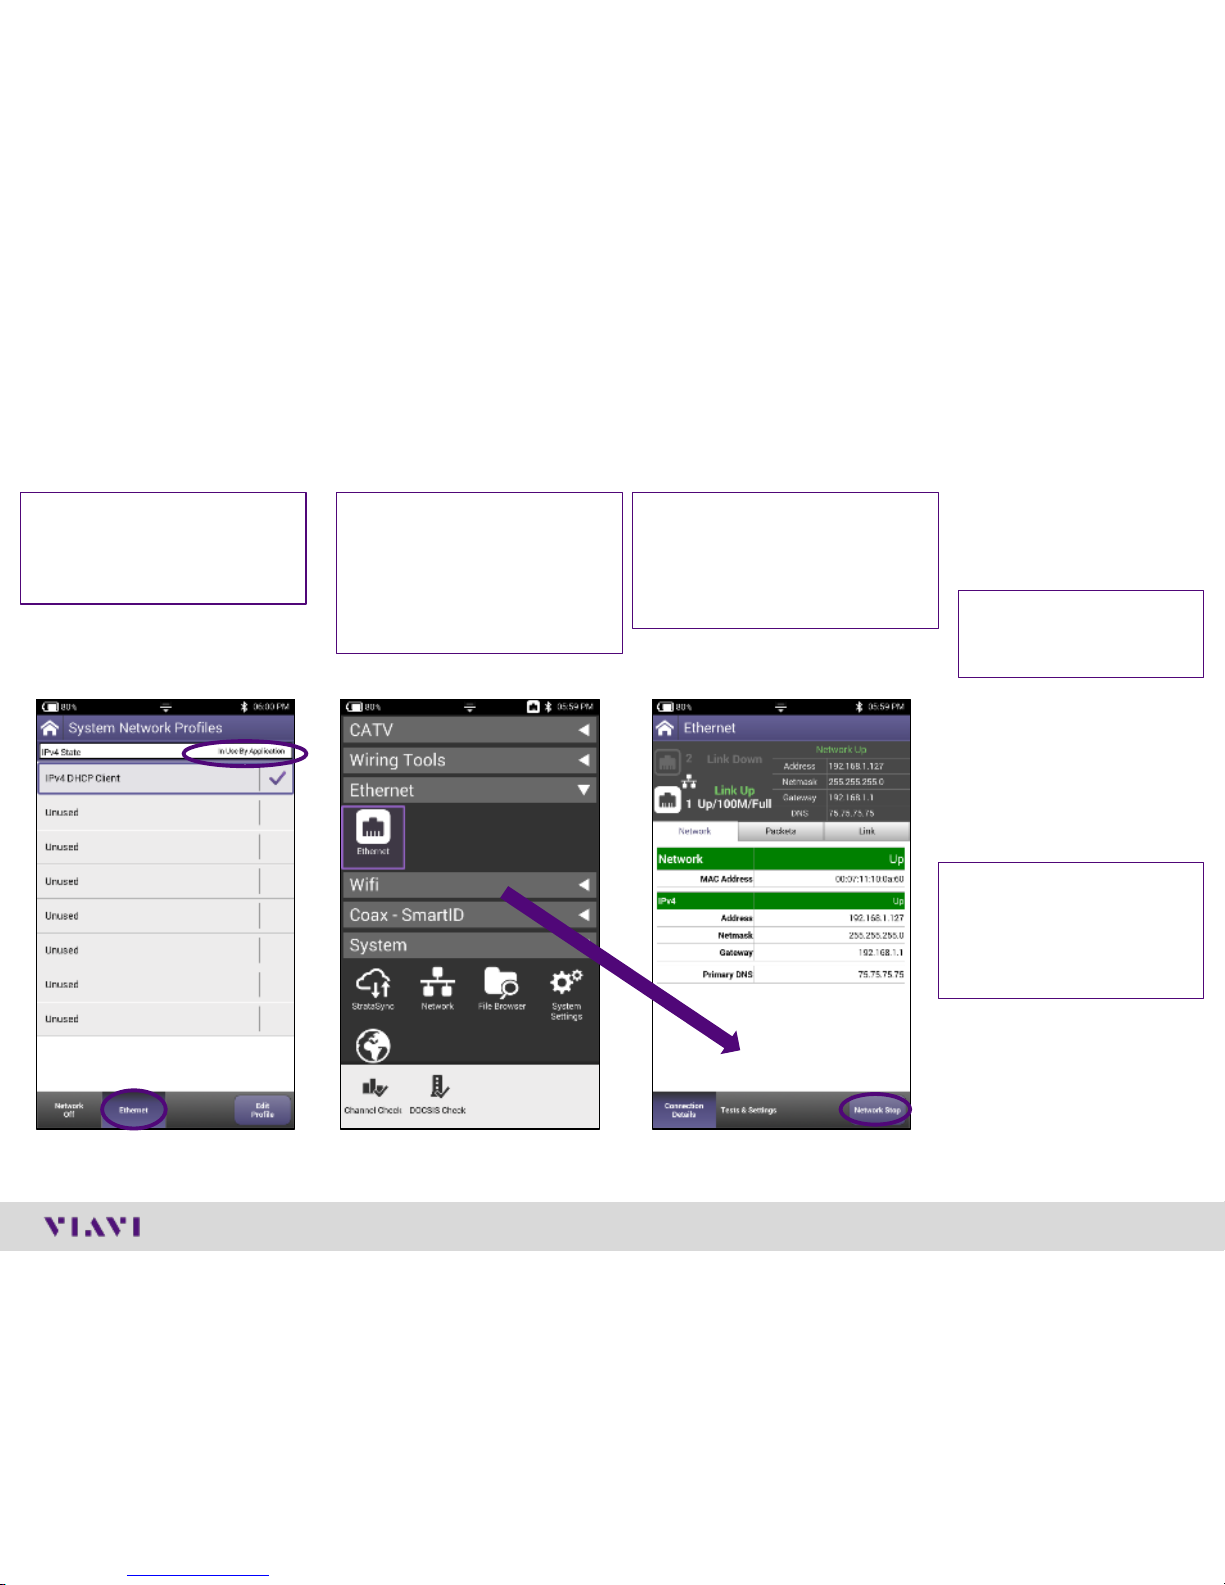
Troubleshooting the ONX FW/SW Upgrade Process
- No IP address
1) Confirm the Ethernet
port is turned on by
selecting the Ethernet
option at the bottom
2) If the IPv4 State = “In
Use By Application” –
From the Home Screen
and navigate to the
Ethernet menu –
Select Ethernet
3) Select the Network Stop
button at the bottom –
This dis associates the
Ethernet port with the
Ethernet testing function
4) Press the Back
button and Power
Cycle the Meter
*When the meter returns
to the Home screen start
from Step 1 at the
beginning of this
document

© 2017 Viavi Solutions, Inc. | Viavi Confidential and Proprietary Information
26
System Settings − Remote Operation of ONX

ONX CATV - Engineering Mode
© 2017 Viavi Solutions, Inc. | Viavi Confidential and Proprietary Information
28
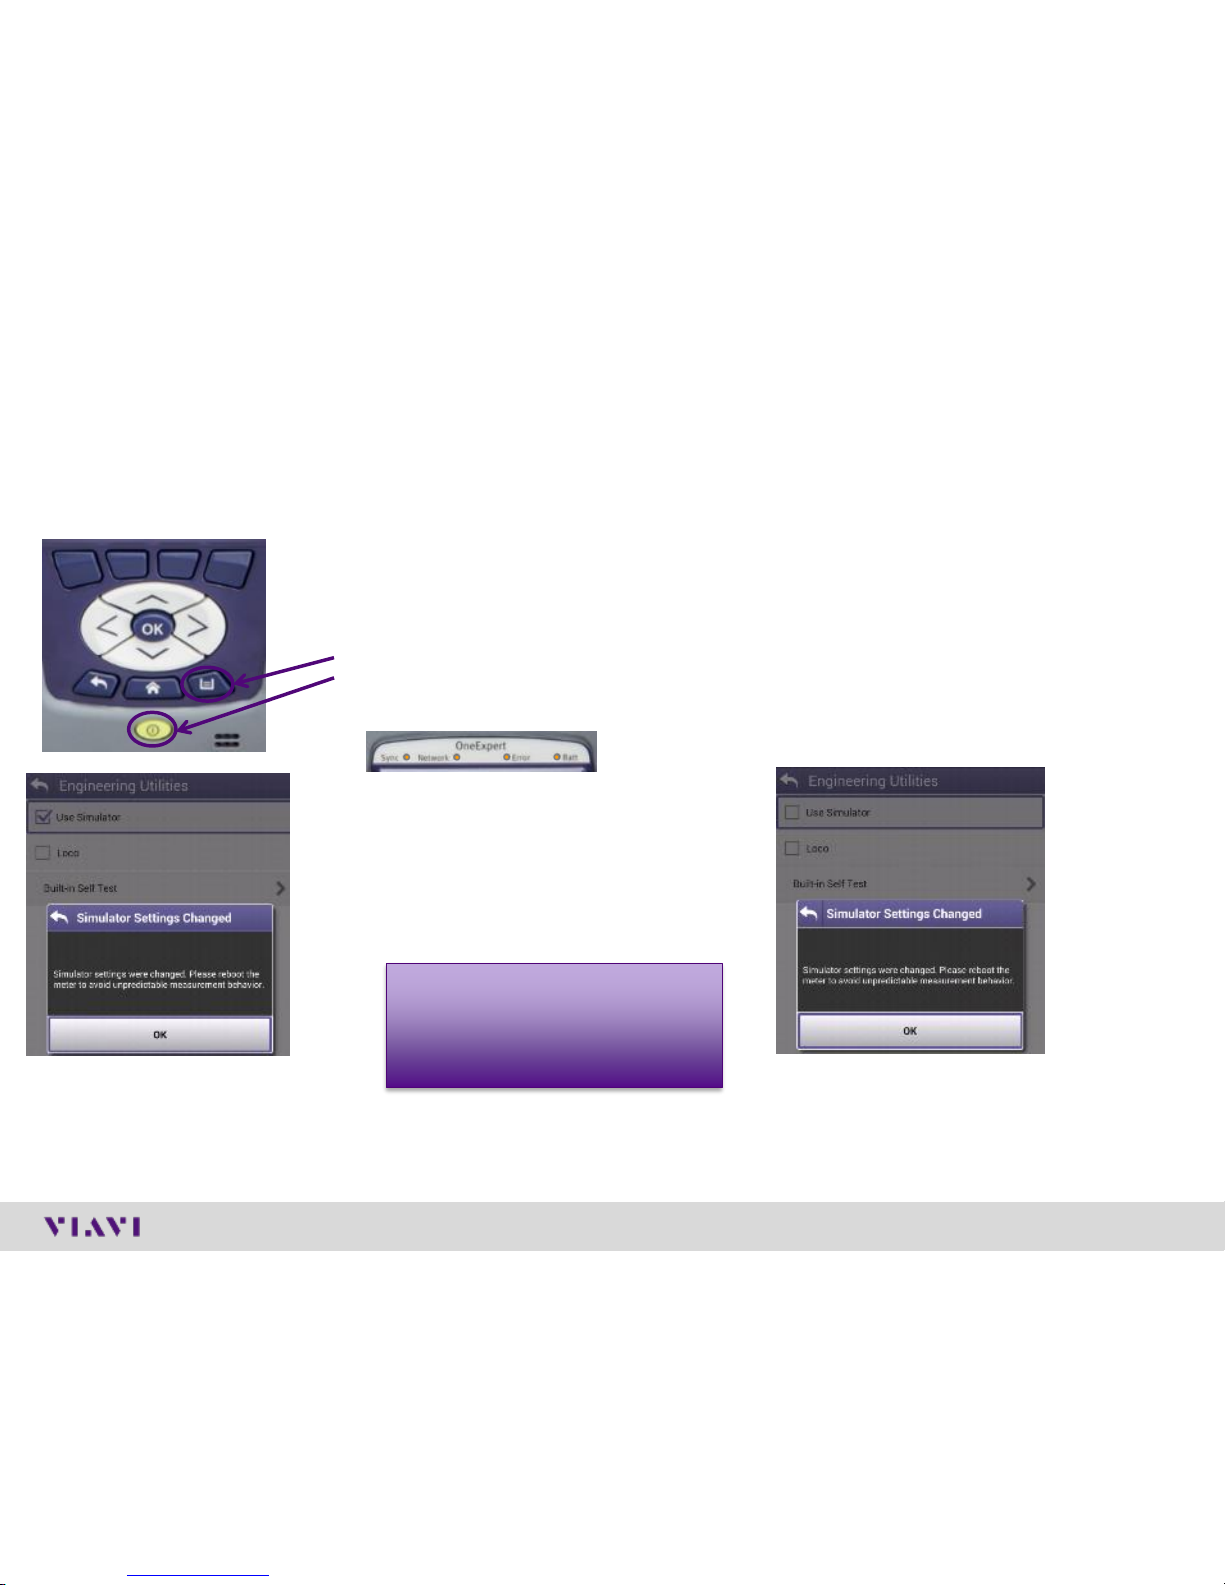
ONX Demo mode (Simulator Settings)
Enable Demo mode:
1. The unit is switch off
2. Press and hold the Tray key
3. Press shortly the Power on key
4. Hold the Tray key until the for top
led are orange (takes about 3sec)
5. Release the Tray key
6. Go in CATV setting and select
Engineering Utilities
7. Select “Use Simulator”
8. Reboot the unit
Disable Demo mode:
1. The unit is switch off
2. Press and hold the Tray key
3. Press shortly the Power on key
4. Hold the Tray key until the for top
led are orange (takes about 3sec)
5. Release the Tray key
6. Go in CATV setting and select
Engineering Utilities
7. Unselect “Use Simulator”
8. Reboot the unit
IMPORT: NEVER
UPGRADE A ONX
CATV in Demo Mode !
© 2017 Viavi Solutions, Inc. | Viavi Confidential and Proprietary Information
29
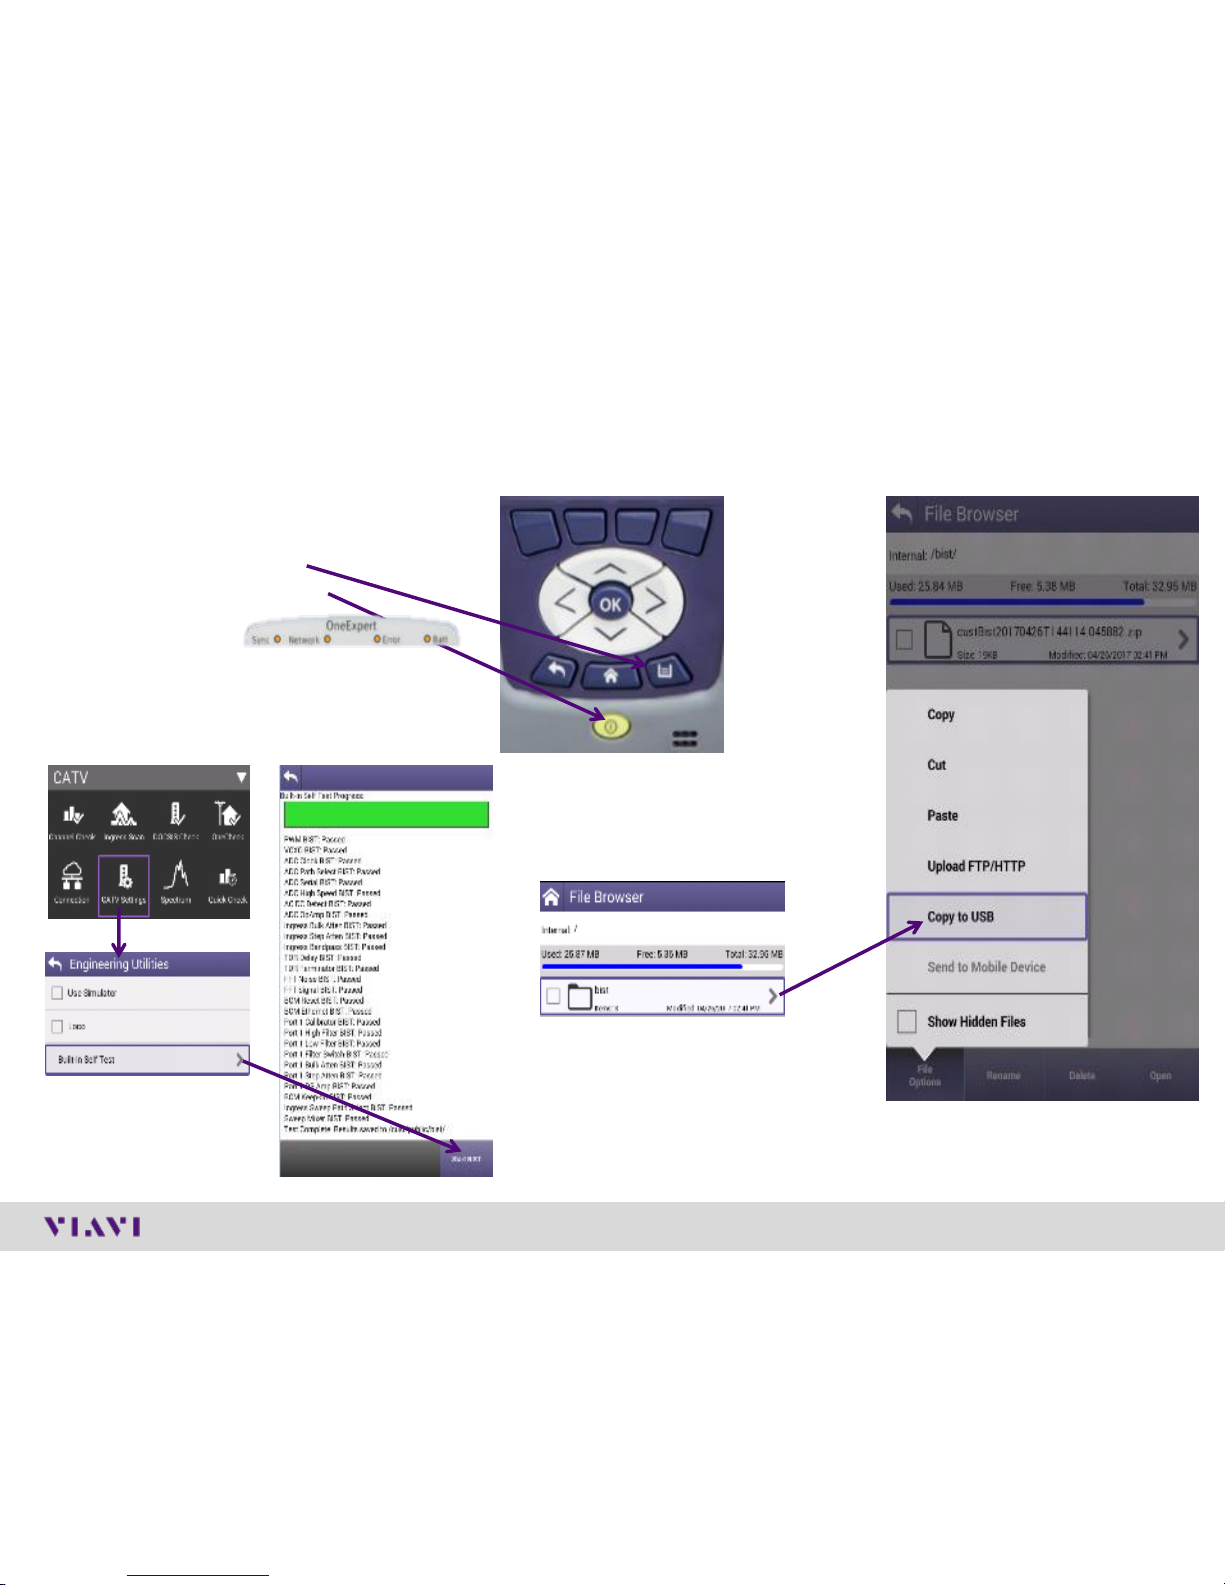
ONX Engineering Mode and Build-in Self Test (BIST)
Enable Engineering mode and run a BIST:
1. The unit is switch off
2. Press and hold the Tray key
3. Press shortly the Power on key
4. Hold the Tray key until the for top
led are orange
(takes about 3sec)
5. Release the Tray key
6. Go in CATV setting and select Engineering
Utilities
7. Select “Built-in Self Test” and Start BIST :
8. Go to File Browser and copy
the custBist*.zip file to a
plugged USB memory stick :

ONX CATV - Ethernet Testing
 Loading...