

Viavi OneExpert CATV 630 Extended Quick Start Manual

OneExpert
CATV 630
Extended Quick Start Guide v4
August 2019

Table of Contents – OneExpert CATV
ONX CATV – Interfaces and Controls
System Settings
CATV Settings
SW Upgrade and Data Synchronization
Firmware Upgrades
Synchronization with StrataSync
Ethernet Testing
CATV Measurements
QuickCheck
Spectrum
TDR
HL Leakage Option and Transmitter
Ingress Scan
Channel Check
DOCSIS Check
OneCHECK
Configure Screens
QuickCheck EXPERT
Channel EXPERT
DOCSIS EXPERT
Ingress EXPERT
Return Signal Generator (RSG) w/
Loopback
Forward and Return Sweep
Sweepless Sweep
D3.1 Measurements
CATV NETWORK Measurements
© 2017 Viavi Solutions, Inc. | Viavi Confidential and Proprietary Information
2

Support Links
Viavi Customer Care:
For questions about warranty information, repair and calibration, Return
Material Authorization (RMA) request, services quotation, order status.
T: 1-844 GO VIAVI (+1-844-468-4284)
E: NAM.CustomerCare@viavisolutions.com
https://www.viavisolutions.com/en-us/services-and-support/supportcenter/customer-care
Customer Care Portal Login
https://www.viavisolutions.com/en-us/services-and-support/supportcenter/customer-care/customer-portal-login
RMA Request Form:
http://www.viavisolutions.com/en-us/services-and-support/returnmaterial-authorization-rma-request
Viavi Technical Support:
Will assist you in using/configuring products or address issues regarding
product performance.
T: +1-844 GO VIAVI (+1-844-468-4284)
E: catvsupport@viavisolutions.com
For access to online technical and product support:
http://support.viavisolutions.com
Quick Tip Videos (including ONX):
https://www.viavisolutions.com/en-us/support/quick-references/quick-
tip-videos
Product Focused YouTube Channel:
ViaviSolutions CIVT
© 2017 Viavi Solutions, Inc. | Viavi Confidential and Proprietary Information
3

ONX CATV - Overview
© 2017 Viavi Solutions, Inc. | Viavi Confidential and Proprietary Information
4© 2018 VIAVI Solutions Inc.viavisolutions.com
4
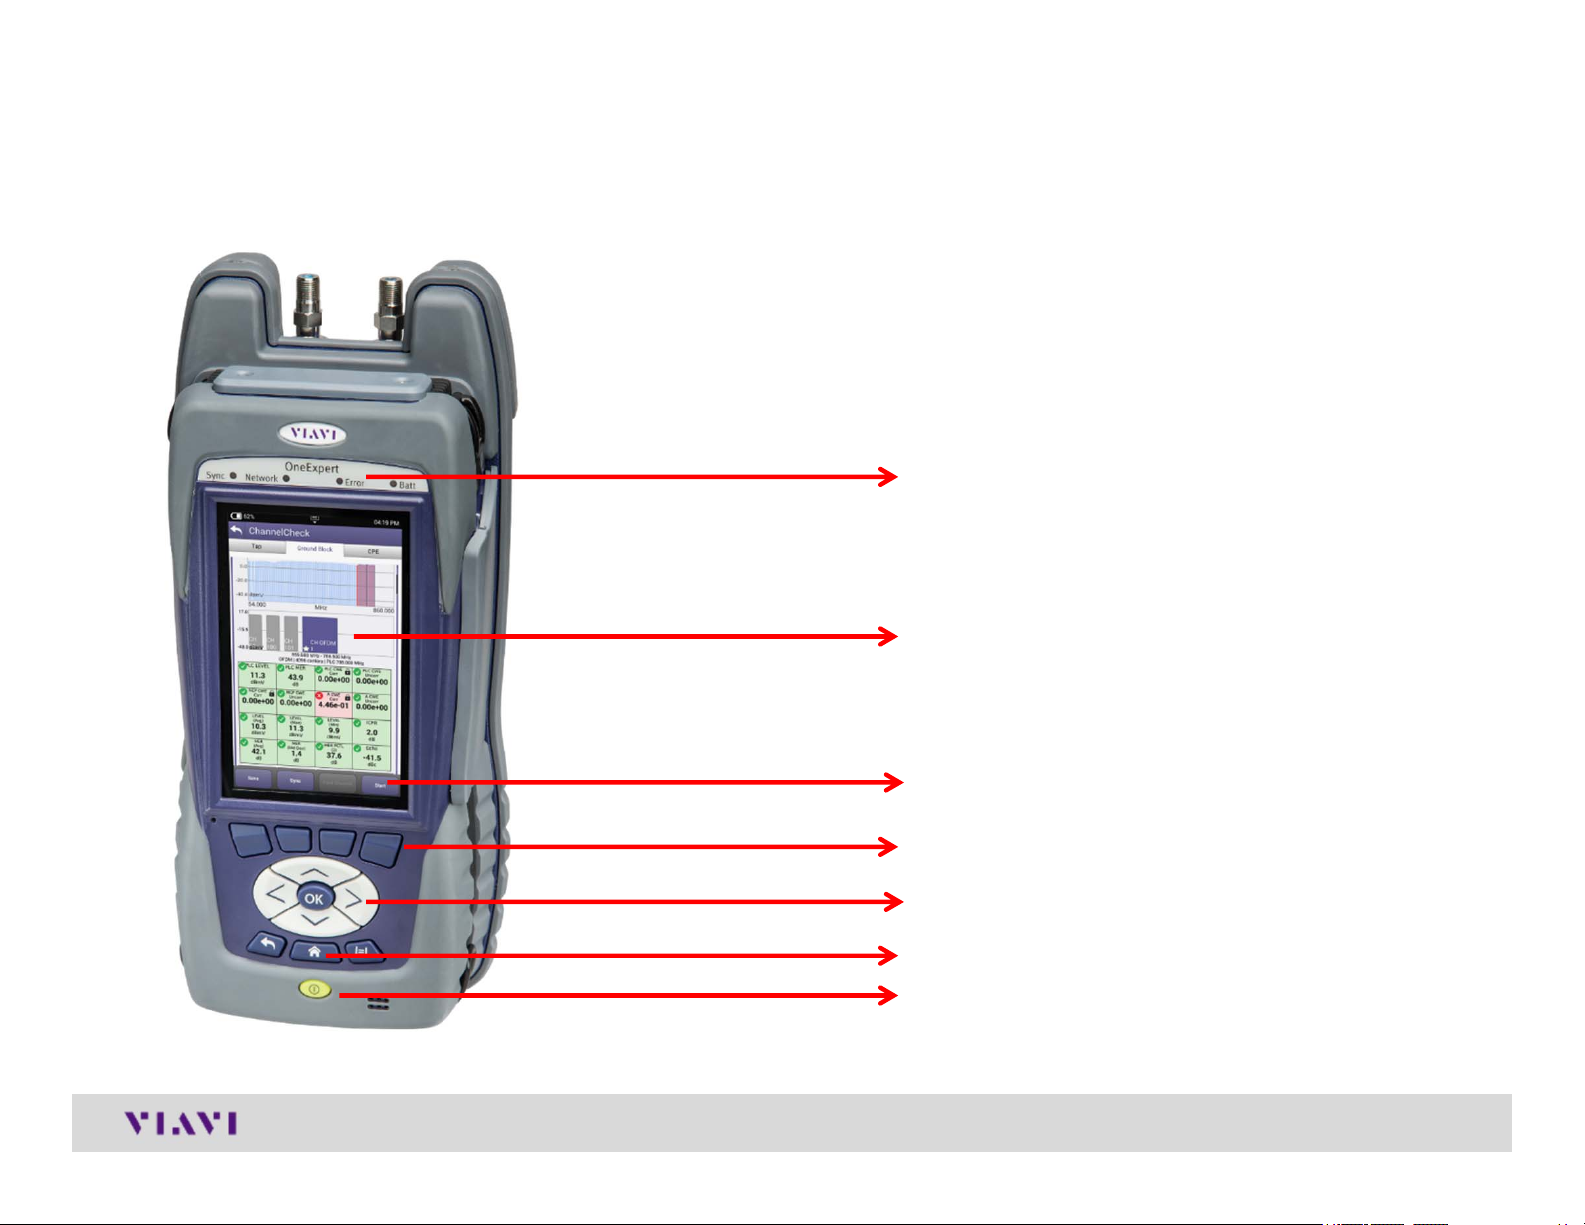
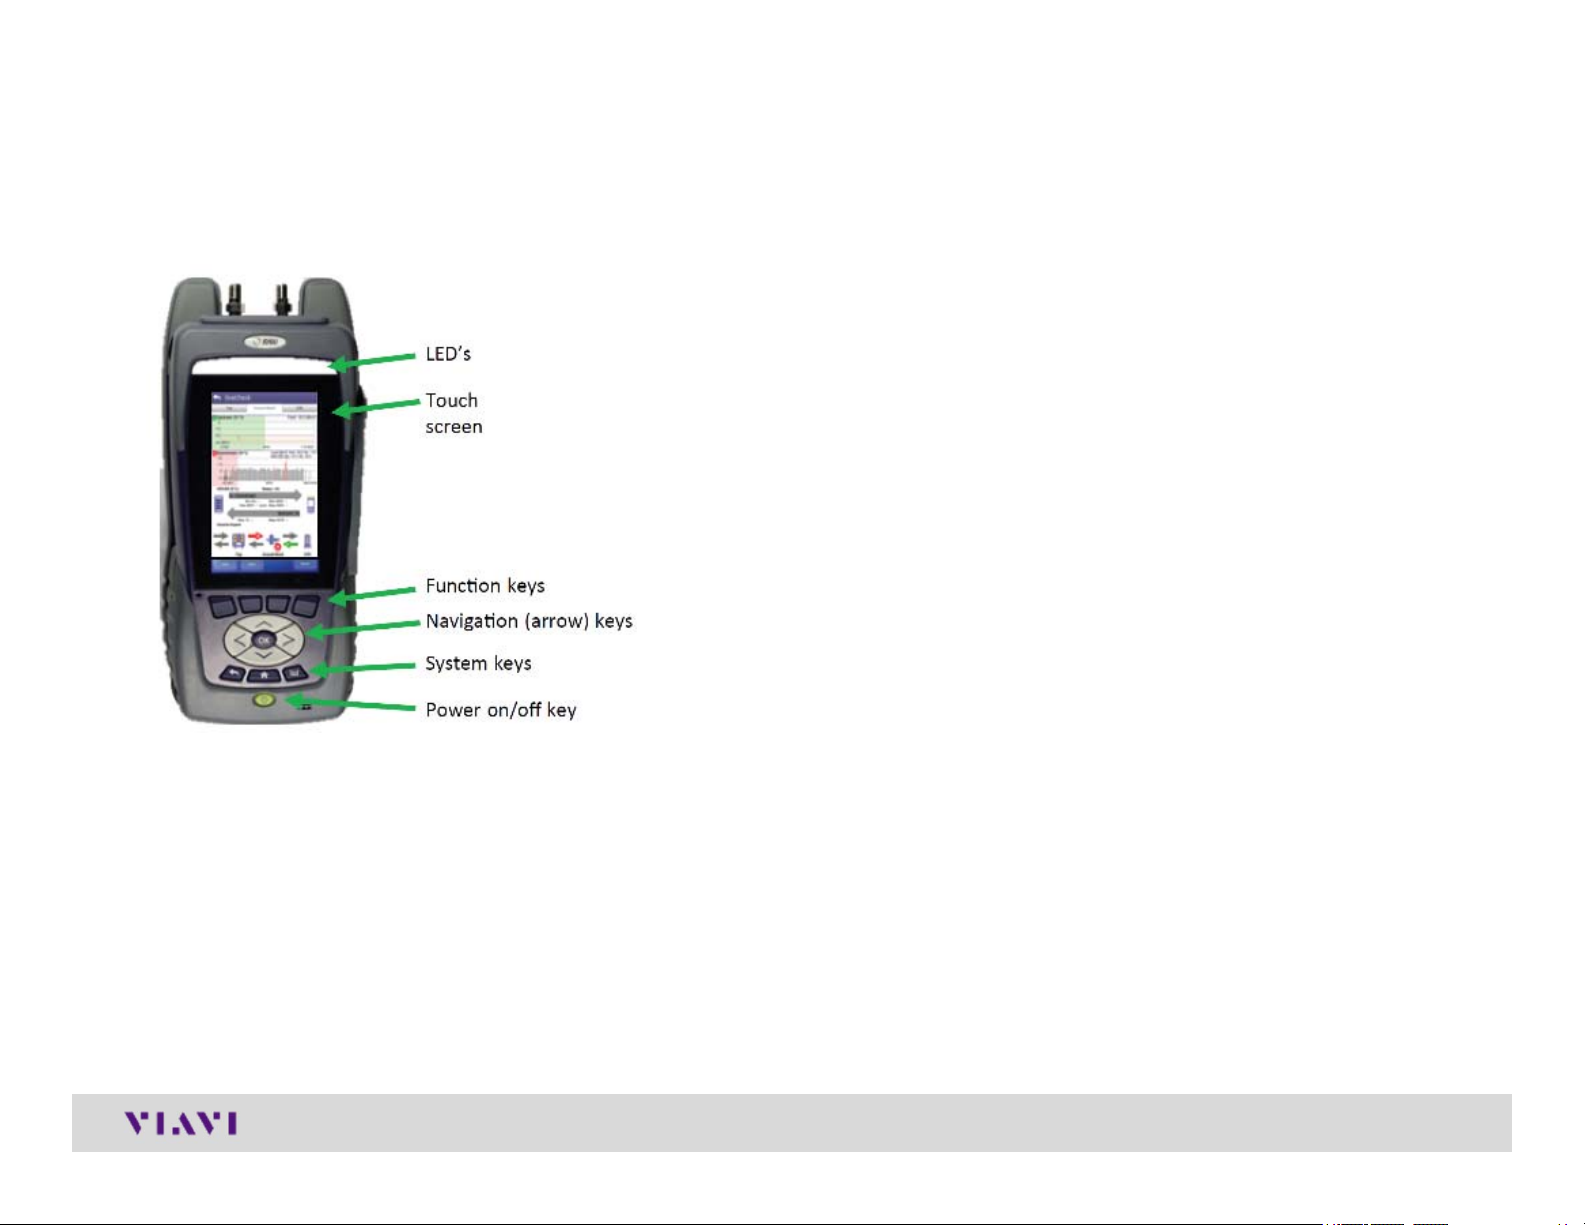
ONX Control keys
Network Indicator LEDs
High Sensitivity Touch Screen
Shortcut Buttons
Short Cut Hard keys – Functions keys
Navigation Directional Buttons
Back, Home Screen, and Utility Buttons
Power On/Off Button
© 2017 Viavi Solutions, Inc. | Viavi Confidential and Proprietary Information
5
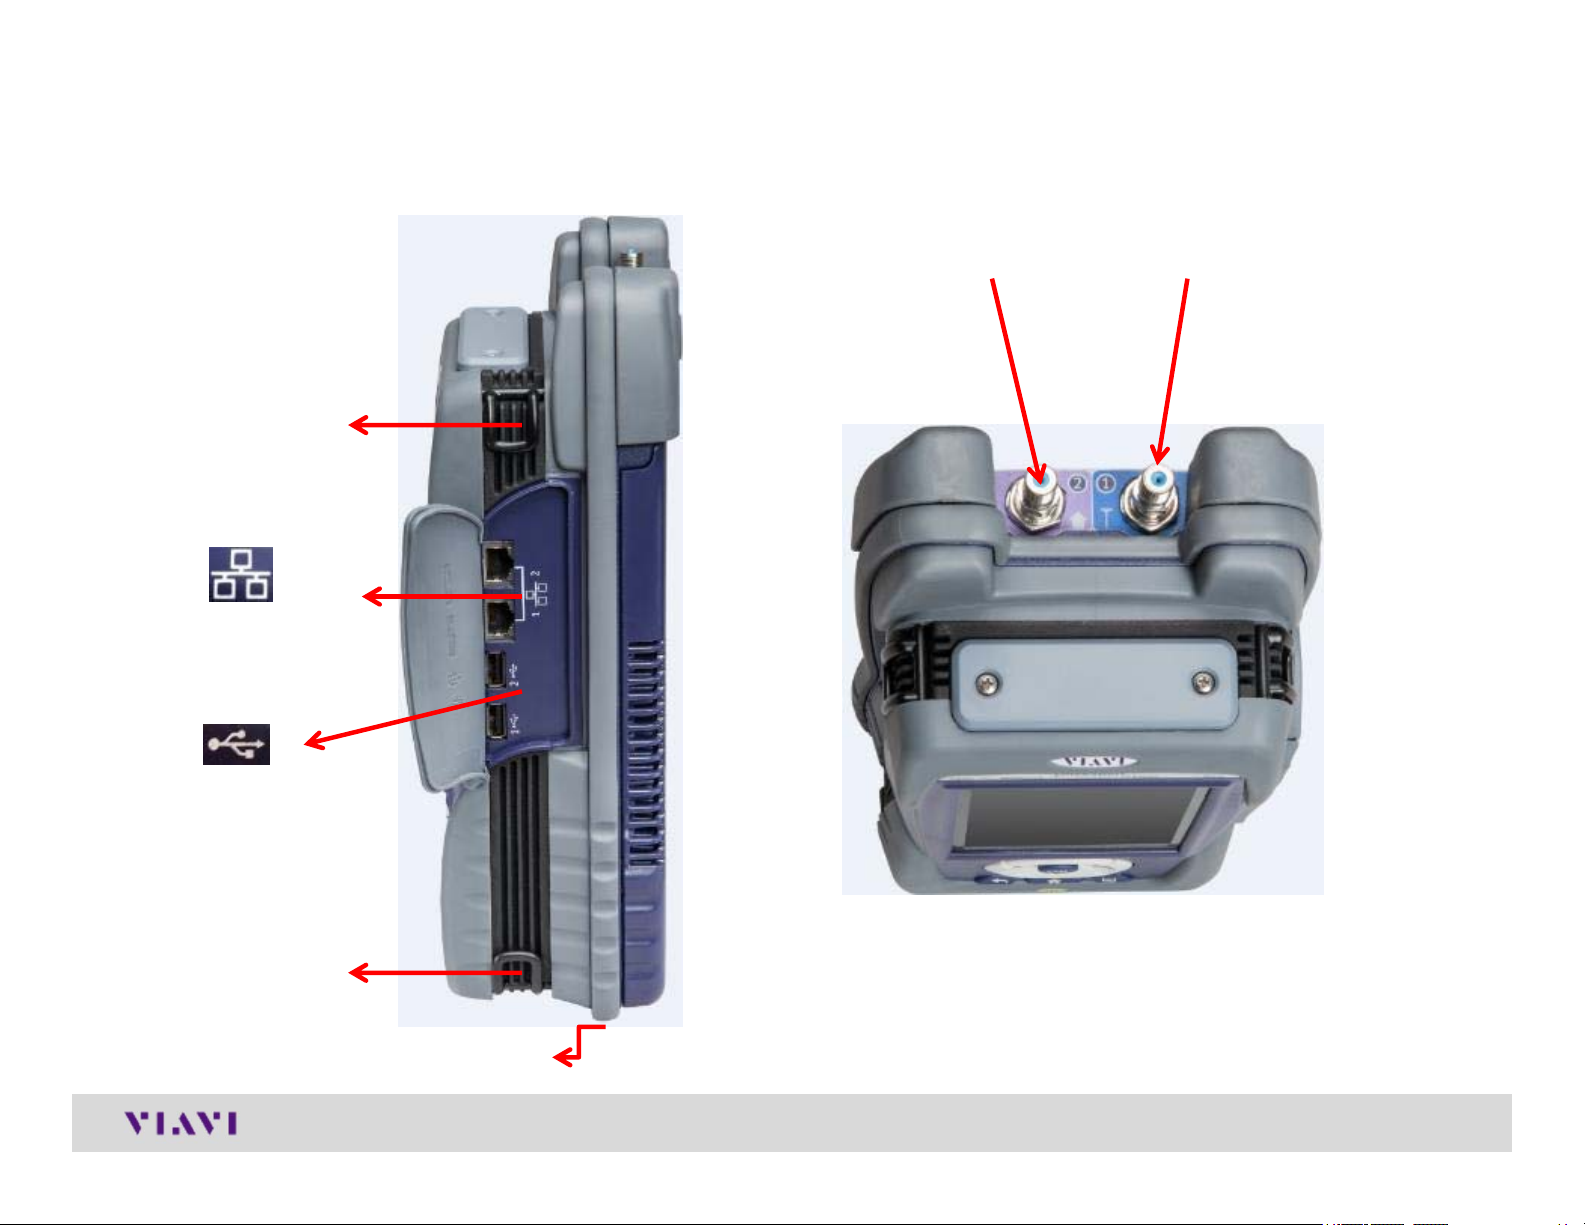
ONX Interfaces
D-Ring
Dual 10/100/1000
RJ45 Ports
Port 2 – RF Ingress Port
Connect to
upstream from house
for Ingress Scan
Port 1 – RF US/DS Analysis
DOCSIS, QAM
Dual USB 2.0 Ports
D-Ring
Battery Charger Port (under flap)
© 2017 Viavi Solutions, Inc. | Viavi Confidential and Proprietary Information
6

Power LED and Systems Keys
The DC Power Input, located on the bottom
The Charge LED located next to the power
Solid green indicates that charging is
Slow flashing red indicates that the battery
Fast flashing red indicates that the charging
of the instrument, is used to connect the AC
adapter.
input indicates that the adapter is connected.
complete.
charge is critically low, and less than 10%.
was suspended due to a fault and user
intervention is necessary (for example, an
incorrect charger is attached).
Solid red indicates that the charging was
suspended due to overheating. The unit can
continue to run, and no user intervention
necessary.
Solid amber indicates that the battery is
charging.
© 2017 Viavi Solutions, Inc. | Viavi Confidential and Proprietary Information
7
LED’s
Sync – Reports the status of modem synchronization.
Blinking green indicates that the modem is ranging.
Solid green indicates that the modem has
successfully ranged.
Network – Indicates the status of network
connectivity.
Blinking green indicates that the unit is acquiring
an IP address.
Solid green indicates that an IP address has been
acquired.
Blinking amber indicates a timeout – the unit was
unable to acquire an IP address.
If the LED is not illuminated, the network is not
active – either the unit is not connected or it is
logged off.
Error – Solid red indicates error and
alarm conditions. The type of error
varies and depends on the
application.
Batt – A multi-color LED that indicates the battery
status.
Solid green indicates that either the battery charge
is higher than 30%, or that an external source is
powering the unit.
Solid red indicates that the battery charge is
critically low, and less than 10%.
Solid amber indicates that the battery is getting
low, and the charge is between 10% and 30%.
© 2017 Viavi Solutions, Inc. | Viavi Confidential and Proprietary Information
8
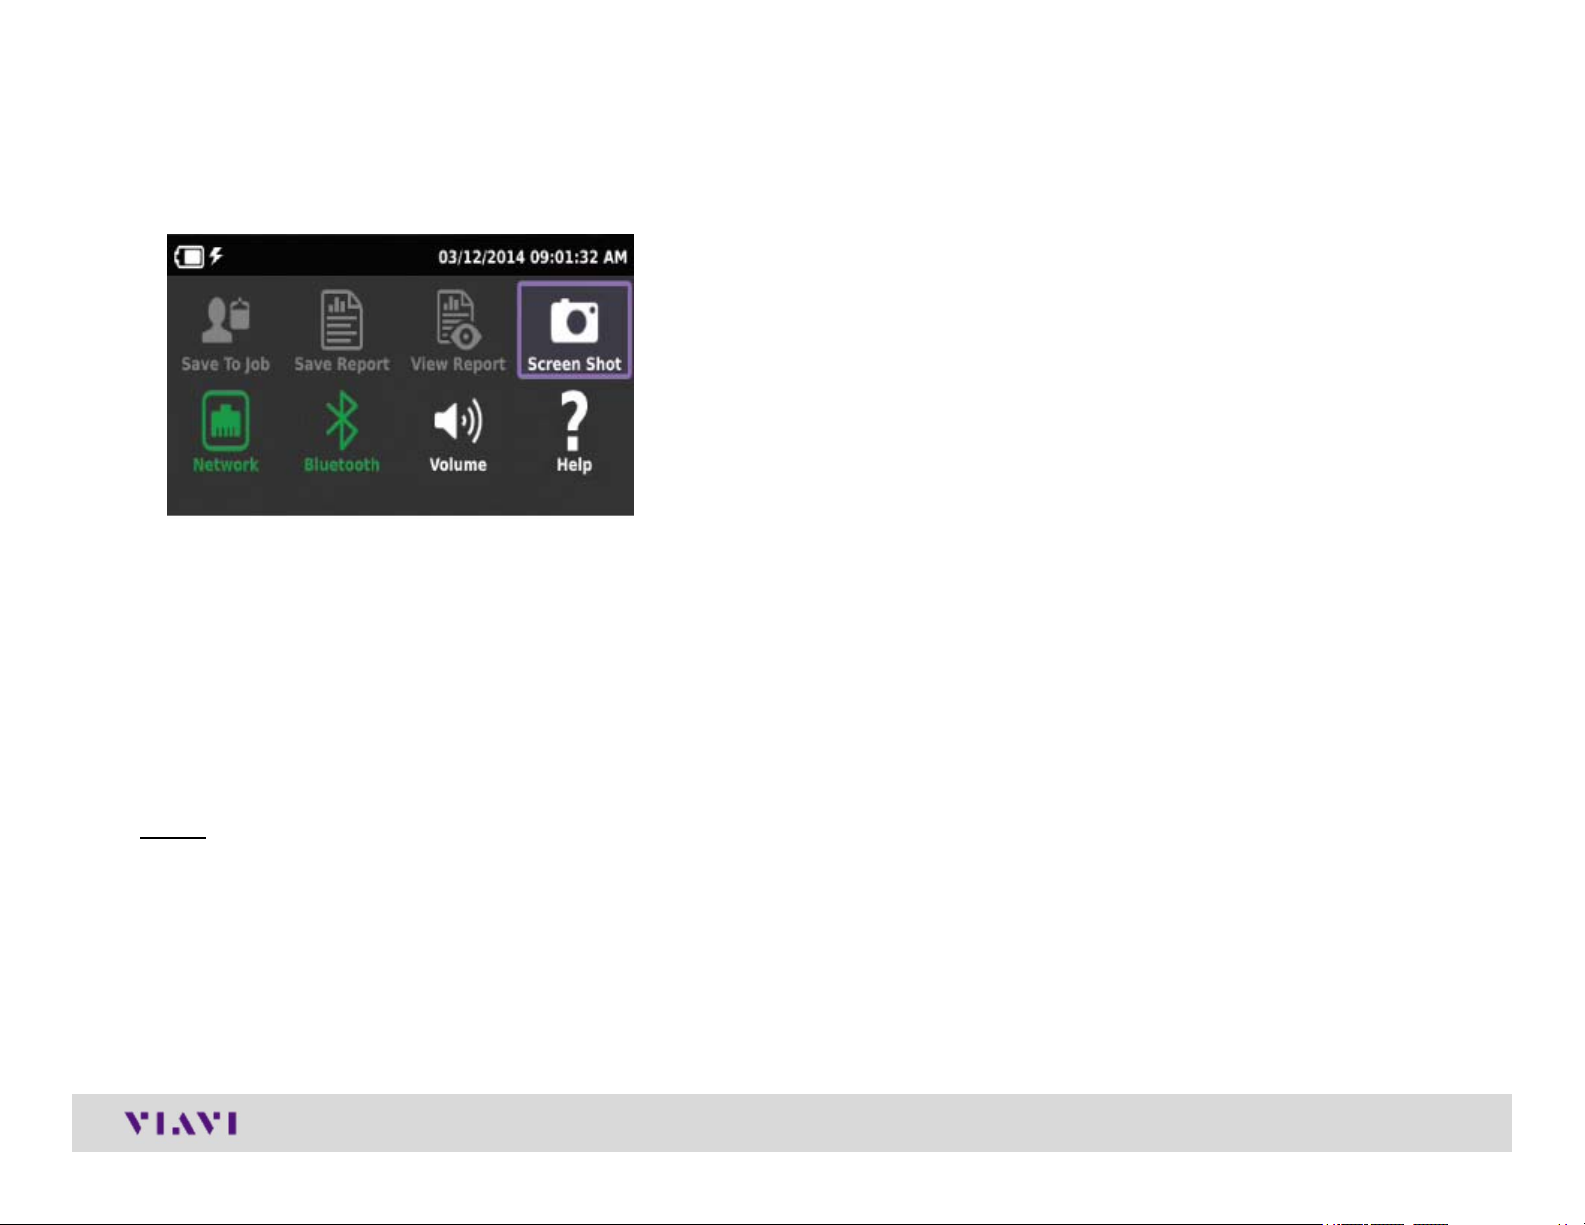
Tray Menu
SAVE TO JOB – Saves the results to job ticket.
SAVE TO REPORT – Saves the results to a
report. Formats available: XML, PDF, or HTML.
VIEW REPORT – Views a saved report. Select
View Report and then select the saved report to
view. If there are no saved reports, the text will
be grayed out.
USING THE TRAY MENU
The tray menu allows access to
commonly used functions. It can
be accessed either by pressing the
Tray system key or by swiping
downward from the top of the LCD.
Hint:
A long push on TRAY key will
automatically start a screen capture. It is
useful when a short Tray key push
doesn’t open the Tray menu (when for
example a function key menu is open)
SCREENSHOT – Takes a screen capture of the
current menu (the screen you were viewing
when you launched the tray menu).
NETWORK – Enables or disables the
home/Ethernet network.
BLUETOOTH – Enables or disables Bluetooth.
VOLUME – Control the device volume.
HELP – Provides TAC phone numbers.
© 2017 Viavi Solutions, Inc. | Viavi Confidential and Proprietary Information
9

User interface
SELECTING A MENU
To select a menu, either touch the item or use the arrow
navigation keys to highlight the desired menu item and
then press the OK key.
COLLAPSIBLE MENUS
Each main item is a collapsible menu. Touch the
triangle on the right (the triangle rotates from
pointing left to pointing down) or use the arrow
keys to highlight the menu item and then press
the OK key.
SHORTCUTS
If you have a test or function that you use
frequently you can make it a shortcut.
Touch and hold the icon for the function and then
drag it to the bottom of the screen to create a
shortcut.
You can create up to four shortcuts.
To remove the shortcut, drag it off the shortcut bar.
REARRANGING ICONS
You can rearrange icons within a menu for tests
or functions you use frequently.
To rearrange icons inside a menu, touch and
hold the icon and then drag it to the new
location.
© 2017 Viavi Solutions, Inc. | Viavi Confidential and Proprietary Information
10
Home Screen
Home Screen is default when ONX is turned on
It can be reached by selecting the Home Screen
button above the On/Off Button
Back Button also returns the user to the Home
Screen
Each Menu option is labeled and can be opened or
collapsed by the triangle buttons to the right
Shortcuts are located across the bottom and can be
customized by selecting an icon and dragging it to the
shortcut bar
© 2017 Viavi Solutions, Inc. | Viavi Confidential and Proprietary Information
11

System Settings
Navigate from the Home
Screen down to the bottom,
using the D PAD to swiping
with a finger
Select System Settings
From System Settings, the
user can set up the meter a
variety of ways
© 2017 Viavi Solutions, Inc. | Viavi Confidential and Proprietary Information
12
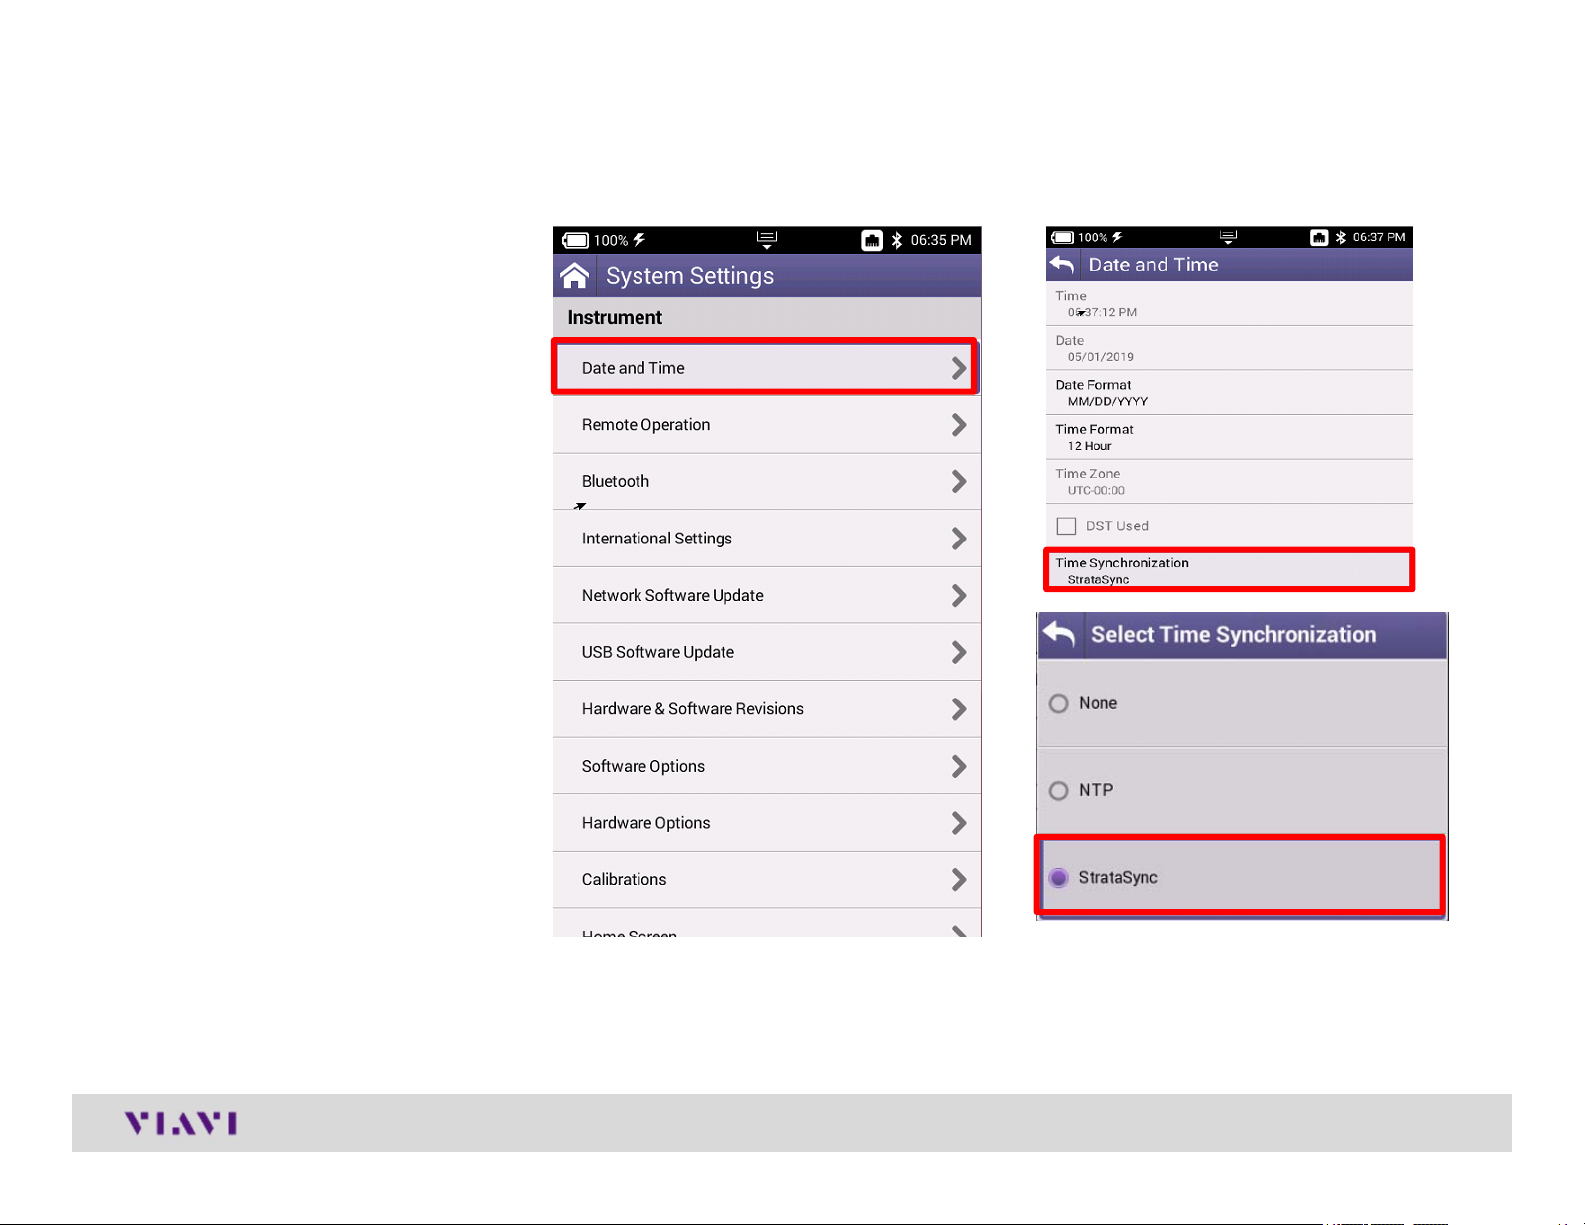
Date and Time
Select Date and Time and
make sure that Time
Synchronization is set to
StrataSync
This is important because
test data will need to be time
stamped with the correct
date and time
© 2017 Viavi Solutions, Inc. | Viavi Confidential and Proprietary Information
13
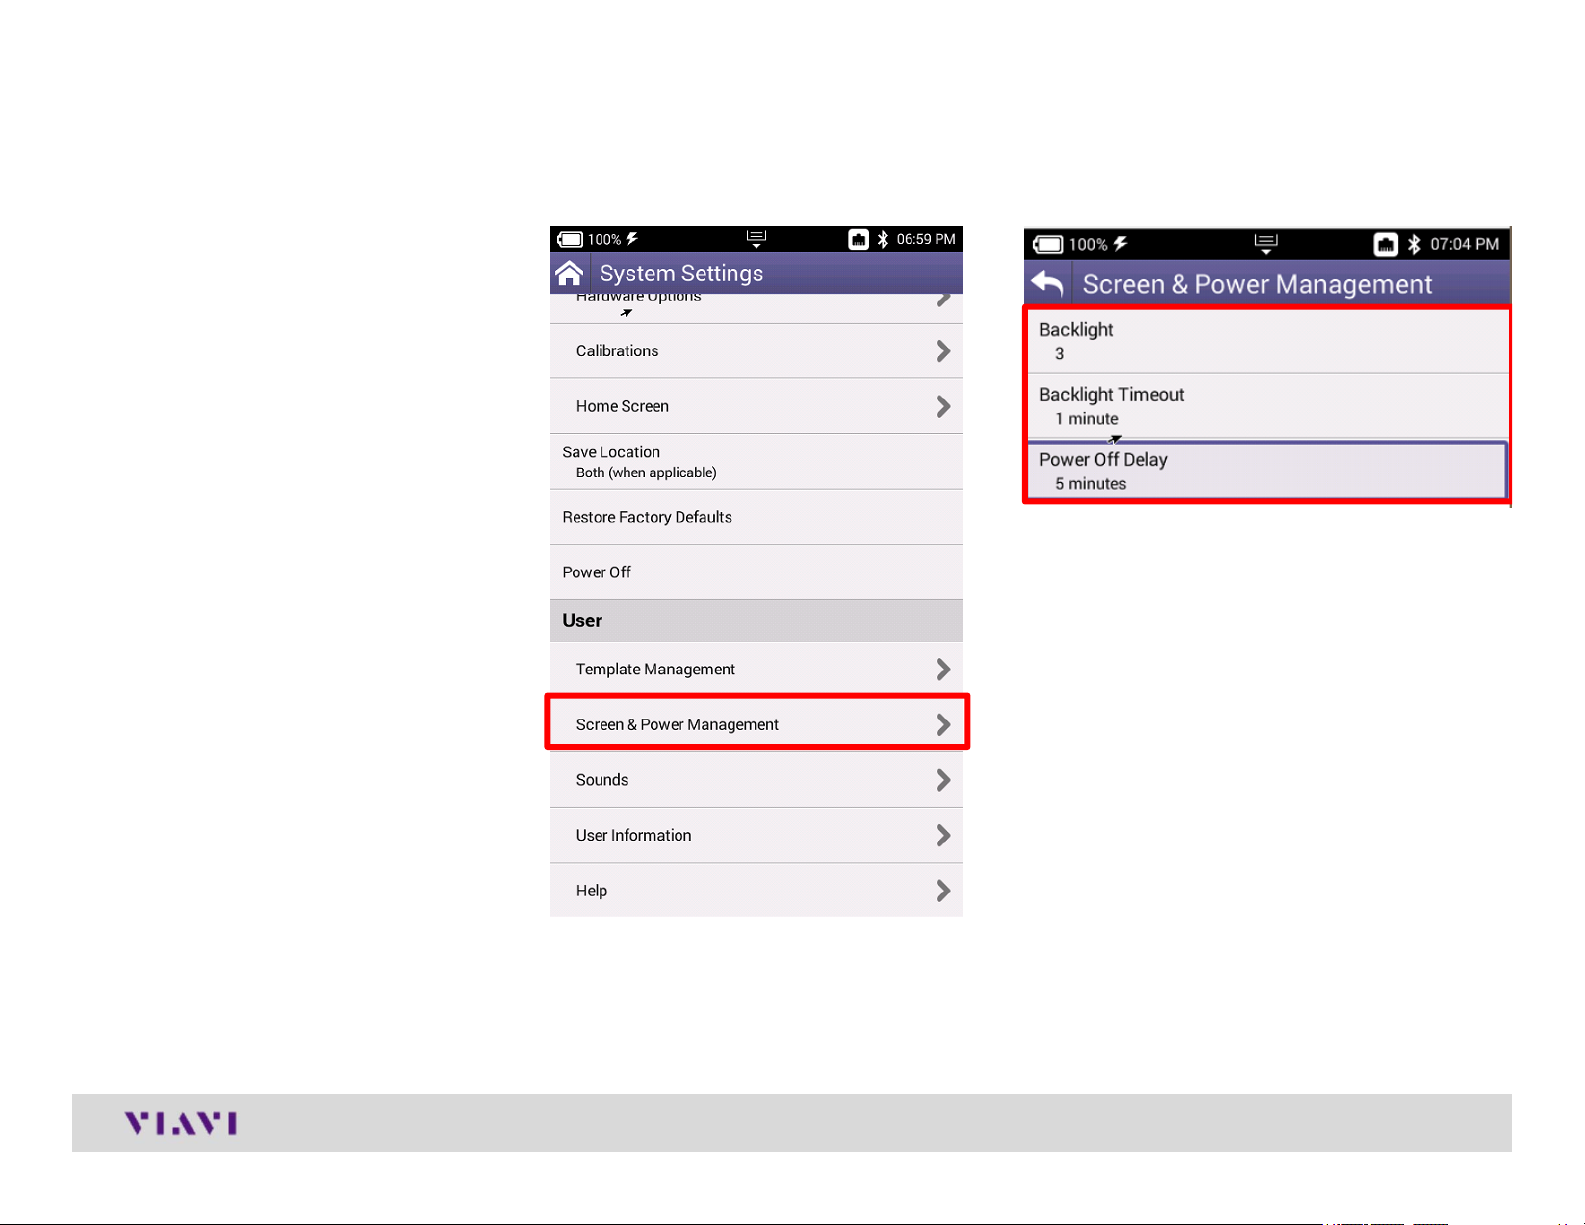
Screen and Power Management
Select Screen and Power
Management to better
conserve the ONX battery
life
Recommended values are
shown to the right. However,
if Power off Delay needs to
be set higher in order to
accommodate technician’s
pace, select appropriate
time
© 2017 Viavi Solutions, Inc. | Viavi Confidential and Proprietary Information
14
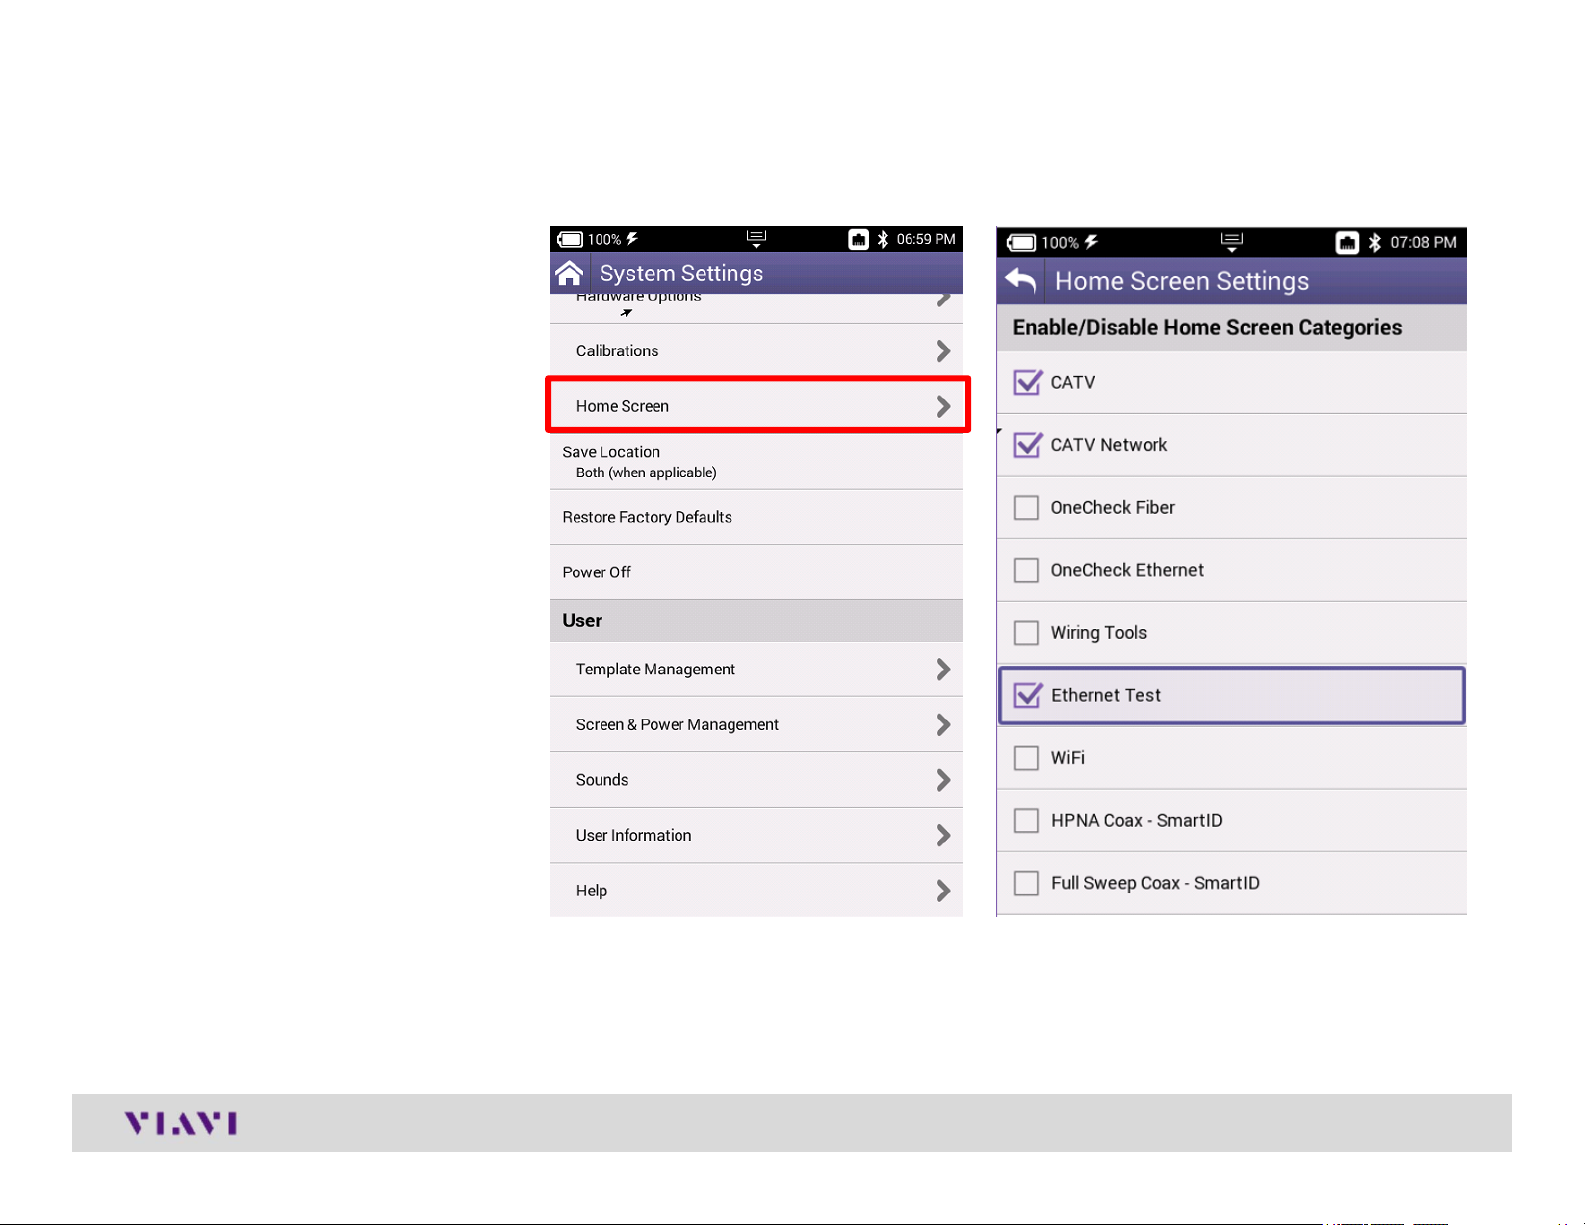
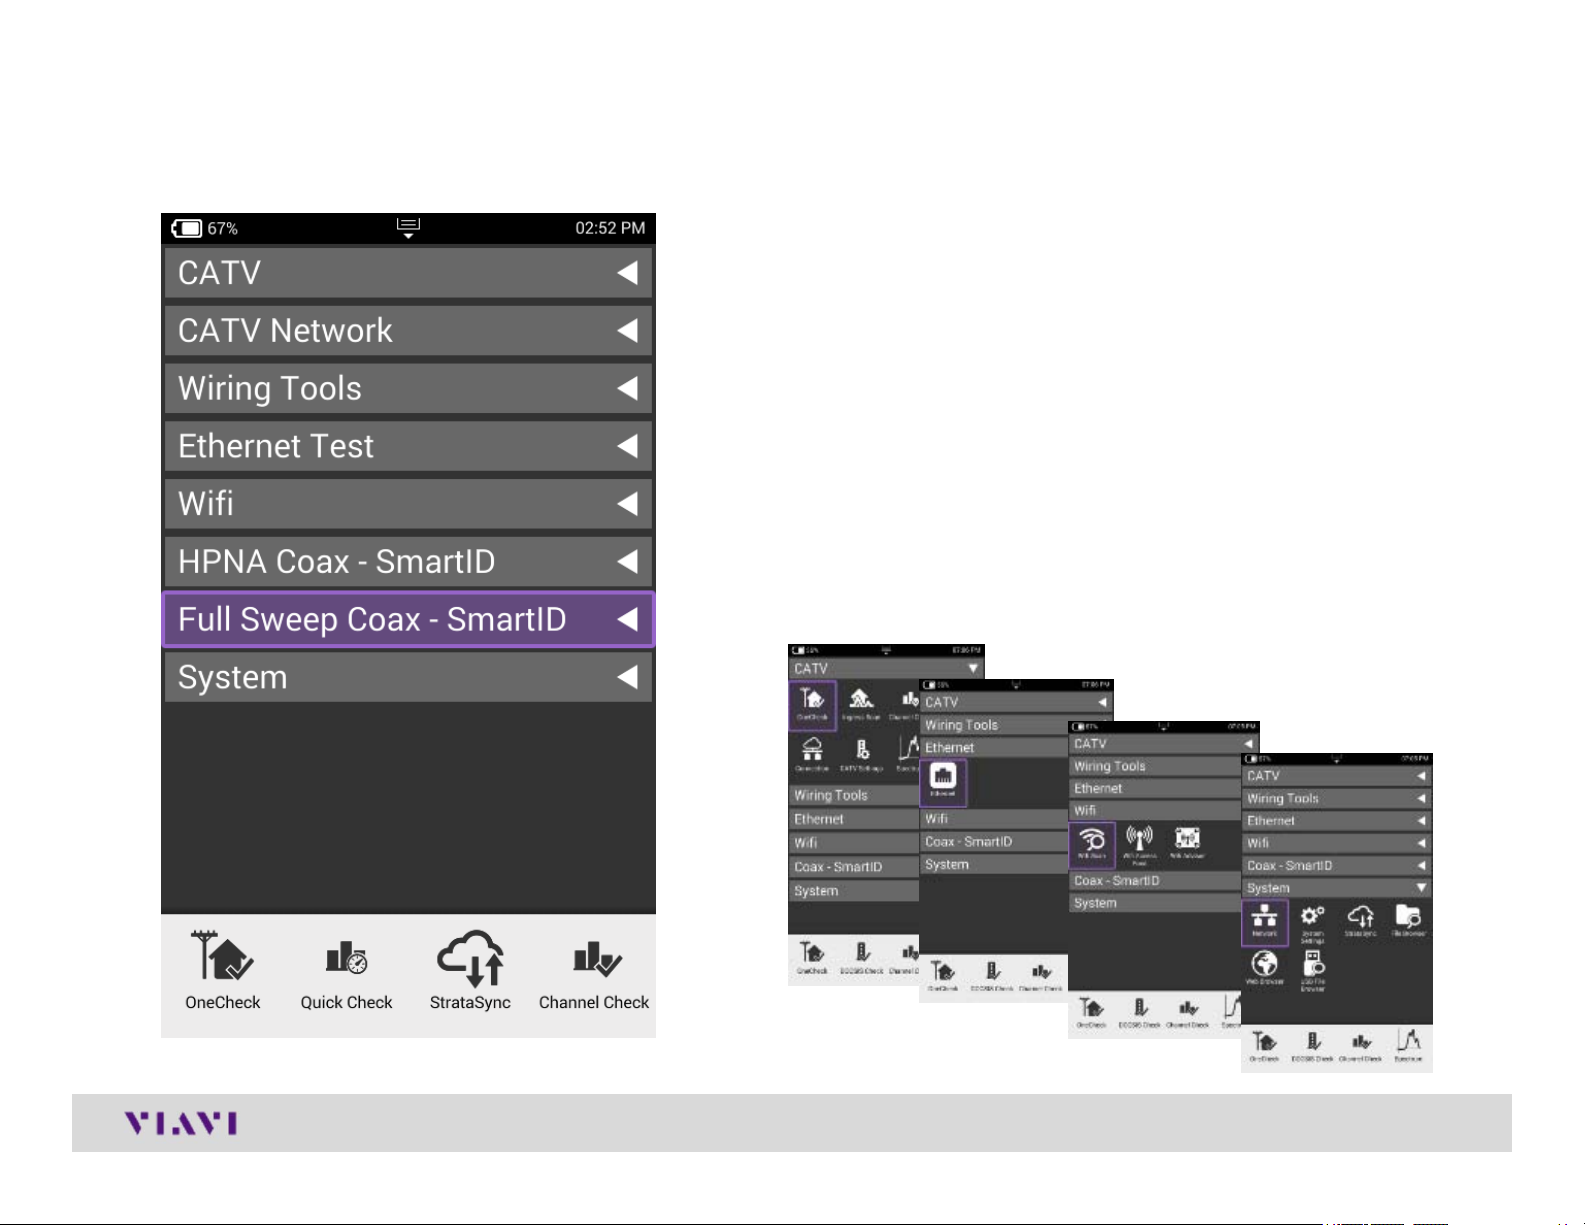
Customizing the Home Screen
Select Home Screen to
customize which
measurement bundles are
available on the Home
Screen of the ONX630
For the Network Technician,
CATV, CATV Network and
Ethernet Test are the only
truly applicable test bundles
Technicians are invited to
customized as needed
© 2017 Viavi Solutions, Inc. | Viavi Confidential and Proprietary Information
15
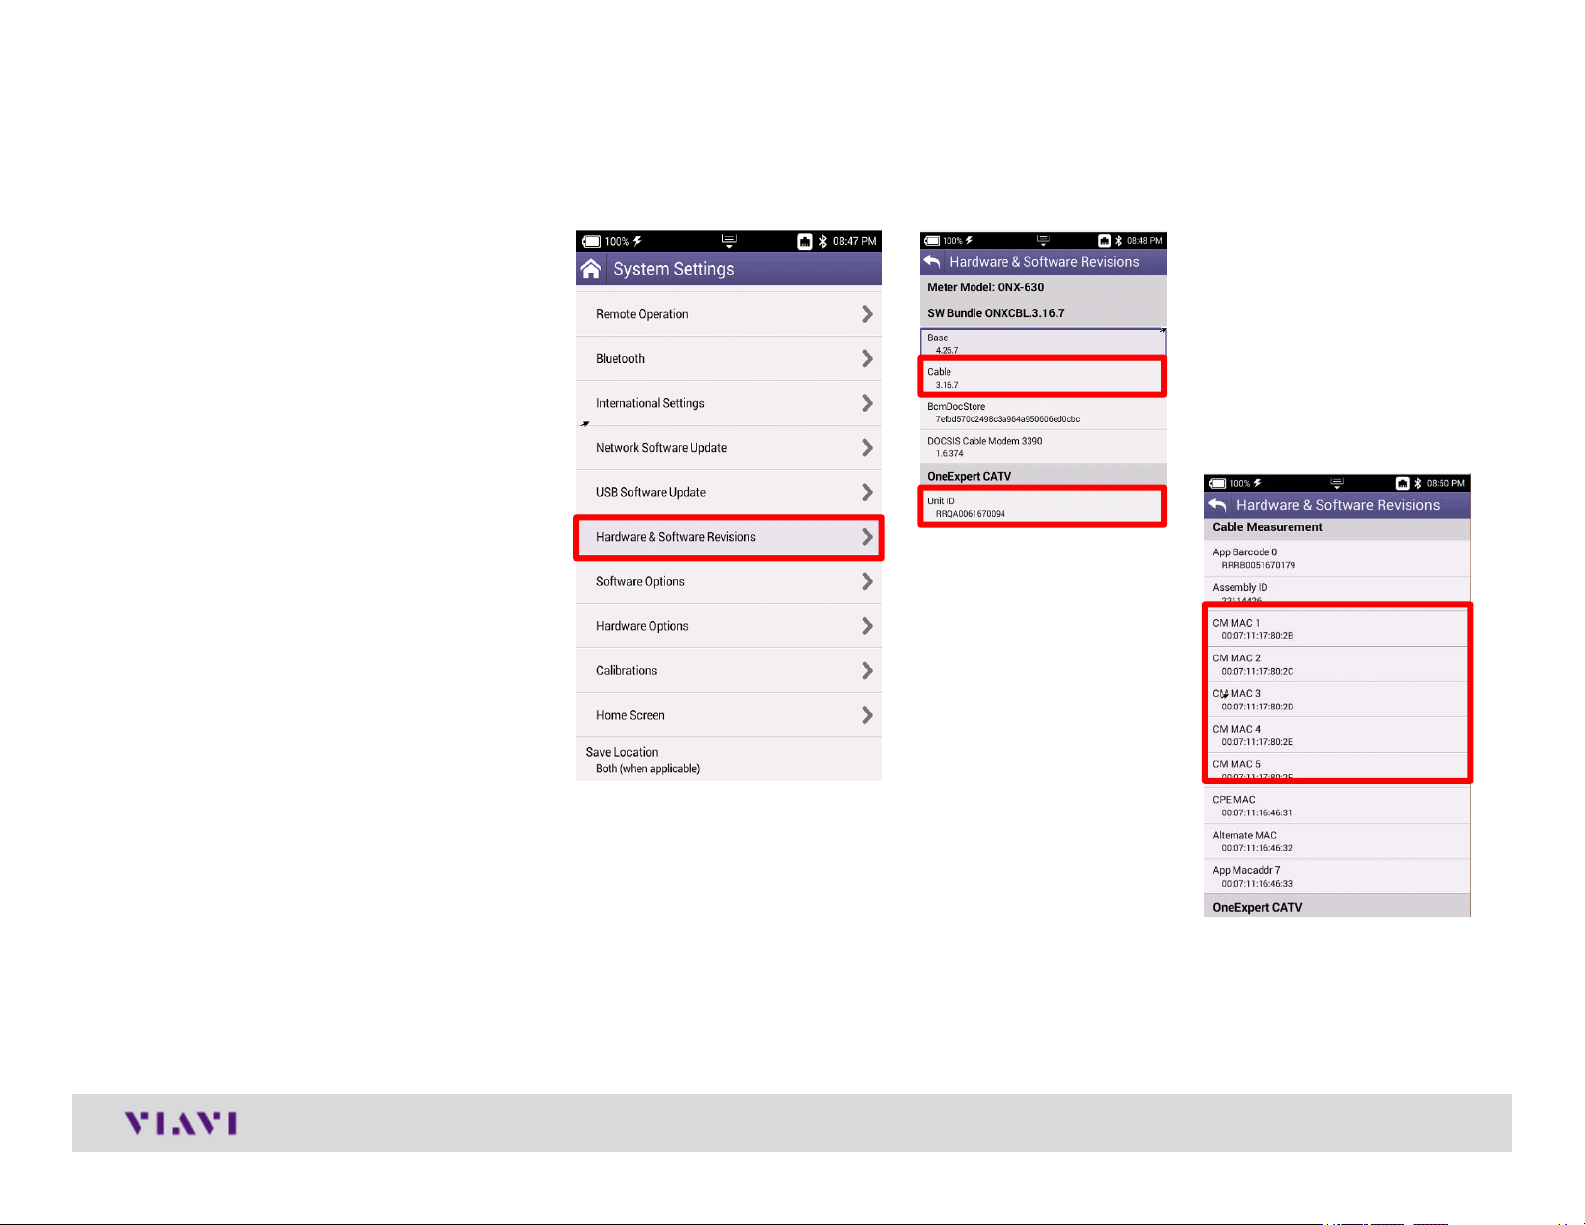
Hardware and Software Revisions
Select Hardware & Software
Revisions to verify the most
up to date Firmware is
installed
Additionally, ONX630 Serial
Number (listed as Unit ID)
and CM MAC Addresses
(used in provisioning of the
onboard Cable Modem)
© 2017 Viavi Solutions, Inc. | Viavi Confidential and Proprietary Information
16
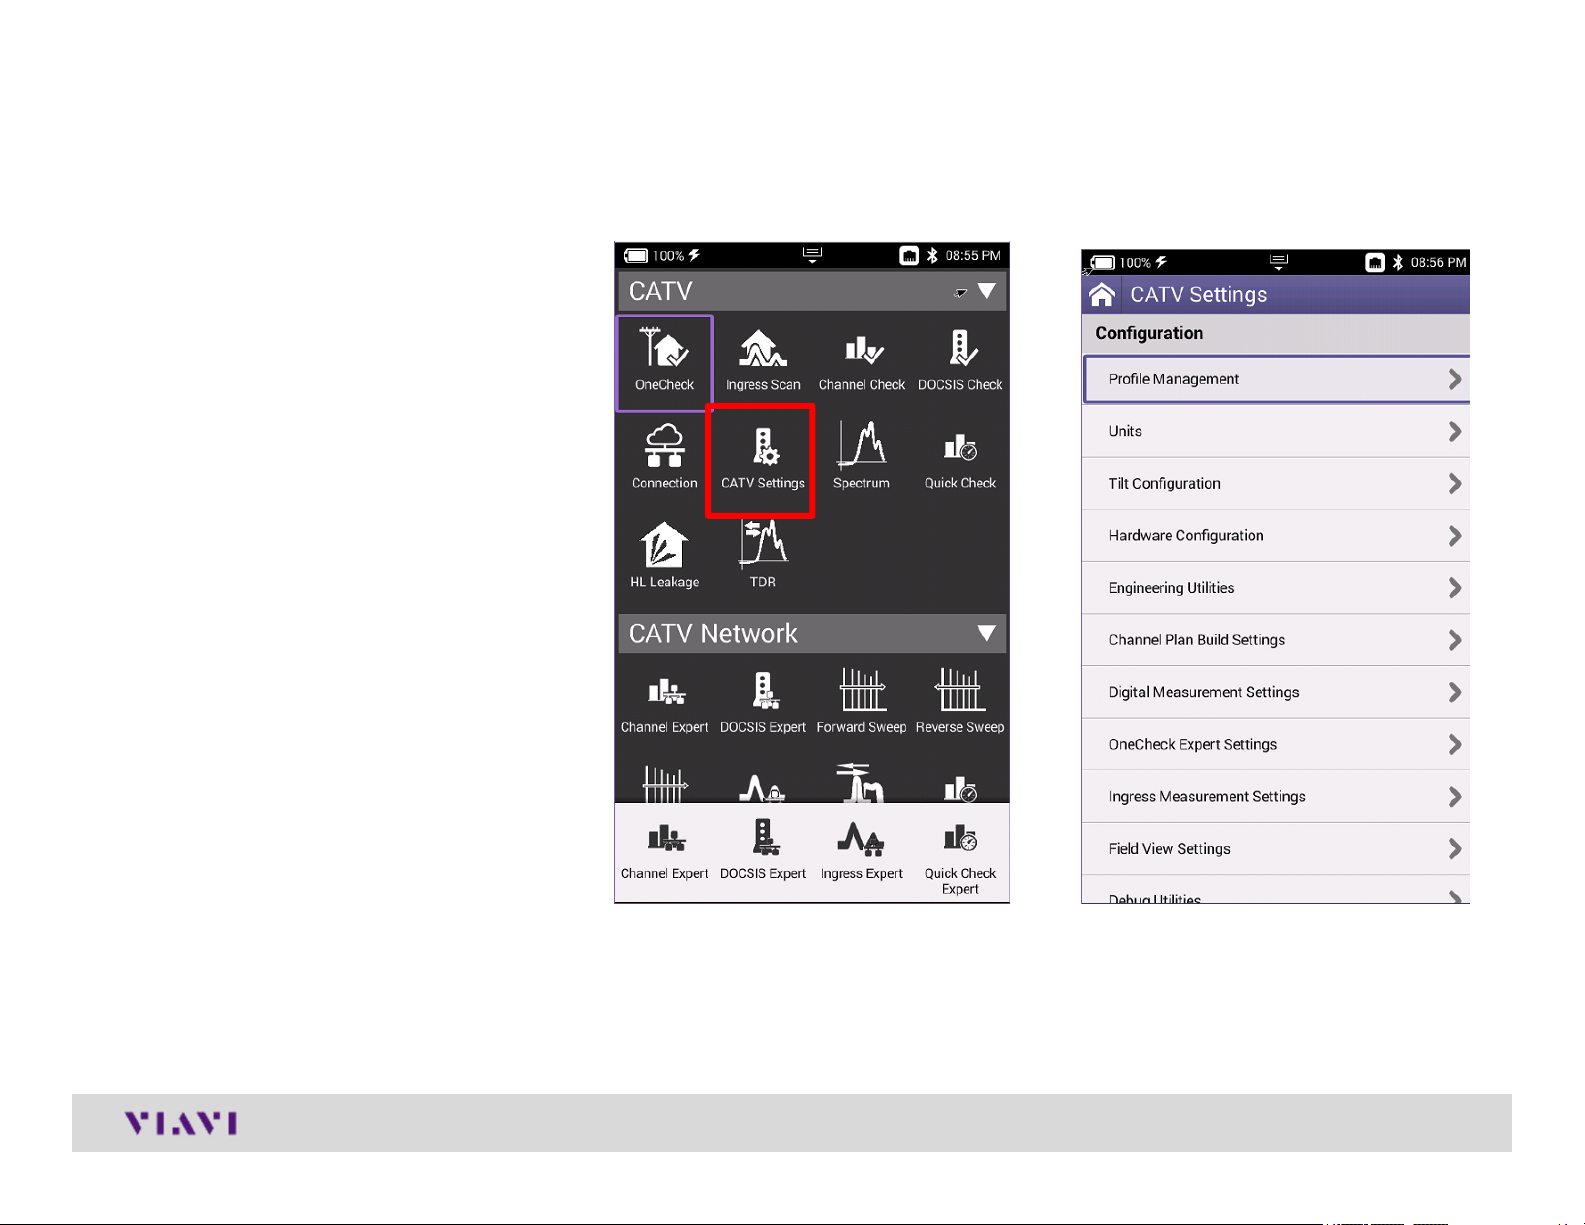
CATV Settings
Navigate from the Home
Screen to CATV Settings
• Here the tech can validate
IPv4 or IPv6
• Tilt
• Sweep
• Diplex
• Digital Measurement
• Channel Plan Build
Settings
© 2017 Viavi Solutions, Inc. | Viavi Confidential and Proprietary Information
17
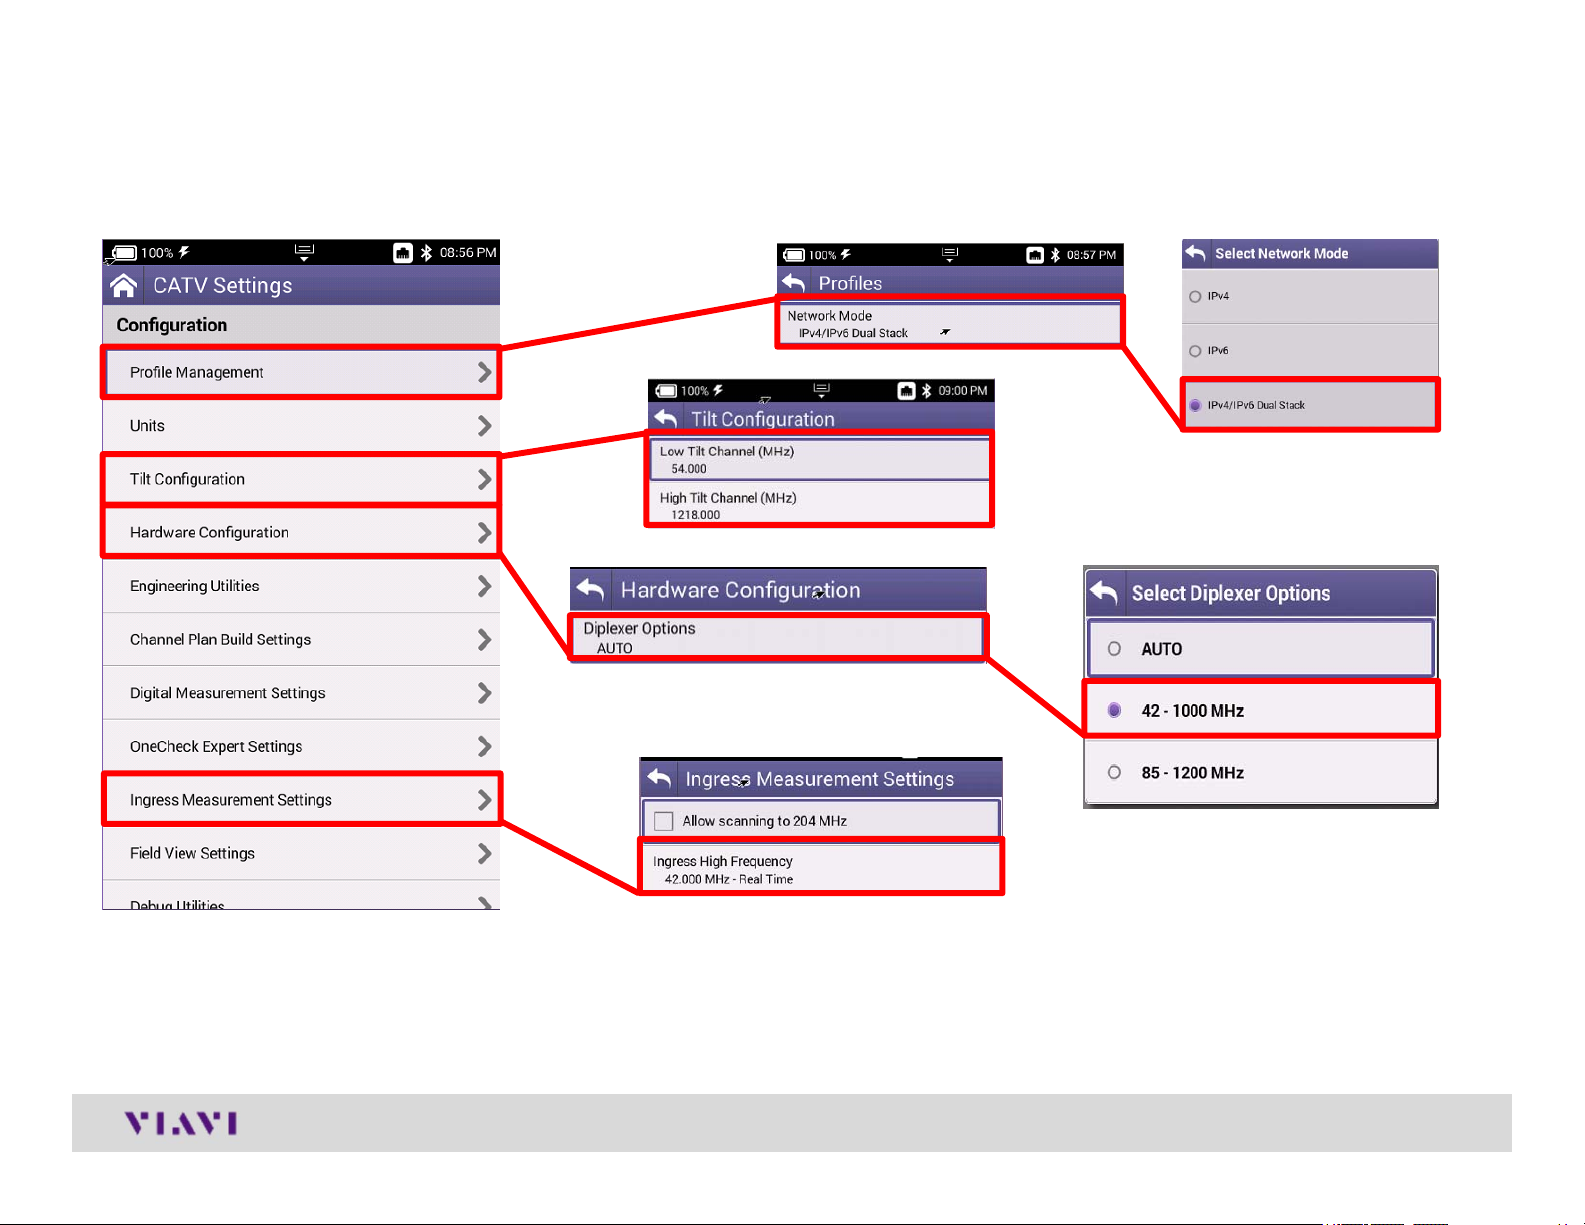
Advanced CATV Settings
© 2017 Viavi Solutions, Inc. | Viavi Confidential and Proprietary Information
18
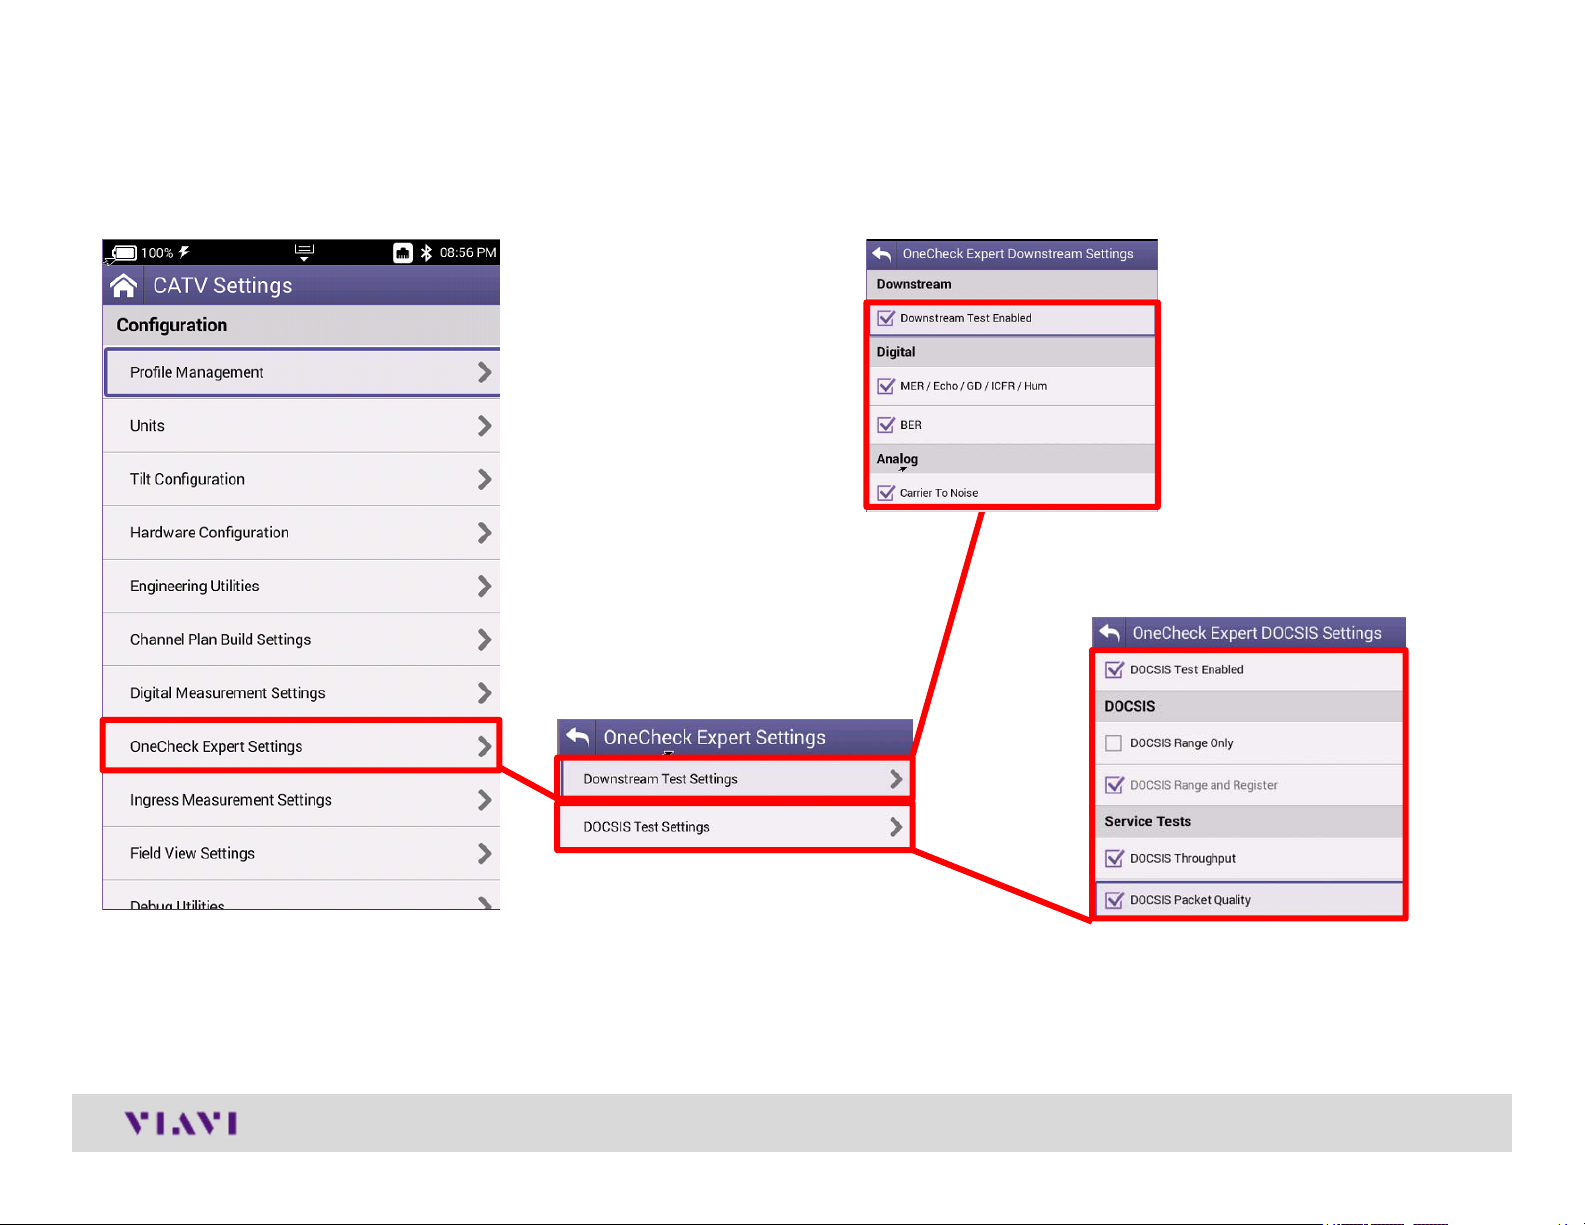
Advanced CATV Settings
© 2017 Viavi Solutions, Inc. | Viavi Confidential and Proprietary Information
19
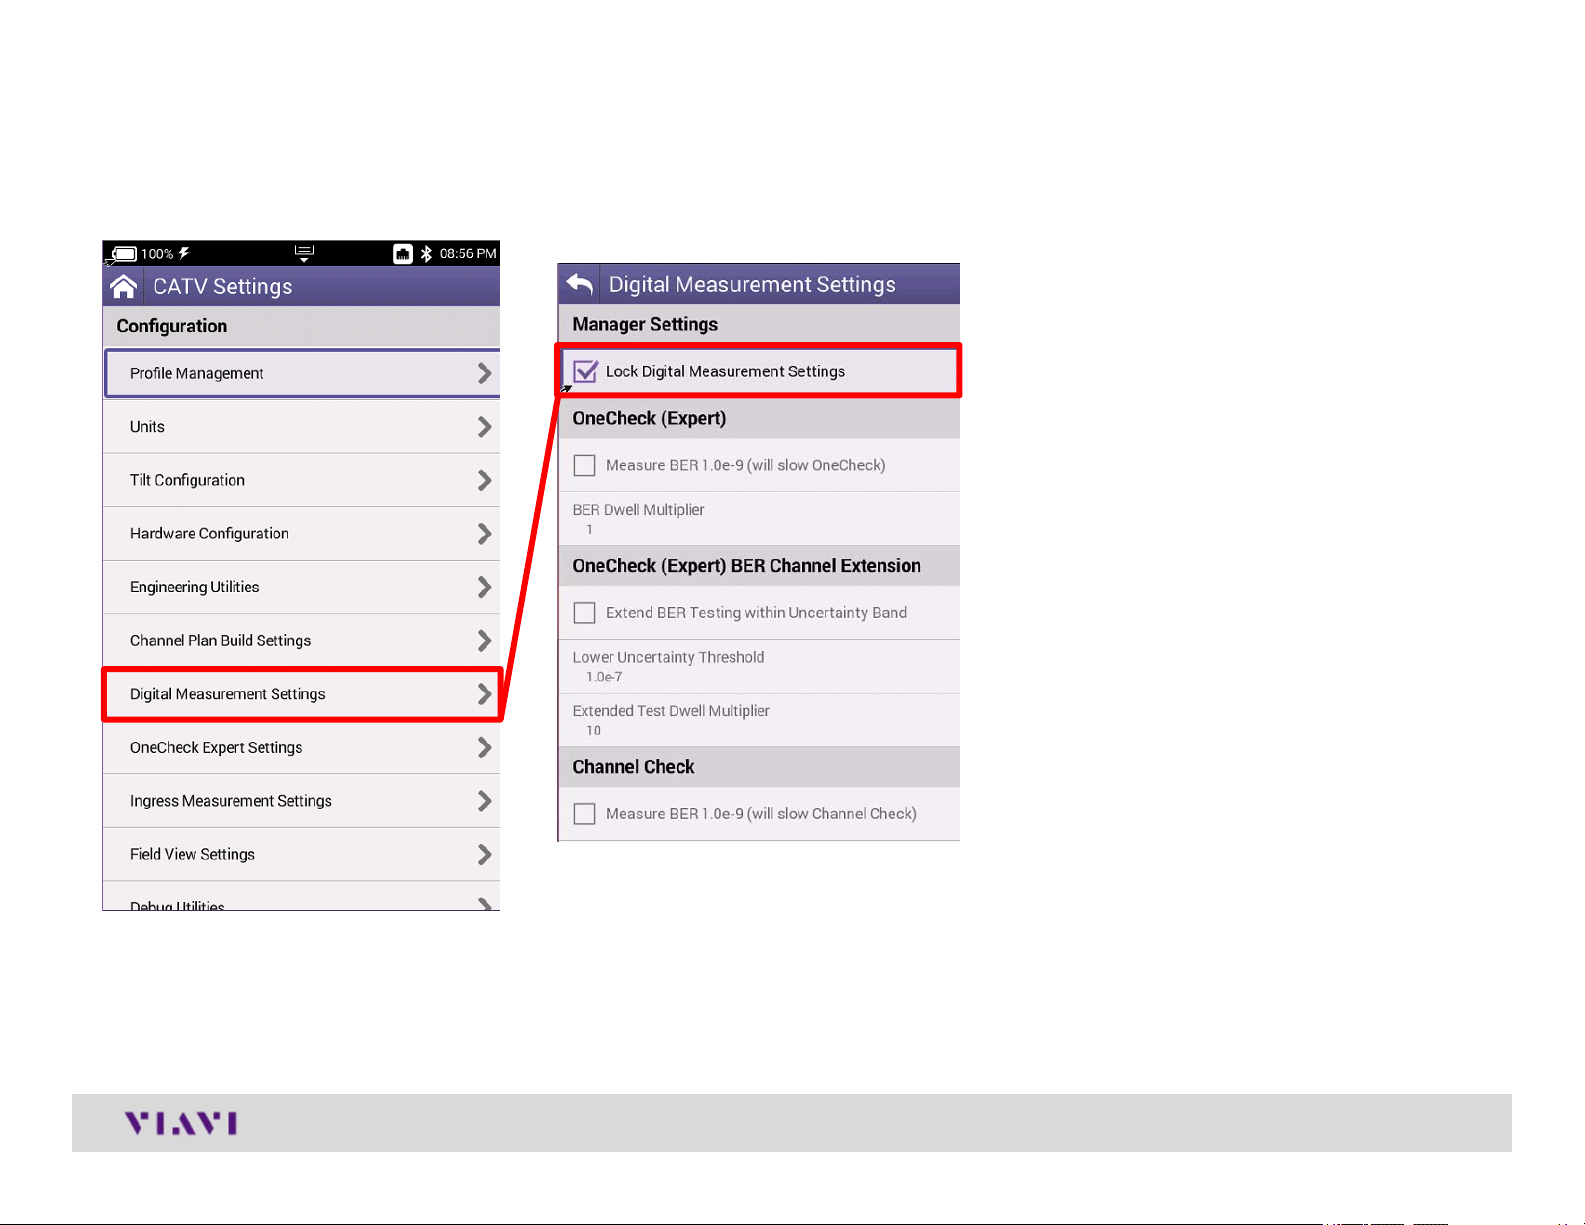
Advanced CATV Settings
© 2017 Viavi Solutions, Inc. | Viavi Confidential and Proprietary Information
20
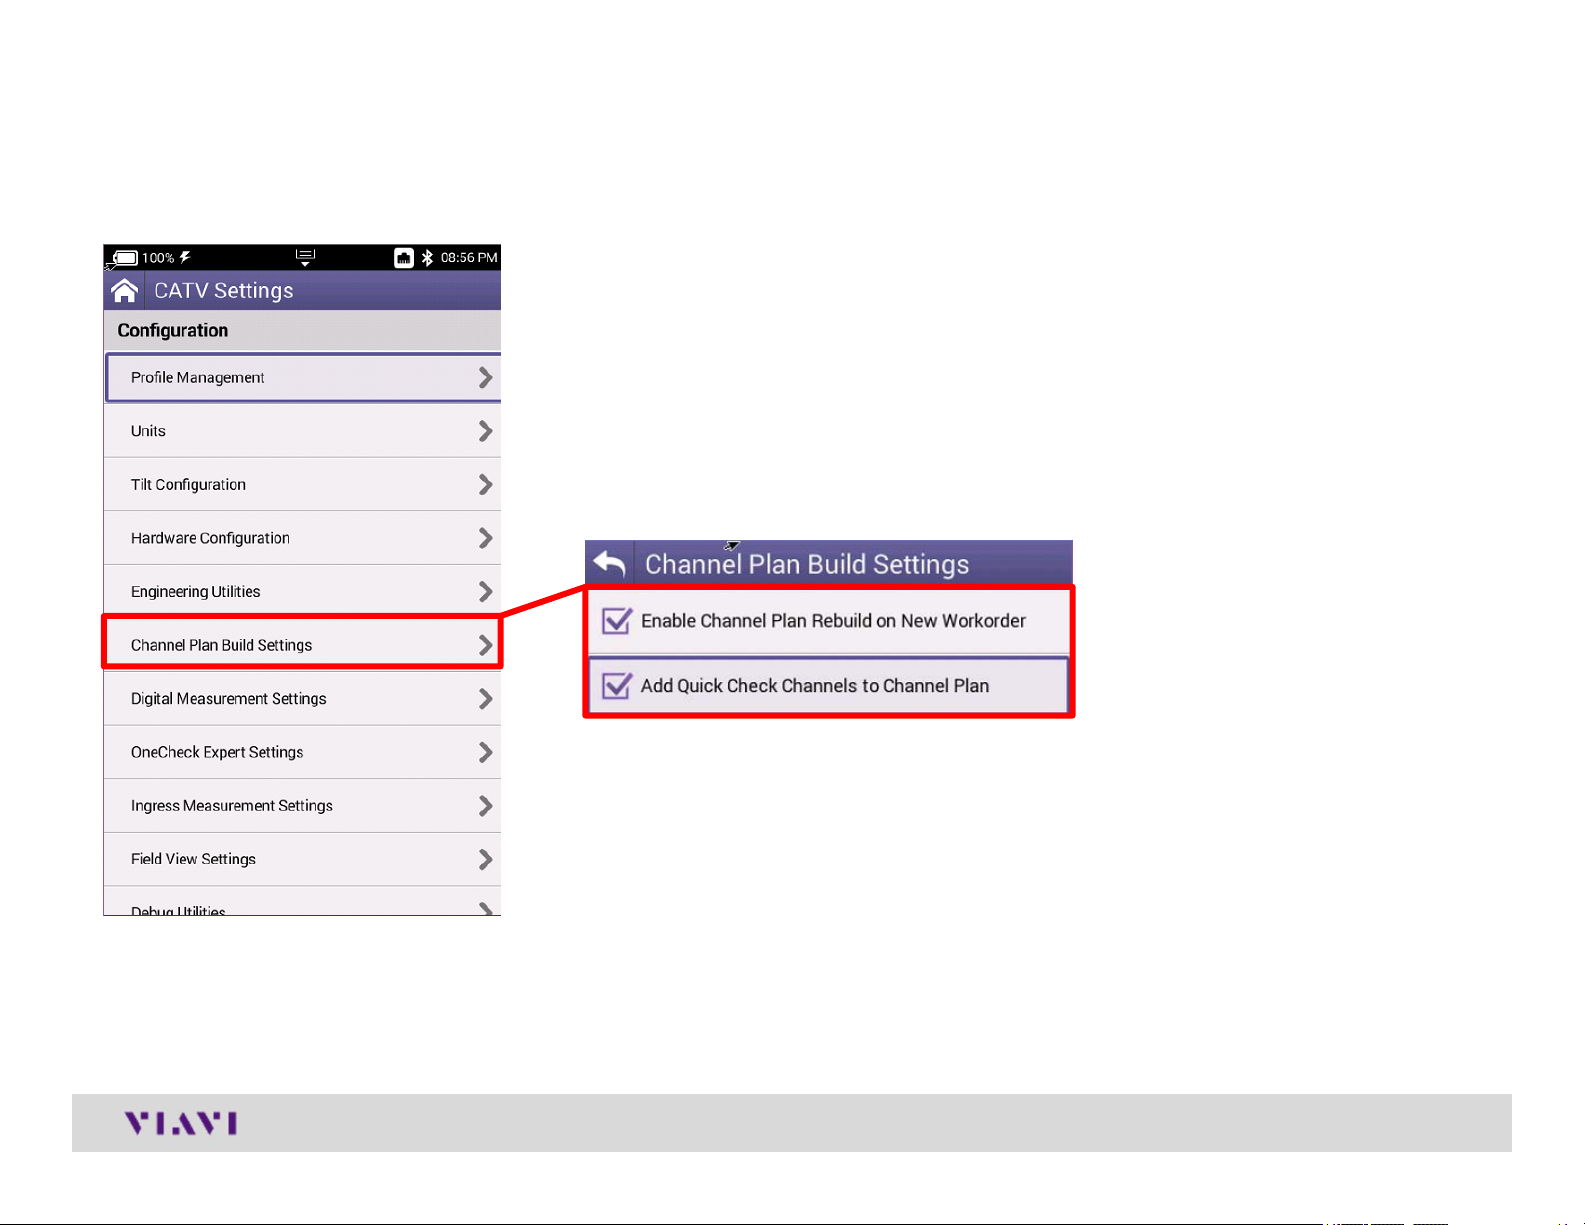
Advanced CATV Settings
© 2017 Viavi Solutions, Inc. | Viavi Confidential and Proprietary Information
21

ONX CATV - SW Upgrade and
Data Synchronization
© 2017 Viavi Solutions, Inc. | Viavi Confidential and Proprietary Information
22© 2018 VIAVI Solutions Inc.viavisolutions.com
22

ONX Software / Firmware Upgrades
Software (SW) and Firmware (FW) releases are the best way to ensure your
VIAVI OneExpert ONX is functioning at its best.
VIAVI delivers SW and FW easily via StrataSync and USB Stick
All ONX units should be upgraded to the latest production software release –
available through StrataSync (or your Viavi representative)
New SW Version offer substantial operational improvements and enhancements
over earlier software releases including the version that shipped with the units
initially.
The software will be deployed to the units by the StrataSync Administrator, but
each unit needs to be configured to connect with StrataSync.
Follow these steps to ensure your meter is configured correctly and you can
connect to StrataSync to receive the latest updates.
© 2017 Viavi Solutions, Inc. | Viavi Confidential and Proprietary Information
23
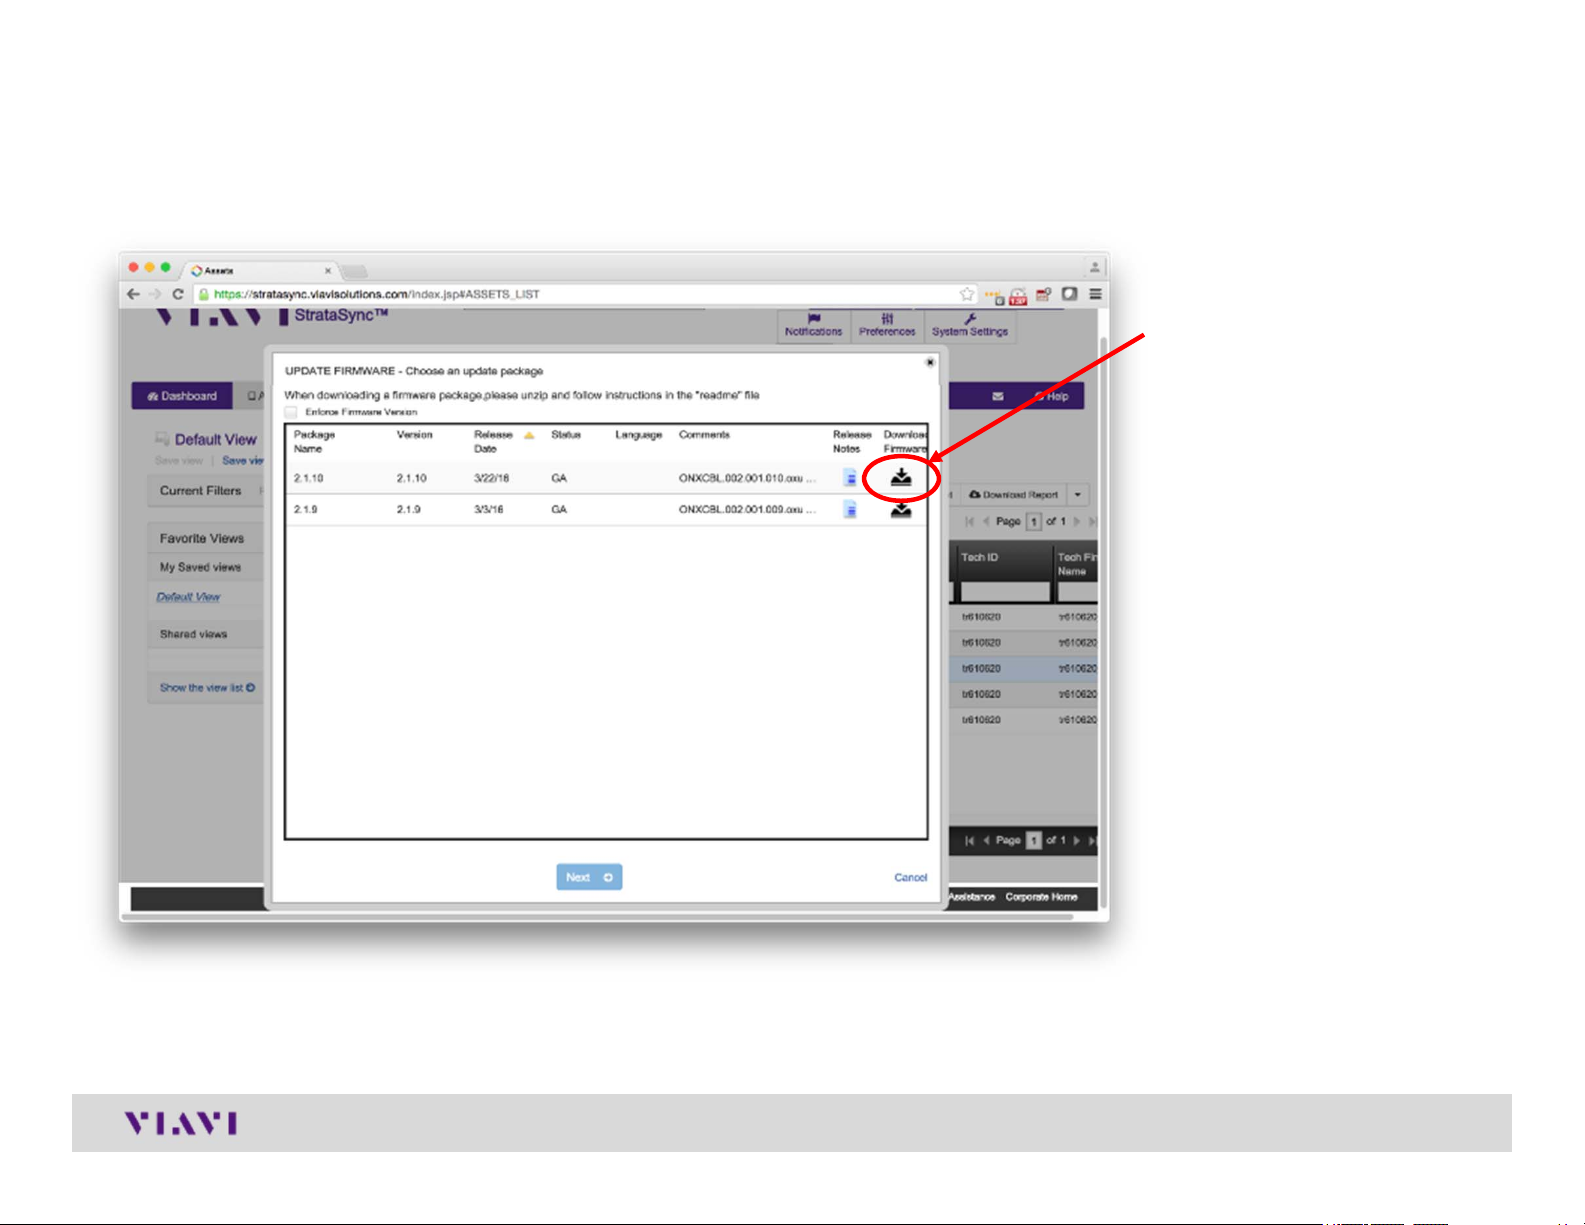
USB Upgrade Process
Click here to download the
newest firmware
Copy the downloaded file
ONXCBL.xxx.xxx.xxx.oxu to
the root directory of a USB
thumb drive.
Note: Firmware must be downloaded from StrataSync first
Press Cancel once the
download has completed
and you have placed the file
on the USB thumb drive.
© 2017 Viavi Solutions, Inc. | Viavi Confidential and Proprietary Information
24
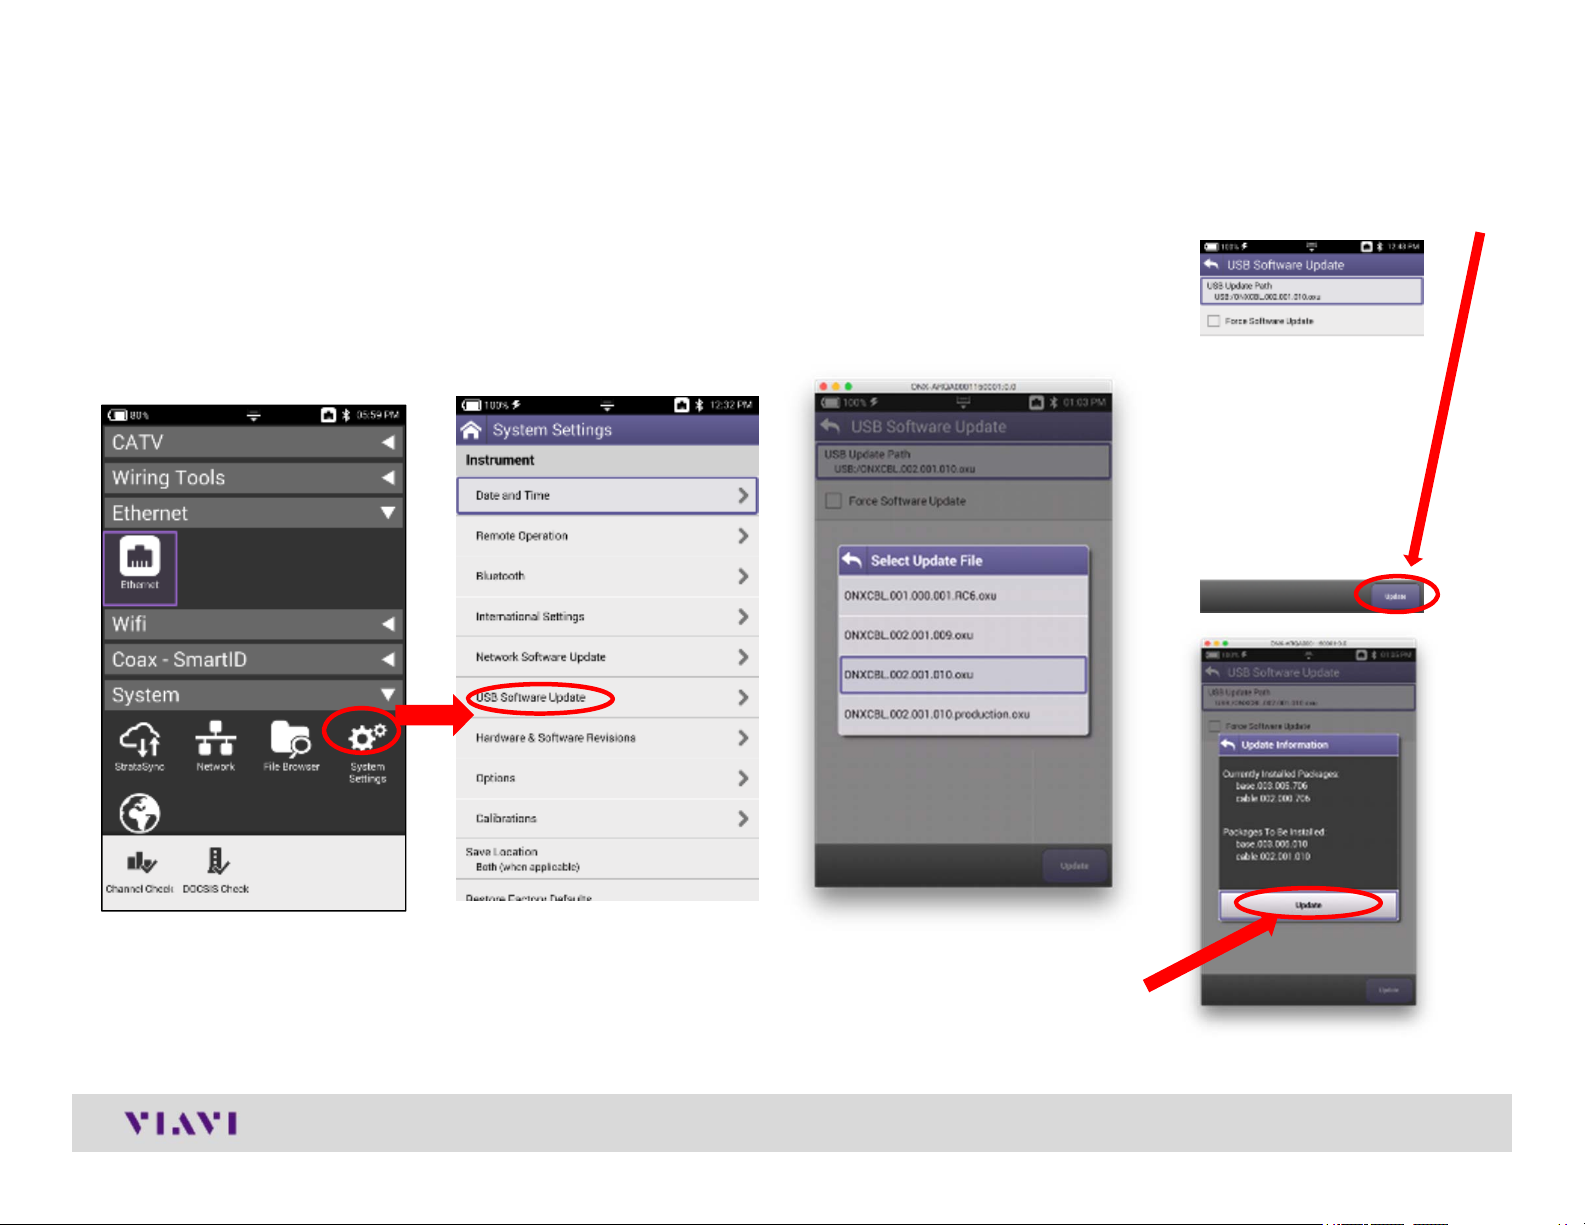
USB Upgrade Process
1) Insert the thumb drive
into either USB port on
the side of the ONX.
Then start System
Settings
2) Select USB Software
Update
4) Press Update to
start the upgrade
3) At the popup, select the
firmware image you wish
to select for upgrade.
5) Press Update to confirm and start the upgrade. The meter will power off when
the update is complete.
Note: Make sure you do not have an Ethernet cable plugged in when upgrading by USB
© 2017 Viavi Solutions, Inc. | Viavi Confidential and Proprietary Information
25
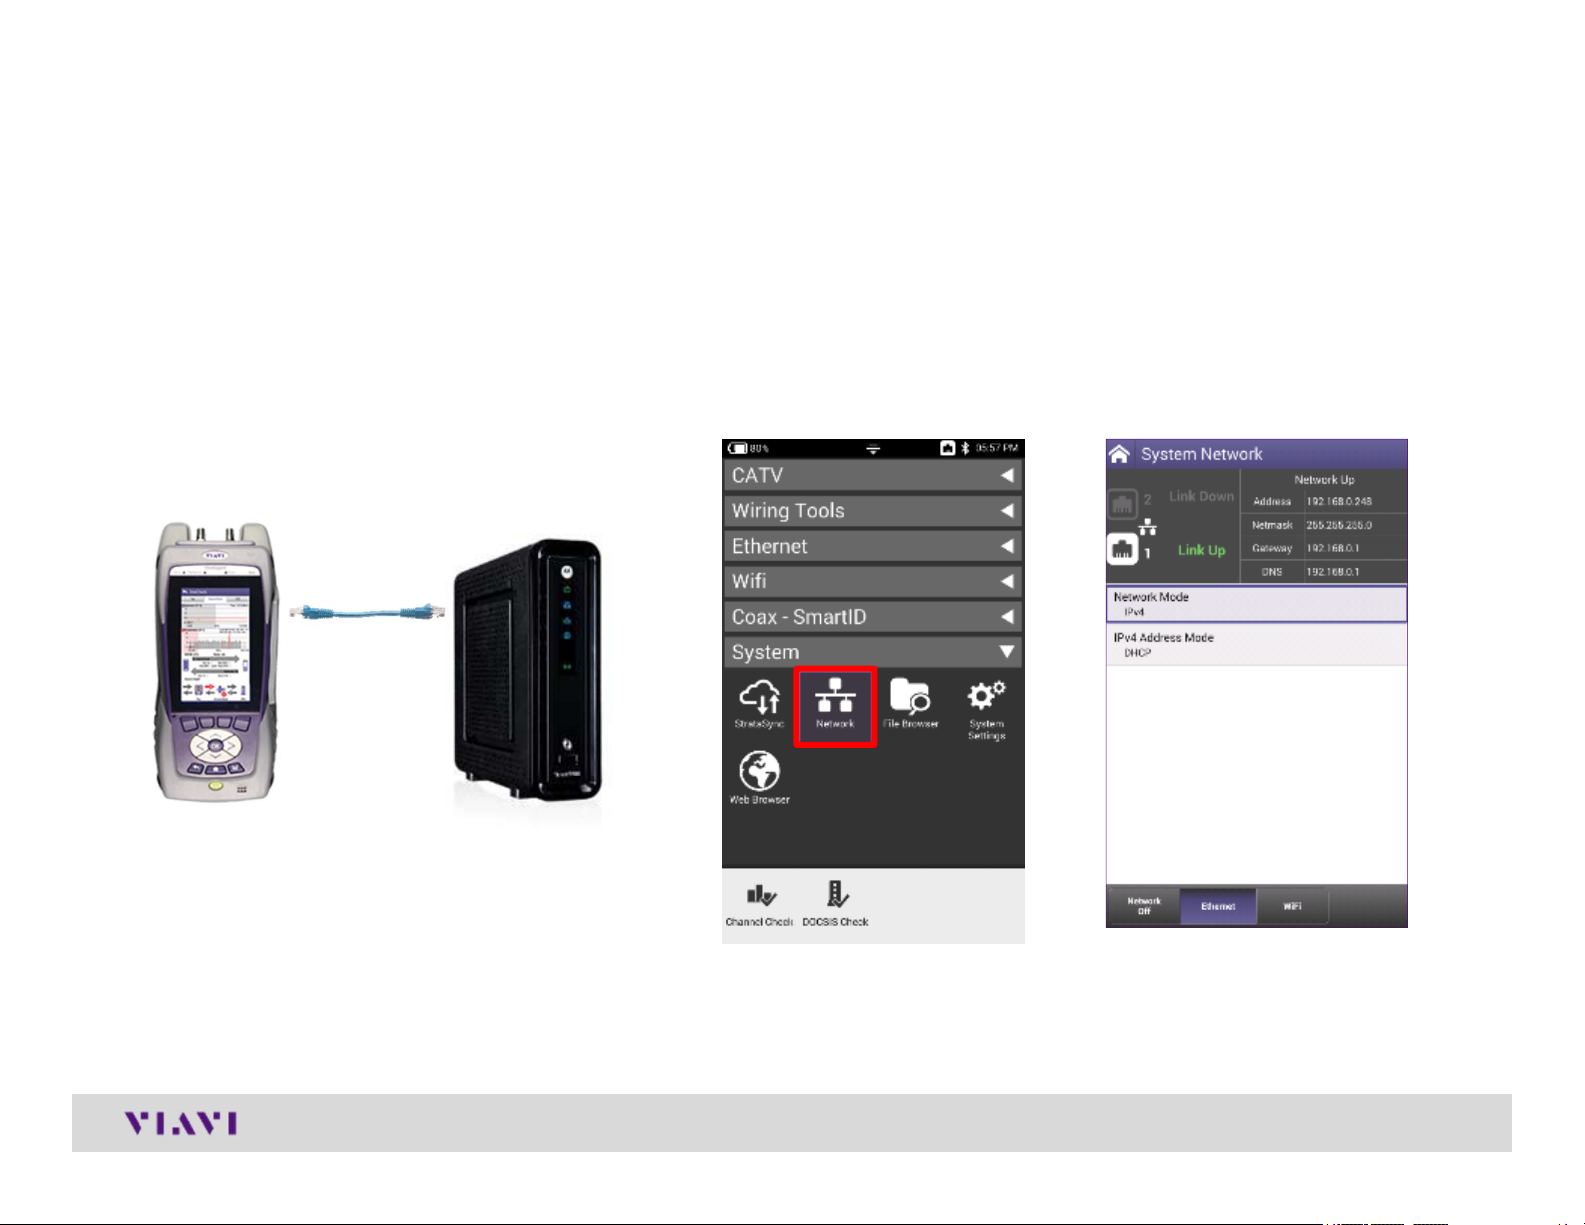
StrataSync Synchronization - ETHERNET
Note - You can synchronize to StrataSync via RF or WiFi, but this is ONLY for sending test files, receiving
configuration information like limit plans, etc. - not for SW/FW upgrades
1) Connect an Ethernet cable from an
active internet connection (Cable
Modem or router/gateway) to Port
1 on the ONX
2) From the ONX home screen navigate to
System Menu and select Network - Verify the
ONX has a valid IP address*
© 2017 Viavi Solutions, Inc. | Viavi Confidential and Proprietary Information
26
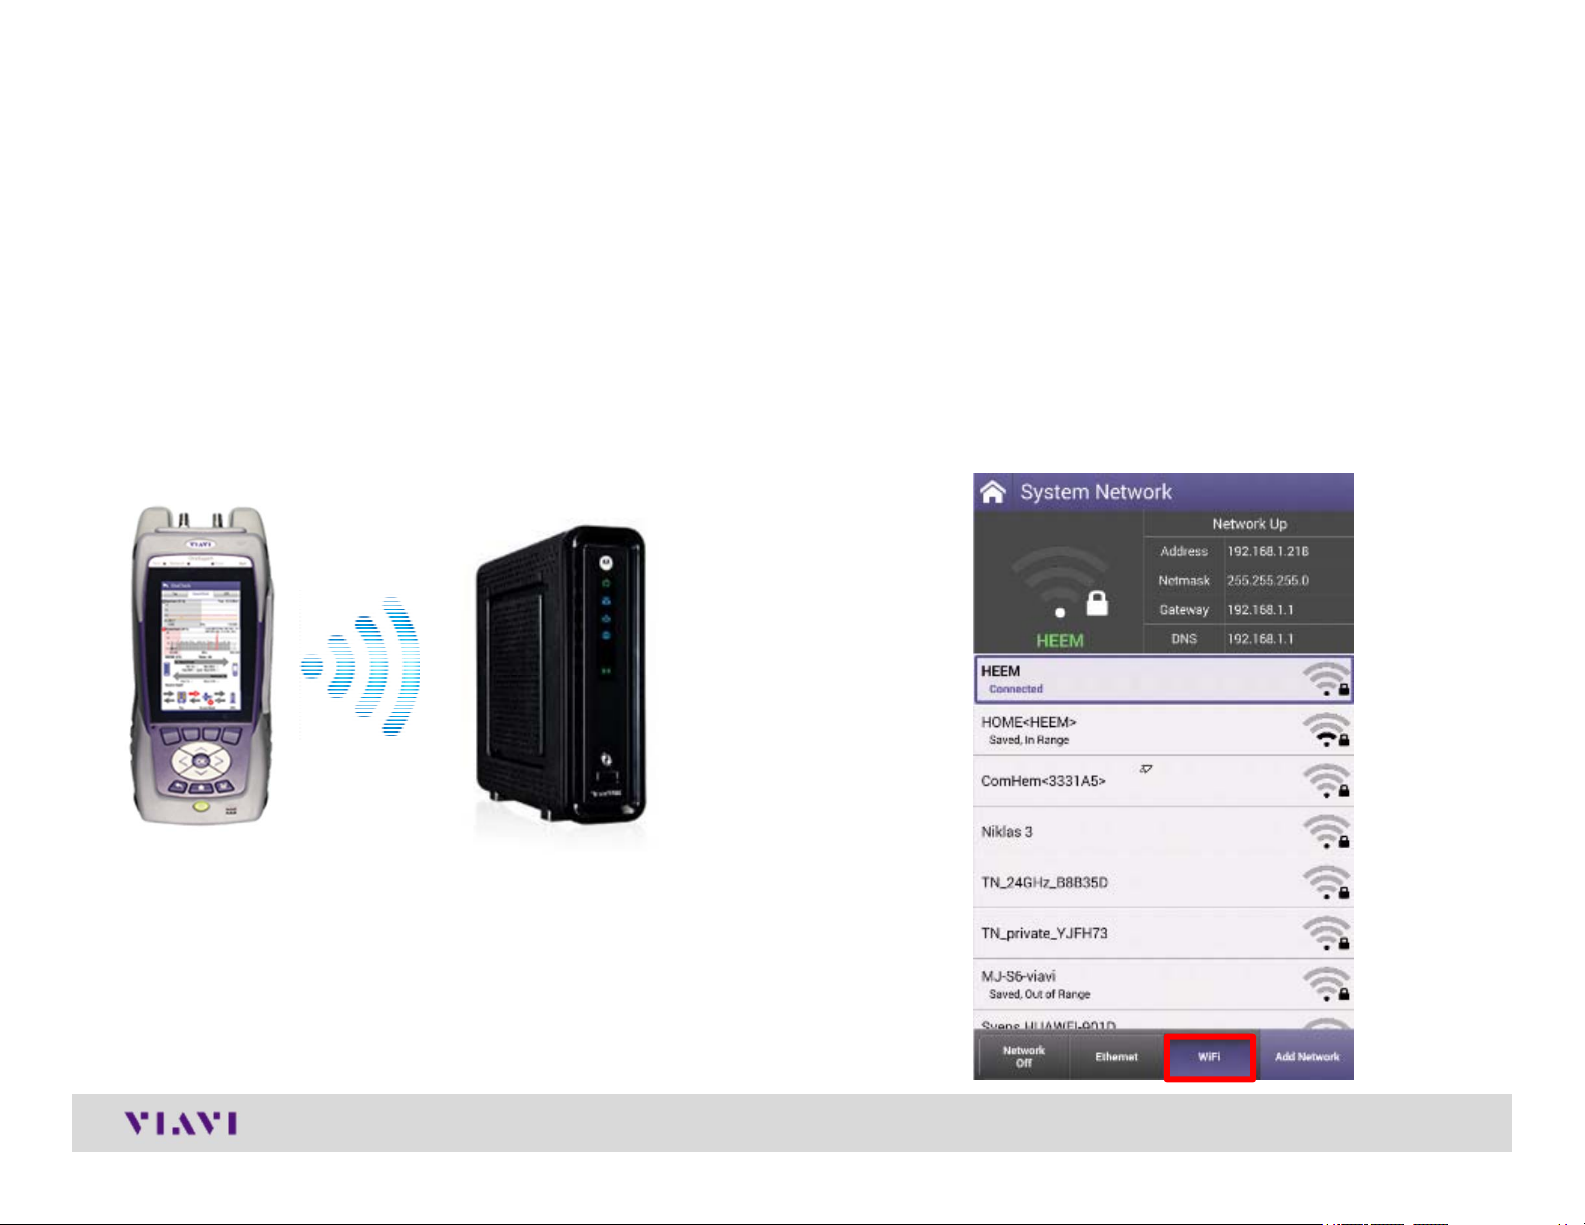
StrataSync Synchronization - WIFI
Note - Sync via WiFi is now supported. Use Network Settings app to configure and join a WiFi network prior to performing
sync. You can synchronize to StrataSync via WiFi, but this is ONLY for sending test files, receiving configuration
information like limit plans, etc.
1) Connect with WiFi from an active
internet connection (Cable Modem
or router/gateway)
2) From the ONX home screen navigate to
System Network / WiFi- Verify the ONX has a
valid IP address
© 2017 Viavi Solutions, Inc. | Viavi Confidential and Proprietary Information
27
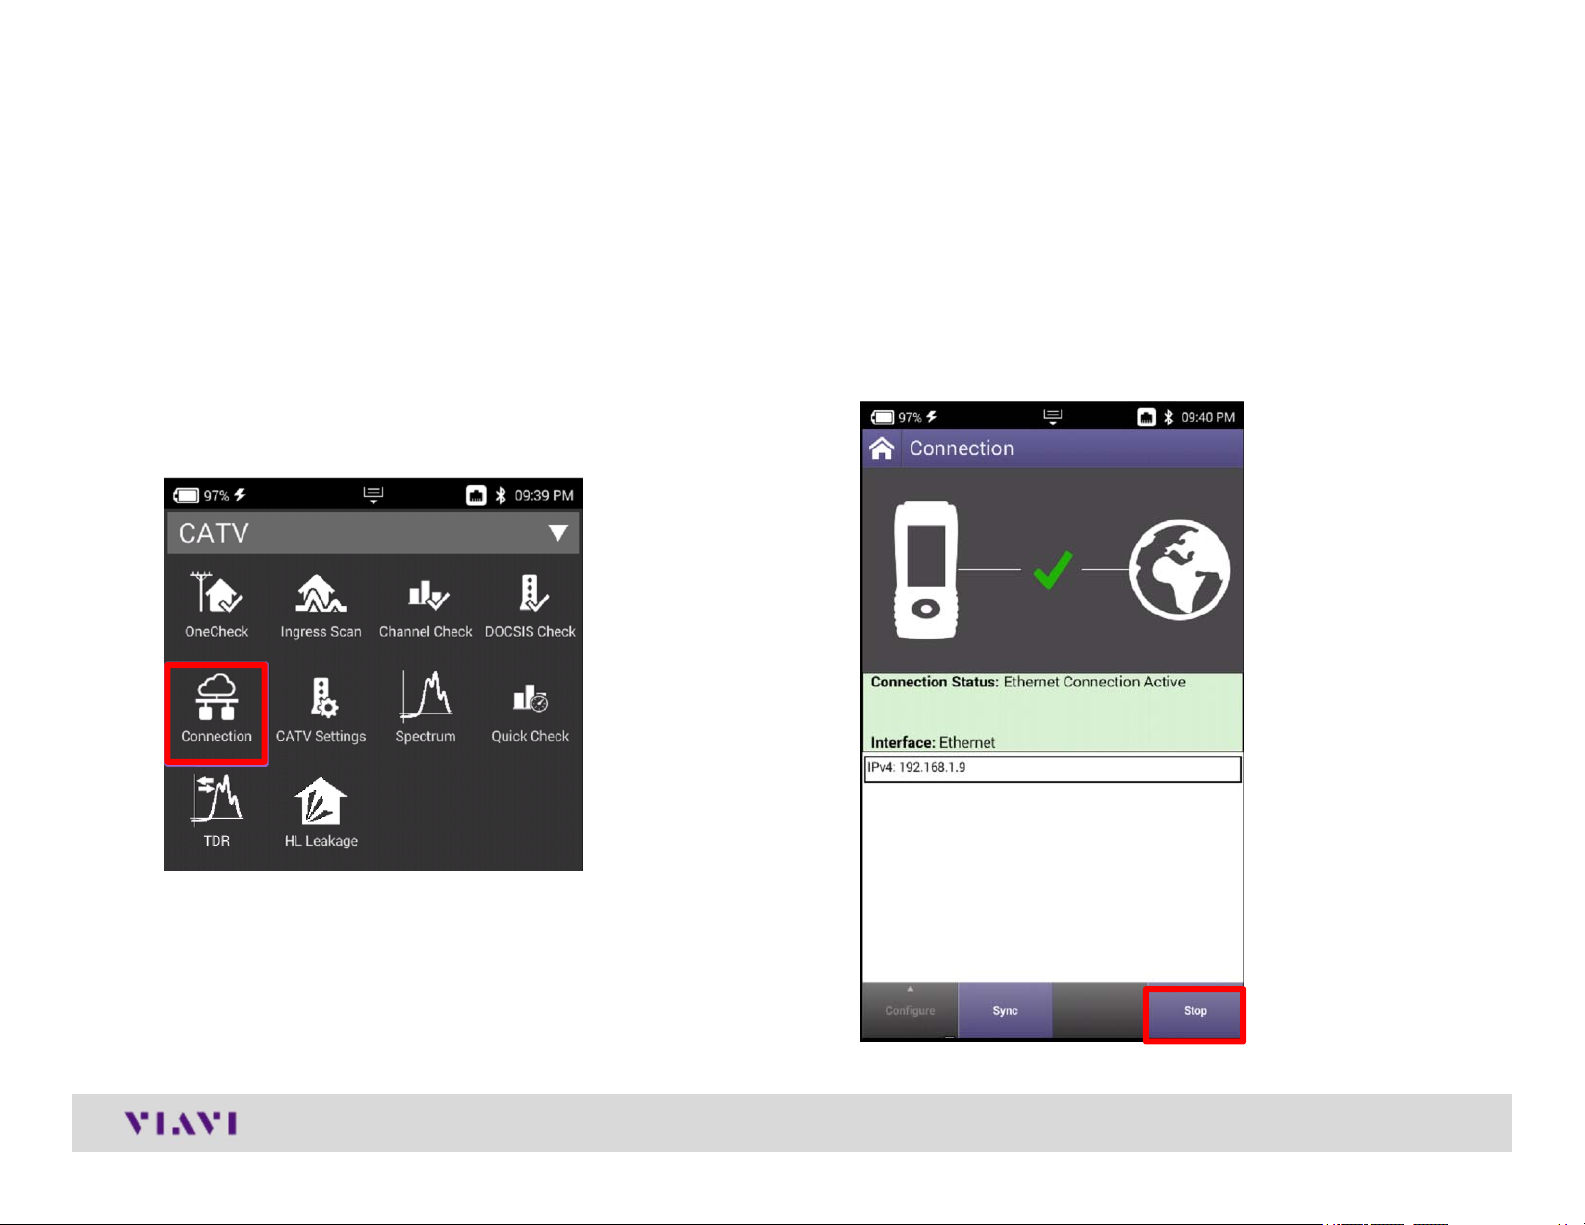
StrataSync Synchronization - RF
1) Make sure that CM MAC 1 is
provisioned in the billing system
2) Select the CONNECTION APP
from CATV
3) Once CONNECTION STATUS
reports a GREN Check mark and
INTERFACE: RF; IP ADDRESS is
shown
© 2017 Viavi Solutions, Inc. | Viavi Confidential and Proprietary Information
28
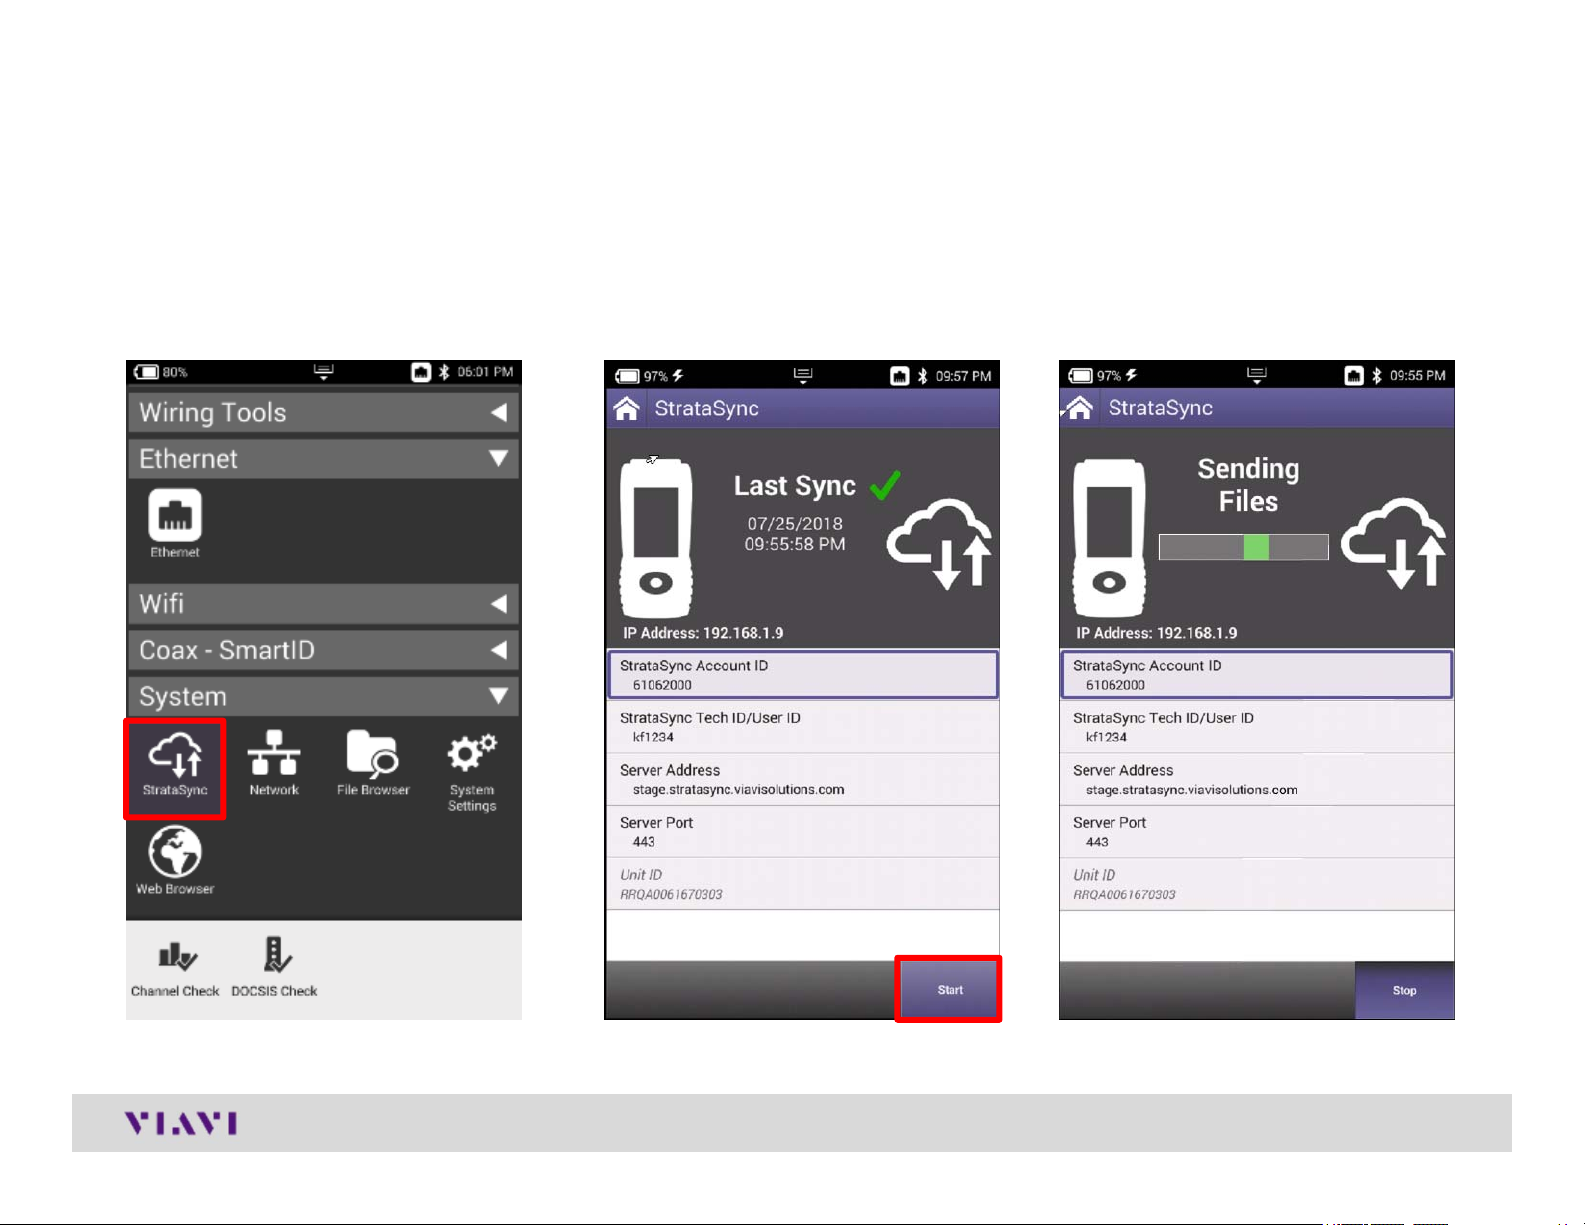
StrataSync Synchronization – ETHERNET, WIFI and RF
1) After IP Address verification, navigate to
the System Menu and select
StrataSync
2) StrataSync Account ID = xxxxxxxxx
Server Address = stratasync.jdsu.com
(stratasync.viavisolutions.com also works)
Server Port = 443
© 2017 Viavi Solutions, Inc. | Viavi Confidential and Proprietary Information
29
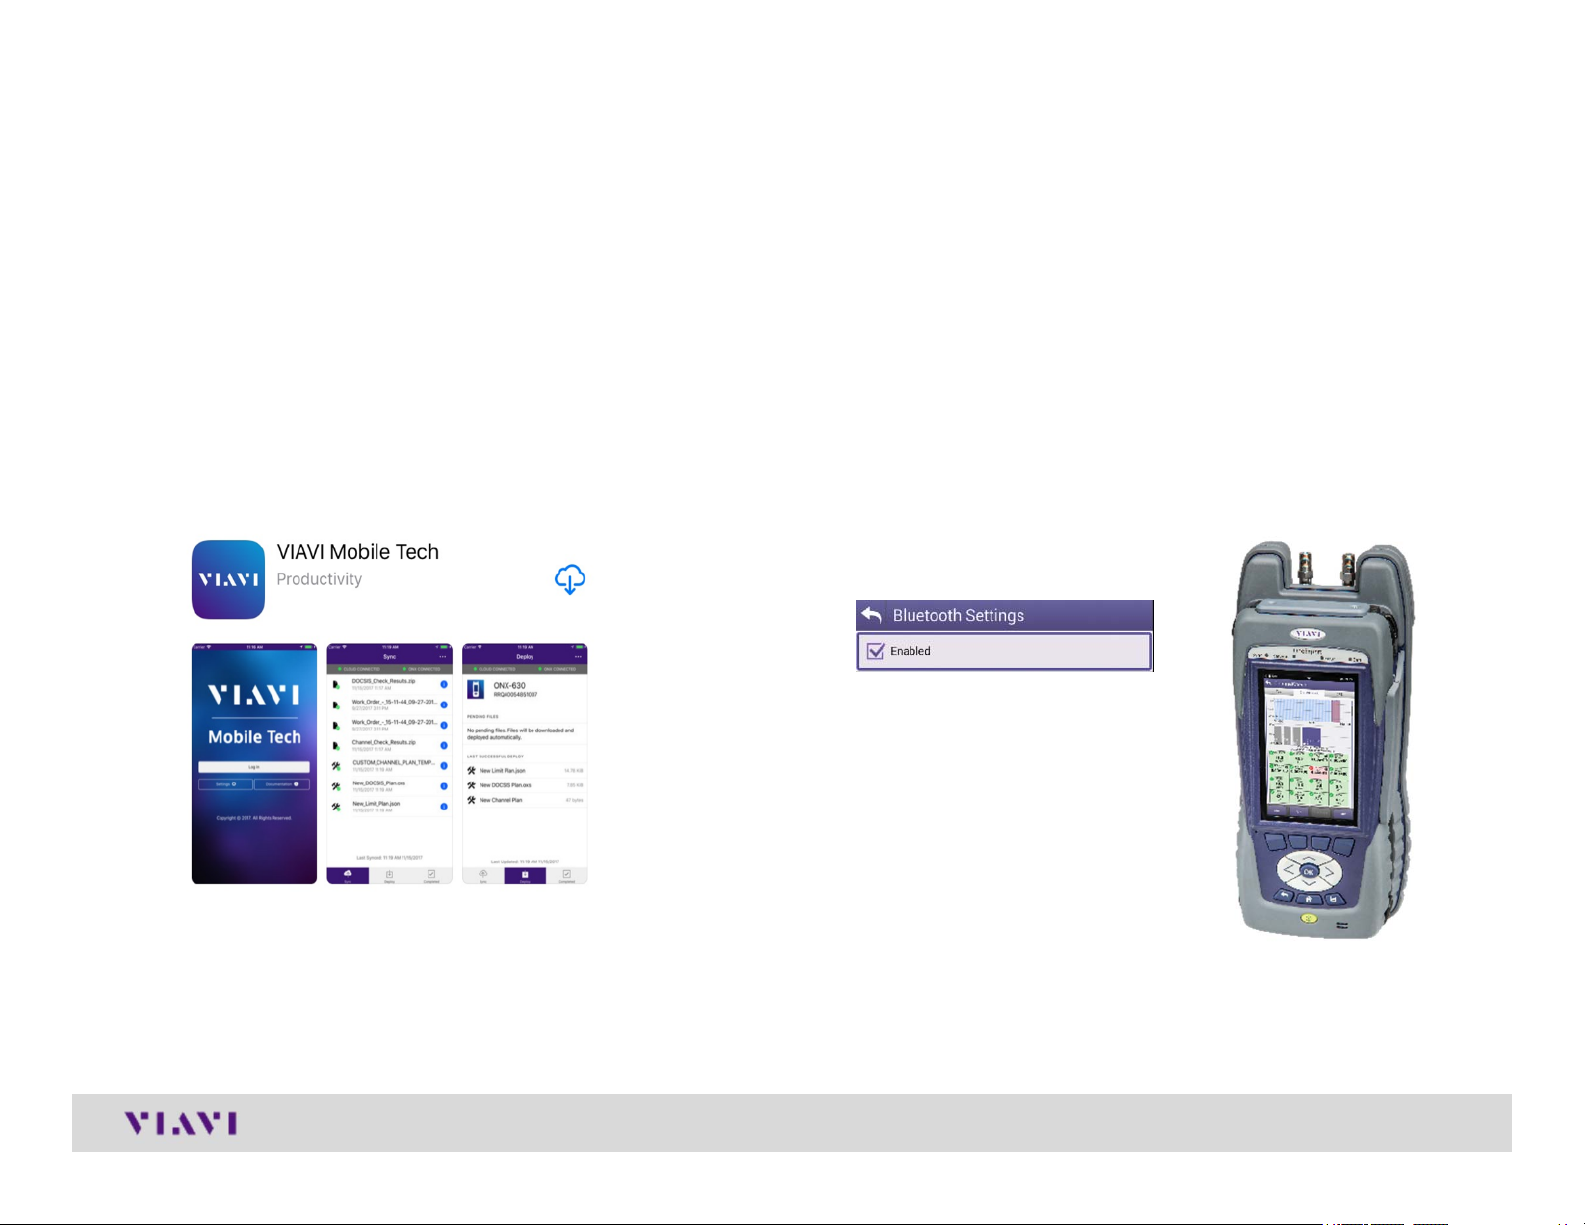
StrataSync Synchronization – Mobile Tech App
On ONX620 or 630, enable
BLUETOOTH by going to SYSTEM
SETTINGS->BLUETOOTH
Download VIAVI MOBILE TECH v2
SETTINGS
app
© 2017 Viavi Solutions, Inc. | Viavi Confidential and Proprietary Information
30
 Loading...