

Page 1
5
5
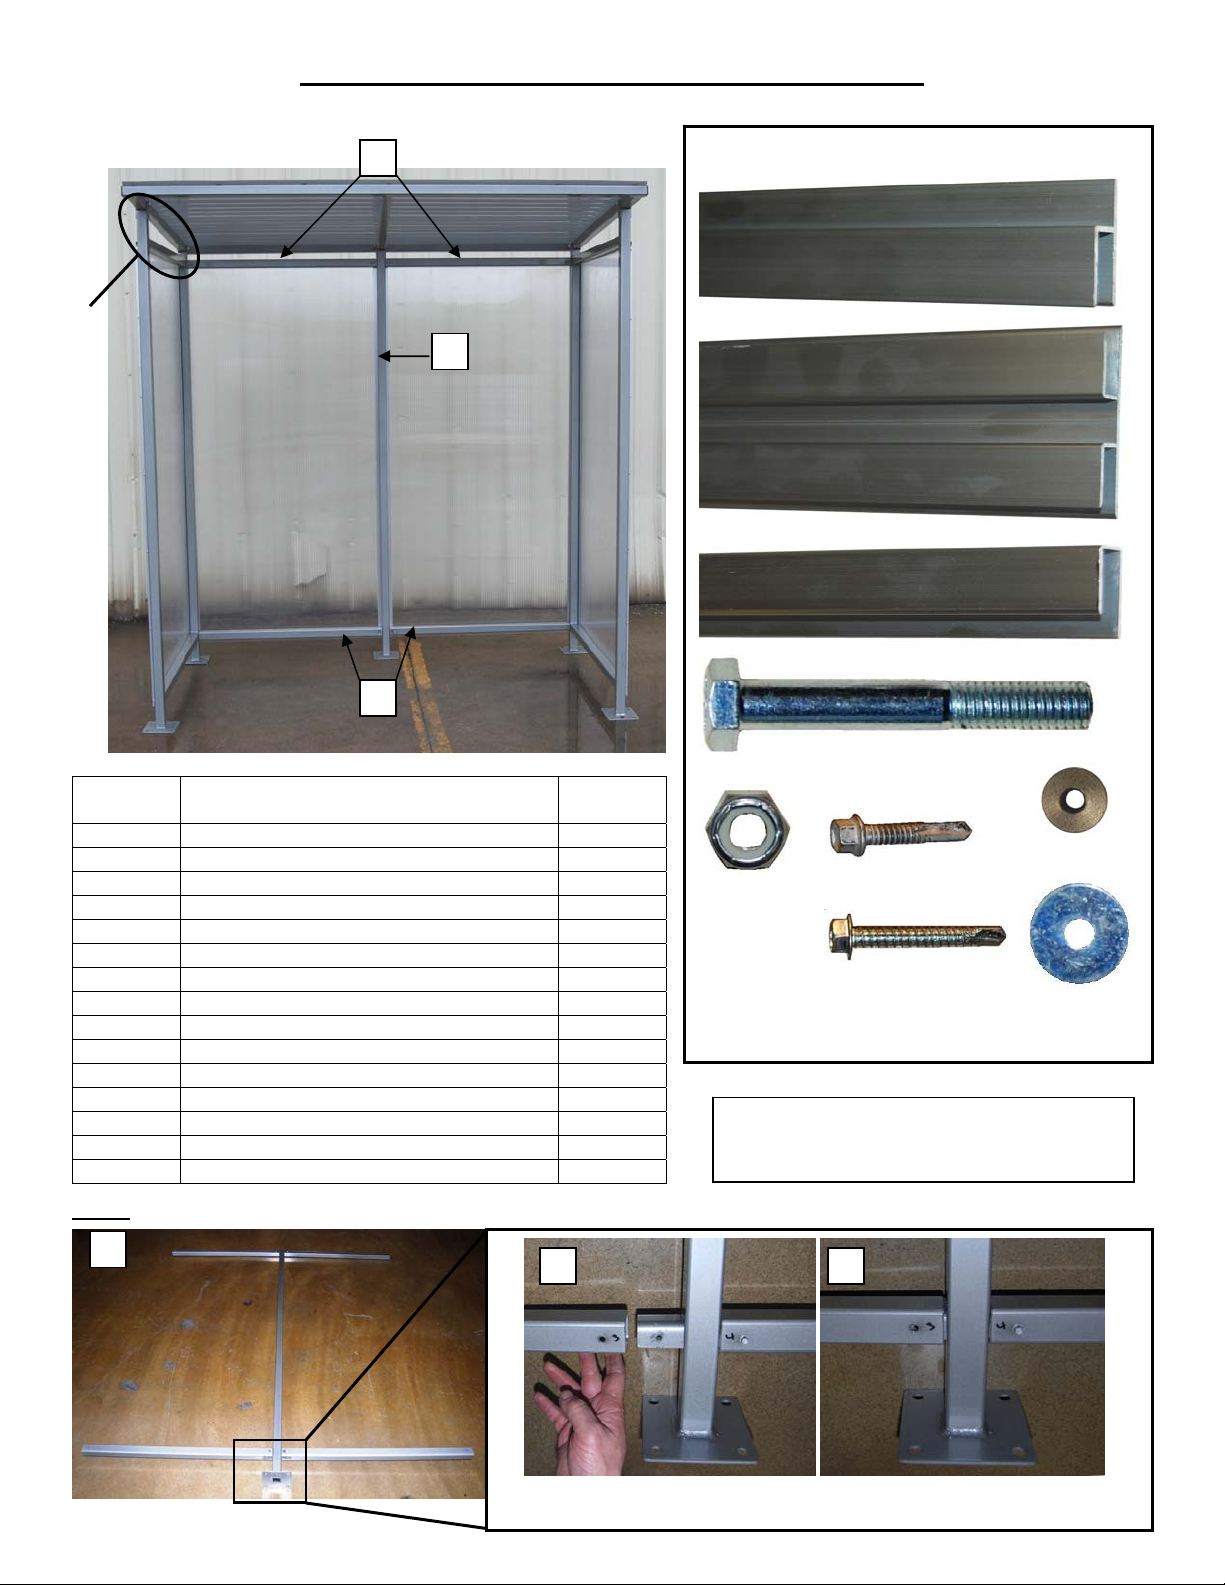
FIG. 1: Front View of Fully
4
g
c
b
a
Assembled Shed
Side
assembly
roof
brackets
Instructions for Assembling the Smoking Shed
1
6 6
Hardware:
7
8
3
2
Diagram
number Description
Quantity
1 Roof Assembly 1
2 *Right Side Assembly* 1
3 *Left Side Assembly* 1
4 Vertical Support 1
5 Horizontal Support 4
6 Plastic Panel 2
7 Single-Sided Panel Brackets 2
8 Double-Sided Panel Bracket 1
9 Panel Top Bracket 2
10 5/16 x 2-1/4 inch Roof Fastening Bolt 5
11 5/16 inch Nylock Nut 5
12 #12 x 7/8 inch LG Tek Screw 29
13 #12 x 1-1/4 inch LG Tek Screw 6
14 Rubber-backed washer 6
15 Flat Washer 6
Step 1: Assemble the supporting framework for the plastic panels.
9
10
14
12
11
13
15
* The side assemblies are named “left” and
“right” from the perspective of a person
standin
in front of the shelter.
Attach the
horizontal
supports to
the vertical
support as
shown in
photos a &
b.
b.) Slide a horizontal support over the connection tabs on the vertical support;
c.) Use a #12 x 7/8 inch LG Tek screw to fasten the pieces together.
Page 2

b
c
a
a
b
c
b
a
: Attach the supporting framework to each of the side assemblies.
Step 2
a. Position a side assembly (the right
side assembly is shown in photo a) close
to the supporting structure.
b. Slide the free end of each horizontal
support over the connecting tabs of the
side assembly.
c. Fasten the two pieces together with
#12 x 7/8 inch LG Tek screws.
Repeat steps a through c with the other
Step 3: Attach the roof assembly.
Rear bracket hole
side assembly.
Front bracket hole
a.) Each side of the roof
assembly includes bracket
holes. Notice that the rear
bracket hole is positioned
close to an end, while the
front bracket hole is inset
~8-10 inches from the front
edge of the roof.
b.) Set the roof assembly into
the roof brackets.
c.) Fasten the roof assembly
to each roof bracket with a
2-1/4 inch bolt. Tighten a
nylock nut onto each bolt.
Step 4: Attach the double-sided bracket to the vertical support.
a. Drill holes in the center portion of the double-sided bracket.
Drill a hole approximately 1 inch from each e nd. Drill 5 more
holes evenly spaced between the top and bottom holes.
Clamp the bracket to the vertical support so that the top of
the bracket aligns with the dotted line shown in photo a
(approx. 1-1/4inch from the top of the horizontal support).
Drill holes in the vertical support that match the holes you just
drilled in the bracket. Start a #12 x 7/8 inch LG Tek Screw in
the top hole of the double-sided bracket. Match the end of
the screw with the top hole in the vertical support.
b. Place a #12 x 7/8 inch LG Tek Screw in each of the
remaining holes.
NOTE: Installing the plastic panels may require some looseness
in the connection between the vertical support and the doublesided bracket.
Page 3

Step 5: Install the plastic panels.
abc
d
e
g
f
a & b. Slide a plastic panel into the right side of the
double-sided bracket. Notice that each panel is
covered by a thin sheet of plastic. The protective
covering will indicate which side of a panel is the
exterior. Remove the plastic covering from both
sides of each panel. Insert the panel into the
bracket with the exterior side facing outwards. Line
up the top of the panel with the dashed white line
shown in photo b.
c. Slide a single-sided panel bracket onto the free
end of the panel. Align the top of the bracket with
the bottom of the horizontal support (dotted line).
d. Tap the single-sided panel bracket onto the panel
to ensure a secure connection. Clamp the bracket
to the side assembly. Drill a hole at each end of the
bracket and inset them approximately 1 inch. Drill
through the bracket and into the side assembly.
e. Fasten the bracket to the side assembly using
#12 x 7/8 inch Tek screws.
f. Connect the bottom of the panel to the horizontal
support. Drill 3 evenly-spaced holes through each
of the panels and into the horizontal support behind
it.
Wind a rubber-backed washer onto a ¾ inch #10
Tek screw, and then slide a flat washer onto the
screw, and then fasten the panel to the horizontal
support.
g. Slide the top bracket over the top of the panel.
Repeat steps “a” through “g” with the other
panel.
If you had to loosen the screws holding the
double-sided bracket to the vertical support
(step 4), retighten the connections.
 Loading...