

Page 1
01/11 rev. 2/19/2014 LM-boom, manual
VESTIL MANUFACTURING CORP.
2999 North Wayne Street, P.O. Box 507, Angola, IN 46703
Telephone: (260) 665-7586 -or- Toll Free (800) 348-0868
Fax: (260) 665-1339
www.vestilmfg.com e-mail: sales@vestil.com
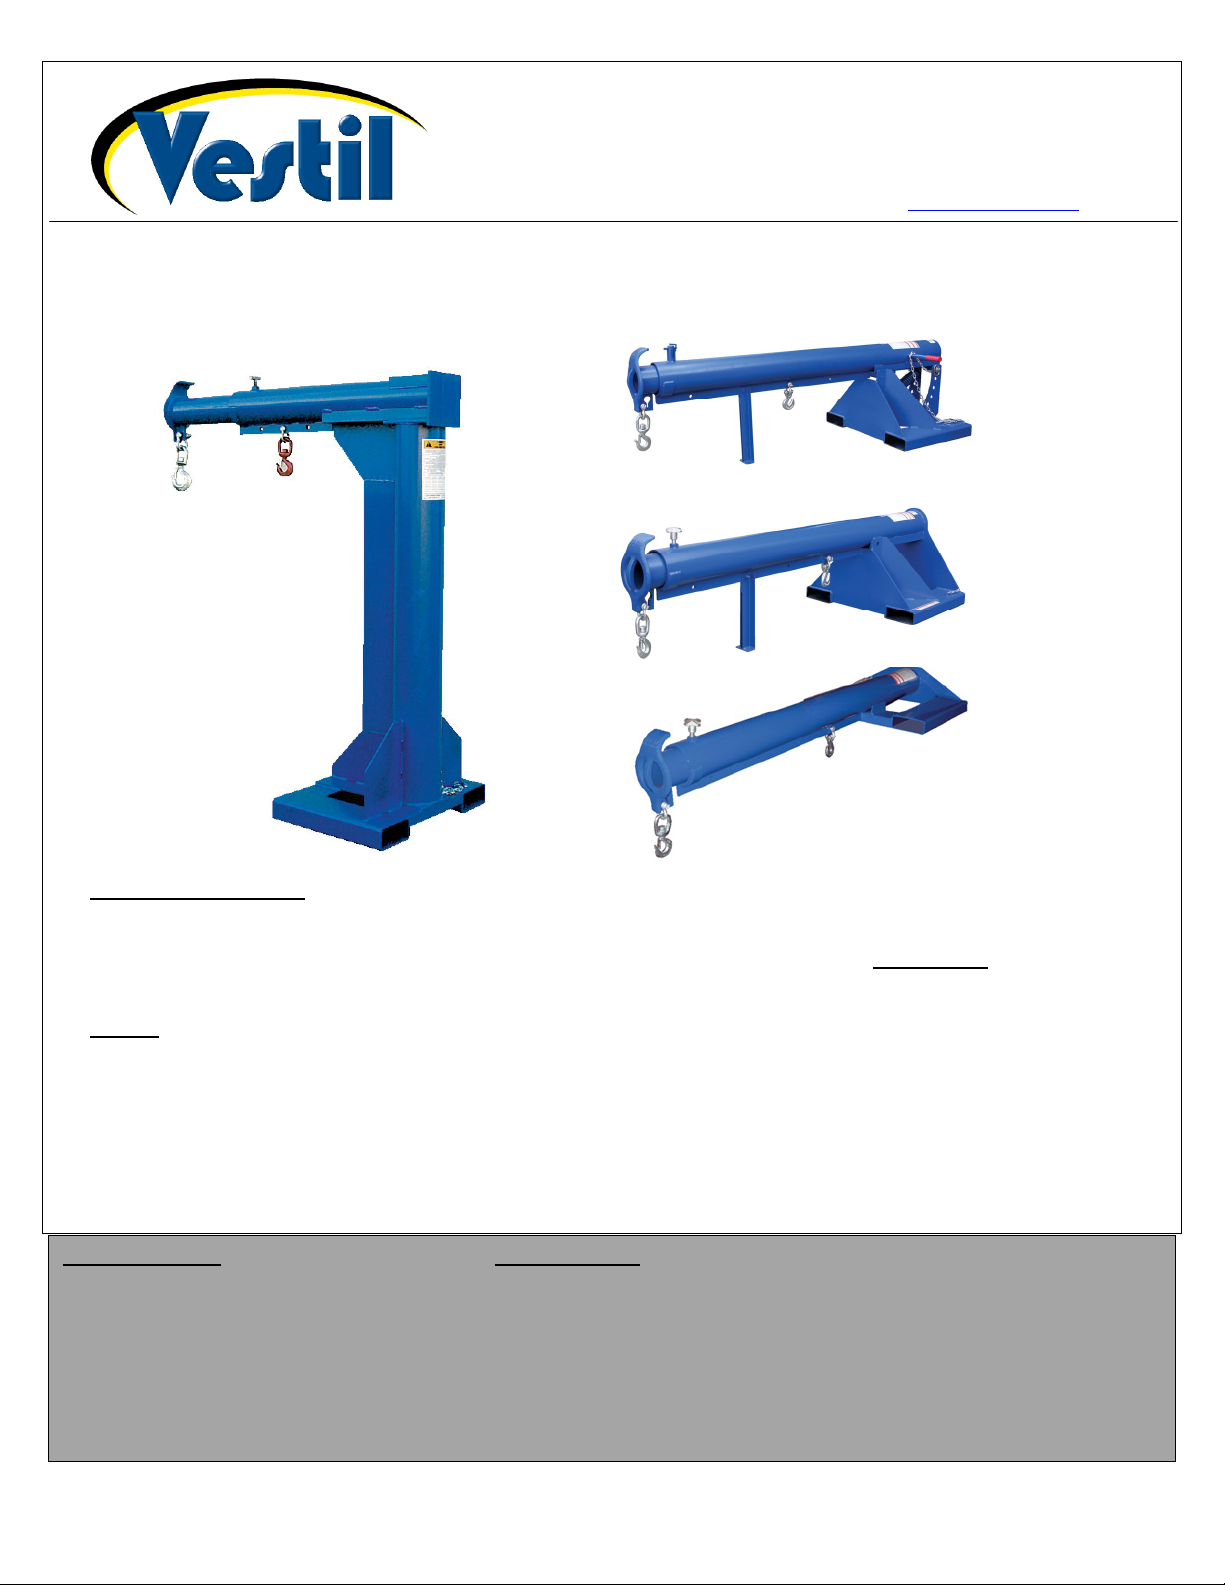
LM-SERIES FORK-MOUNTED LIFT MASTER BOOMS
USE AND MAINTENANCE MANUAL
LM-OBT &
LM-OBNT
LM-HRT &
LM-HRNT
LM-1T &
LM-1NT
Receiving instructions:
After delivery, IMMEDIATELY remove the packaging from the product in a manner that preserves the packaging and
maintains the orientation of the product in the packaging; then inspect the product closely to determine whether it
sustained damage during transport. If damage is discovered during the inspection, immediately record a complete
description of the damage on the bill of lading. If the product is undamaged, discard the packaging.
NOTES:
1) Compliance with laws, regulations, codes, and non-voluntary standards enforced in the location where the product is
used is exclusively the responsibility of the owner/end-user. Before using the boom for the first time, the end-user/owner
should perform an “Initial Inspection”. (See “Initial Inspection,” p. 21).
2) VESTIL is not liable for any injury or property damage that occurs as a consequence of failing to apply either:
a) Instructions in this manual; or b) information provided on labels affixed to the product. Neither is Vestil responsible for
any consequential damages sustained as a result of failing to exercise sound judgment while assembling, installing, using
or maintaining this product.
Table of Contents Table of Figures
Product Introduction…………………… 2 Fig. 1 LM-1T & -1NT Exploded Parts Diagrams & Parts Lists………. 5 - 8
Safety Principles……………………..... 3 Fig. 2 LM-OBT & -OBNT Exploded Parts Diagrams & Parts Lists..... 9 - 12
Safety Recommendations…………….. 3 – 4 Fig. 3 LM-HRT & -HRNT Exploded Parts Diagram & Parts Lists….. 13 - 16
Standard Design Elements………….. 4 Fig. 4 LM-EBT & -EBNT Exploded Parts Diagram & Parts Lists…… 17 - 20
Operation Instructions………………… 22 - 24 Fig. 5 LMS-(EBT & -EBNT)-46-(4k, 6k, & 8k) & Parts Lists……..…… 21
Inspections & Maintenance………….. 25 - 26 Fig. 6 Step 1 - Securely connect boom to fork truck...……………….. 24
Label placement diagram…………….. 27 Fig. 7 Step 3 - Manual adjust degree of boom extension….………… 22
Limited Warranty…………………….. 28 Fig. 8 [OBT Models] Step 4 - Boom Angle Adjustment ……………… 23
LM-EBT &
LM-EBNT
Copyright 2013 Vestil Manufacturing Corp.
Page 2

LM-series fork-mountable booms 01/11 rev. 11/14/2013
PRODUCT INTRODUCTION:
Thank you for purchasing a fork-mounted Lift Master boom (“boom”, “product” or simply “LM”) made by Vestil
Manufacturing Corporation (“Vestil”). Our booms are durable, high-quality products that combine safetyconscious design features and rigorous engineering. Although operation and use procedures are relatively
intuitive, all persons who might use or operate of this product must familiarize themselves with the instructions
provided in this manual
Standard design features include: 2 fork pockets that receive the tines (forks) of a fork truck; 2 load attachment
points (hooks); and either a safety chain or safety strap to wrap around the fork carriage and prevent the boom
from sliding off of the forks during use. Dimensions of offered models, as well as other product specifications
appear in the following table:
Model
Telescoping boom variants
LM-1T-4
LM-OBT-4
LM-HRT-4
LM-EBT-4
LM-1T-6
LM-OBT-6
LM-HRT-6
LM-EBT-6
LM-1T-8
LM-OBT-8
LM-EBT-8
LM-1NT-4
LM-OBNT-4
LM-HRNT-4
LM-EBNT-4
LM-1NT-6
LM-OBNT-6
LM-HRNT-6
LM-EBNT-6
LM-1NT-8
LM-OBNT-8
LM-EBNT-8
“Shorty” lift master booms
Telescoping variants
Model
LMS-EBT-46-4
LMS-EBT-46-6
LMS-EBT-46-8
Non-telescoping variants
LMS-EBNT-40-4
LMS-EBNT-40-6
LMS-EBNT-40-8
Vestil Manufacturing Corp. created this manual to acquaint owners and operators of our fork-mounted booms
with safe operation and maintenance procedures. Employers are responsible for instructing employees to
use the product properly. Employees and any other person, who might foreseeably assemble, use,
repair, or perform maintenance on the boom must read and understand every instruction BEFOREHAND.
Boom operators should have access to the manual at all times and should review the directions before each
use. Contact Vestil for answers to any question you have after reading the entire manual.
Although Vestil diligently strives to identify foreseeable, hazardous situations, this manual cannot address
every conceivable danger. The end-user is ultimately responsible for exercising sound judgment at all times.
.
Overall Height
Maximum Rated Load
Net weight
22.5” (~57 cm) 4,000 (~1818 kg) 399 lb. (~181 kg)
28” (~71 cm) 4,000 (~1818 kg) 405 lb. (~184 kg)
80” (~203 cm) 4,000 (~1818 kg) 875 lb. (~251 kg)
13” (~33 cm) 4,000 (~1818 kg) 333 lb. (~166 kg)
22.5” (~57 cm) 6,000 (~2727 kg) 462 lb. (~210 kg)
28” (~71 cm) 6,000 (~2727 kg) 456 lb. (~207 kg)
80” (~203 cm) 6,000 (~2727 kg) 949 lb. (~431 kg)
13” (~33 cm) 6,000 (~2727 kg) 375 lb. (~170 kg)
23.5” (~60 cm) 8,000 (~3636 kg) 656 lb. (~298 kg)
28” (~71 cm) 8,000 (~3636 kg) 622 lb. (~283 kg)
11.5” (~29 cm) 8,000 (~3636 kg) 562 lb. (~255 kg)
Non-telescoping models
25” (~64 cm) 4,000 (~1818 kg) 319 lb. (~145 kg)
25” (~64 cm) 4,000 (~1818 kg) 325 lb. (~148 kg)
79” (~201 cm) 4,000 (~1818 kg) 627 lb. (~285 kg)
12” (~30.5 cm) 4,000 (~1818 kg) 251 lb. (~114 kg)
25” (~64 cm) 6,000 (~2727 kg) 382 lb. (~174 kg)
28” (~71 cm) 6,000 (~2727 kg) 376 lb. (~171 kg)
79” (~201 cm) 6,000 (~2727 kg) 697 lb. (~317 kg)
12” (~30.5 cm) 6,000 (~2727 kg) 503 lb. (~229 kg)
23.5” (~60 cm) 8,000 (~3636 kg) 595 lb. (~271 kg)
28” (~71 cm) 8,000 (~3636 kg) 461 lb. (~210 kg)
11.5” (~29.2 cm) 8,000 (~3636 kg) 620 lb. (~282 kg)
Total Length in
Inches (cm)
46.5 – 76.5
(118 – 194 cm)
46.5 – 76.5
(118 – 194 cm)
46.5 – 76.5
(118 – 194 cm)
Maximum Rated Load
in Pounds (kg)
4,000
(1,818 kg)
6,000
(2,727 kg)
8,000
(3,636 kg)
Net Weight in Pounds
(kg)
249
(113 kg)
281
(128 kg)
430
(195 kg)
41.5 (~105 cm) 4,000 (~1818 kg) 196 (~ 89 kg)
41.5 (~105 cm) 6,000 (~2727 kg) 228 (~104 kg)
41.5 (~105 cm) 8,000 (~3636 kg) 380 (~173 kg)
Page 2 of 28
Copyright 2013 Vestil Manufacturing Corp.
Page 3
LM-series fork-mountable booms 01/11 rev. 11/14/2013
SAFETY PRINCIPLES:
Vestil manufactures 5 models of Lift Master booms. The 5 variants are distinguishable by boom length,
whether the boom length is adjustable or fixed, and maximum rated load. Each unit conforms to the generalized
specifications disclosed in this manual and fulfills our demanding standards for quality, safety and durability.
Vestil Manufacturing Corp. recognizes the critical importance of workplace safety. Each person who might
participate in the operation or maintenance of the product must read this manual. Read the entire manual and
fully understand the directions BEFORE using or performing maintenance on the boom. If you do not
understand an instruction, contact Vestil for clarification. Failure to adhere to the directions in this
manual might lead to serious personal injury or even death.
Vestil is not liable for any injury or property damage that occurs as a consequence of failing to apply either:
1) the instructions that appear in this manual; or 2) the information disclosed on labels affixed to the product.
Furthermore, failure to exercise good judgment and common sense may result in property damage, serious
personal injury or death, and also are not the responsibility of Vestil.
This manual classifies personal injury risks and situations that could lead to property damage with SIGNAL
WORDS. These signal words announce an associated safety message. The reader must understand that the
signal word chosen indicates the seriousness of the described hazard.
Identifies a hazardous situation which, if not avoided, WILL result in DEATH or
Identifies a hazardous situation which, if not avoided, COULD result in DEATH or
Indicates a hazardous situation which, if not avoided, COULD result in MINOR or
Identifies practices likely to result in product/property damage, such as operation that might
Safety Recommendations:
Vestil diligently strives to identify foreseeable hazards associated with the use of its products. However,
material handling is inherently dangerous and no manual can address every conceivable risk. The end-user
ultimately is responsible for exercising sound judgment at all times.
SERIOUS INJURY. Use of this signal word is limited to the most extreme situations.
SERIOUS INJURY.
MODERATE injury.
damage the boom.
Electrocution might result if the boom contacts electrified wires. Reduce the likelihood that an
operator or bystander might be electrocuted by applying common sense:
DO NOT contact electrified wires with the boom;
DO NOT use the boom in an area where it will contact electrified wires;
DO NOT operate the boom close to electrified wires or other sources of electricity;
Before using the boom, always inspect the usage area for unusual conditions that require special precautions.
Material handling is dangerous. Improper or careless operation might result in serious personal
injuries sustained by the boom operator(s) and bystanders. Always conform to OSHA material handling
regulations (29 CFR section 1910 Subpart N). Subpart N includes 2 sections that regulate the use of forkmounted boom-type devices: section 1910.178, “Powered industrial trucks,” and section 1910.179, “Overhead
and gantry cranes” (see http://www.osha.gov/). In addition to regulatory requirements, boom operators should
conform to the following:
DO NOT use a damaged boom. Inspect the boom before each use according to the inspection instructions on
p. 22-23. DO NOT use the boom unless it passes every part of the inspection.
DO NOT use the boom if the safety chain/strap is damaged or absent. The only purpose of the safety chain is
to prevent the boom from sliding off of the forks—it is NOT intended or designed to bear the full load rating.
DO NOT use a malfunctioning or structurally compromised boom.
DO NOT lift the boom until it is securely connected to the carriage of the fork truck with the restraint strap.
DO NOT attempt to lift a load weighing more than the boom’s maximum rated load (see Table, p. 2).
DO NOT stand beneath or travel under the boom at any time, and especially not when a load is suspended.
DO NOT permit any person to stand beneath or travel under the boom or the load.
Inform all persons in the area that you are going to use the boom; instruct them to stay clear of the device and
the supported load during operation.
Failure to read and understand the instructions included in this manual before using or servicing the boom
constitutes misuse
DO NOT allow people to ride on either the boom or the load.
Page 3 of 28
Copyright 2013 Vestil Manufacturing Corp.
Page 4
LM-series fork-mountable booms 01/11 rev. 11/14/2013
p
DO NOT use the boom if any product label (see p. 24) is unreadable, damaged, or absent. Contact Vestil to
order a replacement label(s).
(continued from p. 3)
ALWAYS apply proper (fork) lift operation practices learned during your training program. Before raising the
boom from the floor AND before attaching the load to the boom, tilt the fork lift mast away from the boom to
ensure that the boom will not slide towards the tips of the forks.
ALWAYS load the boom according to the instructions that appear on p. 20-21. Failure to properly position a
load might cause the load to swing, which might result in the operator(s) or other persons sustaining serious
personal injuries.
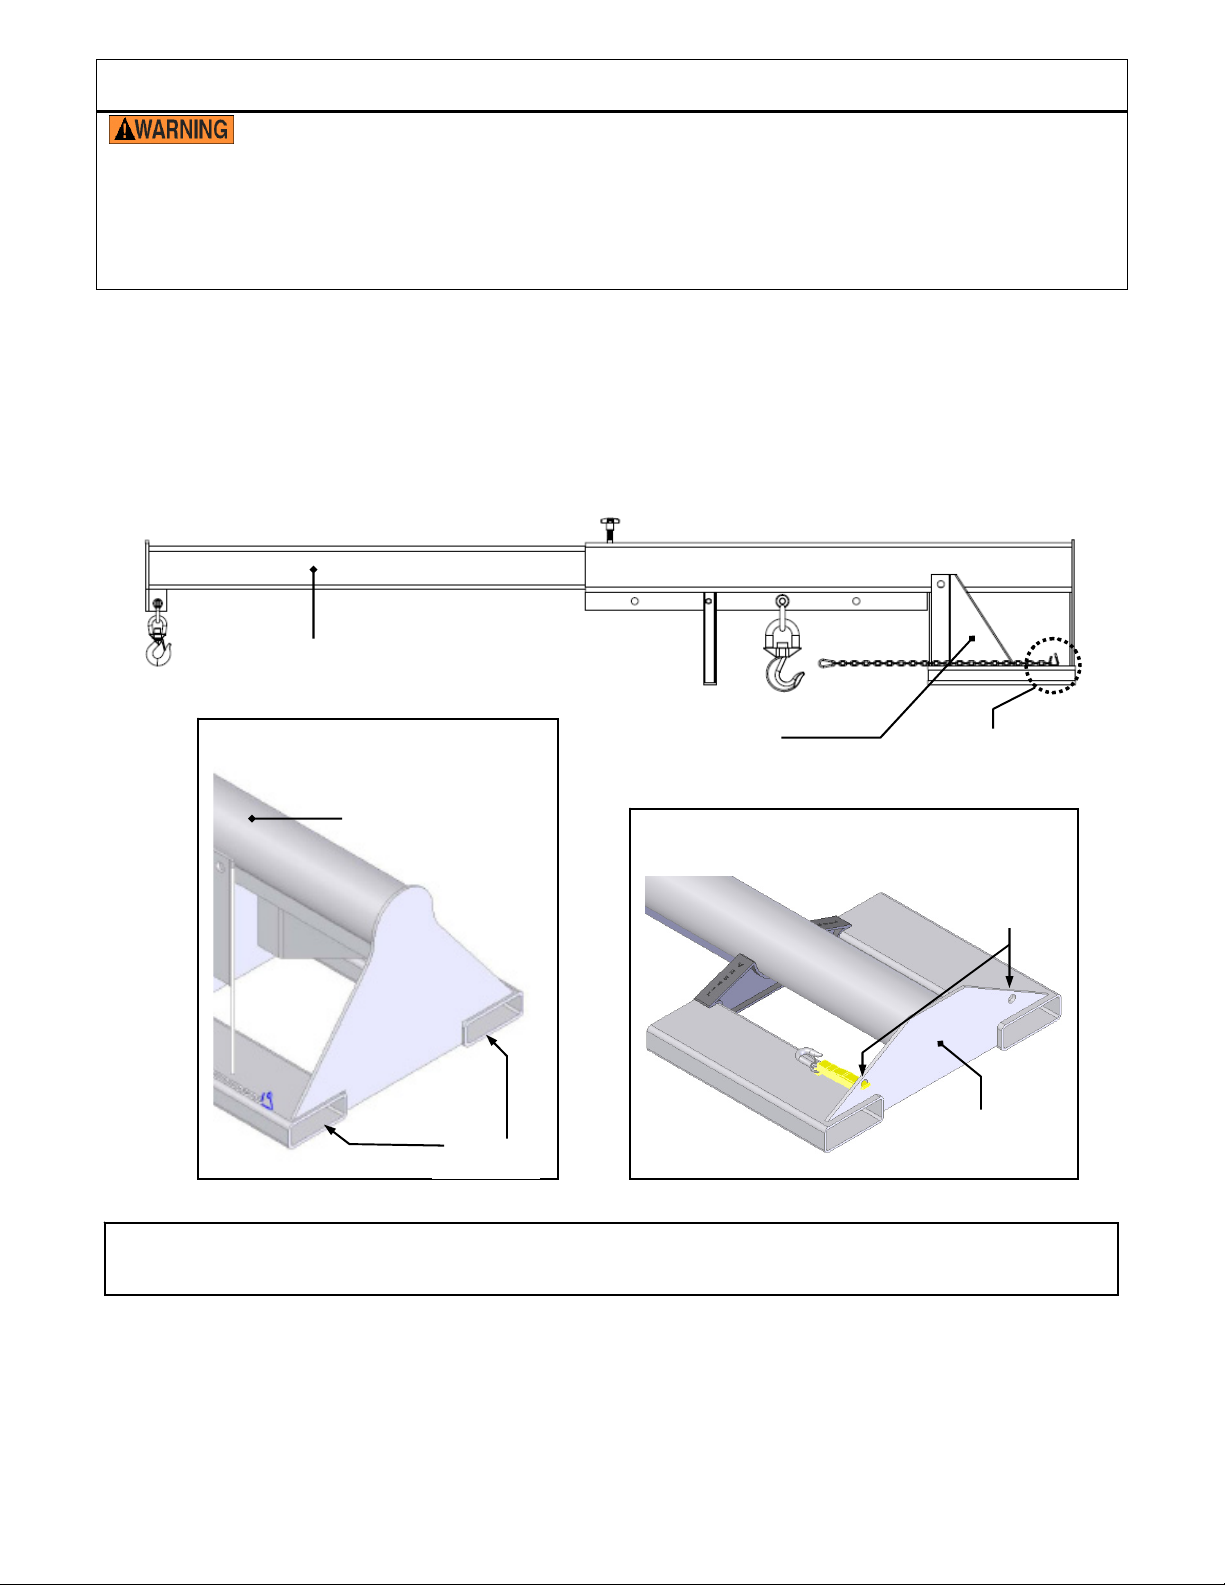
Standard design elements:
All Lift-Master booms share the features identified in the diagram below.
Boom sleeve
Boom
[Models featuring safety chains]
Boom
[Models that use safety straps instead of chains]
Supporting
frame
Cold shut
Boom
sleeve
Supporting
frame
Fork
pockets
Safety strap
Safety strap
snap hook
attachment
oints
Supporting
frame
NOTE: In the exploded parts diagrams that appear on p. 4-17, the boom, boom sleeve, supporting frame and
fork pockets are referred to together as “Boom, base frame weldment”.
Page 4 of 28
Copyright 2013 Vestil Manufacturing Corp.
Page 5
01/11 rev. 2/19/2014 LM-boom, manual
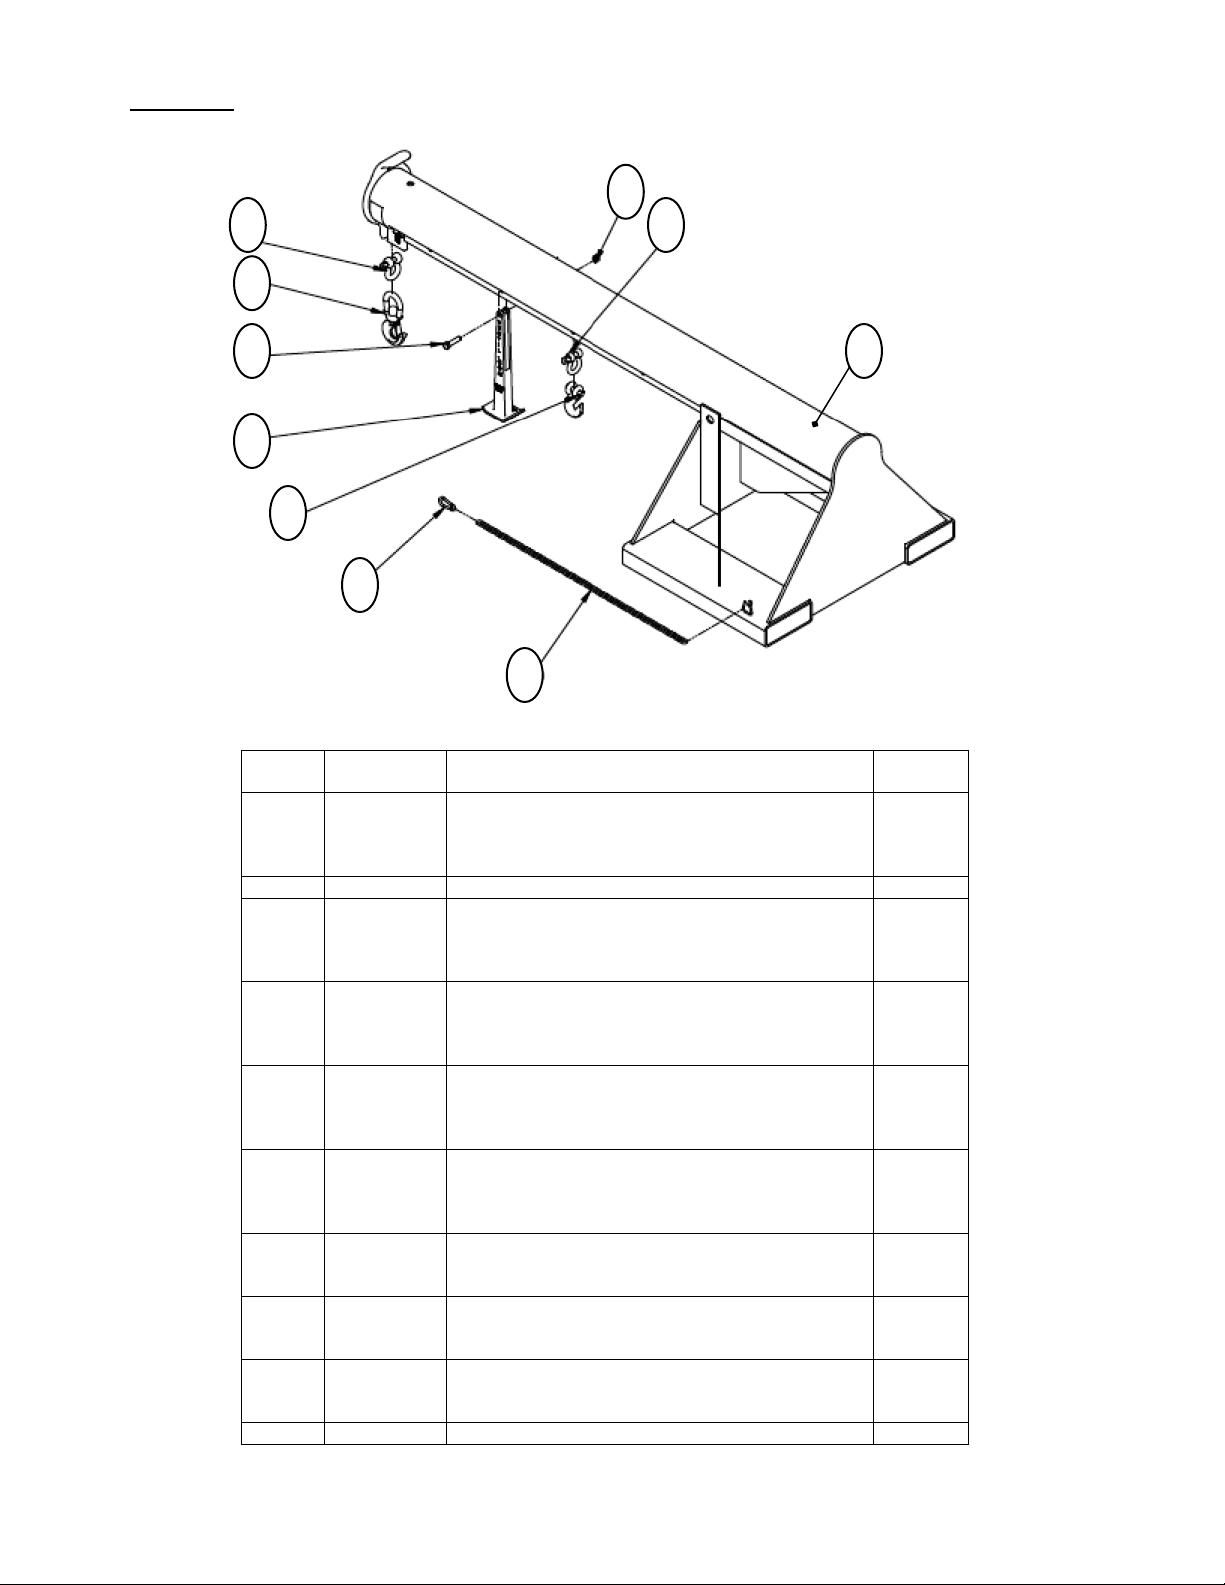
FIG. 1A: Exploded Parts Diagram & Parts List for LM-1T-4k, 6k, & 8k Models
7
3
4
8
5
6
10
9
1
2
Item No. Part No. Description Quantity
1
08-215-111
08-514-028
08-514-115
2 08-145-008 Snap Hook 1
3
08-145-003
08-145-004
08-145-004
4
08-145-001
08-145-002
08-145-002
5
08-145-010
08-145-004
08-145-006
6
08-145-009
08-145-002
08-145-005
7 08-025-004 X-handle locking bolt 1
8
11211
11209
9
36109
36110
10
08-014-134
08-514-117
11 99-145-025 3/16” x 36” safety chain 1
Boom, base frame weldment:
LM-1T-4k
LM-1T-6k
LM-1T-8k
Shackle
LM-1T-4k: 2-ton max. rated load
LM-1T-6k: 3-ton max. rated load
LM-1T-8k: 4-ton max. rated load
Load hook
LM-1T-4k: 2-ton max. rated load swivel hook
LM-1T-6k: 3-ton max. rated load swivel hook
LM-1T-8k: 4-ton max. rated load
Shackle
LM-1T-4k: 2-ton max. rated load
LM-1T-6k: 3-ton max. rated load
LM-1T-8k: 5-ton max. rated load
Load hook
LM-1T-4k: 2-ton max. load clevis grab hook
LM-1T-6k: 3-ton max. rated load swivel hook
LM-1T-8k: 5-ton max. rated load D-fork hook
Support leg connecting bolt
LM-1T-4k & 6K: ½” – 13 x 2” UNC Z-plated bolt
LM-1T-8k: ½” -13 x 1-1/2” HHCS Z-plated bolt
Support leg nut
LM-1T-4k & 6K: ½” -13 UNC hex nut
LM-1T-8k: ½” -13 Z-plated hex nut
Front support leg
LM-1T-4k & 6K: casting
LM-1T-8k: weldment
11
1
1
1
1
1
1
1
1
1
1
1
1
1
1
1
1
1
1
1
1
1
5
Page 6
LM-series fork-mountable booms 01/11 rev. 11/14/2013
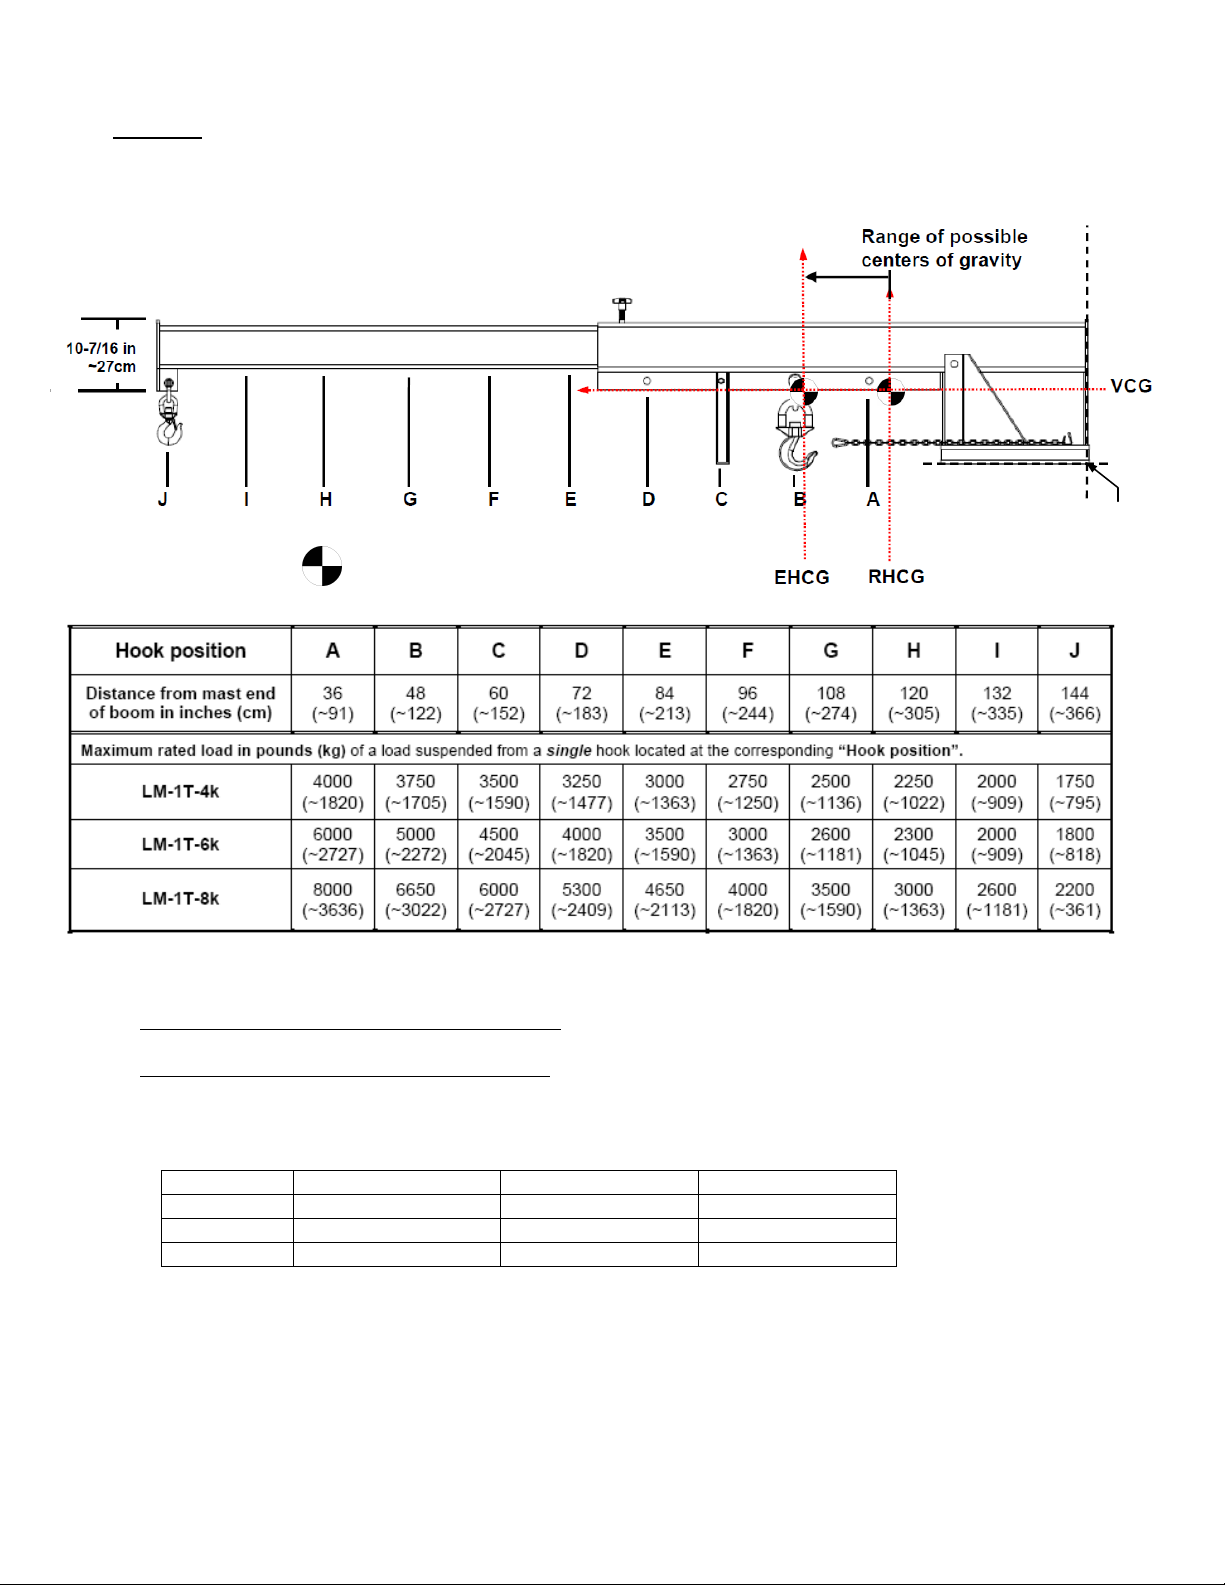
Fig. 1B: LM-1T- 4k, 6k & 8k Centers of Gravity and Maximum Load Ratings for
Varying Load Attachment Point and Boom Extension Combinations
FIG. 1B: LM-1T- 4K, 6K & 8K CENTERS OF GRAVITY AND MAXIMUM LOAD RATINGS FOR
VARYING LOAD ATTACHMENT POINT AND BOOM EXTENSION COMBINATIONS
Origin
= Center of gravity
RHCG
point for
centers
of gravity
VCG
The center of gravity has a vertical component as well as a horizontal component. The vertical center of gravity is
located 15.5 in. (~39.4cm) above the bottom edges of the fork pockets. The horizontal component ranges from 31
inches to 47 inches measured from the outer edges of the fork pockets. As shown in the diagram above:
Retracted horizontal center of gravity (RHCG): boom fully retracted with a load attached at position A, the
center of gravity is located 31 inches (~79 cm) from the outer edges of the fork pockets;
Extended horizontal center of gravity (EHCG): fully extended with a load attached at position J, the center of
gravity is located 47 inches (~119 cm) from the outer edges of the fork pockets.
All other combinations (of boom extension and load position) yield horizontal centers of gravity located at or
between RHCG and EHCG.
Model EHCG RHCG VCG
LM-1T-4k 49½ in. (~126cm) 32 5/16 in. (~82cm) 13 5/16 in. (~34cm)
LM-1T-6k 46 5/16 in. (~123cm) 30 5/8 in. (~78cm) 12 3/8 in. (~31cm)
LM-1T-8k 47 in. (~119cm) 31 in. (~79cm) 15 ½ in. (~cm)
Page 6 of 28
Copyright 2013 Vestil Manufacturing Corp.
Page 7
LM-series fork-mountable booms 01/11 rev. 11/14/2013
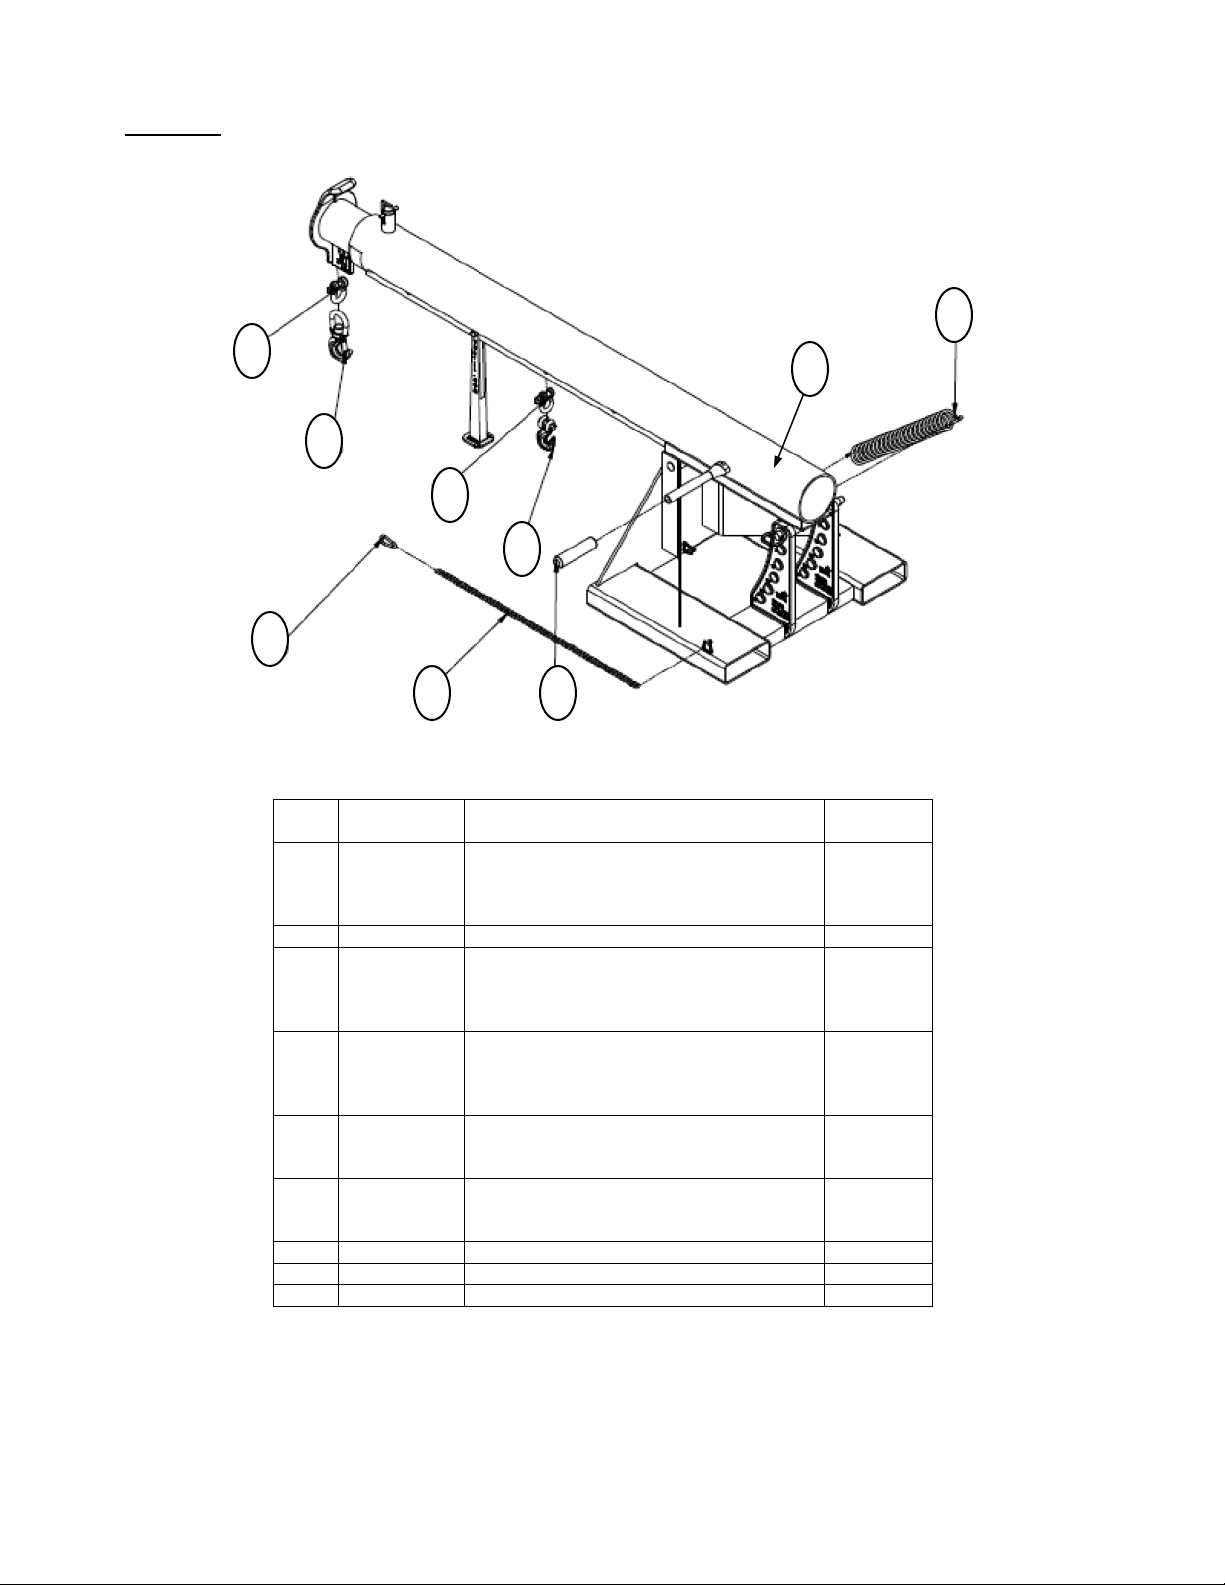
FIG. 1C: Exploded Parts Diagram & Parts List for LM-1NT-4k, 6k, & 8k
Models
8
3
5
4
7
1
9
6
2
10
Item
No.
1
2 08-145-008 Snap hook 1
3
4
5
6
7
8
9
10 99-145-025 3/16” x 36” safety chain 1
Part No. Description Quantity
08-514-128
08-514-129
08-514-130
08-145-003
08-145-004
08-145-004
08-145-001
08-145-002
08-145-002
08-145-010
08-145-004
08-145-006
08-145-009
08-145-002
08-145-005
11211
11209
36109
36110
08-014-134
08-514-117
Boom, base frame weldment
LM-1NT-4k
LM-1NT-6k
LM-1NT-8k
Shackle
LM-1NT-4k: 2-ton max. rated load
LM-1NT-6k: 3-ton max. rated load
LM-1NT-8K: 3-ton max. rated load
Load hook
LM-1NT-4k: 2-ton max. rated load
LM-1NT-6k: 3-ton max. rated load
LM-1NT-8k: 3-ton max. rated load
Shackle
LM-1NT-4k: 2-ton max. rated load
LM-1NT-6k: 3-ton max. rated load
LM-1NT-8k: 5-ton max. rated load
Load hook
LM-1NT-4k: 2-ton max. rated load
LM-1NT-6k: 3-ton max. rated load
LM-1NT-8k: 5-ton max. rated load
Support leg connecting bolt
LM-1NT-4k & 6k: ½” – 13 x 2” UNC Z-plated bolt
LM-1NT-8k: ½” – 13 x1-1/2” HHCS Z-plated bolt
Support leg nut
LM-1NT-4k & 6k: ½” – 13 UNC hex nut
LM-1NT-8k: ½” -13 Z-plated hex nut
Front support leg
LM-1NT-4k & 6K: casting
LM-1NT-8K: weldment
1
1
1
1
1
1
1
1
1
1
1
1
1
1
1
1
1
1
1
Page 7 of 28
Copyright 2013 Vestil Manufacturing Corp.
Page 8
LM-series fork-mountable booms 01/11 rev. 11/14/2013
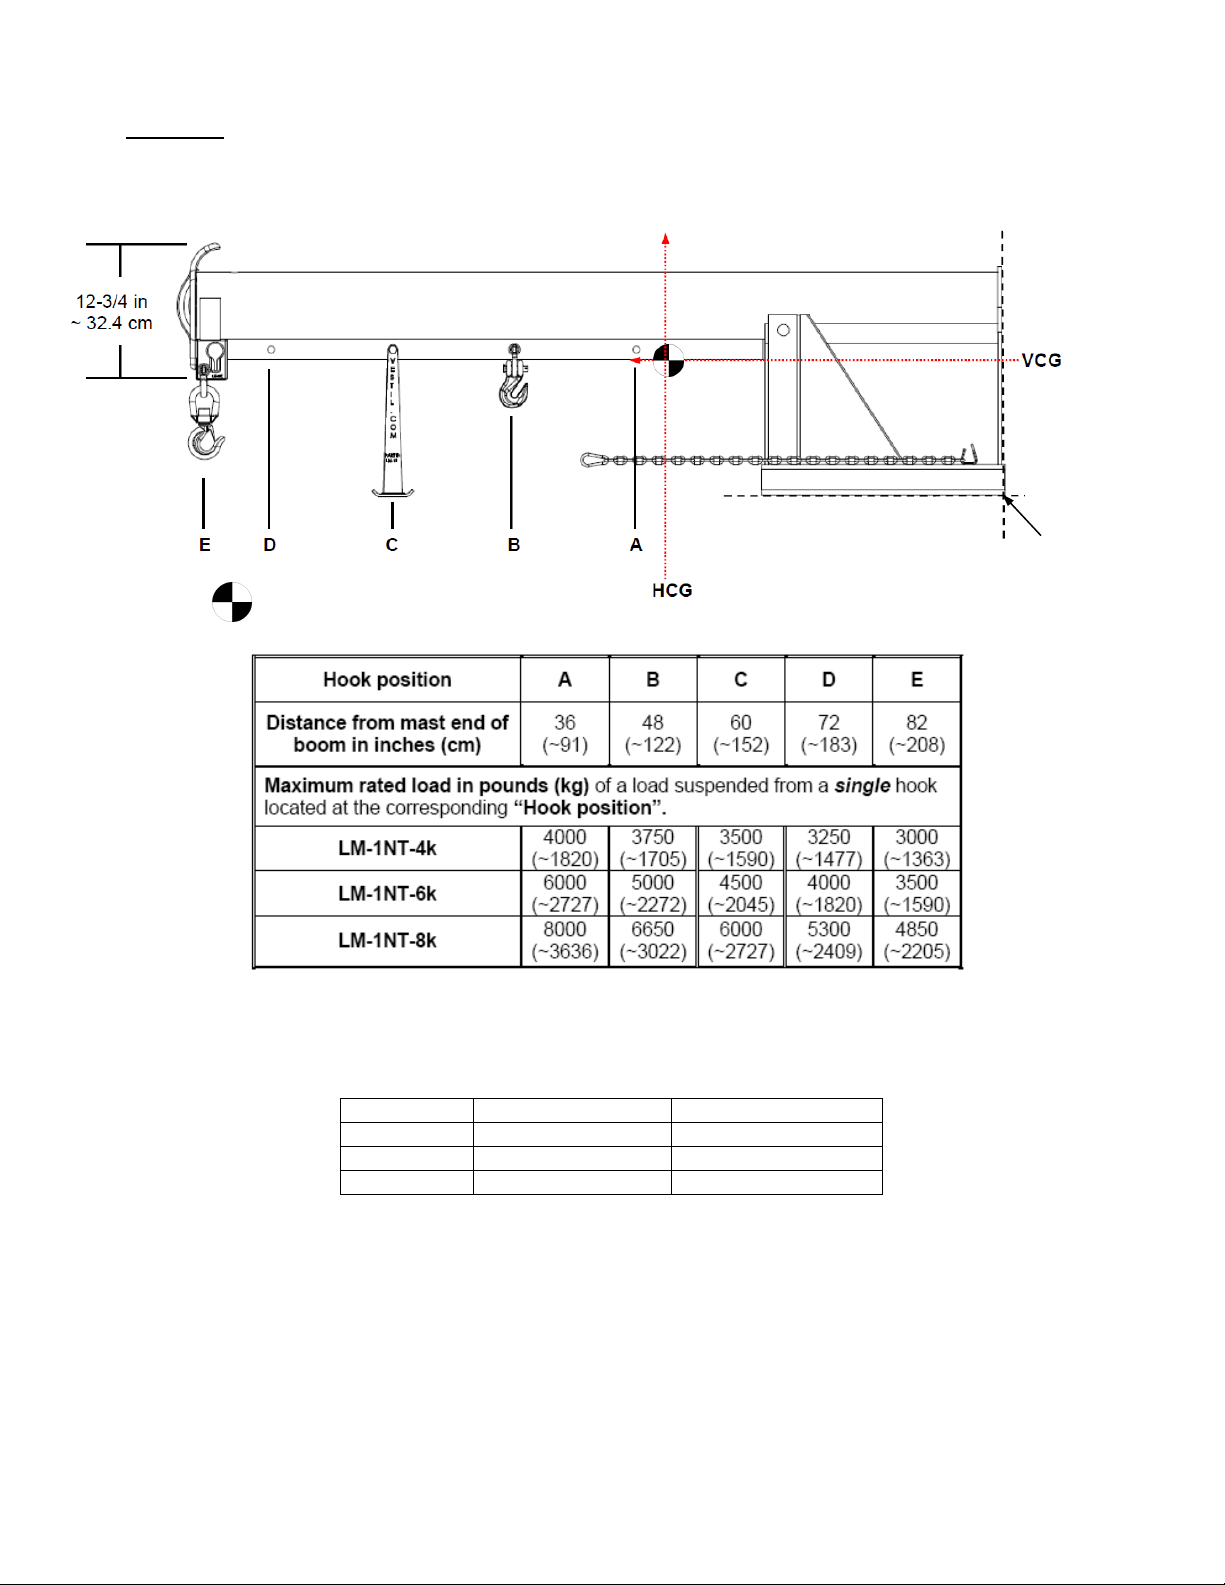
FIG. 1D: LM-1NT- 4k, 6k & 8k Centers of Gravity and Maximum Load Ratings
for Varying Load Attachment Points
HCG
= Center of gravity
Center of gravity has both a horizontal component and a vertical component. The vertical center of gravity
(VCG) lies along a line 15.5 inches (~39.4 cm) from the bottom edges of the fork pockets. Similarly, the
horizontal center of gravity (HCG) is located 31 inches (~79 cm) from the outer edges of the fork pockets.
Model HCG VCG
LM-1NT-4k 28 11/16 in. (~73cm) 10 13/16 in. (~27½ cm)
LM-1NT-6k 27 in. (~69cm) 10 13/16 in. (~27½ cm)
LM-1NT-8k 30 3/8 in. (~77cm) 11 ¾ in. (~30cm)
VCG
Origin
point for
centers
of
gravity
Page 8 of 28
Copyright 2013 Vestil Manufacturing Corp.
Page 9
LM-series fork-mountable booms 01/11 rev. 11/14/2013
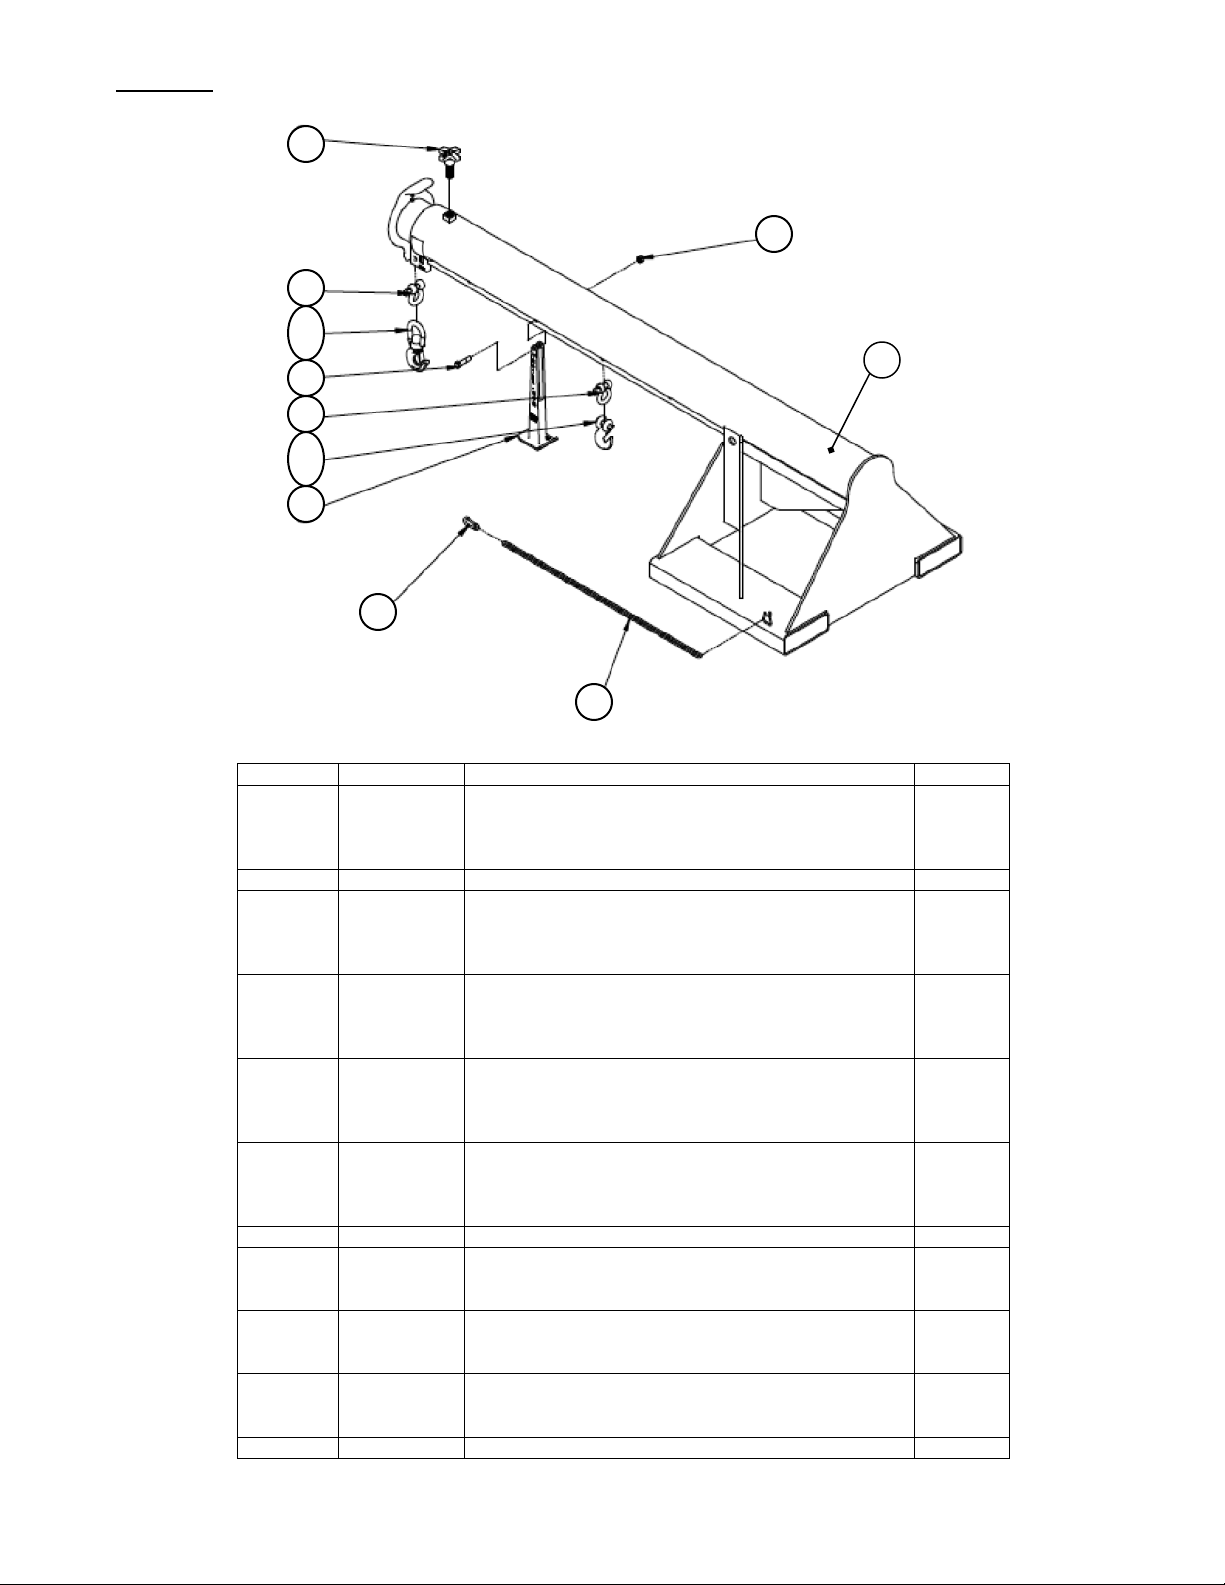
FIG. 2A: Exploded Parts Diagram & Parts List for LM-OBT-4k, 6k, & 8k Models
5
1
7
6
3
4
2
8
9
Item
No.
1
2 08-145-008 Snap hook 1
3
4
5
6
7 08-146-002 Boom pivoting spring 1
8 99-145-025 3/16” x 36” safety chain 1
9 13-025-003 1-1/8” grip (white 208) 1
Part No. Description
Boom, base frame weldment
08-514-119
08-514-122
08-514-125
08-145-010
08-145-004
08-145-006
08-145-009
08-145-002
08-145-005
08-145-003
08-145-004
08-145-001
08-145-002
LM-OBT-4k
LM-OBT-6k
LM-OBT-8k
Shackle
LM-OBT-4k: 2-ton max. rated load
LM-OBT-6k: 3-ton max. rated load
LM-OBT-8k: 5-ton max. rated load
(Swivel) Load hook
LM-OBT-4k: 2-ton max. rated load
LM-OBT-6k: 3-ton max. rated load
LM-OBT-8k: 5-ton max. rated load
Shackle
LM-OBT-4k: 2-ton max. rated load
LM-OBT-6k & 8k: 3-ton max. rated load
Load hook
LM-OBT-4k: 2-ton max. rated load
LM-OBT-6k & 8k: 3-ton max. rated load
Quantity
1
1
1
1
1
1
1
1
1
1
1
1
1
Page 9 of 28
Copyright 2013 Vestil Manufacturing Corp.
Page 10

LM-series fork-mountable booms 01/11 rev. 11/14/2013
FIG. 2B: LM-OBT- 4k, 6k & 8k Centers of Gravity and Maximum Load Ratings for Varying
Load Attachment Point and Boom Extension Combinations
Range of possible
centers of gravity
RHCG
VCG
= Center of gravity
EHCG
for centers of
gravity
LM-OBT-4k
Origin point
LM-OBT-6k
LM-OBT-8k
The center of gravity has a vertical component as well as a horizontal component. The vertical center of
gravity is located 13 in. (~33 cm) above the bottom edges of the fork pockets. The horizontal component
ranges from 28 inches to 47 inches measured from the outer edges of the fork pockets. As shown in the
diagram above:
Retracted horizontal center of gravity (RHCG): boom fully retracted with a load attached at position A,
the center of gravity is located 28 inches (~71 cm) from the outer edges of the fork pockets;
Extended horizontal center of gravity (EHCG): fully extended with a load attached at position J, the
center of gravity is located 41-1/2 inches (~105 cm) from the outer edges of the fork pockets.
All other combinations (of boom extension and load position) yield horizontal centers of gravity located
at or between RHCG and EHCG.
Model EHCG RHCG VCG
LM-OBT-4k 47 1/8 in. (~120cm) 31 13/16 in. (~81cm) 14 3/8 in. (~36 ½ cm)
LM-OBT-6k 44 3/16 in. (~112cm) 31 in. (~79cm) 14 3/8 in. (~36 ½ cm)
LM-OBT-8k 51 11/16 in. (~131cm) 35 in. (~89cm) 15 ¼ in. (~39cm)
Page 10 of 28
Copyright 2013 Vestil Manufacturing Corp.
Page 11

LM-series fork-mountable booms 01/11 rev. 11/14/2013
FIG. 2C: Exploded Parts Diagram & Parts List for LM-OBNT-4k, 6k, & 8k Models
1
7
5
6
2
3
4
9
8
Item No. Part No. Description Quantity
1
08-514-132
08-514-135
08-514-136
Boom, base frame weldment
LM-OBNT-4k
LM-OBNT-6k
LM-OBNT-8k
1
1
1
2 08-145-008 Snap hook 1
3
08-145-010
08-145-004
08-145-006
4
08-145-009
08-145-002
08-145-005
5
08-145-003
08-145-004
08-145-004
6
08-145-001
08-145-002
08-145-002
Shackle
LM-OBNT-4k: 2-ton max. rated load
LM-OBNT-6k: 3-ton max. rated load
LM-OBNT-8k: 5-ton max. rated load
Load hook
LM-OBNT-4k: 2-ton max. rated load
LM-OBNT-6k: 3-ton max. rated load
LM-OBNT-8k: 5-ton max. rated load
Shackle
LM-OBNT-4k: 2-ton max. rated load
LM-OBNT-6k: 3-ton max. rated load
LM-OBNT-8k: 3-ton max. rated load
Load hook
LM-OBNT-4k: 2-ton max. rated load
LM-OBNT-6k: 3-ton max. rated load
LM-OBNT-8k: 3-ton max. rated load
1
1
1
1
1
1
1
1
1
1
1
1
7 08-146-002 Boom pivoting spring 1
8 99-145-025 3/16” x 36” Safety chain 1
9 13-025-003 1-1/8” grip (white 208) 1
Page 11 of 28
Copyright 2013 Vestil Manufacturing Corp.
Page 12

LM-series fork-mountable booms 01/11 rev. 11/14/2013
FIG. 2D: LM-OBNT- 4k, 6k & 8k Centers of Gravity and Maximum Load
Ratings for Varying Load Attachment Points
HCG
VCG = 15 in.
VCG
(~38cm)
= Center of gravity
Origin point
for centers of
gravity
Center of gravity has both a horizontal component and a vertical component. The vertical center of gravity
(VCG) lies along a line 15 inches (~38 cm) from the bottom edges of the fork pockets. Similarly, the horizontal
center of gravity (HCG) is located 35-7/8 inches (~91 cm) from the outer edges of the fork pockets.
Model HCG VCG
LM-OBNT-4k 26 ¾ in. (~68cm) 11 5/8 in. (~29 ½ cm)
LM-OBNT-6k 26 ¾ in. (~68cm) 11 5/8 in. (~29 ½ cm)
LM-OBNT-8k 30 3/8 in. (~77cm) 11 7/16 in. (~29cm)
Page 12 of 28
Copyright 2013 Vestil Manufacturing Corp.
Page 13

LM-series fork-mountable booms 01/11 rev. 11/14/2013
FIG. 3A: Exploded Parts Diagram & Parts List for LM-HRT-4k & 6k Models
3
4
5
6
7
2
8
Item
No.
Part No. Description
1
08-514-005
08-514-006
Boom, base frame weldment
LM-HRT-4k
LM-HRT-6k
1
Quantity
2 08-145-008 Snap hook 1
3 08-025-004 X-handle locking bolt 1
4
08-145-003
08-145-004
5
08-145-001
08-145-002
6
08-145-010
08-145-004
7
08-145-009
08-145-002
Shackle
LM-HRT-4k: 2-ton max. rated load
LM-HRT-6k: 3-ton max. rated load
Load hook
LM-HRT-4k: 2-ton max. rated load
LM-HRT-6k: 3-ton max. rated load
Shackle
LM-HRT-4k: 2-ton max. rated load
LM-HRT-6k: 3-ton max. rated load
Load hook
LM-HRT-4k: 2-ton max. rated load
LM-HRT-6k: 3-ton max. rated load
8 99-145-025 3/16” x 36” safety chain 1
1
1
1
1
1
1
1
1
1
1
Page 13 of 28
Copyright 2013 Vestil Manufacturing Corp.
Page 14

LM-series fork-mountable booms 01/11 rev. 11/14/2013
V
FIG. 3B: LM-HRT- 4k & 6k Centers of Gravity and Maximum Load Ratings for
Varying Load Attachment Point and Boom Extension Combinations
VCG
LM-HRT-4k 13 1/16 in. (~33 cm) 9 15/16 in. (~25 cm) 313/8 in. (~80 cm)
LM-HRT-6k 13 1/16 in. (~33 cm) 9 15/16 in. (~25 cm) 313/8 in. (~80 cm)
= Center of gravity
Model EHCG RHCG
CG
EHCG
Origin point
for centers of
gravity
The center of gravity has a vertical component as well as a horizontal component. The vertical center of
gravity (VCG) is located 38 inches (~97 cm) from the bottom edges of the fork pockets. The horizontal center of
gravity (HCG) ranges from 3 inches up to 8 inches from the front edge of the vertical support. As depicted in the
diagram above:
Retracted horizontal center of gravity (RHCG): boom fully retracted, with a load attached at position A,
the horizontal center of gravity is located 8 inches (~20cm) from the front edge of the vertical support;
Extended horizontal center of gravity (EHCG): boom fully extended, with a load attached at position I,
the center of gravity is located 3 inches (~7.6cm) from the front edge of the vertical support.
All other combinations of boom extension and load position yield horizontal centers of gravity located 3
inches to 8 inches from the front edge of the vertical support. (See “Range of possible horizontal
centers of gravity” in diagram above).
Page 14 of 28
Copyright 2013 Vestil Manufacturing Corp.
Page 15

LM-series fork-mountable booms 01/11 rev. 11/14/2013
FIG. 3C: Exploded Parts Diagram & Parts List for LM-HRNT-4k & 6k Models
3
5
4
6
1
2
7
Item No. Part No. Description Quantity
1
08-514-007
08-514-022
2 08-145-008 Snap hook 1
3
08-145-003
08-145-004
4
08-145-001
08-145-002
5
08-145-010
08-145-004
6
08-145-009
08-145-002
7 99-145-025 3/16” x 36” safety chain 1
Boom, base frame weldment
LM-HRNT-4k
LM-HRNT-6k
Shackle
LM-HRNT-4k: 2-ton max. rated load
LM-HRNT-6k: 3-ton max. rated load
Load hook:
LM-HRNT-4k: 2-ton max. rated load
LM-HRNT-6k: 3-ton max. rated load
Shackle
LM-HRNT-4k: 2-ton max. rated load
LM-HRNT-6k: 3-ton max. rated load
Hook
LM-HRNT-4k: 2-ton hook
LM-HRNT-6k: 3-ton max. rated load
1
1
1
1
1
1
1
1
1
1
Page 15 of 28
Copyright 2013 Vestil Manufacturing Corp.
Page 16

LM-series fork-mountable booms 01/11 rev. 11/14/2013
FIG. 3D: LM-HRNT- 4k & 6k Centers of Gravity and Maximum Load Ratings
for Varying Load Attachment Points
= Center of gravity
VCG
= Center of gravity
Origin point for
HCG
centers of gravity
Center of gravity has both a horizontal component and a vertical component. The vertical center of gravity
(VCG) lies along a line 38 inches (~97 cm) from the bottom edges of the fork pockets. Similarly, the horizontal
center of gravity (HCG) is located 8 inches (~20cm) from the front edge of the vertical support.
Model HCG VCG
LM-HRNT-4k 8 5/8 in. (~21 cm) 28 3/8 in. (~72 cm)
LM-HRNT-6k 8 5/8 in. (~21 cm) 28 3/8 in. (~72 cm)
Page 16 of 28
Copyright 2013 Vestil Manufacturing Corp.
Page 17

LM-series fork-mountable booms 01/11 rev. 11/14/2013
FIG. 4A: Exploded Parts Diagram & Parts List for LM-EBT-4k, 6k & 8k Models
2
3
4
5
6
7
1
Item
No.
1
2 08-025-004 X-handle locking bolt 1
3
4
5
6
7 08-145-028
Part No. Description
Boom, base frame weldment
08-514-001
08-514-028
08-514-192
08-145-003
08-145-004
08-145-004
08-145-001
08-145-002
08-145-002
08-145-010
08-145-004
08-145-006
08-145-009
08-145-002
08-145-005
99-145-025
LM-EBT-4k
LM-EBT-6k
LM-EBT-8k
Shackle
LM-EBT-4k: 2-ton max. rated load
LM-EBT-6k: 3-ton max. rated load
LM-EBT-8k: 3-ton max. rated load
Load hook
LM-EBT-4k: 2-ton max. rated load
LM-EBT-6k: 3-ton max. rated load
LM-EBT-8k: 3-ton max. rated load
Shackle
LM-EBT-4k: 2-ton max. rated load
LM-EBT-6k: 3-ton max. rated load
LM-EBT-8k: 5-ton max. rated load
Load hook
LM-EBT-4k: 2-ton max. rated load
LM-EBT-6k: 3-ton max. rated load
LM-EBT-8k: 5-ton max. rated load
LM-EBT-4k & 6k: safety strap
LM-EBT-8k: 3/16” x 36” safety chain
Quantity
1
1
1
1
1
1
1
1
1
1
1
1
1
1
1
1
1
Page 17 of 28
Copyright 2013 Vestil Manufacturing Corp.
Page 18

LM-series fork-mountable booms 01/11 rev. 11/14/2013
FIG. 4B: LM-EBT – 4k, 6k & 8k Centers of Gravity and Maximum Load Ratings
for Varying Load Attachment Point and Boom Extension Combinations
= Center of gravity
The center of gravity of the boom ranges between a minimum of 34.5 inches and a maximum of 54.5
inches from the outer edges of the fork pockets. As shown in the diagram above, the horizontal center of
gravity may be located at any point from RHCG to EHCG:
RHCG [stands for “Retracted horizontal center of gravity”]: boom fully retracted, and load attached
at position A, the center of gravity is located 34.5 inches (~88cm) from the outer edges of the fork
pockets;
Extended horizontal center of gravity (EHCG): fully extended with a load attached at position J, the
center of gravity is located 54.5 inches (~138cm) from the outer edges of the fork pockets.
All other combinations of boom extension and load position produce a horizontal center of gravity
located somewhere between RHCG and EHCG.
Model EHCG RHCG VCG
LM-EBT-4k 56 1/2 in. (~143 ½ cm) 36 in. (~91 ½ cm) 4 7/16 in. (~11 cm)
LM-EBT-6k 56 1/2 in. (~143 ½ cm) 36 in. (~91 ½ cm) 4 7/16 in. (~11 cm)
LM-EBT-8k 57 1/8 in. (~145 cm) 38 in. (~96 ½ cm) 4 13/16 in. (~12cm)
Origin
point for
centers
of
gravity
Page 18 of 28
Copyright 2013 Vestil Manufacturing Corp.
Page 19

LM-series fork-mountable booms 01/11 rev. 11/14/2013
FIG. 4C: Exploded Parts Diagram & Parts List for LM-EBNT-4k, 6k & 8k Models
5
1
7
6
3
4
2
8
9
Item
No. Part No. Description
Quantity
1
08-514-003
08-514-004
08-514-191
2 08-145-008 Snap hook
3
08-145-003
08-145-004
08-145-004
4
08-145-001
08-145-002
08-145-002
5
08-145-010
08-145-004
08-145-006
6
08-145-009
08-145-002
08-145-005
7 99-145-025 3/16” x 36” Safety chain 1
Boom, base frame weldment
LM-EBNT-4k
LM-EBNT-6k
LM-EBNT-8k
Shackle
LM-EBNT-4k: 2-ton max. rated load
LM-EBNT-6k: 3-ton max. rated load
LM-EBNT-8k: 3-ton max. rated load
Hook
LM-EBNT-4k: 2-ton max. rated load
LM-EBNT-6k: 3-ton max. rated load
LM-EBNT-8k: 3-ton max. rated load
Shackle
LM-EBNT-4k: 2-ton max. rated load
LM-EBNT-6k: 3-ton max. rated load
LM-EBNT-8k: 5-ton max. rated load
Hook
LM-EBNT-4k: 2-ton max. rated load
LM-EBNT-6k: 3-ton max. rated load
LM-EBNT-8k: 5-ton max. rated load
1
1
1
1
1
1
1
1
1
1
1
1
1
1
1
1
Page 19 of 28
Copyright 2013 Vestil Manufacturing Corp.
Page 20

LM-series fork-mountable booms 01/11 rev. 11/14/2013
Fig. 4D: LM-EBNT- 4k, 6k & 8k Centers of Gravity and Maximum Load
Ratings for Varying Load Attachment Points
HCG
= Center of gravity
VCG
Origin
point for
centers of
gravity
Center of gravity has both a horizontal component and a vertical component. The vertical center of gravity
(VCG) lies along a line 15 inches (~38 cm) from the bottom edges of the fork pockets. Similarly, the horizontal
center of gravity (HCG) is located 35-7/8 inches (~91 cm) from the outer edges of the fork pockets.
Model HCG VCG
LM-EBNT-4k 32 1/16 in. (~81 ½ cm) 3 15/16 in. (~10 cm)
LM-EBNT-6k 30 1/8 in. (~76 ½ cm) 3 5/8 in. (~9 cm)
LM-EBNT-8k 32 ¼ in. (~82 cm) 4 1/16 in. (~10 cm)
Page 20 of 28
Copyright 2013 Vestil Manufacturing Corp.
Page 21

LM-series fork-mountable booms 01/11 rev. 11/14/2013
FIG. 5A: Exploded Parts Diagram & Parts List for LMS-EBT-46-4, 6 & 8 Models
2
7
Item
No. Part No. Description
08-145-008 Snap hook 1
1
1
08-025-004 X-handle locking bolt 1
2
3
4
5
6
7
8
08-145-003
08-145-004
08-145-004
08-145-001
08-145-002
08-145-002
08-145-010
08-145-004
08-145-006
08-145-009
08-145-002
08-145-005
08-514-194
08-514-195
08-514-202
Shackle
LMS-EBT-46-4: 2-ton max. rated load
LMS-EBT-46-6: 3-ton max. rated load
LMS-EBT-46-8: 3-ton max. rated load
Load hook
LMS-EBT-46-4: 2-ton max. rated load
LMS-EBT-46-6: 3-ton max. rated load
LMS-EBT-46-8: 3-ton max. rated load
Shackle
LMS-EBT-46-4: 2-ton max. rated load
LMS-EBT-46-6: 3-ton max. rated load
LMS-EBT-46-8: 5-ton max. rated load
Load hook
LMS-EBT-46-4: 2-ton max. rated load
LMS-EBT-46-6: 3-ton max. rated load
LMS-EBT-46-8: 5-ton max. rated load
Boom, base frame weldment
LMS-EBT-46-4
LMS-EBT-46-6
LMS-EBT-46-8
99-145-025 3/16” x 36” safety chain 1
1
3
4
5
6
8
Quantity
1
1
1
1
1
1
1
1
1
1
1
1
1
1
1
FIG. 5B: Exploded Parts Diagram & Parts List for LMS-EBNT-40-4, 6 & 8 Models
Item
Part No. Description Quantity
No.
1
1
2
3
4
5
6
7
1
2
3
4
5
6
7
08-514-196
08-514-197
08-514-203
Boom, base frame weldment
LMS-EBNT-40-4
LMS-EBNT-40-6
LMS-EBNT-40-8
08-145-008 Snap hook 1
08-145-003
08-145-004
08-145-004
08-145-001
08-145-002
08-145-002
08-145-010
08-145-004
08-145-006
08-145-009
08-145-002
08-145-005
Shackle
LMS-EBNT-40-4: 2-ton max. rated load
LMS-EBNT-40-6: 3-ton max. rated load
LMS-EBNT-40-8: 3-ton max. rated load
Hook
LMS-EBNT-40-4: 2-ton max. rated load
LMS-EBNT-40-6: 3-ton max. rated load
LMS-EBNT-40-8: 3-ton max. rated load
Shackle
LMS-EBNT-40-4: 2-ton max. rated load
LMS-EBNT-40-6: 3-ton max. rated load
LMS-EBNT-40-8: 5-ton max. rated load
Hook
LMS-EBNT-40-4: 2-ton max. rated load
LMS-EBNT-40-6: 3-ton max. rated load
LMS-EBNT-40-8: 5-ton max. rated load
99-145-025 3/16” x 36” safety chain 1
1
1
1
1
1
1
1
1
1
1
1
1
1
1
1
Page 21 of 28
Copyright 2013 Vestil Manufacturing Corp.
Page 22

LM-series fork-mountable booms 01/11 rev. 11/14/2013
Operation Instructions:
Review “Safety Guidelines” on p. 2-3 before using the boom.
1. Insert fork truck tines into the fork pockets and drive as far forward as possible; then lower the forks completely.
The drawings below demonstrate this step:
Fig. 6: Step 1 - Securely connect boom to fork truck
Boom sleeve
Snap hook Cold shut
Boom sleeve
Safety chain/strap
wrapped around fork
carriage & snap hook
fastened to cold shut
2. Securely connect the boom to the carriage of the fork truck with the safety chain.
Wrap the safety chain (or strap) around the fork carriage so that it cannot slide free of the carriage; then fasten
the hook to the chain/strap. There should be no slack in the chain/strap. The only purpose of the safety chain is to
prevent the boom from sliding off of the forks—it is NOT intended or designed to bear the full load rating.
3. [Telescoping models only] Adjust the boom length:
a. Loosen the X-handle locking bolt (“locking bolt”), by turning it counterclockwise.
b. Grasp the adjustment handle at the end of the boom and pull the boom to the desired length.
c. Tighten the locking bolt by turning it clockwise. Turn the locking bolt until it cannot be tightened more.
Fig. 7: Step 3 - Manually adjust degree of boom extension
Boom extension
adjustment handle
Outer edges
of fork pockets
Fork
truck
Fork carriage
Fully lower the forks
Fork
truck
to rest against the
bottoms of the fork
pockets
Turn X-handle locking bolt
counterclockwise to loosen
Boom sleeve
Turn X-handle locking
bolt clockwise to tighten
Boom sleeve
Page 22 of 28
Copyright 2013 Vestil Manufacturing Corp.
Page 23

LM-series fork-mountable booms 01/11 rev. 11/14/2013
p
4. [LM-OBT-4k, 6k & 8k Models] Adjust the pitch of the boom as required by the size/shape of the
intended load. To safely perform the adjustment process requires at least 2 people:
4. [OBT models] Adjust the boom angle:
a. 1 person must grasp the red pitch handle with one hand
b. while the other person pulls out the locking pin; then
c. both persons press down on the angle-adjusting handle until the desired angle is achieved;
d. The person who removed the locking pin should reinsert the pin through the openings in the
adjustment brackets and through the locking pin channel.
Fig. 8: [OBT Models] Step 4 - Boom Angle Adjustment
Locking pin
channel
Locking
pin
Angleadjusting
handle
Locking
in
Adjustment
bracket
(View from behind)
injuries. To reduce risk:
Verify that the load weighs less than the maximum rated load of your boom model AND that your fork lift is rated to
Agency rule (not law) compels you to contact the manufacturer of your fork lift truck BEFORE using a boom to
DO NOT use the boom UNTIL the lift truck manufacturer provides adjusted maximum rated load tags for your fork lift.
DO NOT attempt to lift more than the rated load of the boom or lift truck, whichever is smaller. The information
Strictly adhere to safe load-lifting rules applied at your worksite.
Attach the load to the boom following OSHA-recommended practices for “Hoisting equipment,” 29 CFR 1910.179(h).
ONLY use rigging having maximum load ratings that exceed the load weight.
DO NOT connect a load to only 1 hook, if the load is likely to rotate during lifting and/or transport operations. A load
Single-hook
(circled)
load likely to
rotate
5. Attach the load to the boom.
6.
Material handling is inherently dangerous; improper use of this product might result in serious personal
safely lift both the boom and the load.
request:
1. Written approval to use boom with your lift truck [29 CFR 1910.178(a)(4)]; AND
2. Markings (labels) for the lift truck that:
– Identify your LM-boom; AND
– Provide the approximate net weight of the forklift truck and boom at the maximum fork elevation with
laterally-centered load. [29 CFR 1910.178(a)(5)].
presented in the tables that appear with Figures 1B, 1D, 2B, 2D, 3B, 3D, 4B & 4D is the maximum rated load of the
specified BOOM ONLY; you MUST compare the appropriate table entry with the adjusted maximum rated load label
provided by the fork truck manufacturer.
should connect to both hooks simultaneously:
(Side view)
Attaching load to both hooks limits load rotation
Load
Page 23 of 28
Copyright 2013 Vestil Manufacturing Corp.
Load
Page 24

LM-series fork-mountable booms 01/11 rev. 11/14/2013
(continued from p. 19)
Test the stability of the load attachment. Raise the forks slowly to minimize load movement. Raise the forks until the
load is entirely suspended from the boom. Watch the load and boom closely for either of the following issues:
1. Load sliding in rigging; or
2. Boom sliding towards tips of forks.
If you notice either #1 or #2 occurring, immediately lower the forks until the load is completely supported by the
ground; then adjust the rigging. Retest the stability of the load in the rigging. If a stable lift cannot be performed, DO
NOT use the boom.
While transporting a load with the boom, the load should only be 6-8 inches from the ground, but adjusted to avoid
obstacles along the travel path.
DO NOT exceed approximately 1.5mi./hr (2.4km/hr) while transporting a load with the boom, and travel ONLY on
smooth, level surfaces. Execute turns slowly and smoothly.
a. Connect the load to appropriate rigging;
b. Attach the rigging to the end hook or to both the end hook and the stabilizing hook;
End hook
Stabilizing
hook
c. Verify that the load attachment is stable (see “Test the stability of the load attachment” in the warning
messages above);
d. Raise the load until it is elevated no more than 6-8 inches above the ground (entirely suspended from
the boom).
e. Slowly transport the load to the desired unloading location;
f. Slowly lower the load until it is entirely supported by the ground, and there is slack in all rigging.
g. Disconnect the rigging from the hooks;
h. Lower the forks until they are no more than 6-8 inches above the ground;
i. Transport the boom to its storage location.
NOTE: Users of OBT and OBNT model booms should return the boom to the fully
lowered (horizontal) position by reversing Step 4 on p. 23 BEFORE backing out of
the fork pockets.
Page 24 of 28
Copyright 2013 Vestil Manufacturing Corp.
Page 25

LM-series fork-mountable booms 01/11 rev. 11/14/2013
Inspections & Maintenance:
Inspection and maintenance personnel should immobilize the boom before either conducting
inspections or performing maintenance. The boom is properly immobilized if it cannot tip over.
If one or more problem is discovered during an inspection, restore the boom to normal operating
condition BEFORE using it again. DO NOT use a boom that is structurally damaged in any way. Structural
damage includes, but is not limited to, cracked welds, warping or deformation of the fork pockets, support leg,
frame members, boom, boom sleeve, hooks or shackles.
Lift Master booms function like a hoist-less crane: instead of using a hoist to lift loads, the bridge girder rises
and lowers through the movement of the forks of a lift truck. Therefore, boom owners/end-users should inspect
the boom regularly following an established process. An example of an inspection procedure appears in 29 CFR
1910.179 (visit http://www.osha.gov/ and navigate to “Regulations” section 1910.179). Paraphrased, relevant
portions appear below:
1. Initial inspection — before a new or modified crane (boom) may be used for the first time, it must be inspected
to insure normal condition.
After the first use, the boom end-user/owner must conduct the following 2 types of inspection:
2. Frequent inspection [29 CFR 1910.179(j)(1)(ii)(a)] — Daily to monthly intervals.
The following items shall be inspected for defects at the intervals specifically indicated, including observation
during operation for any defects which might appear between inspections. All deficiencies such as those listed
shall be carefully examined to determine whether they constitute a safety hazard:
[Inspect daily] All functional operating mechanisms (boom, X-handle locking bolt, boom sleeve, base
frame weldment, safety chain/strap, fork pockets, support arm, and all fasteners) for maladjustment or
damage that might interfere with proper operation. Inspect the boom for:
1. Dirt or other matter on the surface of the boom.
2. Pivot point wear (if applicable);
3. Looseness or wear of any parts that move during boom operation;
4. Integrity of hardware and fasteners, including but not limited to bolts, nuts, pins, knobs,
shackles, and hooks;
5. Normal operability of manually (by hand or foot) operated mechanisms;
6. Abnormal or noisy movement during use;
7. Excessive wear of, damage to, or indications of metal fatigue in any portion of the fork
pockets, support frame, boom or boom sleeve;
8. Damaged or unreadable labels;
9. Thinned regions or tears in the safety strap, or stretching, thinning, or twisting of any link(s) in
the safety chain;
10. Evidence of corrosion or rust-related metal erosion.
[Inspect daily (visually) and at least once per month inspect and make a certification record, which
includes the date of inspection, the signature of the person who performed the inspection and the
serial number (or other identifier) of the hook inspected] Hooks with deformation or cracks.
Immediately discard cracked hooks or hooks whose throat opening is more than 15 percent wider
than the normal throat opening, or that are twisted more than 10° from the plane of the unbent hook.
[Inspect daily (visually and at least once per month inspect and make a certification record which
includes the date of inspection, the signature of the person who performed the inspection and an
identifier of the chain which was inspected] Hooks and shackles, including end connections, for
excessive wear, twist, stretch. Disconnect any hook or shackle found to exhibit these problems and
discard them.
[Inspect weekly] All functional operating mechanisms (boom, X-handle locking bolt, boom sleeve
(base frame weldment), safety chain/strap, fork pockets, support arm, and all fasteners) for excessive
wear.
3. Periodic inspection [29 CFR 1910.179(j)(1)(ii)(b)] — 1-to-12 month intervals.
Complete inspections of the crane (boom) shall be performed at intervals depending upon its activity, severity
of service, and environment, or as specifically indicated below. Perform all of the applicable “Frequent
inspection” steps and carefully examine the boom for any the problems that appear below () to determine
whether they constitute a safety hazard:
Deformed, cracked, or corroded members.
Loose bolts or rivets.
Page 25 of 28
Copyright 2013 Vestil Manufacturing Corp.
Page 26

LM-series fork-mountable booms 01/11 rev. 11/14/2013
Worn, cracked or distorted parts such as pins, shackles, hooks.
Boom not in regular use:
For each of the 3 bullet points below, in addition to the inspections, any boom, which has been idle for a period of
a month or more due to shutdown or storage of the boom, must be given a thorough inspection before it is used
again. An appointed person, whose approval is required before the boom may be used, must inspect the boom for
all types of deterioration. A certification record must be available for inspection. The record must include at least
the date of inspection, the signature of the person who performed the inspection and an identifier for the rope
inspected.
A boom which has been idle for a period of 1 month (or longer), but less than 6 months, shall be
given a “Frequent inspection” before returning it to service.
A boom which has been idle for longer than 6 months shall be given a “Periodic [complete]
inspection” before placing it in service.
Standby booms shall be given a frequent inspection at least semi-annually (twice per year; 1
inspection each 6 months).
Annual performance evaluation: At least once per year, authorized inspection personnel should verify the
soundness of the boom. Use the LM to lift a maximum rated load. Afterwards, conduct a “Frequent inspection” to
verify that the product is in normal operating condition.
Maintenance:
The end-user, i.e. operators and operators’ employer, must implement a maintenance program to ensure that the
product functions properly and is adequately maintained. OSHA “General Industry” standards applied to
“Overhead and gantry cranes,” 29CFR 1910.179, describe official, recommended maintenance procedures. The
following steps should be utilized in conjunction with those recommendations.
The end-user is responsible for selecting and training employees to work on the boom. “Work on”
refers to operating, loading, cleaning, servicing, maintaining, or repairing the product. ONLY trained, authorized
maintenance personnel or contractors should perform inspection, maintenance, or repair work.
Step 1: Tag the boom, “Out of Service.”
Step 2: Remove any dirt or other matter from all surfaces.
Step 3: Conduct a “Before each use” inspection. If deformity, corrosion, rusting, or excessive wear of structural
members is found, DO NOT use the product.
Step 4: Perform all other necessary adjustments, replacements and/or repairs. DO NOT modify the boom.
The reader should understand the significant difference between necessary adjustments and
repairs, and modifications.
An “adjustment” is a simple correction that restores the boom to normal operating condition, such as tightening
loose fasteners, or removing dirt or other debris from the surface. “Repair” refers to removing worn parts and
installing replacement parts.
DO NOT use the Lift-Master boom if adjustments and/or repairs are incomplete! Return it to service ONLY
after finishing all necessary repairs and adjustments.
A “modification” is a change that alters the boom from normal operating condition, like bending the structural
members or removing a part or several parts. NEVER modify the boom without the express, written approval of
Vestil. Modifications may render the device unsafe to use.
Step 5: Make a dated record of any repairs, adjustments and/or replacements.
Page 26 of 28
Copyright 2013 Vestil Manufacturing Corp.
Page 27

LM-series fork-mountable booms 01/11 rev. 11/14/2013
Label placement diagram
TABLE 1:
Label Model
928 LM-OBT
929 LM-OBNT
930 LM-1T
931 LM-EBT
932 LM-HRT
933 LM-EBNT
934 LM-HRNT
935 LM-1NT
One of labels 928-935 as indicated in TABLE
1. (Label 928 shown in this diagram)
Label 203-2
Label 218
Label 287
Page 27 of 28
Copyright 2013 Vestil Manufacturing Corp.
Page 28

LM-series fork-mountable booms 01/11 rev. 11/14/2013
LIMITED WARRANTY
Vestil Manufacturing Corporation (“Vestil”) warrants this product to be free of defects in material and workmanship
during the warranty period. Our warranty obligation is to provide a replacement for a defective original part if the part
is covered by the warranty, after we receive a proper request from the warrantee (you) for warranty service.
Who may request service?
Only a warrantee may request service. You are a warrantee if you purchased the product from Vestil or from an
authorized distributor AND Vestil has been fully paid.
What is an “original part”?
An original part is a part used to make the product as shipped to the warrantee.
What is a “proper request”?
A request for warranty service is proper if Vestil receives: 1) a photocopy of the Customer Invoice that displays the
shipping date; AND 2) a written request for warranty service including your name and phone number. Send requests
by any of the following methods:
Mail Fax Email
Vestil Manufacturing Corporation (260) 665-1339 sales@vestil.com
2999 North Wayne Street, PO Box 507 Phone
Angola, IN 46703 (260) 665-7586
In the written request, list the parts believed to be defective and include the address where replacements should be
delivered.
What is covered under the warranty?
After Vestil receives your request for warranty service, an authorized representative will contact you to determine
whether your claim is covered by the warranty. Before providing warranty service, Vestil may require you to send the
entire product, or just the defective part or parts, to its facility in Angola, IN. The warranty covers defects in the
following original dynamic components: motors, hydraulic pumps, electronic controllers, switches and cylinders. It
also covers defects in original parts that wear under normal usage conditions (“wearing parts”), such as bearings,
hoses, wheels, seals, brushes, and batteries.
How long is the warranty period?
The warranty period for original components is 1 year. The warranty period begins on the date when Vestil ships the
product to the warrantee. If the product was purchased from an authorized distributor, the period begins when the
distributor ships the product. Vestil may extend the warranty period for products shipped from authorized distributors
by up to 30 days to account for shipping time.
If a defective part is covered by the warranty, what will Vestil do to correct the problem?
Vestil will provide an appropriate replacement for any covered part. An authorized representative of Vestil will contact
you to discuss your claim.
What is not covered by the warranty?
1. Labor;
2. Freight;
3. Occurrence of any of the following, which automatically voids the warranty:
Product misuse;
Negligent operation or repair;
Corrosion or use in corrosive environments;
Inadequate or improper maintenance;
Damage sustained during shipping;
Collisions or other incidental contacts causing damage to the product;
Unauthorized modifications: DO NOT modify the product IN ANY WAY without first receiving written
authorization from Vestil. Modification(s) might make the product unsafe to use or might cause excessive
and/or abnormal wear.
Do any other warranties apply to the product?
Vestil Manufacturing Corp. makes no other express warranties. All implied warranties are disclaimed to the extent
allowed by law. Any implied warranty not disclaimed is limited in scope to the terms of this Limited Warranty.
Page 28 of 28
Copyright 2013 Vestil Manufacturing Corp.
 Loading...