

Page 1
01/06 42-126-120
O
VESTIL MANUFACTURING CORP.
2999 N. Wayne St., Angola, IN 46703
Ph: 260-665-7586 · Fax: 260- 6 65-1339
E-mail: sales@vestil.com · Website: www.vestil.com
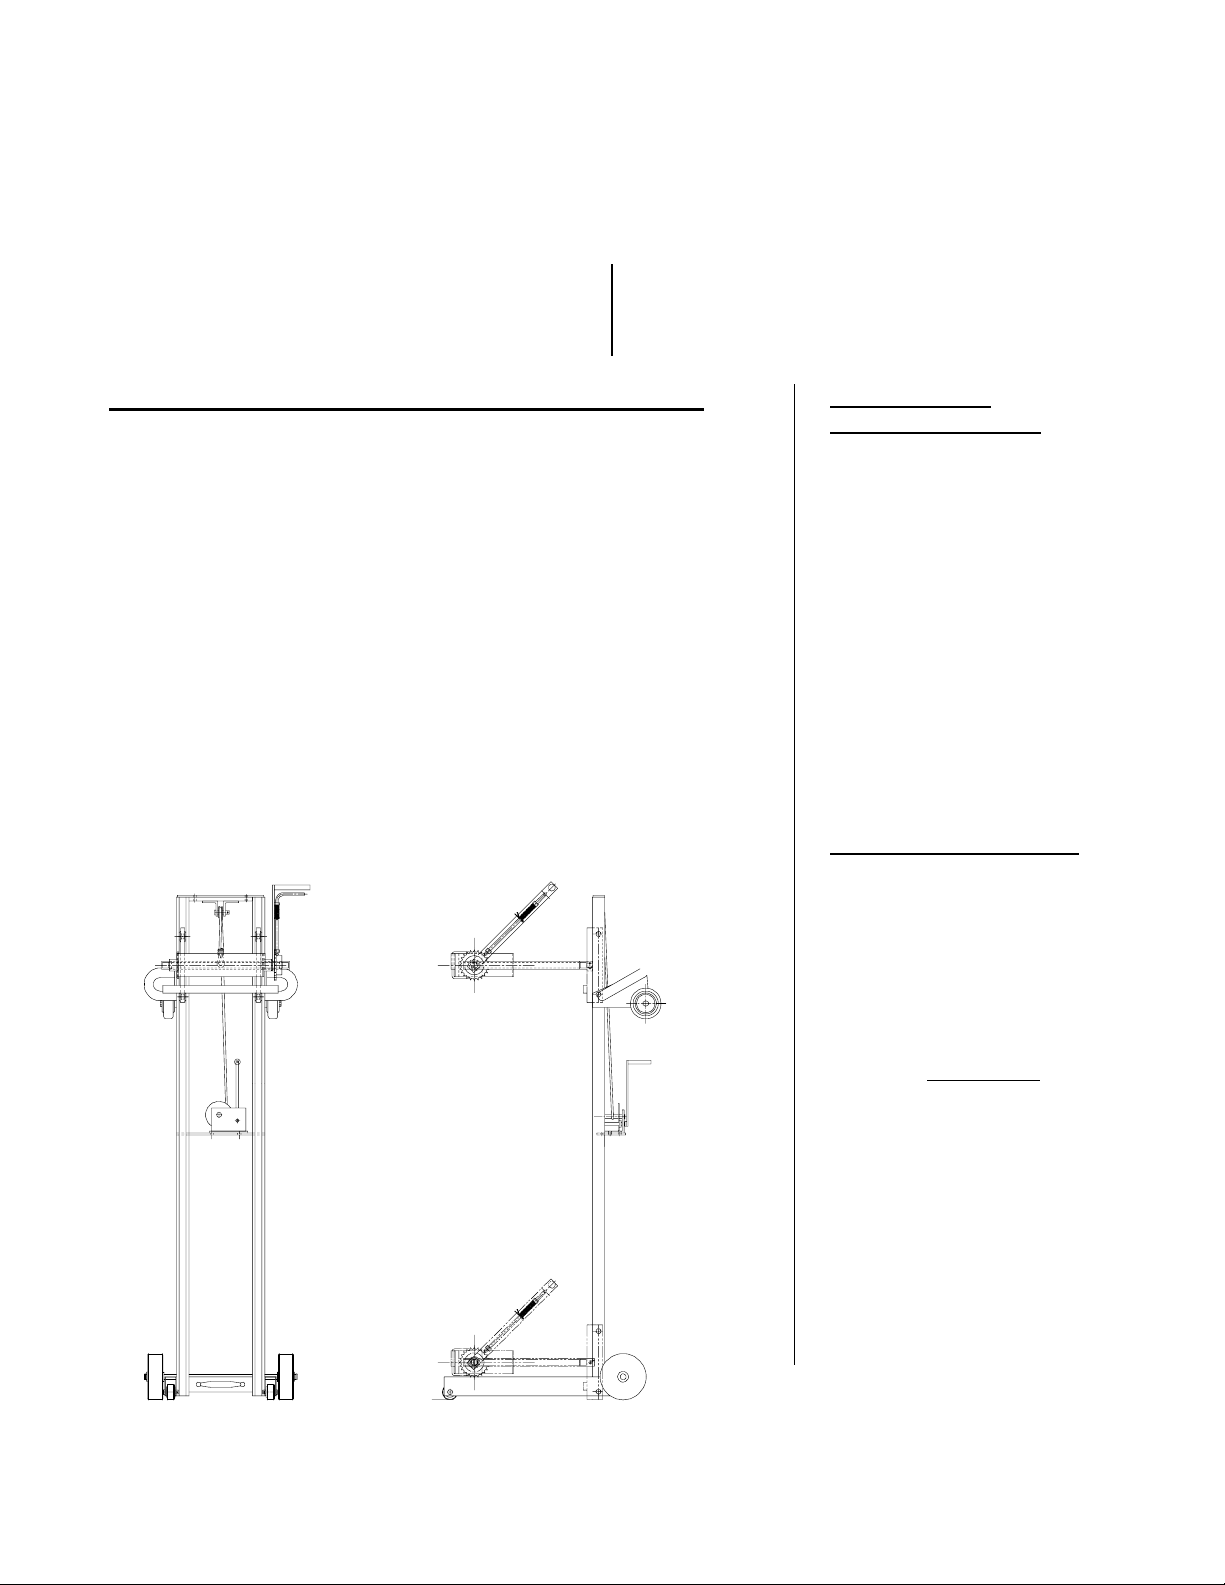
MODEL LLW-PAILD-200
Serial number ____________
Operation Instructions ……………………….……….. 2
Safety Label Identification ............................................ 3
Routine Maintenance & Safety Checks ….…………… 4
Structural Parts BOM ..................................…….……. 4
IMPORTANT NOTES, WARNINGS AND SAFETY INSTRUCTIONS
Ensure that all employees understand and follow the following.
* Failure to read and understand this owner’s manual before using or
servicing the pail dumper constitutes a misuse of the product. All
persons who will use or care for this product must be familiar with this
material.
o The pail carrier must be fully lowered before any work is performed on
the pail dumper.
o Ensure that all information/safety/warning labels stay in place and are
legible.
o Do not use the pail dumper if any damage or unusual noise is observed.
o Always watch the pail and the pail carrier carefully when transporting or
dumping material.
o The pail dumper is intended for use only on compacted, improved surfaces.
♦ Do not perform any modifications to the pail dumper without the
manufacturer’s approval. Failure to receive authorization for changes to
the equipment could void the warranty.
♦ Maintenance and repairs are to be done only by personnel qualified to
perform the required work. Consideration will not be given for warranty
repair charges without prior written authorization by the manufacturer.
Structural Parts Drawing …..............................……...... 5
Troubleshooting …………………………....………….. 6
Warranty …………………………………….……..….. 6
WNER’S
MANUAL
WHEN ORDERING
REPLACEMENT PARTS:
We take pride in using quality
parts on the equipment we
manufacture. We are not
responsible for equipment
problems resulting from the use
of unapproved replacement
parts.
To order replacement or
spare parts for this equipment,
contact the factory.
In any communication with
the factory please be prepared
to provide the machine’s serial
number, which is indicated on
the machine dataplate.
RECEIVING INSTRUCTIONS
It is possible that this product
could incur damage during
transit.
Inspect the unit closely when
it arrives. If you see evidence
of damage or rough handling to
either the packaging or to the
product when it is being
unloaded, immediately
note of it on the Bill Of Lading!
It is important that you
remove the product’s packaging
upon its arrival to ensure that
there is no concealed damage
or to enable a timely claim with
the carrier for freight damage.
Also verify that the product
and its specifications are as
ordered.
make a
ESTIL MFG. CO. 1
V
Page 2

01/06 42-126-120
OPERATION INSTRUCTIONS – LLW-PAILD-200
o Ensure that all employees involved in the operation of this pail dumper understand and follow these instructions!
The standard model pail dumper is suitable for use indoors in most industrial and commercial locations. It is
intended to be used to transport (sealed pails only), lift (up to 52”), and rotate plastic or steel 5-gallon pails containing
stable, relatively free-flowing non-hazardous materials.
Loading:
The load rating, in pounds, is shown on the machine dataplate located on the operator’s side at the top of the left
frame upright. It indicates the net capacity of the pail dumper when used to dump freely-flowing materials.
Warning: Do not exceed the pail dumper’s load rating. Injury to personnel or permanent damage to the pail dumper
could result from exceeding the listed capacity.
Raise or lower the carrier so that its pivot point is positioned at approximately half the height of the pail to be
dumped. Unhook the pail carrier’s saddle strap and move it out of the way so that it does not obstruct the pail from
entering the saddle. Move the dumper up to the pail so that the pail is inside of, and up against, the inside of the
carrier saddle.
Place the pail-securing strap around the front of the pail and fasten it into the slot at the side of the saddle. Use the
saddle strap’s ratchet to cinch it down snugly to the pail.
Caution: Take care to not tighten the strap so much that it crushes the sides of the pail!
Raise the pail slightly from the floor and ensure that it is secure for lifting and rotating. When properly gripped, the
pail should not be able to spin or move within the straddle.
Operation:
Warning: Keep all personnel clear of the machine when it is in operation. Be certain no part of any person or o bject is
under any part of the pail before lowering the carrier.
Warning: Always carefully observe the pail and the material inside it when dumping.
Note: A material’s viscosity should be considered before determin ing the maximum rate at which to dump material
from a pail.
Warning: Take care when moving the pail dumper into final position if the pail’s lid is removed for dumping.
Warning: In moving a pail from one location to another, the pail must be securely closed with a tight-fitting lid,
oriented vertically, and kept as low to floor as possible.
Do not exceed a rate of two feet per second when moving the pail dumper.
Caution: If the pail has a carrying handle and the pail will be rotated more than 100° from vertical, consideration must
be given to any potential problems that might arise from the handle dropping into the flow path of the material coming
out of the drum.
The pail dumper utilizes a hand winch to lift pails to a maximum height of 52” off the floor.
Standing from the operator’s position, the winch handle is to be rotated clockwise to raise the pail carrier, and
counterclockwise to lower it. The winch has a braking mechanism which helps to control the descent of the pail
carrier -- the operator does not need to engage a pawl on the winch in order to lower a load in a controlled manner.
Raise the pail to the required dump height.
To rotate the pail and dump its contents, use the right hand to grip the rotating handle and pull the sprocket-locking
mechanism. Rotate the handle slowly counterclockwise to dump the contents of the pail. The sprocket-locking
mechanism can be released at any time to lock the carrier saddle into an angle setting. (There are nine locking
positions between vertical and 135° forward rotation from vertical.)
To upright the pail, grasp the rotating handle, pull the sprocket-locking mechanism, and rotate the handle clockwise.
To remove the pail from the dumper, orient the pail to the vertical position and lower it until the bottom of the pail
touches the floor. To remove the pail, grasp the ratchet handle and pull the release lever inside the handle as you do
so. Pull outward on the ratchet handle to loosen the saddle strap. Unhook the saddle strap from the slot in the side of
the saddle and remove the pail from inside the saddle.
The pail dumper incorporates design elements of a hand truck, and has two wheels underneath the push handle to
allow it to be easily loaded into a van or truck when it is being transported to another location.
Ensure that all information/safety/warning labels stay in place and are legible.
(Refer to the labels page in this manual.)
ESTIL MFG. CO. 2
V
Page 3

01/06 42-126-120
SAFETY LABEL IDENTIFICATION -- LLW-PAILD-200
* Product safety signs or labels should be periodically inspected and cleaned by the product users as necessary to
maintain good legibility for safe viewing distance -- ANSI 535.4 (10.21). Contact the manufacturer for replacement
labels.
ESTIL MFG. CO. 3
V
Page 4

01/06 42-126-120
ROUTINE MAINTENANCE & SAFETY CHECKS – LLW-PAILD-200
o Warning: Care should be taken to identify all potential hazards and comply with applicable safety procedures
before beginning work.
o Only qualified individuals trained to understand mechanical devices should attempt trou bleshooting and repair of
this equipment
(A) Inspect daily for:
1.) Broken strands, fraying or kinking of the lifting cable.
2.) Damage or structural deformation to the structural members.
3.) Unusual noise or binding, or evidence thereof.
(B) Inspect monthly for:
1.) Worn or damaged lifting cable.
2.) Pivot point wear of the pail carrier.
3.) Pail carrier saddle strap looseness and/or wear.
4.) Integrity of the retaining hardware on all rollers and on all pivot point pins.
5.) Looseness, wear, or damage to the casters’ bearings, mounting hardware, or su rface material.
6.) Unusual noises or movement during operation.
7.) All the information/safety/warning labels being in place and in good condition.
8.) The need to clean off dirt and debris.
B
ILL OF MATERIALS -- LLW-PAILD-220
Item #: Description Part number Qty.
1 Weldment, frame sub-assembly 21-514-005 1
2 Sub-assembly, deck 42-538-004 1
3 Roller, with bushing 21-527-002 2
4 Pulley, with bushing 21-527-001 1
5 Washer, flat, 9/16” ID A/L 4
6 Pin, clevis, ½”Ø x 1¾” long 21-112-003 3
7 Pin, cotter, 1/8” x 1” long A/L 3
8 Wheel, MR-6/2-RB 16-132-058 2
9 Retaining ring, external, for ¾” ID pin 15-117-002 2
10 Washer, flat, ½” ID A/L 4
11 Nut, hex, 3/8”-16 UNC A/L 5
12 HHCS, 3/8”-16 UNC x 1¼” A/L 5
13 Washer, lock, 3/8” ID A/L 5
14 Cable, aircraft, 3/16” A/L 1
15 Thimble, cable, 3/16” A/L 1
16 Anchor, cable A/L 1
17 Stiffener, bar 21-017-016 1
18 Pin, roller, ½”Ø HR x 113/16” long 21-112-002 4
19 Roller, guide (13/8” OD x ½” ID x .35” thick 21-027-003 8
20 Winch (Dutton-Lainson DLB 800) 21-042-002 1
21 Wheel, HR-4/1.25-SLB 16-132-009 2
22 Bolt, hex head, 3/8”-16 UNC x 2½” long A/L 2
23 Nut, hex, nylock, 3/8”-16 UNC A/L 2
ESTIL MFG. CO. 4
V
Page 5

01/06 42-126-120
EXPLODED PARTS VIEW -- LLW-PAILD-220
ESTIL MFG. CO. 5
V
Page 6

01/06 42-126-120
TROUBLESHOOTING GUIDE -- LLW-PAILD-200
Warning: Before performing any task, always lower the pail dumper fully to the floor and remove the pail.
Consult the factory for any problems not addressed below.
Problem: Possible cause(s): Action:
The pail carrier will not raise or
is very difficult to raise.
The pail carrier will not lower. Same as the previous two line items, above.
The pail carrier will not rotate. Something has caused the pivot point(s) to
The pail carrier travels the
wrong direction when the
winch handle is turned
clockwise.
The pail carrier’s saddle strap
will not stay tight.
The pail carrier will not lock
into a rotated position.
Too much load in the carrier.
The cable has come off the upper pulley.
One or more guide rollers has seized.
The guide rollers are bound up by an
obstruction in, or damage to, the guide track.
Not enough load on the winch.
Winch is bound up.
seize.
Cable is wound backwards around the winch
drum.
Worn web strap.
Worn or damaged strap ratchet.
Ratchet strap release mechanism is stuck in the
“release” position.
The locking mechanism is stuck in the “release”
position.
Remove some of the pail’s contents.
Rotate the winch crank counterclockwise one
full turn after the carrier is lowered to the
floor. Reinstall the cable into the upper
pulley’s groove. Rotate the winch clockwise
to wind the slack cable back onto the spool.
Lubricate or replace the roller(s).
Inspect for damage to the roller guide track.
Repair or lubricate as necessary.
Same as above.
Lubricate the roller guide track. Pull or push
down on the pail carrier as the crank
handle is turned counterclockwise.
Repair or replace the winch. Consult factory.
Check for corrosion or hardened material
buildup at the carrier saddle’s pivoting
points.
Rotate the crank handle to unspool all the
cable from the winch. Continue rotating
the handle in the same direction until all
the cable slack is taken up on the spool.
Replace the strap and ratchet assembly.
Same as above.
Inspect for and eliminate the cause of the
release mechanism sticking. If damaged,
replace the strap and ratchet.
Inspect the locking mechanism for damage,
bowing, or buildup of material that could
be causing it to stick. Take the
appropriate steps to correct the problem
found.
PRODUCT WARRANTY
90-DAY LIMITED WARRANTY
The manufacturer warrants for the original purchaser against defects in materials and wo rkmanship under normal use
for 90 days after date of shipment. Any part that is determined by the manufacturer to be defective in material or
workmanship and returned to the factory, shipping costs prepaid, will be, as the exclusive remedy, repaired or
replaced at our option. Labor costs for warranty repairs and/or modifications are not covered unless pre-approved by
the manufacturer or done at the manufacturer’s facilities. Any modifications performed without prior written approval
of the manufacturer may void warranty. This limited warranty gives purchaser specific legal rights which vary from
state to state.
All specifications are subject to change without notice.
LIMITATION OF LIABILITY
To the extent allowable under applicable law, the manufacturer’s liability for consequential and incidental damages is
expressly disclaimed. The manufacturer’s liability in any event is limited to, and shall not exceed, the purchase price
paid. Misuse or modification may void warranty.
Warranty does not cover labor or consequential damages including, but not limited to, business interruption costs, lost
profits, or lost business opportunities.
WARRANTY DISCLAIMER
The manufacturer has made a diligent effort to accurately illustrate and describe their products. However, such
illustrations and descriptions are for the sole purpose of identification, and do not express or imply a warranty that the
products are merchantable or fit for a particular purpose, or that the products will necessarily conform to the
illustrations or descriptions.
The provisions of the warranty shall be construed and enforced in accordance with the Uniform Commercial Code and
laws as enacted in the State of Indiana.
DISPOSITION
Our company will make a good faith effort for prompt correction or other adjustment with respect to any product that
proves to be defective within the Limited Warranty Period. Warranty claims must be made in writing within s aid year.
ESTIL MFG. CO. 6
V
 Loading...