

Page 1
Rev. 3/11/2013 LAD-FM, Manual
VESTIL MANUFACTURING CORP.
2999 North Wayne Street, P.O. Box 507, Angola, IN 46703
Telephone: (260) 665-7586 -or- Toll Free (800) 348-0868
Fax: (260) 665-1339
www.vestilmfg.com e-mail: sales@vestil.com
LAD-FM SERIES MEZZANINE LADDERS
INSTRUCTION MANUAL
Receiving instructions:
After delivery, IMMEDIATELY remove the packaging from the product in a manner that preserves the
packaging and maintains the orientation of the product in the packaging; then inspect the product
closely to determine whether it sustained damage during transport. If damage is discovered during
the inspection, immediately
record a complete description of the damage on the bill of lading. If
the product is undamaged, discard the packaging.
NOTES
:
1) Compliance with laws, regulations, codes, and non-voluntary standards enforced in the location
where the product is used is exclusively the responsibility of the owner/end-user.
2) VESTIL is not liable for any injury or property damage that occurs as a consequence of failing to apply either:
a) Instructions in this manual; or b) Information provided on labels affixed to the product.
Neither is Vestil
responsible for any consequential damages sustained as a result of failing to exercise sound judgment
while assembling, installing, using or maintaining this product.
Table of Contents
Hazard identification: explanation of signal words……………………………………………… 2
Safety Guidelines…………………………………………………………………………..……..2-3
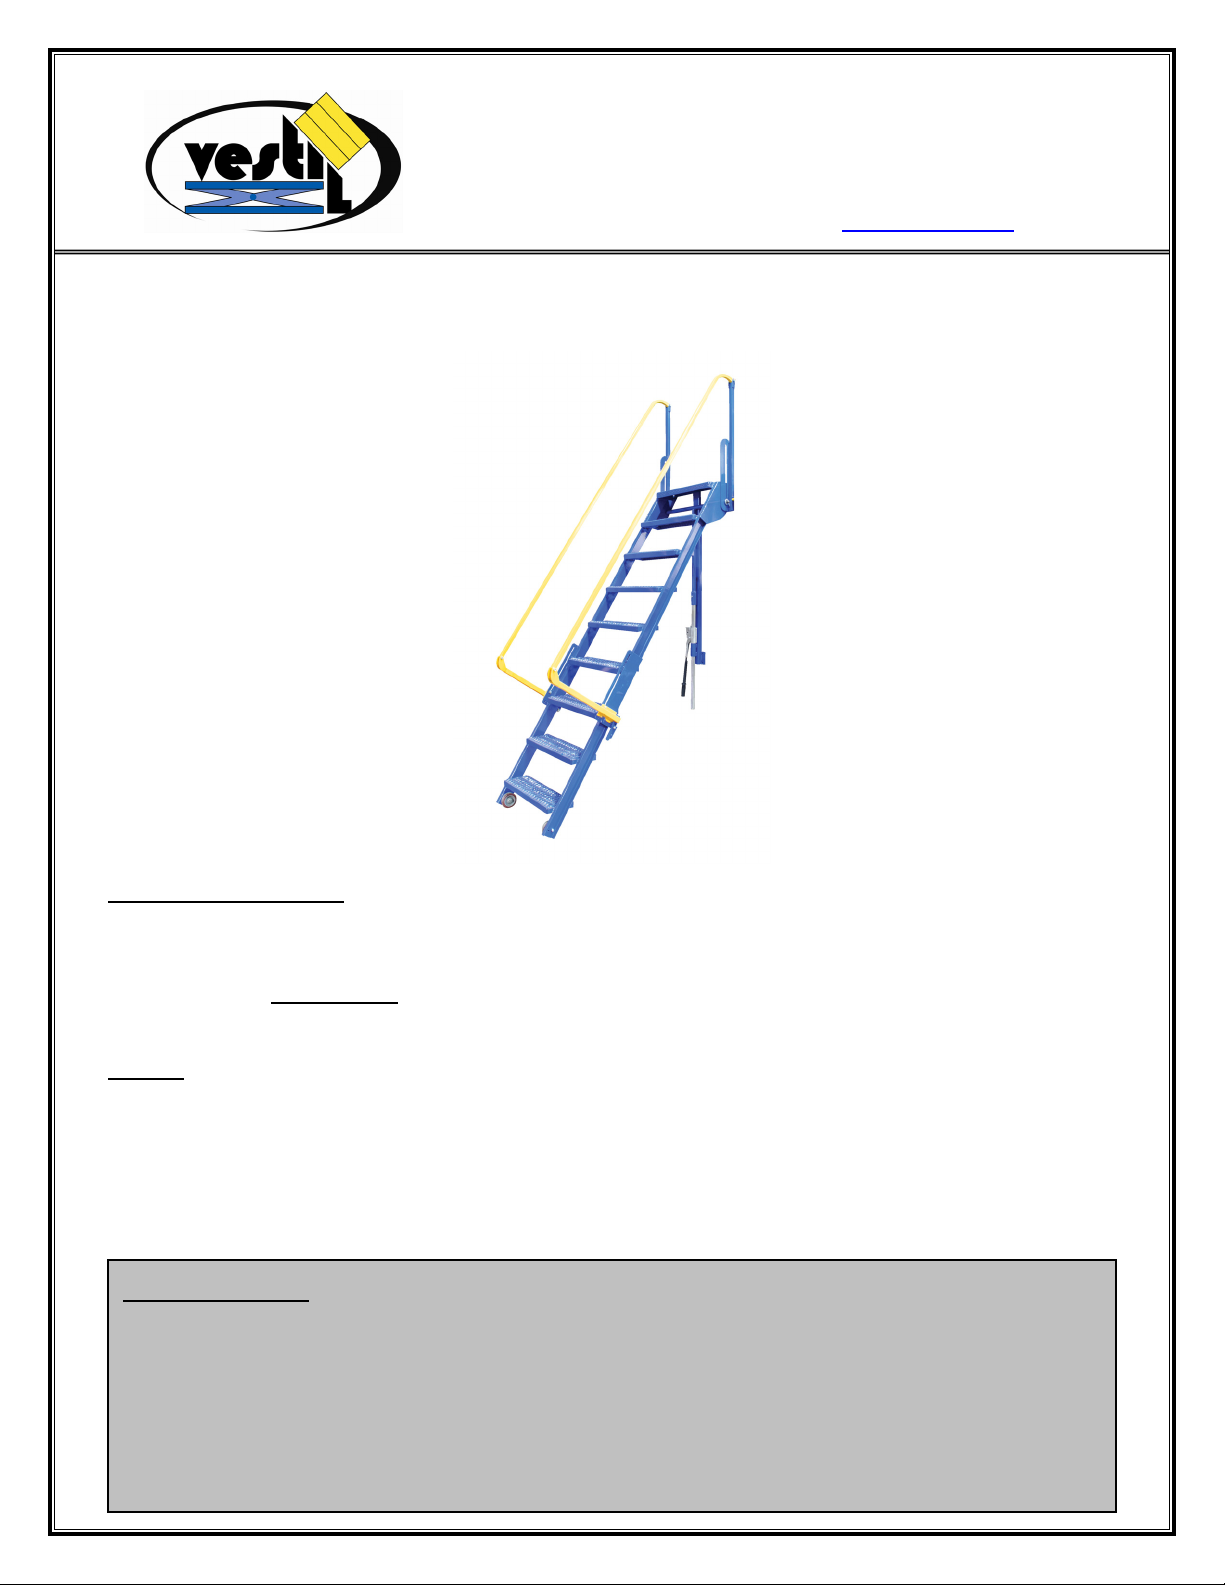
FIG. 1: Fully assembled stair system……………………………………………………………. 3
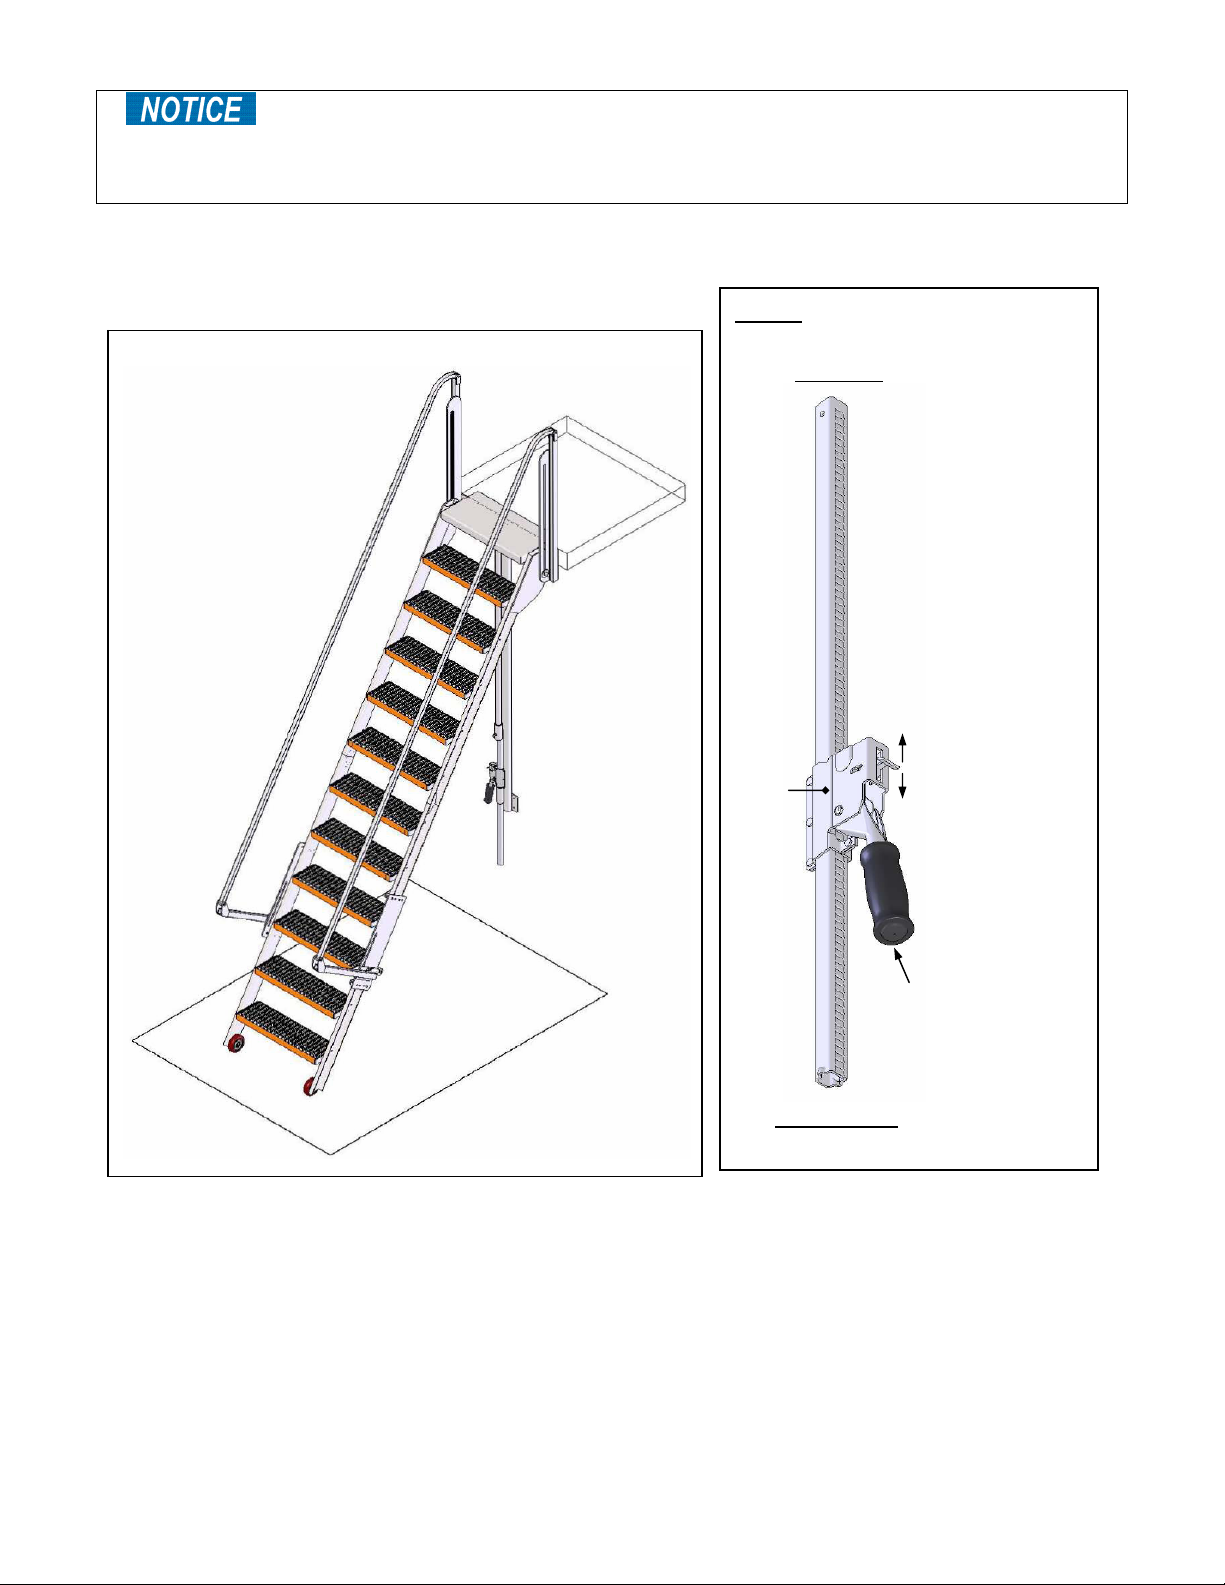
FIG. 2: Jack direction selector……………………………………………………………………. 3
Installation instructions…………………………………………………………………………...4-6
Storage……………………………………………………………………………………………… 6
Limited warranty……………………………………………………………………………………. 7
yright 2013 Vestil Manufacturing Corp. Page 1 of 7
Cop
Page 2

Rev. 3/11/2013 LAD-FM, Manual
Hazard Identification--Explanation of SIGNAL WORDS
This manual uses SIGNAL WORDS to indicate the likelihood of personal injuries, as well as the
probable seriousness of those injuries, if the product is misused in the ways described. Other signal words
call attention to uses of the product likely cause property damage.
The signal words used appear below along with the meaning of each word:
Identifies a hazardous situation which, if not avoided, WILL
result in DEATH or SERIOUS INJURY. Use of this signal
word is limited to the most extreme situations.
Identifies a hazardous situation which, if not avoided,
COULD result in DEATH or SERIOUS INJURY.
Indicates a hazardous situation which, if not avoided,
Identifies practices likely to result in product/property damage,
COULD result in MINOR or MODERATE injury.
such as operation that might damage the product.
Each person who assembles, installs, uses, or maintains this product should read the entire manual in
advance and fully understand the directions. If after reading the manual you do not understand an
instruction, ask your supervisor or employer for clarification, because failure to adhere to the
directions in this manual might result in serious personal injury.
SAFETY GUIDELINES
Vestil diligently strives to identify foreseeable hazards associated with the use of its products. However,
no manual can address every conceivable risk. The end-user ultimately is responsible for exercising sound
judgment at all times.
Electrocution might result if any part of the mezzanine ladder contacts electrified wires.
Reduce the likelihood of electrocution by applying common sense:
DO NOT install the stairs where it will contact electrified wires is likely;
DO NOT install the stairs in a location where users will contact overhead electrical wires.
If this product is used improperly or carelessly, the operator and/or bystanders might sustain
serious personal injuries or even be killed. ALWAYS use the product properly:
Failure to read and understand the entire manual before assembling, installing, using or
servicing the product constitutes misuse. Read the manual to refresh your understanding of proper use
and maintenance procedures.
DO NOT exceed the maximum rated load.
Inspect the stairs at least once every 3 months. DO NOT use these stairs if the inspection reveals
structural damage. Examples of structural damage include: 1) broken, missing, or deformed risers (steps); 2)
damaged or deformed stair rails or siderails; 3) cracked welds; 4) damaged fasteners (particularly those
used to fasten the top of the stairs to the structure or wall above) enlarged openings for fasteners, pins, etc.;
5) corrosion, extreme wear, or other condition that affects the ability of the product to support applied weight
or itself; 6) damaged, deformed or cracked ratchet jack. Immediately tag out the stairs and replace each part
that fails to pass inspection. DO NOT use the product until it is fully restored to normal condition. ONLY use
manufacturer-approved replacement parts.
DO NOT use the stairs if any unusual noise or movement is observed while weight is applied to it. If a
malfunction occurs, remove the unit from service and notify your supervisor or maintenance personnel about
the issue.
DO NOT use the stairs UNLESS it is securely fastened to the structure of the floor above.
DO NOT use the stairs as a storage rack.
DO NOT remove or obscure any label. All product labels must be readable and undamaged.
DO NOT modify the stairs in any way. Unauthorized modifications automatically void the limited
warranty (see p. 10) and might make the table unsafe to use.
yright 2013 Vestil Manufacturing Corp. Page 2 of 7
Cop
Page 3
Rev. 3/11/2013 LAD-FM, Manual
Proper installation, use, and maintenance are essential for this product to function properly.
o Always use this product in accordance with the instructions in this manual.
o Keep the stairs clean & dry.
o Periodically lubricate pivot points.
FIG. 1: Fully assembled stair system
FIG. 2: Jack direction selector
Top end
Jack
body
Bottom end
UP position:
lowers the stairs
Jack
ratchet
slide
DOWN position:
raises the stairs (for
storage)
Handle
yright 2013 Vestil Manufacturing Corp. Page 3 of 7
Cop
Page 4

Rev. 3/11/2013 LAD-FM, Manual
Installation Instructions
This stair system must be fastened securely to a wall or a walkway at a location capable of supporting AT
LEAST the combined weight of the stair system plus the maximum rated load of the stairs. Select the
location where the stairs will fasten to the mezzanine and follow the installation instructions (steps 1 - 6) in
order.
Step 1
length of the top of the mounting plate and determine the location of the midpoint. Use these
measurements to determine the proper location for the mounting plate on the wall or mezzanine.
Step 2: Use point D as the reference for determining the proper locations of bolt holes. Each of the holes
drilled into the mezzanine/walkway must be
mounting plate. Dimensions of the center mounting plate are shown below:
Either clamp the mounting plate against the mezzanine or wall and use the mounting plate as a template
for drilling the necessary holes, or use the mounting plate diagram above to prepare the mezzanine.
Make a line that extends 8 inches on both sides of point D on the wall or mezzanine. The line must be
parallel with the floor. Next, draw a plumb line at both 8in. marks (lines are labeled “a” and “b” in the
diagram above). Mark each plumb line 1½ inches and 5 inches below the level line. Bolt holes will be
drilled at all four points as shown above. In the mounting plate, the pre-drilled holes are
recommend using ½ inch (diameter) fasteners to connect the mounting plate to the wall or mezzanine.
Your building engineer should select hardware appropriate for the wall or mezzanine material.
: Measure from the top of the mounting plate to the bottom of the wheels. Also measure the
D
Guard rail
Selected attachment
location (dashed)
Walkway / mezzanine
Distance from top of mounting
plate to bottom of wheels
Floor
5
/8in and must match the positions of bolt holes in the center
1½in.
a b
8in. 8in.
D
5in.
5
/8in. We
yright 2013 Vestil Manufacturing Corp. Page 4 of 7
Cop
Page 5

Rev. 3/11/2013 LAD-FM, Manual
3
3
Step 3: Fasten the stair mounting plate to the mezzanine using ½ inch (diameter) bolts of appropriate
length selected by your building engineer. Fasten the jack mounting plate to the supporting structure of
the mezzanine using ¼ inch (diameter) bolts of appropriate length. [Diagram below shown with stairs and
handrails removed to clearly show bolt attachment points.]
Fasten mounting plate to
mezzanine with ½ in. hardware
Mounting
plate
weldment
Mezzanine
Stair jack arm
¼ inch
diameter
bolts (4)
Jack mounting plate
Step 4
: Lower the stairs until the top deck plate rests solidly on the mezzanine. Refer to FIG. 1 on p. 3
and make sure that the jack direction selector is DOWN; then move the handle back-and-forth to lower
the stairs. [NOTE: Push the base of the stairs away from the mezzanine (or wall) as you begin lowering
the stairs. Once the stairs begin to lower, it is not necessary to continue to push the base.]
Step 5: Attach the bottom end of the stair rails to the lower stair rail hinges using 3/8 in. – 16 x 2¼ in.
bolts and
sides. [NOTE: As shipped, the lower stair rail posts will be folded to lay parallel to the side rails. Pivot the
posts upward, and pin them in upright orientation as shown in “Storage” on p. 6.]
3
/8 in. - 16 lock nuts. Put a flat washer between the handrail and the handrail bracket on both
Lower stair rail post
ht side)
(rig
3
/8 in. -16 lock nut
/8 in. flat
washer
Stair
rail
hinge
/8 in.
flat
washer
3
/8 in. – 16 x
2¼in. bolt
Left side lower
stair rail post
Detent
yright 2013 Vestil Manufacturing Corp. Page 5 of 7
Cop
Page 6

Rev. 3/11/2013 LAD-FM, Manual
)
3
Step 6
will be (approximately) perpendicular to the siderails of the stairs. After completing the adjustment,
tighten all four lock nuts that secure the stair rail brackets in place.
: Adjust the position of the stair rail brackets. When properly positioned, the lower stair rail posts
Stair rail
link
Siderail
Tighten the
/8 in. – 16 lock nuts
Stair rail bracket (right side
Post fastened through bracket slot with 3/8 in. – 16 x 1 ¼ in. bolt
(from inside) and
5
/16 in. flat washer; secure with 3/8 in. – 16 lock
Tighten the 3/8 in. – 16 lock nuts (on 3/8 in. – 16 x 2½ in. bolts)
Storage
To store the stair system, pull the detents out of the brackets by pulling up on the detent pins, and then
slide the bottom of the post forward in the slot (see dark arrow in diagram below). Make sure that the
jack direction selector is in the DOWN position (see FIG. 1 on p. 3). With the selector in the proper
position, either push the stairs or work the ratchet handle back and forth to incrementally raise the stairs.
With the stairs fully raised, push the post all the way forward in the slot.
:
Pull up on
detent pin
Detent
cket
bra
yright 2013 Vestil Manufacturing Corp. Page 6 of 7
Cop
Page 7

Rev. 3/11/2013 LAD-FM, Manual
LIMITED WARRANTY
Vestil Manufacturing Corporation (“Vestil”) warrants this product to be free of defects in material and workmanship
during the warranty period. Our warranty obligation is to provide a
is covered by the warranty, after we receive a proper request from the warrantee (you) for warranty service.
replacement for a defective original part if the part
Who may request service?
Only a warrantee may request service. You are a warrantee if you purchased the product from Vestil or from an
authorized distributor AND Vestil has been fully paid.
What is an “original part”?
An original part is a part used to make the product as shipped
to the warrantee.
What is a “proper request”?
A request for warranty service is proper if Vestil receives: 1) a photocopy of the Customer Invoice
shipping date; AND 2) a written request
by any of the following methods:
for warranty service including your name and phone number. Send requests
that displays the
Mail Fax Email
Vestil Manufacturing Corporation (260) 665-1339 sales@vestil.com
2999 North Wayne Street, PO Box 507 Phone
Angola, IN 46703 (260) 665-7586
In the written request, list the parts believed to be defective and include the address where replacements should be
delivered.
What is covered under the warranty?
After Vestil receives your request for warranty service, an authorized representative will contact you to determine
whether your claim is covered by the warranty. Before providing warranty service, Vestil may require you to send the
entire product, or just the defective part or parts, to its facility in Angola, IN. The warranty covers defects in the
following original
also covers defects in original
hoses, wheels, seals, brushes, and batteries.
dynamic components: motors, hydraulic pumps, electronic controllers, switches and cylinders. It
parts that wear under normal usage conditions (“wearing parts”), such as bearings,
How long is the warranty period?
The warranty period for original components is 90 days
. The warranty period begins on the date when Vestil ships the
product to the warrantee. If the product was purchased from an authorized distributor, the period begins when the
distributor ships the product. Vestil may extend the warranty period for products shipped from authorized distributors
by up to 30 days to account for shipping time.
If a defective part is covered by the warranty, what will Vestil do to correct the problem?
Vestil will provide an appropriate replacement for any covered part. An authorized representative of Vestil will contact
you to discuss your claim.
What is not covered by the warranty?
1. Labor;
2. Freight;
3. Occurrence of any of the following, which automatically voids the warranty
:
Product misuse;
Negligent operation or repair;
Corrosion or use in corrosive conditions;
Inadequate or improper maintenance;
Damage sustained during shipping;
Accidents involving the product;
Unauthorized modifications
: DO NOT modify the product IN ANY WAY without first receiving
written authorization from Vestil. Modification(s) might make the product unsafe to use or might
cause excessive and/or abnormal wear.
Do any other warranties apply to the product?
Vestil Manufacturing Corp. makes no other express warranties. All implied warranties are disclaimed to the extent
allowed by law. Any implied warranty not disclaimed is limited in scope to the terms of this Limited Warranty.
Copyright 2013 Vestil Manufacturing Corp. Page 7 of 7
 Loading...