

Page 1

USER MANUAL
VSP355g
Page 2

Dear Customer,
You have purchased a quality VESTEL product by preferring our telephone device.
Your device will serve you for long years as long as you display the necessary care and
maintenance. The manual contains instructions and pictures for the telephone.
We hope you enjoy using your device.
Important Safety-Related Information,
Please read the instructions below carefully to know your device quickly and make use of
all the functions of your device.
CAUTION: Important instructions must be followed to prevent damage to data and
components or harming users. This user manual includes important information regarding
first use, safety, cleaning and maintenance of your device. Always keep this manual with
your device.
Page 3

JJ Table of Contents
Safety Information ......................................................................... 3
Important Information Regarding User Manual ................................ 8
Issues to be Considered About Carrying and Transportation .......... 9
Liability Limitation ........................................................................... 9
General Duties of Buttons .............................................................. 10
General Appearance ...................................................................... 11
Telephone Use ............................................................................... 12
Cleaning and Maintenance ............................................................. 35
Troubleshooting ............................................................................ 36
Technical Specifications ............................................................... 42
Page 4

JJ Safety Information
power cable while cleaning it.
• Do not use damaged power cables or
plugs.
• Do not touch the power cable or the
device with wet hands, this could cause
damages to you or your device.
• Do not recharge with any other device
not approved by battery manufacturer.
• Do not place any objects on your device
as its screen might get scratched.
• Do not use your device under rain.
• Do not use other styluses or variations
not approved by the manufacturer.
• Do not try to disassemble your telephone.
• Turn off the product and remove the
• Do not get your device near heaters and
high pressure containers.
• Do not scratch the paint, logo etc. found
on your device.
• Do not use your device if the screen
breaks or cracks.
• Be careful during plugging and unplugging
operations while using the device with
accessories.
• Use accessory cables like power cables,
earphones perpendicularly, without horizontal movement.
• Never use your device in the following
conditions:
-If the device body is damaged and
3
Page 5

electrical parts are exposed,
cause damage to the device or injuries.
-If the device came into contact with water
or other liquids.
• If one of the situations mentioned is
observed, power off the device immediately
and contact authorized service.
• A damaged appliance or damaged parts
of the appliance can cause serious injuries
and fire.
• Device does not contain parts that the
user can interfere with.
• If any malfunction occurs, do not attempt
to repair your device by yourself otherwise,
the device will be out of warranty.
• Using accessories that are not
• If a problem occurs regarding product or
battery; the necessary repair and battery
change operation must only be performed
by the authorized service.
• Do not use the device in extremely cold
or hot, dusty, humid or dry environments.
• The radio frequency emitted by your
device can interfere with some sensory aid
devices.
• Please contact the company manu-
facturing the sensory aids before you
use your device and make sure the radio
frequencies emitted by your device do not
affect the sensory aid.
recommended by the manufacturer can
• Pacemaker manufacturers recommend
4
Page 6

that at least 15cm distance is placed
• Your phone might get hot during normal
between a device and the pacemaker to
prevent a possible interference.
• Do not use your device near devices
or instruments like radio towers or sound
systems which emit radio frequencies.
• Do not unplug the charger by pulling on
the cable. Adhere the rules specified by
hospitals, health institutions, planes and
airports. Do not use your device if its use is
prohibited.
• Do not download software to your
phone from unknown websites. It might
be a malicious software and damage your
phone. Manufacturer is not responsible of
use and charging.
• Close the open applications if your phone
overheats.
• Do not expose your phone or accessories
to open flame or burning tobacco products.
• Unplug the charger from the power
socket and device when not in use.
• Use the AC power source defined in the
charger specifications. Using inappropr-
iate voltage may cause a fire or damage
the charger.
• Do not place your device in places
where the battery and charger can be
damaged due to impact. Otherwise it may
such damages.
cause battery leak, device malfunction,
5
Page 7

overheating, fire or explosion.
the earphones and never text while driving.
• Do not place sharp objects like needles
next to the earplugs.
• Earplugs can attract these objects and
injure you while you use the device.
• Do not leave your phone’s accessories in
places that small children can reach; your
phone contains sharp edges that can cause
injuries and small parts that can detach and
cause choking hazard.
• Uses that will block the air flow of the
device or cause overheating should be
avoided.
• Do not use your phone outdoors in rainy
and stormy weather.
• Do not use the device in gas stations.
• Keep the device 15mm away from your
body or ear while making a call.
• Keep the device away from magnetic
fields.
• Do not use the device when its back cover
is not installed.
• Do not use the camera flash of the device
close to the eyes of humans or pets.
• Do not use the device for an operation
other than its intended use, otherwise the
device warranty will be void.
• Do not plug foreign objects to the inputs
and outputs of the device and the charger.
• Do not use the handset while driving. Use
• Otherwise it may cause explosion or fire.
6
Page 8
• Before use, make sure you read and
WARNING: COMPLIES
understand the user manual.
• Connection may not be established in
any condition during an emergency call.
Only the device should not be relied on for
basic communication.
Environmental Conditions;
• The operating environment of the product
must be 0 - 40º C ambient temperature
and 20 80% relative humidity.
WARNING: To prevent possible hearing
damage, do not listen for long periods on
high volume settings.
WITH ETSI TS 123.038 V8.0.0
AND ETSI TS 123.040 V8.1.0
TECHNICAL SPECIFICATIONS
WHICH CONTAIN ALL
TURKISH CHARACTERS.
Adapter Information
Brand : Jiangsu Chenyang
Electron Co.,Ltd
Model : C-P08
Input : 100-240V 50/60 Hz 0.3A
Output : 5V 1500 mA
7
Page 9

Instruction Symbol
• Copying or duplication by any means of
any text, figure etc. information contained
Wi-Fi (WLAN): This device can be
used in all European countries. 5150 - 5350
MHz band is limited for only indoor use
Important Information Regarding User
Manual
• Some words or phrases are highlighted
with special format in this manual.
• Important instructions must be followed to
prevent damage to data and components
or harming users.
• The information contained in this user
manual is protected by copyrights.
in the manual is forbidden without written
consent of the copyright holders.
• It is forbidden to apply reverse engineering
on or destroy the product supplied with the
manual.
• All visuals in the manual are for reference
only, they might not reflect the facts.
Issues to be Considered About Carrying
and Transportation
• Do not drop the device during transpor-
tation and protect it against impacts.
• The malfunctions and damages that occur
during transportation after the product is
8
Page 10

delivered to the customer are not covered
under the warranty.
Liability Limitation
All the technical information, instructions
of use, the devices operation and maintenance in this manual includes the latest
information regarding your product.
Manufacturing company does not assume
any responsibility for damages and injuries
that might be caused due to not observing
the instructions in this user manual, using
the device outside its intended use,
unauthorized repairs, unauthorized modifications on the device and using spare parts
not approved by the manufacturer.
9
Page 11
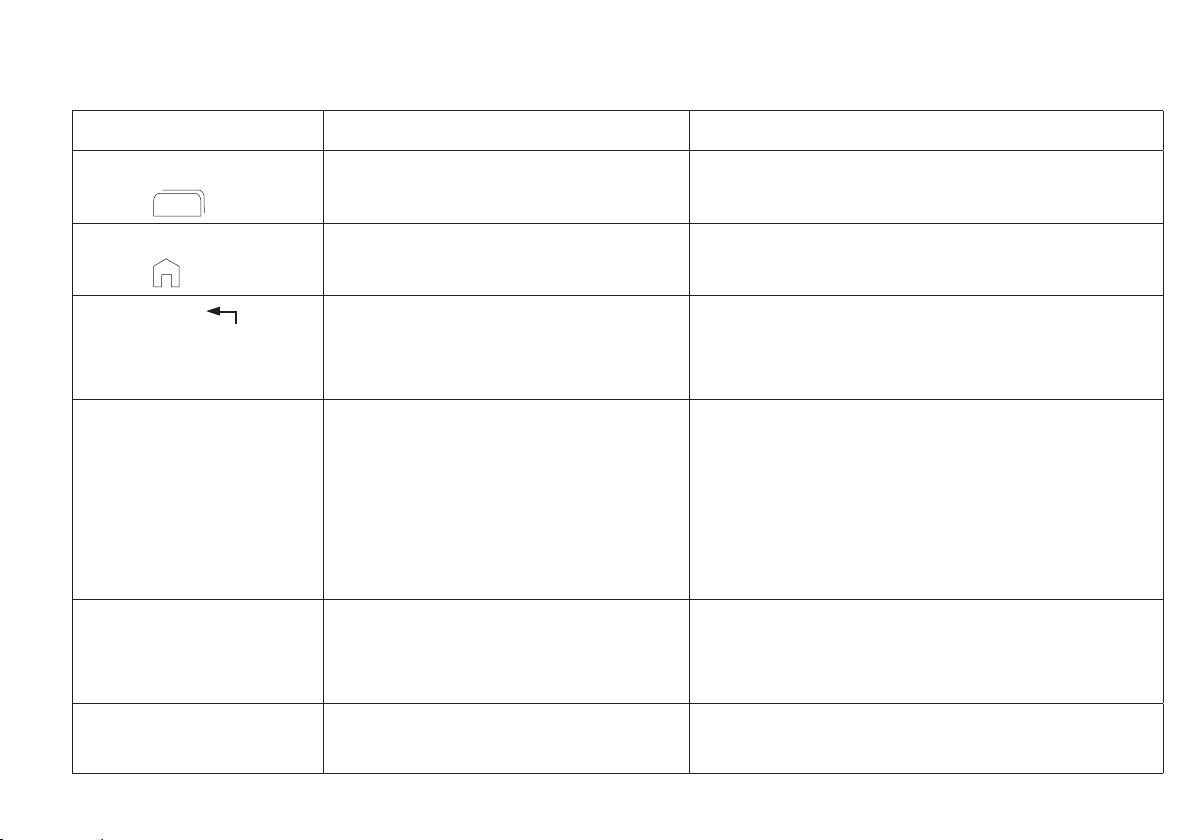
JJ General Duties of Buttons
Key Title One-Click Touch and Hold
Last Applications
Button
Home Screen
Button
Back Button Opens the screen you viewed previ-
Power Button Screen is turned off (darkened) or
Volume buttons Used to increase and
Camera Button Opens the camera and enables
Lists the last used applications.
Opens the the home screen. Google browser opens when home
ously. If the screen keyboard is open,
it closes the screen keyboard.
on with this operation. When ad-
justed from Settings>Accessibility
menu, the same function (turn off/
on function) can be used while making a search.
decrease the volume.
shooting.
screen button is pressed and dragged.
Opens a menu where you can change the
phone profile (sound, silent, vibration),
you can turn off the phone, restart the
phone or activate the plane mode.
Sets the volume to the highest or lowest mode
fast. Also, it serves as zoom +/- in camera
application.
Used to enter camera application quickly.
10
Page 12
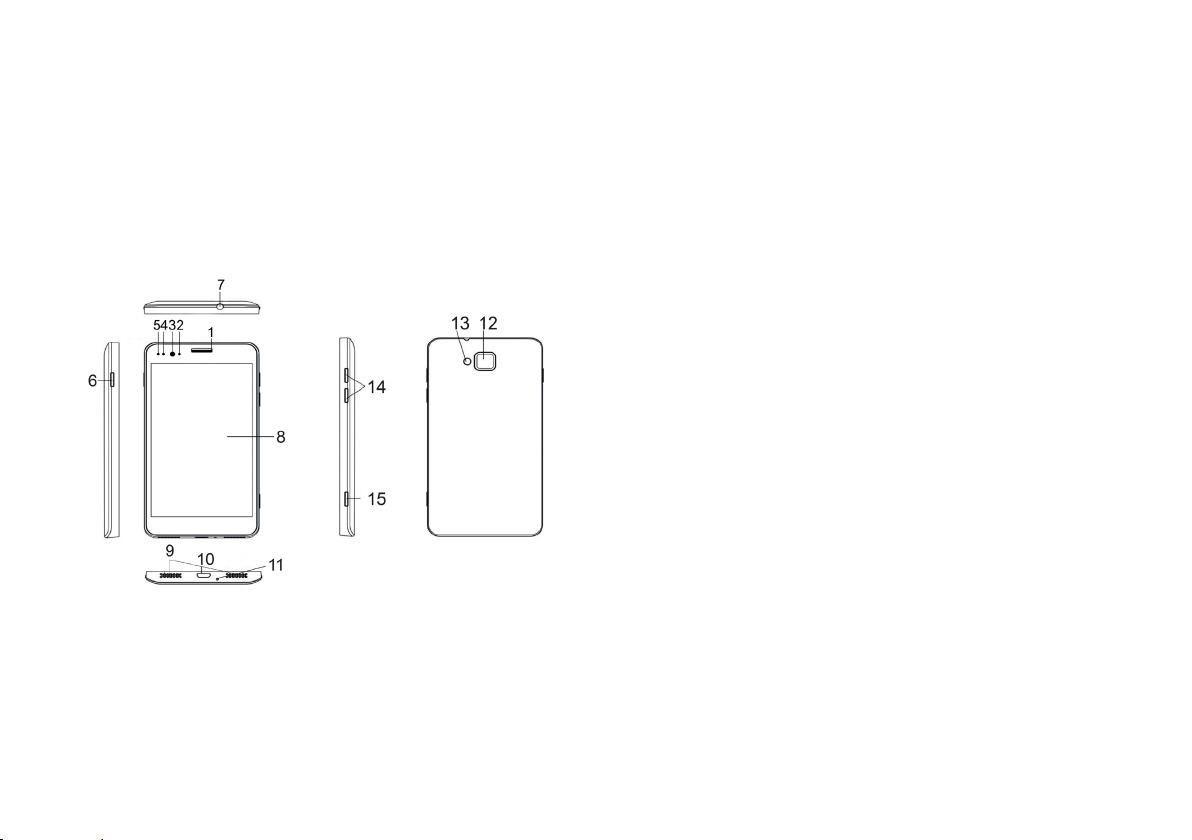
JJ General Appearance
WARNING: The specifications in this
user manual and visuals and the content of
the box can vary depending on model.
1. Earphone Speaker
4. Light sensor
5. Proximity Sensor
6. Power Button
7. Headphones Jack
8. Touch screen
9. Loudspeaker
10. Micro-USB input
11. Microphone
12. Rear Camera
13. Flash
14. Increase/decrease volume
15. Camera Button
2. Notification Light
3. Front Camera
11
Page 13
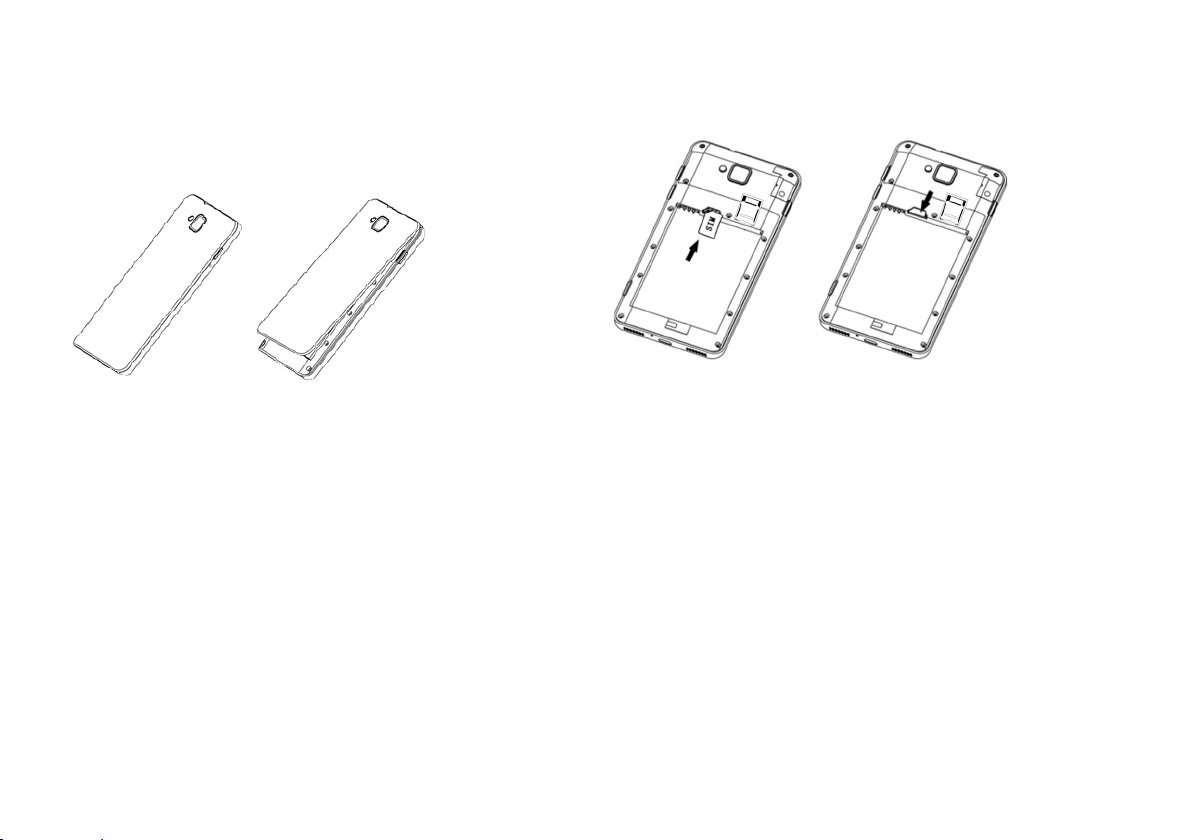
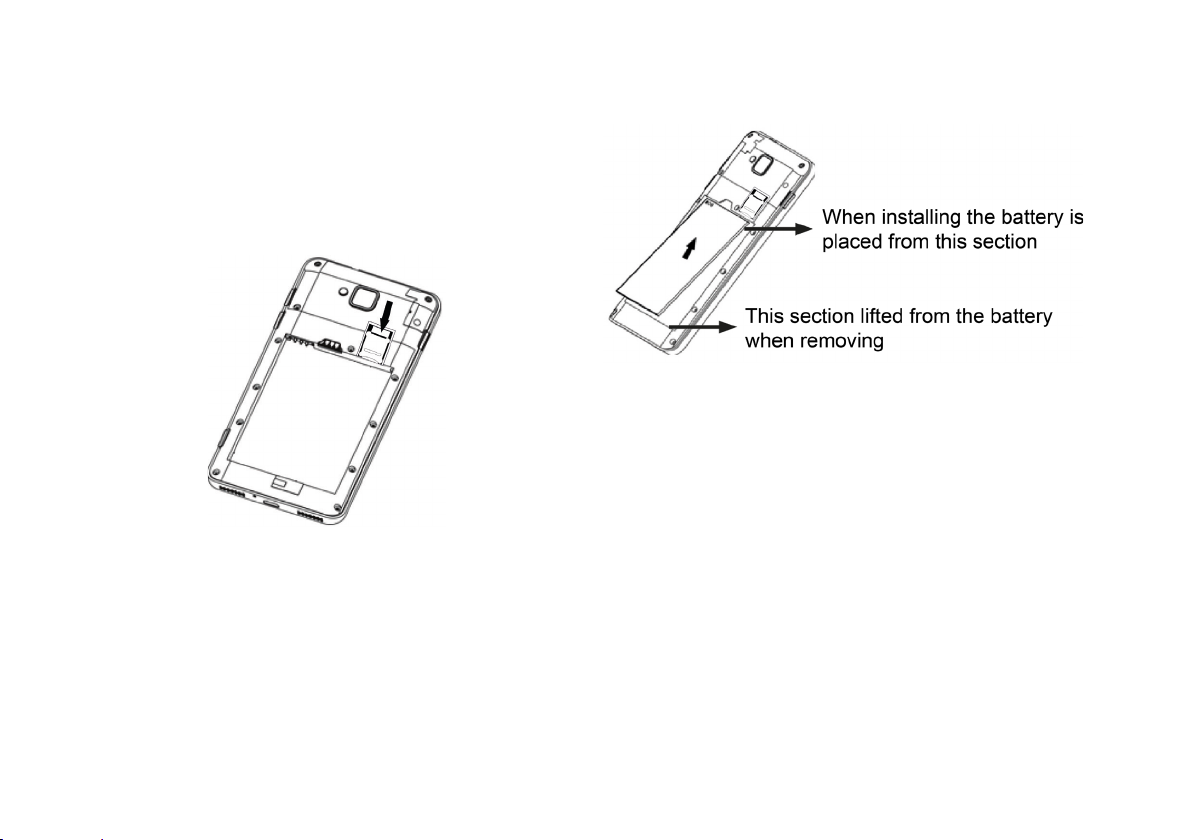
JJ Telephone Use
Opening the Back Cover of the Phone
pull the card downwards.
UIM/SIM Card Inserting and Removing
UIM/SIM Card must be inserted before
making a call. Please turn off your phone
and remove the battery before inserting
UIM/SIM card. Make sure that the metal
part of the chip on the card faces down as
you insert the UIM/SIM Card. To remove
the UIM/SIM card inserted in the phone,
Inserting and Removing SD Card
First, remove the back cover of the phone
to insert SD card. Slide the metal on the
SD card slot towards the camera. Lift the
free slot and insert the SD card into the slot
with the yellow pins facing down. Slide the
slot back in place and lock. Repeat the first
steps to remove the SD card.
12
Page 14
WARNING: SD card inserted/removed
notification and recognition information
requires the smartphone to be turned off
and on.
Inserting and Removing the Battery
Recharging the Battery
It is advised to fully charge the battery
before first use of the phone.
13
Page 15
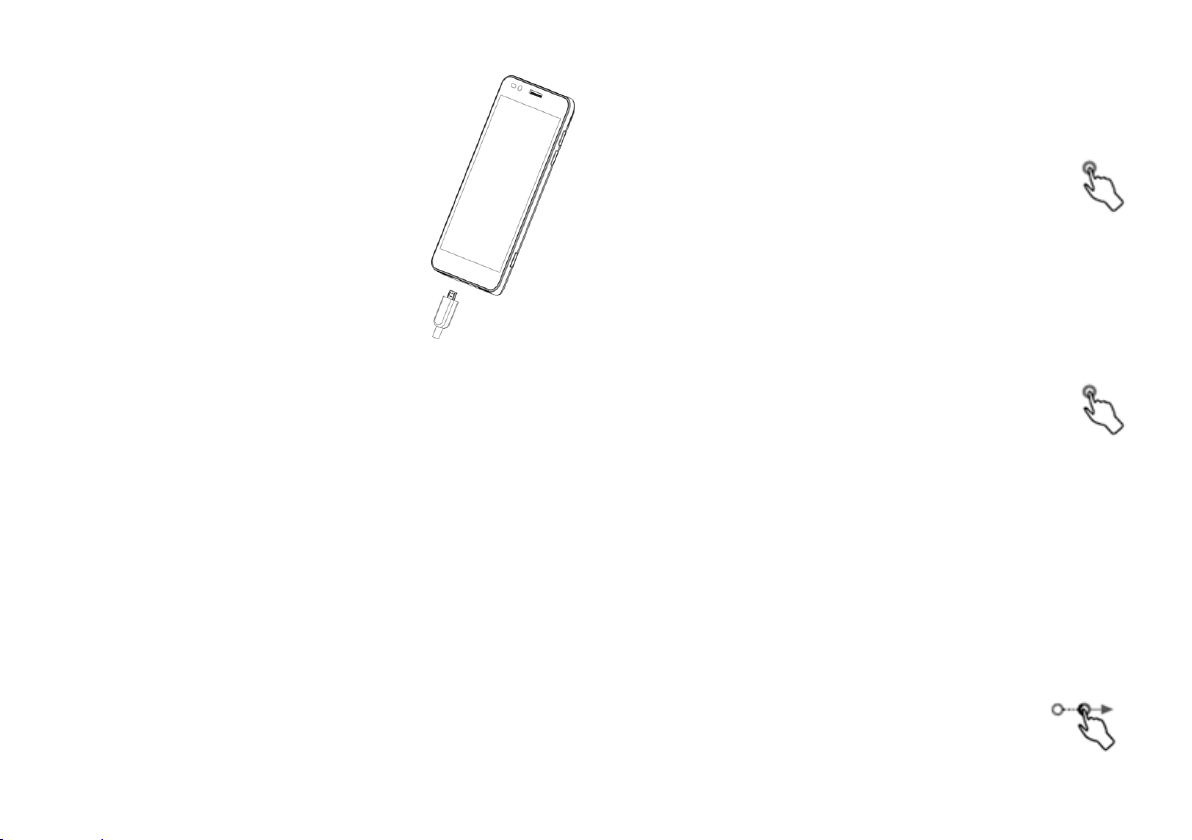
WARNING: When plug-
Light Touch/Short Press/Click
ging the Micro-USB socket
into the phone, the USB
symbol must be up. Phone
will be damaged if it is inserted upside down and
forced.
WARNING: It is risky to make a call when
the battery is being charged.
Using the Touchscreen
You can directly interfere the screen keyboard, symbols and buttons displayed on
the screen by touching them with fingers.
Applications can generally be opened with
a light touch.
Touch and Hold
A symbol on the screen can be lightly pressed without sliding and its options can be
opened.
Dragging
Touch a symbol without lifting your finger
off it, and release when you arrive the
desired destination on the screen. Thus,
you will carry the application shortcut, file
etc.
14
Page 16

Scrolling
and index finger) together, and zoom out
To easily test photographs, web pages and
similar applications, move your finger on
the screen surface without stopping in first
touch (and thus avoid dragging).
Fast Dragging
It resembles dragging but in addition, you
have to slide your finger back and forth
with swift movements.
Resizing & Zooming with Fingers
You can perform the zooming in function
by bringing two fingers (generally thumb
function by sliding your fingers
apart.
NOTE: Generally works in Maps, browsers
and pictures.
Screen Rotation
The function of screen rotating to match
the phone orientation when you turn
the device left or right. Please follow the
Settings> Screen> Auto-rotate screen to
activate screen rotation.
15
Page 17

Proximity Sensor
Turning VSP355g On
Turns off and locks the screen during a call
for the screen not to be affected.
Turning VSP355g On and Off
Please make sure battery and UIM/
SIM card is inserted before you turn on
VSP355g. If you turn VSP355g on without
inserting UIM/SIM card, the “No Sim
Card - Just Emergency Calls” message is
displayed. But you can make emergency
calls and use some functions even if no
UIM/SIM card is inserted in your phone.
1. Keep the power button pressed until the
screen turns on.
2. If you appointed a pin number to your
UIM/SIM card, please enter this pin code.
Info : It might take some time of the phone
to turn on. Please wait.
Turning VSP355g off
1. Keep the power button pressed until the
phone menu is displayed.
2.To turn VSP355g off, select Turn Off and
touch ok.
16
Page 18

Home Screen
Status Bar
From the status bar, you can obtain the
following information by looking at the
symbols which display your phone’s status;
Network signal strength, Battery status,
current time, USB connection status and
data service information.
Notification Indicator
To be able to turn notification indicator on,
pull the status bar down by lightly touching
it. Thus you can access notifications and
wireless network options. When touched
lightly, ‘Back Button’ closes the notification
indicator.
Application Symbols (Screen Shortcuts)
When the desired Symbol is touched, the
related application opens.
17
Page 19

Application Menu
the Symbol to its new location/a new page
Please enter the main Menu list interface
to access the applications.
Arranging the Home Screen
Wallpaper (changing) Setting
At the Home Screen, keep your finger
pressed at a space where no application or
present or on the menu button and select
a wallpaper, for example you can select a
favourite picture as wallpaper.
Relocating
Touch the symbol you want to relocate and
keep it pressed, then drag it to the direction
and release.
Removing the Symbol
Touch the Symbol you want to remove and
keep it pressed, and drag it to the remove
icon that appears on the screen. Thus you
will remove the shortcut of the related
application.
Locking/Unlocking the Screen
Locking the Screen
In the factory settings as default, the screen
turns off and locks itself after a period of
non-use.
(right or left) you want to move it and carry
When the screen is on, it can be locked
18
Page 20

with a single push of the power button.
Writing With The Keyboard
You can continue listening to music or
answering calls while the screen is locked.
Unlocking the Screen
Screen locks automatically when it is not
used for a duration. To unlock the screen,
keep the lock symbol in the centre pressed
and slide it right.
Please adjust the delay time appropria-
te for your use by clicking the “Settings>
Screen> Sleep” options from the menu.
Using the On-Screen Keyboard
When you need to input text or a
Number, the on-screen keyboard appears
automatically.
Determining On-Screen
Keyboard Orientation
Rotate the screen and use the on-screen
keyboard in horizontal or vertical orientation
as you desire.
Call Notification Making a Call
You can easily make a call by clicking on
the call expression .
You can open the numpad by clicking on
19
Page 21

the ‘Call’ Symbol on the application menu
International Call
or the home screen.
Dial the number you want to call or select a
number/contact from the call log and press
the Call symbol.
Fast Dial
Make the fast dial you assigned previously
by keeping the related number pressed.
If that is not possible, keep a selected
button pressed and activate this feature
by selecting a person/Number from the
opening menu.
To make an International Call, keep the
‘0’ button pressed and dial (+). Enter the
international code of the country you
want to call (Ex: +90 for Turkey) and dial
the rest of the number without zero at the
beginning.
Emergency Call
If a SIM card is inserted into your phone
and is working, you can make a call by
dialling the emergency number (Fire
Brigade, Ambulance etc.) If your phone
isn’t inserted any UIM/SIM card or if you
couldn’t open the phone with the pin code,
you can make an emergency call as well.
20
Page 22

Rejecting/Answering Call
All Calls
When another person calls you with the
screen locked, touch the answer symbol,
Answer
and touch the reject symbol
Reject
to
reject the call.
Leaving a Voice Message
With the voice message supported by the
network, you can avoid missing calls. Voice
Message works just like an answering machine and can be controlled.
Call Log
When in Home Screen or in application
menu, press the call button and click on call
Incoming Calls
Outgoing Calls
Missed Calls
You can press the call button to the right of
call history to call the number you desire.
You can check the details by clicking on call
history.
Contacts
Click on the contacts list symbol on home
screen or application menu interface or
display the contacts list from the Contact
List settings in call symbol.
log, and display the recorded call history.
21
Page 23

Call Details
Messages
Touch the contact on call history menu and
then click on the contact profile picture,
you can assign a special ringtone to the
contact from the settings menu on upper
right.
NOTE: Contacts recorded in sim card
cannot be assigned special ringtones.
Contact Settings
Press on a contact and keep pressed to
display the settings menu and select the
desired option.
In the Home Screen or application menu
interface, click on the message icon to see
the message list. You can use your phone
to receive, arrange, write and sent SMS &
MMS (Picture message).
Writing A Message
In the message list interface, click on the
Message button. Also, touching the three
dots on the phone makes message settings
visible.
Sending Text Message
First, enter a number to the recipient part
22
Page 24

of the message/Add a number from the
automatically becomes an MMS message.
last calls list or select one of the contacts.
Then click on the empty message page and
write your message. When your message is
completed, send your message by pressing
the send button (paper plane symbol).
Sending MMS (Picture Message)
MMS allows you to send/ transmit
photographs, (short) videos, PPT files,
email supporting messages, contact cards
and music/sound files. When you add a
multimedia content (photograph, video,
sound and PPT file) or a webpage link,
Before sending the MMS message, enter a
number to the recipient area and write your
message by clicking on the text area.
Open the settings menu by clicking on the
menu icon, select add subject, click on the
paperclip symbol and add a photograph,
video, sound and PPT file. When you are
done, send your message by clicking on
the send button (paper plane symbol).
Messaging
When you receive a new message, the new
message symbol is shown on the status bar.
email address to a normal message, it
Pull the status bar down lightly to open the
23
Page 25

notification panel and view your message
You can open the menu options by keeping
by selecting the incoming message
notification. You can perform the same
action by clicking on the message symbol
on the home screen/application interface.
Messages are ordered according to their
time of sending. If you wish to return to
the Messages list while you write a message,
press the back button or the Menu icon and
select All Messages tab. Inside a message,
when you are in the interface where you
see the Messages written to a person, enter
your message to the content/text bar and
send your message by pressing the send
any conversation pressed in the Active
Messaging list.
• Copy Text
• Forward
• Lock
• Select the text to copy, copy
the message to SIM card
• Message Details
• Delete
Delete All
To delete multiple conversations at once;
delete all messages is selected from the
button (paper plane symbol).
settings symbol on the lower right of the
24
Page 26

Menu - messaging, incoming message
screen.
Notification Settings.
Mail
Search (Magnifier)
Press the search symbol on the lower
right of the message list, write the word
information you want to search to the
search bar, the messages that contain the
text you wrote will be listed.
Settings
The settings under all main title regarding
messages in Message Settings View
mode are; Storage, Short Messages, SMS
Signature, Multimedia Messages and
25
E-mail accounts and e-mail exchanges to
be able to log on to the first mobile data is
turned on or WIFI connection is required .
When using your phone for the first time,
when you perform the setup, you can select
an existing email account or create a new
email account. You can setup a POP3,
IMAP or MS Exchange Mail account on
your phone. If you want to use this feature,
touch the application menu at the home
screen and click on the email symbol. Email
startup assistant will guide you step by step
Page 27

as you create/register your account. Please
Writing and Sending Emails
enter the email address you want to create/
use and its password. If your GSM service
provider does not support email account
service, the phone will recommend you to
make the email setup manually through the
email account interface. Aside from this,
you can enter the send receive settings
information for the email account you want
to create by selecting manual setting
option. When you register, if you enter an
account name (Ex: your name) the name
you entered will be displayed on sent
emails. Finally, click on OK and end the
• Select menu and then email symbol to
access the mail index interface.
• Enter the recipient’s email address to the
To field.
• Enter the mail subject and content in the
Subject field.
• To attach a file to the email, touch the
menu and select add file.
• Finally, touch the plane picture and sent
the mail.
• If you don’t want to send the mail right
away and prefer it to wait as a draft; touch
the menu, select save draft or press back.
process.
26
Page 28

New Event (Add)
Deleting and Editing an Event
You can always add a new event to the
calendar regardless of the view mode
selected.
• When the calendar is open, select menu
and add new event. You can perform the
same action by pressing on the day you
want to add an event to.
• Fill in all the information as you add the
new event. If the new event will continue
throughout the day, select all day. Click on
the approve sign on the screen and finalize
the operation.
Deleting and Editing an Event To see Event
details, select an event and press the Menu
button, select the pencil symbol and edit
or delete the event.
Event Notification
If you set up a notification, this symbol
appears in the notification bar and informs
you that you have a notification. Pull
down the notification panel and touch the
calendar notification list to check the event.
Clock
Select menu and then clock in the home
27
Page 29

screen. Select time zone and time settings
as automatic. To setup an alarm, click on
alarm and complete the setup as desired.
Calculator
You can use the calculator on the phone
for simple and complex mathematical
calculations. To use, click on the ‘Calculator’
icon on the application interface. Calculator
has two interfaces Main Panel for simple
calculations and Advanced Panel for
advanced calculations.
28
There are two methods to switch between
the two panels:
• Hold the Main Panel and slide it left.
• Press the Menu button on the Main Panel
(on upper right, 3 vertical dots ) and select
Advanced Panel from theoptions.
• Copy: Copies the selected numbers.
• Cut: Cuts the selected numbers.
• Paste: Pastes the selected numbers. This
Page 30

option is not displayed if text is not selected
and copier or cut. Perform the calculation
and press the magnifier icon.
you want to make and press the “=” symbol
to finalize it. You can delete the mistyped
numbers and operation symbols with
delete button.
When you type a number and operation
symbol, the following options appear as
you keep the result part pressed.
Internet(Google)
Enter the website you want to visit to the
address bar and click on go. When you are
in search engine (Google, Yandex etc.)
enter the information you want to search
Camera / Digital Video
Your phone is equipped with a camera
to enable you to shoot digital videos and
photos.
Camera
Before using the camera, make sure your
phone has sufficient memory so that the
photographs and videos can be recorded.
Go to the application menu from the
home screen and touch the camera icon.
Camera interface will open and views will
come to the screen. Interface will open in
photograph mode. You can switch to the
29
Page 31

camera mode by touching the camera
Video Recording: Switch to digital video
symbol at the mode selection on lower
right.
WARNING: It is recommended to
turn off autofocus function to get better
performance in moving photograph shoots.
• Touch the camera symbol to switch
between photograph and video.
• Photo is taken when photograph symbol
is pressed.
Digital Video
Video can be recorded easily when video
mode and press the red recording button
to start recording.
• Touch the camera symbol to return to
photograph mode.
Videos
To see the recorded videos; you can click
on the window appearing on lower left
while in video mode. You can also access
your videos from the gallery.
Photos
To see the recorded photos; you can click
mode is activated from photograph mode.
on the window appearing on lower left while
30
Page 32

in photo interface. You can also access your
• First, upload some music to telephone
photos from the gallery.
Music
Some features of Google Play Music
application is as below:
• Artist: Sorts the songs according to artist
name.
• Album: Sorts the songs according to
album name.
• Songs: Sorts all songs alphabetically.
• Play List: The last added music lists and
the lists that contain voice recordings.
• My Library
memory or SD card.
• Enter the music player application and
select the music you want to play and then
select play.
• You can adjust volume by using the
phone’s volume buttons.
• When you click the menu in the music
player interface, you have the following
options:
• Google music play: Where all music
loaded in your phone are located.
• Shuffle Play: Plays the songs in random
order.
1-Playing music:
• Add to Playlist: Adds a song to playlists.
31
Page 33

• Delete
• Sound Effect
AMR, AAC+, OGG, etc.
ES File Manager
WARNING: To avoid hearing loss, please
do not listen to music with high volumes for
prolonged times. It is appropriate to listen
with a medium level of volume so that the
Music Player does not damage you.
Figure 1-Warning Symbol
(IEC 60417-6044)
Music player supports the following music
file formats: WAV, MP3, MIDI, AAC,
With ES File Manager/Assistant/ Browser,
you can arrange all the files on your SD
card and your phone memory.
You can access the sub menu by pressing
the MENU button: Multiple Selection
(you can select more than one), Settings,
Refresh, Rotate, About and Exit.
Connect to Computer via USB
You can use USB data cable for file transfer
between computer, phone and your
phone’s memory card.
32
Page 34

Connecting and Disconnecting
Disconnect from Computer
Phone and Computer
Connecting the Phone to Computer
• You can connect the phone to computer
with the date cable that comes out of its
box.
• When computer connection is estab-
lished, both devices receive a notification
of connection.
• Touch the warning notification and
confirm that USB connection is made.
• From the options, select Media Device
(MTP) and allow data transfer.
You just have to unplug the cable to
disconnect.
Downloads
Qualifies the received/downloaded files by
connecting to internet or another device.
Wi-Fi
You can see the Wi-Fi connection from
the notifications screen or the Wi-Fi tab
on the settings menu. To activate the Wi-
Fi connection, slide the button to its right
and turn Wi-Fi feature on or off. Click on
33
Page 35

the network you wish to connect from
mobile data connection, slide the button to
curront accessible networks list. Also, you
can update the list by touching the “scan”
option from the three dots menu.
Bluetooth
It is a type of wireless connection. It allows
data transfer. It is activated from the
notification screen, and from settings menu
in more detail. The scanned devices can be
seen from the settings menu.
Mobile data
You can see the mobile data connection
from the notifications screen or the mobile
its right. You can use internet with the GSM
network when mobile data is activated.
JJ Cleaning and Maintenance
• To clean your phone, remove all plugged
cables and keep the power button pressed
for a few seconds. Shut down your phone
by approving the notification window. To
clean the dirt and stains, use a cleaning
cloth (not provided with the product).
• WARNING: Do not pour liquids on the
screen.
• WARNING: Do not use screen cleaner,
data tab on the settings menu. To activate
home cleaning materials, aerosol sprays,
34
Page 36

solutions, alcohol, ammonia or abrasive
JJ Troubleshooting
materials to clean your phone.
Storage
• If you will not use your phone for a
prolonged duration, remove your micro SD
card, SIM card and battery from the phone,
and then place your phone in a protective
case and store in an adequately ventilated
dry place without sunlight.
If you detect an abnormal situation with
your phone, you can try to solve the
problem following the explanations in the
table.
If your device still does not work normally,
contact Vestel Contact Centre (+90 44 44
123).
35
Page 37

PROBLEM CAUSE REMEDY
Unable to start
the phone
Starting the Phone and Displaying
Password Screen
You may not
have pressed the
power button
long enough, the
battery might be
incorrectly placed
or you may have
run out of battery.
1. Ensure that you keep the power button pressed for at
least 2 seconds.
2. Ensure that the battery is placed correctly. Remove
the battery and reinstall it correctly and then press the
power button again.
3. Battery might have run out of energy. Please recharge.
1. Entering the password for phone lock: If the phone
lock is active, you must enter this password to use the
phone.
2.Enter PIN code: Enter this password if an active pin
code is assigned.
3.Enter PUK Code: GSM card locks up when you
enter PIN code incorrectly 3 times. To unlock, enter the
PUK code which is provided when you purchased the
GSM card from the operator.
36
Page 38

UIM/SIM card
1.The golden coloured
1.Thoroughly clean this metal contact part with a cloth.
error
Not Connecting
to Network
Unable to make
calls.
part of UIM/SIM card
might be dirty.
2.UIM/SIM card
might be inserted
incorrectly.
3.UIM/SIM damaged.
1.Weak Signal.
2.No Network Service
3.UIM/SIM card
invalid.
1.Press the call button.
2.May be out of
charge.
3.UIM/SIM card invalid or malfunctioning.
2.Insert in correct orientation as specied in UIM/SIM
card user manual.
3.Contact your GSM service provider.
1.Proceed to a location where you can pick up a stronger signal.
2.Go to a point where the service provider provides
this service.
3.Contact your GSM service provider.
1.Make sure you pressed the call button.
2.Make sure your phone is charged enough to make a
call.
3.Make sure your UIM/SIM card is valid/operational.
37
Page 39

Low Call/Voice
1.Phone is muted.
1.Make sure the phone volume is up.
Quality
Unable to
Receive Calls
Other Side
Unable To Hear
Yo u
2.You are in a location
with weak
network signal.
1. Your phone is
turned o or not
connected to GSM
network.
2. Your charge is not
enough.
3. Your UIM/SIM
card does not work.
1.Microphone exit
blocked or closed.
2.Keep the microphone hole close
to your mouth.
2.You might be using the phone in locations with weak
network signal like ground floor, tunnel, places with
intense radio signals or high buildings.
1.Make sure your phone is turned on and connected to
GSM network.
2.Make sure your phone is charged enough to receive
a call.
3.Make sure your UIM/SIM card is valid/operational.
1.Make sure your microphone exit is not blocked/closed.
2.Make sure the microphone hole at the lower part of
your phone is close to your mouth.
38
Page 40

Phone Not
1.You are not connec-
1.Make sure you are connected to the network.
Connecting
To Internet
Short Stand-By
Time
ted to the network.
2.Network connection is faulty.
3.You don’t have
internet service.
4.Phone can’t receive
signal.
1.You have low signal.
2.Your battery is damaged.
2.Check the Network connection settings of your
device.
3.Make sure you have UIM/ SIM card GSM network
internet service.
4.Try to reconnect later in another place.
1.The Stand-By time of the phone depends on network
system settings. In low signal areas, your phone spends
more energy to reach the network signal. Please move
to an area with better signal or turn o the phone temporarily to conserve the battery energy.
2.If battery requires a replacement, install a new battery.
39
Page 41

Not Charging 1.Check your conne-
1.Your phone may not be receiving power due to incor-
ction.
2.There might be dirt
in battery contact or
the charger slot.
3.Socket might be
faulty.
rect/poor connection.
2.Dirt accumulating at inlets. Clean the battery contacts or charger input.
3.Charge the phone in horizontal position. Try charging
from a dierent power socket.
4.Please replace with a new one.
4.Battery or charger
might be malfunctioning.
You can access the detailed user manual of the device from the website
www.vestel.com.tr .
40
Page 42

JJ Technical Specifications
Model name
Dimension
Weight
Processor
Internal Memory
RAM
Removable
Memory
Display
VSP355g
(L)152.5mm*(W) 77.5mm*
(T)9.65mm
180 g
MSM8926 1.2 GHz
Quadcore
16 GB
1 GB
Up to 32 GB
5.5” qHD (1280x720)
GSM
Frequency Band
2G
GPRS Ye s
EDGE Ye s
UMTS
Frequency Band
Carrier
3G
HSDPA 42 Mbps
HSUPA 5.76 Mbps
WiFi WLAN
Revision
LTE
LTE
Frequency Band
NFC Ye s
NFC
Safe Element No
Front 2MP
Front
Rear 13MP
Battery Kapacity
850/900/1800/1900
900/2100
802.11 a/b/g/n
1800/2600
2000mAh
41
Page 43

• Specifications and this manual may be
devices with maximum exposure limit
modified without prior notification.
• Complies with AEEE Regulation.
This appliance complies with
the respective EU Directives.
Specific Absorption Rate
(SAR) Certificate Information
Your device complies with the European
Union (EU) standards that limits people’s
exposure to the amount of radio frequency
(RF) energy emitted by radio and
telecommunication equipment. These
(named Specific Absorption Rate or SAR)
of 2,0 W/kg. After the tests, the recorded
SAR value for this model is 0,324 W/kg.
Since the device is designed to emit RF
energy enough to transmit a signal to the
nearest base station, it is possible that the
real SAR value will be much less than this
value during normal use. Since your device
automatically decreases energy emission
whenever possible, the total amount of RF
energy you are exposed to also decreases.
The Declaration of Conformity at the
back of this manual shows that your
standards prevents the sale of mobile
42
device complies with European Radio and
Page 44

Terminal Telecommunication Equipment
Disposing of your appliance in
(R&TTE) directive.
This Device Can Be Used In
The Following Countries
AT BE CE CZ DK
EE FI FR DE GR
HU IE IT LV LT
LU MT NL PL PT
SK SI ES SE GB
IS LI NO CH BG
RO TR
an environment-friendly way
(Waste Electrical and Electronic
Devices) (For countries with
separate collection systems)
This sign on the product, its
accessories and related documents show
that the product) its accessories (ex: charger,
USB cable) must not be disposed of with
other domestic waste. Please separate
this from other waste types to prevent the
harmful effect of waste not being disposed
of properly has on environment and human
health, and ensure it is recycled so that it
can be re-used sustainably. Home users
43
Page 45

should contact the dealer they purchased
Disposing of Batteries in Correct Way
the product from or the legal authority
for detailed information on where and
how they will send the product for an
environmentally safe disposal. Business
users should contact their supplier and
check the provisions and conditions of the
purchasing contract. This product and its
electronic accessories should not be mixed
with other commercial wastes for disposal.
(For countries with separate
collection systems) Sign on
the battery, manual and its
packaging and its accessories must not
be disposed of with other domestic waste.
Chemical symbols like Hg, Cd or Pb show
that the battery includes mercury, cadmium
or lead over the reference value stated in
EC Directive 2006/66. The battery that
comes with this product cannot be replaced
by the
user. Please contact your service provider
for detailed information regarding
replacing. Do not try to remove the battery
44
Page 46

or throw it into a fire. To not remove, crush
battery. Use screen brightness at a low
or pierce the battery.
If you intend to dispose of the product,
the necessary measures will be taken in the
waste collection area fort he re-processing
and repair of the product, including the
battery.
Recommendations for Energy
Saving
• Turning bluetooth, wifi and 3G off when-
ever your are not using them conserves
energy.
• Your mobile phone’s screen consumes
setting for energy efficiency.
• Never place your phone under a heater
or direct sunlight. Because extreme heat
both decreases the life of your battery and
causes other problems.
Packaging Information
Product package is made from recyclable
materials. Do not dispose of the packaging
waste with domestic or other waste,
dispose of it in packaging collection points
specified by administration.
the largest amount of
45
Page 47

The lifetime of your device stated and declared by the Consumer Protection and Market Surveillance
General Directorate under T.R. Ministry of Customs and Commerce (the period for retaining parts required
for the proper functioning of the device) is 5 years.
 Loading...