

Page 1
(OM~IERS MANUAL)
2-37-l Kamiume. &tn,wya-ku, Tokyo 154
Phone : 03-3412-7011
VWTAX MUSICAL ELECI-RONICB CQRP.
2&Q Cardelia Rd. Suite 120 kCnZald. CA 94595 U&AA.
Plmw ; 707-427.1020
VFSTAX hmme) Lid.
18 St. Ch&to~har*‘B Road Ha&am, Su
Phone: (0) 1428-653117 FL : (0) W-66%1
Pax : KM412-7013
Far : 707-421-3039
GV27 \DQ Eh@srrd
Page 2

[FEATUREs)
l The PDX-a1 is a high end performance turntable
designed Ior the beginners and the professionals with
the same basic quality as the beet selling turntable, the
PDT-5000.
l FAST STARTS BY HIGH TORQUE
Using high-torque direct motor, the in&Dal motor’
delivers l&g-cm start torque. The high-torque gives
quick starts that enables the platter to reach 33-H rpm
within 0.5 second.
l FLOATING SUSPENSION TONEARM
The tonearm is mounted on the deck plate using a
floating suspension system with the drive moter.
Acoustic feedback is minimised by this advanced system.
l QUARTZ-PHASE-LOCKED CONTROL
The pitch is variable continuously by up to approximately
f 10% and returned automatically to the predertermined
speed (38-x or 45 rpm) by on/off switch even if the
pitch control is employed.
e NON-CENTER-CLICK PITCH FADER
Pitch fader has no center click, and it allows delicate
adjustment easily. The PDX-al features detachable pitch
control fader for eatic of replacement when it is worn
out.
# MJNI LIGIIT FOR ILLUMINATING STYLUS(OI?TIONAL)
The PDX-al provids detachable small stylus illuminator
for illuminating the stylus tip during play for low-light
conditions.
l OTHER FEATURES
Quick stops are achieved with an electronic braking
system.
Remote control jack is provided for controlling
START/STOP by other equipment like a fader start etc.
( SAFETY INSTRUCTIONS )
1. Avoid placement of the unit where it will be
exposed to the direct sun light or where
ventilation is inadequate.
2.Avoid places where there is water or
humidity.
3. Don’t allow water or any foreign object to
get incidc of thia unit.
4. Place this unit away from heatemitting
appliances.
5. Place the unit on a stable, holizontal
position, where there is little or no vibration.
6. Check the voltage rating of this unit before
connecting the unil to a power supply.
7. fower supply cords should be routed so that
they are not likely to be walked on or
pinched by items placed on or against them,
paying particular attention to cords at plugs.
convenience receptacles, and the point where
they exit from the aplliance. Never take hold
of the plug or cord if your hand is wet, and
always be sure to grasp the plug body when
connecting or disconnecting.
8. Never attempt repairs yourself ;
A. The power supply cord or the plug has
been damaged
[BEFoRE)
#CAUTION : Never connect the AC power plug before
l CHECKLIST OF PARTS :
This unit includes the f&wing par& ;
1. Turntable Unit
2. Turntable Platlor
3. Slip Mat
4. Shell Weight
5. Headshell
assembly has been completed.
6. Balance Weight
7.45-rpm Adaptor
8. RCA Cable
9. GND Cable
-l-
B. iijeots have fallen or liquid has been
spilled into the appliance
or
C. The appliance has been exposed to rain
D. &, appliance has been dropped or the
enclosure damaged
E. Gie appliance does not appear to operate
normally or exhibits a marked change
in preformance.
9. Except for adjustments explained in the
operating instructions. do not attempt any
repairs yourself. Be sure to request service
from a qualified technician or your dealer or
nearest service center,
Page 3
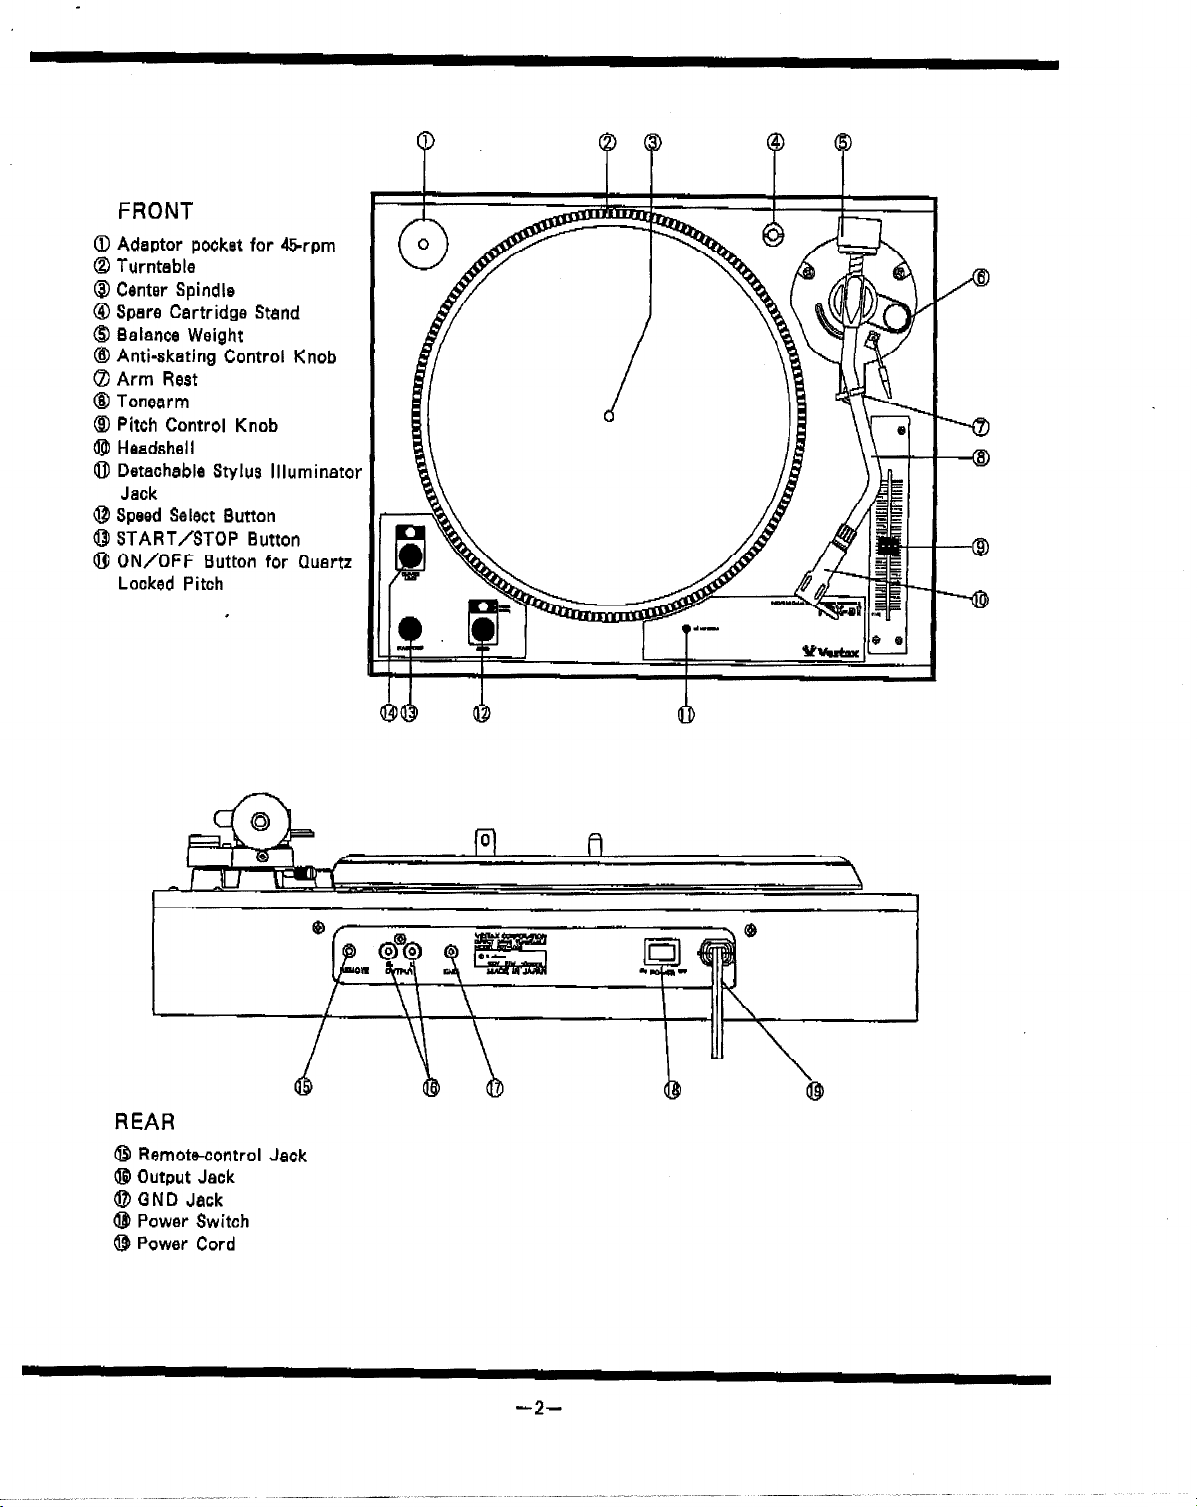
0 Adaptor pocket for 45rpm
0 Turntable
0 Center Spindle
@ Spare Cartridge Stand
6) Balance Weight
@I Anti-skating Control Knob
&1 Arm Rest
@I Tonearm
(g> Pitch Control Knob
@ Headshell
0 Detacheble Stylus Illuminator
Jack
@ Speed Select Button
69 START/STOP Button
@ ON/OFF Button for Quartz
Locked Pitch
.
REAR
@ Remotecontrol Jack
‘Q Output Jack
0 GND Jack
@ Power Switch
@ Power Cord
___-. ~___ ._~~ .~_.
-2-
Page 4

ASSEMBLY AND SET-UP
Installation of Turntable Flatter
1. By placing the turntable platter on the center
spxndle, the platter adjusts to match the spindle by
itself
2. Place the slip mat on the platter.
3. Extra care should be taken to avoid damaging
magnet by dropping it.
Installation of Balance Weght
Place tlrw bdww
weight on the rear shaft of the
tonearm (see fig. 1)
winding the balance weight clockwise.
Installation of Cartridge
In accordance with the instructions of the cartridge,
m&all a cartridge properly.
In caee the cartridge weight is less than 8g, it is
necessary to fix the attached shell weight on the
cartridge.
Connect the lead wires to the cartridge terminals
The terminals of rnoet cartridges are color corded’
Connect each lead wire to the terminal of the same
color.
Red
Green CR-)
.*...*e*** *-Right Channel t
(R+)
***m.*-*-sowRight Channel m,.*.*m*.*e*Left Channel +
be..*..***a*Left Channel -
Adjustment of Overhang
Use a rule, etc. to carry out correct adjustment,
As shown in the illustration, overhang indicates the
distance from the stylue tip to the center of the
turntable spindle when the stylus tip falls on the
extension of e straight line from the pivot of the
tonearm to the center of the spindle. If the overhang
adjustment ls not properly made, the stylus
be able to trace the record grooves correctly.
will not
1. Loosen the two cartridge mounting screws.
2. Position the tonearm over the spindle.
3. Slide, the cartridge forward or backward until the
position of the stylus tip corresponds to the
specified distance from the center of spindle (see
illustration).
4. After, obtaining correct overhang,
tighten
the two
cartrIdge mounting 8~2-9~~ firmly.
Note : Be shure not to touch stylus during adjustment
with finger.
Adjustment of Horizontal Zero Balance
1. Release the tonearm from the armrest to free.
Note 1 Be careful not to touch your hger to the
stylus tip.
2. Turn the balance weight clockwise or counter
clockwise until the tone arm is balanced
horizontally.
3. (see fig. 4)
aExcessive backward retreatment of the
balance weight causes the cartridge side
to be r&d
b-The balance weight and cartridge are
balanced, the tonearm is held horizontal.
c.Excessive forward advancement of the
a
balance weight causes the cartridge side
to be lowered.
LEAD wmd
NUT,
4)
4. Return the tonearm to the armrest.
-3-
Page 5

Adjustment af Stylus Pressure
1. Hold the balance weight with one hand as shown in
the drawing (see fig. 5 1, and rotate only counter
ring to bring the numeral “0” of the ring into
alignment with the center line an the tonearm tear
shaft (see fig. 5).
Note : In case the balance weight moved, do the
adjustment of holiaontal zero balance again.
5
6.
i:
%3
B
4
I
5 6 7.5 a e
4
Anti Sketinn
Conical stylus
Counkr ring
balance weight
2. Turn the balance-weight to prosent the reading on
the gauge to the designed stylus force of your
cartridge kee fii. 6)
As the counter ring moves in step with the balance
weight, proper stylus presauro can be selected by
reading the graduated ring directly.
Adjustment of Anti-skating Control
Turn and set the anti-skating control knob to the
Bame value as the stylus pressure (see fig. 7).
(fig. 7)
,
J
Center line
-4-
-
Page 6

STYLUS ILLUMINATOR (Detachable Mini Light)
The small light for the stylus illumination is
available as an optional extra.
REMOTE CONTROL
In cage you wieh to control the START/STOP with
using external equipment like a foo~switch etc., input
jack is provided at the left side of rear panel.
QUARTZ LOCKED CONTROL AND PITCH ADJUSTMENT
1. Whan the indicator lamp is lit ehowing
the
uporating condition tar the pi-e-determined spec.d
(33-H Or 45 rpm).
Z.During the operation of m-e-determined speed, pitch
control fader can not be functioned. And once press
the quarts control button, the indicator lamp is put
out, the speed can be adjusted by pitch control
fader.
3. During the operation of above 2., if you want to
change the speed to the pre-determined one, press
the quartz butlon. The indicator lamp lights and
speed will become pre-dotermined one even when
the pitch control fader not in the center.
4.Pitch control is poseiblo up to a maximum of
approximately rtlO%. Adjust the Pitch by sliding
the Pitch Control Fader.
ACOUSTtC FEEOEACK AND HUM
Acoustic Feedback is uaally caused by vibration of
speakers, which affects the ecnsitive cartridge. If such
a phenomenon occurs,
relocate the turntable or
speakers as far apart from each other as possible.
Hum ie usually caused by nearby appliances that use
transformar or thermostat. Relocating the unit
further away from the noise sources will readily
solve the problem. Hum may also be produced if the
unit is not properly grounded.
grounding wire extending from the unit is securely
Make sure the
connected to the GND terminal on the amplifier or
mixer.
INSTALLATION
Do not place the unit where it is exposed to direct sun
bght, high temperature or humidity to prevent
pesslble troubles.
Place the unit in a stable and holizontal position,
where there is little or no vibration.
Locate the unit as far away from the speakers as
possible and isolate the unit’ from sound radiation
from them.
rf the unit is placed too close to the radio,
xnterference to AM/FM reception may result.
CONNECTION
COIU
lect the output to inputs of amplifier or mixer.
WHITE(t)
RED(R)
GND
Note
Be sure to connect firmly-the GND terminal t,o
. . . . . ..I . . . . . m.L
..v . . . . . . . . I, . . . . . R
..*... . . . . . . . . ..I. . . . . . . GNl-j
ChmnDl
Chansl
the amplifier or mixer, or a power source
HUM will result..
Relationship between Pitch and Fader Position
PITCH WY.-
-Ii-
Page 7

OPERATION
LPlace the record on the turntable mat.
2.Prese the power switch button provided at rear
panel to turn “ON” position.
%&move the stylus protector if cartridge is
detachable one.
4.Puah the start/stop button, then platter will start
to turn.
S.Move the tonearm position over the record.
&Put it down to the record, and play wili begin.
7.Move the tonearm to the armrest when play is
finished.
&Push the start/stop button, and platter will stop.
S-Turn off the power.
Note : A manual method of operation has been
chosen for the playing of records instead of
using “Cue Levers” _
The unit has been set to select 33-X rpm
automatically when the power button is
pressed to on. Push the 45 rpm speed select
button if you play 45 rpm record.
NOTES
I Before detaching or attaching the headshell, be sure
to turn the power of the amplifier or mixer off.
0 Detaching or attaching of the headehcll with the
volume control turned up may cause damage to the
speakers.
a Do not turn “ON” the power supply, wi’ch the
lurntable platter detached.
l When play is finished, be sure to secure the
tonearm with the arm clamp. Afler play is
finished. if the unit ie not+ to he IV& for aomu time,
care should be taken to secure the tonearm to
protect the stylus tip. For the same reason, the
stylus protector should also be attached.
l Wipe the headshell terminals from time to time.
Dust and dirt at the headshell terminals may result
in increased “HUM” noise or intermittent sound.
Use a soft dry cloth to clean the headshell
terminals.
l Dust and dirt should be carefully removed from
stylus tip or records. Dust and dirt on the stylus
tip or record may not only result in deterioration
of tone quality, but alao cause undue wear of the
record and the stylus tip itself.
l ‘I’raneportatian of the unit to distant places for
removal and the like. Pack up the unit in the
reverse order to that for unpacking, using the
packing materials furniehed when the unit was
purchased. Should there be no such packing
materiala, be sure to take the foIlowing stepe.
Remove the turntable platter together with the
turntable mat, and wrap it up to prevent any
damage to them. Return the tonearm to the arm
rest, and affix it with tape or the like. Remove
the balance weight and the headshell/cartridge
from the tonearm and then wrap them up, to
avoid and damage to them. Wrap up the
turnrable base with a blanket or soft paper also
to prevent any possible damage to it.
TURNTABLE
ARM
SPECIFKATION
MOTOR
STARTING UP TIME
DIRECT DRIVEQWARTZ
o.sR?c (33Wrpm) 7v
STARTING TORQUE 1.&g * cm
BRAKING SYSTEM
ELEmRONIC BRAKE
RAMBLE (S/N RATIO) 76dB (IEC 98A WTD)
SPEED
PITCH
33!&-pm, 45rpm
&lo% (DETOUCHABEE 1oonDn FADER)
wow Br. FTn-rrER 0.03% W. R. M. 6.
TYPE
EFFECTIVE WGTH
OFFSmANGLE
OVERHANG
STATIC BALANCE SYSTEM
23omo J;lmn
22'
16mn
TRACKING ERROR A-2 22' -4-Q' 32'
ANTI SKATING
1 STYLUS PRIBSUAE
1 LIGHT(OPTKONAL,)
SPEEDLOCK
REMO'PE
DYMENSION
WEIGHT
POWER
ADJUSTMENT RANGE O-7.0 B
ADJUSTMENT RANGE O-‘I.08
1 DETOUCBABLE MINI LIGHT DCl2volt lOOmA
QUARTZ LOCK
MOMENTARY START (MINX JACK)
~W~460..X(N)15OnunX(D~370~
9.5ap
AC117V or 230V
-6-
 Loading...