

Page 1

Mobile Phone
User Manual
s758
1
Page 2

LEGAL INFORMATION
Copyright © 2012 SMTX
All rights reserved.
No part of this publication may be quoted, reproduced,
translated or used in any form or by any means, electronic or
mechanical, including photocopying and microfilm, without
the prior written permission of SMTX Corporation.
SMTX Corporation reserves the right to make modifications
on print errors or update specifications in this guide without
prior notice.
Version No.: R1.0
2
Page 3

Contents
3
Page 4
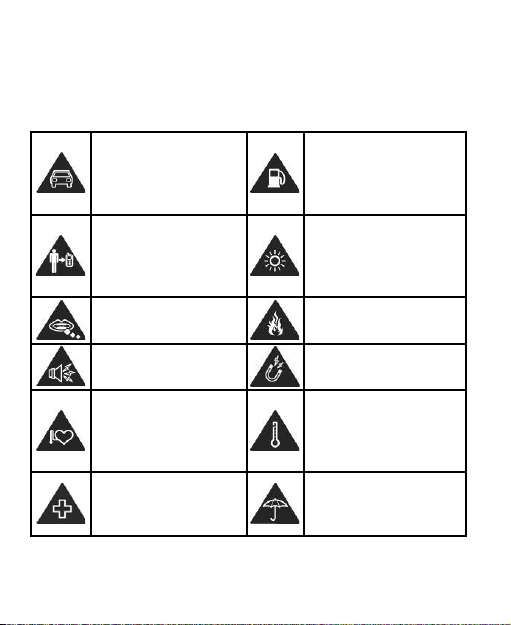
For Your Safety
General Safety
Don’t make or receive
handheld calls while
driving. And never text
while driving.
Don’t use at petrol
stations.
Keep your phone at
least 15 mm away from
your ear or body while
making calls.
Your phone may produce
a bright or flashing light.
Small parts may cause
a choking.
Don’t dispose of your
phone in fire.
Your phone can
produce a loud sound.
Avoid contacting with
anything magnetic.
Keep away from
pacemakers and other
electronic medical
devices.
Avoid extreme
temperatures.
Switch off when asked
to in hospitals and
medical facilities.
Avoid contacting with
liquids. Keep your phone
dry.
4
Page 5
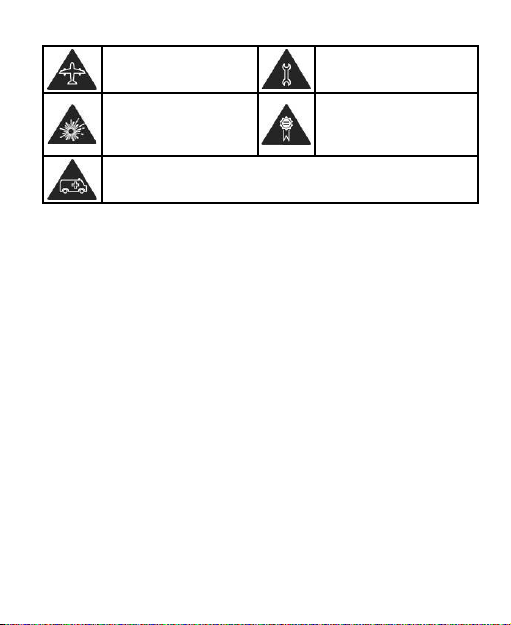
Switch off when told to
in aircrafts and airports.
Don’t take your phone
apart.
Switch off when near
explosive materials or
liquids.
Only use approved
accessories.
Don’t rely on your phone for emergency communications.
Driving
Full attention must be given to driving at all times in order
to reduce the risk of an accident. Using a phone while
driving (even with a hands free kit) can cause distraction and
lead to an accident. You must comply with local laws and
regulations restricting the use of wireless devices while
driving.
Operating Machinery
Full attention mu st be given to operating the machinery in
order to reduce the risk of an accident.
Product Handling
General Statement on Handling and Use
You alone are responsible for how you use your phone and
any consequences of its use.
5
Page 6

You must always switch off your phone wherever the use of
a phone is prohibited. Use of your phone is subject to safety
measures designed to protect users and their environment.
Always treat your phone and its accessories with care
and keep it in a clean and dust-free place.
Do not expose your phone or its accessories to open
flames or lit tobacco products.
Do not expose your phone or its accessories to liquid,
moisture or high humidity.
Do not drop, throw or try to bend your phone or its
accessories.
Do not use harsh chemicals, cleaning solvents, or
aerosols to clean the device or its accessories.
Do not paint your phone or its accessories.
Do not attempt to disassemble your phone or its
accessories, only authorized personnel can do so.
Do not expose your phone or its accessories to extreme
temperatures, minimum - [5] and maximum + [50]
degrees Celsius.
The phone's normal operating temperature is -20 ~℃
60 .In order to ensure the normal phone functions, do℃
not use this phone outside the temperature range.
Please check local regulations for disposal of electronic
products.
Do not carry your phone in your back pocket as it could
6
Page 7

break when you sit down.
Small Children
Do not leave your phone and its accessories within the
reach of small children or allow them to play with it.
They could hurt themselves or others, or could accidentally
damage the phone.
Your phone contains small parts with sharp edges that may
cause an injury or may become detached and create a
choking hazard.
Demagnetization
To avoid the risk of demagnetization, do not allow electronic
devices or magnetic media close to your phone for a long
time.
Electrostatic Discharge (ESD)
Do not touch the SIM card’s metal connectors.
Antenna
Do not touch the antenna unnecessarily.
Normal Use Position
When placing or receiving a phone call, hold your phone to
your ear, with the bottom towards your mouth.
7
Antenna
Page 8

Air Bags
Do not place a phone in the area over an air bag or in the air
bag deployment area.
Store the phone safely before driving your vehicle.
Seizures/ Blackouts
The phone can produce a bright or flashing light.
Repetitive Motion Injuries
To minimize the risk of RSI when texting or playing games
with your phone:
Do not grip the phone too tightly.
Press the buttons lightly.
Use the special features which are designed to minimize
the times of pressing buttons, such as Message
Templates and Predictive Text.
Take lots of breaks to stretch and relax.
Emergency Calls
This phone, like any wireless phone, operates using radio
signals, which cannot guarantee connection in all
conditions. Therefore, you must never rely solely on any
wireless phone for emergency communications.
8
Page 9

Loud Noise
This phone is capable of producing loud noises, which may
damage your hearing. Turn down the volume before using
headphones, Bluetooth stereo headsets or other audio
devices.
Phone Heating
Your phone may become warm during charging and during
normal use.
Electrical Safety
Accessories
Use only approved accessories.
Do not connect with incompatible products or accessories.
Take care not to to uch or allow meta l objects, suc h as
coins or key rings, to contact or short-circuit in the battery
terminals.
Connection to a Car
Seek professional advice when connecting a phone interface
to the vehicle electrical system.
Faulty and Damaged Products
Do not attempt to disassemble the phone or its accessory.
9
Page 10

Only qualified personnel can service or repair the phone or
its accessory.
If your phone or its accessory has been submerged in
water, punctured, or subjected to a severe fall, do not use it
until you have taken it to be checked at an authorized
service centre.
Interference
General Statement on Interface
Care must be taken when using the phone in close
proximity to personal medical devices, such as pacemakers
and hearing aids.
Pacemakers
Pacemaker manufacturers recommend that a minimum
separation of 15 cm be maintained between a mobile phone
and a pacemaker to avoid potential interference with the
pacemaker. To achieve this, use the phone on the opposite
ear to your pacemaker and do not carry it in a breast pocket.
Hearing Aids
People with hearing aids or other cochlear implants may
experience interfering noises when using wireless devices or
when one is nearby.
The level of interference will depend on the type of hearing
10
Page 11

device and the distance from the interference source,
increasing the separation between them may reduce the
interference. You may also consult your hearing aid
manufacturer to discuss alternatives.
Medical Devices
Please consult your doctor and the device manufacturer
to determine if operation of your phone may interfere with
the operation of your medical device.
Hospitals
Switch off your wireless device when requested to do so in
hospitals, clinics or health care facilities. These requests
are designed to prevent possible interference with sensitive
medical equipment.
Aircraft
Switch off your wireless device whenever you are instructed
to do so by airport or airline staff.
Consult the airline staff about the use of wireless devices on
board the aircraft. If your device offers a ‘flight mode’, this
must be enabled prior to boarding an aircraft.
Interference in Cars
Please note that bec ause of possible interference to
electronic equipment, some ve hicle manufacturers forbid
the use of mobile phones in their vehicles unless a hands-
11
Page 12

free kit with an external antenna is included in the
installation.
Explosive Environments
Petrol Stations and Explosive Atmospheres
In locations with potentially explosive atmospheres, obey all
posted signs to turn off wireless devices such as your phone
or other radio equipment.
Areas with potentially explosive atmospheres include fuelling
areas, below decks on boats, fuel or chemical transfer or
storage facilities, areas where the air contains chemicals or
particles, such as grain, dust, or metal powders.
Blasting Caps and Areas
Power off your mobile phone or wireless device when in a
blasting area or in areas posted power off “two-way radios”
or “electronic devices” to avoid interfering with blasting
operations.
12
Page 13
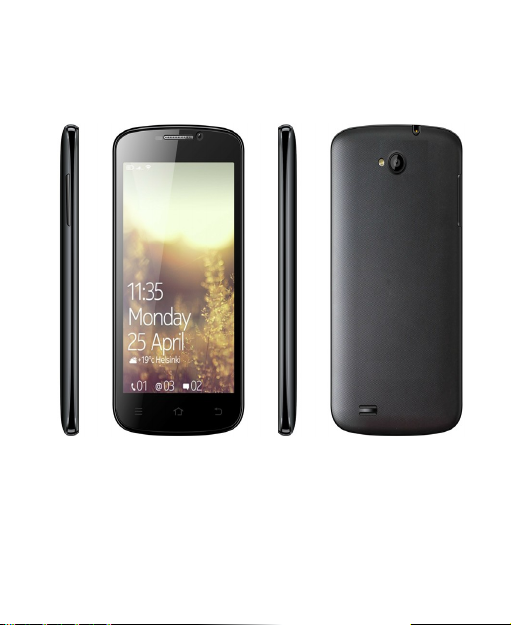
Getting Started
Overview
13
Page 14
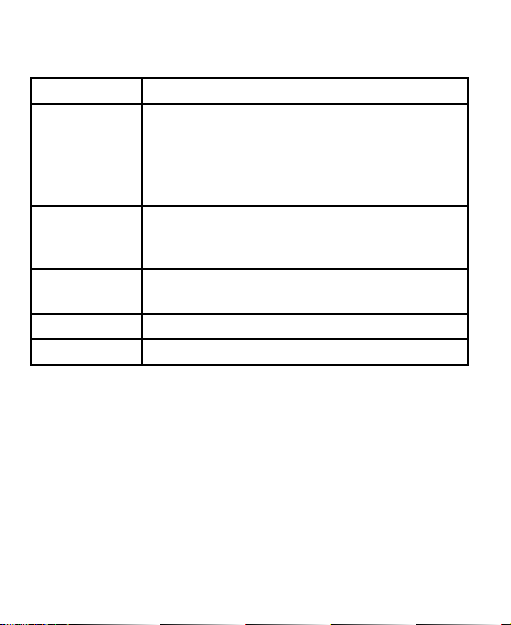
Keys Explained
Key Function
Power Key Hold to switch audio profiles, or to turn on
or off Airplane mode, or to power off.
Press to switch your phone to Sleep
mode.
Press to wake up your phone.
Home Key Press to return to the Home Screen from
any application or screen.
Hold to see recently used applications.
Menu Key Press to get the options for the current
screen.
Back Key Press to go to the previous screen.
Volume Keys Press or hold to turn the volume up or down.
Starting up
Installing the SIM/SD Card and Battery
Switch off your phone before installing or replacing the battery,
SIM, or memory card.
1. Remove the back cover.
14
Page 15
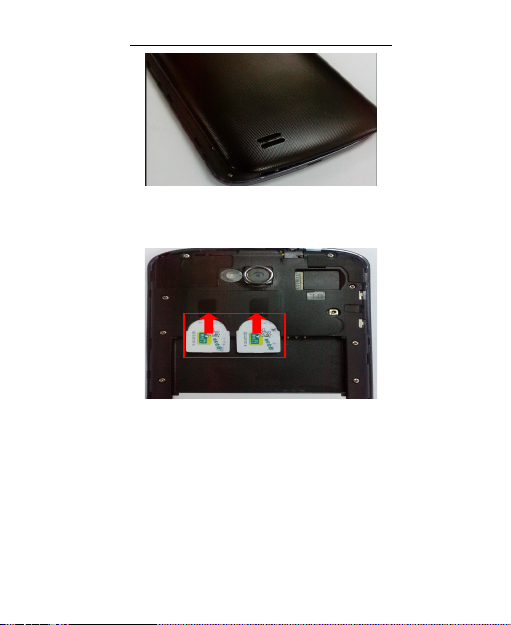
2. Hold the SIM card with the cut corner oriented as shown
and slip it into the card holder.
3. Insert the memory card into the metal slot with the metal
contacts facing down until it clicks to the right position.
15
Page 16
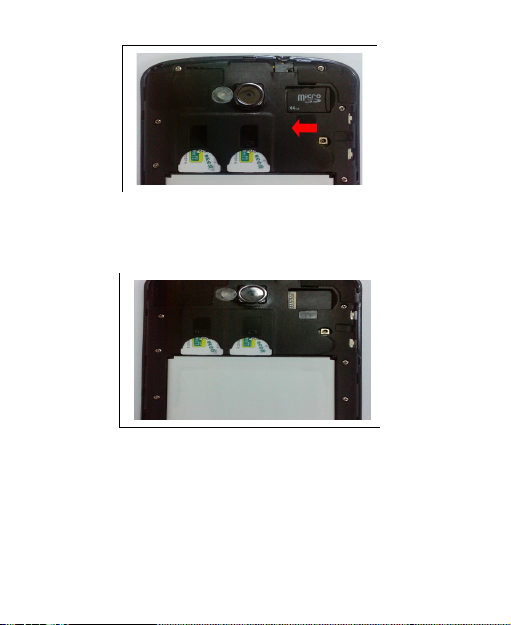
4. Insert the battery by aligning the gold contacts on the
battery with the gold contacts in the battery
compartment. Gently push down on the battery until it
clicks into place.
5. Press the cover gently back into place until you hear a
click.
Removing the Battery and SIM/SD Card
1. Make sure that your mobile phone is off.
2. Remove the back cover.
3. Lift the battery up and out.
16
Page 17

4. Slide the SIM card out.
5. Slide the SD card out.
Charging the Battery
When you first get your new phone you’ll need to charge the
battery.
1. Connect the adapter to the charger jack. Ensure that the
adapter is inserted with the correct orientation. Do not
force the connector into the charger jack.
2. Connect the charger to a standard AC wall outlet.
3. Disconnect the charger when the battery is fully charged.
Switching Your Phone On/Off
Make sure the SIM card is in your device and the battery
is charged.
Hold Power Key to switch on your phone.
To switch it off, hold Power Key to get the phone options.
Select Power off, and then tap OK.
Setting Up Your Phone for the First Time
When you first power on your phone after you purchase it or
reset it to factory settings (see chapter Sorting out Your
Phone Settings – Privacy: Reset to Factory Settings), you
need to do some settings before using it.
Tap Menu Key in the standby mode, then select System
17
Page 18

settings > Language & input > language to change the
language you want to use, if needed.
Switching to Sleep Mode
To save battery power, Sleep Mode suspends your device to
a low-power-consumption state while the display is off. Your
device also goes into Sleep Mode by itself when the display
is automatically turned off after a certain period of time. You
can st art sleep mode by the following method.
Press Power Key to switch to Sleep Mode.
Waking Up Your Phone
1. Press Power Key to activate your screen display.
2. Drag the icon to the right.
NOTE: If you have set an unlock pattern, PIN or password
for your phone (see chapter Sorting out Your Phone Settings
– Security Settings) you’ll need to draw the pattern or enter
the PIN/password to unlock your screen.
Getting Around Your Phone
Touch Control
You can use finger gestures to control your phone. The
controls on your touch-screen change dynamically
depending on the tasks you’re performing.
18
Page 19

1. Tap the buttons, icons, or applications to select items or
to open applications.
2. Flick the screen to scroll up, down, left or right.
3. Point, drag and drop to move particular items across the
screen.
4. Double-tap the screen to zoom in/out an image.
NOTE: You can view the phone screen in portrait or
landscape orientation simply by holding it upright or turning it
on its side. Not all screens are viewable in landscape.
Home Screen
In the Home screen, besides the shortcut icon is displayed,
you can also set your own wallpaper, add the widgets or
application shortcuts you need, or remove them as you
like.
Extended Home Screen
The Home Screen extends beyond the screen width, giving
you loads more space to add more stuff. Simply slide your
finger to the left or right.
Choosing Your Wallpaper Press Home Key to return
to the Home Screen.
5. Tap Menu Key and select Wallpaper.
6. Tap Gallery, Live Wallpapers, Video Wall paper, or
Wallpapers and choose the image o r animation yo u
wan t to use as the wallpaper. Some cropping may be
19
Page 20
needed for Gallery images.
7. Tap Set wallpaper.
Adding Items to Your Home Screen
1. Press Home Key > tap to enter the Application
Program Interface
2. In the list of applications, touch and hold the icon until its
vibration, when the main screen appears, move the
application icon to the idle position, release the finger.
Removing Items from Your Home Screen
1. Press Home Key to return to the Home Screen.
2. Tap and hold the item you want to delete until the
remove icon appears on the top of the screen.
3. Drag the item to the remove icon and release your finger
when the item turns red.
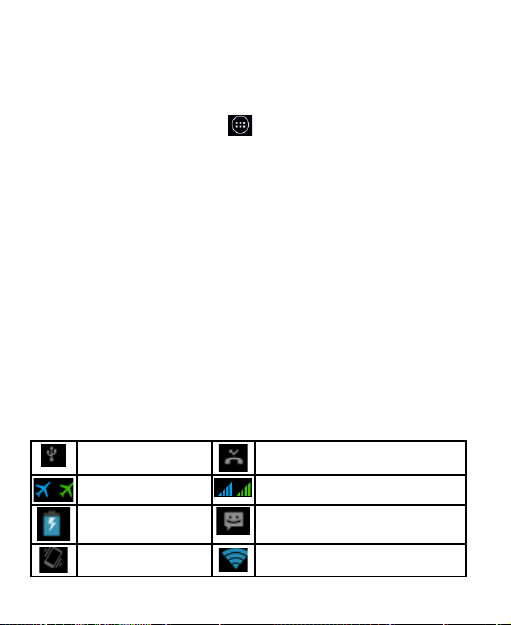
Status and Notification Icons
Your phone will tell you exactly what’s going on by showing
you simple icons. Here’s what they mean.
USB connected Missed call
Airplane mode Signal strength
Battery charge New message
Meeting mode Wi-Fi network
20
Page 21
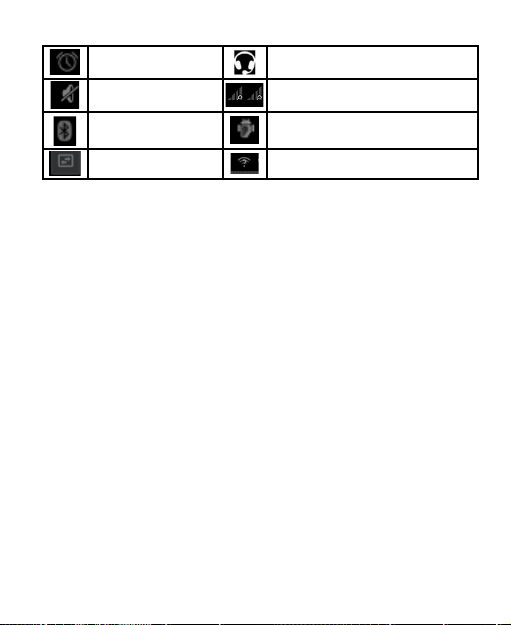
Alarm set Earphone insert
Silent mode Signal searching
Bluetooth icon USB debugging connected
Data Conn off
New Wi-Fi network detected
Using the Notification Panel
Flick the status bar downwards from across the top of the
screen to open the Notification Panel, where you can see
your calendar events, new Messaging, and current settings
– such as call forwarding or call status. From here you can
also open new Messaging, reminders, etc.
Open Recently-Used Applications
1. Hold Home Key from any screen. The phone will display
the applications you used recently.
2. Tap the application you want to open.
Phone Calls
Making Calls
There are many ways to make a call with your phone. And
they’re all easy to do.
21
Page 22
Calling from the Phone
1. Press Home key > tap > Phone or tap on the
Home Screen.
2. Enter the phone number using the on-screen keypad.
Tap to delete wrong digits.
3. Tap the dial icon.
TIPS: To make international calls, hold to enter the
“+”.
Calling from Your Contacts
1. Press Home key > tap > People.
2. Slide your finger to scroll the contacts list and tap the
contact name you want to call, when the contact details
appear, click on the number, choose the SIM card to dial.
You can search for a contact by tapping on the
bottom of the screen.
Calling from Your Call Log
1. If you have opened the dialer, touch the call log tab to
open the call records, respectively touch all, dialed,
received, missed call button to display a list of the
corresponding call records.
2. Tap dial icon on the right side of the current record.
22
Page 23
Calling from a Text Message
If a text message contains a phone number that you want to
call, you can make the call while viewing the text message.
1. Press Home key > tap > Messaging.
2. Tap the conversation and then find the message that
contains the phone number you need.
3. Tap the message, the phone will list the options.
Receiving Calls
Answering a Call
Drag the icon to right to answer the call.
Rejecting a Call
Drag the icon to left to reject the call.
Muting a Call
During a call, you can mute your microphone so that the
person you are speaking to cannot hear you, but you can
still hear them.
Tap to turn your microphone off. To turn your microphone
back on, tap again.
23
Page 24
Turning the Speakerphone On/Off
Tap during a call to turn the speakerphone on. Tap
again to turn off the speakerphone.
Ending a Call
Tap to finish a call.
Contacts
You can add contacts on your phone and synchronize them with
the contacts in your Google account or other accounts that
support contact syncing.
To see your contacts, Press Home key > tap > People.
Creating a Contact
1. Tap from the Contacts Screen.
2. Choose the storage location to save the contact.
3. Enter the contact name, phone numbers, and other
information, and then save it.
Searching for a Contact
1. Tap on the bottom of the Contacts Screen.
2. Input the contact name you want to search for.
The contacts matched will be listed.
24
Page 25

Messaging
Your SMS (text message) and MMS (multimedia messaging
service) are combined into one menu in Home Key > >
Messaging.
The Message Box
Instead of an inbox and outbox, your phone organizes all
Messaging you sent and received into one box, where
Messaging exchanged with the same number are grouped
into one message thread in the Messaging Screen. You can
tap a thread to see the conversation you have had with
someone.
Sending an Message
1. Press Home key > tap > Messaging.
2. Tap to create new message.
3. Enter the recipient’s number or name. As you type,
matching contacts will appear. Tap a suggested contact
to add as a recipient. You can also tap to select
recipients from the contacts.
4. Tap Type message and type your message.
Tap Menu Key to insert quick text, smiley, or contact.
If you are sending an MMS, tap Menu Key to add a
subject, or tap to attach pictures, videos, audio, or
25
Page 26

slideshow.
5. Tap to send your message.
NOTE: Add an attachment to text message and it will be
converted into an MMS automatically. Likewise if you
remove all attachments and the subject from an MMS, it’ll
automatically become a text message.
Message Settings
The phone’s message settings are pre-configured for you to
use immediately. To change them, tap Menu Key > Settings
from the Messaging Screen.
NOTE: From SMS settings screen tap Menu Key > Restore
default settings to change all the message settings back to
the original.
Touch Input Settings
Choose the touch input settings by tapping Menu Key >
System settings > Language & input from Home Screen.
In the KEYBOARD & INPUT METHODS section, you can
choose the settings that you need.
Getting Connected to the Internet
Your phone’s impressive networking capabilities allow you to
access the Internet or your corporate network with ease.
You can use default connection settings to connect to the
26
Page 27
Internet via your mobile network, or Wi-Fi.
The network connection can be enabled /disabled manually.
Just press Home key > tap > Settings > SIM
management > Data connection from the Home
Screen. You can according to the need to set.
Adding a New Network
Connection
To get connected via your mobile network you need a data
plan with your service provider. Also if the networks settings
are not pre-configured on your phone, please contact your
provider to get the necessary information.
You can view settings by pressing Home key > tap >
Settings > More(WIRELESS & NETWORKS) >
Mobile networks > Access Point Names.
Turning On Wi-Fi
Wi-Fi provides wireless Internet access over distances of up
to about 300 feet.
1. Press Home key > tap > Settings.
2. Click next to the Wi-Fi menu to turn it on, click
you can turn off the Wi-Fi function.
Connecting to a Wi-Fi Network
1. Press Home key > tap > Settings > Wi-Fi.
27
Page 28

When the WLAN is on, the Wi-Fi access points, or
“hotspots”, that your phone has detected are displayed
with their names and security settings.
2. Tap an access point to connect to it.
NOTE: If security features are implemented, you’ll need to
enter a password.
Checking the Wi-Fi Network Status
You can check the Wi-Fi network by looking at the icon
in the status bar.
USB tethering & portable hotspot
Share your phone’s data connection via USB or as a
portable Wi-Fi hotspot.
Enabling USB tethering
TIPS: The PC accesses the Internet via the phone’s
mobile network. Therefore, set up the networks
connection correctly before you try to use the phone as a
modem.
Press Home Key > tap Menu Key > System settings >
More (WIRELESS & NETWORKS) > Tethering &
portable hotspot and tick the USB tethering check box.
28
Page 29

Disabling USB tethering
Press Home Key > tap Menu Key > System settings >
More (WIRELESS & NETWORKS) > Tethering &
portable hotspot and clear the USB tethering check
box.
You can also just pull out the USB cable.
Enabling the Wi-Fi Hotspot
You can use the phone as a portable WLAN router, to share
your phone’s internet connection with one or more PC or
other devices.
NOTE:
When the portable Wi-Fi hotspot function is enabled, you
can’t use your phone’s applications to access the internet
via its Wi-Fi connection.
You can configure the Wi-Fi hotspot as follows:
1. Press Home Key > tap Menu Key > System settings >
More (WIRELESS & NETWORKS) > Tethering &
portable hotspot and tick the Portable Wi-Fi hotspot
check box.
2. Tap Configure Wi-Fi hotspot to set up & manage
portable Wi-Fi hotspot.
3. Tap Save. Now you can find the hotspot on other devices
and connect to it.
29
Page 30

Disabling the Wi-Fi Hotspot
Press Home Key > tap Menu Key > System settings >
More (WIRELESS & NETWORKS )> Tethering &
portable hotspot and clear the Portable Wi-Fi hotspot
check box.
Browsing the Internet
You can use your phone to get on the Internet via a network
or Wi-Fi connection.
Press Home Key > tap > Browser.
There are different ways to open web pages:
Tap the address bar to enter the website you want to
browse. Then tap on the touch keyboard.
Tap Menu Key > Bookmarks/History and select a
bookmark or history to open.
Browsing Options
When you browse the Web, you can also do the following:
Press Menu Key > Close and select Quit to exit.
Press Menu Key > Bookmarks/History and select a
bookmark or history to open.
Press Menu Key > Settings to configure browser
settings.
30
Page 31

Using Bookmarks
If you know the Web address, you can manually add
bookmarks. To bookmark a web page, open it and tap Menu
Key > Save to bookmarks. Give the bookmark a name and
save it.
Editing a Bookmark
1. Open a Browser window.
2. Tap Menu Key > Bookmarks/History.
3. Select an item you want to edit and hold on it until the
shortcut menu pops up.
4. Select Edit bookmark.
5. Edit the name or location, and then tap Ok to save it.
Deleting a Bookmark
1. Open a Browser window.
2. Tap Menu Key > Bookmarks/History.
3. Select an item you want to delete and hold on it until the
shortcut menu pops up.
4. Select Delete bookmark and tap OK to confirm.
Changing Browser Settings
Tap Menu Key > Settings from a browser window to change
browser settings.
31
Page 32

Bluetooth
Bluetooth is a short-range wireless communication technology.
Phones or other devices with Bluetooth capabilities can
exchange information wirelessly within a distance of about 10
meters. The Bluetooth devices must be paired before the
communication is performed.
1. Press Home Key > tap > Settings.
2. Click next to the Bluetooth menu to turn it on,
When Bluetooth is on, the icon will appear in the
status bar.
3. Tap Bluetooth. Your phone will show all visible
Bluetooth devices in range.
4. Tap the device you want to pair with and operate
according to the message prompt.
When the owner of the device to be paired accept the
connection, the pairing is completed.
TIPS: Tap your device name to make your phone discoverable
if other devices try to pair with your phone.
Making the Most of Multimedia
Taking Pictures with Your Camera
Your phone has camera function. Open it by pressing Home
Key > tap > Camera.
32
Page 33

Tap to take a shot. To view it, just tap the picture in the
right corner of the screen.
Listening to Your FM Radio
With the FM Radio, you can search for radio channels, listen
to them, and save them on your phone. Note that the quality
of the radio broadcast depends on the coverage of the radio
station in your area. The wired headset works as an
antenna, so always connect the headset when using the
radio.
To tune in, plug your headset into your phone. Press
Home key > tap > FM Radio.
Playing Your Music
You can play digital audio files from your phone’s memory
card in Music. Before playing music, you need to copy
music files to memory card location.
1. Press Home Key >tap > Music to open the Music
Screen.
2. Click the Music category label > music files to start
playing.
3. Adjust the volume with Volume Keys.
33
Page 34
Opening Your Gallery
Press Home Key > tap > Gallery. You can use Gallery
to view pictures and play videos. You can also do some
basic editing of your pictures – such as setting them as
wallpaper or contact photo, and sharing with friends.
Making Voice Memos
Sound Recorder enables you to record your voice memos.
You need a SD card to use it.
1. Press Home Key > tap > Sound Recorder.
2. Tap to start recording.
3. Tap to stop recording.
4. Tap to play back the voice recording.
5. Save the voice recording after stop, or tap Discard to
delete the recording.
Using Your Google Applications
Signing in to your Google Account lets you synchronize
Gmail, Calendar, and Contacts between your phone and the
web. And if you don’t have an account, you can easily create
one.
1. Tap a Google application that needs a Google account,
such as Play Store.
2. If you’ve got a Google account, tap Existing. Enter your
34
Page 35

username and password. Then tap Sign in. (Or tap New
if you don’t have a Google account.)
Gmail
Gmail is a web-based email service that’s configured when
you sign in to your Google account. Depending on your
synchronization settings, the Gmail on your phone can be
automatically synchronized with your Gmail account on the
web. This is how to enter Gmail:
Open Gmail by Pressing Home Key > tap > Gmail.
Places
Google Places helps you find all kinds of businesses near
you. Please enable GPS or wireless networks in settings
application, under location settings.
1. Press Home Key > tap > Places.
2. Select a business category and the information of that
type of business near you will be displayed.
3. Tap a result you are interested in and check out the
details and reviews about that place. You can also see
the place on Google Maps, find out how to get there, or
give that business a call.
35
Page 36

Latitude
Google’s Latitude service is a social tool for sharing your
location information with selected friends. You can also find
on the map the location of your friends - to see nearby
friends and met with them (if necessary).
Press Home key> tap > Latitude to enable Latitude
service.
Sorting out Your Phone Settings
Setting Date and Time
1. Press Home key > tap > Settings > Date & time.
2. Tap Automatic Date & time and select Off if you want to
set the time and date by yourself.
3. Set date, time and change the other options.
Display Settings
Press Home key > tap > Settings > Display, you can
adjust the display settings as you like:
Brightness: Adjust brightness of the screen.
Auto-rotate screen: Rotate the screen display as you
rotate the phone.
Sleep: Set the delay for the screen to automatically turn
off.
36
Page 37

Sound Settings
By pressing Home Key > tap > Settings > Audio
profiles, you can select the profile, adjust the sound
settings, such as ringtones, volume and vibrate.
Language Settings
You can change the language of your phone system in two
simple steps.
1. Press Home key > tap > Settings > Language &
input > language.
2. Select a language from the list given.
Disabling Data Services
Press Home key > tap > Settings > SIM
management > Data connection, then tap Off.
Switching Network Modes
1. Press Home key > tap > Settings > More
(WIRELESS & NETWORKS) > Mobile networks > 3G
service >Network Mode.
2. Select one of the following: GSM/WCDMA (auto mode),
WCDMA only.
Switching Networks
1. Press Home key> tap > Settings > More
37
Page 38

(WIRELESS & NETWORKS) > Mobile networks >
Network operators. The phone automatically searches
for all available networks.
2. Tap the SIM card you want to set.
3. Tap a network to register manually, or tap Select
automatically.
To connect to the Internet you can use the default Access
Point Names (APN). And if you want to add a new APN,
please contact the service provider to find out more.
Press Home key> Menu Key > Settings > More
(WIRELESS & NETWORKS) > Mobile networks > Access
Point Names.
Security Settings
Here’s how to protect your phone and SIM card from
unauthorized use.
Protecting Your Phone with a Pattern
Creating Your Screen Unlock Pattern
1. Press Home key > tap > Settings > Security >
Screen lock > Pattern.
2. Read the instructions on-screen and watch the example
pattern, and select Next.
3. Drag your finger to connect at least four dots, draw the
pattern.
38
Page 39

4. Touch Continue.
5. Redraw your pattern to confirm.
Unlocking the Screen with Your Pattern
1. Press Power Key to wake up the screen.
2. Draw the pattern you set to unlock the screen.
If you make a mistake, your phone will ask you to try again.
Protecting Your Phone with a PIN or
Password
Creating a PIN or Password
1. Press Home key > tap > Settings > Security >
Screen lock.
2. Tap PIN or Password.
3. According to the instruction to complete your PIN or
password settings.
Unlocking the Screen with Your PIN or Password
1. Press Power Key to wake up the phone.
2. Enter the PIN or password you set then select on the
touch keyboard.
Disabling Screen Unlock Security
If you have created an unlock pattern, PIN or password, you
can disable it.
39
Page 40

1. Press Home key > tap > Settings > Security >
Screen lock.
2. Draw the screen unlock pattern or enter your PIN/
password you have created if required.
3. Tap None.
Protecting Your SIM Card with a PIN
Every SIM card comes with a PIN. The initial PIN is provided
by your mobile phone carrier. It’s best to lock your SIM card
as soon as you can.
1. Press Home key > tap > Settings > Security > Set
up SIM card lock.
2. Choose the SIM card you want set.
3. Tick the Lock SIM card check box.
4. Enter the PIN you’ve been given and tap OK.
TIPS: If you enter the wrong SIM PIN more times than
allowed, your SIM card will be locked and you cannot
access the mobile phone network. Contact your operator
for a PIN Unlock Key (PUK) to restore the SIM card.
Changing Your SIM PIN
You can change the PIN you’ve been given to one easier for
you to remember and harder for others to guess.
1. Press Home key > tap > Settings > Security > Set
up SIM card lock.
40
Page 41

2. Make sure you already tick the Lock SIM card check
box.
3. Tap Change SIM PIN.
Managing Your Device Memory
Press Home Key > tap > Settings > Storage.
You can view the space information of the SD card and the
phone storage.
Unmount SD card: You can unmount the SD card to
safely remove it.
Erase SD card: Erase all data on the SD card.
Privacy: Reset to Factory Settings
Press Home key > tap > Settings > Backup & reset
> Factory data reset > Reset phone > Erase
everything.
WARNING: All your personal information and
downloaded applications on your phone will be erased
after the resetting.
Applications
Press Home Key > tap > Settings > Apps.
41
Page 42

Installing an Application
You can install an application from the Play store (Home
Key > > Play Store).
You can also install a non-Marketing application if you
have allowed the installation of it. Make sure that you
select an application developed for your device and
processor type before installing it.
1. Copy the application file to the SD card and install the
card on your phone.
2. Press Home key > tap > File Manager, and open
the folder where the application file is.
3. Tap the file to start installation.
4. Read the installation instructions that come with the
application and follow it to complete the setup.
NOTE: please take your handset as the standard.
Removing an Application
1. Press Home key > tap > Settings > Apps.
2. Select the application you want to delete.
3. Tap Uninstall and OK to confirm.
Moving an Application
You can move the applications downloaded or installed on
your phone to the memory card when the phone memory is
42
Page 43

full. You can also move applications to your phone if the
memory card is getting full.
NOTE: Not all applications can be move to your phone or
memory card.
1. Press Home key > tap > Settings > Apps.
2. Click the application you want to move on the
Downloaded tab.
Managing Other Settings
Text-to-speech Output
You can set the text-to-speech and voice recognition options
by pressing Home Key > tap > Settings >Language &
input > Text-to-speech output.
NOTE: You need to download voice data in order to use the
text-to-speech function.
Accessibility
You can configure accessibility options for accessibility-
related applications by pressing Home Key > tap >
Settings > Accessibility.
43
Page 44

Other Applications
Clock
1. Press Home key > tap > Clock.
2. Tap the default alarm to configure it. Or to create a new
alarm, tap Menu Key > Add alarm.
3. Tick the Turn alarm on box and set up the alarm options.
Calculator
You can use the phone directly perform simple mathematical
calculations.
1. Press Home Key > Tap > Calculator.
2. Click the button corresponding with the calculator
display, perform basic arithmetic.
TIPS: Tap Menu Key > Advanced panel to use scientific
calculation.
Tips: if all suggests and solutions can’t solve your
problem, please contact authorized after service center.
Please do not disassembly or repair your phone without
professional guide.
44
Page 45

FCC RF Exposure Information and
Statement
The SAR limit of USA (FCC) is 1.6 W/kg
averaged over one gram of tissue.
Device types S758
(FCC ID: WARS758 ) has also been
tested against this SAR limit. The
highest SAR value reported under this
standard during product certification for
use at the ear is 0.29W/kg and when
properly worn on the body is 0.55W/kg.
This device was tested for typical body-
worn operations with the back of the
45
Page 46

handset kept 1.5cm from the body. To
maintain compliance with FCC RF
exposure requirements, use accessories
that maintain a 1.5cm separation
distance between the user's body and
the back of the handset. The use of belt
clips, holsters and similar accessories
should not contain metallic components
in its assembly. The use of accessories
that do not satisfy these requirements
may not comply with FCC RF exposure
requirements, and should be avoided.
FCC WARNING
46
Page 47

This device complies with Part 15 of the
FCC Rules. Operation is subject to the
following two conditions:
(1) this device may not cause harmful
interference, and
(2) this device must accept any
interference received, including
interference that may cause
undesired operation.
NOTE 1: This equipment has been
tested and found to comply with the
limits for a Class B digital device,
pursuant to part 15 of the FCC Rules.
47
Page 48

These limits are designed to provide
reasonable protection against harmful
interference in a residential installation.
This equipment generates, uses and
can radiate radio frequency energy and,
if not installed and used in accordance
with the instructions, may cause harmful
interference to radio communications.
However, there is no guarantee that
interference will not occur in a particular
installation. If this equipment does
cause harmful interference to radio or
television reception, which can be
48
Page 49

determined by turning the equipment off
and on, the user is encouraged to try to
correct the interference by one or more
of the following measures:
- Reorient or relocate the receiving
antenna.
- Increase the separation between the
equipment and receiver.
-Connect the equipment into an outlet
on a circuit different from that to which
the receiver is connected.
-Consult the dealer or an experienced
radio/TV technician for help.
49
Page 50

NOTE 2: Any changes or modifications
not expressly approved by the
manufacturer could void the user’s
authority to operate the equipment.
NOTE 3: The manufacturer is not
responsible for any radio or TV
interference caused by unauthorized
modifications to this equipment. Such
modifications could void the user’s
authority to operate the equipment.
FCC Hearing-Aid Compatibility
(HAC) Regulations for Wireless
Devices
50
Page 51

! On July 10, 2003, the U.S. Federal
Communications Commission
(FCC) Report and Order in WT
Docket 01- 309 modified the
exception of wireless phones under
the Hearing Aid Compatibility
! Act of 1988 (HAC Act) to require
digital wireless phones be
compatible with hearing-aids. The
intent of the HAC Act is to ensure
reasonable access to
telecommunications services for
persons with hearing disabilities.
While some wireless phones are
used near some hearing devices
(hearing aids and cochlear
! implants), users may detect a
buzzing, humming, or whining noise.
Some hearing devices are more
51
Page 52

immune than others to this
interference noise, and phones also
vary in the amount of interference
they generate. The wireless
telephone industry has
! developed a rating system for
wireless phones, to assist hearing
device users find phones that may
be compatible with their hearing
devices. Not all phones have been
rated. Phones that are rated have
the rating on their box or a label
located on the box.
! The ratings are not guarantees.
Results will vary depending on the
user’s hearing
! device and hearing loss. If your
hearing device happens to be
vulnerable to interference, you may
52
Page 53

not be able to use a rated phone
successfully. Trying out the phone
with your hearing device is the best
way to evaluate it for your personal
! needs.
! M-Ratings: Phones rated M3 or M4
meet FCC requirements and are
likely to generate less interference
to hearing devices than phones that
are not rated. M4 is the better/higher
of the two ratings.
!
! S758 is rated M3.
!
! T-Ratings: Phones rated T3 or T4
meet FCC requirements and are
likely to be more
! usable with a hearing aid’s telecoil
than phones that are not rated. T4 is
53
Page 54

the better/higher
! of the two ratings.
!
! S758 is rated T3.
!
! Please power off the Bluetooth
function while using hearing aid
devices with your S135.
! Hearing devices may also be rated.
! Your hearing device manufacturer or
hearing health professional may
help you find this rating. Higher
ratings mean that the hearing device
is relatively immune to
! Interference noise.
!
! Safety and regulatory guide
! The hearing aid and wireless phone
rating values are then added
54
Page 55

together. A sum of 5 is considered
acceptable for normal use. A sum of
6 is considered for better use. A
sum of 8 is considered for best use.
In the above example, if a hearing
aid meets the M2 level rating and
the wireless phone meets the M3
level rating, the sum of the two
values equal M5. This should
provide the hearing aid user with
“normal usage” while using their
hearing aid with the particular
wireless phone. “Normal usage” in
this context is defined as a signal
quality that is acceptable for normal
operation. This methodology applies
equally for T ratings. The M mark is
intended to be synonymous with the
U mark. The T mark is intended to
55
Page 56

be synonymous with the UT mark.
The M and T marks are
recommended by the Alliance for
Telecommunications.
! Industries Solutions (ATIS). The U
and UT marks are referenced in
Section 20.19 of the FCC Rules.
The HAC rating and measurement
procedure are described in the
American National Standards
Institute (ANSI) C63.19 standard.
! For information about hearing aids
and digital wireless phones.
! FCC Hearing Aid Compatibility and
Volume Control:
! http://www.fcc.gov/cgb/dro/hearing.h
tml
! Gallaudet University, RERC:
! https://fjallfoss.fcc.gov/oetcf/eas/rep
56
Page 57

orts/GenericSearch.cfm
57
 Loading...