

Page 1

VERTU Constellation Quest
Reference Manual
Page 2

Page 3

Contents
Preface- - - - - - - - - - - - - - - - - - - - - - - - - - - - - - - - - - - - - - - - 6
Conventions used in this guide....................................................................... 6
Health and safety - - - - - - - - - - - - - - - - - - - - - - - - - - - - - - - - 7
General........................................................................................................... 7
Operating environment ................................................................................... 7
Electronic devices .......................................................................................... 7
Battery safety ................................................................................................. 8
Wall charger safety......................................................................................... 8
Looking after your phone - - - - - - - - - - - - - - - - - - - - - - - - - 9
General........................................................................................................... 9
Battery............................................................................................................ 9
Ceramics and sapphire .................................................................................. 9
Leather ........................................................................................................... 9
Metal ............................................................................................................ 10
Introducing your Vertu phone - - - - - - - - - - - - - - - - - - - - - 11
Access codes ............................................................................................... 11
Getting help and support .............................................................................. 12
Getting started- - - - - - - - - - - - - - - - - - - - - - - - - - - - - - - - - 13
Vertu package contents................................................................................ 13
Vertu phone layout - front ............................................................................. 13
Setting up your phone .................................................................................. 15
Home Key..................................................................................................... 19
My Key ......................................................................................................... 19
Dedicated keys............................................................................................. 20
Select keys ................................................................................................... 20
Qwerty keyboard .......................................................................................... 20
Status bar icons............................................................................................ 21
Lower status bar icons.................................................................................. 21
Commands and audible indicators ............................................................... 22
Setting up your phone - - - - - - - - - - - - - - - - - - - - - - - - - - - 23
Setting up your phone for the first time ......................................................... 23
Vertu Startup Wizard .................................................................................... 23
Switch........................................................................................................... 24
Home screen and clock - - - - - - - - - - - - - - - - - - - - - - - - - - 25
Home screen ................................................................................................ 25
Information area ........................................................................................... 25
Dynamic Information area............................................................................. 28
Notification zone........................................................................................... 28
Media Feeds ................................................................................................ 29
Menu.............................................................................................................31
Task viewer ...................................................................................................32
Control panel.................................................................................................32
Setting up your personal and business preferences......................................33
Security- - - - - - - - - - - - - - - - - - - - - - - - - - - - - - - - - - - - - - 34
Security Settings ...........................................................................................34
Phone and SIM card security ........................................................................34
Other security measures - restricting calls.....................................................36
Certificate manager.......................................................................................36
Protected content Digital Rights Management (DRM)...................................37
View and edit security modules .....................................................................38
Browser security ...........................................................................................38
Call functions and Call Log - - - - - - - - - - - - - - - - - - - - - - - 39
Making a call .................................................................................................39
Speed dialling ...............................................................................................40
Answering a call ............................................................................................41
In-call options ................................................................................................42
Voice mail .....................................................................................................43
Multiparty calls ..............................................................................................43
Call barring....................................................................................................44
Call settings ..................................................................................................44
Call divert ......................................................................................................45
Network.........................................................................................................46
Licenses........................................................................................................47
Call Log.........................................................................................................48
Make a video call ..........................................................................................49
Video sharing ................................................................................................50
Video sharing settings...................................................................................50
Share live video or video clips .......................................................................50
Accept an invitation .......................................................................................51
Contacts - - - - - - - - - - - - - - - - - - - - - - - - - - - - - - - - - - - - - 52
About Contacts .............................................................................................52
Working with contacts ...................................................................................52
Creating a new contact..................................................................................52
Send Contact details .....................................................................................52
Editing a Contact...........................................................................................53
Deleting a contact .........................................................................................54
Contact groups..............................................................................................54
Copy and Duplicate (Manage) Contacts .......................................................55
Contacts memory ..........................................................................................56
3
Page 4

Contents
Service numbers .......................................................................................... 56
Contacts settings.......................................................................................... 57
Messages- - - - - - - - - - - - - - - - - - - - - - - - - - - - - - - - - - - - - 58
Message alerts ............................................................................................. 58
Messaging folders ........................................................................................ 59
Organise messages ..................................................................................... 59
Text messages ............................................................................................. 59
Multimedia messages................................................................................... 60
Emails........................................................................................................... 61
Speech messages and Message reader ...................................................... 62
Presentations ............................................................................................... 62
Service messages ........................................................................................ 62
Cell broadcast .............................................................................................. 63
Messaging settings....................................................................................... 63
Email - - - - - - - - - - - - - - - - - - - - - - - - - - - - - - - - - - - - - - - - 67
Setting up your email accounts..................................................................... 67
Email settings ............................................................................................... 71
Vertu Services - - - - - - - - - - - - - - - - - - - - - - - - - - - - - - - - - 74
Vertu Concierge ........................................................................................... 74
Vertu Technical Support ............................................................................... 74
Vertu Remote Assist ..................................................................................... 74
Vertu Select.................................................................................................. 75
City Brief....................................................................................................... 75
Vertu Downloads .......................................................................................... 75
Registration .................................................................................................. 75
Calendar - - - - - - - - - - - - - - - - - - - - - - - - - - - - - - - - - - - - - 76
Calendar entries ........................................................................................... 76
Calendar settings ......................................................................................... 80
Camera - - - - - - - - - - - - - - - - - - - - - - - - - - - - - - - - - - - - - - 82
Camera setup ............................................................................................... 84
Working with captured Images and videos ................................................... 85
Connectivity- - - - - - - - - - - - - - - - - - - - - - - - - - - - - - - - - - - 87
Data connections and access points ............................................................ 87
Network settings........................................................................................... 87
Wireless LAN................................................................................................ 88
Active data connections ............................................................................... 89
Sync ............................................................................................................. 89
Bluetooth connectivity .................................................................................. 90
Remote SIM mode ....................................................................................... 92
PC connections.............................................................................................92
Ovi Suite........................................................................................................93
Net Settings ..................................................................................................93
Working with the Internet - - - - - - - - - - - - - - - - - - - - - - - - 94
Internet..........................................................................................................94
Network destinations.....................................................................................94
Media Feeds .................................................................................................96
Web settings .................................................................................................98
Office Tools- - - - - - - - - - - - - - - - - - - - - - - - - - - - - - - - - - - 99
Active notes ..................................................................................................99
Calculator......................................................................................................99
File manager ...............................................................................................100
Quickoffice ..................................................................................................100
Converter ....................................................................................................100
Zip manager................................................................................................101
PDF reader..................................................................................................101
Dictionary ....................................................................................................101
Notes ..........................................................................................................102
Intranet........................................................................................................102
Gallery- - - - - - - - - - - - - - - - - - - - - - - - - - - - - - - - - - - - - - 103
Gallery main view ........................................................................................103
Sound clips .................................................................................................103
Streaming links............................................................................................103
Presentations ..............................................................................................103
Songs..........................................................................................................104
Images ........................................................................................................104
Video clips...................................................................................................104
View images and videos..............................................................................104
Active toolbar ..............................................................................................105
Albums ........................................................................................................106
Tags ............................................................................................................106
Slide show...................................................................................................106
Edit images .................................................................................................107
Edit videos ..................................................................................................107
Print images ................................................................................................107
Home Network - - - - - - - - - - - - - - - - - - - - - - - - - - - - - - - 109
View and share media files..........................................................................110
Copy media files..........................................................................................111
Home synchronisation ................................................................................111
4
Page 5

Contents
Media - - - - - - - - - - - - - - - - - - - - - - - - - - - - - - - - - - - - - - - 112
Radio.......................................................................................................... 112
Music Player............................................................................................... 114
Ovi music.................................................................................................... 115
Recorder .................................................................................................... 115
Share online ............................................................................................... 115
RealPlayer.................................................................................................. 117
Video centre ............................................................................................... 118
Maps - - - - - - - - - - - - - - - - - - - - - - - - - - - - - - - - - - - - - - - 119
Welcome to Maps....................................................................................... 119
My position ................................................................................................. 119
Change the look of the map........................................................................ 120
Download and update maps....................................................................... 120
Using the compass ..................................................................................... 120
About positioning methods ......................................................................... 121
Find places ................................................................................................. 121
Favourites................................................................................................... 122
Synchronise your Favourites ...................................................................... 122
Share location ............................................................................................ 123
Drive and Walk ........................................................................................... 123
Get traffic and safety information ................................................................ 124
Maps shortcuts ........................................................................................... 126
Map Settings .............................................................................................. 126
Positioning- - - - - - - - - - - - - - - - - - - - - - - - - - - - - - - - - - - 128
Positioning (GPS) ....................................................................................... 128
Application manager - - - - - - - - - - - - - - - - - - - - - - - - - - - 132
Application manager................................................................................... 132
Remove applications and software............................................................. 133
Personal Settings - - - - - - - - - - - - - - - - - - - - - - - - - - - - - 134
Profiles ....................................................................................................... 134
Personalise the home screen ..................................................................... 135
Change the display theme .......................................................................... 135
Audio themes ............................................................................................. 136
Desk stand ................................................................................................. 136
Accessories - - - - - - - - - - - - - - - - - - - - - - - - - - - - - - - - - - 137
Battery........................................................................................................ 137
Wall charger ............................................................................................... 137
Data cable .................................................................................................. 138
SD card ...................................................................................................... 138
AV cable......................................................................................................138
Vertu Wired Headset...................................................................................139
Common accessory settings .......................................................................139
Maintenance - - - - - - - - - - - - - - - - - - - - - - - - - - - - - - - - - 140
Update software..........................................................................................141
Printing - - - - - - - - - - - - - - - - - - - - - - - - - - - - - - - - - - - - - 142
Printing........................................................................................................142
Troubleshooting - - - - - - - - - - - - - - - - - - - - - - - - - - - - - - 144
Specifications - - - - - - - - - - - - - - - - - - - - - - - - - - - - - - - - 146
Shortcuts - - - - - - - - - - - - - - - - - - - - - - - - - - - - - - - - - - - 147
Shortcuts.....................................................................................................147
Warranty and legal information- - - - - - - - - - - - - - - - - - - 149
Manufacturer’s limited warranty ..................................................................149
SAR Notice – RM-582V...............................................................................151
FCC/Industry Canada notice .......................................................................151
Declaration of conformity ............................................................................152
Export controls ............................................................................................152
Notices........................................................................................................152
Licenses......................................................................................................152
EU recycling notice .....................................................................................153
Passive Near Field Communication Device ................................................153
Glossary - - - - - - - - - - - - - - - - - - - - - - - - - - - - - - - - - - - - 154
Index - - - - - - - - - - - - - - - - - - - - - - - - - - - - - - - - - - - - - - - 156
5
Page 6
Preface
Preface
This wireless device is approved for use on EGSM 900 MHz, GSM 850/1800/
1900 MHz, and WCDMA Band I, II, V and VI. Contact your service provider for more
information about networks.
To use a device, you must have service from a wireless service provider. Some
features are not available on all networks; other features may require that you make
specific arrangements with your service provider to use them. Network services
involve transmission of data. Check with your service provider for details about fees
in your home network and when roaming on other networks. Your service provider
can explain what charges will apply.
Your service provider may have requested that certain features be disabled or not
activated in your device. If so, these features will not appear on your device menu.
Your device may also have customised items such as menu names, menu order and
icons.
To use any features in this device other than the alarm clock, the device must be
switched on.
When using the features in this device, obey all laws, and respect all local customs,
privacy and legitimate rights of others, including copyrights.
Copyright protection may prevent some images, music and other content from being
copied, modified or transferred.
Content owners may use different types of digital rights management (DRM)
technologies to protect their intellectual property, including copyrights. This device
uses various types of DRM software to access DRM-protected content. With this
device you can access content protected with WMDRM 10 and OMA DRM 2.0. If
certain DRM software fails to protect the content, content owners may ask that such
DRM software's ability to access new DRM-protected content be revoked.
Revocation may also prevent renewal of such DRM-protected content already in your
device. Revocation of such DRM software does not affect the use of content
protected with other types of DRM or the use of non-DRM-protected content.
Remember to make back-up copies or keep a written record of all important
information stored in your device.
Conventions used in this guide
WARNING: Indicates important information relating to safety.
IMPORTANT: Indicates important information not relating to safety.
NOTE: Indicates a point to be aware of when using your Vertu phone.
TIP: Represents useful information, such as a quick way to access a
feature.
Menu Represents text that appears on your Vertu phone’s display, for
example, “From the Home screen, select Menu”.
Copyright © Vertu 2010. All rights reserved.
Reproduction, transfer, distribution or storage of part or all of the contents in this
document in any form without the prior written permission of Vertu is prohibited. Vertu
operates a policy of continuous development. Vertu reserves the right to make
changes and improvements to any of the products described in this document
without prior notice.
Under no circumstances shall Vertu be responsible for any loss of data or income or
any special, incidental, consequential or indirect damages howsoever caused.
The contents of this document are provided “as is”. Except as required by applicable
law, no warranties of any kind, either expressed or implied, including, but not limited
to, the implied warranties of merchantability and fitness for a particular purpose, are
made in relation to the accuracy, reliability or contents of this document. Vertu
reserves the right to revise this document or withdraw it at any time without prior
notice. The availability of particular products may vary by region. Please check with
Vertu C on c i er g e .
Vertu and the V logo are registered trademarks or trademarks. Other product and
company names mentioned herein may be trademarks or registered trademarks of
their respective owners.
6
Page 7

Health and safety
Health and safety
WARNING: Read the following simple guidelines. Not following them may
be dangerous or illegal.
General
• Do not attempt to dismantle the phone or any of its accessories. Only qualified
service personnel should repair your Vertu phone and its accessories.
• Do not touch the phone, battery or wall charger with wet hands.
• Keep your Vertu phone, and all parts and accessories, out of the reach of small
children and pets. The SIM card and other small parts could present a choking
hazard.
• Use only batteries and accessories approved by Vertu for use with this particular
model. The use of any other types may invalidate any approval or warranty, and
may be dangerous. In particular, use of unapproved chargers or batteries may
present a risk of fire, explosion, leakage or other hazard. For availability of
approved accessories, please check with your dealer.
• The bundled battery and wall charger are only for use with your Vertu phone. Do
not use this battery or charger with any other device.
• Before connecting your Vertu phone to another device, read the supporting
documentation to confirm that the other device is compatible.
Operating environment
• Observe all local safety regulations regarding the use of mobile phones while
driving.
• Pull off the road and park before making or answering a call.
• Do not stop on the hard shoulder of a motorway to answer or make a call, except
in an emergency.
• If using an integrated handsfree device, make sure the phone is securely placed in
its holder.
• Do not place the phone on the passenger seat or where it can break loose during
a collision or sudden stop.
• Only qualified personnel should install the device in a vehicle. Faulty installation or
service may be dangerous. For more information, consult your vehicle
manufacturer or representative.
• Vehicle air bags inflate with great force. Do not place objects, including either
installed or portable wireless equipment, in the area over the airbag or in the airbag
deployment area.
• Switch off your Vertu phone when refuelling.
• Do not handle your Vertu phone when operating machinery.
• Switch your Vertu phone off if you are entering a hospital or health care facility.
Medical equipment may be affected by phone usage.
• Switch your Vertu phone off when travelling on an aircraft. The phone signal may
interfere with systems in the aircraft. You are legally bound to comply with this
recommendation.
• Switch your Vertu phone off in any facility where posted notices prohibit phone
usage. Always follow building regulations governing phone usage.
• Switch your Vertu phone off when blasting is in progress, and observe all provided
guidelines and regulations.
• Switch your Vertu phone off in areas with potentially explosive atmospheres, such
as fuel storage areas and spray paint facilities.
• Keep your Vertu phone away from fuel and chemicals.
Electronic devices
• If you wear a pacemaker, or are in the company of someone who does, you should
be aware that there is a small risk of mobile phone usage interfering with the
operation of the pacemaker. You should contact your doctor, or the manufacturer
of the pacemaker, for more information. If you have any reason to suspect that
interference is taking place, switch off your phone immediately.
• Persons with pacemakers should keep the phone more than 15 cm (6 inches) from
their pacemaker when the phone is switched on.
• Persons with pacemakers should not carry the phone in a breast pocket.
• Persons with pacemakers should use the ear opposite the pacemaker to minimise
the potential for interference.
• Mobile phone usage may interfere with some hearing aids. If this happens, you
should contact your service provider or doctor for further information.
• Mobile phone usage may interfere with the functionality of inadequately shielded
medical devices. Consult a physician or the manufacturer of the device to ensure
safe procedures are used.
• Mobile phone usage may interfere with the functionality of any inadequately
shielded electronic system in a motor vehicle. Examples include airbags and fuel
injection systems. You should contact the manufacturer of the vehicle or system to
ensure that the system is properly shielded.
• Note that excessive sound pressure from earphones and headphones can cause
hearing loss. Consequently before you use any device with earphones and
headphones you should make sure that the volume levels are adjusted to a
comfortable level.
7
Page 8

Battery safety
• Stop using the battery if you detect any abnormalities, such as odour,
discolouration or heat during use, charging or storage.
• Do not use your Vertu phone with a damaged battery.
• Do not short-circuit the battery. Accidental short-circuiting can occur when a
metallic object causes a direct connection between the + and - terminals of the
battery.
• Do not touch the battery terminals.
• Do not leave the battery in areas of extreme cold or heat.
• Do not store your Vertu phone in, or near, direct heat sources such as radiators.
This could cause the battery to overheat and explode.
• Never soak the battery in water or any other liquid.
• Never attempt to open the battery. The battery contains substances that may be
harmful if swallowed or allowed to come into contact with unprotected skin.
• In the unlikely event of a battery leak, take care to keep the battery discharge away
from your eyes and skin. If the leakage does come into contact with eyes or skin,
flush thoroughly with clean water and consult a doctor.
• Do not dispose of the battery in a fire.
• Do not dispose off the battery in a regular waste container. The battery contains
toxic chemicals and must be disposed off appropriately. Contact your local
authorities for more information.
Health and safety
Wall charger safety
• Do not use a damaged or worn charger. The use of a damaged or worn charger
could result in electric shock, burns or fire.
• Do not bend or twist the cable of the charger.
• Do not pull on the connected data cable in order to remove the charger plug from
a socket. Grasp the plug directly when unplugging the charger to avoid causing any
damage to the cable.
• Do not touch the pins of the plug when connecting or disconnecting it from a power
source.
• Never charge your Vertu phone when the connection point is damp or wet.
• Chargers must only be used in dry conditions. They should never be used when
damp or wet.
• Do not place heavy objects on the charger.
• When the charger is not in use, disconnect it from the power source.
8
Page 9

Looking after your pho ne
Your Vertu products have been crafted from some of the finest materials and care
should be taken to keep them in good condition. Damage caused to your Vertu phone
by failing to observe these care instructions is not covered by the warranty.
Looking after your phone
• Only use a soft, clean cloth to clean your Vertu phone. Do not use chemicals,
detergents, abrasive substances, or any liquids. Use a cotton swab to clean the
camera lens.
General
• Always use your Vertu phone in the intended manner. Incorrect usage may affect
performance.
• To avoid permanent damage to your Vertu phone, use only Vertu approved
batteries and accessories.
• The bundled battery and wall charger are only for use with your Vertu phone. Do
not use this battery or charger with any other device. This could cause permanent
damage to the device, battery or charger.
• Use only batteries and accessories approved by Vertu for use with this particular
model.
• Before connecting your Vertu phone to another device, read the supporting
documentation to confirm that the other device is compatible.
• Keep your Vertu phone, and all parts and accessories, out of the reach of small
children and pets.
• Do not allow your Vertu phone, battery or accessories to come into contact with
liquids or moisture. If your Vertu handset accidentally gets wet, dry it completely
with a soft, absorbent cloth before removing the back cover. Remove the battery
and leave all parts to dry naturally. Do not apply heat.
• Do not use or store your Vertu phone in dusty or dirty locations.
• Do not use or store your Vertu phone in hot or cold areas.
• Do not open your Vertu phone unless absolutely necessary. Before replacing the
back cover, ensure that the interior of the phone and the back cover seals are dry,
clean, and free of any foreign objects.
• Do not mishandle or abuse your Vertu phone.
• Do not apply paint or other such substances to your Vertu phone.
• Interference may affect the performance of your Vertu phone. This is normal and
the phone should operate as normal once you move away from the source of the
interference.
• If your Vertu phone, or any of the accessories, are not working as they should,
please consult your dealer. They can provide you with the expert assistance you
require.
• Do not attempt to disassemble your Vertu phone. Only Vertu authorised personnel
should service the phone.
Battery
• Do not leave the battery connected to the charger and power source for longer than
necessary. This will result in repeated short charging, which will reduce battery
performance and life span. Please disconnect the charger when the battery is full.
• Do not leave the battery in areas of extreme cold or heat. This could affect the
performance and lifetime of the battery. A device with a hot or cold battery may not
work temporarily. The battery has optimum performance in an ambient temperature
of between +15 °C (+59 °F) and +25 °C (+77 °F)
• Only remove the battery with the phone switched off.
Ceramics and sapphire
Ceramics and sapphire are very hard materials, but are also brittle and can be
scratched by harder materials or objects. They can also be damaged if dropped.
• Avoid contact between your Vertu phone and hard materials such as diamond
jewellery, nail files, abrasives, and mineral crystals.
• Do not drop or knock your Vertu phone on hard surfaces.
• Avoid repeated rubbing of your Vertu phone against hard surfaces.
Leather
All Vertu leather products are made by expert craftsmen. Each leather hide is unique
and has natural markings which should be considered part of the individuality of fine
leather. All leather can be damaged and should be treated with care.
• Avoid exposing your Vertu phone to water and high humidity.
• Avoid dropping, knocking or rubbing your Vertu phone on hard surfaces.
• Do not expose your Vertu phone to extreme temperatures.
• Avoid contact between your Vertu phone and oily substances, make-up and
solvents.
9
Page 10

Metal
Vertu metals are finished to a high standard and care needs to be taken to maintain
their appearance.
• Avoid contact between your Vertu phone and chemicals such as solvents, alkaline
and acid solutions, cola-based drinks and salt water. If contact occurs, wipe with a
clean, soft cloth as soon as possible.
• Avoid contact between your Vertu phone and sharp objects.
• Avoid dropping or knocking your Vertu phone on hard surfaces.
• Do not use metal polishes on your Vertu phone.
Hallmarks
If you own a gold Vertu phone, the hallmarks are stamped on your phone to
authenticate the precious metal used. Precious metal is tested to ensure that the
purity of the alloy conforms to the exacting standards of the European Convention
mark used under the jurisdiction of the Swiss Assay Office.
The hallmark is made up of several stamps, each of which have an individual
meaning. The stamp is located adjacent to the Vertu logo on the back cover of your
phone.
The assay stamp is made up of five marks as follows:
• Serial number.
• Vertu brand mark.
• Common control mark denoting the European Convention mark - 750 (18 carat
gold) in scales.
• Fineness (purity) mark - AU750, (18 carat gold).
• St. Bernard dog’s head - the Swiss Assay mark.
Looking after your phone
10
Page 11
Introducing your Vertu phone
Introducing your Vertu phone
Your new Vertu phone is a feature rich smartphone with a QWERTY keyboard plus a
high resolution VGA, 640x480 pixel screen. The phone includes a desktop like email
facility, a highly functional web browser and an ability to multitask. Such flexibility
makes it both an ideal business tool as well as a phone which is highly applicable for
managing your personal arrangements as well.
• A feature rich clock which automatically displays your local time and when you
move to another time zone it displays the time at your home location as well.
• Accurate time is maintained automatically using the network time function.
• The analogue clock displays appointments and alarms, helping you with time
management at a glance.
• A Notification area which displays information about recent messages, emails and
missed calls.
• Quick access to the Vertu City Brief feature, so you can quickly find out information
about your local or unfamiliar cities.
• The Concierge button gives you access to Concierge service and Technical
Support. Both the services are available by voice or email. Concierge services for
all your lifestyle needs and Technical Support helps for any technical issues
concerning your phone.
• News feeds and Vertu Select feeds are displayed on the home screen, keeping
you up to date with the latest news and developments.
• A-GPS along with global maps and navigation software enables you to find your
way to unfamiliar locations
• This Vertu phone includes a five mega pixel camera with autofocus, a media
player and FM radio.
• A 40GB (8+32) memory is available to store your personal data including photos
and music.
Access codes
For further assistance with access codes and security, refer to “Security Settings” on
page 34 or contact Vertu Technical Support for help.
• Personal identification number (PIN) code — This code protects your SIM card
against unauthorised use. The PIN code (4 - 8 digits) is usually supplied with the
SIM card. After three consecutive incorrect PIN code entries, the code is blocked,
and you need the PUK code to unblock it.
• UPIN code — This code may be supplied with the USIM card. The USIM card is
an enhanced version of the SIM card and is supported by 3G mobile phones.
• PIN2 code — This code (4 - 8 digits) is supplied with some SIM cards, and is
required to access some functions in your device.
• Lock code (also known as security code) — The lock code helps you to protect
your device against unauthorised use. The preset code is 12345. You can create
and change the code, and set the device to request the code. Keep the new code
secret and in a safe place separate from your device. If you forget the code and
your device is locked, you should contact the Technical Support. Additional
charges may apply, and all the personal data in your device may be deleted. For
more information, contact Vertu.
11
Page 12

Introducing your Vertu phone
• Personal Unblocking Key (PUK) code and PUK2 code — These codes (8 digits)
are required to change a blocked PIN code or PIN2 code, respectively. If the
codes are not supplied with the SIM card, contact the network service provider
whose SIM card is in your device.
• UPUK code — This code (8 digits) is required to change a blocked UPIN code. If
the code is not supplied with the USIM card, contact the network service provider
whose USIM card is in your device.
IMEI number
International Mobile Equipment Identity (IMEI) number — This number (15 or 17
digits) is used to identify valid devices on the GSM network. Phones that are stolen
or lost can be blocked from accessing the network. The IMEI number for your phone
is found in the battery compartment under the battery.
The serial number for your phone is stamped on the battery cover.
Getting help and support
To find out more about using your phone, or if you are unsure how your phone should
function, there are a number of ways in which you can get help.
• Contact Technical Support. You can call or email Vertu Technical support using
the Concierge key.
• Contact Vertu Concierge, who are there to assist you with any issue. Concierge
offers personal and sophisticated help facilities by phone as well as though email
support.
• Use the In-device help or this user guide.
• Setup wizards available on the phone from Menu > Ctrl. Panel > Sett. wizard
which can help you with registration and email installations.
If you cannot resolve an issue, do one of the following:
• Restart the device: switch off the device, and remove the battery. After about a
minute, replace the battery, and switch on the device.
• Restore the original factory settings.
• Update your device software. (See “Update software” on page 141.)
If your issue remains unsolved, contact Vertu Concierge or your Vertu dealer. Before
sending your device back for any reason, always back up the data in your device.
In-device help
Your Vertu phone contains an inbuilt help system to assist you with using the phone.
1. Most functions have contextual help available from Options > Help. This
provides the quickest way to get immediate assistance.
2. You can also access the complete help function by selecting Menu > Help >
Help. This help contains a search function, which is accessed using Options >
Search.
3. When you are reading the instructions, to change the size of the help text, select
Options > Increase font size or Decrease font size.
4. You may find links to related topics at the end of the help text. If you select an
underlined word, a short explanation is displayed. Help texts use the following
indicators:
Link to a related help topic.
Link to the application being discussed.
To switch between help texts and an application that is open in the background, select
Options > Show open apps. and the desired application displays.
SD Card
A removable SD card is normally pre-installed in your Vertu phone. It contains the
Reference Manual in PDF format in supported languages as well as additional
software.
12
Page 13
Getting started
Vertu package contents
1 Vertu Constellation Quest phone RM-582V
2 Battery: BP-4LV (Li-lon)
1 Micro USB wall charger (Multi-region) - AC31
1 V Collection wired stereo headset
1 AV cable - CA-163V
1 Polishing cloth
2 Micro USB - USB data cables (one each for data connection and charger) -
CA101-V
1 32 GB Memory Card
The package contents may vary slightly in accordance with regional regulations.
Getting started
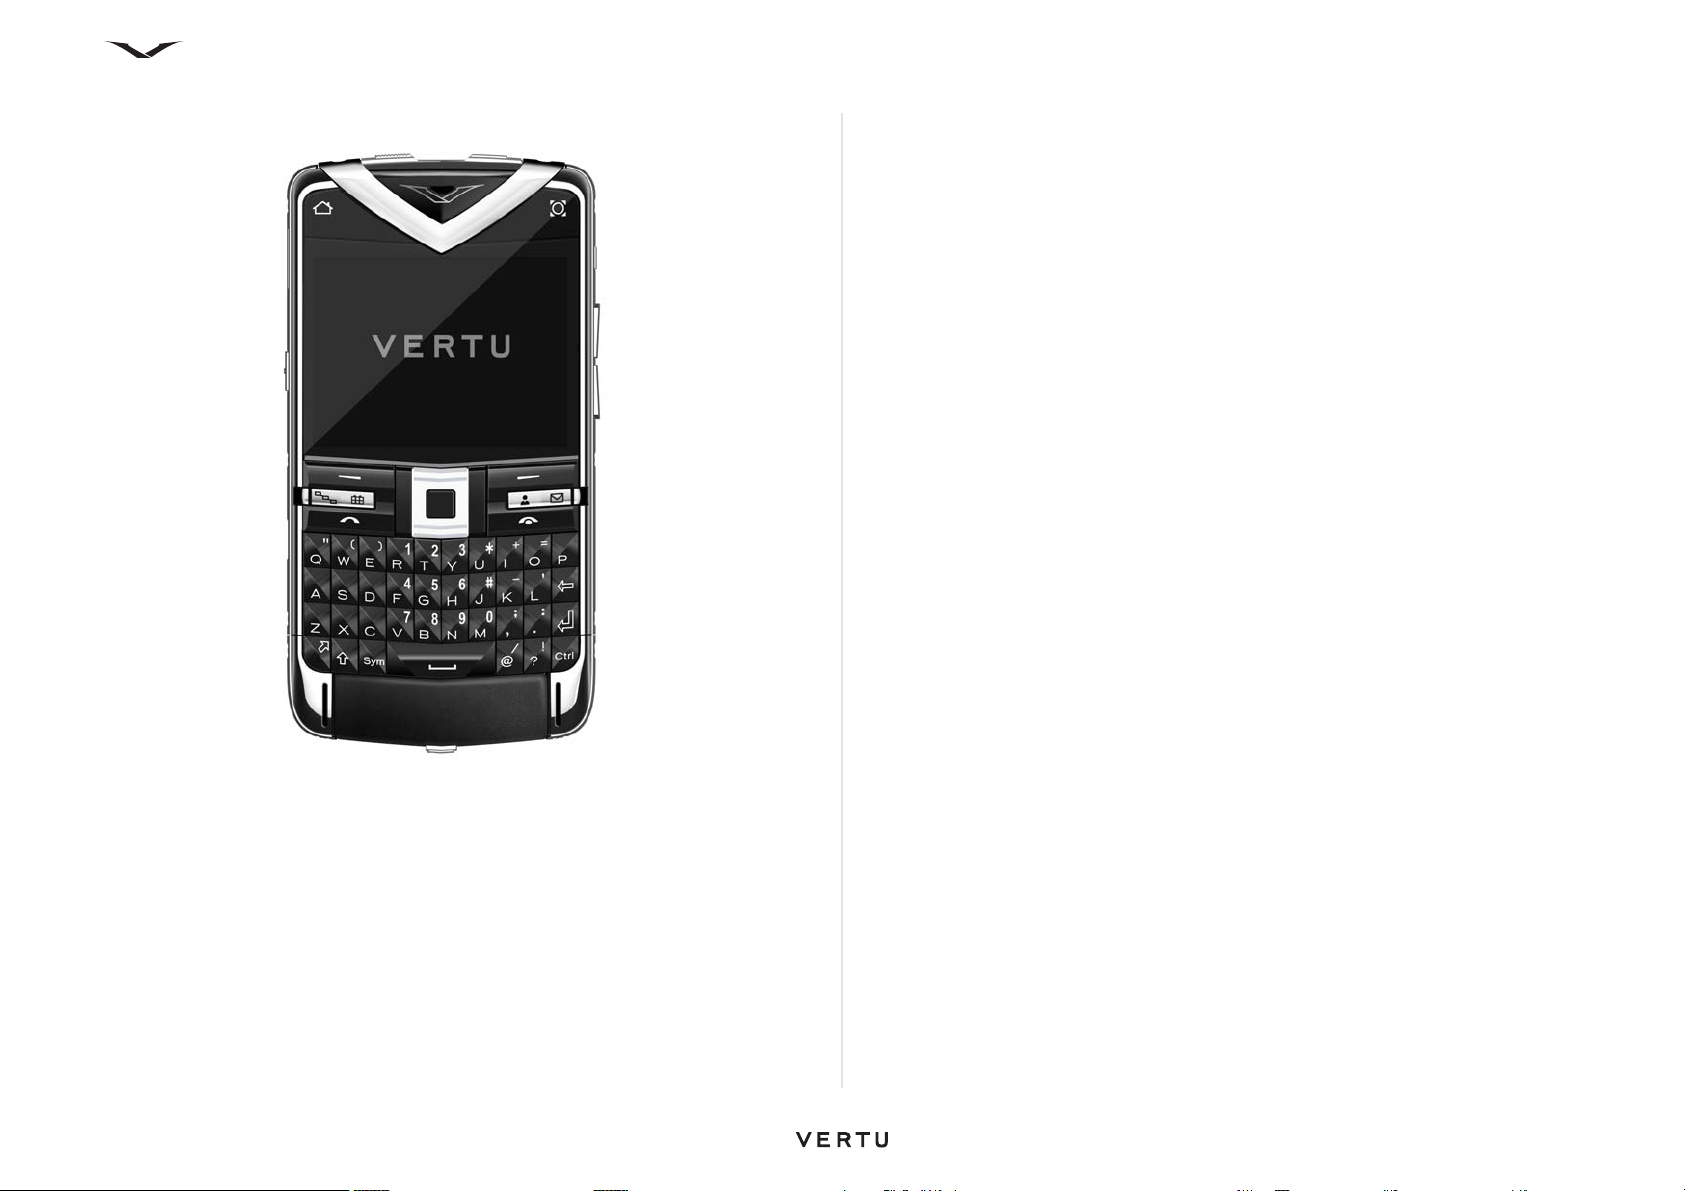
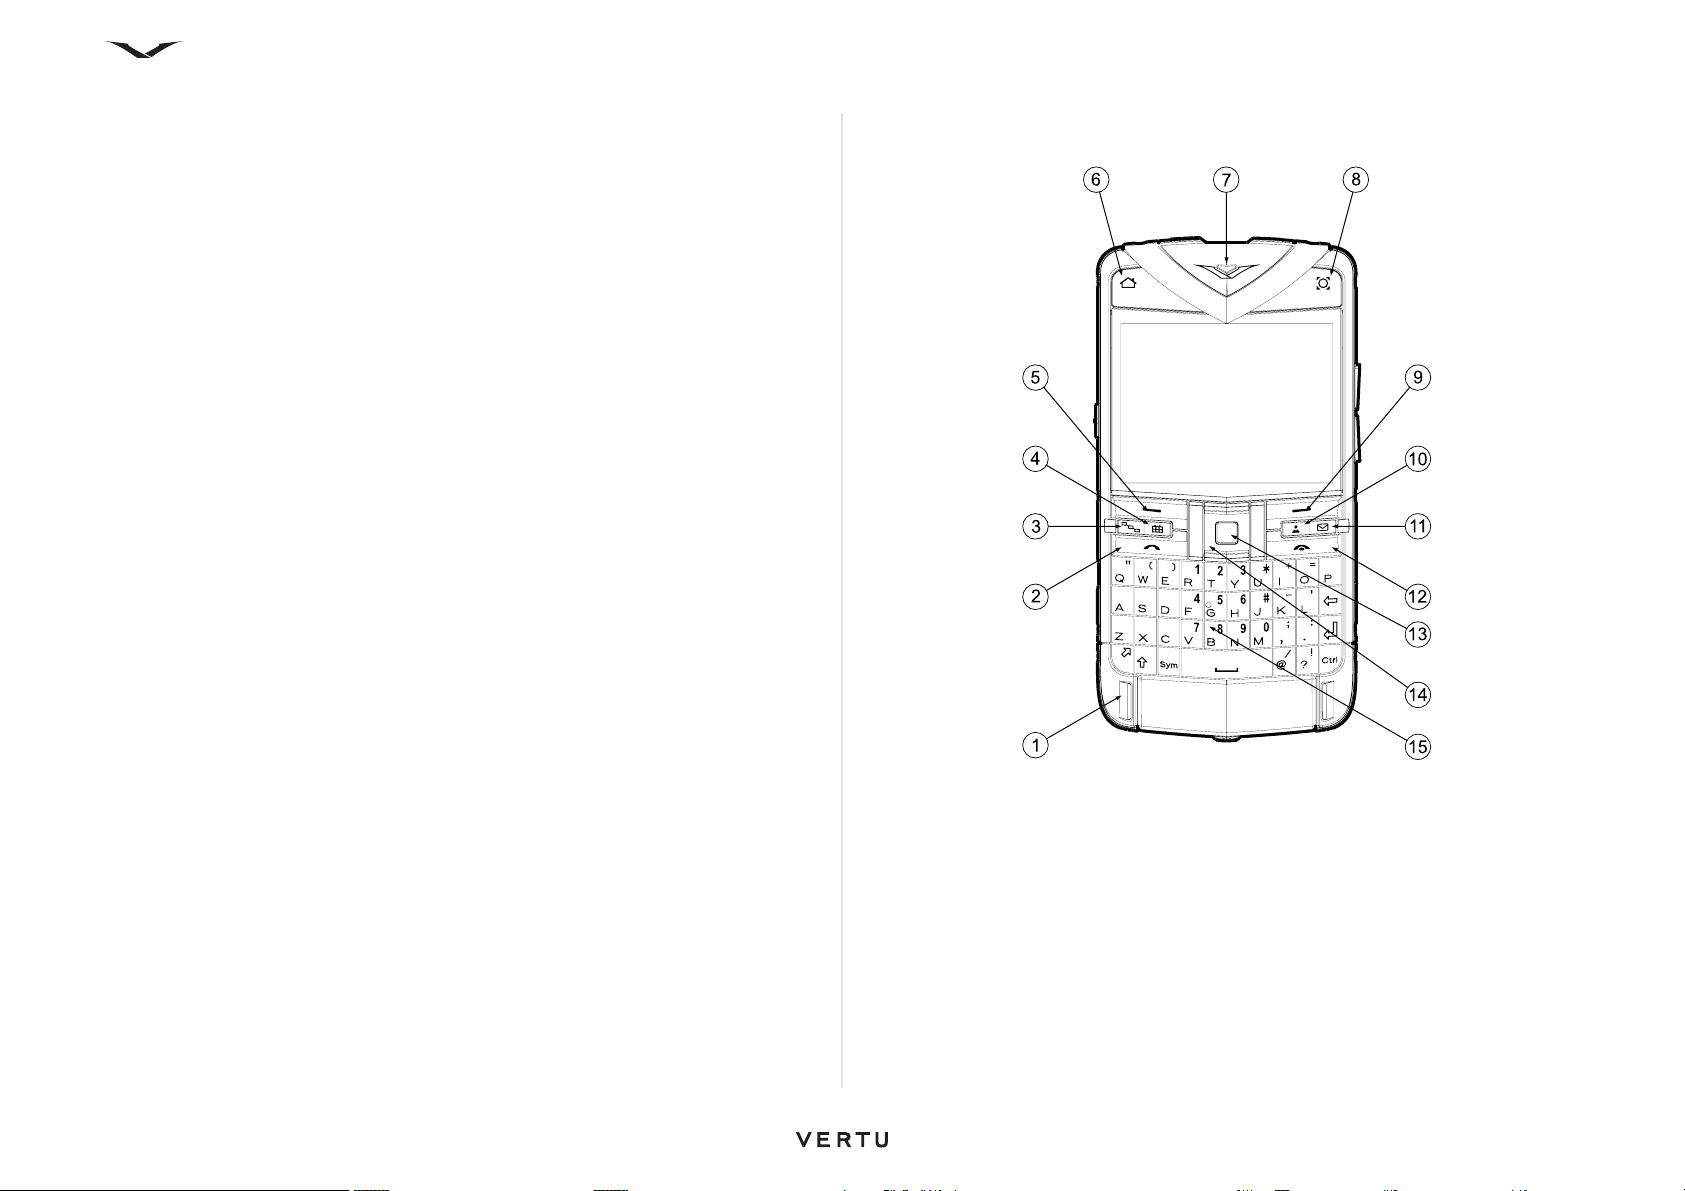
Vertu phone layout - front
13
Page 14
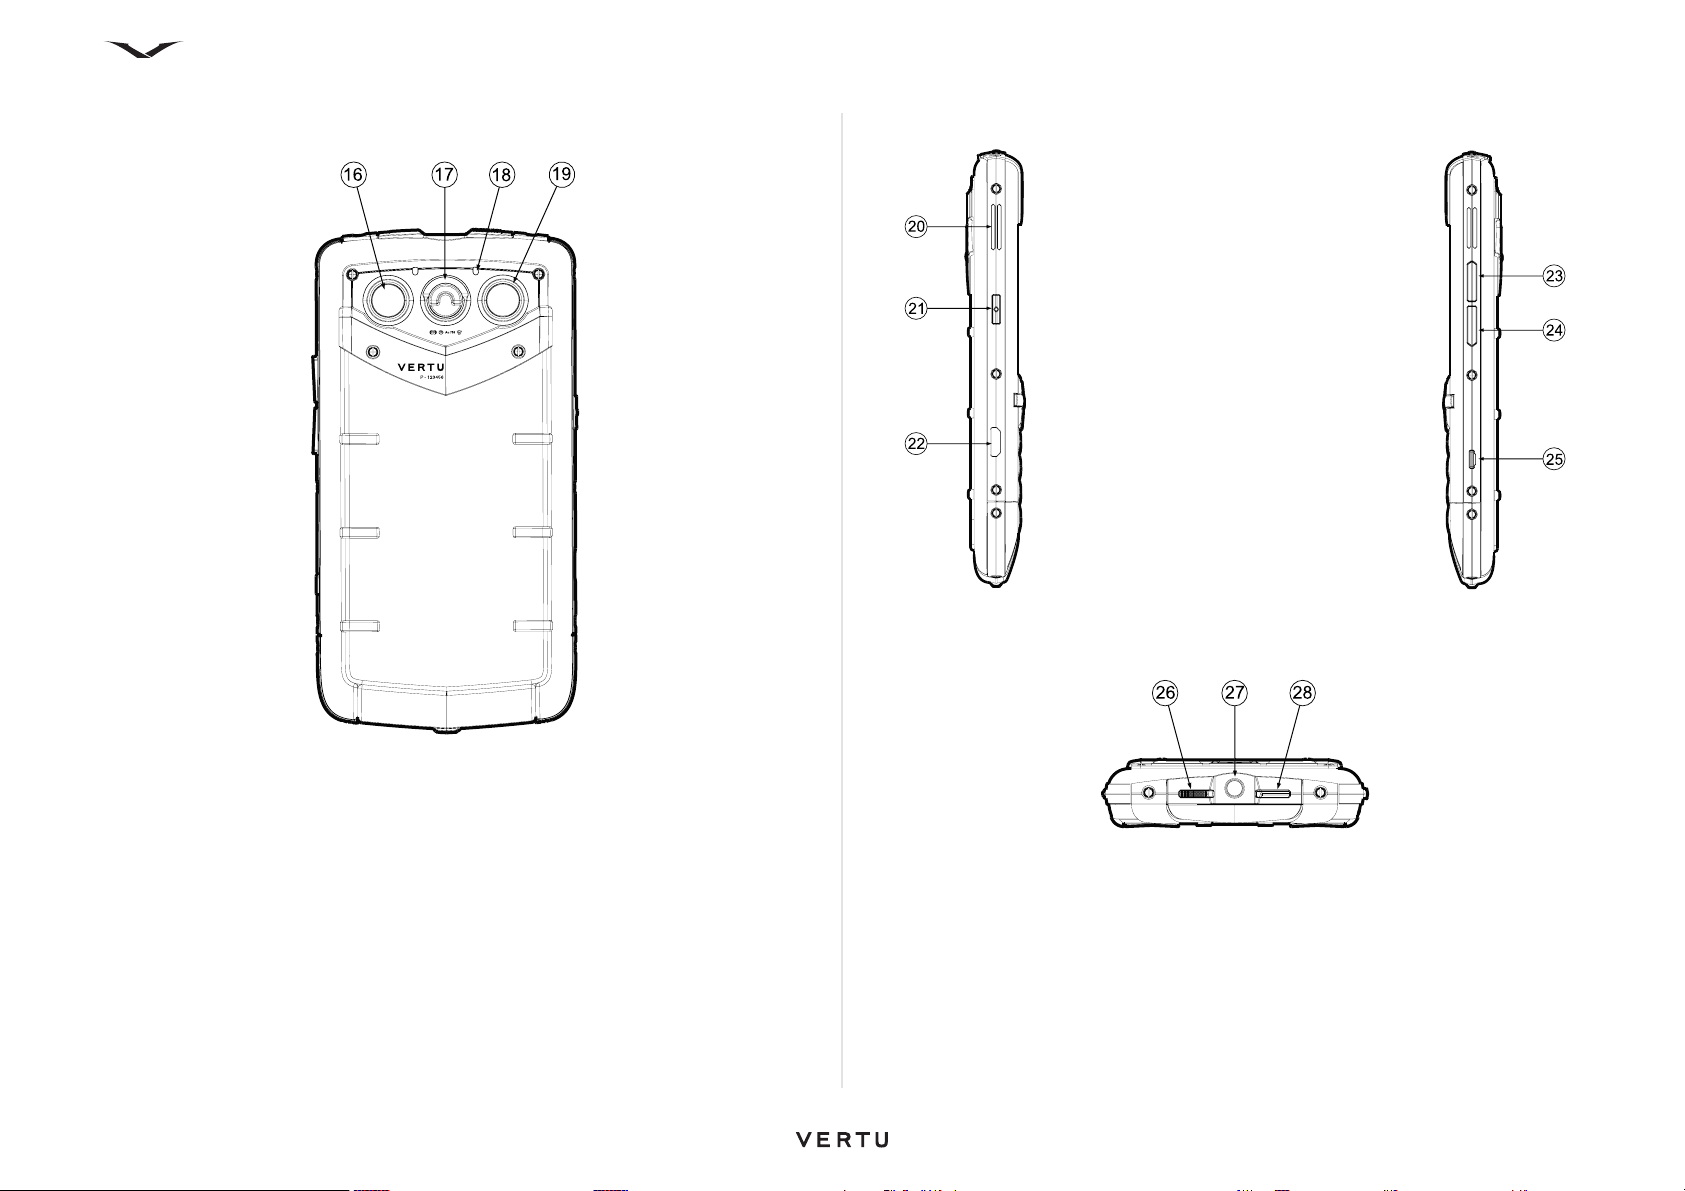
Vertu phone layout - back Vertu phone - Left and right view
Getting started
Top view
14
Page 15
Getting started
Keys
Label No. Keys
1Microphone
2 Call key
3 Menu
4 Calendar
5 Left Select key
6 Home key
7 Earpiece
8 My Key
9 Right Select key
10 Contacts
11 Email
12 End key
13 Middle Select key
14 Scroll keys (four way)
15 QWERTY keyboard
16 Camera
17 D-ring release for back cover
18 Secondary microphone
19 Flash / Torch
20 Loudspeaker
21 Vertu Concierge key
22 USB port
23 Volume increase
24 Volume decrease
25 Strap attachment point
26 Keypad lock
27 3.5 mm audio socket
28 Power key
Setting up your phone
Inserting the SIM card and battery
WARNING: Always switch the phone off and disconnect the charger before
touching the battery.
WARNING: Keep the SIM card out of reach of small children.
IMPORTANT: The SIM card and its contacts are easily damaged. Be
careful when handling, inserting or removing the SIM card.
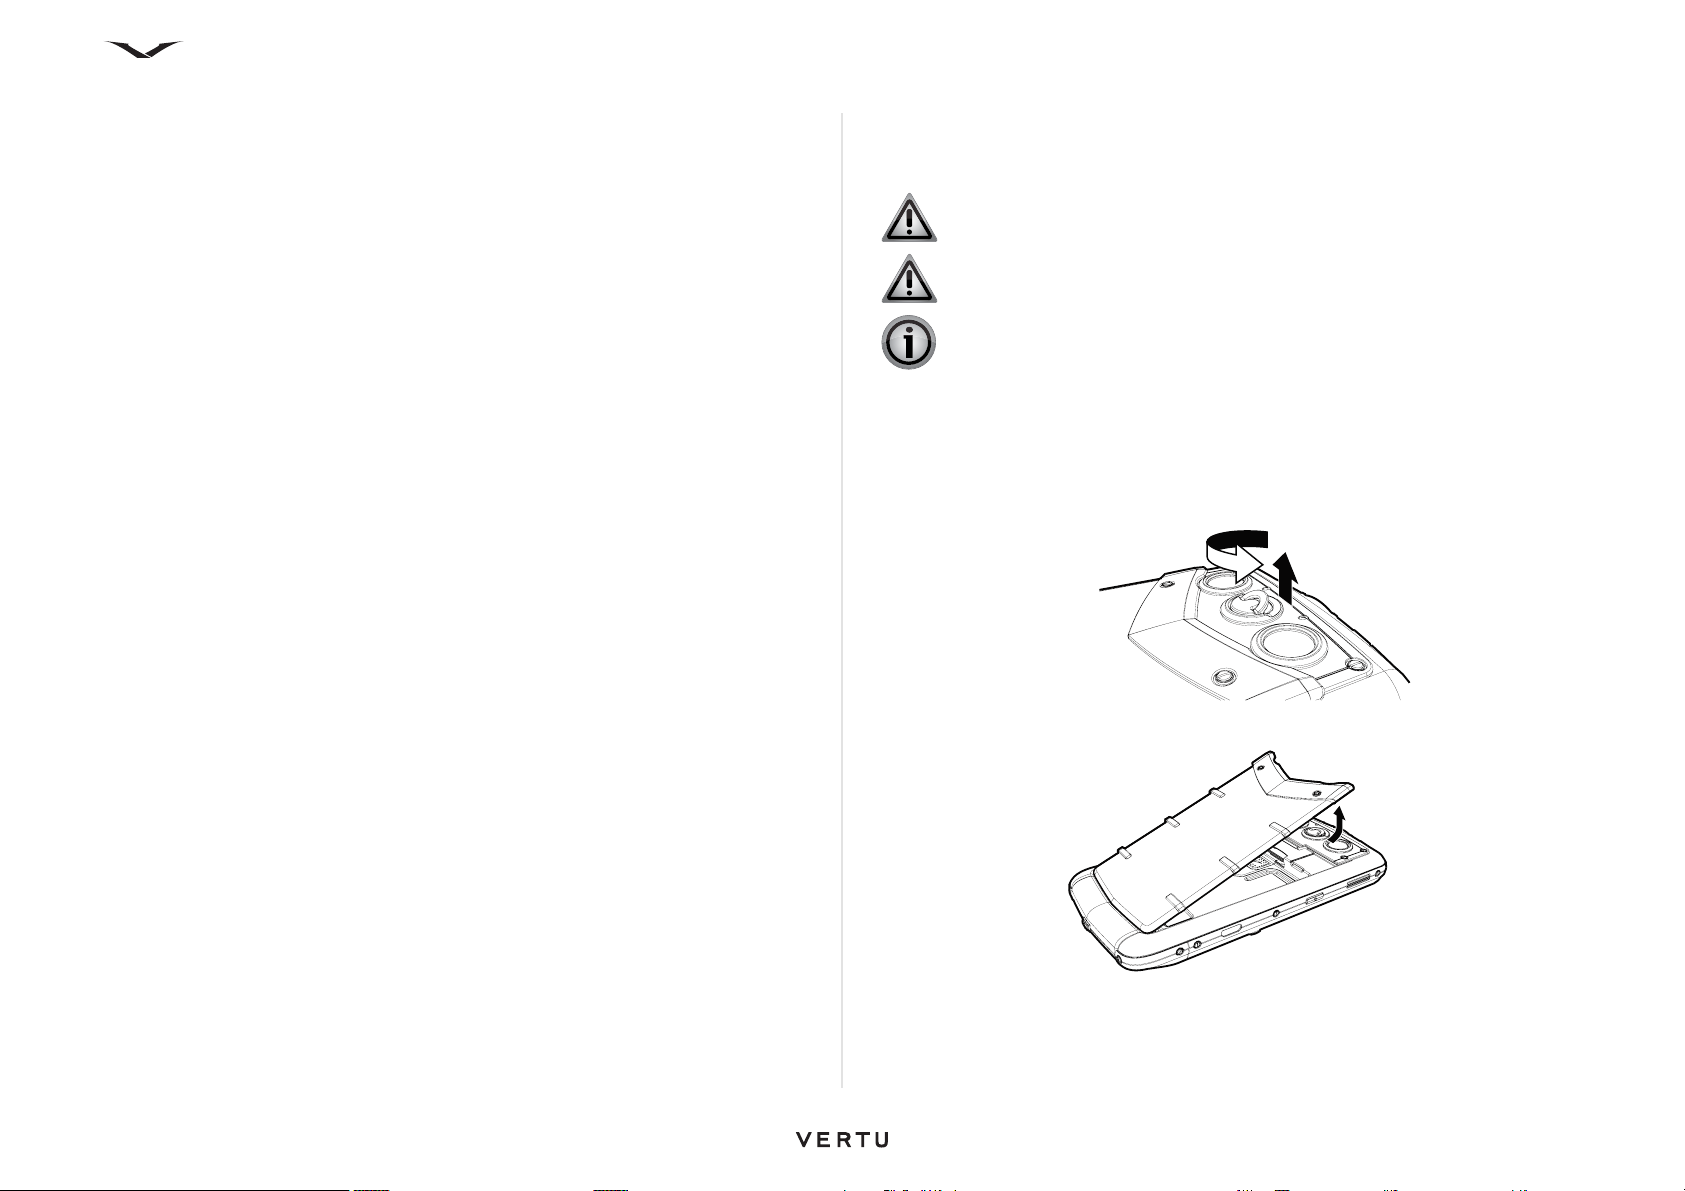
Removing the back cover
With the back of the Vertu phone facing you, lift the D-ring with your finger nail.
Hold the D-ring between your thumb and forefinger and turn it anti-clockwise a
quarter of a turn until the cover pops open.
Gently lift off the back cover as shown.
15
Page 16
Getting started
Inserting the SIM card
IMPORTANT: Always switch the phone off before inserting or removing the
USIM/SIM card.
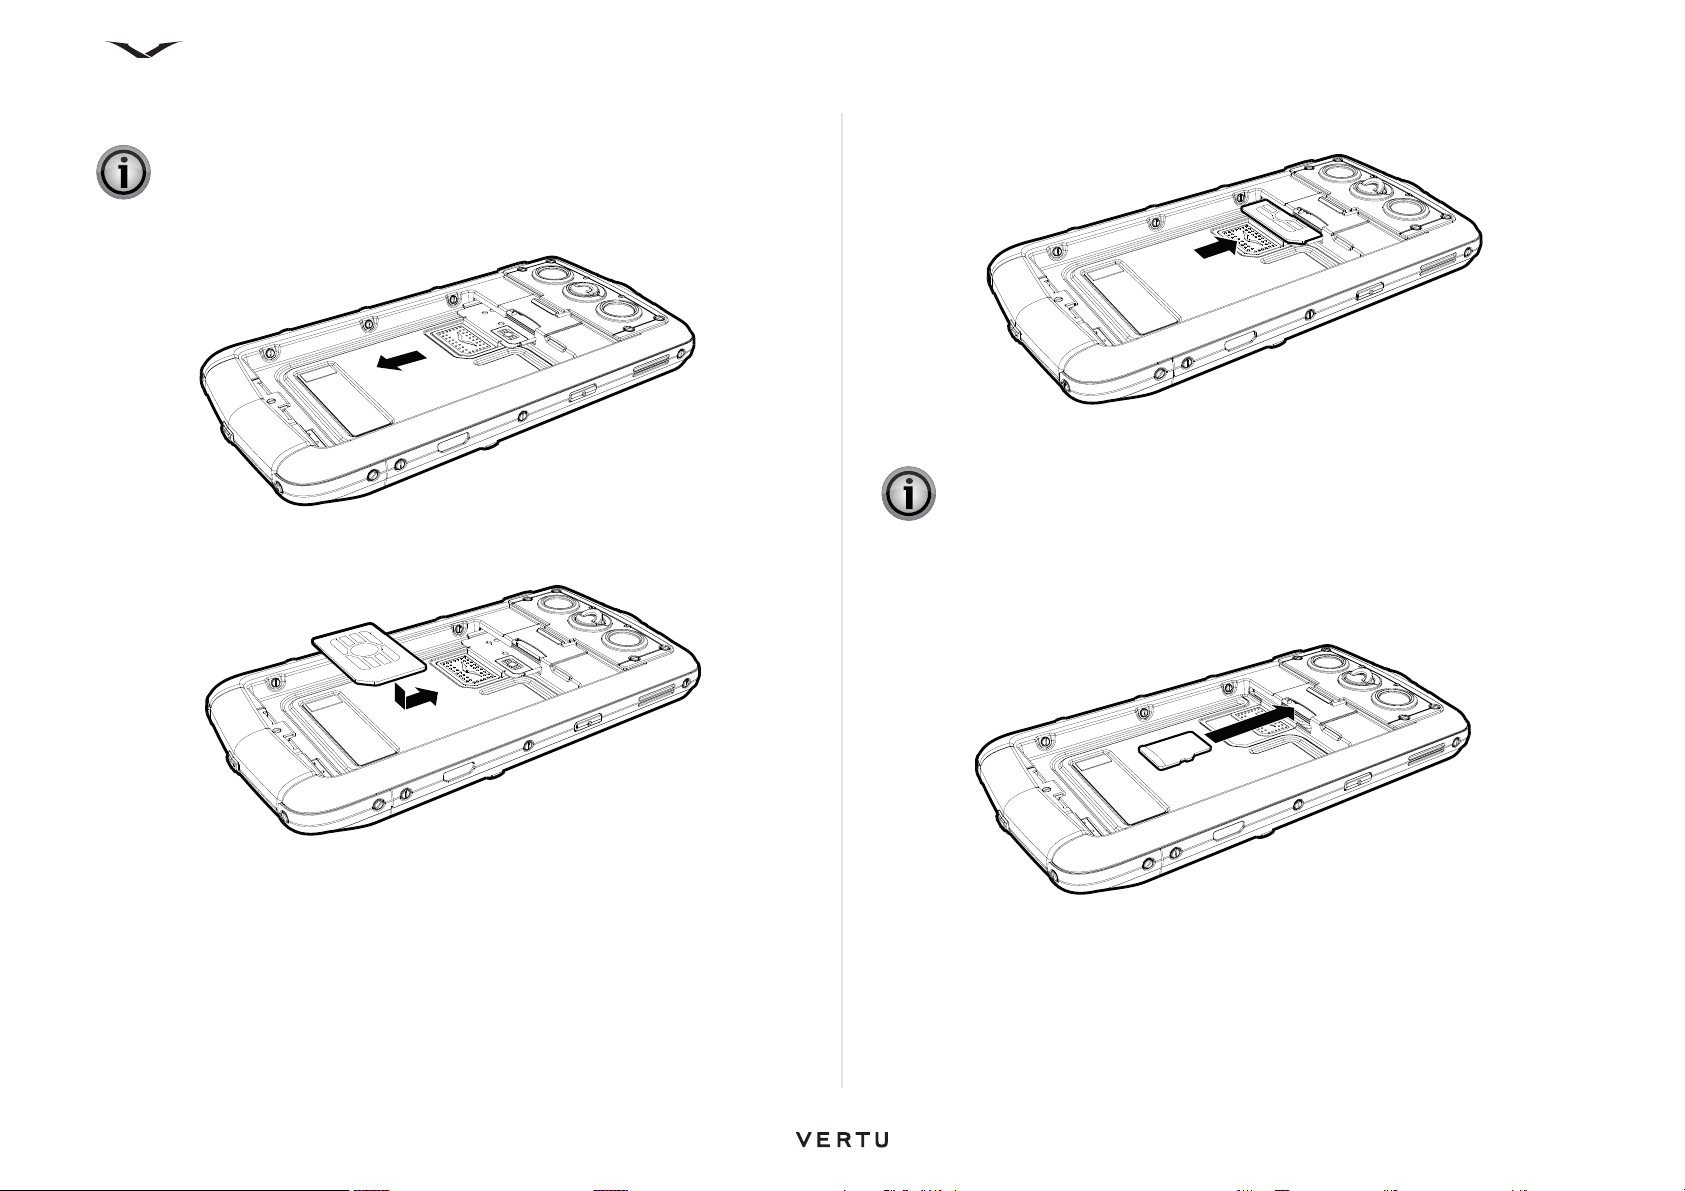
Slide the SIM card tray backwards.
Insert the SIM card into the SIM card tray, ensuring that the bevelled corner is located
at the bottom right and the gold contact area is facing upwards.
Slide the SIM card holder back into the body of the phone until it is fully inserted.
Inserting the memory card
IMPORTANT: Always switch the phone off before inserting or removing a
memory card.
Insert the memory card into the slot just above the SIM card tray, ensuring that the
gold contacts are facing downwards. Avoid touching the contacts of the memory
card.
16
Page 17
Getting started
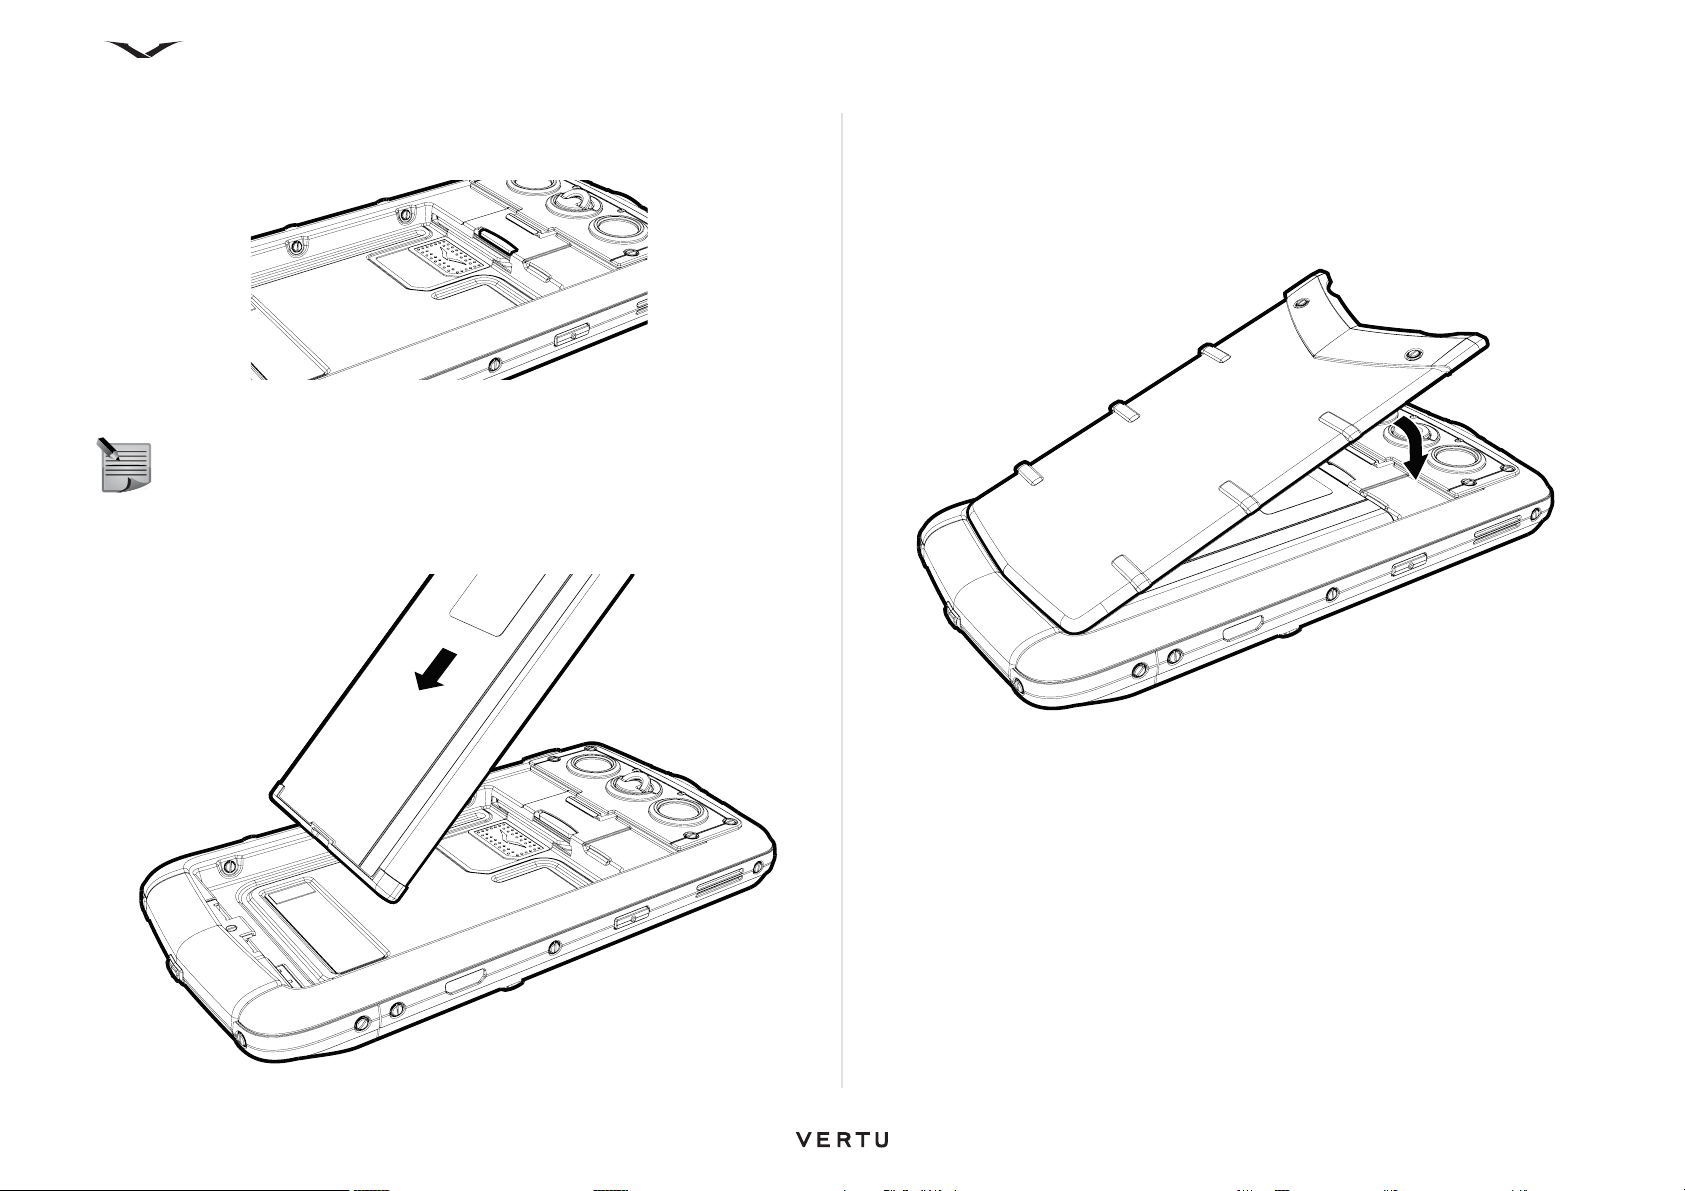
Push the card completely so that it locks into position. To retrieve the memory card,
push the card further into the slot, it will unlock and slide out to make it easy to
remove.
Inserting the battery
NOTE: Ensure that the SIM and memory card are seated correctly before
replacing the battery.
Locate the battery with the three terminals facing downwards. Position the battery so
that the battery contacts align with the contacts present in the phone compartment,
and place the battery in the housing.
Replacing the back cover
Place the two tangs at the base of the back cover in their corresponding slots in the
body of the phone.
Lower the back cover into position and press gently until it clicks into place. The cover
should close tightly using only light pressure.
17
Page 18

Getting started
Keypad Lock
Power Key
Switching on your Vertu phone
Press and hold the Power key (shown below), to switch on your Vertu phone.
The battery may need charging when you first receive your Vertu phone. Use the
micro USB cable to connect to the charger or PC to place the phone on charge.
There are a list of options that display when you press the Power key:
Options Description
Switch off Selecting this option switches off the phone
Lock keypad Locks the keypad
General The General profile is activated
Silent The Silent profile is activated
Meeting The Meeting profile is activated
Outdoor The Meeting profile is activated
Pager The Meeting profile is activated
Offline This puts you in offline mode by which you would not
be able to be connected to the network
Lock phone This locks the phone
Activate power saving Switches to power saving mode
Locking and unlocking the keypad
You can lock the keypad on your Vertu phone to prevent the keys being operated
accidentally.
The keypad lock (shown above), slides to lock the keypad. Slide it again to free the
keypad lock.
When the keypad is locked, a key icon displays. When you receive an incoming
call, the keypad lock is automatically suspended. When the call is ended, the keypad
returns to the locked state.
TIP: You can also lock the keypad by pressing the Left Select key, followed
by the Right Select key.
Automatic keyguard
You can set the keyguard to automatically lock the keypad when the phone has not
been used for a set time period.
To set up automatic keyguard:
1. From the Home screen, select Menu > Ctrl. Panel > Settings > General >
Security > Phone and SIM card > Keypad autolock period.
2. Press the Middle Select key and either enter a time in minutes for the autolock
period, or select None if you do not want to use this feature.
For more information on security with your phone, refer to. “Security Settings” on
page 34.
18
Page 19
Getting started
Home Key
The Home key is located at the top left of your phone. A single press on the Home
Key brings you back to the Home screen from anywhere.
The Home key flashes in a number of different ways depending on the status of your
phone.
Indicator Explanation
White pulsing light Phone is on, but is inactive
Green pulsing light Battery is charging
Solid green Battery fully charged
Red flashing light Battery is low and needs to be charged
Blue flashing light An event has occurred, such as a new message, missed call,
or email
Red double flashing Voice call is on mute
My Key
My Key is a user configurable key which you can set up to provide quick access to up
to four applications of your choice.
My Key is located on the top right side of your phone.
To set up My Key:
1. If you are setting up My Key for the first time, pressing My Key displays four fields
where you can select an applications to be added for each field.
2. Press the Middle Select key against an application location and select an
application from the list, then press OK.
3. It is possible to select None against any of the four choices, or simply make only
one active.
To select an application using My Key:
1. Press My Key, and the drop down menu appears.
2. Use the up/down scroll keys to move between the icons, and press the Middle
Select key to open the required application.
To access the My Key function, select Menu > Ctrl. Panel > Settings > General >
Personalisation > My Key.
19
Page 20
Getting started
Dedicated keys
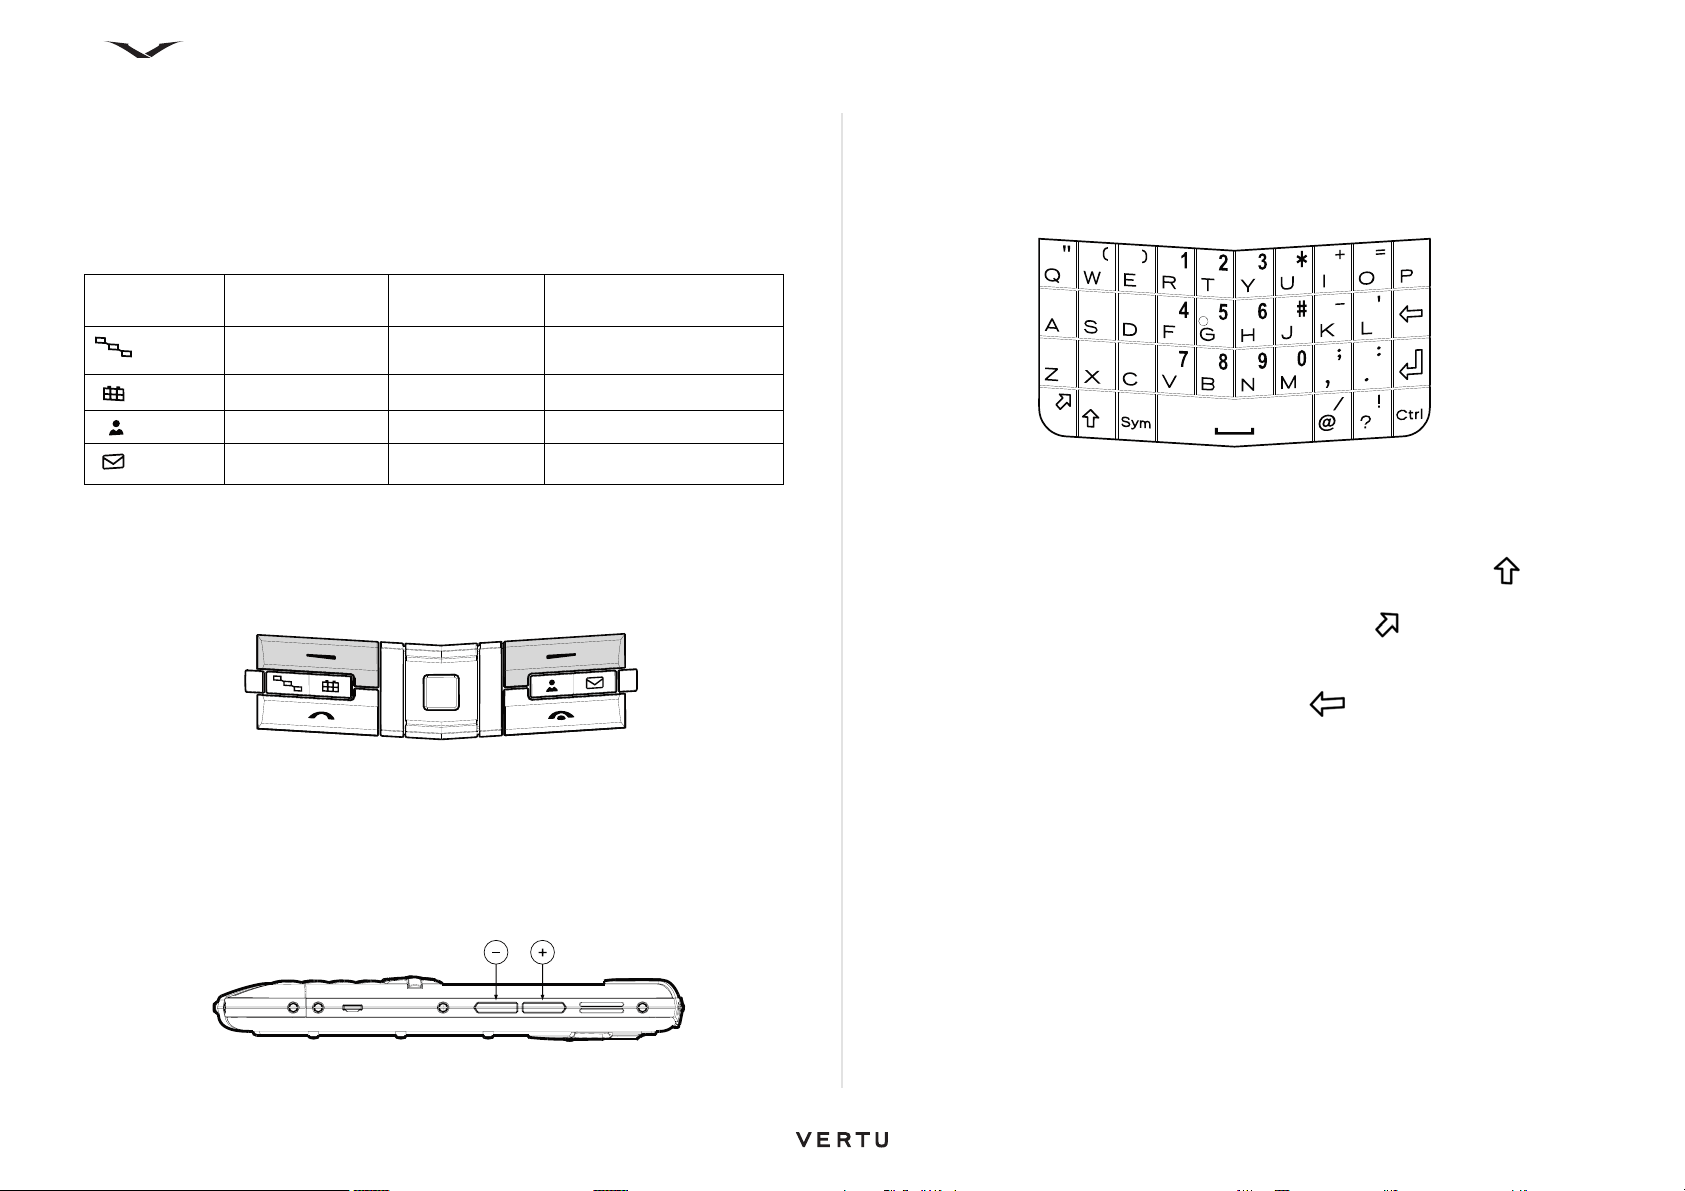
The Menu, Calendar, Contacts, and Email keys are the default dedicated keys.
These dedicated keys help you access certain applications and tasks quickly. Each
key has been assigned to an application or a task. The keys respond differently to a
short press and a long press.
The default settings for dedicated keys are shown below:
Dedicated
keys
Certain keys are user configurable.
To c on fi gu re a k ey, se le c t Menu > Ctrl. Panel > Settings > General >
Personalisation > One-touch key.
Key number
(see Page 15)
3 Menu Open applications
4 Calendar New meeting
10 Contacts New contact
11 Email New email
Short press
opens
Long press opens
Select keys
The Left Select key and the Right Select key enable you to choose the options shown
at the bottom of the display, directly above each Select key.
Volume keys
You can increase or decrease the Volume by pressing the volume keys on the right
side of your phone. See keys below, + (volume high) and - (volume low) below.
Qwerty keyboard
Your Vertu phone uses a qwerty keyboard. The software language in use can be
changed if required. Refer to Menu > Ctrl. Panel > Settings > General >
Personalisation > Language and select Phone language and Writing language.
Writing text with the keyboard
• To insert punctuation marks, press the corresponding key or a combination of
keys.
• To switch between the different character cases, press the Shift key .
• To insert digits or characters printed at the top of keys, press and hold the
corresponding key, or press and hold the Function key and press the
corresponding key.
• To lock the keyboard in the numbers mode, press the Function key twice.
• To erase a character, press the Backspace key .
• To erase several characters, press and hold the Backspace key.
• To insert characters and symbols that are not shown on the keyboard, press the
Sym key, which displays two screens displaying special characters
• To copy text, press and hold the Shift key, and scroll to highlight the word, phrase,
or line of text you want to copy. Press Ctrl + C. To insert the text into a document,
move to the correct place, and press Ctrl + V.
• To change the writing language, press Shift + Sym, or alternatively when using the
keyboard to write text, select Options > Input options > Writing language and
choose a language from the available options.
• To activate predictive text input, select Options > Input options > Activate
prediction.
To set up settings for auto completing words, text correction level and number
matches, select Options > Input options > Settings.
20
Page 21
Getting started
Status bar icons
Top status bar
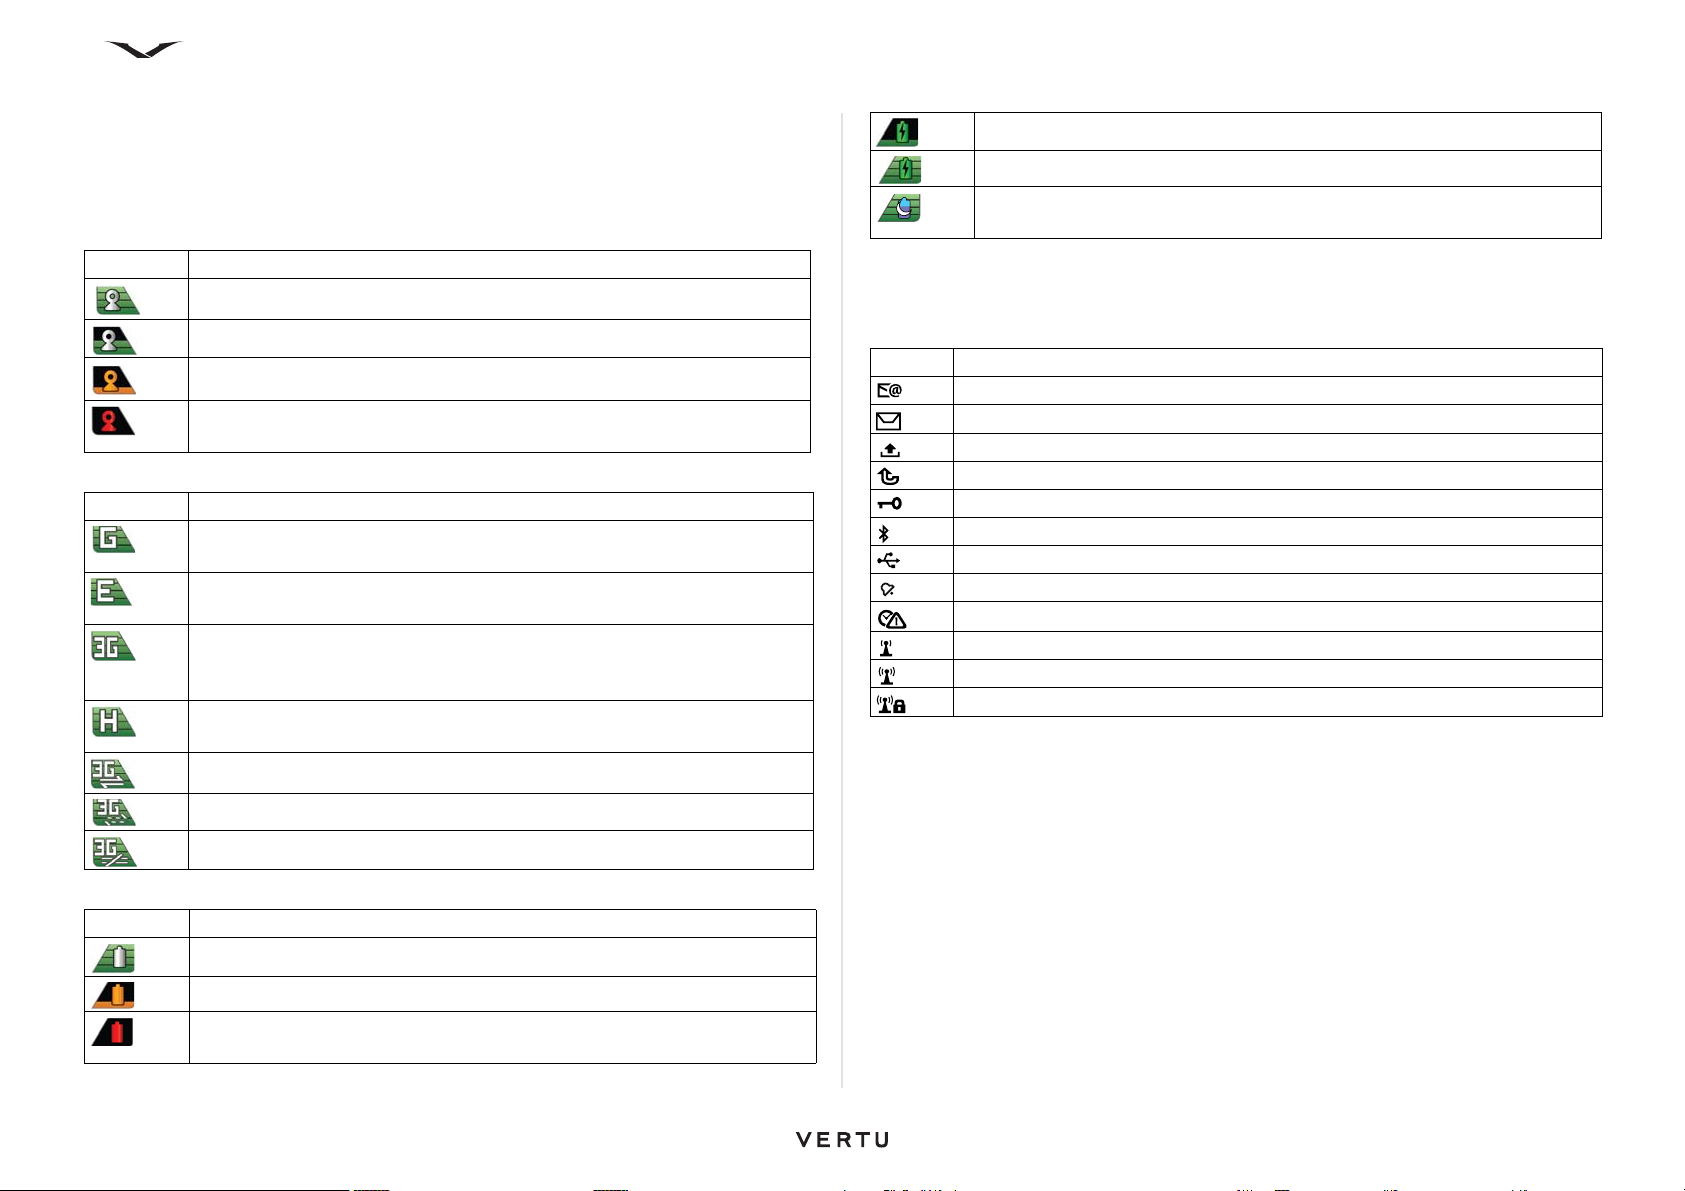
Displays signals, data connectivity and battery status icons along with the date.
Signal indicator icons
Indicator Explanation
Four level signal indicator, currently showing the signal at full strength.
Signal strength adequate, at half level.
Signal strength is Low
Displays when there is no signal or the phone is operating in offline
mode, or no SIM is present in the phone.
Data connectivity icons
Indicator Explanation
GPRS (General Packet Radio Service) system is part of the GSM
mobile phone standard.
EGPRS data connection available. Enhanced GPRS. EGPRS is similar
to GPRS, but it enables faster connection
3G data connection is available. 3rd generation mobile
communications is a digital system for mobile communications which
provides increased bandwidth.
HSDPA data communication is available. HSDPA (High-Speed
Downlink Packet Access) is an enhanced version of 3G.
3G data communication is active.
Battery is charging, but the battery state is low.
Battery is on charge, and is now full. The charger can be disconnected.
Power saver mode active. (Press the Power key and select Activate
power saving).
Lower status bar icons
A variety of icons display in the lower status bar. Each icon displays when a certain
state is active; some examples are shown in the table below.
Icons Explanation
New email notification.
New message is present.
Message is in outbox.
Missed calls.
Keypad locked.
Bluetooth is enabled.
USB connection is active.
One or more alarms are set.
Accurate time facility is not available.
WLAN connection available.
WLAN connection active.
WLAN secure connection active.
3G data communication is suspended.
3G data communication is not available.
Battery indicator icons
Indicator Explanation
Battery is fully charged.
Battery is low.
Critical state where battery is about to run out. The red symbol displays
without bars.
21
Page 22

Getting started
Commands and audible indicators
This section describes useful commands and indicators which add flexibility to your
phone.
Turn to silence calls or alarms
When you have activated the sensors in your device, you can silence incoming calls
or snooze alarms by turning the device face down.
To define the turning options, select Menu > Ctrl. Panel > Settings and General >
Sensors > Turning control.
Flashlight
The camera flash can be used as a flashlight. To switch the flashlight on or off, from
the Home screen, press and hold the space bar.
WARNING: Do not point the flashlight at anyone's eye.
Accessing a phone feature using a voice command
Using voice recognition, your Vertu phone can dial contacts and access phone
features using voice commands.
To initiate a voice command:
1. From the Home screen, press and hold the Right Select key until you hear a tone
2. Speak the voice command..
TIP: If you have a headset connected, press and hold the headset button
until you hear a tone.
Setting up Voice commands
Select Menu > Ctrl. Panel > Phone > Voice comm..
Voice comms . displays all the functions which can be accessed using voice
commands. Voice comms. also enables you to set the voice command you want to
use for each function, or you can accept the default command prompted by the
system.
Audible indicators
Your Vertu phone can be set up to generate an audible signal when a particular event
occurs. For example, when an email arrives at your phone, you can select a specific
tune or set a voice alert that is generated. You can also set the phone to silent for
specific events. This function is set using Audio themes.
This feature is useful if you are using a headset and cannot view the your Vertu phone.
For information on setting up voice alerts, refer to Menu > Ctrl. Panel > Themes >
Audio themes.
If a voice alert is selected, enter text for the speech that will be generated, or accept
the default text that is presented.
The following features on your Vertu phone can be accessed by speaking them as
voice commands, including:
• Individual contacts - speak the name.
• General, Silent, Meeting, Outdoor profiles etc.
• Voice recorder (see Voice recorder in Menu > Media > Recorder).
• Messaging functions, including Messaging, new emails, read emails etc.
• Organiser functions, including Calculator, Calendar and clock
• Call voice mailbox , but note you can only call mailboxes if the function is
supported by your service provider.
22
Page 23
Setting up your phone
Serial Number
Setting up your phone
Setting up your phone for the first time
When your Vertu phone is switched on for the first time, the first item to display is the
Registration. Then it takes you through the Terms and Conditions and the Startup
Wizard. This wizard is designed to help you input the necessary settings as quickly
and simply as possible.
When the Startup wizard has completed successfully, the E-mail setup wizard follows
directly, allowing you to set up your first e-mail account.
NOTE: If there is no SIM car in the phone on boot up, then the system
automatically sets the default date and time, and the Setup wizard does not
run. Once you have inserted your SIM card. the Setup wizard runs.
IMPORTANT: When you are setting up your phone for the first time, make
sure that you are in range of your service provider so that the system can
set you up correctly. If connection is not available full registration cannot
take place.
This chapter also describes Switch, which is an application to help you copy content
such as phone numbers, addresses, calendar items, and images from a compatible
phone to your new Vertu phone.
Vertu Startup Wizard
When your Vertu phone is switched on for the first time, you are taken through a few
simple steps to set up your phone. Prior to the setup, you must insert a valid SIM in
your Constellation Quest, and be in a location with cellular data connectivity.
You will first be asked to accept the Terms and Conditions. This will automatically
enable the phone to use the core features of your Constellation Quest.
You will then be asked to register the product, which is essential for enabling the
extensive and free services offered on your Constellation Quest. If you are already a
Registered Customer, you will need to enter your username and password. If not,
registration is quick as all you need is to enter a few details. To complete the
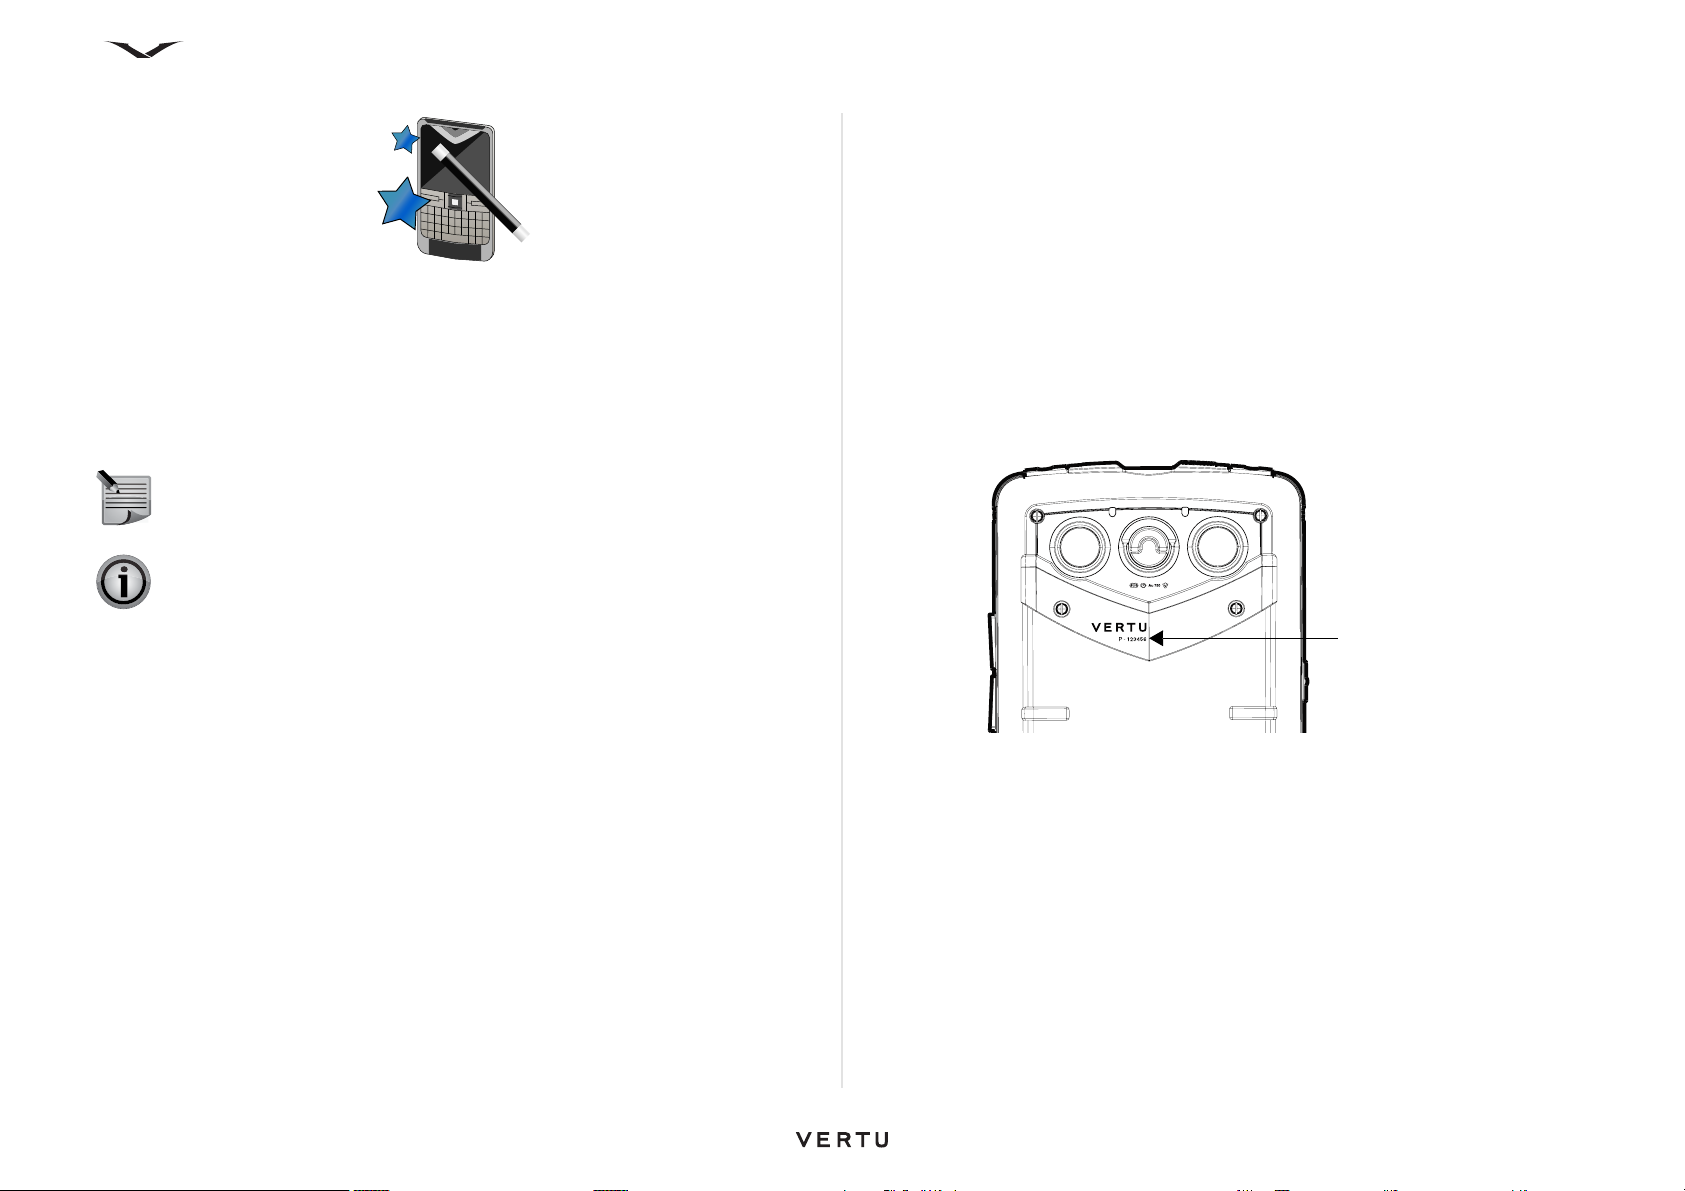
registration, you will need to enter the Serial Number of your Constellation Quest
which can be found on the battery cover at the back of the phone
Registering your Vertu phone
Vertu aims to provide you with the very best service possible. To enable us to do this,
please register your Vertu phone.
Normally your phone will be registered during the set up process using the Vertu
Setup wizard, but there are alternative ways to register your phone, as follows:
• Calling Vertu Concierge using the dedicated key on your phone.
• Register at the www.vertu.me website
Selecting City Brief, or Vertu Select will instigate the registration process if the system
detects that your phone has not yet been registered.
The Email Wizard is now launched to enable you to configure the email accounts that
you wish to use on the phone.
If subsequently you want to re-apply any settings, this can be done by running the
Sett. wizard located in Menu > Ctrl. Panel.
Setting up your email accounts
Your email accounts are normally set up once the registration process is complete
using the E-mail setup wizard. However, if you do not wish to set your email account
at this time, it can be done later. The E-mail setup wizard appears in the Information
area of the Home screen, if no email account is setup during startup.
The wizard helps you set up your Vertu.Me account, your corporate email account or
your personal accounts. You can have up to 5 personal accounts. When setting up an
23
Page 24

Setting up your phone
account, you need to enter your username and password.
You can choose to synchronise your contacts, calendar and tasks on your phone with
either your corporate account or with your Vertu.me account.
Refer to the Email section for more information.
If you skip the process of setting wizard, then you can manually go to the wizard. From
the Home screen, select Menu
> Ctrl. Panel > Sett. wizard.
Switch
Transfer content
You can use the Switch application to copy content such as phone numbers,
addresses, calendar items, and images from your previous phone to your present
Vertu phone, provided the two phones are compatible.
The type of content that can be transferred depends on the model of the phone from
which you want to transfer content. If that phone supports synchronisation, you can
synchronise data between the devices. Your device notifies you if the other phone is
not compatible.
If the other phone cannot be switched on without a SIM card, you must insert a SIM
card in it. When your phone is switched on without a SIM card, the Offline profile is
automatically activated, and transfer can be done.
Transfer content for the first time
1. To retrieve data from the other phone for the first time, on your phone, select
Menu > Ctrl. Panel > Switch.
2. Select the connection type you want to use to transfer the data. Both devices
must support the selected connection type.
3. If you select Bluetooth connectivity as the connection type, connect the two
phones. To have your phone search for phones with Bluetooth connectivity,
select Continue. Select the phone from which you want to transfer content. You
are asked to enter a code on your phone. Enter a code (1-16 digits), and select
OK. Enter the same code on the other phone, and select OK. The phones are
now paired.
Some earlier phones may not have the Switch application. In this case, the
Switch application is sent to the other phone as a message. To install Switch on
the other phone, open the message, and follow the instructions on the display.
4. On your phone, select the content you want to transfer from the other phone.
Once the transfer has started, you can cancel it and continue later.
Content is transferred from the memory of the other phone to the corresponding
location in your phone. The transfer time depends on the amount of data to be
transferred.
Synchronise, retrieve, or send content
Once data has been transferred for the first time, you can select from one of the
following options to start a subsequent transfer. The process involved depends on
the model.
Select Menu > Ctrl. Panel > Switch.
•Synchronise data in a two-way process, provided the other phone supports
synchronisation. If an item is deleted in one phone, it is deleted in both. You cannot
restore deleted items with synchronisation.
• Retrieve content from the other phone to your phone.
With retrieval, content is transferred from the other phone to your phone. You may
be asked to keep or delete the original content in the other phone, depending on
the phone model.
• Send content from your phone to your other phone
If you cannot send an item, depending on the type of the other phone, you can add
the item to the Vertu folder, to C:\Vertu or E:\Vertu in your phone. When you select
the folder to transfer, the items are synchronised in the corresponding folder in the
other phone, and vice versa.
Use shortcuts to repeat a transfer
After a data transfer, you can save a shortcut with the transfer settings to the main
view to repeat the same transfer later.
To edit the shortcut, select Options > Shortcut settings. For example, you can
create or change the name of the shortcut.
A transfer log is shown after every transfer. To view the log of the last transfer, select
a shortcut in the main view and Options > Vi ew log.
Handle transfer conflicts
If an item to be transferred has been edited in both phones, the phone attempts to
merge the changes automatically. If this is not possible, there is a transfer conflict.
Select Check one by one, Priority to this phone, or Priority to the other phone
to solve the conflict.
24
Page 25
Home Screen and Clock
2
3
4
5
6
1
Home screen and clock
Home screen
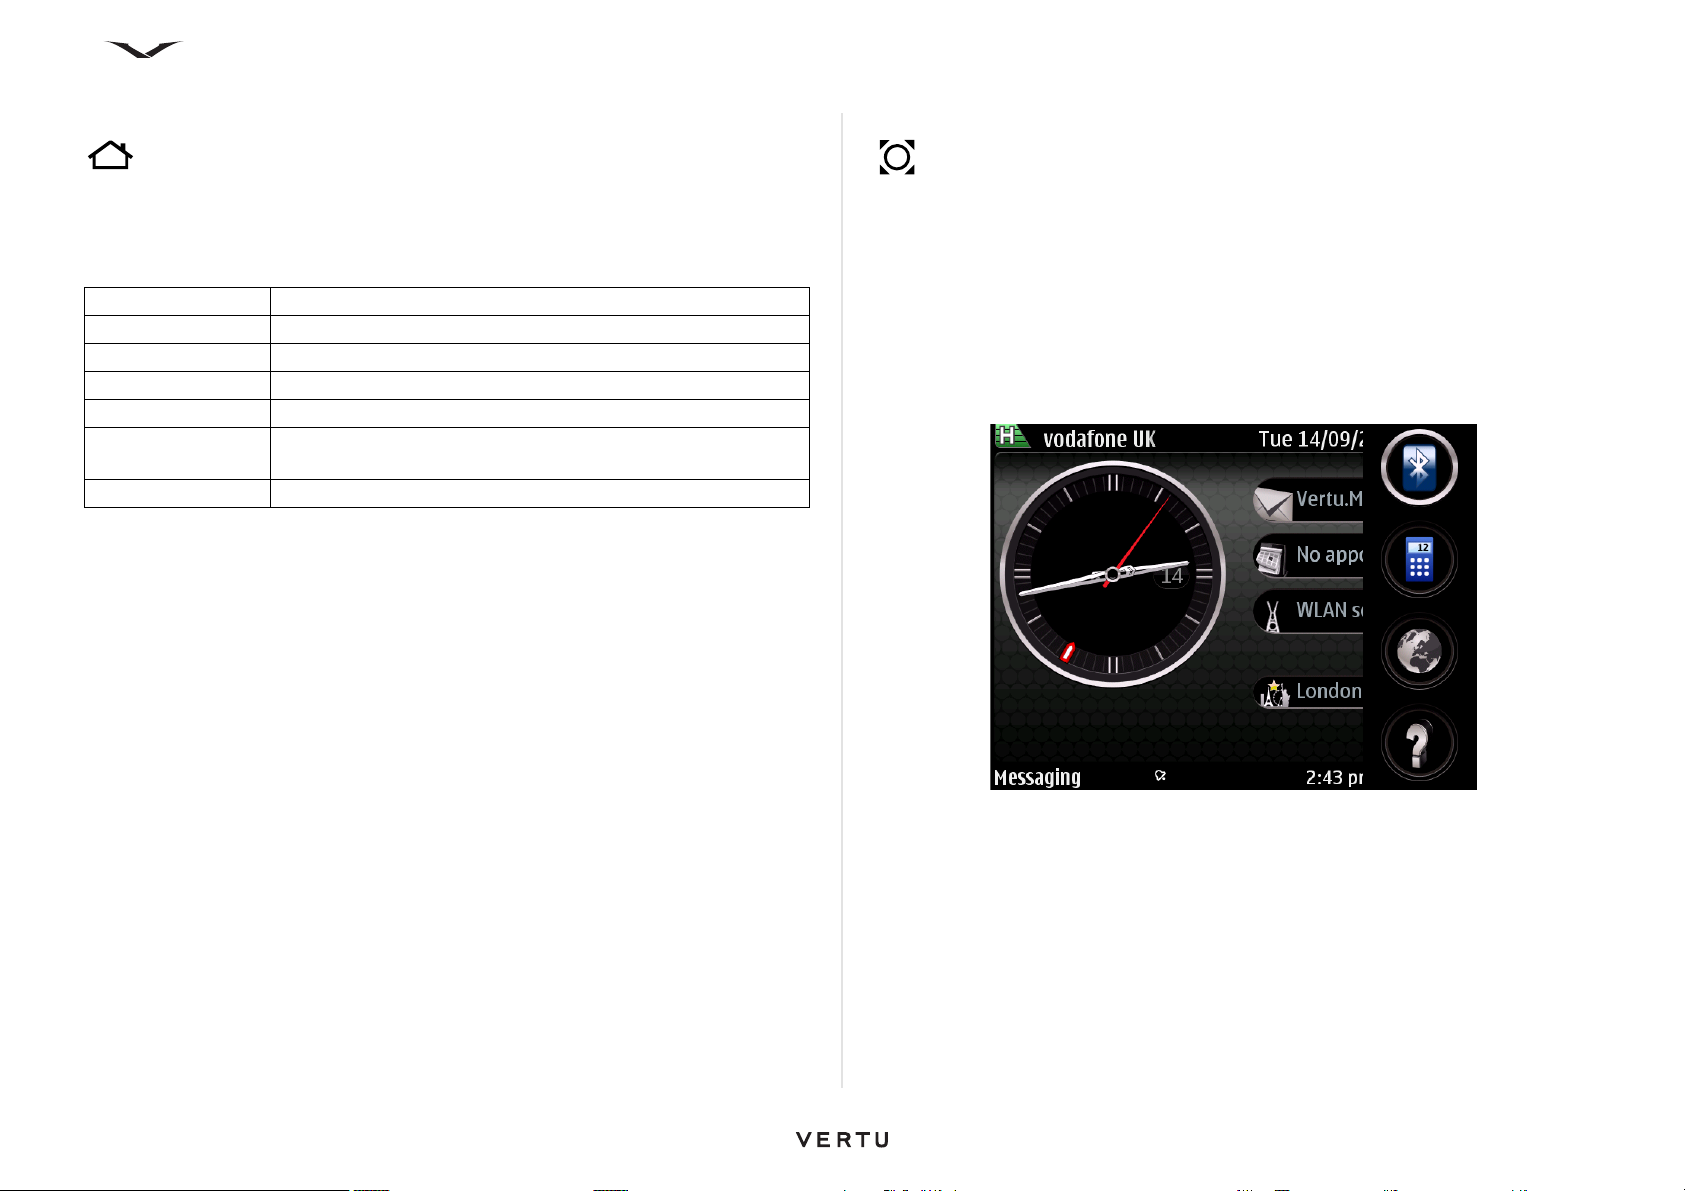
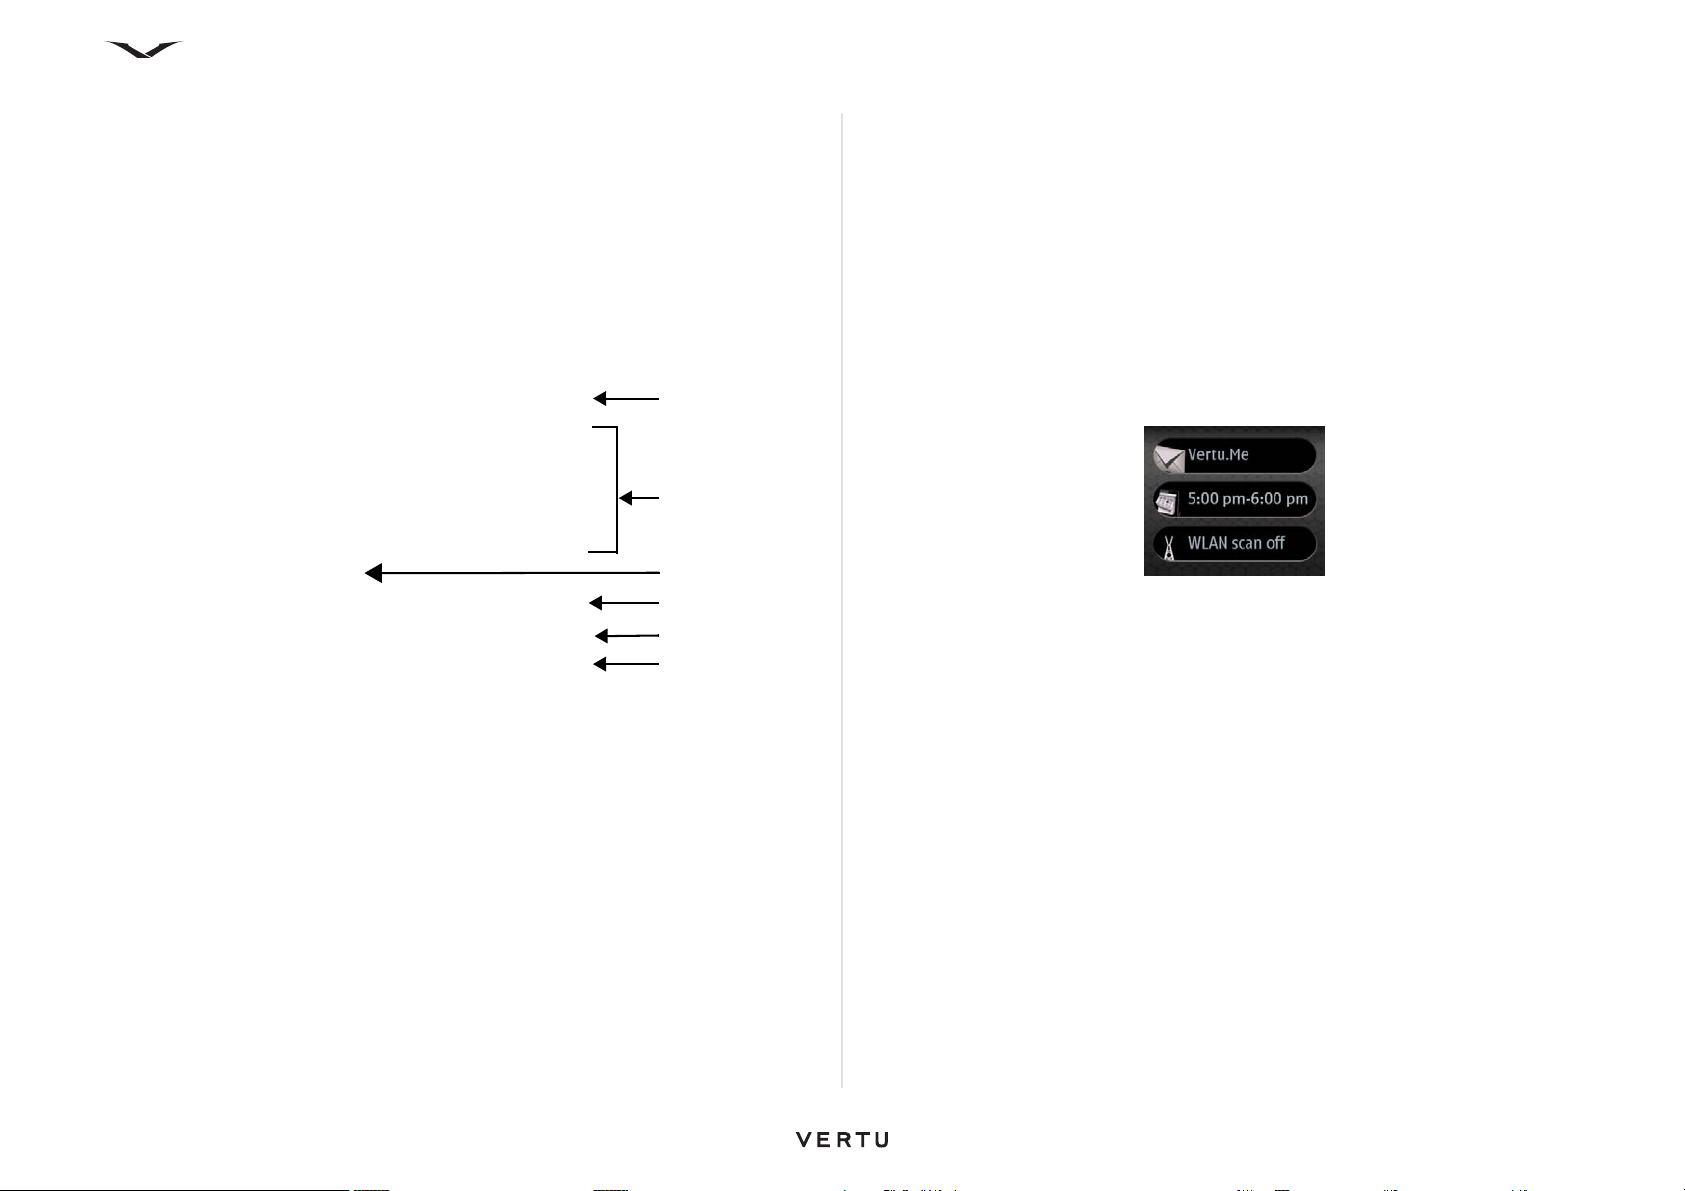
The Home screen displays a Clock, an Information area, a Dynamic zone, and web
feeds in the Notification zone.
Icons and indicators display in the status bars providing information about the status
of your Vertu phone.
Use the scroll keys to move the focus around the Home screen.
Press the Middle Select key when the focus is on a feature that you wish to open.
The Home screen contains the following areas:
1. Top status bar
2. Information area
3. Clock
4. Dynamic Information area
5. Notification zone
6. Lower status bar
The status bar icons are described in the chapter “Getting Started”.
Information area
The following three items are displayed in the Information Area, when the phone is
first started:
• The Set up e-mail wizard displays when the phone is first started.
• WLAN scan off is displayed. This function provides access to the WLAN
application which enables you to search for WLAN networks.
• Calendar displays with the message ‘No appointments’ when your phone is first
set up.
If you have set up at least two email accounts, the top two information areas display
notifications from these email accounts.
The information area below displays calendar appointments. The time of the next
appointment is shown.
Setting up the Information area in the Home Screen
There are a number of applications that can be displayed in the Information area. You
can choose which applications you would like to display as follows:
1. Select Menu > Ctrl. Panel > Settings > General > Personalisation > Standby
mode > Mode settings > Home screen applications.
2. Select the options that you want displayed on screen. Note that there are 13
items or more that can be selected, and the system prioritises the items that are
displayed following the hierarchy shown in the Home screen applications
menu. Thus you may select an item, but it will only be displayed once its priority
becomes high enough, and thus you may need to de-select items to ensure that
an item is displayed.
3. Note that this function controls the display of the Media Feeds and the message
alerts as well.
25
Page 26
Home Screen and Clock
Clock
The clock has the following features:
• Displays time and date in either analogue or digital format.
• Displays alarms set for the next 12 hours (analogue display only).
• Displays free and busy periods taken from the Calendar, around the clock bezel
(analogue display only)
• Maintains time accurately, using the automatic time feature.
• Displays the local time or, if you are roaming, displays both the local time and the
time in your home location.
WARNING: The date and time are normally set by the automatic time
feature and should not be tampered with.
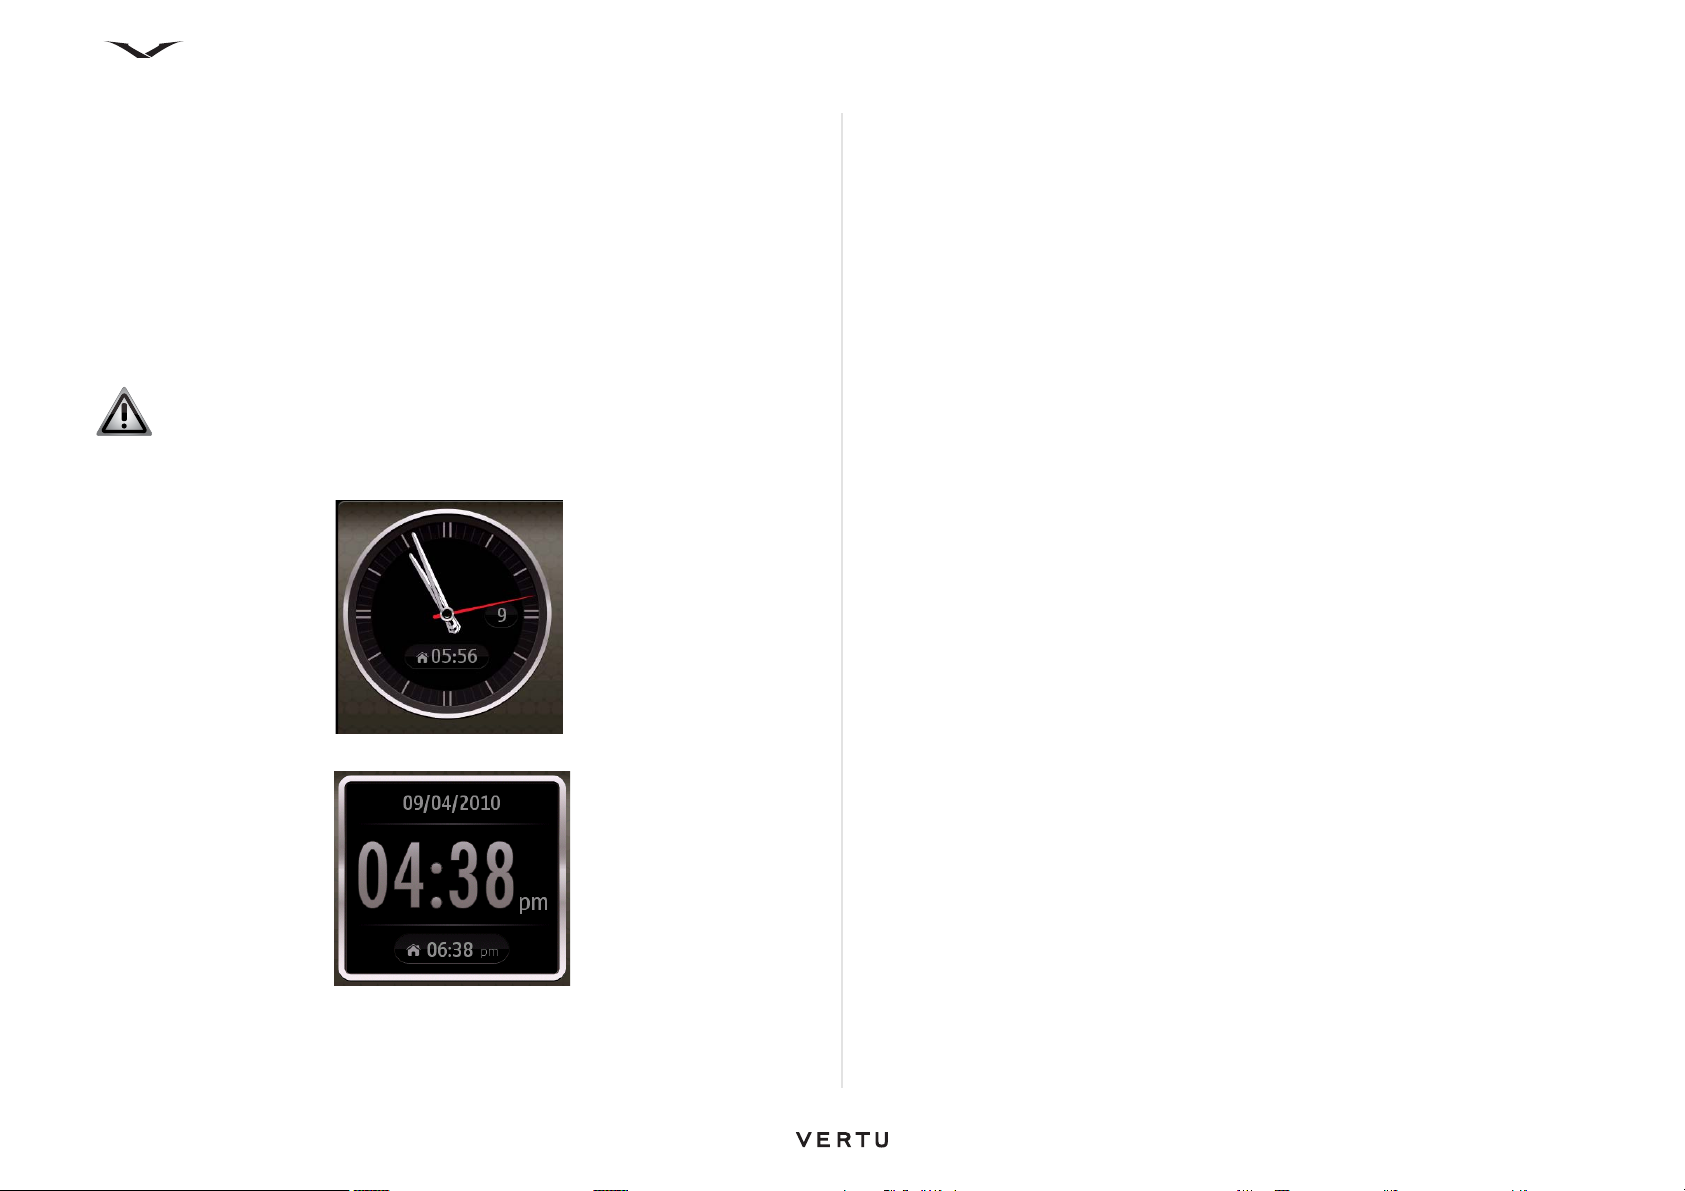
Analogue Clock, showing local time and home time (digital).
Digital Clock showing local time in the large digits and home time in small digits.
screen
To change the clock time and set alarms from the Home screen
To access the clock, scroll to the left or the right to highlight the clock and press the
Middle Select key.
The Clock application displays with the emphasis on the current Time.
Use the left and right scroll keys to display one of the three options, Time, Alarms
and World clock.
To change the Date and Time settings from the main Menu
Clock, date and time settings are accessed as follows.
From the Menu > Ctrl. Panel > Settings > General > Date and time, or
Menu > Ctrl. Panel > Clock > Options > Settings.
Change the settings as necessary.
Clock - Alarms
To set an alarm:
1. With the Clock application open, from either the Time or Alarms tab, select
Options > New alarm.
2. Scroll to Alarm time: and select the time for the alarm.
3. Scroll to Description, and change the alarm text if required.
4. Scroll to Repeat. By default the alarm is set to Within 24hrs, which means that
the alarm is only valid within the next day. Press the Middle Select key and select
an alternative option if required; the alarm can be repeated daily, weekly, on
workdays or not repeated.
5. Press Done, and the alarm is saved. Set additional alarms if required.
6. The display shows when the next alarm is due to activate.
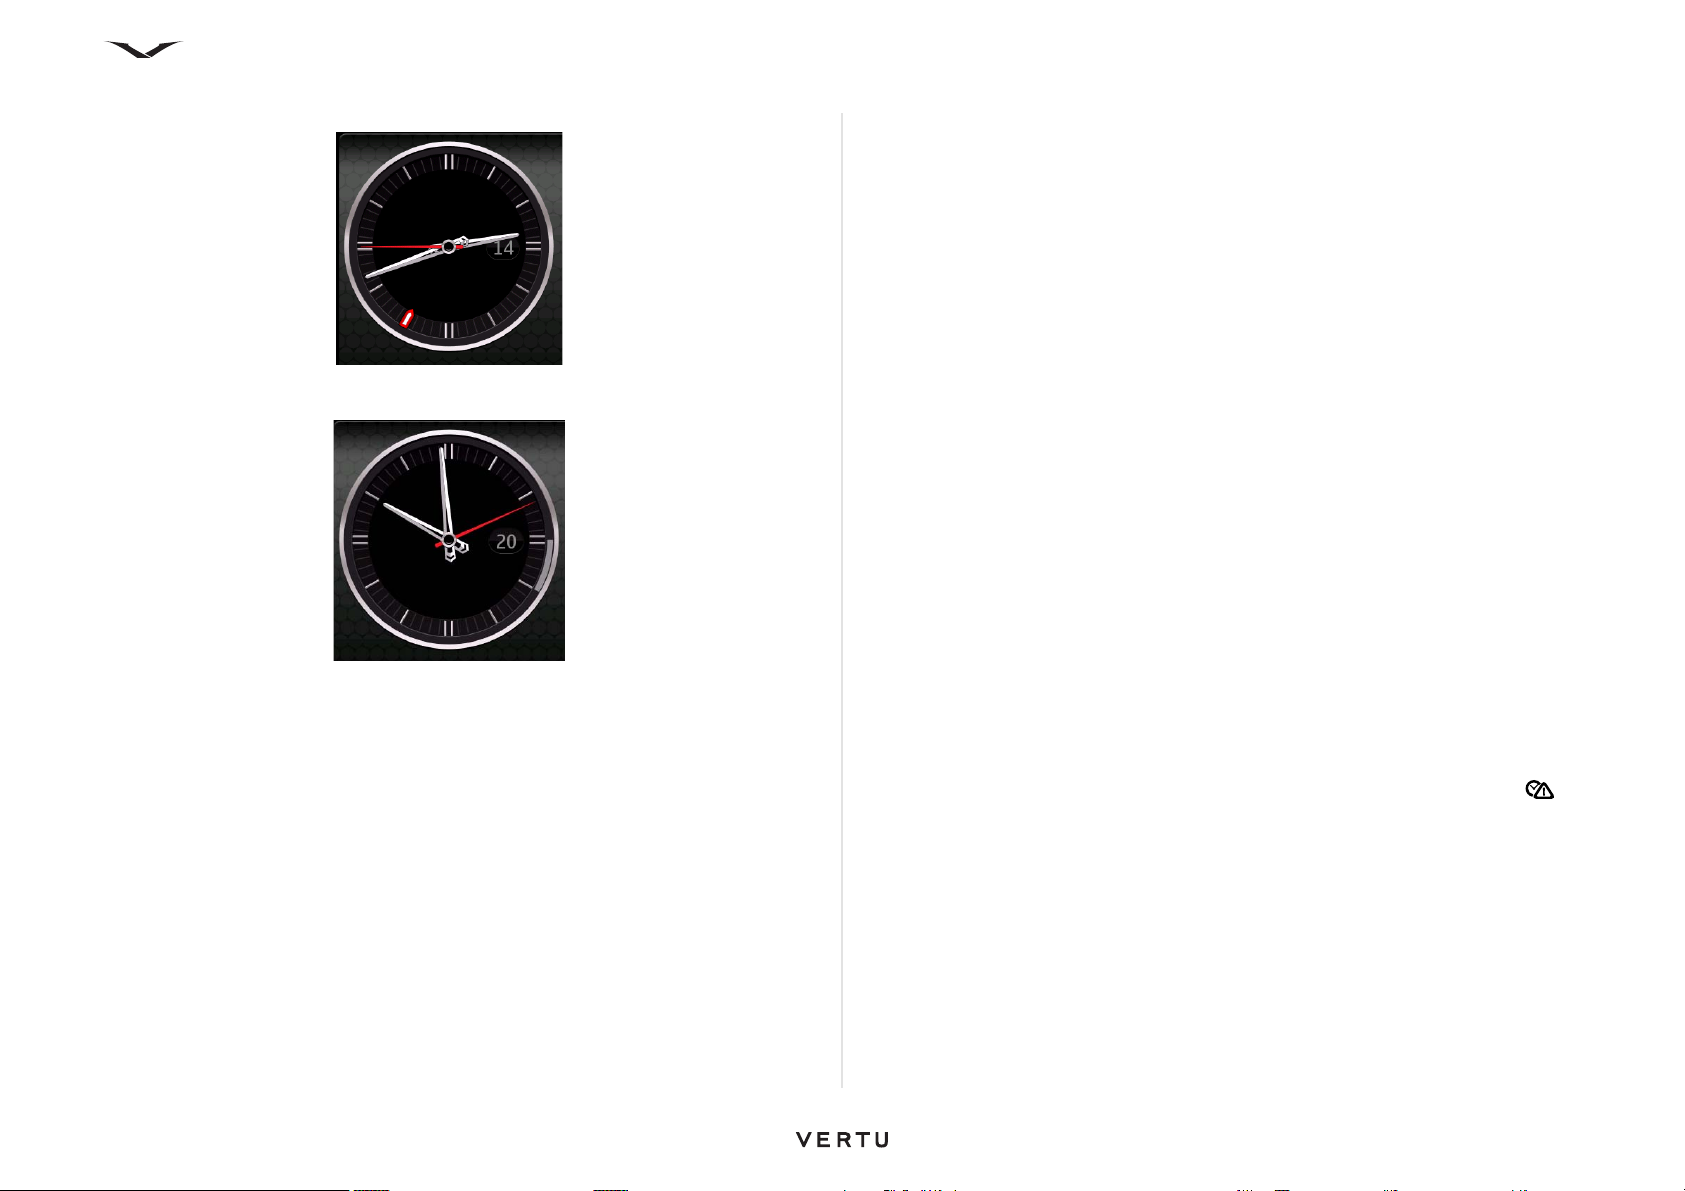
Clock alarms and appointments
The clock, alarm and the world clock are all accessed via the clock, from the Home
Any meetings or appointments set, are displayed in the analogue clock as shown
below.
26
Page 27
Home Screen and Clock
Analogue clock showing alarm at 7 o’clock.
Analogue clock showing busy from 3 to 4 o'clock.
To reset an Alarm
1. If you want to reset an alarm, click on the Options and select Reset alarm. Press
Done when you have made your changes.
To remove an alarm
1. Highlight the alarm you want to delete.
2. Select Options > Remove alarm and press Yes when prompted.
Set alarm ring tones
The selected alarm tone applies to all alarms.
1. With the clock function open.
2. Select Options > Settings > Clock alarm tone, and select an alarm from the
displayed list.
3. Press Back to exit the Settings.
World Clock and Dual Time
The Clock allows you to see timings of different locations in the world clock.
To add a specific location to your world clock, select, Clock > World clock >
Options > Add location. It gives you a list of places you can view the time for.
Selecting a particular places adds in the location along with the current time at that
place.
You can change the settings of the clock by Clock > World clock > Options >
Settings. This provides you with various options like setting the time zone, setting the
home location, date and time format, clock type and so on.
The Clock includes a dual time handling system which comes into effect when you
travel away from either:
•Your home country
• Your home location time zone
Your phone handles the location using the Mobile Carrier Code of the current network
to obtain the current time, plus if necessary access to an online service to obtain
greater accuracy.
By default both digital and analogue clocks display the home time in digital format
within the current clock zone. On returning to the home location, the clock will switch
back to the single clock only showing a single current time.
Automatic Time setting
The automatic time feature keeps the phone clock accurate, and means that you do
not need to set the time or date manually at different locations (but the SIM card must
be present in the phone). When enabled, this sets the system clock to the local UTC
value, from which the necessary GMT offsets are applied automatically to present the
correct time and date.
If there is a problem with the automatic time update system, a warning icon
appears in the lower status bar to cover various situations such as:
• The current and home time, and the current location is unknown so the time
cannot be updated.
• On first power-up, when the user agreed to the terms and conditions, the mobile
phone network was out of reach.
• Travelling to a country with multi-time zone and where the geographic location is
unknown.
• Clock is believed to be inaccurate due to length of time since the last successful
synchronisation.
The automatic time setting function can be turned On or Off.
27
Page 28

Home Screen and Clock
Missed call Unread messages Voice mail
1. From the clock application > Options > Settings > Automatic time update.
Or: Menu > Ctrl. Panel > Settings > General > Date and time > Automatic
time update.
2. When the setting is turned On, the following applies:
• The Vertu clock automatically sets the time.
• The phone is in dual time handling mode.
NOTE: If the automatic clock is out of service, an icon displays on the
bottom status panel notifying users that current time is inaccurate.
NOTE: On factory reset or restore you can re-set the clock options from the
Setup wizard. If you skip the wizard or do not agree with T&C, then clock is
set manually. However, you can still activate the automatic update feature
from the Date and time feature in the Settings menu, as described above.
Dynamic Information area
This area shows either City Brie f, Music player or Radio. If neither the Music
player or Radio is active then the City Brief link is displayed.
Notification zone
The notification zone is dynamic and displays information about calls, messages and
news feeds.
By default, the notification zone displays information about recent unread messages,
emails and missed calls. News feeds is displayed when no outstanding items of
higher priority are present.
To view a notification:
1. Scroll to the box and press the Middle Select key to open it. A box is only visible
if there are items present.
2. The example below displays three notifications; for missed calls, presence of
new messages and voice mail.
28
Page 29
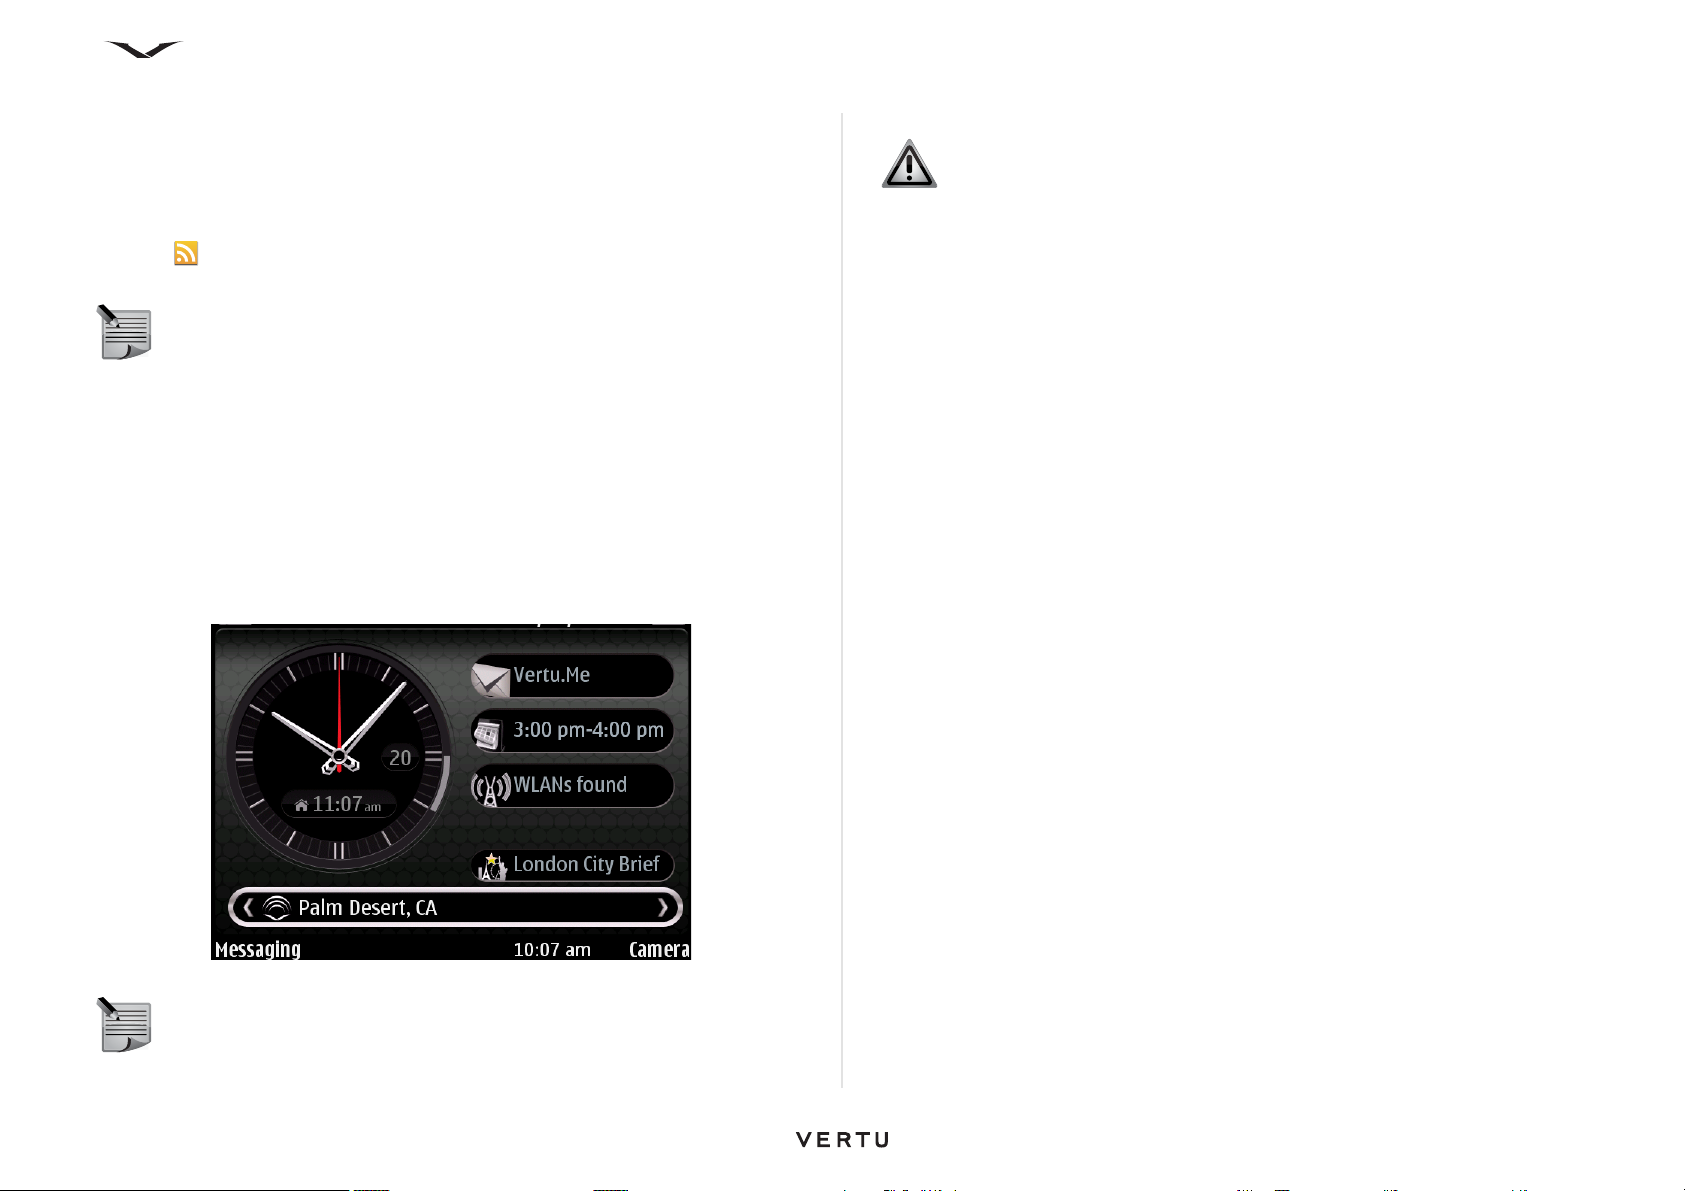
Media Feeds
Media Feeds enable you to easily follow news headlines and your favourite news
feeds.
Media Feeds are commonly found on news sites, blog, and wiki pages. Media Feeds
are also known as RSS feeds or web feeds, and are identified on the web page by the
RSS icon .
NOTE: When the phone is set up for the first time, the voice mail notification
appears in the notification zone. Media feeds will only display when the
notification for messages, missed calls and voice mail are cleared.
Reading a Media Feed
1. Use the scroll keys to highlight the Media feeds area.
2. Scroll left or right through the Media feeds, and view the latest headlines.
3. Press the Middle Select key to view a list of Media Feeds items.
4. Select a Media Feed and press the Middle Select key again to view the news
feed which can be opened up in a web page.
5. The list of news feeds also gives you an opportunity to select other news item.
Home Screen and Clock
WARNING: When using Media feeds, outside of your home network,
roaming charges may be imposed by the network operator. Such changes
can vary considerably depending on the operator.
To disable roaming, from the Media feeds panel, select Options >
Settings > Roaming behaviour > Disabled.
Download Media Feeds
Media feeds can be downloaded from the Latest headlines panel.
1. Highlight Media feeds in the Home screen and press the Middle Select key to
take you to the Latest headlines.
2. Scroll up or down and select the media feed you want to download.
3. Press the Middle Select key and a summary of the page is downloaded.
4. The item can be opened directly when it is downloaded using the Middle Select
key.
5. Press Back to exit the application.
To subscribe to a Media Feed from the browser
1. Open the web page, locate the RSS icon and select it with the Middle Select key
2. A message, Subscribe to feed? is displayed. Then, select Yes.
3. The feed is displayed in the Media fe ed s panel.
NOTE: Alternatively, Media feeds can be opened from Menu >
Applications > Media feeds.
To subscribe to a Media Feed manually
1. Highlight Media feeds in the Home screen and press the Middle Select key to
take you to the Latest headlines.
2. Select Options > Feed list. The Media feeds panel displays.
3. Select Options > Feed subscriptions, and the Subscribe to feeds panel
displays.
4. Select Options > Add manuallyand enter the URL of the media feed.
5. Press Add. The system validates the feed and adds it to the list or displays a
warning message.
29
Page 30
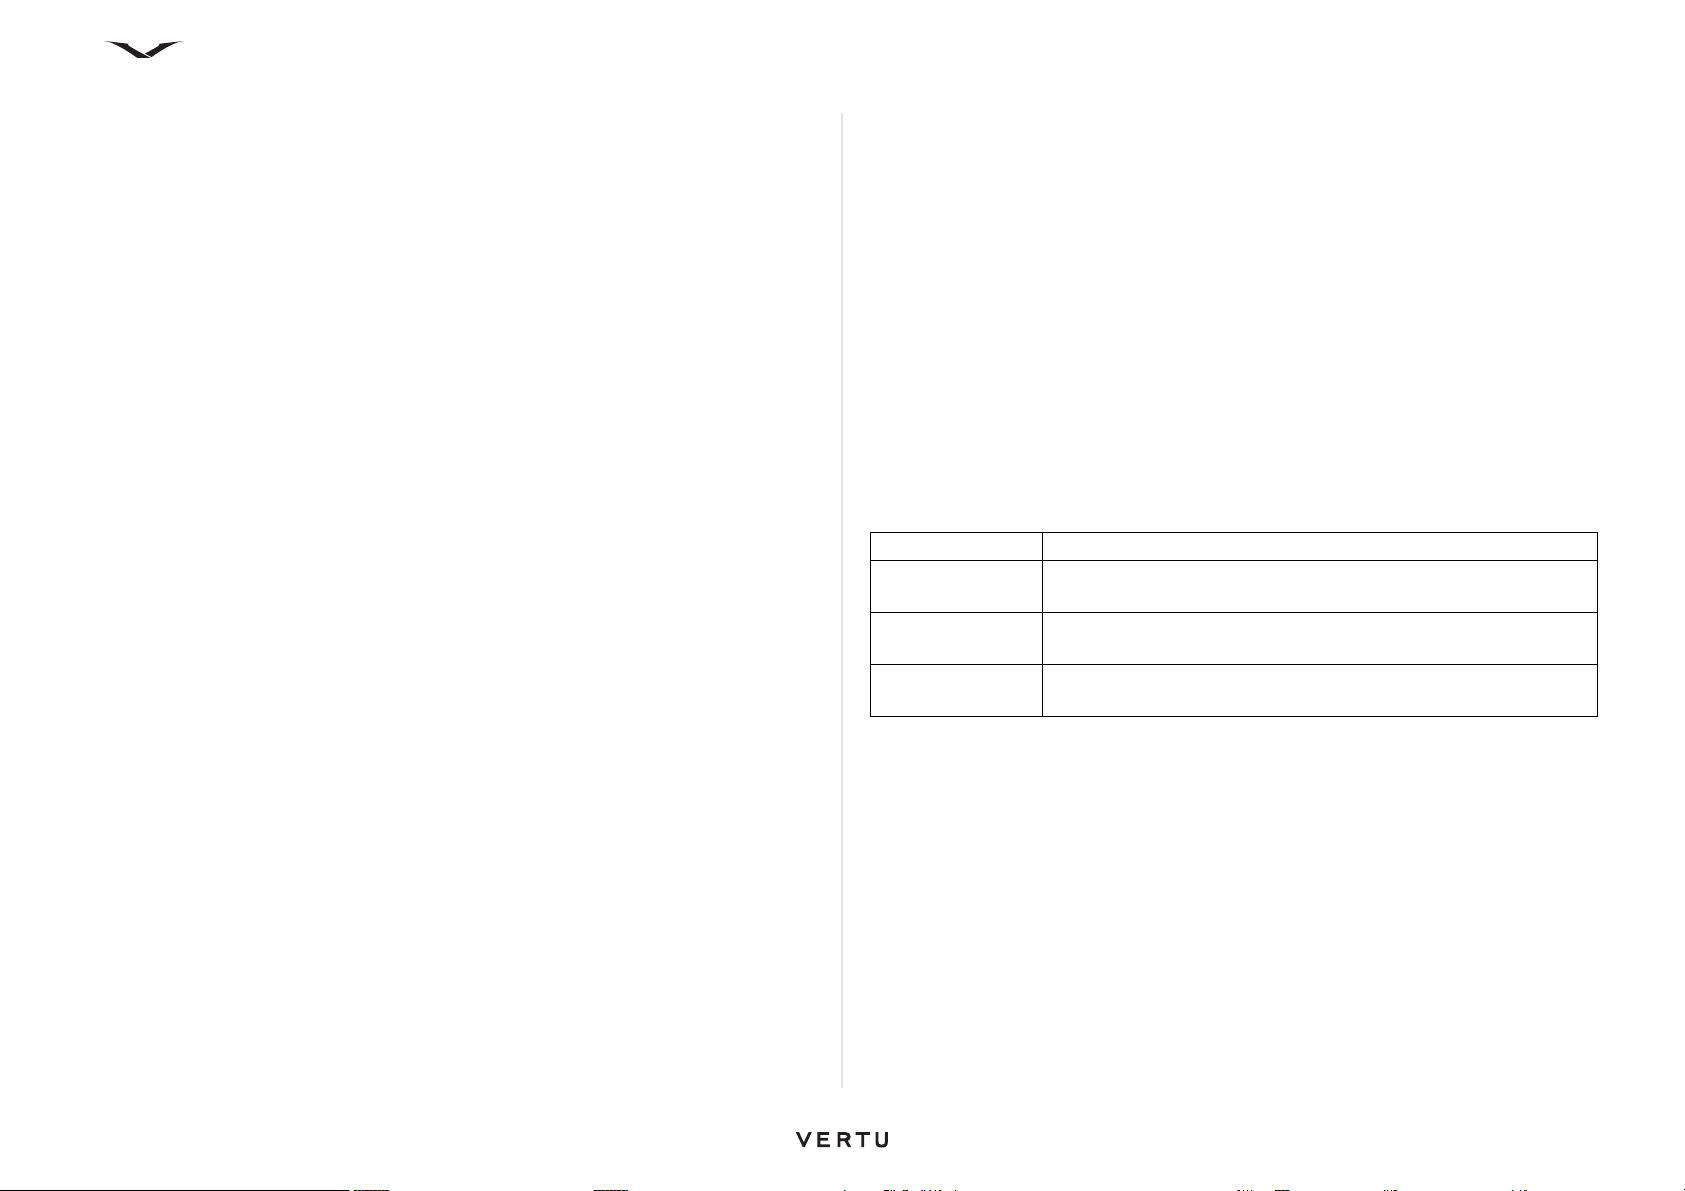
Home Screen and Clock
Auto update of Media Feeds
This is done from the Settings menu.
1. Highlight Media feeds in the Home screen and press the Middle Select key to
take you to the Latest headlines.
2. Select Options > Feed list. The Media feeds panel displays.
3. Choose Options > Settings > Automatic update, and select a time interval or
Off.
4. Select Back until you exit the function.
Organising your Media Feeds
This function enables you to create folders and move your web feeds into relevant
folders.
1. Highlight Media feeds in the Home screen and press the Middle Select key to
take you to the Latest headlines.
2. Select Options > Feed list. The Media feeds panel displays.
3. To add a folder, press Options > Add folder and enter a name for the folder and
press OK.
4. To move an item, highlight it and then press Options > Move. Press the Middle
Select key and the system displays the possible locations for the web feed.
Select the relevant folder and press Move, when the item is moved to the
relevant location.
Sorting Media Feeds
Media feeds can be sorted by time or name.
1. When in one of the Media Feeds panels, select Options > Sort by and select
either Name or Time.
2. The Media feeds on the panel are sorted accordingly.
5. Once an option has been selected, it is included in the media feeds.
6. Press Back to exit Subscribe to feeds. Save the changes when prompted. The
system may take a moment to action your requests.
Deleting Media Feeds
Note that you cannot delete news items, you can only delete the feeds.
1. Proceed up to step 2 in Organising your Media Feeds.
2. Highlight the item you want to delete. Press Options > Delete. Press the Middle
Select key and the items are deleted.
Media Feeds settings
1. Highlight the Media feeds in the Home screen and press the Middle Select key
to take you to the Latest headlines page.
2. Press the Options > Settings. The settings options are shown in the table
below.
Memory in use Select the memory where to store data.
Automatic
update
Internet access
point
Roaming
behaviour
Select the frequency for automatic updates, or turn off the
facility.
Set the access point for data transfer. Options includes Always
ask, so you can select the most appro prate route.
Deactivate the media feeds data connection when not in your
home network.
Adding pre-defined feeds to the display
1. Proceed up to step 2 in Organising your Media feedss.
2. Press Options > Feed subscriptions.
3. The Subscribe to feeds panel is presented.
4. Scroll through the list and select items. This is a toggle function, and you can
either select/deselect an item with the Middle Select key. Alternatively, highlight
an entry and press Options > Subscribe or (Unsubscribe). Items within this list
cannot be deleted.
The feeds icon is greyed out when an item is de-selected.
30
Page 31
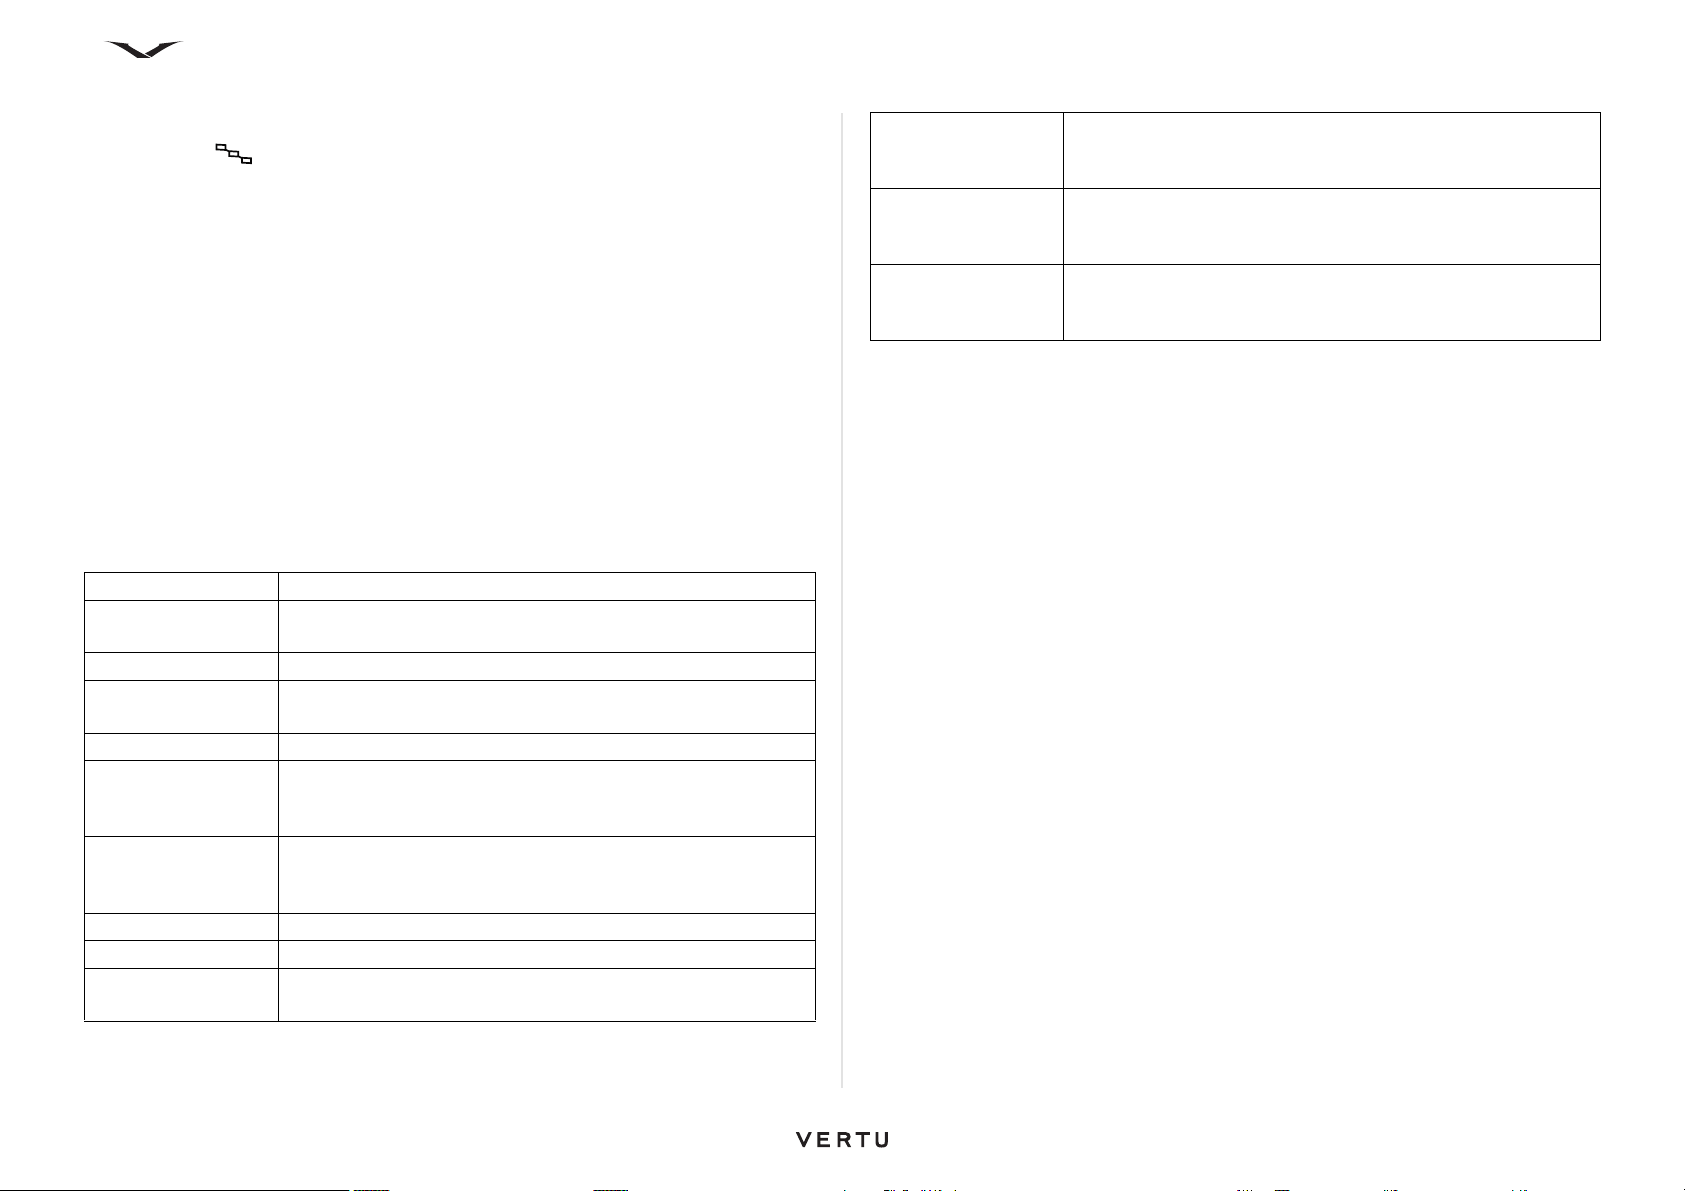
Home Screen and Clock
Menu
The Menu key displays all the top level categories within your phone. From here
you can access all functions and applications.
Application Function
Calendar Enables you to keep track of your appointments, meetings
and special events.
Contacts Holds details of all the contacts on your phone.
Log Displays information about missed, received and dialled
calls.
Web Feature rich web browser
Messaging Use messaging to send and receive text messages,
multimedia messages, data messages and audio messages
as well as email messages.
Media Provides access to functions for working with images,
videos, music, sound clips and for listening to the radio. You
can also post your images online.
Ctrl. Panel Used for setting up your phone.
Help Provides access to the online help for your phone.
Applications View and manage software packages installed on your
phone.
Maps Use Maps to locate your position, cities, streets and services.
You can also plan and execute routes either for driving or
walking.
Office Includes tools for handling documents, presentations and
spreadsheets like text editor, calculator, conversion facility,
pdf reader and others.
Vertu Provides access to Vertu Select, City Brief, Vertu
Concierge, Technical Support, Remote Assist, Download
and Registration.
31
Page 32
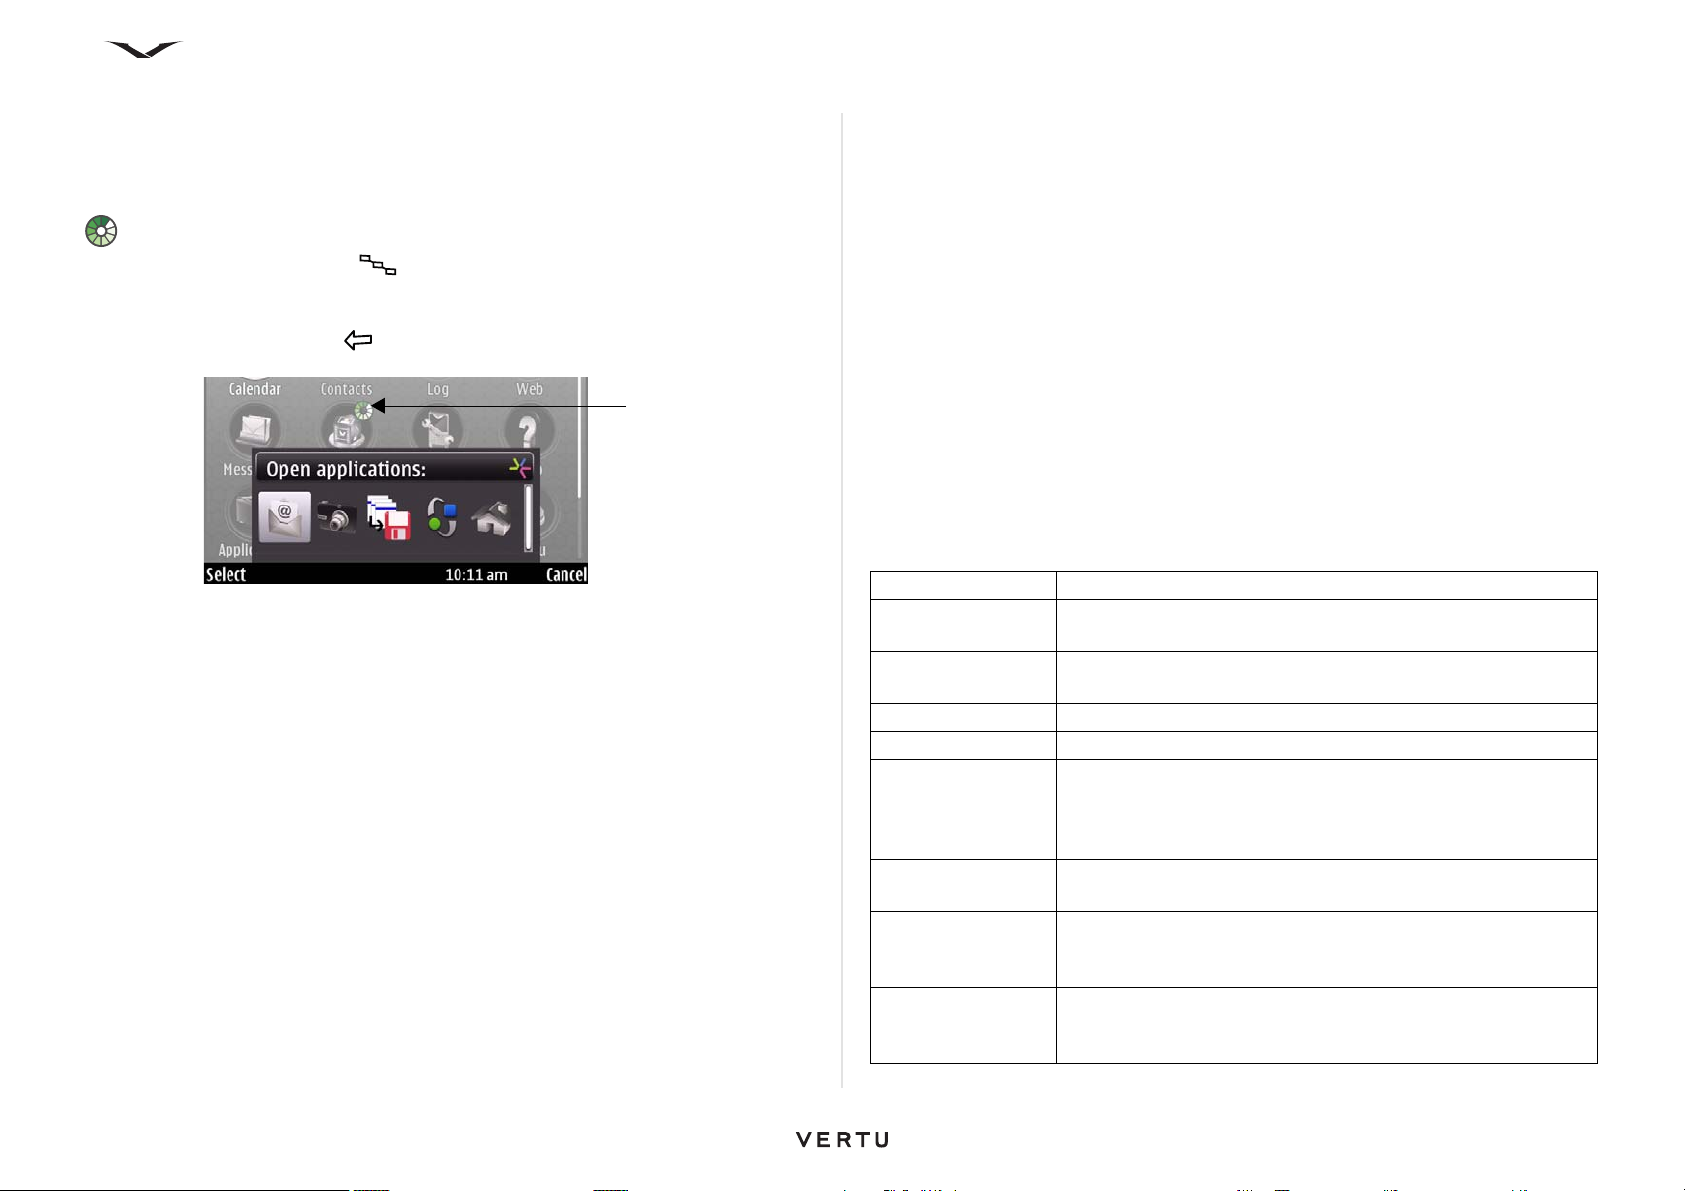
Home Screen and Clock
Open
Application
Task viewer
Your Vertu phone can run a number of applications at one time. Applications that are
open can be distinguished with a small green and white circle at the top of the
application, as shown below.
A long press on the Menu key, displays all the Open applications. Use the
right/left scroll key to highlight an application. Press the Middle Select key to go to that
application. To exit the application, highlight the application with the right/left scroll
key and press the delete key, on your keypad.
To reduce power consumption and thereby extend the battery life, it is advisable to
quit applications that you are not using.
Control panel
The Control panel provides access to the functions which are used for setting up your
Vertu phone. They are covered in detail in this User Guide under their separate
chapters.
Applications Function
Connectivity Sets up connectivity to other devices via Bluetooth, WLAN
and USB etc.
Phone Sets up all aspects of the phone, including voice mail, speed
dialling, encryption and synchronisation.
App. Mgr. Download, install and manage applications.
Themes Set up themes and wallpapers.
Settings Sets up functions including Date & time settings,
Personalisation, Telephone, Connection and
Applications for configuring the Camera, Calendar and
others.
Profiles Set up profiles, such as Meeting, Silent, Outdoor, Pager etc
to suit your requirements.
Switch Transfer data (such as contacts and calendar items) from a
compatible Vertu phone, which is useful when setting up your
new Vertu phone.
Modes Switch between business and personal modes. Use Modes
to select how you want your Home screen to appear in each
mode.
32
Page 33
Clock Set up time and date, alarms, time zone and home location.
Printers Set up a printer for the phone.
Sett. wizard Access the setup wizard for registration and email setup.
Net settings Sets up VOIP services.
Setting up your personal and business preferences
You can switch between two home screen views, one for your personal use, and
another for business.
To toggle between Personal and Business home screen views, select Menu > Ctrl.
Panel > Themes > General > and select a view.
To set up your Personal and Business modes, refer to refer to “Email account
preferences” on page 70.
Home Screen and Clock
33
Page 34
Security
Security
Your Vertu phone has a number of security features that help to prevent:
• Unauthorised use of your Vertu phone when your SIM card is inserted.
• Unauthorised use of your Vertu phone if a different SIM card is inserted.
• Unauthorised use of your SIM card in another phone.
Security Settings
Security functions are contained within the Security module in the phone, where
security is set up for four separate aspects.
Select Menu > Ctrl. Panel > Settings > General > Security.
Phone and SIM
card
Certificate
management
Protected content Adjusts your settings for DRM protected content
Security module Manages your security module
Adjusts the security settings for your device and SIM card.
See “Phone and SIM card security” on page 34
Manages your security certificates
See “Certificate manager” on page 36
See “Protected content Digital Rights Management (DRM)”
on page 37
See “View and edit security modules” on page 38
Phone and SIM card security
PIN code
The PIN code protects your device from unauthorised use. The PIN code is supplied
with the SIM card.
When the PIN code security feature is active, you need to enter the PIN code each
time you switch on your Vertu phone. If you previously used your SIM card in another
phone, the code will be the same.
IMPORTANT: The SIM card will be blocked if you enter an incorrect PIN
code three times in succession.
If this happens, you will need to contact your service provider to obtain the
PUK (PIN Unblocking Key), and enter this on your phone.
The PUK cannot be changed. If you enter an incorrect PUK 10 times in
succession, your SIM card will be permanently blocked.
NOTE: The default setting for the PIN code security feature is defined by
your service provider. Some service providers do not allow you to disable
the PIN code request.
PIN code request
To activate or deactivate the PIN code security feature:
1. From the Home screen, select Menu > Ctrl. Panel > Settings > General >
Security > Phone and SIM card > PIN code request.
2. Select On to enable the PIN code request, or Off
3. Enter the PIN code (which must be 4 to 8 digits long), then select OK. A
confirmation message is displayed.
To change the PIN code
to disable it.
Avoid using codes that are similar to emergency numbers to prevent accidental
dialling of the emergency number.
Codes are shown as asterisks. When you change a code, enter the current code,
then the new code twice.
NOTE: To change the PIN code, the PIN code request must be set to On.
1. From the Home screen, select Menu > Ctrl. Panel > Settings > General >
Security > Phone and SIM card > PIN code.
2. Press the Middle select, and when prompted, enter the current PIN code, then
select OK.
3. When prompted, enter the new PIN code, then select OK.
4. Enter the new PIN code again for verification, then select OK. A confirmation
message is displayed.
34
Page 35

Security
PIN2 code
The PIN2 code is used to protect the advanced user functions of your SIM card, for
example, fixed dialling. The PIN2 code must not be the same as the PIN code.
NOTE: The PIN2 code is supplied with some SIM cards. For more
information, contact your service provider.
To change the PIN2 code:
1. From the Home screen, select Menu > Ctrl. Panel > Settings > General >
Security > Phone and SIM card > PIN2 code
2. Press the Middle select, and when prompted, enter the current PIN2 code, then
select OK.
3. When prompted, enter the new PIN2 code, then select OK.
4. Enter the new PIN2 code again for verification, then select OK. A confirmation
message is displayed.
IMPORTANT: Th e PIN2 prote cted fe atures of yo ur SIM card will be blocked
if you incorrectly enter your PIN2 code a number of times, normally after
three consecutive attempts.
If this happens, you will need to contact your service provider to obtain the
PUK2 (PIN2 Unblocking Key). Enter this on your phone to unblock the PIN2
code and restore your SIM card’s full functionality.
Keypad autolock period
This function enables you to set the keypad to lock automatically after a defined
period.
1. From the Home screen, select Menu > Ctrl. Panel > Settings > General >
Security > Phone and SIM card > Keypad autolock period.
2. Press the Middle select and either enter a time in minutes for the autolock period,
or select None if you do not want to use this feature.
Phone autolock period
To set a time-out after which the device is automatically locked and can be used only
if the correct Lock code is entered. When the device is locked, you can still answer
incoming calls, and calls may still be possible to the official emergency number
programmed into your device.
1. From the Home screen, select Menu > Ctrl. Panel > Settings > General >
Security > Phone and SIM card > Phone autolock period.
2. Press the Middle select key and enter a number for the time-out in minutes, or
select None to if you do not want to use this feature.
3. Enter the Lock code when prompted.
Lock code
The lock code is used to unlock the device. To avoid unauthorised use of your device,
change the lock code.
To set a new lock code for the phone autolock function:
1. From the Home screen, select Menu > Ctrl. Panel > Settings > General >
Security > Phone and SIM card > Lock code.
2. The preset Lock code is 12345. Enter the current code and then the new code
twice. The new code can be 4 - 255 characters long. Both alphabets and digits
can be used, and both uppercase and lowercase alphabets are possible.
3. The device notifies you if the Lock code is not properly formatted.
Lock if SIM card changed
To lock the phone if you change your SIM card, select Menu > Ctrl. Panel > Settings
> General > Security > Phone and SIM card > Lock if SIM card changed.
To prevent the use of your device with an unauthorised SIM card, select Change >
Yes. The device now asks for the Lock code every time a new SIM card is inserted.
Remote phone locking
To lock your phone though your phone is not with you, select Menu > Ctrl. Panel >
Settings > General > Security > Phone and SIM card > Remote phone locking.
To enable locking of your phone with a text message, if your phone is lost or stolen
select Enabled. Write the locking message. You may need to enter the Lock code
to change this setting. To use a remotely locked device again, enter the Lock code.
35
Page 36

Security
Closed user group
NOTE: Closed user groups are only available if they are supported by your
service provider.
A closed user group is a network service that allows you to restrict incoming and
outgoing calls to the specific groups. Contact your service provider for more
information about using this feature.
NOTE: When outgoing calls are limited to closed user groups, calls may be
possible to the emergency numbers programmed in your Vertu phone, for
example 000, 08, 110, 112, 118, 119, 911 and 999, or other official
emergency numbers.
Select Menu > Ctrl. Panel > Settings > General > Security > Phone and SIM card
> Closed user group.
Select Default to activate the groups agreed upon with your network operator, or On
to enter the index number of another group.
Confirm SIM services
Select Menu > Ctrl. Panel > Settings > General > Security > Phone and SIM card
> Confirm SIM services.
To display the confirmation messages sent between the device and the network
when you use network services supported by your SIM card, select Change > Yes.
Other security measures - restricting calls
Call barring
Fixed dialling
NOTE: Fixed dialling is only available if it is supported by your service
provider.
Fixed dialling is a network service that allows you to restrict outgoing calls to only the
numbers you specify in a fixed dialling list. Contact your service provider for more
information about using this feature.
Certificate manager
Select Menu > Ctrl. Panel > Settings > General > Security > Certificate
management.
Digital certificates are used to verify the origins of software but do not guarantee
safety. There are a number of different types of certificates available:
1. Authority certificates
1. Truste d site certificates
2. Personal certificates
3. Phone certificates
During a secure connection, a server may send a server certificate to your device.
Upon receipt, it is checked through an authority certificate stored in your device. You
receive notification if the identity of the server is not authentic or if you do not have the
correct certificate in your device.
You can download a certificate from a web site, or receive a certificate as a message.
Certificates should be used when you connect to an online bank or a remote server
to transfer confidential information. They should also be used if you want to reduce
the risk of viruses or other malicious software, and to check the authenticity of the
software when you download and install software to your device.
TIP: When you add a new certificate, check its authenticity.
NOTE: Call barring is only available if it is supported by your service
provider.
Call barring is a way of controlling calls and maintaining security with your phone
calls. Refer to “Call barring” on page 44.
36
Page 37
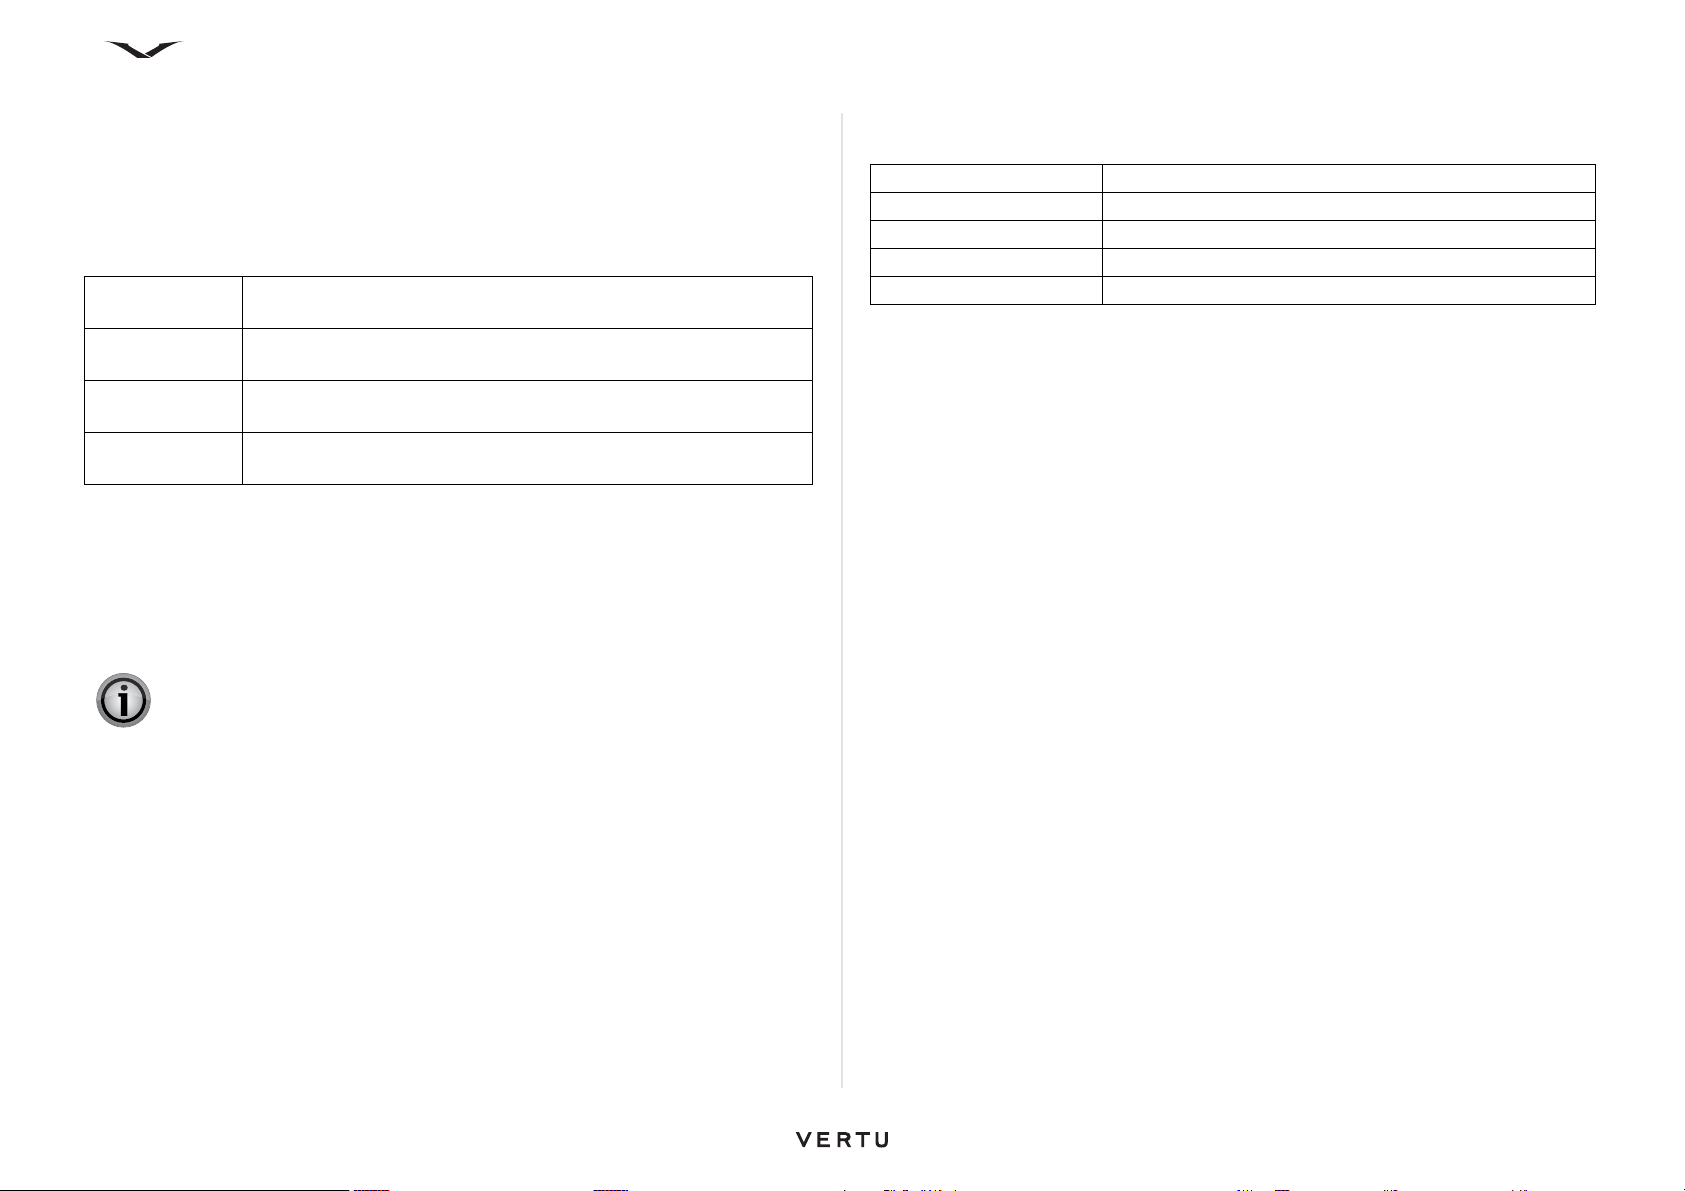
Security
View certificate details
You can only be sure of the correct identity of a server when the signature and the
validity period of a server certificate have been checked.
To view certificate details, open a certificate folder, and select a certificate and
Options > Certificate details.
One of the following notes may appear:
Certificate not
trusted
Expired
certificate
Certificate not
valid yet
Certificate
corrupted
You have not set any application to use the certificate. You may
want to change the trust settings.
The period of validity has ended for the selected certificate.
The period of validity has not yet begun for the selected
certificate.
The certificate cannot be used. Contact the certificate issuer.
Certificate trust settings
Select Menu > Ctrl. Panel > Settings > General > Security > Certificate
management.
Trusting a certificate means that you authorise it to verify web pages, email servers,
software packages, and other data. Only trusted certificates can be used to verify
services and software.
IMPORTANT: Even if the use of certificates makes the risks involved in
remote connections and software installation considerably smaller, they
must be used correctly in order to benefit from increased security. The
existence of a certificate does not offer any protection by itself; the
certificate manager must contain correct, authentic, or trusted certificates
for increased security to be available. Certificates have a restricted lifetime.
If Expired certificate or Certificate not valid yet is shown, even if the
certificate should be valid, check that the current date and time in your
device are correct.
Before changing any certificate settings, you must make sure that you really
trust the owner of the certificate and that the certificate really belongs to the
listed owner.
Depending on the certificate, a list of applications that can use the certificate is
displayed.
Symbian installation New Symbian operating system application.
Internet Email and graphics.
App. Installation New Java application.
Online certif. check Online certificate status protocol.
VPN Applicable to the VPN.
Protected content Digital Rights Management (DRM)
Other devices can send you media files that are protected by usage rights and for
which you need activation keys. Some activation keys contain unique IDs that allow
the media file provider to track the sending device. Some providers use this service
to reward people who distribute their media files to others who buy usage rights for
the files.
Protected content enables you to elect whether providers of usage-right protected
media objects are allowed to track transfers and transactions of the objects or not.
1. Select Menu > Ctrl. Panel > Settings > General > Security > Protected
content.
2. To allow media file providers to track the files sent to you select Yes in Track
protected object.
3. To save your setting select Back.
To change the trust settings, select a certificate and Options > T rust settings. Scroll
to an application field, and press the scroll key to select Yes or No. You cannot
change the trust settings of a personal certificate.
37
Page 38
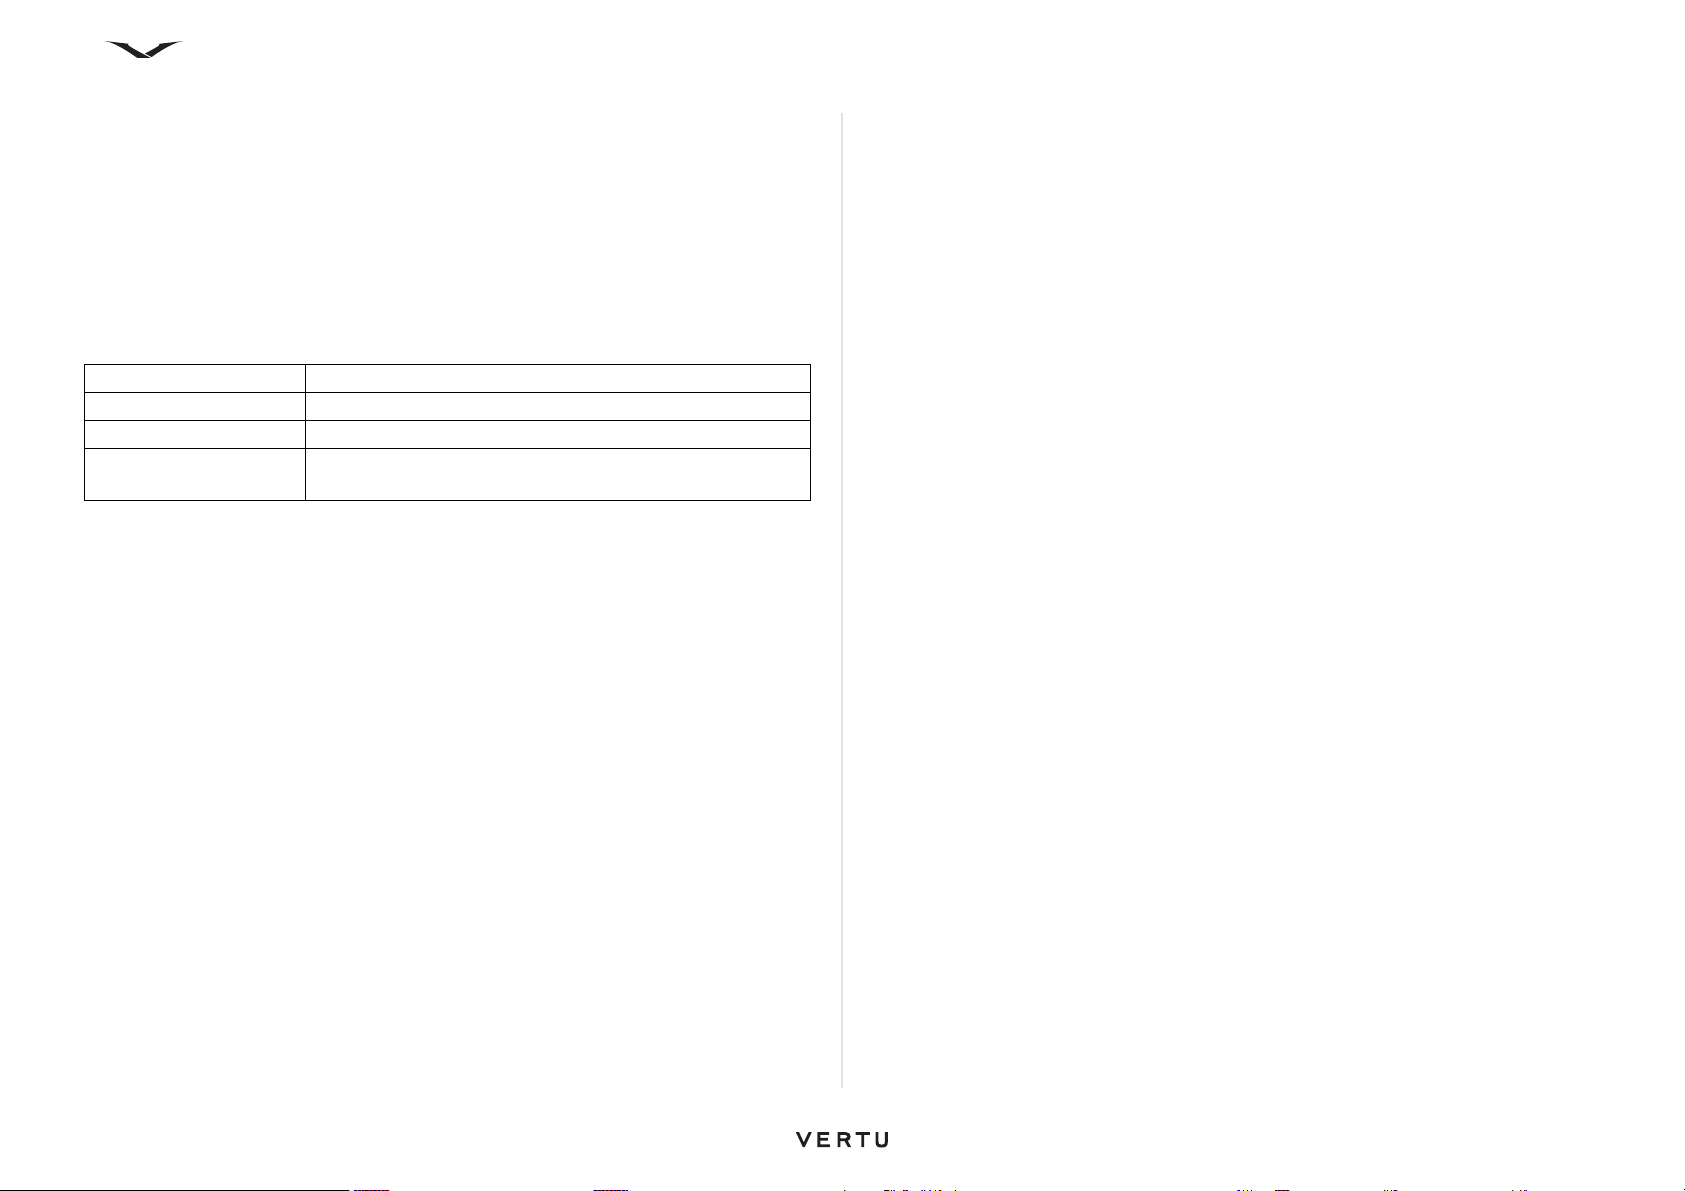
Security
Background
Content owners may use different types of digital rights management (DRM)
technologies to protect their intellectual property, including copyrights. This device
uses various types of DRM software to access DRM-protected content. With this
device you can access content protected with WMDRM 10 and OMA DRM 2.0. If
certain DRM software fails to protect the content, content owners may ask that such
DRM software's ability to access new DRM-protected content be revoked.
Revocation may also prevent renewal of such DRM-protected content already in your
device. Revocation of such DRM software does not affect the use of content
protected with other types of DRM or the use of non-DRM-protected content.
Licence acquisition Options are Automatic or Confirm first
Allow usage reporting Yes or No
Track protected object Yes or No
Licence deletion “Licence store is not yet full. Delete licences anyway?”
Options are Yes or No.
View and edit security modules
Security modules usually contain security certificates and public and private keys,
and improve security of network connections. Security modules also allow you to use
digital certificates.
Select Menu > Ctrl. Panel > Settings > General > Security > Security module.
• To view or edit a Security module, select the module from the list.
• To view detailed information about a security module, select Options > Security
details.
• To edit the PIN codes for the security module, open the module, and select
Module PIN to edit the PIN code for the Security module or Signing PIN to edit
the PIN code for digital signatures. You may not be able to change these codes for
all security modules.
• The key store contains the contents of the security module. To delete the key
store, select Options > Delete. You may not be able to delete the key store of all
security modules.
Browser security
Security features may be required for some services, for example online banking or
shopping. For such connections you need security certificates and possibly a
security module, which may be available on your SIM card. For more information,
contact your service provider.
38
Page 39
Call functions and Call Log
Call functions and Call Log
Making a call
Before making a call, check that you have a good signal and the battery is charged.
Making a call from the home screen
To make a call from the Home screen:
1. Using the keypad, enter the phone number to call. To remove a number, press
the backspace key.
2. Press the Call key.
3. To end the call (or to cancel the call attempt), press the End key.
Pressing the End always ends a call, even if another application is active.
If you press the Middle Select key instead of the Call key, you can make a Voice call,
Video call or save the number to contacts.
Additionally you can make a call in Number mode or Alpha mode. Use Number
mode for most calls, while Alpha mode is selected where alphanumerics are
appropriate, such as for internet calls. This is a toggle function.
Making an emergency call
WARNING: Your Vertu phone, like any wireless phone, operates using
radio signals, wireless and land line networks as well as user-programmed
functions. Because of this, connections in all conditions cannot be
guaranteed. Therefore, you should never rely solely upon any wireless
phone for essential communications, for example medical emergencies.
WARNING: If certain features are in use, you may need to turn them off
before you can make an emergency call. For more information, contact
your service provider.
WARNING: Some networks require a valid SIM card to be inserted in the
phone in order to make an emergency call.
To make an emergency call:
1. Press the Home key to return to the Home screen.
2. Enter a valid emergency number, for example 000, 08, 110, 112, 118, 119, 911
or 999.
WARNING: Emergency numbers vary by location and those listed above
may not be supported by your service provider.
3. Press the Send key.
NOTE: When making an emergency call, remember to give all the
necessary information as accurately as possible.
NOTE: Remember that your phone may be the only means of
communication at the scene of an accident – do not end the call until you
are sure that it is appropriate to do so.
Making a call from contacts
To make a call from Contacts:
1. Press the Contacts key to access your Contacts.
2. Locate the required contact, by scrolling to the desired name, or enter the first
letters or characters of the name in the type to search field to narrow down the
search.
3. Scroll to the required number, then press the Call key.
Making a call from the call logs
To make a call from the call logs:
1. From the Home screen, press the Call key, and use the left and right scroll keys
to move between Missed calls, Received calls and Dialled numbers.
Alternatively, select Menu > Log and then select the call category.
2. Select Recent calls.
3. Scroll to the required name or number, then press the Call key to make the call.
4. Alternatively, press the Options key for alternative actions, such as Create
message.
39
Page 40

Call functions and Call Log
Calling the last dialled number
To call the last dialled number, press the Call key twice.
TIP: If you have a headset connected, you can call the last dialled number
by pressing the headset button twice (depending on headset type).
Automatic redialling
Occasionally, a call may not connect because your network is experiencing heavy
traffic, or the called party is busy. With the automatic redial feature activated, your
Vertu phone redials the number up to 10 times, and notifies you when the network is
available.
To activate automatic redial:
1. Select Menu
2. Select On by pressing the Middle Select key.
> Ctrl. panel > Settings >Phone > Call> Automatic redial.
Making a call using voice dialling
Using voice recognition, your Vertu phone can dial contacts and access menu items
using voice commands. These commands are not dependent on the speaker’s voice
so you do not need to record voice tags in advance.
TIP: Voice dialling works best for long unique names.
To make a call to a contact using voice dialling:
1. From the Home screen, press and hold the Right Select key until you hear a
tone.
If you have a headset connected, press and hold the headset button until you
hear a tone.
2. Speak the name of the contact to call.
3. Select the required contact from the displayed list. Your Vertu phone
automatically dials the number.
4. If you do not select a contact from the list within five seconds, the first option is
automatically dialled.
TIP: If the contact you want to call is not listed, select Quit to exit voice
dialling.
Speed dialling
Speed dialling enables you to quickly dial numbers from the Home screen. You can
save up to eight numbers in your speed dial list.
Activating speed dialling
To activate speed dialling:
1. Select Menu > Ctrl. panel > Settings > Phone > Call > Speed dialling.
2. Select On by pressing the Middle Select key.
Assign a number to the speed dial list
To assign a phone number to one of the number keys (2-9):
1. Press the Contacts key.
2. Scroll to the required number, open it, then select Options > Assign speed dial.
3. Select the speed dial number to assign to the phone number. A confirmation
message is displayed
NOTE: The speed dial number 1 is reserved for calling your voice mailbox
number as a speed dial.
Making a call using speed dialling
To make a call using Speed dialling:
From the Home screen, simply press and hold the numeric key assigned to the
required phone number.
Deleting a speed dial
To delete a speed dial:
1. Press the Contacts key.
2. Scroll to the required number, open it, then select Options > Remove speed
dial.
3. Select Yes to confirm the deletion.
40
Page 41
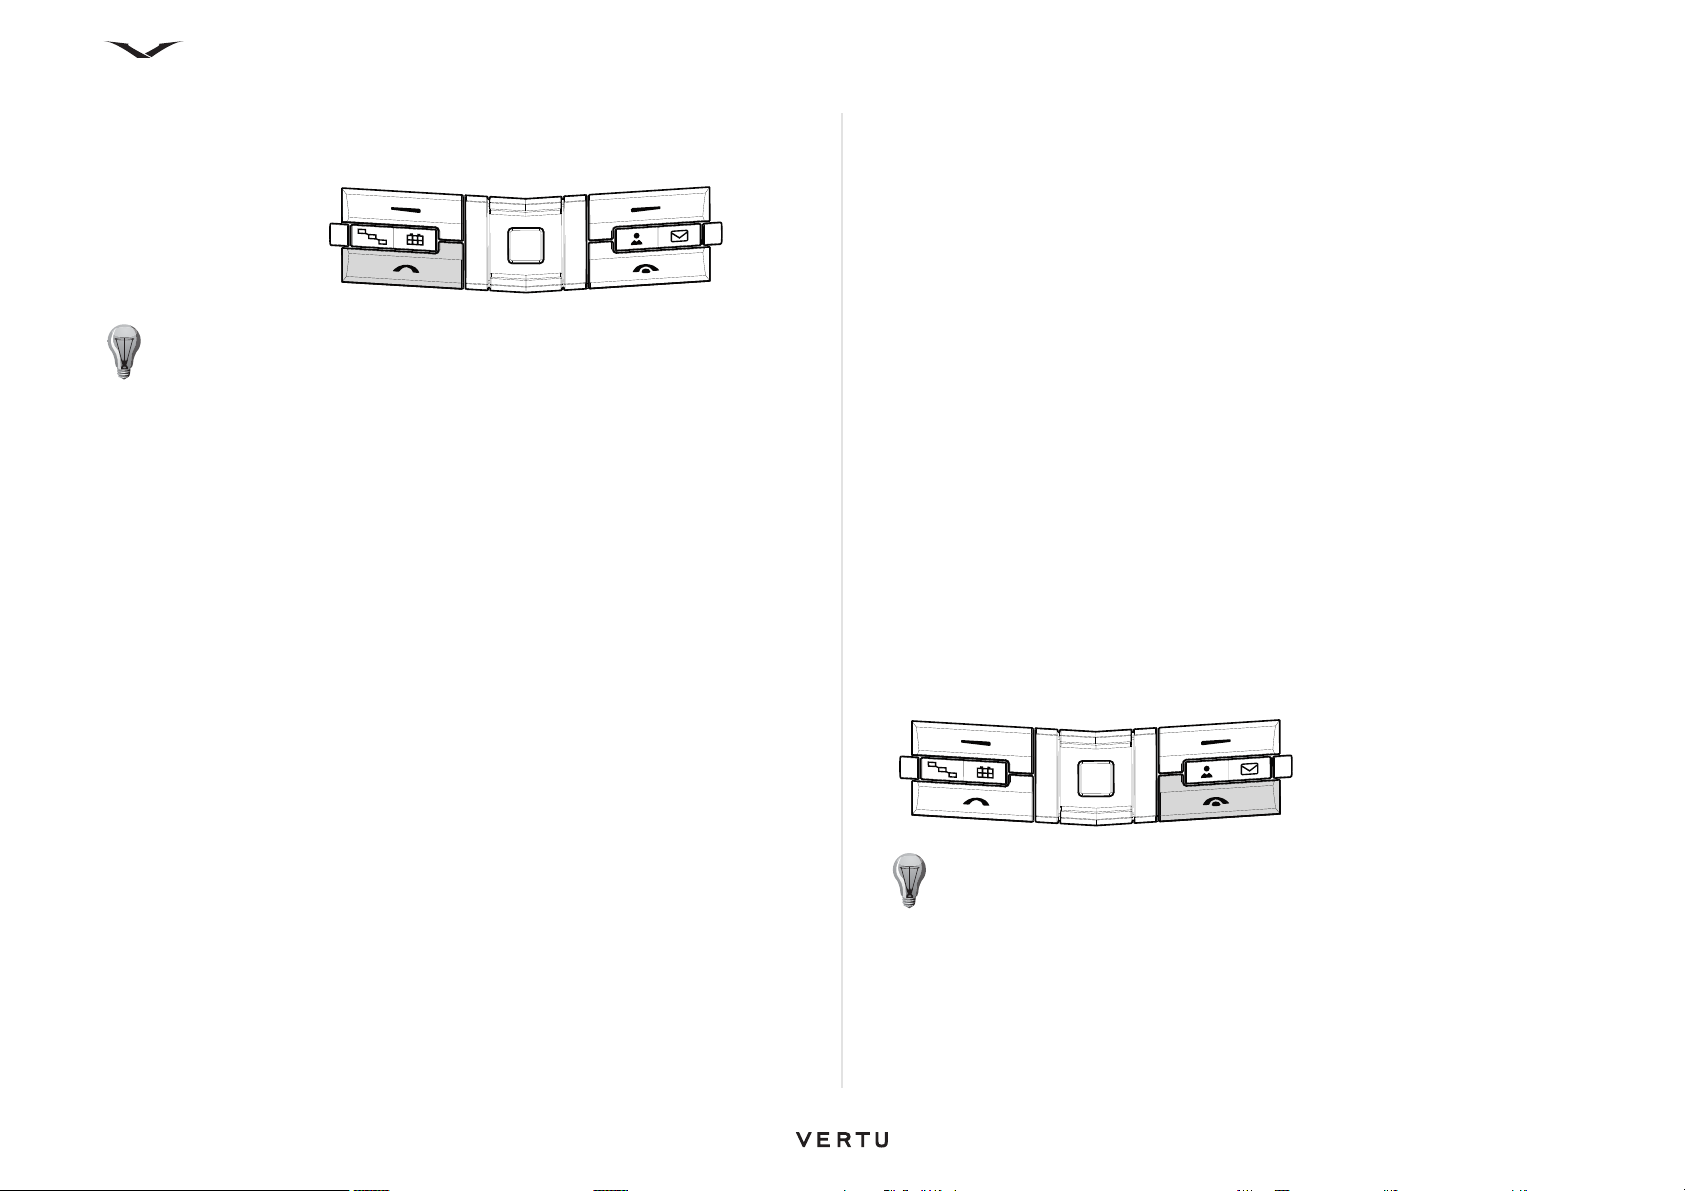
Call functions and Call Log
Answering a call
To answer an incoming call:
Press the Call key.
TIP: If you have a headset connected, you can answer an incoming call by
pressing the headset button, if present.
Anykey answer
With the Anykey answer feature activated, you can answer an incoming call by
pressing any key except the Power key, selection keys and End key.
To a c t i v at e Anykey answer:
1. Select Menu
2. Select On by pressing the Middle Select key.
Silence the ringing tone of a call
To mute the ringing tone of an incoming call, select Silence.
If you do not want to answer a call, press the End key.
Note that if you have activated the Voice call div ert function from Menu > Ctrl. panel
> Settings > Phone > Call divert > Voice calls, that when you decline an incoming
call this also diverts the call.
> Ctrl. panel > Settings > Phone > Call > Anykey answer.
Call waiting
You can answer a call while you have another call in progress. To activate call waiting
(network service), select Menu > Ctrl. panel > Settings > Phone > Call > Call
waiting.
• To answer the waiting call, press the Call key. The first call is put on hold.
• To switch between the two calls, select Swap.
• To connect an incoming call or a call on hold with an active call and to disconnect
yourself from the calls, select Options > Transfer.
• To end the active call, press the End key.
• To end both calls, select Options > End all calls.
Automatic answer
With the Automatic answer feature activated, calls are automatically answered when
a hands free accessory is connected.
To activate Automatic answer:
1. Select Menu > Ctrl. panel > Settings > General > Enhancement.
2. Select either Headset or Wireless car kit as appropriate.
3. Select Automatic answer.
4. Select On. The automatic answer icon is displayed on the Home screen.
Rejecting or ending a call
To reject or end an incoming call:
When you select Silence to mute the ringing tone of an incoming call, you can send
a text message without rejecting the call, informing the caller that you cannot answer
the call. Select Options > Send message. To set up this option and write a standard
text message, select Menu > Ctrl. panel > Settings > Phone > Call > Reject call
with message and complete Message text.
Press the End key.
TIP: If you have a headset connected, you can reject an incoming call by
pressing the headset button twice, if present.
Multiple calls
To end an active call and replace it by answering the waiting call, select Options >
Replace.
If you have several calls active, to end them all, select Options > End all calls.
Many of the options that you can use during a voice call are network services.
41
Page 42

Call functions and Call Log
In-call options
Adjusting volume
To adjust the volume during a call, use the Volume keys on the side of your phone.
You can also use the left and right scroll keys to change the volume. If you have set
the volume to Mute, select Unmute first.
Putting a call on speakerphone
To put a call on speakerphone, select Loudsp. to activate loudspeaker.
To switch back to the handset, select Handset.
Alternatively, select Options > Activate loudspeaker / Options > Activate
handset.
Putting a call on hold
To put a call on hold, press the Send or select Options > Hold. A notification is
displayed.
To unhold the call, press the Send or select Unhold.
To switch between the active and the held call, select Options > Swap.
Muting a call
To activate mute when in a call, either press the Concierge key or select Options >
Mute. The call muted icon is displayed .
To unmute the call, select the Concierge key again or press Unmute.
Putting a call on handsfree
If you have attached a compatible headset with Bluetooth connectivity, to route the
sound to the headset, select Options > Activate handsfree. To switch back to the
handset, select Options > Activate handset.
TIP: When you have only one active voice call, to put the call on hold, press
the Call. To activate the call, press the Call key again.
Menu
You can access the main menu while in a call by selecting the Menu key.
Record
To record the conversation, select Menu > Media > Recorder. All parties are
recorded.
Sending an image or a video clip
To send an image or a video clip in a multimedia message to the other participant of
the call, select Options > Send MMS and select Media file (in UMTS networks only).
You can edit the message and change the recipient before sending. Press the Call to
send the file to a compatible device.
To send DTMF tone strings
The Dual Tone Multi Frequency (DTMF) signals are tones that can be used to access
services such as voice mailboxes and automated billing systems.To send DTMF tone
strings (for example, a password), select Options > Send DTMF. Enter the DTMF
string or search for it in Contacts. To enter a wait character (w) or a pause character
(p), press * repeatedly.
To send the tone, select OK. You can add DTMF tones to the phone number or DTMF
fields in a contact card.
42
Page 43

Call functions and Call Log
Voice mail
Select Menu > Ctrl. panel > Phone > Call mailbox.
Any Voice mail messages are flagged for your attention in the Notification area of the
Home screen. Click on the icon to access Messages. The icon displays the number
of new messages. Dial your mailbox to access the voicemails. (See “Web Feeds”,
“Media Feeds” and “Notification zone” ).
When you open the Voice mail application (network service) for the first time, you are
requested to enter the number of your voice mailbox.
• To call your voice mailbox, scroll to Voice mailbox in the Notification zone on the
Home screen, and select Options > Call voice mailbox.
• To call your video mailbox, scroll to Video mailbox in the Notification zone on the
Home screen, and select Options > Call video mailbox.
• If you have configured net call settings to your device and have an internet call
mailbox, to call the mailbox select Menu
and select Options > Call internet call mbx.
• To call your mailbox in the home screen, press and hold 1; or press 1 and then
press Call. Select the mailbox you want to call.
• To change the mailbox number, select Menu
mailbox and select Options > Change number.
• Call mailbox can be set up as an item on My Key. To do this, access Menu
> Settings > Personalisation > My Key and select Call mail.
panel
> Ctrl. panel > Phone > Call mailbox
> Ctrl. panel > Phone > Call
> Ctrl.
Multiparty calls
Making a second call
To make a call while already in a call:
1. Select Options > New call.
2. Enter the second number, or select Search to use a number from your contacts.
3. Select Call. The first call is put on hold.
Answering or rejecting a second call
To answer an incoming call while already in a call, press the Send key or select
Answer. The first call is put on hold.
To reject an incoming call while already in a call, select Reject.
NOTE: To interact with a second call, Call waiting needs to be active. For
information on activating Call waiting, see Call waiting.
Swapping between calls
To swap between calls, press the Send key or select Swap.
Creating a conference call
A conference call can be created when you have two calls on your Vertu phone - one
that is active and one that is held. By creating a conference call, the separate calls are
joined together. Each party is then able to talk with the others.
To create a conference call, select Options > Conference.
Adding a party to a conference call
To add a new party to an ongoing conference call:
1. Make a second call. Select Options > New call. The conference call is put on
hold.
2. When the second call has connected, select Options > Add to conference.
Having a private conversation with a conference call party
To have a private conversation with a conference call party, you need to separate that
party from the conference call. To do this:
1. Select Options > Conference > Private call.
2. Select the party with whom you want to have a private conversation.
3. To cut off a participant, select Conference > Drop a participant.
43
Page 44
Call functions and Call Log
Call barring
Call barring functions are located within: Menu > Ctrl. panel > Settings > Phone >
Call barring.
You can bar the calls that can be made or received with the phone (network service).
To modify the settings, you need the barring password from your service provider.
Call barring affects all call types.
Select from the following voice call barring settings:
• Outgoing calls — Prevent making voice calls with your phone.
• International calls — Prevent calling to foreign countries or regions.
• International calls except t o home country — Prevent calls to foreign countries
or regions, but allow calls to your home country.
• Incoming calls — Prevent incoming calls.
• Incoming calls when roaming — Prevent incoming calls when outside your home
country.
To work with voice call barring:
1. Within Call barring, select the barring option and then Options > Check status.
2. To activate the selected call option, Options > Activate.
3. To deactivate the selected call option, Options > Deactivate.
4. To deactivate all voice call barring, select a barring option and Options >
Deactivate all barrings.
5. To change the password used for barring voice and fax calls, select Options >
Edit barring password.
6. Enter the current code, then the new code twice. The barring password must be
four digits long. For details, contact your service provider.
Call settings
To view call settings go to:
Select Menu
Select from the following:
Call settings Description
Send my caller ID Displays your phone number to the person you are calling.
Send my internet
call ID
Call waiting Sets the device to notify you of incoming calls while you are in a
Internet call
waiting
Internet call alert Selects On to set your device to alert for incoming internet calls. If
Reject call with
message
Message text Writes the standard text message that is sent when you reject a
Own video in
recvd. call
Image in video
call
Automatic redial Sets your device to make a maximum of 10 attempts to connect
Show call
duration
Summary after
call
Speed dialling Activates speed dialling.
Anykey answer Activates anykey answer.
> Ctrl. panel > Settings > Phone > Call.
Displays your internet call address to the person you are calling
using an internet call.
call (network service).
Sets the device to notify you of a new incoming internet call while
you are in a call.
you select Off, you receive only a notification if you missed a call.
Rejects a call, and send a text message to the caller.
call.
Allows or deny video sending during a video call from your device.
Displays a still image if video is not sent during a video call.
the call after an unsuccessful call attempt. To stop automatic
redialling, press the end key.
Displays the length of a call during the call.
Displays the length of a call after the call.
44
Page 45
Call functions and Call Log
Call settings Description
Line in use This setting (network service) is shown only if the SIM card
supports two subscriber numbers, that is, two phone lines. Select
which phone line you want to use for making calls and sending
text messages. Calls on both lines can be answered irrespective
of the selected line. If you select Line 2 and have not subscribed
to this network service, you are not able to make calls. When line
2 is selected, is displayed in the home screen.
Line change Prevents line selection (network service), if supported by your
SIM card. To change this setting, you need the PIN2 code.
Contact search Activate contact search in the home screen.
Note that the available options may vary.
Call divert
The call divert feature enables you to divert incoming calls to another phone number
or mailbox if you are not able to answer them. This ensures that no calls are missed.
NOTE: Call divert is only available if it is supported by your service provider.
3. Select Activate.
TIP: To view the current status of the divert, select Check status. The
current status is displayed. To view the number that calls are diverted to,
select Number.
TIP: To cancel this divert, select Deactivate.
4. If you have activated the call divert for the option If not answered or If not
available, select the destination for the call, and choose a time after which the
divert should occur.
NOTE: Cancelling all call diverts may affect the ability to receive voice mail
messages.
NOTE: Your service provider may not allow you to cancel all call diverts.
Contact your service provider for further information.
Call waiting
Call waiting notifies you of an incoming call while you are in another call. You can then
answer or reject the second call. For information on how to answer or reject a second
call, see Answering or rejecting a second call.
NOTE: Call waiting is only available if it is supported by your service
provider.
To set up call divert:
1. Select Menu
2. Select the conditions during which you would like to divert incoming calls from
the following:
• All voice calls - to divert all calls.
• If busy - to divert calls when you are already in a call.
• If not answered - to divert calls when you cannot answer them.
• If out of reach - to divert calls when your Vertu phone is switched off or out of
network coverage.
• If not available - to divert unanswered calls or divert calls when your phone is
busy or out of network coverage.
TIP: To cancel all call diverts, select Deactivate all diverts.
> Ctrl. panel > Settings > Phone > Call divert > Voice calls.
To set up call waiting:
1. Select Menu
2. Select Activate.
TIP: To view the current status of call waiting, select Check status.
TIP: To cancel call waiting, select Deactivate.
> Ctrl. panel > Settings > Phone > Call > Call waiting.
45
Page 46

Call functions and Call Log
Call duration display
This feature displays the call duration during each call.
To activate the Show call duration feature:
1. Select Menu
2. Select On.
> Ctrl. panel > Settings > Phone > Call > Show call duration.
Summary after call
This feature displays the call duration after each call.
To activate the Summary after call feature:
1. Select Menu
2. Select On.
> Ctrl. panel > Settings > Phone > Call > Summary after call.
Send my caller ID
This feature enables call recipients to view your phone number on their phone when
you call them.
To change the caller ID setting:
1. Select Menu
2. Select one of the following options:
• Set by network
• Yes - to show your phone number to all call recipients.
• No - to hide your phone number from all call recipients.
> Ctrl. panel > Settings > Phone > Call > Send my caller ID.
- to use the default setting supplied by your service provider.
Network
Menu > Ctrl. panel > Settings > Phone > Network
Networks enables you to select the network type, the manner of selecting networks,
and indicate when your phone is used in a microcellular network.
To select the type of network to use, select Network mode. Select the network type
and then select OK. This setting may be preset for your phone and you may not be
able to select it.
To define how to choose between different available networks, select Operator
selection > Options > Change > Automatic or Manual.
Select Manual if you know that one network is less expensive than the other, or that
it provides faster data transmission.
To indicate when your phone is used in a microcellular network (MCN), select Cell
info display > Options > Change > On. The MCN indicator is only displayed in the
standby mode,
Note that in a microcellular network, local calls can cost less.
To change the network settings:
1. Select Menu
2. Select one of the following options:
• Network mode
UMTS (3G) and GSM.
• Operator selection - options are Automatic or Manual.
• Cell info display - options are On or Off.
3. To save your settings, select Back.
> Ctrl. panel > Settings > Phone > Network.
- select the type of network to use, options include Dual mode,
Note that the available options may vary.
46
Page 47

Call functions and Call Log
Licenses
About Licenses
Select Menu > Ctrl. panel > Phone > Licences.
Some media files, such as images, music, or video clips, are protected by digital
usage rights. The licenses for such files may allow or restrict their usage. For
example, with some licenses you may listen to a song only a limited number of times.
During one playback session you may rewind, fast- forward, or pause the song, but
once you stop it, you have used one of the instances allowed.
Use licences
Digital rights management (DRM) protected content comes with an associated
licence that defines your rights to use the content.
If your device has OMA DRM-protected content, to back up both the licence and the
content, use the backup feature of Ovi Suite.
Other transfer methods may not transfer the licence which need to be restored with
the content for you to be able to continue the use of OMA DRM-protected content
after the device memory is formatted. You may also need to restore the licence in
case the files on your device get corrupted.
If your device has WMDRM-protected content, both the licence and the content will
be lost if the device memory is formatted. You may also lose the licence and the
content if the files on your device get corrupted. Losing the licence or the content may
limit your ability to use the same content on your device again. For more information,
contact your service provider.
Some licence may be connected to a specific SIM card, and the protected content
can be accessed only if the SIM card is inserted in the device.
To view your licences by typ e, select Valid licences, Invalid licences, or Not in use.
To view the licence details, select Options > Licence details.
The following details are displayed for each media file:
• Status — The status is Licence is valid, Licence expired, or Licence not yet
valid.
• Content sending — Allowed indicates that you can send the file to another
device.
• Content in phone — Yes indicates that the file is in the device and the path of the
file is displayed. No indicates that the related file is not currently in the device.
To activate a licence, in the licences main view, select Invalid licences > Options >
Get licence. Establish a network connection at the prompt, and you are directed to
a website where you can purchase rights to the media.
To remove file rights, go to the desired file, and select Options > Delete. If there are
several rights related to the same media file, all the rights are deleted.
The group licence view displays all of the files related to a group right. If you have
downloaded multiple media files with the same rights, they are all displayed in this
view.
You can open the group view from either the valid licences or invalid licences tabs. To
access these files, open the group rights folder.
47
Page 48
Call functions and Call Log
Call Log
The Call Log feature displays information about calls that you have missed, received
and made recently. You can also view information about message recipients, packet
data, and the number of messages sent and received.
Call history entries are displayed in chronological order. New entries are added to the
top of the lists, with older entries moved down a position. If a new entry is added to a
full list, the last entry in the list is removed.
Viewing recent call information
To view recent call information:
1. Select Menu > Log. The display shows Recent calls> Call duration and
Packet data. Select the call category as required.
2. If Recent calls is selected, three categories are displayed, Missed calls,
Received calls and Dialled numbers. Select the relevant option.
Viewing Call Log
Clearing log lists
To clear log lists:
1.Select Menu > Log. Right scroll to the calls list, and select Options.
2. Select the Clear log command which deletes all log entries, even if only a filtered
selection is displayed.
NOTE: Lists are cleared immediately without confirmation requests. When
lists have been cleared, the information cannot be recovered.
Viewing call duration
To view information about the duration of calls made and received by your Vertu
phone:
1. Select Menu > Log > Call duration.
2. Select Last call/Receive d calls/Dialled numbers/All calls to view as required.
TIP: To clear all call duration lists, select Clear timers. You need to enter
the security code. For information about the security code, see View and
edit security modules in Security.
Viewing packet data counters
To view details of all calls in:
1. Select Menu > Log. Use the right scroll key and tab to the right, which shows all
calls listed in chronological order.
2. All types of call are displayed, prefaced with Voice, Pack., SMS etc. Missed calls
are flagged in red, outgoing calls in blue and received calls in green.
3. Scroll through the list, and press the Middle Select key to view details of a
particular call.
4. Select Options > Filter to sort calls by type to make your search more focused.
5. Numbers can be used for calling or saved to Contacts, using the relevant
command in the Options menu.
6. Settings enables you to set a duration for the time Log entries are stored. The
default is 30 days.
To view information about the volume of packet data (in bytes) sent and received:
1. Select Menu > Log > Packet data.
2. Select the required item.
NOTE: SMS messages sent over the General Packet Radio Service
(GPRS) are not included in packet data counters or timers.
TIP: To clear all packet data counters, select Clear counters. You need to
enter the security code. For information about the security code, see View
and edit security modules in Security.
48
Page 49

Call functions and Call Log
Make a video call
When you make a video call (network service), you can see a real-time, two-way
video between you and the recipient of the call. The live video image, or video image
captured by the camera in your device is shown to the video call recipient
NOTE: The Vertu phone has the camera on the back of the phone, thus the
video call function is more suited to showing other people or objects to the
recipient, rather than being used in a face to face situation.
To be able to make a video call, you must have a USIM card and be in the coverage
of a UMTS network. For availability of and subscription to video call services, contact
your network service provider.
A video call can only be made between two parties. The video call can be made to a
compatible mobile device or an ISDN client. Video calls cannot be made while
another voice, video, or data call is active.
Icons
You are not receiving video (the recipient is not sending video or the network
is not transmitting it).
You have denied video sending from your device. To send a still image
instead, select Menu
call.
Even if you are denied video sending during a video call, the call is still charged as a
video call. Check the pricing with your service provider.
1. To start a video call, enter the phone number in the home screen, press the
Middle Select key, then select Video call.
Or:
From Contacts select a contact and number then press the Middle Select key
and select Call > Video call.
2. The camera on the back is used for video calls. Starting a video call may take a
while.The message Waiting for video image is shown. If the call is not
successful (for example, video calls are not supported by the network, or the
receiving device is not compatible), you are asked if you want to try a normal call
or send a text or multimedia message instead.
The video call is active when you see two video images, and hear the sound
through the loudspeaker. The call recipient may deny video sending , in which
> Ctrl. panel > Settings > Phone > Call > Image in video
case you only hear the sound and may see a still image or a grey background
graphic.
3. To end the video call, press the End key.
Options during a video call
To change between showing video or hearing only sound, select Options > Enable,
or Disable and the desired option.
• To take a snapshot of the video you are sending, select Options > Send
snapshot. Video sending is paused and the snapshot is shown to the recipient.
The snapshot is not saved. Press Cancel to resume sending video.
• To zoom your image in or out, select Options > Zoom.
• To route the audio to a compatible headset with Bluetooth connectivity attached
to your device, select Options > Activate handsfree.
• To route the audio back to the loudspeaker of your device, select Options >
Activate handset.
• To change the video quality, select Options > Video preference. Normal quality
is framerate 10 fps. Use Clearer detail for small, static details. Use Smoother
motion for moving images.
• To adjust the volume during a video call, use the Volume key on the side of the
device.
Answer or decline a video call
When a video call arrives, is displayed.
• To answer the video call, press the Call key. Allow video image to be sent to
caller? is displayed. To start sending live video image, select Yes.
If you do not activate the video call, you only hear the sound of the caller. A grey
screen replaces the video image.
• To replace the grey screen with a still image captured by the camera in your
device, select Menu
call.
• To end the video call, press the End.
> Ctrl. panel > Settings > Phone > Call > Image in video
49
Page 50

Call functions and Call Log
Video sharing
Use video sharing (network service) to send live video or a video clip from your
mobile device to another compatible mobile device during a voice call.
The loudspeaker is active when you activate video sharing.
If you do not want to use the loudspeaker for the voice call while you share video, you
can also use a compatible headset.
WARNING: Continuous exposure to high volume may damage your
hearing. Listen to music at a moderate level, and do not hold the device
near your ear when the loudspeaker is in use.
Video sharing requirements
Video sharing requires a UMTS connection. For more information on the service,
UMTS network availability, and fees associated with using this service, contact your
service provider.
To use video sharing you must do the following:
• Ensure that your device is set up for person-to-person connections.
• Ensure you have an active UMTS connection and are within UMTS network
coverage. If you move outside the UMTS network during a video sharing session,
the sharing stops while your voice call continues.
• Ensure that both the sender and recipient are registered to the UMTS network. If
you invite someone to a sharing session and the recipient’s device is not within
UMTS network coverage, does not have video sharing installed, or person-toperson connections set up, the recipient does not receive invitations. You receive
an error message that indicates that the recipient cannot accept the invitation.
Person-to-person connection settings
A person-to-person connection is also known as a session initiation protocol (SIP)
connection. The SIP profile settings must be configured in your device before you can
use video sharing. Contact your service provider for the SIP profile settings, and save
them to your device. Your service provider may send you the settings or give you a
list of the needed parameters.
To add a SIP address to a contact:
1. Select Menu > Contacts.
2. Select the contact, or create a new contact.
3. Select Options > Edit.
4. Select Options > Add detaill > Share video.
5. Enter the SIP address in the format username@domainname (you can use an IP
address instead of a domain name).
If you do not know the SIP address for the contact, you can use the phone
number of the recipient, including the country code, to share video (if supported
by the network service provider).
UMTS connection settings
To set up your UMTS connection:
• Contact your service provider to establish an agreement for you to use the UMTS
network.
• Ensure that the UMTS access point connection settings for your device are
configured properly. For more information about the settings, contact your service
provider.
Video sharing settings
To adjust video sharing settings, select Menu > Ctrl. panel > Settings and
Connection > Video sharing.
To set up video sharing, you need person-to-person and UMTS connection settings.
Share live video or video clips
During an active voice call, select Options > Share video.
1. To share live video during the call, select Live video.
To share a video clip, select Video clip and the clip you want to share.
You may need to convert the video clip into a suitable format to be able to share
it. If your device notifies you that the video clip must be converted, select OK.
Your device must have a video editor for the conversion to work.
2. If the recipient has several SIP addresses or phone numbers including the
country code saved in the contacts list, select the desired address or number. If
the SIP address or phone number of the recipient is not available, enter the
address or number of the recipient including the country code, and select OK to
send the invitation. Your device sends the invitation to the SIP address.
50
Page 51

Sharing begins automatically when the recipient accepts the invitation.
Options during video sharing
Zoom the video (available for sender only).
Adjust the brightness (available for sender only).
or Mute or unmute the microphone.
or Turn the loudspeaker on and off.
or Pause and resume video sharing.
Switch to full screen mode (available for receiver only).
3. To end the sharing session, select Stop. To end the voice call, press the End.
When you end the call, video sharing also ends.
To save the live video you shared, select Yes when prompted. The device notifies you
of the memory location of the saved video. To define the preferred memory location,
select Menu
saving memory.
If you access other applications while you are sharing a video clip, the sharing is
paused. To return to the video sharing view, and to continue sharing, in the home
screen, select Options > Continue.
> Ctrl. p anel > Settings and Connection > Video sharing > Preferred
Accept an invitation
When someone sends you a video sharing invitation, the invitation message displays
the sender’s name or SIP address. If your device is not set to silent, it rings when you
receive an invitation.
If someone sends you a share invitation and you are not within UMTS network
coverage, you will not know that you received an invitation.
When you receive an invitation, select from the following:
• Yes — Accept the invitation, and activate the sharing session.
• No — Reject the invitation. The sender receives a message that you rejected the
invitation. You can also press the end key to reject the invitation and end the voice
call.
To mute the video on your device, select Options > Mute.
To play the video at the original volume, select Options > Original volume. This
does not affect the audio playback of the other party of the phone call.
To end the sharing session, select Stop. To end the voice call, press the End. When
you end the call, also video sharing ends.
Call functions and Call Log
51
Page 52
Contacts
Contacts
About Contact s
Select the Contacts dedicated key.
With Contacts, you can save and update contact information, including phone
numbers, home addresses, and email addresses. You can add a personal ringing
tone or a thumbnail image to a contact. You can also create contact groups, which
allow you to communicate with several contacts at the same time. You can also send
contact information to compatible phones.
Working with contacts
Making a call from Contacts
1. Press the Contacts key to access your contacts.
2. Locate the required contact, by scrolling to the desired name, or enter the first
letters or characters of the name to narrow the search field.
3. Scroll to the required number, select the call type and then either press the Call
key or the Middle Select key.
Creating a new contact
To create and save a new contact on your Vertu phone:
1. Press the Contacts key to access your contacts.
2. Select Options > New contact.
3. Enter the details of the new contact in the panels that display.
4. Select Done when you have finished and the details are saved.
You can save contacts on your SIM card as well as on your phone memory by copying
contacts from your phone to your SIM card. This is useful when you want to put your
SIM card in another phone.
TIP: You can also save a new contact from the Home screen. To do this:
1. Enter a number, then select Options > Save to contacts, and select
Create new or Update existing as required.
2. Select the number type.
3. Enter a name for the contact, then select Done to save it.
TIP: If someone whose phone number isn’t stored in Contacts calls you,
you can create a contact for that person. To do this:
1. Scroll to the required number in Log (in Missed calls or Received
calls), then select Options > Save to contacts and either Create new
or Update existing. For information on the Call history, see Log >
Recent calls.
2. Enter a name for the contact, then select Done to save.
Searching for a contact
To find a contact stored on your Vertu phone:
1. Press the Contacts key.
2. Enter the first letter of the name of the contact to find in the T ype to search field.
The list of contacts is filtered to display only the matching contacts.
3. Enter more letters of the contact’s name if needed. Select a contact to view the
details for that contact.
NOTE: Contacts saved on the SIM card have the SIM icon displayed
alongside.
Send Contact det ails
The business card feature enables you to send and receive contact information via
text message, email or Bluetooth.
Sending a business card
To send a business card in a multimedia message:
1. From the Home screen press the Contacts key.
2. Scroll to the required contact, then press the Middle Select key.
3. Select Options > Send business card.
52
Page 53

Contacts
4. Select the relevant option from the list, Via message, Via e-mail, Vi a Bluetooth
or Upload.
5. If the contact details include more than one phone number and a ring tone, select
Selected detail only to send only the default phone number
or
select All contact data to send all of the contact information.
6. Add a recipient to the message, then select Options > Send. A confirmation
message is displayed when the business card has been sent.
Follow any on screen instructions to send the details via the selected method,
especially if Upload is selected.
NOTE: If the contact details include an image and/or ring tone, the image
and/or ring tone can only be sent in a business card as a multimedia
message or Via e-mail or Via Bluetooth.
Receiving a business card
When you receive a business card, a notification is displayed on the home page.
To save a received business card:
1. Either open the message from the Notification area or from Messages > Inbox
and view the business card.
2. Select Options > Save business card and press the Middle Select key. A
confirmation message is displayed on saving the details to Contacts.
To discard a received business card without saving it:
1. If you want to view the business card before discarding it, select Options > Open
then Options > Delete.
2. The business card is deleted. A confirmation message is displayed.
Editing a Contact
Contacts can be edited at any time, any detail can be changed, for instance numbers
can be added or removed, while an image can be added.
Adding an image to a contact
When you add an image to a contact, that image is displayed when you call the
contact or the contact calls you.
To add an image to a contact:
1. Press the Contacts key to access your contacts.
2. Scroll to the required contact, then press the Middle Select key to open the
contact.
3. Select Options > Add image (if there is already an image attached, you have
the option to View, Change or Remove the image).
4. The Select image: dialog appears, which enables you to choose an image from
the Gallery.
5. Scroll through the list of images that display and press Select when the
appropriate image is in focus, and this is attached to the contact.
6. Press Back to exit and save.
Personalising the ring tone
When you add a ring tone to a contact, that tone is played when the contact calls you.
To personalise the ring tone for a contact:
1. Press the Contacts key to access your contacts.
2. Scroll to the required contact, then press the Middle Select key to open the
contact.
3. Select Options > Ringing tone.
Either select one of the existing tones from the list that displays.
or
Press Download sounds, and access the Ovi site, or press Options and Go to
a New web page of your choice to locate a ring tone.
TIP: For information on accessing tones in the Gallery, see “Sound clips” on
page 103 in the Gallery.
Saving multiple phone numbers for a contact
You can save a number of phone numbers for a contact. These can be any
combination of any of the phone types listed, and can include more than one phone
number of the same type.
To add a phone number to a contact:
1. Press the Contacts key to access your contacts.
2. Scroll to the required contact and select Options > Edit.
3. Select Options > Add detail, and choose the type of number you want to add
from the scrollable list.
53
Page 54

Contacts
4. Enter the number, then select Done to save the new number.
TIP: To change the number type:
1. Press the Contacts key to access your contacts.
2. Scroll to the required contact and select Options > Edit.
3. Scroll to the required number.
4. Select Options > Edit label, then type in the label you want for that
number. The label is free text, but the number category, such as Mobile
or email, does not actually change.
Default phone number
The first number saved for a contact is automatically set as the default phone number.
When you call or send a message to a contact without specifying which phone
number to use, this default number is used.
Adding information to a contact
You can save other information for a contact, such as postal address, birthday and
email addresses, on your Vertu phone.
To add information to a contact:
1. Press the Contacts key to access your contacts.
2. Scroll to the required contact and select Options > Edit.
3. Select Options > Add det ail, then select the type of information you want to add.
4. Enter the information, then select Done. The contact details are saved directly.
Deleting a contact
To delete a single contact:
1. Press the Contacts key to access your Contacts.
2. Scroll to the required contact and select Options > Delete.
3. Select Yes to confirm the deletion.
Or
If you are deleting marked items from a Group, select Options > Remove from
group.
5. Select Yes to confirm the deletion.
Contact groups
The contact groups feature enables you to easily manage and use contacts by
assigning them to groups.
You can add a ring tone to a group. For example, if you create a group for work
colleagues and assign a specific ring tone to this group, you can quickly and easily
recognise when you are being called by a work colleague.
You can also send messages to a group instead of adding contacts as message
recipients one by one.
Create and save a new group
To create and save a new group:
1. Access Contacts.
2. Select Options > Group > New group.
3. Enter a name for the group.
4. If required, add the conference service number, ID and PIN for that group, as
follows:
Conf. service number — Enter the conference call service number.
Conf. service ID — Enter the conference call ID.
Conf. service PIN — Enter the conference call PIN code.
5. Select a ring tone for the group if required, then select Save. The list of groups is
displayed after a confirmation message.
To delete multiple contacts:
1. Press the Contacts key to access your contacts.
2. From the Options menu select Mark/Unmark.
3. Either select Mark to flag individual contacts, or select Mark all to select all
contacts within a group.
4. Then select Options > Delete. A warning message displays showing the items
selected for deletion.
Adding contacts to a group
NOTE: You need to save a group before you can add contacts to it.
To add a contact to a group:
1. Access Contacts.
2. Scroll to the required group. Groups are denoted by the Group icon.
54
Page 55

Contacts
3. Select Options > Group > Add members.
4. Scroll through the list of contacts. Select the contact(s) to add to the group using
the Middle Select key to mark a contact.
5. Press OK to add the selected members to the Group. Contacts are copied over
from the main list, so all contacts remain displayed in the full list. Contacts can
belong to more than one group.
6. Add more contacts to the group as required.
Adding a ring tone to a group
1. Select the group you want to work with, and select Options > Group > Ringing
tone.
2. Choose an existing tone to assign to the group, or download a tone.
3. Press Select to assign the tone and exit.
Viewing and editing group details
To view and edit the details of a group:
1. Access Contacts.
2. Scroll to the required group, then select Options > Group > Edit group.
3. Change the details of the group as required, then select Done to save.
Viewing details of group members
To view the details of group members:
1. Access Contacts.
2. Scroll to the required group, then select Options > Open.
3. To view the details of a group member, scroll to the required member, then select
Options > Open.
Deleting a group
To d e l e t e a gr ou p:
1. Access Contacts.
2. Scroll to the required group, then select Options > Group > Delete group.
3. Press the Middle Select key to delete the group, and then Yes to confirm the
deletion.
Removing contacts from a group
To remove a contact from a group:
1. Access Contacts.
2. Scroll to the required group, then select Options > Open to open the group.
3. Scroll to the required contact, then select Options > Group > Remove member.
4. Select Yes to confirm the deletion, or No to abort the process.
Copy and Duplicate (Manage) Contacts
Contacts can be stored in various locations on your Vertu phone. They can be stored
on your SIM card, and they can also be backed up on either the mass memory in the
phone and/or to the removable memory card.
Contacts can be copied and duplicated. Copying contacts copies them to the phone
memory, while Duplicating creates a copy of the same contact in the same memory
location, ready for you to insert a new name.
The Backup function enables you to copy single, selected or all contacts to selected
locations.
Copying contacts and creating backups is done at the contact level.
When a single contact is opened for editing, it is possible to Copy, Cut and Paste
specific text and numbers between both contacts and other applications on your
Vertu p ho n e.
Managing Contacts
To copy single contacts:
1. Access Contacts.
2. Select Options > Manage > Copy, to copy the contact to another location. If the
contact is in the SIM card, you are offered the option to save to the phone
memory, while if the contact is located on the phone memory, you can save the
contact to the SIM card.
or
Select Options > Manage > Duplicate, a copy of the contact is created ready
for you to save it with a new name.
55
Page 56

Contacts
To copy multiple contacts:
1. Access Contacts.
2. Select Options, select Mark/Unmark > Mark in order to select the contact in
focus.
3. Repeat step 2 on all relevant contacts.
4. Select Manage > Copy and press OK, and all the marked contacts are copied to
the memory or SIM card as appropriate.
Create Backups
To backup single contacts:
1. Access Contacts.
2. Select Options, select Create backup > Phone to memory card
or Memory card to phone.
In this way, you can move a contact to the required location.
3. Select E: Mass Memory or F: Memory card (if present), and the contact is copied
to the selected location.
To backup multiple contacts:
1. Access Contacts.
2. Select Options, select Mark/Unmark > Mark in order to select the contact in
focus.
3. Repeat step 2 on all relevant contacts.
4. Select Create backup > Phone to memory card and press the Middle Select
key,
5. Select the destination memory location, and all the marked contacts are copied
to the selected memory as appropriate.
Contacts memory
Contacts can be stored on your Vertu phone (E: Mass Memory or F: Memory card, if
present) and on the SIM card.
SIM card memory
Contacts stored on the SIM card only have a single name and phone number.
Contacts stored on a USIM card can have a name, three phone numbers and an
email address.
The number of contacts that can be stored on the SIM/USIM card and the number of
characters supported is determined by your service provider.
If you move the SIM card to another phone, your SIM contacts are moved as well.
Selecting the memory to use
To select the memory to be used by Contacts:
1. Access Contacts.
2. Select Options > Settings > Contacts.
3. Select Default saving memory.
4. Select either Phone Memory or SIM:
• Phone - New contacts will be stored on the phone.
• SIM card - New contacts will be stored on the SIM card.
5. Repeat the process to step 2, and select Contacts to display. The options are
Phone memory, SIM memory and Service numbers. Select which of these
you want to display in your contacts.
A confirmation message is displayed.
NOTE: The memory capac ity of th e SIM card is de ter mine d by you r ser vice
provider.
Service numbers
The Service numbers feature enables your to view and call phone numbers, such as
help lines, special service numbers, etc., that your service provider has stored on the
SIM card.
NOTE: You can only view and call service numbers if this functionality is
supported by your service provider.
NOTE: You cannot edit or delete service numbers.
56
Page 57
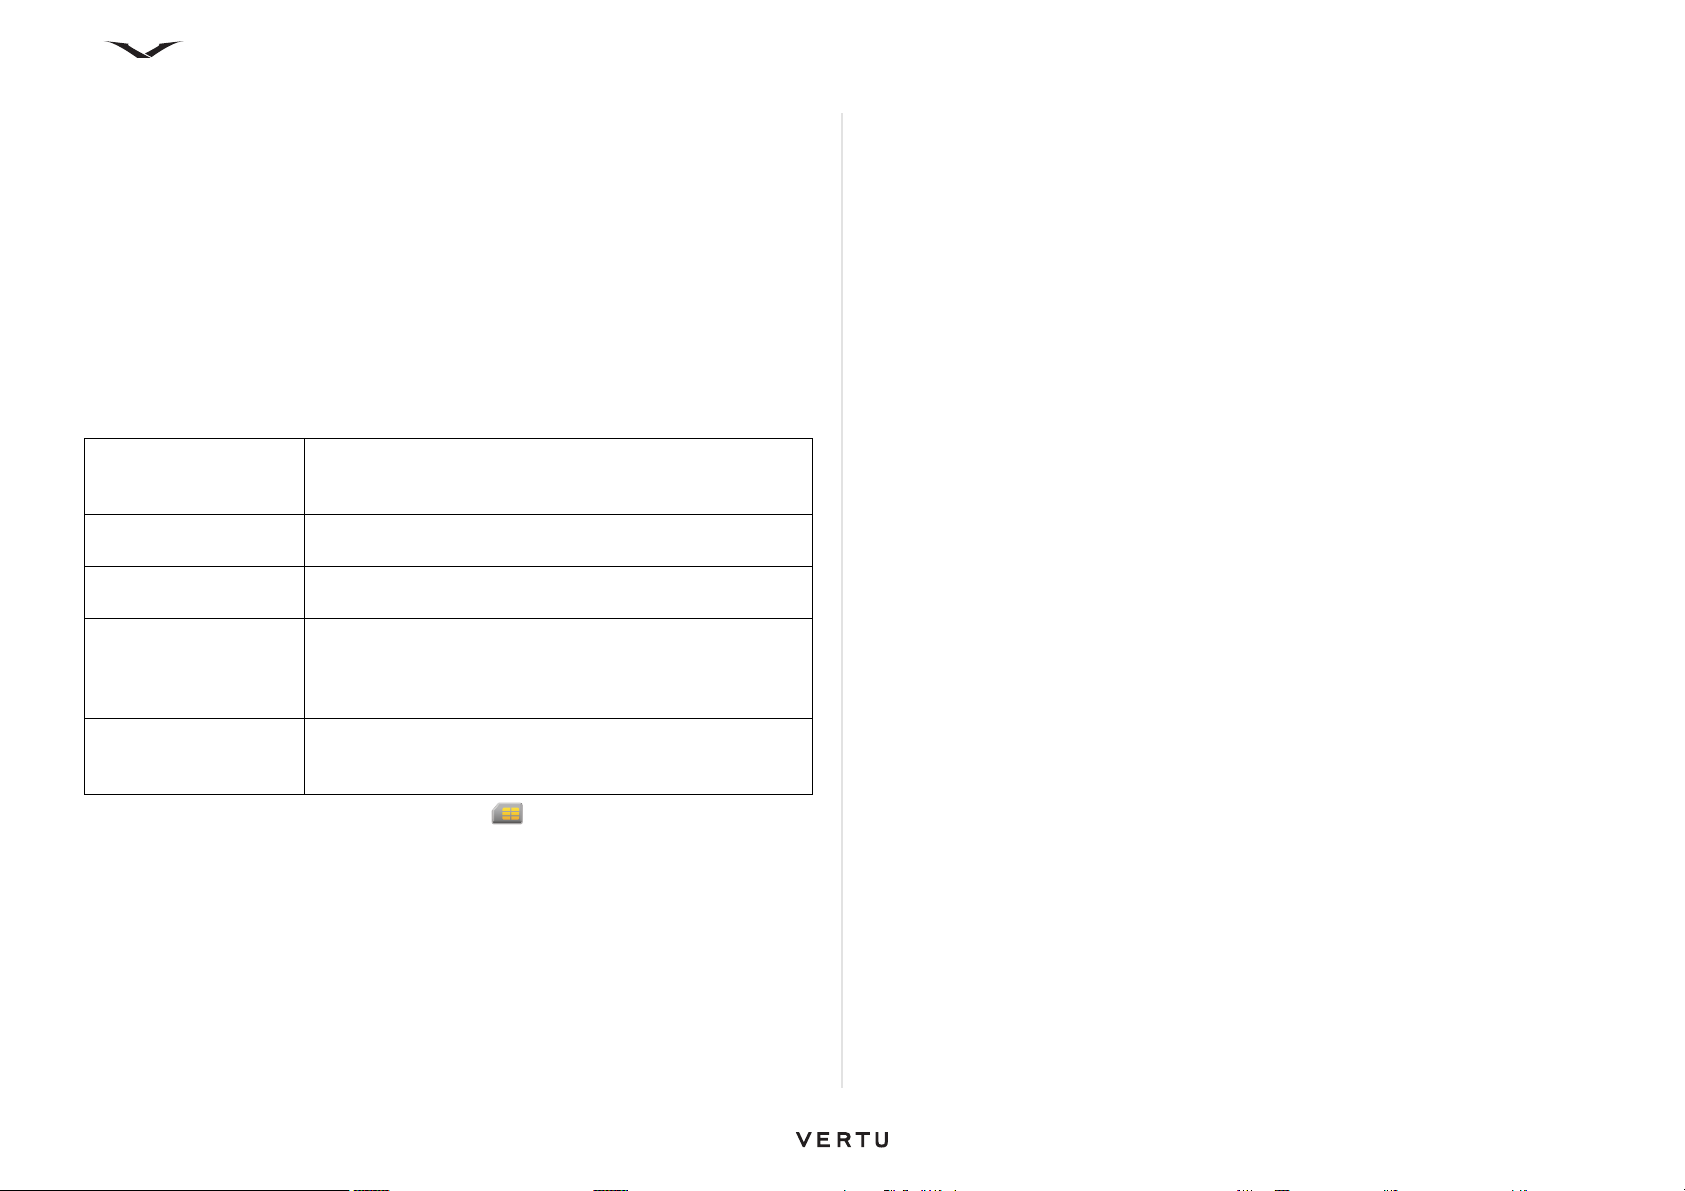
Contacts
To view and call a service numbers:
1. Access Contacts.
2. Select Service numbers. The list of services is displayed.
3. To call a service number, scroll to the required service, then press the Send key
or select Call.
Contacts settings
To set up Contacts:
1. Access Contacts.
2. Select Options > Settings > Contacts and the following options shown in the
table below display.
3. Set up each option as required.The options available may vary.
Contacts to display Select the contacts you want displayed in the Contact list.
Options include Phone memory, SIM memory and
Service numbers. Each option is separately selectable.
Default saving
memory
Name display Change the way contacts' names are displayed. This
Remote search server Change the remote contacts database. This option is
Default contact list Select which contacts list opens when you open the
Contacts saved on the SIM card have the SIM graphic alongside.
Select whether to save new numbers to the Phone;
options are memory or the SIM card memory
setting is not available for all languages.
available only if remote contacts databases are supported
by your service provider. Options are None, Mail for
Exchange or Intellisync
Contacts application. This setting is only available when
there is more than one contacts list.
4. To search for contacts in the home screen, start entering characters in the home
screen, and select the database from the proposed matches.
5. To change the remote contacts database, select Options > Settings >
Contacts > Remote search server. This setting affects the database used in
the Contacts and Calendar applications and the home screen, but not the
database that is used for email.
Search for contacts in a remote database
This only works if your email service provider supports this function.
1. To activate remote contact search, select Options > Settings > Contacts >
Remote search server. You must define a remote server before you can do
remote contact searches.
2. To search for contacts in a remote database, select Contacts > Options >
Search from remote.
3. Enter the name of the contact you want to search for, and select Search. The
phone establishes a data connection to the remote database.
57
Page 58
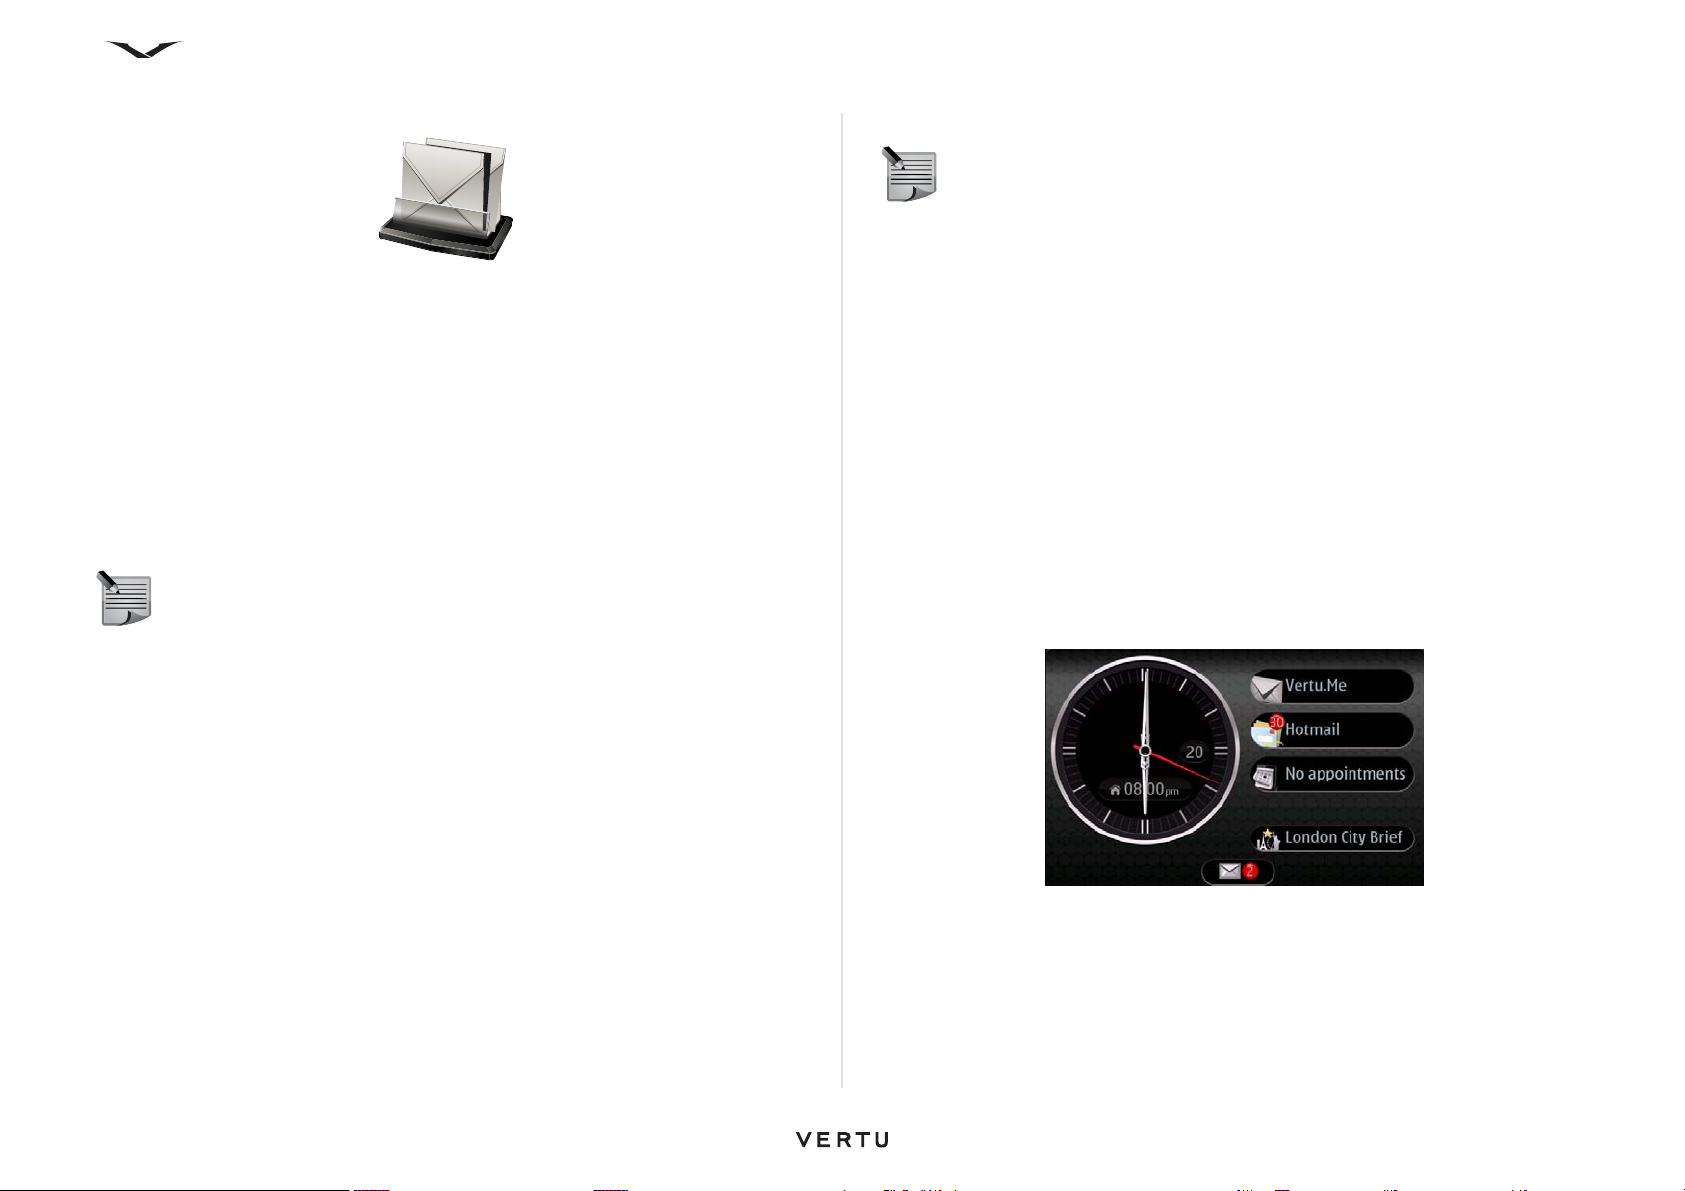
Messages
Your Vertu phone contains a comprehensive messaging function, which enables you
to send and receive a wide variety of messages types. Message types that can be
handled by your phone include:
• Text messages (Short Message Service (SMS) messages)
• Multimedia messages (Multimedia Messaging Service (MMS))
• Emails
• Speech messages
• Presentations (messages including slide shows or video)
• Service messages
• Cell broadcast messages
NOTE: The various types of messages are only available when supported
by your service provider.
Messages
NOTE: Email messages can also be accessed through Messaging.
Message alerts
Text messages are automatically received when your Vertu phone is switched on.
When your phone is off, messages are held by your service provider until the next
time your phone is connected to the network.
When a message arrives on your phone, alerts are displayed on the Home screen.
The presence of a new text message is displayed in the Notification area.
When an email arrives on your phone, and if it belongs to one of the email accounts
displayed on the Home screen, a red icon displays the number of new messages
alongside the email account name. If the email account does not display in the
Information area, then an alert is displayed at the bottom in the Notification area.
Messages can be accessed directly by highlighting the relevant alert box, and
pressing the Middle Select key, which takes you to the relevant message function.
For further information, refer to the “Home screen” on page 25.
To begin with using the feature you need to check the following:
• Insert a valid SIM card in the device and be located in the service area of a cellular
network.
• Verify that the network supports the messaging features you want to use and that
they are activated on your SIM card.
• Define the internet access point settings on the device.
• Define the email account settings on the device (see “Setting up your phone for the
first time” on page 23 and “Email settings” on page 71).
• Define the text message settings on the device.
• Define the multimedia message settings on the device.
Your Vertu phone normally recognises the SIM card provider and automatically
configures some of the message settings during the wizard driven set up process. If
not, you may need to define the settings manually; or contact your service provider to
configure the settings.
Messaging is accessed using the Left Select key on your Vertu phone.
58
Page 59
Messages
Messaging folders
The messaging function contains the following folders:
New message Access to create a new message in a selected format.
Inbox Messages and files received via Bluetooth are stored
in the Inbox folder.
My folders User defined folder structure for storing messages.
E-mail account Access to e-mail accounts that you have set up. Email
messages are stored within such mailbox folders.
Drafts Messages that have not yet been sent can be saved
in the Drafts folder.
Sent Messages that have been sent, excluding Bluetooth
messages, are stored in the Sent folder.
Outbox Messages are stored in the Outbox if they cannot be
sent, for transmission later.
Reports Reports from message providers are automatically
saved to this area.
TIP: You can move between the Inbox, My folders, Drafts, Sent and
Outbox using the scroll button to move you through the tabbed panels.
TIP: Messages are placed in the Outbox folder, when, for example, your
device is outside network coverage.
NOTE: The message sent icon or text on your device screen does not
indicate that the message has been received at the intended destination.
To request the network to send you delivery reports of the text and multimedia
messages that you have sent:
1. Select Options > Settings > Text message (or Multimedia message) >
Receive report and select Yes or the relevant option.
2. The reports are then saved in the Reports folder.
Organise messages
Using My folders, you can create a folder structure for storing you messages in a
logical order.
Select Messaging > My folders.
• To create a new folder to organise your messages, select Options > New folder.
• To rename a folder, select Options > Rename folder. You can only rename
folders that you have created.
• To move a message to another folder, highlight the message, select, Options >
Move to folder, the folder and then OK.
• To sort messages in a specific order, select Options > Sort by and select the
appropriate option.
• To view the properties of a message, highlight the message and select Options >
Message details.
Text messages
Text messaging, or the Short Message Service (SMS), enables you to exchange
messages containing only text with other phones.
When you send a text message, your Vertu phone uses a profile that defines how the
phone handles interaction with your service provider. In most cases, the profile will
be set using information on the SIM card.
For most service providers you will not need to modify these settings as the
necessary information is obtained from your SIM card automatically. Depending on
your SIM card, you may be able to store more than one set of message profiles.
For information on setting up your text messages refer to:
Messaging > Settings > Text message > Message centres. Select your service
provider, and open the panel to view the message centre number.
IMPORTANT: Exercise caution when opening messages. Messages may
contain malicious software or otherwise be harmful to your device or PC.
Opening a Text Message
1. Select Menu > Messaging > Inbox.
2. Scroll to the relevant message, and press the Middle Select key to open the
message.
59
Page 60

Messages
Replying to a message
With the message open:
1. Press the Middle Select key > Reply > Via message.
2. Enter details of your reply.
3. Select Options > Send.
Sending a text message
1. Select Messaging > New message > Message.
2. Press the Middle Select key and select the recipient. You can select multiple
recipients or if a recipient has more than one number, you will be asked to select
which number to send the message to.
3. In the message field, type in your message.
4. Select Options > Send.
TIP: You can also send an email to the contact if an email address is listed.
Forwarding a text message
To forward a text message:
1. From an open text message, select Options > Forward.
2. Press the Middle Select key and add recipients.
3. If required, edit the message text.
4. Select Options > Send.
Calling the sender of a message
To call the sender of a message:
From an open message, press the Call key.
Editing a message and copying text
You can edit a received message before forwarding or saving it.
To edit a message:
1. Open the message, edit the text, and add recipients as necessary.
2. To copy or paste text, select Options > Editing options, and select Copy or
Paste.
3. To insert data, select Options > Insert content to add images, videos, text etc.
4. Close the message when you have finished.
Multimedia messages
Only devices that have compatible features can receive and display multimedia
messages. The appearance of a message may vary depending on the receiving
device.
A multimedia message (MMS) can contain text and objects such as images, sound
clips, or video clips. Before you can send or receive multimedia messages on your
phone, you must define the multimedia message settings. Your phone may recognise
the SIM card provider and configure the correct multimedia message settings
automatically. If not, contact your service provider for the correct settings, order the
settings from your service provider in a configuration message, or use the Settings
wizard application.
The wireless network may limit the size of MMS messages.
If the inserted picture exceeds this limit, the device may make it smaller so that it can
be sent by MMS.
Check the size limit of email messages with your service provider. If you attempt to
send an email message that exceeds the size limit of the email server, the message
is left in the Outbox folder, and the device attempts to resend it periodically. Sending
an email requires a data connection, and continuous attempts to resend the email
may increase your data transfer costs. In the Outbox folder, you can delete such a
message, or move it to the Drafts folder.
Creating a multimedia message
1. Select New message, press the Middle Select key and select the relevant
option. Select Message, to send a text or multimedia message (MMS), Audio
message to send a multimedia message that includes one sound clip, or E-mail
to send an email message.
2. Enter the recipient, and create the message.
3. To add a media file to a multimedia message, select Options > Insert content.
Highlight the relevant icon to define the file type or source you require, and then
locate the desired file.
You can add existing media or capture new images or video etc for inclusion in
the message, for example Options > Insert content > Insert image > New.
4. Select the Insert other icon to insert a business card, slide, note, or other file.
5. To send the message, select Options > Send, or press the Call key.
60
Page 61
NOTE: The message sent icon or text on your device screen does not
indicate that the message is received at the intended destination.
Your device supports text messages beyond the limit for a single message. Longer
messages are sent as two or more messages. Your service provider may charge
accordingly.
Characters with accents, other marks, or some language options take more space,
and limit the number of characters that can be sent in a single message.
You may not be able to send video clips that are saved in the MP4 file format or that
exceed the size limit of the wireless network in a multimedia message.
Receive and reply to multimedia messages
IMPORTANT: Exercise caution when opening messages. Messages may
contain malicious software or otherwise be harmful to your device or PC.
TIP: If you receive multimedia messages that contain objects unsupported
by your device, you cannot open them. Try to send these objects to another
device such as a computer, and open them there
1. To reply to a multimedia message, open the message, and select Options >
Reply.
2. Select, To sender to reply to the sender, To all, to reply to everyone included in
the received message, Via audio message to reply with an audio message, or
Via e-mail to reply with an email message. Email message is available only if a
mailbox is configured and the message is sent from an email address.
3. Enter the text of the message, and select Options > Send.
Messages
Emails
Emails can be worked on in either the Messaging or Email functions.
For detailed information about working with emails and setting up email accounts
refer to the Email chapter. Only brief information is provided about use of emails in
this chapter.
Reading an email message
IMPORTANT: Exercise caution when opening messages. Messages may
contain malicious software or otherwise be harmful to your device or PC.
1. Select the Messaging key.
2. Scroll to the relevant email account, and press the Middle Select key to open it.
3. The email Inbox is displayed. Scroll to the relevant message, and press the
Middle Select key to open the message.
4. To open other folders, such as Drafts, scroll up to the Inbox header and open
the drop down field and make a selection.
5. To change the order of your emails, scroll to the Date header, and select the
required ordering method.
• To reply to the message sender, select Options > Reply.
• To reply to the sender and all other recipients, select Options > Reply to all.
• To forward the message, select Options > Forward.
• To add an attachment to the email message, select Options > Add attachment.
• To remove the selected attachment, select Options > Remove attachment.
• To delete an email message, select the message and Options > Actions >
Delete.
Create and send an email
1. Select the Messaging key.
2. Either select Messaging, select email account, then Options > Create email.
Or
Select Messaging > New message > E-mail and then select the email account.
3. Enter the recipient's email address in the To field. Press the Middle Select key
to open Contacts and locate the recipient's email address.
4. Complete the email.
5. Select Options > Send.
61
Page 62

Messages
Speech messages and Message reader
With Message reader you can listen to text, multimedia, audio, and email messages.
• To listen to new messages or email, from the Home screen, press and hold the
Left Select key until Msg. Reader opens.
• To listen to a message from your Inbox, scroll to the message, and select Options
> Listen.
• To listen to an email message from your mailbox, scroll to the message, and select
Options > Listen.
• To stop the reading, press the End key.
• To pause and continue the reading, press the scroll key.
• To skip to the next message, scroll right.
• To replay the current message or email, scroll left.
• To skip to the previous message, scroll left at the beginning of the message.
• To view the current message or email in text format without the sound, select
Options > View.
Presentations
Select the Messaging key.
Creating multimedia presentations is not possible if MMS creation mode is set to
Restricted.
To change the setting, select Options > Settings > Multimedia message > MMS
creation mode > Free or Guided.
Creating a presentation message
1. Create the message as described for “Creating a multimedia message” on
page 60.
2. Select Options > Insert content and choose the Insert presentation icon.
Select the template type to define which media objects you can include in the
presentation, where they appear, and which effects are displayed between
images and slides.
3. To insert images, sound or video clips, or notes in your presentation, scroll to the
corresponding object area, and select Options > Insert. Options include image,
new Image, sound clip. Select New slide to add another image.
4. Scroll to the text area, and enter the text.
• To select the background colour for the presentation and background images
for different slides, select Options > Background settings.
• To set effects between images or slides, select Options > Effect settings.
• To preview the presentation, select Options > Preview.
Multimedia presentations may only be viewed in compatible phones that
support presentations. They may appear different depending on the phone
used.
View presentations
• To view a presentation, open the multimedia message from the Inbox folder. Scroll
to the presentation, and press the Middle Select key to play the presentation.
• To pause the presentation, press the Left Select key or Right Select key.
• To resume playing the presentation, select Options > Continue.
View and save multimedia attachments
• To view multimedia messages as complete presentations, open the message,
and select Options > Play presentation.
TIP: To view or play a multimedia object in a multimedia message, select
View image, Play sound clip, or Play video clip.
• To view the name and size of an attachment, select the message and Options >
Objects.
• To save a multimedia object, select Options > Objects, the object, and Options
> Save.
Service messages
Select the Messaging key.
You can receive special messages that contain data, such as operator logos, ringing
tones, bookmarks, or internet access or email account settings.
Service messages are sent to your device by service providers. Service messages
may contain notifications such as news headlines, services, or links through which
the message content can be downloaded.
• To define the service message settings, select. Messaging and Options >
Settings > Service message.
• To download the service or message content, select Messaging > Options >
Message details.
• To save the contents of these messages, select Options > Save
• To view information about the sender, web address, expiration date, and other
details of the message before downloading it, select Messaging > Options >
Message details.
62
Page 63

Messages
Send service commands
You can send a service request message (also known as a USSD command) to your
service provider and request activation for certain network services. Contact your
service provider for the service request text.
To send a service request message, select Messaging > Options > Service
commands. Enter the service request text and select Options > Send.
Cell broadcast
Select Messaging and Options > Cell broadcast.
With the cell broadcast network service, you can receive messages on various topics
from your service provider, such as weather or traffic conditions in a particular region.
For available topics and relevant topic numbers, contact your service provider. Cell
broadcast messages cannot be received when the device is in the remote SIM mode.
A packet data (GPRS) connection may prevent cell broadcast reception.
Cell broadcast messages cannot be received in UMTS (3G) networks.
• To receive cell broadcast messages, you may need to turn cell broadcast
reception on. Select Options > Settings > Cell broadcast > Reception > On.
• To view messages related to a topic, select the topic.
• To receive messages related to a topic, select Options > Subscribe.
TIP: You can set important topics as hot topics. You are notified in the home
screen, when you receive a message related to a hot topic. Select a topic
and Options > Hotmark.
• To add, edit, or delete topics, select Options > Topic.
Text messages on the SIM card
Text messages may be stored on your SIM card. Before you can view SIM messages,
you must copy the messages to a folder in the device. After copying the messages to
a folder, you can view them in the folder or delete them from the SIM card.
1. Select Messaging and Options > SIM messages.
2. Select Options > Mark/Unmark > Mark or Mark all to mark every message.
3. Select Options > Copy.
4. Select a folder and OK to begin copying.
To view SIM card messages, open the folder where you copied the messages, and
open a message.
Messaging settings
Select Messaging and Options > Settings.
Open the message type in question, and define all fields marked with Must be
defined or with a red asterisk.
Your device may recognise the SIM card provider and configure the correct text
message, multimedia message, and GPRS settings automatically. If not, contact your
service provider for the correct settings, order the settings from your service provider
in a configuration message, or use the Settings wizard application.
63
Page 64
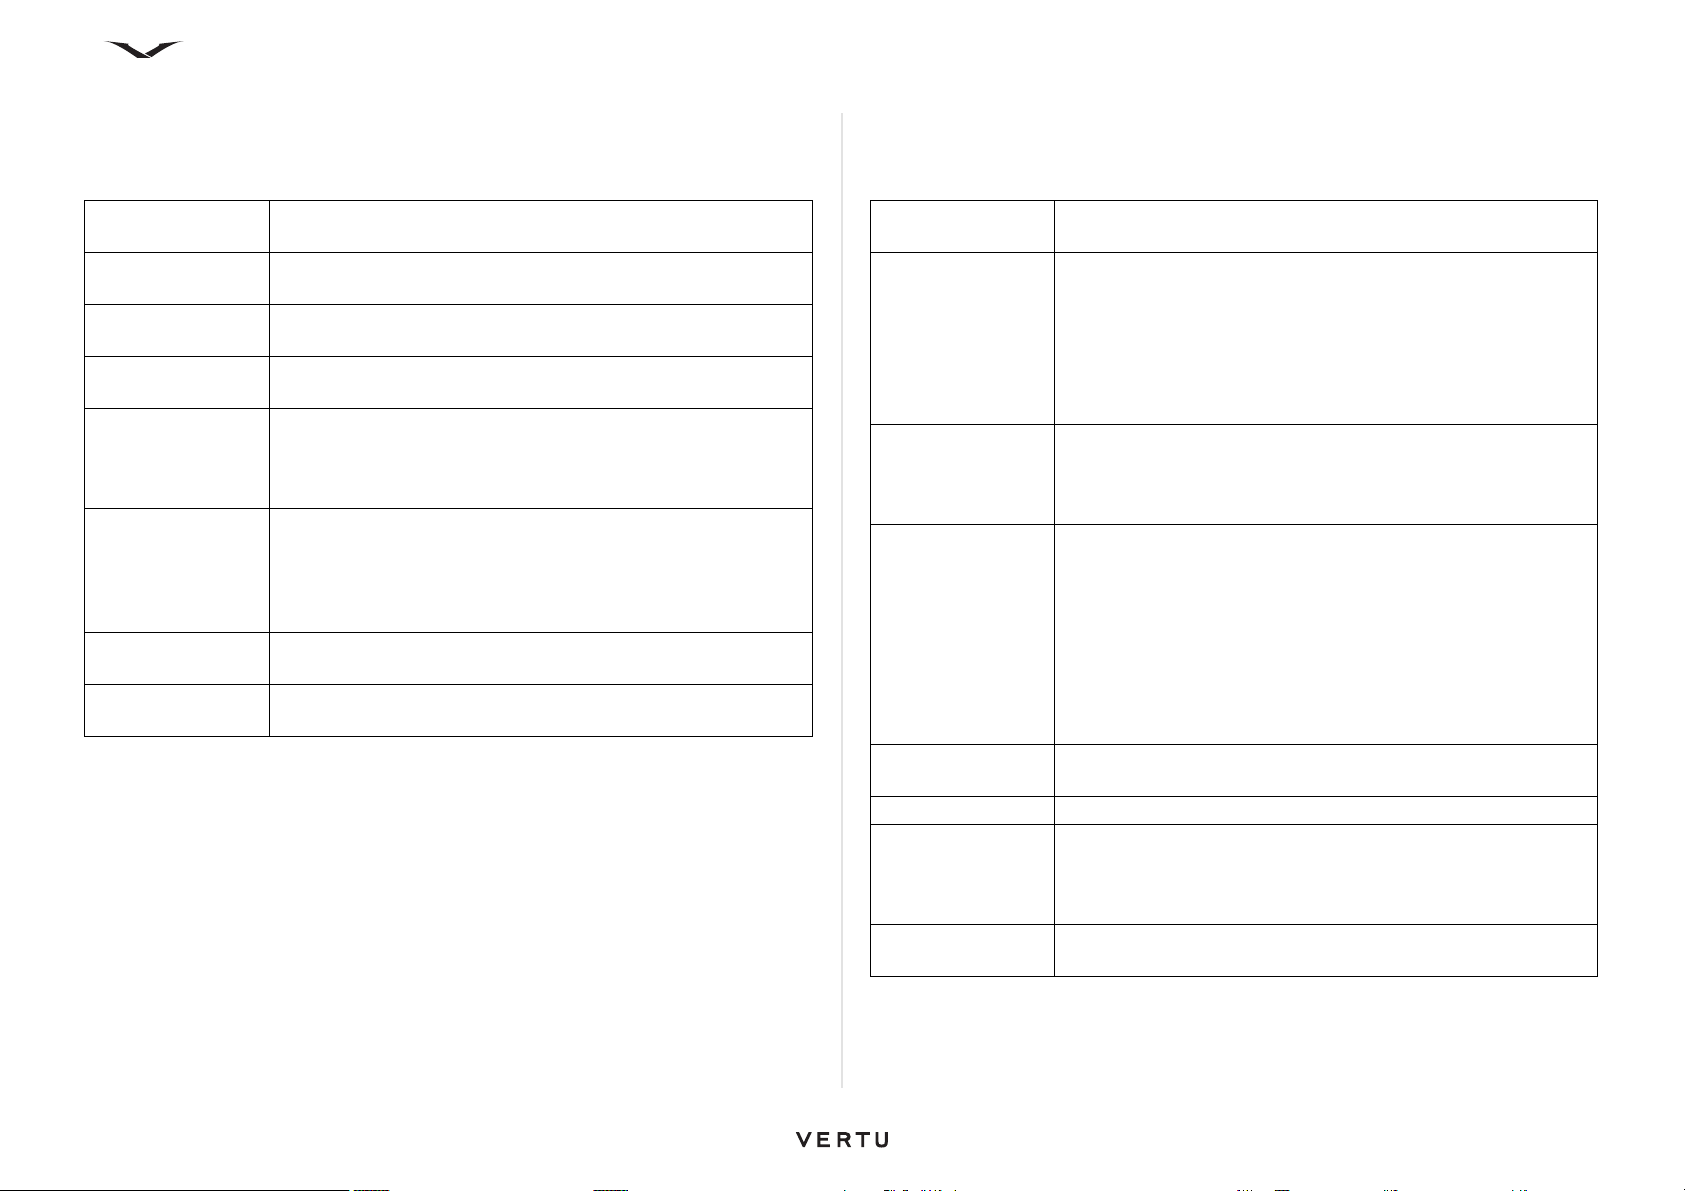
Messages
Text message settings
Select Messaging and Options > Settings > Text message.
Select from the following:
Message centres View the available message centres for your device, or add a
new one.
Message centre in
use
Character coding Select reduced support to use automatic character
Receive report Select Yes if you want the network to send you delivery reports
Message validity Select how long the message centre resends your message if
Message sent as Convert the message to another format, for example, fax or e-
Preferred
connection
Reply via same
centre
Select a message centre to send the message.
conversion to another encoding system when available.
on your messages (network service).
the first attempt fails (network service). If the recipient cannot
be reached within the validity period, the message is deleted
from the message centre.
mail. Change this option only if you are sure that your
message centre is able to convert text messages into these
other formats. For more information, contact your service
provider.
Select the preferred method of connection when sending text
messages from your device.
Select whether you want the reply message to be sent using
the same text message centre number (network service).
Multimedia message settings
Select Messaging and Options > Settings >Multimedia message.
Select from the following:
Image size Sets the image size used in your multimedia image, options
are large or small.
MMS creation
mode
Access point in
use
Multimedia
retrieval
Allow anonymous
msgs.
Receive adverts Receive messages defined as advertisements.
Receive reports Request for delivery and read reports of sent messages
Deny report
sending
Select Restricted to set your phone to prevent you from
including content in multimedia messages that may not be
supported by the network or the receiving device. To receive
warnings about including such content, select Guided. To
create a multimedia message with no restrictions on
attachment type, select Free. If you select Restricted,
creating multimedia presentations is not possible.
Select the default access point to connect to the multimedia
message centre. You may not be able to change the default
access point if it is preset in your device by your service
provider.
Select how you want to receive messages, if available. Select
Always automatic to receive multimedia messages always
automatically, Aut o in home netw. to receive notification of a
new multimedia message that you can retrieve from the
message centre (for example, when you are travelling abroad
and are outside your home network), Manual to retrieve
multimedia messages from the message centre manually, or
Off to prevent receipt of any multimedia messages. Automatic
retrieval may not be supported in all regions.
Receive messages from unknown senders.
(network service). Receiving a delivery report of a multimedia
message that has been sent to an e-mail address may not be
possible.
Select Yes to not send delivery reports from your device for
received multimedia messages.
64
Page 65
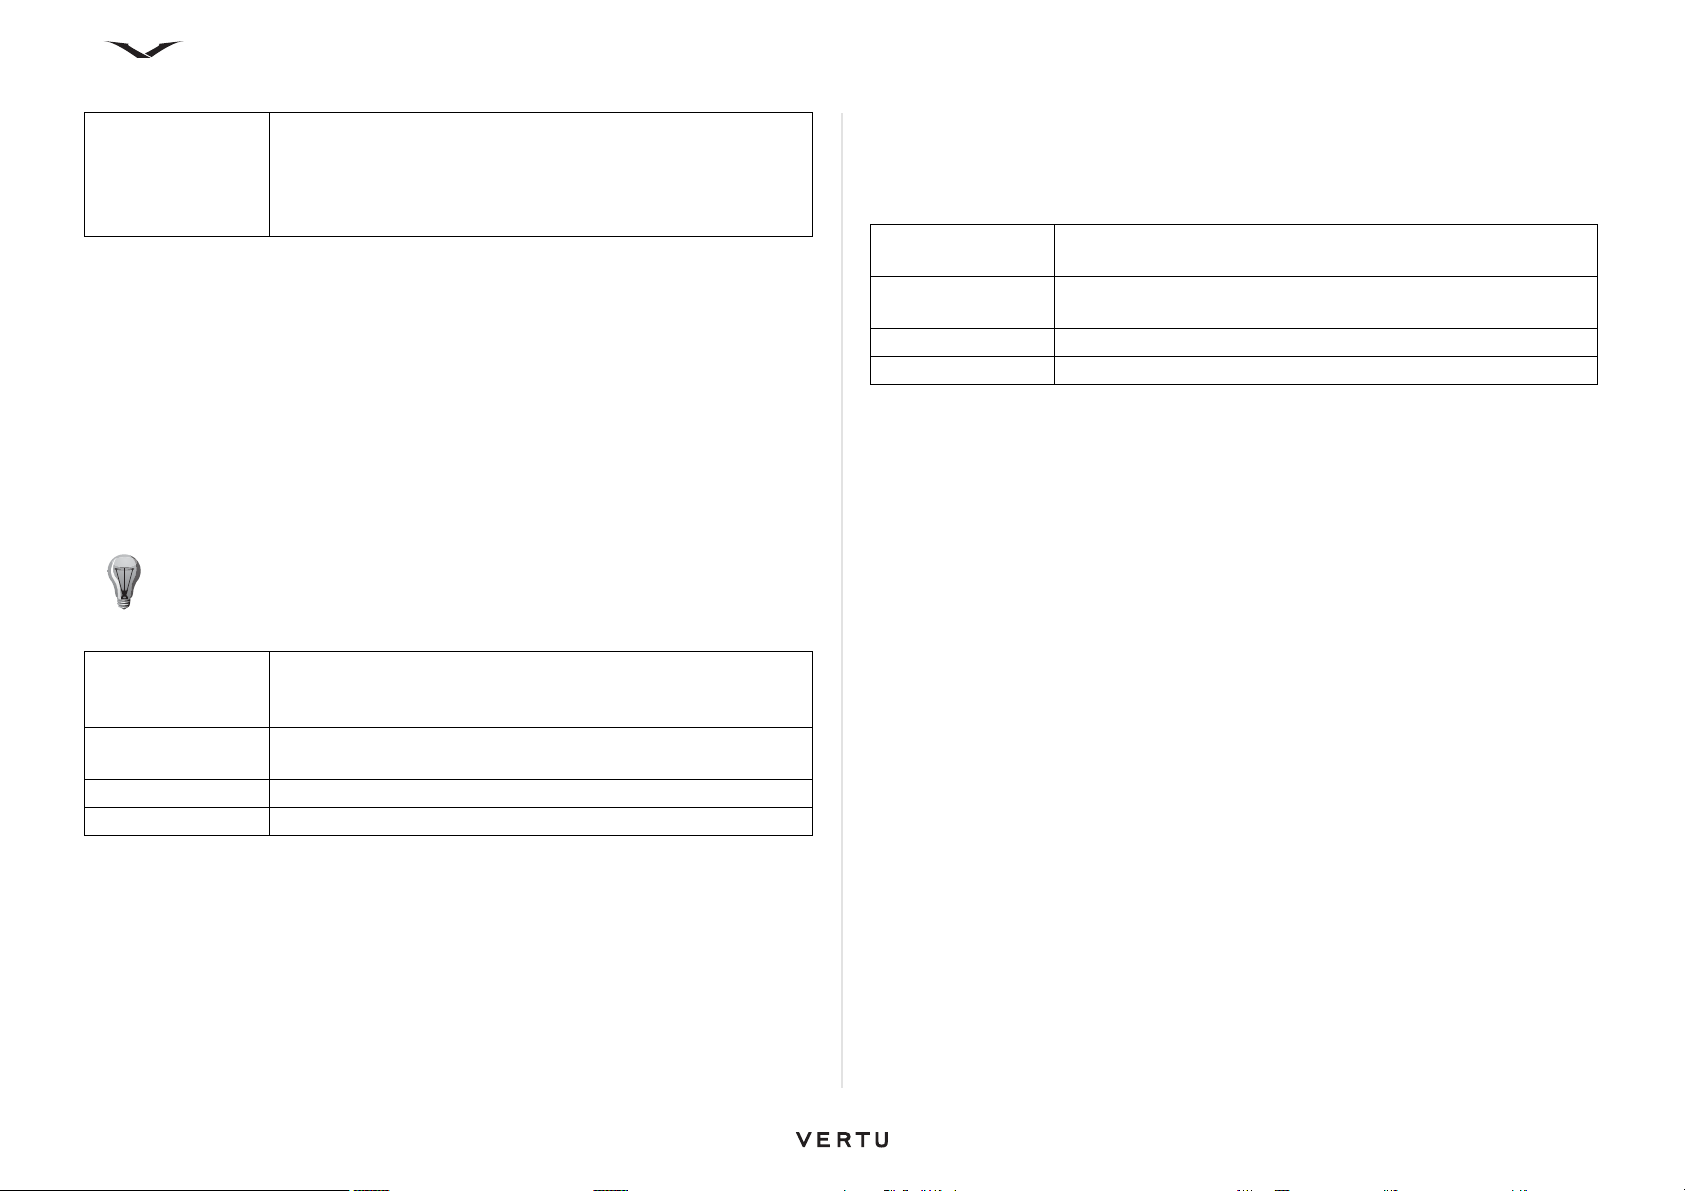
Messages
Message validity Select how long the messaging centre tries to send the
message (network service). If the recipient of a message
cannot be reached within the validity period, the message is
removed from the multimedia messaging centre. Maximum
time is the maximum amount of time allowed by the network.
The device requires network support to indicate that a sent message has been
received or read. Depending on the network and other circumstances, this
information may not always be reliable.
Email settings
All information about setting up and managing your email accounts is given in the
chapter on Emails.
Speech settings
Select Menu > Ctrl. Panel > Phone > Speech.
With Speech, you can set the language, voice, and voice properties for the message
reader.
TIP: When you download a new language, you must download at least one
voice for that language.
Language Sets the Language for the message reader. To download
additional languages to your device, select Options >
Download languages.
Voice Sets the speaking Voice. The voice depends on the selected
language.
Speed Sets the speaking rate
Volume Sets the speaking volume
• To view details of a voice, open Speech and reselect the second Speech tab.
Select the voice you want to listen to. Select Options > Voice details. To listen to
a voice, select the voice and Options > Play voice.
• To delete languages or voices, select the item and Options > Delete.
Message reader settings
Select Menu > Ctrl. Panel > Phone > Speech, then scroll right to display the
Settings tab.
To change the message reader settings, define the following:
Language
detection
Continuous
reading
Speech prompts Set the message reader to insert prompts in messages.
Audio source Listen to messages through the earpiece or loudspeaker.
Activate automatic reading language detection.
Activate continuous reading of all selected messages.
Service message settings
Select Messaging and Options > Settings > Service message.
• To allow your device to receive service messages from your service provider,
select Service messages > On.
• To select how to download services and service message content, select
Message details > Automatically or Manually. If you select automatically, you
may still need to confirm some downloads since not all services can be
downloaded automatically.
Cell broadcast settings
Select Messaging and Options > Settings > Cell broadcast.
• To receive cell broadcast messages, select Reception > On.
• To select the languages in which you want to receive cell broadcast messages,
select Language.
• To display new topics in the cell broadcast topics list, select Topic detection >
On.
65
Page 66
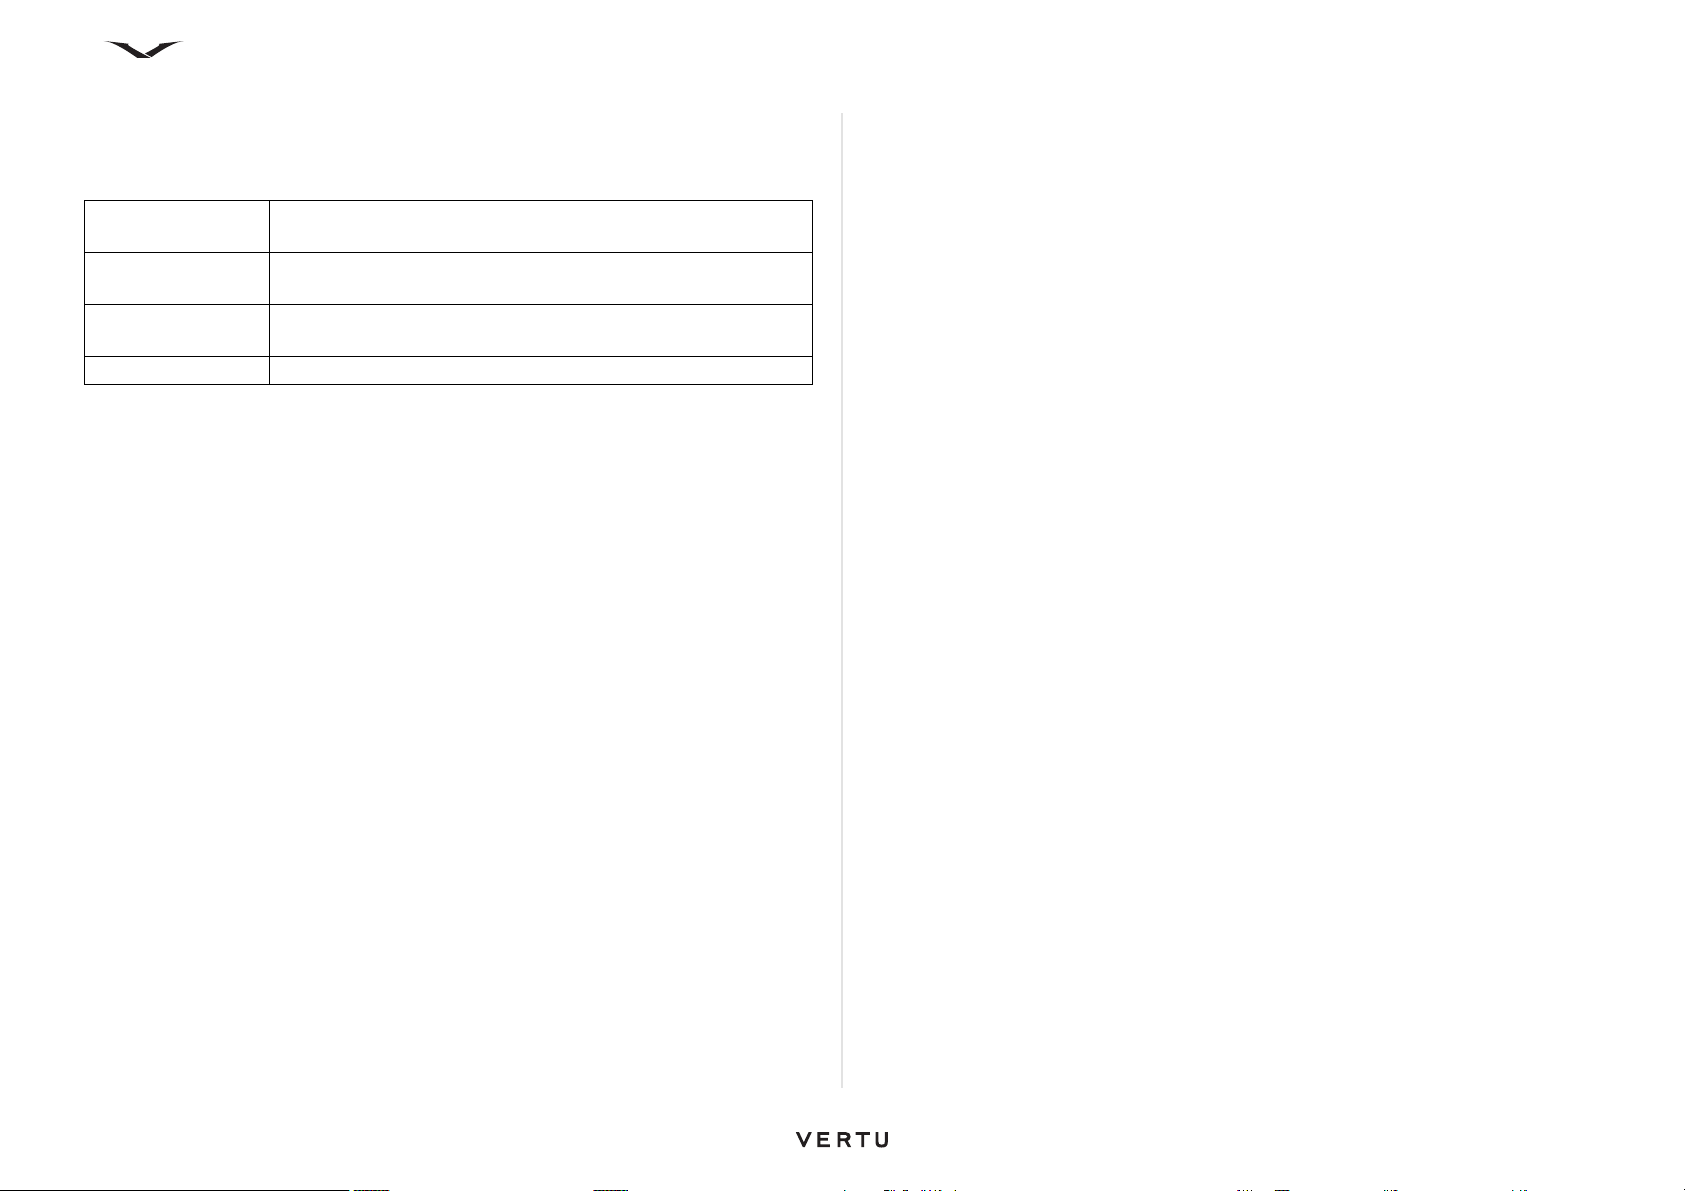
Other settings
Select Messaging and Options > Settings > Other.
Select from the following:
Save sent
messages
Number of saved
msgs.
Memory in use Select where to save your messages. You can save messages
Folder view Select if you want to see folder information on one or two lines.
Select whether to save sent messages in the Sent folder.
Enter the number of sent messages to save. When the limit is
reached, the oldest message is deleted.
to the memory card only if a memory card is inserted.
Messages
66
Page 67

Constellation Quest provides you with easy access to multiple email accounts. These
can run under the protocols Mail for Exchange, IMAP and POP3.
Use Mail for Exchange for a corporate email account using a MS Exchange Server.
You can choose to set this Mail for Exchange account to synchronize your calendar,
contacts and tasks automatically. If you do this, your email, calendar, contacts and
tasks on the phone will be synchronized with the MS Exchange Server.
You should note that you can only synchronise with one server and hence you can
only use Mail for Exchange if you do not want to synchronise your Vertu.Me calendar,
contacts and tasks.
Other email accounts can be set up in the Email function, and they will be
automatically provisioned to use the correct protocol.
Setting up your email accounts
The email wizard is the preferred route for setting up your email accounts. It displays
as part of the startup wizard when the phone is first initialised for use. Email accounts
are set up as follows:
• If no email is set up on initiation, the, Set up e-mail message appears in the
Information area of your Home screen. This is the easiest way to access the
wizard.
• Alternatively, if one or more email accounts have already been set up, press the
Email key and the Email panel displays. Select New mailb. and the email wizard
displays.
Email
If pressing the Email key results in the inbox of your emailbox being displayed,
press Back and then press the Email key once again and the Email panel shown
above displays.
TIP: Technical Support can set up your email if you prefer, or if you are
having problems. To do this just call Technical Support using the Concierge
key.
Running the email wizard
1. When the email wizard displays select Start.
2. You are asked, Do you want to setup a corporate Mail for Exchange account?
Select Yes, to set up your corporate account if it uses MS Exchange Server.
Select No, if you are setting up your Vertu.Me, Hotmail, Yahoo or Google or any
other email account.
3. When setting up your Mail for Exchange account, enter details when requested.
You need your account name, password, user name and domain details.
4. When setting up accounts such as Vertu.Me, Hotmail, Yahoo, Google, or any
other listed service, select the relevant service from the list displayed, and enter
your username and password. Press Accept if a terms and conditions panel
displays. Follow the on screen instructions to set up your email account. The
process ends when your email box is displayed.
5. For any other email account, choose the “Other” option from the list and enter
your username and password. Press Accept if a terms and conditions panel
displays. Follow the on screen instructions to set up your email account. The
process ends when your email box is displayed.
67
Page 68
Email
The first email account you set up is displayed in place of the Set up e-mail
message displayed on the Home screen. When you set up a second email
account this is placed in the second slot of the Information area. Only two
accounts can be displayed on the Home screen.
Details of your Microsoft Exchange Server should be available from your corporate IT
department, or alternatively call Technical support for assistance.
Your email account types are identified by icons. Generic email accounts are
identified with the standard email icon, your Vertu.Me account is identified with
the Vertu.Me email icon, while accounts such as Hotmail, Google and Yahoo are
identified with their specific icons.
NOTE: If no SIM is present, the phone will try to make a connection via the
WLAN if previously setup.
Lotus Notes Traveller
Vertu users can connect to their corporate email accounts via IBM® Lotus Notes®
Traveller. Lotus Notes Traveller provides two-way, over-the-air synchronization of
information between mobile devices and corporate email accounts via Lotus Notes
even while offline.
This provides users with access to email (including attachments), and Personal
Information Management (PIM) applications such as calendar, contacts,
appointments and to-do lists.
Scheduled synchronization and data filtering can be used to optimise phone usage.
Lotus Notes Traveller uses a secure socket layer (SSL) connection for encrypting
data via an HTTPS protocol.
The email link on the Home screen shows the number of unread emails in the Inbox
for that email service, in a red circle. This increments to a maximum of 99.
Refer to the “Home screen” on page 25 for an explanation of the Home screen.
Reading an email message
IMPORTANT: Exercise caution when opening messages. Messages may
contain malicious software or otherwise be harmful to your device or PC.
1. Open the relevant email account as described above.
2. Scroll to the relevant message, and press the Middle Select key to open and read
the message.
3. To open other folders, such as Drafts, scroll up to the Inbox header and open
the drop down field and make a selection.
TIP: Press T to take you to the top of the list, or B to take you to the bottom.
Left scroll takes you to the header section which displays the date from
anywhere in the list.
4. To change the order of your emails, scroll to the Date header, and select the
required ordering method for your emails.
Accessing your emails
All your email accounts, including your Mail for Exchange account can be accessed
in a number of ways as follows:
• Highlight and select the relevant email account displayed on the Home screen.
•From the Home screen press the Left Select key and to run the Messaging
application and select the relevant email account in the Messaging panel.
• Press the Email key, and select the relevant email account.
68
Page 69

Email
Replying and forwarding an email
1. To reply to a message highlight it and select Options > Reply.
2. To reply to a message including all recipients, highlight it and select Options >
Reply to all.
3. To forward the message, select Options > Forward.
Creating and sending an email
1. From either Messaging or Email open the relevant email account, then select
Options > Create email.
2. In the To field, enter the recipient's email address or press the Middle Select key
and Contacts will open, so you can select the contacts to whom you wish to send
the email. If you add several recipients, insert a semi-colon “;” to separate the
email addresses. Use the Cc field to send a copy to other recipients, or the Bcc
field to send a blind copy to recipients. If the Bcc field is not visible, select
Options > More > Show Bcc field.
3. Complete the subject and enter your message in the text area.
4. Select Options and from the following:
Priority Set the priority of the message.
Add attachment Add an attachment to the message.
Flag Flag the message for follow-up.
Insert template Insert text from a template.
Add recipient Add recipients to the message from Contacts.
Input options Activate or deactivate predictive text input, or select the
writing language.
Editing options Cut, copy, or paste the selected text.
More Hide or Show Cc and Bcc fields
5. Select Options > Send.
Add attachments
Open the relevant email account.
• To add an attachment to the email message, select Options > Add attachment
• To remove the selected attachment, select Options > Remove attachment.
Download attachments
1. To view the attachments in a received email message, scroll to the attachment
field, and select Options > Actions. If there is one attachment in the message,
select Open to open the attachment. If there are several attachments, select
View list to see a list showing which attachments have been downloaded.
2. To download the selected attachment or all the attachments from the list to your
device, select Options > Actions > Download or Download all. The
attachments are not saved in your device, and are deleted when you delete the
message.
3. To save the selected attachment or all the downloaded attachments in your
device, select Options > Actions > Save or Save all.
4. To open the selected, downloaded attachment, select Options > Actions >
Open.
Reply to a meeting request
1. Open the appropriate email account.
2. Select a received meeting request, Options, and from the following:
Accept Accept the meeting request.
Decline Decline the meeting request.
Forward Forward the meeting request to another recipient.
Remove from
Calendar
Remove a cancelled meeting from your calendar.
Search for email messages
1. Open the relevant email mailbox.
2. To search for items within the recipients, subjects, and body texts of the email
messages in the mailbox, select Options > Search.
3. To stop the search, select Options > Stop search.
4. To start a new search, select Options > New search.
Delete emails
1. Open the relevant email account.
2. To delete an email message, select the message and Options > Actions >
Delete. The message is placed in the Deleted items folder, if available. If there is
no Deleted items folder available, the message is deleted permanently.
3. To empty the Deleted items folder, select the folder and Options > Empty
deleted items.
69
Page 70

Email
Switch between email folders
1. Open the appropriate email account.
2. To open another email folder, place the focus on the Inbox at the top of the
display. Press the Middle Select key to display the list of email folders.
3. Use the scroll keys to select the relevant folder and press the Middle Select key
to open that folder.
You can also use this method to switch between email accounts.
Disconnect from the mailbox
1. Open the appropriate mailbox.
2. To cancel the synchronisation between the device and the email server, and to
work with email without a wireless connection, select Options > Disconnect. If
your mailbox does not have the Disconnect option, select Options > Exit to
disconnect from the mailbox.
3. To start the synchronisation again, select Options > Connect.
Set an out-of-office reply
This option is not available with all mailbox providers.
1. Open the appropriate mailbox.
2. Select Options > Settings > Mailbox settings.
3. The options presented depend on the mailbox type. Typically select either
Mailbox > Out of office > On or Mailbox settings > Out of office > Off, but these
settings depend on your mailbox provider.
4. To enter the text for the reply, select Out of office reply.
Email account preferences
Setting up your Email key
This option enables you to select which mailbox to open with the Email key when you
access it with a long press.
1. Menu > Ctrl. Panel > Settings > General > E-mail key settings.
2. Choose an email account or select the Default setting to use the one you have
previously set as your default email.
Setting up business and personal accounts
To set up your business and personal accounts go to Menu > Ctrl. Panel > Modes
> Current mode. Select either Business or Personal.
Setting up your primary and secondary email accounts
Note that you can select different email accounts for your Business and Personal
settings.
1. To set up your primary and secondary email accounts, go to Menu > Ctrl. Panel
> Modes and set up E-mail notifications.
2. When Mailbox displays, select the Primary tab.
3. Select which mailbox you want to designate as your primary account. This may
well be your Vertu.Me account.
4. Scroll to select the Secondary tab and select which mailbox you want for your
secondary email.
5. Press OK to save and exit.
Synchronising email messages
Synchronising email messages between your phone and the email server is done as
follows.
1. Press the Email key, and highlight the relevant email account, but do not open it.
2. Select Options >Synchronise all.
3. To cancel the synchronisation process, select Options > Cancel
synchronisation
4. To stop the synchronisation and work with email without a network connection,
select Options > Disconnect all.
5. To reopen the network connection, select Options > Connect all.
Setting up your default mailbox
To set the default mailbox for your Vertu phone:
1. Select Messaging > Options > Settings > Email > Default mailbox.
2. Highlight the appropriate mailbox and press Middle Select key to activate it.
3. Press Back to save and exit.
70
Page 71
Email
Setting up Lotus Notes Traveller
Follow the instructions given in the Configuration Wizard. You will need to enter your
userID, password, server name and details of the Access point, which may be your
WLAN.
It is possible you may have to update the Advanced settings, which enable you to
select the Sync protocol and port numbers to use and the Servlet which the phone
accesses.
The View log option provides details of the communication between devices.
Once set up, Lotus Notes Traveller provides you with a mailbox that is synchronised
with your Lotus Notes corporate email account, and is used in a similar way to the
other Email accounts.
Email settings
Access Email settings as follows:
Menu > Ctrl. Panel > Settings > General > Email.
The following options become available:
• Global settings for your email accounts.
• Settings for individual email accounts
• Personal Information Management (PIM)
It is also possible to access email settings using the pathways below, but some
functions are accessed in alternative ways.
• Messaging key and select Options > Settings > Email and select the relevant
email account.
• Email key and then select the relevant account, then select Options > Settings
and choose one of the available options.
Note that in certain circumstances, Global settings only appear when you select
Back from within the Mailbox settings for an account.
Global Settings
Message list
layout
Body text preview Preview messages when scrolling through the list of email
Title dividers To be able to expand and collapse the list of email messages,
Download
notifications
Warn before
delete
Home screen Define how many lines of email are displayed in the home
Select whether the email messages in Inbox display one or
two lines of text.
messages in Inbox.
select On.
Set the device to display a notification when an email
attachment has been downloaded.
Set the device to display a warning before you delete an email
message.
screen information area.
Email accounts
For each email account, the following settings are displayed: Mailbox, What to
sync, and When to sync:
To access the email accounts:
1. Select Menu > Ctrl. Panel > Settings > General > Email.
2. Highlight the relevant mailbox account, and open it with the Middle Select key.
The options available vary, depending on the type of email accounts that have been
set up. If no email accounts have been configured few options are displayed.
Options displayed include:
• Global settings
• Mailbox settings
• Account settings
• What to sync
• When to sync
71
Page 72
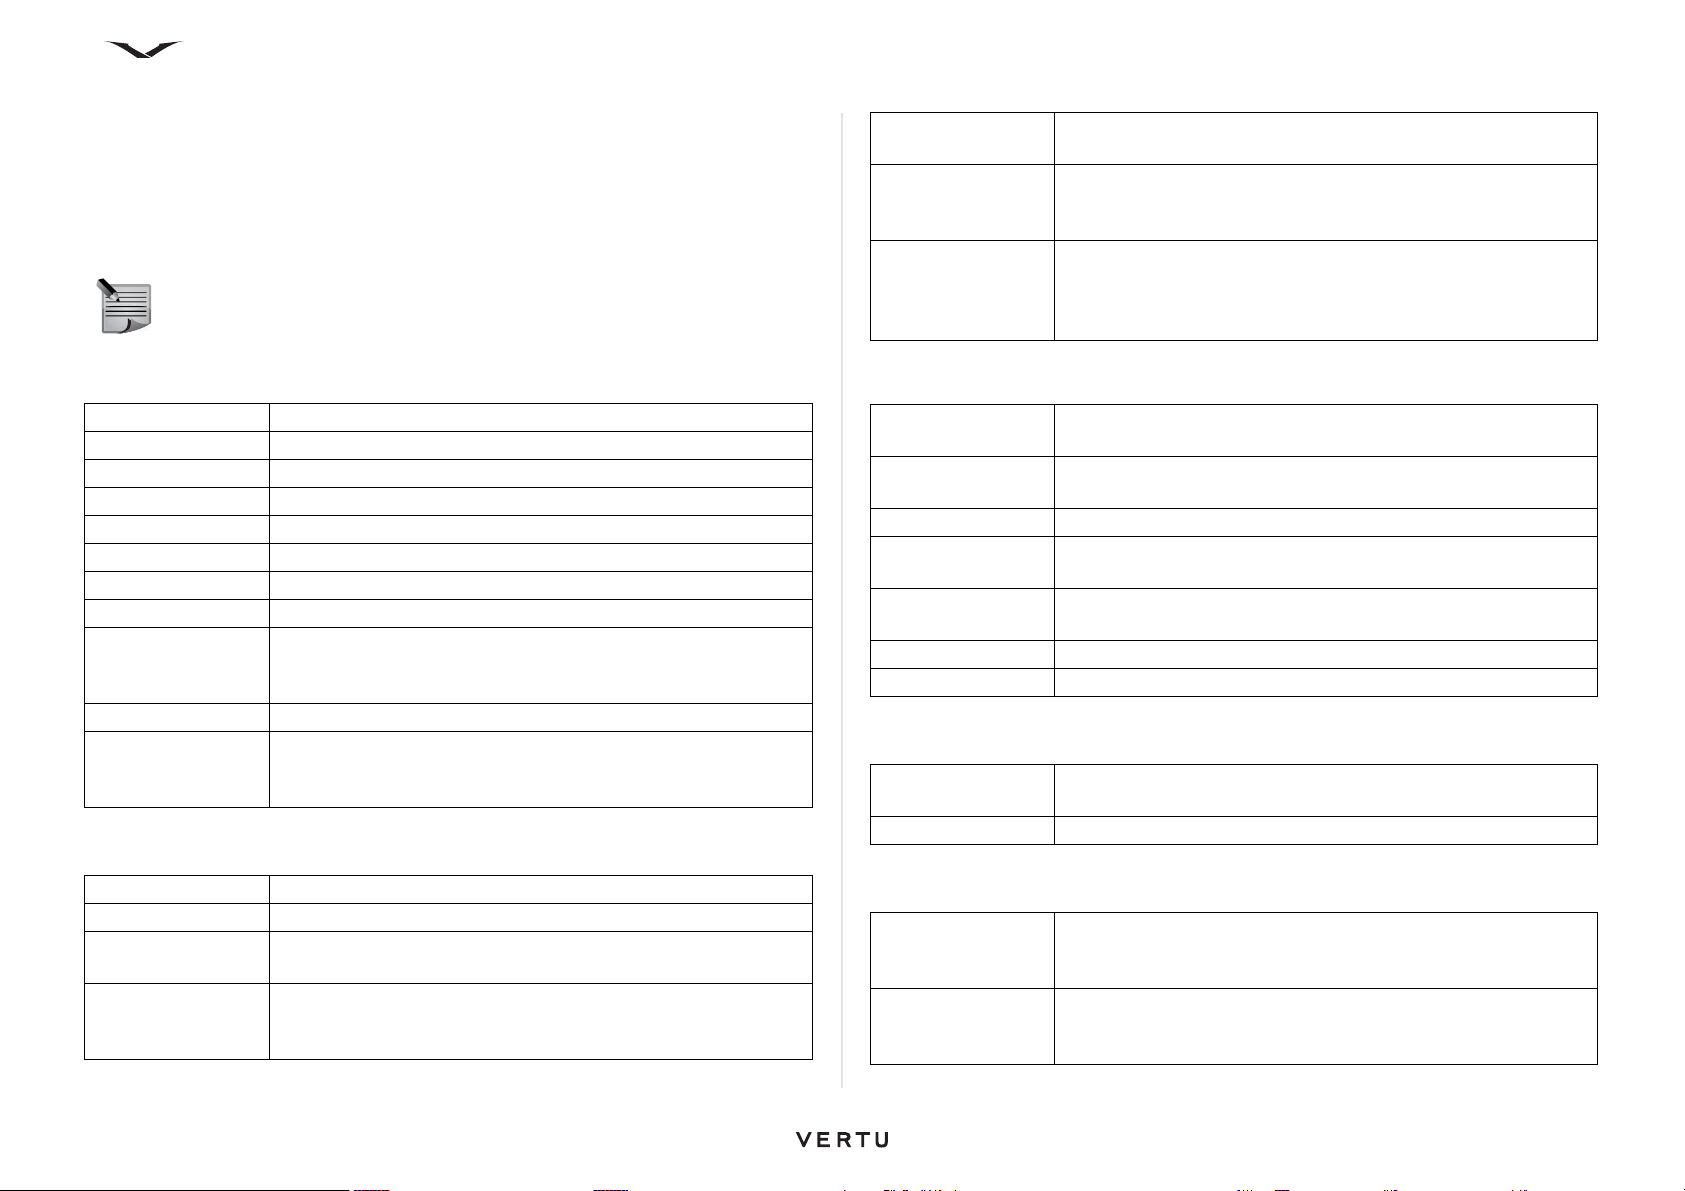
Email
Generic Mailbox Settings
Highlight the relevant mailbox account, and select it with the Middle Select key. The
Settings for that mailbox are displayed.
Displays details of the mailbox settings, including mailbox name, user name,
password and domain.
NOTE: Note that the options available vary according to email provider.
Mailbox
My email address Displays the full email address of the account.
Reply-to address Optional address for reply.
Mailbox name Name of the email account, such as Hotmail or Google.
Mailbox type Options are POP3 or IMAP4.
My name Enter the name you want displayed when you send an email.
User name Account user name.
Password Account password.
Server name Defined by the email provider.
Use signature Options are On or Off. Email signature enables you to place a
line of text automatically at the end of every email, such as
your name.
Signature line Enter the line of text that you want to enter for your signature.
Advanced mailb.
settings
Incoming email settings
Options presented vary with the email provider. They can be
Port and Secure connection, or Incoming email settings and
Outgoing email settings, as displayed in the table below.
Security Select the required type of security, if any. Options are On
(StartTLS), On (SSL/TLS) or Off.
Port Enter the number of the port to be used to connect to the
incoming email server. Options are Default setting or User
defined.
APOP secure
login
Outgoing email settings
User
authentication
User name The user name assigned to you by your email service
Password Enter and verify you login password.
Outgoing mail
server
Access point in
use
Security Options are On (SSL/TLS), On (StartTLS) or Off.
Port Default or user defined
Generic mailbox What to sync
Retrieve Options are Only headers, Less than (kb), which you can
Emails to retrieve Options are All or Number of emails, which you can define.
APOP is an extension to POP3 and uses secures
mechanisms to transfer usernames & passwords during the
login transaction. Options are On or Off. This needs to be
supported by the Email service provider.
Options are none, Same as for incoming or User
authentication.
provider.
Name of the outgoing SMTP email server.
Always ask or user defined
define, and Body text and attach.
User name Displays the full email address of the account.
Password Account password.
Incoming mail
server
Access point in
use
Select the type of server that hosts your email server. This can
be POP3 or IMAP4. Normally set automatically.
The access point can be defined if you are not using the
preferred access point. Options are Always ask or User
defined.
Generic mailbox When to Sync
What to sync Options are Yes and No. Old emails can be removed after a
user defined time limit using Remove e-m. older than
command.
When to sync Setup the Connection days, Conne ction hours, Update
interval, and Retrieve when abroad. Select Only in home
network to avoid roaming charges.
72
Page 73
Email
Account information
Some accounts display account information relating to that mailbox.
User name The user name assigned to you by your email service
provider.
Password Password for your email account
Server name Name of the SMTP email server
Phone number Any associated phone number
Access point Normally set by your service provider
PIM settings
Personal Information Settings, or PIM management is used to set up synchronisation
settings for Calendar, Contacts and To-do lists.
Menu > Ctrl. Panel > Settings > General > Email > Applications.
Select Calendar
Calendar sync Options are Yes or No
Remove entr. older
than
Initial sync Options are Delete items on phone or Keep items on
Select Contacts
Old items can be removed after a specified time limit.
phone.
Nokia Messaging
The Nokia Messaging service automatically pushes email from your existing email
address to your Vertu phone, which enables you to read, respond to, and organise
your emails on the go.
The Messaging service works with a number of internet email providers that are often
used for personal email, such as Google email services.
The Messaging service must be supported by your network and may not be available
in all regions. The Messaging application is pre-installed on your Vertu phone.
The Messaging service can run on your device even if you have installed other email
applications which do not use Nokia Messaging.
NOTE: It is possible to decline the Nokia Messaging facility, and then set
up your email account in the regular way using the IMAP/POP3 services
used by your email provider.
Calendar sync Options are Yes or No
Initial sync Options are Delete items on phone or Keep items on
phone.
Select To-do
To-do sync Options are Yes or No
Initial sync Options are Delete items on phone or Keep items on
phone.
Sync completed todos
Select If conflict
If conflict Options are Server wins or Device wins.
Options are Yes or No.
73
Page 74
Vertu Services
Vertu Services
Vertu provides a number of exclusive services to enhance the user experience with
your Vertu phone. These are Vertu Select, City Brief, Vertu Concierge, Technical
support, Remote Assist and Download.
Select Menu > Vertu.
Vertu Concierge
If you are unable to contact Vertu Concierge using the Concierge key, call
+448707375535.
Vertu Technical Support
Should you require technical help using your Vertu phone, simply call or email Vertu
T echnical support using the Concierge key and select support. If you are unable to
contact Technical support using the Concierge key, call +441252867500. Refer to
the web site http://www.vertu.com for local numbers.
Ver tu Technical support is available 24 hours a day, 7 days a week.
Vertu Concierge is a dedicated and independent lifestyle assistance service
available globally 24/7 in your preferred language. Your Vertu Constellation Quest
comes with 12 months complimentary access to this service, once you have
registered the product. Your experience will begin with a personalized call designed
to introduce you to the service, understand your needs and capture your preferences.
This ensures your relationship with Vertu Concierge is a rich and rewarding one,
satisfying your needs and delivering you unique opportunities.
To c o n ta ct Vertu Concierge:
Press the Vertu Concierge key (key 2) on the left side of your phone (screen facing
you), select Vertu Concierge and select Voice call or Send email.
Vertu Remote Assist
On a single use basis and provided Vertu has your consent, this utility enables Vertu's
Technical Support team to remotely access your phone. It is used to assist you,
should you have problems setting up or using your phone. Please contact Technical
Support before trying to use this service.
74
Page 75
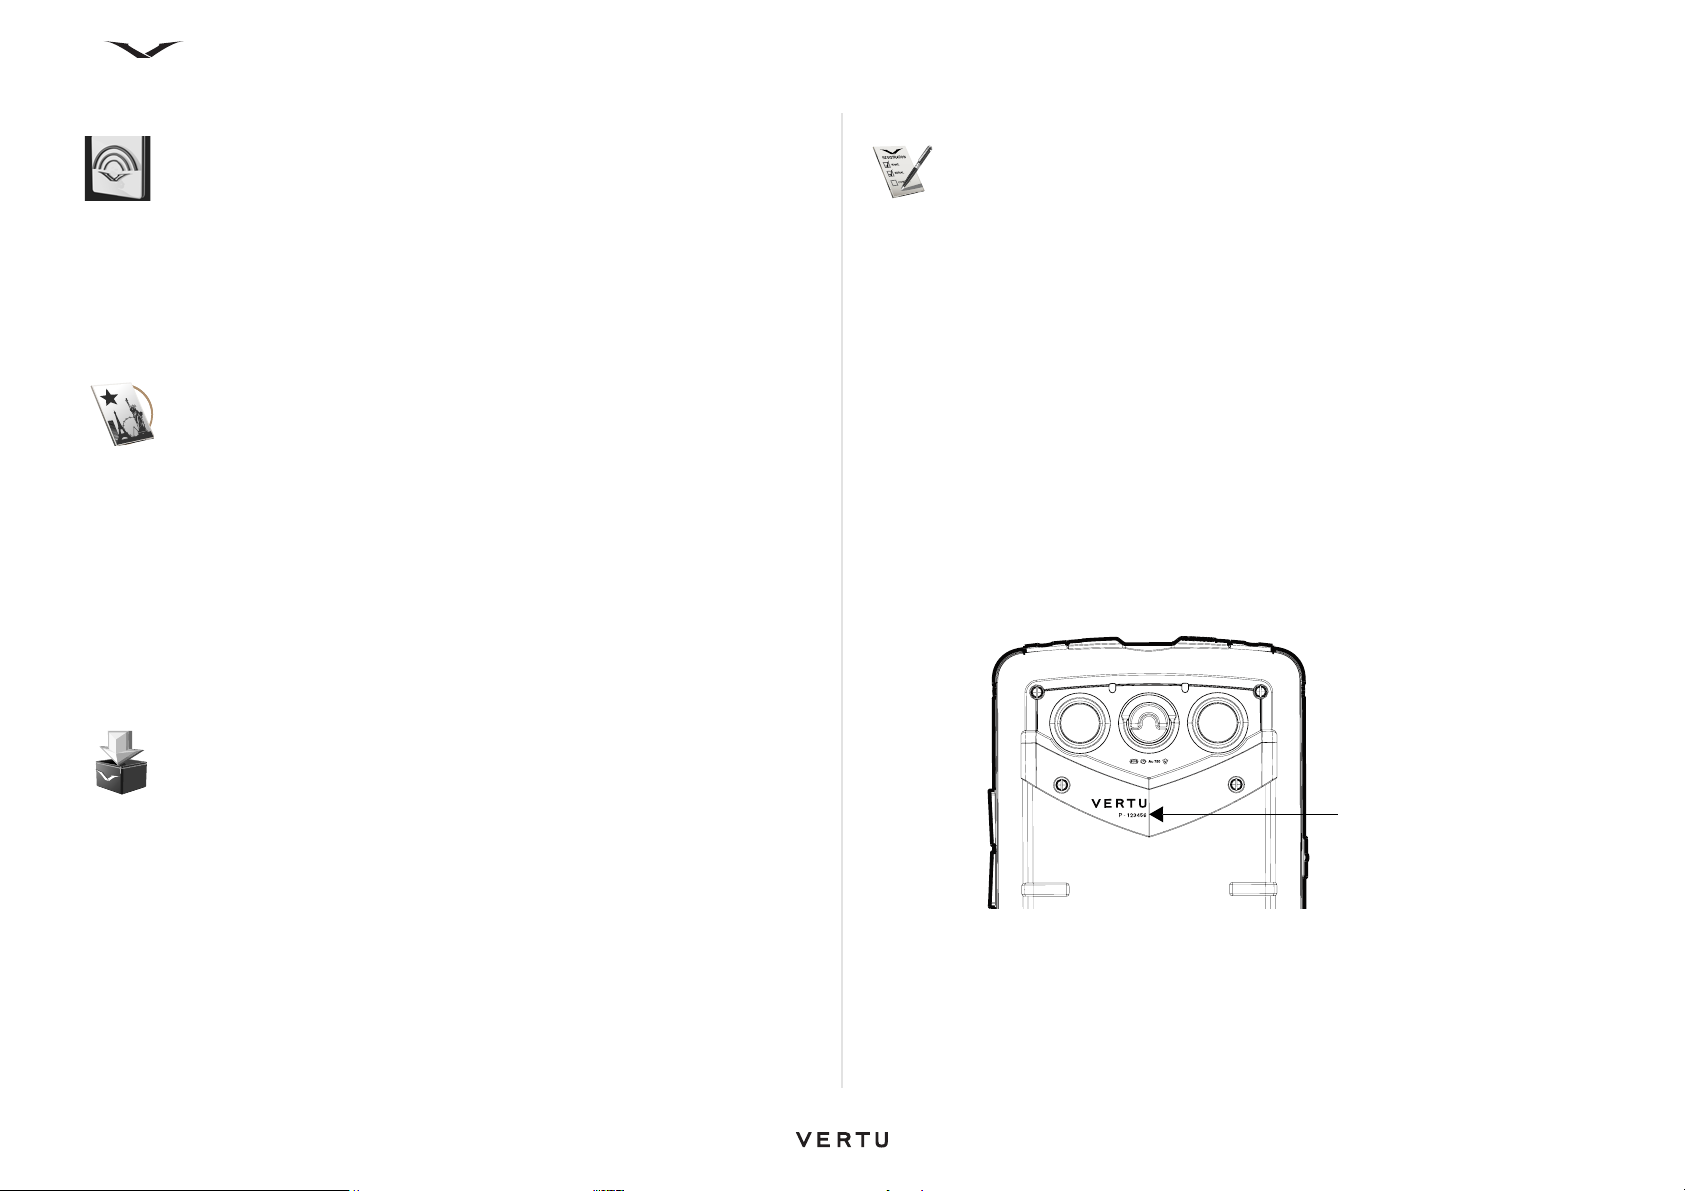
Vertu Services
Serial Number
Vertu Select
Vertu Select delivers original articles selected to inspire, inform and entertain based
on your region, preferences and passions. Written by selected experts and
organizations, Vertu Select appears on your Vertu Constellation Quest in the media
feeds on the Home screen following registration of the product. The content is often
linked to exclusive offers accessed through Concierge.
City Brief
Vertu City Brief is an independently written series of destination guides. Each guide
is presented to you on your Vertu Constellation Quest automatically when you are in
that location. City Brief provides helpful advice and suggestions on where to eat,
drink and visit during your stay.
The link is present on the Home screen. To access City Brief, highlight the area on
the Home screen and press the Middle Select key, and City Brief opens in the web
browser.
City Brief is updated regularly so you can always be confident the information is
accurate and relevant. New destinations are added on a regular basis.
Registration
When your Vertu phone is switched on for the first time, you are taken through a few
simple steps to set up your phone. Prior to the setup, you must insert a valid SIM in
your Constellation Quest, and be in a location with cellular data connectivity.
You will first be asked to accept the Terms and Conditions. This will automatically
enable the phone to use the core features of your Constellation Quest.
You will then be asked to register the product, which is essential for enabling the
extensive and free services offered on your Constellation Quest. If you are already a
Registered Customer, you will need to enter your username and password. If not,
registration is quick as all you need is to enter a few details. To complete the
registration, you will need to enter the Serial Number of your Constellation Quest
which can be found on the battery cover at the back of the phone.
If you do not register your phone at initial setup, you can do so from Registration in
the Vertu menu at a later stage.
Vertu Downloads
Vertu Downloads allows access to downloadable content, carefully selected by
Vertu, to be appropriate for Constellation Quest customers.
75
Page 76

Calendar
Calendar
The Calendar feature works like an electronic diary. It enables you to keep track of
your appointments, meetings and other events, such as birthdays. You can also
create To-do lists.
In Month view, all calendar entries are marked with a triangle. The Anniversary
entries are marked with a triangle and an exclamation mark. The entries of the
selected day are displayed as a list.
Clock
Appointments for the next 12 hours are displayed on the analogue Clock, their
duration being shown around the bevel of the clock (See “Clock” on page 26.)
Calendar
By default, Calendar displays in Month view. Calendar can display in Week view,
Day view, Agenda view or by To-do list. The display can be changed at any time.
The default view is selected in Calendar Settings. The procedures described below
assume that the default, Month view is enabled.
• Memo entries are related to the whole day but not to a specific time of the day.
• Anniversary entries remind you of birthdays and special dates. They refer to a
certain day but not a specific time of the day. Anniversary entries are repeated
every year.
• To-do entries remind you of a task that has a due date but not a specific time of
the day. A priority can be attached to a To-do entry.
Calendar views
Calendar views display the following information:
• Month view shows the current month and the calendar entries of the selected day
in a list.
• Week view shows the events for the selected week in seven day boxes.
• Day view shows the events for the selected day grouped into time slots according
to their starting time.
• To-do view shows all to-do items.
• Agenda view shows the events for the selected day in a list.
To change the view:
Select Options > Change View and the desired view.
TIP: You can quickly move between views using the short cut keys, as
follows: Month view (M), Week view (W), Day view (D), Agenda view
(A), and To-do view (T).
Opening Calendar
1. To open Calendar, press the dedicated Calendar key
Or select Menu
2. Move around the calendar and select the relevant date with the Middle Select
key. Calendar then opens to display the Day view, by hour.
3. Whenever you see the triangle icon, scroll across the icon and view the
engagement on the right. To close the list, scroll away from the icon.
> Calendar.
Calendar entries
You can create the following types of Calendar entries:
• Meeting entries remind you of events that have a specific date and time.
• Meeting request are invitations that you can send to the participants. Before you
create a Meeting request you must have a compatible mailbox configured on
your phone.
Go to a date
Go to date takes you directly to the chosen date.
1. Press the
2. Select Options > Go to date.
3. Enter the required date in the panel, and press OK. Calendar re-displays with
the selected date highlighted, in the default display format.
To move to the next or the previous day in Month view, Week view, Day view, and
Agenda view, select the desired day using the scroll keys.
Calendar key.
76
Page 77

Calendar
Creating a meeting entry
To create a reminder for an event at a specific time:
1. Press the Calendar key then choose a date.
2. Press Options > New entry, and then Meeting (N). A new meeting panel
displays.
3. Alternatively, with Calendar open at the Day view, scroll to the time when you
want the meeting to take place, then press the Middle Select key, when a yellow
line displays with the icon. Use the Up and Down scroll keys to select the
duration of the meeting and then press the Middle Select key again. A New
meeting panel displays.
4. Overtype the (Enter subject) field with a suitable description.
5. Enter the start and end times and dates, or place a tick mark against the All day
event option.
6. Enter the Location.
7. Select an Alarm time for the event, if required. The alarm can be set to one of a
number of fixed time intervals before the meeting, (ranging from a number of
days to 0 minutes), or the alarm can be turned off.
If an All day event is selected, the first option offered is to turn the alarm On or
Off. If On is selected, a time for the alarm can be selected, as well as a date. The
system defaults to 12 pm on the previous day.
8. For a recurring meeting, set the recurrence time (Daily, Weekly, Fortnightly
Monthly OR Yearly). Enter the Repeat until date.
9. By default, the priority is set to Public, but Private or None can be selected using
the left or right scroll key.
Priority defines how the entry is handled during synchronisation. Select Private
to hide the entry from viewers if the calendar is available online. Select Public to
make the entry visible to viewers, or select None, in which case the entry is not
copied to your computer.
10.Enter a description of the meeting if required.
11.Press Done to save the entry, or select Options > Save, and a confirmation
message is displayed.
TIP: You can quickly create a new Meeting entry by pressing the N key
when the Calendar is displayed.
Creating a meeting request
To c re at e a n ew Calendar meeting request, inviting other participants:
1. Press the
2. Press Options > New entry, and then Meeting request.
3. If you have a number of email accounts, select the relevant email account when
prompted.
4. A Ne w meeting panel displays. Under the (Required) heading, press the Middle
Select key when the list of possible contacts displays. Scroll through the list and
select individual contacts using the Middle Select key to select individuals. When
the selection is complete, press OK to enter the names. Alternatively, to add
names from your contacts list, enter the first few characters, and select from the
proposed matches. To add optional participants, select Options > Add optional
participants.
5. Complete the remainder of the panel as described for “Creating a meeting entry”
on page 77.
6. Press Done to save the entry if you are not ready to send out the meeting
request.
7. Select Options > Send which sends the meeting requires to a compatible device
via a message, email or Bluetooth.
Calendar key and choose a date.
Creating a new Calendar memo
To c re at e a n ew Calendar memo:
1. Press the
2. Press Options > New entry, and then Memo.
3. A New memo panel displays. Enter the subject for the memo, and scroll down
and enter the details for the memo if required. The date of the selected day is
displayed, which can be changed if required.
4. Set the priority as described for “Creating a meeting entry” on page 77.
5. Press Done to save the entry.
6. Select Options and either Save, Delete, Send or Edit an existing entry. Send
enables you to send the Memo to a compatible device via a message, email or
Bluetooth.
Printing options are set up from the Options menu.
Calendar key and choose a date.
77
Page 78

Calendar
Creating an anniversary entry
To create a reminder for an event at a specific time:
1. Press the
2. Press Options > New entry, and then Anniversary.
A New anniversary panel displays.
3. Overtype the Enter occasion field with a suitable description.
4. Change the date if required, or accept the selected date.
5. An early warning reminder for the event can be set if required. If the alarm is set
to Off, no alarm or reminder options are displayed.
6. Select the reminder time and date options for the event if required.
7. Set the priority as described for “Creating a meeting entry” on page 77.
8. Enter a description of the Anniversary if required.
9. Press Done to save the entry, or select Options > Save, and a confirmation
message is displayed.
Calendar key and choose a date.
Creating a to do entry
To c re at e a To-do entry at a specific time:
1. Press the
2. Press Options > New entry, and then To-do.
A new To-do panel displays.
3. Overtype the Enter subject field with a suitable description.
4. Change the date if required, or accept the selected date.
5. An early warning reminder for the event can be set if required. If the alarm is set
to Off, no alarm or date reminder options are displayed.
6. The To-do list can be prioritised. Options are Low, Normal or High.
7. Select the reminder time and date options for the event if required.
8. Set the priority as described for Creating a meeting entry (above).
9. Enter a description of the To-do reminder if required.
10.Press Done to save the entry, or select Options > Save, and a confirmation
message is displayed.
Calendar key and choose a date.
Edit a Calendar item
To edit an existing Calendar item:
1. Press the
2. Scroll to the relevant date where the triangle displays, then press the Middle
Select key to select that day. Scroll to the relevant item entry and highlight it, and
press the Middle Select key to open the item.
3. Press Options > Edit to make the Memo available for editing.
4. Scroll though the item, making changes as necessary.
5. To save the changes, press Done or Options > Save.
Calendar key.
Moving a Calendar item
This procedure describes how to move a Calendar item, by changing it to a different
date.
To move a Calendar item:
1. Open the relevant item, as described above for editing a calendar item.
2. Press Options > Edit to make the Memo available for editing.
3. Change the date using the scroll keys and keyboard to make changes.
4. To save the changes, press Options > Save.
Copying a Calendar item
This describes how to copy a calendar item to another location. Note that not all
elements of an item can be copied (such as the date):
1. Open the relevant item, as described (see “Edit a Calendar item” on page 78).
2. Press Options > Edit to make the item available for editing.
3. Place the cursor in the relevant location where the Copy is to start, then select
Options > Editing options > Copy. Press the Left Select key which displays
Start. Press Start and using the scroll keys, highlight the text to copy. Now press
the Left Select key which displays Copy. A message displays stating Text
copied to clipboard.
4. Navigate to another item where you want to place the text you have copied, and
place the cursor in the correct location.
5. Follow steps 1 to 3 as described above, then select Paste and the text is pasted
in that location.
6. Press Options > Save to save the changes. A confirmation message is
displayed.
78
Page 79

Calendar
Deleting a Calendar item
1. Press the Calendar key.
2. Scroll to the relevant date where the triangle displays, then press the Middle
Select key to select that day. Scroll to the relevant item entry and highlight it, and
press the Middle Select key to open the item.
3. Press Options > Entry, and a Delete entry? message displays. Select Yes to
delete the item.
The options presented vary according to context. Options presented include
Delete an individual entry and the Before date option which enables you to
delete everything before a user defined date, which must be in the past.
If the item is a recurring meeting, you are offered the option to Delete this
occurrence, or to Delete the series.
Sending Calendar items
You can send a calendar item in the following ways:
• Within the body of a text message or multimedia message. The message type
depends on the details of the calendar note.
• As an attachment to a multimedia message.
• As a calendar note.
• Via Bluetooth.
To send a calendar item in a text message:
1. Press the
2. Scroll to the date of the event, and press the Middle Select key to display the
events for the day.
3. Scroll to the required event and highlight it.
4. Select Options > Send and select Via message.
5. Press the Select key.
6. Add a recipient or recipient group to the message, then select Send. A
confirmation message is displayed when the calendar note has been sent.
For further information on messages refer to “Messages” on page 58.
To send a calendar item as an attachment to an email message:
1. Press the
2. Scroll to the date of the event, and press the Middle Select key to display the
events for the day.
Calendar key.
Calendar key.
3. Scroll to the required event and highlight it.
4. Select Options > Send and select Via email. Select an email account if
prompted.
5. Press the Middle Select key, and your email account opens. The calendar entry
is attached automatically to the email.
6. Scroll to the To list, and press the Middle Select key when the email contacts list
displays. Highlight a recipient, and press OK. Add additional recipients to the
message as required.
7. Select Options > Send. A confirmation message is displayed when the
message has been sent, or if the phone is off-line, that the message has been
sent to the Outbox.
To send a calendar item via Via Bluetooth:
1. Press the
2. Scroll to the date of the event, and press the Middle Select key to display the
events for the day.
3. Scroll to the required event and highlight it.
4. Select Options > Send and select Via Bluetooth.
5. Your Vertu phone will search for nearby Bluetooth devices and display them in a
list. (Alternatively, the phone displays the message Activate Bluetooth in
offline mode? Select Yes to continue.
6. Select the device to which you want to send the calendar memo. Your Vertu
phone connects to the device and sends the memo. A confirmation message is
displayed when the note has been sent.
For further information on Bluetooth, refer to “Bluetooth connectivity” on page 90.
Calendar key.
Receiving Calendar items
When you receive a calendar item, a notification is displayed.
To save a received calendar memo:
1. Open the received message, which displays the details of the memo.
2. Select Options using the Left Select key.
3. Select Save to Calendar to save the item.
4. A confirmation message, Calendar entry saved is displayed.
To discard a received calendar item without saving it:
1. Open the received message, which displays the details of the memo.
2. Select Options using the Left Select key.
3. Select Delete to delete the memo.
79
Page 80

Calendar
Calendar settings
The Calendar Settings menu enables you to set up Calendar to suit your
preferences. You can set up the following:
• Calendar alarm tone
• Alarm snooze time
• Default view
• Week starts on
• Title of week view
• Shortcuts
• Default mailbox
Calendar will revert back to the configuration applied in the Settings menu.
Calendar alarm tone
The calendar alarm tone is played when an alarm is set for a calendar meeting, event
or to-do list.
To set the calendar alarm tone:
1. Press the
2. Scroll to Calendar alarm tone, and press the Middle Select key to display the
list.
3. Scroll through the list and select a tone.
4. Press the Middle Select key to save and close the function.
5. Press Back to exit.
Alarm snooze time
The alarm snooze time can be set for any time from 1 minute to 60 minutes.
To set the alarm snooze time:
1. Press the
2. Scroll to Alarm snooze time, and press the Middle Select key to display the
setting.
3. Use the left and right scroll keys to set the value.
4. Press the Middle Select key to save and close the function.
5. Press Back to exit.
Calendar key, and select Options > Settings.
Calendar key, and select Options > Settings.
Calendar views
The default Calendar view is the Month view. However Calendar can also display in
Week view, Day view, Agenda view and To-do format.
To set the Default view
1. Press the
2. Scroll to Default view, and press the Middle Select key to display the list.
3. Scroll through the list and highlight a setting.
4. Press the Middle Select key to save and close the function.
5. Press Back to exit.
Calendar key, and select Options > Settings.
First day of week
To set the first day of the week:
1. Press the
2. Scroll to Week star t s on, and press the Middle Select key to display the days of
the week.
3. Use the up and down scroll keys to select the first day of the week.
4. Press the Middle Select key to save and close the function.
5. Press Back to exit.
Calendar key, and select Options > Settings.
Title of week view
This is a toggle function that enables you to have the W eek number or Duration of
week as the title of the weekly view in Calendar.
1. Press the
2. Scroll to Title of week view, and press the scroll keys to toggle between the two
options.
3. Press the Middle Select key to save and close the function.
4. Press Back to exit.
Calendar key, and select Options > Settings.
Shortcuts
This is a toggle function which enables or disables calendar shortcuts:
1. Press the
2. Scroll to Shortcuts, and press the Middle Select key to toggle Shortcuts On or
Off.
3. Scroll away from the function and press Back to exit.
Calendar key, and select Options > Settings.
80
Page 81

Default mailbox
This option only displays when at least one mailbox has been set up, and enables you
to connect your Calendar to a particular email address.
1. Press the
2. Scroll to Default mailbox, and press the Middle Select key to display the list of
available mailboxes.
3. Use the up and down scroll keys to select the relevant email address.
4. Press the Middle Select key to save and close the function.
5. Press Back to exit.
Calendar key, and select Options > Settings.
Calendar
81
Page 82
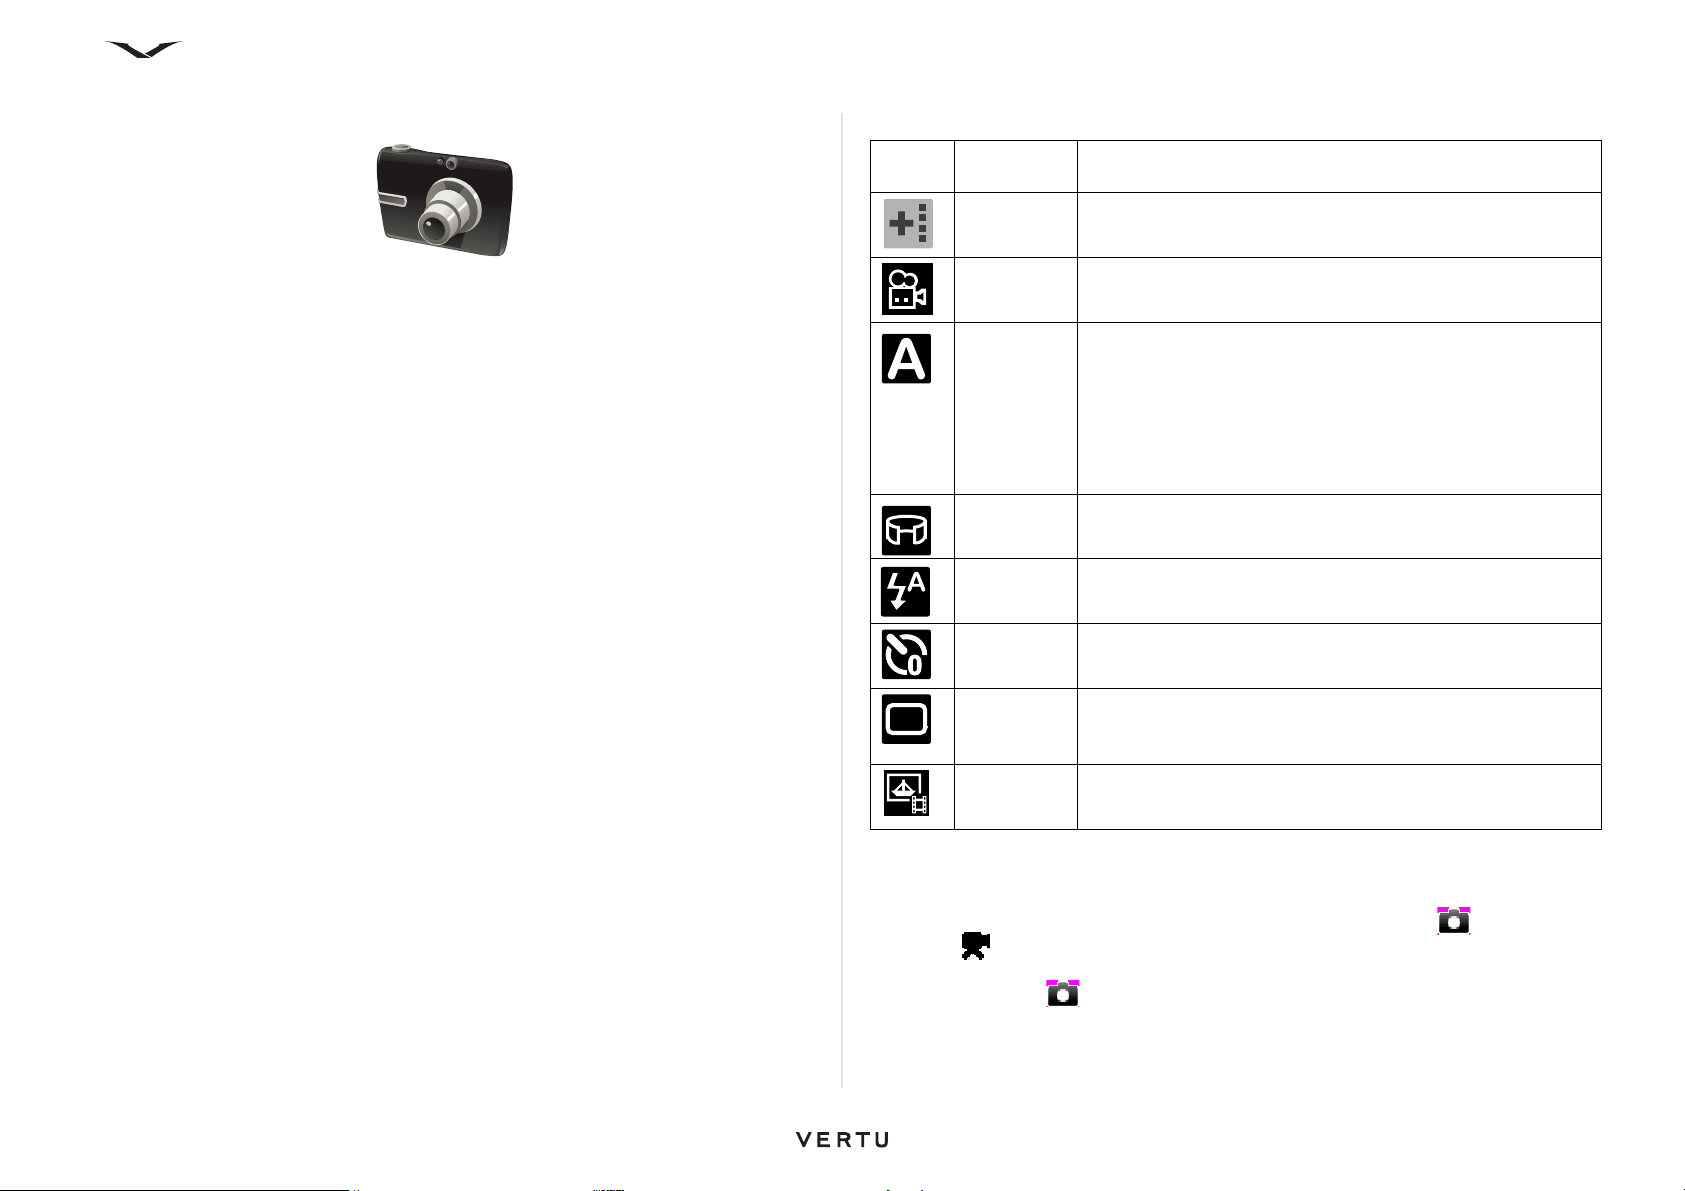
Camera
Camera
Your Vertu phone is equipped with a digital camera that can be used to take photos
and record video clips. The camera can also capture panoramic views.
Photos are saved in JPEG (.jpg) format, and video clips are saved in 3GPP (.3gp)
format.
Opening Camera
1. Select Menu > Media > Camera
Or use the Right Select key which by default is set up to open the Camera, but
note that this can be changed.
Toolbar
The toolbar is displayed on the right side of the camera application. Once the camera
function has been opened, press the Left Select key or Right Select key and the
toolbar displays.
1. Use the Up/Down scroll bars to select an option, and the name of the selected
option is displayed.
2. Select the option by pressing the Middle Select key.
3. The toolbar will close automatically after a number of seconds.
The toolbar provides you with shortcuts to different items and settings before and
after capturing an image, or recording a video clip. The items displayed in the toolbar
are context sensitive and can be customised by adding shortcuts of your choice to
the toolbar.
To customise the camera toolbar, switch to image mode (for taking still images), and
select Options > Customise toolbar.
The following are the options presented which you can include on the toolbar:
Image Shortcut
name
Add
shortcut
Video
mode
Scene
modes
Panorama Switches to panorama mode.
Flash Selects the flash mode (images only).
Self timer Switches to self-timer (images only), where you can set a
Seq. mode Switches to sequence mode (images only) where you can
Go to
Photos
Description
Lists the available shortcuts and adds the selected
shortcuts to the toolbar present.
Switches to video mode.
Selects the scene mode in the toolbar.
For still images, options include Automatic, User Defined,
Portrait, Landscape, Sport, Night and Night portrait.
(see “Scene modes” on page 83 for more information on the
user defined scene modes.)
For video, the only available options are Automatic or
Night.
time to take the photo.
select the number of photos you want to take in a single
click.
Opens the destination where the photos are saved.
To capture an image
1. From the Home screen, press the Right Select key to activate the camera.
2. The icon in the top left corner shows if the camera is in image , panorama or
video mode. Press the Left Select key or Right Select key to display the tool
bar. Select the image mode icon from the toolbar using the Up/Down scroll keys.
Then select the option with the Middle Select key.
3. Depending on whether you want to take a portrait or landscape photo, hold your
Vertu phone the required way. The camera orientation automatically changes as
you move the phone.
82
Page 83
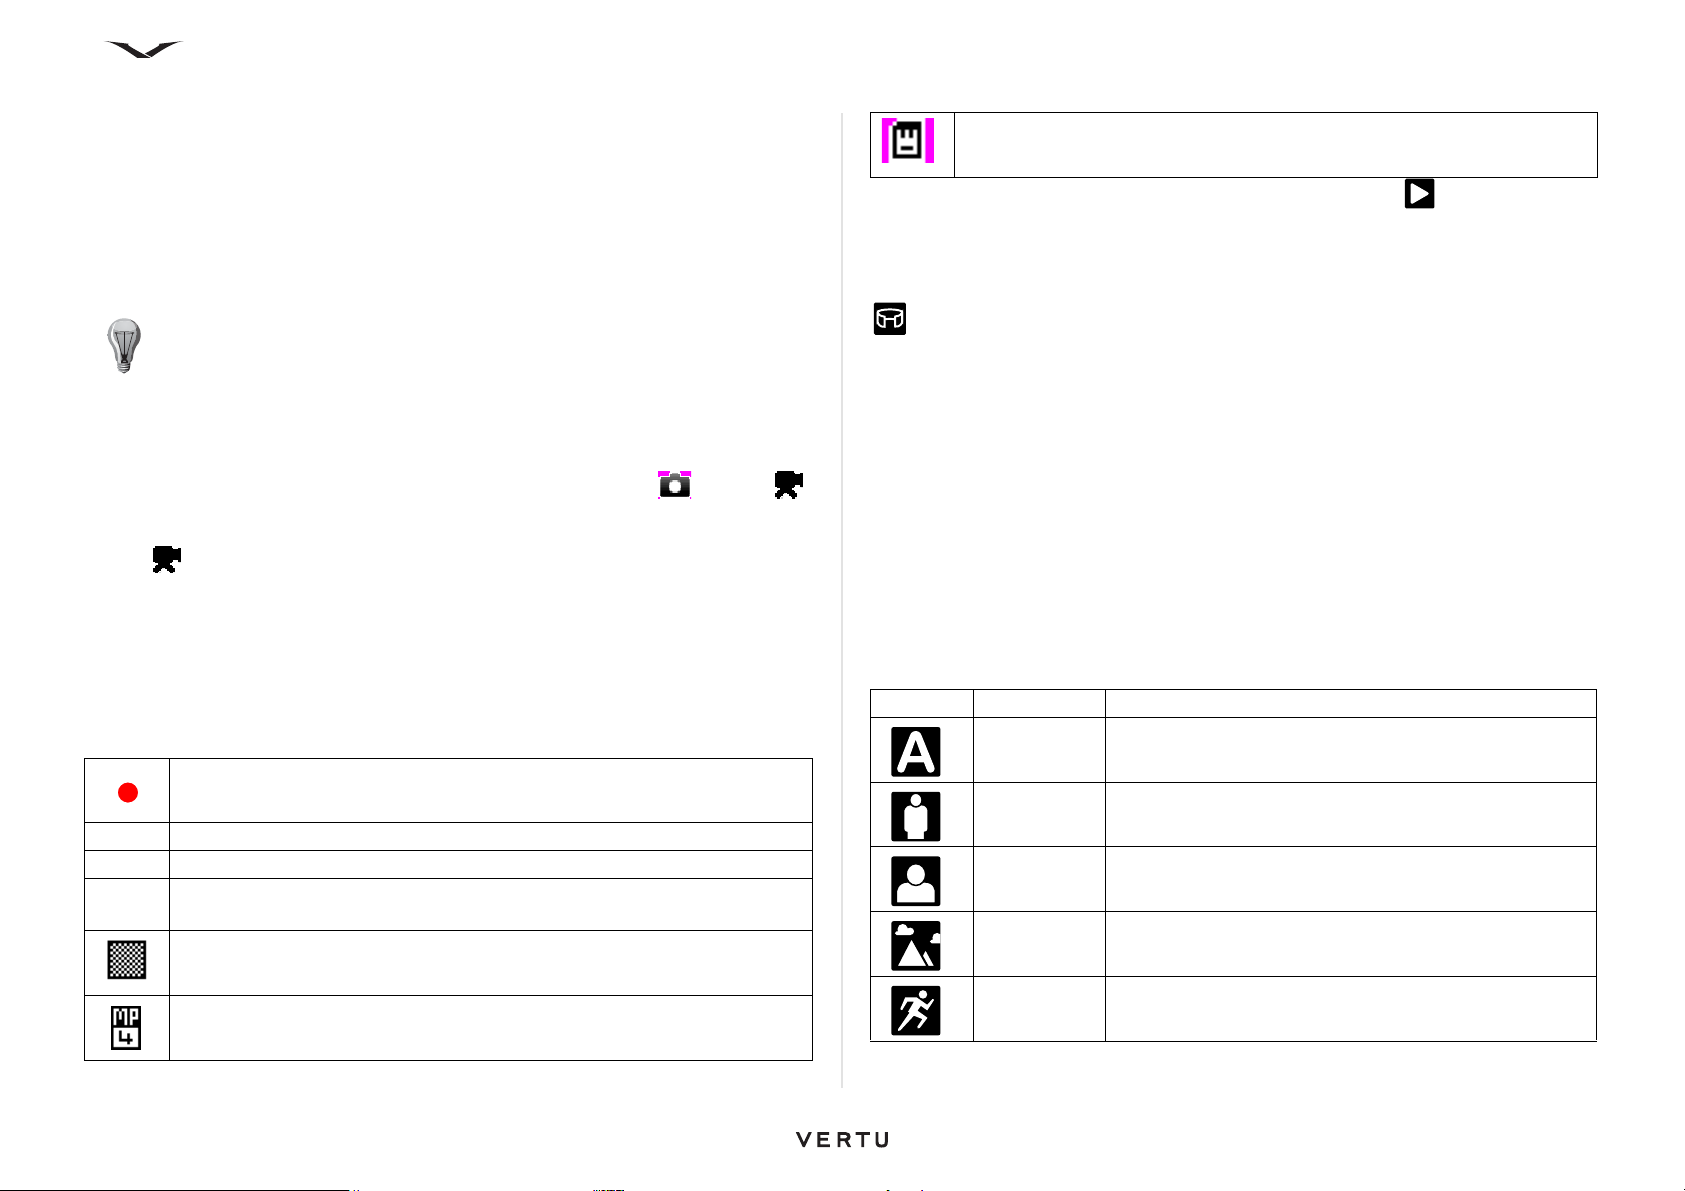
Camera
4. Aim the camera at the subject, then press the Middle Select key to capture the
image.
5. To zoom in or out before capturing an image, use the Up/Down scroll keys, or the
Volume keys. A slider displays on the right hand side showing the extent of the
zoom.
A preview of the photo is displayed. Press Back to return to the camera function, or
work with the image, as described in “Working with captured Images and
videos” on page 85.
TIP: The number of photos that you can store on your Vertu phone with the
current settings is shown at the top right of the screen when the toolbar is
displayed.
To capture a video clip
1. From the Home screen, press the Right Select key to activate the camera.
2. The icon in the top left corner shows if the camera is in image or video
mode. Press the Left Select key or Right Select key to display the tool bar. Select
the Video mode icon from the toolbar using the Up/Down scroll keys. Then select
the option with the Middle Select key.
3. Press and release the Middle Select key to start the recording. Use the Left
Select key or Right Select key that is, Stop or Pause to control the recording. If
Pause is selected, press the Right Select key to continue with the recording.
4. To zoom in or out, use the Up/Down scroll keys, or the Volume keys. A slider
displays on the right hand side showing the extent of the zoom.
The status bar at the top of the screen displays information about the recording, as
displayed in the table below.
Red dot indicates recording is in progress; flashing blue lines indicate that
recording is paused.
0.54.10 Elapsed time run for the current video clip
Graphical representation showing the elapsed time of the recording.
1.23.15 Remaining memory for video clip storage in H:MM:SS on the selected
storage medium.
Symbol displays the quality of the recording (small blocks =High; larger
blocks =Normal)
Format of the video recording, such as MP4
Icon indicates the selected storage for the video clip, such as phone or
memory card
The video clip is available for reviewing by pressing the Play icon.
Press Back to return to the camera function.
Panorama mode
Panorama mode can be selected from the Options menu or from the Panorama icon
in the Toolbar. Panorama applies only to still images, and enables you to take a
selection of images which are automatically joined together giving you a panoramic
view.
To take an image in panoramic view, press the Middle Select key to take the first
image, then move round to the next position, as shown by the red rectangle on
screen, and the phone will automatically take the next image. Move on round to
subsequent locations, and the camera will take up to six images as it captures the
panoramic view. The camera then joins the individual images into one panoramic
view. Press Cancel or Stop if you want to end the process early.
Scene modes
The options present for the scene mode will differ when in image mode and when in
video mode.
A variety of image capture modes are available, which are optimised for certain
conditions. Below is a list of options present when in image mode.
Image Mode Description
Automatic All camera settings are adjusted automatically
User
Defined
Portrait Ideal to capture portrait images
Landscape Ideal to capture outdoor images
Sport Ideal to capture fast moving images
Creates, edits and saves your personalised settings
83
Page 84
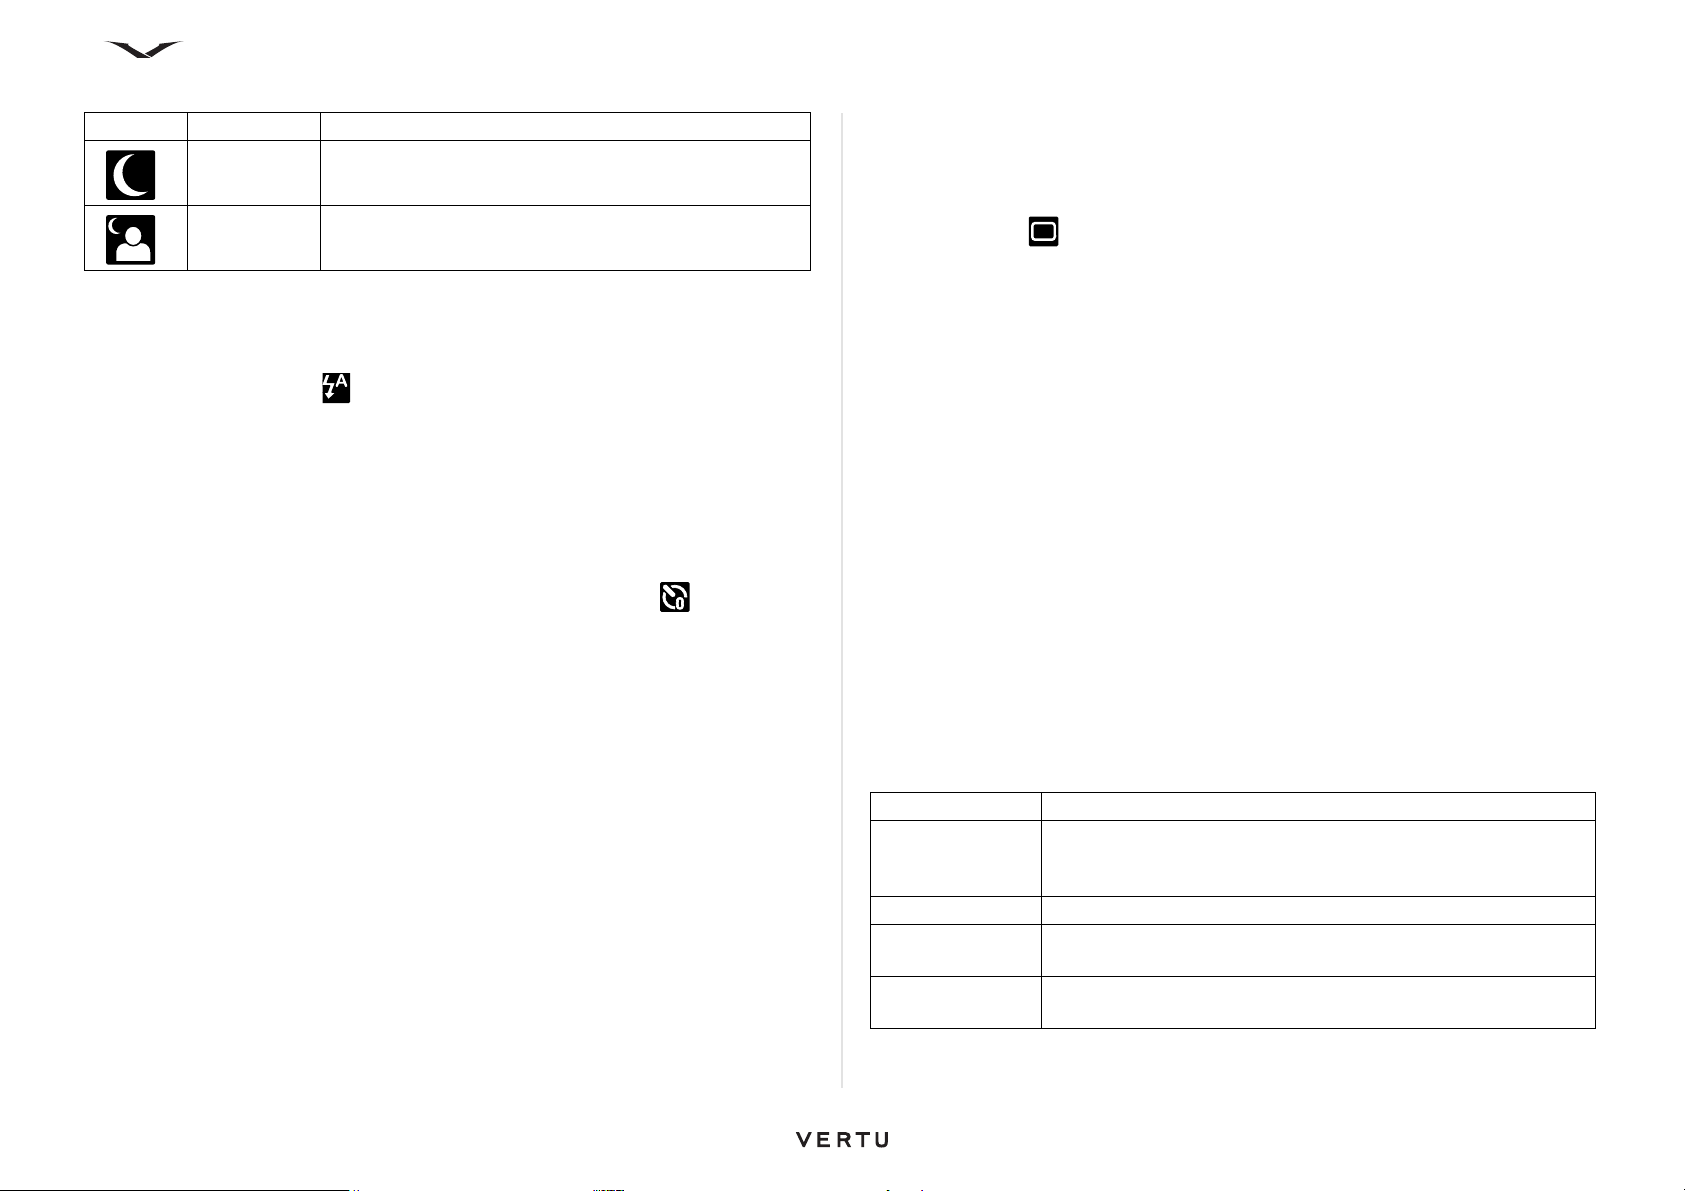
Camera
Image Mode Description
Night Ideal to capture images in low light without flash
Night
portrait
When the camera is in video mode the options present for the scene mode are
Automatic and Night.
Ideal to capture portraits in low light with flash
Flash setting
1. Highlight the flash icon from the toolbar, and then press the Middle Select
key.
2. Select the relevant option, and the appropriate icon displays in the toolbar.
Options include Automatic, On, Reduce red eye, and Off.
3. This option is retained until a change is made.
Self timer
To take a photo using the self-timer:
1. With the Camera in image mode, select the Self-timer option from the
toolbar.
2. You get a list of options to chose from: Off, 2 seconds, 10 seconds, and 20
seconds. Select the relevant option and press OK.
When you are ready to take the photo, press Activate and an audible countdown
starts and the image is captured.
Sequence mode
This enables you to capture several images in a sequence, if enough memory is
available.
Use the Left Select key or Right Select key to display the toolbar and select the
Sequence mode from the options and then press the Middle Select key.
A number of options are available, ranging from single shot to a user determined
sequence. The sequence setting captures 6 shots or if the key is held down, shots
are taken continuously until the memory available runs out.
Alternatively, select a specified time interval ranging from every 10 seconds to every
30 minutes, which will take images continuously until the memory runs out.
• Press Cancel to stop the capture process.
• The image is displayed along with a toolbar that appears on the right displaying a
list of options that can be done to work on the captured images.
• Select the Options button to delete the image, delete the sequence or go to the
Gallery where all the images are present.
• To deactivate sequence mode, select Sequence mode > Single shot in the
toolbar.
Camera setup
A number of parameters can be set for taking still images or video clips, which are
determined from the context sensitive Options > Settings. The settings vary for
images and video.
Image settings
To modify still image settings, select the image mode, select Options > Settings and
from the following:
Settings Description
Image quality Set the image quality. The better the image quality, the more
memory the image consumes. Displays the image size for each
resolution.
Add to Album Define the album to which the recorded videos are saved.
Show captured
image
Default image
name
To see the image after the capture, select Yes. To continue
capturing images immediately, select Off.
Define the default name for the captured images.
84
Page 85
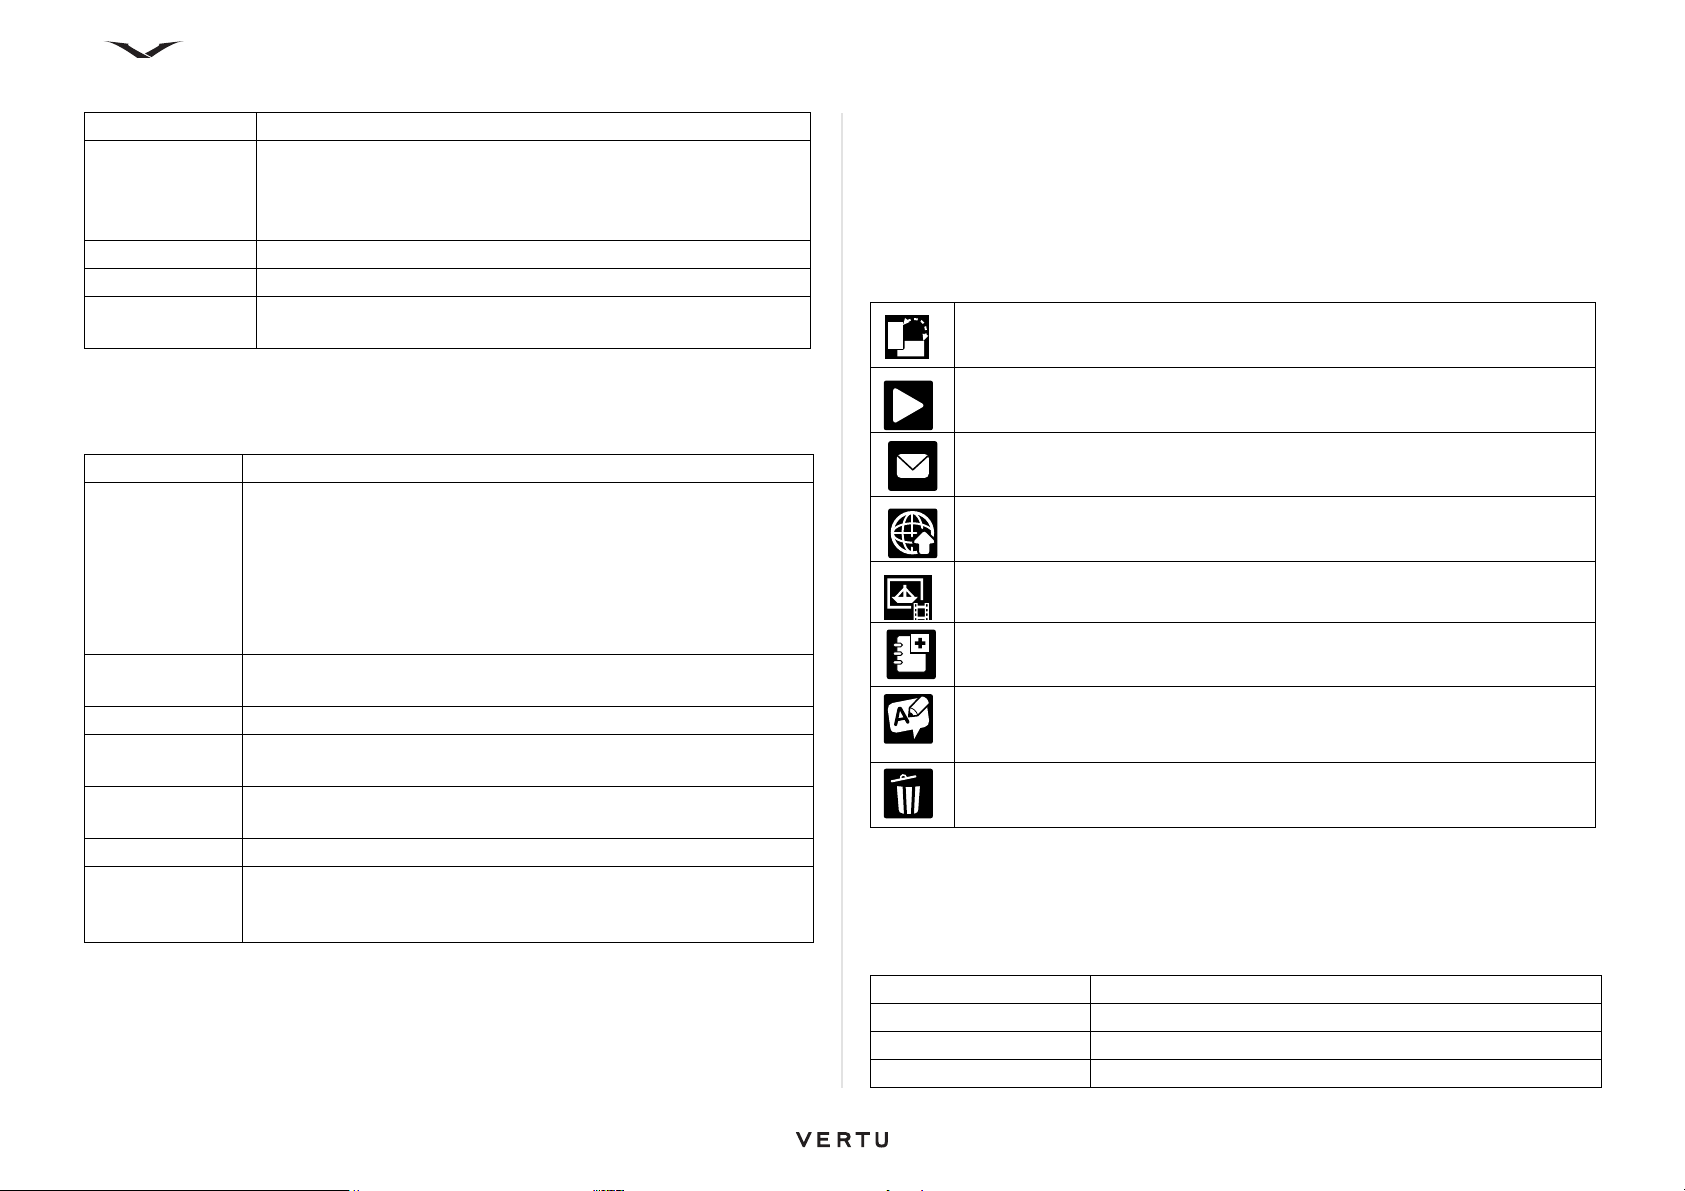
Camera
Settings Description
Extended digital
zoom
Capture tone Set the tone that sounds when you capture an image.
Memory in use Select where to store your images.
Restore camera
settings
The On (continuous) option allows the zoom increments to be
smooth and continuous between the digital and extended
digital zoom. The Off option allows a limited amount of zoom
while retaining the image resolution.
Restore the camera settings to the default values.
Video settings
To modify video image settings, with the video camera selected, select Options >
Settings and from the following:
Settings Description
Video quality Set the quality of the video clip. Options are High, Normal or
Sharing. Select Sharing, if you want to send the video clip using
a multimedia message. The clip is recorded with OCIF resolution,
in the 3GPP file format, and the size is limited to 300 KB
(approximately 20 seconds). You may not be able to send video
clips saved in the MPEG-4 file format in a multimedia message.
The remaining recording time is displayed for the selected option
Audio
recording
Add to Album Define the album to which the recorded videos are saved.
Show captured
video
Default video
name
Memory in use Select where to store your video clips.
Restore
camera
settings
Select Mute if you do not want to record sound. An icon displays
on screen when Mute is selected.
View the first frame of the recorded video clip after the recording
stops. To view the entire video clip, select Play from the toolbar.
Define the default name for recorded video clips.
Restore the camera settings to the default values.
Working with captured Images and videos
The images and videos you capture are automatically saved in Menu > Media >
Gallery > Images.
Once a image/video has been taken, the phone offers a choice of actions which are
available from the context sensitive toolbar. The options available vary for the images
and videos.
Image Description
View in portrait switches the image between Portrait and Landscape
view
Play the video clip
Send image/video via message, Bluetooth, or upload to the Outbox
Sign in for Share Online so that you can share images with your online
Go to Photos takes you to that particular image/video
Add to Album
Details provides information about the image/video clip, including
resolution, typically 2592 x 1944. Allows you to tag and add in description
regarding the image
Delete the image or video clip
There are certain options available from the options menu for the images as well as
the videos.
Pressing the Left Select key brings up a list of options available:
For images:
To printer or kiosk Select a printer or destination for the image
Set as wallpaper Sets the image as the current wallpaper
Assign to contact Links the image to a specific contact or contact group
Rename image Rename with a meaningful file name
85
Page 86
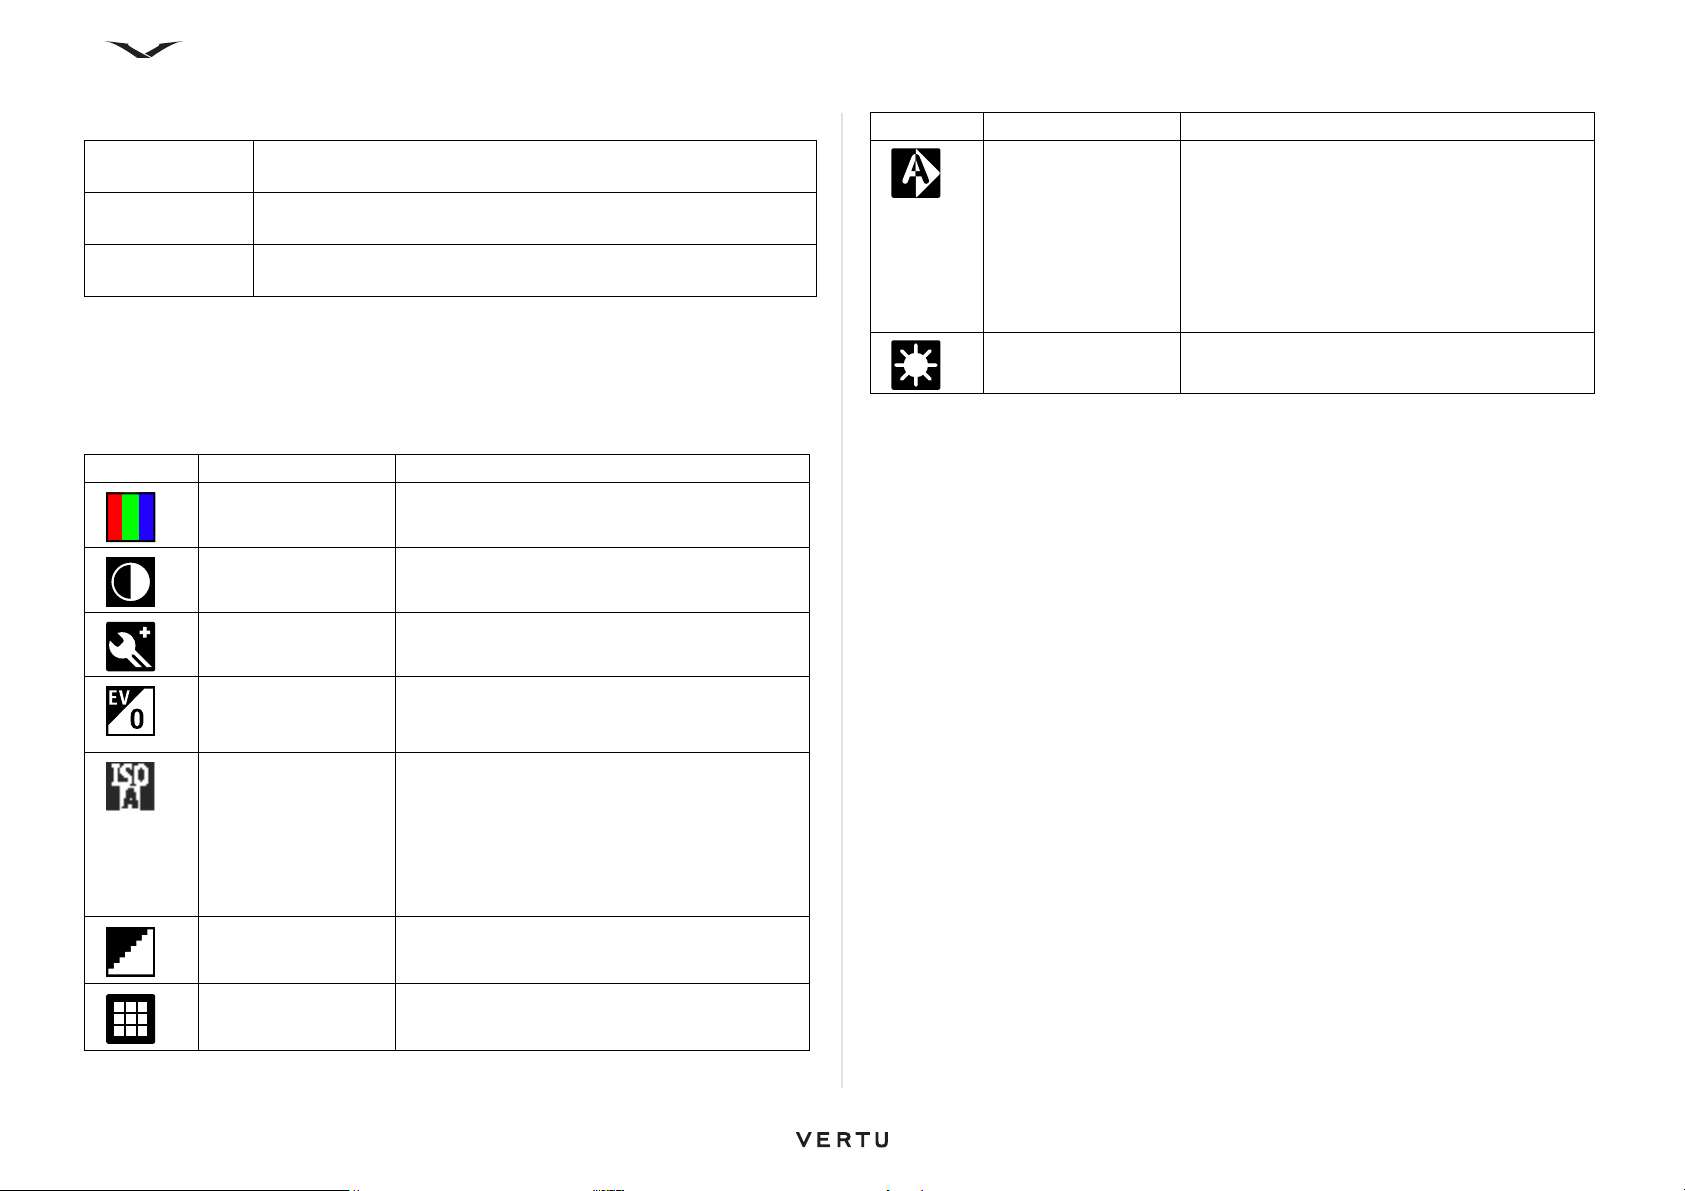
Camera
For videos:
Set as ringing
tone
Set as contact
ring. tone
Rename video
clip
Set the video clip as a ringing tone for your Profile or a selection
of your Profiles.
Set the video clip as the ringing tone for a specific contact.
Rename the video clip.
Add shortcuts
This option enables you to add items to the Camera toolbar. To access Add
shortcut, when in the image mode, select Options, then Customise toolbar and
select Add shor tcut. Options are available to add All shortcuts and also to Restore
defaults.
Image Shortcuts Description
Colour tone Changes the colour tone before capture.
Contrast Can be varied from High to Low using a slider.
A preview is shown alongside.
Edit toolbar Manages the shortcuts on the toolbar
Exposure Enables you to compensate for dark or light
conditions using a slider, ranging from two
stops over or under exposed.
Light sensitivity Sets the light for the image before capturing.
The options present are:
• Automatic
• Low
• Medium
• High
Sharpness Sets the sharpness of the image to one of the
three; Hard, Normal or Soft.
Image Shortcuts Description
Wh. balance Sets the white balance before capture from the
options;
• Automatic
• Sunny
• Cloudy
• Incandescent
• Flourescent
Brightness Sets the brightness before capturing an image.
To view images and videos
You can view the images and videos from the camera application and through the
Menu.
Through the camera:
1. Select the image/video mode in camera.
2. Select Go to Photos option from the toolbar. This opens the last captured
image.
3. Using the Right Select key, select Back, which displays other images.
4. All the captured images are displayed along with the month it was captured, the
Albums present in the gallery, any tagged images, any downloaded images and
the images being shared online.
The images/videos can be viewed from the menu as well. To do this, select Menu >
Media > Gallery.
Viewfinder Sets the grid while capturing an image.
86
Page 87
Connectivity
Connectivity
Your Vertu phone can be connected to the internet or to another compatible device
or PC in a number of ways, which are described in this section.
Data connections and access points
Your Vertu phone supports packet data connections (network service), such as
GPRS in the GSM network. When using your phone in GSM and UMTS networks,
multiple data connections can be active at the same time, and access points can
share a data connection. In the UMTS network, data connections remain active
during voice calls.
Yo u c an al so us e a WLAN data connection. Only one connection in one wireless LAN
can be active at a time, but several applications can use the same Internet access
point.
To establish a data connection, an access point is required.
You can define different kinds of access points, such as the following:
• MMS access point to send and receive multimedia messages
• Internet access point (IAP) to send and receive email and connect to the internet
Check the type of access point you need with your service provider for the service
you want to access. For availability and subscription to packet data connection
services, contact your service provider.
Network settings
Your device can automatically switch between the GSM and UMTS networks.
Select Menu > Ctrl. Panel > Settings and Phone > Network and from the following:
Network mode Select which network to use. If you select Dual mode, the
device uses the GSM or UMTS network automatically,
according to the network parameters and the roaming
agreements between the wireless service providers. For
details and roaming costs, contact your network service
provider. This option is shown only if supported by the
wireless service provider.
A roaming agreement is an agreement between two or more
service providers to enable the users of one service provider
to use the services of other service providers.
Operator
selection
Cell info display Set the device to indicate when it is used in a cellular network
Select Automatic to set the device to search for and select
any of the available networks. Select Manual to manually
select the network from a list of available networks. If the
connection to the manually selected network is lost, the
device sounds an error tone and asks you to reselect a
network. The selected network must have a roaming
agreement with your home cellular network.
based on micro cellular network (MCN) technology and to
activate cell info reception.
87
Page 88
Connectivity
Wireless LAN
Your device can detect and connect to wireless local area networks (WLAN). Using
a WLAN, you can connect your device to the internet and compatible devices that
have WLAN support.
About WLAN
To u se a w i r el e s s L AN ( WLAN) connection, it must be available in the location, and
your device must be connected to the WLAN. Some WLANs are protected, and you
need an access key from the service provider to connect to them.
NOTE: In France, you are only allowed to use WLAN indoors.
Features that use WLAN, or that are allowed to run in the background while using
other features, increase the demand on battery power and reduce the battery life.
IMPORTANT: Always enable one of the available encryption methods to
increase the security of your wireless LAN connection. Using Encryption
reduces the risk of unauthorised access to your data.
WLAN connections
To u se a w i r el e s s L AN ( WLAN) connection, you must create an Internet access
point (IAP) for WLAN. Use the access point for applications that need to connect to
the internet.
A WLAN connection is established when you create a data connection using a
WLAN internet access point. The active WLAN connection ends when you end the
data connection.
You can use WLAN during a voice call or when packet data is active. You can only be
connected to one WLAN access point device at a time, but several applications can
use the same internet access point.
When the device is in the offline profile, you can still use WLAN (if available).
Remember to comply with any applicable safety requirements when establishing and
using a WLAN connection.
TIP: To check the unique media access control (MAC) address that
identifies your device, enter *#62209526# in the home screen.
WLAN wizard
Select Menu > Ctrl. Panel > Connectivity > WLAN wiz..
The WLAN wizard helps you to connect to a wireless LAN (WLAN) and manage your
WLAN connections.
If the search finds WLANs, to create an Internet access point (IAP) for a connection
and start the web browser using this IAP, select the connection and Start web
browsing from the Options menu.
If you select a secured WLAN, you are asked to enter the relevant password. To
connect to a hidden network, you must enter the correct network name (service set
identifier, SSID).
If you already have the web browser running using the currently active WLAN
connection, to return to the web browser, select Cont. web browsing. to end the
active connection, select the connection and Disconnect WLAN.
WLAN internet access points
Select Menu > Ctrl. Panel > Connectivity > WLAN wiz. and Options.
Select from the following:
Filter WLAN
networks
Details View the details of a network shown in the list. If you select an
Filter out wireless LANs (WLAN) from the list of found
networks. The selected networks are not displayed the next
time the application searches for WLANs.
active connection, the connection details are displayed.
Operating Modes
There are two operating modes in WLAN: infrastructure and ad hoc.
The infrastructure operating mode allows two kinds of communication: wireless
devices are connected to each other through a WLAN access point device, or
wireless devices are connected to a wired LAN through a WLAN access point
device.
In the ad hoc operating mode, devices can send and receive data directly with each
other.
88
Page 89
Connectivity
WLAN settings
Select Menu > Ctrl. Panel > Settings > Connection > Wireless LAN.
Show WLAN
availability
Scan for networks To select the interval for your device to scan for available
Internet
connectivity test
To check the unique media access control (MAC) address that identifies your device,
enter *#62209526# in the home screen. The MAC address is displayed.
To have an indicator displayed when there is a Wireless LAN
(WLAN) available in your current location, select Show
WLAN availability > Yes.
WLANs, and to update the indicator, select Scan for
networks. This setting is not available unless you select
Show WLAN availability > Yes.
To set the device to test the internet capability of the selected
WLAN automatically, to ask for permission every time, or to
never perform the connectivity test, select Internet
connectivity test > Run automatically, Ask every time, or
Never run. If you select Run automatically or allow the test
to be performed when the device asks for it, and the
connectivity test is performed successfully, the access point is
saved to internet destinations.
Active data connections
Select Menu > Ctrl. Panel > Connectivity > Conn. mgr.
Select Active data connections.
In the active data connections view, you can see the open data connections:
packet data connections
Wireless LAN (WLAN) connections.
NOTE: The actual invoice for calls and services from your service provider
may vary, depending on network features, rounding off for billing, taxes,
and so forth.
• To end a connection, select Options > Disconnect.
• To close all open connections, select Options > Disconnect all.
• To view the details of a connection, select Options > Details.
Sync
Select Menu > Ctrl. Panel > Phone > Sync.
Sync. enables you to synchronise your notes, calendar entries, text and multimedia
messages, browser bookmarks, or contacts with various compatible applications on
a compatible computer or on the internet.
You may receive synchronisation settings in a special message from your service
provider.
A synchronisation profile contains the necessary settings for synchronisation.
When you open the Sync. application, the default or previously used sync profile is
displayed. To modify the profile, scroll to a sync item, and select Mark to include it in
the profile or Unmark to leave it out.
• To manage sync profiles, select Options and the desired option.
• To synchronise data, select Options > Synchronise. To cancel synchronisation
before it finishes, select Cancel.
Normally synchronisation is to your PC using Ovi Suite.
89
Page 90
Connectivity
Listed below are some typical settings for the Sync. process.
Sync profile name This is a descriptive name for the profile, such as Ovi Suite.
Server version Email protocol version that you can use with your server. You
can only synchronise email with protocol version 1.2.
Server ID Enter the server ID. This option is only available if you select
1.2 as the protocol version.
Data bearer Select the connection type used to connect to the remote
database during synchronisation (such as Bluetooth).
Host address Enter the web address of the server that contains the
database with which you want to synchronise your device.
User name Enter your user name to identify your device to the server.
Password Enter your password to identify your device to the server.
Allow sync
requests
Network user
name and
Password
Synchronisation
type
Contacts sync
settings
Calendar sync
settings
Advanced settings enable you to define the synchronisation process when
Roaming is operative.
The available options may vary.
To allow the remote server to start synchronising
automatically select Automatica ll y ac ce p t. To prevent
automatic synchronisation, select Not allowed. To have the
server contact you for permission before starting
synchronisation, select Ask first.
If present, enter your HTTPS user name and password.
Define the direction of the synchronisation process.
Edit the Contacts synchronisation settings.
Edit the Calendar synchronisation settings etc.
Bluetooth connectivity
About Bluetooth connectivity
With Bluetooth connectivity, you can make a wireless connection to other compatible
devices, such as mobile phones, computers, headsets, and car kits.
You can use the connection to send images, video clips, music and sound clips, and
notes, transfer files from your compatible PC, and print images with a compatible
printer.
Since devices with Bluetooth wireless technology communicate using radio waves,
they do not need to be in direct line-of-sight. However, they must be within 10 metres
(33 feet) of each other, although the connection may be subject to interference from
obstructions such as walls or from other electronic devices.
This device is compliant with Bluetooth Specification 2.0 + EDR supporting the
following profiles: Advanced Audio Distribution, Audio Video Remote Control, Basic
Imaging, Basic Printing, Dial-up Networking, File Transfer, Generic Access, Handsfree, Headset, Human Interface Device, Local Positioning, Object Push, Phone Book
Access, SIM Access, Serial Port, Video Distribution. To ensure inter operability
between other devices supporting Bluetooth technology, use Vertu approved
accessories for this model. Check with the manufacturers of other devices to
determine their compatibility with this device.
Features using Bluetooth technology increase the demand on battery power and
reduce the battery life.
When the device is locked, only connections to authorised devices are possible.
Viewing the synchronisation log
The synchronisation log stores statistics about the data that has been transferred
when synchronising your Vertu phone with a computer or server.
To view the synchronisation log:
From the Home screen, select Menu > Ctrl. Panel > Phone > Sync. > Options > View
log.
90
Page 91
Connectivity
Bluetooth settings
Select Menu > Ctrl. Panel > Connectivity > Bluetooth.
When you open the application for the first time, you are asked to define a name for
your device. You can change the name later.
Select from the following:
Bluetooth Tu r n Bluetooth connectivity On or Off.
My phone’s
visibility
My phone’s name Edit the name shown to other devices with Bluetooth wireless
Remote SIM Enable or disable another device, such as a compatible car kit
To allow your device to be found by other devices with
Bluetooth wireless technology, select Shown to all. To set a
time period after which the visibility is set from shown to
hidden, select Define period. To hide your device from other
devices, select Hidden.
technology.
accessory, to use the SIM card in your device to connect to
the network.
Security tips
When you are not using Bluetooth connectivity, you can control who can find your
device and connect to it as follows:
Select Menu > Ctrl. Panel > Connectivity > Bluetooth, then choose Bluetooth >
Off or select My phone’s visibility and change to Hidden.
Operating the device in Hidden mode is a safer way to avoid malicious software. Do
not accept Bluetooth connectivity from sources you do not trust. Alternatively, switch
off the Bluetooth function. This does not affect other functions of the device.
Do not pair with or accept connection requests from an unknown device. This
protects your device from harmful content.
Send data using Bluetooth connectivity
Several Bluetooth connections can be active at a time. For example, if you are
connected to a compatible headset, you can also transfer files to another compatible
device at the same time.
1. Open the application where the item you want to send is stored.
2. Scroll to an item, and select Options > Send > Via Bluetooth.
Devices using Bluetooth technology within range are displayed.
Device icons are as follows:
computer
phone
audio or video device
other device
To interrupt the search, select Cancel.
3. Select the device with which you want to connect.
4. If the other device requires pairing before data can be transmitted, a tone
sounds, and you are asked to enter a pass code. The same pass code must be
entered in both devices.
When the connection is established, Sending data is displayed.
Pair devices
To pair with compatible devices and view your paired devices, select Menu > Ctrl.
Panel > Connectivity > Bluetooth. In the main view of Bluetooth connectivity,
scroll right.
Before pairing, create your own pass code (1 to 16 digits), and agree with the owner
of the other device to use the same code. Devices that do not have a user interface
have a factory-set pass code. The pass code is used only once.
1. To pair with a device, select Options > New paired device. Devices that are
within range are displayed.
2. Select the device, and enter the pass code. The same pass code must be
entered on the other device as well.
91
Page 92
Connectivity
3. Some audio enhancements connect automatically to your device after pairing.
Otherwise, scroll to the enhancement, and select Options > Connect to audio
device.
Paired devices are indicated by in the device search.
4. To set a device as authorised or unauthorised, scroll to the device, and select
from the following options:
Set as authorised Connections between your device and the authorised device
can be made without your knowledge. No separate
acceptance or authorisation is needed. Use this status for
your own devices, such as your compatible headset or PC or
devices that belong to someone you trust. indicates
authorised devices in the paired devices view.
Set as
unauthorised
5. To cancel a pairing, scroll to the device, and select Options > Delete.
If you want to cancel all pairings, select Options> Delete all.
Connection requests from this device must be accepted
separately every time.
Receive data using Bluetooth connectivity
When you receive data through Bluetooth connectivity, a tone sounds, and you are
aske d if you wa nt to acce pt the messa ge. If you accept, the icon is displayed, and
the item is placed in the Inbox folder in Messaging. Messages received through
Bluetooth connectivity are indicated by .
TIP: If your device notifies you that the memory is full when you try to
receive data through Bluetooth connectivity, change the location where the
data is to be stored.
Remote SIM mode
Before the Remote SIM mode can be activated, the two devices must be paired and
the pairing initiated from the other device. When pairing, use a 16-digit pass code,
and set the other device as authorised.
To use the Remote SIM mode with a compatible car kit enhancement, activate
Bluetooth connectivity, and enable the use of the remote SIM mode with your device.
Activate the Remote SIM mode from the other device.
When the Remote SIM mode is on in your device, Remote SIM mode is displayed
in the standby mode. The connection to the wireless network is turned off, as
indicated by in the signal strength indicator area, and you cannot use SIM card
services or features requiring cellular network coverage.
Whe n the w irel ess d evice is in the Remote SIM mode, you can only use a compatible
connected enhancement, such as a car kit, to make or receive calls. Your wireless
device will not make any calls while in this mode, except to the emergency numbers
programmed into your device. To make calls from your device, you must leave the
remote SIM mode. If the device is locked, enter the lock code to unlock it.
To leave the remote SIM mode, press the Power key, and select Exit remote SIM
mode.
PC connections
You can use your mobile device with a variety of compatible PC connectivity and data
communications applications. With Ovi Suite you can, for example, transfer files and
images between your device and a compatible computer.
NOTE: To avoid corrupting data, do not disconnect the USB data cable
during data transfer.
Block devices
Select Menu > Ctrl. Panel > Connectivity > Bluetooth.
1. To block a device from establishing a Bluetooth connection to your device, open
the Paired devices tab, as described for “Pair devices” on page 91.
2. Scroll to a device you want to block, and select Options > Block.
3. To unblock a device, open the Blocked devices tab, scroll to a device, and select
Options > Delete.
4. To unblock all blocked devices, select Options > Delete all.
If you reject a pairing request from another device, you are asked if you want to block
all future connection requests from this device. If you accept the query, the remote
device is added to the list of blocked devices.
To transfer data between your device and a PC
1. Insert a memory card in your device, and connect the device to a compatible PC
with the data cable.
2. When the device asks which mode to use, select Mass storage. In this mode,
you can see your device as a removable hard drive in your computer.
3. End the connection from the computer (from the Unplug or Eject Hardware
wizard in Microsoft Windows, for example) to avoid damaging the memory card
92
Page 93
Connectivity
USB data connection options
Ovi Suite To use Ovi Suite with your device, install Ovi Suite on your
PC, connect the data cable, and select Ovi Suite.
Mass storage To view your phone on a computer as a mass memory device
where you can transfer any data files.
Image transfer To connect your phone to a compatible printer.
Media transfer To synchronise music with Windows Media Player; a
compatible memory card must be inserted in the phone.
Connect PC to
web
• To synchronise the music in your device with Music Player, install the Music
Player software on your PC, connect the data cable, and select Media transfer.
• To change the USB mode you normally use with the data cable, select Menu >
Ctrl. Panel > Connectivity > USB and USB connection mode, and the desired
option.
• To set the device to ask for the mode each time you connect the data cable to the
device, select Menu > Ctrl. Panel > Connectivity > USB and Ask on
connection > Yes.
Enables your phone to provide your computer with access to
the internet.
Ovi Suite
Ovi Suite is a set of applications that you can install to a compatible PC. Ovi Suite
groups all available applications in a launcher window from which you can open the
applications. Ovi Suite is included on the SD card supplied with your Vertu phone.
Yo u ca n u se Ovi Suite to synchronise contacts, calendar, and to-do and other notes
between your device and a compatible PC application. You can also use Ovi Suite to
transfer bookmarks between your device and compatible browsers, and transfer
images and video clips between your device and compatible PCs.
Pay attention to synchronisation settings. Data deletion as part of normal
synchronisation process is determined by the settings selected.
To u se Ovi Suite, you need a PC that runs Microsoft Windows XP (SP2 or newer) or
Windows Vista (SP1 or newer), and is compatible with a USB data cable or with
Bluetooth connectivity.
Ovi Suite is compatible with PCs only.
For more information about Ovi Suite, see the support area at www.ovi.com.
Install Ovi Suite
The latest version of Ovi Suite can be downloaded and installed on your PC from
www.ovi.com.
NOTE: When you are working on your phone with the USB cable
connected in Mass storage mode, you will find that the E: and F: drives are
not available for storing data or for any phone use. Once you disconnect the
USB cable, these drives become available again.
iSync
The Mac’s iSync application lets you automatically transfer information from iCal
calendars and Address Book contacts stored on a Mac to your mobile phone. Your
mobile phone can be synchronised using iSync to display your latest events, and your
contact list can always be up-to-date with your Mac.
Before synchronising your Mac computer and Vertu phone, you need to install Vertu
iSync plug-ins. This can be downloaded from the Vertu technical support site. For
more information please visit the technical support page of the Vertu web site, select
“Software for MAC and PC”, then choose Constellation Quest and download iSync
plugins to your MAC.
Net Settings
Select Menu > Ctrl. Panel > Net settings.
Net settings enables you to set up internet call services.
To add a new internet call service, select Download.
To view and edit the settings for a specific service, select that service.
93
Page 94
Working with the Internet
Working with the Internet
Internet
With the Web browser, you can view hypertext markup language (HTML) web pages
on the internet as originally designed. You can also browse web pages that are
designed specifically for mobile devices, and use extensible hypertext markup
language (XHTML), or the wireless markup language (WML).
To browse the web, you need to have an internet access point configured in your
phone. Using the web browser requires network support.
Browsing the web
To open the web Browser:
1. Select Menu > Web.
Or press and hold 0 in the Home screen.
2. By default, the web page displays in bookmarks view, displaying a number of
pre-configured bookmarks.
3. Some web pages may contain material, such as video clips, that requires a large
amount of memory to view. If your device runs out of memory while loading such
a web page, insert a memory card. Otherwise, the video clips are not displayed.
TIP: To send the browser to the background without exiting the application
or closing the connection, press the End key once.
Network destinations
This feature allows your Constellation Quest to automatically select your preferred
wireless access point for Internet use. If your phone can find a wireless LAN that you
have previously configured for use by the phone and have set as the highest priority,
it will automatically select this access point on subsequent occasion. This means that
you will automatically use your preferred Internet access when it is available,
potentially ensuring you are using the highest speed data connectivity and/or the
cheapest rate.
In order to check the way the connection is made to the internet, refer to Menu > Ctrl.
Panel > Settings > Connection > Destinations > Internet.
Review the current options, and select Options > Organise > Change priority to
change the priority of the connection method if required.
To add an alternative way of connecting to the internet, within Network destinations
select Internet > Options > New access point.
The table below lists commonly used commands for navigating the web.
Go to a web page In the bookmarks view, select a bookmark, or start entering a
web address (the field opens automatically), and select
Go to.
Open a new web
page
Open a Web feed Options > Go to > Web feeds.
Access History Options > Go to > History.
Bookmark pages This adds a new bookmark to the web page, Options >
Bookmark manager To manage your bookmarked pages select Options and the
Clear privacy data Clears saved data from the Cache, Cookies, History as well
Set up the
Homepage
Disable graphics Disable graphics to save memory and speed up
View snapshots of
visited web pages
View the shortcut
keys
Refresh the content
of the web page
Options > Go to > New web page .
Bookmark options > Add bookmark.
relevant option.
as password data. Select Options > Clear privacy dat a and
the relevant option. Also available from Options > Settings >
Privacy.
Options > Settings > General >Homepage.
downloading. Select Options > Settings > Page > Load
content > Text only.
Select Back. A list of pages you have visited during the
current browsing session opens. This option is available if
History list is activated. See Settings > General > History
list.
Options > Keypad shortcuts. To edit the shortcut keys,
select Edit.
Options >
Web page options > Re
load.
94
Page 95
Working with the Internet
Block or allow the
automatic opening
of multiple windows
Zoom In Press * (star key).
Zoom Out Press # (hash key).
Close Web Options > Exit.
The options present within a Web browser:
Options > Web page options > Block pop-ups or Allow
pop-ups.
Browser toolbar
The browser toolbar helps you select frequently used browser functions.
Open toolbar Press, 1 or press the Middle Select key on a blank area
of the web page.
Close toolbar Press Hide. Also closes automatically after a
subsequent action.
Move within the toolbar Scroll left or right.
To select a function from the toolbar:
Options > Settings > Toolbar shortcuts.
1. Press the scroll key.
2. From the toolbar, select one of the following actions, depending on what you
want to do:
Navigate pages
When browsing a large web page, you can use Mini map or Page overview to view
the page quickly.
Using the Mini map:
1. Select Menu > Web.
2. Activate the Mini map. Select Options > Settings > General > Mini map > On.
When you scroll through a large web page, the Mini map opens and shows an
overview of the page.
3. Move around the Mini map, scroll left, right, up, or down
4. When you find the desired location, stop scrolling. The Mini map disappears and
leaves you at the selected location.
To locate information on a web page using Page overview.
1. Press the number 8 key. A miniature image of the current web page opens.
2. Move on the miniature image by scrolling up, down, left, or right.
3. When you find a section you want to view, select OK to go to that section on the
web page.
Go to web
address
Recently visited
pages
Bookmarks Open the bookmarks view.
Full screen View the web page in full screen.
Overview Display an overview of the current web page.
Search by
keyword
Settings Modify the web browser settings.
Enter a web address.
View a list of the web addresses you visit frequently.
Search the current web page.
95
Page 96
Working with the Internet
Media Feeds
Media Feeds enable you to easily follow news headlines and your favourite news
feed.
Media Feeds, also known as web feeds or RSS feeds, are a collection of news items
found on web pages. For example, they are used to share the latest news headlines.
Media Feeds are commonly found on news sites, blog, and wiki pages.
The browser application automatically detects if a web page contains Media Feeds.
To subscribe to an available feed
1. Highlight the Media Feed icon on the web page, and press the Middle Select
key.
2. The Subscribe to feed?message displays. Select Yes.
3. The web page is now added to your list of Media Feeds.
4. The feed will now be included in the list of feeds that displays on the Home
screen of your phone.
The table below lists some common commands for use with Media Feeds.
Subscribe to an available
Media Feed on the current
page
Update a Media Feed In the Web feeds view, select a feed and Options >
Set automatic update for all
Media Feeds
WARNING: When using Web feeds, it is strongly recommended that
Roaming is switched off. Charges for these feeds may be imposed by the
network operator. Such changes can vary considerably depending on the
operator.
In the Media Feeds panel, select Options > Bookmarks > Web fe eds >
Update when roaming.
Highlight the link for the feed, select Options >
Subscribe to web feeds.
Web feed options > Refresh.
In the Web feeds view, select Options > Edit > Edit
and select a time interval. This option is not available
if one or more feeds are marked.
Accessing Media Feeds
The Media Feeds panel displays media feeds including any feeds that have been
added manually within the Latest headlines panel.
1. To access the list of Media Feeds, from the Home screen, highlight the Media
Feeds area and press the Middle Select key, the Latest headlines panel then
displays.
2. Select Options > Feed list, the Media Feeds panel then displays.
Web Feeds
1. From the browser home page which by default is Bookmarks, select Options >
Go to > Web feeds and the Web feeds page displays.
2. To add a new feed, select Options > Web feed options > New feed.
3. A new New feed panel displays for you to complete. Add the title, URL and then
decide how often you want the feed to be updated.
4. Web feeds can be exported or imported.
Accessing Bookmarks
You can store your favourite web pages in Bookmarks for instant access.
To access your bookmarks:
1. If you have a page other than Bookmarks as your homepage, select Options >
Go to > Bookmarks.
2. Select a web address from the list or from the collection of bookmarks in the
Recently visited pages folder.
Useful commands related to Bookmarks are shown below.
Save the current web page as a
bookmark
Edit or delete bookmarks With bookmarks displayed, select Options >
Send or add a bookmark, or set
a bookmarked web page as the
homepage
While browsing, select Options > Web page
options > Save as bookmark.
Bookmark manager and the relevant option.
Select Options > Bookmark options and
choose the relevant option.
96
Page 97

Working with the Internet
Content search
With keyword search, you can quickly find the information you are looking for on a
web page.
• To search for text within the current web page, select Options > Find keyword.
• To go to the previous or next match, scroll up or down.
TIP: To search for text within the current web page, press 2.
End the connection
To end the connection and close the Browser application, select Options > Exit.
Privacy data
All Privacy data can be deleted with the All command, or specific items can be
deleted separately, as described below.
To delete All Privacy data, select Options > Clear privacy data > All.
Empty the cache
Emptying the cache memory helps you keep your data secure. The information or
services you have accessed are stored in the cache memory of the device. If you
have accessed or tried to access confidential information requiring passwords,
empty the cache after each browsing session.
With the web browser open, select Options > Clear privacy data > Cache.
Delete Cookies
Cookies contain information collected about your visits to web pages.
To delete cookies, select Options > Clear privacy data > Cookies.
Connection security
With a secure connection and security certificates, you can safely browse the
internet.
If the security indicator (ICON) is displayed during a connection, the data
transmission between the device and the internet gateway or server is encrypted.
The security icon does not indicate that the data transmission between the gateway
and the content server (where the data is stored) is secure. The service provider
secures the data transmission between the gateway and the content server.
Security certificates may be required for some services, such as banking services.
You are notified if the identity of the server is not authentic or if you do not have the
correct security certificate in your device. For more information, contact your service
provider.
IMPORTANT: Even if the use of certificates makes the risks involved in
remote connections and software installation considerably smaller, they
must be used correctly in order to benefit from increased security. The
existence of a certificate does not offer any protection by itself; the
certificate manager must contain correct, authentic, or trusted certificates
for increased security to be available. Certificates have a restricted lifetime.
If Expired certificate or Certificate not valid yet is shown, even if the
certificate should be valid, check that the current date and time in your
device are correct.
Before changing any certificate settings, you must make sure that you really
trust the owner of the certificate and that the certificate really belongs to the
listed owner.
Delete History
History contain information about web pages you have visited.
To delete history, select Options > Clear privacy data > History.
Form/password data
Form/password data contains information on the password data, or data you enter on
different forms on a web page when in use.
To d e l e t e Form/password data, select Options > Clear privacy data > Form/
password data.
97
Page 98
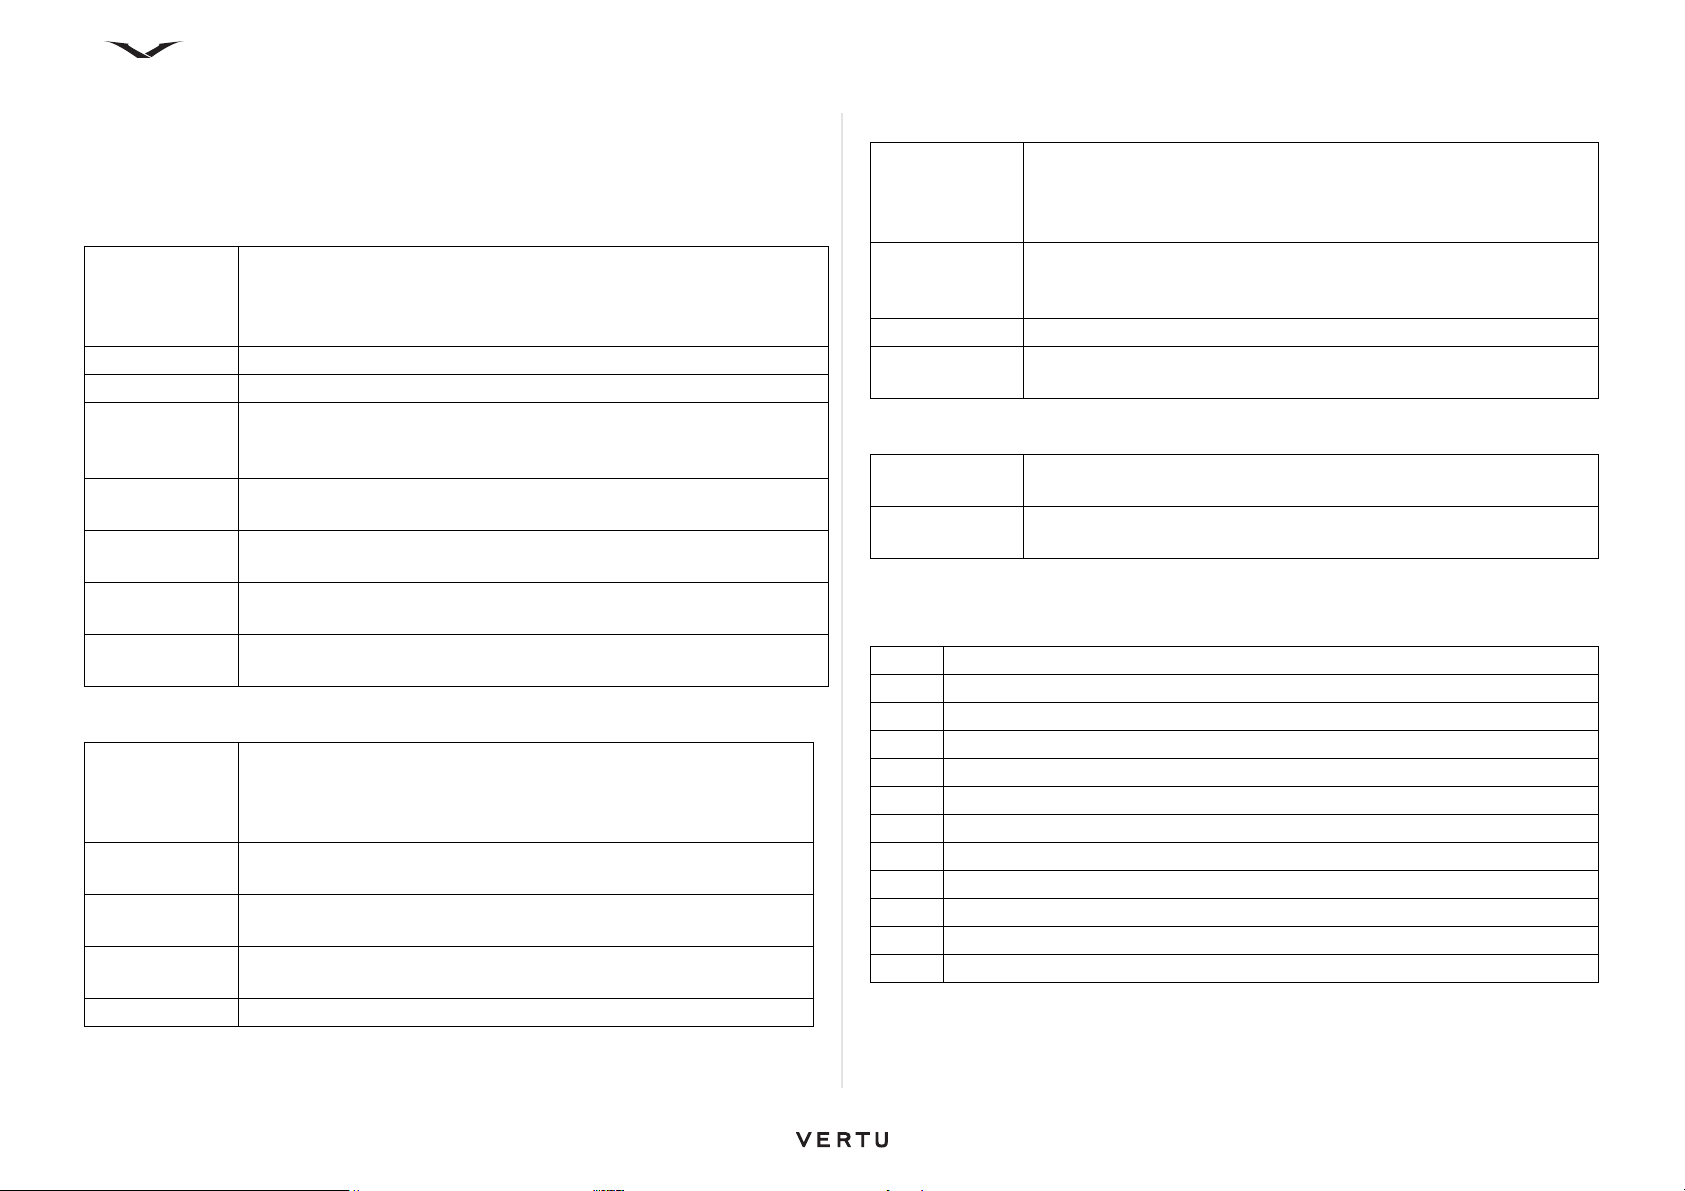
Working with the Internet
Web settings
In order to access the Web settings, select Menu > Web and Options > Settings,
then select the appropriate function from the following:
General settings
Access point Change the default access point; options include Internet, WAP
se rvices or Al ways as k. Some o r all a ccess poin ts m ay b e pr ese t for
your device by your service provider. You may not be able to
change, create, edit, or remove them.
Homepage Define the homepage.
Mini map Tu r n Mini map on or off. Mini map helps with web page navigation.
History list Select On while browsing, and a list of the pages you have visited
can be seen during the current session. Select Back to view the
pages.
Web address
suffix
Security
warnings
Java/ECMA
script
Java/ECMA
script errors
Page settings
Load content Select whether you want to load images and other objects while
Default
encoding
Block pop-ups Allow or block automatic opening of different pop-ups while
Automatic
reload
Font size Define the font size that is used for web pages.
Enables you to define the type of web address that are valid, such
as .com, .net and .org.
Hide or show security notifications.
Enable or disable the use of scripts.
Select whether you want to receive log and pop-up notes, create a
log file, show pop-up notes or none at all.
browsing. If you select Text only, and wish to load images or
objects later during browsing, select Options > Display options
> Load images.
If text characters are not shown correctly, you can select another
encoding according to the language for the current page.
browsing.
Select whether you want the web pages to be refreshed
automatically while browsing.
Privacy settings
Recently
visited pages
Form data
saving
Cookies Enable or disable the receiving and sending of Cookies.
Serial no.
sending
Enable or disable automatic bookmark collecting. If you want to
continue saving the addresses of the visited web pages into the
Recently visited pages folder, but hide the folder from the
bookmarks view, select Hide folder.
Select whether you want the password data or data you enter on
different forms on a web page to be saved and used the next time
you open the page.
Options are On or Off.
Web feed settings
Acc. point for
auto-update
Update when
roaming
Note that options available may vary.
Select the desired access point for updating. This option is only
available when Automatic updates is active.
Select whether you want the web feeds to be updated
automatically when roaming.
Keypad shortcuts
0Go to Homepage
1 Opens toolbar
2Search by keyword
3 Back one page
4 Save as bookmark
5 Keyboard shortcuts
6 Reload
7 Full screen
8 Page overview
9 Go to web address
* Star Zooms In
# Hash Zooms Out
98
Page 99
Office Tools
Office Tools
Office Tools
Your Vertu phone contains a suite of useful tools within the Office folder. Office
includes two Note generators, calculator, conversion facility, file manager, ZIP
manager, Dictionary, Intranet and Quickoffice for viewing Microsoft Office files.
Active notes
Active notes allows you to create, edit, and view different kinds of notes, for example,
meeting memos, hobby notes, or shopping lists. You can insert images, videos, and
sound in the notes. You can link notes to other applications, such as Contacts, and
send notes to others.
Create and edit notes
Select Menu > Office > Active notes. To add a new note, select Options > New note.
Or, from Active notes, select the new note by pressing the Middle Select key. To
create a note, start writing.
To edit a note, select the note and Options > Editing options.
To add boldface, italics, or underlining to your text or change the font colour, press
and hold the Shift key, and scroll to select the text. Then select Options > Text and
the relevant option. There are a list of other options that appear. They are:
• Insert object — Inserts images, sound or video clips, business cards, web
bookmarks, and files.
• Insert new — Adds new items to the note, like images, sound and video clips.
• Input options — You can set the way the note is written. Can turn on the
prediction, change the settings of word auto-completion, text correction, set the
writing language.
Other functions are available within Active notes, you can organise your notes by
creating folders for different notes. You can change the settings of the notes, the way
the notes appear, storage place of the notes on the phone. You can also move,
rename and delete notes.
Settings for Active notes
Select Menu > Office > Active notes and Options > Settings.
• To select where to save notes, select Memory in use and the desired memory.
• To change the layout of active notes, or to view the notes as a list, select Change
view > Grid or List.
• To see a note in the background when making or receiving phone calls, select
Show note during call > Yes.
TIP: If you temporarily do not want to see notes during phone calls, select
Show note during call > No. This way you do not have to remove the links
between notes and contact cards.
Calculator
Select Menu > Office > Calculator.
This calculator has limited accuracy and is designed for simple calculations.
To make a calculation, enter the first number of the calculation. Select a function such
as add or subtract from the function map using the scroll bars and the Middle Select
key. Enter the second number and then select =. The calculator performs operations
in the order they are entered. The result of the calculation remains in the editor field
and can be used as the first number of a new calculation.
The device saves the result of the last calculation in Last result. Exiting the Calculator
application or switching off the device does not clear the memory. To recall the last
saved result the next time you open the Calculator application, select Options > Last
result.
To save the numbers or results of a calculation, select Options > Memory > Save.
To retrieve the results of a calculation from the memory and use them in a calculation,
select Options > Memory > Recall.
99
Page 100

Office Tools
File manager
Select Menu > Office > File mgr..
With File manager, you can browse, manage, and open files from various locations.
It can be from the phone memory, the mass memory or the memory card.
The available options may vary.
To map or delete drives, or to define settings for a compatible remote drive connected
to your device, select Options > Remote drives.
Find and organise files
Select Menu > Office > File mgr..
• To find a file, select Options > Find, select the location from where you want to
search. Enter a search term that matches the file name.
• To move and copy files and folders, or to create new folders, select Options >
Organise
•To map a Remote drives > Map new drive.
Manage the phone memory
All options are available only if a compatible memory card is inserted in the device.
Select Menu > Office > File mgr..
The amount of memory available within each of the three memory options within your
phone is displayed, which are:
C: Phone Memory
E: Mass Memory
F: Removable Memory card
Select Options and from the following:
• Back up phone memory — Creates a backup on memory card. Existing backup
will be overwritten.
• Restore from mem. card — Restores the backup data from memory cards to
phone memory.
Other memory card options include the following:
• Memory card options — Name or format a memory card.
• Memory card password — Set a password to protect a memory card.
Yo u ca n f or ma t t he Mass memory if required, although all data is deleted during the
process. Open the Mass memory, and select Options > Format mass memory.
and select the appropriate option.
Quickoffice
Select Menu > Office > Quickoffice.
Quickoffice consists of Quickword for viewing Microsoft Word documents,
Quicksheet for viewing Microsoft Excel worksheets, Quickpoint for Microsoft
PowerPoint presentations, and Quickmanager. You can view Microsoft Office 2000,
XP, 2003, and 2007 documents (DOC, XLS, and PPT file formats) with Quickoffice
and also edit files.
Not all file formats or features are supported.
Converter
Using Converter,you can convert units of measurement for length, area, volume,
energy, pressure, time, temperature, velocity, weights and currency.
Convert measurements
Select Menu > Office > Converter.
1. Scroll to the Type field, and use the Middle Select key to open a list of measures.
Select the measurement type to use (other than currency) and OK.
2. Scroll to the first Unit field, and use the Middle Select key to open the unit of
measurement. Select the unit from which to convert and OK. Scroll to the next
unit field, and select the unit to which to convert.
3. Scroll to the first Amount field, and enter the value to convert. The other Amount
field changes automatically to show the converted value.
Set base currency and exchange rate
Select Menu > Office > Converter.
When you change base currency, you must enter new exchange rates because all
previously set exchange rates are cleared.
Before you can make currency conversions, you must choose a base currency and
add exchange rates. The rate of the base currency is always 1. The base currency
determines the conversion rates of the other currencies.
100
 Loading...