

Page 1

Quick Guide
Page 2

Contents
Safety ............................................................................... 3
Warranties........................................................................ 9
Using your Vertu phone ............................................... 13
Vertu package contents.......................................................................... 13
Networks ................................................................................................ 13
Conventions used in this guide .............................................................. 13
Glossary ................................................................................................. 14
Vertu phone layout (front)....................................................................... 15
Vertu phone layout (back) ...................................................................... 15
Inserting the battery and SIM card ......................................................... 16
Display icons and indicators................................................................... 17
Switching your Vertu phone on and off .................................................. 18
The [Joystick] key................................................................................... 18
[Selection] keys ...................................................................................... 18
Setting the time and date ....................................................................... 18
Making a call .......................................................................................... 18
Making an international call.................................................................... 19
Answering a call ..................................................................................... 20
Sending an E-mail .................................................................................. 21
Making an emergency call...................................................................... 21
Protecting your Vertu phone................................................................... 22
The main menu ...................................................................................... 22
Personalising your Vertu phone ............................................................. 25
Quick access to useful features.............................................................. 29
Camera................................................................................................... 30
Music player ........................................................................................... 31
Memory................................................................................................... 31
Stopwatch............................................................................................... 31
Network mode ........................................................................................ 32
Travel application
Accessories ............................................................................................ 34
CD-ROM................................................................................................. 37
Care and maintenance ........................................................................... 38
Specifications ......................................................................................... 39
............................................................................... 33
2
Page 3
Safety
SOS
Read the following simple guidelines. Not following them may be
dangerous or illegal.
When using the features in this device, ob
customs, privacy and legitimate rights of others, including copyrights.
SWITCH ON SAFELY
Do not switch the phone on when wireless phone use is prohibited or
when it may cause interference or danger.
ROAD SAFETY COMES FIRST
Obey all local laws. Always keep your hand s free to operate the vehicle
while driving. Your first consideration while driving should be road safety.
INTERFERENCE
All wireless phones may be susceptible to interference which could affect
performance.
SWITCH OFF IN HOSPITALS
Follow any restrictions. Switch phone off near medical equipment.
SWITCH OFF IN AIRCRAFT
Follow any restrictions. Wireless devices can cause interference in
aircraft.
SWITCH OFF WHEN REFUELLING
Do not use the phone at a refuelling point. Do not use near fuel or chemicals.
SWITCH OFF NEAR BLASTING
Follow any restrictions. Do not use the phone where blasting is in progress.
USE SENSIBLY
Use only in normal position. Do not touch the antenna unnecessarily.
QUALIFIED SERVICE
Only qualified personnel may repair this phone.
ACCESSORIES AND BATTERIES
Use only approved accessories and batteries. Do not connect
incompatible products.
ey all laws and respect local
WATER RESISTANCE
Your Vertu phone is not water resistant. Keep it dry.
BACK-UP COPIES
Remember to make back-up copies or keep a written record of any
important information stored in your phone.
CONNECTING TO OTHER DEVICES
When connecting to any other device, read its user guide for detailed
safety instructions. Do not connect incompatible devices.
EMERGENCY CALLS
Ensure the phone is switched on and in service. Press the END key as
many times as needed to clear the display and return to the stand-by
display. Enter the emergency number, then press the SEND key. Give
your location. Do not end the call until given permission to do so.
Traffic safety
Do not use a hand-held telephone while driving a vehicle. If using a hand-
held phone, park the vehicle before using the phone in any way. Do not
place the phone on the passenger seat or where it can break loose in a
collision or sudden stop.
Operating environment
In certain countries and regions, services may not be available with certain
handset models. Please contact any Vertu store, authorised Vertu dealer
or Vertu Customer Service at 03-6738-3955 (or +81-3-6738-3955 from
countries outside Japan) for further information.
Remember to follow any special regulations in force in
switch off your phone whenever it is forbidden to use it, or when it may
cause interference or danger. As with other mobile radio transmitting
equipment, users are advised that for the satisfactory operation of the
equipment and for the safety of personnel, it is recommended that the
equipment should only be used in the normal operating position.
This phone meets RF exposure guidelines when used either in the normal
use position
against the ear or when positioned at least 2.2 cm (7/8 inch)
any area and always
Safety 3
Page 4

away from the body. When a carry case, belt clip or holder is used for body-
worn operation, it should not contain metal and should position the phone
the above-stated distance away from your body.
Use only the supplied or approved pa
rts. Unauthorised antennas,
modifications or attachments could damage the phone and may violate
regulations governing radio devices.
Electronic devices
Most modern electronic equipment is shielded from radio frequency (RF)
signals. However, certain electronic equipment may not be shielded
against the RF signals from your wireless phone.
> Hold the wireless device to the ear opposite the medical device to minimise the
potential for interference;
> Turn the wireless device off immediately if there is any reason to suspect that
interference is taking place;
> Read and follow the directions from the manufacturer of their implanted medical
device.
If you have any questions about using your wireless device with an
implanted medical device, consult your health care provider.
Hearing aids
Some wireless phones may interfere with some hearing aids. In the event
of such interference, consult your service provider.
Medical devices
Operation of any radio transmitting equipment, including wireless phones,
may interfere with the functionality of inadequately protected medical
devices. Consult a physician or the manufacturer of the medical device to
determine if they are adequately shielded from external RF energy or if you
have any questions. Switch off your device in health care facilities when
any regulations posted in these areas instruct you to do so. Hospitals or
health care facilities may be using equipment that could be sensitive to
external RF energy.
Implanted medical devices
Manufacturers of medical devices recommend that a minimum separation
of 15.3 centimetres (6 inches) should be maintained between a wireless
device and an implanted medical device, such as a pacemaker or
implanted cardioverter defibrillator, to avoid potential interference with the
medical device.
Persons who have such devices should:
> Always keep the wireless device more than 15.3 centimetres (6 inches) from the
medical device when the wireless device is turned on;
> Not carry the wireless device in a breast pocket;
4 Safety
Other medical devices
Operation of any radio transmitting equipment, including wireless phones,
may interfere with the functionality of inadequately protected medical
devices.
Switch off your phone in health care facilities when any
regulations posted
in these areas instruct you to do so.
Vehicles
RF signals may affect improperly installed or inadequately shielded
electronic systems in motor vehicles (e.g. electronic fuel injection systems,
electronic anti-skid (anti-lock) braking systems, electronic speed control
systems, air bag systems).
Check with the manufacturer or its repr
You should also consult the manufacturer of any equipment that has been
added to your vehicle.
Only qualified personnel should service the
vehicle. Faulty installation or service may be dangerous and may invalidate
any warranty that may apply to the device. Check regularly that all wireless
device equipment in your vehicle is mounted and operating properly.
esentative regarding your vehicle.
device or install the device in a
Page 5

Do not store or carry flammable liquids, gases or explosive materials in the
same compartment as the phone, its parts or accessories.
For vehicles equipped with an air bag, rememb
with great force. Do not place objects, including both installed or portable
wireless equipment in the area over the air bag or in the air bag deployment
area.
er that an air bag inflates
Aircraft
Using your device while flying in aircraft is prohibited. Switch off your phone
before boarding an aircraft. The use of wireless telephones in an aircraft
may be dangerous to the operation of the aircraft, disrupt the wireless
telephone network and may be illegal. In the United States, FCC
regulations currently prohibit using your Vertu phone while in the air.
Failure to observe these instructions may
telephone services to the offender, or legal action or both.
lead to suspension or denial of
Potentially explosive atmospheres
Switch off your phone when in any area with a potentially explosive
atmosphere and obey all signs and instructions. Sparks in such areas could
cause an explosion or fire resulting in bodily injury or even death.
You are advised to switch off the phone when at a refuelling point or service
station. Observe re
(fuel storage and distribution areas), chemical plants or where blasting
operations are in progress.
Areas with a potentially explosive atmospher
clearly marked. They include below deck on boats; chemical transfer or
storage facilities; vehicles using liquified petroleum gas (such as propane
or butane); areas where the air contains chemicals or particles, such as
grain, dust or metal powders; and any other area where you would normally
be advised to turn off your vehicle engine.
strictions on the use of radio equipment in fuel depots
e are often but not always
Water resistance
Your Vertu phone is not water resistant. Keep it dry.
If your Vertu phone is accidentally splashed
completely before removing the back cover. Remove the battery and leave
all parts to dry naturally. Do not apply heat.
Never charge your Vertu phone when the connector is damp or wet.
Chargers must only be used in dry cond
when damp or wet.
Make sure the interior of your Vertu phone and the back cover seals are dry,
clea
n, and free of any foreign objects before you replace the back cover.
with water, ensure you dry it
itions. They should never be used
Don’t touch the antenna area
Avoid touching the antenna area (refer to page 39) of your Vertu phone
unnecessarily when the phone is switched on. Contact with the antenna area
affects call qualit
level than otherwise needed and reduce the talk time of your Vertu phone.
y and may cause the phone to operate at a higher power
Obey laws
When using your Vertu phone, obey all laws and respect local customs,
privacy and legitimate rights of others, including copyrights.
Care and maintenance
Your Vertu phone has been crafted from some of the finest materials.
Please see page 38 for full care and maintenance instructions. Damage
caused to your Vertu phone by failing to obser
not covered by the warranty.
ve these care instructions is
Charm attachment
The charm attachment point is designed for Vertu charms which should be
fitted by your authorised Vertu dealer. The charm attachment point is not a
lanyard loop fixing.
Safety 5
Page 6
SAR Notice – RM-267V
YOUR VERTU PHONE (MODEL: Ascent Ti, TYPE: RM-267V, FCC ID:
P7QRM-267V) MEETS GUIDELINES FOR EXPOSURE TO RADIO WAVES
Your Vertu phone is a radio transmitter and receiver. It is designed not to
exceed the limits for
international guidelines. These guidelines were developed by the
independent scientific organization ICNIRP and include safety margins
designed to assure the protection of all persons, regardless of age and
health.
The exposure guidelines for mobile devices employ a unit
known as the Specific Absorption Rate or SAR. The SAR limit stated in the
ICNIRP guidelines is 2.0 watts/kilogram (W/kg) averaged over ten grams of
tissue. Tests for SAR are conducted using standard operating positions
with the device transmitting at its highest certified power level in all tested
frequency bands. The actual SAR level of an operating device can be
below the maximum value because the device is designed to use only the
power required to reach the network. That amount changes depending on
a number of factors such as how close you are to a network base station.
The highest SAR value under the ICNIRP guidelines for use of the device
at the ear is 0.57 W/kg.
This phone meets RF exposure guidelines wh
use position against the ear or when positioned at least 2.2cm (7/8 inch)
away from the body. When a carry case, belt clip or holder is used for body-
worn operation, it should not contain metal and should position the phone
the above-stated distance away from your body. In order to transmit data
files or messages, this device requires a good quality connection to the
network. In some cases, transmission of data files or messages may be
delayed until such a connection is available. Ensure the above separation
distance instructions are followed until the transmission is completed.
Use of device accessories and enhancements m
values. SAR values may vary depending on national reporting and testing
requirements and the network band. Additional SAR information may be
exposure to radio waves recommended by
of measurement
en used either in the normal
ay result in different SAR
provided under product information on the Vertu official web site.
USA and Canada:
requirements for exposure to radio waves established by the Federal
Communications Commission (USA) and Industry Canada. These
requirements set a SAR limit of 1.6 W/kg averaged over one gram of tissue.
The highest SAR value reported under this standard during product
certification for use at the ear is 0.54 W/kg and when properly worn on the
body is 0.86 W/kg.
Your mobile device is also designed to meet the
Declaration of conformity
We, Vertu declare under our sole responsibility that the product, Model
Ascent Ti, type RM-267V is in conformity with the provision of the following
Council Directive: 1999/5/EC.
A copy of the Declaration of Conformity can be
web site.
Copyright © Vertu 2008. All rights reserved.
Reproduction, transfer, distribution or storage
in this document in any form without the prior written permission of Vertu is
prohibited. Vertu operates a policy of continuous development. Vertu
reserves the right to make changes and improvements to any of the
products described in this document without prior notice.
TO THE MAXIMUM EXTENT PERMITTED BY APPLICABLE LAW,
ER NO CIRCUMSTANCES SHALL VERTU OR ANY OF ITS
UND
LICENSORS BE RESPONSIBLE FOR ANY LOSS OF DATA OR INCOME
OR ANY SPECIAL, INCIDENTAL, CONSEQUENTIAL OR INDIRECT
DAMAGES HOWSOEVER CAUSED.
THE CONTENTS OF THIS DOCUMENT ARE PROVIDED “AS IS”.
EXCEPT AS REQUIRE
ANY KIND, EITHER EXPRESS OR IMPLIED, INCLUDING, BUT NOT
D BY APPLICABLE LAW, NO WARRANTIES OF
found on the Vertu official
of part or all of the contents
6 Safety
Page 7

LIMITED TO, THE IMPLIED WARRANTIES OF MERCHANTABILITY AND
Ascent Ti
RM-267V
FITNESS FOR A PARTICULAR PURPOSE, ARE MADE IN RELATION
TO THE ACCURACY, RELIABILITY OR CONTENTS OF THIS
DOCUMENT. VERTU RESERVES THE RIGHT TO REVISE THIS
DOCUMENT OR WITHDRAW IT AT ANY TIME WITHOUT PRIOR
NOTICE.
Vertu and the V logo are registered trademarks or trademarks. Other
roduct and company names mentioned herein may be trademarks or
p
registered trademarks of their respective owners.
Includes RSA BSAFE cryptographic or security protocol software
from RSA Security.
Bluetooth is a registered trademark of Bluetooth SIG, Inc.
Java and all Java-based marks are trademarks or registered
tra
demarks of Sun Microsystems, Inc.
The third-party applications provided with your device may have been
created and may be owned by persons or entities not affiliated with or
related to Vertu. Vertu does not own the copyrights or intellectual property
rights to the third-party applications. As such, Vertu does not take any
responsibility for end-user support, functionality of the applications, or the
information in the applications or these materials. Vertu does not provide
any warranty for the third-party applications.
THAT THE APPLICATIONS WILL NOT INFRINGE ANY THIRD-PARTY
PATENTS, COPYRIGHTS, TRADEMARKS, OR OTHER RIGHTS.
Export controls
Your Vertu phone may contain commodities, technology, or software
exported from the United States in accordance with the Export
Administration regulations. Diversion contrary to U.S. law is prohibited.
FCC/Industry Canada notice
Your Vertu phone may cause TV or radio interference (for example, when
using a telephone in close proximity to receiving equipment). The FCC or
Industry Canada can require you to stop using your phone if such
interference cannot be eliminated. If you require assistance, contact Vertu
Customer Service at 03-6738-3955 (or +81-3-6738-3955 from countries
outside Japan). This device complies with Part 15 of the FCC rules.
Operation is subject to the following two conditions:
(1) this device may not cause harmful interference, and
(2) this device must accept any interference received, including interference that
may cause undesired operation.
Any changes or modifications not expressly approved by Vertu could void
the user’s authority to operate this equipment.
BY USING THE APPLICATIONS YOU ACKNOWLEDGE THAT THE
APPLICATIONS ARE PROVIDED AS IS WITHOUT WARRANTY OF ANY
KIND, EXPRESS OR IMPLIED, TO THE MAXIMUM EXTENT
PERMITTED BY APPLICABLE LAW. YOU FURTHER ACKNOWLEDGE
THAT NEITHER VERTU NOR ITS AFFILIATES MAKE ANY
REPRESENTATIONS OR WARRANTIES, EXPRESS OR IMPLIED,
INCLUDING BUT NOT LIMITED TO WARRANTIES OF TITLE,
MERCHANTABILITY OR FITNESS FOR A PARTICULAR PURPOSE, OR
Safety 7
Page 8
EU recycling notice
The crossed-out wheeled-bin symbol on your product, literature, or
packaging reminds you that all electrical and electronic products, batteries,
and accumulators must be taken to separate collection at the end of their
working life. This requirement applies to the European Union and other
locations where separate collection systems are available. Do not dispose
of these products as unsorted municipal waste.
By returning the products to collection you help prevent uncontrolled waste
disposal and
information is available from the product retailer, local waste authorities,
national producer responsibility organizations, or your local Vertu
representative. For the product Eco-Declaration or instructions for returning
your obsolete product, go to country-specific information on the Vertu
official web site.
promote the reuse of material resources. More detailed
Bluetooth
Industrial, scientific and medical devices such as microwave ovens,
licensed premises radio stations for moving object identification system in
factory production lines, specified low power radio stations which do not
require licenses, and amateur radio stations (hereafter referred to as “other
radio stations”) also use the frequency bandwidth used by this product.
1. Make sure that there are no “other radio stations” nearby before using this
product.
2. If radio wave interferences between this product and “other radio stations” occur,
cha
nge your location or stop transmitting radio waves to avoid radio wave
interferences.
3. If you have any questions or encounter any
Japan, contact the number below.
Vertu Customer Service:
03-6738-3955 (or +81-3-6738-3955 from countries outside Japan)
Operations hours: 9:00 a.m.–8:00 p.m. (Mon–Sun, including holidays)
problems in using this product in
The symbol indicates that the product was put onto the market after the
egislation was implemented and that the consumer should not
WEEE l
dispose of the item in normal household waste, but that it should be
appropriately recycled.
Should you wish Vertu to recycle your
product at the end of its life, please
either return it to the point from which you purchased your product (if
known) or return it to Vertu’s headquarters.
Alternatively, should you purchase a replacement
product from another
supplier, the new supplier is obligated to take back the product that is being
replaced and recycle it appropriately.
Background information on the European WEEE directive is ava
ilable from
www.europa.eu.int/
8 Safety
2.4FH1
This product uses 2.4 GHz and utilizes the FH-SS
modulation system.The estimated interference distance is
10 m or less.
Page 9

Warranties
Vertu two-year limited international warranty
for cellular phone
THIS LIMITED WARRANTY SHALL NEITHER EXCLUDE NOR LIMIT (I) ANY
MANDATORY STATUTORY RIGHTS OF THE CLIENT OR (II) ANY OF THE
CLIENT’S RIGHTS AGAINST THE SELLER/DEALER OF THE PRODUCT.
VERTU warrants that this cellular phone (“Product”) is free from defects in material
and workmanshi
1. The Limited Warranty for the Product extends for TWO (2) years beginning on the
dat
of a change of owner/user, such warranty period shall continue for the remaining
part of the twenty-four (24) month period and otherwise remain unaffected.
2. During the period of the Limited Warranty, Vertu will repair, modify or replace, at
Ver
for their intended use with new or refurbished replacement items if such repair or
replacement is needed because of product malfunction or failure during normal
usage. No charge will be made to the Client for the repair or replacement of any
such parts. Vertu will also pay for the labour charges incurred by Vertu in repairing
or replacing the defective parts. The repaired Product will be warranted for the
balance of the original warranty period or for ninety (90) days from the date of
repair, whichever is longer. This Limited Warranty does not cover damage to or
defects in (other than manufacturing defects) appearance, cosmetic, decorative
or structural items and any non-operative parts. Vertu’s limit of liability under the
Limited Warranty shall be the price paid by the Client for the Product less a
reasonable amount for usage. These remedies are the Client’s exclusive
remedies for breach of this Limited Warranty.
3. Upon request from Vertu, the Client must prove the date of the original purchase
or deliver
certificate of authenticity which clearly indicates the name and address of an
authorised retailer, the date and place of purchase/delivery, the product type and
the IMEI or serial number of the Product, a bill of sale or a dated receipt which
contains the same information.
4. Vertu shall bear the cost of shipping the Product to the location from which the
Clien
completion of service under this Limited Warranty.
5. The Client shall have no coverage or benefits under this Limited Warranty if any of
he following conditions are applicable:
t
a) The Product has been subject to abnormal use, abnormal conditions, improper storage,
p according to the following terms and conditions:
e of original purchase or delivery of the Product, whichever is the later. In case
tu’s sole option, any defective parts, or any parts that will not properly operate
y of the Product by producing a legible and non-modified original
t handed over the Product to Vertu (or its representatives) after the
exposure to moisture or dampness, spillage of food or liquid, exposure to chemical agents,
unauthorised modifications, unauthorised connections, unauthorised repair, rough
handling, misuse, neglect, abuse, accident, alteration, improper installation, or other acts
which are not the fault of Vertu, including without limitation damage caused by shipping,
dropping the Product, deterioration of consumable parts, such as batteries which by their
nature have a limited lifecycle, and breakage or damage to antennas.
b) The Product has been damaged from external causes such as collision with an object, or
from fire, flooding, sand, dirt, windstorm, lightning, earthquake or damage from exposure to
thermal, environmental or weather conditions, an Act of God, or battery leakage, theft,
blown fuse, or improper use of any electrical source, damage caused by computer or
internet viruses, bugs, worms, Trojan Horses, cancel bots or damage caused by the
connection to other products not recommended for interconnection by Vertu.
c) The Customer Service at Vertu was not advised by the Client in writing of the alleged defect
or malfunction of the Product withi n thirty (30) days after the expiration of the applicable
warranty period.
d) The Product was not returned to Vertu or its authorised retailer within thirty (30) days after
the appearance of the defect within the warranty period.
e) The Product serial number plate or the accessory data code has been removed, defaced,
altered or is illegible.
f) The defect or damage was caused by the defective function of the cellular network system
or by inadequate signal reception by the external antenna.
g) The defect was caused by the Product being used with or connected to an accessory not
manufactured and supplied by Vertu or used other than for its intended use.
h) The battery was short-circuited or the seals of the battery enclosure or cells are broken or
show evidence of tampering or the battery was used in equipment other than that for which
it has been specified.
i) The Product software needs to be updated due to changes in cellular network parameters.
j) The defect or damage was as a result of general wear and tear incurred in normal usage of
the Product.
6. If a problem develops during the period of the Limited Warranty, the following
procedure will apply:
a) The Client shall return the Product to the place of purchase for repair or replacement
processing or if this is not convenient because of distance (more than 50 miles/80 km) or for
other good cause, the Client may contact Vertu Customer Service at 03-6738-3955 (or +813-6738-3955 from countries outside Japan).
b) The Client shall bear the costs of transporting the Product to the relevant Vertu service
location, with transport and insura nce charges prepaid.
c) Subject to Clause 6(e), the Client will be billed for any parts or labour charges not covered
by this Limited Warranty.
d) Vertu will repair or authorise the repair of the Product under the Limited Warranty within 30
days after receipt of the Product by Vertu or a Vertu authorised service centre, or within an
extended period as may be notified by Vertu to Client due to the nature of the repair
(“Timeframe”). If Vertu cannot repair within the Timeframe, or after a reasonable number of
attempts to repair the same defect, Vertu at its sole option, will provide a replacement
Product or refund the purchase price of the Product less a reasonable amount for usage.
e) If the Product is returned to the Customer Service at Vertu during the period of the Limited
Warranty, but the problem with the Product is not covered under the terms and conditions of
this Limited Warranty, the Client will be notified and given an estimate of the charges the
Client must pay to have the Product repaired, with all shipping charges billed to the Client. If
the estimate is refused, the Product will be returned freight collect. If the Product is returned
to the Customer Service at Vertu after the expiration of the warranty period, Vertuís normal
service policies shall apply and the Client will be responsible for all shipping charges.
7. TO THE FULLEST EXTENT PERMITTED BY LAW, THE WARRANTIES AND
CONDITIONS STATED IN THIS LIMITED WARRANTY ARE IN LIEU OF ALL
OTHER CONDITIONS, WARRANTIES OR OTHER TERMS CONCERNING
THE SUPPLY OR PURPORTED SUPPLY OF, OR FAILURE TO SUPPLY OR
DELAY IN SUPPLYING THE PRODUCT WHICH MIGHT, BUT FOR THE
AFFECT OF THIS CLAUSE 7, HAVE EFFECT BETWEEN VERTU AND THE
Safety 9
Page 10

CLIENT OR WOULD OTHERWISE BE IMPLIED OR INCORPORATED INTO
THIS LIMITED WARRANTY OR ANY COLLATERAL CONTRACT, WHETHER
BY STATUTE, COMMON LAW OR OTHERWISE, ALL OF WHICH ARE
HEREBY EXCLUDED (INCLUDING WITHOUT LIMITATION, THE IMPLIED
CONDITIONS, WARRANTIES OR OTHER TERMS AS TO SATISFACTORY
QUALITY OR FITNESS FOR PURPOSE).
8. VERTU SHALL NOT BE LIABLE FOR LOSS OR DAMAGE, WHETHER
SPECIAL, INDIRECT, INCIDENTAL OR CONSEQUENTIAL, INCLUDING BUT
NOT LIMITED TO ANY OF THE FOLLOWING LOSSES OR DAMAGE
(WHETHER SUCH LOSSES OR DAMAGE WERE FORESEEN,
FORESEEABLE, KNOWN OR OTHERWISE):
a) LOSS OF ANTICIPATED BENEFITS OR PROFITS.
b) LOSS OF ACTUAL OR ANTICIPATED SAVINGS.
c) PUNITIVE, SPECIAL OR CONSEQUENTIAL DAMAGES.
d) THIRD PARTY CLAIMS.
e) LOSS OF USE OF THE PRODUCT OR ANY ASSOCIATED EQUIPMENT OR
FACILITIES.
f) DOWNTIME OR LOSS OF BUSINESS.
g) LOSS OF OPPORTUNITY.
h) LOSS OF GOODWILL.
i) LOSS OF REPUTATION.
j) LOSS OF OR DAMAGE TO OR CORRUPTION OF DATA.
9. Vertu does not warrant uninterrupted or error free internet or data connections.
10. Vertu shall not be liable for any delay in r
endering service under the Limited
Warranty, or loss of use during the period that the Product is being repaired.
11. Vertu’s total liability in contract, tort (including negligence or breach of statutory
ty), misrepresentation or otherwise, arising in connection with the sale of the
du
Product shall be the price paid by the Client for the Product less a reasonable
amount for usage.
12. The invalidity or unenforceability of any term or any part of any term of, or any right
ar
ising pursuant to, this Limited Warranty shall not affect the validity or
enforceability of any other terms or rights or the remainder of any such term or
right, which shall continue in full force and effect except for any such invalid or
unenforceable provision or part thereof.
13. Vertu neither assumes nor authorises any authorised service centre or any other
pe
rson or entity to assume for it any other obligation or liability beyond that which
is expressly provided for in this Limited Warranty, including the provider or seller
of any extended warranty or service agreement. Any change or amendment to
this Limited Warranty requires Vertu’s prior written consent.
14. This Limited Warranty represents the whole agreement between the parties
r
elating to the subject matter hereof.
15. This Limited Warranty allocates the risk of failure of the Product between the
Clie
nt and Vertu. The allocation is recognised by the Client and is reflected in the
purchase price of the Product.
16. Any action or lawsuit for breach of warranty must be commenced within thirty (30)
ths following delivery of the Product.
mon
17. All warranty information, product features and
specifications are subject to
change without notice.
Vertu operates a policy of continuous developmen
t. Vertu reserves the right to make
changes and improvements to any of the products described in this document without
prior notice. Questions concerning this Limited Warranty may be directed to the
Customer Service at the following addresses.
If calling us from Japan:
Vertu Customer Service
03 6738 3955 (or +81 3 6738 3955 from countries outside Japan)
If contacting us from Europe, Middle East and Africa:
Vertu
Beacon Hill Road
Church Crookham
Hampshire
GU52 8DY
United Kingdom
If calling us from the Americas:
+1 914 368 0432
If contacting us from Asia Pacific:
Vertu
391B Orchard Road
#24-02/05, Ngee Ann City, Tower B
Singapore 23887
Vertu one-year limited international warranty
for accessories
THIS LIMITED WARRANTY SHALL NEITHER EXCLUDE NOR LIMIT (I) ANY
MANDATORY STATUTORY RIGHTS OF THE OWNER OR (II) ANY OF THE
OWNER’S RIGHTS AGAINST THE SELLER/DEALER OF THE PRODUCT.
Vertu (“Vertu”) warrants that this accessory product (“Product”) is free from defects in
erial and workmanship, according to the following terms and conditions:
mat
1. The Limited Warranty for the Product extends for ONE (1) year beginning on the
ate of original purchase or delivery of the Product whichever is the later. In case
d
of a change of owner/user (“Owner”), such warranty period shall continue for the
remaining part of the one (1) year period.
2. During the period of the Limited Warranty, V
Vertu’s sole option, any defective parts, or any parts that will not properly operate
for their intended use with new or refurbished replacement items if such repair or
ertu will repair, modify or replace, at
10 Safety
Page 11

replacement is needed because of product malfunction or failure during normal
usage. No charge will be made to the Owner for the repair or replacement of any
such parts. Vertu will also pay for the labour charges incurred by Vertu in repairing
or replacing the defective parts. The repaired Product will be warranted for the
balance of the original warranty period. This Limited Warranty does not cover
damage to or defects in (other than manufacturing defects) appearance,
cosmetic, decorative or structural items and any non-operative parts. Vertu’s limit
of liability under the Limited Warranty shall be the price paid by the Owner for the
Product when the Owner purchased the Product as a stand alone product or, in
the event that the Owner received the Product when purchasing a Vertu cellular
phone, the then current sale price for the Product, in both cases less a reasonable
amount for usage. These remedies are the Owner’s exclusive remedies for
breach of this Limited Warranty.
3. Upon request from Vertu, the Owner must prove the date of the original purchase
or deliver
y of the Product by producing a legible and non-modified original
warranty card which clearly indicates the name and address of an authorised
retailer, the date and place of purchase/delivery, the product type and the IMEI or
serial number of the Product, a bill of sale or a dated receipt which contains the
same information.
4. Vertu shall bear the cost of shipping the Product to the location from which the
Owne
r handed over the Product to Vertu (or its representatives) after the
completion of service under this Limited Warranty.
5. The Owner shall have no coverage or benefit
s under this Limited Warranty if any
of the following conditions are applicable:
a) The Product has been subject to abnormal use, abnormal conditions, improper storage,
spillage of liquid, misuse, neglect, exposure to cleaning agents not recommended, or other
acts which are not the fault of Vertu, unauthorised repair, accident, alteration or other acts
which are not the fault of Vertu.
b) Vertu was not advised by the Owner in writing of the alleged defect or malfunction of the
Product within thirty (30) days after the expiration of the applicable warranty period; or
c) The Product was not returned to Vertu or its authorised retailer within thirty (30) days after
the appearance of the defect withi n the warranty period.
d) The defect or damage was as a result of general wear and tear incurred in normal usage of
the Product.
e) The Product is used with a product different to the one with which the Product was supplied
with by Vertu, or the Product is used with any product whose use with the Product has not
been expressly authorised by Vertu.
6. If a problem develops during the period of the Limited Warranty, the following
procedure will apply:
a) The Owner shall return the Product to the place of purchase for repair or replacement
processing or if this is not convenient because of distance (more than 50 miles/80 km) or for
other good cause, the Owner may contact Vertu Customer Service 03-6738-3955 (or +813-6738-3955 from countries outside Japan).
b) The Owner shall bear the costs of transporting the Product to the relevant Vertu service
location, with transport and insurance charges prepaid.
c) Subject to clause 6(e), the Owner will be billed for any parts or labour charges not covered
by this Limited Warranty.
d) Vertu will repair or authorise the repair of the Product under the Limited Warranty within 30
days of receipt of the Product by Vertu or a Vertu authorised service centre, or within an
extended period as may be notified by Vertu to Owner due to the nature of the repair
("Timeframe"). If Vertu cannot r epair within the Timeframe, or after a reasonable number of
attempts to repair the same defect, Vertu at its sole option, will provide a replacement
Product or refund the purchase price of the Product less a reasonable amount for usage.
e) If the Product is returned to the Vertu during the period of the Limited Warranty, but the
problem with the Product is not covered under the terms and conditions of this Limited
Warranty, the Owner will be notified and given an estimate of the charges the Owner must
pay to have the Product repaired, with all shipping charges billed to the Owner. If the
estimate is refused, the Product will be returned freight collect. If the Product is returned to
Vertu after the expiration of the warranty period, Vertu’s normal service policies shall apply
and the Owner will be responsible for all shipping charges.
7. TO THE FULLEST EXTENT PERMITTED BY LAW, THE WARRANTIES AND
CONDITIONS STATED IN THIS LIMITED WARRANTY ARE IN LIEU OF ALL
OTHER CONDITIONS, WARRANTIES OR OTHER TERMS CONCERNING
THE SUPPLY OR PURPORTED SUPPLY OF, OR FAILURE TO SUPPLY OR
DELAY IN SUPPLYING THE PRODUCT WHICH MIGHT, BUT FOR THE
AFFECT OF THIS CLAUSE 7, HAVE EFFECT BETWEEN VERTU AND THE
OWNER OR WOULD OTHERWISE BE IMPLIED OR INCORPORATED INTO
THIS LIMITED WARRANTY OR ANY COLLATERAL CONTRACT, WHETHER
BY STATUTE, COMMON LAW OR OTHERWISE, ALL OF WHICH ARE
HEREBY EXCLUDED (INCLUDING WITHOUT LIMITATION, THE IMPLIED
CONDITIONS, WARRANTIES OR OTHER TERMS AS TO SATISFACTORY
QUALITY OR FITNESS FOR PURPOSE).
8. VERTU SHALL NOT BE LIABLE FOR LOSS OR DAMAGE, WHETHER
SPECIAL, INDIRECT, INCIDENTAL OR CONSEQUENTIAL, INCLUDING BUT
NOT LIMITED TO ANY OF THE FOLLOWING LOSSES OR DAMAGE
(WHETHER SUCH LOSSES OR DAMAGE WERE FORESEEN,
FORESEEABLE, KNOWN OR OTHERWISE):
a) LOSS OF ACTUAL OR ANTICIPATED BENEFITS OR PROFITS
b) LOSS OF ACTUAL OR ANTICIPATED SAVINGS
c) PUNITIVE, SPECIAL OR CONSEQUENTIAL DAMAGES.
d) THIRD PARTY CLAIMS
e) LOSS OF USE OF THE PRODUCT OR ANY ASSOCIATED EQUIPMENT OR
FACILITIES
f) DOWNTIME OR LOSS OF BUSINESS
g) LOSS OF OPPORTUNITY
h) LOSS OF GOODWILL
i) LOSS OF REPUTATION
j) LOSS OF OR DAMAGE TO OR CORRUPTION OF DATA.
9. Vertu shall not be liable for any delay in rendering service under the Limited
Warranty, or loss of use during the period that the Product is being repaired.
10. Vertu’s total liability in contract, tort (including negligence or breach of statutory
ty), misrepresentation or otherwise, arising in connection with the sale of the
du
Product shall be the price paid by the Owner for the Product less a reasonable
amount for usage.
11. The invalidity or unenforceability of any term or any
part of any term of, or any right
arising pursuant to, this Limited Warranty shall not affect the validity or
enforceability of any other terms or rights or the remainder of any such term or
Safety 11
Page 12

right, which shall continue in full force and effect except for any such invalid or
unenforceable provision or part thereof.
12. Vertu neither assumes nor authorises any authorised service centre or any other
rson or entity to assume for it any other obligation or liability beyond that which
pe
is expressly provided for in this Limited Warranty including the provider or seller of
any extended warranty or service agreement. Any change or amendment to this
Limited Warranty requires Vertu’s prior written consent.
13. This Limited Warranty represents the whole agreement between the parties
r
elating to the subject matter hereof.
14. This Limited Warranty allocates the risk of failure of the Product between the
wner and Vertu. The allocation is recognised by the Owner and is reflected in
O
the purchase price of the Product.
15. Any action or lawsuit for breach of warranty must be commenced within eighteen
8) months following delivery of the Product.
(1
16. All warranty information, product features and specifications are subject to
chan
ge without notice.
Vertu operates a policy of continuous development
changes and improvements to any of the products described in this document without
prior notice.Questions concerning this Limited Warranty may be directed to the
Customer Service at the following addresses.
If calling us from Japan:
Vertu Customer Service
03 6738 3955 (or +81 3 6738 3955 from countries outside Japan)
If contacting us from Europe, Middle East and Africa:
Vertu
Beacon Hill Road
Church Crookham
Hampshire
GU52 8DY
United Kingdom
If calling us from the Americas:
+1 914 368 0432
If contacting us from Asia Pacific:
Vertu
391B Orchard Road
#24-02/05, Ngee Ann City, Tower B
Singapore 23887
. Vertu reserves the right to make
12 Safety
Page 13
Using your Vertu phone
Vertu package contents
Thank you for choosing the Vertu Ascent Ti.
After unpacking, please check the contents of the packaging for the
following items:
>
Vertu Ascent Ti (RM-267V) phone
>
Japanese user guide
>
Welcome to Ascent Ti
>
CD-ROM
>
CERTIFICATE OF AUTHENTICITY
>
Back cover release key
>
Battery
>
Wall charger
>
Data cable
>
Microfibre polishing cloth
CD-ROM
The supplied CD-ROM contains the following files:
> Vertu PC Suite installer (for PC only)
> ISYNC PLUG-IN (for Macintosh only)
> Electronic versions of Japanese User Guide and English Quick Guide
Networks
To optimise the performance and make maximum use of the functions of
your Vertu phone, you will need a SIM card authorised by Vertu. If you use
a SIM card other than one supplied by Vertu, your Vertu phone may not
operate properly. For more information, contact Vertu Customer Service at
03-6738-3955 (or +81-3-6738-3955 from countries outside Japan). For
available services and charges when a SIM card other than one supplied
by Vertu is used, contact your service provider.
This mobile phone supports GSM 8
50/900/1800/1900 and 3G (WCDMA)
2100 networks.
Conventions used in this guide
Menu
[Send] key
Warning:
Tip:
Note:
> The screens and illustrations used in this document aim to help you deepen
your understanding of the product. They may, however, differ from those on the
actual product.
Represents text that appears on your Vertu phone's
display.
Example: “From the stand-by display, press
Menu”.
Represents a Vertu phone key.
Example: “Press the [Send] key to make the call”.
Important information relating to safety.
Represents useful information or a quick way to access
or operate a feature
Represents points to be aware of when using your Vertu
phone.
Using your Vertu phone 13
Page 14

Glossary
[Joystick] key
Number keys
Default
SIM card
A four-direction navigation key located on the front face
of the phone. Use this for selecting the desired item
while moving the cursor on the screen, adjusting
volume, and scrolling between pages, etc. This is the
most frequently used key in a variety of situations.
The keys that are used to enter text or numbers.
Initial product setting as supplied by Vertu when the
phone leaves our workshop.
Subscriber Identity Module. This is a small IC card
supplied by your service provider to insert into your
Vertu phone for a network connection.
3G (WCDMA) network
GSM network
GPRS
3rd generation mobile communication network, which
conforms to the global 3GPP (3rd Generation
Partnership Project) standards. When used in Japan,
this mobile phone operates on this WCDMA network.
2nd generation mobile communication network with
digital technology, which is a commonly used standard
throughout the world.
2.5-generation mobile communication network, which
is resulted from the upgrade of GSM technology,
making data communications such as packet
communications more efficient. This is a commonly
used standard abroad.
Service provider
Network service
Stand-by display
PIN number
A network operator who provides your SIM card and all
associated network services.
Various network services supplied by service providers.
These services include voice mailbox and call divert.
The operational conditions of the individual services
differ depending on the service provider networks.
The display shown when the Vertu phone is turned on
or when the [End] key is pressed to exit the function in
use. Menu appears at the bottom of the stand-by
display.
A Personal Identification Number that allows only
authorised access to your Vertu phone and SIM card.
We strongly recommend that you set these up when
you receive your new Vertu phone and SIM card.
14 Using your Vertu phone
Page 15
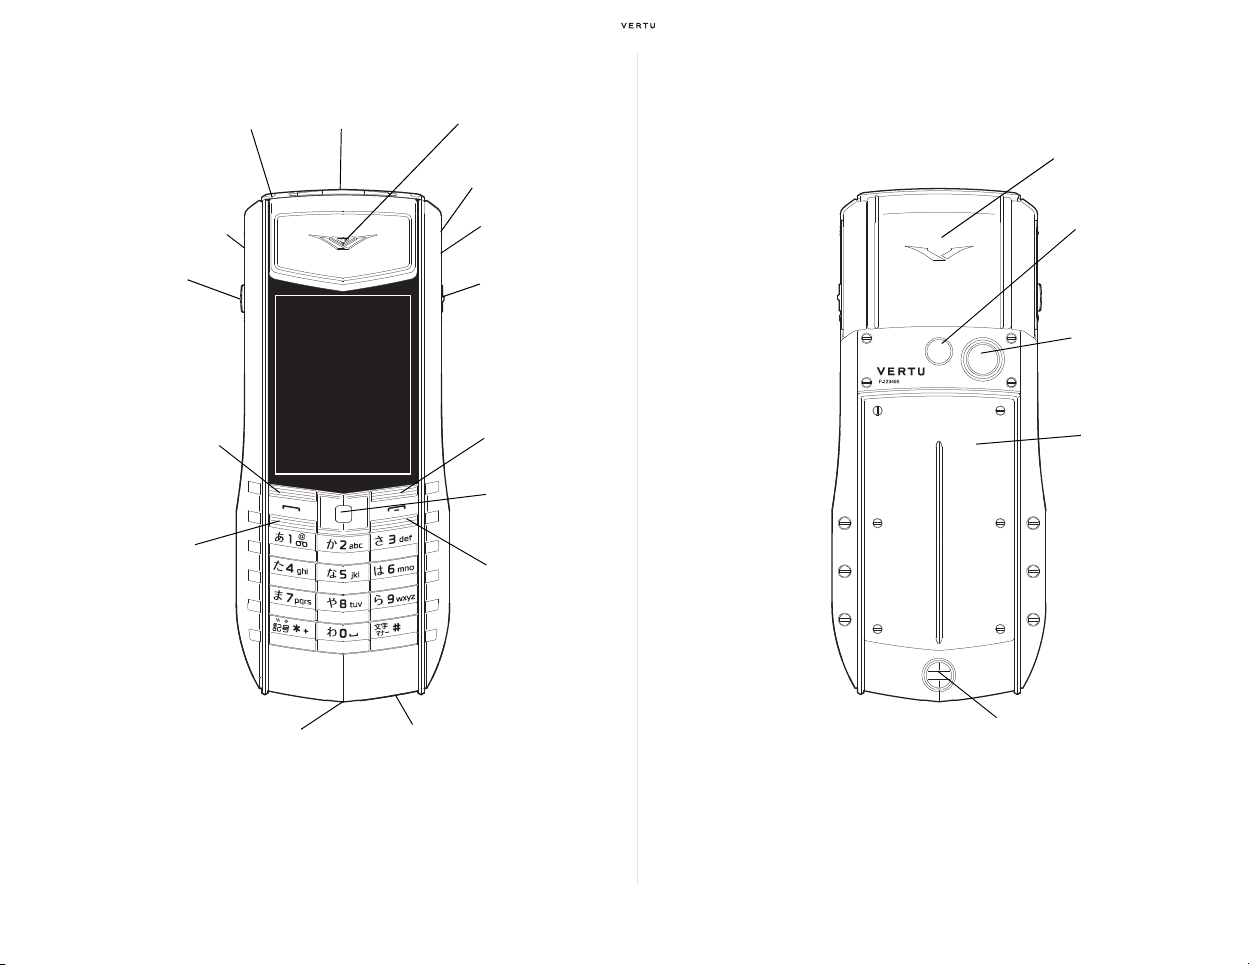
Vertu phone layout (front) Vertu phone layout (back)
Microphone
Connector
[
E
n
d
]
k
e
y
[Joystick] key
[Selection] key
(Right)
[Concierge] key
Speaker (Right)
Earpiece
[
P
o
w
e
r
]
k
e
y
Light sensor
Speaker (Left)
[Camera] key
[Send] key
[Selection] key
(Left)
Charm attachment
loop
Back cover release
Back cover
Camera lens
Flash
Antenna area
Using your Vertu phone 15
Page 16
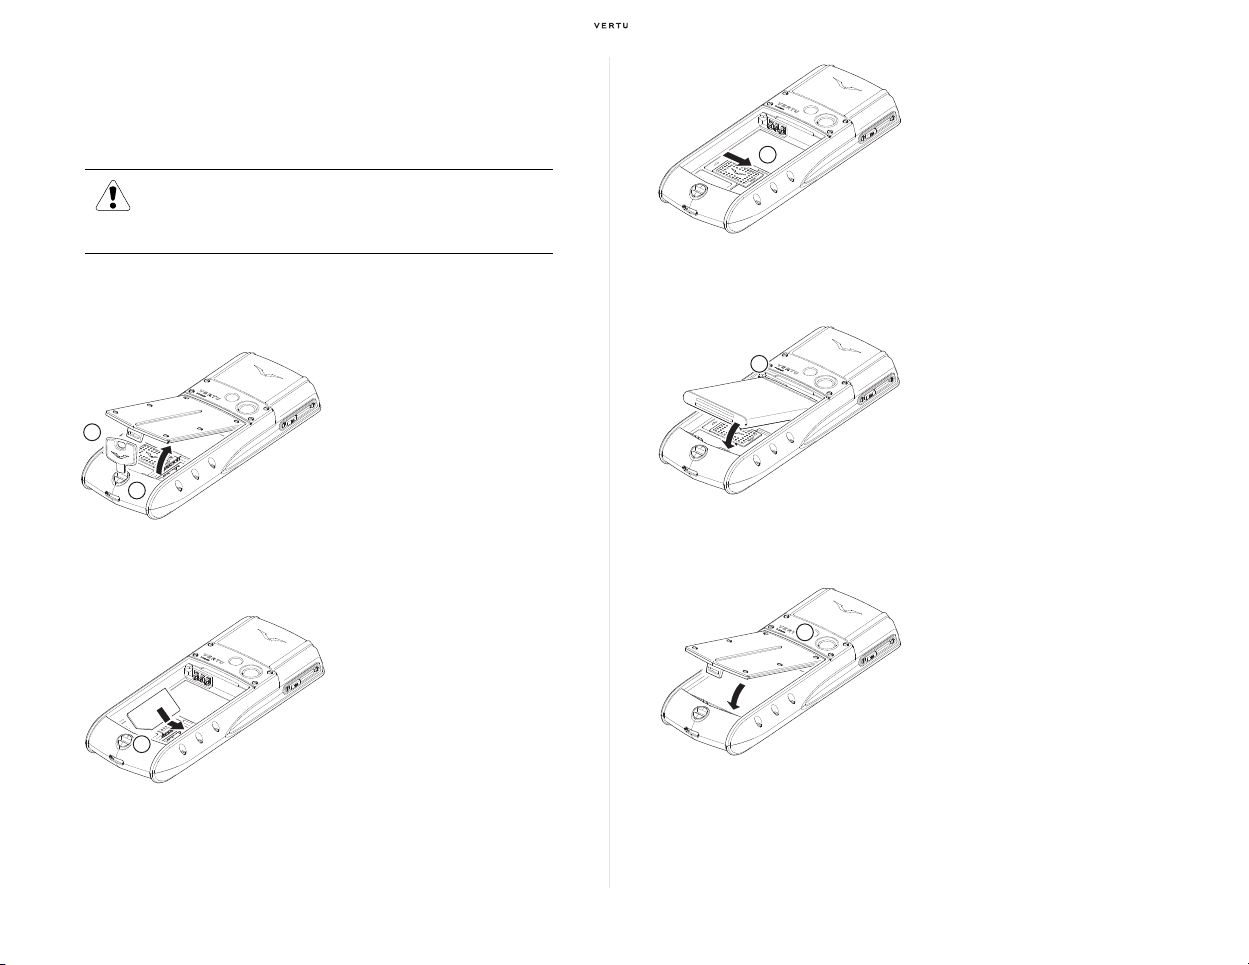
Inserting the battery and SIM card
01
02
03
04
05
06
The SIM card and its contacts are easily damaged.
Be careful when handling, inserting or removing the SIM card.
Warning: Keep SIM cards and the back cover release key out of
the reach of small children.
Always switch the phone off and disconnect the charger before
removing the battery.
Removing the back cover
With the back of your Vertu
phone facing you, position the
back cover release key (
the slot of the locking screw
02
).
(
Turn the key (01) a quarter of a
turn anticlockwise, and gently
lift off the back cover as shown.
Inserting the SIM card
Insert the SIM card into the SIM
card
compartment, ensuring
that the bevelled corner (03) is
located bottom right and the IC
surface is facing downwards.
01
) into
Inserting the battery
Replacing the back cover
Slide the locking mechanism
(04) over the SIM card to hold it
in place.
Position the battery so that the
contacts align with the contacts
in the battery compartment (
Ensure that the battery and
SIM card are seated correctly
before replacing the back
cover.
To replace the back cover,
the internal clip (06) first.
locate
Lower the back cover into
position unt
The cover should close tightly
using only light pressure.
il it clicks into place.
05
).
16 Using your Vertu phone
Charging your Vertu phone
For details on how to charge your Vertu phone, please see "Charging the
battery" (page 35).
Page 17
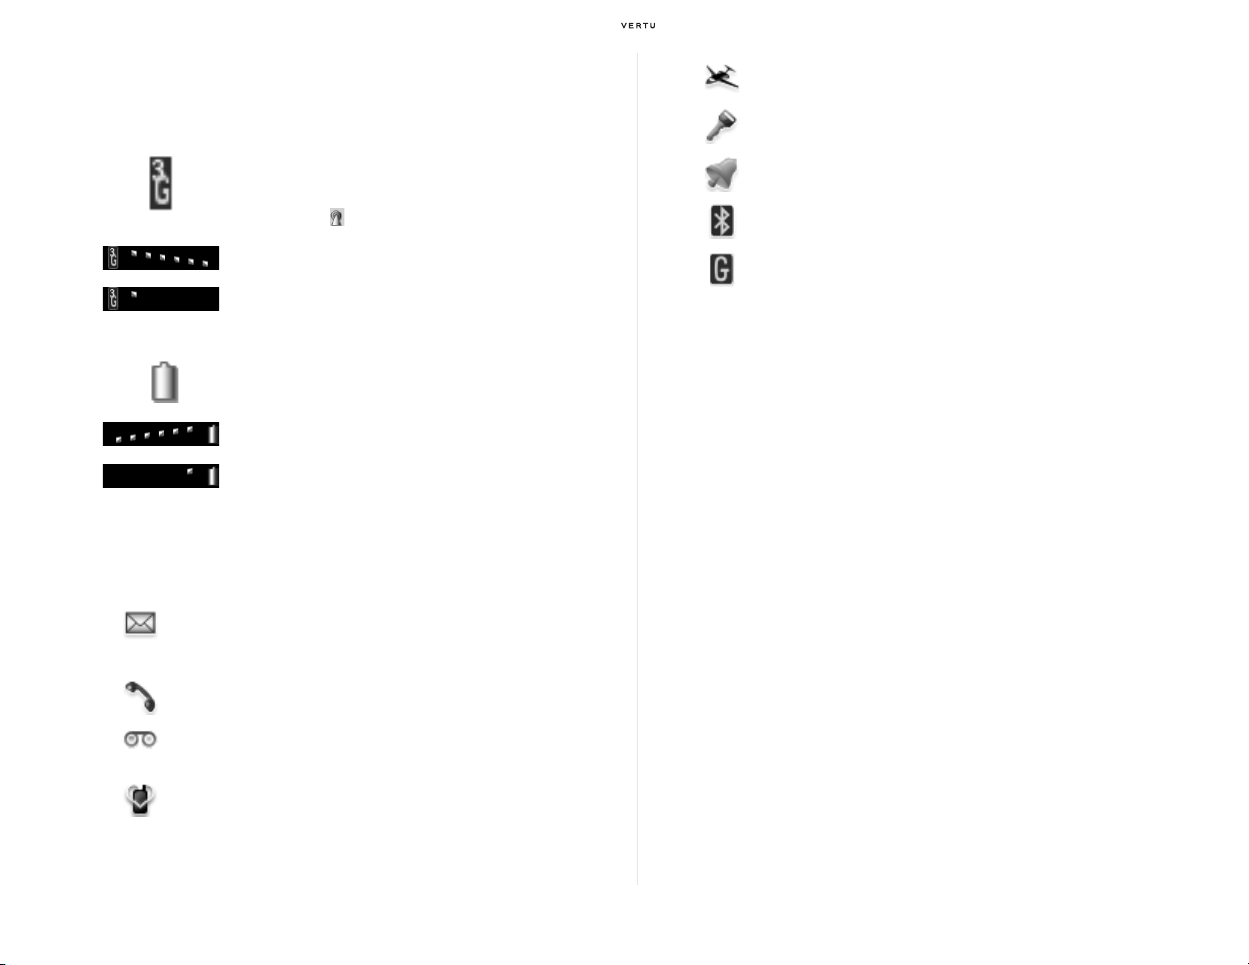
Display icons and indicators
When your Vertu phone is switched on, the following indicators appear at
the top of the display.
This icon shows the signal strength when your Vertu
phone is used through a 3G (WCDMA) network. It
appears at the top left of the display. When using a GSM
connection, appears.
This picture shows a strong signal.
This picture shows that the signal strength is weak.
To
obtain a stronger signal, move to an area clear of
obstructions that may block the signal.
The battery charge indicator appears at the top right
he display.
t
of
This picture shows a fully charged battery.
The Flight profile is selected.
The keypad is locked.
An alarm is set.
Bluetooth is switched on.
Packet transfer is active.
This picture shows that the battery charge level is
low and you need
soon.
Status icons are displayed below the battery ch
to recharge your Vertu phone
arge and signal strength
indicators. The most commonly displayed icons are:
You have one or more unread messages.
(When this icon is evolving on the display, your phone is downloading
the message(s) from the network.)
You have missed a call. (This icon appears when the screen is in
power saver mode.)
You have a voice message waiting (may not be shown on all
networks).
The Manner pro
file is selected.
Using your Vertu phone 17
Page 18
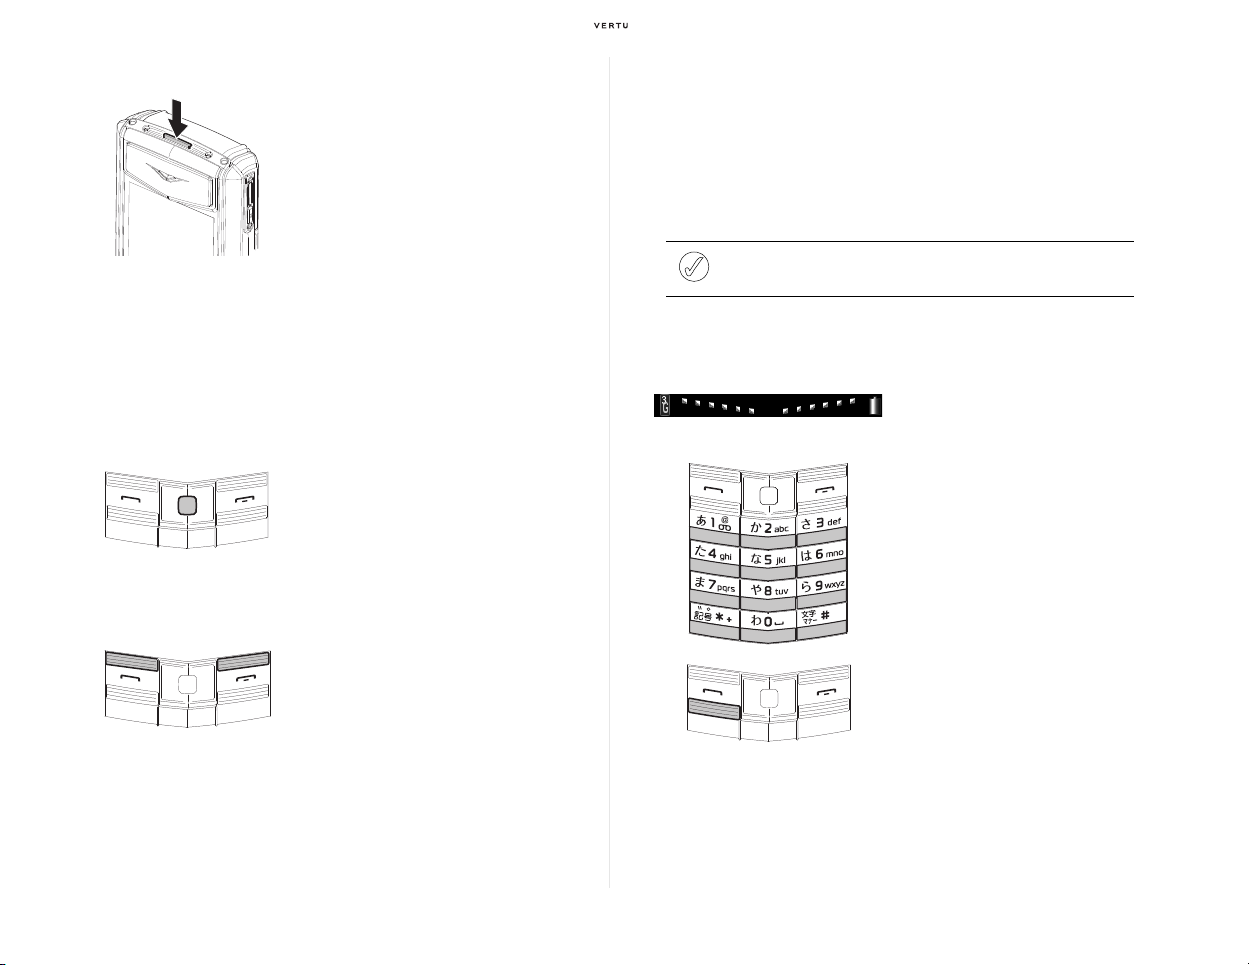
Switching your Vertu phone on and off
Press and hold the [Power] key to
switch your Vertu phone on or off.
The battery may not be fully charged when you first receive your Vertu
phone. If a Battery low message is displayed when you switch on your
Vertu phone, please see "Charging the battery" (page 35), and charge your
phone.
The [Joystick] key
The [Joystick] key enables you to
e cursor around the display
move th
in any direction. To select an item
currently displayed, press the
[Joystick] key (Centre).
[Selection] keys
The [Selection] keys enable you to
lect the options displayed at the
se
bottom of the display, directly
above the keys.
Setting the time and date
When you first switch on your Vertu phone you will be prompted to enter the
time and date if they are not already set up.
Use the [Joystick] key and Number keys to enter the date and then time.
When in Japan, sele
ct GMT +9 for the time zone and +0 for daylight saving
time. After completing all entries, select Save to save the settings.
Note: If the battery is removed from your Vertu phone for longer than
an hour, the time and date data may be lost.
Making a call
Check that you are in a strong
signal area and the battery is
charged.
Use the Number keys to enter the
elephone number you want to call.
t
Press the [Send] key to begin your
l.
cal
18 Using your Vertu phone
Page 19
Making an international call
Making a call while abroad
You can make an international call by entering a “+” first from the stand-by
display, and then a country code, an area code (with the first 0 omitted) and
a phone number in turn.
To make an international call from Japan:
1. If you are currently using your Vertu phone with the SoftBank SIM card,
make sure the International Prefix setting is Automatic.
> For more details on the International Prefix function, refer to "To SoftBank
SIM users" (page 20).
> If you are not a SoftBank SIM card user, skip to the next step.
2. From the stand-by display, press the [*] key twice to enter a “+” sign.
3. Using the Number keys, enter a country code and the phone number
you would like to
> Following a “+” sign, enter a country code, an area code (with the first 0
omitted), then a phone number.
> For example, if you want to call 020-XXXX-XXXX in London from Japan, dial
+4420XXXXXXXX; 44 is the country code of the United Kingdom, and 20 is
the area code with the first 0 omitted.
call.
4. Press the [Send] key to make a call.
1. From the stand-by display, select
Prefix
, and make sure the
> This setting should be turned off for any SIM card users while in a country
outside Japan.
Menu
»
Settings
International Prefix
»
Call
setting is
»
International
Off.
2. From the stand-by display, press the [*] key twice to enter a “+” sign.
3. Enter the phone number you would like to call.
> Following a “+” sign, enter a country code, an area code (with the first 0
omitted), then a phone number.
> When you place a call to Japan from abroad, enter +81 first, followed by an
area code (with the first 0 omitted), then a phone number; for example, if the
area code is 03 (23 wards in Tokyo), merely enter 3; for a mobile phone
number starting with 090, enter 90.
4. Press the [Send] key to begin your call.
Tip: When calling international numbers, press the [*] key twice briefly
to display a “+” sign.
Using your Vertu phone 19
Page 20
To SoftBank SIM users
Please make the following settings, if you have occasions to make
international calls.
Register international prefix code (first time only):
1. From the stand-by display, select Menu » Settings » Call »
International Prefix » Edit IDD Prefix
2. Enter “010”, and then select Save
Answering a call
When you receive an incoming call, a ringing tone is played and a call
message is displayed. Your Vertu phone will also vibrate if you have set a
vibrating alert.
Press the [Send] key to answer an
incoming call or press the [Joystick]
key when you see Answer on the
screen.
Change the setting below, depending on your current location:
1. From the stand-by display, select Menu » Settings » Call »
International Prefix
2. Depending on the country you are staying in, select either of the
owing
foll
> When you are in Japan, select Automatic
> When you are in a country outside Japan, select Off
Adjusting listening volume
Tip: While in a call, you can use the speaker phone for a hands-free
call. Use the right [Selection] key to press Loudsp. to switch to
speaker phone.
Ending or rejecting calls
To change the earpiece volume
le you are in a call, move the
whi
[Joystick] key (Up) or (Down).
Press the [End] key to end a call or
reject an incoming call.
20 Using your Vertu phone
Page 21
Sending an E-mail
Making an emergency call
1. From the stand-by display, select Menu » Messages » Create
Message.
> You can also launch the same E-mail editor screen by pressing the left
[Selection] key on the stand-by screen, if you have not changed the default
settings. Refer to "Assigning Shortcut Functions" (page 25).
> You can also change the message type from E-mail to SMS (text message)
on the launched E-mail editor. To change the message type, open the E-mail
editor as per Step 1, and then select Options » Change to text msg..
2. In the recipient field, enter the e-mail address of the recipient.
> In the recipient field, directly enter an e-mail address, or you may press the
[Joystick] key (Centre) and select an address from Contacts or the message
log.
3. Press the [Joystick] key (Down) to move to the subject field.
4. In the subject field, enter the subject.
5. Press the [Joystick] key (Down) to move to the text field.
6. Enter the message text.
> To insert symbols or pictographs, press the [*] key once or twice, or select
Options » Insert Symbol.
7. Press the [Send] key or select Options » Send.
Note: Before using the E-mail service, make sure that a SIM card
supplied by Vertu has been inserted into your Vertu phone.
You may be able to use the E-mail service (widely known as
“multimedia messaging service” or “MMS” in the world), even if you
have inserted a SIM card which is not supplied by Vertu. If this is the
case, however, you would need configure proper connection settings by
yourself unless the SIM card you use already has proper settings in it.
To obtain a SIM card supplied by Vertu, you need join VERTU Club.
Warning: Your Vertu phone, like any wireless device, operates
using radio signals, wireless and landline networks as well as
user-programmed functions. Because of this, connections in all
conditions cannot be guaranteed. Therefore, you should never
rely solely upon any wireless device for essential
communications, such as for medical emergencies.
> If the phone is not on, switch it on. Some networks require that a valid SIM
card is properly inserted in the phone.
> Press the [End] key as many times as necessary to return to the stand-by
display.
> Enter the emergency number, for example 000, 08, 110, 112, 118, 119, 911,
999, or other official emergency number used overseas.
> Press the [Send] key.
Tip: Emergency numbers vary by location and those listed above may
not be supported by your current network.
If certain features are in use, you may first need to turn those features off before
you can make an emergency call. For more information consult your local
service provider.
When making an emergency call, remember to give all the necessary
information as accurately as possible.
Remember that your phone may be the only means of communication at the
scene of an accident - do not end the call until given permission to do so.
Using your Vertu phone 21
Page 22
Protecting your Vertu phone
Tip: Enter “*#06#” from the stand-by display to find the IMEI serial
number. Make a note of your IMEI serial number and keep it in a safe
place.
Locking the keypad
You can lock the keypad on your Vertu phone to prevent accidentally
dialling any numbers.
From the stand-by display, press the [Joystick] key (
[*] key within two seconds. A confirmation message will be displayed.
When the keypad is locked, a appears at the top of the screen.
When you receive an incoming call the keypad
suspended. When the call is ended, the keypad returns to the locked state.
Tip: You can also lock the keypad in any of the following ways:
> From the stand-by display, briefly press the [Power] key located
at the top of your Vertu phone. After the profile list appears, press
the [Joystick] key (Up) to select Lock keypad from the list.
>
From the stand-by display, press the [Joystick] key (Up) once to
display a shortcut menu. Press the [Joystick] key (Up) once again to
Lock keypad
select
the default settings of the shortcut menu (page 25) assigned to the
[Joystick] key (Up)).
>
You can also enable a setting whereby the keys are automatically
locked if there is no key operation on the phone for a specified
period. To use this function, select
Automatic keyguard
from the list. (available if you have not changed
.
Unlocking the keypad
Press the [Joystick] key (Centre) followed by the [*] key within two seconds.
Tip: You may still be able to make calls to the emergency numbers
even when the keypad is locked.
Centre) followed by the
lock is automatically
Menu » Settings » Phone »
Setting various password protections (PIN code, security code, etc.)
To prevent unauthorised use of your SIM card and Vertu phone, select the
following to set or change the PIN code and security code.
> Menu » Settings » Security » PIN code request (Specify whether to display
the PIN code entry screen each time you switch on your Vertu phone.)
> Menu » Settings » Security » Access codes » Change PIN code (Change
the PIN code stored on the IC chip of the SIM card.)
> Menu » Settings » Security » Access codes » Create security code (Set a
security code. Once a security code is created, this menu item is replaced by
Change security code.)
The main menu
The main menu appears when you select Menu ([Joystick] key (Centre))
from the stand-by display. You can access all the functions of your Vertu
phone from the main menu.
Tip: You can also assign the functions that you use most often, to the
left and right [Selection] keys or to the [Joystick] key (Up), (Down),
(Left), and (Right), so that you can access the functions directly from
the stand-by display. For more information, please see
Shortcut Functions" (page 25).
Selecting desired menus
The main menu of your Vertu phone provides a total of nine main menu
items. To select these items, use the [Joystick] key.
To move the cursor in the display, use the [Joystick] key (Up), (Down),
(Lef
t), and (Right). To select the highlighted item, press the [Joystick] key
(Centre).
If you find submenu options under the selected main menu item, use the
[Joy
stick] key in the same way to select the desired option.
"Assigning
22 Using your Vertu phone
Page 23
Returning to the previous display or the standby display
To return to the previous display or the stand-by display after selecting a
function or menu option from a menu screen, select Back or Exit. Pressing
the [END] key while any function or menu option is selected, returns to the
stand-by display.
Meanwhile, when you are playing music with
the music player, giving a
short press on the [End] key causes the screen to be returned to the stand-
by display. At this time, however, note that playback of the music continues
in the background. To close the music player and stop playback as well,
press and hold the [End] key for more than one second.
Changing how the menu is displayed
You can customise how the menu is displayed using the following
procedure:
1. From the stand-by display, press Menu
2. Select one of the following options:
> List: Displays one main menu item with a large icon filling out the screen at a
time. To move to the next menu item, press the [Joystick] key (Down). To
return to the previous item, press the [Joystick] key (Up).
> Grid (default setting): Lists all of the nine main menu items with small icons
on the same screen. You can change the positions of the icons as you wish;
for example, you may move the icons of functions that you use most often, to
the top of the screen.
> Tab : Displays all the main menu items with even smaller icons along the top
line of the screen. When any icon is selected, its submenu items are shown
underneath, listed vertically. To move between the main menu items shown at
the top line, press the [Joystick] key (Left) or (Right). To scroll the submenu list
shown underneath, press the [Joystick] key (Up) or (Down).
» Options » Main menu view.
Time
> Alarm clock
> Stopwatch
> Date and time
> Timer
VERTU Club
> Concierge
> Web
> Fortress
>
Customer service
Additions
> Applications
> Video
> Music player
> Equaliser
> Stereo widening
me menu contains submenus
The Ti
for an alarm clock, a countdown timer
and a stopwatch.
You can also set the date and time on
th
is menu.
As a
VERTU Club
member, you can
use the Concierge, Web, and Fortress
services from the
VERTU Club
menu.
In addition, this menu allows any user
to contact Vertu Customer Service.
For Concierge, you can press the
[Concierge] key as well on the right
side of your Vertu phone to contact
them via phone or e-mail.
ditions menu allows you to
The Ad
use the video and music player as well
as Travel application. It also allows
you to play preinstalled games.
Using your Vertu phone 23
Page 24
Gallery
> Images
> Video clips
> Music files
> Themes
> Graphics
> Tones
> Recordings
> Received files
> App. downloads
> Tone downl.
> Theme downl.
Messages
> Create message
> Inbox
> Drafts
> Outbox
> Sent items
> Saved items
> Delivery reports
> Delete messages
> Message settings
> PC mail
The Gallery me
nu stores various
media files such as pictures, video
clips, and music files.
You can also access data such as
p
reinstalled themes and ringing tones
and downloaded files.
The Mes
sages menu enables you to
write, send, receive and read
messages.
Your Vertu phone supports:
> E-mail (MMS)
> SMS
> PC mail
Camera
Tools
> Calculator
> Calendar
> To-do list
> Notes
> Voice messages
> Voice recorder
> Bluetooth
Contacts
> Names
> Add new contacts
> Call history
> Settings
> Groups
> Speed dials
> My numbers
> Del. all contacts
> Move contacts
> Copy contacts
You can launch the camera by
selecting the Camera menu.
You can also launch it by pressing the
[Ca
mera] key on the left side of your
Vertu phone.
The T
ools menu allows you to select
submenus for calendar, To-do list,
notes, voice messages, voice
recorder and Bluetooth.
The menu also allows you to select
calculator with
scientific calculation
and loan calculation capabilities.
The Co
ntacts menu allows you not
only to add and delete contacts but
also to set up speed dialling and to
check your call history.
You can manage up to 1,500
egistrations in the Contacts menu,
r
and depending on your preference,
you can also switch the screen view
between “AKaSaTaNa” tab search
mode and all list search mode.
24 Using your Vertu phone
Page 25
ttings menu enables you to
Settings
The Se
change the way your Vertu phone is
configured.
This covers a wide range of features
> Profiles
> Themes
> Ton es
> Display
> Date and time
> My shortcuts
> Connectivity
> Call
> Phone
> Enhancements
> Configuration
> Security
> Workshop reset
> Sync and backup
from changing th
themes, assigning shortcuts to keys
as well as changing call settings.
Among those features, the Sec
menu is especially important. To
protect your Vertu phone from
unauthorised use, use this menu to
set up password protection.
e profiles to setting
urity
Text entry
The text entry system of your Vertu phone supports the Japanese
predictive text input.
If English has been set as the default language
the English predictive text input as well.
To switch the text entry mode, press the [#] key when writing text.
To enable or disable the Japanese or English predictive text input, select
tions » Prediction options while writing any text.
Op
on your phone, you can use
Personalising your Vertu phone
Assigning Shortcut Functions
Shortcuts assigned to keys
Your Vertu phone provides a variety of shortcut functions, and allows you
to assign functions that you use most often, to the [Selection] keys and the
[Joystick] key, so that you can quickly access the functions from the stand-
by display.
The following functions have been assigned to
you first receive your Vertu phone. You can change the settings by
selecting Menu » Settings » My shortcuts.
[Selection] key (Left) Create messages
[Selection] key (Right) Home
[Joystick] key (Up) Go to
[Joystick] key (Down) Names
[Joystick] key (Left) Dialled numbers
[Joystick] key (Right) Received calls
Tip: You can also change the functions assigned to the [Joystick] key
(Up), (Down), (Left), and (Right), following the steps below:
1. From the stand-by display, press and hold any [Joystick] key (Up),
(Down), (Left), or (Right).
2. From the displayed list, select a function to be newly assigned.
Using the Go to application
When you have not changed the default configuration after you first
received your Vertu phone, you can use the Go to application assigned to
the [Joystick] key (Up) to manage a list of shortcuts.
the individual keys when
Using your Vertu phone 25
Page 26

For example, assume that you will often use the alarm and calendar. You
need not remember in which layer of the menu screen (page 22) these
functions have been assigned. You can quickly select Alarm
clock and
Calendar from the list merely by pressing the [Joystick] key (Up) once.
By default, the following functions have been a
ssigned in the shortcut list.
You can also customise this list after you received your Vertu phone.
> Alarm clock
> Volum e
> Stopwatch
> Profiles
> Travel
> Calculator
> Images
> To ne s
> Themes
> Video clips
> Operator selection
> Lock keypad
To customise the Go to shortcut list:
1. From the stand-by display, press the [Joystick] key (Up).
> The Go to shortcut list appears.
2. Select Options » Select options.
> The functions that can be added or removed to/from the Go to list are listed
with checkboxes.
3. Use the [Joystick] key to uncheck the boxes for the functions to be
removed from the Go to list and check the boxes for those to be added
to the list.
4. Select D
one.
5. After a confirmation message appears, select Ye
> The changed settings are saved and you will return to the main screen of the
Go to shortcut list.
> Confirm that the list no longer contains the functions removed in Step 3 and
that the added functions are displayed at the bottom of the list.
s to save the changes.
6. To change the display order of any function added in Step 3, move the
cursor to it and select Options » Organise » Move.
7. Move the cursor up or down, and then press OK.
8. Select Do
ne » Yes.
Auto sort function of the Go to application
By enabling the auto sorting function, you can set up the Go to shortcut
menu so that it automatically customises itself to your needs.
By default, the function is not enabled. To ena
ble the function, press the
[Joystick] key (Up) from the stand-by display to access the Go to shortcut
menu, and then select Options » Auto sorting on. To disable it again,
select Options » Auto sorting off when the shortcut is displayed.
With auto sorting enabled, the five functions used most often and the two
ns most recently used are shown at the topmost of the list.
functio
Note that enabling this function does not allow you to use the S
elect
options and Organise functions, which can be selected in Steps 2 and 6 in
"To customise the Go to shortcut list:" (page 26).
26 Using your Vertu phone
Page 27
Themes
Your can change the screen’s look and feel by setting the theme.
Changing the background
1. From the stand-by display, press Menu » Settings » Themes to
display the theme settings screen.
> If you have not changed the default settings, you can also launch the theme
settings screen by selecting the [Joystick] key (Up) from the stand-by display.
Then, select Theme from the Go to shortcut list (page 25) that appears.
2. Move the cursor to the desired theme, and then press the [Joystick] key
(Centre). Or you can select Options » Downloads to download a
theme from a website if such a service is available.
Profiles (ringing tones/sound settings)
All tones settings such as Ringing tone, Ringing volume, Vibrating alert, or
the sound effects such as Keypad tones, are managed by the Profiles
application.
For example, you can set a loud ringin
calls when you are outdoors, or set Message alert tone to beep just once so
that you can avoid disturbing other people while in an important meeting.
Like this, you can set up separate Profile lists according to various
assumable situations or usage.
Checking and changing profile settings
You can use the following seven profiles on your Vertu phone:
> General
> Manner
> Meeting
> Outdoor
> My style 1
> My style 2
> Flight
g tone so as not to miss incoming
To check the profile settings:
1. From the stand-by display, select Menu » Settings » Profiles.
2. Select a desired profile.
3. Select Perso
nalise.
4. Move the [Joystick] key (Up) and (Down) to check the current settings.
5. Select Back
to return to the previous display. Or press the [End] key to
return to the stand-by display.
To change the profile settings:
1. From the stand-by display, press Menu » Settings » Profiles.
2. Select a desired profile.
3. Press Pe
rsonalise.
4. Use the four-way [Joystick] key to change the settings as necessary.
5. Press Sa
ve.
> The changed settings are saved and you will return to the previous display.
Switching profiles
You can use either of the following methods to switch profiles:
Quick operation using the [Power] key:
1. From the stand-by display, briefly press the [Power] key located at the
top of your Vertu phone.
> The profile list appears.
2. Move the [Joystick] key (Up) and (Down), and then select the profile to
be activated.
> A message appears and the selected profile is enabled.
Tip: While the profile list is on the display as par Step 1 above, you
may also want to press the [Joystick] key (Up) to select Lock keypad.
"Locking the keypad" (page 22).
Refer to
Using your Vertu phone 27
Page 28
Switching from the profile settings screen:
1. From the stand-by display, select Menu » Settings » Profiles.
2. Select a desired profile.
3. Press Activa
> A message appears and the selected profile is activated.
te.
Tip: You can also use a timer for a specific profile to be activated in a
specific periold of time. For example, you may want to activate the
Manner profile during an important meeting, and then want to
automatically resume the General profile when the meeting is over. If
this is the case, while your phone is in the General profile, select
Menu » Settings » Profiles » Manner » Timed, and then set the
Manner profile to expire after any length of time up to 24 hours. Note
that the Flight profile cannot be timed.
Manner profile
You can switch off the ringing tone, message alert tone, keypad tone and
other sounds by just pressing one key. To activate the Manner profile
instantly, press and hold the [#] key from the stand-by display. When the
Manner profile is set, your Vertu phone will vibrate upon receiving phone
calls or e-mails.
The following sounds are not switched off, even if the Manner profile is set:
> Camera shutter sound
> Video recording start/end sound and video playback sound
> Sound/voice from left/right speakers when hands-free conversation is on during
a call
> Music playback sound from the music player
> Sound effects from browser plug-ins
> Sound effects or playback sounds from Java applications and games
> Alarm tone
Tip: Press and hold the [#] key on the stand-by display to quickly
return to the General profile while the Manner profile is set.
Flight profile
The Flight profile allows you to deactivate all radio frequency functions.
With this profile, you can only use the functions that do not require
connection to the network.
You may still be able to make an emergency call, even if this profile is set,
for example, when you use your Vertu phone in a country outside Japan. If
this is the case, make the call as normal and answer Yes when asked “Exit
flight profile?”.
Tip: If you switch the power off with the Flight profile activated and
switch the power on again, a message “Activate flight profile?” will
appear. To continue using the Flight profile, press Ye s. Pressing No
will enable the General profile.
Warning: Always switch the phone off when wireless device use
is prohibited or when it may cause interference or danger.
Ringing tones
Your Vertu phone comes with various special ringing tones. You can also
download ringing tones in AAC, MP3 and MIDI formats from a computer or
a website.
To change the ringing tone:
Use the following procedure to change the ringing tone:
1. From the stand-by display, select Menu
2. Select To
ne s, or select Profiles » current active profile on the phone »
» Settings.
Personalise.
3. Move the cursor to Ring
ing tone, and then press the [Joystick] key
(Left) or (Right) to select Open Gallery.
Tip: You may select Tone downloads in this step to download a
ringing tone from a website, if such a service is available.
28 Using your Vertu phone
Page 29
4. Select the Tones folder or a folder containing files that can be used as
ringing tones.
> A list of selectable ringing tones appears.
5. Move the [Joystick] key (Up) and (Down) to select the desired ringing
tone.
> When you move the cursor to the desired ringing tone and wait for about one
second, the selected ringing tone is played automatically. After confirming the
desired tone is played, press the [Joystick] key (Centre) to set the tone.
Quick access to useful features
Setting an alarm
Your Vertu phone has a useful alarm clock function. You can display the
alarm menu in either of the following ways:
> From the stand-by display, select Menu » Time » Alarm clock.
> Or, if you have not changed the default settings, press the [Joystick] key (Up) to
display the Go to shortcut list (page 25), and then select Al
list.
After the alarm menu is displayed, apply the necessary settings such as
alarm time. At this time, you can also select Options to set the snooze
interval or repeat function, or to cancel an alarm that has already been set.
When there is an alarm set, the alarm
clock icon is displayed on the stand-
by display.
Tip: If the phone is switched off, it will switch itself on at the alarm
time. Please remember this if you are in a restricted area.
arm clock from the
Bluetooth
Bluetooth technology enables you to easily share images and video clips,
and take advantage of wireless connectivity by using a compatible
Bluetooth headset. You first need to pair with the other device which should
be within 10m of your Vertu phone.
The full Bluetooth menu is located in Me
nu » Tools » Bluetooth or in
Menu » Settings » Connectivity » Bluetooth.
Use the Blue
tooth menu to turn Bluetooth on, and the Connect audio
enhan. or Paired devices menu to search other Bluetooth devices that
can be connected. Then, pair your phone with any of the detected devices,
i.e. by entering the passcode agreed beforehand with other party. You can
also change this Vertu phone’s device name to be recognised by other
Bluetooth devices using My phone’s name, and specify whether to make
your Vertu phone discoverable using My phone’s visibility.
Tip: Switch off Bluetooth if it’s not being used, to maximise battery
performance.
Adding a contact
You can quickly add a new contact using the following procedure:
1. From the stand-by display, enter a phone number, and then press the
oystick] key (Centre).
[J
> A list of icons showing phone categories will appear: General, Mobile, Home,
Work and Fax.
2. Select one of the displayed icons.
3. Move the cursor to the name field, enter a name, and then press Save.
4. Press Don
e.
Using your Vertu phone 29
Page 30
Checking your own phone number
To check your own phone number quickly, press the [Joystick] key (Centre),
and then immediately press the Number [0] key.
Your own phone number: [Joystick] key (Centre) » [0] key
Or you can also check your own phone number by selecting Menu »
Contacts » My numbers from the stand-by display.
Note: Depending on the SIM card in use, this function may not work.
Camera
Your Vertu phone incorporates a 3 Megapixel camera with autofocus and
integral LED flash. There is a powerful 8x digital zoom which together with
the 16 million colour QVGA screen produces crisp, high quality images.
Your Vertu phone supports an image capture resolution of 2048 x 1536
pixels. Picture
format. Available recording time depends on the video clip length and
quality settings.
You can take photos and record video clips with the camera and send them
by message t
memory, from where they can be transferred to your computer.
s are saved in jpg format and video clips are saved in 3gp
o your friends if your network supports it, or save them in the
Web
Warning: Only download and use files from sources that offer
adequate security and protection against harmful software.
A VERTU Club member can immediately use the Web service by inserting
a SIM card supplied by Vertu.
To use the We
stand-by display.
You can also view the web pages exclusive to
b service, select Menu » VERTU Club » Web from the
VERTU Club members,
Taking photos
1. To start the camera, give a short press on the [Camera] key on the left
side of your Vertu phone, or select Menu » Camera from the stand-by
display.
> The camera starts.
2. To zoom in or out, move the [Joystick] key (Up) or (Down).
3. To autofocus, press and hold the [Joystick]
white frame. Or slowly press the [Camera] key (press the key halfway)
to display a white frame.
> When using the [Camera] key to autofocus, fully pressing the key will release
using one of the following ways:
> From the stand-by display, press Menu » VERTU Club » Web » Home.
> From the stand-by display, press the right [Selection] key. (available if you
have not changed the defualt settings)
> Or, press and hold the Number [0] key.
> When the white frame turns green, the object is in focus.
4. When the white frame turns green, release the [Joystick] key. If using
the [Camera] key, fully press the key.
> The shutter is released and a photo is taken.
30 Using your Vertu phone
key (Centre) to display a
the shutter, causing a photo to be taken. Therefore, make sure you press the
key slowly and gently to ensure that a white frame appears.
Page 31

Taking videos
Memory
1. To start the video camera, give a long press on the [Camera] key on the
left side of your Vertu phone, or select Menu » Additions » Video from
the stand-by display.
> Or start the camera by following the steps in "Taking photos" (page 30), and
then press the [Joystick] key (Right) to switch to the video mode.
2. To zoom in or out, move the [Joystick] key (Up) or (Down).
3. To start recording a video, press the [Joystick] key (Centre) or press the
ra] key.
[Came
> To pause the recording, select Pause; to resume the recording, select
Continue. To stop the recording, select Stop.
Music player
Open the music player to listen to music tracks, recordings or other MP3,
MP4, AAC, eAAC+ or Windows Media Player sound files that you have
transferred to your Vertu phone using File Manager in Vertu PC Suite.
To open the music player, select Menu
the stand-by display.
Music files that you transfer to your Vertu phone are automatically added to
th
e list of songs in the music player.
Tip: Press and hold the [END] key to stop the music player.
» Additions » Music player from
Your Vertu phone has 4GB internal memory. When the memory is full, a
message is displayed. If this is the case, delete some files from the
memory before continuing.
You can check the memory usage status following any of the steps below:
> From the stand-by display, press Menu » Gallery » Options » Memory
Status.
> From the stand-by display, press Menu » Messages » Options » Memory
Status.
> From the stand-by display, press Menu » Contacts » Settings » Memory
Status.
> From the stand-by display, press Menu » Settings » Phone » Memory
Status.
Stopwatch
The Vertu stopwatch function enables you to measure time, take
intermediate times or take lap times in 1/10 of a second intervals.
Split timing
1. From the stand-by display, select Menu » Time » Stopwatch.
> If you have not changed the default configuration, you can also launch the
stopwatch from the Go to shortcut list (page 26) available by pressing the
[Joystick] key (Up) from the stand-by display.
2. Select Options » Split timing.
3. Press the [Camera] key on the left side of your Vertu phone or the
[4] key to start the stopwatch.
Number
> The second hand of the analogue clock shown at the bottom of the display
begins to move and measurement is started. The digital clock shown on the
top left of the display also starts to count.
Using your Vertu phone 31
Page 32

4. Press the [Concierge] key on the right side of your Vertu phone or the
Number [6] key to measure the first intermediate split time.
> The second hand of the analogue clock shown at the bottom of the display
continues moving and the first measurement result of intermediate split time
appears at the top right of the display.
5. Repeat Step 4 as necessary to measure intermediate split time up to 20
times.
> During split time measurement, the second hand of the analogue clock shown
at the bottom of the display continues moving. The measurement results of
intermediate split time are added to the top right of the display, in turn, each
time Step 4 is repeated.
6. Press the [Camera] key on the left side of your Vertu phone or the
Number [4] key to stop all measurements.
> The measurement results can be saved. To save the results, select Save,
enter a title as necessary, then select Save again.
7. Press the [Concierge] key on the right side of your Vertu phone or the
Number [6] key to reset the measurement results.
Lap timing
1. From the stand-by display, select Menu » Time » Stopwatch.
2. Select Opt
3. Press the [Camera] key on the left side of your Vertu phone or the
Number
> The second hand of the analogue clock shown at the bottom of the display
4. Press the [Concierge] key on the right side of your Vertu phone or the
Number [6] key to measure the first lap time.
> The second hand of the analogue clock shown at the bottom of the display is
ions » Lap timing.
[4] key to start the stopwatch.
begins to move and measurement is started. The digital clock shown on the
top left of the display also starts to count.
reset (the digital clock is also reset to 00 hours, 00 minutes, and 00 seconds),
and the next lap time measurement is immediately started. The first result of
the lap time measurement appears at the top right of the display.
5. Repeat Step 4 as necessary to measure lap times up to 19 times.
> During lap time measurement, the second hand of the clock is returned to the
start position followed by the start of new lap time measurement each time
Step 4 is repeated. The results of the lap time measurement are added to the
top right of the display, each in turn.
6. Press the [Camera] key on the left side of your Vertu phone or the
Number [4] key to stop all measurements.
> The measurement results can be saved. To save the results, select Save,
enter a title as necessary, then select Save again.
7. Press the [Concierge] key on the right side of your Vertu phone or the
Number [6] key to reset the measurement results.
Checking measurement results
Take the following steps to check or delete split times or lap times recorded
so far.
1. From the stand-by display, select Menu » Time » Stopwatch.
2. To check past records, select Op
tions » Show last or View times. To
delete the records, press Delete times.
Network mode
Dual mode (3G + GSM) is set as the default network mode. This mode
automatically selects a connectable 3G (WCDMA) or GSM network.
Dual mode first searches for a 3G (
network is available, it will then search for a GSM network.
If you prefer using a GSM network when using your Vertu phone in a
country outside Japan, you can switch
following menu:
1. Select Men
u » Settings » Phone » Network mode.
2. Select GSM.
WCDMA) network. If no 3G (WCDMA)
the network mode using the
32 Using your Vertu phone
Page 33
Travel application
The Travel application provides access to the following information:
> Clocks for multiple cities worldwide, including time zone management and
international daylight saving time.
> Global weather conditions, forecasts and updates for over 250 cities worldwide.
> Real-time flight information including delays, gate and terminal information for
over 75 of the world's leading airlines.
> World map with day and night display and interactive city locators.
> Currency conversion with online access to exchange rates for more than 160
currencies worldwide.
To update the weather, flight, and currency information, you must connect
to the Internet. A VERTU Club member can immediately obtain this
information by inserting a SIM card supplied by Vertu.
If using your Vertu phone with a SIM card other than one supplied by Vertu
in a
country outside Japan for example, you must set up necessary
connection settings such as an access point. If you need more information,
contact your service provider or Vertu Customer Service at 03-6738-3955
(+81-3-6738-3955 from countries outside Japan).
Meanwhile, if you travel to a country outside Japan and find you are unable
connect to the Internet, you may want to select a network operator
to
(service provider) there that has a roaming agreement with your home
network.
To do this, follow the steps below:
1. From the stand-by display, select Men
Operator selection.
2. Select Manual.
> Your Vertu phone displays all the locally available networks.
3. Select a network operator, and then restart the Travel application.
u » Settings » Phone »
Starting Travel application
To start the Travel application, select Menu » Additions » Applications »
Travel from the stand-by display. (Or, if you have not changed the default
settings, you can also launch the Travel application from the Go to shortcut
list available by pressing the [Joystick] key (Up) from the stand-by display.)
When you start this application for the
first time, you may see a license
agreement screen. If this is the case, read the entire text, and if you agree
with the conditions, select “Agree” to use the application.
Navigating the screens
Use the [Joystick] key to move between screens, scroll down the current
screen or move the cursor between fields.
Updating flight, weather and currency information
On the individual screens, select Options (left [Selection] key) to display an
options menu.
To update weather information, select U
pdate weather, so that the latest
information is downloaded. To update flight information, select Get flight
status with an airline company, flight number, and date already specified.
To update currency rates, select Update rate.
Changing settings
To change the city and other settings, select Options (left [Selection] key),
and then select the desired item from the displayed options list. Selecting
Options » Settings allows you to select the time format, date format,
temperature scale, and decimals.
Warning: Not all network operators have roaming agreements
with other network operators.
Using your Vertu phone 33
Page 34

Clocks
This screen displays the time at five different locations. You can set one
clock to display the time in your home city, and the other clocks to display
the time in any other four cities. To change the cities, select Options »
Change city.
Currency rates fluctuate daily. To obtain the current currency rates, press
ns » Update rates.
Optio
Travel application is provided by MobiMate®.
Weather
This screen displays five-day weather forecasts. To update to the latest
weather forecasts, select Options » Update weather. To change the city,
select Options » Change city.
Flights
This screen enables you to search for the latest flight information for over
75 leading airlines. You can see current information on schedules, gates,
terminals, delays and aircraft type.
Select Airlin
Queries you have previously made are stored for reuse in the Sho
e, Flight number and Date, and then select Get flight status.
w recent
queries list.
World map
This screen displays a map of the world, showing which regions are in day
and night. You can select a city from the list and view its location and
current time. Select Options » Change city to select a new city.
Currency
This screen displays three different currencies and enables you to convert
sums of money between them. As the default setting, three kinds of
currencies, JPY (Japanese Yen), EUR (Euro), and USD (U.S. dollar) have
been set. To change the currency, press Options » Change XXX where
XXX designates the name of the currency.
Accessories
The following accessories are provided with your Vertu phone:
> Wall charger
> Battery
> Data cable
In addition, you can also use a vehicle charger or other optional
accessories. For more information about accessories approved for use with
your Vertu phone, please contact Vertu Customer Service at 03-6738-3955
(or +81-3-6738-3955 from countries outside Japan) or refer to the Vertu
official website.
Warning: Keep all parts out of reach of small children.
Use only batteries, chargers and accessories approved by Vertu
for use with this particular phone model. The use of any other
types may invalidate any approval or warranty applying to the
phone and may be dangerous.
When you disconnect an accessory cable from your Vertu phone,
hold and pull the
itself.
To optimise the performance and lifetime of
your warranty coverage, observe the following handling and usage
precautions:
> Keep dry. Precipitation, humidity and all types of liquids or moisture can contain
minerals that will corrode electronic circuits
> Do not use or store in dirty or dusty areas
> Do not attempt to open
connector at the end of the cable, not the cable
your accessories, and protect
34 Using your Vertu phone
Page 35
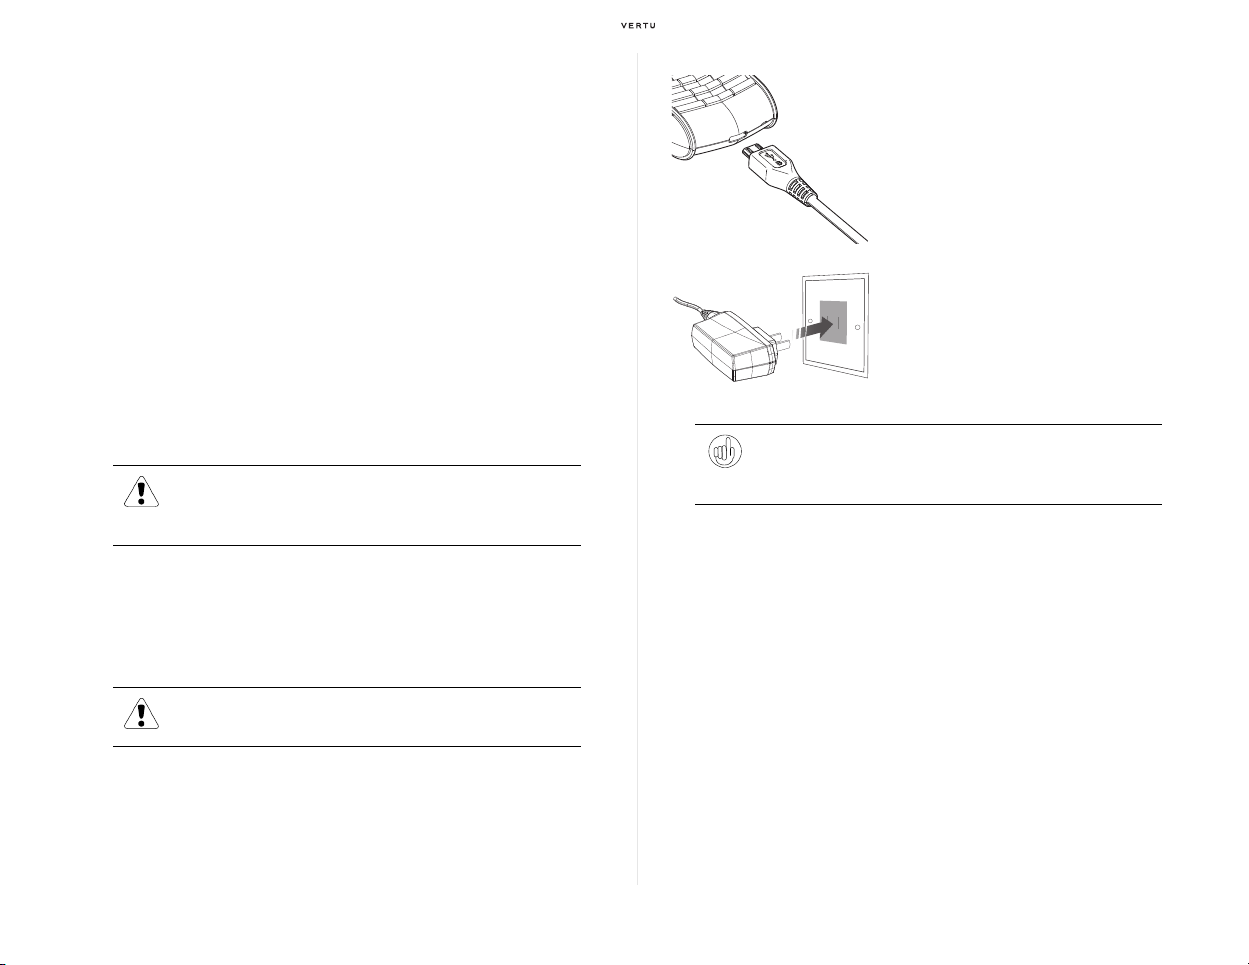
> Do not drop, knock or shake. Rough handling can break fine mechanics
> Do not store in hot areas. High temperatures can shorten the life of electronic
devices and damage batteries
> Do not store in cold areas
> Do not use harsh chemicals, cleaning solvents or strong detergents to clean
> Do not paint
These suggestions apply equally to your device, battery, charger, or any
enhancement. If any device is not working properly, take it to the nearest
authorised service facility for service.
Wall charger
The wall charger supplied with your Vertu phone can be used in Japan.
Before you plug it in, make sure that the electrical rating of the AC outlet is
appropriate for the charger.
Warning: Never attempt to use a damaged charger. When you
need to replace the wall charger, please contact Vertu Customer
Service at 03-6738-3955 (+81-3-6738-3955 from countries outside
Japan).
Charging the battery
The battery for your Vertu phone is rechargeable and requires charging at
regular intervals.
Warning: Only use the approved charger and battery designed
specifically for your Vertu phone.
Insert the charger connector into the
bottom of your Vertu phone as shown.
Please ensure that the connector is
inserted correctly, with the connector
symbol uppermost.
Connect the charger body to a powered
AC outlet.
After a few seconds, the battery indicator
animates and a confirmation message is
displayed if your Vertu phone is switched
on.
Important: If the battery has not been used for some time, you may
need to recondition it by charging it. Although the charging indicator
appears on the display after a few seconds, it may take from several
minutes to an hour before you can make a call.
The charging time will vary with different power sources and we
ecommend the Vertu wall charger should always be used.
r
Always charge the battery until it is fully charged. When the battery is fully
charged, the battery charge indicator stops animating and, if your Vertu
phone is switched on, a “Battery full. Save energy and remove charger
from wall socket.” confirmation message is briefly displayed.
If your Vertu phone is not charging, try the following:
> Disconnect the charger from the AC outlet.
> Check that the electrical rating of the AC outlet is compatible with your charger.
> Verify that the AC outlet has power and that it is switched on. For example, in
many hotel rooms, AC outlets are used for lighting and may be switched on and
off from remote locations in the room.
> Wait for at least 10 seconds and then reconnect the charger to the AC outlet.
> Use another nearby AC outlet that you know is providing power.
Using your Vertu phone 35
Page 36
If charging still fails, contact Vertu Customer Service at 03-6738-3955 (or
+81-3-6738-3955 from countries outside Japan) for further advice.
Use the battery only for its intended purpose. Never use any charger or
y that is damaged. Keep your battery out of the reach of small
batter
children.
Battery
Warning: Never dispose of batteries in a fire.
Always dispose of batteries according to local regulations.
Please recycle when possible. Do not dispose of batteries as
household waste.
Your device is powered by a rechargeable battery. The battery intended for
use with this device is BL-5CV. This device is intended for use when
supplied with power from the following chargers: AC-7JV. The exact
charger model number may vary depending on the type of plug. The plug
variant is identified by one of the following: E, EB, X, AR, U, A, C, or UB.
The battery can be charged and discharged hundreds of times, but it will
eventually w
shorter than normal, replace the battery. Use only Vertu approved
batteries, and recharge your battery only with Vertu approved chargers
designated for this device. Use of an unapproved battery or charger may
present a risk of fire, explosion, leakage, or other hazard.
Do not dismantle, cut, open, crush, bend, deform, puncture, or shred cells
batteries. In the event of a battery leak, do not allow the liquid to come in
or
contact with the skin or eyes. In the event of such a leak, flush your skin or
eyes immediately with water, or seek medical help.
Do not modify, remanufacture, attempt to insert foreign objects into the
batte
Improper battery use may result in a fire, explosion, or other hazard. If the
device or
the battery has been damaged, take it to a service centre for inspection
before continuing to use it.
ear out. When the talk and standby times are noticeably
ry, or immerse or expose it to water or other liquids.
battery is dropped, especially on a hard surface, and you believe
Important: Battery talk and standby times are estimates only and
depend on signal strength, network conditions, features used, battery
age and condition, temperatures to which battery is exposed, use in
digital mode, and many other factors. The amount of time a device is
used for calls will affect its standby time. Likewise, the amount of time
that the device is turned on and in the standby mode will affect its talk
time.
The full performance of a new battery is achieved only after two or three
complete
charge and discharge cycles. The battery can be charged and
discharged hundreds of times but it will eventually wear out. If you notice
that the talk and stand-by times are much shorter than normal, you may
need a new battery. Contact Vertu Customer Service at 03-6738-3955 (or
+81-3-6738-3955) to obtain a Vertu approved battery.
Maximising battery performance
Certain functions in your Vertu phone can be switched off if not in use, to
help maximise your battery performance, for example Bluetooth and 3G.
Charging and discharging
Unplug the charger from the AC outlet and your Vertu phone when not in
use. Do not leave your Vertu phone connected to a charger. The battery
does not have to be completely discharged before you can recharge it.
Continuously charging the battery may shorten its lifetime. If left unused, a
fully charged battery will lose its charge over time. Temperature extremes
can affect the ability of your battery to charge.
Use chargers indoors.
Battery care and safety
Use the battery only for its intended purpose. Never use any charger or
battery that is damaged.
36 Using your Vertu phone
Page 37
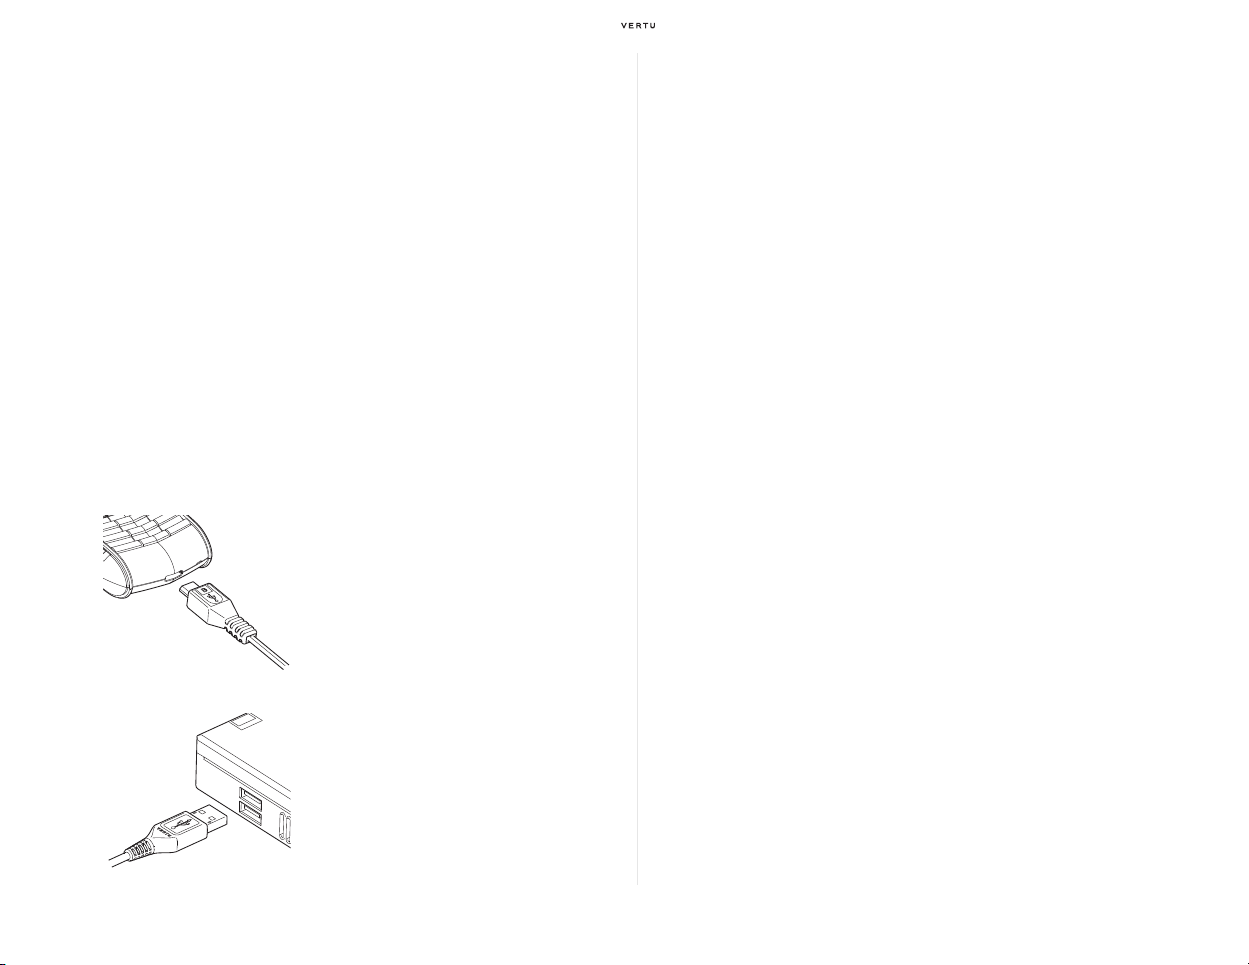
Do not short-circuit the battery. Accidental short-circuiting can occur when
a metallic object such as a coin, clip, or pen causes direct connection of the
positive (+) and negative (-) terminals of the battery (the metal strips on the
battery). This might happen, for example, when you carry a spare battery in
your pocket, purse or bag. Short-circuiting the terminals may damage the
battery and the connecting object.
Leaving the battery in hot or cold places, such as in a closed car in summer
or winter conditions, will reduce the capacity and lifetime of the battery.
Always try to keep the battery between 15°C and 25°C (59°F and 77°F). If
your battery is very hot or extremely cold, your Vertu phone may not work
temporarily, even if the battery is fully charged. Battery performance is
particularly limited in temperatures well below freezing.
CD-ROM
The Vertu CD-ROM works on a compatible computer with a CD-ROM
drive, with Microsoft® Windows® 2000, Microsoft® Windows® XP or
Microsoft® Vista® installed. You need at least 250 MB of free disk space
and administrator rights to the PC.
Connecting to a computer
To connect your Vertu phone to a computer, you need either a Vertu USB
data cable or your computer must be compatible with Bluetooth wireless
technology.
Data cable
The micro-USB data cable transfers data between your Vertu phone and a
compatible computer, for example when you are using Vertu PC Suite, and
between your Vertu phone and a compatible printer supporting PictBridge.
Carefully insert the micro-USB end of
the data cable into the phone
connector.
Make sure the side showing the design
is facing up.
Insert the USB end of the data cable
into the computer’s USB connector.
Using your Vertu phone 37
Vertu PC Suite
Vertu PC Suite includes the following applications to extend the
functionality of your Vertu phone:
> Backup > Contacts
> Synchronise > Messages
> Connect to the Internet > Image store
> Install applications > Multimedia player
> File manager
Installing Vertu PC Suite
Install Vertu PC Suite as per the steps below:
1. Insert your Vertu CD-ROM into the PC’s CD-ROM drive.
2. Select “English” on the language selection screen.
3. Click on the “Install Now” button.
4. Follow the on-screen instructions to complete the installation.
Page 38

Viewing the electronic Quick Guide
Using this CD-ROM, you can view the electronic version of the Quick
Guide.
1. Start the CD-ROM as described above.
2. Click on the “Launch PDF” button on the screen following the language
se
lection screen.
Care and maintenance
Your Vertu products have been crafted from some of the finest materials
and care should be taken to keep them in good condition.
Warning: Damage caused to your Vertu phone by failing to
observe these care instructions is not covered by the warranty.
Ceramics and sapphire
Ceramics and sapphire are very hard materials but are also brittle and can
be scratched by harder materials or objects. They can also be damaged if
dropped.
Avoid the following:
> Contact with other hard materials such as diamond jewellery, nail files,
abrasives, and mineral crystals.
> Dropping or knocking the product on hard surfaces.
> Repeated rubbing against hard surfaces.
Leather
All Vertu leather products are made by expert craftsmen. Each leather hide
is unique and has natural markings which should be considered part of the
individuality of fine leather. All leather can be damaged and should be
treated with care.
Avoid the following:
> Exposure to water and high humidity.
> Dropping, rubbing or knocking on hard surfaces.
> Exposure to extreme temperatures.
> Contact with oily substances, make-up and solvents
Metal
Vertu metals are finished to a high standard and care needs to be taken to
maintain their appearance.
Avoid the following:
> Contact with chemicals such as solvents, alkaline and acid solutions, cola-
based drinks and exposure to salt water. Wipe with a clean, soft cloth as soon
as possible if contact occurs.
> Contact with sharp objects.
> Dropping or knocking against hard surfaces.
> Metal polishes.
38 Using your Vertu phone
Page 39
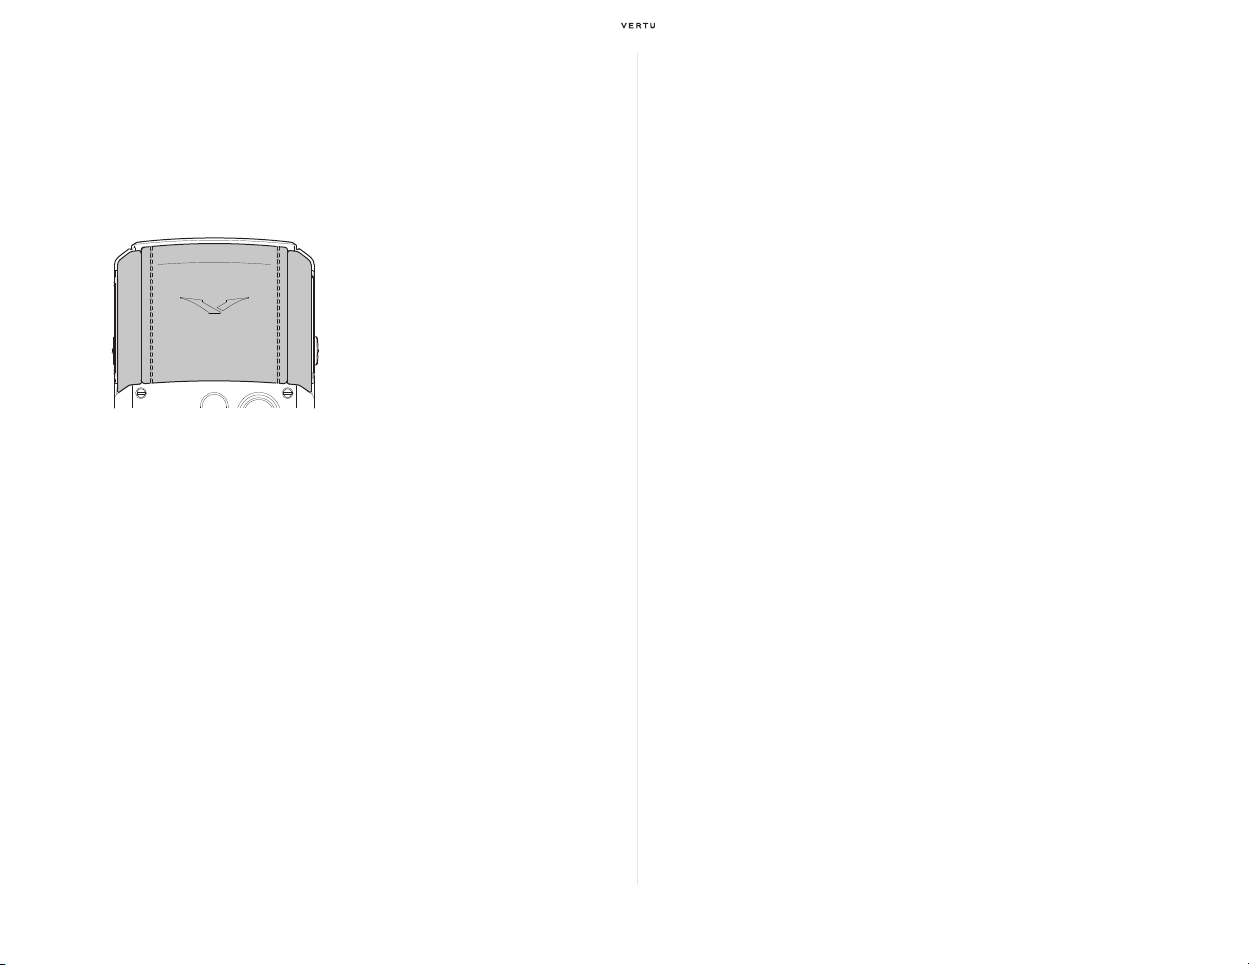
Antenna area
Specifications
Avoid touching the antenna area (see shaded area below) of your Vertu
phone unnecessarily when the phone is switched on. Contact with the
antenna area affects call quality and may cause the phone to operate at a
higher power level than otherwise needed and deplete the battery quicker.
Avoid contact with the antenna
area during a call to optimise the
antenna performance and the talk
time of your Vertu phone.
Volume 82 cc
Weight 161 g
Length 117 mm
Width 49 mm
Thickness 18 mm
BL-5CV Li-ion battery
Talk time GSM up to 270 minutes
3G (WCDMA) up to 210 minutes
Stand-by time GSM up to 400 hours
3G (WCDMA) up to 400 hours
Using your Vertu phone 39
 Loading...